agrimoon.comcreate your first document . just start typing . start with the. ribbon. and the ....
TRANSCRIPT

Microsoft® Office Word 2007 Training
Create your first document
JohnRouda.com presents:

Create your first document
Course contents
• Overview: New to Word?
• Lesson: Meet the document
The lesson includes a list of suggested tasks and a set of test questions.

Create your first document
Overview: New to Word?
Do you need to use Word 2007, but you’re not quite sure how to get started?
Take this course to learn the basics of creating your first document.
You’ll find out how to type where you want to on a page, fix spelling errors, change spacing and page margins, and save your work.

Create your first document
Course goals
• Create and save a document.
• Accept or reject suggested revisions for spelling and grammar as you type.
• Change page margins.
• Adjust spacing by deleting any extra spaces between words or extra lines between paragraphs.

Lesson
Meet the document

Create your first document
Meet the document When you open Word, you see a blank document.
It looks like a sheet of paper and takes up most of the screen space.
You need to get to work, but being new to Word, you may wonder how to get started.
Let’s begin by helping you get comfortable with some Word basics.

Create your first document
Just start typing Start with the Ribbon and the cursor.
1
2
Above the document, the Ribbon spans the top of Word. You use buttons and commands on the Ribbon to tell Word what you want to do.
Word waits for you to start typing. The cursor, a blinking vertical line in the upper-left corner of the page, shows where the content you type appears on the page.

Create your first document
Just start typing Start with the Ribbon and the cursor.
If you’d like to start typing further down the page instead of at the top, press the ENTER key on your keyboard until the cursor is where you want to type.
If you want to indent the first line you type, press the TAB key on your keyboard before you start to type. This will move the cursor one-half inch to the right.

Create your first document
Just start typing Start with the Ribbon and the cursor.
As you type, the cursor moves to the right. When you get to the end of a line on the right side of the page, just continue to type. Word will move on to the next line for you as you type.
To start a new paragraph, press ENTER.

Create your first document
What’s that? Imagine that you’ve typed a few paragraphs.
They seem far apart, and the second paragraph starts farther to the right than the first.
You can see what’s going on by looking at the formatting marks Word automatically inserts as you type.
These marks are always in documents, but they are invisible until you display them.

Create your first document
What’s that? To see formatting marks, use the Ribbon, at the top of the window.
On the Home tab, in the Paragraph group, click the Show/Hide button . Click the button again to hide formatting marks.
These marks aren’t just for show. You can get rid of extra spacing by deleting extra marks.
Create your first document
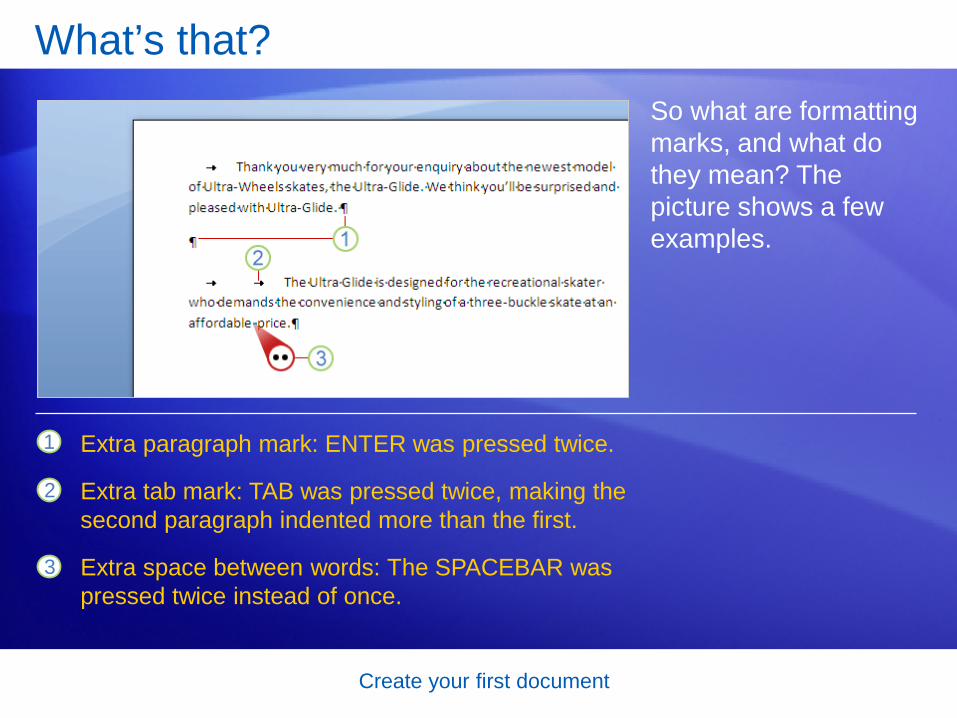
What’s that? So what are formatting marks, and what do they mean? The picture shows a few examples.
1
2
3
Extra paragraph mark: ENTER was pressed twice.
Extra tab mark: TAB was pressed twice, making the second paragraph indented more than the first.
Extra space between words: The SPACEBAR was pressed twice instead of once.

Create your first document
What are those underlines in my document? As you type, Word might on occasion insert a wavy red, green, or blue underline beneath text.
• Red: Indicates either a possible spelling error or that Word doesn’t recognize a word, such as a proper name or place.
• Green: Word thinks grammar should be revised.
• Blue: A word is spelled correctly but does not seem to be the correct word for the sentence.

Create your first document
What are those underlines in my document? The animation shows what you can do about the wavy underlines.
Right-click an underlined word to see suggested revisions (every once in a while Word may not have any alternate spellings). Click a revision to replace the word in the document and get rid of the underlines.
Animation: Right-click, and click Play.
[Author: .swf gets inserted here; delete this placeholder before inserting .swf file.]

Create your first document
What are those underlines in my document? The picture shows an example of what you can do about the wavy underlines, in this case, red for spelling.
Right-click the underlined word to see suggested revisions (every once in a while Word may not have any alternate spellings).
Click a revision to replace the word in the document and get rid of the underlines.

Create your first document
Change page margins Page margins are the blank spaces around the edges of the page.
There is a 1-inch (2.54-cm) page margin at the top, bottom, left, and right sides of the page.
But if you want different margins, you should know how to change them, which you can at any time.
When you type a very brief letter, for example, or a recipe, an invitation, or a poem, you might like different margins.

Create your first document
Change page margins To change margins, use the Ribbon at the top of the window.
Click the Page Layout tab. In the Page Setup group, click Margins.
You’ll see different margin sizes, shown in little pictures (icons), along with the measurements for each of the margins.

Create your first document
Change page margins The first margin in the list is Normal, the current margin.
To get narrower margins, click Narrow. If you want the left and right margins to be much wider, click Wide.
When you click the margin type that you want, your entire document automatically changes to the margin type you selected.

Create your first document
Save your work By now you may have a finely tuned sentence or several paragraphs that you’d regret losing if your cat jumped on your keyboard, or if a power failure shut your computer off.
1
2
Click the Microsoft Office Button in the upper-left corner of the window.
To keep your work, you must save it. It’s never too early.
Click Save. A dialog box opens, where you tell Word where you want to store the document on your computer and what you want to call it.

Create your first document
Save your work After you save your document, and you continue to type, save your work as you go.
Every once in a while, click the Save button on the Quick Access Toolbar in the upper-left corner of the window.

Create your first document
Save your work After you save your document, and you continue to type, save your work as you go.
When you are through with the document and have saved your work, close the file. Click the Microsoft Office Button, and then click Close.

Create your first document
Suggestions for practice 1. Turn formatting marks on.
2. Do some typing in your document.
3. Work with revision marks.
4. Change page margins.
5. Save your document.
Online practice (requires Word 2007)

Create your first document
Test question 1 When should you save your document? (Pick one answer.)
1. Soon after you begin working.
2. When you’re through typing it.
3. It doesn’t matter.

Create your first document
Test question 1: Answer Soon after you begin working.
It takes just a second to lose your work. Get in the habit of saving early, and saving often.

Create your first document
Test question 2 Word puts a red underline beneath text. The word must be misspelled. (Pick one answer.)
1. True.
2. False.

Create your first document
Test question 2: Answer False.
Word enters wavy red underlines beneath misspelled words. But Word does not have every word in its dictionary. Some words, such as proper names, may get an underline because Word does not recognize the word.
Create your first document
Test question 3 Word inserts a blue underline in your document. What’s going on? (Pick one answer.)
1. There’s a grammatical error.
2. A word is correctly spelled but is used incorrectly in a sentence.
3. A proper name is misspelled.

Create your first document
Test question 3: Answer A word is correctly spelled but used incorrectly in a sentence.
You’ll see blue, for example, if you type “too”, but the word should be “to.”

Create your first document
Quick Reference Card
For a summary of the tasks covered in this course, view the Quick Reference Card.

Microsoft® Office Word 2007 Training
Decorate documents with backgrounds, borders,
and text effects
JohnRouda.com presents:

Decorate documents with backgrounds, borders, and text effects
Course contents
• Overview: Less plain, more polished
• Lesson 1: Add a watermark or background
• Lesson 2: Add borders, shading, and styles
• Lesson 3: Use special text effects
Each lesson includes a list of suggested tasks and a set of test questions.

Decorate documents with backgrounds, borders, and text effects
Overview: Less plain, more polished
Your document is complete, but it’s begging for color, polish, and sparkle, all of which you can achieve by using decorative elements in Word 2007.
For example, add defining borders to pages and pictures, use colorful backgrounds for Web documents, and communicate information using a page watermark.
This course shows you these snazzy techniques, and more.
Decorate documents with backgrounds, borders, and text effects
Course goals
• Add a custom watermark to printed documents.
• Add a colorful background to Web-based documents.
• Add defining borders to pages, paragraphs, pictures, or tables.
• Use shading to emphasize headings or paragraphs.
• Give color and snap to shapes and tables.
• Make headings more professional with text effects and WordArt.

Lesson 1
Add a watermark or background

Decorate documents with backgrounds, borders, and text effects
Add a watermark or background Do you want to visually convey that a document is draft only? Or that the information is strictly confidential?
You can do that with a watermark.
Example shows what a watermark is. The watermark tells people something about the document.
1
Watermarks are semitransparent in color, so they sit behind and don’t divert people’s attention from the document’s content. They are for documents that will be printed.

Decorate documents with backgrounds, borders, and text effects
Add a watermark or background Another sort of background, shown in example , is purely for decoration and is intended for documents you’d post to a Web site.
You can add all sorts of colorful backgrounds, including solid colors, gradients, patterns, textures, and even pictures.
The goal is to liven up the page — but you don’t want to make it hard to read.
2
Decorate documents with backgrounds, borders, and text effects
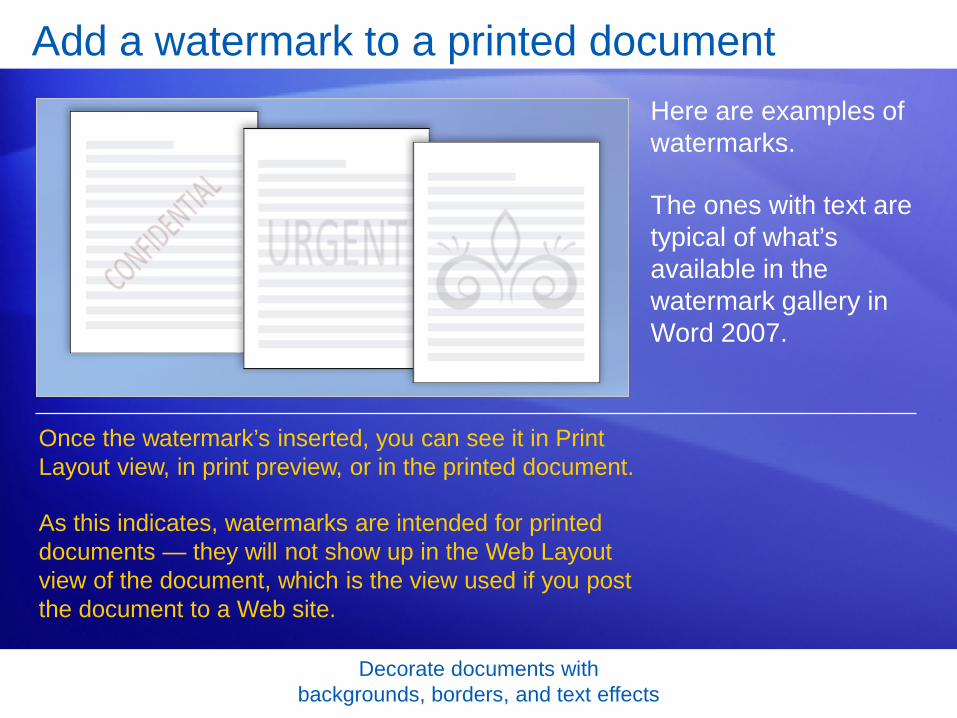
Add a watermark to a printed document Here are examples of watermarks.
The ones with text are typical of what’s available in the watermark gallery in Word 2007.
Once the watermark’s inserted, you can see it in Print Layout view, in print preview, or in the printed document.
As this indicates, watermarks are intended for printed documents — they will not show up in the Web Layout view of the document, which is the view used if you post the document to a Web site.

Decorate documents with backgrounds, borders, and text effects
Add a picture watermark For a custom watermark, you can use either text or a picture.
These steps show how you’d create a picture watermark.
1
2
On the Page Layout tab, click Watermark to open the gallery.
Click Custom Watermark, at the bottom of the gallery.

Decorate documents with backgrounds, borders, and text effects
Add a picture watermark For a custom watermark, you can use either text or a picture.
These steps show how you’d create a picture watermark.
3 Click Picture watermark, and select your picture. Use any image on your computer, or clip art in the Microsoft Clip Organizer.
4 Your result might look something like the example shown.

Decorate documents with backgrounds, borders, and text effects
Add a background to a Web document Use a colorful background to add boldness or flavor to Web documents.
You add a background from the Page Layout tab, by clicking Page Color.
From there, you can apply a solid color or click Fill Effects to choose a gradient, textured, or patterned background, as shown here. Or, you can apply a picture from your computer.

Decorate documents with backgrounds, borders, and text effects
Add a background to a Web document
Important: Don’t overpower your text with the background you choose. You want it to complement the text, not make it unreadable.
Use a colorful background to add boldness or flavor to Web documents.

Decorate documents with backgrounds, borders, and text effects
Suggestions for practice 1. Add a text watermark.
2. Add a picture watermark.
3. Save a watermark to the gallery.
4. Add a background to a Web document.
5. Bonus: Set up Word to print backgrounds
Online practice (requires Word 2007)

Decorate documents with backgrounds, borders, and text effects
Test 1, question 1 What’s the main purpose of a watermark? (Pick one answer.)
1. Authenticate your printed document as the original.
2. Add a dappled, water-like finish to your printed document.
3. Communicate useful information or add visual interest in printed documents, without overpowering the main text.

Decorate documents with backgrounds, borders, and text effects
Test 1, question 1: Answer Communicate useful information or add visual interest in printed documents, without overpowering the main text.
You can add a text watermark such as “Confidential,” “Draft,” or any designator you choose. You can also add a picture watermark. Both sit behind your text so that they don’t obscure it.

Decorate documents with backgrounds, borders, and text effects
Test 1, question 2 You have to be in Print Layout view to see or customize a watermark in a document. (Pick one answer.)
1. True.
2. False.

Decorate documents with backgrounds, borders, and text effects
Test 1, question 2: Answer True.

Decorate documents with backgrounds, borders, and text effects
Test 1, question 3 You want to add a background to a Web document. Which command do you click on the Page Layout tab? (Pick one answer.)
1. Watermark.
2. Page Color.
3. Page Background.

Decorate documents with backgrounds, borders, and text effects
Test 1, question 3: Answer Page Color.
From here, you can apply a solid color or click Fill Effects to choose a gradient, textured, or patterned background, or you can apply a picture from your computer.

Lesson 2
Add borders, shading, and styles

Decorate documents with backgrounds, borders, and text effects
Add borders, shading, and styles Borders, shading, and decorative effects aren’t just for holiday newsletters.
Word gives you many ways to spruce up your documents all year round.
1
2
3
Apply page borders for results ranging from playful to business-sharp.
For pictures, add new style effects, such as shadows and reflections, or simple borders.
Emphasize whole paragraphs with shading and borders.

Decorate documents with backgrounds, borders, and text effects
Add borders, shading, and styles Borders, shading, and decorative effects aren’t just for holiday newsletters.
Word gives you many ways to spruce up your documents all year round.
Choose from new table styles to instantly add color and formatting.
4
5 Give flair to shapes with new styles and fill effects.

Decorate documents with backgrounds, borders, and text effects
Page borders You can add full or partial borders to a page.
Word provides a variety of built-in page borders, from businesslike to fancy.
• The type of border, from simple box to shadowed to 3-D to a custom style of your own design.
• The line style, color, and thickness.
• The artistic style.
You can choose:

Decorate documents with backgrounds, borders, and text effects
Page borders You apply a page border from the Page Layout tab, using the Page Border command.
And you can preview your border design, so it’s easy to see how your chosen effect will look.

Decorate documents with backgrounds, borders, and text effects
Borders for pictures, text, and tables Try borders around various elements within a document, such as the ones shown here.
1
2
3
Use a border to make a picture stand out.
A border can nicely offset an important quotation.
Borders can be very effective in tables. Apply them to every cell if you want that look.

Decorate documents with backgrounds, borders, and text effects
Borders for pictures, text, and tables The methods for adding borders vary depending on what you’re adding a border to.
For a picture, Word 2007 offers a whole new set of picture styles that include borders as well as effects such as reflections and shading.
You find these styles by selecting the picture and then working with the Picture Tools on the Ribbon.

Decorate documents with backgrounds, borders, and text effects
Borders for pictures, text, and tables The methods for adding borders vary depending on what you’re adding a border to.
For other graphics, such as tables, and for text, you’ll find border options similar to those you’d use for page borders.
These are opened from the Page Layout tab.

Decorate documents with backgrounds, borders, and text effects
Shading Use shading to emphasize text. These examples give an idea.
1
2
3
Make a heading stand out.
Use a quotation style and apply a shading background and border to it.
Set off a list.

Decorate documents with backgrounds, borders, and text effects
Shading Use shading to emphasize text. These examples give an idea.
You find shading options in the same place as border options: Start on the Page Layout tab, and click Page Borders.

Decorate documents with backgrounds, borders, and text effects
Quick styles for tables If you want to give coordinated colors and shading to a table, use one of the new table styles.
These each have a unique format and use of color, for a professional result.
It’s more efficient to use a table style than to try to add shading and borders row by row or cell by cell.

Decorate documents with backgrounds, borders, and text effects
Quick styles for tables The picture shows two examples of table styles.
You apply a table style by selecting the table in the document and working with Table Tools on the Ribbon.
Each draws upon one set of colors, available in a theme called Oriel.

Decorate documents with backgrounds, borders, and text effects
Quick styles for shapes Shapes, such as the arrows shown here, have new styling options in Word 2007.
As with tables, whole packages of finished styles are available to give color and instant finish to circles, arrows, text boxes, and myriad other shapes.
The arrows here have three different styles applied.

Decorate documents with backgrounds, borders, and text effects
Quick styles for shapes Shapes have their own tools, as tables and pictures do.
You first select the shape, and then work with the Drawing Tools to select a style — which comes complete with border, look, and type of fill.
You can tinker as you wish with the fill and border.

Decorate documents with backgrounds, borders, and text effects
Suggestions for practice 2 1. Add a page border.
2. Apply a border to a picture.
3. Shade a heading.
4. Apply a table style.
5. Add borders to the table.
6. Add a gradient fill and a style to a shape.
7. Use a theme to change the document’s overall look.
Online practice (requires Word 2007)

Decorate documents with backgrounds, borders, and text effects
Test 2, question 1 To add borders or shading to a page or to text, you start from which Ribbon tab? (Pick one answer.)
1. The Format tab under Drawing Tools.
2. The Insert tab.
3. The Page Layout tab.

Decorate documents with backgrounds, borders, and text effects
Test 2, question 1: Answer The Page Layout tab.
On this tab, click Page Borders to open the Borders and Shading dialog box. Choose the tab that has what you want: Borders, for text or a paragraph; Page Borders, for a whole page or section; and Shading, for text or a paragraph.

Decorate documents with backgrounds, borders, and text effects
Test 2, question 2 What’s the quickest way to add visual formatting to a table? (Pick one answer.)
1. Use the Shading and Borders buttons within Table Tools to format individual rows and columns.
2. Apply a table style.

Decorate documents with backgrounds, borders, and text effects
Test 2, question 2: Answer Apply a table style.
Select the table. The Table Tools appear, with the Design tab. There, choose from the array of coordinated Table Styles complete with borders, shading, colors, and other formatting.

Decorate documents with backgrounds, borders, and text effects
Test 2, question 3 You have a circle shape in your document that you want to apply a gradient fill to. What’s the first step? (Pick one answer.)
1. Click the Insert tab.
2. Select the circle.
3. Click the Shape Fill button.

Decorate documents with backgrounds, borders, and text effects
Test 2, question 3: Answer Select the circle.
Selecting the circle makes the Drawing Tools appear, which you can use to apply the look you want.
Lesson 3
Use special text effects

Decorate documents with backgrounds, borders, and text effects
Use special text effects How do you emphasize text?
Word offers some formatting choices for text that offer more visual impact than the old standbys, bold and italic.
• A dropped capital letter, used at the start of a document or beginning of a new chapter.
• Text effects such as emboss, engrave, and shadow.
• WordArt formatting for bold flash.
They include:

Decorate documents with backgrounds, borders, and text effects
Create a drop cap An ancient illuminated text, the start of a fairy tale, the large first letter that sometimes begins a chapter.
In modern typography, that’s referred to as a drop cap.
The steps are simple: You select the letter you want to turn into a drop cap, and click Drop Cap on the Insert tab.
The drop cap sits in a text box, and you can apply any text formatting to it. The picture shows examples of different fonts you might use.

Decorate documents with backgrounds, borders, and text effects
Create a drop cap You can turn only a single letter into a drop cap.
Even if you select a block of text, only the first letter is affected.
Also, only the first letter of a paragraph can become a drop cap.

Decorate documents with backgrounds, borders, and text effects
Special font effects While font style and color do a lot to give impact to text, you can add a little more to the look with different effects.
The picture shows examples.
1
2
3
An embossing effect makes the text look raised off the page.
An outline effect, removes the solid color fill in the text.
An engraving effect makes text look pressed into the page.

Decorate documents with backgrounds, borders, and text effects
Special font effects These three effects, plus shadowing (not shown) can be used to make a simple heading look more like a logo.
They have more impact on bigger font sizes, sometimes they’re enhanced by bold or italic formatting, and they’re best used sparingly.

Decorate documents with backgrounds, borders, and text effects
Add WordArt WordArt is not for the faint of heart.
Where text effects operate on subtlety, WordArt is big and flashy, and treats text almost like a graphic.
Create WordArt by typing the text you want to style in a WordArt editing dialog box (opened from the Insert tab).
Once WordArt is applied, you treat the affected text somewhat like a picture. You click to select it, which makes WordArt Tools available, with several formatting options on the Format tab.

Decorate documents with backgrounds, borders, and text effects
Suggestions for practice 3 1. Add a high-impact font effect.
2. Try out tips for ways to access font options.
3. Apply a drop cap effect.
4. Insert WordArt.
5. Format the WordArt with a curve, shadow, and color.
Online practice (requires Word 2007)

Decorate documents with backgrounds, borders, and text effects
Test 3, question 1 Which of these is the best practice for using text effects such as WordArt? (Pick one answer.)
1. Be sparing.
2. Variety makes the biggest impact.

Decorate documents with backgrounds, borders, and text effects
Test 3, question 1: Answer Be sparing.
Text effects have the most impact when you limit them.

Decorate documents with backgrounds, borders, and text effects
Test 3, question 2 What’s a good way to access font options? (Pick one answer.)
1. On the Home tab, in Font, click the More arrow to open the Font dialog box.
2. Select and right-click the text. Then click Font on the shortcut menu to open the Font dialog box.
3. Select text you want to change, and watch for the Mini toolbar that appears. Point to it and click anything you want there.
4. All of the above.

Decorate documents with backgrounds, borders, and text effects
Test 3, question 2: Answer All of the above.

Decorate documents with backgrounds, borders, and text effects
Test 3, question 3 You want to change the font in the WordArt you just applied. Where do you start? (Pick one answer.)
1. Click WordArt on the Insert tab.
2. Highlight the WordArt text, and choose a different font in the Font dialog box.
3. Click to select the WordArt text (so it has a dashed border), and then click the Format tab under WordArt Tools.

Decorate documents with backgrounds, borders, and text effects
Test 3, question 3: Answer Click to select the WordArt text (so it has a dashed border), and then click the Format tab under WordArt Tools.
This tab appears only when you have selected the WordArt. You can apply shadows and 3-D effects, change the curvature of the shape, change the text or font, apply word wrapping, and other things.

Decorate documents with backgrounds, borders, and text effects
Quick Reference Card
For a summary of the tasks covered in this course, view the Quick Reference Card.

Microsoft® Office Word 2007 Training
Get up to speed
JohnRouda.com presents:

Get up to speed
Course contents
• Overview: Have you heard the word?
• Lesson 1: Get to know the Ribbon
• Lesson 2: Find everyday commands
• Lesson 3: A new file format
The first two lessons include a list of suggested tasks, and all include a set of test questions.
Get up to speed
Overview: Have you heard the word? Word 2007 is out. It’s exciting, and it’s designed to be better and more productive than the version you’re used to.
But it may look a little unfamiliar. So this course will help get you up to speed.
Find out how to get the best out of the new and easier version of Word, and see how to do the everyday things you’ve always done.

Get up to speed
Course goals • Work with the Ribbon — the new feature that makes Word
easier to use than ever before.
• Find the everyday, common commands you need to do your job.
• Use the new Word file format in the way that’s best for you.

Lesson 1
Get to know the Ribbon

Get up to speed
Get to know the Ribbon When you first open Word 2007, you may be surprised by its new look.
Most of the changes are in the Ribbon, the area that spans the top of Word.
The Ribbon brings the most popular commands to the forefront, so you don’t have to hunt in various parts of the program for things you do all the time.
Why the change? To make your work easier and faster.

Get up to speed
The Ribbon in action The Ribbon’s ease of use and convenience are best understood when seen in action.
Play the animation to see how to cut and paste text, change text formatting, and alter the page background color, all using the Ribbon.
Animation: Right-click, and click Play.

Get up to speed
Use the Ribbon for common actions The Ribbon offers ease of use and convenience, with all common actions shown in one place.
For example, you can cut and paste text by using commands on the Home tab; change text formatting by using a Style; and alter the page background color on the Page Layout tab.

Get up to speed
What’s on the Ribbon? Getting familiar with the three parts of the Ribbon will help you understand how to use it.
They are tabs, groups, and commands.
1
2
3
Tabs: The Ribbon has seven basic ones across the top. Each represents an activity area.
Groups: Each tab has several groups that show related items together.
Commands: A command is a button, a menu, or a box where you can enter information.

Get up to speed
Dialog Box Launchers in groups At first glance, you may not see a certain command from a previous version.
Fret not.
Some groups have a small diagonal arrow in the lower-right corner called the Dialog Box Launcher .
Click it to see more options related to that group. They’ll appear in a familiar-looking dialog box or task pane that you recognize from a previous version of Word.

Get up to speed
Additional tabs appear In the new version of Word, certain tabs appear only when you need them.
Say you insert a picture and want to do more with it, like crop it or change how text wraps around it.
Where are those commands found?

Get up to speed
Additional tabs appear In the new version of Word, certain tabs appear only when you need them.
1
2
3
Select the picture.
The Picture Tools appear. Click the Format tab.
Additional groups and commands appear for working with pictures, like the Picture Styles group.
You don’t need to hunt for them. Instead:

Get up to speed
The Mini toolbar Some formatting commands are so useful that you want them available no matter what you’re doing.
Let’s say you want to quickly format some text, but you’re working on the Page Layout tab.
You could click the Home tab to see the formatting options, but there’s a faster way.

Get up to speed
The Mini toolbar Some formatting commands are so useful that you want them available no matter what you’re doing.
1
2
Select your text by dragging with your mouse, and then point at the selection.
The Mini toolbar will appear in a faded fashion. If you point to the Mini toolbar, it will become solid, and you can click a formatting option on it.

Get up to speed
The Quick Access Toolbar The Quick Access Toolbar is the small area to the upper left of the Ribbon.
It contains the things that you use over and over every day: Save, Undo, and Repeat.
You can also add your favorite commands to the Quick Access Toolbar so that they’re available no matter which tab you’re on.
Animation: Right-click, and click Play.

Get up to speed
The Quick Access Toolbar The Quick Access Toolbar is the small area to the upper left of the Ribbon.
The picture show how you can add your favorite other commands to the Quick Access Toolbar so that they’re available no matter which tab you’re on.
You can also remove buttons from the Quick Access Toolbar.
It contains the things that you use over and over every day: Save, Undo, and Repeat.

Get up to speed
Temporarily hide the Ribbon The Ribbon makes everything nicely centralized and easy to find.
But sometimes you don’t need to find things. You just want to work on your document, and you’d like more room to do that.
In that case, it’s just as easy to hide the Ribbon temporarily as it is to use it.

Get up to speed
Temporarily hide the Ribbon The Ribbon makes everything nicely centralized and easy to find.
1. Double-click the active tab. The groups disappear so that you have more room.
2. To see all the commands again, double-click the active tab again to bring back the groups.
Here’s how:

Get up to speed
Use the keyboard Okay, keyboard people, these slides are for you.
The Ribbon design comes with new shortcuts.
• There are shortcuts for every single button on the Ribbon.
• Shortcuts often require fewer keys.
This change brings two big advantages over previous versions of Office programs:

Get up to speed
Use the keyboard The new shortcuts also have a new name: Key Tips.
1. Press the Key Tip for the tab you want to display. For example, press H for the Home tab. This makes all the Key Tips for that tab’s commands appear.
2. Press the Key Tip for the command you want.
Next:
To use Key Tips, start by pressing ALT.

Get up to speed
• Shortcuts that start with the CTRL key remain the same as in previous versions of Word.
– Examples include CTRL+C for copy and CTRL+ALT+1 for Heading 1.
• You can still use the old ALT+ shortcuts that accessed menus and commands in previous versions of Word.
– However, because the old menus are not available, you’ll have no screen reminders of what letters to press. So you’ll need to know the key sequence by heart in order to use a shortcut.
Use the keyboard What about the old keyboard shortcuts?

Get up to speed
Suggestions for practice 1. Use the Ribbon.
2. Make additional tabs appear, and then insert a picture and work with the Picture Tools.
3. Work with the Mini toolbar.
4. Use the Quick Access Toolbar.
5. Hide groups and commands.
6. Use keyboard shortcuts.
Online practice (requires Word 2007)

Get up to speed
Test 1, question 1 If you click this button in Word 2007, what happens? (Pick one answer.)
1. You temporarily hide the Ribbon so that you have more room for your document.
2. You apply a bigger font size to your text.
3. You see additional options.
4. You add a command to the Quick Access Toolbar.
Get up to speed
Test 1, question 1: Answer You see additional options.
Often a dialog box will appear, and it may look familiar from previous versions of Word.

Get up to speed
Test 1, question 2 Where is the Quick Access Toolbar and when should you use it? (Pick one answer.)
1. It is in the upper-left corner of the screen, and you should use it for your favorite commands.
2. It floats above your text, and you should use it when you need to make formatting changes.
3. It is in the upper-left corner of the screen, and you should use it when you need to quickly access a document.
4. It is on the Home tab, and you should use it when you need to quickly launch or start a new document.

Get up to speed
Test 1, question 2: Answer It is in the upper-left corner of the screen, and you should use it for your favorite commands.
It’s the small toolbar with the Save, Undo, and Repeat buttons. You can add your favorite commands by right-clicking a command and choosing Add to Quick Access Toolbar.

Get up to speed
Test 1, question 3 The Mini toolbar will appear if you do which of the following? (Pick one answer.)
1. Double-click the active tab on the Ribbon.
2. Select text.
3. Select text and then point at it.
4. Any of the above.

Get up to speed
Test 1, question 3: Answer Select the text and then point at it.
It will also appear if you right-click your selected text.

Lesson 2
Find everyday commands

Get up to speed
Find everyday commands Word 2007 is new, and that’s exciting. But you have things to do.
So now it’s time to find out the exact locations of the most commonly used commands.
For example, where do you create a document? Where are the bullets, the styles, and the spelling checker? What about printing?
This lesson will show that the new program design puts those commands right where you need them.

Get up to speed
Start with the Microsoft Office Button What happened to the File menu?
Press the Microsoft Office Button to find out.
The Microsoft Office Button is now the place to start in Word.
When you press it, a menu appears that you use to create, open, or save a document.

Get up to speed
Bullets, numbers, and more Once you have a document open and have typed your text, you’ll no doubt want to format that text.
Many familiar formatting commands are in view on the Home tab, in the Font group: Bold, Italic, Font Size, and so on.
And there are several more you’ll find useful here.

Get up to speed
Bullets, numbers, and more Once you have a document open and have typed your text, you’ll no doubt want to format that text.
For example, don’t overlook the Paragraph group, shown here. It has the ever-popular bulleted lists, numbered lists, and multilevel lists.
Indentation and alignment commands appear here as well.

Get up to speed
What about styles? Interested in a more powerful and efficient approach to formatting than just the bold and italic commands?
You’ll want to know about styles in the new Word.
You can either choose a ready-made Quick Style or apply a style you’ve made before.

Get up to speed
What about styles? You work with styles on the Home tab, in the Styles group.
1 Quick styles are ready-made, professional-looking styles that are quick and easy to apply. And they have a new look with this version of Word.
Click this button to see several more ready-to-use Quick Styles.
Click the Dialog Box Launcher to open the Styles pane.
2
3
The picture shows how to get the styles you want.
Get up to speed
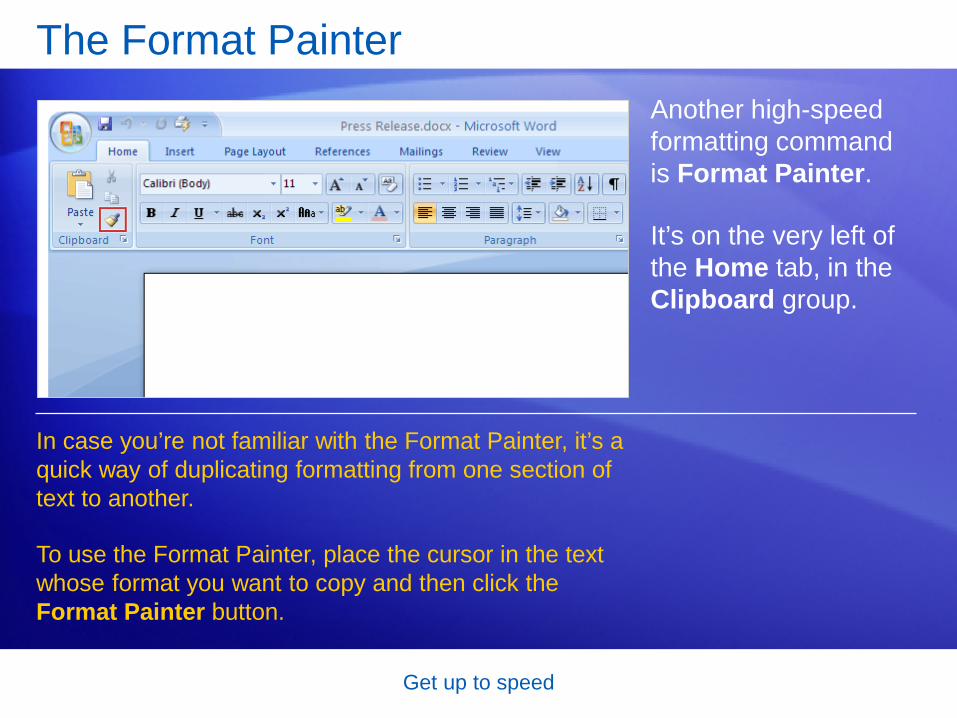
The Format Painter Another high-speed formatting command is Format Painter.
It’s on the very left of the Home tab, in the Clipboard group.
In case you’re not familiar with the Format Painter, it’s a quick way of duplicating formatting from one section of text to another.
To use the Format Painter, place the cursor in the text whose format you want to copy and then click the Format Painter button.

Get up to speed
Insert pictures, hyperlinks, headers, and footers To give your text power and punch, you may want pictures, clip art, charts, or shapes.
The Insert tab offers this wealth of added information.
And those aren’t the only commands on this tab. You’ve got Tables, Hyperlink, Header, and Footer here too.
That’s not all. Not pictured but ready to serve you are page numbers, text boxes, and WordArt.

Get up to speed
Zoom After you insert something, you may need a closer look at the details.
So you’ll definitely want to know where to find the zoom control.
Look in the lower-right corner. Drag the slider to the right to zoom in, and drag it to the left to zoom out.

Get up to speed
Check your spelling and grammar Make no mistake!
When you’ve done most of the work in your document, you’ll want to check spelling and grammar before printing it or sending it in e-mail.
The Spelling & Grammar command is on the Review tab, because this is part of reviewing your work.
Look toward the far left, in the Proofing group.

Get up to speed
Ready to print? You’re ready to print—but are you?
First it’s smart to check how your pages are laid out for the printer.
Everything you need is on the Page Layout tab.
The Page Setup group contains Size (8.5 x 11, A4, and so on), Orientation (landscape and portrait), and Margins.

Get up to speed
Yes, ready to print When you’re truly ready to print, go back to the Microsoft Office Button.
1 If you click the Print command, you’ll get the Print dialog box. But point at the arrow on the right of the Print command instead, and you’ll see three additional commands.
Keep in mind that now you’ve got options:

Get up to speed
Yes, ready to print When you’re truly ready to print, go back to the Microsoft Office Button.
2
3
Quick Print
Print Preview
Keep in mind that now you’ve got options:
4

Get up to speed
Behind the scenes All the features you are accustomed to using every day in Word are on the Ribbon and much easier to find than ever before.
So where are the behind-the-scenes settings that aren’t about producing documents, but that control how Word works?

Get up to speed
Behind the scenes In previous versions of Word, you clicked Options on the Tools menu.
Now, all these settings are part of Word Options, which you see when you click the Word Options button.
It’s on the menu that opens when you click the Microsoft Office Button.

Get up to speed
Suggestions for practice 1. Add a bulleted list.
2. Apply Quick Styles, and then zoom out to see all changes.
3. Change the Quick Style set.
4. Use the Format Painter.
5. Insert a chart by using the Insert tab.
6. Make overall changes with the Page Layout tab. Then try more tabs.
7. Print in all sorts of ways.
Online practice (requires Word 2007)

Get up to speed
Test 2, question 1 You can apply bulleted lists using commands in which group on which tab? (Pick one answer.)
1. In the Paragraph group on the Page Layout tab.
2. In the Paragraph group on the Home tab.
3. In the Symbols group on the Insert tab.
4. In the Text group on the Insert tab.

Get up to speed
Test 2, question 1: Answer In the Paragraph group on the Home tab.
This is where you can apply bulleted lists. Tip: You can also apply bulleted lists by using the Mini toolbar.

Get up to speed
Test 2, question 2 How do you choose print options in the new version of Word? (Pick one answer.)
1. Click the Print button on the Ribbon.
2. Click the Print button on the Quick Access Toolbar.
3. Use the Microsoft Office Button.
4. Either the first or second option above.

Get up to speed
Test 2, question 2: Answer Use the Microsoft Office Button.
This is where you open Print Preview as well.

Get up to speed
Test 2, question 3 Which corner has the zoom control? (Pick one answer.)
1. Upper-right.
2. Upper-left.
3. Lower-left.
4. Lower-right.

Get up to speed
Test 2, question 3: Answer Lower-right.
In the lower-right corner is the control you use to zoom in and out. You can also use the View menu to see the zoom controls.

Lesson 3
A new file format

Get up to speed
A new file format One more big change in the new version of Word: an improved file format.
What does that mean to you?
The new file format helps keep your file sizes smaller, and it helps keep them safer. There are other advantages, too.

Get up to speed
Why the change? XML The new Word document file format is based on the new Office Open XML Formats.
The format brings lots of benefits:
• Helps make your documents safer.
• Helps make your document file sizes smaller.
• Helps make your documents less susceptible to damage.

Get up to speed
Why the change? New features The new file format also gives you the ability to use features that are only available in Word 2007.
One example is the new SmartArt™ graphics feature.
The illustration shows you how to start such a graphic in Word. Notice how many SmartArt graphic designs are available to choose from.

Get up to speed
How do I know I’m using the new format? When you create a new document in Word 2007, and then save the document, the new file format will automatically be chosen for you.
You can make sure of this by looking closely at the Save As dialog box. Notice that the Save as type box says Word Document. This means the new file format is being used.

Get up to speed
There’s more than one file format? Previously, there were just two Word file types: documents and templates (.doc and .dot).
With Word 2007 there are four file types: .docx, .dotx, .docm, and .dotm (the “x” stands for XML and the “m” for macro). Take a look at the table for details.
The only outward difference you are likely to see with new Word file formats is if you use macros or code.
File extension What it’s used for .docx Standard Word document with no
macros or code .dotx Word template with no macros or
code .docm Word document that could contain
macros or code .dotm Word template that could contain
macros or code

Get up to speed
What about the documents I already have? You’re probably wondering, “What happens when I open my older documents in the new version of Word?”
Word 2007 can open files created in all previous versions of Word, 1.0 through 2003.
Word opens older documents in compatibility mode. You know this because at the top of the document “(Compatibility Mode)” appears next to the file name.

Get up to speed
Compatibility mode What’s compatibility mode all about?
In short, Word is telling you that the document uses an older file format.
Because that file format doesn’t understand some of the new features in the new version of Word, those features are either turned off or modified so that they approximate an older version of Word.

Get up to speed
Converting your old files Can you convert an older document to the new file format?
Naturally.
With the document open in Word 2007, you just click the Microsoft Office Button, and then click the Convert command on the menu.
This conversion offers the benefits of the new format (helps create smaller, more secure files, and so on) and also the new features with their full, undiminished capabilities.

Get up to speed
Share documents using a converter If you’ll be sharing documents, there are conversion methods you’ll want to know about.
Here’s a common scenario that involves a converter.
Start by supposing that you’re using the new file format, either by creating and saving new documents or by upgrading older documents by using the Convert command on the menu that opens from the Microsoft Office Button.

Get up to speed
Share documents using a converter If you’ll be sharing documents, there are conversion methods you’ll want to know about.
Here’s a common scenario that involves a converter.
Your friend John has an older version of Word that came with Office 2000. You want to use e-mail to send him your latest document. Will he be able to open it?
Yes. When John clicks the document, the message shown here will ask if he wants to download a converter that will let him open your document.

Get up to speed
Share documents using a converter If you’ll be sharing documents, there are conversion methods you’ll want to know about.
Here’s a common scenario that involves a converter.
The document John opens won’t look exactly the same as the one you made, because there are many features in your new version of Word that don’t exist in his version.
Still, he can open it, and will be able to work with it and send it back to you.
Get up to speed
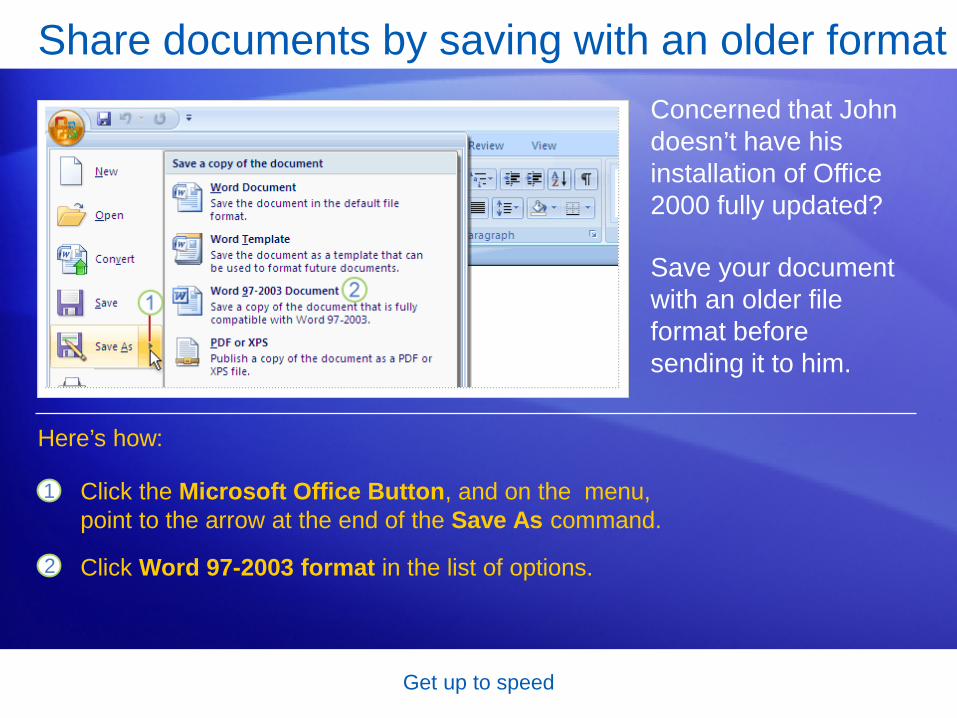
Share documents by saving with an older format Concerned that John doesn’t have his installation of Office 2000 fully updated?
Save your document with an older file format before sending it to him.
1
2
Click the Microsoft Office Button, and on the menu, point to the arrow at the end of the Save As command.
Click Word 97-2003 format in the list of options.
Here’s how:

Get up to speed
Share documents by saving with an older format You may get a warning that saving in the older file format will cause certain features to be lost or modified.
For example, if your document contains a new diagram, Word will notify you that the diagram will be combined into a single, uneditable object. That way John can at least see the diagram. But John won’t be able to edit it, because his version of Word doesn’t understand how to work with this new feature.

Get up to speed
Test 3, question 1 In the title bar of your Word document, it says, “Marketing report.doc (Compatibility Mode).” What does this mean? (Pick one answer.)
1. You can work with the document, but you can’t save it.
2. You can’t work with the document, because it’s not compatible.
3. You can work with the document using all the new Word features.
4. You can work in the document, but Word will limit some new features.

Get up to speed
Test 3, question 1: Answer You can work with the document, but Word will limit some new features.
The document is in the older file format and does not understand the new features in Word. So those features are limited or disabled.

Get up to speed
Test 3, question 2 Your friend sent you a Word 2000 document in an e-mail message. Can you open it in the new version of Word? (Pick one answer.)
1. Yes, but you’ll get a warning telling you to get a converter.
2. Yes, but the document will open in compatibility mode.
3. Yes, if you first turn on compatibility mode with the Quick Access Toolbar.
4. No, only files from Word 2002 and later can be opened in the new version of Word.

Get up to speed
Test 3, question 2: Answer Yes, but the document will open in compatibility mode.
Some features will be limited because you are working with an older file format.

Get up to speed
Test 3, question 3 What happens if you click the Convert command on the menu that opens from the Microsoft Office Button? (Pick one answer.)
1. Word upgrades the existing file to the new file format and renames the file from “document.doc” to “Upgraded: document.doc.”
2. Word upgrades the existing file to the new file format and turns on the new features available in the new version of Word.
3. Word limits its features to be compatible with the document’s file format.
4. Word opens the document in a safe, read-only state so that you can view in the new file format.

Get up to speed
Test 3, question 3: Answer Word upgrades the existing file to the new file format and turns on the new features available in the new version of Word.
And if you have Windows configured to show file extensions, you’ll see that the extension changes from .doc to .docx.

Get up to speed
Quick Reference Card
For a summary of the tasks covered in this course, view the Quick Reference Card.

Microsoft® Office Word 2007 Training
Headers and footers for document sections
JohnRouda.com presents:

Headers and footers for document sections
Course contents
• Overview: Documents with different parts
• Lesson: Varying your headers and footers
The lesson includes a list of suggested tasks and a set of test questions.

Headers and footers for document sections
Overview: Documents with different parts
Your Word 2007 document has several parts. How do you apply headers and footers and vary them so they’re appropriate to each part?
If your document has a cover page, for example, you may want no page number to show there. And you’d like the headers for each chapter to contain the title for that chapter only.
In this course, you’ll see how to tailor your headers and footers to your content.
Headers and footers for document sections
Course goals
• Create document sections by adding section breaks.
• Work within sections to create varied headers and footers.
• Apply a different-first-page setting for headers and footers.
• Create headers and footers for facing pages.

Lesson
Varying your headers and footers

Headers and footers for document sections
Varying your headers and footers You have a multipart document, and you want to create headers and footers that go with each part.
You already know you can apply a header or footer once and have it appear everywhere.
But for the multipart document, you need more control. How do you get that?

Headers and footers for document sections
Create different sections If your document has several parts, and you want unique headers and footers for each part, you first create section breaks between the document’s parts.
A section break enables you to create a unique page layout for the pages in that section.
With the unique layout established, you can set up the headers and footers the way you want them for that section.

Headers and footers for document sections
How to create section breaks You insert section breaks in the main body of the document, not in the header and footer space.
So you’d close the header and footer workspace before doing the steps shown in the picture.

Headers and footers for document sections
How to create section breaks You insert section breaks in the main body of the document, not in the header and footer space.
1
2
3
Place the cursor where you want a new section to start.
On the Ribbon, click the Page Layout tab, and click Breaks.
Under Section Breaks, click Next Page. Word creates a section break before the position of the cursor.

Headers and footers for document sections
How sections are shown in headers and footers The section break means that what comes before it is one section, and what’s after it is another section.
When you open the header and footer workspace, markers appear there that define the sections and keep you oriented.

Headers and footers for document sections
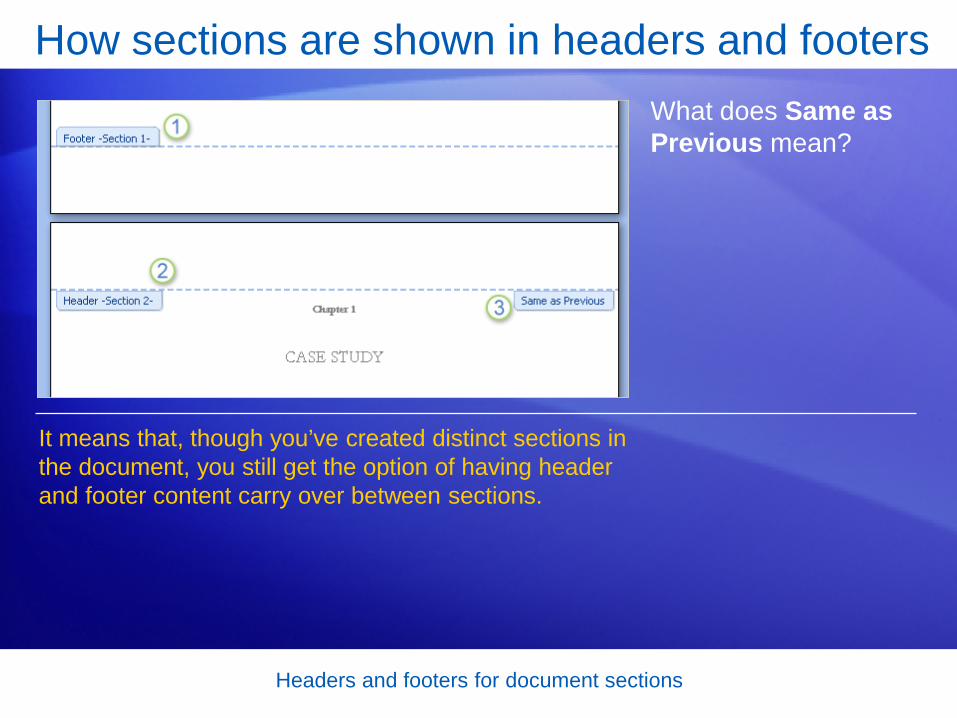
How sections are shown in headers and footers As the picture shows, the header and footer areas indicate the sections and give each a number.
1
2
3
This footer is at the end of section 1.
The header below is at the start of section 2.
And you’ll notice another tab: Same as Previous.
Headers and footers for document sections
How sections are shown in headers and footers What does Same as Previous mean?
It means that, though you’ve created distinct sections in the document, you still get the option of having header and footer content carry over between sections.

Headers and footers for document sections
Create unique text in a header To create unique text in a particular header, you first break the link in the header. This frees the header for content that’s unique to the section.
First, you place the cursor in the header you want to break the link for. Then, in the Navigation group, click Link to Previous to turn that setting off.
Animation: Right-click, and click Play.

Headers and footers for document sections
Create unique text in a header To create unique text in a particular header, you first break the link in the header. This frees the header for content that’s unique to the section.
First, you place the cursor in the header you want to break the link for.
Then, in the Navigation group, click Link to Previous to turn that setting off.

Headers and footers for document sections
Tips for working with different headers and footers Keep the following things in mind as you set up unique headers and footers in a document.
• Break links for each document section.
• Break header and footer links separately.
• Mind your page numbering.

Headers and footers for document sections
Create a different first page Once you’ve turned your front matter into its own section, you can subdivide it even further, in case you want nothing in the headers and footers on the cover page.
1 Use the Different First Page setting, shown here. Selecting this setting enables the header and footer areas to be different from the rest of the pages in the section. You can do this for any section in the document.

Headers and footers for document sections
Create a different first page Once you’ve turned your front matter into its own section, you can subdivide it even further, in case you want nothing in the headers and footers on the cover page.
2 The section’s header and footer areas will now have text above them saying “First Page Header” and “First Page Footer.” (This appears only in the header and footer workspace.)

Headers and footers for document sections
• If you want unique headers and footers only on the first page of your document, you can apply the Different First Page setting and dispense with creating sections.
• However, if you intend to include sections, create those before applying the Different First Page setting. This setting gets carried over into a new section, which is typically not what you’d want.
• Word has predesigned cover pages that you can insert (you find these on the Insert tab). These automatically put the Different First Page setting into effect.
Tips for creating a different first page Tips:

Headers and footers for document sections
Different odd and even pages As you use the galleries of designed headers and footers, you’ll see that some are set up for odd and even pages, with the content on the outer edge of the page.
To apply headers and footers to odd and even pages, you go through the same process described earlier.
That is, you create document sections, break the links between them, and then add the header and footer content that you want in each section.
Headers and footers for document sections
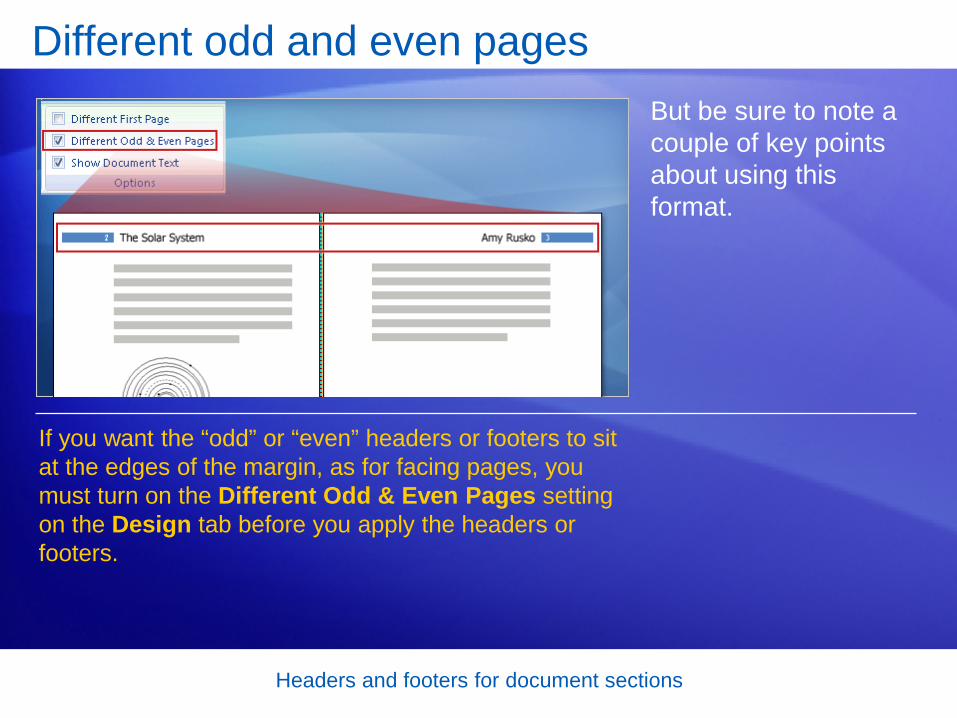
Different odd and even pages But be sure to note a couple of key points about using this format.
If you want the “odd” or “even” headers or footers to sit at the edges of the margin, as for facing pages, you must turn on the Different Odd & Even Pages setting on the Design tab before you apply the headers or footers.

Headers and footers for document sections
Different odd and even pages But be sure to note a couple of key points about using this format.
And this is a document-wide setting. While you can still create unique header and footer content in document sections, you cannot change the odd, even layout.

Headers and footers for document sections
Suggestions for practice 1. Create sections in the document.
2. Break the link between sections, and then create a unique header.
3. Create another unique header.
4. Change elements on the cover page.
Online practice (requires Word 2007)

Headers and footers for document sections
Test question 1 Why use section breaks? (Pick one answer.)
1. They lay the groundwork for layout variations in different areas of your document.
2. They visually break information from page to page.

Headers and footers for document sections
Test question 1: Answer They lay the groundwork for layout variations in different areas of your document.
Section breaks create sections, which are distinct parts of a document. Each section contains a unique set of formatting attributes.

Headers and footers for document sections
Test question 2 A section break means that any header or footer content you create in that section applies only to that section. (Pick one answer.)
1. True.
2. False.

Headers and footers for document sections
Test question 2: Answer False.
The section break is just a first step.

Headers and footers for document sections
Test question 3 There are page numbers throughout your document, in the footer. You don’t want any page numbers on your document’s cover page, however. What do you do? (Pick one answer.)
1. Put the cursor in the footer of the cover page, and use the Remove Footer command.
2. On the Design tab in Header & Footer Tools, click Different First Page.
3. Select the page number on the cover page and manually delete it.

Headers and footers for document sections
Test question 3: Answer On the Design tab in Header & Footer Tools, click Different First Page.
This makes all the footer content on the cover page disappear, and you can leave it blank or add whatever you want there.

Headers and footers for document sections
Quick Reference Card
For a summary of the tasks covered in this course, view the Quick Reference Card.

Microsoft® Office Word 2007 Training
Bullets, numbers, and lists
JohnRouda.com presents:
Bullets, numbers, and lists
Course contents
• Overview: Get the basics
• Simple lists
• Multilevel lists
Each lesson includes a list of suggested tasks and a set of test questions.

Bullets, numbers, and lists
Overview: Get the basics
Arranging information in lists can make it far easier to understand.
You probably use lists in your documents every day but don’t think about them until something gets complicated. Ever tried pasting one list into another, changing the indentation, or swapping bullet styles?
This course will teach you the ins and outs of bullets, numbers, and multilevel lists in Microsoft Office Word 2007.
Bullets, numbers, and lists
Course goals
• Create a bulleted or numbered list.
• Change the look of a bulleted or numbered list.
• Combine two separate lists.
• Use a multilevel list.

Lesson 1
Simple lists

Bullets, numbers, and lists
Simple lists Lists are a useful component of any document, whether you’re summarizing information or making it easier to digest.
Numbered lists are essential for showing a sequence of information. If you’re not worried about sequence, a bulleted list might be better.
Lists can be single-level, with all the items having the same hierarchy and indentation; or multilevel, meaning that there’s a list within a list.
Bullets, numbers, and lists
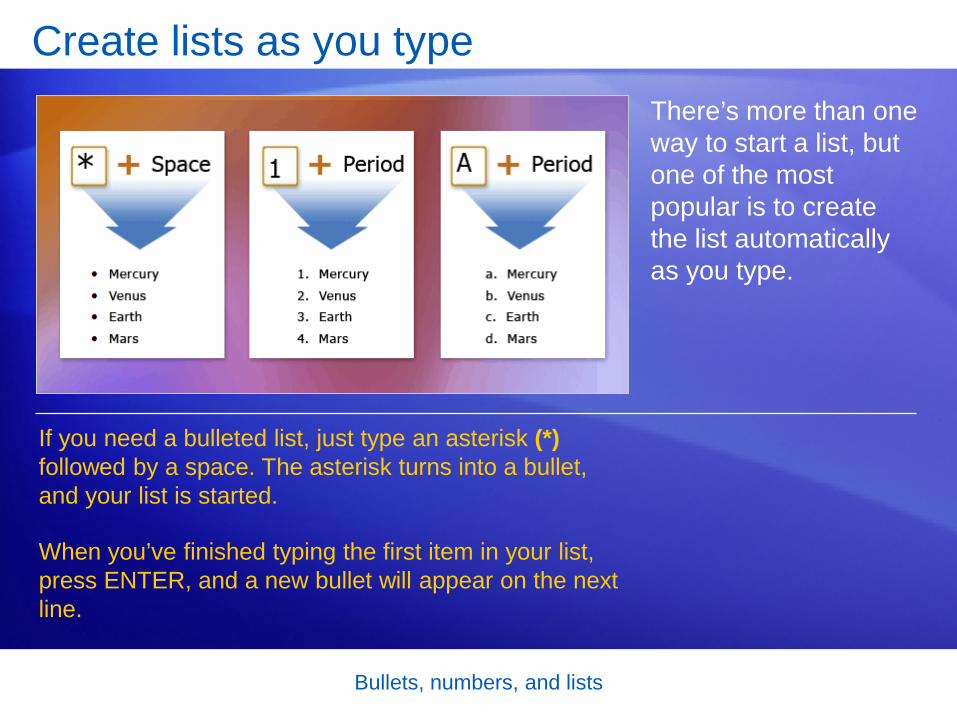
Create lists as you type There’s more than one way to start a list, but one of the most popular is to create the list automatically as you type.
If you need a bulleted list, just type an asterisk (*) followed by a space. The asterisk turns into a bullet, and your list is started.
When you’ve finished typing the first item in your list, press ENTER, and a new bullet will appear on the next line.

Bullets, numbers, and lists
Create lists as you type There’s more than one way to start a list, but one of the most popular is to create the list automatically as you type.
To automatically create numbered lists, type the number one and a period (1.), followed by a space.
This is new for Word 2007; in previous versions, you had to press ENTER before the list started.

Bullets, numbers, and lists
Create lists as you type There’s more than one way to start a list, but one of the most popular is to create the list automatically as you type.
Because lettered lists are just another variety of numbered lists, type the letter a and a period (a.), followed by a space, to start a lettered list.

Bullets, numbers, and lists
Stopping lists You’ve entered the last item in your list. How do you now finish the list and stop the bullets or numbers from appearing?
The animation shows the best methods.
The easiest way to stop creating a list is to press ENTER twice.
If you need something slightly different, use the BACKSPACE key.
Animation: Right-click, and click Play.

Bullets, numbers, and lists
Stopping lists You’ve entered the last item in your list. How do you now finish the list and stop the bullets or numbers from appearing?
The picture shows the best methods.
The easiest way to stop creating a list is to press ENTER twice, as shown on the left.
If you need something slightly different, for example, text that’s indented at the same level as the text or bullet above it, use the BACKSPACE key.
Bullets, numbers, and lists
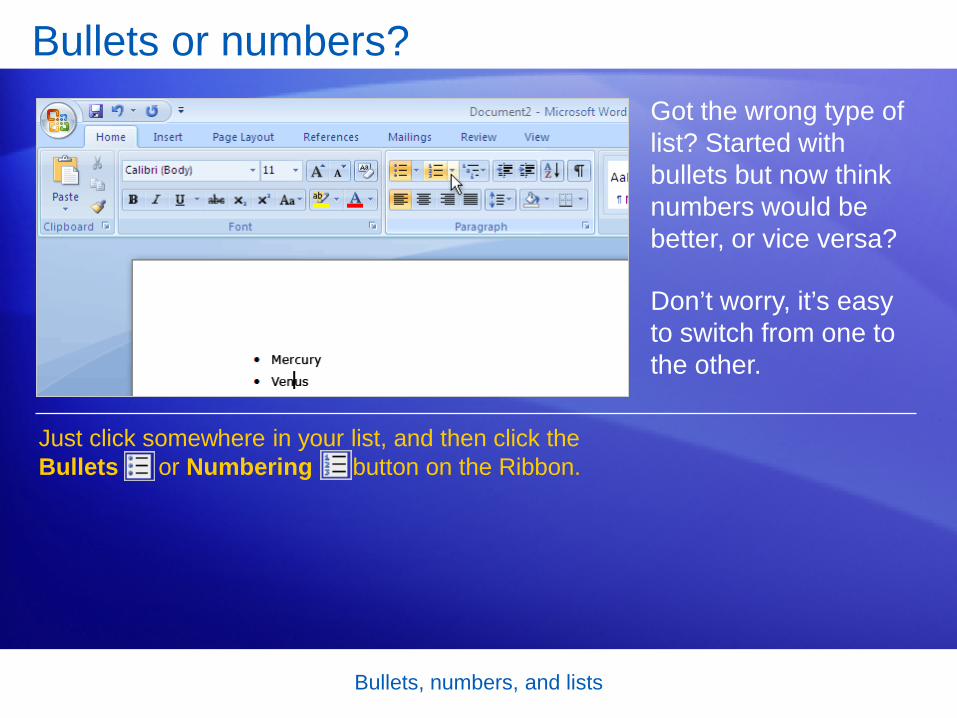
Bullets or numbers? Got the wrong type of list? Started with bullets but now think numbers would be better, or vice versa?
Don’t worry, it’s easy to switch from one to the other.
Just click somewhere in your list, and then click the Bullets or Numbering button on the Ribbon.

Bullets, numbers, and lists
Bullets or numbers? You can also use these buttons to start new lists.
Either click the button and start typing to create your first list item or select the text you’ve already typed and click the Bullets or Numbering button to change each paragraph into a list item.

Bullets, numbers, and lists
Change the look of your list If you have a bulleted list that uses the same boring black circles, there’s good news: You can change the bullet design to one of many different built-in designs.
Just click the arrow next to the Bullets button to see the Bullet Library.
Here’s even more good news: If none of those designs appeal to you, you can create your own by clicking Define New Bullet at the bottom of the dialog box.

Bullets, numbers, and lists
Change the look of your list You can design two types of bullet: symbol and picture.
Symbol bullets use a character from a font. For example, Webdings and Wingdings are popular fonts for bullet symbols.
Picture bullets are just that, tiny little pictures.

Bullets, numbers, and lists
Change the look of your list There’s a built-in Numbering Library too, and you use it in just the same way as the Bullet Library.
You can change font characteristics, such as color, to create your own numbering or symbol bullet style.
After you’ve added a new design, it will appear in the Bullet or Numbering library from then on unless you remove it by right-clicking it and then clicking Remove.

Bullets, numbers, and lists
Format a list It’s a little-known secret that in list items, you can format bullets or numbers separately from text.
The picture shows how to change black numbers to red.
1
2
3
Click the list numbers to select just them, not the text in the list items.
Change the format the way you would any other text, by using commands on the Ribbon.
Click away from the list to see the final reformatted list.

Bullets, numbers, and lists
• If you start a list with a formatting pattern that Word recognizes, Word applies it to each item that follows in your list. For example, if you make the first sentence in a list item bold and then type the rest of the paragraph in normal text, the rest of the list items you type are automatically formatted for you. When you press ENTER at the end of the line and start typing the second item’s text, it’s bold. And after you get to the end of the first sentence, the text goes back to normal text.
Format a list Here’s a formatting tip:
The list would look like this:
• First sentence of first list item is bold. The following sentence uses normal text.
• First sentence of second list item is bold. The following sentence uses normal text.

Bullets, numbers, and lists
Working with paragraphs in lists; pasting lists Suppose you’re creating a numbered or bulleted list and you need some of the list items to include subparagraphs, as shown in the picture.
There are several methods for dealing with this scenario; the one you choose depends on the state of your document and your personal preference.

Bullets, numbers, and lists
• If you want to remove an existing bullet or number from a paragraph in a list, and you want to keep the text indented with the rest of the list items, click after the bullet or number you want to delete and press BACKSPACE. If you have subsequent paragraphs, you can indent them by using the TAB key or the Increase Indent button .
Working with paragraphs in lists; pasting lists Here are some scenarios:
• If you want to remove an existing bullet or a number from a paragraph in a list and make the text line up with the margin rather than the rest of the list, click the bullet or number you want to remove and click DELETE.

Bullets, numbers, and lists
• You can also create subparagraphs in a list by pressing SHIFT+ENTER, rather than just ENTER, to end each block of text. This is known as a soft paragraph; it creates something that looks just like a paragraph break but in fact is just a continuation of the original paragraph on the next line.
Working with paragraphs in lists; pasting lists Here are some scenarios:
• To continue a list after the subparagraphs, type the next number followed by a period; the list will automatically continue. If you use the Numbering button, you’ll notice that Word does not carry on the numbering from the first list; it starts a new list beginning at number 1 again, and the AutoCorrect Options button appears next to the list item. Click the AutoCorrect Options button, and then click Continue Numbering. The new list item will join your list.

Bullets, numbers, and lists
• If you paste a list into or at the end of an existing list, Word automatically joins the lists together and the numbering for the two lists is combined. You can change this by clicking the Paste Options button that appears just after the pasted text and then choosing Paste List Without Merging.
Working with paragraphs in lists; pasting lists And finally, some information about pasting lists:

Bullets, numbers, and lists
Suggestions for practice 1. Automatically create bulleted, numbered, and lettered lists as you type.
2. Use the Ribbon for bullets and numbering.
3. Craft your own bullets and numbering.
Online practice (requires Word 2007)

Bullets, numbers, and lists
Test 1, question 1 What is a single-level list?
1. A list without sublists in any individual item.
2. A list with every bullet or number at the same indentation.
3. A list with only one item.
4. A list that uses just numbers, no bullets.

Bullets, numbers, and lists
Test 1, question 1: Answer A list without sublists in any individual item.
No lists within lists for a single-level list!

Bullets, numbers, and lists
Test 1, question 2 What should you type to automatically create a bulleted list that uses a black dot as the bullet design? (Pick one answer.)
1. 1. and a space
2. @ and a space
3. a. and a space
4. * and a space

Bullets, numbers, and lists
Test 1, question 2: Answer * and a space.
Type an asterisk followed by a space, and you’re off.

Bullets, numbers, and lists
Test 1, question 3 How should you line up a new paragraph so that the text is indented the same amount as the text in the bulleted list item above? (Pick one answer.)
1. Finish the list, and then use the indents on the ruler to line up the start of the new paragraph.
2. Add a new list item, and then press BACKSPACE to get rid of the bullet.
3. Add a new list item, and then press BACKSPACE twice.
4. Add a new list item, and then press ENTER again.

Bullets, numbers, and lists
Test 1, question 3: Answer Add a new list item, and then press BACKSPACE to get rid of the bullet.
This is by far the easiest way of achieving the indented paragraph.

Lesson 2
Multilevel lists

Bullets, numbers, and lists
Multilevel lists What if some of your list items need to have subsets of information? You need a multilevel list.
A multilevel list has lists within lists, in which you can have many levels, or layers.
A multilevel list, like single-level ones, can be bulleted or numbered — but with the added bonus that you can mix numbers, letters, and bullets.
So, for example, one layer could be bulleted, with a numbered list inside it.

Bullets, numbers, and lists
List levels The key to understanding multilevel lists is to understand list levels.
A single-level list has everything at level one, but after you add a list under one item you have list at level two.
Each new list within a list creates a new list level.

Bullets, numbers, and lists
List levels You create a multilevel list by typing or by using the commands on the Ribbon exactly as you did with the single-level lists.
So start with a bullet or number, enter your first item, and then press ENTER.
When you’re ready to start the next level, press the Increase Indent button , type the first list item of that level, and then press ENTER.

Bullets, numbers, and lists
List levels When you’re working with different list levels, you can move between the levels using the Increase Indent and Decrease Indent buttons on the Ribbon.
You can also increase and decrease indents by using keystrokes.
Press TAB to increase the indent, and press SHIFT+TAB to decrease it.

Bullets, numbers, and lists
All about indentation It’s natural to think that the list level is determined by the indentation from the left margin.
While that’s the default behavior of a lot of lists, some don’t have different indents for different levels.
If you want to change the amount a list is indented from the margin, don’t use the TAB key or the Increase Indent button.

Bullets, numbers, and lists
All about indentation It’s natural to think that the list level is determined by the indentation from the left margin.
The picture illustrates what to do instead.
1
2
Here’s a list that does not have different indentation for the different levels.
Right-click the list, and then choose Adjust List Indents. In the dialog box that appears, you can change the indent of both the bullet or number and the text.

Bullets, numbers, and lists
The List Library Just as with single-level lists, you can choose your multilevel list design. But multilevel lists have an extra feature: you can choose each level independently or do it all in one go.
Start by clicking the Multilevel List button to see the List Library. Once again, you can choose a built-in list or design your own.
If you choose to design your own list, click Define New Multilevel List. You’ll have to set the characteristics you want for each level.

Bullets, numbers, and lists
The List Library As you can see in the picture, there’s also an option to define a new list style by using the Define New List Style command.
Defining a new list style is a smart thing to do if you think you’re going to use the same list design again but may want to make some changes to the design later.

Bullets, numbers, and lists
Suggestions for practice 1. Create a multilevel list.
2. Create a list by using keystrokes.
3. Change the formatting and appearance of your list.
Online practice (requires Word 2007)
Bullets, numbers, and lists
Test 2, question 1 What is a multilevel list? (Pick one answer.)
1. A list with more than one item in it.
2. A list with both numbers and bullets in it.
3. A list with sublists under individual items in the main list.
4. A document with more than one list in it.

Bullets, numbers, and lists
Test 2, question 1: Answer A list with sublists under individual items in the main list.
In other words, a list within a list.

Bullets, numbers, and lists
Test 2, question 2 To move between levels in a list you must use the Increase Indent and Decrease Indent buttons. (Pick one answer.)
1. True.
2. False.

Bullets, numbers, and lists
Test 2, question 2: Answer False.
You can also use TAB and SHIFT+TAB to move between levels.

Bullets, numbers, and lists
Test 2, question 3 When changing the design of a multilevel list, you have the following options: (Pick one answer.)
1. Bullets at every level.
2. Numbers at every level.
3. Letters at every level.
4. A mixture of bullets, numbers, and letters.
5. All of the above.
Bullets, numbers, and lists
Test 2, question 3: Answer All of the above.
You can have exactly what you want in a multilevel list.

Bullets, numbers, and lists
Quick Reference Card
For a summary of the tasks covered in this course, view the Quick Reference Card.

Microsoft® Office Word 2007 Training
Mail merge I: Use mail merge for mass mailings
JohnRouda.com presents:

Mail merge I: Use mail merge for mass mailings
Course contents
• Overview: Mailings en masse
• Lesson 1: How it works
• Lesson 2: Set up your recipient list
• Lesson 3: Perform a complete mail merge
Two of the three lessons include a list of suggested tasks; each includes a set of test questions.

Mail merge I: Use mail merge for mass mailings
Overview: Mailings en masse
You need to send to each of your employees a letter or e-mail message containing personal tax withholding and salary information.
Creating each item individually would take hours. Enter mail merge.
Using mail merge, you create one document containing the information that’s the same in each copy, and add placeholders for the unique information. Word takes care of the rest.

Mail merge I: Use mail merge for mass mailings
Course goals
• Understand how mail merge works so that you can get the results you want.
• Set up a document for a mass mailing.
• Use the Mail Merge Wizard to perform a basic mail merge.

Lesson 1
How it works
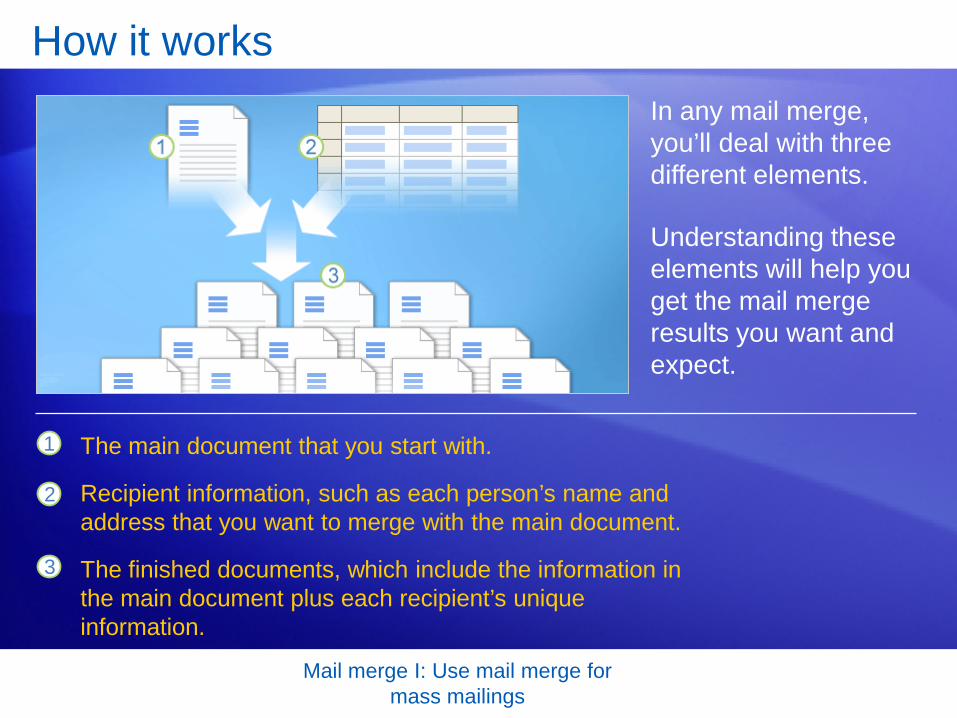
Mail merge I: Use mail merge for mass mailings
How it works In any mail merge, you’ll deal with three different elements.
Understanding these elements will help you get the mail merge results you want and expect.
1
2
3
The main document that you start with.
Recipient information, such as each person’s name and address that you want to merge with the main document.
The finished documents, which include the information in the main document plus each recipient’s unique information.

Mail merge I: Use mail merge for mass mailings
Main document The main document is your starting point. The main document can be a letter, envelope, e-mail, or even a coupon.
It contains the elements shown here.
1
2
Content that is identical in each copy, such as the main body text of a form letter. You only have to type this text once, regardless of how many letters you intend to print.
Placeholders for each recipient’s information. For example, in a form letter, the address block and greeting name would be unique in each copy.

Mail merge I: Use mail merge for mass mailings
Recipient information In a mail merge, the recipient’s information, which is unique in each merged copy, fills in for the placeholders that you added to the main document.
Recipient information might be: Addresses on envelopes or labels; names in the greeting line of a form letter; salary amounts in e-mail messages that you send to your employees; personal notes about favorite products in postcards that you mail to your best customers; or numbers on redeemable coupons.

Mail merge I: Use mail merge for mass mailings
Recipient information Recipient information must be kept in a data source.
“Data source” is an umbrella term that covers a whole category of files you work with all the time.
For example, your Microsoft Office Outlook® contacts list is a data source.

Mail merge I: Use mail merge for mass mailings
Recipient information The recipient information is usually listed in columns and rows, as shown in the table in the picture.
The data source file must be structured in a way that makes it possible to link specific information with the placeholders in the main document.

Mail merge I: Use mail merge for mass mailings
Finished set of documents When you finish a mail merge, you get what’s pictured here.
• The set of individual finished documents, which you can print (for example, letters, labels, envelopes, or coupons) or which you can transmit electronically during the merge process (for example, e-mail messages).

Mail merge I: Use mail merge for mass mailings
Finished set of documents When you finish a mail merge, you get what’s pictured here.
• The main document. This is the document you used as a starting point, which remains a separate document. It is not automatically saved after the merge.

Mail merge I: Use mail merge for mass mailings
Test 1, question 1 In a mail merge, what is the main document? (Pick one answer.)
1. The document you start with that contains both text that is identical for each merged letter, envelope, and so on, and placeholders for the unique recipient information.
2. The first document in the set of finished merged documents.
3. A document that contains only the text that is identical in each merged copy.

Mail merge I: Use mail merge for mass mailings
Test 1, question 1: Answer The document you start with that contains both text that is identical for each merged letter, envelope, and so on, and placeholders for the unique recipient information.
The main document is your starting document, where you add all the text that will be the same in every copy as well as placeholders that indicate what the unique recipient information will be and where it will appear.
Mail merge I: Use mail merge for mass mailings
Test 1, question 2 The main document with the text and placeholders is automatically saved after the merge is complete. (Pick one answer.)
1. True.
2. False.

Mail merge I: Use mail merge for mass mailings
Test 1, question 2: Answer False.
You should save the main document, so that you can use it again to complete a new merge.

Mail merge I: Use mail merge for mass mailings
Test 1, question 3 Why does the unique recipient information you use in a mail merge have to be stored in a data source file? (Pick one answer.)
1. Data source files are a special type of file that only works with mail merge.
2. Data source files organize information in a way that lets you match specific pieces of that information with specific placeholders in the main document.
3. Data source files are designed to hold a lot of information.

Mail merge I: Use mail merge for mass mailings
Test 1, question 3: Answer Data source files organize information in a way that lets you match specific pieces of that information with specific placeholders in the main document.
It’s the structured way that information is organized in the files that makes it possible for you to put information from one cell in that file into one unique document.

Lesson 2
Set up your recipient list

Mail merge I: Use mail merge for mass mailings
Set up your recipient list You know what the basic elements of a mail merge are.
Now you’ll learn how to set up your main document and connect it to the recipient list.
The recipient list, along with the placeholders that you add to your Word document or envelope, is the heart and soul of mail merge.
They work together to get unique information into the final individually merged copies.

Mail merge I: Use mail merge for mass mailings
More about the recipient list A recipient list can be any file that organizes recipient information into columns and rows. You can create it using lots of different programs, such as Excel, Access, or Outlook.
1 The columns in a list represent a category or type of information. Each column is identified by a column heading. For example, in a customer list you might have columns for Name, Last Name, and Street Address.

Mail merge I: Use mail merge for mass mailings
More about the recipient list A recipient list can be any file that organizes recipient information into columns and rows. You can create it using lots of different programs, such as Excel, Access, or Outlook.
2 Each row in a list represents one recipient’s complete information. In the customer list, for example, one row contains all the information about one customer: the customer’s name, address, and so on.
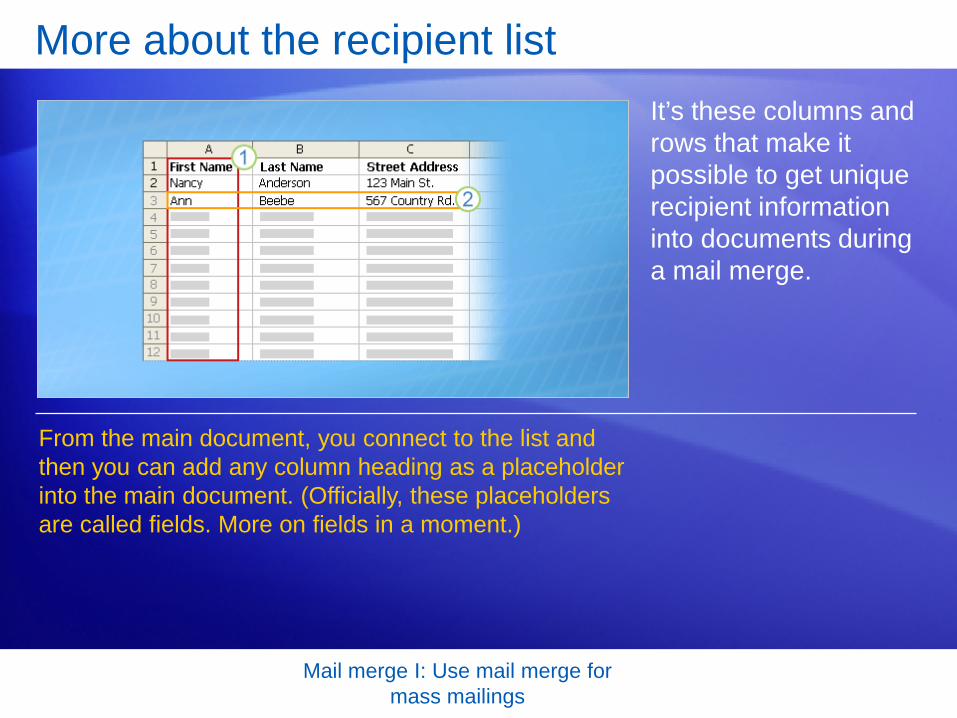
Mail merge I: Use mail merge for mass mailings
More about the recipient list It’s these columns and rows that make it possible to get unique recipient information into documents during a mail merge.
From the main document, you connect to the list and then you can add any column heading as a placeholder into the main document. (Officially, these placeholders are called fields. More on fields in a moment.)

Mail merge I: Use mail merge for mass mailings
More about the recipient list It’s these columns and rows that make it possible to get unique recipient information into documents during a mail merge.
When the mail merge is complete, there will be a finished document for each person that contains information from the entries in one row of the recipient list.

Mail merge I: Use mail merge for mass mailings
Where the recipient list comes from In many cases, the recipient list that you want to use will already exist.
For example, you might have access to a file with a list of the following.
• Customer or contact names, addresses, and more.
• The products or services your company offers.
• Information about your employees.

Mail merge I: Use mail merge for mass mailings
Where the recipient list comes from If the list exists, you can just connect it during the mail merge.
But don’t worry if you don’t have a list yet. The mail merge process includes a step where you can create a recipient list from scratch. More on this in the next lesson.

Mail merge I: Use mail merge for mass mailings
Fields After you connect to the recipient list, you can specify the information that you want to include in the mail merge by using fields.
A field is a set of codes that instructs Word to insert information into a document automatically.
Informally, you can think of fields as placeholders.

Mail merge I: Use mail merge for mass mailings
Fields In a mass mailing, the fields you use are called merge fields, and they are the placeholders for the unique information that comes directly from a recipient list.
For example, in the illustration, merge fields have been added for information stored in the Address and Name columns of a recipient list.
Notice that they’re surrounded by chevrons (« ») in a document.

Mail merge I: Use mail merge for mass mailings
Merge fields You can create a merge field by combining other fields, or group fields and then use spaces, line breaks, and punctuation marks as you would normally in a sentence.
For example, you might want to create a courtesy title before the surname or full name and set up fields in your document like this:
«Title» «Last Name» «Street Address» «City», «State» «Postal Code»

Mail merge I: Use mail merge for mass mailings
Merge fields You can also control how recipient information looks in the merged documents by formatting the fields.
For example, you might want names to be bold or colored red.
In the main document, select the field, including the surrounding chevrons (« »). On the Home tab, click any command in the Font group or the Paragraph group, and choose the formatting options you want.

Mail merge I: Use mail merge for mass mailings
Suggestions for practice 1. Divide the data in the Name column into two columns.
2. Create a Personal Note column.
3. Save the Excel worksheet.
Online practice (requires Excel 2007)

Mail merge I: Use mail merge for mass mailings
Test 2, question 1 What is the relationship between your recipient list and the fields you insert into the main document? (Pick one answer.)
1. There is no relationship.
2. Fields are equivalent to the columns in the recipient list.
3. Each field represents one cell in the recipient list.

Mail merge I: Use mail merge for mass mailings
Test 2, question 1: Answer Fields are equivalent to the columns in the recipient list.
Adding a field to the main document means that information stored in the corresponding column in your list will appear in the merged documents.

Mail merge I: Use mail merge for mass mailings
Test 2, question 2 How can you distinguish a field from other text in a main document? (Pick one answer.)
1. Fields are always formatted as bold text.
2. Fields are italicized.
3. Fields are surrounded by chevrons (« »).

Mail merge I: Use mail merge for mass mailings
Test 2, question 2: Answer Fields are surrounded by chevrons (« »).

Mail merge I: Use mail merge for mass mailings
Test 2, question 3 You must have an existing recipient list in order to perform a mail merge. (Pick one answer.)
1. True.
2. False.

Mail merge I: Use mail merge for mass mailings
Test 2, question 3: Answer False.
You can create this list as part of the mail merge process. If you have only a few people for the mail merge, it may be easiest to type the list during the process.

Lesson 3
Perform a complete mail merge

Mail merge I: Use mail merge for mass mailings
Perform a complete mail merge Now you’ll walk through the process of performing a mail merge by using the Mail Merge Wizard.
At the end of this lesson you will learn about another way to perform a mail merge.

Mail merge I: Use mail merge for mass mailings
Open the Mail Merge Wizard To perform a mail merge, click Start Mail Merge on the Mailings tab, and then click Step by Step Mail Merge Wizard.
The wizard opens on the right of the window in a task pane. Follow the prompts and click Next at the bottom of the pane to step through the wizard (or Previous if you need to go back to an earlier step).
Animation: Right-click, and click Play.

Mail merge I: Use mail merge for mass mailings
Open the Mail Merge Wizard To perform a mail merge, click Start Mail Merge on the Mailings tab, and then click Step by Step Mail Merge Wizard, as shown here.
The wizard opens on the right of the window in a task pane. Follow the prompts and click Next at the bottom of the pane to step through the wizard (or Previous if you need to go back to an earlier step).

Mail merge I: Use mail merge for mass mailings
Set up the main document The second step in the wizard is to set up the starting document.
You may be sending a direct mail letter, or an e-mail message, or perhaps you want to start with envelopes and labels.
Or you may want to create a directory to store listings of data, such as customer names and addresses, product information, and personnel contact data.

Mail merge I: Use mail merge for mass mailings
Set up the main document The options in the wizard vary according to the type of document selected in the first step.
Change document layout. This option is selected because a blank document was open when you started the wizard. You want to change the open blank document to an envelope document. Click Envelope options and choose the envelope size and other options you want, and then the envelope document replaces the blank document.
You selected envelopes, which has these options.

Mail merge I: Use mail merge for mass mailings
Set up the main document The options in the wizard vary according to the type of document selected in the first step.
You selected envelopes, which has these options.
Start from existing document. If you have a previously saved envelope that you want to use for the mail merge, but your screen currently has a blank document open, select this option to replace the blank document with your envelope.
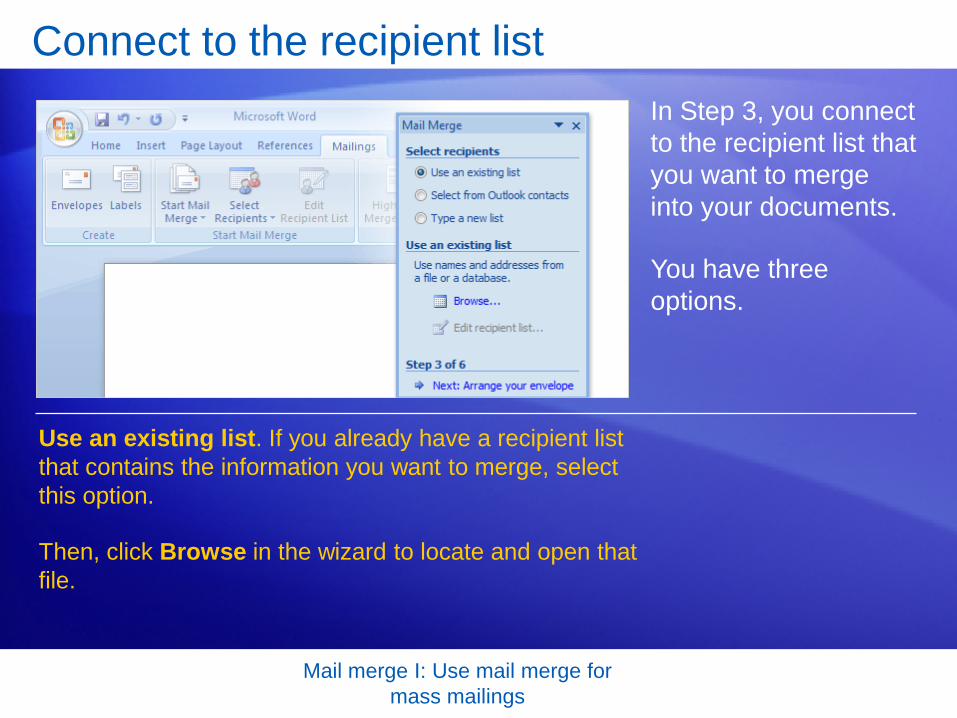
Mail merge I: Use mail merge for mass mailings
Connect to the recipient list In Step 3, you connect to the recipient list that you want to merge into your documents.
You have three options.
Use an existing list. If you already have a recipient list that contains the information you want to merge, select this option.
Then, click Browse in the wizard to locate and open that file.

Mail merge I: Use mail merge for mass mailings
Connect to the recipient list In Step 3, you connect to the recipient list that you want to merge into your documents.
You have three options.
Select from Outlook contacts. If you want to use your Outlook contacts list as your recipient list, select this option.
Then, click Choose Contacts Folder to locate and open the correct contacts list.

Mail merge I: Use mail merge for mass mailings
Connect to the recipient list In Step 3, you connect to the recipient list that you want to merge into your documents.
You have three options.
Type a new list. If you don’t have an appropriate recipient list and want to create one, select this option. The new list is saved as a mailing database (.mdb) file in the My Data Sources folder, which is located in your Documents or My Documents folder.
You can reuse the file for future mail merges.

Mail merge I: Use mail merge for mass mailings
Choose the recipients for your mailing After you connect to the recipient list, you choose the recipients that you want to include in your mailing.
For example, you might want to send a form letter to only those customers in your file with a specific postal code.
Or, you might want to create a directory that includes only one product line.

Mail merge I: Use mail merge for mass mailings
Choose the recipients for your mailing You do all this in the Mail Merge Recipients dialog box, which opens automatically after you connect to or create a recipient list.
1 All the recipients have a check mark next to their name and are included in the mailing by default.

Mail merge I: Use mail merge for mass mailings
Choose the recipients for your mailing You do all this in the Mail Merge Recipients dialog box, which opens automatically after you connect to or create a recipient list.
2 Refine the recipient list by clicking Sort… to choose the column name that you want to view and arrange (either ascending or descending); or clicking Filter… to enter the fields and values of the recipients that you want to view.

Mail merge I: Use mail merge for mass mailings
Arrange the main document Next, you arrange the main document, which means putting content into it.
That content consists of information that stays the same in each merged copy, and placeholders (fields) for the recipient information in each merged copy.
The animation shows how to arrange an envelope.
Animation: Right-click, and click Play.

Mail merge I: Use mail merge for mass mailings
Arrange the main document Next, you arrange the main document, which means putting content into it: the information that stays the same in each merged copy, and placeholders for the recipient data in each merged copy.
For an envelope, the information that stays the same in each merged copy is the return address that you type in the upper left corner. The placeholders are the addresses of each recipient.

Mail merge I: Use mail merge for mass mailings
Arrange the main document The quickest way to add a delivery address is to click Address block in the wizard.
It adds a pre-designed «AddressBlock» field to the envelope, which includes First Name, Last Name, Street Address, City, State, and Postal Code.

Mail merge I: Use mail merge for mass mailings
Preview After you’ve added all the content and fields to the main document, you’re ready to preview how the merged documents will look.
When you click Next at the bottom of the wizard to move to the next step, the first merged document automatically appears.
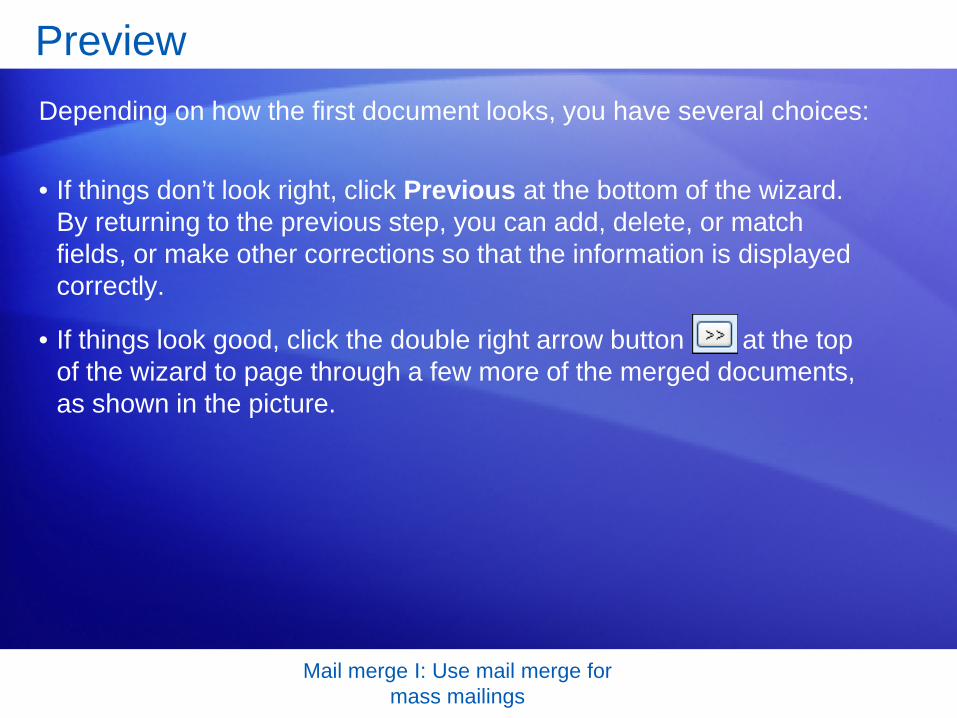
Mail merge I: Use mail merge for mass mailings
• If things don’t look right, click Previous at the bottom of the wizard. By returning to the previous step, you can add, delete, or match fields, or make other corrections so that the information is displayed correctly.
Preview Depending on how the first document looks, you have several choices:
• If things look good, click the double right arrow button at the top of the wizard to page through a few more of the merged documents, as shown in the picture.

Mail merge I: Use mail merge for mass mailings
• If you want to view the merged document for a particular recipient, click Find a recipient to search for that person. As you page through the documents, you can exclude any person from the merge by clicking Exclude this recipient. Note that you’re excluding a recipient only from the final merge results, not deleting anything from the recipient list.
Preview Depending on how the first document looks, you have several choices:
• If you realize that the merge includes some recipients you don’t actually want to include, click Edit recipient list to open the Mail Merge Recipients dialog box. As described previously, you can use this dialog box to narrow down the recipient list.

Mail merge I: Use mail merge for mass mailings
Complete the merge When you’re satisfied with previews of the merged documents, you’re ready to print the final results.
Click Print to open the Merge to Printer dialog box.
Last minute changes?
If you still want one more chance to review the results, or if you want to customize selected envelopes, click Edit individual envelopes in the wizard.

Mail merge I: Use mail merge for mass mailings
Complete the merge When you’re satisfied with previews of the merged documents, you’re ready to print the final results.
Click Print to open the Merge to Printer dialog box.
This creates a separate comprehensive merge that contains all the envelopes in a new Word document.
After you review or modify the envelopes in this comprehensive document, you can print them immediately.

Mail merge I: Use mail merge for mass mailings
Complete the merge When you’re satisfied with previews of the merged documents, you’re ready to print the final results.
Click Print to open the Merge to Printer dialog box.
Or, just save the document and print the envelopes later. If you want to keep the changes you made to individual envelopes, make sure you save this document.
This comprehensive document is separate from the main document and will be larger in size.

Mail merge I: Use mail merge for mass mailings
Cancel or resume a merge You can cancel your mail merge at any time before completing it.
To do this, close the document and choose not to save the changes. The document will be deleted along with the connection to the recipient list.
But if you just need to stop working on the merge and want to come back to it later, save the main document.

Mail merge I: Use mail merge for mass mailings
Cancel or resume a merge You can cancel your mail merge at any time before completing it.
When you open the document again, Word will ask if you want to keep the connection to the recipient list. Click Yes to resume the merge.

Mail merge I: Use mail merge for mass mailings
Introducing mail merges using the Ribbon Did you notice that the commands in the Mailings tab become available as you step through the wizard?
The Ribbon is also a handy way to do a mail merge and the process is very similar to the steps in the wizard.
Using the Ribbon, you’ll have access to more features, such as automatic checking, which looks for errors before you complete the merge.
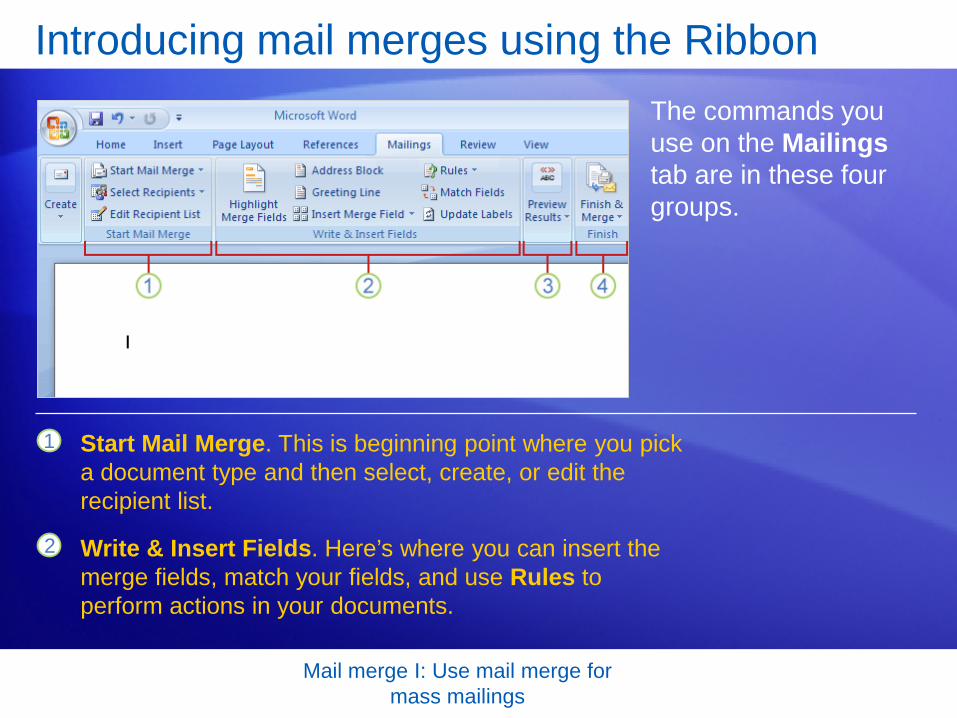
Mail merge I: Use mail merge for mass mailings
Introducing mail merges using the Ribbon The commands you use on the Mailings tab are in these four groups.
1
2
Start Mail Merge. This is beginning point where you pick a document type and then select, create, or edit the recipient list.
Write & Insert Fields. Here’s where you can insert the merge fields, match your fields, and use Rules to perform actions in your documents.

Mail merge I: Use mail merge for mass mailings
Introducing mail merges using the Ribbon The commands you use on the Mailings tab are in these four groups.
3 Preview Results. Besides viewing the individual merged documents, you can use an automatic error checking feature.
4 Finish. Complete the merge and combine your individual documents into one comprehensive document, or print them out, or send them electronically.

Mail merge I: Use mail merge for mass mailings
Suggestions for practice 1. Open the Mail Merge Wizard and set up the main document.
2. Connect to your recipient list and choose the people you want to send mail to.
3. Type content and insert fields.
4. Preview and match fields.
5. Complete the merge.
Online practice (requires Word 2007)

Mail merge I: Use mail merge for mass mailings
Test 3, question 1 How do you open the Mail Merge Wizard? (Pick one answer.)
1. Click the Microsoft Office Button, and then Word Options.
2. On the Mailings tab, click Start Mail Merge.
3. On the Insert tab, click Quick Parts.

Mail merge I: Use mail merge for mass mailings
Test 3, question 1: Answer On the Mailings tab, click Start Mail Merge.

Mail merge I: Use mail merge for mass mailings
Test 3, question 2 How do you exclude a person from a mail merge? (Pick one answer.)
1. Delete all the information in the recipient list for that person.
2. Delete the document addressed to that person when you preview the merge.
3. Use the check boxes in the Mail Merge Recipients dialog box.

Mail merge I: Use mail merge for mass mailings
Test 3, question 2: Answer Use the check boxes in the Mail Merge Recipients dialog box.
The Mail Merge Recipients dialog box is where you can designate the people that will be included in the final merge.

Mail merge I: Use mail merge for mass mailings
Test 3, question 3 After you choose to preview your documents, the merge is complete and you can’t make changes. (Pick one answer.)
1. True.
2. False.

Mail merge I: Use mail merge for mass mailings
Test 3, question 3: Answer False.
Preview gives you a chance to look at your merged documents before the merge is complete.

Mail merge I: Use mail merge for mass mailings
Quick Reference Card
For a summary of the tasks covered in this course, view the Quick Reference Card.

Microsoft® Office Word 2007 Training
Reuse text and other document parts: Introducing building blocks
JohnRouda.com presents:

Reuse text and other document parts: Introducing building blocks
Course contents
• Overview: What you need is built in
• Lesson 1: Get acquainted with building blocks
• Lesson 2: Swap, format, and remove document building blocks
• Lesson 3: Find and organize document building blocks
Each lesson includes a list of suggested tasks and a set of test questions.

Reuse text and other document parts: Introducing building blocks
Overview: What you need is built in
Document parts, such as headers and footers, cover pages, and boilerplate text, are central to building any professional-looking document.
In Word 2007, you can choose from many built-in document parts and use them again and again, whenever you need them.
With these building blocks, you’ll never again struggle to build a cover page or any other critical part of your document at the last minute.

Reuse text and other document parts: Introducing building blocks
Course goals
• Locate and identify document parts in Word 2007.
• Create a document part and add it to a gallery.
• Create boilerplate text and add it to a gallery.
• Make formatting changes to a document part.
• Swap one document part for another.
• Find a document part to add to your document.

Lesson 1
Get acquainted with building blocks

Reuse text and other document parts: Introducing building blocks
Get acquainted with building blocks We’ve all been faced with the drama of a blank page and a deadline, knowing what needs to be in the document but not knowing how to get the parts there quickly and with polish.
Word 2007 extends some of the familiar document parts — such as headers and footers, cover pages, and tables of contents — with galleries of well-designed and formatted parts that you can insert in your document with just a click or two.

Reuse text and other document parts: Introducing building blocks
Get acquainted with building blocks Because the document parts you’ve known have changed so much in Word 2007, let’s call these newly enhanced document parts building blocks.
You can think of a completed Word document as a file made up of regular content, such as plain text, pages, and photos or other document objects, and other optional building blocks that you can add to complete your document.
Animation: Right-click, and click Play.
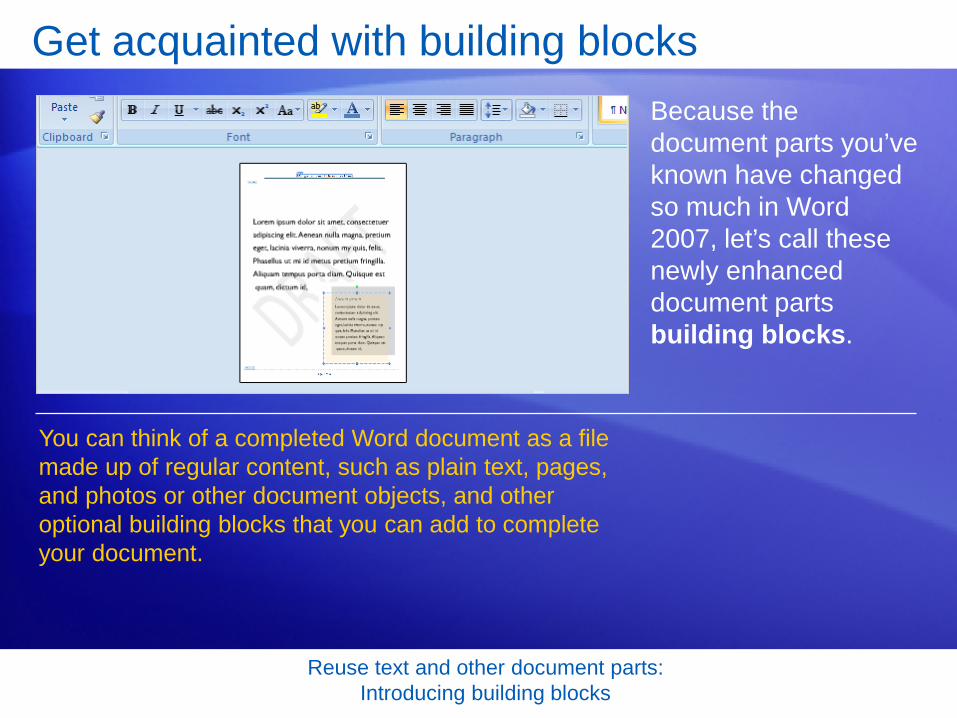
Reuse text and other document parts: Introducing building blocks
Get acquainted with building blocks Because the document parts you’ve known have changed so much in Word 2007, let’s call these newly enhanced document parts building blocks.
You can think of a completed Word document as a file made up of regular content, such as plain text, pages, and photos or other document objects, and other optional building blocks that you can add to complete your document.

Reuse text and other document parts: Introducing building blocks
Find building blocks in galleries You’ll find building blocks in galleries filled with headers and footers, watermarks, tables of contents, cover pages, and even boilerplate text.
And you’ll find these galleries, which contain many built-in designs, throughout the tabs on the Ribbon.
Built-in designs save time because you just choose a design and replace the placeholder text with your own.
Animation: Right-click, and click Play.
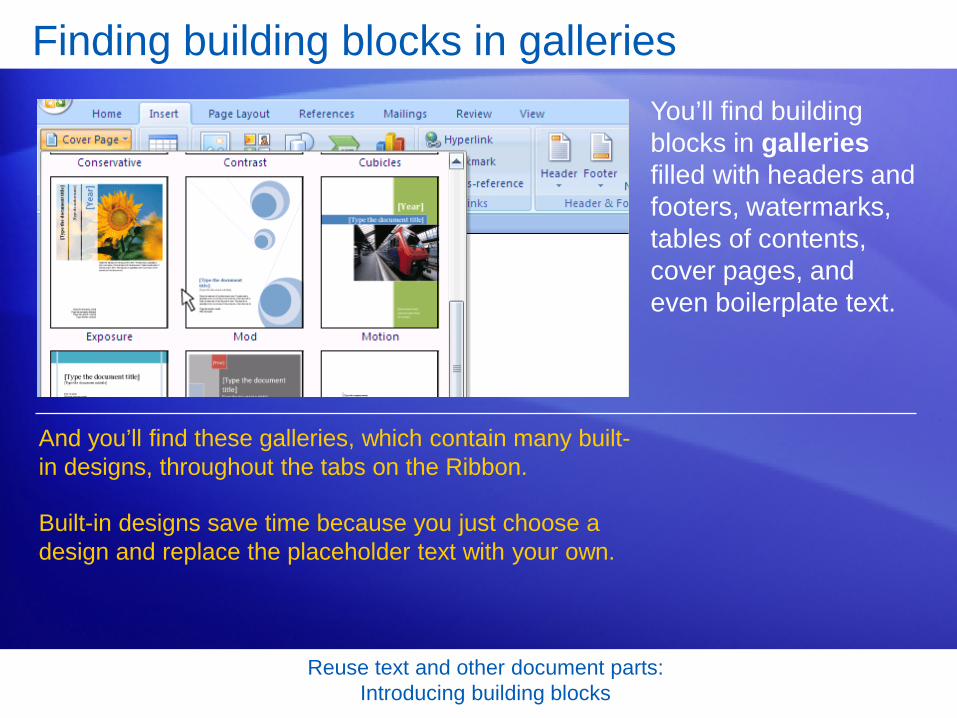
Reuse text and other document parts: Introducing building blocks
Finding building blocks in galleries You’ll find building blocks in galleries filled with headers and footers, watermarks, tables of contents, cover pages, and even boilerplate text.
And you’ll find these galleries, which contain many built-in designs, throughout the tabs on the Ribbon.
Built-in designs save time because you just choose a design and replace the placeholder text with your own.

Reuse text and other document parts: Introducing building blocks
Find all the building blocks in one place You can find the different kinds of building blocks in their individual galleries.
But the Building Blocks Organizer is the single place where you can view and manage all of the building blocks that are available in Word.
You can also use the organizer to find out more about a particular building block or to insert building blocks in your documents.

Reuse text and other document parts: Introducing building blocks
Save building blocks You save a document that contains a building block, such as a header or footer, just as you would any other document.
Click the Microsoft Office Button, and then click Save or Save As.
When you exit a session of Word 2007 after making changes to a built-in building block, or after you create or delete a building block, you are asked whether you want to save the changes. Be sure to click Yes.

Reuse text and other document parts: Introducing building blocks
Suggestions for practice 1. Browse the building blocks galleries.
2. Add a building block to a document.
3. Add a cover page.
Online practice (requires Word 2007)

Reuse text and other document parts: Introducing building blocks
Test 1, question 1 Which of the following are building blocks? (Pick one answer.)
1. Text and pictures.
2. Shapes, SmartArt graphics, and charts.
3. Headers, footers, and cover pages.

Reuse text and other document parts: Introducing building blocks
Test 1, question 1: Answer Headers, footers, and cover pages.
There are many types of building blocks, including headers, footers, cover pages, boilerplate text, and so much more.

Reuse text and other document parts: Introducing building blocks
Test 1, question 2 Where can you find building blocks? (Pick one answer.)
1. In galleries throughout tabs on the Ribbon.
2. On the References tab in the Building Blocks group.
3. Click the Microsoft Office Button, and then click Word Options.

Reuse text and other document parts: Introducing building blocks
Test 1, question 2: Answer In galleries throughout tabs on the Ribbon.
Galleries contain many building blocks designed for you to click and use.

Reuse text and other document parts: Introducing building blocks
Test 1, question 3 A professionally designed document is made up of which of the following: (Pick one answer.)
1. Text, photos, and headers and footers.
2. Text, a table of contents, and a cover page.
3. Text, Quick Styles, and text boxes.
4. All of the above.

Reuse text and other document parts: Introducing building blocks
Test 1, question 3: Answer All of the above.
You use building blocks, text, photos, and other document parts to create a well-designed, professional-looking document.

Lesson 2
Swap, format, and remove document building blocks

Reuse text and other document parts: Introducing building blocks
Swap, format, and remove building blocks You’ve added a cover page to your document. What if you decide at the last minute that you want a different cover page design?
You can click a new building block design at any time to see how the building block looks in your document. If you already replaced the placeholder text with your own text, you can still change the cover page design with a single click.
Animation: Right-click, and click Play.

Reuse text and other document parts: Introducing building blocks
Swap, format, and remove building blocks You’ve added a cover page to your document. What if you decide at the last minute that you want a different cover page design?
You can click a new building block design at any time to see how the building block looks in your document.
If you already replaced the placeholder text with your own text, you can still change the cover page design with a single click.

Reuse text and other document parts: Introducing building blocks
Each building block is made up of different fields called content controls.
For example, a content control in a cover page building block might include a title content control and perhaps a date content control.
The important point to remember is that a content control contains information that you can replace with your own text or content.
Swap, format, and remove building blocks
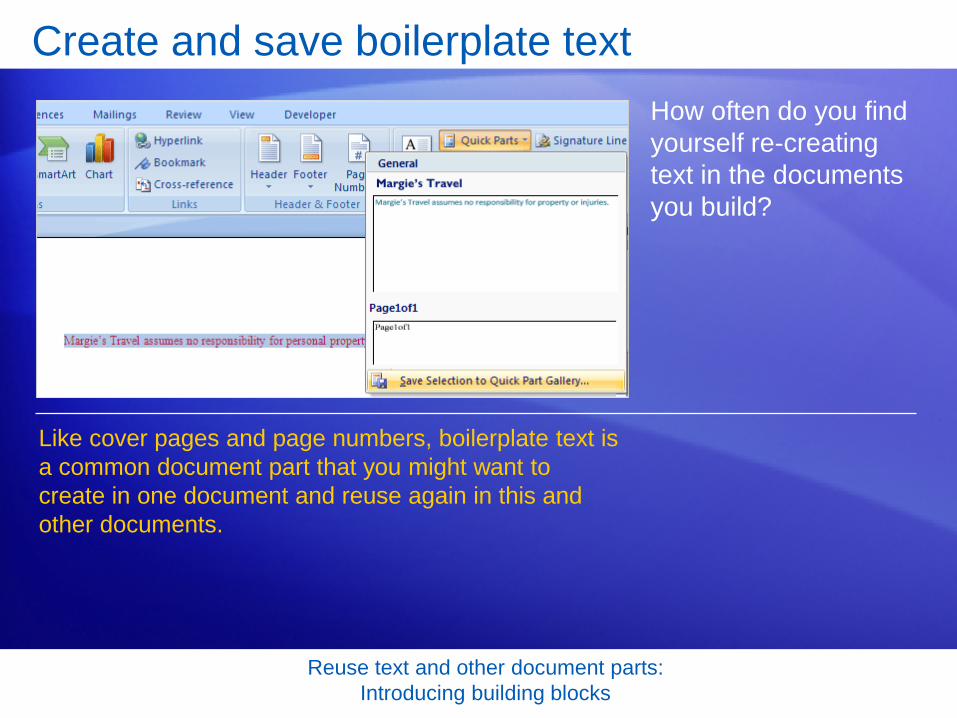
Reuse text and other document parts: Introducing building blocks
Create and save boilerplate text How often do you find yourself re-creating text in the documents you build?
Like cover pages and page numbers, boilerplate text is a common document part that you might want to create in one document and reuse again in this and other documents.

Reuse text and other document parts: Introducing building blocks
Create and save boilerplate text How often do you find yourself re-creating text in the documents you build?
In Word 2007, you can save a text selection to a building block gallery called the Quick Part Gallery, where you can easily locate the text to use again and again.

Reuse text and other document parts: Introducing building blocks
Format building block text Say you want to make some changes to boilerplate text you already created and saved to the Quick Part Gallery.
You can change the font, color, and alignment of the text. You can even redefine the entry for the building blocks gallery so that it’s easy to find later.
After you complete your changes, you can select the text and click Save selection to Quick Part Gallery.

Reuse text and other document parts: Introducing building blocks
Remove a building block from a document If you decide that you no longer want a building block in your document, you can remove it as quickly as you added it.
Most galleries have an option to remove the current building block from the document.
The animation shows the process of removing a header.
Animation: Right-click, and click Play.

Reuse text and other document parts: Introducing building blocks
Remove a building block from a document If you decide that you no longer want a building block in your document, you can remove it as quickly as you added it.
Most galleries have an option to remove the current building block from the document.
This picture shows the start of the process of removing a header. On the Insert tab, click Header, and then click the Remove Header command that appears at the bottom of the gallery.

Reuse text and other document parts: Introducing building blocks
Suggestions for practice 1. Swap one building block design for another.
2. Add boilerplate text to the gallery and save changes to the gallery.
3. Change the building block formatting and save your changes to the gallery.
Online practice (requires Word 2007)

Reuse text and other document parts: Introducing building blocks
Test 2, question 1 You decide that the cover page you’ve chosen is not quite right for your document. What should you do? (Pick one answer.)
1. Delete the cover page.
2. Click a new cover page design in the Cover Page Gallery.
3. Edit the existing cover page design.

Reuse text and other document parts: Introducing building blocks
Test 2, question 1: Answer Click a new cover page design in the Cover Page Gallery.
There are many beautifully designed cover pages to choose from in the Cover Page Gallery.

Reuse text and other document parts: Introducing building blocks
Test 2, question 2 You have a disclaimer that you regularly reuse in documents. How can you save yourself from retyping the text every time you use it? (Pick one answer.)
1. Copy and paste from one document to another.
2. You can’t. You must retype the disclaimer every time you want to use it.
3. Select the text you want to reuse, and save it to the Quick Part Gallery.

Reuse text and other document parts: Introducing building blocks
Test 2, question 2: Answer Select the text you want to use, and save it to the Quick Part Gallery.
The text you’ve selected will be available in the gallery to reuse as often as you like.

Reuse text and other document parts: Introducing building blocks
Test 2, question 3 You can change the font of an existing building block and resave it to the gallery to use again later. (Pick one answer.)
1. True.
2. False.

Reuse text and other document parts: Introducing building blocks
Test 2, question 3: Answer True.
You can reformat and save a building block.

Lesson 3
Find and organize document building blocks

Reuse text and other document parts: Introducing building blocks
Find and use document building blocks When you’re ready to reuse a building block, you can browse the galleries for the building block you want.
Or you can find all of the available building blocks in Word in one place called the Building Blocks Organizer.
You open the Building Blocks Organizer by right-clicking any building block in a gallery and then clicking Organize and Delete.

Reuse text and other document parts: Introducing building blocks
Sort all of the building blocks in Word Sorting makes it easier to find the building block you want. You can sort easily in the Building Blocks Organizer.
1 If you know the name of the piece of text you want, you can find it quickly by clicking Name at the top of the column to see all of the building blocks listed in alphabetical order.
Reuse text and other document parts: Introducing building blocks
Delete document building blocks You can delete a building block from a document, but you can also permanently delete building block designs from Word.
1
2
Right-click any building block, and then click Organize and Delete.
Click the Delete button in the Building Blocks Organizer to delete the building block from Word.

Reuse text and other document parts: Introducing building blocks
Suggestions for practice 1. Find a building block.
2. Delete a building block from a gallery.
Online practice (requires Word 2007)

Reuse text and other document parts: Introducing building blocks
Test 3, question 1 You can get to building blocks through galleries on the Ribbon and by using the Building Blocks Organizer. (Pick one answer.)
1. True.
2. False.

Reuse text and other document parts: Introducing building blocks
Test 3, question 1: Answer True.
You can find building blocks in galleries and in the Building Blocks Organizer, which is available by right-clicking any building block in a gallery and then clicking Organize and Delete.
Reuse text and other document parts: Introducing building blocks
Test 3, question 2 Which of the following can you do from the Building Blocks Organizer? (Pick one answer.)
1. Sort, insert, and delete building blocks.
2. Edit the properties for any building block in Word.
3. Make changes to the content controls in any building block.
4. Both the first and second options.

Reuse text and other document parts: Introducing building blocks
Test 3, question 2: Answer Both the first and second options.
These represent the full functionality of the Building Blocks Organizer.

Reuse text and other document parts: Introducing building blocks
Test 3, question 3 How do you delete a building block from Word? (Pick one answer.)
1. You can’t delete built-in building blocks or building blocks you create.
2. Right-click the building block, and then click Delete.
3. From the Building Blocks Organizer, select the building block you want to delete, and then click the Delete button.

Reuse text and other document parts: Introducing building blocks
Test 3, question 3: Answer From the Building Blocks Organizer, select the building block you want to delete, and then click the Delete button.
This is the easiest way to delete a building block from the Word building block collection.

Reuse text and other document parts: Introducing building blocks
Quick Reference Card
For a summary of the tasks covered in this course, view the Quick Reference Card.

Microsoft® Office Word 2007 Training
Edit text and revise your documents
JohnRouda.com presents:

Edit text and revise your documents
Course contents
• Overview: Moving, selecting, and getting around
• Lesson: Make changes to your document
The lesson concludes with a practice session and a short set of questions to test your understanding of the material.

Edit text and revise your documents
Overview: Moving, selecting, and getting around
Have you created a Word document and then wondered how to make changes to it?
In this course, you’ll learn how to get from one place to another in a document so that you can make changes anywhere on the page.
Then you’ll learn how to add and delete text and move it around.

Edit text and revise your documents
Course goals
• Move the cursor around a document, using either the mouse or the keyboard, so that you can get to where you need to in order to make changes.
• Select text to make revisions.
• Move text by cutting and pasting.

Lesson
Make changes to your document

Edit text and revise your documents
Make changes to your document Documents get changed.
You may make changes as you type, or after you finish the document.
To work quickly and efficiently in the document, you need to know how to move around.
Once you get to the part of the document you want to edit, you’ll need to type the new text you want to add, or select the existing text so that you can change or delete it.

Edit text and revise your documents
Move around the document Imagine that you want to type a new sentence between “civilization” and “During”: “Symphonies and constellations have been named for clocks.”
1
2
The cursor is the vertical line at the end of the second paragraph, in front of the paragraph mark.
You can move the cursor to the first paragraph by moving the pointer and then clicking, or by using the keyboard.
To type where you want, first move the cursor:

Edit text and revise your documents
Select and delete text After adding the sentence to the first paragraph, you read the paragraph.
You think the second sentence will read better if you delete the word “really.”
To delete text, first select what you want to delete. You can do this by using the mouse or the keyboard.
Once “really” is selected, delete the word by pressing DELETE on your keyboard.

Edit text and revise your documents
Select and delete text In the picture, you can see formatting marks: a dot between each word and sentence, and a paragraph mark at the end of each paragraph.
These marks help you when you revise text.
For example, you don’t want to delete the space between words or sentences. One dot between each word or sentence lets you know that the spacing is okay.

Edit text and revise your documents
Move text Still looking at the first paragraph, you decide that the sentence you added should be the last sentence in the paragraph.
You don’t have to delete the sentence and then type it again.
Instead, you can move the sentence by performing a cut-and-paste operation: Cut the sentence to delete it from its current location, and then paste it into the new location.

Edit text and revise your documents
Move text The picture illustrates what to do.
1
2
First select the entire sentence.
Then, on the Ribbon at the top of the window, on the Home tab, in the Clipboard group, click Cut .

Edit text and revise your documents
Move text The picture illustrates what to do.
3 Move the pointer to the end of the paragraph, where you want the sentence to appear (after the dot formatting mark).
4 On the Home tab, in the Clipboard group, click Paste . The sentence is pasted in place.

Edit text and revise your documents
Undo changes You’ve moved the sentence, but now you’re not happy with the change.
Fortunately, you don’t have to go through the cut-and-paste process again to move the sentence back.
1 On the Quick Access Toolbar at the very top of the window, click the arrow on the Undo button .
Instead, use Undo:

Edit text and revise your documents
Undo changes You’ve moved the sentence, but now you’re not happy with the change.
Fortunately, you don’t have to go through the cut-and-paste process again to move the sentence back.
2
Instead, use Undo:
Move the cursor over the last two actions, Paste and Cut, and then click. This will undo the last two actions you took and place the sentence back in its original location.

Edit text and revise your documents
Use the scroll bar to review a document Perhaps you have a long document that you’d like to read all the way through without having to continuously press the arrow keys to move the cursor.
1
2
The scroll bar is on the right side of the window,
To use it, click the scroll box, and then drag it up or down to move through a document without moving the cursor.
You can do that by scrolling, using the scroll bar.

Edit text and revise your documents
Use the scroll bar to review a document Perhaps you have a long document that you’d like to read all the way through without having to continuously press the arrow keys to move the cursor.
3 Or click the single scroll arrows at either end of the scroll bar to move up or down.
You can do that by scrolling, using the scroll bar.

Edit text and revise your documents
Use the scroll bar to review a document Perhaps you have a long document that you’d like to read all the way through without having to continuously press the arrow keys to move the cursor.
To quickly scroll by using your keyboard, press PAGE UP to go up one screen or PAGE DOWN to go down one screen.

Edit text and revise your documents
Suggestions for practice 1. Show formatting marks.
2. Move around in the document.
3. Select text.
4. Move text.
Online practice (requires Word 2007)

Edit text and revise your documents
Test question 1 After you’ve deleted text, you can still get it back. (Pick one answer.)
1. True.
2. False.

Edit text and revise your documents
Test question 1: Answer True.
You can get it back by clicking Undo on the Quick Access Toolbar or by pressing CTRL+Z, as long as you have not yet closed the document or performed any other action that you want to keep.

Edit text and revise your documents
Test question 2 What’s the first thing you do to delete text? (Pick one answer.)
1. Press DELETE.
2. Press BACKSPACE.
3. Select the text you want to delete.

Edit text and revise your documents
Test question 2: Answer Select the text you want to delete.
Select text by using the mouse pointer or the keyboard, and then press DELETE or BACKSPACE.
Edit text and revise your documents
Test question 3 To move text from one location to another, copy the text. (Pick one answer.)
1. True.
2. False.

Edit text and revise your documents
Test question 3: Answer False.
To move the text from one place, select and then cut the text. Paste it in the new location.

Edit text and revise your documents
Quick Reference Card
For a summary of the tasks covered in this course, view the Quick Reference Card.

Microsoft® Office Word 2007 Training
Save time with templates
JohnRouda.com presents:

Save time with templates
Course contents
• Overview: Get a jump-start on your documents
• Lesson 1: Tap into template power
• Lesson 2: Create your own templates
Each lesson includes a list of suggested tasks and a set of test questions.

Save time with templates
Overview: Get a jump-start on your documents
Before creating your Word 2007 document from scratch, think about starting with one of the content-rich templates that already exist.
Word provides a wealth of templates, from letters and resumés to calendars and brochures.
You can even go a step further and turn an existing document into a template that exactly suits your needs. This course shows you how.

Save time with templates
Course goals
• Get a huge time boost by using templates provided by Word and Microsoft Office Online.
• Create your own template, customized to your business needs.

Lesson 1
Tap into template power

Save time with templates
Tap into template power While you may have worked in Word, you might not be so familiar with Word templates.
What’s a template, and what’s its benefit to you?
A template is a type of document that already contains content. Using a template can help ensure impressive document design and save you time.
This lesson offers some examples by providing a firsthand glimpse of the many templates that already exist within Word itself and on Microsoft Office Online.

Save time with templates
Use an already-made fax cover sheet Let’s say that on your job you frequently have the task of sending a fax to another company.
You always need a cover page for the fax.
You could spend the time and create this page in Word every time. Or you could use a fax cover sheet that Word already contains.
You will find this, and other templates, among Word’s installed templates.

Save time with templates
Use an already-prepared agenda Here’s another example of how Word templates could help you.
Imagine that you’re in charge of creating the agenda for your weekly team meeting.
Before you start from a blank page, look at the templates available on Microsoft Office Online—you can link directly to these from within Word.
On Office Online, you’ll find a vast and varied collection of templates organized into categories. Within each, you have several choices of template type.

Save time with templates
Use an already-prepared agenda The picture shows three of the agenda templates.
1
2
3
Simple and straightforward, with formatted text areas that help you fill out the agenda.
A completely finished, artful look; you can type over example text.
Page layout and formatting amped up a notch, with color and tables creating areas for a complex agenda design.
Simply open the agenda you want, and fill in your information.

Save time with templates
Find installed templates Word includes over 30 pre-installed templates for document types such as letters, faxes, reports, resumés, and blog posts.
Here’s how you find them.
1
2
Click the Microsoft Office Button, and click New.
In the New Document window, click Installed Templates.

Save time with templates
Find installed templates Word includes over 30 pre-installed templates for document types such as letters, faxes, reports, resumés, and blog posts.
Here’s how you find them.
3 Click one of the thumbnails, and see its preview on the right.
4 When you’ve found the template you want, click Create.
A new document opens that’s based on the template, and you make the changes to it that you want.

Save time with templates
Find Office Online templates The steps for opening templates from the Office Online Web site are very similar.
As the animation shows, you open the New Document window, but in this case you look in the area under Microsoft Office Online.
Click a category to see thumbnails. To download a template, select the thumbnail and click Download.
Animation: Right-click, and click Play.

Save time with templates
Find Office Online templates The steps for opening templates from the Office Online Web site are very similar.
You open the New Document window, but in this case you look in the area under Microsoft Office Online.
Click a category to see thumbnails. To download a template, select the thumbnail and click Download. A template opens as a fresh new document on your computer for you to add to as you want and then save.

Save time with templates
A template’s special power When you open a template, a new document opens that’s based on the template you selected.
So you’re opening a copy of the template, not the template itself.
And that’s a template’s special power: It opens up a copy of itself, imparting everything it contains to a new, fresh document.
You work in that new document, benefiting from everything that was built into the template, plus adding or deleting what you need to.

Save time with templates
A template’s special power Because the new document is not the template itself, your changes are saved to the document, and the template is left in its original state.
Therefore, one template can be the basis for an unlimited number of documents.
Every document is based on a template of some kind; the template just lives in the background.
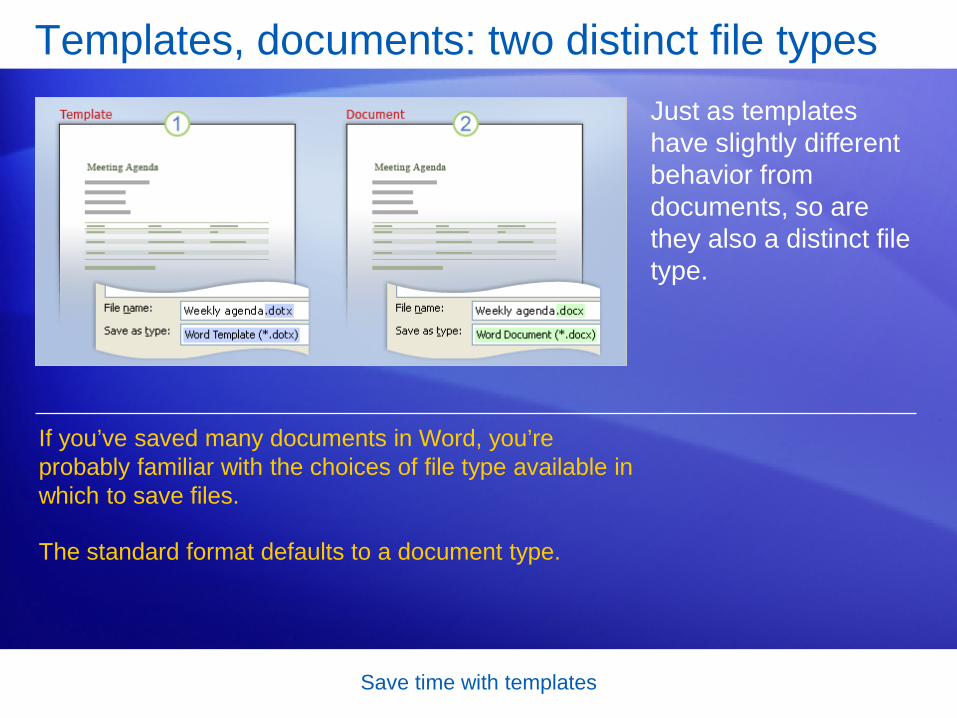
Save time with templates
Templates, documents: two distinct file types Just as templates have slightly different behavior from documents, so are they also a distinct file type.
If you’ve saved many documents in Word, you’re probably familiar with the choices of file type available in which to save files.
The standard format defaults to a document type.

Save time with templates
Templates, documents: two distinct file types A template is a different type, and templates and documents behave differently.
1
2
As shown in example 1: A template is saved as a Word Template type. It has .dotx at the end of its file name. (In prior Word versions, this extension was .dot.)
As shown in example 2: A document is saved as a Word Document type. It has .docx at the end of its file name. (In prior Word versions, this extension was .doc.)

Save time with templates
Suggestions for practice 1. Use a template for a business letter.
2. Add your own text to the letter.
3. Use a template for a flyer.
Online practice (requires Word 2007)

Save time with templates
Test 1, question 1 What’s a significant way in which a template differs from a document? (Pick one answer.)
1. It contains styles.
2. It contains a Word theme.
3. It opens up a copy of itself as a new document.

Save time with templates
Test 1, question 1: Answer It opens up a copy of itself as a new document.
The template is meant to be a starting point for a document that you can go on to customize as you need to. A template has a universal quality that’s widely adaptable, so you can use it repeatedly for a certain type of document.

Save time with templates
Test 1, question 2 Within Word, what’s the first step to finding existing Word templates? (Pick one answer.)
1. Click the Microsoft Office Button, and then click New.
2. Click the Microsoft Office Button, and the click Word Options.

Save time with templates
Test 1, question 2: Answer Click the Microsoft Office Button, and then click New.
Links for installed templates and online templates are contained in the New Document window that opens when you click New.

Save time with templates
Test 1, question 3 A template is different from a document in the way that it behaves and also as a file type. (Pick one answer.)
1. True.
2. False.

Save time with templates
Test 1, question 3: Answer True.
A template differs from a document in that it opens up a copy of itself in the form of a fresh, new document. Also, it is saved as a file type called Word Template, which has the .dotx extension at the end of the file name.

Lesson 2
Create your own templates

Save time with templates
Create your own templates Say you often use a certain invoice whose basic content stays the same except for certain details that change each time.
In effect, you’re using your original document as a template, although you may never have turned it into one.
Why not do so? You’ll have one clear master to work from, and you won’t have to undo outdated content when you’re preparing a current invoice.

Save time with templates
Advantages of creating a template Sticking with the example of an invoice document, here are some things you’d gain by turning the document into a template.
• You wouldn’t have to search through various document versions; changes would all be stored in the template.
• Since a template opens up a copy of itself, you wouldn’t have to worry about accidentally saving over one of your previous invoices.

Save time with templates
Advantages of creating a template Sticking with the example of an invoice document, here are some things you’d gain by turning the document into a template.
• You could alter the template’s content so that it contained only that information you wanted for every single invoice. This way, you would not always have to delete outdated information, and that would save you time and bother.

Save time with templates
Advantages of creating a template Sticking with the example of an invoice document, here are some things you’d gain by turning the document into a template.
• By taking out the obsolete content, you’d reduce the chance of saving and accidentally sending out an invoice with unwanted information.
• The template would always be in the same location in Word, with all your other templates.

Save time with templates
Prepare the content for the template Part of the process of creating a template is leaving or creating just the information in it that you want.
This is the content that you’d want each new document that was based on the template to start with.
Much of what you put in the template depends on your own preferences and the particulars of the content.
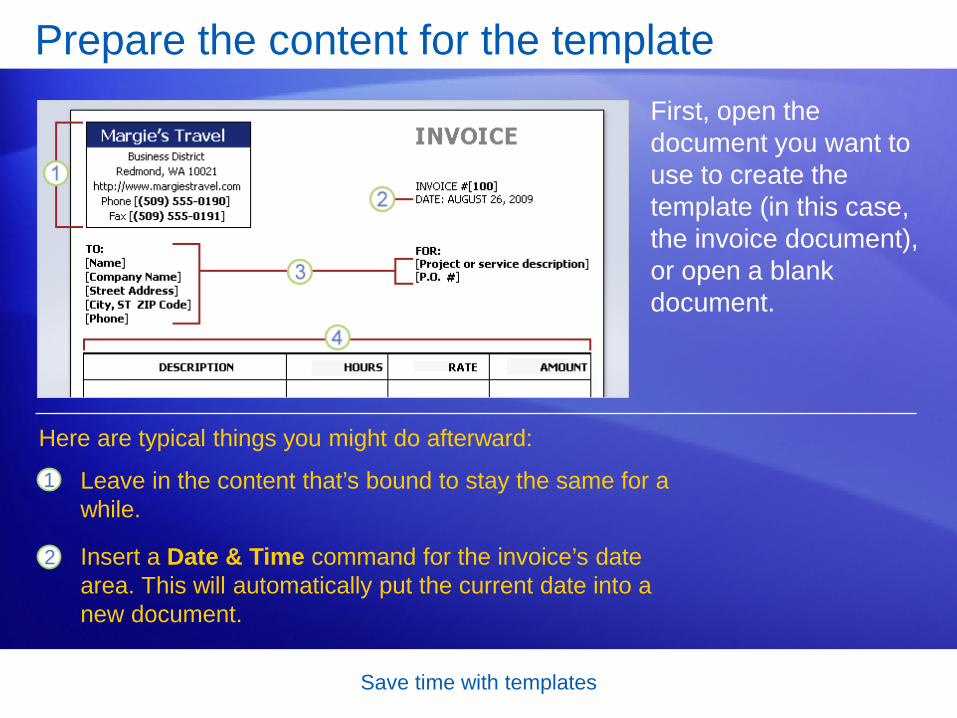
Save time with templates
Prepare the content for the template First, open the document you want to use to create the template (in this case, the invoice document), or open a blank document.
1
2
Leave in the content that’s bound to stay the same for a while.
Insert a Date & Time command for the invoice’s date area. This will automatically put the current date into a new document.
Here are typical things you might do afterward:

Save time with templates
Prepare the content for the template First, open the document you want to use to create the template (in this case, the invoice document), or open a blank document.
3 Leave text placeholder areas for information that will change per invoice: company name and address the invoice goes to.
Here are typical things you might do afterward:
4 Leave empty the areas that will change for every invoice: work done, number of hours, and total cost.

Save time with templates
Save the file as a template Since a template is its own type of file, to save a document as a template you’ll select the file type called Word Template.
Here are the steps.
1
2
Click the Microsoft Office Button, point to Save As, and click Word Template.
In the Save As dialog box, click Trusted Templates as the place in which to save the template.
Name the template, and click Save. 3

Save time with templates
Save the file as a template Putting the template in Trusted Templates is important.
Because macros can contain malicious code, Word is on the lookout against opening documents with macros.
If your computer security settings are at the recommended level, Word will open any template file, but it will disable any macros it contains.
This tells Word that it’s safe to open even if the template should contain macros or other code.

Save time with templates
Save the file as a template Putting the template in Trusted Templates is important.
This tells Word that it’s safe to open even if the template should contain macros or other code.
For templates that are in the Trusted Templates folder, however, Word doesn’t disable the macros. It assumes the files are safe, so be sure the files you store there are from a trusted source.

Save time with templates
Create a document based on the template Another advantage of saving a template in the Trusted Templates folder is that Word then makes it very easy to find.
1
2
3
In the New Document window, click My templates.
Click the template you want.
Make sure that Document is selected on the lower right, under Create New, and then click OK.

Save time with templates
Edit the template What if a vital part of the template information became outdated; for example, your company logo changes?
Here’s how you’d open it up and edit it.
1
2
3
Click the Microsoft Office Button , and click Open.
Click the Trusted Templates folder.
Select the template, and click Open.

Save time with templates
Edit the template What if a vital part of the template information became outdated, for example, your company logo changes?
Here’s how you’d open it up and edit it.
Protecting your templates
If you have created a template that other people in your company plan to use, consider protecting the template’s contents against edits to the template that you may not want.

Save time with templates
Suggestions for practice 1. View extensions in a file name.
2. Turn a document into a template.
3. Find and use the template.
4. Edit the template.
Online practice (requires Word 2007)

Save time with templates
Test 2, question 1 One difference between a document file and a template file shows up in the file name, in the file name extension (the letters after the period). What is the file name extension for a template file? (Pick one answer.)
1. .docx
2. .dotx

Save time with templates
Test 2, question 1: Answer .dotx.
This is the extension for a Word template created in Word 2007.

Save time with templates
Test 2, question 2 When you want to save a file as a template, you point to Save As on the menu under the Microsoft Office Button, and then what to do you click? (Pick one answer.)
1. The Word Template command.
2. The Word Document command.

Save time with templates
Test 2, question 2: Answer The Word Template command.

Save time with templates
Test 2, question 3 What’s one reason you should save a template in the Trusted Templates folder? (Pick one answer.)
1. So that you can find it using the My Templates link in the New Document window.
2. This protects the template from being edited by someone else.

Save time with templates
Test 2, question 3: Answer So that you can find it using the My Templates link in the New Document window.
This is a great reason. Just as important, this tells Microsoft Word it does not have to disable macros, if the template contains them, when it opens the template. For this reason, be sure you can fully trust any template that you put in this folder.

Save time with templates
Quick Reference Card
For a summary of the tasks covered in this course, view the Quick Reference Card.

Microsoft® Office Word 2007 Training
Table of Contents I: Create an automatic TOC
JohnRouda.com presents:
Table of Contents I: Create an automatic TOC
Course contents
• Overview: A quick and simple TOC
• Lesson: Get started on a table of contents
The lesson includes a list of suggested tasks and a set of test questions.

Table of Contents I: Create an automatic TOC
Overview: A quick and simple TOC
Need a quick and simple way to create a table of contents?
Or, have you previously gotten errors when you tried to create one?
This course shows you a guaranteed way to include a TOC in your document — quickly and automatically.

Table of Contents I: Create an automatic TOC
Course goals
• Prepare your document to use an automatic TOC.
• Create an automatic TOC.
• Update your TOC.

Lesson
Get started on a table of contents
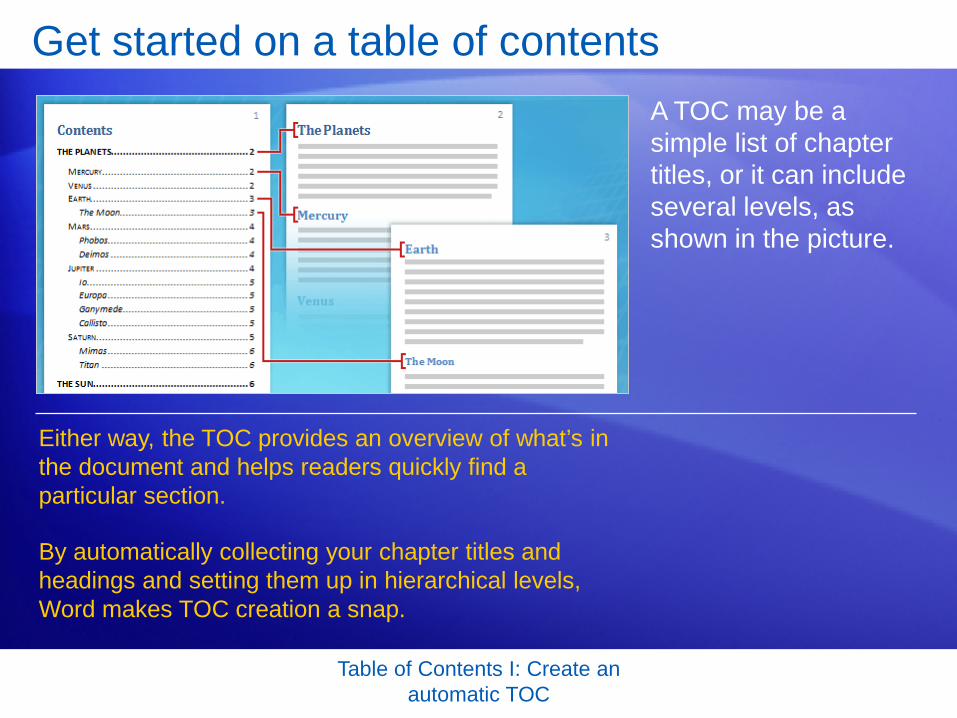
Table of Contents I: Create an automatic TOC
Get started on a table of contents A TOC may be a simple list of chapter titles, or it can include several levels, as shown in the picture.
Either way, the TOC provides an overview of what’s in the document and helps readers quickly find a particular section.
By automatically collecting your chapter titles and headings and setting them up in hierarchical levels, Word makes TOC creation a snap.
Table of Contents I: Create an automatic TOC
How it works There are two steps you take to create an automatic TOC.
1. Prepare your document by assigning heading styles to the chapter titles and headings that you want to appear in the TOC.
2. Collect those titles and headings into the TOC.
Animation: Right-click, and click Play.
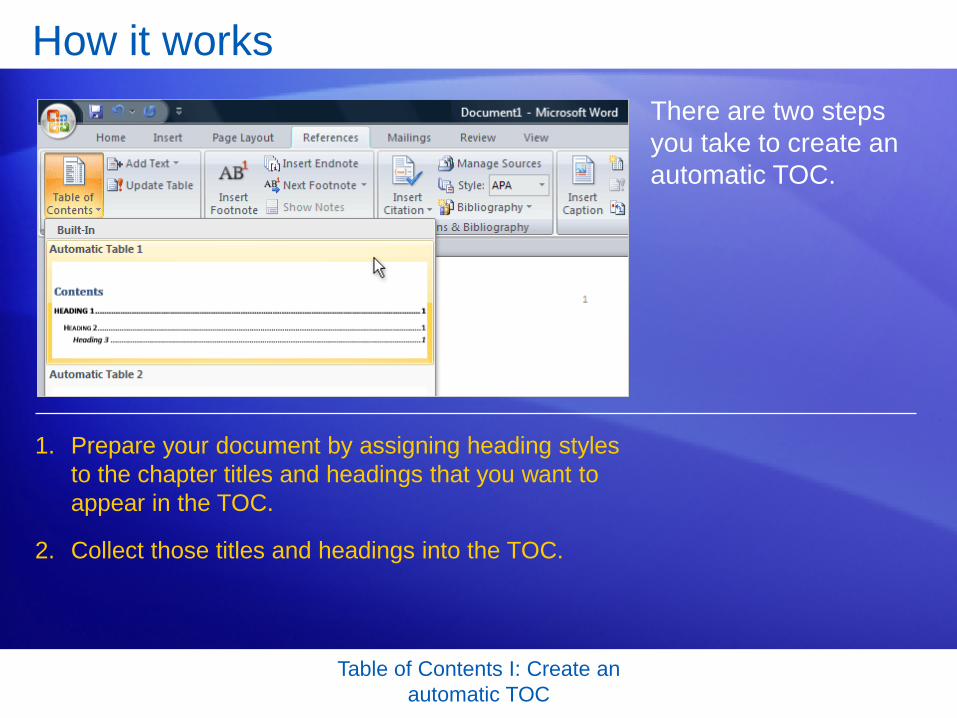
Table of Contents I: Create an automatic TOC
How it works There are two steps you take to create an automatic TOC.
1. Prepare your document by assigning heading styles to the chapter titles and headings that you want to appear in the TOC.
2. Collect those titles and headings into the TOC.
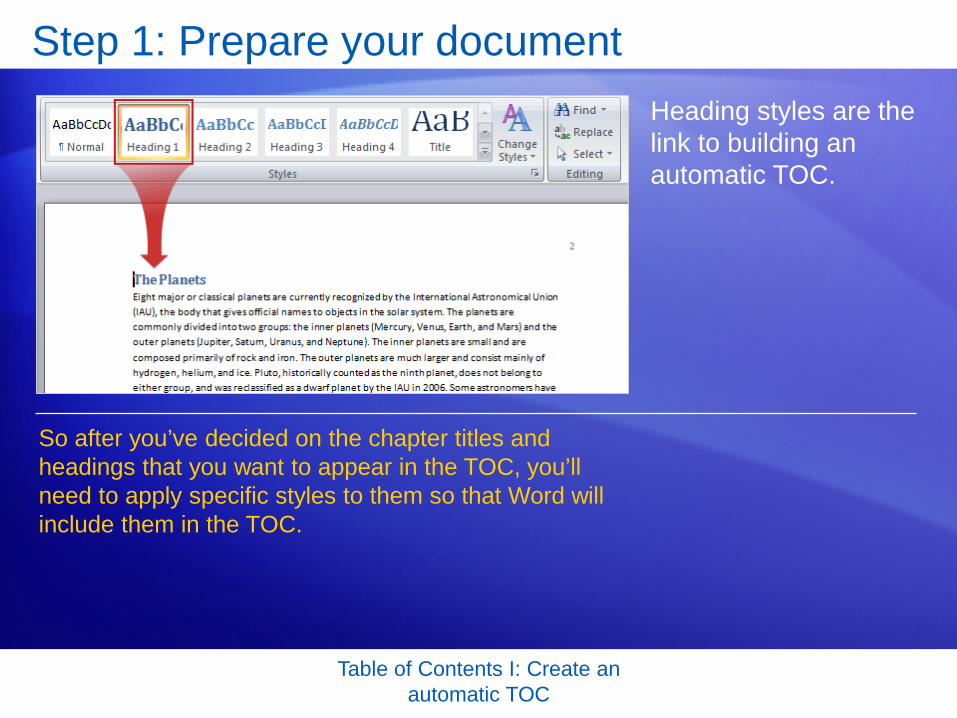
Table of Contents I: Create an automatic TOC
Step 1: Prepare your document Heading styles are the link to building an automatic TOC.
So after you’ve decided on the chapter titles and headings that you want to appear in the TOC, you’ll need to apply specific styles to them so that Word will include them in the TOC.

Table of Contents I: Create an automatic TOC
Step 1: Prepare your document These styles are on the Home tab, in the Styles group.
1. Place the cursor in the chapter title or heading.
2. In the Styles group, click Heading 1 for the highest level, such as a chapter title; Heading 2 for the next level, maybe a section heading; and Heading 3 for a sub-heading.
For each chapter title and heading:

Table of Contents I: Create an automatic TOC
Step 1: Prepare your document These styles are on the Home tab, in the Styles group.
The heading styles and the automatic TOC work together: Word designates Heading 1 titles to the highest level in the TOC; Heading 2 corresponds to the next highest level; and Heading 3 is the following level.

Table of Contents I: Create an automatic TOC
Step 2: Create your TOC After the heading styles are applied, it’s time to collect them all together in the TOC. This is where Word does the work for you.
First, place the cursor where you want the TOC to appear, usually at the beginning of the document.
Then, on the References tab, click Table of Contents, and click either Automatic Table 1 or Automatic Table 2, whichever TOC looks best to you in the instant preview.

Table of Contents I: Create an automatic TOC
Step 2: Create your TOC That’s it! Quick and simple.
When you click in an automatic TOC, it will be displayed in a light blue box. This is okay; it’s a visual cue to let you know that it’s an automatic TOC.
Then when you move the pointer away from the TOC, the entries will turn gray and you will see the cursor where you initially clicked.

Table of Contents I: Create an automatic TOC
Update your TOC After you’ve created your TOC, you will probably have to maintain it.
The TOC is automatically updated whenever you open the document; but it’s a good idea to also update it whenever you add more titles or headings in your document, or when you add more content that may affect the page numbers that appear in the TOC.
It’s easy — just two steps.

Table of Contents I: Create an automatic TOC
Update your TOC You update the TOC by clicking the References tab and then Update Table in the Table of Contents group.
When you update the TOC, you’ll be asked if you want to update the entire TOC, or just the page numbers.
Choose the page numbers option only if you’ve been adding body text but no new headings — it’s faster and will save you time in a long document.

Table of Contents I: Create an automatic TOC
Update your TOC Avoid editing entries in the TOC itself — if you ever update the TOC you will lose those changes.
To change text that appears in the TOC, be sure to edit this text in the body of the document — not in the TOC — and then click Update Table to compile the changes.

Table of Contents I: Create an automatic TOC
More changes to your TOC? There are many more ways that you can change your TOC.
Besides being able to choose from a variety of built-in styles and formats, you can also decide on the details for your TOC.
These include the number of levels, whether page numbers will be displayed, what the dots between the entry and the page number look like, and much more.

Table of Contents I: Create an automatic TOC
Suggestions for practice 1. Create a TOC by adding heading styles and collecting the text into the
TOC.
2. Update your TOC.
Online practice (requires Word 2007)
Table of Contents I: Create an automatic TOC
Test question 1 Which of these is the correct way to create an automatic TOC? (Pick one answer.)
1. Prepare your document by assigning heading styles to the text you want in the TOC, and then use the Table of Contents command to collect that text together into a TOC.
2. Create a blank TOC and then copy and paste items into it.
3. Type out a separate document for the TOC.

Table of Contents I: Create an automatic TOC
Test question 1: Answer Prepare your document by assigning heading styles to the text you want in the TOC, and then use the Table of Contents command to collect that text together into a TOC.
This is the quickest and easiest way to create a TOC.

Table of Contents I: Create an automatic TOC
Test question 2 An automatic TOC should be manually updated by typing new page numbers or text in it. (Pick one answer.)
1. True.
2. False.

Table of Contents I: Create an automatic TOC
Test question 2: Answer False.
The TOC is automatic and should not be edited manually.
Table of Contents I: Create an automatic TOC
Test question 3 Before you create your TOC by clicking the Table of Contents command on the References tab, you must do which of the following? (Pick one answer.)
1. Create a new table for the TOC.
2. Add page numbers.
3. Place the cursor where you want the TOC.
4. Add a blank page.

Table of Contents I: Create an automatic TOC
Test question 3: Answer Place the cursor where you want the TOC.
Always move the cursor first, or you’ll end up with he TOC in the wrong location.

Table of Contents I: Create an automatic TOC
Quick Reference Card
For a summary of the tasks covered in this course, view the Quick Reference Card.

Microsoft® Office Word 2007 Training
Table of Contents II: Customize your TOC
JohnRouda.com presents:

Table of Contents II: Customize your TOC
Course contents
• Overview: Jazz it up
• Lesson 1: Change the appearance of your TOC
• Lesson 2: Include custom titles and headings in your TOC
• Lesson 3: Include outline levels in your TOC
Each lesson includes a list of suggested tasks and a set of test questions.

Table of Contents II: Customize your TOC
Overview: Jazz it up
You know how to create a table of contents; now take it to the next level. For example, your document headings are blue, and now you want your TOC to be blue also.
And if your document has custom styles for chapter titles and headings, and you need to include them into a TOC, it just takes a couple of clicks to add them.
This course will show you how.

Table of Contents II: Customize your TOC
Course goals
• Format a TOC to get it looking the way you want.
• Include custom chapter titles and headings in your TOC.
• Include outline levels in your TOC.

Lesson 1
Change the appearance of your TOC

Table of Contents II: Customize your TOC
Change the appearance of your TOC You’ve created an automatic table of contents, but now you feel like making some changes.
For example, maybe you’d like to make your TOC entries match the color of your document headings. Maybe you’d like to shorten your TOC.
Or, perhaps you’re basically satisfied with the TOC but just want to make a minor change. All these changes, and more, are possible; this lesson will show you how.

Table of Contents II: Customize your TOC
Design the look of your TOC You built a TOC for your document and it looks okay, but you want color in it — the same color as your document chapter titles and headings.
The animation shows you how to get the effect you want.
Animation: Right-click, and click Play.

Table of Contents II: Customize your TOC
Design the look of your TOC You built a TOC for your document and it looks okay, but you want color in it — the same color as your document chapter titles and headings.
It’s easy to do in the Modify Style dialog box, as shown here.

Table of Contents II: Customize your TOC
More changes that you can make Want to make more changes? There are many other options available to you in the Modify Style dialog box that let you completely tailor your TOC.
Notice that if you click Format, you have access to changes such as font, paragraph, tabs, and so on.
You can change these settings and view them in the preview areas before you apply them to the TOC.

Table of Contents II: Customize your TOC
Shorten or lengthen your TOC Is your TOC too long?
Maybe the first two levels (TOC 1, and TOC 2) are all you need for your document.
The Show levels box in the Table of Contents dialog box is where you can choose the number of hierarchical levels you want displayed in your TOC, up to nine.
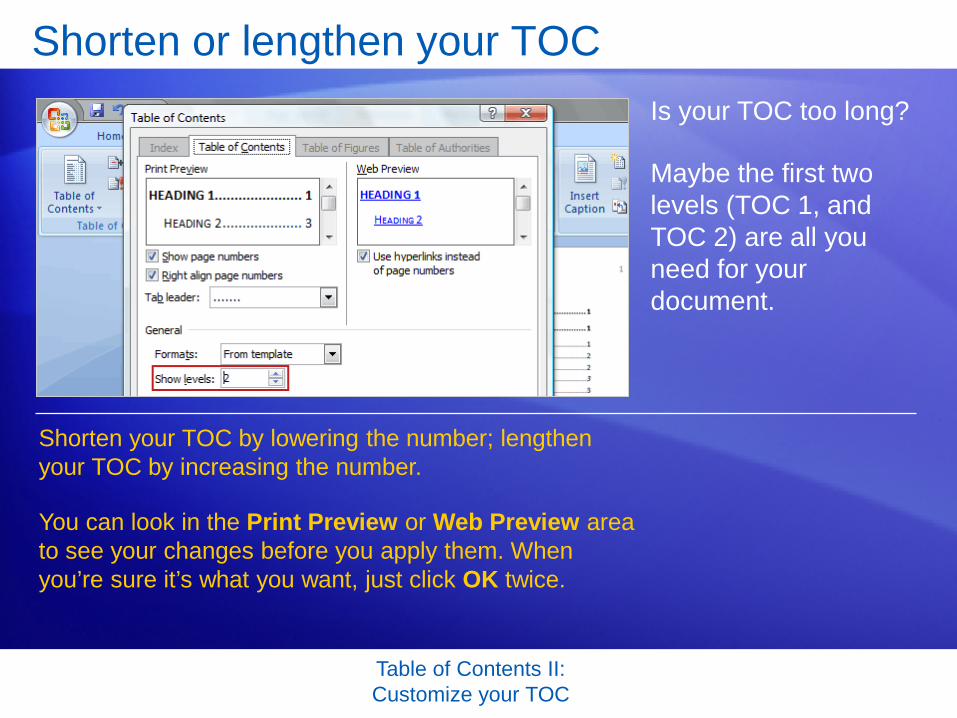
Table of Contents II: Customize your TOC
Shorten or lengthen your TOC Is your TOC too long?
Maybe the first two levels (TOC 1, and TOC 2) are all you need for your document.
Shorten your TOC by lowering the number; lengthen your TOC by increasing the number.
You can look in the Print Preview or Web Preview area to see your changes before you apply them. When you’re sure it’s what you want, just click OK twice.
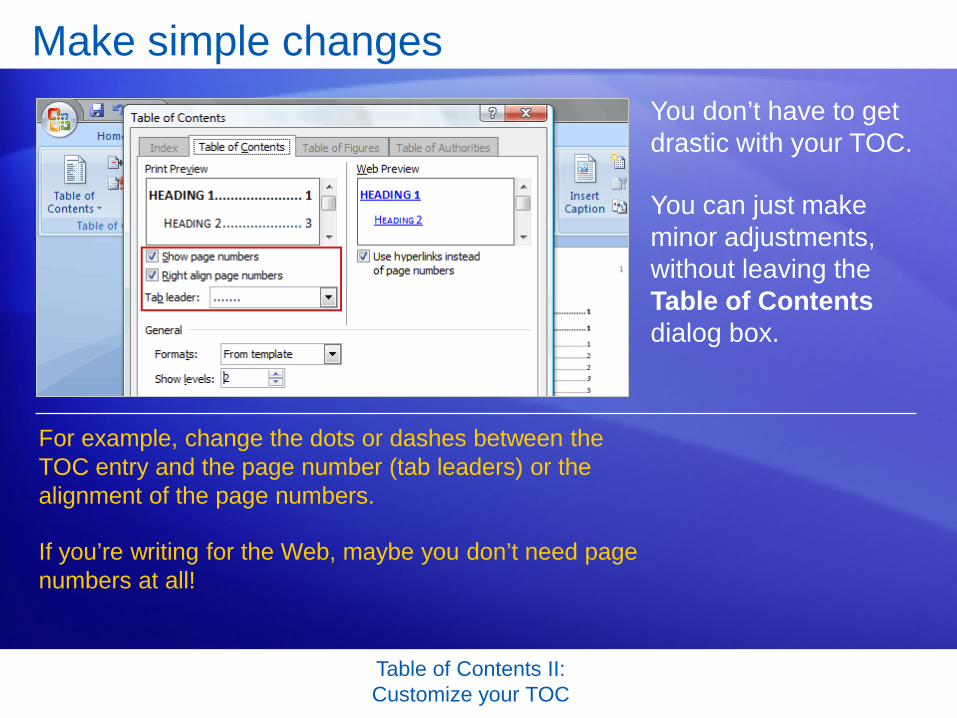
Table of Contents II: Customize your TOC
Make simple changes You don’t have to get drastic with your TOC.
You can just make minor adjustments, without leaving the Table of Contents dialog box.
For example, change the dots or dashes between the TOC entry and the page number (tab leaders) or the alignment of the page numbers.
If you’re writing for the Web, maybe you don’t need page numbers at all!

Table of Contents II: Customize your TOC
Make simple changes To change the tab leaders, click the Tab leader arrow to view different types of dashes and lines.
If you clear the Right align page numbers box, the page numbers will move closer to the TOC entries and the tab leaders will no longer be available.
If you want to delete the page numbers entirely, clear the Show page numbers check box.

Table of Contents II: Customize your TOC
Start over: Remove or reset your TOC Did you get lost making changes to your TOC and now you wish you could start over?
Click the Table of Contents command, and then click Remove Table of Contents, at the bottom of the list.

Table of Contents II: Customize your TOC
Start over: Remove or reset your TOC Did you get lost making changes to your TOC and now you wish you could start over?
Be sure to use the Remove Table of Contents command; if you manually delete the TOC, there is a possibility that hidden code might be left in your document and cause incorrect references in any future TOC that is built.

Table of Contents II: Customize your TOC
Start over: Remove or reset your TOC Did you get lost making changes to your TOC and now you wish you could start over?
You can also return to the default settings — Heading 1, Heading 2, Heading 3 styles as Level 1, Level 2, Level 3 — by clicking Insert Table of Contents from the Table of Contents command, then clicking Options and then Reset.

Table of Contents II: Customize your TOC
Suggestions for practice 1. Match the color of your dominant headings.
2. Shorten your TOC.
3. Format tab leaders and page numbers.
Online practice (requires Word 2007)

Table of Contents II: Customize your TOC
Test 1, question 1 The Show levels box on the Table of Contents dialog box is where you can shorten or lengthen your TOC. (Pick one answer.)
1. True.
2. False.

Table of Contents II: Customize your TOC
Test 1, question 1: Answer True.
In the Show levels box, you can add or subtract levels in your TOC.

Table of Contents II: Customize your TOC
Test 1, question 2 Changing the TOC 1 style will change the Heading 1 style in your document. (Pick one answer.)
1. True.
2. False.

Table of Contents II: Customize your TOC
Test 1, question 2: Answer False.
TOC styles and heading styles are completely separate.

Table of Contents II: Customize your TOC
Test 1, question 3 What’s a tab leader? (Pick one answer.)
1. The row of characters between a TOC entry and the page number.
2. The space the insertion point moves when you press the TAB key.
3. The name of a tab in a dialog box.

Table of Contents II: Customize your TOC
Test 1, question 3: Answer The row of characters between a TOC entry and the page number.
The tab leader can be dots, dashes, or a straight line. Alternatively, you can choose not to have one at all.

Lesson 2
Include custom titles and headings in your TOC

Table of Contents II: Customize your TOC
Include custom titles and headings in your TOC In the first lesson you learned how to customize the look of your automatic TOC entries.
Suppose you’ve inherited a document that uses Word’s predefined Heading 1, Heading 2, and Heading 3 styles as well as custom-styled headings.
Fortunately, building a TOC that includes both kinds of headings, predefined and custom, is not hard. In fact, it takes just a couple of clicks.

Table of Contents II: Customize your TOC
Identify the heading styles used in the document First, find out what styles are used for the custom titles and headings in the document.
Word does not include these custom styles in the TOC — you must set them up manually.
To view the styles, click the Styles Dialog Box Launcher on the Home tab. Then click in the document in the heading that you want to identify.
Note the style name in the Styles box so that you can find it in the Table of Contents dialog box in the next step.

Table of Contents II: Customize your TOC
Include the custom heading styles in your TOC After identifying the styles used in a document, you set up the TOC to collect those custom headings along with Heading 1, Heading 2, and Heading 3.
The animation shows how a custom style is added to a TOC.
Animation: Right-click, and click Play.
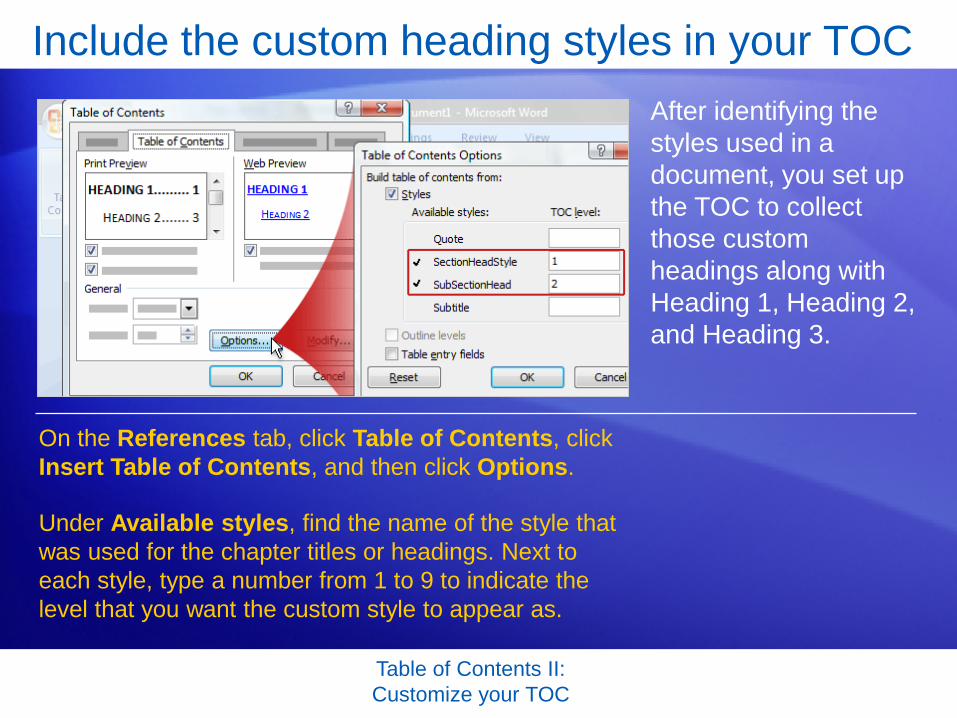
Table of Contents II: Customize your TOC
Include the custom heading styles in your TOC After identifying the styles used in a document, you set up the TOC to collect those custom headings along with Heading 1, Heading 2, and Heading 3.
On the References tab, click Table of Contents, click Insert Table of Contents, and then click Options.
Under Available styles, find the name of the style that was used for the chapter titles or headings. Next to each style, type a number from 1 to 9 to indicate the level that you want the custom style to appear as.

Table of Contents II: Customize your TOC
Suggestions for practice 1. View custom styles.
2. Create an automatic TOC.
3. Include custom styles in the TOC.
Online practice (requires Word 2007)

Table of Contents II: Customize your TOC
Test 2, question 1 Which dialog box do you use to ad custom styles to your TOC? (Pick one answer.)
1. The Modify Styles dialog box.
2. The Formats dialog box.
3. The Table of Contents Options dialog box.
4. All of the above.

Table of Contents II: Customize your TOC
Test 2, question 1: Answer The Table of Contents Options dialog box.
Look in the Available styles list to find the custom style, and then type in the level that you want it to appear as in the TOC.

Table of Contents II: Customize your TOC
Test 2, question 2 You can use the Available styles list to create a custom style and assign it a level in the TOC. (Pick one answer.)
1. True.
2. False.

Table of Contents II: Customize your TOC
Test 2, question 2: Answer False.
The list includes existing pre-defined and custom styles only. Make sure you know the name of the style that you want to include in the TOC.

Table of Contents II: Customize your TOC
Test 2, question 3 You can have up to nine levels in your TOC. (Pick one answer.)
1. True.
2. False.

Table of Contents II: Customize your TOC
Test 2, question 3: Answer True.
The nine levels correspond to the nine heading styles in Word.

Lesson 3
Include outline levels in your TOC

Table of Contents II: Customize your TOC
Include outline levels in your TOC Using Word’s built-in heading styles in your document makes for a quick and easy way of building a TOC.
But if you’re fond of outlining, you can create a document outline and set up the TOC all at the same time. Word’s outline feature automatically includes the entries in your TOC.

Table of Contents II: Customize your TOC
Assign outline levels Start your outline by clicking the View tab, then clicking Outline in the Document Views group, and begin typing.
The animation shows the remainder of the process.
Note that as you work on your outline, the entries for your TOC are set up automatically, with no extra steps required.
Animation: Right-click, and click Play.

Table of Contents II: Customize your TOC
Assign outline levels Start your outline by clicking the View tab, then clicking Outline in the Document Views group, and begin typing.
As you decide on the hierarchal level for the paragraph, simply click the Outline Level box in the Outline Tools group and then click a level from 1 to 9.
As you work on your outline, the entries for your TOC are set up automatically; no extra steps are required.
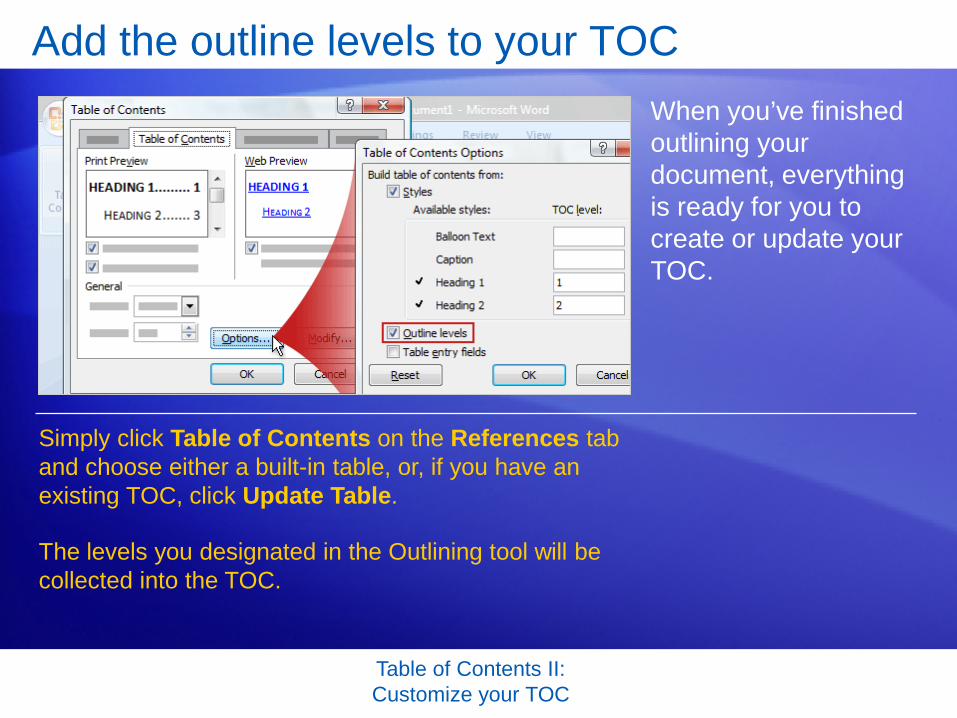
Table of Contents II: Customize your TOC
Add the outline levels to your TOC When you’ve finished outlining your document, everything is ready for you to create or update your TOC.
Simply click Table of Contents on the References tab and choose either a built-in table, or, if you have an existing TOC, click Update Table.
The levels you designated in the Outlining tool will be collected into the TOC.

Table of Contents II: Customize your TOC
Suggestions for practice 1. Mark some outline levels.
2. Build the TOC with outline levels.
Online practice (requires Word 2007)

Table of Contents II: Customize your TOC
Test 3, question 1 Which method of creating TOCs is the easiest to use when you’re outlining a document? (Pick one answer.)
1. Heading styles.
2. Outline levels.
3. Custom styles.
4. All of the above.

Table of Contents II: Customize your TOC
Test 3, question 1: Answer Outline levels.

Table of Contents II: Customize your TOC
Test 3, question 2 When you use the Outlining tool, Word applies heading styles automatically. (Pick one answer.)
1. True.
2. False.
Table of Contents II: Customize your TOC
Test 3, question 2: Answer True.
Level 1, Level 2, and Level 3 from the Outlining tool are tied to Heading 1, Heading 2, Heading 3.
Table of Contents II: Customize your TOC
Test 3, question 3 There are extra steps you need to take to create a TOC when you use outlining. (Pick one answer.)
1. True.
2. False.

Table of Contents II: Customize your TOC
Test 3, question 3: Answer False.
When you have finished outlining your document, everything is ready for you to create your TOC.

Table of Contents II: Customize your TOC
Quick Reference Card
For a summary of the tasks covered in this course, view the Quick Reference Card.

Microsoft® Office Word 2007 Training
Revise documents with Track Changes and Comments
JohnRouda.com presents:

Revise documents with Track Changes and Comments
Course contents
• Overview: Make revisions that others can see
• Lesson 1: Track Changes and Comments: The basics
• Lesson 2: Track Changes and Comments: Beyond the basics
Each lesson includes a list of suggested tasks and a set of test questions.

Revise documents with Track Changes and Comments
Overview: Make revisions that others can see
You have a document to review before it’s sent to a group of employees, and you want to make revisions that your manager can see and then decide if they get accepted or rejected.
Track Changes and Comments enables you to add revisions and comments for others to see, hide them so that others can’t see them, and review changes before finalizing the document.
This course shows you how.

Revise documents with Track Changes and Comments
Course goals
• Use Track Changes when you want to mark up documents with revisions.
• Review tracked changes, and accept or reject them.
• Insert, view, edit, and delete comments.
• Review documents to ensure that no unwanted revisions or comments remain in the distributed documents.

Lesson 1
Track Changes and Comments: The basics

Revise documents with Track Changes and Comments
Track Changes and Comments: The basics You’re reviewing a document for your manager before it’s sent to your entire organization.
You notice changes you want to make, which you also want your manager to see.
When you turn on Track Changes, Word inserts marks that show where deletions, insertions, and formatting changes are made.
To turn on Track Changes, on the Review tab, in the Tracking group, click Track Changes.

Revise documents with Track Changes and Comments
See revisions After you turn Track Changes on, work in Word as you normally do.
As you insert or delete text, or move text or graphics around, each change appears with markup — marks such as colors and lines that show where each revision is and what it is.

Revise documents with Track Changes and Comments
See revisions The picture shows how markup looks when you make changes in your document.
1
2
When you delete the text “with hard work and clear thinking,” the deleted text is put in a balloon in the document margin.
To replace “twelve” with “nine,” you select “twelve” and type “nine” over it. “Twelve” goes into a balloon in the document margin; the newly inserted “nine” is underlined.

Revise documents with Track Changes and Comments
See revisions The picture shows how markup looks when you make changes in your document.
3 A vertical line appears in the left margin next to each sentence with tracked changes. This is an additional signal that there are changes in some sentences.

Revise documents with Track Changes and Comments
Insert a comment You made some revisions, but you’d also like to explain why you deleted “twelve” in the first sentence.
No problem: Insert a comment, which is an annotation that you can add to the document.
To do that, place the cursor at the end of the text you want to comment on, “nine” in this example. On the Review tab, in the Comments group, click New Comment.

Revise documents with Track Changes and Comments
Insert a comment A comment balloon appears in the document margin. The text you are commenting on, “nine,” is highlighted with your review color. You type your text in the comment balloon.
Here’s how to tell the difference between a comment balloon and a deleted text balloon:
• The solid color background in the comment balloon. A deleted text balloon has color only around its outside border.

Revise documents with Track Changes and Comments
Insert a comment A comment balloon appears in the document margin. The text you are commenting on, “nine,” is highlighted with your review color. You type your text in the comment balloon.
• The “Comment” label in the balloon.
• The reviewer’s initials in the balloon.
Here’s how to tell the difference between a comment balloon and a deleted text balloon:

Revise documents with Track Changes and Comments
How to tell which reviewer has done what When more than one person reviews a document, you might want to know what changes were made by which reviewer.
Here are some ways to tell who did what.
1
2
3
See who made a comment by moving the mouse pointer over it in the document.
Look at the color of the revision. Pilar Pinilla’s comments (PP) appear in one color…
…while Richard Bready’s comments (RB) appear in another.
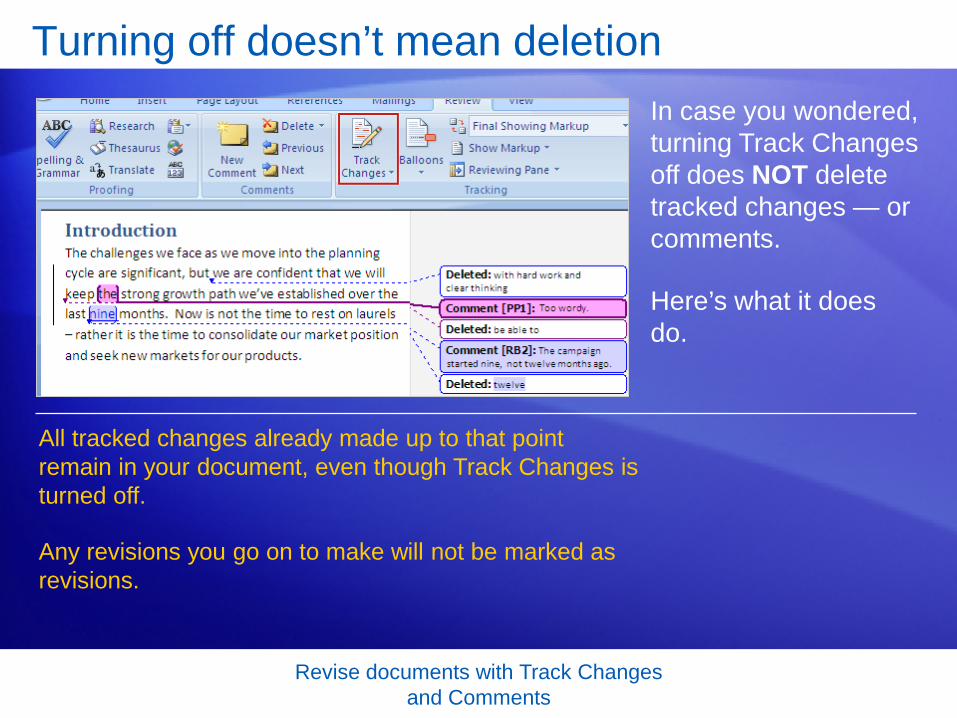
Revise documents with Track Changes and Comments
Turning off doesn’t mean deletion In case you wondered, turning Track Changes off does NOT delete tracked changes — or comments.
Here’s what it does do.
All tracked changes already made up to that point remain in your document, even though Track Changes is turned off.
Any revisions you go on to make will not be marked as revisions.

Revise documents with Track Changes and Comments
Accept or reject changes, and delete comments When the revisions are done, someone must review them and then accept or reject them.
The reviewer can deal with revisions one at a time or all at once, and can read the comments and then delete them.

Revise documents with Track Changes and Comments
Accept or reject changes, and delete comments The picture shows the options.
1
2
On the Review tab, in the Changes group, use the Accept button to accept changes one at a time or in sequence, or to accept all changes at once.
Use the Reject button to reject changes one at a time or in sequence, or to reject all changes at once.

Revise documents with Track Changes and Comments
Accept or reject changes, and delete comments The picture shows the options.
3 Use the Previous button to review each item going toward the beginning of the document.
4 Use the Next button to review each item going toward the end of the document.
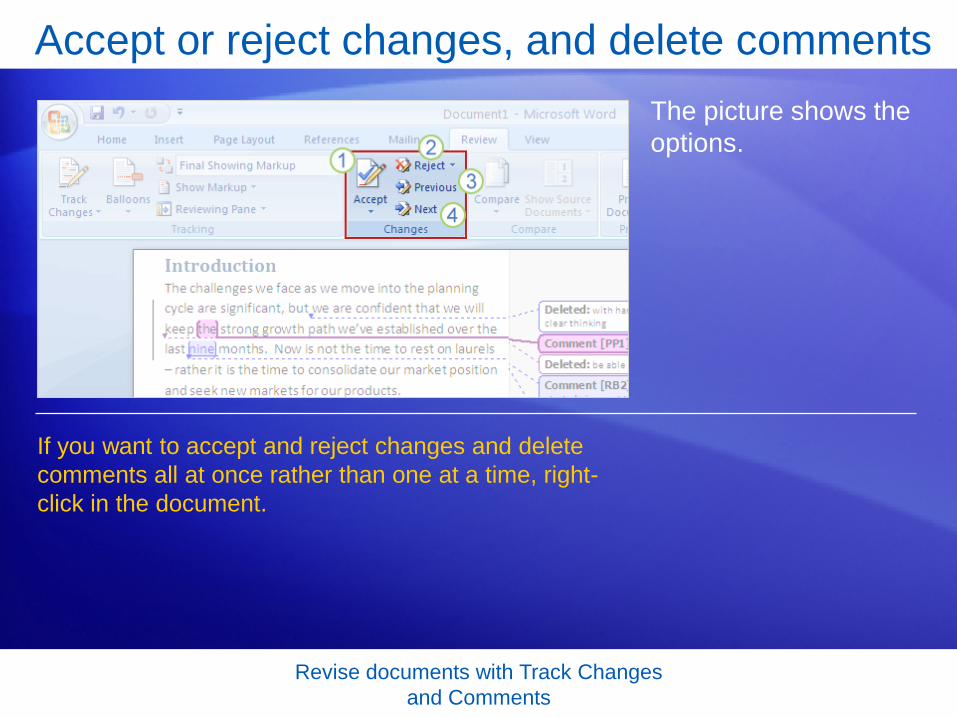
Revise documents with Track Changes and Comments
Accept or reject changes, and delete comments The picture shows the options.
If you want to accept and reject changes and delete comments all at once rather than one at a time, right-click in the document.

Revise documents with Track Changes and Comments
Suggestions for practice 1. Make changes.
2. Move text.
3. Insert comments.
4. Show revisions and comments in a different way.
5. Accept or reject changes and delete comments.
Online practice (requires Word 2007)

Revise documents with Track Changes and Comments
Test 1, question 1 To get rid of tracked changes, turn off Track Changes. (Pick one answer.)
1. True.
2. False.

Revise documents with Track Changes and Comments
Test 1, question 1: Answer False.
Accept or reject tracked changes to get rid of them. And watch for that message at the end of the document telling you that there are no more tracked changes (or comments).

Revise documents with Track Changes and Comments
Test 1, question 2 What does turning off Track Changes do? (Pick one answer.)
1. Deletes tracked changes and comments.
2. Hides existing tracked changes and comments.
3. Stops tracking revisions.

Revise documents with Track Changes and Comments
Test 1, question 2: Answer Stops tracking revisions.
Any revisions made after Track Changes is turned off will not be marked with strikethroughs or underlines, or in balloons. But any revisions already created remain in the document until you accept or reject them. And comments remain until you reject or delete them.

Revise documents with Track Changes and Comments
Test 1, question 3 To insert a comment, you have to turn on Track Changes. (Pick one answer.)
1. True.
2. False.

Revise documents with Track Changes and Comments
Test 1, question 3: Answer False.
Track Changes does not have to be turned on before you insert a comment. You can use comments at any time, not just when you work with tracked changes. On the Review tab, in the Comments group, click New Comment. You can also insert a comment by pressing CTRL+ALT+M.

Lesson 2
Track changes and comments: Beyond the basics

Revise documents with Track Changes and Comments
Track changes and comments: Beyond the basics Imagine that you are about to review a document with changes made by Richard, Kai, and Pilar.
You’d like to see Pilar’s revisions first. You know that you can see them by moving the pointer over all the changes to see her name or by looking for her markup color.
But you wonder if you can see just her changes, without having to sort through Richard’s and Kai’s too. This can be handy when working with long documents.
Revise documents with Track Changes and Comments
Temporarily hide changes To see only Pilar’s changes, you can temporarily hide the information you don’t want to review right now (Richard’s and Kai’s revisions).
On the Review tab, in the Tracking group, click the arrow next to Show Markup, point to Reviewers, and clear the check box next to All Reviewers. Then click the arrow next to Show Markup again, point to Reviewers, and click the check box next to Pilar’s name to select it.
Animation: Right-click, and click Play.

Revise documents with Track Changes and Comments
Temporarily hide changes To see only Pilar’s changes, you can temporarily hide the information you don’t want to review right now (Richard’s and Kai’s revisions).
On the Review tab, in the Tracking group, click the arrow next to Show Markup, point to Reviewers, and clear the check box next to All Reviewers.
Then click the arrow next to Show Markup again, point to Reviewers, and click the check box next to Pilar’s name to select it.

Revise documents with Track Changes and Comments
See a document before and after What did a marked-up document look like before it had all those revisions and changes? What it would look like if you accepted all changes and deleted all comments?
To help prevent you from inadvertently distributing documents with tracked changes and comments, Word automatically displays documents with markup showing.
On the Review tab, in the Tracking group, Final Showing Markup is the default option in the Display for Review box.

Revise documents with Track Changes and Comments
See a document before and after What did a marked-up document look like before it had all those revisions and changes? What it would look like if you accepted all changes and deleted all comments?
To see how the document looked before tracked changes and comments were inserted, click the arrow in the Display for Review box, and then click Original.

Revise documents with Track Changes and Comments
See a document before and after What did a marked-up document look like before it had all those revisions and changes? What it would look like if you accepted all changes and deleted all comments?
To see how the document would look with all revisions accepted and comments deleted, click the arrow in the Display for Review box, and then click Final.
After you review the document, click Final Showing Markup to display tracked changes and comments again.

Revise documents with Track Changes and Comments
As mentioned earlier, hiding tracked changes or comments doesn’t delete markup. It just lets you see the document without underlines and balloons.
If you save and close a document with hidden markup, you (and maybe someone else, too) will see revisions and comments when the document is opened again.
Hiding tracked changes doesn’t mean deletion

Revise documents with Track Changes and Comments
Here are some ways to see if a document contains hidden tracked changes or comments before you close it.
Doing this is especially important if you are about to distribute a document:
• On the Review tab, in the Tracking group, click Show Markup. Make sure there is a check mark next to Comments, Ink (for handwritten notes with a Tablet PC), Insertions and Deletions, and Formatting.
Hiding tracked changes doesn’t mean deletion

Revise documents with Track Changes and Comments
Hiding tracked changes doesn’t mean deletion Here are some ways to see if a document contains hidden tracked changes or comments before you close it.
• Point to Reviewers on the Show Markup menu, and be sure there is a check mark next to All Reviewers.
Doing this is especially important if you are about to distribute a document:

Revise documents with Track Changes and Comments
Check for revisions and comments The only way to get rid of tracked changes is to accept or delete them. The only way to get rid of comments is to delete or reject them.
After you’ve checked to ensure that all revisions and comments are displayed, and before you distribute a document, do what the professionals do, automatically and every time.

Revise documents with Track Changes and Comments
Check for revisions and comments The only way to get rid of tracked changes is to accept or delete them. The only way to get rid of comments is to delete or reject them.
1 On the Review tab, in the Changes group, use the buttons to look for revisions and comments from one end of the document to the other.
Remove any changes by accepting or rejecting them, and delete any comments.

Revise documents with Track Changes and Comments
Check for revisions and comments The only way to get rid of tracked changes is to accept or delete them. The only way to get rid of comments is to delete or reject them.
2 To see if a document contains hidden tracked changes or comments, click any button in the Comments or Changes group.
If you get the message shown here, click Show All to display revisions and comments.

Revise documents with Track Changes and Comments
Choose how you make tracks Do you like to see comments and tracked changes but wish that you could change their look?
You have some options for how tracked changes and comments are displayed. On the Review tab, in the Tracking group, click the arrow on Track Changes. Then click Change Tracking Options.
As the picture shows, there’s lots to choose from.

Revise documents with Track Changes and Comments
Suggestions for practice 1. Use the Show Markup menu to temporarily hide reviewer markup.
2. Track formatting revisions.
3. Use the Show Markup menu to hide revisions by type.
4. Look at different ways to verify that a document doesn’t contain hidden markup.
5. Check out the tracked changes option.
Online practice (requires Word 2007)

Revise documents with Track Changes and Comments
Test 2, question 1 Clearing check boxes on the Show Markup menu does not delete changes. (Pick one answer.)
1. True.
2. False.

Revise documents with Track Changes and Comments
Test 2, question 1: Answer True.
Clearing check boxes temporarily hides revisions and comments. Clearing a check box never deletes changes.

Revise documents with Track Changes and Comments
Test 2, question 2 You have a document with insertions and deletions, formatting changes, and comments. To see just insertions and deletions, on the Show Markup menu, clear which of the following? (Pick one answer.)
1. The check box next to Comments.
2. The check boxes next to Insertions and Deletions.
3. The check boxes next to both Comments and Formatting.

Revise documents with Track Changes and Comments
Test 2, question 2: Answer The check boxes next to both Comments and Formatting.
Clearing these two check boxes will hide comments and formatting revisions, leaving only insertions and deletions.

Revise documents with Track Changes and Comments
Test 2, question 3 What’s the last thing you should do before you distribute a document? (Pick one answer.)
1. Check for spelling and grammar errors.
2. Save the document.
3. Check for revisions and comments.

Revise documents with Track Changes and Comments
Test 2, question 3: Answer Check for revisions and comments.
Before you distribute a document, always check to see if there are any revisions or comments. As a last step, you can use the Document Inspector.

Revise documents with Track Changes and Comments
Quick Reference Card
For a summary of the tasks covered in this course, view the Quick Reference Card.