create to communicate - american english · create to communicate. art activities for the english...
TRANSCRIPT

6 | CONTENTS
ThemeLesson and
Page NumberGrammar Vocabulary Academic Skills Proficiency Level
MIX
ED M
EDIA
My Routines: Diorama Show and TellPage 126
• Past and present comparisons in the habitual past
• School• Objects• Routines
• Reflecting• Describing• Peer review• Summarizing
Intermediate
Symbols: Make It “POP”! Personal SymbolPage 132
• Imperatives • Symbols• Feelings• Self-expression
• Analyzing• Reflecting• Presenting to an
audience
Intermediate
Chains: Scratchboard Chain StoriesPage 138
• Descriptive adjectives • Activities• Objects
• Listing• Referencing• Presenting to an
audience
Intermediate
Life and Family: My Family TreePage 142
• Personal and possessive pronouns
• Family• Nature
• Introducing• Reflecting• Interviewing• Memorizing
High Beginner
Stories and Sequences: Accordion StoriesPage 150
• Linking adverbials through process writing
• Transitions• Directions
• Prioritizing• Categorizing• Describing a process
High Intermediate

CREATEtoCommunicateArt Activities for the English as a Foreign Language Classroom
Published by:
Office of English Language Programs
Bureau of Educational and Cultural Affairs
United States Department of State
Washington, D.C. 20037
americanenglish.state.gov

First Edition: 2013 ISBN (print) 978-1-624-25051-4 ISBN (PDF) 978-1-624-25052-1 ISBN (ePub) 978-1-624-25053-8 ISBN (mobi) 978-1-624-25055-2
In this publication, there are many links to other websites. These links to websites do not constitute an endorsement by the U.S. Department of State
of the site or the opinions presented therein.
Photographs: Images on pages 82, 88, 126, 128, 131, 138, 139 © 2011 Amy TarmeyAll other images © Shutterstock.com

| 7
CREATE TO COMMUNICATEArt Activities for the English as a Foreign Language Classroom
RationaleThere are unlimited advantages to using the visual arts for developing English language learning skills. The arts can be a source of inspiration, imagination, and motivation for learners. They can engage students in a variety of themes, subjects, and issues, as well as introduce learners to new ways of seeing the world. Most importantly, the arts can provide students with a voice in a world where they have limited English proficiency.
This activity book is intended for English language teachers who would like to reap the benefits that the visual arts provide, but are unsure of where or how to begin. By providing art ideas and guidelines, matched with language objectives, this book seeks to use the arts as a tool to build and strengthen English reading, writing, listening, and speaking skills and develop the confidence students need to take risks and explore within a new language. Designed to supplement regular coursework, the purpose of this book is not to provide art lessons, but rather to provide ideas of how to incorporate the arts into the language classroom to make English accessible and understandable to students.
OrganizationThe art and language activities in this book are designed for primary and secondary school students. Each activity lists a language objective and suggested skill level. There are four media explored in this book: drawing, collage, sculpture, and mixed media. The activities are designed to be used in-dependently rather than sequentially, giving the teacher the flexibility to choose an activity that best fits the desired topic, language focus, and available art materials of the language classroom.
In addition to flexibility, an important design feature of this book is adaptability. While art materials, language objectives, and skill levels are listed for each activity, most activities can be adapted and modified in numerous ways. Look for modification suggestions at the beginning and end of each les-son labeled as Art Options or Extension Activities, or at the Additional Resources to supplement and enhance the lesson plans. These features enable the teacher to use, adapt, and modify an activity in various ways to best suit the needs of the students.
The below grid is a model of what will be found at the beginning of each lesson:
Objective: This is the language-learning objective for the lesson plan.
Level: This indicates the student level for the lesson.
Materials: This lists the materials needed for the art project.
Teacher Preparation: This is what the teacher will need to do to prepare for the lesson.
Art Options: This will list variations in case the materials listed above do not work in the teacher’s specific setting.

8 |
Selecting an ActivityThere are three ways to select an activity to fit the needs of the students.
• Language Focus: The language focus of each activity is placed at the beginning of each activ-ity. Most activities in this book are organized around an authentic communication goal and discrete language structures. These objectives are designed to be adapted and modified to best suit the needs of the students.
• Topic: In each chapter, the activities are organized under topic headings.
• Art Medium or Materials: Each chapter of this activity book is organized by art medium. This enables the teacher to easily search for an activity depending on what materials are available. However, most activities also offer suggestions for art material variations. The Art Options listed at the beginning of each lesson offers valuable suggestions on alternate mate-rials. Likewise, adaptation and modification are encouraged.
Teaching the LessonThere are no exact rules or steps for making art. The tips outlined below offer broad guidelines and suggestions to take into consideration when creating art with students.
1. Choose an appropriate activity for the students.
Before beginning an art activity, read through the activity instructions, extensions, and varia-tions to make sure the activity is suitable or adaptable for the age and language ability levels of the students. Most activities can be adapted and modified in numerous ways to fit the needs of students.
2. Collect the necessary materials, or alternate materials, needed to complete the activity.
Read the materials list and the instructions for each lesson before beginning the activity with students. If the resources listed in the beginning of the activity are not available, read the Art Options section at the beginning of the activity for ideas on other ways to complete the activity.
3. Help students plan the basic design of the artwork: the composition.
Most art activities require some planning. The amount and type of planning will depend on the age of the students, the specific activity, and the amount of time desired to spend on the activity. With both two-dimensional and three-dimensional artwork, students have a limited amount of space to work with. The teacher can help students plan how they will use the space provided by asking them to think about the organization or arrangement of the subject(s), the size of the subjects(s), and the desired colors and color combinations to be used. In many cases, the teacher can also show students how to organize the design of a piece of artwork by doing an example with the class, or by demonstrating with a student example.

| 9
CREATE TO COMMUNICATEArt Activities for the English as a Foreign Language Classroom
Art TipsTips specific to each art medium can be found at the beginning of each chapter. Listed below are a few tips and suggestions that are common to all art media and activities included in this book.
• If possible, have students bring in old shirts or other old clothes that can be worn over their clothes to protect them from paint, glue, or any other messy art materials being used.
• If students are working with messy materials, try to cover and protect the surfaces students will be working on (desks, tables, and floor) with old newspapers or scrap (recycled) papers. By covering students’ workspace, the furniture in the classroom will not only be protected but clean-up will also be faster and easier.
• Old baking supplies such as muffin tins or metal baking sheets make good paint mixing trays or palettes.
• Recycled materials such as magazines, papers, cardboard, plastic containers, and glass jars are utilized in many art activities throughout this book. If possible, collect these items for use in the classroom or ask students and other teachers to collect such recycled materials to donate for art activities.
• Each chapter includes a materials list. The lists provided are broad suggestions of common materials used in art activities. They are intended to give the teacher an idea of possible materials that can be used with the art medium. Not all of the materials listed are needed to complete an activity. Feel free to adapt, modify, or add additional materials to any activity to best suit the resources available and the needs of the students.
• There is a glossary provided at the end of the book with definitions and images for art pro-cesses and materials that may be unfamiliar.

126 | UNIT IV: MIXED MEDIA
LESSON 1
MY ROUTINESDiorama Show and Tell
Daily routines using comparisons
Objective: Students will create dioramas and use them to discuss daily routines that hap-pened in the past using past and present comparisons with used to and would.
Level: Intermediate
Materials: Recycled cardboard boxes such as shoe boxes, cereal boxes, or tissue boxes (one for each student), scissors, glue or tape, and any collage materials available, such as re-cycled magazines, photographs, and materials from nature.
Teacher Preparation: 1. Make a model diorama to bring to class, following the instructions in Part Two. 2. Bring in recycled boxes for students to use for their dioramas. Each student will need a box. Ask students and other teachers to bring in recycled boxes for the project as well.
Art Options: If recycled boxes are not available, this activity can also be completed as a col-lage activity. Instead of making a diorama, have students make a collage about their daily lives on a piece of paper or other flat surface.
INSTRUCTIONS
Part One: Activity Log and Inside-Outside Circle Warm-Up Activity
1. Tell students they will be making a diorama. A diorama is a three-dimensional picture or scene and can incorporate a wide variety of materials. Show students the example provided at the beginning of this activity.
2. Tell students the topic for the dioramas is “A Day in My Life.” Their dioramas should show scenes from their daily lives.
3. To brainstorm ideas and items to include in the dioramas, have students write a weekly log of their activities prior to making the diorama. (A log of a few days is fine if a weekly log is not possible.) The activity log will help students see patterns in their daily lives, while also practicing the past tense.
4. Ask students to record what they do for one week. Students should write the time and type of activity in their logs using past tense verbs. Below is an example activity log:

| 127
CREATE TO COMMUNICATEArt Activities for the English as a Foreign Language Classroom
7:00 am I woke up and brushed my teeth.
3:30 pm I helped my father stock the shelves in his store.
7:30 am I ate breakfast with my mother, brother, and sister.
4:00 pm I went home.
8:00 am I walked to school with my brother and sister.
4:30 pm I ate a snack with my brother.
8:30 am I went to school. 5:00 pm I did my math and science homework.
11:30 am I went outside for recess and played soccer with my friends.
7:00 pm I ate dinner with my family.
12:00 pm I ate lunch. 7:45 pm I played outside with my sister.
12:20 pm I went to English class and science class.
8:30 pm I took a bath.
3:00 pm I left school. 9:00 pm I read my book and then went to sleep.
5. After writing a log of their activities for a few days to a week, ask students to look for patterns in their daily activities. Ask students to think about the questions below:
What do you do every day? What do you do every couple of days? What parts of your daily routine do you enjoy the most? What part of your routine do you not enjoy? Which things in your daily routines are most important to you?
These questions will help students brainstorm and choose what to include in their “A Day in My Life” dioramas.
6. To refresh students’ memories, you could draw on the board a continuum using adverbs of frequency:
ALWAYS OFTEN SOMETIMES NEVER
7. To practice speaking and listening with these questions, do an inside-outside speaking activ-ity with students, as explained below.
a. Divide the class in half. If you have an odd number of students, one student can be your helper.
b. Have one group form a circle, facing outwards. The other group then forms a circle around the first circle, facing inwards. The two circles should create pairs of students, facing each other.
c. Tell the inside circle that they will be asking the questions. They should use the ques-tions about patterns in students’ daily activities from Step Five. If needed, write the questions on the board for students to refer to.

128 | UNIT IV: MIXED MEDIA
d. The outside circle has to answer the questions posed by their partners on the inside circle.
e. After a few minutes, have students change partners by having the outside circle move one person to the right. The inside circle does not move.
f. Continue having the students change partners every couple of minutes, with only the outside circle moving to the right. The students on the inside of the circle should al-ways be the ones to ask the questions.
g. After an appropriate amount of time, have the inside and outside circles switch roles. The outside circle should ask questions, while the inside circle answers them. When changing partners, the outside circle still moves but the inside does not.
Part Two: “A Day in My Life” Diorama
1. Tell students the next part of the activity will be to construct their dioramas. Ask students to bring in items from home to include in their dioramas. Items may include pictures of their family members, pictures of pets, memorabilia from sports teams, small tokens from hob-bies, or small toys.
2. Have students also cut out images from magazines, draw pictures, or create collage scenes to include in their dioramas.
3. After students have collected items and created or found images to include in their dioramas, have students begin constructing their dioramas by preparing the recycled boxes.
4. One side of the box needs to be open to view the diorama. If using shoeboxes, simply take the lid of the shoebox off and lay the shoebox on its side. If using a cereal or tissue box, have students (or help students) cut off one of the broad sides of the box. See the example on the right.
5. Have students decorate or add designs to the background and sides of their diorama. If paints are available, stu-dents can paint the background and sides. If collage ma-terials are available, students can cut out colored papers or pieces of magazines and glue them inside the box to create a background. If markers are available, students can color the sides and back of the box.
6. Students can then add their drawings, images, or objects to the inside of the box. Tell stu-dents to experiment with arranging the items in different ways before they tape or glue the items in the box.
7. Remind students to use all of the space of the box and to overlap and layer diorama items. Refer to the project example at the beginning of the activity.
8. Add any finishing touches to the diorama.
Part Three: Practice with Used to and Would
1. Once students have completed their dioramas, ask students to compare things that are part of their daily lives now (as depicted in the dioramas) to things that they used to do, or that used to be a part of their lives.

| 129
CREATE TO COMMUNICATEArt Activities for the English as a Foreign Language Classroom
2. Demonstrate the use of used to and would by telling students things about yourself. If you made a diorama example, you could refer to the diorama and say the following:
I used to drink a lot of coffee, but now I drink tea. When I was younger, I would go for a run every day, but now I prefer going for walks.
3. Review or teach the use of used to and would. Use the chart and information below if desired.
Used to and would refer to past actions and habits that are no longer true.
Used to is used in two ways: • To express a past action that happened repeatedly but is no longer done• To express a past fact that is no longer true
Would is used one way: • To express a past action that happened repeatedly but is no longer done
Would is used only for actions:For example:
When I was young I would hate vegetables. Not correct. When I was young I used to hate vegetables. Correct!When I was young I would grow vegetables. Correct!
4. Play a “Used to or Would” game:a. Break students up into groups. Tell students that one group member should begin the
game by saying one thing he or she used to or would do. For example: I used to ride my bike to school every day… Then, another group member finishes the sentence: …but now I take my private limousine.
b. Encourage students to create funny or entertaining endings to the sentences, but re-mind students their sentences should still be grammatically correct.
c. The person who completed the sentence now starts the beginning of another one: I used to…
d. The game keeps going around the group until every group member has contributed.
Used To
Singular Plural
I used to play soccer.
You used to play soccer.
He/She used to play soccer.
We used to play soccer.
You used to play soccer.
They used to play soccer.
Would
Singular Plural
I would play soccer.
You would play soccer.
He/She would play soccer.
We would play soccer.
You would play soccer.
They would play soccer.

130 | UNIT IV: MIXED MEDIA
Part Four: Journal Writing Closing Activity — Reflecting on Me, Then, and Now
1. Once students have practiced using used to and would, have students write in their journals comparing their life now to what they used to do or used to like. Students should use the things depicted in their diorama as the motivation for their writing. Some examples of topic starters are included below.
I used to ride my bike to school every day. Now, …I used to play soccer on the weekends with my friends. Now, … I used to spend time on the computer every day. Now, … When I was young, I would play in the park. Now, … In the past, I would go swimming. Now, …
2. If possible, display students’ dioramas in the classroom or school for other students to see and to generate conversation.
Extension Activities:
Guessing Game
To prepare, on note cards write down 20 to 30 activities that can easily be acted out. In class, divide the students into two teams. Have one person from each team come up and act out one of the ac-tions. Then, have the teams guess what the action is. At the end of the card stack, whichever team has the most points wins.
I Wish…
For more advanced students, introduce another use of would, with the verb wish. Wish is a verb used to express something you want to happen but is not true now. When you use wish about a future event, will changes to would, and can changes to could. Have students compare their daily lives to things they wish they could do.
Expressing Wishes in the Future
I have to go to English class after school. I can’t go to the mall tomorrow.
I won’t eat vegetables.
I wish I could go to the mall tomorrow.
My mom wishes I would eat vegetables.
Have students practice expressing things they wish, using would and could. Students can work in groups or pairs to come up with sentences to share with the group. For example:
I wish it would rain tomorrow.I wish I could go to the beach this weekend.I wish I could finish my homework faster.

| 131
CREATE TO COMMUNICATEArt Activities for the English as a Foreign Language Classroom
Making Inferences
Explain to students that an inference is the process of making a guess based on an observation or fact. Demonstrate to students how to make an inference. Use the diorama provided in this lesson (shown on the right) as an example, or choose a student’s di-orama. If the example diorama is used, here are some inferences that could be made:
From the diorama, I think this person takes the bus every day. This person also probably uses his or her phone and computer every day. I think this person reads books and likes to drink coffee. I also think this person dreams about going to the beach.
Take turns using students’ dioramas as examples and have other students draw inferences about that student.
What We Have in Common
Have students put their dioramas together in a line so the class can see the entire collection. Stu-dents can then look at all of the dioramas and make statements about what they have in common, or students could count how many people have the same item in their dioramas and make a bar graph, circle graph, or chart of the common activities in the class. Students could then use expressions of quantity to comment on the results of the graph or chart. They might come up with sentences such as “Many people in our class play soccer. Several people like to read and some people play tennis.”

132 | UNIT IV: MIXED MEDIA
LESSON 2
SYMBOLSMake It “POP”! Personal Symbol
Personal statements and imperatives
Objective: Students will create modern art posters and use these to discuss personal state-ments using imperatives.
Level: Intermediate
Materials: Paper, pencils, note cards, and pieces of paper. Optional: paint, paintbrushes, water containers, crayons, markers, glue, old magazines, or other collage materials.
Teacher Preparation: 1. Photocopy the symbols in the Reproducible Worksheets. Cut each symbol out and tape it to a note card or draw the symbols on note cards. Then write what each symbol expresses on a separate note card. Make sure that for every note card with a symbol there is a note card that lists what the symbol expresses. Make enough note cards so that every student in your class has one card, with either a symbol or symbol explanation on it. Add more symbols to the game if desired. 2. Read the various mixed media options for this activity in Part Two, Step Six. Choose an art option depending on the available materials and needs of your class. Prepare the materials for the activity.
Art Options: If these various art media are not available for this activity, choose one me-dium to use. This activity can be completed solely as a drawing, painting, or collage activity.
INSTRUCTIONS
Part One: Symbols and Imperatives, Mix-and-Match Warm-Up Activity
1. Have students work in groups. Show groups the symbols below. The symbols are provided in a larger format in the Reproducible Worksheets section at the end of this lesson.

| 133
CREATE TO COMMUNICATEArt Activities for the English as a Foreign Language Classroom
2. Give students time to look at the symbols and discuss what the symbols express. Group members should help each other clarify symbol meanings.
3. Explain the mix-and-match game to students. Tell students that everybody will get a card with either a symbol or a symbol explanation on it. When you say “Go!” students should walk around the room trading cards with each other. When you say “Stop!” students should stop trading cards and stand still. When everybody has stopped moving, call “Match,” and stu-dents have to find somebody who has the match to their card. If they have a symbol on their card, they need to find the student with the correct meaning. If they have a meaning written on their card, they have to find the student with the correct symbol. When every student has found their match call “Go!” again and the game continues.
4. Mix-and-match variations: If you have an odd number of students there are different options for playing the game. One option is to have the extra student be the assistant, calling “Go,” “Stop,” and “Match.” Another option is to give all students a card. Whoever is the last person to find their match after you call “Match” is out. Each round one student should be out until there is one person left. (This option requires you to make a card for every student.)
5. After playing the game, tell students to get back into their groups again. Ask the students if the symbols above differ from the symbols that represent the same actions or things in their country; if so, have groups discuss the similarities or differences between the symbols. Which symbol do they think is better? Why?
6. Tell students that the ideas symbols express are often verbalized or written using impera-tives (the infinitive form of the verb without to, which is used to express a request, a com-mand, an order, or instructions).
7. Emphasize to students that the symbols above are public symbols that express an order or something that you have to do. (This distinction is important because students will be using imperatives for a different function in Part Three.)
8. Ask groups if they can think of any other symbols that express imperative commands. Have groups take turns coming up to the board and drawing the symbol, while other groups guess the imperative command it expresses.
Part Two: Pop Art Personal Symbol
1. Show students the images at the end of this lesson. These images are examples of the Pop Art style. Examples of Pop Art can also be found online by searching for artwork of famous Pop artists such as Andy Warhol, Jasper Johns, Roy Lichtenstein, or Claes Oldenburg.
2. Ask students what similarities they see in the Pop Art examples. Students may come up with answers such as bright colors and common or everyday objects.
3. Explain to students that Pop Art is an art movement that started in the 1960s in the United States and the United Kingdom. Pop Art uses common objects, cultural symbols, and bright colors and lines to create a work of art.
4. Tell students they will be creating a personal symbol in the Pop Art style to represent them-selves.
5. Have students first draw their ideas for their personal symbol. A personal symbol could be anything from a peace sign to a cell phone to a paintbrush to a soccer ball. Stress to students that their personal symbol should have personal meaning and purpose. Offer students ad-vice on creating their symbols such as:

134 | UNIT IV: MIXED MEDIA
• Keep the symbol simple. Pop Art uses simple and easily recognizable forms. • Design a symbol that has personal meaning. Students’ symbols should represent
their interests, passions, beliefs, or personality in some way. • Once they have a basic design for their symbol, they should think about how they
can make it “Pop Art.” What colors and other design features can they use to make it stand out?
6. Give students time to make their symbols. If only paper and pencils are available, students can draw their personal symbols. If other materials are available, some mixed media options for completing this activity are listed below:
• Use pencil, crayons, colored pencils, or markers to draw the symbol and the back-ground.
• Use collage materials for the background, but paint the actual symbol and then cut it out and add it to the collage background.
• Paint the background and use collage techniques and materials to make the sym-bol.
• Paint the symbol and the background, but use dark markers or crayons to accen-tuate the design or add details once the paint is dry.
For example, if the image shown at the beginning of the chapter was a student’s symbol, the student could create the background by cutting out yellow and white colored paper from magazines. The paper could then be glued together to form rays. The student could then draw or paint the hand making the peace sign.
Part Three: What Does Your Symbol Say?
1. When students are finished creating their personal symbols, have students return to their groups.
2. Collect the symbol artworks, and pass them out among the groups, making sure no group has one of their own artwork.
3. Remind them of the symbols looked at earlier in the activity and the imperative commands that express each symbol.
4. Tell students they need to use imperatives to describe each of their classmate’s symbol art-works. Each group should brainstorm an imperative phrase to represent each piece of art-work and write down the imperative phrase they decide upon. For the personal symbols, the imperative statements should encourage an idea or action rather than an order or command.
5. Provide students with examples: If a student painted a soccer ball flying through the air as her personal symbol, another student might write “Play hard” as the imperative sentence to represent that artwork. If a student who loves to talk creates a Pop Art personal symbol like the below image, an imperative sentence could be “Talk more!”

| 135
CREATE TO COMMUNICATEArt Activities for the English as a Foreign Language Classroom
6. Make sure students understand the difference between the two uses of imperatives in this activity. When contrasting imperative statements like “Wash your hands” and “Talk more,” emphasize that the first sentence is a command while the second sentence encourages an action.
7. Have groups work on creating an imperative statement for each piece of artwork they have and then have groups switch artwork. They should do the same again. Groups should con-tinue switching until several imperative phrases have been generated for each artwork. The imperative phrases should vary depending on different reactions and interpretations of the symbol artwork.
8. Hold up one piece of artwork at a time. Have each group read the imperative phrase they wrote to represent that artwork. The artist of the artwork can choose the phrase he or she likes the best.
9. Have students write the imperative statement they chose for their symbol with large words and display the artwork together with the imperative statement in the classroom or school.
Part Four: 3-2-1 Closing Activity
1. To wrap up this activity, have students do a 3-2-1 closing activity. 2. Tell students to write the following in their journals or on a separate sheet of paper:
• Three things they learned. (The three items can relate to any component of the ac-tivity; for instance, symbols and their meanings, imperative words or statements, or Pop Art.)
• Two things they liked about this activity.• One thing they disliked about this activity.
Extension Activity:
Community Pop Art
Have students create Pop Art symbols on a theme of improving their community. Students might come up with themes such as “keep the streets clean,” “obey traffic rules,” “be nice to the environ-ment,” or themes that are related to an upcoming event or important community topic. Students should also write English statements or slogans to accompany their symbols. If possible, have the students display their community Pop Art symbols around the school or other public location in the community.
Additional Resources:
Keith Haring is a famous contemporary American artist. His artwork transforms everyday images into bold symbols and statements. See examples of his artwork, as well as browse online activities and an online database of lesson plans, on his children’s website. www.haringkids.com
Art Lex is an online art dictionary with great art definitions, images and quotations. Search “Pop Art” for a definition and examples of Pop Art and Pop Artists. www.artlex.com

136 | UNIT IV: MIXED MEDIA
MAKE IT POP!

| 137
CREATE TO COMMUNICATEArt Activities for the English as a Foreign Language Classroom
THE SIGN SAYS
Directions: Look at the images below. What do you think they mean? What do you call these images?

138 | UNIT IV: MIXED MEDIA
LESSON 3
CHAINSScratchboard Chain Stories
Chain stories and vocabulary word poems
Objective: Students will use descriptive adjectives by creating scratchboards to improve their vocabulary.
Level: Intermediate
Materials: White paper, crayons, black tempera paint, liquid dish soap, paint brushes, wa-ter containers, old newspapers, pencils, and paperclips, toothpicks, or wood skewers.
Teacher Preparation: Prepare the materials listed above for making the scratchboards.
Art Options: This activity can be completed as a drawing or collage activity if the materials for making a scratchboard are not available. Students can draw pictures with pencils, cray-ons, markers, or colored pencils, or use magazine papers to create collage images of the specified vocabulary words.
INSTRUCTIONS
Part One: “Name Six” Vocabulary Game Warm-Up Activity
*Adapted from Games & Activities for the ESL/EFL Classroom, a project of the Internet TESL Journal: http://iteslj.org/games/
1. Choose an appropriate topic or theme for the vocabulary game and scratchboards. The topic can relate to previous work completed in class or a theme of an upcoming activity, but make sure that the topic chosen relates to a vocabulary domain that you would like students to learn and uses words that are appropriate for their level. Possible vocabulary topics for this activity may include:
Food {pasta, apple, pizza, noodles, etc.}Weather {sun, clouds, rain, snow, hail, etc.}Sports {basketball, soccer, polo, swimming, etc.}Hobbies {photography, sewing, playing the guitar, jewelry making, etc.}
2. Have students form groups of six people. (Groups can be larger or smaller depending on the size of your class.) Tell groups to sit in a circle facing each other.
3. Find or bring in items that groups can use to pass around the circle: stuffed animals, for ex-ample, or classroom items like a stapler or chalkboard eraser.
4. Tell students the vocabulary domain or topic for the game.

| 139
CREATE TO COMMUNICATEArt Activities for the English as a Foreign Language Classroom
5. When you say, “Go,” students should begin passing the item around the circle. Tell students that when “Stop” is called, the student who has the item in his or her hands has to then name six vocabulary words from the topic you specified at the beginning of the game. While the student names those words, he or she must pass the item around the circle again. He or she has until the item gets back around to name six things from the vocabulary topic.
6. The game then starts again. Students keep passing the item until you say “Stop.” The new student who is holding the item now has to name six vocabulary words in the topic before the item gets back around to him or her. He or she cannot repeat any vocabulary words that have already been said.
Part Two: Making the Scratchboards
*NOTE: Students will need to make a scratchboard to use for their artwork. (A scratchboard is a piece of paper that a drawing or image can be scratched into to reveal colors underneath.)
1. Pass out a white sheet of paper and crayons to students. 2. Have students write their names with pencil on the back of the paper. 3. Tell students to fill the entire space of the paper with crayon shapes, patterns, and designs.
No space on the paper should be left blank. The darker the color is applied the better it will show up on the scratchboard. See the example for this step below.
Scratchboard design without paint
4. Once students have filled in the entire space of their paper with crayon designs, tell students to paint over the crayon with black tempera paint. Students should cover the entire surface of the paper with paint. *TIP: Add a small amount of liquid dish soap to the tempera paint so that it will stick to the crayon wax.
5. Have students put their papers somewhere safe to dry.
Part Three: “Drawing” on the Scratchboards
1. Remind students of the vocabulary topic used in the “Name Six” vocabulary game. Tell stu-dents to choose something from that category to draw on their scratchboard. For instance, if the topic was food, students could draw a pasta dish, an apple, a slice of pizza, or perhaps a bowl of noodles. Students should have a number of ideas to choose from after playing the vocabulary game. If needed, refresh students’ memories by asking them to name words said in the game.

140 | UNIT IV: MIXED MEDIA
2. To draw on the scratchboard, students will need a pointed ob-ject to scratch away the top layer of paint. Various materials can be used for this, including bent paperclips, toothpicks, chopsticks, sticks, or wood skewers.
*TIP: Wood skewers that are traditionally used for cooking work well for this activity. They are long so that students can hold them like a pencil when they draw.
3. When students press the tool on the surface of the scratchboard, the mark will scratch the black paint away, revealing the color from the crayon underneath.
4. Tell students to scratch out their drawing carefully because they cannot “erase”: once the paint is scratched away it cannot be replaced.
5. Give students time to finish their drawings on the assigned topic.
Part Four: Developing the Vocabulary with Chain Stories
1. Once students have finished their scratchboards, have students display their artwork to-gether on a wall or board in the classroom.
2. Have students look at the scratchboard artwork and say the vocabulary word the artwork demonstrates.
3. Compile a list of the vocabulary words on the board. 4. Emphasize to students that the collection of words all belong to a related group or category. 5. Discuss any confusing words or meanings with students. 6. If your class is small, and you have a short list of words, add additional words to the vocabu-
lary list on the board. 7. Break students into groups of three or four. 8. Tell students each group must create a chain story that uses every vocabulary word listed on
the board. 9. One member in the group should start the story, saying a sentence or part of a sentence that
contains a vocabulary word. The next person in the group then continues the story, finishing the sentence, adding to the sentence, or starting a new sentence with another vocabulary word. Each group member should contribute to the story until the story reaches an end and all of the vocabulary words from the board are used.
10. If there is enough time, have students do the activity again, creating a different chain story that utilizes the same vocabulary words.
11. Ask for groups to volunteer to re-tell their stories and share them with the class.
Part Five: Vocabulary Word Poems Closing Activity
1. Have students write a vocabulary word poem as a closing activity. Students can work alone, with a partner, or in a small group.
2. Students select one of the vocabulary words from the list to use for their word poem.3. Students should then write the word vertically, along the column of their papers. 4. Tell students to then write a word, phrase, or sentence for each letter of the word poem
(choose an appropriate option depending on students’ level). See the example on the next page.
5. Have students share their word poems with the class.

| 141
CREATE TO COMMUNICATEArt Activities for the English as a Foreign Language Classroom
Example Word Poem:
Noodles are my favorite food.
Oh, they’re so delicious!
On a cold day, hot noodles make me warm.
Don’t ask me to share my noodles, because I won’t!
Little noodles or big noodles, I like them all.
Every time my grandma makes noodles, I’m so happy!
Slurp, slurp, slurp… I ate every last bite!
Extension Activity:
Crossword Puzzles and Word Searches
Create crossword puzzles or word searches to reinforce the vocabulary words from this activity. Listed below are some online resources that make crossword puzzles or word searches. Edhelper.com: http://edhelper.com/crossword_free.htmPuzzlemaker.com: http://puzzlemaker.discoveryeducation.com/

142 | UNIT IV: MIXED MEDIA
LESSON 4
LIFE AND FAMILYMy Family Tree
Family tree activity using personal and possessive pronouns
Objective: Students will introduce a classmate’s family using personal and possessive pro-nouns and will create a family tree using mixed media.
Level: High Beginner
Materials: Paper, pencils, scissors, and glue. Optional materials depend on which option you choose for Part One, Step Four: photographs of family members, old magazines, tem-pera paint, paint brushes, containers for water, and crayons.
Teacher Preparation: Look at the various options for making a family tree in Part One, Step Four. Choose an option suitable for your class depending on the materials you have available. Prepare materials for the activity ahead of time if needed.
Art Options: Many different materials can be used for this activity. The activity instructions list various options that utilize a combination of drawing, painting, collage, or printmaking techniques. However, this activity may also be completed solely as a drawing, painting, printmaking, or painting activity, depending on the materials available.
INSTRUCTIONS
Part One: Family Tree Artwork
1. Discuss with students what a family tree is. A family tree is a chart that shows the relation-ship of family members in tree structure.
2. (Optional) Make a family tree to show students as an example, or show students the template provided in this activity.
3. If needed, introduce or review tree vocabulary words (see below). Add more words if desired and use the images on page 148 as visual aids.
tree branch forest
pine tree limb leaf/leaves
trunk bark root

| 143
CREATE TO COMMUNICATEArt Activities for the English as a Foreign Language Classroom
4. Students first need to create a tree. There are many art options for creating a tree. Some suggestions are listed below. Feel free to combine, alter, or modify the suggestions to best suit the materials available as well as the age and needs of your students.
a. Draw a tree from observation. If possible, take students to an area outside of the classroom where they can directly observe trees. If paints or crayons are available, students can paint or color their tree when they are back in the classroom.
b. Create a collage tree. Students can create a tree using collage by cutting out brown and green paper and gluing it together to create the trunk and leaves.
c. Use printmaking to create a tree. Have students draw the outline of a tree first. Then, have students paint or color the tree trunk and branches brown. If using paint, let the tree trunk paintings dry. Next, have students cut leaf shapes out of old sponges or carve leaf shapes into hard vegetables, like potatoes. Tell students to lightly dip the sponge or vegetable stamp into green paint and then press the stamp onto the trunk and branches of their tree. Have students repeat dipping their stamp into paint and pressing it onto their papers until they have created the leaves for their tree. *TIP: Use various colors of green paint for the leaf prints. Refer to the color mixing section in Appendix A if needed.
5. Have students put their artwork in a safe place for the paint or glue to dry.
Part Two: Family Tree Construction
1. Show students the structure of a family tree. Draw a family tree chart on the board for stu-dents to copy, or use the template below, available in the Reproducible Worksheets section at the end of this lesson. Add extra boxes for brothers, sisters, aunts, or uncles as needed.
2. Tell students to research the names for their family tree artwork. Students may need to ask their parents the names of their grandparents, great-grandparents, aunts, uncles, or other extended family members. Younger students may not be able to provide much information about their extended family and may only be able to make a family tree of their immediate family.

144 | UNIT IV: MIXED MEDIA
3. Once students have researched the names for their family tree, have students add names to their family tree artwork.
4. Students can add names to their family trees several ways. Four options are listed below. Choose an option most appropriate for your class or allow students to choose an option they prefer.
a. Students can draw name boxes and write their family members’ names directly on their artwork.
b. Students can write the names of family members on white paper boxes, cut the boxes out, and glue them in the correct place on the tree artwork.
c. Students can bring in photos from home, cut the family member out of the photograph, and glue the photo in the correct position on the family tree. Make sure students then write the name of the family member under the photo.
d. Students can create small drawings of their family members and glue them to the correct position on their family tree, writing the names of their family members below the drawings.
Part Three: Practice with Personal Pronouns, Memorization Game
1. Review or teach pronouns (a word that can substitute for or replace a noun) to students. If needed, use the chart below as a resource tool.
Personal Pronoun
Possessive Pronoun Example Sentences
Subject Object Subject Object
I me my mineI have two brothers.
My brothers are nine and ten years old.
you you your yoursYou have three sisters.
Your sisters are all older than you.
he him his hisHe has a very big family.
His family always has dinner together on Sunday.
she her her hersShe is the oldest child in her family.
She has to babysit her brothers and sisters sometimes.
it it its its My family tree painting is large. It has many branches to hold all the members of my family.
we us our oursWe both have two brothers.
Our brothers go to the same school.
they them their theirsThey both have two sisters.
Their sisters are in high school.

| 145
CREATE TO COMMUNICATEArt Activities for the English as a Foreign Language Classroom
2. Once students have a good understanding of personal pronouns, play a pronoun memoriza-tion game.
a. Have the class sit in a big circle, facing each other. b. One student starts by introducing himself or herself, and then saying something about
his or her family. For example: “My name is Amira. I have three brothers.” c. The next student in the group then introduces himself or herself and says something
about his or her family. The second student also has to repeat what was said by the previous student in the circle, changing the personal pronouns. For example: “My name is Tim. I am an only child. This is Amira. She has three brothers.”
d. The game keeps going around the circle, getting harder each time because more in-formation is added and has to be repeated with the correct personal pronoun.
Part Four: Family Introductions
1. After reviewing personal and possessive pronouns in the circle memorization game, have students find a partner. Tell students to choose somebody they do not usually work with.
2. Choose one family tree picture to use as an example. 3. Tape the student’s family tree picture on the board. Use the picture to model how to
talk about what is depicted in the family tree artwork. For example, you might say:
She has a very big family.She has three brothers and two sisters.Her grandmother’s name is Mary. Her grandfather has the same name as her father.
4. Have students look at their partner’s family tree picture. Tell students to ask questions about their partner’s family tree and practice introducing their partner and his or her family. Remind students to use personal or possessive pronouns.
5. Encourage students to ask questions about the family that is being introduced (spe-cifically questions that require the use of personal or possessive pronouns in the an-swer). For example, ask questions like:
What does your brother like to do? Possible answer: He likes to play soccer.
What is your favorite thing about your grandmother? Possible answer: She is a good cook.
6. Have students listen and keep a tally of the similarities among students’ families. After each student’s family has been introduced, students could then report their find-ings. For example: Ten people in our class have a brother. Two people in our class have great-grandparents.
Part Five: Exit Ticket Closing Activity
1. To review personal pronouns, have students line up at the end of class. Show them a pic-ture of a boy, girl, or animal, or point at yourself or them, and have them indicate which personal pronoun would be used. They can leave when they say the correct pronoun.

146 | UNIT IV: MIXED MEDIA
Extension Activities:
Find Someone Who…
Play the Find Someone Who game! Make worksheets with the chart below. To play the game students have to move around the classroom and practice English by turning the statements on the worksheet into questions and asking other students the questions. The first statement, Has an older brother, would be turned into the question Do you have an older brother? When a student finds someone who can answer yes to the question, he or she should write that student’s name next to the statement.
Find someone who… Name
Has an older brother
Is the youngest child in their family
Has three brothers or sisters
Has four living grandparents
Is named after their father or mother
Has more than five aunts or uncles
Is the only child
Has a great-grandparent
Family Timeline
For higher level students, have students interview their family members about major events in their immediate and extended family’s history. Students should record events as far back in the past as they can. Students can then write a timeline of their family history, using the past tense. If desired, students can also draw pictures or use collage to incorporate images into the timeline. Below is an example:
2001: Uncle Joe (mother’s younger brother) got married
2002: Grandparents (maternal) moved from New York to Hawaii

| 147
CREATE TO COMMUNICATEArt Activities for the English as a Foreign Language Classroom
If possible, have students compare events that took place in their families and find out what hap-pened in their families around the same time.
Interview a Relative
Have students interview a relative in their family to find out more about their life history. Students can compile a list of questions together in class, such as:
When were you born?Who were your friends in school?What were your hobbies when you were a child?What type of music did you like?
Have students take notes when they interview their relative and then report their findings about their relative to the class.
Additional Resources:
A website for building family trees is available through Family Tree Magazine. http://kids.familytreemagazine.com/kids/default.asp
USA.gov has many resources for genealogy. http://www.usa.gov/Citizen/Topics/History-Family.shtml
Family tree templates can be found here.http://www.familytreetemplates.net/

148 | UNIT IV: MIXED MEDIA
TREES

| 149
CREATE TO COMMUNICATEArt Activities for the English as a Foreign Language Classroom
MY FAMILY TREE
Directions: Complete the family tree below.

150 | UNIT IV: MIXED MEDIA
LESSON 5
STORIES AND SEQUENCESAccordion Stories
Giving and following instructions using linking adverbials
Objective: Students will be able to use linking adverbials to follow and give directions about a process.
Level: Intermediate
Materials: Recycled thin cardboard (food or tissue boxes), cardstock, paper (long pieces if possible), pencils, glue, and scissors. Optional: colored paper or decorative paper, crayons, markers, colored pencils, tempera paint, and paintbrushes.
Teacher Preparation: 1. Prepare materials for an accordion book. Cut white paper into long, narrow pieces. Each piece of paper should be the same size and length. A length of about 30 inches (70 centimeters) and a width of roughly 10 inches (25 centimeters) works well, but these dimensions can be quite different depending on the desired size of books. Cut enough so that each pair of students will have one piece. *TIP: It may be difficult for younger learners to make an accordion-folded paper. To save time, prepare the folded papers before the activity for young learners. 2. If possible, make an accordion booklet ahead of time to show students as an example. 3. Prepare sets of pictures and linking adverbials (seven pictures and six link-ing adverbial words) for the activity in Part Three. Pictures and words should all be cut apart. Each group of three students should have one set.
Art Options: There are many different types of books that can be made and used in the lan-guage classroom: recycled paper journals, flip books, pop-up books, scrolls, and so on. Use the Internet resources listed at the end of this section for ideas and instructions about how to make other types of books with students.
INSTRUCTIONS
Part One: Making a Paper Airplane
1. Explain the importance of giving and following clear instructions when making something. Emphasize that certain words can be used to make the process clearer.
2. Write the following linking adverbials on the board.
First Second Third Last
To begin with Then Next Finally
At the beginning After that Now Later

| 151
CREATE TO COMMUNICATEArt Activities for the English as a Foreign Language Classroom
3. Assign students to pairs. Tell them they must stay with their partner throughout the activity. 4. Label three corners or areas of the room beginning, middle, and end with a sign or by writing
on the board. *NOTE: This should be done before the class begins if possible.5. Have students stand with their partner in the middle of the room. (Move classroom furniture
or items as necessary.) Tell students that when you say one of the words on the board, they should decide with their partner if it is for the beginning, middle, or end of a process or story and then go together to the area of the room labeled for that part.
6. After pairs have gone to one of the three locations, reveal the correct answer. 7. Keep playing the game until students understand where each linking adverbial belongs — in
the beginning, middle, or end. 8. Assign one student in the pair to be “A” and one to be “B” and give each pair a piece of paper.
Pairs should work together to make the airplane. Person A should follow Steps 1–4 while Person B provides advice. Person B should follow steps 6–8 while Person A gives advice.
9. Slowly read the directions below for making airplanes to the students. Emphasize linking adverbials such as first, second, next, last, and finally. Point at the word on the board and demonstrate each step in the process as you read. Allow time between steps for partners to provide advice.
Directions for making airplanes
1) Okay, Person A, start by picking up the paper. 2) First, fold the paper in half, lengthwise and re-open
the paper so that you have a crease in the middle of the paper.
3) Second, fold the top left corner of the paper towards the center crease until the top edge of the paper is even with the center crease. Do the same with the top right corner of the paper.
4) Now, starting at the tip of the point, fold both new top sides down to touch the center crease.
5) Okay, please give the paper to Person B.6) Next, turn the paper over and fold it in half along the center crease. 7) Now, fold each side of the paper airplane one more time, folding the outside edges of the
airplane halfway over to the center edge and creasing the paper. 8) Finally, hold the paper airplane by the paper in the middle and open the wings.
10. Have pairs compare their results with another pair. Do all of the paper airplanes look the same? If not, how are they different? Encourage students to ask questions about the process if their airplanes do not look right. One good question is “Could you repeat the last step?”
Part Two: Making Accordion Books
1. Tell students they are going to choose an interesting process and work with their partner to learn about and write out the process so someone else could follow it. Explain that they will have a chance to research the topic, so they don’t need to know how to do it before they begin.

152 | UNIT IV: MIXED MEDIA
2. Use linking adverbials and simple English to explain the steps in the process, as in the fol-lowing example:
a. First, you will brainstorm three topics.b. Next, you will ask two other pairs which topic they like
best.c. Then, you will choose one topic.d. After that, you will use the Internet to learn about
this process. Your process should be short, about six steps.
e. Then, you will make an accordion book to write this process on. (Hold up an example if you have one.)
f. Finally, you will read or listen to the processes made by other students.
3. Write a few examples of topics on the board such as the ones in the box. Encourage students to choose processes that most students in the class won’t know. It will be more interesting if students learn something new.
How to draw a cartoon character How to draw a cartoon character
How to do a card trick How to make a braid
4. Have pairs work together to brainstorm three possible topics that they would like to learn and write the process for.
5. Have pairs research the steps of their process. Direct them to use a resource available in your class (e.g., Internet or books). This step could be done at the library or as homework if necessary.
6. Have pairs write out their process, and emphasize that they should have about six steps, and no more than eight.
7. Pass out a long piece of paper to each pair. (See directions in the Teacher Preparation section at the beginning of the activity for preparing the paper.)
8. Instruct the pairs to fold the paper into an accordion using the directions below. When fin-ished, the paper should look like this:
Encourage pairs to get help from each other and other pairs if they don’t understand the in-structions. Provide plenty of time between steps in the process to allow students to help each other.
a. To begin, hold the paper so the long edges are on the sides.

| 153
CREATE TO COMMUNICATEArt Activities for the English as a Foreign Language Classroom
b. Now, fold the paper in half by folding the bottom edge up to the top edge. Demon-strate how to fold the long narrow strip of paper in half.
c. Next, take the top edge of the top half of the paper and fold the edge down to the bottom of the paper.
d. Turn the paper over.e. Fold the top layer in half like you did to the other side of the paper.f. Now, open the paper. This will give an accordion fold with four equal-sized rectangles.
Ask a few pairs of students who have done the folding correctly to hold up their papers for the other pairs to see.
g. With the paper still open, fold the top fourth in half by folding the top edge of the paper down toward you to the nearest fold.
h. Turn the paper over. Be sure to keep the long edges on the sides and the top up.
i. Next, fold the top section down toward you along the first fold.j. Now, turn the paper over again.k. Fold the top section down towards you again.l. Continue turning the paper over and folding the top down toward you until all the
fourths have been folded in half. Some of the folds created in earlier steps may be reversed during the process.
m. You should have a paper folded to give eight equal-sized rectangles. Ask a success-ful pair to hold up their paper. Encourage successful pairs to help pairs that are still not sure what to do. If necessary repeat the verbal instructions.
9. Have pairs write the instructions for their process along with an illustration for each step on the pages of their accordion books. Provide pencils, colored markers, crayons, or another tool for drawing pictures.
10. To finish the book, have students add a title and picture of the final product of the process on the back of the first page and their names on the back of the last page.
11. Have pairs change partners with another pair and have them read their instructions to the new partner. The listeners try to guess what the process is. Have pairs switch partners and repeat.

154 | UNIT IV: MIXED MEDIA
12. (Optional) Choose one or two processes that would be easy for the class to complete. A pro-cess that requires few materials, such as drawing a cartoon character, is usually best. Pro-vide the class with the necessary materials for the process, and have the student pairs work together to try to follow the instructions for the process as the pair of students who created the process read the instructions out loud.
Part Three: Practicing with Linking Adverbials
1. Place students in groups of three and give each group a set of pictures and linking adverbials, found below.
Next Then After that
To begin Finally Later
2. Have the groups work together to create a story from the pictures. They should use six of the seven pictures to make the story. When they have agreed on a story, they should put them in order and put an appropriate linking adverbial below the picture.
3. The three students should take turns telling parts of the story. Each person should talk about two pictures.
4. Combine two groups of three students and have them share their stories with each other.5. Repeat the previous step by having groups of three tell their story to another group.6. (Optional) Ask for groups who want to volunteer to share their stories with the class.7. (Optional) Have the groups write their stories and put them on the classroom wall.
Part Four: Exit Ticket Closing Activity
1. To review sequence words have students line up at the end of class. 2. Tell students you will say “beginning,” “middle,” or “end” and they have to give you a se-
quence word that fits that category. Students cannot leave until they give you a correct word that fits the specified category.
Extension Activities:
Illustrate a Story
Instead of writing instruction steps, have students use the accordion-style book to write and illus-trate a sequence of events from a story.
How-To Presentation
For higher level and older students, have students form groups to discuss and select a project in which they will produce a how-to book on a more complex process. Tell them that the process should be of interest or value to them, such as how paper or plastic is recycled, how to start a business, or how to apply to college or a scholarship abroad. The following steps can be used in the process.
1. Place students in groups of three.2. Have groups brainstorm topics of interest. 3. Have groups present their ideas to six classmates for advice. They should prepare a short
survey which includes questions that will help them decide if they want to select the topic and

| 155
CREATE TO COMMUNICATEArt Activities for the English as a Foreign Language Classroom
then write down responses from the six people that they survey. Some possible questions are:a. Which of our three topics do you like best? Why?b. Which of our processes do you already know how to do?c. Do you have any suggestions for how we could make our topic interesting?
4. Have the groups tabulate the responses and decide which topic they want to learn about.5. Have the groups use available resources (e.g., books, Internet, movies, YouTube, magazines)
to learn more about their topic. If necessary, provide some basic advice about how to search using one of these resources. For example, if the Internet is the resource of choice, demon-strate how to use a search engine for learning about a topic.
6. They should write out the steps and provide an illustration on each page of their accordion books.
7. Have the students put together a three-minute presentation of their how-to process. Each person should speak for about one minute. They should assign two or three pages for each member of the group to talk about.
8. They should practice their sections in their group.9. Groups of three should be paired with another group of three and practice their presenta-
tions. They should provide each other with advice.10. The groups should revise their presentations based on the feedback they received from the
other groups.11. Have groups present their processes to the class. If the materials are available, the audience
can try to follow the process.12. (Optional) Have the groups place their accordion book processes on the wall.
Add Accordion Book Covers
Have students make front and back book covers for their how-to accordion books with recycled cardboard or cardstock. Cut the cardboard or cardstock to fit the size of the first and last folds of the paper book. Have students decorate the back and front book covers before gluing them to the accordion book. Students can decorate them by painting them, drawing on them with markers, or using collage materials and images. The covers can then be glued to the front of the first fold and back of the last fold.
Additional Resources:
Artist Susan Kapuscinski Gaylord’s website Making Books with Children demonstrates how to make accordion books as well as many other types of books. Click on the icon of an accordion book on the homepage. It is also possible to click on the Free Activities section of the website to see examples and instructions for a variety of different types of books that can be made with students. Many ac-tivities also include a link to a video tutorial that shows how to make the book, as well as links to printable instructions. http://www.makingbooks.com/freeprojects.shtml
The National Museum of Women in the Arts online interactive website about art, books, and creativ-ity provides access to additional online resources. Visitors can also see examples of various types of books, as well as watch videos on how to create different types of artist books. http://www.artbookscreativity.org/

156 | UNIT IV: MIXED MEDIA
ACTION CARDS

| 157
CREATE TO COMMUNICATEArt Activities for the English as a Foreign Language Classroom
ACTION CARDS

158 | UNIT IV: MIXED MEDIA
ACTION CARDS

| 159
CREATE TO COMMUNICATEArt Activities for the English as a Foreign Language Classroom
Acrostic (Word Poem)
A type of poem usually made by spelling a word or name vertically and then using each letter of the word or name to write a phrase or adjective.
Example Acrostic Poem:Curious sights, sounds, and smells.Interesting and fascinating buildings and places.Tons of new things to see.Yes! Let’s take a trip to the city!
Background
The part of a picture that seems the farthest away from the person viewing the picture, or the ground or scenery located behind something.
Below, the island is in the background, or back of the picture, and the boats are in the foreground, or front of the picture.
Cardstock
A type of thick, heavy paper. Cardstock is heavier and thicker than normal (computer) paper, and construction paper, but lighter than cardboard.
Cellophane
A type of transparent paper made from plastic. It can be clear or colored and is water- and oil-resistant. Cellophane is usually used to wrap candy, food, and gifts. The wrapper on this gift is cellophane.

160 | GLOSSARY
Clear Tape
A type of adhesive used to bond paper together. It is not strong enough to bond heavier items together such as cardboard or fabric. Clear tape is usually transparent.
Colored Paper
Any kind of paper that is a color other than white. Colored paper can be used in creating a collage, for a background of a picture, or for the picture itself.
Comic Strip
Groups of pictures that tell a story. Comic strips can also have words to help tell the story. The story is usually funny, or “comic”.
Composition
The plan, organization, or arrangement of the elements in a work of art. When artists think about the composition of their artwork, they think about the arrangement of the subjects in the artwork, the size of the subjects, the colors used, and so on.
Computer Paper
A type of lightweight paper most commonly used for everyday printing or for drawing with pencils, crayons, colored pencils or markers.
Construction Paper
A type of paper thicker than computer paper, but not as stiff or thick as cardstock. Construction paper generally comes in a wide variety of colors and can be used in arts and crafts in many different ways.
| 161
CREATE TO COMMUNICATEArt Activities for the English as a Foreign Language Classroom
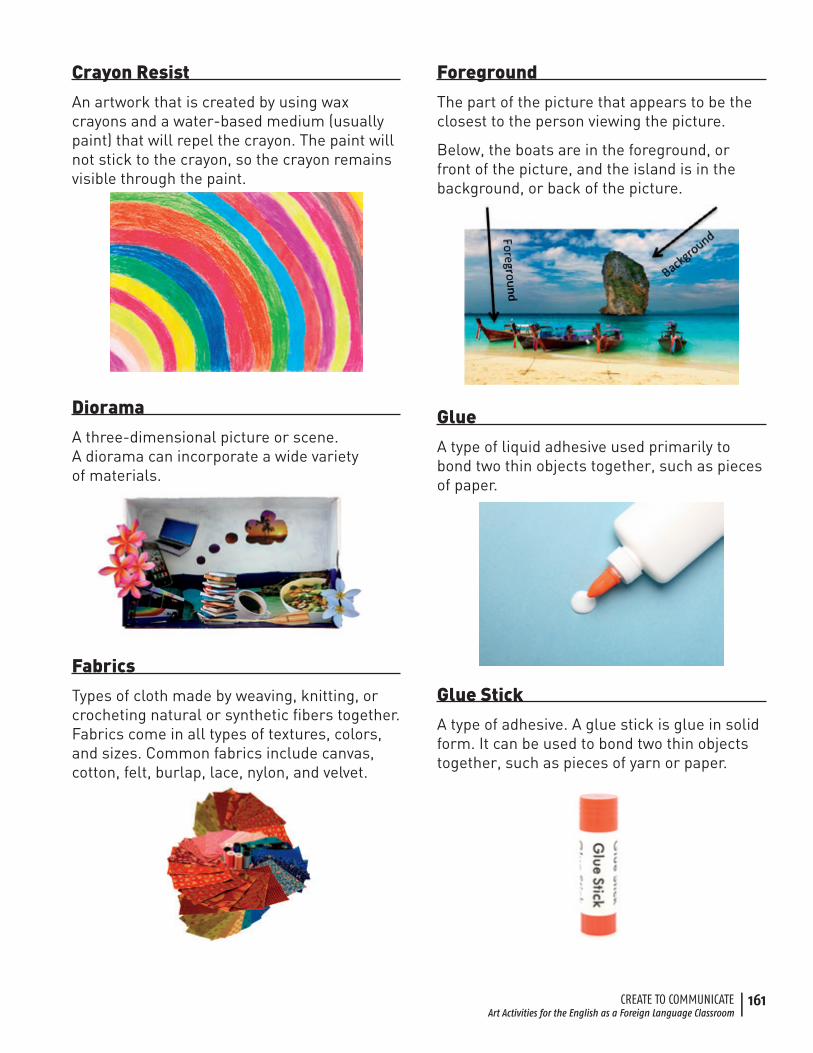
Crayon Resist
An artwork that is created by using wax crayons and a water-based medium (usually paint) that will repel the crayon. The paint will not stick to the crayon, so the crayon remains visible through the paint.
Diorama
A three-dimensional picture or scene. A diorama can incorporate a wide variety of materials.
Fabrics
Types of cloth made by weaving, knitting, or crocheting natural or synthetic fibers together. Fabrics come in all types of textures, colors, and sizes. Common fabrics include canvas, cotton, felt, burlap, lace, nylon, and velvet.
Foreground
The part of the picture that appears to be the closest to the person viewing the picture.
Below, the boats are in the foreground, or front of the picture, and the island is in the background, or back of the picture.
Glue
A type of liquid adhesive used primarily to bond two thin objects together, such as pieces of paper.
Glue Stick
A type of adhesive. A glue stick is glue in solid form. It can be used to bond two thin objects together, such as pieces of yarn or paper.

162 | GLOSSARY
Hot Glue
A type of adhesive used to bond different ma-terials together, such as fabric, cardboard, or plastic. Hot glue is turned into an adhesive by melting the glue with a hot glue gun. Hot glue should be used with caution as the melted glue can burn skin when it comes into contact with it.
Hot Glue Gun
A machine that melts a solid adhesive (hot glue sticks).
Markers
A type of drawing tool made out of colored ink. Some markers have permanent ink, which can stain hands or clothes, while other types are made with washable ink so that students do not stain their hands or clothes.
Masking Tape
A type of adhesive that is usually thin and easy to tear. It is stronger than clear tape. Masking tape can be used with paper, cardboard, or plastic.
Matte
A type of texture that is dull, not shiny or glossy.
Mind Map
A visual graphic that is used to brainstorm and organize ideas around a certain theme or subject. Pictures and words are generally written or drawn around the central idea or theme and then linked to other ideas.

| 163
CREATE TO COMMUNICATEArt Activities for the English as a Foreign Language Classroom
Mobile
A sculpture made by assembling objects together and balancing or arranging them in a manner in which they can move freely.
Non-Toxic
Indicates that the ingredients used in making a certain art supply are not poisonous to humans.
Overlap
When one part of one object lies on top of another object, partly covering up part of the object.
For example, the papers in this collage are overlapping one another.
Paint Roller
A tool used to apply paint or ink evenly and consistently on a surface.
Paper Fasteners
Metal objects that are used to fasten two or more pieces of paper through holes punched in the paper.
Perspective
The technique of representing items in the foreground as larger than items in the background in order to create the illusion of depth, or receding space, on a two- dimensional surface.

164 | GLOSSARY
Pipe Cleaners
Flexible, fabric-coated wires that can be twisted and bent to create a variety of different shapes. Pipe cleaners can also be joined together by twisting the wires together.
Portrait
Any piece of art that captures the image of a person or people (usually the face). Portraits can be created with drawing, painting, photography, and even sculpture.
Poster Board
A type of paper that is generally larger and thicker than normal paper. It is similar to cardstock, but larger in size. It can be used to make large posters, projects, or signs.
Primary Colors
The three basic colors that cannot be mixed or formed by any combination of other colors. The primary colors are red, blue, and yellow. From mixing these three primary colors all other colors can be created. Refer to Appendix A for an explanation of primary, secondary, and tertiary colors and color mixing.
Recycled Materials
Any material that has previously been used and can be used again for an additional purpose. For art activities, recycled materials such as cardboard, magazine paper, glass jars, or metal baking sheets can be used.
Secondary Colors
The colors made from mixing two primary colors together. The secondary colors are green, purple, and orange. Refer to Appendix A for an explanation of primary, secondary, and tertiary colors and color mixing.

| 165
CREATE TO COMMUNICATEArt Activities for the English as a Foreign Language Classroom
Shade
A color made by adding and mixing black to any color. See Appendix A for a more detailed explanation.
Silhouette
The outline of a person, animal, or object that is filled with a solid color such as black.
Sketch
A quick drawing usually done to prepare or plan a more detailed artwork.
Tempera Paint
A water-based paint that dries quickly with a matte finish. Tempera paints can usually be purchased in powdered or liquid form and are appropriate for students of all ages. Make sure the label on the paint specifies it is non-toxic and safe for student use.
Tertiary Colors
Colors that are created by mixing one primary color with one secondary color. For example, yellow mixed with orange creates yellow-orange. Refer to Appendix A for an explanation of primary, secondary, and tertiary colors and color mixing.
Texture
How something feels to the touch. Rough, smooth, and bumpy are words that describe different textures.
Timeline
A line that is drawn to represent events in sequential order. Generally a timeline represents historical accounts. The events are indicated by dots or slashes on the line.

166 | GLOSSARY
Tint
A color made by adding and mixing white with any color. See Appendix A for a detailed explanation.
Tissue Paper
A type of very thin paper that you can see through.
Watercolor Paint
A type of water-based paint, produced by mixing water with pigments. Watercolor paints are appropriate for students of all ages. They usually come in a tray, with squares of dry color pigments. Water can then be added to the dry pigment to paint.

| 167
CREATE TO COMMUNICATEArt Activities for the English as a Foreign Language Classroom
Adding Color
If color materials are available, students can add color to their drawing with a variety of materials. Crayons, markers, colored pencils, or paint can be used to add color, detail, and richness to the drawings students create. Color can not only enhance the artwork students create, but also provide students with increased opportunities for descriptive adjective and vocabulary use related to color.
Tips for Adding Color/Painting:
• Make sure the materials are safe and appropriate for student use.
If using markers or paint, make sure the markers or paint are non-toxic and safe for student use.
• Paints for students:
o Tempera Paint — Tempera paint is appropriate for students of all ages. It is a water-based paint that dries quickly with a matte finish. Tempera paint can usually be pur-chased in powdered or liquid form.
o Watercolor Paint — Watercolor paint is also appropriate for students of all ages. Wa-tercolor is a water-based paint, produced by mixing water with pigments. Watercolor paints usually come in a tray, with squares of various color pigments.
• Save time by “drawing” in color first.
If you are using crayons, colored pencils, makers, or paint, you can save time by having your students draw or paint with such materials first, rather than drawing in pencil and then add-ing color.
• Colors can mix when combined, layered, or touched.
When colors are combined, touched, or layered they will mix. For example, when crayons or colored pencils are layered on top of one another, the two colors will show a new color. When two colors of paint are mixed together, the two colors will create a new color. It is beneficial to know about color mixing because you may have limited colors available, but by showing students how to mix or layer colors or paints, students can create other colors to use in their artwork. Basic information on mixing and creating colors is listed below.

168 | APPENDIX
Primary Colors: RED, BLUE, YELLOW
Primary colors are the three basic colors that cannot be mixed or formed by any com-bination of other colors. From these three primary colors you can mix and create all other colors.
Secondary Colors: ORANGE, PURPLE (Violet), GREEN
Secondary colors are created by mixing the primary colors.
• RED mixed with YELLOW creates ORANGE• RED mixed with BLUE creates PURPLE• BLUE mixed with YELLOW creates GREEN
Tertiary Colors: YELLOW-ORANGE, YELLOW-GREEN, RED-ORANGE, RED-PURPLE, BLUE-GREEN, BLUE-PURPLE
Tertiary colors are created by mixing a primary with a secondary color. The tertiary colors have two-word names which indicate the primary and secondary colors used to create them.
• YELLOW mixed with ORANGE creates YELLOW-ORANGE• YELLOW mixed with GREEN creates YELLOW-GREEN• RED mixed with ORANGE creates RED-ORANGE• RED mixed with PURPLE creates RED-PURPLE• BLUE mixed with GREEN creates BLUE-GREEN• BLUE mixed with PURPLE creates BLUE-PURPLE
Tints and Shades
A tint can be made by adding and mixing white with any color. A shade can be made by adding black to any color.
Color Wheel
The color wheel shows the primary, secondary, and tertiary colors in relation to one another.

| 169
CREATE TO COMMUNICATEArt Activities for the English as a Foreign Language Classroom
Printmaking
Printmaking is the process of creating a picture, shape, mark, or design by applying color (print-ing ink or paint) to a printing tool and then pressing the tool onto a flat surface. The picture, shape, mark, or design is transferred from the tool to the surface. Most prints can be produced repeatedly by reapplying color to the printing tool.
o Printing “tools” can vary. This activity book utilizes printing tools such as hard veg-etables, like potatoes, or old sponges.

170 | APPENDIX
Sculpting Dough
Sculpting dough can be purchased at arts and crafts stores or made with the recipes below.
Sculpting Dough Recipe #1
Ingredients: • 1 cup flour• 1/2 cup salt• 1/2 cup water• (optional) Food coloring to give the dough color
Directions: 1. Mix ingredients well until they form a ball. 2. Knead the dough and add food coloring if desired. 3. If the dough is too sticky, add a bit of flour. If too dry, add a few drops of water.
Sculpting Dough Recipe #2
Ingredients: • 1 cup cold water • 1 cup salt • 2 teaspoons vegetable oil • Tempera paint or food coloring • 3 cups flour • 2 tablespoons cornstarch
Directions:1. In a bowl, mix water, salt, oil, and enough tempera paint or food coloring to make a bright
color. 2. Gradually add flour and cornstarch until the mixture reaches the consistency of bread dough. 3. Cover the dough to store it.