create handmade beaded jewelry from your own bead jewelry
TRANSCRIPT

Guide to Making Jewelry with Beads: Create Handmade Beaded Jewelry
from Your Own Bead Jewelry Designs
Contents
Guide to Making Jewelry with Beads:Create Handmade Beaded Jewelry from Your Own Bead Jewelry Designs
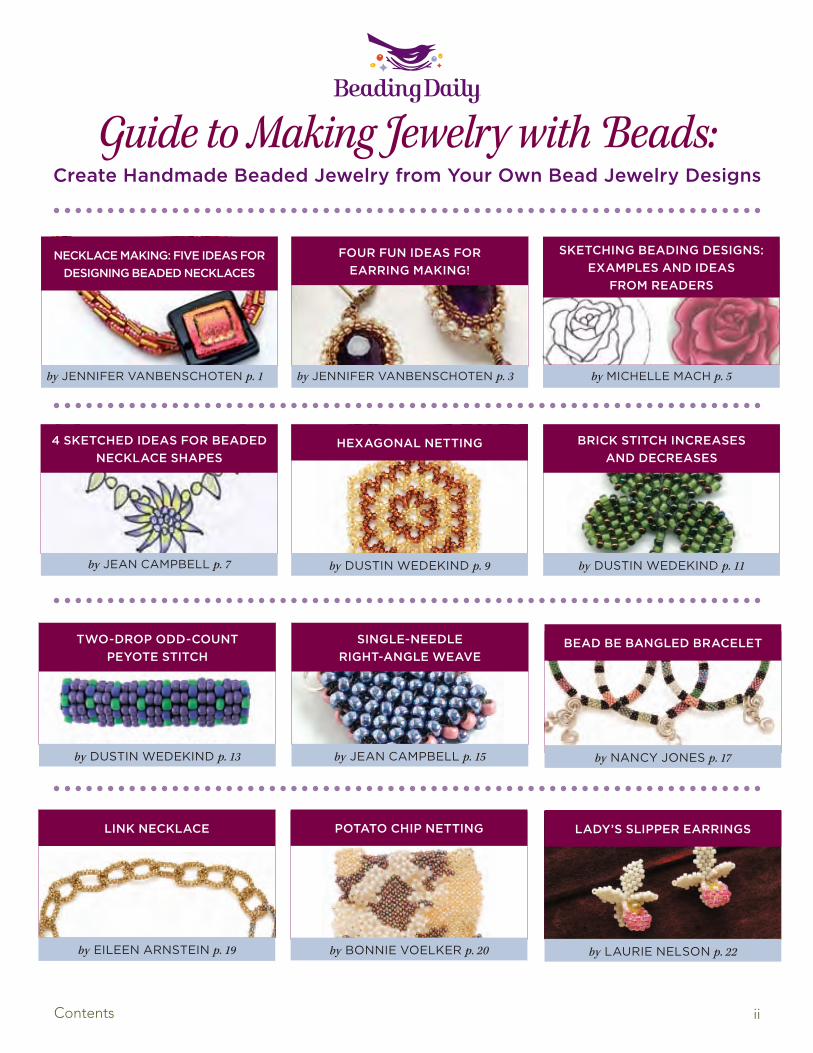
NECKLACE MAKING: FIVE IDEAS FOR DESIGNING BEADED NECKLACES
FOUR FUN IDEAS FOR EARRING MAKING!
SKETCHING BEADING DESIGNS: EXAMPLES AND IDEAS
FROM READERS
4 SKETCHED IDEAS FOR BEADED NECKLACE SHAPES
HEXAGONAL NETTING BRICK STITCH INCREASES AND DECREASES
TWO-DROP ODD-COUNT PEYOTE STITCH
SINGLE-NEEDLE RIGHT-ANGLE WEAVE
LINK NECKLACE LADY’S SLIPPER EARRINGS
BEAD BE BANGLED BRACELET
POTATO CHIP NETTING
by JENNIFER VANBENSCHOTEN p. 1 by JENNIFER VANBENSCHOTEN p. 3 by MICHELLE MACH p. 5
by JEAN CAMPBELL p. 7 by DUSTIN WEDEKIND p. 9 by DUSTIN WEDEKIND p. 11
by DUSTIN WEDEKIND p. 13 by JEAN CAMPBELL p. 15
by EILEEN ARNSTEIN p. 19 by LAURIE NELSON p. 22
by NANCY JONES p. 17
by BONNIE VOELKER p. 20
ii

Guide to Making Jewelry with Beads:editor, beadingdaily JENNIFER VANBENSCHOTEN
photography JOE COCA, ANN SWANSONProjects and information are for inspiration and personal use only. BeadingDaily, Beadwork, and Stringing do not recommend, approve, or endorse any of the advertisers, products, services, or views advertised in this publication. Nor do BeadingDaily, Beadwork, or Stringing evaluate the advertisers’ claims in any way. You should, therefore, use your own judgment in evaluating the advertisers, products, services, and views advertised in BeadingDaily, Beadwork, and Stringing.
iii
Jennifer VanBenschoten, Beading Daily editor
“Where did you come up with the idea for that?”I hear that all the time when I’m showing someone a piece
of my handmade beaded jewelry. And really, if you know where to look, you’ll find beaded jewelry design ideas all around you. Coming up with beaded jewelry design ideas can be as easy as playing around with your favorite beadweaving stitch!
If you love making handcrafted beaded jewelry, you’ll love our new free eBook, our Guide to Making Jewelry with Beads: Create Handmade Beaded Jewelry from Your Own Bead Jew-elry Designs. We’ve selected some of our best jewelry design blogs, beading stitch tutorials and then added a sample of free bead jewelry patterns to show you how each beading stitch can be altered and modified to create a unique piece of hand-crafted beaded jewelry.
favorite blogs about beaded jewelry design ideas, including five ideas for making beaded necklaces, four fun ideas for making beaded earrings, sketching ideas for beaded necklace shapes, and examples straight from the sketchbooks of our readers about how to sketch out your beaded jewelry designs!
increases and decreases to learn more about how to shape
Bead Be Bangled bracelets to see how brick stitch is used to create these easy-to-wear beaded bracelets.
with Dustin Wedekind’s directions. This popular variation on peyote stitch can be used to create shape and texture in your
Lady’s Slipper Earrings to see how shaped peyote stitch can be used to make beaded flower petals.
beaded jewelry designs, and Dustin Wedekind’s hexagonal netting tutorial illustrates how this beading stitch can be modified to create
one step further and uses free-form netting to create one-of-a-kind beaded jewelry.
stitch around. But never fear – in Stitch Pro by Jean Campbell, she takes the guesswork out of single needle right-angle weave. Once
composed to right-angle weave chains that are linked together as you stitch them!
So the next time you feel like making beaded jewelry, sit down with these handy references and see what comes out of your own imagination! Who knows? You might find that you have more beaded jewelry design ideas in you than you ever thought possible!
Bead Happy,Jennifer
Guide to Making Jewelry with Beads:Create Handmade Beaded Jewelry
from Your Own Bead Jewelry Designs
More wonderful beadwork projects are available at shop.beadingdaily.com/jewelryprojects© 2012 INTERWEAVE PRESS LLC. NOT TO BE REPRINTED. ALL RIGHTS RESERVED.
page 1
Necklace Making: Five Ideas for Designing Beaded Necklaces
J E N N I F E R V A N B E N S C H O T E N
has always come easy for me. Even now, I find that my sketchbooks are full of more necklace designs than anything else, and I'm always finding inspiration for new designs every-where.
My process for designing and mak-ing a beaded necklace depends on where I get my idea for the finished piece. Usually, a cabochon or other focal bead is the starting point for making my necklace, as I design around that. I'll draw my colors from the colors in the focal piece and then figure out what beading stitch or bead-ing technique will be used for the rest of the piece.
But sometimes I sit down with the beads and I have no idea where to start. When my necklace making ideas dry up, there are a few things that I'll do to give my beady brain a little bit of a jump-start. Here are five ideas for necklace making when you need a lit-tle inspiration for a new beading project!
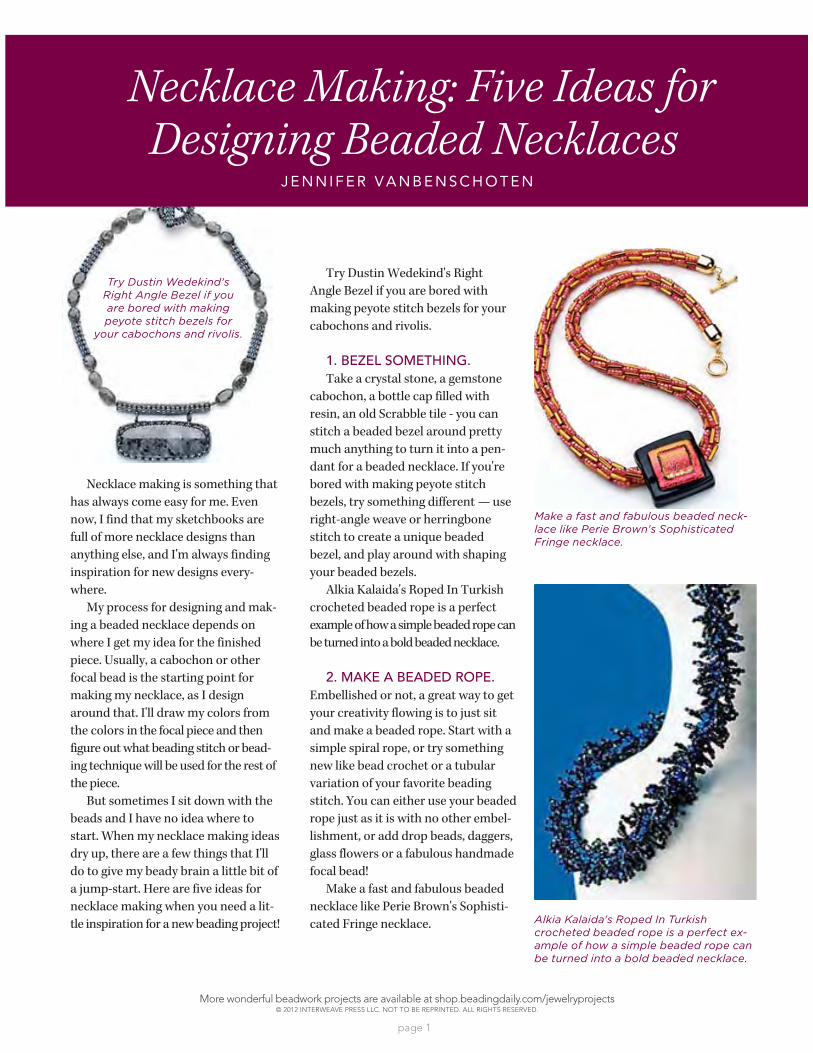
Angle Bezel if you are bored with making peyote stitch bezels for your cabochons and rivolis.
1. BEZEL SOMETHING.
cabochon, a bottle cap filled with resin, an old Scrabble tile - you can stitch a beaded bezel around pretty much anything to turn it into a pen-dant for a beaded necklace. If you're bored with making peyote stitch bezels, try something different –– use right-angle weave or herringbone stitch to create a unique beaded bezel, and play around with shaping your beaded bezels.
crocheted beaded rope is a perfect example of how a simple beaded rope can be turned into a bold beaded necklace.
2. MAKE A BEADED ROPE. Embellished or not, a great way to get your creativity flowing is to just sit and make a beaded rope. Start with a simple spiral rope, or try something new like bead crochet or a tubular variation of your favorite beading stitch. You can either use your beaded rope just as it is with no other embel-lishment, or add drop beads, daggers, glass flowers or a fabulous handmade focal bead!
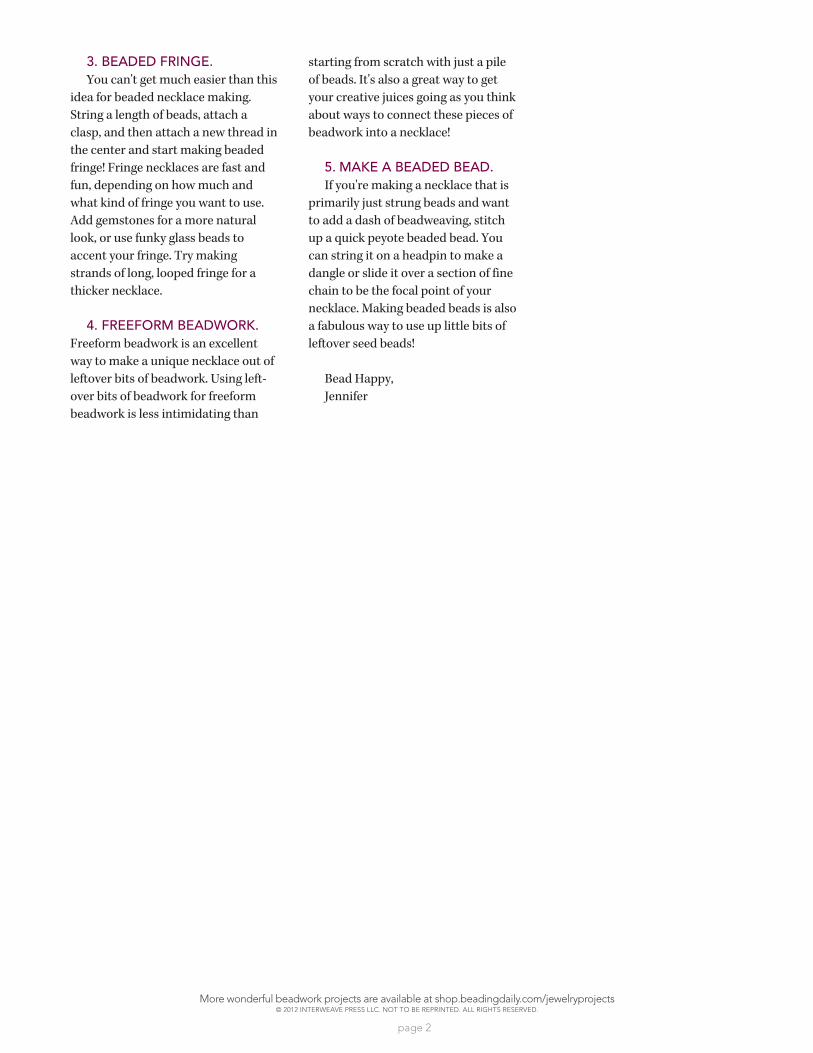
Make a fast and fabulous beaded necklace like Perie Brown's Sophisti-cated Fringe necklace. Alkia Kalaida's Roped In Turkish
crocheted beaded rope is a perfect ex-ample of how a simple beaded rope can be turned into a bold beaded necklace.
Try Dustin Wedekind's Right Angle Bezel if you are bored with making peyote stitch bezels for
your cabochons and rivolis.
Make a fast and fabulous beaded neck-lace like Perie Brown's Sophisticated Fringe necklace.
More wonderful beadwork projects are available at shop.beadingdaily.com/jewelryprojects© 2012 INTERWEAVE PRESS LLC. NOT TO BE REPRINTED. ALL RIGHTS RESERVED.
page 2
3. BEADED FRINGE. You can't get much easier than this
idea for beaded necklace making. String a length of beads, attach a clasp, and then attach a new thread in the center and start making beaded fringe! Fringe necklaces are fast and fun, depending on how much and what kind of fringe you want to use. Add gemstones for a more natural look, or use funky glass beads to
strands of long, looped fringe for a thicker necklace.
4. FREEFORM BEADWORK. Freeform beadwork is an excellent way to make a unique necklace out of leftover bits of beadwork. Using left-over bits of beadwork for freeform beadwork is less intimidating than
starting from scratch with just a pile of beads. It's also a great way to get your creative juices going as you think about ways to connect these pieces of beadwork into a necklace!
5. MAKE A BEADED BEAD. If you're making a necklace that is
primarily just strung beads and want to add a dash of beadweaving, stitch up a quick peyote beaded bead. You can string it on a headpin to make a dangle or slide it over a section of fine chain to be the focal point of your necklace. Making beaded beads is also a fabulous way to use up little bits of leftover seed beads!
Bead Happy,Jennifer
More wonderful beadwork projects are available at shop.beadingdaily.com/jewelryprojects© 2012 INTERWEAVE PRESS LLC. NOT TO BE REPRINTED. ALL RIGHTS RESERVED.
page 3
When I first started learning how to bead and was learning basic jew-elry-making, I loved earring making. I didn't realize it at the time, but mak-ing earrings a great way to learn new beadweaving stitches and jewelry-making techniques. Handmade ear-ring projects are (usually) small and not terribly overwhelming, so they make perfect beading projects when you don't have a lot of time or just need to use up a few leftover beads.
Earring making is also a great way to get a little beading time in during the busy holiday season. Beaded ear-rings make great gifts, especially if you need a last-minute gift for a friend or co-worker. Or maybe you just need a lit-tle something to jazz up your favorite winter sweater - a new pair of earrings can really breathe new life into a favor-ite blouse!
Four Fun Ideas for Earring Making!J E N N I F E R V A N B E N S C H O T E N
Even if you don't have a beading pattern handy, there are lots of ways that you can just pick up your beads and start making earrings. Sometimes working without a pattern can be very intimidating, but try one of these four ideas for earring making and find out just how much fun it can be to design your own beaded earrings!
1. MAKE A BRICK STITCH DIAMOND.
earrings can't get much easier than this. Stitch up a simple brick stitch diamond using your favorite beads - cylinder beads, cube beads, or throw in a big fire polished bead into the center of the diamond. Make some funky fringe with a few leftover bugle beads or maybe some long loops of seed beads, and you have the classic (but updated!) beaded earring. Or just leave the diamond without any fringe and hang it from your favorite earring finding.
Your basic peyote-stitched beaded bead can get a little dressed up to
Earrings.
2. BEADED BEADS. I just have a thing for those easy lit-
tle peyote-stitched beaded beads. It takes literally minutes to stitch up a little piece of peyote and then zip it up. Add some more fringe or a fancy edging and hang it from a tiny seed
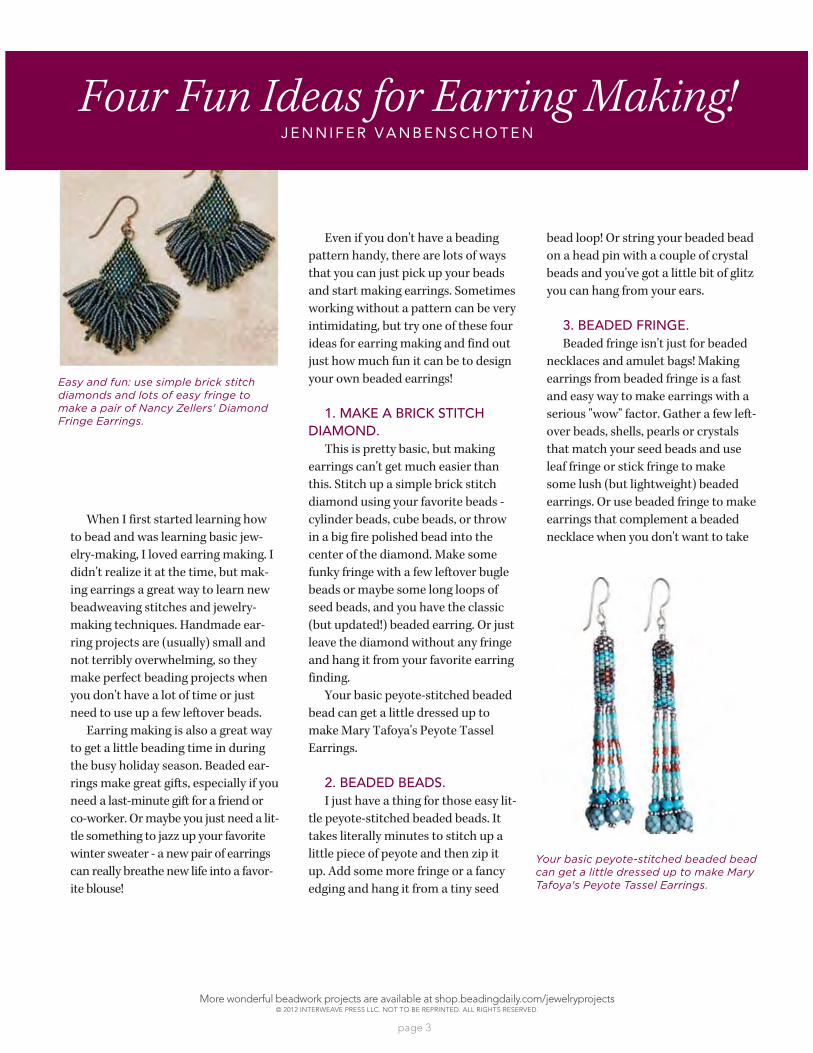
Easy and fun: use simple brick stitch diamonds and lots of easy fringe to make a pair of Nancy Zellers' Diamond Fringe Earrings.
Your basic peyote-stitched beaded bead can get a little dressed up to make Mary Tafoya's Peyote Tassel Earrings.
bead loop! Or string your beaded bead on a head pin with a couple of crystal beads and you've got a little bit of glitz you can hang from your ears.
3. BEADED FRINGE. Beaded fringe isn't just for beaded
necklaces and amulet bags! Making earrings from beaded fringe is a fast and easy way to make earrings with a serious "wow" factor. Gather a few left-over beads, shells, pearls or crystals that match your seed beads and use leaf fringe or stick fringe to make some lush (but lightweight) beaded earrings. Or use beaded fringe to make earrings that complement a beaded necklace when you don't want to take

More wonderful beadwork projects are available at shop.beadingdaily.com/jewelryprojects© 2012 INTERWEAVE PRESS LLC. NOT TO BE REPRINTED. ALL RIGHTS RESERVED.
page 4
too much attention away from the necklace itself!
Practicing your beaded bezels can be fun and beautiful when you stitch up a pair of Cecilia Guastaferro's
4. PRACTICE YOUR BEADED BEZELS.
You can stitch a tiny bezel around almost anything. If you have a couple of crystal stones hanging around (or Scrabble tiles, old typewriter keys, bot-tle caps or something else that would make a funky earring) grab some seed beads and stitch a beaded bezel. Use a seed bead loop to hang a dangle from the bottom, or just stitch a jump ring to the top for easy attachment to an earring finding. You can even stitch tiny bezels around gemstone beads and accent them with crystals and pearls for attention-grabbing earrings.
Bead Happy,Jennifer
Practicing your beaded bezels can be fun and beautiful when you stitch up a pair of Cecilia Guastaferro's Royal Amethyst Earrings.
Find great earring making ideas like these fun felted ball earrings by Dustin Wedekind.
More wonderful beadwork projects are available at shop.beadingdaily.com/jewelryprojects© 2012 INTERWEAVE PRESS LLC. NOT TO BE REPRINTED. ALL RIGHTS RESERVED.
page 5
Sketching Beading Designs: Examples and Ideas from Readers
B Y M I C H E L L E M A C H
Back in April, I wrote about how I sketched the design for my chain
had so many emails from beaders who also sketched their designs that I decided to ask everyone--Do you sketch your designs?
More than 1,300 responded and
group was divided between those who "always" (21%) sketched and those who only "sometimes" (53%) did.
surprise was how some beaders use sketching as a way of working with customers. I'd never thought of that before, but it makes sense for custom designs. Otherwise, you'll waste a lot of time and materials. Another sur-prise was how much technology has influenced the sketching process. When I'm relaxing with my beads, it never occurs to me to open up my computer! But the biggest surprise for me was learning how beadmakers use sketching. When I asked the question, I was thinking about beaded pieces and not individual beads. But it makes a lot of sense for beadmakers to sketch, particularly if they plan on re-creating their designs. Here's what else I learned:
For so many of us who work with tiny little seed beads, we end up doing
a future in selling our handiwork. In fact, rarely does it seem as though we could make money on bead creations, as it takes so many hours of our time.
whip up a piece of jewelry in a matter of minutes. Additionally, wire is a very forgiving medium. If you make a wrong bend, you can usually just unbend it!
they didn't need to or that drawing was too difficult or too time-consuming.
"I guess I'm just wired differently. I stand and stare at the materials and work it out in my head."
"Most of the time I enjoy watching it come to life from my thoughts as I go. Usually thinking ahead takes the spontaneity out of my ideas. I know if I do it in my head and adjust as I go, probably it will be one of a kind."
OF COURSE, BY JUST ASKING THIS QUESTION, I MANAGED TO CHANGE A LEAST ONE PER-SON'S MIND:
"When this survey first came out I
and you know what? It really helps! Even though my drawings are pretty sketchy, it helps me look at my ideas before I go pulling beads out! I had never sketched a design until last weekend. I needed to figure out how the design was going to look using cer-tain numbers. Instead of my usual way, just putting the beads on the wire, I actually put it on paper. Must have been because I read the question in Beading Daily!"
A FEW REASONS FOR SKETCHING included figuring out design problems, capturing inspira-tion, saving time, saving money, keep-ing a record of ideas, planning projects for classes, and working with other people. Many designers did not see their sketches as absolute and changed them as they designed.
"[I sketch] only for commissions, otherwise my designs sort of 'grow' in my head. I usually have a very clear idea of what I want and only use sketches when I have to convey ideas to others".
"I work a lot in silver, so I do sketches so that I don't waste the silver."
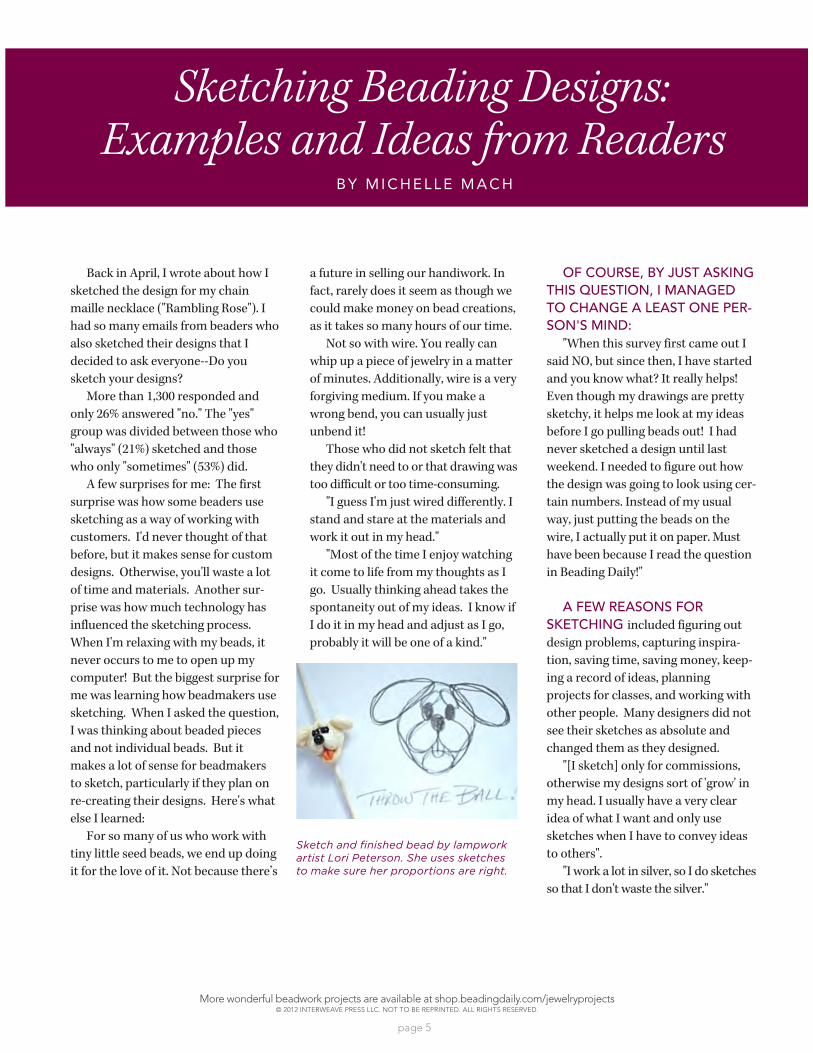
Sketch and finished bead by lampwork artist Lori Peterson. She uses sketches to make sure her proportions are right.
More wonderful beadwork projects are available at shop.beadingdaily.com/jewelryprojects© 2012 INTERWEAVE PRESS LLC. NOT TO BE REPRINTED. ALL RIGHTS RESERVED.
page 6
WORK (ESPECIALLY DURING MEETINGS) WAS A POPULAR PLACE TO WORK OUT DESIGNS.
"I sketch my designs partly to keep my mind busy while I do a boring tele-marketing job. I can come up with an idea and explore it when I get home."
"I am day bartender down here in Sarasota. While working, something will come to mind and I sketch my ideas on bar napkins!"
SKETCHING MATERIALS VARIED GREATLY.
Some beaders used special pens, colored pencils, paper (lined, graphed, plain, art). Other tools mentioned were charcoal, mechanical pencils, and watercolors. One beader has cov-ered her beading notebook in beads!
"I try to keep everything in one note-book, but sometimes I use whatever's handy to make notes or draw on."
"I sketch on random Post-It notes, but then I'm way too young to be orga-nized. Maybe when I get older and wiser I will move into a notebook!"
"I use a 5"x7" notebook and generally use a purple-ink pen. Purple ink is bliss."
"I keep a rubber band around the notebook, as I generally clip photos of things I visualize beaded up from magazines and ads. I also have little Post-It notes in the book, usually of color schemes I find interesting while
"I use a sketch book called Circa (from Levenger.com). It's olive green leather notebook binder, fits 8½"x11" grid paper, and is embossed with my
great, it allows me to insert paper whenever needed, and when the design piece is finished, I can attach a picture of the final piece and remove it for filing. It's perfect!"
TECHNOLOGY HAS IMPACTED SKETCHING.
Some readers had design systems or used programs on the web like Fire Mountain's virtual beadboard. Other tools mentioned were graphic pro-grams like Photoshop Elements and MS Paint, as well as the drawing tools in Microsoft Word.
"I have found it easier to use the camera on my phone to take a picture on my inspiration so I never miss a thing. After downloading the pictures of a leaf that spoke to me, I find that viewing all the pictures together sometimes leads me in a completely different path. Sometimes I even find I change the materials as well."
"I like to use the stylus and touch-screen of my IPAQ Pocket PC. It goes everywhere with me!"
"MS Paint is my swiftest sketch-tool; I use it to check visual balance and colour harmony, and to rough out how many of each type of bead I'll need to fill a length."
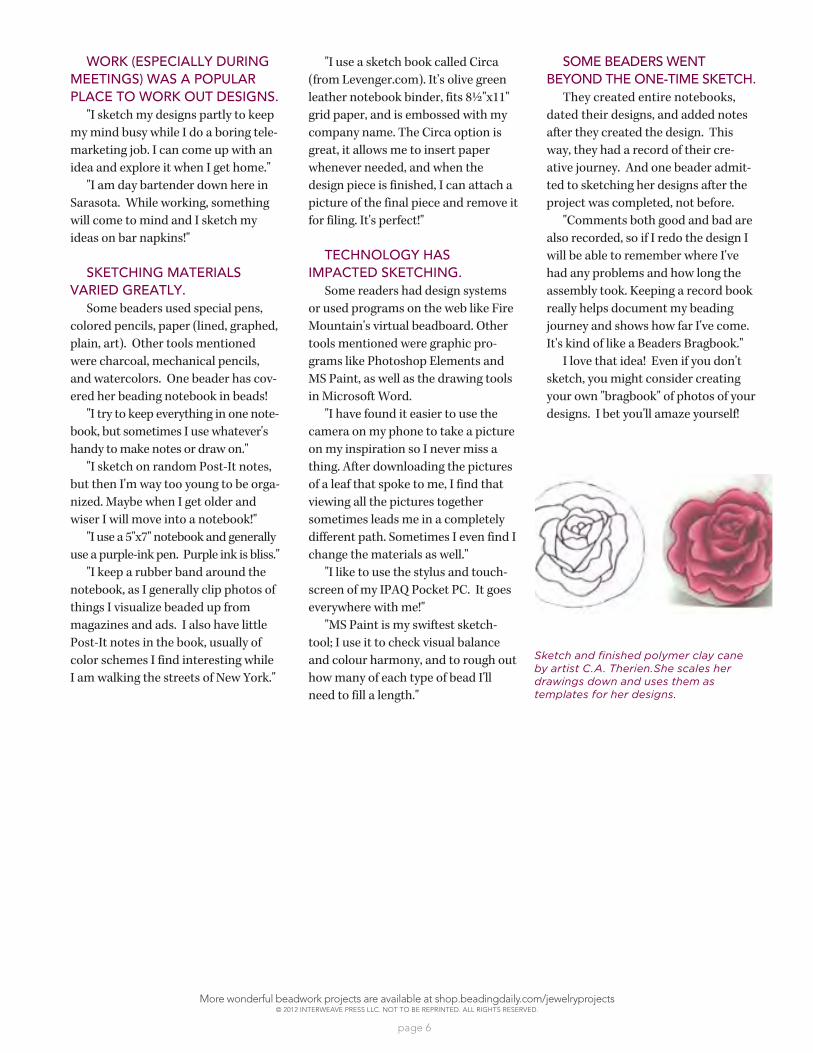
Sketch and finished polymer clay caneby artist C.A. Therien.She scales her drawings down and uses them as templates for her designs.
SOME BEADERS WENT BEYOND THE ONE-TIME SKETCH.
dated their designs, and added notes
way, they had a record of their cre-ative journey. And one beader admit-ted to sketching her designs after the project was completed, not before.
"Comments both good and bad are also recorded, so if I redo the design I will be able to remember where I've had any problems and how long the assembly took. Keeping a record book really helps document my beading journey and shows how far I've come. It's kind of like a Beaders Bragbook."
I love that idea! Even if you don't sketch, you might consider creating your own "bragbook" of photos of your designs. I bet you'll amaze yourself!
More wonderful beadwork projects are available at shop.beadingdaily.com/jewelryprojects© 2012 INTERWEAVE PRESS LLC. NOT TO BE REPRINTED. ALL RIGHTS RESERVED.
page 7
4 Sketched Ideas for Beaded Necklace ShapesB Y J E A N C A M P B E L L
Melinda Barta asked me recently to design a necklace for a project she's
the corner, so I've been madly stitch-ing, trying to come up with something I'm excited about. I came up with a focal piece that I'm happy with: a free-form peyote-stitched flower with a multi-pearl center. It's pretty, colorful, and fun to make. But the next task is to turn that pretty flower into a piece of jewelry. Hmm. I could slap a pin back on it and call it a day, but I don't wear brooches that often in the sum-mer and this is a very summery piece
big and showy for a bracelet, so it's definitely got to be a necklace.
Because I'm on a tight deadline, I've been looking around for ideas on how to incorporate the flower into a strung
Stringing Style, a book with dozens of
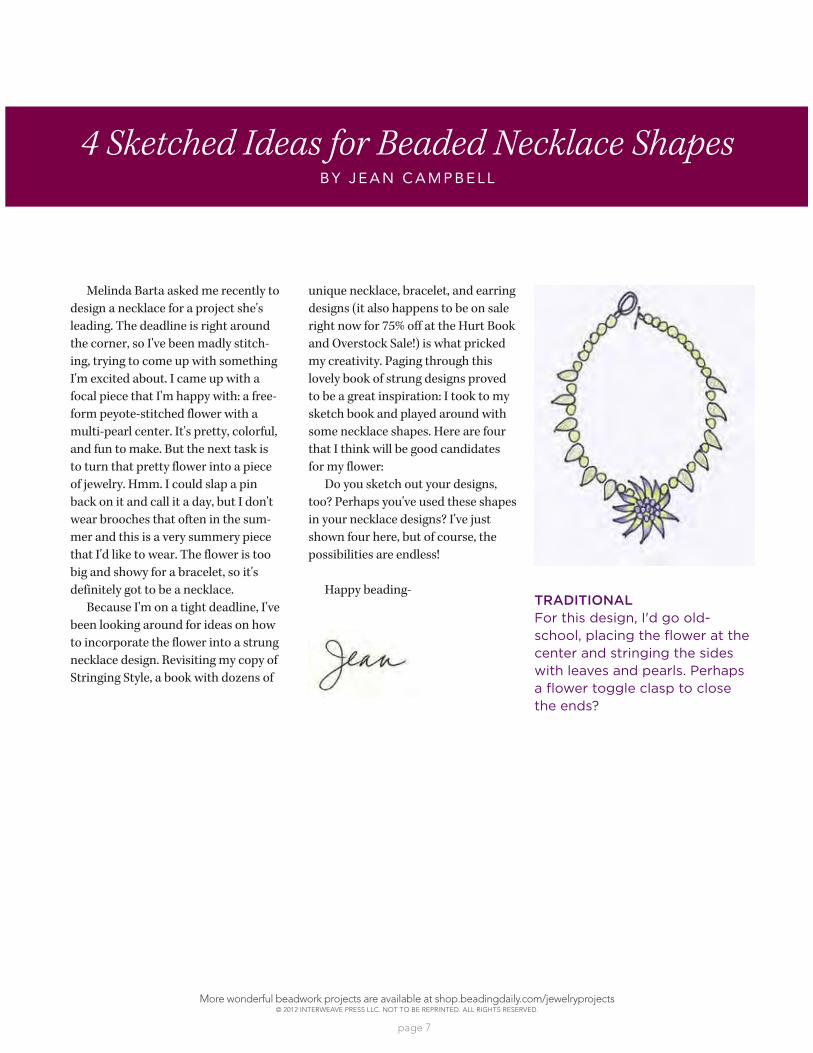
TRADITIONALFor this design, I'd go old-school, placing the flower at the center and stringing the sides with leaves and pearls. Perhaps a flower toggle clasp to close the ends?
unique necklace, bracelet, and earring designs (it also happens to be on sale right now for 75% off at the Hurt Book and Overstock Sale!) is what pricked my creativity. Paging through this lovely book of strung designs proved to be a great inspiration: I took to my sketch book and played around with some necklace shapes. Here are four that I think will be good candidates for my flower:
Do you sketch out your designs, too? Perhaps you've used these shapes in your necklace designs? I've just shown four here, but of course, the possibilities are endless!
Happy beading-
More wonderful beadwork projects are available at shop.beadingdaily.com/jewelryprojects© 2012 INTERWEAVE PRESS LLC. NOT TO BE REPRINTED. ALL RIGHTS RESERVED.
page 8
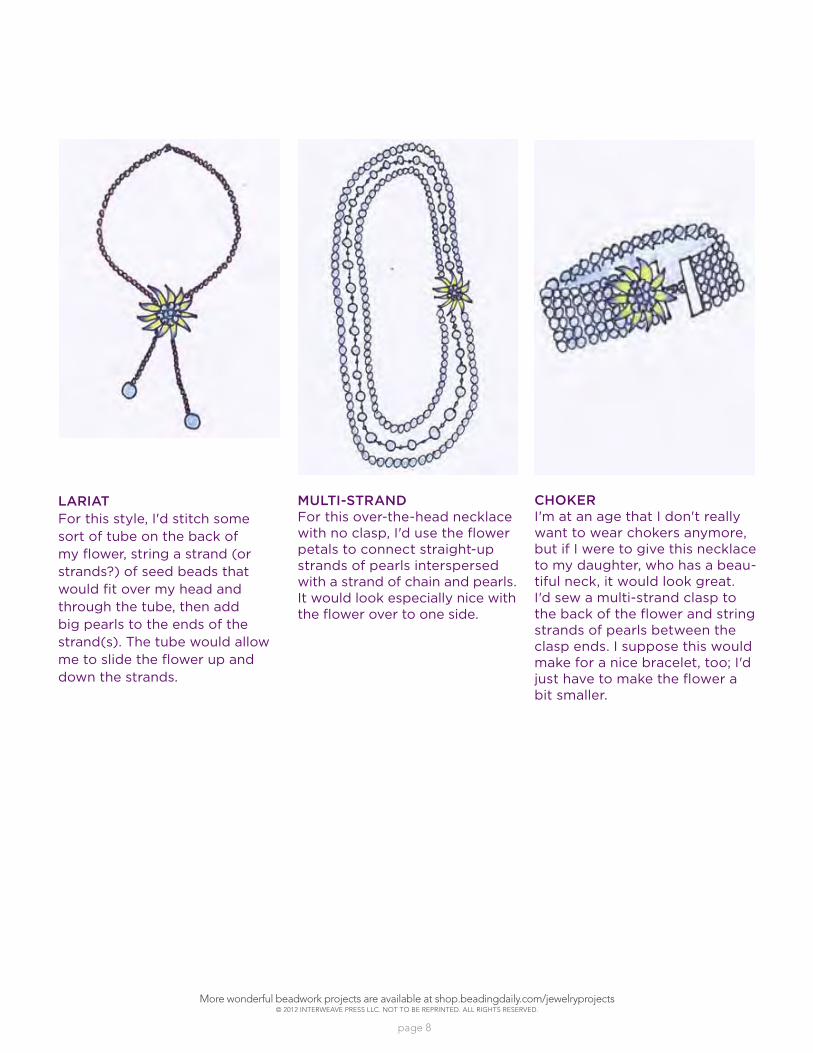
LARIATFor this style, I'd stitch some sort of tube on the back of my flower, string a strand (or strands?) of seed beads that would fit over my head and through the tube, then add big pearls to the ends of the strand(s). The tube would allow me to slide the flower up and down the strands.
MULTI-STRANDFor this over-the-head necklace with no clasp, I'd use the flower petals to connect straight-up strands of pearls interspersed with a strand of chain and pearls. It would look especially nice with the flower over to one side.
CHOKERI'm at an age that I don't really want to wear chokers anymore, but if I were to give this necklace to my daughter, who has a beau-tiful neck, it would look great. I'd sew a multi-strand clasp to the back of the flower and string strands of pearls between the clasp ends. I suppose this would make for a nice bracelet, too; I'd just have to make the flower a bit smaller.
More wonderful beadwork projects are available at shop.beadingdaily.com/jewelryprojects© 2012 INTERWEAVE PRESS LLC. NOT TO BE REPRINTED. ALL RIGHTS RESERVED.
page 9
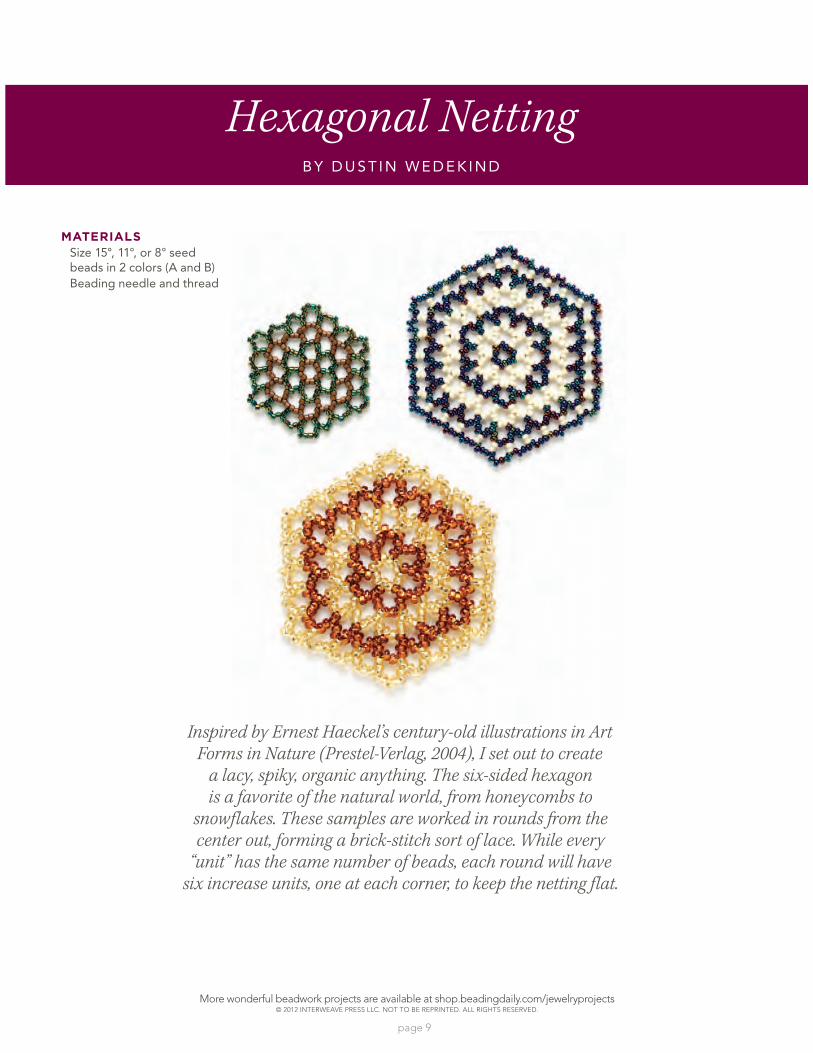
Hexagonal NettingB Y D U S T I N W E D E K I N D
Inspired by Ernest Haeckel’s century-old illustrations in Art Forms in Nature (Prestel-Verlag, 2004), I set out to create
a lacy, spiky, organic anything. The six-sided hexagon is a favorite of the natural world, from honeycombs to
snowflakes. These samples are worked in rounds from the center out, forming a brick-stitch sort of lace. While every
“unit” has the same number of beads, each round will have six increase units, one at each corner, to keep the netting flat.
MATERIALSSize 15°, 11°, or 8° seed beads in 2 colors (A and B)Beading needle and thread
More wonderful beadwork projects are available at shop.beadingdaily.com/jewelryprojects© 2012 INTERWEAVE PRESS LLC. NOT TO BE REPRINTED. ALL RIGHTS RESERVED.
page 10
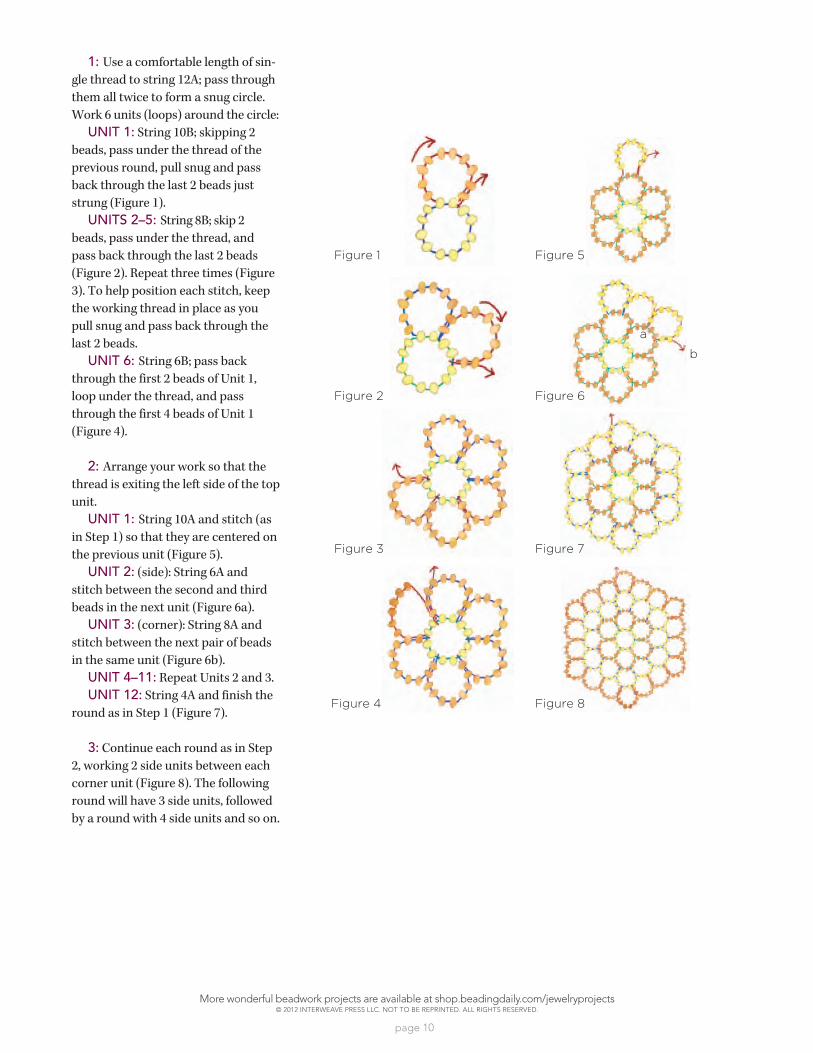
1: Use a comfortable length of sin-gle thread to string 12A; pass through them all twice to form a snug circle. Work 6 units (loops) around the circle:
UNIT 1: String 10B; skipping 2 beads, pass under the thread of the previous round, pull snug and pass back through the last 2 beads just strung (Figure 1).
UNITS 2–5: String 8B; skip 2 beads, pass under the thread, and pass back through the last 2 beads
the working thread in place as you pull snug and pass back through the last 2 beads.
UNIT 6: String 6B; pass back through the first 2 beads of Unit 1, loop under the thread, and pass through the first 4 beads of Unit 1 (Figure 4).
2: Arrange your work so that the thread is exiting the left side of the top unit.
UNIT 1: String 10A and stitch (as in Step 1) so that they are centered on the previous unit (Figure 5).
UNIT 2: (side): String 6A and stitch between the second and third beads in the next unit (Figure 6a).
UNIT 3: (corner): String 8A and stitch between the next pair of beads in the same unit (Figure 6b).
UNIT 4–11:UNIT 12: String 4A and finish the
round as in Step 1 (Figure 7).
3: Continue each round as in Step 2, working 2 side units between each
round will have 3 side units, followed by a round with 4 side units and so on.
Figure 2
Figure 1
Figure 3
Figure 4
Figure 5
Figure 7
Figure 8
a
b
Figure 6
More wonderful beadwork projects are available at shop.beadingdaily.com/jewelryprojects© 2012 INTERWEAVE PRESS LLC. NOT TO BE REPRINTED. ALL RIGHTS RESERVED.
page 11
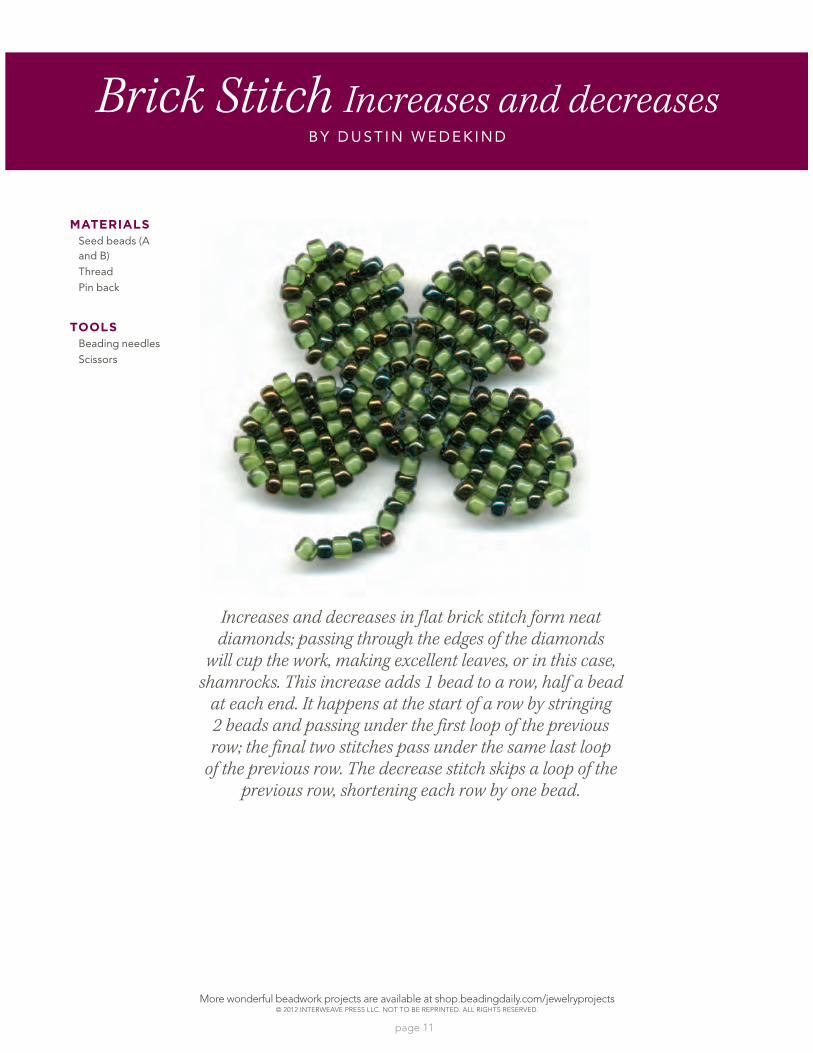
Brick Stitch Increases and decreasesB Y D U S T I N W E D E K I N D
Increases and decreases in flat brick stitch form neat diamonds; passing through the edges of the diamonds
will cup the work, making excellent leaves, or in this case, shamrocks. This increase adds 1 bead to a row, half a bead
at each end. It happens at the start of a row by stringing 2 beads and passing under the first loop of the previous row; the final two stitches pass under the same last loop
of the previous row. The decrease stitch skips a loop of the previous row, shortening each row by one bead.
MATERIALSSeed beads (A and B)ThreadPin back
TOOLSBeading needlesScissors
More wonderful beadwork projects are available at shop.beadingdaily.com/jewelryprojects© 2012 INTERWEAVE PRESS LLC. NOT TO BE REPRINTED. ALL RIGHTS RESERVED.
page 12
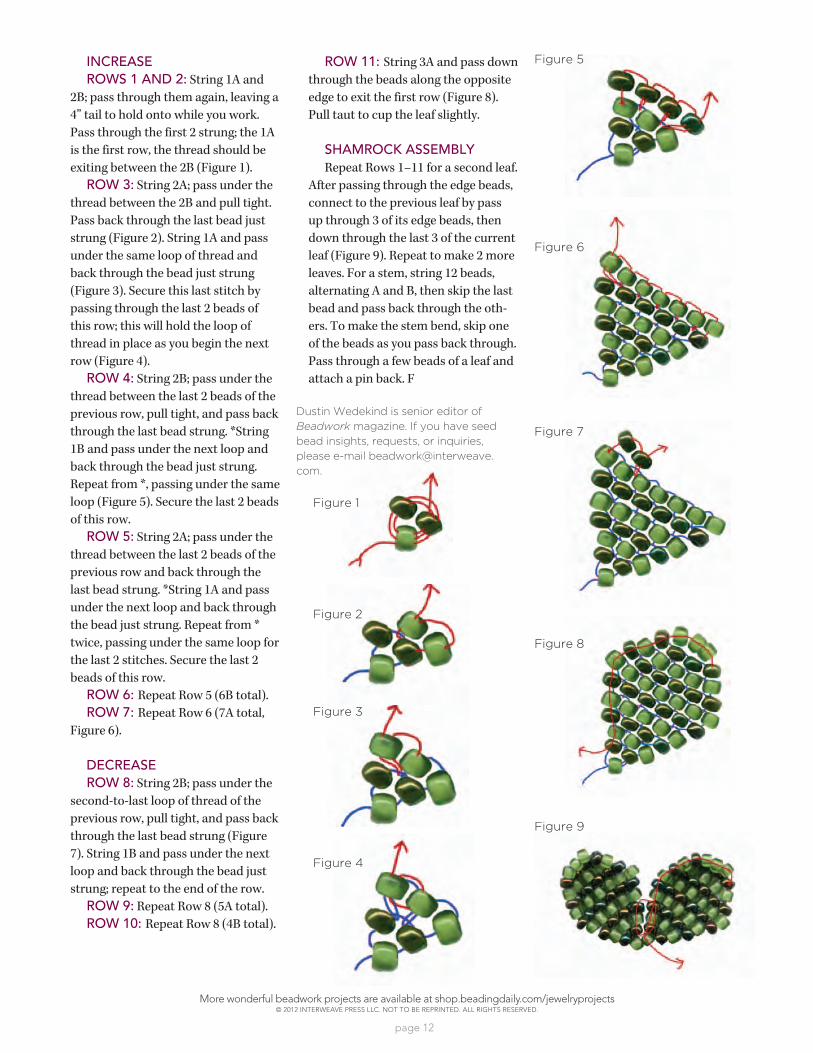
INCREASEROWS 1 AND 2: String 1A and
2B; pass through them again, leaving a 4” tail to hold onto while you work. Pass through the first 2 strung; the 1A is the first row, the thread should be exiting between the 2B (Figure 1).
ROW 3: String 2A; pass under the thread between the 2B and pull tight. Pass back through the last bead just strung (Figure 2). String 1A and pass under the same loop of thread and back through the bead just strung (Figure 3). Secure this last stitch by passing through the last 2 beads of this row; this will hold the loop of thread in place as you begin the next row (Figure 4).
ROW 4: String 2B; pass under the thread between the last 2 beads of the previous row, pull tight, and pass back through the last bead strung. *String 1B and pass under the next loop and back through the bead just strung.
loop (Figure 5). Secure the last 2 beads of this row.
ROW 5: String 2A; pass under the thread between the last 2 beads of the previous row and back through the last bead strung. *String 1A and pass under the next loop and back through
twice, passing under the same loop for the last 2 stitches. Secure the last 2 beads of this row.
ROW 6: ROW 7:
Figure 6).
DECREASEROW 8: String 2B; pass under the
second-to-last loop of thread of the previous row, pull tight, and pass back through the last bead strung (Figure 7). String 1B and pass under the next loop and back through the bead just strung; repeat to the end of the row.
ROW 9:ROW 10:
ROW 11: String 3A and pass down through the beads along the opposite edge to exit the first row (Figure 8). Pull taut to cup the leaf slightly.
SHAMROCK ASSEMBLY
After passing through the edge beads, connect to the previous leaf by pass up through 3 of its edge beads, then down through the last 3 of the current
leaves. For a stem, string 12 beads, alternating A and B, then skip the last bead and pass back through the oth-
of the beads as you pass back through. Pass through a few beads of a leaf and attach a pin back. F
Dustin Wedekind is senior editor of Beadwork magazine. If you have seed bead insights, requests, or inquiries, please e-mail [email protected].
Figure 1
Figure 2
Figure 3
Figure 4
Figure 5
Figure 6
Figure 7
Figure 8
Figure 9
More wonderful beadwork projects are available at shop.beadingdaily.com/jewelryprojects© 2012 INTERWEAVE PRESS LLC. NOT TO BE REPRINTED. ALL RIGHTS RESERVED.
page 13
Two-drop odd-count peyote stitchB Y D U S T I N W E D E K I N D
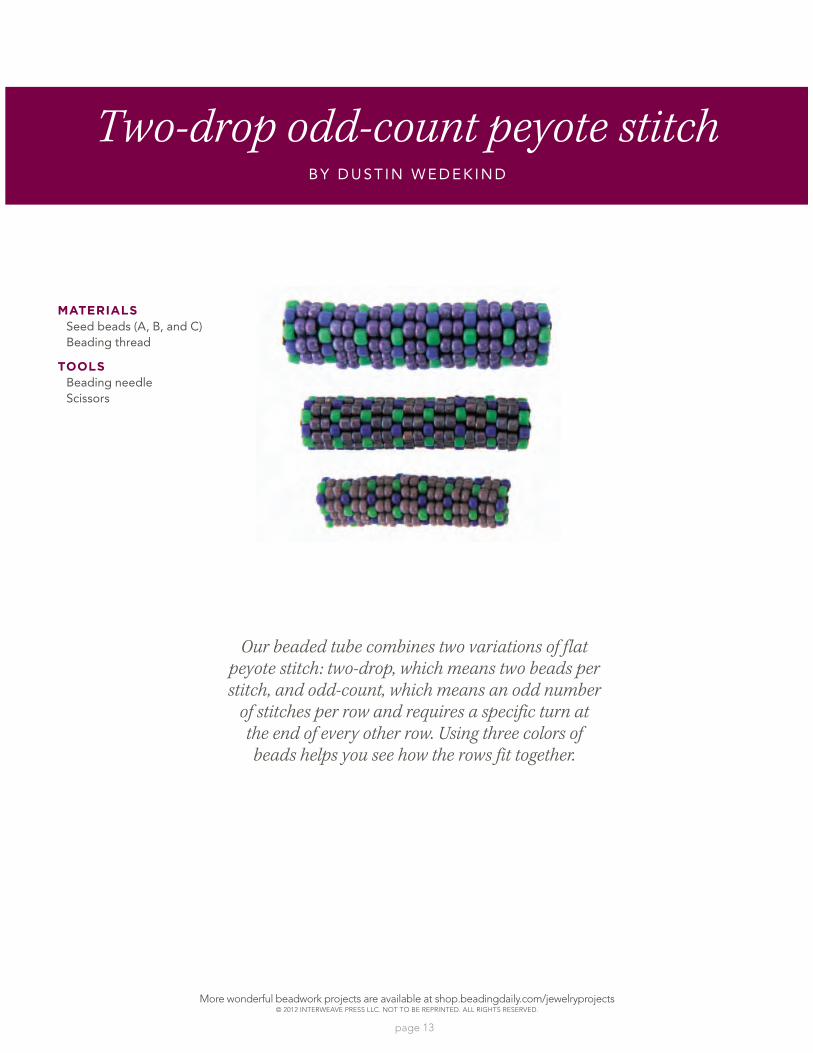
MATERIALSSeed beads (A, B, and C)Beading thread
TOOLSBeading needleScissors
Our beaded tube combines two variations of flat peyote stitch: two-drop, which means two beads per stitch, and odd-count, which means an odd number
of stitches per row and requires a specific turn at the end of every other row. Using three colors of beads helps you see how the rows fit together.
More wonderful beadwork projects are available at shop.beadingdaily.com/jewelryprojects© 2012 INTERWEAVE PRESS LLC. NOT TO BE REPRINTED. ALL RIGHTS RESERVED.
page 14
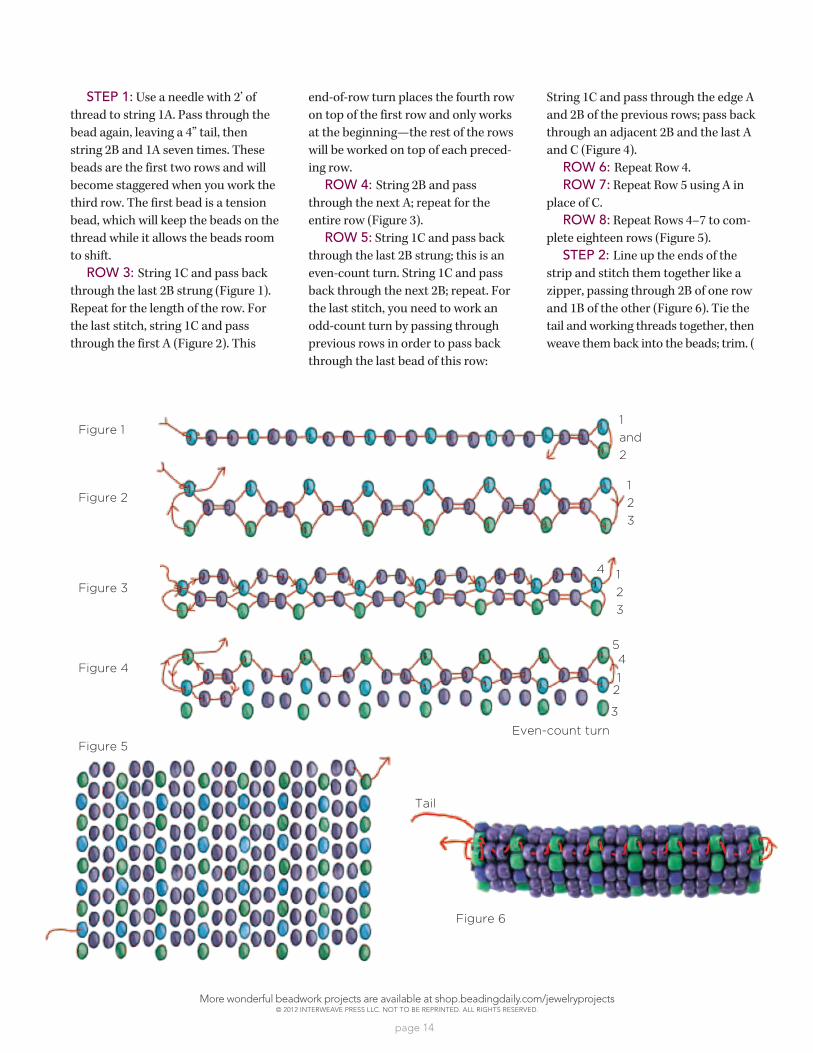
STEP 1: Use a needle with 2’ of thread to string 1A. Pass through the bead again, leaving a 4” tail, then
beads are the first two rows and will become staggered when you work the
bead, which will keep the beads on the thread while it allows the beads room to shift.
ROW 3: String 1C and pass back through the last 2B strung (Figure 1).
the last stitch, string 1C and pass
end-of-row turn places the fourth row on top of the first row and only works at the beginning—the rest of the rows will be worked on top of each preced-ing row.
ROW 4: String 2B and pass through the next A; repeat for the entire row (Figure 3).
ROW 5: String 1C and pass back through the last 2B strung; this is an even-count turn. String 1C and pass back through the next 2B; repeat. For the last stitch, you need to work an odd-count turn by passing through previous rows in order to pass back through the last bead of this row:
String 1C and pass through the edge A and 2B of the previous rows; pass back through an adjacent 2B and the last A and C (Figure 4).
ROW 6: ROW 7:
place of C.ROW 8: -
plete eighteen rows (Figure 5).STEP 2: Line up the ends of the
strip and stitch them together like a zipper, passing through 2B of one row
tail and working threads together, then weave them back into the beads; trim. (
Figure 11 and 2
1 23
1 23
541
2
3
4
Figure 2
Figure 3
Figure 4
Figure 5
Tail
Even-count turn
Figure 6
More wonderful beadwork projects are available at shop.beadingdaily.com/jewelryprojects© 2012 INTERWEAVE PRESS LLC. NOT TO BE REPRINTED. ALL RIGHTS RESERVED.
page 15
single-needle right-angle weaveB Y J E A N C A M P B E L L
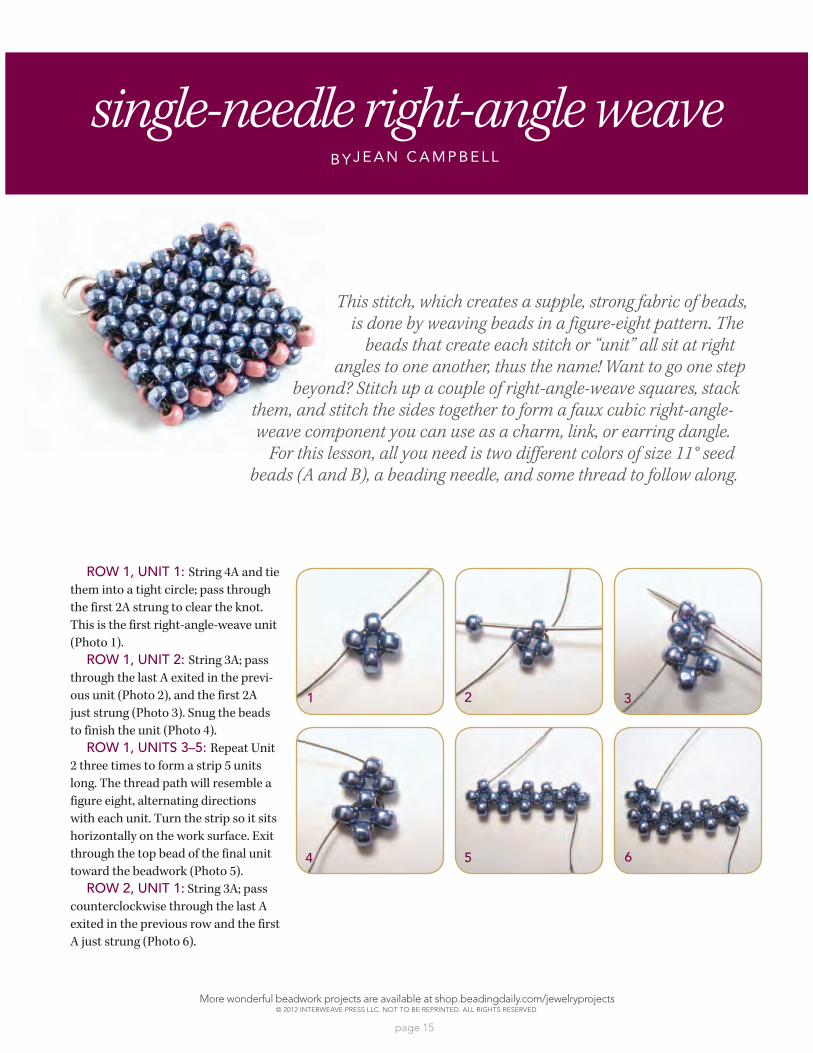
This stitch, which creates a supple, strong fabric of beads, is done by weaving beads in a figure-eight pattern. The
beads that create each stitch or “unit” all sit at right angles to one another, thus the name! Want to go one step
beyond? Stitch up a couple of right-angle-weave squares, stack them, and stitch the sides together to form a faux cubic right-angle-weave component you can use as a charm, link, or earring dangle. For this lesson, all you need is two different colors of size 11° seed beads (A and B), a beading needle, and some thread to follow along.
ROW 1, UNIT 1: String 4A and tie them into a tight circle; pass through the first 2A strung to clear the knot.
(Photo 1). ROW 1, UNIT 2: String 3A; pass
through the last A exited in the previ-ous unit (Photo 2), and the first 2A just strung (Photo 3). Snug the beads to finish the unit (Photo 4).
ROW 1, UNITS 3–5: 2 three times to form a strip 5 units
figure eight, alternating directions
horizontally on the work surface. Exit through the top bead of the final unit toward the beadwork (Photo 5).
ROW 2, UNIT 1: String 3A; pass counterclockwise through the last A exited in the previous row and the first A just strung (Photo 6).
4
3
5 6
1 2
More wonderful beadwork projects are available at shop.beadingdaily.com/jewelryprojects© 2012 INTERWEAVE PRESS LLC. NOT TO BE REPRINTED. ALL RIGHTS RESERVED.
page 16
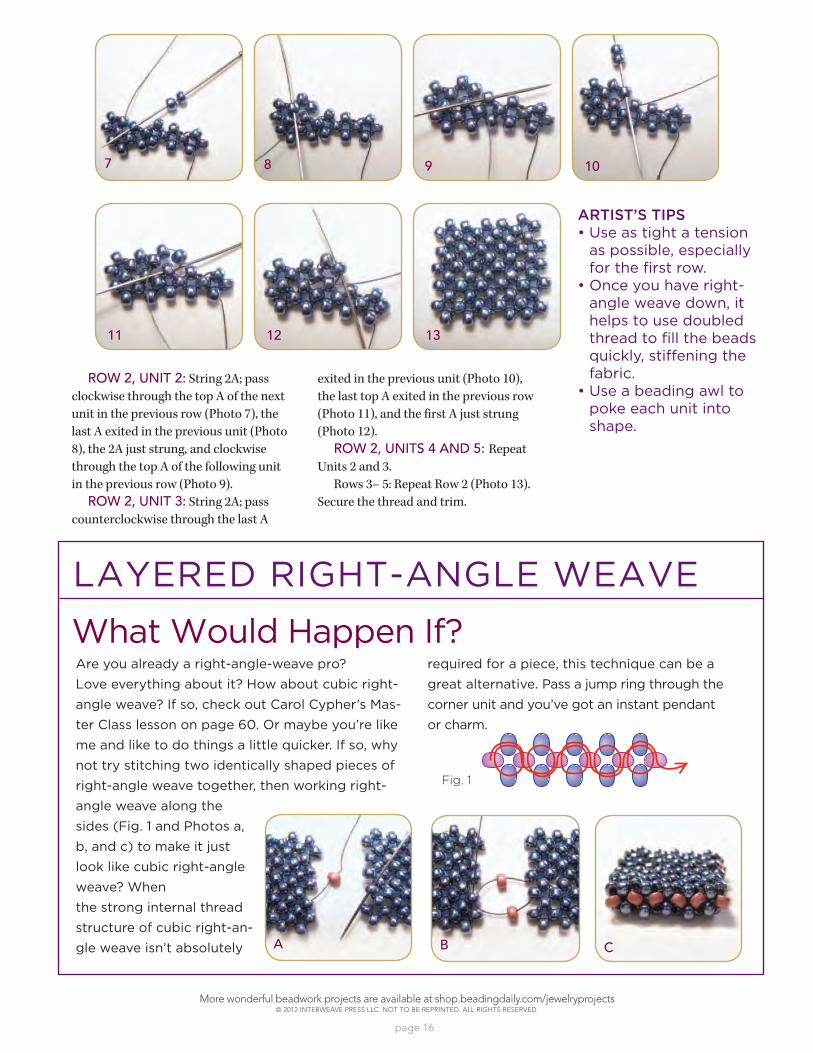
ROW 2, UNIT 2: String 2A; pass clockwise through the top A of the next unit in the previous row (Photo 7), the last A exited in the previous unit (Photo 8), the 2A just strung, and clockwise through the top A of the following unit in the previous row (Photo 9).
ROW 2, UNIT 3: String 2A; pass counterclockwise through the last A
9 10
11 12 13
87
ARTIST’S TIPS
as possible, especially for the first row.
angle weave down, it helps to use doubled thread to fill the beads quickly, stiffening the fabric.
poke each unit into shape.
B C
Fig. 1
Are you already a right-angle-weave pro? Love everything about it? How about cubic right-angle weave? If so, check out Carol Cypher’s Mas-ter Class lesson on page 60. Or maybe you’re like me and like to do things a little quicker. If so, why not try stitching two identically shaped pieces of right-angle weave together, then working right-angle weave along the sides (Fig. 1 and Photos a, b, and c) to make it just look like cubic right-angle weave? When the strong internal thread structure of cubic right-an-gle weave isn’t absolutely
What Would Happen If?
A
required for a piece, this technique can be a great alternative. Pass a jump ring through the corner unit and you’ve got an instant pendant or charm.
LAYERED RIGHT-ANGLE WEAVE
exited in the previous unit (Photo 10), the last top A exited in the previous row (Photo 11), and the first A just strung (Photo 12).
ROW 2, UNITS 4 AND 5: Units 2 and 3.
Secure the thread and trim.
More wonderful beadwork projects are available at shop.beadingdaily.com/jewelryprojects© 2012 INTERWEAVE PRESS LLC. NOT TO BE REPRINTED. ALL RIGHTS RESERVED.
page 17
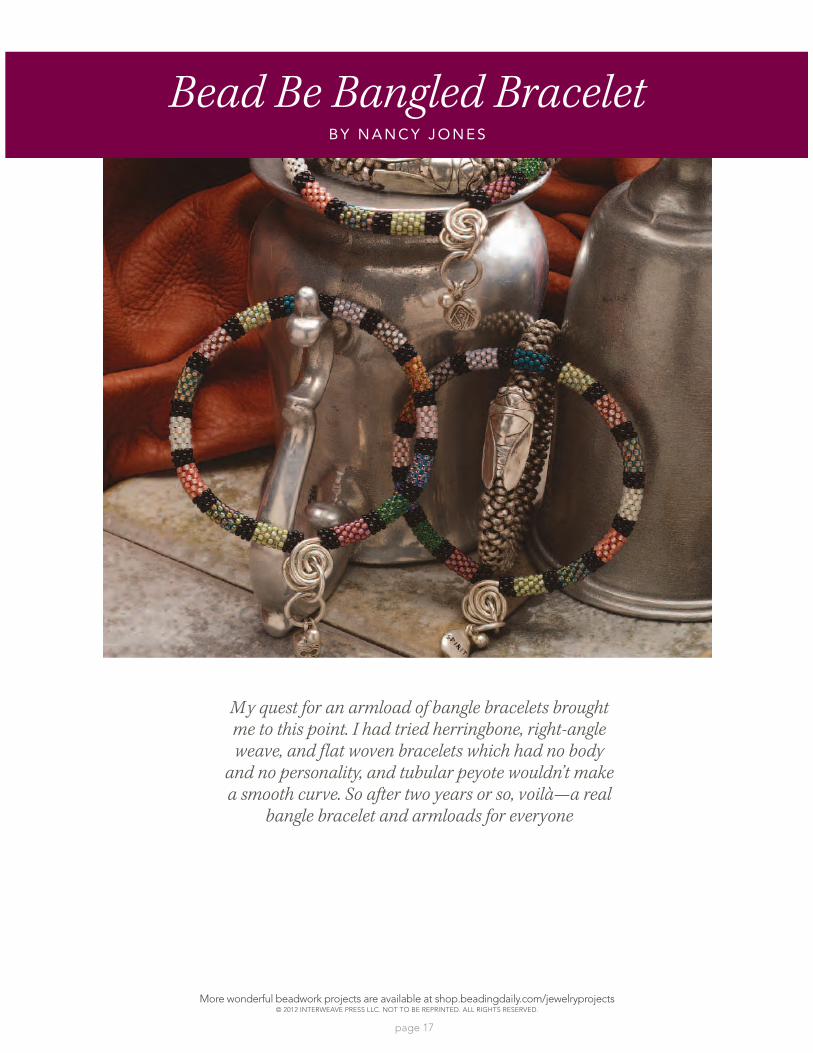
Bead Be Bangled BraceletB Y N A N C Y J O N E S
My quest for an armload of bangle bracelets brought me to this point. I had tried herringbone, right-angle weave, and flat woven bracelets which had no body
and no personality, and tubular peyote wouldn’t make a smooth curve. So after two years or so, voilà—a real
bangle bracelet and armloads for everyone
More wonderful beadwork projects are available at shop.beadingdaily.com/jewelryprojects© 2012 INTERWEAVE PRESS LLC. NOT TO BE REPRINTED. ALL RIGHTS RESERVED.
page 18
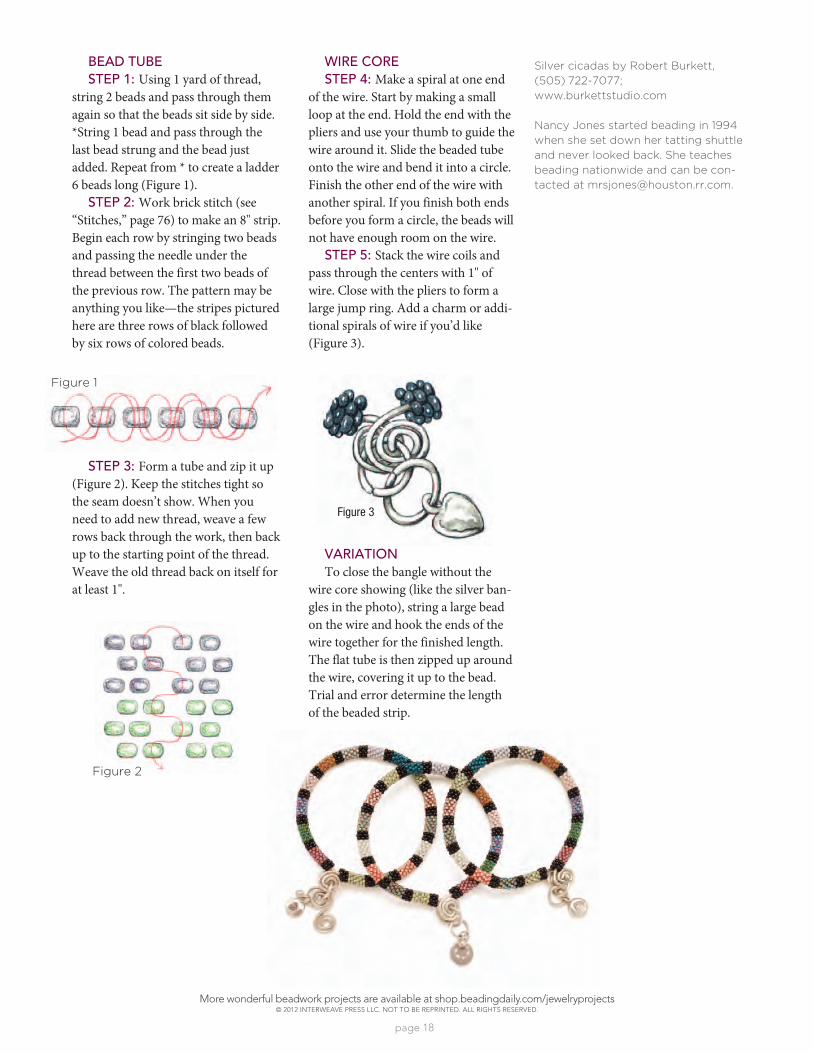
BEAD TUBESTEP 1: Using 1 yard of thread,
string 2 beads and pass through them again so that the beads sit side by side. *String 1 bead and pass through the last bead strung and the bead just added. Repeat from * to create a ladder 6 beads long (Figure 1).
STEP 2: Work brick stitch (see “Stitches,” page 76) to make an 8" strip. Begin each row by stringing two beads and passing the needle under the thread between the first two beads of the previous row. The pattern may be anything you like—the stripes pictured here are three rows of black followed by six rows of colored beads.
STEP 3: Form a tube and zip it up (Figure 2). Keep the stitches tight so the seam doesn’t show. When you need to add new thread, weave a few rows back through the work, then back up to the starting point of the thread. Weave the old thread back on itself for at least 1".
WIRE CORESTEP 4: Make a spiral at one end
of the wire. Start by making a small loop at the end. Hold the end with the pliers and use your thumb to guide the wire around it. Slide the beaded tube onto the wire and bend it into a circle. Finish the other end of the wire with another spiral. If you finish both ends before you form a circle, the beads will not have enough room on the wire.
STEP 5: Stack the wire coils and pass through the centers with 1" of wire. Close with the pliers to form a large jump ring. Add a charm or addi-tional spirals of wire if you’d like (Figure 3).
VARIATIONTo close the bangle without the
wire core showing (like the silver ban-gles in the photo), string a large bead on the wire and hook the ends of the wire together for the finished length. The flat tube is then zipped up around the wire, covering it up to the bead. Trial and error determine the length of the beaded strip.
Figure 1
Figure 2
Figure 3
Silver cicadas by Robert Burkett, (505) 722-7077; www.burkettstudio.com
Nancy Jones started beading in 1994 when she set down her tatting shuttle and never looked back. She teaches beading nationwide and can be con-tacted at [email protected].
More wonderful beadwork projects are available at shop.beadingdaily.com/jewelryprojects© 2012 INTERWEAVE PRESS LLC. NOT TO BE REPRINTED. ALL RIGHTS RESERVED.
page 19
MATERIALS55 strands of 3mm gold Czech fire-polished beadsSize B gold or black beading thread
NOTIONSBeading needleScissors
Figure 1
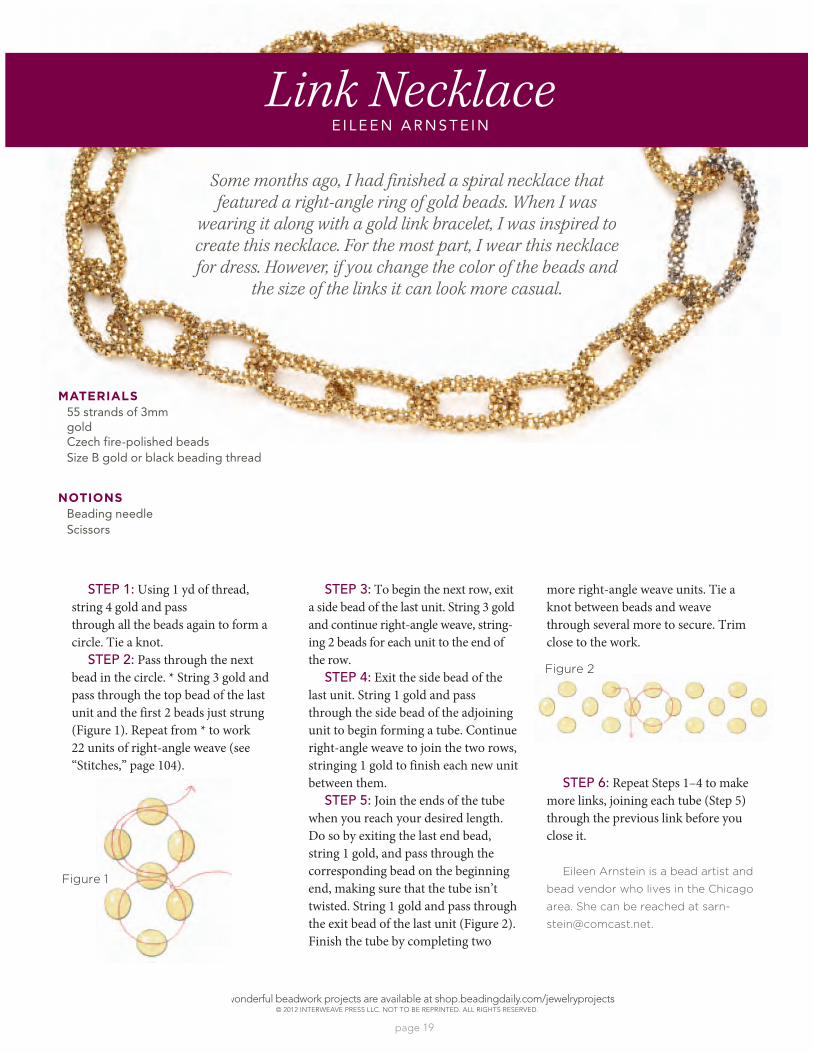
Some months ago, I had finished a spiral necklace that featured a right-angle ring of gold beads. When I was
wearing it along with a gold link bracelet, I was inspired to create this necklace. For the most part, I wear this necklace for dress. However, if you change the color of the beads and
the size of the links it can look more casual.
Link NecklaceE I L E E N A R N S T E I N
STEP 1: Using 1 yd of thread, string 4 gold and pass through all the beads again to form a circle. Tie a knot.
STEP 2: Pass through the next bead in the circle. * String 3 gold and pass through the top bead of the last unit and the first 2 beads just strung (Figure 1). Repeat from * to work 22 units of right-angle weave (see “Stitches,” page 104).
STEP 3: To begin the next row, exit a side bead of the last unit. String 3 gold and continue right-angle weave, string-ing 2 beads for each unit to the end of the row.
STEP 4: Exit the side bead of the last unit. String 1 gold and pass through the side bead of the adjoining unit to begin forming a tube. Continue right-angle weave to join the two rows, stringing 1 gold to finish each new unit between them.
STEP 5: Join the ends of the tube when you reach your desired length. Do so by exiting the last end bead, string 1 gold, and pass through the corresponding bead on the beginning end, making sure that the tube isn’t twisted. String 1 gold and pass through the exit bead of the last unit (Figure 2). Finish the tube by completing two
more right-angle weave units. Tie a knot between beads and weave through several more to secure. Trim close to the work.
STEP 6: Repeat Steps 1–4 to make more links, joining each tube (Step 5) through the previous link before you close it.
Eileen Arnstein is a bead artist and bead vendor who lives in the Chicago area. She can be reached at [email protected].
Figure 2
More wonderful beadwork projects are available at shop.beadingdaily.com/jewelryprojects© 2012 INTERWEAVE PRESS LLC. NOT TO BE REPRINTED. ALL RIGHTS RESERVED.
page 20
Potato Chip NettingB Y B O N N I E V O E L K E R
MATERIALSSize 14°, 11°, and 8° seed beadsBeading thread
NOTIONSBeading needleScissorsBeeswax or Thread Heaven
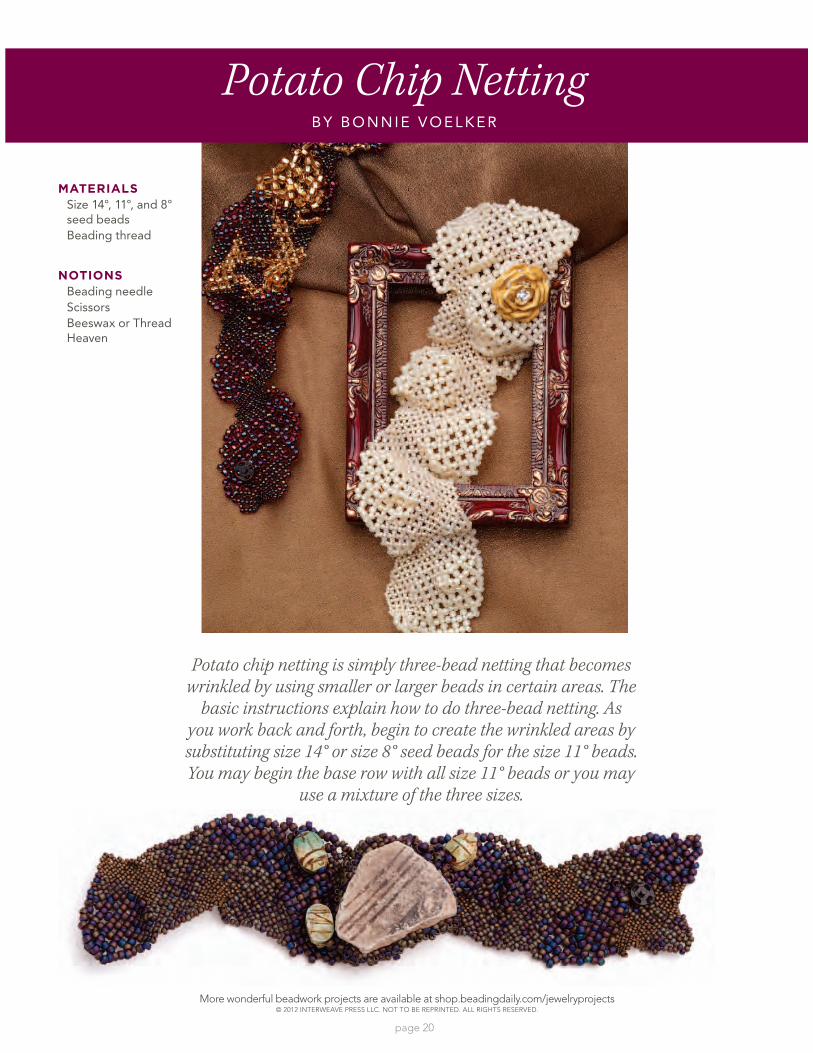
Potato chip netting is simply three-bead netting that becomes wrinkled by using smaller or larger beads in certain areas. The
basic instructions explain how to do three-bead netting. As you work back and forth, begin to create the wrinkled areas by substituting size 14° or size 8° seed beads for the size 11° beads. You may begin the base row with all size 11° beads or you may
use a mixture of the three sizes.
More wonderful beadwork projects are available at shop.beadingdaily.com/jewelryprojects© 2012 INTERWEAVE PRESS LLC. NOT TO BE REPRINTED. ALL RIGHTS RESERVED.
page 21
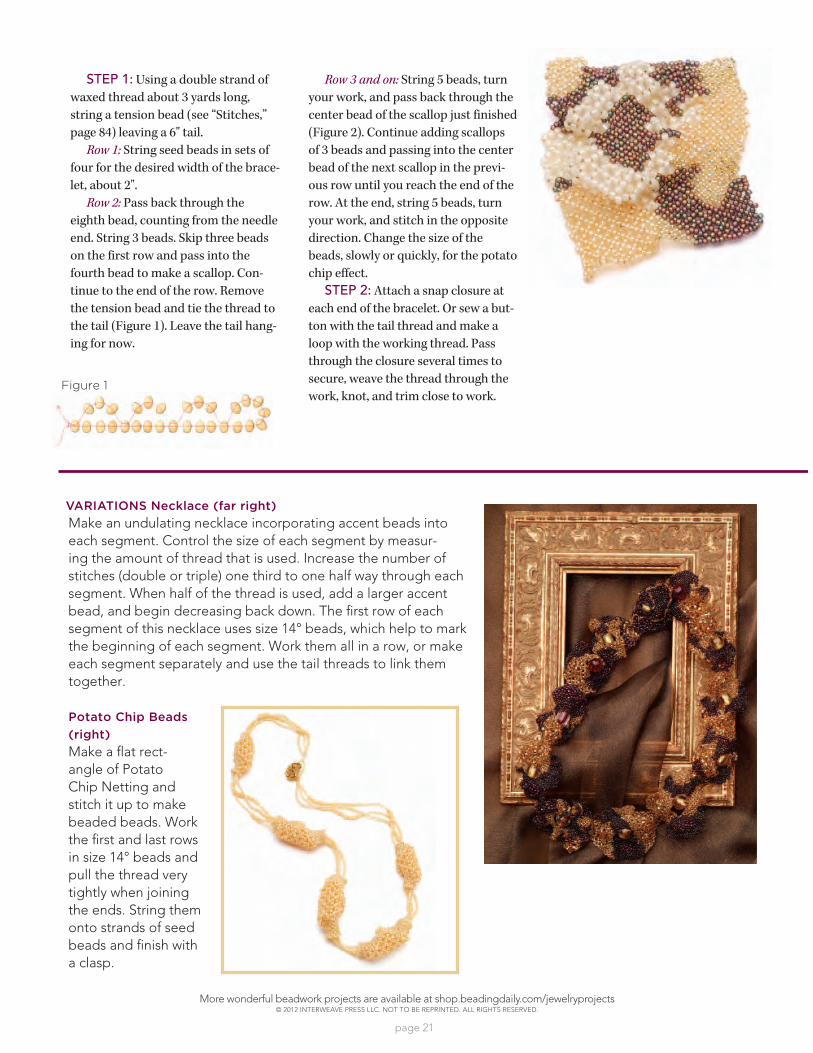
STEP 1: Using a double strand of waxed thread about 3 yards long, string a tension bead (see “Stitches,” page 84) leaving a 6" tail.
Row 1: String seed beads in sets of four for the desired width of the brace-let, about 2".
Row 2: Pass back through the eighth bead, counting from the needle end. String 3 beads. Skip three beads on the first row and pass into the fourth bead to make a scallop. Con-
the tension bead and tie the thread to the tail (Figure 1). Leave the tail hang-ing for now.
Figure 1
Row 3 and on: String 5 beads, turn your work, and pass back through the center bead of the scallop just finished (Figure 2). Continue adding scallops of 3 beads and passing into the center bead of the next scallop in the previ-ous row until you reach the end of the row. At the end, string 5 beads, turn your work, and stitch in the opposite direction. Change the size of the beads, slowly or quickly, for the potato chip effect.
STEP 2: Attach a snap closure at each end of the bracelet. Or sew a but-ton with the tail thread and make a loop with the working thread. Pass through the closure several times to secure, weave the thread through the work, knot, and trim close to work.
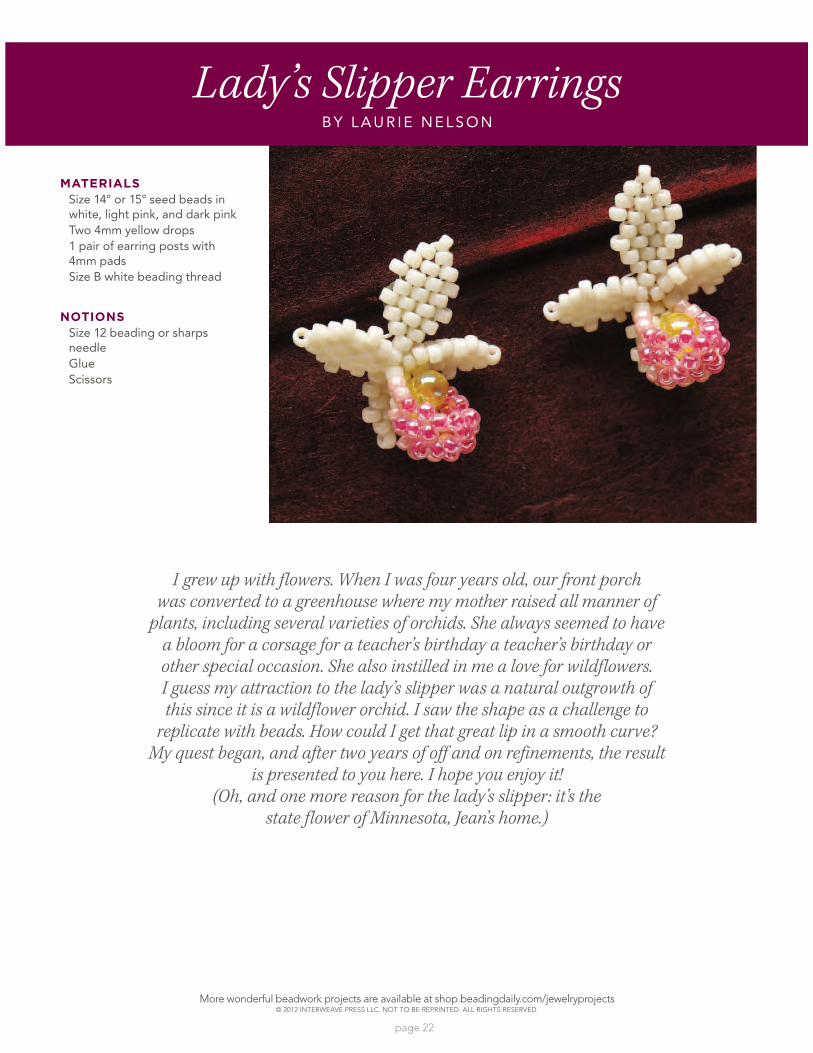
VARIATIONS Necklace (far right)Make an undulating necklace incorporating accent beads into each segment. Control the size of each segment by measur-ing the amount of thread that is used. Increase the number of stitches (double or triple) one third to one half way through each segment. When half of the thread is used, add a larger accent bead, and begin decreasing back down. The first row of each segment of this necklace uses size 14° beads, which help to mark the beginning of each segment. Work them all in a row, or make each segment separately and use the tail threads to link them together.
Potato Chip Beads (right)Make a flat rect-angle of Potato Chip Netting and stitch it up to make beaded beads. Work the first and last rows in size 14° beads and pull the thread very tightly when joining the ends. String them onto strands of seed beads and finish with a clasp.
More wonderful beadwork projects are available at shop.beadingdaily.com/jewelryprojects© 2012 INTERWEAVE PRESS LLC. NOT TO BE REPRINTED. ALL RIGHTS RESERVED.
page 22
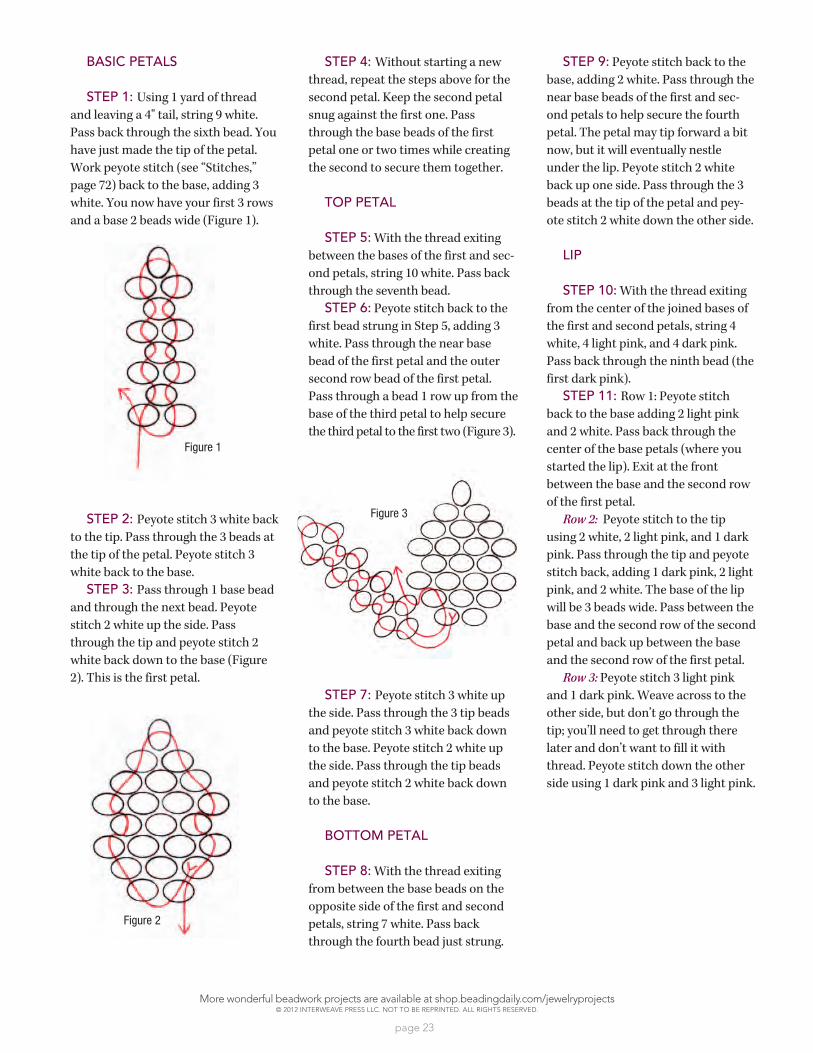
I grew up with flowers. When I was four years old, our front porch was converted to a greenhouse where my mother raised all manner of
plants, including several varieties of orchids. She always seemed to have a bloom for a corsage for a teacher’s birthday a teacher’s birthday or other special occasion. She also instilled in me a love for wildflowers. I guess my attraction to the lady’s slipper was a natural outgrowth of this since it is a wildflower orchid. I saw the shape as a challenge to
replicate with beads. How could I get that great lip in a smooth curve? My quest began, and after two years of off and on refinements, the result
is presented to you here. I hope you enjoy it!(Oh, and one more reason for the lady’s slipper: it’s the
state flower of Minnesota, Jean’s home.)
Lady’s Slipper EarringsB Y L A U R I E N E L S O N
MATERIALSSize 14° or 15° seed beads in white, light pink, and dark pinkTwo 4mm yellow drops1 pair of earring posts with 4mm padsSize B white beading thread
NOTIONSSize 12 beading or sharps needleGlueScissors
More wonderful beadwork projects are available at shop.beadingdaily.com/jewelryprojects© 2012 INTERWEAVE PRESS LLC. NOT TO BE REPRINTED. ALL RIGHTS RESERVED.
page 23
BASIC PETALS
STEP 1: Using 1 yard of thread and leaving a 4" tail, string 9 white. Pass back through the sixth bead. You have just made the tip of the petal. Work peyote stitch (see “Stitches,” page 72) back to the base, adding 3 white. You now have your first 3 rows and a base 2 beads wide (Figure 1).
STEP 2: Peyote stitch 3 white back to the tip. Pass through the 3 beads at the tip of the petal. Peyote stitch 3 white back to the base.
STEP 3: Pass through 1 base bead and through the next bead. Peyote stitch 2 white up the side. Pass through the tip and peyote stitch 2 white back down to the base (Figure
STEP 4: Without starting a new thread, repeat the steps above for the second petal. Keep the second petal snug against the first one. Pass through the base beads of the first petal one or two times while creating the second to secure them together.
TOP PETAL
STEP 5: With the thread exiting between the bases of the first and sec-ond petals, string 10 white. Pass back through the seventh bead.
STEP 6: Peyote stitch back to the first bead strung in Step 5, adding 3 white. Pass through the near base bead of the first petal and the outer second row bead of the first petal. Pass through a bead 1 row up from the base of the third petal to help secure the third petal to the first two (Figure 3).
STEP 7: Peyote stitch 3 white up the side. Pass through the 3 tip beads and peyote stitch 3 white back down to the base. Peyote stitch 2 white up the side. Pass through the tip beads and peyote stitch 2 white back down to the base.
BOTTOM PETAL
STEP 8: With the thread exiting from between the base beads on the opposite side of the first and second petals, string 7 white. Pass back through the fourth bead just strung.
STEP 9: Peyote stitch back to the base, adding 2 white. Pass through the near base beads of the first and sec-ond petals to help secure the fourth
now, but it will eventually nestle under the lip. Peyote stitch 2 white back up one side. Pass through the 3 beads at the tip of the petal and pey-ote stitch 2 white down the other side.
LIP
STEP 10: With the thread exiting from the center of the joined bases of the first and second petals, string 4 white, 4 light pink, and 4 dark pink. Pass back through the ninth bead (the first dark pink).
STEP 11: back to the base adding 2 light pink and 2 white. Pass back through the center of the base petals (where you started the lip). Exit at the front between the base and the second row of the first petal.
Row 2: Peyote stitch to the tip using 2 white, 2 light pink, and 1 dark pink. Pass through the tip and peyote stitch back, adding 1 dark pink, 2 light
will be 3 beads wide. Pass between the base and the second row of the second petal and back up between the base and the second row of the first petal.
Row 3: Peyote stitch 3 light pink and 1 dark pink. Weave across to the other side, but don’t go through the tip; you’ll need to get through there later and don’t want to fill it with thread. Peyote stitch down the other side using 1 dark pink and 3 light pink.
Figure 1
Figure 2
Figure 3
More wonderful beadwork projects are available at shop.beadingdaily.com/jewelryprojects© 2012 INTERWEAVE PRESS LLC. NOT TO BE REPRINTED. ALL RIGHTS RESERVED.
page 24
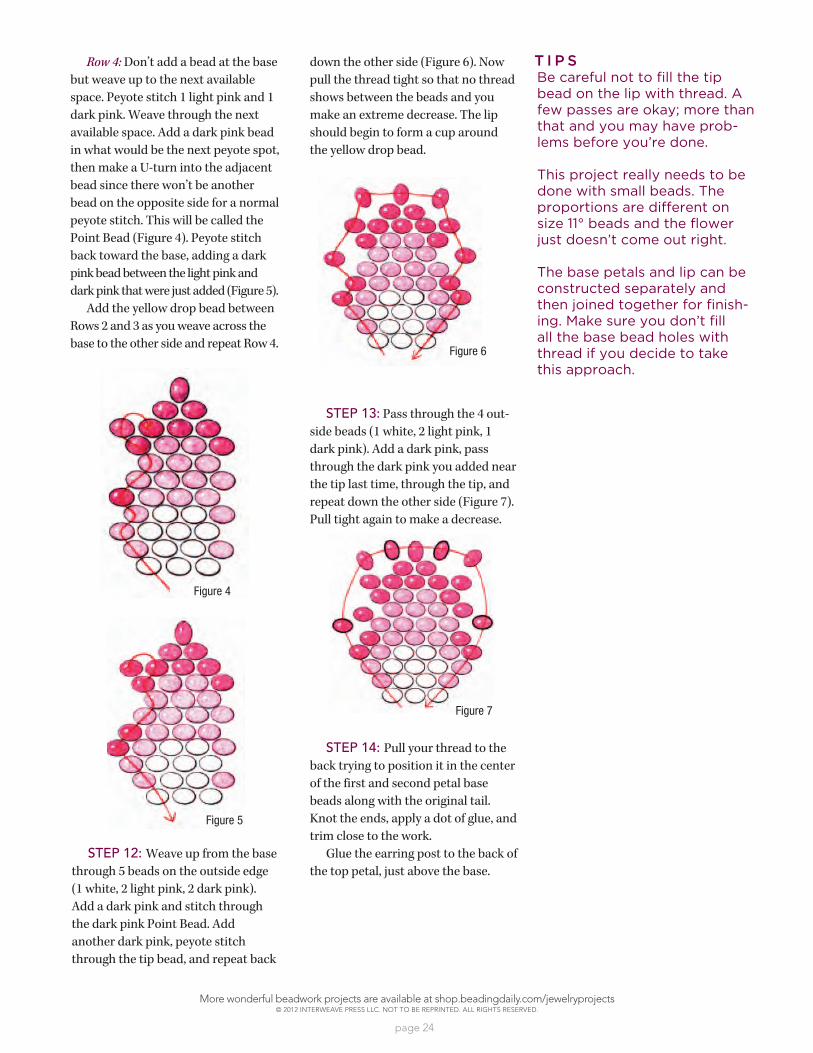
Row 4: Don’t add a bead at the base but weave up to the next available space. Peyote stitch 1 light pink and 1 dark pink. Weave through the next available space. Add a dark pink bead in what would be the next peyote spot, then make a U-turn into the adjacent bead since there won’t be another bead on the opposite side for a normal
Point Bead (Figure 4). Peyote stitch back toward the base, adding a dark pink bead between the light pink and dark pink that were just added (Figure 5).
Add the yellow drop bead between
Figure 4
Figure 5
STEP 12: Weave up from the base through 5 beads on the outside edge (1 white, 2 light pink, 2 dark pink). Add a dark pink and stitch through the dark pink Point Bead. Add another dark pink, peyote stitch through the tip bead, and repeat back
pull the thread tight so that no thread shows between the beads and you
should begin to form a cup around the yellow drop bead.
STEP 13: Pass through the 4 out-side beads (1 white, 2 light pink, 1 dark pink). Add a dark pink, pass through the dark pink you added near the tip last time, through the tip, and repeat down the other side (Figure 7). Pull tight again to make a decrease.
STEP 14: Pull your thread to the back trying to position it in the center of the first and second petal base beads along with the original tail. Knot the ends, apply a dot of glue, and trim close to the work.
Glue the earring post to the back of the top petal, just above the base.
Figure 6
Figure 7
T I P SBe careful not to fill the tip bead on the lip with thread. A few passes are okay; more than that and you may have prob-lems before you’re done.
This project really needs to be done with small beads. The proportions are different on size 11° beads and the flower just doesn’t come out right.
The base petals and lip can be constructed separately and then joined together for finish-ing. Make sure you don’t fill all the base bead holes with thread if you decide to take this approach.