create a zoom online class in moodle a zoom online... · 2020-03-12 · understanding the zoom...
TRANSCRIPT
Last Modified: 9 March 2020
Create a Zoom Online Class in Moodle
Creating a Zoom Moodle Module
In order to create online classes in your Moodle course, you need to add a Zoom
module to your course.
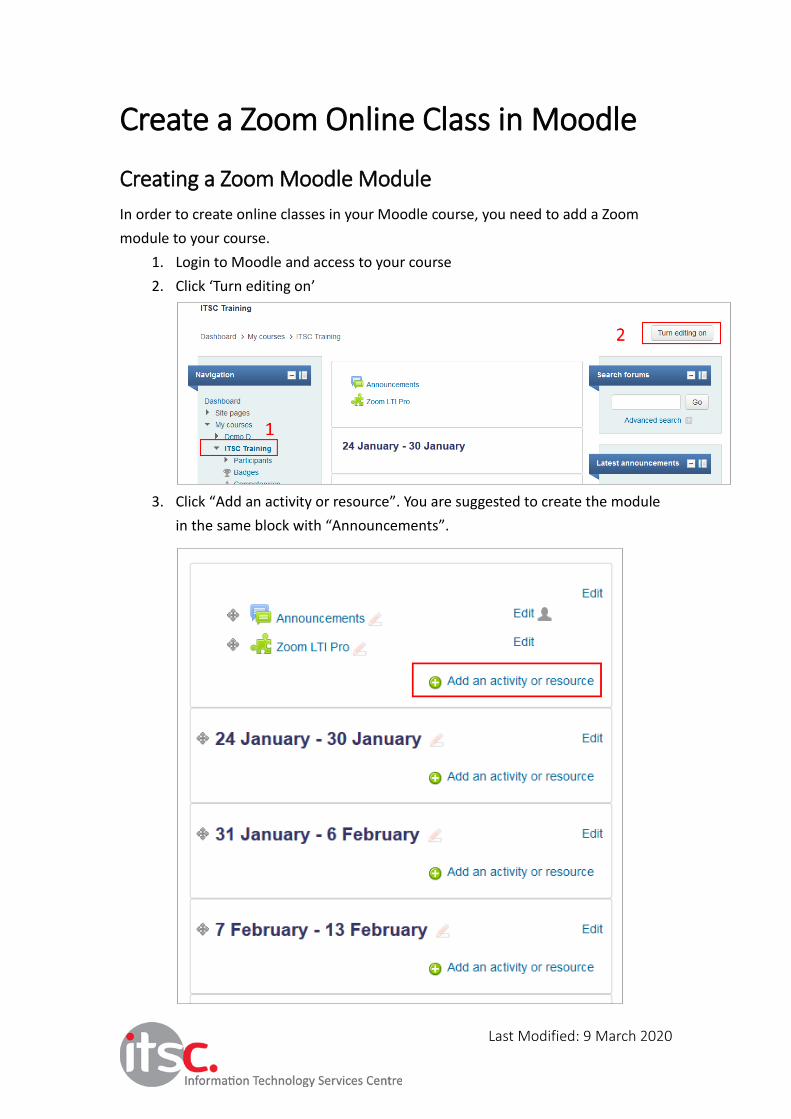
1. Login to Moodle and access to your course
2. Click ‘Turn editing on’
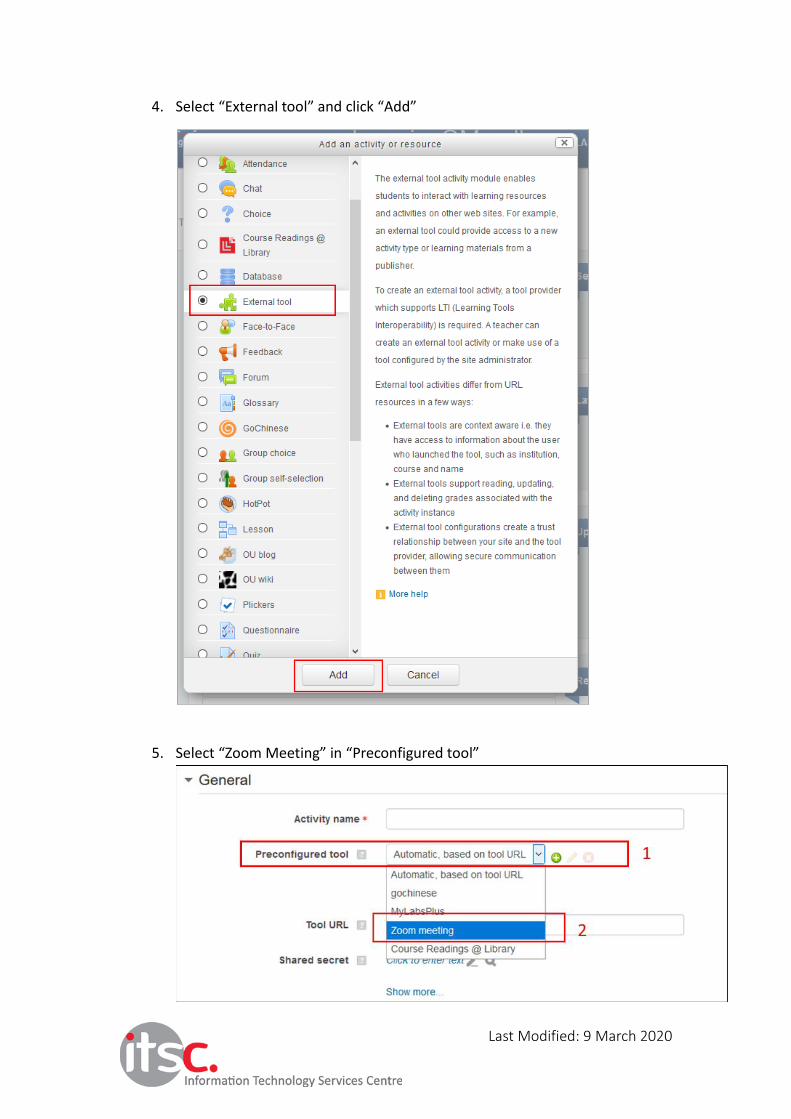
3. Click “Add an activity or resource”. You are suggested to create the module
in the same block with “Announcements”.
Last Modified: 9 March 2020
4. Select “External tool” and click “Add”
5. Select “Zoom Meeting” in “Preconfigured tool”
Last Modified: 9 March 2020
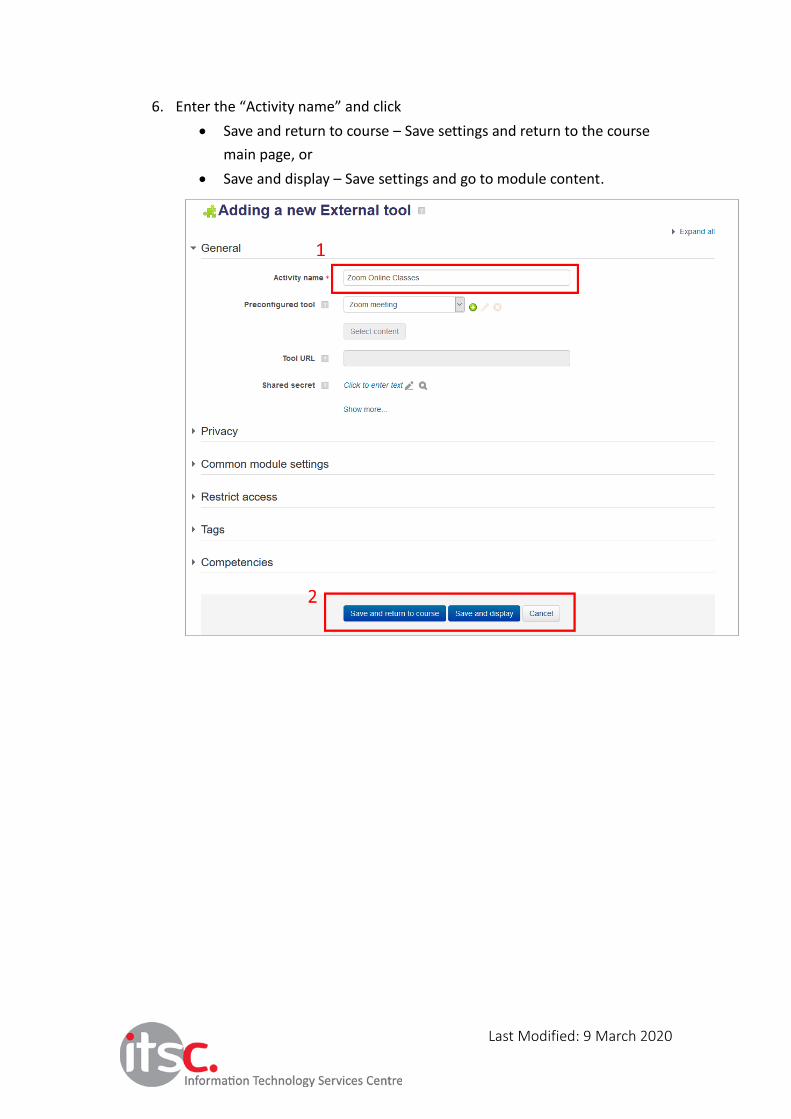
6. Enter the “Activity name” and click
Save and return to course – Save settings and return to the course
main page, or
Save and display – Save settings and go to module content.
Last Modified: 9 March 2020
Understanding the Zoom Moodle Module
Start the Zoom Moodle Module by clicking the module “Zoom Online Classes”
created in steps 4-6 in the previous section
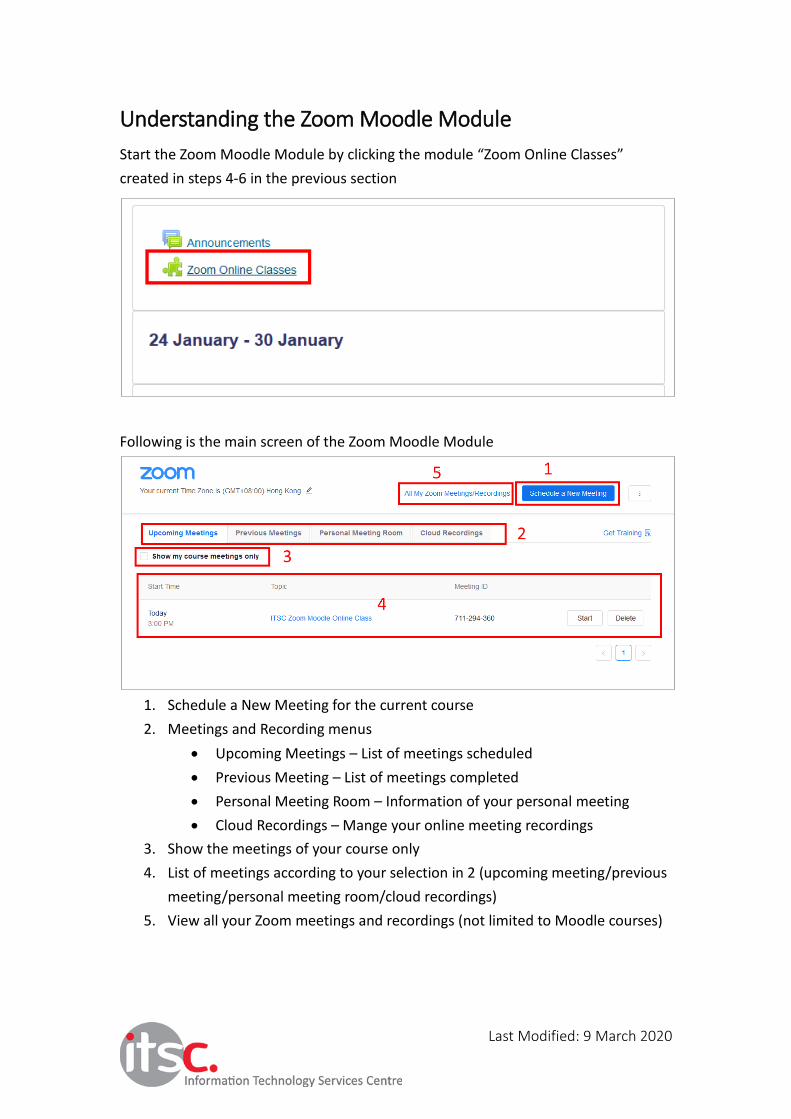
Following is the main screen of the Zoom Moodle Module
1. Schedule a New Meeting for the current course
2. Meetings and Recording menus
Upcoming Meetings – List of meetings scheduled
Previous Meeting – List of meetings completed
Personal Meeting Room – Information of your personal meeting
Cloud Recordings – Mange your online meeting recordings
3. Show the meetings of your course only
4. List of meetings according to your selection in 2 (upcoming meeting/previous
meeting/personal meeting room/cloud recordings)
5. View all your Zoom meetings and recordings (not limited to Moodle courses)
Last Modified: 9 March 2020
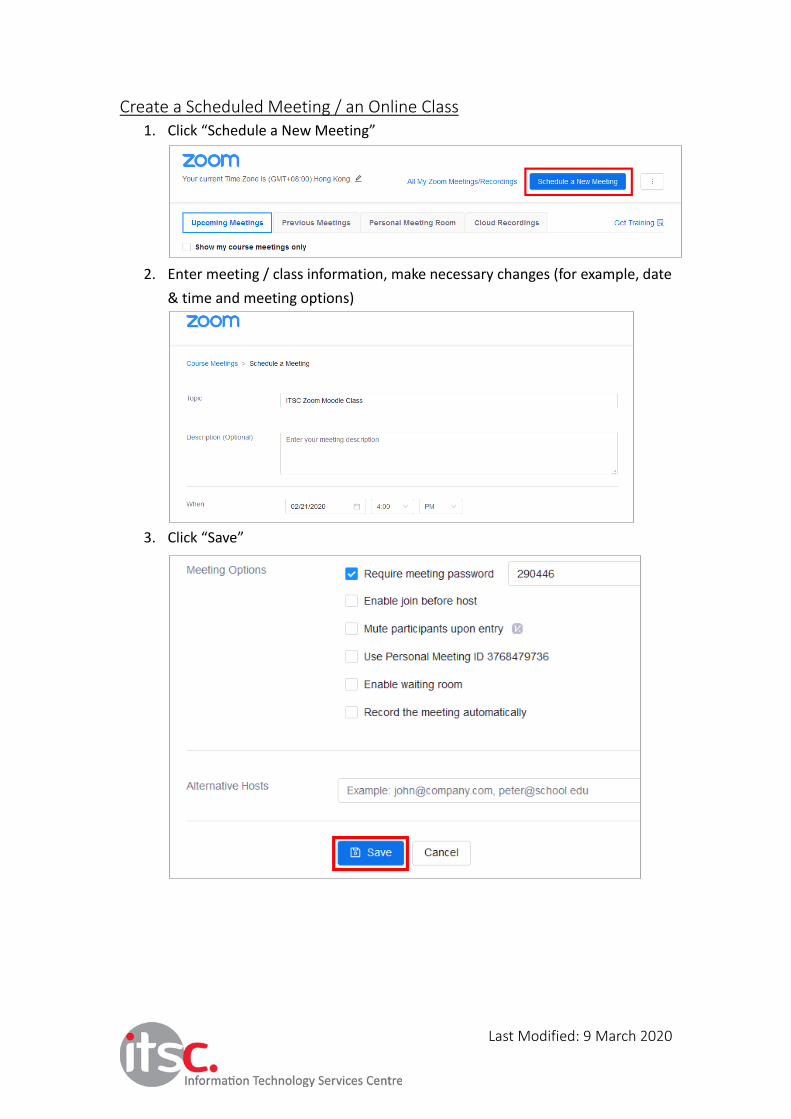
Create a Scheduled Meeting / an Online Class 1. Click “Schedule a New Meeting”
2. Enter meeting / class information, make necessary changes (for example, date
& time and meeting options)
3. Click “Save”
Last Modified: 9 March 2020
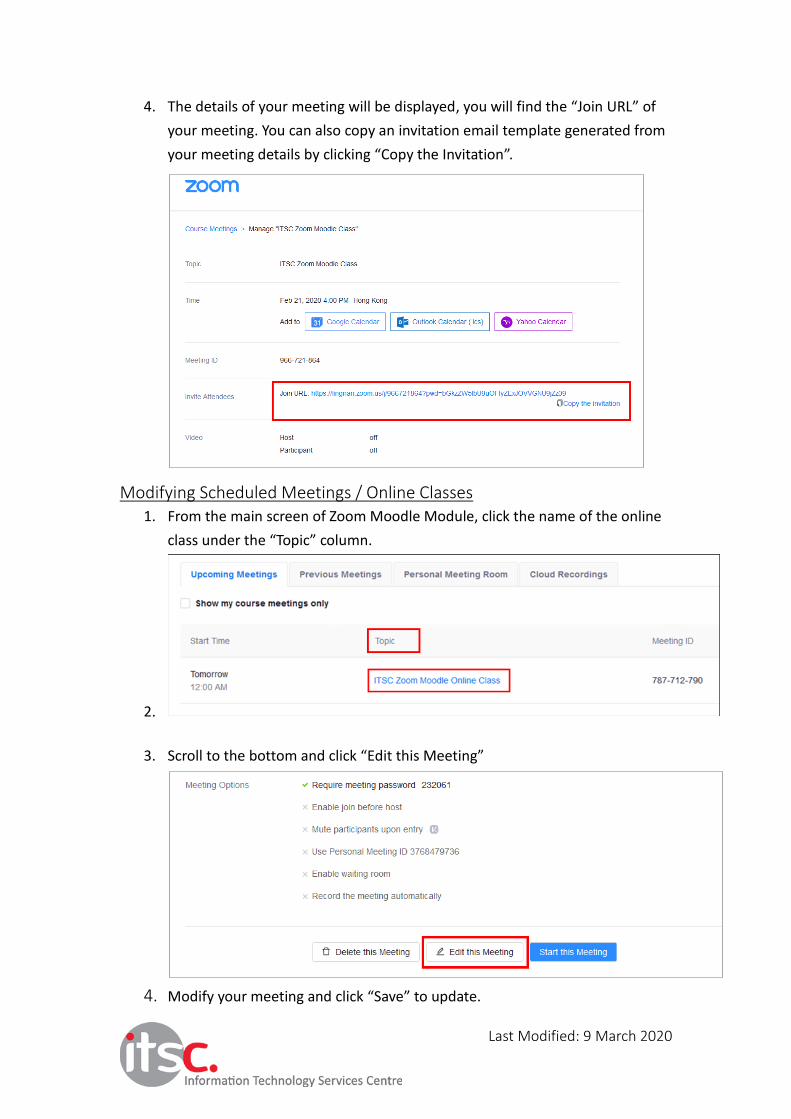
4. The details of your meeting will be displayed, you will find the “Join URL” of
your meeting. You can also copy an invitation email template generated from
your meeting details by clicking “Copy the Invitation”.
Modifying Scheduled Meetings / Online Classes 1. From the main screen of Zoom Moodle Module, click the name of the online
class under the “Topic” column.
2.
3. Scroll to the bottom and click “Edit this Meeting”
4. Modify your meeting and click “Save” to update.
Last Modified: 9 March 2020
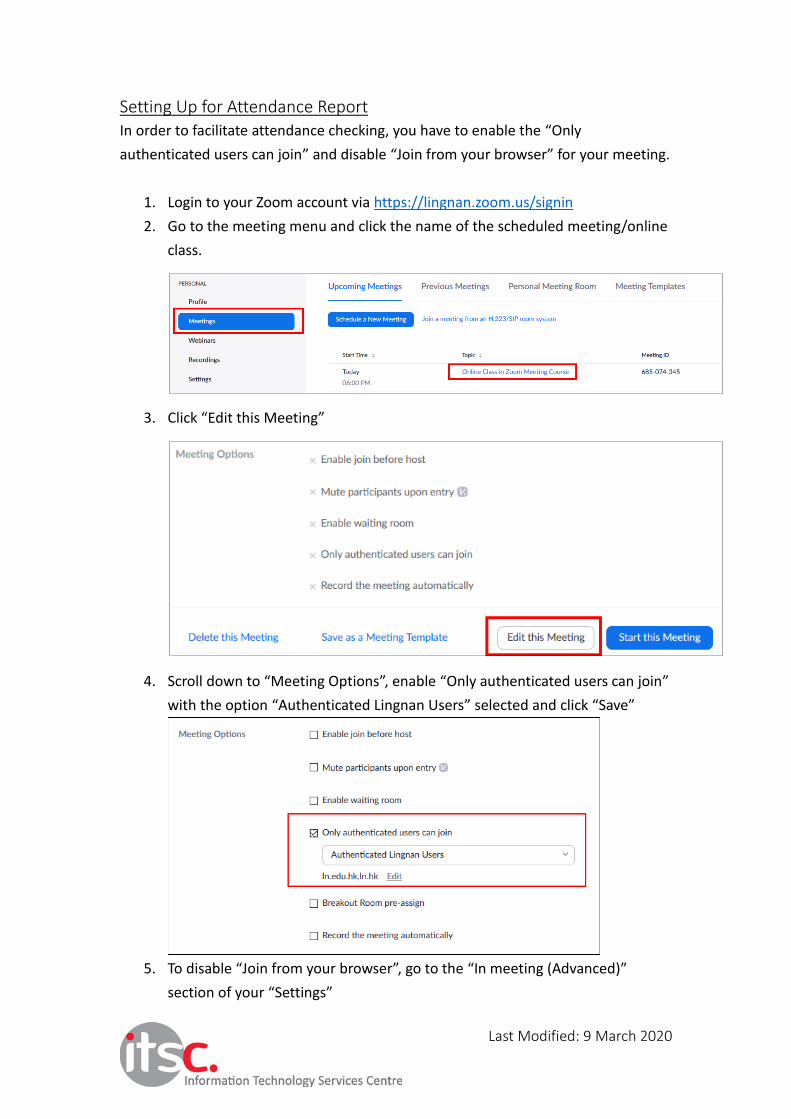
Setting Up for Attendance Report In order to facilitate attendance checking, you have to enable the “Only
authenticated users can join” and disable “Join from your browser” for your meeting.
1. Login to your Zoom account via https://lingnan.zoom.us/signin
2. Go to the meeting menu and click the name of the scheduled meeting/online
class.
3. Click “Edit this Meeting”
4. Scroll down to “Meeting Options”, enable “Only authenticated users can join”
with the option “Authenticated Lingnan Users” selected and click “Save”
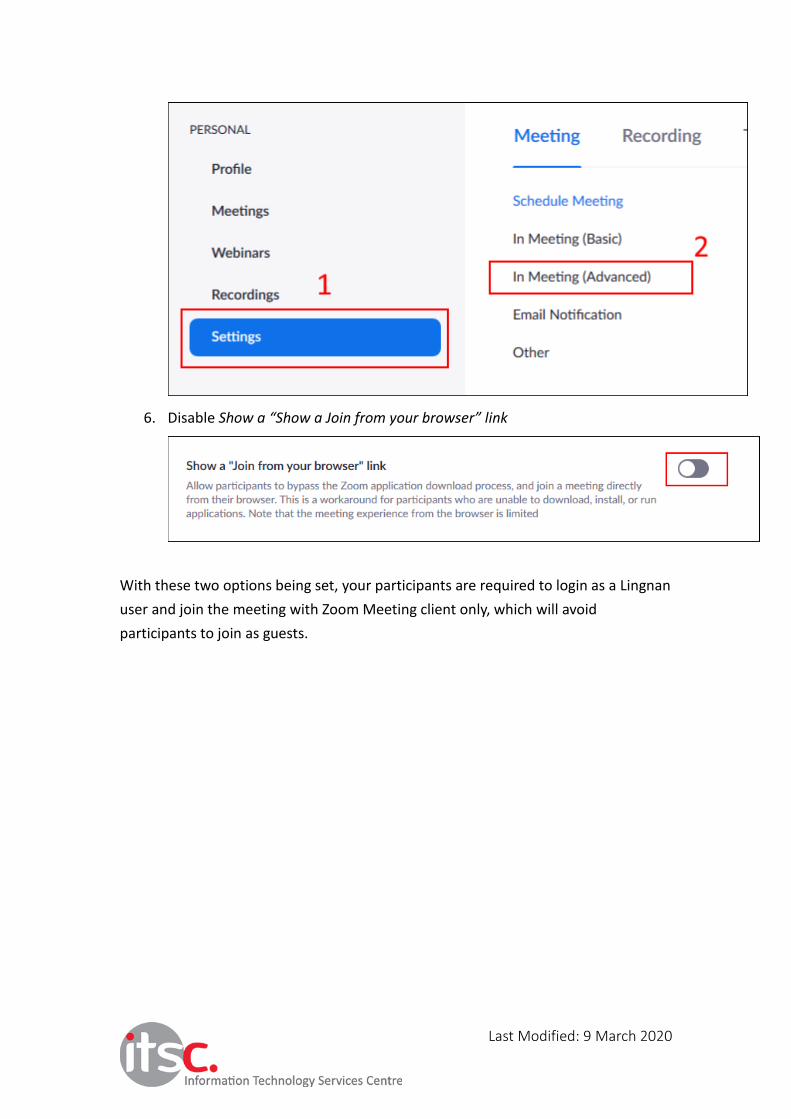
5. To disable “Join from your browser”, go to the “In meeting (Advanced)”
section of your “Settings”
Last Modified: 9 March 2020
6. Disable Show a “Show a Join from your browser” link
With these two options being set, your participants are required to login as a Lingnan
user and join the meeting with Zoom Meeting client only, which will avoid
participants to join as guests.
Last Modified: 9 March 2020
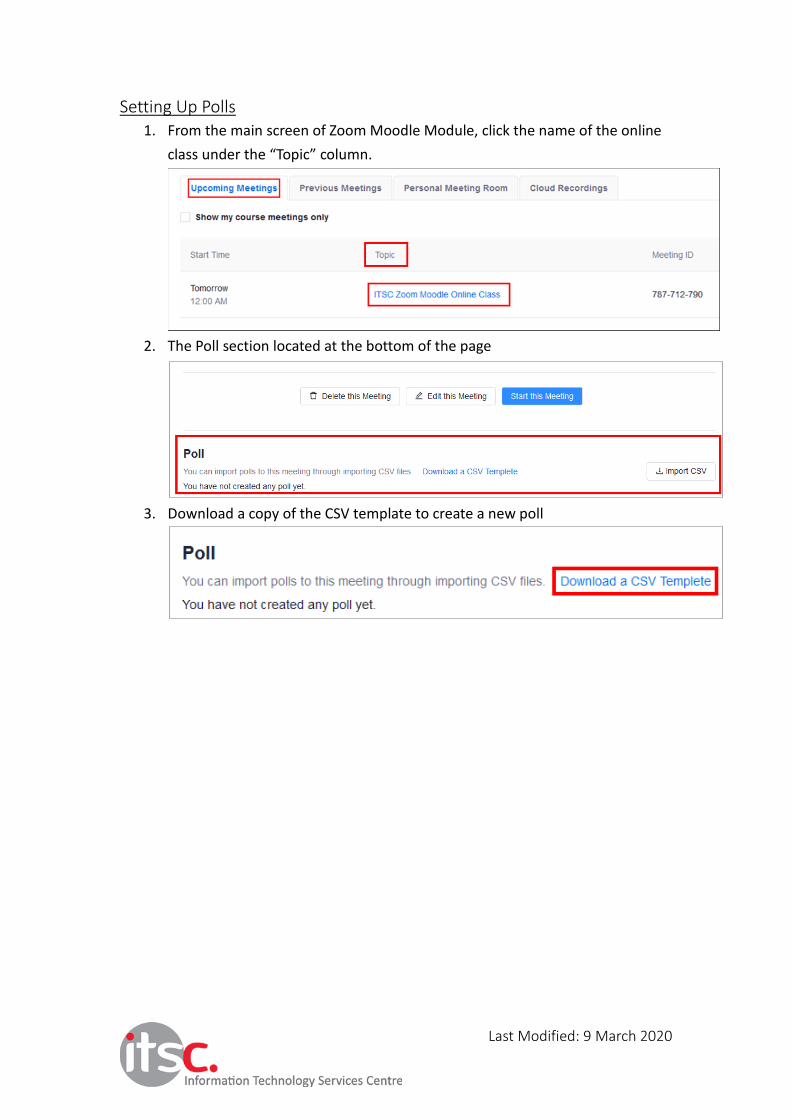
Setting Up Polls 1. From the main screen of Zoom Moodle Module, click the name of the online
class under the “Topic” column.
2. The Poll section located at the bottom of the page
3. Download a copy of the CSV template to create a new poll
Last Modified: 9 March 2020
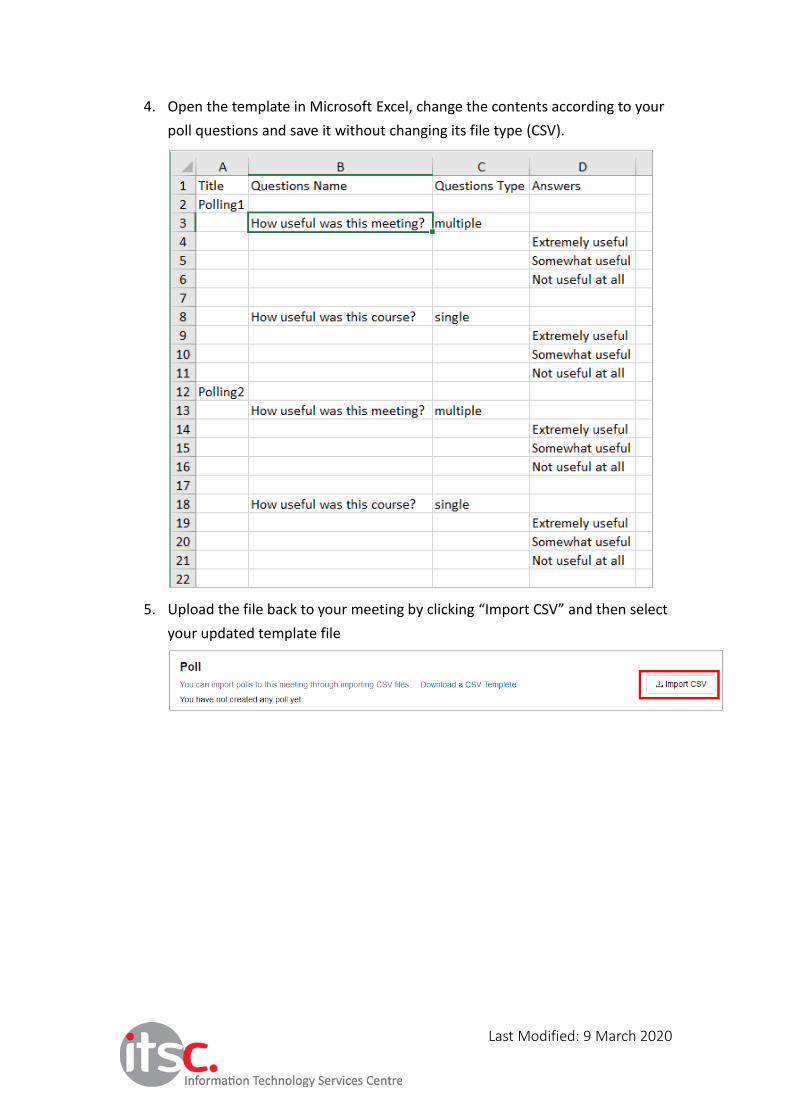
4. Open the template in Microsoft Excel, change the contents according to your
poll questions and save it without changing its file type (CSV).
5. Upload the file back to your meeting by clicking “Import CSV” and then select
your updated template file
Last Modified: 9 March 2020
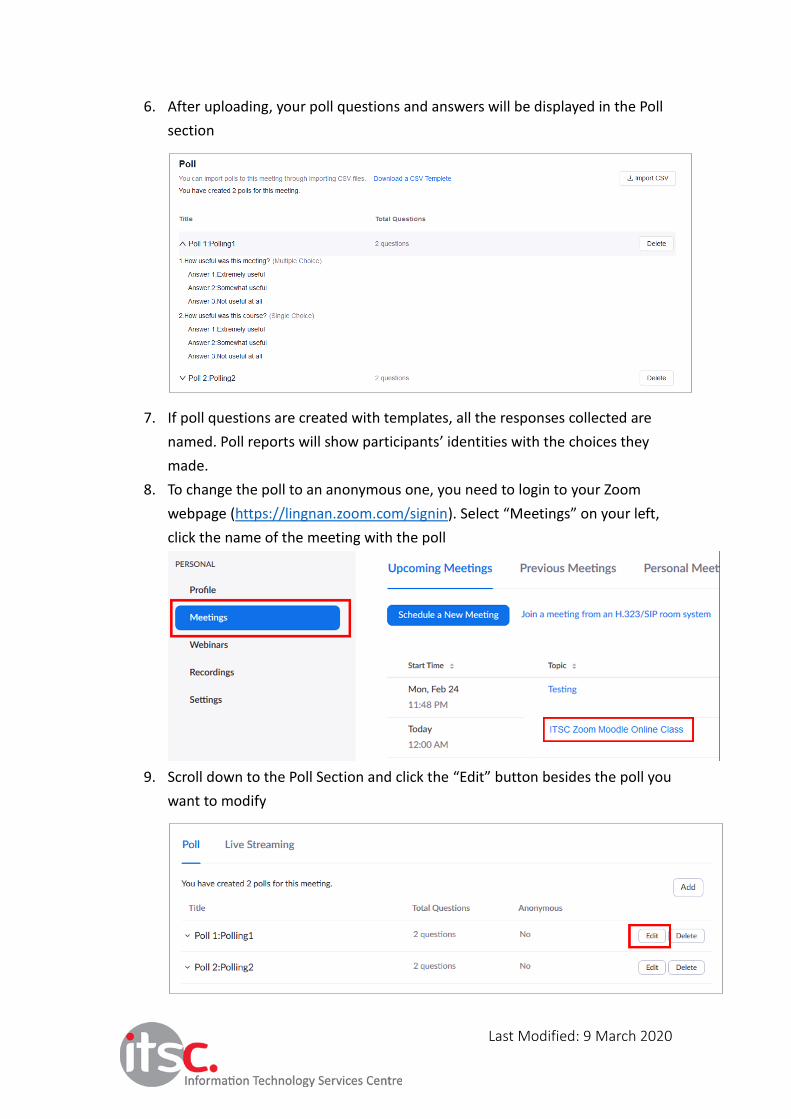
6. After uploading, your poll questions and answers will be displayed in the Poll
section
7. If poll questions are created with templates, all the responses collected are
named. Poll reports will show participants’ identities with the choices they
made.
8. To change the poll to an anonymous one, you need to login to your Zoom
webpage (https://lingnan.zoom.com/signin). Select “Meetings” on your left,
click the name of the meeting with the poll
9. Scroll down to the Poll Section and click the “Edit” button besides the poll you
want to modify
Last Modified: 9 March 2020
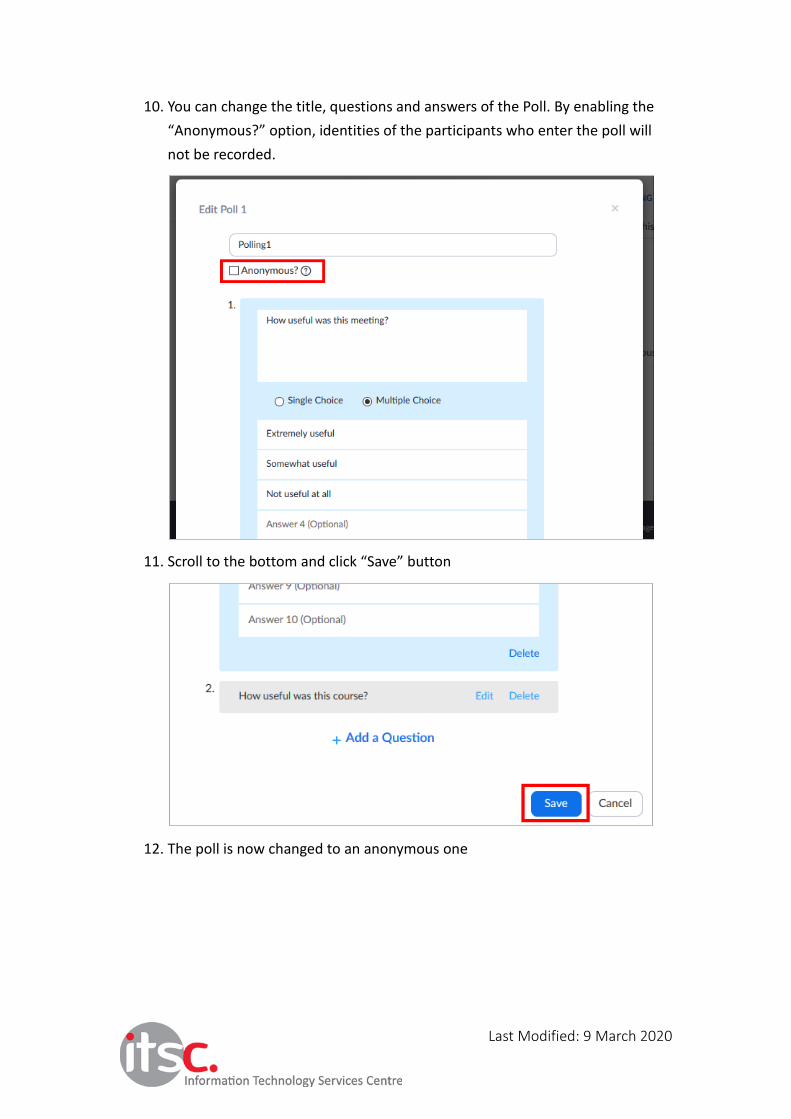
10. You can change the title, questions and answers of the Poll. By enabling the
“Anonymous?” option, identities of the participants who enter the poll will
not be recorded.
11. Scroll to the bottom and click “Save” button
12. The poll is now changed to an anonymous one

Last Modified: 9 March 2020
Start Scheduled Meetings / Online Classes From the main screen of Zoom Moodle Module, select “Upcoming Meetings” and
click “Start” button besides the meeting / online class you want to start. Your
installed Zoom Client will be launched.
Last Modified: 9 March 2020
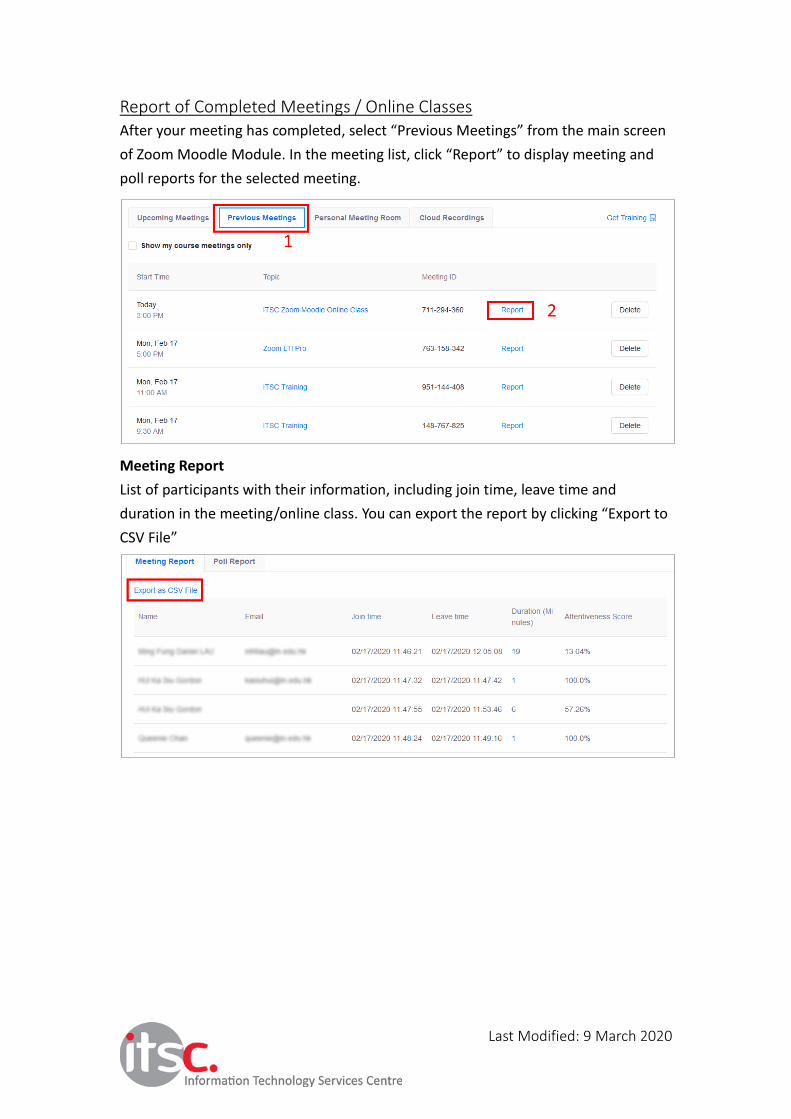
Report of Completed Meetings / Online Classes After your meeting has completed, select “Previous Meetings” from the main screen
of Zoom Moodle Module. In the meeting list, click “Report” to display meeting and
poll reports for the selected meeting.
Meeting Report
List of participants with their information, including join time, leave time and
duration in the meeting/online class. You can export the report by clicking “Export to
CSV File”
Last Modified: 9 March 2020
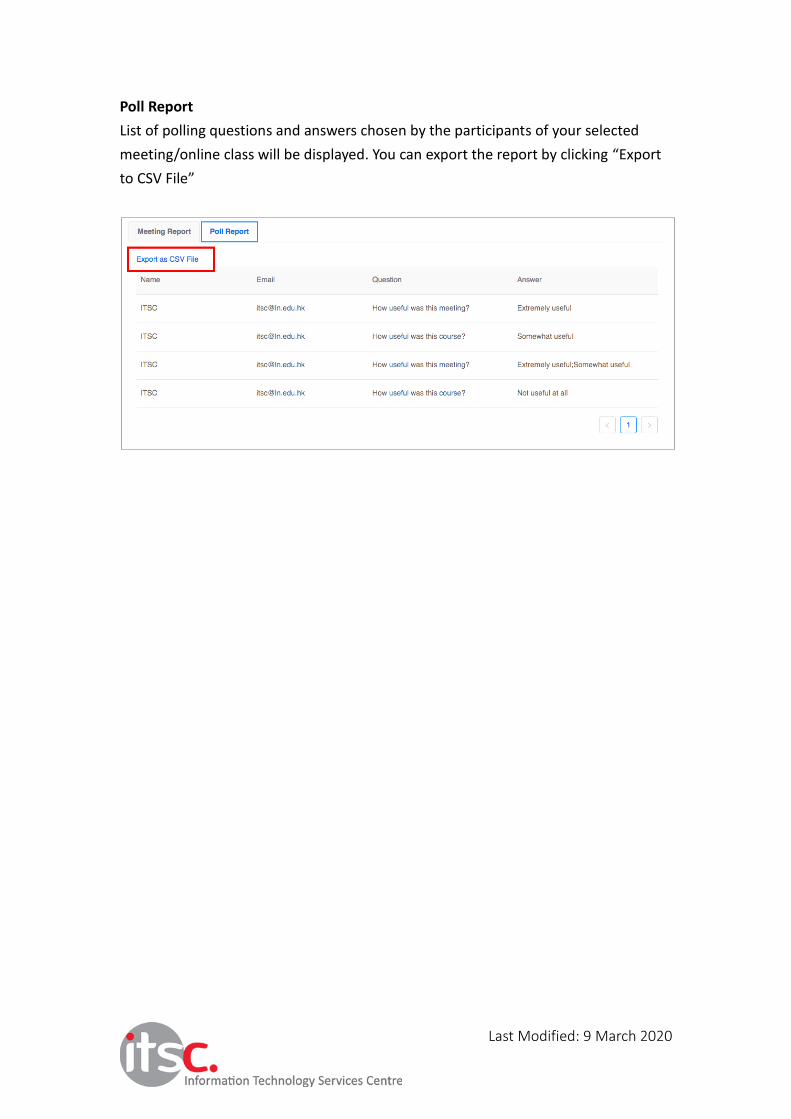
Poll Report
List of polling questions and answers chosen by the participants of your selected
meeting/online class will be displayed. You can export the report by clicking “Export
to CSV File”