crane & rigging€¦ · a rigger. training programs such as the infrastructure health &...
TRANSCRIPT

Name: ___________________________________ Date: __________
Class: _____________________________ Period: _____
Crane & Rigging Operator Training
What is rigging and why am I here?
As we explore the manufacturing industry, you will find that many operators and maintenance crew are
trained rigging professionals. They are needed to use cranes to safely transport heavy machines,
engines, etc from one place to another
throughout the plant. Rigging is NOT
“simply hooking up a chain” to a piece of
machinery and lifting it. That’s a great way
to endanger everyone’s life, including your
own.
“The cause of rigging accidents can often be traced to a lack of knowledge on the part of a rigger. Training programs such as the Infrastructure Health & Safety Association’s Basic Safety Training for Hoisting and Rigging provide workers with a basic knowledge of principles relating to safe hoisting and rigging practices in the construction industry. A safe rigging operation requires the rigger to know
• the weight of the load and rigging hardware
• the capacity of the hoisting device
• the working load limit of the hoisting rope, slings, and hardware. …Most crane and rigging accidents can be prevented by field personnel following basic safe hoisting and rigging practice.” IHSA, Health and Safety Manual Remember, when you have a several ton object suspended in midair, the safety of you and everyone
else on the job site depends on how well you have performed your calculations and made your
selections.
Let’s begin!

Rigging Basics
Definitions:
• WLL (Working Load Limit): The maximum amount of weight a piece of lifting equipment can
handle without fear of breaking.
• Sling: The chain or rope that will be attached the object in need of lifting.
• Hitch: The way the sling is attached to the object in need of lifting.
Equipment Labels:
The following is an example of a sling tag. A tag should be attached to every sling and a sling should not
be used if it is not properly tagged.
Notice there are three numbers – these are the WLLs for this particular sling, broken down by type of
hitch.
The hitch is the way in which the lifting equipment (sling, chain, rope, etc.) is attached to the load you
wish to lift. There are three basic types of hitches:
Part 1: Choker and Basket Hitch Reductions
Mathematical Objectives:
• Accurately measure angles. (TM-G2.B)
• Calculate WLLs using tables, percentages, and formulas. (TM-NS1.D, TM-BA3.A)
• Calculate the ratio of diameters. (TM-NS1.A, TM-NS1.E)
A rigger always checks the sling tag to make sure that the sling can handle the weight of the load.
However, the rigger must also know that the WLL of a sling is MUCH LESS when the sling is used in
anything other than “standard” position.
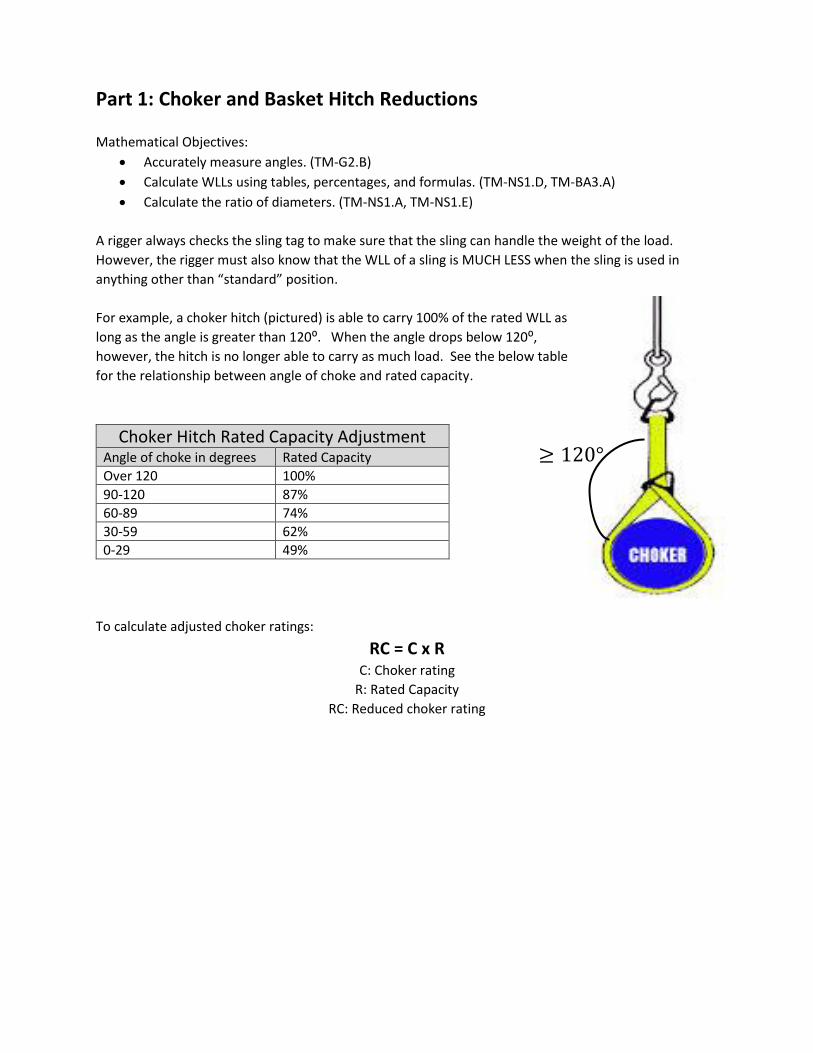
For example, a choker hitch (pictured) is able to carry 100% of the rated WLL as
long as the angle is greater than 120⁰. When the angle drops below 120⁰,
however, the hitch is no longer able to carry as much load. See the below table
for the relationship between angle of choke and rated capacity.
Choker Hitch Rated Capacity Adjustment
Angle of choke in degrees Rated Capacity
Over 120 100%
90-120 87%
60-89 74%
30-59 62%
0-29 49%
To calculate adjusted choker ratings:
RC = C x R C: Choker rating
R: Rated Capacity
RC: Reduced choker rating
≥ 120°
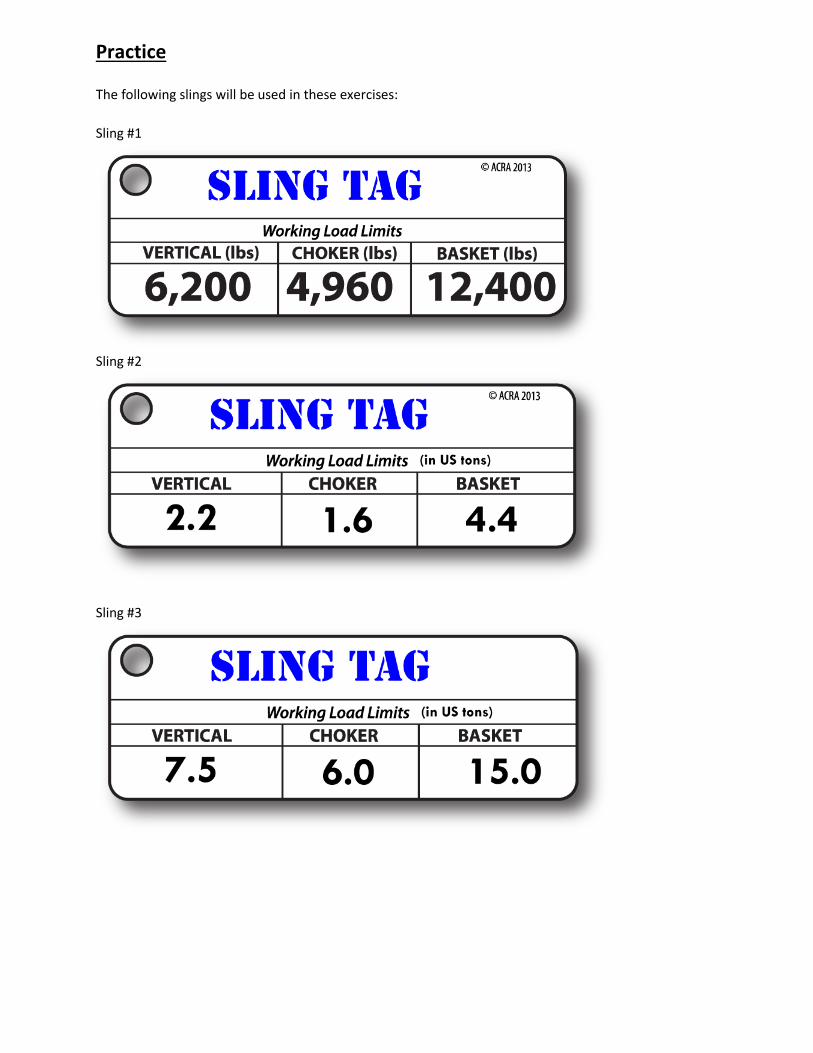
Practice
The following slings will be used in these exercises:
Sling #1
Sling #2
Sling #3

Measure the angle of the following choker hitches, then determine the reduced WLL of the indicated
sling.
1. Use sling #1.
Angle of choke: ____________
Reduced WLL: _____________
Will this sling be able to lift this load safely? Why or why not?
2. Use sling #2.
Angle of choke: ____________
Reduced WLL: _____________
Will this sling be able to lift this load safely? Why or why not?
3. Use sling #3.
Angle of choke: ____________
Reduced WLL: _____________
Will this sling be able to lift this load safely? Why or why not?
4000 lbs
5000 lbs
7000 lbs

4. A rigger measures an angle of choke and finds that it is 59.5⁰. Which rated capacity should he use –
74% or 62%? Justify your answer.
Basket Hitches, as well, have reduced WLLs when used with wire rope. In the case of the basket hitch,
the key measurement is the ratio of the diameter of the load to the diameter of the rope (see picture).
The D/d ratio tells the rigger how many times bigger the diameter of the
load is compared to the rope. For example, if a load has a 10’’ diameter
(D=10) and the rope is ½’’ in diameter (d=1/2), then the D/d ratio is
10
1/2= 20,
meaning the load’s diameter is 20 times bigger than
the diameter of the rope. A D/d ratio of 20 or higher
is generally considered “good”. When the ratio
starts dropping below 20, a rigger must calculate the corresponding drop in the
efficiency of their sling. The following table compares D/d ratios to sling efficiency.
D/d Ratio Strength Efficiencies
D/d Efficiency
30 95%
20 92%
10 86%
5 75%
2 65%
1 50%
Practice
5. Fill in the following table given the load diameter, rope diameter, and the wire rope’s basket rated
WLL.
Load Diameter Rope Diameter Basket WLL D/d Ratio Reduced WLL
20’’ 1’’ 20 tons
10’’ 2’’ 73 tons
14’’ ½’’ 4.0 tons
18’’ ¾’’ 8.6 tons
11 ½’’ 2-1/4’’ 70 tons
Diameter
of Load (D) Diameter of
rope (d)

6. A rigger has a rope that is 1 ½’’ in diameter and is rated at 10,000 lbs for a basket hitch. The rigger
would like to be able to lift at least 8,000 lbs, using the basket hitch. What is the smallest diameter of
load he can carry?
7. In addition to performing calculations, rigging professionals use mathematics to understand the
underlying relationships in rigging operations. In the following table, we will hold the load diameter and
sling rating constant while changing the rope size. Notice what this does to the D/d ratio and WLL.
Load Diameter Rope Diameter Sling Rating for Basket Hitch
D/d Ratio WLL
10’’ ¼’’ 1000 lbs
10’’ ½’’ 1000 lbs
10’’ 1’’ 1000 lbs
10’’ 2’’ 1000 lbs
10’’ 3’’ 1000 lbs
State the pattern – as rope diameter increases, what happens to the WLL?
Note – usually as the width of the rope increases, the sling rating will also go up. However, the pattern
you noticed in exercise 7 is still significant. It means that, if you are wanting to lift a heavier load with
the basket hitch, the answer is not necessarily to reach for your thickest rope. There is an optimal zone
where the rope diameter is small enough to keep the D/d high and the rope’s sling rating is high enough
to give you enough WLL.

Part 2: Vertical Hitch Reductions
Mathematical Objectives:
• Calculate and understand vertical hitch reductions using sin, cos, and tan. (TM-G3.B)
One vertical hitch can be used to lift a load, as shown in the pictures below.
However, for stability, often two vertical hitches are attached to a load and then brought at an angle to
one overhead lift point, as shown below.
60
2000 lbs

When this is done, however, the WLL of the sling is reduced. The amount that it is reduced by is
dependent upon the sling angle: the angle formed between the horizontal top of the load and
the sling itself (when pulled taut).
In order to understand the calculation for the reduced WLL, we will need to call upon a
little bit of physics knowledge! Recall that all objects are acted upon by the force of
gravity and that force acts perpendicular to the ground; in other words,
everything is being pulled straight downwards. In order to keep from
being pulled all the way to the center of the earth, something must be
acting directly opposite that force. In the case of our loads that we are
lifting, the sling must exert an equal and opposite force to gravity in order to keep the load from falling
to the ground. See the following diagram for a visual of where this force is acting.
You can see that the direction of the upward pull is NOT in the same direction as the slings. Here’s the
interesting part – we know the force of the upward pull. It’s the weight of the load. For example, if we
have a 2000 lb load, it is taking 2000 lbs of upward force to keep it in the air. However, the amount of
force the slings are experiencing in this configuration is much different. Not only are these slings
needing to exert the upward force to keep the load in the air but they are also experiencing a certain
amount of left-to-right force due to tension. To understand
this, think of the difference
between carrying a heavy
load with your arms at your
side (only responsible for the
upward force) and carrying a
heavy load with your arms
outstretched (responsible for
upward forces and the
tension of holding a heavy
load away from your body).
60
2000 lbs Sling
Angle
Load
Sling Sling
Dir
ecti
on
of
Gra
vity
Directio
n o
f Up
ward
Pu
ll

So how do we calculate the amount of force (weight) on the sling? Here is where we take advantage of
a little geometry! Notice that when we draw in the vertical force, we split the area in between the slings
into two right triangles. If we assume that each triangle will be responsible for half the load (which they
will be if you’ve properly balanced the load), then we know the value of the vertical side of the triangle.
Given a sling angle, we can then use a little trigonometry to figure out the force on the sling!
sin(60°) =1000
𝑥
𝑥 =1000
sin(60°)= 1,155𝑙𝑏𝑠
The WLL of each of the two slings will need to be 1,155 lbs in order to
safely lift this load.
Practice For the following scenarios, calculate the WLL of each sling needed in order to lift the load at the angle indicated. Diagrams are not necessarily drawn to scale.
1.
2.
3.
4.
60
2000 lbs
10
00
lbs
10
00
lbs
60
2000 lbs
45
2000 lbs
30
2000 lbs
10
2000 lbs

5. Based on your calculations in problems 1 through 4, generalize a pattern. As the angle at which you lift the load become larger, what happens to the amount of weight each of the slings have to handle? What happens as the angle become smaller?
6. Now that you have done this calculation several times in exercises 1-4, you have probably noticed a
pattern to this calculation. Write a formula using θ for the sling angle, W for the weight of the load, and
WLL for the needed Working Load Limit of the sling.
__________________________________
Use your formula on the following problems (A and B). Show all work and be attentive to units.
7. Find the tension per leg for the following scenarios (C and D).

8. Most rigging training recommend NEVER lifting at less than a
30⁰ sling angle. Based on the calculations you have done in
exercises 1-4 and what you know about heavy objects and
human behavior, write a rationale for why you think rigging
training advise so heavily against the 30⁰ (or less) angle.
9. Suppose you are a professional rigger responsible for the training of an apprentice to your trade.
One day the apprentice brings you his rigging handbook with the following figure in it. He says he is a
little lost and asks for you to explain the figure to him. Prepare a verbal explanation of what your
apprentice has brought you.
Part 3: Calculating Loads
Mathematical Objectives:
• Calculate volume. (TM-NS1.C, TM-NS3.B, TM-NS2.B, TM-BA3.D)
• Convert between units as needed. (TM-NS2.A, TM-NS2.D)
Up until this point, you have always been given the weight of the load we are asking you to lift. In
reality, though, the rigging professional is often responsible not only for calculating the WLLs on his/her
slings, but also for calculating the weight of the load! Finding the weight of a load is a two step process:
1. Find the volume of the object.
2. Find the weight of the object by taking volume x weight (per Cu).

The following formulas might be useful:
Cube or Rectangle Length x Width x Height
Cylindrical/Round Shapes 0.7854 x D X D X H D = diameter across base H = height
Round and Hollow (Pipes) T X (D – T) X 3.141 X H D = outside diameter H = overall length of pipe T = wall thickness
Frustum of a cone 0.2618 X h X (D2 + D X d + d2) D = outside diameter of small end h = overall length d = outside diameter of large end
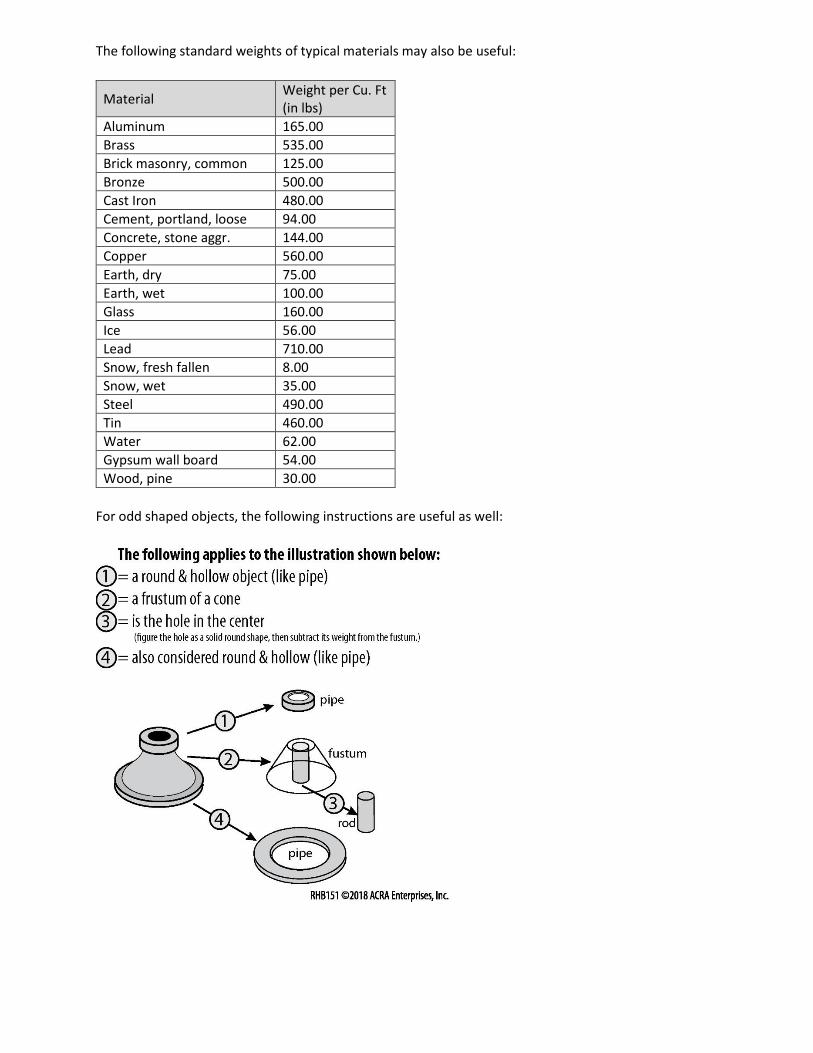
The following standard weights of typical materials may also be useful:
Material Weight per Cu. Ft (in lbs)
Aluminum 165.00
Brass 535.00
Brick masonry, common 125.00
Bronze 500.00
Cast Iron 480.00
Cement, portland, loose 94.00
Concrete, stone aggr. 144.00
Copper 560.00
Earth, dry 75.00
Earth, wet 100.00
Glass 160.00
Ice 56.00
Lead 710.00
Snow, fresh fallen 8.00
Snow, wet 35.00
Steel 490.00
Tin 460.00
Water 62.00
Gypsum wall board 54.00
Wood, pine 30.00
For odd shaped objects, the following instructions are useful as well:

Practice 1. A pipe measures 10 inches across (from outside to outside) and 8 inches across the inside. The pipe
is 8 feet long and made of cast iron. How much does the pipe weigh?
2. A rectangular aluminum bar is 1 ¾’’ by 3’’ by 6’. What is the weight of the bar?
3. What is the weight of the following steel I-beam?
10’’
8’’

3. A hollow steel beam is 4’’ by 4’’ by 8’ and ¼’’ thick. What is the weight of the beam?
4. A concrete frustum has a diameter on the small end of 5 ½’’ inches and a diameter on the large end of
13’’ inches. The frustum is 2’5’’ tall. What is the weight of the frustum?
5. A shaft idler roller, exported from China, is made of aluminum.
The roll is 150 centimeters long, 80 cm in diameter. The shaft is 180
centimeters long. The roller is hollow and the walls are 25
centimeters thick. What is the weight of this roller?
Part 4: Replacing Equipment at your Manufacturing Plant
Mathematical Objectives:
• Use computations to make decisions. (TM-NS4.A, TM-NS4.D)
Throughout this unit, you have been developing costs and analysis for your own manufacturing process!
A fact of owning a manufacturing plant is that machines will break or new machines will be required to
make your product. In such cases, you’ll need to rely on your rigging knowledge to safely bring the
machines into the plant and install them.
To upgrade your process, let’s imagine that you’ll need to install a machine that weighs 10,000 lbs. The
machine is 12 feet tall, 6 feet wide, and 8 feet long. The crane will need to ease it through an opening
that is 20 feet tall. Allow 2 feet for the hook and upper portion of the crane.
In addition, for a new process, you’ll need to transport the following raw materials into your plant on a
regular basis:
• Solid Steel Rods, 1.5’’ diameter, 12’ long
• Solid Steel Bars, 5’’ by 5’’ by 8’
• Copper Pipe, 2’’ outside diameter, 1 ¼’’ inside diameter, 10’ long
• Cast Iron Frustums, small side diameter 8’’, large side diameter 2’, 3’ high
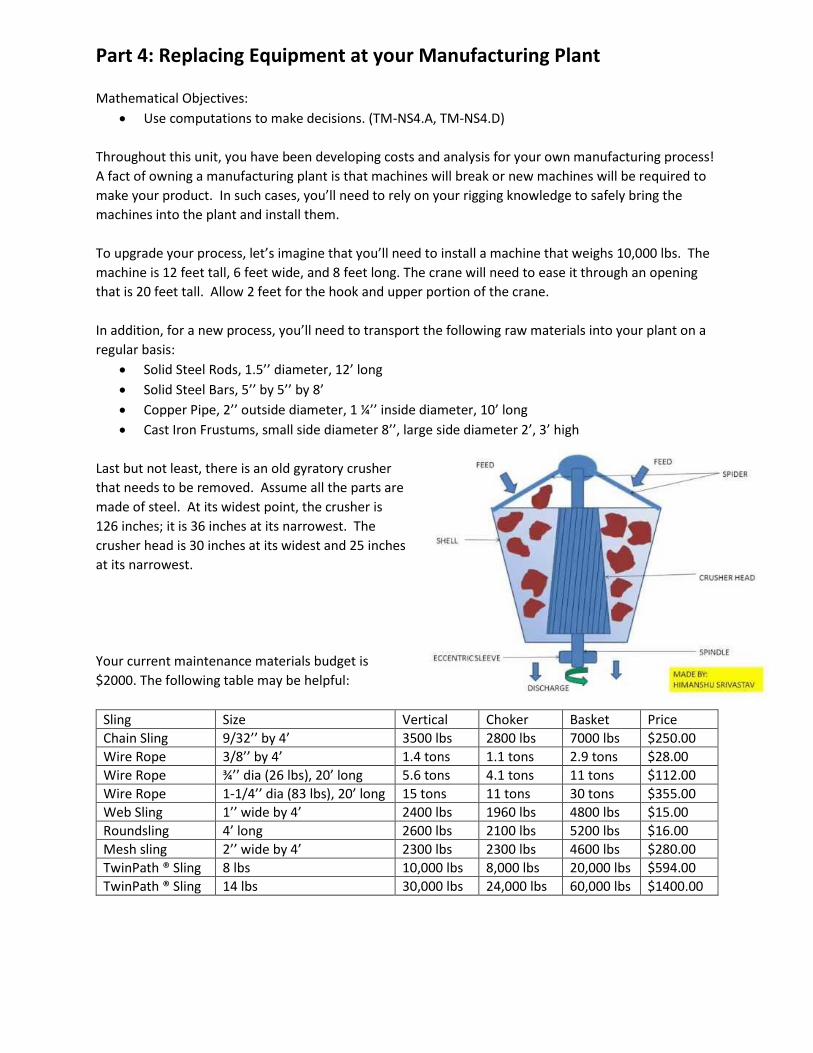
Last but not least, there is an old gyratory crusher
that needs to be removed. Assume all the parts are
made of steel. At its widest point, the crusher is
126 inches; it is 36 inches at its narrowest. The
crusher head is 30 inches at its widest and 25 inches
at its narrowest.
Your current maintenance materials budget is
$2000. The following table may be helpful:
Sling Size Vertical Choker Basket Price
Chain Sling 9/32’’ by 4’ 3500 lbs 2800 lbs 7000 lbs $250.00
Wire Rope 3/8’’ by 4’ 1.4 tons 1.1 tons 2.9 tons $28.00
Wire Rope ¾’’ dia (26 lbs), 20’ long 5.6 tons 4.1 tons 11 tons $112.00
Wire Rope 1-1/4’’ dia (83 lbs), 20’ long 15 tons 11 tons 30 tons $355.00
Web Sling 1’’ wide by 4’ 2400 lbs 1960 lbs 4800 lbs $15.00
Roundsling 4’ long 2600 lbs 2100 lbs 5200 lbs $16.00
Mesh sling 2’’ wide by 4’ 2300 lbs 2300 lbs 4600 lbs $280.00
TwinPath ® Sling 8 lbs 10,000 lbs 8,000 lbs 20,000 lbs $594.00
TwinPath ® Sling 14 lbs 30,000 lbs 24,000 lbs 60,000 lbs $1400.00

Your Task:
Create a presentation for the co-owners of your manufacturing process. In it you’ll need to include how
you plan to lift the new machine, new materials, and old gyratory crusher. Be sure to include all
relevant calculations. Also include a budget of what slings you intend to purchase for the plant.