cq-vx2200u - panasonicpanasonic.ca/pcs/operatinginstructions/cqvx2200-oi-eng...cq-vx2200u operating...
TRANSCRIPT

®
CQ-VX2200UOperating InstructionsManuel d’instructions
Manual de instrucciones
¡Please read these instructions carefully before using this product and keep this manual for future reference.¡Prière de lire ces instructions attentivement avant d’utiliser le produit et garder ce manuel pour l’utilisation ultérieure.¡Lea con atención estas instrucciones antes de utilizar el producto y guarde este manual para poderlo consultar en el futuro.
SKIP ST
DISC
REP
R
SCAN
TPS
LOC
EQB NR
SPACEPOSI
MTL
DISP SPACE1 2 3 4 5 6
REMOTE
REVERSE
SOURCE
OPENOPEN
S·A
D·M
REPEAT
REPEAT
DSP SPACEDISPLAY CLOCK
SEL S·A
TUNETRACK
SCANRANDOM
CQ-VX2200
INTEGRATED CD/CASSETTE RECEIVER WITH DSP
MTL B NR TPS SKIP
MUTE
VOL
AUTO·P
S·ANALYZERPWR
HumanEqualizer
FM DISC
AM45DISCAM45DISC
Integrated CD / Cassette Receiver with DSPCombiné autoradio AM/FM/lecteur de cassettes/lecteur CD
Receptor de AM/FM con reproductor de casetes y CD
2 CQ-VX2200U
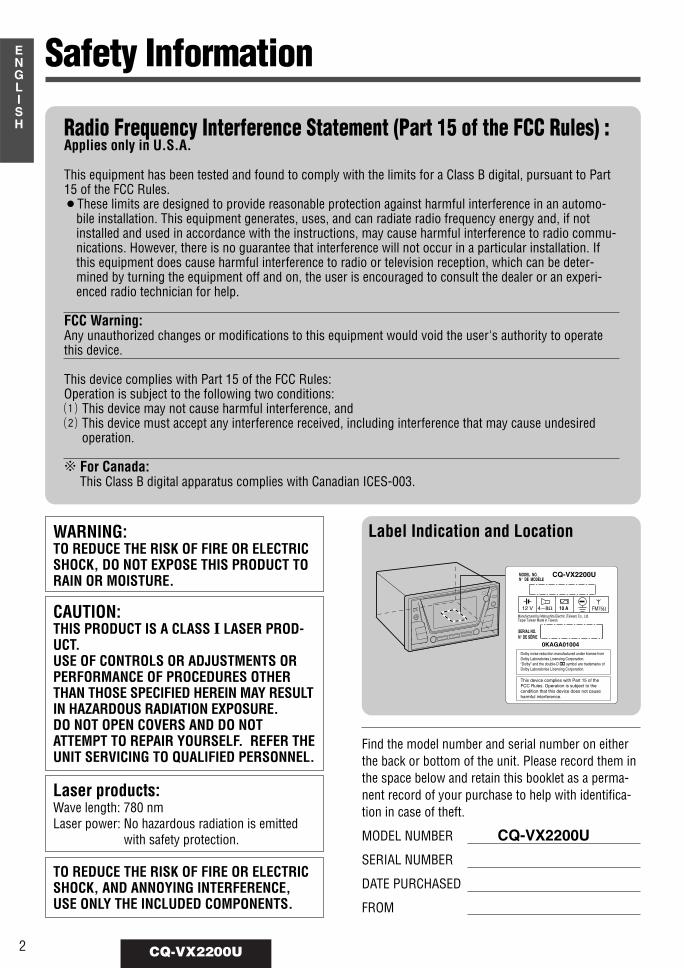
Radio Frequency Interference Statement (Part 15 of the FCC Rules) :Applies only in U.S.A.
This equipment has been tested and found to comply with the limits for a Class B digital, pursuant to Part15 of the FCC Rules.¡These limits are designed to provide reasonable protection against harmful interference in an automo-
bile installation. This equipment generates, uses, and can radiate radio frequency energy and, if notinstalled and used in accordance with the instructions, may cause harmful interference to radio commu-nications. However, there is no guarantee that interference will not occur in a particular installation. Ifthis equipment does cause harmful interference to radio or television reception, which can be deter-mined by turning the equipment off and on, the user is encouraged to consult the dealer or an experi-enced radio technician for help.
FCC Warning:Any unauthorized changes or modifications to this equipment would void the user's authority to operatethis device.
This device complies with Part 15 of the FCC Rules:Operation is subject to the following two conditions:a This device may not cause harmful interference, ands This device must accept any interference received, including interference that may cause undesired
operation.
C For Canada:This Class B digital apparatus complies with Canadian ICES-003.
Find the model number and serial number on eitherthe back or bottom of the unit. Please record them inthe space below and retain this booklet as a perma-nent record of your purchase to help with identifica-tion in case of theft.
MODEL NUMBER CQ-VX2200U
SERIAL NUMBER
DATE PURCHASED
FROM
CAUTION:THIS PRODUCT IS A CLASS I LASER PROD-UCT.USE OF CONTROLS OR ADJUSTMENTS ORPERFORMANCE OF PROCEDURES OTHERTHAN THOSE SPECIFIED HEREIN MAY RESULTIN HAZARDOUS RADIATION EXPOSURE.DO NOT OPEN COVERS AND DO NOTATTEMPT TO REPAIR YOURSELF. REFER THEUNIT SERVICING TO QUALIFIED PERSONNEL.
WARNING:TO REDUCE THE RISK OF FIRE OR ELECTRICSHOCK, DO NOT EXPOSE THIS PRODUCT TORAIN OR MOISTURE.
TO REDUCE THE RISK OF FIRE OR ELECTRICSHOCK, AND ANNOYING INTERFERENCE,USE ONLY THE INCLUDED COMPONENTS.
Laser products:Wave length: 780 nmLaser power: No hazardous radiation is emitted
with safety protection.
ENGLISH
MODEL NO.N° DE MODÈLE
Manufactured by Matsushita Electric (Taiwan) Co., Ltd.Taipei Taiwan Made in Taiwan.
12 V 4~8Ω 10 A
CQ-VX2200U
0KAGA01004
FM75Ω
SERIAL NO.N° DE SÉRIE
This device complies with Part 15 of theFCC Rules. Operation is subject to the condition that this device does not causeharmful interference.
Dolby noise reduction manufactured under license from Dolby Laboratories Licensing Corporation.“Dolby” and the double-D B symbol are trademarks of Dolby Laboratories Licensing Corporation.
Label Indication and Location
Safety Information

3CQ-VX2200U
ATTENTION:CET APPAREIL EST UN PRODUIT LASER DE CLASSEI.L'UTILISATION DE COMMANDES OU RÉGLAGES OUL'EXÉCUTION D'OPÉRATIONS AUTRES QUE CELLESQUI SONT INDIQUÉES DANS CE DOCUMENT PEU-VENT RÉSULTER EN UNE EXPOSITION À UN RAYON-NEMENT DANGEREUX.N'OUVREZ PAS LES COUVERCLES ET N'ESSAYEZPAS D'EFFECTUER VOUS-MÊME DES RÉPARA-TIONS. ADRESSEZ-VOUS À UN PERSONNEL QUALI-FIÉ POUR TOUTE RÉPARATION.
MISE EN GARDE:POUR RÉDUIRE LES RISQUES D'INCENDIE OUD'ÉLECTROCUTION, N'EXPOSEZ PAS CET APPAREILÀ LA PLUIE OU À L'HUMIDITÉ.
AFIN DE PRÉVENIR TOUT RISQUE D'INCENDIE OUD'INTERFÉRENCES, UTILISER UNIQUEMENT LESCOMPOSANTS FOURNIS.
Produits laser:Longueur d'onde: 780 nmPuissance du laser: Aucune radiation dangereuse
n'est émise avec la protectionde sécurité.
PRECAUCIÓN:ÉSTE ES UN PRODUCTO LÁSER DE LA CLASE I.LA UTILIZACIÓN DE CONTROLES, EL HACERAJUSTES O EL SEGUIR PROCEDIMIENTOS DISTIN-TOS DE LOS ESPECIFICADOS EN ESTE MANUALPODRÍA CAUSAR UNA EXPOSICIÓN PELIGROSA ALA RADIACIÓN.NO ABRA LAS CUBIERTAS NI HAGA REPARACIONESUSTED MISMO. SOLICITE LOS TRABAJOS DE SER-VICIO AL PERSONAL CALIFICADO.
ADVERTENCIA:PARA REDUCIR EL RIESGO DE INCENDIOS O SACU-DIDAS ELÉCTRICAS, NO EXPONGA ESTE PRODUC-TO A LA LLUVIA NI A LA HUMEDAD.
PARA REDUCIR RIESGO DE INCENDIOS O SACUDI-DAS ELÉCTRICAS, Y PARA EVITAR LAS INTERFE-RENCIAS MOLESTAS, UTILICE SOLAMENTE LOSCOMPONENTES INCLUIDOS.
Productos láser:Longitud de onda: 780 nmPotencia láser: Con protección de seguridad no se
emite radiación peligrosa.
ll est recommandé de noter, dans l'espace prévu ci-dessous, les numéros de modèle et de série inscritssoit à l'arrière soit sous le fond de l'appareil, et deconserver ce manuel comme mémorandum del'achat afin de permettre l'identification de l'appareilen cas de vol.
NUMÉRO DE MODÈLE CQ-VX2200U
NUMÉRO DE SÉRIE
DATE DE L'ACHAT
VENDEUR
Busque el número del modelo y el número de serieya sea en la parte trasera o en el fondo de la unidad.Sírvase anotar dichos números en el espacio si-guiente, y mantenga este librete como una anotaciónpermanente de su compra para ayudar en la identifi-cación en el caso de robo.
NÚMERO DEL MODELO CQ-VX2200U
NÚMERO DE SERIE
FECHA DE COMPRA
NOMBRE DE LA TIENDA
FRANÇAIS
ESPAÑOL
C Déclaration d'interférence de fréquencesradio (Partie 15 des Règlements FCC):Cet appareil numérique de Classe B est con-forme au règlement ICES-003 canadien.
Consignes de sécurité Información para su seguridad
4 CQ-VX2200U
ENGLISH
Panasonic welcomes you to our ever growing family of electronic product owners. We know that thisproduct will bring you many hours of enjoyment. Our reputation is built on precise electronic and mechani-cal engineering, manufactured with carefully selected components and assembled by people who takepride in their work. Once you discover the quality, reliability, and value we have built into this product, youtoo will be proud to be a member of our family.
When DrivingKeep the volume level low enough to be aware of roadand traffic conditions.
When Washing Your CarDo not expose the product, including the speakers, CDsand tapes to water or excessive moisture. This couldcause electrical shorts, fire, or other damage.
When ParkedParking in direct sunlight can produce very high tempera-tures inside your car. Give the interior a chance to cooldown before switching the unit on.
Use the Proper Power SupplyThis product is designed to operate with a 12 V DC, nega-tive ground battery system (the normal system in a NorthAmerican car.)
Disc MechanismDo not insert coins or any small objects. Keep screw-drivers and other metallic objects away from the discmechanism and disc.
Tape MechanismKeep magnets, screwdrivers or other metallic objectsaway from the tape mechanism and tape head.
Use Authorized ServicentersDo not attempt to disassemble or adjust this precisionproduct. Please refer to the Servicenter list included withthis product for service assistance.
For InstallationThe product should be installed in a horizontal positionwith the front end up at a convenient angle, but not morethan 30˚.
Use This Product Safely
Components¡Operating instructions. . . . . . . . . . . . . . . . . . . . . . . . . 1¡Installation hardware . . . . . . . . . . . . 1 set (a page 32)¡Power connector. . . . . . . . . . . . . . . . . . . . . . . . . . . . . 1¡Remote Control Unit . . . . . . . . . . . . . . . . . . . . . . . . . . 1¡Lithium battery (CR2025) . . . . . . . . . . . . . . . . . . . . . . 1¡Warranty card (Servicenter list included) . . . . . . . . . . 1
Notice:This product has a fluorescent lamp that contains a small amount of mercury. It also contains lead in some components.Disposal of these materials may be regulated in your community due to environmental considerations. For disposal or recy-cling information please contact your local authorities, or the Electronics Industries Alliance: <http://www.eiae.org.>

¢ Remote Control ......................................................................................................... 10Battery Installation, control reference guide
¢ Name of Controls and Functions ......................................................................... 11
¢ Power and Basic Operations ................................................................................. 12How to turn the power on / off, adjust the volume, mode selection, setting mute,selecting the display, clock setting
¢ Radio Basics ............................................................................................................... 14Manual and automatic tuning, band selection, MONO/LOCAL selection, preset stations
¢ CD Player Basics ....................................................................................................... 16Disc insert and playback, stop and disc eject, mode selection, track selection, fastforward/rewind, random, scan, repeat
¢ Cassette Tape Player Basics .................................................................................. 18Tape insert and playback, stop and tape eject, mode selection, changing side, fastforward/rewind, metal tape mode, Dolby noise reduction, TPS operation, blank skip,repeat play
¢ CD Changer Control ................................................................................................. 20Mode selection, disc selection, track selection, fast forward/rewind, random, scan,repeat
¢ Sound Space and Useful Functions .................................................................... 22Sound space reproduction, direct memory, external sound source, spectrum analyzerdisplay pattern, spectrum analyzer arrangement
¢ Sound Setting ............................................................................................................ 26
¢ Other Setting ............................................................................................................... 30
¢ Installation Guide ...................................................................................................... 32Step-by-step procedures
¢ Electrical Connections ............................................................................................ 36Cautions and wiring diagram
¢ Troubleshooting .........................................................................................................39Where to get service help, troubleshooting tips, error display messages
¢ Maintenance ............................................................................................................... 44Care of the unit, notes on CD, notes on cassette tape
¢ Specifications ............................................................................................................ 45
7CQ-VX2200U
ENGLISH
Safety Information …………………………………………………………………… Page 2Radio Frequency Interference Statement (Part 15 of the FCC Rules) ……………………… 2Use this Product Safely …………………………………………………………………… 4Components ………………………………………………………………………………… 4
Contents

10 CQ-VX2200U
1
ENGLISH
Remote Control
¡Do not disassemble or shortthe battery. Do not throw a bat-tery into a fire.
¡Keep batteries away from chil-dren to avoid the risk of acci-dents.
¡Be careful to observe properlocal disposal rules when youdispose of batteries.
Caution: Improper use of bat-teries may cause overheating,an explosion, ignition, resultingin injury or a fire. Battery leak-age may damage the unit.
¡Battery Type:Panasonic lithium battery(CR2025)
¡Battery Life:Approximately 6 months withnormal use (at room temperature)
Battery Installation
Back side
Lithium battery(+ side face up)
Battery holder
q While pushingw Pull
e Install thebattery
Control Reference GuidePoint the remote control unit at the main unit’s sensor (REMOTE).
PWR (Power)¡Power ON/OFF
MUTE / ATT (Attenuator)¡Mute the sound temporarily¡Decrease the volume to 1/10
VOL (Volume)¡Adjust volume
SEL (Select)¡Select the setting item¡Change MONO/LOCAL
DISP (Display)¡Change display
BAND¡Change band¡Auto preset memoryPRG (Program)¡Reverse the tape play
side3 (Stop)¡Stop the tape rewind or
fast forward
Spectrum Analyzer¡Change Spectrum Analyzer pattern¡Arrange Spectrum AnalyzerDIMMER¡Change the dimmer level
SPACE¡Change sound space
SOURCE¡Change source
][ (TUNE) / 1 2 (TRACK)¡Change frequency¡Change track¡Select / Adjust the item (DISC)¡Change disc¡Select / Adjust the item

DISP SPACE1 2 3 4 5 6
REMOTE
REVERSE
SOURCE
OPENOPEN
S·A
D·M
REPEAT
REPEAT
DSP SPACEDISPLAY CLOCK
SEL S·A
TUNETRACK
SCANRANDOM
CQ-VX2200
INTEGRATED CD/CASSETTE RECEIVER WITH DSP
MTL B NR TPS SKIP
MUTE
VOL
AUTO·P
S·ANALYZERPWR
HumanEqualizer
FM DISC
AM45DISCAM45DISC
SKIP ST
DISC
REP
R
SCAN
TPS
LOC
EQB NR
SPACEPOSI
MTL
11CQ-VX2200U
2
ENGLISH
CD EJECT
CST EJECT
CD IN
CST IN
LARGE FLUORESCENT DISPLAY
41W X 4CH AMPLIFIER
15 BAND SPECTRUM ANALYZER
FLIP DOWN PANEL
INTEGRATED CD/CASSETTE RECEIVER WITH DSP
u
u
RESET
CD Slot
Cassette Tape SlotReset Switch
CST (Cassette tape)u (Eject)
CD u (Eject)
Name of Controls and Functions
][ (TUNE) / s d (TRACK)¡Change frequency¡Change track¡Select / Adjust the item
SPACE¡Change sound space
REMOTE(Remote control sensor)
SEL (Select)¡Select the setting
item
DISP (Display)¡Change display
Display (VFD: Vacuum Fluorescent Display)
S•A (Spectrum Analyzer)¡Change Spectrum Analyzer pattern¡Arrange Spectrum Analyzer
OPEN¡Open the panel
PWR (Power) / SOURCE¡Power ON/OFF¡Change source
D•M (Direct Memory)¡Recall the direct memory¡Memorize the frequency
MUTE / ATT (Attenuator)AUTO•P (Auto Preset Memory)¡Mute the sound temporarily¡Decrease the volume to 1/10¡Auto preset memory
(DISC)¡Change band¡Change tape side ¡Change disc¡Select / Adjust the item
VOL (Volume)¡Adjust volume
1 to 6¡Preset memory / Recall preset memory¡Memorize GEQ level adjustment / Recall GEQ level adjustment¡Random ........[4]¡Scan..............[5]¡Repeat...........[6]
For details about terminalson the rear of the unit, pleasesee "Electrical Connections"(a page 37)
Behind the Front Panel
DISP SPACE1 2 3 4 5 6
REMOTE
REVERSE
SOURCE
OPENOPEN
S·A
D·M
REPEAT
REPEAT
DSP SPACEDISPLAY CLOCK
SEL S·A
TUNETRACK
SCANRANDOM
CQ-VX2200
INTEGRATED CD/CASSETTE RECEIVER WITH DSP
MTL B NR TPS SKIP
MUTE
VOL
AUTO·P
S·ANALYZERPWR
HumanEqualizer
FM DISC
AM45DISCAM45DISC
VOLUME 20
12 CQ-VX2200U
3
ENGLISH
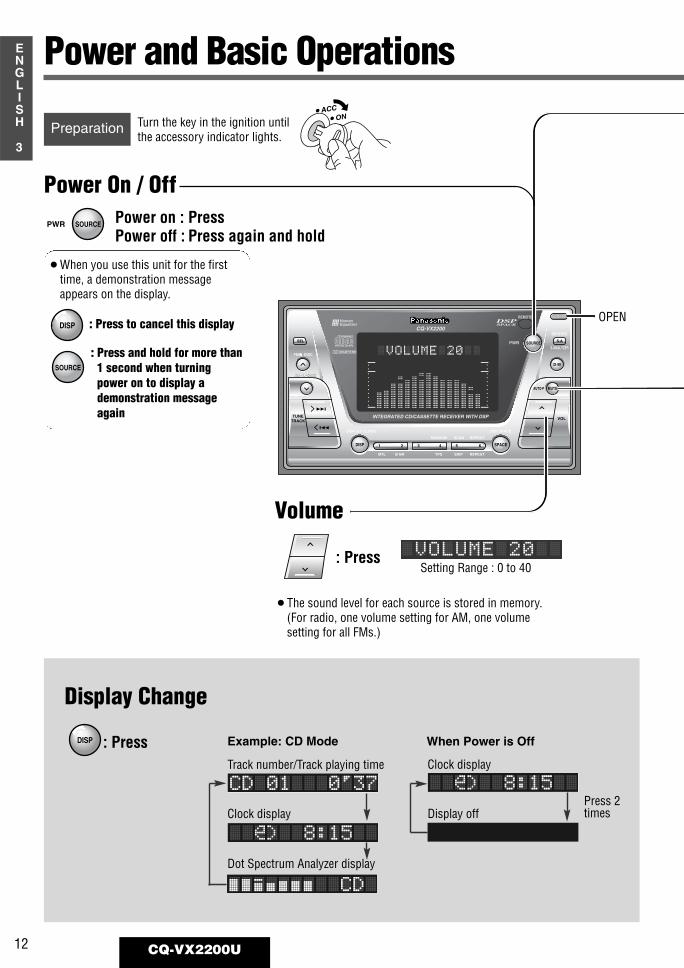
Volume
Power on : PressPower off : Press again and hold
Power On / Off
: PressSetting Range : 0 to 40
¡ACC
¡ONTurn the key in the ignition untilthe accessory indicator lights.
Preparation
SOURCEPWR
DISP
¡The sound level for each source is stored in memory.(For radio, one volume setting for AM, one volumesetting for all FMs.)
OPEN
Display Change
: PressDISP When Power is OffExample: CD Mode
Clock display
Display off
VOLUME 20
Clock display
Dot Spectrum Analyzer display
Track number/Track playing time
CD 01 0’37
8:15
8:15
Power and Basic Operations
¡When you use this unit for the firsttime, a demonstration messageappears on the display.
: Press to cancel this display
SOURCE
: Press and hold for more than1 second when turningpower on to display ademonstration messageagain
Press 2times

13CQ-VX2200U
1
ENGLISH
4
Decreasing volume range depends on setting.(MUTE/ATT setting a page 30)
¡MUTE : No sound (Default)¡ATT : Decrease the volume to 1/10 of previous level.
TUNER CD TAPE
AUXILIARY CHANGER
Mode Selection
Note: Skipping “AUXILIARY” can be set. (a page 30)
Mute / ATT (Attenuator)
: Press to select
Clock Setting
: Press to move tominute
: Press and hold formore than 2 seconds
: Press to adjust hour
: Press to adjust minute
12:00
8:00
8:00
8:15
8:15
DISP
DISPLAY CLOCK
DISP
DISPLAY CLOCK
SOURCE
(When a CD isin the player.)
(When a tape isin the player.)
(When a changer witha magazine loaded isconnected.)
(When AUX-INsetting is ON.)
: Press(Press again to cancel)
MUTE
: Press to set
Notes:¡If clock is not adjusted, “ADJUST” will appear.¡The 12-hour system is used for the clock.¡The clock is not adjustable when the power is off.
MUTE ON

DISP SPACE1 2 3 4 5 6
REMOTE
REVERSE
SOURCE
OPENOPEN
S·A
D·M
REPEAT
REPEAT
DSP SPACEDISPLAY CLOCK
SEL S·A
TUNETRACK
SCANRANDOM
CQ-VX2200
INTEGRATED CD/CASSETTE RECEIVER WITH DSP
MTL B NR TPS SKIP
MUTE
VOL
AUTO·P
S·ANALYZERPWR
HumanEqualizer
FM DISC
AM45DISCAM45DISC
ST
LOC
FM1-1 87.9
14 CQ-VX2200U
5
ENGLISH
ST
LOC
FM1-1 87.9
FM1 FM2 FM3
AM
Mono / Local selection
MONO OFF/LOCAL OFF
MONO: Reduce noise during a weak FM broadcast.LOCAL: Searching stops at a strong signal only.
MONO ON/LOCAL OFF
MONO ON/LOCAL ON
MONO OFF/LOCAL ON
q :Press and hold for more than 2 seconds.
w :Press to select MONO/LOCAL
e :Press to change the display as follows.
SEL
SEL
FM1 FM2 FM3 AM
Radio Basics
SOURCE : Press to select the radiomode
: Press to select an FMband
: Higher frequency: Lower frequency
Press and hold for more than 0.5 secondsthen release.Seeking will start.
Band Frequency
FM Stereo Indicatorlights while FM stereobroadcast is received.
LOCAL Indicatorlights while in LOCALmode.
Preset Number
When in Radio Mode
Mode Selection
Band
: Press to determine theAM band
Tuning
Note: Press when using the remotecontrol
BAND
15CQ-VX2200U
1
ENGLISH
6
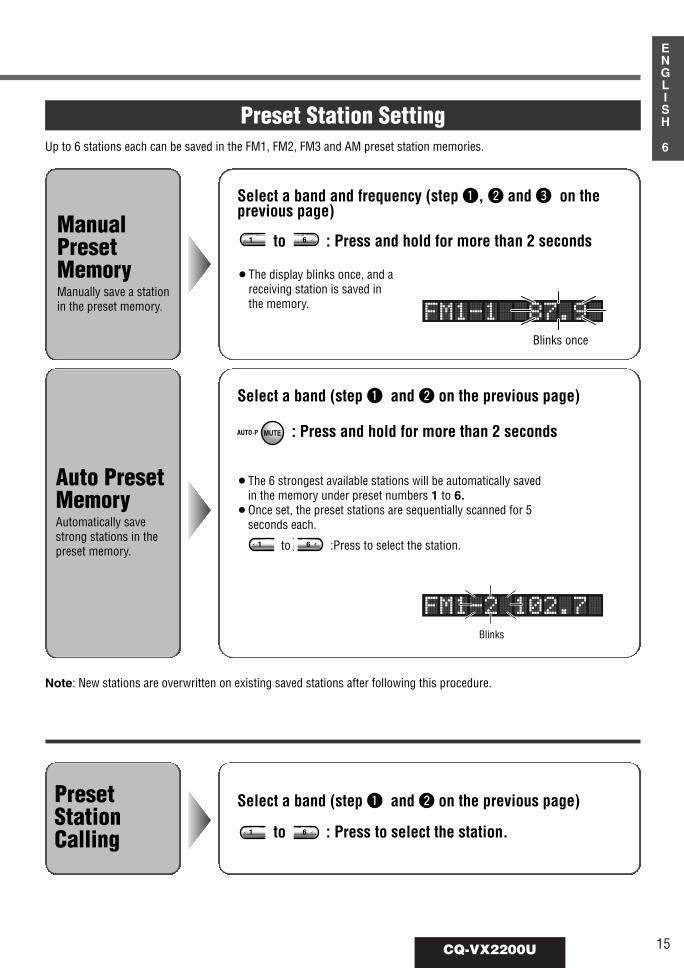
Select a band and frequency (step q, w and e on theprevious page)
Preset Station SettingUp to 6 stations each can be saved in the FM1, FM2, FM3 and AM preset station memories.
Select a band (step q and w on the previous page)
Select a band (step q and w on the previous page)PresetStationCalling
Auto PresetMemoryAutomatically savestrong stations in thepreset memory.
ManualPresetMemoryManually save a stationin the preset memory.
FM1-2 102.7
FM1-1 87.9
MUTEAUTO·P
Note: New stations are overwritten on existing saved stations after following this procedure.
: Press and hold for more than 2 seconds
¡The 6 strongest available stations will be automatically savedin the memory under preset numbers 1 to 6.
¡Once set, the preset stations are sequentially scanned for 5seconds each.
to :Press to select the station.61
Blinks once
Blinks
to : Press to select the station.61
to : Press and hold for more than 2 seconds61
¡The display blinks once, and a receiving station is saved inthe memory.

CD EJECT
MD EJECT
RESET
u
u MD IN
INTEGRATED CD/CASSETTE RECEIVER WITH DSP
VX2200
DISP SPACE1 2 3 4 5 6
REMOTE
REVERSE
SOURCE
OPENOPEN
S·A
D·M
REPEAT
REPEAT
DSP SPACEDISPLAY CLOCK
SEL S·A
TUNETRACK
SCANRANDOM
CQ-VX2200
INTEGRATED CD/CASSETTE RECEIVER WITH DSP
MTL B NR TPS SKIP
MUTE
VOL
AUTO·P
S·ANALYZERPWR
HumanEqualizer
FM DISC
AM45DISCAM45DISC REP
R
SCAN
MTL
CD 01 0’37
16 CQ-VX2200U
7
ENGLISH
REP
R
SCAN
MTL
CD 01 0’37
If lights, a CD has been already loaded.: Press to open the panel
¡Insert the disc and playback will start.Close the front panel manually.
OPENOPEN
When a CD is inside(Blinks during CD play)
CD Player Basics
SOURCE
Disc Insert / Eject
CD u (Eject) Button Label Side
Mode Selection: Press to select the CD
mode
: Next track
Press and hold
: Beginning of the current track /Previous track (Press twice)
Track Selection
Fast Forward / Reverse
: Fast forward
: Fast reverse¡Release to resume the regular CD play.
Track Number Play Time
Repeat, Random andScan Indicator
Cautions:¡Do not use irregularly shaped CDs.¡To avoid damaging the front panel, do not push it
down or place objects on it while it is open.¡Do not pinch your finger or hand in the front
panel. Do not insert foreign matter into the discand cassette tape slots.
Notes:¡Loading a CD when the power is off allows the
power to be turned on.¡Ejecting the CD when the unit is in the CD mode
allows the power to be turned off.
When a CD is in the player
Caution: Only 5” CD is available for this unit.
17CQ-VX2200U
1
ENGLISH
8
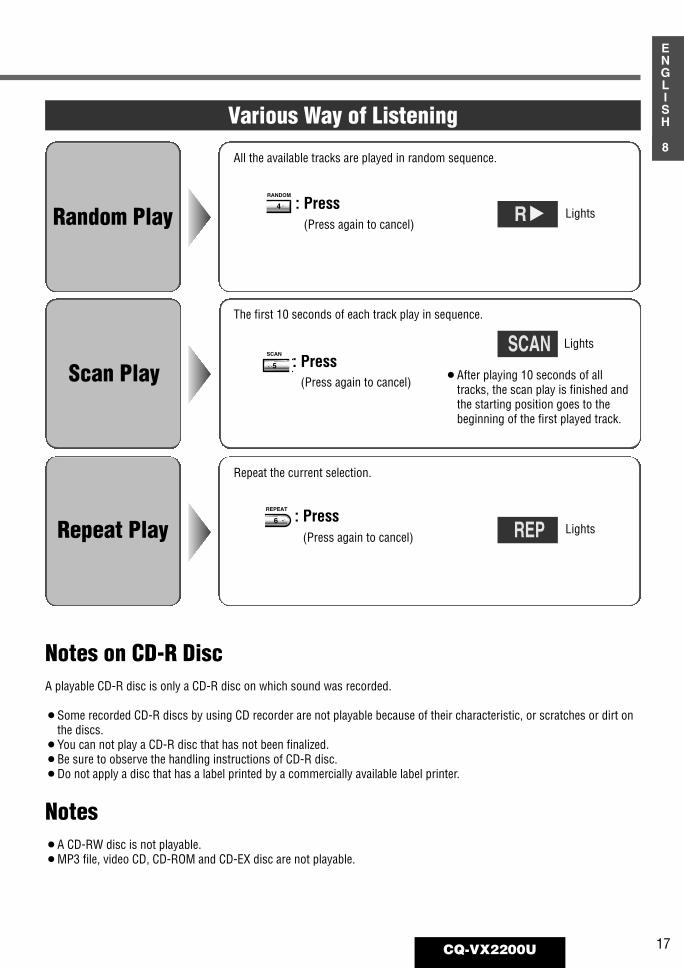
Various Way of Listening
Random Play
Scan Play
Repeat Play
: Press(Press again to cancel)
4
RANDOM
: Press(Press again to cancel)
5
SCAN
: Press(Press again to cancel)
6
REPEAT
R
SCAN
REP
Lights
Lights
Lights
¡After playing 10 seconds of alltracks, the scan play is finished andthe starting position goes to thebeginning of the first played track.
Notes on CD-R DiscA playable CD-R disc is only a CD-R disc on which sound was recorded.
¡Some recorded CD-R discs by using CD recorder are not playable because of their characteristic, or scratches or dirt onthe discs.
¡You can not play a CD-R disc that has not been finalized.¡Be sure to observe the handling instructions of CD-R disc.¡Do not apply a disc that has a label printed by a commercially available label printer.
Notes¡A CD-RW disc is not playable.¡MP3 file, video CD, CD-ROM and CD-EX disc are not playable.
All the available tracks are played in random sequence.
The first 10 seconds of each track play in sequence.
Repeat the current selection.

CD EJECT
MD EJECT
u
u MD IN
INTEGRATED CD/CASSETTE RECEIVER WITH DSP
VX2200
CD IN
RESET
18 CQ-VX2200U
9
ENGLISH
DISP SPACE1 2 3 4 5 6
REMOTE
REVERSE
SOURCE
OPENOPEN
S·A
D·M
REPEAT
REPEAT
DSP SPACEDISPLAY CLOCK
SEL S·A
TUNETRACK
SCANRANDOM
CQ-VX2200
INTEGRATED CD/CASSETTE RECEIVER WITH DSP
MTL B NR TPS SKIP
MUTE
VOL
AUTO·P
S·ANALYZERPWR
HumanEqualizer
FM DISC
AM45DISCAM45DISC
When a Cassette tape is in the player
Cassette Tape Player Basics
SKIP
REP
TPS
B NR
MTL
Tape Insert / EjectIf lights, a tape has been already loaded.
: Press to open the panel¡Insert the tape and playback will start.
Close the front panel manually.
OPENOPEN
Tape u (Eject) Button
Exposed side
SOURCE
Mode Selection: Press to select the cas-
sette tape mode
: Fast Forward: Rewind
Fast Forward / Rewind
Play Side Change
Cautions:¡To avoid damaging the front panel, do not push it
down or place objects on it while it is open.¡Do not pinch your finger or hand in the front
panel. Do not insert foreign matter into the discand cassette tape slots.
Notes:¡Loading a tape when the power is off allows the
power to be turned on.¡Ejecting the tape when the unit is in the Cassette
tape mode allows the power to be turned off.
When a Cassette tape is inside(Blinks during Cassette tape play)
TPS IndicatorMetal tape Indicator
Dolby B NR Indicator
Repeat Indicator
Skip Indicator
Playside (s: Top side, t: Bottom side)
SKIP
REP
TPS
B NR
MTL
: Press to reverse(Press for remote control)BAND
PRG/ ¡PRG/
: Press to resume the tape play
(Press for remote control)BAND
PRG/ ¡PRG/

19CQ-VX2200U
1
ENGLISH
10
Repeat Play
: Press
(Press again to cancel)
4
TPS
: Press(Press again to cancel)
6
REPEAT
Blank Skip: Press
(Press again to cancel)5
SCAN
Metal TapeMode
: Press
(Press again to cancel)
1
MTL MTL
B NR
TPS
Dolby B NoiseReduction : Press
(Press again to cancel)
2
B NR
¡When playing non-metal tape, please set this function off.
SKIP
REP
Lights
Lights
Lights
Lights
Lights
Note: The TPS mode may not work correctly in the following cases.¡There is an interval less than 4 seconds or having a high level of noise or hum
between programs.¡There is particularly low-level passage during the program.
Note: The blank skip does not work when the unrecorded portion of a tape isless than 15 seconds.
Tape ProgramSearch (TPS)
Operation
¡Activates the tape rewind and goes back to the beginning of thecurrent program. The TPS finds the beginning of a followingprogram depending on how many times you press this button.(Up to 8 programs)
¡Activates the tape fast forward and goes to the beginning ofthe next program. The TPS finds the beginning of a followingprogram depending on how many times you press this button.(Up to 9 programs)
* Press to cancel rewind or fast forward.
(Press for remote control)BAND
PRG/ ¡PRG/
When playing metal or chromium dioxide (CrO2) tapes.
Set the Dolby B NR mode when playing back a tape recorded with Dolby B NoiseReduction.
Skip unrecorded portions longer than 15 seconds on the tape.
Repeat the current program.
DISP SPACE1 2 3 4 5 6
REMOTE
REVERSE
SOURCE
OPENOPEN
S·A
D·M
REPEAT
REPEAT
DSP SPACEDISPLAY CLOCK
SEL S·A
TUNETRACK
SCANRANDOM
CQ-VX2200
INTEGRATED CD/CASSETTE RECEIVER WITH DSP
MTL B NR TPS SKIP
MUTE
VOL
AUTO·P
S·ANALYZERPWR
HumanEqualizer
FM DISC
AM45DISCAM45DISC
DISC
REP
R
SCAN
MTL
01-01 1’06
20 CQ-VX2200U
11
ENGLISH
DISC
REP
R
SCAN
MTL
01-01 1’06
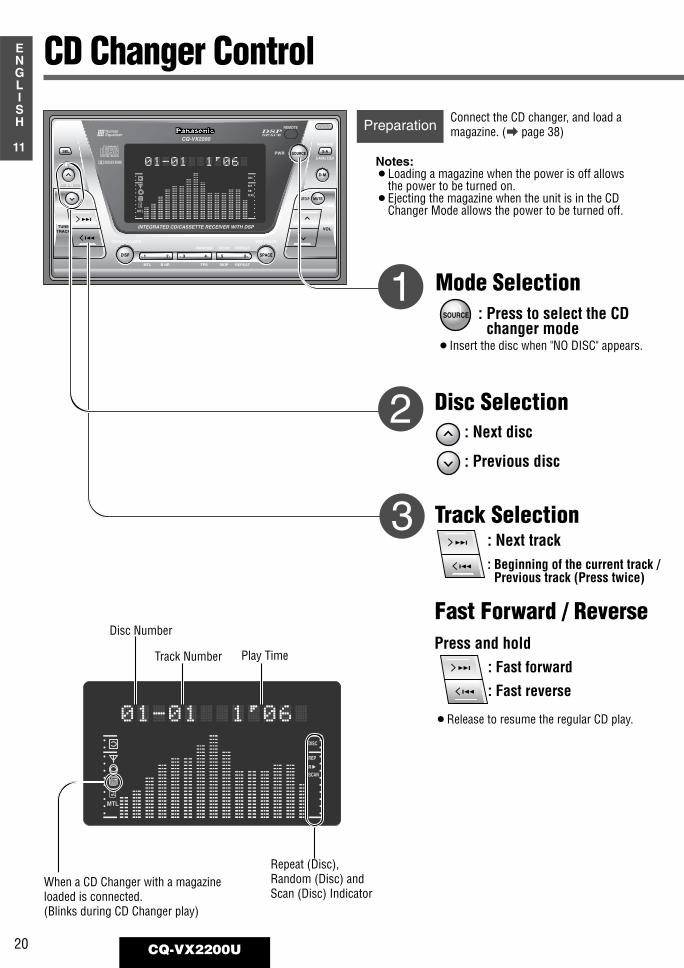
Connect the CD changer, and load amagazine. (a page 38)
Disc Number
Track Number Play Time
CD Changer Control
SOURCE
Preparation
¡Insert the disc when "NO DISC" appears.
Mode Selection: Press to select the CD
changer mode
Disc Selection: Next disc
: Previous disc
Track Selection
Fast Forward / Reverse
¡Release to resume the regular CD play.
When a CD Changer with a magazineloaded is connected.(Blinks during CD Changer play)
Repeat (Disc), Random (Disc) andScan (Disc) Indicator
Notes:¡Loading a magazine when the power is off allows
the power to be turned on.¡Ejecting the magazine when the unit is in the CD
Changer Mode allows the power to be turned off.
: Next track: Beginning of the current track /
Previous track (Press twice)
: Fast forward
: Fast reverse
Press and hold

21CQ-VX2200U
1
ENGLISH
12
Various Way of Listening
: Press(Press again to cancel)
5
SCAN
: Press and hold for more than 2 seconds(Press and hold again to cancel)
5
SCAN
: Press and hold for more than 2 seconds(Press and hold again to cancel)
4
RANDOM
: Press(Press again to cancel)
6
REPEAT
: Press and hold for more than 2 seconds(Press and hold again to cancel)
6
REPEAT
All Tracks
FirstTrack onAll Discs
ScanPlay
CurrentTrack
CurrentDisc
RepeatPlay
DISC
DISC
DISC
: Press(Press again to cancel)
4
RANDOM
Lights
Lights
Lights
Lights
Lights
Lights
Lights
Lights
Lights
¡With the scanning of all tracks over, the originalprogram starts playing from the beginning.
¡With the scanning of all tracks over, the originaldisc starts playing from the beginning.
All Tracks
CurrentDisc
RandomPlay
R
R
SCAN
SCAN
REP
REP
All the available tracks on all discs in the magazine are played in a randomsequence.
All the available tracks on current disc are played in arandom sequence.
The first 10 seconds of each track on the discs plays in sequence.
The first track of all the discs in the magazine is played for 10 seconds each.
Repeat the current track selection.
Repeat the current disc selection.

DISP SPACE1 2 3 4 5 6
REMOTE
REVERSE
SOURCE
OPENOPEN
S·A
D·M
REPEAT
REPEAT
DSP SPACEDISPLAY CLOCK
SEL S·A
TUNETRACK
SCANRANDOM
CQ-VX2200
INTEGRATED CD/CASSETTE RECEIVER WITH DSP
MTL B NR TPS SKIP
MUTE
VOL
AUTO·P
S·ANALYZERPWR
HumanEqualizer
FM DISC
AM45DISCAM45DISC
DISC
REP
R
SCAN
LOC
MTL
SPACE LIVE HOUSE
22 CQ-VX2200U
13
ENGLISH
Sound SpaceReproduction (SPACE)
Sound space can be created in a car tosimulate being in a concert hall. Default : SPACE OFFSetting range : 8 types
(including SPACE OFF)
Sound space is available for each mode(AM, FM, CD, Cassette Tape, CD Changer,AUX-IN and Direct Memory).
SPACEDISP
D•M
SOURCE
Sound Space and Useful Functions
Direct MemoryYour favorite FM/AM radio station can bememorized in the D•M button and you cancall back radio stations just by pressingthe button whatever the current soundsource is, even if the power is off.
Default : FM 88.1 MHz
External SoundSource (AUX IN)
Preparations :Connect an external device to AUX inputterminal. (a page 38)

23CQ-VX2200U
1
ENGLISH
14: Press to change as followsSPACE
SPACE OFF LIVE HOUSE
DISCOVOCAL
CINEMA JAZZ CLUB
CONCERT HALL
STADIUM
: Press to select the AUX IN mode
: Press(Press again to cancel)
D·M
¡New station is overwritten on existing saved station.
¡The direct memory station is received.
: Press and hold for morethan 2 seconds
D·M
D·M 88.1
D·M MEMORY
FM1 98.5
¡After setting, "SPACE" indicator will illuminate.
SOURCE <<AUX IN>>
Select the station in Radio mode(a page 14)
Recalling the Direct Memory
Memorize
DISC
REP
R
SCAN
LOC
MTL
SPACE LIVE HOUSE
Example:
Space Indicator

DISP SPACE1 2 3 4 5 6
REMOTE
REVERSE
SOURCE
OPENOPEN
S·A
D·M
REPEAT
REPEAT
DSP SPACEDISPLAY CLOCK
SEL S·A
TUNETRACK
SCANRANDOM
CQ-VX2200
INTEGRATED CD/CASSETTE RECEIVER WITH DSP
MTL B NR TPS SKIP
MUTE
VOL
AUTO·P
S·ANALYZERPWR
HumanEqualizer
FM DISC
AM45DISCAM45DISC
DISC
REP
R
SCAN
TPS
LOC
MTL
WAVE
24 CQ-VX2200U
15
ENGLISH
S•A
Sound Space and Useful Functions (continued)
Spectrum AnalyzerDisplay PatternDefault : WAVEVariety : 13 types (including BLANK
SPEANA and ALL DISP OFF.)
Spectrum AnalyzerArrangementDefault : NORMAL / POSIVariety : 8 types (except for BLANK
SPEANA and ALL DISP OFF.)
SEL [d ]s
Spectrum Analyzer Display Pattern: Press to change as followsS·A
WAVE
AURORA
MILKY WAY
TWINKLE STAR
SUN
SPC SARGASSO
BIG BANG
FLARE
PROMINENCE
METEOR
SPACE FEVER
BLANK SPEANA
ALL DISP OFF

25CQ-VX2200U
16
ENGLISH
: Press to change S·A
: Press and hold for more than 2 secondsS·A
: Press to change as follows
: Press to change as follows
REVERSE
Example:
DISC
REP
R
SCAN
TPS
LOC
MTL
WAVE¡BLANK SPEANA
In this display, only the spectrum analyzer is turned off.
¡ALL DISP OFFThe whole display, including the lights, goes out.(When some operation is performed, the display lights for about 5 seconds.)
There are special functions in Spectrum Analyzer Display Pattern.
Direction Change
Positive - Negative Switch
Arrange the Spectrum Analyzer Display using these methods.
NORMAL
REVERSE 1
REVERSE 2
REVERSE 3
: Regular Spectrum Analyzer display
: Regular display is reversed vertically
: REVERSE 1 display is reversed horizontally
: REVERSE 2 display is reversed vertically
Example:
SPEANA POSI (Positive) SPEANA NEGA (Negative)
Notes: ¡If no operation is performed within 10 seconds, the display will return to the normal operation mode.¡The indication pattern cannot be changed at letter indicating part of the display.
DISP SPACE1 2 3 4 5 6
REMOTE
REVERSE
SOURCE
OPENOPEN
S·A
D·M
REPEAT
REPEAT
DSP SPACEDISPLAY CLOCK
SEL S·A
TUNETRACK
SCANRANDOM
CQ-VX2200
INTEGRATED CD/CASSETTE RECEIVER WITH DSP
MTL B NR TPS SKIP
MUTE
VOL
AUTO·P
S·ANALYZERPWR
HumanEqualizer
FM DISC
AM45DISCAM45DISC
DISC
REP
R
SCAN
TPS
LOC
EQ
MTL
HUMAN EQ
26 CQ-VX2200U
17
ENGLISH
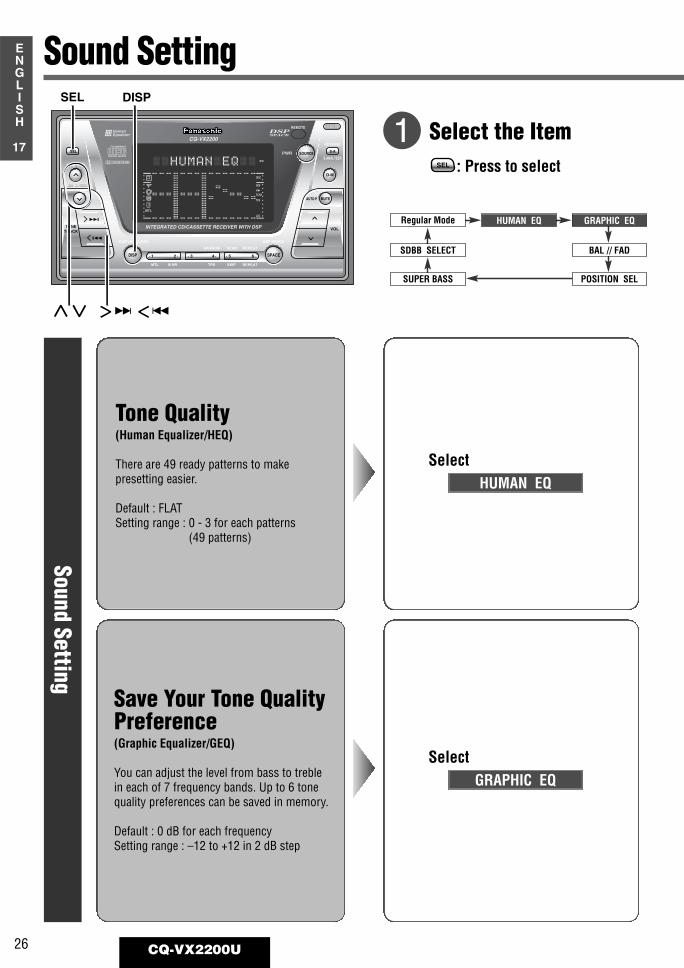
: Press to selectSEL
Tone Quality(Human Equalizer/HEQ)
There are 49 ready patterns to makepresetting easier.
Default : FLATSetting range : 0 - 3 for each patterns
(49 patterns)
SoundSetting
Select HUMAN EQ
Select GRAPHIC EQ
Save Your Tone QualityPreference(Graphic Equalizer/GEQ)
You can adjust the level from bass to treblein each of 7 frequency bands. Up to 6 tonequality preferences can be saved in memory.
Default : 0 dB for each frequencySetting range : –12 to +12 in 2 dB step
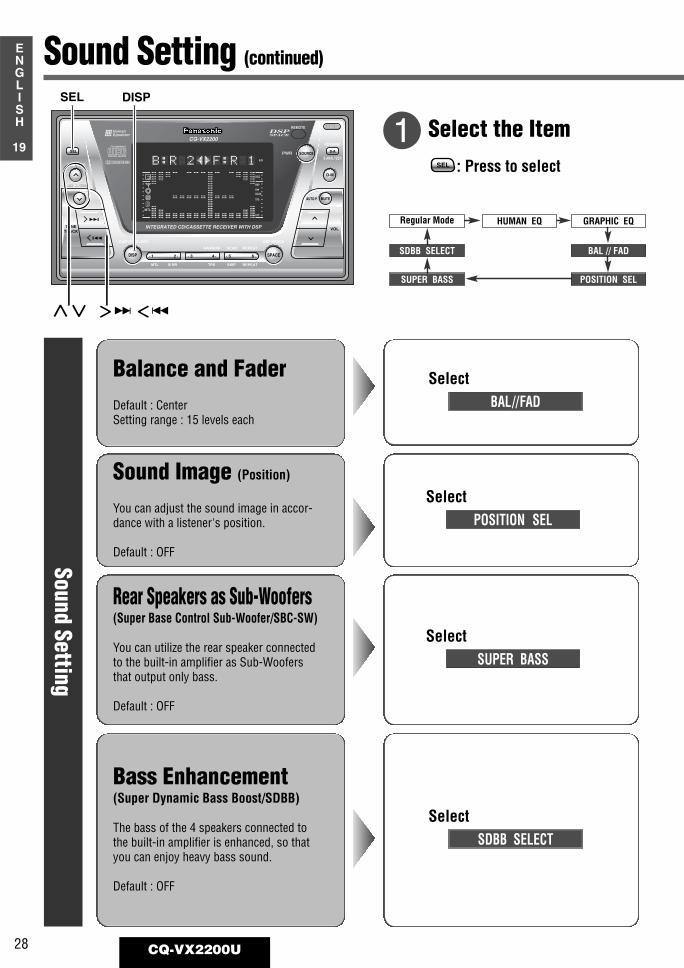
Sound Setting
Select the Item
SDBB SELECT
POSITION SELSUPER BASS
BAL // FAD
HUMAN EQRegular Mode GRAPHIC EQ
SEL
[d ]s
DISP
DISC
REP
R
SCAN
TPS
LOC
EQ
MTL
GEQ-1 1.6kHz
27CQ-VX2200U
1
ENGLISH
18
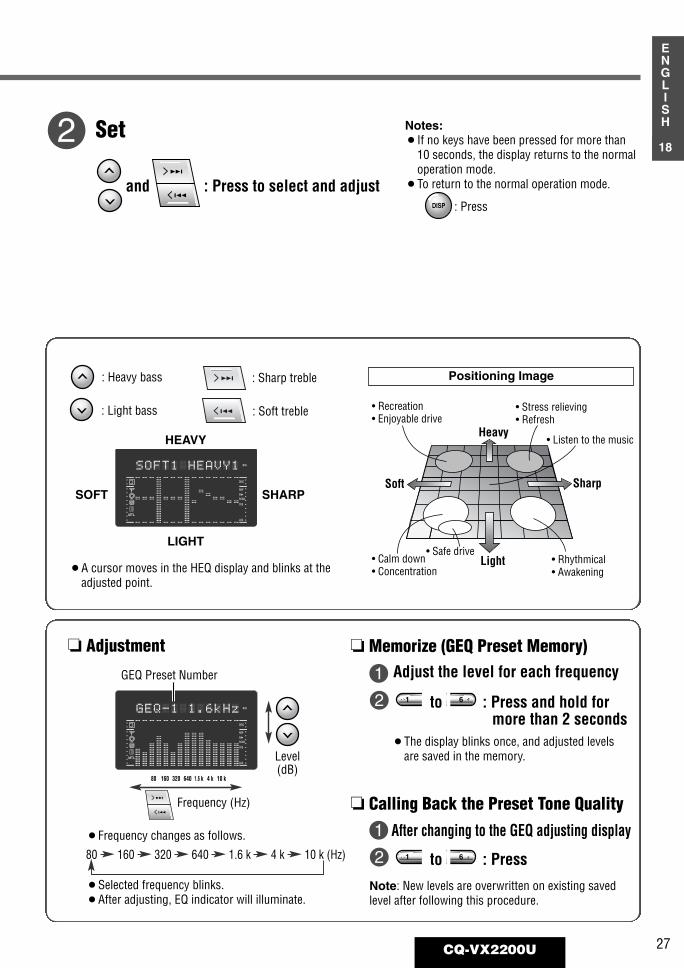
and : Press to select and adjust
• Recreation• Enjoyable drive
• Calm down• Concentration
• Safe drive
• Stress relieving• Refresh
• Listen to the music
• Rhythmical• Awakening
Heavy
Light
SharpSoft
Frequency (Hz)
(dB)Level
GEQ Preset Number
80 160 320 640 1.6 k 4 k 10 k
¡A cursor moves in the HEQ display and blinks at theadjusted point.
SHARPSOFT
LIGHT
DISC
REP
R
SCAN
TPS
LOC
EQ
MTL
SOFT1 HEAVY1
HEAVY
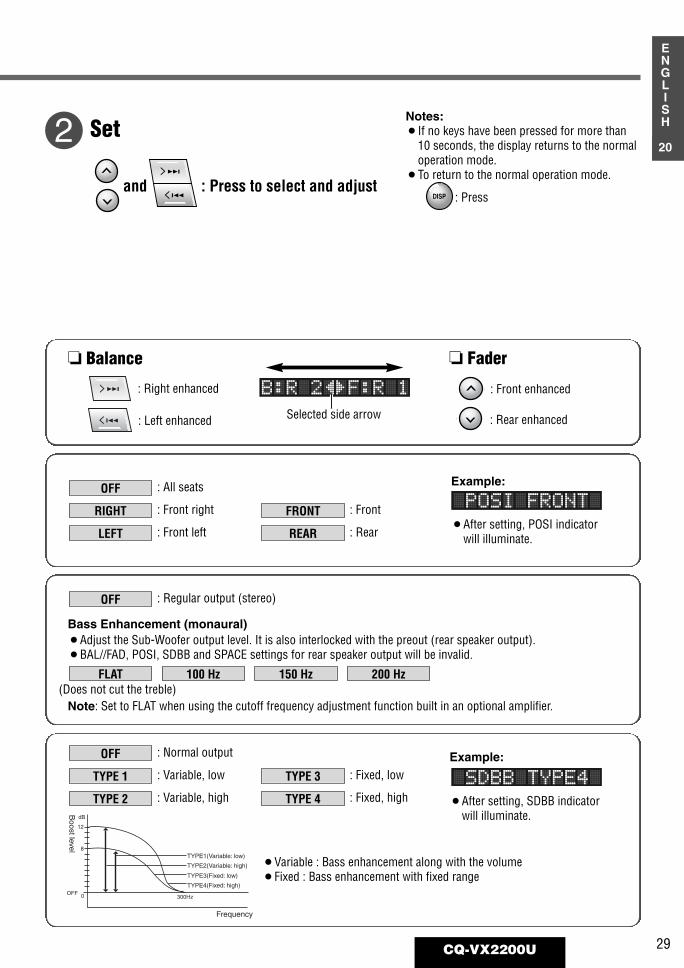
Set Notes: ¡If no keys have been pressed for more than
10 seconds, the display returns to the normaloperation mode.
¡To return to the normal operation mode.
: PressDISP
: Heavy bass
: Light bass
: Sharp treble
: Soft treble
Positioning Image
Memorize (GEQ Preset Memory)
Calling Back the Preset Tone Quality
Adjustment
¡Selected frequency blinks.¡After adjusting, EQ indicator will illuminate.
¡Frequency changes as follows.
Adjust the level for each frequency
to : Press and hold formore than 2 seconds
61
Note: New levels are overwritten on existing savedlevel after following this procedure.
¡The display blinks once, and adjusted levelsare saved in the memory.
to : Press 61
After changing to the GEQ adjusting display80 160 320 640 1.6 k 4 k 10 k (Hz)
DISP SPACE1 2 3 4 5 6
REMOTE
REVERSE
SOURCE
OPENOPEN
S·A
D·M
REPEAT
REPEAT
DSP SPACEDISPLAY CLOCK
SEL S·A
TUNETRACK
SCANRANDOM
CQ-VX2200
INTEGRATED CD/CASSETTE RECEIVER WITH DSP
MTL B NR TPS SKIP
MUTE
VOL
AUTO·P
S·ANALYZERPWR
HumanEqualizer
FM DISC
AM45DISCAM45DISC
DISC
REP
R
SCAN
TPS
LOC
EQ
MTL
28 CQ-VX2200U
19
ENGLISH
SoundSetting
Select SUPER BASS
Rear Speakers as Sub-Woofers(Super Base Control Sub-Woofer/SBC-SW)
You can utilize the rear speaker connectedto the built-in amplifier as Sub-Woofersthat output only bass.
Default : OFF
Bass Enhancement(Super Dynamic Bass Boost/SDBB)
The bass of the 4 speakers connected tothe built-in amplifier is enhanced, so thatyou can enjoy heavy bass sound.
Default : OFF
Select SDBB SELECT
Select POSITION SEL
Sound Image (Position)
You can adjust the sound image in accor-dance with a listener's position.
Default : OFF
SDBB SELECT
POSITION SELSUPER BASS
BAL // FAD
HUMAN EQRegular Mode
: Press to selectSEL
Select the Item
Sound Setting (continued)
Select BAL//FAD
Balance and FaderDefault : CenterSetting range : 15 levels each
GRAPHIC EQ
SEL
[d ]s
DISP
: All seats
: Front right
: Front leftLEFT
RIGHT
OFF
29CQ-VX2200U
1
ENGLISH
20
dB
12
8
0 300HzOFF
Frequency
TYPE1(Variable: low)
TYPE2(Variable: high)
TYPE3(Fixed: low)
TYPE4(Fixed: high)
Boost level
SDBB TYPE4
Example:
POSI FRONT¡After setting, POSI indicator
will illuminate.
and : Press to select and adjust
Set
B:R 2 F:R 1
Notes: ¡If no keys have been pressed for more than
10 seconds, the display returns to the normaloperation mode.
¡To return to the normal operation mode.
: PressDISP
: Front
: RearREAR
FRONT
: Regular output (stereo)OFF
200 Hz150 Hz100 HzFLAT
¡Adjust the Sub-Woofer output level. It is also interlocked with the preout (rear speaker output).¡BAL//FAD, POSI, SDBB and SPACE settings for rear speaker output will be invalid.
Bass Enhancement (monaural)
(Does not cut the treble)Note: Set to FLAT when using the cutoff frequency adjustment function built in an optional amplifier.
: Normal output
: Variable, low
: Variable, highTYPE 2
TYPE 1
OFF
: Fixed, low
: Fixed, highTYPE 4
TYPE 3
¡Variable : Bass enhancement along with the volume¡Fixed : Bass enhancement with fixed range
¡After setting, SDBB indicatorwill illuminate.
Example:
Balance Fader
: Front enhanced
: Rear enhanced
: Right enhanced
: Left enhanced Selected side arrow

DISP SPACE1 2 3 4 5 6
REMOTE
REVERSE
SOURCE
OPENOPEN
S·A
D·M
REPEAT
REPEAT
DSP SPACEDISPLAY CLOCK
SEL S·A
TUNETRACK
SCANRANDOM
CQ-VX2200
INTEGRATED CD/CASSETTE RECEIVER WITH DSP
MTL B NR TPS SKIP
MUTE
VOL
AUTO·P
S·ANALYZERPWR
HumanEqualizer
FM DISC
AM45DISCAM45DISC
DISC
REP
R
SCAN
TPS
LOC
EQ
MTL
SPEANA FAST
30 CQ-VX2200U
21
ENGLISH
Select DIMMER SEL
DimmerDefault : MID (When side-marker lamp is on)
HIGH (When side-marker lamp is off)
OtherSetting
Spectrum AnalyzerSpeedDefault : SPEANA FAST
Select SPEANA SPEED
Excluding AUX-IN fromSource SelectionDefault : ON
Select AUX IN SET
MONO/LOCAUX IN SET
DIMMER SELMUTE KEY SEL
SPEANA SPEEDTITLE SCROLL
Select MUTE KEY SEL
Mute/ATT (Attenuator)Decreasing range by pressing buttoncan be selected.
Default : Mute
MUTE
: Press and hold for morethan 2 seconds and thenpress again
SEL
Select the Item
(C)(a page 31)
(a page 14)
Other Setting
SEL
[d ]s
DISP
MUTE

31CQ-VX2200U
1
ENGLISH
22
Example:
AUX IN ON
and : Press to select and adjust
SetNotes: ¡If no keys have been pressed for more than
10 seconds, the display returns to the normaloperation mode.
¡To return to the normal operation mode.
: PressDISP
: Faster
: SlowerSLOW
FAST
HIGHMIDLOWDarker Medium Brighter
¡Display brightness can be set with the side-marker lamps on or off.
Note: Be sure to connect the illumination lead. (a page 36)
DIMMER MIDExample:
SPEANA FASTExample:
: No sound
: Decrease to 1/10ATT
MUTE MUTE KEYExample:
: External input (AUX-IN) is selectable as a source.
: External input (AUX-IN) is not selectable as a source.OFF
ON
(C) The title scroll function is designed for an MD changer (in future use).
32 CQ-VX2200U
23
ENGLISH WARNING
This installation information is designed for experienced installersand is not intended for non-technical individuals. It does not containwarnings or cautions of potential dangers involved in attempting toinstall this product.Any attempt to install this product in a motor car by anyone otherthan qualified installer could cause damage to the electrical systemand could result in serious personal injury or death.
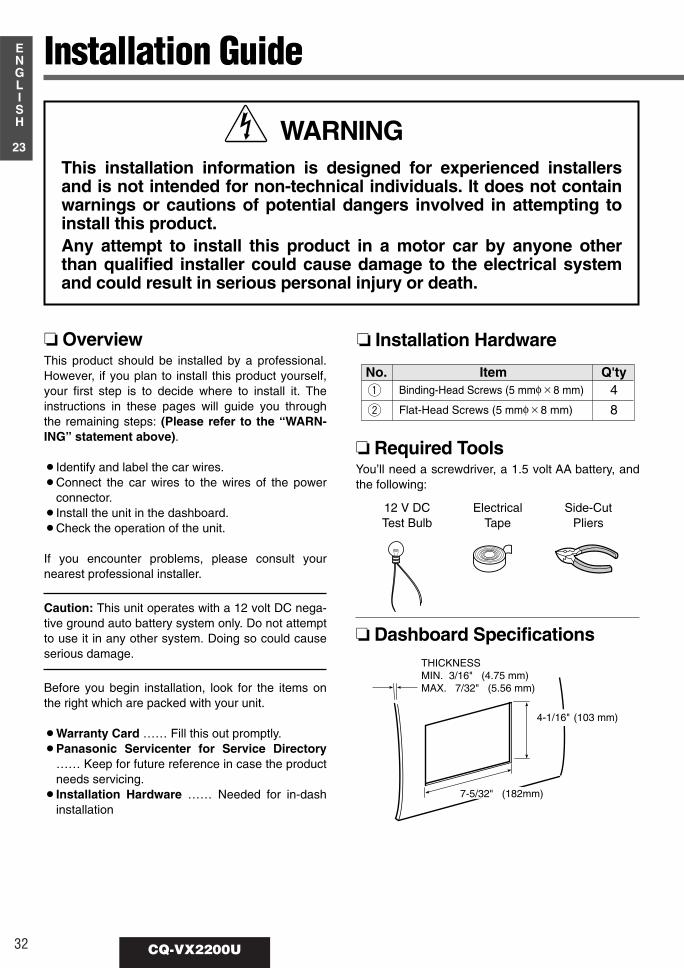
OverviewThis product should be installed by a professional.However, if you plan to install this product yourself,your first step is to decide where to install it. Theinstructions in these pages will guide you throughthe remaining steps: (Please refer to the “WARN-ING” statement above).
¡Identify and label the car wires.¡Connect the car wires to the wires of the power
connector.¡Install the unit in the dashboard.¡Check the operation of the unit.
If you encounter problems, please consult yournearest professional installer.
Caution: This unit operates with a 12 volt DC nega-tive ground auto battery system only. Do not attemptto use it in any other system. Doing so could causeserious damage.
Before you begin installation, look for the items onthe right which are packed with your unit.
¡Warranty Card …… Fill this out promptly.¡Panasonic Servicenter for Service Directory
…… Keep for future reference in case the productneeds servicing.
¡Installation Hardware …… Needed for in-dashinstallation
Installation Hardware
No. Item Q'tyq Binding-Head Screws (5 mmφ × 8 mm) 4
w Flat-Head Screws (5 mmφ × 8 mm) 8
Required ToolsYou’ll need a screwdriver, a 1.5 volt AA battery, andthe following:
Dashboard SpecificationsTHICKNESSMIN. 3/16" (4.75 mm)MAX. 7/32" (5.56 mm)
7-5/32" (182mm)
4-1/16" (103 mm)
12 V DCTest Bulb
ElectricalTape
Side-CutPliers
Installation Guide

33CQ-VX2200U
1
ENGLISH
24
Identify All LeadsThe first step in installation is to identify all the carwires you’ll use when hooking up your sound sys-tem.As you identify each wire, we suggest that you labelit using masking tape and a permanent marker. Thiswill help avoid confusion when making connectionslater.
Note: Do not connect the power connector to thestereo unit until you have made all connections. Ifthere are no plastic caps on the stereo hookingwires, insulate all exposed leads with electrical tapeuntil you are ready to use them. Identify the leads inthe following order.
Power Lead (a Page 36)If your car has a radio or is pre-wired for one :Cut the connector wires one at a time from the plug(leaving the leads as long as possible) so that youcan work with individual leads.
If your car has a radio or is pre-wired for one:With the ignition and headlights off, identify the carbattery lead by grounding one lead of the test bulbto the chassis and checking the remaining exposedwires from the cut radio connector plug.
If your car is not wired for an audio unit : Go to the fuse block and find the fuse port for thebattery, usually marked BAT.
Speakers (a Page 37)Identify the car speaker leads. There will be twoleads for each speaker, usually color coded.A handy way to identify the speaker leads and thespeaker they connect with is to test the leads usinga 1.5 volt AA battery as follows.Hold one lead against one pole of the battery andstroke the other lead across the other pole. You willhear a scraping sound in a speaker if you are hold-ing a speaker lead.If not, keep testing different lead combinations untilyou have located all the speaker leads. When youlabel them, include the speaker location for each.
Antenna Motor (a Page 36)If your car is equipped with an automatic powerantenna, identify the car motor antenna lead by con-necting one bulb tester lead to the car battery leadand touching the remaining exposed wires from thecut radio connector plug one at a time. You will hearthe antenna motor activate when you touch the cor-rect wire.
AntennaThe antenna lead is a thick, black wire with a metalplug at the end.
Turn the ignition on to the accessory position, andground one lead of the test bulb to the chassis.
Touch the other lead of the test bulb to each of theexposed wires from the cut radio connector plug.Touch one wire at a time until you find the outlet thatcauses the test bulb to light.
Now turn the ignition off and then on. If the bulb alsoturns off and on, that outlet is the car power lead.
If your car is not wired for an audio unit : Go to the fuse block and find the fuse port for radio(RADIO), accessory (ACC), or ignition (IGN).
Battery Lead (a Page 36)If your stereo unit has a yellow lead, you will need tolocate the car's battery lead. Otherwise you mayignore this procedure. (The yellow battery lead pro-vides continuous power to maintain a clock, memorystorage, or other function.)

34 CQ-VX2200U
25
ENGLISH
Connect All LeadsNow that you have identified all the wires in the car,you're ready to begin connecting them to the stereounit wires. The connection diagram (a Page 36 to38) shows the proper connections and color codingof the leads.We strongly recommend that you test the unitbefore making a final installation.You can set the unit on the floor and make tempo-rary connections to test the unit. Use electrical tapeto cover all exposed wires.
Important: Connect the red power lead last, afteryou have made and insulated all other connections.
GroundConnect the black ground lead of the power connec-tor to the metal car chassis.
SpeakersConnect the speaker wires. See the wiring diagram(a Page 37) for the proper hookups. Follow the dia-gram carefully to avoid damaging the speakers andthe stereo unit.The speaker used must be able to handle more than41 W of audio power. If using an optional audiopower, the speakers should be able to handle themaximum amplifier output power. Speakers withlow input ratings can be damaged.
Speaker impedance should measure 4 - 8 Ω, whichis typically marked on most speakers. Lower orhigher impedance speakers will affect output andcan cause both speaker and stereo unit damage.
CAUTION : Never ground the speaker cords. Forexample, do not use a chassis ground system or athree-wire speaker common system. Each speakermust be connected separately using parallel insulat-ed wires. If in doubt about how your car's speakersare wired, please consult with your nearest profes-sional installer.
Motor Antenna Connect the car motor antenna lead to the bluemotor antenna relay control lead.
BatteryConnect the yellow battery lead to the correct radiowire or to the battery fuse port on the fuse block.
Installation Guide(continued)
AntennaConnect the antenna by plugging the antenna leadinto the antenna receptacle.
EquipmentConnect any optional equipment such as an amplifi-er, according to the instructions furnished with theequipment. Leave about 12 inches (30 cm) of dis-tance between the speaker cords/amplifier unit andthe antenna/antenna extension cord. Read the oper-ating and installation instructions of any equipmentyou will connect to this unit.
PowerConnect the red power lead to the correct car radiowire or to the appropriate fuse port on the fuseblock.If the stereo unit functions properly with all theseconnections made, disconnect the wires and pro-ceed to the final installation.
Illumination1.Connect to light switch, the control buttons are illu-
minated.2.If you cannot find the light switch, connect the illu-
mination lead (orange with white stripe) to acces-sory (ACC).
Final Installation Lead ConnectionsConnect all wires, making sure that each connectionis insulated and secure. Bundle all loose wires andfasten them with tape so they won't fall down later.
Congratulations! After making a few final checks,you’re ready to enjoy your new auto stereo system.
Connect the power cord after completion of otherconnections to prevent shortings.
Final Checks1. Make sure that all wires are properly connect-
ed and insulated.2. Turn on the ignition to check the unit for prop-
er operation.
If you have difficulties, consult your nearest autho-rized professional installer for assistance.

35CQ-VX2200U
1
ENGLISH
26
Precautions
Be sure to remove the bracket for transportationbefore use (installation).CUse screws (5 mm φ x 8 mm) with washers for
installation.Be careful not to lose any of these parts.
Transportation Bracket x 2
CQ-VX2200U
Screw with washer(5 mmφ × 8 mm) x 4
¡We strongly recommend that you wear gloves for installation work to protect yourself from injuries.¡When bending the mounting tab of the mounting collar with a screwdriver, be careful not to injure your
hands and fingers.
CQ-VX2200U
Typical Installation (For vehicle with double-DIN size)1. Remove Car radio or little object box from the vehicle and the stopping brackets.2. Use the appended screws q or w to install the brackets on this unit.3. Install this unit into the vehicle.
¡If a special kit (option) is necessary for a certain year’s, model or grade ofvehicle, please consult your dealer.
¡For simple electrical connection to your vehicle, you can buy a preparedpower connector from your dealer.
Transportation bracket removal
Note:
¡The screw holes on the right side are not tapped. Please only use screws provided to mount the unit.¡To tighten the screws, press its head down straight forward.
Installation for except for the above motorsFor general use kit (option) or motor’s special kit (option), please consult your dealer.
Note: Use pliers to bend the fingerson the bracket vertically.
Bracket (L)
Bracket (R)Appended Screws (q or w). Select appropriate ones matchingthe hole shape of the bracket.
Note: Binding-Head Screws (5 mmφx 8) q are appended four pieces, theother four pieces are fixed on the transportation bracket. [Screw withwasher (5 mmφ x 8 mm)]
q Binding-HeadScrew x 8 (5 mmφ x 8 mm)
w Flat-Head Screwx 8 (5 mmφ x 8 mm)

36 CQ-VX2200U
27
ENGLISH
Electrical Connections
Power Connector
Illumination Lead
To the power line connected tothe side marker lights of the car
(Orange / white stripe)
External Amplifier Control Power Lead
To an external amplifier (Max. 0.1 A) (Blue / white stripe)
ACC Power Lead
To ACC power, +12V DC (Red)
Resistor (1kΩ)
Battery Lead
To the car battery, continuous+12V DC
Ground Lead
To a clean, bare metallic part ofthe car chassis
(Yellow)
Fuse (10A)
(Black)
Antenna Control Cord
To the auto antenna control powercord of the car (Max. 0.1 A)
(Blue)
Front Speaker Lead
Rear Speaker Lead
CQ-VX2200U
Note: If your car does not have a power line connected to the side marker lights of the car, leave the illumination lead disconnected.
Wiring Diagram

37CQ-VX2200U
1
ENGLISH
28
(Red) : Audio (Right)
(White) : Audio (Left)
!
@
!
@
!
@
!
@
CD Changer Control Connector
CD Changer Input Connector
(Gray)
(Gray / black stripe)
(Green)
(Green / black stripe)
(Violet)
(Violet / black stripe)
(White)
(White / black stripe)
Front Speaker
Rear Speaker
(Left)
(Right)
(Left)
(Right)
Antenna Terminal
AUX-IN Connector Pre-out Connecter (Rear)
Pre-out Connecter (Front)
Power Connecter
Cautions:¡This product is designed to operate off a 12 V DC, negative ground battery system.¡To prevent damage to the unit, be sure to follow the connection diagram below.¡Remove approx. 1/4” (5 mm) of protective covering from the ends of the leads before connecting.¡Be sure to insulate any exposed wires from a possible short-circuit from the car chassis. Bundle all cables and keep
cable terminals free from touching any metal parts.¡Remember, if your car has a drive computer or a navigation computer, the data of its memory may be erased when
the battery terminals are disconnected.¡Connect the power cord after completion of other connections to prevent shortings.
38 CQ-VX2200U
29
ENGLISH
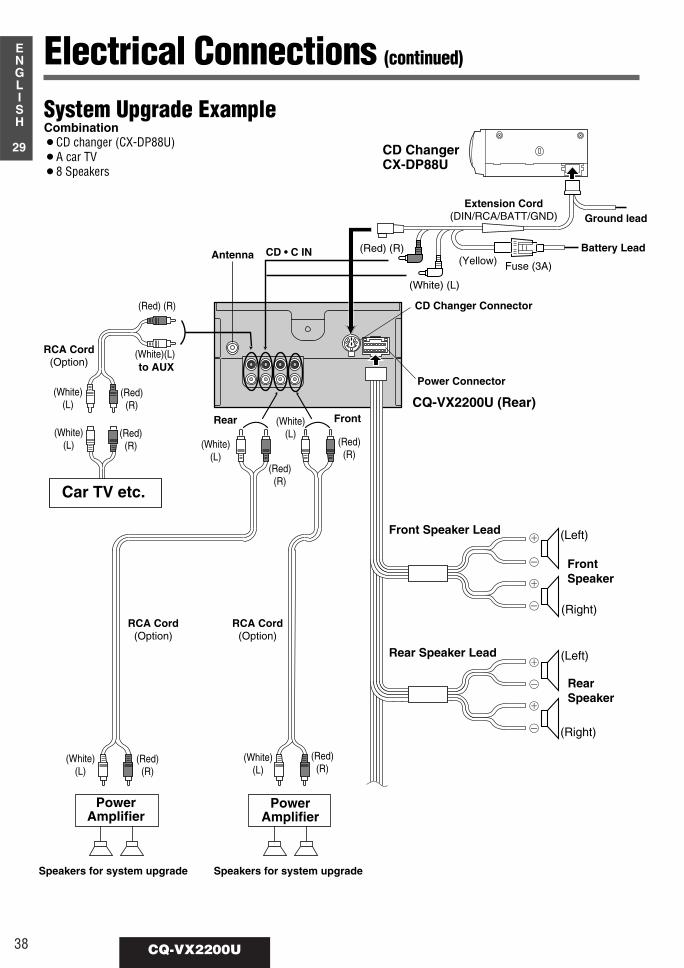
CD Changer CX-DP88U
CD Changer Connector
CQ-VX2200U (Rear)
(White) (L)
(Red) (R)
Extension Cord(DIN/RCA/BATT/GND)
RCA Cord(Option)
RCA Cord(Option)
RCA Cord(Option)
PowerAmplifier
PowerAmplifier
Speakers for system upgrade Speakers for system upgrade
Fuse (3A)(Yellow)
Rear Front
to AUX
(Red)(R)
(Red) (R)
(Red)(R)
(White)(L)
(Red)(R)
(White)(L)
(Red)(R)
(White)(L)
(Red)(R)
(White)(L)
(Red)(R)
(White)(L) (White)
(L)
(White)(L)
Car TV etc.
CD • C IN
Power Connector
Ground lead
Battery LeadAntenna
!
@
!
@
!
@
!
@
Front Speaker Lead
Rear Speaker Lead
Front Speaker
Rear Speaker
(Left)
(Right)
(Left)
(Right)
System Upgrade ExampleCombination¡CD changer (CX-DP88U)¡A car TV¡8 Speakers
Electrical Connections (continued)

39CQ-VX2200U
1
ENGLISH
30
Preliminary StepsCheck and take steps as described in the tables below.
If You Suspect Something WrongImmediately switch power off.Disconnect the power connector and check that there is neithersmoke nor heat coming from the unit before asking for repairs.Never try to repair the unit yourself because it is dangerous to do so.
Cautions:¡Do not use the unit if it malfunctions or
something is wrong.¡Do not use the unit in abnormal conditions,
for example, without sound, or if it emitssmoke or a foul smell, which can causeignition or electric shock. Immediately stopusing the unit and call the store where youpurchased it.
Troubleshooting
Trouble Cause / Step
No power.
No sound.
Noise. A mobile phone is used near the unit.aKeep the mobile phone away from the unit.
Condensation (dew)aWait for a while before use.
Cables are not correctly connected.aConnect cables correctly.
Mute is set to ON.aSet it to OFF.
Fuse is burnt.aCall the store where you purchased the unit, or your nearest Panasonic
Servicenter (see the attached sheet) and ask for fuse replacement.
Grounding wire is not correctly connected.aConnect the grounding wire to a metal part of your car.
Accessory cable is not correctly connected.aConnect the accessory cable to your car's ACC source.
Battery cable is not correctly connected.aConnect the battery cable to the terminal that is always live.
Cables are not correctly connected.aConnect cables correctly.
Car’s engine switch is not on.aTurn your car’s ignition switch to ACC or ON.
Common

40 CQ-VX2200U
31
ENGLISH
Trouble Cause / Step
¡CD is defective.¡Mechanical trouble.aOpen the panel and press [u] (CD EJECT). If failure persists, press the
reset switch. If normal operation is not restored, call the store where youpurchased the unit or the nearest Panasonic Servicenter to ask for repairs.
Unstable mounting.aMount the unit securely with the mounting parts, referring to the section
on Installation.
Mounting angle is over 30 degrees.aAdjust mounting angle to less than 30 degrees.
CD is dirty.aClean CD, referring to the section on Notes on CD.
CD is dirty.aClean CD, referring to the section on Notes on CD.
CD is upside down.aPlace CD in the correct direction with the label side up.
CD is in the CD com-partment but no soundis made, or CD is eject-ed automatically.
CD sound skips, tonequality is low.
Sound skip due tovibration.
CD is not ejected.
CD
Trouble Cause / Step
Poor quality tape.aUse better quality tape.
Heads are dirty.aClean heads. (Ask a service representative for advice.)
Blank tape is inserted in the unit.aInsert recorded tape into the unit.No sound.
Tape sound quality ispoor.
Cassette Tape
Troubleshooting(continued)
Trouble Cause / Step
Battery cable is not correctly connected.aConnect the battery cable to the terminal that is always live.
The motor antenna relay control lead is not connected correctly.a If there is a motor antenna in the car, connect the motor antenna relay control
lead to the motor antenna lead that is correctly installed in the car.
The radio antenna is not extended enough.aExtend the radio antenna.
Station is too far, or signals are too weak.aSelect other stations of higher signal level.
Too much noise in FMstereo and monauralbroadcasts.
Preset station is reset.
Radio

41CQ-VX2200U
1
ENGLISH
32
Trouble Cause / Step
No sound from left,right, front, or rearspeaker.
Left and right soundsare reversed in stereolistening.
Only bass or monauralsound from rear speaker.
SBC-SW is set to ON.aSet SBC-SW to OFF.
The right speaker wire is connected to the left speaker and the left speaker wireto the right speaker.aConnect the speaker wires to the correct one.
Cables are not correctly connected.aConnect the cables correctly.
Left and right balance, or front and rear balance is off on one side.aAdjust BAL//FAD as appropriate.
Sound Setting
Trouble Cause / Step
Buttons are invalid foroperation.
Remote control is in the wrong direction.aDirect the remote control at sensor (REMOTE) on the panel.
Battery has run down.aReplace the battery.
Wrong battery.aCheck the battery.
Battery poles (+) (–) are reversed.aInsert the battery correctly.
Remote Control
Trouble Cause / Step
Tape running mechanism is dirty or out of order.aClean tape running mechanism, or repair it. (Ask a service representative
for advice.)
Heads are magnetized.aDemagnetize heads. (Ask a service representative for advice.)
Normal type tape plays with Metal mode.aChange Metal mode to Normal mode.
Non-Dolby B NR tape plays with Dolby B NR on.aSet Dolby B NR to OFF.
Metal type tape plays with normal mode.aChange Normal mode to Metal mode.
Dolby B NR tape plays with Dolby B NR off.aSet Dolby B NR to ON.High tones are improp-
erly emphasized.
Cassette Tape (continued)
Reproduction of hightones is poor.
Wow and flutter is veryhigh.

42 CQ-VX2200U
33
ENGLISH
Troubleshooting(continued)
Error Display Messages CD
Display Cause / Step
Disc is dirty, or is upside down.a Open the panel and press [u] (CD EJECT) button. Check disc.
No operation by some cause.a Open the panel and press [u] (CD EJECT) button. If failure per-
sists, press the reset switch. If normal operation is not restored yet,call the store where you purchased the unit or the nearest PanasonicServicenter to ask for repairs.
Disc has scratches.a Open the panel and press [u] (CD EJECT) button. Check disc.
PLS EJECT
CD – E3 –
CD – E1 –
CD – E2 –
Action was taken to start playing before disc is fully ejected.a Open the panel and press [u] (CD EJECT) button.
Display Cause / Step
Cassette Tape
PLS EJECTNo operation by some cause.a Open the panel and press [u] (CST EJECT) button.
Display Cause / Step
CD Changer
NO DISC
CD CH – E3 –
CD CH – E1 –
CD CH – E2 –
Disc is dirty, or is upside down.a Select the next available compact disc. Check disc.
Disc has scratches.a Select the next available compact disc. Check disc.
No operation by some cause.a Eject the magazine. If failure persists, press the reset switch. If nor-
mal operation is not restored yet, call the store where you purchasedthe unit or the nearest Panasonic Servicenter to ask for repairs.
No disc in the changer (magazine)a Insert discs into the changer (magazine).

43CQ-VX2200U
1
ENGLISH
34
MaintenanceYour product is designed and manufactured to ensure a minimum of maintenance. Use a dry soft cloth for routine exteriorcleaning. Never use benzine, thinner or other solvents.
Product ServicingIf the suggestions in the charts do not solve the problem, we recommend that you take the product to your nearest autho-rized Panasonic Servicenter. The product should be serviced only by a qualified technician.
Replacing the FuseUse fuses of the same specified rating (10 amps). Using different substitutes or fuses with a higher rating, or connectingthe product directly without a fuse, could cause fire or damage to this unit.If the replacement fuse fails, contact your nearest Panasonic Servicenter for service.
Reset SwitchReset switchInsert a hard, slender stick into the hole and push the switch.
The unit returns to the default state when the trouble is reset.Remember, the data and settings stored in the memory aredeleted.
ImportantPush the switch only when the unit fails to operate with any but-tons.If the unit fails to return to normal condition, call the nearestPanasonic Servicenter and ask for repairs.
CD EJECT
CST EJECT
CD IN
CST IN
INTEGRATED CD/CASSETTE RECEIVER WITH
u
u
RESET

44 CQ-VX2200U
35
ENGLISH
Notes on CD
Care of the Unit
Notes on Cassette Tape
ONLY USE DISCS CARRYING THE LABEL
How to hold the CD¡Do not touch the underside of the disc.¡Do not make scratches on the disc.¡Do not bend disc.¡When not in use, keep CD in the case.
Do not use irregularly shaped CDs
Do not leave discs in the following places:¡Direct sunlight¡Near car heaters¡Dirty, dusty and damp areas¡Seats and dashboards
Disc CleaningUse a dry, soft cloth to wipe from the center outward.
Caution on New DiscsA new disc may have rough edges on its inner andouter perimeter. These may cause malfunction.
Remove the rough edges using a pencil, etc.
* Refer to page 17 as to CD-Rs.
Tape Slack:Use a pencil or similar object to take up theslack as shown. If a loose tape is used, thismay result in the tape becoming tangled in therotating parts of the unit.
Exposed end(Open end)
Pencil
Do not touch or pull out the tape.
Cleaning this unitUse a dry, soft cloth to wipe.
Caution on cleaningNever use solvents such as benzine, thinneras they may mar the surface of the unit.
Label side
<Right>
Rough edge
<Wrong>
Maintenance

45CQ-VX2200U
1
ENGLISH
36
SpecificationsGeneralPower Supply : 12 V DC (11 V - 16 V), test voltage 14.4 V, negative groundCurrent Consumption : Less than 8.5 A (CD play mode)Rated Output : 16 W x 4 ch (1 kHz, 1%, 4 Ω)Maximum Power Output : 41 W x 4 chSuitable Speaker Impedance : 4 ΩAudio Input Impedance : 10 kΩ (AUX IN)Audio Input Voltage : Max. 2 V (AUX IN)Pre-out Output Voltage : 2 VPre-out Output Impedance : 600 ΩDimensions (W x H x D) : 7” x 4” x 6-5/6” (178 x 100 x 160 mm)Weight : 5 lbs. 5 oz (2.4 kg)
DSPNumber of Channels : 2 input channels, 4 output channelsSpace mode : 7 modeEqualizer Center Frequency : 80, 160, 320, 640, 1.6 k, 4 k, 10 k (Hz)Variable Range of Equalizer : –12 to +12 dB (13 steps)
FM Stereo RadioFrequency Range : 87.9 - 107.9 MHzUsable Sensitivity : 12 dBf.Total harmonic distortion (mono) : 0.3 % (1 kHz)Weighted S/N ratio (mono) : 70 dBFrequency Response : 20 Hz – 15 kHz (± 3 dB)Stereo Separation : 42 dB (at 1 kHz)Image response ratio : 75 dB
AM RadioFrequency Range : 530 kHz - 1,710 kHzUsable Sensitivity : 27 dB/µV Image response ratio : 65 dB
CD Player Channel : 2 channelsQuantization : 16-bit linerFrequency Response : 5 Hz - 20 kHz Dynamic range : 90 dB (IHF, A)Wow and Flutter : Below measurable limits
Cassette Tape Player Reproduction system : 4-track, 2-program stereoTape Speed : 4.76 cm/secFast Forward Time : 100 sec (C-60)Rewind Time : 100 sec (C-60)Wow and Flutter : 0.07 % (WRMS)Signal/Noise Ratio : Dolby B NR OFF 56 dB (IHF, A)
Dolby B NR ON 66 dB (IHF, A)Frequency Response : 30 to 18,000 Hz (normal tape)
30 to 20,000 Hz (metal tape)
Above specifications comply with EIA standards.Note : Specifications and the design are subject to modification without notice due to improvements in technology.
Dolby noise reduction manufactured under license from Dolby Laboratories Licensing Corporation. “DOLBY” and the double-D symbol B are trademarks of Dolby Laboratories Licensing Corporation.

Panasonic Consumer ElectronicsCompany, Division of MatsushitaElectric Corporation of AmericaOne Panasonic Way, Secaucus, New Jersey 07094http://www.panasonic.com
Panasonic Sales Company.Division of Matsushita Electric of Puerto Rico, Inc. (“PSC”)Ave. 65 de Infanteria, Km. 9.5San Gabriel Industrial Park, Carolina,Puerto Rico 00985http://www.panasonic.com
Panasonic Canada Inc.5770 Ambler Drive,Mississauga, OntarioL4W 2T3www.panasonic.ca
YEFM284C366ZA TAMACO1101-0 Printed in Taiwan