course - vb
TRANSCRIPT

Learn How To Program
Learn How to Program © IT-Pro Training Ltd 2004

Introduction to Software Development – Student Guide
www.learnhowtoprogram.com
Introduction to Software Development – Student Guide
2
Course Overview
Aims of the course
This course is aimed at individuals who have experience of using computers but who have no previous programming experience. It introduces the various stages of software development before going on to cover software design, general programming and database applications in more detail.
The course aims to teach the general principles of software development which can then be applied in a variety of situations; it is not, and should not be seen as, a course teaching specific design methods or a specific programming language.
You, the student, will gain a good grounding in software development with actual practical experience of design and programming processes. This will enable you to take up a junior programming position and gain further knowledge and experience.
Length of the course
As a distance-learning student, you can work at your own pace. You should expect to spend at least 250 hours to complete the full course.
Software Requirements
The course uses Microsoft Visual Basic 6 and Microsoft Access 2000 and you must have access to these to complete the exercises successfully.
A word-processing package, such as Microsoft Word, should be used to produce the necessary documentation. A means of producing charts will also be useful; Microsoft Organization Chart is available through Microsoft Word and can be used for this.
Course Materials
The course is split into four main sections:
• Software Development and Design
• Introduction to Programming
• Programming with Visual Basic
• Database programming
Each section includes notes, examples, exercises and/or an assignment. Sample solutions are also provided for the exercises and assignments.
Introduction to Software Development – Student Guide
3
Course Structure What you do
Step 1 • Software Development and Quality • Software Design & Exercises
Step 2 • Software Design Assignment
Step 3 • Software Design – Assignment Solution • Introduction to Programming • Example Pass Marks projects
Step 4 • Introduction to Programming – Solutions to Exercises • PosNeg, Furnace, Satellite, Chain Store and Severn Bridge
projects
Step 5 • NumberSort project • Programming with Visual Basic • Example projects
Step 6 • Programming with Visual Basic – Exercise Solutions • PosNeg, Furnace, Satellite, and NumberSort projects • More Programming with Visual Basic
Step 7 • More Programming with Visual Basic – Exercise Solutions • Chain Store and Severn Bridge projects
Step 8 • Using Microsoft Access • Company and Courses databases. (Copy the Company
database to C:\Student.)
Step 9 • Using Microsoft Access – Assignment Solution • Training database (Copy this to C:\Student.) • Introduction to Database Application Development • Example database projects
Step 10 • Introduction to Database Application Development – Exercise Solutions
• DatabaseLink, Navigation, UpdateCancel, Delete, Add and ADO projects
Following the Course
Your tutor
When you have registered for the course, you will be assigned a tutor who will help you throughout your studies. Communication with the tutor will be by e-mail ([email protected]).
The tutor will help to clarify any points about which you are unclear, provide feedback on your exercise solutions and ensure that your assignments are marked.
Exercises and Assignments
It is important that you have a clear understanding of each topic and complete all exercises and assignments for it before moving on to the next one.

Software Development and Quality
www.learnhowtoprogram.com © IT-Pro Training Ltd. 2005
Software Development and Quality
Version 1.0
2
Contents
Contents .......................................................................................................................................... 2 What is Software Development?......................................................................................................... 3 The Software Development Project Life Cycle ...................................................................................... 4
Analysis of User Requirements ........................................................................................................ 5 Outline System Design................................................................................................................... 6 Detailed Design ............................................................................................................................ 6 Implementation............................................................................................................................. 7 System Testing .............................................................................................................................. 7 Acceptance Testing ....................................................................................................................... 7 Installation and Training ................................................................................................................ 7 Software Support and Maintenance ................................................................................................ 8
How is the Project Managed? ............................................................................................................ 8 Staffing......................................................................................................................................... 8 Project Monitoring......................................................................................................................... 8
Quality Assurance............................................................................................................................. 9 What makes a quality piece of software? .......................................................................................... 10
Reliability.................................................................................................................................... 10 Maintainability ............................................................................................................................ 10 Performance ............................................................................................................................... 10 Portability ................................................................................................................................... 11
Ensuring Quality ............................................................................................................................. 11
Software Development and Quality
Version 1.0
3
What is Software Development?
Software development is the process of producing an application which will perform certain functions. For example:
• a word-processing package allows the user to type letters and produce reports and other documents. It allows the text to be formatted in different ways and often allows the inclusion of tables of information and pictures to improve readability and make the appearance more interesting.
• a stock control system will allow the user to keep track of the types and quantity of items in stock, their value and details of when to re-order. It will possibly be linked to supplier details and be updated via a sales system.
• an accounting package allows the user to enter details of transactions associated with various accounts, keep track of VAT if necessary and produce various reports.
Many applications can now be bought ‘off-the-shelf’ and have been designed to meet the general requirements of the majority of users. Other applications are developed to meet a specific need.
Some applications are small and straightforward while others are large and complex. Very small applications may be developed by one or two people whilst the large projects require a team of developers working over a long period of time.
However, regardless of the size and complexity of an application, its development will normally follow the same pattern. We will call this the software development project life cycle.

Software Development and Quality
Version 1.0
4
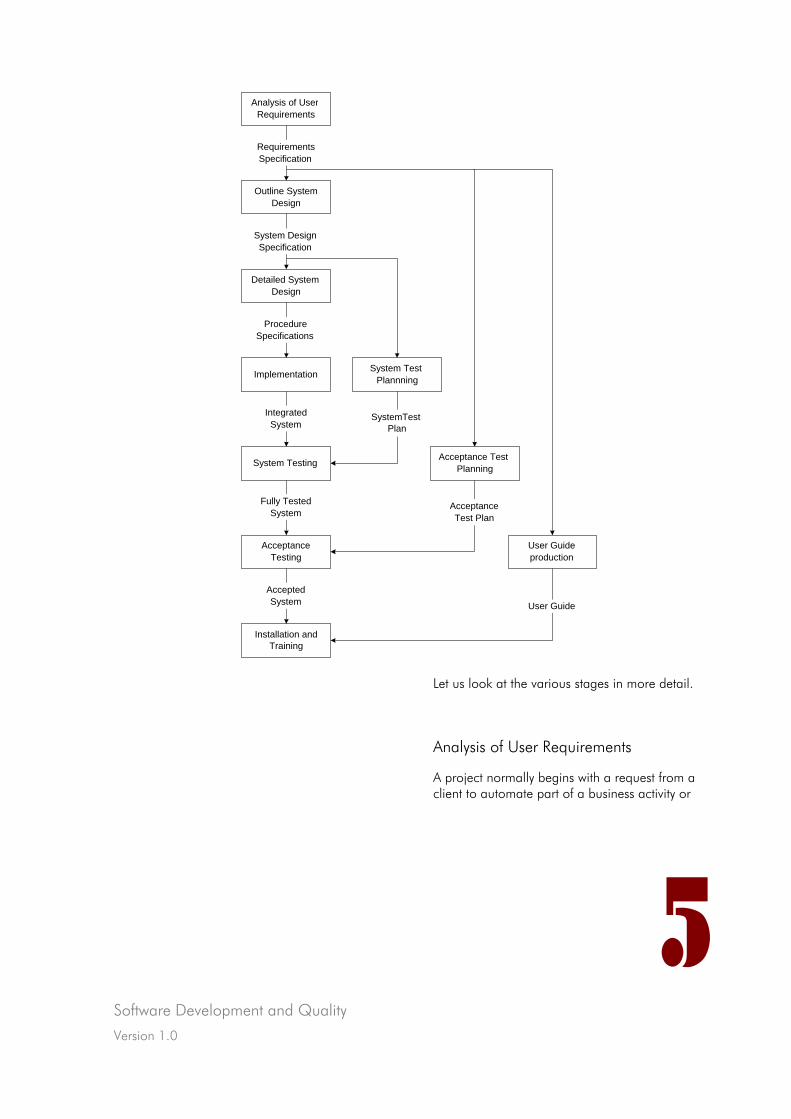
The Software Development Project Life Cycle
A software development project can be broken down into several identifiable phases as shown in the following diagram.
Each of these phases requires input from different sources and produces different outputs. The skills needed by the development staff involved in the various phases also differ.
Although the output from one phase is shown as the input to another, it is possible, and likely, that phases will overlap to some degree. On small projects, it is possible that some phases will be integrated.
Software Development and Quality
Version 1.0
5
Let us look at the various stages in more detail.
Analysis of User Requirements
A project normally begins with a request from a client to automate part of a business activity or
Analysis of UserRequirements
Outline SystemDesign
Detailed SystemDesign
Implementation
System Testing
AcceptanceTesting
Installation andTraining
RequirementsSpecification
System DesignSpecification
ProcedureSpecifications
IntegratedSystem
Fully TestedSystem
AcceptedSystem
User Guideproduction
Acceptance TestPlanning
System TestPlannning
User Guide
SystemTestPlan
AcceptanceTest Plan
Software Development and Quality
Version 1.0
6
to update or improve an existing system. This phase aims to study the existing activity, identify any weaknesses and establish exactly what it is that the client hopes to achieve.
Various people within the client’s organisation should be involved in this process:
• management will be interested in how the business operation can be improved and gains made; they will be able to give an overall view of the business and where the proposed system will fit within it;
• users must be consulted as they will know the details of current procedures and may be able to identify areas which could be improved;
• operations staff from existing systems will be able to offer assistance on the practicalities of running a new system perhaps alongside others.
The analyst must examine these findings and produce a model illustrating what is required of the new system. He must be able to see the situation from the client’s point of view and endeavour to gain a good understanding of the current business activity and the desired changes.
A variety of methodologies is available to assist the analyst in this process including data flow diagrams and structure charts. These can be used to help understand the existing processes and also to show the possibilities of any new system.
The result of this phase is the production of a statement of what is required of the new system - a Requirements Specification. Diagrams and structure charts can be included here together with examples of data input screens and reports.
This Requirements Specification will normally form the basis of an agreement between the client and the developer as to what will be delivered. Any changes to these requirements made at a later date will have an impact on all the succeeding phases of the project. The client must be made fully aware of this as any later changes are likely to affect the overall cost and duration of the project.
Outline System Design
This phase will use the Requirements Specification as its main input. The job of the designer at this stage is to identify the different modules or building blocks of the system, define their organisation and the interfaces between them. Diagrams and structure charts can again be used to illustrate this outline design. It is important at this stage that the computer system on which the new software is to be run is taken into account as it may impose limitations on the design. Any standards already used by the client should be incorporated in the design. Prototypes may be used to demonstrate possible solutions to the client.
The result of this design process is a System Design Specification detailing how the system will be structured with reference to the modules and the data being processed. It will define the main system inputs and outputs.
Detailed Design
This is a continuation of the preceding phase using the System Design Specification as its main input. The designers at this stage do not need a full understanding of the complete system as they can be given a specific part of the system on which to work. They can be given the inputs and outputs, told what processing is required and their job is then to design the procedures to a level from which a programmer can work. Again diagrams and structure charts can be used to advantage.
This design will result in a series of Procedure Specifications covering the complete system and fully detailed descriptions of the data structures.
Software Development and Quality
Version 1.0
7
Implementation
This is the phase at which the programmer works directly from the Procedure Specifications and produces the software itself. There will be an element of further design at this stage to describe in detail exactly how the processing will be done. At this stage structure charts and pseudo-design language should be used. This level of design can then be translated almost directly into the programming language being used.
Once developed, each procedure can be tested individually but must also be plugged into its proper position within the overall system framework and tested in conjunction with other modules. As more and more procedures are completed, the system will grow to its final form.
Rigorous testing at this stage will reduce the need for amendments and change in the next phase. ‘Dummy’ modules can be used during the integration phase for testing purposes until the real procedures are available.
During this implementation phase, programming and testing standards and guidelines should always be followed. This will ensure that system maintenance is made easier and that testing is complete.
The result of this phase is the fully integrated system.
System Testing
If the previous phase has been completed successfully this should be a straightforward process. A System Test Plan should be drawn up based on the System Specification. This can be prepared whilst the Detailed Design and Implementation are in progress.
System testing should aim to mirror all the various types of input which could pass through the system to ensure that all are handled correctly and that the correct results are produced. At this stage volume testing can be done to ensure that the system can handle maximum amounts of data and that response times are within acceptable limits.
The result of this phase will be a fully working
and fully tested system.
Acceptance Testing
This is really the responsibility of the client who should use the original Requirements Specification to draw up a series of tests reflecting the actual data and processes which will pass through the system. It will be similar to the system test but will prove to the client that the system meets the needs of the business.
The result of this phase will be an accepted system.
Installation and Training
Once the system has been accepted by the client, it can be installed and users can be trained in its use. Depending on the size and complexity of the system this could be a straightforward switch from one system to another or it could involve running the new system in parallel with an existing one. Data may need to be transferred to the new system, new documents may need to be introduced within the business operation to enable users to interact easily with it and new manual procedures may have to be introduced.
An important requirement of this phase, therefore, is a comprehensive User Guide detailing any manual procedures surrounding the new system as well as instructions on using the system itself. This User Guide should be drawn up largely from the original Requirements Specification but may also have to refer to the System Design Specification. This task can be carried out in parallel with the main system implementation.
Software Development and Quality
Version 1.0
8
Once installation and training have been carried out, that is, strictly speaking, the end of the software development.
Software Support and Maintenance
Once a new system is installed that is normally the end of the project for the development team. However, there is still a need for support for the system and a means of handling any changes that the client may require later.
It is possible that the user may encounter problems with the new system for any of a number of reasons. Something may not have been covered in training the users, testing may not have shown up a processing error, the overall design may have missed an operational consideration, something may have been omitted from the original Requirements Specification or the business rules or activities themselves may have changed.
The support staff must keep a log of all reported problems and requests for change and the steps taken to correct them or to meet the new requirements. Depending on the nature of the problem, the solution could simply be a case of changing the User Guide or providing extra training or it could be a case of introducing a change in the requirements and following this through the development phases to produce a revised system.
How is the Project Managed?
Staffing
The Project Manager will normally oversee the complete project. He will be the main link between the client and the development team.
He will take responsibility for getting staff with the necessary expertise to work on the various phases of the project. He will need analysts, designers, programmers and system testers.
On a small project it may be that one individual can carry out the analysis and the design or that the designer is also the best programmer for the job. On a large project, teams of analysts, designers and programmers may be employed. If teams are used at any stage, they will work under the supervision of a team leader.
Project Monitoring
An original estimate will have been made as to the cost and duration of the project but this will be reviewed when the Requirements Specification has been agreed with the client; it is only at this stage that a more realistic estimate can be produced. Based on this estimate, detailed project plans can be drawn up showing the resources required and expected timescales for each of the project phases. Milestones should be built into the plan to highlight any significant events.
Progress should be monitored regularly against these plans and the client kept informed as to overall progress on a regular basis. This means that the client can be made aware of any
Software Development and Quality
Version 1.0
9
difficulties or potential problems as early as possible and that steps are being taken to overcome them or he can be assured that things are going as planned. Regular client meetings will also keep the client involved in the process and he can make the development team aware, via the Project Manager, of anything arising from the business side which may impact on the project.
Again there are tools available to assist the Project Manager in project planning and monitoring.
Quality Assurance
The assurance of quality is of great importance in any project and it can be achieved by ensuring that guidelines and standards are followed throughout the development.
Guidelines should be followed for the production of all development documents and standards complied with for coding and testing. These, together with the use of reviews or walkthroughs at all stages of the project, will ensure that a quality product is produced.
Reviews or walkthroughs are carried out by others with relevant experience who will have been provided with all the information required prior to the review. They will be able to check that guidelines and standards are being followed and can check whether the product will fulfil its function; they may be able to offer an alternative solution to a problem or suggest other improvements. On a large project with teams of people working together, solutions may be discussed with others as a matter of course thus reducing the review to a formal exercise; on a small project with only one member of staff involved at any phase it is very important that the work is cross-checked by at least one other qualified individual.
Project meetings are held regularly to monitor progress and discuss future plans. All staff should complete timesheets and these provide actual statistics of work done. These meetings also provide an opportunity for team members to raise any technical issues. Records of all meetings are kept and any decisions, technical and management, are filed for future reference.
Regular reports are made to the client either in meetings or by other means.
Software Development and Quality
Version 1.0
10
What makes a quality piece of software?
How is software judged?
There are no real hard and fast rules about software but it is judged on four main aspects:
• Reliability
• Maintainability
• Performance
• Portability
A quality piece of software is one that can be marked highly in all of these areas; a weakness in any one of them will detract from the quality of the software.
Nobody ever really notices if they are using a quality piece of software. Users only complain about low quality software. As a software developer you should aim to write inconspicuous software!
Reliability
Your program should be able to cope with anything the user wishes to do with (or to) it. Your software should not cause the computer to hang or freeze if the user enters the wrong type of data – e.g. a letter instead of a numerical value. Most errors made by the user are unintentional and they should not be punished for making a mistake.
Your program should cover every eventuality, so that no matter what information is fed into it, the software can recover – even if it simply displays a message informing the user that the data they entered was incorrect and asking them to try again.
Robustness of software comes from being tried and tested. It is not a physical measure of the medium on which the software is stored. Robust software is software that continues to run, even after numerous incorrect inputs. Robust software
will continue to run with little or no maintenance required.
Maintainability
Software should be easily maintainable. Any required modifications should be able to be applied with minimum effort. If part of a program needs to be upgraded, it should not mean that the entire program has to be re-written. An important consideration is how long the software is expected to last – how long before new technology, operating system etc. will be used on the machine, and whether the software will be able to cope with it.
Performance
Your program should run efficiently and perform the required tasks as necessary. Despite the increase in computing speed and power, users are expecting more and more from their computers. What used to be an acceptable waiting time a few years ago is no longer acceptable on today’s machines. A general rule is the ten second gap. If a user has to wait more that ten seconds for a routine operation to be executed, they have waited five seconds too long!!
Users may be willing to forgive a slightly slower piece of software if it performs the required tasks well. If the user can be confident that the result after ten seconds will be worth the wait, they are likely to be more forgiving. But if the user has been made to wait and the result is anything but spectacular, they are likely to lose faith in your software. Software is always being upgraded and improved (especially commercial packages)
Software Development and Quality
Version 1.0
11
so your software must out-perform the opposition.
Portability
Again, nothing to do with the distribution media, portable software is software that can be used on a number of machines. The software may be written to suit a number of operating systems.
Will your software work with different versions of Windows? Does your software require a super-power machine to run, or can it be used on a less powerful machine? The more machines that can run the software, the more people there are likely to use it. Users often begrudge not being able to run software because their computer may be six months behind the leading edge. Try to make your software as portable as possible.
Ensuring Quality
Thought must be given to quality at all stages of the development and checks must be made throughout the project that the four main aspects above are being considered and met as far as possible.
These checks are effectively built in to the management of the project by the inclusion of a Quality Assurance function. However, everyone involved in the development must be made fully aware of the importance of producing a quality product and work towards that goal.

Software Design
www.learnhowtoprogram.com © IT-Pro Training Ltd. 2005
Software Design Version 1.0
2
Contents
Contents .......................................................................................................................................... 2 Software Design Methods .................................................................................................................. 3
How do we design software?.......................................................................................................... 3 Different Approaches to Design ...................................................................................................... 3 Functional Decomposition.............................................................................................................. 3 Design Constructs ......................................................................................................................... 4
Documenting the Design ................................................................................................................... 4 Structure Charts ............................................................................................................................ 4 Pseudo Design Language (PDL) .................................................................................................... 10
Testing the Design .......................................................................................................................... 12 Software Design – Worked Example ................................................................................................. 13
Problem - Pass Marks .................................................................................................................. 13 Working out a Solution................................................................................................................ 13 Final Solution.............................................................................................................................. 14
Software Design Exercises................................................................................................................ 16 Exercise One - Positive / Negative Numbers .................................................................................. 16 Exercise Two – The Furnace ......................................................................................................... 16 Exercise Three - The Chain Store .................................................................................................. 17 Exercise Four - The Satellite Receiver............................................................................................. 18
Software Design Assignment ............................................................................................................ 19
Software Design Version 1.0
3
Software Design Methods
How do we design software?
We have seen that software development is the process of producing an application which will perform certain functions and that there are several stages to be followed in achieving this. We are not aiming to teach the analysis stage here but will start with the design process.
We have to remember that a computer is simply a machine which follows instructions. These instructions must be very precise as the computer will follow them exactly. We are therefore responsible for working out a complete solution to the problem which can be translated into a program which the computer will understand and follow.
Different Approaches to Design
So how do we begin designing a solution to a problem?
We have already seen that it is essential to get the design right before progressing further as any mistakes made at this stage will be carried through to the next stage and mean more work to correct later.
At this design stage, we should be thinking in plain everyday language and using clear straightforward statements to explain what we mean. The translation into ‘computer’ language comes later.
So, faced with a problem, what do we do?
• Linear approach - start at the beginning and work through to the end.
• Evolutionary approach – change an existing design to make it suit a slightly different purpose.
• Bottom up – start with the detail and bring it together to develop the larger design.
• Top down - start with the overall design and break this down into greater detail.
The Top down and Bottom up approaches follow sound engineering practice and are also applicable to software design.
Top down is most useful, but if some detailed elements already exist which can be re-used the Bottom up approach may also be applied to some extent.
Functional Decomposition
Taking the Top down approach leads us through a process of ‘functional decomposition’.
Functional Decomposition concerns itself with what functions or tasks have to be carried out to provide a solution to a problem.
Having identified the main functions, we break each one down into its component parts. Then we break these down to a greater level of detail and continue to do this until we are left with a set of small components each of which will carry out a single task.
Consider an everyday task such as making a cup of tea.
We can start with:
Boil water – brew tea – pour – add milk and sugar if necessary.
However, ‘boil water’ can be broken down into:
fill kettle - switch on - wait until boiled - switch off.
‘Add milk and sugar if necessary’ involves a decision.
This seemingly simple example gives you an idea of the design process.
Knowing what level of detail is required depends
Software Design Version 1.0
4
on design experience and the stage of development at which you are working. Ultimately, the design must result in small components each of which performs a single useful task.
Design Constructs
It is impossible to give any strict guidelines as to how to break down a problem as each one is different. However, we do have methods to help us develop and illustrate the solution. These design methods and all programming languages share certain constructs.
Computers work with only three main constructs which are reflected in the programs we write for them:
• Sequence - complete a set of instructions in a logical sequence, one at a time.
• Selection - perform a set of instructions if a condition is met.
• Iteration - repeat a set of instructions many times.
Since it is (as yet) impossible to train a computer to think like a human, we need to adjust our way of thinking to fit in with that of a computer. We need to begin to think along the lines of sequence, selection and iteration.
Every function that we perform can be broken down into a set of sequence, selection and iteration instructions.
Take the example above.
‘Boil water – brew tea – pour – add milk and sugar if necessary’ is a sequence of actions.
‘Add milk and sugar if necessary’ is a selection based on whether you want milk and/or sugar.
‘Wait until boiled’ can be thought of as an iteration where you are doing something, in this case waiting and checking the state of the water in the kettle, repeatedly, until the water is boiling.
Documenting the Design
It is important that the design is clearly and completely documented to a level which can be easily translated into a programming language.
Here we will look at two methods of developing and documenting the design:
• structure charts
• pseudo design language (PDL)
Both can be used at any level but, in practice, the structure chart is often more suited to showing the overall structure of the solution while the PDL is better for the more detailed processing description.
Structure Charts
To chart a solution, we can use Structure Charts. They give a visual illustration of the programming constructs.
Charting the solution to a problem involves starting with a general overview, the main problem broken down into its main constituent parts. Each of these parts is then taken in turn and broken down into more detail. This process can be continued until the final level of detail performs a simple complete task and is workable as a series of single-step instructions. This is the basis of functional decomposition.
The Structure Charts that we discuss in this section are very simple examples. The charts concentrate purely on the three programming constructs.
5
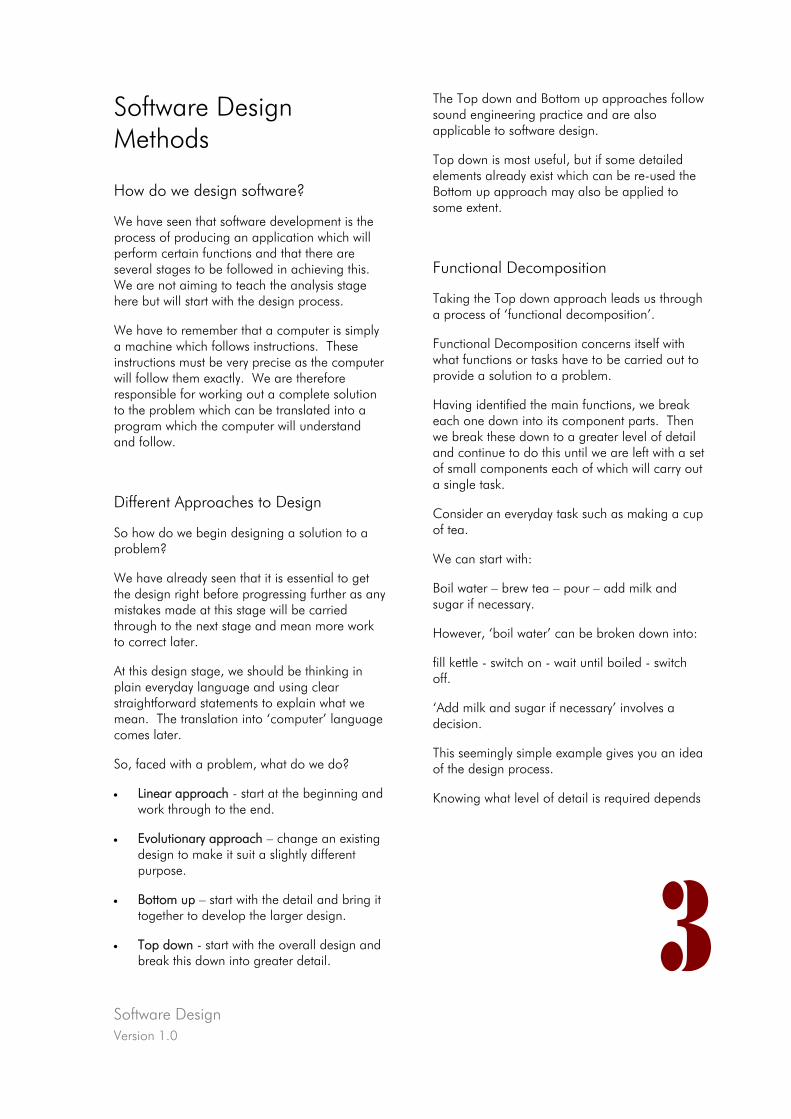
Sequence
A sequence of instructions is charted by placing a number of boxes next to each other. Each box will contain one instruction. Sequencing is read from left to right.
Each box may have a number of boxes underneath it. The lower level shows the parts which make up the higher level: in the example below, Process is made up of Part One followed by Part Two. The further down the chart you work, the more detail is included: Part One itself consists of Step A followed by Step B followed by
Step C.
Each level on the chart reflects a further level of functional decomposition.
Any one box may be replaced by the boxes immediately beneath it, so instead of saying ‘do Part One’, we could say ‘do Step A then Step B then Step C’. Similarly each group of boxes under one topic could be grouped and replaced by the general topic.
In this example, Process ultimately consists of Step A, then Step B, then Step C, then Step D, then Step E and finally Step F.
Process
Part One Part Two
Step A Step B Step C Step D Step E Step F
Software Design Version 1.0
Software Design Version 1.0
6
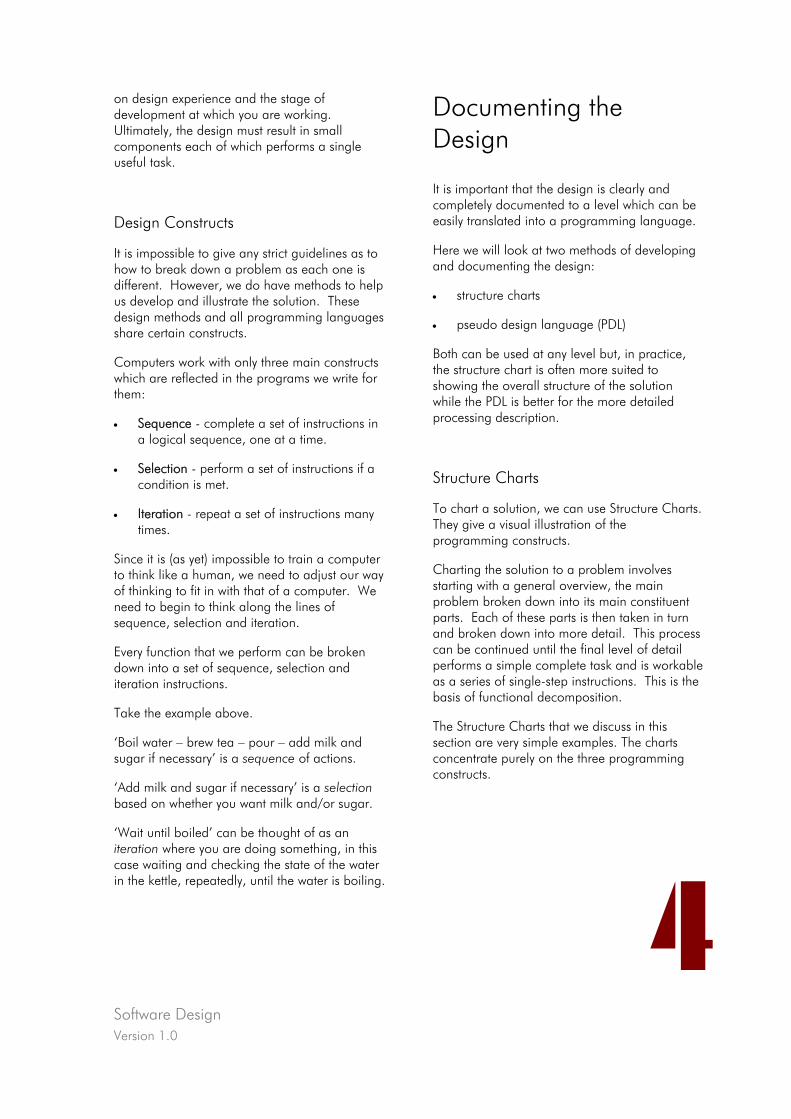
Selection
Selections are of the either/or kind. Only one selection can be made from the options available. If more than one condition can be met, it is only the first available selection that is accepted.
Once a selection has been made, the instructions that make up the processing for that selection are followed before continuing with the next box in sequence following the selection box.
A selection option is shown by a small circle (o) in the top right hand corner of the option box. Selection is sometimes evident by the inclusion of a question-type statement in the decision box.
Below is a typical selection choice made by a local concert organiser. Note how every eventuality is covered.
In this instance, only one of the three possible conditions can be met at any one time.
How many peoplehave booked?
< 10
Cancel concert Perform at venue Move to biggervenue
11 - 100 > 100

Software Design Version 1.0
7
Iteration
An iteration occurs whenever a process needs to be repeated for a number of times.
Sometimes the number of repetitions is known and the iteration may take the form “repeat 10 times”.
Sometimes the number of repetitions is not known. This could be “repeat until all the items have been checked”.
Without a “get-out” clause, an iteration will repeat and repeat without ever proceeding on to the next instruction in the sequence. So it is vital
to know when to stop.
Iterations are shown by a small asterisk (*) in the top right hand corner of the iteration box. A condition must be placed in the box to determine when the program is to stop the iteration process and move on to the next instruction in sequence.
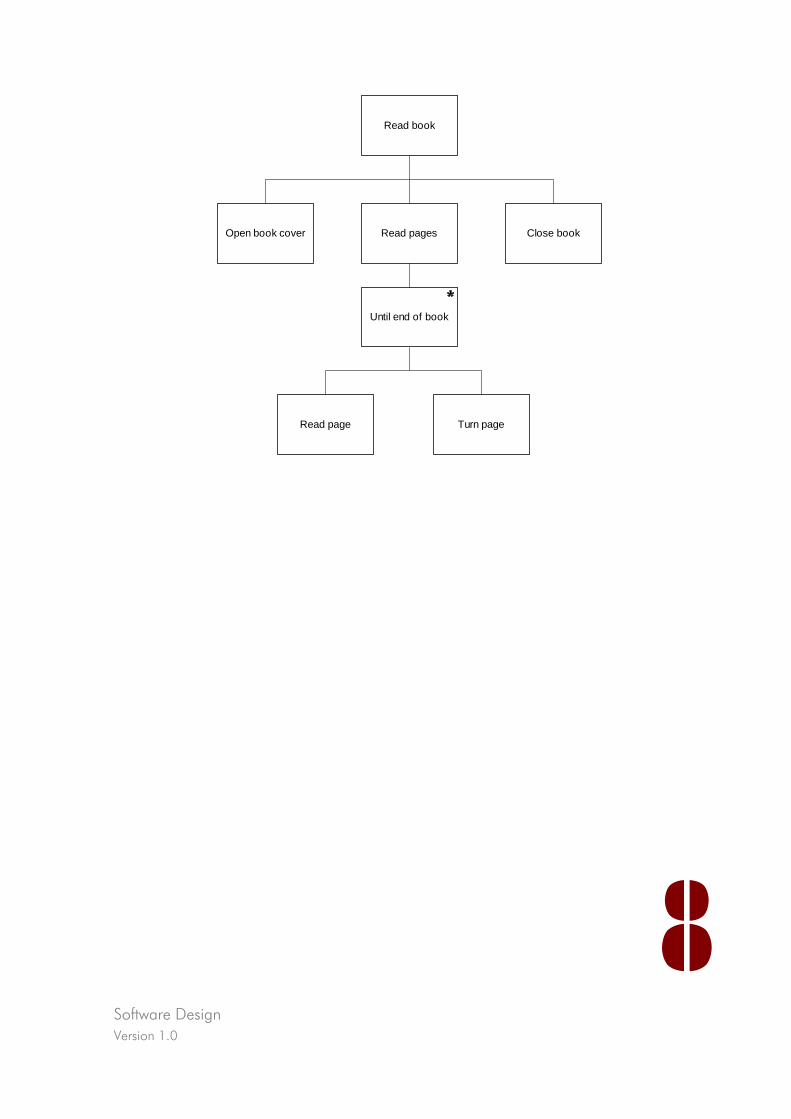
Here the ‘Read pages’ process consists of repeating the actions ‘Read words on page ‘ followed by ‘Turn page’ until the end of the book is reached. The iteration box contains the “get-out” clause and the actions to be repeated are placed below it.
Software Design Version 1.0
8
Read book
Open book cover
Until end of book
Read pages Close book
Read page Turn page
Software Design Version 1.0
9
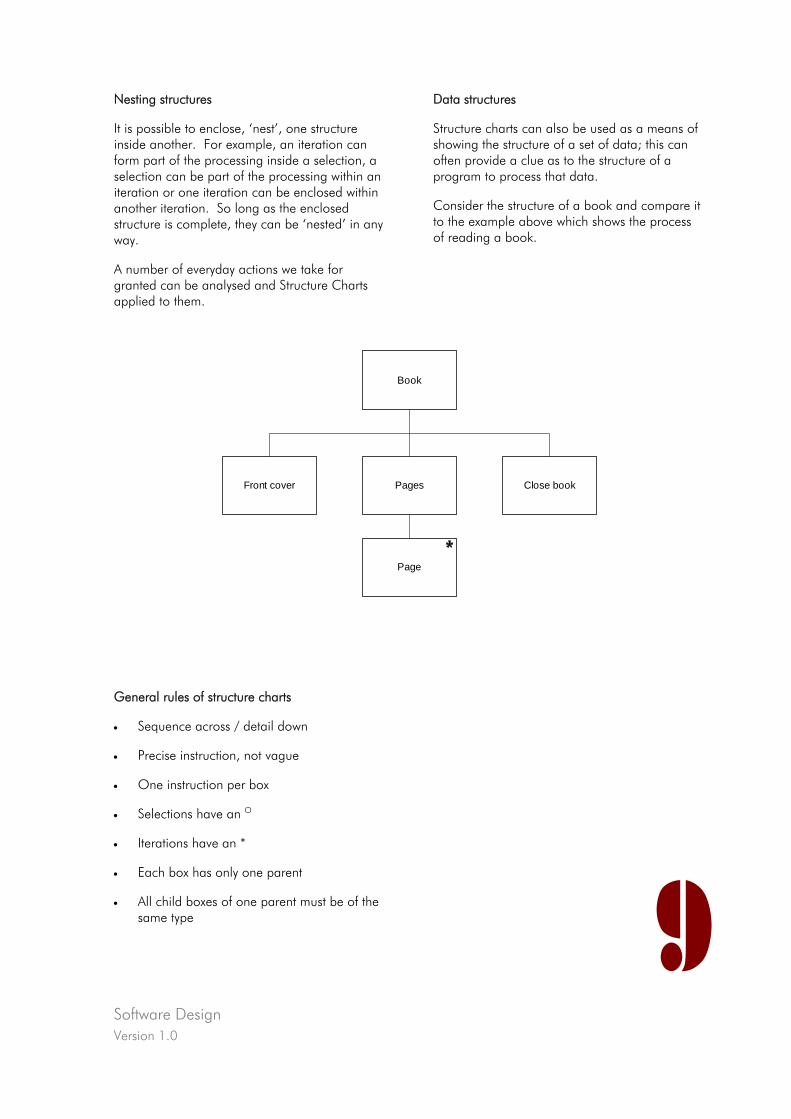
Nesting structures
It is possible to enclose, ‘nest’, one structure inside another. For example, an iteration can form part of the processing inside a selection, a selection can be part of the processing within an iteration or one iteration can be enclosed within another iteration. So long as the enclosed structure is complete, they can be ‘nested’ in any way.
A number of everyday actions we take for granted can be analysed and Structure Charts applied to them.
Data structures
Structure charts can also be used as a means of showing the structure of a set of data; this can often provide a clue as to the structure of a program to process that data.
Consider the structure of a book and compare it to the example above which shows the process of reading a book.
Book
Front cover
Page
Pages Close book
General rules of structure charts
• Sequence across / detail down
• Precise instruction, not vague
• One instruction per box
• Selections have an O
• Iterations have an *
• Each box has only one parent
• All child boxes of one parent must be of the same type
Software Design Version 1.0
10
Pseudo Design Language (PDL)
PDL is simply structured English and offers an alternative to the charting method shown above. It is generally easier to maintain and is more suited to the more detailed processing descriptions which will be directly translated into a programming language. Some people prefer charts which are more visual while others prefer this more narrative presentation.
The important thing is that both methods show a structure.
PDL contains only the three constructs detailed above: sequence, selection and iteration.
Certain words are ‘key’ words used to show the structure. In the following examples these key words are underlined. Indentation is also used to show the structure more visually.
Sequence
The instructions are simply written one per line each starting immediately below its predecessor.
do step A do step B do step C
Selection
When using a simple ‘either - or’ selection, use one of the following constructs:
If condition Then do something End If
If condition Then do something Else do something else End If
For every If there must be a corresponding End If to show the end of the selection.
If milk required Then add milk End if
Sometimes the selection can be one from a list of possibilities. Here we can use another form of selection which is the Select Case:
Select Case value Case 1 do this Case 2 do this instead Case 3 do the other End Select
Like If and End If, every Select must have an End Select.
This format can be used for the concert example above:
Select Case Number of people booked Case < 10 Cancel concert Case 11 to 100 Perform at venue Case > 100 Move to bigger venue End Select
Iteration
There are two main ways of showing iterations in PDL.
Firstly where you know the number of repetitions you could use:
For Each of 1 to 20 items do this End For
Using this construct, we can determine exactly how many times a series of instructions are carried out within the iteration. In the above example, the process will always be completed
Software Design Version 1.0
11
20 times, since we have stated that there are twenty items and that the process should begin with the first item.
An alternative method would be to use:
Do Until all items have been processed do this move to the next item End Do
or
Do While items remain to be processed do this move to the next item End Do
Using the Do construct, it is not always possible to know exactly how many times a particular block of code will be repeated. But it does handle the important question of when to stop the repeat process.
In the above examples, we do not know how many items there are and so cannot determine how many times the process must be carried out, but we do know when to stop the repeating process and get on with the next instruction in the sequence.
Here is the book example in PDL:
Open book cover Do Until no more pages Read page Move to next page End Do Close book
Nesting structures
Structures can be nested in the same way as with Structure Charts but you must be careful to ensure that each structure is completely enclosed within the other.
Here we have an If statement with another If statement embedded within the Then clause and a For nested within the Else clause:
If condition Then If condition Then do something End If Else For Each of 1 to 20 items do this End For End If
Any structure can be nested within any other:
Do Until all items have been processed Select Case value Case 1 do this Case 2 do this instead Case 3 do the other End Select move to the next item End Do
You can have many levels of nesting and good use of indentation helps to keep them clear. However, if you find you need more than three or four, maybe you need to reconsider your logic!
Software Design Version 1.0
12
Testing the Design
During the design process you will realise that some parts of your solution will not do the job required and will have to change it. This is all part of designing. It is important, however, that the design solution is tested properly at this stage before it is taken to the next development stage.
We will look at testing in greater detail later in the course but we need a basic introduction to it here.
The aim of testing anything is to make sure that it does the job it is required to do. So what we need to do is take some realistic data and, using it, methodically follow the logic of the design to ensure that all the necessary actions are carried out when they should be and that the results are correct. Sequences must be performed in the correct order, the correct selection path must be chosen and iterations must be performed the correct number of times.
This is often known as ‘dry-running’.
As well as using valid data, it will often be necessary to test what happens if invalid data enters the system. Your solution may have to identify invalid data as it is entered or be able to report if data is not present when it should be.
Try this out with some of the examples above.
It is useful, and desirable, to get others involved in checking your work. This does not mean getting them to do it! You must have checked it as thoroughly as possible first and talk them through it. They will then be able to look at the design objectively and spot any problem areas which you may not have considered.
This process of checking work is often referred to as a review or walkthrough and can be used at various stages of the development process.
Software Design Version 1.0
13
Software Design – Worked Example
Problem - Pass Marks
A program is required to process the exam results of 20 students, calculating how many have passed and failed.
The results are fed into the system and are then checked and classified as a pass or a fail. The pass mark is 50%. The number of passes and fails are accumulated and then printed.
Working out a Solution
Using a process of functional decomposition we can break the problem down into its main component parts. Here we are using PDL as a design method but we could equally well use structure charts.
PASS MARKS read results check results print number of passes and fails
We can now take each of these parts and break it down further. It is useful to include headings to identify each function and these are presented here in upper case letters to make them easily readable.
READ RESULTS for each of 1 to 20 students read result end for
CHECK RESULTS for each of 1 to 20 students check result end for
PRINT NUMBER OF PASSES AND FAILS print number of passes print number of fails
It is now apparent that we are doing two iterations based on the same condition; we should consider whether the processing contained within them could be accomplished
within one iteration as that may make the processing more efficient.
In this case the processing could be combined:
READ AND CHECK RESULTS
for each of 1 to 20 students read result check result end for
The process of checking the result needs to be broken down further:
CHECK RESULT if result is less than 50% then add 1 to number of fails else add 1 to number of passes end if
Now we can see that we are using two counters for the number of fails and passes. It is important to ensure that they are starting from the correct value, in this case zero, and they should be initialised to this value at the start of the processing.
PASS MARKS set number of fails to zero set number of passes to zero read and check results print number of passes and fails
Software Design Version 1.0
14
Final Solution
The final design can now be documented in PDL as blocks of processing at different levels of detail:
PASS MARKS set number of fails to zero set number of passes to zero read and check results print number of passes and fails
READ AND CHECK RESULTS
for each of 1 to 20 students read result check result end for
CHECK RESULT if result is less than 50% then add 1 to number of fails else add 1 to number of passes end if
PRINT NUMBER OF PASSES AND FAILS print number of passes print number of fails
It can be simplified by ‘nesting’ some of the structures, in other words, by substituting the detailed processing for the summary statement in the higher-level process. The headings have been retained to clarify the various ‘blocks’:
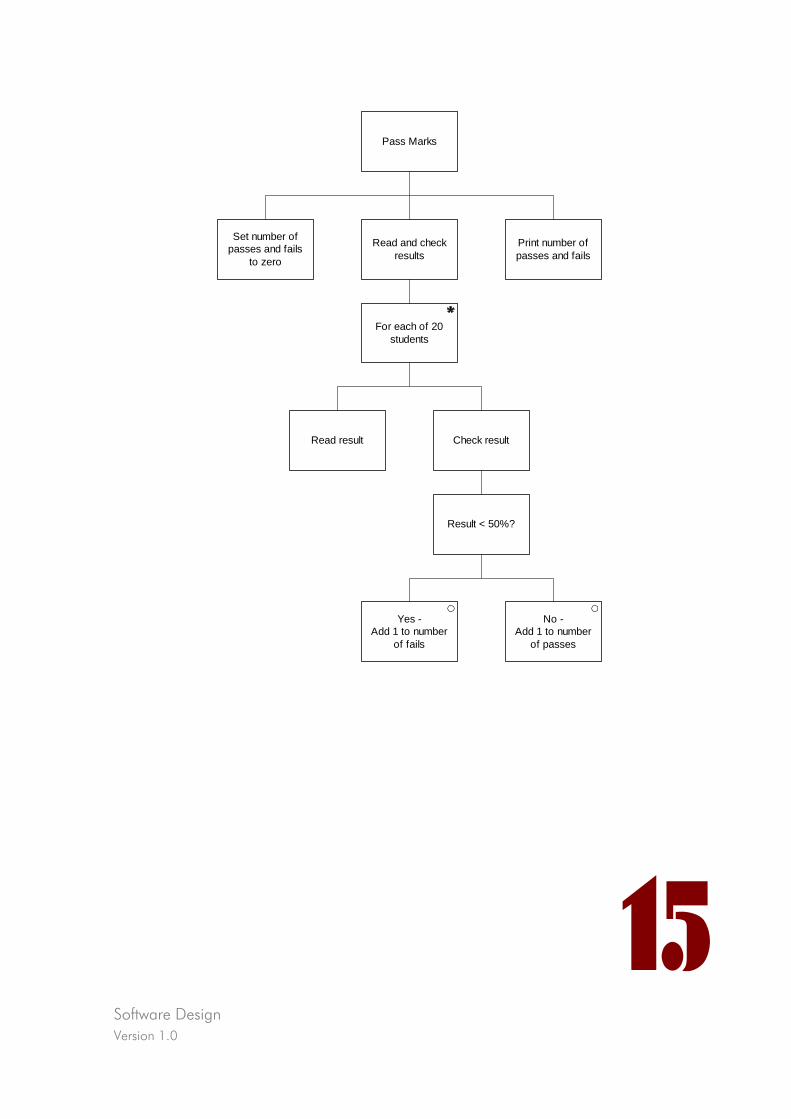
PASS MARKS set number of fails to zero set number of passes to zero READ AND CHECK RESULTS for each of 1 to 20 students read result CHECK RESULT if result is less than 50% then add 1 to number of fails else add 1 to number of passes end if end for PRINT NUMBER OF PASSES AND FAILS print number of passes print number of fails
This solution can also be illustrated as a structure chart as shown overleaf.
It is important to point out that there is never a single correct solution. There may be several ways of arriving at the desired outcome but, often, one will be preferred perhaps because it is more efficient or because it is more logical and easier to understand.
Remember that you will not be the only one to use the design documents: they may be passed on to another developer to produce the final program; they should be reviewed by someone else; they may be used in the future when maintenance work is being carried out.
Design documents, as well as all other development documents, serve a useful purpose both at the time of the initial development and later – make sure that they are completed and filed correctly according to the project standards.
Software Design Version 1.0
Pass Marks
Set number ofpasses and fails
to zero
For each of 20students
Read and checkresults
Print number ofpasses and fails
Read result Check result
Result < 50%?
Yes -Add 1 to number
of fails
No -Add 1 to number
of passes
15
Software Design Version 1.0
16
Software Design Exercises
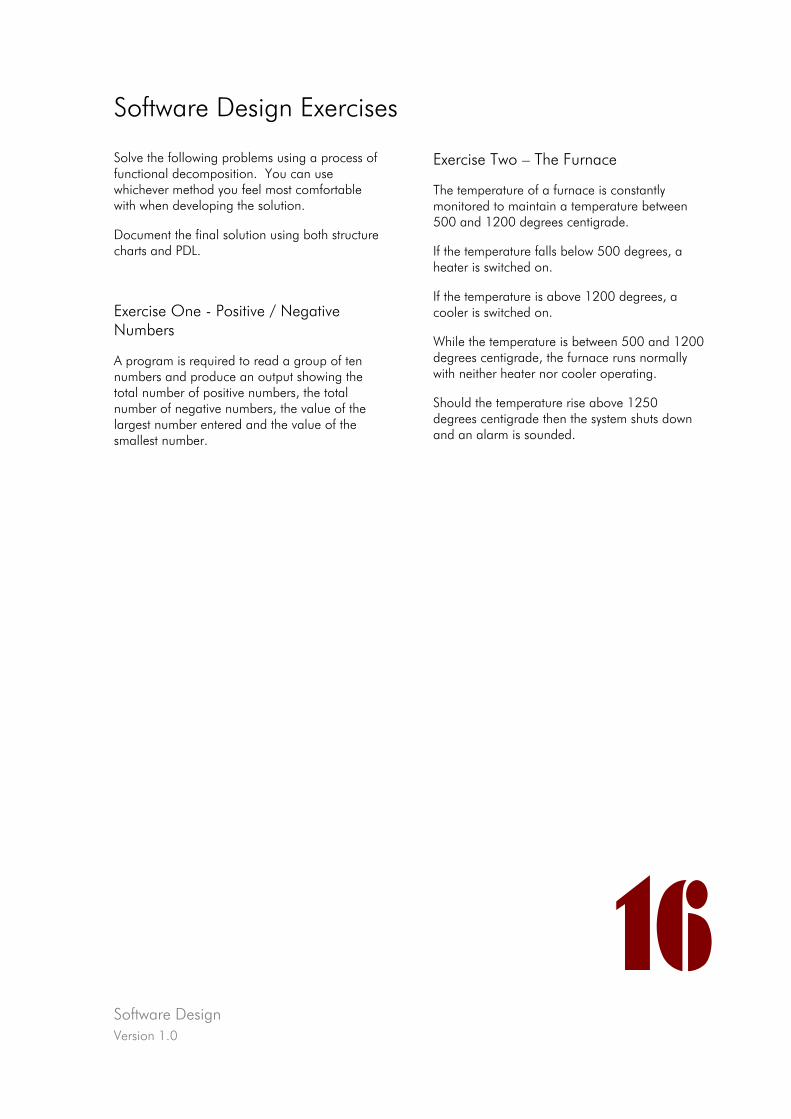
Solve the following problems using a process of functional decomposition. You can use whichever method you feel most comfortable with when developing the solution.
Document the final solution using both structure charts and PDL.
Exercise One - Positive / Negative Numbers
A program is required to read a group of ten numbers and produce an output showing the total number of positive numbers, the total number of negative numbers, the value of the largest number entered and the value of the smallest number.
Exercise Two – The Furnace
The temperature of a furnace is constantly monitored to maintain a temperature between 500 and 1200 degrees centigrade.
If the temperature falls below 500 degrees, a heater is switched on.
If the temperature is above 1200 degrees, a cooler is switched on.
While the temperature is between 500 and 1200 degrees centigrade, the furnace runs normally with neither heater nor cooler operating.
Should the temperature rise above 1250 degrees centigrade then the system shuts down and an alarm is sounded.
Software Design Version 1.0
17
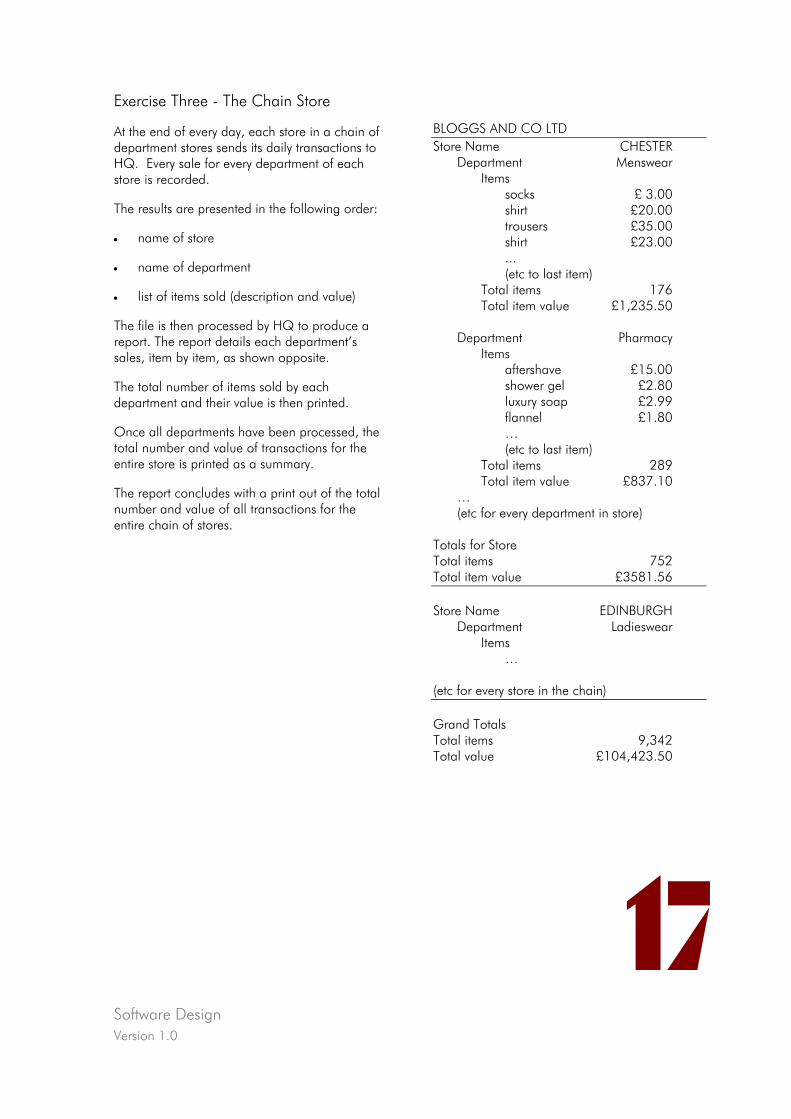
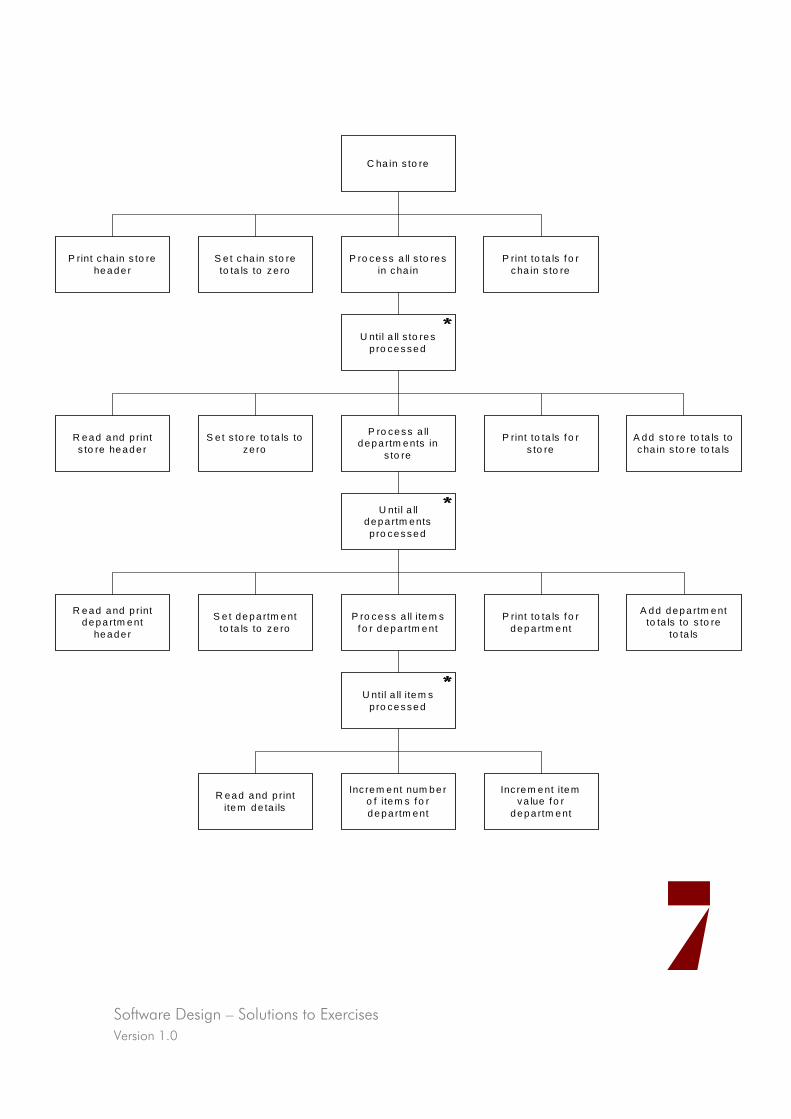
Exercise Three - The Chain Store
At the end of every day, each store in a chain of department stores sends its daily transactions to HQ. Every sale for every department of each store is recorded.
The results are presented in the following order:
• name of store
• name of department
• list of items sold (description and value)
The file is then processed by HQ to produce a report. The report details each department’s sales, item by item, as shown opposite.
The total number of items sold by each department and their value is then printed.
Once all departments have been processed, the total number and value of transactions for the entire store is printed as a summary.
The report concludes with a print out of the total number and value of all transactions for the entire chain of stores.
BLOGGS AND CO LTD Store Name CHESTER Department Menswear Items socks £ 3.00 shirt £20.00 trousers £35.00 shirt £23.00 ... (etc to last item) Total items 176 Total item value £1,235.50 Department Pharmacy Items aftershave £15.00 shower gel £2.80 luxury soap £2.99 flannel £1.80 … (etc to last item) Total items 289 Total item value £837.10 … (etc for every department in store) Totals for Store Total items 752 Total item value £3581.56 Store Name EDINBURGH Department Ladieswear Items … (etc for every store in the chain) Grand Totals Total items 9,342 Total value £104,423.50
Software Design Version 1.0
18
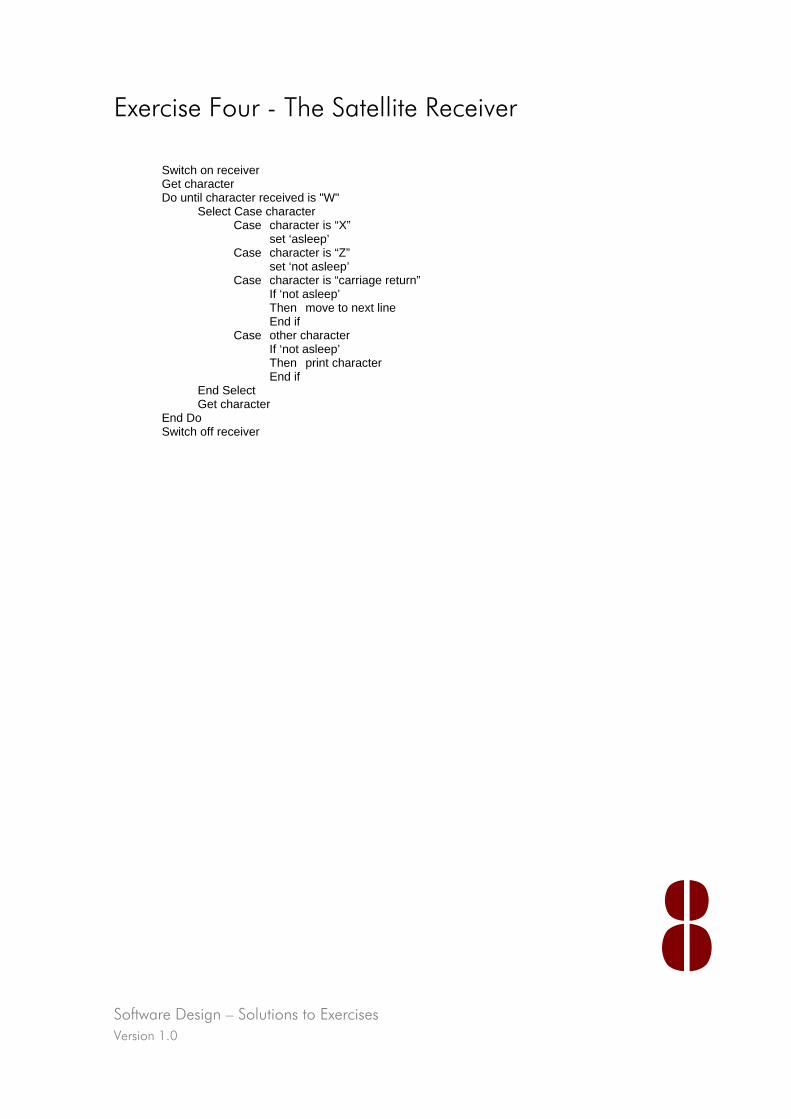
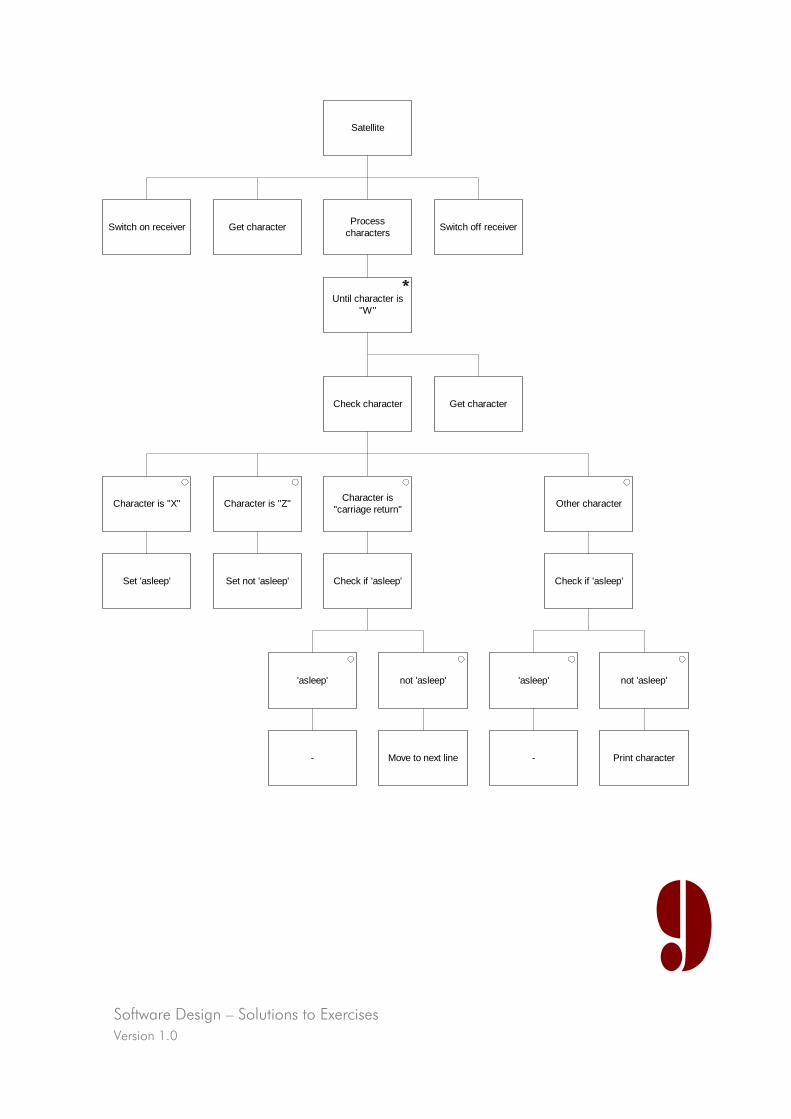
Exercise Four - The Satellite Receiver
A satellite receiver receives characters from a satellite transmission when it is switched on.
It reads each character and prints it on a continuous line.
A number of special characters may be sent to the receiver, which cause it to behave in a slightly different way:
If it receives a carriage return character, it moves onto the next line.
If the character is an X the receiver is put into sleep mode. While in sleep mode, the receiver continues to receive characters but does not print. It remains in sleep mode until the character Z is received which then reactivates printing.
If at any time a letter W is received, the receiver is switched off and the program terminates.
Any other characters are printed on the same line.
Software Design Version 1.0
19
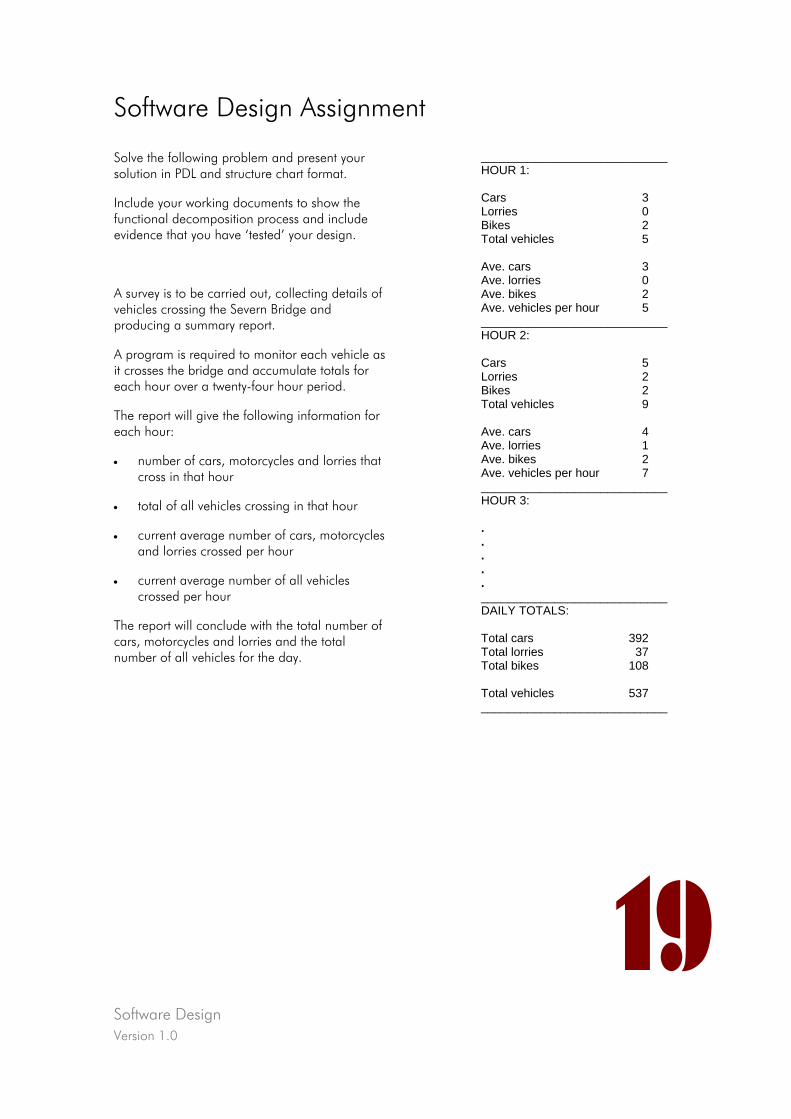
Software Design Assignment
Solve the following problem and present your solution in PDL and structure chart format.
Include your working documents to show the functional decomposition process and include evidence that you have ‘tested’ your design.
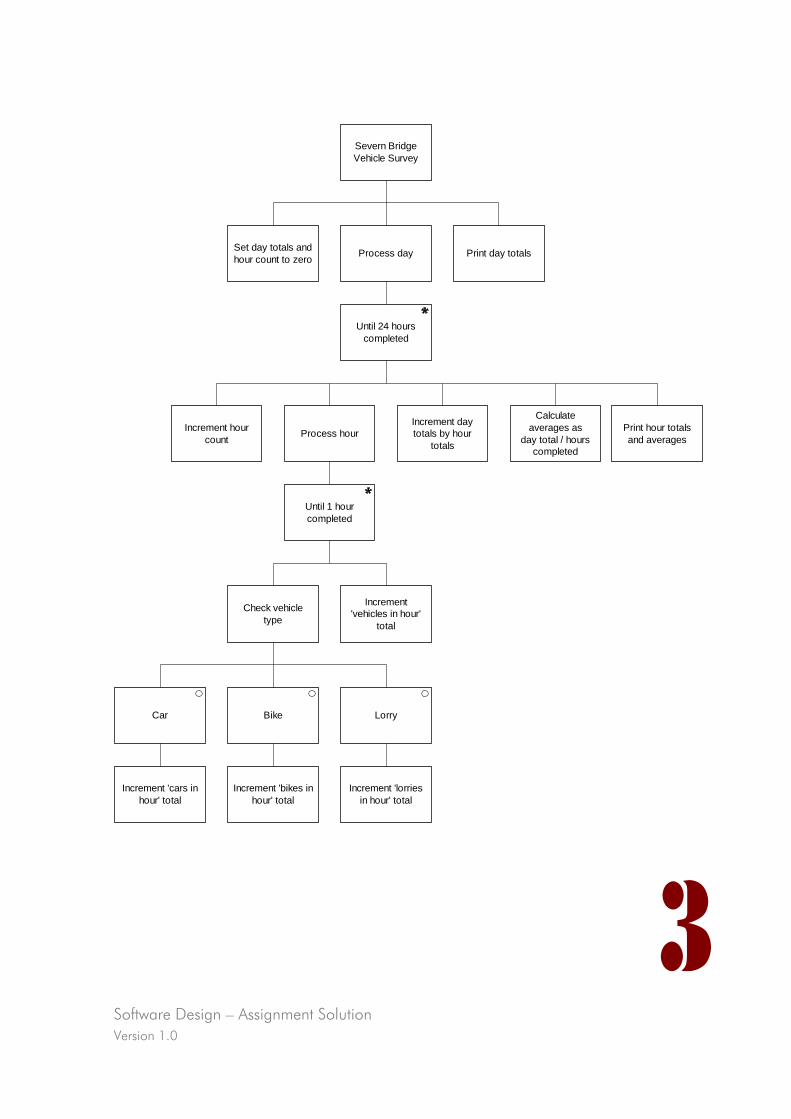
A survey is to be carried out, collecting details of vehicles crossing the Severn Bridge and producing a summary report.
A program is required to monitor each vehicle as it crosses the bridge and accumulate totals for each hour over a twenty-four hour period.
The report will give the following information for each hour:
• number of cars, motorcycles and lorries that cross in that hour
• total of all vehicles crossing in that hour
• current average number of cars, motorcycles and lorries crossed per hour
• current average number of all vehicles crossed per hour
The report will conclude with the total number of cars, motorcycles and lorries and the total number of all vehicles for the day.
____________________________ HOUR 1: Cars 3 Lorries 0 Bikes 2 Total vehicles 5 Ave. cars 3 Ave. lorries 0 Ave. bikes 2 Ave. vehicles per hour 5 ____________________________ HOUR 2: Cars 5 Lorries 2 Bikes 2 Total vehicles 9 Ave. cars 4 Ave. lorries 1 Ave. bikes 2 Ave. vehicles per hour 7 ____________________________ HOUR 3: . . . . . ____________________________ DAILY TOTALS: Total cars 392 Total lorries 37 Total bikes 108 Total vehicles 537 ____________________________

Software Design – Solutions to Exercises
www.learnhowtoprogram.com © IT-Pro Training Ltd. 2005

Visual Basic 6 Training Manual
Version 1.0
Software Design – Solutions to Exercises Version 1.0
2
End for
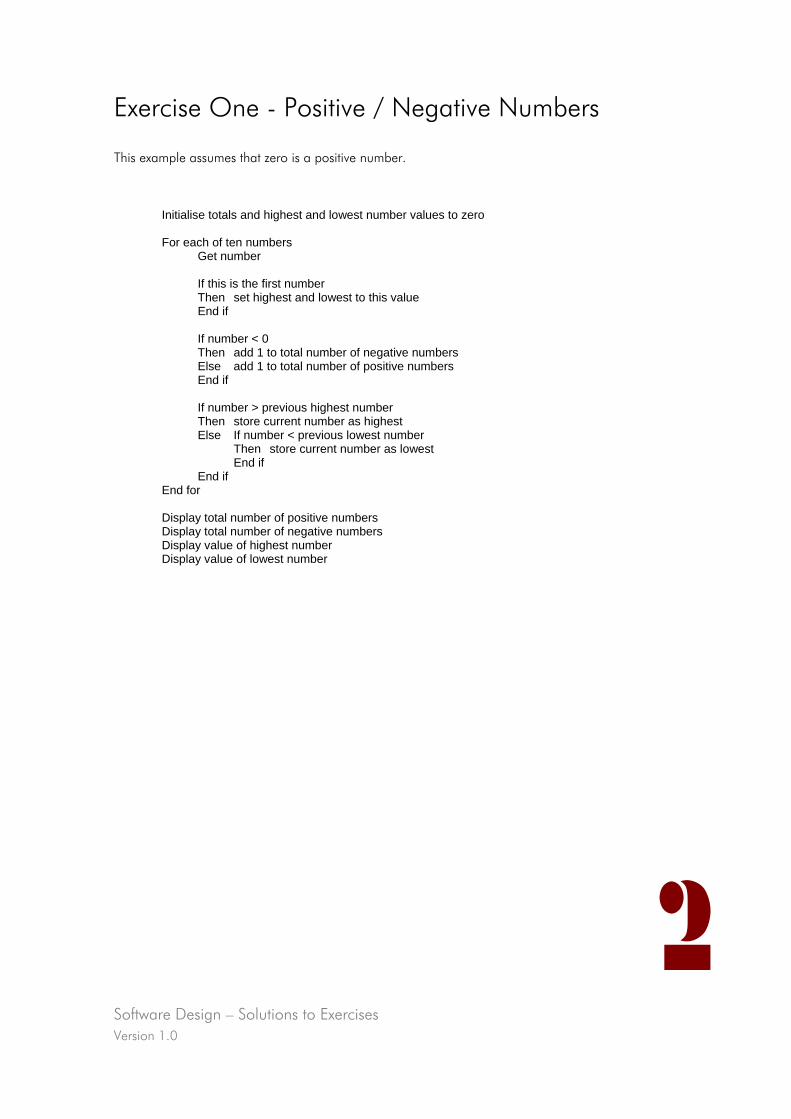
Exercise One - Positive / Negative Numbers
This example assumes that zero is a positive number.
Initialise totals and highest and lowest number values to zero For each of ten numbers Get number If this is the first number Then set highest and lowest to this value End if If number < 0 Then add 1 to total number of negative numbers Else add 1 to total number of positive numbers End if If number > previous highest number Then store current number as highest Else If number < previous lowest number Then store current number as lowest End if End if
Display total number of positive numbers Display total number of negative numbers Display value of highest number Display value of lowest number
Software Design – Solutions to Exercises Version 1.0
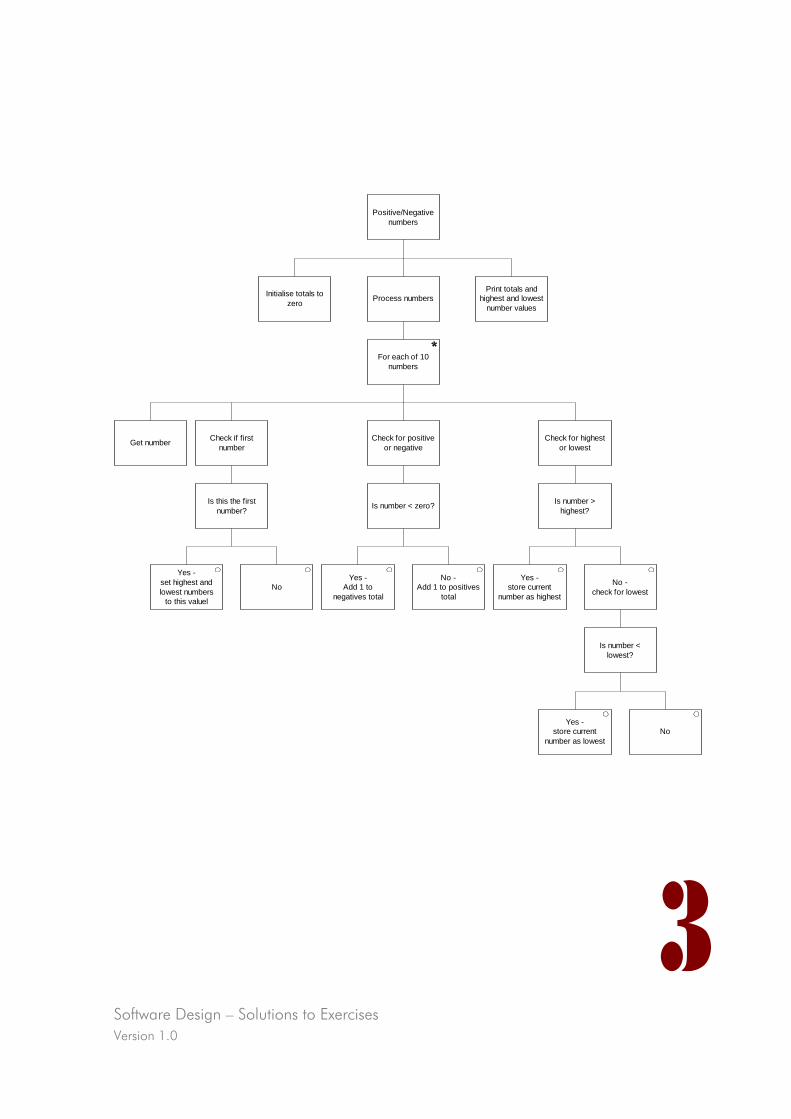
Positive/Negativenumbers
Initialise totals tozero
For each of 10numbers
Process numbersPrint totals and
highest and lowestnumber values
Get number Check for positiveor negative
Is number < zero?
Yes -Add 1 to
negatives total
No -Add 1 to positives
total
Check for highestor lowest
Is number >highest?
Yes -store current
number as highest
No -check for lowest
Is number <lowest?
Yes -store current
number as lowestNo
Check if firstnumber
Is this the firstnumber?
Yes -set highest andlowest numbers
to this valuel
No
3

Software Design – Solutions to Exercises Version 1.0
4
Exercise Two – The Furnace
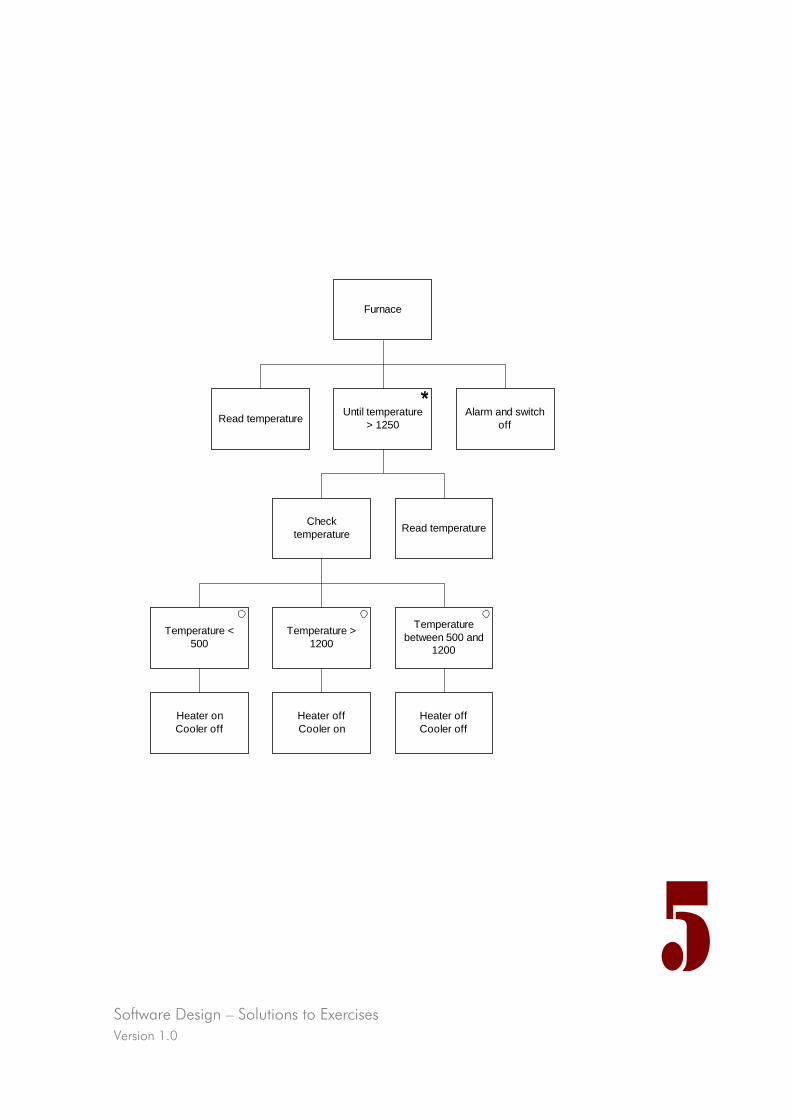
Read temperature Do Until temperature > 1250 Select Case temperature Case < 500 Heater on Cooler off Case >1200 Heater off Cooler on Case Else Heater off Cooler off End Select Read temperature End Do Sound Alarm Switch off furnace
Software Design – Solutions to Exercises Version 1.0
Furnace
Until temperature> 1250
Read temperatureChecktemperature
Temperature <500
Temperature >1200
Temperaturebetween 500 and
1200
Heater onCooler off
Heater offCooler on
Heater offCooler off
Read temperature Alarm and switchoff
5
Software Design – Solutions to Exercises Version 1.0
6
Exercise Three - The Chain Store
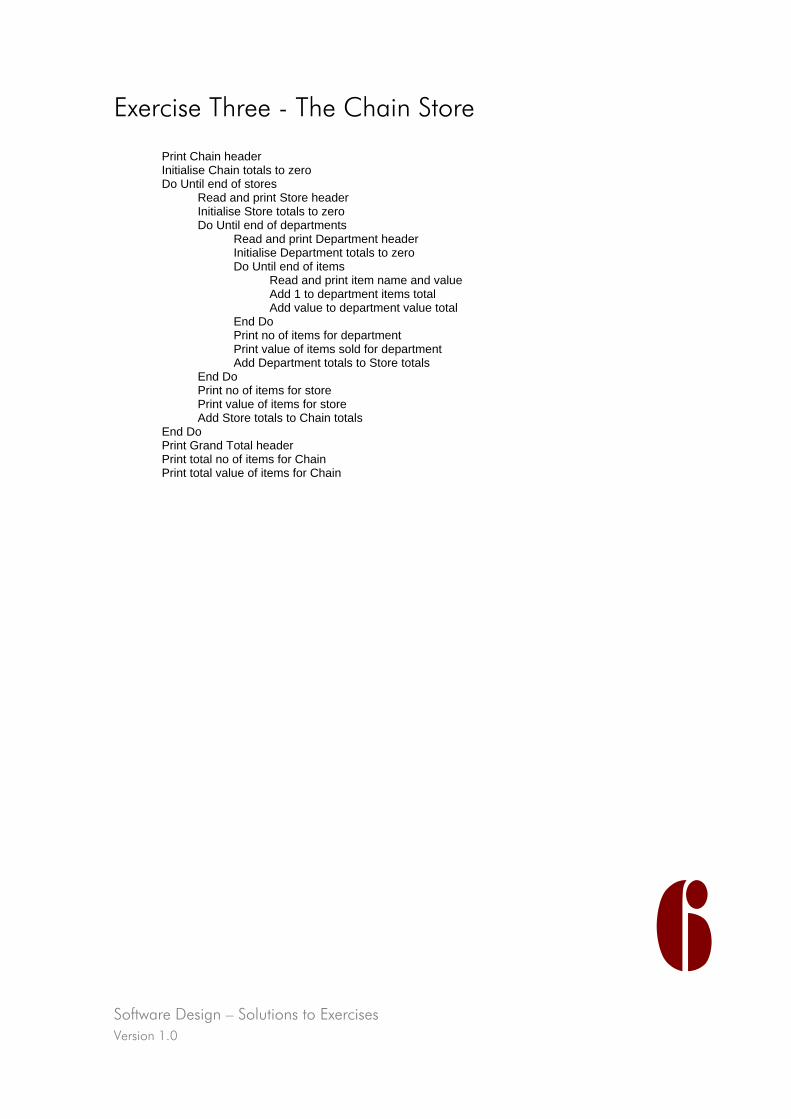
Print Chain header Initialise Chain totals to zero Do Until end of stores Read and print Store header Initialise Store totals to zero Do Until end of departments Read and print Department header Initialise Department totals to zero Do Until end of items Read and print item name and value Add 1 to department items total Add value to department value total End Do Print no of items for department Print value of items sold for department Add Department totals to Store totals End Do Print no of items for store Print value of items for store Add Store totals to Chain totals End Do Print Grand Total header Print total no of items for Chain Print total value of items for Chain
Software Design – Solutions to Exercises Version 1.0
C ha in s to re
U ntil a ll s to resp ro ce s s e d
P rint to ta ls f o rc ha in s to re
P ro ce s s a ll s to re sin c ha in
S e t c ha in s to reto ta ls to z e ro
P rint c ha in s to rehe a d e r
U ntil a lld e p a rtm entsp ro ce s s e d
P rint to ta ls f o rs to re
P ro ce s s a lld e p a rtm e nts in
s to re
S e t s to re to ta ls toze ro
R e a d and p rints to re
7
he a d e r
U ntil a ll ite m spro ce s s e d
P rint to ta ls f o rd ep a rtm e nt
P ro c e s s a ll ite m sfo r d ep a rtm e nt
S e t de p a rtm e ntto ta ls to z e ro
R e a d and p rintd e p a r e nt
he a d e r
tm
Inc re m e nt ite mva lue fo r
d ep a rtm e nt
Inc rem e nt num b e ro f item s fo rd e p a rtm ent
R ea d a nd p rintite m d e ta ils
A d d s to re to ta ls toc ha in s to re to ta ls
A d d d ep a rtm e ntto ta ls to s to re
to ta ls
Software Design – Solutions to Exercises Version 1.0
8
Exercise Four - The Satellite Receiver
Switch on receiver Get character Do until character received is "W" Select Case character Case character is “X” set ‘asleep’ Case character is “Z” set ‘not asleep’ Case character is “carriage return” If ‘not asleep’ Then move to next line End if Case other character If ‘not asleep’ Then print character End if End Select Get character End Do Switch off receiver
Software Design – Solutions to Exercises Version 1.0
Processcharacters
Until character is"W"
Check character
Character is "X" Character is "Z" Character is"carriage return"
Set 'asleep' Set not 'asleep' Check if 'asleep'
Satellite
Switch off receiverSwitch on receiver Get character
not 'asleep''asleep'
Move to next line-
Other character
Check if 'asleep'
not 'asleep''asleep'
Print character-
Get character
9

Software Design – Assignment Solution
www.learnhowtoprogram.com © IT-Pro Training Ltd. 2005

Visual Basic 6 Training Manual
Version 1.0
Software Design – Assignment Solution Version 1.0
2
Print averages
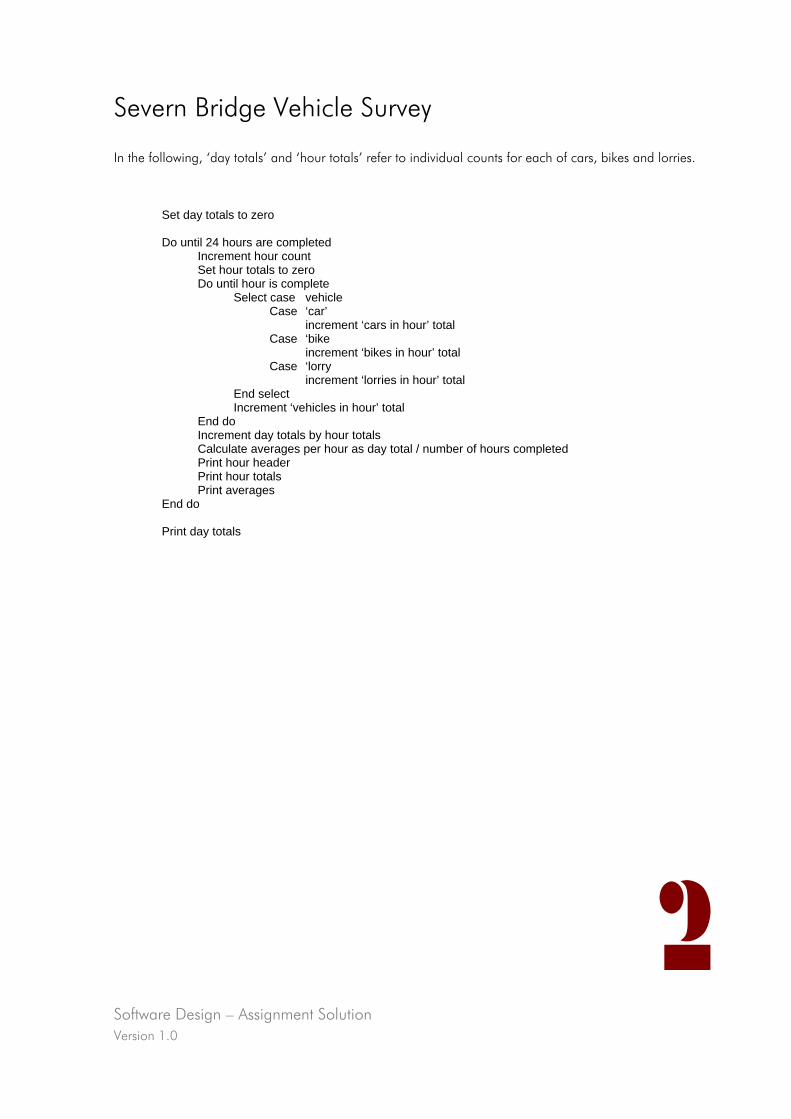
Severn Bridge Vehicle Survey
In the following, ‘day totals’ and ‘hour totals’ refer to individual counts for each of cars, bikes and lorries.
Set day totals to zero Do until 24 hours are completed Increment hour count Set hour totals to zero Do until hour is complete Select case vehicle Case ‘car’ increment ‘cars in hour’ total Case ‘bike increment ‘bikes in hour’ total Case ‘lorry increment ‘lorries in hour’ total End select Increment ‘vehicles in hour’ total End do Increment day totals by hour totals Calculate averages per hour as day total / number of hours completed Print hour header Print hour totals
End do Print day totals
Software Design – Assignment Solution Version 1.0
Severn BridgeVehicle Survey
Until 24 hourscompleted
Print day totalsProcess daySet day totals andhour count to zero
Until 1 hourcompleted
Increment daytotals by hour
totalsProcess hourIncrement hour
countPrint hour totalsand averages
Increment'vehicles in hour'
total
Check vehicletype
LorryBikeCar
Calculateaverages as
day total / hourscompleted
Increment 'lorriesin hour' total
Increment 'bikes inhour' total
Increment 'cars inhour' total
3

Introduction to Programming
www.learnhowtoprogram.com © IT-Pro Training Ltd. 2005

Visual Basic 6 Training Manual
Version 1.0
Introduction to Programming Version 1.0
2
Contents
Contents .......................................................................................................................................... 2 What is Programming?...................................................................................................................... 3
Language Development ................................................................................................................. 3 Language conversion .................................................................................................................... 3 Procedural v. Object-oriented languages ........................................................................................ 4
What do programs do?..................................................................................................................... 4 Variables and Data Types.................................................................................................................. 5
How is data stored? ...................................................................................................................... 5 Bits and bytes................................................................................................................................ 5 ASCII codes.................................................................................................................................. 5 Assigning data types ...................................................................................................................... 6 The importance of declaring data types........................................................................................... 8
Programming Constructs ................................................................................................................... 9 Sequence ..................................................................................................................................... 9 Selection .................................................................................................................................... 10 Iteration – Loops ......................................................................................................................... 14 Operators .................................................................................................................................. 18 Exercises..................................................................................................................................... 19
Programming Standards .................................................................................................................. 23 Good programming techniques.................................................................................................... 23
Programming - Worked Example ..................................................................................................... 26 Entering Code ................................................................................................................................ 27
The (Visual) Basics....................................................................................................................... 27 Organising your project............................................................................................................... 27 Getting Started............................................................................................................................ 28 Checking your work .................................................................................................................... 32 Saving your work......................................................................................................................... 33
Entering Code – Worked Example.................................................................................................... 34 Running and Debugging ................................................................................................................. 35
Error messages - what do they mean?........................................................................................... 35 No error message but it doesn’t work correctly............................................................................... 36 Running the code for the Worked Example .................................................................................... 38
Arrays ............................................................................................................................................ 39 Arrays – Worked Example ............................................................................................................ 41 Multi-dimensional Arrays.............................................................................................................. 42 Multi-dimensional Arrays – An Example......................................................................................... 44 Possible errors when using Arrays ................................................................................................. 45
Procedures and Functions................................................................................................................ 46 Procedures ................................................................................................................................. 46 Creating your own procedures ..................................................................................................... 46 Procedures – Worked Example ..................................................................................................... 48 Functions.................................................................................................................................... 50 Creating your own functions......................................................................................................... 52
Programming Exercises ................................................................................................................... 54 Programming Assignment................................................................................................................ 55

Introduction to Programming Version 1.0
3
What is Programming?
Programming is the translation of a design into a language that a computer can understand.
Each programming language uses its own syntax. However, they all allow the three programming constructs that we used at the design stage - sequence, selection and iteration - although the methods by which they achieve them will be different.
So in writing a program you will follow the rules of the programming language to translate the design constructs into their corresponding programming constructs.
The term programming is usually applied, however, to the whole process of doing the detailed design necessary for each procedure within a system, coding the procedures and testing them both individually and within their immediate environment. This is the Implementation phase of the Software Development Project Life Cycle.
Language Development
The programming languages we write are not directly executed by the computer. They must first be translated into ‘machine code’ which is the basic instructions a computer will understand. Early programmers had to write programs directly in this ‘machine code’ but, gradually, different programming languages have been developed which are more easily understood by the programmer.
Initially, these new languages were still very close to the basic ‘machine code’. They are generally referred to as low-level languages; Assembler is one well-known example.
As language development continued, they became much further removed from the ‘machine code’ and much easier for the programmer to use. These languages are generally referred to as high-level languages; C, Fortran, Pascal and Cobol are some examples.
Further development has seen the introduction of object-oriented languages such as C++ and Visual Basic.
Language conversion
We have said that all these languages must be converted into the code which the computer understands. One instruction in a high-level language will probably need several ‘machine code’ instructions to execute it; let us consider a simple mathematical example:
add number x to number y
In a high-level language this may be achieved by the instruction:
y = y + x
However, there are really several stages to this process:
get x get y add the two values together store the result in y
There are utilities available to do this conversion and, as new languages are developed, so are conversion utilities for those languages. This conversion is generally done in one of two ways: interpreted or compiled.
Interpreted languages (such as early forms of Basic) are converted as the program is running. In other words, the computer reads a line of the program, converts it into machine code then executes it. This means that the program will run relatively slowly as the conversion time is included in the running time. It also means that if a series of statements is repeated the
Introduction to Programming Version 1.0
4
conversion to machine code is repeated each time.
Compiled languages (such as C) have every line of code converted into machine code before the program is run. This means that the program will run more quickly.
Procedural v. Object-oriented languages
Originally, programming languages were procedural. A program was a list of instructions with a definite order in which the instructions were to be processed; the computer would start at the beginning and follow each instruction as it was encountered. When the end of the program was reached, processing stopped. It was not possible to change the order of processing once it had started.
Object-oriented programming languages, however, are event-driven. This means that they are written to respond to events which can be triggered, for example, by the user. You are familiar with applications where you can choose when to perform certain actions: saving a file, changing details, printing, etc. These applications are event-driven.
The advantage of object-oriented languages is that many objects have already been developed. These can simply be copied into your program and tailored to your needs. The code which controls them is already there.
A good example of this is a button, such as an OK button, with which you are familiar. The developer simply writes a series of instructions to be carried out, whenever the user presses or clicks on the button.
The language which we will be using in this course, Visual Basic, is an object-oriented language. However, in learning it, we will write very simple procedural code at first so that the basics of programming are thoroughly understood, before going on to use the full event-driven capabilities of the language where several objects interact.
What do programs do?
Programs usually have some form of input which is processed to produce some form of output. In other words, they manipulate data. Without data a program cannot perform any function.
So, the program is a translation of the design into instructions which the computer can understand, but it must also define the data which it needs to process.
As each instruction, or statement, in the program is executed, the data it refers to is manipulated as required.
For example, a program which is keeping a running total may include the instruction ‘add 1 to total’. In this case the ‘total’ is an item of data. When the instruction is executed the computer will increase its value by one.
Introduction to Programming Version 1.0
5
Variables and Data Types
All programs require data. The data is often numerical or in the form of text. Either way the data must be stored, so that it can be retrieved, manipulated (if necessary) and replaced.
Programs store data in variables.
Variables, as their name suggests, store data that can change. The values held in a variable are not fixed and can be altered as required. In the example above, the variable called ‘total’ will obviously change each time the instruction ‘add 1’ is executed.
Each variable used in a program needs to be allocated a certain amount of memory, or storage space, that can be used to store its value. Different types of variables use different amounts of memory, depending on the size and type of information they contain.
The main data items required will become apparent during the design process e.g. employee name, salary, daily total. The type of data they will hold will also be obvious at this point.
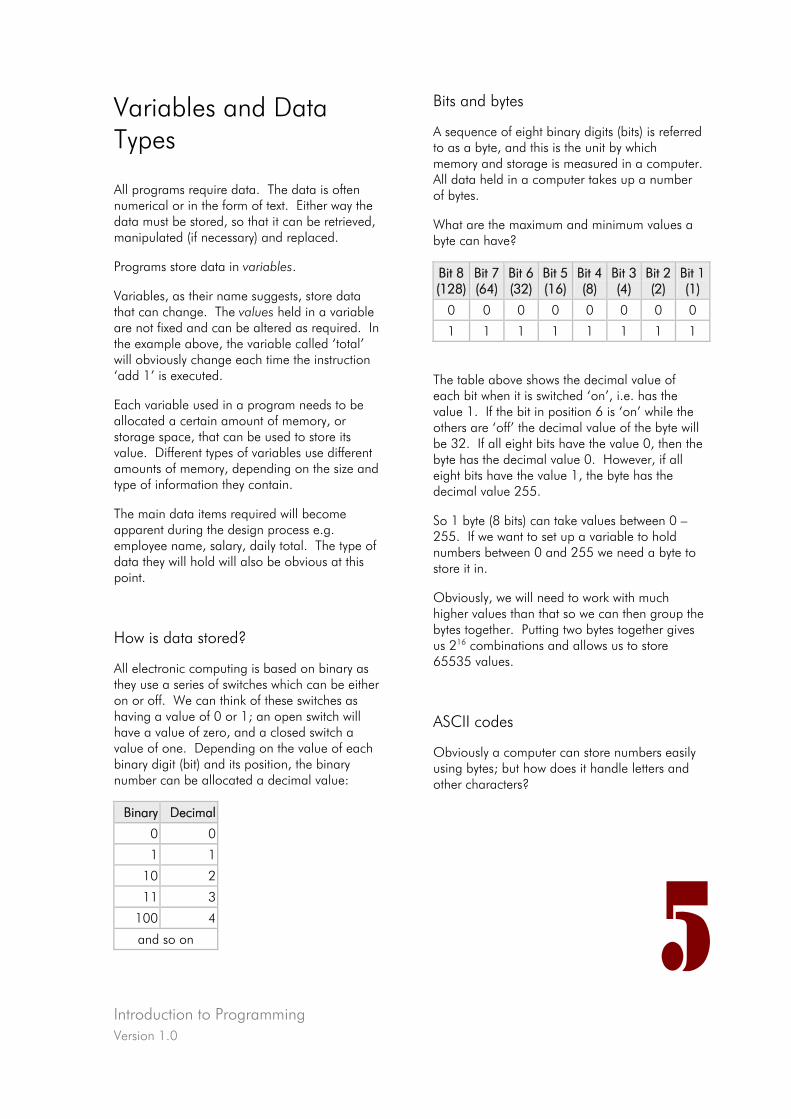
How is data stored?
All electronic computing is based on binary as they use a series of switches which can be either on or off. We can think of these switches as having a value of 0 or 1; an open switch will have a value of zero, and a closed switch a value of one. Depending on the value of each binary digit (bit) and its position, the binary number can be allocated a decimal value:
Binary Decimal
0 0
1 1
10 2
11 3
100 4
and so on
Bits and bytes
A sequence of eight binary digits (bits) is referred to as a byte, and this is the unit by which memory and storage is measured in a computer. All data held in a computer takes up a number of bytes.
What are the maximum and minimum values a byte can have?
Bit 8 (128)
Bit 7 (64)
Bit 6 (32)
Bit 5 (16)
Bit 4 (8)
Bit 3 (4)
Bit 2 (2)
Bit 1 (1)
0 0 0 0 0 0 0 0
1 1 1 1 1 1 1 1
The table above shows the decimal value of each bit when it is switched ‘on’, i.e. has the value 1. If the bit in position 6 is ‘on’ while the others are ‘off’ the decimal value of the byte will be 32. If all eight bits have the value 0, then the byte has the decimal value 0. However, if all eight bits have the value 1, the byte has the decimal value 255.
So 1 byte (8 bits) can take values between 0 – 255. If we want to set up a variable to hold numbers between 0 and 255 we need a byte to store it in.
Obviously, we will need to work with much higher values than that so we can then group the bytes together. Putting two bytes together gives us 216 combinations and allows us to store 65535 values.
ASCII codes
Obviously a computer can store numbers easily using bytes; but how does it handle letters and other characters?
Introduction to Programming Version 1.0
6
A system was developed where each character was assigned a numeric value between 0 and 255; this meant that each character could be stored in one byte. A standard was set and all characters conformed to that standard.
This system is known as ASCII (American Standard Code for Information Interchange).
For example, a capital letter ‘A’ is assigned the ASCII code 65 while a lower-case ‘a’ has the code 97.
Assigning data types
To make efficient use of memory, we can assign data types to variables corresponding to different types of data; for example, a variable used to hold text data would be declared as a string while a variable used to hold a numerical value could be declared as one of many different numerical types, such as a single or an integer.
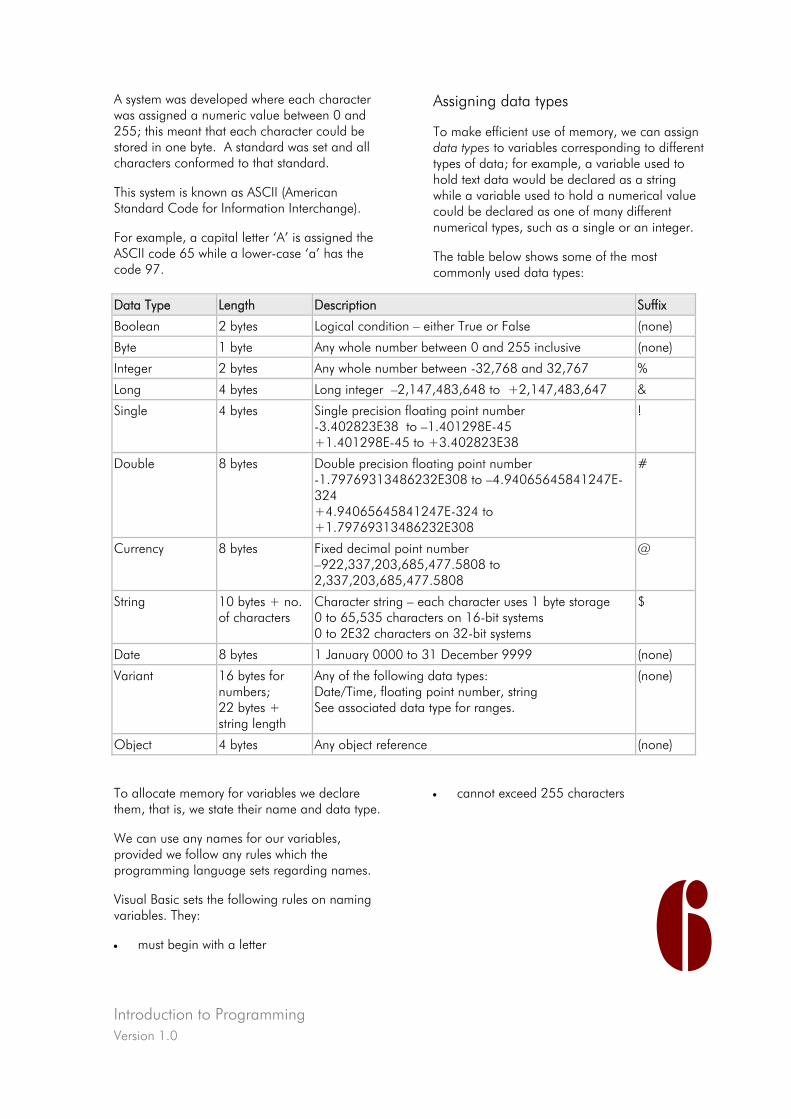
The table below shows some of the most commonly used data types:
Data Type Length Description Suffix
Boolean 2 bytes Logical condition – either True or False (none)
Byte 1 byte Any whole number between 0 and 255 inclusive (none)
Integer 2 bytes Any whole number between -32,768 and 32,767 %
Long 4 bytes Long integer –2,147,483,648 to +2,147,483,647 &
Single 4 bytes Single precision floating point number -3.402823E38 to –1.401298E-45 +1.401298E-45 to +3.402823E38
!
Double 8 bytes Double precision floating point number -1.79769313486232E308 to –4.94065645841247E-324 +4.94065645841247E-324 to +1.79769313486232E308
#
Currency 8 bytes Fixed decimal point number –922,337,203,685,477.5808 to 2,337,203,685,477.5808
@
String 10 bytes + no. of characters
Character string – each character uses 1 byte storage 0 to 65,535 characters on 16-bit systems 0 to 2E32 characters on 32-bit systems
$
Date 8 bytes 1 January 0000 to 31 December 9999 (none)
Variant 16 bytes for numbers; 22 bytes + string length
Any of the following data types: Date/Time, floating point number, string See associated data type for ranges.
(none)
Object 4 bytes Any object reference (none)
To allocate memory for variables we declare them, that is, we state their name and data type.
We can use any names for our variables, provided we follow any rules which the programming language sets regarding names.
Visual Basic sets the following rules on naming variables. They:
• must begin with a letter
• cannot exceed 255 characters
Introduction to Programming Version 1.0
7
• cannot contain the following special characters: . % & @ $
• cannot contain a space
• cannot be a reserved word e.g. If, Select,
• must be unique within the same scope (more on scope later)
Obviously variables should be given names that indicate their use: if a variable is to hold a user’s name, it could be called MyName.
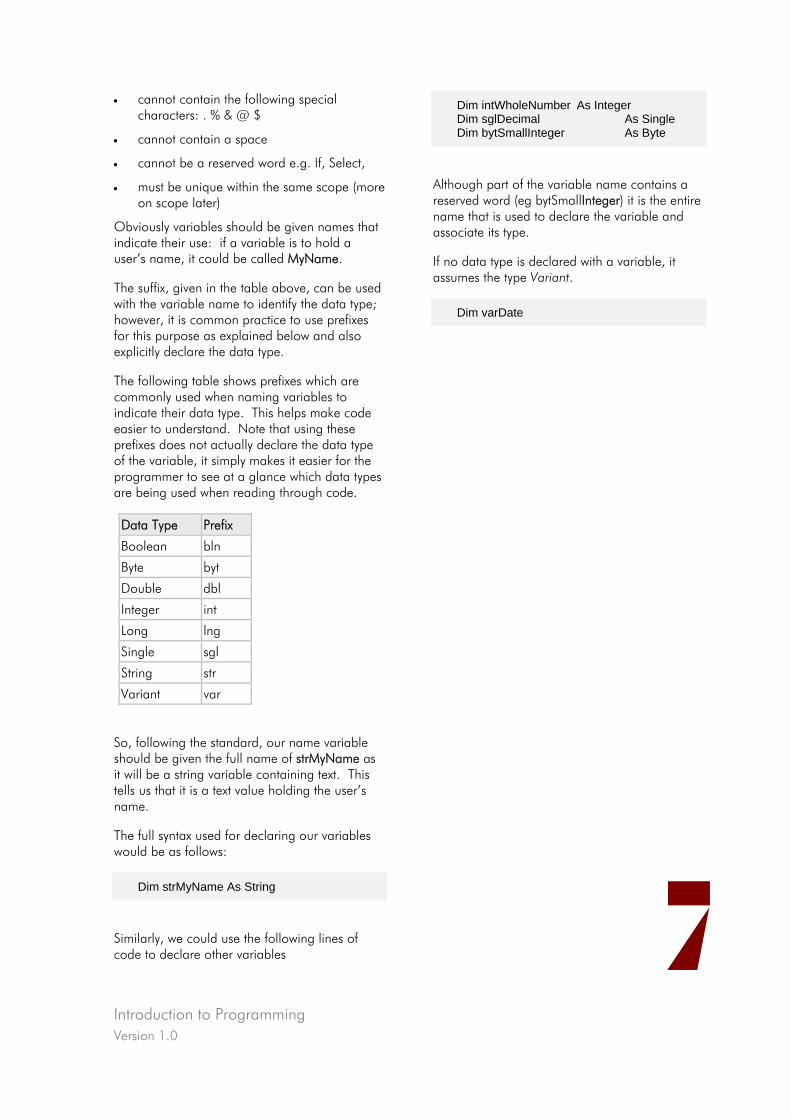
The suffix, given in the table above, can be used with the variable name to identify the data type; however, it is common practice to use prefixes for this purpose as explained below and also explicitly declare the data type.
The following table shows prefixes which are commonly used when naming variables to indicate their data type. This helps make code easier to understand. Note that using these prefixes does not actually declare the data type of the variable, it simply makes it easier for the programmer to see at a glance which data types are being used when reading through code.
Data Type Prefix
Boolean bln
Byte byt
Double dbl
Integer int
Long lng
Single sgl
String str
Variant var
So, following the standard, our name variable should be given the full name of strMyName as it will be a string variable containing text. This tells us that it is a text value holding the user’s name.
The full syntax used for declaring our variables would be as follows:
Dim strMyName As String
Similarly, we could use the following lines of code to declare other variables
Dim intWholeNumber As Integer Dim sglDecimal As Single Dim bytSmallInteger As Byte
Although part of the variable name contains a reserved word (eg bytSmallInteger) it is the entire name that is used to declare the variable and associate its type.
If no data type is declared with a variable, it assumes the type Variant.
Dim varDate
Introduction to Programming Version 1.0
8
The importance of declaring data types
Declaring data types makes your program resource-efficient.
Using the correct data types ensures that only the required amount of memory is allocated to each variable and helps reduce memory wastage.
For example, a variable is required to hold whole number values between 0 and 1000.
A number of data types could be used to hold these values: integer, long, single, double.
Using the double type, 8 bytes of memory would be required; using the single or long type, 4 bytes would be required; if integer type was used, only 2 bytes of memory would be required.
By comparing the amounts of memory required by different data types to hold the same range of values, it is clear that using the integer type would be most efficient. It will also ensure that only whole numbers will be held.
Forcing data declarations
To ensure that your program is written as efficiently as possible each variable should be declared with an appropriate data type.
Visual Basic allows variables to be used that have not been declared although, if variables are not declared or data types not defined, the “variant” type is assumed. Variants are wasteful of memory resources; as can be seen from the table above, they use a minimum of 16 bytes.
To ensure that each variable is declared correctly, it is possible to force data declarations by using the instruction Option Explicit at the start of the code.
This tells the computer that any variable name used in a program instruction must have been explicitly declared before it is used. Any variable name encountered that has not been declared produces an error. It is good practice to use Option Explicit when programming as it forces each variable to be defined correctly.
It is possible to get Visual Basic to do this automatically for you and we will set this feature
when we get on to using the Visual Basic interface.
This also helps to reduce errors which can be caused by simple spelling mistakes. If you accidentally type a wrong letter in a variable name and you have not used the Option Explicit statement, the computer will assume that this is a different variable and you will either get an error or simply not get the results you were expecting.
Introduction to Programming Version 1.0
9
Programming Constructs
We have said that each programming language has constructs which match those used at the design stage. We will now start to learn what these are in Visual Basic and how to translate the design into code.
Sequence
Much of your design solution will involve a sequence of instructions. To achieve this in a programming language you simply write a series of statements, each one beginning on a new line, as you did in PDL.
What is a statement in a programming language? The simplest statements are normally assignment statements where you are setting a variable to a certain value or performing a calculation and storing the result.
intTotal = 0
will set the value of intTotal to zero
blnFinished = False
will set the value of blnFinished to false
intTotal = intTotal + 1
will perform the calculation to the right of the equal sign and store the result back in the intTotal variable, effectively adding 1 to the value of intTotal.
So the value from the right of the ‘=’ is placed in the variable to the left.
It is often necessary to give information to the user. In Visual Basic, one way to do this is to use the MsgBox function. To display the total value from the examples above, the statement would read:
MsgBox intTotal
This will result in a dialog box being displayed with the value of intTotal in it. We could add
some text to indicate which value is being displayed:
MsgBox “Total is “ & intTotal
This will concatenate the text and the value and would result in a message such as “Total is 47” being displayed.
Notice that the text being passed to MsgBox was enclosed in quotes; this shows that it is simply a fixed string of characters and is not a variable name. So these characters are picked up and the value held in intTotal is appended to them.
In these examples, we have used certain operators:
• = is an assignment operator
• + is an arithmetic operator
• & is the concatenation operator.
There are many other operators and information on these will follow later.
Example
Your design may have specified:
increment the weekly total by today’s total display the weekly total
Your code may read:
intWeekTot = intWeekTot + intDayTot MsgBox “Weekly total is “ & intWeekTot
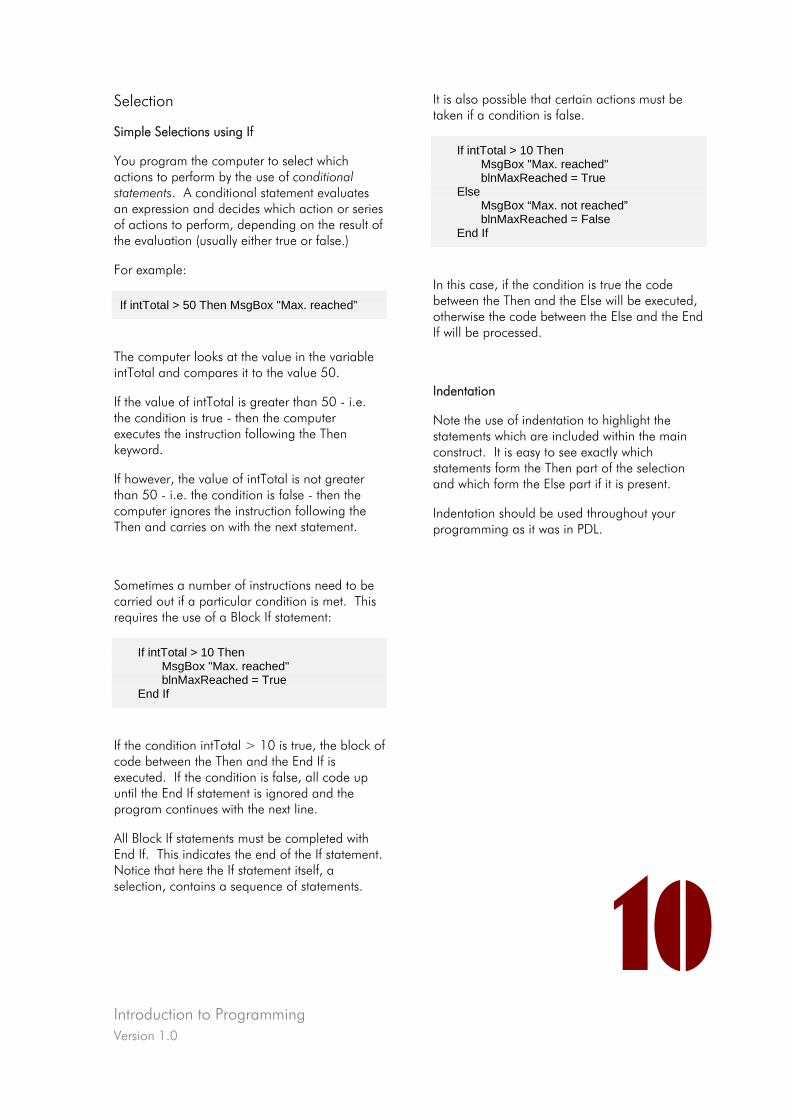
Introduction to Programming Version 1.0
10
Selection
Simple Selections using If
You program the computer to select which actions to perform by the use of conditional statements. A conditional statement evaluates an expression and decides which action or series of actions to perform, depending on the result of the evaluation (usually either true or false.)
For example:
If intTotal > 50 Then MsgBox "Max. reached”
The computer looks at the value in the variable intTotal and compares it to the value 50.
If the value of intTotal is greater than 50 - i.e. the condition is true - then the computer executes the instruction following the Then keyword.
If however, the value of intTotal is not greater than 50 - i.e. the condition is false - then the computer ignores the instruction following the Then and carries on with the next statement.
Sometimes a number of instructions need to be carried out if a particular condition is met. This requires the use of a Block If statement:
If intTotal > 10 Then MsgBox "Max. reached" blnMaxReached = True End If
If the condition intTotal > 10 is true, the block of code between the Then and the End If is executed. If the condition is false, all code up until the End If statement is ignored and the program continues with the next line.
All Block If statements must be completed with End If. This indicates the end of the If statement. Notice that here the If statement itself, a selection, contains a sequence of statements.
It is also possible that certain actions must be taken if a condition is false.
If intTotal > 10 Then MsgBox "Max. reached" blnMaxReached = True Else MsgBox “Max. not reached” blnMaxReached = False End If
In this case, if the condition is true the code between the Then and the Else will be executed, otherwise the code between the Else and the End If will be processed.
Indentation
Note the use of indentation to highlight the statements which are included within the main construct. It is easy to see exactly which statements form the Then part of the selection and which form the Else part if it is present.
Indentation should be used throughout your programming as it was in PDL.
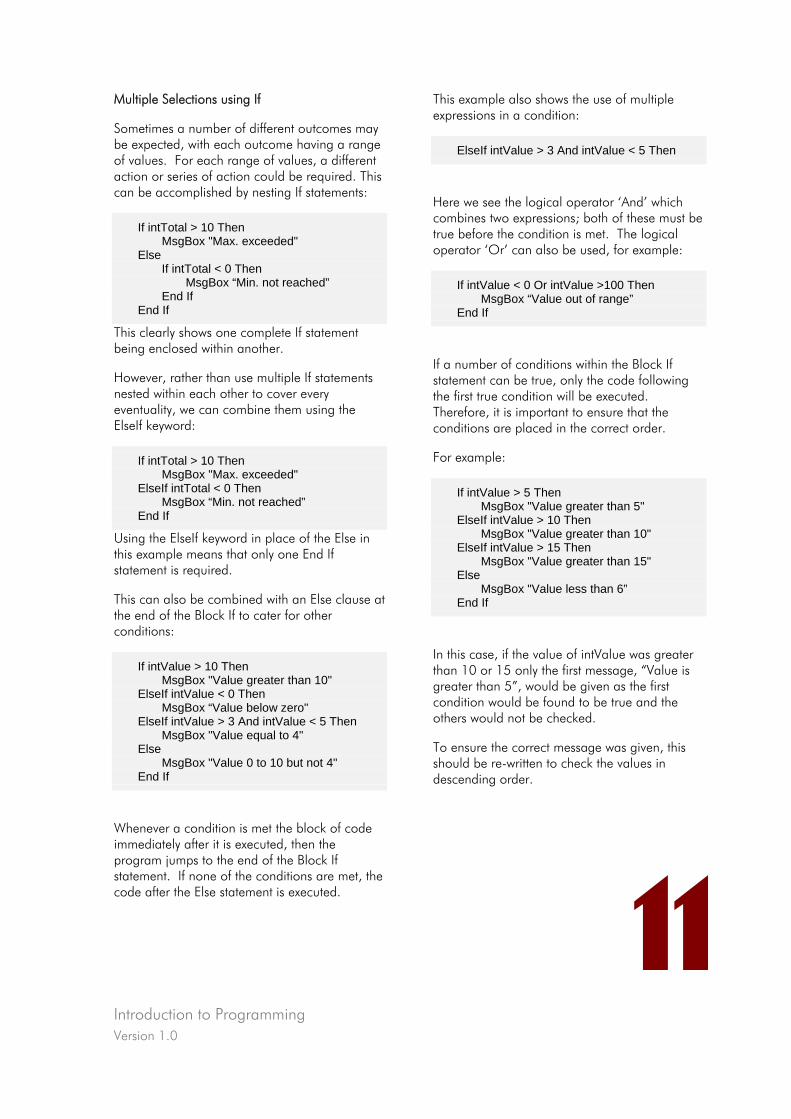
Introduction to Programming Version 1.0
11
Multiple Selections using If
Sometimes a number of different outcomes may be expected, with each outcome having a range of values. For each range of values, a different action or series of action could be required. This can be accomplished by nesting If statements:
If intTotal > 10 Then MsgBox "Max. exceeded" Else If intTotal < 0 Then MsgBox “Min. not reached” End If End If
This clearly shows one complete If statement being enclosed within another.
However, rather than use multiple If statements nested within each other to cover every eventuality, we can combine them using the ElseIf keyword:
If intTotal > 10 Then MsgBox "Max. exceeded" ElseIf intTotal < 0 Then MsgBox “Min. not reached” End If
Using the ElseIf keyword in place of the Else in this example means that only one End If statement is required.
This can also be combined with an Else clause at the end of the Block If to cater for other conditions:
If intValue > 10 Then MsgBox "Value greater than 10" ElseIf intValue < 0 Then MsgBox “Value below zero" ElseIf intValue > 3 And intValue < 5 Then MsgBox "Value equal to 4" Else MsgBox "Value 0 to 10 but not 4" End If
Whenever a condition is met the block of code immediately after it is executed, then the program jumps to the end of the Block If statement. If none of the conditions are met, the code after the Else statement is executed.
This example also shows the use of multiple expressions in a condition:
ElseIf intValue > 3 And intValue < 5 Then
Here we see the logical operator ‘And’ which combines two expressions; both of these must be true before the condition is met. The logical operator ‘Or’ can also be used, for example:
If intValue < 0 Or intValue >100 Then MsgBox “Value out of range” End If
If a number of conditions within the Block If statement can be true, only the code following the first true condition will be executed. Therefore, it is important to ensure that the conditions are placed in the correct order.
For example:
If intValue > 5 Then MsgBox "Value greater than 5" ElseIf intValue > 10 Then MsgBox "Value greater than 10" ElseIf intValue > 15 Then MsgBox "Value greater than 15" Else MsgBox "Value less than 6” End If
In this case, if the value of intValue was greater than 10 or 15 only the first message, “Value is greater than 5”, would be given as the first condition would be found to be true and the others would not be checked.
To ensure the correct message was given, this should be re-written to check the values in descending order.
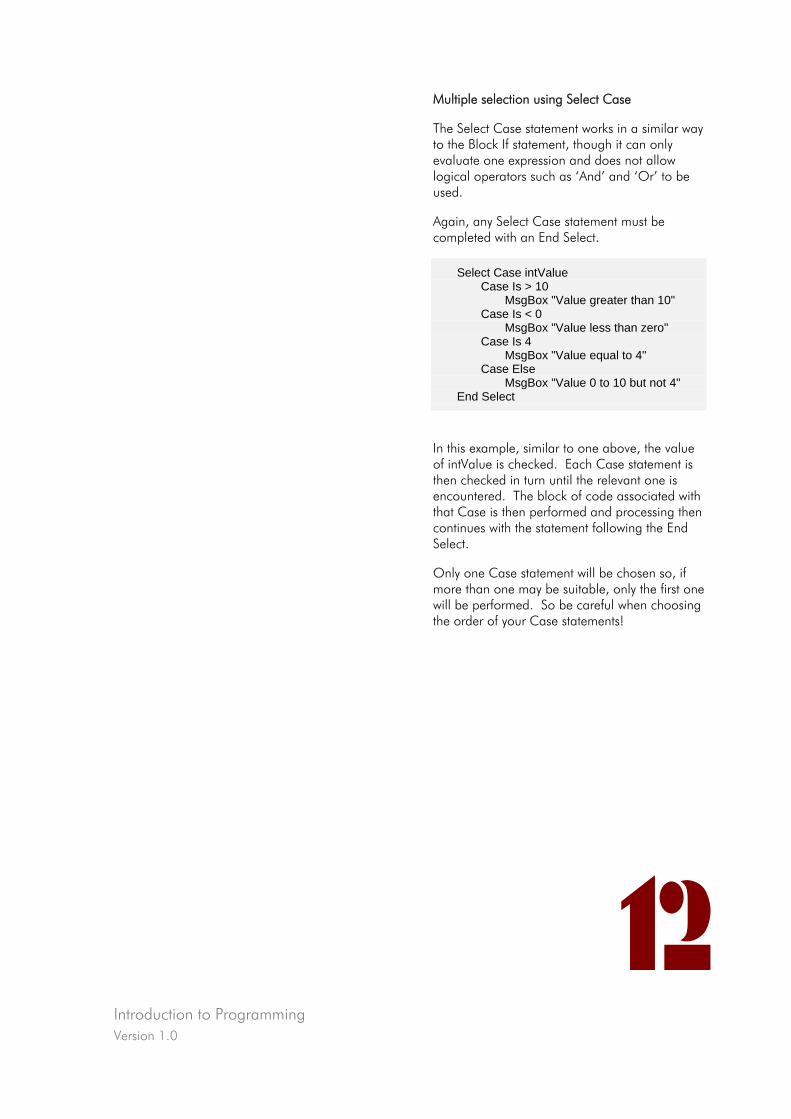
Introduction to Programming Version 1.0
12
Multiple selection using Select Case
The Select Case statement works in a similar way to the Block If statement, though it can only evaluate one expression and does not allow logical operators such as ‘And’ and ‘Or’ to be used.
Again, any Select Case statement must be completed with an End Select.
Select Case intValue Case Is > 10 MsgBox "Value greater than 10" Case Is < 0 MsgBox "Value less than zero" Case Is 4 MsgBox "Value equal to 4" Case Else MsgBox "Value 0 to 10 but not 4" End Select
In this example, similar to one above, the value of intValue is checked. Each Case statement is then checked in turn until the relevant one is encountered. The block of code associated with that Case is then performed and processing then continues with the statement following the End Select.
Only one Case statement will be chosen so, if more than one may be suitable, only the first one will be performed. So be careful when choosing the order of your Case statements!
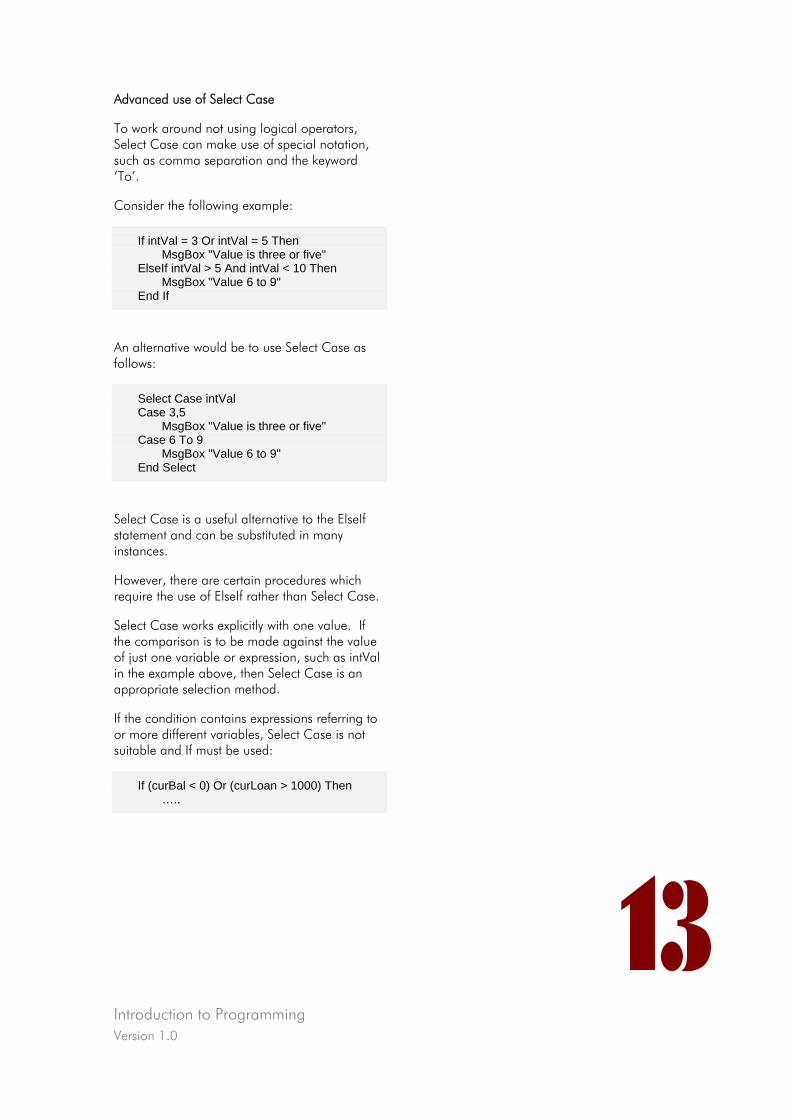
Introduction to Programming Version 1.0
13
Advanced use of Select Case
To work around not using logical operators, Select Case can make use of special notation, such as comma separation and the keyword ‘To’.
Consider the following example:
If intVal = 3 Or intVal = 5 Then MsgBox "Value is three or five" ElseIf intVal > 5 And intVal < 10 Then MsgBox "Value 6 to 9" End If
An alternative would be to use Select Case as follows:
Select Case intVal Case 3,5 MsgBox "Value is three or five" Case 6 To 9 MsgBox "Value 6 to 9" End Select
Select Case is a useful alternative to the ElseIf statement and can be substituted in many instances.
However, there are certain procedures which require the use of ElseIf rather than Select Case.
Select Case works explicitly with one value. If the comparison is to be made against the value of just one variable or expression, such as intVal in the example above, then Select Case is an appropriate selection method.
If the condition contains expressions referring to or more different variables, Select Case is not suitable and If must be used:
If (curBal < 0) Or (curLoan > 1000) Then …..
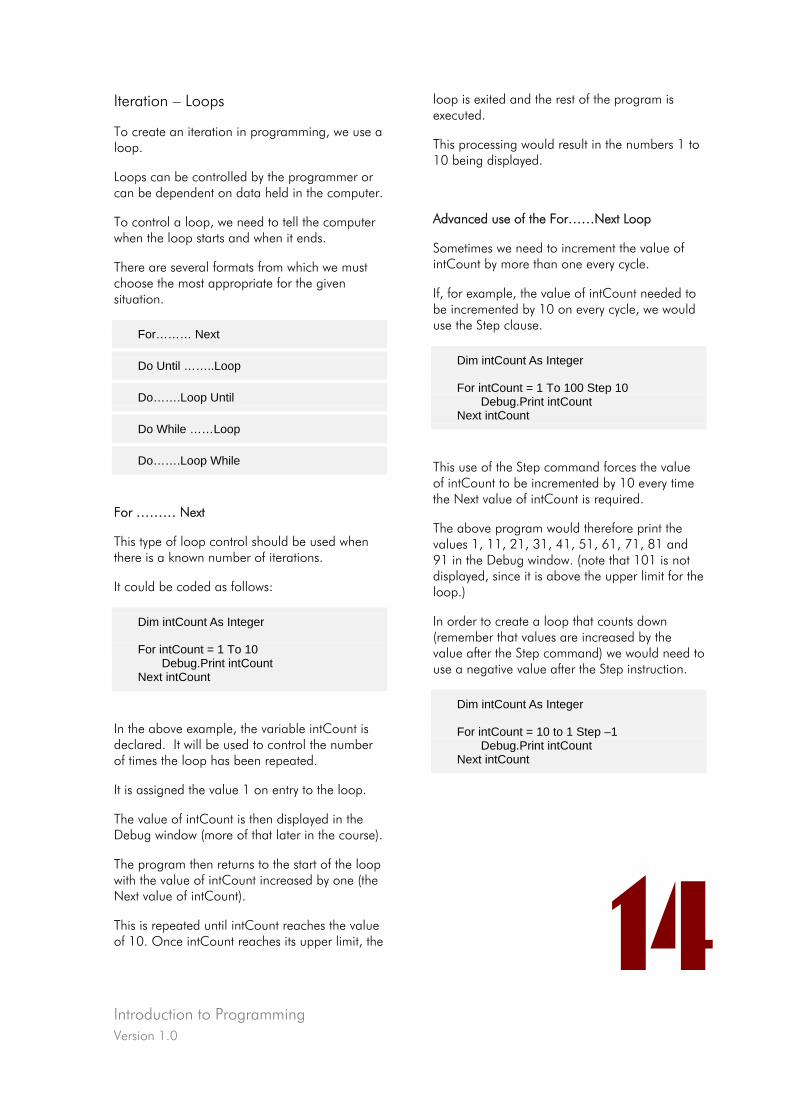
Introduction to Programming Version 1.0
14
Iteration – Loops
To create an iteration in programming, we use a loop.
Loops can be controlled by the programmer or can be dependent on data held in the computer.
To control a loop, we need to tell the computer when the loop starts and when it ends.
There are several formats from which we must choose the most appropriate for the given situation.
For……… Next
Do Until ……..Loop
Do…….Loop Until
Do While ……Loop
Do…….Loop While
For ……… Next
This type of loop control should be used when there is a known number of iterations.
It could be coded as follows:
Dim intCount As Integer For intCount = 1 To 10 Debug.Print intCount Next intCount
In the above example, the variable intCount is declared. It will be used to control the number of times the loop has been repeated.
It is assigned the value 1 on entry to the loop.
The value of intCount is then displayed in the Debug window (more of that later in the course).
The program then returns to the start of the loop with the value of intCount increased by one (the Next value of intCount).
This is repeated until intCount reaches the value of 10. Once intCount reaches its upper limit, the
loop is exited and the rest of the program is executed.
This processing would result in the numbers 1 to 10 being displayed.
Advanced use of the For……Next Loop
Sometimes we need to increment the value of intCount by more than one every cycle.
If, for example, the value of intCount needed to be incremented by 10 on every cycle, we would use the Step clause.
Dim intCount As Integer For intCount = 1 To 100 Step 10 Debug.Print intCount Next intCount
This use of the Step command forces the value of intCount to be incremented by 10 every time the Next value of intCount is required.
The above program would therefore print the values 1, 11, 21, 31, 41, 51, 61, 71, 81 and 91 in the Debug window. (note that 101 is not displayed, since it is above the upper limit for the loop.)
In order to create a loop that counts down (remember that values are increased by the value after the Step command) we would need to use a negative value after the Step instruction.
Dim intCount As Integer For intCount = 10 to 1 Step –1 Debug.Print intCount Next intCount

Introduction to Programming Version 1.0
15
This would display the values 10, 9, 8, 7, 6, 5, 4, 3, 2 and 1 in the Debug window.
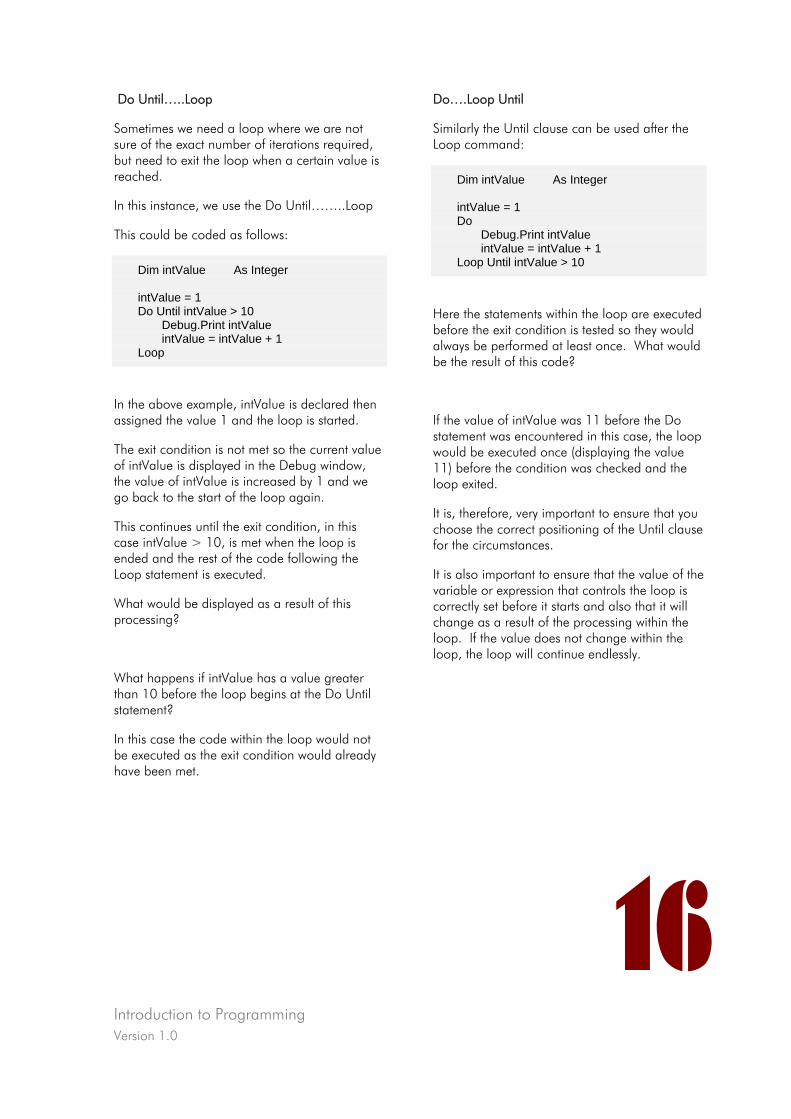
Introduction to Programming Version 1.0
16
Do Until…..Loop
Sometimes we need a loop where we are not sure of the exact number of iterations required, but need to exit the loop when a certain value is reached.
In this instance, we use the Do Until……..Loop
This could be coded as follows:
Dim intValue As Integer intValue = 1 Do Until intValue > 10 Debug.Print intValue intValue = intValue + 1 Loop
In the above example, intValue is declared then assigned the value 1 and the loop is started.
The exit condition is not met so the current value of intValue is displayed in the Debug window, the value of intValue is increased by 1 and we go back to the start of the loop again.
This continues until the exit condition, in this case intValue > 10, is met when the loop is ended and the rest of the code following the Loop statement is executed.
What would be displayed as a result of this processing?
What happens if intValue has a value greater than 10 before the loop begins at the Do Until statement?
In this case the code within the loop would not be executed as the exit condition would already have been met.
Do….Loop Until
Similarly the Until clause can be used after the Loop command:
Dim intValue As Integer intValue = 1 Do Debug.Print intValue intValue = intValue + 1 Loop Until intValue > 10
Here the statements within the loop are executed before the exit condition is tested so they would always be performed at least once. What would be the result of this code?
If the value of intValue was 11 before the Do statement was encountered in this case, the loop would be executed once (displaying the value 11) before the condition was checked and the loop exited.
It is, therefore, very important to ensure that you choose the correct positioning of the Until clause for the circumstances.
It is also important to ensure that the value of the variable or expression that controls the loop is correctly set before it starts and also that it will change as a result of the processing within the loop. If the value does not change within the loop, the loop will continue endlessly.
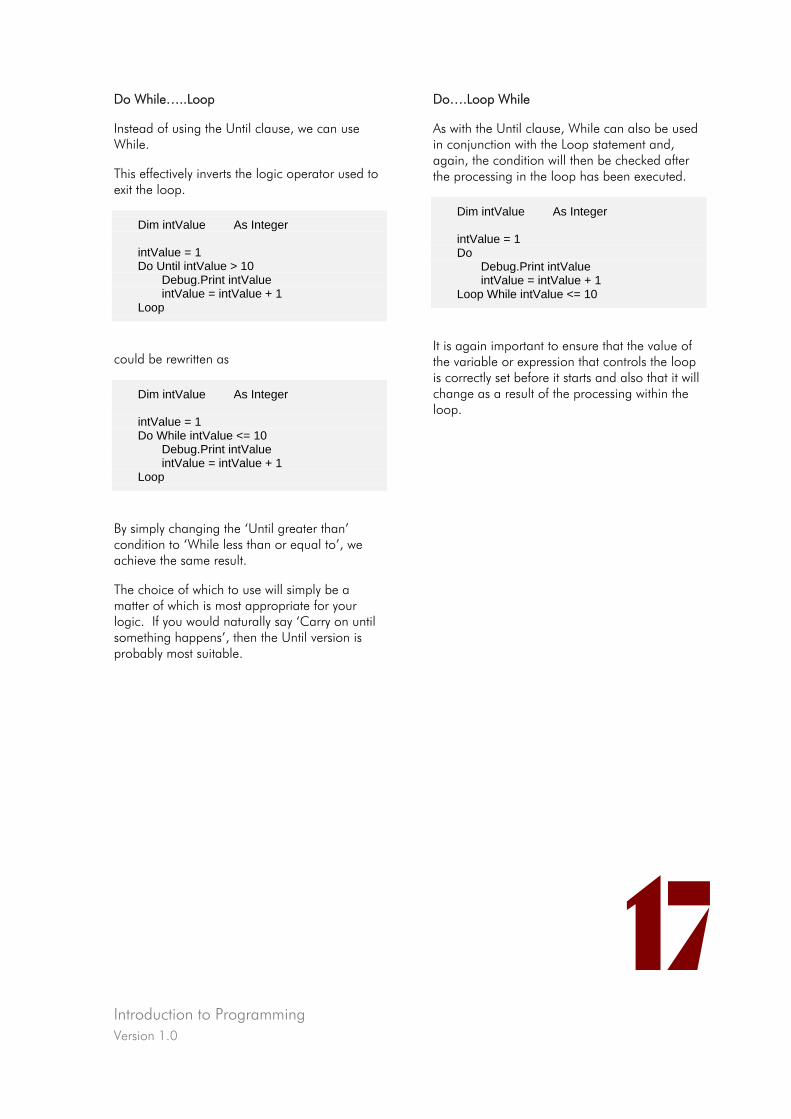
Introduction to Programming Version 1.0
17
Do While…..Loop
Instead of using the Until clause, we can use While.
This effectively inverts the logic operator used to exit the loop.
Dim intValue As Integer intValue = 1 Do Until intValue > 10 Debug.Print intValue intValue = intValue + 1 Loop
could be rewritten as
Dim intValue As Integer intValue = 1 Do While intValue <= 10 Debug.Print intValue intValue = intValue + 1 Loop
By simply changing the ‘Until greater than’ condition to ‘While less than or equal to’, we achieve the same result.
The choice of which to use will simply be a matter of which is most appropriate for your logic. If you would naturally say ‘Carry on until something happens’, then the Until version is probably most suitable.
Do….Loop While
As with the Until clause, While can also be used in conjunction with the Loop statement and, again, the condition will then be checked after the processing in the loop has been executed.
Dim intValue As Integer intValue = 1 Do Debug.Print intValue intValue = intValue + 1 Loop While intValue <= 10
It is again important to ensure that the value of the variable or expression that controls the loop is correctly set before it starts and also that it will change as a result of the processing within the loop.
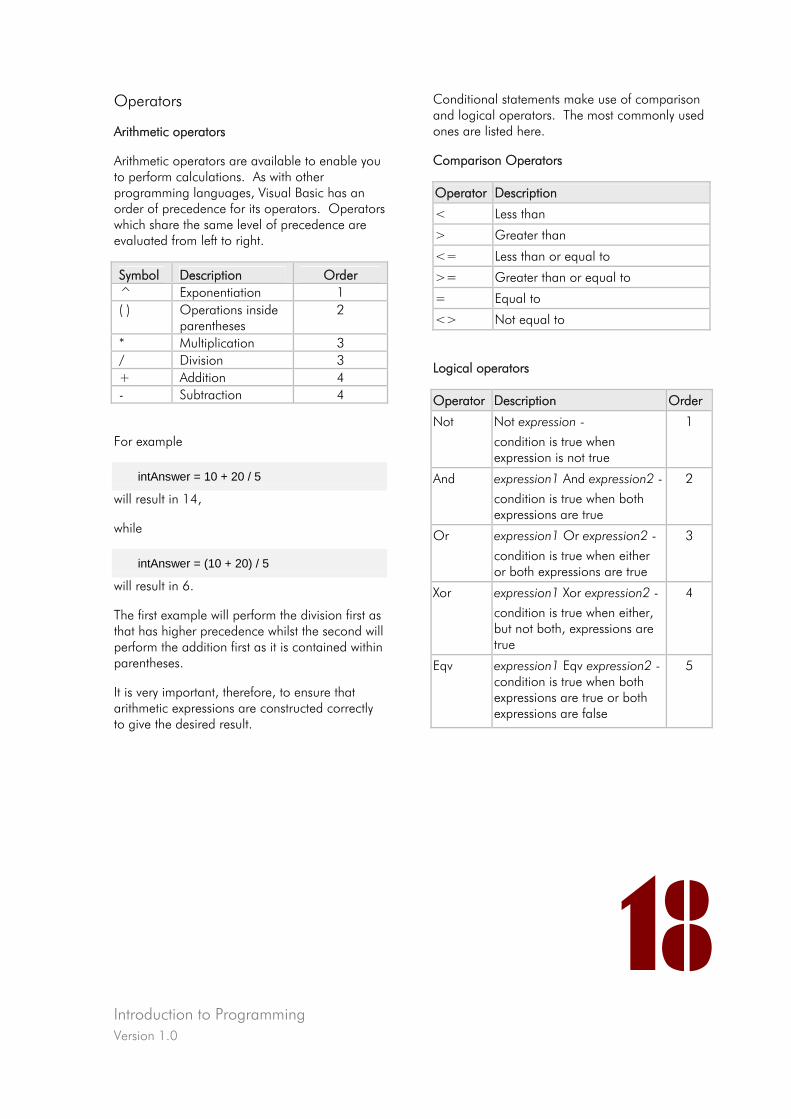
Introduction to Programming Version 1.0
18
Operators
Arithmetic operators
Arithmetic operators are available to enable you to perform calculations. As with other programming languages, Visual Basic has an order of precedence for its operators. Operators which share the same level of precedence are evaluated from left to right.
Symbol Description Order ^ Exponentiation 1 ( ) Operations inside
parentheses 2
* Multiplication 3 / Division 3 + Addition 4 - Subtraction 4
For example
intAnswer = 10 + 20 / 5
will result in 14,
while
intAnswer = (10 + 20) / 5
will result in 6.
The first example will perform the division first as that has higher precedence whilst the second will perform the addition first as it is contained within parentheses.
It is very important, therefore, to ensure that arithmetic expressions are constructed correctly to give the desired result.
Conditional statements make use of comparison and logical operators. The most commonly used ones are listed here.
Comparison Operators
Operator Description
< Less than
> Greater than
<= Less than or equal to
>= Greater than or equal to
= Equal to
<> Not equal to
Logical operators
Operator Description Order
Not Not expression - condition is true when expression is not true
1
And expression1 And expression2 - condition is true when both expressions are true
2
Or expression1 Or expression2 - condition is true when either or both expressions are true
3
Xor expression1 Xor expression2 - condition is true when either, but not both, expressions are true
4
Eqv expression1 Eqv expression2 - condition is true when both expressions are true or both expressions are false
5
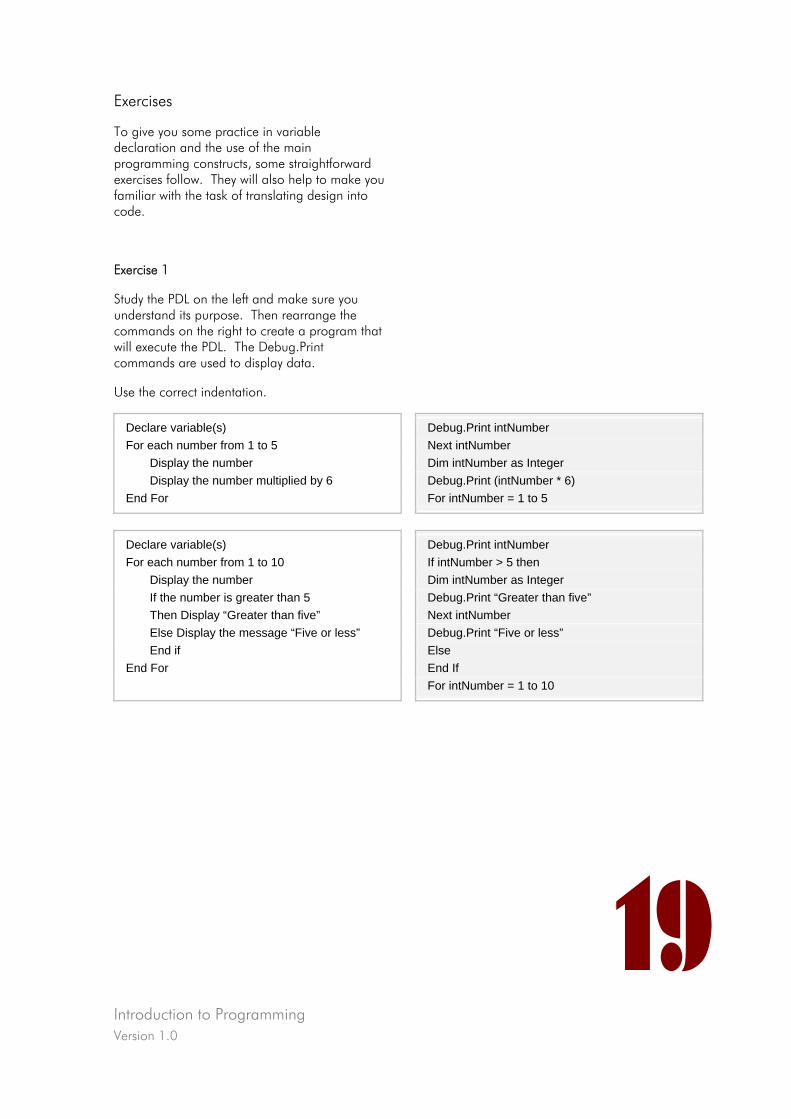
Introduction to Programming Version 1.0
19
Exercises
To give you some practice in variable declaration and the use of the main programming constructs, some straightforward exercises follow. They will also help to make you familiar with the task of translating design into code.
Exercise 1
Study the PDL on the left and make sure you understand its purpose. Then rearrange the commands on the right to create a program that will execute the PDL. The Debug.Print commands are used to display data.
Use the correct indentation.
Declare variable(s) Debug.Print intNumber For each number from 1 to 5 Next intNumber Display the number Dim intNumber as Integer Display the number multiplied by 6 Debug.Print (intNumber * 6) End For For intNumber = 1 to 5
Declare variable(s) Debug.Print intNumber For each number from 1 to 10 If intNumber > 5 then Display the number Dim intNumber as Integer If the number is greater than 5 Debug.Print “Greater than five” Then Display “Greater than five” Next intNumber Else Display the message “Five or less” Debug.Print “Five or less” End if Else End For End If For intNumber = 1 to 10
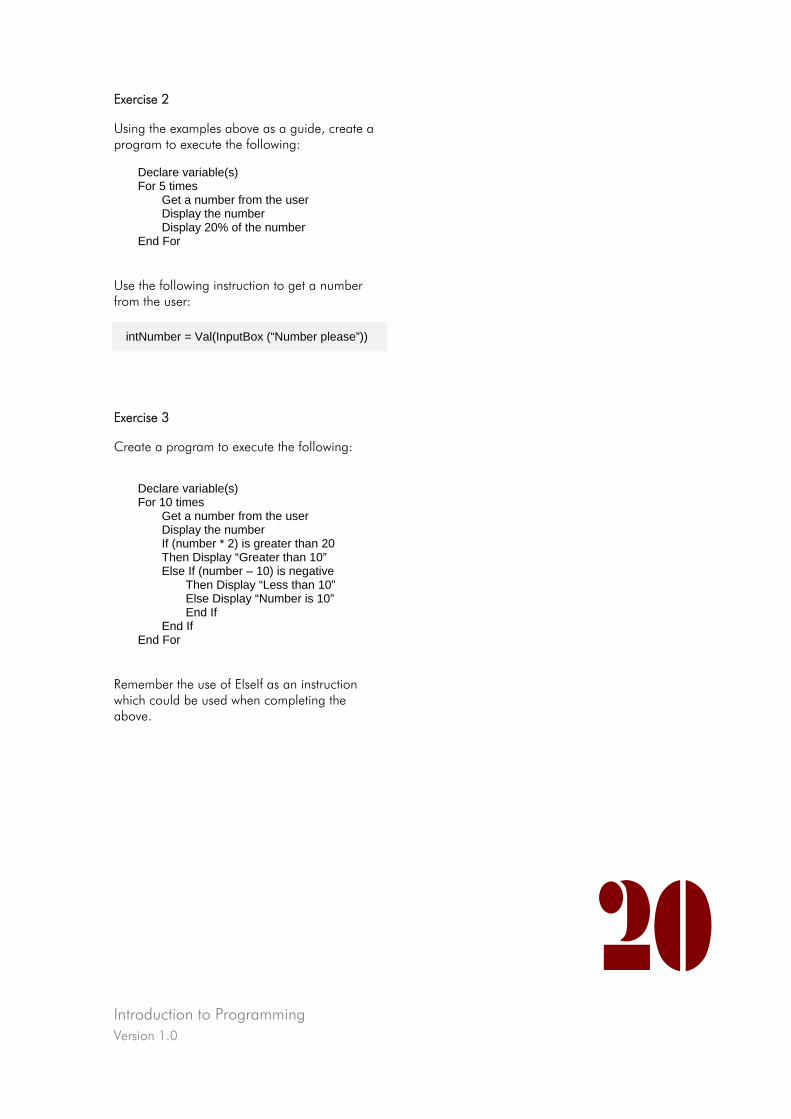
Introduction to Programming Version 1.0
20
Exercise 2
Using the examples above as a guide, create a program to execute the following:
Declare variable(s) For 5 times Get a number from the user Display the number Display 20% of the number End For
Use the following instruction to get a number from the user:
intNumber = Val(InputBox (“Number please”))
Exercise 3
Create a program to execute the following:
Declare variable(s) For 10 times Get a number from the user Display the number If (number * 2) is greater than 20 Then Display “Greater than 10” Else If (number – 10) is negative Then Display “Less than 10” Else Display “Number is 10” End If End If End For
Remember the use of ElseIf as an instruction which could be used when completing the above.
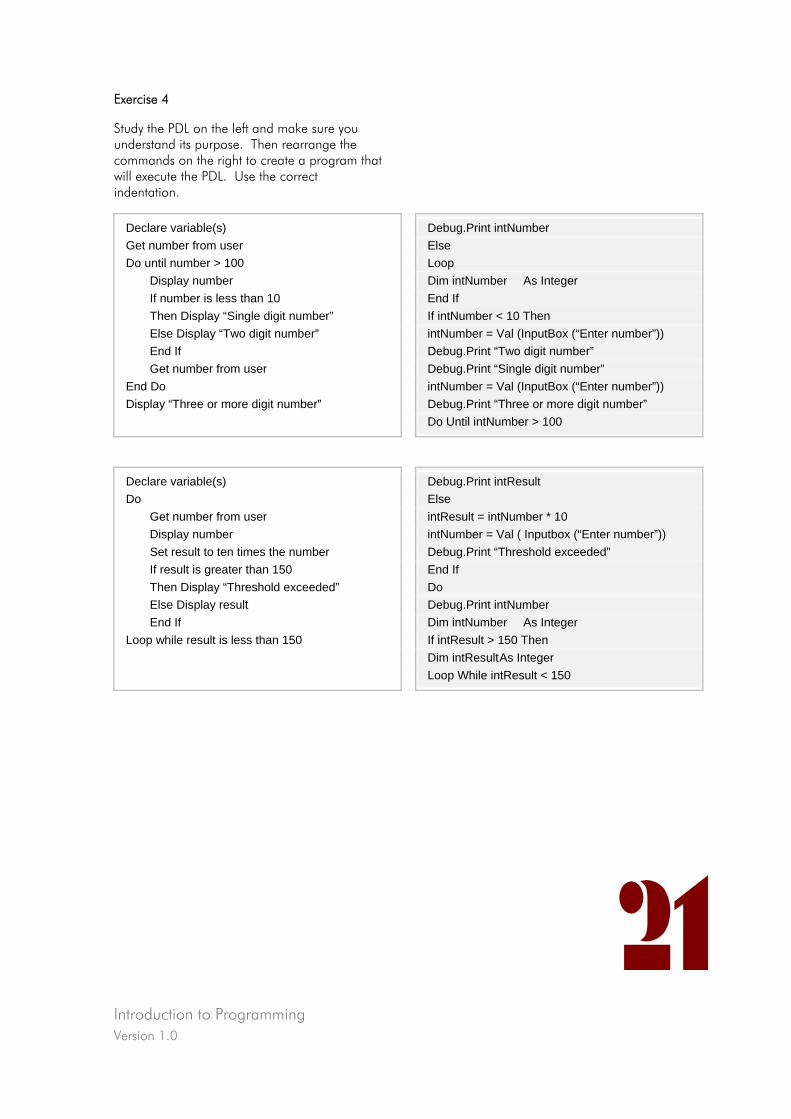
Introduction to Programming Version 1.0
21
Exercise 4
Study the PDL on the left and make sure you understand its purpose. Then rearrange the commands on the right to create a program that will execute the PDL. Use the correct indentation.
Declare variable(s) Debug.Print intNumber Get number from user Else Do until number > 100 Loop Display number Dim intNumber As Integer If number is less than 10 End If Then Display “Single digit number” If intNumber < 10 Then Else Display “Two digit number” intNumber = Val (InputBox (“Enter number”)) End If Debug.Print “Two digit number” Get number from user Debug.Print “Single digit number” End Do intNumber = Val (InputBox (“Enter number”)) Display “Three or more digit number” Debug.Print “Three or more digit number” Do Until intNumber > 100
Declare variable(s) Debug.Print intResult Do Else Get number from user intResult = intNumber * 10 Display number intNumber = Val ( Inputbox (“Enter number”)) Set result to ten times the number Debug.Print “Threshold exceeded” If result is greater than 150 End If Then Display “Threshold exceeded” Do Else Display result Debug.Print intNumber End If Dim intNumber As Integer Loop while result is less than 150 If intResult > 150 Then Dim intResult As Integer Loop While intResult < 150
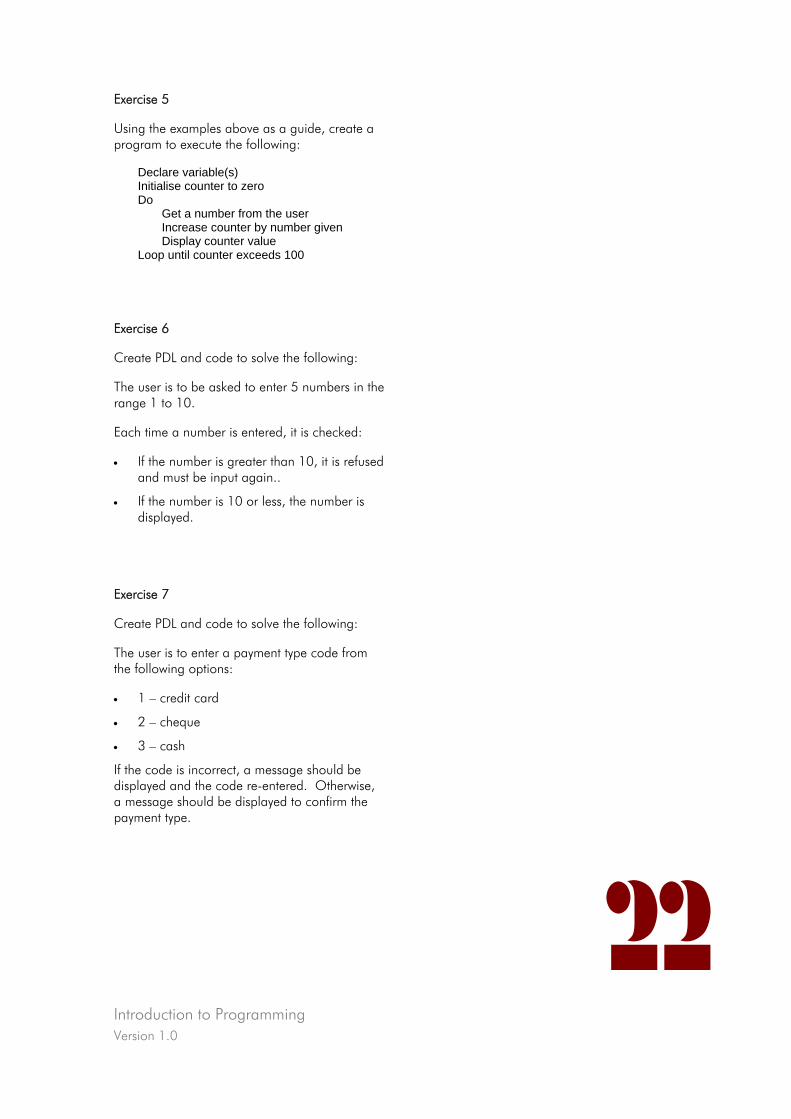
Introduction to Programming Version 1.0
22
Exercise 5
Using the examples above as a guide, create a program to execute the following:
Declare variable(s) Initialise counter to zero Do Get a number from the user Increase counter by number given Display counter value Loop until counter exceeds 100
Exercise 6
Create PDL and code to solve the following:
The user is to be asked to enter 5 numbers in the range 1 to 10.
Each time a number is entered, it is checked:
• If the number is greater than 10, it is refused and must be input again..
• If the number is 10 or less, the number is displayed.
Exercise 7
Create PDL and code to solve the following:
The user is to enter a payment type code from the following options:
• 1 – credit card
• 2 – cheque
• 3 – cash
If the code is incorrect, a message should be displayed and the code re-entered. Otherwise, a message should be displayed to confirm the payment type.

Introduction to Programming Version 1.0
23
Programming Standards
Good programming techniques
When you are writing programs, it is important to remember that it is not only you who will be reading them. Other members of the programming team may need to refer to them during the development stages but, more importantly, later in the life of the system, unexpected errors may be found or changes may have to be incorporated. In this case, someone may have to check or change your code. It is likely that this will be someone who was not involved in the initial development or, if it was a member of the original development team, they will not remember the details. So it is very important that programs are clear and easy to read and understand.
How do we make programs clear and easy to read and understand? There are a few simple ways to achieve this.
Comments
As well as statements which are executed when a program runs, you can include explanatory text which the computer ignores but which can be invaluable to the maintenance programmer.
Where a section of code performs a particular process, you could comment before or after to explain what the section of code actually does.
Comments in Visual Basic are entered by first keying in a single apostrophe ( ' ) and any text following this comment symbol is ignored when the program is running. Therefore, comments can be included on the same line as an executable statement or they can be on a separate line.
Block commenting should be used at the beginning of each procedure to indicate what it does, when it is used, how it is used, the name of the author and when it was written and amended. For example:
'''''''''''''''''''''''''''''''''''''''''''''''''''''''''''''''''''''' ' This procedure calculates VAT. ' It accepts a net price and returns the VAT due. ' The current VAT rate is picked up from the ' system settings. ' ' Written by; Joe Bloggs ' Software Unlimited ' Date written: June 1998 ' ' Amended by: Fred Smith ' Better Programs ' Date amended: July 1999 ''''''''''''''''''''''''''''''''''''''''''''''''''''''''''''''''''''''
This shows how comments can be made to stand out from the rest of the code.
Introduction to Programming Version 1.0
24
Meaningful naming
You have a choice of what names to give to the variables used in your programs. We have seen that it is common practice to use different prefixes to indicate the data type of a variable. It is also expected that the name of a variable will clearly indicate its use. For example, if we have a variable called strCarReg, it would be reasonable to expect it to store a car registration. Doing this makes reading through code much easier and reduces the need to add comments in many cases.
Indentation
Don't forget to use appropriate indenting to identify which constructs belong inside other constructs. Every time a new construct (such as another loop) is started, the following code should be indented until the construct is ended.
Visual Basic encourages the use of indenting and when an indent is placed in code, by use of the tab key for example, the computer knows to start the next line on the same level. Once a construct is ended, press the backspace key to continue coding on the next level up.
White-space
You can improve the clarity of your code by using "white-space". That is divide your code up into logical blocks to make it easier to identify which statements belong together and leave one or two blank lines between the blocks.
It is also helpful to align certain items vertically on the page. For example, if you have a list of variable declarations it is often clearer if the As clauses are aligned. Similarly, with comments on the same line as code, it is clearer if the start of the comments are vertically aligned.
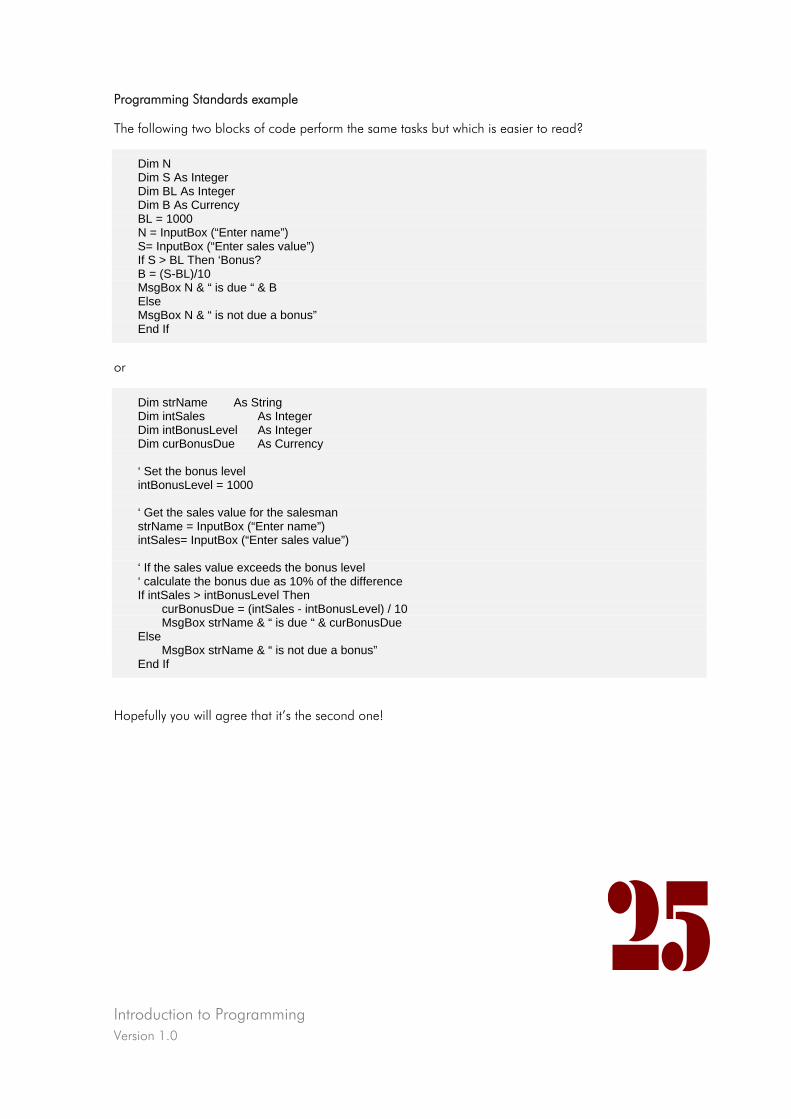
Introduction to Programming Version 1.0
25
Programming Standards example
The following two blocks of code perform the same tasks but which is easier to read?
Dim N Dim S As Integer Dim BL As Integer Dim B As Currency BL = 1000 N = InputBox (“Enter name”) S= InputBox (“Enter sales value”) If S > BL Then ‘Bonus? B = (S-BL)/10 MsgBox N & “ is due “ & B Else MsgBox N & “ is not due a bonus” End If
or
Dim strName As String Dim intSales As Integer Dim intBonusLevel As Integer Dim curBonusDue As Currency ‘ Set the bonus level intBonusLevel = 1000 ‘ Get the sales value for the salesman strName = InputBox (“Enter name”) intSales= InputBox (“Enter sales value”) ‘ If the sales value exceeds the bonus level ‘ calculate the bonus due as 10% of the difference If intSales > intBonusLevel Then curBonusDue = (intSales - intBonusLevel) / 10 MsgBox strName & “ is due “ & curBonusDue Else MsgBox strName & “ is not due a bonus” End If
Hopefully you will agree that it’s the second one!
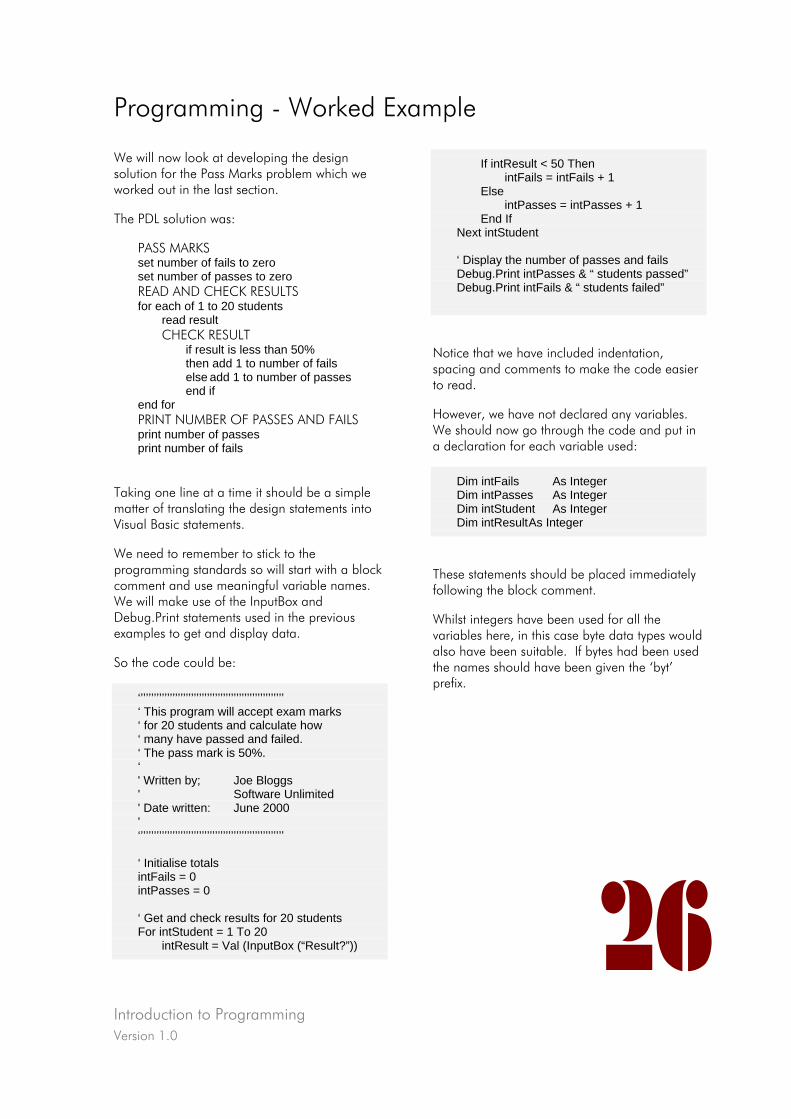
Introduction to Programming Version 1.0
26
Programming - Worked Example
We will now look at developing the design solution for the Pass Marks problem which we worked out in the last section.
The PDL solution was:
PASS MARKS set number of fails to zero set number of passes to zero READ AND CHECK RESULTS for each of 1 to 20 students read result CHECK RESULT if result is less than 50% then add 1 to number of fails else add 1 to number of passes end if end for PRINT NUMBER OF PASSES AND FAILS print number of passes print number of fails
Taking one line at a time it should be a simple matter of translating the design statements into Visual Basic statements.
We need to remember to stick to the programming standards so will start with a block comment and use meaningful variable names. We will make use of the InputBox and Debug.Print statements used in the previous examples to get and display data.
So the code could be:
‘’’’’’’’’’’’’’’’’’’’’’’’’’’’’’’’’’’’’’’’’’’’’’’’’’’’’’’ ‘ This program will accept exam marks ‘ for 20 students and calculate how ‘ many have passed and failed. ‘ The pass mark is 50%. ‘ ' Written by; Joe Bloggs ' Software Unlimited ' Date written: June 2000 ' ‘’’’’’’’’’’’’’’’’’’’’’’’’’’’’’’’’’’’’’’’’’’’’’’’’’’’’’’ ‘ Initialise totals intFails = 0 intPasses = 0 ‘ Get and check results for 20 students For intStudent = 1 To 20 intResult = Val (InputBox (“Result?”))
If intResult < 50 Then intFails = intFails + 1 Else intPasses = intPasses + 1 End If Next intStudent ‘ Display the number of passes and fails Debug.Print intPasses & “ students passed” Debug.Print intFails & “ students failed”
Notice that we have included indentation, spacing and comments to make the code easier to read.
However, we have not declared any variables. We should now go through the code and put in a declaration for each variable used:
Dim intFails As Integer Dim intPasses As Integer Dim intStudent As Integer Dim intResult As Integer
These statements should be placed immediately following the block comment.
Whilst integers have been used for all the variables here, in this case byte data types would also have been suitable. If bytes had been used the names should have been given the ‘byt’ prefix.
Introduction to Programming Version 1.0
27
Entering Code
The (Visual) Basics
Once we have developed the code on paper, we need to enter it onto the computer.
To enter code into Visual Basic we must learn a little about using the development environment and the language itself.
Visual Basic is an event-driven language; in other words, it reacts to events. In this section, we will create a form containing a command button, similar to those you are already familiar with in almost all Windows applications. When the button is pressed (or "clicked"), the code for the program will be run.
Organising your project
Before any work on a project is done, it is always advisable to create a new folder with a suitable name in which to store all the work related to that project. This makes it easy to find all the information later. It may be useful to include a sub-folder to keep analysis and design documents together and a second sub-folder to hold all the code. You may have:
• Clock Project
o Documents
o Code
A Visual Basic project consists of a number of files. It will normally contain:
• a project file (.vbp) and
• one or more form files (.frm).
It may also contain module files (.bas), resource files (.res), workspace files (.vbw) and other program specific files.
When a Visual Basic project is saved, you will be prompted separately to save each of the form files as well as the project file.
A form file contains all the information relating to that form including its design and code. The project file is effectively a means of linking all the form, and other project-related files, together.
It is important not to get them confused, and make sure they are stored together in the correct folder.
This makes it easier when copying a project from one location to another, for example to make a backup copy on another disk; simply copy all the contents of your project folder and you will have everything required.
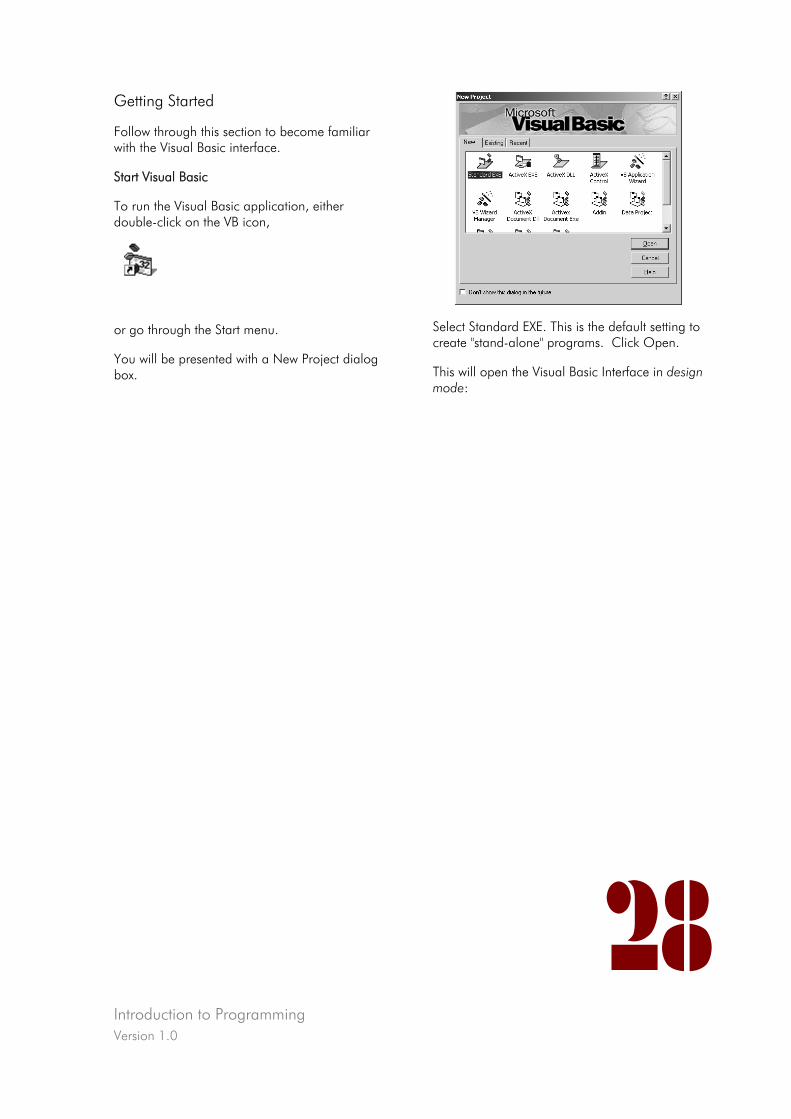
Introduction to Programming Version 1.0
28
Getting Started
Follow through this section to become familiar with the Visual Basic interface.
Start Visual Basic
To run the Visual Basic application, either double-click on the VB icon,
or go through the Start menu.
You will be presented with a New Project dialog box.
Select Standard EXE. This is the default setting to create "stand-alone" programs. Click Open.
This will open the Visual Basic Interface in design mode:
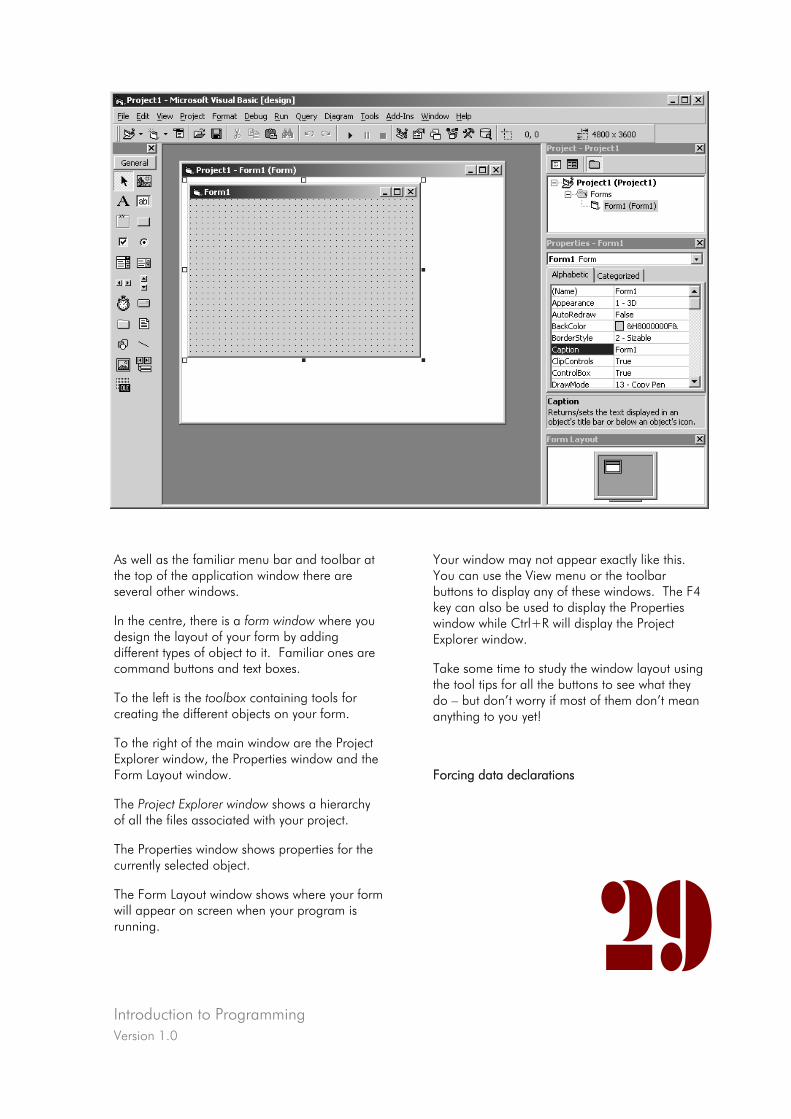
Introduction to Programming Version 1.0
29
As well as the familiar menu bar and toolbar at the top of the application window there are several other windows.
In the centre, there is a form window where you design the layout of your form by adding different types of object to it. Familiar ones are command buttons and text boxes.
To the left is the toolbox containing tools for creating the different objects on your form.
To the right of the main window are the Project Explorer window, the Properties window and the Form Layout window.
The Project Explorer window shows a hierarchy of all the files associated with your project.
The Properties window shows properties for the currently selected object.
The Form Layout window shows where your form will appear on screen when your program is running.
Your window may not appear exactly like this. You can use the View menu or the toolbar buttons to display any of these windows. The F4 key can also be used to display the Properties window while Ctrl+R will display the Project Explorer window.
Take some time to study the window layout using the tool tips for all the buttons to see what they do – but don’t worry if most of them don’t mean anything to you yet!
Forcing data declarations
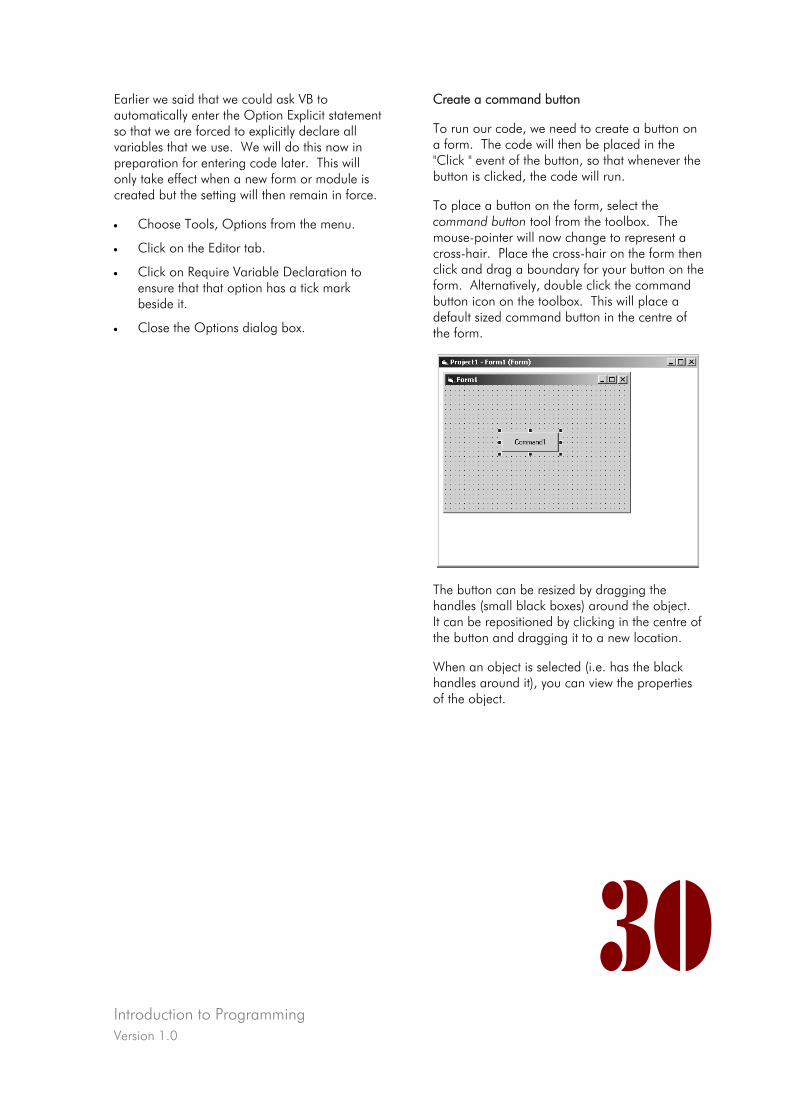
Introduction to Programming Version 1.0
30
Earlier we said that we could ask VB to automatically enter the Option Explicit statement so that we are forced to explicitly declare all variables that we use. We will do this now in preparation for entering code later. This will only take effect when a new form or module is created but the setting will then remain in force.
• Choose Tools, Options from the menu.
• Click on the Editor tab.
• Click on Require Variable Declaration to ensure that that option has a tick mark beside it.
• Close the Options dialog box.
Create a command button
To run our code, we need to create a button on a form. The code will then be placed in the "Click " event of the button, so that whenever the button is clicked, the code will run.
To place a button on the form, select the command button tool from the toolbox. The mouse-pointer will now change to represent a cross-hair. Place the cross-hair on the form then click and drag a boundary for your button on the form. Alternatively, double click the command button icon on the toolbox. This will place a default sized command button in the centre of the form.
The button can be resized by dragging the handles (small black boxes) around the object. It can be repositioned by clicking in the centre of the button and dragging it to a new location.
When an object is selected (i.e. has the black handles around it), you can view the properties of the object.
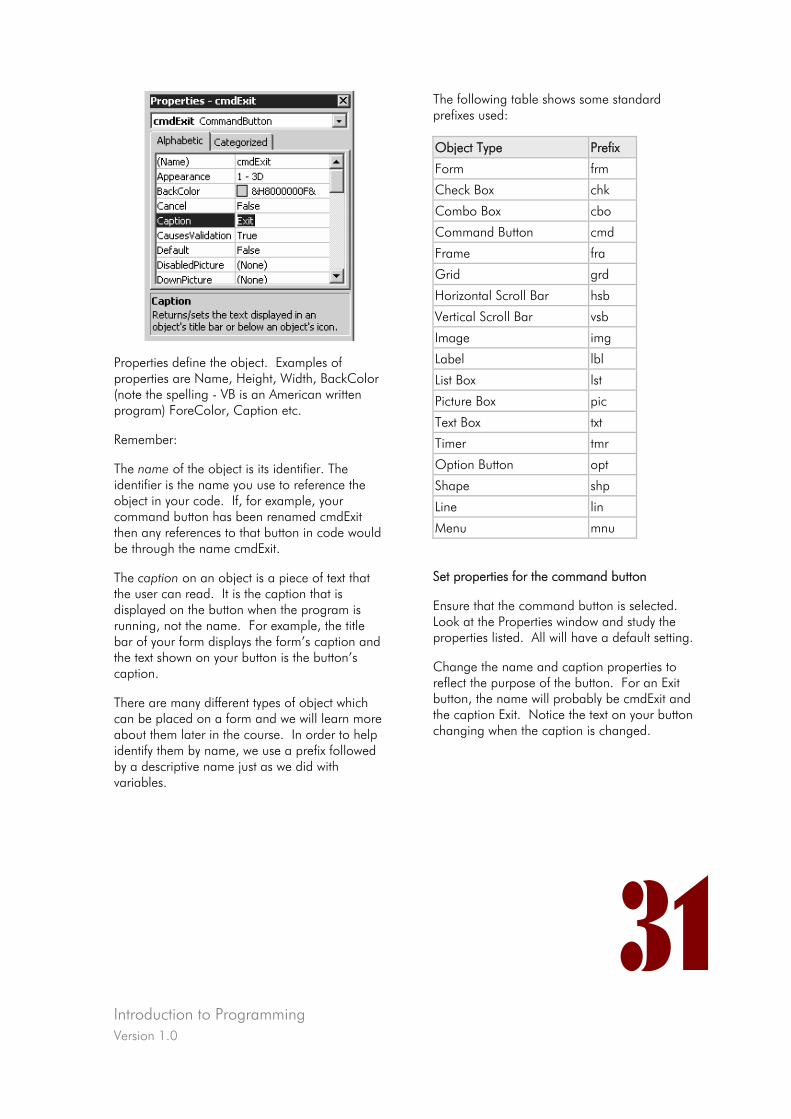
Introduction to Programming Version 1.0
31
Properties define the object. Examples of properties are Name, Height, Width, BackColor (note the spelling - VB is an American written program) ForeColor, Caption etc.
Remember:
The name of the object is its identifier. The identifier is the name you use to reference the object in your code. If, for example, your command button has been renamed cmdExit then any references to that button in code would be through the name cmdExit.
The caption on an object is a piece of text that the user can read. It is the caption that is displayed on the button when the program is running, not the name. For example, the title bar of your form displays the form’s caption and the text shown on your button is the button’s caption.
There are many different types of object which can be placed on a form and we will learn more about them later in the course. In order to help identify them by name, we use a prefix followed by a descriptive name just as we did with variables.
The following table shows some standard prefixes used:
Object Type Prefix
Form frm
Check Box chk
Combo Box cbo
Command Button cmd
Frame fra
Grid grd
Horizontal Scroll Bar hsb
Vertical Scroll Bar vsb
Image img
Label lbl
List Box lst
Picture Box pic
Text Box txt
Timer tmr
Option Button opt
Shape shp
Line lin
Menu mnu
Set properties for the command button
Ensure that the command button is selected. Look at the Properties window and study the properties listed. All will have a default setting.
Change the name and caption properties to reflect the purpose of the button. For an Exit button, the name will probably be cmdExit and the caption Exit. Notice the text on your button changing when the caption is changed.
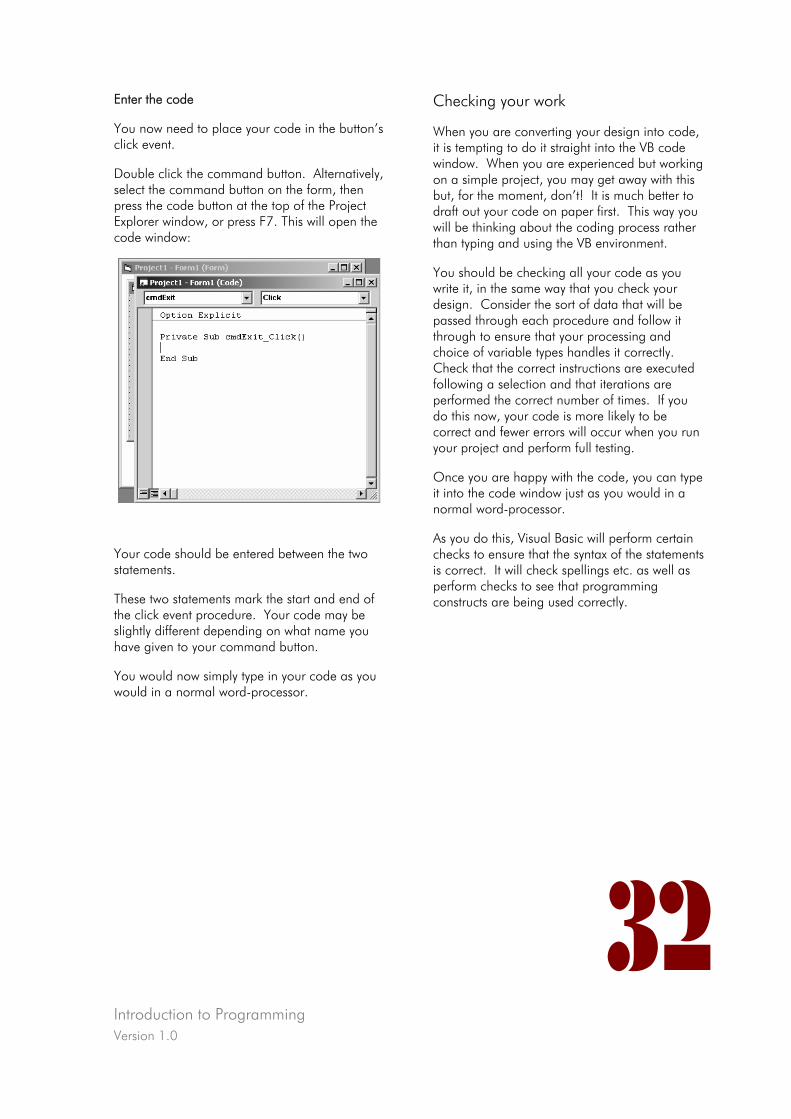
Introduction to Programming Version 1.0
32
Enter the code
You now need to place your code in the button’s click event.
Double click the command button. Alternatively, select the command button on the form, then press the code button at the top of the Project Explorer window, or press F7. This will open the code window:
Your code should be entered between the two statements.
These two statements mark the start and end of the click event procedure. Your code may be slightly different depending on what name you have given to your command button.
You would now simply type in your code as you would in a normal word-processor.
Checking your work
When you are converting your design into code, it is tempting to do it straight into the VB code window. When you are experienced but working on a simple project, you may get away with this but, for the moment, don’t! It is much better to draft out your code on paper first. This way you will be thinking about the coding process rather than typing and using the VB environment.
You should be checking all your code as you write it, in the same way that you check your design. Consider the sort of data that will be passed through each procedure and follow it through to ensure that your processing and choice of variable types handles it correctly. Check that the correct instructions are executed following a selection and that iterations are performed the correct number of times. If you do this now, your code is more likely to be correct and fewer errors will occur when you run your project and perform full testing.
Once you are happy with the code, you can type it into the code window just as you would in a normal word-processor.
As you do this, Visual Basic will perform certain checks to ensure that the syntax of the statements is correct. It will check spellings etc. as well as perform checks to see that programming constructs are being used correctly.
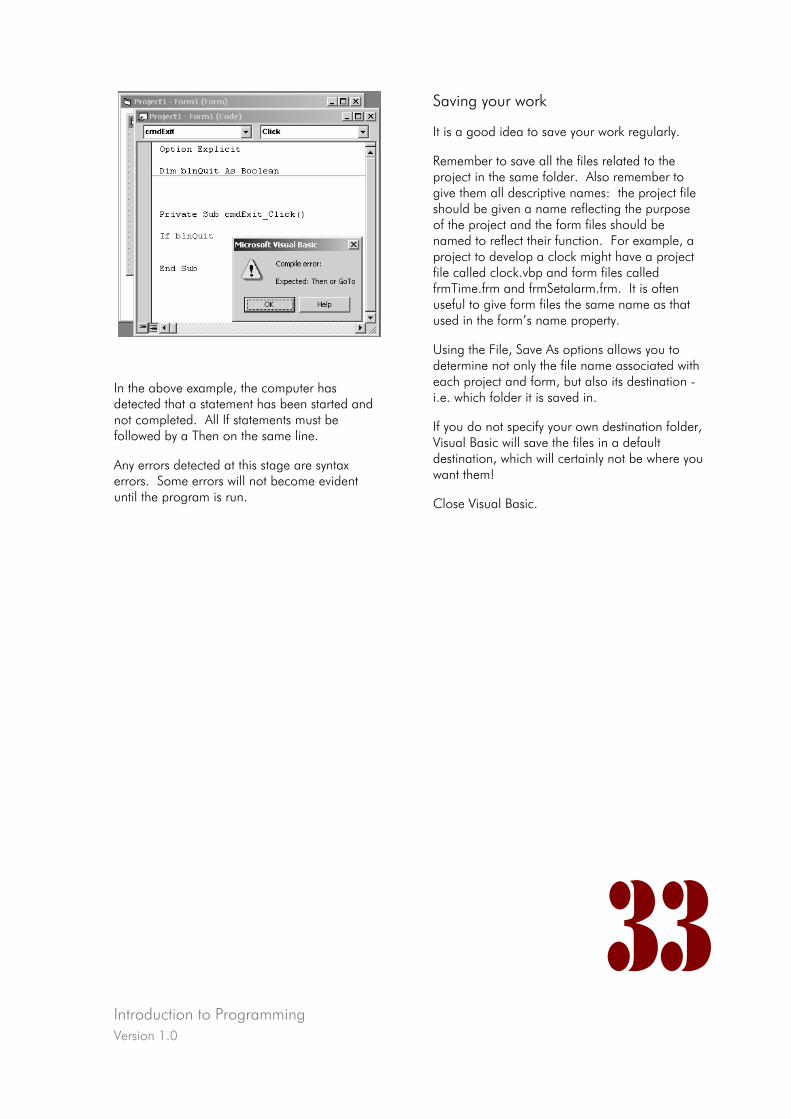
Introduction to Programming Version 1.0
Saving your work
It is a good idea to save your work regularly.
Remember to save all the files related to the project in the same folder. Also remember to give them all descriptive names: the project file should be given a name reflecting the purpose of the project and the form files should be named to reflect their function. For example, a project to develop a clock might have a project file called clock.vbp and form files called frmTime.frm and frmSetalarm.frm. It is often useful to give form files the same name as that used in the form’s name property.
Using the File, Save As options allows you to determine not only the file name associated with each project and form, but also its destination - i.e. which folder it is saved in.
In the above example, the computer has detected that a statement has been started and not completed. All If statements must be followed by a Then on the same line.
If you do not specify your own destination folder, Visual Basic will save the files in a default destination, which will certainly not be where you want them!
Any errors detected at this stage are syntax errors. Some errors will not become evident until the program is run. Close Visual Basic.
33
Introduction to Programming Version 1.0
34
Entering Code – Worked Example
Now we will start to enter our Pass Marks code into the Visual Basic environment.
First create a new folder within your local work area called PassMarks and within this new folder create a folder called Code. You should have something similar to:
• C:\Joe
o C:\Joe\PassMarks
o C:\Joe\PassMarks\Code
Now follow the procedure described previously under Getting Started to start Visual Basic, open a new project and create a command button on the form.
Now we will set some of the properties for the various objects.
• Highlight the project entry in the Project Explorer window then change the name property to PassMarks.
• Click on the Form window (not on the button) to see the form’s properties. Set the properties as:
o Name - frmPassMarks
o Caption - Pass Marks
• Now select the button and set its properties to:
o Name - cmdPassMarks
o Caption - Process Pass Marks
Now it is obvious that the button is to run the Pass Marks code.
Now double-click on the button to open the code window. This will automatically create the outline of a click event procedure for the button.
Enter the code which we developed earlier between the statements:
Private Sub cmdPassMarks_Click()
and
End Sub
When all the lines of code have been typed in, use the Save As options from the File menu to save the form and project files. Choose the destination folder where the files are to be saved; in this case, the code folder you created for this project. Ensure that the form is saved as frmPassMarks.frm and the project as PassMarks.vbp.
Introduction to Programming Version 1.0
35
Running and Debugging
When you have entered your code and saved the project, you can run the program. To do this, choose Start from the Run menu or simply click the Run button on the toolbar. This will change the VB interface to run mode.
When your program is run for the first time, it is very likely that you will get an error message or that your program will not do exactly what you expected. Working out what is wrong is commonly referred to as ‘debugging’.
So why doesn’t it work? What do the error messages mean?
There are two types of error:
• syntax errors where you have broken the rules of the language and
• logic errors where your processing is not logically correct.
Syntax errors will always result in an error message. Logic problems may result in an error message in some cases, but will more often mean that your program simply gives incorrect or unexpected results.
Logic problems are generally more difficult to trace as you have to follow through the processing to simulate what the program is doing, checking the values of variables to ensure that they are correct at each stage. However, this type of problem can be avoided by careful checking at the design stage and as the code is being created!
Error messages - what do they mean?
While entering your code, Visual Basic performs syntax-checking "on-the-fly" - i.e. as you type your code. Any syntax errors are immediately picked up and an appropriate message is displayed. You may have seen this while you entered your code.
Nested constructs
It is important that each construct has a clear beginning and end:
• each For must have a Next
• each Do must have a Loop
• each If must have an End If
• each Select Case must have an End Select
• each Sub must have an End Sub
• each Function must have an End Function
When nesting constructs it is important that one complete construct is placed inside another.
You cannot have
For… If… Next… End If…
as the If is not completed before the Next is encountered.
Most commonly, errors occur at run-time. This suggests that while the code uses the correct syntax, something has been overlooked at the design stage or when you have entered the code. Below is a list of some errors you may encounter with probable causes and possible solutions:
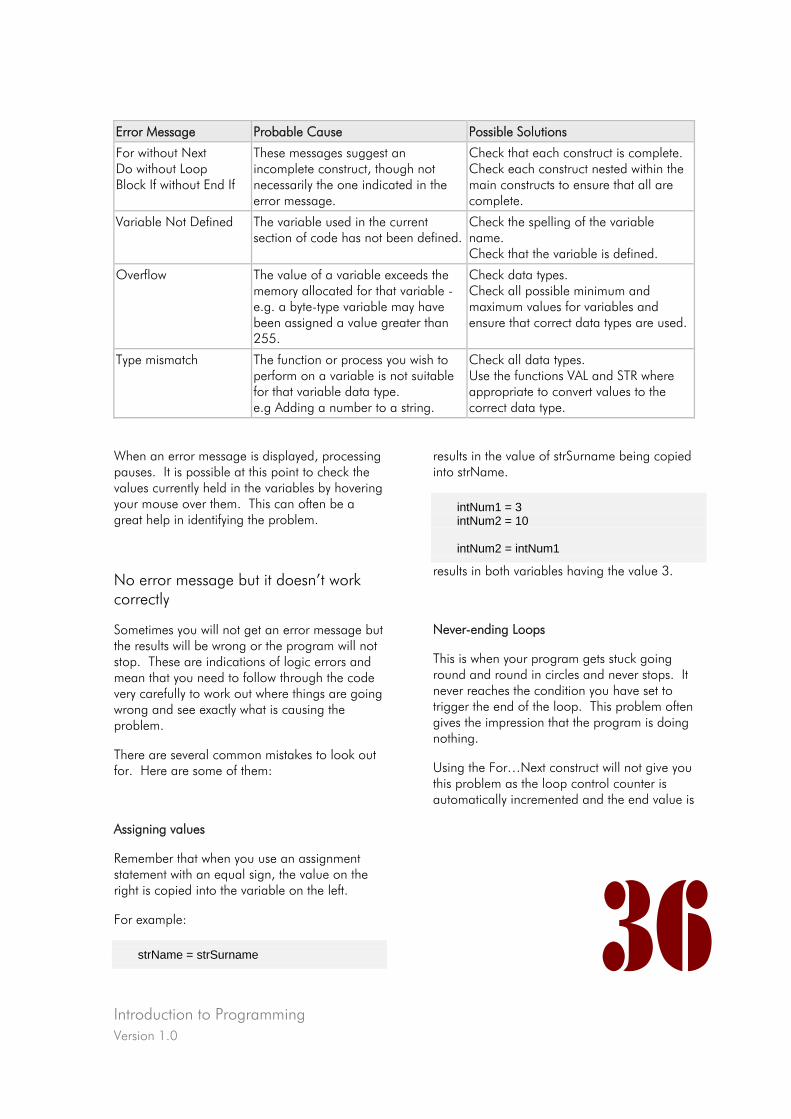
Introduction to Programming Version 1.0
36
Error Message Probable Cause Possible Solutions
For without Next Do without Loop Block If without End If
These messages suggest an incomplete construct, though not necessarily the one indicated in the error message.
Check that each construct is complete. Check each construct nested within the main constructs to ensure that all are complete.
Variable Not Defined The variable used in the current section of code has not been defined.
Check the spelling of the variable name. Check that the variable is defined.
Overflow
The value of a variable exceeds the memory allocated for that variable - e.g. a byte-type variable may have been assigned a value greater than 255.
Check data types. Check all possible minimum and maximum values for variables and ensure that correct data types are used.
Type mismatch
The function or process you wish to perform on a variable is not suitable for that variable data type. e.g Adding a number to a string.
Check all data types. Use the functions VAL and STR where appropriate to convert values to the correct data type.
When an error message is displayed, processing pauses. It is possible at this point to check the values currently held in the variables by hovering your mouse over them. This can often be a great help in identifying the problem.
No error message but it doesn’t work correctly
Sometimes you will not get an error message but the results will be wrong or the program will not stop. These are indications of logic errors and mean that you need to follow through the code very carefully to work out where things are going wrong and see exactly what is causing the problem.
There are several common mistakes to look out for. Here are some of them:
Assigning values
Remember that when you use an assignment statement with an equal sign, the value on the right is copied into the variable on the left.
For example:
strName = strSurname
results in the value of strSurname being copied into strName.
intNum1 = 3 intNum2 = 10 intNum2 = intNum1
results in both variables having the value 3.
Never-ending Loops
This is when your program gets stuck going round and round in circles and never stops. It never reaches the condition you have set to trigger the end of the loop. This problem often gives the impression that the program is doing nothing.
Using the For…Next construct will not give you this problem as the loop control counter is automatically incremented and the end value is
Introduction to Programming Version 1.0
37
defined.
However, Do loops can give rise to these problems.
The value which triggers the end of the loop must be set within the loop.
Beware of having a condition such as x = 6 where the value of x may be incremented past the specified value but never be equal to it.
intNum = 1 Do until intNum = 6 intNum = intNum + 2 Loop
In this case intNum will take the values 1, 3, 5, 7, etc. and the loop will not exit as expected.
Never-got-into loops
With Do While and Do Until loops it is possible that the condition being checked is already met before the loop is entered.
intCount = 6 Do until intCount > 5 . . . . Loop
In this case the condition is immediately true so the code within the loop is never executed.
Using Debug statements
It is often necessary to trace the order of processing as a program runs. One way of achieving this is to add Debug.Print statements to display messages or values whilst testing our code. Remember to remove them afterwards.
VB Help
Make use of the on-line Help when trying to solve problems with syntax or use of functions, etc. It may be confusing at first but it will often have the information you need.
It also has many examples which you can copy and try out for yourself.
Introduction to Programming Version 1.0
38
Running the code for the Worked Example
Now try running the Pass Marks program. The results are displayed in the Immediate window by the Debug.Print statement. If this window is not shown automatically, usually at the bottom of the screen, when your program is run, you can display it via the View menu or by pressing Ctrl+G.
If you have been careful when entering the code, the program should run without any problems and produce the expected results! If it doesn’t, look at the possible errors above and see if you can solve the problem.
Test the program to ensure that it asks you for 20 numbers and counts the correct number of passes ad fails. Use both 49 and 50 as two of your results to check the boundary between a pass and a fail. To make testing less tedious you could reduce the number of results to be entered.
To stop your program when it has finished, click the Stop button on the toolbar. This will return you to design mode.
Introduction to Programming Version 1.0
39
Arrays
Arrays allow one named variable to be split into parts of the same type where each part will store a value. It is often thought of as a series of boxes in which data is stored. Each of these parts or boxes is known as an element.
Arrays are declared as any variable is declared except a subscript is included to indicate how many elements there are in the array.
Dim strName(3) As String
This would create a simple one-dimensional array called strName which allocates enough memory to allow four different string values to be stored. The first element normally has an index number of 0 so that the actual number of elements in an array is one more than the subscript in the declaration.
Each element of an array has a unique index number which identifies its position within the array.
The strName array could be visualised as:
strName(0) strName(1) strName(2) strName(3)
“Bill” “Susan” “Bernard” “Charlie”
Arrays can be forced to start at index one by using the statement
Option Base 1
at the top of your program.
Data is assigned to an array element just as it would be for a variable with the exception that every element of the array must be referred to by its index number:
strName(0) = "Bill" strName(1) = "Susan" strName(2) = "Bernard" strName(3) = "Charlie"
What would the following code result in?
Debug.Print strName(3) Debug.Print strName(1)
Yes, it would display the names Charlie then Susan.
The obvious advantage of using an array is that repetitive tedious instructions can be incorporated into a loop. For example, to display each of the names in the array we could use these instructions:
' Display all four names Debug.Print strName(0) Debug.Print strName(1) Debug.Print strName(2) Debug.Print strName(3)
or we could use a loop to count from zero to four and display the appropriate data from the array:
' Display all four names For intCount = 0 to 3 Debug.Print strName(intCount) Next intCount
Notice that another variable (an integer) is used as the index value instead of a fixed numeric value.
In the same way, initialising an array to hold the same value could be achieved by using another loop as follows:
' ' This sets all names to default "No Entry" ' If later in the program a name is displayed ' that has not been entered, its value will be ' "No Entry"
Introduction to Programming Version 1.0
40
' For intCount = 0 to 3 strName(intCount) = "No entry" Next intCount
This becomes particularly significant when working with a data array that contains numerical values. All values could be initialised to zero quickly by using a simple For…Next loop:
' ' Declare variables ' Dim intNumInStock(5) As Integer Dim bytCount As Byte ' ' Initialise all elements in array to zero ' For bytCount = 0 to 5 intNumInStock(bytCount) = 0 Next bytCount
So wherever related data of the same type is to be stored, instead of using unique variable names it is now possible to use the same variable name but place different data into different elements within the array.
Introduction to Programming Version 1.0
41
Arrays – Worked Example
Our Pass Marks program could be re-coded to use an array for the storage of the actual results. This may be useful if all the results were required for processing together. To emphasise this we have added a requirement for the actual results to be printed out at the end of the processing; this would not have been possible using the previous code as the results were read and processed individually and not all stored together.
‘’’’’’’’’’’’’’’’’’’’’’’’’’’’’’’’’’’’’’’’’’’’’’’’’’’’’’’ ‘ This program will accept exam marks ‘ for 20 students and calculate how ‘ many have passed and failed. ‘ The pass mark is 50%. ‘ ' Written by; Joe Bloggs ' Software Unlimited ' Date written: June 2000 ' ‘’’’’’’’’’’’’’’’’’’’’’’’’’’’’’’’’’’’’’’’’’’’’’’’’’’’’’’ Dim intFails As Integer Dim intPasses As Integer Dim intStudent As Integer Dim intResult (19) As Integer ‘ Initialise totals intFails = 0 intPasses = 0 ‘ Get and store results for 20 students For intStudent = 0 To 19 intResult (intStudent) = Val (InputBox (“Result?”)) Next intStudent ‘ Check the results and count the passes and fails For intStudent = 0 To 19 If intResult (intStudent) < 50 Then intFails = intFails + 1 Else intPasses = intPasses + 1 End If Next intStudent ‘ Display the number of passes and fails Debug.Print intPasses & “ students passed” Debug.Print intFails & “ students failed” ‘ Display the actual results Debug.Print “The actual results were:” For intStudent = 0 To 19 Debug.Print intResult (intStudent) Next intStudent
The results are all entered at the start of the code and stored in an array of 20 elements (numbered 0 to 19). They can now be processed and displayed without any further interaction from the user. Once the computer has the numbers together in memory it can use
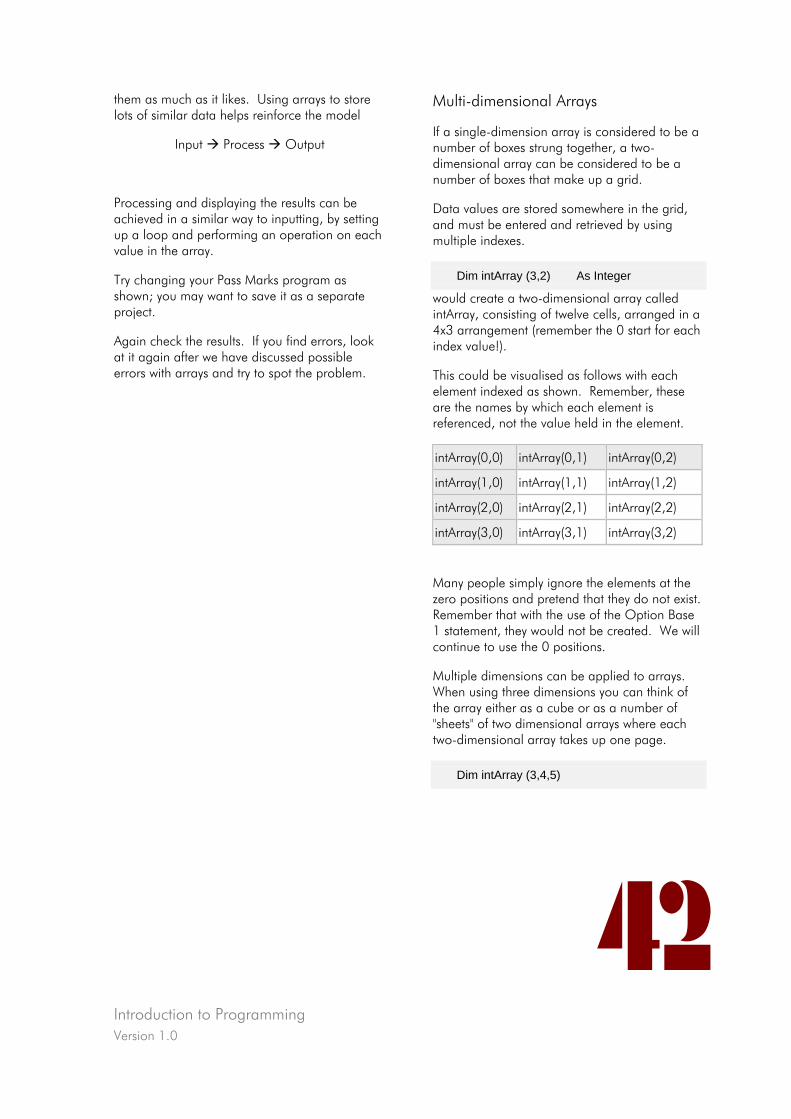
Introduction to Programming Version 1.0
42
them as much as it likes. Using arrays to store lots of similar data helps reinforce the model
Input Process Output
Processing and displaying the results can be achieved in a similar way to inputting, by setting up a loop and performing an operation on each value in the array.
Try changing your Pass Marks program as shown; you may want to save it as a separate project.
Again check the results. If you find errors, look at it again after we have discussed possible errors with arrays and try to spot the problem.
Multi-dimensional Arrays
If a single-dimension array is considered to be a number of boxes strung together, a two-dimensional array can be considered to be a number of boxes that make up a grid.
Data values are stored somewhere in the grid, and must be entered and retrieved by using multiple indexes.
Dim intArray (3,2) As Integer
would create a two-dimensional array called intArray, consisting of twelve cells, arranged in a 4x3 arrangement (remember the 0 start for each index value!).
This could be visualised as follows with each element indexed as shown. Remember, these are the names by which each element is referenced, not the value held in the element.
intArray(0,0) intArray(0,1) intArray(0,2)
intArray(1,0) intArray(1,1) intArray(1,2)
intArray(2,0) intArray(2,1) intArray(2,2)
intArray(3,0) intArray(3,1) intArray(3,2)
Many people simply ignore the elements at the zero positions and pretend that they do not exist. Remember that with the use of the Option Base 1 statement, they would not be created. We will continue to use the 0 positions.
Multiple dimensions can be applied to arrays. When using three dimensions you can think of the array either as a cube or as a number of "sheets" of two dimensional arrays where each two-dimensional array takes up one page.
Dim intArray (3,4,5)

Introduction to Programming Version 1.0
43
Arrays of four dimensions and above are more difficult to visualise and are very rare! Thankfully.
Introduction to Programming Version 1.0
44
Multi-dimensional Arrays – An Example
Let us look at an example of a two-dimensional array. Imagine that a record is to be kept of the quarterly sales figures for different branches of a company. We could visualise this in table-format with a row for each branch and a column for each quarter.
If there are 10 branches, we could use a 10 x 4 array to store the sales figures:
Dim sglSales (9,3) As Single
We could then prompt the user to enter the four quarterly figures for each branch in turn as follows:
For bytBranch = 0 To 9 MsgBox “Please enter sales values for Branch “ & bytBranch For bytQuarter = 0 To 3 sglSalesr(bytBranch) = Val(InputBox ("Enter value")) Next bytQuarter Next bytBranch
This prompts the user for the four sales figures for each branch in turn storing them in the logical element in the array. The use of meaningful names for the array indexes indicates clearly which loop is which. The elements are processed in the order:
(0,0), (0,1), (0,2), (0,3), (1,0), (1,1), (1,2), (1,3), (2,0), (2,1)……..(9,2), (9,3)
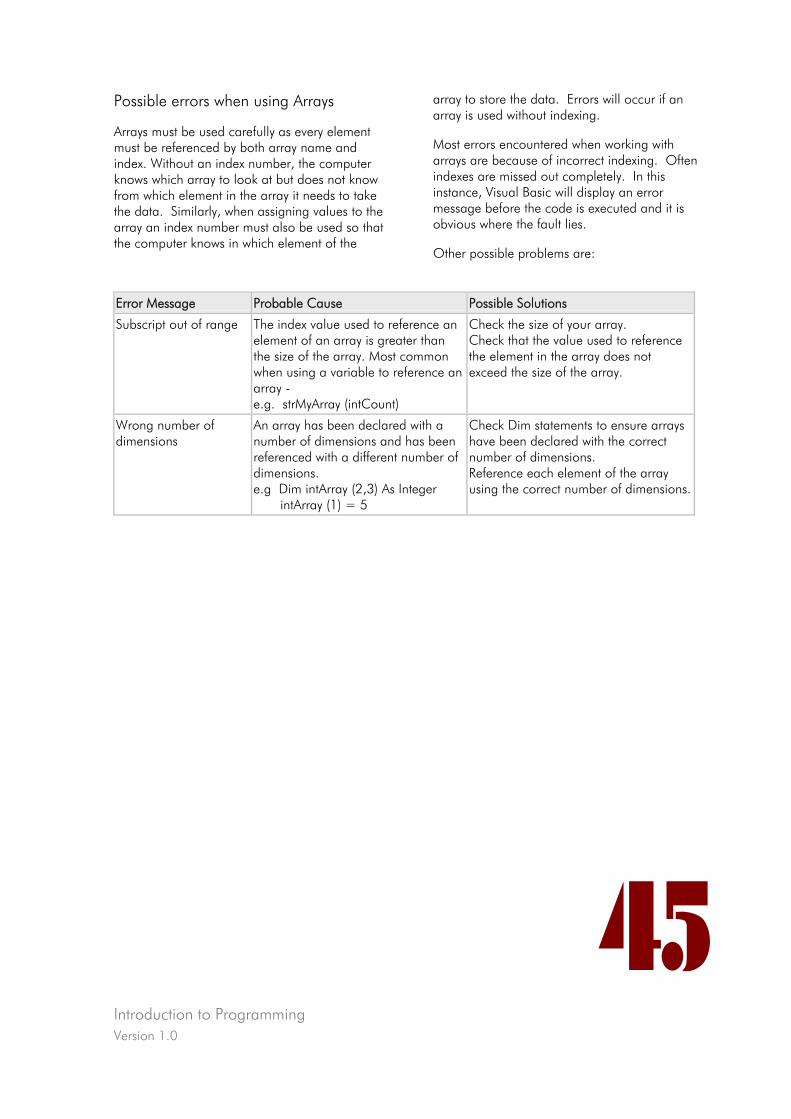
Introduction to Programming Version 1.0
45
Possible errors when using Arrays
Arrays must be used carefully as every element must be referenced by both array name and index. Without an index number, the computer knows which array to look at but does not know from which element in the array it needs to take the data. Similarly, when assigning values to the array an index number must also be used so that the computer knows in which element of the
array to store the data. Errors will occur if an array is used without indexing.
Most errors encountered when working with arrays are because of incorrect indexing. Often indexes are missed out completely. In this instance, Visual Basic will display an error message before the code is executed and it is obvious where the fault lies.
Other possible problems are:
Error Message Probable Cause Possible Solutions
Subscript out of range The index value used to reference an element of an array is greater than the size of the array. Most common when using a variable to reference an array - e.g. strMyArray (intCount)
Check the size of your array. Check that the value used to reference the element in the array does not exceed the size of the array.
Wrong number of dimensions
An array has been declared with a number of dimensions and has been referenced with a different number of dimensions. e.g Dim intArray (2,3) As Integer intArray (1) = 5
Check Dim statements to ensure arrays have been declared with the correct number of dimensions. Reference each element of the array using the correct number of dimensions.
Introduction to Programming Version 1.0
46
Procedures and Functions
Procedures
Using comments to identify the purpose of blocks of code is standard practice when creating a program. Should the need arise, anyone reading the code should be able to identify any relevant section and modify it.
In order to find the appropriate section in code, someone still has to read through the entire listing until they reach the section that they wish to work with. All the code we have looked at so far has been included in one event procedure.
However, it is possible to create our own general procedures to carry out certain specific tasks.
This mirrors the design stages to some extent where we can have one section which is broken down into sub-sections. This is equivalent to one controlling procedure which calls in other procedures as required to carry out some further tasks.
Creating isolated procedures allows each section of code to be written separately and called into the program as required.
Look back to the example of using an array for our Pass Marks example. It consists of three main sections – getting results and storing them in an array, processing the results and finally displaying the results and totals.
The sections of code have been identified by the use of comments and spacing. If the processing section needs to be changed, we need to follow through the code until we reach the appropriate section.
It would be much easier to see the structure of the code if it had a controlling procedure which called other procedures to carry out the various tasks when and as required.
To do this we could create a control procedure and three sub-procedures each of which could carry out a particular task.
This also makes maintenance much easier. If the processing required on the array values in
our example is changed, we simply need to look at the procedure which carries out that task and make the necessary changes.
The benefits of this can be much more easily seen in larger, more complex programs. It is common in large projects for several programmers to be working together each writing different procedures.
It is also possible that one task may be needed in several places within a program; if this is coded as a separate procedure, it is quite easy to simply call the procedure rather than repeat the code. Repeating code allows the possibility of more errors occurring and, if changes are made to the way the task performs, those changes would have to be made in more than one place.
Creating your own procedures
We have already seen a procedure being created in Visual Basic. When we entered our code on the click event of a command button, a procedure was created. This procedure was automatically called when the button was clicked. This was a special type of procedure known as an event procedure.
However, the main structure of any procedure is the same and can be created by use of the keywords as shown below:
Private Sub Procedure_Name () ……… End Sub
Any code between the Sub and End Sub statements make up the procedure.
Like variables, procedures can be given

Introduction to Programming Version 1.0
47
practically any name (avoiding Visual Basic’s own language keywords) but must be of one word. Remember to make the name reflect the task which the procedure is to carry out!
Procedures are usually identified by the use of the underscore character when separating words in a procedure name.
For now we will make all our procedures Private - this will be covered more in the Scope and Lifetime section.
To enable our main variables to be used in the procedures, we need to move them to the top of the program – outside the procedures into the General Declarations section of the code. This means that all the procedures will be able to access them. Again, this question of where to declare variables will be covered later in the Scope and Lifetime section.
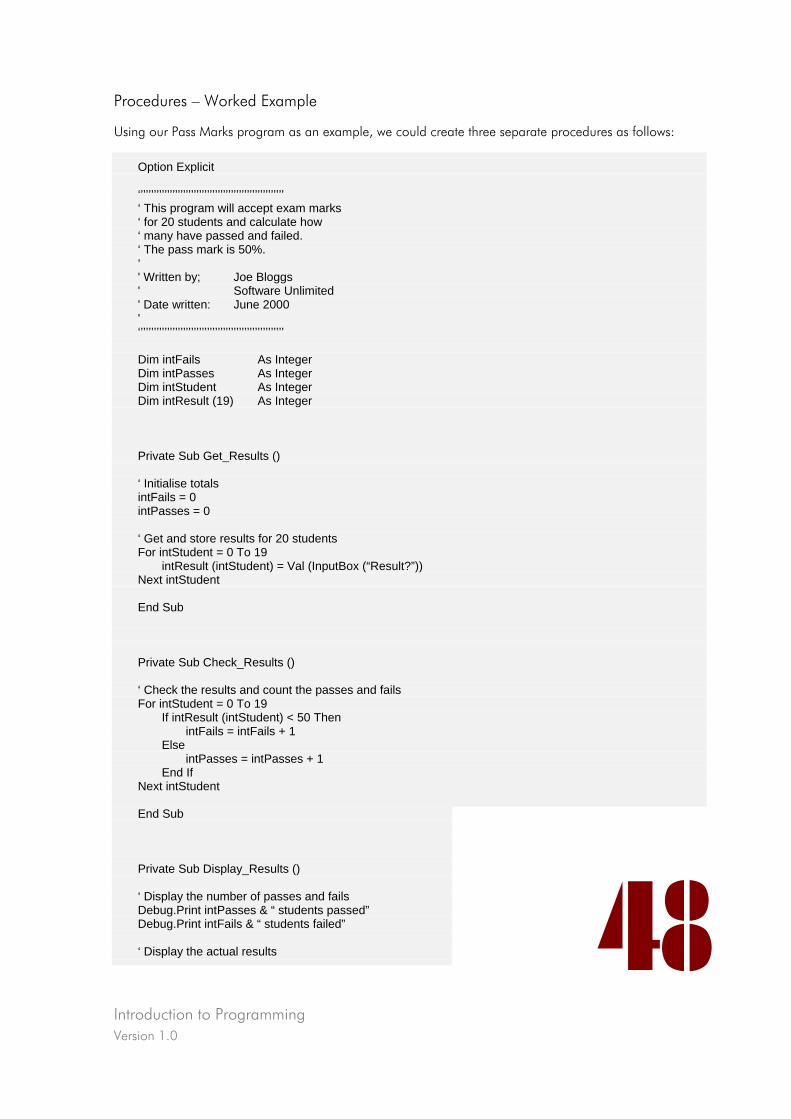
Introduction to Programming Version 1.0
48
Procedures – Worked Example
Using our Pass Marks program as an example, we could create three separate procedures as follows:
Option Explicit ‘’’’’’’’’’’’’’’’’’’’’’’’’’’’’’’’’’’’’’’’’’’’’’’’’’’’’’’ ‘ This program will accept exam marks ‘ for 20 students and calculate how ‘ many have passed and failed. ‘ The pass mark is 50%. ‘ ' Written by; Joe Bloggs ' Software Unlimited ' Date written: June 2000 ' ‘’’’’’’’’’’’’’’’’’’’’’’’’’’’’’’’’’’’’’’’’’’’’’’’’’’’’’’ Dim intFails As Integer Dim intPasses As Integer Dim intStudent As Integer Dim intResult (19) As Integer Private Sub Get_Results () ‘ Initialise totals intFails = 0 intPasses = 0 ‘ Get and store results for 20 students For intStudent = 0 To 19 intResult (intStudent) = Val (InputBox (“Result?”)) Next intStudent End Sub Private Sub Check_Results () ‘ Check the results and count the passes and fails For intStudent = 0 To 19 If intResult (intStudent) < 50 Then intFails = intFails + 1 Else intPasses = intPasses + 1 End If Next intStudent End Sub Private Sub Display_Results () ‘ Display the number of passes and fails Debug.Print intPasses & “ students passed” Debug.Print intFails & “ students failed” ‘ Display the actual results
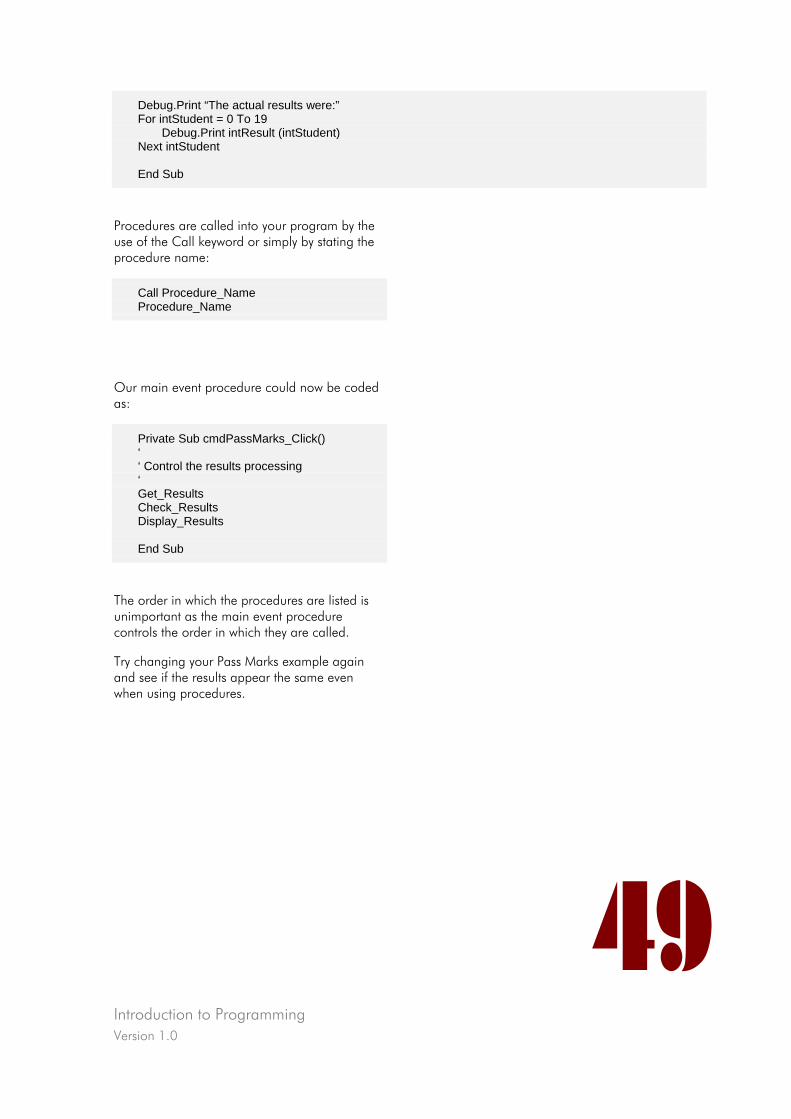
Introduction to Programming Version 1.0
49
Debug.Print “The actual results were:” For intStudent = 0 To 19 Debug.Print intResult (intStudent) Next intStudent End Sub
Procedures are called into your program by the use of the Call keyword or simply by stating the procedure name:
Call Procedure_Name Procedure_Name
Our main event procedure could now be coded as:
Private Sub cmdPassMarks_Click() ‘ ‘ Control the results processing ‘ Get_Results Check_Results Display_Results End Sub
The order in which the procedures are listed is unimportant as the main event procedure controls the order in which they are called.
Try changing your Pass Marks example again and see if the results appear the same even when using procedures.
Introduction to Programming Version 1.0
50
Functions
Functions operate in a similar way to procedures, with one main difference:
• Functions always return a value.
A function is a block of code that performs a process and returns a value to the procedure from which it was called.
We have already made use of functions that have been supplied to us as part of the Visual Basic language. One example of a call to a function is:
strName = InputBox ("Enter your name")
Somewhere within the Visual Basic language sits a function called InputBox. The atatement above calls the InputBox function which prompts the user to enter their name. Whatever the user types in is stored in InputBox and sent back to the calling procedure.
Usually a variable is assigned in the calling procedure to "catch" the value returned from the function. In our case, the value returned by InputBox is assigned to the variable strName for later use.
It is often possible to use a function in a statement in place of a variable. In previous examples we have seen the Val function in use together with the InputBox function. The Val function accepts a character string and converts it to a numeric value. For example:
intNum = Val (“3”)
would give intNum the numeric value 3.
The character value “3” could be replaced by a call to InputBox as follows:
intNum = Val (InputBox ("Enter a number"))
If the user types in the number 3, this is returned by InputBox as a character, for example, “3”. This in turn is passed to Val which returns the actual numeric value , 3, which can then be used in calculations.
Be careful with parentheses or brackets when calling functions. Anything contained within the brackets is the data which is being passed to the function. A matching pair of brackets must always be used in the correct positions.
There are hundreds of functions available in Visual Basic - each one to perform a specific task. Some examples are:
Function Description
ABS returns the absolute value of a number sent to it
STR returns a string consisting of the characters that make up the variable sent to it;
e.g. Str(3) returns a string consisting of the character "3".
SQR returns the square root of the value sent to it.
LEN returns the length of the string sent to it.
As you can see, most functions that perform specific tasks do so on specific data. You must always use appropriate data when sending values to a function. If a function receives data that it does not know how to handle, Visual Basic will return an error.
Random Numbers
One useful function - especially when writing games or "what-if" scenarios - is the ability to generate a random number.
Introduction to Programming Version 1.0
51
This is achieved using the Rnd function.
Rnd returns a value between 0 and 0.999999….9
The number selected, however, is not truly random. It is a number selected from a pre-determined list of 65,535 other numbers. Because of the sheer quantity of numbers that fall with the range 0 - 0.999…9 the numbers selected from the list appear to be random. The selection process can be shown as below:
For intCount = 1 to 10 Debug.Print Rnd Next intCount
Running this code will display 10 apparently random numbers in the immediate window. However, stopping and then running the program again will result in the same ten numbers being displayed.
This is because the numbers are not strictly random, but are being plucked from a list of ready-made numbers.
To make the numbers truly random, you should use the Randomize statement.
Randomize tells the computer to start selecting numbers from a different starting place in the list.
Because Randomize generates a starting place by looking at the system clock for reference, a unique starting point is created. If the Randomize instruction is placed inside the loop, it ensures that the numbers selected follow a truly random order.
Try the above program using the Randomize instruction and note the difference in the outcomes.
Since all numbers generated using the Rnd function are less than one, we must multiply the result to get a number in the range we require.
To create a random number within the range zero to six, the random number is simply multiplied by the upper boundary:
Debug.Print Rnd * 6
It may be that we need a random whole number. In this case, we can make use of the Int function.
This takes a numeric value and returns the integer part of the number; 3.7 would become 3, 5.1 would be 5. It can be used directly with the Rnd function as follows:
Debug.Print Int (Rnd * 6)
In this example, the random number chosen by Rnd might be 0.98.
Multiplying by 6 would give the value 5.88.
The integer value of 5.88 is 5.
As Rnd will always produce a number less than 1, the statement
Debug.Print Int (Rnd * 6)
will only ever display whole random numbers within the range 0 to 5.
To display numbers within the range 0 to 6, you would need to use the instruction
Debug.Print Int (Rnd * 7)
Another approach is to simply add one to the result of Int (Rnd * 6).
This solution however, increases both the upper and lower boundaries by one - i.e. the numbers selected will now be within the range one to six.
So:
Introduction to Programming Version 1.0
52
Int (Rnd * 6)
gives integer values between zero and five,
Int (Rnd * 7)
gives integer values between zero and six,
Int (Rnd * 6) + 1
gives integer values between one and six.
We could make use of the Int and Rnd functions to randomly select results for us in our Pass Marks program. Obviously this is not realistic but it is easier for testing purposes!
Instead of the InputBox statement we could use
intResult (intStudent) = Int (Rnd * 101)
This would generate an integer number between 0 and 100.
Creating your own functions
As well as using the functions provided by Visual Basic, it is possible to create your own functions in a similar way to creating procdures.
Functions are created using the keyword Function.
Unlike the procedures that we have looked at so far, functions also require other information to be included.
Since they are to return a value, it must have the data type declared as follows:
Private Function Double () As Integer …… End Function
In this case, an integer value is to returned by the function Double. Think of the function name as a variable.
Often data must be passed to the function to be used in the processing and this must also be stated.
Function Double (intVal As Integer) As Integer Double = intVal * 2 End Function
This states that Double is expecting to receive an integer value which it will know as intVal. This declaration takes the place of the Dim statement which we have used previously to declare variables.
The Double function will accept any integer value and double it. It can be called from any procedure provided it is supplied with a value that lies within the integer range
Introduction to Programming Version 1.0
53
In order for the doubled value to be returned it must be assigned to the function name, in this case, Double. So any function must include such an assignment statement.
A procedure might call the function as follows:
intTwiceNum = Double(12)
Here, intTwiceNum is the variable used to "catch" the value returned from the function.
Functions can include other programming constructs to return a value:
Function PosNeg (intVal As Integer) As String If intVal < 0 Then PosNeg = "Neg" Else PosNeg = "Pos" End If End Function
The above function returns a string, either "Pos" or "Neg" depending on whether the integer value sent to it is positive or not. This is an example of a function that accepts one data type to return another.
It is also an example of how a selection can be used to determine the value that is returned by the function. A function does not have to simply perform a difficult calculation - it can be treated in much the same way as a procedure, with the only exception that it always returns a value. The function could be called using:
strAnswer = PosNeg (-3)
As a result, strAnswer would have a value of “Neg” in this case.
Introduction to Programming Version 1.0
54
Programming Exercises
Using what you have learned in this section, produce code for each of the design exercise solutions you created and for the design assignment solution:
• Positive / Negative Numbers
• The Furnace
• The Chain Store
• The Satellite Receiver
• Severn Bridge
Ensure that you declare all variables and make use of arrays, procedures and functions if appropriate.
Remember to stick to standards and include comments, meaningful names, good spacing and indentation.
Save your programs in suitably named folders with appropriate file names.
Hints
Make use of InputBox to read in data and Debug.Print to display any actions to be taken or to produce reports.
Any report line spacing does not have to completely accurate. Note that a comma (,) can be used with the Debug.Print statement to move to the next tab position on a line; for example
Debug.Print strItem, strItemVal
will print the two values on the same line separated by a tab width.
Remember, it is always best to work out your code on paper first before typing it in. Work through one exercise at a time from creating the code to testing it. Then, hopefully, you will learn from any mistakes and not duplicate them.
Extra Practice
Make up some extra examples for yourself to make use especially of multi-dimensional arrays and functions.
Introduction to Programming Version 1.0
55
Programming Assignment
Using the correct structure chart and PDL (pseudo Code) create a program to solve the following problem:
The user inputs 10 numbers. The numbers are displayed in their original order, then sorted and displayed in ascending order.
The user is then prompted to enter a further 10 numbers or quit the program.
You should submit complete design documents, code listing and evidence of testing. Your design documents should include working papers and notes on the sort method used.
Introduction to Programming –
Solutions to Exercises
www.learnhowtoprogram.com © IT-Pro Training Ltd. 2005

Visual Basic 6 Training Manual
Version 1.0
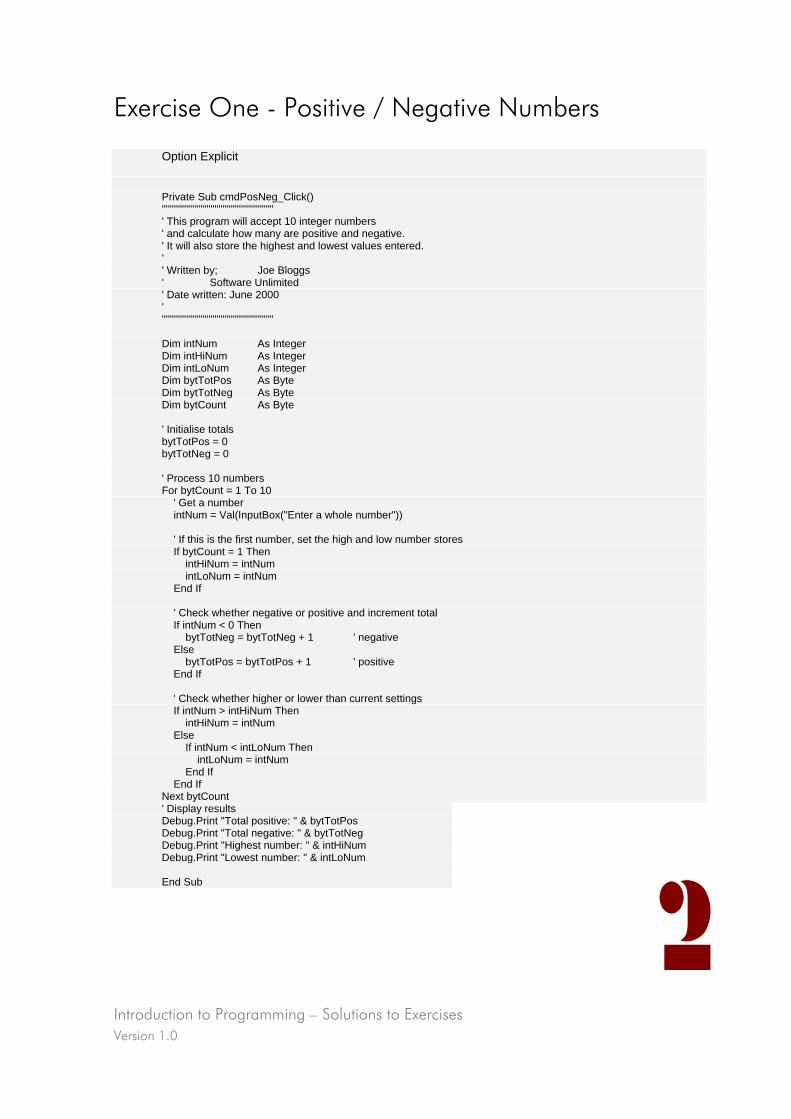
Introduction to Programming – Solutions to Exercises Version 1.0
2
Exercise One - Positive / Negative Numbers
Option Explicit
Private Sub cmdPosNeg_Click() ''''''''''''''''''''''''''''''''''''''''''''''''''''''' ' This program will accept 10 integer numbers ' and calculate how many are positive and negative. ' It will also store the highest and lowest values entered. ' ' Written by; Joe Bloggs ' Software Unlimited ' Date written: June 2000 ' ''''''''''''''''''''''''''''''''''''''''''''''''''''''' Dim intNum As Integer Dim intHiNum As Integer Dim intLoNum As Integer Dim bytTotPos As Byte Dim bytTotNeg As Byte Dim bytCount As Byte ' Initialise totals bytTotPos = 0 bytTotNeg = 0 ' Process 10 numbers For bytCount = 1 To 10 ' Get a number intNum = Val(InputBox("Enter a whole number")) ' If this is the first number, set the high and low number stores If bytCount = 1 Then intHiNum = intNum intLoNum = intNum End If ' Check whether negative or positive and increment total If intNum < 0 Then bytTotNeg = bytTotNeg + 1 ' negative Else bytTotPos = bytTotPos + 1 ' positive End If ' Check whether higher or lower than current settings If intNum > intHiNum Then intHiNum = intNum Else If intNum < intLoNum Then intLoNum = intNum End If End If Next bytCount ' Display results Debug.Print "Total positive: " & bytTotPos Debug.Print "Total negative: " & bytTotNeg Debug.Print "Highest number: " & intHiNum Debug.Print "Lowest number: " & intLoNum End Sub
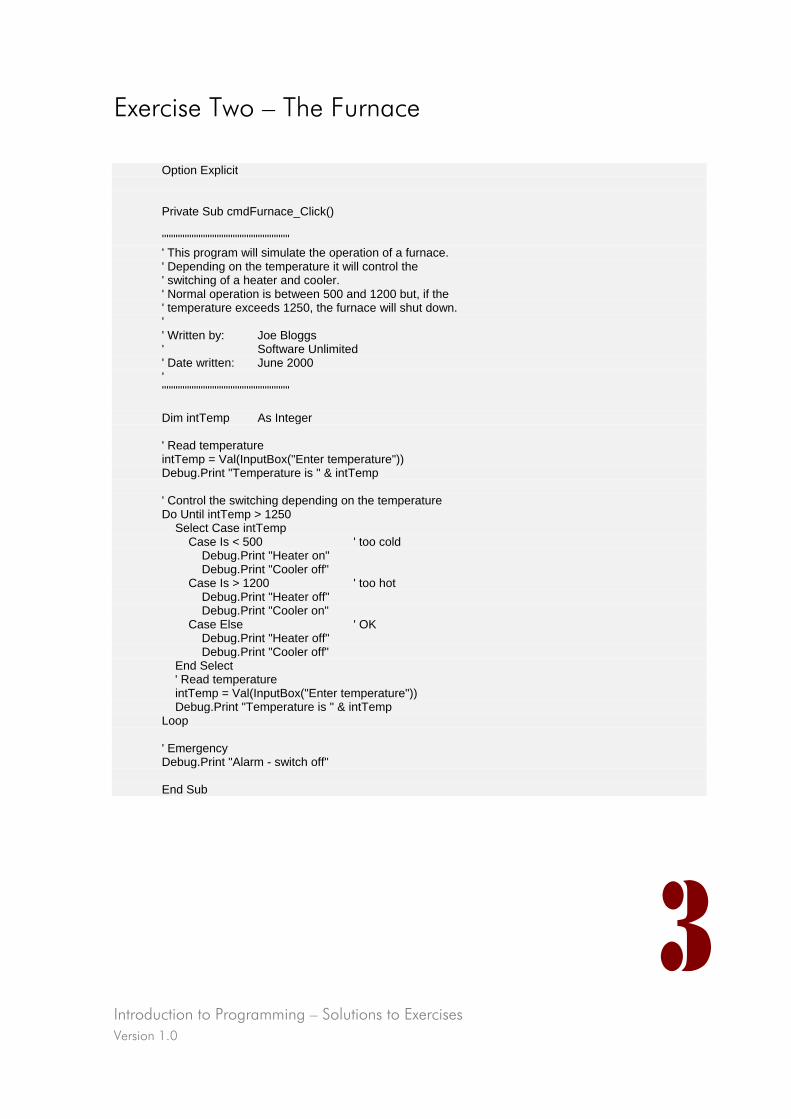
Introduction to Programming – Solutions to Exercises Version 1.0
3
Exercise Two – The Furnace
Option Explicit Private Sub cmdFurnace_Click() '''''''''''''''''''''''''''''''''''''''''''''''''''''''' ' This program will simulate the operation of a furnace. ' Depending on the temperature it will control the ' switching of a heater and cooler. ' Normal operation is between 500 and 1200 but, if the ' temperature exceeds 1250, the furnace will shut down. ' ' Written by: Joe Bloggs ' Software Unlimited ' Date written: June 2000 ' '''''''''''''''''''''''''''''''''''''''''''''''''''''''' Dim intTemp As Integer ' Read temperature intTemp = Val(InputBox("Enter temperature")) Debug.Print "Temperature is " & intTemp ' Control the switching depending on the temperature Do Until intTemp > 1250 Select Case intTemp Case Is < 500 ' too cold Debug.Print "Heater on" Debug.Print "Cooler off" Case Is > 1200 ' too hot Debug.Print "Heater off" Debug.Print "Cooler on" Case Else ' OK Debug.Print "Heater off" Debug.Print "Cooler off" End Select ' Read temperature intTemp = Val(InputBox("Enter temperature")) Debug.Print "Temperature is " & intTemp Loop ' Emergency Debug.Print "Alarm - switch off" End Sub
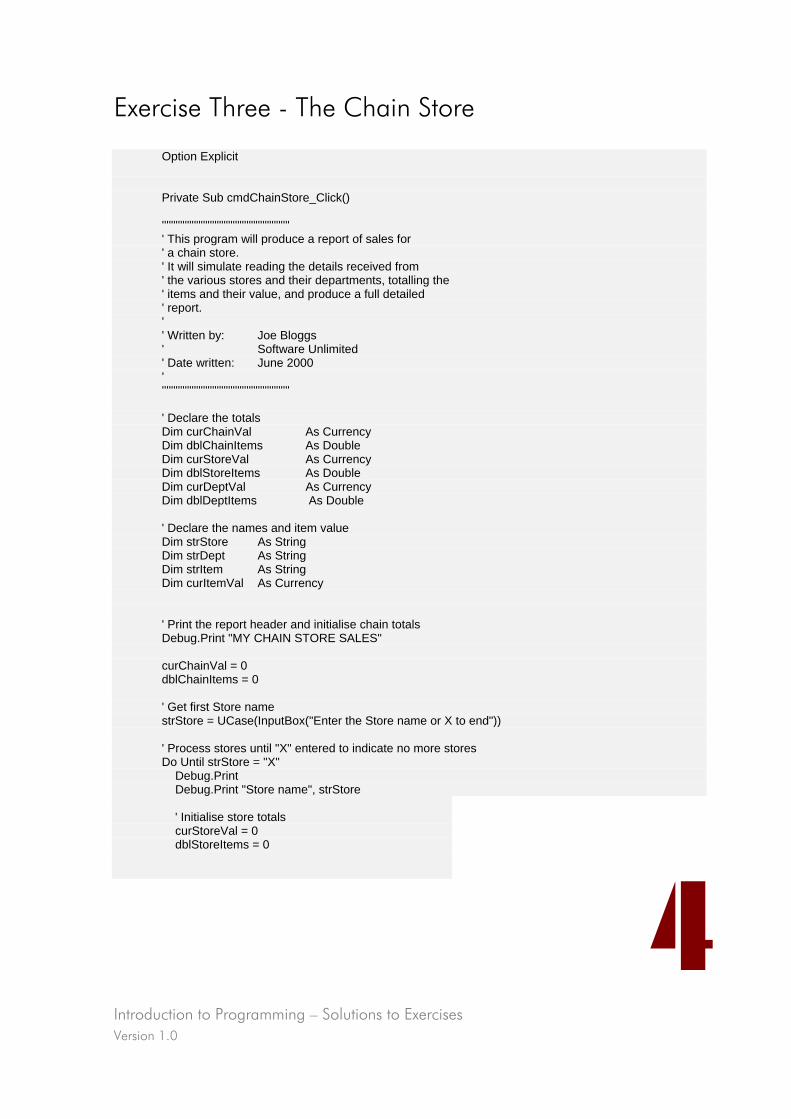
Introduction to Programming – Solutions to Exercises Version 1.0
4
Exercise Three - The Chain Store
Option Explicit Private Sub cmdChainStore_Click() '''''''''''''''''''''''''''''''''''''''''''''''''''''''' ' This program will produce a report of sales for ' a chain store. ' It will simulate reading the details received from ' the various stores and their departments, totalling the ' items and their value, and produce a full detailed ' report. ' ' Written by: Joe Bloggs ' Software Unlimited ' Date written: June 2000 ' '''''''''''''''''''''''''''''''''''''''''''''''''''''''' ' Declare the totals Dim curChainVal As Currency Dim dblChainItems As Double Dim curStoreVal As Currency Dim dblStoreItems As Double Dim curDeptVal As Currency Dim dblDeptItems As Double ' Declare the names and item value Dim strStore As String Dim strDept As String Dim strItem As String Dim curItemVal As Currency ' Print the report header and initialise chain totals Debug.Print "MY CHAIN STORE SALES" curChainVal = 0 dblChainItems = 0 ' Get first Store name strStore = UCase(InputBox("Enter the Store name or X to end")) ' Process stores until "X" entered to indicate no more stores Do Until strStore = "X" Debug.Print Debug.Print "Store name", strStore ' Initialise store totals curStoreVal = 0 dblStoreItems = 0
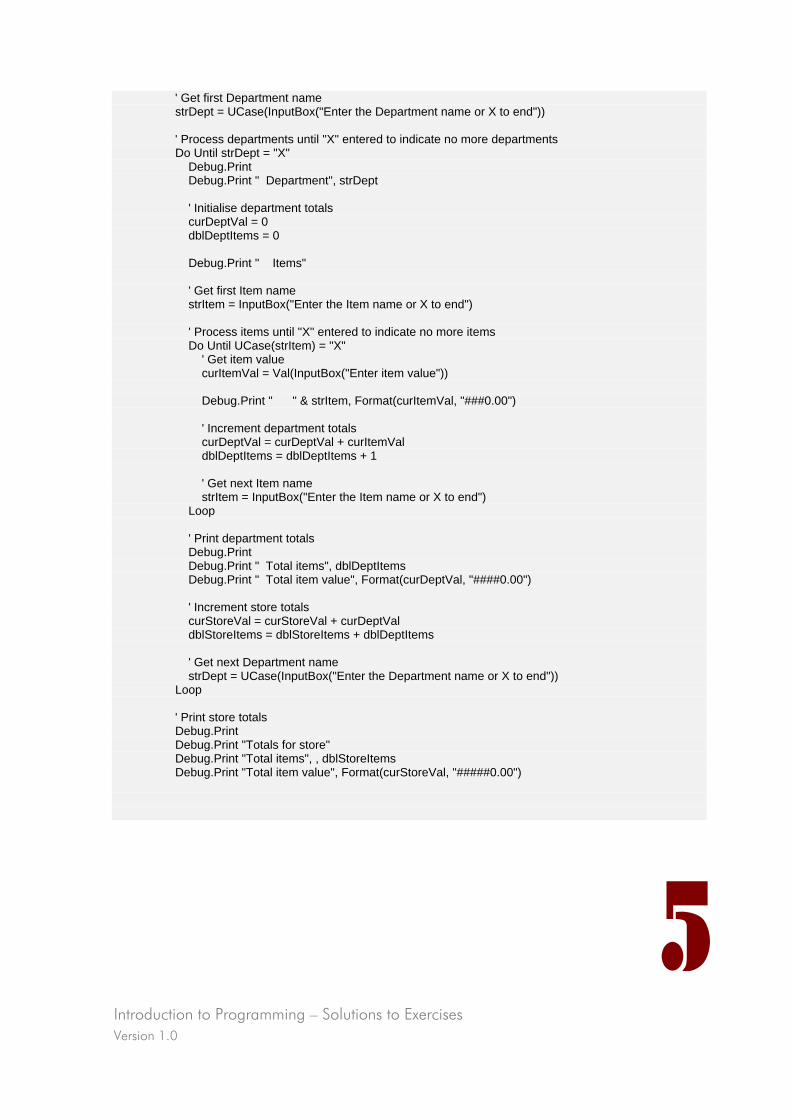
Introduction to Programming – Solutions to Exercises Version 1.0
5
' Get first Department name strDept = UCase(InputBox("Enter the Department name or X to end")) ' Process departments until "X" entered to indicate no more departments Do Until strDept = "X" Debug.Print Debug.Print " Department", strDept ' Initialise department totals curDeptVal = 0 dblDeptItems = 0 Debug.Print " Items" ' Get first Item name strItem = InputBox("Enter the Item name or X to end") ' Process items until "X" entered to indicate no more items Do Until UCase(strItem) = "X" ' Get item value curItemVal = Val(InputBox("Enter item value")) Debug.Print " " & strItem, Format(curItemVal, "###0.00") ' Increment department totals curDeptVal = curDeptVal + curItemVal dblDeptItems = dblDeptItems + 1 ' Get next Item name strItem = InputBox("Enter the Item name or X to end") Loop ' Print department totals Debug.Print Debug.Print " Total items", dblDeptItems Debug.Print " Total item value", Format(curDeptVal, "####0.00") ' Increment store totals curStoreVal = curStoreVal + curDeptVal dblStoreItems = dblStoreItems + dblDeptItems ' Get next Department name strDept = UCase(InputBox("Enter the Department name or X to end")) Loop ' Print store totals Debug.Print Debug.Print "Totals for store" Debug.Print "Total items", , dblStoreItems Debug.Print "Total item value", Format(curStoreVal, "#####0.00")

Introduction to Programming – Solutions to Exercises Version 1.0
6
' Increment chain totals curChainVal = curChainVal + curStoreVal dblChainItems = dblChainItems + dblStoreItems ' Get next Store name strStore = UCase(InputBox("Enter the Store name or X to end")) Loop ' Print report totals Debug.Print Debug.Print "Grand Totals" Debug.Print "Total items", , dblChainItems Debug.Print "Total item value", Format(curChainVal, "######0.00") End Sub
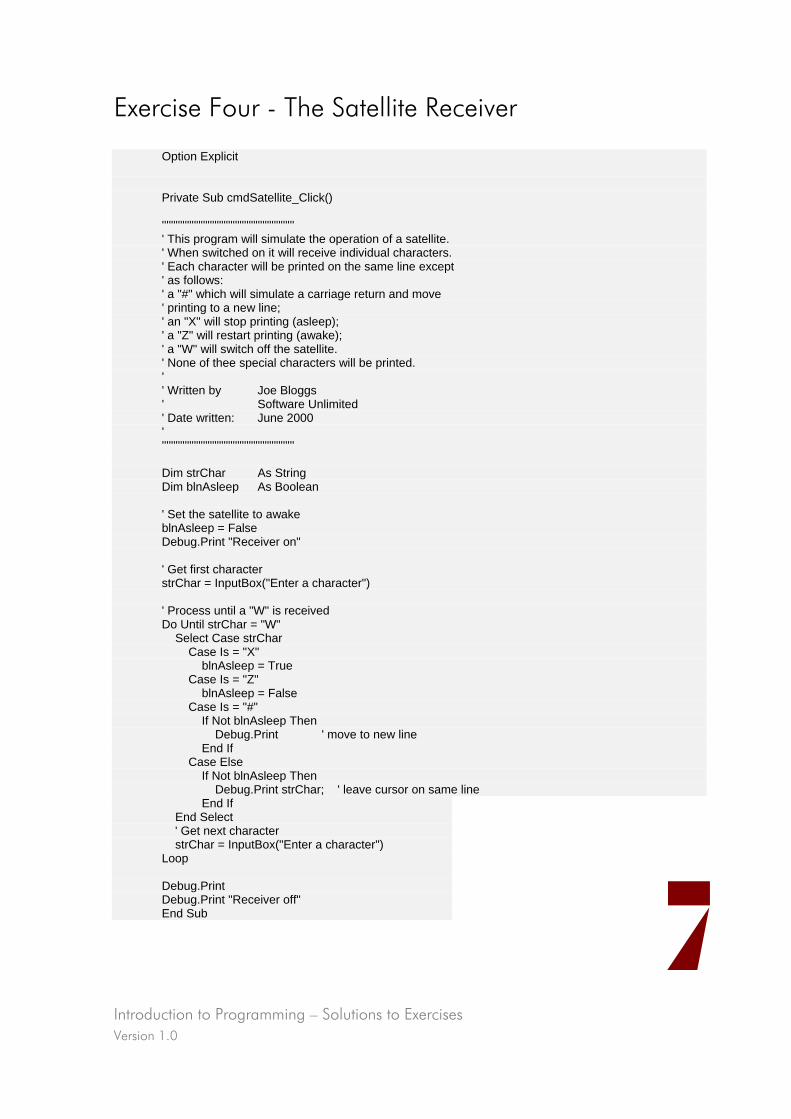
Introduction to Programming – Solutions to Exercises Version 1.0
7
Exercise Four - The Satellite Receiver
Option Explicit Private Sub cmdSatellite_Click() '''''''''''''''''''''''''''''''''''''''''''''''''''''''''' ' This program will simulate the operation of a satellite. ' When switched on it will receive individual characters. ' Each character will be printed on the same line except ' as follows: ' a "#" which will simulate a carriage return and move ' printing to a new line; ' an "X" will stop printing (asleep); ' a "Z" will restart printing (awake); ' a "W" will switch off the satellite. ' None of thee special characters will be printed. ' ' Written by Joe Bloggs ' Software Unlimited ' Date written: June 2000 ' '''''''''''''''''''''''''''''''''''''''''''''''''''''''''' Dim strChar As String Dim blnAsleep As Boolean ' Set the satellite to awake blnAsleep = False Debug.Print "Receiver on" ' Get first character strChar = InputBox("Enter a character") ' Process until a "W" is received Do Until strChar = "W" Select Case strChar Case Is = "X" blnAsleep = True Case Is = "Z" blnAsleep = False Case Is = "#" If Not blnAsleep Then Debug.Print ' move to new line End If Case Else If Not blnAsleep Then Debug.Print strChar; ' leave cursor on same line End If End Select ' Get next character strChar = InputBox("Enter a character") Loop Debug.Print Debug.Print "Receiver off" End Sub
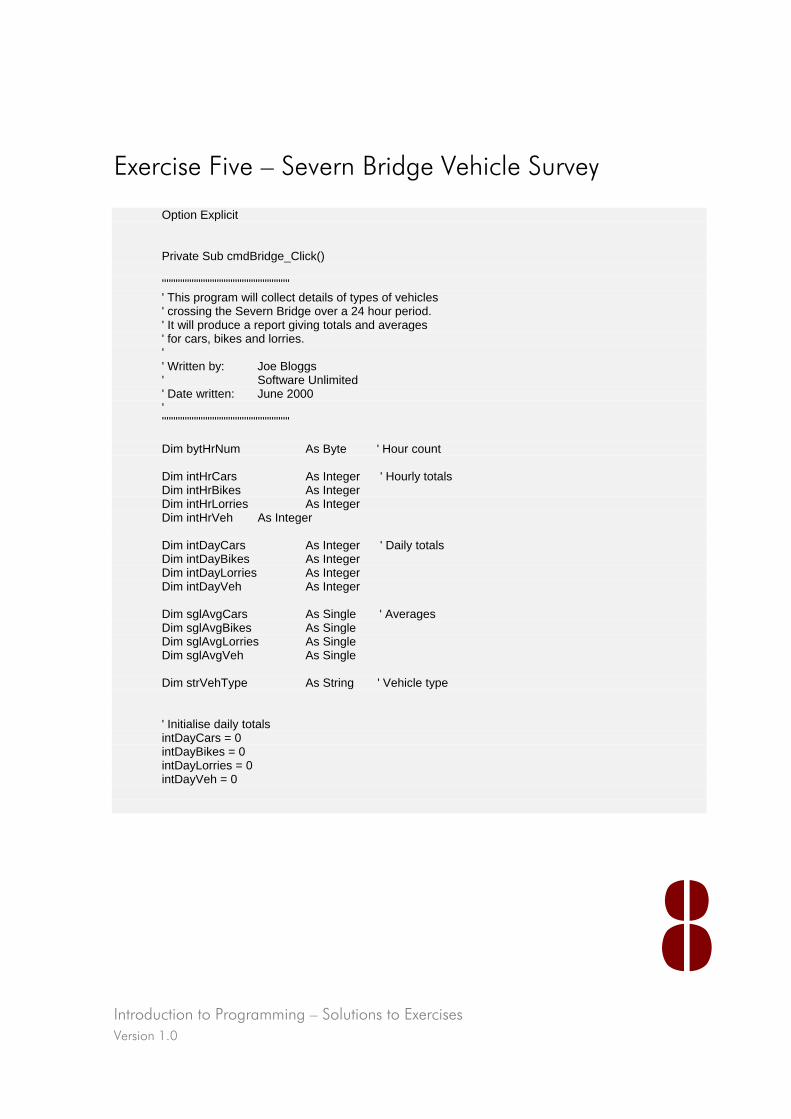
Introduction to Programming – Solutions to Exercises Version 1.0
8
Exercise Five – Severn Bridge Vehicle Survey
Option Explicit Private Sub cmdBridge_Click() '''''''''''''''''''''''''''''''''''''''''''''''''''''''' ' This program will collect details of types of vehicles ' crossing the Severn Bridge over a 24 hour period. ' It will produce a report giving totals and averages ' for cars, bikes and lorries. ' ' Written by: Joe Bloggs ' Software Unlimited ' Date written: June 2000 ' '''''''''''''''''''''''''''''''''''''''''''''''''''''''' Dim bytHrNum As Byte ' Hour count Dim intHrCars As Integer ' Hourly totals Dim intHrBikes As Integer Dim intHrLorries As Integer Dim intHrVeh As Integer Dim intDayCars As Integer ' Daily totals Dim intDayBikes As Integer Dim intDayLorries As Integer Dim intDayVeh As Integer Dim sglAvgCars As Single ' Averages Dim sglAvgBikes As Single Dim sglAvgLorries As Single Dim sglAvgVeh As Single Dim strVehType As String ' Vehicle type ' Initialise daily totals intDayCars = 0 intDayBikes = 0 intDayLorries = 0 intDayVeh = 0
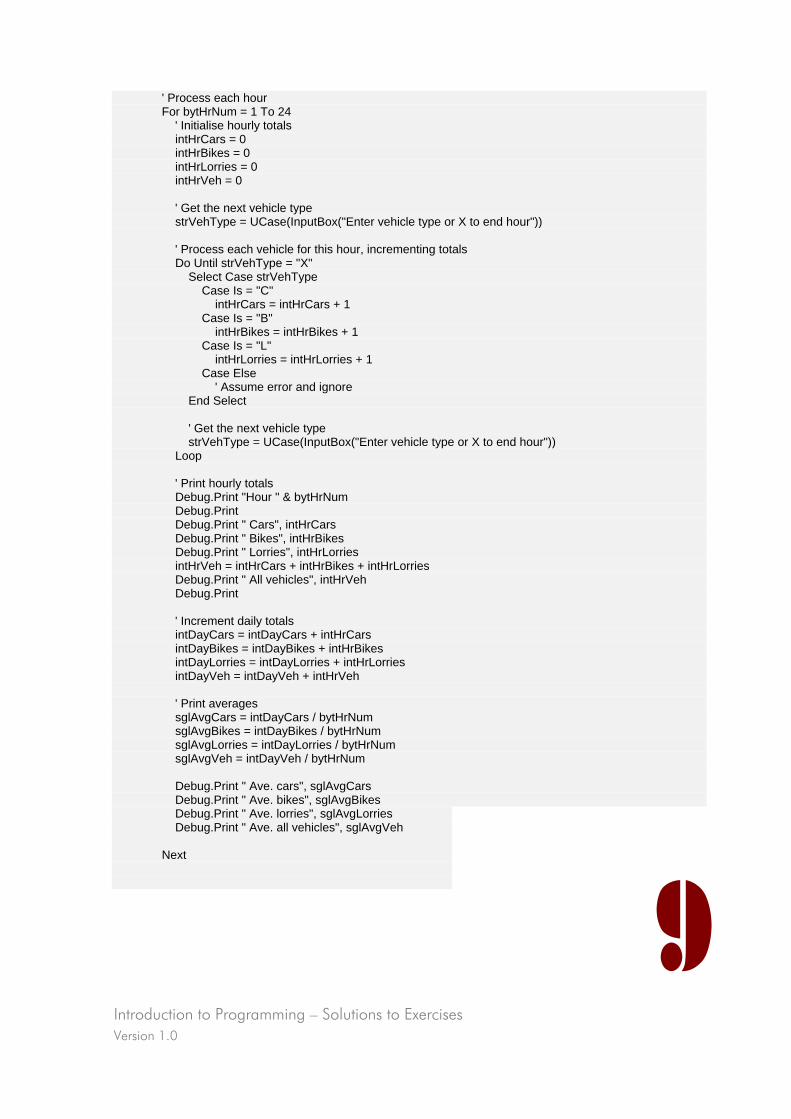
Introduction to Programming – Solutions to Exercises Version 1.0
9
' Process each hour For bytHrNum = 1 To 24 ' Initialise hourly totals intHrCars = 0 intHrBikes = 0 intHrLorries = 0 intHrVeh = 0 ' Get the next vehicle type strVehType = UCase(InputBox("Enter vehicle type or X to end hour")) ' Process each vehicle for this hour, incrementing totals Do Until strVehType = "X" Select Case strVehType Case Is = "C" intHrCars = intHrCars + 1 Case Is = "B" intHrBikes = intHrBikes + 1 Case Is = "L" intHrLorries = intHrLorries + 1 Case Else ' Assume error and ignore End Select ' Get the next vehicle type strVehType = UCase(InputBox("Enter vehicle type or X to end hour")) Loop ' Print hourly totals Debug.Print "Hour " & bytHrNum Debug.Print Debug.Print " Cars", intHrCars Debug.Print " Bikes", intHrBikes Debug.Print " Lorries", intHrLorries intHrVeh = intHrCars + intHrBikes + intHrLorries Debug.Print " All vehicles", intHrVeh Debug.Print ' Increment daily totals intDayCars = intDayCars + intHrCars intDayBikes = intDayBikes + intHrBikes intDayLorries = intDayLorries + intHrLorries intDayVeh = intDayVeh + intHrVeh ' Print averages sglAvgCars = intDayCars / bytHrNum sglAvgBikes = intDayBikes / bytHrNum sglAvgLorries = intDayLorries / bytHrNum sglAvgVeh = intDayVeh / bytHrNum Debug.Print " Ave. cars", sglAvgCars Debug.Print " Ave. bikes", sglAvgBikes Debug.Print " Ave. lorries", sglAvgLorries Debug.Print " Ave. all vehicles", sglAvgVeh Next

Introduction to Programming – Solutions to Exercises Version 1.0
10
' Print daily totals Debug.Print Debug.Print "Daily totals" Debug.Print "Total cars", intDayCars Debug.Print "Total bikes", intDayBikes Debug.Print "Total lorries", intDayLorries Debug.Print "Total all vehicles", intDayVeh End Sub

Visual Basic 6 Training Manual
Version 1.0

Introduction to Programming –
Assignment Solution
www.learnhowtoprogram.com © IT-Pro Training Ltd. 2005

Visual Basic 6 Training Manual
Version 1.0
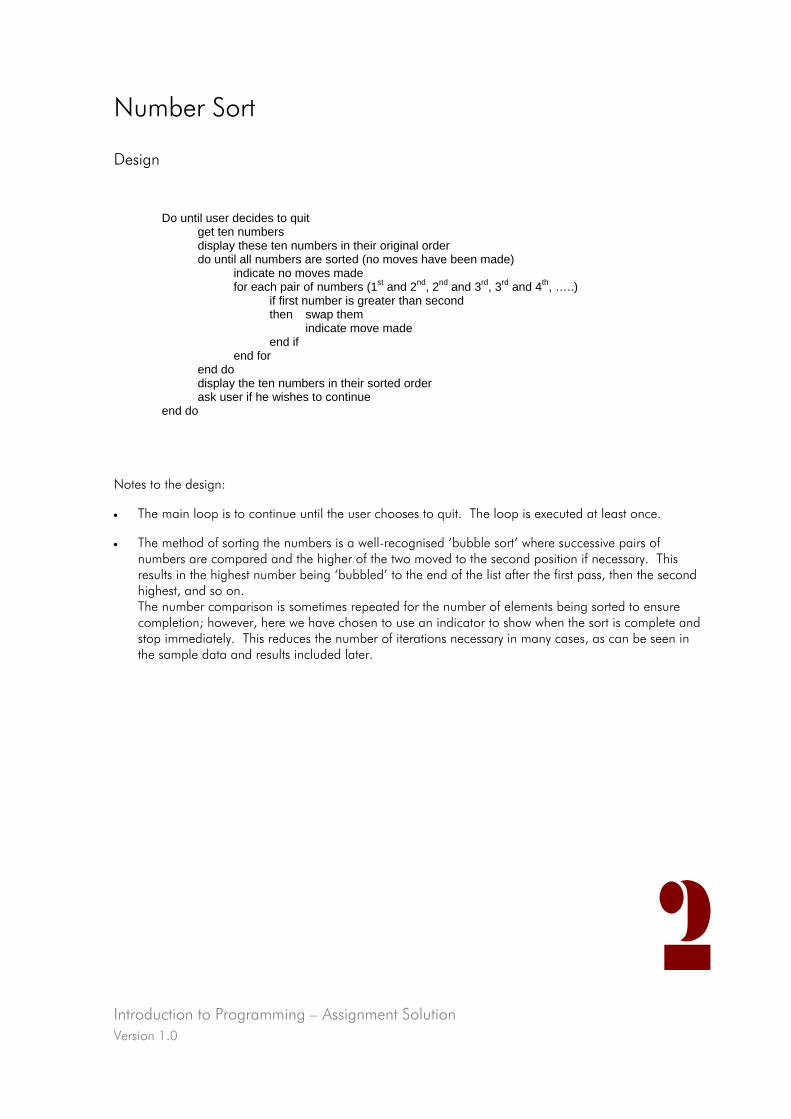
Introduction to Programming – Assignment Solution Version 1.0
2
Number Sort
Design
Do until user decides to quit get ten numbers display these ten numbers in their original order do until all numbers are sorted (no moves have been made) indicate no moves made for each pair of numbers (1st and 2nd, 2nd and 3rd, 3rd and 4th, …..) if first number is greater than second then swap them indicate move made end if end for end do display the ten numbers in their sorted order ask user if he wishes to continue end do
Notes to the design:
• The main loop is to continue until the user chooses to quit. The loop is executed at least once.
• The method of sorting the numbers is a well-recognised ‘bubble sort’ where successive pairs of numbers are compared and the higher of the two moved to the second position if necessary. This results in the highest number being ‘bubbled’ to the end of the list after the first pass, then the second highest, and so on. The number comparison is sometimes repeated for the number of elements being sorted to ensure completion; however, here we have chosen to use an indicator to show when the sort is complete and stop immediately. This reduces the number of iterations necessary in many cases, as can be seen in the sample data and results included later.

Introduction to Programming – Assignment Solution Version 1.0
Number Sort
Until user decidesto quit
Until all numberssorted (no moves
made)
Display numbersin sorted orderSort numbersDisplay numbers
in original orderGet ten numbers
from user
Is first numbergreater than
second?
NoYes
Ask if user wantsto continue or quit
Swao numbers Indicate movemade
Indicate no movemade
-
For eachsuccessive pair of
numbers
3
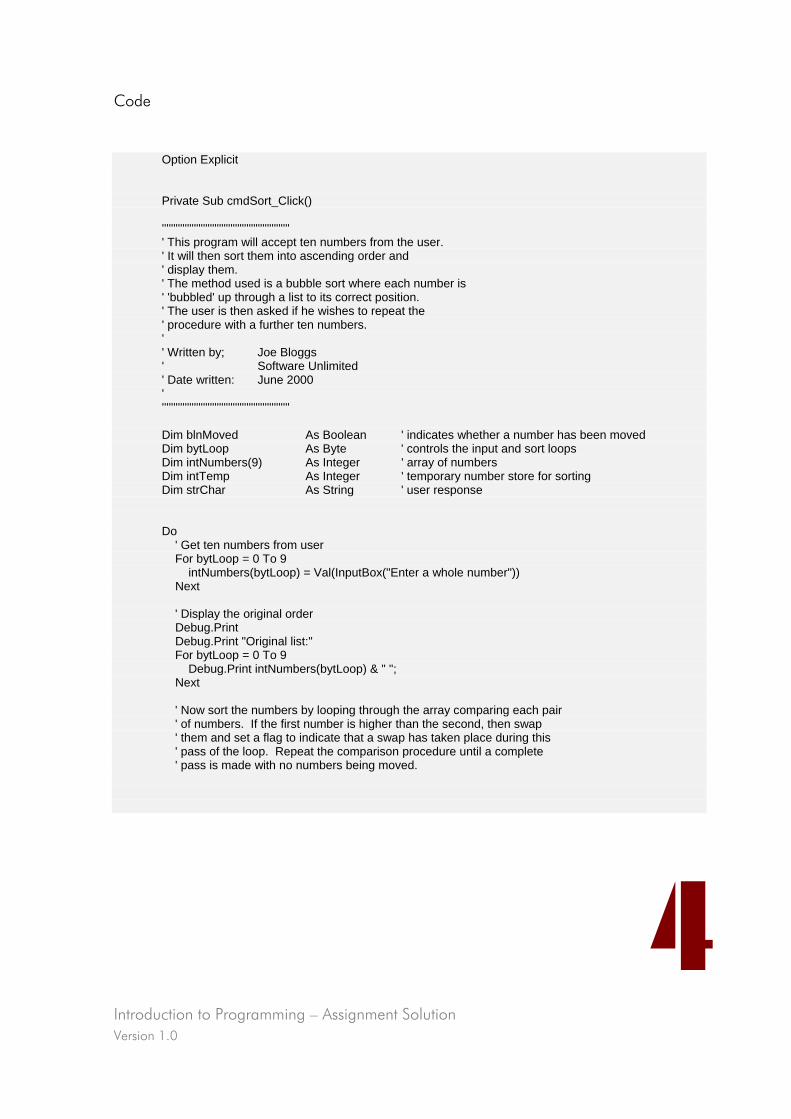
Introduction to Programming – Assignment Solution Version 1.0
4
Code
Option Explicit Private Sub cmdSort_Click() '''''''''''''''''''''''''''''''''''''''''''''''''''''''' ' This program will accept ten numbers from the user. ' It will then sort them into ascending order and ' display them. ' The method used is a bubble sort where each number is ' 'bubbled' up through a list to its correct position. ' The user is then asked if he wishes to repeat the ' procedure with a further ten numbers. ' ' Written by; Joe Bloggs ' Software Unlimited ' Date written: June 2000 ' '''''''''''''''''''''''''''''''''''''''''''''''''''''''' Dim blnMoved As Boolean ' indicates whether a number has been moved Dim bytLoop As Byte ' controls the input and sort loops Dim intNumbers(9) As Integer ' array of numbers Dim intTemp As Integer ' temporary number store for sorting Dim strChar As String ' user response Do ' Get ten numbers from user For bytLoop = 0 To 9 intNumbers(bytLoop) = Val(InputBox("Enter a whole number")) Next ' Display the original order Debug.Print Debug.Print "Original list:" For bytLoop = 0 To 9 Debug.Print intNumbers(bytLoop) & " "; Next ' Now sort the numbers by looping through the array comparing each pair ' of numbers. If the first number is higher than the second, then swap ' them and set a flag to indicate that a swap has taken place during this ' pass of the loop. Repeat the comparison procedure until a complete ' pass is made with no numbers being moved.
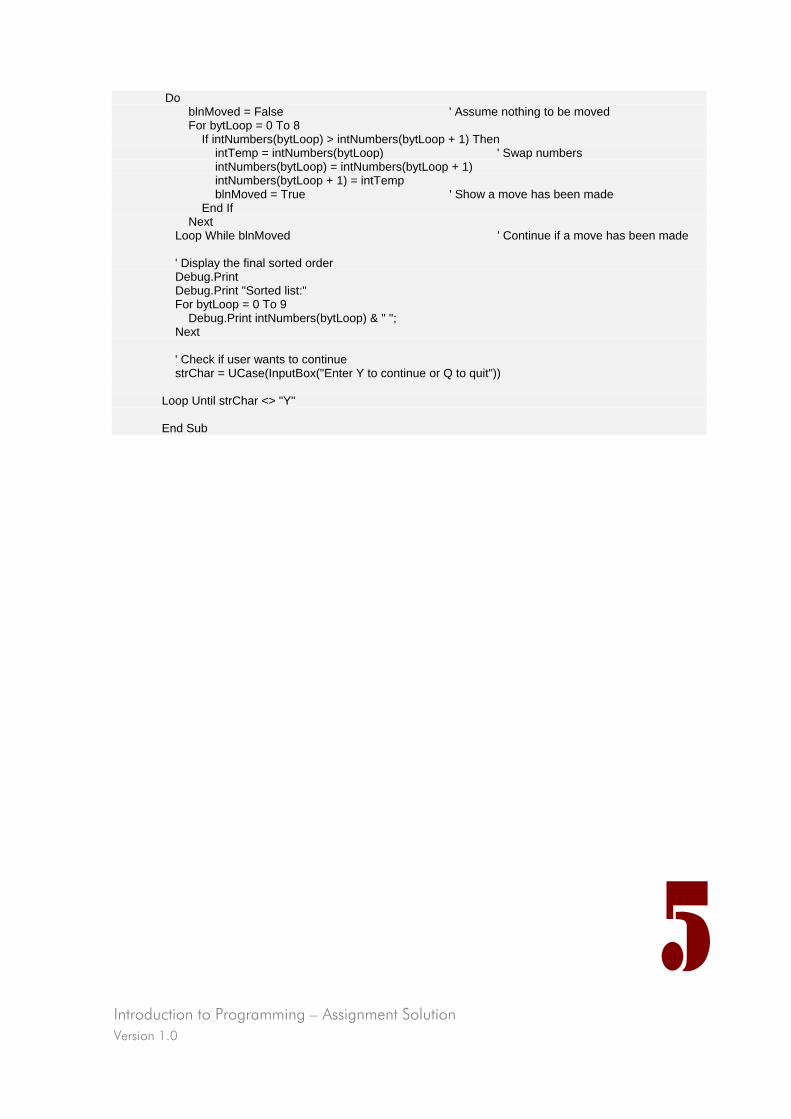
Introduction to Programming – Assignment Solution Version 1.0
5
Do blnMoved = False ' Assume nothing to be moved For bytLoop = 0 To 8 If intNumbers(bytLoop) > intNumbers(bytLoop + 1) Then intTemp = intNumbers(bytLoop) ' Swap numbers intNumbers(bytLoop) = intNumbers(bytLoop + 1) intNumbers(bytLoop + 1) = intTemp blnMoved = True ' Show a move has been made End If Next Loop While blnMoved ' Continue if a move has been made ' Display the final sorted order Debug.Print Debug.Print "Sorted list:" For bytLoop = 0 To 9 Debug.Print intNumbers(bytLoop) & " "; Next ' Check if user wants to continue strChar = UCase(InputBox("Enter Y to continue or Q to quit")) Loop Until strChar <> "Y" End Sub
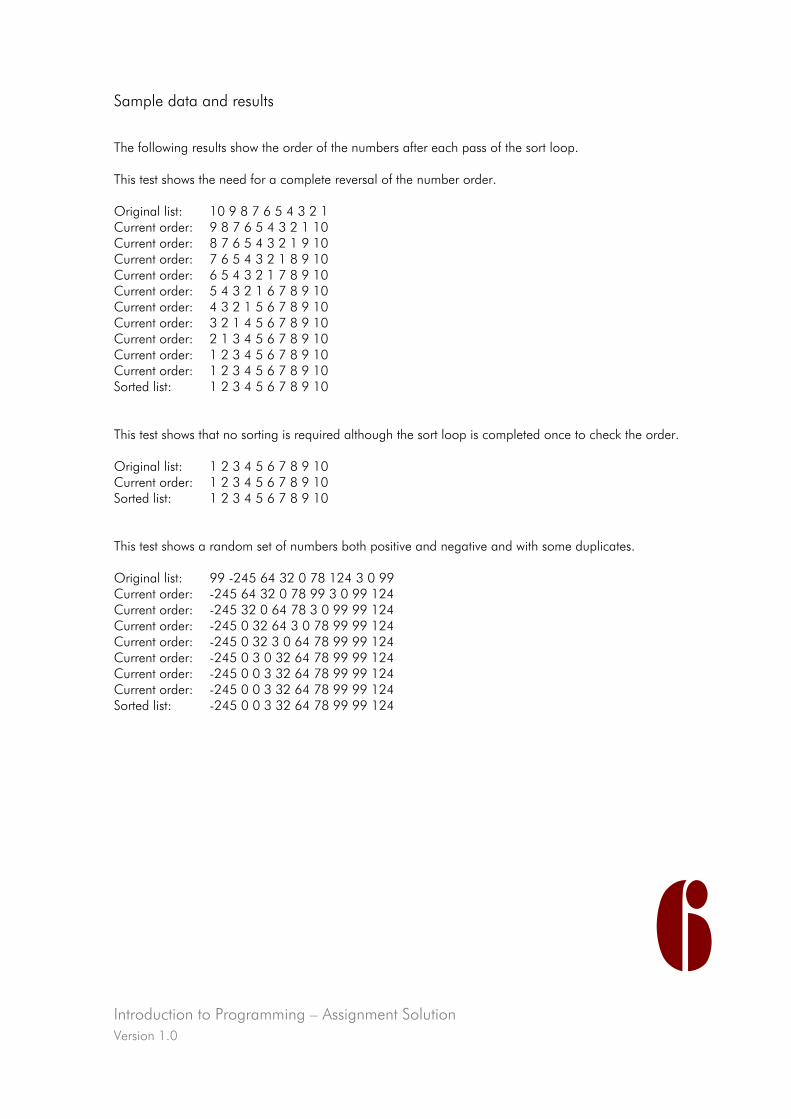
Introduction to Programming – Assignment Solution Version 1.0
6
Sample data and results
The following results show the order of the numbers after each pass of the sort loop. This test shows the need for a complete reversal of the number order. Original list: 10 9 8 7 6 5 4 3 2 1 Current order: 9 8 7 6 5 4 3 2 1 10 Current order: 8 7 6 5 4 3 2 1 9 10 Current order: 7 6 5 4 3 2 1 8 9 10 Current order: 6 5 4 3 2 1 7 8 9 10 Current order: 5 4 3 2 1 6 7 8 9 10 Current order: 4 3 2 1 5 6 7 8 9 10 Current order: 3 2 1 4 5 6 7 8 9 10 Current order: 2 1 3 4 5 6 7 8 9 10 Current order: 1 2 3 4 5 6 7 8 9 10 Current order: 1 2 3 4 5 6 7 8 9 10 Sorted list: 1 2 3 4 5 6 7 8 9 10 This test shows that no sorting is required although the sort loop is completed once to check the order. Original list: 1 2 3 4 5 6 7 8 9 10 Current order: 1 2 3 4 5 6 7 8 9 10 Sorted list: 1 2 3 4 5 6 7 8 9 10 This test shows a random set of numbers both positive and negative and with some duplicates. Original list: 99 -245 64 32 0 78 124 3 0 99 Current order: -245 64 32 0 78 99 3 0 99 124 Current order: -245 32 0 64 78 3 0 99 99 124 Current order: -245 0 32 64 3 0 78 99 99 124 Current order: -245 0 32 3 0 64 78 99 99 124 Current order: -245 0 3 0 32 64 78 99 99 124 Current order: -245 0 0 3 32 64 78 99 99 124 Current order: -245 0 0 3 32 64 78 99 99 124 Sorted list: -245 0 0 3 32 64 78 99 99 124

Visual Basic 6 Training Manual
Version 1.0

Programming with Visual Basic
www.learnhowtoprogram.com © IT-Pro Training Ltd. 2005

Visual Basic 6 Training Manual
Version 1.0
Programmimg with Visual Basic Version 1.0
2
Contents
Contents .......................................................................................................................................... 2 The Integrated Development Environment ........................................................................................... 3 Some Terminology............................................................................................................................ 6 Objects............................................................................................................................................ 7
Types of Objects ........................................................................................................................... 9 Objects and Properties ................................................................................................................ 10
Interface Design ............................................................................................................................. 19 Objects and Methods...................................................................................................................... 23 Objects and Events ......................................................................................................................... 25 Interaction of Controls .................................................................................................................... 30
Text box, Label and Command button .......................................................................................... 30 Timer, Picture box and Command buttons ..................................................................................... 31 Scroll bar and Label .................................................................................................................... 33 Combo box and Labels................................................................................................................ 34 Check boxes and Option buttons ................................................................................................. 36 Control Arrays - Worked Example................................................................................................. 37
Useful Functions ............................................................................................................................. 40 Data Type Conversion ................................................................................................................. 40 Date and Time............................................................................................................................ 41 Handling Strings.......................................................................................................................... 41 Message Boxes ........................................................................................................................... 44 Using colour ............................................................................................................................... 45 Examples of using functions ......................................................................................................... 46
Modular Environment...................................................................................................................... 48 Multiple Forms............................................................................................................................ 49 Standard modules ....................................................................................................................... 54
Scope and Lifetime of Variables ....................................................................................................... 58 Scope ........................................................................................................................................ 58 Lifetime ...................................................................................................................................... 61 Scope and Lifetime – Worked Example.......................................................................................... 61 Statics ........................................................................................................................................ 63
Passing Parameters ......................................................................................................................... 64 By Reference............................................................................................................................... 64 By Value..................................................................................................................................... 64 Passing Arrays as parameters ....................................................................................................... 64
Programming with Visual Basic – Exercises ........................................................................................ 66 Exercise One - Positive / Negative Numbers .................................................................................. 66 Exercise Two – The Furnace ......................................................................................................... 66 Exercise Three - The Satellite Receiver ........................................................................................... 67 Exercise Four – Number Sort ........................................................................................................ 67
Programmimg with Visual Basic Version 1.0
3
The Integrated Development Environment
Visual Basic is often referred to as an integrated development environment or IDE. You have already made use of it to develop and run programs.
It integrates several functions, such as design of forms, entering and editing code, compiling, running and debugging, within one common environment rather than using separate programs or applications - as is the case with some programming languages.
Visual Basic works in two main phases - design mode and run mode:
• Design mode is when you create objects on forms, enter code and alter properties.
• Run mode is when your code is actually executed. It allows you to test and debug your program.
You have already familiarised yourself with the window layout and the commands available through the menus and toolbars. You will be getting more practice with these now.
There are some other features which it is worth introducing now.
Dockable windows
In design mode, some windows - such as the toolbar, toolbox, project explorer and form layout windows - are dockable. A window is "docked" when it is attached or anchored to the edge of the main window.
For example, if you move a dockable window to the edge of the main window or against the edge of another dockable window, it will snap into place, resizing the window as necessary. The window being moved is now docked.
To "un-dock" a window from the edge of another window, either double-click on the window’s title bar (this will resize the window to its previous un-docked position) or move the docked window sufficiently far away from all other dockable windows by clicking and dragging on its title bar.
It can be frustrating sometimes when trying to move a window out of the way only to have it snap back into place all the time or snap to another equally inconvenient place on screen. A window that is about to be docked against the edge of another will have a faint dotted outline.
If the window is not docked it is said to be floating. A floating window will have a thicker more prominent outline when being moved around the screen.
Similarly, to dock a floating window, simply double-click on the title bar of the floating window. This will return the window to its previous docked position.
When a window is docked it is still possible to resize it by dragging its outline. This is useful as you may want to enlarge certain of the windows to see more details; this is especially true of the Properties window. All windows docked together will be resized as a single group.
Experiment with moving the windows around. You may find as you become more familiar with the environment that you want to reposition windows to suit your own preferences.
Using Break mode
In run mode, all the environment components necessary to assist in the execution of the project are available, including options to Run and End your program.
The Immediate window is also available. You
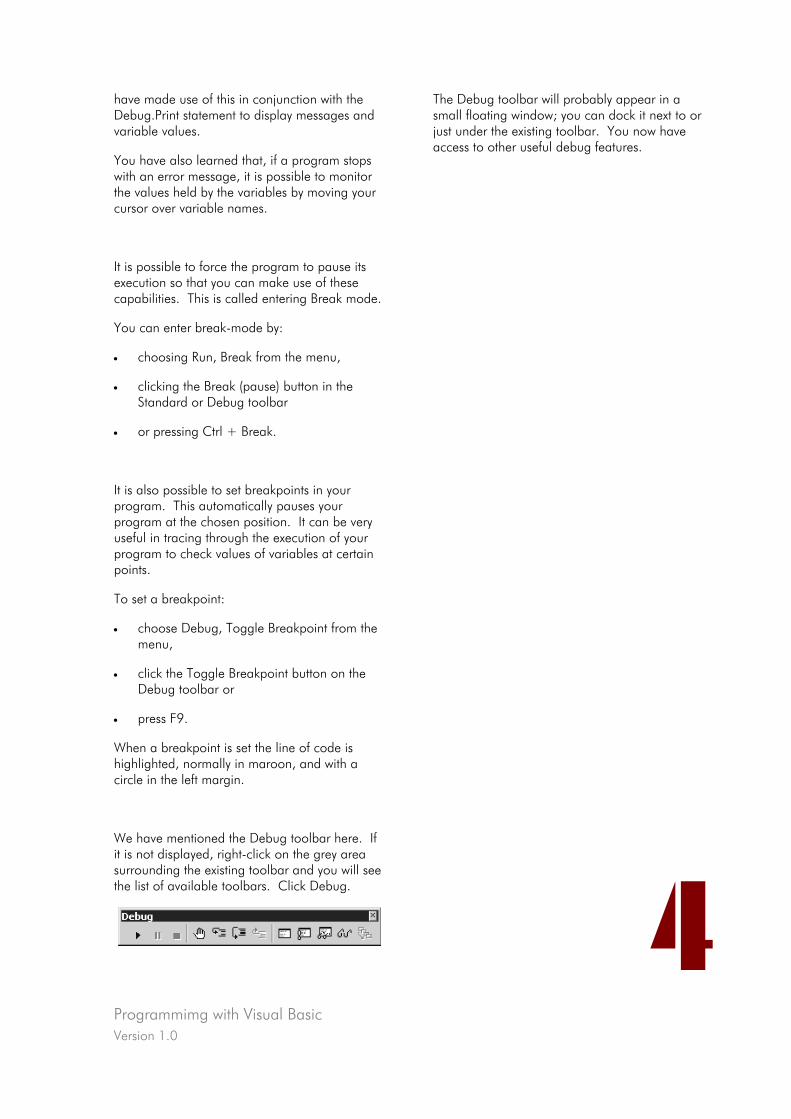
Programmimg with Visual Basic Version 1.0
4
have made use of this in conjunction with the Debug.Print statement to display messages and variable values.
You have also learned that, if a program stops with an error message, it is possible to monitor the values held by the variables by moving your cursor over variable names.
It is possible to force the program to pause its execution so that you can make use of these capabilities. This is called entering Break mode.
You can enter break-mode by:
• choosing Run, Break from the menu,
• clicking the Break (pause) button in the Standard or Debug toolbar
• or pressing Ctrl + Break.
It is also possible to set breakpoints in your program. This automatically pauses your program at the chosen position. It can be very useful in tracing through the execution of your program to check values of variables at certain points.
To set a breakpoint:
• choose Debug, Toggle Breakpoint from the menu,
• click the Toggle Breakpoint button on the Debug toolbar or
• press F9.
When a breakpoint is set the line of code is highlighted, normally in maroon, and with a circle in the left margin.
We have mentioned the Debug toolbar here. If it is not displayed, right-click on the grey area surrounding the existing toolbar and you will see the list of available toolbars. Click Debug.
The Debug toolbar will probably appear in a small floating window; you can dock it next to or just under the existing toolbar. You now have access to other useful debug features.
Programmimg with Visual Basic Version 1.0
5
Break-mode allows you to modify your code and display variable values without stopping and unloading the program from memory. Many features to assist in the testing of your program are available, such as the ability to step-through each line of code in the program as it is running - to monitor values held in variables for example.
When in break-mode, the coding window is displayed and the current line of program execution is highlighted in yellow. A small arrow in the left margin indicates which line will be executed upon resuming the running of your code.
An alternative means of checking variable values is to click on to the Immediate window and enter an instruction such as:
Print intX to display the value of intX in the Immediate window.
It is also possible to enter a code statement in the Immediate window during break mode. This can be done, for example, to temporarily change the value of a variable to aid in testing.
intHrTotal = 10 could reset the value of the variable intHrTotal to enable a test run to continue.
Break-mode is extremely useful for debugging your programs and for locating and fixing any logic errors.
It is possible to edit code in the code window in break mode but it is likely that the program will have to be Ended and restarted for any changes to have an effect.
To continue running your program when in break mode, use the normal Run commands which are now displayed as Continue.
You may want to experiment with using Break
mode when you come to test your programs later in the course.
Programmimg with Visual Basic Version 1.0
6
Some Terminology
There are some terms used in Visual Basic which we need to understand. They are all related to the concept of Object Orientation.
Term Description
Forms the basic components of a Visual Basic application. They provide the interface with which the user interacts when the application is run. The form object is a window or dialog box.
Controls contained within a form object. There are many different types of control each having a particular use such as entering text, displaying data or accessing other applications.
Objects any component of an application is an object.
Properties the attributes of an object, e.g. the caption on a command button or the width of a form.
Methods the actions which apply to an object, e.g. Resize a form, SetFocus to a text box.
Events define an object’s response to a stimulus, e.g. a Change to a text box or a form being Activated.
We have already used forms and command buttons, both examples of Objects.
Note that when an object such as a command button is placed on a form, it is then normally referred to as a Control!
We have also set some of the Properties of these objects and controls as part of the design process and entered code which would be performed in response to an Event occurring on an object or control.
We now need to look at these in more detail.
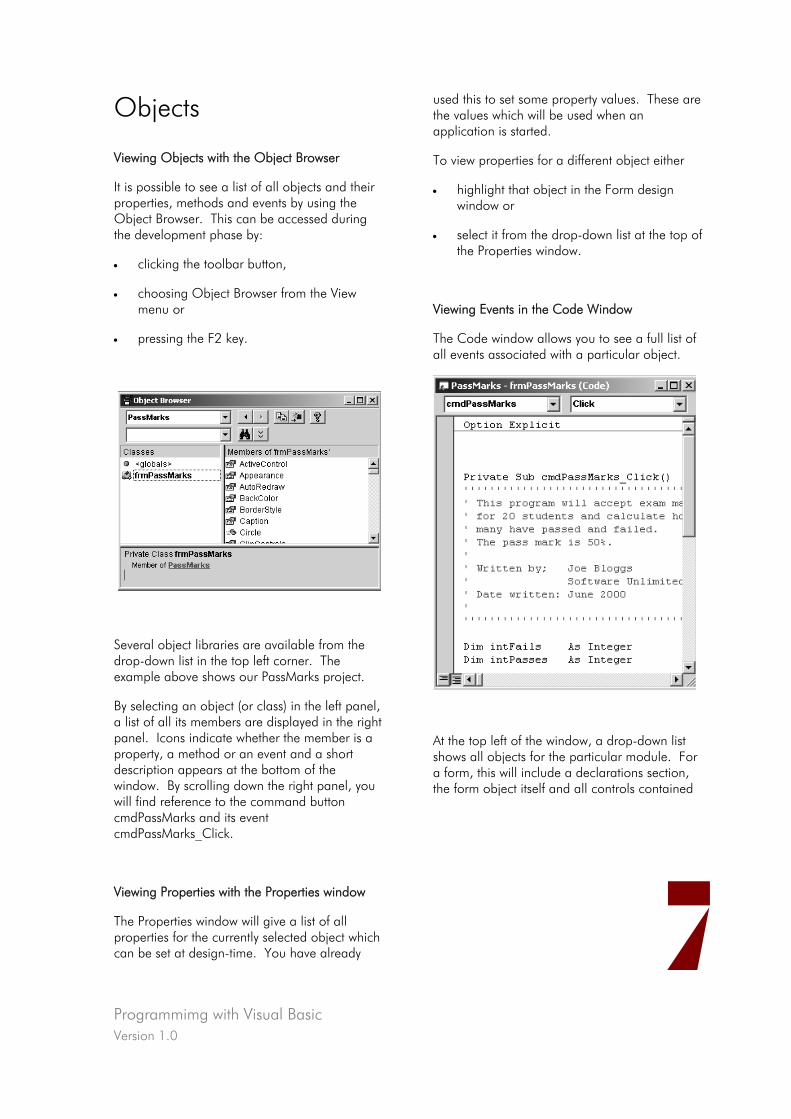
Programmimg with Visual Basic Version 1.0
7
Objects
Viewing Objects with the Object Browser
It is possible to see a list of all objects and their properties, methods and events by using the Object Browser. This can be accessed during the development phase by:
• clicking the toolbar button,
• choosing Object Browser from the View menu or
• pressing the F2 key.
Several object libraries are available from the drop-down list in the top left corner. The example above shows our PassMarks project.
By selecting an object (or class) in the left panel, a list of all its members are displayed in the right panel. Icons indicate whether the member is a property, a method or an event and a short description appears at the bottom of the window. By scrolling down the right panel, you will find reference to the command button cmdPassMarks and its event cmdPassMarks_Click.
Viewing Properties with the Properties window
The Properties window will give a list of all properties for the currently selected object which can be set at design-time. You have already
used this to set some property values. These are the values which will be used when an application is started.
To view properties for a different object either
• highlight that object in the Form design window or
• select it from the drop-down list at the top of the Properties window.
Viewing Events in the Code Window
The Code window allows you to see a full list of all events associated with a particular object.
At the top left of the window, a drop-down list shows all objects for the particular module. For a form, this will include a declarations section, the form object itself and all controls contained
Programmimg with Visual Basic Version 1.0
8
within it.
At the top right of the window, a second drop-down list shows all events for the selected object. Any event for which an event procedure has been coded will appear in bold. Clicking on any other event name will cause a new procedure declaration to be created for that event. If it is not required, simply delete the lines of code created.
Using On-line Help
On-line help will also give full details of the properties, methods and events for all types of objects. This is accessed via the Help menu or by pressing the F1 key whilst an object is selected.
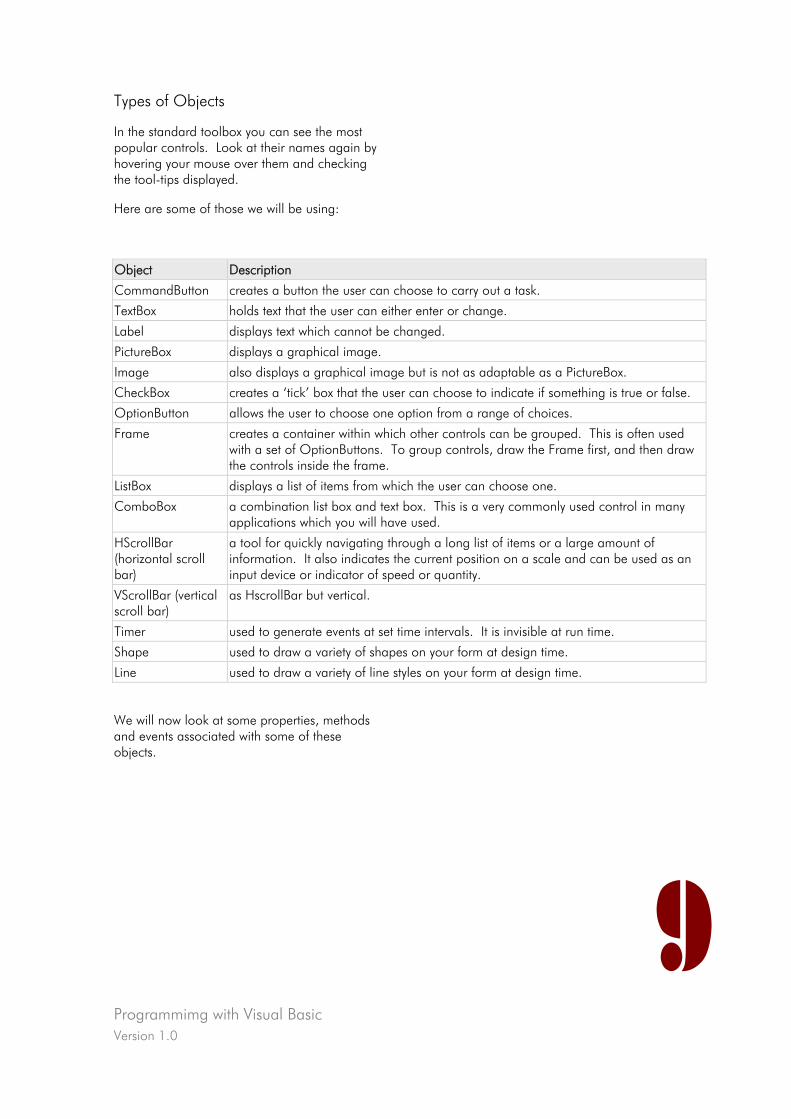
Programmimg with Visual Basic Version 1.0
9
Types of Objects
In the standard toolbox you can see the most popular controls. Look at their names again by hovering your mouse over them and checking the tool-tips displayed.
Here are some of those we will be using:
Object Description
CommandButton creates a button the user can choose to carry out a task.
TextBox holds text that the user can either enter or change.
Label displays text which cannot be changed.
PictureBox displays a graphical image.
Image also displays a graphical image but is not as adaptable as a PictureBox.
CheckBox creates a ‘tick’ box that the user can choose to indicate if something is true or false.
OptionButton allows the user to choose one option from a range of choices.
Frame creates a container within which other controls can be grouped. This is often used with a set of OptionButtons. To group controls, draw the Frame first, and then draw the controls inside the frame.
ListBox displays a list of items from which the user can choose one.
ComboBox a combination list box and text box. This is a very commonly used control in many applications which you will have used.
HScrollBar (horizontal scroll bar)
a tool for quickly navigating through a long list of items or a large amount of information. It also indicates the current position on a scale and can be used as an input device or indicator of speed or quantity.
VScrollBar (vertical scroll bar)
as HscrollBar but vertical.
Timer used to generate events at set time intervals. It is invisible at run time.
Shape used to draw a variety of shapes on your form at design time.
Line used to draw a variety of line styles on your form at design time.
We will now look at some properties, methods and events associated with some of these objects.
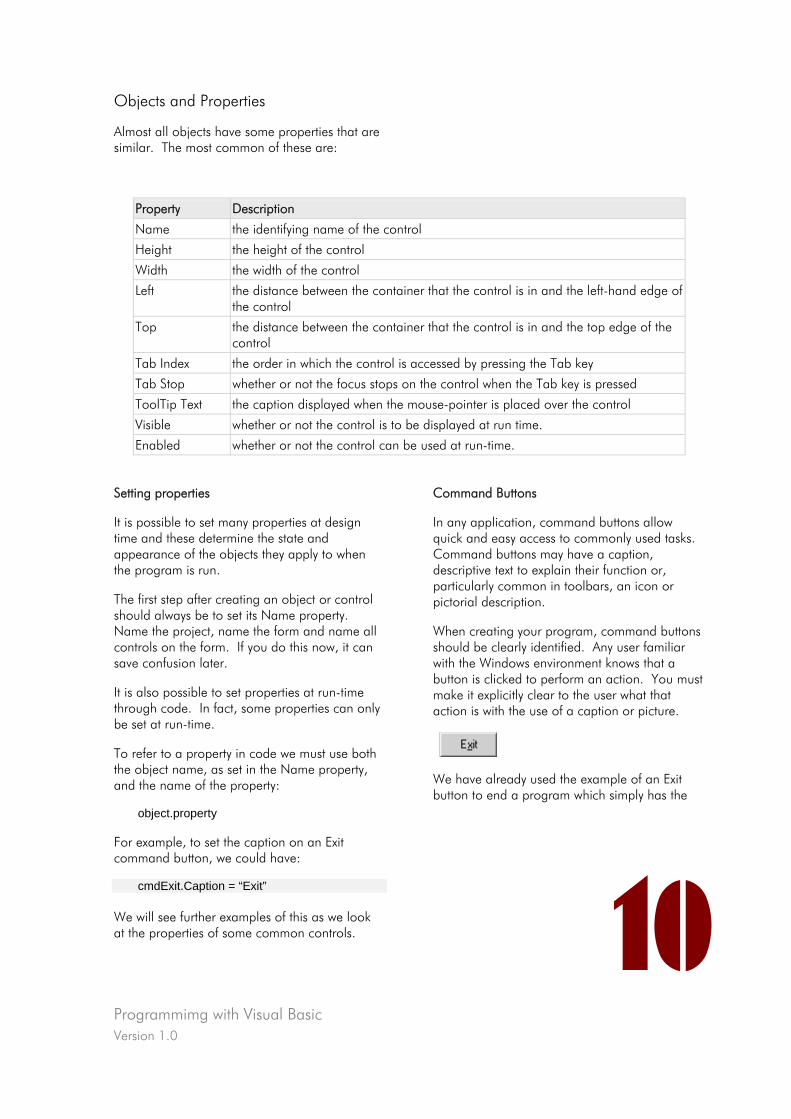
Programmimg with Visual Basic Version 1.0
10
Objects and Properties
Almost all objects have some properties that are similar. The most common of these are:
Property Description
Name the identifying name of the control
Height the height of the control
Width the width of the control
Left the distance between the container that the control is in and the left-hand edge of the control
Top the distance between the container that the control is in and the top edge of the control
Tab Index the order in which the control is accessed by pressing the Tab key
Tab Stop whether or not the focus stops on the control when the Tab key is pressed
ToolTip Text the caption displayed when the mouse-pointer is placed over the control
Visible whether or not the control is to be displayed at run time.
Enabled whether or not the control can be used at run-time.
Setting properties
It is possible to set many properties at design time and these determine the state and appearance of the objects they apply to when the program is run.
The first step after creating an object or control should always be to set its Name property. Name the project, name the form and name all controls on the form. If you do this now, it can save confusion later.
It is also possible to set properties at run-time through code. In fact, some properties can only be set at run-time.
To refer to a property in code we must use both the object name, as set in the Name property, and the name of the property:
object.property
For example, to set the caption on an Exit command button, we could have:
cmdExit.Caption = “Exit” We will see further examples of this as we look at the properties of some common controls.
Command Buttons
In any application, command buttons allow quick and easy access to commonly used tasks. Command buttons may have a caption, descriptive text to explain their function or, particularly common in toolbars, an icon or pictorial description.
When creating your program, command buttons should be clearly identified. Any user familiar with the Windows environment knows that a button is clicked to perform an action. You must make it explicitly clear to the user what that action is with the use of a caption or picture.
We have already used the example of an Exit button to end a program which simply has the
Programmimg with Visual Basic Version 1.0
11
text, Exit, to indicate its use.
We are also familiar with buttons with a picture of a disk to indicate Save or a printer to indicate Print.
Captions are added to command buttons either at design stage or during run-time.
The Exit example above shows a single letter underlined. This shows that the button can also be activated by the use of the Alt key together with the character underlined. So, in this case, Alt + x would activate the button. This is a familiar feature of menus in most applications.
To underline a character in the caption, simple precede the letter by an &. So, the actual setting of this Exit button’s caption is E&xit.
To do this in code:
cmdExit.Caption = “E&xit”
If your caption requires special characters –e.g.. two lines of text separated by the <carriage return> character, it must be set in code at run-time. (We will look at the use of special characters later.)
Images or icons can be added to a button face using the Picture property.
To change or add a picture to your command button, click on the button to the right of the Picture property.
This will open a dialog box to enable you to find the required image file (icon or bitmap). Once selected, the image is loaded into the command button and becomes part of it - the external source is no longer required. For a picture to be displayed, you must also set the Style property to 1 – graphical.
Note that captions are still visible over an icon.
If no text is required, set the caption property to be blank.
This could all be achieved in code by:
cmdPrint.Caption = “” ‘ blank cmdPrint.Picture = “C:\Joe\Print.bmp” cmdPrint.Style = 1 ‘ graphical
To change the colour of your command button, select a colour from the colour palette in the Backcolor property.
Again, changes to the Backcolor property are only evident if the style property is set to 1-graphical.
Practice:
Experiment with some command box properties to see their effect, both at design time and at run time.
Text Boxes
Text boxes are used whenever an application requires the user to enter information via the keyboard. The data entered may be stored for later retrieval or used within the program.
Text boxes can also be used to display currently stored information which may need to be amended.
Text boxes can accept text as a single line or have many lines of text. This is set by the MultLine property.
If a single-line text box is not large enough to display all the text, it will automatically scroll as
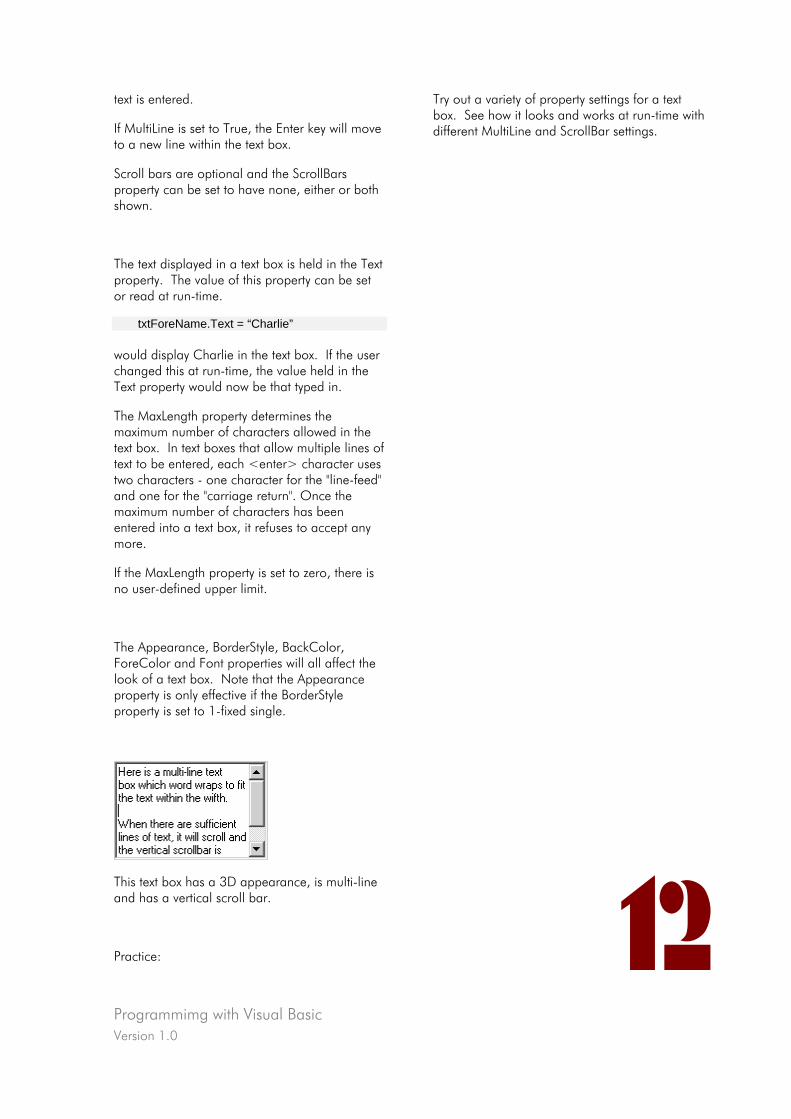
Programmimg with Visual Basic Version 1.0
12
text is entered.
If MultiLine is set to True, the Enter key will move to a new line within the text box.
Scroll bars are optional and the ScrollBars property can be set to have none, either or both shown.
The text displayed in a text box is held in the Text property. The value of this property can be set or read at run-time.
txtForeName.Text = “Charlie” would display Charlie in the text box. If the user changed this at run-time, the value held in the Text property would now be that typed in.
The MaxLength property determines the maximum number of characters allowed in the text box. In text boxes that allow multiple lines of text to be entered, each <enter> character uses two characters - one character for the "line-feed" and one for the "carriage return". Once the maximum number of characters has been entered into a text box, it refuses to accept any more.
If the MaxLength property is set to zero, there is no user-defined upper limit.
The Appearance, BorderStyle, BackColor, ForeColor and Font properties will all affect the look of a text box. Note that the Appearance property is only effective if the BorderStyle property is set to 1-fixed single.
This text box has a 3D appearance, is multi-line and has a vertical scroll bar.
Practice:
Try out a variety of property settings for a text box. See how it looks and works at run-time with different MultiLine and ScrollBar settings.
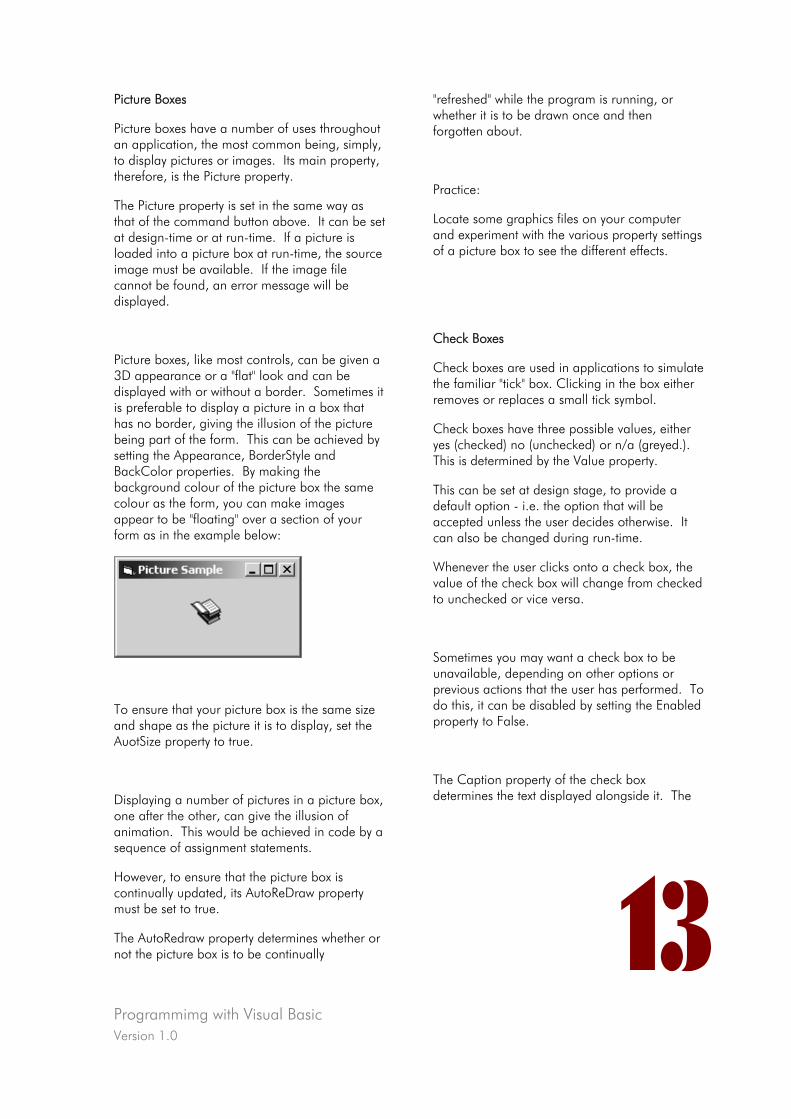
Programmimg with Visual Basic Version 1.0
13
Picture Boxes
Picture boxes have a number of uses throughout an application, the most common being, simply, to display pictures or images. Its main property, therefore, is the Picture property.
The Picture property is set in the same way as that of the command button above. It can be set at design-time or at run-time. If a picture is loaded into a picture box at run-time, the source image must be available. If the image file cannot be found, an error message will be displayed.
Picture boxes, like most controls, can be given a 3D appearance or a "flat" look and can be displayed with or without a border. Sometimes it is preferable to display a picture in a box that has no border, giving the illusion of the picture being part of the form. This can be achieved by setting the Appearance, BorderStyle and BackColor properties. By making the background colour of the picture box the same colour as the form, you can make images appear to be "floating" over a section of your form as in the example below:
To ensure that your picture box is the same size and shape as the picture it is to display, set the AuotSize property to true.
Displaying a number of pictures in a picture box, one after the other, can give the illusion of animation. This would be achieved in code by a sequence of assignment statements.
However, to ensure that the picture box is continually updated, its AutoReDraw property must be set to true.
The AutoRedraw property determines whether or not the picture box is to be continually
"refreshed" while the program is running, or whether it is to be drawn once and then forgotten about.
Practice:
Locate some graphics files on your computer and experiment with the various property settings of a picture box to see the different effects.
Check Boxes
Check boxes are used in applications to simulate the familiar "tick" box. Clicking in the box either removes or replaces a small tick symbol.
Check boxes have three possible values, either yes (checked) no (unchecked) or n/a (greyed.). This is determined by the Value property.
This can be set at design stage, to provide a default option - i.e. the option that will be accepted unless the user decides otherwise. It can also be changed during run-time.
Whenever the user clicks onto a check box, the value of the check box will change from checked to unchecked or vice versa.
Sometimes you may want a check box to be unavailable, depending on other options or previous actions that the user has performed. To do this, it can be disabled by setting the Enabled property to False.
The Caption property of the check box determines the text displayed alongside it. The

Programmimg with Visual Basic Version 1.0
14
Alignment property determines whether the caption is placed to the left or to the right of the check box.
This shows a checked box, an unchecked box and an unavailable (disabled) box.
The Style of the check box can be either standard (as above) or graphical.
Graphical check boxes have an appearance more like a command button, but behave in the same way as a check box. The checked box appears as a button that has been pushed in and an unchecked box appears as a raised button. Unlike command buttons, graphical check boxes do not "pop-up" again after the user has clicked on them.
Graphical check boxes can also display pictures by changing the picture property.
Option Buttons
Option buttons work in a similar way to check boxes but with one main difference - all options
within a container are mutually exclusive (see the section on containers later for more information on grouping controls).
Mutually exclusive means that only one can be chosen at any one time. When one option is selected, all other options in that group are automatically deselected. They are ideally suited to the type of question which can have only one answer.
Option buttons can be made graphical, like check boxes, to display their value as a button which is either raised or pressed-down. Like check boxes, they also have a Picture property which can be used to display a graphic or icon on the button.
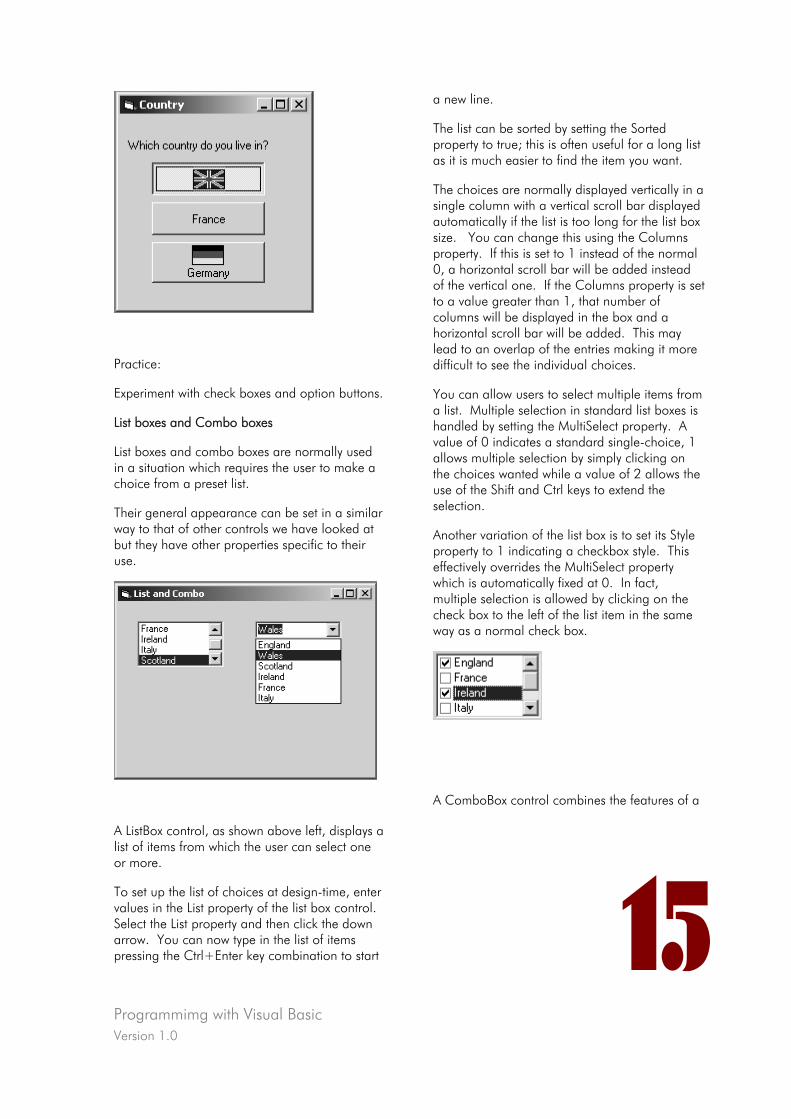
Programmimg with Visual Basic Version 1.0
15
Practice:
Experiment with check boxes and option buttons.
List boxes and Combo boxes
List boxes and combo boxes are normally used in a situation which requires the user to make a choice from a preset list.
Their general appearance can be set in a similar way to that of other controls we have looked at but they have other properties specific to their use.
A ListBox control, as shown above left, displays a list of items from which the user can select one or more.
To set up the list of choices at design-time, enter values in the List property of the list box control. Select the List property and then click the down arrow. You can now type in the list of items pressing the Ctrl+Enter key combination to start
a new line.
The list can be sorted by setting the Sorted property to true; this is often useful for a long list as it is much easier to find the item you want.
The choices are normally displayed vertically in a single column with a vertical scroll bar displayed automatically if the list is too long for the list box size. You can change this using the Columns property. If this is set to 1 instead of the normal 0, a horizontal scroll bar will be added instead of the vertical one. If the Columns property is set to a value greater than 1, that number of columns will be displayed in the box and a horizontal scroll bar will be added. This may lead to an overlap of the entries making it more difficult to see the individual choices.
You can allow users to select multiple items from a list. Multiple selection in standard list boxes is handled by setting the MultiSelect property. A value of 0 indicates a standard single-choice, 1 allows multiple selection by simply clicking on the choices wanted while a value of 2 allows the use of the Shift and Ctrl keys to extend the selection.
Another variation of the list box is to set its Style property to 1 indicating a checkbox style. This effectively overrides the MultiSelect property which is automatically fixed at 0. In fact, multiple selection is allowed by clicking on the check box to the left of the list item in the same way as a normal check box.
A ComboBox control combines the features of a
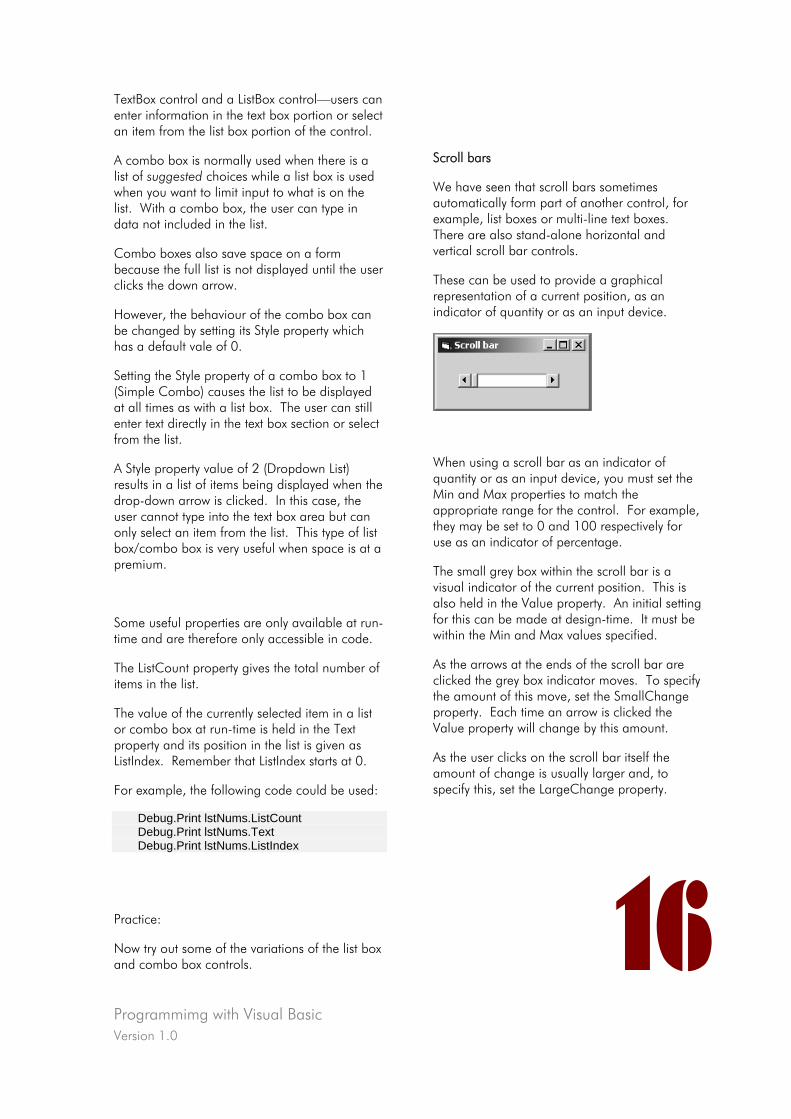
Programmimg with Visual Basic Version 1.0
16
TextBox control and a ListBox control—users can enter information in the text box portion or select an item from the list box portion of the control.
A combo box is normally used when there is a list of suggested choices while a list box is used when you want to limit input to what is on the list. With a combo box, the user can type in data not included in the list.
Combo boxes also save space on a form because the full list is not displayed until the user clicks the down arrow.
However, the behaviour of the combo box can be changed by setting its Style property which has a default vale of 0.
Setting the Style property of a combo box to 1 (Simple Combo) causes the list to be displayed at all times as with a list box. The user can still enter text directly in the text box section or select from the list.
A Style property value of 2 (Dropdown List) results in a list of items being displayed when the drop-down arrow is clicked. In this case, the user cannot type into the text box area but can only select an item from the list. This type of list box/combo box is very useful when space is at a premium.
Some useful properties are only available at run-time and are therefore only accessible in code.
The ListCount property gives the total number of items in the list.
The value of the currently selected item in a list or combo box at run-time is held in the Text property and its position in the list is given as ListIndex. Remember that ListIndex starts at 0.
For example, the following code could be used:
Debug.Print lstNums.ListCount Debug.Print lstNums.Text Debug.Print lstNums.ListIndex
Practice:
Now try out some of the variations of the list box and combo box controls.
Scroll bars
We have seen that scroll bars sometimes automatically form part of another control, for example, list boxes or multi-line text boxes. There are also stand-alone horizontal and vertical scroll bar controls.
These can be used to provide a graphical representation of a current position, as an indicator of quantity or as an input device.
When using a scroll bar as an indicator of quantity or as an input device, you must set the Min and Max properties to match the appropriate range for the control. For example, they may be set to 0 and 100 respectively for use as an indicator of percentage.
The small grey box within the scroll bar is a visual indicator of the current position. This is also held in the Value property. An initial setting for this can be made at design-time. It must be within the Min and Max values specified.
As the arrows at the ends of the scroll bar are clicked the grey box indicator moves. To specify the amount of this move, set the SmallChange property. Each time an arrow is clicked the Value property will change by this amount.
As the user clicks on the scroll bar itself the amount of change is usually larger and, to specify this, set the LargeChange property.
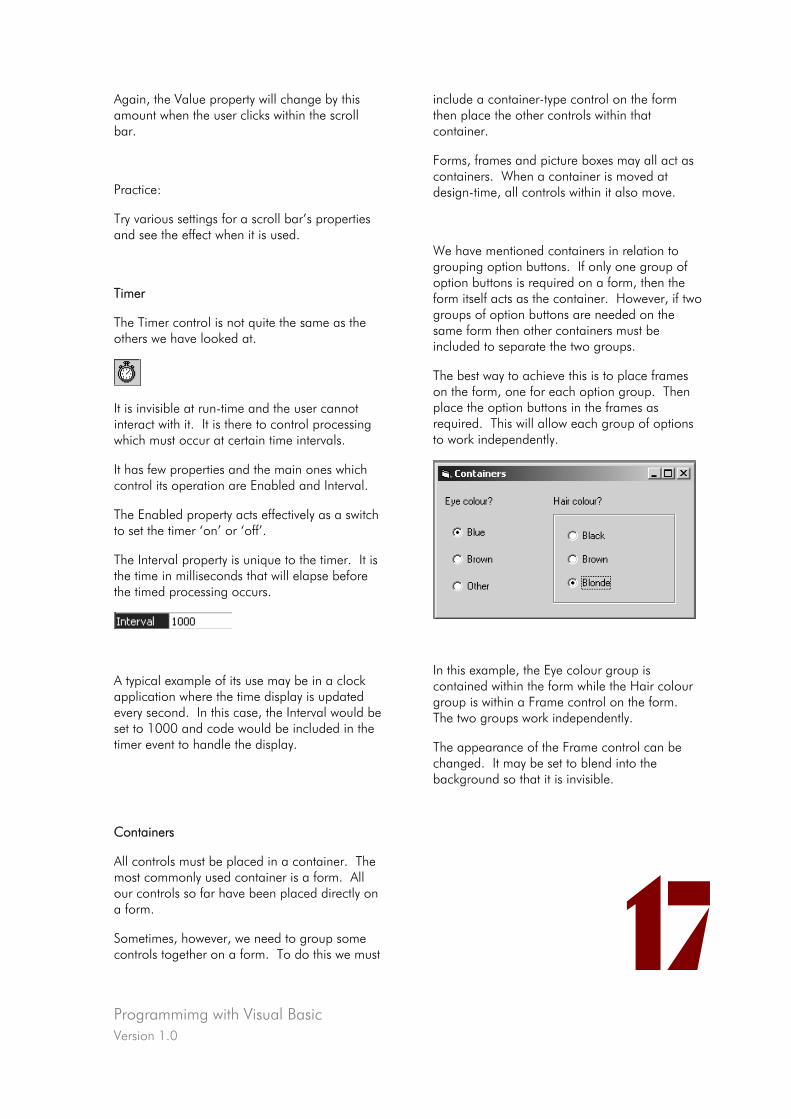
Programmimg with Visual Basic Version 1.0
17
Again, the Value property will change by this amount when the user clicks within the scroll bar.
Practice:
Try various settings for a scroll bar’s properties and see the effect when it is used.
Timer
The Timer control is not quite the same as the others we have looked at.
It is invisible at run-time and the user cannot interact with it. It is there to control processing which must occur at certain time intervals.
It has few properties and the main ones which control its operation are Enabled and Interval.
The Enabled property acts effectively as a switch to set the timer ‘on’ or ‘off’.
The Interval property is unique to the timer. It is the time in milliseconds that will elapse before the timed processing occurs.
A typical example of its use may be in a clock application where the time display is updated every second. In this case, the Interval would be set to 1000 and code would be included in the timer event to handle the display.
Containers
All controls must be placed in a container. The most commonly used container is a form. All our controls so far have been placed directly on a form.
Sometimes, however, we need to group some controls together on a form. To do this we must
include a container-type control on the form then place the other controls within that container.
Forms, frames and picture boxes may all act as containers. When a container is moved at design-time, all controls within it also move.
We have mentioned containers in relation to grouping option buttons. If only one group of option buttons is required on a form, then the form itself acts as the container. However, if two groups of option buttons are needed on the same form then other containers must be included to separate the two groups.
The best way to achieve this is to place frames on the form, one for each option group. Then place the option buttons in the frames as required. This will allow each group of options to work independently.
In this example, the Eye colour group is contained within the form while the Hair colour group is within a Frame control on the form. The two groups work independently.
The appearance of the Frame control can be changed. It may be set to blend into the background so that it is invisible.
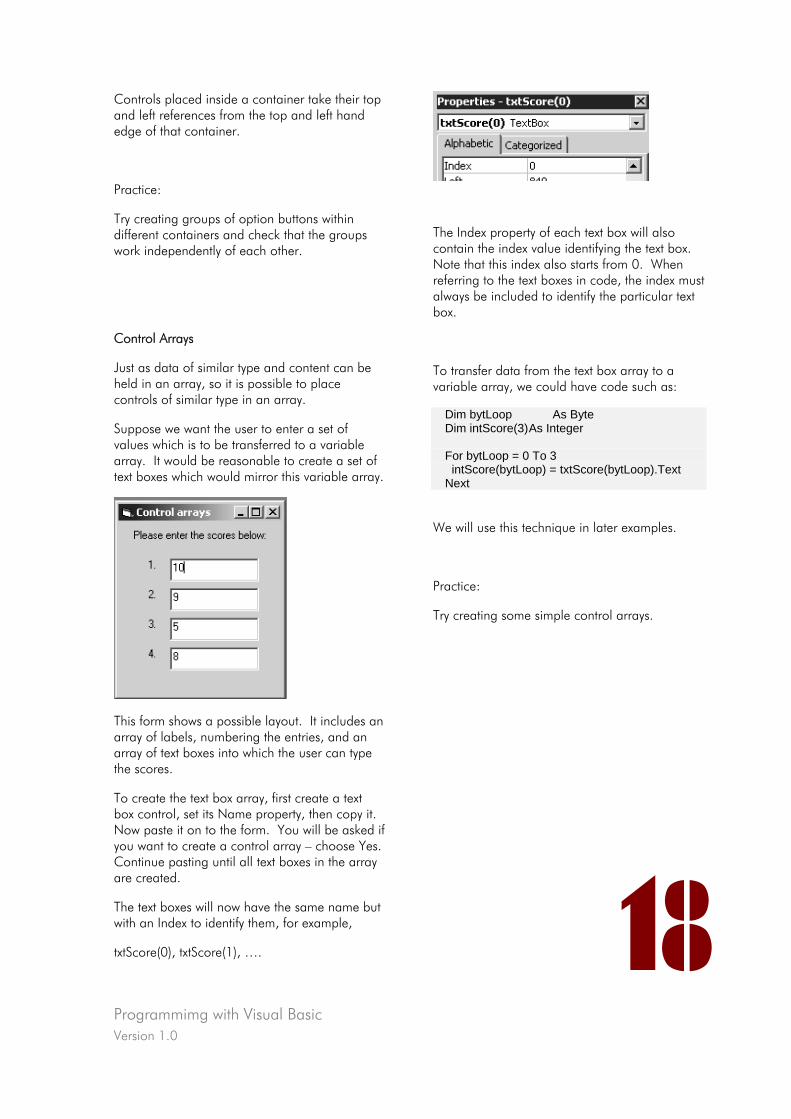
Programmimg with Visual Basic Version 1.0
18
Controls placed inside a container take their top and left references from the top and left hand edge of that container.
Practice:
Try creating groups of option buttons within different containers and check that the groups work independently of each other.
Control Arrays
Just as data of similar type and content can be held in an array, so it is possible to place controls of similar type in an array.
Suppose we want the user to enter a set of values which is to be transferred to a variable array. It would be reasonable to create a set of text boxes which would mirror this variable array.
This form shows a possible layout. It includes an array of labels, numbering the entries, and an array of text boxes into which the user can type the scores.
To create the text box array, first create a text box control, set its Name property, then copy it. Now paste it on to the form. You will be asked if you want to create a control array – choose Yes. Continue pasting until all text boxes in the array are created.
The text boxes will now have the same name but with an Index to identify them, for example,
txtScore(0), txtScore(1), ….
The Index property of each text box will also contain the index value identifying the text box. Note that this index also starts from 0. When referring to the text boxes in code, the index must always be included to identify the particular text box.
To transfer data from the text box array to a variable array, we could have code such as:
Dim bytLoop As Byte Dim intScore(3) As Integer For bytLoop = 0 To 3 intScore(bytLoop) = txtScore(bytLoop).Text Next
We will use this technique in later examples.
Practice:
Try creating some simple control arrays.
Programmimg with Visual Basic Version 1.0
19
Interface Design
As a programmer creating applications which require user interaction, it is important to consider the design of the user interface. The basic design principles of composition, colour and so on, apply as well to a computer screen as they do to a sheet of paper or a canvas.
The importance of interface design is to make it as unobtrusive as possible.
Consider your most often used piece of software, possibly your word-processor application or your web browser. These programs are probably fairly mundane to look at, but they generally present the tools you need clearly and allow you to concentrate on doing the job in hand rather than being over-awed or confused by the interface itself.
You should also aim to simply provide what the user needs clearly so that he can get on with the job.
This is perhaps not as straightforward as it sounds.
Because you don’t normally take much notice of a good interface, you don’t really think about its design. Now that you have been introduced to several of the objects available in Visual Basic and the properties which control their look and behaviour, it is worth looking at some design considerations. You can then take these into account as you progress to creating your own programs.
Look and feel
The layout of the interface not only influences the visual appeal of your program, it also has a massive impact on its usability, or user-friendliness.
The interface should be consistent throughout the application. So, a basic standard should be set for a project and all interfaces should then be based on that.
Try to keep a consistent colour scheme. Pick a style and stick with it throughout the entire application.
The design should be simple and, as we said, unobtrusive. If you are designing a system for a client who already uses other applications regularly, it may be worth following the same basic design as those applications so that he will immediately feel comfortable with the new application.
Positioning controls
In most interfaces, controls are not all equally important; some are used regularly, some rarely.
Important or commonly used controls should be placed in an area of the screen that is prominent to the user, while less often used controls should be in less prominent areas.
In most languages, we read from left to right, starting at the top left of the page and continuing towards the bottom-right. This rule also holds true with a computer screen: the user’s eyes will be drawn towards the top left of the screen at the start of using the application so the most important controls should normally be positioned there.
Buttons such as OK and Next are usually placed in the lower-right portion of the screen as the user does not need them until they have finished working with the other controls on the form.
Grouping controls is important to show the relationship between them. Often, text boxes into which the user types personal details such as name, address, etc. are grouped together since this information is closely related.
Sometimes lines or frame controls are used to highlight this grouping. This can be useful if an interface has to hold a lot of information and there is a minimum of space available.
Programmimg with Visual Basic Version 1.0
20
Generally, your aim should be to design uncluttered interfaces where blank space can be left around controls to make them stand out.
Tab Order
When creating your interface and grouping your controls, you should consider the input methods likely to be used.
If your interface consists of a number of textboxes, into which the user is expected to enter information, the method of input here will obviously be through the keyboard.
But how will the user navigate from one text box to another?
You can obviously move from one control to another by moving the mouse and clicking on appropriate controls. However, when entering data into text boxes using the keyboard, having to use the mouse to move between the text boxes can break up the flow of data input.
Most applications allow the user to move from one control to another by use of the Tab key which will move the focus to the ‘next’ control. You should consider using this method in your application. The question is how to order the controls so that the Tab key moves the focus to the next logical control.
Controls should first be laid out in such a way that when the focus is moved from one control to another, it follows a logical progression. You then need to set the TabStop and TabIndex properties of the controls to ensure that using the Tab key will also follow this logical progression.
For example, if you are typing in address details, you would expect the street to be followed by the town, then the county and finally the postcode. With the wrong tab order set, they may be in a completely different order which will be extremely frustrating for the user.
By using the TabIndex property, you can set the order in which the controls are accessed when the user presses the Tab key. This will initially be set to the order in which the controls were created on the form, but it can be changed simply by setting the property at design-time to the value required. Again the first value will be 0. As you change one TabIndex value, the others will change automatically to fit this.
Remember that all controls on a form have a TabIndex property; only some of them will want to be able to receive the focus. For example, labels and frames will not want the focus.
By setting the TabStop property of your controls to true, you ensure that the control will actually receive the focus when the Tab key is pressed. Setting the TabStop property to false means that the focus will not land on the control when the Tab key is pressed, whether it is the next control in the TabOrder sequence or not.
Making sure tab order is set properly ensures that the user does not get lost in your interface.
An interface which is awkward to use will turn users against your program no matter how good it is in all other respects.
Visual clues
Just by looking at some objects, you can guess their purpose and how they work.
Command buttons look as though they should be pushed, by the three-dimensional effects around the edges. Boxes with a border and white background are used for editable text.
By removing these visual clues and making your controls look "flat", their purpose is not as obvious to the user.
As users have become familiar with these types of clues, you should stick to the same styles if you aim to develop an application which can be used intuitively.
Colour
Programmimg with Visual Basic Version 1.0
21
The use of colour in your interface can add to the visual appeal but you must be very careful not to overdo it. Preference for colours varies a great deal and the user’s taste may not be the same as your own.
Keep in mind who is likely to be using your program. Bright primary colours are ideal for a children’s application, but not what you would expect to see in a business application.
Be especially aware of colours and colour-blindness. Many people are unable to tell the difference between different combinations of primary colours, such as red and green. To some people, red text on a green background would be invisible.
In cases of dyslexia, reading ability can be improved by altering the contrast between words and the background on which they appear. Black on white is very high contrast and not as easy to read as many people believe. Try to tone down contrasts when displaying words on-screen. If the words are black, use a grey or a pastel shade as a background.
Fonts
Fonts are important to the design of your interface.
Not everybody has the same font installed on their system, so try to stick to standard fonts that you know will be installed on your user’s computer. Do not use a large variety of different fonts within your application – decide on styles for headings, labels and general text and stick to that throughout.
Decorative fonts are designed for the printed page and generally do not appear too well on screen.
Resolution
One point often overlooked when creating interfaces is screen resolution.
You should be sure that the user’s screen display will be big enough to display your interface once complete. If uncertain, try to create your forms at a low screen resolution. This should ensure
that the complete interface is visible on the user’s screen.
Screen capabilities must also be considered when choosing colours for your interface as the user’s screen may be limited in how many it can handle. Try to stick to the range of standard colours available and not mix your own.
Accessibility of functions
Most popular applications provide a choice of ways to perform tasks. Often you will have a choice of menu command, toolbar icon and keyboard command to carry out a single task. Providing this variety of methods appeals to users as they will be able to use the method they prefer rather than being forced into using one method. Many people prefer using keyboard commands whilst others cannot live without their mouse!
As a recommended minimum, all your functions should be accessible by both keyboard and the mouse. This requires a little forward planning, but will prove to be worth it in the end.
Using intuition
The most popular interfaces are easy to use because they are intuitive.
If a series of instructions needs to be carried out, the user will be guided through them, not by giving explicit instructions, but by the way the interface reacts to their actions.
Imagine a simple interface where the user must make an entry in a text box and select one of three choices before proceeding by clicking on an OK button.
Programmimg with Visual Basic Version 1.0
22
By disabling the option buttons and the OK button, the user is guided to enter something into the text box. Once text has been entered, the option buttons can be enabled. This suggests to the user that he should now make a selection. Once this selection has been made, the OK button can be enabled.
They can now go back and change the text or select another option, but they have been guided through the process and will know what to do.
Try to adopt this approach in your design where appropriate.
Icons and Images
Effective icons and images in your design can also make your application easier to use. It can improve the accessibility of functions and the intuitiveness of the application. Users can be made aware of the purpose of controls without the need for words.
Users are already familiar with many icons. In most applications, an icon representing a printer is used on a button which, when pressed, will print the current document on the default printer.
To save the current document, the user will click a button which has a disk icon on it.
Good icons convey the function of a control quickly and are easy to remember.
On the other hand, badly designed icons will detract from the usability of your interface, since the user must work out what each icon is meant to represent.
You should make use of icons in appropriate circumstances, but make them clear and recognisable. Their style should fit in with that of the rest of your application.
Errors
Sometimes a user will take an action which they then realise is wrong. A typical example of this may be in the formatting of a document. It is common practice in many applications to include an Undo function which will allow the user to backtrack.
Sometimes an error will occur when your application is running. The required file may not be available or the printer may have run out of paper.
In these instances, your program should be equipped with appropriate error-handling routines to stop the application from being aborted. It should display error or warning messages, which should be clear and provide options for the user. The error messages should be designed to follow a standard style which fits in with the rest of the application. They should use terminology which the user will understand.
Depending on the type of error, it may be useful to include further details which may be needed by a support engineer.
We will look at Error Handling in a later section.
Practice
Using various controls and their properties, experiment with designing interfaces bearing in mind the points made in this section. See what works and what doesn’t. See what others think of your designs – your taste may not suit them.
Programmimg with Visual Basic Version 1.0
23
Objects and Methods
We have studied some objects and seen how their properties can be set to affect their look and behaviour. These properties can be set at design-time and or in code at run-time.
Now we turn our attention to objects and some methods which can be applied to them in code.
The general syntax used to invoke methods for objects is:
Object.Method (optional list of parameters)
We have defined a method as ‘an action which can apply to an object’. There is a variety of methods which can be applied to different objects and we will look at some of the most common ones here. We will put them into practice in later examples!
We have already used this method in our programming examples. To display data in the Immediate window we used the
Debug.Print statement.
This told the computer to take the Debug object, in effect the Immediate window, and print on it. A list of what to print was included, such as:
Debug.Print strName
SetFocus
This can be used to move the focus to the specified control or form. That means the cursor is positioned on that form or control.
For example, to move the cursor to a text box, we might use:
txtName.SetFocus
You can only move the focus to a visible form or control which can receive the focus; in other words, the control must be loaded in memory, be visible and enabled.
It is often useful to set the focus to a specific control depending on other input or as a result of an error which requires the user to re-enter a specific value. It is commonly used with text boxes and command buttons.
Refresh
This method forces a complete repaint of a form or control.
frmTotals.Refresh could be used to completely refresh the display of a form.
Generally, painting a form or control is handled automatically, but there may be situations where you want the form or control updated immediately.
Line
This method is used to draws lines and rectangles on an object. It needs to be given information about the line or rectangle to be drawn, such as start and end points, colour, whether a line or box is to be drawn.
frmShapes.Line (20,20) – (200,200) would draw a straight line on the form between the two points specified.
The appearance of the line would depend on the colour and draw properties of the object itself.
frmShapes.Line (20,20) – (200,200),,B

Programmimg with Visual Basic Version 1.0
24
would draw a box with the two points as opposite corners.
Full details of this method can be found in on-line Help.
Circle
This graphic method draws a circle, ellipse, or arc on an object.
Like the Line method above, it must be given some details about the shape to be drawn.
frmShapes.Circle (100,100), 300 would draw a circle with radius 300 at a centre point of 100,100 on the form.
Other information can specify colour and direct it to draw arcs and ellipses.
Again, full details of this method can be found in on-line Help.
Cls
This method clears any text and graphics generated at run time by graphics and printing statements such as those methods above.
frmShapes.Cls would clear the effects of the previous examples.
Graphics and controls placed on a Form at design time aren't affected by Cls.
Show and Hide
These methods are used to display or hide forms.
frmCalculate.Hide frmResults.Show
would Hide the Calculation form and Show the Results form.
We will be looking at working with multiple forms later in the course and will explain these
methods more fully then.
AddItem
To add items to a list box or combo box, use the AddItem method.
lstCountries.AddItem "Germany" lstCountries.AddItem "India"
would add two items to the end of the list. If the list was sorted, the new items would be added at their correct position within the list.
To add an item to a list at a specific position, specify an index value for the new item. For example,
lstCountries.AddItem "Japan", 0 would add Japan at the start of the list.
Note that, as with arrays, it is 0, not 1, that specifies the first item in a list.
RemoveItem
This, as its name suggests, removes an item from a list. It must be given an item number.
lstCountries.RemoveItem 0 would delete the first item in a list.
Programmimg with Visual Basic Version 1.0
25
Objects and Events
We have said that Visual Basic programs are event-driven which means that the user controls the sequence of processing to an extent by, for example, typing into a particular text box, by clicking on a command button or by closing a form. This is in contrast to procedure-driven programming where the order of events is controlled by the program itself. Processing is performed in the sequence determined by the program and the user can only provide input when prompted.
In an event-driven program, the program waits for an event to occur such as the user moving to a text box and typing something in, clicking on a command button or closing a form. Any processing that you want to be performed when an event occurs must be placed in the relevant event procedure associated with that event. In the Introduction to Programming section, we used the command button’s click event as a means of running code.
Earlier in this section, we saw that the easiest way to view a list of all events for a particular object is through the drop-down lists at the top of the code window. Full details of all events can be found in the on-line help.
An event procedure is identified by the object name followed by an underscore character then the event name, for example, we have used:
Private Sub cmdPassMarks_Click ()
Many events occur directly when the user interacts with the program. However, some events occur automatically and it is important to be aware of this as it may be necessary to add code to these events.
We will now look at some of the most commonly-used events and when they occur. Many of them will be used later in examples and exercises.
Click
This event is most commonly associated with the command button.
A click event comprises a MouseDown and a MouseUp event on the same control. If the user presses the mouse button down but releases it when the mouse pointer is over another object, the click event is not triggered.
Often a user will fill in details on a form then click an OK button. This would then initiate the processing of the details. This processing would be handled within the Click event procedure for the button.
The Click event can also be used for many other controls, such as list and combo boxes, check boxes and option buttons and picture boxes.
GotFocus
This event is triggered whenever a control receives the focus, either by the user clicking on to the control or pressing the Tab key or by the use of the SetFocus method in code.
It should obviously only be used with controls which are Enabled and Visible and can therefore receive the focus.
LostFocus
This event is triggered when the control loses the focus, that is, when the focus moves from this control to another.
The LostFocus event of a control occurs before the GotFocus event of the control being moved to.
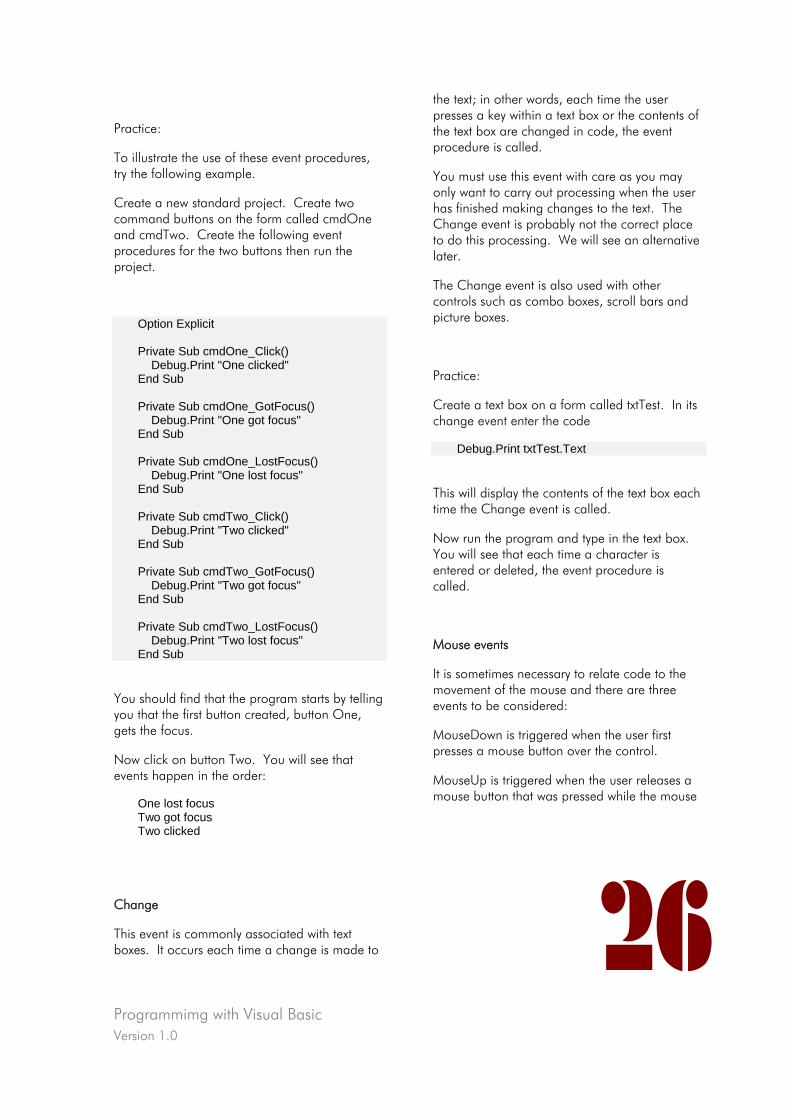
Programmimg with Visual Basic Version 1.0
26
Practice:
To illustrate the use of these event procedures, try the following example.
Create a new standard project. Create two command buttons on the form called cmdOne and cmdTwo. Create the following event procedures for the two buttons then run the project.
Option Explicit
Private Sub cmdOne_Click() Debug.Print "One clicked" End Sub Private Sub cmdOne_GotFocus() Debug.Print "One got focus" End Sub Private Sub cmdOne_LostFocus() Debug.Print "One lost focus" End Sub
Private Sub cmdTwo_Click() Debug.Print "Two clicked" End Sub
Private Sub cmdTwo_GotFocus() Debug.Print "Two got focus" End Sub Private Sub cmdTwo_LostFocus() Debug.Print "Two lost focus" End Sub
You should find that the program starts by telling you that the first button created, button One, gets the focus.
Now click on button Two. You will see that events happen in the order:
One lost focus Two got focus Two clicked
Change
This event is commonly associated with text boxes. It occurs each time a change is made to
the text; in other words, each time the user presses a key within a text box or the contents of the text box are changed in code, the event procedure is called.
You must use this event with care as you may only want to carry out processing when the user has finished making changes to the text. The Change event is probably not the correct place to do this processing. We will see an alternative later.
The Change event is also used with other controls such as combo boxes, scroll bars and picture boxes.
Practice:
Create a text box on a form called txtTest. In its change event enter the code
Debug.Print txtTest.Text
This will display the contents of the text box each time the Change event is called.
Now run the program and type in the text box. You will see that each time a character is entered or deleted, the event procedure is called.
Mouse events
It is sometimes necessary to relate code to the movement of the mouse and there are three events to be considered:
MouseDown is triggered when the user first presses a mouse button over the control.
MouseUp is triggered when the user releases a mouse button that was pressed while the mouse
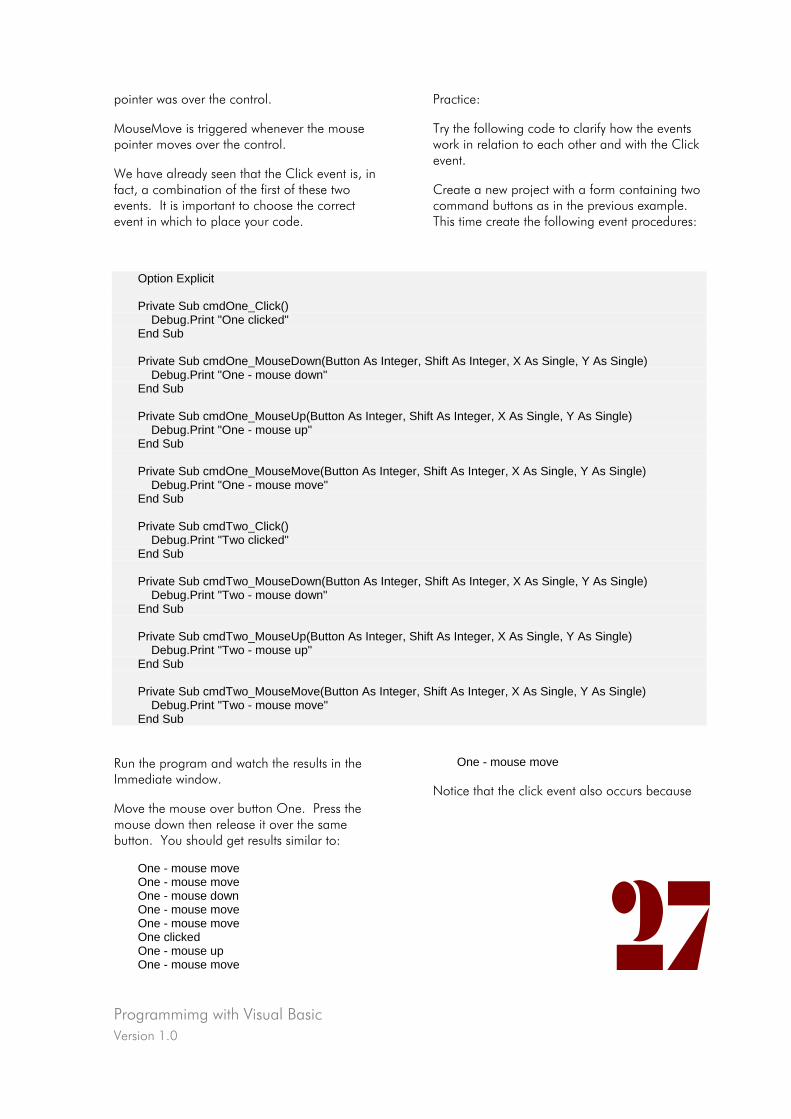
Programmimg with Visual Basic Version 1.0
27
pointer was over the control.
MouseMove is triggered whenever the mouse pointer moves over the control.
We have already seen that the Click event is, in fact, a combination of the first of these two events. It is important to choose the correct event in which to place your code.
Practice:
Try the following code to clarify how the events work in relation to each other and with the Click event.
Create a new project with a form containing two command buttons as in the previous example. This time create the following event procedures:
Option Explicit Private Sub cmdOne_Click() Debug.Print "One clicked" End Sub Private Sub cmdOne_MouseDown(Button As Integer, Shift As Integer, X As Single, Y As Single) Debug.Print "One - mouse down" End Sub Private Sub cmdOne_MouseUp(Button As Integer, Shift As Integer, X As Single, Y As Single) Debug.Print "One - mouse up" End Sub Private Sub cmdOne_MouseMove(Button As Integer, Shift As Integer, X As Single, Y As Single) Debug.Print "One - mouse move" End Sub Private Sub cmdTwo_Click() Debug.Print "Two clicked" End Sub Private Sub cmdTwo_MouseDown(Button As Integer, Shift As Integer, X As Single, Y As Single) Debug.Print "Two - mouse down" End Sub Private Sub cmdTwo_MouseUp(Button As Integer, Shift As Integer, X As Single, Y As Single) Debug.Print "Two - mouse up" End Sub Private Sub cmdTwo_MouseMove(Button As Integer, Shift As Integer, X As Single, Y As Single) Debug.Print "Two - mouse move" End Sub
Run the program and watch the results in the Immediate window.
Move the mouse over button One. Press the mouse down then release it over the same button. You should get results similar to:
One - mouse move One - mouse move One - mouse down One - mouse move One - mouse move One clicked One - mouse up One - mouse move
One - mouse move
Notice that the click event also occurs because

Programmimg with Visual Basic Version 1.0
28
the mouse is pressed and released over the same control.
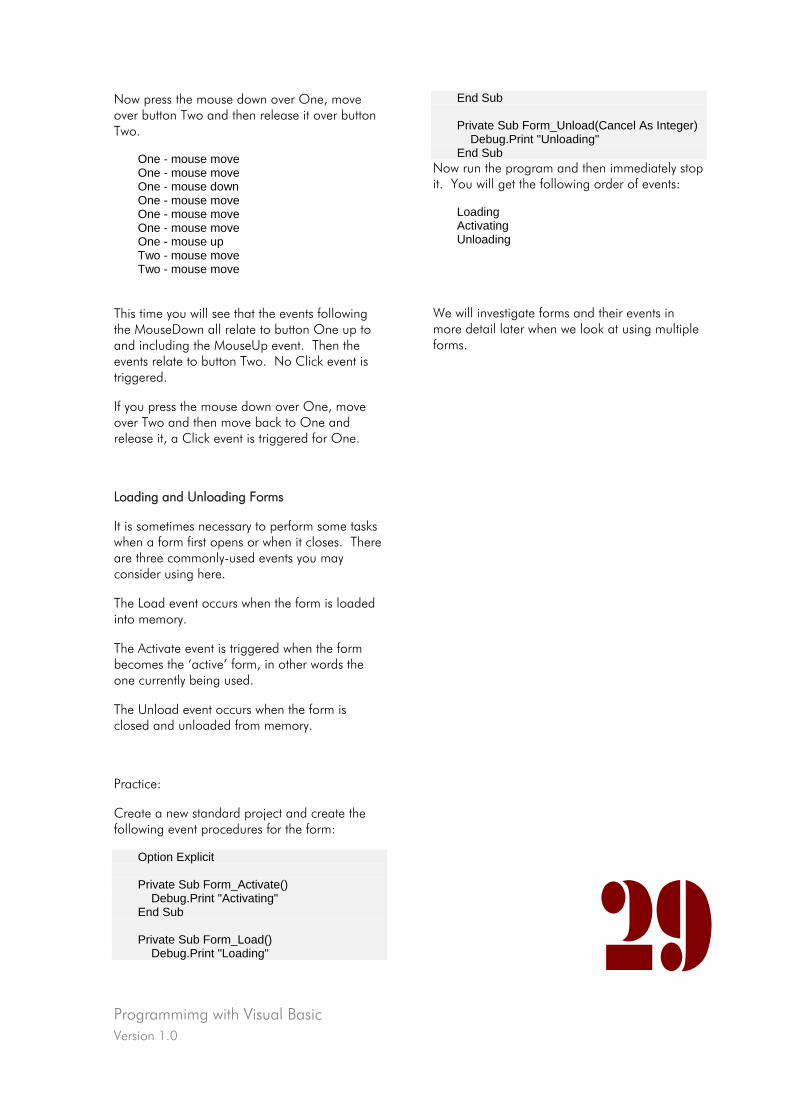
Programmimg with Visual Basic Version 1.0
29
Now press the mouse down over One, move over button Two and then release it over button Two.
One - mouse move One - mouse move One - mouse down One - mouse move One - mouse move One - mouse move One - mouse up Two - mouse move Two - mouse move
This time you will see that the events following the MouseDown all relate to button One up to and including the MouseUp event. Then the events relate to button Two. No Click event is triggered.
If you press the mouse down over One, move over Two and then move back to One and release it, a Click event is triggered for One.
Loading and Unloading Forms
It is sometimes necessary to perform some tasks when a form first opens or when it closes. There are three commonly-used events you may consider using here.
The Load event occurs when the form is loaded into memory.
The Activate event is triggered when the form becomes the ‘active’ form, in other words the one currently being used.
The Unload event occurs when the form is closed and unloaded from memory.
Practice:
Create a new standard project and create the following event procedures for the form:
Option Explicit Private Sub Form_Activate() Debug.Print "Activating" End Sub Private Sub Form_Load() Debug.Print "Loading"
End Sub Private Sub Form_Unload(Cancel As Integer) Debug.Print "Unloading" End Sub
Now run the program and then immediately stop it. You will get the following order of events:
Loading Activating Unloading
We will investigate forms and their events in more detail later when we look at using multiple forms.

Programmimg with Visual Basic Version 1.0
30
Interaction of Controls
Now that we have examined some objects, their properties, methods and events, we will now create some examples of using them. This will emphasise how controls can interact with each other. Remember as you create each example to save it in its own folder with suitable file names.
You will notice as you enter the code for these examples that, once a valid object or control name has been entered followed by a dot (.) to indicate that a property or method is to follow, a dropdown list will appear automatically from which you can choose the required entry. This choice can be made simply by clicking on the option. Otherwise, as you start typing in the property or method name, an entry matching this will be highlighted automatically; hitting the Tab key when the correct option is highlighted will enter it in your code.
Using this entry method can help to reduce typing errors.
Text box, Label and Command button
Create a form with a text box, a label and a command button. Give them all suitable names and set properties to reflect the example below.
The user can make an entry in the text box. When he clicks the Transfer button, we want to copy the text box entry and show it in the label. Create code in your button’s click procedure to do this. It should be similar to:
Private Sub cmdTransfer_Click() ' When the user clicks this button ‘ the text from the text box ' will be copied to the label lblType.Caption = txtType.Text End Sub
Now run the program, type something in the text box and click the button. The text should be copied to the label.
Change the text box entry. Note that nothing happens to the label until you click the button.
This shows you how the code in the button’s Click event procedure refers to the other controls on the form.
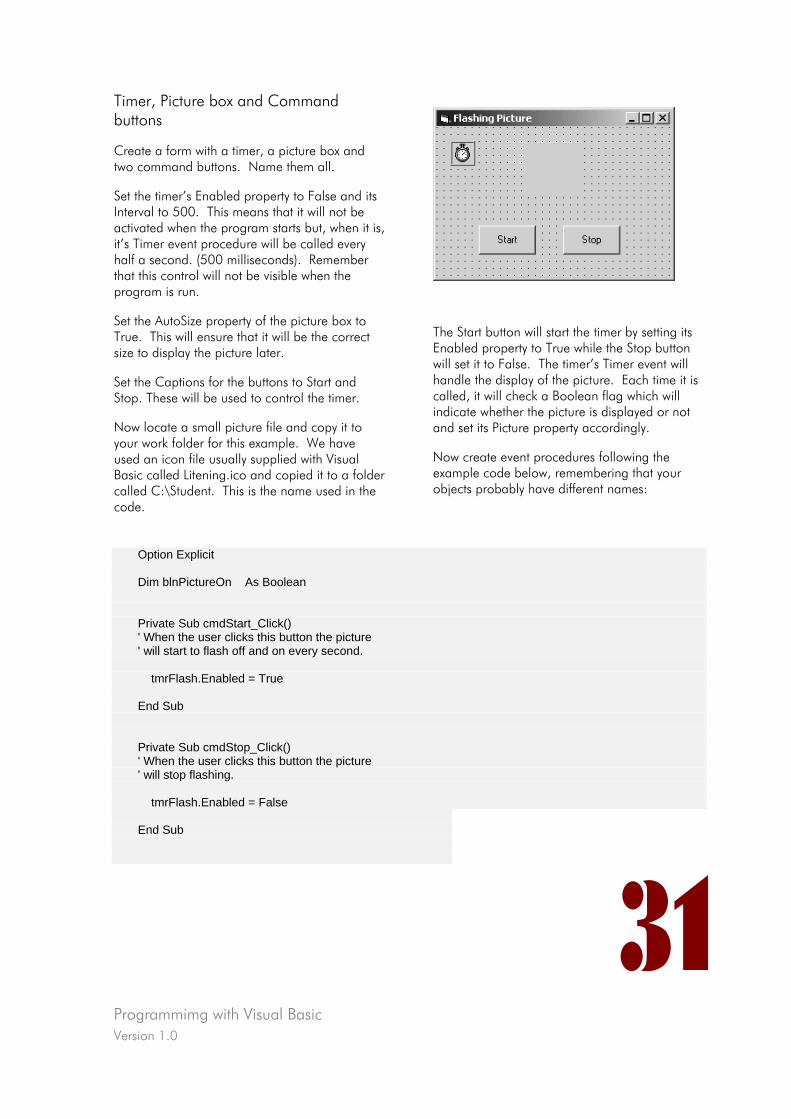
Programmimg with Visual Basic Version 1.0
Timer, Picture box and Command buttons
Create a form with a timer, a picture box and two command buttons. Name them all.
Set the timer’s Enabled property to False and its Interval to 500. This means that it will not be activated when the program starts but, when it is, it’s Timer event procedure will be called every half a second. (500 milliseconds). Remember that this control will not be visible when the program is run.
Set the AutoSize property of the picture box to True. This will ensure that it will be the correct size to display the picture later.
The Start button will start the timer by setting its Enabled property to True while the Stop button will set it to False. The timer’s Timer event will handle the display of the picture. Each time it is called, it will check a Boolean flag which will indicate whether the picture is displayed or not and set its Picture property accordingly.
Set the Captions for the buttons to Start and Stop. These will be used to control the timer.
Now locate a small picture file and copy it to your work folder for this example. We have used an icon file usually supplied with Visual Basic called Litening.ico and copied it to a folder called C:\Student. This is the name used in the code.
Now create event procedures following the example code below, remembering that your objects probably have different names:
Option Explicit Dim blnPictureOn As Boolean Private Sub cmdStart_Click() ' When the user clicks this button the picture ' will start to flash off and on every second. tmrFlash.Enabled = True End Sub Private Sub cmdStop_Click() ' When the user clicks this button the picture ' will stop flashing. tmrFlash.Enabled = False End Sub
31
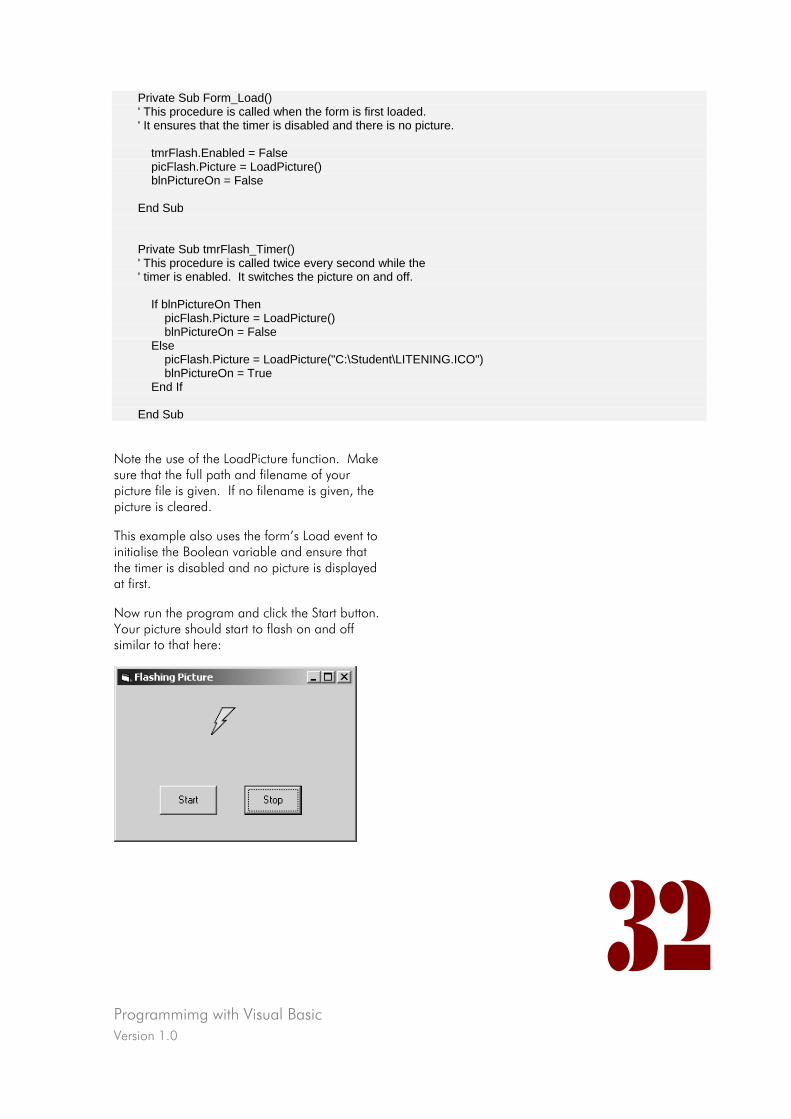
Programmimg with Visual Basic Version 1.0
32
Private Sub Form_Load() ' This procedure is called when the form is first loaded. ' It ensures that the timer is disabled and there is no picture. tmrFlash.Enabled = False picFlash.Picture = LoadPicture() blnPictureOn = False End Sub Private Sub tmrFlash_Timer() ' This procedure is called twice every second while the ' timer is enabled. It switches the picture on and off. If blnPictureOn Then picFlash.Picture = LoadPicture() blnPictureOn = False Else picFlash.Picture = LoadPicture("C:\Student\LITENING.ICO") blnPictureOn = True End If End Sub
Note the use of the LoadPicture function. Make sure that the full path and filename of your picture file is given. If no filename is given, the picture is cleared.
This example also uses the form’s Load event to initialise the Boolean variable and ensure that the timer is disabled and no picture is displayed at first.
Now run the program and click the Start button. Your picture should start to flash on and off similar to that here:
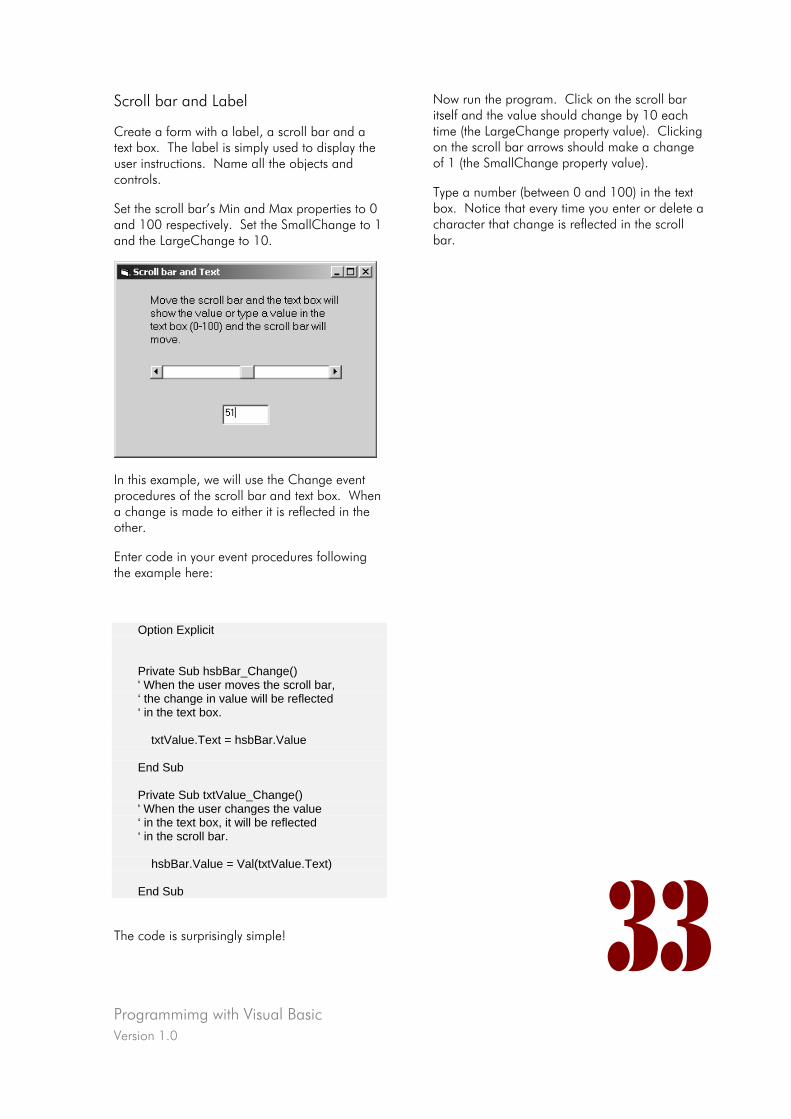
Programmimg with Visual Basic Version 1.0
33
Scroll bar and Label
Create a form with a label, a scroll bar and a text box. The label is simply used to display the user instructions. Name all the objects and controls.
Set the scroll bar’s Min and Max properties to 0 and 100 respectively. Set the SmallChange to 1 and the LargeChange to 10.
In this example, we will use the Change event procedures of the scroll bar and text box. When a change is made to either it is reflected in the other.
Enter code in your event procedures following the example here:
Option Explicit Private Sub hsbBar_Change() ' When the user moves the scroll bar, ‘ the change in value will be reflected ‘ in the text box. txtValue.Text = hsbBar.Value End Sub Private Sub txtValue_Change() ' When the user changes the value ‘ in the text box, it will be reflected ‘ in the scroll bar. hsbBar.Value = Val(txtValue.Text) End Sub
The code is surprisingly simple!
Now run the program. Click on the scroll bar itself and the value should change by 10 each time (the LargeChange property value). Clicking on the scroll bar arrows should make a change of 1 (the SmallChange property value).
Type a number (between 0 and 100) in the text box. Notice that every time you enter or delete a character that change is reflected in the scroll bar.

Programmimg with Visual Basic Version 1.0
34
Combo box and Labels
We will explore various properties and methods of combo boxes here. List boxes are similar.
Create a form with a combo box, six labels and two command buttons similar to that below. Name all the objects and controls.
Set the combo box to be a dropdown combo type. Add entries to its List property; remember to use the Ctrl+Enter key combination to put a new line in the list. Set its Sorted property to True.
Set three of the labels to have ‘Total items’, ‘Current item’ and ‘Current item index’ captions. These are simply to identify the details which will be displayed in the other labels.
Set the command button captions to ‘Add’ and ‘Delete’ to reflect their functions.
The three labels will be updated every time the user clicks on the combo box to select an item. They will also be updated each time an item is added to or deleted from the list. Therefore, it may be a good idea to put this code in a separate procedure and call it as required.
The Add and Delete buttons will make use of the AddItem and RemoveItem methods. Add will prompt the user to type in a new entry which will be put in its correct alphabetical position because this is a sorted list. Delete will delete the item at the current ListIndex position.
Enter code following this example which is based on a list of sports:
Option Explicit
Private Sub cboSport_Click() ' When the user makes a choice from the list, the labels will ' change to reflect this. DisplayInfo End Sub Private Sub cmdAdd_Click() ' When the user clicks this button, he is prompted to enter ' the new item for the list. This is then added to its ' proper position in the list. The labels are updated. cboSport.AddItem InputBox("Please enter a new sport") DisplayInfo End Sub Private Sub cmdDelete_Click() ' When the user clicks this button, the current entry is deleted ' from the list. The labels are updated. cboSport.RemoveItem cboSport.ListIndex DisplayInfo End Sub Private Sub DisplayInfo() ' This displays the details in the labels. lblTotal2.Caption = cboSport.ListCount lblCurrentItem2.Caption = cboSport.Text lblCurrentIndex2.Caption = cboSport.ListIndex End Sub
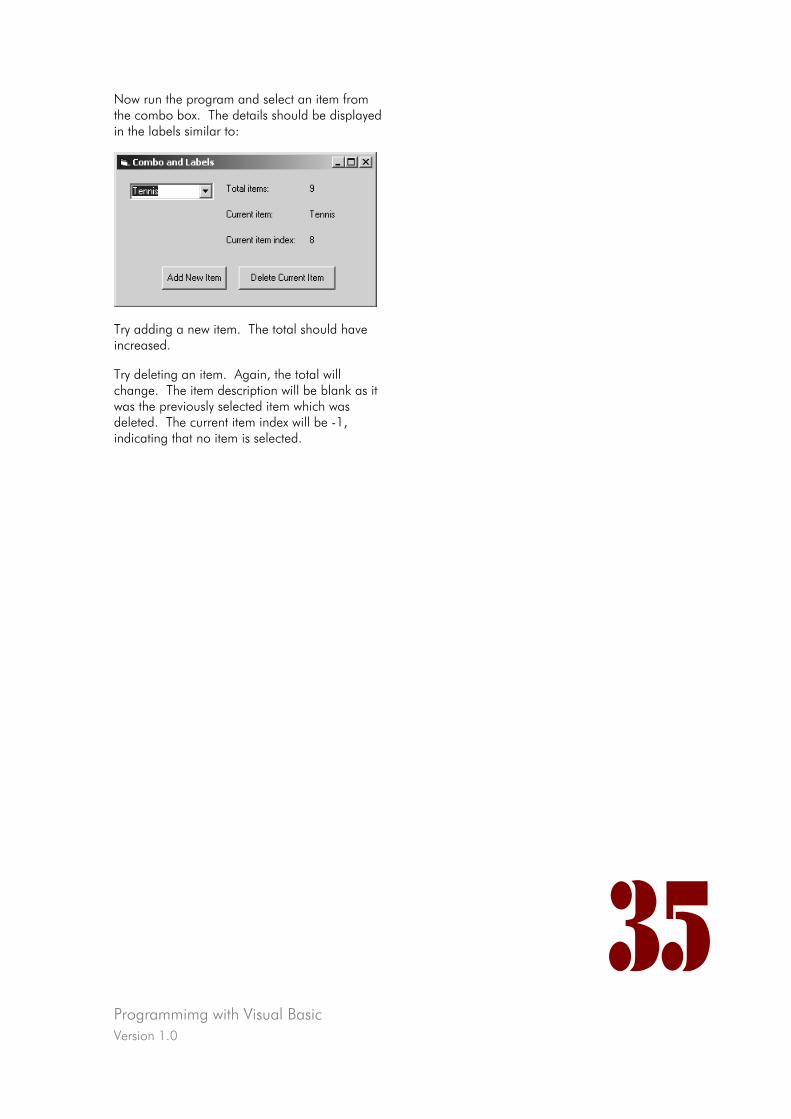
Programmimg with Visual Basic Version 1.0
35
Now run the program and select an item from the combo box. The details should be displayed in the labels similar to:
Try adding a new item. The total should have increased.
Try deleting an item. Again, the total will change. The item description will be blank as it was the previously selected item which was deleted. The current item index will be -1, indicating that no item is selected.
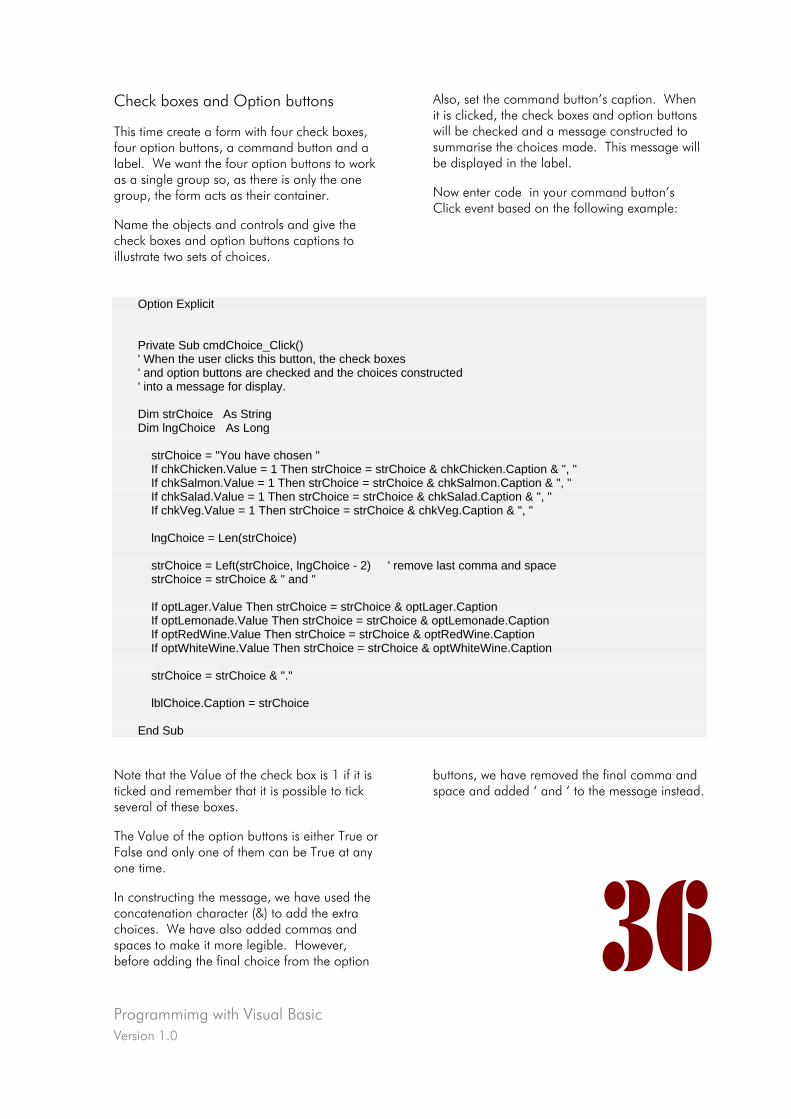
Programmimg with Visual Basic Version 1.0
36
Check boxes and Option buttons
This time create a form with four check boxes, four option buttons, a command button and a label. We want the four option buttons to work as a single group so, as there is only the one group, the form acts as their container.
Name the objects and controls and give the check boxes and option buttons captions to illustrate two sets of choices.
Also, set the command button’s caption. When it is clicked, the check boxes and option buttons will be checked and a message constructed to summarise the choices made. This message will be displayed in the label.
Now enter code in your command button’s Click event based on the following example:
Option Explicit Private Sub cmdChoice_Click() ' When the user clicks this button, the check boxes ' and option buttons are checked and the choices constructed ' into a message for display. Dim strChoice As String Dim lngChoice As Long strChoice = "You have chosen " If chkChicken.Value = 1 Then strChoice = strChoice & chkChicken.Caption & ", " If chkSalmon.Value = 1 Then strChoice = strChoice & chkSalmon.Caption & ", " If chkSalad.Value = 1 Then strChoice = strChoice & chkSalad.Caption & ", " If chkVeg.Value = 1 Then strChoice = strChoice & chkVeg.Caption & ", " lngChoice = Len(strChoice) strChoice = Left(strChoice, lngChoice - 2) ' remove last comma and space strChoice = strChoice & " and " If optLager.Value Then strChoice = strChoice & optLager.Caption If optLemonade.Value Then strChoice = strChoice & optLemonade.Caption If optRedWine.Value Then strChoice = strChoice & optRedWine.Caption If optWhiteWine.Value Then strChoice = strChoice & optWhiteWine.Caption strChoice = strChoice & "." lblChoice.Caption = strChoice End Sub
Note that the Value of the check box is 1 if it is ticked and remember that it is possible to tick several of these boxes.
The Value of the option buttons is either True or False and only one of them can be True at any one time.
In constructing the message, we have used the concatenation character (&) to add the extra choices. We have also added commas and spaces to make it more legible. However, before adding the final choice from the option
buttons, we have removed the final comma and space and added ‘ and ‘ to the message instead.
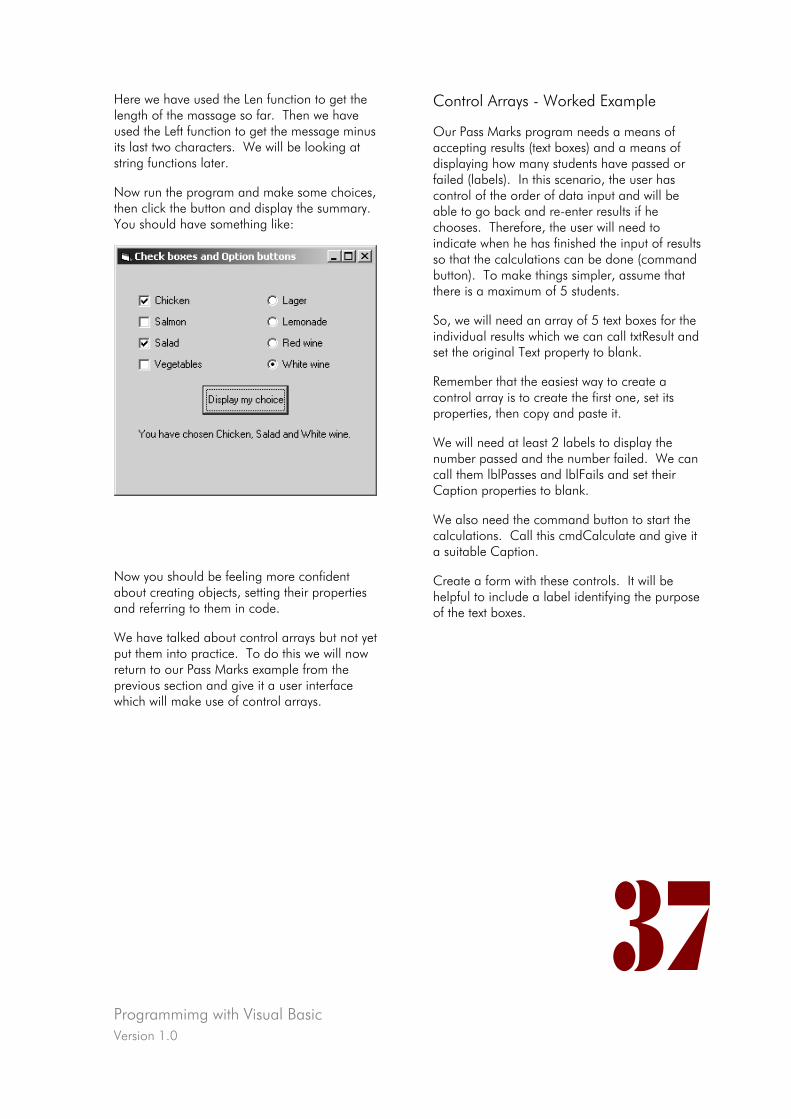
Programmimg with Visual Basic Version 1.0
37
Here we have used the Len function to get the length of the massage so far. Then we have used the Left function to get the message minus its last two characters. We will be looking at string functions later.
Now run the program and make some choices, then click the button and display the summary. You should have something like:
Now you should be feeling more confident about creating objects, setting their properties and referring to them in code.
We have talked about control arrays but not yet put them into practice. To do this we will now return to our Pass Marks example from the previous section and give it a user interface which will make use of control arrays.
Control Arrays - Worked Example
Our Pass Marks program needs a means of accepting results (text boxes) and a means of displaying how many students have passed or failed (labels). In this scenario, the user has control of the order of data input and will be able to go back and re-enter results if he chooses. Therefore, the user will need to indicate when he has finished the input of results so that the calculations can be done (command button). To make things simpler, assume that there is a maximum of 5 students.
So, we will need an array of 5 text boxes for the individual results which we can call txtResult and set the original Text property to blank.
Remember that the easiest way to create a control array is to create the first one, set its properties, then copy and paste it.
We will need at least 2 labels to display the number passed and the number failed. We can call them lblPasses and lblFails and set their Caption properties to blank.
We also need the command button to start the calculations. Call this cmdCalculate and give it a suitable Caption.
Create a form with these controls. It will be helpful to include a label identifying the purpose of the text boxes.
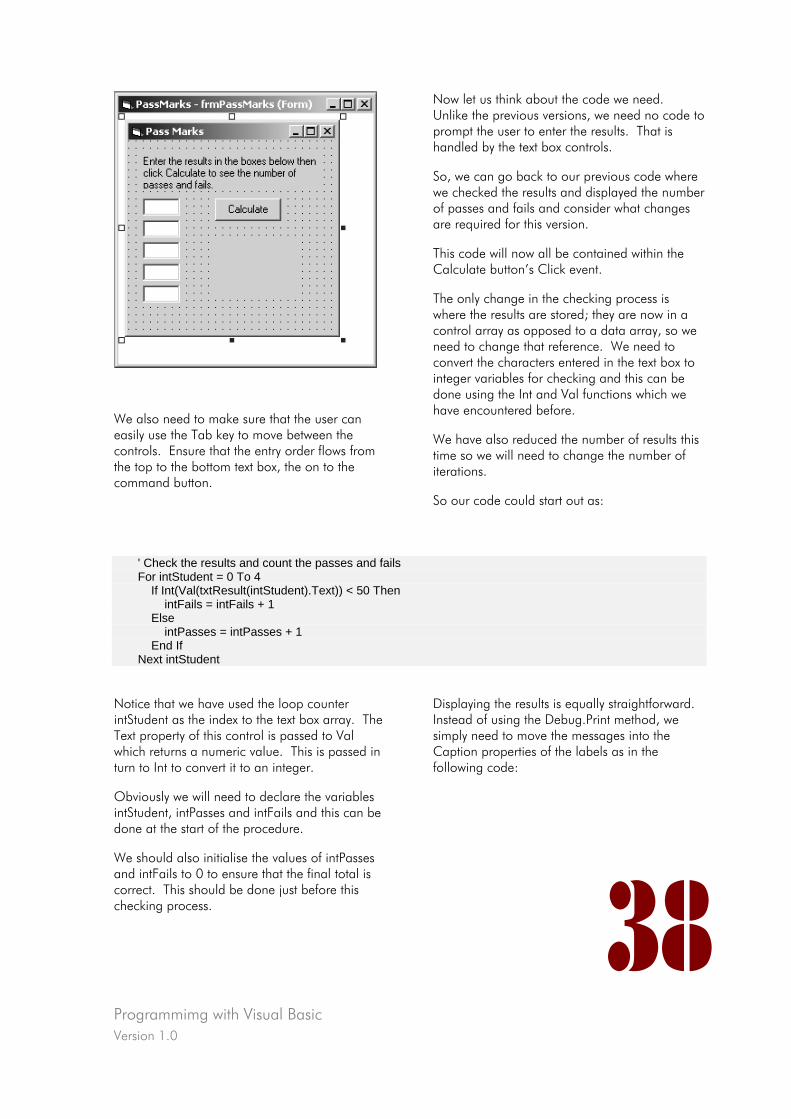
Programmimg with Visual Basic Version 1.0
38
We also need to make sure that the user can easily use the Tab key to move between the controls. Ensure that the entry order flows from the top to the bottom text box, the on to the command button.
Now let us think about the code we need. Unlike the previous versions, we need no code to prompt the user to enter the results. That is handled by the text box controls.
So, we can go back to our previous code where we checked the results and displayed the number of passes and fails and consider what changes are required for this version.
This code will now all be contained within the Calculate button’s Click event.
The only change in the checking process is where the results are stored; they are now in a control array as opposed to a data array, so we need to change that reference. We need to convert the characters entered in the text box to integer variables for checking and this can be done using the Int and Val functions which we have encountered before.
We have also reduced the number of results this time so we will need to change the number of iterations.
So our code could start out as:
' Check the results and count the passes and fails For intStudent = 0 To 4 If Int(Val(txtResult(intStudent).Text)) < 50 Then intFails = intFails + 1 Else intPasses = intPasses + 1 End If Next intStudent
Notice that we have used the loop counter intStudent as the index to the text box array. The Text property of this control is passed to Val which returns a numeric value. This is passed in turn to Int to convert it to an integer.
Obviously we will need to declare the variables intStudent, intPasses and intFails and this can be done at the start of the procedure.
We should also initialise the values of intPasses and intFails to 0 to ensure that the final total is correct. This should be done just before this checking process.
Displaying the results is equally straightforward. Instead of using the Debug.Print method, we simply need to move the messages into the Caption properties of the labels as in the following code:
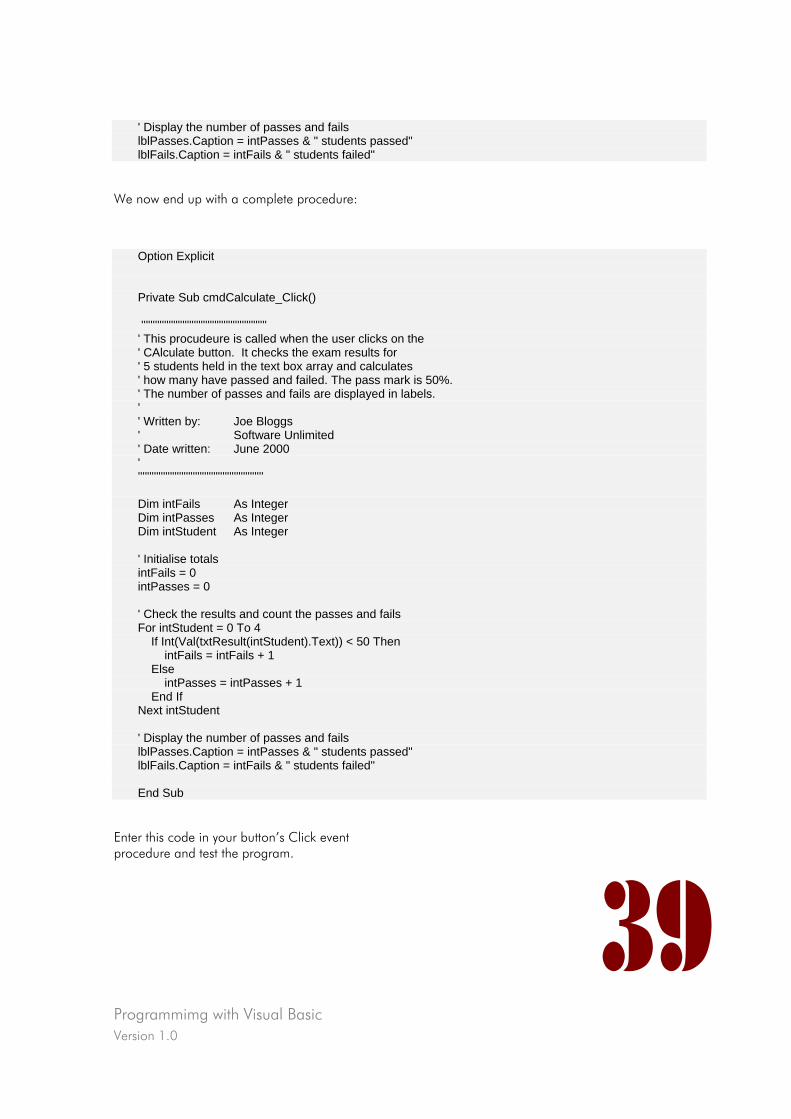
Programmimg with Visual Basic Version 1.0
39
' Display the number of passes and fails lblPasses.Caption = intPasses & " students passed" lblFails.Caption = intFails & " students failed"
We now end up with a complete procedure:
Option Explicit Private Sub cmdCalculate_Click() ''''''''''''''''''''''''''''''''''''''''''''''''''''''' ' This procudeure is called when the user clicks on the ' CAlculate button. It checks the exam results for ' 5 students held in the text box array and calculates ' how many have passed and failed. The pass mark is 50%. ' The number of passes and fails are displayed in labels. ' ' Written by: Joe Bloggs ' Software Unlimited ' Date written: June 2000 ' ''''''''''''''''''''''''''''''''''''''''''''''''''''''' Dim intFails As Integer Dim intPasses As Integer Dim intStudent As Integer ' Initialise totals intFails = 0 intPasses = 0 ' Check the results and count the passes and fails For intStudent = 0 To 4 If Int(Val(txtResult(intStudent).Text)) < 50 Then intFails = intFails + 1 Else intPasses = intPasses + 1 End If Next intStudent ' Display the number of passes and fails lblPasses.Caption = intPasses & " students passed" lblFails.Caption = intFails & " students failed" End Sub
Enter this code in your button’s Click event procedure and test the program.
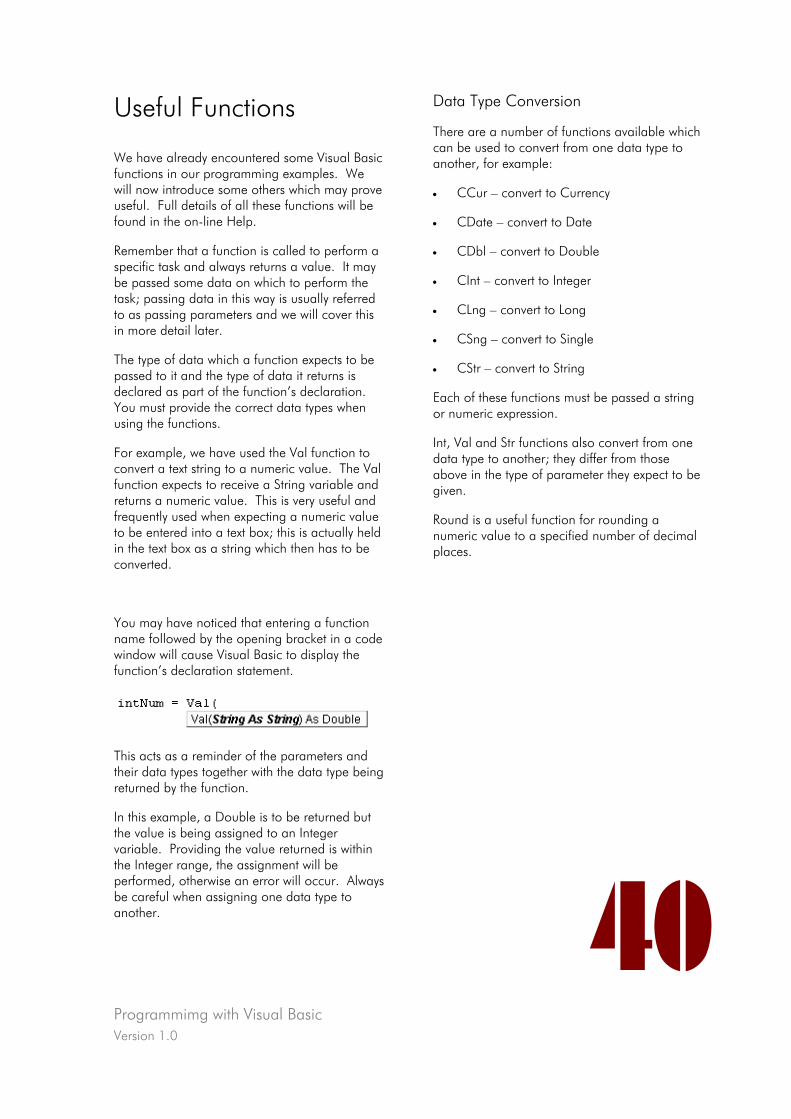
Programmimg with Visual Basic Version 1.0
40
Useful Functions
We have already encountered some Visual Basic functions in our programming examples. We will now introduce some others which may prove useful. Full details of all these functions will be found in the on-line Help.
Remember that a function is called to perform a specific task and always returns a value. It may be passed some data on which to perform the task; passing data in this way is usually referred to as passing parameters and we will cover this in more detail later.
The type of data which a function expects to be passed to it and the type of data it returns is declared as part of the function’s declaration. You must provide the correct data types when using the functions.
For example, we have used the Val function to convert a text string to a numeric value. The Val function expects to receive a String variable and returns a numeric value. This is very useful and frequently used when expecting a numeric value to be entered into a text box; this is actually held in the text box as a string which then has to be converted.
You may have noticed that entering a function name followed by the opening bracket in a code window will cause Visual Basic to display the function’s declaration statement.
This acts as a reminder of the parameters and their data types together with the data type being returned by the function.
In this example, a Double is to be returned but the value is being assigned to an Integer variable. Providing the value returned is within the Integer range, the assignment will be performed, otherwise an error will occur. Always be careful when assigning one data type to another.
Data Type Conversion
There are a number of functions available which can be used to convert from one data type to another, for example:
• CCur – convert to Currency
• CDate – convert to Date
• CDbl – convert to Double
• CInt – convert to Integer
• CLng – convert to Long
• CSng – convert to Single
• CStr – convert to String
Each of these functions must be passed a string or numeric expression.
Int, Val and Str functions also convert from one data type to another; they differ from those above in the type of parameter they expect to be given.
Round is a useful function for rounding a numeric value to a specified number of decimal places.
Programmimg with Visual Basic Version 1.0
41
Date and Time
There is a variety of functions to access the date and time as held by your system.
Function call returns
Now date and time
Date date
Time time
Day (date) day (1-31)
Month (date) month (1-12)
Year (date) year
Weekday (date,[first day])) day number (1-7)
Hour (time) hour (0-23)
Minute (time) minute (0-59)
Second (time) second (0-59)
Most of these are quite self-explanatory. For example, to get the number of the current day in the month you could use the statement:
intDay = Day(Date) This gets the current date from the system, then accesses the day part.
To get the number of the current day of the week, use the Weekday function:
intDayOfWeek = Weekday(Date) This again gets the current system date, gets the day name and returns it as a number. It assumes that day 1 is Sunday and Thursday, therefore, would be day 5.
If you consider a different day to be day 1, then pass this to Weekday using the fixed constants for day names, for example:
intDayOfWeek = Weekday(Date, vbMonday) This tells the function to take Monday as day 1. In this case, Thursday will be returned as 4.
Handling Strings
It is sometimes necessary to scan strings and extract parts of them or check whether a certain combination of characters is contained within them. You might need to know the length of a string or remove any leading or trailing spaces. You might want to convert between lower-case and upper-case. Sometimes you might need to control the appearance and layout of strings.
There are a number of special functions that can be used:
• Left, Mid, Right – extract various portions of a string
• InStr – gives the starting position of one string within another
• Len – gives the length of a string
• Trim, Ltrim, Rtrim – remove leading and trailing spaces
• LCase, UCase – convert between lower and upper-case
• Chr, Asc – convert between characters and their equivalent ASCII codes
• Format – controls the layout of a string
String manipulation
The Left and Right functions must be given a string and the number of characters to return:
Left("Good Afternoon", 3) will give “Goo”
Right("Good Afternoon", 3) will give “oon”
Programmimg with Visual Basic Version 1.0
42
The Mid function requires three pieces of information, a string, a starting position and the number of characters to return:
Mid("Good Afternoon", 6, 5) will give “After”
InStr can be used when looking for a string within a string. It requires two pieces of information - the string to look at and the string that is being looked for. It returns the value of the starting position of the string asked for. If the required string is not present, the function returns a value of zero.
InStr ("Good Afternoon", "noon") will return 11
The Len function is simply passed a string and returns the length.
Len(“Good Afternoon”)
will return 14
The trim functions are used to remove any leading and/or trailing spaces from a string.
Trim(" This is my string ") will give "This is my string"
LTrim(" This is my string ") will give "This is my string "
RTrim(" This is my string ") will give " This is my string"
Sometimes, especially when making comparisons, working with strings can be extremely awkward because Visual Basic is case sensitive. This means that it considers ‘a’ and ’A’ to be different characters.
For example, if you have asked your user to enter either a "y" or an "n" in response to a yes/no type question, how do you evaluate their response if they enter "Y" instead of "y"?
You can use the LCase or UCase functions to convert the response before checking it.
LCase(“A”) will give “a”
UCase(“a”) will give “A”
ASCII character codes
Some special keys and characters cannot be used directly in your programs because they have a special meaning within the development interface or the language. For example, it is impossible to set a Caption property containing a new line at design-time.
To overcome this problem, we can use the Asc and Chr functions. These convert a character to the equivalent ASCII character code and vice versa. The Chr function is often used to add a carriage return or new line character to a string:
Chr(10) gives a new line
Chr(13) gives a carriage return
Asc(“A”) gives 65
Asc(“a”) gives 97
Formatting strings
Sometimes it is necessary to change the appearance and layout of strings. This can be accomplished using the Format function. It is given an expression and the format required.
Format is commonly used when displaying
Programmimg with Visual Basic Version 1.0
43
numerical or date/time values as a string in a text box.
It can use “named” formats or user-defined formats. For example:
Format (12345, “general”) gives the number with no thousands separator or decimal places i.e. 12345
Format (“12 January 2003”, “short date”) gives the date in short-date format, dd/mm/yy, i.e. 12/01/03
Format (12345, “currency”) gives the number with appropriate thousands separator and fixed to two decimal places, i.e. 12,345.00
User defined formats can be created which are especially useful when displaying numeric or date/time values.
In numeric formatting, the # symbol means, if there is a character in that position display it, otherwise leave it out. A 0 means always print a character in that position.
Format (12345, “###,###”) gives 12,345
Format (12345, “###,###.##”) gives 12,345.
Format (12345, “###,###.#0”) gives 12,345.00
Format (12345.678, “###,###. #0”) gives 12345.678 as 12,345.68 (rounded off to two decimal places.)
Format(“2 Jan 2001”, “dddd dd/mm/yyyy”) gives “Tuesday 02/01/2001”
Format(“17:30”, "hh:mm:ss AMPM") gives “05:30:00 PM”
It is also possible to quickly display a string in all upper-case or lower-case using formats:
Format("HELLO", "<") gives "hello"
Format("This is it", ">") gives "THIS IS IT"
Programmimg with Visual Basic Version 1.0
44
Message Boxes
Sometimes we will want to display a message to the user and require him to respond before continuing. MsgBox can be used to achieve this.
In its simplest form, it can be used as a procedure giving no return value. For example:
MsgBox "Record deleted" will display a pop-up window on-screen with the message as it appears in the quotation marks. An OK button will also be included in the window and the user must press this before processing can continue.
Message boxes can also be used to provide break points when debugging your program.
The second use of MsgBox is as a function.
This allows much more interactivity with the message box, since the user can be invited to press one of several buttons. A value is returned depending on the button pressed.
The parameters passed to the MsgBox function are:
• message to be displayed
• indication of which buttons and icon are to be displayed
• title for the message box
There are a variety of button combinations possible and Visual Basic provides fixed numeric variables to indicate these:
• vbOKOnly
• vbOKCancel
• vbAbortRetryIgnore
• vbYesNoCancel
• vbYesNo
• vbRetryCancel
The names are self-explanatory.
A number of icons are also available for display
in the message box showing the type of message:
• vbCritical
• vbQuestion
• vbExclamation
• vbInformation
Again, the names are self-explanatory.
To use these in combination, simply add their values together. For example,
intResponse = MsgBox(“Delete?”, vbYesNo+vbQuestion, “Record delete”) will give a message box with Yes and No buttons and a question icon. (Note that this statement should appear on a single line.)
The return value can also be checked using set variables included with Visual Basic. These correspond to the buttons which can be pressed:
vbOK, vbCancel, vbAbort, vbRetry, vbIgnore, vbYes and vbNo.
For example, we could check the response from the previous message box as follows:
If intResponse = vbYes Then
The appropriate processing could then be done.
Again, full details of the MsgBox function are found in the on-line Help.
Programmimg with Visual Basic Version 1.0
45
Using colour
We have seen that many objects have colour properties, such as BackColor and ForeColor. These can be set at design-time by selecting a colour from a palette. Sometimes, you may wish to set a colour at run-time or use a colour which does not appear in the palette provided. There are two functions available which can be used to set a colour at run-time.
RGB function
Colours are treated as being a mix of red, green and blue. RGB gets its name from the initials of these three colours and expects three numeric values corresponding to them as parameters. Each of these values must be in the range 0 to 255.
RGB (255, 0, 0) gives red,
RGB (0, 255, 0) gives green,
RGB (0, 0, 255) gives blue,
RGB (0, 0, 0) gives black and
RGB (255, 255, 255) gives white.
Any other values give a mixed colour. For example:
RGB (255, 255, 0) gives yellow.
The value returned by RGB is a Long representing the RGB value of the colour.
So the BackColor property of a form could be set to a bright green colour with the following statement:
frmColour.BackColor = RGB (12, 200, 92) QBColor function
This function will set a colour chosen from a basic list of sixteen fixed colours. It is given one parameter, a numeric value in the range 0 to 15, where 0 gives black while 15 gives a bright white.
frmColour.BackColor = QBColor (13) gives a light magenta colour.
The value returned by QBColor is, again, a Long representing the RGB value of the colour.
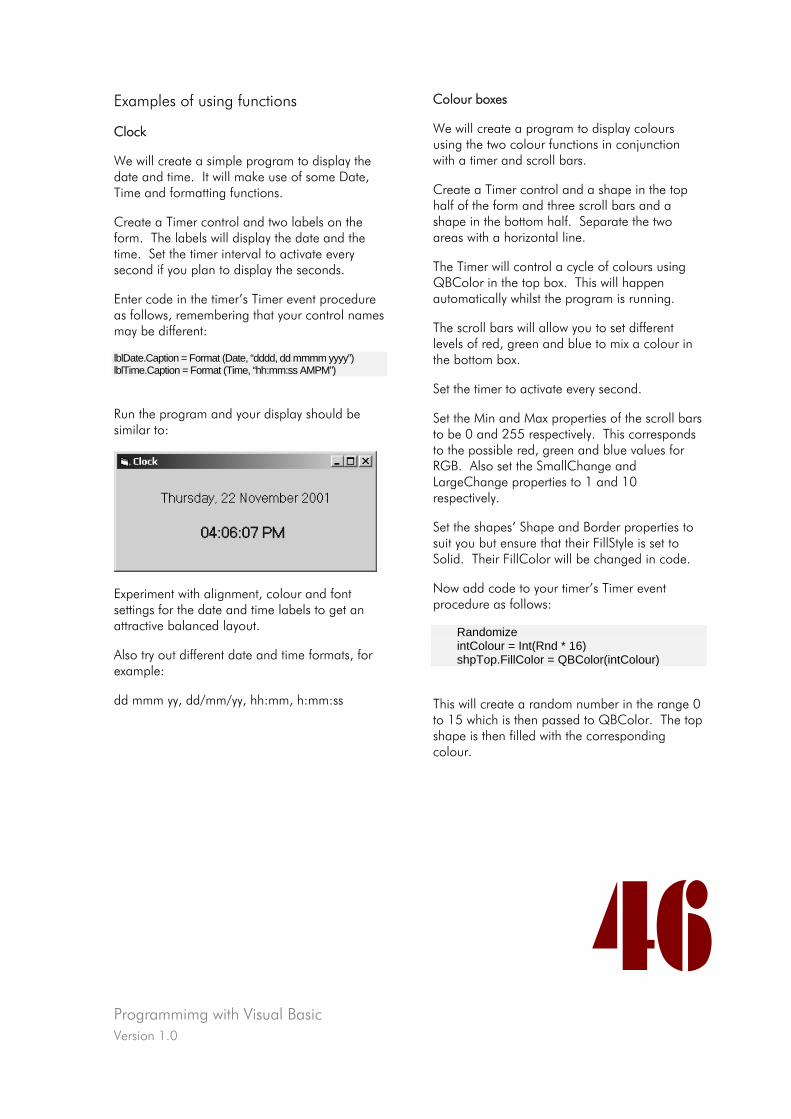
Programmimg with Visual Basic Version 1.0
46
Examples of using functions
Clock
We will create a simple program to display the date and time. It will make use of some Date, Time and formatting functions.
Create a Timer control and two labels on the form. The labels will display the date and the time. Set the timer interval to activate every second if you plan to display the seconds.
Enter code in the timer’s Timer event procedure as follows, remembering that your control names may be different:
lblDate.Caption = Format (Date, “dddd, dd mmmm yyyy”) lblTime.Caption = Format (Time, “hh:mm:ss AMPM”)
Run the program and your display should be similar to:
Experiment with alignment, colour and font settings for the date and time labels to get an attractive balanced layout.
Also try out different date and time formats, for example:
dd mmm yy, dd/mm/yy, hh:mm, h:mm:ss
Colour boxes
We will create a program to display colours using the two colour functions in conjunction with a timer and scroll bars.
Create a Timer control and a shape in the top half of the form and three scroll bars and a shape in the bottom half. Separate the two areas with a horizontal line.
The Timer will control a cycle of colours using QBColor in the top box. This will happen automatically whilst the program is running.
The scroll bars will allow you to set different levels of red, green and blue to mix a colour in the bottom box.
Set the timer to activate every second.
Set the Min and Max properties of the scroll bars to be 0 and 255 respectively. This corresponds to the possible red, green and blue values for RGB. Also set the SmallChange and LargeChange properties to 1 and 10 respectively.
Set the shapes’ Shape and Border properties to suit you but ensure that their FillStyle is set to Solid. Their FillColor will be changed in code.
Now add code to your timer’s Timer event procedure as follows:
Randomize intColour = Int(Rnd * 16) shpTop.FillColor = QBColor(intColour)
This will create a random number in the range 0 to 15 which is then passed to QBColor. The top shape is then filled with the corresponding colour.
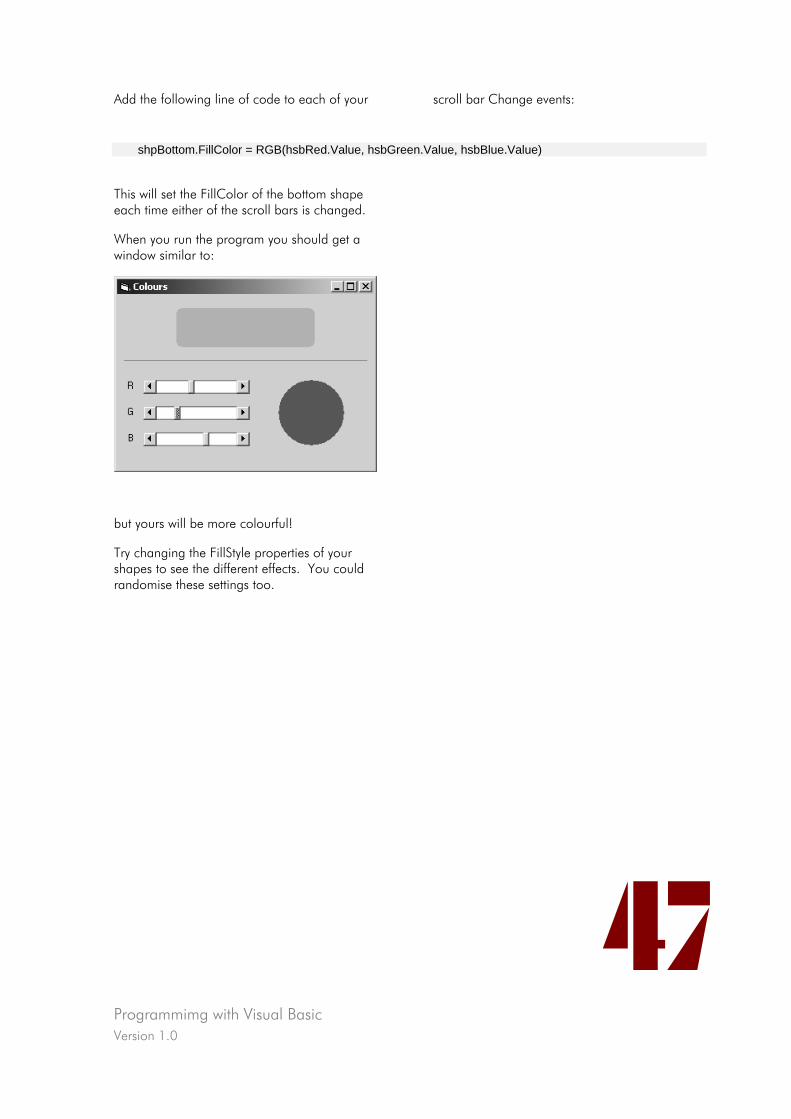
Programmimg with Visual Basic Version 1.0
47
Add the following line of code to each of your scroll bar Change events:
shpBottom.FillColor = RGB(hsbRed.Value, hsbGreen.Value, hsbBlue.Value)
This will set the FillColor of the bottom shape each time either of the scroll bars is changed.
When you run the program you should get a window similar to:
but yours will be more colourful!
Try changing the FillStyle properties of your shapes to see the different effects. You could randomise these settings too.
Programmimg with Visual Basic Version 1.0
48
Modular Environment
Visual Basic programs are modular and several modules are incorporated into a single application. For example, a form module is created for each form in an application. This holds details of the form itself and all the code
which goes with it. As we have already seen, this form module is saved in a separate file with a .frm extension.
There are other types of files which can be included in a Visual Basic project. These are:
File Description
Project file (.VBP) contains the paths and filenames of the files in a project. The project file also contains options that you set for that project. When you open a project file, all its files are listed in the Project window.
Visual Basic project workspace file (.VBW)
automatically created when you save a project. It takes the project name together with the. vbw extension. This saves information about the layout of the workspace so that, next time the project is opened, the layout is the same.
Form (.FRM) contains a description of a form (window) and any items it contains (such as buttons, text boxes, etc.) as well as procedures, functions and variables associated with those items.
Standard module (.BAS)
contains procedures, functions and variables that are not specific to a particular object or control. A standard module is often stored in a directory created for a particular project, although you can share standard modules among many projects.
Resource files (.RES) contains bitmaps, text strings, or other program resources. You can modify resources in a resource file without having to modify programming code. One reason for using a resource file is to make it easy to develop a single application in different languages (for example, English and French).
Class module (.CLS) similar to a form module, except that a class module has no visible user interface (such as windows, buttons, and so forth). You use a class module to create a new class (or kind) of object, including its properties and methods (but no events).
User control (.OCX) contains one or more custom controls, which are displayed as tools in a toolbox.
So far we have had only one form in our programs so you will have seen a project file, a workspace file and form file for each of your projects. We will now go on to look at having more than one form in a project and using Standard code modules.
This course does not cover the other file types listed above in any detail.
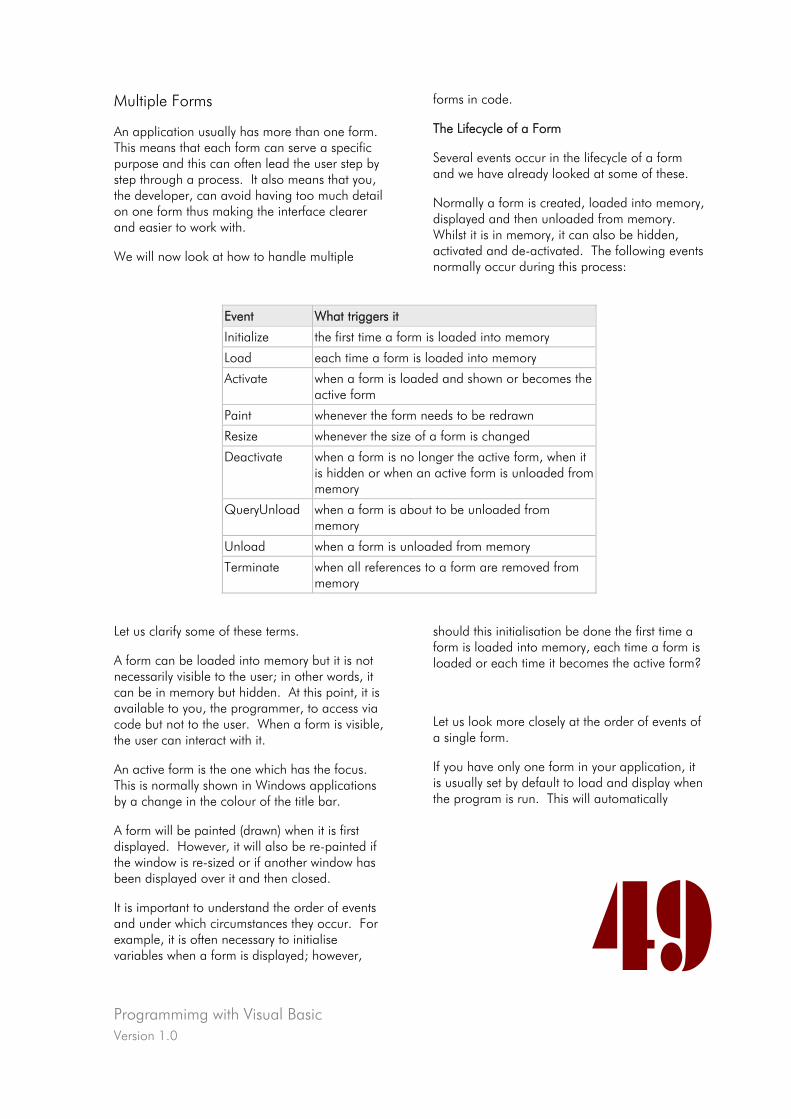
Programmimg with Visual Basic Version 1.0
49
Multiple Forms
An application usually has more than one form. This means that each form can serve a specific purpose and this can often lead the user step by step through a process. It also means that you, the developer, can avoid having too much detail on one form thus making the interface clearer and easier to work with.
We will now look at how to handle multiple
forms in code.
The Lifecycle of a Form
Several events occur in the lifecycle of a form and we have already looked at some of these.
Normally a form is created, loaded into memory, displayed and then unloaded from memory. Whilst it is in memory, it can also be hidden, activated and de-activated. The following events normally occur during this process:
Event What triggers it
Initialize the first time a form is loaded into memory
Load each time a form is loaded into memory
Activate when a form is loaded and shown or becomes the active form
Paint whenever the form needs to be redrawn
Resize whenever the size of a form is changed
Deactivate when a form is no longer the active form, when it is hidden or when an active form is unloaded from memory
QueryUnload when a form is about to be unloaded from memory
Unload when a form is unloaded from memory
Terminate when all references to a form are removed from memory
Let us clarify some of these terms.
A form can be loaded into memory but it is not necessarily visible to the user; in other words, it can be in memory but hidden. At this point, it is available to you, the programmer, to access via code but not to the user. When a form is visible, the user can interact with it.
An active form is the one which has the focus. This is normally shown in Windows applications by a change in the colour of the title bar.
A form will be painted (drawn) when it is first displayed. However, it will also be re-painted if the window is re-sized or if another window has been displayed over it and then closed.
It is important to understand the order of events and under which circumstances they occur. For example, it is often necessary to initialise variables when a form is displayed; however,
should this initialisation be done the first time a form is loaded into memory, each time a form is loaded or each time it becomes the active form?
Let us look more closely at the order of events of a single form.
If you have only one form in your application, it is usually set by default to load and display when the program is run. This will automatically
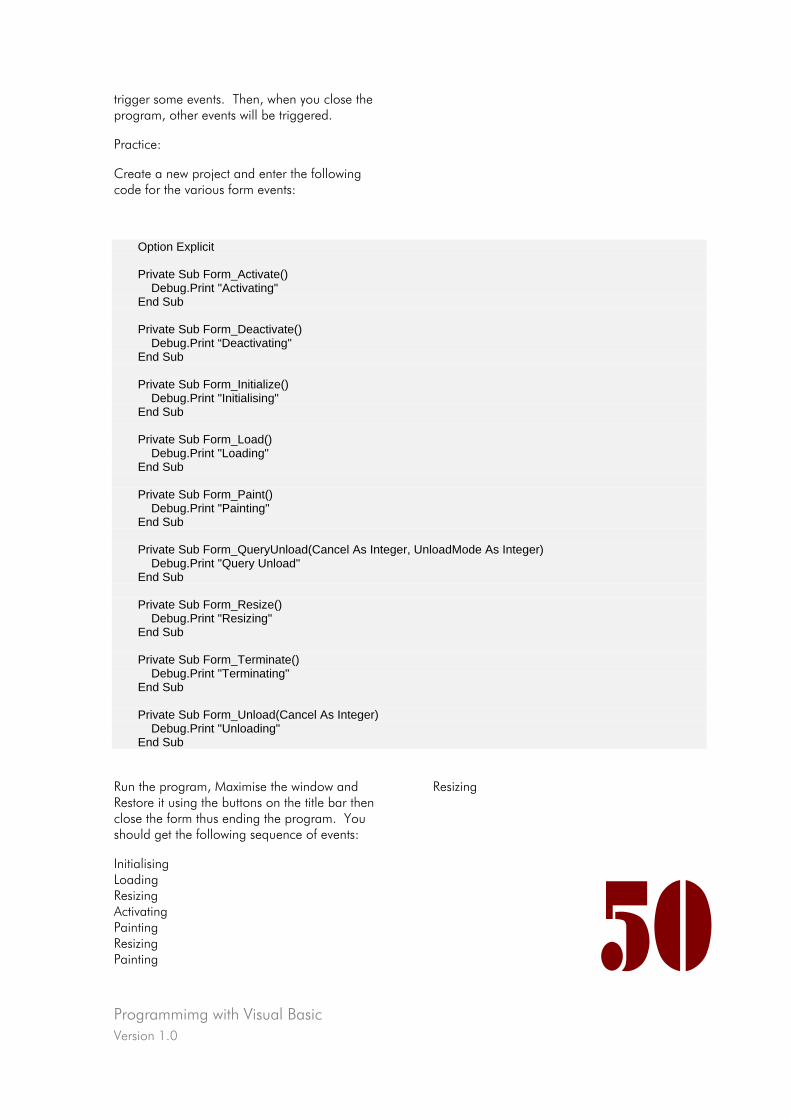
Programmimg with Visual Basic Version 1.0
50
trigger some events. Then, when you close the program, other events will be triggered.
Practice:
Create a new project and enter the following code for the various form events:
Option Explicit
Private Sub Form_Activate() Debug.Print "Activating" End Sub
Private Sub Form_Deactivate() Debug.Print “Deactivating" End Sub
Private Sub Form_Initialize() Debug.Print "Initialising" End Sub
Private Sub Form_Load() Debug.Print "Loading" End Sub
Private Sub Form_Paint() Debug.Print "Painting" End Sub
Private Sub Form_QueryUnload(Cancel As Integer, UnloadMode As Integer) Debug.Print "Query Unload" End Sub
Private Sub Form_Resize() Debug.Print "Resizing" End Sub
Private Sub Form_Terminate() Debug.Print "Terminating" End Sub
Private Sub Form_Unload(Cancel As Integer) Debug.Print "Unloading" End Sub
Run the program, Maximise the window and Restore it using the buttons on the title bar then close the form thus ending the program. You should get the following sequence of events:
Initialising Loading Resizing Activating Painting Resizing Painting
Resizing
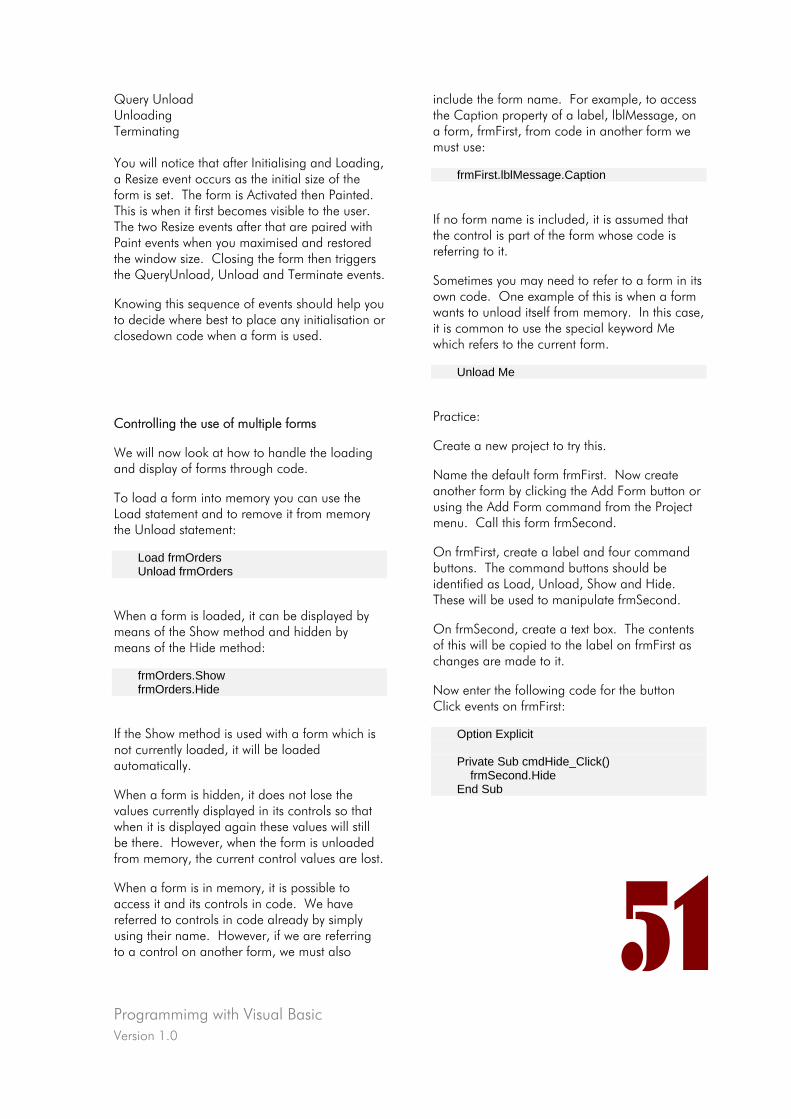
Programmimg with Visual Basic Version 1.0
51
Query Unload Unloading Terminating You will notice that after Initialising and Loading, a Resize event occurs as the initial size of the form is set. The form is Activated then Painted. This is when it first becomes visible to the user. The two Resize events after that are paired with Paint events when you maximised and restored the window size. Closing the form then triggers the QueryUnload, Unload and Terminate events.
Knowing this sequence of events should help you to decide where best to place any initialisation or closedown code when a form is used.
Controlling the use of multiple forms
We will now look at how to handle the loading and display of forms through code.
To load a form into memory you can use the Load statement and to remove it from memory the Unload statement:
Load frmOrders Unload frmOrders
When a form is loaded, it can be displayed by means of the Show method and hidden by means of the Hide method:
frmOrders.Show frmOrders.Hide
If the Show method is used with a form which is not currently loaded, it will be loaded automatically.
When a form is hidden, it does not lose the values currently displayed in its controls so that when it is displayed again these values will still be there. However, when the form is unloaded from memory, the current control values are lost.
When a form is in memory, it is possible to access it and its controls in code. We have referred to controls in code already by simply using their name. However, if we are referring to a control on another form, we must also
include the form name. For example, to access the Caption property of a label, lblMessage, on a form, frmFirst, from code in another form we must use:
frmFirst.lblMessage.Caption
If no form name is included, it is assumed that the control is part of the form whose code is referring to it.
Sometimes you may need to refer to a form in its own code. One example of this is when a form wants to unload itself from memory. In this case, it is common to use the special keyword Me which refers to the current form.
Unload Me
Practice:
Create a new project to try this.
Name the default form frmFirst. Now create another form by clicking the Add Form button or using the Add Form command from the Project menu. Call this form frmSecond.
On frmFirst, create a label and four command buttons. The command buttons should be identified as Load, Unload, Show and Hide. These will be used to manipulate frmSecond.
On frmSecond, create a text box. The contents of this will be copied to the label on frmFirst as changes are made to it.
Now enter the following code for the button Click events on frmFirst:
Option Explicit Private Sub cmdHide_Click() frmSecond.Hide End Sub
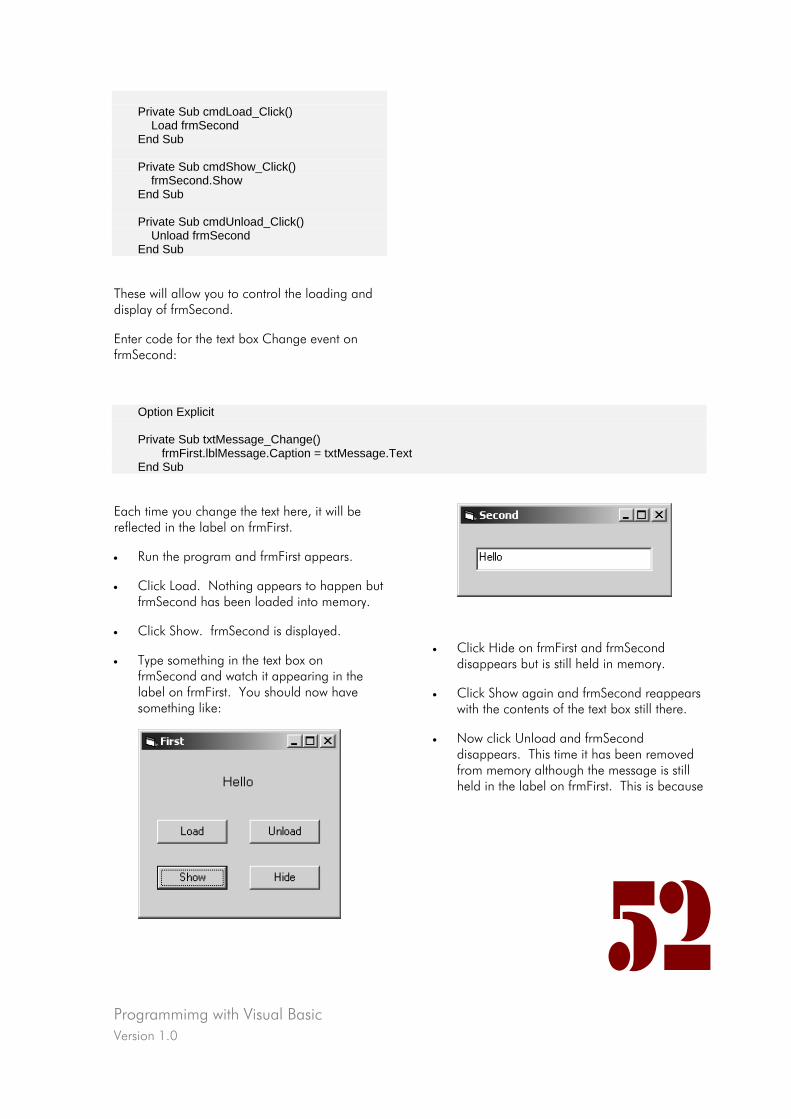
Programmimg with Visual Basic Version 1.0
52
Private Sub cmdLoad_Click() Load frmSecond End Sub Private Sub cmdShow_Click() frmSecond.Show End Sub Private Sub cmdUnload_Click() Unload frmSecond End Sub
These will allow you to control the loading and display of frmSecond.
Enter code for the text box Change event on frmSecond:
Option Explicit Private Sub txtMessage_Change()
frmFirst.lblMessage.Caption = txtMessage.Text End Sub
Each time you change the text here, it will be reflected in the label on frmFirst.
• Run the program and frmFirst appears.
• Click Load. Nothing appears to happen but frmSecond has been loaded into memory.
• Click Show. frmSecond is displayed.
• Type something in the text box on frmSecond and watch it appearing in the label on frmFirst. You should now have something like:
• Click Hide on frmFirst and frmSecond disappears but is still held in memory.
• Click Show again and frmSecond reappears with the contents of the text box still there.
• Now click Unload and frmSecond disappears. This time it has been removed from memory although the message is still held in the label on frmFirst. This is because
Programmimg with Visual Basic Version 1.0
ext box before frmSecond was unloaded.
• ded and displayed with an empty text box.
• text box and it will now appear on frmFirst.
• Click Unload then clase frmFirst.
If you got confused during this, try it again!
Modal and Modeless forms
ver,
er
l e
handled by using modal and modeless forms.
er forms. This is the default state of all forms.
waits
r
r working
with other forms in the application.
tion, they can still switch to another application.
y adding a parameter to the Show method. 53
no change event was triggered on the t
Click Show. This time frmSecond is loa
Type another message in the
During this last practice exercise, you have been switching between forms, clicking buttons on oneand typing into the other. Sometimes, howeyou will want to force the user to complete details on one form before switching to anothone. You may have noticed this when using applications. A dialog box is shown and you wilnot be allowed to go to another window beforcompleting the dialog and closing it. This is
A modeless form enables the user to interact with oth
A modal form, however, forces the user to stay on that form until the required action is taken. A typical example of this is the MsgBox whichfor a user response before processing can continue. It ensures that the user cannot switchfrom it to another form. When designing youown modal forms, it is therefore essential to include a button, for example, allowing the useto respond to the form then continue
Although a modal form stops the user moving between windows within an applica
The manner in which a form is displayed is controlled b
frmOrders.Show vbModeless frmError.Show vbModal
e
0 and 1 which indicate the style. Using them akes the code easier to read and understand.
esigning applications and forms, it is important to decide which type of form is required.
The two variables vbModeless and vbModal arsupplied by Visual Basic to represent the values
m
So, when d
Programmimg with Visual Basic Version 1.0
54
Standard modules
So far we have been designing forms and coding procedures as part of the form itself. We have used event procedures which are linked automatically to objects. We have also used general procedures which we have created ourselves and called as required.
All these procedures have been stored as part of the form itself. This is fine if you only want to use the general procedures as part of the processing for that form.
However, it is possible that you will want to call a general procedure from code in more than one form. One of the main considerations when creating general procedures is that they may be useful in many situations. In this case, it is common to code general procedures in a separate Standard module which is saved with a .bas extension.
For example, you may have a function which checks that a date input is not in the future. This function may be required for many data entry forms and could be placed in a standard module; in this way it will be easily available for all forms.
To add a standard module to your project, choose Add Module from the drop-down Add button on the toolbar or choose Project, Add Module from the menu. This will open a new code window for the standard module.
Notice that the module has a Name property and it is good practice to give the module a suitable name, probably based on the type of procedures or variables which are to be stored in it. If all the procedures are simply for a single application then the name could be based on the project name, say basPassMarks for our sample program. However, you may want to create a set of truly general procedures and functions which can be used by many applications and the name should then reflect
this.
The choice of where the module is to be stored should also be based on whether it is for a single application or for more general use.
Public v. Private procedures
You will have noticed that all our procedures to date have included the keyword Private in their declaration. This means that they can only be called from other procedures within the same module.
This certainly makes sense for event procedures which are only relevant to the objects to which they refer. Declaring a procedure Private is also useful if you have a procedure that would make sense only in a certain context and you do not want it inadvertently called from outside the module.
However, if general procedures are created so that they can be called from anywhere within an application, they cannot be made Private. By default, therefore, general procedures are Public, which means that they can be called from any other procedure in the application.
To summarise, if you have a general procedure which is to be used within a single form or module, make it Private and store it in the particular module where it is used. If you have a truly general procedure which is to be used throughout the application, make it Public and store it in a standard module. Visual Basic does allow you, however, to store Public procedures in form modules although this is not best practice.
You are most likely to have a project with forms and a standard module similar to the following structure:
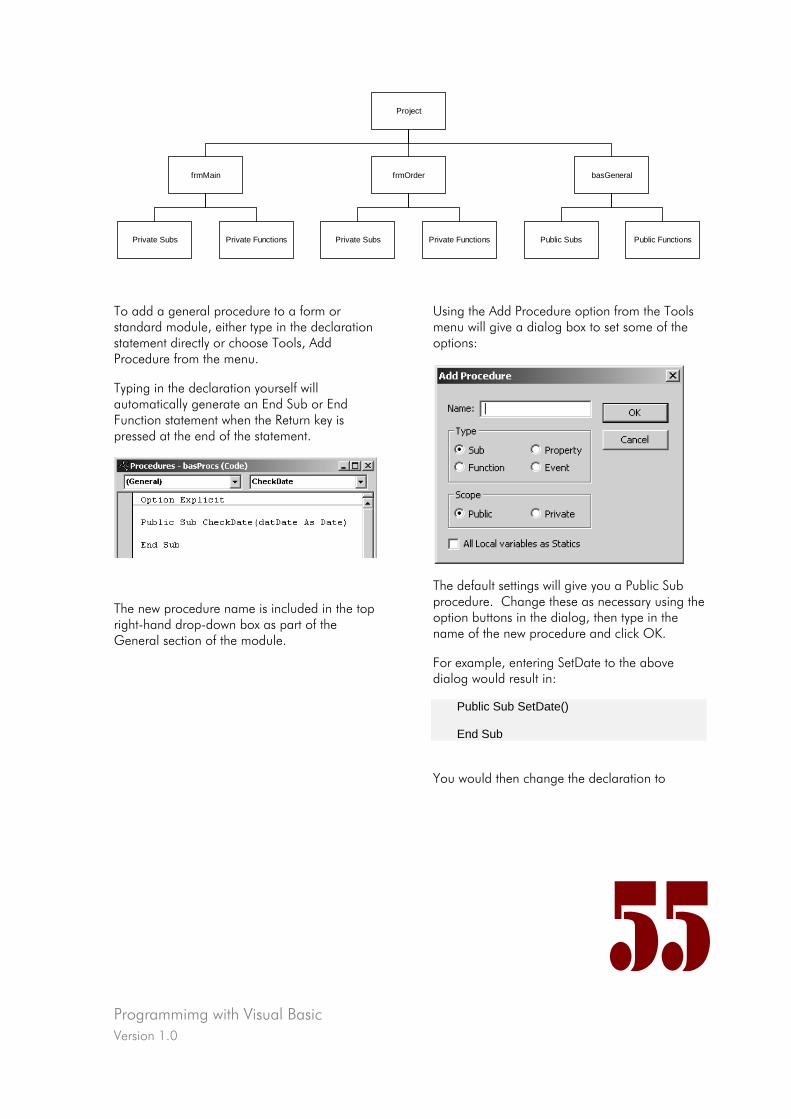
Programmimg with Visual Basic Version 1.0
55
Project
frmMain frmOrder basGeneral
Private Subs Private Functions Private Subs Private Functions Public Subs Public Functions
To add a general procedure to a form or standard module, either type in the declaration statement directly or choose Tools, Add Procedure from the menu.
Typing in the declaration yourself will automatically generate an End Sub or End Function statement when the Return key is pressed at the end of the statement.
The new procedure name is included in the top right-hand drop-down box as part of the General section of the module.
Using the Add Procedure option from the Tools menu will give a dialog box to set some of the options:
The default settings will give you a Public Sub procedure. Change these as necessary using the option buttons in the dialog, then type in the name of the new procedure and click OK.
For example, entering SetDate to the above dialog would result in:
Public Sub SetDate() End Sub
You would then change the declaration to
Programmimg with Visual Basic Version 1.0
56
include any parameters necessary.
To call a public procedure held in a standard module, simply use the name of the procedure as we have done in previous examples. However, to call a public procedure held in a different form module, you must precede the procedure name with the name of the module, for example:
frmMain.DatePast
Starting with a Startup procedure
Normally when you run your project, the first form is loaded and displayed automatically.
However, you might not want to begin your application by loading a form. Instead, certain initialisation processing might need to be carried out before the form is loaded. For example, a data file may need to be opened and read; which form is then loaded might depend on details held in the data file.
To achieve this and ensure that the application starts properly, you should create a Sub procedure called Main in a Standard module that would do any necessary startup processing and then load the appropriate form.
Once the procedure is created and coded, it must be set to run when the application is started. To do this:
• from the Project menu, choose the project Properties option.
• select the General tab.
• from the Startup Object drop-down list, sselect Sub Main.
Displaying a Splash Screen form at startup
You will often notice that when an application starts there is a ‘title’ screen. This can be used as an introduction while any startup processing is performed; it makes any delay in displaying the first form less obvious.
Visual Basic supplies you with a generic Splash Screen form that you can easily modify. To add a Splash Screen form to your application, choose Project, Add Form then select Splash
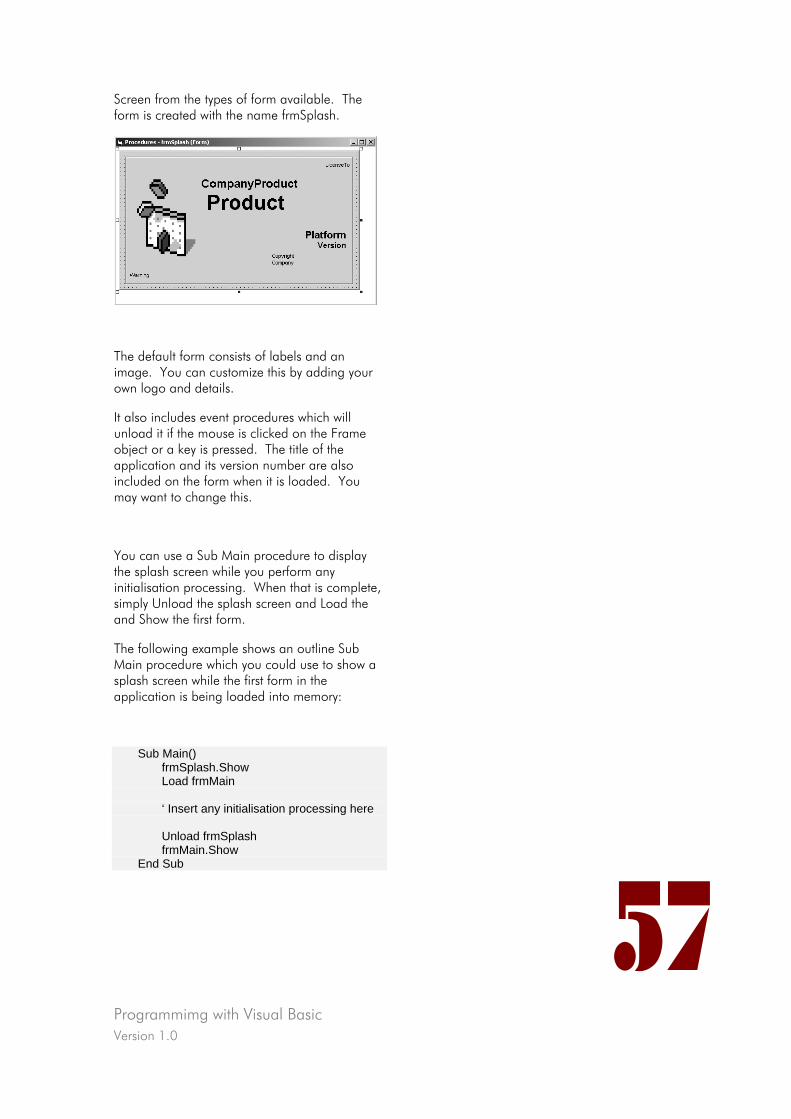
Programmimg with Visual Basic Version 1.0
57
Screen from the types of form available. The form is created with the name frmSplash.
The default form consists of labels and an image. You can customize this by adding your own logo and details.
It also includes event procedures which will unload it if the mouse is clicked on the Frame object or a key is pressed. The title of the application and its version number are also included on the form when it is loaded. You may want to change this.
You can use a Sub Main procedure to display the splash screen while you perform any initialisation processing. When that is complete, simply Unload the splash screen and Load the and Show the first form.
The following example shows an outline Sub Main procedure which you could use to show a splash screen while the first form in the application is being loaded into memory:
Sub Main() frmSplash.Show Load frmMain ‘ Insert any initialisation processing here Unload frmSplash frmMain.Show End Sub
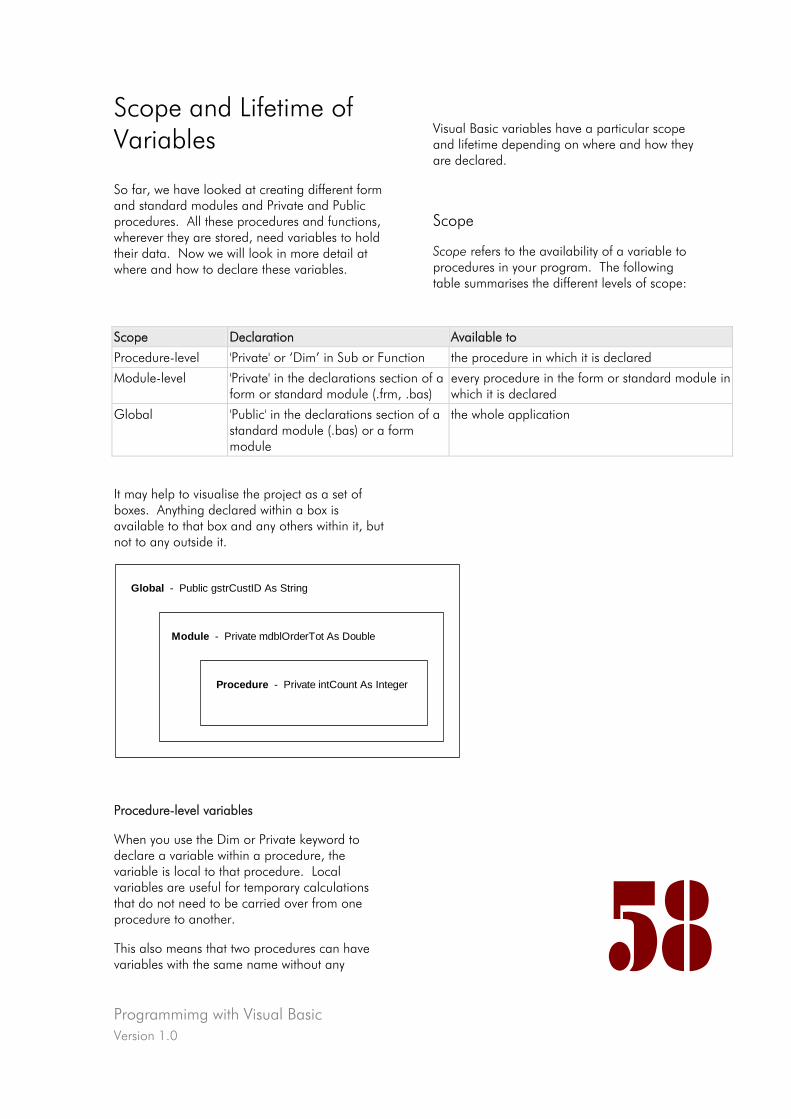
Programmimg with Visual Basic Version 1.0
58
Scope and Lifetime of Variables
So far, we have looked at creating different form and standard modules and Private and Public procedures. All these procedures and functions, wherever they are stored, need variables to hold their data. Now we will look in more detail at where and how to declare these variables.
Visual Basic variables have a particular scope and lifetime depending on where and how they are declared.
Scope
Scope refers to the availability of a variable to procedures in your program. The following table summarises the different levels of scope:
Scope Declaration Available to
Procedure-level 'Private' or ‘Dim’ in Sub or Function the procedure in which it is declared
Module-level 'Private' in the declarations section of a form or standard module (.frm, .bas)
every procedure in the form or standard module in which it is declared
Global 'Public' in the declarations section of a standard module (.bas) or a form module
the whole application
It may help to visualise the project as a set of boxes. Anything declared within a box is available to that box and any others within it, but not to any outside it.
Global - Public gstrCustID As String
Module - Private mdblOrderTot As Double
Procedure - Private intCount As Integer
Procedure-level variables
When you use the Dim or Private keyword to declare a variable within a procedure, the variable is local to that procedure. Local variables are useful for temporary calculations that do not need to be carried over from one procedure to another.
This also means that two procedures can have variables with the same name without any
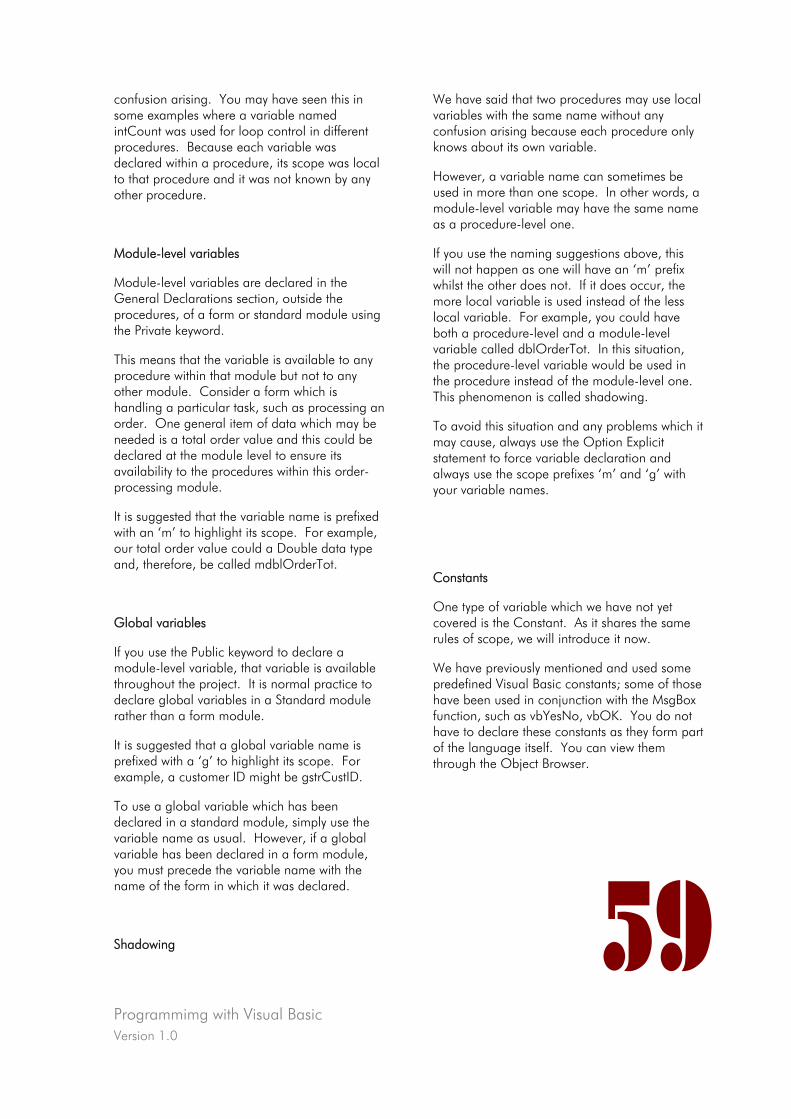
Programmimg with Visual Basic Version 1.0
in
rent
s local
Module-level variables
Module-level variables are declared in the
using
This means that the variable is available to any
sing an
er-
It is suggested that the variable name is prefixed
Global variables
If you use the Public keyword to declare a able
It is suggested that a global variable name is
To use a global variable which has been the
Shadowing 59
confusion arising. You may have seen this some examples where a variable named intCount was used for loop control in diffeprocedures. Because each variable was declared within a procedure, its scope wato that procedure and it was not known by any other procedure.
General Declarations section, outside the procedures, of a form or standard module the Private keyword.
procedure within that module but not to any other module. Consider a form which is handling a particular task, such as procesorder. One general item of data which may be needed is a total order value and this could be declared at the module level to ensure its availability to the procedures within this ordprocessing module.
with an ‘m’ to highlight its scope. For example, our total order value could a Double data type and, therefore, be called mdblOrderTot.
module-level variable, that variable is availthroughout the project. It is normal practice to declare global variables in a Standard module rather than a form module.
prefixed with a ‘g’ to highlight its scope. For example, a customer ID might be gstrCustID.
declared in a standard module, simply usevariable name as usual. However, if a global variable has been declared in a form module, you must precede the variable name with the name of the form in which it was declared.
We have said that two procedures may use local variables with the same name without any confusion arising because each procedure only knows about its own variable.
However, a variable name can sometimes be used in more than one scope. In other words, a module-level variable may have the same name as a procedure-level one.
If you use the naming suggestions above, this will not happen as one will have an ‘m’ prefix whilst the other does not. If it does occur, the more local variable is used instead of the less local variable. For example, you could have both a procedure-level and a module-level variable called dblOrderTot. In this situation, the procedure-level variable would be used in the procedure instead of the module-level one. This phenomenon is called shadowing.
To avoid this situation and any problems which it may cause, always use the Option Explicit statement to force variable declaration and always use the scope prefixes ‘m’ and ‘g’ with your variable names.
Constants
One type of variable which we have not yet covered is the Constant. As it shares the same rules of scope, we will introduce it now.
We have previously mentioned and used some predefined Visual Basic constants; some of those have been used in conjunction with the MsgBox function, such as vbYesNo, vbOK. You do not have to declare these constants as they form part of the language itself. You can view them through the Object Browser.
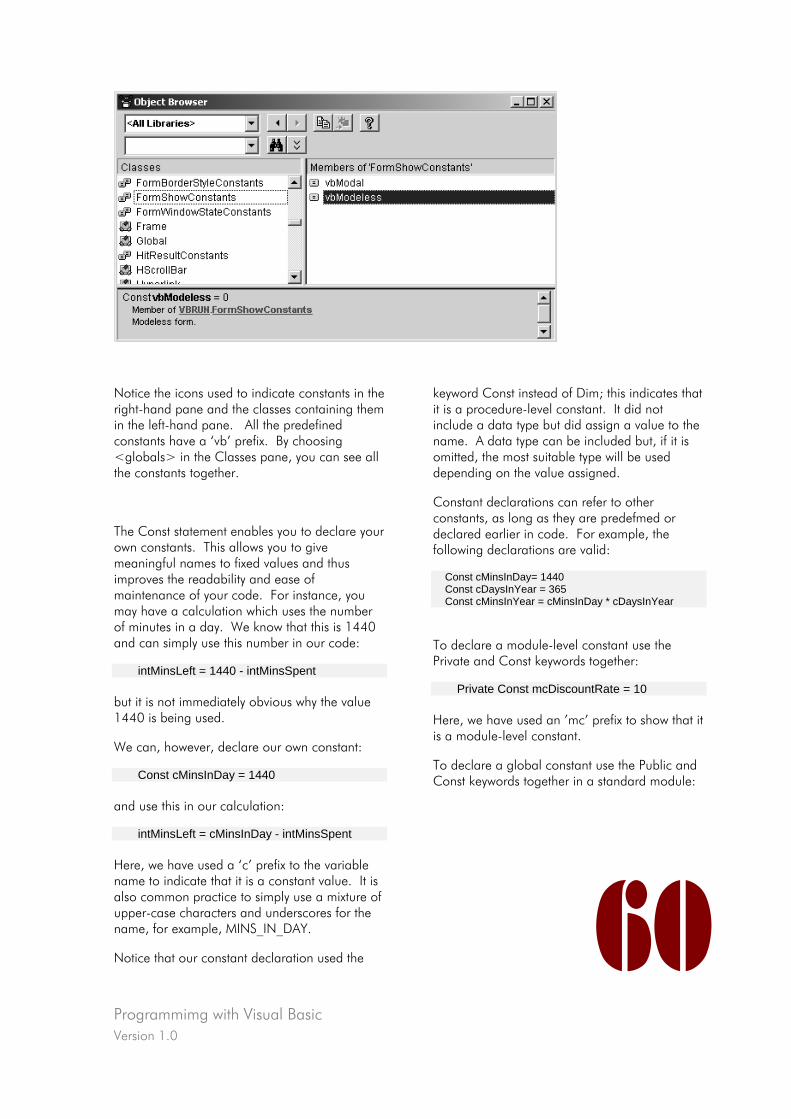
Programmimg with Visual Basic Version 1.0
60
Notice the icons used to indicate constants in the right-hand pane and the classes containing them in the left-hand pane. All the predefined constants have a ‘vb’ prefix. By choosing <globals> in the Classes pane, you can see all the constants together.
The Const statement enables you to declare your own constants. This allows you to give meaningful names to fixed values and thus improves the readability and ease of maintenance of your code. For instance, you may have a calculation which uses the number of minutes in a day. We know that this is 1440 and can simply use this number in our code:
intMinsLeft = 1440 - intMinsSpent but it is not immediately obvious why the value 1440 is being used.
We can, however, declare our own constant:
Const cMinsInDay = 1440 and use this in our calculation:
intMinsLeft = cMinsInDay - intMinsSpent Here, we have used a ‘c’ prefix to the variable name to indicate that it is a constant value. It is also common practice to simply use a mixture of upper-case characters and underscores for the name, for example, MINS_IN_DAY.
Notice that our constant declaration used the
keyword Const instead of Dim; this indicates that it is a procedure-level constant. It did not include a data type but did assign a value to the name. A data type can be included but, if it is omitted, the most suitable type will be used depending on the value assigned.
Constant declarations can refer to other constants, as long as they are predefmed or declared earlier in code. For example, the following declarations are valid:
Const cMinsInDay= 1440 Const cDaysInYear = 365 Const cMinsInYear = cMinsInDay * cDaysInYear
To declare a module-level constant use the Private and Const keywords together:
Private Const mcDiscountRate = 10 Here, we have used an ’mc’ prefix to show that it is a module-level constant.
To declare a global constant use the Public and Const keywords together in a standard module:
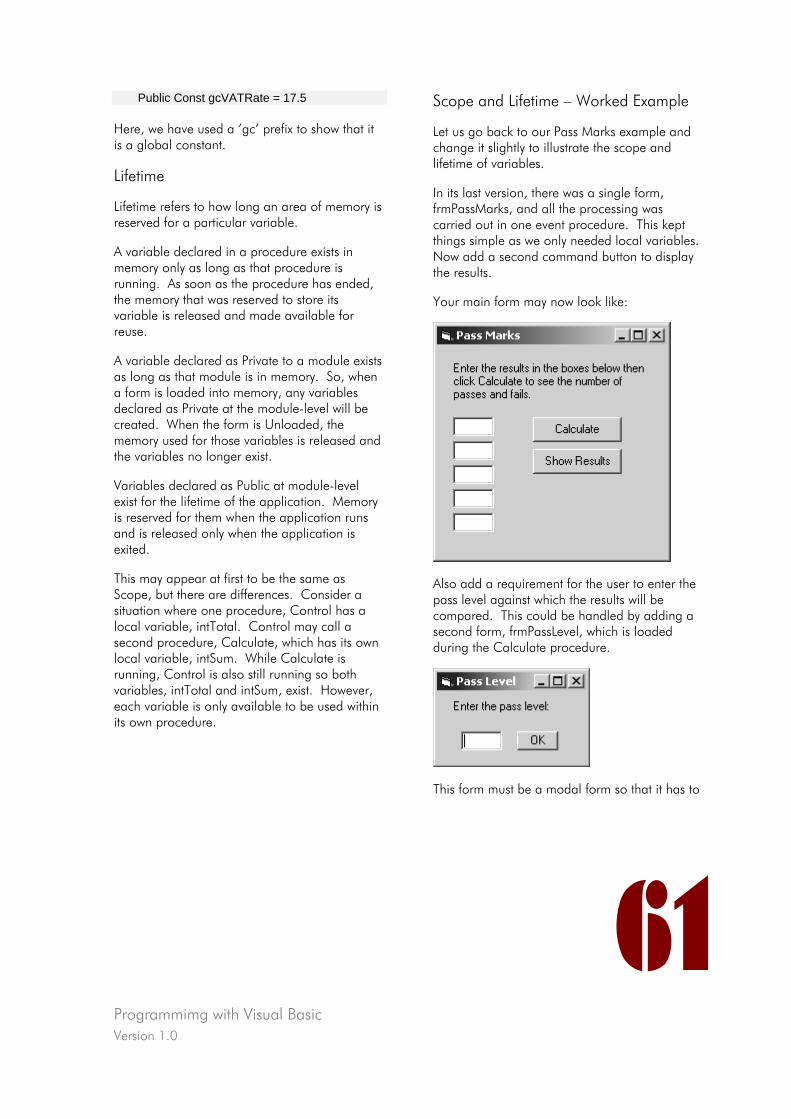
Programmimg with Visual Basic Version 1.0
61
Public Const gcVATRate = 17.5 Here, we have used a ’gc’ prefix to show that it is a global constant.
Lifetime
Lifetime refers to how long an area of memory is reserved for a particular variable.
A variable declared in a procedure exists in memory only as long as that procedure is running. As soon as the procedure has ended, the memory that was reserved to store its variable is released and made available for reuse.
A variable declared as Private to a module exists as long as that module is in memory. So, when a form is loaded into memory, any variables declared as Private at the module-level will be created. When the form is Unloaded, the memory used for those variables is released and the variables no longer exist.
Variables declared as Public at module-level exist for the lifetime of the application. Memory is reserved for them when the application runs and is released only when the application is exited.
This may appear at first to be the same as Scope, but there are differences. Consider a situation where one procedure, Control has a local variable, intTotal. Control may call a second procedure, Calculate, which has its own local variable, intSum. While Calculate is running, Control is also still running so both variables, intTotal and intSum, exist. However, each variable is only available to be used within its own procedure.
Scope and Lifetime – Worked Example
Let us go back to our Pass Marks example and change it slightly to illustrate the scope and lifetime of variables.
In its last version, there was a single form, frmPassMarks, and all the processing was carried out in one event procedure. This kept things simple as we only needed local variables. Now add a second command button to display the results.
Your main form may now look like:
Also add a requirement for the user to enter the pass level against which the results will be compared. This could be handled by adding a second form, frmPassLevel, which is loaded during the Calculate procedure.
This form must be a modal form so that it has to
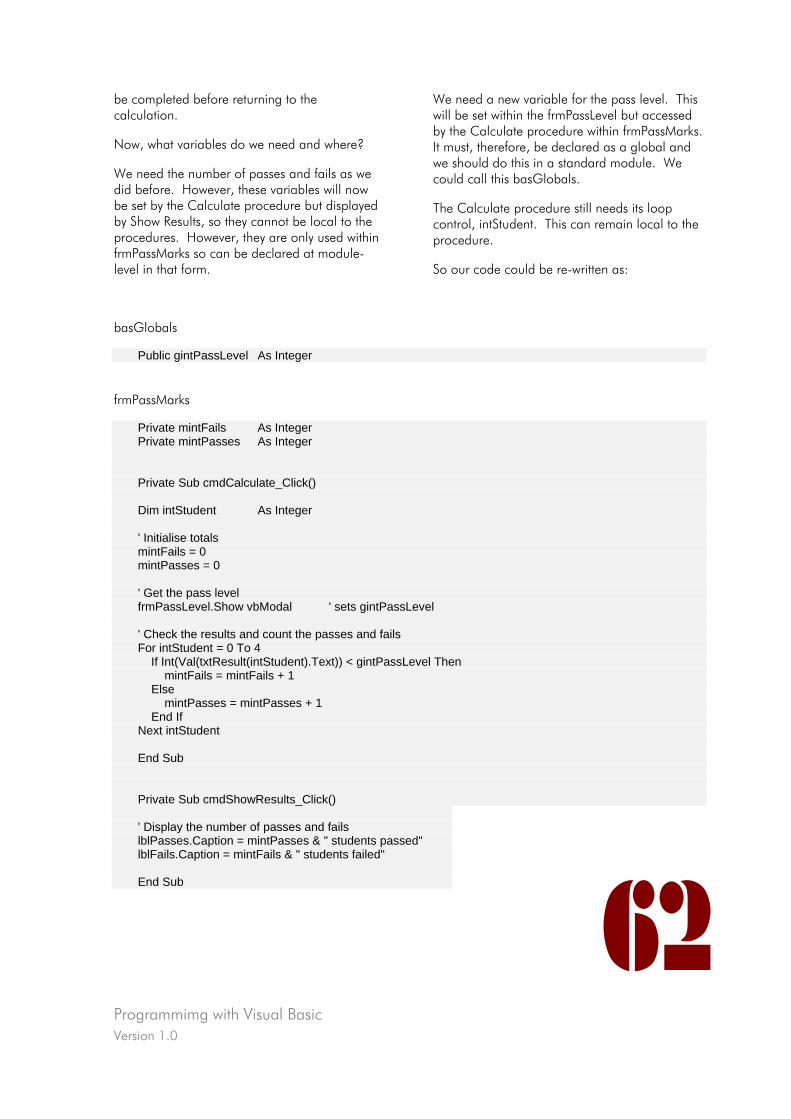
Programmimg with Visual Basic Version 1.0
62
be completed before returning to the calculation.
Now, what variables do we need and where?
We need the number of passes and fails as we did before. However, these variables will now be set by the Calculate procedure but displayed by Show Results, so they cannot be local to the procedures. However, they are only used within frmPassMarks so can be declared at module-level in that form.
We need a new variable for the pass level. This will be set within the frmPassLevel but accessed by the Calculate procedure within frmPassMarks. It must, therefore, be declared as a global and we should do this in a standard module. We could call this basGlobals.
The Calculate procedure still needs its loop control, intStudent. This can remain local to the procedure.
So our code could be re-written as:
basGlobals
Public gintPassLevel As Integer
frmPassMarks
Private mintFails As Integer Private mintPasses As Integer Private Sub cmdCalculate_Click() Dim intStudent As Integer ' Initialise totals mintFails = 0 mintPasses = 0 ' Get the pass level frmPassLevel.Show vbModal ' sets gintPassLevel ' Check the results and count the passes and fails For intStudent = 0 To 4 If Int(Val(txtResult(intStudent).Text)) < gintPassLevel Then mintFails = mintFails + 1 Else mintPasses = mintPasses + 1 End If Next intStudent End Sub Private Sub cmdShowResults_Click() ' Display the number of passes and fails lblPasses.Caption = mintPasses & " students passed" lblFails.Caption = mintFails & " students failed" End Sub
Programmimg with Visual Basic Version 1.0
63
frmPassLevel
Private Sub cmdOK_Click() gintPassLevel = Int(Val(txtPassLevel.Text)) Unload Me End Sub
Note that the use of the ‘m’ and ‘g’ prefixes does help in identifying the scope of the variables.
Statics
We have said that when a procedure ends, all memory used by its local variables is released for reuse. The next time that the procedure runs, the variables are created anew.
However, by declaring a variable as Static, you can specify that Visual Basic preserve the value of that variable so that the next time the procedure is invoked, the last value that the variable had is used. To declare a Static variable, use the Static keyword in place of Dim or Private, as in the following statement:
Static intAccumulate as Integer
You can declare all local variables for a procedure as static by using the Static keyword at the beginning of the procedure heading, as shown:
Static Sub Accumulator()
Static variables can only be declared at procedure-level. They, therefore, have procedure-level scope but effectively exist throughout the lifetime of the application.
Practice:
Create a form with a command button and a label. Each time the command button is clicked it will increment the value of a Static variable by 1 and display its value in the label. Enter code as follows remembering to use your own control names:
Private Sub cmdAccumulate_Click() Static intTotal As Integer intTotal = intTotal + 1 lblTotal.Caption = intTotal End Sub
Run the program and click the button repeatedly; the value should increment by one each time. This demonstrates that, although the variable is declared at procedure-level and therefore has procedure-level scope, its value is retained beyond the lifetime of the procedure.
Programmimg with Visual Basic Version 1.0
64
Passing Parameters
The general rule when declaring variables is to keep their scope and lifetime to a minimum. Restricting the scope means that there is less chance of a procedure changing a variable’s value unintentionally. Reducing the lifetime means that memory is not kept assigned unnecessarily for variables which are no longer needed.
However, sometimes we will want to pass values to procedures or functions which cannot easily share the variables we are using. This is especially true if we are using those functions and procedures provided with Visual Basic or other procedures produced for truly general usage.
We have used the Val function and passed values to it, such as:
Val (strResult) In this case, strResult is a procedure-level variable which the Val function has no way of knowing about, but we can choose to pass it to Val so that it can be processed.
This is known as passing parameters or arguments. The receiving procedure or function can accept these arguments in one of two ways: by reference or by value.
By Reference
When an argument is passed by reference, the receiving procedure uses a pointer to the location in which the variable is stored. This means that, if the receiving procedure changes the value of the variable, the calling procedure sees this changed value.
Consider a procedure, Birthday, which accepts an integer value representing an age. It will add one to the value passed to it. Obviously, the calling procedure will want to see the updated value so the variable must be passed by reference. This is declared as part of the parameter definition in the Birthday procedure’s declaration:
Public Sub Birthday (ByRef intAge As Integer) intAge = intAge + 1 End Sub
The calling procedure could include:
intAge = 32 Birthday intAge MsgBox "I am " & intAge & “ years old"
and the result would be "I am 33 years old”.
By Value
When you pass an argument by value, you are passing a copy of the value itself. This means that, if the value changes within the receiving procedure, this change only affects the copy of the value and not the original.
For example, if the Birthday procedure declaration was changed to use an argument passed by value:
Public Sub Birthday (ByVal intAge As Integer)
and the calling procedure was unchanged, the result would be "I am 32 years old".
Passing Arrays as parameters
So far, we have only considered passing individual variables. However, on some occasions we may want to pass a complete array to a procedure or function. We will now break the rule we learned previously which said that we could not use the array name by itself without
Programmimg with Visual Basic Version 1.0
65
also specifying a particular element!
To pass an array to a procedure, simply use the array name in the parameter list. Suppose we have a procedure, Total, which adds together the values held in an array of numbers; this array is passed to it together with the number of elements in the array. So, we could call the Total procedure with
Total intElements, intNumbers where intElements is the number of elements and intNumbers is the name of the array.
The declaration for the Total procedure must include the array in its parameter list. How will it do this if it does not know how big to make it? It will, in fact, declare it as a dynamic array which will resize itself as necessary. The declaration could be:
Sub Total (intSize As Integer, intNums() As Integer)
It could then use the intSize parameter to control the number of elements it processed.
Remember:
When you are writing your own general procedures or functions, it may be best to pass values to them as parameters rather than use module-level or global variables.
If the method of passing a parameter, ByRef or ByVal, is omitted from the declaration, it is assumed that the value is to be passed by reference. If you want to pass a parameter by value the ByVal keyword must be included.
Programmimg with Visual Basic Version 1.0
66
Programming with Visual Basic – Exercises
We have now covered the main aspects of Visual Basic programming and you need to put them into practice!
You will look again at some of the exercises which you completed in the previous sections and redesign them to include a visual interface.
You should bear the following in mind:
• objects, properties, methods and events
• form and standard modules
• general procedures and functions
• scope and lifetime
• passing parameters
For each exercise, you should produce new design documents. This will normally take the form of interface layouts with notes on the various objects they contain, a chart showing how forms are linked and PDL or structure charts for the individual procedures and functions.
Exercise One - Positive / Negative Numbers
A program is required to read a group of ten numbers and display the total number of positive numbers, the total number of negative numbers, the value of the largest number entered and the value of the smallest number.
Hints:
You could use a control array for the input of the numbers with command buttons to perform the processing on request.
Exercise Two – The Furnace
The temperature of a furnace is constantly monitored to maintain a temperature between 500 and 1200 degrees centigrade.
If the temperature falls below 500 degrees, a heater is switched on.
If the temperature is above 1200 degrees, a cooler is switched on.
While the temperature is between 500 and 1200 degrees centigrade, the furnace runs normally with neither heater nor cooler operating.
Should the temperature rise above 1250 degrees centigrade then the system shuts down and an alarm is sounded.
Hints:
For simulation purposes, it will probably be best to accept temperature readings from the user.
Simple labels could be used to indicate whether the heater or cooler are on and you might want to experiment with colour to give an indication of the temperature level.
You could use the Beep function as an alarm. It is called using the following:
Beep
Programmimg with Visual Basic Version 1.0
67
Exercise Three - The Satellite Receiver
A satellite receiver receives characters from a satellite transmission when it is switched on.
It reads each character and prints it on a continuous line.
A number of special characters may be sent to the receiver, which cause it to behave in a slightly different way:
• if it receives a carriage return character, it moves onto the next line.
• if the character is an X, the receiver is put into sleep mode. While in sleep mode, the receiver continues to receive characters but does not print. It remains in sleep mode until the character Z is received which then reactivates printing.
• if at any time a letter W is received, the receiver is switched off.
• any other characters are printed on the same line.
Hints:
The user could either enter a single character at a time followed by an OK button or enter a string of characters to be processed. If using a string of characters, remember the String functions available.
The results could be placed in a label for display. To force a new line in the output, use the constant vbCrLf in the string.
Exercise Four – Number Sort
The user inputs 10 numbers. The numbers are displayed in their original order, then sorted and displayed in ascending order.
The user is then prompted to enter a further 10 numbers or quit the program.
Hints:
Use a control array to enter the numbers with Sort and Exit buttons to allow the user to choose whether to continue or quit.
You could develop a general purpose Sort procedure.
Programming with Visual Basic –
Solutions to Exercises
www.learnhowtoprogram.com © IT-Pro Training Ltd. 2005

Visual Basic 6 Training Manual
Version 1.0
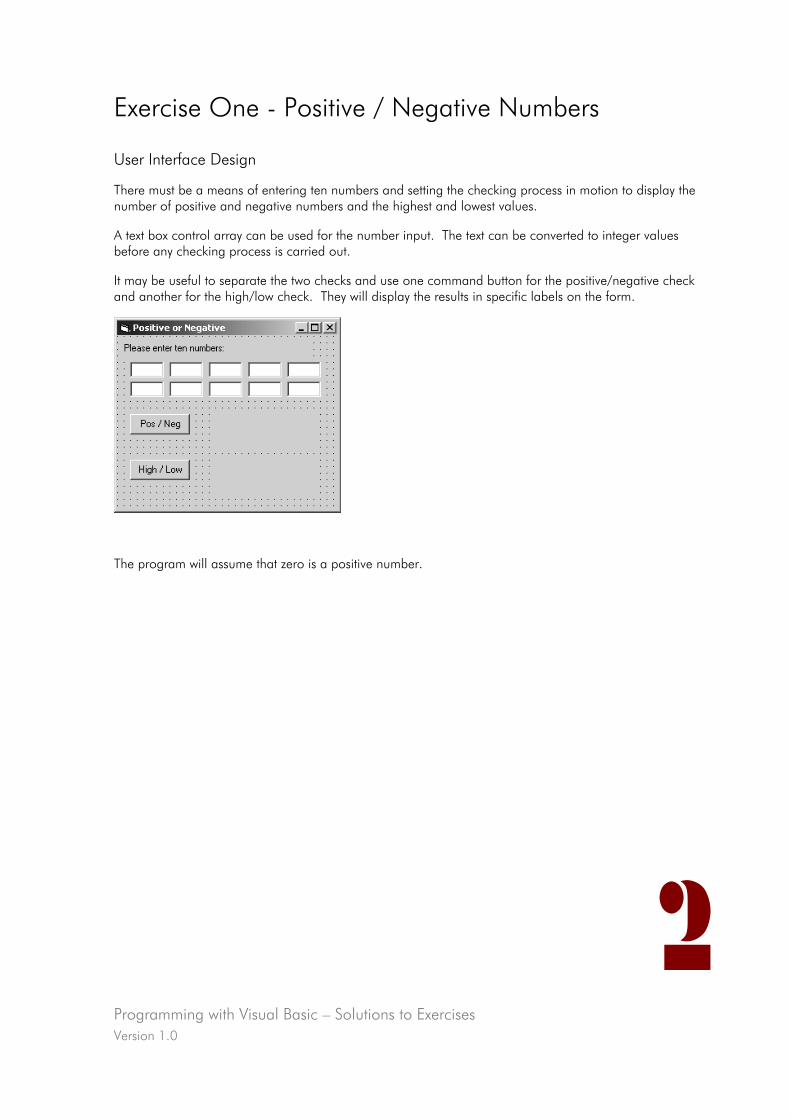
Programming with Visual Basic – Solutions to Exercises Version 1.0
Exercise One - Positive / Negative Numbers
User Interface Design
There must be a means of entering ten numbers and setting the checking process in motion to display the number of positive and negative numbers and the highest and lowest values.
A text box control array can be used for the number input. The text can be converted to integer values before any checking process is carried out.
It may be useful to separate the two checks and use one command button for the positive/negative check and another for the high/low check. They will display the results in specific labels on the form.
The program will assume that zero is a positive number.
2
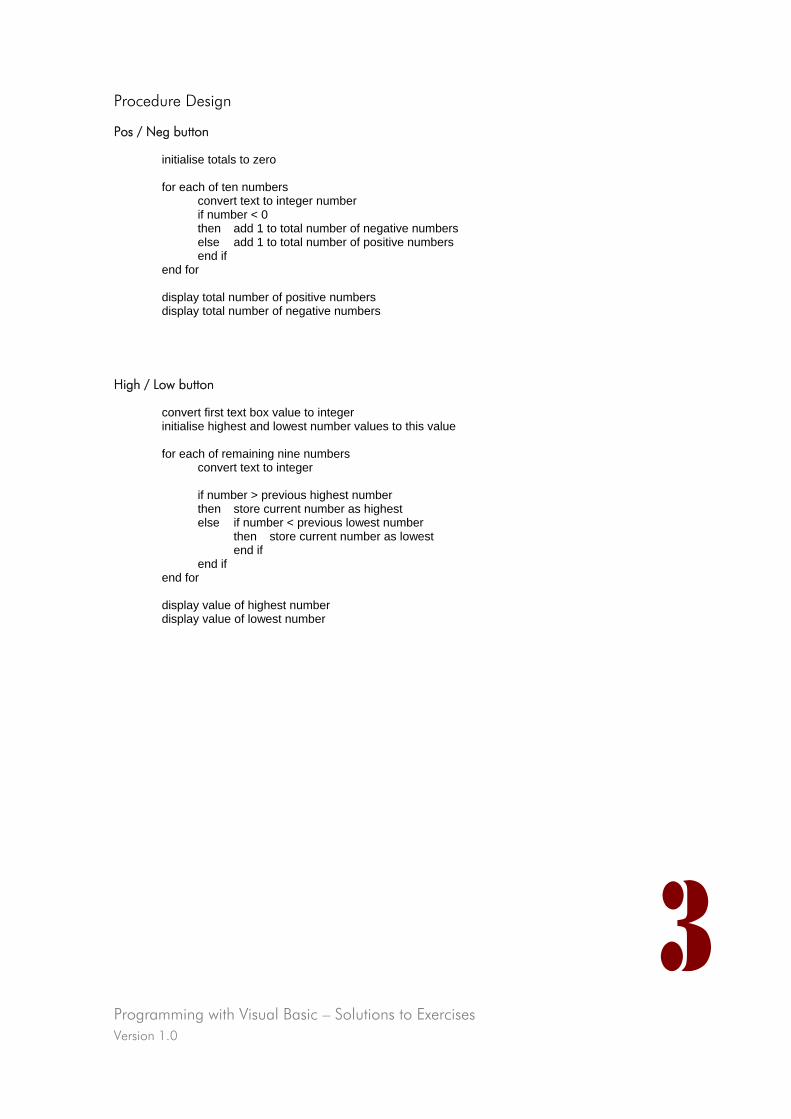
Programming with Visual Basic – Solutions to Exercises Version 1.0
3
display total number of negative numbers
Procedure Design
Pos / Neg button
initialise totals to zero for each of ten numbers convert text to integer number if number < 0 then add 1 to total number of negative numbers else add 1 to total number of positive numbers end if end for display total number of positive numbers
High / Low button
convert first text box value to integer initialise highest and lowest number values to this value for each of remaining nine numbers convert text to integer if number > previous highest number then store current number as highest else if number < previous lowest number then store current number as lowest end if end if end for display value of highest number display value of lowest number
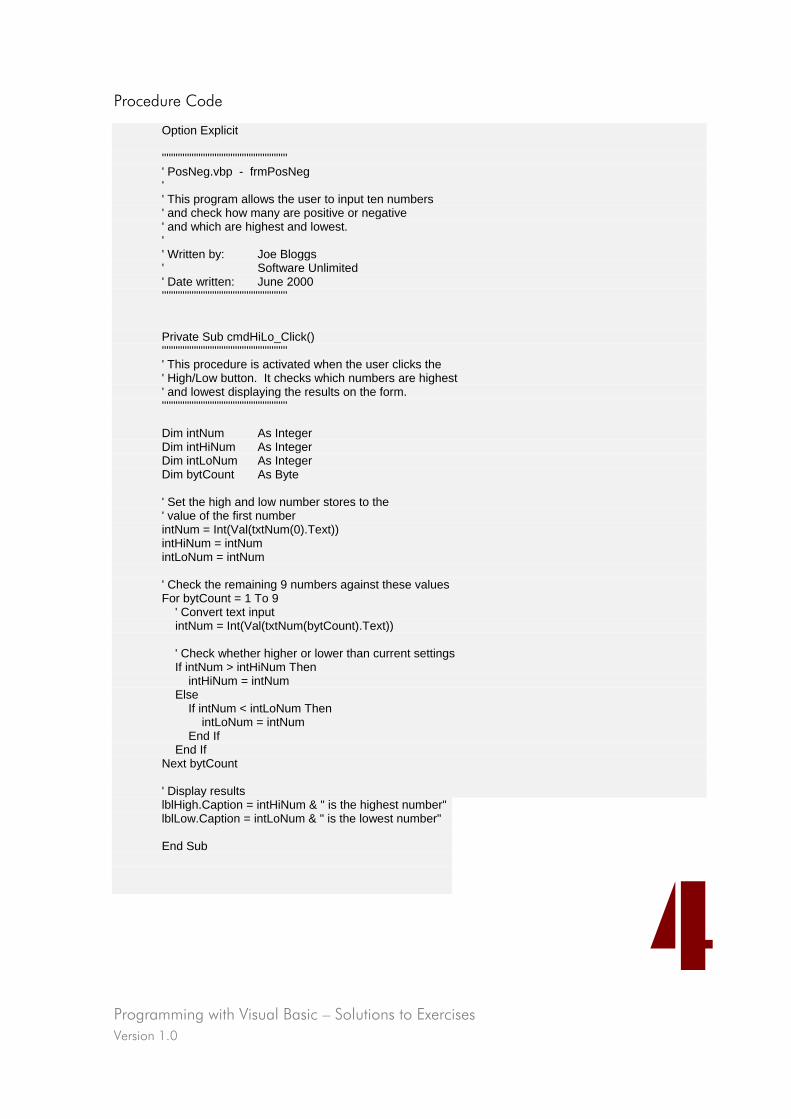
Programming with Visual Basic – Solutions to Exercises Version 1.0
4
Procedure Code
Option Explicit ''''''''''''''''''''''''''''''''''''''''''''''''''''''' ' PosNeg.vbp - frmPosNeg ' ' This program allows the user to input ten numbers ' and check how many are positive or negative ' and which are highest and lowest. ' ' Written by: Joe Bloggs ' Software Unlimited ' Date written: June 2000 ''''''''''''''''''''''''''''''''''''''''''''''''''''''' Private Sub cmdHiLo_Click() ''''''''''''''''''''''''''''''''''''''''''''''''''''''' ' This procedure is activated when the user clicks the ' High/Low button. It checks which numbers are highest ' and lowest displaying the results on the form. ''''''''''''''''''''''''''''''''''''''''''''''''''''''' Dim intNum As Integer Dim intHiNum As Integer Dim intLoNum As Integer Dim bytCount As Byte ' Set the high and low number stores to the ' value of the first number intNum = Int(Val(txtNum(0).Text)) intHiNum = intNum intLoNum = intNum ' Check the remaining 9 numbers against these values For bytCount = 1 To 9 ' Convert text input intNum = Int(Val(txtNum(bytCount).Text)) ' Check whether higher or lower than current settings If intNum > intHiNum Then intHiNum = intNum Else If intNum < intLoNum Then intLoNum = intNum End If End If Next bytCount ' Display results lblHigh.Caption = intHiNum & " is the highest number" lblLow.Caption = intLoNum & " is the lowest number" End Sub
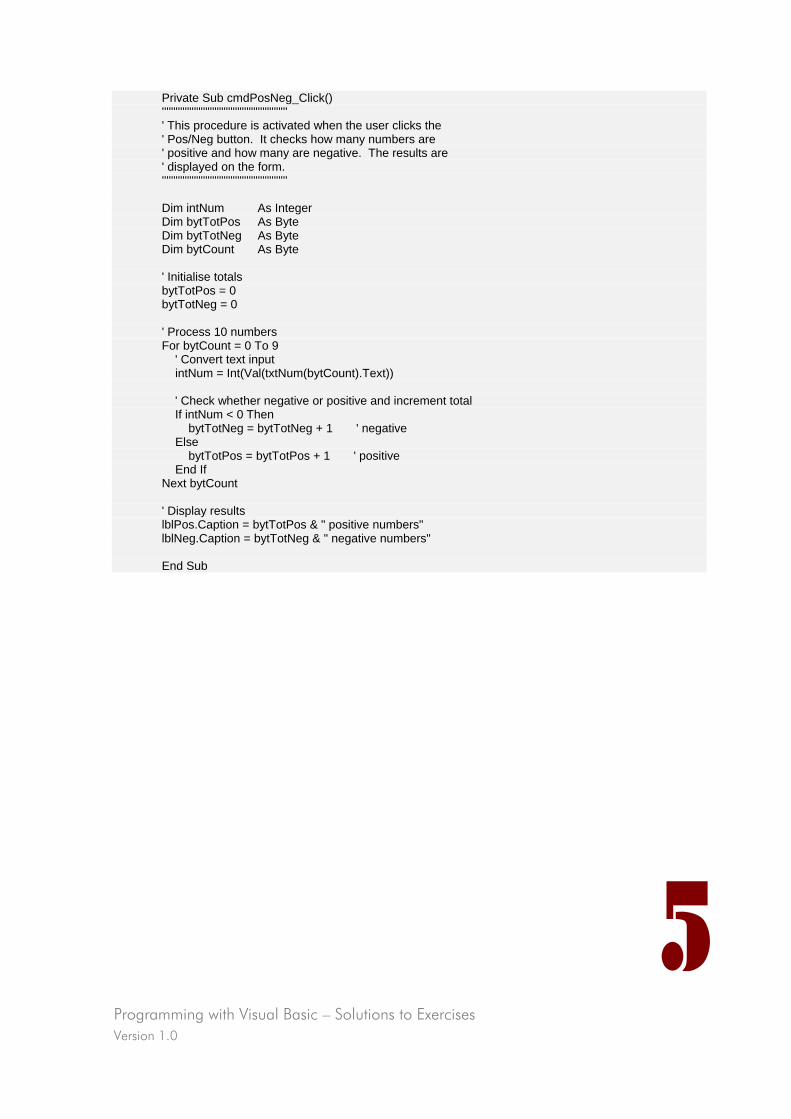
Programming with Visual Basic – Solutions to Exercises Version 1.0
5
Private Sub cmdPosNeg_Click() ''''''''''''''''''''''''''''''''''''''''''''''''''''''' ' This procedure is activated when the user clicks the ' Pos/Neg button. It checks how many numbers are ' positive and how many are negative. The results are ' displayed on the form. ''''''''''''''''''''''''''''''''''''''''''''''''''''''' Dim intNum As Integer Dim bytTotPos As Byte Dim bytTotNeg As Byte Dim bytCount As Byte ' Initialise totals bytTotPos = 0 bytTotNeg = 0 ' Process 10 numbers For bytCount = 0 To 9 ' Convert text input intNum = Int(Val(txtNum(bytCount).Text)) ' Check whether negative or positive and increment total If intNum < 0 Then bytTotNeg = bytTotNeg + 1 ' negative Else bytTotPos = bytTotPos + 1 ' positive End If Next bytCount ' Display results lblPos.Caption = bytTotPos & " positive numbers" lblNeg.Caption = bytTotNeg & " negative numbers" End Sub
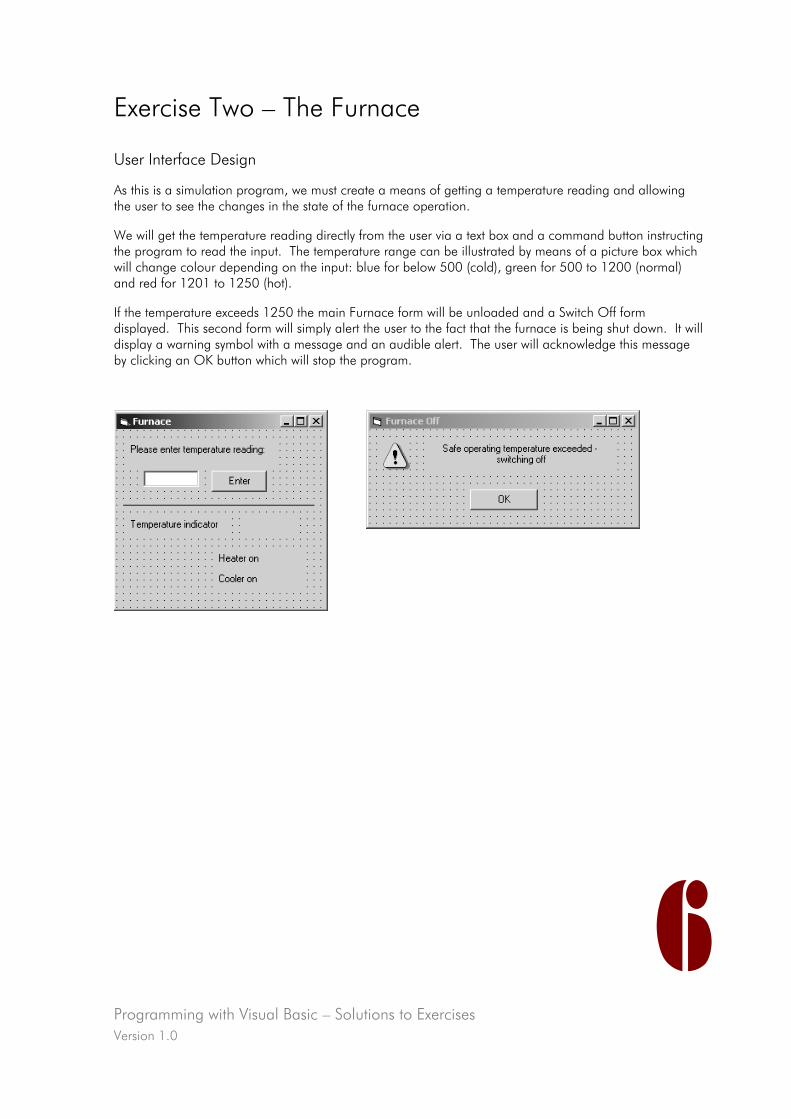
Programming with Visual Basic – Solutions to Exercises Version 1.0
Exercise Two – The Furnace
User Interface Design
As this is a simulation program, we must create a means of getting a temperature reading and allowing the user to see the changes in the state of the furnace operation.
We will get the temperature reading directly from the user via a text box and a command button instructing the program to read the input. The temperature range can be illustrated by means of a picture box which will change colour depending on the input: blue for below 500 (cold), green for 500 to 1200 (normal) and red for 1201 to 1250 (hot).
If the temperature exceeds 1250 the main Furnace form will be unloaded and a Switch Off form displayed. This second form will simply alert the user to the fact that the furnace is being shut down. It will display a warning symbol with a message and an audible alert. The user will acknowledge this message by clicking an OK button which will stop the program.
6
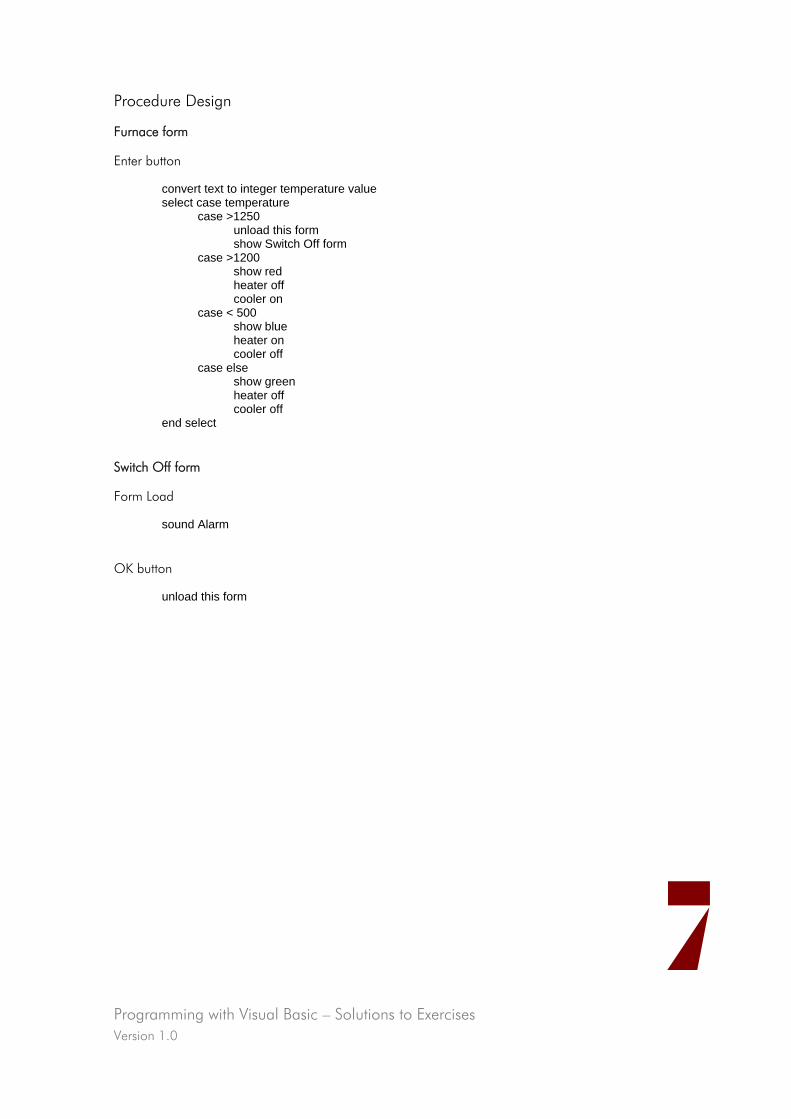
Programming with Visual Basic – Solutions to Exercises Version 1.0
7
Procedure Design
Furnace form
Enter button
convert text to integer temperature value select case temperature case >1250 unload this form show Switch Off form case >1200 show red heater off cooler on case < 500 show blue heater on cooler off case else show green heater off cooler off end select
Switch Off form
Form Load
sound Alarm
OK button
unload this form
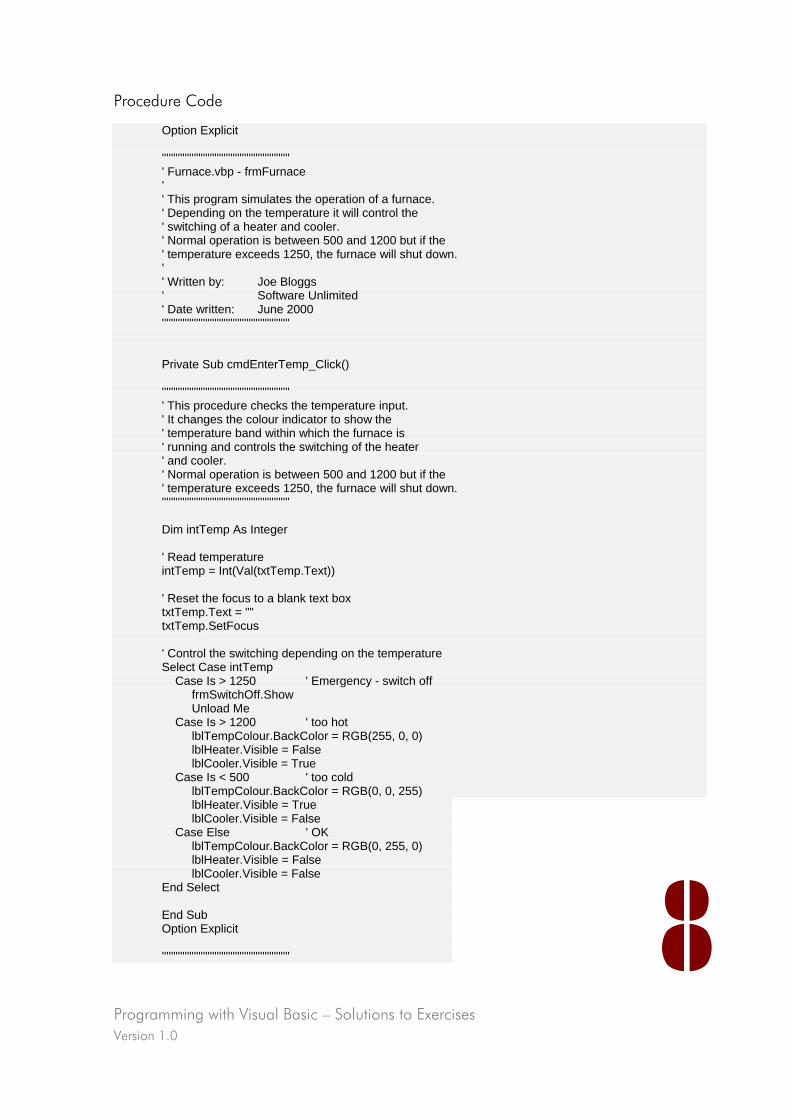
Programming with Visual Basic – Solutions to Exercises Version 1.0
8
Procedure Code
Option Explicit '''''''''''''''''''''''''''''''''''''''''''''''''''''''' ' Furnace.vbp - frmFurnace ' ' This program simulates the operation of a furnace. ' Depending on the temperature it will control the ' switching of a heater and cooler. ' Normal operation is between 500 and 1200 but if the ' temperature exceeds 1250, the furnace will shut down. ' ' Written by: Joe Bloggs ' Software Unlimited ' Date written: June 2000 '''''''''''''''''''''''''''''''''''''''''''''''''''''''' Private Sub cmdEnterTemp_Click() '''''''''''''''''''''''''''''''''''''''''''''''''''''''' ' This procedure checks the temperature input. ' It changes the colour indicator to show the ' temperature band within which the furnace is ' running and controls the switching of the heater ' and cooler. ' Normal operation is between 500 and 1200 but if the ' temperature exceeds 1250, the furnace will shut down. '''''''''''''''''''''''''''''''''''''''''''''''''''''''' Dim intTemp As Integer ' Read temperature intTemp = Int(Val(txtTemp.Text)) ' Reset the focus to a blank text box txtTemp.Text = "" txtTemp.SetFocus ' Control the switching depending on the temperature Select Case intTemp Case Is > 1250 ' Emergency - switch off frmSwitchOff.Show Unload Me Case Is > 1200 ' too hot lblTempColour.BackColor = RGB(255, 0, 0) lblHeater.Visible = False lblCooler.Visible = True Case Is < 500 ' too cold lblTempColour.BackColor = RGB(0, 0, 255) lblHeater.Visible = True lblCooler.Visible = False Case Else ' OK lblTempColour.BackColor = RGB(0, 255, 0) lblHeater.Visible = False lblCooler.Visible = False End Select End Sub Option Explicit ''''''''''''''''''''''''''''''''''''''''''''''''''''''''
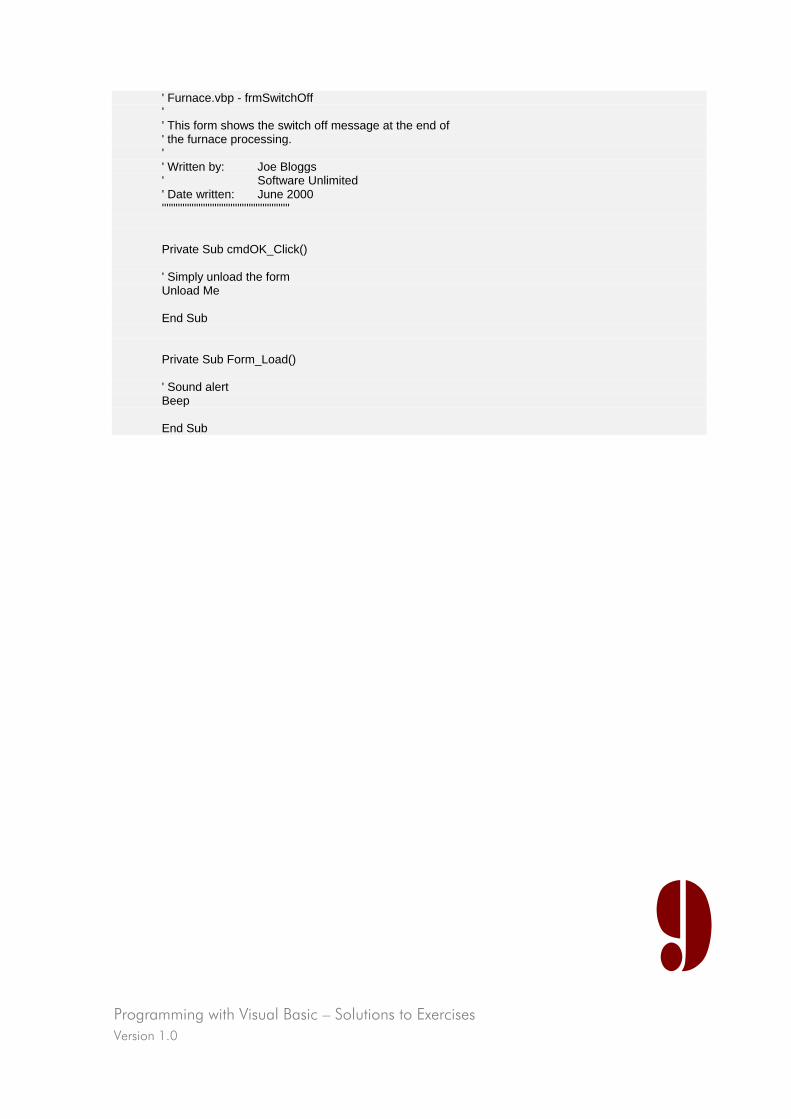
Programming with Visual Basic – Solutions to Exercises Version 1.0
9
' Furnace.vbp - frmSwitchOff ' ' This form shows the switch off message at the end of ' the furnace processing. ' ' Written by: Joe Bloggs ' Software Unlimited ' Date written: June 2000 '''''''''''''''''''''''''''''''''''''''''''''''''''''''' Private Sub cmdOK_Click() ' Simply unload the form Unload Me End Sub Private Sub Form_Load() ' Sound alert Beep End Sub

Programming with Visual Basic – Solutions to Exercises Version 1.0
Exercise Three - The Satellite Receiver
User Interface
As this program is a simulation, we must allow the user to enter characters for transmission to the receiver. These will be entered as a single stream of text. A button will be included for the user to signal that the text is ready to be processed.
The results of the Satellite processing will be displayed in a label on the same form.
Procedure Design
Satellite form
Process button
set satellite ‘not asleep’ get first character do until character received is “W” or the end of the string has been reached select case character case character is “X” set ‘asleep’ case character is “Z” set ‘not asleep’ case character is “carriage return” (# symbol indicates this) if ‘not asleep’ then move to next line end if case other character if ‘not asleep’ then print character end if end select get next character end do
10
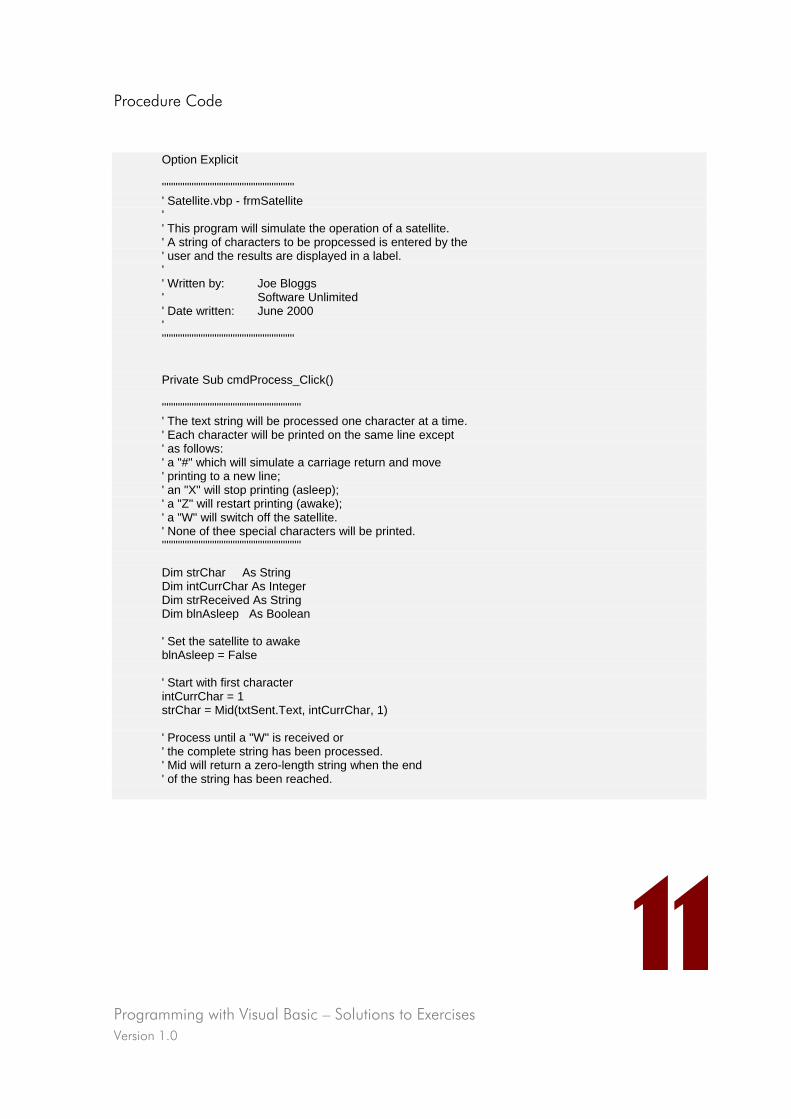
Programming with Visual Basic – Solutions to Exercises Version 1.0
11
Procedure Code
Option Explicit '''''''''''''''''''''''''''''''''''''''''''''''''''''''''' ' Satellite.vbp - frmSatellite ' ' This program will simulate the operation of a satellite. ' A string of characters to be propcessed is entered by the ' user and the results are displayed in a label. ' ' Written by: Joe Bloggs ' Software Unlimited ' Date written: June 2000 ' '''''''''''''''''''''''''''''''''''''''''''''''''''''''''' Private Sub cmdProcess_Click() ''''''''''''''''''''''''''''''''''''''''''''''''''''''''''''' ' The text string will be processed one character at a time. ' Each character will be printed on the same line except ' as follows: ' a "#" which will simulate a carriage return and move ' printing to a new line; ' an "X" will stop printing (asleep); ' a "Z" will restart printing (awake); ' a "W" will switch off the satellite. ' None of thee special characters will be printed. ''''''''''''''''''''''''''''''''''''''''''''''''''''''''''''' Dim strChar As String Dim intCurrChar As Integer Dim strReceived As String Dim blnAsleep As Boolean ' Set the satellite to awake blnAsleep = False ' Start with first character intCurrChar = 1 strChar = Mid(txtSent.Text, intCurrChar, 1) ' Process until a "W" is received or ' the complete string has been processed. ' Mid will return a zero-length string when the end ' of the string has been reached.
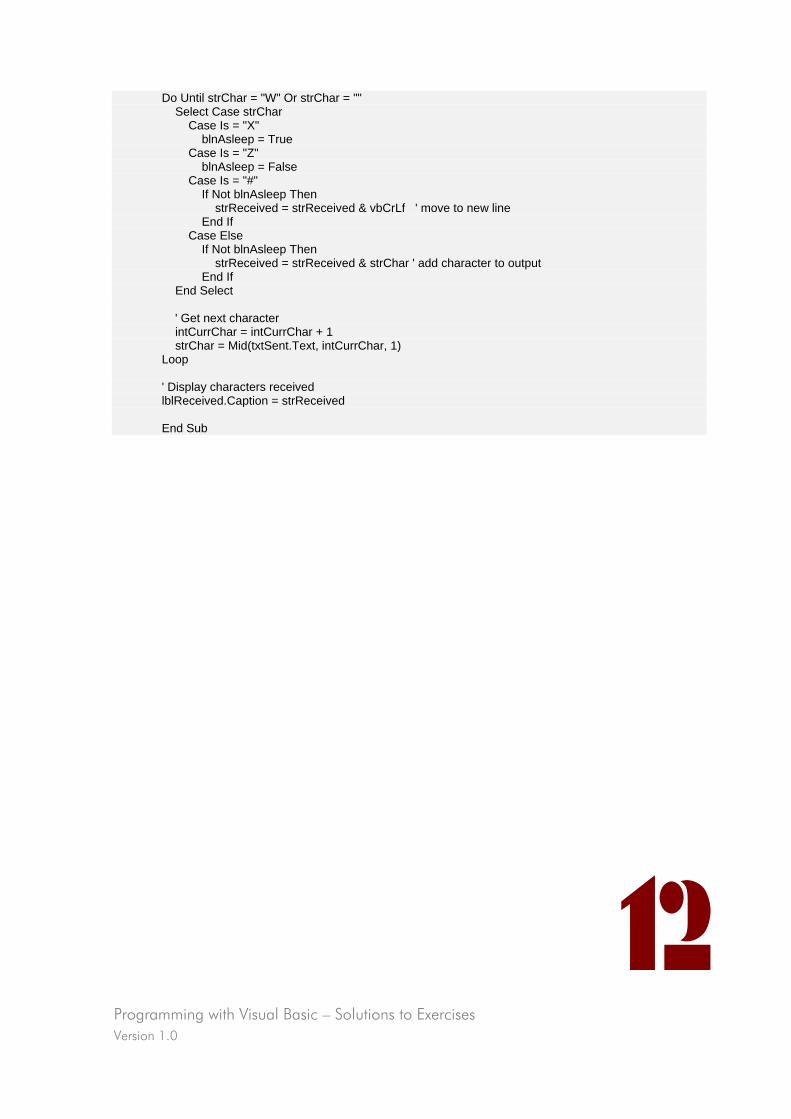
Programming with Visual Basic – Solutions to Exercises Version 1.0
12
Do Until strChar = "W" Or strChar = "" Select Case strChar Case Is = "X" blnAsleep = True Case Is = "Z" blnAsleep = False Case Is = "#" If Not blnAsleep Then strReceived = strReceived & vbCrLf ' move to new line End If Case Else If Not blnAsleep Then strReceived = strReceived & strChar ' add character to output End If End Select ' Get next character intCurrChar = intCurrChar + 1 strChar = Mid(txtSent.Text, intCurrChar, 1) Loop ' Display characters received lblReceived.Caption = strReceived End Sub
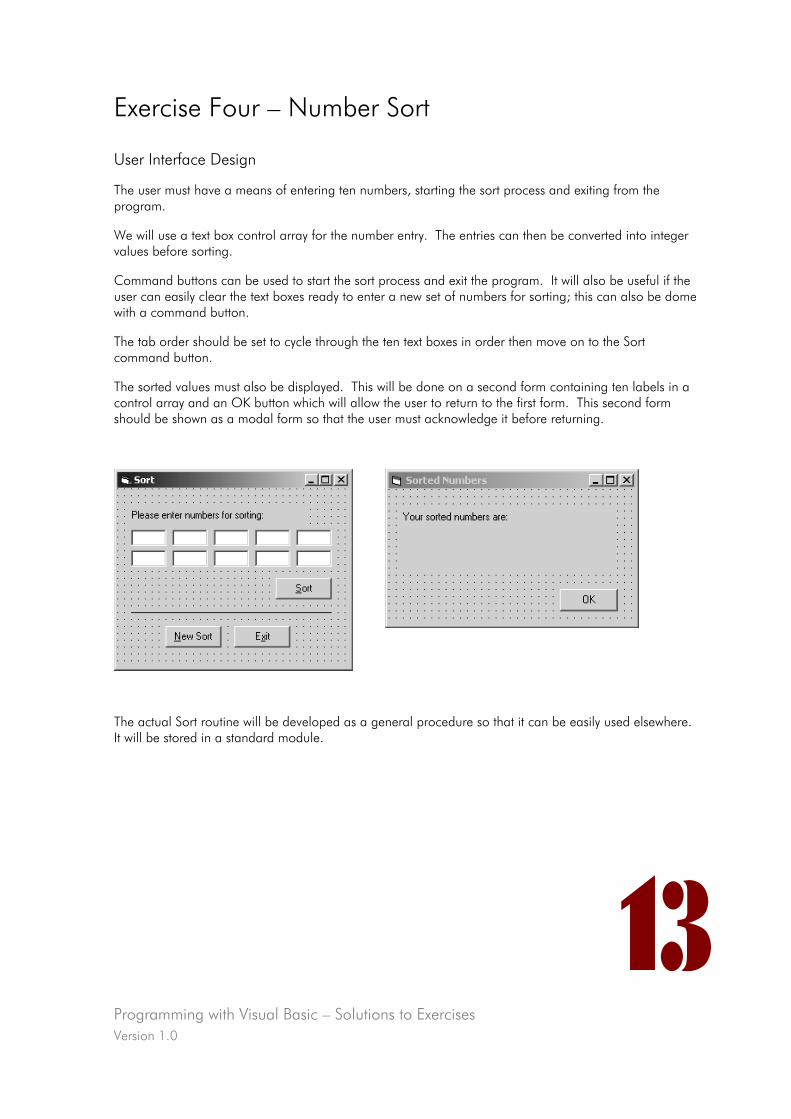
Programming with Visual Basic – Solutions to Exercises Version 1.0
Exercise Four – Number Sort
User Interface Design
The user must have a means of entering ten numbers, starting the sort process and exiting from the program.
We will use a text box control array for the number entry. The entries can then be converted into integer values before sorting.
Command buttons can be used to start the sort process and exit the program. It will also be useful if the user can easily clear the text boxes ready to enter a new set of numbers for sorting; this can also be dome with a command button.
The tab order should be set to cycle through the ten text boxes in order then move on to the Sort command button.
The sorted values must also be displayed. This will be done on a second form containing ten labels in a control array and an OK button which will allow the user to return to the first form. This second form should be shown as a modal form so that the user must acknowledge it before returning.
The actual Sort routine will be developed as a general procedure so that it can be easily used elsewhere. It will be stored in a standard module.
13
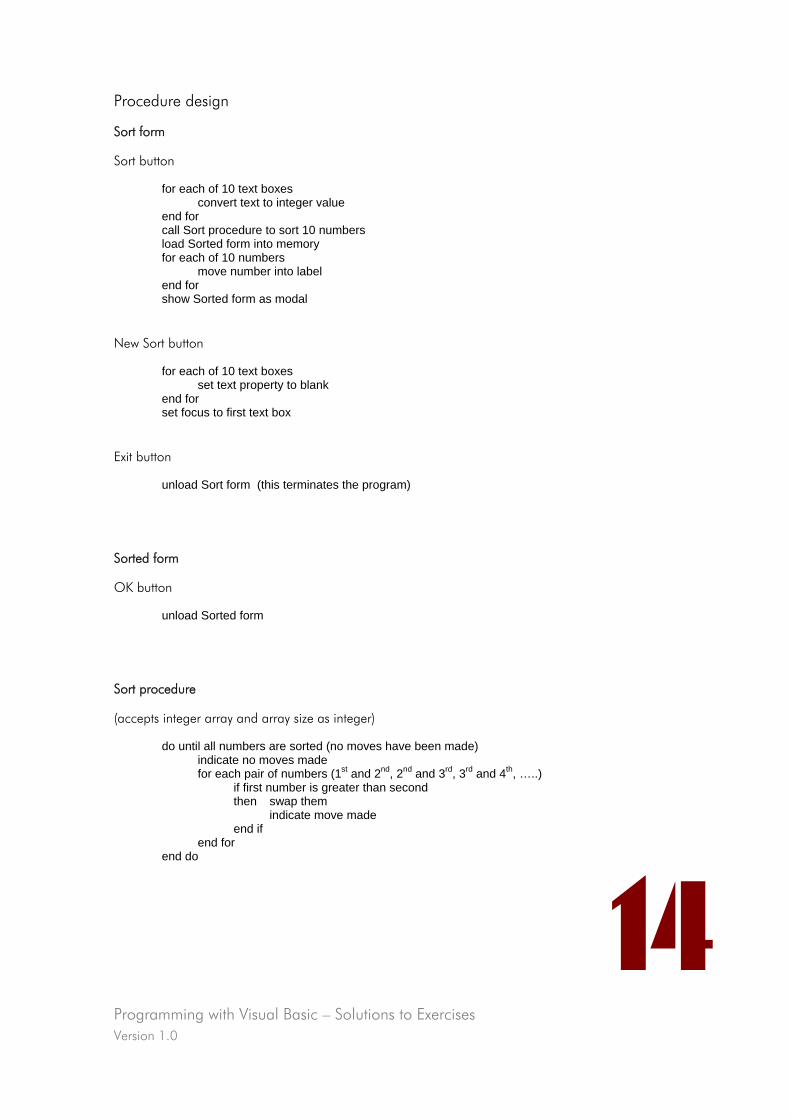
Programming with Visual Basic – Solutions to Exercises Version 1.0
14
Procedure design
Sort form
Sort button
for each of 10 text boxes convert text to integer value end for call Sort procedure to sort 10 numbers load Sorted form into memory for each of 10 numbers move number into label end for show Sorted form as modal
New Sort button
for each of 10 text boxes set text property to blank end for set focus to first text box
Exit button
unload Sort form (this terminates the program)
Sorted form
OK button
unload Sorted form
Sort procedure
(accepts integer array and array size as integer)
do until all numbers are sorted (no moves have been made) indicate no moves made for each pair of numbers (1st and 2nd, 2nd and 3rd, 3rd and 4th, …..) if first number is greater than second then swap them indicate move made end if end for end do
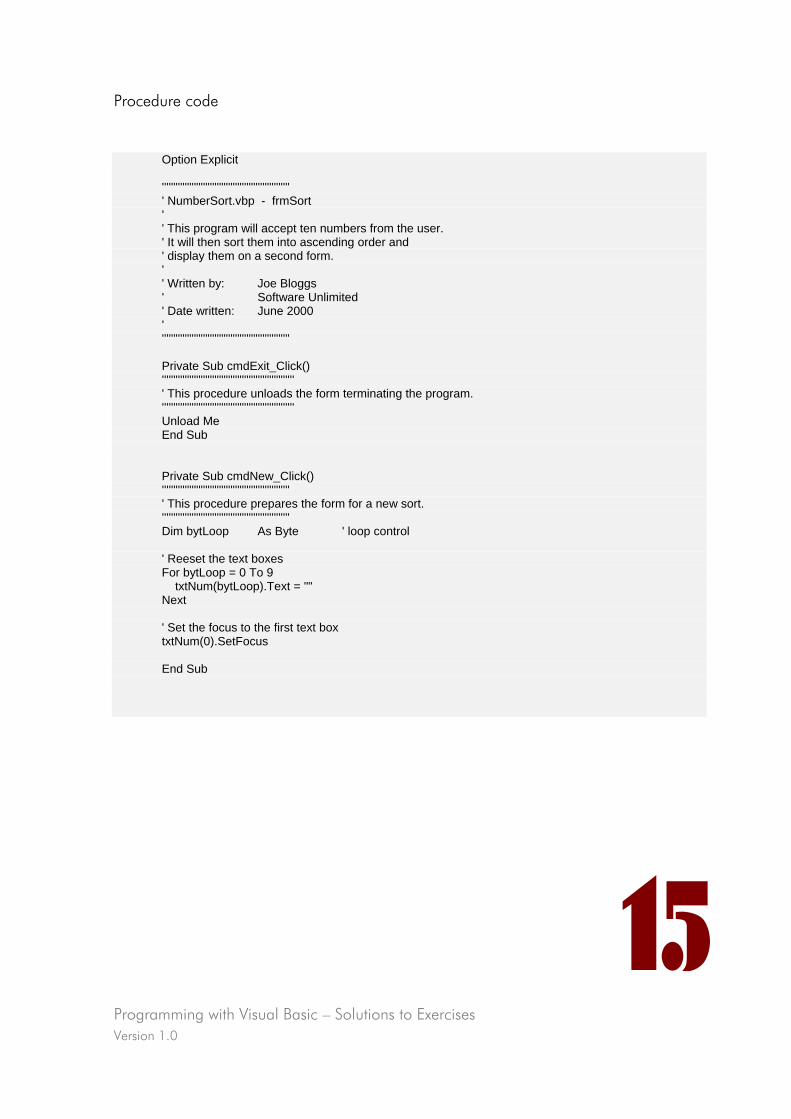
Programming with Visual Basic – Solutions to Exercises Version 1.0
15
Procedure code
Option Explicit '''''''''''''''''''''''''''''''''''''''''''''''''''''''' ' NumberSort.vbp - frmSort ' ' This program will accept ten numbers from the user. ' It will then sort them into ascending order and ' display them on a second form. ' ' Written by: Joe Bloggs ' Software Unlimited ' Date written: June 2000 ' ''''''''''''''''''''''''''''''''''''''''''''''''''''''''
Private Sub cmdExit_Click() '''''''''''''''''''''''''''''''''''''''''''''''''''''''''' ' This procedure unloads the form terminating the program. '''''''''''''''''''''''''''''''''''''''''''''''''''''''''' Unload Me End Sub
Private Sub cmdNew_Click() '''''''''''''''''''''''''''''''''''''''''''''''''''''''' ' This procedure prepares the form for a new sort. '''''''''''''''''''''''''''''''''''''''''''''''''''''''' Dim bytLoop As Byte ' loop control ' Reeset the text boxes For bytLoop = 0 To 9 txtNum(bytLoop).Text = "" Next ' Set the focus to the first text box txtNum(0).SetFocus End Sub
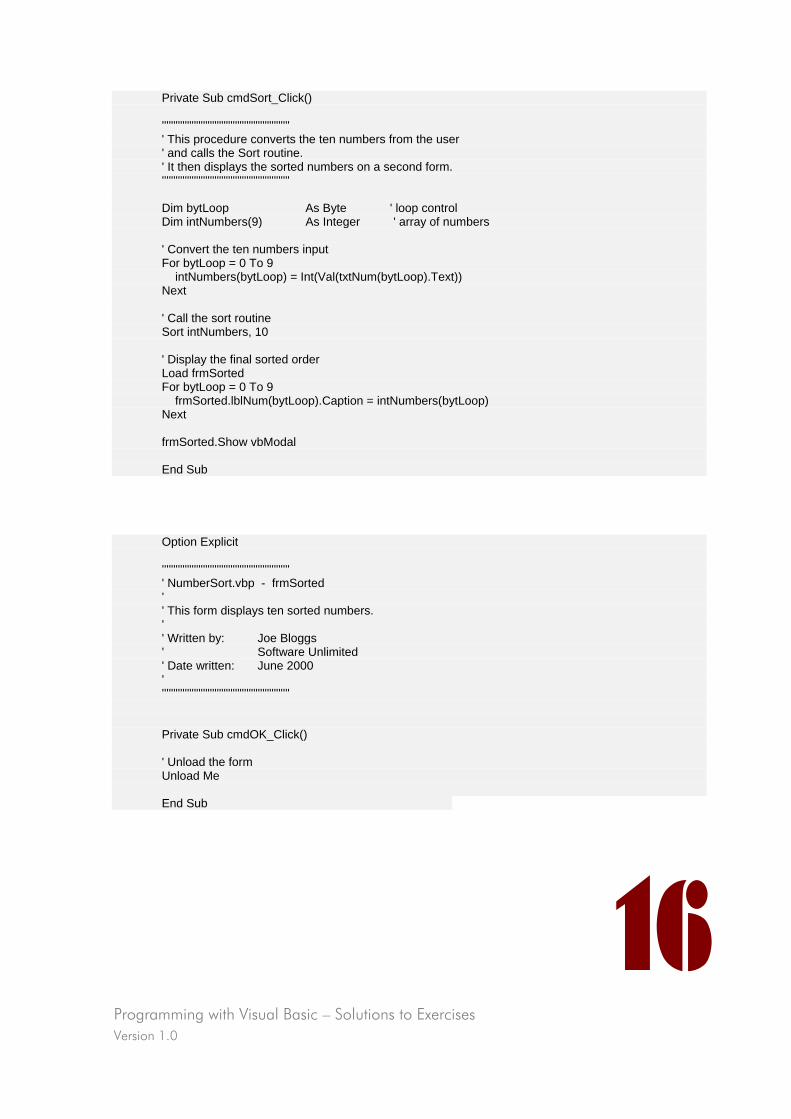
Programming with Visual Basic – Solutions to Exercises Version 1.0
16
Private Sub cmdSort_Click() '''''''''''''''''''''''''''''''''''''''''''''''''''''''' ' This procedure converts the ten numbers from the user ' and calls the Sort routine. ' It then displays the sorted numbers on a second form. '''''''''''''''''''''''''''''''''''''''''''''''''''''''' Dim bytLoop As Byte ' loop control Dim intNumbers(9) As Integer ' array of numbers ' Convert the ten numbers input For bytLoop = 0 To 9 intNumbers(bytLoop) = Int(Val(txtNum(bytLoop).Text)) Next ' Call the sort routine Sort intNumbers, 10 ' Display the final sorted order Load frmSorted For bytLoop = 0 To 9 frmSorted.lblNum(bytLoop).Caption = intNumbers(bytLoop) Next frmSorted.Show vbModal End Sub
Option Explicit '''''''''''''''''''''''''''''''''''''''''''''''''''''''' ' NumberSort.vbp - frmSorted ' ' This form displays ten sorted numbers. ' ' Written by: Joe Bloggs ' Software Unlimited ' Date written: June 2000 ' '''''''''''''''''''''''''''''''''''''''''''''''''''''''' Private Sub cmdOK_Click() ' Unload the form Unload Me End Sub
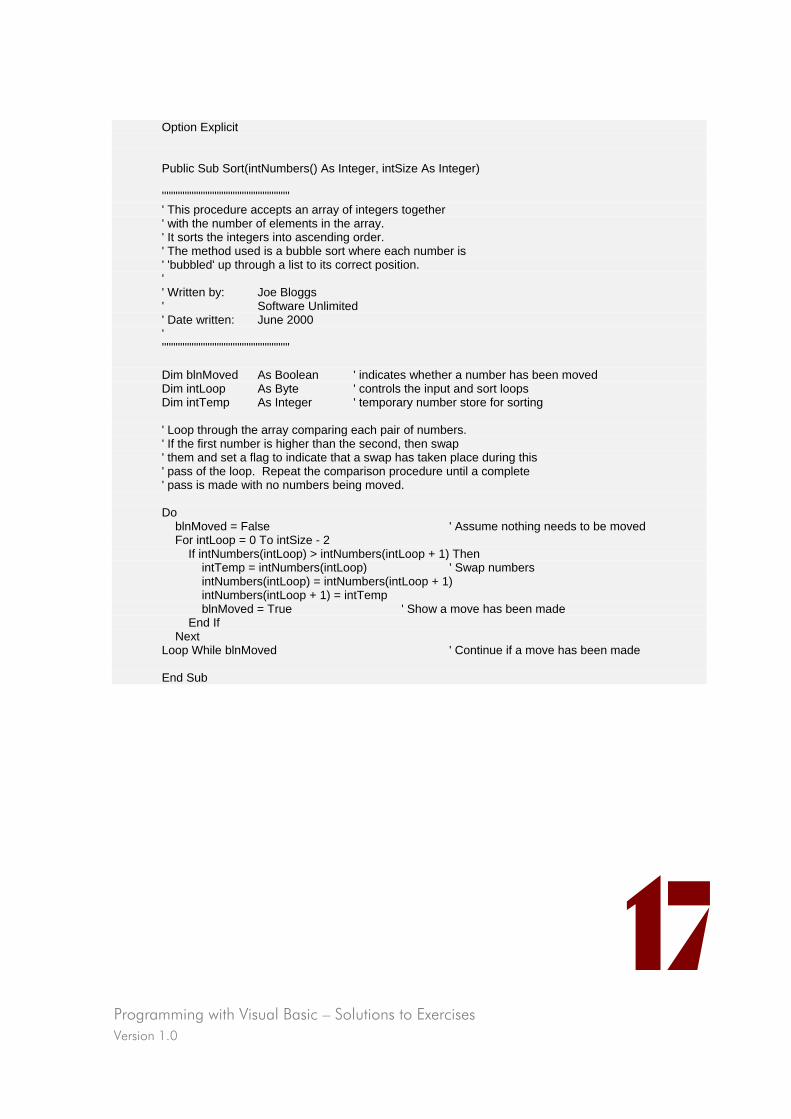
Programming with Visual Basic – Solutions to Exercises Version 1.0
17
Option Explicit Public Sub Sort(intNumbers() As Integer, intSize As Integer) '''''''''''''''''''''''''''''''''''''''''''''''''''''''' ' This procedure accepts an array of integers together ' with the number of elements in the array. ' It sorts the integers into ascending order. ' The method used is a bubble sort where each number is ' 'bubbled' up through a list to its correct position. ' ' Written by: Joe Bloggs ' Software Unlimited ' Date written: June 2000 ' '''''''''''''''''''''''''''''''''''''''''''''''''''''''' Dim blnMoved As Boolean ' indicates whether a number has been moved Dim intLoop As Byte ' controls the input and sort loops Dim intTemp As Integer ' temporary number store for sorting ' Loop through the array comparing each pair of numbers. ' If the first number is higher than the second, then swap ' them and set a flag to indicate that a swap has taken place during this ' pass of the loop. Repeat the comparison procedure until a complete ' pass is made with no numbers being moved. Do blnMoved = False ' Assume nothing needs to be moved For intLoop = 0 To intSize - 2 If intNumbers(intLoop) > intNumbers(intLoop + 1) Then intTemp = intNumbers(intLoop) ' Swap numbers intNumbers(intLoop) = intNumbers(intLoop + 1) intNumbers(intLoop + 1) = intTemp blnMoved = True ' Show a move has been made End If Next Loop While blnMoved ' Continue if a move has been made End Sub

More Programming with Visual Basic
www.learnhowtoprogram.com © IT-Pro Training Ltd. 2005

Visual Basic 6 Training Manual
Version 1.0
More Programmimg with Visual Basic Version 1.0
2
Contents
Contents .......................................................................................................................................... 2 File Handling ................................................................................................................................... 3
File Types ..................................................................................................................................... 3 Types of direct file access............................................................................................................... 3 Accessing files............................................................................................................................... 4 Using file-system controls ............................................................................................................. 19
Error Handling................................................................................................................................ 27 On Error statement...................................................................................................................... 27 Err object.................................................................................................................................... 28 Some common errors are: ........................................................................................................... 28 Resume statement ....................................................................................................................... 29
Menus and Toolbars ....................................................................................................................... 31 Menus........................................................................................................................................ 31 Toolbars..................................................................................................................................... 33
Testing........................................................................................................................................... 37 How do we test? ......................................................................................................................... 37 How to develop a test plan .......................................................................................................... 37 What to do when an error is found ............................................................................................... 38
Making Executables ........................................................................................................................ 40 Preparing your project ................................................................................................................. 40 Making the executable file ........................................................................................................... 40
Steps to developing an application................................................................................................... 42 More Programming with Visual Basic - Exercises................................................................................ 45
Exercise One - The Chain Store.................................................................................................... 45 Exercise Two – Severn Bridge Survey ............................................................................................. 46
Programming with Visual Basic - Assignment ..................................................................................... 48
More Programmimg with Visual Basic Version 1.0
3
File Handling
In all our examples and exercises so far, we have taken data input directly from the user and displayed results on screen. We will now look at handling data stored in files.
There are two sides to file handling – reading data from existing files and writing it to new or existing files. There are also a number of different file types suitable for different situations.
File Types
The options available for storing and retrieving data include:
• direct file access: directly creating, reading, and writing files.
• accessing database files through database-access tools.
In this section, we will examine direct file access. Database access is covered separately later in the course.
Types of direct file access
Visual Basic provides three types of file access: sequential, random, and binary.
Sequential access
Sequential access enables you to store and retrieve data in ASCII text files. It is suitable for applications, such as text editors, that store unstructured text data. It is not suited for applications, such as database management systems and spreadsheets, which need to structure data in records and fields.
• Text is stored in sequence, from first character to last.
• Text is retrieved in sequence, from first character to last.
So, sequential access is particularly suited to storing streams of text data.
Sequential access typically uses delimiters to separate items and records. Commas separate individual items, quotes surround strings and a carriage-return and linefeed character combination indicate the end of a record.
Random access
Random access enables you to work with files structured in fixed-length records and fields. Because records are all the same length, you can quickly find the location of any record. This means that you can directly access any record by number. However, even when data within a field is shorter than the field length, the remainder of the storage space in that field is tied up, wasting storage.
• Data is stored in fixed-length records
• Any record can be retrieved directly
Random access should be used to store data structured in fixed-length records and fields of various data types.
Binary access
Binary access enables you to work with files at the byte level. While this gives you great flexibility, it also requires that you develop your own structure and approach for storing and retrieving files.
By using binary access, you can develop very
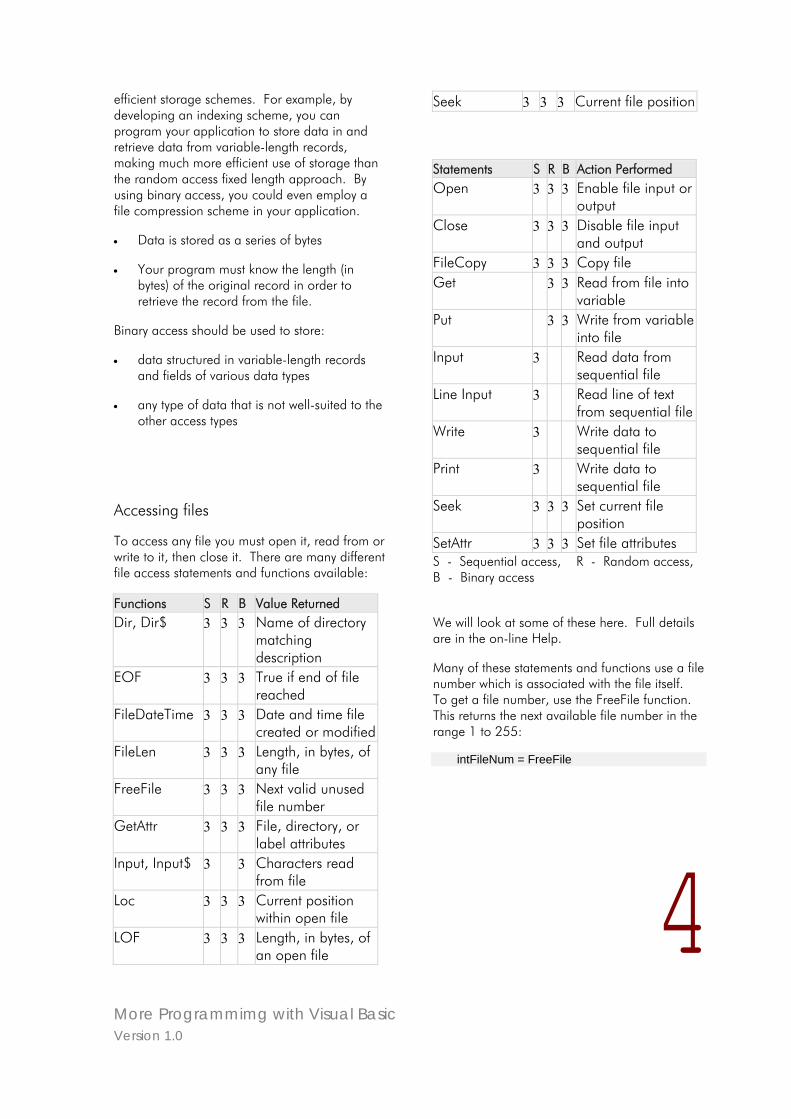
More Programmimg with Visual Basic Version 1.0
4
efficient storage schemes. For example, by developing an indexing scheme, you can program your application to store data in and retrieve data from variable-length records, making much more efficient use of storage than the random access fixed length approach. By using binary access, you could even employ a file compression scheme in your application.
• Data is stored as a series of bytes
• Your program must know the length (in bytes) of the original record in order to retrieve the record from the file.
Binary access should be used to store:
• data structured in variable-length records and fields of various data types
• any type of data that is not well-suited to the other access types
Accessing files
To access any file you must open it, read from or write to it, then close it. There are many different file access statements and functions available:
Functions S R B Value Returned Dir, Dir$ 3 3 3 Name of directory
matching description
EOF 3 3 3 True if end of file reached
FileDateTime 3 3 3 Date and time file created or modified
FileLen 3 3 3 Length, in bytes, of any file
FreeFile 3 3 3 Next valid unused file number
GetAttr 3 3 3 File, directory, or label attributes
Input, Input$ 3 3 Characters read from file
Loc 3 3 3 Current position within open file
LOF 3 3 3 Length, in bytes, of an open file
Seek 3 3 3 Current file position Statements S R B Action Performed Open 3 3 3 Enable file input or
output Close 3 3 3 Disable file input
and output FileCopy 3 3 3 Copy file Get 3 3 Read from file into
variable Put 3 3 Write from variable
into file Input 3 Read data from
sequential file Line Input 3 Read line of text
from sequential file Write 3 Write data to
sequential file Print 3 Write data to
sequential file Seek 3 3 3 Set current file
position SetAttr 3 3 3 Set file attributes S - Sequential access, R - Random access, B - Binary access
We will look at some of these here. Full details are in the on-line Help.
Many of these statements and functions use a file number which is associated with the file itself. To get a file number, use the FreeFile function. This returns the next available file number in the range 1 to 255:
intFileNum = FreeFile
More Programmimg with Visual Basic Version 1.0
5
This number can then be used with the other file access statements.
Accessing Sequential files
To write to a sequential file, it must be opened for output.
Open "TestFile" For Output As #intFileNum would open a file called TestFile and associate it with the file number intFileNum which was returned by FreeFile. If the file does not already exist, it will be created.
To read a sequential file, it must be opened for input:
Open "TestFile" For Input As #intFileNum
There are two main methods of writing to and reading from a sequential file:
• Print and Line Input
• Write and Input
Print and Line Input
These statements work with lines of text separated by carriage return and line feed characters.
Each Print statement will produce a separate line. The Tab and Spc functions can be used to improve the layout of the text:
Print #intFileNum, "Testing Print" Print #intFileNum, ' blank line Print #intFileNum, "Hello" ; " " ; "World" Print #intFileNum, Spc(5) ; "5 spaces in" Print #intFileNum, Tab(10) ; "10 spaces in" intNum = 42 blnFlag = True dtmDate = #25/12/2000# curBal = 25.50
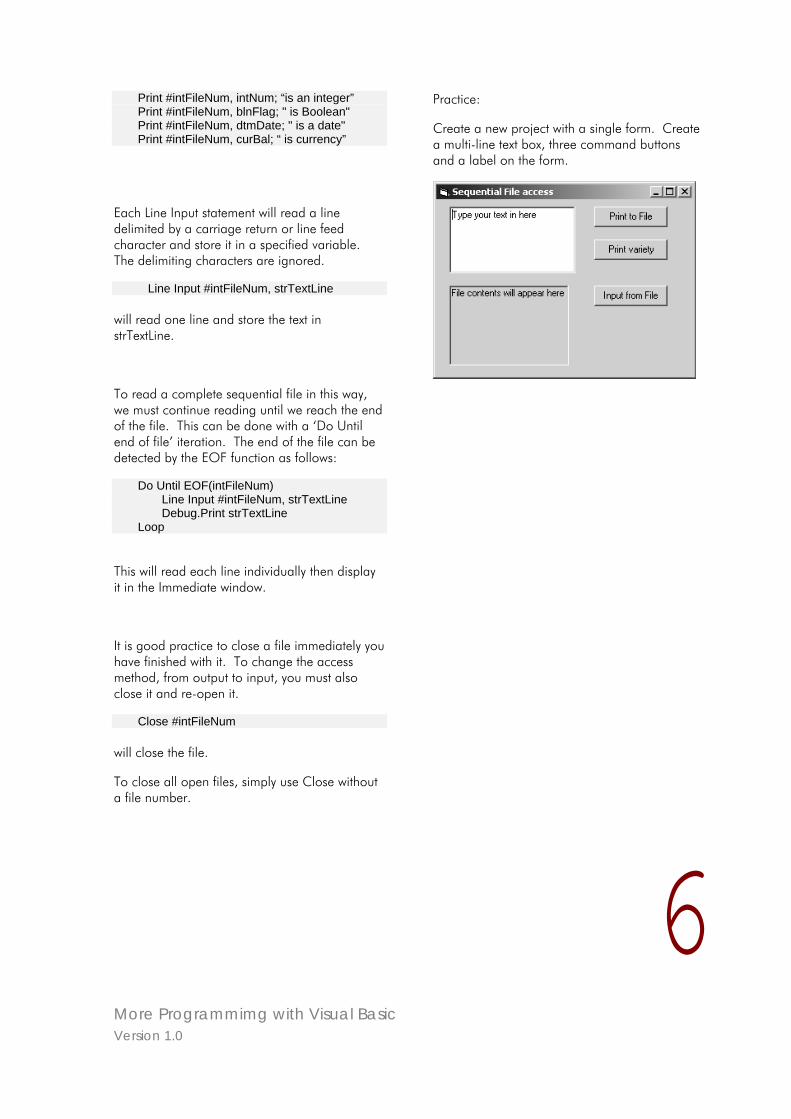
More Programmimg with Visual Basic Version 1.0
6
Print #intFileNum, intNum; “is an integer” Print #intFileNum, blnFlag; " is Boolean" Print #intFileNum, dtmDate; " is a date" Print #intFileNum, curBal; “ is currency”
Each Line Input statement will read a line delimited by a carriage return or line feed character and store it in a specified variable. The delimiting characters are ignored.
Line Input #intFileNum, strTextLine will read one line and store the text in strTextLine.
To read a complete sequential file in this way, we must continue reading until we reach the end of the file. This can be done with a ‘Do Until end of file’ iteration. The end of the file can be detected by the EOF function as follows:
Do Until EOF(intFileNum) Line Input #intFileNum, strTextLine Debug.Print strTextLine Loop
This will read each line individually then display it in the Immediate window.
It is good practice to close a file immediately you have finished with it. To change the access method, from output to input, you must also close it and re-open it.
Close #intFileNum will close the file.
To close all open files, simply use Close without a file number.
Practice:
Create a new project with a single form. Create a multi-line text box, three command buttons and a label on the form.
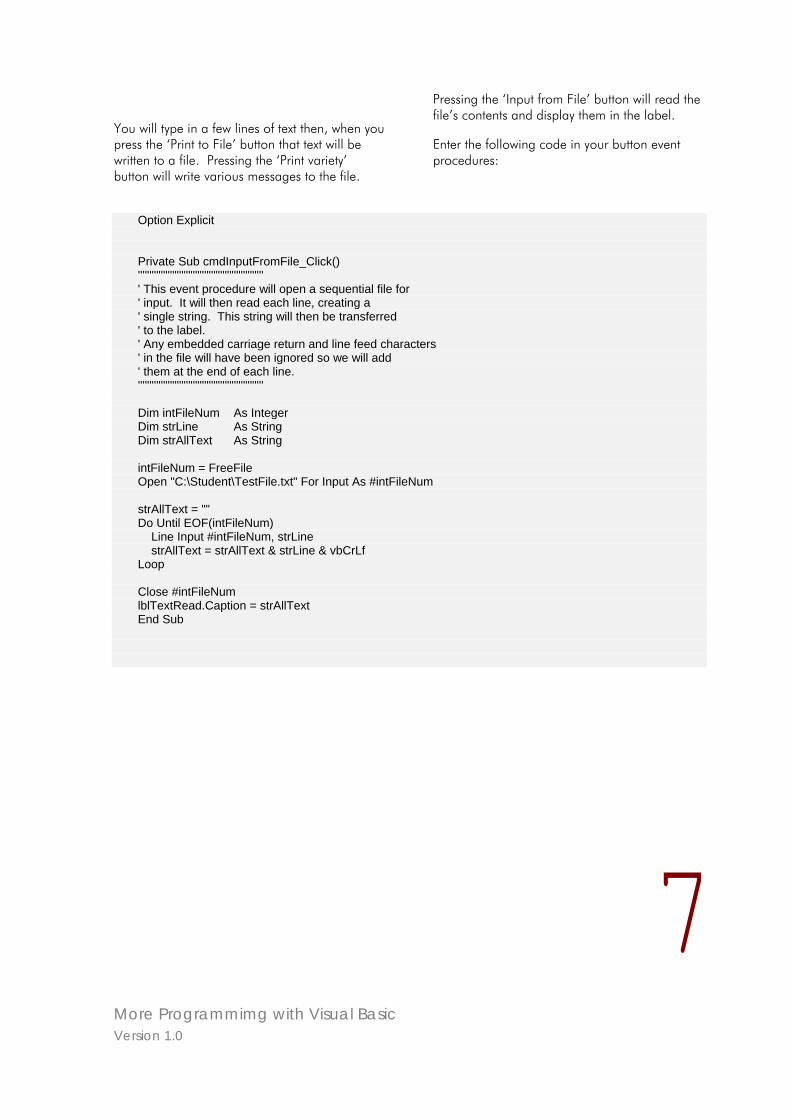
More Programmimg with Visual Basic Version 1.0
7
You will type in a few lines of text then, when you press the ‘Print to File’ button that text will be written to a file. Pressing the ‘Print variety’ button will write various messages to the file.
Pressing the ‘Input from File’ button will read the file’s contents and display them in the label.
Enter the following code in your button event procedures:
Option Explicit Private Sub cmdInputFromFile_Click() ''''''''''''''''''''''''''''''''''''''''''''''''''''''' ' This event procedure will open a sequential file for ' input. It will then read each line, creating a ' single string. This string will then be transferred ' to the label. ' Any embedded carriage return and line feed characters ' in the file will have been ignored so we will add ' them at the end of each line. ''''''''''''''''''''''''''''''''''''''''''''''''''''''' Dim intFileNum As Integer Dim strLine As String Dim strAllText As String intFileNum = FreeFile Open "C:\Student\TestFile.txt" For Input As #intFileNum strAllText = "" Do Until EOF(intFileNum) Line Input #intFileNum, strLine strAllText = strAllText & strLine & vbCrLf Loop Close #intFileNum lblTextRead.Caption = strAllText End Sub
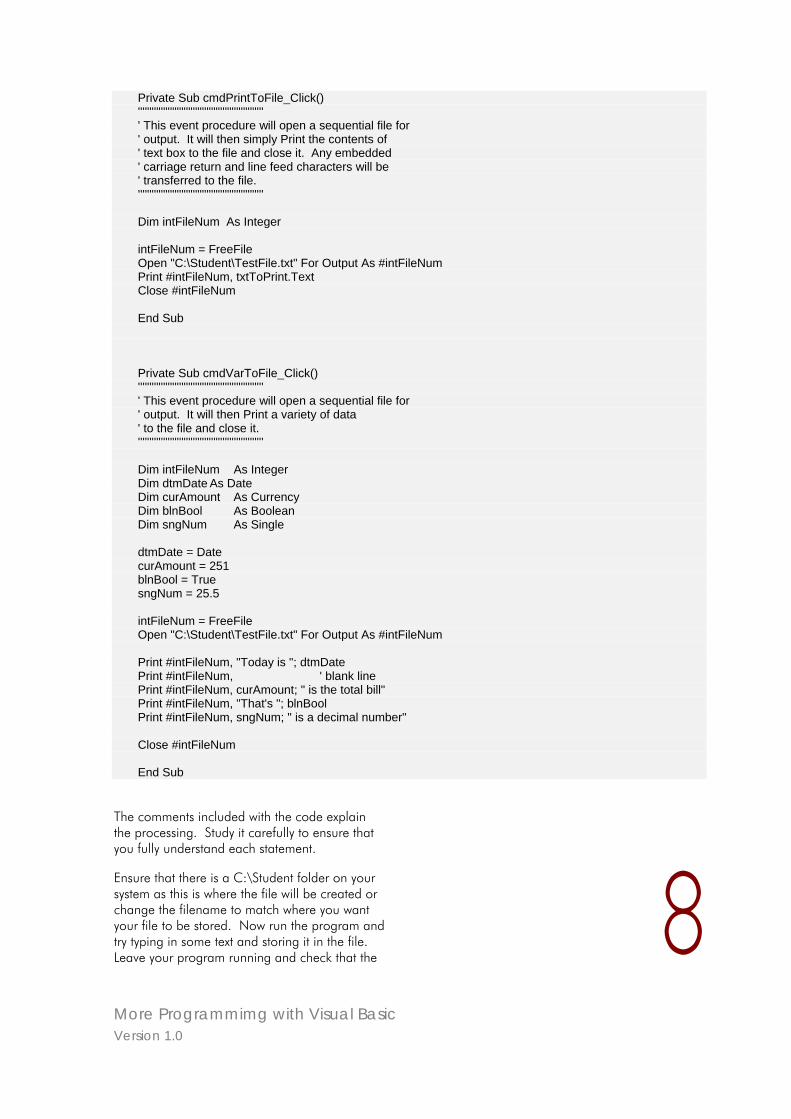
More Programmimg with Visual Basic Version 1.0
8
Private Sub cmdPrintToFile_Click() ''''''''''''''''''''''''''''''''''''''''''''''''''''''' ' This event procedure will open a sequential file for ' output. It will then simply Print the contents of ' text box to the file and close it. Any embedded ' carriage return and line feed characters will be ' transferred to the file. ''''''''''''''''''''''''''''''''''''''''''''''''''''''' Dim intFileNum As Integer intFileNum = FreeFile Open "C:\Student\TestFile.txt" For Output As #intFileNum Print #intFileNum, txtToPrint.Text Close #intFileNum End Sub Private Sub cmdVarToFile_Click() ''''''''''''''''''''''''''''''''''''''''''''''''''''''' ' This event procedure will open a sequential file for ' output. It will then Print a variety of data ' to the file and close it. ''''''''''''''''''''''''''''''''''''''''''''''''''''''' Dim intFileNum As Integer Dim dtmDate As Date Dim curAmount As Currency Dim blnBool As Boolean Dim sngNum As Single dtmDate = Date curAmount = 251 blnBool = True sngNum = 25.5 intFileNum = FreeFile Open "C:\Student\TestFile.txt" For Output As #intFileNum Print #intFileNum, "Today is "; dtmDate Print #intFileNum, ' blank line Print #intFileNum, curAmount; " is the total bill" Print #intFileNum, "That's "; blnBool Print #intFileNum, sngNum; " is a decimal number" Close #intFileNum End Sub
The comments included with the code explain the processing. Study it carefully to ensure that you fully understand each statement.
Ensure that there is a C:\Student folder on your system as this is where the file will be created or change the filename to match where you want your file to be stored. Now run the program and try typing in some text and storing it in the file. Leave your program running and check that the
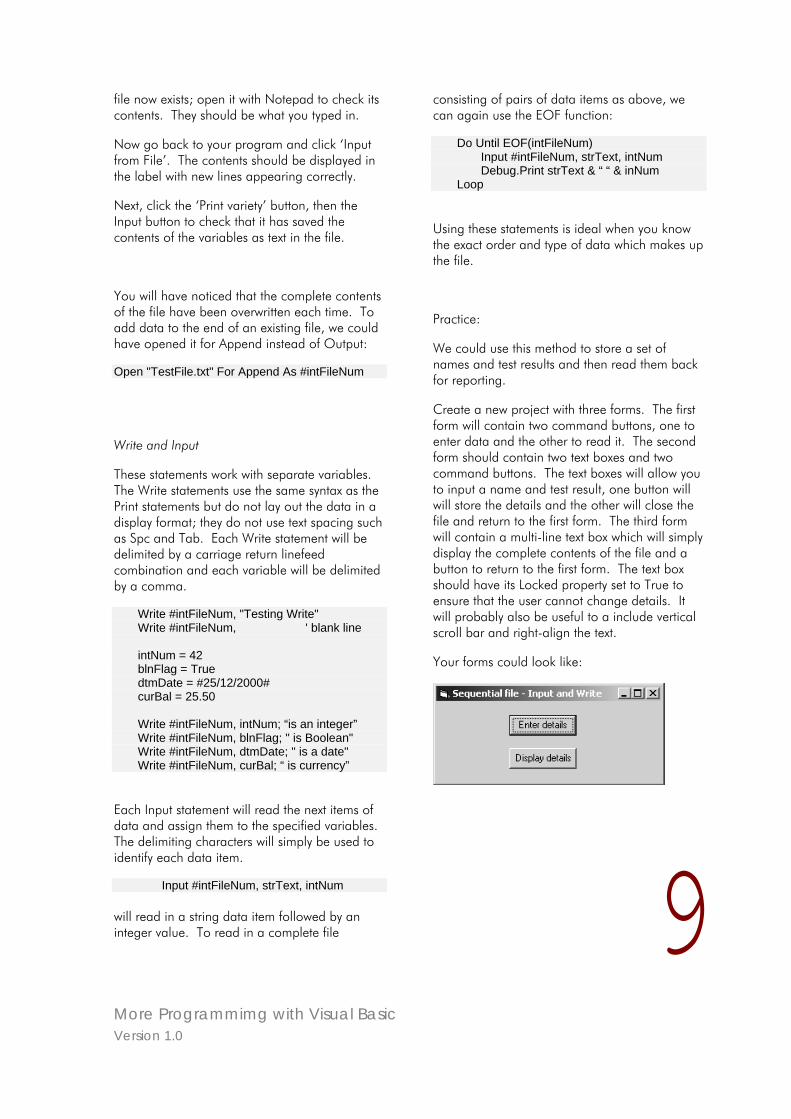
More Programmimg with Visual Basic Version 1.0
9
file now exists; open it with Notepad to check its contents. They should be what you typed in.
Now go back to your program and click ‘Input from File’. The contents should be displayed in the label with new lines appearing correctly.
Next, click the ‘Print variety’ button, then the Input button to check that it has saved the contents of the variables as text in the file.
You will have noticed that the complete contents of the file have been overwritten each time. To add data to the end of an existing file, we could have opened it for Append instead of Output:
Open "TestFile.txt" For Append As #intFileNum
Write and Input
These statements work with separate variables. The Write statements use the same syntax as the Print statements but do not lay out the data in a display format; they do not use text spacing such as Spc and Tab. Each Write statement will be delimited by a carriage return linefeed combination and each variable will be delimited by a comma.
Write #intFileNum, "Testing Write" Write #intFileNum, ' blank line intNum = 42 blnFlag = True dtmDate = #25/12/2000# curBal = 25.50 Write #intFileNum, intNum; “is an integer” Write #intFileNum, blnFlag; " is Boolean" Write #intFileNum, dtmDate; " is a date" Write #intFileNum, curBal; “ is currency”
Each Input statement will read the next items of data and assign them to the specified variables. The delimiting characters will simply be used to identify each data item.
Input #intFileNum, strText, intNum will read in a string data item followed by an integer value. To read in a complete file
consisting of pairs of data items as above, we can again use the EOF function:
Do Until EOF(intFileNum) Input #intFileNum, strText, intNum Debug.Print strText & “ “ & inNum Loop
Using these statements is ideal when you know the exact order and type of data which makes up the file.
Practice:
We could use this method to store a set of names and test results and then read them back for reporting.
Create a new project with three forms. The first form will contain two command buttons, one to enter data and the other to read it. The second form should contain two text boxes and two command buttons. The text boxes will allow you to input a name and test result, one button will will store the details and the other will close the file and return to the first form. The third form will contain a multi-line text box which will simply display the complete contents of the file and a button to return to the first form. The text box should have its Locked property set to True to ensure that the user cannot change details. It will probably also be useful to a include vertical scroll bar and right-align the text.
Your forms could look like:
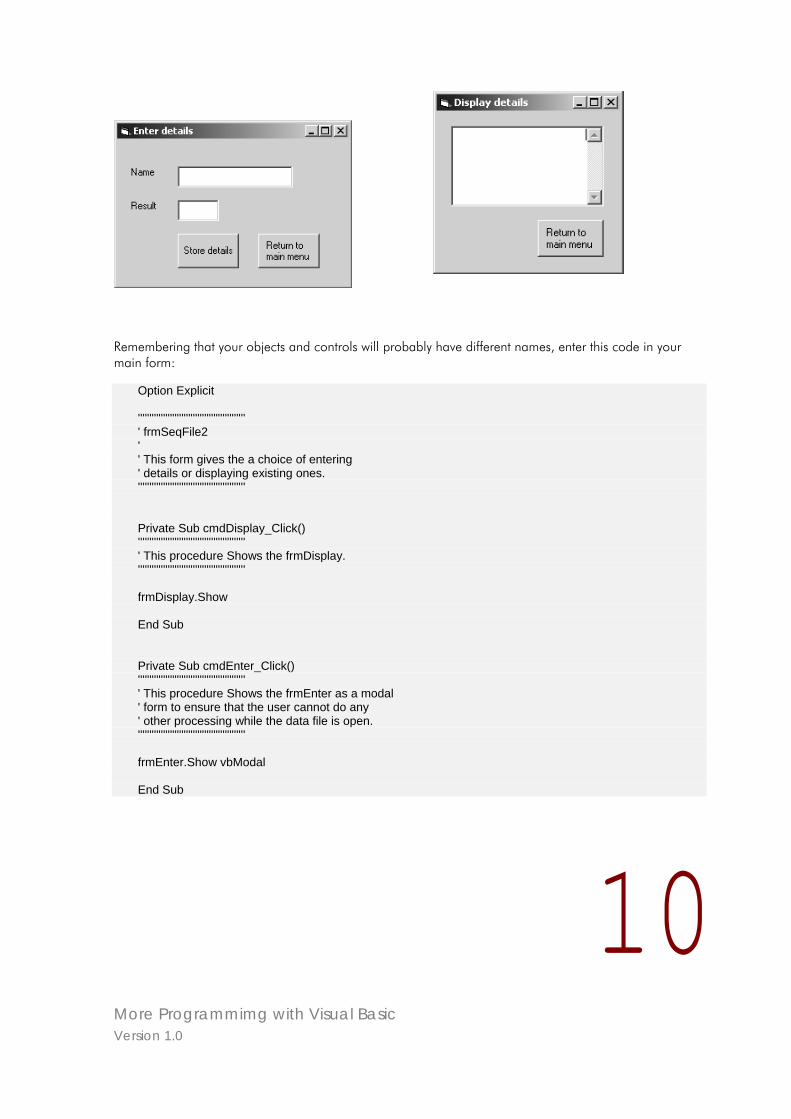
More Programmimg with Visual Basic Version 1.0
Remembering that your objects and controls will probably have different names, enter this code in your main form:
Option Explicit ''''''''''''''''''''''''''''''''''''''''''''''' ' frmSeqFile2 ' ' This form gives the a choice of entering ' details or displaying existing ones. ''''''''''''''''''''''''''''''''''''''''''''''' Private Sub cmdDisplay_Click() ''''''''''''''''''''''''''''''''''''''''''''''' ' This procedure Shows the frmDisplay. ''''''''''''''''''''''''''''''''''''''''''''''' frmDisplay.Show End Sub Private Sub cmdEnter_Click() ''''''''''''''''''''''''''''''''''''''''''''''' ' This procedure Shows the frmEnter as a modal ' form to ensure that the user cannot do any ' other processing while the data file is open. ''''''''''''''''''''''''''''''''''''''''''''''' frmEnter.Show vbModal End Sub
10
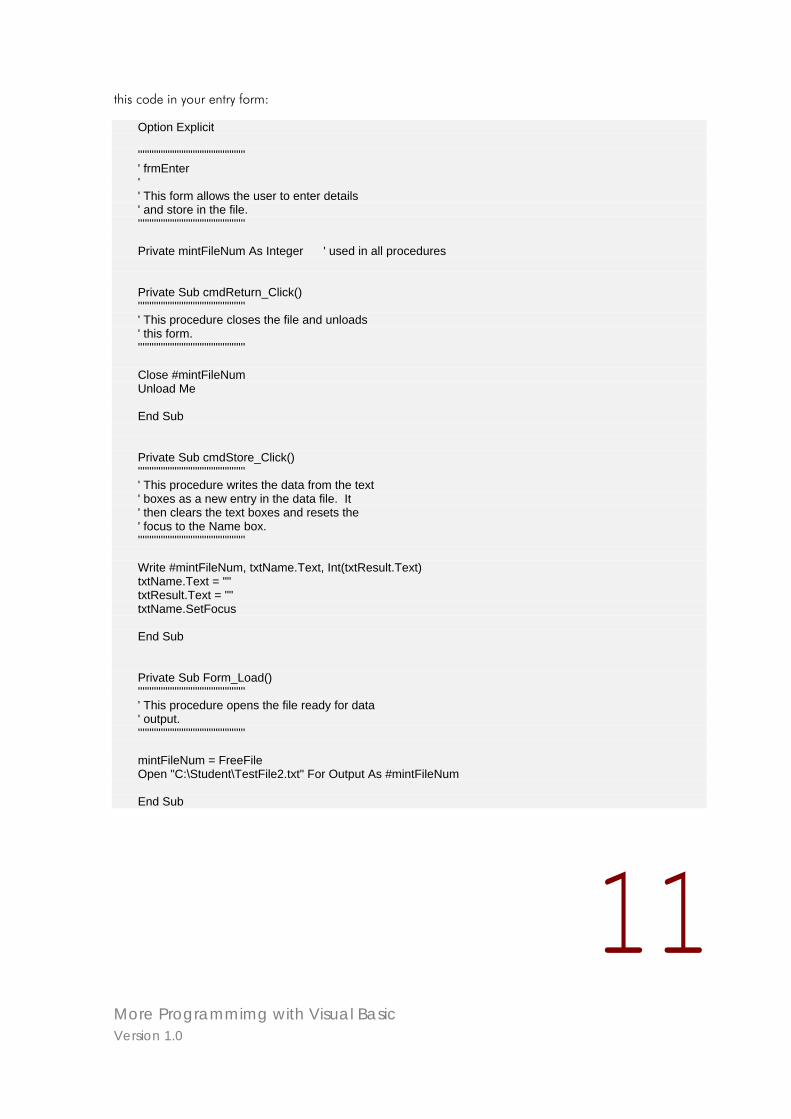
More Programmimg with Visual Basic Version 1.0
11
this code in your entry form:
Option Explicit ''''''''''''''''''''''''''''''''''''''''''''''' ' frmEnter ' ' This form allows the user to enter details ' and store in the file. ''''''''''''''''''''''''''''''''''''''''''''''' Private mintFileNum As Integer ' used in all procedures Private Sub cmdReturn_Click() ''''''''''''''''''''''''''''''''''''''''''''''' ' This procedure closes the file and unloads ' this form. ''''''''''''''''''''''''''''''''''''''''''''''' Close #mintFileNum Unload Me End Sub Private Sub cmdStore_Click() ''''''''''''''''''''''''''''''''''''''''''''''' ' This procedure writes the data from the text ' boxes as a new entry in the data file. It ' then clears the text boxes and resets the ' focus to the Name box. ''''''''''''''''''''''''''''''''''''''''''''''' Write #mintFileNum, txtName.Text, Int(txtResult.Text) txtName.Text = "" txtResult.Text = "" txtName.SetFocus End Sub Private Sub Form_Load() ''''''''''''''''''''''''''''''''''''''''''''''' ' This procedure opens the file ready for data ' output. ''''''''''''''''''''''''''''''''''''''''''''''' mintFileNum = FreeFile Open "C:\Student\TestFile2.txt" For Output As #mintFileNum End Sub
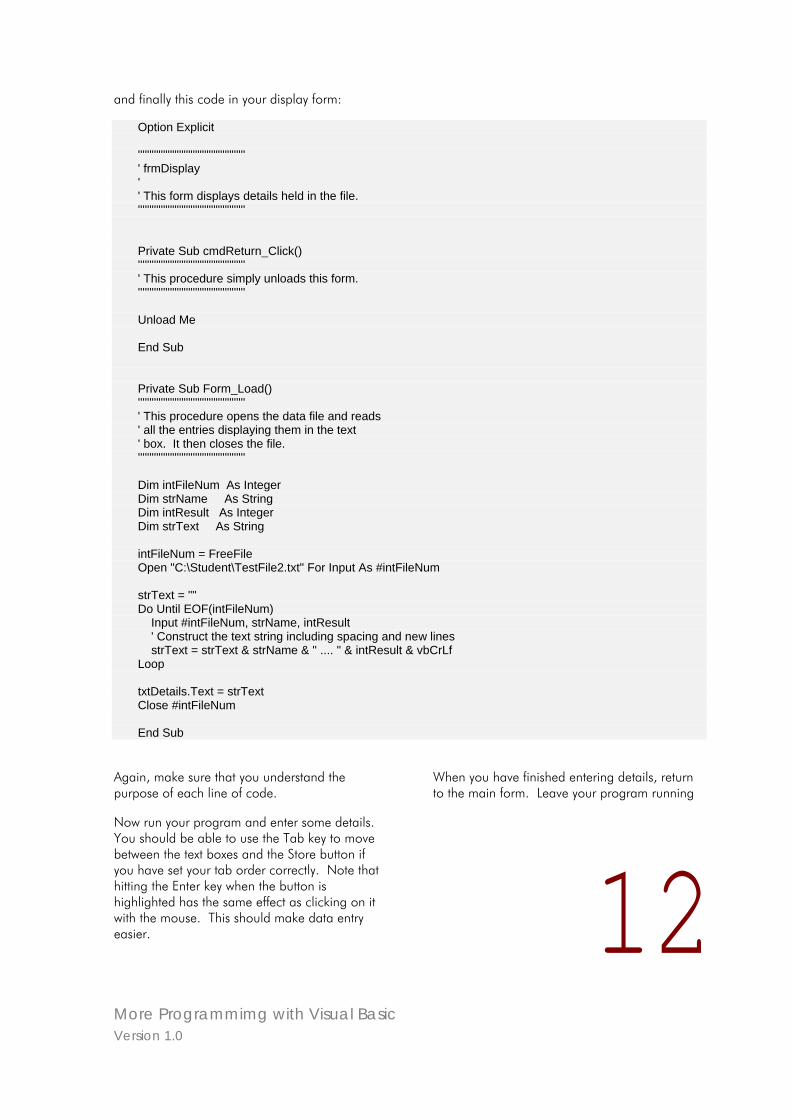
More Programmimg with Visual Basic Version 1.0
12
and finally this code in your display form:
Option Explicit ''''''''''''''''''''''''''''''''''''''''''''''' ' frmDisplay ' ' This form displays details held in the file. ''''''''''''''''''''''''''''''''''''''''''''''' Private Sub cmdReturn_Click() ''''''''''''''''''''''''''''''''''''''''''''''' ' This procedure simply unloads this form. ''''''''''''''''''''''''''''''''''''''''''''''' Unload Me End Sub Private Sub Form_Load() ''''''''''''''''''''''''''''''''''''''''''''''' ' This procedure opens the data file and reads ' all the entries displaying them in the text ' box. It then closes the file. ''''''''''''''''''''''''''''''''''''''''''''''' Dim intFileNum As Integer Dim strName As String Dim intResult As Integer Dim strText As String intFileNum = FreeFile Open "C:\Student\TestFile2.txt" For Input As #intFileNum strText = "" Do Until EOF(intFileNum) Input #intFileNum, strName, intResult ' Construct the text string including spacing and new lines strText = strText & strName & " .... " & intResult & vbCrLf Loop txtDetails.Text = strText Close #intFileNum End Sub
Again, make sure that you understand the purpose of each line of code.
Now run your program and enter some details. You should be able to use the Tab key to move between the text boxes and the Store button if you have set your tab order correctly. Note that hitting the Enter key when the button is highlighted has the same effect as clicking on it with the mouse. This should make data entry easier.
When you have finished entering details, return to the main form. Leave your program running
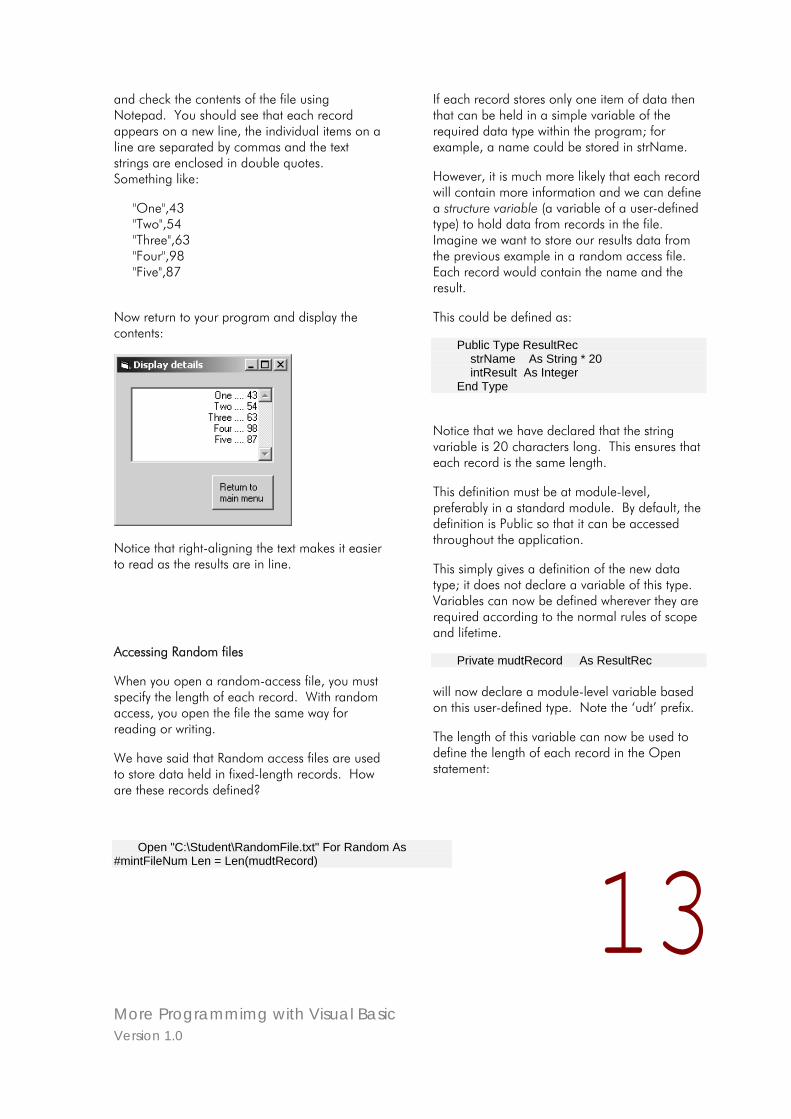
More Programmimg with Visual Basic Version 1.0
13
and check the contents of the file using Notepad. You should see that each record appears on a new line, the individual items on a line are separated by commas and the text strings are enclosed in double quotes. Something like:
"One",43 "Two",54 "Three",63 "Four",98 "Five",87
Now return to your program and display the contents:
Notice that right-aligning the text makes it easier to read as the results are in line.
Accessing Random files
When you open a random-access file, you must specify the length of each record. With random access, you open the file the same way for reading or writing.
We have said that Random access files are used to store data held in fixed-length records. How are these records defined?
If each record stores only one item of data then that can be held in a simple variable of the required data type within the program; for example, a name could be stored in strName.
However, it is much more likely that each record will contain more information and we can define a structure variable (a variable of a user-defined type) to hold data from records in the file. Imagine we want to store our results data from the previous example in a random access file. Each record would contain the name and the result.
This could be defined as:
Public Type ResultRec strName As String * 20 intResult As Integer End Type
Notice that we have declared that the string variable is 20 characters long. This ensures that each record is the same length.
This definition must be at module-level, preferably in a standard module. By default, the definition is Public so that it can be accessed throughout the application.
This simply gives a definition of the new data type; it does not declare a variable of this type. Variables can now be defined wherever they are required according to the normal rules of scope and lifetime.
Private mudtRecord As ResultRec will now declare a module-level variable based on this user-defined type. Note the ‘udt’ prefix.
The length of this variable can now be used to define the length of each record in the Open statement:
Open "C:\Student\RandomFile.txt" For Random As #mintFileNum Len = Len(mudtRecord)
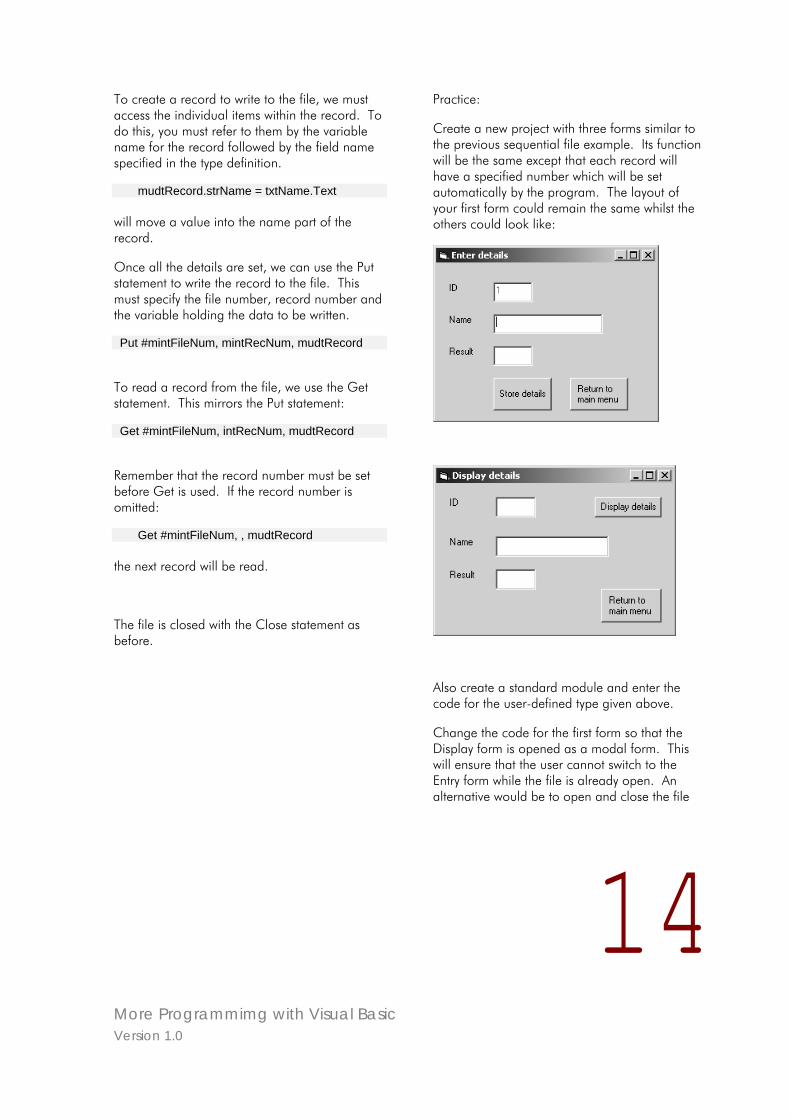
More Programmimg with Visual Basic Version 1.0
14
To create a record to write to the file, we must access the individual items within the record. To do this, you must refer to them by the variable name for the record followed by the field name specified in the type definition.
mudtRecord.strName = txtName.Text will move a value into the name part of the record.
Once all the details are set, we can use the Put statement to write the record to the file. This must specify the file number, record number and the variable holding the data to be written.
Put #mintFileNum, mintRecNum, mudtRecord
To read a record from the file, we use the Get statement. This mirrors the Put statement:
Get #mintFileNum, intRecNum, mudtRecord
Remember that the record number must be set before Get is used. If the record number is omitted:
Get #mintFileNum, , mudtRecord the next record will be read.
The file is closed with the Close statement as before.
Practice:
Create a new project with three forms similar to the previous sequential file example. Its function will be the same except that each record will have a specified number which will be set automatically by the program. The layout of your first form could remain the same whilst the others could look like:
Also create a standard module and enter the code for the user-defined type given above.
Change the code for the first form so that the Display form is opened as a modal form. This will ensure that the user cannot switch to the Entry form while the file is already open. An alternative would be to open and close the file

More Programmimg with Visual Basic Version 1.0
15
as part of the processing in the first form.
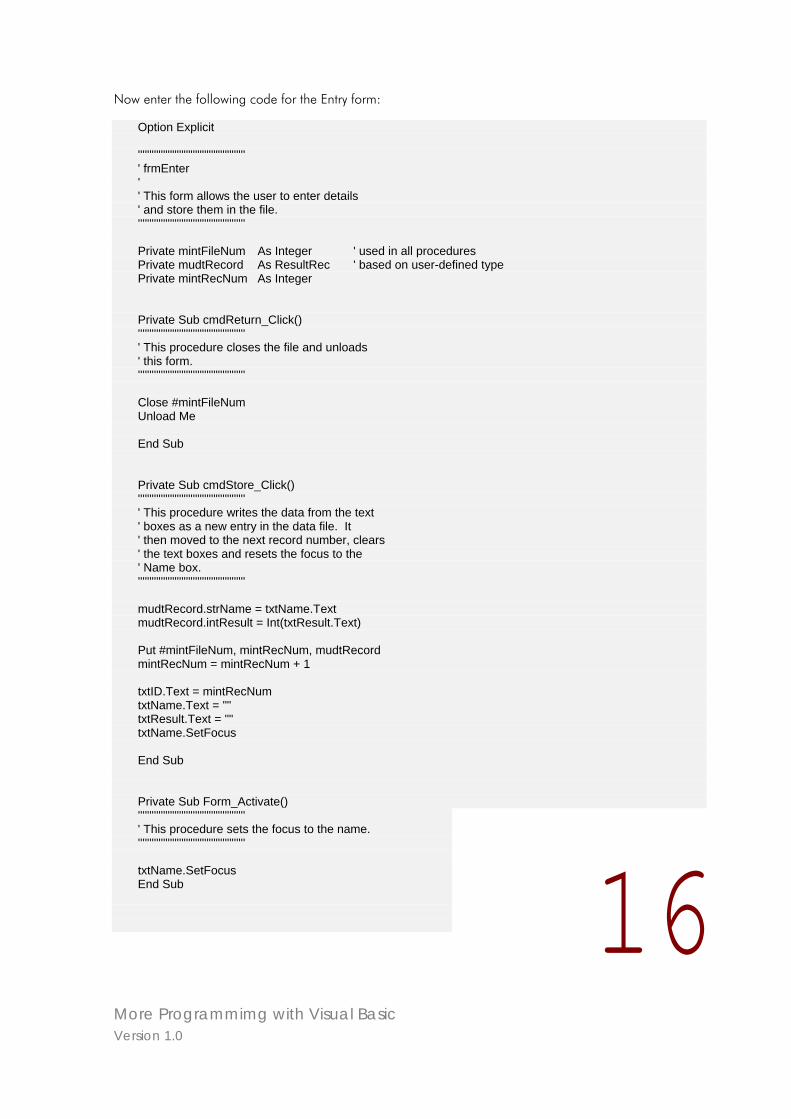
More Programmimg with Visual Basic Version 1.0
16
Now enter the following code for the Entry form:
Option Explicit ''''''''''''''''''''''''''''''''''''''''''''''' ' frmEnter ' ' This form allows the user to enter details ' and store them in the file. ''''''''''''''''''''''''''''''''''''''''''''''' Private mintFileNum As Integer ' used in all procedures Private mudtRecord As ResultRec ' based on user-defined type Private mintRecNum As Integer Private Sub cmdReturn_Click() ''''''''''''''''''''''''''''''''''''''''''''''' ' This procedure closes the file and unloads ' this form. ''''''''''''''''''''''''''''''''''''''''''''''' Close #mintFileNum Unload Me End Sub Private Sub cmdStore_Click() ''''''''''''''''''''''''''''''''''''''''''''''' ' This procedure writes the data from the text ' boxes as a new entry in the data file. It ' then moved to the next record number, clears ' the text boxes and resets the focus to the ' Name box. ''''''''''''''''''''''''''''''''''''''''''''''' mudtRecord.strName = txtName.Text mudtRecord.intResult = Int(txtResult.Text) Put #mintFileNum, mintRecNum, mudtRecord mintRecNum = mintRecNum + 1 txtID.Text = mintRecNum txtName.Text = "" txtResult.Text = "" txtName.SetFocus End Sub Private Sub Form_Activate() ''''''''''''''''''''''''''''''''''''''''''''''' ' This procedure sets the focus to the name. ''''''''''''''''''''''''''''''''''''''''''''''' txtName.SetFocus End Sub
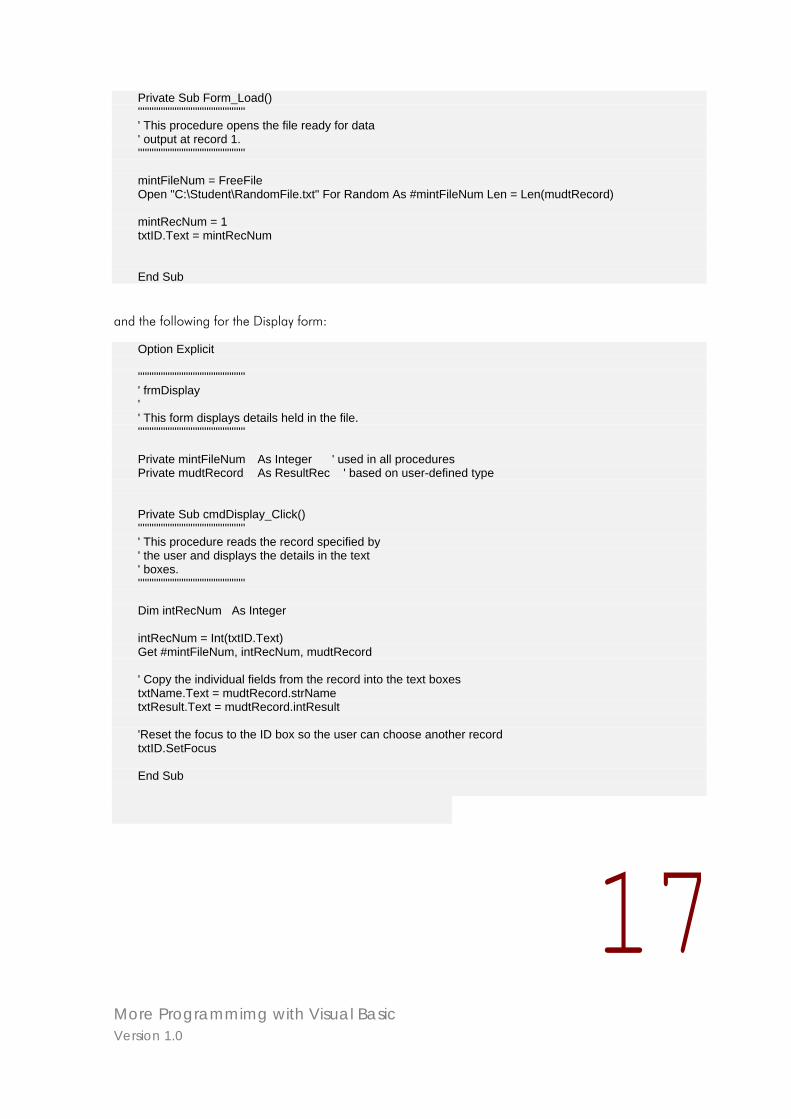
More Programmimg with Visual Basic Version 1.0
17
Private Sub Form_Load() ''''''''''''''''''''''''''''''''''''''''''''''' ' This procedure opens the file ready for data ' output at record 1. ''''''''''''''''''''''''''''''''''''''''''''''' mintFileNum = FreeFile Open "C:\Student\RandomFile.txt" For Random As #mintFileNum Len = Len(mudtRecord) mintRecNum = 1 txtID.Text = mintRecNum End Sub
and the following for the Display form:
Option Explicit ''''''''''''''''''''''''''''''''''''''''''''''' ' frmDisplay ' ' This form displays details held in the file. ''''''''''''''''''''''''''''''''''''''''''''''' Private mintFileNum As Integer ' used in all procedures Private mudtRecord As ResultRec ' based on user-defined type Private Sub cmdDisplay_Click() ''''''''''''''''''''''''''''''''''''''''''''''' ' This procedure reads the record specified by ' the user and displays the details in the text ' boxes. ''''''''''''''''''''''''''''''''''''''''''''''' Dim intRecNum As Integer intRecNum = Int(txtID.Text) Get #mintFileNum, intRecNum, mudtRecord ' Copy the individual fields from the record into the text boxes txtName.Text = mudtRecord.strName txtResult.Text = mudtRecord.intResult 'Reset the focus to the ID box so the user can choose another record txtID.SetFocus End Sub
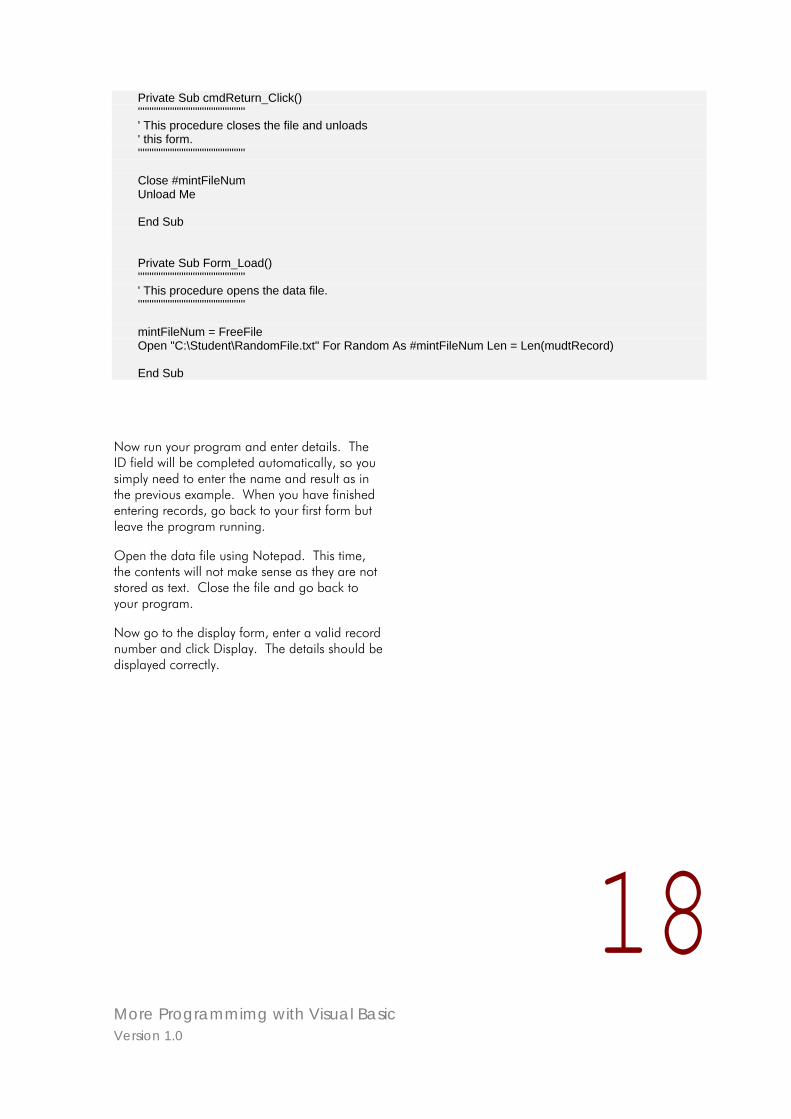
More Programmimg with Visual Basic Version 1.0
18
Private Sub cmdReturn_Click() ''''''''''''''''''''''''''''''''''''''''''''''' ' This procedure closes the file and unloads ' this form. ''''''''''''''''''''''''''''''''''''''''''''''' Close #mintFileNum Unload Me End Sub Private Sub Form_Load() ''''''''''''''''''''''''''''''''''''''''''''''' ' This procedure opens the data file. ''''''''''''''''''''''''''''''''''''''''''''''' mintFileNum = FreeFile Open "C:\Student\RandomFile.txt" For Random As #mintFileNum Len = Len(mudtRecord) End Sub
Now run your program and enter details. The ID field will be completed automatically, so you simply need to enter the name and result as in the previous example. When you have finished entering records, go back to your first form but leave the program running.
Open the data file using Notepad. This time, the contents will not make sense as they are not stored as text. Close the file and go back to your program.
Now go to the display form, enter a valid record number and click Display. The details should be displayed correctly.
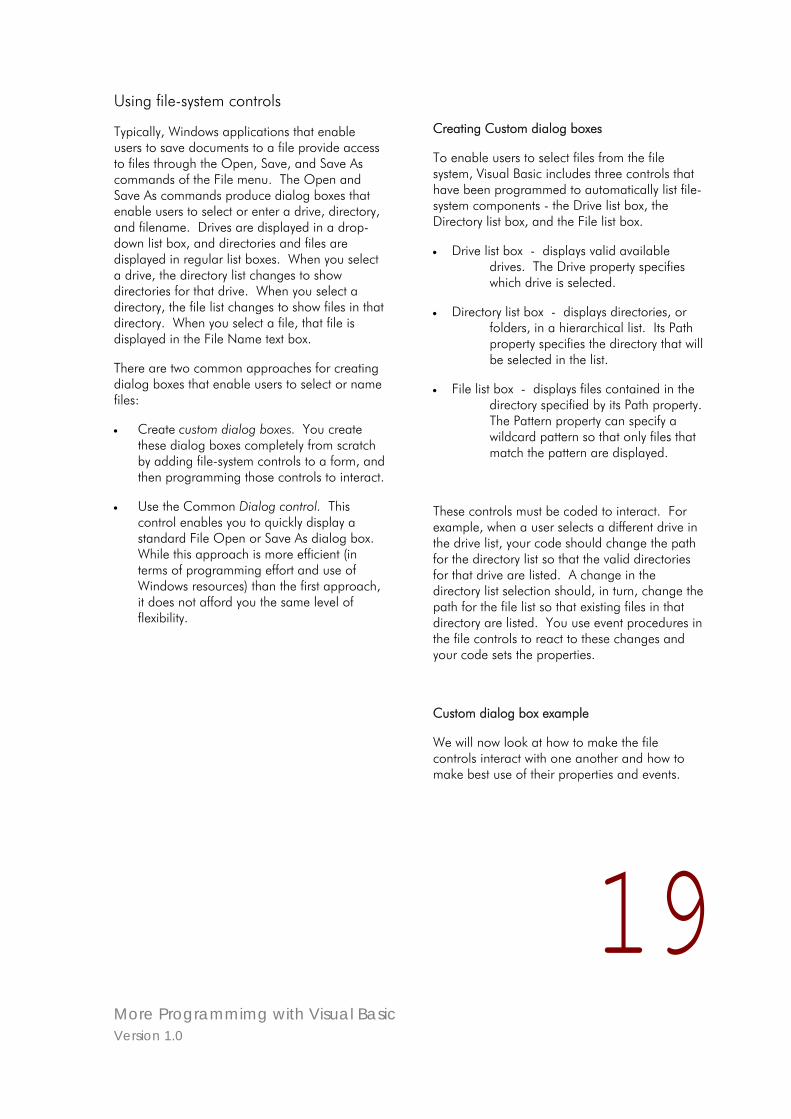
More Programmimg with Visual Basic Version 1.0
19
Using file-system controls
Typically, Windows applications that enable users to save documents to a file provide access to files through the Open, Save, and Save As commands of the File menu. The Open and Save As commands produce dialog boxes that enable users to select or enter a drive, directory, and filename. Drives are displayed in a drop-down list box, and directories and files are displayed in regular list boxes. When you select a drive, the directory list changes to show directories for that drive. When you select a directory, the file list changes to show files in that directory. When you select a file, that file is displayed in the File Name text box.
There are two common approaches for creating dialog boxes that enable users to select or name files:
• Create custom dialog boxes. You create these dialog boxes completely from scratch by adding file-system controls to a form, and then programming those controls to interact.
• Use the Common Dialog control. This control enables you to quickly display a standard File Open or Save As dialog box. While this approach is more efficient (in terms of programming effort and use of Windows resources) than the first approach, it does not afford you the same level of flexibility.
Creating Custom dialog boxes
To enable users to select files from the file system, Visual Basic includes three controls that have been programmed to automatically list file-system components - the Drive list box, the Directory list box, and the File list box.
• Drive list box - displays valid available drives. The Drive property specifies which drive is selected.
• Directory list box - displays directories, or folders, in a hierarchical list. Its Path property specifies the directory that will be selected in the list.
• File list box - displays files contained in the directory specified by its Path property. The Pattern property can specify a wildcard pattern so that only files that match the pattern are displayed.
These controls must be coded to interact. For example, when a user selects a different drive in the drive list, your code should change the path for the directory list so that the valid directories for that drive are listed. A change in the directory list selection should, in turn, change the path for the file list so that existing files in that directory are listed. You use event procedures in the file controls to react to these changes and your code sets the properties.
Custom dialog box example
We will now look at how to make the file controls interact with one another and how to make best use of their properties and events.
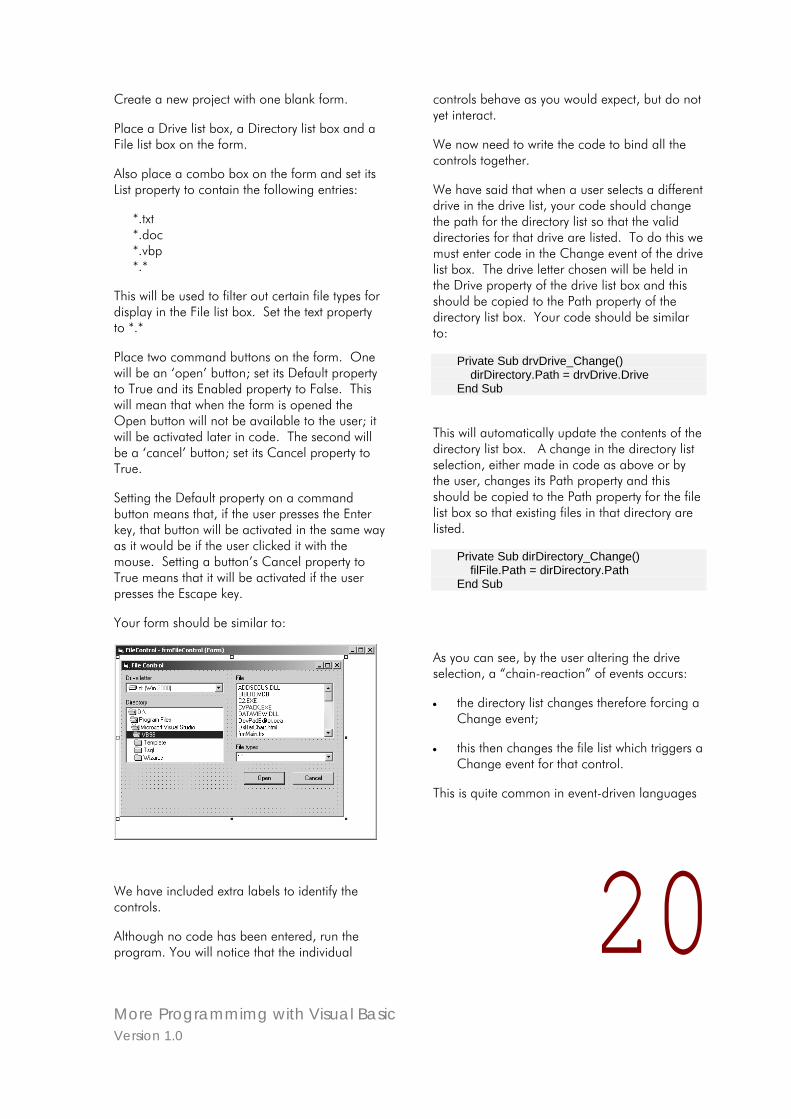
More Programmimg with Visual Basic Version 1.0
20
Create a new project with one blank form.
Place a Drive list box, a Directory list box and a File list box on the form.
Also place a combo box on the form and set its List property to contain the following entries:
*.txt *.doc *.vbp *.*
This will be used to filter out certain file types for display in the File list box. Set the text property to *.*
Place two command buttons on the form. One will be an ‘open’ button; set its Default property to True and its Enabled property to False. This will mean that when the form is opened the Open button will not be available to the user; it will be activated later in code. The second will be a ‘cancel’ button; set its Cancel property to True.
Setting the Default property on a command button means that, if the user presses the Enter key, that button will be activated in the same way as it would be if the user clicked it with the mouse. Setting a button’s Cancel property to True means that it will be activated if the user presses the Escape key.
Your form should be similar to:
We have included extra labels to identify the controls.
Although no code has been entered, run the program. You will notice that the individual
controls behave as you would expect, but do not yet interact.
We now need to write the code to bind all the controls together.
We have said that when a user selects a different drive in the drive list, your code should change the path for the directory list so that the valid directories for that drive are listed. To do this we must enter code in the Change event of the drive list box. The drive letter chosen will be held in the Drive property of the drive list box and this should be copied to the Path property of the directory list box. Your code should be similar to:
Private Sub drvDrive_Change() dirDirectory.Path = drvDrive.Drive End Sub
This will automatically update the contents of the directory list box. A change in the directory list selection, either made in code as above or by the user, changes its Path property and this should be copied to the Path property for the file list box so that existing files in that directory are listed.
Private Sub dirDirectory_Change() filFile.Path = dirDirectory.Path End Sub
As you can see, by the user altering the drive selection, a “chain-reaction” of events occurs:
• the directory list changes therefore forcing a Change event;
• this then changes the file list which triggers a Change event for that control.
This is quite common in event-driven languages
More Programmimg with Visual Basic Version 1.0
21
such as Visual Basic.
When designing your interface, care must be taken to ensure that only the required actions are carried out under the appropriate events, otherwise a lot of duplicate code may be executed as the code behind one event triggers another.
Now that we have arrived at the correct path for the file list, we need to look at how to limit the types of file being displayed. This is done by manipulating the Pattern property of the file list box.
Since the type of file to be displayed is in a combo box, there are two ways that the user can enter data – either by selecting from a drop down list, or by entering a file type extension via the keyboard.
Both are equally valid input methods, requiring us to write code under two events – the Change event (when changing the contents of the combo box by typing) and the Click event (when the user selects an option from the list). Note that the Change event does not occur if the user selects an option from the list.
If the user enters a file type via the keyboard, the pattern of the File List box should be changed to match that of the file type entered.
Private Sub cboFileType_Change() filFile.Pattern = cboFileType.Text End Sub
Similarly, if the user selects a file type from the list, the pattern of the File List box should be changed to match that of the file type selected.
Private Sub cboFileType_Click() filFile.Pattern = cboFileType.Text End Sub
So the user can now select a new drive, directory and file type which will result in a list of files being displayed in the file list box. The next step will be to select a file by clicking on it in the list and opening it using the Open button. However, in the initial construction of the interface, we set the Open button to be disabled until a file was selected.
Now, we must enable the Open button when a file is selected and to do this we simply add code to the Click event of the file list box:
Private Sub filFile_Click() cmdOpen.Enabled = True End Sub
With this code entered, the user can browse through drives and folders to find a particular file, but, although we have enabled the Open button, it still does not do anything!
We now need to construct the full path and file name for the file so that it can be used as necessary to actually perform the open operation.
In our code, we have passed the drive letter through to the directory list and the directory path through to the file list’s Path property. So, in this way, the full path for the file is already constructed. When a file is selected from the file list, its name is automatically held in the FileName property. All we need to do, therefore, is join the two together in the correct format.
Remember that drive letters, directory names and file names in a full path are separated by the ‘\’ character, for example:
C:\Student\TestFile.txt which is one of the sample files we created.
The contents of the file list’s Path property for this file would be ‘C:\Student’ and the FileName property would be ‘TestFile.txt’. Looking carefully at these values shows you that the separator between the path and the filename is not included in either, so we must include it in our construction.
In the Open button Click event, we can now

More Programmimg with Visual Basic Version 1.0
22
enter the code needed to concatenate these values. In this example, we will simply display
the full file name in a label, whereas normally it would be used in an Open statement.
More Programmimg with Visual Basic Version 1.0
23
Private Sub cmdOpen_Click() Dim strFileName As String strFileName = filFile.Path & "\" & filFile.FileName lblFileName.Caption = strFileName End Sub
There is still a Cancel button on our form which will allow the user to simply close the dialog without opening any files. It must simply Unload the form.
Once you have entered this piece of code, run the program and check what happens. Try changing the drive letter and selecting a new directory by double-clicking on it. The list of files should change in line with this. Select a different file type and the list of files will again change. Click on a file name to select it and you should see that the Open button is enabled. Click it and see the full filename displayed.
Try changing the drive or directory selections and there will now be no file selected. However, the Open button will still be enabled and this could cause problems. Without selecting a file name, click the Open button and see what is displayed as the file name in the label. You should see that, although a string is displayed, it is simply a path with no filename attached. To overcome this problem, we can simply disable the Open button again until a filename is selected. But where should we do this?
The file list will change when either the drive, directory or file type is changed. We could choose to add code to each of these events. However, bearing in mind that certain events trigger other events automatically, we can make use of this feature to reduce the number of places where the code needs to be added.
The file list box has two events, PathChange and PatternChange which are activated whenever the Path or Pattern properties are changed. Changing either the drive, directory or file type will cause a chain reaction culminating in one or other of these events being activated. We can,
therefore, simply add code to each of these events:
Private Sub filFile_PathChange() cmdOpen.Enabled = False End Sub Private Sub filFile_PatternChange() cmdOpen.Enabled = False End Sub
Now rerun the program and check the enabling and disabling of the Open button under all possible circumstances. You should find that the Open button is only enabled when a filename is selected. If not, check your code and correct the problem!
Make sure that you fully understand how this example works. It will give you a basis for developing future file handling dialog boxes. With some changes and additions, it will be possible to develop Save dialog boxes.

More Programmimg with Visual Basic Version 1.0
24
Using the Common Dialog control
The second means of selecting files to be opened or naming files to be saved is to make use of the Common Dialog control. This is not included in the standard toolbox and must be added to it.
The Common Dialog control provides a set of standard dialog boxes for opening, saving, and printing files, and for selecting colours and fonts. By using the Common Dialog control, you can include complex standard dialog boxes without adding a form to your project and without writing a large amount of code. They are developed to match the standard Windows styles and may not match your particular application. Consider this when deciding which method to use.
Create a new project to try out this alternative method.
The Common Dialog control is made available to your project through a .ocx file. To add the Common Dialog control to the project's toolbox, choose Components from the Project menu.
Ensure that the Controls tab is selected. Scroll down the list until you find an entry called Microsoft Common Dialog Control. Highlight this entry and you will see the associated file name given at the bottom; it will include ‘comdlg’ and, in our case, it is called ‘comdlg32.ocx’.
Click the check box for the entry and then OK. The control will be added at the bottom of the toolbox.
Create a Common Dialog control on your form. Like the Timer control, this will not be visible at run-time.
It has several properties. The Name property should be set using a ‘cdlg’ prefix. The DialogTitle can be used to identify the dialog if necessary, although the values used by default are usually sufficient. We will look at some of the other properties as we investigate the various types of dialog box provided.
The Common Dialog control has several methods, each of which displays a particular type of dialog box, as shown in the following table:
Method Dialog box ShowOpen Open ShowSave Save ShowColor Color ShowFont Font ShowPrinter Print ShowHelp Windows Help
ShowOpen
Create an Open command button on your form. When clicked, this will show a standard Open dialog.
Before showing the Open dialog, we will set two of its properties to initialise it in a specific directory with a specific file type. To do this we must set the InitDir and Filter properties of the
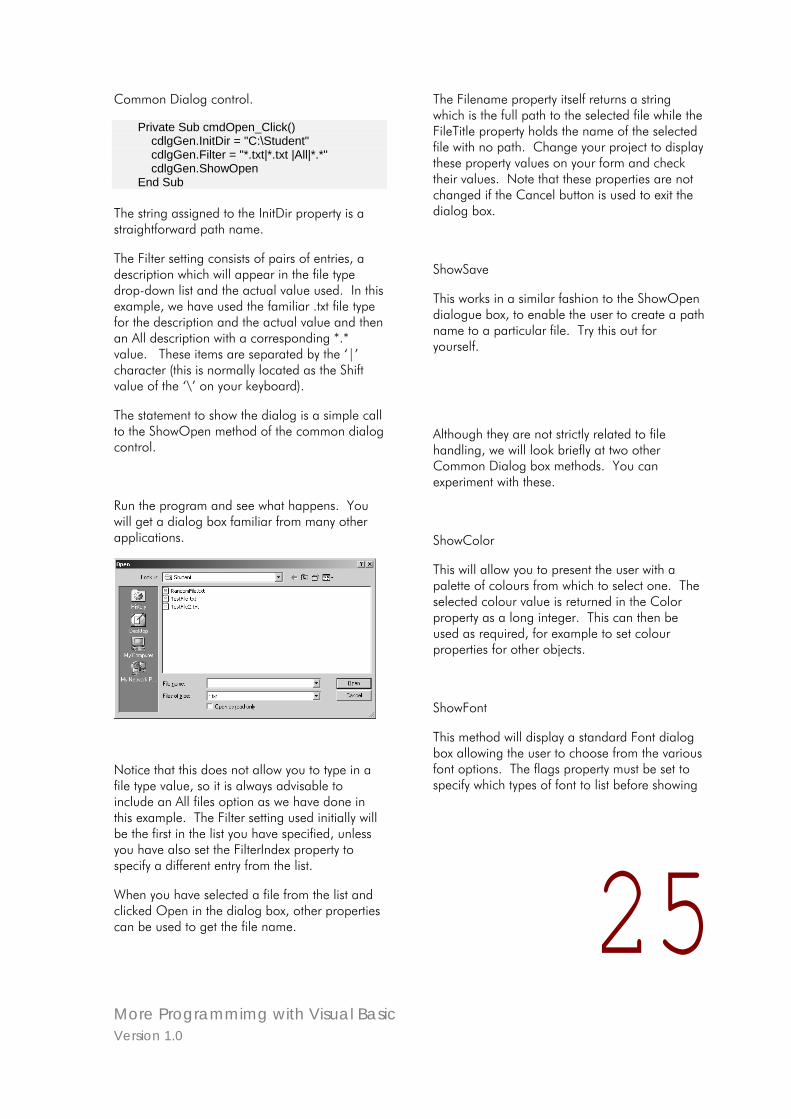
More Programmimg with Visual Basic Version 1.0
25
Common Dialog control.
Private Sub cmdOpen_Click() cdlgGen.InitDir = "C:\Student" cdlgGen.Filter = "*.txt|*.txt |All|*.*" cdlgGen.ShowOpen End Sub
The string assigned to the InitDir property is a straightforward path name.
The Filter setting consists of pairs of entries, a description which will appear in the file type drop-down list and the actual value used. In this example, we have used the familiar .txt file type for the description and the actual value and then an All description with a corresponding *.* value. These items are separated by the ‘|’ character (this is normally located as the Shift value of the ‘\’ on your keyboard).
The statement to show the dialog is a simple call to the ShowOpen method of the common dialog control.
Run the program and see what happens. You will get a dialog box familiar from many other applications.
Notice that this does not allow you to type in a file type value, so it is always advisable to include an All files option as we have done in this example. The Filter setting used initially will be the first in the list you have specified, unless you have also set the FilterIndex property to specify a different entry from the list.
When you have selected a file from the list and clicked Open in the dialog box, other properties can be used to get the file name.
The Filename property itself returns a string which is the full path to the selected file while the FileTitle property holds the name of the selected file with no path. Change your project to display these property values on your form and check their values. Note that these properties are not changed if the Cancel button is used to exit the dialog box.
ShowSave
This works in a similar fashion to the ShowOpen dialogue box, to enable the user to create a path name to a particular file. Try this out for yourself.
Although they are not strictly related to file handling, we will look briefly at two other Common Dialog box methods. You can experiment with these.
ShowColor
This will allow you to present the user with a palette of colours from which to select one. The selected colour value is returned in the Color property as a long integer. This can then be used as required, for example to set colour properties for other objects.
ShowFont
This method will display a standard Font dialog box allowing the user to choose from the various font options. The flags property must be set to specify which types of font to list before showing
More Programmimg with Visual Basic Version 1.0
26
the dialog. For example:
cdlgGen.Flags = cdlCFBoth tells the dialog to show both screen and printer fonts.
The options will be returned in various property settings which can then be copied to the equivalent properties of other objects. For example:
txtName.FontName = cdlgGen.FontName txtName.FontSize = cdlgGen.FontSize txtName.FontBold = cdlgGen.FontBold txtName.FontItalic = cdlgGen.FontItalic
Any of the Font properties may be set before showing the font dialog box, to show a default setting.
You are now equipped to open and close files which the user has selected, read data from them and write data to them.

More Programmimg with Visual Basic Version 1.0
27
Error Handling
Although a well-written, fully-tested program will prevent most errors from occurring, some errors will still occur at run-time simply because you have no way of preventing them.
Examples of run-time errors which may occur are:
• trying to find a file which no longer exists or has been moved
• accessing a disk which is corrupt or damaged
• printing to a printer which does not respond
For such situations, you can provide a means of trapping the error, correcting it if possible and reporting it. Code that detects, reports, and corrects error conditions is called error-handling code.
Error handlers are local to the procedure in which they are located. They have two responsibilities:
• trap and handle the error
• continue processing as appropriate
Whenever you write code which needs to access a file on a disk or communicate with some external device, such as a printer, you should include error handling routines to trap and handle possible errors. If you do not do this and an error occurs, the program will produce its own error message and terminate. Often these error messages are not very informative to the user and it gives the user no opportunity to get round the problem and continue with the processing.
Using an error handler, you could program the application to display a helpful message box, informing the user of the error and asking for instruction on how to handle it. In some cases, you may be able to take corrective action within the program and continue processing without the user being aware of any problem.
The first stage then is to trap the error. This is done by including an On Error statement in your code.
On Error statement
The On Error statement specifies that, when an error occurs, control is passed to an error-handling routine. On Error is used with a label to specify the location of the error-handling code.
On Error GoTo errOpenFile This statement specifies that, if an error is encountered, control should pass to the section of code labelled errOpenFile.
We have said that error handling is local to a procedure and, therefore, it is important to include the error handling code at the point in the program where the error may occur. For example, if you have a procedure to open a file, it should include the error handler to cope with any problem in accessing that file.
Private Sub OpenFile() On Error GoTo errOpenFile ‘ normal processing here … exitOpenFile: Exit Sub errOpenFile: ‘ error handler code here … End Sub
This example shows the basic structure of a procedure which includes error handling.
As the first line of executable code, we have the On Error statement. This switches on the error
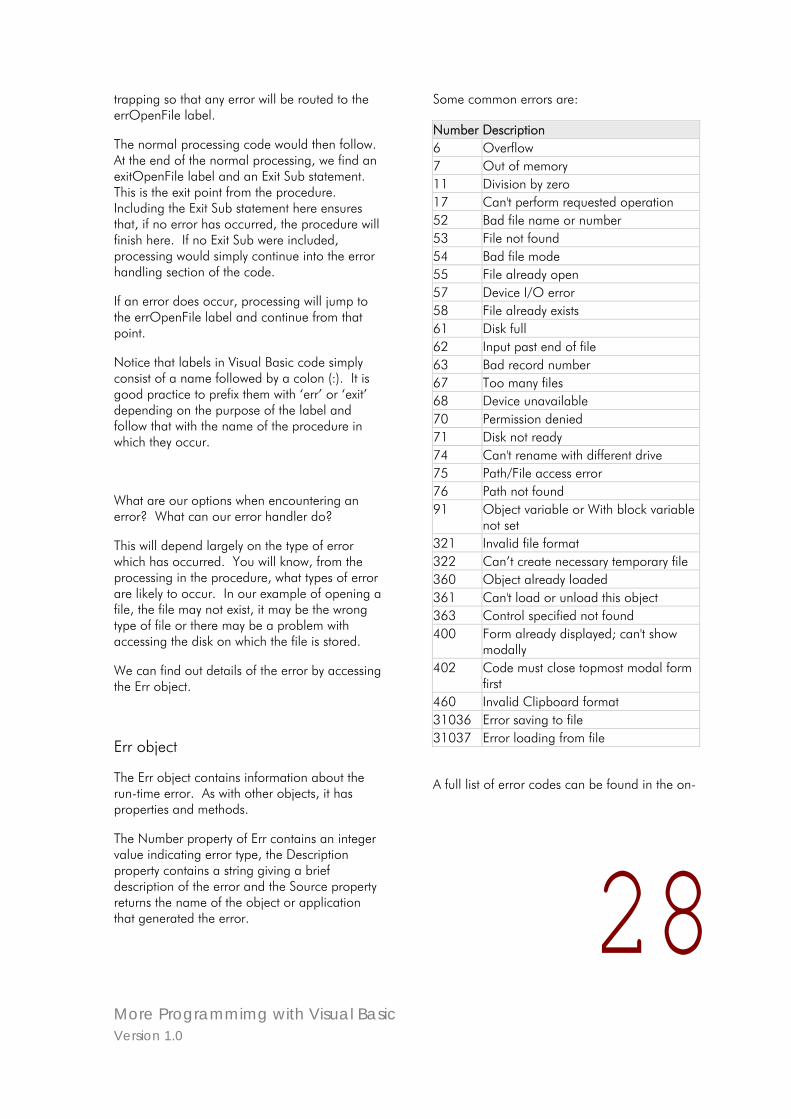
More Programmimg with Visual Basic Version 1.0
28
trapping so that any error will be routed to the errOpenFile label.
The normal processing code would then follow. At the end of the normal processing, we find an exitOpenFile label and an Exit Sub statement. This is the exit point from the procedure. Including the Exit Sub statement here ensures that, if no error has occurred, the procedure will finish here. If no Exit Sub were included, processing would simply continue into the error handling section of the code.
If an error does occur, processing will jump to the errOpenFile label and continue from that point.
Notice that labels in Visual Basic code simply consist of a name followed by a colon (:). It is good practice to prefix them with ‘err’ or ‘exit’ depending on the purpose of the label and follow that with the name of the procedure in which they occur.
What are our options when encountering an error? What can our error handler do?
This will depend largely on the type of error which has occurred. You will know, from the processing in the procedure, what types of error are likely to occur. In our example of opening a file, the file may not exist, it may be the wrong type of file or there may be a problem with accessing the disk on which the file is stored.
We can find out details of the error by accessing the Err object.
Err object
The Err object contains information about the run-time error. As with other objects, it has properties and methods.
The Number property of Err contains an integer value indicating error type, the Description property contains a string giving a brief description of the error and the Source property returns the name of the object or application that generated the error.
Some common errors are:
Number Description 6 Overflow 7 Out of memory 11 Division by zero 17 Can't perform requested operation 52 Bad file name or number 53 File not found 54 Bad file mode 55 File already open 57 Device I/O error 58 File already exists 61 Disk full 62 Input past end of file 63 Bad record number 67 Too many files 68 Device unavailable 70 Permission denied 71 Disk not ready 74 Can't rename with different drive 75 Path/File access error 76 Path not found 91 Object variable or With block variable
not set 321 Invalid file format 322 Can’t create necessary temporary file 360 Object already loaded 361 Can't load or unload this object 363 Control specified not found 400 Form already displayed; can't show
modally 402 Code must close topmost modal form
first 460 Invalid Clipboard format 31036 Error saving to file 31037 Error loading from file
A full list of error codes can be found in the on-
More Programmimg with Visual Basic Version 1.0
29
line help.
You can use Err.Number in a Select Case statement to determine what action to take. In our OpenFile procedure, we may encounter
• 53 - File not found
• 55 - File already open
• 71 - Disk not ready
and wish to take different actions in each case.
We should first try to handle the error within the program without alerting the user. If the file is already open, it may be acceptable to simply bypass this OpenFile process and continue. If the disk is not ready, perhaps the user has forgotten to insert the disk in the drive and simply needs to be prompted to do so. If the file cannot be found, we may simply have to report the fact and abort processing. The Err object’s Number, Description and Source property values can be included in any message displayed to assist in tracing the cause of the error.
Resume statement
If you plan to resume processing after an error occurs, you should make sure that your error-handling routine corrects the problem that caused the error before returning to a suitable point in the normal processing. The Resume
statement allows us to choose at which point to continue.
• Resume - specifies that program execution should resume with the statement that caused the error.
• Resume Next - specifies that program execution should resume with the statement following the statement that caused the error, as in the example above.
• Resume lineReference - specifies that program execution should resume with the line indicated by 1ineReference, which can be a line number or a line label.
So to retry, we would use the simple Resume statement. To continue from the statement following that which caused the error, we would use Resume Next. To continue from a specific point, for example the procedure’s exit point, we could use Resume exitOpenFile; this is sometimes useful if we need to skip any further processing in this procedure but wish to carry on otherwise.
If it is not possible to continue, the End statement will terminate the program immediately.
Study the following example which handles possible errors in the way we have already outlined:
Private Sub OpenFile() Dim intFileNum As Integer Dim strFileName As String Dim strMess As String On Error GoTo errOpenFile intFileNum = FreeFile strFileName = "C:\Student\TestFile.txt" Open strFileName For Input As #intFileNum exitOpenFile: Exit Sub
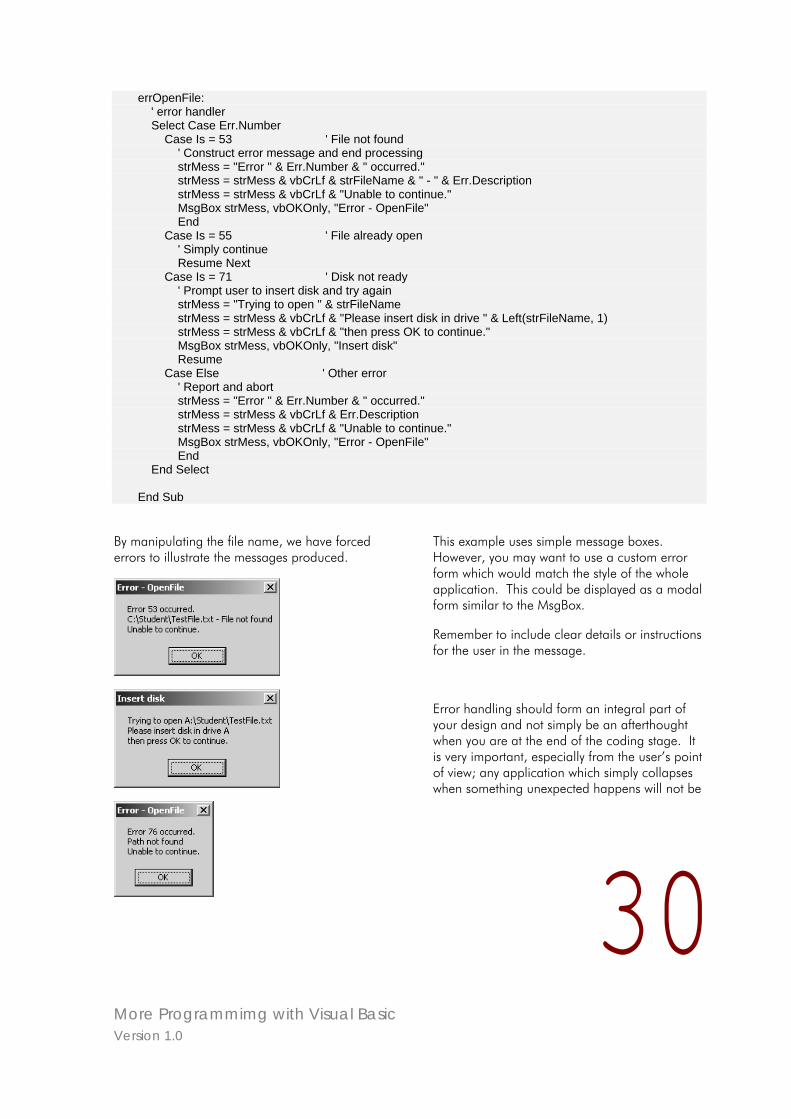
More Programmimg with Visual Basic Version 1.0
30
errOpenFile: ' error handler Select Case Err.Number Case Is = 53 ' File not found ' Construct error message and end processing strMess = "Error " & Err.Number & " occurred." strMess = strMess & vbCrLf & strFileName & " - " & Err.Description strMess = strMess & vbCrLf & "Unable to continue." MsgBox strMess, vbOKOnly, "Error - OpenFile" End Case Is = 55 ' File already open ' Simply continue Resume Next Case Is = 71 ' Disk not ready ' Prompt user to insert disk and try again strMess = "Trying to open " & strFileName strMess = strMess & vbCrLf & "Please insert disk in drive " & Left(strFileName, 1) strMess = strMess & vbCrLf & "then press OK to continue." MsgBox strMess, vbOKOnly, "Insert disk" Resume Case Else ' Other error ' Report and abort strMess = "Error " & Err.Number & " occurred." strMess = strMess & vbCrLf & Err.Description strMess = strMess & vbCrLf & "Unable to continue." MsgBox strMess, vbOKOnly, "Error - OpenFile" End End Select End Sub
By manipulating the file name, we have forced errors to illustrate the messages produced.
This example uses simple message boxes. However, you may want to use a custom error form which would match the style of the whole application. This could be displayed as a modal form similar to the MsgBox.
Remember to include clear details or instructions for the user in the message.
Error handling should form an integral part of your design and not simply be an afterthought when you are at the end of the coding stage. It is very important, especially from the user’s point of view; any application which simply collapses when something unexpected happens will not be
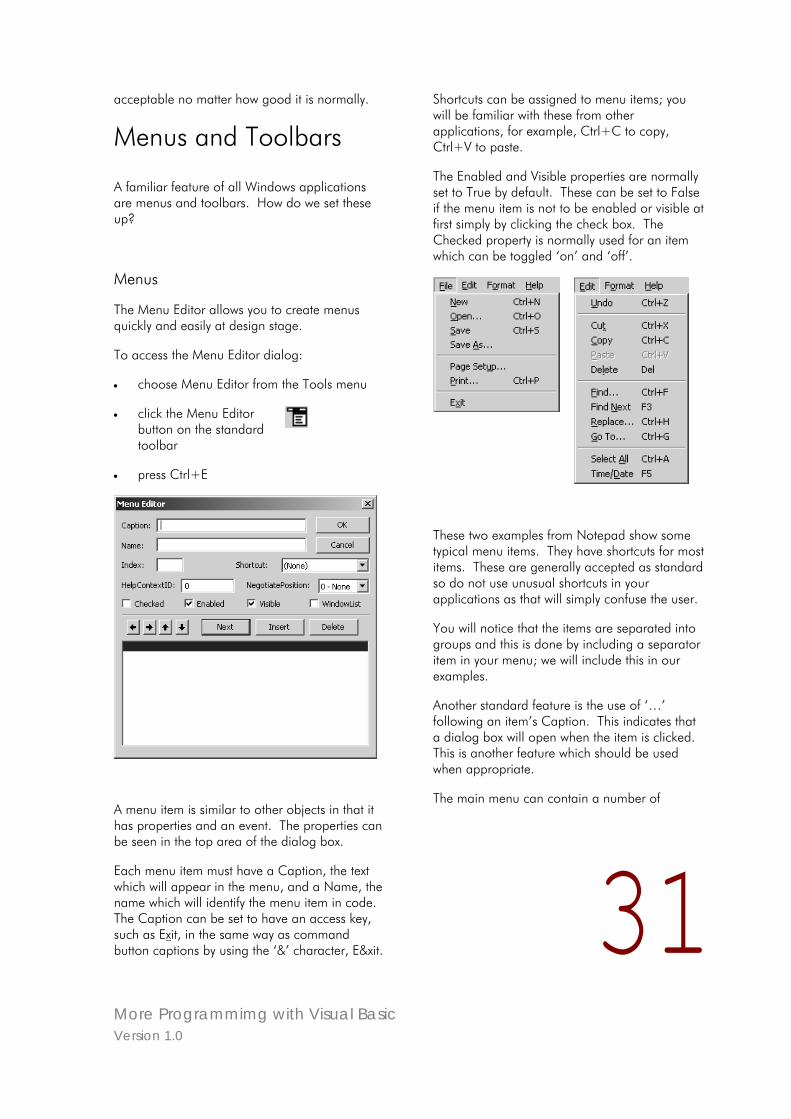
More Programmimg with Visual Basic Version 1.0
31
acceptable no matter how good it is normally.
Menus and Toolbars
A familiar feature of all Windows applications are menus and toolbars. How do we set these up?
Menus
The Menu Editor allows you to create menus quickly and easily at design stage.
To access the Menu Editor dialog:
• choose Menu Editor from the Tools menu
• click the Menu Editor button on the standard toolbar
• press Ctrl+E
A menu item is similar to other objects in that it has properties and an event. The properties can be seen in the top area of the dialog box.
Each menu item must have a Caption, the text which will appear in the menu, and a Name, the name which will identify the menu item in code. The Caption can be set to have an access key, such as Exit, in the same way as command button captions by using the ‘&’ character, E&xit.
Shortcuts can be assigned to menu items; you will be familiar with these from other applications, for example, Ctrl+C to copy, Ctrl+V to paste.
The Enabled and Visible properties are normally set to True by default. These can be set to False if the menu item is not to be enabled or visible at first simply by clicking the check box. The Checked property is normally used for an item which can be toggled ‘on’ and ‘off’.
These two examples from Notepad show some typical menu items. They have shortcuts for most items. These are generally accepted as standard so do not use unusual shortcuts in your applications as that will simply confuse the user.
You will notice that the items are separated into groups and this is done by including a separator item in your menu; we will include this in our examples.
Another standard feature is the use of ‘…’ following an item’s Caption. This indicates that a dialog box will open when the item is clicked. This is another feature which should be used when appropriate.
The main menu can contain a number of

More Programmimg with Visual Basic Version 1.0
32
submenus, up to a maximum of four. The ‘ ’ symbol, inserted automatically, following a menu item indicates that this will lead to a further submenu.
We will now create a simple example to incorporate most of the above features and learn how to achieve them using the Menu Editor.
We will create two top-level menus, File and Edit, with submenu items as follows:
Create a new project with a single form. Open the Menu Editor.
First create the File menu item. Enter the Caption making F the access key. Name the item as mnuFile. It is good practice to give menu item names the ‘mnu’ prefix and follow that with the basic caption, in this case ‘File’. No other changes need to be made to the properties so click Next; this will add the File item to the list and prepare the dialog for the entry of the next item.
Now enter the Open caption and name it mnuFileOpen. This naming convention helps to make code easier to read as the menu structure can also be seen. Select the appropriate shortcut key combination from the list. To set this as a submenu item, we need to indent it under the File entry; to do this, click the right-arrow button. The left-arrow button will move an item up one level; the up and down arrows will move an item up or down in the list. Now click Next and see the result in the list.
Make the remaining entries for the File menu and all those for the Edit menu remembering the access keys, the shortcuts and the levels of indentation.
Finally, we need to enter the separator in the File menu. Select the Exit item in the list and click Insert. This will create a new blank entry. Set the Caption to ‘-‘ and the name to mnuFileSep.
All the items should now be created and your dialog should look like:
Click OK to close the dialog.
Your menus should now appear at he top of the form. Run the program and check that the menus appear correctly.
Now we need to add code behind the Click event of the menu items to make them actually do something!
Whilst in design mode, a single click on any menu item will take you to the Click event of that item. Simply enter code here as you would for any other event procedure. For example, for the Exit menu item you may simply want to close the program immediately so do this using the End statement. Now run the program again and check that the Exit menu item works.
You are now equipped to create full menus for
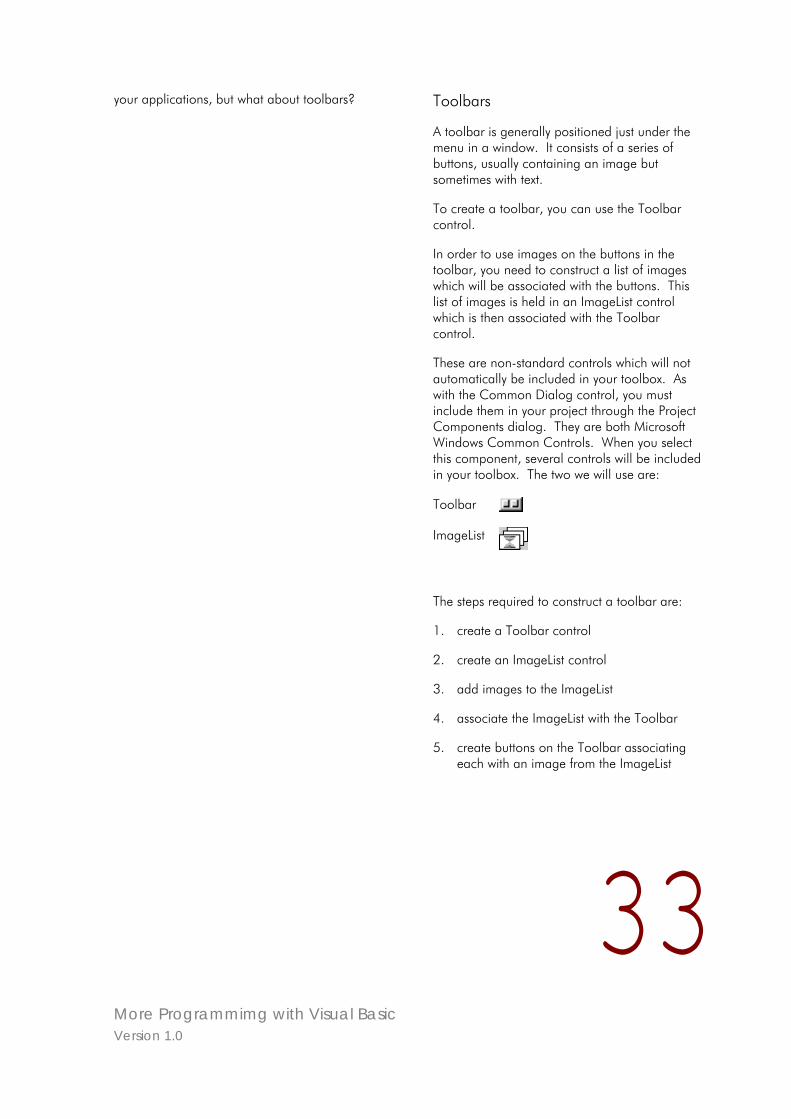
More Programmimg with Visual Basic Version 1.0
33
your applications, but what about toolbars?
Toolbars
A toolbar is generally positioned just under the menu in a window. It consists of a series of buttons, usually containing an image but sometimes with text.
To create a toolbar, you can use the Toolbar control.
In order to use images on the buttons in the toolbar, you need to construct a list of images which will be associated with the buttons. This list of images is held in an ImageList control which is then associated with the Toolbar control.
These are non-standard controls which will not automatically be included in your toolbox. As with the Common Dialog control, you must include them in your project through the Project Components dialog. They are both Microsoft Windows Common Controls. When you select this component, several controls will be included in your toolbox. The two we will use are:
Toolbar
ImageList
The steps required to construct a toolbar are:
1. create a Toolbar control
2. create an ImageList control
3. add images to the ImageList
4. associate the ImageList with the Toolbar
5. create buttons on the Toolbar associating each with an image from the ImageList
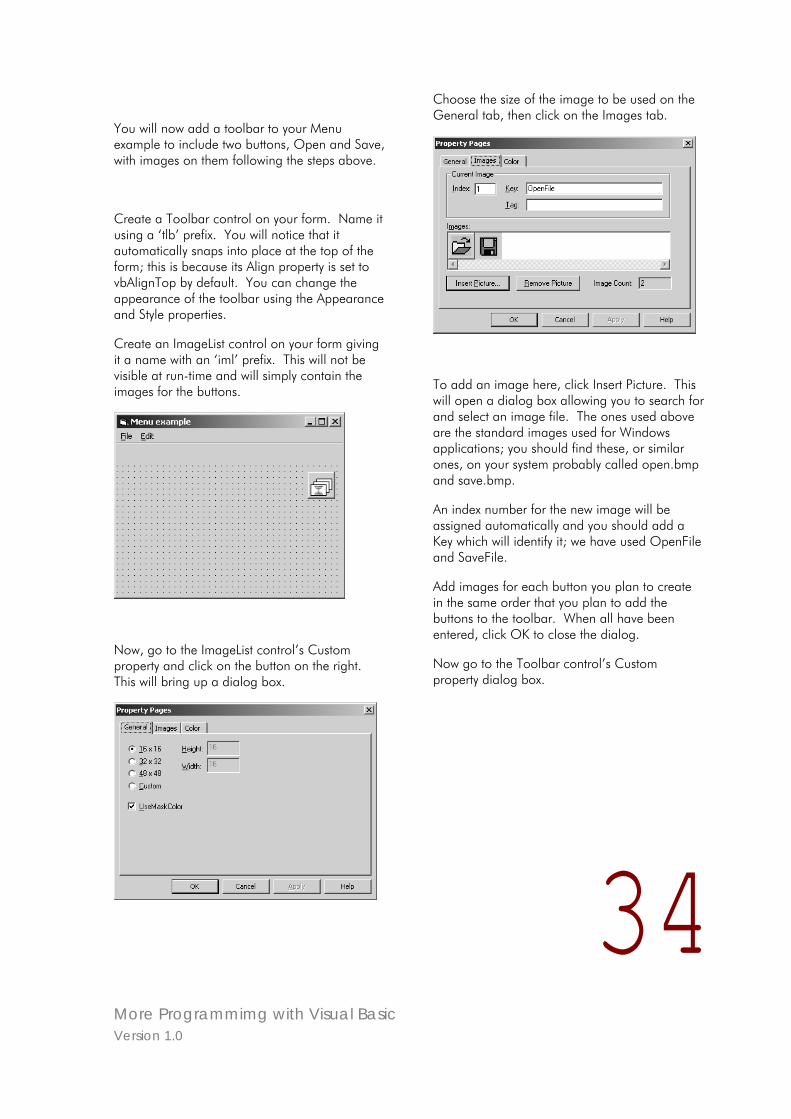
More Programmimg with Visual Basic Version 1.0
34
You will now add a toolbar to your Menu example to include two buttons, Open and Save, with images on them following the steps above.
Create a Toolbar control on your form. Name it using a ‘tlb’ prefix. You will notice that it automatically snaps into place at the top of the form; this is because its Align property is set to vbAlignTop by default. You can change the appearance of the toolbar using the Appearance and Style properties.
Create an ImageList control on your form giving it a name with an ‘iml’ prefix. This will not be visible at run-time and will simply contain the images for the buttons.
Now, go to the ImageList control’s Custom property and click on the button on the right. This will bring up a dialog box.
Choose the size of the image to be used on the General tab, then click on the Images tab.
To add an image here, click Insert Picture. This will open a dialog box allowing you to search for and select an image file. The ones used above are the standard images used for Windows applications; you should find these, or similar ones, on your system probably called open.bmp and save.bmp.
An index number for the new image will be assigned automatically and you should add a Key which will identify it; we have used OpenFile and SaveFile.
Add images for each button you plan to create in the same order that you plan to add the buttons to the toolbar. When all have been entered, click OK to close the dialog.
Now go to the Toolbar control’s Custom property dialog box.
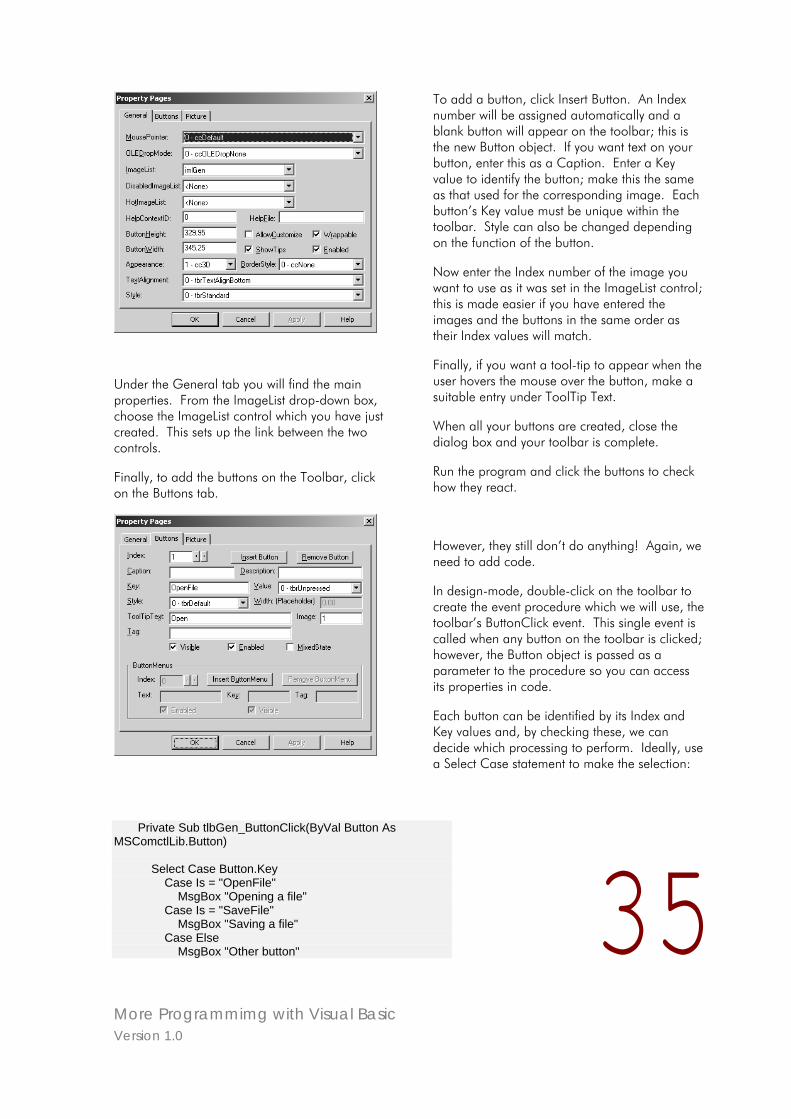
More Programmimg with Visual Basic Version 1.0
To add a button, click Insert Button. An Index number will be assigned automatically and a blank button will appear on the toolbar; this is the new Button object. If you want text on your button, enter this as a Caption. Enter a Key value to identify the button; make this the same as that used for the corresponding image. Each button’s Key value must be unique within the toolbar. Style can also be changed depending on the function of the button.
Now enter the Index number of the image you want to use as it was set in the ImageList control; this is made easier if you have entered the images and the buttons in the same order as their Index values will match.
Finally, if you want a tool-tip to appear when the user hovers the mouse over the button, make a suitable entry under ToolTip Text.
Under the General tab you will find the main properties. From the ImageList drop-down box, choose the ImageList control which you have just created. This sets up the link between the two controls.
When all your buttons are created, close the dialog box and your toolbar is complete.
Run the program and click the buttons to check how they react.
Finally, to add the buttons on the Toolbar, click on the Buttons tab.
However, they still don’t do anything! Again, we need to add code.
In design-mode, double-click on the toolbar to create the event procedure which we will use, the toolbar’s ButtonClick event. This single event is called when any button on the toolbar is clicked; however, the Button object is passed as a parameter to the procedure so you can access its properties in code.
Each button can be identified by its Index and Key values and, by checking these, we can decide which processing to perform. Ideally, use a Select Case statement to make the selection:
35
Private Sub tlbGen_ButtonClick(ByVal Button As MSComctlLib.Button)
Select Case Button.Key Case Is = "OpenFile" MsgBox "Opening a file" Case Is = "SaveFile" MsgBox "Saving a file" Case Else MsgBox "Other button"
More Programmimg with Visual Basic Version 1.0
36
End Select End Sub
It is likely that you would have menu options and matching toolbar buttons available to perform the same tasks; in this example, we now have both a menu item and a button to open a file. In your code, therefore, you would probably have an OpenFile procedure or function which both the menu and toolbar event procedures would call.
You can now also add toolbars to your applications and provide the user with single-click access to useful functions.
We have covered all the main aspects of developing a Windows application with its objects, properties, methods and events. We have considered where, when and how to declare variables and how to pass data between procedures and functions. We have considered the important points to bear in mind when designing a user interface and looked at ways of making it meet the accepted standards. We have also used files and error handling and created menus and toolbars.
During this process, you have been carrying out some testing of your applications but we have not looked at how to do this thoroughly – we will do that next.
More Programmimg with Visual Basic Version 1.0
37
Testing
The aim of testing is to ensure that the procedure or system performs according to the specification. It should do everything the specification states and nothing else.
Testing is a very important and often very underestimated part of software development. It is vital that the application does the job it is designed to do; it may look good and be efficient but if it doesn’t do what is required of it, it is worthless.
There are three levels of testing:
• unit testing
• system testing
• acceptance testing
and the objective is the same for all levels:
• to check that all possible types of input are handled correctly and the output generated is correct for the circumstances.
Unit testing concentrates on an individual procedure or component. It aims to prove
• that each statement works correctly and
• that each statement is performed at the correct time and under the relevant circumstances.
System testing links all the procedures or components together and aims to prove
• that each procedure performs correctly,
• that each procedure communicates correctly with the others and
• that the system as a whole performs according to the specification.
It should also aim to test the system with large amounts of data and check efficiency and response times and ensure that these are acceptable.
Acceptance testing aims to prove
• that the system will handle all the data which the client will normally be processing and provide all the required outputs.
It should especially test all the interfaces with other systems / activities whether manual or automated.
How do we test?
As an overall approach to testing we should:
1. Test each procedure and component as it is developed.
2. Link the tested component to its environment and test to prove that communication is correct. This could mean ensuring that event procedures occur when they should; they may be triggered indirectly by other events. It could mean checking that a general procedure is called correctly and returns the correct information.
3. When all procedures or components have been developed and linked, test the complete system.
How to develop a test plan
In order to ensure that testing is rigorous and complete, it is essential to prepare a full test plan for each stage of testing and follow it.
Each path through a procedure or system must be tested at least once.
• With sequences, it is simply a case of checking that all the processing is performed and in the correct order.
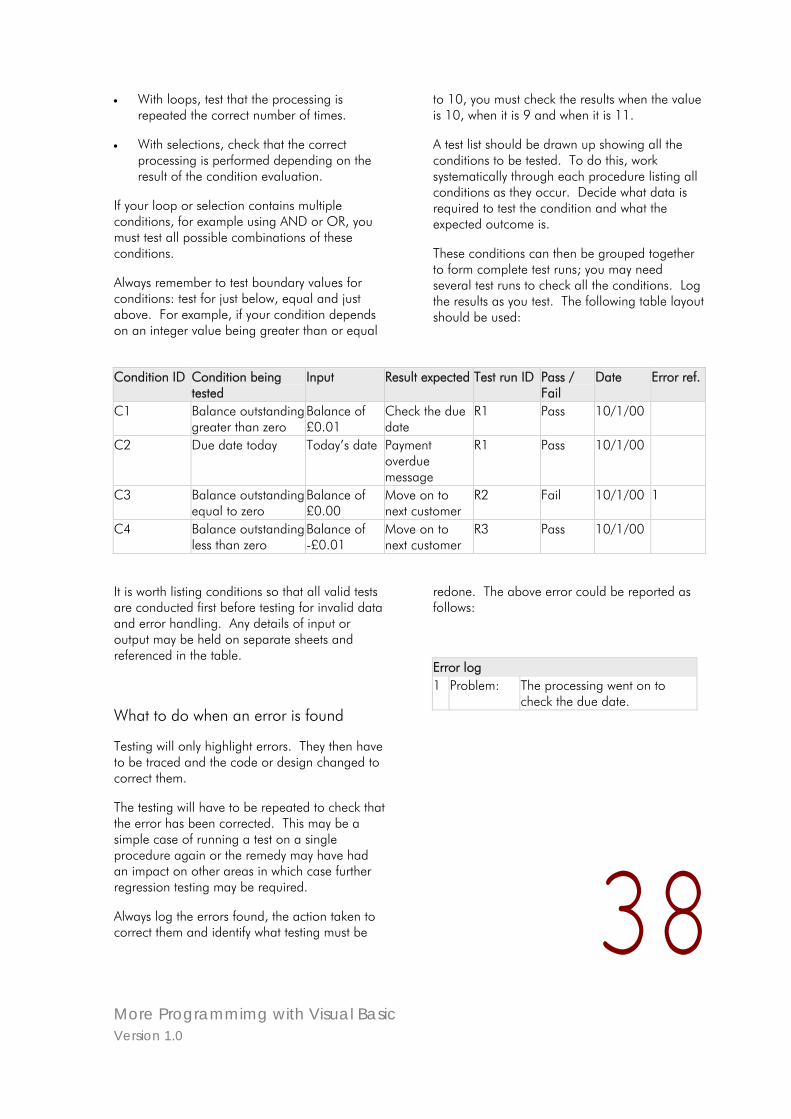
More Programmimg with Visual Basic Version 1.0
38
• With loops, test that the processing is repeated the correct number of times.
• With selections, check that the correct processing is performed depending on the result of the condition evaluation.
If your loop or selection contains multiple conditions, for example using AND or OR, you must test all possible combinations of these conditions.
Always remember to test boundary values for conditions: test for just below, equal and just above. For example, if your condition depends on an integer value being greater than or equal
to 10, you must check the results when the value is 10, when it is 9 and when it is 11.
A test list should be drawn up showing all the conditions to be tested. To do this, work systematically through each procedure listing all conditions as they occur. Decide what data is required to test the condition and what the expected outcome is.
These conditions can then be grouped together to form complete test runs; you may need several test runs to check all the conditions. Log the results as you test. The following table layout should be used:
Condition ID Condition being tested
Input Result expected Test run ID Pass / Fail
Date Error ref.
C1 Balance outstandinggreater than zero
Balance of £0.01
Check the due date
R1 Pass 10/1/00
C2 Due date today Today’s date Payment overdue message
R1 Pass 10/1/00
C3 Balance outstandingequal to zero
Balance of £0.00
Move on to next customer
R2 Fail 10/1/00 1
C4 Balance outstandingless than zero
Balance of -£0.01
Move on to next customer
R3 Pass 10/1/00
It is worth listing conditions so that all valid tests are conducted first before testing for invalid data and error handling. Any details of input or output may be held on separate sheets and referenced in the table.
What to do when an error is found
Testing will only highlight errors. They then have to be traced and the code or design changed to correct them.
The testing will have to be repeated to check that the error has been corrected. This may be a simple case of running a test on a single procedure again or the remedy may have had an impact on other areas in which case further regression testing may be required.
Always log the errors found, the action taken to correct them and identify what testing must be
redone. The above error could be reported as follows:
Error log 1 Problem: The processing went on to
check the due date.
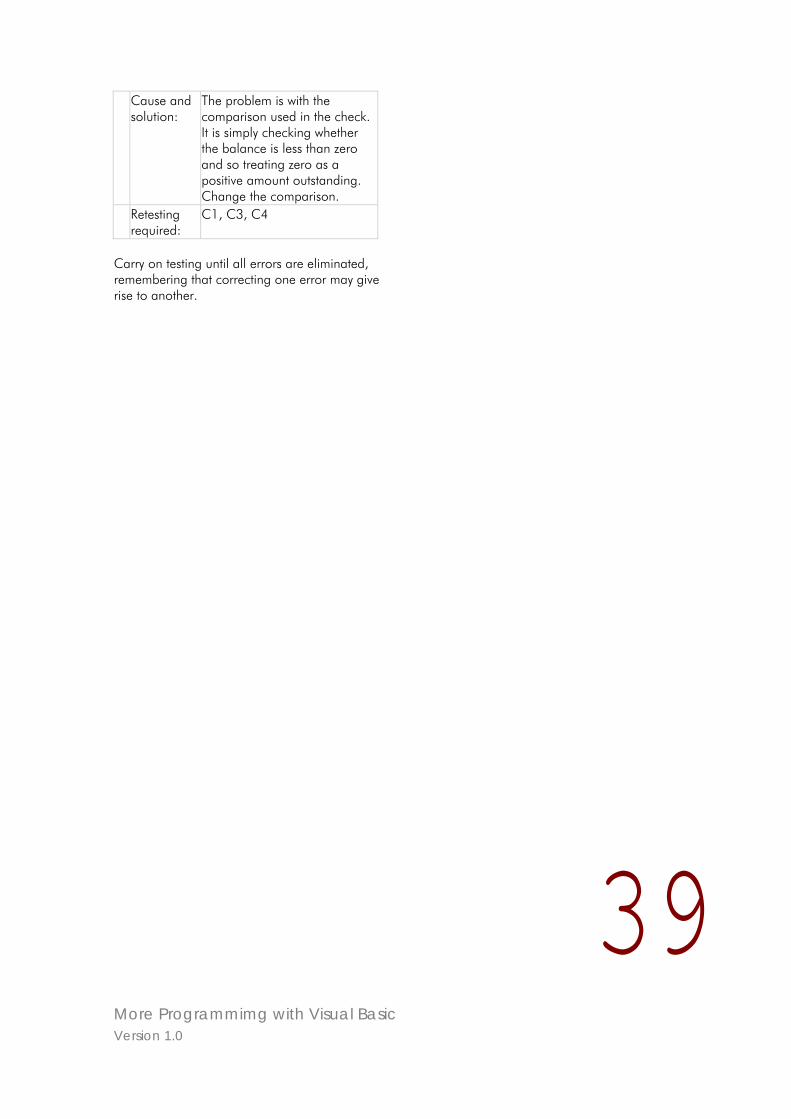
More Programmimg with Visual Basic Version 1.0
39
Cause and solution:
The problem is with the comparison used in the check. It is simply checking whether the balance is less than zero and so treating zero as a positive amount outstanding. Change the comparison.
Retesting required:
C1, C3, C4
Carry on testing until all errors are eliminated, remembering that correcting one error may give rise to another.
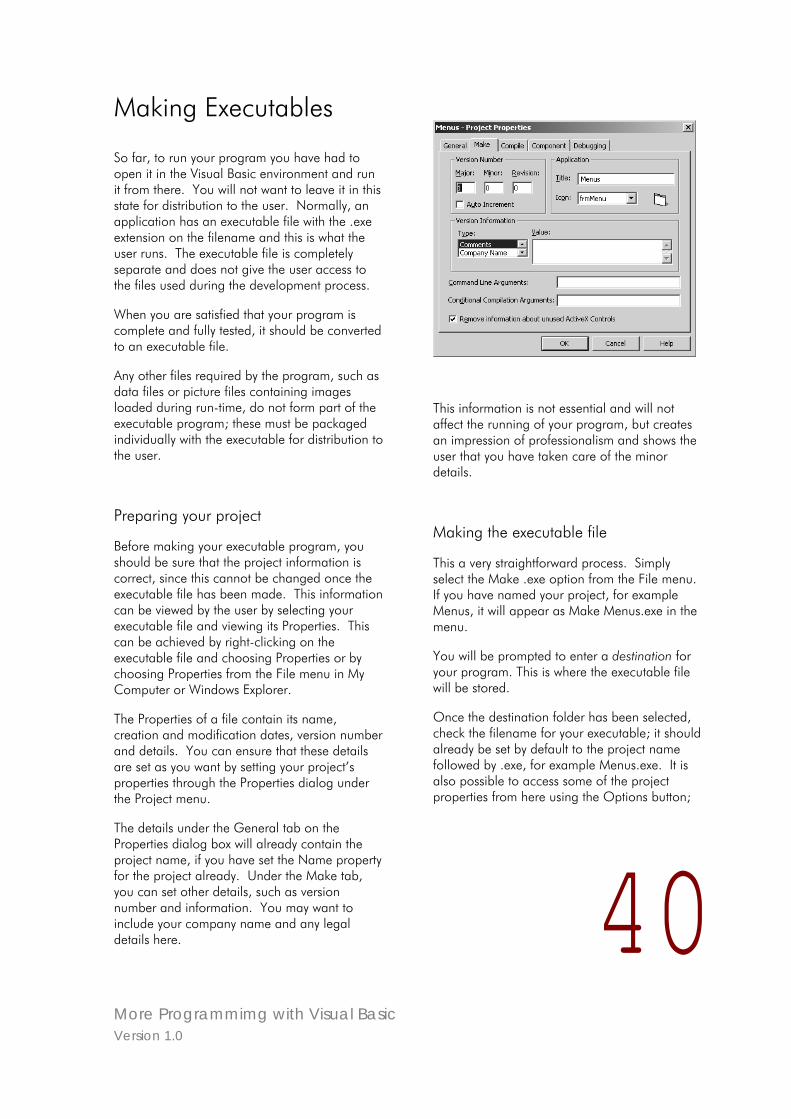
More Programmimg with Visual Basic Version 1.0
40
Making Executables
So far, to run your program you have had to open it in the Visual Basic environment and run it from there. You will not want to leave it in this state for distribution to the user. Normally, an application has an executable file with the .exe extension on the filename and this is what the user runs. The executable file is completely separate and does not give the user access to the files used during the development process.
When you are satisfied that your program is complete and fully tested, it should be converted to an executable file.
Any other files required by the program, such as data files or picture files containing images loaded during run-time, do not form part of the executable program; these must be packaged individually with the executable for distribution to the user.
Preparing your project
Before making your executable program, you should be sure that the project information is correct, since this cannot be changed once the executable file has been made. This information can be viewed by the user by selecting your executable file and viewing its Properties. This can be achieved by right-clicking on the executable file and choosing Properties or by choosing Properties from the File menu in My Computer or Windows Explorer.
The Properties of a file contain its name, creation and modification dates, version number and details. You can ensure that these details are set as you want by setting your project’s properties through the Properties dialog under the Project menu.
The details under the General tab on the Properties dialog box will already contain the project name, if you have set the Name property for the project already. Under the Make tab, you can set other details, such as version number and information. You may want to include your company name and any legal details here.
This information is not essential and will not affect the running of your program, but creates an impression of professionalism and shows the user that you have taken care of the minor details.
Making the executable file
This a very straightforward process. Simply select the Make .exe option from the File menu. If you have named your project, for example Menus, it will appear as Make Menus.exe in the menu.
You will be prompted to enter a destination for your program. This is where the executable file will be stored.
Once the destination folder has been selected, check the filename for your executable; it should already be set by default to the project name followed by .exe, for example Menus.exe. It is also possible to access some of the project properties from here using the Options button;
More Programmimg with Visual Basic Version 1.0
41
this allows you to set the version information as described above.
Whilst your project is being converted, you should see a message to the right of the standard toolbar as the project is compiled and the executable file written to the chosen destination.
Once this is complete, you can leave the Visual Basic environment, locate your new executable file and run it simply by double-clicking on it.
Your application is now ready to be bundled with any other necessary files and distributed to the user.
More Programmimg with Visual Basic Version 1.0
42
Steps to developing an application
You now have a good idea of what the full software development life-cycle involves and have practiced some aspects of it, especially software design and programming. You will gain more experience of these and also of testing in the remaining exercises and assignments. It is now a good time to review the steps to follow and remind you of some points of good practice.
1. Create a folder in which to save all the files associated with the project.
2. Ensure that you understand the user’s requirements.
3. Fully design the user interface and processing. Test your design.
4. Convert your design into code following standards and conventions.
5. Create a new project in Visual Basic (or whichever language is being used).
6. Create the user interface.
7. Set the properties of all the objects.
8. Write the code for each event.
9. Write any general procedures and functions.
10. Fully test and debug the application.
11. Create an executable file.
Let us look at these steps in more detail.
Create a project folder
Saving all documents and files related to a project in one location helps to ensure that everything is easily found.
Understand the user’s requirements
It is vital that you fully understand what is required before you start. Do not make assumptions; if you are unsure about something or feel you need more detail, ask. Getting things wrong at this stage will mean that the finished product may not perform the tasks it was meant to and may not be accepted by the user.
Document these requirements. All documentation should be clearly identified – using headers and footers will help to achieve this.
Design the user interface and processing
You may already have basic user interface layouts and an outline of the processing.
You must now ensure that the interface design is complete to a level of detail from which you can easily create them using suitable objects and controls. Remember the points made in the Interface Design section earlier in the course. This design should be accompanied by notes explaining how the various forms and objects interact.
The processing must be designed (using PDL or charts) to a level of detail from which you can do a simple translation to code.
All the design must be fully documented.
Convert your design into code
When the processing design is complete, convert it into code. Initially, you should do this on paper until you have gained enough knowledge of the language and confidence in using its development environment.
More Programmimg with Visual Basic Version 1.0
43
Create a new project
Open the development environment and create a new project. Name it.
Create the user interface
Create the various interfaces as forms within your project, naming each form to reflect its purpose and with a ‘frm’ prefix.
Ensure that you save the project file and all the form files in the specified project folder.
Set the properties of all the objects
As you create controls on the forms, set their properties.
Most importantly, set the Name property to give the object a meaningful name and use the appropriate prefix, such as ‘txt’ for text boxes, ‘cbo’ for combo boxes, etc.
Other properties which may need to be set at this stage are putting captions on command buttons and labels, clearing text in text boxes and setting appearance and style properties.
When all the controls are in place, check the tab order to ensure that the controls are accessed in a logical order when the tab key is used to move from one to another.
Write the code for each event
When all the objects and controls are created and saved, you are ready to enter your code.
Enter the code for the event procedures.

More Programmimg with Visual Basic Version 1.0
44
Remember that the procedure name includes the name of the control as set in its Name property. If you create code for a control’s event procedure then go back and change the Name property of the control, the name of the event procedure will not change automatically. Therefore, the link between the control and its event code will be lost until you manually change the event procedure name. This is why it is best to name all your controls before assigning code to them.
When writing code, follow any standards and conventions laid down by your organisation. These standards and conventions make the code easier to read and understand and can be invaluable for future maintenance.
Write general procedures and functions
Enter the code for general procedures and functions in the appropriate module. This may
be part of a form module or it may be in a standard code module.
Test and debug the application
Draw up full test plans for all your procedures and forms. Also include tests to ensure that any communication between forms is handled correctly.
Carry out test runs and log the results as they are completed. Document any errors and the changes required to correct them, then repeat testing as necessary.
Create an executable file
When you are satisfied that the project contains no errors, create an executable file.
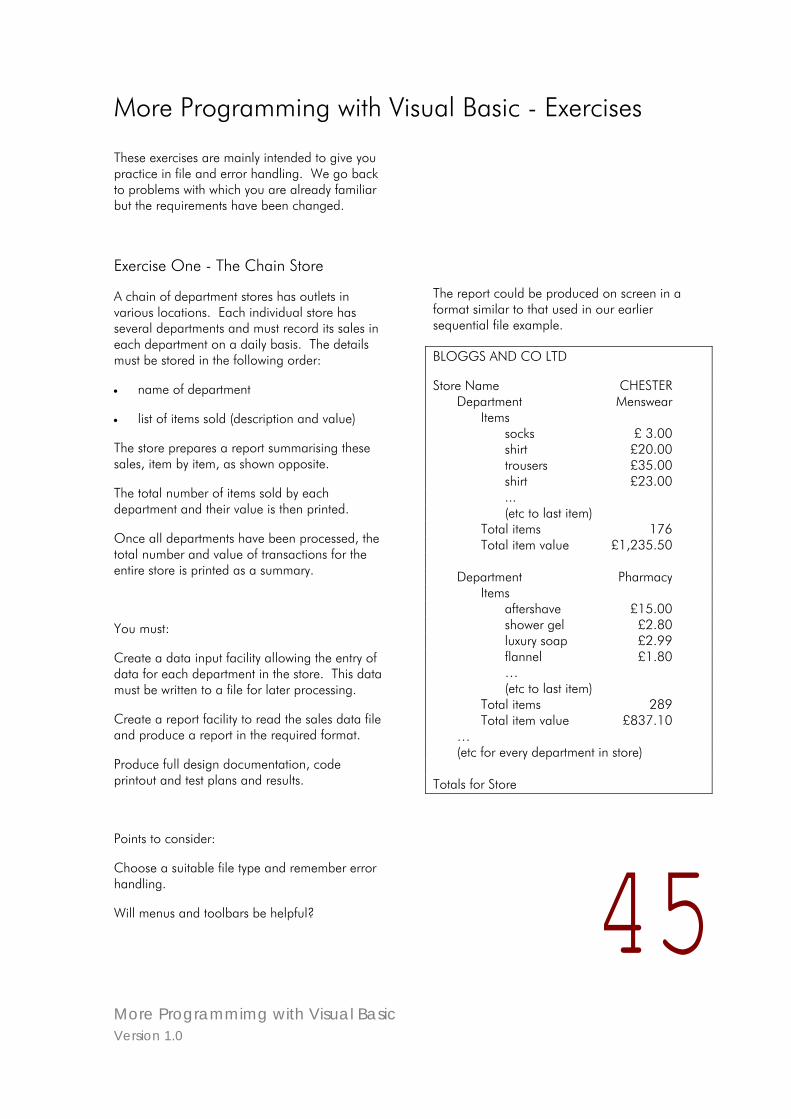
More Programmimg with Visual Basic Version 1.0
45
More Programming with Visual Basic - Exercises
These exercises are mainly intended to give you practice in file and error handling. We go back to problems with which you are already familiar but the requirements have been changed.
Exercise One - The Chain Store
A chain of department stores has outlets in various locations. Each individual store has several departments and must record its sales in each department on a daily basis. The details must be stored in the following order:
• name of department
• list of items sold (description and value)
The store prepares a report summarising these sales, item by item, as shown opposite.
The total number of items sold by each department and their value is then printed.
Once all departments have been processed, the total number and value of transactions for the entire store is printed as a summary.
You must:
Create a data input facility allowing the entry of data for each department in the store. This data must be written to a file for later processing.
Create a report facility to read the sales data file and produce a report in the required format.
Produce full design documentation, code printout and test plans and results.
Points to consider:
Choose a suitable file type and remember error handling.
Will menus and toolbars be helpful?
The report could be produced on screen in a format similar to that used in our earlier sequential file example.
BLOGGS AND CO LTD
Store Name CHESTER Department Menswear Items socks £ 3.00 shirt £20.00 trousers £35.00 shirt £23.00 ... (etc to last item) Total items 176 Total item value £1,235.50 Department Pharmacy Items aftershave £15.00 shower gel £2.80 luxury soap £2.99 flannel £1.80 … (etc to last item) Total items 289 Total item value £837.10 … (etc for every department in store) Totals for Store
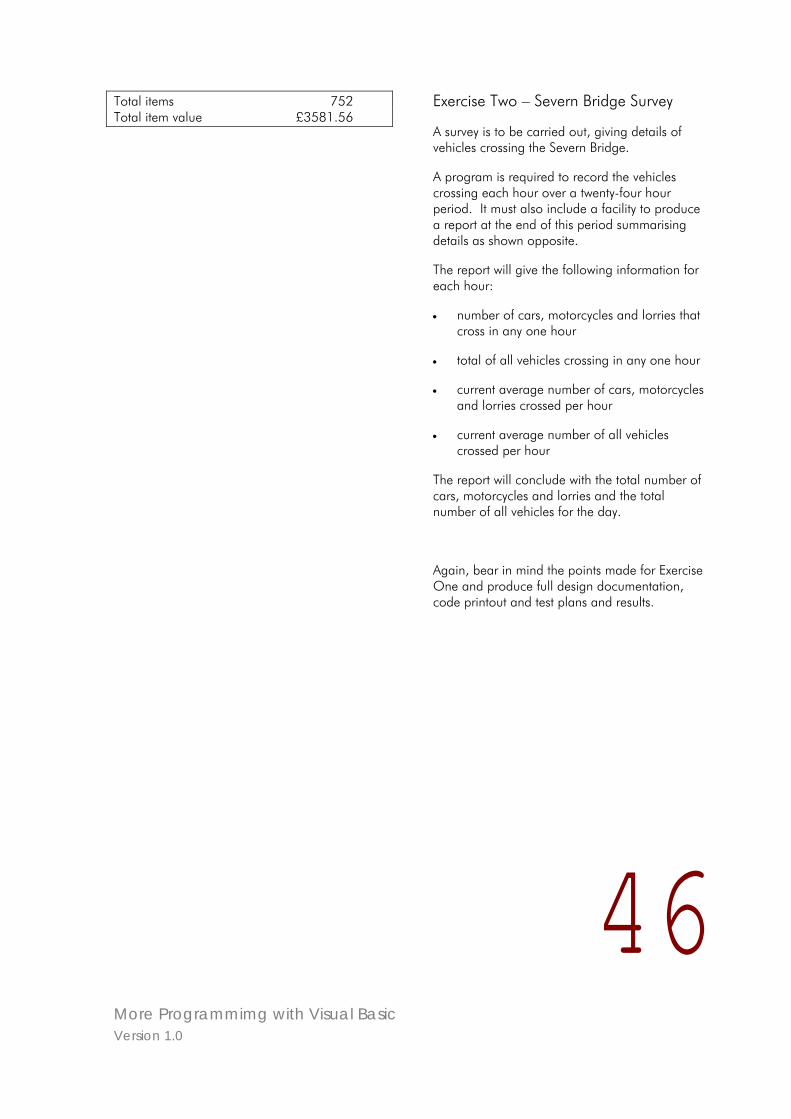
More Programmimg with Visual Basic Version 1.0
46
Total items 752 Total item value £3581.56
Exercise Two – Severn Bridge Survey
A survey is to be carried out, giving details of vehicles crossing the Severn Bridge.
A program is required to record the vehicles crossing each hour over a twenty-four hour period. It must also include a facility to produce a report at the end of this period summarising details as shown opposite.
The report will give the following information for each hour:
• number of cars, motorcycles and lorries that cross in any one hour
• total of all vehicles crossing in any one hour
• current average number of cars, motorcycles and lorries crossed per hour
• current average number of all vehicles crossed per hour
The report will conclude with the total number of cars, motorcycles and lorries and the total number of all vehicles for the day.
Again, bear in mind the points made for Exercise One and produce full design documentation, code printout and test plans and results.
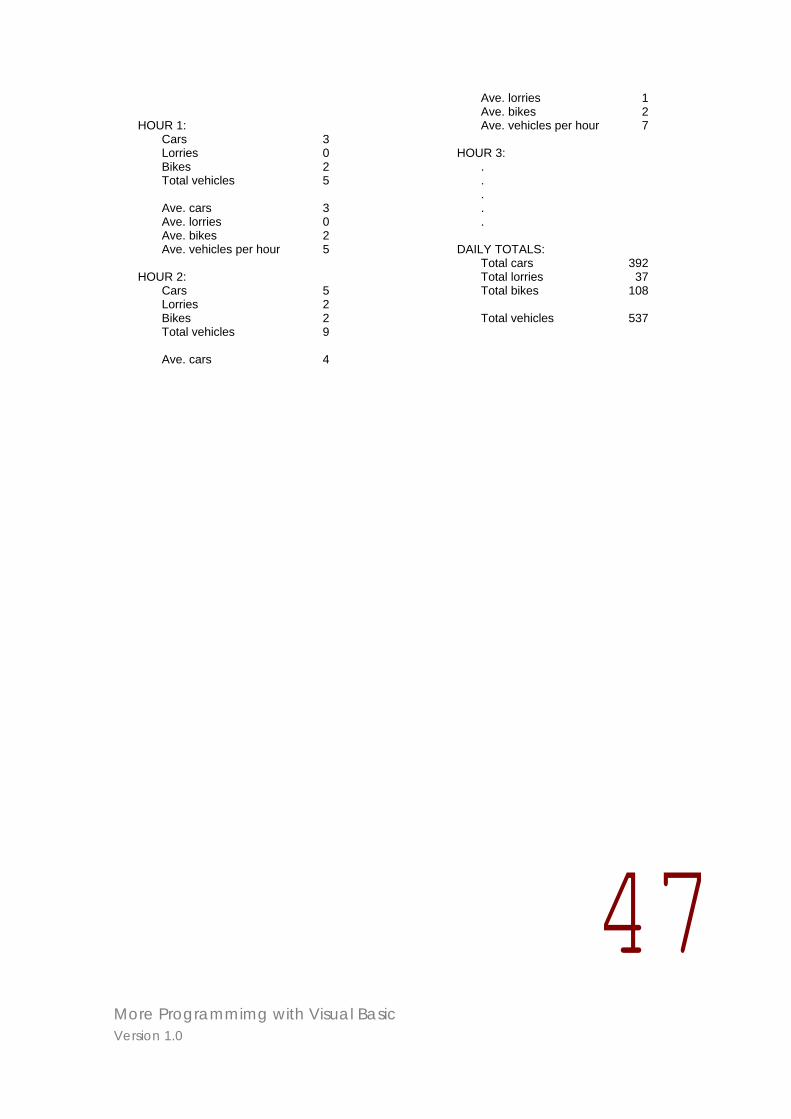
More Programmimg with Visual Basic Version 1.0
47
HOUR 1:
Cars 3 Lorries 0 Bikes 2 Total vehicles 5 Ave. cars 3 Ave. lorries 0 Ave. bikes 2 Ave. vehicles per hour 5
HOUR 2:
Cars 5 Lorries 2 Bikes 2 Total vehicles 9 Ave. cars 4
Ave. lorries 1 Ave. bikes 2 Ave. vehicles per hour 7
HOUR 3:
.
.
.
.
.
DAILY TOTALS: Total cars 392 Total lorries 37 Total bikes 108 Total vehicles 537
More Programmimg with Visual Basic Version 1.0
48
Programming with Visual Basic - Assignment
The purpose of this assignment is to allow you to follow the full software development life-cycle from specifying the user’s requirements through to the production of a fully tested and working application. The choice of application is yours, but do not be tempted to try anything too complicated.
Agree the initial specification with your tutor before commencing design and further development; extra functions can always be added later.
Draw up a development plan, including timescales, and log your progress against this. This will help to simulate a realistic development situation where you will be given a schedule and be expected to follow it and report progress regularly. Do not worry at this stage if your estimated timescales are not very realistic!
Some suggestions for a possible application are:
• a times table program,
• a game, perhaps noughts and crosses, battle ships or hangman,
• an educational program that asks multiple-choice questions and gives the user a final score.
You are expected to submit full documentation including your development plans and progress logs.

Visual Basic 6 Training Manual
Version 1.0
More Programming with Visual Basic –
Solutions to Exercises
www.learnhowtoprogram.com © IT-Pro Training Ltd. 2005

Visual Basic 6 Training Manual
Version 1.0
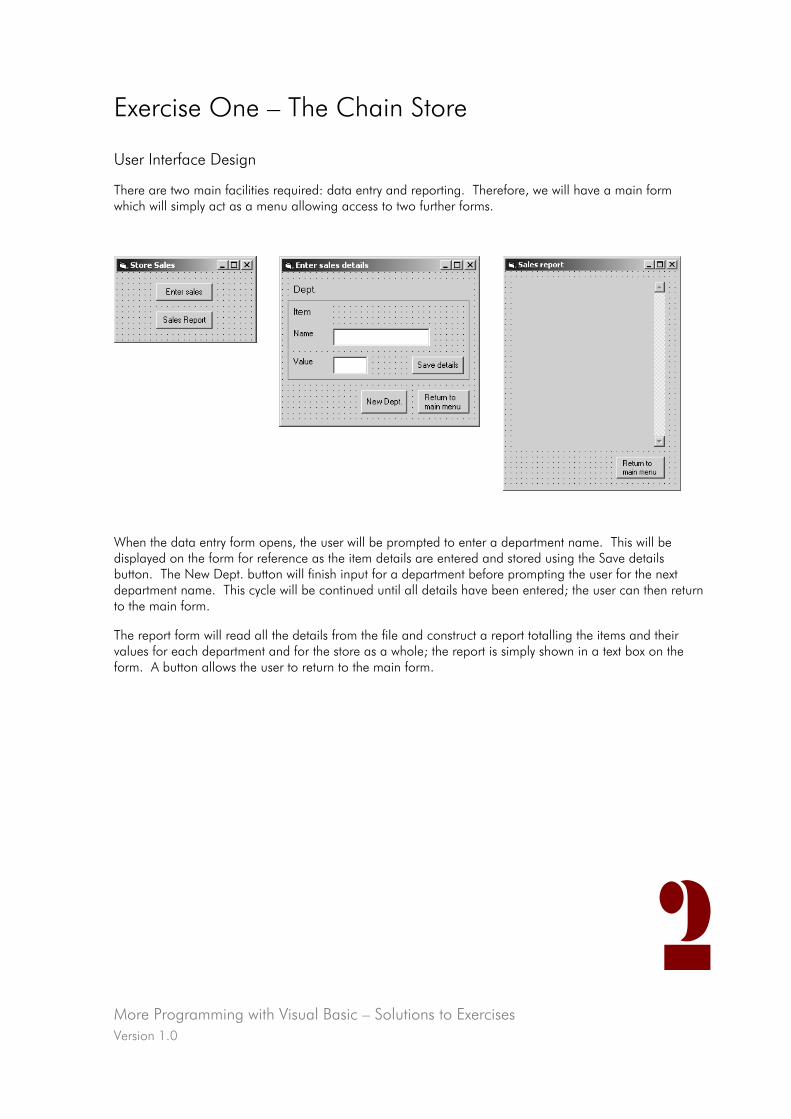
More Programming with Visual Basic – Solutions to Exercises Version 1.0
Exercise One – The Chain Store
User Interface Design
There are two main facilities required: data entry and reporting. Therefore, we will have a main form which will simply act as a menu allowing access to two further forms.
When the data entry form opens, the user will be prompted to enter a department name. This will be displayed on the form for reference as the item details are entered and stored using the Save details button. The New Dept. button will finish input for a department before prompting the user for the next department name. This cycle will be continued until all details have been entered; the user can then return to the main form.
The report form will read all the details from the file and construct a report totalling the items and their values for each department and for the store as a whole; the report is simply shown in a text box on the form. A button allows the user to return to the main form.
2
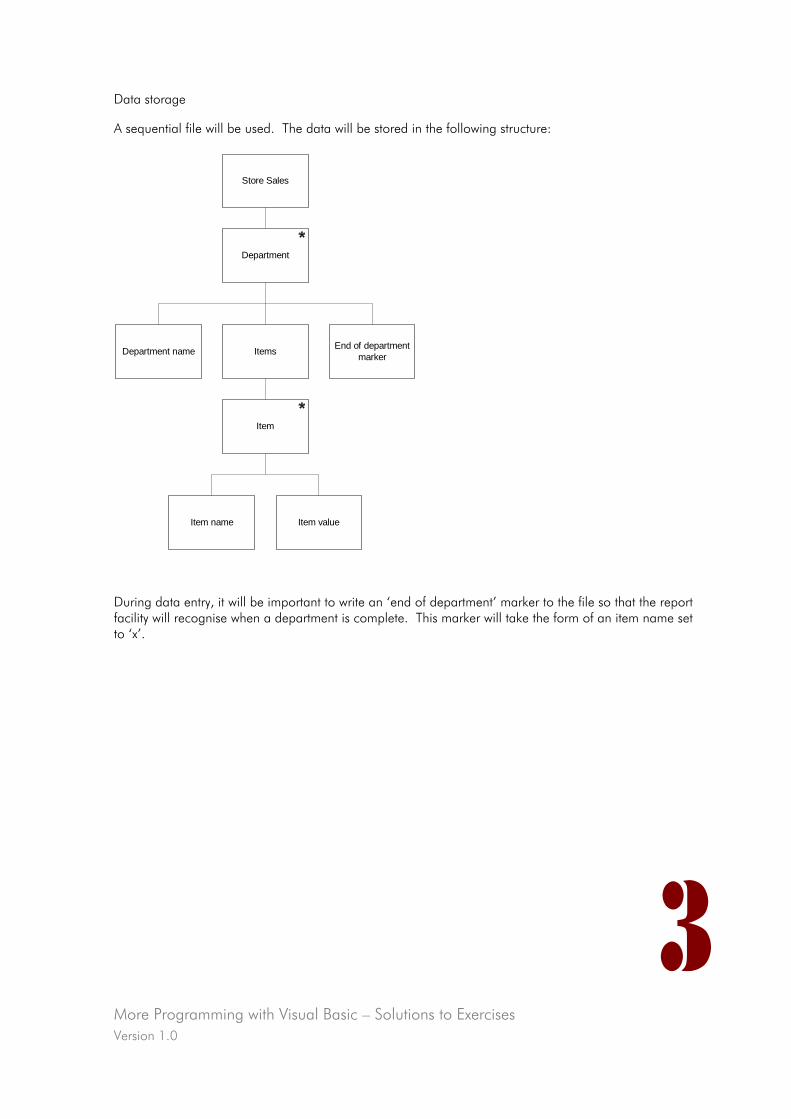
More Programming with Visual Basic – Solutions to Exercises Version 1.0
Data storage
A sequential file will be used. The data will be stored in the following structure:
Store Sales
Department
ItemsDepartment name End of departmentmarker
Item name Item value
Item
During data entry, it will be important to write an ‘end of department’ marker to the file so that the report facility will recognise when a department is complete. This marker will take the form of an item name set to ‘x’.
3
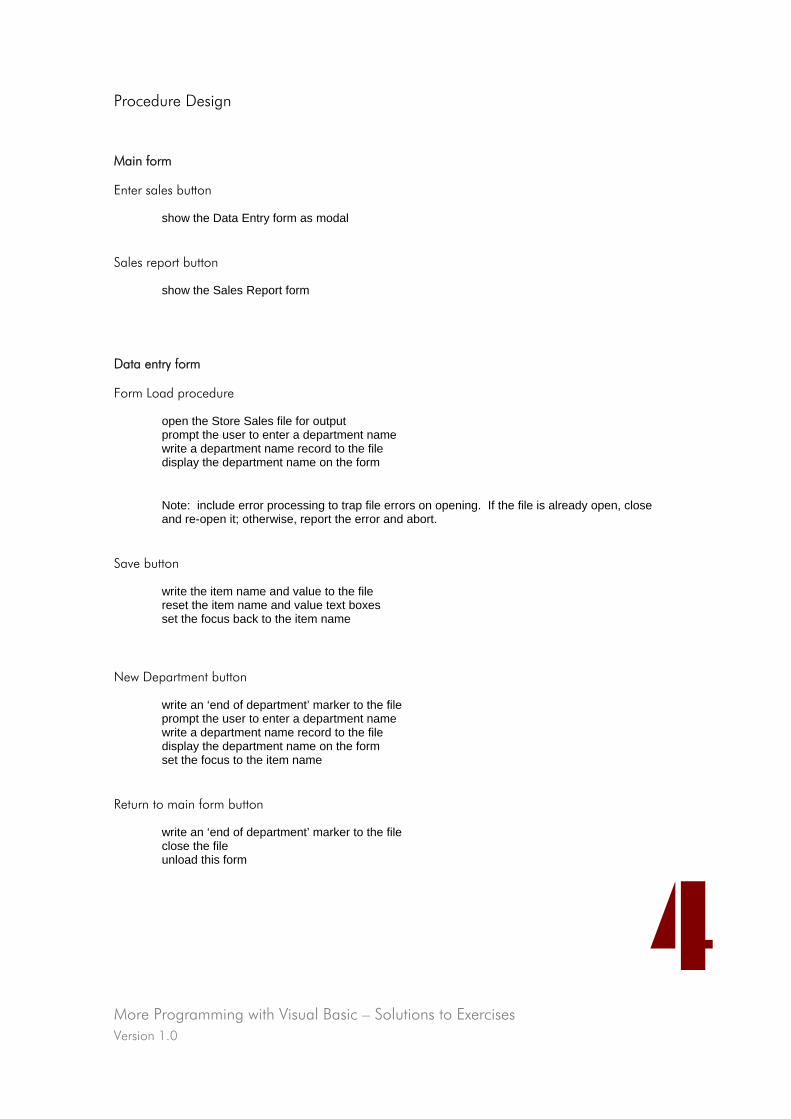
More Programming with Visual Basic – Solutions to Exercises Version 1.0
4
show the Data Entry form as modal
Procedure Design
Main form
Enter sales button
Sales report button
show the Sales Report form
Data entry form
Form Load procedure
open the Store Sales file for output prompt the user to enter a department name write a department name record to the file display the department name on the form
Note: include error processing to trap file errors on opening. If the file is already open, close and re-open it; otherwise, report the error and abort.
Save button
write the item name and value to the file reset the item name and value text boxes set the focus back to the item name
New Department button
write an ‘end of department’ marker to the file prompt the user to enter a department name write a department name record to the file display the department name on the form set the focus to the item name
Return to main form button
write an ‘end of department’ marker to the file close the file unload this form
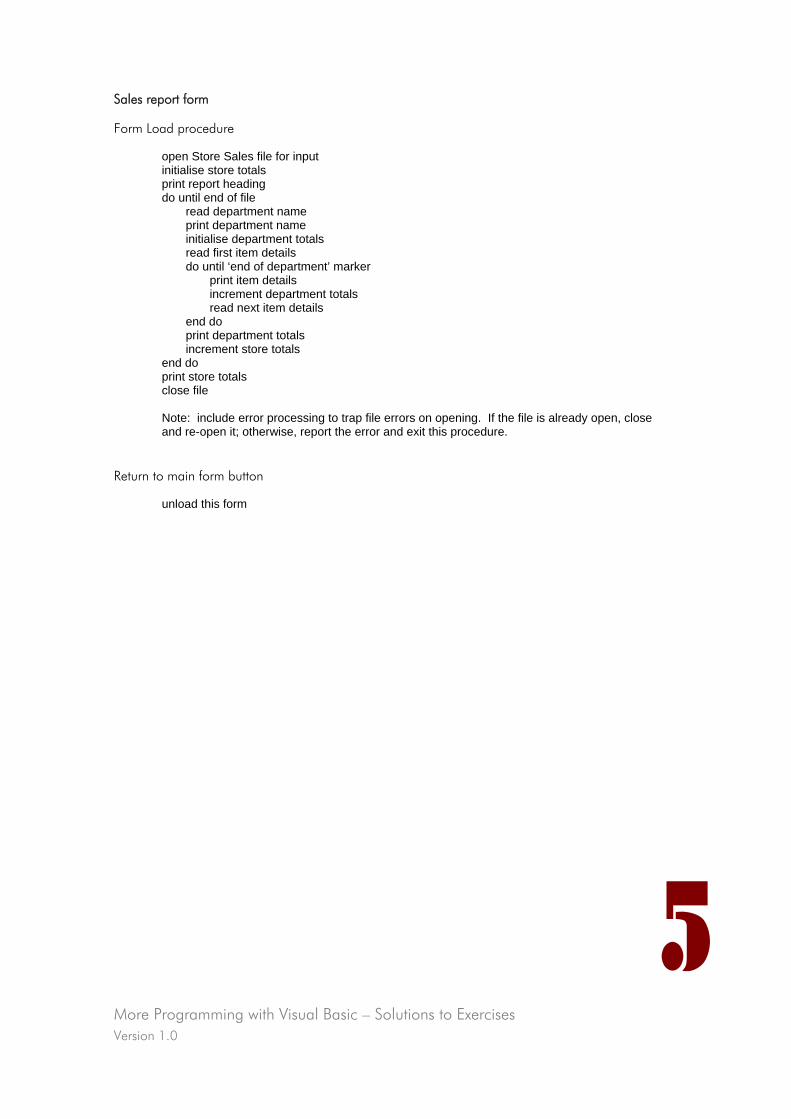
More Programming with Visual Basic – Solutions to Exercises Version 1.0
5
Sales report form
Form Load procedure
open Store Sales file for input initialise store totals print report heading do until end of file read department name print department name initialise department totals read first item details do until ‘end of department’ marker print item details increment department totals read next item details end do print department totals increment store totals end do print store totals close file Note: include error processing to trap file errors on opening. If the file is already open, close and re-open it; otherwise, report the error and exit this procedure.
Return to main form button
unload this form
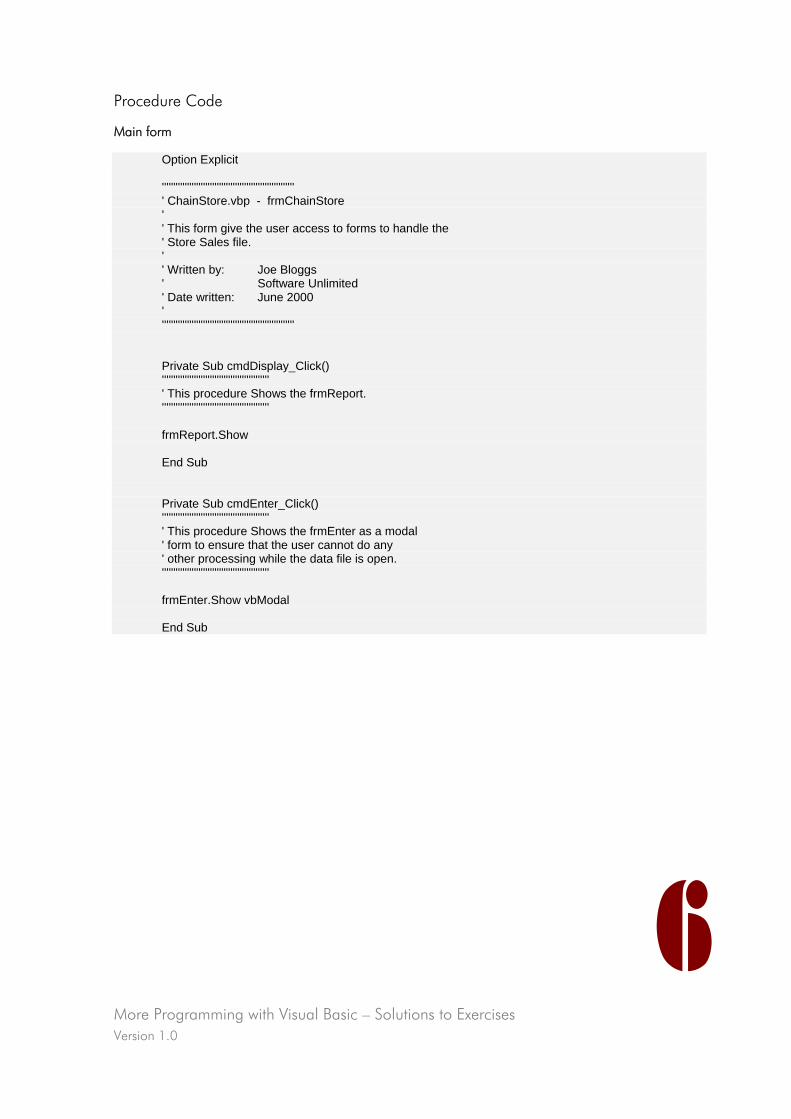
More Programming with Visual Basic – Solutions to Exercises Version 1.0
6
Procedure Code
Main form
Option Explicit '''''''''''''''''''''''''''''''''''''''''''''''''''''''''' ' ChainStore.vbp - frmChainStore ' ' This form give the user access to forms to handle the ' Store Sales file. ' ' Written by: Joe Bloggs ' Software Unlimited ' Date written: June 2000 ' '''''''''''''''''''''''''''''''''''''''''''''''''''''''''' Private Sub cmdDisplay_Click() ''''''''''''''''''''''''''''''''''''''''''''''' ' This procedure Shows the frmReport. ''''''''''''''''''''''''''''''''''''''''''''''' frmReport.Show End Sub Private Sub cmdEnter_Click() ''''''''''''''''''''''''''''''''''''''''''''''' ' This procedure Shows the frmEnter as a modal ' form to ensure that the user cannot do any ' other processing while the data file is open. ''''''''''''''''''''''''''''''''''''''''''''''' frmEnter.Show vbModal End Sub
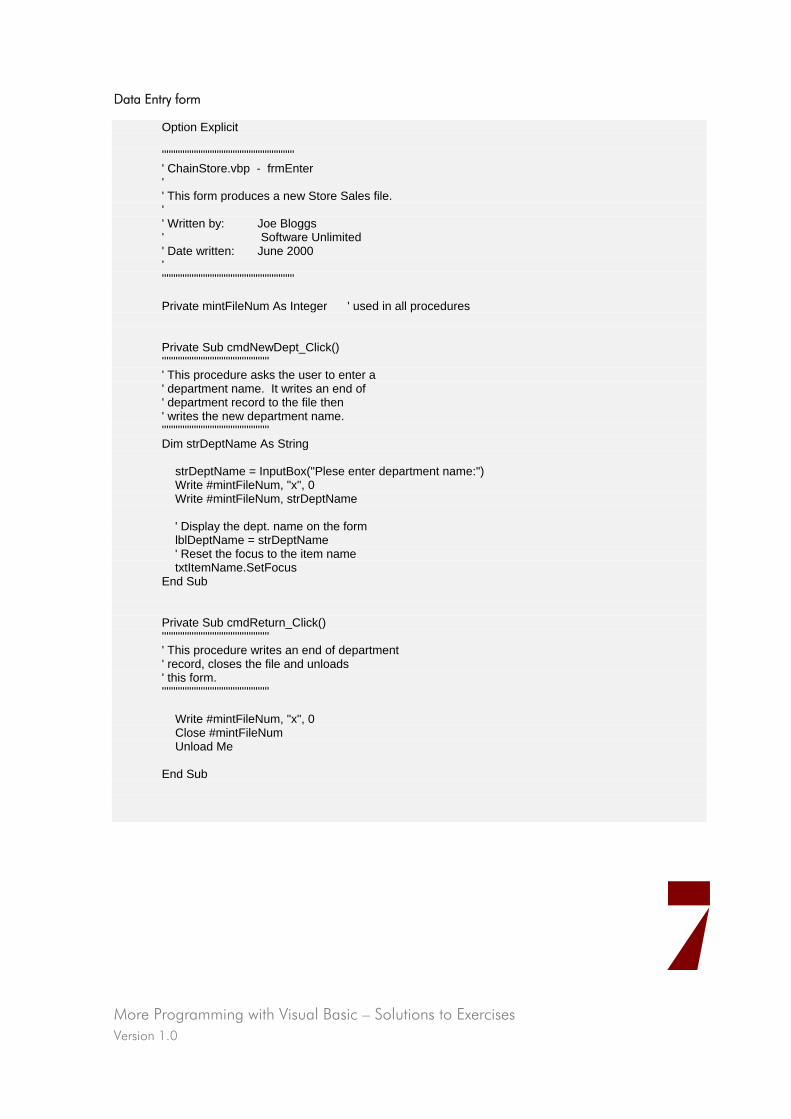
More Programming with Visual Basic – Solutions to Exercises Version 1.0
7
Data Entry form
Option Explicit '''''''''''''''''''''''''''''''''''''''''''''''''''''''''' ' ChainStore.vbp - frmEnter ' ' This form produces a new Store Sales file. ' ' Written by: Joe Bloggs ' Software Unlimited ' Date written: June 2000 ' '''''''''''''''''''''''''''''''''''''''''''''''''''''''''' Private mintFileNum As Integer ' used in all procedures Private Sub cmdNewDept_Click() ''''''''''''''''''''''''''''''''''''''''''''''' ' This procedure asks the user to enter a ' department name. It writes an end of ' department record to the file then ' writes the new department name. ''''''''''''''''''''''''''''''''''''''''''''''' Dim strDeptName As String strDeptName = InputBox("Plese enter department name:") Write #mintFileNum, "x", 0 Write #mintFileNum, strDeptName ' Display the dept. name on the form lblDeptName = strDeptName ' Reset the focus to the item name txtItemName.SetFocus End Sub Private Sub cmdReturn_Click() ''''''''''''''''''''''''''''''''''''''''''''''' ' This procedure writes an end of department ' record, closes the file and unloads ' this form. ''''''''''''''''''''''''''''''''''''''''''''''' Write #mintFileNum, "x", 0 Close #mintFileNum Unload Me End Sub
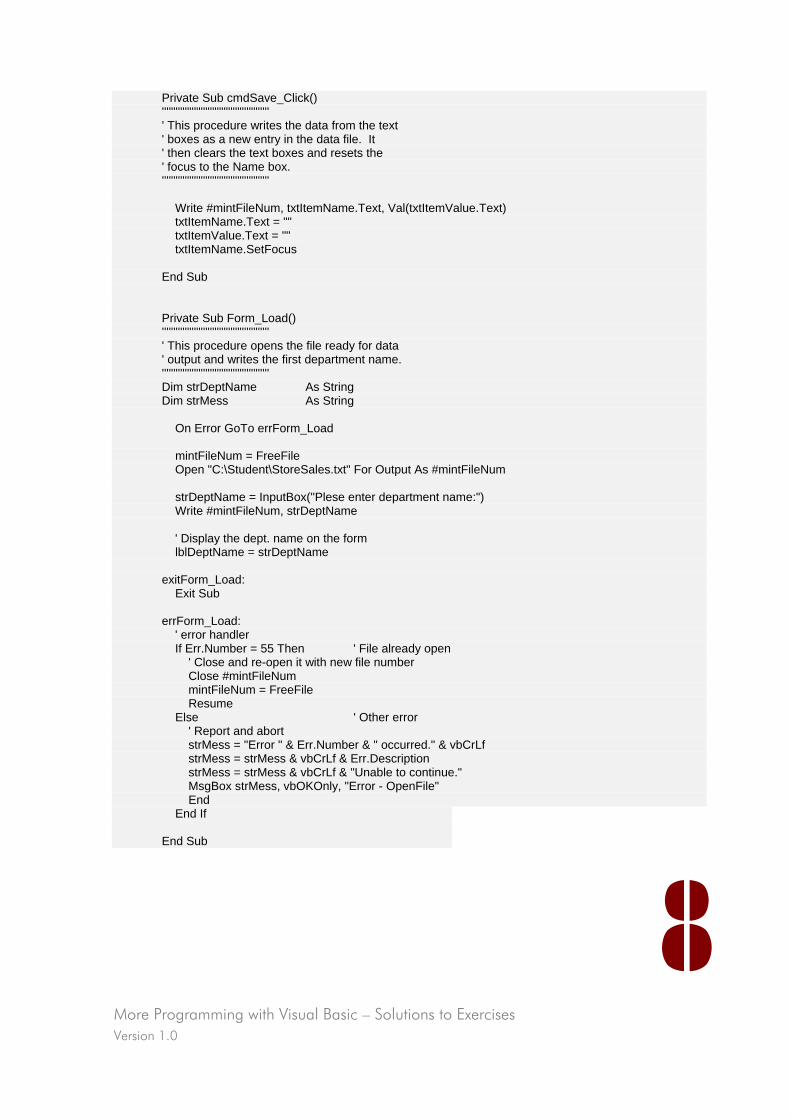
More Programming with Visual Basic – Solutions to Exercises Version 1.0
8
Private Sub cmdSave_Click() ''''''''''''''''''''''''''''''''''''''''''''''' ' This procedure writes the data from the text ' boxes as a new entry in the data file. It ' then clears the text boxes and resets the ' focus to the Name box. ''''''''''''''''''''''''''''''''''''''''''''''' Write #mintFileNum, txtItemName.Text, Val(txtItemValue.Text) txtItemName.Text = "" txtItemValue.Text = "" txtItemName.SetFocus End Sub Private Sub Form_Load() ''''''''''''''''''''''''''''''''''''''''''''''' ' This procedure opens the file ready for data ' output and writes the first department name. ''''''''''''''''''''''''''''''''''''''''''''''' Dim strDeptName As String Dim strMess As String On Error GoTo errForm_Load mintFileNum = FreeFile Open "C:\Student\StoreSales.txt" For Output As #mintFileNum strDeptName = InputBox("Plese enter department name:") Write #mintFileNum, strDeptName ' Display the dept. name on the form lblDeptName = strDeptName exitForm_Load: Exit Sub errForm_Load: ' error handler If Err.Number = 55 Then ' File already open ' Close and re-open it with new file number Close #mintFileNum mintFileNum = FreeFile Resume Else ' Other error ' Report and abort strMess = "Error " & Err.Number & " occurred." & vbCrLf strMess = strMess & vbCrLf & Err.Description strMess = strMess & vbCrLf & "Unable to continue." MsgBox strMess, vbOKOnly, "Error - OpenFile" End End If End Sub

More Programming with Visual Basic – Solutions to Exercises Version 1.0
9
Sales report form
Option Explicit '''''''''''''''''''''''''''''''''''''''''''''''''''''''''' ' ChainStore.vbp - frmReport ' ' This form processes the Store Sales file and produces a ' simple report. ' ' Written by: Joe Bloggs ' Software Unlimited ' Date written: June 2000 ' '''''''''''''''''''''''''''''''''''''''''''''''''''''''''' Private Sub cmdReturn_Click() ''''''''''''''''''''''''''''''''''''''''''''''' ' This procedure simply unloads this form. ''''''''''''''''''''''''''''''''''''''''''''''' Unload Me End Sub Private Sub Form_Load() ''''''''''''''''''''''''''''''''''''''''''''''' ' This procedure opens the data file and reads ' all the entries displaying them in the text ' box. It then closes the file. ''''''''''''''''''''''''''''''''''''''''''''''' Dim intFileNum As Integer Dim strDeptName As String Dim strItemName As String Dim curItemValue As Currency Dim strText As String ' Report text Dim intDeptItems As Integer ' Total items for dept. Dim curDeptItemVal As Currency ' Total value for dept. Dim intStoreItems As Integer ' Total items for store Dim curStoreItemVal As Currency ' Total value for store Dim strMess As String On Error GoTo errForm_Load intFileNum = FreeFile Open "C:\Student\StoreSales.txt" For Input As #intFileNum ' Initialise store totals intStoreItems = 0 curStoreItemVal = 0
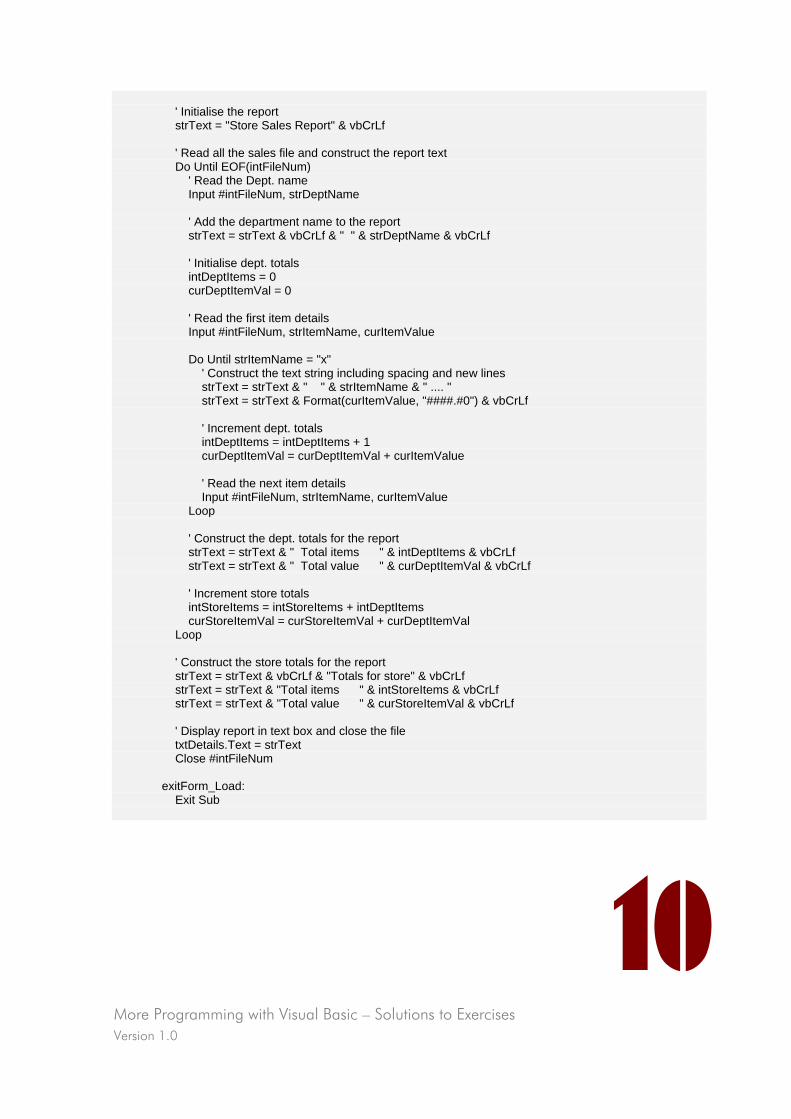
More Programming with Visual Basic – Solutions to Exercises Version 1.0
10
' Initialise the report strText = "Store Sales Report" & vbCrLf ' Read all the sales file and construct the report text Do Until EOF(intFileNum) ' Read the Dept. name Input #intFileNum, strDeptName ' Add the department name to the report strText = strText & vbCrLf & " " & strDeptName & vbCrLf ' Initialise dept. totals intDeptItems = 0 curDeptItemVal = 0 ' Read the first item details Input #intFileNum, strItemName, curItemValue Do Until strItemName = "x" ' Construct the text string including spacing and new lines strText = strText & " " & strItemName & " .... " strText = strText & Format(curItemValue, "####.#0") & vbCrLf ' Increment dept. totals intDeptItems = intDeptItems + 1 curDeptItemVal = curDeptItemVal + curItemValue ' Read the next item details Input #intFileNum, strItemName, curItemValue Loop ' Construct the dept. totals for the report strText = strText & " Total items " & intDeptItems & vbCrLf strText = strText & " Total value " & curDeptItemVal & vbCrLf ' Increment store totals intStoreItems = intStoreItems + intDeptItems curStoreItemVal = curStoreItemVal + curDeptItemVal Loop ' Construct the store totals for the report strText = strText & vbCrLf & "Totals for store" & vbCrLf strText = strText & "Total items " & intStoreItems & vbCrLf strText = strText & "Total value " & curStoreItemVal & vbCrLf ' Display report in text box and close the file txtDetails.Text = strText Close #intFileNum exitForm_Load: Exit Sub

More Programming with Visual Basic – Solutions to Exercises Version 1.0
11
errForm_Load: ' Error handler If Err.Number = 55 Then ' File already open ' Close and re-open it with new file number Close #intFileNum intFileNum = FreeFile Resume Else ' Other error ' Report and exit procedure strMess = "Error " & Err.Number & " occurred." & vbCrLf strMess = strMess & vbCrLf & Err.Description strMess = strMess & vbCrLf & "Unable to produce report." MsgBox strMess, vbOKOnly, "Error - OpenFile" Resume exitForm_Load End If End Sub
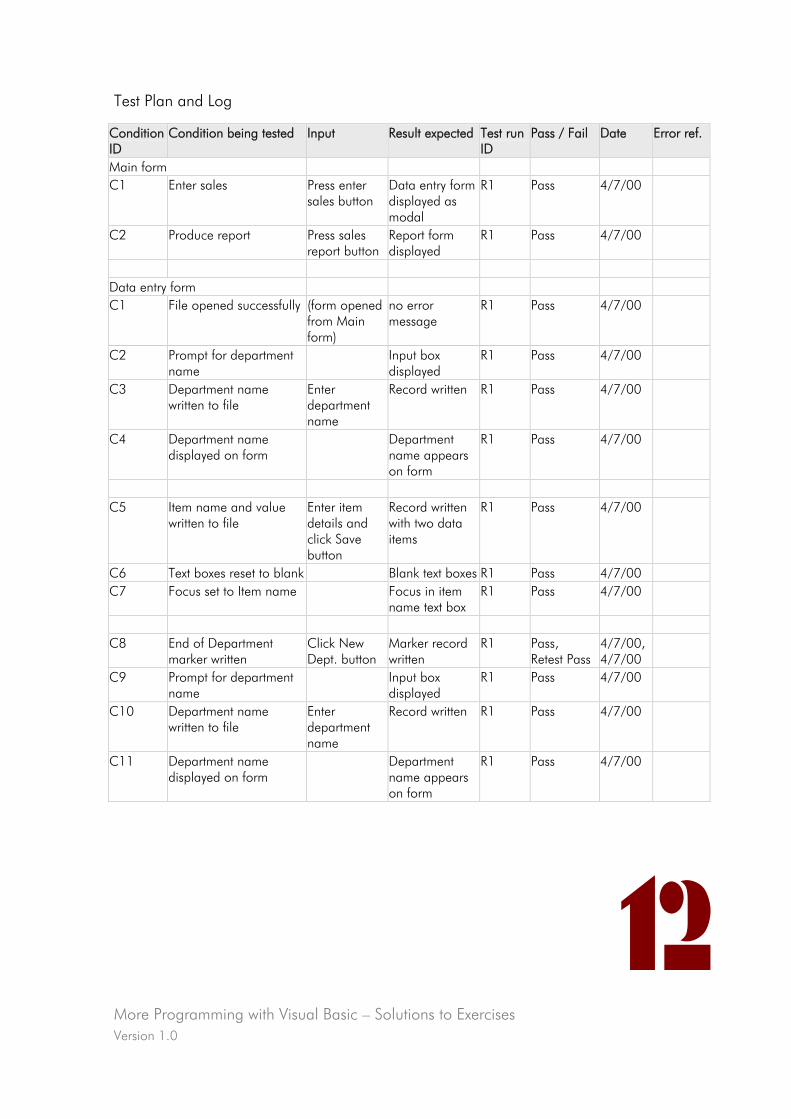
More Programming with Visual Basic – Solutions to Exercises Version 1.0
12
Test Plan and Log
Condition ID
Condition being tested Input Result expected Test run ID
Pass / Fail Date Error ref.
Main form C1 Enter sales Press enter
sales button Data entry form displayed as modal
R1 Pass 4/7/00
C2 Produce report Press sales report button
Report form displayed
R1 Pass 4/7/00
Data entry form C1 File opened successfully (form opened
from Main form)
no error message
R1 Pass 4/7/00
C2 Prompt for department name
Input box displayed
R1 Pass 4/7/00
C3 Department name written to file
Enter department name
Record written R1 Pass 4/7/00
C4 Department name displayed on form
Department name appears on form
R1 Pass 4/7/00
C5 Item name and value
written to file Enter item details and click Save button
Record written with two data items
R1 Pass 4/7/00
C6 Text boxes reset to blank Blank text boxes R1 Pass 4/7/00 C7 Focus set to Item name Focus in item
name text box R1 Pass 4/7/00
C8 End of Department
marker written Click New Dept. button
Marker record written
R1 Pass, Retest Pass
4/7/00, 4/7/00
C9 Prompt for department name
Input box displayed
R1 Pass 4/7/00
C10 Department name written to file
Enter department name
Record written R1 Pass 4/7/00
C11 Department name displayed on form
Department name appears on form
R1 Pass 4/7/00

More Programming with Visual Basic – Solutions to Exercises Version 1.0
13
C12 Focus set to Item name Focus in item name text box
R1 Pass 4/7/00
C13 End of Department
marker written Click Return button
Final marker record written
R1 Pass 4/7/00
C14 File closed File closed R1 Pass 4/7/00 C15 Data entry form closed Form closed
and focus back to Main form
R1 Pass 4/7/00
Sales Report form C1 File opened (form opened
from Main form)
no error message
R1 Pass 4/7/00
C2 Report heading printed Heading at top of report
R1 Fail Pass
4/7/00 4/7/00
1
C3 Department heading printed
Dept. record on file
Department name on report
R1 Pass 4/7/00
C4 Item details printed Item details on file
All item details printed for department
R1 Pass 4/7/00
C5 End of department marker recognised
End of dept. marker on file
Correct department totals printed
R1 Pass 4/7/00
C7 End of file recognised Correct store totals printed
R1 Fail Pass
4/7/00 4/7/00
2
C8 File closed File closed R1 Pass 4/7/00 C9 Sales Report form closed Click Return
button Form closed and focus back to Main form
R1 Pass 4/7/00
Special cases C1 Department with no
items enter department name but no items
Department name followed by zero totals on report
R1 Pass 4/7/00
C2 No departments Go to Data entry form but enter no details
Store heading and zero totals for Store
R2 Pass 4/7/00

More Programming with Visual Basic – Solutions to Exercises Version 1.0
14
Test data
Test Run 1:
Input Expected results Department: Ladieswear Items: Vest, 2.50 Tights, 1 Skirt, 24.99 Department: Menswear No items Department: Household Items: Basin, 4.50
Store Sales Report
Ladieswear Vest…. 2.50
Tights….1.00 Skirt….24.99 Total items 3
Total value 28.49
Menswear Total items 0 Total value 0
Household
Basin….4.50 Total items 1
Total value 4.50
Totals for store Total items 4
Total value 32.99
Test run 2: no details input and report with zero totals.
Error log 1 Problem: Error 62 – Input past end of file Cause and
solution: End of department marker being read as having two data items but was only written with one. Change record to be written with an item name of ‘x’ and a value of 0.
Retesting required:
Data Entry C8 and C13
2 Problem: Final department totals repeated Cause and
solution: Wrong variables used in print. Simply change statement to use correct variables.

More Programming with Visual Basic – Solutions to Exercises Version 1.0
15
Retesting required:
Sales report C7
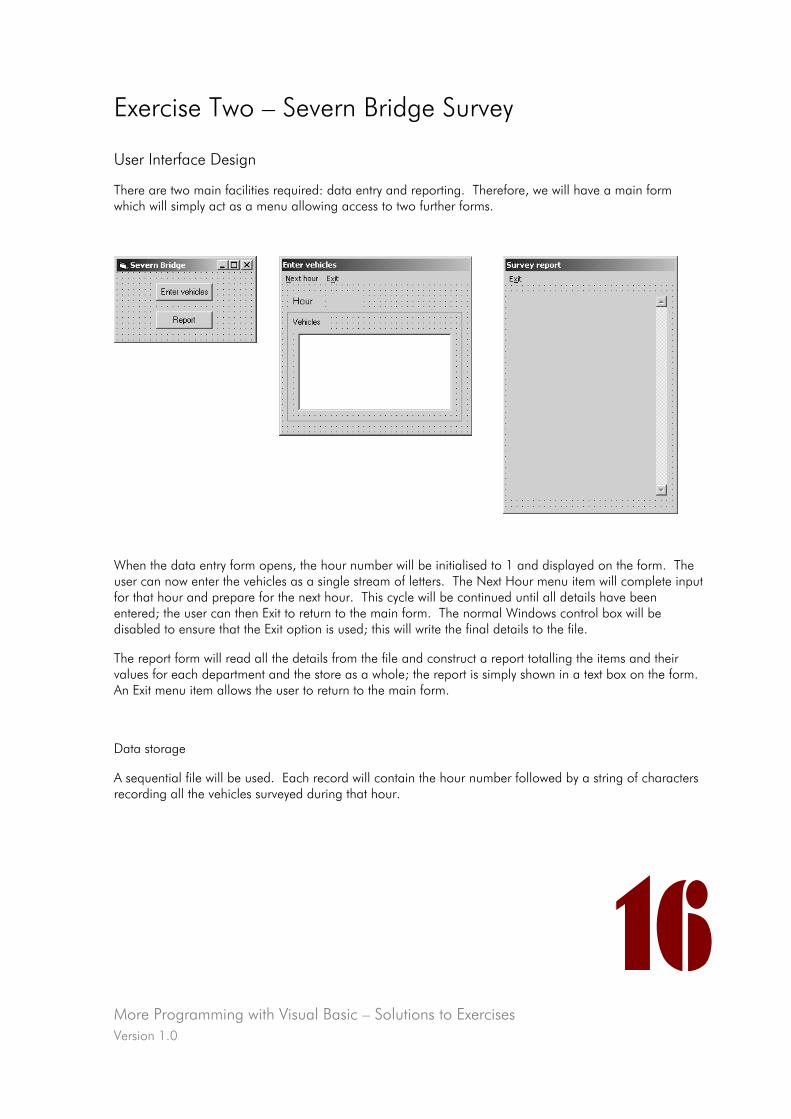
More Programming with Visual Basic – Solutions to Exercises Version 1.0
Exercise Two – Severn Bridge Survey
User Interface Design
There are two main facilities required: data entry and reporting. Therefore, we will have a main form which will simply act as a menu allowing access to two further forms.
When the data entry form opens, the hour number will be initialised to 1 and displayed on the form. The user can now enter the vehicles as a single stream of letters. The Next Hour menu item will complete input for that hour and prepare for the next hour. This cycle will be continued until all details have been entered; the user can then Exit to return to the main form. The normal Windows control box will be disabled to ensure that the Exit option is used; this will write the final details to the file.
The report form will read all the details from the file and construct a report totalling the items and their values for each department and the store as a whole; the report is simply shown in a text box on the form. An Exit menu item allows the user to return to the main form.
Data storage
A sequential file will be used. Each record will contain the hour number followed by a string of characters recording all the vehicles surveyed during that hour.
16
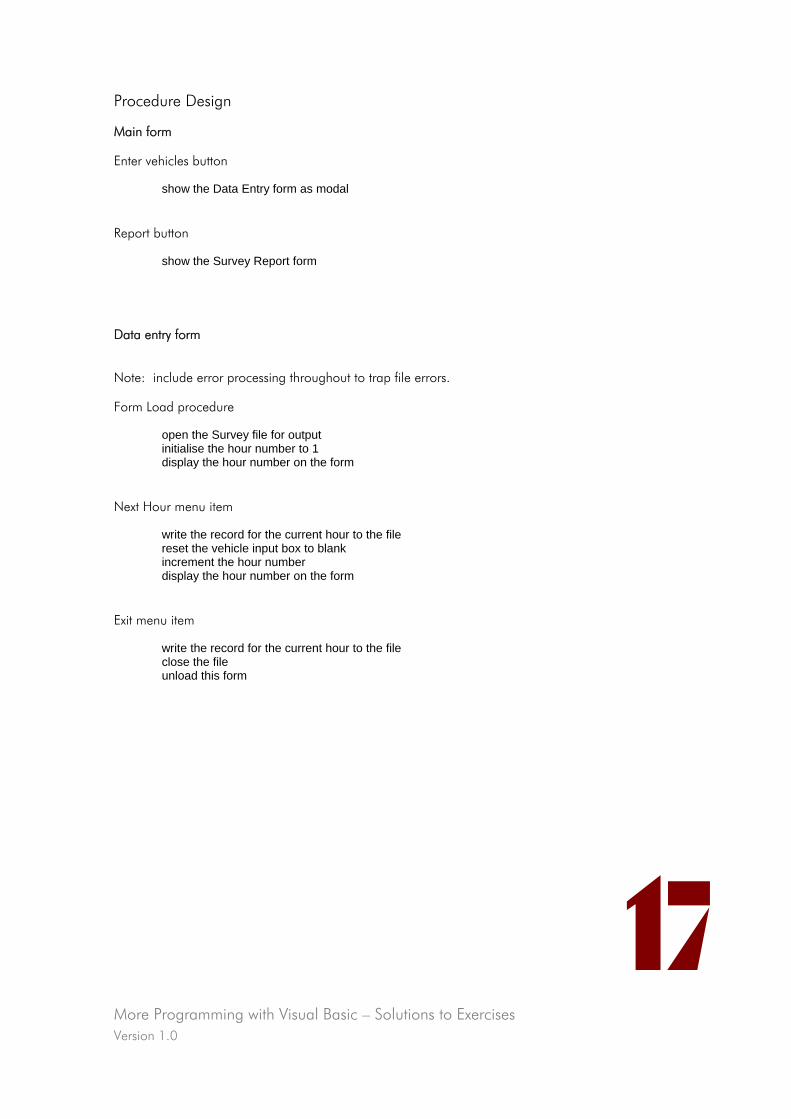
More Programming with Visual Basic – Solutions to Exercises Version 1.0
17
Procedure Design
Main form
Enter vehicles button
show the Data Entry form as modal
Report button
show the Survey Report form
Data entry form
Note: include error processing throughout to trap file errors.
Form Load procedure
open the Survey file for output initialise the hour number to 1 display the hour number on the form
Next Hour menu item
write the record for the current hour to the file reset the vehicle input box to blank increment the hour number display the hour number on the form
Exit menu item
write the record for the current hour to the file close the file unload this form
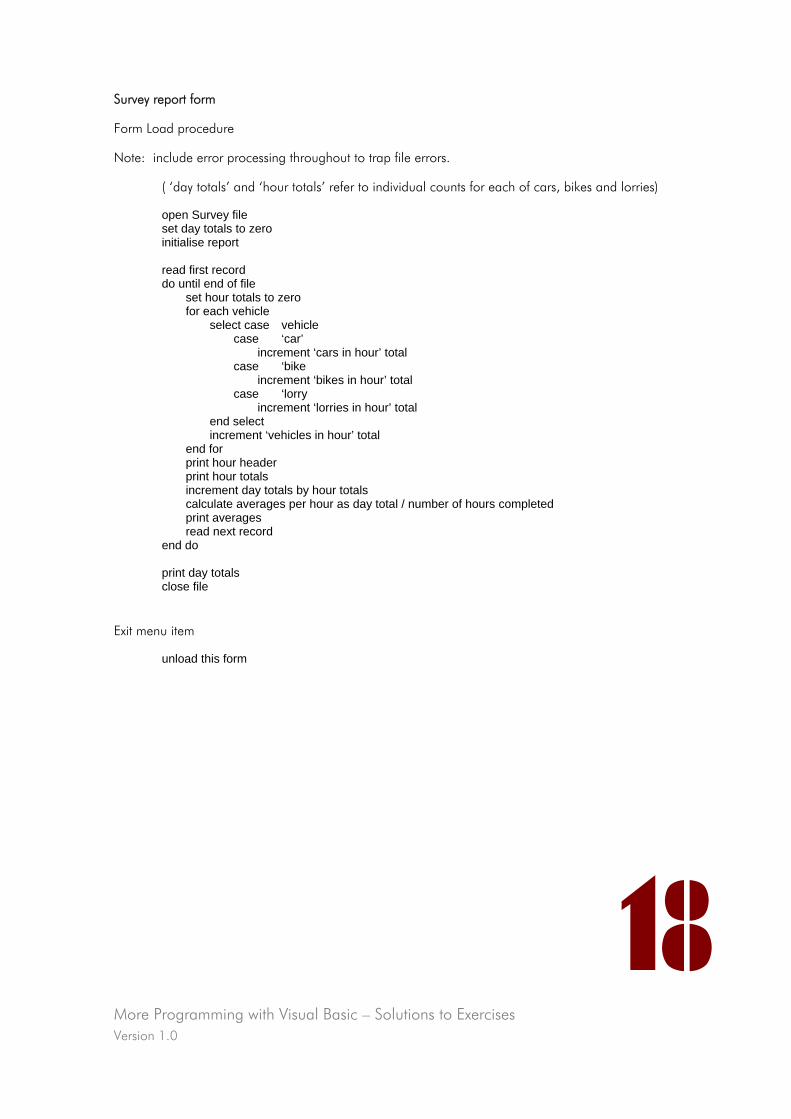
More Programming with Visual Basic – Solutions to Exercises Version 1.0
18
Survey report form
Form Load procedure
Note: include error processing throughout to trap file errors.
( ‘day totals’ and ‘hour totals’ refer to individual counts for each of cars, bikes and lorries)
open Survey file set day totals to zero initialise report read first record do until end of file set hour totals to zero for each vehicle select case vehicle case ‘car’ increment ‘cars in hour’ total case ‘bike increment ‘bikes in hour’ total case ‘lorry increment ‘lorries in hour’ total end select increment ‘vehicles in hour’ total end for print hour header print hour totals increment day totals by hour totals calculate averages per hour as day total / number of hours completed print averages read next record end do print day totals close file
Exit menu item
unload this form
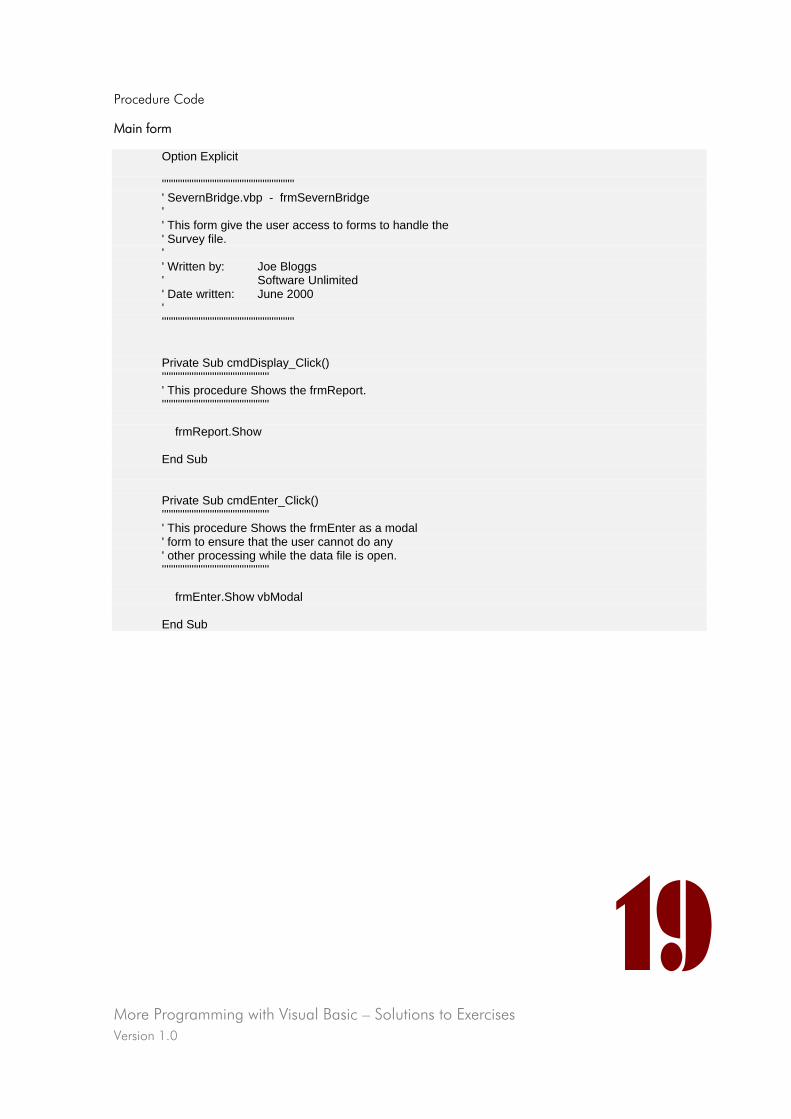
More Programming with Visual Basic – Solutions to Exercises Version 1.0
19
Procedure Code
Main form
Option Explicit '''''''''''''''''''''''''''''''''''''''''''''''''''''''''' ' SevernBridge.vbp - frmSevernBridge ' ' This form give the user access to forms to handle the ' Survey file. ' ' Written by: Joe Bloggs ' Software Unlimited ' Date written: June 2000 ' '''''''''''''''''''''''''''''''''''''''''''''''''''''''''' Private Sub cmdDisplay_Click() ''''''''''''''''''''''''''''''''''''''''''''''' ' This procedure Shows the frmReport. ''''''''''''''''''''''''''''''''''''''''''''''' frmReport.Show End Sub Private Sub cmdEnter_Click() ''''''''''''''''''''''''''''''''''''''''''''''' ' This procedure Shows the frmEnter as a modal ' form to ensure that the user cannot do any ' other processing while the data file is open. ''''''''''''''''''''''''''''''''''''''''''''''' frmEnter.Show vbModal End Sub
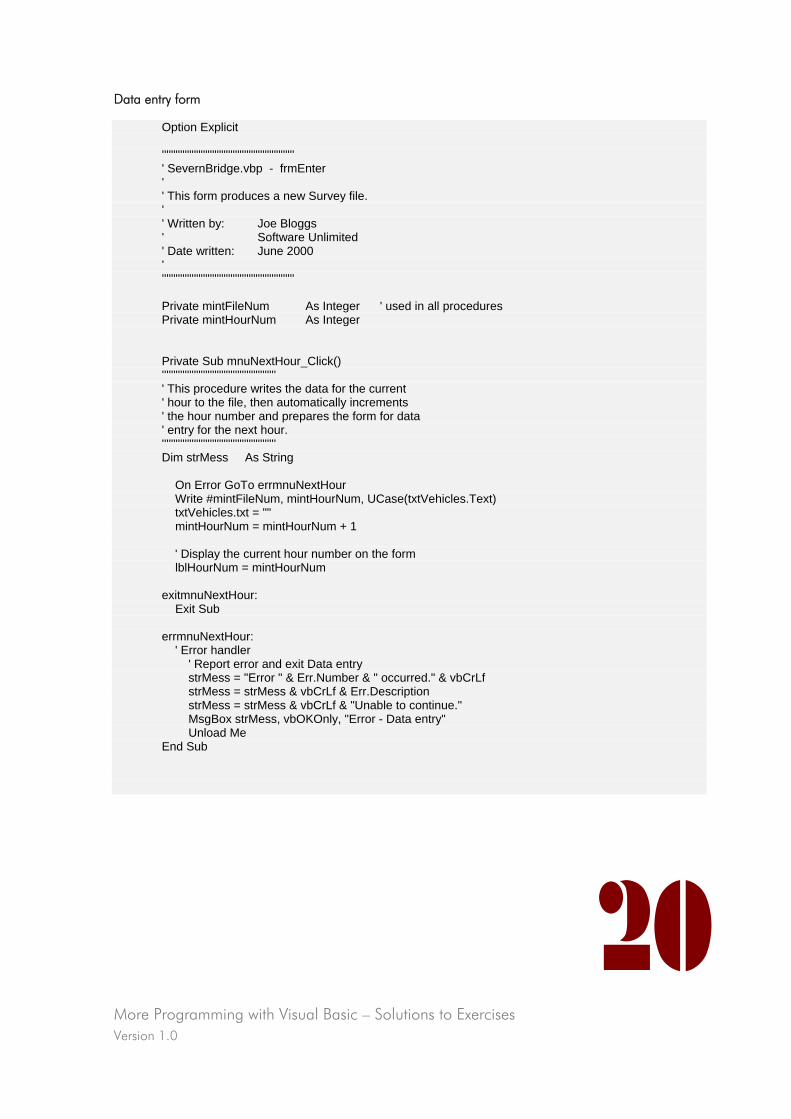
More Programming with Visual Basic – Solutions to Exercises Version 1.0
20
Data entry form
Option Explicit '''''''''''''''''''''''''''''''''''''''''''''''''''''''''' ' SevernBridge.vbp - frmEnter ' ' This form produces a new Survey file. ' ' Written by: Joe Bloggs ' Software Unlimited ' Date written: June 2000 ' '''''''''''''''''''''''''''''''''''''''''''''''''''''''''' Private mintFileNum As Integer ' used in all procedures Private mintHourNum As Integer Private Sub mnuNextHour_Click() '''''''''''''''''''''''''''''''''''''''''''''''''' ' This procedure writes the data for the current ' hour to the file, then automatically increments ' the hour number and prepares the form for data ' entry for the next hour. '''''''''''''''''''''''''''''''''''''''''''''''''' Dim strMess As String On Error GoTo errmnuNextHour Write #mintFileNum, mintHourNum, UCase(txtVehicles.Text) txtVehicles.txt = "" mintHourNum = mintHourNum + 1 ' Display the current hour number on the form lblHourNum = mintHourNum exitmnuNextHour: Exit Sub errmnuNextHour: ' Error handler ' Report error and exit Data entry strMess = "Error " & Err.Number & " occurred." & vbCrLf strMess = strMess & vbCrLf & Err.Description strMess = strMess & vbCrLf & "Unable to continue." MsgBox strMess, vbOKOnly, "Error - Data entry" Unload Me End Sub
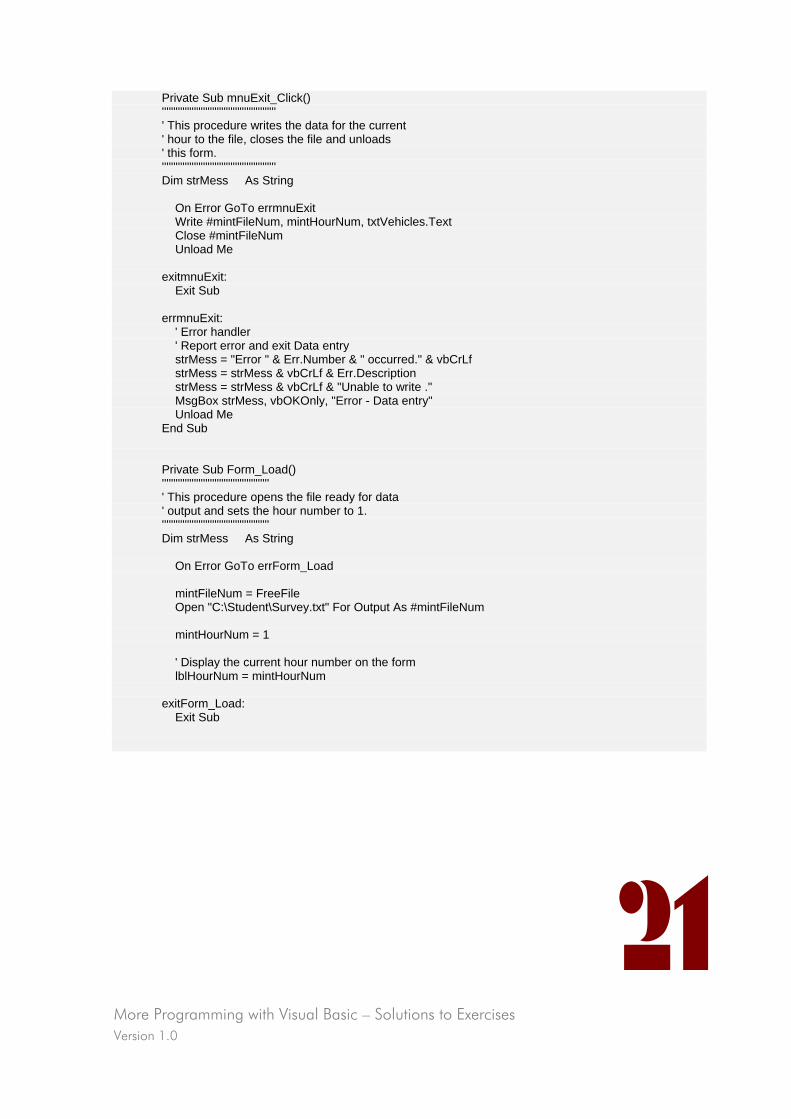
More Programming with Visual Basic – Solutions to Exercises Version 1.0
21
Private Sub mnuExit_Click() '''''''''''''''''''''''''''''''''''''''''''''''''' ' This procedure writes the data for the current ' hour to the file, closes the file and unloads ' this form. '''''''''''''''''''''''''''''''''''''''''''''''''' Dim strMess As String On Error GoTo errmnuExit Write #mintFileNum, mintHourNum, txtVehicles.Text Close #mintFileNum Unload Me exitmnuExit: Exit Sub errmnuExit: ' Error handler ' Report error and exit Data entry strMess = "Error " & Err.Number & " occurred." & vbCrLf strMess = strMess & vbCrLf & Err.Description strMess = strMess & vbCrLf & "Unable to write ." MsgBox strMess, vbOKOnly, "Error - Data entry" Unload Me End Sub Private Sub Form_Load() ''''''''''''''''''''''''''''''''''''''''''''''' ' This procedure opens the file ready for data ' output and sets the hour number to 1. ''''''''''''''''''''''''''''''''''''''''''''''' Dim strMess As String On Error GoTo errForm_Load mintFileNum = FreeFile Open "C:\Student\Survey.txt" For Output As #mintFileNum mintHourNum = 1 ' Display the current hour number on the form lblHourNum = mintHourNum exitForm_Load: Exit Sub

More Programming with Visual Basic – Solutions to Exercises Version 1.0
22
errForm_Load: ' error handler If Err.Number = 55 Then ' File already open ' Close and re-open it with new file number Close #mintFileNum mintFileNum = FreeFile Resume Else ' Other error ' Report and abort strMess = "Error " & Err.Number & " occurred." & vbCrLf strMess = strMess & vbCrLf & Err.Description strMess = strMess & vbCrLf & "Unable to continue." MsgBox strMess, vbOKOnly, "Error - OpenFile" End End If End Sub
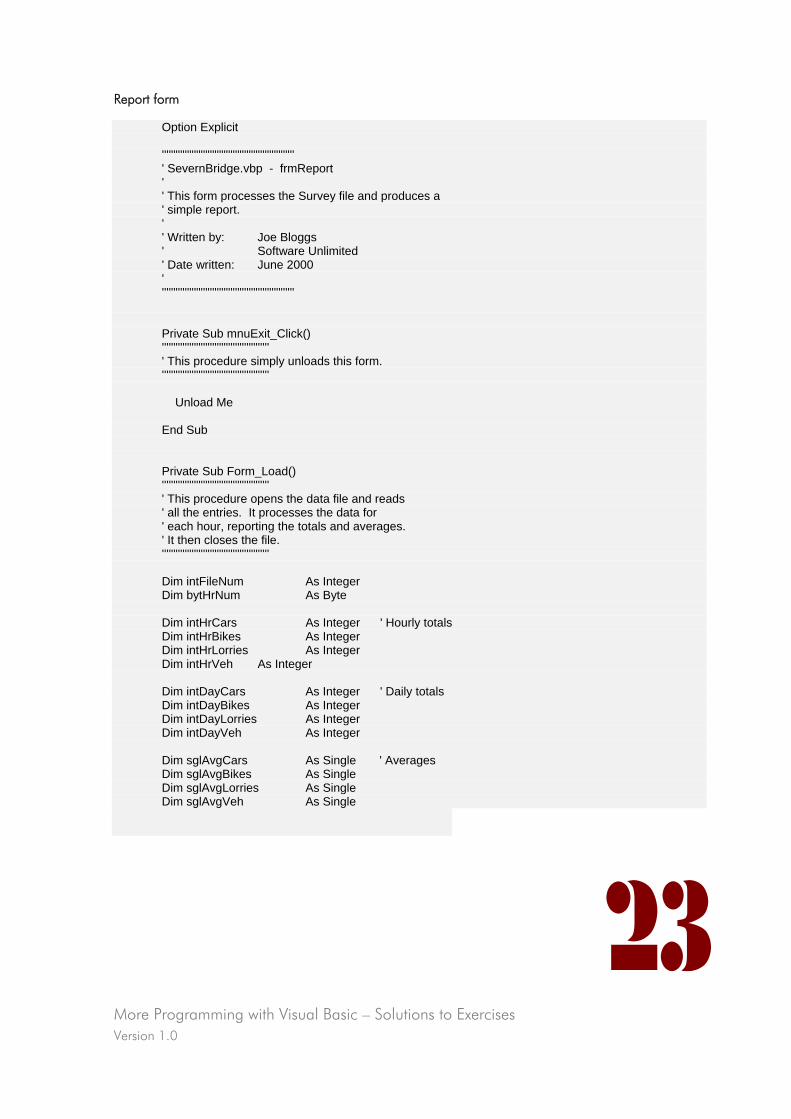
More Programming with Visual Basic – Solutions to Exercises Version 1.0
23
Report form
Option Explicit '''''''''''''''''''''''''''''''''''''''''''''''''''''''''' ' SevernBridge.vbp - frmReport ' ' This form processes the Survey file and produces a ' simple report. ' ' Written by: Joe Bloggs ' Software Unlimited ' Date written: June 2000 ' '''''''''''''''''''''''''''''''''''''''''''''''''''''''''' Private Sub mnuExit_Click() ''''''''''''''''''''''''''''''''''''''''''''''' ' This procedure simply unloads this form. ''''''''''''''''''''''''''''''''''''''''''''''' Unload Me End Sub Private Sub Form_Load() ''''''''''''''''''''''''''''''''''''''''''''''' ' This procedure opens the data file and reads ' all the entries. It processes the data for ' each hour, reporting the totals and averages. ' It then closes the file. ''''''''''''''''''''''''''''''''''''''''''''''' Dim intFileNum As Integer Dim bytHrNum As Byte Dim intHrCars As Integer ' Hourly totals Dim intHrBikes As Integer Dim intHrLorries As Integer Dim intHrVeh As Integer Dim intDayCars As Integer ' Daily totals Dim intDayBikes As Integer Dim intDayLorries As Integer Dim intDayVeh As Integer Dim sglAvgCars As Single ' Averages Dim sglAvgBikes As Single Dim sglAvgLorries As Single Dim sglAvgVeh As Single
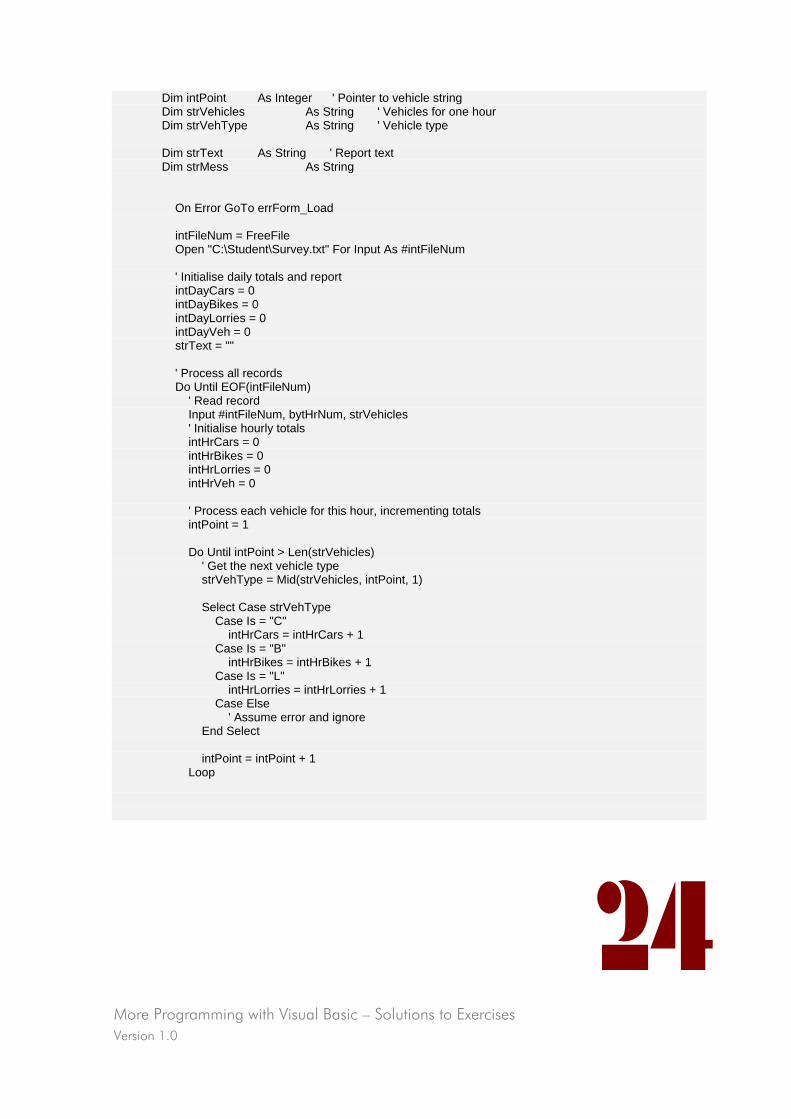
More Programming with Visual Basic – Solutions to Exercises Version 1.0
24
Dim intPoint As Integer ' Pointer to vehicle string Dim strVehicles As String ' Vehicles for one hour Dim strVehType As String ' Vehicle type Dim strText As String ' Report text Dim strMess As String On Error GoTo errForm_Load intFileNum = FreeFile Open "C:\Student\Survey.txt" For Input As #intFileNum ' Initialise daily totals and report intDayCars = 0 intDayBikes = 0 intDayLorries = 0 intDayVeh = 0 strText = "" ' Process all records Do Until EOF(intFileNum) ' Read record Input #intFileNum, bytHrNum, strVehicles ' Initialise hourly totals intHrCars = 0 intHrBikes = 0 intHrLorries = 0 intHrVeh = 0 ' Process each vehicle for this hour, incrementing totals intPoint = 1 Do Until intPoint > Len(strVehicles) ' Get the next vehicle type strVehType = Mid(strVehicles, intPoint, 1) Select Case strVehType Case Is = "C" intHrCars = intHrCars + 1 Case Is = "B" intHrBikes = intHrBikes + 1 Case Is = "L" intHrLorries = intHrLorries + 1 Case Else ' Assume error and ignore End Select intPoint = intPoint + 1 Loop

More Programming with Visual Basic – Solutions to Exercises Version 1.0
25
' Print hourly totals strText = strText & "Hour " & bytHrNum & vbCrLf strText = strText & " Cars...." & intHrCars & vbCrLf strText = strText & " Bikes...." & intHrBikes & vbCrLf strText = strText & " Lorries...." & intHrLorries & vbCrLf intHrVeh = intHrCars + intHrBikes + intHrLorries strText = strText & " All vehicles...." & intHrVeh & vbCrLf ' Increment daily totals intDayCars = intDayCars + intHrCars intDayBikes = intDayBikes + intHrBikes intDayLorries = intDayLorries + intHrLorries intDayVeh = intDayVeh + intHrVeh ' Calculate and print averages sglAvgCars = intDayCars / bytHrNum sglAvgBikes = intDayBikes / bytHrNum sglAvgLorries = intDayLorries / bytHrNum sglAvgVeh = intDayVeh / bytHrNum strText = strText & " Ave. cars...." & sglAvgCars & vbCrLf strText = strText & " Ave. bikes...." & sglAvgBikes & vbCrLf strText = strText & " Ave. lorries...." & sglAvgLorries & vbCrLf strText = strText & " Ave. all vehicles...." & sglAvgVeh & vbCrLf & vbCrLf Loop ' Print daily totals strText = strText & "Daily totals" & vbCrLf strText = strText & " Total cars...." & intDayCars & vbCrLf strText = strText & " Total bikes...." & intDayBikes & vbCrLf strText = strText & " Total lorries...." & intDayLorries & vbCrLf strText = strText & " Total all vehicles...." & intDayVeh & vbCrLf ' Display report in text box and close the file txtDetails.Text = strText Close #intFileNum exitForm_Load: Exit Sub errForm_Load: ' Error handler If Err.Number = 55 Then ' File already open ' Close and re-open it with new file number Close #intFileNum intFileNum = FreeFile Resume Else ' Other error

More Programming with Visual Basic – Solutions to Exercises Version 1.0
26
' Report and exit procedure strMess = "Error " & Err.Number & " occurred." & vbCrLf strMess = strMess & vbCrLf & Err.Description strMess = strMess & vbCrLf & "Unable to produce report." MsgBox strMess, vbOKOnly, "Error - Survey report" Resume exitForm_Load End If End Sub

More Programming with Visual Basic – Solutions to Exercises Version 1.0
27
Test Plan and Log
ConditionID
Condition being tested Input Result expected Test run ID
Pass / Fail Date Error ref.
Main form C1 Enter vehicles Press enter
vehicles buttonData entry form displayed as modal
R1 Pass 4/7/00
C2 Produce report Press survey report button
Report form displayed
R1 Pass 4/7/00
Data entry form C1 File opened successfully (form opened
from Main form)
no error message
R1 Pass 4/7/00
C2 Hour number set and displayed
Hour 1 appears on form
R1 Pass 4/7/00
C3 Hour number and
vehicle list written to file Enter vehicle details and click Next Hour
Record written with two data items
R1 Pass 4/7/00
C4 Text box reset to blank Blank text box R1 Pass 4/7/00 C5 Hour number
incremented and displayed
Next hour number appears on form
R1 Pass 4/7/00
C6 Hour number and
vehicle list written to file Click Exit Final record
written R1 Pass 4/7/00
C7 File closed File closed R1 Pass 4/7/00 C8 Data entry form closed Form closed
and focus back to Main form
R1 Pass 4/7/00
Survey Report form C1 File opened (form opened
from Main form)
no error message
R1 Pass 4/7/00
C2 Hour number printed Hour number on record
Hour number on report
R1 Pass 4/7/00
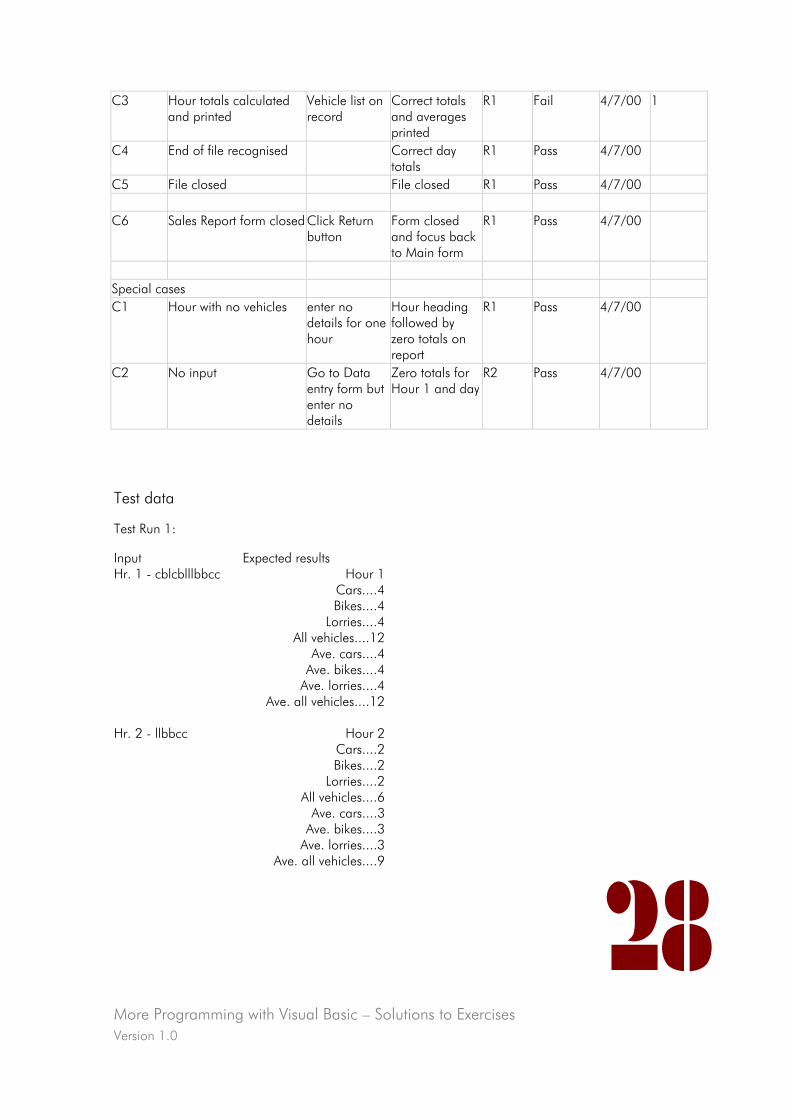
More Programming with Visual Basic – Solutions to Exercises Version 1.0
28
C3 Hour totals calculated and printed
Vehicle list on record
Correct totals and averages printed
R1 Fail 4/7/00 1
C4 End of file recognised Correct day totals
R1 Pass 4/7/00
C5 File closed File closed R1 Pass 4/7/00 C6 Sales Report form closed Click Return
button Form closed and focus back to Main form
R1 Pass 4/7/00
Special cases C1 Hour with no vehicles enter no
details for one hour
Hour heading followed by zero totals on report
R1 Pass 4/7/00
C2 No input Go to Data entry form but enter no details
Zero totals for Hour 1 and day
R2 Pass 4/7/00
Test data
Test Run 1:
Input Expected results Hr. 1 - cblcblllbbcc Hour 1
Cars....4 Bikes....4
Lorries....4 All vehicles....12
Ave. cars....4 Ave. bikes....4
Ave. lorries....4 Ave. all vehicles....12
Hr. 2 - llbbcc Hour 2
Cars....2 Bikes....2
Lorries....2 All vehicles....6
Ave. cars....3 Ave. bikes....3
Ave. lorries....3 Ave. all vehicles....9
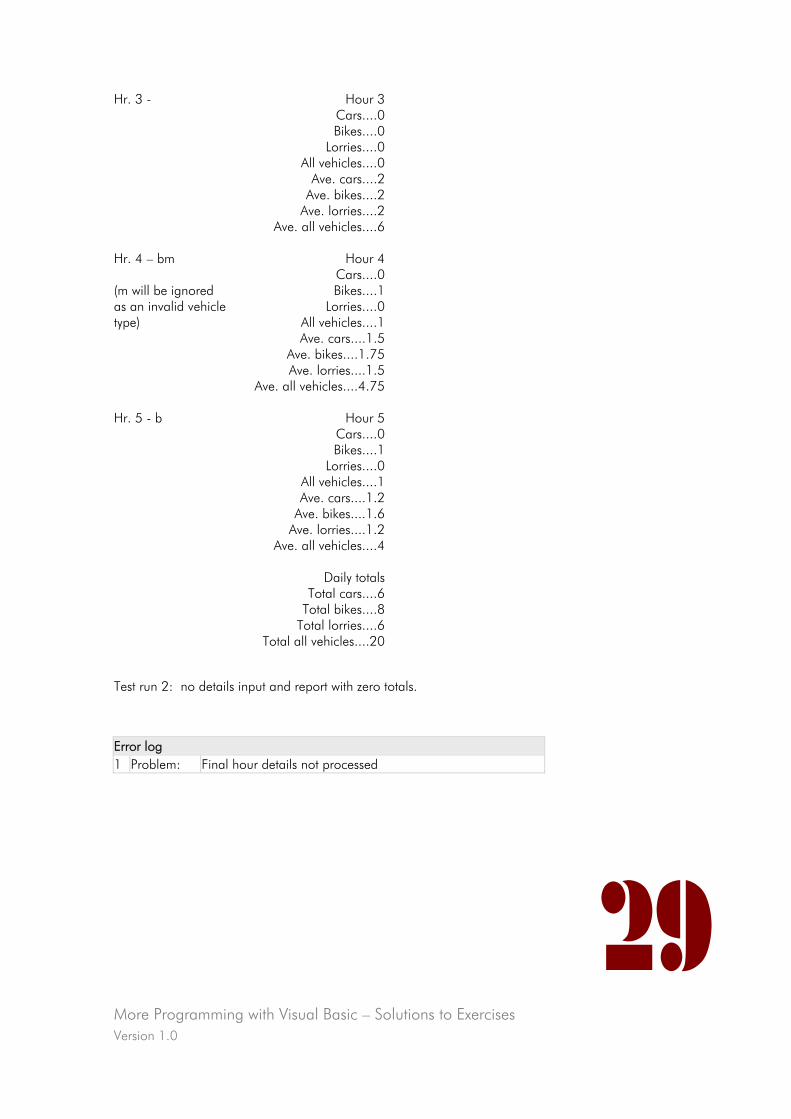
More Programming with Visual Basic – Solutions to Exercises Version 1.0
29
Hr. 3 - Hour 3 Cars....0 Bikes....0
Lorries....0 All vehicles....0
Ave. cars....2 Ave. bikes....2
Ave. lorries....2 Ave. all vehicles....6
Hr. 4 – bm (m will be ignored as an invalid vehicle type)
Hour 4 Cars....0 Bikes....1
Lorries....0 All vehicles....1 Ave. cars....1.5
Ave. bikes....1.75 Ave. lorries....1.5
Ave. all vehicles....4.75
Hr. 5 - b Hour 5 Cars....0 Bikes....1
Lorries....0 All vehicles....1 Ave. cars....1.2
Ave. bikes....1.6 Ave. lorries....1.2
Ave. all vehicles....4
Daily totals Total cars....6
Total bikes....8 Total lorries....6
Total all vehicles....20
Test run 2: no details input and report with zero totals.
Error log 1 Problem: Final hour details not processed

More Programming with Visual Basic – Solutions to Exercises Version 1.0
30
Cause and solution:
End of file triggered before last record is processed. Read record as first statement in main processing loop. Therewill always be at least one record on file.
Retesting required:
Survey report C3 and C4

Visual Basic 6 Training Manual
Version 1.0

Using Microsoft Access
www.learnhowtoprogram.com © IT-Pro Training Ltd. 2005

Visual Basic 6 Training Manual
Version 1.0
Using Microsoft Access Version 1.0
2
Contents
Contents .......................................................................................................................................... 2 Introduction...................................................................................................................................... 3
What is a Database? ..................................................................................................................... 3 A Relational Database ................................................................................................................... 4 Terminology ................................................................................................................................. 4
Working with an Existing Database..................................................................................................... 5 Opening a database ..................................................................................................................... 5 The Database Window .................................................................................................................. 5 Closing a database ....................................................................................................................... 5
Designing a Database....................................................................................................................... 6 Tables .......................................................................................................................................... 6
Creating a Database......................................................................................................................... 8 Creating a Table ........................................................................................................................... 8 Entering Data into a Table using a Datasheet ................................................................................ 10 Datasheet Layout ........................................................................................................................ 10 Creating relationships between tables ........................................................................................... 11 Relationship types........................................................................................................................ 12 Deleting a relationship................................................................................................................. 13
Forms ............................................................................................................................................ 14 Creating a Form using the Form Wizard........................................................................................ 14 Customising Forms...................................................................................................................... 15 Altering Properties ....................................................................................................................... 17 Adding controls to forms.............................................................................................................. 17
Reports .......................................................................................................................................... 19 Queries ......................................................................................................................................... 20
Creating Select Queries............................................................................................................... 20 Creating Parameter Queries......................................................................................................... 24 Creating action queries................................................................................................................ 24 SQL ........................................................................................................................................... 26
Using Microsoft Access - Assignment ................................................................................................ 28
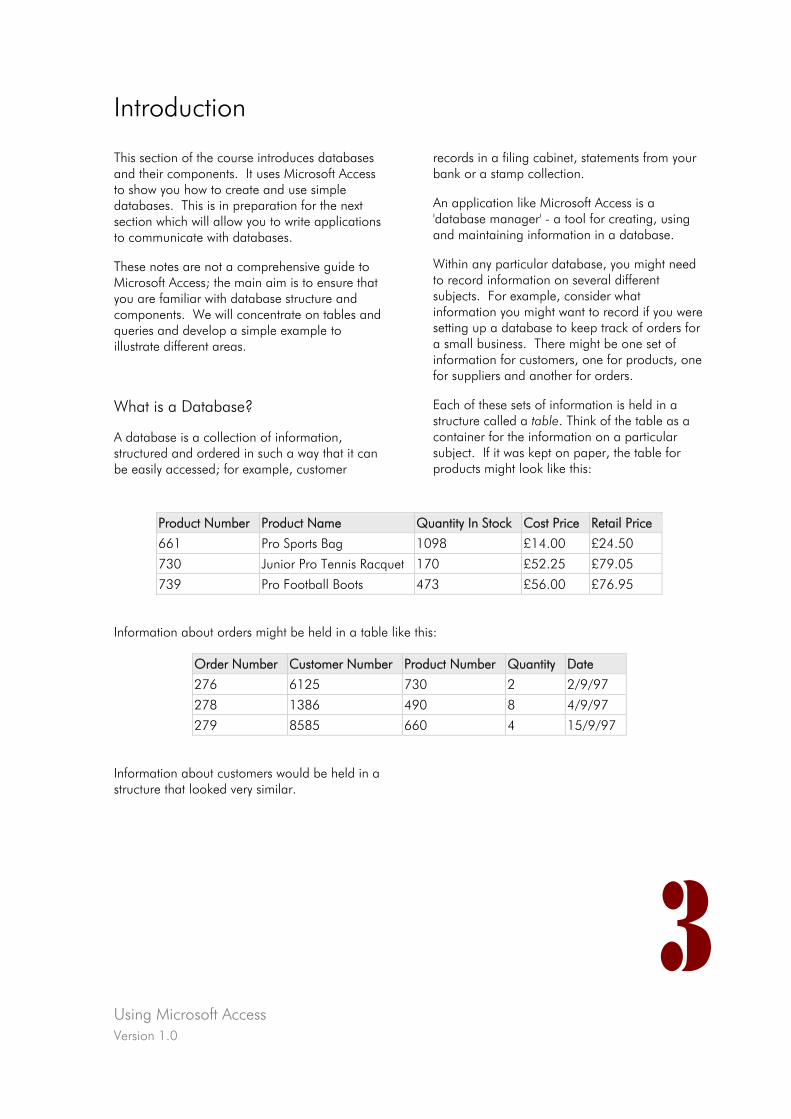
Using Microsoft Access Version 1.0
3
Introduction
This section of the course introduces databases and their components. It uses Microsoft Access to show you how to create and use simple databases. This is in preparation for the next section which will allow you to write applications to communicate with databases.
These notes are not a comprehensive guide to Microsoft Access; the main aim is to ensure that you are familiar with database structure and components. We will concentrate on tables and queries and develop a simple example to illustrate different areas.
What is a Database?
A database is a collection of information, structured and ordered in such a way that it can be easily accessed; for example, customer
records in a filing cabinet, statements from your bank or a stamp collection.
An application like Microsoft Access is a 'database manager' - a tool for creating, using and maintaining information in a database.
Within any particular database, you might need to record information on several different subjects. For example, consider what information you might want to record if you were setting up a database to keep track of orders for a small business. There might be one set of information for customers, one for products, one for suppliers and another for orders.
Each of these sets of information is held in a structure called a table. Think of the table as a container for the information on a particular subject. If it was kept on paper, the table for products might look like this:
Product Number Product Name Quantity In Stock Cost Price Retail Price
661 Pro Sports Bag 1098 £14.00 £24.50
730 Junior Pro Tennis Racquet 170 £52.25 £79.05
739 Pro Football Boots 473 £56.00 £76.95
Information about orders might be held in a table like this:
Order Number Customer Number Product Number Quantity Date
276 6125 730 2 2/9/97
278 1386 490 8 4/9/97
279 8585 660 4 15/9/97
Information about customers would be held in a structure that looked very similar.
Using Microsoft Access Version 1.0
4
This table structure of rows and columns is common to any type of information you might wish to store.
• A database consists of one or more tables.
• A table has a regular structure of rows and columns.
• Each row in a table is called a record, and contains all the information about one particular event or item.
• Each record is made up of a number of fields (columns) where the actual information is stored.
A Relational Database
The power of database managers like Access is that they are 'relational'. This means they are able to link information from separate tables together.
For example, when an order is recorded it is only necessary to record the number of the customer with the order details. The corresponding address can be found by linking the customer number in the orders table to the customer details table.
Terminology
A database in Access consists not just of tables, but also a collection of other objects designed to work with the data you store in your tables. We will look at some of these:
Forms
A form is a means of displaying information on screen. A view of the table itself, a datasheet, is useful for seeing many records at once but, more often, you want to look at a single record at a time. With Access, you can design forms to display data from your tables as you want.
Reports
A report is a means of setting out information from your tables for printing. The report designer in Access helps you lay out the information exactly as you want it. You can use
special text effects, group records together and include sub and grand totals.
Queries
A query is a question you ask about data in your tables – for instance, "Which customers have not ordered within the last year?" or "Which products are out of stock?"
A dynaset is the set of information that provides the answer to a query. For example, if the query is "Which products are out of stock?", the dynaset could be the set of records from a products table which have a Quantity in Stock value of zero.
Dynasets can be displayed on screen just as if they were tables in their own right. The data in an Access dynaset is dynamically linked to the data in the table from which it came. This means that you can display a dynaset, edit the information and the information in the underlying table will also be changed.
It is very easy to create a query that displays a dynaset of information from several different tables, linking the information as appropriate.
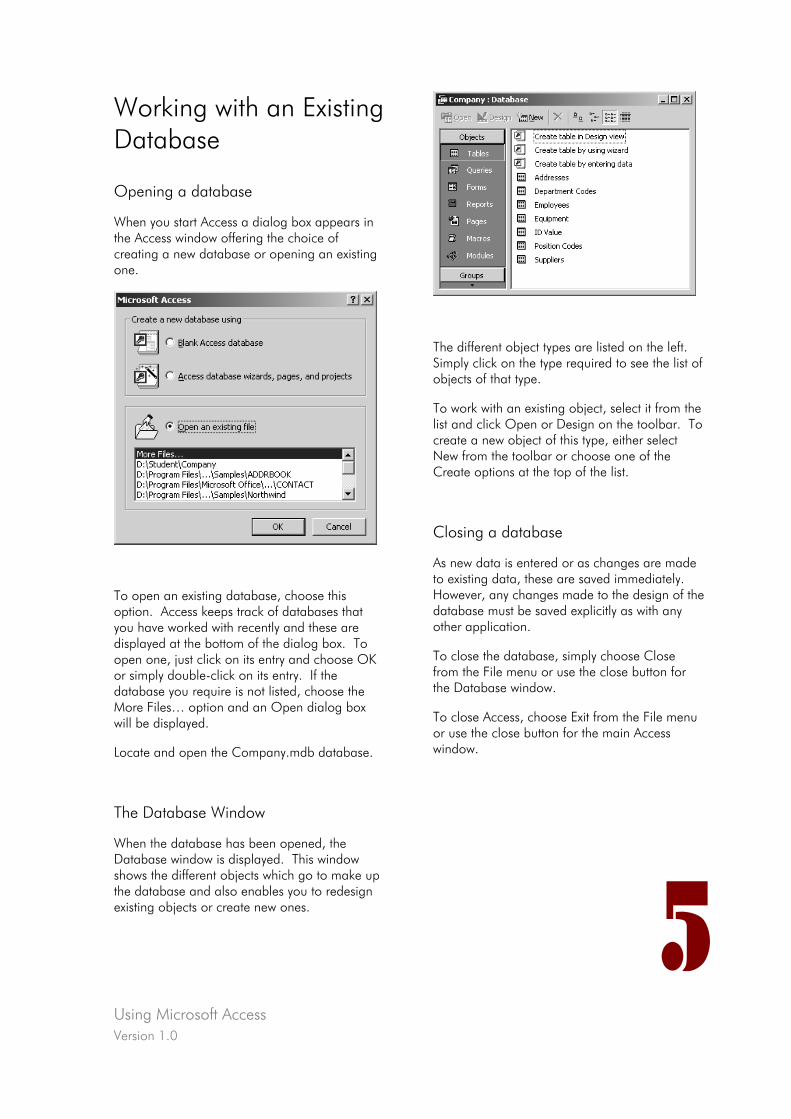
Using Microsoft Access Version 1.0
5
Working with an Existing Database
Opening a database
When you start Access a dialog box appears in the Access window offering the choice of creating a new database or opening an existing one.
To open an existing database, choose this option. Access keeps track of databases that you have worked with recently and these are displayed at the bottom of the dialog box. To open one, just click on its entry and choose OK or simply double-click on its entry. If the database you require is not listed, choose the More Files… option and an Open dialog box will be displayed.
Locate and open the Company.mdb database.
The Database Window
When the database has been opened, the Database window is displayed. This window shows the different objects which go to make up the database and also enables you to redesign existing objects or create new ones.
The different object types are listed on the left. Simply click on the type required to see the list of objects of that type.
To work with an existing object, select it from the list and click Open or Design on the toolbar. To create a new object of this type, either select New from the toolbar or choose one of the Create options at the top of the list.
Closing a database
As new data is entered or as changes are made to existing data, these are saved immediately. However, any changes made to the design of the database must be saved explicitly as with any other application.
To close the database, simply choose Close from the File menu or use the close button for the Database window.
To close Access, choose Exit from the File menu or use the close button for the main Access window.
Using Microsoft Access Version 1.0
6
Designing a Database
A 'database manager' is unlike most other applications in that you cannot start it and input information immediately. You must first design and create the structures which will hold the information
This design stage is extremely important and the planning must be thorough. It can be split into a number of stages:
1. Establish the purpose of the database. This will enable you to decide what information must be stored.
2. Split the information into logical groups. These will form the tables of information to be held in the database.
3. Establish exactly what details are to be stored for each item. This will reflect the fields to be contained within each record in the table.
4. Decide how the information in the various tables relates to each other.
5. Decide how you need to work with the data. This will indicate what forms, queries and reports are needed.
Try to concentrate on what information you want from the database rather than thinking of what should go into it. Look at existing forms and reports where they exist and think of the information needed by different people to carry out their jobs successfully. Talk to potential users to see if there are improvements to existing practices which could be implemented.
When you have a clear picture of the data which is needed, split it up logically so that, for instance, all information which refers to a customer is stored together in one table. Remember that if two pieces of information are required on a form or report, they do not have to be stored in the same table. Do not repeat the same information in more than one place.
Tables
Whilst some very small databases may have only one table, most will have two or more and you must consider how these are related.
In an order processing system, there will be details for customers and for the orders they have placed. These can be held in separate tables which are then linked using a customer reference which will appear in both tables. This relationship will be of the 'one-to-many' type where one customer can have many orders. This is the most common type of relationship.
In the case of a link between products and suppliers, it may be that one supplier supplies many products and also that one product can be provided by many suppliers. This is a 'many-to-many’ relationship. This type of relationship is not supported directly by Access but can be achieved by using a 'linking table'.
In some cases, you may want to split details across two tables. For example, an employee number, name and department may be stored in one table while more personal details are stored in a separate table. This may help to reduce the time taken to access frequently used information when there is a large amount of data stored. This is a 'one-to-one' relationship.
Primary Key
In order to work efficiently with data, Access needs to be able to uniquely identify each record of information in a table. This unique identifier is known as the primary key.
Often there will be a natural primary key such as a customer reference number. The customer name would not be a suitable primary key because it may not be unique. If there is no obviously unique identifier, Access can create
Using Microsoft Access Version 1.0
7
one for you.
It will not be possible to add a new record with a duplicate primary key value.
If no primary key is defined, it will not be possible to link tables in relationships as described above.
Field Types
When you define a table structure, you must specify what kind of information each field will store. This is similar to defining variables and their data types. For example, the product description will be held as text whilst the current stock level will be a number and the price will be a currency value. The main field types are:
• text up to 255 alphanumeric characters
• memo over 65,000 alphanumeric characters
• number different numeric types available
• date/time dates and/or times
• currency
• autonumber automatically created value
• Yes/No
Tables are the foundation of all databases as they contain the data with which all the other objects work.
We will now look at creating a simple database with related tables.
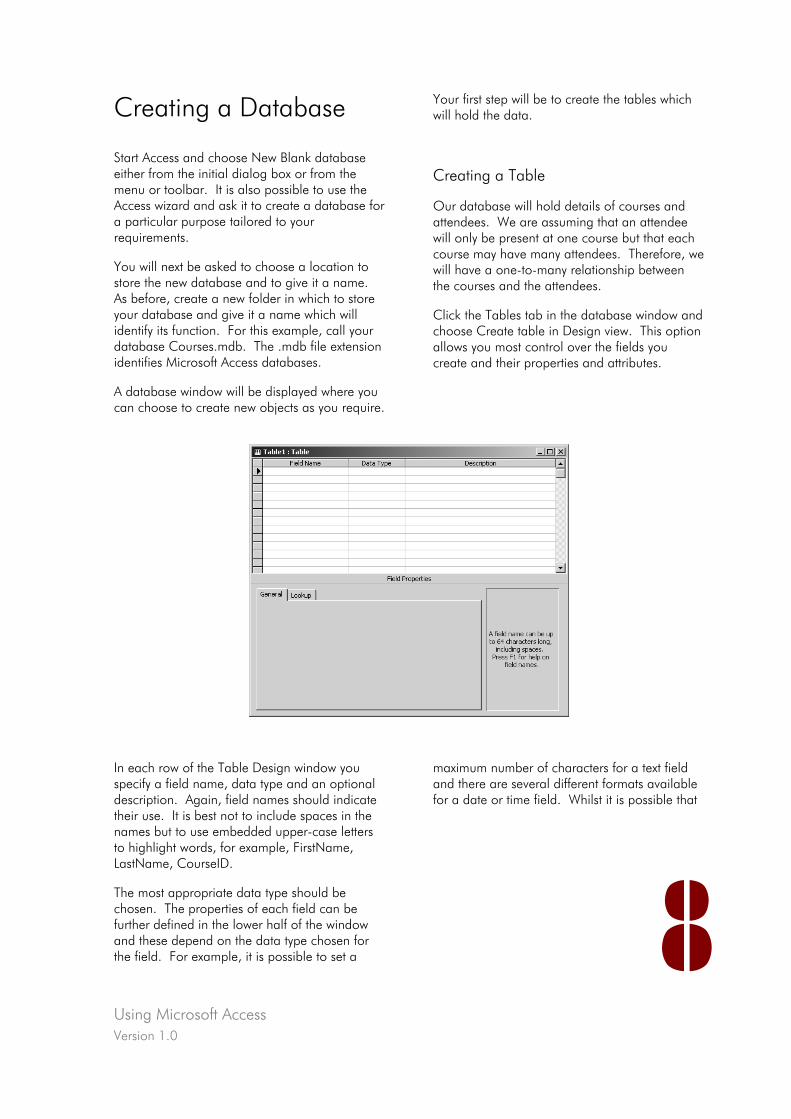
Using Microsoft Access Version 1.0
8
Creating a Database
Start Access and choose New Blank database either from the initial dialog box or from the menu or toolbar. It is also possible to use the Access wizard and ask it to create a database for a particular purpose tailored to your requirements.
You will next be asked to choose a location to store the new database and to give it a name. As before, create a new folder in which to store your database and give it a name which will identify its function. For this example, call your database Courses.mdb. The .mdb file extension identifies Microsoft Access databases.
A database window will be displayed where you can choose to create new objects as you require.
Your first step will be to create the tables which will hold the data.
Creating a Table
Our database will hold details of courses and attendees. We are assuming that an attendee will only be present at one course but that each course may have many attendees. Therefore, we will have a one-to-many relationship between the courses and the attendees.
Click the Tables tab in the database window and choose Create table in Design view. This option allows you most control over the fields you create and their properties and attributes.
In each row of the Table Design window you specify a field name, data type and an optional description. Again, field names should indicate their use. It is best not to include spaces in the names but to use embedded upper-case letters to highlight words, for example, FirstName, LastName, CourseID.
The most appropriate data type should be chosen. The properties of each field can be further defined in the lower half of the window and these depend on the data type chosen for the field. For example, it is possible to set a
maximum number of characters for a text field and there are several different formats available for a date or time field. Whilst it is possible that
Using Microsoft Access Version 1.0
9
the defaults chosen by Access will be suitable for your needs, it is always advisable to check them individually as you create new fields.
Fields can be inserted and deleted using Insert, Rows and Edit, Delete Rows from the main menu or by using the toolbar buttons. Their order can be changed by selecting a row, then dragging it with the row header box to its new position.
Enter the following fields for the Courses table, choosing the most appropriate data type and properties for each:
• Course ID – 5 characters
• Course name – 50 characters
• Start date
• End date
• Duration – number of days training
• Location
As this table is to be linked to another, it must have a primary key. In this case, the Course ID is the obvious choice as it will uniquely identify the course. Select this field, then set it as the Primary Key by clicking the Primary Key button on the toolbar or by selecting Primary Key from the Edit menu. Notice, that the Indexed property will be set automatically to Yes (No Duplicates). If you do not specify a primary key, Access will alert you when you save the table and ask if you want it to automatically add one for you.
Now save the table with the name Courses.
To change the design of an existing table, select it from the list of tables in the database window and click the Design button. This will display the Table Design window.
Be careful when changing the design of a table after data has been entered. Data may be converted or truncated with unexpected results. It is therefore very important to ensure that the initial design covers all possibilities.
Using Field Properties
To enhance a table's design and to facilitate data entry in the datasheet and in related forms, you can set field properties.
Caption:
This will be used in any labels created on forms or reports to identify the field. If no caption is entered the field name will be used instead.
Indexing:
Searching large tables may take a long time. If you regularly search or sort on the same field or fields it is worth making those indexed fields. This will enable Access to carry out these operations much more quickly.
The Primary Key is automatically an indexed field which does not allow duplicates. To create a further index, open the table in Design view then select the required field. At the bottom of the properties for that field, select the Indexed property. From the drop-down box, select Yes (Duplicates OK) if you want to allow more than one record with that field value or Yes (No Duplicates) if duplicates are not to be allowed. A Last Name field may be commonly used as an index on a customer table.
Decimal places:
For currency and number fields, you can set the number of Decimal Places to be displayed by setting this property.
Default value:
If the value for a specific field is likely to be the same for the majority of records, you can specify a Default Value which will be set automatically for new records.
Data validation:
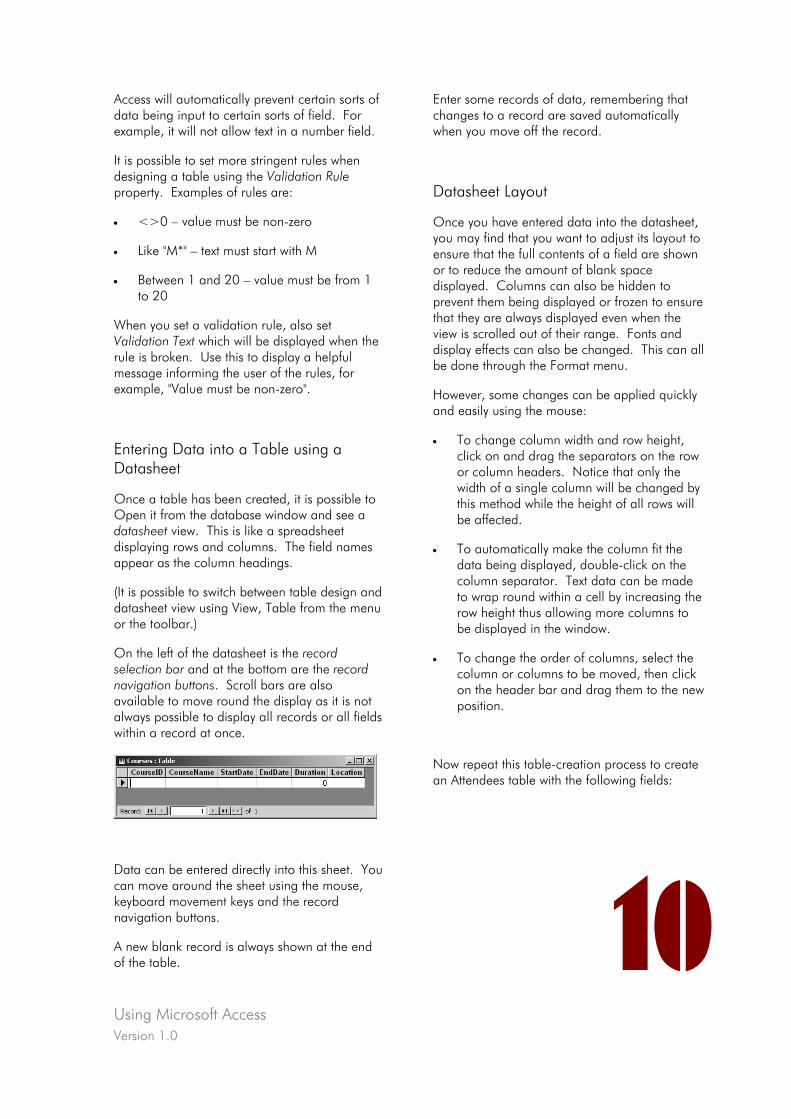
Using Microsoft Access Version 1.0
10
Access will automatically prevent certain sorts of data being input to certain sorts of field. For example, it will not allow text in a number field.
It is possible to set more stringent rules when designing a table using the Validation Rule property. Examples of rules are:
• <>0 – value must be non-zero
• Like "M*" – text must start with M
• Between 1 and 20 – value must be from 1 to 20
When you set a validation rule, also set Validation Text which will be displayed when the rule is broken. Use this to display a helpful message informing the user of the rules, for example, "Value must be non-zero".
Entering Data into a Table using a Datasheet
Once a table has been created, it is possible to Open it from the database window and see a datasheet view. This is like a spreadsheet displaying rows and columns. The field names appear as the column headings.
(It is possible to switch between table design and datasheet view using View, Table from the menu or the toolbar.)
On the left of the datasheet is the record selection bar and at the bottom are the record navigation buttons. Scroll bars are also available to move round the display as it is not always possible to display all records or all fields within a record at once.
Data can be entered directly into this sheet. You can move around the sheet using the mouse, keyboard movement keys and the record navigation buttons.
A new blank record is always shown at the end of the table.
Enter some records of data, remembering that changes to a record are saved automatically when you move off the record.
Datasheet Layout
Once you have entered data into the datasheet, you may find that you want to adjust its layout to ensure that the full contents of a field are shown or to reduce the amount of blank space displayed. Columns can also be hidden to prevent them being displayed or frozen to ensure that they are always displayed even when the view is scrolled out of their range. Fonts and display effects can also be changed. This can all be done through the Format menu.
However, some changes can be applied quickly and easily using the mouse:
• To change column width and row height, click on and drag the separators on the row or column headers. Notice that only the width of a single column will be changed by this method while the height of all rows will be affected.
• To automatically make the column fit the data being displayed, double-click on the column separator. Text data can be made to wrap round within a cell by increasing the row height thus allowing more columns to be displayed in the window.
• To change the order of columns, select the column or columns to be moved, then click on the header bar and drag them to the new position.
Now repeat this table-creation process to create an Attendees table with the following fields:
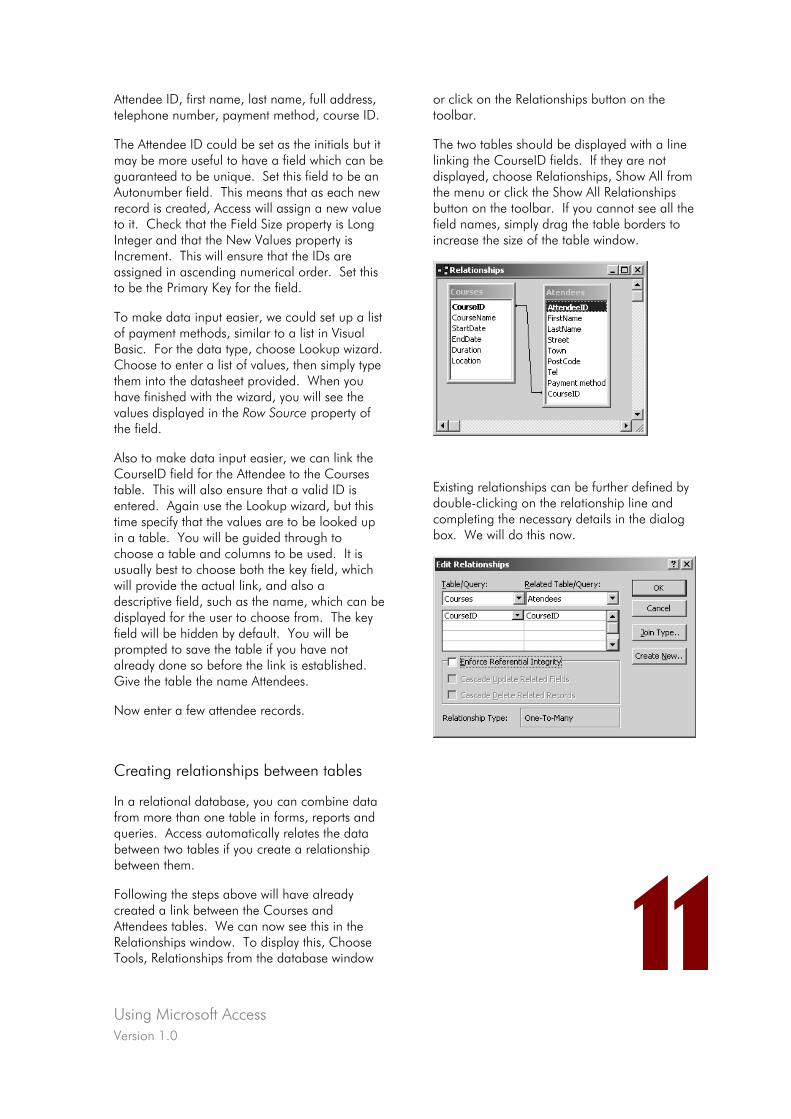
Using Microsoft Access Version 1.0
11
Attendee ID, first name, last name, full address, telephone number, payment method, course ID.
The Attendee ID could be set as the initials but it may be more useful to have a field which can be guaranteed to be unique. Set this field to be an Autonumber field. This means that as each new record is created, Access will assign a new value to it. Check that the Field Size property is Long Integer and that the New Values property is Increment. This will ensure that the IDs are assigned in ascending numerical order. Set this to be the Primary Key for the field.
To make data input easier, we could set up a list of payment methods, similar to a list in Visual Basic. For the data type, choose Lookup wizard. Choose to enter a list of values, then simply type them into the datasheet provided. When you have finished with the wizard, you will see the values displayed in the Row Source property of the field.
Also to make data input easier, we can link the CourseID field for the Attendee to the Courses table. This will also ensure that a valid ID is entered. Again use the Lookup wizard, but this time specify that the values are to be looked up in a table. You will be guided through to choose a table and columns to be used. It is usually best to choose both the key field, which will provide the actual link, and also a descriptive field, such as the name, which can be displayed for the user to choose from. The key field will be hidden by default. You will be prompted to save the table if you have not already done so before the link is established. Give the table the name Attendees.
Now enter a few attendee records.
Creating relationships between tables
In a relational database, you can combine data from more than one table in forms, reports and queries. Access automatically relates the data between two tables if you create a relationship between them.
Following the steps above will have already created a link between the Courses and Attendees tables. We can now see this in the Relationships window. To display this, Choose Tools, Relationships from the database window
or click on the Relationships button on the toolbar.
The two tables should be displayed with a line linking the CourseID fields. If they are not displayed, choose Relationships, Show All from the menu or click the Show All Relationships button on the toolbar. If you cannot see all the field names, simply drag the table borders to increase the size of the table window.
Existing relationships can be further defined by double-clicking on the relationship line and completing the necessary details in the dialog box. We will do this now.
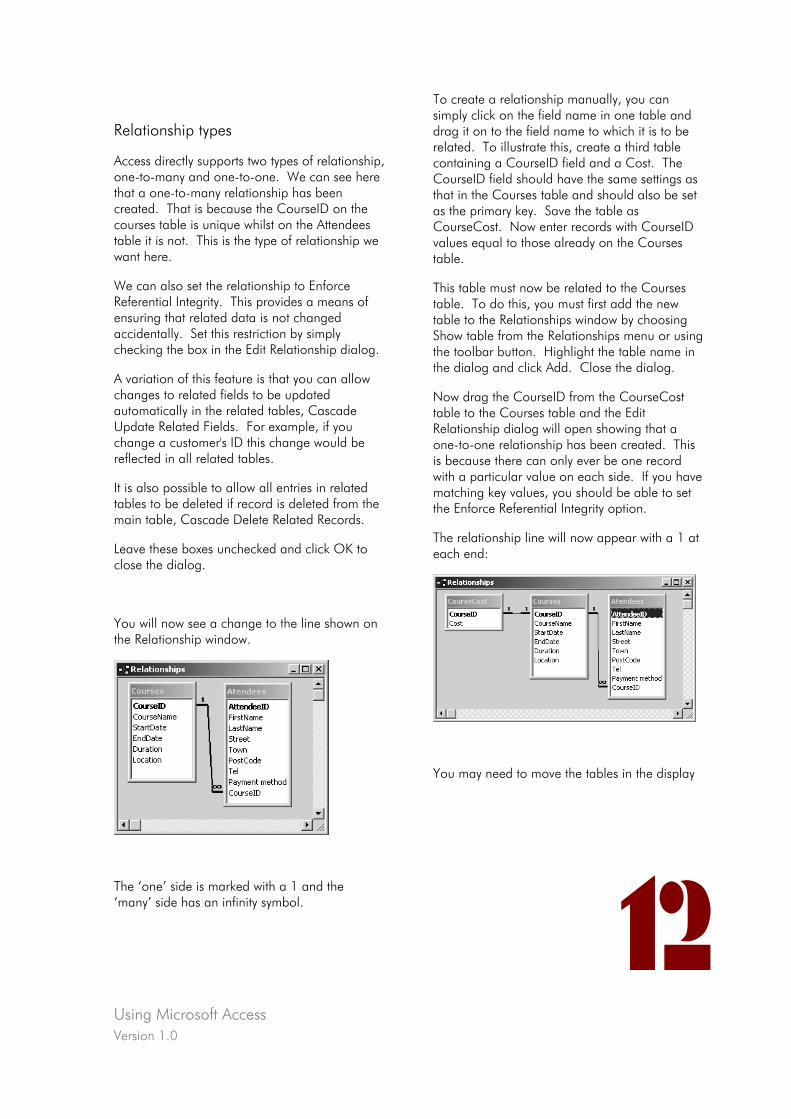
Using Microsoft Access Version 1.0
12
Relationship types
Access directly supports two types of relationship, one-to-many and one-to-one. We can see here that a one-to-many relationship has been created. That is because the CourseID on the courses table is unique whilst on the Attendees table it is not. This is the type of relationship we want here.
We can also set the relationship to Enforce Referential Integrity. This provides a means of ensuring that related data is not changed accidentally. Set this restriction by simply checking the box in the Edit Relationship dialog.
A variation of this feature is that you can allow changes to related fields to be updated automatically in the related tables, Cascade Update Related Fields. For example, if you change a customer's ID this change would be reflected in all related tables.
It is also possible to allow all entries in related tables to be deleted if record is deleted from the main table, Cascade Delete Related Records.
Leave these boxes unchecked and click OK to close the dialog.
You will now see a change to the line shown on the Relationship window.
The ‘one’ side is marked with a 1 and the ‘many’ side has an infinity symbol.
To create a relationship manually, you can simply click on the field name in one table and drag it on to the field name to which it is to be related. To illustrate this, create a third table containing a CourseID field and a Cost. The CourseID field should have the same settings as that in the Courses table and should also be set as the primary key. Save the table as CourseCost. Now enter records with CourseID values equal to those already on the Courses table.
This table must now be related to the Courses table. To do this, you must first add the new table to the Relationships window by choosing Show table from the Relationships menu or using the toolbar button. Highlight the table name in the dialog and click Add. Close the dialog.
Now drag the CourseID from the CourseCost table to the Courses table and the Edit Relationship dialog will open showing that a one-to-one relationship has been created. This is because there can only ever be one record with a particular value on each side. If you have matching key values, you should be able to set the Enforce Referential Integrity option.
The relationship line will now appear with a 1 at each end:
You may need to move the tables in the display

Using Microsoft Access Version 1.0
13
to see the relationships clearly.
Deleting a relationship
To delete a relationship, select the join line between the tables on the Relationships window then press Delete on the keyboard or choose Edit, Delete from the menu.
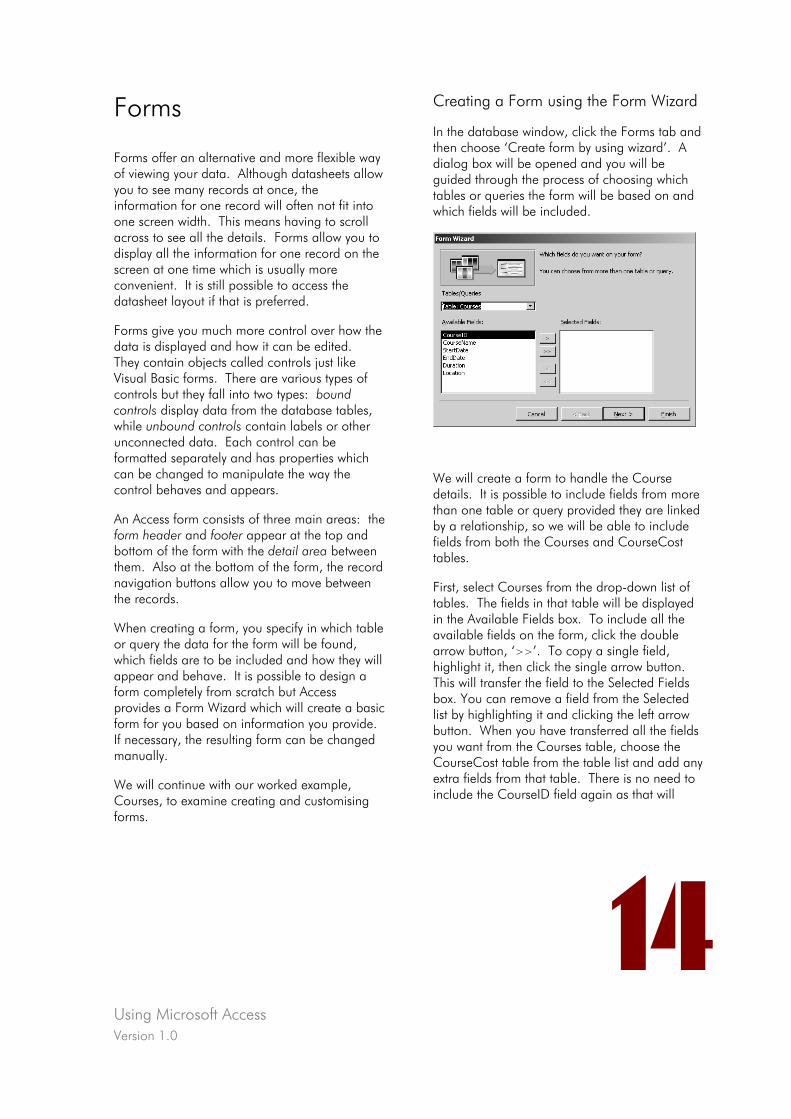
Using Microsoft Access Version 1.0
14
Forms
Forms offer an alternative and more flexible way of viewing your data. Although datasheets allow you to see many records at once, the information for one record will often not fit into one screen width. This means having to scroll across to see all the details. Forms allow you to display all the information for one record on the screen at one time which is usually more convenient. It is still possible to access the datasheet layout if that is preferred.
Forms give you much more control over how the data is displayed and how it can be edited. They contain objects called controls just like Visual Basic forms. There are various types of controls but they fall into two types: bound controls display data from the database tables, while unbound controls contain labels or other unconnected data. Each control can be formatted separately and has properties which can be changed to manipulate the way the control behaves and appears.
An Access form consists of three main areas: the form header and footer appear at the top and bottom of the form with the detail area between them. Also at the bottom of the form, the record navigation buttons allow you to move between the records.
When creating a form, you specify in which table or query the data for the form will be found, which fields are to be included and how they will appear and behave. It is possible to design a form completely from scratch but Access provides a Form Wizard which will create a basic form for you based on information you provide. If necessary, the resulting form can be changed manually.
We will continue with our worked example, Courses, to examine creating and customising forms.
Creating a Form using the Form Wizard
In the database window, click the Forms tab and then choose ‘Create form by using wizard’. A dialog box will be opened and you will be guided through the process of choosing which tables or queries the form will be based on and which fields will be included.
We will create a form to handle the Course details. It is possible to include fields from more than one table or query provided they are linked by a relationship, so we will be able to include fields from both the Courses and CourseCost tables.
First, select Courses from the drop-down list of tables. The fields in that table will be displayed in the Available Fields box. To include all the available fields on the form, click the double arrow button, ‘>>’. To copy a single field, highlight it, then click the single arrow button. This will transfer the field to the Selected Fields box. You can remove a field from the Selected list by highlighting it and clicking the left arrow button. When you have transferred all the fields you want from the Courses table, choose the CourseCost table from the table list and add any extra fields from that table. There is no need to include the CourseID field again as that will
Using Microsoft Access Version 1.0
15
match the one from the Courses table. When all fields are selected, click Next.
You will then be asked to decide on a layout for the form and a background colour, pattern or design. Previews of the options are given to help you make your choice, but remember that you will be able to tailor the layout and style of the form later. The rules of interface design which we looked at earlier in the course also apply here, so bear these in mind when making your choice.
Finally you will specify a title for the new form, CourseDetails, and choose whether to open it for data input or for further design changes. Choose to open it for data input.
The form will then be created and saved and will open to display the first record. Scroll through
the records to check that they are all there, then add a new record at the end. Close the form, then open both the tables to see that a new record has been created in each. This shows the relationship between the form and the underlying tables.
Customising Forms
When you choose to design an existing form, the layout is presented together with new toolbars and a changed menu. With your CourseDetails form highlighted in the Database window, click the Design button and you will see the new toolbars and also see your form in design view.
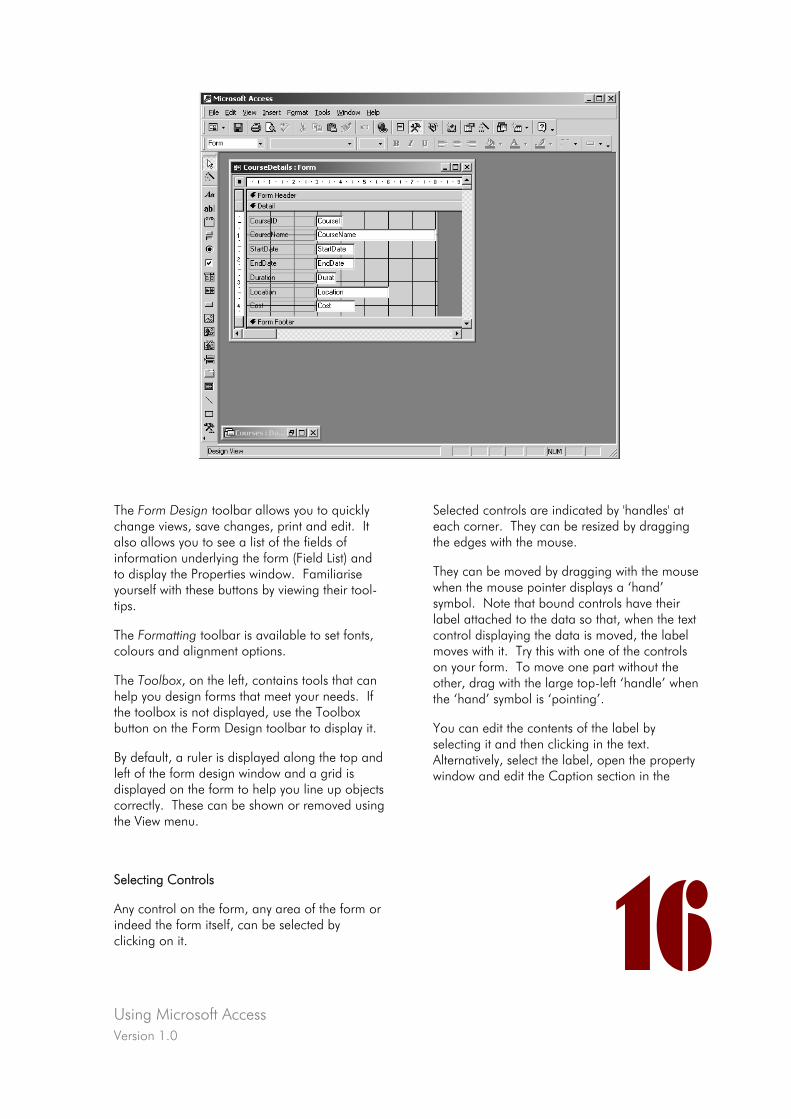
Using Microsoft Access Version 1.0
16
The Form Design toolbar allows you to quickly change views, save changes, print and edit. It also allows you to see a list of the fields of information underlying the form (Field List) and to display the Properties window. Familiarise yourself with these buttons by viewing their tool-tips.
The Formatting toolbar is available to set fonts, colours and alignment options.
The Toolbox, on the left, contains tools that can help you design forms that meet your needs. If the toolbox is not displayed, use the Toolbox button on the Form Design toolbar to display it.
By default, a ruler is displayed along the top and left of the form design window and a grid is displayed on the form to help you line up objects correctly. These can be shown or removed using the View menu.
Selecting Controls
Any control on the form, any area of the form or indeed the form itself, can be selected by clicking on it.
Selected controls are indicated by 'handles' at each corner. They can be resized by dragging the edges with the mouse.
They can be moved by dragging with the mouse when the mouse pointer displays a ‘hand’ symbol. Note that bound controls have their label attached to the data so that, when the text control displaying the data is moved, the label moves with it. Try this with one of the controls on your form. To move one part without the other, drag with the large top-left ‘handle’ when the ‘hand’ symbol is ‘pointing’.
You can edit the contents of the label by selecting it and then clicking in the text. Alternatively, select the label, open the property window and edit the Caption section in the
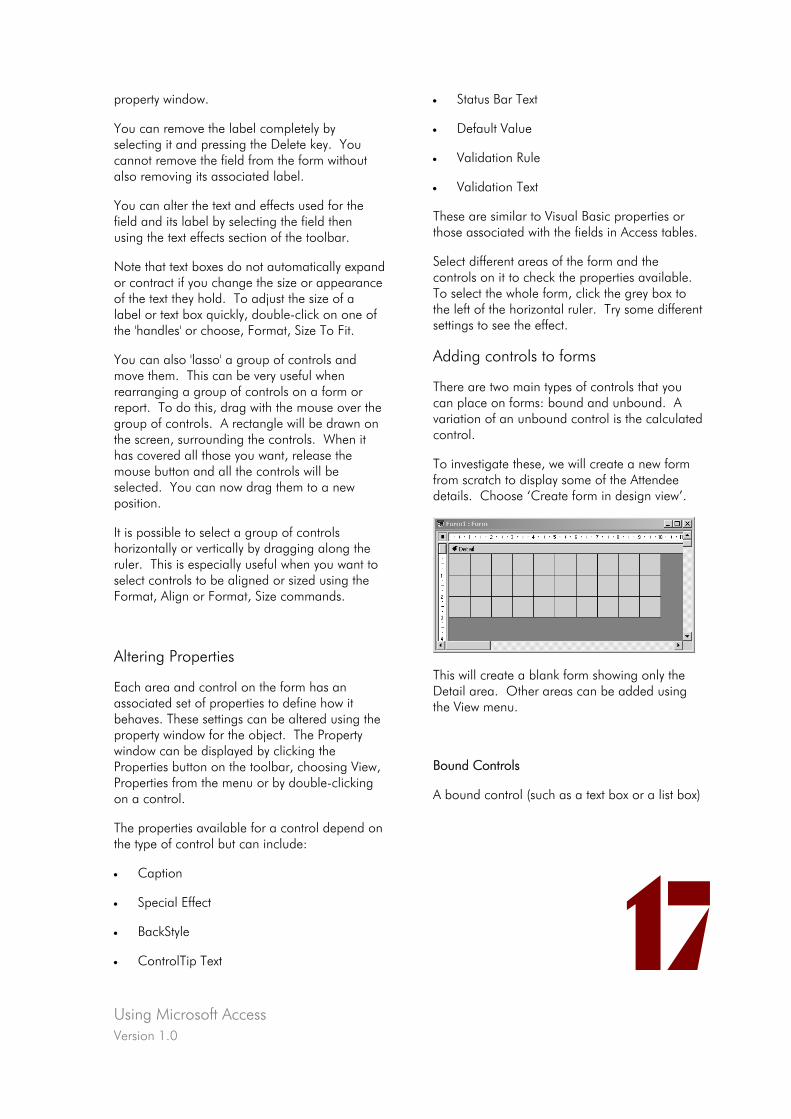
Using Microsoft Access Version 1.0
17
property window.
You can remove the label completely by selecting it and pressing the Delete key. You cannot remove the field from the form without also removing its associated label.
You can alter the text and effects used for the field and its label by selecting the field then using the text effects section of the toolbar.
Note that text boxes do not automatically expand or contract if you change the size or appearance of the text they hold. To adjust the size of a label or text box quickly, double-click on one of the 'handles' or choose, Format, Size To Fit.
You can also 'lasso' a group of controls and move them. This can be very useful when rearranging a group of controls on a form or report. To do this, drag with the mouse over the group of controls. A rectangle will be drawn on the screen, surrounding the controls. When it has covered all those you want, release the mouse button and all the controls will be selected. You can now drag them to a new position.
It is possible to select a group of controls horizontally or vertically by dragging along the ruler. This is especially useful when you want to select controls to be aligned or sized using the Format, Align or Format, Size commands.
Altering Properties
Each area and control on the form has an associated set of properties to define how it behaves. These settings can be altered using the property window for the object. The Property window can be displayed by clicking the Properties button on the toolbar, choosing View, Properties from the menu or by double-clicking on a control.
The properties available for a control depend on the type of control but can include:
• Caption
• Special Effect
• BackStyle
• ControlTip Text
• Status Bar Text
• Default Value
• Validation Rule
• Validation Text
These are similar to Visual Basic properties or those associated with the fields in Access tables.
Select different areas of the form and the controls on it to check the properties available. To select the whole form, click the grey box to the left of the horizontal ruler. Try some different settings to see the effect.
Adding controls to forms
There are two main types of controls that you can place on forms: bound and unbound. A variation of an unbound control is the calculated control.
To investigate these, we will create a new form from scratch to display some of the Attendee details. Choose ‘Create form in design view’.
This will create a blank form showing only the Detail area. Other areas can be added using the View menu.
Bound Controls
A bound control (such as a text box or a list box)

Using Microsoft Access Version 1.0
18
is connected to a field in a table or a query and displays the value of that field.
To add these bound controls, the form must first be linked to an underlying source of data, such as a table or query. To do this, select the form and open the Properties window. Click on the Data tab.
Click the drop-down arrow for the Record Source property. The existing tables will be listed; select Attendees.
The Field List should now pop up. If it doesn’t click the Field List button on the Form Design toolbar.
To add fields from this list to your form as bound controls, simply click on the field name and drag it to the position required.
You can then resize and reposition it as necessary.
By adding further controls, reformatting them and editing their properties, you could develop a form to handle the Attendee name and address details.
Create your own form. As the ID value will be set automatically, set its Locked property to Yes and its Tab Stop property to No. Check the Tab Order for all the data entry fields to ensure that they follow a logical order. Now switch to Form view and edit some name and address details.
Bound controls created on forms carry with them the properties first assigned to the fields in the table design. These properties, such as Validation Rules and Default Values, can be changed in the form design. If you change a field’s properties in the table design after you design a form with a bound control based on it, the changed field properties do not carry over into the control’s properties on the form. You must also change the properties in the form design or delete the control and add it again.
Unbound controls
An unbound control is not connected to a field. It can display informational text (such as in a label), a rectangle, a line, a command button, or a picture. A picture, such as a company logo, might be stored in a bitmap file, separate from any tables.
A calculated control is connected to an expression, rather than to a field; the expression is stored in the Control Source property. For example, the expression used to calculate a
Using Microsoft Access Version 1.0
19
monthly salary from an annual salary field might be = [AnnualSalary]/12.
To create unbound and calculated controls on a form, you must use the Toolbox. This is very similar to creating controls on a Visual Basic form.
If the Control Wizards button in the Toolbox is pressed, some tools will open a Wizard to assist you in creating the control. After the controls are placed in the form, you can move, size, and adjust the properties to meet your needs.
Reports
It is possible to print your data from a datasheet or form but it is usually much better to create a report which will present the information in a much clearer format. Access allows you to create reports in much the same way as it does forms providing Report Wizard options or the ability to design a report from scratch.
Reports, like forms, contain bound and unbound controls whose format can be changed individually.
A report also contains a number of areas. The report header and footer appear at the beginning and end of the full report; the page header and footer appear at the top and bottom of each page of the report and the detail area is repeated between these, appearing once for each record of information included in the report. It is also possible to group and sort records as they are included in the report.
The process of creating a report is similar to that of creating a form where you specify where the data is to come from, choose layout and appearance and specify a title.
Experiment with the options available.
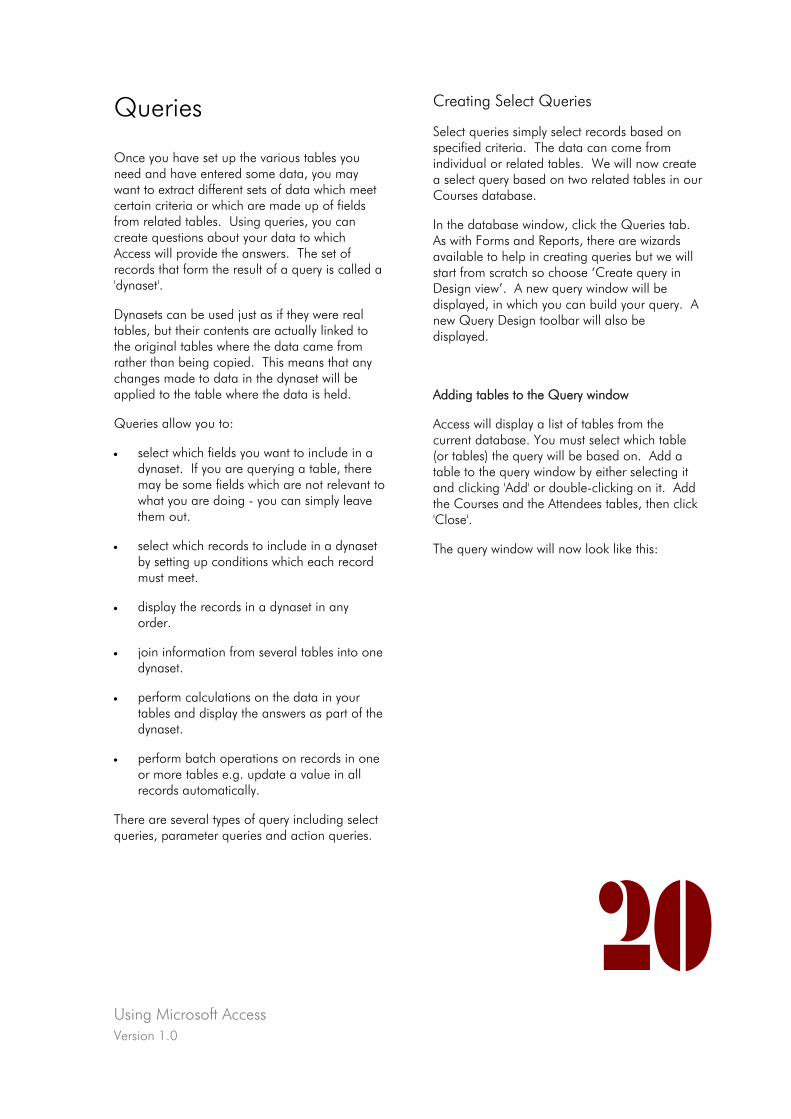
Using Microsoft Access Version 1.0
20
Queries
Once you have set up the various tables you need and have entered some data, you may want to extract different sets of data which meet certain criteria or which are made up of fields from related tables. Using queries, you can create questions about your data to which Access will provide the answers. The set of records that form the result of a query is called a 'dynaset'.
Dynasets can be used just as if they were real tables, but their contents are actually linked to the original tables where the data came from rather than being copied. This means that any changes made to data in the dynaset will be applied to the table where the data is held.
Queries allow you to:
• select which fields you want to include in a dynaset. If you are querying a table, there may be some fields which are not relevant to what you are doing - you can simply leave them out.
• select which records to include in a dynaset by setting up conditions which each record must meet.
• display the records in a dynaset in any order.
• join information from several tables into one dynaset.
• perform calculations on the data in your tables and display the answers as part of the dynaset.
• perform batch operations on records in one or more tables e.g. update a value in all records automatically.
There are several types of query including select queries, parameter queries and action queries.
Creating Select Queries
Select queries simply select records based on specified criteria. The data can come from individual or related tables. We will now create a select query based on two related tables in our Courses database.
In the database window, click the Queries tab. As with Forms and Reports, there are wizards available to help in creating queries but we will start from scratch so choose ‘Create query in Design view’. A new query window will be displayed, in which you can build your query. A new Query Design toolbar will also be displayed.
Adding tables to the Query window
Access will display a list of tables from the current database. You must select which table (or tables) the query will be based on. Add a table to the query window by either selecting it and clicking 'Add' or double-clicking on it. Add the Courses and the Attendees tables, then click 'Close'.
The query window will now look like this:
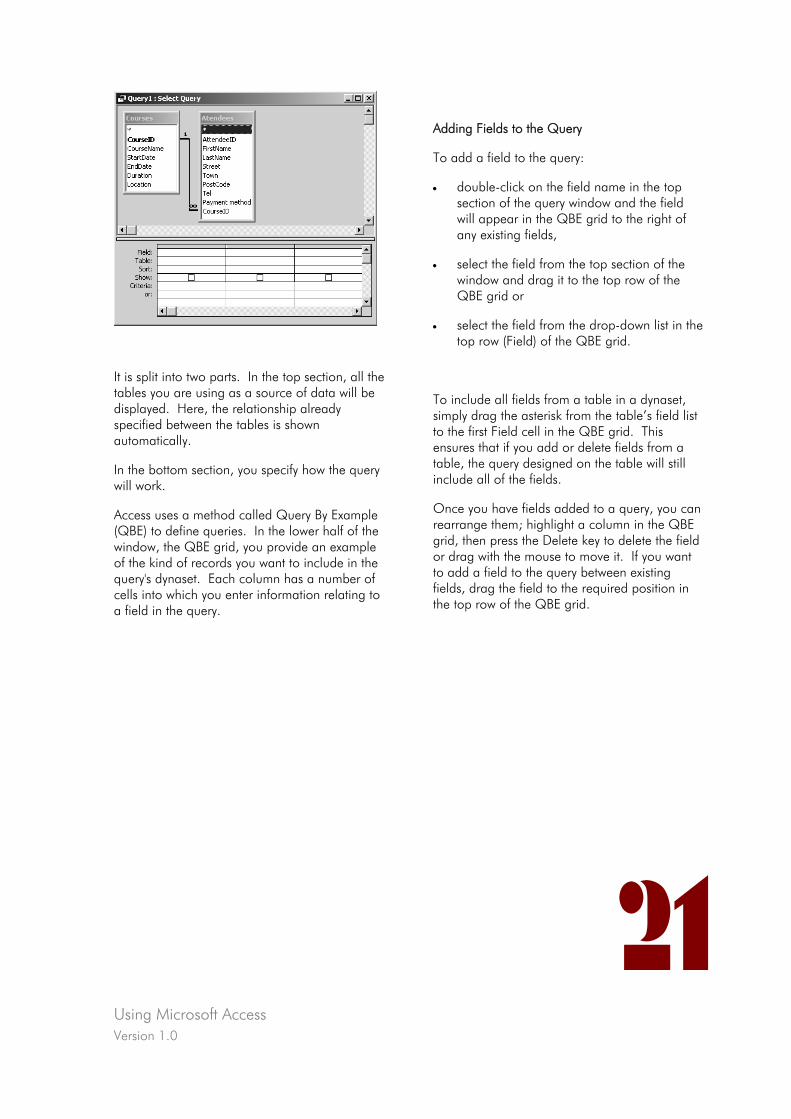
Using Microsoft Access Version 1.0
Adding Fields to the Query
To add a field to the query:
• double-click on the field name in the top section of the query window and the field will appear in the QBE grid to the right of any existing fields,
• select the field from the top section of the window and drag it to the top row of the QBE grid or
• select the field from the drop-down list in the top row (Field) of the QBE grid.
It is split into two parts. In the top section, all the tables you are using as a source of data will be displayed. Here, the relationship already specified between the tables is shown automatically.
To include all fields from a table in a dynaset, simply drag the asterisk from the table’s field list to the first Field cell in the QBE grid. This ensures that if you add or delete fields from a table, the query designed on the table will still include all of the fields.
In the bottom section, you specify how the query will work.
Once you have fields added to a query, you can rearrange them; highlight a column in the QBE grid, then press the Delete key to delete the field or drag with the mouse to move it. If you want to add a field to the query between existing fields, drag the field to the required position in the top row of the QBE grid.
Access uses a method called Query By Example (QBE) to define queries. In the lower half of the window, the QBE grid, you provide an example of the kind of records you want to include in the query's dynaset. Each column has a number of cells into which you enter information relating to a field in the query.
21
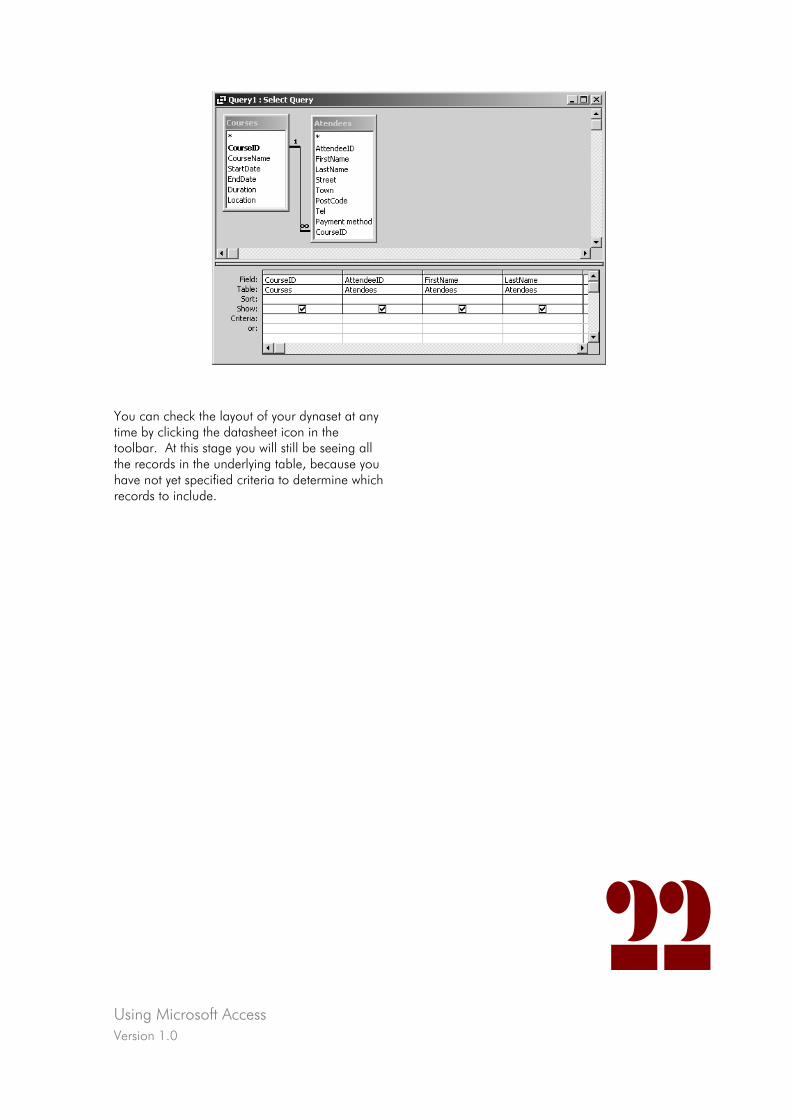
Using Microsoft Access Version 1.0
22
You can check the layout of your dynaset at any time by clicking the datasheet icon in the toolbar. At this stage you will still be seeing all the records in the underlying table, because you have not yet specified criteria to determine which records to include.
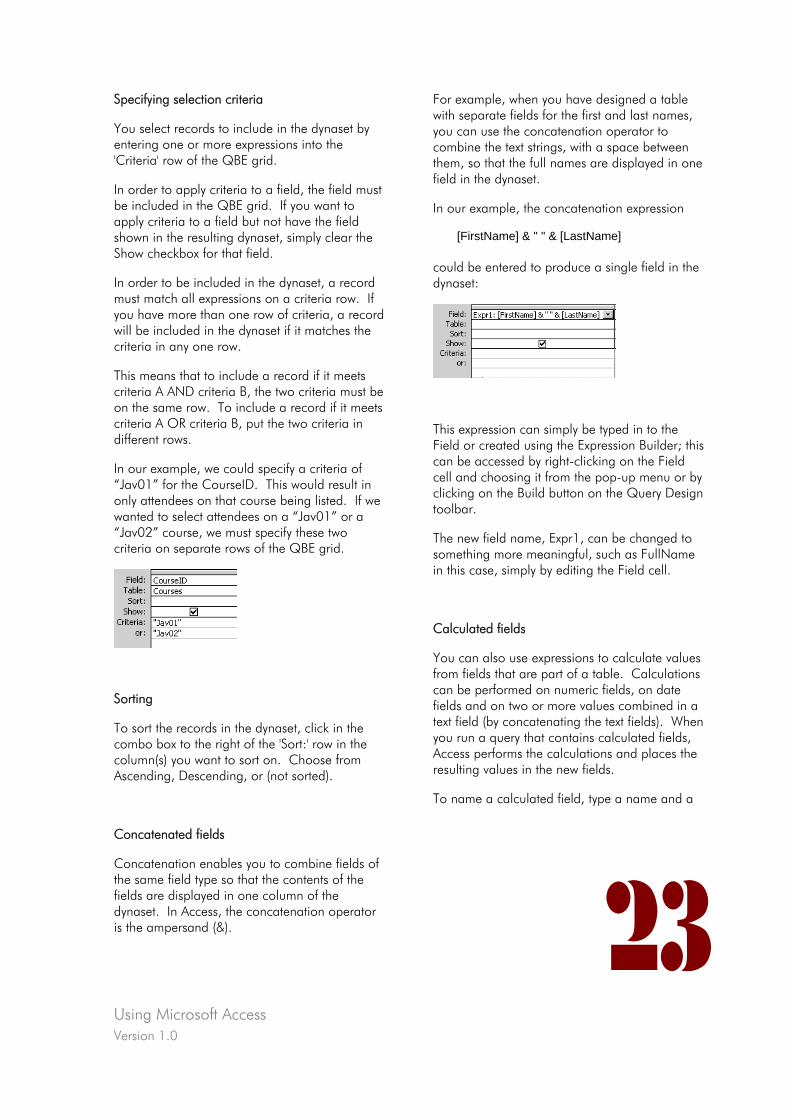
Using Microsoft Access Version 1.0
23
Specifying selection criteria
You select records to include in the dynaset by entering one or more expressions into the 'Criteria' row of the QBE grid.
In order to apply criteria to a field, the field must be included in the QBE grid. If you want to apply criteria to a field but not have the field shown in the resulting dynaset, simply clear the Show checkbox for that field.
In order to be included in the dynaset, a record must match all expressions on a criteria row. If you have more than one row of criteria, a record will be included in the dynaset if it matches the criteria in any one row.
This means that to include a record if it meets criteria A AND criteria B, the two criteria must be on the same row. To include a record if it meets criteria A OR criteria B, put the two criteria in different rows.
In our example, we could specify a criteria of “Jav01” for the CourseID. This would result in only attendees on that course being listed. If we wanted to select attendees on a “Jav01” or a “Jav02” course, we must specify these two criteria on separate rows of the QBE grid.
Sorting
To sort the records in the dynaset, click in the combo box to the right of the 'Sort:' row in the column(s) you want to sort on. Choose from Ascending, Descending, or (not sorted).
Concatenated fields
Concatenation enables you to combine fields of the same field type so that the contents of the fields are displayed in one column of the dynaset. In Access, the concatenation operator is the ampersand (&).
For example, when you have designed a table with separate fields for the first and last names, you can use the concatenation operator to combine the text strings, with a space between them, so that the full names are displayed in one field in the dynaset.
In our example, the concatenation expression
[FirstName] & " " & [LastName] could be entered to produce a single field in the dynaset:
This expression can simply be typed in to the Field or created using the Expression Builder; this can be accessed by right-clicking on the Field cell and choosing it from the pop-up menu or by clicking on the Build button on the Query Design toolbar.
The new field name, Expr1, can be changed to something more meaningful, such as FullName in this case, simply by editing the Field cell.
Calculated fields
You can also use expressions to calculate values from fields that are part of a table. Calculations can be performed on numeric fields, on date fields and on two or more values combined in a text field (by concatenating the text fields). When you run a query that contains calculated fields, Access performs the calculations and places the resulting values in the new fields.
To name a calculated field, type a name and a
Using Microsoft Access Version 1.0
24
colon (:) to the left of the expression in the Field cell. In the dynaset, Access displays the name as the column heading for the calculated field. For example:
Total: [QtyOrdered] * [UnitPrice] could be used to get a total price for an order line.
Creating Parameter Queries
If you run a select query repeatedly but you want to change the criteria each time, then you might find it useful to create a parameter query. For example, you might want to see a list of attendees on a course but specify a different course each time.
When you run a parameter query, you are prompted to enter the criteria in one or more dialog boxes.
To create a parameter query, type the text which you want to appear as the prompt in the dialog box into the Criteria cell for the required field. The text must be enclosed in square brackets. To prompt the user to enter a course ID, we could set the Criteria for the CourseID field to
[Enter Course ID]
When the query is run, you will be prompted to enter a parameter value. When a value is entered, the query runs using that value as the criterion and the appropriate dynaset is displayed.
Parameter queries with multiple criteria
If you design a parameter query to prompt for more than one criterion, a separate dialog box is displayed for each. You are prompted to enter criteria in the order in which they appear in the Query Parameters dialog box.
It is possible to enter an expression in a Criteria box, for example, to select values within a range to be specified.
To select courses starting within a certain time period, you could include the following expression for the StartDate field in a query:
Between [From:] And [To:]
This would result in you being prompted to enter two values.
Normally you are prompted to enter criteria in the order in which the parameters are listed in the QBE grid. To change this order, choose Query, Parameters when in query design and type in the names and data types for the parameters which you want to prompt for first. Any parameter not included in this list will be displayed in the QBE grid order.
Creating action queries
Unlike select queries which produce a dynaset based on the underlying table, action queries are applied directly to the specified table. They are an efficient means of making permanent adjustments to data. Because the changes are permanent, it is advisable to first run a select query based on the same criteria to ensure that the correct set of records are selected. The action query can then be run.
Update query
In an update query, you can change values for all records or for groups of records in a table. An example is to calculate an increase for values in a numeric or currency field.
After checking that the query specifications select the correct data, choose Query, Update Query from the menu or click the Query Type, Update
Using Microsoft Access Version 1.0
25
button on the toolbar.
A new Update To row is added to the QBE grid. In the field to be updated, type in the expression or value you want in that field. For example, to increase a Cost field by 5%, you could use the expression
[Cost] * 1.05 Be very careful that your expression will give the correct result as, once the query is run, you cannot undo the changes.
Choose Query, Run or click the Run button on the toolbar. You will be warned that the changes are about to be made and asked whether you want to continue or not.
Delete query
When you want to remove records from a table and those records meet certain criteria, you can use a delete query. For example, you may want to delete all discontinued products. Because deleted records cannot be retrieved, it is important to ensure that the correct records are selected for deletion.
Append query
To add complete records from one table to another, you can use an append query. The two tables must have some fields in common. Fields are considered a match when the field name and data type are identical. You can use an append query even if some fields in the first table are not in the second table because Access appends values where the fields match and ignores others.
Make-table query
You can use a make-table query to create a table consisting of fields and records selected from one or more existing tables. You can use this query to make backup copies of data, to create a history table containing old records or to take a snapshot of your data at a specific point in time.
Using Microsoft Access Version 1.0
26
SQL
So far, we have only seen the query as it is specified in the Query window. However, we can also view it in SQL (Structured Query Language) form.
With a query open, choose View, SQL either from the menu or from the toolbar. This will show the query definition as an SQL statement. For example, our previous CourseAttendees parameter query will be translated as:
SELECT Courses.CourseID, Atendees.AttendeeID, [FirstName] & " " & [LastName] AS FullName FROM Courses INNER JOIN Atendees ON Courses.CourseID = Atendees.CourseID WHERE (((Courses.CourseID)=[Enter Course ID]));
The SQL keywords are shown in upper-case.
SELECT specifies that this is a Select query. This is followed by a list of the field names to be included. These field names are prefixed by the name of the table from which they come, e.g. Courses.CourseID, and separated by commas. If the query is based on a single table, the field names would appear on their own.
Notice that the concatenated field is specified as:
[FirstName] & " " & [LastName] AS FullName
FROM then specifies the tables which underlie the query and their relationship. INNER JOIN specifies the type of relationship and ON specifies the fields which are related.
WHERE then specifies the criteria which must be met; in this case it shows a parameter query prompt.
SQL statements can also be used directly in the Record Source property for forms or reports. When we created our first form, CourseDetails, using the Form Wizard, we used data from two related tables. Go to the Design view of this form and open the Properties window to show the form properties. Find the Record Source property under the Data tab.
Right-click on the property value and choose Zoom to see the whole statement. It should be
SELECT [Courses].[CourseID], [Courses].[CourseName], [Courses].[StartDate], [Courses].[EndDate], [Courses].[Duration], [Courses].[Location], [CourseCost].[Cost] FROM CourseCost INNER JOIN Courses ON [CourseCost].[CourseID]=[Courses].[CourseID];
We will look more closely at SQL in the next section of the course.

Using Microsoft Access Version 1.0
27
Using Microsoft Access Version 1.0
28
Using Microsoft Access - Assignment
Create a small relational database of three or more tables giving examples of ‘one-to-one’ and ‘one-to-many’ relationships. Choose a subject which interests you and which can be used to give a good illustration of a relational database. Pay particular attention to field data types and properties.
Create at least one entry form and one query.
You must provide a full description of the purpose and structure of your database explaining how the relational aspect was used.
Include screen shots and sample data to illustrate the database in use, especially its relational aspects.
The SQL created by the query must be included and explained.

Visual Basic 6 Training Manual
Version 1.0

Using Microsoft Access – Assignment Solution
www.learnhowtoprogram.com © IT-Pro Training Ltd. 2005

Visual Basic 6 Training Manual
Version 1.0
Using Microsoft Access – Assignment Solution Version 1.0
2
Training Database
Requirements
A small training company requires a system to store details of training courses and attendees on these courses. There will be several attendees on each course and one attendee may book for several courses.
The course details to be held are:
course name, start date, end date, duration (in days), location, cost
The details to be held for each attendee are:
full name, full address, telephone number
When a booking is made, the method of payment must be stored together with a record of the amount paid.
It must also be possible to view a list of bookings where there is still a payment outstanding.
Design
Data storage
All the attendee details can be held in a single table, Attendees. The name will be split into first and last name fields and the address into street, town, county and post code. All these fields will be text with the post code limited to 8 characters. The last name will be indexed but will allow duplicates to speed up any sorting done by last name. A unique identifier must be assigned to each attendee and this will be automatically set as an attendee is added.
The course details will be split over two tables with the cost stored separately, Courses and CourseCost. A course ID will be assigned by the user but this must be unique. It will be held in a 5-character field and the format used will probably be three letters followed by two digits. The two tables will be linked in a one-to-one relationship.
As bookings are received, a link between the attendee and the course will be stored with the payment method and any amount paid. This link will effectively create a many-to-many relationship between the Attendees and the Courses tables via the Bookings table.
Data input
Forms will be available to input or amend all attendee details from the Attendee table, all course details from the Courses and CourseCost tables and all booking details.
The booking form will allow the user to select an attendee and a course from the existing data and display basic details for each to enable confirmation that the correct attendee and course have been chosen.
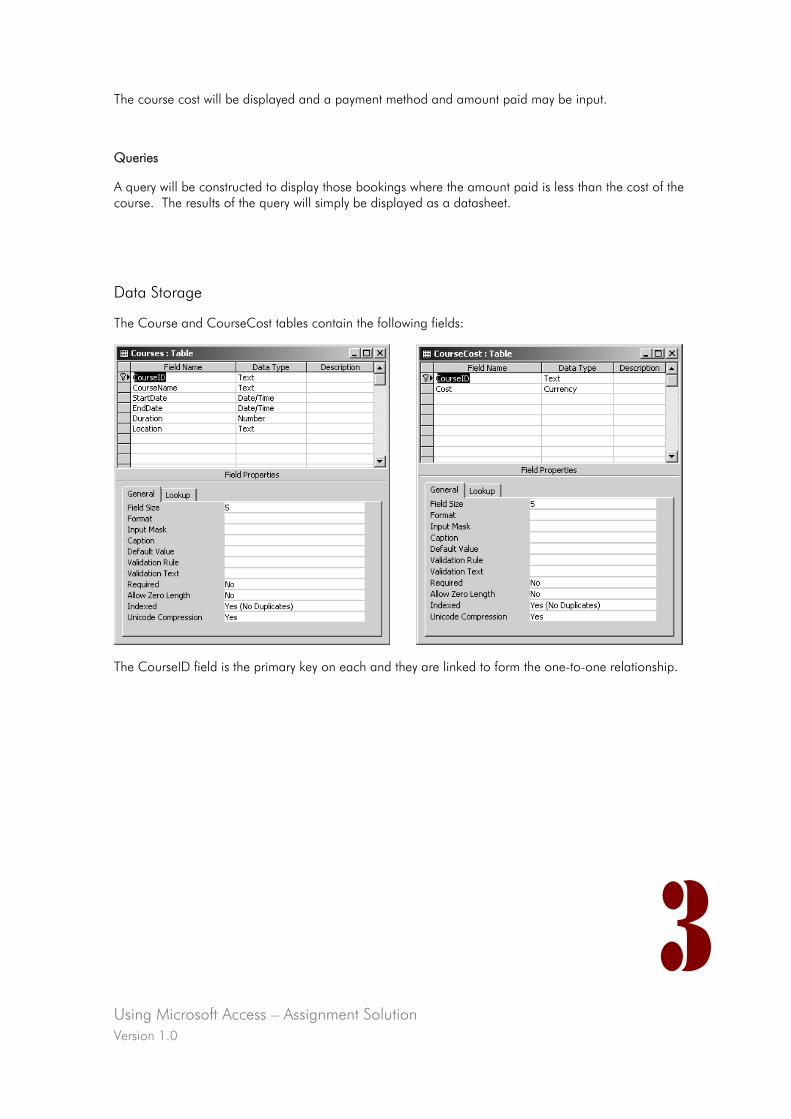
Using Microsoft Access – Assignment Solution Version 1.0
The course cost will be displayed and a payment method and amount paid may be input.
3
Queries
A query will be constructed to display those bookings where the amount paid is less than the cost of the course. The results of the query will simply be displayed as a datasheet.
Data Storage
The Course and CourseCost tables contain the following fields:
The CourseID field is the primary key on each and they are linked to form the one-to-one relationship.
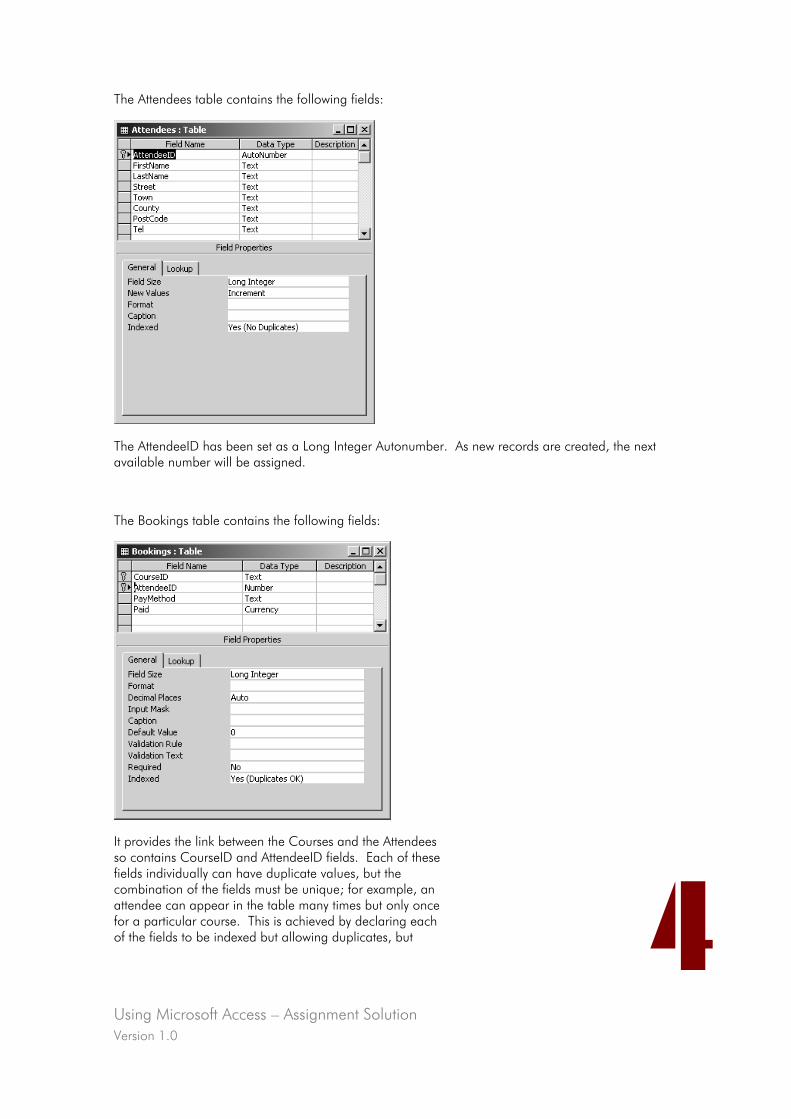
Using Microsoft Access – Assignment Solution Version 1.0
The Attendees table contains the following fields:
The AttendeeID has been set as a Long Integer Autonumber. As new records are created, the next available number will be assigned.
The Bookings table contains the following fields:
It provides the link between the Courses and the Attendees so contains CourseID and AttendeeID fields. Each of these fields individually can have duplicate values, but the combination of the fields must be unique; for example, an attendee can appear in the table many times but only once for a particular course. This is achieved by declaring each of the fields to be indexed but allowing duplicates, but 4
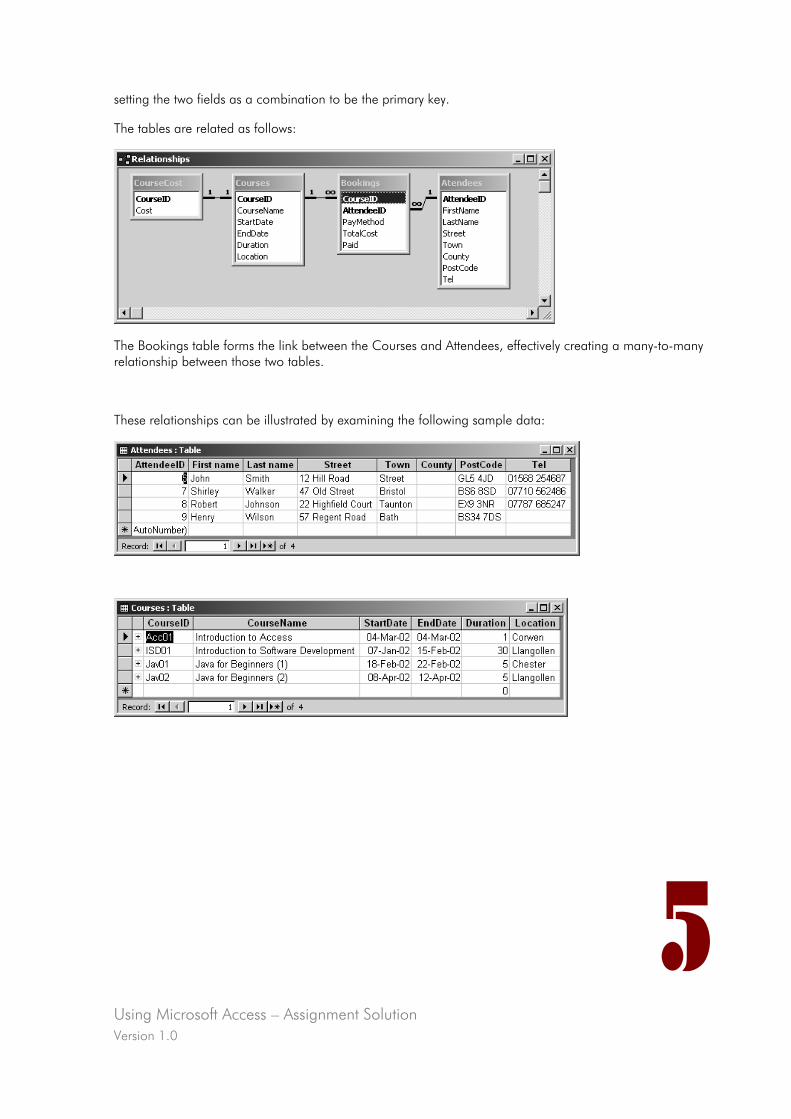
Using Microsoft Access – Assignment Solution Version 1.0
setting the two fields as a combination to be the primary key.
The tables are related as follows:
The Bookings table forms the link between the Courses and Attendees, effectively creating a many-to-many relationship between those two tables.
These relationships can be illustrated by examining the following sample data:
5
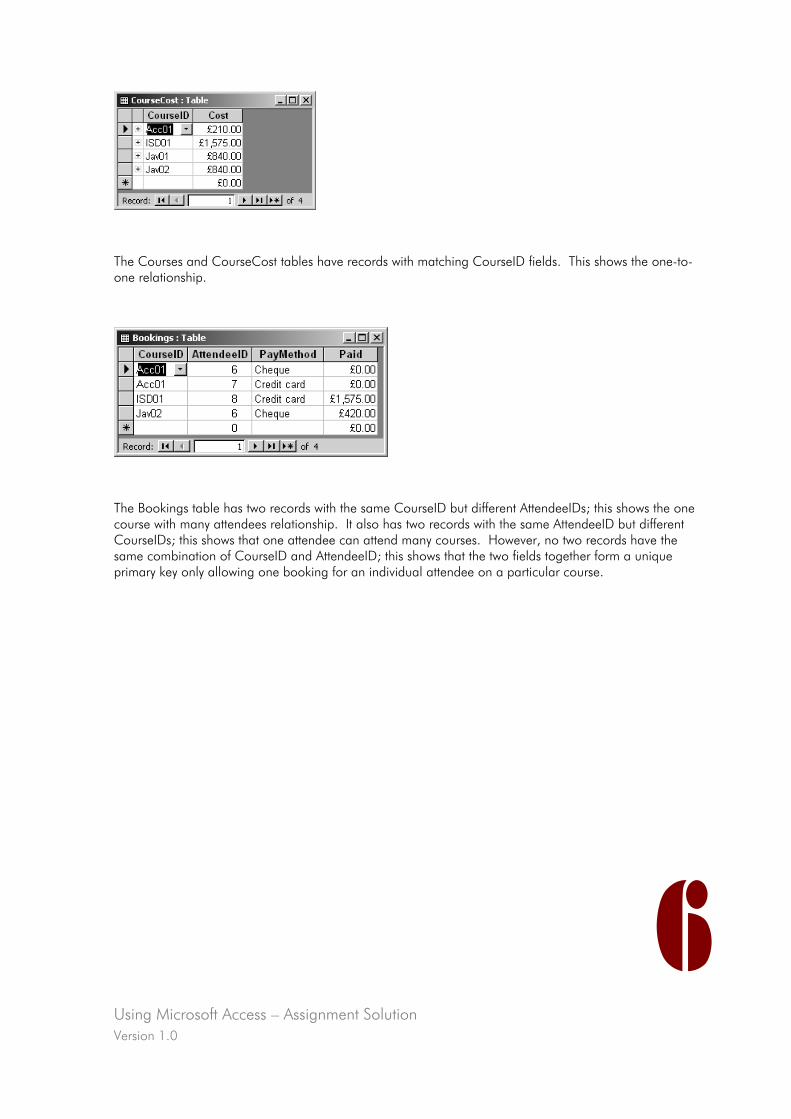
Using Microsoft Access – Assignment Solution Version 1.0
The Courses and CourseCost tables have records with matching CourseID fields. This shows the one-to-one relationship.
The Bookings table has two records with the same CourseID but different AttendeeIDs; this shows the one course with many attendees relationship. It also has two records with the same AttendeeID but different CourseIDs; this shows that one attendee can attend many courses. However, no two records have the same combination of CourseID and AttendeeID; this shows that the two fields together form a unique primary key only allowing one booking for an individual attendee on a particular course.
6
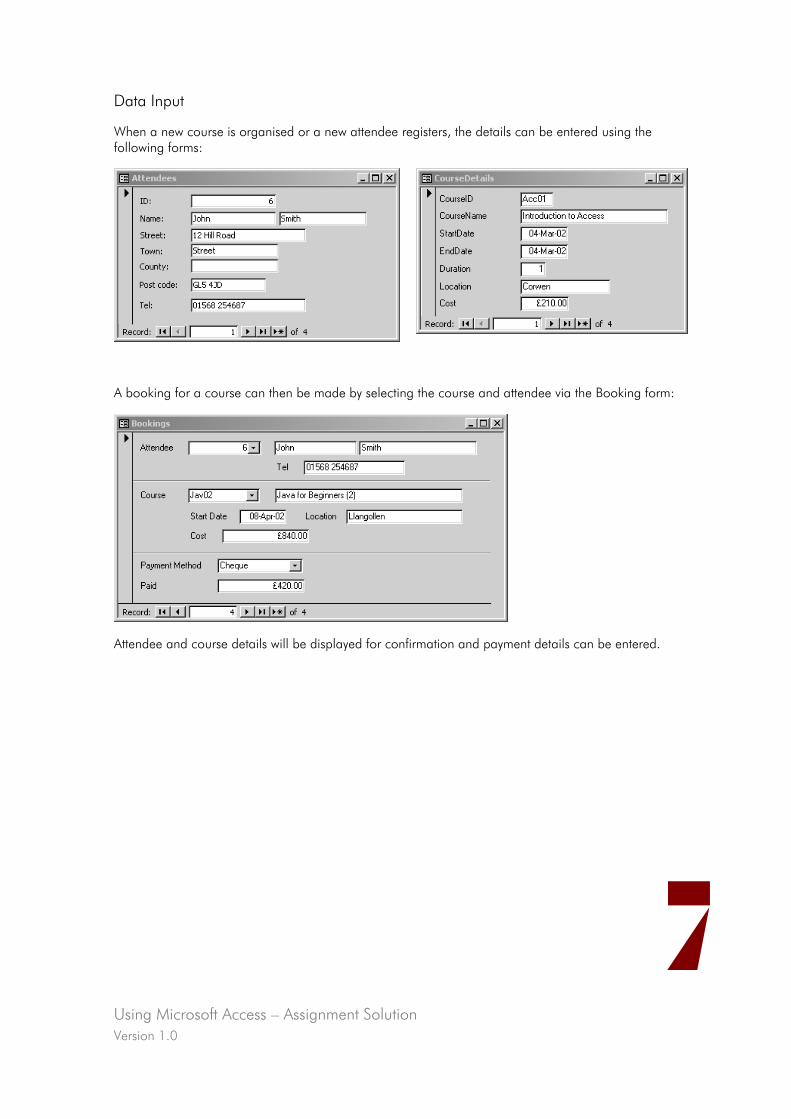
Using Microsoft Access – Assignment Solution Version 1.0
Data Input
When a new course is organised or a new attendee registers, the details can be entered using the following forms:
A booking for a course can then be made by selecting the course and attendee via the Booking form:
Attendee and course details will be displayed for confirmation and payment details can be entered.
7
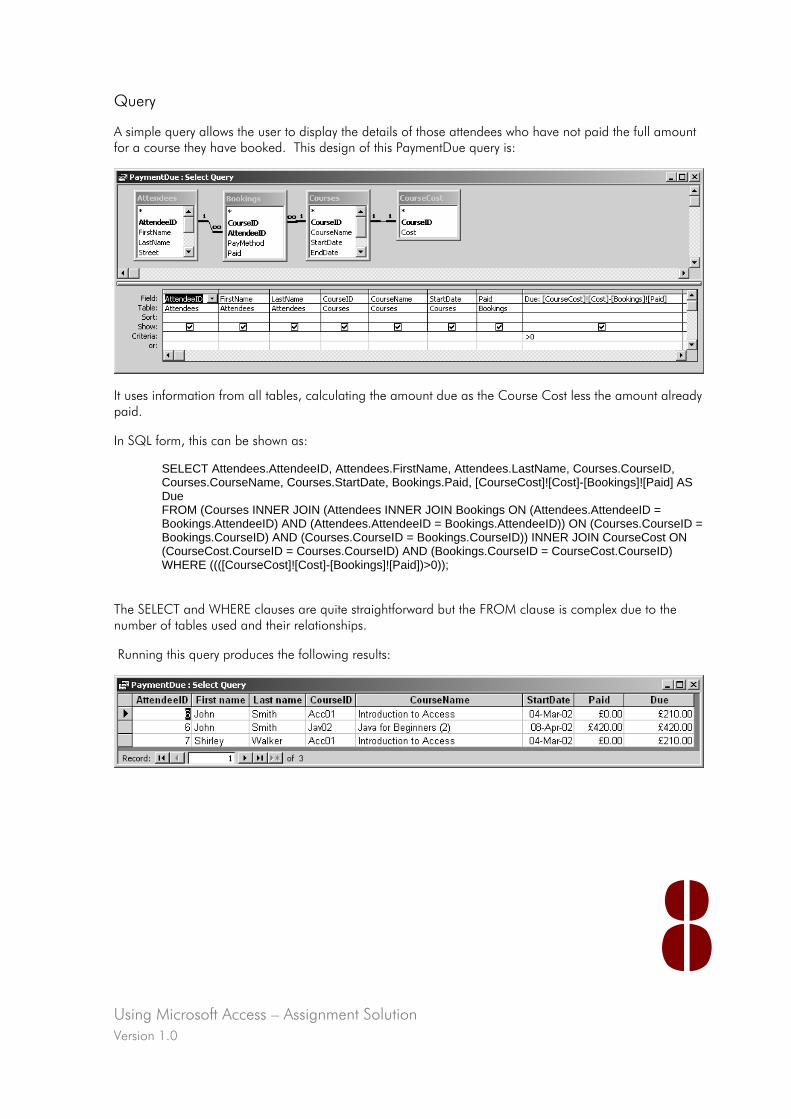
Using Microsoft Access – Assignment Solution Version 1.0
Query
A simple query allows the user to display the details of those attendees who have not paid the full amount for a course they have booked. This design of this PaymentDue query is:
It uses information from all tables, calculating the amount due as the Course Cost less the amount already paid.
In SQL form, this can be shown as:
SELECT Attendees.AttendeeID, Attendees.FirstName, Attendees.LastName, Courses.CourseID, Courses.CourseName, Courses.StartDate, Bookings.Paid, [CourseCost]![Cost]-[Bookings]![Paid] AS Due FROM (Courses INNER JOIN (Attendees INNER JOIN Bookings ON (Attendees.AttendeeID = Bookings.AttendeeID) AND (Attendees.AttendeeID = Bookings.AttendeeID)) ON (Courses.CourseID = Bookings.CourseID) AND (Courses.CourseID = Bookings.CourseID)) INNER JOIN CourseCost ON (CourseCost.CourseID = Courses.CourseID) AND (Bookings.CourseID = CourseCost.CourseID) WHERE ((([CourseCost]![Cost]-[Bookings]![Paid])>0));
The SELECT and WHERE clauses are quite straightforward but the FROM clause is complex due to the number of tables used and their relationships.
Running this query produces the following results:
8

Visual Basic 6 Training Manual
Version 1.0

Introduction to Database Application Development
www.learnhowtoprogram.com © IT-Pro Training Ltd. 2005

Visual Basic 6 Training Manual
Version 1.0
Introduction to Database Application Development Version 1.0
2
Contents
Contents .......................................................................................................................................... 2 Components of database applications................................................................................................ 3
User interface ............................................................................................................................... 3 Data engine.................................................................................................................................. 3 Data repository ............................................................................................................................. 3
Accessing Databases from Visual Basic using the ADO data control...................................................... 4 The ADO data control ................................................................................................................... 4 Bound controls.............................................................................................................................. 6 Database Link Exercise .................................................................................................................. 7
Navigating Records via an ADO Data control ..................................................................................... 8 Using Command buttons ............................................................................................................... 8 Navigation buttons Exercise ......................................................................................................... 10
Updating, adding and deleting data with the ADO Data control ......................................................... 11 Updating data ............................................................................................................................ 11 Update and Cancel Exercise ........................................................................................................ 14 Deleting records.......................................................................................................................... 15 Delete Exercise............................................................................................................................ 17 Adding new records..................................................................................................................... 18 AddNew Exercise......................................................................................................................... 19
Overview of ActiveX Data Objects .................................................................................................... 20 Accessing Databases using ADO in Visual Basic code........................................................................ 23
Creating the Database link........................................................................................................... 23 Creating a Recordset Object ........................................................................................................ 23 Connection and Recordset Object Exercise.................................................................................... 26 Displaying data field values in unbound controls............................................................................ 27 Null value Exercise ...................................................................................................................... 28 Updating, Adding and Deleting data............................................................................................. 29 Closing Recordset and Connection objects .................................................................................... 31 ADO Exercise ............................................................................................................................. 32
Locating Records ............................................................................................................................ 33 Find Exercise............................................................................................................................... 34
SQL............................................................................................................................................... 35 Using SQL to create a Recordset .................................................................................................. 36 SQL Exercise............................................................................................................................... 37
Other points................................................................................................................................... 38 DML and DDL............................................................................................................................. 38 Optimising Recordset object performance ..................................................................................... 38 More Help.................................................................................................................................. 38
Database Application Development - Assignment .............................................................................. 39
Introduction to Database Application Development Version 1.0
3
Components of database applications
You now have an understanding of database structure and components through using Microsoft Access. This section looks at creating applications to communicate with and handle data stored in databases using Visual Basic and Microsoft Access databases.
Database applications in Visual Basic require three essential components:
1. The user interface, containing controls that enable the user to interact with the database.
2. A data engine, or translator, which performs data operations/manipulation based on the action taken by the user.
3. A data repository where the data is defined and stored.
User interface
The user interface includes all the controls that enable the user to view, update, add, or delete data. It also includes all the code you write in control events, sub procedures, and user-defined functions. In fact, it contains the same elements as any other application.
The controls, the properties and methods they contain and the constants and functions you use in your applications are made available to Visual Basic through object libraries. Some examples of object libraries include Microsoft ADO Data Control, Microsoft DataGrid Control and
Microsoft DataList Contols. You have used similar features in previous examples when you added project components to make use of controls such as the Common Dialog and the Toolbar.
Data engine
The user interface for a database application also needs a means of communicating with the database and this is done via the data engine.
The data engine 'translates' requests from the application and performs physical operations such as indexing, locking, security, and maintaining referential integrity. It also includes a query processor to run Structured Query Language (SQL) queries and a results processor to manage the result sets returned by SQL queries.
Data repository
The data repository is the file (or files) that contains the physical data as well as the data that describes the structure of the database. The data repository is primarily a place to store data; it performs no data management functions.
Your application may use one of many file formats for its data repository; for example, the Microsoft Access file format is .mdb. Visual Basic enables you to work with almost any data repository format, such as SQL Server, ORACLE or FoxPro.
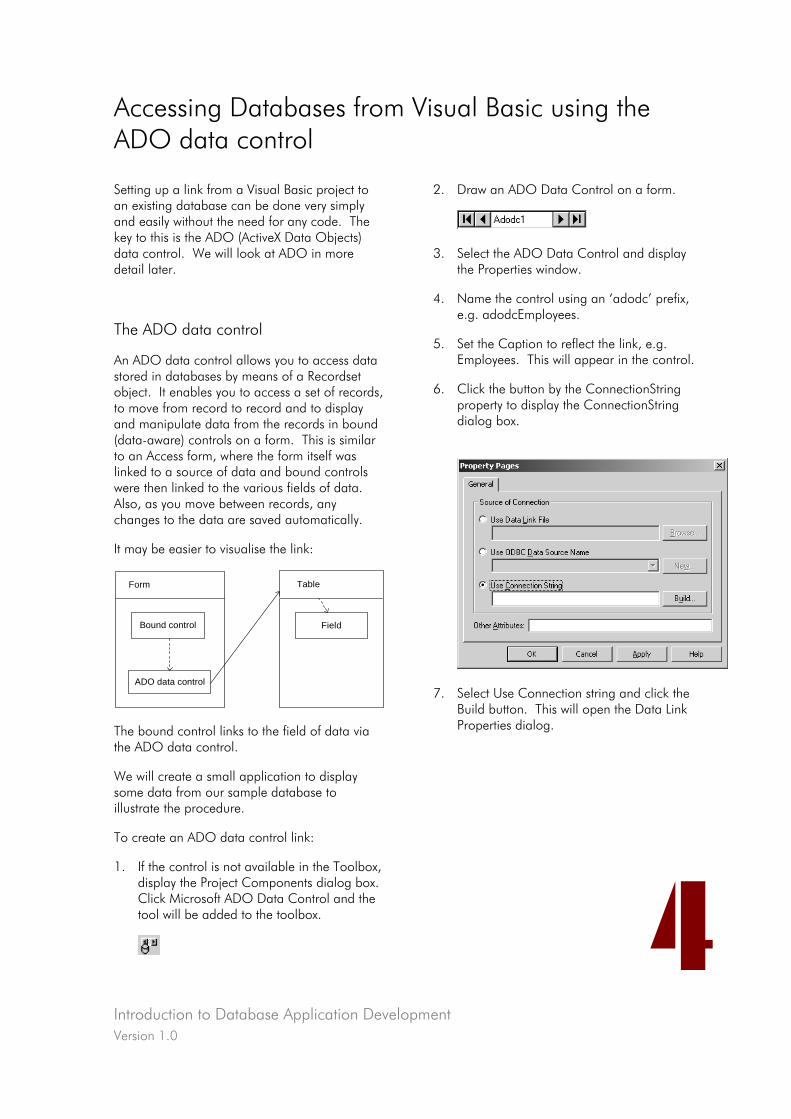
Introduction to Database Application Development Version 1.0
4
Accessing Databases from Visual Basic using the ADO data control
Setting up a link from a Visual Basic project to an existing database can be done very simply and easily without the need for any code. The key to this is the ADO (ActiveX Data Objects) data control. We will look at ADO in more detail later.
The ADO data control
An ADO data control allows you to access data stored in databases by means of a Recordset object. It enables you to access a set of records, to move from record to record and to display and manipulate data from the records in bound (data-aware) controls on a form. This is similar to an Access form, where the form itself was linked to a source of data and bound controls were then linked to the various fields of data. Also, as you move between records, any changes to the data are saved automatically.
It may be easier to visualise the link:
Form
Bound control
ADO data control
Table
Field
The bound control links to the field of data via the ADO data control.
We will create a small application to display some data from our sample database to illustrate the procedure.
To create an ADO data control link:
1. If the control is not available in the Toolbox, display the Project Components dialog box. Click Microsoft ADO Data Control and the tool will be added to the toolbox.
2. Draw an ADO Data Control on a form.
3. Select the ADO Data Control and display the Properties window.
4. Name the control using an ‘adodc’ prefix, e.g. adodcEmployees.
5. Set the Caption to reflect the link, e.g. Employees. This will appear in the control.
6. Click the button by the ConnectionString property to display the ConnectionString dialog box.
7. Select Use Connection string and click the
Build button. This will open the Data Link Properties dialog.
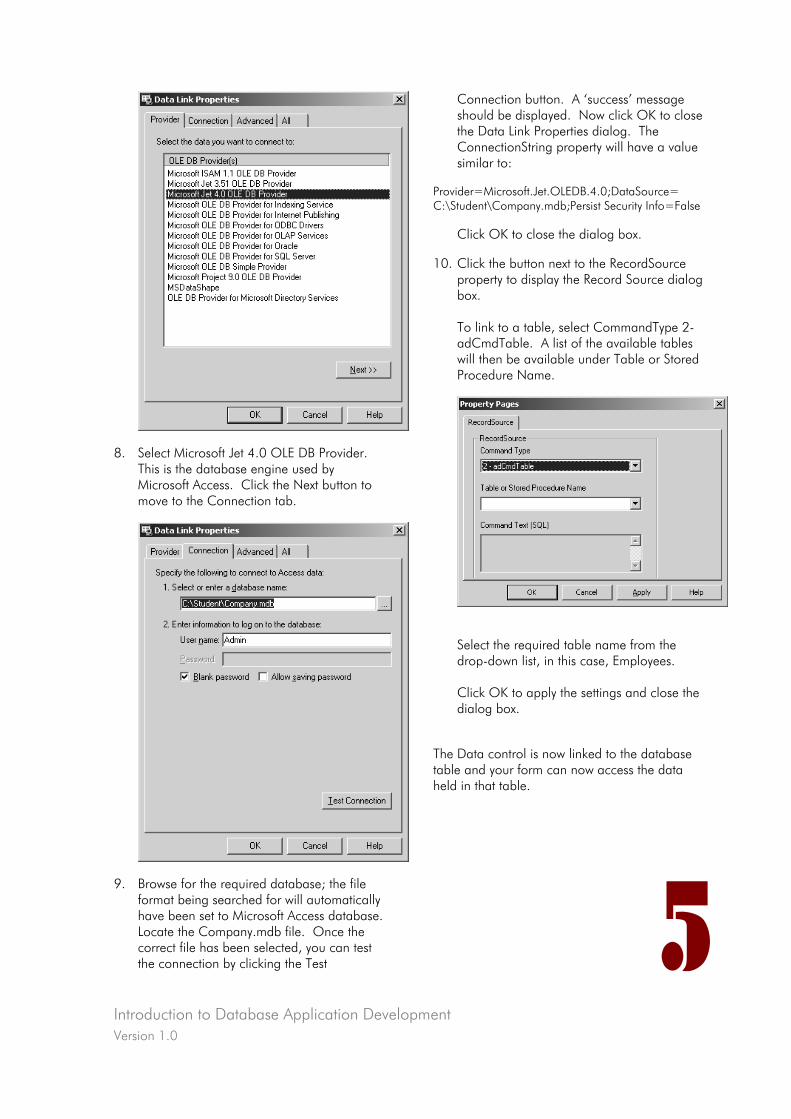
Introduction to Database Application Development Version 1.0
5
8. Select Microsoft Jet 4.0 OLE DB Provider. This is the database engine used by Microsoft Access. Click the Next button to move to the Connection tab.
9. Browse for the required database; the file format being searched for will automatically have been set to Microsoft Access database. Locate the Company.mdb file. Once the correct file has been selected, you can test the connection by clicking the Test
Connection button. A ‘success’ message should be displayed. Now click OK to close the Data Link Properties dialog. The ConnectionString property will have a value similar to:
Provider=Microsoft.Jet.OLEDB.4.0;DataSource= C:\Student\Company.mdb;Persist Security Info=False
Click OK to close the dialog box.
10. Click the button next to the RecordSource property to display the Record Source dialog box. To link to a table, select CommandType 2-adCmdTable. A list of the available tables will then be available under Table or Stored Procedure Name.
Select the required table name from the drop-down list, in this case, Employees. Click OK to apply the settings and close the dialog box.
The Data control is now linked to the database table and your form can now access the data held in that table.
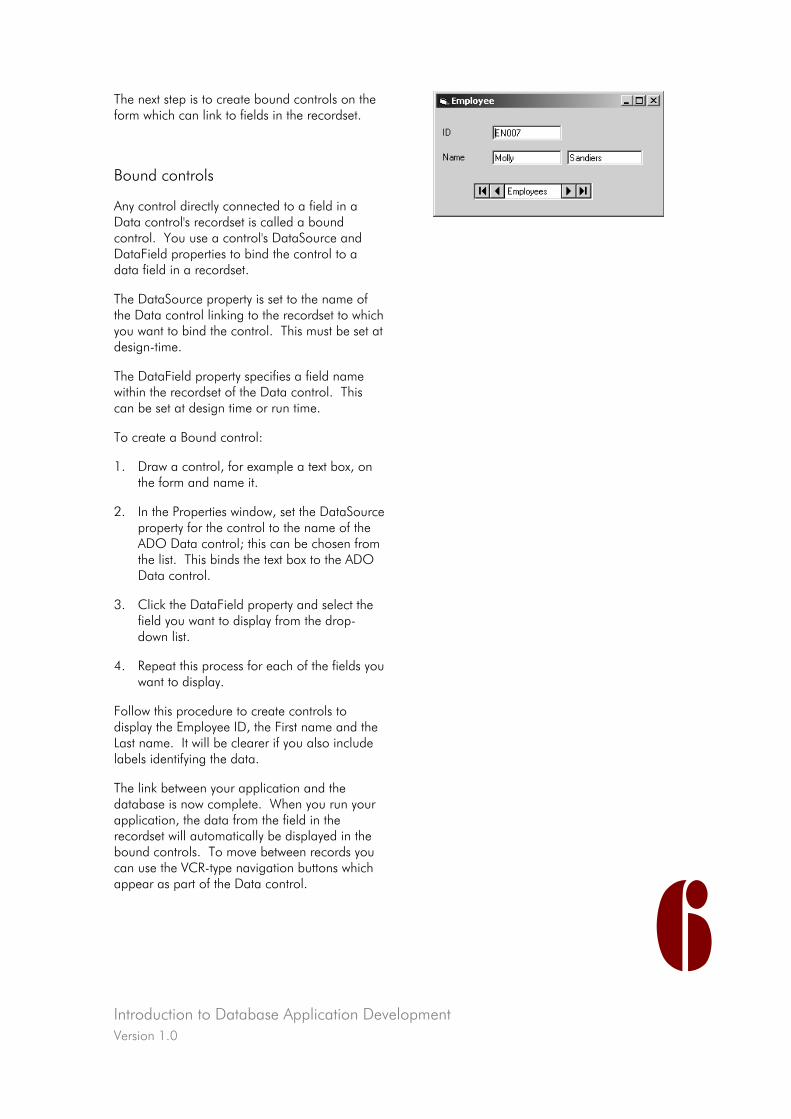
Introduction to Database Application Development Version 1.0
6
The next step is to create bound controls on the form which can link to fields in the recordset.
Bound controls
Any control directly connected to a field in a Data control's recordset is called a bound control. You use a control's DataSource and DataField properties to bind the control to a data field in a recordset.
The DataSource property is set to the name of the Data control linking to the recordset to which you want to bind the control. This must be set at design-time.
The DataField property specifies a field name within the recordset of the Data control. This can be set at design time or run time.
To create a Bound control:
1. Draw a control, for example a text box, on the form and name it.
2. In the Properties window, set the DataSource property for the control to the name of the ADO Data control; this can be chosen from the list. This binds the text box to the ADO Data control.
3. Click the DataField property and select the field you want to display from the drop-down list.
4. Repeat this process for each of the fields you want to display.
Follow this procedure to create controls to display the Employee ID, the First name and the Last name. It will be clearer if you also include labels identifying the data.
The link between your application and the database is now complete. When you run your application, the data from the field in the recordset will automatically be displayed in the bound controls. To move between records you can use the VCR-type navigation buttons which appear as part of the Data control.
Introduction to Database Application Development Version 1.0
7
Database Link Exercise
1. Create a new Visual Basic project.
2. Create a link to an existing database table. This could be the database you created for the last assignment.
3. Create suitable bound controls to display data from the table in a format to suit you.
4. Test that the data is displayed correctly and that you can move between records.
5. Change some data and check that the changes are applied.
Introduction to Database Application Development Version 1.0
8
Navigating Records via an ADO Data control
Using Command buttons
Although the Data control provides built-in navigation buttons to move to the first, previous, next or last records, there are several reasons why creating your own navigation command buttons might provide a better user interface:
• Command buttons can support keyboard shortcut keys, for example using Alt+x to access an Exit button. Many users prefer using the keyboard to the mouse, and keyboard shortcuts enable you to provide both options.
• Because they can be any size, command buttons are often easier to select than the VCR-type buttons on the Data control which may be quite small.
• Command buttons are a standard user interface convention.
The following table identifies the methods necessary to create command button event procedures to navigate through the records in a Data control's recordset.
Method Description
MoveFirst Move to the first record in the recordset
MovePrevious Move to the previous record in the recordset
MoveNext Move to the next record in the recordset
MoveLast Move to the last record in the recordset
Property Description
BOF signals when the beginning of the recordset has been encountered
EOF signals when the end of the recordset has been encountered
You will need to use the Data control's Recordset property to access these methods. The following event procedures show the use of these methods and properties in the code for a set of four command button Click events:
Private Sub cmdFirst_Click() ' This procedure is called when the user clicks the First command button. adodcEmployees.Recordset.MoveFirst End Sub Private Sub cmdLast_Click() ' This procedure is called when the user clicks the Last command button. adodcEmployees.Recordset.MoveLast End Sub

Introduction to Database Application Development Version 1.0
9
Private Sub cmdNext_Click() ' This procedure is called when the user clicks the Next command button. adodcEmployees.Recordset.MoveNext If adodcEmployees.Recordset.EOF Then 'If we are already at the end of the recordset adodcEmployees.Recordset.MoveLast 'set the last record as the current record. End If End Sub Private Sub cmdPrevious_Click() ' This procedure is called when the user clicks the Previous command button. adodcEmployees.Recordset.MovePrevious If adodcEmployees.Recordset.BOF Then 'If we are already at the beginning of the recordset adodcEmployees.Recordset.MoveFirst 'set the first record as the current record. End If End Sub
Notice that we have included checks when moving to the previous or next records to ensure that we never move beyond the beginning or end of the recordset; doing so would cause an error.
Introduction to Database Application Development Version 1.0
10
Navigation buttons Exercise
1. Open the ADODataCtrl.vbp example project.
2. Study the navigation command buttons on the frmEmployees form. The Click event procedure code for them is shown above.
3. Run the project.
4. Test the VCR-type buttons on the Data control and the navigation command buttons. They both work in the same way.
5. Close the project.
6. Following this example, create navigation command buttons for your database project.
Introduction to Database Application Development Version 1.0
11
Updating, adding and deleting data with the ADO Data control
Updating data
When managing data that is bound by a Data control, the data is updated automatically whenever the current record is changed by one of the Move methods. No separate code is required for the data changes to be recorded.
However, you might want to get users to confirm data changes to ensure that records are not changed accidentally.
To do this, you must:
• identify when a change has been made,
• stop the user from moving to a new record,
• provide the user with a means of saving or cancelling the changes,
• enable the user to move between records again.
You will study a full example of this type of processing as part of the next exercise.
The Change event and the DataChanged property
By writing code in a control's Change event, you can determine if the data in it has been changed. Remember that Visual Basic calls the Change procedure whenever data in a control changes.
To determine if the data displayed in a bound control is different from the underlying data in the table, you can test the control's DataChanged property. If the data has changed, you can disable the form's navigation buttons and thereby force the user to confirm the data changes.
Disabling navigation during an update
You can accomplish this by placing code in the Change event procedures for the bound controls. If the data has changed, simply set the Enabled property of any controls which would allow movement between records to False. The following example calls a procedure to perform this.
Private Sub txtFirst_Change() ' This procedure is called whenever a change is made to the First name. ' The navigation buttons are disabled to prevent accidental changes to ' the record; the user must process the update by using the Update button. If Not mblnChangesInProgress Then If txtFirst.DataChanged Then DisableButtons End If End Sub
The DisableButtons procedure used here disables the navigation buttons and the Data control to prevent movement between records. Note that if you are providing navigation command buttons you would normally hide the Data control on the form, whereas this example includes both.
Introduction to Database Application Development Version 1.0
12
The Update method
Whilst a record is being edited, you can think of it as being held in a temporary area. The underlying data, however, is not changed until you execute the recordset’s Update method. The Update method writes the edited data to the current record.
adodcEmployees.Recordset.Update
To allow the user to save the changes, you might provide an Update command button. The Update method could be used in the button’s Click event to apply the changes to the current record. The navigation buttons should then also be re-enabled to allow movement through the recordset.
Cancelling an update
If users have the ability to make changes to records and save those changes, they must also be given the ability to cancel the changes. To cancel any changes, you can use the CancelUpdate method.
adodcEmployees.Recordset.CancelUpdate
However, this does not automatically update the display with the original data. One means of achieving this is to simply use the Move method to move zero records:
adodcEmployees.Recordset.Move 0
These methods could be used in the code for a Cancel command button. Again, the navigation buttons would have to be re-enabled.
Introduction to Database Application Development Version 1.0
13
The Cancel and Default properties
A common means of cancelling an action is to use the Escape key and it is often good practice to incorporate this into your applications. You can do this by setting a Cancel command button to have this property.
When you set a command button's Cancel property to True, that button's Click procedure will be called when a user presses the Escape key. This property can be set to True on a form for one command button only. When you set one command button's Cancel property to True, all the other command buttons’ Cancel properties on the form are set to False.
Similarly, it is common practice to use the Return or Enter key to confirm an action. You can
incorporate this into your applications by, for example, setting an OK button to be the default.
When you set a command button's Default property to True, that button's Click procedure will be called when a user presses the Enter key. Like the Cancel property, this property can also be used on only one command button on a form.
So, in this example, the Update button could have its Default property set to True and the Cancel button have its Cancel property set to True.
Introduction to Database Application Development Version 1.0
14
Update and Cancel Exercise
1. Open the ADODataCtrl.vbp example project.
2. Run the project.
3. Change an item of data and see that the navigation command buttons and the Data control have been disabled and the Update and Cancel buttons enabled.
4. Click the Update button. The buttons and the Data control are enabled. The record has been saved and remains current. Note that the Update button is highlighted when changes are being made; this indicates that it is the default button which is activated when the user presses the Return key. Try changing another item of data and press the Return key. This has the same effect as clicking the Update button.
5. Change an item of data again.
6. Click the Cancel button. The original data is displayed and the buttons and Data control are enabled again. Try changing an item of data again but this time press the Escape key. The change is again cancelled because the button's Cancel property is set to True and it is activated by use of the Escape key.
7. Click the Exit button to stop the application.
8. Check the Default and Cancel properties for the various buttons.
9. Study the code for the various Change event procedures and the DisableButtons procedure. When any change is made to the data, the navigation buttons and the Data control are disabled.
10. Study the code for the cmdUpdate_Click procedure. This button serves two functions, Save and Update. Check the code.
11. Study the code for the cmdCancel_Click procedure. Again, this refers to the function currently being performed by the Update button. In the case of an Update, it uses the CancelUpdate method to cancel the update.
12. Close the project.
13. Following this example, create Update and Cancel buttons for your database project and include the processing required to force the user to confirm or cancel changes.
Introduction to Database Application Development Version 1.0
15
Deleting records
The Delete method is used to remove the current record from the recordset.
After calling the Delete method, data from the deleted record remains displayed in the bound controls. To clear the bound controls, you should call one of the Move methods.
It is normal practice to move to the next record when a record is deleted as shown in this example:
adodcEmployees.Recordset.Delete ' delete the record adodcEmployees.Recordset.MoveNext ' and move on to the next one If adodcEmployees.Recordset.EOF Then ' If it's the end of the recordset adodcEmployees.Recordset.Requery ' then rebuild it adodcEmployees.Recordset.MoveLast ' and move to the last record End If
Note the use of the Requery method if the end of the recordset has been encountered. This is to overcome a problem caused when the final record in a recordset is deleted. The MoveNext sets the EOF property to True; if we then simply try to move to the last record, an error occurs because it has just been deleted. Performing a Requery rebuilds the entire recordset and the last record marker is again valid.
Confirming deletions
As record deletion cannot normally be undone, it is always advisable to ask the user to confirm any Delete action before processing it. You can use the MsgBox function to achieve this.
' Create a message box with all the proper components strMsgTitle = "Delete Current Record" strMsg = "Deleting the record is a permanent operation. Do you want to continue?" intMsgType = vbYesNo + vbExclamation + vbDefaultButton2 intResponse = MsgBox(strMsg, intMsgType, strMsgTitle)
' Get user response
The MsgBox function here displays a Yes/No option with the default button set to No (button 2) as defined by the Type setting. The Yes/No user response is assigned to the variable intResponse. This can then be checked to see
Introduction to Database Application Development Version 1.0
16
whether the Delete should be processed or cancelled.
If there is an error during deleting, you may want to cancel the delete. For example, the record you are trying to delete may have related records in other tables and referential integrity rules may not allow it to be deleted. This situation will result in the record having been marked for deletion, but the delete does not actually occur.
You can trap and report this error. However, no other actions are allowed on the recordset whilst the deletion marker is in place. To remove the deletion marker from the record, simply use the CancelUpdate method as you did to cancel data changes:
adodcEmployees.Recordset.CancelUpdate
Introduction to Database Application Development Version 1.0
17
Delete Exercise
1. Open the ADODataCtrl.vbp example project.
2. Run the project.
3. Move to a record and click the Delete button.
4. When the message box is displayed, click the No button.
5. Click the Delete button again. This time confirm the delete and the next record is displayed. If, however, you deleted the last record the new last record will now be displayed. Note that this example does not have the possibility of referential integrity violation as any related records are also automatically deleted.
6. Click the Exit button to stop the application.
7. Study the code for the cmdDelete_Click event procedure in frmEmployees.
8. Close the project.
9. Following this example, create a Delete option in your database project.
Introduction to Database Application Development Version 1.0
18
Adding new records
You use the AddNew method to add a new record to the recordset. When you call the AddNew method, Visual Basic adds a ‘tentative append’ record (in other words, one which may
or may not be added!) and makes this new record current. The user can then enter data before choosing a Save option to add this record to the recordset or a Cancel option to cancel it.
Private Sub cmdAdd_Click() ' This procedure is called when the user clicks the Add command button. It prepares ' the form for new data input. ' Add new record as a tentative append record adodcEmployees.Recordset.AddNew ' Set focus to the First name field and disable navigation buttons txtFirst.SetFocus DisableButtons ' Enable all data input fields when adding a record ' Set the cmdUpdate command button Caption property to &Save EnableAddNewFields cmdUpdate.Caption = "&Save" End Sub
This example uses the Update button to serve two purposes, updating existing records and saving new ones. It distinguishes between the two by changing the Caption property of the Update command button is changed to '&Save' when adding new records. This helps to make it clearer to the user and also allows you to use the button's Caption property to make decisions in code.
Saving or Cancelling the Add
To save a new record, simply use the Update method as for saving changes to an existing record.
adodcEmployees.Recordset.Update
To cancel an Add, simply use the CancelUpdate method. The record which was current before the AddNew was executed again becomes the current record.
adodcEmployees.Recordset.CancelUpdate
Introduction to Database Application Development Version 1.0
19
AddNew Exercise
1. Open the ADODataCtrl.vbp example project.
2. Run the project.
3. Click the Add button and see that the navigation command buttons and the Data control have been disabled and the caption on the Update button has been changed to Save.
4. Enter some new details, using SS as the Dept. code and TW as the Position Code. These values must match those already present in the related tables in the database.
5. Click the Save button. The navigation buttons and the Data control are enabled. The record has been saved and remains current.
6. Click the Add button again and enter new details.
7. Click the Cancel button. The first record is displayed and the buttons and Data control are enabled.
8. Click the Exit button to stop the application.
9. Study the code for the cmdAdd_Click, cmdUpdate_Click and cmdCancel_Click event procedures in frmEmployees.
10. Close the project.
11. Following this example, create an Add button for your database project and update the code for the Update and Cancel buttons to allow the Add to be processed or cancelled.
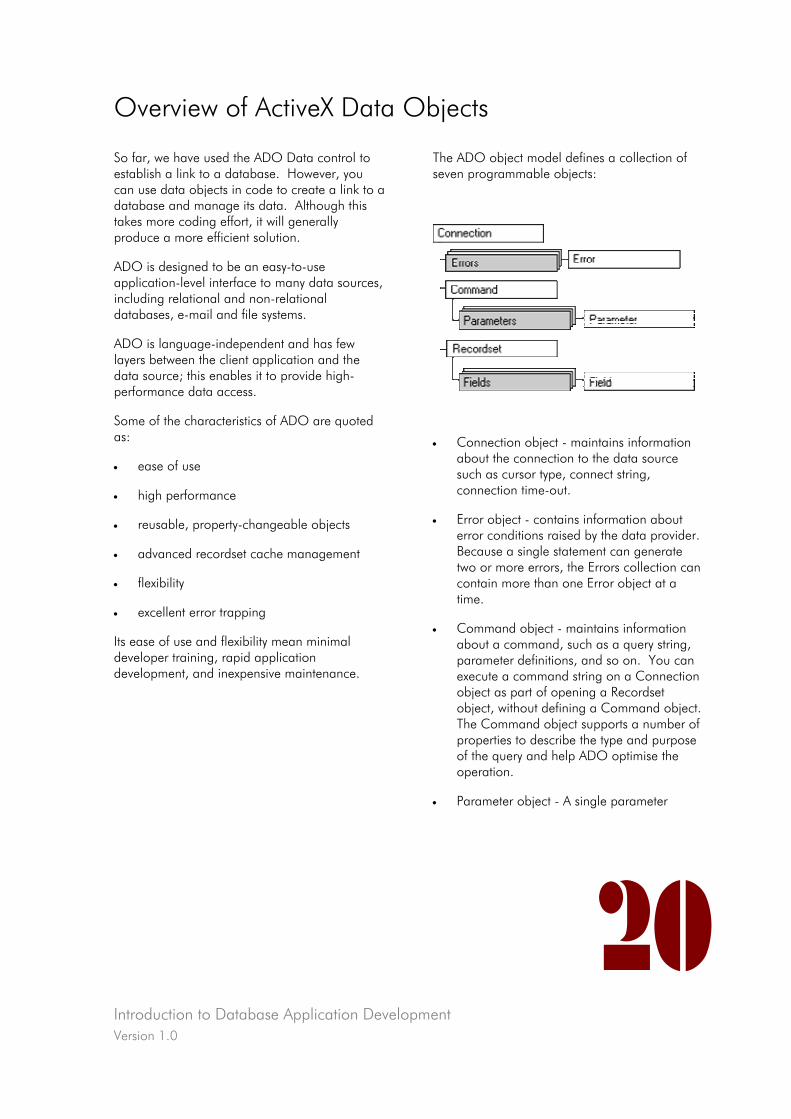
Introduction to Database Application Development Version 1.0
20
Overview of ActiveX Data Objects
So far, we have used the ADO Data control to establish a link to a database. However, you can use data objects in code to create a link to a database and manage its data. Although this takes more coding effort, it will generally produce a more efficient solution.
ADO is designed to be an easy-to-use application-level interface to many data sources, including relational and non-relational databases, e-mail and file systems.
ADO is language-independent and has few layers between the client application and the data source; this enables it to provide high-performance data access.
Some of the characteristics of ADO are quoted as:
• ease of use
• high performance
• reusable, property-changeable objects
• advanced recordset cache management
• flexibility
• excellent error trapping
Its ease of use and flexibility mean minimal developer training, rapid application development, and inexpensive maintenance.
The ADO object model defines a collection of seven programmable objects:
• Connection object - maintains information about the connection to the data source such as cursor type, connect string, connection time-out.
• Error object - contains information about error conditions raised by the data provider. Because a single statement can generate two or more errors, the Errors collection can contain more than one Error object at a time.
• Command object - maintains information about a command, such as a query string, parameter definitions, and so on. You can execute a command string on a Connection object as part of opening a Recordset object, without defining a Command object. The Command object supports a number of properties to describe the type and purpose of the query and help ADO optimise the operation.
• Parameter object - A single parameter

Introduction to Database Application Development Version 1.0
21
associated with a Command. The Command object uses the Parameters collection to contain all of its Parameter objects. ADO Parameter objects can be created automatically by sending queries to the database. However, you can also build this collection programmatically to improve performance at run time.
• Recordset object - A set of rows returned from a query, including a cursor into those rows. You can open a Recordset object (that is, execute a query) without explicitly opening a Connection object. However, if you do first create a Connection object, you can open multiple Recordset objects on the same connection.
• Field object - Contains information about a single column of data within a recordset. The Recordset object uses the Fields collection to contain all of its Field objects. This Field information includes data type, precision, and numeric scale.
Some of these objects also have a collection of Properties:
• Property object - a provider-defined characteristic of an ADO object. ADO objects have two types of properties: built-in and dynamic. Built-in properties are those properties implemented in ADO and available to any new ADO object. Dynamic properties are defined by the underlying data provider and appear in the Properties collection for the appropriate ADO object. For example, a property may indicate if a Recordset object supports transactions or updating. This is one of the greatest features of ADO, in that it lets the ADO service provider present special interfaces.
This course will concentrate on only some of the objects described above, using them to create a link in code to a database.
The Connection, Recordset, and Command objects are the most important ADO objects. ADO applications typically use the:
• Connection object to establish a connection to the data
• Command object to issue commands, such as SQL queries and updates, to the data
• Recordset object to view and manipulate the results of the query
The Fields collection and Field object are accessed through the Recordset object after data exists in the Recordset object.
The Properties collection provides information about the characteristics of the Connection, Command, Recordset, and Field objects. Each Property object belonging to the Properties collection must be accessed through one of those four objects.
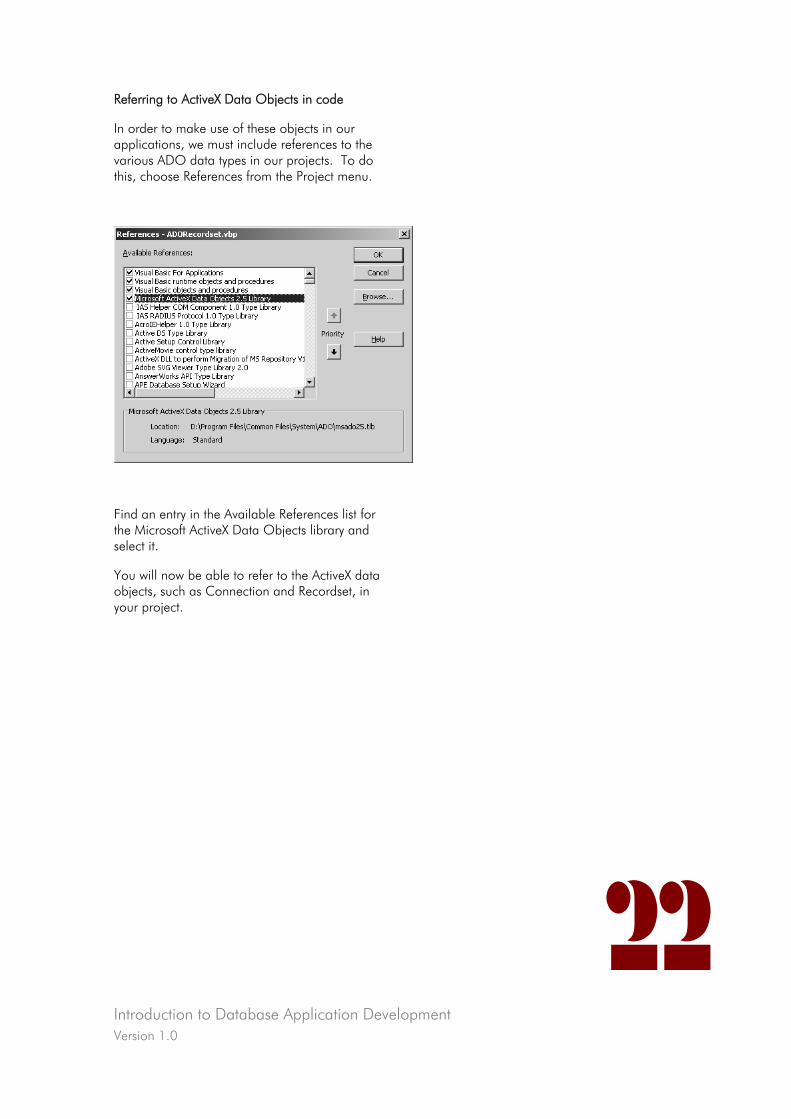
Introduction to Database Application Development Version 1.0
22
Referring to ActiveX Data Objects in code
In order to make use of these objects in our applications, we must include references to the various ADO data types in our projects. To do this, choose References from the Project menu.
Find an entry in the Available References list for the Microsoft ActiveX Data Objects library and select it.
You will now be able to refer to the ActiveX data objects, such as Connection and Recordset, in your project.
Introduction to Database Application Development Version 1.0
23
Accessing Databases using ADO in Visual Basic code
Creating the Database link
There are three simple steps to achieve this as illustrated in the following example:
1. The connection string is constructed; the important details here are the Provider and Data Source information. You will notice that the connection string contains the same
information as that created automatically when you were using an ADO data control to provide the link.
2. A new Connection object is created. Remember to use the Set and New keywords here.
3. The connection is opened using the connection string details.
Dim mcnnCompany As ADODB.Connection Dim strCnn As String ' Open a connection to the database strCnn = "Provider=Microsoft.Jet.OLEDB.4.0;" strCnn = strCnn & "Data Source=C:\Student\Company.mdb;Persist Security Info=False" Set mcnnCompany = New ADODB.Connection mcnnCompany.Open strCnn
Creating a Recordset Object
When the Connection is open, you can create recordset objects. The recordset can represent the entire set of records from a table or the results of an executed command such as an SQL
query. At any time, the Recordset object refers to only a single record within the set as the current record.
This example shows the steps required to open a recordset representing a table using the Connection created above.
Dim mrstTable As ADODB.Recordset Dim strTableName As String ' Open the table Set mrstTable = New ADODB.Recordset mrstTable.CursorType = adOpenKeyset mrstTable.LockType = adLockOptimistic ' Enclose table name in brackets to allow for spaces in
name strTableName = "[" & cboTableName.Text & "]" mrstTable.Open strTableName, mcnnCompany, , ,
adCmdTable ‘ Set the first record as current mrstTable.MoveFirst
Introduction to Database Application Development Version 1.0
24
First, we will look at what the code does, then explain some of the aspects in more detail.
There are four things to consider: the Recordset object itself, its properties, details of what data is to be accessed and which Connection object is being used.
1. Create a new Recordset object. Again, remember to use the Set and New keywords.
2. Set two of the recordset's Properties, CursorType and LockType. We will look at these below.
3. Create the table name in a string. In this case, the name is selected from a list held in a combo box. Square brackets are added round the name to allow for the possibility of spaces being included, e.g. Position Codes.
4. Using this information, open the recordset passing it the table name, connection and a flag indicating that a full table is being accessed.
Cursor Type
The cursor type defines the type of access allowed to the recordset. There are four different cursor types in ADO:
• Dynamic cursor — allows you to view additions, changes, and deletions by other users. It allows all types of movement through the Recordset that don't rely on bookmarks; however, it does allow bookmarks if the provider supports them.
• Keyset cursor — behaves like a dynamic cursor, except that it does not allow you to see records that other users add, and prevents access to records that other users delete. Data changes by other users will still be visible. It supports bookmarks and therefore allows all types of movement through the Recordset.
• Static cursor — provides a static copy of a set of records for you to use to find data or generate reports. Like the keyset cursor, it allows bookmarks and therefore allows all types of movement through the Recordset. Additions, changes, or deletions by other users will not be visible. This is the only type
of cursor allowed when you open a client-side Recordset object.
• Forward-only cursor — allows you to only scroll forward through the Recordset. Additions, changes, or deletions by other users will not be visible. This improves performance in situations where you need to make only a single pass through a Recordset, for example to create a report.
You can set the CursorType property before opening the Recordset, as shown in the example above, or pass a CursorType argument with the Open method. Some providers do not support all cursor types so it is important to check the documentation for the provider. If you don't specify a cursor type, ADO opens a forward-only cursor by default.
You can now use the Move methods and BOF and EOF properties as before to navigate the recordset, for example:
mrstTable.MoveNext If mrstTable.EOF Then mrstTable.MoveLast End If
Lock Type
This specifies what type of locking is to be used when records are being accessed. This helps to control and co-ordinate changes to the data when several users are accessing the database at the same time. The value can be one of the following:
• adLockReadOnly - default. Read-only - you cannot alter the data.
• adLockPessimistic - Pessimistic locking,

Introduction to Database Application Development Version 1.0
25
record by record. Records are usually locked at the data source immediately editing begins.
• adLockOptimistic - Optimistic locking, record by record. Records are only locked when you call the Update method.
• adLockBatchOptimistic — Optimistic batch updates—required for batch update mode as opposed to immediate update mode.

Introduction to Database Application Development Version 1.0
26
Connection and Recordset Object Exercise
1. Open the ADORecordset.vbp example project.
2. Run the project. There are no controls displayed for the data.
3. Choose the Suppliers table and click the Open Table button. The Suppliers table is opened, controls are created and the data displayed in them.
4. Stop the project by clicking the Close button.
5. Study the Form_Load and cmdOpenTable_Click event procedures to see how the links to the database and table have been achieved. Note the use of the OpenSchema method to access a list of the tables in the database.
6. Close the project.
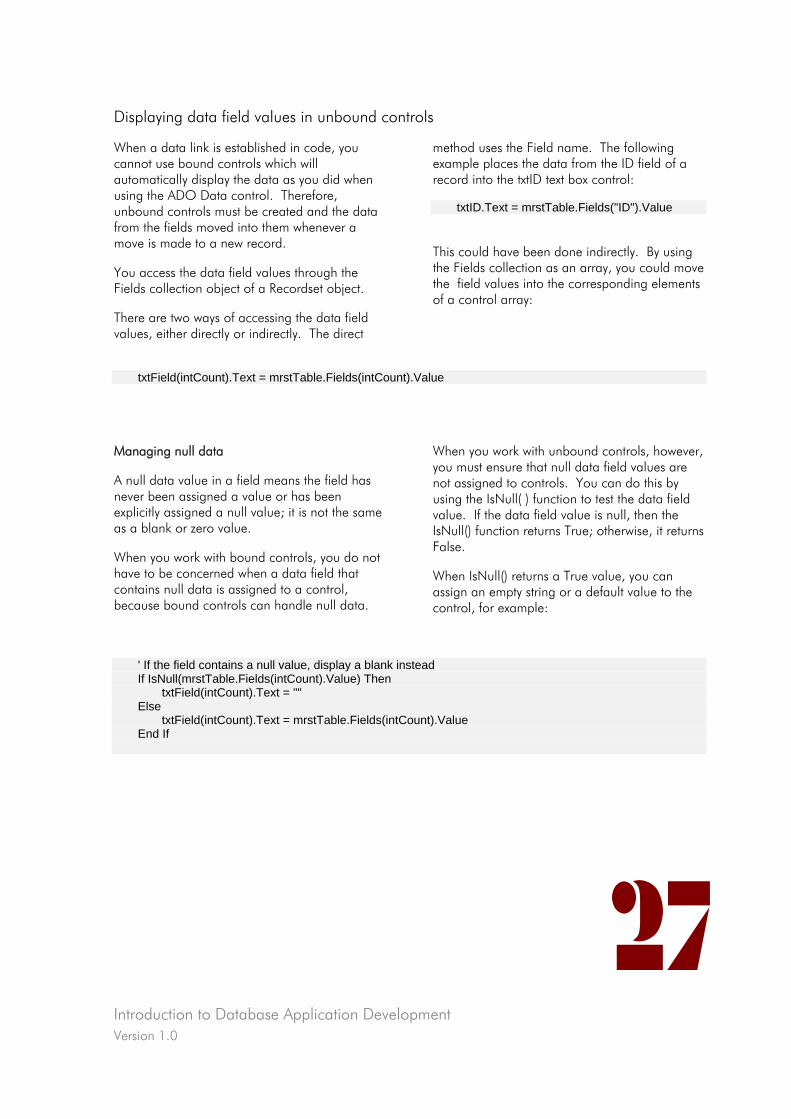
Introduction to Database Application Development Version 1.0
27
Displaying data field values in unbound controls
When a data link is established in code, you cannot use bound controls which will automatically display the data as you did when using the ADO Data control. Therefore, unbound controls must be created and the data from the fields moved into them whenever a move is made to a new record.
You access the data field values through the Fields collection object of a Recordset object.
There are two ways of accessing the data field values, either directly or indirectly. The direct
method uses the Field name. The following example places the data from the ID field of a record into the txtID text box control:
txtID.Text = mrstTable.Fields("ID").Value
This could have been done indirectly. By using the Fields collection as an array, you could move the field values into the corresponding elements of a control array:
txtField(intCount).Text = mrstTable.Fields(intCount).Value
Managing null data
A null data value in a field means the field has never been assigned a value or has been explicitly assigned a null value; it is not the same as a blank or zero value.
When you work with bound controls, you do not have to be concerned when a data field that contains null data is assigned to a control, because bound controls can handle null data.
When you work with unbound controls, however, you must ensure that null data field values are not assigned to controls. You can do this by using the IsNull( ) function to test the data field value. If the data field value is null, then the IsNull() function returns True; otherwise, it returns False.
When IsNull() returns a True value, you can assign an empty string or a default value to the control, for example:
' If the field contains a null value, display a blank instead If IsNull(mrstTable.Fields(intCount).Value) Then txtField(intCount).Text = "" Else txtField(intCount).Text = mrstTable.Fields(intCount).Value End If
Introduction to Database Application Development Version 1.0
28
Null value Exercise
1. Open the ADORecordset.vbp example project.
2. Study the LoadControls procedure to see how the controls are created on the form using the Load statement. The number of controls to be created is found from the Count property of the recordset’s Fields collection.
3. Study the PlaceDataInControls procedure to see how the controls are displayed, null values are checked for and the data placed into the controls. Note the use of the Name and Value properties of the recordset’s Field object.
4. Close the project.
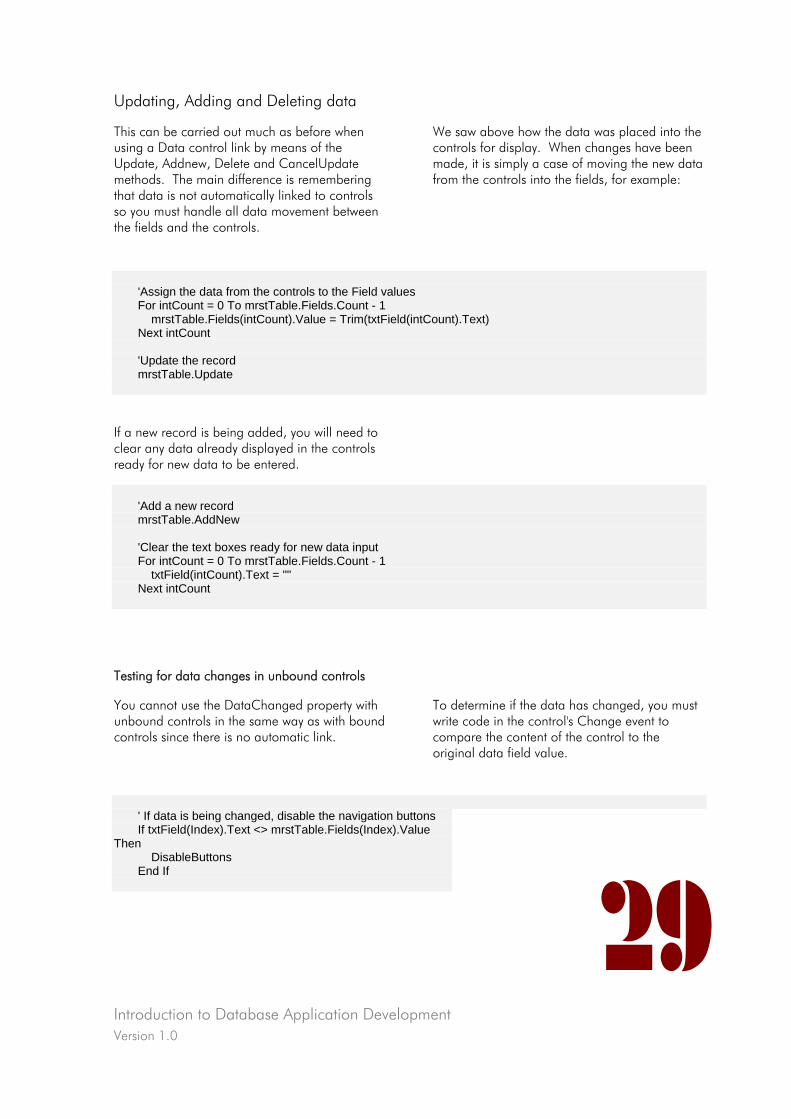
Introduction to Database Application Development Version 1.0
29
Updating, Adding and Deleting data
This can be carried out much as before when using a Data control link by means of the Update, Addnew, Delete and CancelUpdate methods. The main difference is remembering that data is not automatically linked to controls so you must handle all data movement between the fields and the controls.
We saw above how the data was placed into the controls for display. When changes have been made, it is simply a case of moving the new data from the controls into the fields, for example:
'Assign the data from the controls to the Field values For intCount = 0 To mrstTable.Fields.Count - 1 mrstTable.Fields(intCount).Value = Trim(txtField(intCount).Text) Next intCount 'Update the record mrstTable.Update
If a new record is being added, you will need to clear any data already displayed in the controls ready for new data to be entered.
'Add a new record mrstTable.AddNew 'Clear the text boxes ready for new data input For intCount = 0 To mrstTable.Fields.Count - 1 txtField(intCount).Text = "" Next intCount
Testing for data changes in unbound controls
You cannot use the DataChanged property with unbound controls in the same way as with bound controls since there is no automatic link.
To determine if the data has changed, you must write code in the control's Change event to compare the content of the control to the original data field value.
' If data is being changed, disable the navigation buttons If txtField(Index).Text <> mrstTable.Fields(Index).Value
Then DisableButtons End If

Introduction to Database Application Development Version 1.0
30
Limiting the input length of controls
When you assign a data field to an unbound control, you should also set the control's MaxLength property to the size of the data field as held in the DefinedSize property. By doing this, you ensure that any data changes cannot exceed the size of the field. If you attempt to
assign data from a control to a data field and you exceed the field size, an error will occur when you try to update the record.
The following example shows how to set the text box control's MaxLength property:
'Set the size of the text box controls For intCount = 0 To mrstTable.Fields.Count - 1 txtField(intCount).MaxLength =m rstTable.Fields(intCount).DefinedSize Next intCount
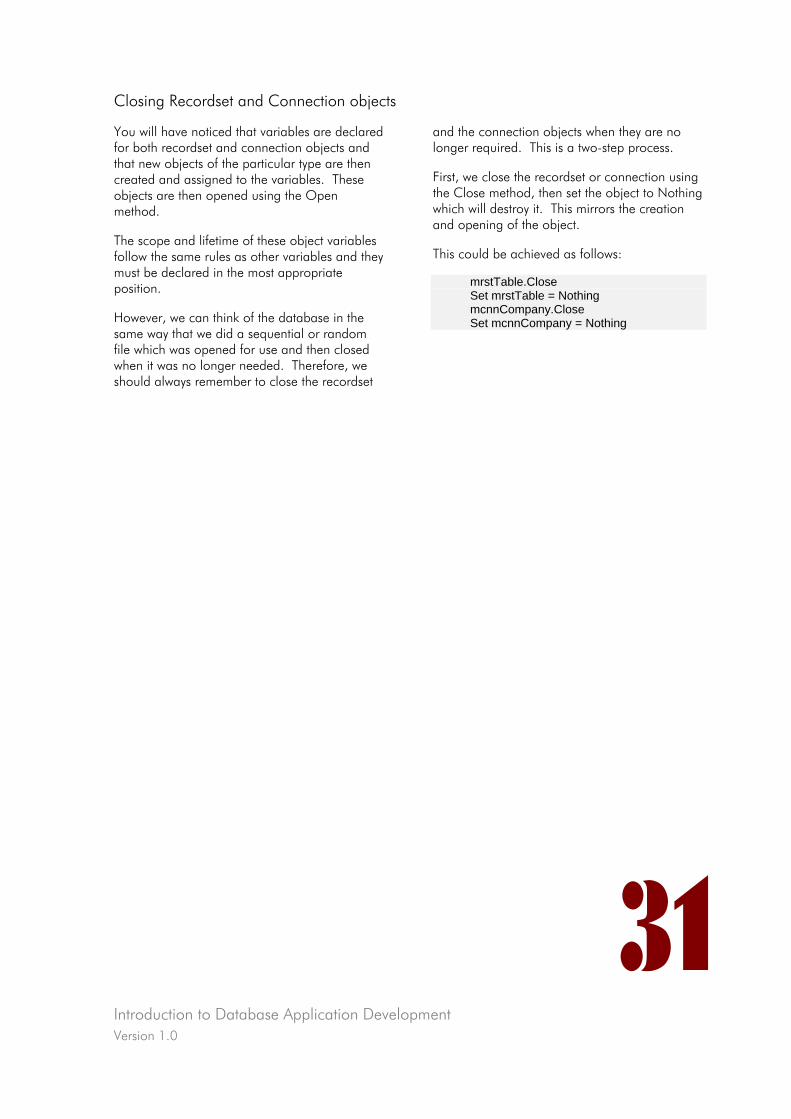
Introduction to Database Application Development Version 1.0
31
Closing Recordset and Connection objects
You will have noticed that variables are declared for both recordset and connection objects and that new objects of the particular type are then created and assigned to the variables. These objects are then opened using the Open method.
The scope and lifetime of these object variables follow the same rules as other variables and they must be declared in the most appropriate position.
However, we can think of the database in the same way that we did a sequential or random file which was opened for use and then closed when it was no longer needed. Therefore, we should always remember to close the recordset
and the connection objects when they are no longer required. This is a two-step process.
First, we close the recordset or connection using the Close method, then set the object to Nothing which will destroy it. This mirrors the creation and opening of the object.
This could be achieved as follows:
mrstTable.Close Set mrstTable = Nothing mcnnCompany.Close Set mcnnCompany = Nothing
Introduction to Database Application Development Version 1.0
32
ADO Exercise
1. Following the examples above, change your previous project to use Connection and Recordset objects instead of the Data control to access a table from your own database and display its contents.
2. Change the code for the various command buttons to allow navigation through the recordset and to allow changes to be made to the data.
3. Test the project.
Introduction to Database Application Development Version 1.0
33
Locating Records
The Find method
You can use the Find method to search through recordset data based on criteria you provide. You can instruct it where to start and in which direction to search. By default the search will start with the current record and work forward through the recordset. The following example searches forward from the current position based on criteria held in a text box.
adodcEmployees.Recordset.Find txtCriteria.Text, , adSearchForward
The criteria expression consists of three parts: the data field name, a comparison operator and the value to be matched.
Criteria expression Uses Finds
Last = ‘Binga’ Enclose strings within single quotes. Records with the surname Binga.
Last = ‘O’’Mara’ Where there is a single quote within a string add an extra one; it will then be treated as a character rather than an end of string marker.
Records with the surname O’Hara.
Last like ‘H*’ A wildcard character can be used with the ‘like’ comparison.
Records with surnames beginning with the letter H.
[Pay Rate] > 20 Where a field name includes a space character use square brackets around it.
Records with a pay rate greater then 20.
Hired > #01/01/90# Date type with # delimiters. Records with hired date since 01/01/90.
The Bookmark property
You might want to mark a record and return to it later. This can be achieved using the Bookmark property.
Store the Bookmark value in a Variant variable:
varBookmark = adodcEmployees.Recordset.Bookmark
You can then return to it by resetting the Bookmark property to the stored value:
adodcEmployees.Recordset.Bookmark = varBookmark
Introduction to Database Application Development Version 1.0
34
Find Exercise
1. Open the ADOFind.vbp project.
2. Study the form. It contains a Data control to link to the database, a text box to input criteria for the Find and a data grid in which to display the data. The grid is linked to the underlying table via the Data control.
3. Run the project. The grid is automatically filled with the underlying data and the first record is marked as current by the arrow in the left margin of the grid.
4. Type in a criteria string, such as First > 'W'.
5. Click Find First. The first record with a First name value starting with the letter 'W' will be marked by the current record pointer.
6. Click Find Next and the next one starting with 'W' will be indicated.
7. Experiment with the various buttons and different criteria.
8. Stop the program.
9. Study the code for the various buttons and the FindForward and FindBackward procedures to see the use of the Find method and Bookmark property.
10. Close the project.
11. Create a similar project to access your own database and find records with specific criteria. To make use of the data grid, youmust include it in your project through the Project Components dialog. Select the Microsoft DataGrid Control (OLEDB) and it will be added to the toolbox:

Introduction to Database Application Development Version 1.0
35
SQL
We have looked briefly at SQL when creating queries in Microsoft Access. We will now look at it again with a view to using it to create recordsets through code. This enables you to include the data you require rather than complete tables of data.
Mandatory clauses
Structured Query Language (SQL) can be used to extract data from a database and to perform certain operations upon it. SQL statements are made up of several clauses, some required, some optional.
When you use SQL to return data, you work with SELECT statements. Every SELECT statement must contain at least two clauses: the SELECT clause itself and the FROM clause. The SELECT clause indicates which fields to include in the query, whilst the FROM clause identifies the table or tables from which those fields are to be taken. The basic syntax is as follows:
SELECT field1, field2, field3... FROM table;
The following statement will extract a list of all employee names and their pay rate from the Employees table:
SELECT Last, First, [Pay Rate] FROM Employees;
When working with names that contain spaces (such as the field object name 'Pay Rate'), you must enclose the names in square brackets ([ ]). The semicolon character (;), while not required, is conventionally used to end an SQL statement.
You can request all the fields in a table by using the asterisk wildcard in place of a list of fields in the SELECT clause (*). The fields appear in the order in which they occur in the table.
The following statement will return the complete contents of the Employees table:
SELECT * FROM Employees;
Optional clauses
There are various optional clauses you can use in SQL statements to make them more powerful. A SELECT statement can have up to four optional clauses, WHERE, GROUP BY, HAVING, and ORDER BY, which must appear in that order.
SELECT Last, First, [Department Code], Hired FROM Employees
WHERE Hired > #1/1/90#; will return the details specified for all employees hired since 1/1/90.
SELECT [Department Code], Count([Department Code]) FROM Employees
GROUP BY [Department Code]; will produce a list of departments with the number of employees in each.
SELECT [Department Code], Count([Department Code]) FROM Employees
GROUP BY [Department Code] HAVING Count([Department Code]) > 5;
will only list those departments with more than 5 employees.
SELECT Last, First, [Department Code], Hired FROM Employees
ORDER BY [Department Code], Hired Desc; will produce a list of employees in order of ascending department code and descending hire date within each department.
Introduction to Database Application Development Version 1.0
36
Using SQL to create a Recordset
You can use an SQL statement as the RecordSource of a Recordset as in the following examples.
Using an ADO data control to establish the database link, the CommandType and RecordSource properties could have been set at design time or through code as follows:
' Create the recordset adodcEmployees.CommandType = adCmdText adodcEmployees.RecordSource = “SELECT Last, First, [Pay Rate] FROM Employees;” adodcEmployees.Refresh
This would result in only the name and pay fields being included in the recordset.
If you are creating a long SQL string, it will be better to create the string in a variable before assigning it to the property:
strSQL = “SELECT Last, First, [Pay Rate] “ strSQL = strSQL & “FROM Employees;” adodcEmployees.RecordSource = strSQL
If the database connection has been established in code, the same recordset could be created using code such as:
rstEmpPay.Open strSQL, mcnnCompany, , , adCmdText
Here the SQL string is passed to the Open method instead of the table name and the command type parameter is set to indicate that a text string is being used to define the record source.
If you are creating long and complex SQL strings, consider using Access to create the query and produce the SQL for you. You can then easily test the query results then copy the SQL string and include it in your code as required. This will reduce the chances of typing errors and incorrect SQL syntax. But do make sure that you fully understand the SQL that has been produced!
Introduction to Database Application Development Version 1.0
37
SQL Exercise
1. Open the ADOSqlRecordset.vbp example.
2. Study the form. It includes an ADO Data control to link to a specified database, a data grid to display the records and a text box in which to enter SQL statements.
3. Run the project. The full details of the Employees table are displayed by default.
4. Enter an SQL statement from the examples above and check the results. Experiment with different SQL statements.
5. Exit the program.
6. Study the cmdTestSQL_Click event procedure to see how the SQL string is used to refresh the recordset.
7. Close the project.
Introduction to Database Application Development Version 1.0
38
Other points
DML and DDL
The SQL data manipulation language (DML) enables you to perform such operations as retrieving, updating, adding, or deleting records. You can also build queries to sort, filter, and extract data from databases.
DML statements are expressions that incorporate the following keywords:
SELECT Query a database for records that satisfy a certain criteria.
UPDATE Modify records and fields.
INSERT Use a single operation to load batches of data into a database.
DELETE Remove records from a database.
These are equivalent to the Update queries which we looked at in Access and can also be used in code.
Optimising Recordset object performance
You can improve the performance of your application by using SQL statements to limit the size of recordsets.
Opening an entire table that contains only a few hundred records might be as efficient as using SQL to limit the size of the recordset. However, as the recordset size increases, your application’s performance can deteriorate quickly.
Remember that SQL statements can be used not only with the ADO Data control but also when creating recordsets in code.
More Help
You should now understand and be able to use the basics of ADO data access. There are many more features which you will find in Microsoft's Help.
Introduction to Database Application Development Version 1.0
39
Database Application Development - Assignment
You will now go back to your previous assignment and incorporate a database.
The purpose of the database will obviously depend on the application you produced:
• a high scores table could be added to a simple game program,
• quiz questions and their correct answers could be stored in a database.
You should document the changes to the user requirements and the design before going on to change the code as necessary. New test plans must be drawn up and testing and error correction logged.
Again, full documentation must be submitted.
Introduction to Database Application Development –
Exercise Solutions
www.learnhowtoprogram.com © IT-Pro Training Ltd. 2005

Visual Basic 6 Training Manual
Version 1.0
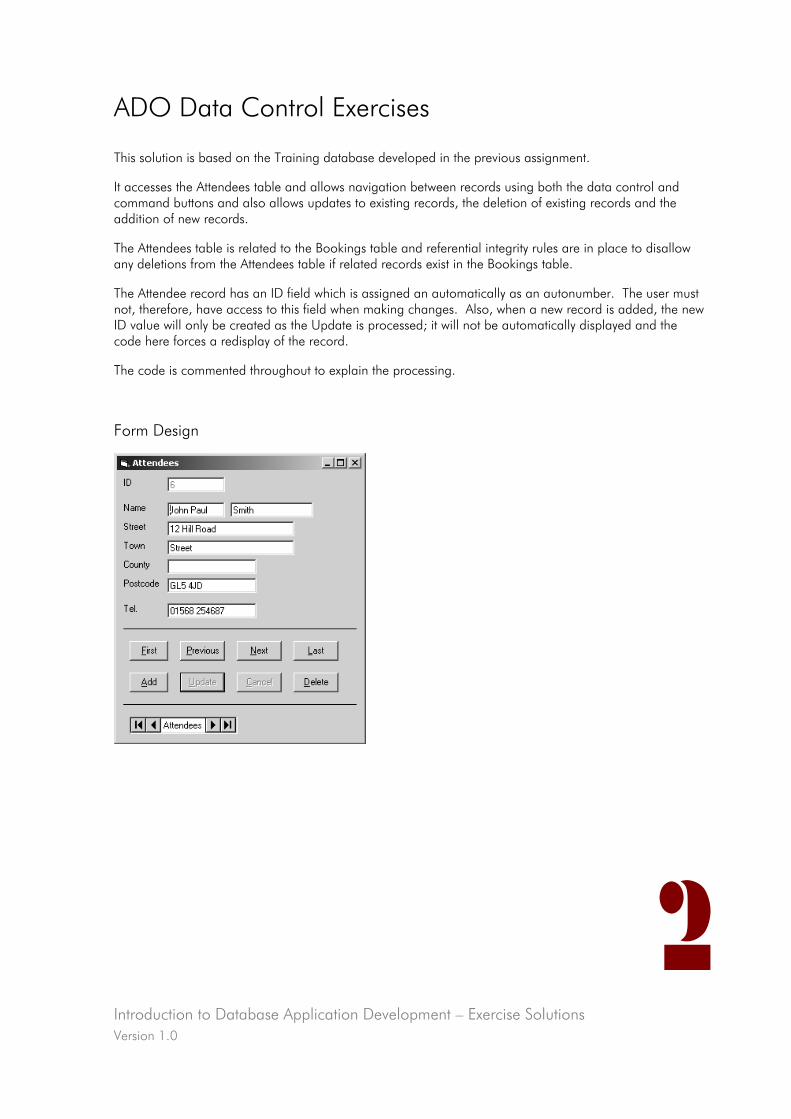
Introduction to Database Application Development – Exercise Solutions Version 1.0
ADO Data Control Exercises
This solution is based on the Training database developed in the previous assignment.
It accesses the Attendees table and allows navigation between records using both the data control and command buttons and also allows updates to existing records, the deletion of existing records and the addition of new records.
The Attendees table is related to the Bookings table and referential integrity rules are in place to disallow any deletions from the Attendees table if related records exist in the Bookings table.
The Attendee record has an ID field which is assigned an automatically as an autonumber. The user must not, therefore, have access to this field when making changes. Also, when a new record is added, the new ID value will only be created as the Update is processed; it will not be automatically displayed and the code here forces a redisplay of the record.
The code is commented throughout to explain the processing.
Form Design
2

Introduction to Database Application Development – Exercise Solutions Version 1.0
3
Code
Option Explicit ''''''''''''''''''''''''''''''''''''''''''''''''''''''''''''''''''''''''''''''''''''''' ' Project: Training ' Main form frmAttendees ' ' This sample application shows the use of the ADO data control to create a link to ' a table, Attendees, within an Access database, C:\Student\Training.mdb. It ' illustrates the ability to navigate through the records in this table using ' the buttons on the data control and the use of command buttons. ' It also includes buttons to allow updates to be applied to existing records, ' records to be deleted and new records to be added. ' ' Developed by: Fred Bloggs ' Date: Sept 2000 ''''''''''''''''''''''''''''''''''''''''''''''''''''''''''''''''''''''''''''''''''''''' Private mblnChangesInProgress As Boolean Private Sub cmdAdd_Click() ' This procedure is called when the user clicks the Add command button. It prepares ' the form for new data input. ' Add new record as a tentative append record adodcAttendees.Recordset.AddNew ' Set focus to the First name field and disable navigation buttons txtFirst.SetFocus DisableButtons ' Set the cmdUpdate command button Caption property to &Save cmdUpdate.Caption = "&Save" End Sub Private Sub cmdCancel_Click() ' To clear an AddNew or to clear data changes to an existing record ' use the CancelUpdate method. adodcAttendees.Recordset.CancelUpdate If cmdUpdate.Caption = "&Save" Then ' If cancelling an Add cmdUpdate.Caption = "&Update" ' set to the default button caption Else ' If cancelling an Update adodcAttendees.Recordset.Move 0 ' redisplay the original data End If EnableButtons End Sub
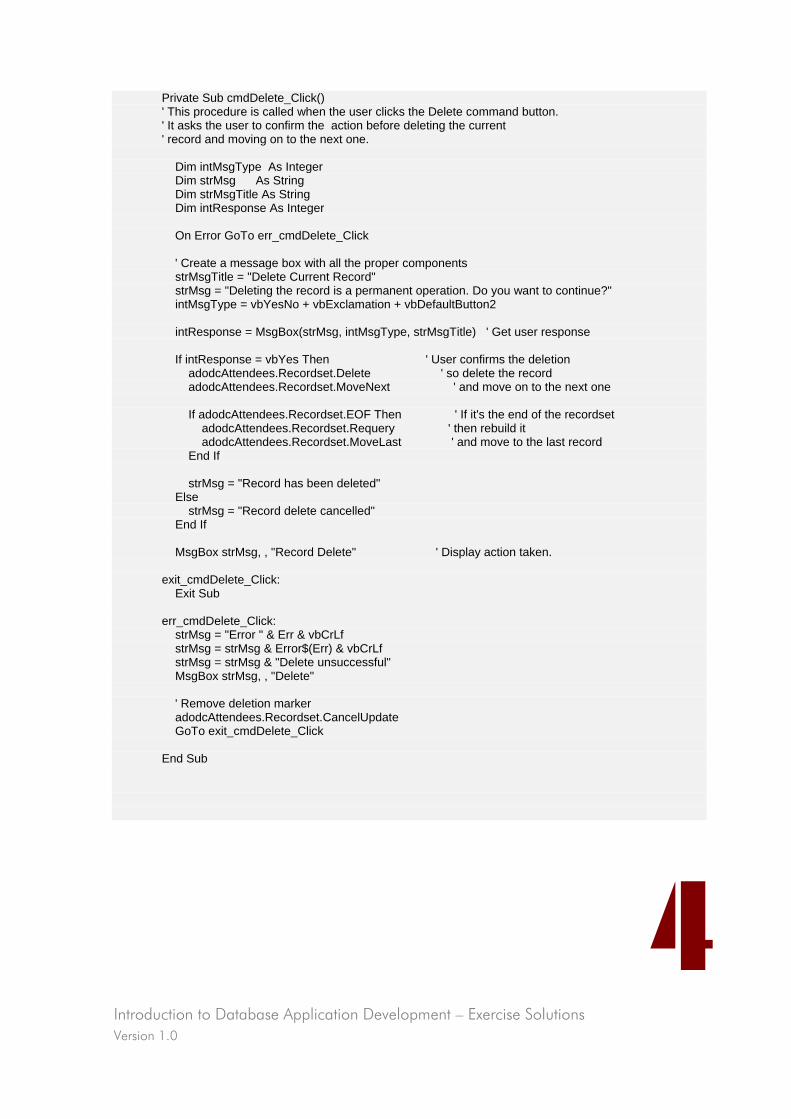
Introduction to Database Application Development – Exercise Solutions Version 1.0
4
Private Sub cmdDelete_Click() ' This procedure is called when the user clicks the Delete command button. ' It asks the user to confirm the action before deleting the current ' record and moving on to the next one. Dim intMsgType As Integer Dim strMsg As String Dim strMsgTitle As String Dim intResponse As Integer On Error GoTo err_cmdDelete_Click ' Create a message box with all the proper components strMsgTitle = "Delete Current Record" strMsg = "Deleting the record is a permanent operation. Do you want to continue?" intMsgType = vbYesNo + vbExclamation + vbDefaultButton2 intResponse = MsgBox(strMsg, intMsgType, strMsgTitle) ' Get user response If intResponse = vbYes Then ' User confirms the deletion adodcAttendees.Recordset.Delete ' so delete the record adodcAttendees.Recordset.MoveNext ' and move on to the next one If adodcAttendees.Recordset.EOF Then ' If it's the end of the recordset adodcAttendees.Recordset.Requery ' then rebuild it adodcAttendees.Recordset.MoveLast ' and move to the last record End If strMsg = "Record has been deleted" Else strMsg = "Record delete cancelled" End If MsgBox strMsg, , "Record Delete" ' Display action taken. exit_cmdDelete_Click: Exit Sub err_cmdDelete_Click: strMsg = "Error " & Err & vbCrLf strMsg = strMsg & Error$(Err) & vbCrLf strMsg = strMsg & "Delete unsuccessful" MsgBox strMsg, , "Delete" ' Remove deletion marker adodcAttendees.Recordset.CancelUpdate GoTo exit_cmdDelete_Click End Sub
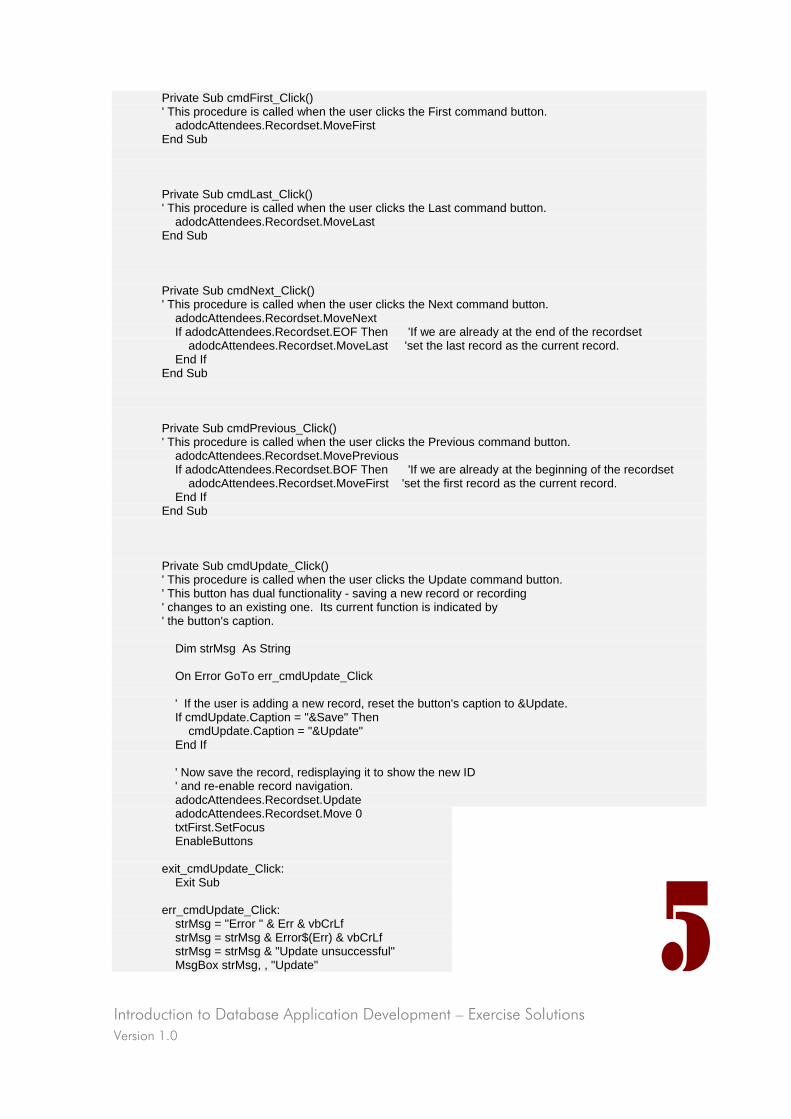
Introduction to Database Application Development – Exercise Solutions Version 1.0
5
Private Sub cmdFirst_Click() ' This procedure is called when the user clicks the First command button. adodcAttendees.Recordset.MoveFirst End Sub Private Sub cmdLast_Click() ' This procedure is called when the user clicks the Last command button. adodcAttendees.Recordset.MoveLast End Sub Private Sub cmdNext_Click() ' This procedure is called when the user clicks the Next command button. adodcAttendees.Recordset.MoveNext If adodcAttendees.Recordset.EOF Then 'If we are already at the end of the recordset adodcAttendees.Recordset.MoveLast 'set the last record as the current record. End If End Sub Private Sub cmdPrevious_Click() ' This procedure is called when the user clicks the Previous command button. adodcAttendees.Recordset.MovePrevious If adodcAttendees.Recordset.BOF Then 'If we are already at the beginning of the recordset adodcAttendees.Recordset.MoveFirst 'set the first record as the current record. End If End Sub Private Sub cmdUpdate_Click() ' This procedure is called when the user clicks the Update command button. ' This button has dual functionality - saving a new record or recording ' changes to an existing one. Its current function is indicated by ' the button's caption. Dim strMsg As String On Error GoTo err_cmdUpdate_Click ' If the user is adding a new record, reset the button's caption to &Update. If cmdUpdate.Caption = "&Save" Then cmdUpdate.Caption = "&Update" End If ' Now save the record, redisplaying it to show the new ID ' and re-enable record navigation. adodcAttendees.Recordset.Update adodcAttendees.Recordset.Move 0 txtFirst.SetFocus EnableButtons exit_cmdUpdate_Click: Exit Sub err_cmdUpdate_Click: strMsg = "Error " & Err & vbCrLf strMsg = strMsg & Error$(Err) & vbCrLf strMsg = strMsg & "Update unsuccessful" MsgBox strMsg, , "Update"
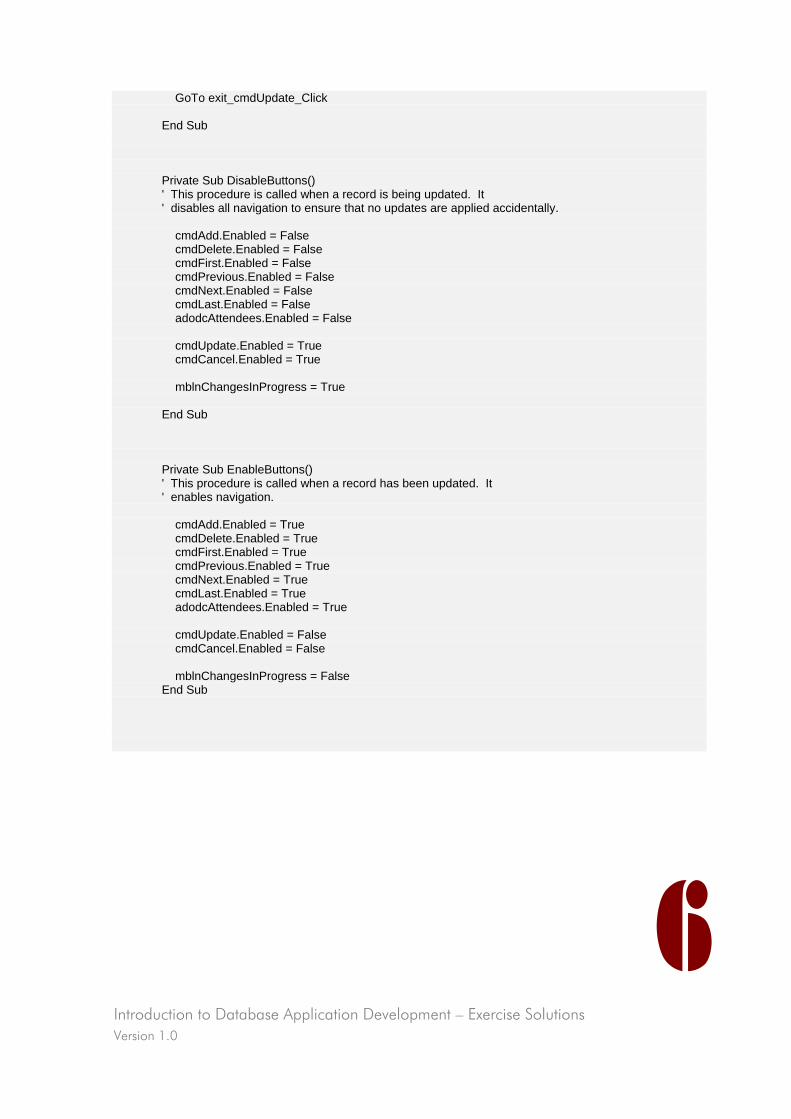
Introduction to Database Application Development – Exercise Solutions Version 1.0
6
GoTo exit_cmdUpdate_Click End Sub Private Sub DisableButtons() ' This procedure is called when a record is being updated. It ' disables all navigation to ensure that no updates are applied accidentally. cmdAdd.Enabled = False cmdDelete.Enabled = False cmdFirst.Enabled = False cmdPrevious.Enabled = False cmdNext.Enabled = False cmdLast.Enabled = False adodcAttendees.Enabled = False cmdUpdate.Enabled = True cmdCancel.Enabled = True mblnChangesInProgress = True End Sub Private Sub EnableButtons() ' This procedure is called when a record has been updated. It ' enables navigation. cmdAdd.Enabled = True cmdDelete.Enabled = True cmdFirst.Enabled = True cmdPrevious.Enabled = True cmdNext.Enabled = True cmdLast.Enabled = True adodcAttendees.Enabled = True cmdUpdate.Enabled = False cmdCancel.Enabled = False mblnChangesInProgress = False End Sub
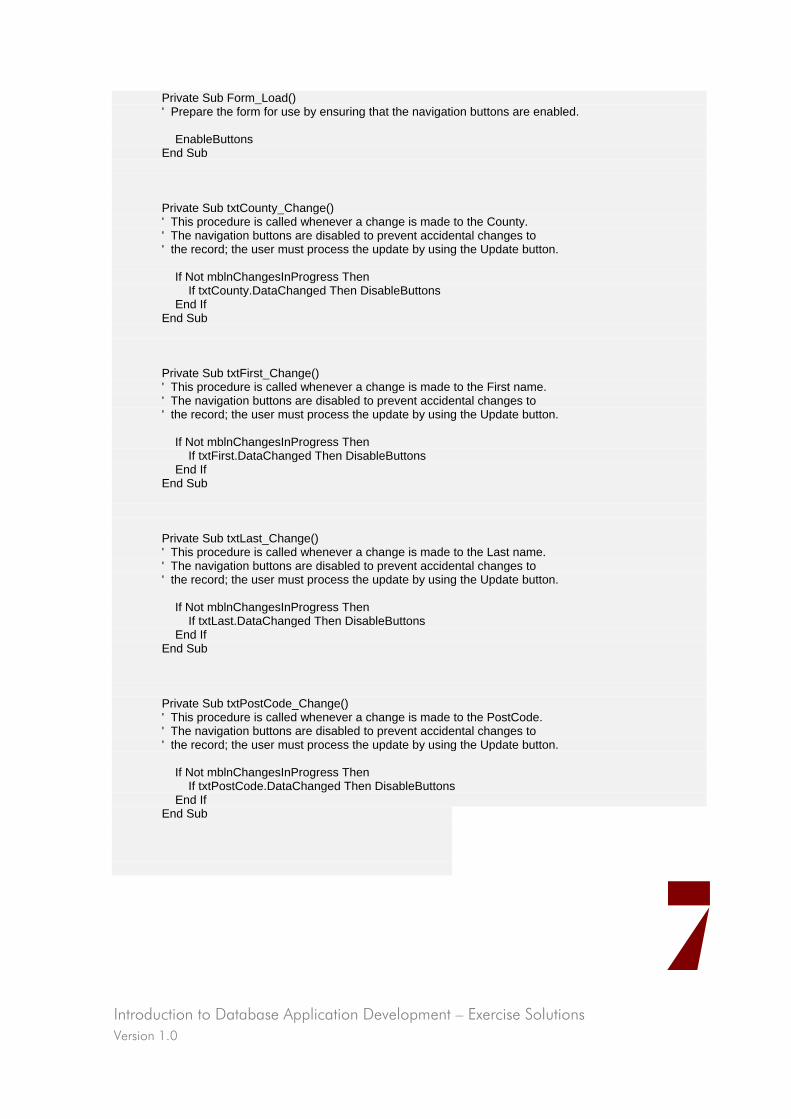
Introduction to Database Application Development – Exercise Solutions Version 1.0
7
Private Sub Form_Load() ' Prepare the form for use by ensuring that the navigation buttons are enabled. EnableButtons End Sub Private Sub txtCounty_Change() ' This procedure is called whenever a change is made to the County. ' The navigation buttons are disabled to prevent accidental changes to ' the record; the user must process the update by using the Update button. If Not mblnChangesInProgress Then If txtCounty.DataChanged Then DisableButtons End If End Sub Private Sub txtFirst_Change() ' This procedure is called whenever a change is made to the First name. ' The navigation buttons are disabled to prevent accidental changes to ' the record; the user must process the update by using the Update button. If Not mblnChangesInProgress Then If txtFirst.DataChanged Then DisableButtons End If End Sub Private Sub txtLast_Change() ' This procedure is called whenever a change is made to the Last name. ' The navigation buttons are disabled to prevent accidental changes to ' the record; the user must process the update by using the Update button. If Not mblnChangesInProgress Then If txtLast.DataChanged Then DisableButtons End If End Sub Private Sub txtPostCode_Change() ' This procedure is called whenever a change is made to the PostCode. ' The navigation buttons are disabled to prevent accidental changes to ' the record; the user must process the update by using the Update button. If Not mblnChangesInProgress Then If txtPostCode.DataChanged Then DisableButtons End If End Sub
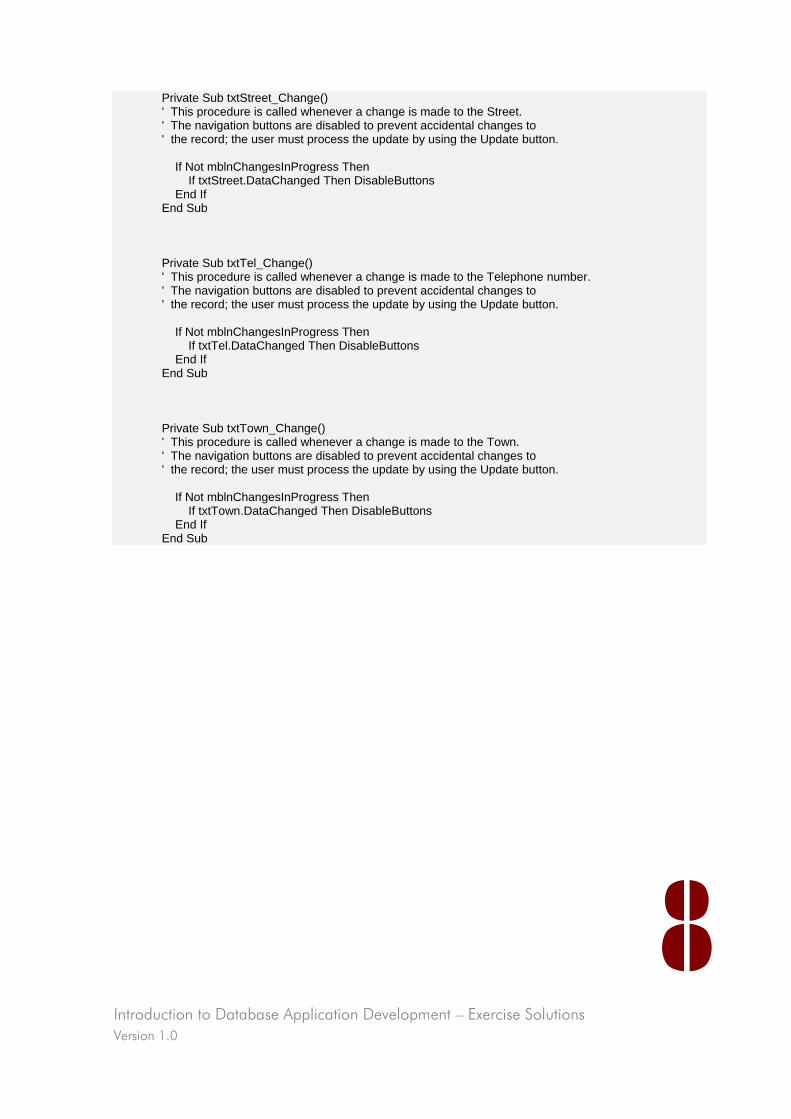
Introduction to Database Application Development – Exercise Solutions Version 1.0
8
Private Sub txtStreet_Change() ' This procedure is called whenever a change is made to the Street. ' The navigation buttons are disabled to prevent accidental changes to ' the record; the user must process the update by using the Update button. If Not mblnChangesInProgress Then If txtStreet.DataChanged Then DisableButtons End If End Sub Private Sub txtTel_Change() ' This procedure is called whenever a change is made to the Telephone number. ' The navigation buttons are disabled to prevent accidental changes to ' the record; the user must process the update by using the Update button. If Not mblnChangesInProgress Then If txtTel.DataChanged Then DisableButtons End If End Sub Private Sub txtTown_Change() ' This procedure is called whenever a change is made to the Town. ' The navigation buttons are disabled to prevent accidental changes to ' the record; the user must process the update by using the Update button. If Not mblnChangesInProgress Then If txtTown.DataChanged Then DisableButtons End If End Sub
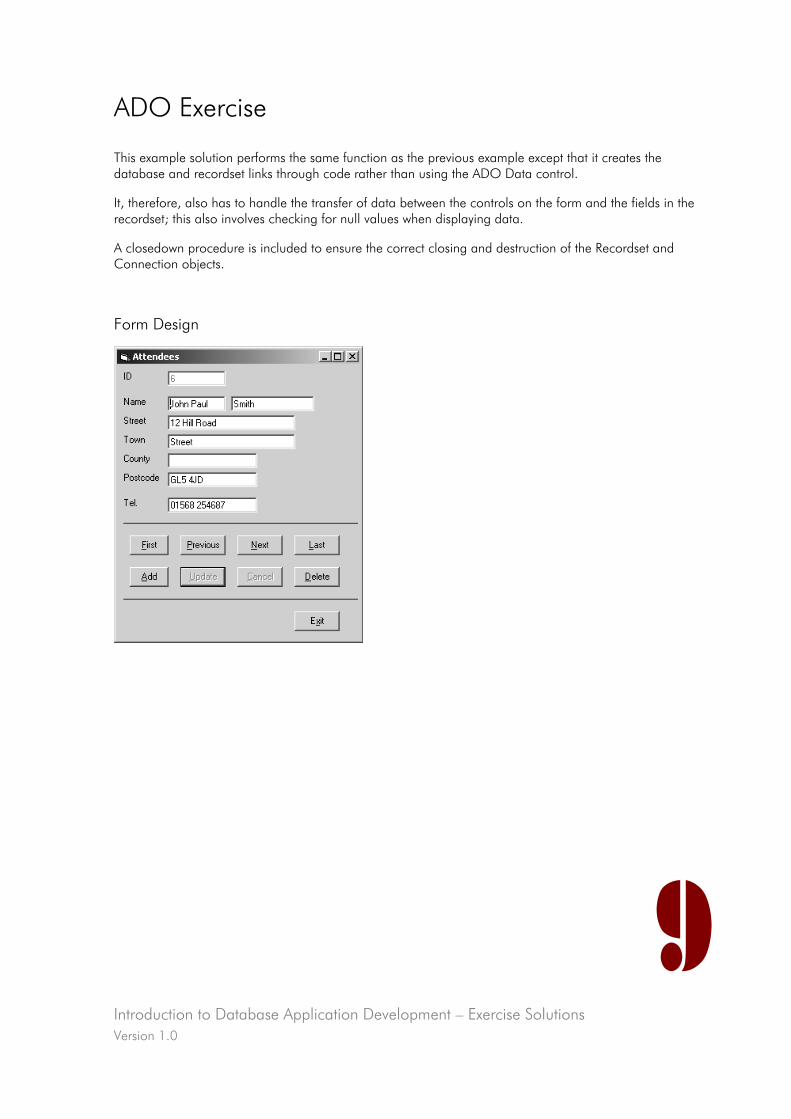
Introduction to Database Application Development – Exercise Solutions Version 1.0
ADO Exercise
This example solution performs the same function as the previous example except that it creates the database and recordset links through code rather than using the ADO Data control.
It, therefore, also has to handle the transfer of data between the controls on the form and the fields in the recordset; this also involves checking for null values when displaying data.
A closedown procedure is included to ensure the correct closing and destruction of the Recordset and Connection objects.
Form Design
9
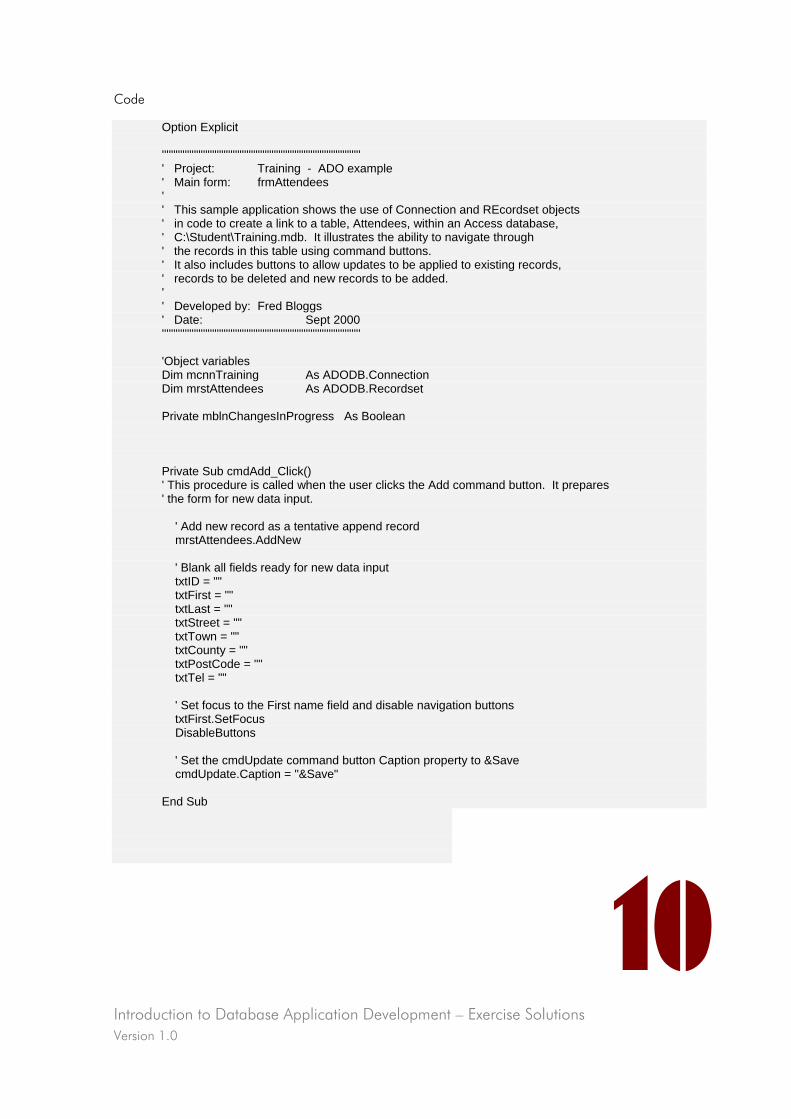
Introduction to Database Application Development – Exercise Solutions Version 1.0
10
Code
Option Explicit ''''''''''''''''''''''''''''''''''''''''''''''''''''''''''''''''''''''''''''''''''''''' ' Project: Training - ADO example ' Main form: frmAttendees ' ' This sample application shows the use of Connection and REcordset objects ' in code to create a link to a table, Attendees, within an Access database, ' C:\Student\Training.mdb. It illustrates the ability to navigate through ' the records in this table using command buttons. ' It also includes buttons to allow updates to be applied to existing records, ' records to be deleted and new records to be added. ' ' Developed by: Fred Bloggs ' Date: Sept 2000 ''''''''''''''''''''''''''''''''''''''''''''''''''''''''''''''''''''''''''''''''''''''' 'Object variables Dim mcnnTraining As ADODB.Connection Dim mrstAttendees As ADODB.Recordset Private mblnChangesInProgress As Boolean Private Sub cmdAdd_Click() ' This procedure is called when the user clicks the Add command button. It prepares ' the form for new data input. ' Add new record as a tentative append record mrstAttendees.AddNew ' Blank all fields ready for new data input txtID = "" txtFirst = "" txtLast = "" txtStreet = "" txtTown = "" txtCounty = "" txtPostCode = "" txtTel = "" ' Set focus to the First name field and disable navigation buttons txtFirst.SetFocus DisableButtons ' Set the cmdUpdate command button Caption property to &Save cmdUpdate.Caption = "&Save" End Sub
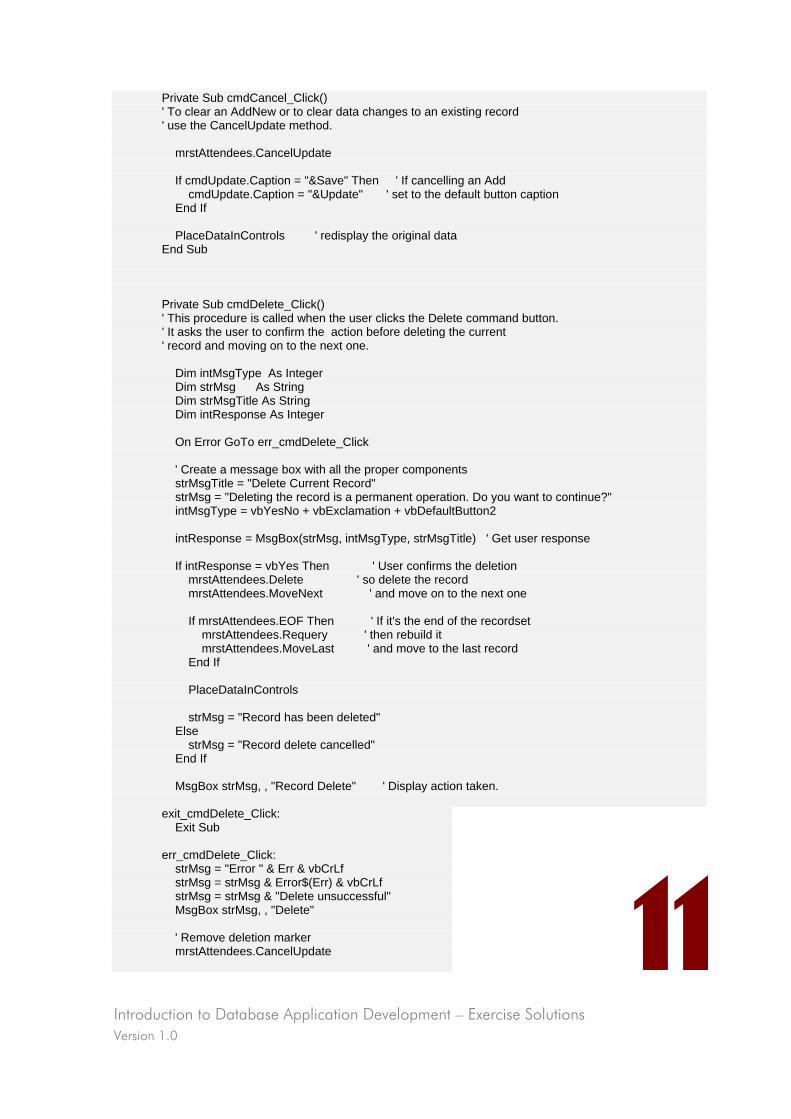
Introduction to Database Application Development – Exercise Solutions Version 1.0
11
Private Sub cmdCancel_Click() ' To clear an AddNew or to clear data changes to an existing record ' use the CancelUpdate method. mrstAttendees.CancelUpdate If cmdUpdate.Caption = "&Save" Then ' If cancelling an Add cmdUpdate.Caption = "&Update" ' set to the default button caption End If PlaceDataInControls ' redisplay the original data End Sub Private Sub cmdDelete_Click() ' This procedure is called when the user clicks the Delete command button. ' It asks the user to confirm the action before deleting the current ' record and moving on to the next one. Dim intMsgType As Integer Dim strMsg As String Dim strMsgTitle As String Dim intResponse As Integer On Error GoTo err_cmdDelete_Click ' Create a message box with all the proper components strMsgTitle = "Delete Current Record" strMsg = "Deleting the record is a permanent operation. Do you want to continue?" intMsgType = vbYesNo + vbExclamation + vbDefaultButton2 intResponse = MsgBox(strMsg, intMsgType, strMsgTitle) ' Get user response If intResponse = vbYes Then ' User confirms the deletion mrstAttendees.Delete ' so delete the record mrstAttendees.MoveNext ' and move on to the next one If mrstAttendees.EOF Then ' If it's the end of the recordset mrstAttendees.Requery ' then rebuild it mrstAttendees.MoveLast ' and move to the last record End If PlaceDataInControls strMsg = "Record has been deleted" Else strMsg = "Record delete cancelled" End If MsgBox strMsg, , "Record Delete" ' Display action taken. exit_cmdDelete_Click: Exit Sub err_cmdDelete_Click: strMsg = "Error " & Err & vbCrLf strMsg = strMsg & Error$(Err) & vbCrLf strMsg = strMsg & "Delete unsuccessful" MsgBox strMsg, , "Delete" ' Remove deletion marker mrstAttendees.CancelUpdate
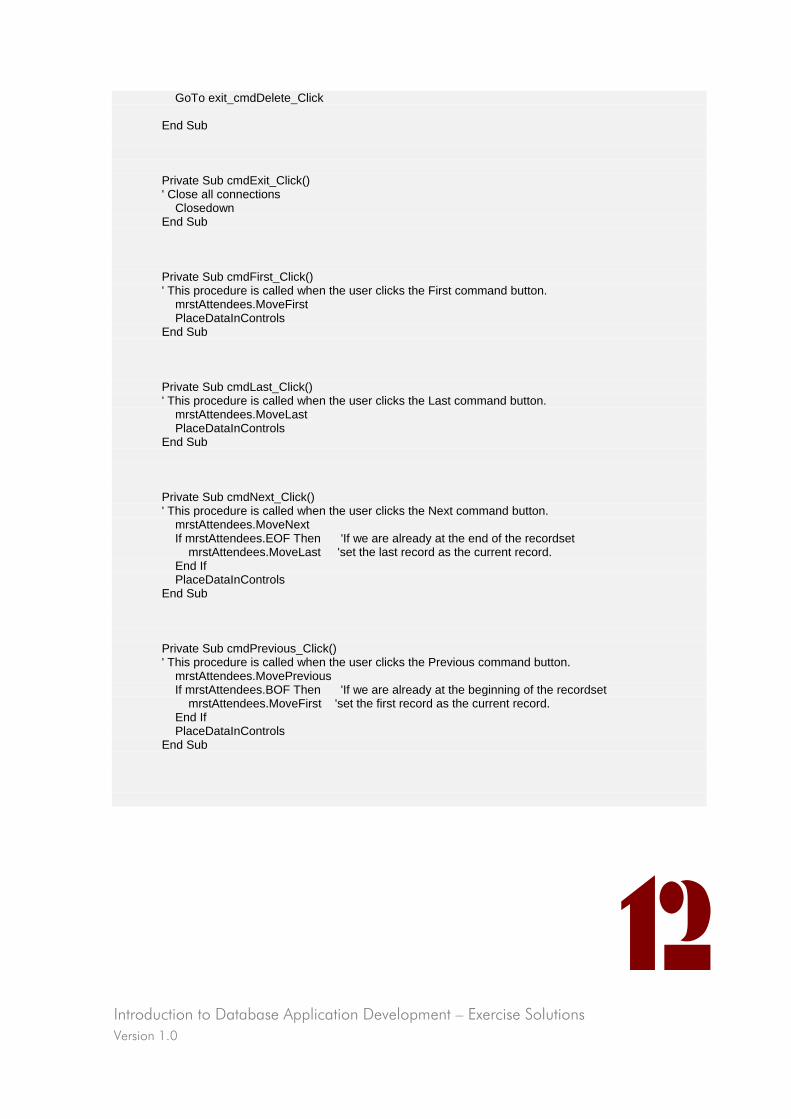
Introduction to Database Application Development – Exercise Solutions Version 1.0
12
GoTo exit_cmdDelete_Click End Sub Private Sub cmdExit_Click() ' Close all connections Closedown End Sub Private Sub cmdFirst_Click() ' This procedure is called when the user clicks the First command button. mrstAttendees.MoveFirst PlaceDataInControls End Sub Private Sub cmdLast_Click() ' This procedure is called when the user clicks the Last command button. mrstAttendees.MoveLast PlaceDataInControls End Sub Private Sub cmdNext_Click() ' This procedure is called when the user clicks the Next command button. mrstAttendees.MoveNext If mrstAttendees.EOF Then 'If we are already at the end of the recordset mrstAttendees.MoveLast 'set the last record as the current record. End If PlaceDataInControls End Sub Private Sub cmdPrevious_Click() ' This procedure is called when the user clicks the Previous command button. mrstAttendees.MovePrevious If mrstAttendees.BOF Then 'If we are already at the beginning of the recordset mrstAttendees.MoveFirst 'set the first record as the current record. End If PlaceDataInControls End Sub

Introduction to Database Application Development – Exercise Solutions Version 1.0
13
Private Sub cmdUpdate_Click() ' This procedure is called when the user clicks the Update command button. ' This button has dual functionality - saving a new record or recording ' changes to an existing one. Its current function is indicated by ' the button's caption. Dim strMsg As String On Error GoTo err_cmdUpdate_Click ' If the user is adding a new record, reset the button's caption to &Update. If cmdUpdate.Caption = "&Save" Then cmdUpdate.Caption = "&Update" End If ' Now move values into record and save it. mrstAttendees.Fields("FirstName").Value = txtFirst.Text mrstAttendees.Fields("LastName").Value = txtLast.Text mrstAttendees.Fields("Street").Value = txtStreet.Text mrstAttendees.Fields("Town").Value = txtTown.Text mrstAttendees.Fields("County").Value = txtCounty.Text mrstAttendees.Fields("PostCode").Value = txtPostCode.Text mrstAttendees.Fields("Tel").Value = txtTel.Text mrstAttendees.Update ' Redisplay the record to show the new ID ' and re-enable record navigation. mrstAttendees.Move 0 PlaceDataInControls txtFirst.SetFocus exit_cmdUpdate_Click: Exit Sub err_cmdUpdate_Click: strMsg = "Error " & Err & vbCrLf strMsg = strMsg & Error$(Err) & vbCrLf strMsg = strMsg & "Error during update" MsgBox strMsg, , "Update" GoTo exit_cmdUpdate_Click End Sub Private Sub Closedown() ' Close the recordset and database connection and end the program. mrstAttendees.Close Set mrstAttendees = Nothing mcnnTraining.Close Set mcnnTraining = Nothing End End Sub Private Sub DisableButtons() ' This procedure is called when a record is being
updated. It
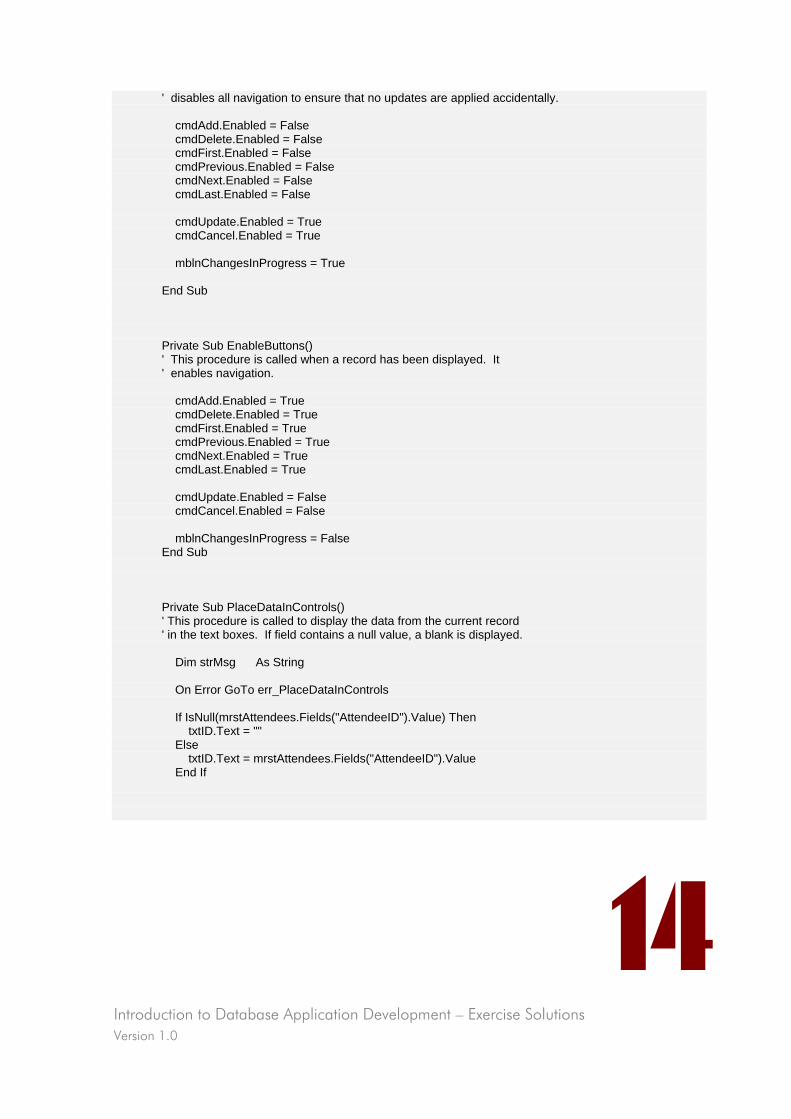
Introduction to Database Application Development – Exercise Solutions Version 1.0
14
' disables all navigation to ensure that no updates are applied accidentally. cmdAdd.Enabled = False cmdDelete.Enabled = False cmdFirst.Enabled = False cmdPrevious.Enabled = False cmdNext.Enabled = False cmdLast.Enabled = False cmdUpdate.Enabled = True cmdCancel.Enabled = True mblnChangesInProgress = True End Sub Private Sub EnableButtons() ' This procedure is called when a record has been displayed. It ' enables navigation. cmdAdd.Enabled = True cmdDelete.Enabled = True cmdFirst.Enabled = True cmdPrevious.Enabled = True cmdNext.Enabled = True cmdLast.Enabled = True cmdUpdate.Enabled = False cmdCancel.Enabled = False mblnChangesInProgress = False End Sub Private Sub PlaceDataInControls() ' This procedure is called to display the data from the current record ' in the text boxes. If field contains a null value, a blank is displayed. Dim strMsg As String On Error GoTo err_PlaceDataInControls If IsNull(mrstAttendees.Fields("AttendeeID").Value) Then txtID.Text = "" Else txtID.Text = mrstAttendees.Fields("AttendeeID").Value End If
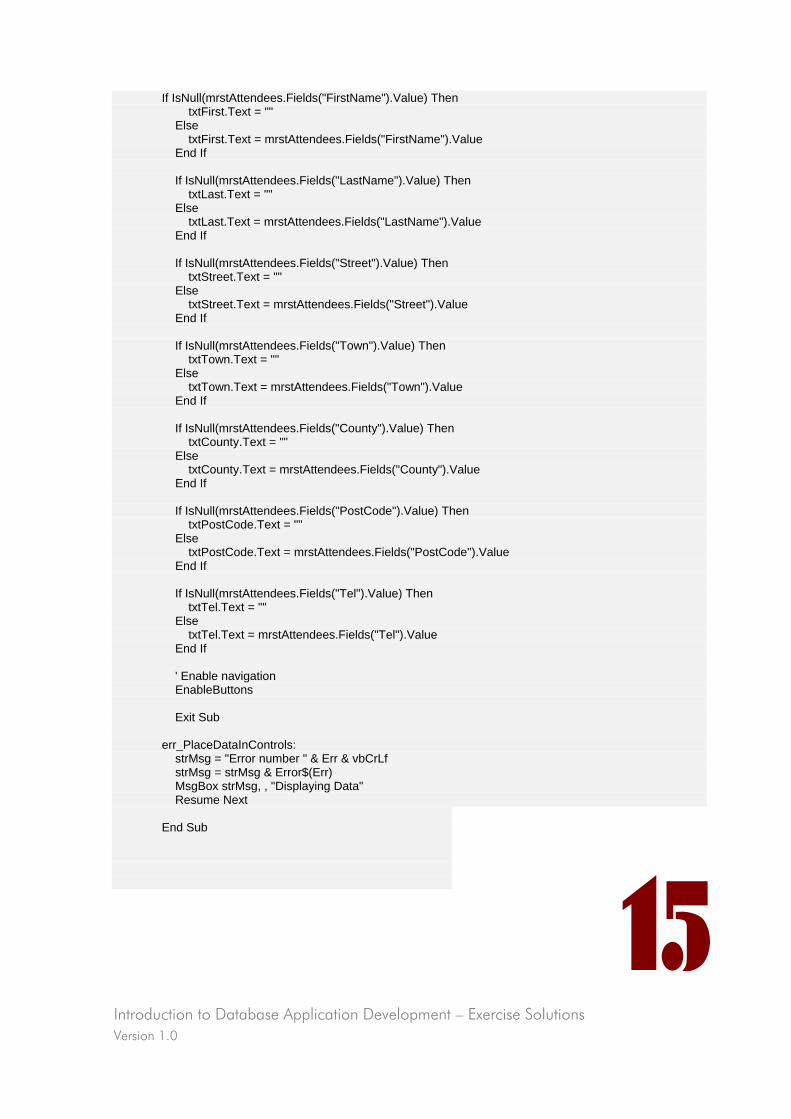
Introduction to Database Application Development – Exercise Solutions Version 1.0
15
If IsNull(mrstAttendees.Fields("FirstName").Value) Then txtFirst.Text = "" Else txtFirst.Text = mrstAttendees.Fields("FirstName").Value End If If IsNull(mrstAttendees.Fields("LastName").Value) Then txtLast.Text = "" Else txtLast.Text = mrstAttendees.Fields("LastName").Value End If If IsNull(mrstAttendees.Fields("Street").Value) Then txtStreet.Text = "" Else txtStreet.Text = mrstAttendees.Fields("Street").Value End If If IsNull(mrstAttendees.Fields("Town").Value) Then txtTown.Text = "" Else txtTown.Text = mrstAttendees.Fields("Town").Value End If If IsNull(mrstAttendees.Fields("County").Value) Then txtCounty.Text = "" Else txtCounty.Text = mrstAttendees.Fields("County").Value End If If IsNull(mrstAttendees.Fields("PostCode").Value) Then txtPostCode.Text = "" Else txtPostCode.Text = mrstAttendees.Fields("PostCode").Value End If If IsNull(mrstAttendees.Fields("Tel").Value) Then txtTel.Text = "" Else txtTel.Text = mrstAttendees.Fields("Tel").Value End If ' Enable navigation EnableButtons Exit Sub err_PlaceDataInControls: strMsg = "Error number " & Err & vbCrLf strMsg = strMsg & Error$(Err) MsgBox strMsg, , "Displaying Data" Resume Next End Sub
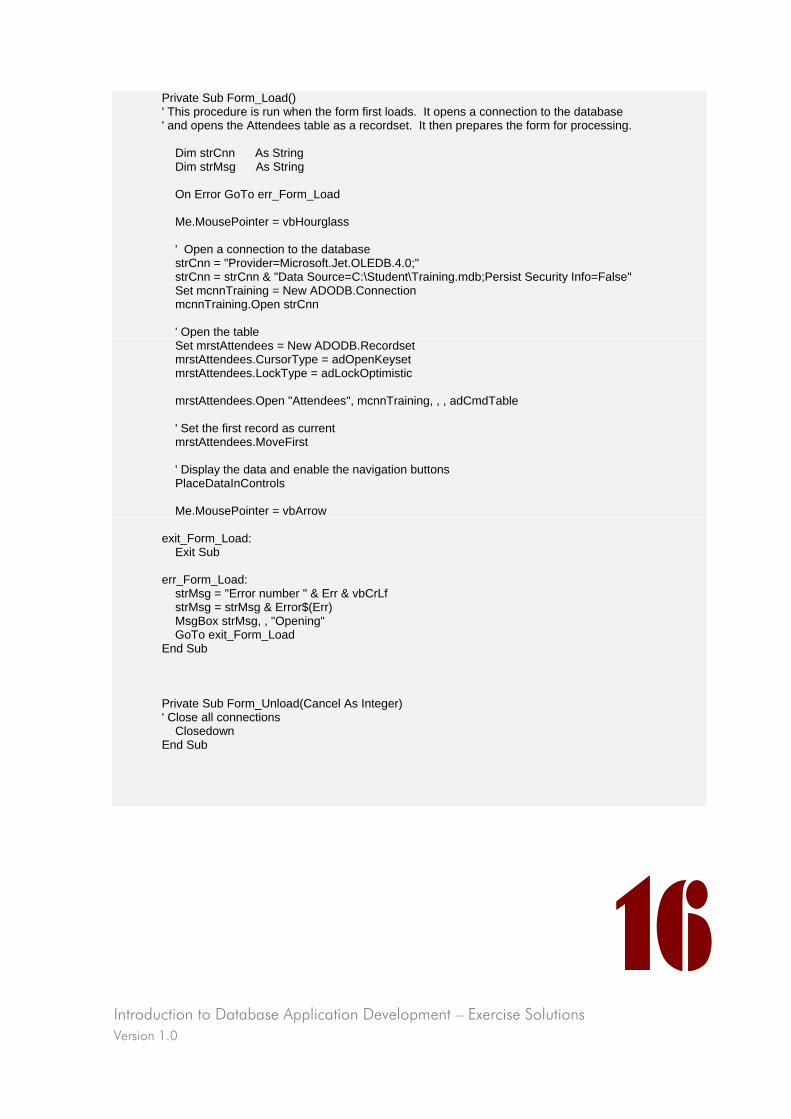
Introduction to Database Application Development – Exercise Solutions Version 1.0
16
Private Sub Form_Load() ' This procedure is run when the form first loads. It opens a connection to the database ' and opens the Attendees table as a recordset. It then prepares the form for processing. Dim strCnn As String Dim strMsg As String On Error GoTo err_Form_Load Me.MousePointer = vbHourglass ' Open a connection to the database strCnn = "Provider=Microsoft.Jet.OLEDB.4.0;" strCnn = strCnn & "Data Source=C:\Student\Training.mdb;Persist Security Info=False" Set mcnnTraining = New ADODB.Connection mcnnTraining.Open strCnn ' Open the table Set mrstAttendees = New ADODB.Recordset mrstAttendees.CursorType = adOpenKeyset mrstAttendees.LockType = adLockOptimistic mrstAttendees.Open "Attendees", mcnnTraining, , , adCmdTable ' Set the first record as current mrstAttendees.MoveFirst ' Display the data and enable the navigation buttons PlaceDataInControls Me.MousePointer = vbArrow exit_Form_Load: Exit Sub err_Form_Load: strMsg = "Error number " & Err & vbCrLf strMsg = strMsg & Error$(Err) MsgBox strMsg, , "Opening" GoTo exit_Form_Load End Sub Private Sub Form_Unload(Cancel As Integer) ' Close all connections Closedown End Sub
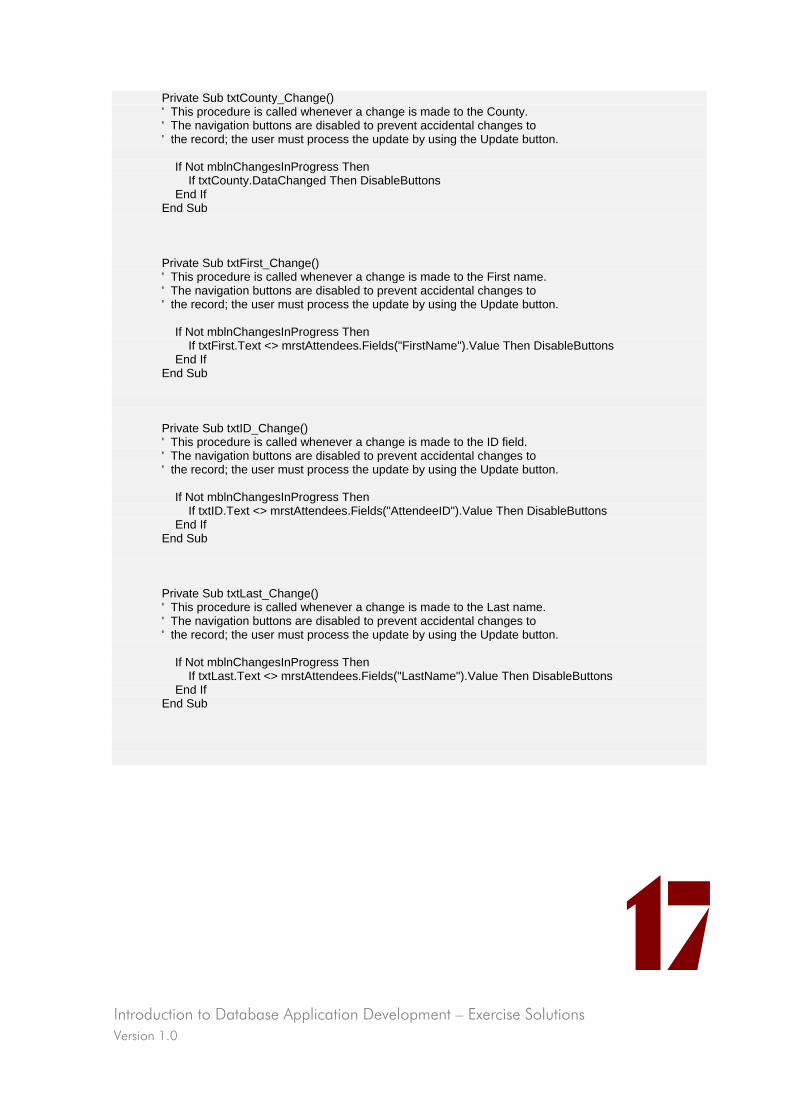
Introduction to Database Application Development – Exercise Solutions Version 1.0
17
Private Sub txtCounty_Change() ' This procedure is called whenever a change is made to the County. ' The navigation buttons are disabled to prevent accidental changes to ' the record; the user must process the update by using the Update button. If Not mblnChangesInProgress Then If txtCounty.DataChanged Then DisableButtons End If End Sub Private Sub txtFirst_Change() ' This procedure is called whenever a change is made to the First name. ' The navigation buttons are disabled to prevent accidental changes to ' the record; the user must process the update by using the Update button. If Not mblnChangesInProgress Then If txtFirst.Text <> mrstAttendees.Fields("FirstName").Value Then DisableButtons End If End Sub Private Sub txtID_Change() ' This procedure is called whenever a change is made to the ID field. ' The navigation buttons are disabled to prevent accidental changes to ' the record; the user must process the update by using the Update button. If Not mblnChangesInProgress Then If txtID.Text <> mrstAttendees.Fields("AttendeeID").Value Then DisableButtons End If End Sub Private Sub txtLast_Change() ' This procedure is called whenever a change is made to the Last name. ' The navigation buttons are disabled to prevent accidental changes to ' the record; the user must process the update by using the Update button. If Not mblnChangesInProgress Then If txtLast.Text <> mrstAttendees.Fields("LastName").Value Then DisableButtons End If End Sub
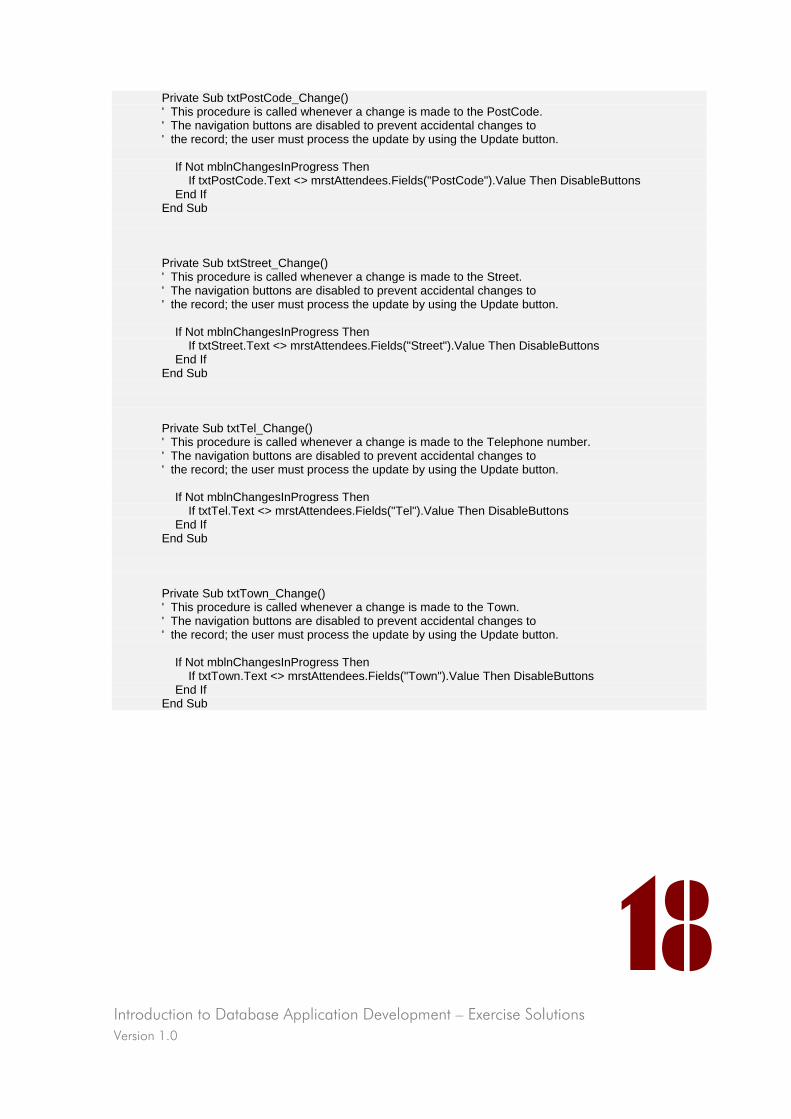
Introduction to Database Application Development – Exercise Solutions Version 1.0
18
Private Sub txtPostCode_Change() ' This procedure is called whenever a change is made to the PostCode. ' The navigation buttons are disabled to prevent accidental changes to ' the record; the user must process the update by using the Update button. If Not mblnChangesInProgress Then If txtPostCode.Text <> mrstAttendees.Fields("PostCode").Value Then DisableButtons End If End Sub Private Sub txtStreet_Change() ' This procedure is called whenever a change is made to the Street. ' The navigation buttons are disabled to prevent accidental changes to ' the record; the user must process the update by using the Update button. If Not mblnChangesInProgress Then If txtStreet.Text <> mrstAttendees.Fields("Street").Value Then DisableButtons End If End Sub Private Sub txtTel_Change() ' This procedure is called whenever a change is made to the Telephone number. ' The navigation buttons are disabled to prevent accidental changes to ' the record; the user must process the update by using the Update button. If Not mblnChangesInProgress Then If txtTel.Text <> mrstAttendees.Fields("Tel").Value Then DisableButtons End If End Sub Private Sub txtTown_Change() ' This procedure is called whenever a change is made to the Town. ' The navigation buttons are disabled to prevent accidental changes to ' the record; the user must process the update by using the Update button. If Not mblnChangesInProgress Then If txtTown.Text <> mrstAttendees.Fields("Town").Value Then DisableButtons End If End Sub

Visual Basic 6 Training Manual
Version 1.0