cosmos reference manual - globalbase.org · cosmos reference manual hirohisa mori joshua at...
TRANSCRIPT

COSMOS Reference Manual
Hirohisa Morijoshua at globalbase.org
Transrated byReiko Inoue Bendtsen c/o Suzaku Translations
(http://www.suzaku-translations.com/)
Edition 2010-12-01
Contents
1 Overview 31.1 Abstract and Goal . . . . . . . . . . . . . . . . . . . . . . . . . . . . . . . . . . . . . . . . 31.2 Human Requirements . . . . . . . . . . . . . . . . . . . . . . . . . . . . . . . . . . . . . . 31.3 System Requirements . . . . . . . . . . . . . . . . . . . . . . . . . . . . . . . . . . . . . . 3
2 Basic Reference Manual 42.1 Abstract . . . . . . . . . . . . . . . . . . . . . . . . . . . . . . . . . . . . . . . . . . . . . . 42.2 Menu . . . . . . . . . . . . . . . . . . . . . . . . . . . . . . . . . . . . . . . . . . . . . . . 5
2.2.1 File Menu . . . . . . . . . . . . . . . . . . . . . . . . . . . . . . . . . . . . . . . . . 52.2.2 Edit Menu . . . . . . . . . . . . . . . . . . . . . . . . . . . . . . . . . . . . . . . . 62.2.3 Warp Menu . . . . . . . . . . . . . . . . . . . . . . . . . . . . . . . . . . . . . . . . 72.2.4 View Menu . . . . . . . . . . . . . . . . . . . . . . . . . . . . . . . . . . . . . . . . 92.2.5 Window Menu . . . . . . . . . . . . . . . . . . . . . . . . . . . . . . . . . . . . . . 102.2.6 Help Menu . . . . . . . . . . . . . . . . . . . . . . . . . . . . . . . . . . . . . . . . 11
3 Basic Window Reference 133.1 Abstract . . . . . . . . . . . . . . . . . . . . . . . . . . . . . . . . . . . . . . . . . . . . . . 133.2 Window . . . . . . . . . . . . . . . . . . . . . . . . . . . . . . . . . . . . . . . . . . . . . . 14
3.2.1 Browser Window . . . . . . . . . . . . . . . . . . . . . . . . . . . . . . . . . . . . . 143.2.2 Search Conditions Tab . . . . . . . . . . . . . . . . . . . . . . . . . . . . . . . . . . 163.2.3 Displayed Coordinates Tab . . . . . . . . . . . . . . . . . . . . . . . . . . . . . . . 173.2.4 Query Edit Window (Floating) . . . . . . . . . . . . . . . . . . . . . . . . . . . . . 193.2.5 Warp Menu Edit window . . . . . . . . . . . . . . . . . . . . . . . . . . . . . . . . 213.2.6 Authentication Dialog . . . . . . . . . . . . . . . . . . . . . . . . . . . . . . . . . . 23
4 Preferences Dialog Reference 274.1 Abstract . . . . . . . . . . . . . . . . . . . . . . . . . . . . . . . . . . . . . . . . . . . . . . 274.2 Window . . . . . . . . . . . . . . . . . . . . . . . . . . . . . . . . . . . . . . . . . . . . . . 29
4.2.1 Preferences Dialog/Home URL Tab . . . . . . . . . . . . . . . . . . . . . . . . . . 294.2.2 Preferences Dialog/Appearance Tab . . . . . . . . . . . . . . . . . . . . . . . . . . 324.2.3 Preferences Dialog/Cache Tab . . . . . . . . . . . . . . . . . . . . . . . . . . . . . 334.2.4 Preferences Dialog/Proxy Tab . . . . . . . . . . . . . . . . . . . . . . . . . . . . . 354.2.5 Preferences Dialog/Proxy Tab/HTTP Proxy Tab . . . . . . . . . . . . . . . . . . . 374.2.6 Preferences Dialog/Proxy Tab/Native Proxy Tab . . . . . . . . . . . . . . . . . . . 39
5 Glossary of Computer Terms 415.1 Words: OS . . . . . . . . . . . . . . . . . . . . . . . . . . . . . . . . . . . . . . . . . . . . 415.2 Words: Resource . . . . . . . . . . . . . . . . . . . . . . . . . . . . . . . . . . . . . . . . . 415.3 Words: Application . . . . . . . . . . . . . . . . . . . . . . . . . . . . . . . . . . . . . . . . 415.4 Words: Basic Software . . . . . . . . . . . . . . . . . . . . . . . . . . . . . . . . . . . . . . 415.5 Words: Installation . . . . . . . . . . . . . . . . . . . . . . . . . . . . . . . . . . . . . . . . 415.6 Words: Software . . . . . . . . . . . . . . . . . . . . . . . . . . . . . . . . . . . . . . . . . 425.7 Words: Hardware . . . . . . . . . . . . . . . . . . . . . . . . . . . . . . . . . . . . . . . . . 425.8 Words: Data . . . . . . . . . . . . . . . . . . . . . . . . . . . . . . . . . . . . . . . . . . . 425.9 Words: Algorithm . . . . . . . . . . . . . . . . . . . . . . . . . . . . . . . . . . . . . . . . 42
1
5.10 Words: Program . . . . . . . . . . . . . . . . . . . . . . . . . . . . . . . . . . . . . . . . . 425.11 Words: Menu . . . . . . . . . . . . . . . . . . . . . . . . . . . . . . . . . . . . . . . . . . . 425.12 Words: Graphical Interface . . . . . . . . . . . . . . . . . . . . . . . . . . . . . . . . . . . 425.13 Words: User Interface . . . . . . . . . . . . . . . . . . . . . . . . . . . . . . . . . . . . . . 425.14 Words: Interface . . . . . . . . . . . . . . . . . . . . . . . . . . . . . . . . . . . . . . . . . 435.15 Words: User . . . . . . . . . . . . . . . . . . . . . . . . . . . . . . . . . . . . . . . . . . . . 435.16 Words: Protocol . . . . . . . . . . . . . . . . . . . . . . . . . . . . . . . . . . . . . . . . . 435.17 Words: GUI . . . . . . . . . . . . . . . . . . . . . . . . . . . . . . . . . . . . . . . . . . . . 435.18 Words: Window System . . . . . . . . . . . . . . . . . . . . . . . . . . . . . . . . . . . . . 435.19 Words: Close Box . . . . . . . . . . . . . . . . . . . . . . . . . . . . . . . . . . . . . . . . 445.20 Words: Minimize Box . . . . . . . . . . . . . . . . . . . . . . . . . . . . . . . . . . . . . . 445.21 Words: Icon . . . . . . . . . . . . . . . . . . . . . . . . . . . . . . . . . . . . . . . . . . . . 445.22 Words: Maximize Box . . . . . . . . . . . . . . . . . . . . . . . . . . . . . . . . . . . . . . 455.23 Words: Resize Box . . . . . . . . . . . . . . . . . . . . . . . . . . . . . . . . . . . . . . . . 455.24 Words: Scroll Bar . . . . . . . . . . . . . . . . . . . . . . . . . . . . . . . . . . . . . . . . 455.25 Words: Window . . . . . . . . . . . . . . . . . . . . . . . . . . . . . . . . . . . . . . . . . 455.26 Words: Warp . . . . . . . . . . . . . . . . . . . . . . . . . . . . . . . . . . . . . . . . . . . 455.27 Words: Warp Point . . . . . . . . . . . . . . . . . . . . . . . . . . . . . . . . . . . . . . . . 455.28 Words: Cut and Paste . . . . . . . . . . . . . . . . . . . . . . . . . . . . . . . . . . . . . . 455.29 Words: Clipboard . . . . . . . . . . . . . . . . . . . . . . . . . . . . . . . . . . . . . . . . 465.30 Words: URL . . . . . . . . . . . . . . . . . . . . . . . . . . . . . . . . . . . . . . . . . . . 46
6 Glossary of GLOBALBASE Terms 476.1 Words: GLOBALBASE . . . . . . . . . . . . . . . . . . . . . . . . . . . . . . . . . . . . . 476.2 Words: GLOBALBASE PROJECT . . . . . . . . . . . . . . . . . . . . . . . . . . . . . . . 476.3 Words: GLOBALBASE Architecture . . . . . . . . . . . . . . . . . . . . . . . . . . . . . . 476.4 Words: Coordinate System . . . . . . . . . . . . . . . . . . . . . . . . . . . . . . . . . . . 476.5 Words: Reference System . . . . . . . . . . . . . . . . . . . . . . . . . . . . . . . . . . . . 476.6 Words: Mapping . . . . . . . . . . . . . . . . . . . . . . . . . . . . . . . . . . . . . . . . . 486.7 Words: Matrix . . . . . . . . . . . . . . . . . . . . . . . . . . . . . . . . . . . . . . . . . . 486.8 Words: Node (Matrix) . . . . . . . . . . . . . . . . . . . . . . . . . . . . . . . . . . . . . . 486.9 Words: Dimension Code (Matrix) . . . . . . . . . . . . . . . . . . . . . . . . . . . . . . . . 486.10 Words: Attribute Node (Matrix) . . . . . . . . . . . . . . . . . . . . . . . . . . . . . . . . 486.11 Words: Channel Flag (Matrix) . . . . . . . . . . . . . . . . . . . . . . . . . . . . . . . . . 486.12 Words: Service (Authentication) . . . . . . . . . . . . . . . . . . . . . . . . . . . . . . . . 49
2

Chapter 1
Overview
1.1 Abstract and Goal
The COSMOS User’s Manual explains functions of COSMOS, the dedicated browser for GLOBALBASE.First, install COSMOS. Please refer to ”COSMOS Users Manuals” [1]for how to use COSMOS for variouspurposes.
1.2 Human Requirements
In order to use the COSMOS browser, the user should have basic knowledge about how to handle PCswith MacOSX, Windows, Linux or similar operating systems.
1.3 System Requirements
The COSMOS browser runs under the following operating systems.
1. Windows XP
2. MacOSX
3. Linux
4. FreeBSD
5. Solaris
3
Chapter 2
Basic Reference Manual
2.1 Abstract
This reference manual explains the basic menus of COSMOS.
4

2.2 Menu
2.2.1 File Menu
Menu
Figure 2.1: File Menu
Submenu(s)
• New
• Open
• Save
• Save As
• Page Setup...
• Print...
Environment(s)
• Browser Window (Section 3.2.1)
• Warp Menu Edit Window (Section 3.2.5)
ExplainationThis menu is used for handling file processing and printing. Please note that the print function is not
yet supported ( as of ver.B.b14).The actual dialog boxes opened with the menu items Open and New of the File menu vary depending
on in which window the menu items are selected.ReferencesBugsError
5

2.2.2 Edit Menu
Menu
Figure 2.2: Edit Menu
Submenu(s)
• Cut
• Copy
• Paste
• Clear
• Select All
• Copy Place Info.
Environment(s)
• Browser Window (Section 3.2.1)
• Warp Menu Edit Window (Section 3.2.5)
• @Search Conditions@ Window (Section 3.2.4)
ExplainationThe Edit menu is used to edit an active browser window section 3.2.1 or the Warp Menu Edit window
section 3.2.5 . The menu items provide the standard editing functions of the OS used. Please be awarethat the target of each editing operation varies depending on the active window type.
The Copy Place Info menu item is only valid for the browser window (Section 3.2.1) . If this menuitem is selected in the browser window, the location currently displayed in the browser is copied to theclipboard as a warp point. In the Warp Menu Edit window (Section 3.2.5) , it is possible to insert thiswarp point as a menu item in the Warp menu with the Paste function. If you insert the warp point onthe clipboard into another application, it is inserted as an XML-formatted character string specifying theinformation of the warp point; thus, the information can easily be transferred between applications, sentvia email etc.
The Paste function becomes valid if the focus is on the map currently displayed in the browser window(Section 3.2.1) while a warp point is copied onto the clip board. If you select the Paste function at thispoint, the browser warps to the newly pasted warp point. Note that it is necessary to keep the focuson a map in order to perform this paste operation.
ReferencesBugsError
6

2.2.3 Warp Menu
Menu
Figure 2.3: Warp Menu
Submenu(s)
• Replace Mode
• Insert Mode
• Add Warp Point
• Set Home Position
• Edit Warp Point
• New Warp Group
• Warp destination names and place names
• Loading... [URL] ( a menu appearing in the list)
Environment(s)
• Browser Window (Section 3.2.1)
• Warp Menu Edit Window (Section 3.2.5)
• @Search Conditions@ Window (Section 3.2.4)
ExplainationThe Warp menu is used to add warp points and warp to the currently set warp points. Warp points
can be thought of as bookmarks of WWW browsers.It is possible to toggle between the Replace Mode and Insert Mode by selecting the corresponding
menu items; these modes determine how searching conditions are handled at warping. If the ReplaceMode is selected, all search conditions of the current map that do not match the search conditions set forthe warp position are ignored while warping. If the Insert Mode is selected, the search conditions of thecurrent map are maintained and new search conditions specified for the current warp point are added tothe existing list.
7
Use the Add Warp Point menu item to add the map position and search conditions currentlydisplayed in the browsing panel (Section 3.2.1) as a warp point in the Warp Point menu.
Use the Set Home Position menu item to set the location currently displayed as the ”home position,”which is displayed by default when the browser window is started up.
If you select the Edit Warp Point menu item, the Warp Menu Edit window (Section 3.2.5) appears.In this window, you can change titles of warp points, make detailed settings of positions and rotationangles and so on. Please refer to section 3.2.5 for more information.
The New Warp Group menu item is used to create new warp groups; it is only valid in the WarpMenu Edit (Section 3.2.5) window. In the menu, warp groups are arranged in sub-menus.
Select a warp destination name or location name to warp ( jump) to the warp point specifiedin the menu item. The list of warp destinations may be arranged hierarchically.
The Loading... [URL]” menu may appear in the list of warp menu items. If you select this menu,the browser accesses the URL specified in this menu item, downloads a new warp group and inserts it atthe selected position in the menu. Once a collection of warp points is inserted, it is stored in the settinginformation of each user. The next time COSMOS is started up, the latest collection of warp points isdownloaded automatically.
You can use the Warp Menu Edit window (Section 3.2.5) to stop downloading or change downloaddestinations.
ReferencesBugsError
8
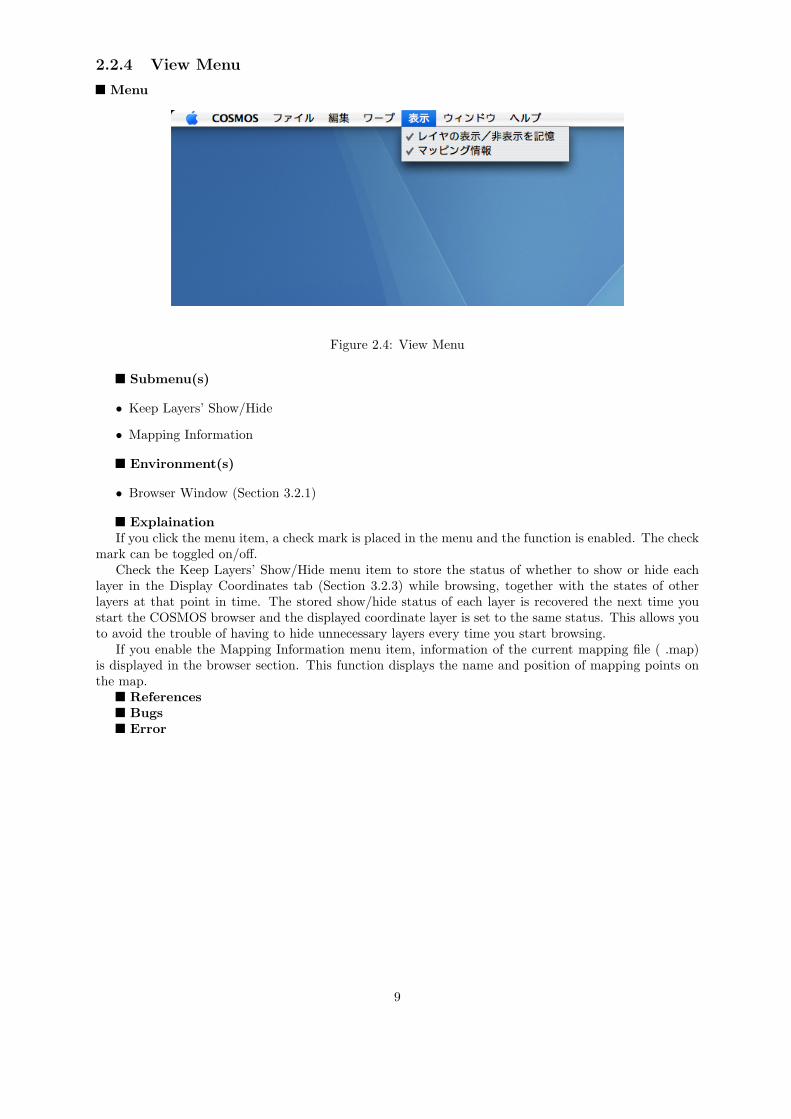
2.2.4 View Menu
Menu
Figure 2.4: View Menu
Submenu(s)
• Keep Layers’ Show/Hide
• Mapping Information
Environment(s)
• Browser Window (Section 3.2.1)
ExplainationIf you click the menu item, a check mark is placed in the menu and the function is enabled. The check
mark can be toggled on/off.Check the Keep Layers’ Show/Hide menu item to store the status of whether to show or hide each
layer in the Display Coordinates tab (Section 3.2.3) while browsing, together with the states of otherlayers at that point in time. The stored show/hide status of each layer is recovered the next time youstart the COSMOS browser and the displayed coordinate layer is set to the same status. This allows youto avoid the trouble of having to hide unnecessary layers every time you start browsing.
If you enable the Mapping Information menu item, information of the current mapping file ( .map)is displayed in the browser section. This function displays the name and position of mapping points onthe map.
ReferencesBugsError
9

2.2.5 Window Menu
Menu
Figure 2.5: Window Menu
Submenu(s)
• Names of currently active windows
Environment(s)
• Browser Window (Section 3.2.1)
• Warp Menu Edit Window (Section 3.2.5)
ExplainationThis menu is used to select a window from the currently active windows. Floating windows are not
displayed in the list, however. The menu items provide the standard window selection functions of theOS used. Thus, in case of Windows, for example, the active windows are added to the window menu listdisplayed at the bottom of the menu rather than within the actual menu.
ReferencesBugsError
10

2.2.6 Help Menu
Menu
Figure 2.6: Help Menu
Submenu(s)
• Online Help
• Release Note
• GLOBALBASE
• Download Information
Environment(s)
• Browser Window (Section 3.2.1)
• Warp Menu Edit Window (Section 3.2.5)
ExplainationThis menu provides links to various Help files of COSMOS, download sites and software information.”Online Help” links to a website where the different GLOBALBASE manuals created thus far,
including this manual, can be found. Fig.2.7”Release Notes” links to the release information of the version of COSMOS currently being exe-
cuted. The release notes explain functions implemented in the current version of COSMOS.”GLOBALBASE” links to the GLOBALBASE Website, (http://www.globalbase.org/).”Download Information” links to the sourceforge.jp Website from where you can download new
releases and so on.ReferencesBugsError
11

Figure 2.7: Online Help
12

Chapter 3
Basic Window Reference
3.1 Abstract
This reference manual explains the basic windows of COSMOS.
13
3.2 Window
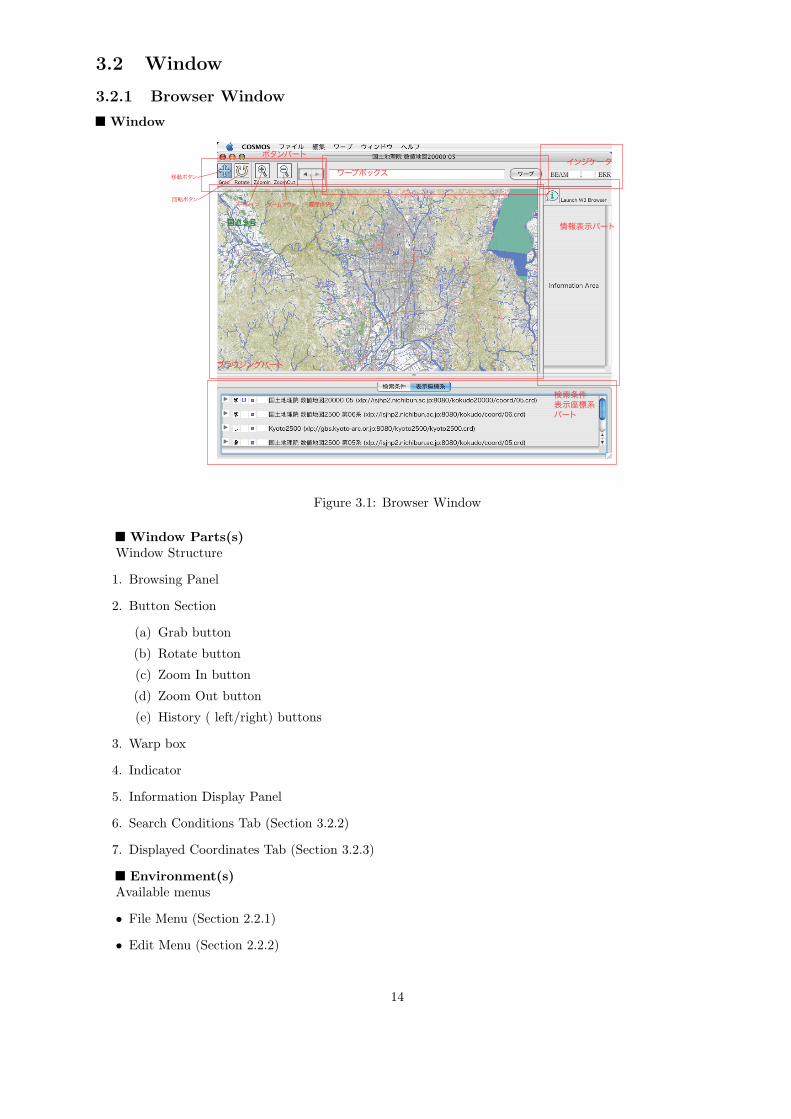
3.2.1 Browser Window
Window
ブラウジングパート
ワープボックスインジケータ
情報表示パート
検索条件表示座標系パート
ボタンパート
移動ボタン
回転ボタンズームイン ズームアウト 履歴ボタン
Figure 3.1: Browser Window
Window Parts(s)Window Structure
1. Browsing Panel
2. Button Section
(a) Grab button
(b) Rotate button
(c) Zoom In button
(d) Zoom Out button
(e) History ( left/right) buttons
3. Warp box
4. Indicator
5. Information Display Panel
6. Search Conditions Tab (Section 3.2.2)
7. Displayed Coordinates Tab (Section 3.2.3)
Environment(s)Available menus
• File Menu (Section 2.2.1)
• Edit Menu (Section 2.2.2)
14
• Edit Warp Point Menu (Section 2.2.3)
• Help Menu (Section 2.2.6)
ExplainationThis is the main window of the COSMOS browser; it is used to browse various geographical informa-
tion.Browsing PanelWhen the Browsing panel is in focus, you can move the displayed map with the mouse. If you click
the Grab button ( colored), you can click and drag the mouse on the map to move the view up/down orleft/right. If you click the Rotate button, you can move the mouse to rotate the map.
Click the Zoom In button to view a smaller area on the map in greater detail. Click the Zoom Outbutton to view a larger area of the map in less detail. The left and right History buttons are used togo to map locations you have visited before. Click the left button to go back to previous map locationsvisited in the past. If you go too far back, you can click the right button to go forward.
Warp BoxUse the Warp box to jump to a desired URL, by entering the coordinates and clicking the Warp
button. At this point, the search conditions are not changed. You can also warp to coordinate URLsusing the Warp menu. Please refer to section 2.2.3 for more information.
Various convenient advanced features are available when entering URLs in the Warp box.
1. Entry Matching with URL Condition Settings
For example, enclose the last part with [] as follows.
xlp://gbs.ur-plaza.osaka-cu.ac.jp:8080/others/noaa/ [type2/image.crd]
This instructs the viewer to set the URL search conditions to the following character string:
xlp://gbs.ur-plaza.osaka-cu.ac.jp:8080/others/noaa/
and then warp to the following location:
xlp://gbs.ur-plaza.osaka-cu.ac.jp:8080/others/noaa/type2/image.crd
As a result, all coordinates under the /others/noaa/ directory are displayed.
Information Display PanelIf you place the mouse on the map, this panel displays the information at the mouse position. If you
want to display the information in a WWW browser, click the Launch W3 Browser button. A WWWbrowser starts up and displays the information.
@Search Conditions@ TabThe Search Conditions tab is used to set criteria for searching for maps that can be downloaded via
the network. In the same panel, the Displayed Coordinates tab is shown as well. These tabs have thesame structure as the Navigation Condition panel in the Home tab of the Preferences (Section 4) dialogdisplayed by clicking the Preferences menu item in the File menu of the browser window as well as WarpMenu Edit window (Section 3.2.5) . It allows changing search conditions while browsing as well. Pleaserefer to section 3.2.2 section 3.2.4 for how to change conditions.
Displayed Coordinates TabThe Displayed Coordinates tab lists layers of maps currently displayed. Click the triangle button
(Section 3.2.1) to display the coordinates of the current mouse position.In general, coordinate systems matching the search conditions set in the @Search Conditions tab
(Section 3.2.2) are selected from the network, and the targets selected to be displayed are listed in theDisplayed Coordinates tab. The matching targets are overlapped and displayed in the Browsing section.
ReferencesBugsError
15
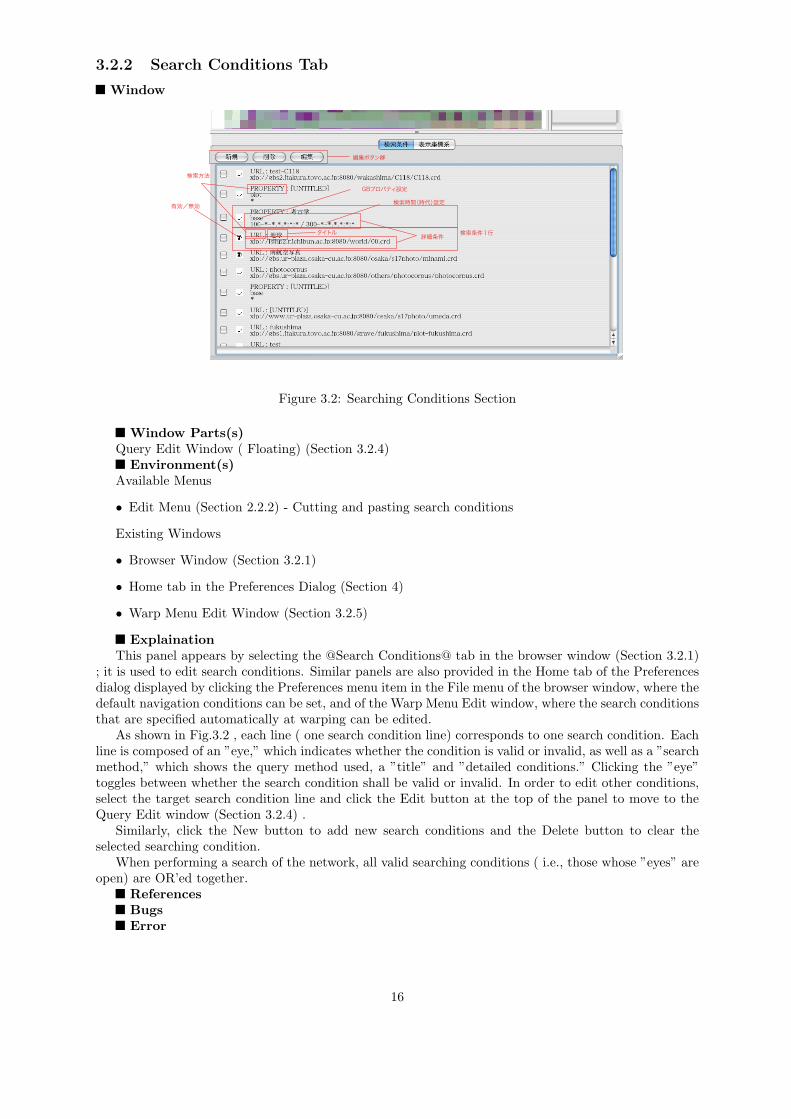
3.2.2 Search Conditions Tab
Window
GBプロパティ設定
検索時間(時代)設定
詳細条件
検索方法
有効/無効
タイトル
編集ボタン群
検索条件1行
Figure 3.2: Searching Conditions Section
Window Parts(s)Query Edit Window ( Floating) (Section 3.2.4)
Environment(s)Available Menus
• Edit Menu (Section 2.2.2) - Cutting and pasting search conditions
Existing Windows
• Browser Window (Section 3.2.1)
• Home tab in the Preferences Dialog (Section 4)
• Warp Menu Edit Window (Section 3.2.5)
ExplainationThis panel appears by selecting the @Search Conditions@ tab in the browser window (Section 3.2.1)
; it is used to edit search conditions. Similar panels are also provided in the Home tab of the Preferencesdialog displayed by clicking the Preferences menu item in the File menu of the browser window, where thedefault navigation conditions can be set, and of the Warp Menu Edit window, where the search conditionsthat are specified automatically at warping can be edited.
As shown in Fig.3.2 , each line ( one search condition line) corresponds to one search condition. Eachline is composed of an ”eye,” which indicates whether the condition is valid or invalid, as well as a ”searchmethod,” which shows the query method used, a ”title” and ”detailed conditions.” Clicking the ”eye”toggles between whether the search condition shall be valid or invalid. In order to edit other conditions,select the target search condition line and click the Edit button at the top of the panel to move to theQuery Edit window (Section 3.2.4) .
Similarly, click the New button to add new search conditions and the Delete button to clear theselected searching condition.
When performing a search of the network, all valid searching conditions ( i.e., those whose ”eyes” areopen) are OR’ed together.
ReferencesBugsError
16
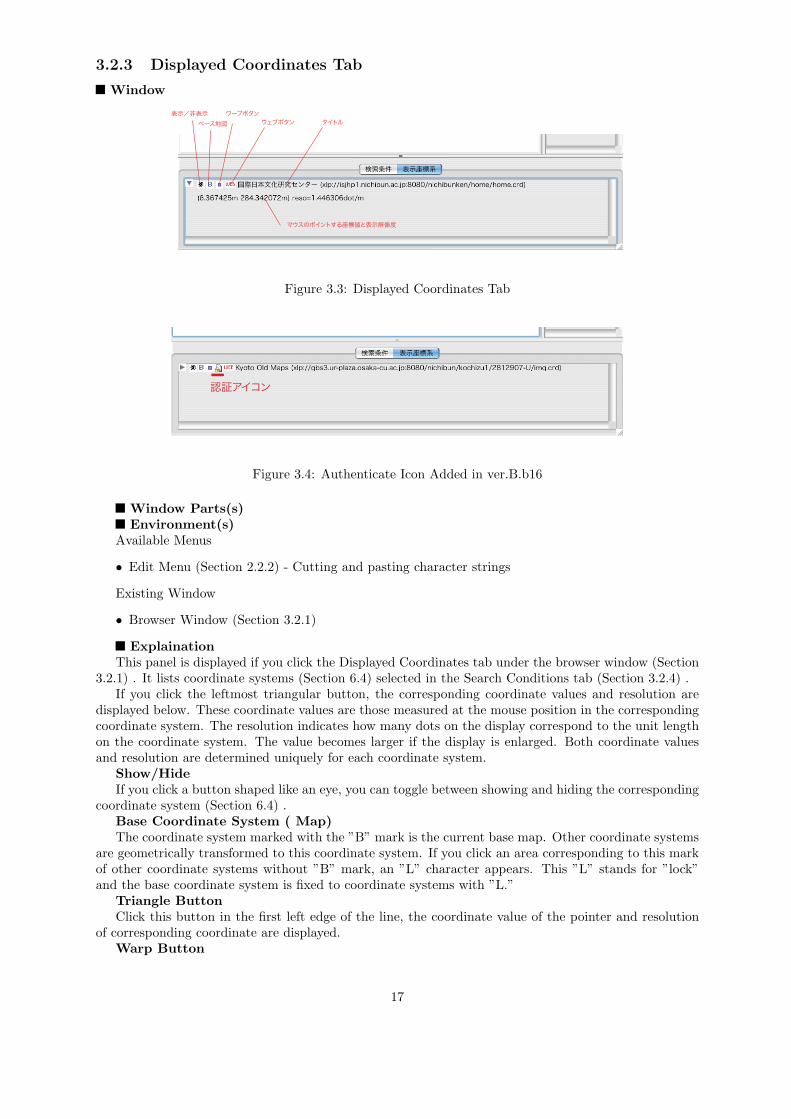
3.2.3 Displayed Coordinates Tab
Window
表示/非表示ベース地図
ワープボタンウェブボタン タイトル
マウスのポイントする座標値と表示解像度
Figure 3.3: Displayed Coordinates Tab
認証アイコン
Figure 3.4: Authenticate Icon Added in ver.B.b16
Window Parts(s)Environment(s)
Available Menus
• Edit Menu (Section 2.2.2) - Cutting and pasting character strings
Existing Window
• Browser Window (Section 3.2.1)
ExplainationThis panel is displayed if you click the Displayed Coordinates tab under the browser window (Section
3.2.1) . It lists coordinate systems (Section 6.4) selected in the Search Conditions tab (Section 3.2.4) .If you click the leftmost triangular button, the corresponding coordinate values and resolution are
displayed below. These coordinate values are those measured at the mouse position in the correspondingcoordinate system. The resolution indicates how many dots on the display correspond to the unit lengthon the coordinate system. The value becomes larger if the display is enlarged. Both coordinate valuesand resolution are determined uniquely for each coordinate system.
Show/HideIf you click a button shaped like an eye, you can toggle between showing and hiding the corresponding
coordinate system (Section 6.4) .Base Coordinate System ( Map)The coordinate system marked with the ”B” mark is the current base map. Other coordinate systems
are geometrically transformed to this coordinate system. If you click an area corresponding to this markof other coordinate systems without ”B” mark, an ”L” character appears. This ”L” stands for ”lock”and the base coordinate system is fixed to coordinate systems with ”L.”
Triangle ButtonClick this button in the first left edge of the line, the coordinate value of the pointer and resolution
of corresponding coordinate are displayed.Warp Button
17
Click this button to warp the map such that the ccorresponding coordinate system is positioned atthe center of the display. This button is helpful when the coordinate system is in the list but too smallto see in the browsing panel.
Web ButtonIf a Website is linked to a coordinate system, the characters ”WEB” appear at the corresponding
position. If you click these characters while enabled, the linked Website opens in a WWW browser.TitleThe title and URL of the coordinate system set in the bibliographic information of the coordinate
system are displayed.Authentication IconFrom ver.B.b16, an authentication icon was added in the Displayed Coordinates tab. This lock
shaped icon appears when contents requiring authentication are included in the coordinate systems listedin this tab. If you click this icon the Authentication dialogue (Section 3.2.6) appears, allowing you toenter authentication details. If the authentication succeeds, the contents requiring authentication can bedisplayed. Please refer to section 3.2.6 for the explanation of the Authentication dialogue.
ReferencesBugsError
18

3.2.4 Query Edit Window (Floating)
Window
Figure 3.5: URL Search
Figure 3.6: GB Property Search
Window Parts(s)Window Structure
1. URL Search Setting
2. GB Property Search Setting
Environment(s)Available Menus
• Edit Menu (Section 2.2.2) - When a text box is selected
19
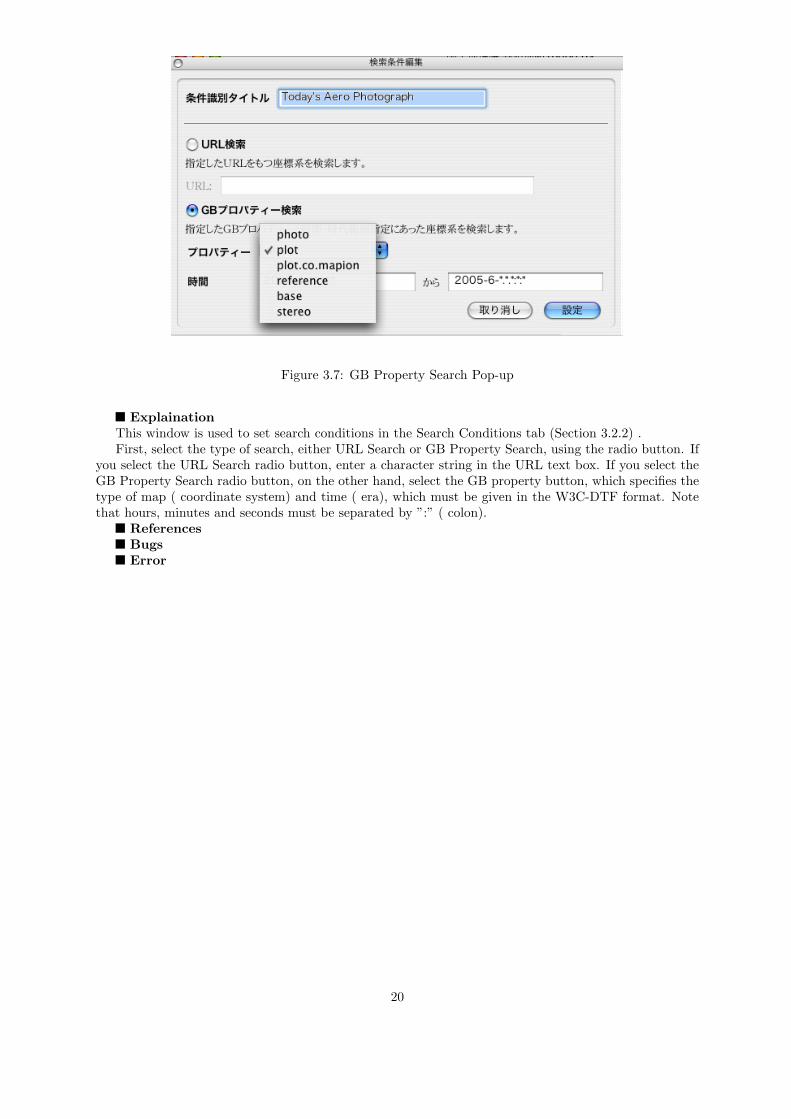
Figure 3.7: GB Property Search Pop-up
ExplainationThis window is used to set search conditions in the Search Conditions tab (Section 3.2.2) .First, select the type of search, either URL Search or GB Property Search, using the radio button. If
you select the URL Search radio button, enter a character string in the URL text box. If you select theGB Property Search radio button, on the other hand, select the GB property button, which specifies thetype of map ( coordinate system) and time ( era), which must be given in the W3C-DTF format. Notethat hours, minutes and seconds must be separated by ”:” ( colon).
ReferencesBugsError
20

3.2.5 Warp Menu Edit window
Window
Figure 3.8: Warp Menu Edit window
Window Parts(s)Window Structure
1. Menu Browsing Panel
2. Details Setting Section
Environment(s)Available Menus
• File Menu (Section 2.2.1)
• Edit Menu (Section 2.2.2)
• Warp Menu (Section 2.2.3)
ExplainationThis window is used to edit warp point menus. Open the browser window (Section 3.2.1) and select
the Edit Warp Point menu item from the Warp (Section 2.2.3) menu in the Browsing panel. The WarpMenu Edit window opens, displaying the warp points currently set as default. Alternatively, open theWarp Menu Edit window and select the New menu item from the File menu to open an empty WarpMenu Edit window.
You can also select a warp point menu saved in a file by selecting Open from the File menu.After editing is completed, click the Close box (Section 5.19) ; a dialog prompting to save the edited
warp point appears, whereupon the window can be closed. The functions of the Save and Save As menuitems in the File menu are the same as for the basic save operations of the OS. The default warp point
21

Figure 3.9: Warp Menu Edit Window (with a group opened)
menu opened from the browser panel is saved as the default setting. On the other hand, a warp pointmenu opened from a file or newly opened warp point menu is saved as an external file by the savingoperation.
ReferencesBugsError
22

Figure 3.10: Warp Menu Edit window (with the Details panel opened)
3.2.6 Authentication Dialog
WindowWindow Parts(s)
Window Structure
1. Preamble Dialog Panel
2. Service Dialog Panel
Environment(s)Available Menus: None
ExplainationIf coordinate systems listed in the Displayed Coordinates tab (Section 3.2.3) as display targets con-
tain contents requiring authentication, an authentication icon appears at the line of the correspondingcoordinate system Fig.3.12 . Click this authentication icon to open the Authentication dialog Fig.3.11to perform authentication operation. If the authentication succeeeds, the authentication icon in theDisplayed Coordinates tab disappears and the target contents are displayed. This section explains thestructure of the Authentication dialog and how to authenticate contents.
Fig.3.13 shows each component of the Authentication dialog. The dialog is largely divided into thePreamble Dialog panel and the Service Dialog panel. The Preamble Dialog panel deals with overallauthentication and contains the Cancel and Authenticate buttons for deciding whether or not to authen-ticate all contents. Under the panel, one or more Service Dialog panels follow.
The Service Dialog panels are used to specify authentification settings for individual ”services” thatsend various contents once they are authenticated. Some coordinate systems combine content providedby multiple services and/or multiple contents provided by individual services. In such cases, there aremultiple services and multiple Service Dialog panels thus appear. In the case of Fig.3.13 , only one ServiceDialog panel is shown.
23

Figure 3.11: Authentication Dialog
認証アイコン
Figure 3.12: Authentification Icon in the Displayed Coordinates Tab at the Lower Part of the MainWindow
In the following, each part is explained in the order of authentication operation.
1. Title/Description ( Explanation)
This area provides the title or short description of the service in question. In Fig.3.13 , the title”Old Maps of Kyoto” is shown. You can confirm the service contents in this area.
2. Details Button
This button is enabled if a Website containing detailed information about the service contentsis available. Click this button to launch a WWW browser to jump to the page containing theexplanation.
3. Service Name
This is the code given to a service. The system identifies services by their codes. You can use it asan indication to check whether a given service is something you requested or not.
4. Authentication Type
This is a keyword indicating the authentication method. As of the current version, ver.B.b16, thefollowing two authentication methods are supported.
• fix-user-passwd
24
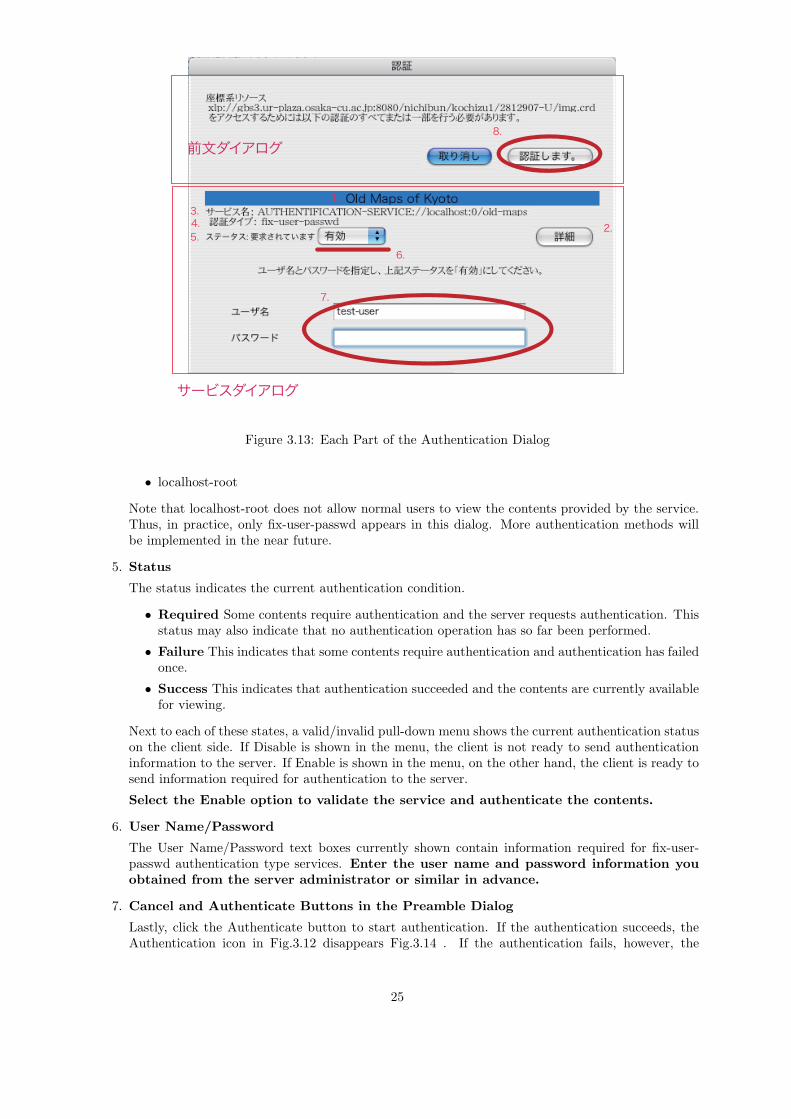
1.3.4.5.
6.
7.
2.
8.前文ダイアログ
サービスダイアログ
Figure 3.13: Each Part of the Authentication Dialog
• localhost-root
Note that localhost-root does not allow normal users to view the contents provided by the service.Thus, in practice, only fix-user-passwd appears in this dialog. More authentication methods willbe implemented in the near future.
5. Status
The status indicates the current authentication condition.
• Required Some contents require authentication and the server requests authentication. Thisstatus may also indicate that no authentication operation has so far been performed.
• Failure This indicates that some contents require authentication and authentication has failedonce.
• Success This indicates that authentication succeeded and the contents are currently availablefor viewing.
Next to each of these states, a valid/invalid pull-down menu shows the current authentication statuson the client side. If Disable is shown in the menu, the client is not ready to send authenticationinformation to the server. If Enable is shown in the menu, on the other hand, the client is ready tosend information required for authentication to the server.
Select the Enable option to validate the service and authenticate the contents.
6. User Name/Password
The User Name/Password text boxes currently shown contain information required for fix-user-passwd authentication type services. Enter the user name and password information youobtained from the server administrator or similar in advance.
7. Cancel and Authenticate Buttons in the Preamble Dialog
Lastly, click the Authenticate button to start authentication. If the authentication succeeds, theAuthentication icon in Fig.3.12 disappears Fig.3.14 . If the authentication fails, however, the
25

Authentication icon appears again; you can click the Authentication icon to try to authenticateagain.
Click the Cancel button if authentication should not be performed.
Figure 3.14: Main Window after Authentication, the Authentication Icon Disappears
Even if several services are displayed, it is not required to select Enable for all the services. If servicesare provided at several levels, Enable should only be selected for required contents. It is risky to Enablecontents indiscriminately; the more contents are made valid, the more personal informationis sent to the server side.
ReferencesBugsError
26
Chapter 4
Preferences Dialog Reference
4.1 Abstract
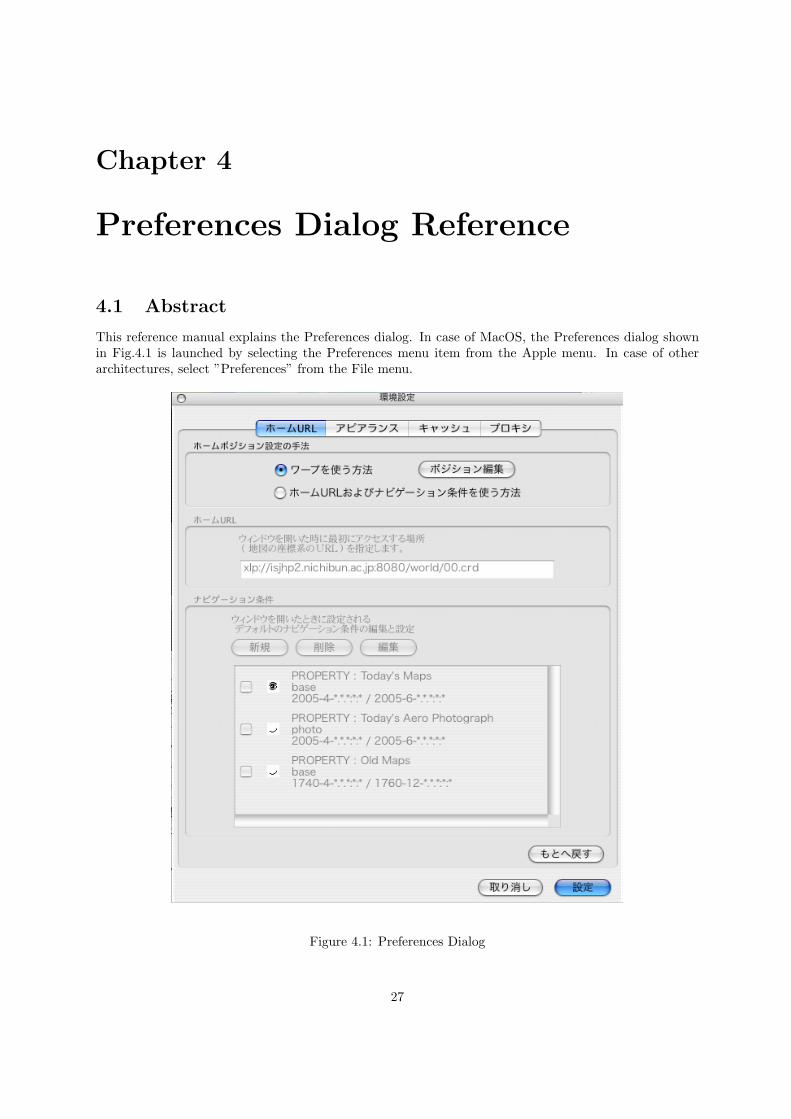
This reference manual explains the Preferences dialog. In case of MacOS, the Preferences dialog shownin Fig.4.1 is launched by selecting the Preferences menu item from the Apple menu. In case of otherarchitectures, select ”Preferences” from the File menu.
Figure 4.1: Preferences Dialog
27

The Preferences dialog contains several tabs. This reference manual explains each tab separately.
28

4.2 Window
4.2.1 Preferences Dialog/Home URL Tab
Window
Figure 4.2: Preferences Dialog/Home URL Tab (Using Warp)
Window Parts(s)Window Structure
1. How to define the home position
(a) Radio button - Using Warp
(b) Radio button - Using Home URL and Navigation Condition
2. Home URL
3. Navigation Condition
Environment(s)Available Menus
• File Menu (Section 2.2.1)
• Edit Menu (Section 2.2.2)
29

Figure 4.3: Preferences Dialog/Home URL Tab (Home URL and Navigation Condition)
• Help Menu (Section 2.2.6)
ExplainationIn this tab, it is defined how the initial map is displayed when the browser window (Section 3.2.1)
is opened. There are two basic settings, Using Warp and Using Home URL and Navigation Condition,which can be selected using the radio buttons in the @Define Home Position@ panel. The default at theinitial installation is Using Warp.
Using warpIn this method, one warp (Section 5.26) position is stored in advance, which is called up at the same
time as the browser window is launched, thus determining the map to be displayed at first. The defaultvalues are specified for the warp position at intallation. It is also possible to change the setting: Openthe browser window (Section 3.2.1) , place the focus on the map, and select the Set Home Position menuitem from the Warp menu (Section 2.2.3) displayed to store the current browser window display statusas the initial warp position. From then on, this status is reproduced every time a new browser windowis opened.
It is also possible to edit an already set warp point. Click the Editing Position button to open theWarp Menu Edit window (Section 3.2.5) where one warp menu is specified. Then edit the menu accordingto the instructions shown in the Warp Menu Edit window to customize the display method.
Using Home URL and Navigation ConditionUnlike Using Warp, in this mode the initially displayed map is determined by the specified Hom and
Navigation Condition settings. When you open the browser window, the map corresponding to the URL
30
set as the ”Home URL” is called up. Next, maps matching the ”Navigation Condition” in the vicinityare searched for and overlapped with the default map.
The Navigation Condition can be edited in the same way as for the browser window’s Search Condi-tions tab (Section 3.2.2) . Please refer to section 3.2.2 .
Referencessection 3.2.1section 2.2.3section 3.2.2section 3.2.5
BugsError
31

4.2.2 Preferences Dialog/Appearance Tab
Window
Figure 4.4: Preferences Dialog/Appearance
Window Parts(s)Window Structure
1. Language
2. Theme
Environment(s)Available Menus
ExplainationIn this tab, you can select the language, design and theme to be used in the entire application.
Select the appropriate language/theme from the pull-down menu. During the intallation, the languageis automatically set to the same language as the operating system under which it is installed. Currently,only Japanese and English are supported.
ReferencesBugsError
32
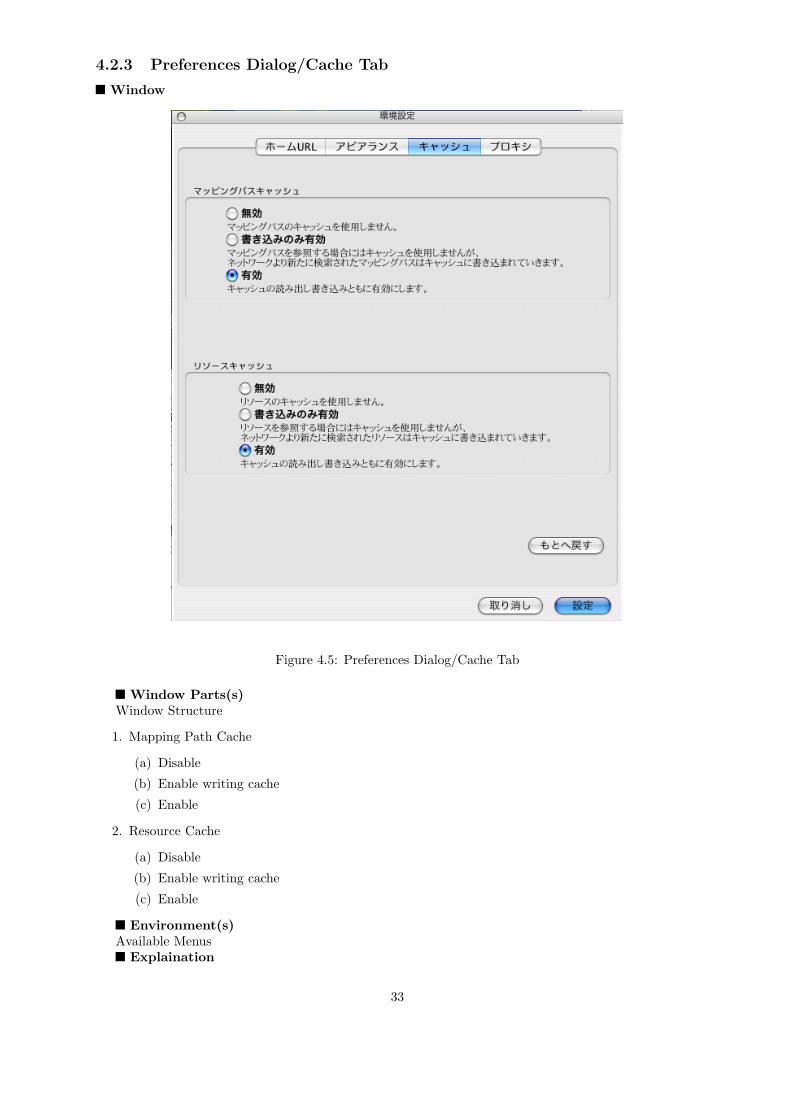
4.2.3 Preferences Dialog/Cache Tab
Window
Figure 4.5: Preferences Dialog/Cache Tab
Window Parts(s)Window Structure
1. Mapping Path Cache
(a) Disable
(b) Enable writing cache
(c) Enable
2. Resource Cache
(a) Disable
(b) Enable writing cache
(c) Enable
Environment(s)Available Menus
Explaination
33
This tab is used to define how displayed resources shall be cached. If you select Disable from thepull-down menu, the resources are not cached at all and all the required resources are acquired directlyfrom the network. Acquired resources are not saved in cache; all resources maintained in memory arelost when the application is terminated.
If you select Enable from the pull-down menu, all new resources are first acquired from the networkin the same way as for Disable. In this mode, however, the acquired resources are always stored in thecache. The Enable setting takes effect the next time the browser is launched.
If you select Enable, the cache is referenced first when resources are requested. If the resources havealready been stored in the cache, they are acquired from it rather than downloaded via the net. Thecontent is only kept in the cache for a certain period of time, after which it expires and must be acquiredby accessing the network if required at a later point. Resources not found in cache are also acquired fromthe network. Acquired resources are written to cache.
There are two basic types of resources, ”mapping paths” and other ”resources.” Mapping paths areresources that link other resources together through coordinate transformations. Other resources includeraster data, vector data, as well as resources of maps themselves, such as the coordinate systems in whichthey are placed. It is possible to specify a cache for each type of resource.
ReferencesBugs
The Disable option in the Resource Cache panel does not function correctly.Error
34

4.2.4 Preferences Dialog/Proxy Tab
Window
Figure 4.6: Preferences Dialog/Proxy Tab
Window Parts(s)Window Structure
1. HTTP Proxy (Section 4.2.5)
2. XL Native Proxy (Section 4.2.6)
3. Gateway
Environment(s)Available Menus
• File Menu (Section 2.2.1)
• Edit Menu (Section 2.2.2)
• Help Menu (Section 2.2.6)
Explaination
35

The COSMOS viewer provides methods of accessing resources outside the local network via a proxyserver in cases where it is not possible to access external resources directly.
HTTP ProxyIf the Internet can only be accessed through a HTTP proxy server or a firewall that only allows
HTTP protocol communication to go through, this proxy setting should be enabled. This option allowsthe XL protocol unique to GLOBALBASE to be communicated via the HTTP protocol. Thus, if a firewallallows only HTTP traffic to go through, the HTTP protocol can be used to access GLOBALBASE serversdirectly. Refer to section 4.2.5 for the detailed information.
XL Native ProxyIn this method, if an XL native proxy server exists, access to GLOBALBASE is made through the
server. Refer to section 4.2.6 for the detailed information.GatewayIn this tab, it is possible to select a method for viewing via COSMOS using the HTTP gateway
[UNDEF REF (http-gateway)], which may come in handy for PCs with low processing power. Pleasenote that this option is deprecated. We are considering to delete the function in the future. The HTTPgateway can be viewed via a Web browser.
Referencessection 4.2.5section 4.2.6
BugsThe HTTP proxy is not compatible with all proxy servers. Moreover, the XL native proxy has
problems in communication speed.Error
36

4.2.5 Preferences Dialog/Proxy Tab/HTTP Proxy Tab
Window
Figure 4.7: Preferences Dialog/Proxy Tab/HTTPProxy Tab
Window Parts(s)Window Structure
1. Radio button
(a) Disable Proxy
(b) XL over HTTP
(c) Enable Proxy
2. Data list
(a) Proxy Server
(b) Port No.
(c) @Servers to be accessed directly should be listed here.@
(d) Data text box
Environment(s)Available Menus
37

• File Menu (Section 2.2.1)
• Edit Menu (Section 2.2.2)
• Help Menu (Section 2.2.6)
ExplainationIn this tab, specify the method to access servers via the XL native proxy server, if it is used.Select the Enable Proxy radio button and enter the proxy server name and port No. If an internal
server exists and GLOBALBASE servers must be accessed directly, enter the servers to be accesseddirectly and click the Add button. The servers to be accessed directly appear in the Data list below. Ifyou want to delete any servers from the list, select the servers to be deleted from the list and click theDelete button.
Referencessection 4.2.4section 4.2.5
BugsThe HTTP proxy may not be compatible with all proxy servers and there may be cases where
communication cannot be established. We intend to improve this point in the near future.Error
38

4.2.6 Preferences Dialog/Proxy Tab/Native Proxy Tab
Window
Figure 4.8: Preferences Dialog/Proxy Tab/XL Native Proxy Tab
Window Parts(s)Window Structure
1. Radio button
(a) Disable Proxy
(b) Enable Proxy
2. Data text box
(a) Proxy server
(b) Port No.
(c) Servers to be accessed directly should be listed here.
(d) Data
Environment(s)Available Menus
• File Menu (Section 2.2.1)
39
• Edit Menu (Section 2.2.2)
• Help Menu (Section 2.2.6)
ExplainationIf the Internet can only be accessed through a HTTP proxy server or a firewall that only allows HTTP
protocol communication to go through, this proxy setting should be enabled. This option allows the XLprotocol, which is unique to GLOBALBASE, to be communicated via the HTTP protocol. Thus, if afirewall that allows only HTTP traffic to go through exists, the HTTP protocol can be used to accessGLOBALBASE servers directly.
If such a firewall exists, simply select the XL over HTTP radio button. In this case, there is no needto set any other information. The XL protocol is embedded in HTTP packets to allow the traffic to gothrough the firewall.
If it is necessary to access servers via the HTTP proxy, select the Enable Proxy radio button andset the proxy server name and port No. If an internal server exists and GLOBALBASE servers must beaccessed directly, enter the information of the servers to be accessed directly and click the Add button.The servers to be accessed directly appear in the Data list below. If you want to delete a server from thislist, select the server to be deleted and click the Delete button.
Referencessection 4.2.4section 4.2.6
BugsThe server is not compatible with all proxy servers and there are pending problems regarding the
communication speed. To alleviate this, we are in the process of developing light-weight, high-speedstreaming [UNDEF REF (xl-stream-routing)]methods. We intend to shift to proxy servers that utilizesuch methods in the future. COSMOS does not support such methods yet.
Error
40

Chapter 5
Glossary of Computer Terms
5.1 Words: OS
ExplainOperating System. Refers to a system that controls various resources (Section 5.2) of a computer.
Resources include files on the hard disk, CPU usage, display output, mouse and keyboard input and soon. An application (Section 5.3) requests the OS a permission to use such resources. Sometimes, thesame resource is used by multiple applications. In such cases, the operating systems coordinate the usageof the resources such that no data is lost in the process.
5.2 Words: Resource
ExplainSubjects used by computer systems. There are many different kinds of resources, including files on
the hard disk, CPU usage, display output, mouse and keyboard input and so on.
5.3 Words: Application
ExplainApplication programs. Programs designed for particular purposes. COSMOS is an example of such
programs. The opposite concept of applications is known as basic software (Section 5.4) .
5.4 Words: Basic Software
ExplainBasic software (Section 5.6) is required when executing operating systems (Section 5.1) and other
applications (Section 5.3) . In addition to the operating system itself, basic software includes databasesoftware, Windows system, network protocols and so on. LANDSCAPE [2]can be considered basicsoftware. WWW browsers are also considered basic software sometimes.
The boundary between basic software and applications is vague. It is necessary to judge whichprograms shall be considered basic software on a case by case basis, and may sometimes even changefrom one discussion to the next.
5.5 Words: Installation
ExplainThe task of copying and setting up software (Section 5.6) such that it can be used.
41

5.6 Words: Software
ExplainAs opposed to hardware (Section 5.7) , software refers to data (Section 5.8) and programs (Section
5.10) that can be manipulated according to the usage purposes. cf.Shannon’s information theorem
5.7 Words: Hardware
ExplainPhysically existing machines. In particular, it refers to machines that execute software (Section 5.6)
such that it may be used in a meaningful way.
5.8 Words: Data
ExplainInformation. A collection of symbols used to distinguish or represent things. In computer science, in
particular, the minimum unit of information is called a bit. 8bits are called 1byte.
5.9 Words: Algorithm
ExplainProcedures for operating machines, hardware (Section 5.7) and so on.No single, universal definition of the notion of algorithm exists. Turing machines, lambda calculus,
state automata section 5.10 etc. have all been proposed as formal definitions, and it has been proven thatthey are equivalent in the sense that it is possible to express the same objects and statements within thelanguage of each formalism. Such a collection of statements operating on objects is called an algorithm.
5.10 Words: Program
ExplainAn algorithm (Section 5.9) expressed in a form that can be understood by hardware (Section 5.7)
and/or human readers.
5.11 Words: Menu
ExplainA graphical interface (Section 5.12) that lists currently available functions in the currenly running
application (Section 5.3) . Refer to Fig.5.1 .
5.12 Words: Graphical Interface
ExplainGUI ( Graphical User Interface). Operation environment, or user interface (Section 5.13) , where
the ease of operation of a program is improved by graphically visualizing various operations that users(Section 5.15) of the program can order the program to carry out.
5.13 Words: User Interface
ExplainA means for operators, i.e., users (Section 5.15) , to interact with computers, for instance via a display,
mouse, keyboard etc. Alternatively, a means and/or method for providing instructions and informationto various users on the display. The definition is often narrowed down to a system for processing variousinstructions and commands given by users via keyboard and mouse.
42

5.14 Words: Interface
ExplainA means or method for handling operations and exchanging information between machines or between
users (Section 5.15) and machines.See also Protocol (Section 5.16)
5.15 Words: User
ExplainA user is a person operating a computer.
5.16 Words: Protocol
ExplainA protocol is a set of rules and means for machines to exchange information. See also Interface
(Section 5.14) .Protocols often place relatively restrictive rules on exchange of information between machines. Whereas
the term protocol refer to the rules themselves, the term interface is used for the actual implementationof such rules, for instance as programs and/or hardware.
5.17 Words: GUI
ExplainAbbreviation of Graphical User Interface. Refer to Graphical Interface (Section 5.12) .
5.18 Words: Window System
Explain
メニュー
ウィンドウ
Figure 5.1: Windows System (Macintosh)
43

タイトルバー
クローズボックス
最小化ボックス
最大化ボックス
リサイズボックス
スクロールバー
Figure 5.2: c Ec Bcsc hc E(Macintosh)
As shown in Fig.5.1 and Fig.5.2 , a window system is a graphical interface (Section 5.12) that displaysinformation etc. in rectangular graphical objects called windows on a computer screen or similar. Fig.5.2shows an example one such window.
There are basically two types of window systems, overlapping and non-overlapping ones. Overlappingwindows can be placed ’on top of each other’ as shown in Fig.5.1 . The overlapping processing placesa high computational load on the computers, however. Non-overlapping windows, on the other hand,are always arranged horizontally or vertically, and never overlap. As the windows do not overlap, thecomputational burden is much lighter. For this reason, the former type is primarily used in PCs where thedemands for advanced interface functions are high while the latter type is often used in mobile phones,car navigation systems and other embedded systems that require user interfaces but are limited in termsof processing power.
5.19 Words: Close Box
ExplainA button for closing a window. Fig.5.2
5.20 Words: Minimize Box
ExplainA button for iconizing (Section 5.22) windows that may not be used immediately, but will be used
later, thereby hiding them but not ending the programs. Fig.5.2
5.21 Words: Icon
ExplainA small image that indicates a certain thing, for example a file, minimized window etc. The image is
typically chosen such that it expresses the contents it represents in a straightforward manner.
44

5.22 Words: Maximize Box
ExplainA button for enlarging a window so that it fills the entire display. Fig.5.2
5.23 Words: Resize Box
ExplainA button for changing the window size. Fig.5.2
5.24 Words: Scroll Bar
ExplainA slender button for changing the position of the information displayed in a window. Fig.5.2
5.25 Words: Window
ExplainA rectangular graphical object used for displaying information, as shown in Fig.5.1 and Fig.5.2 . Note
that windows are not necessarily rectangular; some systems allow round windows as well.
5.26 Words: Warp
ExplainTo warp refers to an operation in GLOBALBASE where the display is changed to a certain map
position.
5.27 Words: Warp Point
ExplainIn GLOBALBASE, a Warp point refers to the destination of a warp (Section 5.26) operation.
5.28 Words: Cut and Paste
ExplainCut and Paste refers to a means of copying and moving information to be used in GUI (Section 5.12)
applications, when it is desired to use information available at a certain location in another location aswell or when it is desired to use particular information of a certain application in another application.Under normal circumstances, these functions are placed in the Edit menu.
An ( invisible) storage area commonly called a clipboard (Section 6.8) is prepared by the operatingsystem, in which the copied information is stored temporarily. In this way it becomes possible to moveinformation visible in a window to the clipboard and move temporarily stored information from theclipboard back to a window. Specifically, the following operations are possible.
• Cut
Information selected in a window is moved to the clipboard and the information selected in thewindow is deleted.
• Copy
Information selected in a window is copied to the clipboard. The information in the window is notdeleted.
• @Delete@
Information selected in a window is deleted. The information is not moved to the clipboard.
45

• Paste
Information on the clipboard is copied to the position selected in a window. The information onthe clipboard is not deleted.
There are various types of information. For example, in addition to character strings and images,warp points and search conditions can be moved and/or copied via cut and paste operations in COSMOS.Which information that can be copied on to the clipboard or which information that can be pasted dependson the type of currently active window. Please refer to the manual for each window.
5.29 Words: Clipboard
ExplainAn area in the memory where information is temporarily stored for Cut and Paste (Section 6.7)
operations.
5.30 Words: URL
ExplainAbbreviation of Uniform Resource Locator. Identifiers for identifying files that can be referenced
by applications supporting WWW, COSMOS or other network protocols ( published files). They areencoded using character strings.
URLs have the following format structure.
<protocol>://<hostdomainname>[:<port>]/<path>/[<filename>]
Information in [] can be omitted. can be http, xlp, telnet, mailto and so on. is a computer machinename that can be identified uniquely by DNS mechanisms. The subsequent port, path, and filename arenecessarily unique. can be omitted. If it is omitted, it is automatically assumed that the standard portfor the protocol indicated by should be used.
46
Chapter 6
Glossary of GLOBALBASE Terms
6.1 Words: GLOBALBASE
ExplainA generic term for technologies and software for linking geographical information throughout the
world using distributed technologies ( P2P networks etc.) to create a seamless virtual space, as wellas initiatives to create such data. Please refer to (http://www.globalbase.org/). This project originallybegan in 1999as a project about archiving old maps in the International Research Center for JapaneseStudies (http://www.nichibun.ac.jp/).
Recently, similar technologies such as Google Maps, Google Earth and various other Earth Browsersare appearing. They are similar to GLOBALBASE in the sense that it is possible to display the entireEarth and place various search information there. GLOBALBASE is different from those initiatives inseveral aspects, however. First of all, one major difference is that other architectures prepare one singlecoordinate system that is used as the basis, and embed all other data in that coordinate system.
6.2 Words: GLOBALBASE PROJECT
ExplainGLOBALBASE (Section 6.1) Project
6.3 Words: GLOBALBASE Architecture
ExplainA network system based on P2P and distributed technologies developed in GLOBALBASE (Section
6.1) .
6.4 Words: Coordinate System
ExplainA specification of a particular space of finite size in GLOBALBASE. In such a space, a position can be
identified via coordinate values. It is possible to place various data, including images, in such a space. Acoordinate system is expressed as files with the extension crd on a GLOBALBASE server and publishedcoordinate systems are given URLs, through which they can be referenced.
6.5 Words: Reference System
ExplainA reference system is a coordinate system (Section 6.4) that is used as reference when mapping from
one coordinate system to another or overlapping maps. It is also referred to as public coordinate system,
47

world geodetic system etc. Note that images etc. are not allowed to be placed in the reference coordinatesystem.
6.6 Words: Mapping
ExplainData that acts as a link between two coordinate systems (Section 6.4) or between a coordinate system
and images pasted on it. It holds information about coordinate transformation such as where in thecurrent coordinate system another system is fixed.
6.7 Words: Matrix
ExplainData format used for distributing huge image data at high speeds. Data represented as matrix entries
is arranged in patterns according to the resolution of individual images. Matrices are for instance usedto manage raster data and vector data. Matrices are not limited to 2-dimensionaldata; they can easilybe expanded to contain data with 3or more dimensions.
6.8 Words: Node (Matrix)
ExplainUnit of one image stored as a matrix (Section 6.7) . Images are transferred through the network node
by node.
6.9 Words: Dimension Code (Matrix)
ExplainCodes for identifying nodes (Section 6.8) in a matrix (Section 6.7) . A code consists of a layer number
and a code for each dimension; it is a string of integers of length equal to the number of dimensions plus
6.10 Words: Attribute Node (Matrix)
ExplainNodes (Section 6.8) in a matrix (Section 6.7) , for which dimension codes (Section 6.9) that include
negative integer values are assigned, are not treated as nodes containing image data, but as nodes con-taining various attribute information related to the entire matrix. Such nodes are called attribute nodes.
6.11 Words: Channel Flag (Matrix)
ExplainChannel flags determine various characteristics of each channel of a node (Section 6.8) in a matrix
(Section 6.7) .
• MF VISU indicates that the channel data can be displayed.
• MF SEND indicates that the channel data can be transmitted to the network.
• MF FILE indicates that the channel data can be saved in a file.
• MF SEND VISU indicates the channel data can be transmitted via the network and displayedat the transmission destination.
• MF SEND FILE indicates the channel data can be transmitted via the network and saved in afile at the transmission destination.
48

6.12 Words: Service (Authentication)
ExplainA service refers to a unit of ”service” that provides contents requiring authentication. Refer to section
3.2.6 for explanation on authentication and services.
49

Bibliography
[1] Mori Hirohisa. COSMOS Startup Manual. GLOBALBASE PROJECT, 2006.
[2] Mori Hirohisa and Fujita Haruhiro. LANDSCAPE Startup Manual. GLOBALBASE PROJECT,2006.
50

History
1. Date: 2010-12-01
Generatting this manual。(Edition 2010-12-01)
2. Date: 2006-12-07
Author: Hirohisa Mori TargetVersion: ver.B.b14
Created this manual
3. Date: 2007-03-29
Author: Hirohisa Mori TargetVersion: ver.B.b14.04
Corrected description of ”Copy Place Info.”
4. Date: 2007-04-08
Author: Hirohisa Mori TargetVersion: ver.B.b15
Added glossary items
5. Date: 2007-05-06
Author: Hirohisa Mori TargetVersion: ver.B.b16
Added the authentication dialog box
6. Date: 2007-07-15
Author: Hirohisa Mori TargetVersion: ver.B.b16.08
Added ”View” menu items
7. Date: 2007-07-15
Author: Hirohisa Mori TargetVersion: ver.B.b16.13
Added the warp box function
8. Date: 2008-06-19
Author: Hirohisa Mori TargetVersion: ver.B.b17.04
Added reference to the Preferences dialog
9. Date: 2008-07-22
Author: Reiko Inoue Bendtsen TargetVersion: ver.B.b17.07
Transrated this manual into English
51