corporate lodging consultants ela website: hotel user-guide
TRANSCRIPT

ELA.CORPLODGING.COM
Online Account User Guide
1

TABLE OF CONTENTSProgram Enrollment
Online Account Sign-In
My ELA Page
Property Information Updates
Guest Qualification & Check-in
Submit Billing
Guest Summary
Billing History
Hotel Payment Processing Instructions
Pages 3-9
Page 10
Page 11
Page 12
Pages 13-16
Page 17
Page 18-20
Pages 21-22
Page 23-242

• All hotels/lodging providers wishing to
participate in the Emergency Lodging
Assistance (ELA) Program must first
complete CLC Lodging’s (CLC) online
enrollment process at the Program website
ela.corplodging.com (NOTE: no www)
PROGRAM ENROLLMENT
3

PROGRAM ENROLLMENT (CONTINUED)
• Click Enroll to begin the ELA account
enrollment process
• Properties with existing CLC WebCheckINN
accounts may enter their respective
WebCheckINN usernames and passwords and
then click Login to pre-populate associated
hotel information on the next page
• Hotels/lodging providers can identify theirproperty via one of three convenient options:• CLC number & CLC Check number• Hotel Chain & Chain Property number• Sabre or Worldspan number & Zip Code• Enter the applicable information in the fieldsprovided• Click Submit
• If you are unable to provide any of the aboveinformation, click Skip This to manually createyour hotel account 4

• The Hotel Account Creation screen allows
prospective ELA program partners to create an
ELA account by supplying complete contact
information
• Enter your property’s contact information in the
fields provided
• Create a Username for your ELA account (NOTE: choose a username that is property-related and easy for
you to remember)
• Enter your first and last name in the fields
provided
• Enter your email in the fields providedNOTE: accurate email information
is essential. CLC delivers your new
account password to the email
address provided
• Click Submit
PROGRAM ENROLLMENT (CONTINUED)
5
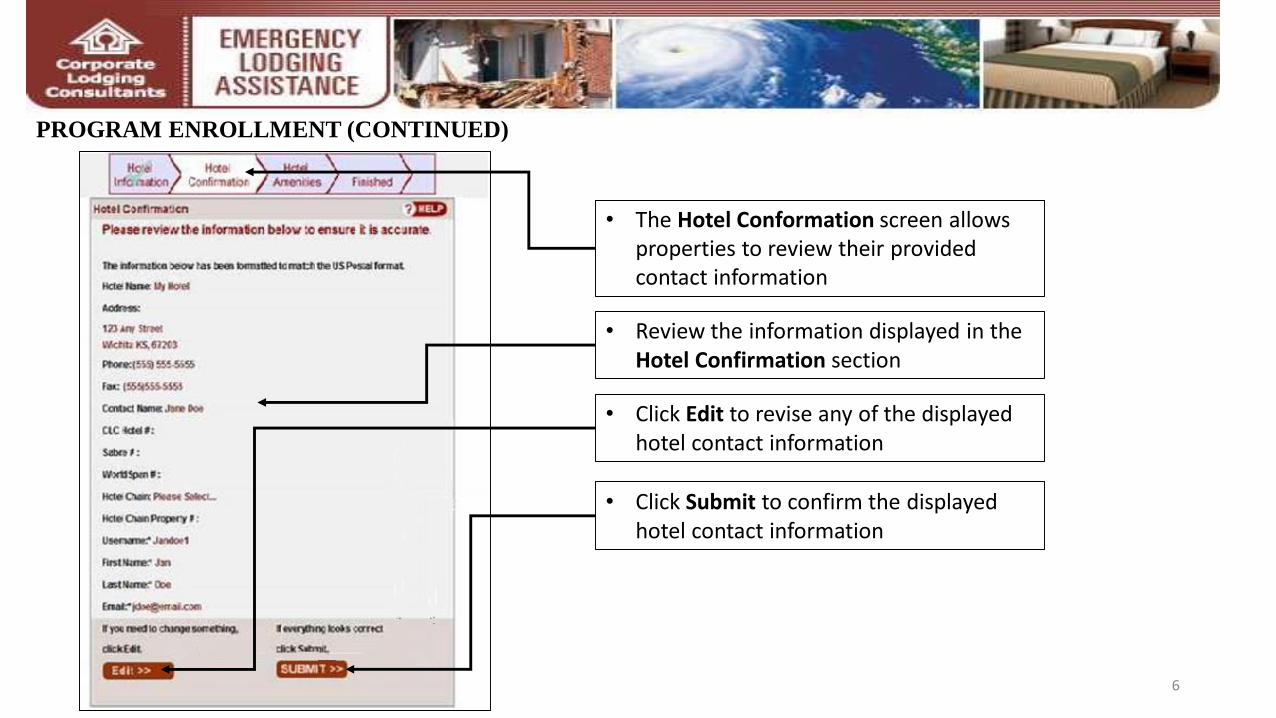
• The Hotel Conformation screen allows properties to review their provided contact information
• Review the information displayed in the Hotel Confirmation section
• Click Edit to revise any of the displayed hotel contact information
• Click Submit to confirm the displayed hotel contact information
PROGRAM ENROLLMENT (CONTINUED)
6

• The Hotel Amenities screen allows
lodging partners to identify various
facilities and services available at their
property
• In the required fields provided, identify
the amenities available at your property
NOTE: please provide as accurate information as
possible to assist individuals seeking lodging
PROGRAM ENROLLMENT (CONTINUED)
7

• In the optional fields provided in the Hotel
Amenities screen, identify additional
amenities available at your property
• Click Submit
PROGRAM ENROLLMENT (CONTINUED)
8

• Upon successful enrollment, your ELA account will
be activated
• CLC emails your ELA account password to the
email address provided during the enrollment
process
• Use your username and supplied password to access
your ELA account
• It is important to immediately sign into the newly
requested ELA account to review the Emergency
Lodging Assistance Payment Contract
• The system prompts you to initial and agree to the
contractual terms provided
• Print a copy of the payment contract for your
records prior to initialing and agreeing to the terms
electronically
PROGRAM ENROLLMENT (CONTINUED)
9

• Participating lodging partners are required to
enter their Username and Password to access
the Emergency Lodging Assistance online
billing system
• Enter your Username and Password in the fields provided
• Click the SUBMIT button
• The Username and Password is established
by each property. If the Password is lost, click
on the applicable I forgot my password
retrieval link
ONLINE ELA ACCOUNT SIGN-IN
10

• From the MyELA page, lodging partners are able to change
ELA account passwords
• ELA program partners Update Room Availability to remove
or publish their properties to the Program lodging directory
(www.femaevachotels.com)
• Click on the green/red oval to Make Rooms Unavailable or to
Make Rooms Available (pertaining to additional rooms
available and not FEMA guests already in house)
• Program updates can be viewed in theELA Program News section
• Updates regarding FEMA guests’ qualification periods,
including extensions or terminations of assistance, are reviewed
in the Guest Alerts section of the MyELA page
• You can view and edit contact info on the MyELA page
• To make any changes, click the Edit This Information link in
the Hotel Information field
MyELA PAGE
11

• You can view and edit contact info on the MyELA page
• To make any changes, click the Edit This Information
link in the Hotel Information field
PROPERTY INFORMATION UPDATES
12

CLC provides ELA Program partners with instant
guest verification, authorized dates of stay and
number of rooms allocated when the Check Guest
Qualification online form is completed
• Enter or select the guest’s Date of Checkin in the
field provided, followed by 3 of the following
fields:
• Guest’s Registration ID number
• Guest’s First Name
• Guest’s Last Name
• Guest’s Last 4 digits of Social Security number
(SSN#)
• Guest’s Date of Birth
(NOTE: guest registration information must match
FEMA’s records exactly when submitted or the guest may
not be found in the database. For assistance or to
confirm guest qualification, please contact the ELA
Lodging Support Center at 1-866-545-9865)
• Click SUBMIT
GUEST QUALIFICATION & CHECK-IN
13

• All qualified guests requesting lodging must provide a valid,
government-issued photo ID (for example, a current state issued
driver’s license) at check-in
• Make a copy of the guest’s photo ID for proof of verification
• Obtain a signed-and-completed ELA Terms and Conditions
Form from the guest. The form is printed by the property and is
found by clicking on the Program Information menu (NOTE:
updates regarding FEMA guests’ qualification periods are
reviewed in the Guest Alerts section of the MyELA page)
• Check the following boxes as appropriate:
• “I have collected identification for this guest…”
• “I have collected a signed and completed (by the guest)…”
• “I agree to comply…”
• Click Check In to proceed with the guest’s check in process
If the guest is unable to provide a valid, government-issued photo ID,
click Cancel to end the check-in session
GUEST QUALIFICATION & CHECK-IN
14

• After guest qualification, complete the check in
process via the Guest Room Assignment screen
The Guest Room Assignment screen displays the
guest’s authorization information (including ELA
eligibility period and rooms available)
• Click Check In to assign the guest a room
• Enter the requested room information in the
fields provided
• Hotels may enter UP TO the regular RACK
room rate and taxes for the assigned room.
• Click SUBMIT
• CLC’s ELA website immediately alerts hotels of
daily room charges that exceed the program’s
overage threshold as determined by FEMA for
the specificdisaster
GUEST QUALIFICATION & CHECK-IN (CONTINUED)
15

• Qualified guests are responsible for paying any amount
exceeding the program’s overage threshold
(NOTE: hotels/lodging providers are responsible for collecting any
overage amount from the guest)
• If this happens, the hotel re-enters the adjusted guest
room assignment information when prompted
• After completing the guest’s check- in, the ELA
website allows hotels to:
• Edit the guest’s Check In
• Cancel the guest’s Check In
• Check Out the guest
(NOTE: refer to the User Guide Guest Summary section for
instructions with these options)
• If applicable, click Check In to assign an additional
room for the guest or Cancel Check In as needed
GUEST QUALIFICATION & CHECK-IN (CONTINUED)
16

• To begin the billing process, hotels must first qualify
and check-in the guest(NOTE: refer to the User Guide Guest Qualification & Check-in for
further instructions)
• Click Submit Billing on the navigation bar to access the
Guests Available for Billing screen
• The Guests Available for Billing screen displays an
overview of all guests checked into the hotel
• Hotels have the flexibility to either partially bill for ELA
guest stays or complete final billing at their convenience NOTE: Each guest stay can only be billed once per day)
• Under Options, click the BILL button to issue a bill for
the guest’s stay
• On the Bill Stay screen, enter all applicable information
in the fields provided, including opting to either check
out the guest or leave checked in, based on their in-
house status
• Click Submit
SUBMIT BILLING
17
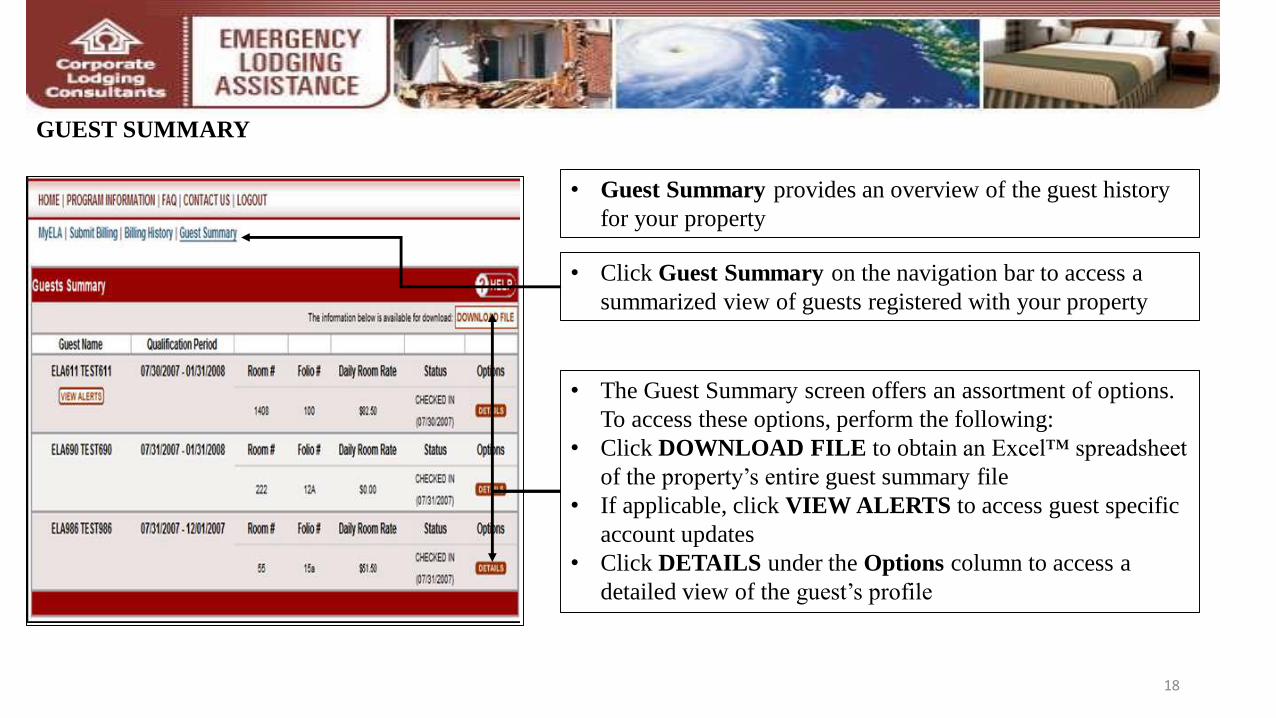
• Guest Summary provides an overview of the guest history
for your property
• Click Guest Summary on the navigation bar to access a
summarized view of guests registered with your property
• The Guest Summary screen offers an assortment of options.
To access these options, perform the following:
• Click DOWNLOAD FILE to obtain an Excel™ spreadsheet
of the property’s entire guest summary file
• If applicable, click VIEW ALERTS to access guest specific
account updates
• Click DETAILS under the Options column to access a
detailed view of the guest’s profile
GUEST SUMMARY
18

• The Guest Details screen provides an overview of the guest’s
check-in information
• If applicable, the Guest Details screen displays additional
rooms available for the guest
• If necessary, click Check In to assign an additional room for
the guest. (NOTE: refer to the User Guide Guest Qualification & Check-in section for
further instructions)
• If necessary, click Edit This Check In to access the Edit
Room screen
• If necessary, click Cancel Check In to void the guest’s check
in from your hotel registry
• If necessary, click Check Out to access the guest’s Check
Out screen. In most cases, it is best to submit final billing at
the same time as checking out guests.
(NOTE: refer to the User Guide Submit Billing section for further instructions)
GUEST SUMMARY (CONTINUED)
19

• The Edit Room screen allows lodging partners to revise a
guest’s check-in information
• Enter the revised guest check-in information in the fields
provided
• Click SUBMIT to complete the revised guest check in process
• The Check Out screen allows properties to check out a guest
• Enter the check-out date in the field provided
• Click SUBMIT to complete the guest check out process.
• Hotels must submit guest billing in order to receive payment
(NOTE: refer to the User Guide Submit Billing section for further instructions)
GUEST SUMMARY (CONTINUED)
20

• Billing History provides an overview of all submitted
billings. Detailed views of guest billings and payment
inquiries are available for convenient recordkeeping
• Click Billing History on the navigation bar to access a
summarized view of a property’s historical billing record
• The Billing History Search dialog box allows user to
customize their search
• The Billing History screen offers an assortment of options.
To access these options, perform the following:
• Click DOWNLOAD FILE to obtain an Excel™ spreadsheet
of the property’s entire guest billing file
• If applicable, click VOID under the Actions column to cancel
the guest billing
• Please contact CLC via the ELA Program Lodging Support
Center (1-866-545-9865) for instructions on how to ADJUST
billing for guest stays which reflect status of PROCESSED
• Click DETAILS under the Actions column for a detailed
view of the guest billing
BILLING HISTORY
21

• The Bill History Detail screen displays:
• The guest’s qualification end date, room information, and
cumulative rates
• Complete itemized history of all billings submitted for the
guest
• Click Back to return to the Billing History screen
• Thank you for your participation with the Emergency Lodging
Assistance (ELA)Program
• For additional questions, the ELA Program Lodging Support
Center can be reached by phone at 1-866-545-9865 (Monday
through Friday, 8 a.m. to 5 p.m. CST) or by email at
BILLING HISTORY
22

23
HOTEL PAYMENT PROCESSIONG INSTRUCTIONS
ELA Virtual Card Payment Program!
• You will receive a remittance advice and a MasterCard account number via email each time we have
approved a payment to you.
• You will be issued a 6-digit prefix you will need to retain for all future payments.
• You will receive an email notification of payment for listed invoices with a unique 10-digit number.
• Combine the 6-digit prefix with the unique 10-digit number to create your complete Mastercard account
number. You will process this payment like any other credit card transaction.
• Your funds settlement will be received within 24-48 hours through your merchant processor.
• Your remittance advice will be emailed from our payment processor, Comdata. Please make sure your
email system will accept messages from the following email addresses:
[email protected], [email protected] and [email protected].
• The “Billing History” tab on your ela.corplodging.com account will have all of the details for this
payment.

24
HOTEL PAYMENT PROCESSIONG INSTRUCTIONS
Example of an actual payment email notification