copyright by in sung kim 2006 - ferguson structural engineering
TRANSCRIPT

Copyright
by
In Sung Kim
2006

Rehabilitation of Poorly Detailed RC Structures Using CFRP Materials
by
In Sung Kim, B.S.
Thesis
Presented to the Faculty of the Graduate School of
The University of Texas at Austin
in Partial Fulfillment
of the Requirements
for the Degree of
Master of Science in Engineering
The University of Texas at Austin
May 2006

Rehabilitation of Poorly Detailed RC Structures Using CFRP Materials
Approved by Supervising Committee:
James O. Jirsa
Oguzhan Bayrak

i
Acknowledgements
My parents, Soon Hee Kim and Yeo Keun Kim, as well as other members have
provided care, physical and emotional.
My most sincere thanks go to my supervisor, Professor James O. Jirsa, whose
perceptive criticism, kind encouragement, and willing assistance helped bring the
research to a successful conclusion. I wish also record my appreciation to Professor
Oguzhan Bayrak who acted as my consultant during the research and second reader of
this thesis.
Many colleagues have offered useful supports and suggestions for the project, and
I would like to give particular thanks to Widianto, Sarah Orton and Jun-ki Lee.
Technical assistance provided by the Ferguson Structural Engineering Laboratory
staff is greatly acknowledged, and I would like to give special thanks to Blake Stasney
and Dennis Fillip.
The research and writing of this article were made possible by funding from
National Science Foundation and donation of the CFRP materials from FYFE Co. LLC,
and I gratefully acknowledge them.
Finally, I am extremely grateful to the Korea Science and Engineering Foundation
for the award of a two-year scholarship in 2004-2006 that enabled me to research on this
topic.

ii
Abstract
Rehabilitation of Poorly Detailed RC Structures Using CFRP Materials
In Sung Kim, M.S.E.
The University of Texas at Austin, 2006
Supervisor: James O. Jirsa
In many reinforced concrete structures built in the 1970’s and earlier, bottom
beam reinforcement is not continuous and if a column support is lost due to terrorist
attack or other unexpected action, the structure could be vulnerable to progressive
collapse. The use of CFRP material may provide a solution for rehabilitating such
structures. CFRP materials can not develop full tensile capacity unless they are properly
anchored to the reinforced concrete structure. The intent of this study is to find an
effective method of anchoring CFRP material to a reinforced concrete beam so that the
ultimate tensile strength of the CFRP is realized. In this study, ten reinforced concrete
beams rehabilitated using different configurations of anchors were tested to assess the
effectiveness of the anchors. Both CFRP anchors and CFRP U-wraps were investigated.
The rehabilitated beams were loaded until failure of the CFRP material or anchor
occurred. Different failure modes, strengths and deformation capacities of the
rehabilitated beams were observed depending on the configurations of anchors. The
maximum capacity was obtained using a combination of CFRP anchors and U-wraps.

iii
Table of Contents
CHAPTER1 INTRODUCTION ………………………………..………………………1
1.1MOTIVATION……………………………………………………………….1
1.2 OBJECTIVE………………………………………………………………….1
CHAPTER 2 BACKGROUND…………………………………………………………3
2.1 LITERATURE REVIEW……………………………………………………..3
2.1.1 Continuity in Members of Structure………………….……………..3
2.1.2 Flexural Strengthening Using CFRP Materials……………………..4
2.1.3 CFRP Anchor………………………………………………………..6
2.2 MATERIAL PROPERTIES…………………………………………………..9
2.2.1 Concrete……………………………………………………………10
2.2.2 Steel………………………………………………………………...10
2.2.3 CFRP……………………………………..……………………….. 10
CHAPTER 3 EXPERIMENTAL METHOD……………….………………………...12
3.1 SPECIMEN CONFIGURATION……………………………………………12
3.2 CONFIGURATION OF CFRP IN SPECIMENS…………………………...14
3.3 INSTALLATION PROCEDURE OF CFRP MATERIALS………………...20
3.4. TEST SETUP……………………………………………….……………….25
3.5 TARGET STRENGTH OF SPECIMEN……………………………………26
CHAPTER 4 EXPERIMENTAL RESULT…………………………………………..27
4.1 GENERAL…………………………………………………………………...27
4.2 SPECIMEN NO.1………………………………………………...………….29
4.2.1 Configuration………………………...…...………………..………29

iv
4.2.2 Failure Mode…………………………………………………...…..30
4.2.3 Load - Deflection Relationship………………………………...…..30
4.2.4 Strain in CFRP Sheet………………………………..……………..32
4.2.5 Strain in Steel Bar……………………………………………..…...35
4.2.6 Summary…………………………………………………………...37
4.3 SPECIMEN NO.2……………………………………………………………38
4.3.1 Configuration ……………………………………………….……..38
4.3.2 Failure Mode…………………………………………………..…...39
4.3.3 Load - Deflection Relationship…………………………………….40
4.3.4 Strain in CFRP Sheet ……………………………………….……..41
4.3.5 Strain in Steel Bar…………………………….................................44
4.3.6 Summary…………………………………………………………...46
4.4 SPECIMEN NO.3………………………………….……………………….. 47
4.4.1 Configuration…………………………………………………..…..47
4.4.2 Failure Mode…………………………………………………….....48
4.4.3 Load - Deflection Relationship…………………………………….49
4.4.4 Strain in CFRP Sheet………………………………………………50
4.4.5 Strain in Steel Bar ……………………………................................53
4.4.6 Summary…………………………………………………………...55
4.5 SPECIMEN NO.4………………………………………………..………….56
4.5.1 Configuration……………………………………………….……..56
4.5.2 Failure Mode……………………………………………………....57
4.5.3 Load - Deflection Relationship…………………………………....58
4.5.4 Strain in CFRP Sheet ………………………………………….…..59
4.5.5 Strain in Steel Bar……………………………………………….....62

v
4.5.6 Summary…………………………………………………………...64
4.6 SPECIMEN NO.5…………………………………………………………... 66
4.6.1 Configuration…………………........................................................66
4.6.2 Failure Mode………………….........................................................67
4.6.3 Load - Deflection Relationship…………….....................................68
4.6.4 Strain in CFRP Sheet……………………………………..………..69
4.6.5 Strain in Steel Bar……………………………………………….....72
4.6.6 Summary…………………………………………………………...74
4.7 SPECIMEN NO.6……………………............................................................75
4.7.1 Configuration ………………...........................................................75
4.7.2 Failure Mode………………….........................................................75
4.7.3 Load - Deflection Relationship……………….................................78
4.7.4 Strain in CFRP Sheet ………….…………………………………..79
4.7.5 Strain in Steel Bar …………………………………………………83
4.7.6 Summary…………………………………………………………..85
4.8 SPECIMEN NO.7…………………………………………………………...86
4.8.1 Configuration…………………........................................................86
4.8.2 Failure Mode ………………….......................................................87
4.8.3 Load - Deflection Relationship ………………...............................91
4.8.4 Strain in CFRP Sheet ……………………......................................92
4.8.5 Strain in Steel Bar ……………………………...............................96
4.8.6 Summary…………………………………………………………..98
4.9 SPECIMEN NO.8……………………...........................................................99
4.9.1 Configuration………………............................................................99
4.9.2 Failure Mode…………………......................................................100

vi
4.9.3 Load - Deflection Relationship…………………….…………….102
4.9.4 Strain in CFRP Sheet……………………………………………..103
4.9.5 Strain in Steel Bar …………………………………………….….107
4.9.6 Summary………………………………………………………….109
4.10 SPECIMEN NO.9…………………………………………………………110
4.10.1 Configuration ……………….......................................................110
4.10.2 Failure Mode………………….....................................................111
4.10.3 Load - Deflection Relationship…………………………....…….113
4.10.4 Strain in CFRP Sheet …………….…………………………..…114
4.10.5 Strain in Steel Bar ……………………………………………....118
4.10.6 Summary……………………………………………………...…120
4.11 SPECIMEN NO.10………………………………………………………..121
4.11.1 Configuration…………………....................................................121
4.11.2 Failure Mode ………………........................................................122
4.11.3 Load - Deflection Relationship …………………………………123
4.11.4 Strain in CFRP Sheet……………………………………………124
4.11.5 Strain in Steel Bar……………………………………………….128
4.11.6 Summary………………………………………...………………130
CHAPTER 5 DISCUSSION OF TEST RESULTS…………………………………131
5.1 FAILURE MODE…………………………………………………………..131
5.2 LOAD-DEFLECTION RELATIONSHIP………………………………….133
5.2.1 Strength…………………………………………………………...133
5.2.2 Deformation Capacity…………………………………………….133
5.2.3 Load - Deflection Relationship…………………………………...135
5.2.3.1 Specimens of single layer of CFRP sheet………………135

vii
5.2.3.2 Specimens of double layers of CFRP sheet with two
additional anchorages each side………………………………………..136
5.2.3.3 Specimens of double layers of CFRP sheet with CFRP
anchor…………………………………………………………………..137
5.2.3.4 Specimen No.1 and specimen No.8…………………….138
5.4 MATERIAL EFFICIENCY………………………………………………..139
5.5 WORKABILITY…………………………………………………………...139
CHAPTER 6 CONCLUSION…….………………………………………………….141
Reference………………………………………………………………………………142
Vita.…......…...…………………………………………………………………………144

CHAPTER 1
INTRODUCTION
1.1 MOTIVATION
In many reinforced concrete structures built in the 1970’s and earlier, bottom
beam reinforcement is not continuous and if a column support is lost due to terrorist
attack or other unexpected action, the structure could be vulnerable to progressive
collapse. The beams may not develop catenary action if the reinforcement is not
continuous. The use of Carbon Fiber Reinforced Polymer (CFRP) materials may provide
a solution for rehabilitating such structures.
1.2 OBJECTIVE
CFRP materials can not develop full tensile capacity unless they are properly
anchored to the reinforced concrete structure. The intent of this study is to find an
effective method of anchoring CFRP material to a reinforced concrete beam so that the
ultimate tensile strength of the CFRP is realized.
The basic rehabilitation technique for this program was installation of CFRP
materials on the sides of the beam to provide continuity to bottom reinforcements and is
shown in Figure 1.1 and 1.2. A CFRP sheet was attached to the concrete surface by
epoxy resin and additional anchorage using CFRP materials in order to develop full
tensile capacity of CFRP sheet after delamination of CFRP sheet occurs.
1

Figure 1.1 Rehabilitation Technique
Span BSpan A
Continuity with CFRP
Span A Span B
Discontinuity in bottom reinforcement
Strengthening by CFRP
Column removed due to blast or impact
Figure 1.2 Behavior of Rehabilitated Structure after Removal of the Column
2

CHAPTER 2
BACKGROUND
2.1 LITERATURE REVIEW
2.1.1 Continuity in Members of Structures
Continuity in members of structures is discussed in ASCE 7-02, Section 1.4,
General Structural Integrity. According to the section, local damage in the structure
shall not extend disproportionately to the remaining portion of the structure. Damage is
limited by providing sufficient continuity and redundancy, or energy-dissipating capacity
(ductility), or a combination thereof, in the member of structure. It clearly expresses the
requirement of continuity in the structural members although it does not discuss specific
methods to achieve structural integrity.
Continuity in members of structures is also discussed in Progressive Collapse
Analysis and Design Guidelines for New Federal Office Buildings and Major
Modernization Projects, (2003, US General Service Administration). One of the
recommended structural characteristics in the document (Section 4 Reinforced Concrete
Building Analysis and Design) to provide a robust structure and to increase the
probability of achieving a low potential for progressive collapse is ‘the use of detailing to
provide structural continuity and ductility’ in reinforced concrete structures. It also
expresses correct detailing of connections to provide beam-to-beam continuity across a
column. The existing structures considered in this research do not have such continuity.
The document also recommends that existing structures undergoing modernization
should be upgraded to new construction requirements. This means that an existing
structure rehabilitated to limit progressive collapse should have the same level of the
continuity in the members as a new structure designed to limit progressive collapse.
3

2.1.2 Flexural Strengthening Using CFRP Materials
Design guidelines for rehabilitation of reinforced concrete structures using CFRP
materials are provided by ACI 440.2R-02, Guide for the Design and Construction of
Externally Bonded FRP Systems for Strengthening Concrete Structures. Chapter 9,
Flexural Strengthening, of the document includes design procedure for flexural
strengthening of reinforced concrete structures that is topic of this report.
The main flexural design procedure of ACI 440.2 R-02 follows ACI318-99 and is
based on strain compatibility and internal force equilibrium. ACI 440.2 R-02
recommends the use of the strength reduction factors φ required by ACI-318-99 (Eq.2-1)
with an additional strength reduction factor fψ of 0.85 applied to the flexural
contribution of FRP reinforcement alone. Equation (2-2) is an application of fψ factor
to a reinforced rectangular section with tension reinforcement only.
un MM ≥φ (2-1)
)2
()2
( 11 chfAcdfAM feffssnβ
ψβ
−+−= (2-2)
is the nominal moment strength, is the factored moment at the section, d
and c are the depth to the steel reinforcement and neutral axis, h is the overall thickness,
and are area and stress in steel reinforcement, and are area and effective
stress in FRP external reinforcement, and
nM uM
sA sf fA fef
1β ratio of the depth of the equivalent
rectangular stress block to the depth of the neutral axis (Figure2.1).
4

sA sf
fA fef
c1β
'cfγcε
sε
biεfeε
b
h d
c
biε
feε
sεcε : Strain in the concrete : Strain in the steel reinforcement
: Effective strain in the FRP reinforcement
: Strain in the concrete substrate in the time of the FRP installation
Figure 2.1 Internal Strain and Stress Distribution for a Rectangular Section under
flexure at ultimate stage.
FRP delamination can occur if the force in the FRP cannot be sustained by the
substrate. ACI 440.2 R-02 assumes that FRP delamination precedes fracture of FRP
materials. In order to prevent the delamination, a limitation is placed on the strain level
developed in the CFRP through the specification of an effective stress in the FRP external
reinforcement that is reduced from an ultimate tensile strength of FRP . ACI
440.2 R-02 recommends not using this design procedure in expected plastic hinge regions.
fef fuf
However, in this research, CFRP materials were applied at expected hinge region
and the designed failure mode of the member is not the delamination of CFRP but
fracture of the CFRP sheet. Therefore, the target flexural strength was selected
corresponding to an ultimate tensile strength of CFRP , and no reduction factor
(i.e.
fuf
fψ ) was used in the calculation of . nM
5

2.1.3 CFRP Anchor
A CFRP anchor is shown in Figure and consists of a roll of CFRP sheet inserted
into the concrete and splayed out over the CFRP sheet. Pictures of the CFRP anchor are
shown in Figure 2.2 and Figure 2.3.
Figure 2.2 CFRP Anchor before Installation
Figure 2.3 CFRP Anchor after Installation
Early use of CFRP anchors is reported by Kobayashi et. al. (2001). Kobayashi
investigated application of CFRP anchors to a CFRP wrapped column with wing walls
(Figure 2.4). Due to wing walls, the CFRP sheet can not be wrapped around the column
continuously. The CFRP anchor can provide continuity of semi-closed CFRP sheet
through the wing wall. He investigated the stress transfer mechanism of the CFRP
anchor and factors that influence the capacity of CFRP anchor.
6

Figure 2.4 CFRP Anchors for CFRP Wrapping the Column with Wing Walls
(Kobayashi et. al.2001)
Further research on the capacity of the CFRP anchor was conducted by Ozdemir
and Akyuz (2005). They investigated the effects of concrete compressive strength,
anchorage depth, anchorage diameter, and number of fibers on the tensile strength
capacity of CFRP anchor, and found that:
- Compressive strength of the concrete did not effect the tensile capacity of the
CFRP anchor if its embedment depth was less than 50mm. However, as
embedment depth increased, the effect of concrete compressive strength became
more significant.
- As embedment depth increased, tensile capacity of the CFRP anchor also
increased linearly until the depth reached an effective bond length of 100mm.
Beyond this length the tensile capacity did not increase.
7
- The diameter of the anchor hole did not have a significant effect on the tensile
capacity of the CFRP anchor.
- The tensile capacity of the CFRP anchor increased with an increase in the amount
of CFRP materials, but the capacity increase was not proportional to the increase
in the material.
8

2.2 MATERIAL PROPERTIES
2.2.1 Concrete
Five specimens were cast from a single batch of concrete. Concrete cylinders (6
in. diameter by 12 in. height) were as specified in ASTM C - 40 for tensile and
compressive strength. ASTM C 39 - 04a and ASTM C 496 - 96 were used for
measuring the compressive and tensile strength of the concrete. The design value of the
compressive strength was 3,500 psi for all the specimens. Test results are shown in Table
2.1.
Compressive Strength Tensile Strength Cast Cylinder
No. fc', psi Cylinder No. ft, psi
1 2,772 1 321 2 3,162 2 220 3 3,041 3 254 4 355 5 292 6 254
Cast 1 (Sp.1~5)
Mean 2,992 Mean 283
1 3,641 1 355 2 3,364 2 420 3 3,475 3 406 4 3,318 4 424 5 3,594 5 446 6 3,172 6 368
Cast 2 (Sp.6~10)
Mean 3,427 Mean 403
Table 2.1 Compressive and Tensile Strength of Concrete
9

2.2.2 Steel
Grade 60 steel bars were used in the specimens, and the bars were from two
different heats. The bars in specimen No.1 ~ No.7 were from one heat (1) and the bars in
specimen No.8~No.10 were from another heat (2). The bar coupons for the tensile
strength tests were loaded only to the yield strength as measured by 0.2% offset method.
No bars yielded during the tests of the specimens. The yield strength fy of the bars from
heat 1 was 70 ksi and 65 ksi for heat 2.
2.2.3 CFRP
The CFRP material used in this study was Tyfo® SCH -35 composites with Tyfo®
S Epoxy from FYFE Co. LLC.
The tensile strength of the CFRP materials was measured using ASTM D 3039
procedures. Two in. wide by 12 in. long CFRP coupons were tested (Figure 2.5). The
test results showed that the material properties of the CFRP materials were consistent
with the specified properties from the manufacturer and are shown in Table 2.2. The
CFRP material was one directional material and had no tensile capacity in the transverse
direction of the fabrics.
Figure 2.5 CFRP Coupons for Tensile Strength Test
10

Property Typical Test Value
Ultimate tensile strength in primary fiber direction, psi 143,000 psi
Elongation at fracture 1.26 %
Tensile Modulus, psi 11.4 ×10⁶ psi
Ultimate tensile strength 90 degree to primary fiber, psi 0
Laminate thickness, in 0.035 in.
Table2.2 Specified Material Properties of CFRP
The stress-strain curves of the CFRP materials and the steel bars are shown in
Figure 2.6. Although the CFRP materials had higher strength than the steel bar, the
CFRP materials were less stiff than the steel bars. The CFRP material had a linear stress-
strain relationship up to fracture.
0
20
40
60
80
100
120
140
160
0 0.0025 0.005 0.0075 0.01 0.0125 0.015
Strain, (in./in.)
Stress, (ksi)
CFRP
Steel
CFRP
Steel
Figure 2.6 Stress - Strain Curves of the CFRP Material and the Steel bar
11

CHAPTER 3
EXPERIMENTAL METHOD
3.1 SPECIMEN CONFIGURATION
All the specimens had the same configuration before the CFRP materials were
placed. The scale of the specimen was 3/4 of the prototype structure. The length of the
specimens was determined so that it would correspond to the distance between the
inflection points of the beams. The represented portion of the structure by the specimens
is shown in Figure 3.1.
Portion of structure Represented by the specimens
Inflection Points
Figure 3.1 Portion of Structure Represented by the Test Specimens
12

The 12 in. long deepened section at mid span represented a portion of the
supporting column. Bottom beam reinforcement extended 4.5 in. from column face
leaving a 3 in. discontinuity at the middle of the column (Figure 3.2).
96 in.
12 in.
3 in.
7 in. 8 in.
16 in.
2 in.
5 No. #6 bars
#3 tie @ 7 in.
Bottom: 0.75in. clear cover
Top: 1.25 in. clear cover Column
Figure 3.2 Specimen Configuration
Strain gages were installed on the bottom bars. Specimens No.1 ~ No.5 had
strain gages at the column faces only (4 gages per specimen), but specimen No.6- No.10
had 3 additional strain gages at 6 in. spacing in each direction from the mid span to
observe the strain distribution on the bottom bars. (16 gages per specimen) The
distribution of strain gages are shown in Figure 3.3.
6 in. 6 in. 6 in.
Figure 3.3 Strain gages on the Bars
13

3.2 CONFIGURATION OF CFRP IN SPECIMENS
The CFRP materials were used for 2 different purposes. First, they were used as a
tensile element to provide continuity to the bottom reinforcement. CFRP sheet indicates
use for flexural continuity. Second, the CFRP materials were used as anchors to transfer
forces from the CFRP sheet to the concrete substrate. Three types of the anchors were
used, and they are 1)CFRP anchor, 2)CFRP U-wrap and 3) insertion of ends of CFRP
sheet into holes.
. . In this research, The CFRP sheet was attached using two different sheet
arrangements. In one case, a CFRP sheet 5.5 in. wide x 66 in. long was attached on the
both sides of the beam (Figure 3.4). In the other case, two CFRP sheets 2.75 x 66 in.
were placed on top of one another (Figure 3.5). The area of the CFRP materials in both
cases was the same. The area and strength of the CFRP sheet were selected to provide an
ultimate tensile force the same as that for two #6 bottom bars at yield. The length of the
CFRP sheet was determined considering the development length of the steel bar. The
development length of a #6 bar was 30.4 in. for the geometry of test specimen. The
distance from the end of bar in the column to the end of CFRP sheet was 31.5 in..
14

Figure 3.4 One Layer of CFRP sheet, 5.5 in. wide
Figure 3.5 Double Layers of CFRP sheets, 2.75 in. wide
Three types of anchorage methods were investigated in this research, 1)CFRP
anchor, 2)CFRP U-wrap and 3) insertion of ends of CFRP sheet into holes. One or more
of these types of anchorage methods were used in all the specimens except specimen
No.1 which had a CFRP sheet attached only with epoxy resin and no additional
anchorage.
CFRP anchors were used in specimen No.2, 4, 6, 7, 8, 9. A CFRP anchor was
made using the same width of CFRP, 5.5 in., sheet as that of the attached to the beam.
The length of the anchor was 9.5 in. with 4 in. of the anchor inserted into a 5/8 in. hole
drilled into the concrete. The rest of the anchor was splayed out in a fan shape on the
CFRP sheet. Pictures of CFRP anchor before and after installation are shown in Figure
3.6 and 3.7. The angle of fan shape portion depended on the width of the CFRP sheet. It
was 60 degree for the 5.5 in. wide CFRP sheet and 30 degree for the 2.75 in. wide CFRP
sheet. Kobayashi (2001) recommended that the use of CFRP anchors with less than 90
degree angle of spreading. The number of CFRP anchors installed in a specimen varied.
15

The diameter of anchor holes was 5/8 in. for all the specimens. The anchor hole
was always installed right under the longitudinal bar where the core of a concrete section
was located in order to decrease the possibility of concrete cover failure.
9.5 in.
Figure 3.6 CFRP Anchor before Installation
5.5 in.
Splayed end of anchor
Figure 3.7 CFRP Anchor on 2.75 in. wide CFRP sheet after Installation
CFRP U-wraps were used in specimens No.5, 8, 9 and 10. A CFRP U-wrap was
also made of the same 5.5 in. width of CFRP sheet with a total length of 26 in.. The
CFRP U-wrap was attached on each side of the beam over the CFRP sheet, and extended
9 in. from the bottom face of the beam. Pictures of CFRP anchor before and after
installation are shown in Figure 3.8 and 3.9. The number of CFRP U-wraps installed in
16

a specimen varied, and both CFRP U-wraps and CFRP anchors were installed in
specimens No.8 and 9.
26 in.
5.5 in.
Figure 3.8 CFRP U-wrap before Installation
9 in.
Figure 3.9 CFRP U-wrap after Installation
17

The third anchorage method was the insertion of the end of the CFRP sheets into
holes in the specimen without any additional anchor (Figure 3.10). The inserted depth
was 4 in. long as the same as CFRP anchor. This anchorage method was used only in
specimen No.3. It was quite difficult to place the end of sheet into the hole and provide
a smooth transition from the sheet width to the hole dimension as can be seen in Figure
3.10.
Figure 3.10 Insertion of end of CFRP Sheet into Hole
All the configurations of the CFRP materials in the specimens are shown in Table
3.1. Both sides of the specimens had a symmetric configuration.
18

Specimen
No. specimen CFRP sheet & Anchorage Method
1
1 layer & No anchor
2
1 layer & 1 CFRP anchor each side
3 1 layer &
Insertion end of CFRP sheet into holes
4
2 layers & 1 CFRP anchor each side
5
1 layer & 1 CFRP U-wrap each side
6
2 layers & 2 CFRP anchors each side
7
2 layers & 3 CFRP anchors each side
8 2 layers &
2 CFRP anchors each side with CFRP U-wrap
9
2 layers & 2 CFRP U-wraps each side anchored by CFRP anchor
10 2 layers &
2 CFRP U-wraps each side
Table 3.1 Configuration of CFRP materials on Test Specimens
19

3.3 INSTALLATION PROCEDURE OF CFRP MATERIALS
The installation procedure of the CFRP materials was based on procedure ACI
440.2R Chapter 5. The installation procedure is as follows.
1) Sand-blast to roughen the concrete surface
2) Drill holes if required for anchorage
3) Prepare the epoxy resin
4) Saturate the concrete surface and holes with epoxy resin
5) Saturate carbon fiber with epoxy and remove excess epoxy
6) Place the CFRP material on a specimen
7) Cure
The concrete surface of a specimen where CFRP material would be applied was
sand – blasted. The concrete surface before and after sand-blasting are shown in
Figure3.11 and 3.12.
The concrete surface was prepared to meet the requirement for a minimum
concrete surface profile (CSP) 3 as defined in the International Concrete Research
Institute (ICRI)-surface-profile-chips. However, it was not possible to maintain the same
surface condition for all the specimens because the concrete quality was different in the
specimen. Some specimens were over blasted because of the poor quality of the concrete.
The surface preparation conditions are shown in the Figure 3.13 and 3.14.
20

Area for U-wrap
Before sand-blasting
Figure 3.11 Concrete Surface before Sand - Blasting
Blasted surface
Figure 3.12 Concrete Surface after Sand – Blasting
21

Figure 3.13 Regularly Blasted Surface
Figure 3.14 Over Blasted Surface
22

A CFRP anchor requires a hole in the concrete for installation. The holes were
drilled with 5/8 in. diameter masonry drill bit, and they were cleaned with air compressed.
The edge of hole was ground to smooth perimeter transition of the CFRP materials from
the hole to the sheet. An anchor hole prior to installation of the CFRP materials is shown
in Figure 3.15.
Figure 3.15 Hole for CFRP Anchor
Epoxy resin was used for bonding the carbon fabric to the concrete surface. The
epoxy resin used in this study was Tyfo® S Epoxy and it was a two component epoxy
matrix material. The specified mix ratio between two components was 100 parts of the
component A to 42 parts of the component B by volume. They were mixed for five
minutes at 400 ~ 600 RPM until uniformly blended (Figure 3.16).
Figure 3.16 Preparation of Epoxy Resin
23

The concrete surface and holes were saturated with epoxy before the CFRP
materials were applied. The concrete surface and holes were saturated with the epoxy
resin by a small paint roller (Figure 3.17) and an injector.
Figure 3.17 Saturation of Concrete Surface with Epoxy
Pieces of carbon fabric for the CFRP sheet and additional anchorage were
saturated with epoxy resin and squeezed with a roller. Then the CFRP fabric saturated
with epoxy resin was placed on the specimen and smoothed by hand to remove air
pockets (Figure 3.18).
The specimen was cured for at least 72 hours at ambient temperature before test.
Figure 3.18 Placement of CFRP Materials
24

3.4. TEST SETUP
Specimens were tested in an upside -down position for convenience of testing.
The specimen was supported 4 in. from both ends, and all the specimens were loaded at
“mid span” to represent the loading when the column below is removed (Figure 3.19).
Deflection of specimen was measured by two linear transducers on the top of
specimen at mid span.
4 in.
12 in.
88 in.
P
P/2 P/2
Linear Transducer
Figure 3.19 Test Setup
25

3.5 TARGET STRENGTH OF SPECIMEN
The target strength was P=32 kip which corresponded to nominal strength of the
beam with two #6 continuous bottom bars. The nominal moment capacity Mn of
specimen was 707 kip-in. and the required mid span point load was 32 kip ( nn MlP=
4).
If full tensile capacity of the CFRP sheet can be developed, the target strength will be
achieved. The area of the CFRP sheet was determined through the procedure in ACI
440.2 R-02, and no strength reduction factor was used. The procedure was introduced in
Chapter 2.1.2.
26

CHAPTER 4
EXPERIMENTAL RESULT
4.1 GENERAL
In Chapter 4, data from each test result and an interpretation of that data are
presented as follows:
1) Configuration of Specimen
2) Failure Mode
3) Load - Deflection Relationship
4) Strain in CFRP Sheet
5) Strain in Steel Bar
6) Summary
Geometry of CFRP materials in a specimen will be presented under Configuration
of Specimen.
Failure mode of each specimen will be discussed in the subsection entitled
Failure Mode. Two main failure modes existed in the tests except specimen No.1 whose
failure mode was delamination of CFRP sheet. One main failure mode was failure of
anchorage and the other failure mode was failure of the CFRP sheet. These failure
modes were observed after delamination of the CFRP sheet occurred. The failure of
anchorage involved failure of CFRP anchors, CFRP U-wraps or the end of a CFRP sheet
inserted into a hole. Such failures occurred in the CFRP materials used for anchorage or
by concrete crushing around the anchorage. The second main failure mode involved
failure of the CFRP sheet in tension. Two different failure patterns of the CFRP sheet
were observed through the tests. One failure pattern of the CFRP sheet was splitting of
27

the CFRP sheet and fracturing progressively. The other failure pattern was fracture of the
whole CFRP sheet simultaneously.
The desirable failure mode was not the failure of the anchorage but the failure of
the CFRP sheet, and fracture of the whole CFRP sheet was more desirable than split-and-
fracture pattern because fracture of the whole CFRP sheet led to develop the full strength
of the CFRP sheet.
The peak load and deflection at the peak load are presented under Load -
Deflection Relationship. In addition, the failure load and deflection at the failure are also
presented in this section. The peak load indicated the strength of a specimen and was
compared with the target strength 32 kip. The failure load was compared with the peak
load of the specimen to investigate the load carrying capacity of a specimen before failure.
The deflection at the failure load was compared with that of specimen No.1 which had no
additional anchorage. The deflection at the failure indicated peak deformation of a
specimen.
In the subsection, Strain in CFRP Sheet, the location of strain gages in the CFRP
sheet, maximum strain measured and strain distribution along the CFRP sheet are
presented. The value and location of the maximum strain in the CFRP sheet were an
important parameter to determine whether full strength of CFRP sheet was developed.
The strains in the CFRP materials in the additional anchorage were also measured but did
not provide data that could be easily interpreted.
The maximum strain measured in steel bar is indicated in the subsection, Strain in
Steel Bar and was compared with the yield strain of bar. Strain gages were installed only
at the location of the column face in specimens No.1 ~ No.5 but the strain gages in
specimens No.6 ~No.10 were installed at the column face and along the bar. The
maximum value of bar strain and distribution of strain on the bar gave an indication of
load transfer from the CFRP sheets to the bars. In other words, they provided measure of
the continuity and efficiency of the alternative load path created by the CFRP materials.
28

4.2 SPECIMEN NO.1
4.2.1 Configuration
Specimen No.1 had 1 layer of the CFRP sheet and no additional anchorage. The
width of CFRP sheet was 5.5 in. when it was cut, but it extended about 0.5 in. after it was
attached to the specimen (6 in. total) because the CFRP materials were one directional
material and there was no restraint in the transverse direction. The CFRP sheets were
placed on the both sides of the specimen. Configuration of specimen No.1 is shown in
Figure 4.1.
6”
66”
Figure 4.1 Configuration of Specimen No.1
29

4.2.2 Failure Mode
The failure mode of specimen was delamination of the CFRP sheet from the
concrete surface because no additional anchorage existed in specimen No.1. Both sides
showed the same failure mode, and one side failed right after the other (Figure 4.2).
Figure 4.2 Failure mode of Specimen No.1, Delamination of CFRP Sheet
4.2.3 Load - Deflection Relationship
The peak load was 14.6 kip for specimen No.1, and the strength of specimen No.1
was 46% of the target strength, 32 kip. The deflection at this point was 0.21 in.
The failure load (13.9 kip) was 95 % of the peak load, 14.6 kip, and the deflection
at the failure (0.35 in.) was compared with the deflection of the other specimens in order
to find relative deformation capacities of the specimens.
Three key points were noted in the load - deflection curve for specimen No.1
(Figure 4.3). The first key point corresponded with the occurrence of the first concrete
crack at the mid span. Delamination of the CFRP sheets on the both sides started from
this crack. Applied load increased until total debonding of the CFRP sheet on one side of
30

the specimen occurred. After the peak point, the load was carried by the CFRP sheet on
the other side. The specimen maintained nearly the same load carrying capacity for a
short duration until the total debonding occurred the other side. Debonding of the CFRP
sheet in the other side proceeded rapidly when the third key point in the curve was
reached. Comparing load-strain relationships of the CFRP sheets in from strain gages
placed in symmetric positions, almost the same load - strain relationship was found.
The curve begins above the origin because reactions had some play in them
before they seated.
0.21 in., 14.57 kip
0.35 in., 13.85 kip
0.00
2.00
4.00
6.00
8.00
10.00
12.00
14.00
16.00
0.00 0.10 0.20 0.30 0.40 0.50 0.60deflection (in.)
load (kip)
Failure, Debonding of other side
Peak, Debonding of one sidedCracking
Figure 4.3Load - Deflection Relationship of Specimen No.1
31

4.2.4 Strain in CFRP Sheet
The location of the strain gages installed on both sides of specimen No.1 and the
maximum measured strain in each gage are shown in Figure 4.4 and 4.5.
The maximum strain measured in specimen No.1 was 0.0053 at strain gage No.14
in side-A, and was 42% of the specified maximum fracture strain, 0.0126. The maximum
measured strain was not as the same as the true maximum strain of the CFRP sheet
because it was possible that the true maximum strain occurred at other points away from
the strain gage locations.
From the data of the horizontal distribution of strains on the CFRP sheet, the part
of the CFRP sheet developed the highest strain was where debonding failure occurred,
and the same pattern was observed on the both sides of the specimen (Figure 4.4 and 4.5).
The horizontal strain distribution at 10 kip load (before the cracking) and middle
load (12kip) between 10 kip and the peak load (after the cracking but before reaching the
peak load) are also shown in Figure 4.4 and 4.5.
Vertical distribution of strains in the CFRP sheet was observed by strain gages
No.10, 11 and 12 (Figure4.4). As indicated in the figure, the strain was 0.0049 closest to
the extreme fiber of the beam and reduced to 0.0039 and 0.0033 as the distance from the
extreme fiber increased. The highest strain was observed in the strain gage closest to the
extreme tension fiber, strain gage No.10, and it was smaller at strain gages below that
point. Vertical distribution of strains in the CFRP sheet was also observed using gages
No.15, 16 and 17 but rapid delamination of the CFRP sheet occurred at that location, so
the strain data did not properly indicate the vertical distribution of strains.
32

3.79 3.65 3.87
5.34
3.83
3.22
0.07 0.11 0.140
1
2
3
4
5
6
-30 -20 -10 0 10 20 30
distance , (ft)
milli-strain
Max.P=12 kip, After CrackP=10 kip, Before Crack
Figure 4.4 Strain in CFRP Sheet in Specimen No.1, Side-A
66
1”
8 11 7 9 16 13 6 5
17”
9”
14
3”
12
10 15
17
6”
1” (0.07) (3.79) (3.65) (3.31)
(3.87)
(4.91)
(3.83) (5.34)(0.02)
(3.22)
(0.02)
(0.11) (0.14)
Unit: milli - strain, (10 -3)
Failure part
in in
33

3.86
4.87
4.00
0.080.19 0.11
4.104.20
3.55
0
1
2
3
4
5
6
-30 -20 -10 0 10 20 30distance, (ft)
mill i-strain
Max.P=12 kip, After CrackP=10 kip, Before Crack
Failure part
66”
21 23 20 22 26 24 19 18
17”
9”
25
3”
6”
6” 6”
(4.00) (4.87) (3.86) (3.55) (4.20) (4.10) (0.19) (0.11) (0.08)
Unit: milli - strain, (10 -3)
in
Figure 4.5 Strain in CFRP Sheet in Specimen No.1, Side-B
34

Load-strain relationship in a pair of strain gages placed in symmetric positions
showed similar load - strain relationship. It meant that the CFRP sheets on the both sides
developed their capacity at the same time (Figure 4.6).
0
2
4
6
8
10
12
14
16
0 0.0005 0.001 0.0015 0.002 0.0025 0.003 0.0035 0.004 0.0045
strain
load (kip)
Side-A, Gage 9
Side-B, Gage 22
Figure 4.6 Load - Strain Relationship Measured in the Strain Gages at Symmetric
Position
4.2.5 Strain in Steel Bar
The strains in the bar were measured only at the column face with 4 strain gages
in specimen No.1 (Figure 4.7), so it was not possible to observe the distribution of strains
in the bar. Therefore, load transfer from the CFRP sheet to the bar was estimated only by
the strain at the location of the column face. The maximum measured bar strain in
specimen No.1 was 0.0005 which was 24% of the yield strain. It showed that the load
did not transfer effectively from the CFRP sheets to the bars over that short distance (4.5
in).
35

Unit: milli - strain, (10 -3)
(0.50) (0.36)
Figure 4.7 Location of Bar Strain Gages and Maximum Measured Strains
Load - strain relationships of the bar and the CFRP sheet were similar before
cracking of the specimen as shown by comparing measured strains in the bar and the
CFRP sheet at the same distance from the mid span (Figure 4.8).
Rebar CFRP Sheet
0
2
4
6
8
10
12
14
16
0 0.0005 0.001 0.0015 0.002 0.0025 0.003 0.0035 0.004
strain
load (kip)
Figure 4.8 Load - Strain Relationship between Bar and CFRP Sheet, At the Column
Face
(0.40)(0.40)
36

4.2.6 Summary
Specimen No.1 was a pilot test specimen which has no additional anchorage.
Summary of the test results is shown in Table4.1.
Failure Mode Delamination CFRP sheet
Peak Load
Displacement at the peak
14.6 kip, 46% of target strength
0.21 in.
Failure load
Displacement at the failure
13.9 kip, 95% of peak load
0.35 in.
Measured maximum CFRP strain 0.0053, 42% of specified fracture strain
Measured maximum bar strain 0.0005, 24% of yield strain
Table 4.1 Summary of Test Results of Specimen No.1
37

4.3 SPECIMEN NO.2
4.3.1 Configuration
Specimen No.2 had 1 layer of the CFRP sheet and 1 CFRP anchor at each end of
the CFRP sheet. The dimension of the CFRP sheet was the same as specimen No.1
except the CFRP anchors. Location of the anchor holes for the CFRP anchors was
selected as 2/3 of the development length of the bar, and it was 18 in. from the column
face. Configuration of specimen No.2 is shown in Figure 4.9.
6”
18” Distance from column
face to anchor holeCFRP anchor
66”
Figure 4.9 Configuration of Specimen No.2
38

4.3.2 Failure Mode
The failure mode of specimen No.2 involved split-and-fracture of the CFRP sheet.
Both sides showed the same failure mode (Figure 4.10 and 4.11).
Figure 4.10 Failure mode of Specimen No.2, Side-A
Figure 4.11 Failure mode of Specimen No.2, Side-B
39

4.3.3 Load - Deflection Relationship
The load-deflection curve of specimen No.2 is shown in Figure 4.12. The peak
load was17.1 kip for specimen No.2, and the strength of specimen No.2 was 53% of the
target strength, 32 kip. The deflection at this point was 0.59 in.. The increase in strength
of specimen No.2 with respect to that of specimen No.1 was only 2.5 kip because a split-
and-fracture failure occurred. It was impossible to develop the full strength of the CFRP
sheet failing in this manner.
The failure load (16.3 kip) was 95 % of the peak load, 17.1 kip, and the deflection
at the failure (0.69 in.) was about twice as that of specimen No.1. Deformation capacity
of the specimen increased significantly after installation of the CFRP anchors although
the strength of the specimen was not improved much.
The load-deflection curve showed many peak points rather than showed only 3
peak points which are represent crack of specimen, failure of one side, and failure of the
other side. The ‘jagged’ shape of the load-deflection curve is the result of splitting and
fracturing of the CFRP sheets. When one piece of the CFRP sheet split and fractured, the
load decreased, and then increased again until another piece split and fractured. Repeat
of that process on the both sides of the specimen resulted in multiple peaks in the load -
deflection curve.
0.59 in., 17.08 kip
0.69 in., 16.30 kip
0
2
4
6
8
10
12
14
16
18
0 0.2 0.4 0.6 0.8 1 1.2 1.4 1.6
deflection (in.)
load (kip)
Failure, failure of other side
Peak, failure of one sided
Cracking
Figure 4.12 Load - Deflection Relationship of Specimen No.2
40

4.3.4 Strain in CFRP Sheet
The location of the strain gages installed on the both sides of specimen No.2 and
the maximum measured strain in each strain gage are shown in Figure 4.13 and 4.14.
The maximum strain measured in specimen No.2 was 0.0136 at strain gage No.6
in side-A in front of the CFRP anchor, and reached 108% of the specified fracture strain
of 0.0126.
From horizontal distribution of strain in the CFRP sheet, the highest strains
indicate where failure occurred on both sides of specimen (Figure 4.13 and 4.14)
The horizontal strain distribution at 10 kip load (before the cracking) and middle
load (14 kip) between 10 kip and the peak load (after the cracking but before reaching the
peak load) are also shown in Figure 4.13 and 4.14.
The vertical distribution of strains in the CFRP sheet was observed by strain
gages No.9, 10, 11and 12, 13 and 14 (Figure4.13). The highest strain was observed in the
strain gages closest to the extreme tension fiber, strain gage No.9 and 12, and reduced
near the neutral axis of the beam.
Strain gages were also installed on the CFRP anchors but the data were not
available.
41

13.61
6.20
1.12
5.675.494.43
0
5
10
15
-20 -15 -10 -5 0 5 10 15 20 25distance, (ft)
milli-strain
Max.P=14 kip, After CrackP=10 kip, Before Crack
Figure 4.13 Strain in CFRP Sheet in Specimen No.2, Side-A
66”
17”
11”
6” 3”
11”
(1.12)
1”
7 10 8
12
6 13
11
9
14
16
1” (0.18) (13.61)
(6.02)
(4.43) (5.49)
(5.67)
(4.20)
(6.20)
(0.08)
(3.96)
(7.70)5 15
2”
Unit: milli - strain, (10-
in
Failure part
3)
42

8.197.13
6.526.38
0
5
10
-20 -15 -10 -5 0 5 10 15 20 25
distance, (ft)
milli-strain
Max.P=14 kip, After CrackP=10 kip Before Crack
66”
11”
6”
11”
18 20 19 17 21
3” (6.38) (6.52) (7.13) (8.19)(0.49)
Unit: milli - strain, (10-3)
Failure part
in
Figure 4.14 Strain in CFRP Sheet in Specimen No.2, Side-B
43

Load - strain relationship in a pair of strain gages placed in symmetric position
showed similar load - strain relationship and indicated the CFRP sheets on the both sides
reached capacity at the same time (Figure 4.15). Strain gages at other symmetric position
showed similar strains.
Side-A, Gage 10
Side-B, Gage 18
0
2
4
6
8
10
12
14
16
18
0 0.001 0.002 0.003 0.004 0.005 0.006strain
load (kip)
Figure 4.15 Load - Strain relationship measured in strain gages at symmetric position
(At the Mid Span)
4.3.5 Strain in Steel Bar
The strains in the bar were measured only at the column face with 4 strain gages
in specimen No.2 (Figure 4.16), so it was not possible to observe the distribution of the
strains in the bar. Therefore, load transfer from the CFRP sheet to the bar was estimated
only by the strain at the location of the column face. The maximum measured bar strain
in specimen No.2 was 0.0004 which was 19% of the yield strain of bar. It showed that
the load did not transfer effectively from the CFRP sheets to the bars in the short 4.5 in.
distance with in the column.
44

Unit: milli - strain, (10 -3)
(0.34) (0.42)
Figure 4.16 Location of bar strain gages and maximum measured strains
Load - strain relationships of the bar and the CFRP sheet were similar before
crack of the specimen as shown in Figure 4.17.
Rebar
CFRP Sheet
0
2
4
6
8
10
12
14
16
18
0 0.001 0.002 0.003 0.004 0.005 0.006
strain
load (kip)
Figure 4.17 Load - Strain Relationship between Bar and CFRP Sheet, At the Column
Face
(0.32)(0.34)
45

4.3.6 Summary
Summary of the test results is shown in Table 4.2.
Failure Mode CFRP sheet failure, split-and-fracture pattern
Peak Load
Displacement at the peak 17.1 kip, 53 % of target strength
0.59 in
Failure load
Displacement at the failure 16.3 kip, 95% of peak load
0.69 in
Measured maximum CFRP strain 0.0136, 108 % of specified fracture strain
Measured maximum bar strain 0.0004, 19% of yield strain
Table 4.2 Summary of test results for specimen No.2
The specimen with the CFRP anchors showed better behavior than the specimen
without them but its performance was not improved significantly. The reason for the
poor behavior was a split-and-fracture type of failure.
One wide layer of CFRP tended to fail in the split and fracture and indicated that
it was not an efficient way of using the repair materials because the centroid of the CFRP
sheet was not close to the extreme tension fiber or to the reinforcement. Therefore, the
use of double layers of CFRP sheet with half width but the same amount of materials
became a more attractive alternative although it had less bond strength between the CFRP
sheet and the concrete because bonded area was smaller. Such a drawback was overcome
with proper additional anchorage of the sheet.
46

4.4 SPECIMEN NO.3
4.4.1 Configuration
Specimen No.3 had 1 layer of the CFRP sheet and inserted ends of the CFRP
sheet into holes. Location of the holes for the inserted portion of the CFRP sheets was
selected as 2/3 of the development length of the bar, and it was 18 in. from the column
face which was the same location as specimen No.2. Configuration of specimen No.3 is
shown in Figure 4.18.
6”
18” Distance from column
face to hole Inserted end
and hole
48”
Figure 4.18 Configuration of Specimen No.3
47

4.4.2 Failure Mode
The failure mode of specimen No.3 was failure of the inserted part of the CFRP
sheet near the hole. Both sides showed the same failure mode. The failure mode of
specimen No.3 is shown in Figure 4.19 and 4.20
Figure 4.19 Failure Mode of Specimen No.3
Figure 4.20 Failure Mode of Specimen No.3
48

4.4.3 Load - Deflection Relationship
Load-deflection curve of specimen No.3 is shown in Figure 4.21. The peak load
was 14.2 kip for specimen No.3, and the strength of specimen No.3 was 44 % of the
target strength, 32 kip. The deflection at this point was 0.25 in. The peak point was the
same as the failure point. There was no increase of the strength with respect to specimen
No.1, and the deformation capacity of specimen No.3 was less than that of specimen
No.1.
It was more difficult to insert the ends of the CFRP sheet into the holes than to
install CFRP anchors. As a result, the performance of specimen No.3 was not as good as
that of specimen No.2, and moreover, the strength and deformation capacities were near
those of specimen No.1 which had no additional anchorage. It indicates that this
procedure was ineffective.
0.25in,, 14.2kip
0
2
4
6
8
10
12
14
16
0 0.2 0.4 0.6 0.8 1 1.2 1.4 1.6
deflection (in.)
load (kip)
Peak & Failure
Cracking
Figure 4.21 Load - Deflection Relationship for Specimen No.3
49

4.4.4 Strain in CFRP Sheet
The location of the strain gages installed on the both sides of specimen No.3 and
the maximum measured strain in each gage are shown in Figure 4.22 and 4.23. The
maximum strain measured in specimen No.3 was 0.0054 at strain gage No.6 in side-A
where the transition of CFRP sheet to the hole started. At that location, strain was 43%
of the specified fracture strain. In side-B, the highest strain was observed at mid span.
The horizontal strain distribution at 10 kip load (before the cracking) and middle
load (12 kip) between 10 kip and the peak load (after the cracking but before reaching
the peak load) are also shown in Figure 4.22 and 4.23.
The vertical distribution of strains in the CFRP sheet was determined using strain
gages No.9, 10, 11and 12, 13, 14 (Figure 4.22). The highest strain was observed in the
strain gages closest to the extreme tension fiber, strain gage No.9 and12, and was less at
gages nearer the neutral axis.
Strain gages were also installed near by the holes, but the strains were very low
even though the failure occurred around the holes.
50

4.21
5.39
0.09 0.060.15
2.92
4.20
0
1
2
3
4
5
6
-30 -25 -20 -15 -10 -5 0 5 10 15 20 25distance, (ft)
mill i-strain
Max.P=12 kip, After CrackP=10 kip, Before Crack
Figure 4.22 Strain in CFRP Sheet in Specimen No.3, Side -A
Failure part
48”
7 10 8 6
18 No. 1=17”
12”
13
3.5
11
9
5 17 16
15
1”
1”
12
14
3”
6”
2.75” (4.21) (4.20) (3.31)(5.39)
(0.13)(0.01)
(0.09)
(0.15)(2.92)
(3.89)
(0.09) (0.06)
(0.12)
Unit: milli - strain, (10 -3)
in
51

3.10
1.68
0.040.08
2.36
4.76
00.5
11.5
22.5
33.5
44.5
5
-25 -20 -15 -10 -5 0 5 10 15 20 25 30
distance, (ft)
mill i-strain
MaxP=12kip, After CrackP=10 kip, Before Crack
Failure part
48”
19 21 20 18
18 No. 1=17”
12”
22 23
(3.10) (4.76) (2.36)(1.68) (0.08)(0.04)
Unit: milli - strain, (10 -3)
in
Figure 4.23 Strain in CFRP Sheet in Specimen No.3, Side-B
52

Load - strain relationships in a pair of strain gages in symmetric position showed
similar load - strain relationship but they were not as similar as the other specimens
(Figure 4.24). It was because the installation conditions of the CFRP sheets on the both
sides were different. The CFRP sheets in specimen No.3 were not installed as good
quality as specimen No.1 or No.2 because of the inserted part. It was a reason for the
poor performance of specimen No.3.
Side-A, Gage 8
Side-B, Gage 20
0
2
4
6
8
10
12
14
16
0 0.001 0.002 0.003 0.004 0.005 0.006strain
load (kip)
Figure 4.24 Load - Strain Relationship Measured on Strain Gages at Symmetric
Position (At the Mid Span)
4.4.5 Strain in Steel Bar
The strains in the bar was measured only at the column face with 4 strain gages in
specimen No.3 (Figure 4.25) so it was not possible to observe the distribution of strains
in the bar. Therefore, load transfer from the CFRP sheet to the bar was estimated only by
the strain at the location of the column face. The maximum measured bar strain in
specimen No.3 was 0.0005 which was 24% of the yield strain of the bar. It showed that
the load did not transfer effectively from the CFRP sheets to the bars over that short
distance (4.5 in).
53

Unit: milli - strain, (10 -3)
(0.26) (0.42)
(0.51)(0.33)
Figure 4.25 Location of Bar Strain Gages and Maximum Measured Strains
Load - strain relationships of the bar and the CFRP sheet were similar before
crack of the specimen as shown in Figure 4.26.
Rebar
CFRP Sheet
0
2
4
6
8
10
12
14
16
0 0.0005 0.001 0.0015 0.002 0.0025
strain
load (kip)
Figure 4.26 Load - Strain Relationship between Bar and CFRP Sheet, At the Column
Face
54

4.4.6 Summary
Summary of the test results is shown in Table 4.3.
Failure Mode Failure of inserted CFRP sheet near the hole
Peak Load
Displacement at the peak
14.2 kip, 44 % of target strength
0.25 in
Failure load
Displacement at the failure
14.2 kip, 100 % of peak load
0.25 in
Measured maximum CFRP strain
0.0054, 43 % of specified fracture strain
Measured maximum bar strain
0.0005, 24% of yield strain
Table 4.3 Summary of Test Results for Specimen No.3
Specimen No.3 showed poor performance comparing with specimen No.1 and
specimen No.2. The reasons were the CFRP sheet became weak near the hole because
of stress concentration and poor quality in installation of the CFRP sheet due to the
inserted part. Additional anchorage with CFRP anchors provided higher performance
and easier quality control in installation than additional anchorage with the inserted part
of the CFRP sheet.
55

4.5 SPECIMEN NO.4
4.5.1 Configuration
Specimen No.4 had 2 layers of the CFRP sheet and 1 CFRP anchor at each end of
the CFRP sheet. Location of the holes for the CFRP anchors was selected as 2/3 of the
development length of the bar, and it was 18 in. from the column face which was the
same location as specimen No.2 and specimen No.3. Configuration of specimen No.4 is
shown in Figure 4.27.
18” Distance from column
face to anchor holeCFRP anchor
66”
3”
Figure 4.27 Configuration of Specimen No.4
56

4.5.2 Failure Mode
The failure mode of specimen No.4 involved of the additional anchorage, and it
was not the failure of the CFRP materials but the failure of the concrete around the CFRP
anchors. Both sides showed the same failure mode (Figure 4.28 and 4.29).
Figure 4.28 Failure mode of Specimen No.4
Figure 4.29 Failure mode of Specimen No.4
57

4.5.3 Load - Deflection Relationship
Load-deflection curve of specimen No.4 is shown in Figure 4.30. The peak load
was 17.3 kip for specimen No.4, and the strength of specimen No.4 was 54 % of the
target strength, 32 kip. The deflection at his point was 0.53 in. The increase of the
strength of specimen No.4 with respect to that of specimen No.1 was only 2.7 kip
because the additional anchorage failed before developing the full strength of the CFRP
sheet.
The failure load (16.1 kip) was 93 % of the peak load, 17.3 kip, and the deflection
at the failure (0.61 in.) 1.7 times as high as that of specimen No.1. Deformation capacity
of the specimen increased significantly after installation of the CFRP anchors although
the strength of the specimen was not improved much.
Although this specimen showed a similar load - deflection relationship as
specimen No.2, the failure mode was different. A possibility of the strength increase was
observed by the installation of 2 layers of the CFRP sheets with improved additional
anchorage because the CFRP sheet did not fracture.
0.61 in. 16.08 kip
0.53 in., 17.33 kip
0
2
4
6
8
10
12
14
16
18
20
0 0.2 0.4 0.6 0.8 1 1.2
deflection (in.)
load (kip)
Peak, Failure of one side
Failure, Failure of other side
Cracking
Figure 4.30 Load - Deflection Relationship of Specimen No.4
58

4.5.4 Strain in CFRP Sheet
The location of the strain gages installed on the both sides of specimen No.4 and
the maximum measured strain in each strain gage are shown in Figure 4.31 and 4.32.
Gage No.7 and gage No.15 did not work.
The maximum strain measured in specimen No.4 was 0.0086 at strain gage No.9
in side-A in front of the CFRP anchor, and reached 68% of the specified fracture strain of
0.0126.
From the horizontal distribution of strains in the CFRP sheet, the highest strains
indicate where failure occurred on both sides of the specimen (Figure 4.31 and 4.32).
The horizontal strain distribution at 10 kip load (before the cracking) and middle
load (14 kip) between 10 kip and the peak load (after the cracking but before reaching the
peak load) are also shown in Figure 4.31 and 4.32
Strain in the CFRP sheet behind the CFRP anchor (gage No.10) was much less
than that in the sheet in front of the anchor. It was evidence that the CFRP anchor
effectively held the CFRP sheet.
59

5.185.816.11
2.86
8.64
0123456789
10
-20 -15 -10 -5 0 5 10 15 20 25distance, (ft)
milli-strainMax.P=14 kip, After CrackP=10 kip, Before Crack
Figure 4.31 Strain in CFRP Sheet in Specimen No.4, Side-A
66”
6 87
11”
9 3” 5 10
19”
(6.11) (5.81) (5.18)
Failure part
(8.64) (2.86)
Unit: milli - strain, (10 -3)
in
60

5.06
6.15
4.804.49
0
1
2
3
4
5
6
7
-20 -15 -10 -5 0 5 10 15 20 25
distance, (ft)
milli-strain
Max.P=14 kip, After CrackP=10 kip, Before Crack
66”
12 14 13
11”
15 3” 11
19”
(4.49)(5.06)(6.15) (4.80)
Unit: milli - strain, (10 -3)
in
Failure part
in
Figure 4.32 Strain in CFRP Sheet in Specimen No.4, Side-B
61

Load - strain relationship in a pair of strain gages placed in symmetric position
showed similar load - strain relationship and indicated CFRP sheets on the both sides
reached capacity at the same time (Figure 4.33). Strain gages at other symmetric position
showed similar strains.
Side-A, Gage 6
Side-B, Gage 14
0
2
4
6
8
10
12
14
16
18
0 0.001 0.002 0.003 0.004 0.005 0.006strain
load (kip)
Figure 4.33 Load - Strain Relationship Measured on Strain Gages at Symmetric
Position (At the Column Face)
4.5.5 Strain in Steel Bar
The strain in the bars were measured only at the column face with 4 strain gages
in specimen No.4 (Figure 4.34 ) so it was not possible to observe the distribution of
strains in the bar. Therefore, load transfer from the CFRP sheet to the bar was estimated
only by the strain at the location of the column face. The maximum measured bar strain
in specimen No.4 was 0.0005 which was 24% of the yield strain of the bar. It showed
that the load did not transfer effectively form the CFRP sheet s to the bars in the short 4.5
in. distance within the column.
62

Unit: milli - strain, (10 -3)
(0.50) (0.33)
Figure 4.34 Location of Bar Strain Gage and Maximum Measured Strain
Load - strain relationships of the bar and the CFRP sheet were similar before
crack of the specimen as shown in Figure 4.35.
Rebar
CFRP Sheet
0
2
4
6
8
10
12
14
16
18
0 0.0005 0.001 0.0015 0.002 0.0025 0.003 0.0035 0.004 0.0045 0.005
strain
load (kip)
Figure 4.35 Load - Strain Relationship between Bar and CFRP Sheet, At the Column
Face
(0.48)(0.26)
63

4.5.6 Summary
Summary of the test results is shown in Table 4.4.
Failure Mode Concrete failure around CFRP anchor
Peak Load
Displacement at the peak
17.3 kip, 54 % of target strength
0.53 in
Failure load
Displacement at the failure
16.1 kip, 93 % of peak load
0.61 in
Measured maximum CFRP strain
0.0086, 68% of specified fracture strain
Measured maximum bar strain
0.0005, 24% of yield strain
Table 4.4 Summary of Test Results for Specimen No.4
The specimens with the CFRP anchors showed better behavior than the specimens
without them but the strength and deformation capacity of the specimens with the
anchors were not improved significantly. One CFRP anchors at the each end of the
CFRP sheet was not enough to develop full strength of the CFRP sheet, and failure of
anchorage occurred before failure of CFRP sheet.
A split-and-fracture pattern of the CFRP sheet failure did not occurred in
specimen No.4 because of two layers of the CFRP sheets. Two layers of the CFRP sheets
were more effective way of using CFRP materials because they provided larger moment
arm than one layer of the CFRP sheet with the same tensile force capacity. However,
since two layers of the CFRP sheets had small bonding area to the concrete comparing
with one layer of the CFRP sheet, the bonding strength between the concrete and the
CFRP sheet was relatively small. Therefore, the additional anchorage was critical to
develop the full capacity of the two layers of the CFRP sheets. Alternative way to
increase performance of specimens with two layers of the CFRP sheets were found by
testing specimen No.4, installation of improved additional anchorage. The effectiveness
64

of the various anchorages with the two layers of the CFRP sheets was estimated by
specimens No.6, 7, 8, 9 and10.
65
4.6 SPECIMEN NO.5
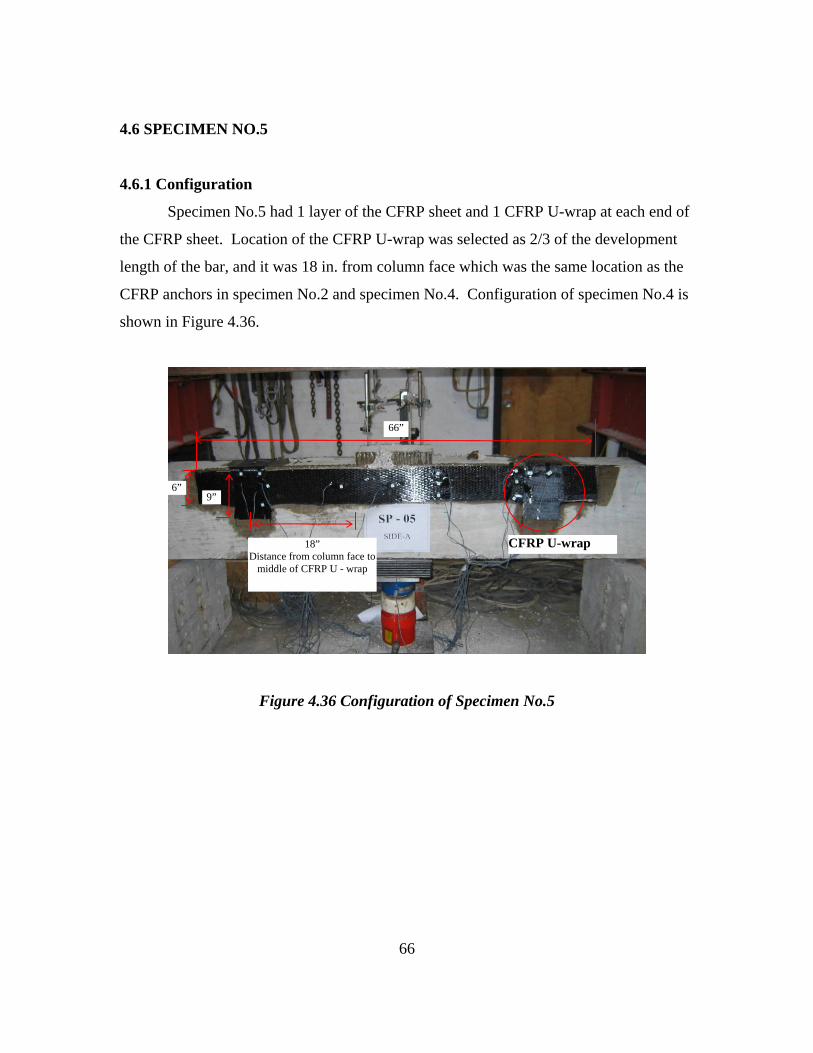
4.6.1 Configuration
Specimen No.5 had 1 layer of the CFRP sheet and 1 CFRP U-wrap at each end of
the CFRP sheet. Location of the CFRP U-wrap was selected as 2/3 of the development
length of the bar, and it was 18 in. from column face which was the same location as the
CFRP anchors in specimen No.2 and specimen No.4. Configuration of specimen No.4 is
shown in Figure 4.36.
6” 9”
CFRP U-wrap
66”
18” Distance from column face to
middle of CFRP U - wrap
Figure 4.36 Configuration of Specimen No.5
66

4.6.2 Failure Mode
The failure mode of specimen No.5 involved of the additional anchorage which
was delamination of CFRP U-wraps. Both sides showed the same failure mode (Figure
4.37 and 4.38).
Figure 4.37 Failure Mode of Specimen No.5
Figure 4.38 Failure Mode of Specimen No.5, Delamination of CFRP U-wrap
67

4.6.3 Load - Deflection Relationship
Load-deflection curve of specimen No.5 is shown in Figure 4.39. The peak load
was 17.6 kip for specimen No.5, and the strength of specimen No.5 was 55% of the target
strength, 32 kip. The deflection at his point was 0.66 in. The increase in strength of
specimen No.5 with respect to that of specimen No.1 was only 3 kip because the
anchorage failed before developing the full strength of the CFRP sheet. The peak point
was the same as the failure point.
The deflection at the failure (0.66 in) was 1.9 times as high as that of specimen
No.1. Deformation capacity of the specimen increased significantly after installation of
the CFRP U-wraps although the strength of the specimen was not improved much. The
strength decreased rapidly after the peak point because the CFRP U-wrap in one side
delaminated from the concrete right after that in other side delaminated.
The load - displacement curve showed plateau when delamination of the CFRP
sheet was propagating. The delamination of the CFRP sheet propagated from the
cracking to the CFRP U-wrap until the U-wrap failed.
0.66 in, 17.6 kip
0
2
4
6
8
10
12
14
16
18
20
0 0.1 0.2 0.3 0.4 0.5 0.6 0.7 0.8
deflection (in.)
load (kip)
Peak & Failure
Cracking
Figure 4.39 Load - Deflection Relationship of Specimen No.5
68

4.6.4 Strain in CFRP Sheet
The location of the strain gages installed on the both sides of specimen No.5 and
the maximum measured strain in each strain gage are shown in Figure 4.40 and 4.41.
Gage No.7 had a calibration strain error about 0.0005.
The maximum strain measured in specimen No.5 was 0.0065 at strain gage No.8
in side-A at the column face, and the strain was 52% of the specified fracture strain of
0.0126.
From the horizontal distribution of strains in the CFRP sheet, the highest strains
indicate where failure occurred on the both sides of specimen.
The horizontal strain distribution at 10 kip load (before the cracking) and middle
load (14 kip) between 10 kip and the peak load (after the cracking but before reaching
the peak load) are also shown in Figure 4.40 and 4.41
The vertical distribution of strains in the CFRP sheet was observed by strain gage
No.8, 9,10 and strain gages No.11, 12, 13 (Figure 4.40). The highest strains were
observed in the strain gages closest to the extreme tension fiber, strain gages No.8 and 11,
and reduced nearer the neutral axis of the beam.
Strain gages were also placed in the CFRP U-wrap. The strain gages placed at the
edge of the beam, gages No.17, 18, 21, 22 and 23 showed compressive strain because the
CFRP U-wrap bended upward after delamination, and strain gages No.19 and 24 showed
tensile strain. Strain gages were also placed in the CFRP U-wrap at the top face of the
beam (the bottom face of the prototype beam) but no strain was observed.
69

5.435.234.75
5.374.84
0
1
2
3
4
5
6
-20 -15 -10 -5 0 5 10 15 20distance, (ft)
milli-strain
Max.P=14 kip, After CrackP=10 kip, Before Crack
66”
1”
6 9 7 125
14.5”
10
8 11
13
6”
1”
6”
9”
18 223”
18”
17
19
23
24
1” 2”
0.75”
(4.75)
(5.07)
(4.84)
(6.52)
( No. (0.81)
(0.89)
(3.99)
(5.37)
(6. 7)
(1.31)
( No.
(0)
(5.23) (5.43)
Unit: milli - strain, (10 -3)
Failure part
in
Figure 4.40 Strain in CFRP Sheet for Specimen No.5 Side-A
70

5.53
6.44
4.33
0
1
2
3
4
5
6
7
-20 -15 -10 -5 0 5 10 15 20distance, (ft)
milli-strain
Max.P=14 kip, After CrackP=10 kip, Before Crack
66”
15 16 14
14.5”
6” 9”
21 3”
18”
18.5”
(4.33)(6.44) (5.56)( No. 1.63)
Unit: milli - strain, (10 -3)
Failure part
in
Figure 4.41 Strain in CFRP Sheet for Specimen No.5 Side-B
71

Load-strain relationships in a pair of strain gages in symmetric position showed
similar load-strain relationship although the calibration error of gage No.7 and indicated
the CFRP sheets on the both sides reached capacity at the same time (Figure 4.42).
Side-A, Gage 7Side-B, Gage 15
0
2
4
6
8
10
12
14
16
18
-0.001 0 0.001 0.002 0.003 0.004 0.005 0.006
strain
load (kip)
Figure 4.42 Load - Strain Relationship Measured in Strain Gages at Symmetric
Position (At the Column Face)
4.6.5 Strain in Steel Bar
The strains in the bars were measured only at the column face with 4 strain gages
in specimen No.5 (Figure 4.43) so it was not possible to observe the distribution of
strains in the bar. Therefore, load transfer from the CFRP sheet to the bar was estimated
only by the strain at the location of the column face. The maximum measured bar strain
in specimen No.4 was 0.0004 which was 19% of the yield strain of the bar.
72

Unit: milli - strain, (10 -3)
(0.41) (0.29)
(0.42)(0.34)
Figure 4.43 Location of Bar Strain Gages and Maximum Measured Strains
Load - strain relationships of the bar and the CFRP sheet were similar before
crack of the specimen as shown in Figure 4.44.
Rebar
CFRP Sheet
0
2
4
6
8
10
12
14
16
18
0 0.001 0.002 0.003 0.004 0.005 0.006
strain
load (kip)
Figure 4.44 Load - Strain Relationship between Bar and CFRP Sheet, At the Column
Face
73

4.6.6 Summary
Summary of the test results is shown in Table 4.5
Failure Mode Delamination of CFRP U-wrap
Peak Load
Displacement at the peak
17.6 kip, 55% of target strength
0.66 in
Failure load
Displacement at the failure
17.6 kip, 100% of target strength
0.66 in
Measured maximum CFRP strain
0.0065, 52% of specified fracture strain
Measured maximum bar strain
0.0004, 19% of yield strain
Table 4.5 Summary of Test Results for Specimen No.5
Although the strength and deformation capacity of specimen No.5 were similar to
those of specimen No.2, the failure modes were different. While fracture of the CFRP
sheet was the failure mode of specimen No.2, delamination of the CFRP U-wrap,
anchorage failure, was the failure mode of specimen No.5. Therefore comparing the
CFRP U-wrap with the CFRP anchor, the CFRP anchors were more efficient way to
provide anchorage to the sheets to the concrete than the U-wraps.
74

4.7 SPECIMEN NO.6
4.7.1 Configuration
Specimen No.6 had 2 layers of the CFRP sheets and 2 CFRP anchors at each end
of the CFRP sheet. Location of one group of the anchor holes for the CFRP anchor was
selected as 2/3 of the development length of the bar, and it was 18 in. from the column
face which is the same location as specimen No.2 and specimen No.3. Location of the
other group of the anchor holes was selected as 6 in. from the column face to place the
CFRP anchors as close as to the column face without over it. Configuration of specimen
No.6 is shown in Figure 4.45.
Distance from column face to anchor hole
6”18” CFRP anchor
66”
3”
Figure 4.45 Configuration of Specimen No.6
4.7.2 Failure Mode
The failure mode of specimen No.6 involved of the additional anchorage and was
not material failure of the CFRP anchors but the failure of the concrete around the CFRP
anchor (Figure 4.46). Both sides showed the same failure mode. It was similar to the
failure mode of specimen No.4. The CFRP sheet on the specimen was cut after the test in
75

order to see the concrete crack and failure shape (Figure 4.47), and then the cover
concrete was removed because the crack propagated along the longitudinal bar from the
mid span to the anchor holes located at 6 in. from the column face (Figure4.48).
Concrete failure
Figure 4.46 Failure Mode of Specimen No.6
Figure 4.47 Failure Mode of Specimen No.6, After Cutting CFRP Sheet
Figure 4.48 Failure Mode of Specimen No.6, After Removing Concrete Cover
76

Although the CFRP sheet did not fracture, the CFRP sheet slipped about 1.25 in.
after delamination. It allowed more deflection to specimen No.6 with maintaining its
strength (Figure 4.49 and 4.50)
Slip of CFRP sheet
Figure 4.49 Slip of CFRP Sheet
Figure 4.50 Slip of CFRP Sheet
77

4.7.3 Load - Deflection Relationship
Load deflection curve of specimen No.6 is shown in Figure4.51. The peak load
was 25.8 kip for specimen No.6, and the strength of specimen No.6 was 81% of the target
strength, 32 kip. The deflection at his point was 0.65 in.. The increase of the strength of
specimen No.6 was 11.2 kip with respect to that of specimen No.1.
The failure load (21.5 kip) was 83 % of the peak load, 25.8 kip, and the deflection
at the failure (0.91 in.) was 2.6 times as high as that of specimen No.1. Both the strength
and deformation capacity increased significantly after the use of two CFRP anchors at
each end of the CFRP sheet.
However, although two CFRP anchors increased the performance of the specimen
significantly, specimen No.6 did not develop the full tensile capacity of the CFRP sheet.
0.65 in., 25.78 kip
0.91 in, 21.50 kip
0
5
10
15
20
25
30
0 0.2 0.4 0.6 0.8 1 1.2 1.4 1.6 1.8 2
deflection (in.)
load (kip)
Cracking
Peak, failure of one side Failure
failure of other side
Figure 4.51 Load - Deflection Relationship of Specimen No.6
78

4.7.4 Strain in CFRP Sheet
The location of strain gages installed in both sides of specimen No.6 and the
maximum measured strain in each strain gage are shown in Figure 4.52 and 4.53. Gages
No.15 and No.17 did not work.
The maximum strain measured in specimen No.6 was 0.0097 at strain gage No.20
in side-B at the mid span, and the strain was 77 % of the specified fracture strain of
0.0126.
From the horizontal distribution of strains in the CFRP sheet, slightly high strain
was observed in which the failure occurred, but more symmetric horizontal distribution
of strains was observed in specimen No.6 than that of the previous specimens tested. The
delamination propagated to the anchors located 18 in. from the column face. The CFRP
anchors controlled the direction of delamination, and it occurred in more uniform way
over the length of the CFRP sheet until the anchorage failure.
The horizontal strain distribution at 10 kip load (before the cracking) and middle
load (18 kip) between 10 kip and the peak load (after the cracking but before reaching the
peak load) are also shown in Figure 4.52 and 4.53
The strain of the CFRP sheet behind the CFRP anchor (gages No.16 and 24) was
much less than that of the sheet in front of the anchor.
79

7.477.93
4.67
7.37
0123456789
-20 -15 -10 -5 0 5 10 15 20distance, (ft)
milli-strain
Max.P=18 kip, After CrackP=10 kip, Before Crack
66”
12 14 13
11”
15 3” 11
8”
(4.67) (7.93) (7.47) (7.37)
6” 6” 12”
Unit: milli - strain, (10 -3)
Failure part
in
Figure 4.52 Strain in CFRP Sheet in Specimen No.6, Side-A
80

9.38
5.00
0.16
4.54
1.67
5.64
9.279.66
0
2
4
6
8
10
12
-35 -25 -15 -5 5 15 25 35distance, (ft)
milli-strain
Max.P=18 kip, After CrackP=10 kip, Before Crack
Figure 4.53 Strain in CFRP Sheet in Specimen No.6, Side-B
66”
19 21 20
11”
22 18 23
8”
(5.00) (9.38) (9.66) (9.27) (5.64) (4.54)
6”
Failure part
6” 12”
24 16
(0.16) 17
(1.67)
Unit: milli - strain, (10 -3)
in
81

Load - strain relationships in a pair of strain gages placed in symmetric position
showed similar load - strain relationship and indicated the CFRP sheets on the both sides
reached capacity at the same time (Figure4.54).
Side-A, Gage13
Side-B, Gage 20
0
5
10
15
20
25
30
0 0.001 0.002 0.003 0.004 0.005 0.006 0.007 0.008 0.009 0.01strain
load (kip)
Figure 4.54 Load - Strain Relationship Measured on Strain Gages at Symmetric
Position (At Mid span)
82

4.7.5 Strain in Steel Bar
The strains in the bars were measured with 10 strain gages for specimen No.6, but
3 strain gages did not work (Figure 4.55). The bar strain gages in specimens No.6, 7, 8, 9
and 10 were distributed horizontally as shown in Figure 4.55 to observe transfer of force
from the CFRP sheets to the bar. The maximum measured bar strain in specimen No.6
was 0.0007 which was 33% of the yield strain of the bar.
The force did not effectively transfer from the CFRP sheet to the bar because the
observed strains were low with respect to the yield strain and the strain in the gages
decreased as they became more distance from mid span. It indicated that the bars did not
contribute to the strength after the cracking.
From the horizontal distribution of strains in the bar, bar strain gages located at
the failure part of specimen showed higher strain than those located where failure did not
occur.
Unit: milli - strain, (10 -3)
6” 6” 6”
0.65
0.340.26
0.140.14
0.45
0.56
0
0.1
0.2
0.3
0.4
0.5
0.6
0.7
-25 -20 -15 -10 -5 0 5 10 15 20 25distance, (ft)
milli-strain
Figure 4.55 Location of Bar Strain Gages and Maximum Measured Strains
(0.65) (0.34) (0.26) (0.14)(0.14)(0.45) (0.56)
83

Load - strain relationships of the bar and the CFRP sheet were similar before
crack of the specimen as shown in Figure4.56.
CFRP Sheet
0
5
10
15
20
25
30
0 0.001 0.002 0.003 0.004 0.005 0.006 0.007 0.008 0.009
strain
load (kip)
Rebar
Figure 4.56 Load - Strain Relationship between Bar and CFRP Sheet, At the Column
Face
84

4.7.7 Summary
Summary of the test results is shown in Table 4.6.
Failure Mode Concrete failure around CFRP anchor
Peak Load
Displacement at the peak
25.8 kip, 81% of target strength
0.65 in.
Failure load
Displacement at the failure
21.5 kip, 83% of peak load
0.91 in
Measured maximum CFRP strain
0.0097, 77% of specified fracture strain
Measured maximum bar strain
0.0007, 33% of yield strain
Table 4.6 Summary of Test Results of Specimen No.6
The strength and deformation capacity of the specimen increased significantly
with two CFRP anchors at each end of the CFRP sheet. However, the failure mode of
specimen No.6 was failure of anchorage, and the capacity of the CFRP sheet did not fully
developed. Therefore, the possibility of increasing capacity of a specimen still existed by
improving anchorage. The specimens with improved anchorage were tested with
specimens No.7, 8 and 9, and these improved anchorages were built based on the
anchorage of specimen No.6.
85

4.8 SPECIMEN NO.7
4.8.1 Configuration
Specimen No.7 had 2 layers of the CFRP sheets and 3 CFRP anchors at each end
of the CFRP sheet. The locations of two groups of anchor holes were as the same as
those of specimen No.6. One group of the anchor holes was located at 18 in. from the
column face and the other group was located at 6 in. from the column face. The location
of the additional group of anchor holes was located at 26 in. from the column face. The
length of the CFRP sheet increased by 2 in., 1 in. for each end, to place the additional
CFRP anchors at the far ends. Configuration of specimen No.7 is shown in Figure 4.57.
Distance from column face to anchor hole
CFRP anchor 26”
18”
6”
68”
Figure 4.57 Configuration of Specimen No.7
86

4.8.2 Failure Mode
Various failure modes were observed in specimen No.7 as shown in Figures from
4.58 to 4.63.
The failure modes of specimen No.7 was a failure of both anchorage and CFRP
sheet. The failure pattern of CFRP sheet was a whole-sheet-fracture. The location of the
fracture was near the anchor hole closest to the column face on both sides (Figure 4.59
and 4.62). However, the failure mode of anchorage was different between side-A and
side-B. The CFRP anchor in side-A fractured (Figure 4.60), and the concrete crushing
occurred around the CFRP anchor in side B (Figure 4.63). Specimen No.7 was the first
specimen showed a material failure of the CFRP anchor.
87

Fracture of CFRP sheet, Material failure of CFRP anchor
Figure 4.58 Failure Mode of Specimen No.7, Side-A
Figure 4.59 Failure Mode of Specimen No.7, Side-A, Fracture of CFRP Sheet
Figure 4.60 Failure Mode of Specimen No.7, Side-A, Fracture of CFRP Anchor
88

Fracture of CFRP sheet, Concrete failure around CFRP anchor
Figure 4.61 Failure Mode of Specimen No.7, Side-B
Figure 4.62 Failure Mode of Specimen No.7, Side-B, Fracture of CFRP Sheet
Figure 4.63 Failure Mode of Specimen No.7, Side-B, Concrete failure around CFRP
Anchor
89

The CFRP sheet in specimen No.7 did not slip because the additional CFRP
anchors held the far ends of the CFRP sheet (Figure 4.64). The deformation capacity of
specimen No.7 was less than that of specimen No.6 because slip did not occur. The
strength of specimen No.7 was also less than that of specimen No.6 although specimen
No.7 had one more CFRP anchor at each end of the sheets than specimen No.6. A
possible reason of the less strength was stress concentration due to this additional anchor.
No slip of CFRP sheet
Figure 4.64 Slip Condition of CFRP Sheet
90

4.8.3 Load - Deflection Relationship
Load-deflection curve of specimen No.7 is shown in Figure 4.65. The peak load
was 23.8 kip for specimen No.7, and the strength of specimen No.7 was 74 % of the
target strength, 32 kip which was less than the strength of specimen No.6. The deflection
at this point was 0.74 in.. The peak point was the same as failure point. The increase in
the strength of specimen No.6 was 11.2 kip with respect to that of specimen No.1.
The deflection at the failure (0.74 in.) was about twice as that of specimen No.1.
Both strength and deformation capacity of specimen No.7 were less than those of
specimen No.6 although more CFRP anchors were placed.
0.74 in,, 23.78 kip
0
5
10
15
20
25
0 0.5 1 1.5 2 2.5 3
deflection (in.)
load (kip)
Peak & Failure
Cracking
Figure 4.65 Load - Deflection Relationship in Specimen No.7
91

4.8.4 Strain in CFRP Sheet
The location of strain gages installed on the both sides of specimen No.7 and the
maximum measured strain in each strain gage are shown in Figure 4.66 and 4.67. Gages
No.14 and No.16 did not work.
The maximum strain measured in specimen No.7 was 0.0117 at strain gage No.23
in side-B at the column face, and the strain was 93% of the specified fracture strain of
0.0126.
From the data of the horizontal distribution of the strains in the CFRP sheet, a
symmetric distribution of the strains was observed with respect to the mid span.
The horizontal strain distribution at 10 kip load (before the cracking) and middle
load (17 kip) between 10 kip and the peak load (after the cracking but before reaching the
peak load) are also shown in Figure 4.66 and 4.67
92

8.19
5.52
2.663.45
8.94
0
12
345
67
89
10
-30 -20 -10 0 10 20 30distance, (ft)
milli-strain
MaxP=17 kip, After CrackP=10 kip, Before Crack
68”
13 15 14
11”
16 12
8”
(5.52) (8.19) (8.94)
6” 18”
26”
17
(3.45) 11
(2.66)
Unit: milli - strain, (10 -3)
Failure part
in
Figure 4.66 Strain in CFRP Sheet for Specimen No.7, Side-A
93

8.45
3.12
0.17 0.29
6.905.49
11.70
8.689.38
0
2
4
6
8
10
12
14
-35 -25 -15 -5 5 15 25 35distance, (ft)
milli-strain
MaxP=17 kip, After CrackP=10 kip, Before Crack
Figure 4.67 Strain in CFRP Sheet for Specimen No.7, Side-B
68”
21 23 22
11”
24
8”
(9.38) (8.68) (11.70) (6.90)
8”
Failure part
Unit: milli - strain, (10 -3)
5.75”18”
25 26 19 20 18 (5.49) (0.29)(3.12)
26”
(8.45) (0.17)
in
94

Load - strain relationships in a pair of strain gages placed in symmetric position
showed similar load - strain relationship and indicated that the CFRP sheets on the both
sides reached capacity at the same time (Figure 4.68).
Side-A, Gage13
Side-B, Gage 23
0
5
10
15
20
25
0 0.002 0.004 0.006 0.008 0.01 0.012strain
load (kip)
Figure 4.68 Load - Strain Relationship Measured in Strain Gages at Symmetric
Position (At the Column Face)
95

4.8.5 Strain in Steel Bar
The strains in the bars were measured with 10 strain gages for specimen No.7, but
3 strain gages did not work (Figure 4.69). The maximum measured bar strain in
specimen No.7 was 0.0007 which was 33% of the yield strain of the bar.
The force did not effectively transfer from the CFRP sheet to the bar because the
observed strains were low with respect to the yield strain and the strain in the gages
decreased as they became more distance from mid span. It indicated that the bars did not
contribute to the strength after the cracking.
Unit: milli - strain, (10 -3)
6” 6” 6”
0.710.59
0.190.11
0.140.30
0.41
00.10.20.3
0.40.5
0.60.70.8
-25 -20 -15 -10 -5 0 5 10 15 20 25distance, (ft)
milli-strain
Figure 4.69 Location of Bar Strain Gages and Maximum Measured Strains
(0.71) (0.59) (0.11)(0.19)(0.30) (041) (0.14)
96

Load - strain relationships of the bar and the CFRP sheet were similar before
crack of the specimen as shown in Figure 4.70.
CFRP Sheet
0
5
10
15
20
25
0 0.001 0.002 0.003 0.004 0.005 0.006 0.007 0.008 0.009
strain
load (kip)
Rebar
Figure 4.70 Load - Strain Relationship between Bar and CFRP Sheet, At the Column
Face
97

4.8.6 Summary
Summary of the test results is shown in Table 4.7.
Failure Mode Whole-fracture of CFRP sheet , material failure of
CFRP anchor and concrete failure around CFRP anchor
Peak Load
Displacement at the peak
23.8 kip, 74 % of target strength
0.74 in
Failure load
Displacement at the failure
23.8 kip, 100 % of peak strength
0.74 in
Measured maximum CFRP strain
0.0117, 93% of specified fracture strain
Measured maximum bar strain
0.0007, 33% of yield strain
Table 4.7 Summary of Test Results for Specimen No.7
One additional CFRP anchor at the each end of the CFRP sheet was installed in
specimen No.7 in order to improve anchorage. However, both strength and deformation
capacity of the specimen were less than those of specimen No.6. A possible reason of the
result can be improper quantity and geometry of CFRP anchors.
If slip of the CFRP sheet is not allowed after delamination due to excessive
quantity of CFRP anchors or improper geometry such as the anchors located at the far
ends of the sheet, stress concentration can occur in the sheet near the anchor hole where
discontinuity of materials exist. Information from this test was not sufficient to verify
effect of the quantity and geometry of CFRP anchors.
Instead of increasing the number of CFRP anchors, CFRP U-wraps were used in
specimen No.8 to prevent the concrete from crushing. The anchorage in specimen No.8
was a combination of CFRP anchors and CFRP U-wraps.
98

4.9 SPECIMEN NO.8
4.9.1 Configuration
Specimen No.8 had 2 layers of the CFRP sheets and 2 CFRP anchors and 2 CFRP
U-wraps at each end of the CFRP sheet. Location of one group of the anchor holes for
the CFRP anchor was selected as 2/3 of the development length of the bar, and it was 18
in. from the column face. Location of the other group of the anchor holes was selected as
6 in. from the column face to place the CFRP anchors as close as to the column face
without over it. The location of the holes was the same as that of specimen No.6. The
CFRP U-wrap was placed on the CFRP sheet, and then CFRP anchor was placed on the
CFRP U-wrap. The anchor was inserted into the anchor hole through the U-wrap and the
sheet. Purpose of using the CFRP U-wrap was to prevent the concrete from the failure
around the anchor hole by confining it and collect tensile force from the CFRP sheet to
the CFRP anchor effectively (Kobayashi, 2001). Configuration of specimen No.8 is
shown in Figure 4.71.
66”
Distance from column face to anchor hole
18” 6”
CFRP anchor
CFRP U-warp
9” 3”
Figure 4.71 Configuration of Specimen No.8
99

4.9.2 Failure Mode
The failure mode of specimen No.8 was a whole-sheet-fracture (Figure 4.72 and
4.73). Both sides showed the same failure mode. Although delamination of the CFRP U-
wrap occurred, the CFRP anchor held both CFRP sheet and U-wrap. The U-wrap
prevented the concrete around the anchor hole from crushing (Figure 4.74).
The fracture of CFRP sheet did not occurred around the anchor hole but in front
of the CFRP anchor closest to the column face. The U-wrap helped the anchor collect the
tensile force efficiently and prevented the sheet from the stress concentration around the
anchor hole.
Whole-sheet-fracture of CFRP sheet
Figure 4.72 Failure Mode of Specimen No.8
Figure 4.73 Failure Mode of Specimen No.8
100

Figure 4.74 Failure Mode of Specimen No.8
The CFRP sheet slipped after delamination occurred until it fractured. The slip
increased the deflection capacity of specimen No.8 (Figure 4.75).
Slip of CFRP sheet
Figure 4.75 Slip Condition of CFRP Sheet
101

4.9.3 Load - Deflection Relationship
Load-deflection curve of specimen No.8 is shown in Figure 4.76. The peak load
was 31.9 kip for specimen No.8, and the target strength was achieved. The deflection at
this point was 0.88 in.. The increase of the strength of specimen No.8 with respect to that
of specimen No.1 was 17.4 kip.
The failure load (27.7 kip) was 87 % of the peak load, 31.9 kip, and the deflection
at the failure (1.12 in.) was 3.2 times as high as that of specimen No.1. Tensile capacity
of the CFRP sheet was fully developed in specimen No.8 which showed the highest load
carrying capacity among all the specimens tested.
1.12in., 27.7 kip
0.88 in., 31.94 kip
0
5
10
15
20
25
30
35
0 0.5 1 1.5 2 2.5
deflection (in.)
load (kip)
Peak
Failure
Cracking
Figure 4.76 Load - Deflection Relationship of Specimen No.8
102

4.9.4 Strain in CFRP Sheet
The location of strain gages installed on the both sides of specimen No.8 and the
maximum measured strain in each strain gage are shown in Figure 4.77 and 4.78. Gage
No.15 did not work.
The maximum strain measured in specimen No.8 was 0.0118 at strain gage No.21
in side-B at the mid span, and the strain was 94 % of the specified fracture strain of
0.0126.
From the horizontal distribution of strains in the CFRP sheet, slightly high strain
was observed where failure occurred, but symmetric horizontal distribution of strains was
observed on both sides of specimen No.8.
The horizontal strain distribution at 10 kip load (before the cracking) and middle
load (21 kip) between 10 kip and the peak load (after the cracking but before reaching the
peak load) are also shown in Figure 4.77 and 4.78
103

9.55
7.16
3.04
0.58
4.20
8.40
0
2
4
6
8
10
12
-30 -20 -10 0 10 20 30
distance, (ft)
mill i-strainMax.P=21kip, After CrackP=10 kip, Before Crack
66”
13 15 14
11”
16 12
10” 6” 12”
1.5”
6”
11 (4.20) (8.40) (9.55) (7.16) (3.04) (0.58)
Unit: milli - strain, (10 -3)
Failure part
in
Figure 4.77 Strain in CFRP Sheet for Specimen No.8, Side –A
104

66”
20 22 21
11”
23 19
10” 6” 12”
24
1.5”
6”
18 (6.97) (9.21) (
6.97
1.72
6.79
2.67
10.5911.80
9.21
0
2
4
6
8
10
12
14
-30 -20 -10 0 10 20 30distance, (ft)
milli-strain
Max.P=21 kip, After CrackP=10 kip, Before Crack
Figure 4.78 Strain in CFRP Sheet for Specimen No.8, Side-B
11.80) (10.59) (2.67) (6.79)
Unit: milli - strain, (10 -3)
Failure part
(1.72)
in
105

Load - strain relationships in a pair of strain gages placed in symmetric position
showed similar load - strain relationship and incidicate the CFRP sheets on the both sides
reached capacity at the same time (Figure 4.79).
Side-A, Gage 14
Side-B, Gage 21
0
5
10
15
20
25
30
35
0 0.002 0.004 0.006 0.008 0.01 0.012strain
load (kip)
Figure 4.79 Load - Strain Relationship Measured in Strain Gages at Symmetric
Position (At the Mid Span)
106

4.9.5 Strain in Steel Bar
The strains in the bars were measured with 10 strain gages for specimen No.8, but
2 strain gages did not work (Figure 4.80). The maximum measured bar strain in
specimen No.8 was 0.0008 which was 38% of the yield strain of the bar.
The difference of the horizontal distribution of bar strains between specimen No.8
and other specimens was the location of the maximum strain. While the maximum strain
occurred at the location closest to the mid span in other specimens, the maximum strain
in specimen No.8 occurred at the location closest to the supports. The result indicated the
force of the CFRP sheet was effectively transferred to the bar and the rebar contributed to
the load carrying capacity after the cracking.
Unit: milli - strain, (10 -3)
(0.30) (0.35)
6” 6” 6”
(0.35) (0.48) (0.79)
0.34
0.560.62
0.48
0.79
0.350.350.30
00.10.20.30.40.50.60.70.80.9
-25 -20 -15 -10 -5 0 5 10 15 20 25distance, (ft)
milli-strain
Figure 4.80 Location of Bar Strain Gages and Maximum Measured Strains
(0.56) (0.34) (0.62)
107

Load - strain relationships of the bar and the CFRP sheet were similar before
crack of the specimen as shown in Figure 4.81.
CFRP Sheet
0
5
10
15
20
25
30
0 0.001 0.002 0.003 0.004 0.005 0.006 0.007 0.008 0.009
strain
load (kip)
Rebar
Figure 4.81 Load - Strain Relationship between Bar and CFRP Sheet, At the Column
Face
108

4.9.6 Summary
Summary of the test results is shown Table 4.8.
Failure Mode Whole-sheet-fracture of CFRP sheet
Peak Load
Displacement at the peak
31.9 kip, 100% of target strength
0.88 in.
Failure load
Displacement at the failure
27.7 kip, 87% of peak load
1.12 in.
Measured maximum CFRP strain
0.0118, 94% of specified fracture strain
Measured maximum bar strain
0.0008, 38 % of yield strain
Table 4.8 Summary of Test Results for Specimen No.8
The tensile capacity of the CFRP sheet was fully developed with the anchorage
with a combination of CFRP anchors and CFRP U-wraps. The failure mode of specimen
was whole-sheet-fracture of the sheet which was the most desirable failure mode. In
addition, Force was effectively transferred from the sheet to the bar. The result indicated
that the CFRP materials were able to be used for providing continuity to the poorly
detailed reinforced concrete structures.
109

4.10 SPECIMEN NO.9
4.10.1 Configuration
Specimen No.9 had 2 layers of the CFRP sheets, and 2 CFRP U-wraps with the
CFRP anchors on the U-wrap at each end of the CFRP sheet. The location of the CFRP
U-wrap in specimen No.9 was the same as that in specimen No.8. The CFRP U-wrap
was placed on the CFRP sheet, and then the CFRP anchor was placed only on the U-wrap
but not on the sheet. This geometry of the CFRP materials was selected because there
was high possibility to hit the longitudinal bars during drilling the holes for the CFRP
anchors because the CFRP sheets needed to be placed as close as to the extreme tension
face in order to increase the moment arm. Therefore, if the anchor holes were placed
near the neutral axis of the beam, they were not required to drill the holes around the bar.
In addition, the possibility of the concrete crushing around the anchor hole reduced
because of the sufficient confinement. Configuration of specimen No.9 is shown in
Figure 4.82.
Distance from column face to anchor hole
3”
66”
16.5” 4.5” CFRP anchor
CFRP U-warp
9”
Figure 4.82 Configuration of Specimen No.9
110

4.10.2 Failure Mode
The failure mode of specimen No.9 was material failure of the CFRP U-wrap
(Figure 4.83, 4.84). Both sides showed the same failure. Although the CFRP anchor
held the U-wrap after delamination of both the U-wrap and sheet, the U-wrap failed by
shear (Figure 4.84).
Material failure of CFRP U-wrap
Figure 4.83 Failure Mode of Specimen No.9
Figure 4.84 Failure Mode of Specimen No.9
111

CFRP sheet slipped after delamination until the U-wrap fractured. The slip
provided large deformation capacity to specimen No.9 (Figure 4.85).
Slip of CFRP sheet
Figure 4.85 Slip of CFRP Sheet
112

4.10.3 Load - Deflection Relationship
Load-deflection curve of specimen No.9 is shown in Figure 4.86. The peak load
was 16.2 kip for specimen No.9, and the strength was 51 % of the target strength, 32 kip.
The deflection at this point was 0.48 in. The increase of the strength of specimen No.9
with respect to that of specimen No.1 was only 1.6 kip. The strength did not increased
although the same amount of the CFRP materials as specimen No.8 was installed in
specimen No.9. The strength was only as half as that of specimen No.8.
The failure load (14.9 kip) was 92 % of the peak load, 16.2 kip, and the deflection
at the failure (1.33 in.) was 3.8 times as high as that of specimen No.1. The specimen
No.9 showed the highest deformation capacity among all the specimens tested. The
anchorage used in specimen No.9 is not effective for strength but effective for
deformation capacity.
1.33 in., 14.88 kip0.48 in., 16.18 kip
0
2
4
6
8
10
12
14
16
18
0 0.2 0.4 0.6 0.8 1 1.2 1.4 1.6 1.8 2
deflection (in.)
load (kip)
Failure
Cracking
Peak
Figure 4.86 Load - Deflection Relationship of Specimen No.9
113

4.10.4 Strain in CFRP Sheet
The location of strain gages installed in both sides of specimen No.9 and the
maximum measured strain in each strain gage are shown in Figure 4.87 and 4.88. Gage
No.14 did not work.
The maximum strain measured in specimen No.9 was 0.0063 at strain gage No.22
in side-B at the location of the column face, and the strain was 50% of the specified
fracture strain of 0.0126.
From the horizontal distribution of strains in the CFRP sheet the highest strains
indicate where failure occurred on the highest strains were observed where failure
occurred on the both sides.
The horizontal strain distribution at 10 kip load (before the cracking) and middle
load (13 kip) between 10 kip and the peak load (after the cracking but before reaching the
peak load) are also shown in Figure 4.87 and 4.88
114

4.95
6.23
2.02
0.12
3.18
4.63
0
1
2
3
4
5
6
7
-30 -20 -10 0 10 20 30
distance, (ft)
milli-strain
Max.P=13 kip, After CrackP=10 kip, Before Crack
66”
13 15 14
11”
16 12
10”
(6.23) (4.95) (4.63)
7.5”
17
(0.12)
19.5”
11
(2.02)
1.5”
3” 3”
(3.18)
Unit: milli - strain, (10 -3)
Failure part
in
Figure 4.87 Strain in CFRP Sheet in Specimen No.9, Side-A
115

4.62
2.62
4.54
2.42
6.265.99
4.70
0
1
2
3
4
5
6
7
-30 -20 -10 0 10 20 30distance, (ft)
milli-strain Max.P=13 kip, After CarckP=10 kip, Before Crack
Figure 4.88 Strain in CFRP Sheet in Specimen No.9, Side-B
Failure part
66”
20 22 21
11”
23 19
10” 7.5”
24
19.5”
18
1.5”
3” 3”
(4.62) (4.70) (5.99) (6.26) (4.54) (2.42)
Unit: milli - strain, (10 -3)
(2.62)
in
116

Load - strain relationships in a pair of strain gages placed in symmetric position
showed similar load - strain relationship. It meant that the CFRP sheets on the both sides
developed their capacity at the same time (Figure 4.89).
Side-A, Gage13
Side-B, Gage 22
02468
1012141618
0 0.001 0.002 0.003 0.004 0.005 0.006strain
load (kip)
Figure 4.89 Load - Strain Relationship Measured in Strain Gages at Symmetric
Position (At the Column Face)
117

4.10.5 Strain in Steel Bar
The strains in the bars were measured with 10 strain gages for specimen No.9, but
1 strain gage did not work (Figure 4.90). The maximum measured bar strain in specimen
No.9 was 0.0005 which was 24% of the yield strain of the bar.
The force did not effectively transfer from the CFRP sheet to the bar because the
measured strains were low comparing with the yield strain and the strain in the gages
decreased as they became more distance from the mid span. It indicated that the bars did
not contribute to the strength after cracking.
Unit: milli - strain, (10 -3)
(0.45)
6” 6” 6”
0.100.070.07 0.070.14
0.510.45
0
0.1
0.2
0.3
0.4
0.5
0.6
-25 -20 -15 -10 -5 0 5 10 15 20 25distance, (ft)
milli-strain
Figure 4.90 Location of Bar Strain Gages and Maximum Measured Strain
(0.51) (0.07)(0.14) (0.07) (0.10)
(0.44) (0.47)
118

Load - strain relationships of the bar and the CFRP sheet were similar before
crack of the specimen as shown in Figure 4.91.
0
2
4
6
8
10
12
14
16
18
0 0.001 0.002 0.003 0.004 0.005 0.006
strain
load (kip)
Rebar
Figure 4.91 Load - Strain Relationship between Bar and CFRP Sheet, At the Column
Face
119

4.10.6 Summary
Summary of the test results is shown in Table 4.9
Failure Mode Material Failure of CFRP U-wrap
Peak Load
Displacement at the peak
16.9 kip, 51% of target strength
0.78 in
Failure load
Displacement at the failure
14.9 kip, 92% of peak load
1.33 in
Measured maximum CFRP strain
0.0063, 50% of specified fracture strain
Measured maximum bar strain
0.0005, 24% of yield strain
Table 4.9 Summary of Test Results for Specimen No.9
While the strength of specimen No.9 did not improved, the deformation capacity
increased significantly, and the highest deformation capacity was observed in it
The anchorage of specimen No.9 is possible to use structures whose deformation
capacity is more critical than strength.
120

4.11 SPECIMEN NO.10
4.11.1 Configuration
Specimen No.10 had 2 layers of the CFRP sheets and 2 CFRP U-wraps at each
end of the sheet. The location of CFRP U-wraps in specimen No10 was the same as
those in specimens No.8 and No.9.
Specimen No.10 was tested for comparison with other specimens with 2 layers of
the CFRP sheets although expected performance was very poor. Configuration of
specimen No. 10 is shown in Figure 4.92.
9”
4.5”
Distance from middle of CFRP U - wrap
CFRP U-warp 16.5”
66”
3”
Figure 4.92 Configuration of Specimen No.10
121

4.11.2 Failure Mode
The failure mode of specimen No.10 was delamination the CFRP U-wrap which
was the same as specimen No.5 (Figure 4.93 and 4.94). Both sides showed the same
failure mode. When only the U-wrap is used for additional anchorage of the CFRP sheet,
bonding strength of the sheet to the concrete is a critical factor to load carrying capacity.
The U-wrap was not able to anchor the CFRP sheet once delamination of the sheet
occurred. Therefore, specimen No.10 which had less bonding area than that of specimen
No.5 showed less strength although specimen No.10 had two U-wraps at the each end of
the sheet.
Delamination of CFRP U-wrap
Figure 4.93 Failure Mode of Specimen No.10
Figure 4.94 Failure Mode of Specimen No.10, Delamination of CFRP U-wrap
122

4.11.3 Load - Deflection Relationship
Load-deflection curve of specimen No.10 is shown in Figure 4.95. The peak load
was 15.4 kip for specimen No.10, and the strength was 48 % of the target strength, 32 kip.
The deflection at this point was 0.43 in. The peak point was the same as the failure point.
The increase of the strength of specimen No.10 with respect to that of specimen No.1 was
only 0.8 kip.
The deflection at the failure (0.43 in.) was 1.2 times as high as that of specimen
No.1.
The shape of load - deflection curve for specimen No.10 was similar to that of
specimen No.5. The load - deflection curve showed only one peak after cracking because
the U-wraps in one side failed right after those in other side failed.
0.43 in., 15.38 kip
02468
1012141618
0 0.2 0.4 0.6 0.8 1
deflection (in.)
load (kip)
Peak & Failure
Cracking
Figure 4.95 Load - Deflection Relationship of Specimen No.10
123

4.11.4 Strain in CFRP Sheet
The location of strain gages installed in both sides of specimen No.10 and the
maximum strain measured in each strain gage are shown in Figure 4.96 and 4.97. Gage
No.14 did not work.
The maximum strain measured in specimen No.10 was 0.0056 at strain gage
No.15 in side-A at the column face, and the strain was 44 % of the specified fracture
strain of 0.0126.
From the horizontal distribution of the strains in the CFRP sheet, a symmetric
distribution of the strains was observed with respect to the mid span.
The horizontal strain distribution at 10 kip load (before the cracking) and middle
load (13 kip) between 10 kip and the peak load (after the cracking but before reaching the
peak load) are also shown in Figure 4.96 and 4.97
124

5.154.61
2.56
0.93
4.21
5.58
0
1
2
3
4
5
6
-30 -20 -10 0 10 20 30
distance , (ft)
milli-strain Max.P=13 kip, After CrackP=10 kip, Before Crack
Figure 4.96 Strain in CFRP Sheet in Specimen No.10, Side-A
66”
13 15 14
11”
16 12
10”
(4.61) (5.15) (5.58) (4.21)
7.5”
Failure part
17
(0.93)
19.5”
11
(2.56)
6”
Unit: milli - strain, (10 -3)
in
125

3.78
5.184.75
2.10
3.95
1.38
3.31
0
1
2
3
4
5
6
-30 -20 -10 0 10 20 30distance, (ft)
milli-strain Max.P=13 kip, After CrackP=10 kip, Before Crack
66”
20 22 21
11”
23 19
10”
(3.31) (3.78) (5.18) (4.75) (3.95)
7.5”
24
(2.10)
19.5”
18
(1.38)
Unit: milli - strain, (10 -3)
Failure part
in
Figure 4.97 Strain in CFRP Sheet in Specimen No.10, Side –B
126

Load - strain relationships in a pair of strain gages placed in symmetric position
showed similar load - strain relationship and idicated the CFRP sheets on the both sides
developed their capacity at the same time (Figure 4.98).
Side-A, Gage13
Side-B, Gage 22
02468
1012141618
0 0.0005 0.001 0.0015 0.002 0.0025 0.003 0.0035 0.004 0.0045 0.005strain
load (kip)
Figure 4.98 Load - Strain Relationship Measured in Strain Gages at Symmetric
Position (At the Column Face)
127

4.11.5 Strain in Steel Bar
The strains in the bars were measured with 10 strain gages for specimen No.10,
but 1 strain gage did not work (Figure 4.99). The maximum measured bar strain in
specimen No.10 was 0.0004 which was 19% of the yield strain of the bar.
The force did not effectively transfer from the CFRP sheet to the bar because the
measured strains were low comparing with the yield strain and the strain in the gages
decreased as they became more distance from mid span. It indicated that the bars did not
contribute to the strength after cracking.
Unit: milli - strain, (10 -3)
6” 6” 6”
0.120.070.05 0.08 0.06
0.10
0.32
0.45
0
0.1
0.2
0.3
0.4
0.5
-25 -20 -15 -10 -5 0 5 10 15 20 25distance, (ft)
milli-strain
Figure 4.99 Location of Bar Strain Gages and Maximum Measured Strains
(0.45) (0.32) (0.06)(0.10) (0.07) (0.12)
(0.33)
(0.05) (0.08)
128

Load - strain relationships of the bar and the CFRP sheet were similar before
crack of the specimen as shown in Figure 4.100.
0
2
4
6
8
10
12
14
16
18
0 0.001 0.002 0.003 0.004 0.005 0.006
strain
load (kip)
Rebar
Figure 4.100 Load - Strain Relationship between Bar and CFRP Sheet, At the Column
Face
129

4.11.6 Summary
Summary of the test results is shown in Table 10.
Failure Mode Delamination of CFRP U-wrap
Peak Load
Displacement at the peak
15.4 kip, 48% of target strength
0.43 in
Failure load
Displacement at the failure
15.4 kip, 100% of peak load
0.43 in
Measured maximum CFRP strain
0.0056, 44% of specified fracture strain
Measured maximum bar strain
0.0004, 19% of yield strain
Table 4.10 Summary of Test Results for Specimen No.10
CFRP U-wraps were not an effective way of anchoring the CFRP sheets. However, the
U-wrap was able to be used to prevent the concrete crushing around the CFRP anchor,
and it increased the performance of the beam significantly. Therefore, The CFRP U-
wraps were effective supplementary element for the CFRP anchors but did not provide
efficient anchorage to the beam alone.
130

CHAPTER 5
DISCUSSION OF TEST RESULTS
5.1 FAILURE MODE
A summary of the failure modes of the specimens is given in Table5.1. If the
CFRP sheets were attached to the concrete only by epoxy resin without any additional
anchorage, the failure mode was delamination of the CFRP sheets (specimen No.1). Two
main failure modes existed after delamination of the CFRP sheet if additional anchorage
existed. They were failure of CFRP sheets and failure of anchorage. Failure of CFRP
sheets after developing their full tensile capacity was the most desirable failure mode, but
if the CFRP sheets split and fractured, they did not develop the full tensile capacity
although they had sufficient anchorage (specimen No.2). Multiple layers of the narrow
width CFRP sheets were required in order to prevent the split-and-fracture type of failure.
In this case, additional anchorage was critical to the capacity of the specimens.
Failure patterns of anchorage were different depending on the types of the
anchorage. However, they were generalized to three patterns delamination, material
failure, and concrete failure. Delamination in anchorage occurred when CFRP U-wraps
were used for the additional anchorage (specimen No.5, 10). Material failure anchorage
was observed in specimen No.3, 7 and 9. The inserted part of the CFRP sheet fractured
near the hole in specimen No.3, the inserted part of the CFRP anchor also fractured in
specimen No.7, and shear failure of the CFRP U-wrap was observed in specimen No.9.
Concrete failure around the anchor holes was observed in specimen No.4 and 6. Such
failure was observed only when CFRP anchors were used for anchorage.
131

No. Specimen Layers of
CFRP sheet
Type of anchorage Failure mode
1
1 layer No anchorage Delamination of CFRP sheet
2
1 layer 1 CFRP anchor each side
Split-and-fracture of CFRP Sheet (partial failure of CFRP anchor)
3
1 layer Insert end of CFRP sheet into holes
Failure of inserted CFRP sheet near the hole
4
2 layers 1 CFRP anchor each side
Concrete Failure around CFRP anchors (Cover failure)
5
1 layer 1 CFRP U-wrap each side Delamination of CFRP U-wrap
6
2 layers 2 CFRP anchors each side
Concrete Failure around CFRP anchors
(Cover failure)
7
2 layers 3 CFRP anchors each side
Whole-sheet-fracture of CFRP sheet and failure of CFRP material in CFRP anchor
8
2 layers 2 CFRP anchors each side with CFRP U-
warp
Whole-sheet-failure of CFRP sheet
9
2 layers 2 CFRP U-wrap each
side anchored by CFRP anchor
Material failure of U-wrap
10
2 layers 2 CFRP U-wrap each side Delamination of CFRP U-wrap
Table 5.1 Test Results, Failure Mode
132

5.2 LOAD-DEFLECTION RELATIONSHIP
5.2.1 Strength
A summary of the strength (peak load) of the specimens is shown in Table5.2.
The target strength (32 kip) was achieved in specimen No.8. The strength of a specimen
was related to its failure mode. If split-and-fracture of the CFRP sheets and anchorage
failure were prevented, target strength was achieved. Split-and-fracture of the sheet was
prevented by using two layers of CFRP sheets (No.4, 6, 7, 8, 9 and 10).
5.2.2 Deformation Capacity
A Summary about deformation capacity (deflection at failure) of the specimens is
also shown in Table 5.3. Deformation capacity is an important factor in developing
catenary action. Large deflection capacity at the location of a removed column allows
the structure to sustain loads without collapse. Typically, as load carrying capacity
increased, deformation capacity also increased in the tests. As anchorage was improved,
both strength and deformation capacity were increased. However, specimen No.9
showed increase of the deformation capacity without much increase in the load carrying
capacity.
133

Peak Failure No. Specimen
Layers of
CFRP sheet
Type of anchorage Load
(kip) Deflection
(in) Load (kip)
Deflection (in)
1
1 layer No anchorage 14.6 0.21 13.9 0.35
2 1 layer 1 CFRP anchor each side 17.1 0.59 16.3 0.69
3 1 layer Insert end of CFRP sheet into holes
14.2 0.25 14.2 0.25
4 2 layers 1 CFRP anchor each side 17.3 0.53 16.1 0.61
5 1 layer 1 CFRP U-wrap each side 17.6 0.66 17.6 0.66
6 2 layers 2 CFRP
anchors each side
25.8 0.65 21.5 0.91
7 2 layers 3 CFRP
anchors each side
23.8 0.74 23.8 0.74
8 2 layers
2 CFRP anchors each
side with CFRP U- warp
31.9 0.88 27.7 1.12
9 2 layers
2 CFRP U-wrap each side
anchored by CFRP anchor
16.2 0.78 14.9 1.33
10 2 layers 2 CFRP U-wrap each side 15.4 0.43 15.4 0.43
Table 5.2 Test Results, Strength and Deformation Capacity
134

5.2.3 Load - Deflection Relationship
5.2.3.1 Specimens of Single Layer of CFRP Sheet
Although the failure modes of the specimens with a single layer of CFRP were
different (Table 5.1), strength and deformation capacity of the specimens were not
improved much with respect to specimen No.1 which had no additional anchorage
(Figure 5.1).
14.57 kip
17.08 kip
14.20 kip
17.60 kip
0
2
4
6
8
10
12
14
16
18
20
0 0.2 0.4 0.6 0.8 1 1.2 1.4 1.6
deflection (in.)
load (kip)
SP-1
SP-2
SP-3
SP-5
Figure 5.1 Load - Deflection Relationship, Specimens of Single layer of CFRP sheet
135

5.2.3.2 Specimens of Double Layers of CFRP Sheet with Two Additional
Anchorages Each Side
As anchorage improved, the load carrying capacity and deformation capacity
increased. The load carrying capacity of specimen No.10 which had only the CFRP U-
wraps for its anchorage was not improved in comparison with specimen No.1. The CFRP
U-wraps provided less effective anchorage than the CFRP anchors. A combination of the
CFRP U-wraps and the CFRP anchors was the most effective anchorage tested.
25.78 kip
31.94 kip
16.18 kip
15.40 kip
0
5
10
15
20
25
30
35
0.0 0.2 0.4 0.6 0.8 1.0 1.2 1.4 1.6 1.8 2.0 2.2
deflection (in.)
load (kip)
SP-6
SP-8
SP-9
SP-10
Figure 5.2 Load - Deflection Relationship, Specimens of Double layers of CFRP sheet
with two additional anchorages each side
136

5.2.3.3 Specimens of Double Layers of CFRP Sheet with CFRP Anchor
An increase in the number of the anchors did not always lead to an increase of the
strength and deformation capacity. The number of CFRP anchors in specimen No.7 was
more than those in specimen No.6, but the strength of specimen No.7 was less than that
of specimen No.6. A possible reason was stress concentrations at the anchors that did
not permit other anchors to carry load before local failure of the sheet occurred. However,
further research is required to understand this type of failure and to verify the proper
quantity and location of anchors for the design.
17.33kip
25.78 kip
23.80 kip
0
5
10
15
20
25
30
0.0 0.2 0.4 0.6 0.8 1.0 1.2 1.4 1.6 1.8 2.0 2.2 2.4 2.6 2.8
deflection (in.)
load (kip)
SP-4
SP-6
SP-7
Figure 5.3 Load - Deflection Relationship, Specimens of Double layers of CFRP sheet
with CFRP anchor
137

5.2.3.4 Specimen No.1 and Specimen No.8
The strength and deformation capacity increase from specimen No.1 to specimen
was significant. If all the undesirable failure modes were prevented, the CFRP sheets
developed full tensile capacity, and both strength and deformation capacity of structure
were improved
32.94 kip
14.57 ki
0
5
10
15
20
25
30
35
0 0.2 0.4 0.6 0.8 1 1.2 1.4 1.6 1.8 2 2.2
deflection (in.)
load (kip)
SP-8
SP-1p
Figure 5.4 - Deflection Relationship, Specimen No.1 and specimen No.8
138

5.4 MATERIAL EFFICIENCY
A summary of the material efficiency of the test specimens is shown in Table 5.3.
Value of material efficiency is ratio of the maximum load carried by a specimen to the
area of the CFRP materials in the specimen including the CFRP sheets and additional
anchorage. Specimen No.7 showed the highest value of material efficiency among all
the specimens although it did not have highest load carrying or deformation capacity.
With respect to the material efficiency, anchorage with only CFRP anchors was more
efficient than combined anchorage of the CFRP anchors and U-wraps.
5.5 WORKABILITY
For best performance, CFRP sheets must be straight, and air voids must not exist
between CFRP sheets and the concrete surface. A wide single layer CFRP sheet was
easier to install than narrow double layer CFRP sheets.
In application of the additional anchorage with CFRP materials, CFRP U-wraps
were easier to install than CFRP anchors. While CFRP U-wraps only required surface
preparation of the concrete, drilling holes was needed for CFRP anchors. The holes had
to be saturated with epoxy, and CFRP anchors had to be inserted into the holes through
the CFRP sheets and splayed out on the sheets.
Inserting ends of CFRP sheets into the anchor holes (specimen No.3) was the
most difficult way to provide additional anchorage because a portion of the CFRP sheet
had to be anchored while the rest of the sheet was maintained in straight, well-bonded
condition.
139

No. Specimen
Layers of
CFRP sheet
Type of anchorage
Peak load (kip)
Area of CFRP (ft2)
Material Efficiency, (kip/ft2 )
(peak Load /CFRP Area)
1
1 layer No anchorage 14.6 5.04 2.9
2 1 layer 1 CFRP anchor each side 17.1 5.77 3.0
3 1 layer Insert end of CFRP sheet into holes
14.2 5.04 2.8
4 2 layers 1 CFRP anchor each side 17.3 5.77 3.0
5 1 layer 1 CFRP U-wrap each side 17.6 7.03 2.5
6 2 layers 2 CFRP
anchors each side
25.8 6.49 4.0
7 2 layers 3 CFRP
anchors each side
23.8 7.22 3.3
8 2 layers
2 CFRP anchors each
side with CFRP U- warp
31.9 10.47 3.1
9 2 layers
2 CFRP U-wrap each side
anchored by CFRP anchor
16.2 10.47 1.5
10 2 layers 2 CFRP U-wrap each side 15.4 9.01 1.7
Table 5.3 Test Results, Material Efficiency
140

CHAPTER 6
CONCLUSION
The following major conclusions can be drawn from this study.
1. It was possible to use CFRP materials to create alternative load path in a beam
-column connection.
2. Anchorage of the CFRP sheet was critical to develop full fracture strength of
the CFRP sheet.
3. Both strength and deformation capacity increased by installation of additional
anchorage for the CFRP sheet with CFRP material to the CFRP sheet.
4. A combination of the CFRP anchor and the CFRP U-wrap was a solution to
provide proper anchorage to the CFRP sheet..
Rehabilitation using CFRP materials to correct poor details was successful only if
proper anchorage was provided. It was necessary to use both CFRP anchors and CFRP
U-wraps to achieve full strength of the CFRP sheet. If either CFRP anchors or CFRP U-
wraps were used alone, delamination of the sheet led to failure of the anchor or U-wrap.
Further research into various geometries and quantities of CFRP anchors and U-
wraps are required before design guidelines can be developed. Moreover, application
may be limited because the method requires flat side surfaces and many beam-column
connections consist of columns that are wider than the beams. However, it is possible to
use the method in other applications in which CFRP sheets are used to provide continuity
in the same plane.
141

Reference
ACI Committee 318. (2005). “Building Code Requirements for Structural Concrete (ACI
318-05).” American Concrete Institute, Farmington Hills, Michigan.
ACI committee 440. (2002). “Guide for the Design and Construction of Externally
bonded FRP Systems for Strengthening Concrete Structures.”, American Concrete
Institute, Farmington Hills, Michigan.
Astaneh-Asl A. (2003). “Progressive Collapse Prevention in New and Existing
Buildings.” Proc. of the 9th Arab Structural Engineering Conf., Emerging Technologies in
Structural Engineering, Abu Dhabi, UAE, pp 1001-1008
Brena, S. (2000). “Strengthening Reinforced Concrete Bridges Using Carbon Fiber
Reinforced Polymer Composite.” PH.D. Dissertation, University of Texas at Austin.
Fib Task Group 9.3, (2001). “Externally Bonded FRP Reinforcement for RC Structures.”,
The International Federation for Structural Concrete, Lausanne, Switzerland.
Kobayashi, K., et al., (2001). “Advanced Wrapping System with CF-Anchor.”,
Proceedings of the 5th International Conference on Fibre Reinforced Plastics for
Reinforced Concrete Structures, Volume 1, pages 379-388
Ozdemir, G., Akyuz, U. (2006). “Tensile Capacities of CFRP Anchors.”, Advances in
Earthquake Engineering for Urban Risk Reduction, Springer (Not yet published.
Available: June 15, 2006)
142

Regan P. (1975). “Catenary Action in Damaged Concrete Structures.” ACI publication
SP-48, American Concrete Institute, Detroit, Michigan. pp 191-224
Teng J.G., et al., (2002). “FRP-strengthened RC Structures”, Willy, New York
Uzumeri S. (1977). “Strength and Ductility of Cast-In-Place Beam-Column Joints.” ACI
publication SP-53, American Concrete Institute, Detroit, Michigan. pp 293-350
143

Vita
In Sung Kim was born in Seoul, Republic of Korea on November 1, 1978, the son
of Soon Hee Kim and Yeo Keun Kim. After completing his work at Chosun University
High School, Kwangju, Korea, in 1997, he entered Yonsei University in Seoul, Korea.
He received the degree of Bachelor of Science from Yonsei University in February, 2001.
During the following years he was employed as an engineer at Seohae Construction Co.
LTD., Incheon, Korea. In August, 2004, he entered The Graduate School at The
University of Texas at Austin.
Permanent Address: Greentown 1304-103,
Jung2dong, Wonmi-Gu, 420-721
Republic of Korea
This thesis was typed by the author.
144