conversion guide: payroll cs to accounting cs payroll · pdf fileconversion guide: payroll cs...
TRANSCRIPT
Conversion Guide: Payroll CS to Accounting CS Payroll TL 31141 Copyright 1998 – 2017 by Thomson Reuters. All rights reserved. Page 1
CONVERSION GUIDE Payroll CS to Accounting CS Payroll Introduction and conversion overview ........................................................................................................... 1 Conversion checklist ..................................................................................................................................... 2 Pre-conversion considerations and recommendations ................................................................................. 3 Custom conversion procedure ...................................................................................................................... 5 Conversion screens within the wizard ........................................................................................................... 6 Batch import procedure ................................................................................................................................. 9 Type and destination of data transferred during conversion ....................................................................... 13 Data that is not transferred .......................................................................................................................... 37 Verifying your converted data ..................................................................................................................... 40 If you encounter problems ........................................................................................................................... 40 Help and Support ........................................................................................................................................ 40
Introduction and conversion overview Accounting CS® Payroll provides two different methods to import data files from Payroll CS® within Creative Solutions Accounting™ (CSA), which is part of the CS Professional Suite® Accounting Products.
• The batch conversion allows you to convert a limited amount of data for multiple client records in a batch. A large amount of additional setup is required following this method of conversion.
• The custom conversion is the recommended method. It converts a single client at a time and provides you with far more control over client details and requires only a small amount of additional setup after the conversion.
This guide explains the procedures for both methods of importing your data files and specifies where your imported CSA data appears within Accounting CS Payroll after the import.
Important! Before you convert your data, we strongly encourage you to thoroughly read both this entire document and the Transitioning from CSA to Accounting CS services topic in our Help & How-To Center.
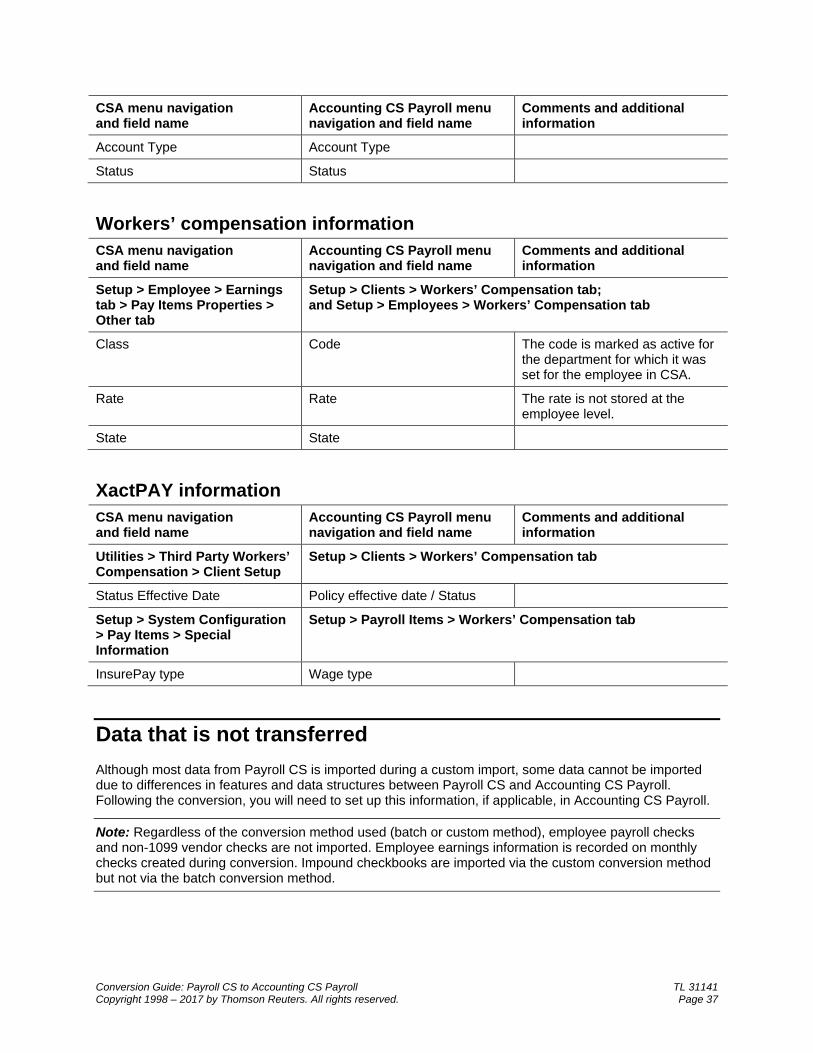
Objective The overall objective of the CS Professional Suite Accounting Products Conversion wizard is to provide a comprehensive conversion of client data from Payroll CS to Accounting CS Payroll. However, due to differences in processing calculations and data structures between Payroll CS and Accounting CS Payroll, some data cannot be imported. Therefore, you should not expect to exactly duplicate results from Payroll CS using the imported data without adding or modifying the appropriate data in Accounting CS Payroll. The specific items that cannot be imported and conversion exceptions are listed in the section of this document entitled “Data that is not transferred” starting on page 37 of this guide.
TL 31141 Conversion Guide: Payroll CS to Accounting CS Payroll Page 2 Copyright 1998 – 2017 by Thomson Reuters. All rights reserved.
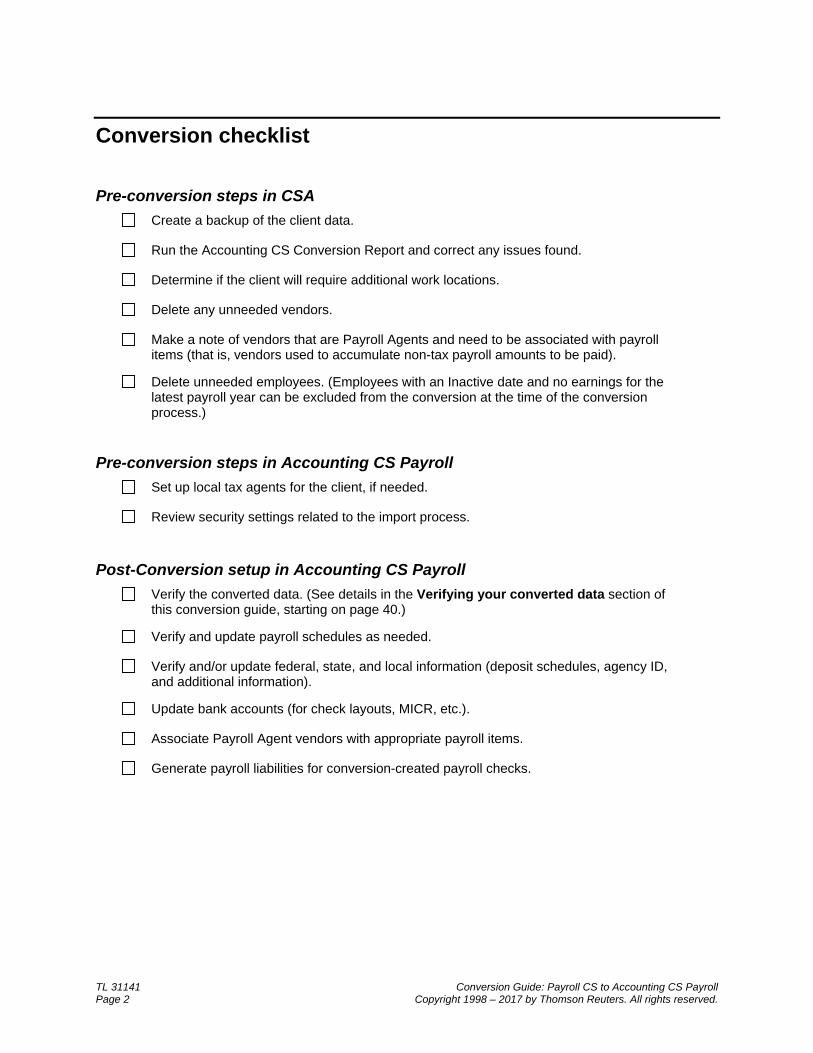
Conversion checklist
Pre-conversion steps in CSA Create a backup of the client data.
Run the Accounting CS Conversion Report and correct any issues found.
Determine if the client will require additional work locations.
Delete any unneeded vendors.
Make a note of vendors that are Payroll Agents and need to be associated with payroll items (that is, vendors used to accumulate non-tax payroll amounts to be paid).
Delete unneeded employees. (Employees with an Inactive date and no earnings for the latest payroll year can be excluded from the conversion at the time of the conversion process.)
Pre-conversion steps in Accounting CS Payroll Set up local tax agents for the client, if needed.
Review security settings related to the import process.
Post-Conversion setup in Accounting CS Payroll Verify the converted data. (See details in the Verifying your converted data section of
this conversion guide, starting on page 40.)
Verify and update payroll schedules as needed.
Verify and/or update federal, state, and local information (deposit schedules, agency ID, and additional information).
Update bank accounts (for check layouts, MICR, etc.).
Associate Payroll Agent vendors with appropriate payroll items.
Generate payroll liabilities for conversion-created payroll checks.
Conversion Guide: Payroll CS to Accounting CS Payroll TL 31141 Copyright 1998 – 2017 by Thomson Reuters. All rights reserved. Page 3
Pre-conversion considerations and recommendations When preparing to import your clients from Payroll CS to Accounting CS Payroll, please review the following considerations and recommendations before starting the conversion process.
We recommend that you import a smaller, easy-to-process client first. This will help you to become familiar with the conversion options in Accounting CS Payroll.
Some data items that exist in CSA are not imported because there are no specific matches in Accounting CS Payroll.
Some data items within Accounting CS Payroll do not exist within CSA and, therefore, the default values in Accounting CS Payroll are used.
Some data items not included in the import process at this time may be made available for import with a subsequent release of Accounting CS Payroll.
Prior to converting the client data
Pre-conversion steps in CSA Tax liabilities for tax forms are check-based in Payroll CS and are not imported to Accounting CS
Payroll. We recommend that you process tax forms in Payroll CS and import at the end of the tax period. Override the amounts in Accounting CS Payroll if they are needed for tax forms.
Add checkbooks to represent any GL accounts that the client uses for checks and deposits. Even if a client is set up with only the General Ledger module, at least one checkbook must be set up for the client in the Setup > Checkbooks screen in CSA. If a checkbook has not been set up for a client before the data is converted, the bank account balances in Accounting CS will be incorrect.
Ensure that each Payroll CS client being imported is in their latest payroll processing period. The application prompts you during the conversion process if the client is not in the latest period.
Compact your client data before importing. From the CSA main window, choose Help > Repair. In the Repair dialog, select the client you are preparing to import, and then click the Compact button.
Compact your global database before importing. In CSA, choose Help > Repair, click the Miscellaneous tab, and then click the Compact Global Database button.
Run the CSA utility to change the case of descriptions for payroll-related data (including checkbook names, payroll items, or departments). Choose Help > Repair, click the Miscellaneous tab, and then click the Repair Case of Descriptions button. If any payroll items are listed in the diagnostic message as missing from the global data, be sure to add them to the global database before importing.
In CSA, run the Accounting CS Conversion Report for clients that you plan to import. Choose Utilities and select Accounting CS Conversion Report. The report will look at various areas of payroll information in the selected clients to aid you in identifying and addressing any concerns before you begin the import process.
For clients using Employee Self-Service: If you need to change any client IDs, change them within CSA prior to conversion. This ensures that the employee records in Accounting CS will sync correctly with employee information in Employee Self-Service.
TL 31141 Conversion Guide: Payroll CS to Accounting CS Payroll Page 4 Copyright 1998 – 2017 by Thomson Reuters. All rights reserved.
Pre-conversion steps in Accounting CS Payroll Review the security settings in Accounting CS Payroll that are related to import processes.
If you have payroll clients that must pay local, municipal, or school district taxes, it is best to set up the tax agents in Accounting CS Payroll prior to starting any conversions. This enables you to map the local tax vendors to the tax agents during the conversion.
Additional conversion information
Employee payroll item rate information In Accounting CS Payroll, the calculation type of a payroll item can be set only at the employee level (and not at the department level as in Payroll CS). For an employee with a payroll item set up for multiple departments, the rate for the non-home department will be set to zero if the calculation type does not match the home department calculation type. Following the conversion and import, you should review and verify the payroll calculation type and rate information for any employee who will be active in multiple work locations or departments.
Employee earnings data Earnings information is imported for the client’s latest payroll year only.
Earnings information is not imported for an employee with an address that is considered to be incomplete or invalid.
The Client and Employee Address Mapping screen within the conversion wizard alerts you about incomplete or invalid addresses. You will have the opportunity to edit the addresses displayed for accurate setup within Accounting CS Payroll. Addresses that appear in this screen are either invalid or have missing information. For example:
The ZIP code does not correspond with the city/state information.
The city is not recognized by the application. (For example, the application may not recognize Mt. Pleasant but it does recognize Mount Pleasant.)
Multiple school districts or municipalities are found for the street/city/state/ZIP combination found in the employee record or work location.
Multiple counties are found for the street/city/state/ZIP combination found in the employee record or work location in AL, IN, KY, MD, or TX, which are states that require the county to be specified for tax calculations or for payroll tax forms.
The street address found on the employee record or for a work location in AL, CA, CO, IN, KY, MD, MI, MO, NJ, NY, OH, PA, TX, or WV is used to assist in the verification and determination of counties/school districts/municipalities.
An employee set up as an Independent Contractor in CSA can be imported under the following conditions:
The employee record includes only pay items set up with the 1099 item type that flows to Form 1099-MISC, box 7. (Any pay items set up with a 1099 item type other than that are not imported.)
Earnings data and payroll checks include withholdings only for federal, state, or local taxes. (Deduction items are imported for Independent Contractors.)

Conversion Guide: Payroll CS to Accounting CS Payroll TL 31141 Copyright 1998 – 2017 by Thomson Reuters. All rights reserved. Page 5
Employees who work in an office/location other than the client’s main office need to be associated with the proper office for appropriate taxing. Be sure that, within Payroll CS, each employee has been set up for a payroll department that can be linked specifically to their work location. To create additional work locations and match a payroll department to that work location, you will need to perform the custom conversion.
Vendor data Payroll agents that were set up as vendors in Payroll CS using G/L Account triggers need to be linked to the appropriate deduction item in Accounting CS Payroll. To do that, select the vendor in the Agent field during the setup of the deduction items in Accounting CS Payroll.
Multiple work locations For clients with more than one business location, setup information for each of those work locations is needed for proper conversion of earnings. For each employee who works in one of those additional locations, be sure to set up the employee in Payroll CS to specify a payroll department that can be linked specifically to the appropriate work location. For these clients, we recommend that you import the client data via custom conversion. During the conversion, click the Add Locations button on the Client Setup - Payroll screen to enter any additional work locations for the client. For a client with multiple work locations and with unemployment earnings information being imported for multiple states, the Do not combine state unemployment checkbox is marked on the Payroll Taxes tab of the Setup > Clients screen in Accounting CS Payroll.
Multi-state data For a client that performs courtesy withholding for any state or locality different from the client’s main address, additional setup information may be needed in Accounting CS Payroll following the conversion to ensure proper taxation. On the Payroll taxes tab of the Setup > Clients screen, mark the Client has nexus in this state checkbox for states in which courtesy withholding is performed. For courtesy withholding at the local level, click the Local button and mark the Nexus checkbox for the local withholding’s tax agent.
Custom conversion procedure We highly recommend that you perform the custom conversion rather than the batch conversion. The custom conversion converts a single client at a time and provides you with far more control over client details and requires only a small amount of additional setup after the conversion.
Use the following steps to start importing existing CSA client data into Accounting CS Payroll using the conversion wizard.
1. Start Accounting CS Payroll by clicking the shortcut icon.
2. Choose File > Import > CS Professional Suite Accounting Conversion.
3. On the Source Data screen, the default locations are displayed for the CS Professional Suite Accounting system (global) data files and client data files (as specified in the Setup > File Locations dialog in Accounting CS Payroll).
The default location for CSA system (global) files in Virtual Office CS is Y:\CSASys (where Y represents the drive where CSA has been installed). The default location for CSA system (global)
TL 31141 Conversion Guide: Payroll CS to Accounting CS Payroll Page 6 Copyright 1998 – 2017 by Thomson Reuters. All rights reserved.
files when not running in the Virtual Office CS environment is X:\Wincsi\CSASys (where X represents the drive where CSA has been installed).
The default location for CSA client data files in Virtual Office CS is Y:\CSAData (where Y represents the drive where CSA has been installed). The default location for CSA client data when not running in the Virtual Office CS environment is X:\Wincsi\CSAData (where X represents the drive where CSA has been installed).
Changing the location for either the global data or the client data during the conversion process is considered a one-time override of the default location and the change is not saved.
Note: Although network drives are not automatically mapped in the Virtual Office CS environment, you can still access them by entering \\client\T$ in the appropriate dialog (where T represents the network drive mapping).
4. Select the Clients option and mark the Perform a custom conversion (Recommended) checkbox. Because you will be making selections that are specific to each client, you will be able to import only one client at a time when using the custom conversion. Click Next.
5. On the Source Data – Clients screen, select the client whose data you would like to import. Click Next to continue.
6. On the Source Data – Modules screen, by default all data types are selected for conversion. Clear the checkboxes for the types of data that you do not wish to import for the selected client(s) and click Next.
Note: If the client has been set up in CSA to export workers’ compensation information from Payroll CS to InsurePay, you will need to use the workers’ compensation mapping screen to ensure proper set up at both the client and the employee level. For a client that exports workers’ compensation information to XactPAY®, you do not need to use the workers’ compensation mapping screen during the conversion process. You do not need to enroll again with InsurePay or XactPAY, nor do you need to set up payroll items or accruable benefits.
7. Follow the instructions within the screens of the wizard, clicking Next when you are finished with each screen.
Conversion screens within the wizard Depending on the options selected on the Modules screen, certain screens listed below may not be applicable for the selected client and so would not appear.
Client Setup – Accounting Information. Select the GL account that Accounting CS should use if it encounters a transaction that has no GL account. If you leave the field blank, the default account 999 is used without regard to the Chart of Account mask. If you choose a GL account here and want to change it after the conversion, you can do so in the Setup > Clients screen.
Client Setup – Account Mask. View or modify the account mask for this client if necessary. For details about account masks, see Setting up a client’s Chart of Accounts mask.
Impound Bank Accounts. Select the types of transactions you plan to fund via each displayed impound bank account.
Payroll – Client Funding. Select the transaction types that you would like to fund for this client. You can also select the impound bank account to be used for those types of transactions.
Conversion Guide: Payroll CS to Accounting CS Payroll TL 31141 Copyright 1998 – 2017 by Thomson Reuters. All rights reserved. Page 7
Client Setup – Payroll
Additional locations. If you used payroll departments in CSA to designate work locations, click the Add Location button to add those locations. You can map the CSA payroll departments to the locations in the Payroll – Departments screen later in the conversion.
Processors. Select a primary and secondary processor for the client by selecting the staff member name from the drop-down list.
Default time entry method. Choose the method to use for entering time information for the client in Accounting CS and the source of that information.
Default Check output. Choose the method by which you will provide checks to this client.
Client and Employee Address Mapping. Accounting CS Payroll calculates taxes based on client and employee addresses, so it’s very important to ensure that all address information is accurate. Addresses in CSA are listed on this screen if any of the following situations apply.
An address is incomplete – The conversion is unable to determine the exact county or school district, for example.
An address is not recognizable – For example, Mt. Pleasant may not be recognized, while Mount Pleasant would be recognized.
An address is inaccurate – For example, the ZIP code is not correct for the street/city/state entered.
a) Click the View Address Diagnostics button to preview a diagnostic report that lists information from the initial address validation attempt.
b) For each address listed in the report and the grid, make the appropriate changes in the Address fields, using the Lookup field for address verification.
c) Click the Update button to move to the next incomplete or invalid address and repeat until all addresses are validated.
Note: Earnings may not be imported for employees for whom addresses are left as incomplete or invalid.
Payroll – Vendors. Select the appropriate vendor type for each CSA vendor to ensure that the client’s tax liabilities will be created for the correct agencies. This mapping process allows for the conversion of 1099 transactions and eliminates duplicate vendors for tax purposes.
Trade Vendor. A CSA vendor not associated with payroll and that does not receive a 1099 at the end of the year (e.g., the electricity company).
Payroll Agent. A CSA vendor to which non-tax payroll amounts are paid (e.g., a 401(k) vendor or a medical insurance agent). Also select the appropriate payment schedule for this agent.
Firm Vendor. A CSA vendor set up to receive payment for services from your client.
1099 Recipient. A CSA vendor that will need to be issued a 1099 information return (e.g., a lawn service vendor, or independent contractor).
Tax Agent. A CSA vendor to which taxes are paid. Tax agencies already set up within Accounting CS Payroll are listed by name. To avoid having unnecessary vendors following the import, you should map each vendor to the appropriate tax agent name by selecting it from the drop-down list. Also select the appropriate deposit schedule for each tax agent, if needed.
Do Not Convert
TL 31141 Conversion Guide: Payroll CS to Accounting CS Payroll Page 8 Copyright 1998 – 2017 by Thomson Reuters. All rights reserved.
Payroll – Departments. CSA uses departments to represent physical locations, GL departments, job descriptions or a combination of these. In contrast, Accounting CS uses departments to represent profit centers or divisions that are accountable for the management of their own revenues or expenses.
Payroll Department Concept. Mark the checkboxes to specify how payroll department information should be converted.
Locations. Available only if you added one or more locations for the client in the Additional Locations dialog from the Client Setup – Payroll screen earlier in the conversion. Mark this checkbox to select a location for each payroll department listed in the grid.
Departments. Mark this checkbox to select a corresponding Accounting CS department for each payroll department listed in the grid.
Employee Template / Job Description. Mark this checkbox to convert employee information and earnings history without any department designation.
Department Mapping. If applicable for this client, select the corresponding location and/or department to use in Accounting CS..
Note: No departments are imported if Employee Template/Job Description is selected.
Payroll – Payroll Items. If you have set up payroll items for an existing Accounting CS client or client template, you can select that client as your mapping client and then map each payroll item to the appropriate Accounting CS payroll item. Because tax jurisdiction assignments are handled automatically within Accounting CS Payroll, withholding items are not imported.
Notes
Unlike in CSA, payroll items in Accounting CS Payroll are client-specific, not global. The application will convert only those CSA payroll items that are used for the employees of the client you are converting.
The application does not convert any withholding items because Accounting CS calculates taxes based on client and employee addresses.
Jurisdiction-specific payroll items are not necessary in Accounting CS. You can combine multiple CSA payroll items (such as Wages – MI and Wages – OH) into a single Accounting CS item (such as Wages) by selecting the same Accounting CS payroll item for each of the CSA items you want to combine.
Payroll – Accruable Benefits. For each CSA benefit item listed in the grid, select the corresponding Accounting CS accruable benefit, or select <Convert as is> to create a new Accounting CS accruable benefit based on the CSA item.
Payroll – Local Withholdings. To import earnings properly for these taxes (city tax, school district tax, etc.), you will need to map the description of the CSA taxes to the appropriate tax description for Accounting CS Payroll.
Payroll – Workers Compensation Classifications. For each CSA workers’ compensation class listed in the grid, select the appropriate Accounting CS classification code. Only the first rate found for each code per state is imported.
Click Finish. When the diagnostics information is displayed on your screen, click the Print button and refer to that information when completing the client setup steps in Accounting CS Payroll.
Conversion Guide: Payroll CS to Accounting CS Payroll TL 31141 Copyright 1998 – 2017 by Thomson Reuters. All rights reserved. Page 9
Additional notes When importing earnings data, use the Details column of the Modules screen (Payroll tab) to specify
the checkbook to import. By default, the conversion uses the first checkbook found in Payroll CS, but you may specify any checkbook by selecting it from the drop-down list.
Important! All employee earnings information in Accounting CS Payroll is check based. Employee earnings from CSA (including third-party sick pay earnings) are imported to monthly payroll checks in Accounting CS Payroll. If available, employer tax amounts are retrieved from payroll checks and entered as handwritten payroll checks using the employee’s ID and month of earnings as the check number. (For example, if employee A1 has earnings for January, those earnings would be displayed on check A1-01.) A bank account must be selected when importing employee earnings to store these created checks in Accounting CS Payroll. The check date will be set to the first day of the month if the earnings period is the same month or a month that comes after the current system date. The check date will be set to the last day of the month if the earnings period is prior to the current system date. Earnings information associated with a payroll department designated for “Third-Party Sick Pay” is imported as a separate monthly payroll check for the employee, with a check number that includes the employee’s ID, month of earnings, and “-TP.” (For example, for an employee with ID “ABC” who has earnings in the department marked as “Third-Party Sick Pay” in the month of June, the import process would create a check record marked with check number ABC-06-TP.)
Batch import procedure
Important! Although you can import information for multiple clients with the batch import, we strongly recommend that you perform the custom conversion that is described in the previous section. It converts a single client at a time and provides you with far more control over client details and requires only a small amount of additional setup after the conversion.
Use the following steps to import existing CSA client data into Accounting CS Payroll using the conversion wizard.
1. Start Accounting CS Payroll by clicking the shortcut icon.
2. Choose File > Import > CS Professional Suite Accounting Conversion.
3. On the Source Data screen, the default locations are displayed for the CS Professional Suite Accounting system (global) data files and client data files (as specified in the Setup > File Locations dialog in Accounting CS Payroll).
The default location for CSA system (global) files in Virtual Office CS is Y:\CSASys (where Y represents the drive where CSA has been installed). The default location for CSA system (global) files when not running in the Virtual Office CS environment is X:\Wincsi\CSASys (where X represents the drive where CSA has been installed).
The default location for CSA client data files in Virtual Office CS is Y:\CSAData (where Y represents the drive where CSA has been installed). The default location for CSA client data when not running in the Virtual Office CS environment is X:\Wincsi\CSAData (where X represents the drive where CSA has been installed).
Changing the location for either the global data or the client data during the conversion process is considered a one-time override of the default location and the change is not saved.

TL 31141 Conversion Guide: Payroll CS to Accounting CS Payroll Page 10 Copyright 1998 – 2017 by Thomson Reuters. All rights reserved.
Note: Although network drives are not automatically mapped in the Virtual Office CS environment, you can still access them by entering \\client\T$ in the appropriate dialog (where T represents the network drive mapping).
4. Clear the Perform a custom conversion (Recommended) checkbox and click Next. Keep in mind that this method will convert only a limited amount of data for your clients. A large amount of additional setup is required following this method of conversion.
5. On the Source Data – Clients screen, select the clients whose data you would like to import. Click Next to continue.
6. On the Source Data – Modules screen, by default all data types are selected for conversion. Clear the checkboxes for the types of data that you do not wish to import for the selected client(s).
7. Click Next.
8. Click Finish and, when the diagnostics information is displayed on your screen, click the Print button and refer to that information when completing the client setup steps in Accounting CS Payroll.
Note: Your responses are required during the conversion process to import certain types of information properly. Therefore, the following types of data are not available for selection during a non-custom (batch) conversion.
Earnings
Impound Checkbooks
Workers’ Compensation
1099 Transactions
Post-conversion considerations and setup steps At the end of each conversion, you should review the client data before beginning any processing. The application may display certain message prompts either to convey information or to specify that you need to complete further action before you begin processing.
Client/Employee address information. If an import diagnostic message refers to invalid address information, you will need to review and verify that data after the conversion. An invalid address could affect tax calculations for payroll checks as well as payroll tax forms.
Unemployment and/or Withholding ID. To verify the Unemployment ID and/or Withholding ID for a client, open the Payroll Taxes tab of the Setup > Clients screen.
Bank account information. Note that bank account information needs to be verified for vendors and employees for purposes of direct deposit. Specify bank routing numbers, bank account numbers, and check layouts for both client and impound bank accounts prior to entering and printing payroll checks.
Import diagnostics. Always print and review the import diagnostics, which will help in pinpointing possible data issues.
For clients using Employee Self-Service: To ensure that Accounting CS employee records sync correctly with employee information in Employee Self-Service, do not change any Client IDs until after the first payroll has been run in Accounting CS.
Conversion Guide: Payroll CS to Accounting CS Payroll TL 31141 Copyright 1998 – 2017 by Thomson Reuters. All rights reserved. Page 11
State identification If any diagnostic messages about state identification numbers appear during the conversion, you will need to review and update those state identification numbers for proper use within Accounting CS Payroll.
1. In Accounting CS Payroll, choose Setup > Clients.
2. In the Clients screen, select the converted client, click the Edit button, and then click the Payroll Taxes tab.
3. Enter the state identification number in the proper format, as provided by the state.
4. Click the Enter button to save the client information.
Employees If any employee address diagnostics were encountered during the conversion, you will need to review and update those employee records for proper setup of those taxes.
1. In Accounting CS Payroll, choose Setup > Employees.
2. Select an employee from the Employees list and click the Edit button.
3. Enter the ZIP code or the city and state in the address verification field.
4. Select the county, school district, and municipality (if applicable).
5. Click the Enter button to save the employee information.
Employee earnings information If any diagnostic messages about earnings appear during the conversion, none of the earnings data for the specified employee are imported. These diagnostics may relate to tax items found for the employee within Payroll CS that are not present within Accounting CS Payroll based on the employee’s home and work locations. You may choose either of two options for handling these issues.
You can open Payroll CS and verify that the proper taxes and work locations are specified in Payroll CS and then reimport the data.
You can manually add the employee’s prior earnings information in Accounting CS Payroll by recording handwritten payroll checks.
Bank accounts If routing number and account number information was not set up for checkbooks in CSA, you will need to add that information in Accounting CS Payroll and also select check layouts for each checkbook before attempting to print checks.
1. In Accounting CS Payroll, choose Setup > Bank Accounts.
2. Select a bank account from the list and click the Edit button.
3. In the Bank field, select the bank associated with this bank account or enter the bank’s routing number.
4. In the Account number field, enter the bank account’s account number.
TL 31141 Conversion Guide: Payroll CS to Accounting CS Payroll Page 12 Copyright 1998 – 2017 by Thomson Reuters. All rights reserved.
5. On the Check Layout tab, select check layouts to use for the printing of payroll and vendor checks from this bank account.
Remote Data Entry, Remote Check Printing, and Employee Self-Service features If you are converting a client from Payroll CS that had been using the Remote Data Entry, Remote Check Printing, and/or Web Employee features, you will need to complete the following additional setup steps.
Steps in Accounting CS Payroll 1. Choose Setup > Clients, click the client name, and then click the Edit button.
2. Click the Payroll Information tab and do the following:
For a Remote Data Entry client: In the Time Entry Method section, choose Import and Remote payroll entry (source).
For a Remote Check Printing Client: In the Default Check Output section, click the Remote check printing option.
For a Web Employee client: In the Self-Service section, mark both the Enable Employee Self-Service checkbox and the Enable time entry checkbox.
Steps in NetFirm CS administration 1. Log in to NetStaff CS and click the Admin tab in the navigation pane.
2. Under the NetClient CS heading in the navigation pane, click the Users link. Select the NetClient CS user’s name in the Users list. (Enter any part of the user name or login in the Find field to locate the user.)
3. Remove the user’s existing permissions settings: Click the Disable button for Remote Check Printing and/or for Remote Payroll and then click Enter.
4. Click the Enable button for Remote Payroll & Check Printing (ACS), mark the checkboxes for the appropriate clients (on the left) and mark the checkboxes for Remote Check Printing and/or Remote Payroll (on the right), and then click Enter.
5. For a Web Employee client: Click the Enable button for Web Employee/ESS, mark the checkboxes for the client, and click Enter. This enables the NetClient CS user to view the check stubs and W-2s of their employees.
Steps for client users Client employees who were previously registered as users of Web Employee will be able to log in to their portals using the same login credentials that they used previously.
To add a previously unregistered user, a client user (with appropriate privileges) would need to add an email address for that employee in the Employees screen, which triggers the application to send a registration email to that address. After responding to the email, the employee will be able to see all prior history of both checks and W-2s.
Conversion Guide: Payroll CS to Accounting CS Payroll TL 31141 Copyright 1998 – 2017 by Thomson Reuters. All rights reserved. Page 13
Notes
Client users will be able to access both new and prior checks using My Check Stubs and both new and prior W-2s, and they will see improved integration and user interface for My Time Entry and My W-4 Information.
Information previously displayed in My Earnings is included on the check stubs.
For additional details, search on the following topics from the search field on the Accounting CS Payroll toolbar: “Remote payroll overview”; “Remote check printing overview”; and “Employee Self-Service overview.”
Type and destination of data transferred during conversion The following tables identify information that is imported from Payroll CS to Accounting CS Payroll and where to find it after the conversion. The following tables provide the location of (and screen navigation for) the data originating in Payroll CS and its destination location in (and screen navigation for) Accounting CS Payroll. .
Accruable benefits CSA menu navigation and field name
Accounting CS Payroll menu navigation and field name
Comments and additional information
Setup > System Configuration > Accruable Benefits dialog
Setup > Accruable Benefits > Main tab
Description Description
Setup > Employees > Earnings tab > Pay Item Properties > Pay Info tab
Wage type See “Payroll items, pay item special types” starting on page 33.
Frequency Imported to pay schedules.
Method Accrual information – Method If an invalid method was selected, the method is set to Per Calendar Year.
Allowance Hourly Allowance – Fixed (amount) Hourly Allowance – Graduated (table)
Limit Available limit

TL 31141 Conversion Guide: Payroll CS to Accounting CS Payroll Page 14 Copyright 1998 – 2017 by Thomson Reuters. All rights reserved.
CSA menu navigation and field name
Accounting CS Payroll menu navigation and field name
Comments and additional information
Limit Annual limit If the Hard limit on accrued hours checkbox is marked in Payroll CS, the limit is imported as an annual limit.
Include O/T hours Include OT hours
Include D/T hours Include DT hours
Reset balances – Method Balance Reset – Method See “Benefits conversion (reset balances)“ on page 16.
Reset balances – Date Balance Reset – Date See “Benefits conversion (reset balances)“ on page 16
Banks and impound bank accounts CSA menu navigation and field name
Accounting CS Payroll menu navigation and field name
Comments and additional information
Utilities > Direct Deposit > Setup > Bank Information
Setup > Firm Information > Banks
Bank name Bank name
RTN Routing number
Setup > System Configuration > Impound Checkbook > General tab
Setup > Firm Information > Impound Bank Accounts > Main tab
Description Description
Bank name Bank This item is imported if not already set up in Accounting CS Payroll.
Routing number Bank
Account number Account number
Next check # Next check number
Inactive Inactive
Setup > System Configuration > Impound Checkbook > Direct Deposit tab
Withdrawal bank Bank
Account type (Checking or Savings)
Account type (Checking, Savings)
Setup > Firm Information > Impound Bank Accounts > Direct Deposit tab
Conversion Guide: Payroll CS to Accounting CS Payroll TL 31141 Copyright 1998 – 2017 by Thomson Reuters. All rights reserved. Page 15
CSA menu navigation and field name
Accounting CS Payroll menu navigation and field name
Comments and additional information
Status (Approved, Prenote/Zero balance, Waiting)
Status (Approved, Prenote, Waiting)
Utilities > Impound Funding > Setup > Direct Deposit
Immediate destination bank ID Immediate destination
Immediate origin Originator bank Both Immediate origin bank ID and Originating DFI bank ID map to the Originator bank field in Accounting CS Payroll. If both are completed in Payroll CS, the Originating DFI bank ID is used.
Immediate origin bank ID Immediate origin – Other
Immediate origin name Immediate origin name – Other
Exclude impound checkbook transaction checkbox
All Balanced File checkboxes If not marked in CSA, the conversion marks the checkboxes in Accounting CS Payroll. If marked in Payroll CS, the conversion clears the checkboxes in Accounting CS Payroll.
Originating DFI bank ID Originator bank Both Immediate origin bank ID and Originating DFI bank ID map to the Originator bank field in Accounting CS Payroll. If both are completed in Payroll CS, the Originating DFI bank ID is used.
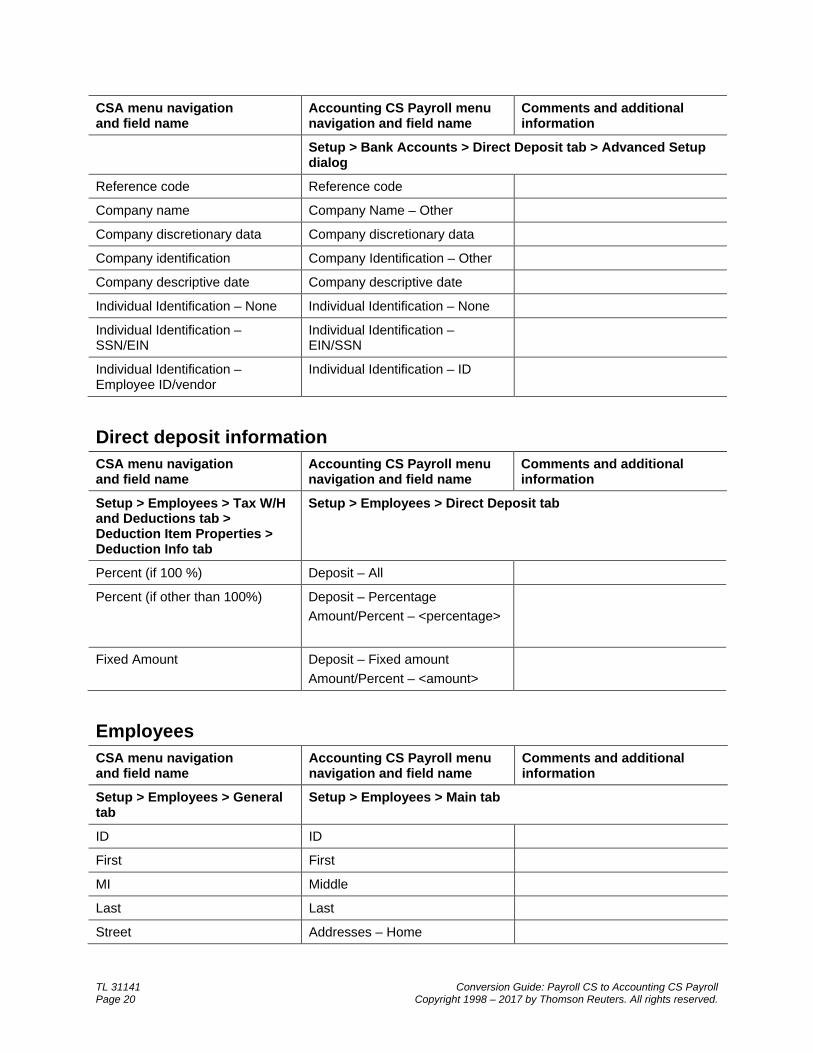
Setup > Firm Information > Impound Bank Accounts > Direct Deposit tab > Advanced Setup dialog
Company discretionary data Company discretionary data
Company identification Company identification – Other
Company descriptive date Company descriptive date
Identification – None Individual identification – None
Reference code Reference code
Company name Company Name – Other
Identification – SSN/EIN Individual Identification – EIN/SSN
TL 31141 Conversion Guide: Payroll CS to Accounting CS Payroll Page 16 Copyright 1998 – 2017 by Thomson Reuters. All rights reserved.
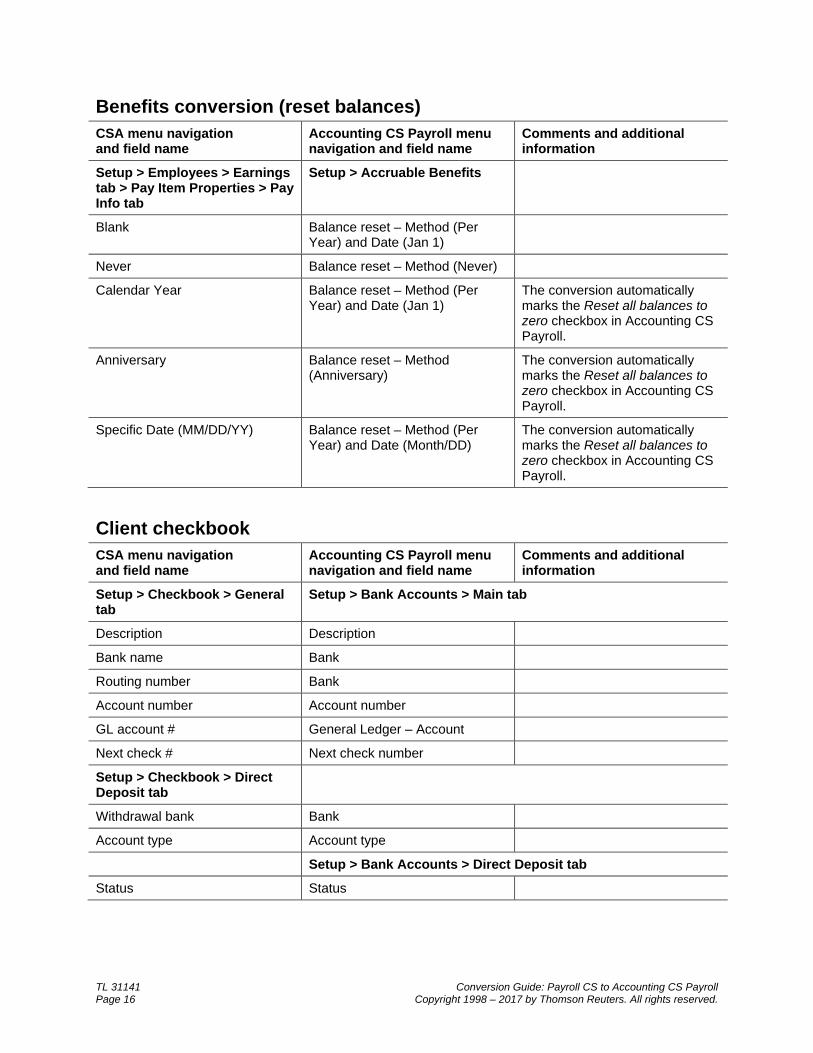
Benefits conversion (reset balances) CSA menu navigation and field name
Accounting CS Payroll menu navigation and field name
Comments and additional information
Setup > Employees > Earnings tab > Pay Item Properties > Pay Info tab
Setup > Accruable Benefits
Blank Balance reset – Method (Per Year) and Date (Jan 1)
Never Balance reset – Method (Never)
Calendar Year Balance reset – Method (Per Year) and Date (Jan 1)
The conversion automatically marks the Reset all balances to zero checkbox in Accounting CS Payroll.
Anniversary Balance reset – Method (Anniversary)
The conversion automatically marks the Reset all balances to zero checkbox in Accounting CS Payroll.
Specific Date (MM/DD/YY) Balance reset – Method (Per Year) and Date (Month/DD)
The conversion automatically marks the Reset all balances to zero checkbox in Accounting CS Payroll.
Client checkbook CSA menu navigation and field name
Accounting CS Payroll menu navigation and field name
Comments and additional information
Setup > Checkbook > General tab
Setup > Bank Accounts > Main tab
Description Description
Bank name Bank
Routing number Bank
Account number Account number
GL account # General Ledger – Account
Next check # Next check number
Setup > Checkbook > Direct Deposit tab
Withdrawal bank Bank
Account type Account type
Setup > Bank Accounts > Direct Deposit tab
Status Status
Conversion Guide: Payroll CS to Accounting CS Payroll TL 31141 Copyright 1998 – 2017 by Thomson Reuters. All rights reserved. Page 17
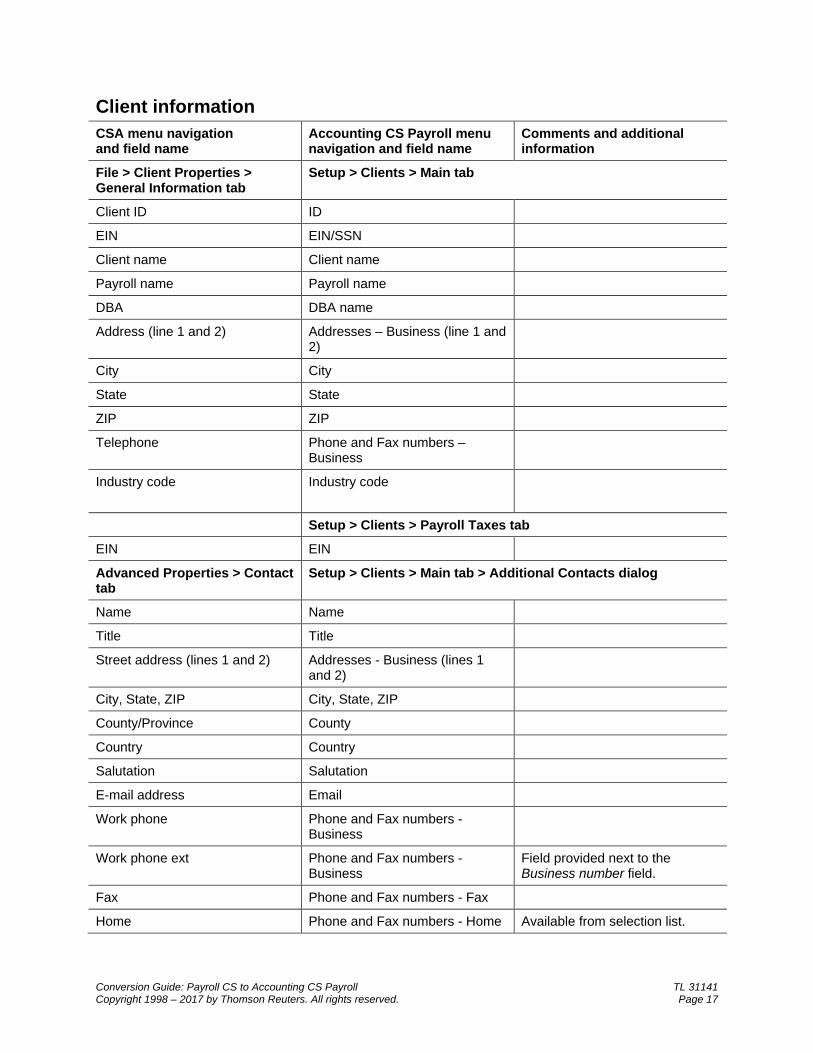
Client information CSA menu navigation and field name
Accounting CS Payroll menu navigation and field name
Comments and additional information
File > Client Properties > General Information tab
Setup > Clients > Main tab
Client ID ID
EIN EIN/SSN
Client name Client name
Payroll name Payroll name
DBA DBA name
Address (line 1 and 2) Addresses – Business (line 1 and 2)
City City
State State
ZIP ZIP
Telephone Phone and Fax numbers – Business
Industry code Industry code
Setup > Clients > Payroll Taxes tab
EIN EIN
Advanced Properties > Contact tab
Setup > Clients > Main tab > Additional Contacts dialog
Name Name
Title Title
Street address (lines 1 and 2) Addresses - Business (lines 1 and 2)
City, State, ZIP City, State, ZIP
County/Province County
Country Country
Salutation Salutation
E-mail address Email
Work phone Phone and Fax numbers - Business
Work phone ext Phone and Fax numbers - Business
Field provided next to the Business number field.
Fax Phone and Fax numbers - Fax
Home Phone and Fax numbers - Home Available from selection list.
TL 31141 Conversion Guide: Payroll CS to Accounting CS Payroll Page 18 Copyright 1998 – 2017 by Thomson Reuters. All rights reserved.
CSA menu navigation and field name
Accounting CS Payroll menu navigation and field name
Comments and additional information
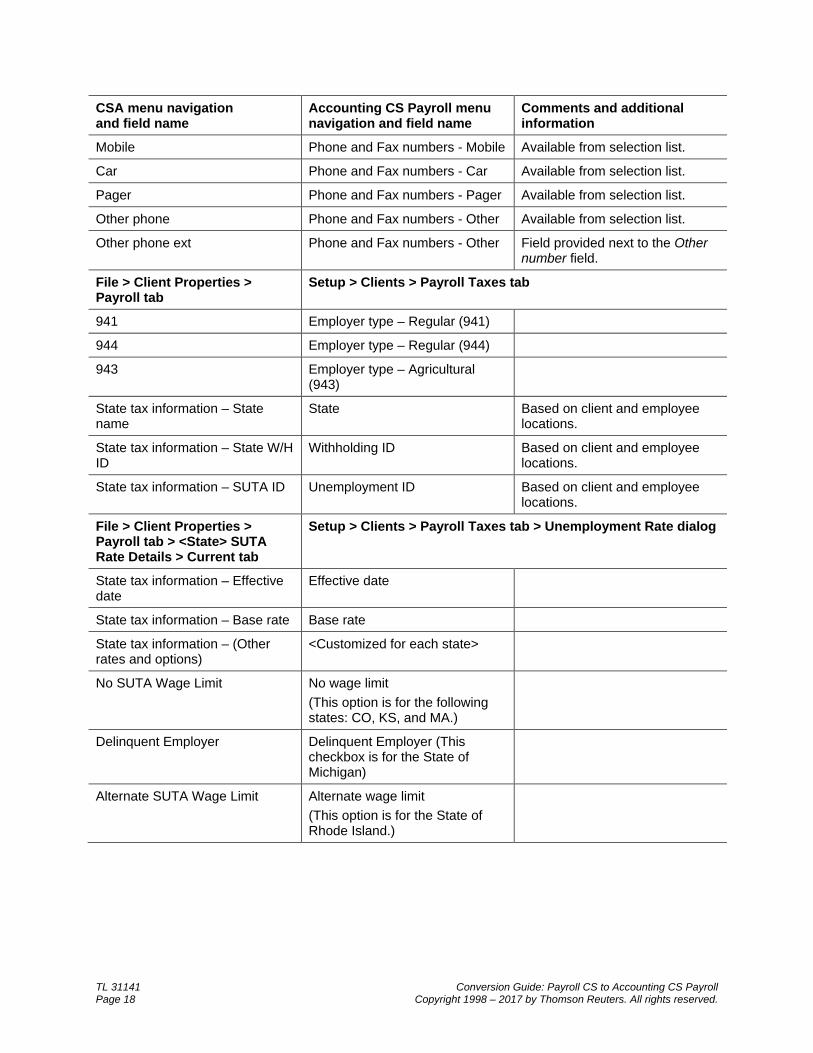
Mobile Phone and Fax numbers - Mobile Available from selection list.
Car Phone and Fax numbers - Car Available from selection list.
Pager Phone and Fax numbers - Pager Available from selection list.
Other phone Phone and Fax numbers - Other Available from selection list.
Other phone ext Phone and Fax numbers - Other Field provided next to the Other number field.
File > Client Properties > Payroll tab
Setup > Clients > Payroll Taxes tab
941 Employer type – Regular (941)
944 Employer type – Regular (944)
943 Employer type – Agricultural (943)
State tax information – State name
State Based on client and employee locations.
State tax information – State W/H ID
Withholding ID Based on client and employee locations.
State tax information – SUTA ID Unemployment ID Based on client and employee locations.
File > Client Properties > Payroll tab > <State> SUTA Rate Details > Current tab
Setup > Clients > Payroll Taxes tab > Unemployment Rate dialog
State tax information – Effective date
Effective date
State tax information – Base rate Base rate
State tax information – (Other rates and options)
<Customized for each state>
No SUTA Wage Limit No wage limit (This option is for the following states: CO, KS, and MA.)
Delinquent Employer Delinquent Employer (This checkbox is for the State of Michigan)
Alternate SUTA Wage Limit Alternate wage limit (This option is for the State of Rhode Island.)
Conversion Guide: Payroll CS to Accounting CS Payroll TL 31141 Copyright 1998 – 2017 by Thomson Reuters. All rights reserved. Page 19
CSA menu navigation and field name
Accounting CS Payroll menu navigation and field name
Comments and additional information
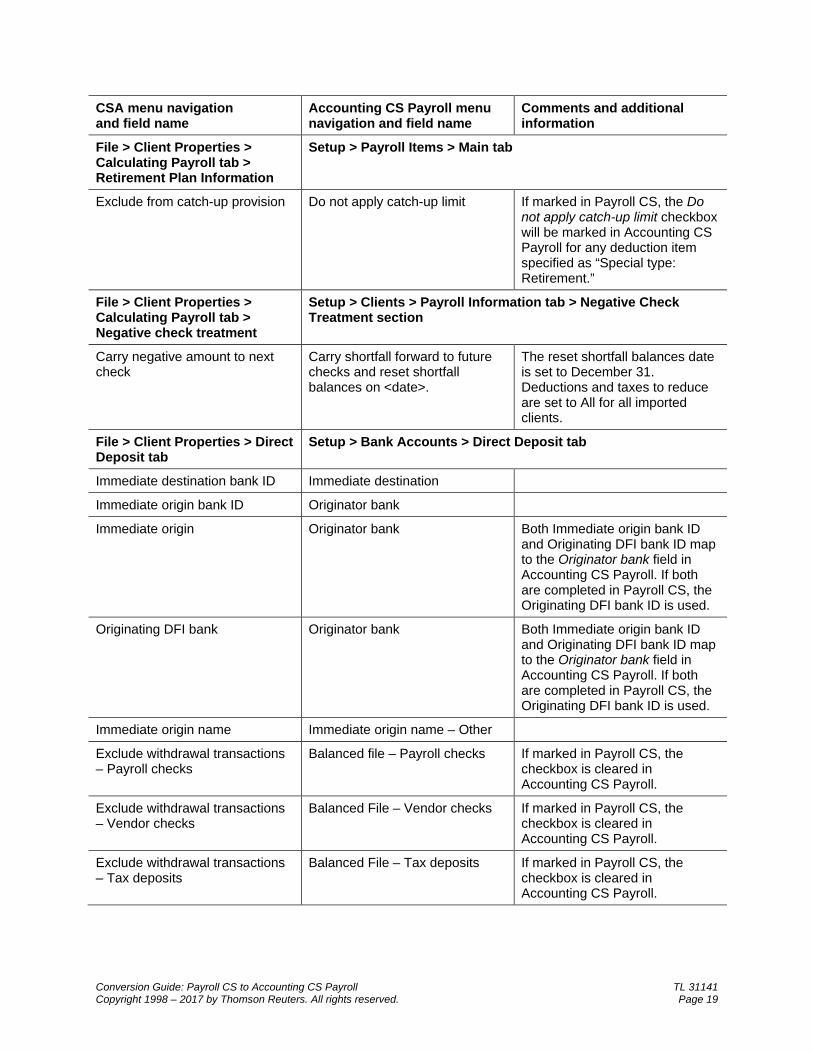
File > Client Properties > Calculating Payroll tab > Retirement Plan Information
Setup > Payroll Items > Main tab
Exclude from catch-up provision Do not apply catch-up limit If marked in Payroll CS, the Do not apply catch-up limit checkbox will be marked in Accounting CS Payroll for any deduction item specified as “Special type: Retirement.”
File > Client Properties > Calculating Payroll tab > Negative check treatment
Setup > Clients > Payroll Information tab > Negative Check Treatment section
Carry negative amount to next check
Carry shortfall forward to future checks and reset shortfall balances on <date>.
The reset shortfall balances date is set to December 31. Deductions and taxes to reduce are set to All for all imported clients.
File > Client Properties > Direct Deposit tab
Setup > Bank Accounts > Direct Deposit tab
Immediate destination bank ID Immediate destination
Immediate origin bank ID Originator bank
Immediate origin Originator bank Both Immediate origin bank ID and Originating DFI bank ID map to the Originator bank field in Accounting CS Payroll. If both are completed in Payroll CS, the Originating DFI bank ID is used.
Originating DFI bank Originator bank Both Immediate origin bank ID and Originating DFI bank ID map to the Originator bank field in Accounting CS Payroll. If both are completed in Payroll CS, the Originating DFI bank ID is used.
Immediate origin name Immediate origin name – Other
Exclude withdrawal transactions – Payroll checks
Balanced file – Payroll checks If marked in Payroll CS, the checkbox is cleared in Accounting CS Payroll.
Exclude withdrawal transactions – Vendor checks
Balanced File – Vendor checks If marked in Payroll CS, the checkbox is cleared in Accounting CS Payroll.
Exclude withdrawal transactions – Tax deposits
Balanced File – Tax deposits If marked in Payroll CS, the checkbox is cleared in Accounting CS Payroll.
TL 31141 Conversion Guide: Payroll CS to Accounting CS Payroll Page 20 Copyright 1998 – 2017 by Thomson Reuters. All rights reserved.
CSA menu navigation and field name
Accounting CS Payroll menu navigation and field name
Comments and additional information
Setup > Bank Accounts > Direct Deposit tab > Advanced Setup dialog
Reference code Reference code
Company name Company Name – Other
Company discretionary data Company discretionary data
Company identification Company Identification – Other
Company descriptive date Company descriptive date
Individual Identification – None Individual Identification – None
Individual Identification – SSN/EIN
Individual Identification – EIN/SSN
Individual Identification – Employee ID/vendor
Individual Identification – ID
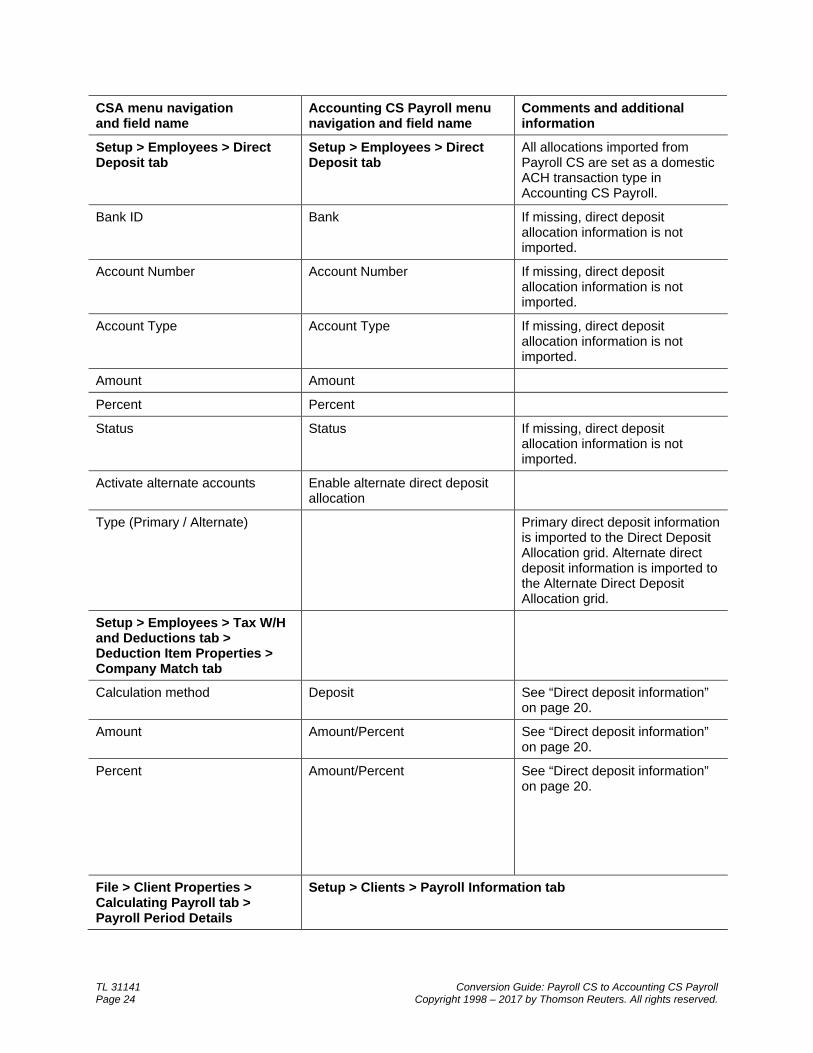
Direct deposit information CSA menu navigation and field name
Accounting CS Payroll menu navigation and field name
Comments and additional information
Setup > Employees > Tax W/H and Deductions tab > Deduction Item Properties > Deduction Info tab
Setup > Employees > Direct Deposit tab
Percent (if 100 %) Deposit – All
Percent (if other than 100%) Deposit – Percentage Amount/Percent – <percentage>
Fixed Amount Deposit – Fixed amount Amount/Percent – <amount>
Employees CSA menu navigation and field name
Accounting CS Payroll menu navigation and field name
Comments and additional information
Setup > Employees > General tab
Setup > Employees > Main tab
ID ID
First First
MI Middle
Last Last
Street Addresses – Home
Conversion Guide: Payroll CS to Accounting CS Payroll TL 31141 Copyright 1998 – 2017 by Thomson Reuters. All rights reserved. Page 21
CSA menu navigation and field name
Accounting CS Payroll menu navigation and field name
Comments and additional information
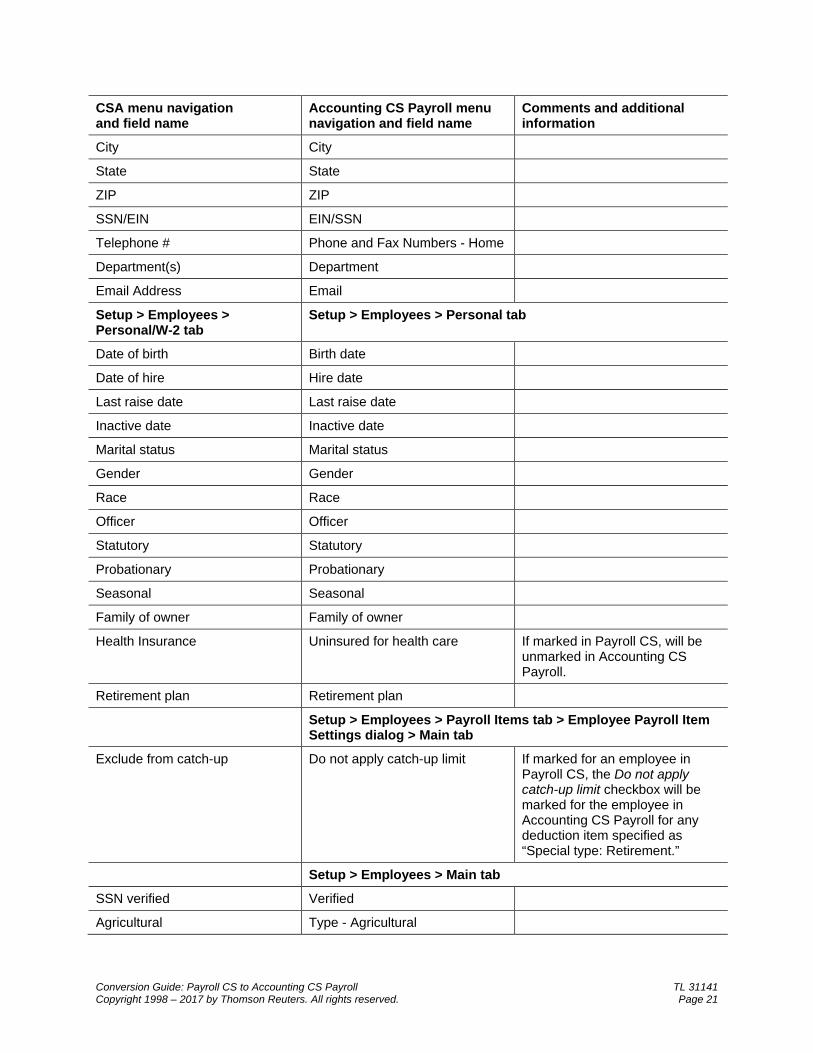
City City
State State
ZIP ZIP
SSN/EIN EIN/SSN
Telephone # Phone and Fax Numbers - Home
Department(s) Department
Email Address Email
Setup > Employees > Personal/W-2 tab
Setup > Employees > Personal tab
Date of birth Birth date
Date of hire Hire date
Last raise date Last raise date
Inactive date Inactive date
Marital status Marital status
Gender Gender
Race Race
Officer Officer
Statutory Statutory
Probationary Probationary
Seasonal Seasonal
Family of owner Family of owner
Health Insurance Uninsured for health care If marked in Payroll CS, will be unmarked in Accounting CS Payroll.
Retirement plan Retirement plan
Setup > Employees > Payroll Items tab > Employee Payroll Item Settings dialog > Main tab
Exclude from catch-up Do not apply catch-up limit If marked for an employee in Payroll CS, the Do not apply catch-up limit checkbox will be marked for the employee in Accounting CS Payroll for any deduction item specified as “Special type: Retirement.”
Setup > Employees > Main tab
SSN verified Verified
Agricultural Type - Agricultural
TL 31141 Conversion Guide: Payroll CS to Accounting CS Payroll Page 22 Copyright 1998 – 2017 by Thomson Reuters. All rights reserved.
CSA menu navigation and field name
Accounting CS Payroll menu navigation and field name
Comments and additional information
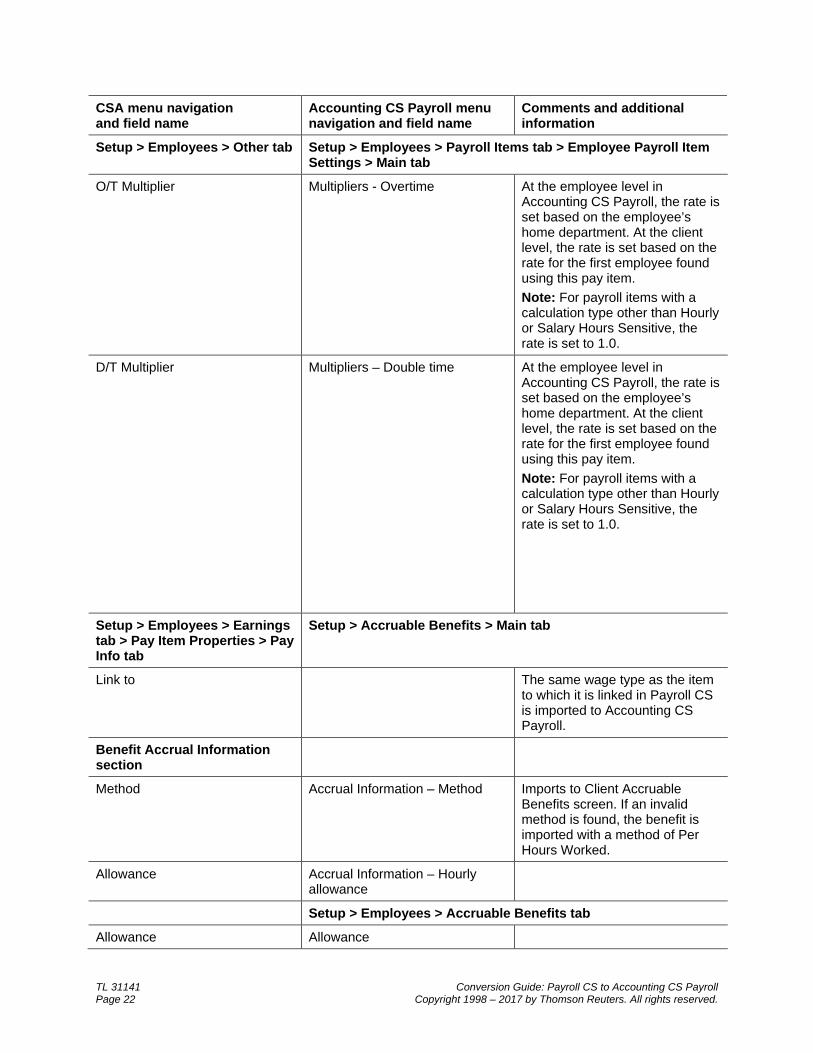
Setup > Employees > Other tab Setup > Employees > Payroll Items tab > Employee Payroll Item Settings > Main tab
O/T Multiplier Multipliers - Overtime At the employee level in Accounting CS Payroll, the rate is set based on the employee’s home department. At the client level, the rate is set based on the rate for the first employee found using this pay item. Note: For payroll items with a calculation type other than Hourly or Salary Hours Sensitive, the rate is set to 1.0.
D/T Multiplier Multipliers – Double time At the employee level in Accounting CS Payroll, the rate is set based on the employee’s home department. At the client level, the rate is set based on the rate for the first employee found using this pay item. Note: For payroll items with a calculation type other than Hourly or Salary Hours Sensitive, the rate is set to 1.0.
Setup > Employees > Earnings tab > Pay Item Properties > Pay Info tab
Setup > Accruable Benefits > Main tab
Link to The same wage type as the item to which it is linked in Payroll CS is imported to Accounting CS Payroll.
Benefit Accrual Information section
Method Accrual Information – Method Imports to Client Accruable Benefits screen. If an invalid method is found, the benefit is imported with a method of Per Hours Worked.
Allowance Accrual Information – Hourly allowance
Setup > Employees > Accruable Benefits tab
Allowance Allowance
Conversion Guide: Payroll CS to Accounting CS Payroll TL 31141 Copyright 1998 – 2017 by Thomson Reuters. All rights reserved. Page 23
CSA menu navigation and field name
Accounting CS Payroll menu navigation and field name
Comments and additional information
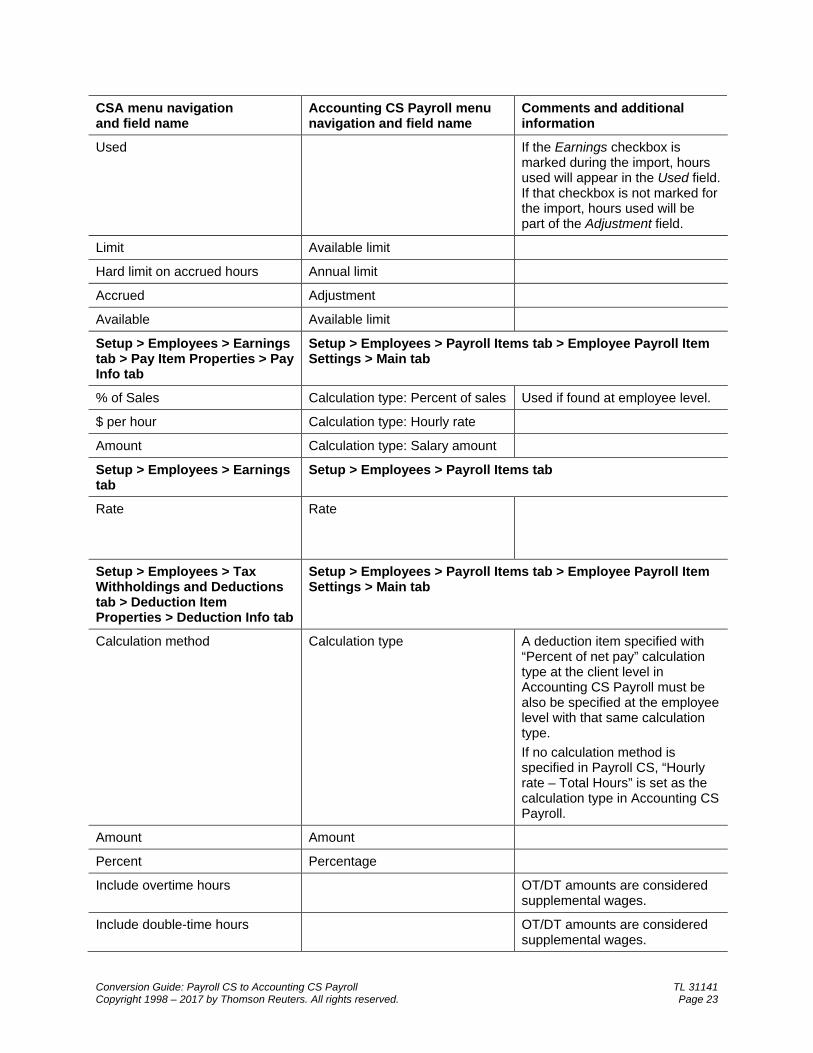
Used If the Earnings checkbox is marked during the import, hours used will appear in the Used field. If that checkbox is not marked for the import, hours used will be part of the Adjustment field.
Limit Available limit
Hard limit on accrued hours Annual limit
Accrued Adjustment
Available Available limit
Setup > Employees > Earnings tab > Pay Item Properties > Pay Info tab
Setup > Employees > Payroll Items tab > Employee Payroll Item Settings > Main tab
% of Sales Calculation type: Percent of sales Used if found at employee level.
$ per hour Calculation type: Hourly rate
Amount Calculation type: Salary amount
Setup > Employees > Earnings tab
Setup > Employees > Payroll Items tab
Rate Rate
Setup > Employees > Tax Withholdings and Deductions tab > Deduction Item Properties > Deduction Info tab
Setup > Employees > Payroll Items tab > Employee Payroll Item Settings > Main tab
Calculation method Calculation type A deduction item specified with “Percent of net pay” calculation type at the client level in Accounting CS Payroll must be also be specified at the employee level with that same calculation type. If no calculation method is specified in Payroll CS, “Hourly rate – Total Hours” is set as the calculation type in Accounting CS Payroll.
Amount Amount
Percent Percentage
Include overtime hours OT/DT amounts are considered supplemental wages.
Include double-time hours OT/DT amounts are considered supplemental wages.
TL 31141 Conversion Guide: Payroll CS to Accounting CS Payroll Page 24 Copyright 1998 – 2017 by Thomson Reuters. All rights reserved.
CSA menu navigation and field name
Accounting CS Payroll menu navigation and field name
Comments and additional information
Setup > Employees > Direct Deposit tab
Setup > Employees > Direct Deposit tab
All allocations imported from Payroll CS are set as a domestic ACH transaction type in Accounting CS Payroll.
Bank ID Bank If missing, direct deposit allocation information is not imported.
Account Number Account Number If missing, direct deposit allocation information is not imported.
Account Type Account Type If missing, direct deposit allocation information is not imported.
Amount Amount
Percent Percent
Status Status If missing, direct deposit allocation information is not imported.
Activate alternate accounts Enable alternate direct deposit allocation
Type (Primary / Alternate) Primary direct deposit information is imported to the Direct Deposit Allocation grid. Alternate direct deposit information is imported to the Alternate Direct Deposit Allocation grid.
Setup > Employees > Tax W/H and Deductions tab > Deduction Item Properties > Company Match tab
Calculation method Deposit See “Direct deposit information” on page 20.
Amount Amount/Percent See “Direct deposit information” on page 20.
Percent Amount/Percent See “Direct deposit information” on page 20.
File > Client Properties > Calculating Payroll tab > Payroll Period Details
Setup > Clients > Payroll Information tab

Conversion Guide: Payroll CS to Accounting CS Payroll TL 31141 Copyright 1998 – 2017 by Thomson Reuters. All rights reserved. Page 25
CSA menu navigation and field name
Accounting CS Payroll menu navigation and field name
Comments and additional information
(Payroll period details date grid) Payroll Schedules If the client does not use detailed periods, payroll schedules are created based on the check dates assigned to checks.
File > Print Checks Setup > Bank Accounts > Main tab
Sort Primary Sort If the sort in Payroll CS is Department, there is a secondary sort of Employee name.
Sort Secondary Sort If the sort in Payroll CS is Department, there is a secondary sort of Employee name.
Employee federal tax information CSA menu navigation and field name
Accounting CS Payroll menu navigation and field name
Comments and additional information
File > Client Properties > Calculating Payroll tab
Setup > Clients > Payroll Taxes tab
Whole dollar rounding – Federal W/H
Federal – Use whole-dollar rounding
Whole dollar rounding – State W/H
State – Use whole dollar rounding.
If this is marked in CSA, all states set up for the importing client are marked for rounding. The following states are automatically marked for rounding and the option is not editable: CO, ID, ME, MS, MO, MT, NC, ND, OK, and WV.
Setup > Employees > Tax W/H and Deductions tab > Federal Withholding Item Properties
Setup > Employees > Payroll taxes tab
Table Filing status If an invalid selection is found, the filing status is set to Single.
Allowances Total allowances
Additional Amount Additional amount
Additional Percentage Additional percentage
Exempt Federal tax exempt
Fixed amount Fixed amount
Fixed percentage Fixed percentage
Setup > Employees > Personal / W2 tab
TL 31141 Conversion Guide: Payroll CS to Accounting CS Payroll Page 26 Copyright 1998 – 2017 by Thomson Reuters. All rights reserved.
CSA menu navigation and field name
Accounting CS Payroll menu navigation and field name
Comments and additional information
Nonresident alien Nonresident alien
New hire FICA credit New hire FICA credit
Employee state tax information Not every state selection in CSA corresponds directly to fields that calculate taxes in Accounting CS Payroll. Only CSA client data that is used to calculate taxes for a specific state is used during the conversion to Accounting CS Payroll.
Note: The state designation is based on the client’s state(s) locations and the employee addresses in Accounting CS Payroll. State settings are used for local tax filing, where applicable.
CSA menu navigation and field name
Accounting CS Payroll menu navigation and field name
Comments and additional information
Setup > Employees > Tax W/H and Deductions tab > State W/H Item Properties > General tab
Setup > Employees > Payroll Taxes tab
State State
Marital Status Filing status State dependent. If the existing selection is invalid for a state, a default is selected.
Withholding table State dependent. If the existing selection is invalid for a state, a default is selected.
Personal State dependent
Additional State dependent
Dependents State dependent
Tax credit State dependent
Est. Deduction State dependent
Exempt State dependent
Setup > Employees > Tax W/H and Deductions tab <State W/H Item Properties> Other tab
Additional amount Additional amount
Additional percent Additional percentage
Fixed amount Fixed amount
Fixed percentage Fixed percentage
Taxpayer blind State dependent.
Conversion Guide: Payroll CS to Accounting CS Payroll TL 31141 Copyright 1998 – 2017 by Thomson Reuters. All rights reserved. Page 27
CSA menu navigation and field name
Accounting CS Payroll menu navigation and field name
Comments and additional information
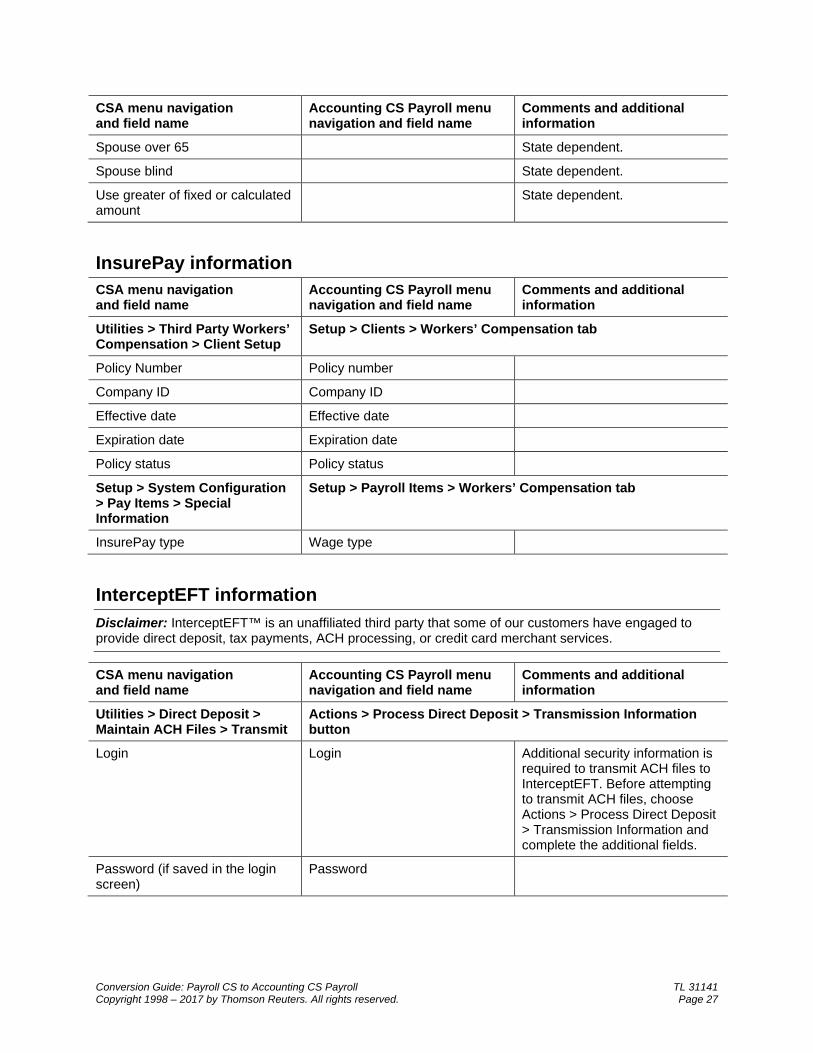
Spouse over 65 State dependent.
Spouse blind State dependent.
Use greater of fixed or calculated amount
State dependent.
InsurePay information CSA menu navigation and field name
Accounting CS Payroll menu navigation and field name
Comments and additional information
Utilities > Third Party Workers’ Compensation > Client Setup
Setup > Clients > Workers’ Compensation tab
Policy Number Policy number
Company ID Company ID
Effective date Effective date
Expiration date Expiration date
Policy status Policy status
Setup > System Configuration > Pay Items > Special Information
Setup > Payroll Items > Workers’ Compensation tab
InsurePay type Wage type
InterceptEFT information Disclaimer: InterceptEFT™ is an unaffiliated third party that some of our customers have engaged to provide direct deposit, tax payments, ACH processing, or credit card merchant services.
CSA menu navigation and field name
Accounting CS Payroll menu navigation and field name
Comments and additional information
Utilities > Direct Deposit > Maintain ACH Files > Transmit
Actions > Process Direct Deposit > Transmission Information button
Login Login Additional security information is required to transmit ACH files to InterceptEFT. Before attempting to transmit ACH files, choose Actions > Process Direct Deposit > Transmission Information and complete the additional fields.
Password (if saved in the login screen)
Password
TL 31141 Conversion Guide: Payroll CS to Accounting CS Payroll Page 28 Copyright 1998 – 2017 by Thomson Reuters. All rights reserved.
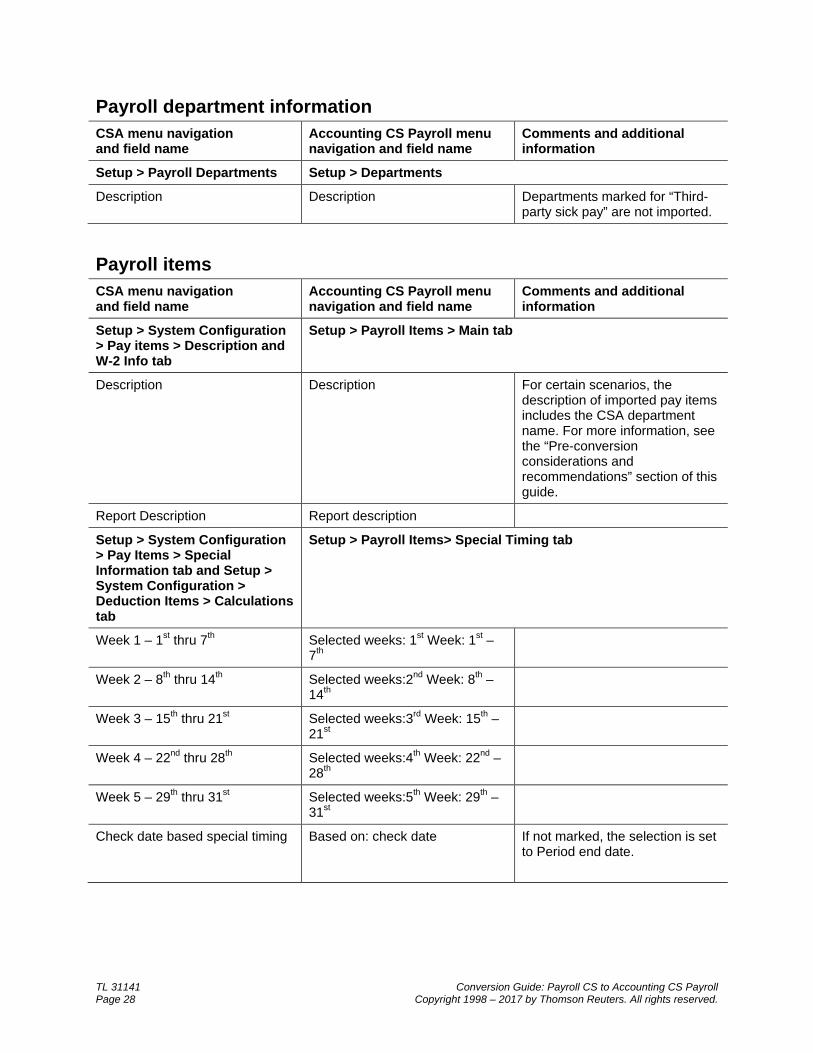
Payroll department information CSA menu navigation and field name
Accounting CS Payroll menu navigation and field name
Comments and additional information
Setup > Payroll Departments Setup > Departments
Description Description Departments marked for “Third-party sick pay” are not imported.
Payroll items CSA menu navigation and field name
Accounting CS Payroll menu navigation and field name
Comments and additional information
Setup > System Configuration > Pay items > Description and W-2 Info tab
Setup > Payroll Items > Main tab
Description Description For certain scenarios, the description of imported pay items includes the CSA department name. For more information, see the “Pre-conversion considerations and recommendations” section of this guide.
Report Description Report description
Setup > System Configuration > Pay Items > Special Information tab and Setup > System Configuration > Deduction Items > Calculations tab
Setup > Payroll Items> Special Timing tab
Week 1 – 1st thru 7th Selected weeks: 1st Week: 1st – 7th
Week 2 – 8th thru 14th Selected weeks:2nd Week: 8th – 14th
Week 3 – 15th thru 21st Selected weeks:3rd Week: 15th – 21st
Week 4 – 22nd thru 28th Selected weeks:4th Week: 22nd – 28th
Week 5 – 29th thru 31st Selected weeks:5th Week: 29th – 31st
Check date based special timing Based on: check date If not marked, the selection is set to Period end date.
Conversion Guide: Payroll CS to Accounting CS Payroll TL 31141 Copyright 1998 – 2017 by Thomson Reuters. All rights reserved. Page 29
CSA menu navigation and field name
Accounting CS Payroll menu navigation and field name
Comments and additional information
Setup > Employee > Tax Withholding and Deductions tab > Deduction Item Properties > Deduction Limits tab
Setup > Employee > Payroll Items tab > Employee Payroll Item Settings > Special Timing tab
Start deduction on date Start date
End deduction on date End date
Start/End date based on check date
Based on: check date The payroll item is set based on the setting for the first employee found using the deduction item.
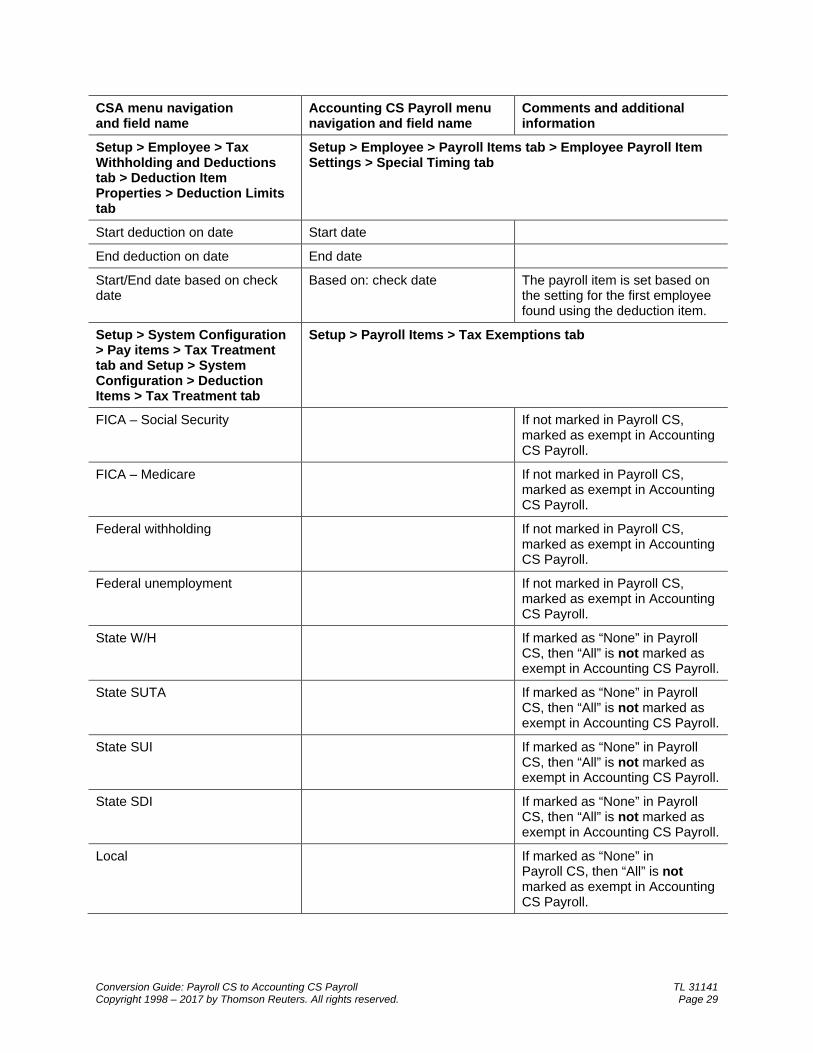
Setup > System Configuration > Pay items > Tax Treatment tab and Setup > System Configuration > Deduction Items > Tax Treatment tab
Setup > Payroll Items > Tax Exemptions tab
FICA – Social Security If not marked in Payroll CS, marked as exempt in Accounting CS Payroll.
FICA – Medicare If not marked in Payroll CS, marked as exempt in Accounting CS Payroll.
Federal withholding If not marked in Payroll CS, marked as exempt in Accounting CS Payroll.
Federal unemployment If not marked in Payroll CS, marked as exempt in Accounting CS Payroll.
State W/H If marked as “None” in Payroll CS, then “All” is not marked as exempt in Accounting CS Payroll.
State SUTA If marked as “None” in Payroll CS, then “All” is not marked as exempt in Accounting CS Payroll.
State SUI If marked as “None” in Payroll CS, then “All” is not marked as exempt in Accounting CS Payroll.
State SDI If marked as “None” in Payroll CS, then “All” is not marked as exempt in Accounting CS Payroll.
Local If marked as “None” in Payroll CS, then “All” is not marked as exempt in Accounting CS Payroll.
TL 31141 Conversion Guide: Payroll CS to Accounting CS Payroll Page 30 Copyright 1998 – 2017 by Thomson Reuters. All rights reserved.
CSA menu navigation and field name
Accounting CS Payroll menu navigation and field name
Comments and additional information
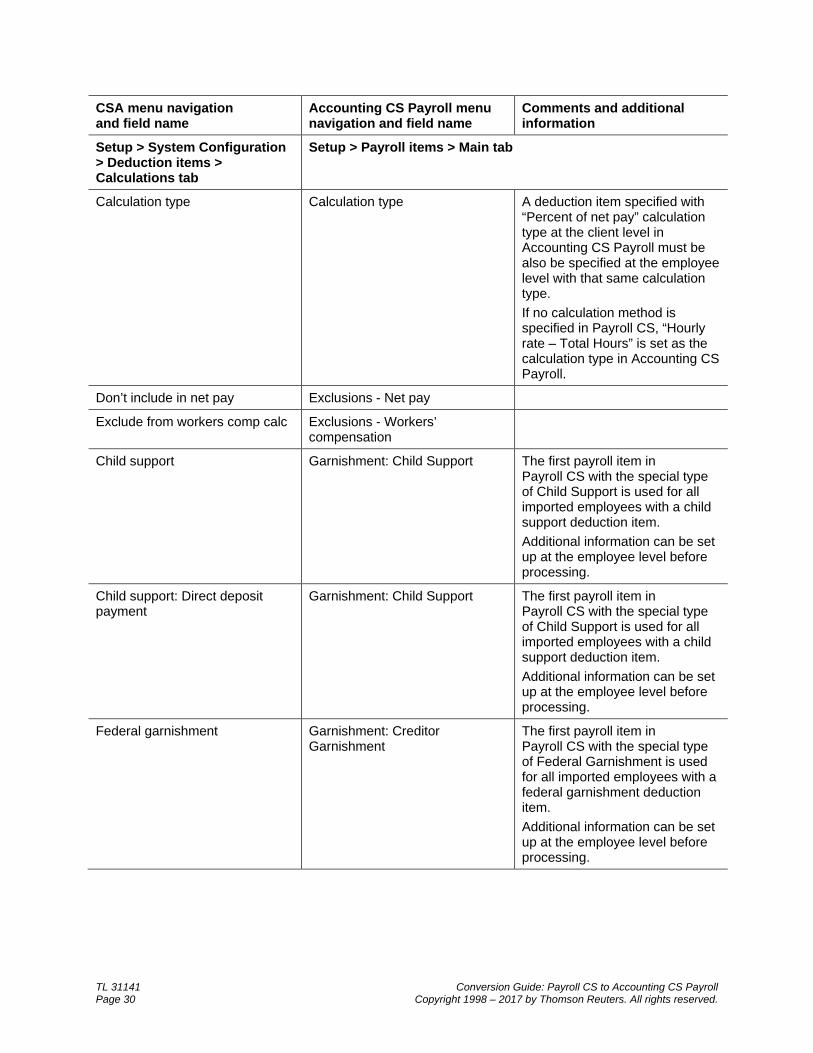
Setup > System Configuration > Deduction items > Calculations tab
Setup > Payroll items > Main tab
Calculation type Calculation type A deduction item specified with “Percent of net pay” calculation type at the client level in Accounting CS Payroll must be also be specified at the employee level with that same calculation type. If no calculation method is specified in Payroll CS, “Hourly rate – Total Hours” is set as the calculation type in Accounting CS Payroll.
Don’t include in net pay Exclusions - Net pay
Exclude from workers comp calc Exclusions - Workers’ compensation
Child support Garnishment: Child Support The first payroll item in Payroll CS with the special type of Child Support is used for all imported employees with a child support deduction item. Additional information can be set up at the employee level before processing.
Child support: Direct deposit payment
Garnishment: Child Support The first payroll item in Payroll CS with the special type of Child Support is used for all imported employees with a child support deduction item. Additional information can be set up at the employee level before processing.
Federal garnishment Garnishment: Creditor Garnishment
The first payroll item in Payroll CS with the special type of Federal Garnishment is used for all imported employees with a federal garnishment deduction item. Additional information can be set up at the employee level before processing.
Conversion Guide: Payroll CS to Accounting CS Payroll TL 31141 Copyright 1998 – 2017 by Thomson Reuters. All rights reserved. Page 31
CSA menu navigation and field name
Accounting CS Payroll menu navigation and field name
Comments and additional information
Federal Levy Garnishment: Federal Levy
The first payroll item in Payroll CS with the selection of Federal Levy is used for all employees imported with a federal levy deduction item. Additional information can be set up at the employee level in Accounting CS Payroll before processing. The calculation type will be set to “Percent of after tax pay” and the rate will be set to “100.00%” for all employees with a federal levy deduction item. For employees with the Exemptions field set to zero in Payroll CS, personal exemptions will be set to 1 in Accounting CS Payroll.
Retirement plan type Retirement/Cafeteria Plan 125 Cafeteria 401(k) Retirement 403(b) Retirement 457 Retirement Roth 401(k) Retirement Roth 403(b) Retirement Simple 408(p) Retirement
There is no designation for a 125 Cafeteria plan within Payroll CS. To classify a deduction as having the retirement plan type 125, the deduction needs to be mapped during the import to an existing deduction of that type.
Subtract from federal levy basis Federal Levy – Subtract from federal levy basis
This information can be set at the employee level or at the client level in Payroll CS. In Accounting CS Payroll, this is set at the employee level for each deduction item (in the Employee Payroll Item Settings dialog).
Department specific calculation Weighted allocation (This option is for the Fixed Amount calculation type.)
If not marked in CSA, the option is marked in Accounting CS Payroll.
Setup > System Configuration > Pay Items > Special Information tab
Special type Special type See “Payroll items, pay item special types” on page 33.
Exclude from net pay Exclusions - Net pay
Exclude from gross pay presentation
Exclusions - Gross pay presentation
TL 31141 Conversion Guide: Payroll CS to Accounting CS Payroll Page 32 Copyright 1998 – 2017 by Thomson Reuters. All rights reserved.
CSA menu navigation and field name
Accounting CS Payroll menu navigation and field name
Comments and additional information
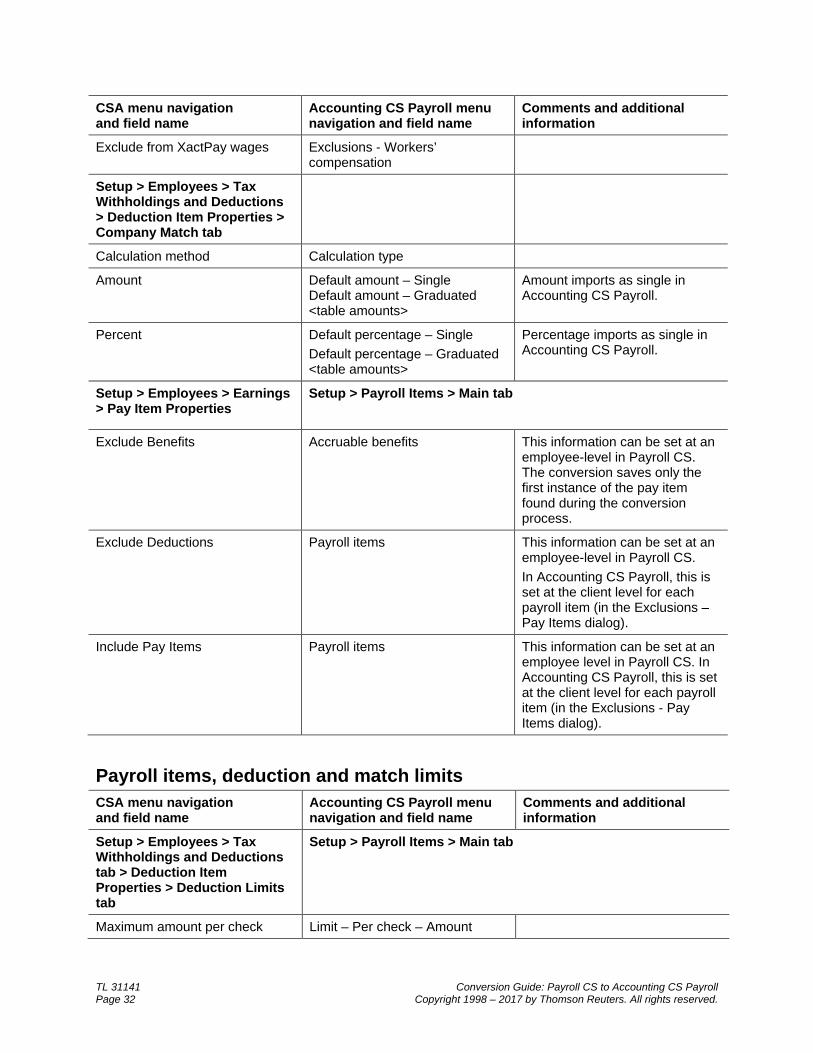
Exclude from XactPay wages Exclusions - Workers’ compensation
Setup > Employees > Tax Withholdings and Deductions > Deduction Item Properties > Company Match tab
Calculation method Calculation type
Amount Default amount – Single Default amount – Graduated <table amounts>
Amount imports as single in Accounting CS Payroll.
Percent Default percentage – Single Default percentage – Graduated <table amounts>
Percentage imports as single in Accounting CS Payroll.
Setup > Employees > Earnings > Pay Item Properties
Setup > Payroll Items > Main tab
Exclude Benefits Accruable benefits This information can be set at an employee-level in Payroll CS. The conversion saves only the first instance of the pay item found during the conversion process.
Exclude Deductions Payroll items This information can be set at an employee-level in Payroll CS. In Accounting CS Payroll, this is set at the client level for each payroll item (in the Exclusions – Pay Items dialog).
Include Pay Items Payroll items This information can be set at an employee level in Payroll CS. In Accounting CS Payroll, this is set at the client level for each payroll item (in the Exclusions - Pay Items dialog).
Payroll items, deduction and match limits CSA menu navigation and field name
Accounting CS Payroll menu navigation and field name
Comments and additional information
Setup > Employees > Tax Withholdings and Deductions tab > Deduction Item Properties > Deduction Limits tab
Setup > Payroll Items > Main tab
Maximum amount per check Limit – Per check – Amount
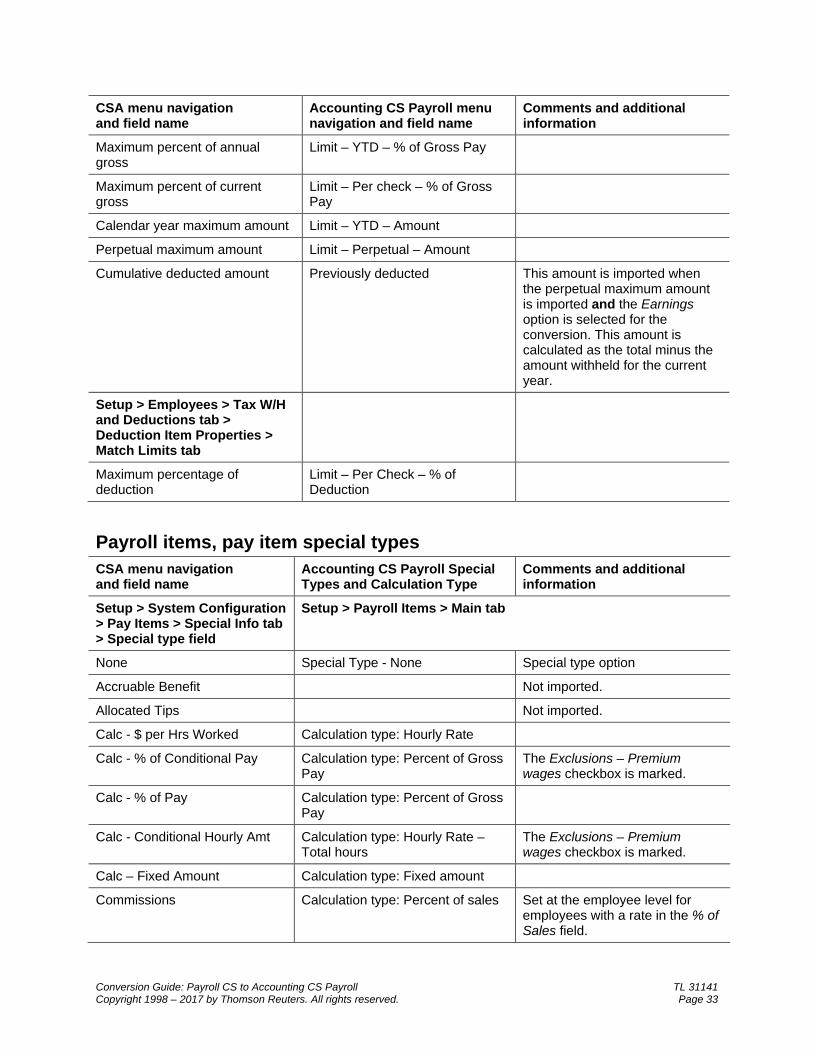
Conversion Guide: Payroll CS to Accounting CS Payroll TL 31141 Copyright 1998 – 2017 by Thomson Reuters. All rights reserved. Page 33
CSA menu navigation and field name
Accounting CS Payroll menu navigation and field name
Comments and additional information
Maximum percent of annual gross
Limit – YTD – % of Gross Pay
Maximum percent of current gross
Limit – Per check – % of Gross Pay
Calendar year maximum amount Limit – YTD – Amount
Perpetual maximum amount Limit – Perpetual – Amount
Cumulative deducted amount Previously deducted This amount is imported when the perpetual maximum amount is imported and the Earnings option is selected for the conversion. This amount is calculated as the total minus the amount withheld for the current year.
Setup > Employees > Tax W/H and Deductions tab > Deduction Item Properties > Match Limits tab
Maximum percentage of deduction
Limit – Per Check – % of Deduction
Payroll items, pay item special types CSA menu navigation and field name
Accounting CS Payroll Special Types and Calculation Type
Comments and additional information
Setup > System Configuration > Pay Items > Special Info tab > Special type field
Setup > Payroll Items > Main tab
None Special Type - None Special type option
Accruable Benefit Not imported.
Allocated Tips Not imported.
Calc - $ per Hrs Worked Calculation type: Hourly Rate
Calc - % of Conditional Pay Calculation type: Percent of Gross Pay
The Exclusions – Premium wages checkbox is marked.
Calc - % of Pay Calculation type: Percent of Gross Pay
Calc - Conditional Hourly Amt Calculation type: Hourly Rate – Total hours
The Exclusions – Premium wages checkbox is marked.
Calc – Fixed Amount Calculation type: Fixed amount
Commissions Calculation type: Percent of sales Set at the employee level for employees with a rate in the % of Sales field.
TL 31141 Conversion Guide: Payroll CS to Accounting CS Payroll Page 34 Copyright 1998 – 2017 by Thomson Reuters. All rights reserved.
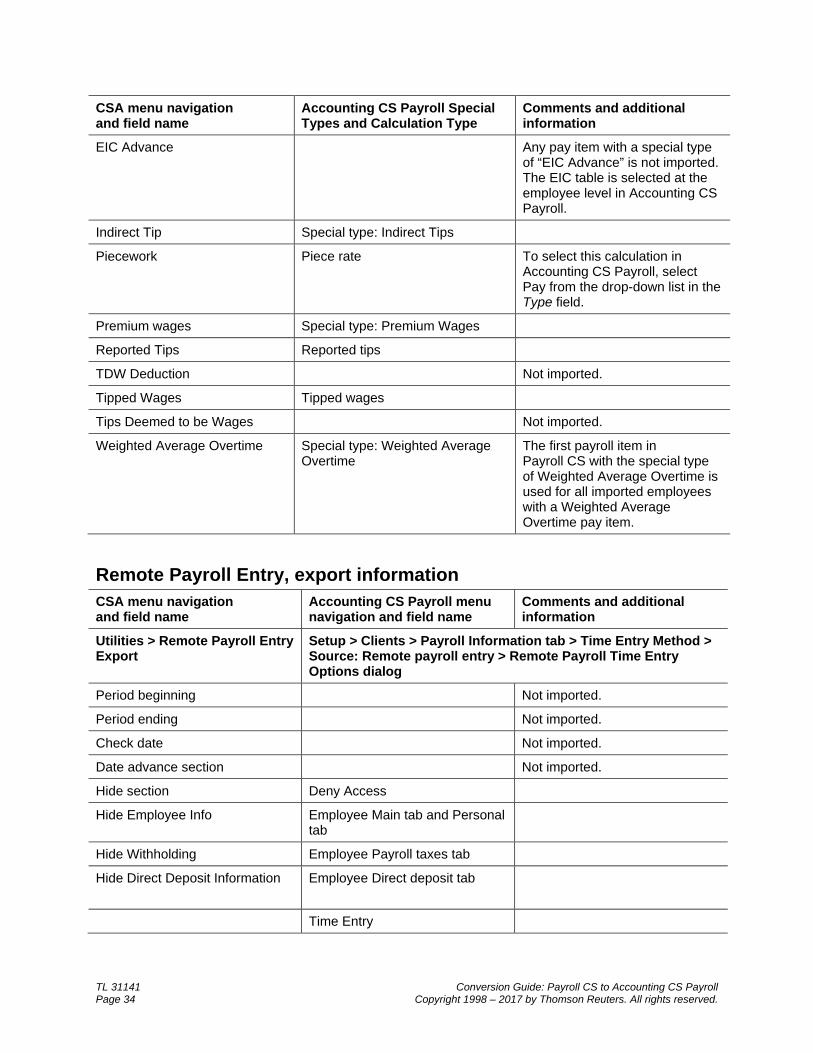
CSA menu navigation and field name
Accounting CS Payroll Special Types and Calculation Type
Comments and additional information
EIC Advance Any pay item with a special type of “EIC Advance” is not imported. The EIC table is selected at the employee level in Accounting CS Payroll.
Indirect Tip Special type: Indirect Tips
Piecework Piece rate To select this calculation in Accounting CS Payroll, select Pay from the drop-down list in the Type field.
Premium wages Special type: Premium Wages
Reported Tips Reported tips
TDW Deduction Not imported.
Tipped Wages Tipped wages
Tips Deemed to be Wages Not imported.
Weighted Average Overtime Special type: Weighted Average Overtime
The first payroll item in Payroll CS with the special type of Weighted Average Overtime is used for all imported employees with a Weighted Average Overtime pay item.
Remote Payroll Entry, export information CSA menu navigation and field name
Accounting CS Payroll menu navigation and field name
Comments and additional information
Utilities > Remote Payroll Entry Export
Setup > Clients > Payroll Information tab > Time Entry Method > Source: Remote payroll entry > Remote Payroll Time Entry Options dialog
Period beginning Not imported.
Period ending Not imported.
Check date Not imported.
Date advance section Not imported.
Hide section Deny Access
Hide Employee Info Employee Main tab and Personal tab
Hide Withholding Employee Payroll taxes tab
Hide Direct Deposit Information Employee Direct deposit tab
Time Entry
Conversion Guide: Payroll CS to Accounting CS Payroll TL 31141 Copyright 1998 – 2017 by Thomson Reuters. All rights reserved. Page 35
CSA menu navigation and field name
Accounting CS Payroll menu navigation and field name
Comments and additional information
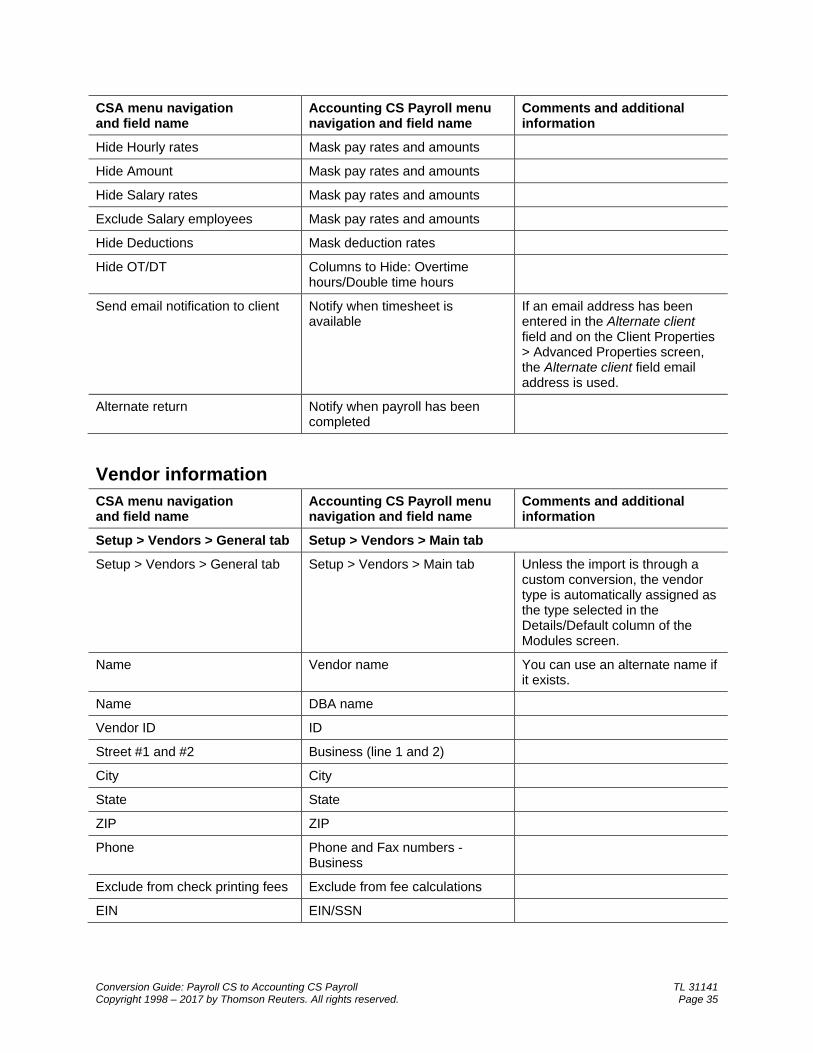
Hide Hourly rates Mask pay rates and amounts
Hide Amount Mask pay rates and amounts
Hide Salary rates Mask pay rates and amounts
Exclude Salary employees Mask pay rates and amounts
Hide Deductions Mask deduction rates
Hide OT/DT Columns to Hide: Overtime hours/Double time hours
Send email notification to client Notify when timesheet is available
If an email address has been entered in the Alternate client field and on the Client Properties > Advanced Properties screen, the Alternate client field email address is used.
Alternate return Notify when payroll has been completed
Vendor information CSA menu navigation and field name
Accounting CS Payroll menu navigation and field name
Comments and additional information
Setup > Vendors > General tab Setup > Vendors > Main tab
Setup > Vendors > General tab Setup > Vendors > Main tab Unless the import is through a custom conversion, the vendor type is automatically assigned as the type selected in the Details/Default column of the Modules screen.
Name Vendor name You can use an alternate name if it exists.
Name DBA name
Vendor ID ID
Street #1 and #2 Business (line 1 and 2)
City City
State State
ZIP ZIP
Phone Phone and Fax numbers - Business
Exclude from check printing fees Exclude from fee calculations
EIN EIN/SSN

TL 31141 Conversion Guide: Payroll CS to Accounting CS Payroll Page 36 Copyright 1998 – 2017 by Thomson Reuters. All rights reserved.
CSA menu navigation and field name
Accounting CS Payroll menu navigation and field name
Comments and additional information
Utilities > EFTPS Batch Filer Export > Payment
Action > Process EFTPS > Setup dialog
Batch filer ID Batch filer ID
Master Inquiry PIN Master inquiry PIN
Setup > Vendors > Main tab
Taxpayer PIN Taxpayer PIN The PIN is added for use with all federal tax agents.
Setup > Vendors > Address and Accounts tab
If this tab includes any address information, the conversion marks the Mailing Address checkbox for address type Other.
Alternate Name Vendor name
Alternate Street #1 Addresses - Other
Alternate Street #2 Addresses - Other
Alternate City Addresses (Other) - City
Alternate State Addresses (Other) - State
Alternate Zip Addresses (Other) - ZIP
Create agent checks in Payment Preferences - Bank account
Setup > Vendors > Distributions tab (1099 Distributions)
Setup > Vendors > 1099 Properties tab
1099 item 1099 Form Selection
Setup > Vendors > Distributions tab (Standard check)
Setup > Vendors > Distributions tab
Account number GL account
Description Description
Amount Amount
1099 item 1099
Setup > Vendors > Direct Deposit tab
Setup > Vendors > Direct Deposit tab
Because only one bank is used in Payroll CS, the Direct Deposit allocation is set to 100%. All allocations imported from Payroll CS are set as a domestic ACH transaction type in Accounting CS Payroll.
Deposit Bank Bank
Deposit account number Account Number
Conversion Guide: Payroll CS to Accounting CS Payroll TL 31141 Copyright 1998 – 2017 by Thomson Reuters. All rights reserved. Page 37
CSA menu navigation and field name
Accounting CS Payroll menu navigation and field name
Comments and additional information
Account Type Account Type
Status Status
Workers’ compensation information CSA menu navigation and field name
Accounting CS Payroll menu navigation and field name
Comments and additional information
Setup > Employee > Earnings tab > Pay Items Properties > Other tab
Setup > Clients > Workers’ Compensation tab; and Setup > Employees > Workers’ Compensation tab
Class Code The code is marked as active for the department for which it was set for the employee in CSA.
Rate Rate The rate is not stored at the employee level.
State State
XactPAY information CSA menu navigation and field name
Accounting CS Payroll menu navigation and field name
Comments and additional information
Utilities > Third Party Workers’ Compensation > Client Setup
Setup > Clients > Workers’ Compensation tab
Status Effective Date Policy effective date / Status
Setup > System Configuration > Pay Items > Special Information
Setup > Payroll Items > Workers’ Compensation tab
InsurePay type Wage type
Data that is not transferred Although most data from Payroll CS is imported during a custom import, some data cannot be imported due to differences in features and data structures between Payroll CS and Accounting CS Payroll. Following the conversion, you will need to set up this information, if applicable, in Accounting CS Payroll.
Note: Regardless of the conversion method used (batch or custom method), employee payroll checks and non-1099 vendor checks are not imported. Employee earnings information is recorded on monthly checks created during conversion. Impound checkbooks are imported via the custom conversion method but not via the batch conversion method.
TL 31141 Conversion Guide: Payroll CS to Accounting CS Payroll Page 38 Copyright 1998 – 2017 by Thomson Reuters. All rights reserved.
Banks and impound bank accounts Checkbook type, address lines (1-3), and all items on the MICR tab of the Setup > System Configuration > Impound Checkbook dialog are not imported.
Direct deposit minimum, exclude withdrawal transaction, company entry description, and message authentication code are not imported.
Check and form printing fees Check and form printing fees are not imported from Payroll CS. For details on fees, enter “Setting up billing items and fee schedules” in the search field on the Accounting CS Payroll toolbar.
Check layouts Check layouts are not imported.
Client checkbook Address lines (1-3) and checkbook type are not imported.
Client information The 940 experience rate, client minimum wage, client alternate minimum wage, default frequency, message authentication code, and taxpayer identifier are not imported.
Client notes / comments / reminder fields The Processing Notes feature in Accounting CS Payroll replaces the Client Notes feature in Payroll CS. Client Notes are imported as Processing Notes if that checkbox is marked for the conversion. (Processing Notes can also serve to replace the Comments field on the General tab of the Setup > Employees window in Payroll CS and the Data Entry Reminder field on the Other tab of the Setup > Employee Templates window, neither of which are imported.)
Employees Workers’ fund exempt status for Oregon clients and employee templates are not imported.
Employee federal tax information Automatic withholdings adjustments, carry negative amount to next check (deduction), check printing fee, system-posted check fees that are nontaxable, and direct deposit minimum are not imported.
Conversion Guide: Payroll CS to Accounting CS Payroll TL 31141 Copyright 1998 – 2017 by Thomson Reuters. All rights reserved. Page 39
Firm client The option to convert client data into an existing client in Accounting CS is not currently available. Therefore, you will not be able to convert data from your CSA Firm client into the Firm client in Accounting CS. However, you can use either of the following methods to transfer data to the Accounting CS Firm client.
Choose File > Import > Spreadsheet to import chart of accounts, employee, and payroll data into the Firm client using the Spreadsheet Import wizard. See the Spreadsheet import overview in our Help & How-To Center.
Convert the CSA Firm client to a new Accounting CS client, and then choose File > Transfer Client Information to transfer setup data from the new client to the Firm client. See the Transferring client information procedure in the Help & How-To Center for more details.
InsurePay information The Payroll Frequency is not imported.
Payroll department information Default employee template, G/L location, and G/L department are not imported.
Payroll items Accruable benefit pay items, allocated tips, CSA direct deposit, and other direct deposit, are not imported. Allocated tips are not imported. Pay items associated with a 1099 item not going to Form 1099-Misc box 7 are not imported.
Staff security settings Security settings are not currently included in the conversion. To set up security in Accounting CS Payroll, mark the Enable firm security checkbox on the Preferences tab of the Setup > Firm Information > Firm screen, close and then re-open Accounting CS Payroll (logging in as an administrator), and then choose Setup > Firm Information > Security Groups.
Tax forms Tax liabilities for tax forms are check-based in CSA and are not imported to Accounting CS Payroll. We recommend that you process tax forms in CSA and import at the end of the tax period. Override the amounts in Accounting CS Payroll if they are needed for tax forms.
Transmittal letters Transmittal letters are not imported.
Vendor transactions Non-1099 vendor transactions are not imported from Payroll CS to Accounting CS Payroll. Vendor checks that have already been printed in CSA will need to be entered manually in Accounting CS Payroll to be stored as historical data. For liability amounts that need to be paid, override the next liability check at the time of printing so that these amounts are included. For details, enter “Bank account transactions” in the search field on the Accounting CS Payroll toolbar.
TL 31141 Conversion Guide: Payroll CS to Accounting CS Payroll Page 40 Copyright 1998 – 2017 by Thomson Reuters. All rights reserved.
Vendors Data from the Amortization Information tab of the Setup > Vendors screen in CSA are not converted. Following the conversion process, you need to enter this information manually in Accounting CS.
Verifying your converted data Although the conversion is designed to import your data as accurately as possible, there are some instances when the conversion may not import all data correctly due to data corruption or other anomalies in the Payroll CS data. Use the following steps to verify that your client data has been imported correctly.
1. In Payroll CS, open the client and print the Employee Listing and the Earnings Report.
2. In Accounting CS Payroll, print the Client Information Listing, the Employee Listing, and the Earnings Report for the imported client.
3. Compare the Client Information Listing from Accounting CS Payroll with the information on the General tab of the Client Properties dialog in CSA, and then compare the two employee listings and earnings reports. If the information contained in the Payroll CS reports does not match the Accounting CS Payroll reports, you will need to determine which items(s) are invalid or missing and manually enter them in Accounting CS Payroll.
If you encounter problems If you encounter problems while importing client data from Payroll CS to Accounting CS Payroll and are unable to reconcile the data using the various reports and tools in CSA, contact CS Support.
Help and Support
Help & How-To Center For answers to questions on using Accounting CS Payroll, access the Help & How-To Center by choosing Help > Help & How-To, by clicking the button on the toolbar, or by pressing CTRL+Y. You can also use the search field on the toolbar to search for topics. For more information, including sample searches, see Finding answers in the Help & How-To Center.
Product support From the Support Contact Information page on our website, you can complete a form to send a question to our Support team. To speak directly with a Support Representative, call 800.968.0600 and follow the prompts. Normal weekday support is available from 9:00 a.m. to 8:00 p.m. eastern time. For additional details (including extended support hours for tax season and hours for other applications), visit the Support section of our website. You can also access the Support section from within Accounting CS Payroll by choosing Help > Additional Resources > General Support Information.

Conversion Guide: Payroll CS to Accounting CS Payroll TL 31141 Copyright 1998 – 2017 by Thomson Reuters. All rights reserved. Page 41
Website resources Visit our website to access the Tax & Accounting Community (formerly ARNE), to learn about training courses, to view blogs and articles, and more. You can access the website from within Accounting CS by choosing Help > On the Web > CS Professional Suite Home Page.
We issue software update notices via email. You can sign up to receive these notices by visiting the My Account section of our website. You’ll need to create a web account (if you don’t already have one) and then sign up for the Email Subscription service where you can indicate which notices you want to receive.