controlpoint for office 365 - · pdf filemetalogix controlpoint for office 365 ... the...
TRANSCRIPT

www.metalogix.com [email protected] 202.609.9100
ControlPoint
February 21, 2018
Installation and Upgrade Guide
for Office 365

© Metalogix International GmbH., 2008-2018Al l rights reserved. No part or section of the contents of this materia l may be reproduced or transmitted in any form or byany means without the wri tten permiss ion of Meta logix International GmbH.
ControlPoint™ is a trademark of Meta logix International GmbH.
Windows SharePoint Services i s ei ther a regis tered trademark or a trademark of Microsoft Corporation in the UnitedStates and/or other countries . Other product and company names mentioned herein may be the trademarks of theirrespective owners .
www.metalogix.com [email protected] 202.609.9100
ControlPoint for Office 365 Installation and Upgrade Guide Metalogix
Technical Support
For information about Meta logix Technica l support vis i t http://meta logix.com/support.
Technica l support specia l i s ts can be reached by phone at +1-202-609-9100. The level of technica l support provideddepends upon the support package that you have purchased. Contact us to discuss your support requirements .
Copyright

ControlPoint for Office 365 Installation and Upgrade Guide Metalogix
www.metalogix.com [email protected] 202.609.9100
ContentsPreface ....................................................................................................................................................... 4
ControlPoint for Office 365 SharePoint Administration (ControlPoint Online) Conceptual Overview ........... 5
System Requirements ................................................................................................................................ 6
First Time Installation and Configuration .................................................................................................... 8
Installing and Deploying ControlPoint Online ....................................................................................... 9
Activating Your ControlPoint Online License ....................................................................................... 17
Activating Your License Online ......................................................................................................18
Activating Your License Without Internet Access ...........................................................................20
Creating or Updating the ControlPoint Online Configuration Site ........................................................ 23
ControlPoint Full Discovery and Scheduler Jobs ........................................................................................ 25
Upgrading from a Previous Version of ControlPoint Online ....................................................................... 27

ControlPoint for Office 365 Installation and Upgrade Guide Metalogix
4
Preface
This guide contains instructions for installing and configuring Metalogix ControlPoint for Office365
SharePoint Administration (alternatively called ControlPoint Online) in a hybrid environment.
ControlPoint Online is a Web-based application that offers a proactive, integrated solution for managing
site collections within a hosted SharePoint environment.

ControlPoint for Office 365 Installation and Upgrade Guide Metalogix
5
ControlPoint for Office 365 SharePointAdministration (ControlPoint Online) ConceptualOverview
In a hybrid installation, the ControlPoint application is installed on premises, on a Windows server
where SharePoint Foundation has been installed (although not necessarily configured). An on-premises
SQL server hosts the ControlPoint Services (xcAdmin) database, which holds configuration information
and analysis data.
After the ControlPoint application is installed, the ControlPoint Configuration site is created in the
hosted environment (or updated if it already exists).
NOTE: Even though ControlPoint Online supports multiple languages, the ControlPoint Configuration
site must be created in English.

ControlPoint for Office 365 Installation and Upgrade Guide Metalogix
6
System RequirementsHosted Environment Requirements
The environment that hosts your SharePoint installation must be running SharePoint 2013 or 2016.
On-Premises Server Requirements
You can install Metalogix ControlPoint for Office 365 SharePoint Administration (ControlPoint Online) on
a server that meets the following requirements:
· Windows Server 2008 or 2008 R2 or 2012 Service Pack 3, 64-bit, with the IIS role configured.
NOTE: The server can be either dedicated to ControlPoint Online or shared with other functions.
· SharePoint 2013 (Foundation or Server) installed, but not necessarily configured.
· For the client Web application: Access to Microsoft SQL Server 2008 or 2012 Service Pack 3 or SQL 2014 (to
host the ControlPoint Service (xcAdmin) database).
NOTE: The SQL server may be on the same physical server as the client Web application, or it may be
on a different machine.
Account Requirements
· The account used to install ControlPoint Online must be:
§ a member of the local Administrator's group on the machine where ControlPoint Online is
installed
§ added to the security server role sysadmin in the SQL server that will be hosting the ControlPoint
Services database
NOTE: If sysadmin privileges cannot be granted, you will need to use an account that has the SQL
server roles securityadmin and dbcreator. as well as SharePoint_Shell_Access rights to the
SharePoint Configuration database.
§ The account used to create the ControlPoint configuration site must be a Site Collection
Administrator for the Site Collection where the site will be created.
· The account that will be used to run ControlPoint (that is the ControlPoint Service Account) must:
§ be a member of the local Administrator's group on the machine where ControlPoint Online is
installed
§ have a valid login for the SQL server that will be hosting the ControlPoint Services database.
(sysadim rights are not required for this account.)
§ be a Site Collection Administrator for each site collection to be managed using ControlPoint.
ControlPoint User Requirements
ControlPoint users must:

ControlPoint for Office 365 Installation and Upgrade Guide Metalogix
7
· be members of the Site Collection Administrators group in site collection that will host the
ControlPoint Configuration site as well as in every Site Collection they will be managing using
ControlPoint Online.
· use a compatible Web browser:
§ Microsoft Internet Explorer (IE) version 10 or later
EXCEPTION: When using Internet Explorer build 11.0.9600.18617, report results do not fill the
entire results section.
§ Microsoft Edge
§ Mozilla Firefox version 3 or later
§ Google Chrome (latest public release)
Note that some browsers may have limitations.
Supported Authentication Methods
Authentication to hosted site collections can be based on either of the following methods:
· Separate accounts that are managed within the hosted environment
When this method is used, credentials are passed to and must be verified in the hosted environment
in order for ControlPoint to be accessed.
OR
· Using Active Directory Federated Services (ADFS)
When this method is used, ControlPoint will authenticate with the local ADFS and use that identity to
communicate with the hosted environment.
OR
· Active Directory accounts in the client environment
This method assumes that these accounts are valid in the hosted environment.

ControlPoint for Office 365 Installation and Upgrade Guide Metalogix
8
First Time Installation and Configuration
Metalogix ControlPoint for Office 365 SharePoint Administration (ControlPoint Online) is installed and
runs as a .NET application. During installation:
· a dedicated application pool is created in IIS for the primary ControlPoint Configuration site, which is
installed under the root site of a hosted site collection
AND
· the ControlPoint Service database (xcAdmin) is created for configuration information and analysis
data
Before You Begin
· The site collection that will host the ControlPoint configuration site must exist on the host and be in
the English language.
· The machine on which you are installing ControlPoint must meet System Requirements.
· Make sure the machine on which you are installing ControlPoint has access to the Internet if you
want to be able to activate your ControlPoint license online.
Have the following information ready (you may wish to record it in the spaces provided):
§ The URL for the site collection that will host the primary ControlPoint Configuration Site* and the
URL of the SharePoint Administration site hosting the site collection.
ControlPoint Configuration Site Collection URL: ____________________________________
SharePoint Administration Site URL: _______________________________________
*REMINDER: The ControlPoint Configuration Site must be created in an English-language site
collection.
§ The name and port number that you want IIS to use to manage the ControlPoint Configuration Site
(The default port number is 2828, but you can set it to any available value.)
Web Site Name:______________________________
Port Number: _____________________________
§ The account under which you want the application pool for the ControlPoint Configuration Site to
run (This is normally a domain account, but if you are running an evaluation version of the product
—and the database is on the same machine as ControlPoint—you may use a local account.)
App Pool Service Account: ____________________________________
Password: ____________________________________
§ The email credentials that you want to use as the "from" account for correspondence sent on
behalf of ControlPoint.
Local SMTP Server: ___________________________________
Email address: ___________________________________

ControlPoint for Office 365 Installation and Upgrade Guide Metalogix
9
§ The name of the SQL server that will host the ControlPoint Service (xcAdmin) database, as well as
the authentication method to be used:
(This is where the content database for the Axceler application will reside.)
Database Server Name: __________________________
Windows Authentication
OR
SQL Server ID ___________________________ Password _______________________________
§ The ControlPoint Online license activation code: ________________________________
§ The Site Collection Administrator account that will be used to create the ControlPoint
Configuration Site.
Site Collection Administrator Account: _____________________________________
Password: _____________________________________
NOTE: If you do not already have a license activation code, contact Metalogix to obtain one.
First Time Installation and Configuration Process
The ControlPoint Online first time installation and configuration process consists of the following stages:
1 Installing the ControlPoint application and deploying ControlPoint features.
2 Activating your ControlPoint license.
3 Creating the ControlPoint Configuration site.
Installing and Deploying ControlPoint Online
It is recommended that you temporarily disable virus checkers on all Web front end servers in the farm
as they can slow the solution deployment enough to trigger timeout errors.
To install the ControlPoint Online application:
REMINDER: If UAC is enabled, you must "Run as Administrator."
1 Unzip the downloaded zip file then launch the installer (ControlPointOnline.exe).
A splash screen displays, followed by the InstallShield Wizard Welcome dialog.
2 Click [Next] to display the License Agreement dialog.
3 Read the license agreement. Select I accept the terms of this license agreement.

ControlPoint for Office 365 Installation and Upgrade Guide Metalogix
10
4 Click [Next] to display the Destination Folder dialog.
The InstallShield Wizard specifies a default install directory (C:\Program Files\Metalogix\ControlPoint
Online), but you can click [Browse] and select a different one.
NOTE: This directory is where the installer will place the files needed to complete the installation.
5 Click [Next] to display the O365 Configuration dialog.
6 Enter the following urls:
§ For Primary ControlPoint Configuration Site URL, the url of the hosted site collection in which the
ControlPoint Configuration site will be created.
§ For SharePoint Administration URL, the url of the primary page for configuring the hosted SharePoint
environment.

ControlPoint for Office 365 Installation and Upgrade Guide Metalogix
11
7 Click [Next] to display the I IS Configuration dialog.
8 Complete the dialog as follows:
a) For Web Site Name, if different from the default (ControlPoint Online), enter the name that you
want IIS to use to manage the site.
NOTE: The name that is entered in this field is for IIS purposes only. The name of the site will
appear in SharePoint and ControlPoint under the name ControlPoint Configuration Site.
b) For Port number, either:
§ accept the default value (2828)
OR
§ enter a different, unused Port number.
9 If different than the default (the account that is logged into the server), enter the name and
password of the Service Account under which you want the application pool that will host the
ControlPoint Configuration Site to run.

ControlPoint for Office 365 Installation and Upgrade Guide Metalogix
12
REMINDER: If your databases reside on a different server, then the Service Account must be a
domain account.
10 Click [Next] to display the ControlPoint Service Database Server dialog.
11 For the Database Server where you want to place the ControlPoint Service (xcAdmin) database:
a) Do one of the following:
§ select a server from the drop-down
OR
§ click [Browse] to choose a different database server
OR
§ enter the server name.

ControlPoint for Office 365 Installation and Upgrade Guide Metalogix
13
b) Specify the authentication method you want to use. (If you select SQL Server authentication, you
will be prompted to enter the Login ID and Password.)
12 Click [Next] to display the Ready to install the ControlPoint Online dialog.

ControlPoint for Office 365 Installation and Upgrade Guide Metalogix
14
13 Click [Install].
14 Click [Next] to display the ControlPoint Online Email Information dialog.

ControlPoint for Office 365 Installation and Upgrade Guide Metalogix
15
15 Enter the email information that will be used as the “from” account for any correspondence sent on
behalf of ControlPoint:
§ For Local SMTP Server, the NETBIOS name of the SMTP server, and
§ the EMail from address of the ControlPoint Online "from" account.
16 Click [Next].
17 The ControlPoint Online installer carries out the following
· Installs the ControlPoint Online application components.
· Creates the ControlPoint Service (xcAdmin) database on the SQL server specified in Step 11.
· Creates the ControlPoint FullDiscovery and Scheduler Jobs tasks in the Windows Task Scheduler
(using the credentials of the ControlPoint Service Account specified in Step 9).
18 When the installler has finished running and the All operations successfully completed message displays,
click [Finish].

ControlPoint for Office 365 Installation and Upgrade Guide Metalogix
16
The Activate ControlPoint Licenses dialog displays.
Continue with Activating Your ControlPoint Online License.
NOTE: If you want to activate the application at a later time, uncheck the Launch ControlPoint License
Manager box before clicking [Finish]. When you are ready to activate ControlPoint, you can invoke this
dialog from the desktop or Windows Start menu on the machine where the application was installed. Be
aware, however, that until you activate ControlPoint you will be unable to use it.

ControlPoint for Office 365 Installation and Upgrade Guide Metalogix
17
Activating Your ControlPoint Online License
The Manage ControlPoint Licenses dialog automatically displays at the conclusion of the installation and
deployment process.
If you chose not to activate ControlPoint Online immediately, you can invoke this dialog from the
Windows Start menu of the server on which the application was installed by choosing Start > All Programs >
Axceler > ControlPoint_Online > Manage ControlPoint Online Licenses.
NOTE: You may need to "Run as Administrator" to invoke the dialog.
If you do not complete the activation process, the following message will display in the ControlPoint
application header: License Not Yet Recorded.
To initiate license activation:
From the Manage ControlPoint Licenses dialog, select Performed a new install of ControlPoint Online, then click
[Manage Licenses].
The conventional way to activate ControlPoint is over the Internet, using the procedure for Activating
Your License Over the Internet.
If the machine on which ControlPoint is installed does not have Internet access, you will need to request
a license file from Metalogix. Continue with the procedure for Activating Your License Without Internet
Access.

ControlPoint for Office 365 Installation and Upgrade Guide Metalogix
18
Activating Your License Online
To activate your ControlPoint license online:
1 On the Manage ControlPoint Licenses dialog, select the appropriate radio button.
2 Click [Manage Licenses] to display the Activate License dialog.
3 Make sure Activate Online is selected.
REMINDER: If the server on which ControlPoint is installed does not have internet access, use the
procedure for Activating Your License Offline.
4 Enter the license activation key provided by Metalogix.

ControlPoint for Office 365 Installation and Upgrade Guide Metalogix
19
NOTE: If you are upgrading from a version earlier than 5.2, the license key field will already be
populated with your current ControlPoint license.
5 Click [Activate].
6 When the License activation succeeded message displays in the lower-left corner of the dialog, click
[Close] to return to the Manage ControlPoint Licenses dialog.

ControlPoint for Office 365 Installation and Upgrade Guide Metalogix
20
7 Click [Record License Info].
The message Processing License displays in the lower left corner of the dialog as license information is
made available to additional Web front-end servers in your environment. When processing is
completed, it is replaced by the message ControlPoint has been activated and License recorded.
When you record your ControlPoint license, the following actions are carried out:
· ControlPoint license makes license information available to additional Web front end servers.
· The polices on all existing Web applications are set to grant the ControlPoint Service Account Full
Control permissions.
· The ControlPoint Service Account is granted the db_owner role in all existing content databases:
· Final setup on the ControlPoint Configuration site is performed.
NOTE: If you do not complete the activation process, the following message will display in the
ControlPoint application header: License file does not exist.
Continue with Creating or Updating the ControlPoint Online Configuration Site.
Activating Your License Without Internet Access
You can activate your ControlPoint license offline by requesting an activation key file from Metalogix.
This file can then be used to activate your ControlPoint license.

ControlPoint for Office 365 Installation and Upgrade Guide Metalogix
21
NOTE: Because the request for the activation key file must be submitted via the Metalogix website the
request must be submitted from a machine that has internet access.
To activate your ControlPoint license offline:
1 On the Manage ControlPoint Licenses dialog, select the appropriate radio button.
2 Click [Manage Licenses] to display the Activate License dialog.
3 Enter the license activation key provided by Metalogix,
NOTE: If you are upgrading from a version earlier than 5.2, the license key field will already be
populated with your current ControlPoint license.

ControlPoint for Office 365 Installation and Upgrade Guide Metalogix
22
4 Select Activate Offline.
5 Follow the instructions that display in the dialog to complete the activation process:
a) Collect the Activation Data. You have the option to either Copy Activation Data to Clipboard or Save
Activation Data to (text) File.
b) Submit collected data to Metalogix. Go to http://www.metalogix.com/Support/OfflineActivation.aspx
and follow the instructions for submitting your activation data.
When your activation key is returned, you have the option of copying it to the clipboard or saving it to a
data file. Make sure that you choose the option to save to a data file as it is the only method that
Activate License dialog allows.
c) Upload Activation Key File obtained from Metalogix to the Activate License dialog.
d) Click [Activate].
When the License activation succeeded message displays in the lower-left corner of the dialog, click
[Close] to return to the Manage ControlPoint Licenses dialog.

ControlPoint for Office 365 Installation and Upgrade Guide Metalogix
23
6 Click [Record License Info].
The message Processing License displays in the lower left corner of the dialog as license information
is made available to additional Web front-end servers in your environment. When processing is
completed, it is replaced by the message ControlPoint has been activated and License recorded.
Continue with Creating or Updating the ControlPoint Online Configuration Site.
Creating or Updating the ControlPoint Online Configuration Site
Once you have finished activating your ControlPoint Online license, you will be prompted to create (or
update) the ControlPoint Online Configuration site.
NOTE: If you choose to dismiss the ControlPoint Online Configuration dialog and create/update the
ControlPoint Configuration Site at a later time you will need to invoke the ControlPoint Online Manage
Licenses dialog and click [Record License Info] to invoke it again. You will not be able to use the
ControlPoint application until this step is carried out.

ControlPoint for Office 365 Installation and Upgrade Guide Metalogix
24
To create or update the ControlPoint Online Configuration Site:
1 Complete the dialog with the User Name and Password of the Microsoft Office 365 Site Collection
Administrator account for the site collection where the ControlPoint Online Configuration Site will
reside
2 Click [Configure]
3 When the message ControlPoint lists were successfully created. displays, click [Go to ControlPoint]
to launch the application.
4 Click [Close] to dismiss the License Manager.
ControlPoint for Office 365 Installation and Upgrade Guide Metalogix
25
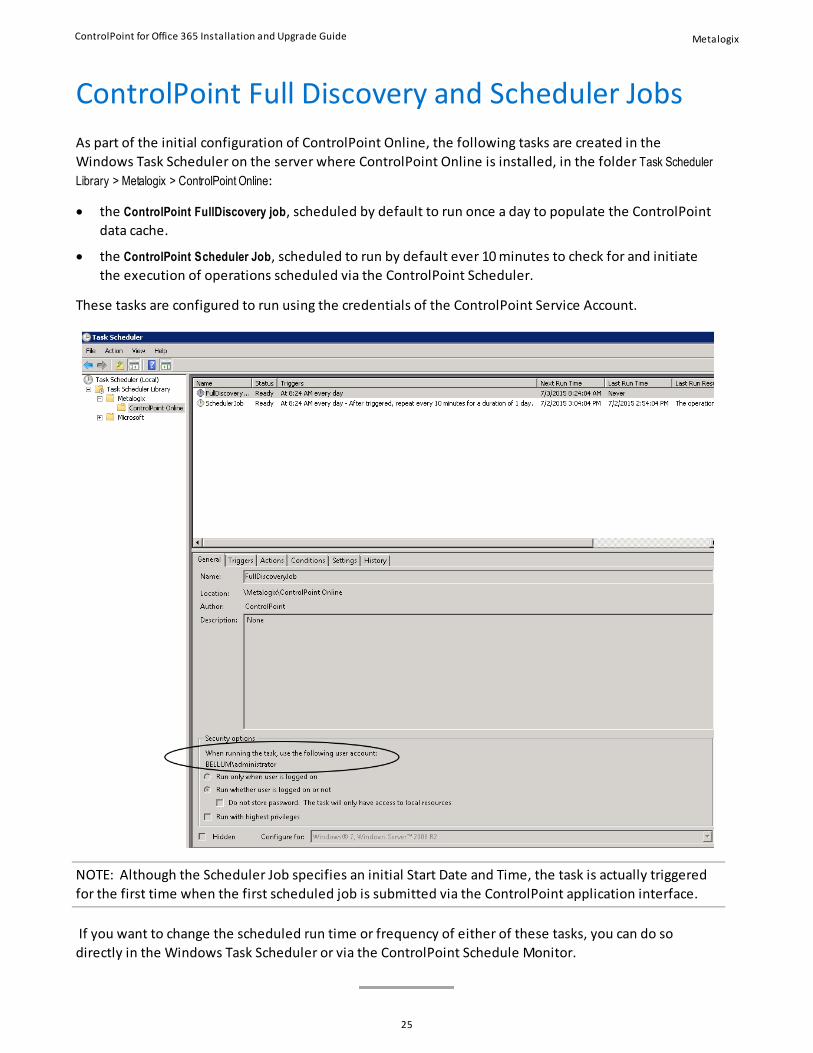
ControlPoint Full Discovery and Scheduler Jobs
As part of the initial configuration of ControlPoint Online, the following tasks are created in the
Windows Task Scheduler on the server where ControlPoint Online is installed, in the folder Task Scheduler
Library > Metalogix > ControlPoint Online:
· the ControlPoint FullDiscovery job, scheduled by default to run once a day to populate the ControlPoint
data cache.
· the ControlPoint Scheduler Job, scheduled to run by default ever 10 minutes to check for and initiate
the execution of operations scheduled via the ControlPoint Scheduler.
These tasks are configured to run using the credentials of the ControlPoint Service Account.
NOTE: Although the Scheduler Job specifies an initial Start Date and Time, the task is actually triggered
for the first time when the first scheduled job is submitted via the ControlPoint application interface.
If you want to change the scheduled run time or frequency of either of these tasks, you can do so
directly in the Windows Task Scheduler or via the ControlPoint Schedule Monitor.

ControlPoint for Office 365 Installation and Upgrade Guide Metalogix
26

ControlPoint for Office 365 Installation and Upgrade Guide Metalogix
27
Upgrading from a Previous Version ofControlPoint OnlineIf ControlPoint Online was originally installed prior to version 6.2, it must be uninstalled (using the
Programs and Features option on the Windows Control Panel) before the new version can be installed
(using the procedures for First Time Installation and Configuration.)
When asked by the installer if you want to remove the Controlpoint Service Database(xcAdmin),
remember to click [No] to avoid losing historical data collected by ControlPoint Online.
Important Note About Full Discovery and Scheduler Job Tasks
As part of the installation, new ControlPoint FullDiscovery and Scheduler Jobs tasks are created in the
Windows Task Scheduler, in the folder Metalogix > ControlPoint Online, and using the credentials of the
ControlPoint Service Account specified during the installation. These task are replacements for the Host
Client Discovery JOB and the Host Client Scheduler JOB, which can be deleted from the Task Scheduler.
If you want to change the default scheduled times and frequency of these jobs (for example, to coincide
with those of the original jobs), you can do so directly in the Task Scheduler or via the ControlPoint
application interface.
See ControlPoint Full Discovery and Scheduler Jobs for complete details.