contrail service orchestration contrail service ... · # the physical server where the virtual...
TRANSCRIPT

Contrail Service Orchestration
Contrail Service Orchestration Installation andUpgrade Guide
Release
4.1.0
Modified: 2019-02-28
Copyright © 2019, Juniper Networks, Inc.

Juniper Networks, Inc.1133 InnovationWaySunnyvale, California 94089USA408-745-2000www.juniper.net
Juniper Networks, the Juniper Networks logo, Juniper, and Junos are registered trademarks of Juniper Networks, Inc. in the United Statesand other countries. All other trademarks, service marks, registeredmarks, or registered service marks are the property of their respectiveowners.
Juniper Networks assumes no responsibility for any inaccuracies in this document. Juniper Networks reserves the right to change, modify,transfer, or otherwise revise this publication without notice.
Contrail Service Orchestration Contrail Service Orchestration Installation and Upgrade Guide4.1.0Copyright © 2019 Juniper Networks, Inc. All rights reserved.
The information in this document is current as of the date on the title page.
YEAR 2000 NOTICE
Juniper Networks hardware and software products are Year 2000 compliant. Junos OS has no known time-related limitations through theyear 2038. However, the NTP application is known to have some difficulty in the year 2036.
ENDUSER LICENSE AGREEMENT
The Juniper Networks product that is the subject of this technical documentation consists of (or is intended for use with) Juniper Networkssoftware. Use of such software is subject to the terms and conditions of the End User License Agreement (“EULA”) posted athttps://support.juniper.net/support/eula/. By downloading, installing or using such software, you agree to the terms and conditions ofthat EULA.
Copyright © 2019, Juniper Networks, Inc.ii

Table of Contents
About the Documentation . . . . . . . . . . . . . . . . . . . . . . . . . . . . . . . . . . . . . . . . . . . . ix
Documentation and Release Notes . . . . . . . . . . . . . . . . . . . . . . . . . . . . . . . . . . ix
Documentation Conventions . . . . . . . . . . . . . . . . . . . . . . . . . . . . . . . . . . . . . . . ix
Documentation Feedback . . . . . . . . . . . . . . . . . . . . . . . . . . . . . . . . . . . . . . . . . xi
Requesting Technical Support . . . . . . . . . . . . . . . . . . . . . . . . . . . . . . . . . . . . . xii
Self-Help Online Tools and Resources . . . . . . . . . . . . . . . . . . . . . . . . . . . xii
Creating a Service Request with JTAC . . . . . . . . . . . . . . . . . . . . . . . . . . . . xiii
Chapter 1 Introduction . . . . . . . . . . . . . . . . . . . . . . . . . . . . . . . . . . . . . . . . . . . . . . . . . . . . . . 15
Contrail Service Orchestration Overview . . . . . . . . . . . . . . . . . . . . . . . . . . . . . . . . . 15
Chapter 2 Hardware and Software Requirements . . . . . . . . . . . . . . . . . . . . . . . . . . . . . . . 17
Hardware and Software Tested for Contrail Service Orchestration . . . . . . . . . . . . 17
Node Servers and Servers Tested in Contrail Service Orchestration . . . . . . . . 17
NetworkDevices andSoftwareTested in theHybridWAN(DistributedCPE)
and SD-WAN Deployments . . . . . . . . . . . . . . . . . . . . . . . . . . . . . . . . . . . . 18
Minimum Requirements for Servers and VMs . . . . . . . . . . . . . . . . . . . . . . . . . . . . 20
Minimum Hardware Requirements for Node Servers and Servers . . . . . . . . . 20
Minimum Requirements for VMs on CSO Node Servers and Servers . . . . . . . 22
Chapter 3 Installing Contrail Service Orchestration with GUI . . . . . . . . . . . . . . . . . . . . . 33
CSO GUI Installer Overview . . . . . . . . . . . . . . . . . . . . . . . . . . . . . . . . . . . . . . . . . . . 33
About the Downloader Component . . . . . . . . . . . . . . . . . . . . . . . . . . . . . . . . . 34
About the Installer Component . . . . . . . . . . . . . . . . . . . . . . . . . . . . . . . . . . . . 35
Installing Contrail Service Orchestration with the GUI Installer . . . . . . . . . . . . . . . 36
Troubleshooting the CSO GUI Installer-Related Errors . . . . . . . . . . . . . . . . . . . . . . 41
Downloader Component . . . . . . . . . . . . . . . . . . . . . . . . . . . . . . . . . . . . . . . . . . 41
Installer Component . . . . . . . . . . . . . . . . . . . . . . . . . . . . . . . . . . . . . . . . . . . . . 42
Chapter 4 Installing Contrail Service Orchestration with CLI . . . . . . . . . . . . . . . . . . . . . 43
Removing a Previous Deployment . . . . . . . . . . . . . . . . . . . . . . . . . . . . . . . . . . . . . 43
Provisioning VMs on Contrail Service Orchestration Nodes or Servers . . . . . . . . . 44
Before You Begin . . . . . . . . . . . . . . . . . . . . . . . . . . . . . . . . . . . . . . . . . . . . . . . . 45
Downloading the Installer . . . . . . . . . . . . . . . . . . . . . . . . . . . . . . . . . . . . . . . . 45
Creating a Bridge Interface for KVM . . . . . . . . . . . . . . . . . . . . . . . . . . . . . . . . . 46
Creating a Data Interface for a Distributed Deployment . . . . . . . . . . . . . . . . . 47
Customizing the Configuration File for the Provisioning Tool . . . . . . . . . . . . . 49
Provisioning VMs with the Provisioning Tool for the KVM Hypervisor . . . . . . . 72
Provisioning VMware ESXi VMs Using the Provisioning Tool . . . . . . . . . . . . . . 73
Manually ProvisioningVRRVMson theContrail ServiceOrchestrationNode
or Server . . . . . . . . . . . . . . . . . . . . . . . . . . . . . . . . . . . . . . . . . . . . . . . . . . . 75
iiiCopyright © 2019, Juniper Networks, Inc.

Verifying Connectivity of the VMs . . . . . . . . . . . . . . . . . . . . . . . . . . . . . . . . . . . 76
Setting Up the Installation Package and Library Access . . . . . . . . . . . . . . . . . . . . 76
Copying the Installer Package to the Installer VM . . . . . . . . . . . . . . . . . . . . . . 76
Creating a Private Repository on an External Server . . . . . . . . . . . . . . . . . . . . 77
Installing and Configuring Contrail Service Orchestration . . . . . . . . . . . . . . . . . . . 78
Before You Begin . . . . . . . . . . . . . . . . . . . . . . . . . . . . . . . . . . . . . . . . . . . . . . . . 78
Creating the Configuration Files . . . . . . . . . . . . . . . . . . . . . . . . . . . . . . . . . . . . 81
Deploying Infrastructure Services . . . . . . . . . . . . . . . . . . . . . . . . . . . . . . . . . . 85
Deploying Microservices . . . . . . . . . . . . . . . . . . . . . . . . . . . . . . . . . . . . . . . . . . 86
Checking the Status of the Microservices . . . . . . . . . . . . . . . . . . . . . . . . . . . . 86
Loading Data . . . . . . . . . . . . . . . . . . . . . . . . . . . . . . . . . . . . . . . . . . . . . . . . . . . 87
Taking Snapshot of the VMs . . . . . . . . . . . . . . . . . . . . . . . . . . . . . . . . . . . . . . 88
Reverting Snapshots . . . . . . . . . . . . . . . . . . . . . . . . . . . . . . . . . . . . . . . . . . . . 95
Performing a Health Check of Infrastructure Components . . . . . . . . . . . . . . 99
Chapter 5 Post Installation Tasks . . . . . . . . . . . . . . . . . . . . . . . . . . . . . . . . . . . . . . . . . . . . 103
Generating and Encrypting Passwords for Infrastructure Components . . . . . . . . 104
Applying NAT Rules if CSO Is Deployed Behind NAT . . . . . . . . . . . . . . . . . . . . . . . 105
Applying Security Patches . . . . . . . . . . . . . . . . . . . . . . . . . . . . . . . . . . . . . . . . . . . 107
Viewing Information About Microservices . . . . . . . . . . . . . . . . . . . . . . . . . . . . . . . 107
. . . . . . . . . . . . . . . . . . . . . . . . . . . . . . . . . . . . . . . . . . . . . . . . . . . . . . . . . . . . . 110
Chapter 6 Upgrading Contrail Service Orchestration . . . . . . . . . . . . . . . . . . . . . . . . . . . . 111
Upgrading Contrail Service Orchestration Overview . . . . . . . . . . . . . . . . . . . . . . . . 111
Limitations . . . . . . . . . . . . . . . . . . . . . . . . . . . . . . . . . . . . . . . . . . . . . . . . . . . . 112
Impact of the CSO Upgrade . . . . . . . . . . . . . . . . . . . . . . . . . . . . . . . . . . . . . . . 112
Upgrading Contrail Service Orchestration . . . . . . . . . . . . . . . . . . . . . . . . . . . . . . . 113
Adding Virtual Route Reflectors (VRRs) After Upgrading . . . . . . . . . . . . . . . . . . . 116
Troubleshooting Upgrade Related Errors . . . . . . . . . . . . . . . . . . . . . . . . . . . . . . . . 118
Salt Synchronization Error . . . . . . . . . . . . . . . . . . . . . . . . . . . . . . . . . . . . . . . . 118
Cache Clearance Error . . . . . . . . . . . . . . . . . . . . . . . . . . . . . . . . . . . . . . . . . . . 119
Kube-system Pod Error . . . . . . . . . . . . . . . . . . . . . . . . . . . . . . . . . . . . . . . . . . 120
Kubernetes Node Error . . . . . . . . . . . . . . . . . . . . . . . . . . . . . . . . . . . . . . . . . . . 121
Copyright © 2019, Juniper Networks, Inc.iv
Contrail Service Orchestration Installation and Upgrade Guide

List of Figures
Chapter 3 Installing Contrail Service Orchestration with GUI . . . . . . . . . . . . . . . . . . . . . 33
Figure 1: Example Express Install Window . . . . . . . . . . . . . . . . . . . . . . . . . . . . . . . 38
Figure 2: Custom Install Virtual IP Address and Hostname . . . . . . . . . . . . . . . . . . 40
vCopyright © 2019, Juniper Networks, Inc.

Copyright © 2019, Juniper Networks, Inc.vi
Contrail Service Orchestration Installation and Upgrade Guide

List of Tables
About the Documentation . . . . . . . . . . . . . . . . . . . . . . . . . . . . . . . . . . . . . . . . . . ix
Table 1: Notice Icons . . . . . . . . . . . . . . . . . . . . . . . . . . . . . . . . . . . . . . . . . . . . . . . . . . x
Table 2: Text and Syntax Conventions . . . . . . . . . . . . . . . . . . . . . . . . . . . . . . . . . . . . x
Chapter 2 Hardware and Software Requirements . . . . . . . . . . . . . . . . . . . . . . . . . . . . . . . 17
Table 3: COTS Node Servers and Servers Tested in the Cloud CPE and SD-WAN
Solutions . . . . . . . . . . . . . . . . . . . . . . . . . . . . . . . . . . . . . . . . . . . . . . . . . . . . . . . 17
Table 4: Software Tested for the COTS Nodes and Servers . . . . . . . . . . . . . . . . . . 18
Table 5: Network Devices Tested for the Distributed Deployment and SD-WAN
Implementation . . . . . . . . . . . . . . . . . . . . . . . . . . . . . . . . . . . . . . . . . . . . . . . . . 18
Table 6: Software Tested in the Distributed Deployment and SD-WAN
Solution . . . . . . . . . . . . . . . . . . . . . . . . . . . . . . . . . . . . . . . . . . . . . . . . . . . . . . . 19
Table 7: Specification for Node Servers and Servers . . . . . . . . . . . . . . . . . . . . . . . 20
Table 8: Server Requirements . . . . . . . . . . . . . . . . . . . . . . . . . . . . . . . . . . . . . . . . . . 21
Table 9: Details of VMs for a Small Deployment . . . . . . . . . . . . . . . . . . . . . . . . . . 22
Table 10: Details of VMs for a Medium Deployment . . . . . . . . . . . . . . . . . . . . . . . . 23
Table 11: Details of VMs for a Large Deployment . . . . . . . . . . . . . . . . . . . . . . . . . . . 25
Table 12: Ports to Open on CSO VMs . . . . . . . . . . . . . . . . . . . . . . . . . . . . . . . . . . . . 29
Chapter 3 Installing Contrail Service Orchestration with GUI . . . . . . . . . . . . . . . . . . . . . 33
Table 13: Resources per Size . . . . . . . . . . . . . . . . . . . . . . . . . . . . . . . . . . . . . . . . . . 35
Chapter 4 Installing Contrail Service Orchestration with CLI . . . . . . . . . . . . . . . . . . . . . 43
Table 14: Location of Configuration Files for Provisioning VMs . . . . . . . . . . . . . . . 49
Chapter 5 Post Installation Tasks . . . . . . . . . . . . . . . . . . . . . . . . . . . . . . . . . . . . . . . . . . . . 103
Table 15: Functions of Microservices . . . . . . . . . . . . . . . . . . . . . . . . . . . . . . . . . . . 107
Chapter 6 Upgrading Contrail Service Orchestration . . . . . . . . . . . . . . . . . . . . . . . . . . . . 111
Table 16: Impact of the CSO Upgrade . . . . . . . . . . . . . . . . . . . . . . . . . . . . . . . . . . . 112
viiCopyright © 2019, Juniper Networks, Inc.

Copyright © 2019, Juniper Networks, Inc.viii
Contrail Service Orchestration Installation and Upgrade Guide

About the Documentation
• Documentation and Release Notes on page ix
• Documentation Conventions on page ix
• Documentation Feedback on page xi
• Requesting Technical Support on page xii
Documentation and Release Notes
To obtain the most current version of all Juniper Networks®technical documentation,
see the product documentation page on the Juniper Networks website at
https://www.juniper.net/documentation/.
If the information in the latest release notes differs from the information in the
documentation, follow the product Release Notes.
Juniper Networks Books publishes books by Juniper Networks engineers and subject
matter experts. These books go beyond the technical documentation to explore the
nuances of network architecture, deployment, and administration. The current list can
be viewed at https://www.juniper.net/books.
Documentation Conventions
Table 1 on page x defines notice icons used in this guide.
ixCopyright © 2019, Juniper Networks, Inc.

Table 1: Notice Icons
DescriptionMeaningIcon
Indicates important features or instructions.Informational note
Indicates a situation that might result in loss of data or hardware damage.Caution
Alerts you to the risk of personal injury or death.Warning
Alerts you to the risk of personal injury from a laser.Laser warning
Indicates helpful information.Tip
Alerts you to a recommended use or implementation.Best practice
Table 2 on page x defines the text and syntax conventions used in this guide.
Table 2: Text and Syntax Conventions
ExamplesDescriptionConvention
To enter configuration mode, type theconfigure command:
user@host> configure
Represents text that you type.Bold text like this
user@host> show chassis alarms
No alarms currently active
Represents output that appears on theterminal screen.
Fixed-width text like this
• A policy term is a named structurethat defines match conditions andactions.
• Junos OS CLI User Guide
• RFC 1997,BGPCommunities Attribute
• Introduces or emphasizes importantnew terms.
• Identifies guide names.
• Identifies RFC and Internet draft titles.
Italic text like this
Configure themachine’s domain name:
[edit]root@# set system domain-namedomain-name
Represents variables (options for whichyou substitute a value) in commands orconfiguration statements.
Italic text like this
Copyright © 2019, Juniper Networks, Inc.x
Contrail Service Orchestration Installation and Upgrade Guide

Table 2: Text and Syntax Conventions (continued)
ExamplesDescriptionConvention
• To configure a stub area, include thestub statement at the [edit protocolsospf area area-id] hierarchy level.
• Theconsoleport is labeledCONSOLE.
Represents names of configurationstatements, commands, files, anddirectories; configurationhierarchy levels;or labels on routing platformcomponents.
Text like this
stub <default-metricmetric>;Encloses optional keywords or variables.< > (angle brackets)
broadcast | multicast
(string1 | string2 | string3)
Indicates a choice between themutuallyexclusive keywords or variables on eitherside of the symbol. The set of choices isoften enclosed in parentheses for clarity.
| (pipe symbol)
rsvp { # Required for dynamicMPLS onlyIndicates a comment specified on thesame lineas theconfiguration statementto which it applies.
# (pound sign)
community namemembers [community-ids ]
Encloses a variable for which you cansubstitute one or more values.
[ ] (square brackets)
[edit]routing-options {static {route default {nexthop address;retain;
}}
}
Identifies a level in the configurationhierarchy.
Indention and braces ( { } )
Identifies a leaf statement at aconfiguration hierarchy level.
; (semicolon)
GUI Conventions
• In the Logical Interfaces box, selectAll Interfaces.
• To cancel the configuration, clickCancel.
Representsgraphicaluser interface(GUI)items you click or select.
Bold text like this
In the configuration editor hierarchy,select Protocols>Ospf.
Separates levels in a hierarchy of menuselections.
> (bold right angle bracket)
Documentation Feedback
We encourage you to provide feedback so that we can improve our documentation. You
can use either of the following methods:
• Online feedback system—Click TechLibrary Feedback, on the lower right of any page
on the Juniper Networks TechLibrary site, and do one of the following:
xiCopyright © 2019, Juniper Networks, Inc.
About the Documentation
• Click the thumbs-up icon if the information on the page was helpful to you.
• Click the thumbs-down icon if the information on the page was not helpful to you
or if you have suggestions for improvement, and use the pop-up form to provide
feedback.
• E-mail—Sendyourcommentsto [email protected]. Includethedocument
or topic name, URL or page number, and software version (if applicable).
Requesting Technical Support
Technical product support is available through the JuniperNetworksTechnicalAssistance
Center (JTAC). If you are a customer with an active J-Care or Partner Support Service
support contract, or are covered under warranty, and need post-sales technical support,
you can access our tools and resources online or open a case with JTAC.
• JTAC policies—For a complete understanding of our JTAC procedures and policies,
review the JTAC User Guide located at
https://www.juniper.net/us/en/local/pdf/resource-guides/7100059-en.pdf.
• Product warranties—For product warranty information, visit
https://www.juniper.net/support/warranty/.
• JTAC hours of operation—The JTAC centers have resources available 24 hours a day,
7 days a week, 365 days a year.
Self-Help Online Tools and Resources
For quick and easy problem resolution, Juniper Networks has designed an online
self-service portal called the Customer Support Center (CSC) that provides youwith the
following features:
• Find CSC offerings: https://www.juniper.net/customers/support/
• Search for known bugs: https://prsearch.juniper.net/
• Find product documentation: https://www.juniper.net/documentation/
• Find solutions and answer questions using our Knowledge Base: https://kb.juniper.net/
• Download the latest versions of software and review release notes:
https://www.juniper.net/customers/csc/software/
• Search technical bulletins for relevant hardware and software notifications:
https://kb.juniper.net/InfoCenter/
Copyright © 2019, Juniper Networks, Inc.xii
Contrail Service Orchestration Installation and Upgrade Guide
• Join and participate in the Juniper Networks Community Forum:
https://www.juniper.net/company/communities/
• Create a service request online: https://myjuniper.juniper.net
Toverify serviceentitlementbyproduct serial number, useourSerialNumberEntitlement
(SNE) Tool: https://entitlementsearch.juniper.net/entitlementsearch/
Creating a Service Request with JTAC
You can create a service request with JTAC on theWeb or by telephone.
• Visit https://myjuniper.juniper.net.
• Call 1-888-314-JTAC (1-888-314-5822 toll-free in the USA, Canada, and Mexico).
For international or direct-dial options in countries without toll-free numbers, see
https://support.juniper.net/support/requesting-support/.
xiiiCopyright © 2019, Juniper Networks, Inc.
About the Documentation

Copyright © 2019, Juniper Networks, Inc.xiv
Contrail Service Orchestration Installation and Upgrade Guide

CHAPTER 1
Introduction
• Contrail Service Orchestration Overview on page 15
Contrail Service Orchestration Overview
Contrail Service Orchestration (CSO) is a software platform that designs, secures,
automates and runs the entire service life cycle across NFX Series Network Services
Platforms, MX Series Routers, and SRX Series Services Gateways, along with the vSRX
Virtual Firewall available in public cloudmarketplaces.
Thesolutionsupportsboth JuniperNetworksand third-party virtualizednetwork functions
(VNFs). CSO provides a RESTful APIs to connect with service providers’ operational
support systems(OSS)andbusinesssupport systems(BSS)applications. It is responsible
for manymanagement and orchestration (MANO) activities in the deployment.
CSO features:
The following CSO components connect to Network Service Orchestrator through its
RESTful API:
• AdministrationPortal:GUI tomanage resources, customers, andavailability ofnetwork
services. It uses the RESTful APIs of other Contrail Service Orchestration components.
• Customer Portal: GUI to manage sites, customer premises equipment (CPE) devices,
and network services for organizations.
The portals offer role-based access control (RBAC) for administrators and operators.
This guide provides information about installing and upgrading the Contrail Service
Orchestration (CSO) Release 4.1.0 components.
CSO solution software:
• Contrail Service Orchestrator (CSO): Includes both the Network Service Orchestrator
(NSO) and Network Service Controller (NSC) to deploy, manage, andmonitor CPE
devices, and provide topology and CPE lifecycle management functionality.
• CSO Network Service Controller: Includes only the controller layer of CSO to provide
topology and CPE lifecycle management functionality, as well as site-to-site routing
and reachability, but without the user interface layer. Typically used when integrating
with another management system.
15Copyright © 2019, Juniper Networks, Inc.

CSO Release 4.0.0 and later, you can install CSO by using the new installation GUI as
well as through the CLI.
NOTE: The GUI Installation option is available by default for a freshinstallation from CSO Release 4.1.0. You can, however, use the CLI, if youprefer.
CAUTION: Currently, the upgrade process is not supported through the GUI.
Deployment types:
CSO 4.1 supports the following types of deployments:
• Small Deployment—Manages approximately 500 devices. You cannot configure high
availability with small deployments.
• Medium Deployment—Manages approximately 3500 devices. High availability is
supported onmedium deployments.
• LargeDeployment—Manages approximately 6000devices. High availability is support
on large deployments.
For detailed informationonconfiguringContrail ServiceOrchestration, seeContrailService
Orchestration Deployment Guide.
RelatedDocumentation
• Contrail Service Orchestration (CSO) Deployment Guide
Copyright © 2019, Juniper Networks, Inc.16
Contrail Service Orchestration Installation and Upgrade Guide

CHAPTER 2
Hardware and Software Requirements
• Hardware and Software Tested for Contrail Service Orchestration on page 17
• Minimum Requirements for Servers and VMs on page 20
Hardware and Software Tested for Contrail Service Orchestration
Contrail Service Orchestration requires commercial off-the-shelf (COTS) node servers
or servers, specific networkdevices, andspecific software versions. The following sections
list the hardware and software that are required and have been tested for the Cloud CPE
and SD-WAN solutions.
• Node Servers and Servers Tested in Contrail Service Orchestration on page 17
• Network Devices and Software Tested in the HybridWAN (Distributed CPE) and
SD-WAN Deployments on page 18
Node Servers and Servers Tested in Contrail Service Orchestration
Use COTS node servers or servers for the following functions:
• Contrail Service Orchestration (CSO) central and regional servers.
• Contrail Analytics servers.
• Contrail controller and compute nodes in the centralized deployment.
Table 3 on page 17 lists the node servers and servers that have been tested for these
functions.
Table 3: COTS Node Servers and Servers Tested in the Cloud CPE and SD-WAN Solutions
TypeModelVendorOption
Multinode server accepting 4 nodesT41S-2U 4-Node serverQuantaPlex1
Multinode server accepting 4 nodesSuperServer ModelSYS-2028TPHC1TR-OTO-4
Supermicro2
1U rack-mounted serverPowerEdge R420 rack serverDell3
17Copyright © 2019, Juniper Networks, Inc.

Table 4 on page 18 shows the software that has been tested for COTS servers used in
the Cloud CPE solution. Youmust use these specific versions of the software when you
implement the Cloud CPE and SD-WAN solutions.
Table 4: Software Tested for the COTS Nodes and Servers
VersionDescription
Ubuntu 14.04.5 LTS
NOTE: Ensure that you perform a fresh install of Ubuntu 14.04.5 LTS on theCSO servers in your deployment because upgrading from a previous versionto Ubuntu 14.04.5 LTSmight cause issues with the installation.
Operating system for all COTS nodes andservers
• Ubuntu 14.04.5 LTS for VMs that you configure manually and not with theprovisioning tool.
• The provisioning tool installs Ubuntu 14.04.5 LTS in all VMs.
Operating system for VMs on CSO servers
KVM provided by the Ubuntu operating system on the server or VMware ESXiVersion 5.5.0 onwards
NOTE: Amix of different hypervisors across machines is not supported.
Hypervisor on CSO servers
Secure File Transfer Protocol (SFTP)Additional software for CSO servers
Contrail Cloud Platform Release 3.2.5 with Heat v2 APIsSoftware defined networking (SDN) for acentralized deployment
Contrail Release 4.1.2.0-171Contrail Analytics
Network Devices and Software Tested in the HybridWAN (Distributed CPE) and SD-WANDeployments
Table 5 on page 18 shows the network devices that have been tested for the distributed
deployment and the SD-WAN implementation.
Table 5: Network Devices Tested for the Distributed Deployment and SD-WAN Implementation
ModelDeviceFunction
• MX960,MX480,orMX240routerwitha Multiservices MPC line card
• MX80 or MX104 router withMultiservices MIC line card
• Other MX Series routers with aMultiservicesMPCorMultiservicesMICline card
SeeMPCs Supported by MX SeriesRoutersandMICsSupportedbyMXSeries Routers for information aboutMX Series routers that supportMultiservicesMPC andMIC line cards.
JuniperNetworksMXSeries3DUniversalEdge Router
PE routerand IPsecconcentrator (HybridWAN distributed deployment only)
Copyright © 2019, Juniper Networks, Inc.18
Contrail Service Orchestration Installation and Upgrade Guide

Table 5: Network Devices Tested for the Distributed Deployment and SD-WAN Implementation (continued)
ModelDeviceFunction
• MX104, MX240, MX480, or MX960router with an Multiservices MIC linecard.
SeeMPCs Supported by MX SeriesRoutersandMICsSupportedbyMXSeries Routers for information aboutMX Series routers that supportMultiservicesMPC andMIC line cards.
• SRX1500 Services Gateway
• SRX4100 Services Gateway
• SRX4200 Services Gateway
• vSRX
JuniperNetworksMXSeries3DUniversalEdge Router
Juniper Networks SRX Series ServicesGateway
vSRX on an x86 server
Cloud hub device (SD-WANimplementation only)
• NFX250-LS1 device
• NFX250-S1 device
• NFX250-S2 device
• NFX150-S1
• NFX150-S1E
• NFX150-C-S1
• NFX150-C-S1-AE/AA
• NFX150-C-S1E-AE/AA
• SRX300 Services Gateway
• SRX320 Services Gateway
• SRX340 Services Gateway
• SRX345 Services Gateway
• vSRX
NFX Series Network Services Platforms
SRX Series Services Gateways
vSRX on an x86 server
CPE device (HybridWAN deployment)or spoke device (SD-WANimplementation)
Table 6 on page 19 shows the software tested for the distributed deployment. Youmust
use thesespecific versionsof thesoftwarewhenyou implementadistributeddeployment
and SD-WAN solution.
Table 6: Software Tested in the Distributed Deployment and SD-WAN Solution
Software and VersionFunction
KVM provided by the Ubuntu operating system on theserver or VMware ESXi Version 5.5.0
Hypervisor on CSO servers
OpenStack MitakaAuthentication and Authorization
CSO Release 4.1.0Network Functions Virtualization (NFV)
Contrail Release 4.1.2.0-171Contrail Analytics
Junos OS Release 15.1X53-D496NFX Software
19Copyright © 2019, Juniper Networks, Inc.
Chapter 2: Hardware and Software Requirements

Table 6: Software Tested in the Distributed Deployment and SD-WAN Solution (continued)
Software and VersionFunction
vSRX KVM Appliance 15.1X49-D170Routing and Security for NFX250 device
vSRX KVM Appliance 15.1X49-D170Operating system for vSRX used as a CPE device on an x86 server
Junos OS Release 15.1X49-D170Operating system for SRX Series Services Gateway used as a CPEdevice or spoke device
Junos OS Release 16.1R3.00Operating system for MX Series router used as PE router
Junos OS Release 16.1R5.7Operating system for MX Series router used as a hub device for anSD-WAN implementation
Junos OS Release 15.1X49-D170Operating system for SRX Series Services Gateway used as a hubdevice for an SD-WAN implementation
RelatedDocumentation
Minimum Requirements for Servers and VMs on page 20•
MinimumRequirements for Servers and VMs
• MinimumHardware Requirements for Node Servers and Servers on page 20
• Minimum Requirements for VMs on CSO Node Servers and Servers on page 22
MinimumHardware Requirements for Node Servers and Servers
For information about the makes andmodels of node servers and servers that you can
use in the Cloud CPE solution, see Table 4 on page 18. When you obtain node servers
and servers for the Cloud CPE and SD-WAN solution, we recommend that you:
• Select hardware that wasmanufactured within the last year.
• Ensure that you have active support contracts for servers so that you can upgrade to
the latest firmware and BIOS versions.
Table 7 on page 20 shows the specification for the node servers and servers for theCloud
CPE or SD-WAN solution.
Table 7: Specification for Node Servers and Servers
RequirementItem
Greater than the summation of VMs which are deployed on the node. Storage drive can be one ofthe following types:
• Serial Advanced Technology Attachment (SATA)
• Serial Attached SCSI (SAS)
• Solid-state drive (SSD)
NOTE: Solid-state drive (SSD) is preferred storage for better performance.
Storage
Copyright © 2019, Juniper Networks, Inc.20
Contrail Service Orchestration Installation and Upgrade Guide

Table 7: Specification for Node Servers and Servers (continued)
RequirementItem
One64-bit dual processor, type IntelSandybridge, suchas [email protected]
CPU
One 1-Gigabit Ethernet or 10-Gigabit Ethernet interfaceNetwork interface
The number of node servers and servers that you require depends on whether you are
installing a small, medium, or large deployment.
Table 8 on page 21 shows the required hardware specifications for node servers and
servers in the supported deployments. The server specifications are slightly higher than
the sum of the virtual machine (VM) specifications listed in “MinimumRequirements for
VMs on CSONode Servers and Servers” on page 22, because some additional resources
are required for the system software.
Table 8: Server Requirements
Large DeploymentMedium DeploymentSmall DeploymentFunction
Contrail Service Orchestration (CSO) Servers
NOTE: If you install a small deployment with virtualized network functions (VNFs) that require Junos Space as the ElementManagement System (EMS), youmust install Junos Space on a VM on another server. This server specification for a smalldeployment does not include Junos Space. For information about Junos Space VM requirements, see Table 9 on page 22.
7
• 4 central servers
• 3 regional servers
31Number of nodes or servers
484848vCPUs per node or server
256 GB256 GB256 GBRAM per node or server
Contrail Cloud Platform for a Centralized Deployment
NOTE: These servers are not needed for HybridWAN or SD-WAN solutions
4–28
• 3 nodes for Contrailcontroller and analytics
• 1–25Contrail computenodes
4–8
• 3 nodes for Contrailcontroller and analytics
• 1–4 Contrail computenodes
1Number of nodes or servers
48484vCPUs per node or server
256 GB256 GB16 GBRAM per node or server
Total Numbers of Servers
21Copyright © 2019, Juniper Networks, Inc.
Chapter 2: Hardware and Software Requirements

Table 8: Server Requirements (continued)
Large DeploymentMedium DeploymentSmall DeploymentFunction
10–347–112Centralized deployment
731HybridWAN or SD-WAN
MinimumRequirements for VMs on CSONode Servers and Servers
The number of VMs needed andminimum requirements for CSO VMs depend on the
deployment environment and whether or not you use high availability (HA):
• For a small deployment, see Table 9 on page 22.
• For a medium deployment, see Table 10 on page 23.
• For a large deployment, see Table 11 on page 25.
For information about the ports that must be open on VMs for all deployments, see
Table 12 on page 29.
Use small deployments for managing approximately 500 sites. You cannot configure
high availability with small deployments.
Table 9 on page 22 shows details about the VMs for a small deployment.
Table 9: Details of VMs for a Small Deployment
Resources RequiredComponents That Installer Places inVMName of VM
• 4 vCPUs
• 8 GB RAM
• 550 GB hard disk storage
—csp-installer-vm
• 8 CPU
• 48 GB RAM
• 500 GB hard disk storage
Third-party applications used asinfrastructure services
csp-central-infravm
• 8 CPU
• 48 GB RAM
• 250 GB hard disk storage
All microservices, including GUIapplications
csp-central-msvm
• 16 vCPUs
• 48 GB RAM
• 300 GB hard disk storage
Contrail Analytics for a distributeddeployment
For a centralized or combineddeployment, you use Contrail Analyticsin the Contrail Cloud Platform
csp-contrailanalytics-1
• 2 vCPUs
• 4 GB RAM
• 50 GB hard disk storage
Load balancer for device to FaultManagementPerformanceManagement(FMPM)microservice connectivity
csp-regional-sblb
Copyright © 2019, Juniper Networks, Inc.22
Contrail Service Orchestration Installation and Upgrade Guide
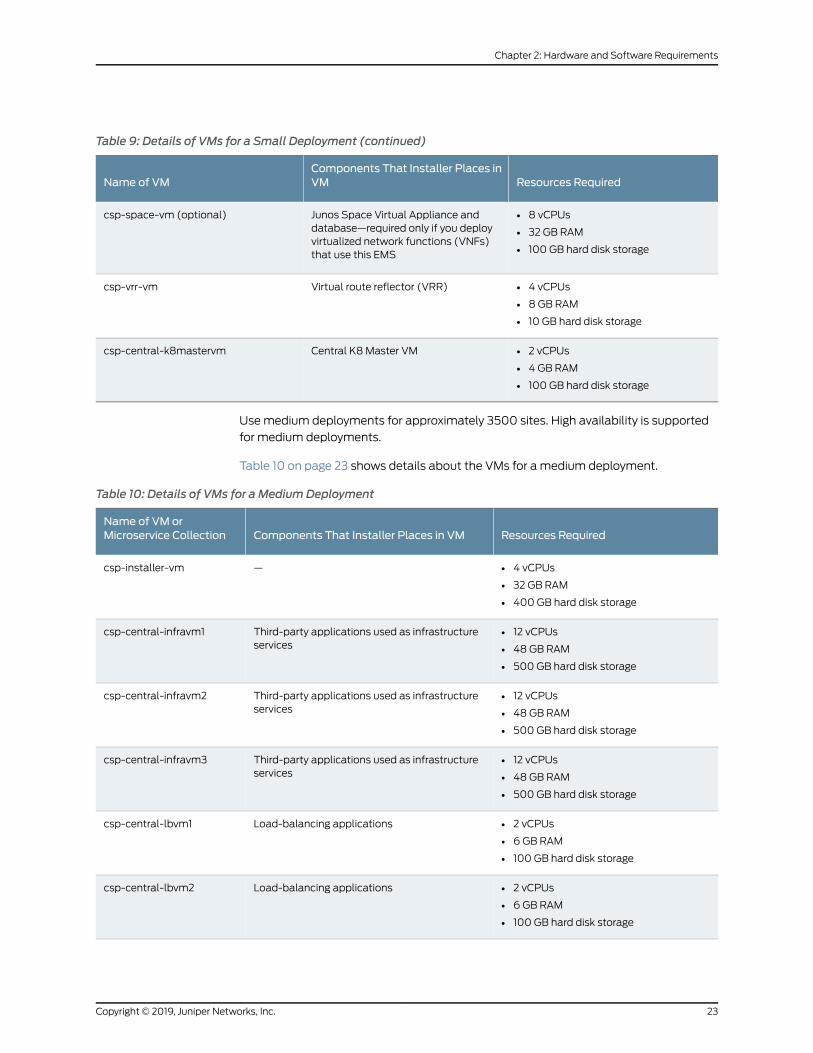
Table 9: Details of VMs for a Small Deployment (continued)
Resources RequiredComponents That Installer Places inVMName of VM
• 8 vCPUs
• 32 GB RAM
• 100 GB hard disk storage
Junos Space Virtual Appliance anddatabase—required only if you deployvirtualized network functions (VNFs)that use this EMS
csp-space-vm (optional)
• 4 vCPUs
• 8 GB RAM
• 10 GB hard disk storage
Virtual route reflector (VRR)csp-vrr-vm
• 2 vCPUs
• 4 GB RAM
• 100 GB hard disk storage
Central K8 Master VMcsp-central-k8mastervm
Usemedium deployments for approximately 3500 sites. High availability is supported
for medium deployments.
Table 10 on page 23 shows details about the VMs for a medium deployment.
Table 10: Details of VMs for a MediumDeployment
Resources RequiredComponents That Installer Places in VMName of VM orMicroservice Collection
• 4 vCPUs
• 32 GB RAM
• 400 GB hard disk storage
—csp-installer-vm
• 12 vCPUs
• 48 GB RAM
• 500 GB hard disk storage
Third-party applications used as infrastructureservices
csp-central-infravm1
• 12 vCPUs
• 48 GB RAM
• 500 GB hard disk storage
Third-party applications used as infrastructureservices
csp-central-infravm2
• 12 vCPUs
• 48 GB RAM
• 500 GB hard disk storage
Third-party applications used as infrastructureservices
csp-central-infravm3
• 2 vCPUs
• 6 GB RAM
• 100 GB hard disk storage
Load-balancing applicationscsp-central-lbvm1
• 2 vCPUs
• 6 GB RAM
• 100 GB hard disk storage
Load-balancing applicationscsp-central-lbvm2
23Copyright © 2019, Juniper Networks, Inc.
Chapter 2: Hardware and Software Requirements
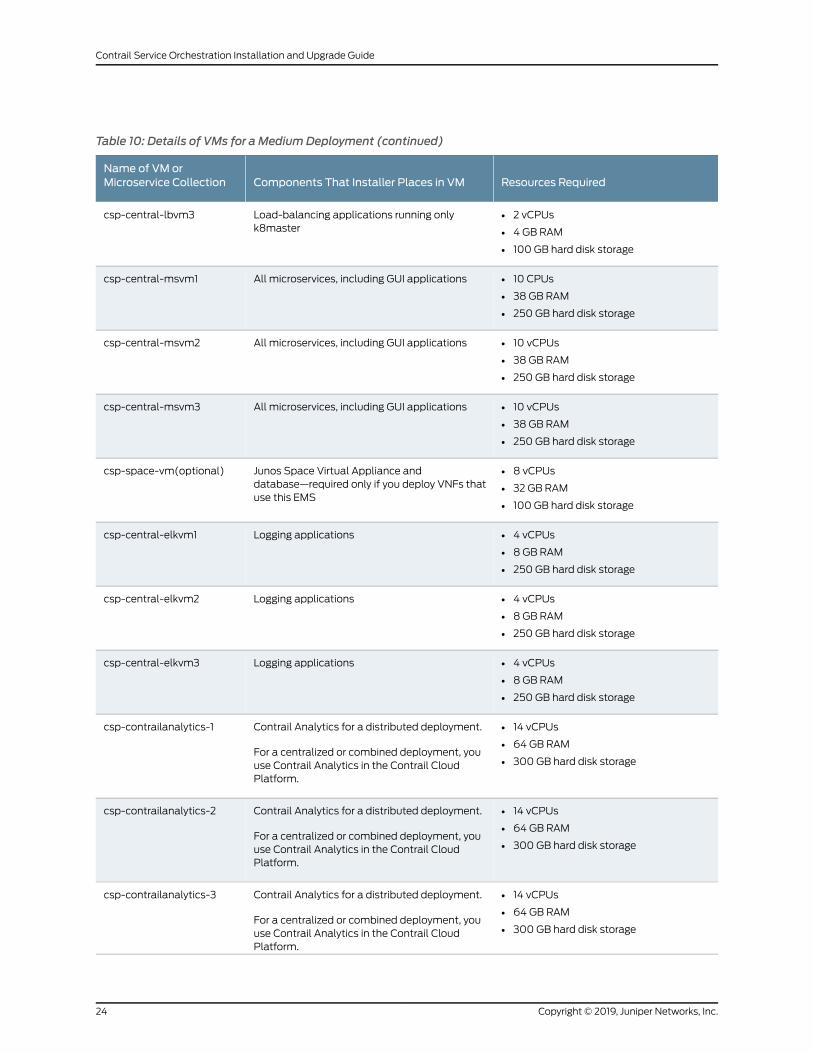
Table 10: Details of VMs for a MediumDeployment (continued)
Resources RequiredComponents That Installer Places in VMName of VM orMicroservice Collection
• 2 vCPUs
• 4 GB RAM
• 100 GB hard disk storage
Load-balancing applications running onlyk8master
csp-central-lbvm3
• 10 CPUs
• 38 GB RAM
• 250 GB hard disk storage
All microservices, including GUI applicationscsp-central-msvm1
• 10 vCPUs
• 38 GB RAM
• 250 GB hard disk storage
All microservices, including GUI applicationscsp-central-msvm2
• 10 vCPUs
• 38 GB RAM
• 250 GB hard disk storage
All microservices, including GUI applicationscsp-central-msvm3
• 8 vCPUs
• 32 GB RAM
• 100 GB hard disk storage
Junos Space Virtual Appliance anddatabase—required only if you deploy VNFs thatuse this EMS
csp-space-vm(optional)
• 4 vCPUs
• 8 GB RAM
• 250 GB hard disk storage
Logging applicationscsp-central-elkvm1
• 4 vCPUs
• 8 GB RAM
• 250 GB hard disk storage
Logging applicationscsp-central-elkvm2
• 4 vCPUs
• 8 GB RAM
• 250 GB hard disk storage
Logging applicationscsp-central-elkvm3
• 14 vCPUs
• 64 GB RAM
• 300 GB hard disk storage
Contrail Analytics for a distributed deployment.
For a centralized or combined deployment, youuse Contrail Analytics in the Contrail CloudPlatform.
csp-contrailanalytics-1
• 14 vCPUs
• 64 GB RAM
• 300 GB hard disk storage
Contrail Analytics for a distributed deployment.
For a centralized or combined deployment, youuse Contrail Analytics in the Contrail CloudPlatform.
csp-contrailanalytics-2
• 14 vCPUs
• 64 GB RAM
• 300 GB hard disk storage
Contrail Analytics for a distributed deployment.
For a centralized or combined deployment, youuse Contrail Analytics in the Contrail CloudPlatform.
csp-contrailanalytics-3
Copyright © 2019, Juniper Networks, Inc.24
Contrail Service Orchestration Installation and Upgrade Guide

Table 10: Details of VMs for a MediumDeployment (continued)
Resources RequiredComponents That Installer Places in VMName of VM orMicroservice Collection
• 2 vCPUs
• 4 GB RAM
• 100 GB hard disk storage
Load balancer for device to FMPMmicroserviceconnectivity
csp-regional-sblb1
• 2 vCPUs
• 4 GB RAM
• 100 GB hard disk storage
Load balancer for device to FMPMmicroserviceconnectivity
csp-regional-sblb2
• 4 vCPUs
• 16 GB RAM
• 10 GB hard disk storage
Virtual route reflector (VRR)csp-vrr-vm1
• 4 vCPUs
• 16 GB RAM
• 10 GB hard disk storage
Virtual route reflector (VRR)csp-vrr-vm2
Use large deployments for managing approximately 6000 sites. High availability is
supported for large deployments.
Table 11 on page 25 shows details about the VMs for a large deployment.
Table 11: Details of VMs for a Large Deployment
Resources RequiredComponents That Installer Places in VMName of VM orMicroservice Collection
• 8 vCPUs
• 32 GB RAM
• 400 GB hard disk storage
—csp-installer-vm
• 12 vCPUs
• 48 GB RAM
• 500 GB hard disk storage
Third-partyapplicationsusedas infrastructureservices
csp-central-infravm1
• 12 vCPUs
• 48 GB RAM
• 500 GB hard disk storage
Third-partyapplicationsusedas infrastructureservices
csp-central-infravm2
• 12 vCPUs
• 48 GB RAM
• 500 GB hard disk storage
Third-partyapplicationsusedas infrastructureservices
csp-central-infravm3
• 2 vCPUs
• 6 GB RAM
• 100 GB hard disk storage
Load-balancing applicationscsp-central-lbvm1
25Copyright © 2019, Juniper Networks, Inc.
Chapter 2: Hardware and Software Requirements
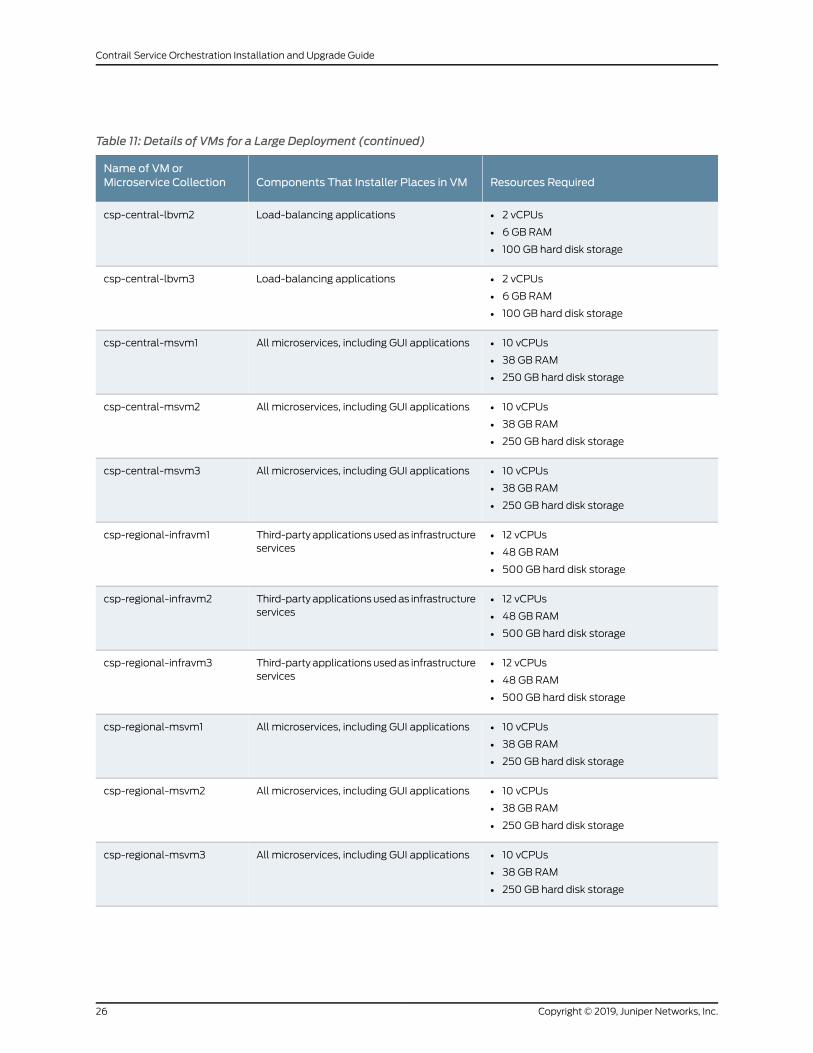
Table 11: Details of VMs for a Large Deployment (continued)
Resources RequiredComponents That Installer Places in VMName of VM orMicroservice Collection
• 2 vCPUs
• 6 GB RAM
• 100 GB hard disk storage
Load-balancing applicationscsp-central-lbvm2
• 2 vCPUs
• 6 GB RAM
• 100 GB hard disk storage
Load-balancing applicationscsp-central-lbvm3
• 10 vCPUs
• 38 GB RAM
• 250 GB hard disk storage
All microservices, including GUI applicationscsp-central-msvm1
• 10 vCPUs
• 38 GB RAM
• 250 GB hard disk storage
All microservices, including GUI applicationscsp-central-msvm2
• 10 vCPUs
• 38 GB RAM
• 250 GB hard disk storage
All microservices, including GUI applicationscsp-central-msvm3
• 12 vCPUs
• 48 GB RAM
• 500 GB hard disk storage
Third-partyapplicationsusedas infrastructureservices
csp-regional-infravm1
• 12 vCPUs
• 48 GB RAM
• 500 GB hard disk storage
Third-partyapplicationsusedas infrastructureservices
csp-regional-infravm2
• 12 vCPUs
• 48 GB RAM
• 500 GB hard disk storage
Third-partyapplicationsusedas infrastructureservices
csp-regional-infravm3
• 10 vCPUs
• 38 GB RAM
• 250 GB hard disk storage
All microservices, including GUI applicationscsp-regional-msvm1
• 10 vCPUs
• 38 GB RAM
• 250 GB hard disk storage
All microservices, including GUI applicationscsp-regional-msvm2
• 10 vCPUs
• 38 GB RAM
• 250 GB hard disk storage
All microservices, including GUI applicationscsp-regional-msvm3
Copyright © 2019, Juniper Networks, Inc.26
Contrail Service Orchestration Installation and Upgrade Guide

Table 11: Details of VMs for a Large Deployment (continued)
Resources RequiredComponents That Installer Places in VMName of VM orMicroservice Collection
• 2 vCPUs
• 6 GB RAM
• 100 GB hard disk storage
Load-balancing applicationscsp-regional-lbvm1
• 2 vCPUs
• 6 GB RAM
• 100 GB hard disk storage
Load-balancing applicationscsp-regional-lbvm2
• 2 vCPUs
• 6 GB RAM
• 100 GB hard disk storage
Load-balancing applicationscsp-regional-lbvm3
• 4 vCPUs
• 32 GB RAM
• 300 GB hard disk storage
Junos Space Virtual Appliance anddatabase—required only if you deploy VNFsthat use this EMS
csp-space-vm (optional)
• 4 vCPUs
• 16 GB RAM
• 400 GB hard disk storage
Logging applicationscsp-central-elkvm1
• 4 vCPUs
• 16 GB RAM
• 400 GB hard disk storage
Logging applicationscsp-central-elkvm2
• 4 vCPUs
• 16 GB RAM
• 400 GB hard disk storage
Logging applicationscsp-central-elkvm3
• 2 vCPUs
• 8 GB RAM
• 400 GB hard disk storage
Logging applicationscsp-regional-elkvm1
• 4 vCPUs
• 16 GB RAM
• 400 GB hard disk storage
Logging applicationscsp-regional-elkvm2
• 4 vCPUs
• 16 GB RAM
• 400 GB hard disk storage
Logging applicationscsp-regional-elkvm3
• 2 vCPUs
• 8 GB RAM
• 100 GB hard disk storage
Load balancer for device to FMPMmicroservice connectivity
csp-regional-sblb1
27Copyright © 2019, Juniper Networks, Inc.
Chapter 2: Hardware and Software Requirements

Table 11: Details of VMs for a Large Deployment (continued)
Resources RequiredComponents That Installer Places in VMName of VM orMicroservice Collection
• 2 vCPUs
• 8 GB RAM
• 100 GB hard disk storage
Load balancer for device to FMPMmicroservice connectivity
csp-regional-sblb2
• 4 vCPUs
• 16 GB RAM
• 300 GB hard disk storage
Virtual route reflector (VRR)csp-vrr-vm1
• 4 vCPUs
• 16 GB RAM
• 300 GB hard disk storage
Virtual route reflector (VRR)csp-vrr-vm2
• 4 vCPUs
• 16 GB RAM
• 300 GB hard disk storage
Virtual route reflector (VRR)csp-vrr-vm3
• 4 vCPUs
• 16 GB RAM
• 300 GB hard disk storage
Virtual route reflector (VRR)csp-vrr-vm4
• 4 vCPUs
• 16 GB RAM
• 300 GB hard disk storage
Virtual route reflector (VRR)csp-vrr-vm5
• 4 vCPUs
• 16 GB RAM
• 300 GB hard disk storage
Virtual route reflector (VRR)csp-vrr-vm6
• 24 vCPUs
• 64 GB RAM
• 700 GB hard disk storage
Contrail Analytics foradistributeddeployment
For a centralized or combined deployment,youuseContrail Analytics in theContrail CloudPlatform
csp-contrailanalytics-1
• 24 vCPUs
• 64 GB RAM
• 700 GB hard disk storage
Contrail Analytics foradistributeddeployment
For a centralized or combined deployment,youuseContrail Analytics in theContrail CloudPlatform
csp-contrailanalytics-2
• 24 vCPUs
• 64 GB RAM
• 700 GB hard disk storage
Contrail Analytics foradistributeddeployment
For a centralized or combined deployment,youuseContrail Analytics in theContrail CloudPlatform
csp-contrailanalytics-3
Table 12 on page 29 shows the ports that must be open on all CSO VMs to enable the
following types of CSO communications:
Copyright © 2019, Juniper Networks, Inc.28
Contrail Service Orchestration Installation and Upgrade Guide
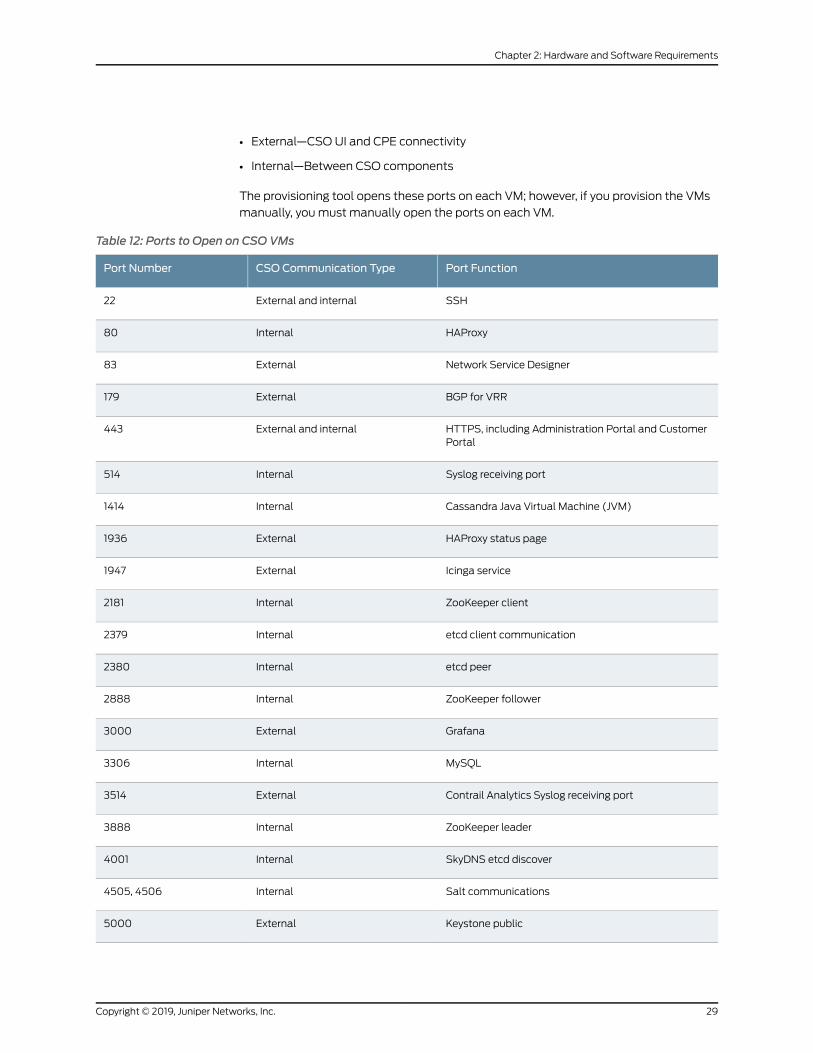
• External—CSO UI and CPE connectivity
• Internal—Between CSO components
The provisioning tool opens these ports on each VM; however, if you provision the VMs
manually, you must manually open the ports on each VM.
Table 12: Ports to Open on CSO VMs
Port FunctionCSO Communication TypePort Number
SSHExternal and internal22
HAProxyInternal80
Network Service DesignerExternal83
BGP for VRRExternal179
HTTPS, including Administration Portal and CustomerPortal
External and internal443
Syslog receiving portInternal514
Cassandra Java Virtual Machine (JVM)Internal1414
HAProxy status pageExternal1936
Icinga serviceExternal1947
ZooKeeper clientInternal2181
etcd client communicationInternal2379
etcd peerInternal2380
ZooKeeper followerInternal2888
GrafanaExternal3000
MySQLInternal3306
Contrail Analytics Syslog receiving portExternal3514
ZooKeeper leaderInternal3888
SkyDNS etcd discoverInternal4001
Salt communicationsInternal4505, 4506
Keystone publicExternal5000
29Copyright © 2019, Juniper Networks, Inc.
Chapter 2: Hardware and Software Requirements

Table 12: Ports to Open on CSO VMs (continued)
Port FunctionCSO Communication TypePort Number
BeatsInternal5044
Logstash UDPInternal5543
Kibana UIExternal5601
Icinga APIInternal5665
icinga nrpeInternal5666
RabbitMQ SSL listenerInternal5671
RabbitMQ clientInternal5672
Swift Object ServerInternal6000
Swift Container ServerInternal6001
Swift Account ServerInternal6002
RedisInternal6379
Virtualized Network Function manager (VNFM)Internal6543
Device connectivityExternal7804
Network Service OrchestratorInternal8006
Notification engineInternal8016
cAdvisorInternal8080
Device Management Service (DMS) centralInternal8082
Activation Service (AS) centralInternal8083
DMS SchemaInternal8085
Contrail AnalyticsInternal8086
Generic containerInternal8090, 8091
ArangoDBInternal8529
Cassandra native transportInternal9042
Swift Proxy ServerInternal9090
Copyright © 2019, Juniper Networks, Inc.30
Contrail Service Orchestration Installation and Upgrade Guide
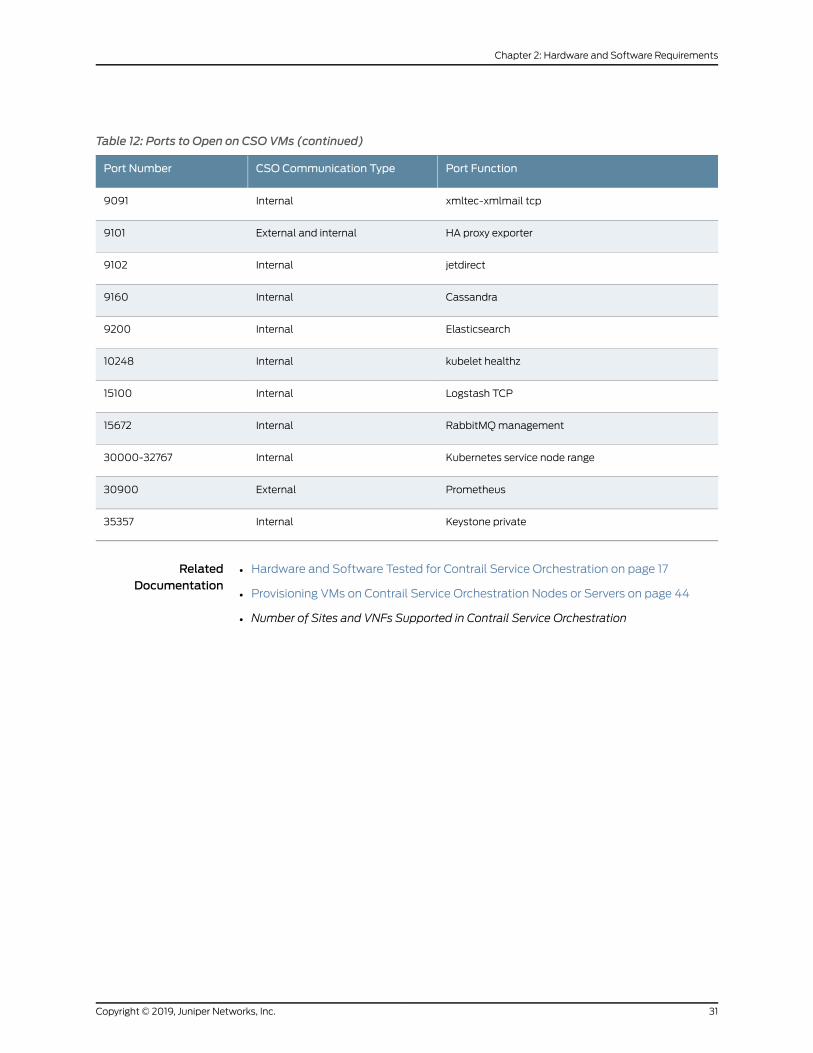
Table 12: Ports to Open on CSO VMs (continued)
Port FunctionCSO Communication TypePort Number
xmltec-xmlmail tcpInternal9091
HA proxy exporterExternal and internal9101
jetdirectInternal9102
CassandraInternal9160
ElasticsearchInternal9200
kubelet healthzInternal10248
Logstash TCPInternal15100
RabbitMQmanagementInternal15672
Kubernetes service node rangeInternal30000-32767
PrometheusExternal30900
Keystone privateInternal35357
RelatedDocumentation
• Hardware and Software Tested for Contrail Service Orchestration on page 17
• Provisioning VMs on Contrail Service Orchestration Nodes or Servers on page 44
• Number of Sites and VNFs Supported in Contrail Service Orchestration
31Copyright © 2019, Juniper Networks, Inc.
Chapter 2: Hardware and Software Requirements

Copyright © 2019, Juniper Networks, Inc.32
Contrail Service Orchestration Installation and Upgrade Guide

CHAPTER 3
Installing Contrail Service Orchestrationwith GUI
• CSO GUI Installer Overview on page 33
• Installing Contrail Service Orchestration with the GUI Installer on page 36
• Troubleshooting the CSO GUI Installer-Related Errors on page 41
CSOGUI Installer Overview
The CSO installer walks you through the steps needed to install and configure CSO onto
your virtualmachine(VM.) Itprovides featuressuchas fasterdownloadingand installation,
auto-provisioning of the CSO virtual machines, and a UI for interaction and installation
status. The installer can be run on the following operating systems:
• Apple OS X and later.
• Microsoft Windows 10 and later.
• Ubuntu 14.04 and later.
NOTE: Juniper Networks recommends using the CSO installer to install andconfigure CSO because of its ease-of-use and is less error-prone. You can,however, use the CLI if you prefer.
The overall flow for using the CSO installer is as follows:
1. Download the CSO Downloader from the CSODownload page.
2. Launch the CSO Downloader and click on Install.
3. Log in using your Juniper Networks credentials.
4. Enter setup information, such as hypervisor and the solution to install.
5. Select your deployment size.
33Copyright © 2019, Juniper Networks, Inc.

6. Select location to download the CSO package, such as on the existing Installer VM
(IVM) or on the host or on the local machine.
7. Enter server credentials and the CSO Downloader downloads the required packages
at the specified location.
8. Click Next to set up the Installer UI.
9. The CSO Downloader creates and deploys the necessary VMs.
10. Once the installation is successful, the CSO Installer UI is automatically launched. If
not, Click on CSO Installer GUI.
NOTE: Use the CSO installer only for new installations. You cannot currentlyupgrade from a previously installed version using the CSO Downloader.
Upgrading from a previously installed version only downloads the CSOpackages. It does not perform the actual upgrade. Youmust use the CLI toupgrade CSO. For more information, see “Upgrading Contrail ServiceOrchestration Overview” on page 111.
The CSO Downloader and Installer has twomain components that perform the steps
listed above:
• Downloader—Downloads the CSO packages and creates an Installer Virtual Machine
(IVM).
• Installer—Creates the necessary VMs and installs the CSO packages.
About the Downloader Component
The downloader component of the CSO installer performs the following tasks:
• Downloads the necessary CSO packages.
• Creates an IVM.
• Transfers the CSO packages to the IVM.
• Launches the Installer component web-based user interface from the IVM.
The downloader component gives you the option to install now or to install later. The
install now option performs all the tasks listed above. The install later option downloads
the necessary packages but does not create the IVMor transfer the packages to the IVM.
For example, if you do not know the host machine IP address and root password, you
might choose to download the necessary packages now andwait to create the IVM until
you have that information.
Copyright © 2019, Juniper Networks, Inc.34
Contrail Service Orchestration Installation and Upgrade Guide

Or, youmight choose install later to download the necessary packages and use the CLI
to install CSO.
About the Installer Component
The installer component of the CSO installer starts automatically after the downloader
component finishes, and performs the following tasks:
• Creates the required VMs.
• Installs the CSO packages in the VMs.
When running the installer component, you select the following options in addition to
configuring the VMs. Each option is described in detail in the installer user interface.
• Size of the network to manage—small, medium, or large. The option you select
determines the number of servers and the resource per server required. See
Table 13 on page 35.
Table 13: Resources per Size
LargeMediumSmall
60003500500Approximate number ofmanaged sites
YesYesNoHigh availability
731Servers
484848vCPUs/server
256 GB256 GB256 GBRAM/server
Greater than the summation of VMs which are deployed on the node.Disk space/server
• Express install or Custom install. The express install uses pre-defined defaults and
requires lessuser input. Select custom install if youwant full control over the installation
and configuration parameters.
• Network type — CSO reachable directly or CSO behind a NAT gateway.
CSO reachable directly means you can access themanaged devices and CSOwithout
going through a NAT gateway. Here, the CSO and devices IP’s are routable to each
other within the enterprises private network. This topology is common in a campus
environment where multiple locations are connected through VPNs as a single logical
private network.
For CSO behind a NAT gateway, the managed devices are typically remote devices
not residing in thedatacenterwhereCSO is installed.Thesedevices reachCSOthrough
a NAT gateway using a public IP address exposed for the data center. This topology
is common when CSOmanages customer’s remote or on-premises devices. For
example, the branch locations of a bank or restaurant chain.
35Copyright © 2019, Juniper Networks, Inc.
Chapter 3: Installing Contrail Service Orchestration with GUI

Installing Contrail Service Orchestration with the GUI Installer
If you prefer to install CSO using the CLI, following the instructions below and select the
Install Later option to download the CSO files to your local drive. Manually transfer the
CSO files to your installer VM using scp, ftp, or other similar programs. Log in to your
installer VM and follow the instructions described in “Installing and Configuring Contrail
Service Orchestration” on page 78.
NOTE: Upgrading fromapreviously installed version viaGUI only downloadstheCSOpackages. It does not perform the actual upgrade. Youmust use theCLI to upgrade CSO. For more information, see “Upgrading Contrail ServiceOrchestration Overview” on page 111.
During IVMcreation, itwill useDNS information.Make sure theDNS information is correct
before you begin CSO installation process.
To download and run the CSO installer:
1. From your browser, go to the CSO download page.
2. On the page that appears, click the Software tab and select 4.1 from the Version
drop-downmenu.
3. Click the CSO Downloader link corresponding to your operating system to download
the file to your local drive.
The CSO Downloader will be downloaded to the local PC. During the install process,
the CSO Downloader is then downloaded from the local PC to the server. If you need
to start the install process over, you can save timebyusing the sameCSODownloader
from the given location.
4. Locate the file on your local drive and launch it.
• ForWindows, double-click the executable file.
• For Linux, enter the following command:
dpkg –i cso-downloader.deb
• For macOS, drag the .dmg file to the installation window.
NOTE: When you install the CSO Downloader onmacOS, youmightreceive an error message indicating that the application cannot beopened because it is from an unidentified developer. As a workaround,open the Security & Privacy Systems Preference. Click the General tab
and clickOpen Anyway.
Copyright © 2019, Juniper Networks, Inc.36
Contrail Service Orchestration Installation and Upgrade Guide

5. Install the CSO Downloader.
6. Enter your Juniper Networks support credentials and click Next.
7. Follow the instructions to specify the software setup, including:
• CSO release version to install.
• Hypervisor server type—KVM or ESXi.
• New installation or upgrade from a previously installed version.
• CSO solution to install—Contrail Service Orchestrator or CSO Network Service
Controller.
8. Read and accept the license agreement, then click Next.
9. Select CSO Deployment Type-Small, or Medium, or Large.
10. Select location to download CSO package—Existing Installer VM, or Download on
Host, or Local Machine
TheCSODownloaderperformshealthcheck toverify connectivity,memoryavailability,
host OS version, kernel version, disk space, and DNS server.
11. Enter the required details.
CSOdownloader verifies theentereddetails andvalidates IPavailability, virtual bridge,
gateway ping, and subnet mask.
NOTE: Remember the password as you will need it later.
12. Click Next to download the CSO Installer.
Additional files are downloaded as needed. Depending on your Internet bandwidth,
itmight take30minutesormore todownload the files.After thedownload is complete,
the CSO Downloader verifies the MD5 checksum of each file.
13. Click Next after the download is complete to proceed with setting up the Installer UI.
14. After setting up the Installer UI, you are redirected to the Installer UI webpage
automatically. On the installer welcome page, enter the IVM password you created
in Step 11 and click Login.
15. Identify the size of the network to bemanaged and click either Express or Custom.
The express install uses predefined defaults and requires less user input. Whichever
option you select, you can click Back on the next page to return to this page to select
the other option.
37Copyright © 2019, Juniper Networks, Inc.
Chapter 3: Installing Contrail Service Orchestration with GUI

16. If you select the Express install, the Express window appears.
Figure 1 on page 38 shows an example of the Express window for a small install.
Figure 1: Example Express Install Window
For small andmedium-sizedmanaged networks, all hosts belong to a common CSO
cluster or region.
For large networks, youmust have aminimum of two regions. By default, a central
region and regional region is configured for you. You can add an additional twomore
regions. Note that adding more regions requires more physical hosts.
a. For each host, enter the IP address with subnet mask, the root password, select
the VM network (or datastores for ESXi servers) from the drop-downmenu, and
VM gateway.
b. Select the network type—CSODirectly Reachable or CSOBehind NAT. For more
information, see “CSO GUI Installer Overview” on page 33.
c. Enter the IP addresses for the VMs.
• Click Input IP Range to add the IP addresses as a range.
• Click Input IP to add a list of individual IP addresses, separated with a comma.
d. (CSO Behind NAT only) Enter the central NAT gateway IP address.
This is the NAT gateway public-facing IP address.
e. Enter the regional NAT gateway IP address.
Each CSO region or cluster can have a different NAT gateway or the same NAT
gateway.
f. Enter the NTP server IP address or FQDN name.
g. Verify the default Kubernetes overlay network IP address and subnet mask and
update as needed.
h. Click Install.
Copyright © 2019, Juniper Networks, Inc.38
Contrail Service Orchestration Installation and Upgrade Guide

The CSO installer now creates the required CSO VMs and installs services within
these VMs. A status window displays the progress.
17. If you select the Custom install, the Custom install window appears.
a. For eachhost, enter the IPaddresswith subnetmask, the rootpassword, andselect
the VM network (or datastores for ESXi servers) from the drop-downmenu, and
VM gateway.
b. For each Contrail Analytics Node (CAN), enter the IP address with subnet mask,
the root password, the VM network (or datastores for ESXi servers) from the
drop-downmenu, and VM gateway.
c. Select the network type—CSODirectly Reachable or CSOBehind NAT. For more
information, see “CSO GUI Installer Overview” on page 33.
d. Enter the IP addresses for the VMs.
• Click Input IP Range to add the IP addresses as a range.
• Click Input IP to add a list of individual IP addresses, separated with a comma.
e. (CSO Behind NAT only) Enter the central NAT gateway IP address.
This is the NAT gateway public-facing IP address.
f. Enter the regional NAT gateway IP address.
Each CSO region or cluster can have a different NAT gateway or the same NAT
gateway.
g. Enter the NTP server IP address or FQDN name.
h. Verify the default Kubernetes overlay network IP address and subnet mask and
update as needed.
i. For each region, enter the virtual IPaddressandhostname.SeeFigure2onpage40.
39Copyright © 2019, Juniper Networks, Inc.
Chapter 3: Installing Contrail Service Orchestration with GUI

Figure 2: Custom Install Virtual IP Address and Hostname
For small andmedium-sizedmanaged networks, all hosts belong to a common
CSO cluster or region.
For large networks, youmust have aminimum of two regions. By default, a central
and regional region is configured for you. You can add an additional twomore
regions. Note that adding more regions requires more physical hosts.
For secure communication between devices to CSO services, digital certificates
must be uploaded to CSO. These certificates are mapped to a hostname or an
associated IP / Virtual IP (VIP) address. For example, two certificates can be
uploaded for a single VM. Onemaps to its VIP and the other to its hostname.
Typically, one hostname or VIP is required per region.In case of small andmedium
installs, there is no concept of different regions. All VMs are part of a common
central region. Therefore, a single set of certificates is uploaded for this central
region. In case of a large install, where the CSOVMs are replicated acrossmultiple
regions, one or more certificates for each region should be uploaded.
CSO generates certificates for VIPs and hostnames. However, these certificates
are not signed by a trusted Certificate Authorities (CA). This results in “untrusted
site” and “add security exception” warning messages to users. If you prefer to
upload trusted CA signed certificates tied to a specific VIP or hostname, you can
upload them to CSO (one or more for each region).
The regional VIP and hostnamemust be provided wherever high availability of
services is available. For example, in medium and large installs. The small install
does not provide high availability. The VIP address is used as a front-end address
for a set of load-balancers of a region in the back-end. In addition, an FQDN
hostname should be provided for this VIP address. For example,
cso-central.domain.net. Note that the uploaded signed certificate should be
generated for this hostname.
Copyright © 2019, Juniper Networks, Inc.40
Contrail Service Orchestration Installation and Upgrade Guide

j. Click Choose Files to locate the certificate for that specific region.
k. Review the default component configuration settings and update as needed.
l. If youselectExternal fromtheKeystoneServicemenu, enter the followingadditional
information:
• Keystone IP address.
• Keystone administrator password.
• External Keystone service token.
If you do not know the service token, log in to your external keystone server. View
the /etc/keystone/keystonerc fileandsearch for theES_SERVICE_TOKENvariable.
For example:
export OS_SERVICE_TOKEN=abcdefg1234567
• Keystone administrator e-mail address.
m. Click Install.
The CSO installer now creates the required CSO VMs and installs services within
these VMs. A status window displays the progress.
NOTE: Once the installation process is completed, click on show
CSO-passwords link. You will need this password for the initial login.
18. Select launch CSO-Admin portal to login to CSO. The initial username is cspadminand the initial password is the password noted in the previous step. Once you login,
you will be asked to change the password.
RelatedDocumentation
Hardware and Software Tested for Contrail Service Orchestration on page 17•
• Removing a Previous Deployment on page 43
Troubleshooting the CSOGUI Installer-Related Errors
Use the following to troubleshoot software issues with the CSO GUI Installer.
Downloader Component
If you encounter any errors with the downloader component, forward the installer log
file to Juniper Networks Technical Support. You can access the application (installation)
logs fromwithin the CSO Downloader GUI. To access the logs, click the View Logs icon
at the top-right corner of the GUI.
The installer log file is located at:
41Copyright © 2019, Juniper Networks, Inc.
Chapter 3: Installing Contrail Service Orchestration with GUI

<home>/.juniper/application.log
For example, C:\Users\bob\.juniper\application.log.
Installer Component
The installer component screens validate user entries. For example, IP addresses are
pinged to verify they are valid and reachable. However, errors can occur after you click
Install. When this happens, you are presented the following two options:
• Retry—This option retries the operation that failed.
• View Logs—This option lets you download the installer component logs, which you
can then send to Juniper Networks Technical Support for assistance.
Copyright © 2019, Juniper Networks, Inc.42
Contrail Service Orchestration Installation and Upgrade Guide

CHAPTER 4
Installing Contrail Service Orchestrationwith CLI
• Removing a Previous Deployment on page 43
• Provisioning VMs on Contrail Service Orchestration Nodes or Servers on page 44
• Setting Up the Installation Package and Library Access on page 76
• Installing and Configuring Contrail Service Orchestration on page 78
Removing a Previous Deployment
You should remove a previous deployment and perform a new installation if the
architecture of the VMs on the CSO server node or server has changed significantly
between releases.
If you do not have previous deployment, proceed with “Provisioning VMs on Contrail
Service Orchestration Nodes or Servers” on page 44
To remove a previous installation:
1. Remove VMs on the physical server.
a. Log in to the CSO node or server as root.
b. View the list of VMs.
For example:
root@host:~/# virsh list --all
Output:
Id Name State2 csp-ui-vm running
c. Remove each VM and its contents.
For example:
root@host:~/# virsh destroy csp-ui-vm
43Copyright © 2019, Juniper Networks, Inc.

root@host:~/# virsh undefine csp-ui-vm
Where, csp-ui-vm is the name of VM you want to delete.
d. Delete the Ubuntu source directories and VM.
For example:
root@host:~/# rm -rf /root/disksroot@host:~/# rm -rf /root/disks_canroot@host:~/# cd /root/ubuntu_vmroot@host:~/# rm -rf <vm-name>
2. Delete the Salt minion keys.
For example:
root@host:~/# salt-key -D
RelatedDocumentation
Provisioning VMs on Contrail Service Orchestration Nodes or Servers on page 44•
Provisioning VMs on Contrail Service Orchestration Nodes or Servers
VirtualMachines (VMs) on the central and regional Contrail ServiceOrchestration (CSO)
nodes or servers host the infrastructure services and some components. All servers and
VMs for the solution should be in the same subnet.
Use the provisioning tool to create and configure the VMs if you use the KVM hypervisor
or VMware ESXi on a CSO node or server.
The VMs created by provisioning tool have Ubuntu preinstalled.
NOTE: If youusetheKVMhypervisorwhile installingaDistributedCPE(HybridWAN) or an SD-WAN solution, youmust create a bridge interface on thephysical server.Thebridge interfaceshouldmaptheprimarynetwork interface(Ethernet management interface) on each CSO server node or server to avirtual interface before you create VMs. This action enables the VMs tocommunicate with the network.
Thisapproach isapplicableonly if youare installingaDistributedCPE(HybridWAN) or an SD-WAN solution. It is not required for a centralized solution.
The VMs required on a CSO node or server depend on whether you configure:
• Small deployment. (See Table 9 on page 22)
• Medium deployment. See (Table 10 on page 23)
• Large deployment. See (Table 11 on page 25)
Copyright © 2019, Juniper Networks, Inc.44
Contrail Service Orchestration Installation and Upgrade Guide

The small andmedium deployments are always region-less deployment whereas the
large deployment is always region-based deployment.
See “MinimumRequirements for Servers andVMs” on page 20 for details of the VMs and
associated resources required for each deployment.
The following sections describe the procedures for provisioning the VMs:
• Before You Begin on page 45
• Downloading the Installer on page 45
• Creating a Bridge Interface for KVM on page 46
• Creating a Data Interface for a Distributed Deployment on page 47
• Customizing the Configuration File for the Provisioning Tool on page 49
• Provisioning VMs with the Provisioning Tool for the KVMHypervisor on page 72
• Provisioning VMware ESXi VMs Using the Provisioning Tool on page 73
• Manually Provisioning VRR VMs on the Contrail Service Orchestration Node or
Server on page 75
• Verifying Connectivity of the VMs on page 76
Before You Begin
Before you begin youmust:
• Configure the physical servers or node servers and nodes.
• Install Ubuntu 14.04.5 LTS as the operating system for the physical servers.
• Configure the Contrail Cloud Platform and install Contrail OpenStack if you are
performing a centralized CPE deployment.
Downloading the Installer
To download the installer package:
1. Log in as root to the central CSO node or server.
The current directory is the home directory.
2. Download the appropriate installer package from the CSODownload page.
• Use the Contrail Service Orchestration installer if you have purchased licenses for
acentralizeddeploymentorbothNetworkServiceOrchestratorandNetworkService
Controller licenses for a distributed deployment.
This installer includesall theContrail ServiceOrchestrationgraphical user interfaces
(GUIs).
• Use the Network Service Controller installer if you have purchased only Network
ServiceController licenses foradistributeddeploymentorSD-WAN implementation.
This installer includes Administration Portal andService and InfrastructureMonitor,
but not the Designer Tools.
45Copyright © 2019, Juniper Networks, Inc.
Chapter 4: Installing Contrail Service Orchestration with CLI

3. Expand the installer package,whichhasanamespecific to its contentsand the release.
For example, if the name of the installer package is csoVersion.tar.gz:
root@host:~/# tar –xvzf csoVersion.tar.gz
The expandedpackage is a directory that has the samenameas the installer package
and contains the installation files.
Creating a Bridge Interface for KVM
If you use the KVM hypervisor, you must create a bridge interface on the physical server
thatmaps theprimary network interface (Ethernetmanagement interface) oneachCSO
server node or server to a virtual interface before you create VMs. This action enables
the VMs to communicate with the network.
A physical server or node needs Internet access to install the libvirt-bin package.
To create the bridge interface:
1. Log in as root on the central CSO node or server.
2. Update the index files of the software packages installed on the server to reference
the latest versions.
root@host:~/# apt-get update
3. Viewthenetwork interfacesconfiguredon the server toobtain thenameof theprimary
interface on the server.
root@host:~/# ifconfig
4. Install the libvirt software.
root@host:~/# apt-get install libvirt-bin
5. View the list of network interfaces, which now includes the virtual interface virbr0.
root@host:~/# ifconfig
6. Open the /etc/network/interfaces file andmodify it to map the primary network
interface to the virtual interface virbr0.
For example, use the following configuration tomap the primary interface eth0 to the
virtual interface virbr0:
# This file describes the network interfaces available on your system# and how to activate them. For more information, see interfaces (5).# The loopback network interfaceauto loiface lo inet loopback
Copyright © 2019, Juniper Networks, Inc.46
Contrail Service Orchestration Installation and Upgrade Guide

# The primary network interfaceauto eth0iface eth0 inet manual up ifconfig eth0 0.0.0.0 up
auto virbr0iface virbr0 inet static bridge_ports eth0 address 192.168.1.2 netmask 255.255.255.0 network 192.168.1.0 broadcast 192.168.1.255 gateway 192.168.1.1 dns-nameservers 8.8.8.8 dns-search example.net
7. Reboot the physical machine and log in as root again.
8. Verify that the primary network interface is mapped to the virbr0 interface.
root@host:~/# brctl show
bridge name bridge id STP enabled interfaces virbr0 8000.0cc47a010808 no em1 vnet1 vnet2
Creating a Data Interface for a Distributed Deployment
For a distributed deployment on KVM hypervisor, you create a second bridge interface
that the VMs use to send data communications to the CPE device.
A physical server or node needs Internet access to install libvirt-bin package.
To create a data interface:
1. Log in to the central CSO server as root.
2. Configure the new virtual interface andmap it to a physical interface.
For example:
root@host:~/# virsh brctl addbr virbr1root@host:~/# virsh brctl addif virbr1 eth1
3. Create a file with the name virbr1.xml in the /var/lib/libvirt/networkdirectory.
4. Paste the following content into the virbr1.xml file, and edit the file tomatch the actual
settings for your interface.
For example:
47Copyright © 2019, Juniper Networks, Inc.
Chapter 4: Installing Contrail Service Orchestration with CLI

<network> <name>default</name> <uuid>0f04ffd0-a27c-4120-8873-854bbfb02074</uuid> <bridge name='virbr1' stp='off' delay='0'/> <ip address='192.0.2.1' netmask='255.255.255.0'> </ip></network>
5. Open the /etc/network/interfaces file and add the details for the second interface.
For example:
# This file describes the network interfaces available on your system# and how to activate them. For more information, see interfaces (5).# The loopback network interfaceauto loiface lo inet loopback
# The primary network interfaceauto eth0iface eth0 inet manual up ifconfig eth0 0.0.0.0 up
auto eth1iface eth1 inet manual up ifconfig eth1 0.0.0.0 up
auto virbr0iface virbr0 inet static bridge_ports eth0 address 192.168.1.2 netmask 255.255.255.0 network 192.168.1.0 broadcast 192.168.1.255 gateway 192.168.1.1 dns-nameservers 8.8.8.8 dns-search example.netauto virbr1iface virbr1 inet static bridge_ports eth1 address 192.0.2.1 netmask 255.255.255.0
6. Reboot the server.
7. Verify that the secondary network interface, eth1, is mapped to the second interface.
root@host:~/# brctl show
bridge name bridge id STP enabled interfaces virbr0 8000.0cc47a010808 no em1 vnet1 vnet2
Copyright © 2019, Juniper Networks, Inc.48
Contrail Service Orchestration Installation and Upgrade Guide

virbr1 8000.0cc47a010809 no em2 vnet0
Customizing the Configuration File for the Provisioning Tool
Theprovisioning tool usesaconfiguration file,which youmust customize for your network.
The configuration file is in YAML format.
To customize the configuration file:
1. Log in as root to the central CSO node or server.
2. Access the confs directory that contains the sample configuration files. For example,
if the name of the installer directory is csoVersion.
root@host:~/# cd csoVersion/confs
3. Access the directory for the environment that you want to configure.
Table 14 on page 49 shows the directories that contain the sample configuration file.
Table 14: Location of Configuration Files for Provisioning VMs
Directory for Sample Configuration FileDeployment
confs/cso4.1.0/production/nonha/provisionvm/provision_vm_collocated_example.confSmall deployment
confs/cso4.1.0/production/ha/provisionvm/provision_vm_collocated_example.confMedium deployment
confs/cso4.1.0/production/ha/provisionvm/provision_vm_example.confLarge deployment
4. Make a copy of the sample configuration file in the /confs directory and name it
provision_vm.conf.
For example:
root@host:~/cspVersion# cpconfs/cso4.1.0/production/nonha/provisionvm/provision_vm_collocated_example.confprovision_vm.conf
5. Open the provision_vm.conf file with a text editor.
6. In the [TARGETS] section, specify the following values for the network onwhich CSO
resides.
49Copyright © 2019, Juniper Networks, Inc.
Chapter 4: Installing Contrail Service Orchestration with CLI

• installer_ip—IP address of the management interface of the host on which you
deployed the installer.
• ntp_servers—Comma-separated list of fully qualified domain names (FQDNs) of
Network Time Protocol (NTP) servers. For networks within firewalls, specify NTP
servers specific to your network.
• physical—Comma-separated list of hostnames of the CSO nodes or servers.
• virtual—Comma-separated list of names of the virtualmachines (VMs) on theCSO
servers.
7. Specify the following configuration values for each CSO node or server that you
specified in Step 6.
• [hostname]—Hostname of the CSO node or server.
• management_address—IPaddressof theEthernetmanagement (primary) interface
in classless Interdomain routing (CIDR) notation.
• management_interface—Name of the Ethernet management interface, virbr0.
• gateway—IP address of the gateway for the host.
• dns_search—Domain for DNS operations.
• dns_servers—Comma-separated list of DNS name servers, including DNS servers
specific to your network.
• hostname—Hostname of the node.
• username—Username for logging in to the node.
• password—Password for logging in to the node.
• data_interface—Name of the data interface. Leave blank for a centralized
deployment. Specify the name of the data interface, such as virbr1, that you
configured for a distributed deployment.
8. Specify configuration values for each VM that you specified in Step 6.
• [VM name]—Name of the VM.
• management_address—IP address of the Ethernet management interface in CIDR
notation.
• hostname—Fully qualified domain name (FQDN) of the VM.
• username—Login name of user who canmanage all VMs.
• password—Password for user who canmanage all VMs.
• local_user—Login name of user who canmanage this VM.
• local_password—Password for user who canmanage this VM.
• guest_os—Name of the operating system.
• host_server—Hostname of the CSO node or server.
• memory—Required amount of RAM in GB.
Copyright © 2019, Juniper Networks, Inc.50
Contrail Service Orchestration Installation and Upgrade Guide

• vCPU—Required number of virtual central processing units (vCPUs).
• enable_data_interface—True enables the VM to transmit data and false prevents
the VM from transmitting data. The default is false.
9. For the Junos Space VM, specify configuration values for each VM that you specified
in Step 6.
• [VM name]—Name of the VM.
• management_address—IP address of the Ethernet management interface in CIDR
notation.
• web_address—Virtual IP (VIP)addressof theprimary JunosSpaceVirtualAppliance.
(Setting only required for the VM on which the primary Junos Space Virtual Space
appliance resides.)
• gateway—IP address of the gateway for the host. If you do not specify a value, the
value defaults to the gateway defined for the CSO node or server that hosts the
VM.
• nameserver_address—IP address of the DNS nameserver.
• hostname—FQDN of the VM.
• username—Username for logging in to Junos Space.
• password—Default password for logging in to Junos Space.
• newpassword—Password that you provide when you configure the Junos Space
appliance.
• guest_os—Name of the operating system.
• host_server—Hostname of the CSO node or server.
• memory—Required amount of RAM in GB.
• vCPU—Required number of virtual central processing units (vCPUs).
• vm_type—Preinstalled OSSwith VM types of baseInfra/baseMS.
• volumes—Data partitions of CSO (Eg: /mnt/data:400G.
• base_disk_size—OS partitions of CSO (Eg: 100G).
10. Save the file.
11. Download the ESXi-4.1.0.tar.gz file to the
/root/Contrail_Service_Orchestration_4.1.0/artifacts folder on the Ubuntu VM.
or
Download the KVM-4.1.0.tar.gz file to the
/root/Contrail_Service_Orchestration_4.1.0/artifactsfolder on the Ubuntu VM.
12. Run the following command to start virtual machines:
For KVM:
51Copyright © 2019, Juniper Networks, Inc.
Chapter 4: Installing Contrail Service Orchestration with CLI
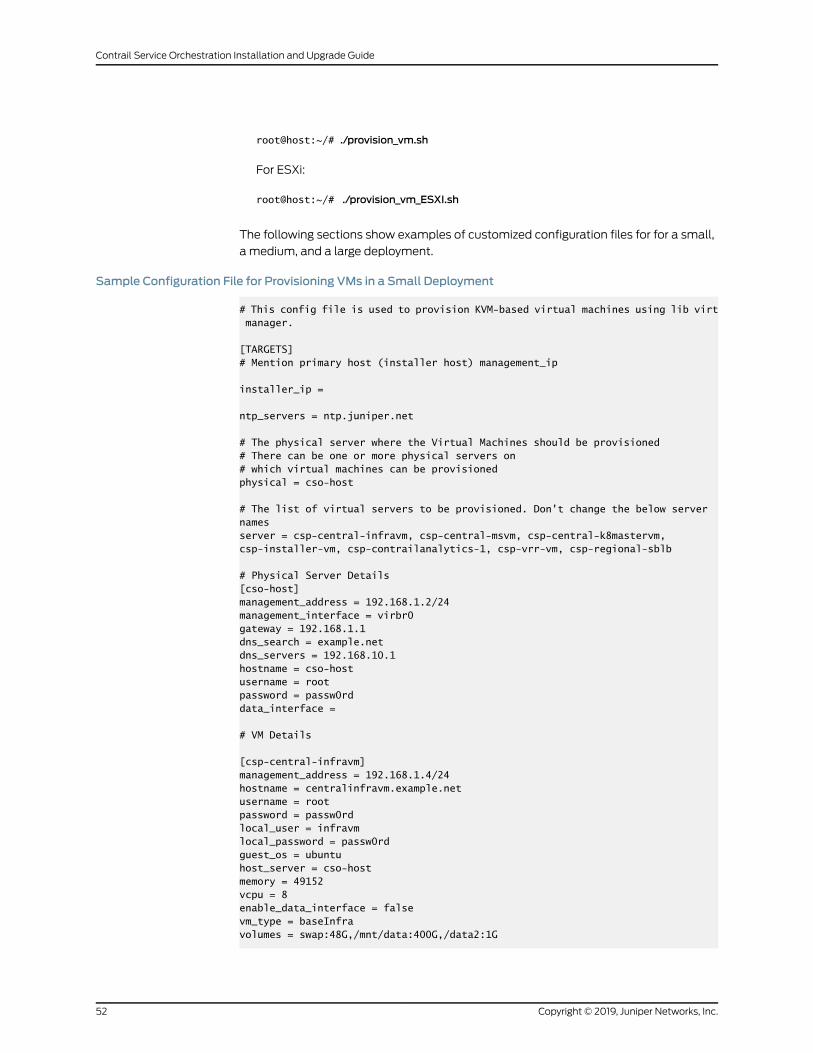
root@host:~/# ./provision_vm.sh
For ESXi:
root@host:~/# ./provision_vm_ESXI.sh
The following sections show examples of customized configuration files for for a small,
a medium, and a large deployment.
Sample Configuration File for Provisioning VMs in a Small Deployment
# This config file is used to provision KVM-based virtual machines using lib virt manager.
[TARGETS]# Mention primary host (installer host) management_ip
installer_ip =
ntp_servers = ntp.juniper.net
# The physical server where the Virtual Machines should be provisioned# There can be one or more physical servers on# which virtual machines can be provisionedphysical = cso-host
# The list of virtual servers to be provisioned. Don't change the below server namesserver = csp-central-infravm, csp-central-msvm, csp-central-k8mastervm, csp-installer-vm, csp-contrailanalytics-1, csp-vrr-vm, csp-regional-sblb
# Physical Server Details[cso-host]management_address = 192.168.1.2/24management_interface = virbr0gateway = 192.168.1.1dns_search = example.netdns_servers = 192.168.10.1hostname = cso-hostusername = rootpassword = passw0rddata_interface =
# VM Details
[csp-central-infravm]management_address = 192.168.1.4/24hostname = centralinfravm.example.netusername = rootpassword = passw0rdlocal_user = infravmlocal_password = passw0rdguest_os = ubuntuhost_server = cso-hostmemory = 49152vcpu = 8enable_data_interface = falsevm_type = baseInfravolumes = swap:48G,/mnt/data:400G,/data2:1G
Copyright © 2019, Juniper Networks, Inc.52
Contrail Service Orchestration Installation and Upgrade Guide

base_disk_size = 100G
[csp-central-msvm]management_address = 192.168.1.5/24hostname = centralmsvm.example.netusername = rootpassword = passw0rdlocal_user = msvmlocal_password = passw0rdguest_os = ubuntuhost_server = cso-hostmemory = 32768vcpu = 6enable_data_interface = falsevm_type = baseMSvolumes = swap:32G,/mnt/data:400G,/data2:1Gbase_disk_size = 100G
[csp-central-k8mastervm]management_address = 192.168.1.14/24hostname = centralk8mastervm.example.netusername = rootpassword = passw0rdlocal_user = msvmlocal_password = passw0rdguest_os = ubuntuhost_server = cso-hostmemory = 4096vcpu = 2enable_data_interface = falsevm_type =volumes = swap:4G,/mnt/data:400G,/data2:1Gbase_disk_size = 100G
[csp-installer-vm]management_address = 192.168.1.10/24hostname = installervm.example.netusername = rootpassword = passw0rdlocal_user = installervmlocal_password = passw0rdguest_os = ubuntuhost_server = cso-hostmemory = 8192vcpu = 4enable_data_interface = falsevm_type =volumes = swap:24G,/mnt/data:400G,/data2:1Gbase_disk_size = 100G
[csp-contrailanalytics-1]management_address = 192.168.1.11/24hostname = canvm.example.netusername = rootpassword = passw0rdlocal_user = installervmlocal_password = passw0rdguest_os = ubuntuhost_server = cso-hostmemory = 49152
53Copyright © 2019, Juniper Networks, Inc.
Chapter 4: Installing Contrail Service Orchestration with CLI

vcpu = 8enable_data_interface = falsevm_type =volumes = swap:48G,/data1:1G,/data2:1Gbase_disk_size = 500G
[csp-regional-sblb]management_address = 192.168.1.12/24hostname = regional-sblb.example.netusername = rootpassword = passw0rdlocal_user = sblblocal_password = passw0rdguest_os = ubuntuhost_server = cso-hostmemory = 4096vcpu = 2enable_data_interface = truevm_type =volumes = swap:4G,/mnt/data:400G,/data2:1Gbase_disk_size = 500G
[csp-vrr-vm]management_address = 192.168.1.13/24hostname = vrr.example.netgateway = 192.168.1.1newpassword = passw0rdguest_os = vrrhost_server = cso-hostmemory = 8192vcpu = 4
[csp-space-vm]management_address = 192.168.1.14/24web_address = 192.168.1.15/24gateway = 192.168.1.1nameserver_address = 192.168.1.254hostname = spacevm.example.netusername = adminpassword = abc123newpassword = jnpr123!guest_os = spacehost_server = cso-hostmemory = 16384vcpu = 4
Sample Configuration File for Provisioning VMs in aMediumDeployment
# This config file is used to provision KVM-based virtual machines using lib virt manager.
[TARGETS]# Mention primary host (installer host) management_ip
installer_ip =
ntp_servers = ntp.juniper.net
Copyright © 2019, Juniper Networks, Inc.54
Contrail Service Orchestration Installation and Upgrade Guide

# The physical server where the Virtual Machines should be provisioned# There can be one or more physical servers on# which virtual machines can be provisionedphysical = cso-host1, cso-host2, cso-host3
# The list of servers to be provisioned and mention the contrail analytics servers also in "server" list.server = csp-central-infravm1, csp-central-infravm2, csp-central-infravm3, csp-central-lbvm1, csp-central-lbvm2, csp-central-lbvm3, csp-installer-vm, csp-contrailanalytics-1, csp-contrailanalytics-2, csp-contrailanalytics-3, csp-central-elkvm1, csp-central-elkvm2, csp-central-elkvm3, csp-central-msvm1, csp-central-msvm2, csp-central-msvm3, csp-regional-sblb1, csp-regional-sblb2, csp-vrr-vm1, csp-vrr-vm2
# Physical Server Details[cso-host1]management_address = 192.168.1.2/24management_interface = virbr0gateway = 192.168.1.1dns_search = example.netdns_servers = 192.168.10.1hostname = cso-host1username = rootpassword = passw0rddata_interface =
[cso-host2]management_address = 192.168.1.3/24management_interface = virbr0gateway = 192.168.1.1dns_search = example.netdns_servers = 192.168.10.1hostname = cso-host2username = rootpassword = passw0rddata_interface =
[cso-host3]management_address = 192.168.1.4/24management_interface = virbr0gateway = 192.168.1.1dns_search = example.netdns_servers = 192.168.10.1hostname = cso-host3username = rootpassword = passw0rddata_interface =
# VM Details
[csp-central-infravm1]management_address = 192.168.1.6/24hostname = centralinfravm1.example.netusername = rootpassword = passw0rdlocal_user = infravmlocal_password = passw0rdguest_os = ubuntu
55Copyright © 2019, Juniper Networks, Inc.
Chapter 4: Installing Contrail Service Orchestration with CLI

host_server = cso-host1memory = 49152vcpu = 12enable_data_interface = falsevm_type = baseInfravolumes = swap:48G,/mnt/data:400G,/data2:1Gbase_disk_size = 100G
[csp-central-infravm2]management_address = 192.168.1.7/24hostname = centralinfravm2.example.netusername = rootpassword = passw0rdlocal_user = infravmlocal_password = passw0rdguest_os = ubuntuhost_server = cso-host2memory = 49152vcpu = 12enable_data_interface = falsevm_type = baseInfravolumes = swap:48G,/mnt/data:400G,/data2:1Gbase_disk_size = 100G
[csp-central-infravm3]management_address = 192.168.1.8/24hostname = centralinfravm3.example.netusername = rootpassword = passw0rdlocal_user = infravmlocal_password = passw0rdguest_os = ubuntuhost_server = cso-host3memory = 49152vcpu = 12enable_data_interface = falsevm_type = baseInfravolumes = swap:48G,/mnt/data:400G,/data2:1Gbase_disk_size = 100G
[csp-installer-vm]management_address = 192.168.1.9/24hostname = installervm.example.netusername = rootpassword = passw0rdlocal_user = installervmlocal_password = passw0rdguest_os = ubuntuhost_server = cso-host1memory = 32768vcpu = 4enable_data_interface = falsevm_type =volumes = swap:24G,/mnt/data:400G,/data2:1Gbase_disk_size = 100G
[csp-central-lbvm1]management_address = 192.168.1.10/24hostname = centrallbvm1.example.netusername = root
Copyright © 2019, Juniper Networks, Inc.56
Contrail Service Orchestration Installation and Upgrade Guide
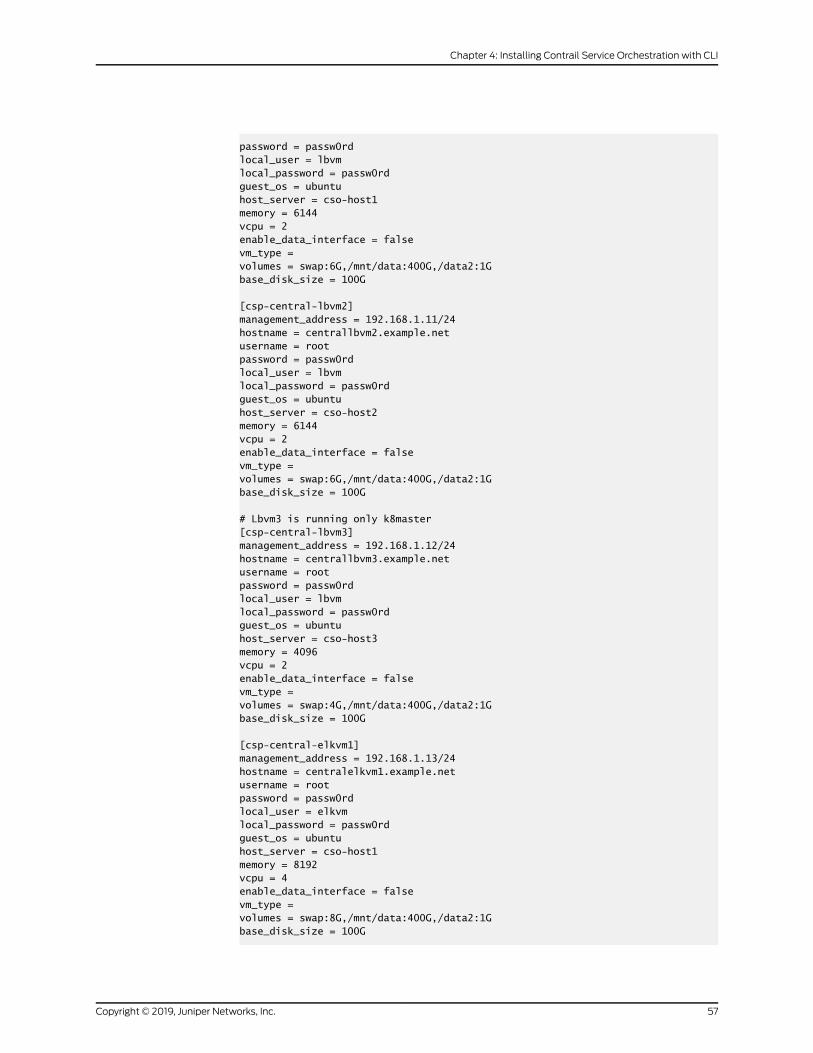
password = passw0rdlocal_user = lbvmlocal_password = passw0rdguest_os = ubuntuhost_server = cso-host1memory = 6144vcpu = 2enable_data_interface = falsevm_type =volumes = swap:6G,/mnt/data:400G,/data2:1Gbase_disk_size = 100G
[csp-central-lbvm2]management_address = 192.168.1.11/24hostname = centrallbvm2.example.netusername = rootpassword = passw0rdlocal_user = lbvmlocal_password = passw0rdguest_os = ubuntuhost_server = cso-host2memory = 6144vcpu = 2enable_data_interface = falsevm_type =volumes = swap:6G,/mnt/data:400G,/data2:1Gbase_disk_size = 100G
# Lbvm3 is running only k8master[csp-central-lbvm3]management_address = 192.168.1.12/24hostname = centrallbvm3.example.netusername = rootpassword = passw0rdlocal_user = lbvmlocal_password = passw0rdguest_os = ubuntuhost_server = cso-host3memory = 4096vcpu = 2enable_data_interface = falsevm_type =volumes = swap:4G,/mnt/data:400G,/data2:1Gbase_disk_size = 100G
[csp-central-elkvm1]management_address = 192.168.1.13/24hostname = centralelkvm1.example.netusername = rootpassword = passw0rdlocal_user = elkvmlocal_password = passw0rdguest_os = ubuntuhost_server = cso-host1memory = 8192vcpu = 4enable_data_interface = falsevm_type =volumes = swap:8G,/mnt/data:400G,/data2:1Gbase_disk_size = 100G
57Copyright © 2019, Juniper Networks, Inc.
Chapter 4: Installing Contrail Service Orchestration with CLI

[csp-central-elkvm2]management_address = 192.168.1.14/24hostname = centralelkvm2.example.netusername = rootpassword = passw0rdlocal_user = elkvmlocal_password = passw0rdguest_os = ubuntuhost_server = cso-host2memory = 8192vcpu = 4enable_data_interface = falsevm_type =volumes = swap:8G,/mnt/data:400G,/data2:1Gbase_disk_size = 100G
[csp-central-elkvm3]management_address = 192.168.1.15/24hostname = centralelkvm3.example.netusername = rootpassword = passw0rdlocal_user = elkvmlocal_password = passw0rdguest_os = ubuntuhost_server = cso-host3memory = 8192vcpu = 4enable_data_interface = falsevm_type =volumes = swap:8G,/mnt/data:400G,/data2:1Gbase_disk_size = 100G
[csp-central-msvm1]management_address = 192.168.1.16/24hostname = centralmsvm1.example.netusername = rootpassword = passw0rdlocal_user = msvmlocal_password = passw0rdguest_os = ubuntuhost_server = cso-host1memory = 38912vcpu = 10enable_data_interface = falsevm_type = baseMSvolumes = swap:38G,/mnt/data:400G,/data2:1Gbase_disk_size = 100G
[csp-central-msvm2]management_address = 192.168.1.17/24hostname = centralmsvm2.example.netusername = rootpassword = passw0rdlocal_user = msvmlocal_password = passw0rdguest_os = ubuntuhost_server = cso-host2memory = 38912vcpu = 10
Copyright © 2019, Juniper Networks, Inc.58
Contrail Service Orchestration Installation and Upgrade Guide

enable_data_interface = falsevm_type = baseMSvolumes = swap:38G,/mnt/data:400G,/data2:1Gbase_disk_size = 100G
[csp-central-msvm3]management_address = 192.168.1.18/24hostname = centralmsvm3.example.netusername = rootpassword = passw0rdlocal_user = msvmlocal_password = passw0rdguest_os = ubuntuhost_server = cso-host3memory = 38912vcpu = 10enable_data_interface = falsevm_type = baseMSvolumes = swap:38G,/mnt/data:400G,/data2:1Gbase_disk_size = 100G
[csp-regional-sblb1]management_address = 192.168.1.19/24hostname = sblb1.example.netusername = rootpassword = passw0rdlocal_user = sblblocal_password = passw0rdguest_os = ubuntuhost_server = cso-host2memory = 4096vcpu = 2enable_data_interface = truevm_type =volumes = swap:4G,/mnt/data:400G,/data2:1Gbase_disk_size = 100G
[csp-regional-sblb2]management_address = 192.168.1.20/24hostname = sblb2.example.netusername = rootpassword = passw0rdlocal_user = sblblocal_password = passw0rdguest_os = ubuntuhost_server = cso-host3memory = 4096vcpu = 2enable_data_interface = truevm_type =volumes = swap:4G,/data1:1G,/data2:1Gbase_disk_size = 500G
[csp-contrailanalytics-1]management_address = 192.168.1.21/24hostname = can1.example.netusername = rootpassword = passw0rdlocal_user = canvmlocal_password = passw0rd
59Copyright © 2019, Juniper Networks, Inc.
Chapter 4: Installing Contrail Service Orchestration with CLI

guest_os = ubuntuhost_server = cso-host1memory = 65536vcpu = 14enable_data_interface = falsevm_type =volumes = swap:64G,/data1:1G,/data2:1Gbase_disk_size = 500G
[csp-contrailanalytics-2]management_address = 192.168.1.22/24hostname = can2.example.netusername = rootpassword = passw0rdlocal_user = canvmlocal_password = passw0rdguest_os = ubuntuhost_server = cso-host2memory = 65536vcpu = 14enable_data_interface = falsevm_type =volumes = swap:64G,/data1:1G,/data2:1Gbase_disk_size = 500G
[csp-contrailanalytics-3]management_address = 192.168.1.23/24hostname = can3.example.netusername = rootpassword = passw0rdlocal_user = canvmlocal_password = passw0rdguest_os = ubuntuhost_server = cso-host3memory = 65536vcpu = 14enable_data_interface = falsevm_type =volumes = swap:64G,/data1:1G,/data2:1Gbase_disk_size = 500G
[csp-vrr-vm1]management_address = 192.168.1.24/24hostname = vrr1.example.netgateway = 192.168.1.1newpassword = passw0rdguest_os = vrrhost_server = cso-host2memory = 16384vcpu = 4
[csp-vrr-vm2]management_address = 192.168.1.25/24hostname = vrr2.example.netgateway = 192.168.1.1newpassword = passw0rdguest_os = vrrhost_server = cso-host3
Copyright © 2019, Juniper Networks, Inc.60
Contrail Service Orchestration Installation and Upgrade Guide
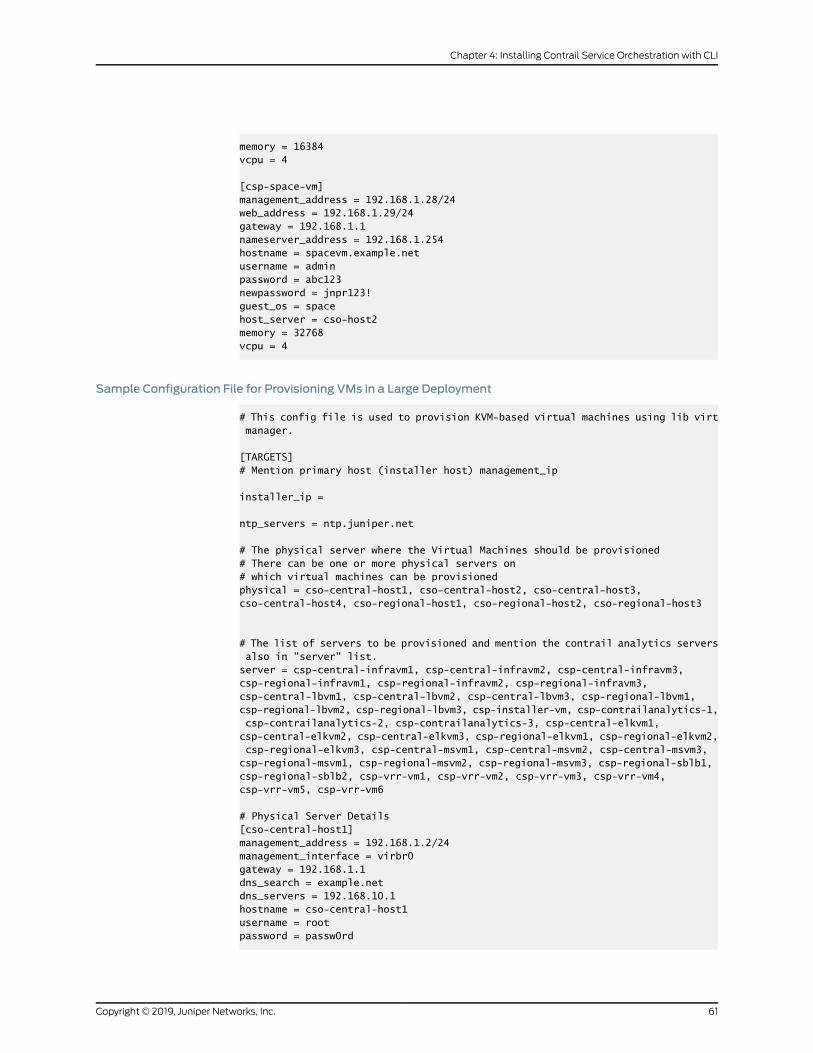
memory = 16384vcpu = 4
[csp-space-vm]management_address = 192.168.1.28/24web_address = 192.168.1.29/24gateway = 192.168.1.1nameserver_address = 192.168.1.254hostname = spacevm.example.netusername = adminpassword = abc123newpassword = jnpr123!guest_os = spacehost_server = cso-host2memory = 32768vcpu = 4
Sample Configuration File for Provisioning VMs in a Large Deployment
# This config file is used to provision KVM-based virtual machines using lib virt manager.
[TARGETS]# Mention primary host (installer host) management_ip
installer_ip =
ntp_servers = ntp.juniper.net
# The physical server where the Virtual Machines should be provisioned# There can be one or more physical servers on# which virtual machines can be provisionedphysical = cso-central-host1, cso-central-host2, cso-central-host3, cso-central-host4, cso-regional-host1, cso-regional-host2, cso-regional-host3
# The list of servers to be provisioned and mention the contrail analytics servers also in "server" list.server = csp-central-infravm1, csp-central-infravm2, csp-central-infravm3, csp-regional-infravm1, csp-regional-infravm2, csp-regional-infravm3, csp-central-lbvm1, csp-central-lbvm2, csp-central-lbvm3, csp-regional-lbvm1, csp-regional-lbvm2, csp-regional-lbvm3, csp-installer-vm, csp-contrailanalytics-1, csp-contrailanalytics-2, csp-contrailanalytics-3, csp-central-elkvm1, csp-central-elkvm2, csp-central-elkvm3, csp-regional-elkvm1, csp-regional-elkvm2, csp-regional-elkvm3, csp-central-msvm1, csp-central-msvm2, csp-central-msvm3, csp-regional-msvm1, csp-regional-msvm2, csp-regional-msvm3, csp-regional-sblb1, csp-regional-sblb2, csp-vrr-vm1, csp-vrr-vm2, csp-vrr-vm3, csp-vrr-vm4, csp-vrr-vm5, csp-vrr-vm6
# Physical Server Details[cso-central-host1]management_address = 192.168.1.2/24management_interface = virbr0gateway = 192.168.1.1dns_search = example.netdns_servers = 192.168.10.1hostname = cso-central-host1username = rootpassword = passw0rd
61Copyright © 2019, Juniper Networks, Inc.
Chapter 4: Installing Contrail Service Orchestration with CLI

data_interface =
[cso-central-host2]management_address = 192.168.1.3/24management_interface = virbr0gateway = 192.168.1.1dns_search = example.netdns_servers = 192.168.10.1hostname = cso-central-host2username = rootpassword = passw0rddata_interface =
[cso-central-host3]management_address = 192.168.1.4/24management_interface = virbr0gateway = 192.168.1.1dns_search = example.netdns_servers = 192.168.10.1hostname = cso-central-host3username = rootpassword = passw0rddata_interface =
[cso-central-host4]management_address = 192.168.1.5/24management_interface = virbr0gateway = 192.168.1.1dns_search = example.netdns_servers = 192.168.10.1hostname = cso-central-host4username = rootpassword = passw0rddata_interface =
[cso-regional-host1]management_address = 192.168.1.6/24management_interface = virbr0gateway = 192.168.1.1dns_search = example.netdns_servers = 192.168.10.1hostname = cso-regional-host1username = rootpassword = passw0rddata_interface =
[cso-regional-host2]management_address = 192.168.1.7/24management_interface = virbr0gateway = 192.168.1.1dns_search = example.netdns_servers = 192.168.10.1hostname = cso-regional-host2username = rootpassword = passw0rddata_interface =
[cso-regional-host3]management_address = 192.168.1.8/24management_interface = virbr0
Copyright © 2019, Juniper Networks, Inc.62
Contrail Service Orchestration Installation and Upgrade Guide

gateway = 192.168.1.1dns_search = example.netdns_servers = 192.168.10.1hostname = cso-regional-host3username = rootpassword = passw0rddata_interface =
# VM Details
[csp-central-infravm1]management_address = 192.168.1.9/24hostname = centralinfravm1.example.netusername = rootpassword = passw0rdlocal_user = infravmlocal_password = passw0rdguest_os = ubuntuhost_server = cso-central-host2memory = 49152vcpu = 12enable_data_interface = falsevm_type = baseInfravolumes = swap:48G,/mnt/data:400G,/data2:1Gbase_disk_size = 100G
[csp-central-infravm2]management_address = 192.168.1.10/24hostname = centralinfravm2.example.netusername = rootpassword = passw0rdlocal_user = infravmlocal_password = passw0rdguest_os = ubuntuhost_server = cso-central-host4memory = 49152vcpu = 12enable_data_interface = falsevm_type = baseInfravolumes = swap:48G,/mnt/data:400G,/data2:1Gbase_disk_size = 100G
[csp-central-infravm3]management_address = 192.168.1.11/24hostname = centralinfravm3.example.netusername = rootpassword = passw0rdlocal_user = infravmlocal_password = passw0rdguest_os = ubuntuhost_server = cso-central-host3memory = 49152vcpu = 12enable_data_interface = falsevm_type = baseInfravolumes = swap:48G,/mnt/data:400G,/data2:1Gbase_disk_size = 100G
[csp-regional-infravm1]management_address = 192.168.1.12/24
63Copyright © 2019, Juniper Networks, Inc.
Chapter 4: Installing Contrail Service Orchestration with CLI

hostname = regionalinfravm1.example.netusername = rootpassword = passw0rdlocal_user = infravmlocal_password = passw0rdguest_os = ubuntuhost_server = cso-regional-host1memory = 49152vcpu = 12enable_data_interface = falsevm_type = baseInfravolumes = swap:48G,/mnt/data:400G,/data2:1Gbase_disk_size = 100G
[csp-regional-infravm2]management_address = 192.168.1.13/24hostname = regionalinfravm2.example.netusername = rootpassword = passw0rdlocal_user = infravmlocal_password = passw0rdguest_os = ubuntuhost_server = cso-regional-host2memory = 49152vcpu = 12enable_data_interface = falsevm_type = baseInfravolumes = swap:48G,/mnt/data:400G,/data2:1Gbase_disk_size = 100G
[csp-regional-infravm3]management_address = 192.168.1.14/24hostname = regionalinfravm3.example.netusername = rootpassword = passw0rdlocal_user = infravmlocal_password = passw0rdguest_os = ubuntuhost_server = cso-regional-host3memory = 49152vcpu = 12enable_data_interface = falsevm_type = baseInfravolumes = swap:48G,/mnt/data:400G,/data2:1Gbase_disk_size = 100G
[csp-space-vm]management_address = 192.168.1.15/24web_address = 192.168.1.15/24gateway = 192.168.1.1nameserver_address = 192.168.1.254hostname = spacevm.example.netusername = adminpassword = abc123newpassword = jnpr123!guest_os = spacehost_server = cso-central-host2memory = 32768vcpu = 4
Copyright © 2019, Juniper Networks, Inc.64
Contrail Service Orchestration Installation and Upgrade Guide

[csp-installer-vm]management_address = 192.168.1.16/24hostname = installervm.example.netusername = rootpassword = passw0rdlocal_user = installervmlocal_password = passw0rdguest_os = ubuntuhost_server = cso-central-host1memory = 24576vcpu = 4enable_data_interface = falsevm_type =volumes = swap:32G,/mnt/data:400G,/data2:1Gbase_disk_size = 100G
[csp-contrailanalytics-1]management_address = 192.168.1.17/24hostname = can1.example.netusername = rootpassword = passw0rdlocal_user = canvmlocal_password = passw0rdguest_os = ubuntuhost_server = cso-central-host1memory = 65536vcpu = 24enable_data_interface = falsevm_type =volumes = swap:64G,/data1:1G,/data2:1Gbase_disk_size = 500G
[csp-contrailanalytics-2]management_address = 192.168.1.18/24hostname = can2.example.netusername = rootpassword = passw0rdlocal_user = canvmlocal_password = passw0rdguest_os = ubuntuhost_server = cso-central-host2memory = 65536vcpu = 24enable_data_interface = falsevm_type =volumes = swap:64G,/data1:1G,/data2:1Gbase_disk_size = 500G
[csp-contrailanalytics-3]management_address = 192.168.1.19/24hostname = can3.example.netusername = rootpassword = passw0rdlocal_user = canvmlocal_password = passw0rdguest_os = ubuntuhost_server = cso-central-host4memory = 65536vcpu = 24
65Copyright © 2019, Juniper Networks, Inc.
Chapter 4: Installing Contrail Service Orchestration with CLI

enable_data_interface = falsevm_type =volumes = swap:64G,/data1:1G,/data2:1Gbase_disk_size = 500G
[csp-central-lbvm1]management_address = 192.168.1.20/24hostname = centrallbvm1.example.netusername = rootpassword = passw0rdlocal_user = lbvmlocal_password = passw0rdguest_os = ubuntuhost_server = cso-central-host1memory = 6144vcpu = 2enable_data_interface = falsevm_type =volumes = swap:6G,/mnt/data:400G,/data2:1Gbase_disk_size = 100G
[csp-central-lbvm2]management_address = 192.168.1.21/24hostname = centrallbvm2.example.netusername = rootpassword = passw0rdlocal_user = lbvmlocal_password = passw0rdguest_os = ubuntuhost_server = cso-central-host2memory = 6144vcpu = 2enable_data_interface = falsevm_type =volumes = swap:6G,/mnt/data:400G,/data2:1Gbase_disk_size = 100G
[csp-central-lbvm3]management_address = 192.168.1.22/24hostname = centrallbvm3.example.netusername = rootpassword = passw0rdlocal_user = lbvmlocal_password = passw0rdguest_os = ubuntuhost_server = cso-central-host3memory = 4096vcpu = 2enable_data_interface = falsevm_type =volumes = swap:4G,/mnt/data:400G,/data2:1Gbase_disk_size = 100G
[csp-regional-lbvm1]management_address = 192.168.1.23/24hostname = regionallbvm1.example.netusername = rootpassword = passw0rdlocal_user = lbvmlocal_password = passw0rd
Copyright © 2019, Juniper Networks, Inc.66
Contrail Service Orchestration Installation and Upgrade Guide
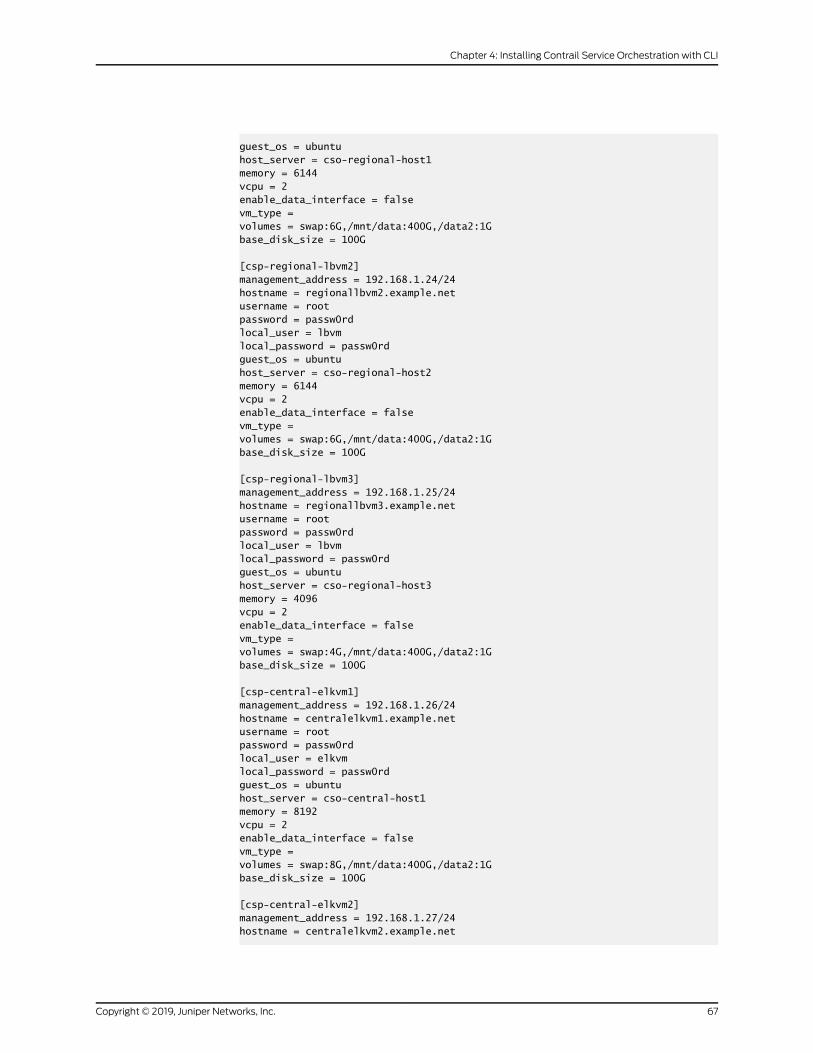
guest_os = ubuntuhost_server = cso-regional-host1memory = 6144vcpu = 2enable_data_interface = falsevm_type =volumes = swap:6G,/mnt/data:400G,/data2:1Gbase_disk_size = 100G
[csp-regional-lbvm2]management_address = 192.168.1.24/24hostname = regionallbvm2.example.netusername = rootpassword = passw0rdlocal_user = lbvmlocal_password = passw0rdguest_os = ubuntuhost_server = cso-regional-host2memory = 6144vcpu = 2enable_data_interface = falsevm_type =volumes = swap:6G,/mnt/data:400G,/data2:1Gbase_disk_size = 100G
[csp-regional-lbvm3]management_address = 192.168.1.25/24hostname = regionallbvm3.example.netusername = rootpassword = passw0rdlocal_user = lbvmlocal_password = passw0rdguest_os = ubuntuhost_server = cso-regional-host3memory = 4096vcpu = 2enable_data_interface = falsevm_type =volumes = swap:4G,/mnt/data:400G,/data2:1Gbase_disk_size = 100G
[csp-central-elkvm1]management_address = 192.168.1.26/24hostname = centralelkvm1.example.netusername = rootpassword = passw0rdlocal_user = elkvmlocal_password = passw0rdguest_os = ubuntuhost_server = cso-central-host1memory = 8192vcpu = 2enable_data_interface = falsevm_type = volumes = swap:8G,/mnt/data:400G,/data2:1Gbase_disk_size = 100G
[csp-central-elkvm2]management_address = 192.168.1.27/24hostname = centralelkvm2.example.net
67Copyright © 2019, Juniper Networks, Inc.
Chapter 4: Installing Contrail Service Orchestration with CLI

username = rootpassword = passw0rdlocal_user = elkvmlocal_password = passw0rdguest_os = ubuntuhost_server = cso-central-host2memory = 8192vcpu = 2enable_data_interface = falsevm_type = volumes = swap:8G,/mnt/data:400G,/data2:1Gbase_disk_size = 100G
[csp-central-elkvm3]management_address = 192.168.1.28/24hostname = centralelkvm3.example.netusername = rootpassword = passw0rdlocal_user = elkvmlocal_password = passw0rdguest_os = ubuntuhost_server = cso-central-host3memory = 8192vcpu = 2enable_data_interface = falsevm_type =volumes = swap:8G,/mnt/data:400G,/data2:1Gbase_disk_size = 100G
[csp-regional-elkvm1]management_address = 192.168.1.29/24hostname = regionalelkvm1.example.netusername = rootpassword = passw0rdlocal_user = elkvmlocal_password = passw0rdguest_os = ubuntuhost_server = cso-regional-host1memory = 8192vcpu = 2enable_data_interface = falsevm_type =volumes = swap:8G,/mnt/data:400G,/data2:1Gbase_disk_size = 100G
[csp-regional-elkvm2]management_address = 192.168.1.30/24hostname = regionalelkvm2.example.netusername = rootpassword = passw0rdlocal_user = elkvmlocal_password = passw0rdguest_os = ubuntuhost_server = cso-regional-host2memory = 8192vcpu = 2enable_data_interface = falsevm_type =volumes = swap:8G,/mnt/data:400G,/data2:1Gbase_disk_size = 100G
Copyright © 2019, Juniper Networks, Inc.68
Contrail Service Orchestration Installation and Upgrade Guide

[csp-regional-elkvm3]management_address = 192.168.1.31/24hostname = regionalelkvm3.example.netusername = rootpassword = passw0rdlocal_user = elkvmlocal_password = passw0rdguest_os = ubuntuhost_server = cso-regional-host3memory = 8192vcpu = 2enable_data_interface = falsevm_type =volumes = swap:8G,/mnt/data:400G,/data2:1Gbase_disk_size = 100G
[csp-central-msvm1]management_address = 192.168.1.32/24hostname = centralmsvm1.example.netusername = rootpassword = passw0rdlocal_user = msvmlocal_password = passw0rdguest_os = ubuntuhost_server = cso-central-host1memory = 38912vcpu = 10enable_data_interface = falsevm_type = baseMSvolumes = swap:38G,/mnt/data:400G,/data2:1Gbase_disk_size = 100G
[csp-central-msvm2]management_address = 192.168.1.33/24hostname = centralmsvm2.example.netusername = rootpassword = passw0rdlocal_user = msvmlocal_password = passw0rdguest_os = ubuntuhost_server = cso-central-host4memory = 38912vcpu = 10enable_data_interface = falsevm_type = baseMSvolumes = swap:38G,/mnt/data:400G,/data2:1Gbase_disk_size = 100G
[csp-central-msvm3]management_address = 192.168.1.34/24hostname = centralmsvm3.example.netusername = rootpassword = passw0rdlocal_user = msvmlocal_password = passw0rdguest_os = ubuntuhost_server = cso-central-host3memory = 38912vcpu = 10
69Copyright © 2019, Juniper Networks, Inc.
Chapter 4: Installing Contrail Service Orchestration with CLI

enable_data_interface = falsevm_type = baseMSvolumes = swap:38G,/mnt/data:400G,/data2:1Gbase_disk_size = 100G
[csp-regional-msvm1]management_address = 192.168.1.35/24hostname = regionalmsvm1.example.netusername = rootpassword = passw0rdlocal_user = msvmlocal_password = passw0rdguest_os = ubuntuhost_server = cso-regional-host1memory = 38912vcpu = 10enable_data_interface = falsevm_type = baseMSvolumes = swap:38G,/mnt/data:400G,/data2:1Gbase_disk_size = 100G
[csp-regional-msvm2]management_address = 192.168.1.36/24hostname = regionalmsvm2.example.netusername = rootpassword = passw0rdlocal_user = msvmlocal_password = passw0rdguest_os = ubuntuhost_server = cso-regional-host2memory = 38912vcpu = 10enable_data_interface = falsevm_type = baseMSvolumes = swap:38G,/mnt/data:400G,/data2:1Gbase_disk_size = 100G
[csp-regional-msvm3]management_address = 192.168.1.37/24hostname = regionalmsvm3.example.netusername = rootpassword = passw0rdlocal_user = msvmlocal_password = passw0rdguest_os = ubuntuhost_server = cso-regional-host3memory = 38912vcpu = 10enable_data_interface = falsevm_type = baseMSvolumes = swap:38G,/mnt/data:400G,/data2:1Gbase_disk_size = 100G
[csp-regional-sblb1]management_address = 192.168.1.38/24hostname = regional-sblb1.example.netusername = rootpassword = passw0rdlocal_user = sblblocal_password = passw0rd
Copyright © 2019, Juniper Networks, Inc.70
Contrail Service Orchestration Installation and Upgrade Guide

guest_os = ubuntuhost_server = cso-regional-host1memory = 4096vcpu = 2enable_data_interface = truevm_type =volumes = swap:4G,/mnt/data:400G,/data2:1Gbase_disk_size = 100G
[csp-regional-sblb2]management_address = 192.168.1.39/24hostname = regional-sblb2.example.netusername = rootpassword = passw0rdlocal_user = sblblocal_password = passw0rdguest_os = ubuntuhost_server = cso-regional-host2memory = 4096vcpu = 2enable_data_interface = truevm_type =volumes = swap:4G,/mnt/data:400G,/data2:1Gbase_disk_size = 100G
[csp-vrr-vm1]management_address = 192.168.1.40/24hostname = vrr1.example.netgateway = 192.168.1.1newpassword = passw0rdguest_os = vrrhost_server = cso-central-host1memory = 16384vcpu = 4
[csp-vrr-vm2]management_address = 192.168.1.41/24hostname = vrr2.example.netgateway = 192.168.1.1newpassword = passw0rdguest_os = vrrhost_server = cso-central-host2memory = 16384vcpu = 4
[csp-vrr-vm3]management_address = 192.168.1.42/24hostname = vrr3.example.netgateway = 192.168.1.1newpassword = passw0rdguest_os = vrrhost_server = cso-central-host3memory = 16384vcpu = 4
[csp-vrr-vm4]management_address = 192.168.1.43/24hostname = vrr4.example.netgateway = 192.168.1.1newpassword = passw0rd
71Copyright © 2019, Juniper Networks, Inc.
Chapter 4: Installing Contrail Service Orchestration with CLI

guest_os = vrrhost_server = cso-regional-host1memory = 16384vcpu = 4
[csp-vrr-vm5]management_address = 192.168.1.44/24hostname = vrr4.example.netgateway = 192.168.1.1newpassword = passw0rdguest_os = vrrhost_server = cso-regional-host2memory = 16384vcpu = 4
[csp-vrr-vm6]management_address = 192.168.1.45/24hostname = vrr4.example.netgateway = 192.168.1.1newpassword = passw0rdguest_os = vrrhost_server = cso-regional-host3memory = 16384vcpu = 4
Provisioning VMswith the Provisioning Tool for the KVMHypervisor
If you use the KVM hypervisor for the CSO node or server, you can use the provisioning
tool to create and configure the VMs for the CSO and Junos Space components.
TheVMsprovisionedby the toolwill havepre-installedUbuntuand JunosSpaceNetwork
Management Platform software in the Junos Space VM.
To provision VMs with the provisioning tool:
1. Log in as root to the central CSO node or server.
2. Access the directory for the installer. For example, if the nameof the installer directory
is csoVersion:
root@host:~/# cd /~/csoVersion/
3. Run the provisioning tool.
root@host:~/cspVersion/# ./provision_vm.sh
The provisioning begins.
4. During installation, observe detailed messages in the log files about the provisioning
of the VMs.
• provision_vm.log—Contains details about the provisioning process
Copyright © 2019, Juniper Networks, Inc.72
Contrail Service Orchestration Installation and Upgrade Guide
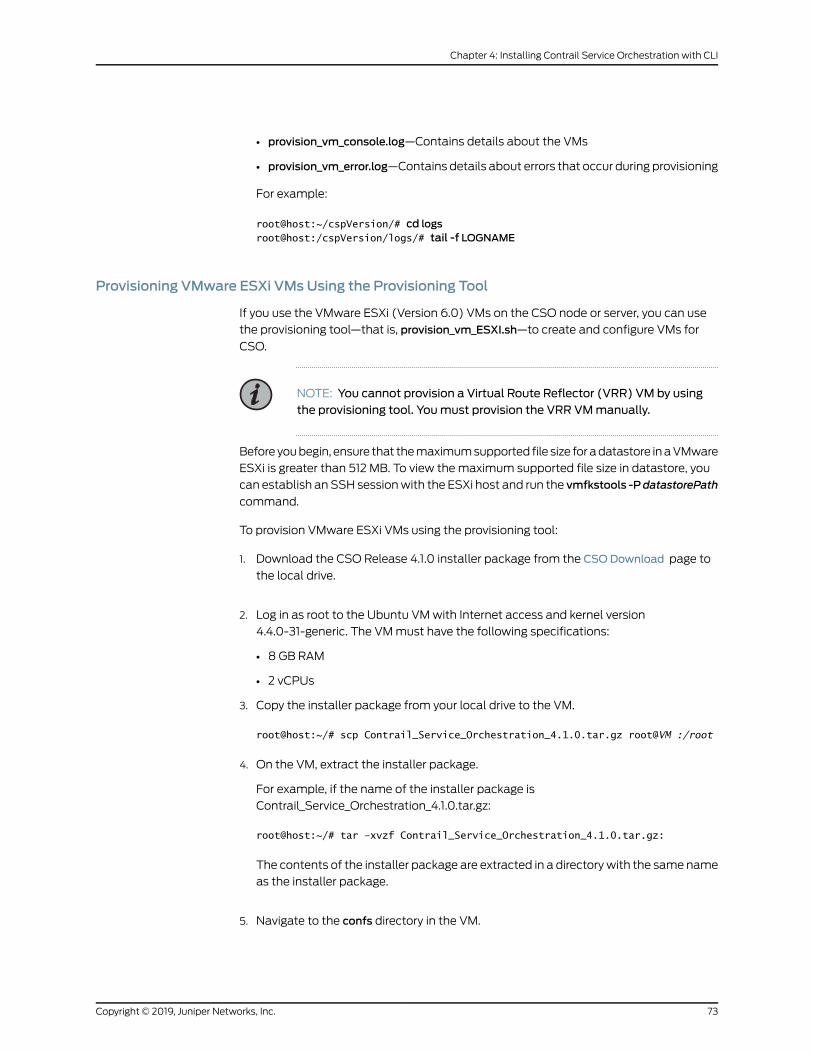
• provision_vm_console.log—Contains details about the VMs
• provision_vm_error.log—Contains details about errors that occur during provisioning
For example:
root@host:~/cspVersion/# cd logsroot@host:/cspVersion/logs/# tail -f LOGNAME
Provisioning VMware ESXi VMs Using the Provisioning Tool
If you use the VMware ESXi (Version 6.0) VMs on the CSO node or server, you can use
the provisioning tool—that is, provision_vm_ESXI.sh—to create and configure VMs for
CSO.
NOTE: You cannot provision a Virtual Route Reflector (VRR) VM by usingthe provisioning tool. Youmust provision the VRR VMmanually.
Before youbegin, ensure that themaximumsupported file size for adatastore inaVMware
ESXi is greater than 512 MB. To view themaximum supported file size in datastore, you
can establish an SSH sessionwith the ESXi host and run the vmfkstools -PdatastorePath
command.
To provision VMware ESXi VMs using the provisioning tool:
1. Download the CSO Release 4.1.0 installer package from the CSODownload page to
the local drive.
2. Log in as root to the Ubuntu VMwith Internet access and kernel version
4.4.0-31-generic. The VMmust have the following specifications:
• 8 GB RAM
• 2 vCPUs
3. Copy the installer package from your local drive to the VM.
root@host:~/# scp Contrail_Service_Orchestration_4.1.0.tar.gz root@VM :/root
4. On the VM, extract the installer package.
For example, if the name of the installer package is
Contrail_Service_Orchestration_4.1.0.tar.gz:
root@host:~/# tar –xvzf Contrail_Service_Orchestration_4.1.0.tar.gz:
The contents of the installer package are extracted in a directorywith the same name
as the installer package.
5. Navigate to the confs directory in the VM.
73Copyright © 2019, Juniper Networks, Inc.
Chapter 4: Installing Contrail Service Orchestration with CLI
For example:
root@host:~/# cd Contrail_Service_Orchestration_4.1.0/confs
root@host:~/Contrail_Service_Orchestration_4.1.0/confs#
6. Make a copy of the sample configuration file, provision_vm_example_ESXI.conf, that
is available in the confs directory and rename it provision_vmI.conf.
For example:
root@host:~/Contrail_Service_Orchestration_4.1# cp/confs/cso4.1.0/production/nonha/provisionvm/provision_vm_collocated_ESXI.confprovision_vm.conf
7. Open the provision_vm.conf file with a text editor.
8. In the [TARGETS] section, specify the following values for the network onwhich CSO
resides.
• installer_ip—IP address of the management interface of the VM on which you are
running the provisioning script.
• ntp_servers—Comma-separated list of fully qualified domain names (FQDNs) of
Network Time Protocol (NTP) servers. For networks within firewalls, specify NTP
servers specific to your network.
You need not edit the following values:
• physical—Comma-separated list of hostnames of the CSO nodes or servers are
displayed.
• virtual—Comma-separated list of names of the virtualmachines (VMs) on theCSO
servers are displayed.
9. Specify the following configuration values for each ESXi host on the CSO node or
server.
• management_address—IPaddressof theEthernetmanagement (primary) interface
in Classless Interdomain Routing (CIDR) notation of the VM network. For example,
192.0.2.0/24.
• gateway—Gateway IP address of the VM network.
• dns_search—Domain for DNS operations.
• dns_servers—Comma-separated list of DNS name servers, including DNS servers
specific to your network.
• hostname—Hostname of the VMware ESXi host.
• username—Username for logging in to the VMware ESXi host.
• password—Password for logging in to the VMware ESXi host.
• vmnetwork—Label for each virtual network adapter. This label is used to identify
the physical network that is associated to a virtual network adapter.
Copyright © 2019, Juniper Networks, Inc.74
Contrail Service Orchestration Installation and Upgrade Guide

The vmnetwork data for each VM is available in the Summary tab of a VM in the
vSphere Client. Youmust not specify vmnetwork data within double quotation
marks..
• datastore—Datastore value to save all VM files.
The datastore data for each VM is available in the Summary tab of a VM in the
vSphere Client. Youmust not specify datastore data within double quotes.
10. Save the provision_vm.conf file.
11. Run the provision_vm_ESXI.sh script to create the VMs.
root@host:~/Contrail_Service_Orchestration_4.1.0/# ./provision_vm_ESXI.sh
12. Copy the provision_vm.conf file to the installer VM.
For example:
root@host:~/Contrail_Service_Orchestration_4.1.0/#scp confs/provision_vm.confroot@installer_VM_IP:/root/Contrail_Service_Orchestration_4.1.0/confs
This action of provisioning VMs using the Provisioning Tool brings up VMware ESXi VMs
with the configuration provided in the files.
Manually Provisioning VRR VMs on the Contrail Service Orchestration Node or Server
Tomanually provision the VRR VM:
1. Download theVRRRelease 15.1R6.7 software package (.ova format) for VMware from
the Virtual Route Reflector page, to a location accessible to the server.
2. Launch the VRR by using vSphere or vCenter Client for your ESXi server and log in to
the server with your credentials.
3. Set up an SSH session to the VRR VM.
4. Execute the following commands:
root@host:~/# configureroot@host:~/# delete groups global system services ssh root-login deny-passwordroot@host:~/# set system root-authentication plain-text-passwordroot@host:~/# New Password:<password>root@host:~/# Retype New Password:<password>root@host:~/# set system services sshroot@host:~/# set system services netconf sshroot@host:~/# set routing-options rib inet.3 static route 0.0.0.0/0 discardroot@host:~/# commitroot@host:~/# exit
75Copyright © 2019, Juniper Networks, Inc.
Chapter 4: Installing Contrail Service Orchestration with CLI
Verifying Connectivity of the VMs
From each VM, verify that you can ping the IP addresses and hostnames of all the other
servers, nodes, and VMs in the CSO.
CAUTION: If the VMs cannot communicate with all the other hosts in thedeployment, the installation will fail.
RelatedDocumentation
Installing and Configuring Contrail Service Orchestration on page 78•
Setting Up the Installation Package and Library Access
• Copying the Installer Package to the Installer VM on page 76
• Creating a Private Repository on an External Server on page 77
Copying the Installer Package to the Installer VM
After you have provisioned the VMs,perform the following steps:
1. Copy the installer package file from the central CSO server to the installer VM.
TIP: Copy the installer package from the Ubuntu VM to the installer VMfor ESXi. After provisioning the VMs, copy the installer package from thecentral server to the installer VM.
2. Log in to the installer VM as root.
3. Expand the installer package.
For example, if the name of the installer package is csoVersion.tar.gz:
root@host:~/# tar –xvzf csoVersion.tar.gz
The contents of the installer package are placed in a directory with the same name
as the installer package. In this example, the name of the directory is csoVersion.
4. If you have created an installer VM by using the provisioning tool, you must copy the
/csoVersion/confs/provision_vm.conf file from the Ubuntu VM to the
/csoversion/confs/provision_vm.conf directory of the installer VM.
5. Open the provision_vm.conf file with a text editor.
Copyright © 2019, Juniper Networks, Inc.76
Contrail Service Orchestration Installation and Upgrade Guide

6. For installer_ip in the [TARGETS] section, specify the IP address of the installer VM.
7. Save the file.
Creating a Private Repository on an External Server
You use a private repository to download the libraries required for Contrail Service
Orchestration. Use of a private repository for the libraries means that you do not require
Internet access during the installation.
You can use a private repository either on the installer VM (the default choice) or on an
external server.
• If you use the installer VM for the private repository, it is created when you install the
solution, and you can skip this procedure.
• If you use an external server for the private repository, use the following procedure to
create it.
To create the private repository on an external server:
1. Install the requiredUbuntu releaseon the server that youuse for theprivate repository.
2. Copy the installer package to the server.
3. Uncompress the installer package.
For example, if the name of the installer package is csoVersion.tar.gz:
root@host:~/# tar –xvzf csoVersion.tar.gz
The contents of the installer package are placed in a directory with the same name
as the installer package. In this example, the name of the directory is csoVersion.
4. Access the installer directory:
For example:
root@host:~/# cd csoVersion
5. Execute the create_private_repo.sh script to create the private repository.
root@host:~/csoVersion#./create_private_repo.sh
The script creates the private repository.
6. When you run the setup_assist script to create configuration files, specify that you use
an external private repository. See “Installing and Configuring Contrail Service
Orchestration” on page 78.
77Copyright © 2019, Juniper Networks, Inc.
Chapter 4: Installing Contrail Service Orchestration with CLI

RelatedDocumentation
Provisioning VMs on Contrail Service Orchestration Nodes or Servers on page 44•
• Installing and Configuring Contrail Service Orchestration on page 78
Installing and Configuring Contrail Service Orchestration
You use the same installation process for both Contrail ServiceOrchestration (CSO) and
Network Service Controller and for both KVM and ESXi environments.
• Before You Begin on page 78
• Creating the Configuration Files on page 81
• Deploying Infrastructure Services on page 85
• Deploying Microservices on page 86
• Checking the Status of the Microservices on page 86
• Loading Data on page 87
• Taking Snapshot of the VMs on page 88
• Reverting Snapshots on page 95
• Performing a Health Check of Infrastructure Components on page 99
Before You Begin
Before you begin:
• Provision the virtual machines (VMs) for the CSO node or server. (See “Provisioning
VMs on Contrail Service Orchestration Nodes or Servers” on page 44).
• Copy the installer package to the installer VM and expand it. (See “Setting Up the
Installation Package and Library Access” on page 76)
• If you have created an installer VM using the provisioning tool, you must copy the
/Contrail_Service_Orchestration_4.1.0/confs/provision_vm.conf file from the Ubuntu
VM to the /csoversion/confs/provision_vm.conf directory of the installer VM.
• If you use an external server rather than the installer VM for the private repository that
contains the libraries for the installation, create the repository on the server. (See
“Setting Up the Installation Package and Library Access” on page 76).
The installation process uses a private repository so that you do not need Internet
access during the installation.
• Determine the following information:
• The size of deployment: small, medium, large.
• For large deployment, 2 regions are configured by default - central and regional. You
can add up to 2 additional regions with desired names. (e.g.- "Tokyo" or
"East-Coast").
• The IP address of the VM that hosts the installer.
• The time zone for the servers in the deployment, based on the Ubuntu time zone
guidelines.
Copyright © 2019, Juniper Networks, Inc.78
Contrail Service Orchestration Installation and Upgrade Guide

The default value for this setting is the current time zone of the installer host.
• The fully qualified domain name (FQDN) of each Network Time Protocol (NTP)
server that the solution uses. For networks within firewalls, use NTP servers specific
to your network.
For example: ntp.example.net
• If youwant to access theAdministrationPortalwith the single sign-onmethod, enter
the name of the public domain in which the CSO servers reside. Alternatively if you
want toaccess theAdministrationPortalwith local authentication, youneed toenter
a dummy domain name.
• For a distributed deployment, whether you use transport layer security (TLS) to
encrypt data that passes between the CPE device and CSO.
YoumustuseTLSunless youhaveanexplicit reason fornotencryptingdatabetween
the CPE device and CSO.
• Whether you use the CSO Keystone or an external Keystone for authentication of
CSO operations.
• A CSO Keystone is installed with CSO and resides on the central CSO server.
This default option is recommended for all deployments, and is required for a
distributed deployment. Use of aCSOKeystone offers enhanced security because
the Keystone is dedicated to CSO and is not shared with any other applications.
• An external Keystone resides on a different server to the CSO server and is not
installed with CSO.
You specify the IP address and access details for the Keystone during the
installation.
• TheContrailOpenStackKeystone in theContrail CloudPlatform for acentralized
deployment is an example of an external Keystone.
In this case, customers andCloudCPE infrastructure components use the same
Keystone token.
• You can also use your own external Keystone that is not part of the CSO or
Contrail OpenStack installation.
• If you use an external Keystone, the username and service token.
• The IP address of the Contrail controller node for a centralized deployment. For a
centralized deployment, you specify this external server for Contrail Analytics.
• Whether you use a common password for all VMs or a different password for each
VM, and the value of each password.
• The CIDR address of the subnet on which the CSO VMs reside.
• If you use NATwith your CSO installation, the public IP addresses used for NAT for
the central and regional regions.
• The primary interface for all VMs.
The default is eth0.
79Copyright © 2019, Juniper Networks, Inc.
Chapter 4: Installing Contrail Service Orchestration with CLI

• The following information for each server and VM in the deployment:
• Management IP address in CIDR notation
For example: 192.0.2.1/24
• FQDN of each host
For example: central-infravm.example.net
• Password for the root user
If you use the same password for all the VMs, you can enter the password once.
Otherwise, youmust provide the password for each VM.
• For the microservices in the central and each regional region:
• The IPaddressof theKubernetesoverlaynetworkaddress inClassless Interdomain
Routing (CIDR) notation.
The default value is 172.16.0.0/16. If this value is close to your network range, use
a similar address with a /16 subnet.
• The range of the Kubernetes service overlay network addresses, in CIDR notation.
The default value is 192.168.3.0/24.
• The IP address of theKubernetes serviceAPI server, which is on the service overlay
network.
This IP addressmust be in the range you specify for theKubernetesService overlay
network. The default value is 192.168.3.1.
• The IP address of the Kubernetes Cluster Domain Name System (DNS)
This IP addressmust be in the range you specify for theKubernetesService overlay
network. The default value is 192.168.3.1.
• The tunnel interface unit range that CSO uses for an SD-WAN implementation
with an MX Series hub device.
Youmust choose values that are different to those that you configured for theMX
Series router. The possible range of values is 0–16,385, and the default range is
4000–6000.
• The FQDN that the load balancer uses to access the installation.
• For the small deployment, the IP address and the FQDN of the VM that hosts
the HAProxy.
• For medium or large deployments, the virtual IP address and the associated
hostname that you configure for the HAProxy.
• The replication factor for eachmicroservice is pre-determined based on the size
of the deployment.
Copyright © 2019, Juniper Networks, Inc.80
Contrail Service Orchestration Installation and Upgrade Guide

Creating the Configuration Files
You use an interactive script to create configuration files for the environment topology.
The installer uses these configuration files to customize the topology when you deploy
the solution.
To run the installation tool:
1. Log in as root to the host on which you deployed the installer.
2. Access the directory for the installer. For example, if the nameof the installer directory
is csoVersion:
root@host:~/# cd /~/csoVersion/
3. Run the setup tool:
root@host:~/cspVersion/# ./setup_assist.sh
The script starts, sets up the installer, and requests that you enter information about
the installation.
NOTE: Take a note of a password shown. It is later used as the initialpassword for the CSO Administration portal.
4. Specify the management IP address of the VM that hosts the installer file.
5. Specify whether CSO is behind Network Address Translation (NAT).
• y—CSO is behind NAT. After you deploy CSO, youmust apply NAT rules. For
information about NAT rules, see “Applying NAT Rules if CSO Is Deployed Behind
NAT” on page 105.
• n—CSO is not behind NAT (default).
6. Accept the default time zone or specify the Ubuntu time zone for the servers in the
topology.
7. Specify a comma-separated list of FQDNs of NTP servers.
For example: ntp.example.net, ntp.example.com
8. Specify whether the deployment uses high availability (HA).
• y—Deployment uses HA.
• n—Deployment does not use HA.
9. Specify whether the deployment has multiple regions:
• y—Deployment uses multiple regions.
81Copyright © 2019, Juniper Networks, Inc.
Chapter 4: Installing Contrail Service Orchestration with CLI

• n—Deployment uses single region.
10. Press enter if you use only one region or specify a comma-separated list or regions if
you usemultiple regions. You can configure a maximum of three regions. The default
region is regional.
11. Specify the CSO certificate validity in days.
The default value is 365 days.
12. For a distributed deployment, specify whether you use TLS to enable secure
communication between the CPE device and CSO.
Accept the default unless you have an explicit reason for not using encryption for
communications between the CPE device and CSO.
• n—Specifies that TLS is not used.
• y—Specifies use of TLS. This is the default setting.
13. Specify the e-mail address of Admin User.
14. Specify a domain name to determine how you access the Administration Portal, the
main CSO GUI:
• If you want to access the Administration Portal with the single sign-onmethod,
specify the name of the public domain in which the CSO servers reside.
For example:organization.com,whereorganization is the nameof your organization.
• If you want to use local authentication for the Administration portal, you specify a
dummy name.
For example: example.net
15. Specify whether you use an external Keystone to authenticate CSO operations, and
if so, specify the OpenStack Keystone service token.
• n—Specifies use of the CSOKeystonewhich is installedwith and dedicated to CSO.
We recommend that you use this default option unless you have a specific
requirement for an external Keystone.
• y—Specifies use of an external OpenStack Keystone, such as a Keystone specific
to your network. Select the IP address and access details for the Keystone.
16. Specify whether you use an external Contrail Analytics server:
• y—Specifies use of Contrail Analytics in Contrail OpenStack for a centralized or
combined deployment.
Youmust provide the IP address of the Contrail controller node.
• n—Specifies use of the Contrail Analytics VM for a distributed deployment.
17. Specify whether you use a common password for all CSO VMs, and if so, specify the
password.
Copyright © 2019, Juniper Networks, Inc.82
Contrail Service Orchestration Installation and Upgrade Guide

18. Specify the following information for the virtual route reflector (VRR) that you create:
a. Specify whether VRR is behind NAT.
• Specify the number of VRR instances.
• For non-HA deployments, youmust create at least one VRR.
• For HA deployments, we recommend that you create VRRs in even numbers,
and youmust create at least two VRRs. Each VRRmust be in a different
redundancy group. If the primary VRR fails or connectivity is lost, the session
remains active as the secondary VRR continues to receive and advertise LAN
routes to a site, thereby providing redundancy.
• y—VRR is behind NAT. If you are deploying a VRR in a private network, the NAT
instance translates all requests (BGP traffic) to a VRR from a public IP address
to a private IP address.
• n—VRR is not behind NAT (default).
b. Specify whether you use a common password for all VRRs:
• y—Specify the common password for all VRRs.
• n—Specify the password for each VRR.
c. Specify the public IP address for each VRR that you create. For example,
192.0.20.118/24.
d. Specify the redundancy group for each VRR that you have created.
• For non-HA deployments, specify the redundant group of the VRR as zero.
• For HA deployments, the VRRsmust be distributed among the redundancy
groups. There can be two groups—group 0 and group 1. For example, if you have
two VRRs, specify the redundancy group for VRR1 as 0 and the VRR2 as 1.
19. Starting with the central region, specify the following information for each server in
the deployment of each region.
The script prompts you for each set of information that youmust enter.
NOTE: The IP addresses 172.16.0.0/16 and 192.168.3.0/24must not beused for CSO VMs .
• Management IP address with CIDR.
For example: 192.0.2.1/24
• Password for the root user (only required if you use different passwords for each
VM).
• The IP address of the Kubernetes overlay network address, in CIDR notation, that
the microservices use.
The default value is 172.16.0.0/16. If this value is close to your network range, use a
similar address with a /16 subnet.
83Copyright © 2019, Juniper Networks, Inc.
Chapter 4: Installing Contrail Service Orchestration with CLI

• The range of the Kubernetes service overlay network addresses, in CIDR notation.
Thedefault value is 192.168.3.0/24. It is unlikely that therewill be a conflict between
this default and your network, so you can usually accept the default. If, however,
there is a conflict with your network, use a similar address with a /24 subnet.
• The IP address of the Kubernetes service API server, which is on the service overlay
network.
This IP addressmust be in the range you specify for the Kubernetes Service overlay
network. The default value is 192.168.3.1.
• The IP address of the Kubernetes Cluster DNS server.
This IP addressmust be in the range you specify for the Kubernetes Service overlay
network. The default value is 192.168.3.1.
• Specify the range of tunnel interface units that CSO uses for an SD-WAN
implementation with an MX Series hub device
The default setting is 4000–6000. You specify values in the range 0–16,385 that
are different to those that you configured on the MX Series router.
• The IP address and FQDN of the host for the load balancer:
• For non-HA deployments, the IP address and FQDN of the VM that hosts the
HAProxy.
• For HA deployments, the virtual IP address and associated FQDN that you
configure for the HAproxy.
• The replication factor for eachmicroservice is pre-determined based on the size of
the deployment.
The tool uses the input data to configure each region and indicates when the
configuration stage is complete.
20.Configure settings for each region in the deployment:
• Specify the IP address and prefix of the Kubernetes overlay network that the
microservices use.
• Specify the fully-qualified domain names of the host for the load balancer.
• For a non-HA deployment, the IP address or FQDN of the VM that hosts the
HAProxy.
• For an HA deployment, the virtual IP address that you configure for the HAProxy.
• Specify a unique virtual router identifier in the range 0–255 for the HAProxy VM in
each region.
NOTE: Use a different number for this setting in each region.
• Specify the number of instances of microservices:
Copyright © 2019, Juniper Networks, Inc.84
Contrail Service Orchestration Installation and Upgrade Guide
• For non-HA installations, specify 1.
• For HA installations, specify 2.
The tool uses the input data to configure each region and indicates when the
configuration stage is complete.
21. Specify the subnet in CIDR notation on which the CSO VMs reside.
The script requires this input, but uses the value only for distributed deployments and
not for centralized deployments.
22. Specify the range for tunnel interface unit.
23.Accept or specify the primary interface for all VMs.
The default is eth0. Accept this value unless you have explicitly changed the primary
interface on your host of VMs.
24.When all the regions are configured, the tool starts displaying the deployment
commands.
The commands shown depends on the deployment size.
• For small/medium deployments:
root@host:~/# ./deploy_infra_services.shroot@host:~/# ./deploy_micro_services.sh
• For large deployment:
root@host:~/# DEPLOYMENT_ENV=central ./deploy_infra_services.shroot@host:~/# DEPLOYMENT_ENV=regional ./deploy_infra_services.shroot@host:~/# DEPLOYMENT_ENV=central ./deploy_micro_services.shroot@host:~/# DEPLOYMENT_ENV=regional ./deploy_micro_services.sh
NOTE: The password for each infrastructure component and theAdministration Portal password are displayed on the console after youcomplete answering the Setup Assistance questions. Youmust note thepassword that isdisplayedontheconsoleas theyarenotsaved in thesystem.To enhance the password security, the length and pattern for each passwordis different and the password is encrypted, and passwords in the log file aremasked.
Deploying Infrastructure Services
To deploy infrastructure services:
1. Log in as root to the Installer VM.
85Copyright © 2019, Juniper Networks, Inc.
Chapter 4: Installing Contrail Service Orchestration with CLI
2. Deploy the central infrastructure services.
root@host:~/# "DEPLOYMENT_ENV=central ./deploy_infra_services.sh"
CAUTION: Wait at least tenminutes before executing the next command.Otherwise, themicroservicesmight not be deployed correctly.
3. Deploy the regional infrastructure services and wait for the process to complete.
root@host:~/# "DEPLOYMENT_ENV=regional ./deploy_infra_services.sh"
If youhaveconfiguredmultiple regions, thenyoucandeploy the infrastructure services
on the regions in any order after deploying the central infrastructure.
NOTE: The deploy_infra_services.sh script performs a health check ofinfrastructure services. If you encounter an error, youmust rerun thedeploy_infra_services.sh script.
DeployingMicroservices
To deploy the microservices:
1. Log in as root to the Installer VM.
2. Deploy the central microservices.
root@host:~/# "DEPLOYMENT_ENV=central ./deploy_micro_services.sh"
CAUTION: Wait at least tenminutes before executing the next command.Otherwise, themicroservicesmight not be deployed correctly.
3. Deploy the regional microservices and wait for the process to complete:
root@host:~/# "DEPLOYMENT_ENV=regional ./deploy_micro_services.sh"
Checking the Status of theMicroservices
To check the status of the microservices:
1. Log in as root into the VM or server that hosts the central microservices.
2. Run the following command with required region – central or regional.
root@host:~/# kubectl get pods –n <region> | grep -v Running
Copyright © 2019, Juniper Networks, Inc.86
Contrail Service Orchestration Installation and Upgrade Guide

If the result is an empty display, as shown below, the microservices are running and
you can proceed to the next section.
root@host:~/# kubectl get pods –n <region>| grep -v Running
NAME READY STATUS RESTARTS AGE
Region can only be central or regional. For any other customized region (e.g. - site1),
it is listed under "regional".
If the display contains an itemwith the status CrashLoopBackOff or Terminating, a
microservice is not running.
3. Delete and restart the pod.
root@host:~/# kubectl get pods
NAME READY STATUS RESTARTS AGE csp.ams-3909406435-4yb0l 1/1 CrashLoopBackOff 0 8m csp.nso-core-3445362165-s55x8 0/1 Running 0 8m
The first item in the display shows themicroservice and the second item shows its
pod.
root@host:~/# kubectl delete pods -l microservice=csp.nso-core –n <region>
4. Wait a couple of minutes and then check the status of the microservice and its pod.
root@host:~/#kubectl get pods –n <region>
NAME READY STATUS RESTARTS AGE
csp.ams-4890899323-3dfd02 1/1 Running 0 1m csp.nso-core-09009278633-fr234f 0/1 Running 0 1m
Loading Data
After you check that themicroservices are running, youmust loaddata to import plug-ins
and data design tools.
To load data:
1. Ensure that all themicroservices are up and running on the central and each regional
microservices host.
2. (Optional) Specify the value of the regional subnet in the
/micro_services/data/inputs.yaml file on the installer VM. By default, the subnet
address is themanagementaddressof the regionalmicroserviceshost that youspecify
in the topology.conf file.
3. Access the home directory of the installer VM.
87Copyright © 2019, Juniper Networks, Inc.
Chapter 4: Installing Contrail Service Orchestration with CLI

4. Execute the ./load_services_data.sh command.
root@host:~/#./load_services_data.sh
NOTE: Youmust not execute load_services_data.shmore than once after a
new deployment.
Taking Snapshot of the VMs
At the end of “Loading Data” on page 87, the following message is displayed:
Please run snapshot.sh to take snapshot of all the VMs. This enables to perform recovery from single node VM failures. It is a recommended step for production setups.
This utility will not take snapshot of the installer VM and the VRR VMs.
NOTE: This script needs confs/provision_vm.conf file to be present on theInstaller VM.
The VMs on KVM host are required to shut down before taking snapshots. The VMs will
reboot on running this script.
The VMs on ESXi host are not required to shut down on running this script.
CAUTION: Make sure that the vmname field is not empty for any of the VMsin confs/provision_vm.conf file. Otherwise, the script will fail.
1. On the installer VM, navigate to Contrail_Service_Orchestration_4.1.0
2. Run./snapshot.sh
Sample output:
2019-02-05 20:52:36 INFO snapshot snapshot.py ===============================================2019-02-05 20:52:36 INFO snapshot snapshot.py Snapshot Start Time: 2019-02-05 20:52:36.6942872019-02-05 20:52:36 INFO snapshot snapshot.py ===============================================2019-02-05 20:52:36 INFO snapshot snapshot.py Going to perform CSO Health Check2019-02-05 20:52:54 INFO snapshot check_infracomponent.py Health Check for Infrastructure Component SaltStack Started2019-02-05 20:52:55 INFO snapshot check_infracomponent.py The Infrastructure Component SaltStack is Healthy
Copyright © 2019, Juniper Networks, Inc.88
Contrail Service Orchestration Installation and Upgrade Guide

2019-02-05 20:52:55 INFO snapshot check_infracomponent.py Health Check for Infrastructure Component Cassandra Started2019-02-05 20:52:56 INFO snapshot check_infracomponent.py The Infrastructure Component Cassandra is Healthy
2019-02-05 20:52:56 INFO snapshot check_infracomponent.py Health Check for Infrastructure Component ElasticSearch Started2019-02-05 20:52:58 INFO snapshot check_infracomponent.py The Infrastructure Component ElasticSearch is Healthy
2019-02-05 20:52:58 INFO snapshot check_infracomponent.py Health Check for Infrastructure Component Etcd Started2019-02-05 20:52:59 INFO snapshot check_infracomponent.py The Infrastructure Component Etcd is Healthy
2019-02-05 20:52:59 INFO snapshot check_infracomponent.py Health Check for Infrastructure Component MariaDb Started2019-02-05 20:53:01 INFO snapshot check_infracomponent.py The Infrastructure Component MariaDb is Healthy
2019-02-05 20:53:01 INFO snapshot check_infracomponent.py Health Check for Infrastructure Component RabbitMQ Started2019-02-05 20:53:04 INFO snapshot check_infracomponent.py The Infrastructure Component RabbitMQ is Healthy
2019-02-05 20:53:04 INFO snapshot check_infracomponent.py Health Check for Infrastructure Component ZooKeeper Started2019-02-05 20:53:05 INFO snapshot check_infracomponent.py The Infrastructure Component ZooKeeper is Healthy
2019-02-05 20:53:05 INFO snapshot check_infracomponent.py Health Check for Infrastructure Component Redis Started2019-02-05 20:53:05 INFO snapshot check_infracomponent.py The Infrastructure Component Redis is Healthy
2019-02-05 20:53:05 INFO snapshot check_infracomponent.py Health Check for Infrastructure Component ArangoDb Started2019-02-05 20:53:07 INFO snapshot check_infracomponent.py The Infrastructure Component ArangoDb is Healthy
2019-02-05 20:53:07 INFO snapshot check_infracomponent.py Health Check for Infrastructure Component Sim_Cluster Started2019-02-05 20:53:07 INFO snapshot check_infracomponent.py The Infrastructure Component Sim_Cluster is Healthy
2019-02-05 20:53:07 INFO snapshot check_infracomponent.py Health Check for Infrastructure Component Elk_Logstash Started2019-02-05 20:53:08 INFO snapshot check_infracomponent.py The Infrastructure Component Elk_Logstash is Healthy
2019-02-05 20:53:08 INFO snapshot check_infracomponent.py Health Check for Infrastructure Component Elk_Kibana Started2019-02-05 20:53:09 INFO snapshot check_infracomponent.py The Infrastructure Component Elk_Kibana is Healthy
2019-02-05 20:53:09 INFO snapshot check_infracomponent.py Health Check for Infrastructure Component Keystone Started2019-02-05 20:53:10 INFO snapshot check_infracomponent.py The Infrastructure Component Keystone is Healthy
89Copyright © 2019, Juniper Networks, Inc.
Chapter 4: Installing Contrail Service Orchestration with CLI
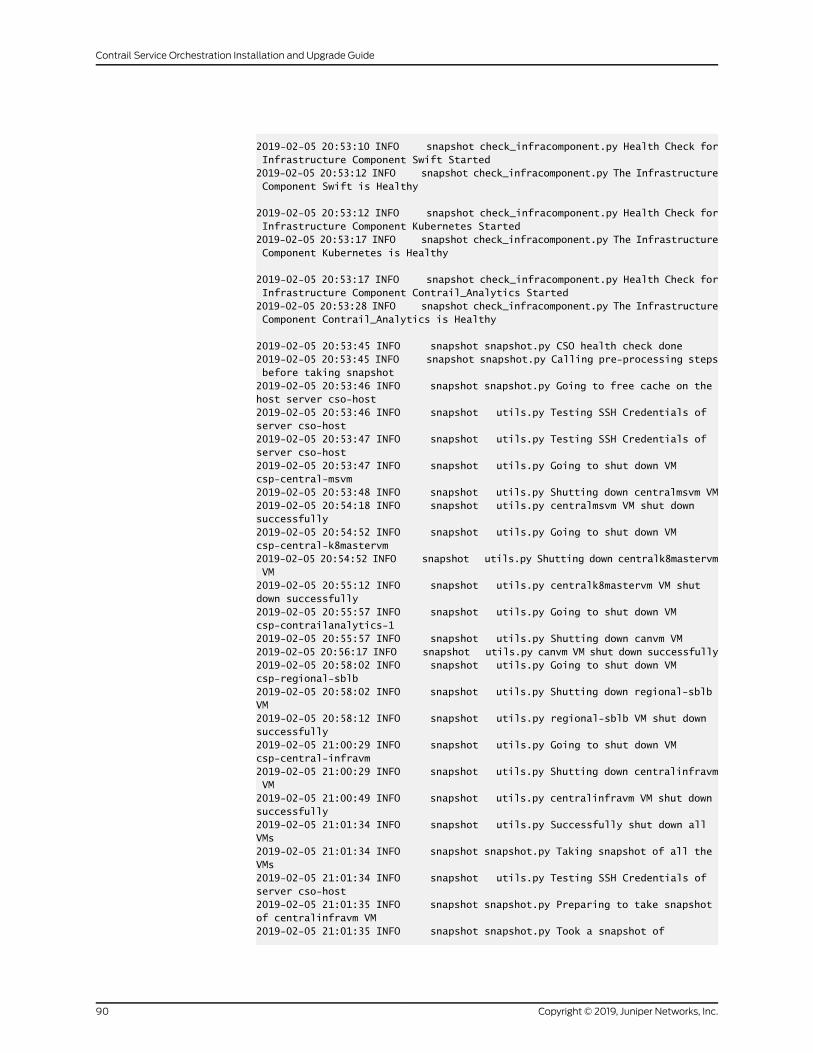
2019-02-05 20:53:10 INFO snapshot check_infracomponent.py Health Check for Infrastructure Component Swift Started2019-02-05 20:53:12 INFO snapshot check_infracomponent.py The Infrastructure Component Swift is Healthy
2019-02-05 20:53:12 INFO snapshot check_infracomponent.py Health Check for Infrastructure Component Kubernetes Started2019-02-05 20:53:17 INFO snapshot check_infracomponent.py The Infrastructure Component Kubernetes is Healthy
2019-02-05 20:53:17 INFO snapshot check_infracomponent.py Health Check for Infrastructure Component Contrail_Analytics Started2019-02-05 20:53:28 INFO snapshot check_infracomponent.py The Infrastructure Component Contrail_Analytics is Healthy
2019-02-05 20:53:45 INFO snapshot snapshot.py CSO health check done2019-02-05 20:53:45 INFO snapshot snapshot.py Calling pre-processing steps before taking snapshot2019-02-05 20:53:46 INFO snapshot snapshot.py Going to free cache on the host server cso-host2019-02-05 20:53:46 INFO snapshot utils.py Testing SSH Credentials of server cso-host2019-02-05 20:53:47 INFO snapshot utils.py Testing SSH Credentials of server cso-host2019-02-05 20:53:47 INFO snapshot utils.py Going to shut down VM csp-central-msvm2019-02-05 20:53:48 INFO snapshot utils.py Shutting down centralmsvm VM2019-02-05 20:54:18 INFO snapshot utils.py centralmsvm VM shut down successfully2019-02-05 20:54:52 INFO snapshot utils.py Going to shut down VM csp-central-k8mastervm2019-02-05 20:54:52 INFO snapshot utils.py Shutting down centralk8mastervm VM2019-02-05 20:55:12 INFO snapshot utils.py centralk8mastervm VM shut down successfully2019-02-05 20:55:57 INFO snapshot utils.py Going to shut down VM csp-contrailanalytics-12019-02-05 20:55:57 INFO snapshot utils.py Shutting down canvm VM2019-02-05 20:56:17 INFO snapshot utils.py canvm VM shut down successfully2019-02-05 20:58:02 INFO snapshot utils.py Going to shut down VM csp-regional-sblb2019-02-05 20:58:02 INFO snapshot utils.py Shutting down regional-sblb VM2019-02-05 20:58:12 INFO snapshot utils.py regional-sblb VM shut down successfully2019-02-05 21:00:29 INFO snapshot utils.py Going to shut down VM csp-central-infravm2019-02-05 21:00:29 INFO snapshot utils.py Shutting down centralinfravm VM2019-02-05 21:00:49 INFO snapshot utils.py centralinfravm VM shut down successfully2019-02-05 21:01:34 INFO snapshot utils.py Successfully shut down all VMs2019-02-05 21:01:34 INFO snapshot snapshot.py Taking snapshot of all the VMs2019-02-05 21:01:34 INFO snapshot utils.py Testing SSH Credentials of server cso-host2019-02-05 21:01:35 INFO snapshot snapshot.py Preparing to take snapshot of centralinfravm VM2019-02-05 21:01:35 INFO snapshot snapshot.py Took a snapshot of
Copyright © 2019, Juniper Networks, Inc.90
Contrail Service Orchestration Installation and Upgrade Guide

centralinfravm-data2 image of centralinfravm VM at 2019-02-05/21:01:352019-02-05 21:01:35 INFO snapshot snapshot.py Took a snapshot of centralinfravm image of centralinfravm VM at 2019-02-05/21:01:352019-02-05 21:01:37 INFO snapshot snapshot.py Took a snapshot of centralinfravm-mnt_data image of centralinfravm VM at 2019-02-05/21:01:352019-02-05 21:01:37 INFO snapshot snapshot.py Preparing to take snapshot of centralmsvm VM2019-02-05 21:01:37 INFO snapshot snapshot.py Took a snapshot of centralmsvm-data2 image of centralmsvm VM at 2019-02-05/21:01:372019-02-05 21:01:38 INFO snapshot snapshot.py Took a snapshot of centralmsvm image of centralmsvm VM at 2019-02-05/21:01:372019-02-05 21:01:39 INFO snapshot snapshot.py Took a snapshot of centralmsvm-mnt_data image of centralmsvm VM at 2019-02-05/21:01:372019-02-05 21:01:39 INFO snapshot snapshot.py Preparing to take snapshot of centralk8mastervm VM2019-02-05 21:01:40 INFO snapshot snapshot.py Took a snapshot of centralk8mastervm-data2 image of centralk8mastervm VM at 2019-02-05/21:01:392019-02-05 21:01:40 INFO snapshot snapshot.py Took a snapshot of centralk8mastervm image of centralk8mastervm VM at 2019-02-05/21:01:392019-02-05 21:01:41 INFO snapshot snapshot.py Took a snapshot of centralk8mastervm-mnt_data image of centralk8mastervm VM at 2019-02-05/21:01:392019-02-05 21:01:41 INFO snapshot snapshot.py Preparing to take snapshot of canvm VM2019-02-05 21:01:42 INFO snapshot snapshot.py Took a snapshot of canvm-data1 image of canvm VM at 2019-02-05/21:01:412019-02-05 21:01:42 INFO snapshot snapshot.py Took a snapshot of canvm-data2 image of canvm VM at 2019-02-05/21:01:412019-02-05 21:01:44 INFO snapshot snapshot.py Took a snapshot of canvm image of canvm VM at 2019-02-05/21:01:412019-02-05 21:01:44 INFO snapshot snapshot.py Preparing to take snapshot of regional-sblb VM2019-02-05 21:01:44 INFO snapshot snapshot.py Took a snapshot of regional-sblb-data2 image of regional-sblb VM at 2019-02-05/21:01:442019-02-05 21:01:46 INFO snapshot snapshot.py Took a snapshot of regional-sblb image of regional-sblb VM at 2019-02-05/21:01:442019-02-05 21:01:47 INFO snapshot snapshot.py Took a snapshot of regional-sblb-mnt_data image of regional-sblb VM at 2019-02-05/21:01:442019-02-05 21:01:47 INFO snapshot snapshot.py Successfully took snapshot of all VMS2019-02-05 21:01:48 INFO snapshot utils.py Testing SSH Credentials of server cso-host2019-02-05 21:01:48 INFO snapshot utils.py Going to start VM csp-central-infravm2019-02-05 21:01:48 INFO snapshot utils.py Starting centralinfravm VM2019-02-05 21:01:58 INFO snapshot utils.py centralinfravm VM started successfully2019-02-05 21:06:28 INFO snapshot utils.py Going to start VM csp-regional-sblb2019-02-05 21:06:28 INFO snapshot utils.py Starting regional-sblb VM2019-02-05 21:06:38 INFO snapshot utils.py regional-sblb VM started successfully2019-02-05 21:06:53 INFO snapshot utils.py Going to start VM csp-contrailanalytics-12019-02-05 21:06:53 INFO snapshot utils.py Starting canvm VM2019-02-05 21:07:03 INFO snapshot utils.py canvm VM started successfully2019-02-05 21:08:23 INFO snapshot utils.py Going to start VM csp-central-k8mastervm2019-02-05 21:08:23 INFO snapshot utils.py Starting centralk8mastervm VM2019-02-05 21:08:33 INFO snapshot utils.py centralk8mastervm VM started
91Copyright © 2019, Juniper Networks, Inc.
Chapter 4: Installing Contrail Service Orchestration with CLI

successfully2019-02-05 21:09:33 INFO snapshot utils.py Going to start VM csp-central-msvm2019-02-05 21:09:33 INFO snapshot utils.py Starting centralmsvm VM2019-02-05 21:09:44 INFO snapshot utils.py centralmsvm VM started successfully2019-02-05 21:10:38 INFO snapshot utils.py Successfully started all VMs2019-02-05 21:10:40 INFO snapshot snapshot.py Restarting salt-minion in csp-central-infravm VM2019-02-05 21:10:42 INFO snapshot snapshot.py Restarting salt-minion in csp-central-msvm VM2019-02-05 21:10:43 INFO snapshot snapshot.py Restarting salt-minion in csp-central-k8mastervm VM2019-02-05 21:10:44 INFO snapshot snapshot.py Restarting salt-minion in csp-contrailanalytics-1 VM2019-02-05 21:10:44 INFO snapshot snapshot.py Restarting salt-minion in csp-regional-sblb VM2019-02-05 21:10:53 INFO snapshot snapshot.py Going to sync salt across all VMs; this will take a while2019-02-05 21:10:55 INFO snapshot snapshot.py Going to recover Swift processes2019-02-05 21:10:55 INFO snapshot snapshot.py Killing Swift zombie processes in central2019-02-05 21:10:55 INFO snapshot snapshot.py 2019-02-05 21:10:55 INFO snapshot snapshot.py Restarting Swift service in central2019-02-05 21:11:04 INFO snapshot snapshot.py swift-object start/running2019-02-05 21:11:05 INFO snapshot snapshot.py Checking MariaDB health and calling MariaDB Recovery, if required2019-02-05 21:11:06 INFO snapshot check_infracomponent.py Health Check for Component mariadb Started 2019-02-05 21:11:07 INFO snapshot check_infracomponent.py The Components mariadb is Healthy in central Environment
2019-02-05 21:11:28 INFO snapshot check_infracomponent.py Health Check for Component mariadb Started 2019-02-05 21:11:30 INFO snapshot check_infracomponent.py The Components mariadb is Healthy in central Environment
2019-02-05 21:11:30 INFO snapshot snapshot.py Checking Redis health and calling Redis Recovery, if required2019-02-05 21:11:31 INFO snapshot snapshot.py Going to perform CSO Health Check2019-02-05 21:11:49 INFO snapshot check_infracomponent.py Health Check for Infrastructure Component SaltStack Started2019-02-05 21:11:50 INFO snapshot check_infracomponent.py The Infrastructure Component SaltStack is Healthy
2019-02-05 21:11:50 INFO snapshot check_infracomponent.py Health Check for Infrastructure Component Cassandra Started2019-02-05 21:11:51 INFO snapshot check_infracomponent.py The Infrastructure Component Cassandra is Healthy
2019-02-05 21:11:51 INFO snapshot check_infracomponent.py Health Check for Infrastructure Component ElasticSearch Started2019-02-05 21:11:52 INFO snapshot check_infracomponent.py The Infrastructure Component ElasticSearch is Healthy
2019-02-05 21:11:52 INFO snapshot check_infracomponent.py Health Check for Infrastructure Component Etcd Started
Copyright © 2019, Juniper Networks, Inc.92
Contrail Service Orchestration Installation and Upgrade Guide

2019-02-05 21:11:54 INFO snapshot check_infracomponent.py The Infrastructure Component Etcd is Healthy
2019-02-05 21:11:54 INFO snapshot check_infracomponent.py Health Check for Infrastructure Component MariaDb Started2019-02-05 21:11:56 INFO snapshot check_infracomponent.py The Infrastructure Component MariaDb is Healthy
2019-02-05 21:11:56 INFO snapshot check_infracomponent.py Health Check for Infrastructure Component RabbitMQ Started2019-02-05 21:11:59 INFO snapshot check_infracomponent.py The Infrastructure Component RabbitMQ is Healthy
2019-02-05 21:11:59 INFO snapshot check_infracomponent.py Health Check for Infrastructure Component ZooKeeper Started2019-02-05 21:12:00 INFO snapshot check_infracomponent.py The Infrastructure Component ZooKeeper is Healthy
2019-02-05 21:12:00 INFO snapshot check_infracomponent.py Health Check for Infrastructure Component Redis Started2019-02-05 21:12:00 INFO snapshot check_infracomponent.py The Infrastructure Component Redis is Healthy
2019-02-05 21:12:00 INFO snapshot check_infracomponent.py Health Check for Infrastructure Component ArangoDb Started2019-02-05 21:12:02 INFO snapshot check_infracomponent.py The Infrastructure Component ArangoDb is Healthy
2019-02-05 21:12:02 INFO snapshot check_infracomponent.py Health Check for Infrastructure Component Sim_Cluster Started2019-02-05 21:12:02 INFO snapshot check_infracomponent.py The Infrastructure Component Sim_Cluster is Healthy
2019-02-05 21:12:02 INFO snapshot check_infracomponent.py Health Check for Infrastructure Component Elk_Logstash Started2019-02-05 21:12:03 INFO snapshot check_infracomponent.py The Infrastructure Component Elk_Logstash is Healthy
2019-02-05 21:12:03 INFO snapshot check_infracomponent.py Health Check for Infrastructure Component Elk_Kibana Started2019-02-05 21:12:04 INFO snapshot check_infracomponent.py The Infrastructure Component Elk_Kibana is Healthy
2019-02-05 21:12:04 INFO snapshot check_infracomponent.py Health Check for Infrastructure Component Keystone Started2019-02-05 21:12:05 INFO snapshot check_infracomponent.py The Infrastructure Component Keystone is Healthy
2019-02-05 21:12:05 INFO snapshot check_infracomponent.py Health Check for Infrastructure Component Swift Started2019-02-05 21:12:08 INFO snapshot check_infracomponent.py The Infrastructure Component Swift is Healthy
2019-02-05 21:12:08 INFO snapshot check_infracomponent.py Health Check for Infrastructure Component Kubernetes Started2019-02-05 21:12:12 INFO snapshot check_infracomponent.py The Infrastructure Component Kubernetes is Healthy
2019-02-05 21:12:12 INFO snapshot check_infracomponent.py Health Check for Infrastructure Component Contrail_Analytics Started
93Copyright © 2019, Juniper Networks, Inc.
Chapter 4: Installing Contrail Service Orchestration with CLI
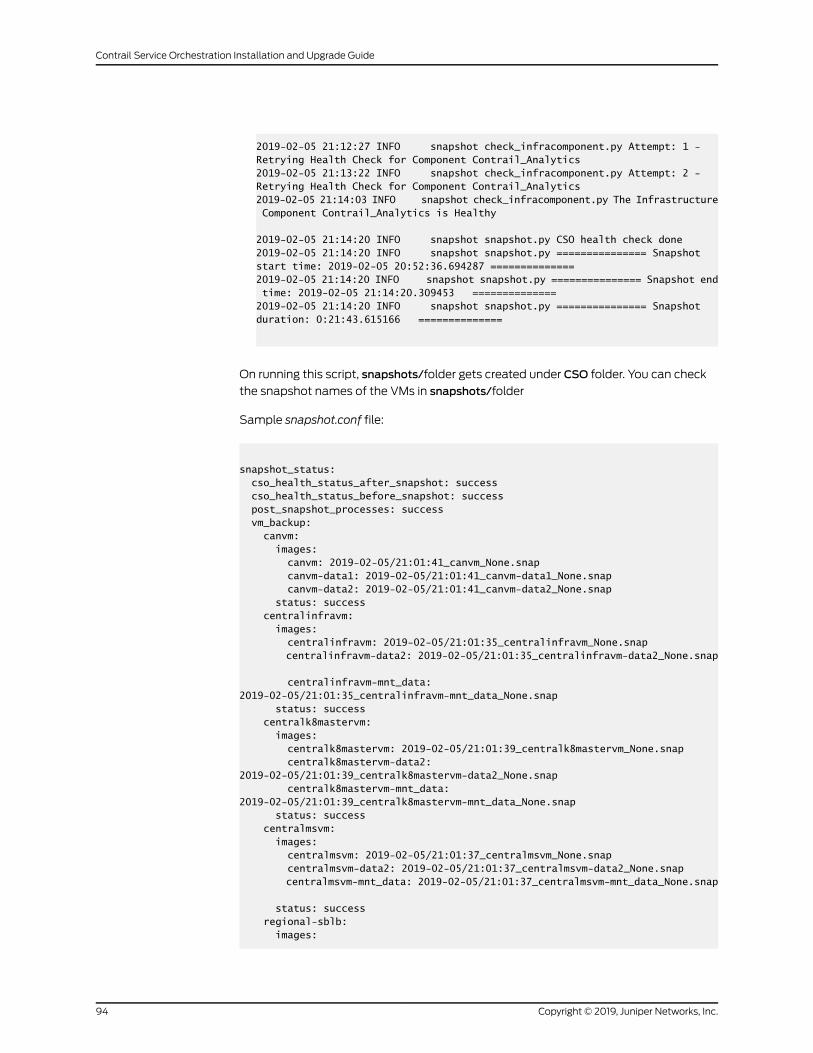
2019-02-05 21:12:27 INFO snapshot check_infracomponent.py Attempt: 1 - Retrying Health Check for Component Contrail_Analytics2019-02-05 21:13:22 INFO snapshot check_infracomponent.py Attempt: 2 - Retrying Health Check for Component Contrail_Analytics2019-02-05 21:14:03 INFO snapshot check_infracomponent.py The Infrastructure Component Contrail_Analytics is Healthy
2019-02-05 21:14:20 INFO snapshot snapshot.py CSO health check done2019-02-05 21:14:20 INFO snapshot snapshot.py =============== Snapshot start time: 2019-02-05 20:52:36.694287 ==============2019-02-05 21:14:20 INFO snapshot snapshot.py =============== Snapshot end time: 2019-02-05 21:14:20.309453 ==============2019-02-05 21:14:20 INFO snapshot snapshot.py =============== Snapshot duration: 0:21:43.615166 ==============
On running this script, snapshots/folder gets created under CSO folder. You can check
the snapshot names of the VMs in snapshots/folder
Sample snapshot.conf file:
snapshot_status: cso_health_status_after_snapshot: success cso_health_status_before_snapshot: success post_snapshot_processes: success vm_backup: canvm: images: canvm: 2019-02-05/21:01:41_canvm_None.snap canvm-data1: 2019-02-05/21:01:41_canvm-data1_None.snap canvm-data2: 2019-02-05/21:01:41_canvm-data2_None.snap status: success centralinfravm: images: centralinfravm: 2019-02-05/21:01:35_centralinfravm_None.snap centralinfravm-data2: 2019-02-05/21:01:35_centralinfravm-data2_None.snap
centralinfravm-mnt_data: 2019-02-05/21:01:35_centralinfravm-mnt_data_None.snap status: success centralk8mastervm: images: centralk8mastervm: 2019-02-05/21:01:39_centralk8mastervm_None.snap centralk8mastervm-data2: 2019-02-05/21:01:39_centralk8mastervm-data2_None.snap centralk8mastervm-mnt_data: 2019-02-05/21:01:39_centralk8mastervm-mnt_data_None.snap status: success centralmsvm: images: centralmsvm: 2019-02-05/21:01:37_centralmsvm_None.snap centralmsvm-data2: 2019-02-05/21:01:37_centralmsvm-data2_None.snap centralmsvm-mnt_data: 2019-02-05/21:01:37_centralmsvm-mnt_data_None.snap
status: success regional-sblb: images:
Copyright © 2019, Juniper Networks, Inc.94
Contrail Service Orchestration Installation and Upgrade Guide

regional-sblb: 2019-02-05/21:01:44_regional-sblb_None.snap regional-sblb-data2: 2019-02-05/21:01:44_regional-sblb-data2_None.snap regional-sblb-mnt_data: 2019-02-05/21:01:44_regional-sblb-mnt_data_None.snap status: success vm_snapshot: success
Reverting Snapshots
You can restore the parent snapshot of the VM.When you revert to a snapshot, changes
made after the snapshot was taken are reverted to the snapshot point.
1. On the installer VM, navigate to Contrail_Service_Orchestration_4.1.0
2. Run ./revert.sh --snapshot
This utility displays a list of all the snapshots taken:
Sample Output:
This utility will display a list of snapshots takenList of snapshots present in the system:
1 : snapshot_2019-02-07_22:42:382 : snapshot_2019-02-05_20:52:36
Choose a snapshot to revert to: 12019-02-08 11:34:40 INFO revert revert.py ===============================================2019-02-08 11:34:40 INFO revert revert.py Revert Start Time: 2019-02-08 11:34:40.9631272019-02-08 11:34:40 INFO revert revert.py ===============================================2019-02-08 11:34:40 INFO revert revert.py Reverting VM snapshots2019-02-08 11:34:42 INFO revert utils.py Testing SSH Credentials of server cso-host2019-02-08 11:34:42 INFO revert utils.py Going to shut down VM csp-central-msvm2019-02-08 11:34:44 INFO revert utils.py Shutting down centralmsvm VM2019-02-08 11:35:14 INFO revert utils.py centralmsvm VM shut down successfully2019-02-08 11:35:47 INFO revert utils.py Going to shut down VM csp-central-k8mastervm2019-02-08 11:35:47 INFO revert utils.py Shutting down centralk8mastervm VM2019-02-08 11:36:07 INFO revert utils.py centralk8mastervm VM shut down successfully2019-02-08 11:36:52 INFO revert utils.py Going to shut down VM csp-contrailanalytics-12019-02-08 11:36:52 INFO revert utils.py Shutting down canvm VM2019-02-08 11:37:02 INFO revert utils.py canvm VM shut down successfully2019-02-08 11:38:57 INFO revert utils.py Going to shut down VM csp-regional-sblb2019-02-08 11:38:57 INFO revert utils.py Shutting down regional-sblb VM2019-02-08 11:39:07 INFO revert utils.py regional-sblb VM shut down
95Copyright © 2019, Juniper Networks, Inc.
Chapter 4: Installing Contrail Service Orchestration with CLI

successfully2019-02-08 11:41:23 INFO revert utils.py Going to shut down VM csp-central-infravm2019-02-08 11:41:23 INFO revert utils.py Shutting down centralinfravm VM2019-02-08 11:41:53 INFO revert utils.py centralinfravm VM shut down successfully2019-02-08 11:42:28 INFO revert utils.py Successfully shut down all VMs2019-02-08 11:42:28 INFO revert revert_snapshot.py Reverting snapshots for all the VMs2019-02-08 11:42:28 INFO revert utils.py Testing SSH Credentials of server cso-host2019-02-08 11:42:29 INFO revert revert_snapshot.py Reverted to snapshot 2019-02-07/22:51:37_centralinfravm-data2_None.snap for centralinfravm VM2019-02-08 11:42:41 INFO revert revert_snapshot.py Reverted to snapshot 2019-02-07/22:51:37_centralinfravm-mnt_data_None.snap for centralinfravm VM2019-02-08 11:42:41 INFO revert revert_snapshot.py Reverted to snapshot 2019-02-07/22:51:37_centralinfravm_None.snap for centralinfravm VM2019-02-08 11:42:41 INFO revert revert_snapshot.py Reverted to snapshot 2019-02-07/22:51:39_centralmsvm-data2_None.snap for centralmsvm VM2019-02-08 11:42:46 INFO revert revert_snapshot.py Reverted to snapshot 2019-02-07/22:51:39_centralmsvm-mnt_data_None.snap for centralmsvm VM2019-02-08 11:42:46 INFO revert revert_snapshot.py Reverted to snapshot 2019-02-07/22:51:39_centralmsvm_None.snap for centralmsvm VM2019-02-08 11:42:46 INFO revert revert_snapshot.py Reverted to snapshot 2019-02-07/22:51:41_centralk8mastervm-mnt_data_None.snap for centralk8mastervm VM2019-02-08 11:42:47 INFO revert revert_snapshot.py Reverted to snapshot 2019-02-07/22:51:41_centralk8mastervm-data2_None.snap for centralk8mastervm VM2019-02-08 11:42:47 INFO revert revert_snapshot.py Reverted to snapshot 2019-02-07/22:51:41_centralk8mastervm_None.snap for centralk8mastervm VM2019-02-08 11:42:47 INFO revert revert_snapshot.py Reverted to snapshot 2019-02-07/22:51:42_canvm-data1_None.snap for canvm VM2019-02-08 11:42:47 INFO revert revert_snapshot.py Reverted to snapshot 2019-02-07/22:51:42_canvm-data2_None.snap for canvm VM2019-02-08 11:42:50 INFO revert revert_snapshot.py Reverted to snapshot 2019-02-07/22:51:42_canvm_None.snap for canvm VM2019-02-08 11:42:50 INFO revert revert_snapshot.py Reverted to snapshot 2019-02-07/22:51:43_regional-sblb-data2_None.snap for regional-sblb VM2019-02-08 11:42:50 INFO revert revert_snapshot.py Reverted to snapshot 2019-02-07/22:51:43_regional-sblb_None.snap for regional-sblb VM2019-02-08 11:42:50 INFO revert revert_snapshot.py Reverted to snapshot 2019-02-07/22:51:43_regional-sblb-mnt_data_None.snap for regional-sblb VM2019-02-08 11:42:51 INFO revert utils.py Testing SSH Credentials of server cso-host2019-02-08 11:42:51 INFO revert utils.py Going to start VM csp-central-infravm2019-02-08 11:42:51 INFO revert utils.py Starting centralinfravm VM2019-02-08 11:43:01 INFO revert utils.py centralinfravm VM started successfully2019-02-08 11:47:31 INFO revert utils.py Going to start VM csp-regional-sblb2019-02-08 11:47:31 INFO revert utils.py Starting regional-sblb VM2019-02-08 11:47:41 INFO revert utils.py regional-sblb VM started successfully2019-02-08 11:47:56 INFO revert utils.py Going to start VM csp-contrailanalytics-12019-02-08 11:47:56 INFO revert utils.py Starting canvm VM2019-02-08 11:48:06 INFO revert utils.py canvm VM started successfully2019-02-08 11:49:26 INFO revert utils.py Going to start VM csp-central-k8mastervm
Copyright © 2019, Juniper Networks, Inc.96
Contrail Service Orchestration Installation and Upgrade Guide

2019-02-08 11:49:26 INFO revert utils.py Starting centralk8mastervm VM2019-02-08 11:49:36 INFO revert utils.py centralk8mastervm VM started successfully2019-02-08 11:50:36 INFO revert utils.py Going to start VM csp-central-msvm2019-02-08 11:50:36 INFO revert utils.py Starting centralmsvm VM2019-02-08 11:50:46 INFO revert utils.py centralmsvm VM started successfully2019-02-08 11:51:41 INFO revert utils.py Successfully started all VMs2019-02-08 11:51:41 INFO revert revert.py Waiting for CSO to boot; this will take a while2019-02-08 11:52:43 INFO revert revert.py Checking MariaDB health and calling MariaDB Recovery, if required2019-02-08 11:53:17 INFO revert check_infracomponent.py Health Check for Component mariadb Started2019-02-08 11:53:19 INFO revert check_infracomponent.py The Components mariadb is Healthy in central Environment
2019-02-08 11:53:39 INFO revert check_infracomponent.py Health Check for Component mariadb Started2019-02-08 11:53:41 INFO revert check_infracomponent.py The Components mariadb is Healthy in central Environment
2019-02-08 11:53:41 INFO revert revert.py Checking Redis health and calling Redis Recovery, if required2019-02-08 11:53:42 INFO revert revert.py Going to perform CSO Health Check2019-02-08 11:54:00 INFO revert check_infracomponent.py Health Check for Infrastructure Component SaltStack Started2019-02-08 11:54:01 INFO revert check_infracomponent.py The Infrastructure Component SaltStack is Healthy
2019-02-08 11:54:01 INFO revert check_infracomponent.py Health Check for Infrastructure Component Cassandra Started2019-02-08 11:54:02 INFO revert check_infracomponent.py The Infrastructure Component Cassandra is Healthy
2019-02-08 11:54:02 INFO revert check_infracomponent.py Health Check for Infrastructure Component ElasticSearch Started2019-02-08 11:54:04 INFO revert check_infracomponent.py The Infrastructure Component ElasticSearch is Healthy
2019-02-08 11:54:04 INFO revert check_infracomponent.py Health Check for Infrastructure Component Etcd Started2019-02-08 11:54:05 INFO revert check_infracomponent.py The Infrastructure Component Etcd is Healthy
2019-02-08 11:54:05 INFO revert check_infracomponent.py Health Check for Infrastructure Component MariaDb Started2019-02-08 11:54:07 INFO revert check_infracomponent.py The Infrastructure Component MariaDb is Healthy
2019-02-08 11:54:07 INFO revert check_infracomponent.py Health Check for Infrastructure Component RabbitMQ Started2019-02-08 11:54:10 INFO revert check_infracomponent.py The Infrastructure Component RabbitMQ is Healthy
2019-02-08 11:54:10 INFO revert check_infracomponent.py Health Check for Infrastructure Component ZooKeeper Started2019-02-08 11:54:11 INFO revert check_infracomponent.py The Infrastructure Component ZooKeeper is Healthy
97Copyright © 2019, Juniper Networks, Inc.
Chapter 4: Installing Contrail Service Orchestration with CLI

2019-02-08 11:54:11 INFO revert check_infracomponent.py Health Check for Infrastructure Component Redis Started2019-02-08 11:54:11 INFO revert check_infracomponent.py The Infrastructure Component Redis is Healthy
2019-02-08 11:54:11 INFO revert check_infracomponent.py Health Check for Infrastructure Component ArangoDb Started2019-02-08 11:54:13 INFO revert check_infracomponent.py The Infrastructure Component ArangoDb is Healthy
2019-02-08 11:54:13 INFO revert check_infracomponent.py Health Check for Infrastructure Component Sim_Cluster Started2019-02-08 11:54:13 INFO revert check_infracomponent.py The Infrastructure Component Sim_Cluster is Healthy
2019-02-08 11:54:13 INFO revert check_infracomponent.py Health Check for Infrastructure Component Elk_Logstash Started2019-02-08 11:54:14 INFO revert check_infracomponent.py The Infrastructure Component Elk_Logstash is Healthy
2019-02-08 11:54:14 INFO revert check_infracomponent.py Health Check for Infrastructure Component Elk_Kibana Started2019-02-08 11:54:15 INFO revert check_infracomponent.py The Infrastructure Component Elk_Kibana is Healthy
2019-02-08 11:54:15 INFO revert check_infracomponent.py Health Check for Infrastructure Component Keystone Started2019-02-08 11:54:16 INFO revert check_infracomponent.py The Infrastructure Component Keystone is Healthy
2019-02-08 11:54:16 INFO revert check_infracomponent.py Health Check for Infrastructure Component Swift Started2019-02-08 11:54:18 INFO revert check_infracomponent.py The Infrastructure Component Swift is Healthy
2019-02-08 11:54:18 INFO revert check_infracomponent.py Health Check for Infrastructure Component Kubernetes Started2019-02-08 11:54:23 INFO revert check_infracomponent.py The Infrastructure Component Kubernetes is Healthy
2019-02-08 11:54:23 INFO revert check_infracomponent.py Health Check for Infrastructure Component Contrail_Analytics Started2019-02-08 11:54:33 INFO revert check_infracomponent.py The Infrastructure Component Contrail_Analytics is Healthy
2019-02-08 11:54:50 INFO revert revert.py Revert process successful2019-02-08 11:54:50 INFO revert revert.py =============== Revert start time : 2019-02-08 15:22:15.882347 ==============2019-02-08 11:54:50 INFO revert revert.py =============== Revert end time : 2019-02-08 15:23:50.761300 ==============2019-02-08 11:54:50 INFO revert revert.py =============== Revert duration : 0:20:10.878953 ==============2019-02-08 11:54:50 INFO revert revert.py ===============================================2019-02-08 11:54:50 INFO revert revert.py Overall Revert Summary2019-02-08 11:54:50 INFO revert revert.py ===============================================
Copyright © 2019, Juniper Networks, Inc.98
Contrail Service Orchestration Installation and Upgrade Guide

Performing a Health Check of Infrastructure Components
After you install or upgradeCSO, youcan run thecomponents_health.sh script toperforma health check of all infrastructure components. This script detects whether any
infrastructure component has failed and displays the health status of the following
infrastructure components:
• SaltStack
• Cassandra
• Elasticsearch
• Etcd
• MariaDB
• RabbitMQ
• ZooKeeper
• Redis
• ArangoDb
• SimCluster
• ELK Logstash
• ELK Kibana
• Contrail Analytics
• Keystone
• Swift
• Kubernetes
To check the status of infrastructure components:
1. Log in to the installer VM as root.
2. Navigate to the CSO directory in the installer VM.
For example:
root@host:~/# cd Contrail_Service_Orchestration_4.1.0root@host:~/Contrail_Service_Orchestration_4.1.0#
3. Run the components_health.sh script.
To check the status of infrastructure components of the central environment, run the
following command:
root@host:~/Contrail_Service_Orchestration_4.1.0./components_health.sh central
To check the health component of the regional environment, run the following
command:
99Copyright © 2019, Juniper Networks, Inc.
Chapter 4: Installing Contrail Service Orchestration with CLI

root@host:~/Contrail_Service_Orchestration_4.1.0./components_health.sh regional
Tocheck thehealthcomponentof central and regional environments, run the following
command:
root@host:~/Contrail_Service_Orchestration_4.1.0 ./components_health.sh
After a couple of minutes, the status of each infrastructure component for central
and regional environments is displayed.
For example:
************************************************************************
HEALTH CHECK FOR INFRASTRUCTURE COMPONENTS STARTED IN CENTRAL ENVIRONMENT
************************************************************************
INFO Health Check for Infrastructure Component SaltStack StartedINFO The Infrastructure Component SaltStack is Healthy
INFO Health Check for Infrastructure Component Cassandra StartedINFO The Infrastructure Component Cassandra is Healthy
INFO Health Check for Infrastructure Component ElasticSearch StartedINFO The Infrastructure Component ElasticSearch is Healthy
INFO Health Check for Infrastructure Component Etcd StartedINFO The Infrastructure Component Etcd is Healthy
INFO Health Check for Infrastructure Component MariaDb StartedINFO The Infrastructure Component MariaDb is Healthy
INFO Health Check for Infrastructure Component RabbitMQ StartedINFO The Infrastructure Component RabbitMQ is Healthy
INFO Health Check for Infrastructure Component ZooKeeper StartedINFO The Infrastructure Component ZooKeeper is Healthy
INFO Health Check for Infrastructure Component Redis StartedINFO The Infrastructure Component Redis is Healthy
INFO Health Check for Infrastructure Component ArangoDb StartedINFO The Infrastructure Component ArangoDb is Healthy
INFO Health Check for Infrastructure Component Sim_Cluster StartedINFO The Infrastructure Component Sim_Cluster is Healthy
INFO Health Check for Infrastructure Component Elk_Logstash StartedINFO The Infrastructure Component Elk_Logstash is Healthy
INFO Health Check for Infrastructure Component Elk_Kibana StartedINFO The Infrastructure Component Elk_Kibana is Healthy
INFO Health Check for Infrastructure Component Keystone StartedINFO The Infrastructure Component Keystone is Healthy
INFO Health Check for Infrastructure Component Swift StartedINFO The Infrastructure Component Swift is Healthy
Copyright © 2019, Juniper Networks, Inc.100
Contrail Service Orchestration Installation and Upgrade Guide

INFO Health Check for Infrastructure Component Kubernetes StartedINFO The Infrastructure Component Kubernetes is Healthy
INFO Health Check for Infrastructure Component Contrail_Analytics StartedINFO The Infrastructure Component Contrail_Analytics is Healthy
Overall result:
The following Infrastructure Components are Healthy:
['SaltStack', 'Cassandra', 'ElasticSearch', 'Etcd', 'MariaDb', 'RabbitMQ', 'ZooKeeper', 'Redis', 'ArangoDb', 'Sim_Cluster', 'Elk_Logstash', 'Elk_Kibana', 'Keystone', 'Swift', 'Kubernetes', 'Contrail_Analytics'] HEALTH CHECK NOT REQUIRED FOR COLLOCATED REGION
Please check the logs:
Console Logs Path: /root/CSP/Contrail_Service_Orchestration_4.1.0/logs/health_check_console.log
Error Logs Path: /root/CSP/Contrail_Service_Orchestration_4.1.0/logs/health_check_error.log
Info Logs Path: /root/CSP/Contrail_Service_Orchestration_4.1.0/logs/health_check.log
RelatedDocumentation
• Provisioning VMs on Contrail Service Orchestration Nodes or Servers on page 44
• Generating and Encrypting Passwords for Infrastructure Components on page 104
101Copyright © 2019, Juniper Networks, Inc.
Chapter 4: Installing Contrail Service Orchestration with CLI

Copyright © 2019, Juniper Networks, Inc.102
Contrail Service Orchestration Installation and Upgrade Guide
CHAPTER 5
Post Installation Tasks
• Generating and Encrypting Passwords for Infrastructure Components on page 104
• Applying NAT Rules if CSO Is Deployed Behind NAT on page 105
• Applying Security Patches on page 107
• Viewing Information About Microservices on page 107
103Copyright © 2019, Juniper Networks, Inc.

Generating and Encrypting Passwords for Infrastructure Components
CSO uses an algorithm to automatically generate a dynamic password for the following
infrastructure components:
• Cassandra.
• Keystone.
• MariaDB.
• RabbitMQ.
• Icinga.
• Prometheus.
• ArangoDB.
• Elasticsearch.
• ZooKeeper.
The automatically generated passwords for each infrastructure component and the
cspadmin password for Administration Portal are displayed on the console after you
complete answering the Setup Assistance questions.
Your can access the Administration portal by opening a browser with central-msvm IP
address. The initial user name is cspadmin and the initial password is the passwordshownafter running the ./setup_assist.sh script under “InstallingandConfiguringContrailService Orchestration” on page 78 topic.
NOTE: Youmustnote theautomaticallygeneratedpasswordthat isdisplayedon the console as they are not saved in the system.
To enhance the password security, the length and pattern for each password is different
and the password is encrypted. The passwords in the log file are masked.
Run the following script to retrieve password for all infrastructure components:
CSO>./python.sh deploy_manager/utils/decrypt_password.py
UI Password for cspadmin user: P72t9hxDVC?gKeystone Password for admin user: piILl1XadDCFwOzarangodb root user password: pTSWtfI8UXGmCDIVCassandra DB password for cassandra user: S9rVeyLcQLNgeLCassandra DB password for casadmin user: iz2Tj9BYM05o4XA0Elasticsearch admin Password: A6Oo5f95I4hElKeystone Password for swift user: g6J2hPFWCfBoMariadb Password for root/admin user: fsHE0Z99LV9ec5urMariadb Password for clusteruser user: 9KpP7oWTczYF0pPassword for prometheus user: UItspGCHJyofDLRabbitmq cspmq Password: VE5v59zCsqS7
Copyright © 2019, Juniper Networks, Inc.104
Contrail Service Orchestration Installation and Upgrade Guide

Icinga UI Password: urgNf7nV7YGVzgIsPassword for Zookeeper admin user: NzKiwWbjoHwG
CAUTION: Youcan’t retrieve the cspadminuserpassword. It canonlybe resetfrom the CSO Installer webpage or CLI.
Follow the steps to reset the cspadmin user password from the CSO Installer webpage:
1. Click Forget Password? on the login page of the CSO Installer webpage.
2. Receive a verification code to the registered e-mail ID.
3. Type the received verification code as the password on the CSO Installer webpage.
4. Follow the steps to reset the password.
RelatedDocumentation
Installing and Configuring Contrail Service Orchestration on page 78•
Applying NAT Rules if CSO Is Deployed Behind NAT
If you have deployed Contrail Service Orchestration (CSO) behind NAT, youmust apply
NAT rules after you run the setup_assit.sh script on central and regional hosts. The NATrule set determines the direction of the traffic to be processed.
NOTE: If you do not apply NAT rules after you install or upgrade CSO, youcannot access the Administration Portal, the Kibana UI, and the Rabbit MQconsole.
The following procedure is only applicable in case of a NAT server. Apply similar rules if
you have any external Juniper or third party firewall.
To apply NAT rules:
1. Log in to the installer VM as root.
2. Apply NAT rules for central and regional NAT servers.
• To quickly apply the NAT rules for central NAT servers:
a. Copy the following commands and paste them into a text file.
iptables -t nat -A PREROUTING -p tcp -dcentral-nat-server-public-ip-address--dport 443 -j DNAT --to-destinationnorthbound-virtual-private-ip-address:443
105Copyright © 2019, Juniper Networks, Inc.
Chapter 5: Post Installation Tasks

iptables -t nat -A PREROUTING -p tcp -dcentral-nat-server-public-ip-address--dport 35357 -j DNAT --to-destinationnorthbound-virtual-private-ip-address:35357iptables -t nat -A PREROUTING -p tcp -dcentral-nat-server-public-ip-address--dport 5601 -j DNAT --to-destinationnorthbound-virtual-private-ip-address:5601iptables -t nat -A PREROUTING -p tcp -dcentral-nat-server-public-ip-address --dport 9200 -j DNAT --to-destinationnorthbound-virtual-private-ip-address:9200iptables -t nat -A PREROUTING -p tcp -dcentral-nat-server-public-ip-address --dport 1947 -j DNAT --to-destinationnorthbound-virtual-private-ip-address:1947
b. Youmust specify IP addresses in the command tomatch your network
configuration.
c. Copy and paste the updated commands into the CLI.
• To quickly apply the NAT rules for regional NAT servers:
a. Copy the following commands and paste them into a text file.
iptables -t nat -A POSTROUTING -o virbr0 -p tcp --dport 5601 -dnorthbound-virtual-private-ip-address -j SNAT --to-sourceregional-management-interface-ip-addressiptables -t nat -A PREROUTING -p tcp -dregional-nat-server-public-ip-address --dport 5601 -j DNAT --to-destinationnorthbound-virtual-private-ip-address:5601iptables -t nat -A POSTROUTING -o virbr0 -p tcp --dport 7804 -dnorthbound-virtual-private-ip-address -j SNAT --to-sourceregional-management-interface-ip-addressiptables -t nat -A PREROUTING -p tcp -dregional-nat-server-public-ip-address --dport 7804 -j DNAT --to-destinationnorthbound-virtual-private-ip-address:7804iptables -t nat -A POSTROUTING -o virbr0 -p tcp --dport 3514 -dsouthbound-virtual-private-ip-address -j SNAT --to-sourceregional-management-interface-ip-addressiptables -t nat -A PREROUTING -p tcp -dregional-nat-server-public-ip-address--dport 3514 -j DNAT --to-destinationsouthbound-virtual-private-ip-address:3514iptables -t nat -A POSTROUTING -o virbr0 -p tcp --dport 514 -dsouthbound-virtual-private-ip-address-j SNAT --to-sourceregional-management-interface-ip-addressiptables -t nat -A PREROUTING -p tcp -dregional-nat-server-public-ip-address --dport 514 -j DNAT --to-destinationsouthbound-virtual-private-ip-address:514iptables -t nat -A POSTROUTING -o virbr0 -p tcp --dport 443 -dsouthbound-virtual-private-ip-address -j SNAT --to-sourceregional-management-interface-ip-addressiptables -t nat -A PREROUTING -p tcp -dregional-nat-server-public-ip-address --dport 443 -j DNAT --to-destinationnorthbound-virtual-private-ip-address:443iptables -t nat -A PREROUTING -d regional-nat-server-public-ip-address/32-p tcp -m tcp --dport 2216 -j DNAT --to-destinationsouthbound-virtual-private-ip-address:2216iptables -t nat -A POSTROUTING -d southbound-virtual-private-ip-address/32-o virbr0 -p tcp -m tcp --dport 2216 -j SNAT --to-sourceregional-management-interface-ip-address
Copyright © 2019, Juniper Networks, Inc.106
Contrail Service Orchestration Installation and Upgrade Guide

b. Youmust specify IP addresses in the commands to match your network
configuration.
c. Copy and paste the updated commands into the CLI.
The NAT rules are applied for central and regional NAT servers, and you can access
Administration Portal, Kibana UI, and Rabbit MQ console.
RelatedDocumentation
Installing and Configuring Contrail Service Orchestration on page 78•
Applying Security Patches
You can apply in-service patches to CSOmicroservices without having to reboot the
VMs.
This feature is applicable only to microservices and is not supported for infrastructure
components like Cassandra, RabbitMQ, kernel etc. The process does not impact sites or
CSOworkflows.
You can always revert the applied patch in case of unsuccessful execution.
You can follow the following steps to apply security patches:
• Download the tar file that contains the hotfix.
• Run patch script - patch.sh to apply security patches.
The script is bundled in the tar file which needs to be executed on the installer VM.
The script performs in-service patching of CSOmicroservices.
RelatedDocumentation
Contrail Service Orchestration Monitoring and Troubleshooting Guide•
• Viewing Information About Microservices on page 107
Viewing Information About Microservices
Whenyou log intoKibana, yousee theDiscoverpage,whichdisplaysachart of thenumber
of logs for a specific time period and a list of events for the deployment. You can filter
this data to viewsubsetsof logsandadd fields to the table to find the specific information
that you need. You can also change the time period for which you view events.
Table 15 on page 107 provides basic functions of eachmicroservice. The list is limited to
some of the external facing microservices.
Table 15: Functions of Microservices
DescriptionMicroservice
Providesnetworkactivation functions toenablezero touch provisioning of devices.
Activation Service (Central)
107Copyright © 2019, Juniper Networks, Inc.
Chapter 5: Post Installation Tasks
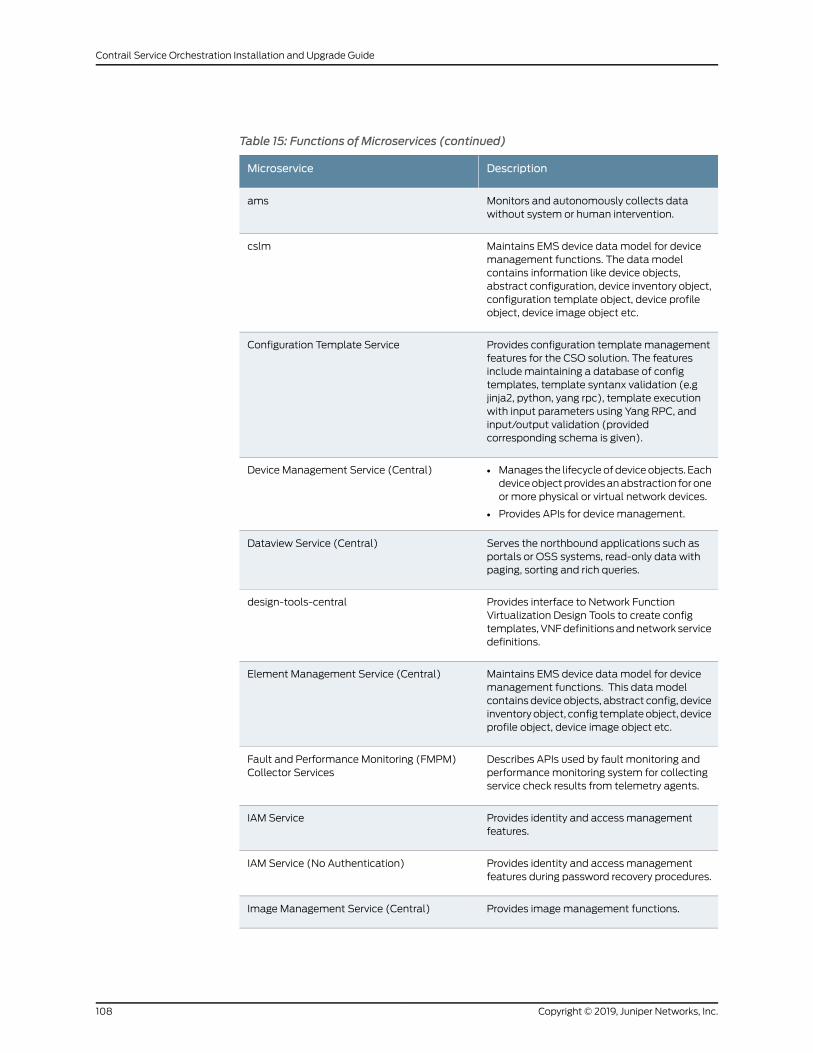
Table 15: Functions of Microservices (continued)
DescriptionMicroservice
Monitors and autonomously collects datawithout system or human intervention.
ams
Maintains EMS device data model for devicemanagement functions. The data modelcontains information like device objects,abstract configuration, device inventory object,configuration template object, device profileobject, device image object etc.
cslm
Provides configuration template managementfeatures for the CSO solution. The featuresincludemaintaining a database of configtemplates, template syntanx validation (e.gjinja2, python, yang rpc), template executionwith input parameters using Yang RPC, andinput/output validation (providedcorresponding schema is given).
Configuration Template Service
• Manages the lifecycleofdeviceobjects. Eachdeviceobjectprovidesanabstraction foroneor more physical or virtual network devices.
• Provides APIs for device management.
Device Management Service (Central)
Serves the northbound applications such asportals or OSS systems, read-only data withpaging, sorting and rich queries.
Dataview Service (Central)
Provides interface to Network FunctionVirtualization Design Tools to create configtemplates,VNFdefinitionsandnetwork servicedefinitions.
design-tools-central
Maintains EMS device data model for devicemanagement functions. This data modelcontains device objects, abstract config, deviceinventoryobject, config templateobject, deviceprofile object, device image object etc.
Element Management Service (Central)
Describes APIs used by fault monitoring andperformancemonitoring system for collectingservice check results from telemetry agents.
Fault and Performance Monitoring (FMPM)Collector Services
Provides identity and access managementfeatures.
IAM Service
Provides identity and access managementfeatures during password recovery procedures.
IAM Service (No Authentication)
Provides imagemanagement functions.Image Management Service (Central)
Copyright © 2019, Juniper Networks, Inc.108
Contrail Service Orchestration Installation and Upgrade Guide

Table 15: Functions of Microservices (continued)
DescriptionMicroservice
Provides generic inventory managementfunctions.
Inventory Management Service (Central)
• Provides jobmanagement functionality.
• Supports creation of synchronous andasynchronous jobs, track status, rack startand completion time.
Job Service
Provides Policy and SLA profile objectmanagement service to enablesoftware-definedWAN (SD-WAN) functions.
Intent based Policy Management
Enables software-definedWAN (SDWAN)function.
Policy and SLAmanagement Service
Provides APIs to manage routing operationssuch as to create VPN, interface toroute-reflector, enable routingonCPE locations.
Routing Manager Service
• Provides highly available, persistent datastore for various schemas used by CSPapplications.
• Provides APIs to create, read, update, anddelete schemas.
Schema Service
Varies based on type of schema.Shared Object Service
Manages application signaturesSignature Manager Service
Provides config template of CSOmanagementfeature.
This feature maintains database of configtemplates, template syntax validation (e.g -jinja2, python, yang rpc), template executionwith input parameters using Yang RPC, andinput/output validation ((providedcorresponding schema is given).
Template Service
Provides API for modeling topologies andworking with network elements like devices,hubs, spokes, policy enforcement points andother objects.
Topology Service
Provides APIs for tenant, site and servicemanagement.
Tenant, Site and Service Manager Service
109Copyright © 2019, Juniper Networks, Inc.
Chapter 5: Post Installation Tasks

Table 15: Functions of Microservices (continued)
DescriptionMicroservice
Provides common APIs to create virtualnetworks, virtual links, instantiate VNFs,instantiate service chains for various virtualnetwork infrastructures.
VIM
RelatedDocumentation
• Contrail Service Orchestration Monitoring and Troubleshooting Guide
Copyright © 2019, Juniper Networks, Inc.110
Contrail Service Orchestration Installation and Upgrade Guide

CHAPTER 6
Upgrading Contrail Service Orchestration
• Upgrading Contrail Service Orchestration Overview on page 111
• Upgrading Contrail Service Orchestration on page 113
• Adding Virtual Route Reflectors (VRRs) After Upgrading on page 116
• Troubleshooting Upgrade Related Errors on page 118
Upgrading Contrail Service Orchestration Overview
If your installed version is Contrail Service Orchestration (CSO) Release 3.2.1 or later, you
can use a script to upgrade to CSO Release 4.1.0.
CAUTION: Theupgradeprocess supports n–1 release upgrade approach. Forexample, if you have CSO Release 3.3 and you intend to upgrade it to CSORelease 4.1.0, youmust first upgrade to CSO Release 4.0.2 and, then followthe same steps to upgrade to CSO Release 4.1.0.
We recommend that you take snapshots of your current VMs before you proceed with
the upgrade process.
You can roll back to the previous CSO release if the upgrade is unsuccessful, provided
you have taken snapshots of the VMs.
To upgrade to CSO Release 4.1.0, youmust run the scripts that are available in the
Contrail_Service_Orchestration_4.1.0.tar.gz file in the following order:
1. upgrade.sh—This script upgrades CSO software to Release 4.1.0. The upgrade.sh
script, puts CSO in maintenancemode, takes a snapshot of all the VMs so that you
can roll back to the previous release if the upgrade fails (optional), upgrades all
microservices and infrastructure components, if required, performs health checks at
various levels, validates if all theVMs, infracomponents, andmicroservices are up and
running, and then puts the CSO in live mode.
NOTE: Before you upgrade ensure that all ongoing jobs are stopped;otherwise, theupgradeprocesswill fail.During theupgrade, youexperiencea downtime as CSO goes intomaintenancemode.
111Copyright © 2019, Juniper Networks, Inc.

2. revert.sh—Run this script only if the upgrade fails and if you have taken a snapshot
of all VMs. This script reverts to the previously installed version.
Upgrade to CSORelease 4.1.0 is independent of the deployment type (HA and non- HA),
environment type (small,mediumor large), infrastructurecomponentsandmicroservices
used, and the hypervisor type (KVM or VMware ESXi).
To ensure a smooth upgrade, the scripts perform a number of health checks before and
after the upgrade. Health checks are performed to determine the operational condition
of all components, the host, and VMs. If there is an error during the health check, the
upgradeprocess is paused.Youcan rerun the script to rectify theerror that youencounter.
Following are the types of health checks that are performed:
• Component health checks—Checks the operational condition of the infrastructure
components.
• Systemhealth checks—Checks the followingparametersofVMsand thehostmachine.
• Available space on the host machine and VMs.
• Operating System (OS) version of the host machine and VMs.
• Kernel version of the host machine and VMs.
• Disk space on the host machine and VMs.
Limitations
NOTE: The upgrade process is applicable to CSO Release 3.2.1 and later.
Upgrade to CSO Release 4.1.0 has the following limitations:
• There are no changes to the device image or device configurations.
• Upgrade cannot be performed through the GUI.
• CSO Release 4.1.0 allows to separate OS and Data partitions for CSO deployments.
This feature is not applicable for upgrades.
Impact of the CSOUpgrade
Table 16 on page 112 describes the impact of the CSO upgrade to Release 4.1.0.
Table 16: Impact of the CSOUpgrade
After the UpgradeFeature
• Release 4.1.0 security management-related features are supported on devices that are onboardedin Release 4.0.x or Release 3.3.x.
SecurityManagement
Copyright © 2019, Juniper Networks, Inc.112
Contrail Service Orchestration Installation and Upgrade Guide

Table 16: Impact of the CSOUpgrade (continued)
After the UpgradeFeature
• For the Application Visibility feature, the trend data is reset after the upgrade. You can access theRelease 3.2.1 trend data through the REST APIs.
• The Application Quality of Experience (AppQoE) feature works only for the tenants that you createin Release 4.1.0. For more information on AppQoE, see Application Quality of Experience (AppQoE)Overview in the Contrail Service Orchestration User Guide.
• Device Management functions work for Release 3.3.1 or later sites.
SD-WAN
• All functionalities of centralized and distributed deployments continues towork on Release 4.1.0 sitesor devices that are onboarded in Release 3.3.1 or later.
• Multi-region support for centralized deployment is not supported on Release 4.1.0 sites or devicesthat are onboarded in Release 3.3.1.
• Device Management functions work for Release 4.1.0 sites.
• High availability (HA) for VRRs is not supported for sites that are created in Release 3.2.1.
Cloud CPE
RelatedDocumentation
Upgrading Contrail Service Orchestration on page 113•
Upgrading Contrail Service Orchestration
The upgrade process supports n–1 release upgrade approach. For example, if you have
CSORelease3.3andyou intend toupgrade it toCSORelease4.1.0, youmust first upgrade
to CSO Release 4.0.x and, then follow the same steps to upgrade to CSO Release 4.1.0.
If your CSO release version is lower than 3.2.1, you have to opt for fresh installation.
We recommend that you take a snapshot of your current configuration and VMs before
you proceed with upgrade process.
NOTE: The upgrade process is applicable to CSO Release 3.2.1 and later.
This upgrade procedure is independent of the deployment type (trial and production),
environment type (non-HAandHA), infrastructure components andmicroservices used,
and the hypervisor type (KVM or VMware ESXi).
Before you begin the upgrade:
• Ensure that you are in Contrail Service Orchestration (CSO) Release 3.2.1 or later.
• Ensure the installer Virtual Machine (VM) is up and running.
• If you are using VMware ESXi VMs, youmust create the provision_vm.conf file in the
Contrail_Service_Orchestration_4.1.0/confs/ directory.
113Copyright © 2019, Juniper Networks, Inc.
Chapter 6: Upgrading Contrail Service Orchestration

To upgrade to CSO Release 4.1.0:
1. Download the CSO Release 4.1.0 installer package from the CSODownload page to
the local drive.
2. Log in to the installer VM as root.
3. Copy the installer package from your local folder to the installer VM.
root@host:~/# scp Contrail_Service_Orchestration_4.1.0.tar.gz root@installerVM :/root
4. On the installer VM, extract the installer package.
For example, if the name of the installer package is
Contrail_Service_Orchestration_4.1.0.tar.gz,
root@host:~/# tar –xvzf Contrail_Service_Orchestration_4.1.0.tar.gz
The contents of the installer package are extracted in a directorywith the same name
as the installer package.
5. Navigate to the CSO Release 4.1.0 directory in the installer VM.
root@host:~/# cd Contrail_Service_Orchestration_4.1.0
root@host:~/Contrail_Service_Orchestration_4.1.0#
(Optional) You can view the list of files in the Contrail_Service_Orchestration_4.1.0.
root@host:~/Contrail_Service_Orchestration_4.1.0# ls
The Contrail_Service_Orchestration_4.1.0.tar.tz file includes the following scripts:
• upgrade.sh
• revert.sh
6. Run the upgrade.sh script.
WARNING: Before you upgrade ensure that all ongoing jobs inAdministration Portal and Customer Portal are stopped; otherwise, theupgrade processwill fail. During the upgrade, you experience a downtimeas CSO goes intomaintenancemode.
This script upgrades CSO software to Release 4.1.0. The upgrade.sh script puts CSO
in maintenancemode; takes a snapshot of running status of all VMs (optional);
upgradesallmicroservicesand infrastructure components, if required; performshealth
checks at various levels; validates whether all VMs, infrastructure components, and
microservicesareupand running; andputs theCSO in livemode.Theupgrade.sh script
takes a snapshot of all VMs by default.
Copyright © 2019, Juniper Networks, Inc.114
Contrail Service Orchestration Installation and Upgrade Guide

NOTE: The script does not take a snapshot of the Installer VMandVirtualRoute Reflector (VRR) VM.
root@host:~/Contrail_Service_Orchestration_4.1.0# ./upgrade.sh
INFO Configuration Upgrade : success INFO System Health Check : success INFO CSO Health-Check Before Upgrade : success INFO CSO Maintenance Mode Enabled : success INFO Kernel Upgrade : NA INFO VM Snapshot : success INFO Selective Infra Components Upgrade : NA INFO Central Infra Upgrade : success INFO Regional Infra Upgrade : success INFO Microservices pre-deploy scripts execution : success INFO Central Microservices Upgrade : success INFO Regional Microservices upgrade : success INFO Microservices post-deploy scripts execution : success INFO CSO Health-Check after Upgrade : success INFO Enable CSO Services : success INFO Load Microservices Data : success INFO ============================================INFO CSO is successfully upgraded to Release Contrail_Service_Orchestration_4.1.0INFO ============================================
NOTE: The password for each infrastructure component is displayed onthe console after the upgrade is successful. Youmust note the passwordthat is displayed on the console as they are not saved in the system. Toenhance the password security, the length andpattern for each passwordis different, the password is encrypted, and passwords in the log file aremasked.
The time taken to complete the upgrade process depends on the hypervisor type and
the environment type. All VMs onKVMare shut downwhile a snapshot is being taken.
All VMs on VMware ESXi are up and running while a snapshot is being taken.
If an error occurs, youmust fix the error and rerun the upgrade.sh script. When you
rerun the upgrade.sh script, the script continues to execute from the previously failed
step.
You can view the following log files that are available at
root/Contrail_Service_Orchestration_4.1.0/logs:
• upgrade_console.log
• upgrade_error.log
• upgrade.log
7. (Optional) If youareunable to troubleshoot theerror youcan roll back toyourprevious
release. Run the revert.sh script.
115Copyright © 2019, Juniper Networks, Inc.
Chapter 6: Upgrading Contrail Service Orchestration

NOTE: You can roll back to the previous release only if you have takensnapshot of VMs before starting the upgrade process.
root@host:~/Contrail_Service_Orchestration_4.1.0# ./revert.sh
INFO revert revert.py Overall Revert SummaryINFO revert revert.py ===============================================INFO revert revert.py Revert VM Snapshots : successINFO revert revert.py Revert Kernel Upgrade : NAINFO revert revert.py Revert Salt Master Configurations : successINFO revert revert.py Post-revert processes : successINFO revert revert.py CSO Health-Check after Revert : successINFO revert revert.py Start Kubernet pods : successINFO revert revert.py Enable CSO Services : successINFO revert revert.py =============================================================INFO revert revert.py CSO successfully reverted to the previously installed version.INFO revert revert.py =============================================================
After a successful upgrade, CSO is functional and you can log in to Administrator Portal
and Customer Portal.
NOTE: After successfully upgrading the CSO software, ensure that youdownload the application signatures before installing signatures on thedevice. This is a one-time operation after the upgrade.
RelatedDocumentation
Upgrading Contrail Service Orchestration Overview on page 111•
Adding Virtual Route Reflectors (VRRs) After Upgrading
To support high availability (HA) for Virtual RouteReflectors (VRRs), youmust addVRRs
and create redundancy groups after you upgrade to Contrail Service Orchestrator (CSO)
Release 4.1.0.
To add VRRs:
1. Log in to the installer VM as root.
2. Navigate to the CSO Release 4.1.0 directory in the installer VM.
root@host:~/# cd Contrail_Service_Orchestration_4.1.0
root@host:~/Contrail_Service_Orchestration_4.1.0#
3. Run the add_vrr.sh script.
Copyright © 2019, Juniper Networks, Inc.116
Contrail Service Orchestration Installation and Upgrade Guide

root@host:~/Contrail_Service_Orchestration_4.1.0# ./add_vrr.sh
The existing VRR details are displayed.
=========== Existing VRR Details ========
host-name | redundancy-group
vrr-192.204.243.28 0
=========================================
NOTE: By default, VRRs that are created with CSO Release 3.2.1 or laterbelong to the redundancy group group 0.
4. To add VRRs, you are prompted to answer the following questions:
a. Specify whether VRR is behind NAT.
• y—VRR is behind NAT. If you are deploying a VRR in a private network, the NAT
instance translates all requests (BGP traffic) to a VRR from a public IP address
to a private IP address.
• n—VRR is not behind NAT (default).
b. Specify whether you want to use a common password for all VRRs.
• If you want to use a common password for all VRRs, enter y and specify the
common password.
• If you want to use a different password for each VRR, enter n and specify the
password for each VRR.
c. Specify the number of VRR instances.
• For non-HA deployments, youmust create at least one VRR.
• For HA deployments, we recommend that you create VRRs in even numbers,
and youmust create at least two VRRs. Each VRRmust be in a different
redundancy group. If the primary VRR fails or connectivity is lost, the session
remains active as the secondary VRR continues to receive and advertise LAN
routes to a site, thereby providing redundancy.
d. For each VRR instance, specify the following:
• Specify the public IP address for each VRR that you create. For example,
192.110.20.118/24.
• Specify the redundancy group for each VRR that you have created.
• For non-HA deployments, specify the redundancy group of the VRR as zero.
• For HA deployments, the VRRsmust be distributed among the redundancy
groups. There can be two groups—group 0 and group 1. For example, if you
117Copyright © 2019, Juniper Networks, Inc.
Chapter 6: Upgrading Contrail Service Orchestration

have two VRRs, specify the redundancy group for VRR1 as 0 and the VRR2 as
1.
• Specify the username for each VRR.
• Specify the password for each VRR.
If youhavechosenacommonpassword for all VRRs, youareprompted to specify
the common password only for the first VRR instance.
You can view the newly added VRRs through the APIs: routing-manager (GET: https://IP
Address of Administration Portal/routing-manager/vrr-instance) or ems-central (GET:
https://IP Address of Administration Portal/ems-central/device).
Each hub or spoke device establishes a BGP peering session with VRRs that you have
created and assigned to different redundancy groups, thereby providing redundancy.
RelatedDocumentation
Upgrading Contrail Service Orchestration on page 113•
Troubleshooting Upgrade Related Errors
This topic describes thepossible errors that youmight encounterwhile youare upgrading
Contrail Service Orchestrator (CSO).
It also suggests how to resolve those errors.
• Salt Synchronization Error on page 118
• Cache Clearance Error on page 119
• Kube-system Pod Error on page 120
• Kubernetes Node Error on page 121
Salt Synchronization Error
Problem Description: The upgrade or revert status is displayed as Going to sync salt... for aconsiderable timewhileupgradingCSOtoCSORelease4.1.0or reverting to thepreviously
installed release.
TheSaltMaster on the installer VMmight be unable to reachall SaltMinions on theother
VMs and a salt timeout exception might occur.
Solution Based on the output of the salt --timeout=30 ‘*’ test.ping command, youmust restart
either the Salt Master or the Salt Minion.
To resolve the error:
1. Open another instance of installer VM.
2. Run the salt --timeout=30 ‘*’ test.ping command, to check whether the Salt Master
on the installer VM is able to reach other VMs.
Copyright © 2019, Juniper Networks, Inc.118
Contrail Service Orchestration Installation and Upgrade Guide

root@host:~/# salt --timeout=30 ‘*’ test.ping
• Restart the Salt Master if the following error occurs:
Salt request timedout.Themaster isnot responding. If thiserrorpersistsafter verifying
themaster is up,worker_threadsmay need to be increased
root@host:~/# service salt-master restart
• If there are no errors, review the output.
root@host:~/# salt --timeout=30 ‘*’ test.ping
csp-regional-sblb.DB7RFF.regional:Truecsp-contrailanalytics-1.8V1O2D.central: Truecsp-central-msvm.8V1O2D.central: Truecsp-regional-k8mastervm.DB7RFF.regional: Truecsp-central-infravm.8V1O2D.central: Falsecsp-regional-msvm.DB7RFF.regional: Falsecsp-regional-infravm.DB7RFF.regional: Truecsp-central-k8mastervm.8V1O2D.central: True
Youmust log in to the VM and restart the Salt Minion whether the status of the VM
is False.
root@host:~/csp-central-infravm.8V1O2D.central# service salt-minion restart
3. Rerun the salt --timeout=30 ‘*’ test.ping command to verify whether the status for all
VMs is True.
Cache Clearance Error
Problem Description: The following error might occur while upgrading CSO to CSO Release 4.1.0:
Could not free cache on host server ServerName
Solution Youmust clear the cache on the host server.
To resolve the error:
1. Log in to the host server through SSH.
2. To clear the cache, run the following command:
root@host:~/Contrail_Service_Orchestration_4.1.0# free && sync && echo 3 >/proc/sys/vm/drop_caches && free
119Copyright © 2019, Juniper Networks, Inc.
Chapter 6: Upgrading Contrail Service Orchestration

The following output is displayed:
total used free shared buffers cachedMem: 264036628 214945716 49090912 15092 198092 71878992-/+ buffers/cache: 142868632 121167996Swap: 390233084 473808 389759276 total used free shared buffers cachedMem: 264036628 142165996 121870632 15092 3256 75792-/+ buffers/cache: 142086948 121949680Swap: 390233084 473808 389759276
The cache is cleared on the host server.
Kube-systemPod Error
Problem Description: The following error might occur while upgrading to CSO Release 4.1.0:
One ormore kube-system pods are not running
Solution Check the status of the kube-system pod, and restart kube-proxy if required.
To resolve the error:
1. Log in to the central or regional microservices VM through SSH.
2. Run the following command to view the status of the kube-system pod:
root@host:~/# kubectl get pods –namespace=kube-system
The following output is displayed:
NAME READY STATUS RESTARTS AGEetcd-empty-dir-cleanup-10.213.20.182 1/1 Running 2 3dkube-addon-manager-10.213.20.182 1/1 Running 2 3dkube-apiserver-10.213.20.182 1/1 Running 2 3dkube-controller-manager-10.213.20.182 1/1 Running 6 3dkube-dns-v11-4cmhl 4/4 Running 0 3hkube-proxy-10.213.20.181 0/1 Error 2 3dkube-scheduler-10.213.20.182 1/1 Running 6 3d
Check the status of kube-proxy. Youmust restart kube-proxy if the status is Error,
Crashloopback, orMatchNodeSelector.
3. Run the following command to restart kube-proxy
root@host:~/# Kubectl apply –f /etc/kubernetes/manifests/kube-proxy.yaml
The kube-system pod-related error is resolved.
Copyright © 2019, Juniper Networks, Inc.120
Contrail Service Orchestration Installation and Upgrade Guide

Kubernetes Node Error
Problem Description: The following error might occur while upgrading CSO to CSO Release 4.1.0:
One ormore nodes down
Solution Check the status of kube-master or kube-minion and restart the nodes, if required.
To resolve the issue:
1. Log in to the central or regional microservices VM through SSH.
2. Run the following command to check the status of each node:
root@host:~/# kubectl get nodes
NAME STATUS AGE VERSION10.213.20.181 Not Ready 3d v1.6.010.213.20.182 Ready 3d v1.6.0
Identify thenode that is in theNotReady status. Youmust restart thenode if the status
is Not Ready.
3. Restart the node if the status isNot Ready by logging in to the node through SSH and
running the following command:
root@host:~/# service kubelet restart
4. Rerun the following command to check the status of the node that you restarted.
root@host:~/# kubectl get nodes
The Kubernetes node-related error is resolved.
RelatedDocumentation
• Upgrading Contrail Service Orchestration on page 113
121Copyright © 2019, Juniper Networks, Inc.
Chapter 6: Upgrading Contrail Service Orchestration

Copyright © 2019, Juniper Networks, Inc.122
Contrail Service Orchestration Installation and Upgrade Guide