contractor handbook
TRANSCRIPT

Contractor Handbook

2

TABLE OF CONTENTS
Product OfferingSiding Panels .................................................................................... 4
Accessories ................................................................................. 4-11
InstallationStorage & Handling ........................................................................12
Wall Preparation .............................................................................12
Key Vocabulary ...............................................................................12
Key Rules of Installation ................................................................12
How to Measure .......................................................................13-14
Cutting & Routing ..........................................................................15
Fastening ........................................................................................15
Touch up .........................................................................................16
Glues & Sealants ......................................................................16-17
Horizontal Lap Panel Installation ............................................18-26
Board & Batten Panel Installation ..........................................27-36
Shake Panel Installation ..........................................................37-44
Trim Assembly Models ...................................................................45
Trim Board Joints ...........................................................................46
Finish Trim Uses .............................................................................47
Cleaning & Maintenance ...............................................................48
Replacing Damaged Panel .......................................................49-51
Typical Window Profile Illustrations ........................................52-53
Installing an Apron .........................................................................54
Frequently Asked Questions ....................................................55-56
3

PRODUCT OFFERING
SIDING
PRODUCT CODE EXPOSURE LENGTHUNIT SIZE
COLOR AVAILABILITY
PROFILE HEIGHT
CEL 7 7" Horizontal Lap 12'4"
1 Sq./Carton All 18 3/4"
CEL 4 4" Horizontal Lap 12'6"
CELBB8 8" Vertical Board & Batten 10'
7" Shake 4'
STARTER STRIP & UNPAINTED FURRING STRIP
PRODUCT CODE DESCRIPTION LENGTH UNIT SIZE COLOR AVAILABILITY
CELSS01 Starter Strip 12' 24 / CTN N/A
S4S 1x2 Unpainted Furring Strip 18'4 / CTN White
2018 Unpainted Lattice 16'
COLORSLatte ............................. LATCarriage Red ...............CRRWillow ........................WLWShale ........................... SHLMoss ...........................MOSOceana ........................OCE
River Rock ................... RRKGrove ...........................GRVCotton ......................... COTDune ........................... DUNChocolate ....................CHCFrost ............................. FST
Chestnut .....................CHTPearl .............................PRLHeron Blue .................. HBLWrought Iron .............. WRIPine Brook .....................BKPottery ........................ POT
4

CORNER
DESCRIPTION PRODUCT CODE EXPOSURE LENGTHUNIT SIZE
COLOR AVAILABILITY
OCP 10' CELOC1PSTD10RM5 1/2"
10'
2 / CTN All 18OCP 20' CELOC1PSTD20RM 20'
ICP 10' CELIC1PSTD10RM 10’
TRIMBOARDNOMINAL
SIZE ACTUAL SIZE PRODUCT CODE LENGTHUNIT SIZE
COLOR AVAILABILITY
5/8" x 4" 5/8" x 3 1/2" CELS4S58418
18' 4 / CTN All 18
5/8" x 6" 5/8" x 5 1/2" CELS4S58618
5/8" x 8" 5/8" x 7 1/4" CELS4S58818
5/8" x 10" 5/8" x 9 1/4" CELS4S581018
1 x 2 3/4" x 1 1/2" CELS4S1218
1 x 4 3/4" x 3 1/2" CELS4S1418
1 x 6 3/4" x 5 1/2" CELS4S1618
1 x 8 3/4" x 7 1/4" CELS4S1818
1 x 10 3/4" x 9 1/4" CELS4S11018
5/4 x 4 1" x 3 1/2" CELS4S54418
5/4 x 6 1" x 5 1/2" CELS4S54618
5/4 x 8 1" x 9 1/4" CELS4S54818
COLORSLatte ............................. LATCarriage Red ...............CRRWillow ........................WLWShale ........................... SHLMoss ...........................MOSOceana ........................OCE
River Rock ................... RRKGrove ...........................GRVCotton ......................... COTDune ........................... DUNChocolate ....................CHCFrost ............................. FST
Chestnut .....................CHTPearl .............................PRLHeron Blue .................. HBLWrought Iron .............. WRIPine Brook .....................BKPottery ........................ POT
5

SKIRT BOARD & FINISH TRIMNOMINAL
SIZE ACTUAL SIZE PRODUCT CODE LENGTH UNIT SIZECOLOR
AVAILABILITY
1 x 4 3/4" x 3 1/2" CELSKT1418
18' 4 / CTN All 18
1 x 6 3/4" x 5 1/2" CELSKT1618
5/4 x 4 1" x 3 1/2" CELSKT54418
5/4 x 6 1" x 5 1/2" CELSKT54618
N/A 1" x 1 3/4"
CROWN
DESCRIPTION PRODUCT CODE LENGTH UNIT SIZECOLOR
AVAILABILITY
Rams Crown CELRMSCRN16 16'
4 / CTN All 18
One Piece Crown CELCUC31212 12'
Crown 3 5/8" CELCRN35816
16'Crown 5 1/4" CELCRN51416
2 3/4" CELCRN23416
COLORSLatte ............................. LATCarriage Red ...............CRRWillow ........................WLWShale ........................... SHLMoss ...........................MOSOceana ........................OCE
River Rock ................... RRKGrove ...........................GRVCotton ......................... COTDune ........................... DUNChocolate ....................CHCFrost ............................. FST
Chestnut .....................CHTPearl .............................PRLHeron Blue .................. HBLWrought Iron .............. WRIPine Brook .....................BKPottery ........................ POT
6

SILL NOSE
DESCRIPTION PRODUCT CODE LENGTH UNIT SIZE COLOR AVAILABILITY
Sill Nose 1 3/16" CELSILL216
16' 4 / CTN All 18Sill Nose 1 3/4" CELSILL13416
Sill Nose 2 3/4” CELSILL23416
MISCELLANEOUS MOULDINGS
DESCRIPTION PRODUCT CODE LENGTH UNIT SIZE COLOR AVAILABILITY
Shingle Mould CELSHNGL16
16' 4 / CTN All 18Quarter Round CELQRTR16
Beaded Plank CELBDPLNK16
COLORSLatte ............................. LATCarriage Red ...............CRRWillow ........................WLWShale ........................... SHLMoss ...........................MOSOceana ........................OCE
River Rock ................... RRKGrove ...........................GRVCotton ......................... COTDune ........................... DUNChocolate ....................CHCFrost ............................. FST
Chestnut .....................CHTPearl .............................PRLHeron Blue .................. HBLWrought Iron .............. WRIPine Brook .....................BKPottery ........................ POT
7

COLORSLatte ............................. LATCarriage Red ...............CRRWillow ........................WLWShale ........................... SHLMoss ...........................MOSOceana ........................OCE
River Rock ................... RRKGrove ...........................GRVCotton ......................... COTDune ........................... DUNChocolate ....................CHCFrost ............................. FST
Chestnut .....................CHTPearl .............................PRLHeron Blue .................. HBLWrought Iron .............. WRIPine Brook .....................BKPottery ........................ POT
BLOCKS & MOUNTS
DESCRIPTION PRODUCT CODE UNIT SIZE COLOR AVAILABILITY
VENT/LIGHT 9" x 9" CELBDVSH1 / BAG All 18
ELECTRICAL 8-1/4" x 7-3/4" CELELMSH
8

COLORSLatte ............................. LATCarriage Red ...............CRRWillow ........................WLWShale ........................... SHLMoss ...........................MOSOceana ........................OCE
River Rock ................... RRKGrove ...........................GRVCotton ......................... COTDune ........................... DUNChocolate ....................CHCFrost ............................. FST
Chestnut .....................CHTPearl .............................PRLHeron Blue .................. HBLWrought Iron .............. WRIPine Brook .....................BKPottery ........................ POT
BLOCKS & MOUNTS
DESCRIPTION PRODUCT CODE UNIT SIZE COLOR AVAILABILITY
UNIVERSAL 8-1/4” x 7-3/4” CELSTMSH1 / BAG All 18
SPLIT 8-1/4" x 7-3/4" CELSPMSH
9

COLORSLatte ............................. LATCarriage Red ...............CRRWillow ........................WLWShale ........................... SHLMoss ...........................MOSOceana ........................OCE
River Rock ................... RRKGrove ...........................GRVCotton ......................... COTDune ........................... DUNChocolate ....................CHCFrost ............................. FST
Chestnut .....................CHTPearl .............................PRLHeron Blue .................. HBLWrought Iron .............. WRIPine Brook .....................BKPottery ........................ POT
BLOCKS & MOUNTS
DESCRIPTION PRODUCT CODE UNIT SIZE COLOR AVAILABILITY
RECESSED 9" x 9" CELRCMSH1 / BAG All 18
GANG BLOCK 28" x 8-1/4" CELGGBSH
10
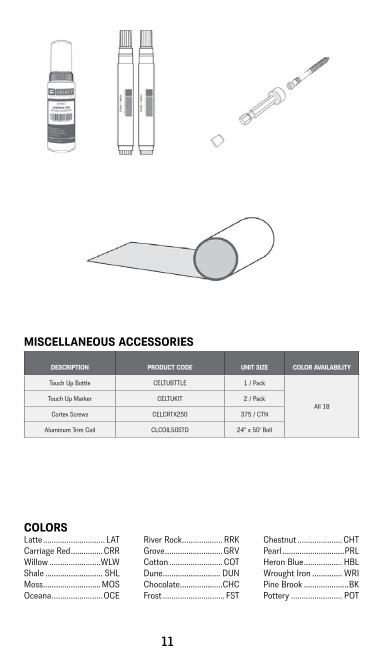
MISCELLANEOUS ACCESSORIES
DESCRIPTION PRODUCT CODE UNIT SIZE COLOR AVAILABILITY
Touch Up Bottle CELTUBTTLE 1 / Pack
All 18Touch Up Marker CELTUKIT 2 / Pack
Cortex Screws CELCRTX250 375 / CTN
Aluminum Trim Coil CLCOIL50STD 24" x 50' Roll
COLORSLatte ............................. LATCarriage Red ...............CRRWillow ........................WLWShale ........................... SHLMoss ...........................MOSOceana ........................OCE
River Rock ................... RRKGrove ...........................GRVCotton ......................... COTDune ........................... DUNChocolate ....................CHCFrost ............................. FST
Chestnut .....................CHTPearl .............................PRLHeron Blue .................. HBLWrought Iron .............. WRIPine Brook .....................BKPottery ........................ POT
11

STORAGE AND HANDLINGIf bundles are to be stored outside, do not lay them directly on the ground. Lay them on wood supports (e.g. 2x4)Do not store under tarps.Do not store bundles upright.Do not store bundles more than 5 high.Keep away from heat sources.
WALL PREPARATIONCelect siding is a rain screen but not intended to be a water resistive barrier. Therefore, Celect siding must be installed over a continuous water-resistive barrier with properly integrated flashing.
New ConstructionCelect must be applied over rigid nail-able sheathing that provides a smooth flat surface. Never install Celect siding directly to open framing/studs.
Re-sidingIt may not be necessary to remove existing siding providing all loose boards are re-secured and any rotten boards are replaced. Install furring strips or wall leveling siding underlayment to create a flat surface for the siding.
KEY VOCABULARY• Course - Row of siding panels, one panel wide, running the
length of the wall.• Center Pin - placing a nail at both ends of a nailing slot to
force the movement of the panel left and right of that slot.• Pocket - Space created behind the trim to hide or cover the
panel ends so as to allow the expansion and contraction of the panel(s) without it being visible.
KEY RULES• Nail in the center of the nailing slot unless pinning is
necessary.• Fasteners must be placed in the center of the nailing slots at
approximately 16" spacing leaving about 1/32" between the head of the fastener and the nailing hem of the panel. Celect panels expand and contract through temperature changes.
• Never face nail the panels.12

HOW TO MEASUREEstimating the Required Materials
■ All houses can be broke down into shapes of rectangles or triangles, or a combination of both.
■ The area to be sided can be determined be measuring the height and width of the house, including windows.
■ Total all of the measurements for the areas to be sided. Windows and doors are not usually deducted. Including them will provide an allowance factor for waste. If the windows and doors are extremely large (such as a garage or sliding glass doors), some deductions can be made.
■ To estimate the amount of start strip required, measure the linear feet around the entire base of the house.
■ Add siding to all material estimates to allow for waste, depending on the pitch of the roof and other house-specific factors.
■ Every 100 square feet (9.29 square meters) is called a “square” for ordering purposes.
Horizontal Siding and ShinglesHeight feet (meters) x width feet (meters) =
square feet (square meters)
Vertical Siding (Pieces of vertical siding)Number of panels at inches (mm) wide and 10 feet long
width feet (meters), inches (mm)
13

14
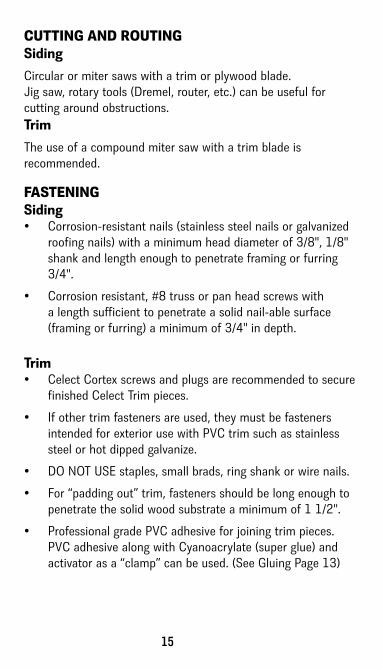
CUTTING AND ROUTINGSidingCircular or miter saws with a trim or plywood blade.Jig saw, rotary tools (Dremel, router, etc.) can be useful for cutting around obstructions.TrimThe use of a compound miter saw with a trim blade is recommended.
FASTENINGSiding• Corrosion-resistant nails (stainless steel nails or galvanized
roofing nails) with a minimum head diameter of 3/8", 1/8" shank and length enough to penetrate framing or furring 3/4".
• Corrosion resistant, #8 truss or pan head screws with a length sufficient to penetrate a solid nail-able surface (framing or furring) a minimum of 3/4" in depth.
Trim• Celect Cortex screws and plugs are recommended to secure
finished Celect Trim pieces.
• If other trim fasteners are used, they must be fasteners intended for exterior use with PVC trim such as stainless steel or hot dipped galvanize.
• DO NOT USE staples, small brads, ring shank or wire nails.
• For “padding out” trim, fasteners should be long enough to penetrate the solid wood substrate a minimum of 1 1/2".
• Professional grade PVC adhesive for joining trim pieces. PVC adhesive along with Cyanoacrylate (super glue) and activator as a “clamp” can be used. (See Gluing Page 13)
15
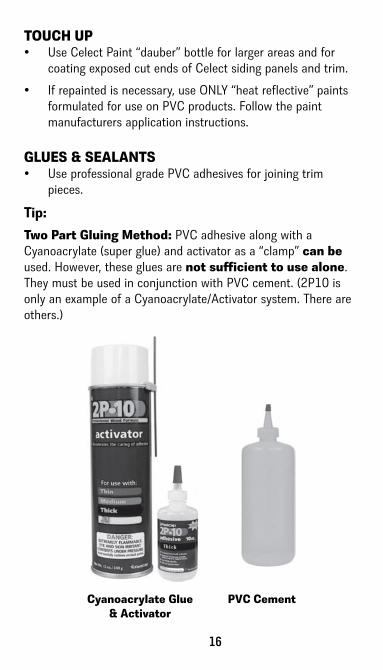
TOUCH UP• Use Celect Paint “dauber” bottle for larger areas and for
coating exposed cut ends of Celect siding panels and trim.
• If repainted is necessary, use ONLY “heat reflective” paints formulated for use on PVC products. Follow the paint manufacturers application instructions.
GLUES & SEALANTS• Use professional grade PVC adhesives for joining trim
pieces.
Tip:Two Part Gluing Method: PVC adhesive along with a Cyanoacrylate (super glue) and activator as a “clamp” can be used. However, these glues are not sufficient to use alone. They must be used in conjunction with PVC cement. (2P10 is only an example of a Cyanoacrylate/Activator system. There are others.)
Cyanoacrylate Glue & Activator
PVC Cement
16

USING A TWO PART GLUING METHOD• First place a bead of PVC cement along one edge of one of
the pieces to be glued.
• Next place a similar bead of Cyanoacrylate glue.
• Spray the activator along the other pieces to be glued. Do not spray the coated face of the piece.
• Carefully join the two pieces together making sure that they are aligned properly. Hold the pieces in place for 5-10 seconds or until the Cyanoacrylate glue adheres. This will allow for installation of the piece and give sufficient time for the PVC cement to create a permanent bond.
17

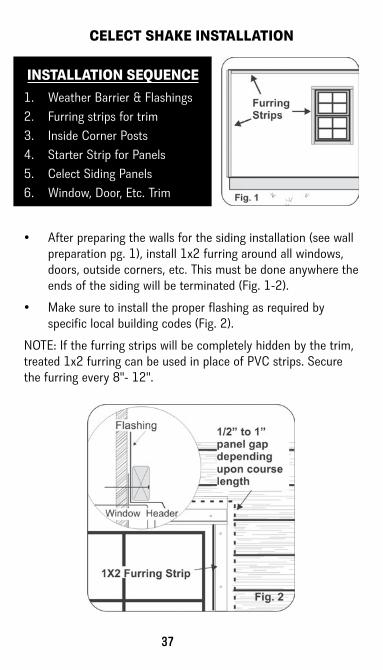
• After preparing the walls for the siding installation (see Wall Preparation pg. 1), install 1x2 furring around all windows, doors, outside corners, etc. This must be done anywhere the ends of the siding will be terminated (Fig 1-2).
• Make sure to install the proper flashing as required by specific local building codes (Fig 2)
NOTE: If the furring strips will be completely hidden by the trim, treated 1x2 during can be used in place of PVC strips. Secure the furring every 8"-12".
INSTALLATION SEQUENCE1. Weather Barrier & Flashings2. Furring strips for trim3. Inside Corner Posts4. Starter Strip for Panels5. Celect Siding Panels6. Window, Door, Etc. Trim
4" and 7" LAP INSTALLATION
18
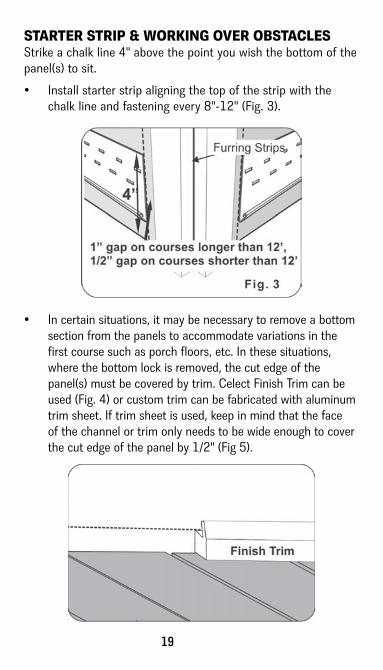
STARTER STRIP & WORKING OVER OBSTACLESStrike a chalk line 4" above the point you wish the bottom of the panel(s) to sit.
• Install starter strip aligning the top of the strip with the chalk line and fastening every 8"-12" (Fig. 3).
• In certain situations, it may be necessary to remove a bottom section from the panels to accommodate variations in the first course such as porch floors, etc. In these situations, where the bottom lock is removed, the cut edge of the panel(s) must be covered by trim. Celect Finish Trim can be used (Fig. 4) or custom trim can be fabricated with aluminum trim sheet. If trim sheet is used, keep in mind that the face of the channel or trim only needs to be wide enough to cover the cut edge of the panel by 1/2" (Fig 5).
19

INSIDE CORNER POSTS• Install any inside corners. Fasten the inside corners using
weather resistant screws placed inside the pocket of the corner no more than 16" apart (Fig. 5). Unlike the other finished trim, inside corners are applied before the siding. NOTE: Make sure not to draw the pocket in when fastening to the wall. The pocket width must remain 3/4". Use a scrap piece of siding as a spacer in the pocket. The inside of the corner post should not lay against the siding.
20

EXPANSION GAP• Install the Celect siding panels keeping the ends of the panels
1" away from the furring strips if the course is over 12' long, 1/2" away if the course is less than 12' long.
• Fasten the panels by placing a fastener in the center of the slot approximately every 16" leaving about 1/32" between the head of the fastener and the nailing hem of the panel. Celect panels expand and contract through temperature changes. (Fig. 6).
• If the course is longer than 12', pin the center of the course (not each panel) by placing a fastener in each side of one slot keeping in mind that the “center” of each course will change as you work around windows, doors, etc. (Fig. 7).
21

MAXIMUM WALL LENGTH• Celect siding panels can be installed continuously up to 60'.
If the siding courses are longer than 60', break the course(s) with an expansion joint. This joint can be fabricated using furring strips and 1"x6". (Fig. 8)
22

ROOF LINES• When installing over roof lines, use the same 30' rule. If the
longest panel will be under 30', there is no need for a trim board. The panels can be installed within 1/2" from the roof line and pinned there to hold the panel edges even; letting them expand and contract away from the pinned area.
• If the longest panels will be over 30' in length, there must be a furring installed, a 1" gap between the furring and the end of the panel(s) and trim board installed to hide the ends of the panel(s). (Fig. 9-10)
23
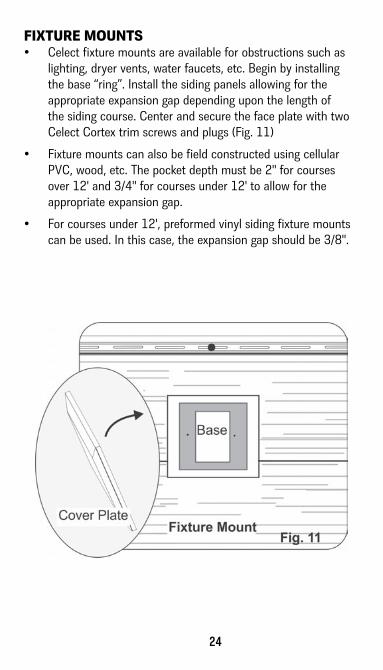
FIXTURE MOUNTS• Celect fixture mounts are available for obstructions such as
lighting, dryer vents, water faucets, etc. Begin by installing the base “ring”. Install the siding panels allowing for the appropriate expansion gap depending upon the length of the siding course. Center and secure the face plate with two Celect Cortex trim screws and plugs (Fig. 11)
• Fixture mounts can also be field constructed using cellular PVC, wood, etc. The pocket depth must be 2" for courses over 12' and 3/4" for courses under 12' to allow for the appropriate expansion gap.
• For courses under 12', preformed vinyl siding fixture mounts can be used. In this case, the expansion gap should be 3/8".
24

TOP COURSE INSTALLATION• Depending upon the trim you choose to use to finish the
top of the wall, measure and cut the top course panel to fit. A freeze board or finish trim can be applied to cover the fasteners and give a finished appearance.
• Install the panel securing it by placing nails along the cut edge of the panel approximately every 16". DO NOT FACE NAIL THE PANEL. The head of the nails will hold the panel back to the wall and the shaft of the nail will keep the panel from raising and becoming unlocked from the panel below it (Fig. 12).
25

TRIM INSTALLATION • Install trim over furring strips (Fig. 13-14). It is easiest to
assemble window and door trims before applying them to the wall. When using Celect trim, be sure to build the trim slightly larger (1/8" each side) than the window or door to give the finished frame room to expand and contract through temperature changes.
• Cortex screws and matching plugs should be used when installing Celect trim. Space the fasteners no more than 16" apart and no closer than 2" from the end of the trim. Make sure not to fasten through the siding or into the expansion pocket (Fig 14).
NOTE: See trim assembly section for more.
26

BOARD AND BATTEN1. Weather Barrier & Flashings2. Furring strips for trim3. Inside Corner Posts4. Celect Board & Batten Siding
Panels5. Window, Door, Etc. Trim
BOARD AND BATTEN INSTALLATION
• After preparing the walls for the siding installation (see wall preparation pg. 8), install 1x2 furring around all windows, doors, outside corners, etc. This must be done anywhere the ends of the siding terminate with the exception of along the bottom of the course up to 10'. If the panels are longer than 10' a furring strip and trim will be necessary along the bottom as well. (Fig. 1-2).
• Make sure to install the proper flashing as required by specific local building codes (Fig. 2)
NOTE: If no solid nail-able substrate exists, either furring strips installed horizontally at 12" spacing or solid nail-able sheathing MUST be applied prior to the installation of the vertical panels.
27
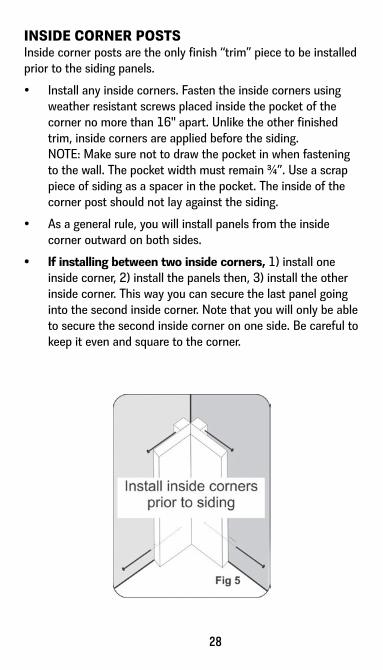
INSIDE CORNER POSTSInside corner posts are the only finish “trim” piece to be installed prior to the siding panels.
• Install any inside corners. Fasten the inside corners using weather resistant screws placed inside the pocket of the corner no more than 16" apart. Unlike the other finished trim, inside corners are applied before the siding. NOTE: Make sure not to draw the pocket in when fastening to the wall. The pocket width must remain ¾”. Use a scrap piece of siding as a spacer in the pocket. The inside of the corner post should not lay against the siding.
• As a general rule, you will install panels from the inside corner outward on both sides.
• If installing between two inside corners, 1) install one inside corner, 2) install the panels then, 3) install the other inside corner. This way you can secure the last panel going into the second inside corner. Note that you will only be able to secure the second inside corner on one side. Be careful to keep it even and square to the corner.
28

CREATING A BALANCED APPEARANCE It’s important to create a “balanced” appearance across the wall; meaning, the batten strips appear to be the same distance from both corners. The following describes how to achieve this.
• Using a chalk line, strike a plumb line 1/2" from the furring strips on both the starting side and the ending side.
• Divide the length of the wall in inches by 8 (Fig. 3).
• Then divide any fraction of a panel into 2. This will give you the width of exposure for both the starting panel and the ending panel (Fig. 4).
29

FIRST PANELOnce the exposure for the first panel has been calculated (Fig. 3-4), measure from the edge above the nailing slots across the panel the calculated measurement plus 1-1/2". In our example from the previous page 3-1/2".
30

PANEL INSTALLATION • The length of the panel should be 1" from the top furring
and a minimum of 1/2" over the foundation at the bottom (Fig. 5)
• Install the first panel by placing the cut edge along the chalk line.
• Hold the panel in place by placing the first fastener at the top of a nailing slot no more than 12" from the bottom edge of the panel. Do not drive tight. Leave approximately 1/32" between the head and the panel.
• Make sure the panel is plumb and continue fastening it placing the fasteners in the center of the slots at 8"-12" intervals (Fig. 6)
31

PANEL INSTALLATION CONT’D • Continue installing panels across the wall making certain
that 1) the lock is fully engaged and 2) the panel is “pinned” into place by 1 fastener within 12" of the bottom of the panel.
• For the best look, make sure that all the panels are even across the bottom of the wall.
• When cutting and installing around windows, doors, etc., allow for 1/2" gap along any vertical cuts always and 1/2" along horizontal cuts up to 8' and 1" beyond 8' (Fig. 7)
32

MORE THAN ONE COURSE If the wall is taller than one course (above 10'), the courses must be separated by a transition piece. The diagrams below show two examples. Note that, if the panels are being held closer than 1" to trim at the bottom of the course, there must be a 1" gap at the top to allow for expansion of the panel(s)
33

FIXTURE MOUNTS• Celect fixture mounts are available for obstructions
such as lighting, dryer vents, water faucets, etc. Begin by installing the base “ring”. Install the siding panels allowing for the appropriate expansion gap depending upon the length of the siding course. Center and secure the face plate with two Celect Cortex trim screws and plugs (Fig. 11)
• Fixture mounts can also be field constructed using Cellular PVC, wood, etc. The pocket depth must be 2" for courses over 12' and 3/4" for courses under 12' to allow for the appropriate expansion gap.
• Preformed vinyl siding fixture mounts can be used. In this case, the expansion gap should be 3/8".
34

FINAL PANEL INSTALLATION • Measure for the last panel by measuring from above the
nailing hem of the next to last panel to the chalk line and add 1-1/2".
• Measure from the batten strip side of the last panel and cut.
• Prior to installing the panel, pre-drill a hole within 12" of the bottom of the panel to hold it in place. The hole should be slightly larger than the shaft of the fastener.
• Install the panel and place a fastener through the pre-drilled hole.
• Continue to secure the panel by placing fasteners along the cut edge of the panel at 8"-12" intervals. The fastener head will hold the panel back. Do not fasten tightly and do NOT place the fasteners through the panel.
35

TRIM INSTALLATION • Install trim over furring strips (Fig. 10-11). It is easiest to
assemble window and door trims before applying them to the wall. When using Celect trim, be sure to build the trim slightly larger ( 1/8" each side) than the window or door to give the finished frame room to expand and contract through temperature changes.
• Cortex screws and matching plugs should be used when installing Celect trim. Space the fasteners no more than 16" apart and no closer than 2" from the end of the trim. Make sure not to fasten through the siding or into the expansion pocket (Fig. 14).
NOTE: See trim assembly section for more.
36
CELECT SHAKE INSTALLATION
INSTALLATION SEQUENCE1. Weather Barrier & Flashings2. Furring strips for trim3. Inside Corner Posts4. Starter Strip for Panels5. Celect Siding Panels6. Window, Door, Etc. Trim
• After preparing the walls for the siding installation (see wall preparation pg. 1), install 1x2 furring around all windows, doors, outside corners, etc. This must be done anywhere the ends of the siding will be terminated (Fig. 1-2).
• Make sure to install the proper flashing as required by specific local building codes (Fig. 2).
NOTE: If the furring strips will be completely hidden by the trim, treated 1x2 furring can be used in place of PVC strips. Secure the furring every 8"- 12".
37

STARTER STRIP & WORKING OVER OBSTACLES• Strike a chalk line 4" above the point you wish the bottom
of the panel(s) to sit.
• Install starter strip aligning the top of the strip with the chalk line and fastening every 8"-12" (Fig. 3).
• In certain situations, it may be necessary to remove a bottom section from of the panels to accommodate variations in the first course such as porch floors, etc. In these situations, where the bottom lock is removed, the cut edge of the panel(s) must be covered by trim. Celect Finish Trim can be used (Fig. 4) or Custom trim can be fabricated with aluminum trim sheet. If trim sheet is used, keep in mind that the face of the channel or trim only needs be wide enough to cover the cut edge of the panel by 1/2" (Fig. 5).
38

INSIDE CORNER POSTSInside corner posts are the only finish “trim” piece to be installed prior to the siding panels.
• Install any inside corners. Fasten the inside corners using weather resistant screws placed inside the pocket of the corner no more than 16" apart. Unlike the other finished trim, inside corners are applied before the siding. NOTE: Make sure not to draw the pocket in when fastening to the wall. The pocket width must remain 3/4". Use a scrap piece of siding as a spacer in the pocket. The inside of the corner post should not lay against the siding.
39

INSTALLING PANELS • Panels install left to right.
• Install the first panel locking it down onto the starter strip and keeping the left end of the panel 3/8" away from the furring strip.
• Fasten the panels by placing fasteners in the nailing flange; one in the center of the panel and two on either side, evenly placed. Keep fasteners approximately 2" in from both ends. (Fig. 6).
• The same 3/8" gap should be left in gable areas or anywhere the ends of the panels terminate (Fig.7-8). Either trim board or finish board can be used.
40

SHAKE PANEL INSTALLATION CONT’D• Install the remainder of the course overlapping the seams
and leaving the necessary space between the shakes. If the temperature is above 70°F leave 1/8", if the temperature is below 70°F leave 1/4" (Fig. 8).
• Measure for the starting panel of the second and remaining courses by measuring from the closest indexing mark to the corner (Fig. 9).
• Measure and cut the panel so the right end of the panel will align with the indexing mark.
• Fasten and complete the courses.
41
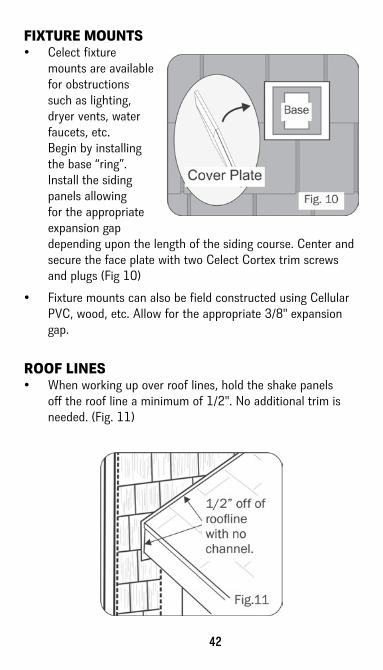
FIXTURE MOUNTS • Celect fixture
mounts are available for obstructions such as lighting, dryer vents, water faucets, etc. Begin by installing the base “ring”. Install the siding panels allowing for the appropriate expansion gap depending upon the length of the siding course. Center and secure the face plate with two Celect Cortex trim screws and plugs (Fig 10)
• Fixture mounts can also be field constructed using Cellular PVC, wood, etc. Allow for the appropriate 3/8" expansion gap.
ROOF LINES• When working up over roof lines, hold the shake panels
off the roof line a minimum of 1/2". No additional trim is needed. (Fig. 11)
42

TOP COURSE INSTALLATION• Depending upon the trim you choose to use to finish the
top of the wall, measure and cut the top course panel to fit. A freeze board or finish trim can be applied to cover the fasteners and give a finished appearance.
• Install the panel securing it by placing nails along the cut edge of the panel approximately every 16". The head of the nails will hold the panel back to the wall and the shaft of the nail will keep the panel from raising and becoming unlocked from the panel below it (Fig. 12). Pin each panel in place by placing one nail through the panel itself toward the middle of the panel (Fig. 13).
43

TRIM INSTALLATION • Install trim over furring strips (Fig. 10-11). It is easiest to
assemble window and door trims before applying them to the wall. When using Celect trim, be sure to build the trim slightly larger (1/8” each side) than the window or door to give the finished frame room to expand and contract through temperature changes.
• Cortex screws and matching plugs should be used when installing Celect trim. Space the fasteners no more than 16" apart and no closer than 2" from the end of the trim. Make sure not to fasten through the siding or into the expansion pocket (Fig. 14). Note: See trim assembly section for more.
44

TRIM ASSEMBLY MODELS FasteningCelect Cortex fasteners are recommended to secure Celect trim.
BOARD WIDTHFASTENERS
Width 16" O.C. Max
4" 1
6" - 8" 2
10" - 12" 3
Skirt Board Frieze Boards
45

TRIM BOARD JOINTS When joining boards in areas such as under eves or on fascia, a shiplap joint is recommended with the exception of at corners; a mitered corner will give the best appearance.
MitersWhen mitering a corner, the following rules apply:• The trim board with a mitered
end should be no longer than 4'
• Always glue the ends of the boards with PVC cement.
• Place a fastener 2" from the seam on both sides.
Managing expansion/contraction on longer runs
Less than 12' glued both ends
46

CELECT FINISH TRIM Celect Finish Trim can be used to cover the cut edges of panels along horizontal cuts or where expansion and contraction of the panel(s) is not a concern. Leave 1/4" gap between the edge of the panel and the trim. Secure the finish trim with Cortex screws and plugs approximately every 12" - 16".
47
CLEANING AND MAINTENANCE• Always test a small area of the wall in an inconspicuous
location first, prior to attempting to use any cleaning solution or method to ensure no damage occurs.
• Use a clean soft cotton cloth when necessary, taking care to frequently replace the cloth to avoid scratching the coating finish. • For regular general washing mild detergents such
as 1/32 diluted TSP (Tri Sodium Phosphate), Dawn, Murphy’s Oil Soap, or Vinegar & Water are recommended.
• For small spot cleaning it is acceptable to use Windex or Isopropyl Alcohol, but avoid scrubbing the same spot repeatedly as this could soften or damage the coating finish.
• It is recommended to apply any acceptable cleaning solutions to the surface of the siding using a standard pump spray bottle, followed by rinsing the surface of the siding with a garden hose.
• The finish on Celect is resistant to mildew however, should this occur, standard laundry bleach can be added to the cleaning solution at a ratio of 1 part bleach to 10 parts water (13 ounces per gallon)
• Avoid using solvents such as nail polish remover, acetone, MEK, Butyl Carbitol, etc., as these chemicals will damage the coating finish.
• Avoid using bleach or cleaners which contain bleach such as Clorox Cleanup, as these cleaners may permanently discolor the coating finish.
• Avoid using any cleaners containing abrasives of any sort such as soft scrub, as these abrasives may scratch the coating finish.
• Avoid using scrub brushes. • Avoid pressure washing the siding at high pressure
as this may damage the siding and or coating finish.
48

REPLACING A DAMAGED PANEL Using a circular saw, set the depth of the blade deep enough to cut just through the face of the damaged panel but not through the wall sheathing. • Cut a 1" strip along the length of the panel just under the
panel above. (Fig. 1)
IMPORTANT: Stop approximately 1" from both ends at the seams.
• Finish the cuts at the seams using a utility knife being careful not to cut into or damage the adjacent panel(s). On a right end seam, you will need to use a flat blade screw driver or narrow chisel to finish the cuts behind the seam. (Fig. 2)
• Remove both the 1" strip and the remaining bottom section of the panel.
• Next remove the top portion or nailing hem portion of the damaged panel. To achieve this, you’ll need to cut the fasteners holding the piece. An oscillating tool, reciprocating saw or a hack saw blade can be used.
49

• Install Celect panel replacement clips by inserting the locking tab end of the clip into the gravity lock on the panel above the one you removed. Nail the clip to the wall. Place clips at a minimum of 16" apart. This will secure the bottom of the panel. (Fig. 3)
• Locate a new panel that is as close to the length of the damaged panel as possible. You may have to adjust the adjacent panel(s) slightly to achieve a necessary measurement.
• Remove the nailing hem of the replacement panel using a utility knife cutting along the indentation just below the nailing slots.
• If the panel will be seamed on the right end, measure up from the bottom of the panel 2" along the seam locking tab. File down the locking tab flush with the rest of the tab with a knife. This will allow for easier installation at this seam.
50

• Begin the installation of the replacement panel installing the bottom right end of the panel behind the adjacent panel first, then lift the rest of the panel into place making certain that the top edge of the panel is sliding under the panel above it.
• Lastly, using only your hands, “smack” the face of the replacement panel in a downward motion lowering the panel over the nailing hem of the panel below it until the lock is fully engaged.
51

TYPICAL WINDOW PROFILE ILLUSTRATIONS
Picture Framing
Glue all Joints is advisable
Note: All Screws must be weather resistant
Pocket holes
Washer head screws
52

TYPICAL WINDOW PROFILE ILLUSTRATIONS
Adding Rams Crown and Sill Nose
Glue returns with PVC cement
Weather resistant Screws
Glue all joints is advisable
Weather resistant screws
NOTE: all screws must be weather resistant
53

Installing an Apron• Begin be fastening the
apron to the jamb trim. (It is typical to use a wider board for the apron so as to result in a similar apron reveal below the sill nose.)
• Run a bead of PVC cement on apron where sill will be placed.
• Next install the sill nose with screws as shown. Bugle Head
Screws
Washer Head Screws
54

FREQUENTLY ASKED QUESTIONS
What is the best method for cutting Celect?Celect siding panels are most easily cut using standard wood cutting tools such as a miter saw or circular saw for straight cuts and jig saw around obstacles. The best tool for Celect Trim is a power miter saw.
Do the cut ends need to be sealed?No, not necessarily. The only reason to coat them is if the ends are going to be visible. This way the finish color will match the adjacent sides of the part.
Where and when can I use caulking?The use of caulking should be held at a minimum. If it is desired for aesthetic reasons, caulking can be used around window and door trim, etc.
Never caulk at any expansion gaps such as in trim pockets or at the top of corners.
My existing windows have a built in J channel. Do I still need additional trim around the window?Typically, yes. Celect horizontal profiles require 1/2" to 1" expansion gaps along the jambs of windows and most built in channels are only 3/4" deep. This means that the end of the panel could contract to the point that it would be visible outside the pocket of the channel. The same holds true for Celect Board and Batten panels only not at the jambs but above and below windows for the same reason. Unless the built in trim is at least 1" in depth, additional trim should be installed.
55

FREQUENTLY ASKED QUESTIONS
Can Celect siding and trim be repainted?Yes. We recommend 100% acrylic latex paint. If you’re going to paint the product a darker color, consult the paint manufacturer for the LRV (Light Reflectance Value). Painting Celect products with paint darker than 56% on the LRV scale voids the products warranty.
There are paint manufacturers that sell coatings specifically designed for PVC. These paints are typically referred to as “vinyl-safe” paints or “heat reflective” coatings.
NOTES
56


59

02-16
91 Royal Group Crescent Woodbridge, Ontario, Canada L4H 1X91.855.5CELECT celect.royalbuildingproducts.com