contract time determination...
TRANSCRIPT

Contract Time Determination
TPD | PPM
Texas Department of Transportation
November 13, 2018
G U I D A N C E
The purpose of this document is to offer guidance to project managers and project team members who are responsible for estimating a project’s construction duration (Contract Time) typically during the project development process for inclusion into the project contract documents at the time of Letting. For questions regarding this document, contact the Project & Portfolio Management (PPM) HelpDesk via phone at 512-416-3333 or email at [email protected].

Guidance Document
TPD | PPM Contract Time Determination Guidance Page 1 Revised 11/13/2018
Subject: Contract Time Determination Doc. Number: CTD001
Responsible Area: Project Managers, CTD Developers, Area Office Staff Issue Date: 8/17/2018
Contact Information: For questions regarding this document, contact the PPM Helpdesk at [email protected] or at 512-416-3333.
Revision: 2.0
Table of Contents 1.0 Introduction .................................................................................................................................. 2 2.0 General ......................................................................................................................................... 3 3.0 Steps for Development of Contract Time Determination Schedule .......................................... 4
Step 1. Identifying the Scope of Work ................................................................................................ 4 Step 2. Establishing Production Rates............................................................................................... 4 Step 3. Adapting Production Rates to a Particular Project ............................................................... 5 Step 4. Understanding Potential Constraints .................................................................................... 6 Step 5: Computing Contract Time ...................................................................................................... 7 Step 6. Review and Develop CTD Narrative ...................................................................................... 9
4.0 Summary ................................................................................................................................... 10 Attachments Attachment A. Contract Time Determination Schedule Using CTE + P6 Attachment B. Contract Time Determination Checklist Attachment C. Contract Time Determination Narrative Template Revision History
Revision Number Date Change Description
1.0 8/17/2018 Original draft
2.0 11/13/2018 Incorporated comments from all review parties – Removed Draft stamp

Guidance Document
TPD | PPM Contract Time Determination Guidance Page 2 Revised 11/13/2018
1.0 Introduction Contract time is the maximum time allowed in the contract for completion of all work contained in the contract documents. The determination of contract time affects not only the actual duration of the construction project, but also affects aspects of the construction process including cost, selection of contractor, and impacts to the traveling public. The contract time is a factor in what the contractor bids on at Letting and becomes what they are held accountable for in the contract. Estimating contract time accurately can create significant benefits to all parties involved. By completing construction in a timely manner, the public, the agency, and the contracting industry benefit. The 2017 Sunset Advisory Commission report found that a quarter of all construction projects during fiscal years 2013 to 2015 experienced a contractor fault delay. These project delays are often a result of contractors not meeting the timelines in the contract. In the case where innovative contracting methods like A+B Bidding are used, an accurate contract time estimate is also critically important. The estimate must be accurate and detailed enough to evaluate the reasonableness of Contractors bid, as well as reasonable enough as to not set a maximum allowed days too low such that it discourages Contractors from bidding. A good contract time determination schedule developed in the design phase can also be passed along to the Area Office in the construction phase to aid in evaluating the Contractors baseline construction schedule. These are a few reasons why the validity of the contract time included in contracts, and the method used to calculate contract time determination schedules, is extremely important and must be done reasonably and accurately. Contracts that specify too few working days or an unreasonably short contract time may:
• Raise bid prices • Deter qualified bidders from
submitting bids • Potentially reduce quality of
the work • Increase the number of time
overruns • Increase possibility of claims • Decrease the chance of
successfully completing the project within the executed contract time.
On the other hand, contract times that specify an excessive number of working days and are too long may:
• Inconvenience the traveling public with ongoing construction activities and work zones • Allow contractors to stop all work on projects for extended periods causing a public
perception issue • Discourage innovative management and/or construction techniques to complete projects in
a timely fashion • Increase administration, engineering, and inspection costs • Affect road users by extended travel distance, additional travel time, and potentially a
decrease in safety.
“The determination of contract time affects not only the actual duration of the construction
project, but also affects aspects of the construction process including cost, selection of contractor, and impacts to the traveling public.”
Guidance Document
TPD | PPM Contract Time Determination Guidance Page 3 Revised 11/13/2018
The goal is that contract time represents the time in which an average, competent contractor will be able to complete the project. This guidance document is designed for project managers and project team members who are responsible for estimating a project’s construction duration in working day (Contract Time) typically during the project development process for inclusion into the project contract documents at the time of Letting.
2.0 General Contract Time Determination (CTD) is a procedure for determining the number of working days in construction contracts for placement in bid documents. An essential element of the CTD development process is to collaborate with an experienced team that includes designers, the project manager, and construction and/or maintenance personnel, such that all aspects of sequencing, planning, and constructability are considered. In general, the CTD schedule should be performed in a way that: allows the contractor sufficient time to complete the project is based upon at least one reasonable/constructible solution minimizes inconvenience to the traveling public and economic impacts to local communities includes considerations to accelerated construction practices when applicable utilizes any valuable information that has been developed in the planning of the engineers
estimate (if applicable) takes into account all known limitations of construction operations that the contractor will
need to be made aware as part of the bid documents considers any unusual circumstances that impact the time related aspects of the
construction
When using this guidance the duration estimates produced should always be validated by individuals having experience in construction and are knowledgeable of topics including production rates, procurement times, construction means and methods, maintenance of traffic, weather and seasonal impacts, and other factors that affect construction duration. It is the responsibility of the CTD developer to coordinate with Area Office staff, division staff, or other staff on any of these items they are not familiar with. While the CTD is typically finalized late in the design phase of the project, typically after the quantities have been completely tabulated, contract time should be considered throughout the plan development process. The contract time should be analyzed at milestone review meetings beginning after preliminary traffic control plans are determined. A conceptual CTD including sequencing of activities can be prepared as early as 30% PS&E, prior to determining final quantities. The finalized CTD should be reviewed at district plan review meetings by the different disciplines of design and construction staff for completeness and reasonableness.
“…estimates produced should always be validated by individuals having experience in construction and that are knowledgeable of
topics that affect construction duration.”

Guidance Document
TPD | PPM Contract Time Determination Guidance Page 4 Revised 11/13/2018
3.0 Steps for Development of Contract Time Determination Schedule
For most projects the essential elements in determining contract time include: 1. Identifying the scope of work 2. Establishing production rates 3. Adapting production rates to a particular project 4. Understanding potential constraints 5. Computing contract time 6. Review and Develop CTD Narrative
Step 1. Identifying the Scope of Work This step involves reviewing the plans, specifications, special provisions, and other items to obtain an understanding of the work involved for the project. Designers should understand the plans and construction elements well enough to understand sequencing of construction. While the CTD schedule does not need to be as detailed as a contractor’s construction schedule, enough granularity in activities is needed to ensure all elements affecting construction time are taken into account for each work item. In general, the level of detail found in the production rates table in Step 2 is a sufficient level of detail for activities within the CTD schedule. The CTD schedule should follow the sequence of work as outlined in the plans and specifically the traffic control plans (TCP) narrative. A Work Breakdown Structure (WBS) and associated Activities representing major tasks should be created for each phase and stage of construction as represented in the TCP. The Activities developed should mirror the TCP narrative accordingly for each phase and stage in the project. Additionally, quantities for each construction element should be broken out by phase or stage for each activity. The CTD schedule developer should also give consideration to potential risks that may occur during construction of the project. Examples included space limitations, difficult site conditions, the constructability of specific work items, material availability, and the economic environment that could affect construction. These identified risks can impact production rate decisions made in Steps 3 and 4 outlined below.
Step 2. Establishing Production Rates A production rate is the quantity produced or constructed over a specified time period. The application of realistic production rates is key in calculating appropriate contract working days. Production rates for the same item of work will vary across the state, from small to large construction projects, and from rural to urban areas. Production rates should be established based on project size, type of work, location, complexity for all items of work, quantities per phase, and impacts to the traveling public. TxDOT has established Construction Production Rates for use in estimating project contract time. This document contains a set of production rates for many of the activities that occur in highway and bridge construction projects. Production rates for all possible activities are not included nor are all production rates used in each construction job. The production rates listed accounts for all work included as described in the Payment section for each work item in the Standard Specifications for Construction and Maintenance of Highways, Streets, and Bridges book. The production rates may have to be supplemented with information from other sources including Area Office staff and should be adjusted with good engineering judgment and past experience with similar work.

Guidance Document
TPD | PPM Contract Time Determination Guidance Page 5 Revised 11/13/2018
A production rate should be assigned to each activity developed in Step 1 and adapted for each particular project as described in Step 3.
Step 3. Adapting Production Rates to a Particular Project Before time durations for an individual activity can be calculated, certain project specific information should be determined and some engineering judgement(s) made. A determination should be made relative to the urgency of the completion of the proposed project. The traffic volumes affected by the construction as well as the effect of detours should be analyzed. The size and location of the project should be reviewed as well as the effects of staging, working double shifts, and the feasibility of night work, as well as restrictions on closing lanes and other restrictions set out in the traffic control plan. For example, it might be appropriate to consider the need for multiple crews on a specific item to expedite the completion when there are exceptionally large quantities or when there is a large impact on traffic. Also, the availability of material for controlling items of work should be investigated. For example, the proximity of a project to a hot mix plant could affect the production rate, lowering the rate for a project further away. In the Construction Production Rates document, rates are given for a low, medium, and high rate of production. It is important to note that the selection of using a low / medium / high production rate may vary between individual work items in the same project. The low production rates category would include those projects which may include some of the following characteristics:
• heavy traffic • urban area • tight working conditions • complex staging • mostly hand work or "piece-
work" • not readily available material • reconstruction • difficult earthwork (poor soil
type, i.e. rock; steep grading; on-road vs. off-road truck haul)
• non-standard construction (variable pavement widths, etc.)
The medium production rates category would include those projects which may include some of the following characteristics:
• light traffic • rural area • simple staging • mostly machine work (i.e. slip-form paving) • readily available material • new construction or relocation • easy earthwork (good soil type; scraper haul) • standard construction (uniform pavement widths, etc.)
“Since production rates are so dependent on the location, size, complexity, and conditions at the
project site, Area Office staff can be an invaluable resource for helping to determine
accurate production rates to use.”
Guidance Document
TPD | PPM Contract Time Determination Guidance Page 6 Revised 11/13/2018
The high production rates category would include critical types of projects where an efficient contractor is working more than 8 hours per day and possibly with additional workers. The production rates used should be based on the desired level of resource commitment, labor and equipment, deemed practical given the physical limitations of the project. Since production rates are so dependent on the location, size, complexity, and conditions at the project site, Area Office staff can be an invaluable resource for helping to determine accurate production rates to use.
Step 4. Understanding Potential Constraints In addition to production rates, there are other constraints that should be considered when determining contract time. It will be the CTD developer’s responsibility to determine which factors apply and are most relevant to the specific project. Listed below are typical factors which should be given consideration.
• Definition of Working Day for contract time charges. Understanding how working days creates the contract time, which is the number of days to be charged in the project, and which working day definition is used in the contract.
• Effects of traffic control plan requirements on scheduling and the sequence of operations.
• The Accelerated Construction Program for understanding and utilizing effective project-specific accelerated construction strategies that will improve project completion time and positively impact business and traffic flow. More information and guidelines can be found at the TxDOT Construction Division website.
• Curing time and waiting periods between successive paving courses or between concrete placement operations, as well as specified embankment settlement periods. Subsidiary items like phase changes, testing, coffer dam installation, ride quality testing, and punchlist items, should be considered.
• Seasonal limitations for certain items which affect the number of days the contractor will be able to work as well as time of the year of the letting.
• Conflicting operations of adjacent projects, both public and private.
• Review time for falsework plans, shop drawings, post-tensioning plans, mix designs, etc.
• Time for fabrication of structural steel, precast concrete units, traffic signal equipment, and other specialty items.
• Coordination with utilities and right of way.
• Coordination with railroads and the requirements for working along and over their Right-of-Way.
• Time to obtain permits and the effect of permit conditions and/or restrictions. Although permits are mostly obtained prior to letting and therefore do not effect contract time, consideration should be given for environmental permits that may require special conditions such as restrictions on demolition and clearing operations during migratory bird nesting seasons.
• Restrictions for nighttime and weekend operations. Typically projects involving night or weekend work require longer durations as compared to projects completed during normal daytime hours because production rates at these times are lower and greater portions of that time are spent on safety procedures. However, under high-volume traffic conditions, night work may actually increase production rates because interference is reduced. Stringent

Guidance Document
TPD | PPM Contract Time Determination Guidance Page 7 Revised 11/13/2018
restrictions on working hours may reduce the production rates below the low rates provided in the table.
• Location. In most cases, a project located in an urban area will be estimated to take more time than a similar project in a rural area. However, in some situations, projects in rural areas may require more time because of longer mobilization times and greater distances for material delivery.
• Delivery of materials timeframes.
• Coordination with major community events, venues, and holidays.
• Commitments which have been made.
The previous information is intended as guidance only. Each project is different and contains its own unique set of circumstances that may not be covered by this information. Engineering judgement should be exercised in the creation of the CTD schedule to ensure that each project’s unique requirements and schedule impacts are captured.
Step 5: Computing Contract Time The contract time for most construction projects can be determined by developing a contract time determination schedule. The schedule shows the items of work, sequenced in accordance to the TCP, and the durations associated with the chosen production rates. The time to complete each controlling item of work included in the schedule is computed based on the production rates applicable to that project. Also included are relationships between activities such that inter-dependency among the various phases of work can be shown creating a critical path. There are currently three methods to create a CTD schedule. These are described below:
a. Automated Time Line – an Excel based (Timeline_2016.xlsm) graphical representation of projects with specific completion dates, activities, and relationships. Time Line is generally applicable for use with projects in which there are relatively few work components with easily understood relationships between the components. The Time Line spreadsheet is advantageous in that it is relatively simple to develop and easy to understand. However some disadvantages are that calendar variations cannot be included for different activities, like cure time, and developing the relationships between each activity can be cumbersome. These limitations may be a handicap to effective contract time estimation, especially when dealing with complex projects. For this reason, the Time Line application is only recommended to be used on projects with simple Traffic Control Plans, few phases, and limited possibilities for multiple critical paths during construction.
b. CTE + P6 Critical Path Method (CPM) Schedule – this method utilizes a
Contract Time Estimate (CTE) spreadsheet (CTE + P6.xlsm) to begin developing activities, production rates, and durations. The activities and durations are then imported into P6 where relationships can be added more easily and a true critical path method (CPM) schedule can be developed. A CPM schedule evaluates the critical tasks which take the greatest amount of time to complete and ultimately determine the duration to complete a project.
“The CPM schedule is
appropriate for projects that have
more complex relationships, sequencing,
and uncertainty.”
Guidance Document
TPD | PPM Contract Time Determination Guidance Page 8 Revised 11/13/2018
One advantage of using P6 to develop a schedule is the ability to vary the type of working day calendar for each project and activity. The default calendar selected when developing a P6 CPM schedule should match the manner in which working days will be charged in accordance with the contract. Default calendars have been created in P6 based off the options in Item 8. Prosecution and Progress from the 2014 Standard Specification book for how working days will be charged for each project. For contracts using a Five-Day, Six-Day, or Seven-Day Workweek where days are charged regardless of weather conditions or material availability, bad weather days should be accounted for when using P6 to calculate the working days for contract time. For these calendars non-work days for weather have already been included in the associated P6 calendar, making it unnecessary to include another time factor to account for these anticipated non-work days. For these types of working day charges, the appropriate five, six, or seven day workweek with holidays and weather calendar should be selected as the default P6 calendar for activities. If using the Standard Workweek definition where a day is not charged if weather or other conditions do not permit the performance of critical path work on the project, it is not necessary to include weather days in the P6 default calendar to calculate working days for contract time. The P6 default calendar that should be utilized is the Standard Workweek including holidays calendar. If a particular project necessitates a calendar that does not closely match one of the default calendars provided, a Project Calendar can be created in P6 for that specific project. For a full description of the calendars available, their definitions, and uses, see the ‘Calendars’ tab in the CTD+P6 Excel spreadsheet. The CPM schedule is appropriate for all projects, but especially for projects that have more complex relationships, sequencings, and uncertainty. Attachment A: Contract Time Determination Schedule Using CTE + P6 provides step by step instructions to create a CPM CTD schedule using this method.
c. P6 Critical Path Method (CPM) Schedule – This method creates a contract
time determination schedule fully in the Primavera P6 program from start to finish. Activities, durations, relationships, activity codes, and calendar assignments are all done within P6. This method can be used for any type of project and is only dependent on the developers’ familiarity with P6. Once familiar with the tool, P6 can also easily be used to develop a CTD schedule for even simple, non-complex projects. Likewise, utilizing P6 for simple projects helps build proficiency in using the software.
Guidance Document
TPD | PPM Contract Time Determination Guidance Page 9 Revised 11/13/2018
Step 6. Review and Develop CTD Narrative The CTD deliverable should be reviewed to ensure that the overall schedule appears to be logical, there are no obvious errors or mistakes in logic, and that the Project Duration appears to be reasonable. The Attachment B. Contract Time Determination Checklist can be used to aid in this review. It is important to include a review for CTD deliverables developed by consultants as well. The contract time schedule should be reviewed at milestone review meetings starting as early as the 30% PS&E review meeting. Reviews should include looking at activities selected, sequencing, discussion of conditions that might affect production rates chosen, other potential constraints, and opportunities to utilize incentives/disincentives, accelerated construction, or other contractual options to help achieve project goals. The finalized CTD should be reviewed at district plan review meetings or at a standalone CTD Workshop typically held during or after the 95% (90%) PS&E submittal. The TxDOT Project Manager organizes this meeting and invites the following people:
• Consultant Project Manager and appropriate staff (if applicable) • Appropriate multi-discipline design staff (roadway, hydraulics, traffic, bridge,
geotechnical, etc.) • TxDOT Area Engineer and appropriate staff
The purpose of the workshop is to go through the CTD schedule deliverable with the Area Office staff and review activities, sequencing, production rates and durations, relationships, and general completeness of the schedule. The following items should be included in the workshop:
• PS&E plans of each of the TCP phases (a roll works best with the aerial turned on)
• PS&E TCP Narrative and Typical Sections
• PS&E Summary Sheets • Contract Time Determination
schedule • Backup for production rates • Basis for assumptions and
constraints made The contracting industry can also provide reviews of the CTD deliverable in the same way PS&E plans are posted online for review. Once the CTD is calculated and reviewed a written CTD Narrative should be developed. The narrative should explain all elements of the schedule, including:
• basis of quantities and production rates used • any assumptions made by the CTD developer • identify any significant risks that contractors should be made aware of • explanation of the use of calendars, working day definition, and assumed weather • explain how any constraints to operations were incorporated into the schedule
“The contract time schedule should be reviewed at milestone review meetings starting as early
as the 30% PS&E review meeting.”

Guidance Document
TPD | PPM Contract Time Determination Guidance Page 10 Revised 11/13/2018
• explain any schedule compression/acceleration that was used to achieve any required dates
• identify any other important time related considerations
A template for a contract time determination narrative can be found in Attachment C. Contract Time Determination Narrative Template. This document should be filed with any other project documentation used to develop the CTD schedule.
4.0 Summary An essential element of determining contract time is good communication between design and construction subject matter experts to ensure that realistic assumptions have been made and all items affecting construction duration have been accounted for when developing the schedule. Experience and engineering judgement are crucial to effective contract time estimation. Referring to past performance of similar projects can also be a useful tool in estimating time for future projects. While there are different tools available to develop the contract time determination schedule, developing a critical path method schedule in P6 is the most recommended.

Guidance Document
TPD | PPM Contract Time Determination Guidance - Attachment A Page A-1 Revised 11/13/2018
Attachment A. Contract Time Determination Schedule Using CTE + P6
1.0 Introduction This procedure documents how to create a Contract Time Determination (CTD) schedule in P6 utilizing the Contract Time Estimate (CTE) spreadsheet and import into P6 method to calculate the number of Working Days to include in the project contract. The CTE is an Excel spreadsheet that once filled out can be imported into Primavera P6 software to create a Critical Path Method schedule that provides contract time.
Activity ID and descriptions, activity codes, and durations are inputted into the CTE template. The template is then imported into P6 and activity relationships are added to the schedule and any activity calendar edits can be completed. Sequencing, start and finish date calculations, determination of longest path, and calculation of the ultimate duration will all be calculated by P6.
With minimal effort, users have a powerful tool that can calculate working days (contract time) for projects based off of the relationship of critical activities and determination of the critical path.
The following text provides step by step instructions for utilizing the CTE spreadsheet and P6 to create a CTD schedule.
The steps outlined include:
CTE Spreadsheet
Step 1. Exporting “Dummy” P6 Schedule as Excel
Step 2. Transferring Data from CTE Spreadsheet into Exported P6 Spreadsheet
Step 3. Importing the P6 Export back into P6
Step 4. Adding Relationships
Step 5. Adjusting the Activity Calendars
Step 6. Scheduling and Determining Contract Time (Working Days)

Guidance Document
TPD | PPM Contract Time Determination Guidance - Attachment A Page A-2 Revised 11/13/2018
Definitions
Calendar Day: Any day shown on a calendar beginning and ending at midnight
Working Day: A calendar day which permits the performance of the principal unit of work underway, as determined by the Engineer, for a continuous period of at least 7 hr. between 7:00 A.M. and 6:00 P.M., unless otherwise shown in the contract.
Contract Time: The number of working days specified for completion of the work
Project Duration: The timeframe between the start of a project to the completion of it, measured in calendar days
Global Calendar: A calendar within the P6 database that can be assigned to any activity or project in the database
Project Calendar: A calendar associated with a specific P6 project and can only be assigned to activities in that P6 project.
Activity Calendar: The calendar assigned to each individual activity in the P6 project. Changed on the Activities screen in P6.
Project Default Calendar: Calendar assigned from the Projects screen in P6. If two or more activity calendars types are used in the P6 project, the default calendar will be used to calculate duration in the schedule.
Guidance Document
TPD | PPM Contract Time Determination Guidance - Attachment A Page A-3 Revised 11/13/2018
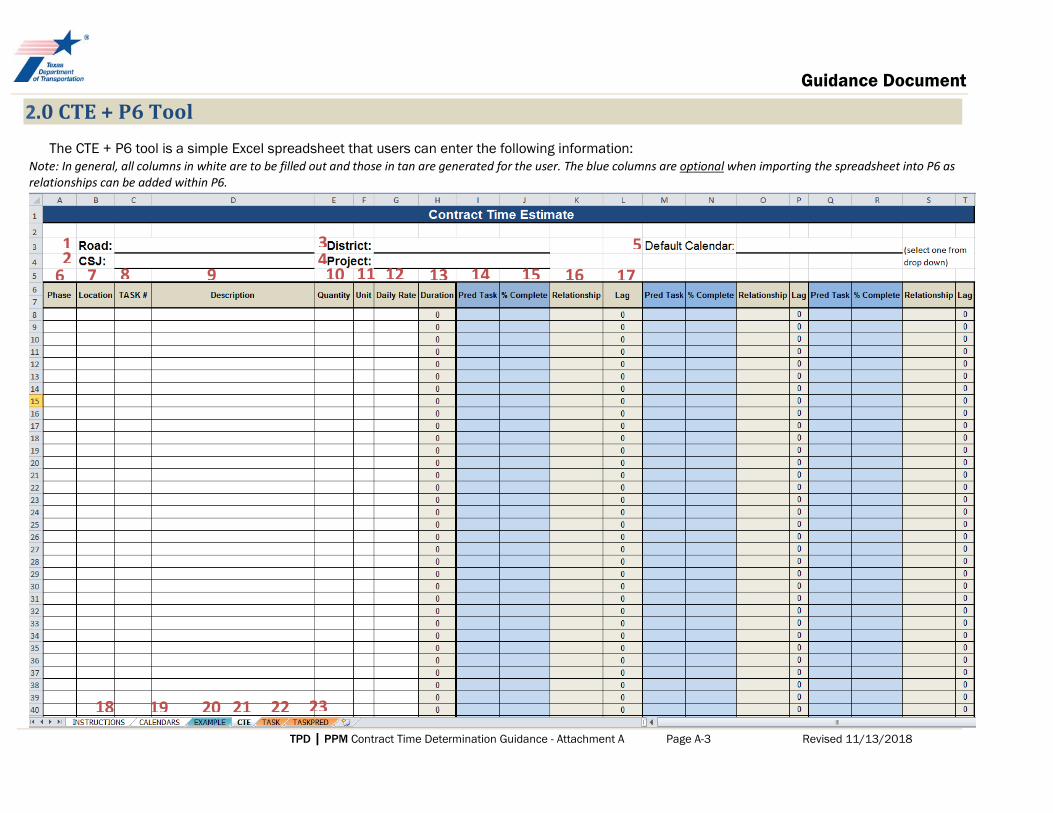
2.0 CTE + P6 Tool The CTE + P6 tool is a simple Excel spreadsheet that users can enter the following information:
Note: In general, all columns in white are to be filled out and those in tan are generated for the user. The blue columns are optional when importing the spreadsheet into P6 as relationships can be added within P6.
1 2
3 4
5
6 7 8 9 10 11 12 13 14 15 16 17
18 19 20 21 22 23

Guidance Document
TPD | PPM Contract Time Determination Guidance - Attachment A Page A-4 Revised 11/13/2018
1) Road: The name of the roadway being worked on (i.e. SH 358, US 190, etc.) 2) CSJ: CSJ for the project. This field is mandatory because the CSJ here is the Project name in
P6. The ID is unique for each project. (i.e. 123456789 (no dashes)) 3) District: District where project is located 4) Project: Descriptive name of the project (i.e. US 190 Bridge Replacement) 5) Default Calendar: Calendar to be assigned to every activity in P6. The work calendar selected
should adhere to the project Specifications. This is a drop down and a selection must be chosen. Individual activity calendars can be altered once in P6. See Calendar Tab in CTE spreadsheet for more information on calendar definitions.
6) Phase: This is the phase for the corresponding task (i.e. Phase 1, Phase 1-A, etc.) as outlined in the traffic control plans. If the project has no phases, leave blank. This helps group tasks by phase in P6.
7) Location: The location for the corresponding task (i.e. Frontage Rd, North Section, Bridge 1, etc.). This allows P6 to group tasks by locations if desired
8) Task #: This field is a unique identification number assigned to each activity. This must be unique for each task and should follow a sequential pattern. The example provided (A1000) or any of that nature is suggested. Avoid using singular numbers. It is suggested that the first activity in the template be “Let” for all projects. This allows the schedule to be changed easily if there is a change in the Let date or if there are any provisions that affect the project start (i.e. construction cannot begin until 90 days after Letting).
9) Description: The name of the activity or description of a grouping of similar tasks. In many ways, these are the Work Items of the project.
10) Quantity: The quantity for each activity. 11) Unit: The unit of measure of each task 12) Daily Production Rate: The daily production rate for each task. This is unique for each task
(ea./day, LF/day, etc.). This is to be determined utilizing the guidance provided in the CTD Schedule Guidance document using the Construction Production Rates spreadsheet
13) Duration: The duration (in days) for the activity. This is automatically calculated based on the Quantity and Daily Production Rate.
14) Pred Task: Any predecessor to the current activity. Any activity that must be completed or started before the current task can begin (i.e. Curing cannot happen until the concrete has been poured). Up to three (3) predecessors can be added per activity. Note: the Pred Task fields are optional as relationships can be added within the P6 software.
15) % Complete: The percent complete for the predecessor in order for the current activity to begin. This can be any number from 0 to 100. If the predecessor has to be completed before the current task can begin, assign 100. Note: the % complete fields are optional as relationships can be added within the P6 software.
16) Relationship: This is the relationship assignment for P6. This is automatically generated based on fields 14 and 15 and will be blank if relationships are to be added in P6.
17) Lag: Represents any delay in start for the current task. For example, if the predecessor has to be 50% complete for the current task to start and the predecessor has a duration of 4 days, then the lag for the current task is 2 days. This field is automatically calculated and will be blank if relationships are to be added in P6.
18) Instructions: Basic instructions for filling out the CTE + P6 spreadsheet.

Guidance Document
TPD | PPM Contract Time Determination Guidance - Attachment A Page A-5 Revised 11/13/2018
19) Calendars: Provides instructions for choosing the appropriate default calendar. 20) Example: An example CTE filled out in order to assist the users 21) Task: Formats all the task information into a format that can be imported into P6. This tab is
automatically populated based on the CTE tab. It is one of the tabs that will be imported into P6 22) Taskpred: Formats all the predecessor and relation information for all tasks into a format that
can be imported into P6. This tab is automatically populated based on the CTE tab. It is one of the tabs that will be imported into P6 if the user chooses to add relationships in the spreadsheet. If not, this tab can be ignored.
3.0 Creating a CTD using the CTE + P6 Spreadsheet The CTE tab of the CTE + P6 excel file should be filled out in accordance with the CTD guidance documents recommendations for developing activities, quantities, and production rates. The inclusion of relationships is optional because these can be added directly in P6. This document will walk the user through importing the CTE + P6 spreadsheet into P6, adding relationships, editing calendars as necessary, and calculating the critical path driven contract time.
Step 1. Exporting “Dummy” P6 Schedule as Excel
1.1 Log into the P6 PMDB_CTD Database via Citrix with your normal login credentials.
Note: Specific security profile settings are needed to follow these directions. If issues are encountered with these directions, please contact the PPM Helpdesk to check the profile settings assigned to your account.
1.2 Click “File””New” to create a New Project
Guidance Document
TPD | PPM Contract Time Determination Guidance - Attachment A Page A-6 Revised 11/13/2018
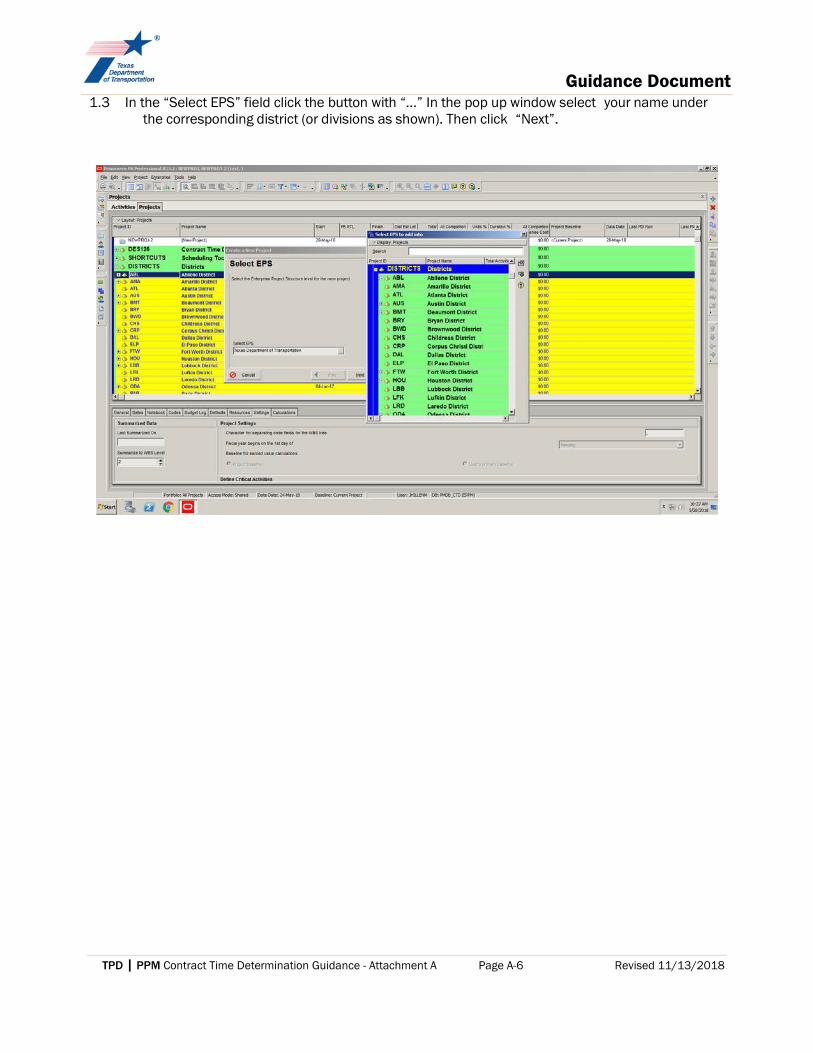
1.3 In the “Select EPS” field click the button with “…” In the pop up window select your name under the corresponding district (or divisions as shown). Then click “Next”.

Guidance Document
TPD | PPM Contract Time Determination Guidance - Attachment A Page A-7 Revised 11/13/2018
1.4 In the “Project ID” field, input the CSJ of the project (i.e. 123456789). Assign the Project Name as it is shown in the CTE + P6 template. Then select finish.
1.5 Right click on the newly created project and select “Open Project”

Guidance Document
TPD | PPM Contract Time Determination Guidance - Attachment A Page A-8 Revised 11/13/2018
1.6 Click “File””Export”. Then select “Spreadsheet – (XLS)” and click “Next”
1.7 Select “Activities” checkbox and click “Next”. Note – if you have chosen to add the Relationships in the CTE + P6 spreadsheet, you should also select the Activity Relationships checkbox.

Guidance Document
TPD | PPM Contract Time Determination Guidance - Attachment A Page A-9 Revised 11/13/2018
1.8 Under “Export” check the project and click “Next”
1.9 Select “Time Determination Schedule” under Select Template and click “Next”.

Guidance Document
TPD | PPM Contract Time Determination Guidance - Attachment A Page A-10 Revised 11/13/2018
1.10 Under “Select Excel File” choose where to save the file to. Double click on the file name or click the “…” to browse the Network drives to find the most appropriate location to save the file. Then click “Next” and on the following screen, select “Finish”.
The project has been successfully exported to the location where the user has designated in Excel format.
Step 2. Transferring Data from CTE Spreadsheet into Exported P6 Spreadsheet The following section will guide the user on transferring the data inputted in the CTE + P6 spreadsheet into the newly exported P6 spreadsheet. For convenience, the tabs in the CTE + P6 spreadsheet (i.e. TASK and TASKPRED) have been appropriately labeled to match its destination in the P6 file just exported.
2.1 Open both the CTE + P6 and P6 exported spreadsheets (named as the CSJ).
2.2 Select the “TASK” tab in both spreadsheets. Note that the activities inputted in the “CTE” tab have automatically populated the “TASK” tab in the CTD + P6 spreadsheet. Copy the populated fields beginning with cell “A3”.
Guidance Document
TPD | PPM Contract Time Determination Guidance - Attachment A Page A-11 Revised 11/13/2018
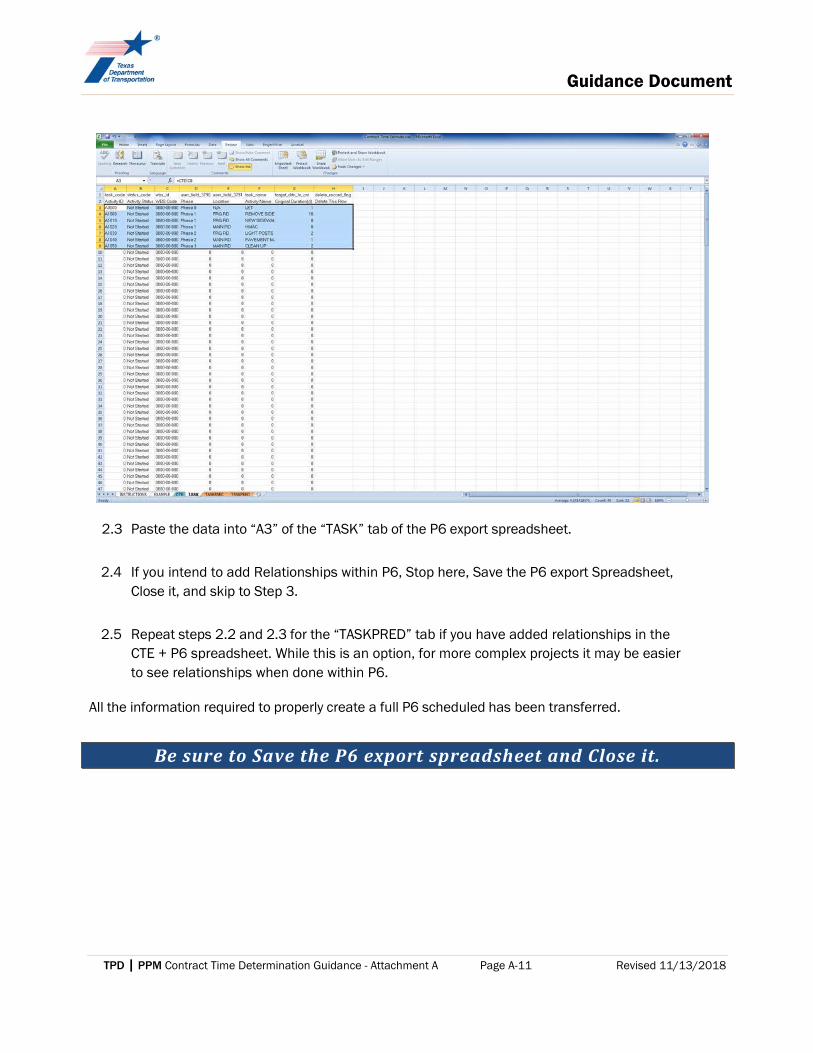
2.3 Paste the data into “A3” of the “TASK” tab of the P6 export spreadsheet.
2.4 If you intend to add Relationships within P6, Stop here, Save the P6 export Spreadsheet,
Close it, and skip to Step 3. 2.5 Repeat steps 2.2 and 2.3 for the “TASKPRED” tab if you have added relationships in the
CTE + P6 spreadsheet. While this is an option, for more complex projects it may be easier to see relationships when done within P6.
All the information required to properly create a full P6 scheduled has been transferred.
Be sure to Save the P6 export spreadsheet and Close it.

Guidance Document
TPD | PPM Contract Time Determination Guidance - Attachment A Page A-12 Revised 11/13/2018
Step 3. Importing the P6 Export back into P6 Now that the required information to create the CTD schedule has been created and transferred to the spreadsheet, the Excel export file is ready to import back into the P6 project schedule.
3.1 Select “File””Import” in P6. Make sure that the correct project schedule is Open and the Excel file you are going to import is Closed.

Guidance Document
TPD | PPM Contract Time Determination Guidance - Attachment A Page A-13 Revised 11/13/2018
3.2 Select “Spreadsheet – (XLS)” then click “Next”
3.3 Select the button with “…” and search for the Excel file previously exported and saved. Click
“Open” then click “Next”.

Guidance Document
TPD | PPM Contract Time Determination Guidance - Attachment A Page A-14 Revised 11/13/2018
3.4 Select “Activities” then click “Next”. If you are importing Activity Relationships as well, click “Activity Relationships”.
3.5 Under “Import To”, click the button with “…”. A new box will open that should have the current
open project in it. Select the project and double-click. Then click “Next”.
Guidance Document
TPD | PPM Contract Time Determination Guidance - Attachment A Page A-15 Revised 11/13/2018
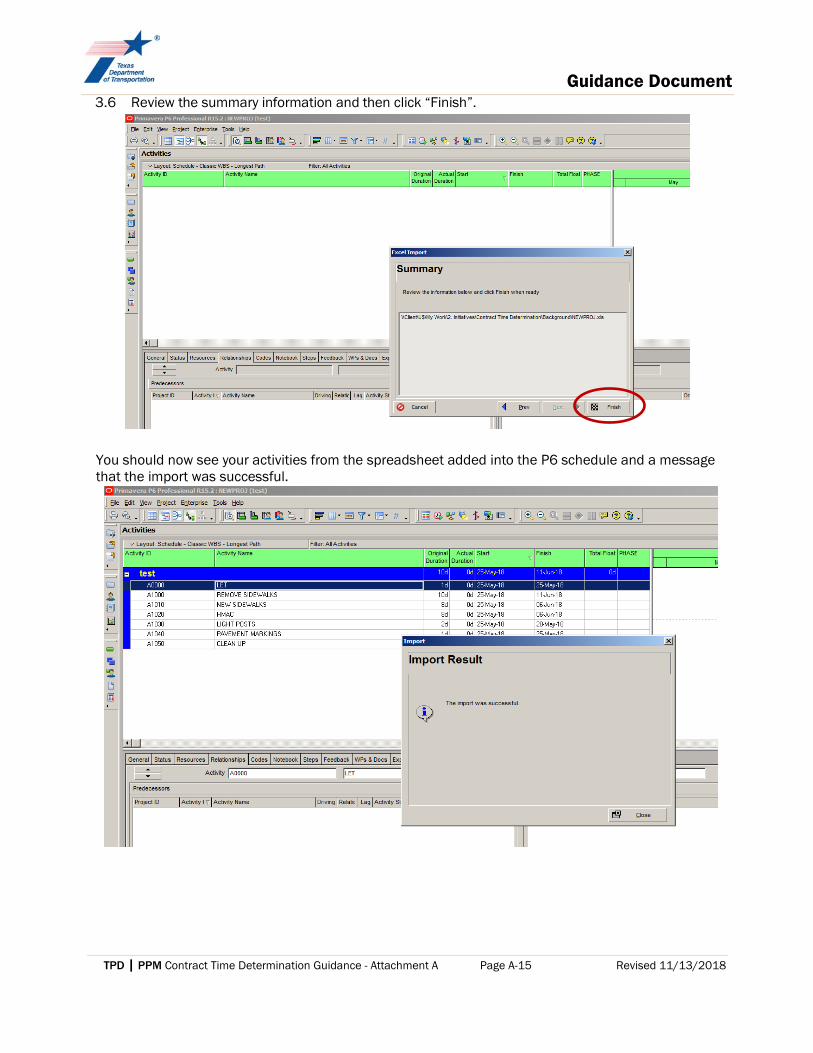
3.6 Review the summary information and then click “Finish”.
You should now see your activities from the spreadsheet added into the P6 schedule and a message that the import was successful.
Guidance Document
TPD | PPM Contract Time Determination Guidance - Attachment A Page A-16 Revised 11/13/2018
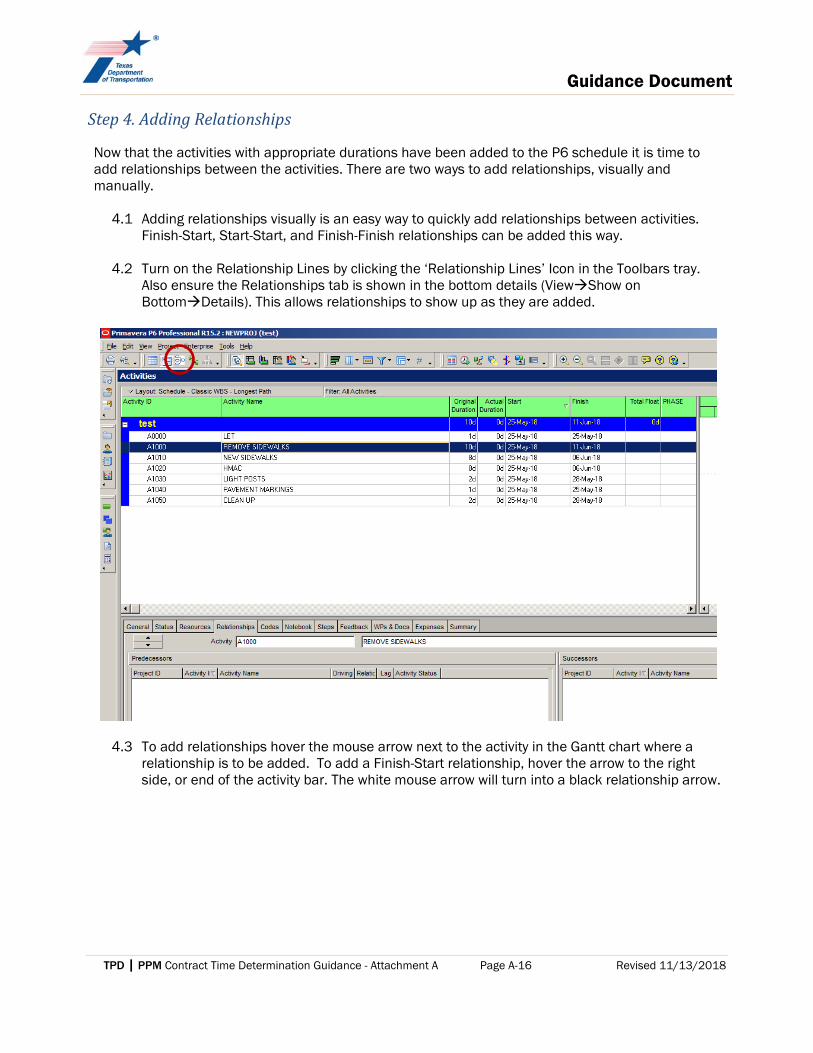
Step 4. Adding Relationships
Now that the activities with appropriate durations have been added to the P6 schedule it is time to add relationships between the activities. There are two ways to add relationships, visually and manually.
4.1 Adding relationships visually is an easy way to quickly add relationships between activities.
Finish-Start, Start-Start, and Finish-Finish relationships can be added this way.
4.2 Turn on the Relationship Lines by clicking the ‘Relationship Lines’ Icon in the Toolbars tray. Also ensure the Relationships tab is shown in the bottom details (ViewShow on BottomDetails). This allows relationships to show up as they are added.
4.3 To add relationships hover the mouse arrow next to the activity in the Gantt chart where a relationship is to be added. To add a Finish-Start relationship, hover the arrow to the right side, or end of the activity bar. The white mouse arrow will turn into a black relationship arrow.

Guidance Document
TPD | PPM Contract Time Determination Guidance - Attachment A Page A-17 Revised 11/13/2018
4.4 Click next to the first activity and while holding hold as the mouse is moved to either the start or finish of another activity. When moving from activity to activity, a yellow box will show what relationship will add depending on when the mouse is released.
4.5 To add a Finish (Let) to Start (Remove Sidewalks) relationship, release the mouse and a
relationship line will show up in the Gantt chart and the relationship will also be added in the appropriate Predecessor or Successor box in the details below.

Guidance Document
TPD | PPM Contract Time Determination Guidance - Attachment A Page A-18 Revised 11/13/2018
4.6 Continue adding relationships in this manner until all relationships are added. Lag can also be added in the Relationships details box if necessary.

Guidance Document
TPD | PPM Contract Time Determination Guidance - Attachment A Page A-19 Revised 11/13/2018
Hint: To see the starts and finish of individual activities more easily, hover over the timescale at the top and use the magnifying glass
icon to increase or decrease the scale.
4.7 Another way to add relationships is to use the ‘Assign’ button in the details layout to select an activity to add as a relationship. Highlight the activity to add relationship to, click the Assign button, select the activity to add and double-click. The relationship will be added.

Guidance Document
TPD | PPM Contract Time Determination Guidance - Attachment A Page A-20 Revised 11/13/2018
Step 5. Adjusting the Activity Calendars
A default calendar was selected when filling out the CTE + P6 spreadsheet according to the manner in which working days will be charged according to the contract (See ‘Calendar’ tab in CTE+P6 Excel spreadsheet for more information on choosing the default calendar). This default calendar was applied to all activities in the schedule. However, there may be some activities that need to be on a different calendar. Some examples of when an activity calendar may need to be changed from the default include:
• The ‘LET’ activity in the schedule that is not affected by weather • If a particular activity is allowed by the contract to operate 7 days a week or overnight, for
example administrative items such as letting and award periods • If a particular items has seasonal work restrictions • Items that are continuous regardless of contractor work (submittals, procurement, curing) • If the default P6 calendar includes non-work days for weather, changing items not affected by
weather to a calendar that does not include bad weather days. • A hammock activity used to calculate contract time should be changed to a calendar that

Guidance Document
TPD | PPM Contract Time Determination Guidance - Attachment A Page A-21 Revised 11/13/2018
matches the specification definition of working day.
5.1 Open the ‘Contract Time Determination’ global layout (ViewLayoutOpen Layout). This will organize your schedule by Phase and Location as well as add a column that indicates the assigned calendar.
5.2 The calendar can be updated for individual activities as necessary. Double-click on the calendar name for the activity that needs to be changed and select a new calendar.

Guidance Document
TPD | PPM Contract Time Determination Guidance - Attachment A Page A-22 Revised 11/13/2018
Step 6. Scheduling and Determining Contract Time (Working Days) Once activities with durations, relationships, and calendars have all been set in the schedule, the project can be Scheduled and reviewed.
6.1 Schedule the project using the Schedule Icon or by clicking F9, and click “Schedule”.
6.2 The schedule should be reviewed to make sure all relationships were added as intended and the schedule makes sense. The Schedule Log can assist with determining if any red flags exist in the schedule.
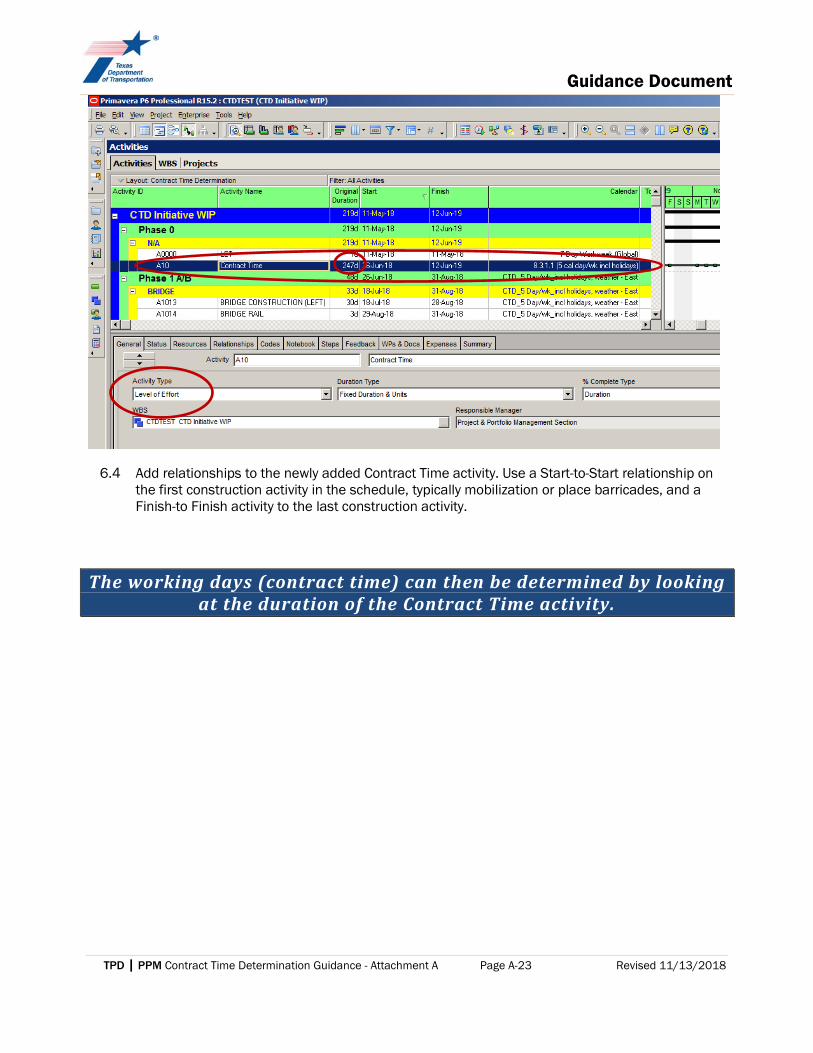
6.3 Once the project has been scheduled, P6 can be used to calculate the number of working days
to allow in the contract. To do this, a new activity should be added to the schedule called “Contract Time”. The activity type should be set to “Level of Effort”. The calendar for this single activity should be changed to make sure it matches the working day definition as written in the spec book. Valid choices are:
Working Day Name Spec Book definition of day charges
8.3.1.1 Five-Day Workweek 8.3.1.1 (5 cal day/wk incl holidays) 8.3.1.2 Six-Day Workweek 8.3.1.2 (6 cal day/wk incl holidays) 8.3.1.3 Seven-Day Workweek 8.3.1.3 (7 cal day/wk incl holidays) 8.3.1.4 Standard Workweek CTD_Std 5 day/wk incl holidays 8.3.1.5 Calendar Day CTD_7 Day Calendar Day_no holidays, no weather
For more information regarding available calendars, see the ‘Calendars’ tab in the CTE+P6 Excel spreadsheet.
Guidance Document
TPD | PPM Contract Time Determination Guidance - Attachment A Page A-23 Revised 11/13/2018
6.4 Add relationships to the newly added Contract Time activity. Use a Start-to-Start relationship on the first construction activity in the schedule, typically mobilization or place barricades, and a Finish-to Finish activity to the last construction activity.
The working days (contract time) can then be determined by looking at the duration of the Contract Time activity.
Guidance Document
Revised 11/13/2018 TPD | PPM Contract Time Determination Guidance - Attachment B Page B-1
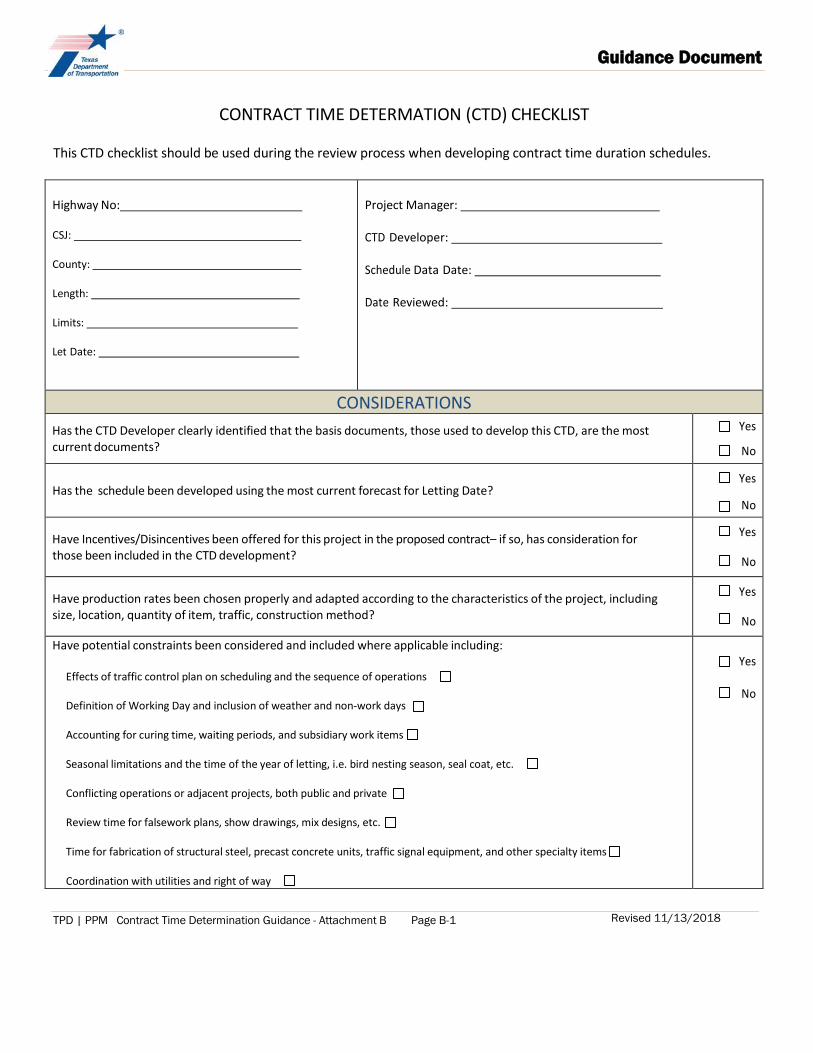
CONTRACT TIME DETERMATION (CTD) CHECKLIST
This CTD checklist should be used during the review process when developing contract time duration schedules.
Highway No:
CSJ:
County:
Length:
Limits:
Let Date:
Project Manager:
CTD Developer:
Schedule Data Date:
Date Reviewed:
CONSIDERATIONS Has the CTD Developer clearly identified that the basis documents, those used to develop this CTD, are the most current documents?
Yes
No
Has the schedule been developed using the most current forecast for Letting Date?
Yes
No
Have Incentives/Disincentives been offered for this project in the proposed contract– if so, has consideration for those been included in the CTD development?
Yes
No
Have production rates been chosen properly and adapted according to the characteristics of the project, including size, location, quantity of item, traffic, construction method?
Yes
No
Have potential constraints been considered and included where applicable including:
Effects of traffic control plan on scheduling and the sequence of operations
Definition of Working Day and inclusion of weather and non-work days
Accounting for curing time, waiting periods, and subsidiary work items
Seasonal limitations and the time of the year of letting, i.e. bird nesting season, seal coat, etc.
Conflicting operations or adjacent projects, both public and private
Review time for falsework plans, show drawings, mix designs, etc.
Time for fabrication of structural steel, precast concrete units, traffic signal equipment, and other specialty items
Coordination with utilities and right of way
Yes
No

Guidance Document
Revised 11/13/2018 TPD | PPM Contract Time Determination Guidance - Attachment B Page B-2
Coordination with railroads. Railroad work restrictions should be discussed with rail road, approved, and incorporated
Environmental permit restrictions or noise restrictions
Restrictions for nighttime and weekend operations, i.e. Hours of operations, lane closures, etc.
Delivery of materials timeframes
Location of project
Coordination with major community events, venues and holidays
Any commitments which may have been made
Has the CTD been reviewed by Area Office or other construction staff experienced with this type of project?
Yes
No Has a narrative been developed that documents the elements of the schedule including:
• Basis of quantities and production rates • Assumptions made • Identified risks that construction should be aware of • Explanation of user of calendars, working day, and assumed weather • Discussion of production rates chosen and resources assumed • Any constrains to operations • Explanation of any schedule compression/acceleration included • Any other importation time related considerations
Yes
No
If this CTD is an update, have previous comments, from the Area Engineer or applicable reviewers been incorporated or documented/addressed?
Yes
No

Guidance Document
TPD | PPM Contract Time Determination Guidance - Attachment C Page C-1 Revised 11/13/2018
Attachment C. Contract Time Determination Narrative Template
1.0 Overview The CTD is prepared using [Time Line / CTE + P6 Critical Path Method (CPM) scheduling techniques / P6 CPM scheduling techniques] to estimate the duration of the construction portion of the project and is generated to demonstrate that there is at least one reasonable plan to finish the project within the timeframe specified. This CTD considers critical constructability aspects as part of this planning effort, however, not all constructability aspects have been included upon as part of this CTD. This CTD schedule is based on the [60% / 60% / 90% PS&E] and is intended to provide a conceptual schedule of what is a reasonable and achievable duration for the construction of the project. 2.0 Project Description [Include brief project description including estimated cost, rigor of project, type and scope of work, proposed Let date] 3.0 Assumptions The following assumptions were used in the development of the CTD as shown: [List assumptions regarding:
• Definition of work day • Calendars • Production rates • Resources assumed • Constraints • Limitations of Operations • Seasonal restrictions • Traffic Control • Incentives / Disincentives considered]
4.0 Contract Time Summary
The contract time duration calculated by the above described method and including the above described assumptions resulted in a project duration of [____ days] using a [____ calendar definition]. [A copy of the created schedule should be included as an attachment.]
READ & DELETE! The highlighted portion of the document should be edited for each specific narrative.