continuing education at your...
TRANSCRIPT

1
Beauty Educators
5150 Mayfield Road Lyndhurst, Ohio 44124 Phone: (440) 442-4500 Email: [email protected] Website: InnerStateBeautySchool.com
CE At Home- Cosmetology
Continuing Education at your Convenience!
Course Name: CE At Home for Cosmetology Professionals Course Number: SC 110430 Hours: Eight (8)
Send To:
The Ohio State Board of Cosmetology has approved both at home and online training for license renewal for the renewal period
ending on January 31, 2013. This course is approved for eight (8) hours of continuing education for Cosmetologists!
PRSRT STD U.S.
POSTAGE
PAID PERMIT NO. 944
CLEVELAN

2
Beauty Educators
5150 Mayfield Road Lyndhurst, Ohio 44124 Phone: (440) 442-4500 Email: [email protected] Website: InnerStateBeautySchool.com
CE AT HOME
COSMETOLOGIST Dear Colleague: Thank you for your interest in our 8-hour at-home course. For over 25 years, Inner State Beauty School has been dedicated to providing the highest standard of on-site cosmetology education. More than 3,500 students have received their beauty licenses through this institution, entering the field with endless opportunities for fulfilling, rewarding career options. In addition, we have been offering on-site continuing education classes since 1996. With today’s busy schedules, taking a correspondence course in the comfort of your own home is an appealing option for many beauty professionals. Like all of our course offerings, this course is approved by the Ohio State Board of Cosmetology. To take this course: 1. Simply read each of the eight sections, complete the final exam at the end of the Course, and fill out the course evaluation. Each section includes a practice test to prepare you for the final exam. 2. Mail the completed Final Examination sheet along with the Course Evaluation to us with the test fee of $19.95. 3. A score of 75% or higher will guarantee that you receive 8 hours of continuing education for your license renewal. You will receive your results by mail.
You may take this course if you have a Cosmetology license.
Thank you for your interest in the Beauty Educator’s At Home course. I hope you find this a convenient, cost effective alternative to on-site continuing education. Please contact us if you have any questions. Sincerely,
Heather Walczak Heather Walczak Director of Continuing Education The Beauty Educators
3
TABLE OF CONTENTS
SECTION 1
Infection Control………....…………………………………………………………2
Section 1 Practice Test……………………………………………………………...7
SECTION 2
Hair Care……………………………………………………………………………8
Section 2 Practice Test…………………………………………………………….28
SECTION 3
Facials……………………………………………………………………………....28
Section 3 Practice Test…………………………………………………………….34
SECTION 4
Nail Care – Manicuring…………………………………………………………...34
Section 4 Practice Test…………………………………………………………….39
FINAL EXAM QUESTIONS…………………………………………………….40
ANSWER SHEET…………………………………………………………………42
COURSE EVALUATION………………………………………………………...43

4
SECTION 1 INFECTION CONTROL
(2 credit hours)
General
Media attention, consumer awareness and information accessibility has placed a higher level of scrutiny on sanitation and disinfection procedures and practices in salons across the country. Due to highly publicized outbreaks of bacterial infections in salons in California and elsewhere, clients have developed a higher level of awareness and concern for their safety. Indeed, clients should expect nothing less from their salon than the highest possible standards of disinfection and sanitation. Nothing less than strict adherence to sanitation and disinfection procedures by a salon owner will ensure its clients’ health and safety.
Regulation
The cosmetology industry is regulated by state and federal agencies. These agencies set guidelines for safety in the workplace for employees and their clients. They also regulate licensing, enforcement and conduct when working in the salon. Federal Agencies regulating the salon industry include The Occupational Safety and Health Administration (OSHA) and the Environmental Protection Agency (EPA). OSHA which was created to protect employees in the workplace. Due to the potentially toxic nature of many of the products used in salons, OSHA set standards related to the handling, mixing, storing and disposing of such products. The EPA licenses the two types of disinfectants used in salons, hospital and tuberculocidal. According to federal law, all disinfectants used in salons must be used according to packaging and EPA guidelines. State Agencies provide protection to consumers. State boards of cosmetology, licensing agencies and health departments are just a few of the regulatory agencies dedicated to protecting consumers by ensuring salons follow specified procedures. These agencies are empowered to issue penalties against salon owners and operators through fines, probation and suspension of licenses. It is vital that all
cosmetologists and salon owners understand and follow the laws and rules in their state at all times. Laws are set by the government and allow regulatory agencies to make rules within the confines of the law. Rules determine how the law will be applied and establish conduct that can be updated. Agencies such as state boards of cosmetology and health departments develop rules for salons to follow in accordance with the law. All salons have a legal obligation to provide safe services and prevent consumers from harm by practicing safely. If a client is infected because a salon did not correctly perform a service, the cosmetologist performing the service and/or the salon owner may be found legally responsible for the client’s injury, infection or resulting illness.
Bacteria
Bacteria are too tiny to see, and exist almost everywhere on the planet including the human body. They can be found on the skin, hair, under the nails and even on clothing.
Types of Bacteria
These single-celled microorganisms can be classified into two distinct categories, nonpathogenic and pathogenic. Nonpathogenic bacteria are useful bacteria. In humans, nonpathogenic bacteria serve a variety of functions including metabolizing food, protecting against infection, and stimulating immune response. Pathogenic or disease-causing bacteria can cause infection when they invade the human body. They enter the body through open wounds in the skin, and via the eyes, nose, mouth or ears, and begin to multiply quickly. Infection is impossible without the presence of pathogenic bacteria. One of the most common types of bacteria are Cocci. Staphylococci cause skin problems like abscesses and boils. Streptococci can cause infections such as strep throat and Diplococcic can cause disease like pneumonia. Bacilli cause serious diseases such as tetanus, typhoid fever and tuberculosis. Spirilla can cause diseases like syphilis and Lyme disease.

5
Cocci do not move but are transmitted through the air in dust or on surfaces where they settle. Bacilli and spirilla do have self-movement and are generally mobile in liquid. Bacteria can be active or inactive. When active, they grow and reproduce. They multiply best in warm, dark, damp or dirty places. Under favorable conditions, bacteria grow quickly and thrive. If conditions are not favorable, they either die or become inactive.
Cocci
Bacterial Infections
Infection occurs when body tissues are invaded by pathogenic bacteria. Staphylococci are the most common human bacteria and are most commonly spread through skin-to-skin contact. This bacteria can also be picked up on surfaces such as doorknobs, sinks or countertops. Shaking hands and using unclean implements are common ways bacteria might spread in a salon. Bacterial infections can be local or general and can be treated with antibiotics.
Local infection is confined to a small area, such as an infected wound. Signs of infection include redness, swelling and lesions containing pus. General infection is carried to all parts of the body through the bloodstream. Blood poisoning is an example of a general infection. When a disease spreads from person to person, it is considered contagious. Without safe procedures, harmful bacteria can be transferred to clients and salon practioners. Coughing, sneezing, common drinking cups, and unclean implements can all spread disease.
Viruses
Viruses are capable of invading plants, animals and even bacteria. When a virus invades the human body, it survives by attaching itself to healthy cells where it can multiply. Viruses are the cause of many diseases including measles, chicken pox, smallpox, the common cold, hepatitis and HIV. Viruses cannot be treated with antibiotics. Some viruses can be prevented through the use of vaccinations.
Hepatitis
Hepatitis types A, B and C are bloodborne viruses that should be of concern to the cosmetologist. Hepatitis causes inflammation of the liver and is present in blood and body fluids. Unlike HIV, the Hepatitis virus can live for long periods of time on hard surfaces. Care must be taken to disinfect all surfaces properly to protect against the Hepatitis virus. Hepatitis B is the most difficult to kill on surfaces, so check the label of disinfectants being used to be sure that the product is effective against it. Vaccines are available for Hepatitis, and should be considered by anyone working with the public.
HIV/AIDS
HIV (Human Immunodeficiency Virus) is the virus that causes AIDS (Acquired Immune Deficiency Syndrome). HIV is spread through blood and body fluids, such as semen and vaginal secretions. Transmission of HIV occurs most often by the sharing of needles by IV drug users. Another way the disease is spread is through unprotected sexual contact or accidents with needles by health care workers. The virus is less likely to be transmitted via contact with cuts or sores. It is not transmitted through casual contact such as hugging, kissing or sharing food. There are no documented cases of the virus being spread by hair, skin or nail salon services. Proper disinfection and sanitation procedures can prevent the spread of viruses and bacteria.
Bloodborne Pathogens
Any bacteria or virus that is carried through the body via the bloodstream or bodily fluids are called bloodborne pathogens. Any implement that cuts a client with a bloodborne virus such as hepatitis is contaminated. Transmission of that disease to another client

6
is likely unless the implement is properly cleaned and disinfected. Transmission is possible any time the skin is broken. Salon procedures such as shaving, clipping, waxing, tweezing and facial treatments are all services in which a client is at risk of skin puncturing or cutting. Pathogens enter the body through broken skin, the mouth, nose, ears, eyes and unprotected sex. The body protects itself from infections through healthy skin, body secretions, white blood cells and antitoxins.
Parasites
A parasite cannot live without a host, and must draw nourishment from another living organism to survive. Parasites can be plants or animals. Fungi are plant-based parasites that produce contagious diseases such as ringworm and nail fungus. Animal parasites include lice and scabies. Clients with parasites should be referred to a physician for treatment, and any contaminated implements that have come in contact with such clients should be cleaned and disinfected for 10 minutes with an EPA registered disinfectant or bleach solution.
Head lice
Immunity
People in good health have strong immune systems. Immunity is the ability of the body to destroy bacteria that have entered the body, and to withstand infection. Acquired immunity is the immunity the body develops after it overcomes disease or is inoculated. Flu vaccinations are common inoculations.
Prevention
There are three steps to decontamination: sanitation, disinfection and sterilization. Hospitals and medical facilities must practice
all three steps. Salons must only concern themselves with sanitation and disinfection. Sanitation is the removal of all visible dirt and debris. In other words, sanitation is cleaning. A surface must be properly cleaned before it is properly disinfected. Cleaned or sanitized surfaces may still harbor pathogens but have a decreased chance of spreading infection. To sanitize, salons may scrub with a brush, use an ultrasonic unit or solvent. Disinfection kills most bacteria, fungi and viruses on non-living surfaces such as shears, nippers and other salon equipment. Disinfectants are not for use on human skin and should never be used as hand cleaners. In fact, disinfectants should be used with caution and clearly state on the label that use should not involve skin contact. Sterilization is used in hospitals and eliminates the presence of all microbial life. It is necessary only in surgical procedures.
Disinfectants must be used properly and according to the manufacturer’s instructions. If the label does not have the word “concentrate” on it the product is already mixed and must be used as is. All EPA disinfectants require 10-minute contact on precleaned, hard surfaces. Implements must be cleaned thoroughly prior to immersing in disinfectants. Once cleaned, they must be completely immersed in solution for the time specified on the label. Any use other than that listed on the label is a violation of Federal law.
Completely Immerse Tools & Implements in Disinfectant Solution

7
Types of Disinfectants
Quats Quaternary ammonium compounds safe and useful disinfectants. Typically, quat solutions disinfect implements within 10 minutes. Certain tools, particularly fine steel, may be damaged if left too long in a quat solution. Phenols Phenolic disinfectants, or phenols, are powerful tuberculocidal disinfectants. Extra caution should be exercised when using phenolics as they can be harmful to the environment, damage skin or eyes and can damage rubber and plastic instruments.
Alcohol Ethyl and isopropyl alcohol of 70% strength are safe to sanitize hands, but are not approved for use on tools in Ohio.
Bleach can be effective to disinfect items in the salon and should be mixed with a ratio of 1 cup bleach to 1 gallon of water. Bleach can be corrosive to metals and plastics. Bleach has been used in salons long before the EPA existed so it is not required to have an EPA registration number. In the past, a solution of formalin (formaldehyde in water) was a recommended disinfectant. Formaldehyde has been associated with irritation to the skin, eyes, nose, throat and lungs, and is a suspected cancer-causing agent. As such, formalin is no longer considered safe for salon use. Glutaraldehyde is another chemical that is not safe for salon use. Any time disinfectants are used, caution must be exercised: they can cause skin and eye damage. Gloves and safety goggles should be used when mixing or using disinfectants. When mixing, disinfectants should be added to water, water should never be poured onto a disinfectant. Containers should be marked and directions followed when using disinfectants. Solutions should be changed daily and containers should be covered but not airtight.
DISINFECT OR DISPOSE?
Items that can be disinfected include non-porous equipment such as shears, combs and pushers. Some porous items such as towels and some buffers and nail files can be
disinfected and reused. Items easily damaged by disinfecting or containing residue such as orangewood sticks or pumice stones cannot be disinfected and must be thrown away. Disinfecting tools such as combs, brushes, tweezers and nail clippers must start with cleaning. Remove all visible debris with warm, soapy water, rinse thoroughly and pat dry with clean towel. Then, completely immerse implements in disinfecting solution for 10 minutes or per the manufacturer’s instructions. Finally, remove tools with gloves or implements, rinse and let dry. Tools can be stored in clean container but not airtight. Towels, robes, and linens shall be laundered in a washing machine with laundry detergent and chlorine bleach used following manufacturer’s directions for sanitation purposes. Work surfaces, doorknobs and chairs should be cleaned regularly to ensure a safe, healthy salon. Client packs can be saved but must be cleaned and disinfected before storing in loosely closed containers or bags. State rules require all tools and equipment be cleaned and disinfected even if used for the same client over and over again. If a client should bring their own tools to the salon, they must be cleaned and disinfected at the salon prior to use. Foot spas and pedicure equipment must be cleaned and disinfected after each use, and logged accordingly. Water must be drained, all visible debris removed, walls and basin cleaned thoroughly, and finally, disinfected for 10 minutes. At the end of each day the unit screen should be cleaned and the basin flushed and drained before disinfecting. Finally the unit must be allowed to dry completely overnight. Chelating surfactant soaps are important to use for pedicure spas in order to remove residue from salts, scrubs and masques. Any disposable supplies such as orangewood sticks, disposable files or cotton must be thrown away after a single use. If contaminated with blood, these products must be double-bagged, marked with a biohazard sticker and disposed of according to OSHA standards.

8
Hand washing should be practiced by both cosmetologists and their clients. Proper hand washing procedures require that the hands are lathered and scrubbed for at least 20 seconds. Both sides of hands should be washed including any exposed areas of arms. A nail brush should be used to scrub the underside of nails where bacteria can hide. Hands should be washed prior to each service. Hand sanitizers can be used if soap and water are not available but should not replace soap and water.
UNIVERSAL PRECAUTIONS
Universal Precautions are a set of guidelines published by OSHA that require employers and employees to assume that all human blood and body fluids are infectious for bloodborne pathogens. Clients who carry viruses such as HIV or Hepatitis may not show any symptoms, so it is vital that precautions must be made every time blood exposure is possible. These precautions include hand washing, wearing gloves, and the proper handling and disposal of sharp instruments. If an accident happens and a client is cut during a salon service, this is called an exposure incident. When an exposure incident occurs, the following must happen:
1. Stop the service 2. Wear gloves to protect against contact
with blood. 3. Clean the injured area with antiseptic. 4. Bandage the cut with an adhesive
bandage. 5. Clean workstation as necessary. 6. Discard any contaminated disposable
objects by double-bagging and labeling bag for contaminated waste.
7. Properly clean and disinfect all tools and implements before removing gloves.
8. Never touch an open sore or wound. 9. Remove gloves and wash hands with
soap and water before returning to the service.
Professional Salon Image
Salons should practice cleanliness as part of the daily routine. The following guidelines are suggested to project a professional image and maintain the highest quality standards.
1. Sweep hair after every client and regularly vacuum and mop floors.
2. Keep trash contained and covered. 3. Control dust, hair and debris. 4. Keep fans, ventilation systems and
humidifiers clean. 5. Keep all work areas well lit. 6. Keep restrooms and door handles
clean. 7. Provide toilet tissue, paper towels,
liquid soap and clean nail brushes in the restrooms.
8. No cooking in the salon. 9. Never place food in refrigerators used
for salon products. 10. No eating, drinking or smoking in
areas where service is performed. 11. Empty trash regularly throughout the
day. 12. All containers should be properly
marked and stored. 13. Never place tools or equipment in
mouth or pockets. 14. Clean and disinfect tools after each
use. 15. Store clean and disinfected tools
properly in clean container. 16. Avoid touching face, eyes, mouth
during service. 17. Clean all work surfaces after every
client. 18. Use clean linens on every client. 19. Use exhaust systems in salon to
ensure air quality. Professionalism starts with clients’ health and safety. Shortcuts in cleaning and disinfecting are not acceptable. It is the salon owner’s responsibility to follow all state laws and rules.

9
PRACTICE TEST – SECTION 1
All answers to the following practice test can
be found in the text of Section 1.
1. Federal agencies include OSHA and the
EPA. True False
2. State boards of cosmetology, licensing
agencies and health departments are just a few of the regulatory agencies dedicated to protecting consumers. True False
3. Fungi and parasites should not be a
concern in a salon. True False
4. Disinfectants are safe to use for hand
washing. True False
5. It is necessary to sterilize all equipment and surfaces in a salon. True False
6. Salon owners have a responsibility to
provide a clean, safe environment for their clients. True False
7. If a client appears healthy, Universal
Precautions are not necessary. True False
8. Salons must use EPA registered
disinfecting agents. True False
9. Hepatitis is a virus spread through blood
and body fluids. True False
10. HIV is a commonly spread disease in
salons. True False
10
SECTION 2
HAIR CARE
(4 credit hours)
HAIRCUTTING
General Principles
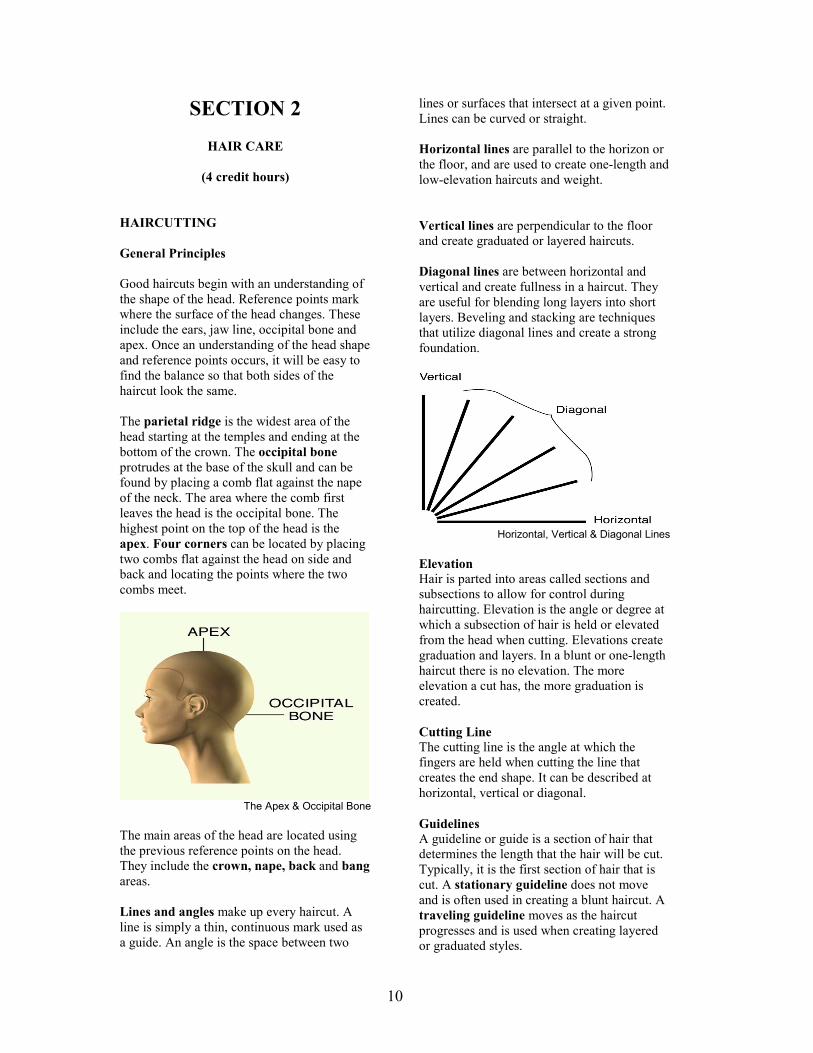
Good haircuts begin with an understanding of the shape of the head. Reference points mark where the surface of the head changes. These include the ears, jaw line, occipital bone and apex. Once an understanding of the head shape and reference points occurs, it will be easy to find the balance so that both sides of the haircut look the same. The parietal ridge is the widest area of the head starting at the temples and ending at the bottom of the crown. The occipital bone protrudes at the base of the skull and can be found by placing a comb flat against the nape of the neck. The area where the comb first leaves the head is the occipital bone. The highest point on the top of the head is the apex. Four corners can be located by placing two combs flat against the head on side and back and locating the points where the two combs meet.
The Apex & Occipital Bone
The main areas of the head are located using the previous reference points on the head. They include the crown, nape, back and bang areas. Lines and angles make up every haircut. A line is simply a thin, continuous mark used as a guide. An angle is the space between two
lines or surfaces that intersect at a given point. Lines can be curved or straight. Horizontal lines are parallel to the horizon or the floor, and are used to create one-length and low-elevation haircuts and weight. Vertical lines are perpendicular to the floor and create graduated or layered haircuts. Diagonal lines are between horizontal and vertical and create fullness in a haircut. They are useful for blending long layers into short layers. Beveling and stacking are techniques that utilize diagonal lines and create a strong foundation.
Horizontal, Vertical & Diagonal Lines
Elevation Hair is parted into areas called sections and subsections to allow for control during haircutting. Elevation is the angle or degree at which a subsection of hair is held or elevated from the head when cutting. Elevations create graduation and layers. In a blunt or one-length haircut there is no elevation. The more elevation a cut has, the more graduation is created.
Cutting Line
The cutting line is the angle at which the fingers are held when cutting the line that creates the end shape. It can be described at horizontal, vertical or diagonal.
Guidelines
A guideline or guide is a section of hair that determines the length that the hair will be cut. Typically, it is the first section of hair that is cut. A stationary guideline does not move and is often used in creating a blunt haircut. A traveling guideline moves as the haircut progresses and is used when creating layered or graduated styles.

11
Over-Direction
This technique is commonly used in graduated and layered haircuts. It occurs when the hair is combed away from its natural falling position and allows for the creation of a length increase in the design.
Client Consultation
A consult is a conversation between the client and the stylist. It is an opportunity for the client to explain what he/she envisions for the haircut, and a joint opportunity to find out what best suits the client. If the client has a particular look in mind, it is the stylist’s opportunity to discuss whether that look is appropriate for the client’s face shape and hair type. Clients should also be questioned about how much time they can spend on their hair, their day-to-day lifestyle, and how they view themselves in terms of fashion. Face shape can be analyzed by pulling all hair away from a client’s face. Look for wide and narrow areas. Both weight and volume draw attention to an area and can make the face appear wider or narrower. Long faces benefit from hairstyles with fullness on the sides. Adding or removing weight in different areas can help create balance to a client’s face. Placement of the part and desired length should also be discussed.
Hair Analysis
Characteristics that determine behavior of the hair include: texture, density, porosity, elasticity and growth patterns. Growth pattern is the direction in which the hair grows from the scalp. The natural falling position can affect where the hair ends up when dry. Cowlicks, whorls and other growth patterns affect the outcome of a haircut. Hair density is usually described as thin, medium or thick. Hair texture is the thickness of the hair strands and can be described as coarse, medium or fine. Fine-haired clients may also have a lot of density to their hair. Both texture and density are critical and respond to different types of cutting. Some need more layers and some need more weight.
Wave patterns refer to the amount of movement in the hair and can be described as straight, wavy or curly.
Tools, Body Positions & Safety
Haircutting tools should be high-quality professional implements from a reliable manufacturer. The investment will last a lifetime provided they are cared for properly. Haircutting shears are used to cut blunt or straight lines in hair. Shears and scissors are often used interchangeably. Texturizing shears, also referred to as thinning shears or tapering shears are notched and used to thin and remove bulk from hair.
Haircutting & Thinning Shears
Straight razors or feather blades can be used to create an entire haircut and give a softer effect on the ends of the hair. Clippers are electric and used for short haircuts or flat tops. They can shave hair right down to the scalp.
Trimmers are small versions of clippers and are used to clean up areas around the ears and neck and create crisp outlines. Typically, trimmers are used for men’s haircuts.
Clippers & Trimmers

12
Sectioning Clips come in a variety of shapes and sizes and are used to clip back sections of hair during cutting or styling. Wide-tooth combs are used for detangling. Tail combs are used to section the hair during a cut. Barber combs are used for tapers on the nape and sides when using the scissor-over-comb technique. Styling or cutting combs are all-purpose combs used on the majority of haircutting. Holding a tool is important to do in the proper way as it gives the stylist the most control, the best results and avoids the strain of muscles in hands, arms, neck and back. Posture and body position are critical when working with clients. Correct body position will help ensure better haircut results, less strain on back and legs and more control over the process. Encouraging the client to sit up straight and keep legs uncrossed can also help ensure good results. Safety in haircutting is essential for protecting the stylist and the client. Palming the shears and ensuring that no cutting occurs past the knuckle protects the fleshy part of the finger and ensures the client’s safety. Razors must be disposed of properly to protect others from getting cut. Any tools or implements should be sanitized between clients. Finally, hands must be washed with soap and water between clients.
Basic Haircuts
Blunt haircuts are also known as one-length haircuts. This style is good for fine or thin hair as it makes hair appear thicker. Another term for the blunt haircut is the zero-elevation cut.
Blunt Cut
A graduated haircut results from cutting the hair with tension or over-direction and gives the ends of the hair a stacked appearance. Layered hair is achieved by cutting the hair with elevation or over-direction and creates movement and volume in hair. Layered hair can be long-layered or short-layered.
Blunt Haircut Procedure
1. Detangle and part hair with a wide-
tooth comb. Comb hair back from face and push forward to find the part.
2. Divide hair into two sections from crown to nape.
3. Find the apex and create a part from ear to ear on both sides so the hair is now divided into four sections.
4. Create a subsection on the left side by taking a horizontal parting a ½ to ¼ inch from the hairline.
5. Comb subsection with client’s head upright from scalp to ends. Comb again stopping just above the cutting line and cut straight across against the comb. Keep shears horizontal and parallel to the floor. Before moving on, check to make sure cutting line is straight. This is the guideline for the entire cut.
6. An alternative method if the hair lies nicely is to comb down the subsection and hold the hair against the skin with the non-dominant hand. Cut the guideline below the hand making sure the shears are horizontal and parallel to the floor.
7. Continue cutting by returning to the left side and take another horizontal parting, creating a subsection the same size as the previous subsection. The guideline should be visible through the new subsection. Comb the hair down and cut the length to match the guide. Repeat on the right side.
8. Continue working the back of the head alternating from left to right in ½ inch subsections.
9. Cut the crown area while paying close attention to the natural fall of the hair. Cut with little or no tension to match the guide. Both the crown and around the ears are “danger

13
zones” and care should be taken to keep an even cutting line.
10. Cutting the sides should begin by taking a horizontal parting on the left side while parting off a portion of the back to match. This will help maintain consistency and connect the back and sides.
11. Cut the right side and make sure your shears are pointing to the back. If you are left-handed you will be moving to the left side at this stage in the haircut. Gradually move forward until you reach the face.
12. An alternative method is to turn the wrist so the palm is facing upward and shears point toward the face.
13. Check the sides before moving on and make any adjustments needed.
14. Continue on the left side using horizontal partings to match the guide. Use care when cutting the hair that falls along the face and comb the hair so it lies on the side, not the front of the face.
15. Cross-check haircut using vertical sections. Elevate hair and cut off any excess removing minimal amounts.
16. Sweep hair from floor and dispose of properly.
17. Blow-dry the haircut creating a smooth line with little lift at the scalp.
18. Check the line and make sure there is an even, horizontal line around the head.
19. Remove the drape and neck strip and dispose of properly.
20. Clean neck and face by brushing any loose hair from the client and escort to the reception area of the salon.
21. Disinfect all tools and implements, sanitize workstation and wash
hands.
Graduated Haircut Procedure
1. Part hair into six sections beginning with a part form the front hairline just above the middle of each eyebrow back to the crown and clip the hair in place. Make another part from the crown area where section one ends to the back of each ear forming side sections. Part hair down center of back to form
sections four and five and take a horizontal part from one ear to the other across the nape area to form section six.
2. Create a guideline by cutting the center of the nape section to the desired length. Use a horizontal cutting line parallel to the fingers. Cut right and left sides of the nape section the same length as the center guideline.
3. Measure and part off first
section. Working upward in left back section, measure and part off the first horizontal section approximately 1 inch wide.
4. Create vertical subsection.
Beginning at center part, establish a vertical subsection approximately ½ inch wide. Extend to include the nape guideline and comb smooth at 45-degree angle to scalp. Hold fingers at a 90-degree angle to the strand and cut.
5. Cut horizontal section.
Continue to cut the entire horizontal section by parting off vertical subsections and cutting in the same manner as above. Continue to check each section vertically and horizontally throughout the haircut. The newly completed section will serve as a guideline to the next section.
6. Part off another horizontal section 1 inch wide. Beginning at center, create another vertical subsection that extends down and includes the previously cut strands. Comb hair smoothly at a 45-degree elevation to the head, hold fingers and shears at a 90-degree angle to the subsection and cut. Cut the entire horizontal section this way making sure to blend each section evenly with the previously cut section.
7. Continue throughout left and
right sections. Continue taking horizontal sections and follow the same cutting procedure. The hair will gradually become longer as it reaches the apex.
14
8. Cut crown. Maintain length in crown by holding each vertical subsection throughout crown area at a 90-degree angle while cutting. Then proceed to left-side section.
9. Create side guide by establishing a narrow guide section on the left side at the hairline approximately ½ inch wide. Then move to right and match the guideline there.
10. Create side section that curves and follows the hairline above the ear back to the nape section.
11. Blend nape and side. Holding hair with very little tension, cut from nape guide to side guide. Fingers must be held at slight angle to connect the guides.
12. Cut left side guide. Establish horizontal section on left side, keeping in mind the width of the section will vary because of the irregular hairline around the ear.
13. Cut ear guide. Part a ½ inch subsection starting at the ear including the underlying guideline and a small portion of nape section.
14. Cut side section. Continue following the same cutting procedure holding fingers at a 90-degree angle and elevating the hair at a 45-degree angle from the head.
15. Cut left side. Continue establishing horizontal sections on the left side of the head and follow the same cutting procedure ensuring the ends are evenly blended.
16. Blend side section. When the left side is complete the hair in uppermost part should be the same length as those in the upper crown area. In final 1-inch section, comb the vertical subsections and hold them at a 90-degree angle to the head. Position fingers at 90-degrees to hair and cut parallel to fingers.
17. Cut right side in same manner as left side.
18. Cut bang area. Cut bang length close to that of the side guideline.
Create a bang guide section along the hairline about ½ inch wide. Starting at center part move to the left side of forehead and cut to desired length.
19. Connect bang and side by combing the bang section including the center guide and small portion of the side area. Connecting the two guidelines will determine the angle of the cut.
20. Cut bang at low elevation and check for evenness.
21. Continue to cut bang, taking narrow vertical subsections that include the guideline underneath. The section should blend evenly with side section.
22. Cut right side of bang area same as left.
23. Complete top section by taking ½-inch vertical subsections parallel to center part. Hold hair up from head at 90-degree angle and cut to blend the section with the other two pre-cut sections. Trim any uneven ends once the top section is complete.
24. Blow-dry haircut and check for movement and evenly blended ends.
25. Clean up as described in “blunt haircut” procedure.
Layered Haircuts
Long-layered haircuts use increased layering, featuring progressively longer layers. The guide is interior and starts at the top of the head. All remaining hair will be elevated up to match the guide.
Procedure
1. Part hair into five cutting sections. 2. Begin at crown by taking ½ inch
subsection across head. Comb up from head and cut straight across.
3. Cut top section by working to the
front of section and take a second
½-inch subsection. Direct first subsection to second and cut to same length.
4. Complete top by using the previously cut subsection as guideline

15
and cut a new ½ inch subsection throughout the top section.
5. Cut left side using ½ inch horizontal subsections. Comb hair straight up and match to previously cut hair. Work down the side until the hair no longer reaches the guide.
6. Repeat on right side. 7. Blend. At tope of left rear section,
comb hair straight up from head matching length to top section. Cut straight across.
8. Continue cutting using ½ inch horizontal subsections and work form top to bottom until the hair no longer reaches the guideline.
9. Repeat on right side. 10. Blow-dry hair.
Layered Cut
Variations on Layered Cut
A short version of the layered cut is often referred to as a “pixie” or “Caesar” haircut and can be flattering to both men and women. A square-shaped version of the layered cut is common in a basic men’s haircut. The “shag” is also a version of a layered cut but has longer perimeter lengths.
Men’s Clipper Cut
The men’s basic clipper cut is cropped close along bottom and sides and lengthens as it travels up the head. The clipper can be positioned horizontally, vertically or diagonally and the distance between the comb and scalp determines the length of the cut.
Procedure
1. Part hair by making a horseshoe parting about two inches below the
apex of the head, beginning and ending at the front hairline.
2. Cut the nape area by placing comb against the scalp from 0 to 45 degrees. Cut the hair that extends through the teeth of the comb.
3. Cut back of head by moving upwards/ Blend the lengths over the curve of the head by cross-cutting horizontally from side to side. Then cut both sides of the back from ear to ear.
4. Blend the lengths carefully over the curve of the head by cross-cutting.
5. Use a low number length
attachment on the clipper and cut up each side from sideburn to parietal ridge.
6. Create a guide in the crown. Cut a narrow guideline at the crown end of the horseshoe part. Length is determined by forehead measurement. At the crown, cut top area with clipper to the length of the initial crown guideline. Move toward the forehead and over-direct hair back toward the guideline to increase length at the forehead.
7. Cut around ears using clipper attachment. Shorten and shape hair around the ears and sidelines.
8. Clean up using standard cleanup and sanitation techniques.
WET HAIRSTYLING
A consult with a client is the first step in the hairstyling process. Photos from magazines or portfolios can provide a clue to what the client is looking for in a hairstyle. Keep in mind the face shape, hair type and lifestyle of the client when discussing hairstyling. A hairstylist’s tools for wet styling include combs, brushes, rollers, clips, pins and clamps. Preparation for wet styling includes a consult with the client and a hair analysis. The client is then shampooed and towel dried. Using a wide-toothed comb, remove tangles starting at the ends and working up to the scalp. Find the natural part by combing hair back from hairline and push gently forward with hand. Use comb to separate hair where it parts.
16
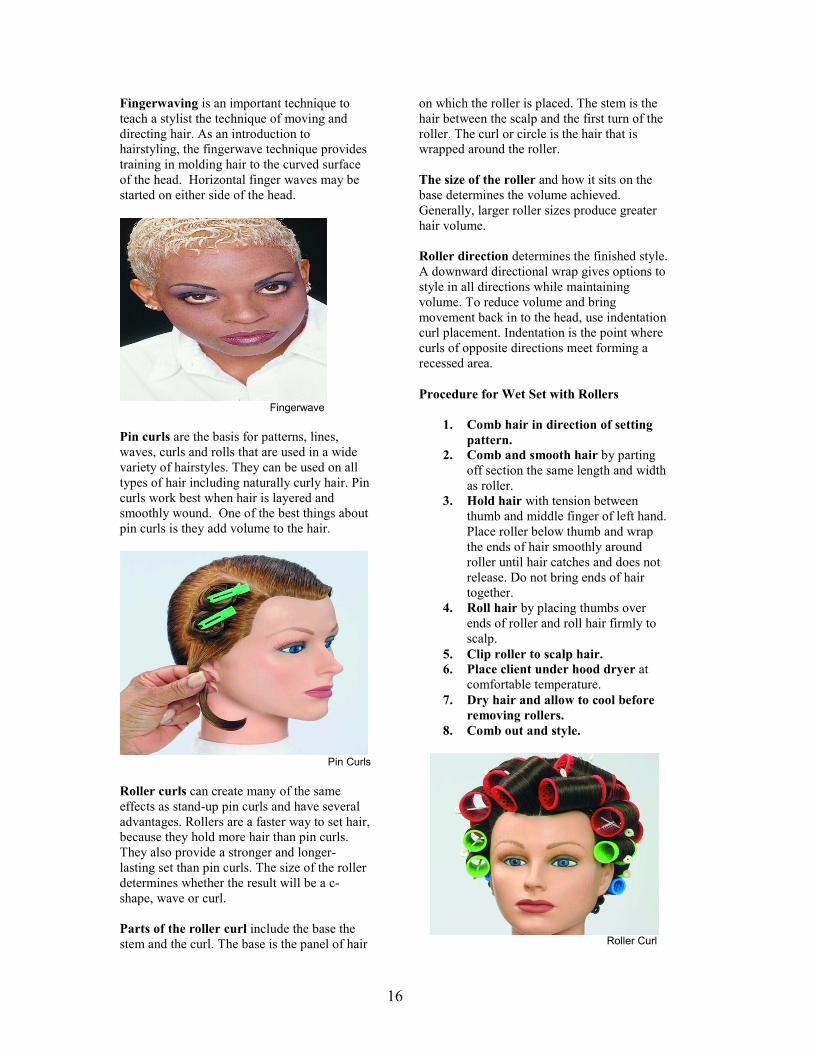
Fingerwaving is an important technique to teach a stylist the technique of moving and directing hair. As an introduction to hairstyling, the fingerwave technique provides training in molding hair to the curved surface of the head. Horizontal finger waves may be started on either side of the head.
Fingerwave
Pin curls are the basis for patterns, lines, waves, curls and rolls that are used in a wide variety of hairstyles. They can be used on all types of hair including naturally curly hair. Pin curls work best when hair is layered and smoothly wound. One of the best things about pin curls is they add volume to the hair.
Pin Curls
Roller curls can create many of the same effects as stand-up pin curls and have several advantages. Rollers are a faster way to set hair, because they hold more hair than pin curls. They also provide a stronger and longer-lasting set than pin curls. The size of the roller determines whether the result will be a c-shape, wave or curl. Parts of the roller curl include the base the stem and the curl. The base is the panel of hair
on which the roller is placed. The stem is the hair between the scalp and the first turn of the roller. The curl or circle is the hair that is wrapped around the roller. The size of the roller and how it sits on the base determines the volume achieved. Generally, larger roller sizes produce greater hair volume. Roller direction determines the finished style. A downward directional wrap gives options to style in all directions while maintaining volume. To reduce volume and bring movement back in to the head, use indentation curl placement. Indentation is the point where curls of opposite directions meet forming a recessed area.
Procedure for Wet Set with Rollers
1. Comb hair in direction of setting
pattern.
2. Comb and smooth hair by parting off section the same length and width as roller.
3. Hold hair with tension between thumb and middle finger of left hand. Place roller below thumb and wrap the ends of hair smoothly around roller until hair catches and does not release. Do not bring ends of hair together.
4. Roll hair by placing thumbs over ends of roller and roll hair firmly to scalp.
5. Clip roller to scalp hair.
6. Place client under hood dryer at comfortable temperature.
7. Dry hair and allow to cool before
removing rollers.
8. Comb out and style.
Roller Curl

17
Comb-Out Techniques
Volume can be increased with proper comb-out techniques. Back-combing and back-brushing are used in styling updos or to add height to a hairstyle after hot roller setting or blow-drying. Both techniques require that the hair is sectioned, and pushed back towards the scalp to create volume. Once the desired volume is achieved, the hair can be blended and smoothed. Hair wrapping keeps curly hair smooth and straight. Wrapping hair does not create volume, but does create a smooth, sleek look. Wet hair wrapping starts with wet hair. Shine can be created by applying gel to wet hair before it is wrapped. To wrap the outer perimeter of hair, hair is brushed clockwise around the head and smoothed in a circular motion. Duckbill clips are used to keep the hair in place while wrapping. When all hair is wrapped, a neck strip can be stretched around the head, overlapped and secured with a bobby pin. Once secured, the clips can be removed. The client can then be placed under a hooded dryer until the hair is dry. The longer the hair is wrapped the smoother it will be.
Blow-dry Styling
Blow-drying allows the hair to be dried and styled at one time. The blow-dryer is an electrical appliance designed for drying and styling hair. Temperature control settings help produce a steady stream of air at the desired temperature. A diffuser can be attached to the dryer to soften air flow and keep textural definition. Combs picks and brushes are tools used in blow-drying hair. The blow-dryer should never be held too long in one place and must always be directed away from the client’s scalp to prevent burns. The air from the blow-dryer should flow the direction in which the hair is wound to prevent frizziness. Combs are used to distribute and part the hair and come in a variety of shapes and sizes. Teeth that are closely spaced on a comb remove definition from the curl while widely spaced teeth shape larger sections of the hair for a more textured surface. Brushes serve a variety of purposes and must be chosen with care. Paddle brushes are ideal for mid- to longer-length hair. Grooming
brushes can be ideal for adding polish and shine and can be used to comb out updos. Vent brushes speed up the drying process and add lift at the scalp. Round brushes come in different diameters. Smaller ones add more curl while larger brushes straighten the hair. Teasing brushes are perfect for back-combing and smoothing hair. Sectioning clips allow the stylist to hold back sections of hair that are not being worked on. Wet hair should be sectioned off in clips while drying hair so the wet hair does not make the dry hair damp.
Styling Products
Styling products should be considered liquid tools and can give a style more hold and shine. Considerations such as type of hair, climate and clients’ needs should be made when choosing a styling product. Is the hair fine, thick or curly and what is the desired outcome? Is the weather wet, humid, dry or windy? Does the client prefer light or firm hold? Foam or mousse is a light styling product that builds body and volume into the hair and is good for fine hair because it does not weigh the hair down. Gel is a thick liquid that comes in a tube or bottle and gives control to slicked or molded styles. Liquid gels or texturizers are lighter than gels and are good for all hair types. They allow for easy styling and give volume and body to the hair. They also give good hold with less heaviness that gels. Straightening gel gives hair a smooth straight look and helps prevent frizziness in dryer climate conditions. Pomade or wax is a heavier product that is used on dry hair to show separation lines. It should be used sparingly. Silicone adds gloss and shine to the hair while creating definition. Silicone products are excellent for all hair types to finish and add shine to a style. Hair spray is sprayed or pumped on the hair in a mist form to hold a style in position. It is

18
one of the most widely used hairstyling products. It should be used at the end of the styling session.
THERMAL HAIRSTYLING
Thermal waving and curling uses thermal irons on dry hair to create curled, straight or pressed hair. Thermal irons are steel implements used to curl dry hair. Electric curling irons provide an even heat and range in barrel size from ½ inch to 3 inches in diameter. Flat irons have 2 plates that can range in size from ½ inch to 3 inches and create smooth, straight styles.
Thermal Hair Straightening (Hair Pressing)
Hair pressing temporarily straightens extremely curly or unruly hair by means of a heated comb and lasts until the hair is shampooed. It also prepares the hair for additional services such as thermal curling or croquignole thermal curling. Done properly, hair pressing is not harmful to the hair and leaves it in a natural and lustrous condition. There are three main types of hair pressing:
Soft press, medium press and hard press.
Hard press removes 100 percent of curl while soft press only removes 50 to 60 percent of curl.
Analysis of Hair and Scalp
Before a client’s hair is pressed, the condition of hair and scalp must be analyzed. If the hair and scalp are not healthy, appropriate advice should be given regarding treatment. If scalp skin disease is suspected, the client should be advised to see a dermatologist. Hair should be checked for elasticity and porosity. It should also be analyzed for wave pattern, length, texture, feel, elasticity, color, condition and condition of scalp. Hair texture is determined by the diameter (coarse, medium or fine) and feel (wiry, soft or silky) of hair. Coarse hair makes it difficult to press and requires more heat and pressure than medium or fine hair. Medium curly hair is considered “normal” and is least resistant to hair pressing. Fine hair breaks easily and
requires less heat and pressure than other hair textures. Scalp condition can be described as normal, tight or flexible. A tight scalp is usually combined with coarse hair and requires that the hair is pressed in the direction of growth. Flexible scalps need more pressure to press the hair satisfactorily. Records should be kept on the results of a client’s analysis and the pressing treatments performed. Clients should also be questioned about tints, colors or lighteners that may have been applied to hair. Finally, a release statement should be signed and kept on file protecting the stylist from responsibility of accidents or damage. Conditioning treatments involve cosmetic preparations for hair and scalp, thorough brushing and scalp massage. Treatments usually give better results in hair pressing. Pressing combs are either regular or electric. Both should be made of stainless steel or brass with wood handles to protect from heat. Less space between comb teeth results in a smoother press while wider teeth produce an open-looking press. Any new brass pressing comb should be tempered to allow the brass to hold heat evenly and give better results. Heating the comb can be done in electric heaters or in electrical or gas stoves. Combs should be tested on a piece of light paper before applying to hair. If paper is scorched, the comb should be allowed to cool.
Electric Heater for Pressing Combs

19
Cleaning the comb should be performed after every client. First, wipe the comb clean of loose hair, grease and dirt. The heat is enough to sterilize the comb after it is wiped. Pressing oil or cream is used to prepare the hair for pressing treatment. Oils and creams can make the hair softer and protect it from burning or breaking. It also adds shine and helps hair stay pressed longer. Hard press or double press is only recommended when a soft press does not give the desired result. Touch-ups can be done if the hair becomes damp or curly again. The process is the same but without the shampoo and blow-dry. Safety measures should always be taken to prevent burns, breakage or scars. For fine hair, too much pressure and heat should be avoided. If hair is short and fine, the pressing comb should not be too hot and extra care should be taken near the scalp. When pressing coarse hair, enough pressure should be applied to ensure the hair remains straightened. Tinted, lightened or gray hair also requires special care. Conditioning treatments may be required. Gray hair should be treated with light pressure and less heat to prevent breakage.
BRAIDING & BRAID EXTENSIONS
Braiding salons are popular in urban areas across the US and their popularity continues to grow. Hair braiding has roots in Africa, and is considered natural hairstyling. The process uses no chemicals or dyes and does not alter the curl or coil pattern of the in any way. Historically, African tribes made statements about social status by the style and type of braiding used in their hairstyles. Today, braiding continues to communicate important signals about a person’s self image. Hair braiding can take hours to complete, but can last up to 3 months with proper care. Due to the time involved in the braiding process, it is critical that an in-depth consultation occurs before the braiding begins. This way the client and the stylist have a common understanding of what will make the client happy.
Finished Braided Hairstyle
Hair Analysis
It is important that the stylist determine the client’s hair texture. Is the hair straight, curly, oily, dry, coarse or fine? The condition of the scalp and hair should also be analyzed.
Facial Shape
Certain braiding styles complement different facial shapes and features. Once the shape of the client’s face is determined, it is easier to suggest a flattering braiding style. Oval facial shapes are one of the easiest to work with as most styles flatter this face shape. Round faces benefit from updo braiding styles which tend to lengthen the appearance of the face. Square faces look best in full styles that frame the face near the forehead, temples and jaw line and soften the angular lines. Diamond faces usually look best in bangs with fullness around the forehead or jaw line. Triangular faces look best in styles that frame the cheekbones and go around the ears. Heart shaped faces benefit from partial bangs and braiding that frames the face. Oblong faces appear shorter with a full style in a medium length.
Tools for Braiding
The right brush or comb can make a difference in the ease with which a stylist completes the braiding process and in the final result. For example, a tail comb is excellent for design parting and sectioning large segments of hair. A pick is helpful when lifting and separating textured hair. Vent brushes prevent tearing and breaking while removing tangles.

20
Tools for Braiding
The implements and materials needed for extensions include: Extension fibers, a hackle
and a drawing board.
Materials for Extensions
There are a variety of fiber options for extensions. It is important to note that the quality of fibers used in extensions determine how successful and durable the extension will be. It is a good idea to buy new products in small quantities to test them before using on clients or ordering large quantities. The following options are the most commonly used for hair extensions: Human hair is the highest standard for hair extensions. However, it is important to know the supplier. Much human hair is imported and little information or regulation exists to prove the quality and source. Kanekalon is a synthetic fiber of high quality. It comes in a variety of colors, is durable and holds up to shampooing and styling. Though the cost may be more than other options, it is a high-quality product. Nylon/rayon synthetics are less expensive options that Kanekalon and come in a variety of quality levels. Both nylon and rayon are known to break hair and shampooing effects their durability. High heat from blow-dryers can melt the extensions. Yarn is an inexpensive say to add color to extensions. While yarn is durable, it may expand when shampooing. Color should be checked carefully before purchasing.
Lin is a wood fiber imported from Africa and has a matte finish. It is flammable. Yak is a fiber that comes from a breed of ox found in the mountains of Central Asia. It can be used alone or blended with human hair. Working with Wet or Dry Hair depends on the client’s hair type. Curly hair is best braided dry to avoid shrinkage and excess scalp tension. Straight hair should be braided when slightly damp or towel-dried. Textured hair is fragile and the best method with this hair type is to blow-dry first followed by braiding.
Braiding the Hair
Braids are visible or invisible. Visible braids consist of three strands that are woven using the underhand technique. Invisible, or inverted braids, overlap the strands on top of each other. Invisible braids use a technique referred to as overhand pick-up. It can be done on the scalp, off the scalp and with or without extensions. It is best suited to long hair. Rope braids consist of two strands that are twisted around each other. It is a good method for blunt-cut hair or long-layered hair.
Finished Rope Braid
Fishtail braids are best for hair that is at least shoulder length and requires a simple two-strand process. Hair is picked up from the sides and added to the strands as they are crossed over each other. Single braids are free-hanging braids with or without extensions. They are executed with an

21
underhand or overhand stitch, and can be used with all hair textures in a variety of ways. Cornrows are narrow rows of visible braids that lie close to the scalp. They are created with a three-strand, on-the-scalp technique. Consistent and even partings are the foundation of beautiful cornrows. Cornrows are worn by men, women and children and can be braided on hair of various lengths and textures. Extensions can be applied to cornrows. Styles vary and the stylist’s skill can be displayed through cornrows with elaborate designs. Cornrows can last up to several months if applied with extensions.
Finished Cornrows
WIGS & HAIR ENHANCEMENTS
Hair additions and enhancements are a specialty much in demand. From cancer patients to clients suffering from premature hair loss or thinning hair, specialists in wigs and hair enhancements have the ability to change someone’s life and help them feel better about their appearance. Consultation with a client is critical and provides protection for both parties. Sensitivity is important during an initial consultation. The stylist should be aware of the client’s reason for a hair enhancement. It could be just to try something new, or it could be to cover up a devastating hair loss. Either way, clients often feel anxious when discussing hair enhancement and should be approached with sensitivity. It is important that a consultation discuss the clients need and desire. Personality also comes
into play when deciding on a new style. The client’s hair type, face shape and bone structure should also be taken into consideration. Will the addition be temporary or semi-permanent? Budgetary concerns are also critical. A stylist must be willing to give the client the best option within their price range, and the cost of any additional services such as cutting, coloring or styling of the extension, wig or hairpiece.
Wigs
Wigs are artificial head coverings made of a network of interwoven hair. Those that do not cover the head completely are classified as hairpieces. Human hair wigs have several advantages over synthetic wigs. In appearance, they look very natural. They also offer greater durability and have the same styling and maintenance requirements as natural hair. Because the hair is real, it can stand up to blow drying and heat styling and be colored or permed to suit the client. However, natural wigs also react to climate change such as humidity and require resetting after shampooing. Cost can also be an issue for some clients, as human hair wigs are more costly than synthetic wigs. Synthetic wigs have improved in appearance and technology over the years. Good quality synthetics offer a natural feel and look that mimics real hair. Because style and texture is set into the hair, they are easy to maintain even when shampooed. They come in a huge array of colors and styles, and are a more cost-effective option than human hair wigs.
Types of Wigs
Cap wigs have an elasticized base to which the hair is attached. They require special fittings and offer a snug, secure fit. They are the best option for clients with little or no hair, since they do not allow the scalp to show through.
Capless wigs are machine-made and woven into long strips called wefts. They are ready-to-wear and less costly than cap wigs. They are also light and comfortable to wear.

22
Capless Wig
Taking wig measurements is the first step in the creation of a custom-made wig. Measurements should be taken using a soft tape measure and carefully recorded. Hair shade, length, and quality should be noted when ordering a custom-made wig for a client. If the wig is ready-to-wear measuring is not necessary. It can be adjusted to fit the clients head and trimmed to suit the client. A block is a head-shaped form used to fit, clean and style a wig. It is typically made from cork or Styrofoam.
Instruction is critical in wig service. Clients should be educated on how to prepare their own hair before putting on the wig, as well as how to secure the hair under the wig. Proper preparation can include a hair wrap or pin curls, and is critical to how the wig will sit on the head.
Hairpieces
Hairpieces offer coverage of 20- to 70-percent and are usually attached using temporary methods to the top of the hair. Hair pieces can add volume, length or both. Combs, elastic, clips and Velcro can all be used to attach hairpieces to a client’s existing hair. A good rule of thumb is that less is more. An overworked style can overwhelm a client. Integration hairpieces are created to blend with the client’s own hair. These light, natural-looking products have openings in the base in which a client’s own hair is pulled and blended with the integration hairpiece.
Toupees are small wigs used to cover the top and crown of the head. They can be temporary or semi-permanent and are commonly used by men with thinning hair. Fashion hairpieces are common for women who are celebrating a special occasion like a wedding. Chignons, ponytails or pieces used in updos are common fashion accessories used by women to enhance their own hair.
Hair Extensions
Commonly used by celebrities, hair extensions are perfect for people who want to grow long hair overnight, add texture or volume to their hair. They are attached by sewing or bonding and are semi-permanent. Because they are integrated with a client’s real hair, they look natural.
CHEMICAL TEXTURE SERVICES
Chemical texture services permanently change the hair’s wave pattern. Permanent waving adds wave or curl to the hair and relaxing removes curl, leaving the hair smooth. Client consultation is critical prior to any texture service. Understanding what the client’s expectations of the service are, what coloring products are currently being used by the client, if the client has had previous textural services, what the condition of the client’s hair is, and the desired finished hairstyle by the client will ensure that the client will be satisfied by the results. Metallic salts are not compatible with permanent waving. A simple test can confirm if metallic salts are present in a client’s hair. Client records should be entered upon initial evaluation and after each service. Type of perm, rods and techniques should all be recorded for future reference. Scalp analysis is an important step prior to any chemical service. Do not proceed with service if the scalp is red or there are signs of cuts, sores or scalp disease. Hair analysis will help avoid most problems during a chemical process. Texture, density, porosity, elasticity and growth direction should all be analyzed prior to service.
23
Permanent Waving
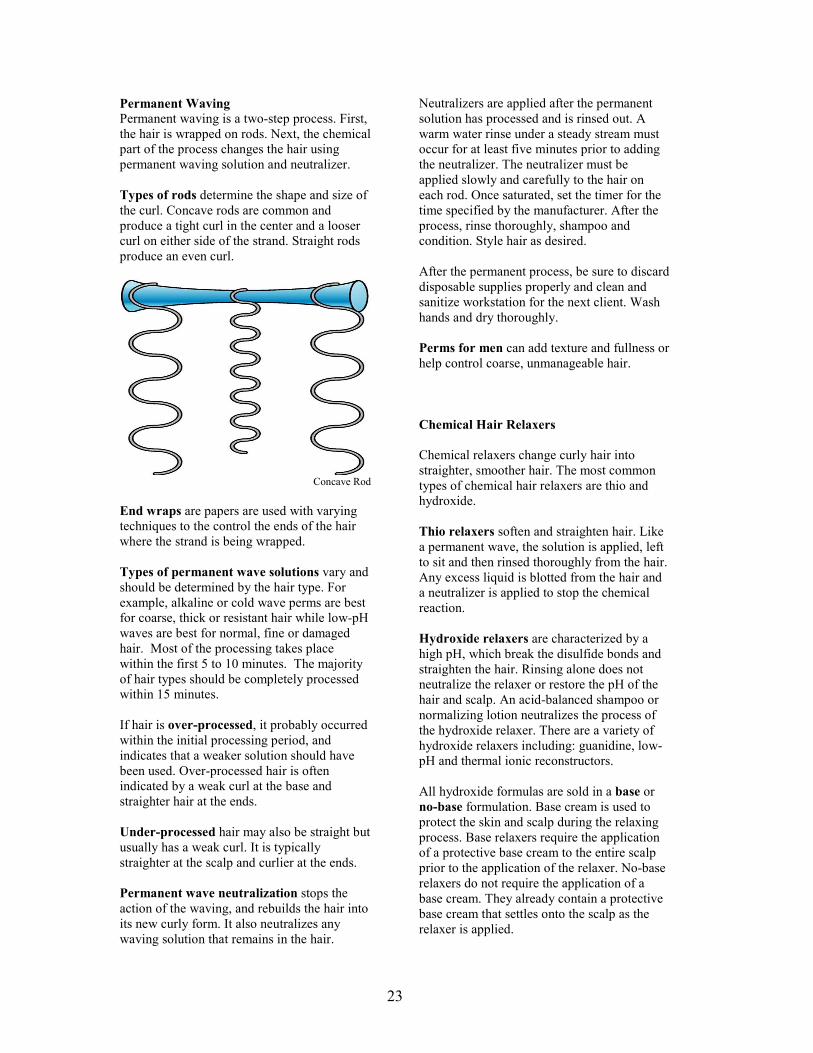
Permanent waving is a two-step process. First, the hair is wrapped on rods. Next, the chemical part of the process changes the hair using permanent waving solution and neutralizer. Types of rods determine the shape and size of the curl. Concave rods are common and produce a tight curl in the center and a looser curl on either side of the strand. Straight rods produce an even curl.
Concave Rod
End wraps are papers are used with varying techniques to the control the ends of the hair where the strand is being wrapped. Types of permanent wave solutions vary and should be determined by the hair type. For example, alkaline or cold wave perms are best for coarse, thick or resistant hair while low-pH waves are best for normal, fine or damaged hair. Most of the processing takes place within the first 5 to 10 minutes. The majority of hair types should be completely processed within 15 minutes. If hair is over-processed, it probably occurred within the initial processing period, and indicates that a weaker solution should have been used. Over-processed hair is often indicated by a weak curl at the base and straighter hair at the ends. Under-processed hair may also be straight but usually has a weak curl. It is typically straighter at the scalp and curlier at the ends. Permanent wave neutralization stops the action of the waving, and rebuilds the hair into its new curly form. It also neutralizes any waving solution that remains in the hair.
Neutralizers are applied after the permanent solution has processed and is rinsed out. A warm water rinse under a steady stream must occur for at least five minutes prior to adding the neutralizer. The neutralizer must be applied slowly and carefully to the hair on each rod. Once saturated, set the timer for the time specified by the manufacturer. After the process, rinse thoroughly, shampoo and condition. Style hair as desired. After the permanent process, be sure to discard disposable supplies properly and clean and sanitize workstation for the next client. Wash hands and dry thoroughly. Perms for men can add texture and fullness or help control coarse, unmanageable hair.
Chemical Hair Relaxers
Chemical relaxers change curly hair into straighter, smoother hair. The most common types of chemical hair relaxers are thio and hydroxide. Thio relaxers soften and straighten hair. Like a permanent wave, the solution is applied, left to sit and then rinsed thoroughly from the hair. Any excess liquid is blotted from the hair and a neutralizer is applied to stop the chemical reaction. Hydroxide relaxers are characterized by a high pH, which break the disulfide bonds and straighten the hair. Rinsing alone does not neutralize the relaxer or restore the pH of the hair and scalp. An acid-balanced shampoo or normalizing lotion neutralizes the process of the hydroxide relaxer. There are a variety of hydroxide relaxers including: guanidine, low-pH and thermal ionic reconstructors. All hydroxide formulas are sold in a base or no-base formulation. Base cream is used to protect the skin and scalp during the relaxing process. Base relaxers require the application of a protective base cream to the entire scalp prior to the application of the relaxer. No-base relaxers do not require the application of a base cream. They already contain a protective base cream that settles onto the scalp as the relaxer is applied.

24
Strengths of relaxers vary and include mild, regular and super-strength. Mild is formulated for fine or damaged hair with super-strength is recommended for coarse or extremely curly hair. Regular is for normal hair texture and curl.
Relaxed Hair
HAIR COLORING
Hair coloring can enhance natural hair color, cover gray hair, lighten natural hair color, add color to previously colored hair or create dimensional color. Statistics show that clients are extremely loyal to their colorists and tend to stay with them as long as 8 years. The most common reasons people color their hair are to cover up gray hair, enhance an existing hair color or to create a fashion statement. Color can also be used to correct unwanted hair colors or tones by elements such as chlorine, or to enhance a particular haircut.
Hair Structure
Hair is composed of the cutille, the cortex and the medulla. The cuticle is the outermost layer of hair and protects the interior cortex. The cortex is the middle layer and gives hair most of its strength. The medulla is the innermost layer of hair and does not play a role in the hair coloring process. Hair texture, density and porosity play an important role in defining length of processing time and the amount of color to apply for proper coverage and absorption. Coarse hair
can take longer to process than fine hair. Density must also be considered when applying haircolor to ensure proper coverage of all strands. If hair is highly porous, it will take color quickly but also fade quickly. If hair is of a low porosity, it will require a longer processing time. Identifying natural hair color and tone is another critical assessment that a colorist must make. Colorists use the level system to determine the lightness or darkness of colors. Within each level of color a tone or hue is the balance of that color. Tones are described as warm cool or neutral. Warmer tones tend to make hair look lighter than their level while cool tones can look deeper than their level. Warm tones are often described as auburn, copper, strawberry or bronze. Cool tones can be described as smoky or ash.
The Level System
Gray hair is associated with aging and often increases as the client gets older. Most people have a mix in their hair that has some pigmented hair and some gray.
Color Theory
Color is described as a property of objects that depends on the light they reflect. Color is perceived by the human eye in primary shades of red, green, blue or shades of those colors. Base colors are important for a colorist to determine and will help minimize unwanted tones. Violet base colors deliver cool results and minimize yellow tones. Red-orange base tones create bright, warm results for redheads. Gold base colors create warm results for blonds and brunettes.
The Law of Color
The law of color is a system for understanding color and provides consistency for hair colorists. Red and blue in equal amounts create violet. Blue and yellow in equal amounts

25
create green. The primary colors red, yellow and blue are the foundation from which all colors are created. Blue is the strongest of those colors and adds coolness to tones. It can also bring depth or darkness to any color. Red can make blue-based tones appear lighter and darken yellow tones. Yellow can make other colors appear lighter and brighter. Secondary colors are created by mixing primary colors and tertiary colors are achieved by mixing secondary colors and primary colors. Complementary colors are those primary and secondary colors positioned directly opposite one another on the color wheel. Complementary colors neutralize each other. Understanding these tones can help a colorist neutralize unwanted tones in hair or complement skin tone or eye color.
Complementary Colors
Types of Haircolor
Hair coloring products are either nonoxidative or oxidative. Nonoxidative haircolor can be temporary or semi permanent while oxidative are demi permanent and permanent. Hair lightening or bleaching is a chemical process involving the diffusion of the natural hair color pigment from the hair. It is a process essential to permanent haircolor and hair lighteners. Permanent haircolor products contain developers or oxidizing agents and an alkalizing ingredient. The alkalizing ingredient allows for the penetration of dye within the hair. Temporary haircolor neutralizes yellow or unwanted hair tones. They can be applied as a color rinse, colored mousse or gel, hair mascara or as a spray-on color. Color-enhancing shampoos can brighten and impart a
slight color to hair. Temporary haircolor is removed by shampooing. Semi permanent haircolor lasts through several shampoos or four to six weeks depending upon the hair’s porosity. Color generally fades with each shampoo. Demi permanent haircolor or deposit-only haircolor does not lighten hair. It is ideal for clients who want to change their hair tone without lightening their natural color. It is also a good option for clients who want to cover gray, refresh faded color on hair ends or make color corrections. Permanent haircolor can lighten and deposit color at the same time and during a single process. It is used to match, lighten and cover gray hair. However, permanent color requires a patch test 24 to 48 hours before application. Permanent hair coloring products are excellent for covering gray hair as they remove natural pigment from the hair through lightening and add artificial color to the hair. The act of removing and adding color to the hair at the same time blends gray hair uniformly and results in natural-looking color. Natural hair colors or vegetable hair colors such as henna are obtained from the leaves or bark of plants. Color results tend to be week and the process is lengthy and messy. Shade ranges are generally limited to clear, black, chestnut and auburn tones. They are generally not used in salons, and chemical products cannot be applied over natural hair colors. Metallic hair colors are generally marketed to men and change the hair color by progressive buildup and exposure to air. They create a dull, metallic appearance. Drawbacks include the necessity of daily application, an unnatural-looking result and limited haircolor options. Hydrogen peroxide developers are oxidizing agents that mix with oxidation haircolor and create a change in natural hair color. Hydrogen peroxide is the most commonly used developer in haircolor. Volume measures the concentration and strength of hydrogen peroxide. Most haircolor products use 10-, 20-, 30- or 40-volume hydrogen peroxide for lift and color development. Ten-volume is used when less

26
lightening is desired, and 20-volume is the standard. To provide maximum lift in a one-step color service, 40-volume is commonly used. Lighteners lighten the hair by the process of oxidation. They can lighten hair prior to the application of a final color or lighten hair to a particular shade. These products can also brighten and lighten an existing shade or be used to lighten parts of the hair. Decolorizing process can result in natural hair going through as many as 10 stages of color as it lightens. Decolorizing allows the colorist to create the exact degree of contributing pigment needed for the final result. Once the hair is decolorized to the appropriate level, the new color is applied to deposit the desired color. Lightening the hair to the correct state is essential to a beautiful, controlled, final hair coloring result. Toners are semi permanent, demi permanent and permanent haircolor products that are used on prelightened hair. They allow the colorist to achieve pale and delicate colors after the decolorizing process. Lightening dark hair to a very pale blond can be difficult and cause damage to the hair. Clients looking for light blond results should be alerted to this danger before undergoing a coloring process. Consultation with a client before a haircolor service is critical. The salon should allow an extra 15 minutes for a color consult and have a client fill out an information card. Specific questions should be asked to determine what the client is looking for in terms of results. It is also important for the owner to discuss pricing and options that will suit a client’s budget.
Formulation
Colorists must know the natural level of the hair and whether or not it includes gray hair before a color is formulated. The client’s desired level and tone must also be clear. Colorists must also decide if there are contributing pigments or undertones to be revealed. Finally, colorists need to know what colors should be mixed to get the desired results.
Mixing permanent colors depends on the application being used. Permanent color is applied by the applicator bottle or bowl-and-brush method. A patch test should be given 24 to 48 hours in advance of a treatment to identify if the client has an allergy or sensitivity to a mixture. If the result of the test shows redness or a rash, the client should not receive haircolor service with the haircolor tested.
Haircolor Applications
Haircolor services are best performed and result in the safest and most satisfactory results using prescribed procedures. Preliminary strand test tells the colorist how the hair will react to a color formula and how long the formula should be left on the hair. The test is performed after the client is prepared for the coloring service. Procedure: After scalp and hair analysis, the client should be draped to protect skin and clothing. Part a ½ inch strand of hair in lower crown and clip all other hair out of the way. Place strand over foil or plastic wrap and follow application method for color procedure. Check development at 5-minute intervals until desired color is achieved, noting time. Shampoo strand and mist with water to rinse. Dry with towel to observe results. Temporary colors should always be applied according to manufacturer’s directions. Procedure: Client should be draped. Shampoo and towel-dry hair. Have client recline in shampoo bowl. Using gloves, apply color using applicator bottle. Work around entire head and blend with comb, applying more color if necessary. Do not rinse hair but towel-blot excess product. Proceed with styling. Semi permanent hair colors do not lighten color. It is important to note that color applied on top of existing color always creates a darker color. Single-process hair coloring lightens and deposits color in a single application. Virgin applications refer to the first time the hair is colored.

27
Single-process color retouch retouches the new growth to avoid a two-toned effect on hair. Color should only be applied to the new growth, being careful not to overlap the previously colored hair. Double-process high-lift haircolor is used if the client asks for a dramatically lighter color. The hair is first decolorized with a lightener. Then, a separate product is used to deposit the desired tone. The two-step process gives the colorist more control over the final result. Procedure: Perform a preliminary patch test 24 to 48 hours prior to service. If test is negative, proceed with application process. Consult with client and analyze hair and scalp. Perform a strand test and record results on client’s card. Shampoo and towel-dry client’s hair. Put on gloves and apply protective cream around hairline and ears. Separate hair into four sections and apply color to new growth or scalp area in all four sections. Work color through the rest of hair from shaft to ends until hair is saturated. If plastic cap is required, place on client. Set timer to process. Rinse, shampoo, condition and style hair.
Single-process color for virgin hair
procedure: Use the same preparation for traditional semi-permanent color and perform patch test. Apply protective cream to hairline and ears and prepare color formula for bottle or brush application. Begin to apply color in section where color change will be the greatest. Lift subsection and apply color to mid-strand area. Stay at least ½-inch from scalp and do not apply to porous ends. Process according to strand test results and check for color development. Apply color to hair at scalp and pull color through the ends of hair. Rinse with warm water, massage color into lather and rinse thoroughly. Remove stains around hairline with shampoo. Shampoo hair, rinse and condition as needed. Towel-dry and style the hair.
Permanent single-process retouch with
glaze procedure: Part dry hair in four sections and apply color to new growth using ¼-inch partings. Complete all four sides and set timer for 45 minutes. Rinse and towel-dry. Prepare a no-lift deposit-only glaze formula to apply to the mid-strand and ends. Apply no-lift deposit-only glaze and work through hair. Check results before rinsing. Rinse and style as usual.
Demi permanent haircolor application is similar to that of semi permanent color. Simply follow the manufacturer’s directions for application and processing time. Gray hair may appear too harsh unless allowances are made for brightness and warmth in the formulation.
Using Lighteners
Lighteners come in oil, cream and powder formulations. Oil and cream lighteners can be used directly on the scalp while powdered lighteners cannot. Oil is the mildest type and appropriate for only one or two levels of lift. They are also used to lighten dark facial and body hair. Cream lighteners can be used for high-lift blonding are a gentle enough for the scalp. Powdered lighteners are strong and fast-acting but can cause scalp irritation. Time factors for lightening are affected by the hair color and porosity. The darker the hair, the longer it takes to lighten. The more porous the hair, the faster the hair will process. The product strength also affects the speed and amount of lightening. Heat also leads to faster lightening but should be used with caution, as it may not produce the proper tone. Lightener retouch becomes necessary as new growth occurs. On a retouch, the new growth should be lightened first. A cream lightener is generally used for a lightener retouch because it is less irritating to the scalp and prevents overlapping of previously lightened hair.
Using Toners
Toners are used on prelightened hair to achieve pale, delicate colors. They require a double-process application. The application of the lightener is followed by the application of the toner. No-lift deposit-only hair colors are often used as toners. The contributing pigment is the color that remains in the hair after lightening. Manufacturers of toners include literature with their products that recommend the contributing pigment necessary to achieve the desired color. Generally, the paler the desired color, the lighter the contributing pigment will be.
Special Effects Hair coloring
Any technique that involves partial lightening or coloring is considered special effects hair coloring. Highlighting involves coloring some of the hair strands lighter than the natural color

28
to add lighter shades and give depth to the hair color. Reverse highlighting or lowlighting is the technique of coloring strands of hair darker than the natural color. The three most frequently used methods for highlighting include cap, foil and baliage techniques. Cap technique involves pulling clean, dry hair through a perforated cap with a thin plastic hook. The hair pulled through the cap is highlighted or lowlighted, creating a subtle look. The more strands pulled through the cap, the more dramatic the effect. The hair pulled through the cap is usually lightened with a powdered off-the-scalp lightener or high-lift color. The lightener is then removed by a rinse and shampoo.
Pulling Strands through Plastic Cap
Foil technique involves the coloring of selected strands by slicing or weaving out sections of hair and placing them on foil or plastic wrap. Haircolor is then applied to the strands to create softer, more natural-looking highlights. Foil highlights take practice to create the desired effect. Foil can be used to highlight hair to frame the face, cover half the head or highlight the entire head of hair.
Foil Highlight Technique
Baliage technique is a free-form technique of painting on a lightener directly onto clean, styled hair. The effect is subtle and generally used on the surface of the hair. Highlighting shampoos contain permanent haircolor and hydrogen peroxide. They can highlight the hair in a single application and result in the natural color being slightly lightened.
Special Haircolor Challenges & Solutions
Even the most skilled colorist can have problems that can’t be predicted. Remaining calm is key to solving an unexpected problem.
Gray hair can present unique challenges in coloring processes. A yellow cast can be caused by smoking, medication, sun exposure and styling aids. Lightener and haircolor removers help remove yellow discoloration. For clients who are 80- to 100-percent gray, haircolor in the blond range is generally more flattering than darker tones. When attempting to cover unpigmented hair in a salt-and-pepper head, formulations should be two levels lighter than the natural level to ensure a natural result and avoid a pigment that is too dark. It is also important for a colorist to determine the amount of gray and distribution of gray. Some gray is evenly dispersed, while other gray might be present in patches. If the gray patch is close to the client’s face, it may be important to formulate based on the percentage of gray that the client sees in the mirror. Techniques such as presoftening can allow for better penetration of color on gray hair. Presofteners are applied, processed and removed prior to the application of haircolor.
Covering Gray Can Be Challenging

29
Damaged Hair
Hair can be damaged by blow-drying, shampooing and chemical services. Other products like hairspray, can coat the hair and make it difficult for color to penetrate. It is important that damaged hair receive reconditioning treatments prior to and after chemical services. Clients can be scheduled for conditioning treatments between chemical services, at-home products should be recommended for clients to use at home, and rich conditioners should be used during the salon visit to help repair damaged hair. Color fillers help equalize porosity and deposit color in one application. They deposit color to faded ends and hair shaft, help hair hold color, prevent streaking and dull appearance and prevent off-color results. Color fillers also produce a more uniform, natural-looking color. They can be applied directly from their containers to damaged hair prior to coloring or added to haircolor and applied to damaged ends. To select the proper filler, use the primary or secondary color that is missing in the hair. That color is called the complementary color. Yellow blond hair can be corrected to natural blond by adding the two missing primary colors, red and blue. Orange blond hair can be corrected by adding the missing blue.
Haircolor Tips for Redheads
The most common problem with color-treated red hair is fading. A red-orange base color is recommended to create warm, coppery red. Fiery red is created using red-violet or true red color. Once hair is colored, use a no-lift deposit-only color to refresh shaft and ends. A soap cap of equal parts shampoo and remaining color formula can brighten haircolor and refresh red-heads.
Haircolor Tips for Brunettes
Orange or brassy tones can be avoided on brown hair by using a cool blue base. Lightening more than two levels above the natural color should be avoided. Natural highlights in brunette hair should be deep or caramel colored. Blond highlights require frequent service and can look unnatural.
Haircolor Tips for Blonds
Lightening brown hair may result in unwanted warm tones. Double-process blonding is the best way to obtain pale blond results. When covering gray hair with blond, use a Level 7 or
darker for best coverage. If highlights become to blond or all one color, lowlights or deeper strands can be foiled into the hair to create a more natural color. Glaze can also add warmth to the hair.
Common Haircolor Solutions
Green cast can occur from a buildup of minerals from well water or chlorine. Products designed to remove mineral buildup can be used. No-lift deposit-only colors can neutralize any unwanted color that remains in the hair. Overall haircolor is too light can be the result of an incorrect formulation. Apply a no-lift deposit-only color that is one or two levels darker than the previous formula. Overall haircolor is too dark can be due to buildup or formulation. Apply haircolor remover to areas that need to be lightened, process for 10 minutes and check development. Once results are achieved, rinse and shampoo. Restoring blond to natural haircolor can be difficult. New growth should be softened with a level 6-violet base color with 20 volume. Apply to scalp area and let process for 30 minutes. Rinse and towel-dry. Next, apply a no-lift deposit-only glaze with 1 ounce of a Level-8 light natural blond and 1 ounce of a Level-9 red-orange. Apply to all lightened hair not the scalp area. Process up to 20 minutes. Reevaluate at the client’s next visit and decide if the color should be made deeper.

30
PRACTICE TEST - SECTION 2
All answers to this Practice Test can be found
in Section 2.
1. Blunt or one-length cuts can make fine hair appear thicker. True False
2. To comb out towel-dried hair, start at
the roots and pull hard with the comb until the tangles come loose. True False
3. Hair pressing temporarily straightens curly hair using a heated comb. True False
4. Hair braiding utilizes a variety of chemicals and dyes and can be harmful to hair. True False
5. Human hair is the highest standard
for hair extensions, but can be costly. True False
6. Cap wigs are an excellent option for
clients with little or no hair. True False
7. The primary colors are orange, green
and violet. They are the foundation from which all other colors derive. True False
8. Permanent hair coloring products are
excellent for covering gray hair. True False
9. Colorists use the Level system to
determine the lightness or darkness of colors. True False
10. Double-process high-lift haircolor is perfect for the client who wishes to go dark with color. True False
SECTION 3 FACIALS
(1 credit hour)
Skin Analysis and Consultation
Skin analysis is a very important part of the facial treatment and helps determine what type of skin the client has and what type of treatment is best for the client. A consultation allows the cosmetologist to ask the client questions about his/her health, skin care history and offer advice on home care treatments and products.
Health Screening
Clients should be asked to fill out a questionnaire to determine contraindications prior to treatment. A contraindication is a condition or treatment a client has that might cause a negative side effect during a facial treatment. Certain medications or allergies are examples of contraindications that could react negatively to treatment during a facial. A standard questionnaire should start with a client’s name, address and how they were referred for treatment. It should also include detailed questions about medications, skin disorders, physician information, allergies, current skin care products, health conditions, diseases and whether or not this is the client’s first facial experience. Any important information should be highlighted and noted.
Analysis Procedure
Clients should be made comfortable and asked to discuss any questions they might have about the procedure. Once all questions are answered, the client can change into a smock, and remove all jewelry. Secure the client’s hair with a headband or towel. Using gentle upward movements, warm cleansing milk should be massaged into skin and removed with warm, damp facial sponges. Once the face is thoroughly cleansed, cotton eye pads should be placed gently over the eyes.

31
Determine Skin Type
Skin types are hereditary and cannot be changed. However, proper treatment can improve the skin and conditions associated with particular types of skin. Dry or alipidic skin can become dehydrated and lack moisture. Dehydrated skin may be flaky or dry with fine lines and wrinkles. A lack of visible pores is consistent with alipidic skin. The client may also complain of having skin that feels itchy or tight. Oily skin is indicated by large pores and often appears shiny or greasy. Clogged pores or blackheads may be present. Acne is a hereditary skin condition indicated by the presence of pimples. With acne, follicles become clogged and infected. Acne bacteria live at the bottom of a follicle and multiply quickly. Eventually the area becomes red and sore. Acne papules are red pimples that do not have a pus head. Pimples with a pus head are called pustules.
Analysis of Skin Conditions
Dehydration can be identified by dry, flaky areas of the skin. Dehydrated skin can be caused by using drying products, sun exposure, or lack of care. Hydrators help bind water to the skin surface and can result in smoother-looking skin. Hyperpigmentation is indicated by dark or discolored blotches and can be caused by sun exposure or horrnone imbalances. It can be treated with exfoliation and home care products that discourage pigmentation. Clients should also be advised to use sunscreen. Sensitive skin turns red easily and can be easily irritated and inflamed by skin care products. Strong products, fragrances and exfoliants should be avoided when treating sensitive skin. Aging skin tends to sag and suffers from a loss of elasticity. The appearance of wrinkles and fine lines can be improved with treatments that hydrate and exfoliate the skin. Sun-damaged skin has been damaged from frequent sun exposure over long periods of time. Hyperpigmentation, wrinkles and sagging can be effects of sun damage.
Skin Care Products
There are a huge variety of skin care products on the market for home and salon use. They can be divided into several categories.
Variety of Skin Care Products
Cleansing milks are nonfoaming lotions designed to cleanse dry and sensitive skin types. They can be applied with the hands but should be removed with a damp sponge, cloth or pad. Foaming cleansers contain detergents and foam up and rinse off easily. They are generally recommended for oily or combination skin types, but can also be formulated for dry and sensitive skin. Toners are designed to lower the pH of the skin after cleansing and remove any residue the cleanser has left behind. Most toners are stronger products designed to use for oily skin. Exfoliants are products that remove dead skin cells from the skin’s surface and help the skin appear smoother and clearer. Mechanical exfoliants physically remove dead skin build up through the use of scrubs or masks. Microdermabrasion can be used as a machine treatment. Chemical exfoliants such as alpha hydroxy acids and enzyme peels use chemicals to remove dead cell buildup. These products can improve the overall appearance of skin by reducing clogged pores, promoting

32
smoothness, fading skin discoloration, eliminating fine lines and softening wrinkles.
Moisturizers
Made of humectants and emollients, moisturizers increase the moisture content of the skin’s surface and help the appearance of fine lines and wrinkles. Moisturizers for oily skin typically come in the form of a lotion. Dry skins benefit from a heavier moisturizer in cream form. Some moisturizers also contain sunscreens or soothing agents.
Sunscreens and Day Protection Products
Sunscreen is one of the most important products to benefit the skin. It can prevent premature aging and skin cancer. A broad-spectrum sunscreen with UVA and UVB protection is key and should have an SPF of 15 or higher. Formulations for oily, dry and combination skin are available. Night treatment products are designed to treat specific skin problems and are generally heavier than products designed for day-use. Serums are popular night treatment products that are often applied under a moisturizer.
Masks
Clay-based masks are used for oily or combination skin and can help shrink the appearance of large pores. Cream masks contain oils and emollients and are used for dry skin. Gel masks can be soothing for sensitive or dehydrated skin and contain skin-calming ingredients. Alginate masks contain seaweed and can be used in combination with serums and treatment creams. Paraffin wax masks are melted and applied warm over the application of creams and other treatments. The warm paraffin helps the absorption of the cream or treatment and can be removed once it hardens. Modelage masks are also used with treatment creams and harden after they are applied. These masks are beneficial for dry skin but should not be used on sensitive or acne prone skin. The mask can become heavy and
confining and is not recommended for people with claustrophobia.
Modelage Mask
Gauze or cheesecloth can be used in conjunction with masks to hold the mask in place while allowing for penetration of the cream or treatment to the skin underneath.
Post-Facial Consultation
Clients should be in a quiet environment during a facial to ensure a relaxing treatment process. The client should be encouraged to ask questions regarding at-home care after the service. Product recommendations should reinforce and complement salon treatments.
Facial Massage
Facial massage requires control and a firm, sure touch. Its purpose is to increase circulation and metabolism through rubbing, kneading and gentle movements. Facial massage can keep the skin healthy and muscles firm. The hands of a masseuse must be soft and flexible. Nails should be short and filed to avoid the possibility of scratching a client’s face. All movement during a massage should be from the insertion of the muscle toward its origin. The origin is the portion of the muscle at the fixed attachment to the immovable portion of the skeleton. Effleurage is a light, continuous stroking movement in a rhythmic manner. No pressure is used. Fingertips are used at the delicate areas around the eyes and the palms are used on the larger surfaces. Petrissage is a kneading movement used by pressing and squeezing the tissue with light,

33
firm pressure. Muscles, nerves and glands are stimulated by this method. Fulling is a form of petrissage in which the tissues is grasped, lifted and spread out. Shoulders, arms and back benefit from the petrissage technique.
Petrissage Technique
Friction is excellent for circulation and glandular activity and involves a deep rubbing movement. It is beneficial for the scalp, arms, hands and even the face and neck. Tapotement is used in facial massage and consists of a light tapping of the fingertips on the skin in rapid succession.
Tapotement Technique
Physiological Effects of Massage
Facial massage benefits include relaxation, increased circulation, softening of the skin, increased glandular activity, strengthened muscle fibers and tension and pain relief. Weekly facial and scalp massages can improve the condition of the skin and scalp.
Facial Manipulations
During any facial massage, a soft even rhythm will encourage relaxation. Once the hands have touched the clients face and the massage has begun, the hands should not be removed until the massage is complete. Massage may begin at the forehead or the chin and should consist of light circular movements. Manipulations should continue to the lower cheeks, brow and eye area and nose and upper cheeks. Neck and upper chest should follow.
Facial Equipment
Facial steamers provide a warm jet of steam to soften the skin and help it absorb moisturizers and other treatment products. In lieu of steam, a warm moist towel can be placed over the face leaving the nose exposed.
A brushing machine is an electrical device that exfoliates and cleanses the skin. Different sizes and textures of brushes can be used for a variety of areas of the skin. Brushing should not be used on clients with rosacea, sensitive skin, pustular acne or who are on kertolytic drugs. All brushes must be cleaned and disinfected between clients.
Brushing Machine
Electrotherapy is the use of electrical currents to treat the skin. Electrodes are used to direct an electric current to the skin and can be helpful in treating oily and acne-prone skin. The active electrode is applied to the skin while the positive electrode is held by the client. Once the treatment takes place, sebum deposits can be extracted with gentle pressure. Electrotherapy cannot be used on heart patients, pregnant clients, clients with implants

34
or pacemakers, clients with epilepsy or seizure disorders or those with open or broken skin. Microcurrent is a galvanic treatment that tones and tightens the skin using a computerized device. High-Frequency Current uses electrodes that can be applied directly to the skin or held by the client. The machine stimulates blood flow and warms the tissues allowing for a higher absorption of lotions or creams. It can also create a stimulating massage.
Client Holding Electrode
Light therapy is used to improve skin conditions such as acne, and for hair and scalp treatments. LED (light-emitting diode) therapy is one of the newest light treatments available and has been shown to reduce redness and improve skin smoothness. Microdermabrasion requires special training, but is a popular treatment for wrinkles and aging skin. It uses a closed vacuum to shoot crystals onto the skin, removing dead skin cells.
Facial Treatments
Professional facials are a relaxing spa experience that can improve the tone, texture and appearance of a client’s skin. Generally, facials are either preservative or corrective. A corrective facial is designed to improve or correct facial skin conditions such as dryness, aging lines or oiliness. A preservative facial is
usually booked by a client who wants to maintain the current health of their skin and enjoy the relaxing experience.
Guidelines for Facial Treatments
Facials should be a relaxing, quiet experience for the client. Proper analysis of the client’s skin is essential to providing an effective facial. The facial should be performed in a quiet atmosphere with clean, sanitary conditions.
Basic Facial Application Procedures vary, but the cosmetologist should be aware of any skin conditions such as acne, dryness or oily skin. If the client is under medical care, the role of the cosmetologist is to work with the client’s physician, following the physician’s instructions for the kind and frequency of facial treatments. For acne, a cosmetologist is typically limited to cleansing the skin, applying topical applications, removing comedones and using medicated preparations. Skin with acne does contain infectious matter and gloves should be worn during the facial. Some acne medications make skin sensitive to skin care products, which should be carefully noted.
Home Care
During consultation, a cosmetologist should explain proper home care for the client’s skin conditions. The home care plan should complement the facial treatment and should be explained as part of a long-range plan to improve the client’s skin.
Basic Facial Procedure
Once the client arrives, they will be asked to change into a strapless gown. The client should be shown to the facial bed and asked to remove any jewelry including necklaces and earrings before reclining on the bed. The cosmetologist should cover the client’s chest with a clean town and drape the client’s head with a tissue or towel to protect the hair. The cosmetologist will perform the consultation and remove any makeup the client is wearing. Eye makeup remover should be applied using cotton pads. The pads should rest on the clients closed lids for 1 minute prior to gently wiping off the eye makeup. Lipstick should also be removed at this time.

35
Cotton Pads with Eye Makeup Remover
With a clean spatula, remove cleanser from container and start at the client’s neck. With small circular movements, the cleanser should be massaged up the chin, jaws and checks and continued on the sides of the nose. With sweeping movements, continue across the brows, forehead and extend to the temples. With another clean spatula, take additional cleanser and smooth is across the neck, chest and upper back. Return to the forehead, continue around the eyes, to the temples, back through the forehead down the nose, chin and around the jaw. Remove the cleanser with facial sponges or warm, moist towels. Begin at the forehead, removing cleanser from one section of the face at a time, finishing with the neck and chest. At this time, analyze the skin to determine the types of products and procedures that should be continued.
Analyze Skin
Using warm, moist towels or a facial steamer, steam the face so it can be cleansed of oil and comedones. Cover the client’s eyes with cotton pads moistened with water or freshener. If the client does not have sensitive skin, apply a scrub to the face and gently massage in small, circular motions. Avoid the eye area. Remove the scrub with damp sponges or cotton pads. At this time, choose the correct cream or lotion for the client’s skin type and massage using proper facial manipulation. Remove excess massage cream with warm, moist towels or sponges. Sponge the face with toner or freshener. If appropriate, apply a mask formulated for the client’s skin condition or skin type and let it remain on the face approximately 7 – 10 minutes. Remove with wet cotton pads, sponges or towels and apply toner or freshener. Apply moisturizer. Remove head covering from the client and offer assistance to the dressing room if needed. Dispose of all used supplies and materials in the proper receptacle, clean and close product containers and place used towels and linens in proper hamper. Sanitize workstation and wash hands with soap and water. These above procedure should be adjusted for oily, acne-prone or dry skin with appropriate products and implements. Finally, meet with the client before they exit the salon with proposals and instructions for proper home care. Any products the client wishes to purchase at that time should be accompanied with written instructions for home use. Book any future appointments.
Aromatherapy
Aromatherapy can be an important addition to the salon experience for the client. Essential oils, candles and sprays can enhance the salon experience and help relax the client. Caution should be exercised as some oils and scents can be overpowering and become a negative experience for some clients.

36
PRACTICE TEST – SECTION 3
All answers to the following practice test can be
found in Section 3.
1. Medications a client may be taking should not affect the way a facial is administered. True False
2. Granular scrubs or exfoliants can be beneficial for clients with sensitive skin. True False
3. Oily skin is indicated by large pores and often appears shiny. True False
4. A clay-based mask is an excellent choice
for a client suffering from dry or dehydrated skin. True False
5. Facial steamers soften the skin and help it absorb moisturizers and treatments. True False
6. Consulting with a client prior to a facial is a waste of time for the cosmetologist and the client. True False
7. Electrotherapy can be helpful in treating acne-prone skin. True False
8. A gel mask is an excellent choice for a client with sensitive skin. True False
SECTION 4
NAIL CARE - MANICURING
(1 credit hour)
Nail Technology Supplies
The standard manicure table and adjustable lamp are critical to the professional manicurist. Both the manicurist and the client should also be provided with ergonomic chairs that can be easily cleaned and sanitized. Client chairs should be adjustable for the height of the client so that they can rest their hands comfortably on the table. A fingerbowl is designed for soaking the client’s fingers in warm, soapy water and can be made of metal, glass or plastic.
Fingerbowl
Disinfection containers are covered containers designed for holding liquid disinfectant solutions and implements. Many containers have a lift tray that allows the manicurist to lift out the implements without using tongs. The tray should be large enough to completely immerse the implements in the liquid solution. Never touch disinfectant with bare hands. Always use tongs. Arm cushions or folded towels should be provided for the clients’ comfort and convenience. Wipe containers hold clean cotton wipes or cotton balls for polish removal.

37
The supply tray holds all polishes, removers and creams that a manicurist should have on hand during the manicure. The display should be neat and professional. Ultraviolet or electric nail polish dryers are a nice touch for the client who is waiting for polish to dry. These items are designed to dry the nails more quickly than air-drying. Implements include any tools used to perform the manicure service. Some are disposable while others need to be cleaned and disinfected between each client. Wooden pushers are disposable implements that help remove cuticle tissue from the nail plate and can aid in cleaning off excess polish. Metal pushers must be sanitized and disinfected before use on a client.
Wooden Pusher
Nail files and buffers come in a variety of types, sizes and grits. Fine grit are designed for buffing and polishing, while coarser grits are used for nail shaping and should be used with caution. Some boards can be sanitized and disinfected, while others are disposable. Buffers are not approved in all states. Nippers are sharp implements used to trim small tags of dead skin around the nail. They must be cleaned and disinfected between clients. Tweezers must also be cleaned and disinfected between clients and are used for removing debris from the nail plate or extracting implements from the disinfecting solution. A nail brush is designed to clean fingernails with warm, soapy water and must be sanitized and disinfected between clients.
Nail clippers are used to trim nails and must be sanitized and disinfected prior to each use.
Sanitation & Disinfection Process
Manicurists should have several sets of tools and implements so that one is always cleaned and ready for the client. It takes time to properly clean and sanitize an implement, and clients should not be left waiting. The process:
1. Wash the implement with warm, soapy water and rinse well.
2. Fully immerse the tool or implement in disinfection container filled with solution approved by state board regulations and according to manufacturer’s directions.
3. If required, rinse the implement with water and air dry on a clean towel.
4. Store all disinfected tools in a clean container.
Wash Implements in Warm Soapy Water to Sanitize
Disposable Materials
The following materials are disposable and must be replaced for each client or laundered appropriately: Towels Brushes and applicators Cotton balls, pads or pledgets Plastic spatulas A trash container with self-closing lid must be located next to the workstation. It is the best way to prevent the fumes and vapors from overpowering the salon.
Professional Nail Cosmetic Products
Nail cosmetics are personal preferences and should be researched prior to purchasing. Products containing fragrance should be carefully considered as many clients have allergies or sensitive skin. The following products are staples for the manicurist:

38
Liquid soap for soaking Polish remover Nail creams and oils Cuticle removers Nail bleach Pumice powder Colored polishes Base coat polish Nail hardeners Top coat polish Nail polish dryers Hand creams & lotions Nail conditioners Basic table set-up should start with a clean, disinfected table draped with a fresh, clean towel for each client. Table pads should be covered with fresh towels for each client. The disinfectant container should be filled with fresh disinfectant daily or whenever it becomes cloudy with debris. All products should be placed on the side of the table within easy reach. The fingerbowl should be placed in the center of the table toward the client. The drawer should house clean items such as nail buffers, cotton balls and other supplies. Nail polish should be displayed so clients can see them and choose their color.
Basic Table Set-Up
Nail Shapes
The client consult should include a selection of nail shape by the client. There are five basic shapes:
1. Square nails are completely straight across, with no rounding.
2. Squoval nails have a square-free edge that is rounded off and extends only slightly past the fingertip. It is a sturdy shape and ideal for clients who work with their hands, do keyboard typing or want a no-fuss nail.
3. Round is a natural shape that male clients often prefer. It is slightly tapered and extends just past the fingertip.
4. Oval nails are flattering for most women, and features rounded edges. The nail can extend longer past the fingertips if preferred by the client.
5. Pointed nails are tapered and can give the flattering appearance of longer fingers. Due to the pointy shape, this style is weaker and can break easily.
Basic Nail Shapes
Procedures for Cuts, Scrapes or Bleeding
If a client gets cut or scraped during a manicure it is important not to panic. Universal Precautions should be followed as established by OSHA. The procedure should proceed as follows:
1. Put on gloves. Apologize to the client and proceed.
2. Have the client hold a clean piece of cotton to the cut or scrape until the bleeding stops.
3. If appropriate, continue and complete the service, avoiding the area where the injury occurred.
4. Discard any blood-contaminated materials or files during the service. Blood-contaminated materials must be double-bagged. Follow all techniques on proper disposal required by state regulations.
5. Clean and disinfect the table and all implements.
6. Remove gloves and wash hands.

39
Sanitation Process
Prior to a giving a manicure, all salon implements and tools must be sanitized and disinfected according to proper procedures listed above. The manicure should begin with a clean table draped with a clean towel. The proper table set-up should be evident with all materials stocked and ready within easy reach.
Sanitize & Disinfect Table
Performing a Basic Manicure
Once the client is comfortably settled, begin working with the hand that is not the client’s dominant hand. If the client is right-handed, begin with the left hand. Throughout the manicure it is important to discuss products and procedures, and suggest any maintenance products recommended for the client to use between salon visits. The manicure should proceed as follows:
1. Remove polish with a saturated cotton ball. Soak the cotton and hold on the nail for 10 seconds and stroke toward the free edge.
2. Shape the nails using an abrasive board in the shape the client has requested. File the little finger first and proceed inward towards the thumb. File from right side to center and from left side to center. Never saw back and forth. Do not file nails that have been soaking in water as water will absorb into the nail and make it weaker and softer.
3. Soften the cuticles by soaking the nails on the hand that has just been filed. File the nails on the other hand while the first hand is soaking.
Soften Cuticles by Soaking in Warm Water
4. Clean nails with a nail brush on the
hand that has been soaking paying attention to the area under the nail tip.
5. Dry the hand with a fresh towel and gently push back the cuticles.
6. Apply cuticle remover using a cotton-tipped wooden or metal pusher. Avoid getting the product on skin surrounding the cuticle.
7. Loosen and remove the cuticle
using a wooden or metal pusher. Use a small circular movement to push and lift cuticle tissue off each nail.
8. Use nippers to clip away and dead skin or hangnails. Do not rip, tear or cut living skin.
Use Nippers to Clip Away Hangnails
9. Clean under free edge of nail using cotton swab or cotton-covered wooden pusher. Remove other hand from finger bowl.
10. Repeat steps 5 through 9 on right hand.
11. Bleach nails if yellow or discolored. Apply bleaching agent to yellowed nail with cotton-tipped orangewood stick. Do not let bleach come in contact with surrounding skin.
12. Buff nails if buffers are state-approved.

40
13. Apply nail oil to each nail. Massage into nail plate with circular motion.
14. Bevel nails on the underside of the free edge at a 45-degree angle to remove rough edges.
15. Apply lotion and massage into hands and arms.
16. Remove oil and lotion from nail bed with polish remover or polish will not adhere.
17. Choose a color. The client may have a color in mind. If not, help her choose an appropriate color for her skin tone or suggest a seasonally appropriate color.
18. Apply polish starting with a clear base coat followed by two coats of polish color. Follow with one top coat. Never shake the nail polish bottle, roll between the hands to mix. Brush toward the free edge of the nail. Thin even coats work best.
Schedule the next appointment, advise client about proper home care for nails, and advise care when opening doors. Give any recommendations for retail products if the client shows interest. Finally, clean work area, disinfect implements and prepare for the next client.
Types of Polish Application
Full coverage nails have the entire nail plate polished. Free edge nails have the tip free of polish to prevent chipping. Hairline tip leaves 1/16-inch free of polish to avoid chips. Slimline or free walls makes a wide nail plate appear narrower by leaving 1/16-inch strip bare on either side of nail plate. Half-moon leaves the base of the nail unpolished. French manicure features a dramatic white free edge of nail with natural color on the base. American manicure shows a subtle white free edge with natural color on the base.
Types of Polish Application
Conditioning Oil Manicure
This manicure is recommended for clients who suffer from brittle nails or dry skin around the nail. It can improve the hand and nail plate condition and leaves the skin soft.
Manicures for Men
The procedure for men is executed in the same manner as for women. However, instead of colored polish, a clear polish or buffed nails to add shine will suffice. Men typically prefer a rounded nail shape and may require more time and care for cuticle work.
Finished Man’s Manicure
Paraffin Wax Treatment
Paraffin is a petroleum wax product that seals and holds in moisture. Special units are designed to melt the wax into liquid form and keep it at 125 – 130° F. Paraffin wax should never be heated in anything other than proper equipment. The treatment is typically given prior to a manicure.

41
Client Dipping Hand in Paraffin Wax
Paraffin Wax Treatment Procedure
1. Perform pre-service sanitation and table set-up.
2. Make sure the client’s hands are free from open wounds or skin disorders.
3. Apply moisturizing lotion or oil to the client’s clean, washed hands.
4. Test the temperature of the wax. 5. Position the hand for dipping. Palm
should be flat with wrist slightly bent and fingers apart.
6. Help the client dip one hand into wax for 3 seconds. Let wax dry and repeat up three to five times.
7. Wrap hands in plastic wrap or gloves and insert into warming mitt.
8. Repeat on other hand. 9. Allow paraffin to penetrate 5 to 10
minutes. 10. With plastic still on client’s hands,
peel off wax from wrist to fingertips in a massaging motion.
11. Dispose of used paraffin properly. Never reuse paraffin.
12. Begin the manicure.
Spa Manicure
Spa manicures involve both skin and nail care and are an advanced area of knowledge. Professionals can find this area to be lucrative for the salon and beneficial to clients. A spa manicure should include a relaxing massage and some form of exfoliation to enhance penetration of spa-based products. They often are labeled with names that incorporate the use of specific products. Spa manicures may include paraffin dips, aromatherapy, hand and arm massage and moist towel applications.
PRACTICE TEST – SECTION 4
All answers to the following practice test can be
found in Section 4.
1. Cuticles should be pushed gently back using an orange stick or metal pusher. True False
2. Nails should be filed after they are soaked to ensure a smooth result. True False
3. Universal Precautions should be used if a client is cut or scraped during a manicure. True False
4. When filing nails, use a sawing motion
back and forth until the nail is smooth. True False
5. A squoval shape is an excellent choice for women who work with their hands. True False
6. Most men prefer a pointed nail shape. True False
7. Paraffin wax can be heated in the microwave and reused multiple times. True False
8. Spa manicures require advanced knowledge of skin and nail care. True False
9. Cuticle remover cream can be used on the entire hand if desired. True False
10. Cotton balls can be reused as long as they are used for polish removal. True False

42
FINAL EXAMINATION
SECTIONS 1-4
Mark your answers on the answer sheet
found on page 44 of this course booklet.
To receive 8 credit hours, your total score
must be 75% or higher.
1. Foil highlights involve coloring selected
strands of hair and placing on foil or plastic wrap. True False
2. Universal Precautions are guidelines set by OSHA and require employees to assume all human blood and body fluids are infectious for bloodborne pathogens. True False
3. Paraffin wax should be kept at a temperature of 180-200° F. True False
4. Single-process hair coloring lightens and deposits color in a two-step process. True False
5. Clients should be asked to fill out a detailed questionnaire prior to a facial. True False
6. Disinfection can be accomplished by cleaning with soap and water. True False
7. A manicurist should begin a manicure by working on the client’s dominant hand. True False
8. Bacteria can be classified into two categories, non-pathogenic and pathogenic. True False
9. It is only necessary to clean and disinfect tools and implements at the end of the day. True False
10. The parietal ridge is also known as the backbone. True False
11. Graduated haircuts are also known as one-length or blunt-cut styles. True False
12. Permanent haircolor is a poor choice for clients who wish to cover their gray hair. True False
13. Hair braiding has its roots in Africa and is considered natural hairstyling. True False
14. Salons should provide safe services to clients, but are not legally responsible for an injury that occurs in the salon. True False
15. Squoval nails have long, pointed tips. True False
16. Clippers are electric implements that are often used for cutting men’s hair. True False
17. Foam or mousse is an excellent choice for styling fine hair. True False
18. The Occupational Safety and Health Administration and the Environmental Protective Agency are federal agencies that regulate the salon industry. True False
19. If a manicurist accidently cuts or scrapes a client, Universal Precautions should be observed. True False
20. A stationary guideline does not move and is commonly used in creating blunt cut styles. True False
21. A pixie cut refers to a blunt cut or one-length hairstyle. True False
22. Nail brushes do not have to be disinfected between clients since they are used with soap and water. True False
23. Exfoliants are excellent for sensitive skin. True False
24. Hair texture is usually described as coarse, medium or fine. True False
25. Hair density is usually described as thin, medium or thick. True False
26. Hair pressing is safe regardless of the condition of the client’s scalp. True False

43
27. Non-pathogenic bacteria are disease-causing bacteria. True False
28. Plastic spatulas can be used multiple times as long as they are wiped clean in between clients. True False
29. Clients with acne should not have facials. True False
30. A fingerbowl is designed for soaking the client’s fingers in warm, soapy water during a manicure. True False
31. Clients with hyperpigmentation should be encouraged to sit out in the sun. True False
32. Wooden orange sticks can be cleaned, disinfected and used multiple times. True False
33. Roller curls are a faster way to set hair than pin curls. True False
34. The highest point on the head is the apex. True False
35. Volume measures the concentration and strength of hydrogen peroxide. True False
36. Hair extensions add texture, length and volume to existing hair. True False
37. Hepatitis is a curable disease that should
not be a concern in salons. True False
38. Nail clippers can be used for multiple clients without disinfecting. True False
39. Dry skin often appears shiny or greasy. True False
40. Haircutting shears are designed to shave hair right down to the scalp. True False
41. Horizontal lines are perpendicular to the floor and create graduated or layered haircuts. True False
42. Sanitation is the process of removing dirt and debris with soap and water. True False
43. One of the most common types of bacteria is the Cocci. True False
44. Acne is a hereditary skin condition indicated by the presence of pimples. True False
45. Bloodborne pathogens are spread through sneezing or hand-shaking. True False
46. Toners lower the pH of the skin and remove excess residue. True False
47. Effleurage is a technique that requires deep-tissue massage. True False
48. A cream-based mask is an excellent choice for oily skin. True False
49. Hair-wrapping adds curl and volume to straight hair. True False
50. Alpha-hydroxy is a chemical exfoliant. True False

44
Mail to: Inner State Beauty School Questions ?
5150 Mayfield Road Call (440) 442-4500 Lyndhurst, Ohio 44124
Fax to: (440) 442-4630
Please mail Final Examination and Course Evaluation to Inner State Beauty School along with a check or money order for $19.95. You may pay by credit card by completing the credit card information section below. Please print and complete all required information. Keep a copy for your records. Feel free to photocopy the answer sheet and pass the booklet along to a friend.
__________________________________________________________________________________ First Name Middle Initial Last Name
__________________________________________________________________________________
Street Address Suite/Floor/Apt. #
__________________________________________________________________________________
City State Zip Code
______________________________ ___ ___ ___ ___ . ___ ___ ___ ___ ___ ___ ___
Area Code/Telephone State Board ID Number
Payment Method:
���� Check or Money Order enclosed for $19.95
���� Discover/ MasterCard/ Visa
V-code:________ (3 digits back card)
___________________________________ _____________ _____________________________
Credit Card Number Expiration Date Signature
CE At Home- Cosmetology FINAL EXAMINATION
Read and answer all the final exam questions for this at home test. Please fill in all circles completely with a #2 pencil. Any incomplete circles or unanswered questions will be scored as incorrect. You must score 75% to receive 8 credit hours.
T F T F T F T F T F
1. � � 11. � � 21. � � 31. � � 41. � �
2. � � 12. � � 22. � � 32. � � 42. � �
3. � � 13. � � 23. � � 33. � � 43. � �
4. � � 14. � � 24. � � 34. � � 44. � �
5. � � 15. � � 25. � � 35. � � 45. � �
6. � � 16. � � 26. � � 36. � � 46. � �
7. � � 17. � � 27. � � 37. � � 47. � �
8. � � 18. � � 28. � � 38. � � 48. � �
9. � � 19. � � 29. � � 39. � � 49. � �
10. � � 20. � � 30. � � 40. � � 50. � �
45
Course Evaluation: Please Complete and Return with Exam to Inner State Beauty School
Your opinion counts! Take a moment and give us some valuable feedback to keep our standards high. CE # _______________ Course Name: CE At Home- Cosmetology I would rate this course 1 2 3 4 5
This course was easy to read 1 2 3 4 5
The content was helpful to my career 1 2 3 4 5
The test information was informative 1 2 3 4 5
I would take another at-home course Yes No
I would recommend this course to a co-worker Yes No
Comments________________________________________________________________________ ________________________________________________________________________________
Continuing Education at your Convenience! Course Name: CE at Home- Cosmetology
Course Number: SC __________ Hours: Eight (8)
Inner State Beauty School
5150 Mayfield Road
Lyndhurst, Ohio 44124
PRSRT STD
U.S. POSTAGE
PAID PERMIT NO. 944 CLEVELAND,
OHIO
CE at Home for Cosmetology. This is an 8-hour correspondence course that you
can take in the privacy of your home. It is an excellent way to fulfill your
Continuing Education requirement for the renewal period that ends January 31,
2013. Approved for 8 hours by the Ohio State Board of Cosmetology
The Ohio State Board of Cosmetology has approved both at home and online training for license renewal for the renewal period ending on January 31, 2013. This course is approved for eight (8) hours of continuing education for Cosmetologists.

46