contents - sam broadcasterdownload.spacial.com/support/spacialhelpbundle.pdf · contents - sam...
TRANSCRIPT
Contents - SAM Broadcaster
Getting Started
Before You Install SAM BroadcasterHow to Install SAM Broadcaster with FirebirdHow to Install SAM Broadcaster with MS SQLHow to Install SAM Broadcaster with MySQLHow to Add MusicIntroduction to Clockwheel RotationHow to Set Up Your MP3 EncoderHow to Set Up Your AAC EncoderHow to Set Up Your Windows Media (WMA) EncoderHow to Set Up Your Windows Media Statistic RelaysHow to Set Up SHOUTcast Statistic RelaysHow to Set Up SHOUTcast 2.0 Statistic Relays
Tips & Tricks
How to Select the Right DatabaseHow to Organize and Schedule MusicHow to Use Smart Categories
Troubleshooting
Players Are StuckHow to Find a Track
Contents - SAM DJ
Getting Started
Before You Install SAM DJHow to Install SAM DJHow to Add MusicIntroduction to Clockwheel Rotation
Tips & Tricks
How to Organize and Schedule MusicHow to Use Smart Categories
Troubleshooting
Players Are StuckHow to Find a Track
Contents - SAM Cast
Getting Started
Before You Install SAM CastHow to Configure Your General SettingsHow to Configure Your Sound Capture DeviceHow to Set Up Your Windows Media (WMA) EncoderHow to Set Up Your AAC Encoder with SHOUTcastHow To Set Up Your MP3 Encoder with SHOUTCastHow to Set Up SHOUTcast Statistic RelaysHow to Set Up Windows Media Statistic RelaysIntroduction to SAM Cast Sound Processing Features
Tips & Tricks
How to Capture Audio from Your SpeakersHow to Send Artist, Title and Song Metadata to the Player
Troubleshooting
How to Deal with the "Unable to create record handle" ErrorHow to Prevent Streaming SilenceHow to Remove an Echo from Your StreamTrouble Activating SAM Cast
SAM Broadcaster - Getting Started
Before You Install SAM BroadcasterPosted: 06/02/11
The first thing you need to do is make sure you're set up with these minimum system requirements:
Operating system: Windows XP, Vista, Windows 7CPU: 1 GHzMemory: 1 GBDisk space: 100 MBSound card: OptionalInternet: You'll need a solid Internet connection
Ideally, your system is set up with the following:
Operating system: Windows XP or Windows 7CPU: 2 GHzMemory: 2 GBDisk space: 100 MB + enough space for all the music filesSound card: Any high quality sound device; we recommend internal sound devices instead of externallyconnected USB devicesInternet: ADSL, cable or direct fiber Internet connection with enough capacity to broadcast your streamsto the stream hosting provider
Avoid running other tasks or processes simultaneously with SAM, including automated anti-virus scans. Thesecould hinder SAM Broadcaster's real-time performance.
When you install SAM Broadcaster, your firewall may request that you authorize SAM to open a port. If itdoes, make sure to allow it.
For best results, avoid using external or network-connected drives.
Recommended reading:
How to Select the Right Database

SAM Broadcaster - Getting Started
How to Install SAM Broadcaster with FirebirdPosted: 06/02/11
Firebird is a relational database management system that's popular with SAM users because it simplifies theinstallation process. Before going on, read to decide which database is best for you.this Help Document
There are 3 installation options with SAM Broadcaster. Firebird is packaged with 2 of them. Select Firebird's64-bit Edition if you're running Windows in 64-bit mode; otherwise choose the 32-bit Edition.
Once you've finished downloading SAM Broadcaster with Firebird, run the installer and follow the instructions.
After that's done, run SAM Broadcaster to wrap up the installation process.
During the SAM Broadcaster set-up:
Select the Firebird database.Don't change the program's default database settings.Select a sound playback and recording device.Enter your registration key, if available.
This concludes the instructions on how to install SAM Broadcaster with Firebird. We recommend consultingthe following articles to find out more about how to use SAM Broadcaster:
How to Add MusicIntroduction to Clockwheel RotationHow to Set Up your MP3 EncoderHow to Set Up your AAC EncoderHow to Set Up your Windows Media EncoderHow to Set Up SHOUTcast Statistic Relays
SAM Broadcaster - Getting Started
How to Install SAM Broadcaster with MS SQLPosted: 06/02/11
MS SQL is an ideal database for those who develop in Microsoft technologies like ASP and .NET.
Make sure MS SQL is already installed on your computer. You can install a free ("Express") version of MSSQL . Don't forget to select the MSI Installer that applies to your operating system (either 32-bit or 64-bit).here
Use the administration tools to create a database called "SAMDB." Then use the administration tools to create auser login that can access the database and create and modify tables.
Click to install SAM Broadcaster with MS SQL and follow the installer's instructions.here
After that's done, run SAM Broadcaster to wrap up the installation process.
Recommended reading:
How to Add MusicIntroduction to Clockwheel RotationHow to Set Up your MP3 EncoderHow to Set Up your AAC EncoderHow to Set Up your Windows Media EncoderHow to Set Up SHOUTcast Statistic Relays
SAM Broadcaster - Getting Started
How to Install SAM Broadcaster with MySQLPosted: 06/02/11
The MySQL database is recommended for large music libraries and for stations that need simple webintegration. Before going on, read this Help Document to decide which database is best for you.
Before you start, make sure MySQL is installed on your computer. to download and install MySQL.Click hereDon't forget to select the MSI Installer that applies to your operating system (either 32-bit or 64-bit).
When installing MySQL, don't change the program's defaults, except when it asks to specify a root password(make sure to write it down for later use). You can simply click "next" the rest of the time.
to download and install SAM Broadcaster and follow the installer's instructions.Click here
After that's done, run SAM Broadcaster to wrap up the installation process.
During the SAM Broadcaster set-up:
Select the MySQL database.Change the default database settings and enter your root password from earlier. We recommend notchanging any of the other settings.Select a sound playback and recording device.Enter your registration key, if available.
This concludes the instructions on how to install SAM Broadcaster with MySQL. We recommend consultingthe following articles to find out more about how to use SAM Broadcaster:
How to Add MusicIntroduction to Clockwheel RotationHow to Set Up your MP3 EncoderHow to Set Up your AAC EncoderHow to Set Up your Windows Media EncoderHow to Set Up SHOUTcast Statistic Relays
SAM Broadcaster - Getting Started
How to Add MusicPosted: 06/03/11
Adding music is the most vital part of using this software. It's also one of the easiest tasks.
There are two ways to add music. For starters, open SAM Broadcaster. Once there, follow these steps:
Click on "Desktop A" from the toolbar.In the "Playlist" window, click on "Tracks" the content of which will be seen in the "Tracks in selectedcategory" window, immediately below.One way to add music is to click on the plus sign ("+") to browse your documents, then locate and selectmusic files.
There's a down arrow next to the plus sign ("+"), which lets you add a directory (so you can placeall your media files in a specific directory) or add a playlist (so you can import existing M3U, PLS,or ASX files).
Another way to add music is to drag files from Windows Explorer and drop them directly into the"Tracks in selected category" window.
To create a playlist, simply drag your tracks from the "Tracks in selected category" window and drop them intothe "Queue" window. To select more than one track at a time, hold down "Shift" or "Ctrl."
You can also right-click on a category name or on any track within that category to add those songs to a playlistyou'd like to create.
Recommended reading:
Introduction to Clockwheel RotationHow to Use Smart CategoriesHow to Find a TrackHow to Organize and Schedule Music

SAM Broadcaster - Getting Started
Introduction to Clockwheel RotationPosted: 06/03/11
Clockwheel rotation controls when songs are played to avoid randomly generated tracks and repetition.
Create Categories
The first step consists of organizing your music into specific categories. For example, a Top 40 station mightuse the categories "Golden Oldies," "Current Hits," and "New Music."
To create new categories, follow these steps:
Click on the "Categories" window on Desktop ARight-click on "Playlists"Select "New"Type a category name
Add music to these categories by dragging and dropping music files from Windows Explorer, from your"Queue," or even from other categories.
Configure Playlist Rules
Next, you need to configure playlist rules. To do this, click on "Config" in your toolbar, then select "Playlistrotation rules." In this window, you can decide how often an album, artist, title, or track should play. Note thatmore than one track can have the same title (e.g. "Believe" by Elton John vs. "Believe" by Cher).
To configure your playlist rules settings properly, make sure all the songs in your playlist contain valid songinformation. Also make sure these rules match your library's size. For example, if you set a rule to 1,000 hours,your library must have at least 1,000 hours or more of music.
You can also configure the number of songs you want to have in your queue. If ever there are fewer songs thanthe number specified in this rule, SAM Broadcaster will automatically add another song to your queue.
We recommend leaving "Use ghost queue…" checked since it will cache the next song into its memory, soSAM Broadcaster will load the next song faster.
Leaving "Cache queue count" checked will improve SAM Broadcaster's performance by avoiding a databasequery each time the queue is empty. We recommend unchecking it only if you change the SAM Broadcasterqueue using external scripts and database queries.
Under "Playlist logic module," you'll find a selection of 3 built-in logic modules. We recommend the default"Clockwheel (Category Rotation) logic module" because it makes it easy to specify your station's format whenyou select songs from categories in a certain order. The "Weighted Playlist rotation logic module" assigns eachsong a "weight," which increases each time the song is requested, meaning popular songs will play more oftenthan unpopular ones. The "Web scripting based logic module" will contact a website each time you want to usea song. So if you know PHP, ASP, or any other Web script, you can manage SAM Broadcaster's playlistrotation logic according to your own script.
Build your Clockwheel
In the "Playlist rotation rules" window, select "Clockwheel Category Rotation logic module" and click"Configure." A "Category rotation logic configuration" window will pop up. From here, you can format yourclockwheel.
Here is what the buttons on the right do:
+ Category: Select a song from a category rule+ Directory: Select a song from a directory rule+ Request: Select a pending request and move it to the queue+ Comment: Add a comment or description to the clockwheel that provides more information- Clear: Empty the clockwheelLoad: Load a clockwheel format from a fileSave: Save the current clockwheel format to a file
When you set your clockwheel, it will select a track from a specific category using the rules you configured.Once selected, it will go to the next clockwheel entry and repeat the process until all songs have been played.Then it will start over again.
Here's an example of how to set a simple clockwheel:
Click on "- Clear."Click on "+ Category," and the "Select category" window will pop up.On the left side of the window, select the "Tracks" category.On the right side of the window, choose a "Selection method," which will determine what logic to employwhen selecting a track.For example, "Least recently played song" will select the song that hasn't been played for the longesttime.For this exercise, leave "Enforce playlist rotation rules" checked and select "Lemming Rules (randomlogic)," then click "OK."Your clockwheel script will look like this: Cat['Tracks'].QueueBottom(smLemmingLogic, EnforceRules);Click "OK" to save this configuration.With this configuration, SAM Broadcaster will only select a song from the "Tracks" category each time itrequires a song for rotation.
We recommend using "NoRules" if you select items like "Station ID," where the rules are too strict. YouTips:should also apply a balanced mix of logic methods to spread out the rotation across your music library.
SAM Broadcaster - Getting Started
How to Set Up Your MP3 EncoderPosted: 06/03/11
MP3 is one of the oldest streaming formats, which means it's compatible with most players on most software,sound devices, and browsers. Its low-bitrate sound quality isn't as good as, say, AAC format, but MP3 is verypopular.
Before you start, you must retrieve server details from your SpacialNet account. For the sake of example, let'ssay you've signed up for a SHOUTcast hosting account through SpacialNet.
Log into SpacialNet.Under "Hosting" in the left menu, click on "Stream hosting."Click on "View" next to your account.Either leave this page open or copy it so you can use it when setting up your MP3 encoder.
To set up your MP3 encoder, open SAM Broadcaster and follow these steps:
Click on "Desktop B" in the toolbar.In the "Encoders" window, click the plus sign ("+") to add a new encoder.Select "MP3 (LAME_ENC)."Click "OK."
The MP3 (LAME) encoder window will then appear.
In the "Converter" tab:
Set your "Bitrate" under "Setting." The bitrate is the amount of bandwidth used by a single stream. Thehigher the bitrate, the better the sound quality. However, a higher bitrate also costs more and will requiremore bandwidth. For a good cost/quality ratio, we recommend 64 kbps.
To avoid having your streaming service suspended, select a profile that will stream at a bitratethat's less than or equal to what you signed up for on SpacialNet. For example, if you signed up fora 64 kbps stream, your profile must stream at 64 kbps or lower.Make sure your bandwidth can support your streaming bitrate. The combined bitrate of all yourstreams should never exceed 80% of the value of the upload speed reported by .speedtest.net
Set your "Mode" under "Setting." For bitrates higher than 48 kbps, select "Stereo." For bitrates lower than48 kbps, select "Mono."
Select "Joint stereo" for optimized stereo compression.Select "Dual channel" if you have different audio content (for example, in different languages) oneach channel.
There are several "Sampling rate" options to choose from. Selecting "Auto" means the encoder willautomatically select the best sampling rate for your chosen bitrate.Under "General options," check "Auto start encoder after" if you want the encoder to start automaticallyeach time you launch SAM Broadcaster. If you check this option, make sure to specify how manyseconds you want to elapse before the encoder starts.Under "General options," leave "Auto reconnect encoder after" checked so SAM Broadcaster can recoverfrom network errors.Under "General options," leave "Allow scripts in stream" unchecked, since modern players don't use this
feature.
In the "Server Details" tab:
Select the server you want to send your MP3 file stream to. You have the choice between SHOUTcast(versions 1 and 2), Live365, IceCast, or no server.We recommend selecting the "SHOUTcast" server to reach a broader audience.If you select "No server," the encoder will archive your audio content without streaming it.Fill in your server and radio station details.
Your "Server IP" should be something like sc6.spacialnet.com.You can find your "Server Port" in your SpacialNet account details.Use your SpacialNet password.In "Station Details," write your radio station's name, select a genre from the drop-down menu, andprovide your website's URL.The "AIM," "ICQ," and "IRC Channel" fields are optional.We recommend checking "List on public station listing" to include your station in SHOUTcastdirectory.You may leave "Enable title streaming" checked to stream song information.We recommend keeping the "Caption template" default setting ("$combine$").
If you select SHOUTcast 2, you will have to provide a valid SID.
In the "Stream Archive" tab:
Check "Save stream to file" if you want to save a copy of your stream to your local hard drive.
Once you've configured all your settings, click "OK" to close the MP3 (LAME) encoder window.
Recommended reading:
How to Set Up SHOUTcast Statistic RelaysHow to Set Up your AAC EncoderHow to Set Up your Windows Media Encoder
SAM Broadcaster - Getting Started
How to Set Up Your AAC EncoderPosted: 06/03/11
There are many advantages to setting up an AAC encoder. For one, it has the best sound quality at a lowerbitrate, so it'll save on streaming costs. It's also supported by Flash, Microsoft Silverlight, and a wide range ofmobile devices, giving your listeners different options for tuning in.
Before you start, you must retrieve server details from your SpacialNet account. For the sake of example, let'ssay you've signed up for a SHOUTcast hosting account through SpacialNet.
Log into SpacialNet.Under "Hosting" in the left menu, click on "Stream hosting."Click on "View" next to your account.Either leave this page open or copy it so you can use it when setting up your AAC encoder.
To set up your AAC encoder, open SAM Broadcaster and follow these steps:
Click on "Desktop B" in the toolbar.In the "Encoders" window, click the plus sign ("+") to add a new encoder.Select "aacPlusV2."Click "OK."
The aacPlusV2 encoder window will then appear.
In the "Converter" tab:
Under "Output format settings," select your bitrate using the drop-down menu under "Format."Selecting an AAC bitrate with "Parametric stereo" provides the best low bitrate/sound quality ratio.To avoid having your streaming service suspended, select a profile that will stream at a bitratethat's less than or equal to what you signed up for on SpacialNet. For example, if you signed up fora 64 kbps stream, your profile must stream at 64 kbps or lower.Make sure your bandwidth can support your streaming bitrate. The combined bitrate of all yourstreams should never exceed 80% of the value of the upload speed reported by .speedtest.net
Under "General options," check "Auto start encoder after" if you want the encoder to start automaticallyeach time you launch SAM Broadcaster. If you check this option, make sure to specify how manyseconds you want to elapse before the encoder starts.Under "General options," leave "Auto reconnect encoder after" checked so SAM Broadcaster can recoverfrom network errors.Under "General options," leave "Allow scripts in stream" unchecked, since modern players don't use thisfeature.
In the "Server Details" tab:
Select the server you want to send your AAC file stream to. You have the choice between SHOUTcast(versions 1 and 2), Live365, IceCast, or no server.We recommend selecting the "SHOUTcast" server to reach a broader audience.If you select "No server," the encoder will archive your audio content without streaming it.

Fill in your server and radio station details:Your "Server IP" should be something like sc6.spacialnet.com.You can find your "Server Port" in your SpacialNet account details.Use your SpacialNet password.In "Station Details," write your radio station's name, select a genre from the drop-down menu, andprovide your website's URL.The "AIM," "ICQ," and "IRC Channel" fields are optional.We recommend checking "List on public station listing" to include your station in SHOUTcastdirectory.You may leave "Enable title streaming" checked to stream song information.We recommend keeping the "Caption template" default setting ("$combine$").
If you select SHOUTcast 2, you will have to provide a valid SID.
In the "Stream Archive" tab:
Check "Save stream to file" if you want to save a copy of your stream to your local hard drive.
Once you've configured all your settings, click "OK" to close the aacPlusV2 encoder window.
Recommended reading:
How to Set Up your MP3 EncoderHow to Set Up your Windows Media EncoderHow to Set Up SHOUTcast Statistic Relays

SAM Broadcaster - Getting Started
How to Set Up Your Windows Media (WMA)EncoderPosted: 06/03/11
The WMA encoder is popular because any computer operating system from Windows XP or higher will comeequipped with a Windows Media Player. WMA also works nicely with Microsoft Silverlight.
Before you start, you must retrieve server details from your SpacialNet account. For the sake of example, let'ssay you've signed up for a Windows Media hosting account through SpacialNet.
Log into SpacialNet.Under "Hosting" in the left menu, click on "Stream hosting."Click on "View" next to your account.Either leave this page open or copy it so you can use it when setting up your WMA encoder.
To set up your WMA encoder, open SAM Broadcaster and follow these steps:
Click on "Desktop B" in the toolbar.In the "Encoders" window, click the plus sign ("+") to add a new encoder.Select "WMA (v9 advanced [ROBUST])."Click "OK."
The WMA (v9 advanced [ROBUST]) encoder window will then appear.
In the "Profile" tab:
Select the streaming profile that applies to you.To avoid a failed connection, select a profile that will stream at a bitrate that's less than or equal towhat you signed up for on SpacialNet. For example, if you signed up for a 64 kbps stream, yourprofile must stream at 64 kbps or lower.Make sure your bandwidth can support your streaming bitrate. The combined bitrate of all yourstreams should never exceed 80% of the value of the upload speed reported by .speedtest.net
In the "Stream Options" tab:
Check "Auto start encoder after" if you want the encoder to start automatically each time you launchSAM Broadcaster. If you check this option, make sure to specify how many seconds you want to elapsebefore the encoder starts.Select "Use PULL distribution" if you're experienced with setting up routers, and "Use PUSHdistribution" if you're not.Under "Media server host/IP," fill in your server details. Your server IP should be something likewm6.spacialnet.com.Under "Publishing Point," use the same "Alias" you provided on your SpacialNet account.Leave the space under "Template publishing point" blank.Type in your username and password under "Authentication."Check "Auto reconnect encoder after" under "Error recovery" so SAM Broadcaster can recover from

network errors.
In the "Scripting" tab:
Note that the default settings will ensure compatibility with AudioRealm players.You can also fill in the details to customize how your metadata shows up in your stream.
In the "Stream Archive" tab:
Check "Save stream to file" if you want to save a copy of your stream to your local hard drive.
Once you've configured all your settings, click "OK" to close the WMA (v9 advanced [ROBUST]) encoderwindow.
Recommended reading:
How to Set Up your Windows Media Statistic RelaysHow to Set Up your AAC EncoderHow to Set Up your MP3 Encoder
SAM Broadcaster - Getting Started
How to Set Up Your Windows Media StatisticRelaysPosted: 06/03/11
Setting up a statistic relay for Windows Media (WMA) will let you know how many listeners you have on theWMA server at any given time.
Before you start, you must retrieve server details from your SpacialNet account.
Log into SpacialNet.Under "Hosting" in the left menu, click on "Stream hosting."Click on "View" next to your account.Either leave this page open or copy it so you can use it when setting up your WMA statistic relay.
To set up statistic relays for WMA, open SAM Broadcaster and follow these steps:
Click on "Desktop B" in the toolbar.In the "Statistic Relays" window, click the plus sign ("+") to add a new relay.Select "MediaPoint Manager statistic relay" from the list.Click "OK."
The WMA "MediaPoint Manager" server details window will appear. In it, enter the following details:
In the "Host" field, type your DNS name or IP address, in this case, "wm1.spacialnet.com."In the "MPM Port" field, type 8008.In the "Username" field, type your SpacialNet username.In the "Password" field, type your SpacialNet or WMA password.In the "Alias" field, click on the dropdown menu to select from the list of aliases. Select the alias youwant to grab your statistic from.To select the "Color on graph," click on the color box, and a color selection window will appear. In it,select the color you want to use to represent this particular statistic on your relays graph.We recommend leaving "Private statistic relay" unchecked, since "Public" relays get listed onAudioRealm.com.Click "OK."
Your WMA statistic relay is now configured and functional.
Recommended reading:
How to Set Up your Windows Media EncoderHow to Set Up SHOUTcast Statistic Relays
SAM Broadcaster - Getting Started
How to Set Up SHOUTcast Statistic RelaysPosted: 06/03/11
Setting up a statistic relay for SHOUTcast will let you know how many listeners you have on the SHOUTcastserver at any given time.
Before you start, you must retrieve server details from your SpacialNet account.
Log into SpacialNet.Under "Hosting" in the left menu, click on "Stream hosting."Click on "View" next to your account.Either leave this page open or copy it so you can use it when setting up your SHOUTcast statistic relay.
To set up statistic relays for SHOUTcast, open SAM Broadcaster and follow these steps:
Click on "Desktop B" in the toolbar.In the "Statistic Relays" window, click the plus sign ("+") to add a new relay.Select "SHOUTcast statistic relay" from the list.Click "OK."
The SHOUTcast server details window will appear. In it, enter the following details:
In the "Host" field, type your DNS name or IP address, for example, "sc6.spacialnet.com" if your streamhosting account is with SpacialNet.In the "Port" field, type "80" for SHOUTcast 2.0 hosting.
Otherwise, type the port number indicated in your SpacialNet account.In the "Password" field, type the password from your stream hosting account.Leave the SID field at zero if you are using SHOUTcast 1.0, otherwise enter the SID as indicated in yourstream hosting account.To select the "Color on graph," click on the color box, and a color selection window will appear. In it,select the color you want to use to represent this particular statistic on your relays graph.We recommend leaving "Private statistic relay" unchecked, since "Public" relays get listed onAudioRealm.com.Click "OK."
Your SHOUTcast statistic relay is now configured.
Recommended reading:
How to Set Up your MP3 EncoderHow to Set Up your AAC EncoderHow to Set Up your Windows Media EncoderHow to Set Up your Windows Media Statistic Relays
SAM Broadcaster - Getting Started
How to Set Up SHOUTcast 2.0 Statistic RelaysPosted: 06/03/11
Setting up a statistic relay for SHOUTcast 2.0 will let you know how many listeners you have on theSHOUTcast server at any given time.
Before you start, you must retrieve server details from your SpacialNet account.
Log into SpacialNet.Under "Hosting" in the left menu, click on "Stream hosting."Click on "View" next to your account.Either leave this page open or copy it so you can use it when setting up your SHOUTcast 2.0 statisticrelay.
To set up statistic relays for SHOUTcast 2.0, open SAM Broadcaster and follow these steps:
Click on "Desktop B" in the toolbar.In the "Statistic Relays" window, click the plus sign ("+") to add a new relay.Select "SHOUTcast statistic relay" from the list.Click "OK."
The SHOUTcast 2.0 server details window will appear. In it, enter the following details:
In the "Host" field, type your DNS name or IP address, for example, "sc6.spacialnet.com" if your streamhosting account is with SpacialNet.In the "Port" field, type "80" for SHOUTcast 2.0 hosting.
Otherwise, type the port number indicated in your SpacialNet account.In the "Password" field, type the password from your stream hosting account.Enter the SID as indicated in your stream hosting account.To select the "Color on graph," click on the color box, and a color selection window will appear. In it,select the color you want to use to represent this particular statistic on your relays graph.We recommend leaving "Private statistic relay" unchecked, since "Public" relays get listed onAudioRealm.com.Click "OK."
Your SHOUTcast 2.0 statistic relay is now configured.
Recommended reading:
How to Set Up your MP3 EncoderHow to Set Up your AAC EncoderHow to Set Up your Windows Media EncoderHow to Set Up your Windows Media Statistic Relays

SAM Broadcaster - Tips & Tricks
How to Select the Right DatabasePosted: 06/02/11
Firebird
Firebird is already packaged with the SAM Broadcaster installation file. Users who don't want to go through thehassle of installing a database server separately will appreciate this option.
However, there are a few trade-offs. Firebird is slightly slower than MySQL or MS SQL. As such, it's best touse another database if your music library contains more than 20,000 tracks. Also, while there's no problemintegrating Firebird with dynamic PHP, ASP, or other Web languages, many developers don't have experienceworking with Firebird. So MySQL or MS SQL might be a better option if Web integration is high on your listof priorities.
MySQL
Power users should use this database. This means downloading and installing MySQL separately, and beforeyou install SAM Broadcaster.
Installing MySQL is quite simple and worth the effort. It's fast and used for most open-source languages likePHP. Plus, the community edition of MySQL is free.
The only drawback is that it's a fairly heavy download.
MS SQL
If you want to develop in Microsoft technologies like ASP and .NET and you're already familiar withadministering MS SQL, this database is an ideal option.
That said, it's costly and a heavy download if you don't have an installation CD. Luckily, there's a free versionthat could work out nicely for smaller radio stations:http://www.microsoft.com/express/Database/

SAM Broadcaster - Tips & Tricks
How to Organize and Schedule MusicPosted: 06/06/11
The way you organize and schedule your music can really make your station stand out. There's an ‘80s mix, andthen there's your ‘80s mix. Here, we'll cover the technical aspects of creating your mix.
First, we recommend reading the following Help Documents:
How to Add MusicHow to Use Smart CategoriesIntroduction to Clockwheel Rotation
Before You Start
You need to decide what your station is all about, and how often you plan to play certain tracks, artists, jingles,and promos. For a little inspiration, visit Spacial's and ask other broadcasters how they made thoseForumkinds of decisions when they got started.
Organize your Music
Start by creating categories in SAM Broadcaster that make sense to you. We recommend category names thatpoint to a common attribute, like "Top 40," "Trance," or "Ambient."
Format Your Station
Now you have to decide how you're going to arrange your music.
For the sake of example, let's set up a Top 40 station. The idea is to play the latest hits more frequently thanolder music:
80s HitsTop 4090s HitsStation IDTop 4000s HitsTop 40OldiesStation ID
To do this, set up your schedule's logic as follows (read the " " Help Document for moreclockwheel rotationinformation):
80s Hits [Least Recently Played Artist]Top 40 [Weighted]90s Hits [Least Recently Played Artist]Station ID [Random, NoRules]

Top 40 [Weighted]00s Hits [Least Recently Played Artist]Top40 [Random]Oldies [Least Recently Played Artist]Station ID [Random, NoRules]
In this example, Top 40 songs are "Weighted," which means they're prioritized over other tracks so they'replayed more frequently. This kind of logic will evenly distribute your Top 40 tunes.
You'll also note that we marked that last Top 40 track as "Random" to avoid having tracks play in the sameorder each time (this sort of thing comes up with "Weighted" rotations).
We marked songs from the ‘80s, ‘90s, and ‘00s as "Least Recently Played Artists" to ensure a good musicalbalance.
We used "Random" logic for station identification because we only have a few files in this category. Inaddition, when there are only a few items in any given category, it's important to disable separation rules. If youdon't, SAM Broadcaster will not select Station IDs because it won't be able to find any that don't breakseparation rules.
This is part of the " " process. You can create many clockwheels and save them to file. Useclockwheel rotationthe Event Scheduler to create a new clockwheel for different parts of the day or week.
SAM Broadcaster - Tips & Tricks
How to Use Smart CategoriesPosted: 06/06/11
SAM Broadcaster has a set of default categories under "Content" and "Special" in the "Playlist" window. Wecall them "Smart Categories" because they group tracks based on a common feature.
When you right-click on a track, select "Song Info." In this window, under the "Info" tab and near the bottom,you'll notice that the file has a "Type." Here are the different types SAM Broadcaster can attribute to media files(you can also change the file type manually in this window):
S: Normal songI: Station IDP: PromoJ: JingleA: AdvertisementN: Syndicated newsV: InterviewsX: Sound FXC: Unknown content?: Unknown
So, for example, under Content > Music > Music (All), all the tracks found in this smart category should bemarked as Type "S" to indicate that they're all "Normal songs."
You'll find other smart categories under "Special," also in "Playlist." These include "Weighted Rotation,""Overlay," "Song Rights," and "Play Limit."
The categories under "Groups" in "Playlist" are read-only files. You also can't drag new items into thesecategories. However, they're ideal for locating tracks from a specific artist, title, year, genre, or album.
Smart Editing
What makes the smart categories so clever is their ability to edit data to match a category. For example, if youdrag and drop a normal music file into the "Sound FX" category, it will automatically change that song's settingto Type "X." In other words, you won't have to change the song's type in the "Song Info" window manually.You can even drag and drop multiple files into a smart category and change their settings in one quick motion.This applies to all smart categories except "Groups."
After you edit media files in "Song Info," hit F5 to refresh your smart categories.
SAM Broadcaster - Troubleshooting
Players Are StuckPosted: 06/06/11
If your players freeze or won't play a track when you load it onto the deck, your sound device may beimproperly configured.
To fix this, click on "Config" in the toolbar and select "Audio Mixer Pipeline." Then follow these steps:
Click the "Air Out" button, and an "Audio Settings" window will pop up.Under "Air output settings," select the proper "Output driver" from the drop-down menu.
This is usually "DirectSound" output.Even if this option is already selected as a default setting, select it manually from the drop-downmenu.
Also under "Air output settings," select the proper "Output device" from the drop-down menu.Even if this option is already selected as a default setting, select it manually from the drop-downmenu.
Click the "Apply now" button followed by "OK."
When using a USB device, always plug it into the same USB port before booting up your system. This willTip:allow your device driver details to remain consistent.
SAM Broadcaster - Troubleshooting
How to Find a TrackPosted: 06/06/11
Finding a track is one of SAM DJ's simplest functions.
To find a track, follow these steps:
Click on any window that contains tracks (e.g. Playlist, Tracks in selected category, Queue, History, etc.)Then either click on the search button (the magnifying glass icon) or simply start typing the artist's nameor track title.The search window will pop up right away and display matching results as you type.
You can customize some of the search options to generate more specific results. For example, you can check"Artist" to match your query to the artist field only.
Once you've located a given track, you can perform a number of tasks:
Right-click the track and select "Song info" to edit the metadata.Right-click the track and select "Remove" to delete it from your media library.Drag and drop the track into a queue or playlist category.Drag tracks into player decks.
Alternatively, you can find a track by clicking on the "Groups" category in the "Playlist" window. From here,select the group you want to use to narrow down your search, for example, "By Artist (A to Z)." You can thensee all the tracks available in that selection.
SAM DJ - Getting Started
Before You Install SAM DJPosted: 06/20/11
The first thing you need to do is make sure you're set up with these minimum system requirements:
Operating system: Windows XP, Vista, Windows 7CPU: 1 GHzMemory: 1 GBDisk space: 100 MBSound card: OptionalInternet: You'll need a solid Internet connection
Ideally, your system is set up with the following:
Operating system: Windows XP or Windows 7CPU: 2 GHzMemory: 2 GBDisk space: 100 MB + enough space for all the music filesSound card: Any high quality sound device; we recommend internal sound devices instead of externallyconnected USB devicesInternet: ADSL, cable or direct fiber Internet connection with enough capacity to broadcast your streamsto the stream hosting provider
Avoid running other tasks or processes simultaneously with SAM, including automated anti-virus scans. Thesecould hinder SAM DJ's real-time performance.
When you install SAM DJ, your firewall may request that you authorize SAM to open a port. If it does, makesure to allow it.
For best results, avoid using external or network-connected drives.
Recommended reading:
How to Install SAM DJ
SAM DJ - Getting Started
How to Install SAM DJPosted: 06/21/11
Download the 64-bit Edition if you're running Windows in 64-bit mode; otherwise choose the 32-bit Edition.
Once you've finished downloading SAM DJ, run the installer and follow the instructions.
After that's done, run SAM DJ to wrap up the installation process.
During the SAM DJ set-up:
Select a sound playback and recording device.Enter your registration key, if available.
This concludes the instructions on how to install SAM DJ. We recommend consulting the following helpdocuments to find out more about how to use SAM DJ:
How to Add MusicIntroduction to Clockwheel Rotation
SAM DJ - Getting Started
How to Add MusicPosted: 06/21/11
Adding music is the most vital part of using this software. It's also one of the easiest tasks.
There are two ways to add music. For starters, open SAM DJ. Once there, follow these steps:
Click on "Desktop A" from the toolbar.In the "Playlist" window, click on "Tracks." The available tracks will appear in the "Tracks in selectedcategory" window, immediately below./li>One way to add music is to click on the plus sign ("+"), then click on "Add Files" to browse your foldersand select music files.The other options let you add a directory (so you can place all your media files in a specific directory) oradd a playlist (so you can import existing M3U, PLS, or ASX files).Another way to add music is to drag files from Windows Explorer and drop them directly into the"Tracks in selected category" window.
To create a playlist, simply drag your tracks from the "Tracks in selected category" window and drop them intothe "Queue" window. To select more than one track at a time, hold down "Shift" or "Ctrl."
You can also right-click on a category name or on any track within that category to add those songs to a playlistyou'd like to create.
Recommended reading:
Introduction to Clockwheel RotationHow to Use Smart CategoriesHow to Organize and Schedule Music

SAM DJ - Getting Started
Introduction to Clockwheel RotationPosted: 06/21/11
Clockwheel rotation controls when songs are played to avoid randomly generated tracks and repetition.
Create Categories
The first step consists of organizing your music into specific categories. For example, a DJ who specializes indance music might use the categories "Trance," "House," and "Electroclash."
To create new categories, follow these steps:
Click on the "Categories" window on Desktop ARight-click on "Playlists"Select "New"Type a category name
Add music to these categories by dragging and dropping music files from Windows Explorer, from your"Queue," or even from other categories.
Configure Playlist Rules
Next, you need to configure playlist rules. To do this, click on "Config" in your toolbar, then select "Playlistrotation rules." In this window, you can decide how often an album, artist, title, or track should play. Note thatmore than one track can have the same title (e.g. "Believe" by Elton John vs. "Believe" by Cher).
To configure your playlist rules settings properly, make sure all the songs in your playlist contain valid songinformation. Also make sure these rules match your library's size. For example, if you set a rule to 1,000 hours,your library must have at least 1,000 hours or more of music.
You can also configure the number of songs you want to have in your queue. If ever there are fewer songs thanthe number specified in this rule, SAM DJ will automatically add another song to your queue.
We recommend leaving "Use ghost queue…" checked since it will cache the next song into its memory, soSAM DJ will load the next song faster.
Under "Playlist logic module," you'll find a selection of 3 built-in logic modules. We recommend the default"Clockwheel (Category Rotation) logic module" because it makes it easy to specify your station's format whenyou select songs from categories in a certain order. The "Weighted Playlist rotation logic module" assigns eachsong a "weight," which increases each time the song is requested, meaning popular songs will play more oftenthan unpopular ones. The "Web scripting–based logic module" will contact a website each time you want to usea song. So if you know PHP, ASP, or any other Web script, you can manage SAM DJ's playlist rotation logicaccording to your own script.
Build your Clockwheel
In the "Playlist rotation rules" window, select "Clockwheel Category Rotation logic module" and click
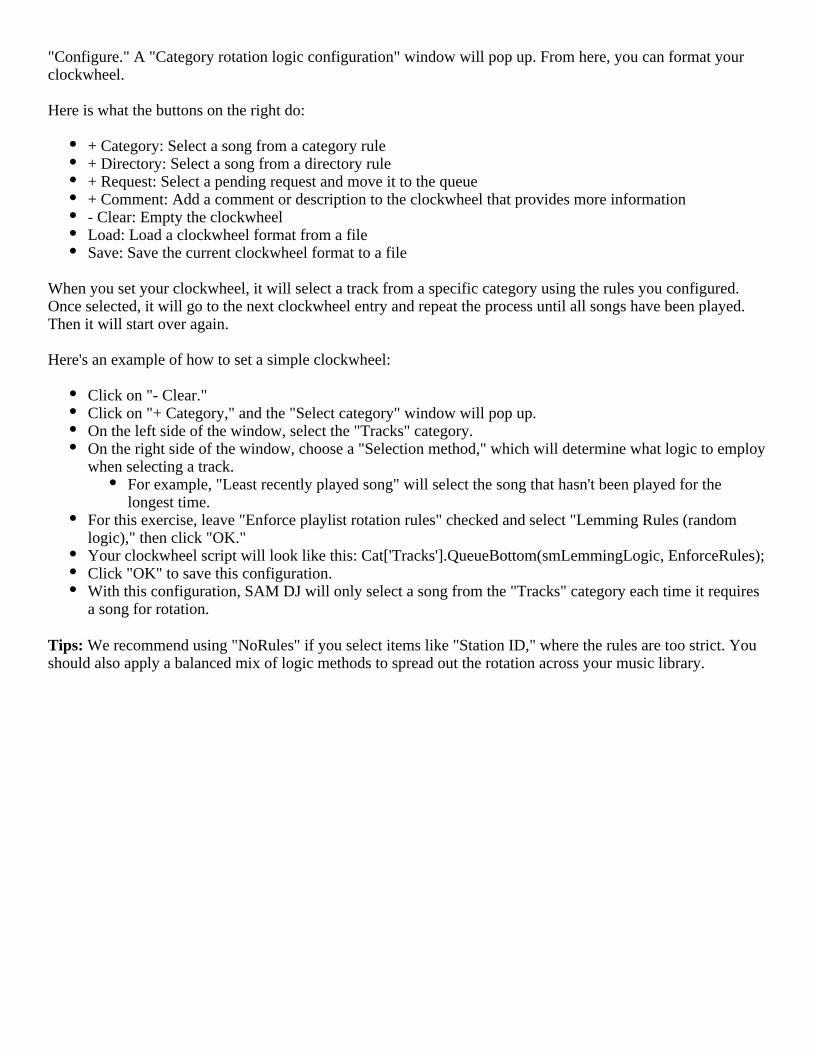
"Configure." A "Category rotation logic configuration" window will pop up. From here, you can format yourclockwheel.
Here is what the buttons on the right do:
+ Category: Select a song from a category rule+ Directory: Select a song from a directory rule+ Request: Select a pending request and move it to the queue+ Comment: Add a comment or description to the clockwheel that provides more information- Clear: Empty the clockwheelLoad: Load a clockwheel format from a fileSave: Save the current clockwheel format to a file
When you set your clockwheel, it will select a track from a specific category using the rules you configured.Once selected, it will go to the next clockwheel entry and repeat the process until all songs have been played.Then it will start over again.
Here's an example of how to set a simple clockwheel:
Click on "- Clear."Click on "+ Category," and the "Select category" window will pop up.On the left side of the window, select the "Tracks" category.On the right side of the window, choose a "Selection method," which will determine what logic to employwhen selecting a track.
For example, "Least recently played song" will select the song that hasn't been played for thelongest time.
For this exercise, leave "Enforce playlist rotation rules" checked and select "Lemming Rules (randomlogic)," then click "OK."Your clockwheel script will look like this: Cat['Tracks'].QueueBottom(smLemmingLogic, EnforceRules);Click "OK" to save this configuration.With this configuration, SAM DJ will only select a song from the "Tracks" category each time it requiresa song for rotation.
We recommend using "NoRules" if you select items like "Station ID," where the rules are too strict. YouTips:should also apply a balanced mix of logic methods to spread out the rotation across your music library.
SAM DJ - Tips & Tricks
How to Organize and Schedule MusicPosted: 06/22/11
The way you organize and schedule your music can really make you stand out as a DJ. Here, we'll cover thetechnical aspects of creating your mix.
First, we recommend reading the following Help Documents:
How to Add MusicHow to Use Smart CategoriesIntroduction to Clockwheel Rotation
Before You Start
You need to already have an idea in your head of the kind of music you want to play and how well the tracksyou want to play will mix with each other. For a little inspiration, visit Spacial's and ask other DJs howForumthey made those kinds of decisions when they got started.
Organize Your Music
Start by creating categories in SAM DJ that make sense to you. We recommend category names that point to acommon attribute, like “Hits,” “Electronica,” or “Reggae.”
Once you’ve created the categories you want, drag and drop media files into these categories. It doesn’t matterif the same file gets dropped into multiple categories.
Format Your Playlist
Now you have to decide how you're going to arrange your music.
For the sake of example, let's pretend you're DJing an event where your audience expects to hear hits from thenand now:
80s HitsTop 4090s Hits00s HitsOldies
To do this, set up your schedule's logic as follows (read the Help Document for more"clockwheel rotation"information):
80s Hits [Least Recently Played Artist]Top 40 [Weighted]90s Hits [Least Recently Played Artist]Station ID [Random, NoRules]Top 40 [Weighted]
00s Hits [Least Recently Played Artist]Top40 [Random]Oldies [Least Recently Played Artist]Station ID [Random, NoRules]
In this example, Top 40 songs are "Weighted," which means they're prioritized over other tracks so they'replayed more frequently. This kind of logic will evenly distribute your Top 40 tunes.
You'll also note that we marked that last Top 40 track as "Random" to avoid having tracks play in the sameorder each time (this sort of thing comes up with "Weighted" rotations).
We marked songs from the ‘80s, ‘90s, and ‘00s as "Least Recently Played Artists" to ensure a good musicalbalance.
We used "Random" logic for station identification because we only have a few files in this category. Inaddition, when there are only a few items in any given category, it's important to disable separation rules. If youdon't, SAM DJ will not select Station IDs because it won't be able to find any that don't break separation rules.
This is part of the process. You can create many clockwheels and save them to file. Use"clockwheel rotation"the Event Scheduler to create a new clockwheel for different parts of the day or week.
SAM DJ - Tips & Tricks
How to Use Smart CategoriesPosted: 06/21/11
SAM DJ has a set of default categories under "Content" and "Special" in the "Playlist" window. We call them"Smart Categories" because they group tracks based on a common feature.
When you right-click on a track, select "Song Info." In this window, under the "Info" tab and near the bottom,you'll notice that the file has a "Type." Here are the different types SAM DJ can attribute to media files (youcan also change the file type manually in this window):
S: Normal songK: KaraokeI: Station IDP: PromoJ: JingleA: AdvertisementN: Syndicated newsV: InterviewsX: Sound FXC: Unknown content?: Unknown
So, for example, under Content > Music > Music (All), all the tracks found in this smart category should bemarked as Type "S" to indicate that they're all "Normal songs."
You'll find other smart categories under "Special," also in "Playlist." These include "Weighted Rotation" and"Play Limit."
The categories under "Groups" in "Playlist" are read-only files. You also can't drag new items into thesecategories. However, they're ideal for locating tracks from a specific artist, title, year, genre, or album.
Smart Editing
What makes the smart categories so clever is their ability to edit data to match a category. For example, if youdrag and drop a normal music file into the "Sound FX" category, it will automatically change that song's settingto Type "X." In other words, you won't have to change the song's type in the "Song Info" window manually.You can even drag and drop multiple files into a smart category and change their settings in one quick motion.This applies to all smart categories except "Groups."
After you edit media files in "Song Info," hit F5 to refresh your smart categories.
Recommended reading:
How to Add MusicIntroduction to Clockwheel RotationHow to Organize and Schedule Music
SAM DJ - Troubleshooting
Players Are StuckPosted: 06/22/11
If your players freeze or won't play a track when you load it onto the deck, your sound device may beimproperly configured.
To fix this, click on "Config" in the toolbar and select "Audio Mixer Pipeline." Then follow these steps:
Click the "Air Out" button, and an "Audio Settings" window will pop up.Under "Air output settings," select the proper "Output driver" from the drop-down menu.
This is usually "DirectSound output."Even if this option is already selected as a default setting, select it manually from the drop-downmenu.
Also under "Air output settings," select the proper "Output device" from the drop-down menu.Even if this option is already selected as a default setting, select it manually from the drop-downmenu.
Click the "Apply now" button followed by "OK."
Tip: When using a USB device, always plug it into the same USB port before booting up your system. This willallow your device driver details to remain consistent.
SAM DJ - Troubleshooting
How to Find a TrackPosted: 06/22/11
Finding a track is one of SAM DJ's simplest functions.
To find a track, follow these steps:
Click on any window that contains tracks (e.g. Playlist, Tracks in selected category, Queue, History, etc.)Then either click on the search button (the magnifying glass icon) or simply start typing the artist's nameor track title.The search window will pop up right away and display matching results as you type.
You can customize some of the search options to generate more specific results. For example, you can check"Artist" to match your query to the artist field only.
Once you've located a given track, you can perform a number of tasks:
Right-click the track and select "Song info" to edit the metadata.Right-click the track and select "Remove" to delete it from your media library.Drag and drop the track into a queue or playlist category.Drag tracks into player decks.
Alternatively, you can find a track by clicking on the "Groups" category in the "Playlist" window. From here,select the group you want to use to narrow down your search, for example, "By Artist (A to Z)." You can thensee all the tracks available in that selection.
SAM Cast - Getting Started
Before You Install SAM CastPosted: 06/20/11
The first thing you need to do is make sure you're set up with these minimum system requirements:
Operating system: Windows XP, Vista, Windows 7CPU: 1 GHzMemory: 1 GBDisk space: 100 MBSound card: RequiredInternet: You'll need a solid Internet connection
Ideally, your system is set up with the following:
Operating system: Windows XP or Windows 7CPU: 2 GHzMemory: 2 GBDisk space: 100 MBSound card: Any high quality sound device; we recommend internal sound devices instead of externallyconnected USB devicesInternet: ADSL, cable or direct fiber Internet connection with enough capacity to broadcast your streamsto the stream hosting provider
Avoid running other tasks or processes simultaneously with SAM, including automated anti-virus scans. Thesecould hinder SAM Cast's real-time performance.
When you install SAM Cast, your firewall may request that you authorize SAM to open a port. If it does, makesure to allow it.
SAM Cast - Getting Started
How to Configure Your General SettingsPosted: 06/21/11
Once you’ve launched the SAM Cast program, click on “Settings” from the top menu. A window will then popup. All of the following settings fall under “General options.”
If you check "Automatically start on load," SAM Cast will start capturing sound and streaming it automaticallyas soon as you launch the program. If you leave this option unchecked, SAM Cast will only capture sound andstream it when you click on the big blue "Start" button.
In the drop-down menu below "Capture sound from device," select the sound device you want to capture audiofrom. This could be a sound card that's already installed on your PC, a USB microphone, or an external USBdevice, like a mixer.
If you check "Send final audio output to sound card," the final audio mix will be played back on the device youselect from the drop-down menu. It also means you'll be able to preview your stream's audio levels withouttuning into the stream itself.
We recommend tuning into your stream as well, since the encoder will compress the audio.If you hear an echo, you need to either send the audio to another device or simply uncheck this option todisable it altogether.
If you check "Save log to file," it'll save important log information to a specific file location.
We recommend checking this option for debugging purposes.The field below this option lets you locate and name the file.Just below this, you can set a maximum log size. Once the audio mix reaches its maximum capacity, itwill be deleted and a new log file will be created.
Recommended reading:
How to Configure Your Sound Device
SAM Cast - Getting Started
How to Configure Your Sound Capture DevicePosted: 06/21/11
This is the most important setting to configure since SAM Cast receives its audio from your sound capturedevice. A sound capture device could be a sound card that’s already installed on your computer, a USBmicrophone, or an external USB device like a mixer.
Each version of Windows requires slightly different settings, which we’ll take you through.
Windows 7
Click on the Windows button at the bottom left corner of your screen. Click on “Control Panel,” then on the“Sounds” icon. Alternatively, you could also type “Manage audio devices” into the Windows search box toinstantly locate this function.
From here, select the “Recording” tab. You’ll then see all the available sound capture devices on yourcomputer. SAM Cast can capture audio from all of these. Double-click the device you want SAM Cast tocapture audio from.
If the device you’re looking for isn’t here, right-click the window and select “Show Disabled Devices” from thepop-up menu. Right-click on the disabled device to enable it.
When you double-click on the device you want SAM Cast to use, a new window will pop up. From here, selectthe “Listen” tab and check the “Listen to this device” option if you want to hear what your microphone capturesthrough your speakers. Make sure to select the correct device for playback under “Playback through thisdevice.”
Under the “Levels” tab, make sure the sound device is not set on mute and that the volume is loud enough torecord.
Note that you can also output your SAM Cast audio to a sound device. Read more about this in "How toConfigure Your General Settings."
Windows Vista
Click on the “Windows” button at the bottom left corner of your screen, then click on “Control Panel.” If theControl Panel is in “Classic View” mode, click on the “Sound” applet, then select the “Recording” tab.
From here, you’ll be able to see all the available sound capture devices on your computer. SAM Cast cancapture audio from all of these. Double-click the device you want SAM Cast to capture audio from.
If the device you’re looking for isn’t here, right-click the window and select “Show Disabled Devices” from thepop-up menu. Right-click on the disabled device to enable it.
Depending on your device, there could be more tabs with configuration options. Review these options to see ifyou need to adjust any of them.
Under the “Levels” tab, make sure the sound device is not set on mute and that the volume is loud enough torecord.
Windows XP
Click on the “Start” button at the bottom left corner of your screen, then click on “Control Panel.” If you are in“Category view mode,” click on “Sound, Speech, and Audio Devices,” then select the “Sounds and AudioDevices” option. If the Control Panel is in “Classic View” mode, click on the “Sounds and Audio Devices”applet. This will bring up the “Sound and Audio Devices Properties” window.
From here, select the “Audio” tab. Under “Sound recording,” select the sound device you want SAM Cast toinput audio on. Then click on the “Volume” button to bring up the device’s recording volume controls.Depending on your device, you may be able to adjust the volume on one or more controls. Adjust the applicablecontrols accordingly.
Not all volume controls are visible by default. To view all available volume controls, go to the “Options” menuand select “Properties.” Select the “Recording” option, then select all the volume controls you want to see.Adjust these volume controls if required.
Recommended reading:
How to Configure Your General SettingsHow to Capture Audio from Your Speakers
SAM Cast - Getting Started
How to Set Up Your Windows Media (WMA)EncoderPosted: 06/21/11
The WMA encoder is popular because any computer operating system from Windows XP or higher will comeequipped with a Windows Media Player. WMA also works nicely with Microsoft Silverlight.
Before you start, you must retrieve server details from your SpacialNet account. For the sake of example, let’ssay you’ve signed up for a Windows Media hosting account through SpacialNet.
Log into SpacialNet.Under “Hosting” in the left menu, click on “Stream hosting.”Click on “View” next to your account.Either leave this page open or copy it so you can use it when setting up your WMA encoder.
To set up your WMA encoder, open SAM Cast and follow these steps:
Click on the “Encoders” button at the bottom left corner.In the “Encoders” window, click the plus sign (“+”) to add a new encoder.Select “WMA (v9 advanced [ROBUST])” from the list.Click “OK.”
The WMA (v9 advanced [ROBUST]) encoder window will then appear.
In the “Profile” tab:
Select the streaming profile that applies to you.To avoid a failed connection, select a profile that will stream at a bitrate that’s less than or equal towhat you signed up for on SpacialNet. For example, if you signed up for a 64kbps stream, yourprofile must stream at 64 kbps or lower.Make sure your bandwidth can support your streaming bitrate. The combined bitrate of all yourstreams should never exceed 80% of the value of the upload speed reported byspeedtest.net
In the “Stream Options” tab:
Check “Auto start encoder after” if you want the encoder to start automatically each time you launchSAM Cast. If you check this option, make sure to specify how many seconds you want to elapse beforethe encoder starts.Select “Use PULL distribution” if you’re experienced with setting up routers, and “Use PUSHdistribution” if you’re not.Make sure you have your SpacialNet.com streaming settings handy for the following steps.Under “Media server host/IP,” fill in your server details. Your server IP should be something likewm6.spacialnet.com.Under “Publishing Point,” use the same “Alias” you provided on your SpacialNet account.Leave the space under “Template publishing point” blank.Type in your username and password under “Authentication.”

Check “Auto reconnect encoder after” under “Error recovery” so SAM Cast can recover from networkerrors.
In the “Scripting” tab:
Note that the default settings will ensure compatibility with AudioRealm players.You can also fill in the details to customize how your metadata shows up in your stream.
In the “Stream Archive” tab:
Check “Save stream to file” if you want to save a copy of your stream to your local hard drive.
Once you’ve configured all your settings, click “OK” to close the WMA (v9 advanced [ROBUST]) encoderwindow. Now click on “Start” to start the encoder. If everything is configured correctly, the report will showthat SAM Cast is actively encoding and streaming.
Recommended reading:
How to Set Up Windows Media Statistic RelaysHow to Set Up Your AAC EncoderHow to Set Up Your MP3 Encoder
SAM Cast - Getting Started
How to Set Up Your AAC Encoder withSHOUTcastPosted: 06/21/11
There are many advantages to setting up an AAC encoder. For one, it has the best sound quality at a lowerbitrate, so it'll save on streaming costs. It's also supported by Flash, Microsoft Silverlight, and a wide range ofmobile devices, giving your listeners different options for tuning in.
Before you start, you must retrieve server details from your SpacialNet account. For the sake of example, let'ssay you've signed up for a SHOUTcast hosting account through SpacialNet.
Log into SpacialNet.Under "Hosting" in the left menu, click on "Stream hosting."Click on "View" next to your account.Either leave this page open or copy it so you can use it when setting up your AAC encoder.
To set up your AAC encoder, open SAM Cast and follow these steps:
Click on the "Encoders" button at the bottom left corner.In the "Encoders" window, click the plus sign ("+") to add a new encoder.Select "aacPlusV2."Click "OK."
The aacPlusV2 encoder window will then appear.
In the "Converter" tab:
Under "Output format settings," select your bitrate using the drop-down menu under "Format."Selecting an AAC bitrate with "Parametric stereo" provides the best low bitrate/sound quality ratio.To avoid having your streaming service suspended, select a profile that will stream at a bitratethat's less than or equal to what you signed up for on SpacialNet. For example, if you signed up fora 64 kbps stream, your profile must stream at 64 kbps or lower.Make sure your bandwidth can support your streaming bitrate. The combined bitrate of all yourstreams should never exceed 80% of the value of the upload speed reported by .speedtest.net
Under "General options," check "Auto start encoder after" if you want the encoder to start automaticallyeach time you launch SAM Cast. If you check this option, make sure to specify how many seconds youwant to elapse before the encoder starts.Under "General options," leave "Auto reconnect encoder after" checked so SAM Cast can recover fromnetwork errors.
In the "Server Details" tab:
Select the server you want to send your AAC file stream to. You have the choice between SHOUTcast(versions 1 and 2), IceCast, or no server.We recommend selecting the "SHOUTcast" server to reach a broader audience.If you select "No server," the encoder will archive your audio content without streaming it.

Fill in your server and radio station details:Your "Server IP" should be something like sc6.spacialnet.com.You can find your "Server Port" in your SpacialNet account details. For SHOUTcast 2, this isnormally port 80.Use your SpacialNet password.In "Station Details," write your radio station's name, select a genre from the drop-down menu, andprovide your website's URL.The "AIM," "ICQ," and "IRC Channel" fields are optional.We recommend checking "List on public station listing" to include your station in the SHOUTcastdirectory.You may leave "Enable title streaming" checked to stream song information.We recommend keeping the "Caption template" default setting ("$combine$").
If you select SHOUTcast 2, you will have to provide a valid SID.
In the "Stream Archive" tab:
Check "Save stream to file" if you want to save a copy of your stream to your local hard drive.
Once you've configured all your settings, click "OK" to close the aacPlusV2 encoder window. Now click on"Start" to start the encoder. If everything is configured correctly, the report will show that SAM Cast is activelyencoding and streaming.
Recommended reading:
How to Set Up Your Windows Media EncoderHow to Set Up SHOUTcast Statistic Relays
SAM Cast - Getting Started
How To Set Up Your MP3 Encoder withSHOUTCastPosted: 06/21/11
MP3 is one of the oldest streaming formats, which means it's compatible with most players on most software,sound devices, and browsers. Its low-bitrate sound quality isn't as good as, say, AAC format, but MP3 is verypopular.
Before you start, you must retrieve server details from your SpacialNet account. For the sake of example, let'ssay you've signed up for a SHOUTcast hosting account through SpacialNet.
Log into SpacialNet.Under "Hosting" in the left menu, click on "Stream hosting."Click on "View" next to your account.Either leave this page open or copy it so you can use it when setting up your MP3 encoder.
To set up your MP3 encoder, open SAM Cast and follow these steps:
Click on the "Encoders" button at the bottom left corner.In the "Encoders" window, click the plus sign ("+") to add a new encoder.Select "MP3 (LAME_ENC)."Click "OK."
The MP3 (LAME) encoder window will then appear.
In the "Converter" tab:
Set your "Bitrate" under "Setting." The bitrate is the amount of bandwidth used by a single stream. Thehigher the bitrate, the better the sound quality. However, a higher bitrate also costs more and will requiremore bandwidth. For a good cost/quality ratio, we recommend 64 kbps.
To avoid having your streaming service suspended, select a profile that will stream at a bitratethat's less than or equal to what you signed up for on SpacialNet. For example, if you signed up fora 64 kbps stream, your profile must stream at 64 kbps or lower.Make sure your bandwidth can support your streaming bitrate. The combined bitrate of all yourstreams should never exceed 80% of the value of the upload speed reported by .speedtest.net
Set your "Mode" under "Setting."For bitrates higher than 48 kbps, select "Stereo."For bitrates lower than 48 kbps, select "Mono."Select "Joint stereo" for optimized stereo compression.Select "Dual channel" if you have different audio content (for example, in different languages) oneach channel.
There are several "Sampling rate" options to choose from. Selecting "Auto" means the encoder willautomatically select the best sampling rate for your chosen bitrate.Under "General options," check "Auto start encoder after" if you want the encoder to start automaticallyeach time you launch SAM Cast. If you check this option, make sure to specify how many seconds youwant to elapse before the encoder starts.
Under "General options," leave "Auto reconnect encoder after" checked so SAM Cast can recover fromnetwork errors.Under "General options," leave "Allow scripts in stream" unchecked, since modern players don't use thisfeature.
In the "Server Details" tab:
Select the server you want to send your MP3 file stream to. You have the choice between SHOUTcast(versions 1 and 2), Live365, IceCast, or no server.We recommend selecting the "SHOUTcast" server to reach a broader audience.If you select "No server," the encoder will archive your audio content without streaming it.Fill in your server and radio station details.
Your "Server IP" should be something like sc6.spacialnet.com.You can find your "Server Port" in your SpacialNet account details. For SHOUTcast 2, this isusually port 80.Use your SpacialNet password.In "Station Details," write your radio station's name, select a genre from the drop-down menu, andprovide your website's URL.The "AIM," "ICQ," and "IRC Channel" fields are optional.We recommend checking "List on public station listing" to include your station in the SHOUTcastdirectory.You may leave "Enable title streaming" checked to stream song information.We recommend keeping the "Caption template" default setting ("$combine$").
If you select SHOUTcast 2, you will have to provide a valid SID.
In the "Stream Archive" tab:
Check "Save stream to file" if you want to save a copy of your stream to your local hard drive.
Once you've configured all your settings, click "OK" to close the MP3 (LAME) encoder window. Now click on"Start" to start the encoder. If everything is configured correctly, the report will show that SAM Cast is activelyencoding and streaming.
Recommended reading:
How to Set Up SHOUTcast Statistic RelaysHow to Set Up Your AAC Encoder with SHOUTcastHow to Set Up Your Windows Media Encoder
SAM Cast - Getting Started
How to Set Up SHOUTcast Statistic RelaysPosted: 06/21/11
Setting up a statistic relay for SHOUTcast will let you know how many listeners you have on the SHOUTcastserver at any given time.
Before you start, you must retrieve server details from your SpacialNet account.
Log into SpacialNet.Under "Hosting" in the left menu, click on "Stream hosting."Click on "View" next to your account.Either leave this page open or copy it so you can use it when setting up your SHOUTcast statistic relay.
To set up statistic relays for SHOUTcast, open SAM Cast and follow these steps:
Click on the "Statistics" button at the bottom center.In the "Statistics" window, click the plus sign ("+") to add a new relay.Select "SHOUTcast statistic relay" from the list.Click "OK."
The SHOUTcast server details window will appear. In it, enter the following details:
In the "Host" field, type your DNS name or IP address, for example, "sc6.spacialnet.com" if your streamhosting account is with SpacialNet.In the "Port" field, type "80" for SHOUTcast 2 hosting.
Otherwise, type the port number indicated in your SpacialNet account.In the "Password" field, type the password from your stream hosting account.Leave the SID field at zero if you are using SHOUTcast 1.0, otherwise enter the SID as indicated in yourstream hosting account.To select the "Color on graph," click on the color box, and a color selection window will appear. In it,select the color you want to use to represent this particular statistic on your relays graph.We recommend leaving "Private statistic relay" unchecked, since "Public" relays get listed onAudioRealm.com.Click "OK."
Your SHOUTcast statistic relay is now configured.
Click on the large "refresh" button to force the relays to immediately update their statistics. The display shouldtake a few seconds to update. If everything is configured correctly, the status message should read "Active(OK)." If the status message reads "Inactive (No encoder connected to server)," it means your statistic relay isconfigured correctly, but no encoder is actively streaming to the server.
Recommended reading:
How to Set Up your MP3 Encoder with SHOUTcastHow to Set Up your AAC Encoder with SHOUTcastHow to Set Up your Windows Media Encoder

How to Set Up Windows Media Statistic Relays
SAM Cast - Getting Started
How to Set Up Windows Media Statistic RelaysPosted: 06/21/11
Setting up a statistic relay for Windows Media (WMA) will let you know how many listeners you have on theWMA server at any given time.
Before you start, you must retrieve server details from your SpacialNet account.
Log into SpacialNet.Under "Hosting" in the left menu, click on "Stream hosting."Click on "View" next to your account.Either leave this page open or copy it so you can use it when setting up your WMA statistic relay.
To set up statistic relays for WMA, open SAM Cast and follow these steps:
Click on the "Statistics" button at the bottom center.In the "Statistics" window, click the plus sign ("+") to add a new relay.Select "MediaPoint Manager statistic relay" from the list.Click "OK."
The WMA "MediaPoint Manager" server details window will appear. In it, enter the following details:
In the "Host" field, type your DNS name or IP address, in this case, "wm1.spacialnet.com."In the "MPM Port" field, type 8008.In the "Username" field, type your SpacialNet username.In the "Password" field, type your SpacialNet or WMA password.In the "Alias" field, click on the dropdown menu to select from the list of aliases. Select the alias youwant to grab your statistic from.To select the "Color on graph," click on the color box, and a color selection window will appear. In it,select the color you want to use to represent this particular statistic on your relays graph.We recommend leaving "Private statistic relay" unchecked, since "Public" relays get listed onAudioRealm.com.Click "OK."
Your WMA statistic relay is now configured.
Click on the large "refresh" button to force the relays to immediately update their statistics. The display shouldtake a few seconds to update. If everything is configured correctly, the status message should read "Active(OK)." If the status message reads "Inactive (No encoder connected to server)," it means your statistic relay isconfigured correctly, but no encoder is actively streaming to the server.
Recommended reading:
How to Set Up Your Windows Media EncoderHow to Set Up SHOUTcast Statistic Relays
SAM Cast - Getting Started
Introduction to SAM Cast Sound ProcessingFeaturesPosted: 06/21/11
SAM Cast’s built-in sound processing features give your audio broadcast that professional feel. To access them,launch SAM Cast and click on the “Sound Processing” button at the bottom right corner.
Equalizer
In the “Equalizer” tab, you can tweak your audio levels by adjusting the frequency bands. Click on the“Enabled” button to turn the equalizer on. Try some of the presets from the drop-down menu. They’re designedto provide ideal audio levels for specific types of music, like classical, reggae, rock, and so forth.
AGC
In the “AGC” tab, you’ll find a slew of advanced audio processing features. These include:
Gated AGC (Average Gain Control)Stereo expanderBass EQ5-band processorDual-band processorClipper
Make sure the “Bypass all” button near the top left is disabled to activate these sound processing features. Youcan also test it out by turning it off to hear the difference.
The 5-band processor takes a lot more CPU power than the dual-band. We only recommend using the 5-bandprocessor if you have a lot of CPU power. Do not run the dual- and 5-band processors simultaneously, since thiswill over-process the audio.
To try some of Spacial’s built-in presets, click the “Load preset” button.
Once your AGC is adjusted to your liking, be sure to save your settings as a preset file so you can select themlater, if needed.
DSP
In the “DSP” tab, you can add DSP plugins to the audio pipeline. This is ideal if the built-in AGC is not to yourliking or if you want to do any additional audio processing. SAM Cast supports Winamp DSP plugins. You candownload these DSP plugins from the and install them in the SAM Cast plugins folder,Winamp website usually located in c:program filesSpacialSAMCastplugins
Not all DSP plugins will function in SAM Cast. Some of them are dependent on the Winamp API, which SAMCast only partially mimics. Certain badly developed DSP plugins can also cause instability issues. Use DSPplugins at your own risk.
Sound Card AGC
Certain sound cards can process audio through a dedicated CPU on the device. Such devices include the OrbanOptimod 1100 and E-MU 0404/E-MU 1212 sound cards.
SAM Cast can capture the original audio, send it to the sound card to process, and capture the final processedaudio from the sound card again.
To set up your sound card, click the “Use Sound Card AGC” button in the “Sound Card AGC” tab. In the “In”box, select the device that will perform the audio processing. In the “Out” box, select the device that capturesprocessed audio.
If you hear an echo, you either did not select the correct device or your sound card does not support soundprocessing.
Recommended reading:
How to Configure Your Sound Capture DeviceHow to Configure Your General Settings

SAM Cast - Tips & Tricks
How to Capture Audio from Your SpeakersPosted: 06/21/11
With SAM Cast, people often want to broadcast what they hear over their speakers. For example, if you have amedia player that plays audio over your sound card, you might want to stream it.
To do this, the first thing you have to do is disable all Windows sounds. Any audio being played over yoursound card will be broadcast, so make sure the audio being sent to the sound card is what you want tobroadcast.
There are 3 possible ways of setting this up.
Method 1
Most sound devices can let you record everything that's being played over your sound card. This usually showsup as a volume control (Windows XP) or as an audio recording device (Windows Vista and Windows 7).
Make sure the appropriate input device is selected, not muted, and that the volume is loud enough. Dependingon your sound device, the volume controls may be called:
What-u-hearWave-MixStereo-MixRec. Playback
Each device has its own name for this function. Some sound cards can't capture what's playing on the playbackdevice. If that's the case for you, try one of the next 2 methods.
Method 2
You'll need a physical audio cable. Plug a regular audio jack into the output of the sound device that plays theaudio, and plug the other end of the cable into the sound device's line-in. SAM Cast will capture the audio fromthe line-in.
Method 3
Use a program called "Virtual Audio Cables" (VAC). This creates a virtual sound device on your computer.You can play the audio into this virtual device, which will redirect the audio to a virtual sound capture device.SAM Cast will then capture the audio from this virtual sound capture device.
Visit the VAC or go for more information. There are also some on using VACs.website here video tutorials
Recommended reading:
How to Configure Your Sound Capture DeviceHow to Configure Your General Settings
SAM Cast - Tips & Tricks
How to Send Artist, Title and Song Metadata to thePlayerPosted: 06/21/11
One of SAM Cast's greatest features is its ability to update the metadata of live audio and log it to a history file,while also embedding it to the broadcast stream. In other words, your player will show what's playing inreal-time. This data will also be displayed on radio directories like AudioRealm.com and SHOUTcast.com.
Where the information comes from
Usually, metadata is available from your playback or automation system. It can read metadata from the mediasource files and export it in real-time. If you are broadcasting a live show, there are no media source files withmetadata to use. In such a case, you can still manually update the metadata with the HTTP event adaptor.
HTTP, TCP or Serial
When using an automation system like SAM Broadcaster, it will export metadata over a TCP networkconnection, an HTTP network connection or a linked serial cable.
HTTP Event Adaptor
When you launch SAM Cast, click on "Settings." Go to "Event Adaptors" and select "HTTP Event adaptor." Setthe port to 8181 then click "OK." Stop SAM Cast if it's running and start it again so it will use the new eventadaptor settings.
Open up your favorite browser (FireFox, Chrome or Internet Explorer) and copy and paste this into the URLfield:http://localhost:8181/?artist=myartist&title=mytitle&songtype=S&duration=240000
Something like "OK 2:09:21 AM" should appear.
Now check the SAM Cast event log. It should look something like this:2011-01-26 13:35:26> Song change: myartist - mytitle (4:00)
In this example, we provided the artist, title, songtype and duration fields. You should always provide theserecommended fields as a bare minimum. Note that the duration is in milliseconds (1 second = 1000milliseconds).
In this next example, we created an HTML page that makes it easy to manually update your metadata viaHTTP. This file is located in your local scripts folder.
Go to Windows Start>All Program>SAM Cast>Utils and click on "DATA-Folder." This will open WindowsExplorer in the SAM Cast data directory. Then browse the "scripts" folder.
Open the "http-update.html" file in your Internet browser. Fill in the fields and click "submit."

Note how this page automatically "URL encodes" the data. For example, type in "Jane & Joe" into the artistfield and click "submit." See the URL in the browser? The HTTP protocol requires parameters in the URL to beproperly formatted.
You can set the following fields:artist, title, duration, songtype, album, buycd, website, picture, filename, trackno, albumyear, composer, ISRC,label, copyright
Serial (Scripted) Event Adaptor
Most automation systems used by radio stations have the ability to output what is currently playing via anull-modem serial cable connected to the COM ports of the computer running the automation system, and to theother computer running SAM Cast.
To configure SAM Cast to accept metadata from a serial cable, go to Settings>Event Adaptors and select"Serial (Scripted)."
In the "Serial Adaptor" tab, adjust the serial settings. This includes the COM port, Parity, Databits, Baudrate,Flowcontrol and Stop bits. Make sure your SAM Cast settings match those of your automation system exactly.
During script development, we highly recommend enabling the "Enable RAW debug output" setting. This willwrite all data received over the serial cable to the log, including HEX values for the characters. This is great tospot those invisible characters like Linefeed, Carriage return, Tab, etc.
Now go to the "Script" tab. This is where you write a mini-script that processes the input data and fills in themetadata object. Once the data is parsed out, the script can trigger a song change event that will apply to themetadata. See "Script Development" below for more details.
TCP (Scripted) Event Adaptor
This event adaptor listens for incoming data connections on the specified port. One or more TCP clients canthen connect to SAM Cast and send metadata.
During script development, we highly recommend enabling the "Enable RAW debug output" setting. This willwrite all data received over the serial cable to the log, including HEX values for the characters. This is great tospot those invisible characters like Linefeed, Carriage return, Tab, etc.
Now go to the "Script" tab. There is where you write a mini-script that processes the input data and fills in themetadata object. Once the data is parsed out, the script can trigger a song change that will be applied to themetadata. See "Script Development" below for more details.
TCP Client (Scripted) Event Adaptor
This event adaptor connects to a TCP server—in most cases, the automation system—on the specified hostaddress and port. It will then wait for the server to send data over the TCP client connection. If the connection islost, the TCP client will try to reconnect to the server every 15 seconds.
During script development, we highly recommend enabling the "Enable RAW debug output" setting. This willwrite all data received over the serial cable to the log, including HEX values for the characters. This is great tospot those invisible characters like Linefeed, Carriage return, Tab, etc.
Now go to the "Script" tab. There is where you write a mini-script that processes the input data and fills in themetadata object. Once the data is parsed out, the script can trigger a song change that will be applied to the

1.
2. 3.
4.
metadata. See "Script Development" below for more details.
Script Development
Scripts can be written in Jscript or VBScript. The examples we provide are in VBScript. All scripts shouldcontain a "HandleLine" function, which is contacted each time SAM Cast receives new data. The data needs tobe processed, then values need to be assigned to the "SongInfo" field. Once this is done, make contact"SongInfo.DoSongChange()" to trigger the metadata update.
The best way to learn is to look over the following script samples. We recommend you review them in thisorder:
vb.hello_world.txtvb.static_update.txtvb.simple_parser.txtvb.library.txtvb.audiovault_example.txt
vb.library.txt is especially useful. It contains code snippets that will help you deal with most of the stringprocessing scenarios you may encounter.
Debugging scripts
Capture data from source: Enable the "Enable RAW debug output" setting and run the automation systemfor a while so you can capture a good sample of input data lines. Don't worry about script errors for now.We're only interested in capturing the data.Switch to the TCP (Scripted) event adaptor and run the TCP Sender application.Now use the TCP Sender utility to mimic the data you captured in SAM Cast by sending it directly toSAM Cast, again via the TCP Sender utility. This allows you to debug and test your scripts withouthaving to wait for the on-air automation system to send out events. This can greatly speed up scriptdevelopment.Once your script is developed and tested, switch back to the appropriate event adaptor and make sure itworks with the automation system as intended. Repeat steps 1 to 3 if it doesn't work.
SAM Cast - Troubleshooting
How to Deal with the "Unable to create recordhandle" ErrorPosted: 06/21/11
If you get this error message, it means SAM Cast is unable to capture audio from the sound device. To fix this,make sure you have selected the right device under Settings>General options.
Make sure the device is plugged in, enabled, and functioning properly. You should also check to see if anyother application is currently recording audio from your device. This could be causing the problem as well.
Recommended reading:
How to Configure Your Sound Capture DeviceHow to Prevent Streaming SilenceHow to Capture Audio from Your Speakers
SAM Cast - Troubleshooting
How to Prevent Streaming SilencePosted: 06/21/11
If you find you're streaming silence, it's likely you selected the wrong sound capture device in Settings>Generaloptions. It's also possible that you haven't enabled the correct volume control in your sound deviceconfigurations. All of this is covered in " ."How to Configure Your Sound Capture Device
A sound device may have a line-in, microphone and other inputs, but on certain devices, only one can be activeat a time. You have to make sure the right ones are activated, not muted, and that the volume level is loudenough.
Disable your "Sound Processing" settings in the Equalizer, AGC, DSP and SoundCard AGC tabs to make surenone of them are causing the silent stream.
You can tell that you're capturing silence on the input when the VU meter on the main SAM Cast windowdoesn't move. However, if it is moving and the VU meters on the encoders aren't, something on the soundprocessing panel was probably incorrectly configured.
Recommended reading:
How to Configure Your Sound Capture DeviceHow to Remove an Echo from Your StreamHow to Capture Audio from Your Speakers

SAM Cast - Troubleshooting
How to Remove an Echo from Your StreamPosted: 06/21/11
In the Sound Processing window, disable your Sound Card AGC settings if they've been configured. If the echogoes away, you either have not configured your sound device correctly or your sound card does not supportAGC processing.
Under Settings->General options, disable the "Send final audio to sound card" option.
Also check to make sure your sound device is not configured to send all incoming recorded audio to anotherplayback device.
Recommended reading:
How to Configure Your Sound Capture DeviceHow to Prevent Streaming SilenceHow to Capture Audio from Your Speakers
SAM Cast - Troubleshooting
Trouble Activating SAM CastPosted: 06/21/11
Internet activation works for most people. If you don't have an Internet connection or your firewall is blockingthe activation, you can still activate the program manually. Select the "Activate via Phone" option, but insteadof calling, use the activation codes to open a ticket with the Spacial Support team.
Recommended reading:
How to Configure Your Sound Capture DeviceHow to Configure Your General Settings