contents - dl.flavoursys.comdl.flavoursys.com/manuals/sb5-admin/latest/flavoursysstrawberry5... ·...
TRANSCRIPT
ContentsLast Updated July 20 2017 1
Introduction 1
System Requirements 1
Storage File System Requirements 1
List of Certified Storage Vendors 1
List of Supported Storage File Systems 1
Strawberry Server HWSW Requirements for Production Environments 2
Minimum Server HWSW Requirements for Demonstration amp POC Environments 2
Minimum Requirements for a dedicated View Proxy Encoding Node 2
Requirements for the Strawberry Client 2
Strawberry Client SSL 2
Requirements for the Strawberry Adobe Panel 2
Minimum Web Browser Requirements 2
Installation Manuals 3
Strawberry Client 3
Installing the Client 3
Starting the Client 3
Upgrading the Client 3
Deleting the Client 3
Client Configuration for NAS 3
SMB Mounts Configuration 7
Paths to Editing applications (App Launcher) 8
Mount your drives under Windows 7 amp 8 9
Mount your drives under OSX 11
Client Configuration for StorNext amp XSAN 13
SAN Mount Configuration 14
Client Configuration for Shared Edits under macOS 17
Client Configuration for Shared Edits under Windows 18
Changing the Clients Fuse Blocksize (macOS only) 20
Adobe Panel 21
Installing the Panel 21
Updating the Panel 21
Removing the Panel 21
Testing the Panel 21
Users Roles amp Teams 22
Manage Roles 22
Available Capabilities 22
Creating a role 24
Editing a role 25
Deleting a role 25
Manage Users 25
Creating a User 25
Changing a Users Role 25
User Specific Roles 25
Assigning a User to Teams 26
Deleting a User 27
Removing a User from a Team 27
Manage Teams 27
Creating a Team 27
Changing a Teams Name 27
Changing a Teams Quota 27
Deleting a Team 27
Manage Edits 27
Manage Projects 28
Manage Online Projects 28
Force Closing a Project 28
Deleting one or multiple Projects 28
Archiving a Project 28
Manage Archived Projects 29
Retrieving a Project from the Archive 29
Download Project List 29
Custom Metadata 29
Manage Libraries 30
Introduction 30
Library States 30
Ingest Libraries 30
Creating a Library Project 30
Configuring an Ingest Library 31
Configuring the Library Ingest Interval 32
Configuring the Library Clean Interval 32
Good to Know 33
External Libraries 33
Creating a Library Project 33
Configuring an External Library 34
Configuring the Library Clean Interval 35
Configuring the External Library Reindex Interval 35
Good to Know 36
Custom Metadata 36
Custom Metadata Sets 36
The Master Set 36
Creating a Metadata Set 36
Connecting Metadata Sets 37
Deleting a Metadata Set 37
Creating a Dropdown Menu 38
Creating a Text Input Field 39
Creating a Replacement Pattern 40
Editing a Value 41
Deleting a Value 41
Creating Project Status Flags 41
Deleting Project Status Flags 41
Supported Unix Time Modifiers 42
Archive amp Copy To 42
Creating an Archive Strategy 43
Canceling an ArchiveRetrieval Job 44
Clearing ArchiveRetrieval Errors 44
Project Copy-to Strategies 44
Asset Copy-to Strategies 45
Good to Know 45
Freezing Archived Projects 45
Templates 45
Working with Templates 45
Creating a Template (Avid Media Composer) 46
Creating a Template (Adobe Premiere) 49
Rename a Templates 51
Duplicate a Template 52
Delete a Template(s) 52
Configuring the Avid Attic 52
Manage Indexers 52
Storage Quota 52
MYSQL Backup 53
Versions amp License 53
VIEW Proxy Encoder 53
Supported Video Audio and Image File Formats 53
Enabling or Disabling View 55
Proxy Encoder Configuration 55
Blacklists amp Whitelists 56
Applying Blacklist amp Whitelist Changes 56
Node and Worker Control 57
Content Download Options 57
Rescan-Project(s) 57
Repair-Project(s) 57
Reencode-Everything 58
Miscellaneous 58
Manage Templates 58
Safe Search 58
Enabling Safe Search 58
Define ldquoSafe Searchrdquo Metadata 58
Good to Know 60
Manage Indexers 60
General 60
Technical Metadata Whitelist 60
Storage Quota 61
Adobe Premiere Specific Feature 61
Auto-Link media from Library into project 61
Auto-Ingest local media into project 61
Auto-Link subproject media into project 61
Preditor 62
SMTP Setup 62
MYSQL Backup 62
Empty Trash 62
Osiris Option 62
Versions amp License 62
Updating a License 62
Legal Information 62
Last Updated July 20 2017
IntroductionWelcome to the Strawberry 5 Administration manual You hereby acknowledge that you have read and understandthe end user license agreement (EULA) and agree that your use of the software as well as any relateddocumentation is an acknowledgment of your agreement to be bound by the end user license agreement as writtendown here httpwwwflavoursyscomeula
The full Strawberry changelog is available here httpdlflavoursyscominstallersbChangeLog
If you wish to scheduel an update or upgrade please put your request herehttpwwwflavoursyscomsupportschedule-an-update
an overview of the latest Strawberry feature is available here httpwwwflavoursyscomwelcome-to-strawberry-5
System Requirements
Storage File System RequirementsStrawberry requires a Linux based storage file systems to work properly Windows storage file systems (eg NTFS)are not supported at this point
List of Certified Storage Vendors
bull Bright Technologies
bull EMC Isilon
bull Hitachi
bull IBM
bull NetApp
bull Panasas
bull Quantum
bull Qumulo
bull Rohde amp Schwarz DVS
bull Scale Logic
List of Supported Storage File Systems
bull BWFS
bull HyperFS
bull EXT4
bull HFS
bull IBM Spectrum Scale
bull OneFS
bull StorNext
bull XFS
bull XSan
bull ZFS
bull Other Linux based storage file systems [1]
Last Updated July 20 2017
1
[1] File system not listed here might be supported if they comply to the POSIX standard (httpsenwikipediaorgwikiPOSIX ) Please contact us for more information httpwwwflavoursyscomcontact
Strawberry Server HWSW Requirements for Production EnvironmentsThe Strawberry server is hosting the Strawberry services amp the database Additionally it can perform 247 proxyencoding
bull 24 GB RAM
bull 16 CPU cores (Intel Xeon AMD Opteron 24 GHZ or comparable)
bull 2x 500GB SSD (mirrored)
bull A dedicated connection to the storage and a dedicated network connection to the client network (min 10gbitEthernet or comparable)
bull RHEL 65 or newer Centos 65 or newer 64bit
Minimum Server HWSW Requirements for Demonstration amp POC EnvironmentsThe below configuration is suitable for demonstration and proof of concept environments only
bull 8GB RAM
bull 6 CPU cores
bull 1x 250GB HDD
bull RHEL 65 or newer Centos 65 or newer 64bit
Minimum Requirements for a dedicated View Proxy Encoding NodeThe VIEW server serves as a dedicated proxy encoding node for Strawberry Strawberry can operate using multipleproxy encoding nodes while automatically performing load balancing among these
bull 12 GB RAM
bull 16 CPU cores or more (Intel Xeon AMD Opteron 24 GHZ or comparable)
bull 2x 500GB SSD (mirrored)
bull A fast connection between the Strawberry server and the store storage (min 10Gbit Ethernet or comparable)
bull An adequate connection between the View encoder node and the Strawberry server for metadata traffic (1GbitEthernet)
bull RHEL 65 or newer Centos 65 or newer 64bit
Requirements for the Strawberry ClientThe Strawberry 5 client application requires at least Windows 7 or macOS 109 to work properly Updated Clientversions can be downloaded here httpwwwflavoursyscomsupportstrawberry-product-downloads
Strawberry Client SSLThe Strawberry Client supports SSL connections when Strawberry Server certificates are signed by Trusted RootCertification Authorities Windows and Mac OSX clients fully support self-signed certificates To use SSL withStrawberry add proper certificates to your server configuration and prepend the server name in the client withhttps instead of http
Requirements for the Strawberry Adobe Panel
Minimum Web Browser Requirements
Last Updated July 20 2017
2
The Strawberry user interface can be accessed from most modern web browser Strawberry was tested with thefollowing browsers
bull Apple Safari (Version 605 or newer)
bull Google Chrome (Version 31 or newer)
bull Mozilla Firefox (Version 37 or newer)ƒ _index_installation
Installation Manuals
Strawberry Client
Installing the Client
1 Download the latest Strawberry client for your Strawberry version and client operating system herehttpwwwflavoursyscomsupportstrawberry-product-downloads
2 Run the installer and follow the instructions of the installation wizard
Starting the ClientAt the first start the client will require additional configuration Depending on your storage and network environmentplease follow the appropriate configuration steps below
Upgrading the Client
1 Download the latest Strawberry client for your Strawberry version and client operating system herehttpwwwflavoursyscomsupportstrawberry-product-downloads
2 Run the installer and follow the instructions of the installation wizardThis procedure will automatically overwrite older versions of the client software
Deleting the ClientMacOS
1 If you have a project open in Strawberry please close it first
2 Close the Strawberry client application
3 Open Finder and Navigate to the Applications folder
4 Select Strawberry Client and move it to the trashWindows
1 If you have a project open in Strawberry please close it first
2 Close the Strawberry client application
3 Open Programs and Features by clicking the Start clicking Control Panel clicking Programs and then clickingPrograms and Features
4 From the program list select Strawberry Client lick uninstall and follow the Windows instructions
Client Configuration for NASPlease follow these instructions if your Strawberry server is configured to not use shared edits
First enter the Strawberry server IP address or fully qualified domain name into the ldquoStrawberry Serverrdquo field Thewizard will automatically add the ldquohttprdquo
Installation Manuals
3
In the second field (ldquoEdit namerdquo) you need to enter the unique workstation name of the current machine you areinstalling the client on Make sure there is no other machine with this name setup for strawberry If you arereinstalling the client and have chosen an existing name the client will warn you Acknowledge the warning as thisis totally fine
In this example we have chosen ldquoNetwork Attached Storage (NAS) via SMBrdquo as storage type If this is the first timesetting up the edit also click the ldquoCreate SMB Userrdquo checkbox This will make the server setup an SMB user andthe corresponding edit work directories on the storage
The Strawberry server has now created the SMB user and folders successfully and the client will display the SMBcredentials The randomly generated password shown can also be found in the admin panel under ldquoUsersrdquo rarrldquoManage Editsrdquo if needed later
Installation Manuals
4
If you have already setup an edit workstation before and are reinstalling the client you do not need to have the SMBuser recreated Only enter the IP address and existing workstation name in the corresponding fields and selectldquoNetwork Attached Storage (NAS) via SMBrdquo without checking the ldquoCreate SMB userrdquo checkbox
Please use the existing SMB credentials to mount the shares for the next step
Installation Manuals
5
After clicking the ldquoNext -gtrdquo button the following screen appears This is to inform you that the setup has workedsuccessfully
You now need to mount the correct media and project shares for you current edit workstation Refer to later in themanual if you need to know how to mount shares via SMB
Installation Manuals
6
SMB Mounts ConfigurationOnce you have mounted the shares hit the ldquoNext -gtrdquo button The client setup wizard will now want to know whichdrive letters (or mount paths for OSX) the shares are connected to In this example we have mounted the projectshare to drive P and the media share to drive M
For the project share hit the ldquoChooserdquo button and navigate to the drive or mount point
For the media share hit the ldquoAddrdquo button and select the first media drive You can add more media drives this way ifyou have a multi media storage type setup
Installation Manuals
7
Paths to Editing applications (App Launcher)In the last setup wizard window you can assign file type extensions to the corresponding applications You firstchoose the the application by clicking the ldquoChooserdquo button Navigate to the program folder you want to have your fileopened with Choose the exe file for Windows or the application package folder for OSX Next enter the fileextension (eg ldquoavprdquo for Avid project files ldquoprprojrdquo for Premiere files) and click the ldquoAddrdquo button The chosenapplication and extension will be added to the list below If the extension you want to add already exists you need toselect it in the list and hit the ldquoRemoverdquo button to delete it first
The ldquoEnabledrdquo checkbox allows you to activate or deactivate the application assignments
Installation Manuals
8
Mount your drives under Windows 7 amp 8Right-click the ldquoComputerrdquo entry in the explorer and select ldquoMap network driverdquo
Installation Manuals
9
Select the drive letter for the first share (eg ldquoPrdquo for the project share) and enter the SMB path to the NAS server(eg 20000168sb4-projects) You might need to ask your administrator for the correct path(s) If you want thedrives to auto mount next time you log in check the ldquoReconnect at logonrdquo checkbox Select the ldquoConnect usingdifferent credentialsrdquo checkbox to be able to enter the correct login data Use the credentials generated by the serveror provided by the admin
Please do the same for your other shares (eg 20000168sb4-media) Try to keep the drive lettering identicalacross different workstations
Installation Manuals
10
You should now have the drives mounted like so and can select them during the setup wizard phase
Mount your drives under OSXGo to Finder rarr Go rarr Connect to Server
Installation Manuals
11
Mount the first share by typing the SMB URL cifs[ServerIP][name of share] into the ldquoServer Addressrdquo field (egcifs20000182sb4-projects)
The system will ask for the SMBcifs credentials Select the ldquoRegistered Userrdquo checkbox Use the credentialsgenerated by the server or provided by the admin You can save the credentials in your OSX users keychain byselecting the checkbox at the bottom
Installation Manuals
12
Please do the same for your other shares (eg cifs20000182sb4-media)
You should now have mounted your shares successfully
Client Configuration for StorNext amp XSANPlease follow this chapter if you are using Strawberry in combination with StorNext or XSAN
Installation Manuals
13
SAN Mount Configuration
1 Install amp start the Strawberry client application (httpwwwflavoursyscomsupportstrawberry-product-downloads )
2 In the configuration Window enter the IP address of your Strawberry server the custom edit name (can befreely defined) and choose SAN as the storage type
bull The edit name can not start with a number and can not include space
bull Creating an SMB user is only required if you plan to use this edit with Strawberry via SMB at a later pointOtherwise just keep this box unchecked
3 Click Next until you reach a Window called SAN mounts configuration
4 If you are not using Avid Media Composer Next to the Directory text field is a button called Choose Clickthis button and navigate to the edit media directory that Strawberry created for your edit This directory isusually is under SAN_Volume_NameStrawberryMedia_1editsedit_name The edit_name is the name thatyou have defined in step 2
5 OSX Under Volume name enter the name under which you wish the Strawberry media volume to appear Ifyou are unsure what to choose just enter sb_media
6 Windows Drive choose the drive letter under which you wish the Strawberry media drive to appear If you areunsure we recommend to go with the M drive if possible
Installation Manuals
14
Make sure that the Strawberry media volumedrive name is the same on all of your editing systemx This willprevent offline media issues
7 Click Open
Installation Manuals
15
8 If you are using Avid Media Composer Perform step 4 After this you will need to setup a dedicated projectvolume for Avid To do so Click on the Choose button next to the Directory text field again Now navigate toSAN_Volume_NameStrawberryprojectseditsedit_name The edit_name is the name that you havedefined in step 2 Name the volume sb_avid_project or choose a custom name Now click Add In thevolume list check the checkbox that say Project Volume
9 OSX Under Volume name enter the name under which you wish the Strawberry Avid project volume toappear If you are unsure what to choose just enter sb_avid_project
10 Windows Drive choose the drive letter under which you wish the Strawberry project drive to appear If youare unsure we recommend to go with the P drive if possible
Make sure that the Strawberry media volumedrive name is the same on all of your editing systemx This willprevent offline media issues
11 Click Next
12 To configure Paths to editing applications please read the App Launcher chapter
13 Click Next to reach Miscellaneous Options
bull Create desktop shortcuts (If enabled Strawberry will create a desktop shortcut to the open project Theshortcut will point to the Strawberry media volume mounted on the Client machine)
bull Desktop shortcuts point to source (original) mounts (If enabled desktop shortcuts will not point to theStrawberry media volume on the local computer but to the project folder directly on the SAN Leave thisunchecked per default)
Installation Manuals
16
bull Final Cut Pro 7 fix (Select this option only if you use FCP 7) It is not required for FCP X
bull Show Strawberry mounts in the Finder (Enabled by default Only disable this if you which to hide theStrawberry media volumes from Windows Explorer or OSX Finder)
bull Remount volumes when openingclosing project (Per default the Strawberry media volumes get mounted whenstarting the Client and remain mounted when openingclosing projects When this option is enabled Strawberrywill unmount the volumes every time a project gets closed and mount them when opening a project)
bull Library Location (This feature is in beta stadium and not documented yet)
Client Configuration for Shared Edits under macOSIn order to configure the Strawberry client for shared edits the Strawberry server has to be configured to theshared edits mode first If you wish to update to shared edits edits please contact FlavourSys support first Thefollowing steps are valid for NAS and SAN environments
1 Install amp start the Strawberry client application (httpwwwflavoursyscomsupportstrawberry-product-downloads )
2 In the configuration Window enter the IP address of your Strawberry server the custom edit name and chooseShared Edits as the storage type
bull The edit name can not start with a number and can not include space
bull Creating an SMB user is not required for this mode
Installation Manuals
17
3 Click next until you reach the window shared edits mount configuration
4 In here provide the path to the central Strawberry media directory by clicking on the Add button This usuallyis Storage_Volume_Namestrawberrymedia_1media
5 Click Next
6 To configure Paths to editing applications please read the App Launcher chapter
7 Click next until you reach a window called Miscellanous options
bull Create desktop shortcuts (If enabled Strawberry will create a desktop shortcut to the open project Theshortcut will point to the Strawberry media volume mounted on the Client machine)
bull Desktop shortcuts point to source (original) mounts (If enabled desktop shortcuts will not point to theStrawberry media volume on the local computer but to the project folder directly on the SAN Leave thisunchecked per default)
8 Click Finish and enter the OSX Administrator credentials to save the configuration
Client Configuration for Shared Edits under WindowsIn order to configure the Strawberry client for shared edits the Strawberry server has to be configured to theshared edits mode first If you wish to update to shared edits edits please contact FlavourSys support first Thefollowing steps are valid for NAS and SAN environments
Installation Manuals
18
1 Download Strawberry client application and run the installer (httpwwwflavoursyscomsupportstrawberry-product-downloads )
2 The installer will prompt you with the message Allow all users to create file references on this machine(required for Shared Edits) Please make sure that the checkbox is checked
3 In the configuration Window enter the IP address of your Strawberry server the custom edit name and chooseShared Edits as the storage type
bull The edit name can not start with a number and can not include space
bull Creating an SMB user is not required for this mode
4 Click next until you reach the window shared edits mount configuration
5 In here provide the static drive letter under which open projects should appear on this editing station and thepath to the central Strawberry media directory This usually isStorage_Volume_Namestrawberrymedia_1media
Installation Manuals
19
Click Next
6 Click Next
7 To configure Paths to editing applications please read the App Launcher chapter
8 Click next until you reach a window called Miscellanous options
bull Create desktop shortcuts (If enabled Strawberry will create a desktop shortcut to the open project Theshortcut will point to the Strawberry media volume mounted on the Client machine)
bull Desktop shortcuts point to source (original) mounts (If enabled desktop shortcuts will not point to theStrawberry media drive on the local computer but to the project folder directly on the SAN or NAS Leave thisunchecked per default)
9 Click Finish
Changing the Clients Fuse Blocksize (macOS only)This function requires Strawberry Client 504 or newerYou can set custom block size running the client from the command line like this (the default value is 4K)
$ ApplicationsStrawberry ClientappContentsMacOSfsclient --blocksize 64k
The block size has to be provided in the following way
bull 4k
Installation Manuals
20
bull 8k
bull 16k
bull 32k
bull 64k
bull 128k
bull 256k
bull 512k
bull 1M
Adobe Panel
Installing the PanelThe installation process for the Strawberry Adobe panel is similar under OSX and Windows Only amacOSWindows Admin user can install the panel as this is an Adobe requirement
Important Note The Adobe Extension Manager is no longer required for the installation of the Strawberry AdobePanel and is obsolete as of CC2015
1 Download the latest Strawberry Adobe Premiere CC Panel that matches your current Strawberry versionhttpwwwflavoursyscomstrawberry-product-downloads
2 Close all Adobe applications running on your computer
3 Extract the zip to a local hard drive (the installation will NOT work from a network or USB location)
4 Go into the extracted folder Strawberry-AdobePanel-5xx
5 OSX Make sure you are logged in as an Administrator Double-click on the installcommand file Once theinstallation is completed you will see the following success message Strawberry AdobePanel installedsuccessfully If you see an error message instead please review the error code on the following websitehttpwwwadobeexchangecomresources19errors
6 Windows Double-click on the installcmd The installer will not return any success message However incase of an installation error you will see a Failed to install status = error code message In case this happensplease review the error code on the following website httpwwwadobeexchangecomresources19errors
Updating the PanelIn order to update the Strawberry Adobe panel please repeat the above installation process using a newer panelversion
Removing the Panel
1 Go into the local folder from which you originally installed the Strawberry Adobe panel If the folder is notpresent on your Computer anymore download the latest panel and extract it on an internal hard drive (USB ampNetowk drives wont work) httpwwwflavoursyscomstrawberry-product-downloads
2 OSX Double-click on the removecommand file You will be prompted to enter the OSX Administratorpassword
3 Windows Double-click on the removecmd file (The uninstaller requires Administrator privileges to workproperly)
Testing the PanelIn order to test the Strawberry Adobe panel launch the Strawberry client application and login with your credentialsCreate a project using the Adobe Premiere template or open an existing Premiere project In Premiere navigate tothe menu bar and click on Window Extensions Strawberry 5xx
Installation Manuals
21
Users Roles amp Teams
Manage RolesPurpose Strawberry enables Administrators to create custom user roles A role is a set of permissions (capabilities)that determine what a user can and can not do withing the Strawberry system A role can be assigned to multipleusers
Available CapabilitiesThis is a list of all available capabilities available in the Strawberry user role system
Project related and general capabilities
bull Can login to client application(Users with this capability can login to the Strawberry client application installed on the editing systems)
bull Can login to Strawberry web interface using a web browser(Users with this capability can login to the Strawberry interface using a web browser)
bull Can create new projects(Users with this capability can create new projects within the Strawberry user interface)
bull Can see users and teams(Users with this capability can see users and teams in the Strawberry system)
bull Can assign projects to own teams and their members(Users with this capability can share projects visible to them with teams that they are a member of includingmembers of these teams)
bull Can assign project to teams that the user isnt member(Users with this capability can share projects visible to them with teams that they are a not a member of)
bull Projects created by this user are available to all teams of which the user is a member(This will only apply if the user is able to assign Projects to own teams)
bull Can archive own projects(Users with this capability are allowed to archive projects that they created only)
bull Can retrieve own projects(Users with this capability are allowed to retrieve projects that they created only)
bull Can archive other peoples projects(Users with this capability are allowed to archive all projects that they see no mater if they created these projects ornot)
bull Can retrieve other peoples projects(Users with this capability are allowed to retrieve all projects that they see no mater if they created these projects ornot)
bull Can use copy to on own projects(Users with this capability are allowed to use copy to on projects that they created only)
bull Can use copy to on other peoples projects(Users with this capability are allowed to copy all projects that they see no mater if they created these projects ornot)
bull Can freezemelt own projects(Users with this capability are allowed to freeze and melt projects that they created)
bull Can freezemelt other peoples projects
Users Roles amp Teams
22
(Users with this capability are allowed to freeze and melt projects that they created)
bull Can modify the status and custom metadata of projects without write access(Users with this capability are allowed to change custom metadata from all projects that they see no matter if theywrite access to these projects or not)
bull Can re-scan projects (including Libraries)(Users with this capability are allowed to perform a rescan on projects that they see)
Asset related capabilities
bull Can delete assets and folders via user interface(Users with this capability are allowed to delete media assets via the Strawberry user interface (Recommended forsuper users only)
bull Can use copy to on assets(Users with this capability are allowed to use copy to on media assets from projects that they have at least readaccess to)
bull Can download proxy version of assets(Users with this capability are allowed to download LowRes proxies from projects that they have at least read accessto)
bull Can download high-res version assets(Users with this capability are allowed to download HighRes media assets from projects that they have at least readaccess to)
bull Can share assets via email(Users with this capability are allowed to share proxy versions of assets via email)
bull Can re-create proxy files(Users with this capability are allowed to trigger a re-encoding job on any Strawberry managed media asset)
bull Can track down assets but not delete(Users with this capability are allowed to see into which projects a given media file is linked Caution Advised This isa potential security risk because it does not respect individual user or team access rights Users could potentiallysee names of projects that they normally couldnt see)
bull Can track down assets and delete(Users with this capability are allowed to see into which projects a given media file is linked and also delete it fromthere Caution Advised This is a potential security risk because it does not respect individual user or team accessrights (Recommended for super users only)
Annotation amp Description related capabilities
bull Can comment on projects(Users with this capability can write comments for projects)
bull Can comment on assets(Users with this capability can write comments on assets)
bull Can apply annotations to assets (go to annotation view)(Users with this capability can write annotations for assets)
bull Can download annotations(Users with this capability can download the annotations of an Asset)
bull Can delete other peoples annotations (deletion of own annotations is always possible)(Users with this capability can delete annotations that other people created)
Preditor related capabilities
bull Can login to Preditor (to open sequences)
Users Roles amp Teams
23
(Users with this capability are allowed to login to Preditor)
bull Can create new Preditor sequences(Users with this capability are allowed to create new sequences within Preditor)
bull Can assign sequences to own teams and their members(Users with this capability can share Preditor sequences with teams that they are a member of including members ofthese teams)
bull Can assign sequences to teams that user isnt a member of(Users with this capability can share Preditor sequences even with teams that the user isnt a member of)
bull Sequences created by this user are available to all teams of which the user is a member(This will only apply if the user is able to assign Sequences to own teams)
bull Can export and import Preditor sequences(Users with this capability can export and import a Preditor sequence to an existing Strawberry project)
bull Can download sequence as xmlaaf file(Users with this capability can download Preditor sequences as XML or AAF files)
Creating a roleLog into the Administration panel and click on the USERS tab Click on the MANAGE ROLES bar to expand itBelow the role list is a button named ADD ROLE Click on this button and provide a role name as well as thedesired capabilities for that role Once you are done click CONFIRM to save your changes
Users Roles amp Teams
24
Editing a roleLog into the Administration panel and click on the USER tab Click on the MANAGE ROLES bar to expand itcheckbox the role(s) you intend to edit and then click on the EDIT ROLE button Once you are done clickCONFIRM to save your changes
Deleting a roleLog into the Administration panel and click on the USER tab Click on the MANAGE ROLES bar to expand itcheckbox the role(s) you intend to delete and then click on the DELETE ROLE button and confirm by clicking onYES You can only delete roles that are currently not assigned to any user(s)
Manage Users
Creating a UserLog into the Administration panel and click on the USER tab Click on the MANAGE USERS bar to expand itBelow the user list is a button named ADD USER Click on this button and fill out the required information anddefine a user role
Changing a Users RoleUsage Log into the Administration panel and click on the USER tab Expand the MANAGE USERS bar Next tothe LOGIN NAME column is a column called ROLE In order to change a users role click on the current role andselect the new role from the drop down menu
User Specific RolesIf you have users to which none of your existing roles apply you may create custom user roles for these users only
Usage Log into the Administration panel and click on the USER tab Expand the MANAGE USERS barCheckbox the user and then click on the EDIT ROLE button Now you can either assign another existing role tothat user or you can create a custom role by simply changing the users capabilities When changing thecapabilities without choosing a new role the role name will change to custom This indicates that this user now hasa role that is tied to himher only Custom roles can be overwritten by assigning an existing role to the user
Users Roles amp Teams
25
Purpose In certain Strawberry environments users never get created within Strawberry but authenticate againstLDAP or Active Directory To make sure that the capabilities of these user are limited Administrators can define adefault role for new users
Usage Log into the Administration panel and click on the USER tab Expand the MANAGE USERS bar Belowthe user list is an option named Default Role for new Users with a drop down menu next to it Choose the defaultrole from the drop down From now on every new user coming from LDAP or Active Directory will be assigned withthis role The role of the user can of course be changed later
Assigning a User to TeamsPurpose Per default newly-created users can only see their own projects but are not assigned to any specificteams The following text describes how to assign a user to one or more teams
Example Editors A B and C and the Production Director are working together on the popular series Making MadEditors C D and E and the Production Director will work together on the new season of Game of Chairs Simplycreate teams for Making Mad and Game of Chairs and assign Editor C and the Production Director to both teamsand they will be able to collaborate and view all projects for both teams Editors A B D and E will only be able toview content for their respective teams
Users Roles amp Teams
26
Usage Log into the Administration panel and click on the USER tab Click on the MANAGE USERS bar toexpand it Select the user that you want to assign to a specific team Next to the user list appears a list with allavailable teams You can assign the user to one or more of these teams by simply checking the box on the left ofthe team name Now when the user logs into the Strawberry 4 user interface he or she will be able to see theprojects from all the teams to which she or he is assigned
Deleting a UserUsage Log into the Administration panel and click on the USER tab Expand the MANAGE USERS bar andselect the user you want to delete using the checkbox next to the username Click the delete button and confirm thedeletion
Removing a User from a TeamUsage Log into the Administration panel and click on the USER tab Expand the MANAGE USERS bar In orderto remove a user from a team select the user Now you can see a list on the right to the user list This second list isnamed The selected user is a member of these teams You can remove the user from one or multiple of theseteams by unchecking the box on the left of the team name
Example Freelancer John Smith has been helping with Game of Chairs production and his contract is finished TheAdministrator removes John Smith from the Game of Chairs team to ensure that he no longer has access to thoseprojects but leaves John Smith as a user in the system for future collaboration
Manage Teams
Creating a TeamAvailable in Strawberry version 40 or newerPurpose Users can share projects with other users but in some cases it is more efficient to share projects with anentire team Usage Log into the Administration panel and click on the USER tab Now Expand the MANAGETEAMS bar Below the teams list is a button that says ADD Team Click this button and fill out the requiredinformation During this process strawberry will ask you to set a teams storage quota The team quota virtually limitsthe storage space but without restricting write access once a team has reached it In Strawberry no project has areal owner For this reason the teams quota is a so called additive quota which means that a project that is visible tomultiple teams will influence the quota of each of these teams This also means that the additive quotadifferentiates from the physical (real) storage quota which can be configured under MISCgtSTORAGE QUOTA
Changing a Teams NameUsage Log into the Administration panel and click on the USER tab Expand the MANAGE TEAMS bar Selectthe checkbox next the team you want to edit and then click the EDIT TEAM button Change the team name andconfirm
Changing a Teams QuotaUsage Log into the Administration panel and click on the USER tab Expand the MANAGE TEAMS bar Selectthe team you want to edit and then click the EDIT TEAM button Change the teams quota and confirm
Deleting a TeamAvailable in Strawberry version 40 or newerUsage Log into the Administration panel and click on the USER tab Expand the MANAGE TEAMS bar Selectthe team that you want to delete and press the DELETE button below the teams list Confirm the message Pleasenote that projects that were exclusively visible to this team should be reassigned to other users or teams beforedeletion
Manage Edits
Users Roles amp Teams
27
Important Note The edit list only shows Samba mounts that have been created via the Strawberry Client wizard onth eStrawberry server You will not see any edits that have been created directly on your storage (which is therecommended way of doing it) If you want to see the edits on your storage please check its Samba configuration
Manage Projects
Manage Online Projects
Force Closing a ProjectPurpose This feature allows the administrator to close a project while it is opened (locked) by an editing systemThis feature can be useful in case a computer crashes caused by a hardware failure on the editing system and it isnot possible to close the project from this computer anymore
Usage Log into the Administration panel and click on the PROJECTS tab Expand the MANAGE PROJECTSbar Select the project that you want to force close and press the FORCE CLOSE button below the project listConfirm to the warning message to force close the project
Deleting one or multiple ProjectsPurpose This feature allows the administrator to delete projects permanently When deleting a project project filesmedia files as well as proxy files and MySQL database entries will be deleted permanently
Usage Log into the Administration panel and click on the PROJECTS tab Expand the MANAGE PROJECTSbar Select the project(s) that you want to delete and press the DELETE button below the project list Confirm tothe warning message to delete the project(s)
Archiving a Project
bull Available in Strawberry version 40 or newerbull ArchivalRetrieval of multiple projects at once is possible in Strawberry version 46 or newerbull The possibility to archive into a compressed zip file has been dropped in Strawberry version 46 or
newer because it was too error-pronePurpose Strawberry allows certain users (admins amp users but not guests) to archive and retrieve editing projectsWhen performing an archive operation Strawberry takes every single file which is part of the project and sends it toan archive destination which was previously defined by the administrator As soon as the project is in the archiveStrawberry 4 will delete it from the production storage (aka source) but will keep the metadata and proxy filesavailable for further use Please keep in mind that Strawberry does not archive any subprojects that are added to theprojects that you archive If you you want to archive project A which has subproject B and in case project Aactually uses media files from subproject B please make sure to consolidate or copy the affected media files toproject A before sending it to the archive This will ensure that all the used media files will be archived properly andthat the project will be fully operational after retrieval To check which projects are related to one another just selecta project and check the PARENT PROJECTS SUB PROJECTS list on the right of the project list
Usage Log into the Administration panel and click on the PROJECTS tab Expand the MANAGE PROJECTS bar Select the project(s) that you want to archive by clicking on the checkbox(es) next to the project name(s) and
Manage Projects
28
press the ARCHIVE button below the project list Choose an Archive Strategy from the list and confirm As soonas the project is in the archive it will change its visual appearance as following
The project avchd is online while the project avchd sony fs700 slowmo is in the archive Once a project is inthe archive it will appear under Projects Manage Archived Projects
Manage Archived Projects
Retrieving a Project from the ArchivePurpose Strawberry allows certain users (admins amp users but not guests) to archive and retrieve editing projects Inorder to be able to retrieve Strawberry has to be able to access the projects archive location Please note if anexternal archive application has moved the project for instance off to a tape library an integration may be necessaryto trigger the restore process in the archive application
Usage Log into the Administration panel and click on the PROJECTS tab Expand the MANAGE PROJECTSbar Select the project(s) that you want to retrieve from the archive and press the RETRIEVE button below theproject listThe RETRIEVEARCHIVE button is a toggle button which is an ARCHIVE button if you select a projectwhich is not already in the archive and becomes a RETRIEVE button once you select an archived project Confirmthe message to proceed Depending on the project size the retrieval progress can take some time Check the projectlist from time to time to see if the project has been retrieved You will notice a retrieved project by its visualappearance
The project avchd is online while the project avchd sony fs700 slowmo is in the archive Archived projects area bit greyed out and have a grey dot next to their project name
Download Project ListUsage In order to download the project list as an XLS file go to the Admin Panel Projects and click on the buttonDownload XLS
Purpose Project statuses help users to determine what the working status of a project is Statuses can be forinstance in editing in color grading etc and are defined by the administrator The status of each project isdisplayed in the metadata area of the Strawberry 4 user interface
Usage Log into the Administration panel and click on the PROJECTS tab Expand the STATUS OPTIONS barNow click on ADD STATUS and define a name for the new status Once the status is created users can choose itfrom the Strawberry frontend
Custom MetadataPlease read the rarr Custom Metadata larr chapter for more information on metadata sets and values
Manage Projects
29
Manage Libraries
IntroductionLibraries are an optional Add-on and can only be configured with a valid add-on license This sectionexplains how to create Ingest Watchfolders and External Libraries using the Strawberry admin panel
Library StatesLibrary no matter whether Ingest Libraries or External Libraries can have three different states
bull State Active - The library is fully operational
bull State Not Configured - The Library exists but is not yet configured
bull State Inactive - the library is configured but either the source watch folder or the target project are notreachable or missing
Ingest LibrariesPurpose An Ingest Library is a Strawberry library project that gets populated via an ingest watch folderStrawberry scans that watch folder on an Administrator defined interval and moves new media into thecorresponding Strawberry library project folder on the storage Eg If you create a library called My Example IngestLibrary a folder called My Example Ingest Library will be created within strawberrymedia_1media and mediafrom the related ingest watch folder will be moved to this location
Creating a Library Project
1 In order to create a new Library project you need to create a normal project first To do so open the Strawberryclient application and create a new project Name the project as you wish the library to be named Once theproject has been created close it and go back to the admin panel
2 In the admin panel go to Projects Manage Online Projects and checkbox the project that you created in theprevious step No click on the Flag as Library button on the lower right of the project list Then confirm withyes
Manage Libraries
30
Once the library has been created it will appear under Projects Manage Libraries inside the Strawberry Adminpanel
Configuring an Ingest LibraryPreparation Before configuring an ingest library you need to create an ingest watch folder The watch folder can belocated on one of your Strawberry-managed storages or on any storage accessible by the Strawberry server Theingest watch folder can not be located within the Strawberry root (eg optsb4data) or any sub folder below thispath To review how the storage root is configured on your system login to the Strawberry server and type catoptsb4appfsbaseconfigstrawrageyml The storage root is provided in the line root_path
1 Go to Projects Manage Libraries and checkbox the Library that you created in the previous step The librarywill be shown as Not Configured
2 Click on the Edit button below the library project list The following options appear
bull Name - Name of the Library
bull Watchfolder Type - Library Ingest or External Library Select Ingest Library here
bull Ingest Path - The path to the ingest watchfolder as seen by the Strawberry server
bull Target Storage - The storage to which ingested content should be moved This is only relevant if Strawberryis controlling multiple storage systems
bull Encoding Priority - The encoding priority for proxy files in this Library The ration between normal and highpriority is 14
Manage Libraries
31
bull Example for a Library Ingest configuration
Configuring the Library Ingest IntervalPurpose The library ingest interval determines how often Strawberry will check all your configured ingest watchfolders for new media files in order to move them to the target library By default the value is set to 1 minuteAssuming you added new media to the ingest watch folder Strawberry will see the files after 1 minute One minutelater it will check if the files size in the ingest watch folder changed (to determine if the file is still being copied) If thefile size did not change Strawberry will move it to the target library If the file size changed Strawberry will checkagain 1 minute later and so on
UsageIn order to change the Library Ingest Interval go to Projects Manage Libraries and adjust the value accordinglyto your needs
Configuring the Library Clean IntervalPurpose The clean interval scans your existing libraries for deleted media files on a recurring basis This however isonly important if you delete media files directly from the library folder on the storage and not from the Strawberryuser interface If you are not deleting Library media directly from the storage we recommend to set the recurrency toweekly instead of daily
Manage Libraries
32
Good to Know
bull There can only be one ingest watchfolder per library
bull Folder structures inside the ingest watchfolders will refelct inside the Strawberry library project
bull For usability reasons folder strctures inside the ingest watchfolders will not be deleted
bull Libraries can be archived equally to normal projects
External LibrariesPurpose An External Library is a folder structure outside of the usual Strawberry managed folder structure on thestorage Strawberry can index that external folder structure to make it seachable and (proxy-)viewable from theStrawberry user interfaces Media in External Libraries remains where it is meaning Strawberry will notautomatically move but only monitor it
Creating a Library Project
1 In order to create a new Library project you need to create a normal project first To do so open the Strawberryclient application and create a new project Name the project as you wish the library to be named Once theproject has been created close it and go back to the admin panel
Manage Libraries
33
2 In the admin panel go to Projects Manage Online Projects and checkbox the project that you created in theprevious step No click on the Flag as Library button on the lower right of the project list Then confirm withyes
Once the library has been created it will appear under Projects Manage Libraries inside the Strawberry Adminpanel
Configuring an External LibraryPreparation Before configuring an ingest library you need to make sure that the folder structure that Strawberryshould watch is reachable by the Strawberry server If you are unsure how to do this please contact next levelsupport
1 Go to Projects Manage Libraries and checkbox the Library that you created in the previous step The librarywill be shown as Not Configured
2 Click on the Edit button below the library project list The following options appear
bull Name - Name of the Library
bull Watchfolder Type - Library Ingest or External Library - Select External Library here
bull External Path - The path to the folder structure that you wish to be watched by Strawberry
bull Target Storage - The storage to which ingested content should be moved This is only relevant if Strawberryis controlling multiple storage systems
bull Encoding Priority - The encoding priority for proxy files in this Library The ration between normal and highpriority is 14
Manage Libraries
34
bull Example for an External Library configuration
Configuring the Library Clean IntervalPurpose The clean interval scan your existing libraries for deleted media files on a recurring basis This however isonly important if you delete media files directly from the library folder on the storage and not from the Strawberryuser interface If you are not deleting Library media directly from the storage we recommend to set the recurrency toweekly instead of daily
Configuring the External Library Reindex IntervalPurpose The external library reindex scans your existing libraries for new modified and deleted media files on arecurring basis This make sure that all changes in the external location will reflect within Strawberry The ExternalLibrary Reindex is MUCH slower than the Library Clean Interval which is why it is not possible to run it hourly Werecommend a daily or even better week recurrency for this index job
Manage Libraries
35
Good to Know
bull There can only be one External Library location per library project
bull Folder structures inside the external library will refelct inside the Strawberry library project
bull When adding a media from an External Library to an open Strawberry project that media will always becopied
Custom Metadata
Custom Metadata SetsPurpose This feature allows the Administrators to create several metadata sets Metadata sets can either containdrop down menus or text input fields Users will be be asked to select from the values provided in the metadata setsupon project creation
How the custom metadata could look in the user frontend
An example of custom metadata fields asking the user to provide the requested information Metadata fields withan asterisk symbol are mandatory for the user to fill out
The Master SetUsage Log into the Administration panel and click on the PROJECTS tab Expand the CUSTOM METADATAbar
The master set is the default set for all Strawberry installations and it is the set that every user sees upon projectcreation The master set can be populated with drop down menus and text input fields
Creating a Metadata SetUsage Log into the Administration panel and click on the PROJECTS tab Expand the CUSTOM METADATAbar
Custom Metadata
36
Click the ADD SET button and provide a name for the new set Once the set is created you can populate it withmetadata values like dropdown menus or text input fields
Connecting Metadata SetsUsage Log into the Administration panel and click on the PROJECTS tab Expand the CUSTOM METADATAbar
Metadata sets can be connected via drop down menus meaning that a specific drop drop down selection will load aspecific metadata set for the user In order to connect a drop down value with a metadata set edit the metadatavalue by clicking the checkbox next to the value and then the EDIT VALUE button
Each drop down menu contains Values and Targets The value is the drop down value that the user can choosefrom upon project creating The target is the metadata set to which the value should refer If the target None isselected the value will not load any metadata set If a target set is selected this target set will be loaded when theuser chooses this specific value
Deleting a Metadata Set
Custom Metadata
37
Usage Log into the Administration panel and click on the PROJECTS tab Expand the CUSTOM METADATAbar Select the metadata set that you wish to delete by checking the box next to it and then press the delete buttonon the botton of the metadata set list
Creating a Dropdown MenuUsage Log into the Administration panel and click on the PROJECTS tab Expand the CUSTOM METADATAbar
Click the ADD VALUE button and provide the following information
bull Name The name of the dropdown menu as the user will see it (for example Customer)
bull Type dropdown menu
bull Maximum Characters Not relevant for dropdown
bull Restrict input to Not relvant for dropdown
bull Pattern Not relvant for dropdownbull Mandatory Defines if this value is mandatory (checked) or not (unchecked)
bull Use in Project String Defines if items from this dropdown will appear in the project name if the users enablesthe checkbox Create Project Name from Above Entries upon project creation
No you can type the drodown items into the Value field To add additional drodown values click on the + buttonon the right of the value field To connect a drop down value with another Metadata Set select the set as a Targetnext to the related value
Click CONFIRM when done
Custom Metadata
38
Creating a Text Input FieldUsage Log into the Administration panel and click on the PROJECTS tab Expand the CUSTOM METADATAbar
Click the ADD VALUE button and provide the following information
bull Name The name of the text input field as the user will see it (for example Project Number)
bull Type Text Input
bull Maximum Characters The amount of characters a user can type into that field 0 equals infinite
bull Restrict input to Restrict input to numbers only letters only or numbers amp letters No restriction will allowany UTF-8 character
bull Pattern Not relevant for text input
bull Mandatory Defines if this value is mandatory (checked) or not (unchecked)
bull Use in Project String Defines if items from this text input field will appear in the project name if the usersenables the checkbox Create Project Name from Above Entries upon project creation
Click CONFIRM when done
Custom Metadata
39
Creating a Replacement PatternUsage Replacements patterns enable Strawberry to automatically create date values based on Unix date modifiersA List of possible modifiers can be found below Usage Log into the Administration panel and click on thePROJECTS tab Expand the CUSTOM METADATA bar
Click the ADD VALUE button and provide the following information
bull Name The name of the pattern field as the user will see it (for example Date)
bull Type Replacement Pattern
bull Maximum Characters Not relevant for text replacement pattern
bull Restrict input to Not relevant for text replacement pattern
bull Pattern A pattern consisting of Unix modifiers A pattern such as eg Y m d equals year month date
bull Mandatory Not relevant for text replacement pattern
bull Use in Project String Defines if the output from this pattern will appear in the project name if the users enablesthe checkbox Create Project Name from Above Entries upon project creation
Click CONFIRM when done
Custom Metadata
40
Editing a ValueAvailable in Strawberry version 40 or newerUsage Log into the Administration panel and click on the PROJECTS tab Expand the CUSTOM METADATAbar Expand the metadata set that contains the value you want to edit and then select the value by checking the boxnext to it Change the value properties as required and then click CONFIRM
Deleting a ValueUsage Log into the Administration panel and click on the PROJECTS tab Expand the CUSTOM METADATAbar Expand the metadata set that contains the value you want to delete and then select the value by checking thebox next to it Now click on DELETE VALUE
Available in Strawberry version 40 or newer
Creating Project Status FlagsAvailable in Strawberry version 40 or newerPurpose Project statuses help users to determine what the working status of a project is Statuses can be forinstance in editing in color grading ready for approval etc and are defined by the administrator The statuses ofeach project is displayed in the metadata area of the Strawberry 4 user interface
Usage Log into the Administration panel and click on the PROJECTS tab Expand the STATUS OPTIONS barNow click on ADD STATUS and define a name for the new status Once the status is created users can choose itfrom the Strawberry frontend
Deleting Project Status FlagsPurpose Deleting status flags will prevent users from being able to select that status in the future However whendelting a status flag it will remain attached to the projects that are already using it
Custom Metadata
41
Usage Log into the Administration panel and click on the PROJECTS tab Expand the STATUS OPTIONS barNow click on the checkbox next to the status flag that you want to delete and press the DELETE VALUE button
Supported Unix Time Modifiers
bull a localersquos abbreviated weekday name (eg Sun)
bull A localersquos full weekday name (eg Sunday)
bull b localersquos abbreviated month name (eg Jan)
bull B localersquos full month name (eg January)
bull C century like Y except omit last two digits (eg 20)
bull d day of month (eg 01)
bull D date same as mdy
bull e day of month space padded same as _d
bull F full date same as Y-m-d
bull h same as b
bull H hour (0023)
bull I hour (0112)
bull j day of year (001366)
bull k hour ( 023)
bull l hour ( 112)
bull m month (0112)
bull M minute (0059)
bull p localersquos equivalent of either AM or PM blank if not known
bull P like p but lower case
bull r localersquos 12-hour clock time (eg 111104 PM)
bull R 24-hour hour and minute same as HM
bull s seconds since 1970-01-01 000000 UTC
bull S second (0060)
bull T time same as HMS
bull u day of week (17) 1 is Monday
bull U week number of year with Sunday as first day of week (0053)
bull w day of week (06) 0 is Sunday
bull W week number of year with Monday as first day of week (0053)
bull y last two digits of year (0099)
bull Y year
bull z +hhmm numeric timezone (eg -0400)
bull Z alphabetic time zone abbreviation (eg EDT)
Archive amp Copy ToStrawberry allows certain users (admins amp users but not guests) to archive and retrieve editing projects When performing an archive operation Strawberry takes every single file which is part of the project and sends it to an archive destination which was previously defined by the administrator As soon as the project is in the archive Strawberry 4 will delete it from the production storage (aka source) but will keep the metadata and proxy files The
Archive amp Copy To
42
archive path defined here is also the retrieval path If you look for a more sophisticated archivalretrieval process youshould have a look inside the Strawberry API documentation
Creating an Archive StrategyZIP is not longer supported as an archive method in Strawberry because of missing CRC checksumcapabilitiesPurpose Archive strategies allow you to define discrete archive locations and methodologies for different types ofprojects When a user presses the Archive Project button in the user front-end Strawberry will offer the archivestrategies defined here
Usage Log into the Administration panel and click on the Archive tab Expand the ARCHIVE STRATEGIES barClick the ADD button and provide the following information
bull Name The name of the archive strategy The users see the name of the strategy when he or she attempts toarchive a project
bull Type The archive type Please select SB native if you are not using Archiware P5 or Masstore
bull Path The path (aka archive destination) for projects archived using this strategy
bull Method
bull plain Strawberry archives the project and media files without compressing them It archives theprojects folder structure as it is
bull tarball Puts the project amp media files of a project into a tarball before archiving itbull Check
bull Fingerprint Sequential integrity check on a file that only detects serious file damages but no minordefectsbull CRCs are specifically designed to protect against common types of errors on data transmissionswhere they can provide quick and reasonable assurance of the integrity of data delivered Howeverthey are not suitable for protecting against intentional alteration of data
bull None No data integrity check at allbull EnableDisable Strategy Define if an archive strategy is available for users (enabled) or not (disabled)
Archive amp Copy To
43
Canceling an ArchiveRetrieval JobArchive or retrieval jobs can currently only be canceled from the Strawberry user interface but not from theAdministration panel In order to Cancel an archive or retrieval job do the following
1 Login to the user interface as an Administrator and right click on the affected project
2 Select Cancel ArchiveRetrieval Job and confirmIt will take a few seconds up to a couple of minutes until the cancellation has been performed Once it is done youwill see a warning sign next to the project name The warning sign indicates that the operation has been aborted bythe user
When a project archivalretrieval failed the project will have a warning sign next to its name
Clearing ArchiveRetrieval ErrorsIn case a project archive or retrieval failed (either it was canceled by a user or failed for other reasons) you can resetthe project state back to normal by performing the following operations
1 Login to the Strawberry user interface as an Administrator and right click on the affected project
2 Select Clear Archive Error from the context menu and confirmIt will take a few seconds until the fail state of the project has been cleared and the project is displayed asnormal Once the front end reports that the clearance has been successfully done you may retry to archive orretrieve the project if required
Project Copy-to StrategiesPurpose Strawberry enables users to copy projects to another location This location can be another storagedevice (for backup purposes) a render farm or other external application watch folders This feature works verysimilar to the Archive function The main difference is that copied projects will not be deleted from the mediastorage (source volume) but remain there for further use
Usage Log into the Administration panel and click on the Archive tab Expand the Project Copy-to Strategiesbar Click the ADD button and provide the following information
bull Name The name of the copy-to strategy The users see the name of the strategy when he or she attempts tocopy a project
bull Path The path (aka copy-to destination) for projects copied using this strategy
bull Method
bull plain Strawberry archives the project and media files without compressing them It backups theprojects folder structure as it is
bull tarball Puts the project amp media files of a project into a tarball before copying it
bull zip Puts the project amp media files of a project into a zip file before copying it (Please Note Zip filescan not be CRC checked)
bull Check
bull Fingerprint Sequential integrity check on a file that only detects serious file damages but no minordefects
Archive amp Copy To
44
bull CRCs are specifically designed to protect against common types of errors on data transmissionswhere they can provide quick and reasonable assurance of the integrity of data delivered Howeverthey are not suitable for protecting against intentional alteration of data
bull None No data integrity check at allbull EnableDisable Strategy Define if an archive strategy is available for users (enabled) or not (disabled)
Asset Copy-to StrategiesPurpose Strawberry enables users to copy individual assets to another location This location can be anotherstorage device (for backup purpose) a render farm or external application This feature works very similar to theArchive function The difference is that copied assets will not be deleted from the media storage but remain therefor further use
Usage Log into the Administration panel and click on the Archive tab Expand the Asset Backup Strategies barClick the ADD button and provide the following information
bull Name The name of the copy-to strategy The users see the name of the strategy when he or she attempts tocopy a project
bull Path The path (aka archive destination) for projects copied using this strategy
bull Method
bull plain Strawberry archives the project and media files without compressing them It backups theprojects folder structure as it is
bull tarball Puts the project amp media files of a project into a tarball before copying it
bull zip Puts the project amp media files of a project into a zip file before copying it (Please Note Zip filescan not be CRC checked)
bull Check
bull Fingerprint Sequential integrity check on a file that only detects serious file damages but no minordefects
bull CRCs are specifically designed to protect against common types of errors on data transmissionswhere they can provide quick and reasonable assurance of the integrity of data delivered Howeverthey are not suitable for protecting against intentional alteration of data
bull None No data integrity check at allbull EnableDisable Strategy Define if an archive strategy is available for users (enabled) or not (disabled)
Good to Know
Freezing Archived ProjectsAvailable in Strawberry version 44 or newerIn order to avoid that users are accidentally retrieving archived projects you can freeze these projects using rarrfreezeoptions larr
Templates
Working with Templates
Templates
45
Purpose Templates are an extremely efficient way to prepare standardized project settings and content for allStrawbery users in your facility Templates can contain custom file and folder structures
Example 1 Application Specific Templates
One example to illustrate the benefit of templates can be working with Avid Media Composer in different frame rates(24 frames and 25 frames) Avid does not allow to switch the frame rate within a project With Strawberry you couldcreate two templates one for 24 frames and one for 25 frames and copy the related Avid project files into thistemplate When a user creates a project from on of these templates the corresponding projects files (24 frames or25 frames) will be copied into the new projects an renamed after the new project so the user does not need to createa new Avid project manually after he or she created a project in strawberry
Example 2 Production Specific Templates
Another example of working with templates can be a specific production that requires specific preparations Mostmedia facilities create individual folder structures for different productions so that people save graphics visualeffects and sound effects in the right location on the storage Usually these folder structures need to be recreated foreach episode of a production With Strawberry you can create a template which contains a specific folder structureand even media files and copy your prepared folder and media files into this template As soon as a user choosesthe template upon project creation the folders and files that you prepared in the template will be copied over to thenew project and are immediately available for the user
Creating a Template (Avid Media Composer)Before users can create any Avid projects using the Strawberry client software you need to have at least ONEtemplate Log into the admin panel and click on the MISC tab Expand the TEMPLATES bar Now click theCREATE NEW button
Strawberry will ask you for a Template name a preset a token and a naming pattern
Choose a name that best characterizes your template In this example we will create an Avid template that containsa high definition Avid project with a resolution of 1080p So it makes sense to call the template Avid 1080p
In the preset row click on the little down arrow and choose the Avid preset When a user creates a projectbased on an Avid template Strawberry automatically create the Avid MediaFiles and OMFI MediaFiles folderstructure in the project and it will also ensure that Avid project and media files can be shared properly
The token is a replacement string for a file name This means that if your token says replace_me and you createan Avid template named replace_me and copy it into your template folder (discussed later) every time thetemplate replace_me is used the token text (in this case replace_me) will be changed to the name of the currentStrawberry project So the Avid project file called replace_meavp in your templates folder will be used and namedprojectnameavp as its created in your Strawberry project
In the row pattern you can define how a project name based on this template should look The stringYmd-name will result in the project name 20130810-ProjectName Putting the date inside the projectname will enable your user to search for projects by typing in the date If you dont need the date in the project nameyou can simply delete the date-related parts of the string and leave the name piece If you need the date part youcan modify it to your requirements In order to understand the formatting for doing this please refer to the unix timeman page at httpunixhelpedacukCGIman-cgidate
Templates
46
After you are done click Create and then open Avid Media Composer Create a new local project calledreplace_me with the setting 1080p25
Open the newly created project delete the bin that Avid always makes in new project and empty the Avid trashfolder
In order to ensure that Media Composer will recognize network volumes as media drives open Tools gt Console andtype in alldrives If you see the message All drives will be viewed as media drives (Was previously set to havingonly true media drives act as media drives) you are good to go If you see the message Only true media drives willbe viewed as media drives (Was previously set to having all drives act as media drives) type alldrives againThere are just two possible options
Now go to Tools gt Media Creation gt Capture and select the Strawberry media drive (mapped as a networkdrive on your Computer) as the AudioVideo file destination Click on both Apply to All buttons and then click onOK Now close the project
Templates
47
Navigate to the Strawberry template folder on your storage (Strawberrytemplates) Within that template folder youwill see a folder that is named after the template you created in the Strawberry admin panel (in this case we called itAvid 1080p) Inside this folder will be a folder called media_1 and one called projects
Use the Finder or Explorer to navigate to your local Avid projects folder (eg UsersFlavourSysDocumentsAvidProjects) and open the replace_me project folder Copy the files replace_meavp replace_me Settingsxml andreplace_me Settingsavs to your clipboard
Paste the files into your StrawberrytemplatesAvid 1080pprojects folder If an editor creates a new project using thistemplate Strawberry will rename the replace_me string with the name of the current Strawberry project
Now every time a Strawberry user creates a new project based on this template it has all the right settings export preferences etc that it will inherit from the replace_me project that you created and set up before copying it into the Strawberrytemplatesltyour template namegtprojects folder If you need to modify or improve your template
Templates
48
simply make the changes to the local replace_me project and re-copy the three files into theStrawberrytemplatesltyour template namegtprojects folder
Creating a Template (Adobe Premiere)Before you can create an Adobe Premiere editing project from within the Strawberry client software you need tocreate a template for Strawberry to use Click on the Template Tab in the Admin panel and then click on CreateNew
Strawberry will ask you for a Template name a preset a token and a naming pattern
Choose a name that best characterizes your template In this example we will create an Adobe Premiere templatethat contains an Adobe Premiere project So it makes sense to call the template Adobe Premiere
In the preset row click on the little down arrow and choose the Adobe preset When a user creates a projectbased on an Adobe template Strawberry automatically create the Adobe Cache folder structure in the project and itwill also ensure that Adobe project and media files can be shared properly
The token is a replacement string for file names This means that if your token says replace_me in these settingsand you go on to create an Adobe Premiere project named replace_me and put it in your template folder thetemplate will be used and automatically renamed based on the Strawberry project name that is open This way anAdobe Premiere template project file called replace_mePR will be named StrawberryprojectnamePR each timeyou create a new project from within Strawberry
In the row pattern you can define how a project name based on this template should look like The stringYmd-name will result in the project name 20130810-ProjectName Putting the date inside the projectname will enable your user to search for projects by typing in the date If you dont need the date in the project nameyou can simply delete the date related parts of the string and leave the name piece If you need the date part youcan modify it to your requirements In order to understand the formatting for doing this please refer to the unix timeman page at httpunixhelpedacukCGIman-cgidate
After you are done click Create and go to the Strawberry Client Create a new project using the Adobe Premieretemplate Now open Adobe Premiere and create a new project Name the project replace_me and set the captureformat to HDV Ensure that all Scratch Disk locations are set to same as project
Templates
49
Click ok to create and open the project Once the project is opened go to EditgtPreferences Media and choosethe Adobe Cache on your Strawberry media volume as the destination for Media Cache Files and Media CacheDatabase
Templates
50
Tip If you are using the Adobe Premiere Panel launch it now If a user creates a project based on this template thepanel will launch automatically with the new project
Click OK to confirm your changes Now save the project and leave Adobe Premiere Navigate to your local Adobeprojects folder and copy the newly created project file replace_meprproj to the media_1 folder of the Adobetemplate location that you created
Now every time an editor creates a new project using the Adobe Premiere template the replace_mepr templatewill be used and all the settings preferences and destinations will be inherited and used in the newStrawberryprojectnamepr
Rename a Templates
Templates
51
Purpose You want give the Templates a new name for differentation
Usage Log into the admin panel and click on the MISC tab Expand the MANAGE TEMPLATES bar Check thetemplate what you want rename below the templates list is a button says RENAME and fill out with the new nameIf you are ready click CONFIRM else if you want go back click CANCEL
Duplicate a TemplatePurpose Use dublicate a template if you want clone the settings
Usage Log into the admin panel and click on the MISC tab Expand the MANAGE TEMPLATES bar Check thetemplate what you want duplicate below the templates list is a button says DUPLICATE and fill out with the newname If you are ready confirm it with click DUPLICATE else if you want to stop the prozess click CANCEL
Delete a Template(s)Purpose If you want delete a template(s) eg Didnt needed anymore
Usage Log into the admin panel and click on the MISC tab EXPAND the MANAGE TEMPLATES bar Checkthe template what you want delete below the templates list is a button says DELETE
Configuring the Avid AtticWhen utilizing Avid Media Composer the Avid Attic functionality might be important to your workflow To make theAvid Attic work with strawberry please perform the following steps
1 Close Avid Media Composer
2 Navigate to the Avid Attic folder on our computerWin UsersPublicPublic DocumentsAvid editing application
Mac Macintosh HDUsersSharedAvid editing application
3 Rename the Avid Attic folder to Avid Attic_Old
4 Open an Avid Media Composer project using the Strawberry client and open the project in Avid
5 Close the project in Avid Media Composer
6 Go back to the Avid attic and check whether Avid has created a new Attic folder
7 Check the attic folder for the project that was recently opened in Strawberry
Manage IndexersCheck the following boxes if you want the features or unchecked if not
Enable deep indexing for media files
Index adobe premiere project files
Index avid bin files
Storage Quota
Templates
52
Purpose In this section you can define how much physical storage space all projects managed by strawberry areallowed to occupy The quota is a soft quota meaning that there is no physical storage restriction once it getsexpired However Strawberry will send a warning email if if the quota that you defined has been reached
Usage Log into the admin panel and click on the MISC tab Expand the STORAGE QUOTA bar Define howmuch space (in Gigabytes) all projects managed by strawberry are allowed to occupy and press SAVE You canchange this quota at any time
MYSQL BackupWhen clicking the Backup Now button Strawberry creates a dump of its MySQL database The default location forthe database dump is optsb4databackups The default destination can be reconfigured in theoptsb4appfsbaseconfigdatabase-backupyml file
Versions amp LicenseThis section is for license and support purpose only
VIEW Proxy Encoder
Supported Video Audio and Image File FormatsSupported Video Formats amp CodecsApple Intermediate Codec (MOV)Apple MJPEG-B (MOV)Apple ProRes (MOV)
Arri Alexa (ARI)
AS-11 IMX 50 (MXF)AS-11 AVC Intra 100 (MXF)
(X)AVC Intra 50100 (MOV MXF)
Avid 11 amp 11xAvid DV amp DV100
Avid DNxHD (MOV MXF)(45 60 75 90 90x 110 110x 120 120x 145 185 185x 220 220-10Bit)
Avid Interplay C93 amp MVE videoAvid MPEG2 50 - SDAvid Meridien Compressed SD amp Uncompressed SDAvid Packed amp RGBPacked
AVS (Standard amp Chinese)
Black Magic R210
Canopus LosslessCinepak
VIEW Proxy Encoder
53
DV (PAL amp NTSC)
DVCPRO HD | 100 MbpsDVCPRO 50 | 50 MbpsDVCPRO 25 | 25 Mbps
H261H263 H263-1996H263+ H263-1998 H263 version 2H264 AVC MPEG-4 AVC MPEG-4 (MP4 MOV MXF)
HDV
MJPEG amp MJPEG LosslessMPEG 1 amp 2 (M1V M2T M2V MPEG MPG MPGV MPV VOB)MPEG 4 (M4A M4P M4V MP4)
P2 - AVC-Intra 50 100 (MOV MXF)P2 - DVCPRO 25 50 100 (MOV MXF)
QuickTime uncompressed
Red Digital Cine Camera (R3D)
Windows Media Video (All Versions)
XDCAM 25XDCAM IMX 30XDCAM HD 50XDCAM SXS 50
Also SupportedAvid 11 10-bit RGB PackerFlash Video (FLV)Microsoft Video 1On2 VP3On2 VP5On2 VP6QuickTime 8BPS videoQuickTime Animation (RLE) videoQuickTime Graphics (SMC)QuickTime video (RPZA)R10K AJA Kona 10-bit RGB CodecR210 Quicktime Uncompressed RGB 10-bitTheoraVP8VP9WMV7
Supported Audio Formats amp CodecsMost CommonAAC+AACAC-3
CAF
MP3 (All Versions)MPEG-4 (All Versions)
PCM (All Versions amp Bitrates)
WAV
WMA (All Versions)
Also Supported
VIEW Proxy Encoder
54
Apple lossless audioATRAC1ATRAC3ATRAC3+Bink AudioCore Audio Format (CAF)DV audioEnhanced AC-3FLAC (Free Lossless Audio Codec)MACE (Macintosh Audio CompressionExpansion) 31MACE (Macintosh Audio CompressionExpansion) 61MLP (Meridian Lossless Packing)MP1 (MPEG audio layer 1)MP2 (MPEG audio layer 2)OpusRealAudio 10 (144K)RealAudio 20 (288K)RealAudio 30 (dnet)RealAudio LosslessRealAudio SIPR ACELPNETVorbisWindows Media Audio Voice
Supported Image Formats|Targa |TIF |PSD |PSB |PNG |JPG |IFF |GIF |BMP |DPX |EXR |ARI |EPS |AI
Enabling or Disabling ViewLog into the admin panel and click on the VIEW tab If VIEW is enabled proxy files will be created automaticallybased on the criteria below If VIEW is disabled proxy file encoding will not take place and he user front endautomatically jumps to list view instead of thumbnail view
Proxy Encoder ConfigurationIn this menu you can choose from properties of the Strawberry generated proxy files These options include
bull Proxy File Location shows where Strawberry saves the proxy files that it generates This location is definedupon installation and can only be changed by modifying the Strawberry configuration files on the Strawberryserver
bull Bitrate Define the proxy bitrate (per second) Please keep in mind that lower bitrates might be more suitablefor users connecting over the Internet while higher bit rates are good for LAN operations Is there a goldenrule Unfortunately not If you are using the Strawberry Preditor Add-on we recommend a low proxy bitrate(700k - 900k)
bull Resolution Choose a resolution for your proxy files There should always be a coherence between theresolution and the bit rate For example A 1920x1080 proxy file should have a bitrate of at least ~1200k whilea 640x360 proxy should look good with a 600k bitrate
bull Image Sequence Recognition When Strawberry VIEW detects an image sequence (Basename amp Count) withmore than 20 individual images it will create a preview MP4 file out of it An image sequence must have adelimiter between its basename and its count Valid delimiters are - (dash) (dot) and _ (underscore)sequence-name_001 is an example of a valid naming convention
bull Time Code Burn-In If you wish to have a video time code burned into your proxy files you should enable thisfeature
bull Time Code Label Position Defines whether the proxy time codes (or image layer names) are burned in on thebottom or on top of the proxy file
V isual Watermark Check this box if you want Strawberry to burn a visual watermark into your proxy files
bull Watermark Position Decide on which position of the screen your watermark image should be visible
VIEW Proxy Encoder
55
bull Watermark Image Upload a Watermark image as a png file The image should not be larger than your currentproxy resoultion and should have a transparent background You can download example watermarks heredlflavoursyscommanualssupporting_filesExample_Proxy_Watermarkszip
bull Watermark Preview Previews your uploaded watermark in respect of the current proxy resolution as well asthe current Timecode burn-in position
Blacklists amp Whitelists
bull Factory File Blacklist This is a factory blacklist provided by FlavourSys The blacklist has been populatedbased on best practice workflows If you need any of the factory blacklist file extensions whitelisted just enterthe extension into the Files Whitelist
bull File Blacklist Enter any file extension that you dont wish to see in the Strawberry user interface Strawberrywill then ignore files that are having this extension meaning that no proxies are generated However you canstill use the files on the FinderExplorer level in your projects In order to blacklist an item just enter extensionand press enter Press the save button to confirm
bull File Whitelist If you need to whitelist any extensions from the Factory File Blacklist just enter its extensioninto the Files Whitelist In order to whitelist an item just enter extension and press enter Press the savebutton to confirm
bull Factory Folders Blacklist This is a factory blacklist provided by FlavourSys The blacklist has been populatedbased on best practice workflows If you need any of the factory folder blacklist whitelisted just enter the foldername into the Folders Whitelist and press enter Press the save button to confirm
bull Folders Blacklist (Recursive) Enter any folder name that you dont wish to see in the Strawberry user interfaceStrawberry will then ignore the folder and its content meaning that no proxies are created You can still useblacklisted items on the FinderExplorer level in your projects In order to blacklist a folder just enter the foldername into the blacklist and press enter Press the save button to confirm
bull Folders Whitelist (Recursive) If you need to whitelist any folder from the Factory Folders Blacklist just enterits name into the Folders Whitelist and press enter Press the save button to confirm
Applying Blacklist amp Whitelist ChangesStrawberry 5 applies blacklist changes automatically In order to apply whitelist changes please perform thefollowing steps Also perform these steps in order to apply blacklist changes in Strawberry 44 or older versions
VIEW Proxy Encoder
56
1 Login to the Administration panel
2 Click on the MANAGE PROJECT tab
3 Select the project on which you want to apply the operation
4 Click the VIEW button below the project list
5 Select the radio button Rescan Project(s) and confirmDepending on the amount of files in the affected project this operation can take several minutes
Node and Worker Control
Purpose In this section of the admin panel you monitor and change the status of each VIEW encoding node that isintegrated in your environment You also have the possibility to set Schedulers so that you can decide if the nodesand the workers run
Usage Log into the admin panel and click on the VIEW tab Expand the NODE AND WORKER CONTROL barHere you can select from the following options
bull NODE ID The internal ID of each encoding node
bull NODE ADDRESS The hostname or IP address and port under which each node can be reached
bull STATUS Green means running yellow means paused and red means not running
bull NUMBER OF WORKERS Number of encoding workers (threads) that work at the same time Choose theamount of workers based on the amount of CPU cores of each node One worker per core works very well butleave at least one core for the OS and the rest of the Strawberry system The Strawberry Server license comeswith 3 Workers additional workers must be licensed separately
bull Actions Stop start restart or edit a scheduler for individual nodes
Content Download OptionsPurpose If you want to allow user to download media assets using the front end you can define this here Forinstance for workflows requiring executive review or for film schools where faculty could grade from home thisfeature can be beneficial however for feature film workflows this feature can be turned off
Usage Log into the admin panel and click on the VIEW tab Expand the CONTENT DOWNLOAD OPTIONS barIf you want to enable users to download low resolution media files (proxy files) from the front end check the boxnext to Allow users to download proxy files If you want to enable users to download high resolution media filesfrom the front end check the box next to Allow users to download high-res files
Rescan-Project(s)Purpose Scans the project for new files and newly supported file formats and attempts to encode them to proxyfiles It will also apply black list white list changes to existing projects
Usage Log into the Administration panel and click on the PROJECTS tab Expand the MANAGE PROJECTSbar Select the project(s) that you want to rescan and press the VIEW button below the project list and checkRescan Project(s) and confirm it
Repair-Project(s)
VIEW Proxy Encoder
57
Purpose Scans the project for new files and newly supported file formats and attempts to encode them to proxyfiles It will also apply black list white list changes to existing projects
Usage Log into the Administration panel and click on the PROJECTS tab Expand the MANAGE PROJECTSbar Select the project(s) that you want to repair and press the VIEW button below the project list and check RepairProject(s) and confirm it
Reencode-EverythingPurpose Deletes every file in the project to see if meta data have been changed Also looks for new files and newlysupported file formats and attempst to encode them to proxy files It will also apply black list white list changes toexisting projects
Usage Log into the Administration panel and click on the PROJECTS tab Expand the MANAGE PROJECTSbar Select the project(s) that you want to reencode-everything and press the VIEW button below the project listand check Reencode-Everything and confirm it
Miscellaneous
Manage TemplatesPlease visit this manuals rarr Templates larr chapter to get template related information
Safe SearchPurpose ldquoSafe Searchrdquo is an ldquoin edit suiterdquo security feature for Strawberry managed content Its aim is to reducethe visibility and searchability of content while a project with specific custom metadata is open This prevents thatclients see content of other clients while working on a project inside the editing room
Enabling Safe SearchLogin into the Strawberry Administrator panel and select the ldquoMiscrdquo tab Open the ldquoSearch settings and check thebox next to ldquoEnable Safe Search Featurerdquo
Define ldquoSafe Searchrdquo MetadataOnce ldquoSafe Searchrdquo is enabled click on the ldquoProjectsrdquo tab and open the ldquoCustom Metadatardquo menu Select a set andthen a drop down menu within it Then click on ldquoEdit Valuerdquo
Miscellaneous
58
Next to each drop down menu is a checkbox called ldquoSafe Searchrdquo Check this box for each value for which the ldquoSafeSearch filter should apply
When a user opens a project that includes a ldquoSafe Searchrdquo metadata the search field provides the informationaccordingly (safe search enabled for ldquometadata namerdquo) From this point on all searches will be carried within therelated safe search metadata context This applies until the project is closed
Miscellaneous
59
Good to Know
bull Only one drop down menu can have safe search metadata
bull Safe search metadata in the Administrator panel should not be changed enabled or disabled while projects areopened as this can lead to inconsistent search results
Manage IndexersAvailable in Strawberry version 42 or newer
GeneralCheck the following boxes if you want the features or unchecked if not
bull Enable Deep Indexing for Media Files(If enabled Strawberry will extract technical metadata from media files If it is disabled Strawberry will only index filenames and file sizes This feature needs to be enabled in order for the proxy encoding to work)
bull Index Adobe Premiere Project Files(If enabled Strawberry will extract master clip names a descriptions comments from Adobe Premiere master clipsto make these information visible amp searchable in the front-end)
bull Index Avid bin files(If enabled Strawberry will extract master clips names and sequence names from Avid bins to make theseinformation searchable in the front-end However when searching for an Avid master clip or sequence name theuser will not be provided with a visual presentation of the asset or sequence but will only see the project(s) thatcontains these information since this feature is beta we recommend to turn it of)
bull Extract Exif metadata from images(If enabled Strawberry will extract EXIF metadata from image files
bull Extract XMP metadata from files(if enabled Strawberry will extract XMP metadata from media files)
bull Extract XML metadata (Experimental)(if enabled Strawberry will extract XML metadata from xml sidecard files Please contact us for an overview ofsupported XML schemes)
bull Search for technical metadata(If enabled Strawberry will extract technical metadata from video files as well as ID3 tags (album Artist etc) fromaudio files
Technical Metadata WhitelistStrawberry maintains a search index that allows user to carry out searches in an extremely fast fashion Since thissearch index is stored in the server memory its size must be limited and therefor can not include all possible searchparameters Administrator can define the search parameters by white-listing them
Miscellaneous
60
Enter any label that you wish to add to the Strawberry search index To insert a label just click next to an existinglabel and start typing An auto completion list will show available results for your search term Select the technicalmetadata label that you wish to add to the search index Use the x button next to a labels name to remove a labelfrom the search index The changes will not apply immediately but on the next build of the search index (once anight) If you want to apply the settings immediately SSH login to the Strawberry server as root and type thecommand sb reindex
Storage Quota
Purpose In this section you can define how much physical storage space all projects managed by strawberry areallowed to occupy The quota is a soft quota meaning that there is no physical storage restriction once it getsexpired However Strawberry will send a warning email if if the quota that you defined has been reached
Usage Log into the admin panel and click on the MISC tab Expand the STORAGE QUOTA bar Define howmuch space (in Gigabytes) all projects managed by strawberry are allowed to occupy and press SAVE You canchange this quota at any time
Adobe Premiere Specific Feature
Auto-Link media from Library into projectThis feature is part of a custom development and currently not documented
Auto-Ingest local media into projectPurpose If a user imports media from a usb or local hdd into an Adobe Premiere project that is managed byStrawberry Strawberry can automatically copy that media into the projects media volume This ensures that allmedia used in a Premiere project is actually on the centralized storage
Usage Log into the admin panel and click on the MISC tab Expand the Auto Import Library amp unmanaged Assets(Adobe Premiere Only) bar If you wish to enable the Auto-ingest feature check the box next to it and define aninterval The interval determines how often the Strawberry Adobe panel will check for unmanaged inside each openPremiere project
Auto-Link subproject media into projectPurpose If a user imports media from a subproject into an Adobe Premiere project that is managed by StrawberryStrawberry can automatically link that into the from the subproject into the parent project This ensures that anyproject is self contained at any point
Miscellaneous
61
Usage Log into the admin panel and click on the MISC tab Expand the Auto Import Library amp unmanaged Assets(Adobe Premiere Only) bar If you wish to enable the Auto-link feature check the box next to it and define aninterval The interval determines how often the Strawberry Adobe panel will check for imported subproject mediainside the current project to link it
PreditorDefine the Timeout based on which a user should be automatically logged out of Preditor In the process Strawberrywill also automatically close the users sequence in order to free the license slot Preditor creates auto-saves of opensequences every minute and stores these on the server so that progress does not get lost even if the sequence getsauto-closed
SMTP SetupPurpose Strawberry has the ability to send email notifications on specific criteria This usually is the case if a teamexpires its storage quota or if assets are shared via email using the built-in functions For this feature to workStrawberry needs to be provided with STMP information
Usage
1 Login to the Strawberry server and cd to optsb4appfsbaseconfig
2 Open the file smtpymlexample and replace the example SMTP values with your own ones
3 Save the file as smtpymlThe Strawberry services needs to be restarted for the changes to apply
MYSQL BackupWhen clicking the Backup Now button Strawberry creates a dump of its MySQL database The default location forthe database dump is optsb4appbackups The default destination can be reconfigured in theoptsb4appfsbaseconfigdatabase-backupyml file
Empty TrashPressing the Empty Trash Now button will instantly remove all contents from the Strawberry trash folder
Osiris OptionShared Edits only
Purpose If the Osiris option is enabled Strawberry will mount its project media volumes in a specific way AvidMedia Composer will detect these volumes as volumes from an Avid storage and will provide bin locking for allStrawberry managed Media Composer projects
Versions amp LicenseThis section shows you the current version numbers of the Strawberry 4 modules that are installed on yourStrawberry server Additionally it provides you with license related information for your site
Updating a LicenseOnly use this method if you are running Strawberry in a Non-High Availability environment
Please go to the Strawberry admin panel misc versions amp license and click the NEW LICENSE button Copy andpaste the license string in there and click the UPDATE button Once this is done SSH login to the Strawberryserver and type service strawberry4 restart The license will be applied once the Strawberry service has beenrestarted
Legal Information
Legal Information
62
AVID is a trademark of Avid Technologies (wwwavidcom) Apple and FCP are trademarks of Apple in the US(wwwapplecom) Adobe and Premiere are trademarks of Adobe (wwwadobecom) All product names logos andbrands are property of their respective owners All company product and service names used in this manual are foridentification purposes only Use of these names logos and brands does not imply endorsement
Legal Information
63
- Last Updated July 20 2017
-
- Introduction
- System Requirements
-
- Storage File System Requirements
-
- List of Certified Storage Vendors
- List of Supported Storage File Systems
-
- Strawberry Server HWSW Requirements for Production Environments
- Minimum Server HWSW Requirements for Demonstration amp POC Environments
- Minimum Requirements for a dedicated View Proxy Encoding Node
- Requirements for the Strawberry Client
-
- Strawberry Client SSL
-
- Requirements for the Strawberry Adobe Panel
- Minimum Web Browser Requirements
-
- Installation Manuals
-
- Strawberry Client
-
- Installing the Client
- Starting the Client
- Upgrading the Client
- Deleting the Client
-
- Client Configuration for NAS
-
- SMB Mounts Configuration
- Paths to Editing applications (App Launcher)
- Mount your drives under Windows 7 amp 8
- Mount your drives under OSX
-
- Client Configuration for StorNext amp XSAN
-
- SAN Mount Configuration
-
- Client Configuration for Shared Edits under macOS
- Client Configuration for Shared Edits under Windows
- Changing the Clients Fuse Blocksize (macOS only)
- Adobe Panel
-
- Installing the Panel
- Updating the Panel
- Removing the Panel
- Testing the Panel
-
- Users Roles amp Teams
-
- Manage Roles
-
- Available Capabilities
- Creating a role
- Editing a role
- Deleting a role
-
- Manage Users
-
- Creating a User
- Changing a Users Role
- User Specific Roles
- Assigning a User to Teams
- Deleting a User
- Removing a User from a Team
-
- Manage Teams
-
- Creating a Team
- Changing a Teams Name
- Changing a Teams Quota
- Deleting a Team
-
- Manage Edits
-
- Manage Projects
-
- Manage Online Projects
-
- Force Closing a Project
- Deleting one or multiple Projects
- Archiving a Project
-
- Manage Archived Projects
-
- Retrieving a Project from the Archive
-
- Download Project List
- Custom Metadata
-
- Manage Libraries
-
- Introduction
- Library States
- Ingest Libraries
-
- Creating a Library Project
- Configuring an Ingest Library
- Configuring the Library Ingest Interval
- Configuring the Library Clean Interval
- Good to Know
-
- External Libraries
-
- Creating a Library Project
- Configuring an External Library
- Configuring the Library Clean Interval
- Configuring the External Library Reindex Interval
- Good to Know
-
- Custom Metadata
-
- Custom Metadata Sets
- The Master Set
- Creating a Metadata Set
- Connecting Metadata Sets
- Deleting a Metadata Set
- Creating a Dropdown Menu
- Creating a Text Input Field
- Creating a Replacement Pattern
- Editing a Value
- Deleting a Value
- Creating Project Status Flags
- Deleting Project Status Flags
- Supported Unix Time Modifiers
-
- Archive amp Copy To
-
- Creating an Archive Strategy
- Canceling an ArchiveRetrieval Job
- Clearing ArchiveRetrieval Errors
- Project Copy-to Strategies
- Asset Copy-to Strategies
- Good to Know
-
- Freezing Archived Projects
-
- Templates
-
- Working with Templates
- Creating a Template (Avid Media Composer)
- Creating a Template (Adobe Premiere)
- Rename a Templates
- Duplicate a Template
- Delete a Template(s)
- Configuring the Avid Attic
- Manage Indexers
- Storage Quota
- MYSQL Backup
- Versions amp License
-
- VIEW Proxy Encoder
-
- Supported Video Audio and Image File Formats
- Enabling or Disabling View
- Proxy Encoder Configuration
- Blacklists amp Whitelists
- Applying Blacklist amp Whitelist Changes
- Node and Worker Control
- Content Download Options
- Rescan-Project(s)
- Repair-Project(s)
- Reencode-Everything
-
- Miscellaneous
-
- Manage Templates
- Safe Search
-
- Enabling Safe Search
- Define ldquoSafe Searchrdquo Metadata
- Good to Know
-
- Manage Indexers
-
- General
- Technical Metadata Whitelist
-
- Storage Quota
- Adobe Premiere Specific Feature
-
- Auto-Link media from Library into project
- Auto-Ingest local media into project
- Auto-Link subproject media into project
-
- Preditor
- SMTP Setup
- MYSQL Backup
- Empty Trash
- Osiris Option
- Versions amp License
-
- Updating a License
-
- Legal Information
-

Last Updated July 20 2017
IntroductionWelcome to the Strawberry 5 Administration manual You hereby acknowledge that you have read and understandthe end user license agreement (EULA) and agree that your use of the software as well as any relateddocumentation is an acknowledgment of your agreement to be bound by the end user license agreement as writtendown here httpwwwflavoursyscomeula
The full Strawberry changelog is available here httpdlflavoursyscominstallersbChangeLog
If you wish to scheduel an update or upgrade please put your request herehttpwwwflavoursyscomsupportschedule-an-update
an overview of the latest Strawberry feature is available here httpwwwflavoursyscomwelcome-to-strawberry-5
System Requirements
Storage File System RequirementsStrawberry requires a Linux based storage file systems to work properly Windows storage file systems (eg NTFS)are not supported at this point
List of Certified Storage Vendors
bull Bright Technologies
bull EMC Isilon
bull Hitachi
bull IBM
bull NetApp
bull Panasas
bull Quantum
bull Qumulo
bull Rohde amp Schwarz DVS
bull Scale Logic
List of Supported Storage File Systems
bull BWFS
bull HyperFS
bull EXT4
bull HFS
bull IBM Spectrum Scale
bull OneFS
bull StorNext
bull XFS
bull XSan
bull ZFS
bull Other Linux based storage file systems [1]
Last Updated July 20 2017
1
[1] File system not listed here might be supported if they comply to the POSIX standard (httpsenwikipediaorgwikiPOSIX ) Please contact us for more information httpwwwflavoursyscomcontact
Strawberry Server HWSW Requirements for Production EnvironmentsThe Strawberry server is hosting the Strawberry services amp the database Additionally it can perform 247 proxyencoding
bull 24 GB RAM
bull 16 CPU cores (Intel Xeon AMD Opteron 24 GHZ or comparable)
bull 2x 500GB SSD (mirrored)
bull A dedicated connection to the storage and a dedicated network connection to the client network (min 10gbitEthernet or comparable)
bull RHEL 65 or newer Centos 65 or newer 64bit
Minimum Server HWSW Requirements for Demonstration amp POC EnvironmentsThe below configuration is suitable for demonstration and proof of concept environments only
bull 8GB RAM
bull 6 CPU cores
bull 1x 250GB HDD
bull RHEL 65 or newer Centos 65 or newer 64bit
Minimum Requirements for a dedicated View Proxy Encoding NodeThe VIEW server serves as a dedicated proxy encoding node for Strawberry Strawberry can operate using multipleproxy encoding nodes while automatically performing load balancing among these
bull 12 GB RAM
bull 16 CPU cores or more (Intel Xeon AMD Opteron 24 GHZ or comparable)
bull 2x 500GB SSD (mirrored)
bull A fast connection between the Strawberry server and the store storage (min 10Gbit Ethernet or comparable)
bull An adequate connection between the View encoder node and the Strawberry server for metadata traffic (1GbitEthernet)
bull RHEL 65 or newer Centos 65 or newer 64bit
Requirements for the Strawberry ClientThe Strawberry 5 client application requires at least Windows 7 or macOS 109 to work properly Updated Clientversions can be downloaded here httpwwwflavoursyscomsupportstrawberry-product-downloads
Strawberry Client SSLThe Strawberry Client supports SSL connections when Strawberry Server certificates are signed by Trusted RootCertification Authorities Windows and Mac OSX clients fully support self-signed certificates To use SSL withStrawberry add proper certificates to your server configuration and prepend the server name in the client withhttps instead of http
Requirements for the Strawberry Adobe Panel
Minimum Web Browser Requirements
Last Updated July 20 2017
2
The Strawberry user interface can be accessed from most modern web browser Strawberry was tested with thefollowing browsers
bull Apple Safari (Version 605 or newer)
bull Google Chrome (Version 31 or newer)
bull Mozilla Firefox (Version 37 or newer)ƒ _index_installation
Installation Manuals
Strawberry Client
Installing the Client
1 Download the latest Strawberry client for your Strawberry version and client operating system herehttpwwwflavoursyscomsupportstrawberry-product-downloads
2 Run the installer and follow the instructions of the installation wizard
Starting the ClientAt the first start the client will require additional configuration Depending on your storage and network environmentplease follow the appropriate configuration steps below
Upgrading the Client
1 Download the latest Strawberry client for your Strawberry version and client operating system herehttpwwwflavoursyscomsupportstrawberry-product-downloads
2 Run the installer and follow the instructions of the installation wizardThis procedure will automatically overwrite older versions of the client software
Deleting the ClientMacOS
1 If you have a project open in Strawberry please close it first
2 Close the Strawberry client application
3 Open Finder and Navigate to the Applications folder
4 Select Strawberry Client and move it to the trashWindows
1 If you have a project open in Strawberry please close it first
2 Close the Strawberry client application
3 Open Programs and Features by clicking the Start clicking Control Panel clicking Programs and then clickingPrograms and Features
4 From the program list select Strawberry Client lick uninstall and follow the Windows instructions
Client Configuration for NASPlease follow these instructions if your Strawberry server is configured to not use shared edits
First enter the Strawberry server IP address or fully qualified domain name into the ldquoStrawberry Serverrdquo field Thewizard will automatically add the ldquohttprdquo
Installation Manuals
3
In the second field (ldquoEdit namerdquo) you need to enter the unique workstation name of the current machine you areinstalling the client on Make sure there is no other machine with this name setup for strawberry If you arereinstalling the client and have chosen an existing name the client will warn you Acknowledge the warning as thisis totally fine
In this example we have chosen ldquoNetwork Attached Storage (NAS) via SMBrdquo as storage type If this is the first timesetting up the edit also click the ldquoCreate SMB Userrdquo checkbox This will make the server setup an SMB user andthe corresponding edit work directories on the storage
The Strawberry server has now created the SMB user and folders successfully and the client will display the SMBcredentials The randomly generated password shown can also be found in the admin panel under ldquoUsersrdquo rarrldquoManage Editsrdquo if needed later
Installation Manuals
4
If you have already setup an edit workstation before and are reinstalling the client you do not need to have the SMBuser recreated Only enter the IP address and existing workstation name in the corresponding fields and selectldquoNetwork Attached Storage (NAS) via SMBrdquo without checking the ldquoCreate SMB userrdquo checkbox
Please use the existing SMB credentials to mount the shares for the next step
Installation Manuals
5
After clicking the ldquoNext -gtrdquo button the following screen appears This is to inform you that the setup has workedsuccessfully
You now need to mount the correct media and project shares for you current edit workstation Refer to later in themanual if you need to know how to mount shares via SMB
Installation Manuals
6
SMB Mounts ConfigurationOnce you have mounted the shares hit the ldquoNext -gtrdquo button The client setup wizard will now want to know whichdrive letters (or mount paths for OSX) the shares are connected to In this example we have mounted the projectshare to drive P and the media share to drive M
For the project share hit the ldquoChooserdquo button and navigate to the drive or mount point
For the media share hit the ldquoAddrdquo button and select the first media drive You can add more media drives this way ifyou have a multi media storage type setup
Installation Manuals
7
Paths to Editing applications (App Launcher)In the last setup wizard window you can assign file type extensions to the corresponding applications You firstchoose the the application by clicking the ldquoChooserdquo button Navigate to the program folder you want to have your fileopened with Choose the exe file for Windows or the application package folder for OSX Next enter the fileextension (eg ldquoavprdquo for Avid project files ldquoprprojrdquo for Premiere files) and click the ldquoAddrdquo button The chosenapplication and extension will be added to the list below If the extension you want to add already exists you need toselect it in the list and hit the ldquoRemoverdquo button to delete it first
The ldquoEnabledrdquo checkbox allows you to activate or deactivate the application assignments
Installation Manuals
8
Mount your drives under Windows 7 amp 8Right-click the ldquoComputerrdquo entry in the explorer and select ldquoMap network driverdquo
Installation Manuals
9
Select the drive letter for the first share (eg ldquoPrdquo for the project share) and enter the SMB path to the NAS server(eg 20000168sb4-projects) You might need to ask your administrator for the correct path(s) If you want thedrives to auto mount next time you log in check the ldquoReconnect at logonrdquo checkbox Select the ldquoConnect usingdifferent credentialsrdquo checkbox to be able to enter the correct login data Use the credentials generated by the serveror provided by the admin
Please do the same for your other shares (eg 20000168sb4-media) Try to keep the drive lettering identicalacross different workstations
Installation Manuals
10
You should now have the drives mounted like so and can select them during the setup wizard phase
Mount your drives under OSXGo to Finder rarr Go rarr Connect to Server
Installation Manuals
11
Mount the first share by typing the SMB URL cifs[ServerIP][name of share] into the ldquoServer Addressrdquo field (egcifs20000182sb4-projects)
The system will ask for the SMBcifs credentials Select the ldquoRegistered Userrdquo checkbox Use the credentialsgenerated by the server or provided by the admin You can save the credentials in your OSX users keychain byselecting the checkbox at the bottom
Installation Manuals
12
Please do the same for your other shares (eg cifs20000182sb4-media)
You should now have mounted your shares successfully
Client Configuration for StorNext amp XSANPlease follow this chapter if you are using Strawberry in combination with StorNext or XSAN
Installation Manuals
13
SAN Mount Configuration
1 Install amp start the Strawberry client application (httpwwwflavoursyscomsupportstrawberry-product-downloads )
2 In the configuration Window enter the IP address of your Strawberry server the custom edit name (can befreely defined) and choose SAN as the storage type
bull The edit name can not start with a number and can not include space
bull Creating an SMB user is only required if you plan to use this edit with Strawberry via SMB at a later pointOtherwise just keep this box unchecked
3 Click Next until you reach a Window called SAN mounts configuration
4 If you are not using Avid Media Composer Next to the Directory text field is a button called Choose Clickthis button and navigate to the edit media directory that Strawberry created for your edit This directory isusually is under SAN_Volume_NameStrawberryMedia_1editsedit_name The edit_name is the name thatyou have defined in step 2
5 OSX Under Volume name enter the name under which you wish the Strawberry media volume to appear Ifyou are unsure what to choose just enter sb_media
6 Windows Drive choose the drive letter under which you wish the Strawberry media drive to appear If you areunsure we recommend to go with the M drive if possible
Installation Manuals
14
Make sure that the Strawberry media volumedrive name is the same on all of your editing systemx This willprevent offline media issues
7 Click Open
Installation Manuals
15
8 If you are using Avid Media Composer Perform step 4 After this you will need to setup a dedicated projectvolume for Avid To do so Click on the Choose button next to the Directory text field again Now navigate toSAN_Volume_NameStrawberryprojectseditsedit_name The edit_name is the name that you havedefined in step 2 Name the volume sb_avid_project or choose a custom name Now click Add In thevolume list check the checkbox that say Project Volume
9 OSX Under Volume name enter the name under which you wish the Strawberry Avid project volume toappear If you are unsure what to choose just enter sb_avid_project
10 Windows Drive choose the drive letter under which you wish the Strawberry project drive to appear If youare unsure we recommend to go with the P drive if possible
Make sure that the Strawberry media volumedrive name is the same on all of your editing systemx This willprevent offline media issues
11 Click Next
12 To configure Paths to editing applications please read the App Launcher chapter
13 Click Next to reach Miscellaneous Options
bull Create desktop shortcuts (If enabled Strawberry will create a desktop shortcut to the open project Theshortcut will point to the Strawberry media volume mounted on the Client machine)
bull Desktop shortcuts point to source (original) mounts (If enabled desktop shortcuts will not point to theStrawberry media volume on the local computer but to the project folder directly on the SAN Leave thisunchecked per default)
Installation Manuals
16
bull Final Cut Pro 7 fix (Select this option only if you use FCP 7) It is not required for FCP X
bull Show Strawberry mounts in the Finder (Enabled by default Only disable this if you which to hide theStrawberry media volumes from Windows Explorer or OSX Finder)
bull Remount volumes when openingclosing project (Per default the Strawberry media volumes get mounted whenstarting the Client and remain mounted when openingclosing projects When this option is enabled Strawberrywill unmount the volumes every time a project gets closed and mount them when opening a project)
bull Library Location (This feature is in beta stadium and not documented yet)
Client Configuration for Shared Edits under macOSIn order to configure the Strawberry client for shared edits the Strawberry server has to be configured to theshared edits mode first If you wish to update to shared edits edits please contact FlavourSys support first Thefollowing steps are valid for NAS and SAN environments
1 Install amp start the Strawberry client application (httpwwwflavoursyscomsupportstrawberry-product-downloads )
2 In the configuration Window enter the IP address of your Strawberry server the custom edit name and chooseShared Edits as the storage type
bull The edit name can not start with a number and can not include space
bull Creating an SMB user is not required for this mode
Installation Manuals
17
3 Click next until you reach the window shared edits mount configuration
4 In here provide the path to the central Strawberry media directory by clicking on the Add button This usuallyis Storage_Volume_Namestrawberrymedia_1media
5 Click Next
6 To configure Paths to editing applications please read the App Launcher chapter
7 Click next until you reach a window called Miscellanous options
bull Create desktop shortcuts (If enabled Strawberry will create a desktop shortcut to the open project Theshortcut will point to the Strawberry media volume mounted on the Client machine)
bull Desktop shortcuts point to source (original) mounts (If enabled desktop shortcuts will not point to theStrawberry media volume on the local computer but to the project folder directly on the SAN Leave thisunchecked per default)
8 Click Finish and enter the OSX Administrator credentials to save the configuration
Client Configuration for Shared Edits under WindowsIn order to configure the Strawberry client for shared edits the Strawberry server has to be configured to theshared edits mode first If you wish to update to shared edits edits please contact FlavourSys support first Thefollowing steps are valid for NAS and SAN environments
Installation Manuals
18
1 Download Strawberry client application and run the installer (httpwwwflavoursyscomsupportstrawberry-product-downloads )
2 The installer will prompt you with the message Allow all users to create file references on this machine(required for Shared Edits) Please make sure that the checkbox is checked
3 In the configuration Window enter the IP address of your Strawberry server the custom edit name and chooseShared Edits as the storage type
bull The edit name can not start with a number and can not include space
bull Creating an SMB user is not required for this mode
4 Click next until you reach the window shared edits mount configuration
5 In here provide the static drive letter under which open projects should appear on this editing station and thepath to the central Strawberry media directory This usually isStorage_Volume_Namestrawberrymedia_1media
Installation Manuals
19
Click Next
6 Click Next
7 To configure Paths to editing applications please read the App Launcher chapter
8 Click next until you reach a window called Miscellanous options
bull Create desktop shortcuts (If enabled Strawberry will create a desktop shortcut to the open project Theshortcut will point to the Strawberry media volume mounted on the Client machine)
bull Desktop shortcuts point to source (original) mounts (If enabled desktop shortcuts will not point to theStrawberry media drive on the local computer but to the project folder directly on the SAN or NAS Leave thisunchecked per default)
9 Click Finish
Changing the Clients Fuse Blocksize (macOS only)This function requires Strawberry Client 504 or newerYou can set custom block size running the client from the command line like this (the default value is 4K)
$ ApplicationsStrawberry ClientappContentsMacOSfsclient --blocksize 64k
The block size has to be provided in the following way
bull 4k
Installation Manuals
20
bull 8k
bull 16k
bull 32k
bull 64k
bull 128k
bull 256k
bull 512k
bull 1M
Adobe Panel
Installing the PanelThe installation process for the Strawberry Adobe panel is similar under OSX and Windows Only amacOSWindows Admin user can install the panel as this is an Adobe requirement
Important Note The Adobe Extension Manager is no longer required for the installation of the Strawberry AdobePanel and is obsolete as of CC2015
1 Download the latest Strawberry Adobe Premiere CC Panel that matches your current Strawberry versionhttpwwwflavoursyscomstrawberry-product-downloads
2 Close all Adobe applications running on your computer
3 Extract the zip to a local hard drive (the installation will NOT work from a network or USB location)
4 Go into the extracted folder Strawberry-AdobePanel-5xx
5 OSX Make sure you are logged in as an Administrator Double-click on the installcommand file Once theinstallation is completed you will see the following success message Strawberry AdobePanel installedsuccessfully If you see an error message instead please review the error code on the following websitehttpwwwadobeexchangecomresources19errors
6 Windows Double-click on the installcmd The installer will not return any success message However incase of an installation error you will see a Failed to install status = error code message In case this happensplease review the error code on the following website httpwwwadobeexchangecomresources19errors
Updating the PanelIn order to update the Strawberry Adobe panel please repeat the above installation process using a newer panelversion
Removing the Panel
1 Go into the local folder from which you originally installed the Strawberry Adobe panel If the folder is notpresent on your Computer anymore download the latest panel and extract it on an internal hard drive (USB ampNetowk drives wont work) httpwwwflavoursyscomstrawberry-product-downloads
2 OSX Double-click on the removecommand file You will be prompted to enter the OSX Administratorpassword
3 Windows Double-click on the removecmd file (The uninstaller requires Administrator privileges to workproperly)
Testing the PanelIn order to test the Strawberry Adobe panel launch the Strawberry client application and login with your credentialsCreate a project using the Adobe Premiere template or open an existing Premiere project In Premiere navigate tothe menu bar and click on Window Extensions Strawberry 5xx
Installation Manuals
21
Users Roles amp Teams
Manage RolesPurpose Strawberry enables Administrators to create custom user roles A role is a set of permissions (capabilities)that determine what a user can and can not do withing the Strawberry system A role can be assigned to multipleusers
Available CapabilitiesThis is a list of all available capabilities available in the Strawberry user role system
Project related and general capabilities
bull Can login to client application(Users with this capability can login to the Strawberry client application installed on the editing systems)
bull Can login to Strawberry web interface using a web browser(Users with this capability can login to the Strawberry interface using a web browser)
bull Can create new projects(Users with this capability can create new projects within the Strawberry user interface)
bull Can see users and teams(Users with this capability can see users and teams in the Strawberry system)
bull Can assign projects to own teams and their members(Users with this capability can share projects visible to them with teams that they are a member of includingmembers of these teams)
bull Can assign project to teams that the user isnt member(Users with this capability can share projects visible to them with teams that they are a not a member of)
bull Projects created by this user are available to all teams of which the user is a member(This will only apply if the user is able to assign Projects to own teams)
bull Can archive own projects(Users with this capability are allowed to archive projects that they created only)
bull Can retrieve own projects(Users with this capability are allowed to retrieve projects that they created only)
bull Can archive other peoples projects(Users with this capability are allowed to archive all projects that they see no mater if they created these projects ornot)
bull Can retrieve other peoples projects(Users with this capability are allowed to retrieve all projects that they see no mater if they created these projects ornot)
bull Can use copy to on own projects(Users with this capability are allowed to use copy to on projects that they created only)
bull Can use copy to on other peoples projects(Users with this capability are allowed to copy all projects that they see no mater if they created these projects ornot)
bull Can freezemelt own projects(Users with this capability are allowed to freeze and melt projects that they created)
bull Can freezemelt other peoples projects
Users Roles amp Teams
22
(Users with this capability are allowed to freeze and melt projects that they created)
bull Can modify the status and custom metadata of projects without write access(Users with this capability are allowed to change custom metadata from all projects that they see no matter if theywrite access to these projects or not)
bull Can re-scan projects (including Libraries)(Users with this capability are allowed to perform a rescan on projects that they see)
Asset related capabilities
bull Can delete assets and folders via user interface(Users with this capability are allowed to delete media assets via the Strawberry user interface (Recommended forsuper users only)
bull Can use copy to on assets(Users with this capability are allowed to use copy to on media assets from projects that they have at least readaccess to)
bull Can download proxy version of assets(Users with this capability are allowed to download LowRes proxies from projects that they have at least read accessto)
bull Can download high-res version assets(Users with this capability are allowed to download HighRes media assets from projects that they have at least readaccess to)
bull Can share assets via email(Users with this capability are allowed to share proxy versions of assets via email)
bull Can re-create proxy files(Users with this capability are allowed to trigger a re-encoding job on any Strawberry managed media asset)
bull Can track down assets but not delete(Users with this capability are allowed to see into which projects a given media file is linked Caution Advised This isa potential security risk because it does not respect individual user or team access rights Users could potentiallysee names of projects that they normally couldnt see)
bull Can track down assets and delete(Users with this capability are allowed to see into which projects a given media file is linked and also delete it fromthere Caution Advised This is a potential security risk because it does not respect individual user or team accessrights (Recommended for super users only)
Annotation amp Description related capabilities
bull Can comment on projects(Users with this capability can write comments for projects)
bull Can comment on assets(Users with this capability can write comments on assets)
bull Can apply annotations to assets (go to annotation view)(Users with this capability can write annotations for assets)
bull Can download annotations(Users with this capability can download the annotations of an Asset)
bull Can delete other peoples annotations (deletion of own annotations is always possible)(Users with this capability can delete annotations that other people created)
Preditor related capabilities
bull Can login to Preditor (to open sequences)
Users Roles amp Teams
23
(Users with this capability are allowed to login to Preditor)
bull Can create new Preditor sequences(Users with this capability are allowed to create new sequences within Preditor)
bull Can assign sequences to own teams and their members(Users with this capability can share Preditor sequences with teams that they are a member of including members ofthese teams)
bull Can assign sequences to teams that user isnt a member of(Users with this capability can share Preditor sequences even with teams that the user isnt a member of)
bull Sequences created by this user are available to all teams of which the user is a member(This will only apply if the user is able to assign Sequences to own teams)
bull Can export and import Preditor sequences(Users with this capability can export and import a Preditor sequence to an existing Strawberry project)
bull Can download sequence as xmlaaf file(Users with this capability can download Preditor sequences as XML or AAF files)
Creating a roleLog into the Administration panel and click on the USERS tab Click on the MANAGE ROLES bar to expand itBelow the role list is a button named ADD ROLE Click on this button and provide a role name as well as thedesired capabilities for that role Once you are done click CONFIRM to save your changes
Users Roles amp Teams
24
Editing a roleLog into the Administration panel and click on the USER tab Click on the MANAGE ROLES bar to expand itcheckbox the role(s) you intend to edit and then click on the EDIT ROLE button Once you are done clickCONFIRM to save your changes
Deleting a roleLog into the Administration panel and click on the USER tab Click on the MANAGE ROLES bar to expand itcheckbox the role(s) you intend to delete and then click on the DELETE ROLE button and confirm by clicking onYES You can only delete roles that are currently not assigned to any user(s)
Manage Users
Creating a UserLog into the Administration panel and click on the USER tab Click on the MANAGE USERS bar to expand itBelow the user list is a button named ADD USER Click on this button and fill out the required information anddefine a user role
Changing a Users RoleUsage Log into the Administration panel and click on the USER tab Expand the MANAGE USERS bar Next tothe LOGIN NAME column is a column called ROLE In order to change a users role click on the current role andselect the new role from the drop down menu
User Specific RolesIf you have users to which none of your existing roles apply you may create custom user roles for these users only
Usage Log into the Administration panel and click on the USER tab Expand the MANAGE USERS barCheckbox the user and then click on the EDIT ROLE button Now you can either assign another existing role tothat user or you can create a custom role by simply changing the users capabilities When changing thecapabilities without choosing a new role the role name will change to custom This indicates that this user now hasa role that is tied to himher only Custom roles can be overwritten by assigning an existing role to the user
Users Roles amp Teams
25
Purpose In certain Strawberry environments users never get created within Strawberry but authenticate againstLDAP or Active Directory To make sure that the capabilities of these user are limited Administrators can define adefault role for new users
Usage Log into the Administration panel and click on the USER tab Expand the MANAGE USERS bar Belowthe user list is an option named Default Role for new Users with a drop down menu next to it Choose the defaultrole from the drop down From now on every new user coming from LDAP or Active Directory will be assigned withthis role The role of the user can of course be changed later
Assigning a User to TeamsPurpose Per default newly-created users can only see their own projects but are not assigned to any specificteams The following text describes how to assign a user to one or more teams
Example Editors A B and C and the Production Director are working together on the popular series Making MadEditors C D and E and the Production Director will work together on the new season of Game of Chairs Simplycreate teams for Making Mad and Game of Chairs and assign Editor C and the Production Director to both teamsand they will be able to collaborate and view all projects for both teams Editors A B D and E will only be able toview content for their respective teams
Users Roles amp Teams
26
Usage Log into the Administration panel and click on the USER tab Click on the MANAGE USERS bar toexpand it Select the user that you want to assign to a specific team Next to the user list appears a list with allavailable teams You can assign the user to one or more of these teams by simply checking the box on the left ofthe team name Now when the user logs into the Strawberry 4 user interface he or she will be able to see theprojects from all the teams to which she or he is assigned
Deleting a UserUsage Log into the Administration panel and click on the USER tab Expand the MANAGE USERS bar andselect the user you want to delete using the checkbox next to the username Click the delete button and confirm thedeletion
Removing a User from a TeamUsage Log into the Administration panel and click on the USER tab Expand the MANAGE USERS bar In orderto remove a user from a team select the user Now you can see a list on the right to the user list This second list isnamed The selected user is a member of these teams You can remove the user from one or multiple of theseteams by unchecking the box on the left of the team name
Example Freelancer John Smith has been helping with Game of Chairs production and his contract is finished TheAdministrator removes John Smith from the Game of Chairs team to ensure that he no longer has access to thoseprojects but leaves John Smith as a user in the system for future collaboration
Manage Teams
Creating a TeamAvailable in Strawberry version 40 or newerPurpose Users can share projects with other users but in some cases it is more efficient to share projects with anentire team Usage Log into the Administration panel and click on the USER tab Now Expand the MANAGETEAMS bar Below the teams list is a button that says ADD Team Click this button and fill out the requiredinformation During this process strawberry will ask you to set a teams storage quota The team quota virtually limitsthe storage space but without restricting write access once a team has reached it In Strawberry no project has areal owner For this reason the teams quota is a so called additive quota which means that a project that is visible tomultiple teams will influence the quota of each of these teams This also means that the additive quotadifferentiates from the physical (real) storage quota which can be configured under MISCgtSTORAGE QUOTA
Changing a Teams NameUsage Log into the Administration panel and click on the USER tab Expand the MANAGE TEAMS bar Selectthe checkbox next the team you want to edit and then click the EDIT TEAM button Change the team name andconfirm
Changing a Teams QuotaUsage Log into the Administration panel and click on the USER tab Expand the MANAGE TEAMS bar Selectthe team you want to edit and then click the EDIT TEAM button Change the teams quota and confirm
Deleting a TeamAvailable in Strawberry version 40 or newerUsage Log into the Administration panel and click on the USER tab Expand the MANAGE TEAMS bar Selectthe team that you want to delete and press the DELETE button below the teams list Confirm the message Pleasenote that projects that were exclusively visible to this team should be reassigned to other users or teams beforedeletion
Manage Edits
Users Roles amp Teams
27
Important Note The edit list only shows Samba mounts that have been created via the Strawberry Client wizard onth eStrawberry server You will not see any edits that have been created directly on your storage (which is therecommended way of doing it) If you want to see the edits on your storage please check its Samba configuration
Manage Projects
Manage Online Projects
Force Closing a ProjectPurpose This feature allows the administrator to close a project while it is opened (locked) by an editing systemThis feature can be useful in case a computer crashes caused by a hardware failure on the editing system and it isnot possible to close the project from this computer anymore
Usage Log into the Administration panel and click on the PROJECTS tab Expand the MANAGE PROJECTSbar Select the project that you want to force close and press the FORCE CLOSE button below the project listConfirm to the warning message to force close the project
Deleting one or multiple ProjectsPurpose This feature allows the administrator to delete projects permanently When deleting a project project filesmedia files as well as proxy files and MySQL database entries will be deleted permanently
Usage Log into the Administration panel and click on the PROJECTS tab Expand the MANAGE PROJECTSbar Select the project(s) that you want to delete and press the DELETE button below the project list Confirm tothe warning message to delete the project(s)
Archiving a Project
bull Available in Strawberry version 40 or newerbull ArchivalRetrieval of multiple projects at once is possible in Strawberry version 46 or newerbull The possibility to archive into a compressed zip file has been dropped in Strawberry version 46 or
newer because it was too error-pronePurpose Strawberry allows certain users (admins amp users but not guests) to archive and retrieve editing projectsWhen performing an archive operation Strawberry takes every single file which is part of the project and sends it toan archive destination which was previously defined by the administrator As soon as the project is in the archiveStrawberry 4 will delete it from the production storage (aka source) but will keep the metadata and proxy filesavailable for further use Please keep in mind that Strawberry does not archive any subprojects that are added to theprojects that you archive If you you want to archive project A which has subproject B and in case project Aactually uses media files from subproject B please make sure to consolidate or copy the affected media files toproject A before sending it to the archive This will ensure that all the used media files will be archived properly andthat the project will be fully operational after retrieval To check which projects are related to one another just selecta project and check the PARENT PROJECTS SUB PROJECTS list on the right of the project list
Usage Log into the Administration panel and click on the PROJECTS tab Expand the MANAGE PROJECTS bar Select the project(s) that you want to archive by clicking on the checkbox(es) next to the project name(s) and
Manage Projects
28
press the ARCHIVE button below the project list Choose an Archive Strategy from the list and confirm As soonas the project is in the archive it will change its visual appearance as following
The project avchd is online while the project avchd sony fs700 slowmo is in the archive Once a project is inthe archive it will appear under Projects Manage Archived Projects
Manage Archived Projects
Retrieving a Project from the ArchivePurpose Strawberry allows certain users (admins amp users but not guests) to archive and retrieve editing projects Inorder to be able to retrieve Strawberry has to be able to access the projects archive location Please note if anexternal archive application has moved the project for instance off to a tape library an integration may be necessaryto trigger the restore process in the archive application
Usage Log into the Administration panel and click on the PROJECTS tab Expand the MANAGE PROJECTSbar Select the project(s) that you want to retrieve from the archive and press the RETRIEVE button below theproject listThe RETRIEVEARCHIVE button is a toggle button which is an ARCHIVE button if you select a projectwhich is not already in the archive and becomes a RETRIEVE button once you select an archived project Confirmthe message to proceed Depending on the project size the retrieval progress can take some time Check the projectlist from time to time to see if the project has been retrieved You will notice a retrieved project by its visualappearance
The project avchd is online while the project avchd sony fs700 slowmo is in the archive Archived projects area bit greyed out and have a grey dot next to their project name
Download Project ListUsage In order to download the project list as an XLS file go to the Admin Panel Projects and click on the buttonDownload XLS
Purpose Project statuses help users to determine what the working status of a project is Statuses can be forinstance in editing in color grading etc and are defined by the administrator The status of each project isdisplayed in the metadata area of the Strawberry 4 user interface
Usage Log into the Administration panel and click on the PROJECTS tab Expand the STATUS OPTIONS barNow click on ADD STATUS and define a name for the new status Once the status is created users can choose itfrom the Strawberry frontend
Custom MetadataPlease read the rarr Custom Metadata larr chapter for more information on metadata sets and values
Manage Projects
29
Manage Libraries
IntroductionLibraries are an optional Add-on and can only be configured with a valid add-on license This sectionexplains how to create Ingest Watchfolders and External Libraries using the Strawberry admin panel
Library StatesLibrary no matter whether Ingest Libraries or External Libraries can have three different states
bull State Active - The library is fully operational
bull State Not Configured - The Library exists but is not yet configured
bull State Inactive - the library is configured but either the source watch folder or the target project are notreachable or missing
Ingest LibrariesPurpose An Ingest Library is a Strawberry library project that gets populated via an ingest watch folderStrawberry scans that watch folder on an Administrator defined interval and moves new media into thecorresponding Strawberry library project folder on the storage Eg If you create a library called My Example IngestLibrary a folder called My Example Ingest Library will be created within strawberrymedia_1media and mediafrom the related ingest watch folder will be moved to this location
Creating a Library Project
1 In order to create a new Library project you need to create a normal project first To do so open the Strawberryclient application and create a new project Name the project as you wish the library to be named Once theproject has been created close it and go back to the admin panel
2 In the admin panel go to Projects Manage Online Projects and checkbox the project that you created in theprevious step No click on the Flag as Library button on the lower right of the project list Then confirm withyes
Manage Libraries
30
Once the library has been created it will appear under Projects Manage Libraries inside the Strawberry Adminpanel
Configuring an Ingest LibraryPreparation Before configuring an ingest library you need to create an ingest watch folder The watch folder can belocated on one of your Strawberry-managed storages or on any storage accessible by the Strawberry server Theingest watch folder can not be located within the Strawberry root (eg optsb4data) or any sub folder below thispath To review how the storage root is configured on your system login to the Strawberry server and type catoptsb4appfsbaseconfigstrawrageyml The storage root is provided in the line root_path
1 Go to Projects Manage Libraries and checkbox the Library that you created in the previous step The librarywill be shown as Not Configured
2 Click on the Edit button below the library project list The following options appear
bull Name - Name of the Library
bull Watchfolder Type - Library Ingest or External Library Select Ingest Library here
bull Ingest Path - The path to the ingest watchfolder as seen by the Strawberry server
bull Target Storage - The storage to which ingested content should be moved This is only relevant if Strawberryis controlling multiple storage systems
bull Encoding Priority - The encoding priority for proxy files in this Library The ration between normal and highpriority is 14
Manage Libraries
31
bull Example for a Library Ingest configuration
Configuring the Library Ingest IntervalPurpose The library ingest interval determines how often Strawberry will check all your configured ingest watchfolders for new media files in order to move them to the target library By default the value is set to 1 minuteAssuming you added new media to the ingest watch folder Strawberry will see the files after 1 minute One minutelater it will check if the files size in the ingest watch folder changed (to determine if the file is still being copied) If thefile size did not change Strawberry will move it to the target library If the file size changed Strawberry will checkagain 1 minute later and so on
UsageIn order to change the Library Ingest Interval go to Projects Manage Libraries and adjust the value accordinglyto your needs
Configuring the Library Clean IntervalPurpose The clean interval scans your existing libraries for deleted media files on a recurring basis This however isonly important if you delete media files directly from the library folder on the storage and not from the Strawberryuser interface If you are not deleting Library media directly from the storage we recommend to set the recurrency toweekly instead of daily
Manage Libraries
32
Good to Know
bull There can only be one ingest watchfolder per library
bull Folder structures inside the ingest watchfolders will refelct inside the Strawberry library project
bull For usability reasons folder strctures inside the ingest watchfolders will not be deleted
bull Libraries can be archived equally to normal projects
External LibrariesPurpose An External Library is a folder structure outside of the usual Strawberry managed folder structure on thestorage Strawberry can index that external folder structure to make it seachable and (proxy-)viewable from theStrawberry user interfaces Media in External Libraries remains where it is meaning Strawberry will notautomatically move but only monitor it
Creating a Library Project
1 In order to create a new Library project you need to create a normal project first To do so open the Strawberryclient application and create a new project Name the project as you wish the library to be named Once theproject has been created close it and go back to the admin panel
Manage Libraries
33
2 In the admin panel go to Projects Manage Online Projects and checkbox the project that you created in theprevious step No click on the Flag as Library button on the lower right of the project list Then confirm withyes
Once the library has been created it will appear under Projects Manage Libraries inside the Strawberry Adminpanel
Configuring an External LibraryPreparation Before configuring an ingest library you need to make sure that the folder structure that Strawberryshould watch is reachable by the Strawberry server If you are unsure how to do this please contact next levelsupport
1 Go to Projects Manage Libraries and checkbox the Library that you created in the previous step The librarywill be shown as Not Configured
2 Click on the Edit button below the library project list The following options appear
bull Name - Name of the Library
bull Watchfolder Type - Library Ingest or External Library - Select External Library here
bull External Path - The path to the folder structure that you wish to be watched by Strawberry
bull Target Storage - The storage to which ingested content should be moved This is only relevant if Strawberryis controlling multiple storage systems
bull Encoding Priority - The encoding priority for proxy files in this Library The ration between normal and highpriority is 14
Manage Libraries
34
bull Example for an External Library configuration
Configuring the Library Clean IntervalPurpose The clean interval scan your existing libraries for deleted media files on a recurring basis This however isonly important if you delete media files directly from the library folder on the storage and not from the Strawberryuser interface If you are not deleting Library media directly from the storage we recommend to set the recurrency toweekly instead of daily
Configuring the External Library Reindex IntervalPurpose The external library reindex scans your existing libraries for new modified and deleted media files on arecurring basis This make sure that all changes in the external location will reflect within Strawberry The ExternalLibrary Reindex is MUCH slower than the Library Clean Interval which is why it is not possible to run it hourly Werecommend a daily or even better week recurrency for this index job
Manage Libraries
35
Good to Know
bull There can only be one External Library location per library project
bull Folder structures inside the external library will refelct inside the Strawberry library project
bull When adding a media from an External Library to an open Strawberry project that media will always becopied
Custom Metadata
Custom Metadata SetsPurpose This feature allows the Administrators to create several metadata sets Metadata sets can either containdrop down menus or text input fields Users will be be asked to select from the values provided in the metadata setsupon project creation
How the custom metadata could look in the user frontend
An example of custom metadata fields asking the user to provide the requested information Metadata fields withan asterisk symbol are mandatory for the user to fill out
The Master SetUsage Log into the Administration panel and click on the PROJECTS tab Expand the CUSTOM METADATAbar
The master set is the default set for all Strawberry installations and it is the set that every user sees upon projectcreation The master set can be populated with drop down menus and text input fields
Creating a Metadata SetUsage Log into the Administration panel and click on the PROJECTS tab Expand the CUSTOM METADATAbar
Custom Metadata
36
Click the ADD SET button and provide a name for the new set Once the set is created you can populate it withmetadata values like dropdown menus or text input fields
Connecting Metadata SetsUsage Log into the Administration panel and click on the PROJECTS tab Expand the CUSTOM METADATAbar
Metadata sets can be connected via drop down menus meaning that a specific drop drop down selection will load aspecific metadata set for the user In order to connect a drop down value with a metadata set edit the metadatavalue by clicking the checkbox next to the value and then the EDIT VALUE button
Each drop down menu contains Values and Targets The value is the drop down value that the user can choosefrom upon project creating The target is the metadata set to which the value should refer If the target None isselected the value will not load any metadata set If a target set is selected this target set will be loaded when theuser chooses this specific value
Deleting a Metadata Set
Custom Metadata
37
Usage Log into the Administration panel and click on the PROJECTS tab Expand the CUSTOM METADATAbar Select the metadata set that you wish to delete by checking the box next to it and then press the delete buttonon the botton of the metadata set list
Creating a Dropdown MenuUsage Log into the Administration panel and click on the PROJECTS tab Expand the CUSTOM METADATAbar
Click the ADD VALUE button and provide the following information
bull Name The name of the dropdown menu as the user will see it (for example Customer)
bull Type dropdown menu
bull Maximum Characters Not relevant for dropdown
bull Restrict input to Not relvant for dropdown
bull Pattern Not relvant for dropdownbull Mandatory Defines if this value is mandatory (checked) or not (unchecked)
bull Use in Project String Defines if items from this dropdown will appear in the project name if the users enablesthe checkbox Create Project Name from Above Entries upon project creation
No you can type the drodown items into the Value field To add additional drodown values click on the + buttonon the right of the value field To connect a drop down value with another Metadata Set select the set as a Targetnext to the related value
Click CONFIRM when done
Custom Metadata
38
Creating a Text Input FieldUsage Log into the Administration panel and click on the PROJECTS tab Expand the CUSTOM METADATAbar
Click the ADD VALUE button and provide the following information
bull Name The name of the text input field as the user will see it (for example Project Number)
bull Type Text Input
bull Maximum Characters The amount of characters a user can type into that field 0 equals infinite
bull Restrict input to Restrict input to numbers only letters only or numbers amp letters No restriction will allowany UTF-8 character
bull Pattern Not relevant for text input
bull Mandatory Defines if this value is mandatory (checked) or not (unchecked)
bull Use in Project String Defines if items from this text input field will appear in the project name if the usersenables the checkbox Create Project Name from Above Entries upon project creation
Click CONFIRM when done
Custom Metadata
39
Creating a Replacement PatternUsage Replacements patterns enable Strawberry to automatically create date values based on Unix date modifiersA List of possible modifiers can be found below Usage Log into the Administration panel and click on thePROJECTS tab Expand the CUSTOM METADATA bar
Click the ADD VALUE button and provide the following information
bull Name The name of the pattern field as the user will see it (for example Date)
bull Type Replacement Pattern
bull Maximum Characters Not relevant for text replacement pattern
bull Restrict input to Not relevant for text replacement pattern
bull Pattern A pattern consisting of Unix modifiers A pattern such as eg Y m d equals year month date
bull Mandatory Not relevant for text replacement pattern
bull Use in Project String Defines if the output from this pattern will appear in the project name if the users enablesthe checkbox Create Project Name from Above Entries upon project creation
Click CONFIRM when done
Custom Metadata
40
Editing a ValueAvailable in Strawberry version 40 or newerUsage Log into the Administration panel and click on the PROJECTS tab Expand the CUSTOM METADATAbar Expand the metadata set that contains the value you want to edit and then select the value by checking the boxnext to it Change the value properties as required and then click CONFIRM
Deleting a ValueUsage Log into the Administration panel and click on the PROJECTS tab Expand the CUSTOM METADATAbar Expand the metadata set that contains the value you want to delete and then select the value by checking thebox next to it Now click on DELETE VALUE
Available in Strawberry version 40 or newer
Creating Project Status FlagsAvailable in Strawberry version 40 or newerPurpose Project statuses help users to determine what the working status of a project is Statuses can be forinstance in editing in color grading ready for approval etc and are defined by the administrator The statuses ofeach project is displayed in the metadata area of the Strawberry 4 user interface
Usage Log into the Administration panel and click on the PROJECTS tab Expand the STATUS OPTIONS barNow click on ADD STATUS and define a name for the new status Once the status is created users can choose itfrom the Strawberry frontend
Deleting Project Status FlagsPurpose Deleting status flags will prevent users from being able to select that status in the future However whendelting a status flag it will remain attached to the projects that are already using it
Custom Metadata
41
Usage Log into the Administration panel and click on the PROJECTS tab Expand the STATUS OPTIONS barNow click on the checkbox next to the status flag that you want to delete and press the DELETE VALUE button
Supported Unix Time Modifiers
bull a localersquos abbreviated weekday name (eg Sun)
bull A localersquos full weekday name (eg Sunday)
bull b localersquos abbreviated month name (eg Jan)
bull B localersquos full month name (eg January)
bull C century like Y except omit last two digits (eg 20)
bull d day of month (eg 01)
bull D date same as mdy
bull e day of month space padded same as _d
bull F full date same as Y-m-d
bull h same as b
bull H hour (0023)
bull I hour (0112)
bull j day of year (001366)
bull k hour ( 023)
bull l hour ( 112)
bull m month (0112)
bull M minute (0059)
bull p localersquos equivalent of either AM or PM blank if not known
bull P like p but lower case
bull r localersquos 12-hour clock time (eg 111104 PM)
bull R 24-hour hour and minute same as HM
bull s seconds since 1970-01-01 000000 UTC
bull S second (0060)
bull T time same as HMS
bull u day of week (17) 1 is Monday
bull U week number of year with Sunday as first day of week (0053)
bull w day of week (06) 0 is Sunday
bull W week number of year with Monday as first day of week (0053)
bull y last two digits of year (0099)
bull Y year
bull z +hhmm numeric timezone (eg -0400)
bull Z alphabetic time zone abbreviation (eg EDT)
Archive amp Copy ToStrawberry allows certain users (admins amp users but not guests) to archive and retrieve editing projects When performing an archive operation Strawberry takes every single file which is part of the project and sends it to an archive destination which was previously defined by the administrator As soon as the project is in the archive Strawberry 4 will delete it from the production storage (aka source) but will keep the metadata and proxy files The
Archive amp Copy To
42
archive path defined here is also the retrieval path If you look for a more sophisticated archivalretrieval process youshould have a look inside the Strawberry API documentation
Creating an Archive StrategyZIP is not longer supported as an archive method in Strawberry because of missing CRC checksumcapabilitiesPurpose Archive strategies allow you to define discrete archive locations and methodologies for different types ofprojects When a user presses the Archive Project button in the user front-end Strawberry will offer the archivestrategies defined here
Usage Log into the Administration panel and click on the Archive tab Expand the ARCHIVE STRATEGIES barClick the ADD button and provide the following information
bull Name The name of the archive strategy The users see the name of the strategy when he or she attempts toarchive a project
bull Type The archive type Please select SB native if you are not using Archiware P5 or Masstore
bull Path The path (aka archive destination) for projects archived using this strategy
bull Method
bull plain Strawberry archives the project and media files without compressing them It archives theprojects folder structure as it is
bull tarball Puts the project amp media files of a project into a tarball before archiving itbull Check
bull Fingerprint Sequential integrity check on a file that only detects serious file damages but no minordefectsbull CRCs are specifically designed to protect against common types of errors on data transmissionswhere they can provide quick and reasonable assurance of the integrity of data delivered Howeverthey are not suitable for protecting against intentional alteration of data
bull None No data integrity check at allbull EnableDisable Strategy Define if an archive strategy is available for users (enabled) or not (disabled)
Archive amp Copy To
43
Canceling an ArchiveRetrieval JobArchive or retrieval jobs can currently only be canceled from the Strawberry user interface but not from theAdministration panel In order to Cancel an archive or retrieval job do the following
1 Login to the user interface as an Administrator and right click on the affected project
2 Select Cancel ArchiveRetrieval Job and confirmIt will take a few seconds up to a couple of minutes until the cancellation has been performed Once it is done youwill see a warning sign next to the project name The warning sign indicates that the operation has been aborted bythe user
When a project archivalretrieval failed the project will have a warning sign next to its name
Clearing ArchiveRetrieval ErrorsIn case a project archive or retrieval failed (either it was canceled by a user or failed for other reasons) you can resetthe project state back to normal by performing the following operations
1 Login to the Strawberry user interface as an Administrator and right click on the affected project
2 Select Clear Archive Error from the context menu and confirmIt will take a few seconds until the fail state of the project has been cleared and the project is displayed asnormal Once the front end reports that the clearance has been successfully done you may retry to archive orretrieve the project if required
Project Copy-to StrategiesPurpose Strawberry enables users to copy projects to another location This location can be another storagedevice (for backup purposes) a render farm or other external application watch folders This feature works verysimilar to the Archive function The main difference is that copied projects will not be deleted from the mediastorage (source volume) but remain there for further use
Usage Log into the Administration panel and click on the Archive tab Expand the Project Copy-to Strategiesbar Click the ADD button and provide the following information
bull Name The name of the copy-to strategy The users see the name of the strategy when he or she attempts tocopy a project
bull Path The path (aka copy-to destination) for projects copied using this strategy
bull Method
bull plain Strawberry archives the project and media files without compressing them It backups theprojects folder structure as it is
bull tarball Puts the project amp media files of a project into a tarball before copying it
bull zip Puts the project amp media files of a project into a zip file before copying it (Please Note Zip filescan not be CRC checked)
bull Check
bull Fingerprint Sequential integrity check on a file that only detects serious file damages but no minordefects
Archive amp Copy To
44
bull CRCs are specifically designed to protect against common types of errors on data transmissionswhere they can provide quick and reasonable assurance of the integrity of data delivered Howeverthey are not suitable for protecting against intentional alteration of data
bull None No data integrity check at allbull EnableDisable Strategy Define if an archive strategy is available for users (enabled) or not (disabled)
Asset Copy-to StrategiesPurpose Strawberry enables users to copy individual assets to another location This location can be anotherstorage device (for backup purpose) a render farm or external application This feature works very similar to theArchive function The difference is that copied assets will not be deleted from the media storage but remain therefor further use
Usage Log into the Administration panel and click on the Archive tab Expand the Asset Backup Strategies barClick the ADD button and provide the following information
bull Name The name of the copy-to strategy The users see the name of the strategy when he or she attempts tocopy a project
bull Path The path (aka archive destination) for projects copied using this strategy
bull Method
bull plain Strawberry archives the project and media files without compressing them It backups theprojects folder structure as it is
bull tarball Puts the project amp media files of a project into a tarball before copying it
bull zip Puts the project amp media files of a project into a zip file before copying it (Please Note Zip filescan not be CRC checked)
bull Check
bull Fingerprint Sequential integrity check on a file that only detects serious file damages but no minordefects
bull CRCs are specifically designed to protect against common types of errors on data transmissionswhere they can provide quick and reasonable assurance of the integrity of data delivered Howeverthey are not suitable for protecting against intentional alteration of data
bull None No data integrity check at allbull EnableDisable Strategy Define if an archive strategy is available for users (enabled) or not (disabled)
Good to Know
Freezing Archived ProjectsAvailable in Strawberry version 44 or newerIn order to avoid that users are accidentally retrieving archived projects you can freeze these projects using rarrfreezeoptions larr
Templates
Working with Templates
Templates
45
Purpose Templates are an extremely efficient way to prepare standardized project settings and content for allStrawbery users in your facility Templates can contain custom file and folder structures
Example 1 Application Specific Templates
One example to illustrate the benefit of templates can be working with Avid Media Composer in different frame rates(24 frames and 25 frames) Avid does not allow to switch the frame rate within a project With Strawberry you couldcreate two templates one for 24 frames and one for 25 frames and copy the related Avid project files into thistemplate When a user creates a project from on of these templates the corresponding projects files (24 frames or25 frames) will be copied into the new projects an renamed after the new project so the user does not need to createa new Avid project manually after he or she created a project in strawberry
Example 2 Production Specific Templates
Another example of working with templates can be a specific production that requires specific preparations Mostmedia facilities create individual folder structures for different productions so that people save graphics visualeffects and sound effects in the right location on the storage Usually these folder structures need to be recreated foreach episode of a production With Strawberry you can create a template which contains a specific folder structureand even media files and copy your prepared folder and media files into this template As soon as a user choosesthe template upon project creation the folders and files that you prepared in the template will be copied over to thenew project and are immediately available for the user
Creating a Template (Avid Media Composer)Before users can create any Avid projects using the Strawberry client software you need to have at least ONEtemplate Log into the admin panel and click on the MISC tab Expand the TEMPLATES bar Now click theCREATE NEW button
Strawberry will ask you for a Template name a preset a token and a naming pattern
Choose a name that best characterizes your template In this example we will create an Avid template that containsa high definition Avid project with a resolution of 1080p So it makes sense to call the template Avid 1080p
In the preset row click on the little down arrow and choose the Avid preset When a user creates a projectbased on an Avid template Strawberry automatically create the Avid MediaFiles and OMFI MediaFiles folderstructure in the project and it will also ensure that Avid project and media files can be shared properly
The token is a replacement string for a file name This means that if your token says replace_me and you createan Avid template named replace_me and copy it into your template folder (discussed later) every time thetemplate replace_me is used the token text (in this case replace_me) will be changed to the name of the currentStrawberry project So the Avid project file called replace_meavp in your templates folder will be used and namedprojectnameavp as its created in your Strawberry project
In the row pattern you can define how a project name based on this template should look The stringYmd-name will result in the project name 20130810-ProjectName Putting the date inside the projectname will enable your user to search for projects by typing in the date If you dont need the date in the project nameyou can simply delete the date-related parts of the string and leave the name piece If you need the date part youcan modify it to your requirements In order to understand the formatting for doing this please refer to the unix timeman page at httpunixhelpedacukCGIman-cgidate
Templates
46
After you are done click Create and then open Avid Media Composer Create a new local project calledreplace_me with the setting 1080p25
Open the newly created project delete the bin that Avid always makes in new project and empty the Avid trashfolder
In order to ensure that Media Composer will recognize network volumes as media drives open Tools gt Console andtype in alldrives If you see the message All drives will be viewed as media drives (Was previously set to havingonly true media drives act as media drives) you are good to go If you see the message Only true media drives willbe viewed as media drives (Was previously set to having all drives act as media drives) type alldrives againThere are just two possible options
Now go to Tools gt Media Creation gt Capture and select the Strawberry media drive (mapped as a networkdrive on your Computer) as the AudioVideo file destination Click on both Apply to All buttons and then click onOK Now close the project
Templates
47
Navigate to the Strawberry template folder on your storage (Strawberrytemplates) Within that template folder youwill see a folder that is named after the template you created in the Strawberry admin panel (in this case we called itAvid 1080p) Inside this folder will be a folder called media_1 and one called projects
Use the Finder or Explorer to navigate to your local Avid projects folder (eg UsersFlavourSysDocumentsAvidProjects) and open the replace_me project folder Copy the files replace_meavp replace_me Settingsxml andreplace_me Settingsavs to your clipboard
Paste the files into your StrawberrytemplatesAvid 1080pprojects folder If an editor creates a new project using thistemplate Strawberry will rename the replace_me string with the name of the current Strawberry project
Now every time a Strawberry user creates a new project based on this template it has all the right settings export preferences etc that it will inherit from the replace_me project that you created and set up before copying it into the Strawberrytemplatesltyour template namegtprojects folder If you need to modify or improve your template
Templates
48
simply make the changes to the local replace_me project and re-copy the three files into theStrawberrytemplatesltyour template namegtprojects folder
Creating a Template (Adobe Premiere)Before you can create an Adobe Premiere editing project from within the Strawberry client software you need tocreate a template for Strawberry to use Click on the Template Tab in the Admin panel and then click on CreateNew
Strawberry will ask you for a Template name a preset a token and a naming pattern
Choose a name that best characterizes your template In this example we will create an Adobe Premiere templatethat contains an Adobe Premiere project So it makes sense to call the template Adobe Premiere
In the preset row click on the little down arrow and choose the Adobe preset When a user creates a projectbased on an Adobe template Strawberry automatically create the Adobe Cache folder structure in the project and itwill also ensure that Adobe project and media files can be shared properly
The token is a replacement string for file names This means that if your token says replace_me in these settingsand you go on to create an Adobe Premiere project named replace_me and put it in your template folder thetemplate will be used and automatically renamed based on the Strawberry project name that is open This way anAdobe Premiere template project file called replace_mePR will be named StrawberryprojectnamePR each timeyou create a new project from within Strawberry
In the row pattern you can define how a project name based on this template should look like The stringYmd-name will result in the project name 20130810-ProjectName Putting the date inside the projectname will enable your user to search for projects by typing in the date If you dont need the date in the project nameyou can simply delete the date related parts of the string and leave the name piece If you need the date part youcan modify it to your requirements In order to understand the formatting for doing this please refer to the unix timeman page at httpunixhelpedacukCGIman-cgidate
After you are done click Create and go to the Strawberry Client Create a new project using the Adobe Premieretemplate Now open Adobe Premiere and create a new project Name the project replace_me and set the captureformat to HDV Ensure that all Scratch Disk locations are set to same as project
Templates
49
Click ok to create and open the project Once the project is opened go to EditgtPreferences Media and choosethe Adobe Cache on your Strawberry media volume as the destination for Media Cache Files and Media CacheDatabase
Templates
50
Tip If you are using the Adobe Premiere Panel launch it now If a user creates a project based on this template thepanel will launch automatically with the new project
Click OK to confirm your changes Now save the project and leave Adobe Premiere Navigate to your local Adobeprojects folder and copy the newly created project file replace_meprproj to the media_1 folder of the Adobetemplate location that you created
Now every time an editor creates a new project using the Adobe Premiere template the replace_mepr templatewill be used and all the settings preferences and destinations will be inherited and used in the newStrawberryprojectnamepr
Rename a Templates
Templates
51
Purpose You want give the Templates a new name for differentation
Usage Log into the admin panel and click on the MISC tab Expand the MANAGE TEMPLATES bar Check thetemplate what you want rename below the templates list is a button says RENAME and fill out with the new nameIf you are ready click CONFIRM else if you want go back click CANCEL
Duplicate a TemplatePurpose Use dublicate a template if you want clone the settings
Usage Log into the admin panel and click on the MISC tab Expand the MANAGE TEMPLATES bar Check thetemplate what you want duplicate below the templates list is a button says DUPLICATE and fill out with the newname If you are ready confirm it with click DUPLICATE else if you want to stop the prozess click CANCEL
Delete a Template(s)Purpose If you want delete a template(s) eg Didnt needed anymore
Usage Log into the admin panel and click on the MISC tab EXPAND the MANAGE TEMPLATES bar Checkthe template what you want delete below the templates list is a button says DELETE
Configuring the Avid AtticWhen utilizing Avid Media Composer the Avid Attic functionality might be important to your workflow To make theAvid Attic work with strawberry please perform the following steps
1 Close Avid Media Composer
2 Navigate to the Avid Attic folder on our computerWin UsersPublicPublic DocumentsAvid editing application
Mac Macintosh HDUsersSharedAvid editing application
3 Rename the Avid Attic folder to Avid Attic_Old
4 Open an Avid Media Composer project using the Strawberry client and open the project in Avid
5 Close the project in Avid Media Composer
6 Go back to the Avid attic and check whether Avid has created a new Attic folder
7 Check the attic folder for the project that was recently opened in Strawberry
Manage IndexersCheck the following boxes if you want the features or unchecked if not
Enable deep indexing for media files
Index adobe premiere project files
Index avid bin files
Storage Quota
Templates
52
Purpose In this section you can define how much physical storage space all projects managed by strawberry areallowed to occupy The quota is a soft quota meaning that there is no physical storage restriction once it getsexpired However Strawberry will send a warning email if if the quota that you defined has been reached
Usage Log into the admin panel and click on the MISC tab Expand the STORAGE QUOTA bar Define howmuch space (in Gigabytes) all projects managed by strawberry are allowed to occupy and press SAVE You canchange this quota at any time
MYSQL BackupWhen clicking the Backup Now button Strawberry creates a dump of its MySQL database The default location forthe database dump is optsb4databackups The default destination can be reconfigured in theoptsb4appfsbaseconfigdatabase-backupyml file
Versions amp LicenseThis section is for license and support purpose only
VIEW Proxy Encoder
Supported Video Audio and Image File FormatsSupported Video Formats amp CodecsApple Intermediate Codec (MOV)Apple MJPEG-B (MOV)Apple ProRes (MOV)
Arri Alexa (ARI)
AS-11 IMX 50 (MXF)AS-11 AVC Intra 100 (MXF)
(X)AVC Intra 50100 (MOV MXF)
Avid 11 amp 11xAvid DV amp DV100
Avid DNxHD (MOV MXF)(45 60 75 90 90x 110 110x 120 120x 145 185 185x 220 220-10Bit)
Avid Interplay C93 amp MVE videoAvid MPEG2 50 - SDAvid Meridien Compressed SD amp Uncompressed SDAvid Packed amp RGBPacked
AVS (Standard amp Chinese)
Black Magic R210
Canopus LosslessCinepak
VIEW Proxy Encoder
53
DV (PAL amp NTSC)
DVCPRO HD | 100 MbpsDVCPRO 50 | 50 MbpsDVCPRO 25 | 25 Mbps
H261H263 H263-1996H263+ H263-1998 H263 version 2H264 AVC MPEG-4 AVC MPEG-4 (MP4 MOV MXF)
HDV
MJPEG amp MJPEG LosslessMPEG 1 amp 2 (M1V M2T M2V MPEG MPG MPGV MPV VOB)MPEG 4 (M4A M4P M4V MP4)
P2 - AVC-Intra 50 100 (MOV MXF)P2 - DVCPRO 25 50 100 (MOV MXF)
QuickTime uncompressed
Red Digital Cine Camera (R3D)
Windows Media Video (All Versions)
XDCAM 25XDCAM IMX 30XDCAM HD 50XDCAM SXS 50
Also SupportedAvid 11 10-bit RGB PackerFlash Video (FLV)Microsoft Video 1On2 VP3On2 VP5On2 VP6QuickTime 8BPS videoQuickTime Animation (RLE) videoQuickTime Graphics (SMC)QuickTime video (RPZA)R10K AJA Kona 10-bit RGB CodecR210 Quicktime Uncompressed RGB 10-bitTheoraVP8VP9WMV7
Supported Audio Formats amp CodecsMost CommonAAC+AACAC-3
CAF
MP3 (All Versions)MPEG-4 (All Versions)
PCM (All Versions amp Bitrates)
WAV
WMA (All Versions)
Also Supported
VIEW Proxy Encoder
54
Apple lossless audioATRAC1ATRAC3ATRAC3+Bink AudioCore Audio Format (CAF)DV audioEnhanced AC-3FLAC (Free Lossless Audio Codec)MACE (Macintosh Audio CompressionExpansion) 31MACE (Macintosh Audio CompressionExpansion) 61MLP (Meridian Lossless Packing)MP1 (MPEG audio layer 1)MP2 (MPEG audio layer 2)OpusRealAudio 10 (144K)RealAudio 20 (288K)RealAudio 30 (dnet)RealAudio LosslessRealAudio SIPR ACELPNETVorbisWindows Media Audio Voice
Supported Image Formats|Targa |TIF |PSD |PSB |PNG |JPG |IFF |GIF |BMP |DPX |EXR |ARI |EPS |AI
Enabling or Disabling ViewLog into the admin panel and click on the VIEW tab If VIEW is enabled proxy files will be created automaticallybased on the criteria below If VIEW is disabled proxy file encoding will not take place and he user front endautomatically jumps to list view instead of thumbnail view
Proxy Encoder ConfigurationIn this menu you can choose from properties of the Strawberry generated proxy files These options include
bull Proxy File Location shows where Strawberry saves the proxy files that it generates This location is definedupon installation and can only be changed by modifying the Strawberry configuration files on the Strawberryserver
bull Bitrate Define the proxy bitrate (per second) Please keep in mind that lower bitrates might be more suitablefor users connecting over the Internet while higher bit rates are good for LAN operations Is there a goldenrule Unfortunately not If you are using the Strawberry Preditor Add-on we recommend a low proxy bitrate(700k - 900k)
bull Resolution Choose a resolution for your proxy files There should always be a coherence between theresolution and the bit rate For example A 1920x1080 proxy file should have a bitrate of at least ~1200k whilea 640x360 proxy should look good with a 600k bitrate
bull Image Sequence Recognition When Strawberry VIEW detects an image sequence (Basename amp Count) withmore than 20 individual images it will create a preview MP4 file out of it An image sequence must have adelimiter between its basename and its count Valid delimiters are - (dash) (dot) and _ (underscore)sequence-name_001 is an example of a valid naming convention
bull Time Code Burn-In If you wish to have a video time code burned into your proxy files you should enable thisfeature
bull Time Code Label Position Defines whether the proxy time codes (or image layer names) are burned in on thebottom or on top of the proxy file
V isual Watermark Check this box if you want Strawberry to burn a visual watermark into your proxy files
bull Watermark Position Decide on which position of the screen your watermark image should be visible
VIEW Proxy Encoder
55
bull Watermark Image Upload a Watermark image as a png file The image should not be larger than your currentproxy resoultion and should have a transparent background You can download example watermarks heredlflavoursyscommanualssupporting_filesExample_Proxy_Watermarkszip
bull Watermark Preview Previews your uploaded watermark in respect of the current proxy resolution as well asthe current Timecode burn-in position
Blacklists amp Whitelists
bull Factory File Blacklist This is a factory blacklist provided by FlavourSys The blacklist has been populatedbased on best practice workflows If you need any of the factory blacklist file extensions whitelisted just enterthe extension into the Files Whitelist
bull File Blacklist Enter any file extension that you dont wish to see in the Strawberry user interface Strawberrywill then ignore files that are having this extension meaning that no proxies are generated However you canstill use the files on the FinderExplorer level in your projects In order to blacklist an item just enter extensionand press enter Press the save button to confirm
bull File Whitelist If you need to whitelist any extensions from the Factory File Blacklist just enter its extensioninto the Files Whitelist In order to whitelist an item just enter extension and press enter Press the savebutton to confirm
bull Factory Folders Blacklist This is a factory blacklist provided by FlavourSys The blacklist has been populatedbased on best practice workflows If you need any of the factory folder blacklist whitelisted just enter the foldername into the Folders Whitelist and press enter Press the save button to confirm
bull Folders Blacklist (Recursive) Enter any folder name that you dont wish to see in the Strawberry user interfaceStrawberry will then ignore the folder and its content meaning that no proxies are created You can still useblacklisted items on the FinderExplorer level in your projects In order to blacklist a folder just enter the foldername into the blacklist and press enter Press the save button to confirm
bull Folders Whitelist (Recursive) If you need to whitelist any folder from the Factory Folders Blacklist just enterits name into the Folders Whitelist and press enter Press the save button to confirm
Applying Blacklist amp Whitelist ChangesStrawberry 5 applies blacklist changes automatically In order to apply whitelist changes please perform thefollowing steps Also perform these steps in order to apply blacklist changes in Strawberry 44 or older versions
VIEW Proxy Encoder
56
1 Login to the Administration panel
2 Click on the MANAGE PROJECT tab
3 Select the project on which you want to apply the operation
4 Click the VIEW button below the project list
5 Select the radio button Rescan Project(s) and confirmDepending on the amount of files in the affected project this operation can take several minutes
Node and Worker Control
Purpose In this section of the admin panel you monitor and change the status of each VIEW encoding node that isintegrated in your environment You also have the possibility to set Schedulers so that you can decide if the nodesand the workers run
Usage Log into the admin panel and click on the VIEW tab Expand the NODE AND WORKER CONTROL barHere you can select from the following options
bull NODE ID The internal ID of each encoding node
bull NODE ADDRESS The hostname or IP address and port under which each node can be reached
bull STATUS Green means running yellow means paused and red means not running
bull NUMBER OF WORKERS Number of encoding workers (threads) that work at the same time Choose theamount of workers based on the amount of CPU cores of each node One worker per core works very well butleave at least one core for the OS and the rest of the Strawberry system The Strawberry Server license comeswith 3 Workers additional workers must be licensed separately
bull Actions Stop start restart or edit a scheduler for individual nodes
Content Download OptionsPurpose If you want to allow user to download media assets using the front end you can define this here Forinstance for workflows requiring executive review or for film schools where faculty could grade from home thisfeature can be beneficial however for feature film workflows this feature can be turned off
Usage Log into the admin panel and click on the VIEW tab Expand the CONTENT DOWNLOAD OPTIONS barIf you want to enable users to download low resolution media files (proxy files) from the front end check the boxnext to Allow users to download proxy files If you want to enable users to download high resolution media filesfrom the front end check the box next to Allow users to download high-res files
Rescan-Project(s)Purpose Scans the project for new files and newly supported file formats and attempts to encode them to proxyfiles It will also apply black list white list changes to existing projects
Usage Log into the Administration panel and click on the PROJECTS tab Expand the MANAGE PROJECTSbar Select the project(s) that you want to rescan and press the VIEW button below the project list and checkRescan Project(s) and confirm it
Repair-Project(s)
VIEW Proxy Encoder
57
Purpose Scans the project for new files and newly supported file formats and attempts to encode them to proxyfiles It will also apply black list white list changes to existing projects
Usage Log into the Administration panel and click on the PROJECTS tab Expand the MANAGE PROJECTSbar Select the project(s) that you want to repair and press the VIEW button below the project list and check RepairProject(s) and confirm it
Reencode-EverythingPurpose Deletes every file in the project to see if meta data have been changed Also looks for new files and newlysupported file formats and attempst to encode them to proxy files It will also apply black list white list changes toexisting projects
Usage Log into the Administration panel and click on the PROJECTS tab Expand the MANAGE PROJECTSbar Select the project(s) that you want to reencode-everything and press the VIEW button below the project listand check Reencode-Everything and confirm it
Miscellaneous
Manage TemplatesPlease visit this manuals rarr Templates larr chapter to get template related information
Safe SearchPurpose ldquoSafe Searchrdquo is an ldquoin edit suiterdquo security feature for Strawberry managed content Its aim is to reducethe visibility and searchability of content while a project with specific custom metadata is open This prevents thatclients see content of other clients while working on a project inside the editing room
Enabling Safe SearchLogin into the Strawberry Administrator panel and select the ldquoMiscrdquo tab Open the ldquoSearch settings and check thebox next to ldquoEnable Safe Search Featurerdquo
Define ldquoSafe Searchrdquo MetadataOnce ldquoSafe Searchrdquo is enabled click on the ldquoProjectsrdquo tab and open the ldquoCustom Metadatardquo menu Select a set andthen a drop down menu within it Then click on ldquoEdit Valuerdquo
Miscellaneous
58
Next to each drop down menu is a checkbox called ldquoSafe Searchrdquo Check this box for each value for which the ldquoSafeSearch filter should apply
When a user opens a project that includes a ldquoSafe Searchrdquo metadata the search field provides the informationaccordingly (safe search enabled for ldquometadata namerdquo) From this point on all searches will be carried within therelated safe search metadata context This applies until the project is closed
Miscellaneous
59
Good to Know
bull Only one drop down menu can have safe search metadata
bull Safe search metadata in the Administrator panel should not be changed enabled or disabled while projects areopened as this can lead to inconsistent search results
Manage IndexersAvailable in Strawberry version 42 or newer
GeneralCheck the following boxes if you want the features or unchecked if not
bull Enable Deep Indexing for Media Files(If enabled Strawberry will extract technical metadata from media files If it is disabled Strawberry will only index filenames and file sizes This feature needs to be enabled in order for the proxy encoding to work)
bull Index Adobe Premiere Project Files(If enabled Strawberry will extract master clip names a descriptions comments from Adobe Premiere master clipsto make these information visible amp searchable in the front-end)
bull Index Avid bin files(If enabled Strawberry will extract master clips names and sequence names from Avid bins to make theseinformation searchable in the front-end However when searching for an Avid master clip or sequence name theuser will not be provided with a visual presentation of the asset or sequence but will only see the project(s) thatcontains these information since this feature is beta we recommend to turn it of)
bull Extract Exif metadata from images(If enabled Strawberry will extract EXIF metadata from image files
bull Extract XMP metadata from files(if enabled Strawberry will extract XMP metadata from media files)
bull Extract XML metadata (Experimental)(if enabled Strawberry will extract XML metadata from xml sidecard files Please contact us for an overview ofsupported XML schemes)
bull Search for technical metadata(If enabled Strawberry will extract technical metadata from video files as well as ID3 tags (album Artist etc) fromaudio files
Technical Metadata WhitelistStrawberry maintains a search index that allows user to carry out searches in an extremely fast fashion Since thissearch index is stored in the server memory its size must be limited and therefor can not include all possible searchparameters Administrator can define the search parameters by white-listing them
Miscellaneous
60
Enter any label that you wish to add to the Strawberry search index To insert a label just click next to an existinglabel and start typing An auto completion list will show available results for your search term Select the technicalmetadata label that you wish to add to the search index Use the x button next to a labels name to remove a labelfrom the search index The changes will not apply immediately but on the next build of the search index (once anight) If you want to apply the settings immediately SSH login to the Strawberry server as root and type thecommand sb reindex
Storage Quota
Purpose In this section you can define how much physical storage space all projects managed by strawberry areallowed to occupy The quota is a soft quota meaning that there is no physical storage restriction once it getsexpired However Strawberry will send a warning email if if the quota that you defined has been reached
Usage Log into the admin panel and click on the MISC tab Expand the STORAGE QUOTA bar Define howmuch space (in Gigabytes) all projects managed by strawberry are allowed to occupy and press SAVE You canchange this quota at any time
Adobe Premiere Specific Feature
Auto-Link media from Library into projectThis feature is part of a custom development and currently not documented
Auto-Ingest local media into projectPurpose If a user imports media from a usb or local hdd into an Adobe Premiere project that is managed byStrawberry Strawberry can automatically copy that media into the projects media volume This ensures that allmedia used in a Premiere project is actually on the centralized storage
Usage Log into the admin panel and click on the MISC tab Expand the Auto Import Library amp unmanaged Assets(Adobe Premiere Only) bar If you wish to enable the Auto-ingest feature check the box next to it and define aninterval The interval determines how often the Strawberry Adobe panel will check for unmanaged inside each openPremiere project
Auto-Link subproject media into projectPurpose If a user imports media from a subproject into an Adobe Premiere project that is managed by StrawberryStrawberry can automatically link that into the from the subproject into the parent project This ensures that anyproject is self contained at any point
Miscellaneous
61
Usage Log into the admin panel and click on the MISC tab Expand the Auto Import Library amp unmanaged Assets(Adobe Premiere Only) bar If you wish to enable the Auto-link feature check the box next to it and define aninterval The interval determines how often the Strawberry Adobe panel will check for imported subproject mediainside the current project to link it
PreditorDefine the Timeout based on which a user should be automatically logged out of Preditor In the process Strawberrywill also automatically close the users sequence in order to free the license slot Preditor creates auto-saves of opensequences every minute and stores these on the server so that progress does not get lost even if the sequence getsauto-closed
SMTP SetupPurpose Strawberry has the ability to send email notifications on specific criteria This usually is the case if a teamexpires its storage quota or if assets are shared via email using the built-in functions For this feature to workStrawberry needs to be provided with STMP information
Usage
1 Login to the Strawberry server and cd to optsb4appfsbaseconfig
2 Open the file smtpymlexample and replace the example SMTP values with your own ones
3 Save the file as smtpymlThe Strawberry services needs to be restarted for the changes to apply
MYSQL BackupWhen clicking the Backup Now button Strawberry creates a dump of its MySQL database The default location forthe database dump is optsb4appbackups The default destination can be reconfigured in theoptsb4appfsbaseconfigdatabase-backupyml file
Empty TrashPressing the Empty Trash Now button will instantly remove all contents from the Strawberry trash folder
Osiris OptionShared Edits only
Purpose If the Osiris option is enabled Strawberry will mount its project media volumes in a specific way AvidMedia Composer will detect these volumes as volumes from an Avid storage and will provide bin locking for allStrawberry managed Media Composer projects
Versions amp LicenseThis section shows you the current version numbers of the Strawberry 4 modules that are installed on yourStrawberry server Additionally it provides you with license related information for your site
Updating a LicenseOnly use this method if you are running Strawberry in a Non-High Availability environment
Please go to the Strawberry admin panel misc versions amp license and click the NEW LICENSE button Copy andpaste the license string in there and click the UPDATE button Once this is done SSH login to the Strawberryserver and type service strawberry4 restart The license will be applied once the Strawberry service has beenrestarted
Legal Information
Legal Information
62
AVID is a trademark of Avid Technologies (wwwavidcom) Apple and FCP are trademarks of Apple in the US(wwwapplecom) Adobe and Premiere are trademarks of Adobe (wwwadobecom) All product names logos andbrands are property of their respective owners All company product and service names used in this manual are foridentification purposes only Use of these names logos and brands does not imply endorsement
Legal Information
63
- Last Updated July 20 2017
-
- Introduction
- System Requirements
-
- Storage File System Requirements
-
- List of Certified Storage Vendors
- List of Supported Storage File Systems
-
- Strawberry Server HWSW Requirements for Production Environments
- Minimum Server HWSW Requirements for Demonstration amp POC Environments
- Minimum Requirements for a dedicated View Proxy Encoding Node
- Requirements for the Strawberry Client
-
- Strawberry Client SSL
-
- Requirements for the Strawberry Adobe Panel
- Minimum Web Browser Requirements
-
- Installation Manuals
-
- Strawberry Client
-
- Installing the Client
- Starting the Client
- Upgrading the Client
- Deleting the Client
-
- Client Configuration for NAS
-
- SMB Mounts Configuration
- Paths to Editing applications (App Launcher)
- Mount your drives under Windows 7 amp 8
- Mount your drives under OSX
-
- Client Configuration for StorNext amp XSAN
-
- SAN Mount Configuration
-
- Client Configuration for Shared Edits under macOS
- Client Configuration for Shared Edits under Windows
- Changing the Clients Fuse Blocksize (macOS only)
- Adobe Panel
-
- Installing the Panel
- Updating the Panel
- Removing the Panel
- Testing the Panel
-
- Users Roles amp Teams
-
- Manage Roles
-
- Available Capabilities
- Creating a role
- Editing a role
- Deleting a role
-
- Manage Users
-
- Creating a User
- Changing a Users Role
- User Specific Roles
- Assigning a User to Teams
- Deleting a User
- Removing a User from a Team
-
- Manage Teams
-
- Creating a Team
- Changing a Teams Name
- Changing a Teams Quota
- Deleting a Team
-
- Manage Edits
-
- Manage Projects
-
- Manage Online Projects
-
- Force Closing a Project
- Deleting one or multiple Projects
- Archiving a Project
-
- Manage Archived Projects
-
- Retrieving a Project from the Archive
-
- Download Project List
- Custom Metadata
-
- Manage Libraries
-
- Introduction
- Library States
- Ingest Libraries
-
- Creating a Library Project
- Configuring an Ingest Library
- Configuring the Library Ingest Interval
- Configuring the Library Clean Interval
- Good to Know
-
- External Libraries
-
- Creating a Library Project
- Configuring an External Library
- Configuring the Library Clean Interval
- Configuring the External Library Reindex Interval
- Good to Know
-
- Custom Metadata
-
- Custom Metadata Sets
- The Master Set
- Creating a Metadata Set
- Connecting Metadata Sets
- Deleting a Metadata Set
- Creating a Dropdown Menu
- Creating a Text Input Field
- Creating a Replacement Pattern
- Editing a Value
- Deleting a Value
- Creating Project Status Flags
- Deleting Project Status Flags
- Supported Unix Time Modifiers
-
- Archive amp Copy To
-
- Creating an Archive Strategy
- Canceling an ArchiveRetrieval Job
- Clearing ArchiveRetrieval Errors
- Project Copy-to Strategies
- Asset Copy-to Strategies
- Good to Know
-
- Freezing Archived Projects
-
- Templates
-
- Working with Templates
- Creating a Template (Avid Media Composer)
- Creating a Template (Adobe Premiere)
- Rename a Templates
- Duplicate a Template
- Delete a Template(s)
- Configuring the Avid Attic
- Manage Indexers
- Storage Quota
- MYSQL Backup
- Versions amp License
-
- VIEW Proxy Encoder
-
- Supported Video Audio and Image File Formats
- Enabling or Disabling View
- Proxy Encoder Configuration
- Blacklists amp Whitelists
- Applying Blacklist amp Whitelist Changes
- Node and Worker Control
- Content Download Options
- Rescan-Project(s)
- Repair-Project(s)
- Reencode-Everything
-
- Miscellaneous
-
- Manage Templates
- Safe Search
-
- Enabling Safe Search
- Define ldquoSafe Searchrdquo Metadata
- Good to Know
-
- Manage Indexers
-
- General
- Technical Metadata Whitelist
-
- Storage Quota
- Adobe Premiere Specific Feature
-
- Auto-Link media from Library into project
- Auto-Ingest local media into project
- Auto-Link subproject media into project
-
- Preditor
- SMTP Setup
- MYSQL Backup
- Empty Trash
- Osiris Option
- Versions amp License
-
- Updating a License
-
- Legal Information
-
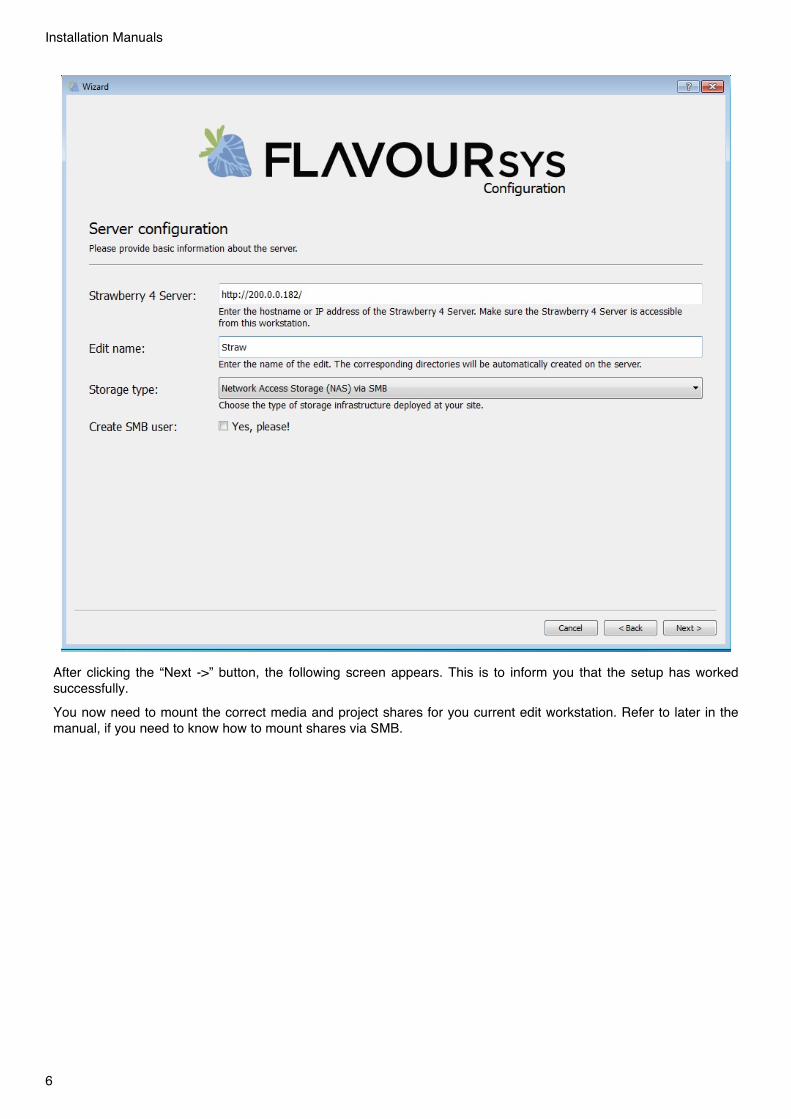
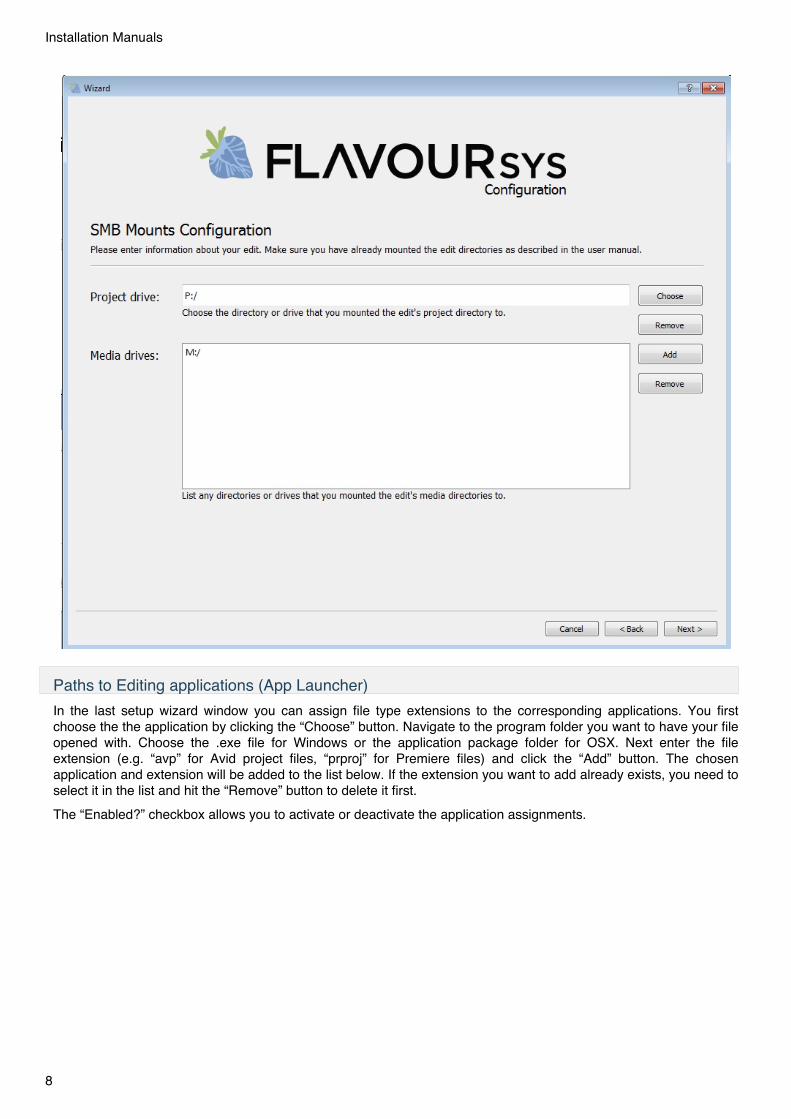
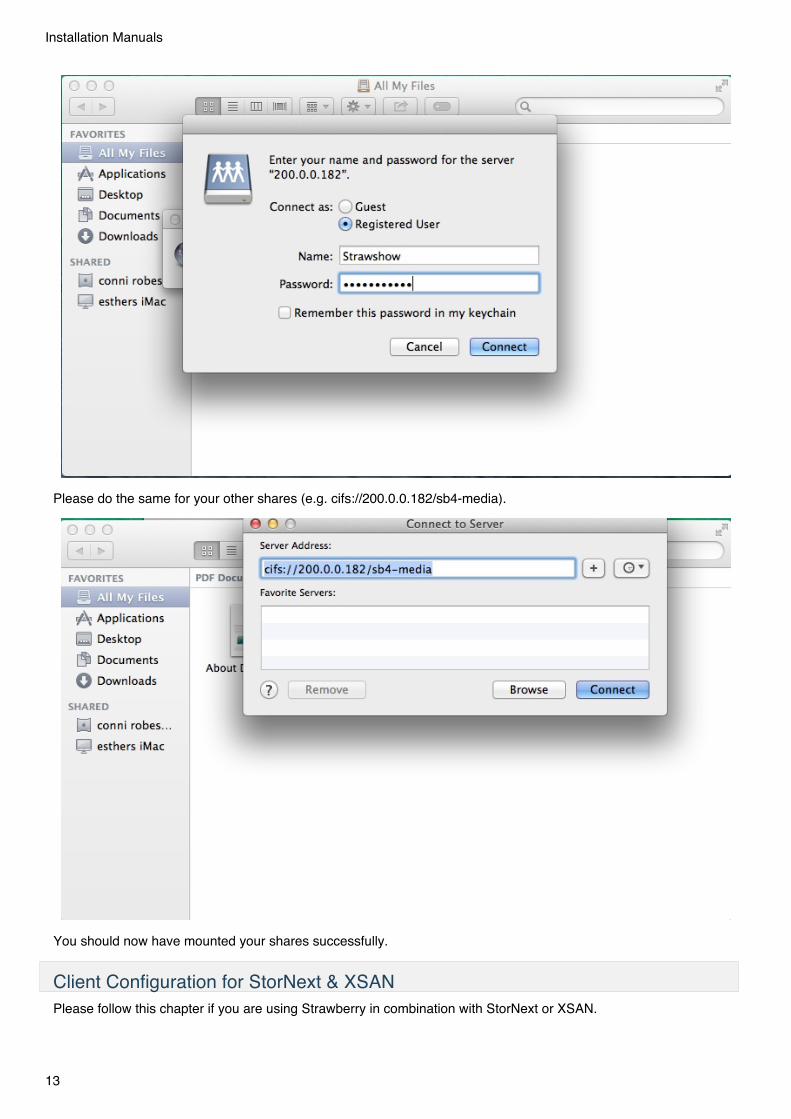

Make sure that the Strawberry media volumedrive name is the same on all of your editing systemx This willprevent offline media issues
7 Click Open
Installation Manuals
15
8 If you are using Avid Media Composer Perform step 4 After this you will need to setup a dedicated projectvolume for Avid To do so Click on the Choose button next to the Directory text field again Now navigate toSAN_Volume_NameStrawberryprojectseditsedit_name The edit_name is the name that you havedefined in step 2 Name the volume sb_avid_project or choose a custom name Now click Add In thevolume list check the checkbox that say Project Volume
9 OSX Under Volume name enter the name under which you wish the Strawberry Avid project volume toappear If you are unsure what to choose just enter sb_avid_project
10 Windows Drive choose the drive letter under which you wish the Strawberry project drive to appear If youare unsure we recommend to go with the P drive if possible
Make sure that the Strawberry media volumedrive name is the same on all of your editing systemx This willprevent offline media issues
11 Click Next
12 To configure Paths to editing applications please read the App Launcher chapter
13 Click Next to reach Miscellaneous Options
bull Create desktop shortcuts (If enabled Strawberry will create a desktop shortcut to the open project Theshortcut will point to the Strawberry media volume mounted on the Client machine)
bull Desktop shortcuts point to source (original) mounts (If enabled desktop shortcuts will not point to theStrawberry media volume on the local computer but to the project folder directly on the SAN Leave thisunchecked per default)
Installation Manuals
16
bull Final Cut Pro 7 fix (Select this option only if you use FCP 7) It is not required for FCP X
bull Show Strawberry mounts in the Finder (Enabled by default Only disable this if you which to hide theStrawberry media volumes from Windows Explorer or OSX Finder)
bull Remount volumes when openingclosing project (Per default the Strawberry media volumes get mounted whenstarting the Client and remain mounted when openingclosing projects When this option is enabled Strawberrywill unmount the volumes every time a project gets closed and mount them when opening a project)
bull Library Location (This feature is in beta stadium and not documented yet)
Client Configuration for Shared Edits under macOSIn order to configure the Strawberry client for shared edits the Strawberry server has to be configured to theshared edits mode first If you wish to update to shared edits edits please contact FlavourSys support first Thefollowing steps are valid for NAS and SAN environments
1 Install amp start the Strawberry client application (httpwwwflavoursyscomsupportstrawberry-product-downloads )
2 In the configuration Window enter the IP address of your Strawberry server the custom edit name and chooseShared Edits as the storage type
bull The edit name can not start with a number and can not include space
bull Creating an SMB user is not required for this mode
Installation Manuals
17
3 Click next until you reach the window shared edits mount configuration
4 In here provide the path to the central Strawberry media directory by clicking on the Add button This usuallyis Storage_Volume_Namestrawberrymedia_1media
5 Click Next
6 To configure Paths to editing applications please read the App Launcher chapter
7 Click next until you reach a window called Miscellanous options
bull Create desktop shortcuts (If enabled Strawberry will create a desktop shortcut to the open project Theshortcut will point to the Strawberry media volume mounted on the Client machine)
bull Desktop shortcuts point to source (original) mounts (If enabled desktop shortcuts will not point to theStrawberry media volume on the local computer but to the project folder directly on the SAN Leave thisunchecked per default)
8 Click Finish and enter the OSX Administrator credentials to save the configuration
Client Configuration for Shared Edits under WindowsIn order to configure the Strawberry client for shared edits the Strawberry server has to be configured to theshared edits mode first If you wish to update to shared edits edits please contact FlavourSys support first Thefollowing steps are valid for NAS and SAN environments
Installation Manuals
18
1 Download Strawberry client application and run the installer (httpwwwflavoursyscomsupportstrawberry-product-downloads )
2 The installer will prompt you with the message Allow all users to create file references on this machine(required for Shared Edits) Please make sure that the checkbox is checked
3 In the configuration Window enter the IP address of your Strawberry server the custom edit name and chooseShared Edits as the storage type
bull The edit name can not start with a number and can not include space
bull Creating an SMB user is not required for this mode
4 Click next until you reach the window shared edits mount configuration
5 In here provide the static drive letter under which open projects should appear on this editing station and thepath to the central Strawberry media directory This usually isStorage_Volume_Namestrawberrymedia_1media
Installation Manuals
19
Click Next
6 Click Next
7 To configure Paths to editing applications please read the App Launcher chapter
8 Click next until you reach a window called Miscellanous options
bull Create desktop shortcuts (If enabled Strawberry will create a desktop shortcut to the open project Theshortcut will point to the Strawberry media volume mounted on the Client machine)
bull Desktop shortcuts point to source (original) mounts (If enabled desktop shortcuts will not point to theStrawberry media drive on the local computer but to the project folder directly on the SAN or NAS Leave thisunchecked per default)
9 Click Finish
Changing the Clients Fuse Blocksize (macOS only)This function requires Strawberry Client 504 or newerYou can set custom block size running the client from the command line like this (the default value is 4K)
$ ApplicationsStrawberry ClientappContentsMacOSfsclient --blocksize 64k
The block size has to be provided in the following way
bull 4k
Installation Manuals
20
bull 8k
bull 16k
bull 32k
bull 64k
bull 128k
bull 256k
bull 512k
bull 1M
Adobe Panel
Installing the PanelThe installation process for the Strawberry Adobe panel is similar under OSX and Windows Only amacOSWindows Admin user can install the panel as this is an Adobe requirement
Important Note The Adobe Extension Manager is no longer required for the installation of the Strawberry AdobePanel and is obsolete as of CC2015
1 Download the latest Strawberry Adobe Premiere CC Panel that matches your current Strawberry versionhttpwwwflavoursyscomstrawberry-product-downloads
2 Close all Adobe applications running on your computer
3 Extract the zip to a local hard drive (the installation will NOT work from a network or USB location)
4 Go into the extracted folder Strawberry-AdobePanel-5xx
5 OSX Make sure you are logged in as an Administrator Double-click on the installcommand file Once theinstallation is completed you will see the following success message Strawberry AdobePanel installedsuccessfully If you see an error message instead please review the error code on the following websitehttpwwwadobeexchangecomresources19errors
6 Windows Double-click on the installcmd The installer will not return any success message However incase of an installation error you will see a Failed to install status = error code message In case this happensplease review the error code on the following website httpwwwadobeexchangecomresources19errors
Updating the PanelIn order to update the Strawberry Adobe panel please repeat the above installation process using a newer panelversion
Removing the Panel
1 Go into the local folder from which you originally installed the Strawberry Adobe panel If the folder is notpresent on your Computer anymore download the latest panel and extract it on an internal hard drive (USB ampNetowk drives wont work) httpwwwflavoursyscomstrawberry-product-downloads
2 OSX Double-click on the removecommand file You will be prompted to enter the OSX Administratorpassword
3 Windows Double-click on the removecmd file (The uninstaller requires Administrator privileges to workproperly)
Testing the PanelIn order to test the Strawberry Adobe panel launch the Strawberry client application and login with your credentialsCreate a project using the Adobe Premiere template or open an existing Premiere project In Premiere navigate tothe menu bar and click on Window Extensions Strawberry 5xx
Installation Manuals
21
Users Roles amp Teams
Manage RolesPurpose Strawberry enables Administrators to create custom user roles A role is a set of permissions (capabilities)that determine what a user can and can not do withing the Strawberry system A role can be assigned to multipleusers
Available CapabilitiesThis is a list of all available capabilities available in the Strawberry user role system
Project related and general capabilities
bull Can login to client application(Users with this capability can login to the Strawberry client application installed on the editing systems)
bull Can login to Strawberry web interface using a web browser(Users with this capability can login to the Strawberry interface using a web browser)
bull Can create new projects(Users with this capability can create new projects within the Strawberry user interface)
bull Can see users and teams(Users with this capability can see users and teams in the Strawberry system)
bull Can assign projects to own teams and their members(Users with this capability can share projects visible to them with teams that they are a member of includingmembers of these teams)
bull Can assign project to teams that the user isnt member(Users with this capability can share projects visible to them with teams that they are a not a member of)
bull Projects created by this user are available to all teams of which the user is a member(This will only apply if the user is able to assign Projects to own teams)
bull Can archive own projects(Users with this capability are allowed to archive projects that they created only)
bull Can retrieve own projects(Users with this capability are allowed to retrieve projects that they created only)
bull Can archive other peoples projects(Users with this capability are allowed to archive all projects that they see no mater if they created these projects ornot)
bull Can retrieve other peoples projects(Users with this capability are allowed to retrieve all projects that they see no mater if they created these projects ornot)
bull Can use copy to on own projects(Users with this capability are allowed to use copy to on projects that they created only)
bull Can use copy to on other peoples projects(Users with this capability are allowed to copy all projects that they see no mater if they created these projects ornot)
bull Can freezemelt own projects(Users with this capability are allowed to freeze and melt projects that they created)
bull Can freezemelt other peoples projects
Users Roles amp Teams
22
(Users with this capability are allowed to freeze and melt projects that they created)
bull Can modify the status and custom metadata of projects without write access(Users with this capability are allowed to change custom metadata from all projects that they see no matter if theywrite access to these projects or not)
bull Can re-scan projects (including Libraries)(Users with this capability are allowed to perform a rescan on projects that they see)
Asset related capabilities
bull Can delete assets and folders via user interface(Users with this capability are allowed to delete media assets via the Strawberry user interface (Recommended forsuper users only)
bull Can use copy to on assets(Users with this capability are allowed to use copy to on media assets from projects that they have at least readaccess to)
bull Can download proxy version of assets(Users with this capability are allowed to download LowRes proxies from projects that they have at least read accessto)
bull Can download high-res version assets(Users with this capability are allowed to download HighRes media assets from projects that they have at least readaccess to)
bull Can share assets via email(Users with this capability are allowed to share proxy versions of assets via email)
bull Can re-create proxy files(Users with this capability are allowed to trigger a re-encoding job on any Strawberry managed media asset)
bull Can track down assets but not delete(Users with this capability are allowed to see into which projects a given media file is linked Caution Advised This isa potential security risk because it does not respect individual user or team access rights Users could potentiallysee names of projects that they normally couldnt see)
bull Can track down assets and delete(Users with this capability are allowed to see into which projects a given media file is linked and also delete it fromthere Caution Advised This is a potential security risk because it does not respect individual user or team accessrights (Recommended for super users only)
Annotation amp Description related capabilities
bull Can comment on projects(Users with this capability can write comments for projects)
bull Can comment on assets(Users with this capability can write comments on assets)
bull Can apply annotations to assets (go to annotation view)(Users with this capability can write annotations for assets)
bull Can download annotations(Users with this capability can download the annotations of an Asset)
bull Can delete other peoples annotations (deletion of own annotations is always possible)(Users with this capability can delete annotations that other people created)
Preditor related capabilities
bull Can login to Preditor (to open sequences)
Users Roles amp Teams
23
(Users with this capability are allowed to login to Preditor)
bull Can create new Preditor sequences(Users with this capability are allowed to create new sequences within Preditor)
bull Can assign sequences to own teams and their members(Users with this capability can share Preditor sequences with teams that they are a member of including members ofthese teams)
bull Can assign sequences to teams that user isnt a member of(Users with this capability can share Preditor sequences even with teams that the user isnt a member of)
bull Sequences created by this user are available to all teams of which the user is a member(This will only apply if the user is able to assign Sequences to own teams)
bull Can export and import Preditor sequences(Users with this capability can export and import a Preditor sequence to an existing Strawberry project)
bull Can download sequence as xmlaaf file(Users with this capability can download Preditor sequences as XML or AAF files)
Creating a roleLog into the Administration panel and click on the USERS tab Click on the MANAGE ROLES bar to expand itBelow the role list is a button named ADD ROLE Click on this button and provide a role name as well as thedesired capabilities for that role Once you are done click CONFIRM to save your changes
Users Roles amp Teams
24
Editing a roleLog into the Administration panel and click on the USER tab Click on the MANAGE ROLES bar to expand itcheckbox the role(s) you intend to edit and then click on the EDIT ROLE button Once you are done clickCONFIRM to save your changes
Deleting a roleLog into the Administration panel and click on the USER tab Click on the MANAGE ROLES bar to expand itcheckbox the role(s) you intend to delete and then click on the DELETE ROLE button and confirm by clicking onYES You can only delete roles that are currently not assigned to any user(s)
Manage Users
Creating a UserLog into the Administration panel and click on the USER tab Click on the MANAGE USERS bar to expand itBelow the user list is a button named ADD USER Click on this button and fill out the required information anddefine a user role
Changing a Users RoleUsage Log into the Administration panel and click on the USER tab Expand the MANAGE USERS bar Next tothe LOGIN NAME column is a column called ROLE In order to change a users role click on the current role andselect the new role from the drop down menu
User Specific RolesIf you have users to which none of your existing roles apply you may create custom user roles for these users only
Usage Log into the Administration panel and click on the USER tab Expand the MANAGE USERS barCheckbox the user and then click on the EDIT ROLE button Now you can either assign another existing role tothat user or you can create a custom role by simply changing the users capabilities When changing thecapabilities without choosing a new role the role name will change to custom This indicates that this user now hasa role that is tied to himher only Custom roles can be overwritten by assigning an existing role to the user
Users Roles amp Teams
25
Purpose In certain Strawberry environments users never get created within Strawberry but authenticate againstLDAP or Active Directory To make sure that the capabilities of these user are limited Administrators can define adefault role for new users
Usage Log into the Administration panel and click on the USER tab Expand the MANAGE USERS bar Belowthe user list is an option named Default Role for new Users with a drop down menu next to it Choose the defaultrole from the drop down From now on every new user coming from LDAP or Active Directory will be assigned withthis role The role of the user can of course be changed later
Assigning a User to TeamsPurpose Per default newly-created users can only see their own projects but are not assigned to any specificteams The following text describes how to assign a user to one or more teams
Example Editors A B and C and the Production Director are working together on the popular series Making MadEditors C D and E and the Production Director will work together on the new season of Game of Chairs Simplycreate teams for Making Mad and Game of Chairs and assign Editor C and the Production Director to both teamsand they will be able to collaborate and view all projects for both teams Editors A B D and E will only be able toview content for their respective teams
Users Roles amp Teams
26
Usage Log into the Administration panel and click on the USER tab Click on the MANAGE USERS bar toexpand it Select the user that you want to assign to a specific team Next to the user list appears a list with allavailable teams You can assign the user to one or more of these teams by simply checking the box on the left ofthe team name Now when the user logs into the Strawberry 4 user interface he or she will be able to see theprojects from all the teams to which she or he is assigned
Deleting a UserUsage Log into the Administration panel and click on the USER tab Expand the MANAGE USERS bar andselect the user you want to delete using the checkbox next to the username Click the delete button and confirm thedeletion
Removing a User from a TeamUsage Log into the Administration panel and click on the USER tab Expand the MANAGE USERS bar In orderto remove a user from a team select the user Now you can see a list on the right to the user list This second list isnamed The selected user is a member of these teams You can remove the user from one or multiple of theseteams by unchecking the box on the left of the team name
Example Freelancer John Smith has been helping with Game of Chairs production and his contract is finished TheAdministrator removes John Smith from the Game of Chairs team to ensure that he no longer has access to thoseprojects but leaves John Smith as a user in the system for future collaboration
Manage Teams
Creating a TeamAvailable in Strawberry version 40 or newerPurpose Users can share projects with other users but in some cases it is more efficient to share projects with anentire team Usage Log into the Administration panel and click on the USER tab Now Expand the MANAGETEAMS bar Below the teams list is a button that says ADD Team Click this button and fill out the requiredinformation During this process strawberry will ask you to set a teams storage quota The team quota virtually limitsthe storage space but without restricting write access once a team has reached it In Strawberry no project has areal owner For this reason the teams quota is a so called additive quota which means that a project that is visible tomultiple teams will influence the quota of each of these teams This also means that the additive quotadifferentiates from the physical (real) storage quota which can be configured under MISCgtSTORAGE QUOTA
Changing a Teams NameUsage Log into the Administration panel and click on the USER tab Expand the MANAGE TEAMS bar Selectthe checkbox next the team you want to edit and then click the EDIT TEAM button Change the team name andconfirm
Changing a Teams QuotaUsage Log into the Administration panel and click on the USER tab Expand the MANAGE TEAMS bar Selectthe team you want to edit and then click the EDIT TEAM button Change the teams quota and confirm
Deleting a TeamAvailable in Strawberry version 40 or newerUsage Log into the Administration panel and click on the USER tab Expand the MANAGE TEAMS bar Selectthe team that you want to delete and press the DELETE button below the teams list Confirm the message Pleasenote that projects that were exclusively visible to this team should be reassigned to other users or teams beforedeletion
Manage Edits
Users Roles amp Teams
27
Important Note The edit list only shows Samba mounts that have been created via the Strawberry Client wizard onth eStrawberry server You will not see any edits that have been created directly on your storage (which is therecommended way of doing it) If you want to see the edits on your storage please check its Samba configuration
Manage Projects
Manage Online Projects
Force Closing a ProjectPurpose This feature allows the administrator to close a project while it is opened (locked) by an editing systemThis feature can be useful in case a computer crashes caused by a hardware failure on the editing system and it isnot possible to close the project from this computer anymore
Usage Log into the Administration panel and click on the PROJECTS tab Expand the MANAGE PROJECTSbar Select the project that you want to force close and press the FORCE CLOSE button below the project listConfirm to the warning message to force close the project
Deleting one or multiple ProjectsPurpose This feature allows the administrator to delete projects permanently When deleting a project project filesmedia files as well as proxy files and MySQL database entries will be deleted permanently
Usage Log into the Administration panel and click on the PROJECTS tab Expand the MANAGE PROJECTSbar Select the project(s) that you want to delete and press the DELETE button below the project list Confirm tothe warning message to delete the project(s)
Archiving a Project
bull Available in Strawberry version 40 or newerbull ArchivalRetrieval of multiple projects at once is possible in Strawberry version 46 or newerbull The possibility to archive into a compressed zip file has been dropped in Strawberry version 46 or
newer because it was too error-pronePurpose Strawberry allows certain users (admins amp users but not guests) to archive and retrieve editing projectsWhen performing an archive operation Strawberry takes every single file which is part of the project and sends it toan archive destination which was previously defined by the administrator As soon as the project is in the archiveStrawberry 4 will delete it from the production storage (aka source) but will keep the metadata and proxy filesavailable for further use Please keep in mind that Strawberry does not archive any subprojects that are added to theprojects that you archive If you you want to archive project A which has subproject B and in case project Aactually uses media files from subproject B please make sure to consolidate or copy the affected media files toproject A before sending it to the archive This will ensure that all the used media files will be archived properly andthat the project will be fully operational after retrieval To check which projects are related to one another just selecta project and check the PARENT PROJECTS SUB PROJECTS list on the right of the project list
Usage Log into the Administration panel and click on the PROJECTS tab Expand the MANAGE PROJECTS bar Select the project(s) that you want to archive by clicking on the checkbox(es) next to the project name(s) and
Manage Projects
28
press the ARCHIVE button below the project list Choose an Archive Strategy from the list and confirm As soonas the project is in the archive it will change its visual appearance as following
The project avchd is online while the project avchd sony fs700 slowmo is in the archive Once a project is inthe archive it will appear under Projects Manage Archived Projects
Manage Archived Projects
Retrieving a Project from the ArchivePurpose Strawberry allows certain users (admins amp users but not guests) to archive and retrieve editing projects Inorder to be able to retrieve Strawberry has to be able to access the projects archive location Please note if anexternal archive application has moved the project for instance off to a tape library an integration may be necessaryto trigger the restore process in the archive application
Usage Log into the Administration panel and click on the PROJECTS tab Expand the MANAGE PROJECTSbar Select the project(s) that you want to retrieve from the archive and press the RETRIEVE button below theproject listThe RETRIEVEARCHIVE button is a toggle button which is an ARCHIVE button if you select a projectwhich is not already in the archive and becomes a RETRIEVE button once you select an archived project Confirmthe message to proceed Depending on the project size the retrieval progress can take some time Check the projectlist from time to time to see if the project has been retrieved You will notice a retrieved project by its visualappearance
The project avchd is online while the project avchd sony fs700 slowmo is in the archive Archived projects area bit greyed out and have a grey dot next to their project name
Download Project ListUsage In order to download the project list as an XLS file go to the Admin Panel Projects and click on the buttonDownload XLS
Purpose Project statuses help users to determine what the working status of a project is Statuses can be forinstance in editing in color grading etc and are defined by the administrator The status of each project isdisplayed in the metadata area of the Strawberry 4 user interface
Usage Log into the Administration panel and click on the PROJECTS tab Expand the STATUS OPTIONS barNow click on ADD STATUS and define a name for the new status Once the status is created users can choose itfrom the Strawberry frontend
Custom MetadataPlease read the rarr Custom Metadata larr chapter for more information on metadata sets and values
Manage Projects
29
Manage Libraries
IntroductionLibraries are an optional Add-on and can only be configured with a valid add-on license This sectionexplains how to create Ingest Watchfolders and External Libraries using the Strawberry admin panel
Library StatesLibrary no matter whether Ingest Libraries or External Libraries can have three different states
bull State Active - The library is fully operational
bull State Not Configured - The Library exists but is not yet configured
bull State Inactive - the library is configured but either the source watch folder or the target project are notreachable or missing
Ingest LibrariesPurpose An Ingest Library is a Strawberry library project that gets populated via an ingest watch folderStrawberry scans that watch folder on an Administrator defined interval and moves new media into thecorresponding Strawberry library project folder on the storage Eg If you create a library called My Example IngestLibrary a folder called My Example Ingest Library will be created within strawberrymedia_1media and mediafrom the related ingest watch folder will be moved to this location
Creating a Library Project
1 In order to create a new Library project you need to create a normal project first To do so open the Strawberryclient application and create a new project Name the project as you wish the library to be named Once theproject has been created close it and go back to the admin panel
2 In the admin panel go to Projects Manage Online Projects and checkbox the project that you created in theprevious step No click on the Flag as Library button on the lower right of the project list Then confirm withyes
Manage Libraries
30
Once the library has been created it will appear under Projects Manage Libraries inside the Strawberry Adminpanel
Configuring an Ingest LibraryPreparation Before configuring an ingest library you need to create an ingest watch folder The watch folder can belocated on one of your Strawberry-managed storages or on any storage accessible by the Strawberry server Theingest watch folder can not be located within the Strawberry root (eg optsb4data) or any sub folder below thispath To review how the storage root is configured on your system login to the Strawberry server and type catoptsb4appfsbaseconfigstrawrageyml The storage root is provided in the line root_path
1 Go to Projects Manage Libraries and checkbox the Library that you created in the previous step The librarywill be shown as Not Configured
2 Click on the Edit button below the library project list The following options appear
bull Name - Name of the Library
bull Watchfolder Type - Library Ingest or External Library Select Ingest Library here
bull Ingest Path - The path to the ingest watchfolder as seen by the Strawberry server
bull Target Storage - The storage to which ingested content should be moved This is only relevant if Strawberryis controlling multiple storage systems
bull Encoding Priority - The encoding priority for proxy files in this Library The ration between normal and highpriority is 14
Manage Libraries
31
bull Example for a Library Ingest configuration
Configuring the Library Ingest IntervalPurpose The library ingest interval determines how often Strawberry will check all your configured ingest watchfolders for new media files in order to move them to the target library By default the value is set to 1 minuteAssuming you added new media to the ingest watch folder Strawberry will see the files after 1 minute One minutelater it will check if the files size in the ingest watch folder changed (to determine if the file is still being copied) If thefile size did not change Strawberry will move it to the target library If the file size changed Strawberry will checkagain 1 minute later and so on
UsageIn order to change the Library Ingest Interval go to Projects Manage Libraries and adjust the value accordinglyto your needs
Configuring the Library Clean IntervalPurpose The clean interval scans your existing libraries for deleted media files on a recurring basis This however isonly important if you delete media files directly from the library folder on the storage and not from the Strawberryuser interface If you are not deleting Library media directly from the storage we recommend to set the recurrency toweekly instead of daily
Manage Libraries
32
Good to Know
bull There can only be one ingest watchfolder per library
bull Folder structures inside the ingest watchfolders will refelct inside the Strawberry library project
bull For usability reasons folder strctures inside the ingest watchfolders will not be deleted
bull Libraries can be archived equally to normal projects
External LibrariesPurpose An External Library is a folder structure outside of the usual Strawberry managed folder structure on thestorage Strawberry can index that external folder structure to make it seachable and (proxy-)viewable from theStrawberry user interfaces Media in External Libraries remains where it is meaning Strawberry will notautomatically move but only monitor it
Creating a Library Project
1 In order to create a new Library project you need to create a normal project first To do so open the Strawberryclient application and create a new project Name the project as you wish the library to be named Once theproject has been created close it and go back to the admin panel
Manage Libraries
33
2 In the admin panel go to Projects Manage Online Projects and checkbox the project that you created in theprevious step No click on the Flag as Library button on the lower right of the project list Then confirm withyes
Once the library has been created it will appear under Projects Manage Libraries inside the Strawberry Adminpanel
Configuring an External LibraryPreparation Before configuring an ingest library you need to make sure that the folder structure that Strawberryshould watch is reachable by the Strawberry server If you are unsure how to do this please contact next levelsupport
1 Go to Projects Manage Libraries and checkbox the Library that you created in the previous step The librarywill be shown as Not Configured
2 Click on the Edit button below the library project list The following options appear
bull Name - Name of the Library
bull Watchfolder Type - Library Ingest or External Library - Select External Library here
bull External Path - The path to the folder structure that you wish to be watched by Strawberry
bull Target Storage - The storage to which ingested content should be moved This is only relevant if Strawberryis controlling multiple storage systems
bull Encoding Priority - The encoding priority for proxy files in this Library The ration between normal and highpriority is 14
Manage Libraries
34
bull Example for an External Library configuration
Configuring the Library Clean IntervalPurpose The clean interval scan your existing libraries for deleted media files on a recurring basis This however isonly important if you delete media files directly from the library folder on the storage and not from the Strawberryuser interface If you are not deleting Library media directly from the storage we recommend to set the recurrency toweekly instead of daily
Configuring the External Library Reindex IntervalPurpose The external library reindex scans your existing libraries for new modified and deleted media files on arecurring basis This make sure that all changes in the external location will reflect within Strawberry The ExternalLibrary Reindex is MUCH slower than the Library Clean Interval which is why it is not possible to run it hourly Werecommend a daily or even better week recurrency for this index job
Manage Libraries
35
Good to Know
bull There can only be one External Library location per library project
bull Folder structures inside the external library will refelct inside the Strawberry library project
bull When adding a media from an External Library to an open Strawberry project that media will always becopied
Custom Metadata
Custom Metadata SetsPurpose This feature allows the Administrators to create several metadata sets Metadata sets can either containdrop down menus or text input fields Users will be be asked to select from the values provided in the metadata setsupon project creation
How the custom metadata could look in the user frontend
An example of custom metadata fields asking the user to provide the requested information Metadata fields withan asterisk symbol are mandatory for the user to fill out
The Master SetUsage Log into the Administration panel and click on the PROJECTS tab Expand the CUSTOM METADATAbar
The master set is the default set for all Strawberry installations and it is the set that every user sees upon projectcreation The master set can be populated with drop down menus and text input fields
Creating a Metadata SetUsage Log into the Administration panel and click on the PROJECTS tab Expand the CUSTOM METADATAbar
Custom Metadata
36
Click the ADD SET button and provide a name for the new set Once the set is created you can populate it withmetadata values like dropdown menus or text input fields
Connecting Metadata SetsUsage Log into the Administration panel and click on the PROJECTS tab Expand the CUSTOM METADATAbar
Metadata sets can be connected via drop down menus meaning that a specific drop drop down selection will load aspecific metadata set for the user In order to connect a drop down value with a metadata set edit the metadatavalue by clicking the checkbox next to the value and then the EDIT VALUE button
Each drop down menu contains Values and Targets The value is the drop down value that the user can choosefrom upon project creating The target is the metadata set to which the value should refer If the target None isselected the value will not load any metadata set If a target set is selected this target set will be loaded when theuser chooses this specific value
Deleting a Metadata Set
Custom Metadata
37
Usage Log into the Administration panel and click on the PROJECTS tab Expand the CUSTOM METADATAbar Select the metadata set that you wish to delete by checking the box next to it and then press the delete buttonon the botton of the metadata set list
Creating a Dropdown MenuUsage Log into the Administration panel and click on the PROJECTS tab Expand the CUSTOM METADATAbar
Click the ADD VALUE button and provide the following information
bull Name The name of the dropdown menu as the user will see it (for example Customer)
bull Type dropdown menu
bull Maximum Characters Not relevant for dropdown
bull Restrict input to Not relvant for dropdown
bull Pattern Not relvant for dropdownbull Mandatory Defines if this value is mandatory (checked) or not (unchecked)
bull Use in Project String Defines if items from this dropdown will appear in the project name if the users enablesthe checkbox Create Project Name from Above Entries upon project creation
No you can type the drodown items into the Value field To add additional drodown values click on the + buttonon the right of the value field To connect a drop down value with another Metadata Set select the set as a Targetnext to the related value
Click CONFIRM when done
Custom Metadata
38
Creating a Text Input FieldUsage Log into the Administration panel and click on the PROJECTS tab Expand the CUSTOM METADATAbar
Click the ADD VALUE button and provide the following information
bull Name The name of the text input field as the user will see it (for example Project Number)
bull Type Text Input
bull Maximum Characters The amount of characters a user can type into that field 0 equals infinite
bull Restrict input to Restrict input to numbers only letters only or numbers amp letters No restriction will allowany UTF-8 character
bull Pattern Not relevant for text input
bull Mandatory Defines if this value is mandatory (checked) or not (unchecked)
bull Use in Project String Defines if items from this text input field will appear in the project name if the usersenables the checkbox Create Project Name from Above Entries upon project creation
Click CONFIRM when done
Custom Metadata
39
Creating a Replacement PatternUsage Replacements patterns enable Strawberry to automatically create date values based on Unix date modifiersA List of possible modifiers can be found below Usage Log into the Administration panel and click on thePROJECTS tab Expand the CUSTOM METADATA bar
Click the ADD VALUE button and provide the following information
bull Name The name of the pattern field as the user will see it (for example Date)
bull Type Replacement Pattern
bull Maximum Characters Not relevant for text replacement pattern
bull Restrict input to Not relevant for text replacement pattern
bull Pattern A pattern consisting of Unix modifiers A pattern such as eg Y m d equals year month date
bull Mandatory Not relevant for text replacement pattern
bull Use in Project String Defines if the output from this pattern will appear in the project name if the users enablesthe checkbox Create Project Name from Above Entries upon project creation
Click CONFIRM when done
Custom Metadata
40
Editing a ValueAvailable in Strawberry version 40 or newerUsage Log into the Administration panel and click on the PROJECTS tab Expand the CUSTOM METADATAbar Expand the metadata set that contains the value you want to edit and then select the value by checking the boxnext to it Change the value properties as required and then click CONFIRM
Deleting a ValueUsage Log into the Administration panel and click on the PROJECTS tab Expand the CUSTOM METADATAbar Expand the metadata set that contains the value you want to delete and then select the value by checking thebox next to it Now click on DELETE VALUE
Available in Strawberry version 40 or newer
Creating Project Status FlagsAvailable in Strawberry version 40 or newerPurpose Project statuses help users to determine what the working status of a project is Statuses can be forinstance in editing in color grading ready for approval etc and are defined by the administrator The statuses ofeach project is displayed in the metadata area of the Strawberry 4 user interface
Usage Log into the Administration panel and click on the PROJECTS tab Expand the STATUS OPTIONS barNow click on ADD STATUS and define a name for the new status Once the status is created users can choose itfrom the Strawberry frontend
Deleting Project Status FlagsPurpose Deleting status flags will prevent users from being able to select that status in the future However whendelting a status flag it will remain attached to the projects that are already using it
Custom Metadata
41
Usage Log into the Administration panel and click on the PROJECTS tab Expand the STATUS OPTIONS barNow click on the checkbox next to the status flag that you want to delete and press the DELETE VALUE button
Supported Unix Time Modifiers
bull a localersquos abbreviated weekday name (eg Sun)
bull A localersquos full weekday name (eg Sunday)
bull b localersquos abbreviated month name (eg Jan)
bull B localersquos full month name (eg January)
bull C century like Y except omit last two digits (eg 20)
bull d day of month (eg 01)
bull D date same as mdy
bull e day of month space padded same as _d
bull F full date same as Y-m-d
bull h same as b
bull H hour (0023)
bull I hour (0112)
bull j day of year (001366)
bull k hour ( 023)
bull l hour ( 112)
bull m month (0112)
bull M minute (0059)
bull p localersquos equivalent of either AM or PM blank if not known
bull P like p but lower case
bull r localersquos 12-hour clock time (eg 111104 PM)
bull R 24-hour hour and minute same as HM
bull s seconds since 1970-01-01 000000 UTC
bull S second (0060)
bull T time same as HMS
bull u day of week (17) 1 is Monday
bull U week number of year with Sunday as first day of week (0053)
bull w day of week (06) 0 is Sunday
bull W week number of year with Monday as first day of week (0053)
bull y last two digits of year (0099)
bull Y year
bull z +hhmm numeric timezone (eg -0400)
bull Z alphabetic time zone abbreviation (eg EDT)
Archive amp Copy ToStrawberry allows certain users (admins amp users but not guests) to archive and retrieve editing projects When performing an archive operation Strawberry takes every single file which is part of the project and sends it to an archive destination which was previously defined by the administrator As soon as the project is in the archive Strawberry 4 will delete it from the production storage (aka source) but will keep the metadata and proxy files The
Archive amp Copy To
42
archive path defined here is also the retrieval path If you look for a more sophisticated archivalretrieval process youshould have a look inside the Strawberry API documentation
Creating an Archive StrategyZIP is not longer supported as an archive method in Strawberry because of missing CRC checksumcapabilitiesPurpose Archive strategies allow you to define discrete archive locations and methodologies for different types ofprojects When a user presses the Archive Project button in the user front-end Strawberry will offer the archivestrategies defined here
Usage Log into the Administration panel and click on the Archive tab Expand the ARCHIVE STRATEGIES barClick the ADD button and provide the following information
bull Name The name of the archive strategy The users see the name of the strategy when he or she attempts toarchive a project
bull Type The archive type Please select SB native if you are not using Archiware P5 or Masstore
bull Path The path (aka archive destination) for projects archived using this strategy
bull Method
bull plain Strawberry archives the project and media files without compressing them It archives theprojects folder structure as it is
bull tarball Puts the project amp media files of a project into a tarball before archiving itbull Check
bull Fingerprint Sequential integrity check on a file that only detects serious file damages but no minordefectsbull CRCs are specifically designed to protect against common types of errors on data transmissionswhere they can provide quick and reasonable assurance of the integrity of data delivered Howeverthey are not suitable for protecting against intentional alteration of data
bull None No data integrity check at allbull EnableDisable Strategy Define if an archive strategy is available for users (enabled) or not (disabled)
Archive amp Copy To
43
Canceling an ArchiveRetrieval JobArchive or retrieval jobs can currently only be canceled from the Strawberry user interface but not from theAdministration panel In order to Cancel an archive or retrieval job do the following
1 Login to the user interface as an Administrator and right click on the affected project
2 Select Cancel ArchiveRetrieval Job and confirmIt will take a few seconds up to a couple of minutes until the cancellation has been performed Once it is done youwill see a warning sign next to the project name The warning sign indicates that the operation has been aborted bythe user
When a project archivalretrieval failed the project will have a warning sign next to its name
Clearing ArchiveRetrieval ErrorsIn case a project archive or retrieval failed (either it was canceled by a user or failed for other reasons) you can resetthe project state back to normal by performing the following operations
1 Login to the Strawberry user interface as an Administrator and right click on the affected project
2 Select Clear Archive Error from the context menu and confirmIt will take a few seconds until the fail state of the project has been cleared and the project is displayed asnormal Once the front end reports that the clearance has been successfully done you may retry to archive orretrieve the project if required
Project Copy-to StrategiesPurpose Strawberry enables users to copy projects to another location This location can be another storagedevice (for backup purposes) a render farm or other external application watch folders This feature works verysimilar to the Archive function The main difference is that copied projects will not be deleted from the mediastorage (source volume) but remain there for further use
Usage Log into the Administration panel and click on the Archive tab Expand the Project Copy-to Strategiesbar Click the ADD button and provide the following information
bull Name The name of the copy-to strategy The users see the name of the strategy when he or she attempts tocopy a project
bull Path The path (aka copy-to destination) for projects copied using this strategy
bull Method
bull plain Strawberry archives the project and media files without compressing them It backups theprojects folder structure as it is
bull tarball Puts the project amp media files of a project into a tarball before copying it
bull zip Puts the project amp media files of a project into a zip file before copying it (Please Note Zip filescan not be CRC checked)
bull Check
bull Fingerprint Sequential integrity check on a file that only detects serious file damages but no minordefects
Archive amp Copy To
44
bull CRCs are specifically designed to protect against common types of errors on data transmissionswhere they can provide quick and reasonable assurance of the integrity of data delivered Howeverthey are not suitable for protecting against intentional alteration of data
bull None No data integrity check at allbull EnableDisable Strategy Define if an archive strategy is available for users (enabled) or not (disabled)
Asset Copy-to StrategiesPurpose Strawberry enables users to copy individual assets to another location This location can be anotherstorage device (for backup purpose) a render farm or external application This feature works very similar to theArchive function The difference is that copied assets will not be deleted from the media storage but remain therefor further use
Usage Log into the Administration panel and click on the Archive tab Expand the Asset Backup Strategies barClick the ADD button and provide the following information
bull Name The name of the copy-to strategy The users see the name of the strategy when he or she attempts tocopy a project
bull Path The path (aka archive destination) for projects copied using this strategy
bull Method
bull plain Strawberry archives the project and media files without compressing them It backups theprojects folder structure as it is
bull tarball Puts the project amp media files of a project into a tarball before copying it
bull zip Puts the project amp media files of a project into a zip file before copying it (Please Note Zip filescan not be CRC checked)
bull Check
bull Fingerprint Sequential integrity check on a file that only detects serious file damages but no minordefects
bull CRCs are specifically designed to protect against common types of errors on data transmissionswhere they can provide quick and reasonable assurance of the integrity of data delivered Howeverthey are not suitable for protecting against intentional alteration of data
bull None No data integrity check at allbull EnableDisable Strategy Define if an archive strategy is available for users (enabled) or not (disabled)
Good to Know
Freezing Archived ProjectsAvailable in Strawberry version 44 or newerIn order to avoid that users are accidentally retrieving archived projects you can freeze these projects using rarrfreezeoptions larr
Templates
Working with Templates
Templates
45
Purpose Templates are an extremely efficient way to prepare standardized project settings and content for allStrawbery users in your facility Templates can contain custom file and folder structures
Example 1 Application Specific Templates
One example to illustrate the benefit of templates can be working with Avid Media Composer in different frame rates(24 frames and 25 frames) Avid does not allow to switch the frame rate within a project With Strawberry you couldcreate two templates one for 24 frames and one for 25 frames and copy the related Avid project files into thistemplate When a user creates a project from on of these templates the corresponding projects files (24 frames or25 frames) will be copied into the new projects an renamed after the new project so the user does not need to createa new Avid project manually after he or she created a project in strawberry
Example 2 Production Specific Templates
Another example of working with templates can be a specific production that requires specific preparations Mostmedia facilities create individual folder structures for different productions so that people save graphics visualeffects and sound effects in the right location on the storage Usually these folder structures need to be recreated foreach episode of a production With Strawberry you can create a template which contains a specific folder structureand even media files and copy your prepared folder and media files into this template As soon as a user choosesthe template upon project creation the folders and files that you prepared in the template will be copied over to thenew project and are immediately available for the user
Creating a Template (Avid Media Composer)Before users can create any Avid projects using the Strawberry client software you need to have at least ONEtemplate Log into the admin panel and click on the MISC tab Expand the TEMPLATES bar Now click theCREATE NEW button
Strawberry will ask you for a Template name a preset a token and a naming pattern
Choose a name that best characterizes your template In this example we will create an Avid template that containsa high definition Avid project with a resolution of 1080p So it makes sense to call the template Avid 1080p
In the preset row click on the little down arrow and choose the Avid preset When a user creates a projectbased on an Avid template Strawberry automatically create the Avid MediaFiles and OMFI MediaFiles folderstructure in the project and it will also ensure that Avid project and media files can be shared properly
The token is a replacement string for a file name This means that if your token says replace_me and you createan Avid template named replace_me and copy it into your template folder (discussed later) every time thetemplate replace_me is used the token text (in this case replace_me) will be changed to the name of the currentStrawberry project So the Avid project file called replace_meavp in your templates folder will be used and namedprojectnameavp as its created in your Strawberry project
In the row pattern you can define how a project name based on this template should look The stringYmd-name will result in the project name 20130810-ProjectName Putting the date inside the projectname will enable your user to search for projects by typing in the date If you dont need the date in the project nameyou can simply delete the date-related parts of the string and leave the name piece If you need the date part youcan modify it to your requirements In order to understand the formatting for doing this please refer to the unix timeman page at httpunixhelpedacukCGIman-cgidate
Templates
46
After you are done click Create and then open Avid Media Composer Create a new local project calledreplace_me with the setting 1080p25
Open the newly created project delete the bin that Avid always makes in new project and empty the Avid trashfolder
In order to ensure that Media Composer will recognize network volumes as media drives open Tools gt Console andtype in alldrives If you see the message All drives will be viewed as media drives (Was previously set to havingonly true media drives act as media drives) you are good to go If you see the message Only true media drives willbe viewed as media drives (Was previously set to having all drives act as media drives) type alldrives againThere are just two possible options
Now go to Tools gt Media Creation gt Capture and select the Strawberry media drive (mapped as a networkdrive on your Computer) as the AudioVideo file destination Click on both Apply to All buttons and then click onOK Now close the project
Templates
47
Navigate to the Strawberry template folder on your storage (Strawberrytemplates) Within that template folder youwill see a folder that is named after the template you created in the Strawberry admin panel (in this case we called itAvid 1080p) Inside this folder will be a folder called media_1 and one called projects
Use the Finder or Explorer to navigate to your local Avid projects folder (eg UsersFlavourSysDocumentsAvidProjects) and open the replace_me project folder Copy the files replace_meavp replace_me Settingsxml andreplace_me Settingsavs to your clipboard
Paste the files into your StrawberrytemplatesAvid 1080pprojects folder If an editor creates a new project using thistemplate Strawberry will rename the replace_me string with the name of the current Strawberry project
Now every time a Strawberry user creates a new project based on this template it has all the right settings export preferences etc that it will inherit from the replace_me project that you created and set up before copying it into the Strawberrytemplatesltyour template namegtprojects folder If you need to modify or improve your template
Templates
48
simply make the changes to the local replace_me project and re-copy the three files into theStrawberrytemplatesltyour template namegtprojects folder
Creating a Template (Adobe Premiere)Before you can create an Adobe Premiere editing project from within the Strawberry client software you need tocreate a template for Strawberry to use Click on the Template Tab in the Admin panel and then click on CreateNew
Strawberry will ask you for a Template name a preset a token and a naming pattern
Choose a name that best characterizes your template In this example we will create an Adobe Premiere templatethat contains an Adobe Premiere project So it makes sense to call the template Adobe Premiere
In the preset row click on the little down arrow and choose the Adobe preset When a user creates a projectbased on an Adobe template Strawberry automatically create the Adobe Cache folder structure in the project and itwill also ensure that Adobe project and media files can be shared properly
The token is a replacement string for file names This means that if your token says replace_me in these settingsand you go on to create an Adobe Premiere project named replace_me and put it in your template folder thetemplate will be used and automatically renamed based on the Strawberry project name that is open This way anAdobe Premiere template project file called replace_mePR will be named StrawberryprojectnamePR each timeyou create a new project from within Strawberry
In the row pattern you can define how a project name based on this template should look like The stringYmd-name will result in the project name 20130810-ProjectName Putting the date inside the projectname will enable your user to search for projects by typing in the date If you dont need the date in the project nameyou can simply delete the date related parts of the string and leave the name piece If you need the date part youcan modify it to your requirements In order to understand the formatting for doing this please refer to the unix timeman page at httpunixhelpedacukCGIman-cgidate
After you are done click Create and go to the Strawberry Client Create a new project using the Adobe Premieretemplate Now open Adobe Premiere and create a new project Name the project replace_me and set the captureformat to HDV Ensure that all Scratch Disk locations are set to same as project
Templates
49
Click ok to create and open the project Once the project is opened go to EditgtPreferences Media and choosethe Adobe Cache on your Strawberry media volume as the destination for Media Cache Files and Media CacheDatabase
Templates
50
Tip If you are using the Adobe Premiere Panel launch it now If a user creates a project based on this template thepanel will launch automatically with the new project
Click OK to confirm your changes Now save the project and leave Adobe Premiere Navigate to your local Adobeprojects folder and copy the newly created project file replace_meprproj to the media_1 folder of the Adobetemplate location that you created
Now every time an editor creates a new project using the Adobe Premiere template the replace_mepr templatewill be used and all the settings preferences and destinations will be inherited and used in the newStrawberryprojectnamepr
Rename a Templates
Templates
51
Purpose You want give the Templates a new name for differentation
Usage Log into the admin panel and click on the MISC tab Expand the MANAGE TEMPLATES bar Check thetemplate what you want rename below the templates list is a button says RENAME and fill out with the new nameIf you are ready click CONFIRM else if you want go back click CANCEL
Duplicate a TemplatePurpose Use dublicate a template if you want clone the settings
Usage Log into the admin panel and click on the MISC tab Expand the MANAGE TEMPLATES bar Check thetemplate what you want duplicate below the templates list is a button says DUPLICATE and fill out with the newname If you are ready confirm it with click DUPLICATE else if you want to stop the prozess click CANCEL
Delete a Template(s)Purpose If you want delete a template(s) eg Didnt needed anymore
Usage Log into the admin panel and click on the MISC tab EXPAND the MANAGE TEMPLATES bar Checkthe template what you want delete below the templates list is a button says DELETE
Configuring the Avid AtticWhen utilizing Avid Media Composer the Avid Attic functionality might be important to your workflow To make theAvid Attic work with strawberry please perform the following steps
1 Close Avid Media Composer
2 Navigate to the Avid Attic folder on our computerWin UsersPublicPublic DocumentsAvid editing application
Mac Macintosh HDUsersSharedAvid editing application
3 Rename the Avid Attic folder to Avid Attic_Old
4 Open an Avid Media Composer project using the Strawberry client and open the project in Avid
5 Close the project in Avid Media Composer
6 Go back to the Avid attic and check whether Avid has created a new Attic folder
7 Check the attic folder for the project that was recently opened in Strawberry
Manage IndexersCheck the following boxes if you want the features or unchecked if not
Enable deep indexing for media files
Index adobe premiere project files
Index avid bin files
Storage Quota
Templates
52
Purpose In this section you can define how much physical storage space all projects managed by strawberry areallowed to occupy The quota is a soft quota meaning that there is no physical storage restriction once it getsexpired However Strawberry will send a warning email if if the quota that you defined has been reached
Usage Log into the admin panel and click on the MISC tab Expand the STORAGE QUOTA bar Define howmuch space (in Gigabytes) all projects managed by strawberry are allowed to occupy and press SAVE You canchange this quota at any time
MYSQL BackupWhen clicking the Backup Now button Strawberry creates a dump of its MySQL database The default location forthe database dump is optsb4databackups The default destination can be reconfigured in theoptsb4appfsbaseconfigdatabase-backupyml file
Versions amp LicenseThis section is for license and support purpose only
VIEW Proxy Encoder
Supported Video Audio and Image File FormatsSupported Video Formats amp CodecsApple Intermediate Codec (MOV)Apple MJPEG-B (MOV)Apple ProRes (MOV)
Arri Alexa (ARI)
AS-11 IMX 50 (MXF)AS-11 AVC Intra 100 (MXF)
(X)AVC Intra 50100 (MOV MXF)
Avid 11 amp 11xAvid DV amp DV100
Avid DNxHD (MOV MXF)(45 60 75 90 90x 110 110x 120 120x 145 185 185x 220 220-10Bit)
Avid Interplay C93 amp MVE videoAvid MPEG2 50 - SDAvid Meridien Compressed SD amp Uncompressed SDAvid Packed amp RGBPacked
AVS (Standard amp Chinese)
Black Magic R210
Canopus LosslessCinepak
VIEW Proxy Encoder
53
DV (PAL amp NTSC)
DVCPRO HD | 100 MbpsDVCPRO 50 | 50 MbpsDVCPRO 25 | 25 Mbps
H261H263 H263-1996H263+ H263-1998 H263 version 2H264 AVC MPEG-4 AVC MPEG-4 (MP4 MOV MXF)
HDV
MJPEG amp MJPEG LosslessMPEG 1 amp 2 (M1V M2T M2V MPEG MPG MPGV MPV VOB)MPEG 4 (M4A M4P M4V MP4)
P2 - AVC-Intra 50 100 (MOV MXF)P2 - DVCPRO 25 50 100 (MOV MXF)
QuickTime uncompressed
Red Digital Cine Camera (R3D)
Windows Media Video (All Versions)
XDCAM 25XDCAM IMX 30XDCAM HD 50XDCAM SXS 50
Also SupportedAvid 11 10-bit RGB PackerFlash Video (FLV)Microsoft Video 1On2 VP3On2 VP5On2 VP6QuickTime 8BPS videoQuickTime Animation (RLE) videoQuickTime Graphics (SMC)QuickTime video (RPZA)R10K AJA Kona 10-bit RGB CodecR210 Quicktime Uncompressed RGB 10-bitTheoraVP8VP9WMV7
Supported Audio Formats amp CodecsMost CommonAAC+AACAC-3
CAF
MP3 (All Versions)MPEG-4 (All Versions)
PCM (All Versions amp Bitrates)
WAV
WMA (All Versions)
Also Supported
VIEW Proxy Encoder
54
Apple lossless audioATRAC1ATRAC3ATRAC3+Bink AudioCore Audio Format (CAF)DV audioEnhanced AC-3FLAC (Free Lossless Audio Codec)MACE (Macintosh Audio CompressionExpansion) 31MACE (Macintosh Audio CompressionExpansion) 61MLP (Meridian Lossless Packing)MP1 (MPEG audio layer 1)MP2 (MPEG audio layer 2)OpusRealAudio 10 (144K)RealAudio 20 (288K)RealAudio 30 (dnet)RealAudio LosslessRealAudio SIPR ACELPNETVorbisWindows Media Audio Voice
Supported Image Formats|Targa |TIF |PSD |PSB |PNG |JPG |IFF |GIF |BMP |DPX |EXR |ARI |EPS |AI
Enabling or Disabling ViewLog into the admin panel and click on the VIEW tab If VIEW is enabled proxy files will be created automaticallybased on the criteria below If VIEW is disabled proxy file encoding will not take place and he user front endautomatically jumps to list view instead of thumbnail view
Proxy Encoder ConfigurationIn this menu you can choose from properties of the Strawberry generated proxy files These options include
bull Proxy File Location shows where Strawberry saves the proxy files that it generates This location is definedupon installation and can only be changed by modifying the Strawberry configuration files on the Strawberryserver
bull Bitrate Define the proxy bitrate (per second) Please keep in mind that lower bitrates might be more suitablefor users connecting over the Internet while higher bit rates are good for LAN operations Is there a goldenrule Unfortunately not If you are using the Strawberry Preditor Add-on we recommend a low proxy bitrate(700k - 900k)
bull Resolution Choose a resolution for your proxy files There should always be a coherence between theresolution and the bit rate For example A 1920x1080 proxy file should have a bitrate of at least ~1200k whilea 640x360 proxy should look good with a 600k bitrate
bull Image Sequence Recognition When Strawberry VIEW detects an image sequence (Basename amp Count) withmore than 20 individual images it will create a preview MP4 file out of it An image sequence must have adelimiter between its basename and its count Valid delimiters are - (dash) (dot) and _ (underscore)sequence-name_001 is an example of a valid naming convention
bull Time Code Burn-In If you wish to have a video time code burned into your proxy files you should enable thisfeature
bull Time Code Label Position Defines whether the proxy time codes (or image layer names) are burned in on thebottom or on top of the proxy file
V isual Watermark Check this box if you want Strawberry to burn a visual watermark into your proxy files
bull Watermark Position Decide on which position of the screen your watermark image should be visible
VIEW Proxy Encoder
55
bull Watermark Image Upload a Watermark image as a png file The image should not be larger than your currentproxy resoultion and should have a transparent background You can download example watermarks heredlflavoursyscommanualssupporting_filesExample_Proxy_Watermarkszip
bull Watermark Preview Previews your uploaded watermark in respect of the current proxy resolution as well asthe current Timecode burn-in position
Blacklists amp Whitelists
bull Factory File Blacklist This is a factory blacklist provided by FlavourSys The blacklist has been populatedbased on best practice workflows If you need any of the factory blacklist file extensions whitelisted just enterthe extension into the Files Whitelist
bull File Blacklist Enter any file extension that you dont wish to see in the Strawberry user interface Strawberrywill then ignore files that are having this extension meaning that no proxies are generated However you canstill use the files on the FinderExplorer level in your projects In order to blacklist an item just enter extensionand press enter Press the save button to confirm
bull File Whitelist If you need to whitelist any extensions from the Factory File Blacklist just enter its extensioninto the Files Whitelist In order to whitelist an item just enter extension and press enter Press the savebutton to confirm
bull Factory Folders Blacklist This is a factory blacklist provided by FlavourSys The blacklist has been populatedbased on best practice workflows If you need any of the factory folder blacklist whitelisted just enter the foldername into the Folders Whitelist and press enter Press the save button to confirm
bull Folders Blacklist (Recursive) Enter any folder name that you dont wish to see in the Strawberry user interfaceStrawberry will then ignore the folder and its content meaning that no proxies are created You can still useblacklisted items on the FinderExplorer level in your projects In order to blacklist a folder just enter the foldername into the blacklist and press enter Press the save button to confirm
bull Folders Whitelist (Recursive) If you need to whitelist any folder from the Factory Folders Blacklist just enterits name into the Folders Whitelist and press enter Press the save button to confirm
Applying Blacklist amp Whitelist ChangesStrawberry 5 applies blacklist changes automatically In order to apply whitelist changes please perform thefollowing steps Also perform these steps in order to apply blacklist changes in Strawberry 44 or older versions
VIEW Proxy Encoder
56
1 Login to the Administration panel
2 Click on the MANAGE PROJECT tab
3 Select the project on which you want to apply the operation
4 Click the VIEW button below the project list
5 Select the radio button Rescan Project(s) and confirmDepending on the amount of files in the affected project this operation can take several minutes
Node and Worker Control
Purpose In this section of the admin panel you monitor and change the status of each VIEW encoding node that isintegrated in your environment You also have the possibility to set Schedulers so that you can decide if the nodesand the workers run
Usage Log into the admin panel and click on the VIEW tab Expand the NODE AND WORKER CONTROL barHere you can select from the following options
bull NODE ID The internal ID of each encoding node
bull NODE ADDRESS The hostname or IP address and port under which each node can be reached
bull STATUS Green means running yellow means paused and red means not running
bull NUMBER OF WORKERS Number of encoding workers (threads) that work at the same time Choose theamount of workers based on the amount of CPU cores of each node One worker per core works very well butleave at least one core for the OS and the rest of the Strawberry system The Strawberry Server license comeswith 3 Workers additional workers must be licensed separately
bull Actions Stop start restart or edit a scheduler for individual nodes
Content Download OptionsPurpose If you want to allow user to download media assets using the front end you can define this here Forinstance for workflows requiring executive review or for film schools where faculty could grade from home thisfeature can be beneficial however for feature film workflows this feature can be turned off
Usage Log into the admin panel and click on the VIEW tab Expand the CONTENT DOWNLOAD OPTIONS barIf you want to enable users to download low resolution media files (proxy files) from the front end check the boxnext to Allow users to download proxy files If you want to enable users to download high resolution media filesfrom the front end check the box next to Allow users to download high-res files
Rescan-Project(s)Purpose Scans the project for new files and newly supported file formats and attempts to encode them to proxyfiles It will also apply black list white list changes to existing projects
Usage Log into the Administration panel and click on the PROJECTS tab Expand the MANAGE PROJECTSbar Select the project(s) that you want to rescan and press the VIEW button below the project list and checkRescan Project(s) and confirm it
Repair-Project(s)
VIEW Proxy Encoder
57
Purpose Scans the project for new files and newly supported file formats and attempts to encode them to proxyfiles It will also apply black list white list changes to existing projects
Usage Log into the Administration panel and click on the PROJECTS tab Expand the MANAGE PROJECTSbar Select the project(s) that you want to repair and press the VIEW button below the project list and check RepairProject(s) and confirm it
Reencode-EverythingPurpose Deletes every file in the project to see if meta data have been changed Also looks for new files and newlysupported file formats and attempst to encode them to proxy files It will also apply black list white list changes toexisting projects
Usage Log into the Administration panel and click on the PROJECTS tab Expand the MANAGE PROJECTSbar Select the project(s) that you want to reencode-everything and press the VIEW button below the project listand check Reencode-Everything and confirm it
Miscellaneous
Manage TemplatesPlease visit this manuals rarr Templates larr chapter to get template related information
Safe SearchPurpose ldquoSafe Searchrdquo is an ldquoin edit suiterdquo security feature for Strawberry managed content Its aim is to reducethe visibility and searchability of content while a project with specific custom metadata is open This prevents thatclients see content of other clients while working on a project inside the editing room
Enabling Safe SearchLogin into the Strawberry Administrator panel and select the ldquoMiscrdquo tab Open the ldquoSearch settings and check thebox next to ldquoEnable Safe Search Featurerdquo
Define ldquoSafe Searchrdquo MetadataOnce ldquoSafe Searchrdquo is enabled click on the ldquoProjectsrdquo tab and open the ldquoCustom Metadatardquo menu Select a set andthen a drop down menu within it Then click on ldquoEdit Valuerdquo
Miscellaneous
58
Next to each drop down menu is a checkbox called ldquoSafe Searchrdquo Check this box for each value for which the ldquoSafeSearch filter should apply
When a user opens a project that includes a ldquoSafe Searchrdquo metadata the search field provides the informationaccordingly (safe search enabled for ldquometadata namerdquo) From this point on all searches will be carried within therelated safe search metadata context This applies until the project is closed
Miscellaneous
59
Good to Know
bull Only one drop down menu can have safe search metadata
bull Safe search metadata in the Administrator panel should not be changed enabled or disabled while projects areopened as this can lead to inconsistent search results
Manage IndexersAvailable in Strawberry version 42 or newer
GeneralCheck the following boxes if you want the features or unchecked if not
bull Enable Deep Indexing for Media Files(If enabled Strawberry will extract technical metadata from media files If it is disabled Strawberry will only index filenames and file sizes This feature needs to be enabled in order for the proxy encoding to work)
bull Index Adobe Premiere Project Files(If enabled Strawberry will extract master clip names a descriptions comments from Adobe Premiere master clipsto make these information visible amp searchable in the front-end)
bull Index Avid bin files(If enabled Strawberry will extract master clips names and sequence names from Avid bins to make theseinformation searchable in the front-end However when searching for an Avid master clip or sequence name theuser will not be provided with a visual presentation of the asset or sequence but will only see the project(s) thatcontains these information since this feature is beta we recommend to turn it of)
bull Extract Exif metadata from images(If enabled Strawberry will extract EXIF metadata from image files
bull Extract XMP metadata from files(if enabled Strawberry will extract XMP metadata from media files)
bull Extract XML metadata (Experimental)(if enabled Strawberry will extract XML metadata from xml sidecard files Please contact us for an overview ofsupported XML schemes)
bull Search for technical metadata(If enabled Strawberry will extract technical metadata from video files as well as ID3 tags (album Artist etc) fromaudio files
Technical Metadata WhitelistStrawberry maintains a search index that allows user to carry out searches in an extremely fast fashion Since thissearch index is stored in the server memory its size must be limited and therefor can not include all possible searchparameters Administrator can define the search parameters by white-listing them
Miscellaneous
60
Enter any label that you wish to add to the Strawberry search index To insert a label just click next to an existinglabel and start typing An auto completion list will show available results for your search term Select the technicalmetadata label that you wish to add to the search index Use the x button next to a labels name to remove a labelfrom the search index The changes will not apply immediately but on the next build of the search index (once anight) If you want to apply the settings immediately SSH login to the Strawberry server as root and type thecommand sb reindex
Storage Quota
Purpose In this section you can define how much physical storage space all projects managed by strawberry areallowed to occupy The quota is a soft quota meaning that there is no physical storage restriction once it getsexpired However Strawberry will send a warning email if if the quota that you defined has been reached
Usage Log into the admin panel and click on the MISC tab Expand the STORAGE QUOTA bar Define howmuch space (in Gigabytes) all projects managed by strawberry are allowed to occupy and press SAVE You canchange this quota at any time
Adobe Premiere Specific Feature
Auto-Link media from Library into projectThis feature is part of a custom development and currently not documented
Auto-Ingest local media into projectPurpose If a user imports media from a usb or local hdd into an Adobe Premiere project that is managed byStrawberry Strawberry can automatically copy that media into the projects media volume This ensures that allmedia used in a Premiere project is actually on the centralized storage
Usage Log into the admin panel and click on the MISC tab Expand the Auto Import Library amp unmanaged Assets(Adobe Premiere Only) bar If you wish to enable the Auto-ingest feature check the box next to it and define aninterval The interval determines how often the Strawberry Adobe panel will check for unmanaged inside each openPremiere project
Auto-Link subproject media into projectPurpose If a user imports media from a subproject into an Adobe Premiere project that is managed by StrawberryStrawberry can automatically link that into the from the subproject into the parent project This ensures that anyproject is self contained at any point
Miscellaneous
61
Usage Log into the admin panel and click on the MISC tab Expand the Auto Import Library amp unmanaged Assets(Adobe Premiere Only) bar If you wish to enable the Auto-link feature check the box next to it and define aninterval The interval determines how often the Strawberry Adobe panel will check for imported subproject mediainside the current project to link it
PreditorDefine the Timeout based on which a user should be automatically logged out of Preditor In the process Strawberrywill also automatically close the users sequence in order to free the license slot Preditor creates auto-saves of opensequences every minute and stores these on the server so that progress does not get lost even if the sequence getsauto-closed
SMTP SetupPurpose Strawberry has the ability to send email notifications on specific criteria This usually is the case if a teamexpires its storage quota or if assets are shared via email using the built-in functions For this feature to workStrawberry needs to be provided with STMP information
Usage
1 Login to the Strawberry server and cd to optsb4appfsbaseconfig
2 Open the file smtpymlexample and replace the example SMTP values with your own ones
3 Save the file as smtpymlThe Strawberry services needs to be restarted for the changes to apply
MYSQL BackupWhen clicking the Backup Now button Strawberry creates a dump of its MySQL database The default location forthe database dump is optsb4appbackups The default destination can be reconfigured in theoptsb4appfsbaseconfigdatabase-backupyml file
Empty TrashPressing the Empty Trash Now button will instantly remove all contents from the Strawberry trash folder
Osiris OptionShared Edits only
Purpose If the Osiris option is enabled Strawberry will mount its project media volumes in a specific way AvidMedia Composer will detect these volumes as volumes from an Avid storage and will provide bin locking for allStrawberry managed Media Composer projects
Versions amp LicenseThis section shows you the current version numbers of the Strawberry 4 modules that are installed on yourStrawberry server Additionally it provides you with license related information for your site
Updating a LicenseOnly use this method if you are running Strawberry in a Non-High Availability environment
Please go to the Strawberry admin panel misc versions amp license and click the NEW LICENSE button Copy andpaste the license string in there and click the UPDATE button Once this is done SSH login to the Strawberryserver and type service strawberry4 restart The license will be applied once the Strawberry service has beenrestarted
Legal Information
Legal Information
62
AVID is a trademark of Avid Technologies (wwwavidcom) Apple and FCP are trademarks of Apple in the US(wwwapplecom) Adobe and Premiere are trademarks of Adobe (wwwadobecom) All product names logos andbrands are property of their respective owners All company product and service names used in this manual are foridentification purposes only Use of these names logos and brands does not imply endorsement
Legal Information
63
- Last Updated July 20 2017
-
- Introduction
- System Requirements
-
- Storage File System Requirements
-
- List of Certified Storage Vendors
- List of Supported Storage File Systems
-
- Strawberry Server HWSW Requirements for Production Environments
- Minimum Server HWSW Requirements for Demonstration amp POC Environments
- Minimum Requirements for a dedicated View Proxy Encoding Node
- Requirements for the Strawberry Client
-
- Strawberry Client SSL
-
- Requirements for the Strawberry Adobe Panel
- Minimum Web Browser Requirements
-
- Installation Manuals
-
- Strawberry Client
-
- Installing the Client
- Starting the Client
- Upgrading the Client
- Deleting the Client
-
- Client Configuration for NAS
-
- SMB Mounts Configuration
- Paths to Editing applications (App Launcher)
- Mount your drives under Windows 7 amp 8
- Mount your drives under OSX
-
- Client Configuration for StorNext amp XSAN
-
- SAN Mount Configuration
-
- Client Configuration for Shared Edits under macOS
- Client Configuration for Shared Edits under Windows
- Changing the Clients Fuse Blocksize (macOS only)
- Adobe Panel
-
- Installing the Panel
- Updating the Panel
- Removing the Panel
- Testing the Panel
-
- Users Roles amp Teams
-
- Manage Roles
-
- Available Capabilities
- Creating a role
- Editing a role
- Deleting a role
-
- Manage Users
-
- Creating a User
- Changing a Users Role
- User Specific Roles
- Assigning a User to Teams
- Deleting a User
- Removing a User from a Team
-
- Manage Teams
-
- Creating a Team
- Changing a Teams Name
- Changing a Teams Quota
- Deleting a Team
-
- Manage Edits
-
- Manage Projects
-
- Manage Online Projects
-
- Force Closing a Project
- Deleting one or multiple Projects
- Archiving a Project
-
- Manage Archived Projects
-
- Retrieving a Project from the Archive
-
- Download Project List
- Custom Metadata
-
- Manage Libraries
-
- Introduction
- Library States
- Ingest Libraries
-
- Creating a Library Project
- Configuring an Ingest Library
- Configuring the Library Ingest Interval
- Configuring the Library Clean Interval
- Good to Know
-
- External Libraries
-
- Creating a Library Project
- Configuring an External Library
- Configuring the Library Clean Interval
- Configuring the External Library Reindex Interval
- Good to Know
-
- Custom Metadata
-
- Custom Metadata Sets
- The Master Set
- Creating a Metadata Set
- Connecting Metadata Sets
- Deleting a Metadata Set
- Creating a Dropdown Menu
- Creating a Text Input Field
- Creating a Replacement Pattern
- Editing a Value
- Deleting a Value
- Creating Project Status Flags
- Deleting Project Status Flags
- Supported Unix Time Modifiers
-
- Archive amp Copy To
-
- Creating an Archive Strategy
- Canceling an ArchiveRetrieval Job
- Clearing ArchiveRetrieval Errors
- Project Copy-to Strategies
- Asset Copy-to Strategies
- Good to Know
-
- Freezing Archived Projects
-
- Templates
-
- Working with Templates
- Creating a Template (Avid Media Composer)
- Creating a Template (Adobe Premiere)
- Rename a Templates
- Duplicate a Template
- Delete a Template(s)
- Configuring the Avid Attic
- Manage Indexers
- Storage Quota
- MYSQL Backup
- Versions amp License
-
- VIEW Proxy Encoder
-
- Supported Video Audio and Image File Formats
- Enabling or Disabling View
- Proxy Encoder Configuration
- Blacklists amp Whitelists
- Applying Blacklist amp Whitelist Changes
- Node and Worker Control
- Content Download Options
- Rescan-Project(s)
- Repair-Project(s)
- Reencode-Everything
-
- Miscellaneous
-
- Manage Templates
- Safe Search
-
- Enabling Safe Search
- Define ldquoSafe Searchrdquo Metadata
- Good to Know
-
- Manage Indexers
-
- General
- Technical Metadata Whitelist
-
- Storage Quota
- Adobe Premiere Specific Feature
-
- Auto-Link media from Library into project
- Auto-Ingest local media into project
- Auto-Link subproject media into project
-
- Preditor
- SMTP Setup
- MYSQL Backup
- Empty Trash
- Osiris Option
- Versions amp License
-
- Updating a License
-
- Legal Information
-
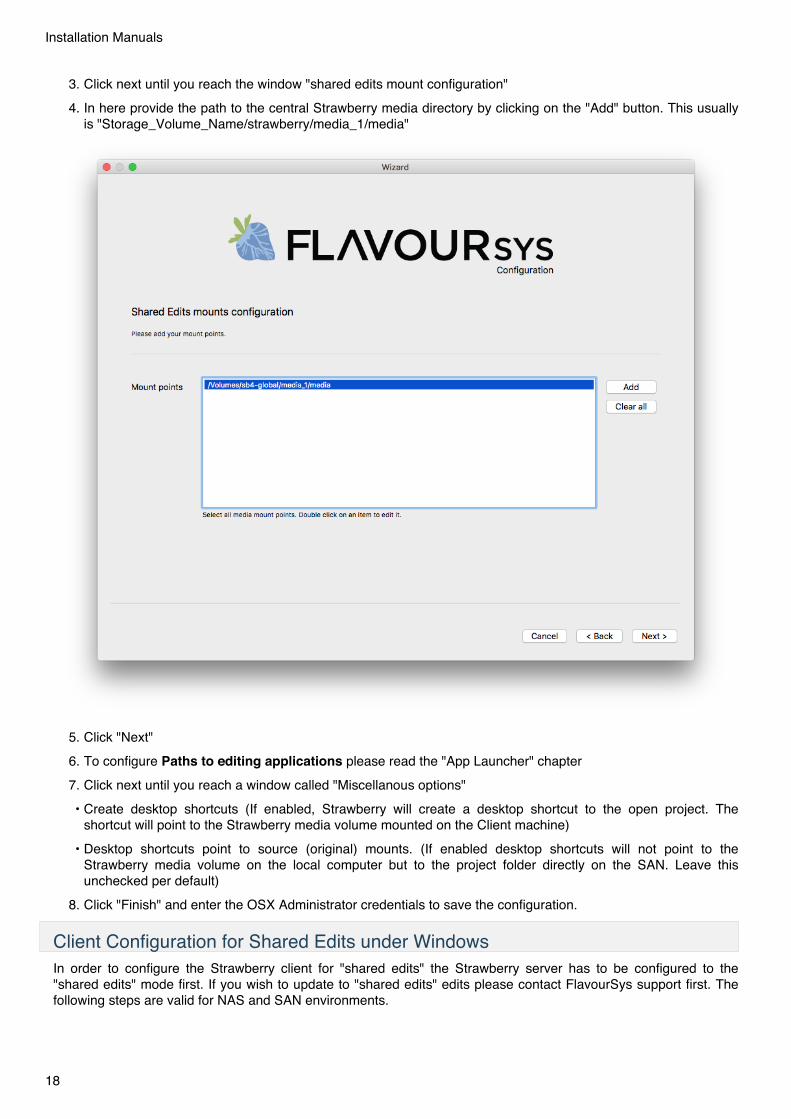
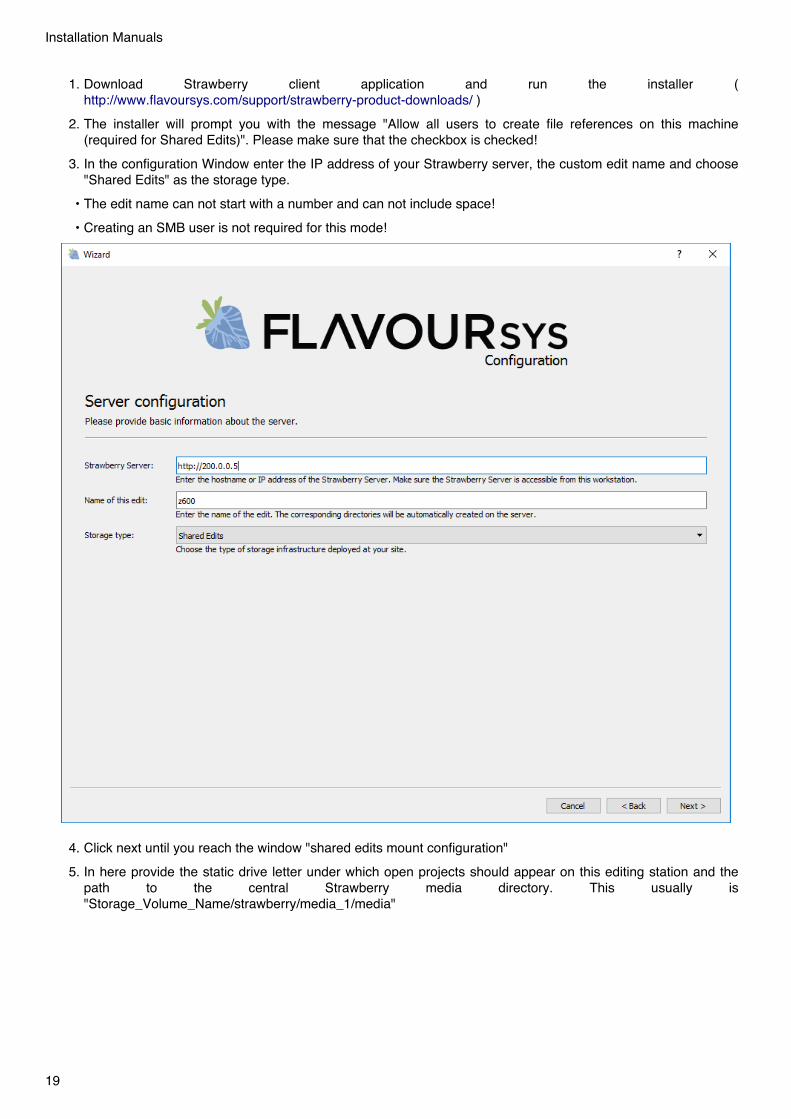

Users Roles amp Teams
Manage RolesPurpose Strawberry enables Administrators to create custom user roles A role is a set of permissions (capabilities)that determine what a user can and can not do withing the Strawberry system A role can be assigned to multipleusers
Available CapabilitiesThis is a list of all available capabilities available in the Strawberry user role system
Project related and general capabilities
bull Can login to client application(Users with this capability can login to the Strawberry client application installed on the editing systems)
bull Can login to Strawberry web interface using a web browser(Users with this capability can login to the Strawberry interface using a web browser)
bull Can create new projects(Users with this capability can create new projects within the Strawberry user interface)
bull Can see users and teams(Users with this capability can see users and teams in the Strawberry system)
bull Can assign projects to own teams and their members(Users with this capability can share projects visible to them with teams that they are a member of includingmembers of these teams)
bull Can assign project to teams that the user isnt member(Users with this capability can share projects visible to them with teams that they are a not a member of)
bull Projects created by this user are available to all teams of which the user is a member(This will only apply if the user is able to assign Projects to own teams)
bull Can archive own projects(Users with this capability are allowed to archive projects that they created only)
bull Can retrieve own projects(Users with this capability are allowed to retrieve projects that they created only)
bull Can archive other peoples projects(Users with this capability are allowed to archive all projects that they see no mater if they created these projects ornot)
bull Can retrieve other peoples projects(Users with this capability are allowed to retrieve all projects that they see no mater if they created these projects ornot)
bull Can use copy to on own projects(Users with this capability are allowed to use copy to on projects that they created only)
bull Can use copy to on other peoples projects(Users with this capability are allowed to copy all projects that they see no mater if they created these projects ornot)
bull Can freezemelt own projects(Users with this capability are allowed to freeze and melt projects that they created)
bull Can freezemelt other peoples projects
Users Roles amp Teams
22
(Users with this capability are allowed to freeze and melt projects that they created)
bull Can modify the status and custom metadata of projects without write access(Users with this capability are allowed to change custom metadata from all projects that they see no matter if theywrite access to these projects or not)
bull Can re-scan projects (including Libraries)(Users with this capability are allowed to perform a rescan on projects that they see)
Asset related capabilities
bull Can delete assets and folders via user interface(Users with this capability are allowed to delete media assets via the Strawberry user interface (Recommended forsuper users only)
bull Can use copy to on assets(Users with this capability are allowed to use copy to on media assets from projects that they have at least readaccess to)
bull Can download proxy version of assets(Users with this capability are allowed to download LowRes proxies from projects that they have at least read accessto)
bull Can download high-res version assets(Users with this capability are allowed to download HighRes media assets from projects that they have at least readaccess to)
bull Can share assets via email(Users with this capability are allowed to share proxy versions of assets via email)
bull Can re-create proxy files(Users with this capability are allowed to trigger a re-encoding job on any Strawberry managed media asset)
bull Can track down assets but not delete(Users with this capability are allowed to see into which projects a given media file is linked Caution Advised This isa potential security risk because it does not respect individual user or team access rights Users could potentiallysee names of projects that they normally couldnt see)
bull Can track down assets and delete(Users with this capability are allowed to see into which projects a given media file is linked and also delete it fromthere Caution Advised This is a potential security risk because it does not respect individual user or team accessrights (Recommended for super users only)
Annotation amp Description related capabilities
bull Can comment on projects(Users with this capability can write comments for projects)
bull Can comment on assets(Users with this capability can write comments on assets)
bull Can apply annotations to assets (go to annotation view)(Users with this capability can write annotations for assets)
bull Can download annotations(Users with this capability can download the annotations of an Asset)
bull Can delete other peoples annotations (deletion of own annotations is always possible)(Users with this capability can delete annotations that other people created)
Preditor related capabilities
bull Can login to Preditor (to open sequences)
Users Roles amp Teams
23
(Users with this capability are allowed to login to Preditor)
bull Can create new Preditor sequences(Users with this capability are allowed to create new sequences within Preditor)
bull Can assign sequences to own teams and their members(Users with this capability can share Preditor sequences with teams that they are a member of including members ofthese teams)
bull Can assign sequences to teams that user isnt a member of(Users with this capability can share Preditor sequences even with teams that the user isnt a member of)
bull Sequences created by this user are available to all teams of which the user is a member(This will only apply if the user is able to assign Sequences to own teams)
bull Can export and import Preditor sequences(Users with this capability can export and import a Preditor sequence to an existing Strawberry project)
bull Can download sequence as xmlaaf file(Users with this capability can download Preditor sequences as XML or AAF files)
Creating a roleLog into the Administration panel and click on the USERS tab Click on the MANAGE ROLES bar to expand itBelow the role list is a button named ADD ROLE Click on this button and provide a role name as well as thedesired capabilities for that role Once you are done click CONFIRM to save your changes
Users Roles amp Teams
24
Editing a roleLog into the Administration panel and click on the USER tab Click on the MANAGE ROLES bar to expand itcheckbox the role(s) you intend to edit and then click on the EDIT ROLE button Once you are done clickCONFIRM to save your changes
Deleting a roleLog into the Administration panel and click on the USER tab Click on the MANAGE ROLES bar to expand itcheckbox the role(s) you intend to delete and then click on the DELETE ROLE button and confirm by clicking onYES You can only delete roles that are currently not assigned to any user(s)
Manage Users
Creating a UserLog into the Administration panel and click on the USER tab Click on the MANAGE USERS bar to expand itBelow the user list is a button named ADD USER Click on this button and fill out the required information anddefine a user role
Changing a Users RoleUsage Log into the Administration panel and click on the USER tab Expand the MANAGE USERS bar Next tothe LOGIN NAME column is a column called ROLE In order to change a users role click on the current role andselect the new role from the drop down menu
User Specific RolesIf you have users to which none of your existing roles apply you may create custom user roles for these users only
Usage Log into the Administration panel and click on the USER tab Expand the MANAGE USERS barCheckbox the user and then click on the EDIT ROLE button Now you can either assign another existing role tothat user or you can create a custom role by simply changing the users capabilities When changing thecapabilities without choosing a new role the role name will change to custom This indicates that this user now hasa role that is tied to himher only Custom roles can be overwritten by assigning an existing role to the user
Users Roles amp Teams
25
Purpose In certain Strawberry environments users never get created within Strawberry but authenticate againstLDAP or Active Directory To make sure that the capabilities of these user are limited Administrators can define adefault role for new users
Usage Log into the Administration panel and click on the USER tab Expand the MANAGE USERS bar Belowthe user list is an option named Default Role for new Users with a drop down menu next to it Choose the defaultrole from the drop down From now on every new user coming from LDAP or Active Directory will be assigned withthis role The role of the user can of course be changed later
Assigning a User to TeamsPurpose Per default newly-created users can only see their own projects but are not assigned to any specificteams The following text describes how to assign a user to one or more teams
Example Editors A B and C and the Production Director are working together on the popular series Making MadEditors C D and E and the Production Director will work together on the new season of Game of Chairs Simplycreate teams for Making Mad and Game of Chairs and assign Editor C and the Production Director to both teamsand they will be able to collaborate and view all projects for both teams Editors A B D and E will only be able toview content for their respective teams
Users Roles amp Teams
26
Usage Log into the Administration panel and click on the USER tab Click on the MANAGE USERS bar toexpand it Select the user that you want to assign to a specific team Next to the user list appears a list with allavailable teams You can assign the user to one or more of these teams by simply checking the box on the left ofthe team name Now when the user logs into the Strawberry 4 user interface he or she will be able to see theprojects from all the teams to which she or he is assigned
Deleting a UserUsage Log into the Administration panel and click on the USER tab Expand the MANAGE USERS bar andselect the user you want to delete using the checkbox next to the username Click the delete button and confirm thedeletion
Removing a User from a TeamUsage Log into the Administration panel and click on the USER tab Expand the MANAGE USERS bar In orderto remove a user from a team select the user Now you can see a list on the right to the user list This second list isnamed The selected user is a member of these teams You can remove the user from one or multiple of theseteams by unchecking the box on the left of the team name
Example Freelancer John Smith has been helping with Game of Chairs production and his contract is finished TheAdministrator removes John Smith from the Game of Chairs team to ensure that he no longer has access to thoseprojects but leaves John Smith as a user in the system for future collaboration
Manage Teams
Creating a TeamAvailable in Strawberry version 40 or newerPurpose Users can share projects with other users but in some cases it is more efficient to share projects with anentire team Usage Log into the Administration panel and click on the USER tab Now Expand the MANAGETEAMS bar Below the teams list is a button that says ADD Team Click this button and fill out the requiredinformation During this process strawberry will ask you to set a teams storage quota The team quota virtually limitsthe storage space but without restricting write access once a team has reached it In Strawberry no project has areal owner For this reason the teams quota is a so called additive quota which means that a project that is visible tomultiple teams will influence the quota of each of these teams This also means that the additive quotadifferentiates from the physical (real) storage quota which can be configured under MISCgtSTORAGE QUOTA
Changing a Teams NameUsage Log into the Administration panel and click on the USER tab Expand the MANAGE TEAMS bar Selectthe checkbox next the team you want to edit and then click the EDIT TEAM button Change the team name andconfirm
Changing a Teams QuotaUsage Log into the Administration panel and click on the USER tab Expand the MANAGE TEAMS bar Selectthe team you want to edit and then click the EDIT TEAM button Change the teams quota and confirm
Deleting a TeamAvailable in Strawberry version 40 or newerUsage Log into the Administration panel and click on the USER tab Expand the MANAGE TEAMS bar Selectthe team that you want to delete and press the DELETE button below the teams list Confirm the message Pleasenote that projects that were exclusively visible to this team should be reassigned to other users or teams beforedeletion
Manage Edits
Users Roles amp Teams
27
Important Note The edit list only shows Samba mounts that have been created via the Strawberry Client wizard onth eStrawberry server You will not see any edits that have been created directly on your storage (which is therecommended way of doing it) If you want to see the edits on your storage please check its Samba configuration
Manage Projects
Manage Online Projects
Force Closing a ProjectPurpose This feature allows the administrator to close a project while it is opened (locked) by an editing systemThis feature can be useful in case a computer crashes caused by a hardware failure on the editing system and it isnot possible to close the project from this computer anymore
Usage Log into the Administration panel and click on the PROJECTS tab Expand the MANAGE PROJECTSbar Select the project that you want to force close and press the FORCE CLOSE button below the project listConfirm to the warning message to force close the project
Deleting one or multiple ProjectsPurpose This feature allows the administrator to delete projects permanently When deleting a project project filesmedia files as well as proxy files and MySQL database entries will be deleted permanently
Usage Log into the Administration panel and click on the PROJECTS tab Expand the MANAGE PROJECTSbar Select the project(s) that you want to delete and press the DELETE button below the project list Confirm tothe warning message to delete the project(s)
Archiving a Project
bull Available in Strawberry version 40 or newerbull ArchivalRetrieval of multiple projects at once is possible in Strawberry version 46 or newerbull The possibility to archive into a compressed zip file has been dropped in Strawberry version 46 or
newer because it was too error-pronePurpose Strawberry allows certain users (admins amp users but not guests) to archive and retrieve editing projectsWhen performing an archive operation Strawberry takes every single file which is part of the project and sends it toan archive destination which was previously defined by the administrator As soon as the project is in the archiveStrawberry 4 will delete it from the production storage (aka source) but will keep the metadata and proxy filesavailable for further use Please keep in mind that Strawberry does not archive any subprojects that are added to theprojects that you archive If you you want to archive project A which has subproject B and in case project Aactually uses media files from subproject B please make sure to consolidate or copy the affected media files toproject A before sending it to the archive This will ensure that all the used media files will be archived properly andthat the project will be fully operational after retrieval To check which projects are related to one another just selecta project and check the PARENT PROJECTS SUB PROJECTS list on the right of the project list
Usage Log into the Administration panel and click on the PROJECTS tab Expand the MANAGE PROJECTS bar Select the project(s) that you want to archive by clicking on the checkbox(es) next to the project name(s) and
Manage Projects
28
press the ARCHIVE button below the project list Choose an Archive Strategy from the list and confirm As soonas the project is in the archive it will change its visual appearance as following
The project avchd is online while the project avchd sony fs700 slowmo is in the archive Once a project is inthe archive it will appear under Projects Manage Archived Projects
Manage Archived Projects
Retrieving a Project from the ArchivePurpose Strawberry allows certain users (admins amp users but not guests) to archive and retrieve editing projects Inorder to be able to retrieve Strawberry has to be able to access the projects archive location Please note if anexternal archive application has moved the project for instance off to a tape library an integration may be necessaryto trigger the restore process in the archive application
Usage Log into the Administration panel and click on the PROJECTS tab Expand the MANAGE PROJECTSbar Select the project(s) that you want to retrieve from the archive and press the RETRIEVE button below theproject listThe RETRIEVEARCHIVE button is a toggle button which is an ARCHIVE button if you select a projectwhich is not already in the archive and becomes a RETRIEVE button once you select an archived project Confirmthe message to proceed Depending on the project size the retrieval progress can take some time Check the projectlist from time to time to see if the project has been retrieved You will notice a retrieved project by its visualappearance
The project avchd is online while the project avchd sony fs700 slowmo is in the archive Archived projects area bit greyed out and have a grey dot next to their project name
Download Project ListUsage In order to download the project list as an XLS file go to the Admin Panel Projects and click on the buttonDownload XLS
Purpose Project statuses help users to determine what the working status of a project is Statuses can be forinstance in editing in color grading etc and are defined by the administrator The status of each project isdisplayed in the metadata area of the Strawberry 4 user interface
Usage Log into the Administration panel and click on the PROJECTS tab Expand the STATUS OPTIONS barNow click on ADD STATUS and define a name for the new status Once the status is created users can choose itfrom the Strawberry frontend
Custom MetadataPlease read the rarr Custom Metadata larr chapter for more information on metadata sets and values
Manage Projects
29
Manage Libraries
IntroductionLibraries are an optional Add-on and can only be configured with a valid add-on license This sectionexplains how to create Ingest Watchfolders and External Libraries using the Strawberry admin panel
Library StatesLibrary no matter whether Ingest Libraries or External Libraries can have three different states
bull State Active - The library is fully operational
bull State Not Configured - The Library exists but is not yet configured
bull State Inactive - the library is configured but either the source watch folder or the target project are notreachable or missing
Ingest LibrariesPurpose An Ingest Library is a Strawberry library project that gets populated via an ingest watch folderStrawberry scans that watch folder on an Administrator defined interval and moves new media into thecorresponding Strawberry library project folder on the storage Eg If you create a library called My Example IngestLibrary a folder called My Example Ingest Library will be created within strawberrymedia_1media and mediafrom the related ingest watch folder will be moved to this location
Creating a Library Project
1 In order to create a new Library project you need to create a normal project first To do so open the Strawberryclient application and create a new project Name the project as you wish the library to be named Once theproject has been created close it and go back to the admin panel
2 In the admin panel go to Projects Manage Online Projects and checkbox the project that you created in theprevious step No click on the Flag as Library button on the lower right of the project list Then confirm withyes
Manage Libraries
30
Once the library has been created it will appear under Projects Manage Libraries inside the Strawberry Adminpanel
Configuring an Ingest LibraryPreparation Before configuring an ingest library you need to create an ingest watch folder The watch folder can belocated on one of your Strawberry-managed storages or on any storage accessible by the Strawberry server Theingest watch folder can not be located within the Strawberry root (eg optsb4data) or any sub folder below thispath To review how the storage root is configured on your system login to the Strawberry server and type catoptsb4appfsbaseconfigstrawrageyml The storage root is provided in the line root_path
1 Go to Projects Manage Libraries and checkbox the Library that you created in the previous step The librarywill be shown as Not Configured
2 Click on the Edit button below the library project list The following options appear
bull Name - Name of the Library
bull Watchfolder Type - Library Ingest or External Library Select Ingest Library here
bull Ingest Path - The path to the ingest watchfolder as seen by the Strawberry server
bull Target Storage - The storage to which ingested content should be moved This is only relevant if Strawberryis controlling multiple storage systems
bull Encoding Priority - The encoding priority for proxy files in this Library The ration between normal and highpriority is 14
Manage Libraries
31
bull Example for a Library Ingest configuration
Configuring the Library Ingest IntervalPurpose The library ingest interval determines how often Strawberry will check all your configured ingest watchfolders for new media files in order to move them to the target library By default the value is set to 1 minuteAssuming you added new media to the ingest watch folder Strawberry will see the files after 1 minute One minutelater it will check if the files size in the ingest watch folder changed (to determine if the file is still being copied) If thefile size did not change Strawberry will move it to the target library If the file size changed Strawberry will checkagain 1 minute later and so on
UsageIn order to change the Library Ingest Interval go to Projects Manage Libraries and adjust the value accordinglyto your needs
Configuring the Library Clean IntervalPurpose The clean interval scans your existing libraries for deleted media files on a recurring basis This however isonly important if you delete media files directly from the library folder on the storage and not from the Strawberryuser interface If you are not deleting Library media directly from the storage we recommend to set the recurrency toweekly instead of daily
Manage Libraries
32
Good to Know
bull There can only be one ingest watchfolder per library
bull Folder structures inside the ingest watchfolders will refelct inside the Strawberry library project
bull For usability reasons folder strctures inside the ingest watchfolders will not be deleted
bull Libraries can be archived equally to normal projects
External LibrariesPurpose An External Library is a folder structure outside of the usual Strawberry managed folder structure on thestorage Strawberry can index that external folder structure to make it seachable and (proxy-)viewable from theStrawberry user interfaces Media in External Libraries remains where it is meaning Strawberry will notautomatically move but only monitor it
Creating a Library Project
1 In order to create a new Library project you need to create a normal project first To do so open the Strawberryclient application and create a new project Name the project as you wish the library to be named Once theproject has been created close it and go back to the admin panel
Manage Libraries
33
2 In the admin panel go to Projects Manage Online Projects and checkbox the project that you created in theprevious step No click on the Flag as Library button on the lower right of the project list Then confirm withyes
Once the library has been created it will appear under Projects Manage Libraries inside the Strawberry Adminpanel
Configuring an External LibraryPreparation Before configuring an ingest library you need to make sure that the folder structure that Strawberryshould watch is reachable by the Strawberry server If you are unsure how to do this please contact next levelsupport
1 Go to Projects Manage Libraries and checkbox the Library that you created in the previous step The librarywill be shown as Not Configured
2 Click on the Edit button below the library project list The following options appear
bull Name - Name of the Library
bull Watchfolder Type - Library Ingest or External Library - Select External Library here
bull External Path - The path to the folder structure that you wish to be watched by Strawberry
bull Target Storage - The storage to which ingested content should be moved This is only relevant if Strawberryis controlling multiple storage systems
bull Encoding Priority - The encoding priority for proxy files in this Library The ration between normal and highpriority is 14
Manage Libraries
34
bull Example for an External Library configuration
Configuring the Library Clean IntervalPurpose The clean interval scan your existing libraries for deleted media files on a recurring basis This however isonly important if you delete media files directly from the library folder on the storage and not from the Strawberryuser interface If you are not deleting Library media directly from the storage we recommend to set the recurrency toweekly instead of daily
Configuring the External Library Reindex IntervalPurpose The external library reindex scans your existing libraries for new modified and deleted media files on arecurring basis This make sure that all changes in the external location will reflect within Strawberry The ExternalLibrary Reindex is MUCH slower than the Library Clean Interval which is why it is not possible to run it hourly Werecommend a daily or even better week recurrency for this index job
Manage Libraries
35
Good to Know
bull There can only be one External Library location per library project
bull Folder structures inside the external library will refelct inside the Strawberry library project
bull When adding a media from an External Library to an open Strawberry project that media will always becopied
Custom Metadata
Custom Metadata SetsPurpose This feature allows the Administrators to create several metadata sets Metadata sets can either containdrop down menus or text input fields Users will be be asked to select from the values provided in the metadata setsupon project creation
How the custom metadata could look in the user frontend
An example of custom metadata fields asking the user to provide the requested information Metadata fields withan asterisk symbol are mandatory for the user to fill out
The Master SetUsage Log into the Administration panel and click on the PROJECTS tab Expand the CUSTOM METADATAbar
The master set is the default set for all Strawberry installations and it is the set that every user sees upon projectcreation The master set can be populated with drop down menus and text input fields
Creating a Metadata SetUsage Log into the Administration panel and click on the PROJECTS tab Expand the CUSTOM METADATAbar
Custom Metadata
36
Click the ADD SET button and provide a name for the new set Once the set is created you can populate it withmetadata values like dropdown menus or text input fields
Connecting Metadata SetsUsage Log into the Administration panel and click on the PROJECTS tab Expand the CUSTOM METADATAbar
Metadata sets can be connected via drop down menus meaning that a specific drop drop down selection will load aspecific metadata set for the user In order to connect a drop down value with a metadata set edit the metadatavalue by clicking the checkbox next to the value and then the EDIT VALUE button
Each drop down menu contains Values and Targets The value is the drop down value that the user can choosefrom upon project creating The target is the metadata set to which the value should refer If the target None isselected the value will not load any metadata set If a target set is selected this target set will be loaded when theuser chooses this specific value
Deleting a Metadata Set
Custom Metadata
37
Usage Log into the Administration panel and click on the PROJECTS tab Expand the CUSTOM METADATAbar Select the metadata set that you wish to delete by checking the box next to it and then press the delete buttonon the botton of the metadata set list
Creating a Dropdown MenuUsage Log into the Administration panel and click on the PROJECTS tab Expand the CUSTOM METADATAbar
Click the ADD VALUE button and provide the following information
bull Name The name of the dropdown menu as the user will see it (for example Customer)
bull Type dropdown menu
bull Maximum Characters Not relevant for dropdown
bull Restrict input to Not relvant for dropdown
bull Pattern Not relvant for dropdownbull Mandatory Defines if this value is mandatory (checked) or not (unchecked)
bull Use in Project String Defines if items from this dropdown will appear in the project name if the users enablesthe checkbox Create Project Name from Above Entries upon project creation
No you can type the drodown items into the Value field To add additional drodown values click on the + buttonon the right of the value field To connect a drop down value with another Metadata Set select the set as a Targetnext to the related value
Click CONFIRM when done
Custom Metadata
38
Creating a Text Input FieldUsage Log into the Administration panel and click on the PROJECTS tab Expand the CUSTOM METADATAbar
Click the ADD VALUE button and provide the following information
bull Name The name of the text input field as the user will see it (for example Project Number)
bull Type Text Input
bull Maximum Characters The amount of characters a user can type into that field 0 equals infinite
bull Restrict input to Restrict input to numbers only letters only or numbers amp letters No restriction will allowany UTF-8 character
bull Pattern Not relevant for text input
bull Mandatory Defines if this value is mandatory (checked) or not (unchecked)
bull Use in Project String Defines if items from this text input field will appear in the project name if the usersenables the checkbox Create Project Name from Above Entries upon project creation
Click CONFIRM when done
Custom Metadata
39
Creating a Replacement PatternUsage Replacements patterns enable Strawberry to automatically create date values based on Unix date modifiersA List of possible modifiers can be found below Usage Log into the Administration panel and click on thePROJECTS tab Expand the CUSTOM METADATA bar
Click the ADD VALUE button and provide the following information
bull Name The name of the pattern field as the user will see it (for example Date)
bull Type Replacement Pattern
bull Maximum Characters Not relevant for text replacement pattern
bull Restrict input to Not relevant for text replacement pattern
bull Pattern A pattern consisting of Unix modifiers A pattern such as eg Y m d equals year month date
bull Mandatory Not relevant for text replacement pattern
bull Use in Project String Defines if the output from this pattern will appear in the project name if the users enablesthe checkbox Create Project Name from Above Entries upon project creation
Click CONFIRM when done
Custom Metadata
40
Editing a ValueAvailable in Strawberry version 40 or newerUsage Log into the Administration panel and click on the PROJECTS tab Expand the CUSTOM METADATAbar Expand the metadata set that contains the value you want to edit and then select the value by checking the boxnext to it Change the value properties as required and then click CONFIRM
Deleting a ValueUsage Log into the Administration panel and click on the PROJECTS tab Expand the CUSTOM METADATAbar Expand the metadata set that contains the value you want to delete and then select the value by checking thebox next to it Now click on DELETE VALUE
Available in Strawberry version 40 or newer
Creating Project Status FlagsAvailable in Strawberry version 40 or newerPurpose Project statuses help users to determine what the working status of a project is Statuses can be forinstance in editing in color grading ready for approval etc and are defined by the administrator The statuses ofeach project is displayed in the metadata area of the Strawberry 4 user interface
Usage Log into the Administration panel and click on the PROJECTS tab Expand the STATUS OPTIONS barNow click on ADD STATUS and define a name for the new status Once the status is created users can choose itfrom the Strawberry frontend
Deleting Project Status FlagsPurpose Deleting status flags will prevent users from being able to select that status in the future However whendelting a status flag it will remain attached to the projects that are already using it
Custom Metadata
41
Usage Log into the Administration panel and click on the PROJECTS tab Expand the STATUS OPTIONS barNow click on the checkbox next to the status flag that you want to delete and press the DELETE VALUE button
Supported Unix Time Modifiers
bull a localersquos abbreviated weekday name (eg Sun)
bull A localersquos full weekday name (eg Sunday)
bull b localersquos abbreviated month name (eg Jan)
bull B localersquos full month name (eg January)
bull C century like Y except omit last two digits (eg 20)
bull d day of month (eg 01)
bull D date same as mdy
bull e day of month space padded same as _d
bull F full date same as Y-m-d
bull h same as b
bull H hour (0023)
bull I hour (0112)
bull j day of year (001366)
bull k hour ( 023)
bull l hour ( 112)
bull m month (0112)
bull M minute (0059)
bull p localersquos equivalent of either AM or PM blank if not known
bull P like p but lower case
bull r localersquos 12-hour clock time (eg 111104 PM)
bull R 24-hour hour and minute same as HM
bull s seconds since 1970-01-01 000000 UTC
bull S second (0060)
bull T time same as HMS
bull u day of week (17) 1 is Monday
bull U week number of year with Sunday as first day of week (0053)
bull w day of week (06) 0 is Sunday
bull W week number of year with Monday as first day of week (0053)
bull y last two digits of year (0099)
bull Y year
bull z +hhmm numeric timezone (eg -0400)
bull Z alphabetic time zone abbreviation (eg EDT)
Archive amp Copy ToStrawberry allows certain users (admins amp users but not guests) to archive and retrieve editing projects When performing an archive operation Strawberry takes every single file which is part of the project and sends it to an archive destination which was previously defined by the administrator As soon as the project is in the archive Strawberry 4 will delete it from the production storage (aka source) but will keep the metadata and proxy files The
Archive amp Copy To
42
archive path defined here is also the retrieval path If you look for a more sophisticated archivalretrieval process youshould have a look inside the Strawberry API documentation
Creating an Archive StrategyZIP is not longer supported as an archive method in Strawberry because of missing CRC checksumcapabilitiesPurpose Archive strategies allow you to define discrete archive locations and methodologies for different types ofprojects When a user presses the Archive Project button in the user front-end Strawberry will offer the archivestrategies defined here
Usage Log into the Administration panel and click on the Archive tab Expand the ARCHIVE STRATEGIES barClick the ADD button and provide the following information
bull Name The name of the archive strategy The users see the name of the strategy when he or she attempts toarchive a project
bull Type The archive type Please select SB native if you are not using Archiware P5 or Masstore
bull Path The path (aka archive destination) for projects archived using this strategy
bull Method
bull plain Strawberry archives the project and media files without compressing them It archives theprojects folder structure as it is
bull tarball Puts the project amp media files of a project into a tarball before archiving itbull Check
bull Fingerprint Sequential integrity check on a file that only detects serious file damages but no minordefectsbull CRCs are specifically designed to protect against common types of errors on data transmissionswhere they can provide quick and reasonable assurance of the integrity of data delivered Howeverthey are not suitable for protecting against intentional alteration of data
bull None No data integrity check at allbull EnableDisable Strategy Define if an archive strategy is available for users (enabled) or not (disabled)
Archive amp Copy To
43
Canceling an ArchiveRetrieval JobArchive or retrieval jobs can currently only be canceled from the Strawberry user interface but not from theAdministration panel In order to Cancel an archive or retrieval job do the following
1 Login to the user interface as an Administrator and right click on the affected project
2 Select Cancel ArchiveRetrieval Job and confirmIt will take a few seconds up to a couple of minutes until the cancellation has been performed Once it is done youwill see a warning sign next to the project name The warning sign indicates that the operation has been aborted bythe user
When a project archivalretrieval failed the project will have a warning sign next to its name
Clearing ArchiveRetrieval ErrorsIn case a project archive or retrieval failed (either it was canceled by a user or failed for other reasons) you can resetthe project state back to normal by performing the following operations
1 Login to the Strawberry user interface as an Administrator and right click on the affected project
2 Select Clear Archive Error from the context menu and confirmIt will take a few seconds until the fail state of the project has been cleared and the project is displayed asnormal Once the front end reports that the clearance has been successfully done you may retry to archive orretrieve the project if required
Project Copy-to StrategiesPurpose Strawberry enables users to copy projects to another location This location can be another storagedevice (for backup purposes) a render farm or other external application watch folders This feature works verysimilar to the Archive function The main difference is that copied projects will not be deleted from the mediastorage (source volume) but remain there for further use
Usage Log into the Administration panel and click on the Archive tab Expand the Project Copy-to Strategiesbar Click the ADD button and provide the following information
bull Name The name of the copy-to strategy The users see the name of the strategy when he or she attempts tocopy a project
bull Path The path (aka copy-to destination) for projects copied using this strategy
bull Method
bull plain Strawberry archives the project and media files without compressing them It backups theprojects folder structure as it is
bull tarball Puts the project amp media files of a project into a tarball before copying it
bull zip Puts the project amp media files of a project into a zip file before copying it (Please Note Zip filescan not be CRC checked)
bull Check
bull Fingerprint Sequential integrity check on a file that only detects serious file damages but no minordefects
Archive amp Copy To
44
bull CRCs are specifically designed to protect against common types of errors on data transmissionswhere they can provide quick and reasonable assurance of the integrity of data delivered Howeverthey are not suitable for protecting against intentional alteration of data
bull None No data integrity check at allbull EnableDisable Strategy Define if an archive strategy is available for users (enabled) or not (disabled)
Asset Copy-to StrategiesPurpose Strawberry enables users to copy individual assets to another location This location can be anotherstorage device (for backup purpose) a render farm or external application This feature works very similar to theArchive function The difference is that copied assets will not be deleted from the media storage but remain therefor further use
Usage Log into the Administration panel and click on the Archive tab Expand the Asset Backup Strategies barClick the ADD button and provide the following information
bull Name The name of the copy-to strategy The users see the name of the strategy when he or she attempts tocopy a project
bull Path The path (aka archive destination) for projects copied using this strategy
bull Method
bull plain Strawberry archives the project and media files without compressing them It backups theprojects folder structure as it is
bull tarball Puts the project amp media files of a project into a tarball before copying it
bull zip Puts the project amp media files of a project into a zip file before copying it (Please Note Zip filescan not be CRC checked)
bull Check
bull Fingerprint Sequential integrity check on a file that only detects serious file damages but no minordefects
bull CRCs are specifically designed to protect against common types of errors on data transmissionswhere they can provide quick and reasonable assurance of the integrity of data delivered Howeverthey are not suitable for protecting against intentional alteration of data
bull None No data integrity check at allbull EnableDisable Strategy Define if an archive strategy is available for users (enabled) or not (disabled)
Good to Know
Freezing Archived ProjectsAvailable in Strawberry version 44 or newerIn order to avoid that users are accidentally retrieving archived projects you can freeze these projects using rarrfreezeoptions larr
Templates
Working with Templates
Templates
45
Purpose Templates are an extremely efficient way to prepare standardized project settings and content for allStrawbery users in your facility Templates can contain custom file and folder structures
Example 1 Application Specific Templates
One example to illustrate the benefit of templates can be working with Avid Media Composer in different frame rates(24 frames and 25 frames) Avid does not allow to switch the frame rate within a project With Strawberry you couldcreate two templates one for 24 frames and one for 25 frames and copy the related Avid project files into thistemplate When a user creates a project from on of these templates the corresponding projects files (24 frames or25 frames) will be copied into the new projects an renamed after the new project so the user does not need to createa new Avid project manually after he or she created a project in strawberry
Example 2 Production Specific Templates
Another example of working with templates can be a specific production that requires specific preparations Mostmedia facilities create individual folder structures for different productions so that people save graphics visualeffects and sound effects in the right location on the storage Usually these folder structures need to be recreated foreach episode of a production With Strawberry you can create a template which contains a specific folder structureand even media files and copy your prepared folder and media files into this template As soon as a user choosesthe template upon project creation the folders and files that you prepared in the template will be copied over to thenew project and are immediately available for the user
Creating a Template (Avid Media Composer)Before users can create any Avid projects using the Strawberry client software you need to have at least ONEtemplate Log into the admin panel and click on the MISC tab Expand the TEMPLATES bar Now click theCREATE NEW button
Strawberry will ask you for a Template name a preset a token and a naming pattern
Choose a name that best characterizes your template In this example we will create an Avid template that containsa high definition Avid project with a resolution of 1080p So it makes sense to call the template Avid 1080p
In the preset row click on the little down arrow and choose the Avid preset When a user creates a projectbased on an Avid template Strawberry automatically create the Avid MediaFiles and OMFI MediaFiles folderstructure in the project and it will also ensure that Avid project and media files can be shared properly
The token is a replacement string for a file name This means that if your token says replace_me and you createan Avid template named replace_me and copy it into your template folder (discussed later) every time thetemplate replace_me is used the token text (in this case replace_me) will be changed to the name of the currentStrawberry project So the Avid project file called replace_meavp in your templates folder will be used and namedprojectnameavp as its created in your Strawberry project
In the row pattern you can define how a project name based on this template should look The stringYmd-name will result in the project name 20130810-ProjectName Putting the date inside the projectname will enable your user to search for projects by typing in the date If you dont need the date in the project nameyou can simply delete the date-related parts of the string and leave the name piece If you need the date part youcan modify it to your requirements In order to understand the formatting for doing this please refer to the unix timeman page at httpunixhelpedacukCGIman-cgidate
Templates
46
After you are done click Create and then open Avid Media Composer Create a new local project calledreplace_me with the setting 1080p25
Open the newly created project delete the bin that Avid always makes in new project and empty the Avid trashfolder
In order to ensure that Media Composer will recognize network volumes as media drives open Tools gt Console andtype in alldrives If you see the message All drives will be viewed as media drives (Was previously set to havingonly true media drives act as media drives) you are good to go If you see the message Only true media drives willbe viewed as media drives (Was previously set to having all drives act as media drives) type alldrives againThere are just two possible options
Now go to Tools gt Media Creation gt Capture and select the Strawberry media drive (mapped as a networkdrive on your Computer) as the AudioVideo file destination Click on both Apply to All buttons and then click onOK Now close the project
Templates
47
Navigate to the Strawberry template folder on your storage (Strawberrytemplates) Within that template folder youwill see a folder that is named after the template you created in the Strawberry admin panel (in this case we called itAvid 1080p) Inside this folder will be a folder called media_1 and one called projects
Use the Finder or Explorer to navigate to your local Avid projects folder (eg UsersFlavourSysDocumentsAvidProjects) and open the replace_me project folder Copy the files replace_meavp replace_me Settingsxml andreplace_me Settingsavs to your clipboard
Paste the files into your StrawberrytemplatesAvid 1080pprojects folder If an editor creates a new project using thistemplate Strawberry will rename the replace_me string with the name of the current Strawberry project
Now every time a Strawberry user creates a new project based on this template it has all the right settings export preferences etc that it will inherit from the replace_me project that you created and set up before copying it into the Strawberrytemplatesltyour template namegtprojects folder If you need to modify or improve your template
Templates
48
simply make the changes to the local replace_me project and re-copy the three files into theStrawberrytemplatesltyour template namegtprojects folder
Creating a Template (Adobe Premiere)Before you can create an Adobe Premiere editing project from within the Strawberry client software you need tocreate a template for Strawberry to use Click on the Template Tab in the Admin panel and then click on CreateNew
Strawberry will ask you for a Template name a preset a token and a naming pattern
Choose a name that best characterizes your template In this example we will create an Adobe Premiere templatethat contains an Adobe Premiere project So it makes sense to call the template Adobe Premiere
In the preset row click on the little down arrow and choose the Adobe preset When a user creates a projectbased on an Adobe template Strawberry automatically create the Adobe Cache folder structure in the project and itwill also ensure that Adobe project and media files can be shared properly
The token is a replacement string for file names This means that if your token says replace_me in these settingsand you go on to create an Adobe Premiere project named replace_me and put it in your template folder thetemplate will be used and automatically renamed based on the Strawberry project name that is open This way anAdobe Premiere template project file called replace_mePR will be named StrawberryprojectnamePR each timeyou create a new project from within Strawberry
In the row pattern you can define how a project name based on this template should look like The stringYmd-name will result in the project name 20130810-ProjectName Putting the date inside the projectname will enable your user to search for projects by typing in the date If you dont need the date in the project nameyou can simply delete the date related parts of the string and leave the name piece If you need the date part youcan modify it to your requirements In order to understand the formatting for doing this please refer to the unix timeman page at httpunixhelpedacukCGIman-cgidate
After you are done click Create and go to the Strawberry Client Create a new project using the Adobe Premieretemplate Now open Adobe Premiere and create a new project Name the project replace_me and set the captureformat to HDV Ensure that all Scratch Disk locations are set to same as project
Templates
49
Click ok to create and open the project Once the project is opened go to EditgtPreferences Media and choosethe Adobe Cache on your Strawberry media volume as the destination for Media Cache Files and Media CacheDatabase
Templates
50
Tip If you are using the Adobe Premiere Panel launch it now If a user creates a project based on this template thepanel will launch automatically with the new project
Click OK to confirm your changes Now save the project and leave Adobe Premiere Navigate to your local Adobeprojects folder and copy the newly created project file replace_meprproj to the media_1 folder of the Adobetemplate location that you created
Now every time an editor creates a new project using the Adobe Premiere template the replace_mepr templatewill be used and all the settings preferences and destinations will be inherited and used in the newStrawberryprojectnamepr
Rename a Templates
Templates
51
Purpose You want give the Templates a new name for differentation
Usage Log into the admin panel and click on the MISC tab Expand the MANAGE TEMPLATES bar Check thetemplate what you want rename below the templates list is a button says RENAME and fill out with the new nameIf you are ready click CONFIRM else if you want go back click CANCEL
Duplicate a TemplatePurpose Use dublicate a template if you want clone the settings
Usage Log into the admin panel and click on the MISC tab Expand the MANAGE TEMPLATES bar Check thetemplate what you want duplicate below the templates list is a button says DUPLICATE and fill out with the newname If you are ready confirm it with click DUPLICATE else if you want to stop the prozess click CANCEL
Delete a Template(s)Purpose If you want delete a template(s) eg Didnt needed anymore
Usage Log into the admin panel and click on the MISC tab EXPAND the MANAGE TEMPLATES bar Checkthe template what you want delete below the templates list is a button says DELETE
Configuring the Avid AtticWhen utilizing Avid Media Composer the Avid Attic functionality might be important to your workflow To make theAvid Attic work with strawberry please perform the following steps
1 Close Avid Media Composer
2 Navigate to the Avid Attic folder on our computerWin UsersPublicPublic DocumentsAvid editing application
Mac Macintosh HDUsersSharedAvid editing application
3 Rename the Avid Attic folder to Avid Attic_Old
4 Open an Avid Media Composer project using the Strawberry client and open the project in Avid
5 Close the project in Avid Media Composer
6 Go back to the Avid attic and check whether Avid has created a new Attic folder
7 Check the attic folder for the project that was recently opened in Strawberry
Manage IndexersCheck the following boxes if you want the features or unchecked if not
Enable deep indexing for media files
Index adobe premiere project files
Index avid bin files
Storage Quota
Templates
52
Purpose In this section you can define how much physical storage space all projects managed by strawberry areallowed to occupy The quota is a soft quota meaning that there is no physical storage restriction once it getsexpired However Strawberry will send a warning email if if the quota that you defined has been reached
Usage Log into the admin panel and click on the MISC tab Expand the STORAGE QUOTA bar Define howmuch space (in Gigabytes) all projects managed by strawberry are allowed to occupy and press SAVE You canchange this quota at any time
MYSQL BackupWhen clicking the Backup Now button Strawberry creates a dump of its MySQL database The default location forthe database dump is optsb4databackups The default destination can be reconfigured in theoptsb4appfsbaseconfigdatabase-backupyml file
Versions amp LicenseThis section is for license and support purpose only
VIEW Proxy Encoder
Supported Video Audio and Image File FormatsSupported Video Formats amp CodecsApple Intermediate Codec (MOV)Apple MJPEG-B (MOV)Apple ProRes (MOV)
Arri Alexa (ARI)
AS-11 IMX 50 (MXF)AS-11 AVC Intra 100 (MXF)
(X)AVC Intra 50100 (MOV MXF)
Avid 11 amp 11xAvid DV amp DV100
Avid DNxHD (MOV MXF)(45 60 75 90 90x 110 110x 120 120x 145 185 185x 220 220-10Bit)
Avid Interplay C93 amp MVE videoAvid MPEG2 50 - SDAvid Meridien Compressed SD amp Uncompressed SDAvid Packed amp RGBPacked
AVS (Standard amp Chinese)
Black Magic R210
Canopus LosslessCinepak
VIEW Proxy Encoder
53
DV (PAL amp NTSC)
DVCPRO HD | 100 MbpsDVCPRO 50 | 50 MbpsDVCPRO 25 | 25 Mbps
H261H263 H263-1996H263+ H263-1998 H263 version 2H264 AVC MPEG-4 AVC MPEG-4 (MP4 MOV MXF)
HDV
MJPEG amp MJPEG LosslessMPEG 1 amp 2 (M1V M2T M2V MPEG MPG MPGV MPV VOB)MPEG 4 (M4A M4P M4V MP4)
P2 - AVC-Intra 50 100 (MOV MXF)P2 - DVCPRO 25 50 100 (MOV MXF)
QuickTime uncompressed
Red Digital Cine Camera (R3D)
Windows Media Video (All Versions)
XDCAM 25XDCAM IMX 30XDCAM HD 50XDCAM SXS 50
Also SupportedAvid 11 10-bit RGB PackerFlash Video (FLV)Microsoft Video 1On2 VP3On2 VP5On2 VP6QuickTime 8BPS videoQuickTime Animation (RLE) videoQuickTime Graphics (SMC)QuickTime video (RPZA)R10K AJA Kona 10-bit RGB CodecR210 Quicktime Uncompressed RGB 10-bitTheoraVP8VP9WMV7
Supported Audio Formats amp CodecsMost CommonAAC+AACAC-3
CAF
MP3 (All Versions)MPEG-4 (All Versions)
PCM (All Versions amp Bitrates)
WAV
WMA (All Versions)
Also Supported
VIEW Proxy Encoder
54
Apple lossless audioATRAC1ATRAC3ATRAC3+Bink AudioCore Audio Format (CAF)DV audioEnhanced AC-3FLAC (Free Lossless Audio Codec)MACE (Macintosh Audio CompressionExpansion) 31MACE (Macintosh Audio CompressionExpansion) 61MLP (Meridian Lossless Packing)MP1 (MPEG audio layer 1)MP2 (MPEG audio layer 2)OpusRealAudio 10 (144K)RealAudio 20 (288K)RealAudio 30 (dnet)RealAudio LosslessRealAudio SIPR ACELPNETVorbisWindows Media Audio Voice
Supported Image Formats|Targa |TIF |PSD |PSB |PNG |JPG |IFF |GIF |BMP |DPX |EXR |ARI |EPS |AI
Enabling or Disabling ViewLog into the admin panel and click on the VIEW tab If VIEW is enabled proxy files will be created automaticallybased on the criteria below If VIEW is disabled proxy file encoding will not take place and he user front endautomatically jumps to list view instead of thumbnail view
Proxy Encoder ConfigurationIn this menu you can choose from properties of the Strawberry generated proxy files These options include
bull Proxy File Location shows where Strawberry saves the proxy files that it generates This location is definedupon installation and can only be changed by modifying the Strawberry configuration files on the Strawberryserver
bull Bitrate Define the proxy bitrate (per second) Please keep in mind that lower bitrates might be more suitablefor users connecting over the Internet while higher bit rates are good for LAN operations Is there a goldenrule Unfortunately not If you are using the Strawberry Preditor Add-on we recommend a low proxy bitrate(700k - 900k)
bull Resolution Choose a resolution for your proxy files There should always be a coherence between theresolution and the bit rate For example A 1920x1080 proxy file should have a bitrate of at least ~1200k whilea 640x360 proxy should look good with a 600k bitrate
bull Image Sequence Recognition When Strawberry VIEW detects an image sequence (Basename amp Count) withmore than 20 individual images it will create a preview MP4 file out of it An image sequence must have adelimiter between its basename and its count Valid delimiters are - (dash) (dot) and _ (underscore)sequence-name_001 is an example of a valid naming convention
bull Time Code Burn-In If you wish to have a video time code burned into your proxy files you should enable thisfeature
bull Time Code Label Position Defines whether the proxy time codes (or image layer names) are burned in on thebottom or on top of the proxy file
V isual Watermark Check this box if you want Strawberry to burn a visual watermark into your proxy files
bull Watermark Position Decide on which position of the screen your watermark image should be visible
VIEW Proxy Encoder
55
bull Watermark Image Upload a Watermark image as a png file The image should not be larger than your currentproxy resoultion and should have a transparent background You can download example watermarks heredlflavoursyscommanualssupporting_filesExample_Proxy_Watermarkszip
bull Watermark Preview Previews your uploaded watermark in respect of the current proxy resolution as well asthe current Timecode burn-in position
Blacklists amp Whitelists
bull Factory File Blacklist This is a factory blacklist provided by FlavourSys The blacklist has been populatedbased on best practice workflows If you need any of the factory blacklist file extensions whitelisted just enterthe extension into the Files Whitelist
bull File Blacklist Enter any file extension that you dont wish to see in the Strawberry user interface Strawberrywill then ignore files that are having this extension meaning that no proxies are generated However you canstill use the files on the FinderExplorer level in your projects In order to blacklist an item just enter extensionand press enter Press the save button to confirm
bull File Whitelist If you need to whitelist any extensions from the Factory File Blacklist just enter its extensioninto the Files Whitelist In order to whitelist an item just enter extension and press enter Press the savebutton to confirm
bull Factory Folders Blacklist This is a factory blacklist provided by FlavourSys The blacklist has been populatedbased on best practice workflows If you need any of the factory folder blacklist whitelisted just enter the foldername into the Folders Whitelist and press enter Press the save button to confirm
bull Folders Blacklist (Recursive) Enter any folder name that you dont wish to see in the Strawberry user interfaceStrawberry will then ignore the folder and its content meaning that no proxies are created You can still useblacklisted items on the FinderExplorer level in your projects In order to blacklist a folder just enter the foldername into the blacklist and press enter Press the save button to confirm
bull Folders Whitelist (Recursive) If you need to whitelist any folder from the Factory Folders Blacklist just enterits name into the Folders Whitelist and press enter Press the save button to confirm
Applying Blacklist amp Whitelist ChangesStrawberry 5 applies blacklist changes automatically In order to apply whitelist changes please perform thefollowing steps Also perform these steps in order to apply blacklist changes in Strawberry 44 or older versions
VIEW Proxy Encoder
56
1 Login to the Administration panel
2 Click on the MANAGE PROJECT tab
3 Select the project on which you want to apply the operation
4 Click the VIEW button below the project list
5 Select the radio button Rescan Project(s) and confirmDepending on the amount of files in the affected project this operation can take several minutes
Node and Worker Control
Purpose In this section of the admin panel you monitor and change the status of each VIEW encoding node that isintegrated in your environment You also have the possibility to set Schedulers so that you can decide if the nodesand the workers run
Usage Log into the admin panel and click on the VIEW tab Expand the NODE AND WORKER CONTROL barHere you can select from the following options
bull NODE ID The internal ID of each encoding node
bull NODE ADDRESS The hostname or IP address and port under which each node can be reached
bull STATUS Green means running yellow means paused and red means not running
bull NUMBER OF WORKERS Number of encoding workers (threads) that work at the same time Choose theamount of workers based on the amount of CPU cores of each node One worker per core works very well butleave at least one core for the OS and the rest of the Strawberry system The Strawberry Server license comeswith 3 Workers additional workers must be licensed separately
bull Actions Stop start restart or edit a scheduler for individual nodes
Content Download OptionsPurpose If you want to allow user to download media assets using the front end you can define this here Forinstance for workflows requiring executive review or for film schools where faculty could grade from home thisfeature can be beneficial however for feature film workflows this feature can be turned off
Usage Log into the admin panel and click on the VIEW tab Expand the CONTENT DOWNLOAD OPTIONS barIf you want to enable users to download low resolution media files (proxy files) from the front end check the boxnext to Allow users to download proxy files If you want to enable users to download high resolution media filesfrom the front end check the box next to Allow users to download high-res files
Rescan-Project(s)Purpose Scans the project for new files and newly supported file formats and attempts to encode them to proxyfiles It will also apply black list white list changes to existing projects
Usage Log into the Administration panel and click on the PROJECTS tab Expand the MANAGE PROJECTSbar Select the project(s) that you want to rescan and press the VIEW button below the project list and checkRescan Project(s) and confirm it
Repair-Project(s)
VIEW Proxy Encoder
57
Purpose Scans the project for new files and newly supported file formats and attempts to encode them to proxyfiles It will also apply black list white list changes to existing projects
Usage Log into the Administration panel and click on the PROJECTS tab Expand the MANAGE PROJECTSbar Select the project(s) that you want to repair and press the VIEW button below the project list and check RepairProject(s) and confirm it
Reencode-EverythingPurpose Deletes every file in the project to see if meta data have been changed Also looks for new files and newlysupported file formats and attempst to encode them to proxy files It will also apply black list white list changes toexisting projects
Usage Log into the Administration panel and click on the PROJECTS tab Expand the MANAGE PROJECTSbar Select the project(s) that you want to reencode-everything and press the VIEW button below the project listand check Reencode-Everything and confirm it
Miscellaneous
Manage TemplatesPlease visit this manuals rarr Templates larr chapter to get template related information
Safe SearchPurpose ldquoSafe Searchrdquo is an ldquoin edit suiterdquo security feature for Strawberry managed content Its aim is to reducethe visibility and searchability of content while a project with specific custom metadata is open This prevents thatclients see content of other clients while working on a project inside the editing room
Enabling Safe SearchLogin into the Strawberry Administrator panel and select the ldquoMiscrdquo tab Open the ldquoSearch settings and check thebox next to ldquoEnable Safe Search Featurerdquo
Define ldquoSafe Searchrdquo MetadataOnce ldquoSafe Searchrdquo is enabled click on the ldquoProjectsrdquo tab and open the ldquoCustom Metadatardquo menu Select a set andthen a drop down menu within it Then click on ldquoEdit Valuerdquo
Miscellaneous
58
Next to each drop down menu is a checkbox called ldquoSafe Searchrdquo Check this box for each value for which the ldquoSafeSearch filter should apply
When a user opens a project that includes a ldquoSafe Searchrdquo metadata the search field provides the informationaccordingly (safe search enabled for ldquometadata namerdquo) From this point on all searches will be carried within therelated safe search metadata context This applies until the project is closed
Miscellaneous
59
Good to Know
bull Only one drop down menu can have safe search metadata
bull Safe search metadata in the Administrator panel should not be changed enabled or disabled while projects areopened as this can lead to inconsistent search results
Manage IndexersAvailable in Strawberry version 42 or newer
GeneralCheck the following boxes if you want the features or unchecked if not
bull Enable Deep Indexing for Media Files(If enabled Strawberry will extract technical metadata from media files If it is disabled Strawberry will only index filenames and file sizes This feature needs to be enabled in order for the proxy encoding to work)
bull Index Adobe Premiere Project Files(If enabled Strawberry will extract master clip names a descriptions comments from Adobe Premiere master clipsto make these information visible amp searchable in the front-end)
bull Index Avid bin files(If enabled Strawberry will extract master clips names and sequence names from Avid bins to make theseinformation searchable in the front-end However when searching for an Avid master clip or sequence name theuser will not be provided with a visual presentation of the asset or sequence but will only see the project(s) thatcontains these information since this feature is beta we recommend to turn it of)
bull Extract Exif metadata from images(If enabled Strawberry will extract EXIF metadata from image files
bull Extract XMP metadata from files(if enabled Strawberry will extract XMP metadata from media files)
bull Extract XML metadata (Experimental)(if enabled Strawberry will extract XML metadata from xml sidecard files Please contact us for an overview ofsupported XML schemes)
bull Search for technical metadata(If enabled Strawberry will extract technical metadata from video files as well as ID3 tags (album Artist etc) fromaudio files
Technical Metadata WhitelistStrawberry maintains a search index that allows user to carry out searches in an extremely fast fashion Since thissearch index is stored in the server memory its size must be limited and therefor can not include all possible searchparameters Administrator can define the search parameters by white-listing them
Miscellaneous
60
Enter any label that you wish to add to the Strawberry search index To insert a label just click next to an existinglabel and start typing An auto completion list will show available results for your search term Select the technicalmetadata label that you wish to add to the search index Use the x button next to a labels name to remove a labelfrom the search index The changes will not apply immediately but on the next build of the search index (once anight) If you want to apply the settings immediately SSH login to the Strawberry server as root and type thecommand sb reindex
Storage Quota
Purpose In this section you can define how much physical storage space all projects managed by strawberry areallowed to occupy The quota is a soft quota meaning that there is no physical storage restriction once it getsexpired However Strawberry will send a warning email if if the quota that you defined has been reached
Usage Log into the admin panel and click on the MISC tab Expand the STORAGE QUOTA bar Define howmuch space (in Gigabytes) all projects managed by strawberry are allowed to occupy and press SAVE You canchange this quota at any time
Adobe Premiere Specific Feature
Auto-Link media from Library into projectThis feature is part of a custom development and currently not documented
Auto-Ingest local media into projectPurpose If a user imports media from a usb or local hdd into an Adobe Premiere project that is managed byStrawberry Strawberry can automatically copy that media into the projects media volume This ensures that allmedia used in a Premiere project is actually on the centralized storage
Usage Log into the admin panel and click on the MISC tab Expand the Auto Import Library amp unmanaged Assets(Adobe Premiere Only) bar If you wish to enable the Auto-ingest feature check the box next to it and define aninterval The interval determines how often the Strawberry Adobe panel will check for unmanaged inside each openPremiere project
Auto-Link subproject media into projectPurpose If a user imports media from a subproject into an Adobe Premiere project that is managed by StrawberryStrawberry can automatically link that into the from the subproject into the parent project This ensures that anyproject is self contained at any point
Miscellaneous
61
Usage Log into the admin panel and click on the MISC tab Expand the Auto Import Library amp unmanaged Assets(Adobe Premiere Only) bar If you wish to enable the Auto-link feature check the box next to it and define aninterval The interval determines how often the Strawberry Adobe panel will check for imported subproject mediainside the current project to link it
PreditorDefine the Timeout based on which a user should be automatically logged out of Preditor In the process Strawberrywill also automatically close the users sequence in order to free the license slot Preditor creates auto-saves of opensequences every minute and stores these on the server so that progress does not get lost even if the sequence getsauto-closed
SMTP SetupPurpose Strawberry has the ability to send email notifications on specific criteria This usually is the case if a teamexpires its storage quota or if assets are shared via email using the built-in functions For this feature to workStrawberry needs to be provided with STMP information
Usage
1 Login to the Strawberry server and cd to optsb4appfsbaseconfig
2 Open the file smtpymlexample and replace the example SMTP values with your own ones
3 Save the file as smtpymlThe Strawberry services needs to be restarted for the changes to apply
MYSQL BackupWhen clicking the Backup Now button Strawberry creates a dump of its MySQL database The default location forthe database dump is optsb4appbackups The default destination can be reconfigured in theoptsb4appfsbaseconfigdatabase-backupyml file
Empty TrashPressing the Empty Trash Now button will instantly remove all contents from the Strawberry trash folder
Osiris OptionShared Edits only
Purpose If the Osiris option is enabled Strawberry will mount its project media volumes in a specific way AvidMedia Composer will detect these volumes as volumes from an Avid storage and will provide bin locking for allStrawberry managed Media Composer projects
Versions amp LicenseThis section shows you the current version numbers of the Strawberry 4 modules that are installed on yourStrawberry server Additionally it provides you with license related information for your site
Updating a LicenseOnly use this method if you are running Strawberry in a Non-High Availability environment
Please go to the Strawberry admin panel misc versions amp license and click the NEW LICENSE button Copy andpaste the license string in there and click the UPDATE button Once this is done SSH login to the Strawberryserver and type service strawberry4 restart The license will be applied once the Strawberry service has beenrestarted
Legal Information
Legal Information
62
AVID is a trademark of Avid Technologies (wwwavidcom) Apple and FCP are trademarks of Apple in the US(wwwapplecom) Adobe and Premiere are trademarks of Adobe (wwwadobecom) All product names logos andbrands are property of their respective owners All company product and service names used in this manual are foridentification purposes only Use of these names logos and brands does not imply endorsement
Legal Information
63
- Last Updated July 20 2017
-
- Introduction
- System Requirements
-
- Storage File System Requirements
-
- List of Certified Storage Vendors
- List of Supported Storage File Systems
-
- Strawberry Server HWSW Requirements for Production Environments
- Minimum Server HWSW Requirements for Demonstration amp POC Environments
- Minimum Requirements for a dedicated View Proxy Encoding Node
- Requirements for the Strawberry Client
-
- Strawberry Client SSL
-
- Requirements for the Strawberry Adobe Panel
- Minimum Web Browser Requirements
-
- Installation Manuals
-
- Strawberry Client
-
- Installing the Client
- Starting the Client
- Upgrading the Client
- Deleting the Client
-
- Client Configuration for NAS
-
- SMB Mounts Configuration
- Paths to Editing applications (App Launcher)
- Mount your drives under Windows 7 amp 8
- Mount your drives under OSX
-
- Client Configuration for StorNext amp XSAN
-
- SAN Mount Configuration
-
- Client Configuration for Shared Edits under macOS
- Client Configuration for Shared Edits under Windows
- Changing the Clients Fuse Blocksize (macOS only)
- Adobe Panel
-
- Installing the Panel
- Updating the Panel
- Removing the Panel
- Testing the Panel
-
- Users Roles amp Teams
-
- Manage Roles
-
- Available Capabilities
- Creating a role
- Editing a role
- Deleting a role
-
- Manage Users
-
- Creating a User
- Changing a Users Role
- User Specific Roles
- Assigning a User to Teams
- Deleting a User
- Removing a User from a Team
-
- Manage Teams
-
- Creating a Team
- Changing a Teams Name
- Changing a Teams Quota
- Deleting a Team
-
- Manage Edits
-
- Manage Projects
-
- Manage Online Projects
-
- Force Closing a Project
- Deleting one or multiple Projects
- Archiving a Project
-
- Manage Archived Projects
-
- Retrieving a Project from the Archive
-
- Download Project List
- Custom Metadata
-
- Manage Libraries
-
- Introduction
- Library States
- Ingest Libraries
-
- Creating a Library Project
- Configuring an Ingest Library
- Configuring the Library Ingest Interval
- Configuring the Library Clean Interval
- Good to Know
-
- External Libraries
-
- Creating a Library Project
- Configuring an External Library
- Configuring the Library Clean Interval
- Configuring the External Library Reindex Interval
- Good to Know
-
- Custom Metadata
-
- Custom Metadata Sets
- The Master Set
- Creating a Metadata Set
- Connecting Metadata Sets
- Deleting a Metadata Set
- Creating a Dropdown Menu
- Creating a Text Input Field
- Creating a Replacement Pattern
- Editing a Value
- Deleting a Value
- Creating Project Status Flags
- Deleting Project Status Flags
- Supported Unix Time Modifiers
-
- Archive amp Copy To
-
- Creating an Archive Strategy
- Canceling an ArchiveRetrieval Job
- Clearing ArchiveRetrieval Errors
- Project Copy-to Strategies
- Asset Copy-to Strategies
- Good to Know
-
- Freezing Archived Projects
-
- Templates
-
- Working with Templates
- Creating a Template (Avid Media Composer)
- Creating a Template (Adobe Premiere)
- Rename a Templates
- Duplicate a Template
- Delete a Template(s)
- Configuring the Avid Attic
- Manage Indexers
- Storage Quota
- MYSQL Backup
- Versions amp License
-
- VIEW Proxy Encoder
-
- Supported Video Audio and Image File Formats
- Enabling or Disabling View
- Proxy Encoder Configuration
- Blacklists amp Whitelists
- Applying Blacklist amp Whitelist Changes
- Node and Worker Control
- Content Download Options
- Rescan-Project(s)
- Repair-Project(s)
- Reencode-Everything
-
- Miscellaneous
-
- Manage Templates
- Safe Search
-
- Enabling Safe Search
- Define ldquoSafe Searchrdquo Metadata
- Good to Know
-
- Manage Indexers
-
- General
- Technical Metadata Whitelist
-
- Storage Quota
- Adobe Premiere Specific Feature
-
- Auto-Link media from Library into project
- Auto-Ingest local media into project
- Auto-Link subproject media into project
-
- Preditor
- SMTP Setup
- MYSQL Backup
- Empty Trash
- Osiris Option
- Versions amp License
-
- Updating a License
-
- Legal Information
-
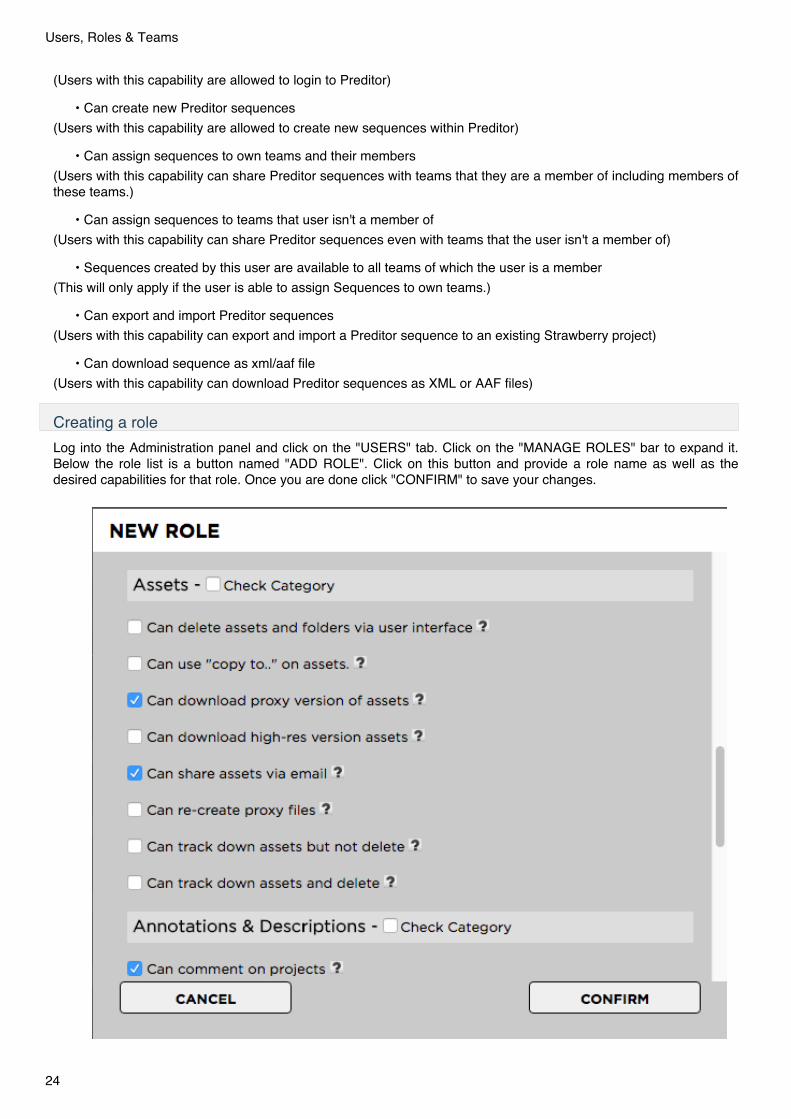
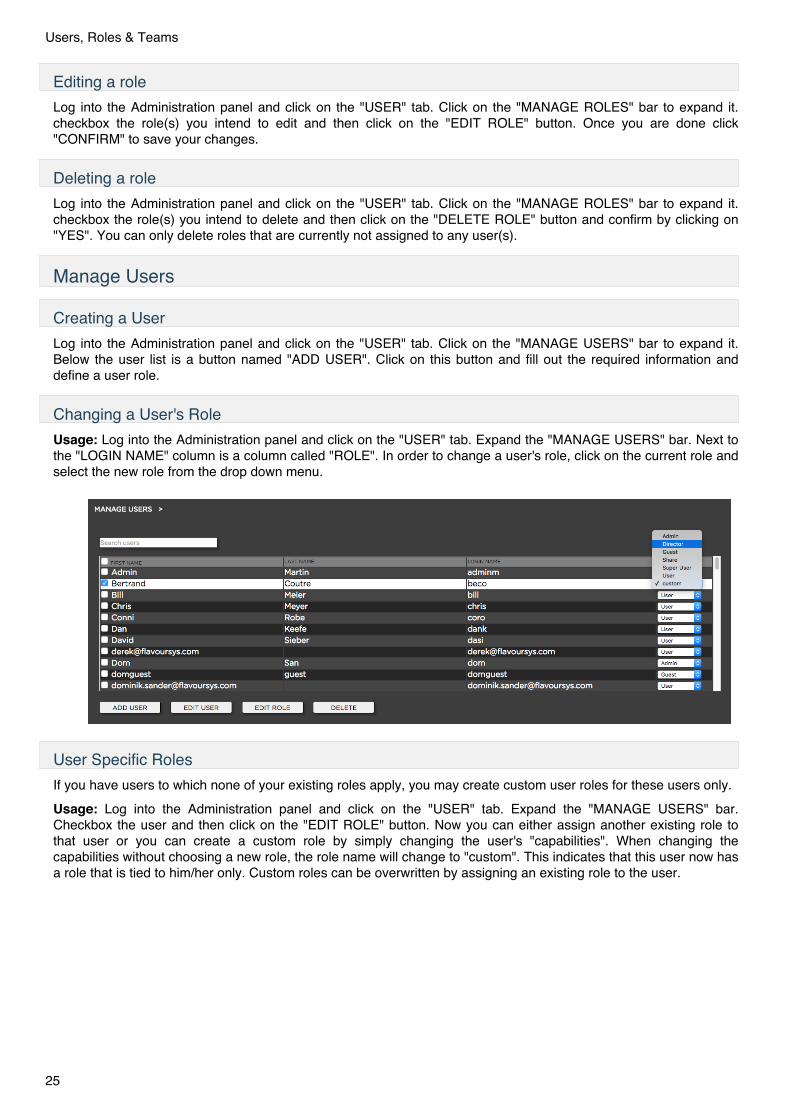
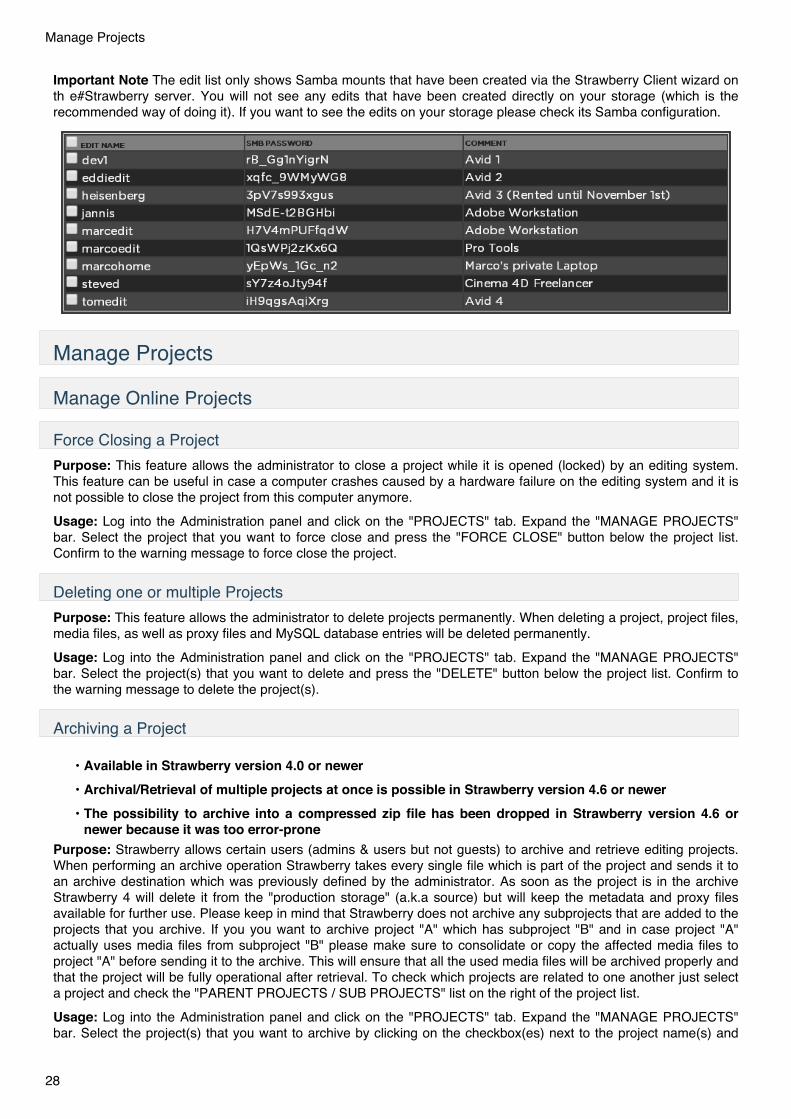

Manage Libraries
IntroductionLibraries are an optional Add-on and can only be configured with a valid add-on license This sectionexplains how to create Ingest Watchfolders and External Libraries using the Strawberry admin panel
Library StatesLibrary no matter whether Ingest Libraries or External Libraries can have three different states
bull State Active - The library is fully operational
bull State Not Configured - The Library exists but is not yet configured
bull State Inactive - the library is configured but either the source watch folder or the target project are notreachable or missing
Ingest LibrariesPurpose An Ingest Library is a Strawberry library project that gets populated via an ingest watch folderStrawberry scans that watch folder on an Administrator defined interval and moves new media into thecorresponding Strawberry library project folder on the storage Eg If you create a library called My Example IngestLibrary a folder called My Example Ingest Library will be created within strawberrymedia_1media and mediafrom the related ingest watch folder will be moved to this location
Creating a Library Project
1 In order to create a new Library project you need to create a normal project first To do so open the Strawberryclient application and create a new project Name the project as you wish the library to be named Once theproject has been created close it and go back to the admin panel
2 In the admin panel go to Projects Manage Online Projects and checkbox the project that you created in theprevious step No click on the Flag as Library button on the lower right of the project list Then confirm withyes
Manage Libraries
30
Once the library has been created it will appear under Projects Manage Libraries inside the Strawberry Adminpanel
Configuring an Ingest LibraryPreparation Before configuring an ingest library you need to create an ingest watch folder The watch folder can belocated on one of your Strawberry-managed storages or on any storage accessible by the Strawberry server Theingest watch folder can not be located within the Strawberry root (eg optsb4data) or any sub folder below thispath To review how the storage root is configured on your system login to the Strawberry server and type catoptsb4appfsbaseconfigstrawrageyml The storage root is provided in the line root_path
1 Go to Projects Manage Libraries and checkbox the Library that you created in the previous step The librarywill be shown as Not Configured
2 Click on the Edit button below the library project list The following options appear
bull Name - Name of the Library
bull Watchfolder Type - Library Ingest or External Library Select Ingest Library here
bull Ingest Path - The path to the ingest watchfolder as seen by the Strawberry server
bull Target Storage - The storage to which ingested content should be moved This is only relevant if Strawberryis controlling multiple storage systems
bull Encoding Priority - The encoding priority for proxy files in this Library The ration between normal and highpriority is 14
Manage Libraries
31
bull Example for a Library Ingest configuration
Configuring the Library Ingest IntervalPurpose The library ingest interval determines how often Strawberry will check all your configured ingest watchfolders for new media files in order to move them to the target library By default the value is set to 1 minuteAssuming you added new media to the ingest watch folder Strawberry will see the files after 1 minute One minutelater it will check if the files size in the ingest watch folder changed (to determine if the file is still being copied) If thefile size did not change Strawberry will move it to the target library If the file size changed Strawberry will checkagain 1 minute later and so on
UsageIn order to change the Library Ingest Interval go to Projects Manage Libraries and adjust the value accordinglyto your needs
Configuring the Library Clean IntervalPurpose The clean interval scans your existing libraries for deleted media files on a recurring basis This however isonly important if you delete media files directly from the library folder on the storage and not from the Strawberryuser interface If you are not deleting Library media directly from the storage we recommend to set the recurrency toweekly instead of daily
Manage Libraries
32
Good to Know
bull There can only be one ingest watchfolder per library
bull Folder structures inside the ingest watchfolders will refelct inside the Strawberry library project
bull For usability reasons folder strctures inside the ingest watchfolders will not be deleted
bull Libraries can be archived equally to normal projects
External LibrariesPurpose An External Library is a folder structure outside of the usual Strawberry managed folder structure on thestorage Strawberry can index that external folder structure to make it seachable and (proxy-)viewable from theStrawberry user interfaces Media in External Libraries remains where it is meaning Strawberry will notautomatically move but only monitor it
Creating a Library Project
1 In order to create a new Library project you need to create a normal project first To do so open the Strawberryclient application and create a new project Name the project as you wish the library to be named Once theproject has been created close it and go back to the admin panel
Manage Libraries
33
2 In the admin panel go to Projects Manage Online Projects and checkbox the project that you created in theprevious step No click on the Flag as Library button on the lower right of the project list Then confirm withyes
Once the library has been created it will appear under Projects Manage Libraries inside the Strawberry Adminpanel
Configuring an External LibraryPreparation Before configuring an ingest library you need to make sure that the folder structure that Strawberryshould watch is reachable by the Strawberry server If you are unsure how to do this please contact next levelsupport
1 Go to Projects Manage Libraries and checkbox the Library that you created in the previous step The librarywill be shown as Not Configured
2 Click on the Edit button below the library project list The following options appear
bull Name - Name of the Library
bull Watchfolder Type - Library Ingest or External Library - Select External Library here
bull External Path - The path to the folder structure that you wish to be watched by Strawberry
bull Target Storage - The storage to which ingested content should be moved This is only relevant if Strawberryis controlling multiple storage systems
bull Encoding Priority - The encoding priority for proxy files in this Library The ration between normal and highpriority is 14
Manage Libraries
34
bull Example for an External Library configuration
Configuring the Library Clean IntervalPurpose The clean interval scan your existing libraries for deleted media files on a recurring basis This however isonly important if you delete media files directly from the library folder on the storage and not from the Strawberryuser interface If you are not deleting Library media directly from the storage we recommend to set the recurrency toweekly instead of daily
Configuring the External Library Reindex IntervalPurpose The external library reindex scans your existing libraries for new modified and deleted media files on arecurring basis This make sure that all changes in the external location will reflect within Strawberry The ExternalLibrary Reindex is MUCH slower than the Library Clean Interval which is why it is not possible to run it hourly Werecommend a daily or even better week recurrency for this index job
Manage Libraries
35
Good to Know
bull There can only be one External Library location per library project
bull Folder structures inside the external library will refelct inside the Strawberry library project
bull When adding a media from an External Library to an open Strawberry project that media will always becopied
Custom Metadata
Custom Metadata SetsPurpose This feature allows the Administrators to create several metadata sets Metadata sets can either containdrop down menus or text input fields Users will be be asked to select from the values provided in the metadata setsupon project creation
How the custom metadata could look in the user frontend
An example of custom metadata fields asking the user to provide the requested information Metadata fields withan asterisk symbol are mandatory for the user to fill out
The Master SetUsage Log into the Administration panel and click on the PROJECTS tab Expand the CUSTOM METADATAbar
The master set is the default set for all Strawberry installations and it is the set that every user sees upon projectcreation The master set can be populated with drop down menus and text input fields
Creating a Metadata SetUsage Log into the Administration panel and click on the PROJECTS tab Expand the CUSTOM METADATAbar
Custom Metadata
36
Click the ADD SET button and provide a name for the new set Once the set is created you can populate it withmetadata values like dropdown menus or text input fields
Connecting Metadata SetsUsage Log into the Administration panel and click on the PROJECTS tab Expand the CUSTOM METADATAbar
Metadata sets can be connected via drop down menus meaning that a specific drop drop down selection will load aspecific metadata set for the user In order to connect a drop down value with a metadata set edit the metadatavalue by clicking the checkbox next to the value and then the EDIT VALUE button
Each drop down menu contains Values and Targets The value is the drop down value that the user can choosefrom upon project creating The target is the metadata set to which the value should refer If the target None isselected the value will not load any metadata set If a target set is selected this target set will be loaded when theuser chooses this specific value
Deleting a Metadata Set
Custom Metadata
37
Usage Log into the Administration panel and click on the PROJECTS tab Expand the CUSTOM METADATAbar Select the metadata set that you wish to delete by checking the box next to it and then press the delete buttonon the botton of the metadata set list
Creating a Dropdown MenuUsage Log into the Administration panel and click on the PROJECTS tab Expand the CUSTOM METADATAbar
Click the ADD VALUE button and provide the following information
bull Name The name of the dropdown menu as the user will see it (for example Customer)
bull Type dropdown menu
bull Maximum Characters Not relevant for dropdown
bull Restrict input to Not relvant for dropdown
bull Pattern Not relvant for dropdownbull Mandatory Defines if this value is mandatory (checked) or not (unchecked)
bull Use in Project String Defines if items from this dropdown will appear in the project name if the users enablesthe checkbox Create Project Name from Above Entries upon project creation
No you can type the drodown items into the Value field To add additional drodown values click on the + buttonon the right of the value field To connect a drop down value with another Metadata Set select the set as a Targetnext to the related value
Click CONFIRM when done
Custom Metadata
38
Creating a Text Input FieldUsage Log into the Administration panel and click on the PROJECTS tab Expand the CUSTOM METADATAbar
Click the ADD VALUE button and provide the following information
bull Name The name of the text input field as the user will see it (for example Project Number)
bull Type Text Input
bull Maximum Characters The amount of characters a user can type into that field 0 equals infinite
bull Restrict input to Restrict input to numbers only letters only or numbers amp letters No restriction will allowany UTF-8 character
bull Pattern Not relevant for text input
bull Mandatory Defines if this value is mandatory (checked) or not (unchecked)
bull Use in Project String Defines if items from this text input field will appear in the project name if the usersenables the checkbox Create Project Name from Above Entries upon project creation
Click CONFIRM when done
Custom Metadata
39
Creating a Replacement PatternUsage Replacements patterns enable Strawberry to automatically create date values based on Unix date modifiersA List of possible modifiers can be found below Usage Log into the Administration panel and click on thePROJECTS tab Expand the CUSTOM METADATA bar
Click the ADD VALUE button and provide the following information
bull Name The name of the pattern field as the user will see it (for example Date)
bull Type Replacement Pattern
bull Maximum Characters Not relevant for text replacement pattern
bull Restrict input to Not relevant for text replacement pattern
bull Pattern A pattern consisting of Unix modifiers A pattern such as eg Y m d equals year month date
bull Mandatory Not relevant for text replacement pattern
bull Use in Project String Defines if the output from this pattern will appear in the project name if the users enablesthe checkbox Create Project Name from Above Entries upon project creation
Click CONFIRM when done
Custom Metadata
40
Editing a ValueAvailable in Strawberry version 40 or newerUsage Log into the Administration panel and click on the PROJECTS tab Expand the CUSTOM METADATAbar Expand the metadata set that contains the value you want to edit and then select the value by checking the boxnext to it Change the value properties as required and then click CONFIRM
Deleting a ValueUsage Log into the Administration panel and click on the PROJECTS tab Expand the CUSTOM METADATAbar Expand the metadata set that contains the value you want to delete and then select the value by checking thebox next to it Now click on DELETE VALUE
Available in Strawberry version 40 or newer
Creating Project Status FlagsAvailable in Strawberry version 40 or newerPurpose Project statuses help users to determine what the working status of a project is Statuses can be forinstance in editing in color grading ready for approval etc and are defined by the administrator The statuses ofeach project is displayed in the metadata area of the Strawberry 4 user interface
Usage Log into the Administration panel and click on the PROJECTS tab Expand the STATUS OPTIONS barNow click on ADD STATUS and define a name for the new status Once the status is created users can choose itfrom the Strawberry frontend
Deleting Project Status FlagsPurpose Deleting status flags will prevent users from being able to select that status in the future However whendelting a status flag it will remain attached to the projects that are already using it
Custom Metadata
41
Usage Log into the Administration panel and click on the PROJECTS tab Expand the STATUS OPTIONS barNow click on the checkbox next to the status flag that you want to delete and press the DELETE VALUE button
Supported Unix Time Modifiers
bull a localersquos abbreviated weekday name (eg Sun)
bull A localersquos full weekday name (eg Sunday)
bull b localersquos abbreviated month name (eg Jan)
bull B localersquos full month name (eg January)
bull C century like Y except omit last two digits (eg 20)
bull d day of month (eg 01)
bull D date same as mdy
bull e day of month space padded same as _d
bull F full date same as Y-m-d
bull h same as b
bull H hour (0023)
bull I hour (0112)
bull j day of year (001366)
bull k hour ( 023)
bull l hour ( 112)
bull m month (0112)
bull M minute (0059)
bull p localersquos equivalent of either AM or PM blank if not known
bull P like p but lower case
bull r localersquos 12-hour clock time (eg 111104 PM)
bull R 24-hour hour and minute same as HM
bull s seconds since 1970-01-01 000000 UTC
bull S second (0060)
bull T time same as HMS
bull u day of week (17) 1 is Monday
bull U week number of year with Sunday as first day of week (0053)
bull w day of week (06) 0 is Sunday
bull W week number of year with Monday as first day of week (0053)
bull y last two digits of year (0099)
bull Y year
bull z +hhmm numeric timezone (eg -0400)
bull Z alphabetic time zone abbreviation (eg EDT)
Archive amp Copy ToStrawberry allows certain users (admins amp users but not guests) to archive and retrieve editing projects When performing an archive operation Strawberry takes every single file which is part of the project and sends it to an archive destination which was previously defined by the administrator As soon as the project is in the archive Strawberry 4 will delete it from the production storage (aka source) but will keep the metadata and proxy files The
Archive amp Copy To
42
archive path defined here is also the retrieval path If you look for a more sophisticated archivalretrieval process youshould have a look inside the Strawberry API documentation
Creating an Archive StrategyZIP is not longer supported as an archive method in Strawberry because of missing CRC checksumcapabilitiesPurpose Archive strategies allow you to define discrete archive locations and methodologies for different types ofprojects When a user presses the Archive Project button in the user front-end Strawberry will offer the archivestrategies defined here
Usage Log into the Administration panel and click on the Archive tab Expand the ARCHIVE STRATEGIES barClick the ADD button and provide the following information
bull Name The name of the archive strategy The users see the name of the strategy when he or she attempts toarchive a project
bull Type The archive type Please select SB native if you are not using Archiware P5 or Masstore
bull Path The path (aka archive destination) for projects archived using this strategy
bull Method
bull plain Strawberry archives the project and media files without compressing them It archives theprojects folder structure as it is
bull tarball Puts the project amp media files of a project into a tarball before archiving itbull Check
bull Fingerprint Sequential integrity check on a file that only detects serious file damages but no minordefectsbull CRCs are specifically designed to protect against common types of errors on data transmissionswhere they can provide quick and reasonable assurance of the integrity of data delivered Howeverthey are not suitable for protecting against intentional alteration of data
bull None No data integrity check at allbull EnableDisable Strategy Define if an archive strategy is available for users (enabled) or not (disabled)
Archive amp Copy To
43
Canceling an ArchiveRetrieval JobArchive or retrieval jobs can currently only be canceled from the Strawberry user interface but not from theAdministration panel In order to Cancel an archive or retrieval job do the following
1 Login to the user interface as an Administrator and right click on the affected project
2 Select Cancel ArchiveRetrieval Job and confirmIt will take a few seconds up to a couple of minutes until the cancellation has been performed Once it is done youwill see a warning sign next to the project name The warning sign indicates that the operation has been aborted bythe user
When a project archivalretrieval failed the project will have a warning sign next to its name
Clearing ArchiveRetrieval ErrorsIn case a project archive or retrieval failed (either it was canceled by a user or failed for other reasons) you can resetthe project state back to normal by performing the following operations
1 Login to the Strawberry user interface as an Administrator and right click on the affected project
2 Select Clear Archive Error from the context menu and confirmIt will take a few seconds until the fail state of the project has been cleared and the project is displayed asnormal Once the front end reports that the clearance has been successfully done you may retry to archive orretrieve the project if required
Project Copy-to StrategiesPurpose Strawberry enables users to copy projects to another location This location can be another storagedevice (for backup purposes) a render farm or other external application watch folders This feature works verysimilar to the Archive function The main difference is that copied projects will not be deleted from the mediastorage (source volume) but remain there for further use
Usage Log into the Administration panel and click on the Archive tab Expand the Project Copy-to Strategiesbar Click the ADD button and provide the following information
bull Name The name of the copy-to strategy The users see the name of the strategy when he or she attempts tocopy a project
bull Path The path (aka copy-to destination) for projects copied using this strategy
bull Method
bull plain Strawberry archives the project and media files without compressing them It backups theprojects folder structure as it is
bull tarball Puts the project amp media files of a project into a tarball before copying it
bull zip Puts the project amp media files of a project into a zip file before copying it (Please Note Zip filescan not be CRC checked)
bull Check
bull Fingerprint Sequential integrity check on a file that only detects serious file damages but no minordefects
Archive amp Copy To
44
bull CRCs are specifically designed to protect against common types of errors on data transmissionswhere they can provide quick and reasonable assurance of the integrity of data delivered Howeverthey are not suitable for protecting against intentional alteration of data
bull None No data integrity check at allbull EnableDisable Strategy Define if an archive strategy is available for users (enabled) or not (disabled)
Asset Copy-to StrategiesPurpose Strawberry enables users to copy individual assets to another location This location can be anotherstorage device (for backup purpose) a render farm or external application This feature works very similar to theArchive function The difference is that copied assets will not be deleted from the media storage but remain therefor further use
Usage Log into the Administration panel and click on the Archive tab Expand the Asset Backup Strategies barClick the ADD button and provide the following information
bull Name The name of the copy-to strategy The users see the name of the strategy when he or she attempts tocopy a project
bull Path The path (aka archive destination) for projects copied using this strategy
bull Method
bull plain Strawberry archives the project and media files without compressing them It backups theprojects folder structure as it is
bull tarball Puts the project amp media files of a project into a tarball before copying it
bull zip Puts the project amp media files of a project into a zip file before copying it (Please Note Zip filescan not be CRC checked)
bull Check
bull Fingerprint Sequential integrity check on a file that only detects serious file damages but no minordefects
bull CRCs are specifically designed to protect against common types of errors on data transmissionswhere they can provide quick and reasonable assurance of the integrity of data delivered Howeverthey are not suitable for protecting against intentional alteration of data
bull None No data integrity check at allbull EnableDisable Strategy Define if an archive strategy is available for users (enabled) or not (disabled)
Good to Know
Freezing Archived ProjectsAvailable in Strawberry version 44 or newerIn order to avoid that users are accidentally retrieving archived projects you can freeze these projects using rarrfreezeoptions larr
Templates
Working with Templates
Templates
45
Purpose Templates are an extremely efficient way to prepare standardized project settings and content for allStrawbery users in your facility Templates can contain custom file and folder structures
Example 1 Application Specific Templates
One example to illustrate the benefit of templates can be working with Avid Media Composer in different frame rates(24 frames and 25 frames) Avid does not allow to switch the frame rate within a project With Strawberry you couldcreate two templates one for 24 frames and one for 25 frames and copy the related Avid project files into thistemplate When a user creates a project from on of these templates the corresponding projects files (24 frames or25 frames) will be copied into the new projects an renamed after the new project so the user does not need to createa new Avid project manually after he or she created a project in strawberry
Example 2 Production Specific Templates
Another example of working with templates can be a specific production that requires specific preparations Mostmedia facilities create individual folder structures for different productions so that people save graphics visualeffects and sound effects in the right location on the storage Usually these folder structures need to be recreated foreach episode of a production With Strawberry you can create a template which contains a specific folder structureand even media files and copy your prepared folder and media files into this template As soon as a user choosesthe template upon project creation the folders and files that you prepared in the template will be copied over to thenew project and are immediately available for the user
Creating a Template (Avid Media Composer)Before users can create any Avid projects using the Strawberry client software you need to have at least ONEtemplate Log into the admin panel and click on the MISC tab Expand the TEMPLATES bar Now click theCREATE NEW button
Strawberry will ask you for a Template name a preset a token and a naming pattern
Choose a name that best characterizes your template In this example we will create an Avid template that containsa high definition Avid project with a resolution of 1080p So it makes sense to call the template Avid 1080p
In the preset row click on the little down arrow and choose the Avid preset When a user creates a projectbased on an Avid template Strawberry automatically create the Avid MediaFiles and OMFI MediaFiles folderstructure in the project and it will also ensure that Avid project and media files can be shared properly
The token is a replacement string for a file name This means that if your token says replace_me and you createan Avid template named replace_me and copy it into your template folder (discussed later) every time thetemplate replace_me is used the token text (in this case replace_me) will be changed to the name of the currentStrawberry project So the Avid project file called replace_meavp in your templates folder will be used and namedprojectnameavp as its created in your Strawberry project
In the row pattern you can define how a project name based on this template should look The stringYmd-name will result in the project name 20130810-ProjectName Putting the date inside the projectname will enable your user to search for projects by typing in the date If you dont need the date in the project nameyou can simply delete the date-related parts of the string and leave the name piece If you need the date part youcan modify it to your requirements In order to understand the formatting for doing this please refer to the unix timeman page at httpunixhelpedacukCGIman-cgidate
Templates
46
After you are done click Create and then open Avid Media Composer Create a new local project calledreplace_me with the setting 1080p25
Open the newly created project delete the bin that Avid always makes in new project and empty the Avid trashfolder
In order to ensure that Media Composer will recognize network volumes as media drives open Tools gt Console andtype in alldrives If you see the message All drives will be viewed as media drives (Was previously set to havingonly true media drives act as media drives) you are good to go If you see the message Only true media drives willbe viewed as media drives (Was previously set to having all drives act as media drives) type alldrives againThere are just two possible options
Now go to Tools gt Media Creation gt Capture and select the Strawberry media drive (mapped as a networkdrive on your Computer) as the AudioVideo file destination Click on both Apply to All buttons and then click onOK Now close the project
Templates
47
Navigate to the Strawberry template folder on your storage (Strawberrytemplates) Within that template folder youwill see a folder that is named after the template you created in the Strawberry admin panel (in this case we called itAvid 1080p) Inside this folder will be a folder called media_1 and one called projects
Use the Finder or Explorer to navigate to your local Avid projects folder (eg UsersFlavourSysDocumentsAvidProjects) and open the replace_me project folder Copy the files replace_meavp replace_me Settingsxml andreplace_me Settingsavs to your clipboard
Paste the files into your StrawberrytemplatesAvid 1080pprojects folder If an editor creates a new project using thistemplate Strawberry will rename the replace_me string with the name of the current Strawberry project
Now every time a Strawberry user creates a new project based on this template it has all the right settings export preferences etc that it will inherit from the replace_me project that you created and set up before copying it into the Strawberrytemplatesltyour template namegtprojects folder If you need to modify or improve your template
Templates
48
simply make the changes to the local replace_me project and re-copy the three files into theStrawberrytemplatesltyour template namegtprojects folder
Creating a Template (Adobe Premiere)Before you can create an Adobe Premiere editing project from within the Strawberry client software you need tocreate a template for Strawberry to use Click on the Template Tab in the Admin panel and then click on CreateNew
Strawberry will ask you for a Template name a preset a token and a naming pattern
Choose a name that best characterizes your template In this example we will create an Adobe Premiere templatethat contains an Adobe Premiere project So it makes sense to call the template Adobe Premiere
In the preset row click on the little down arrow and choose the Adobe preset When a user creates a projectbased on an Adobe template Strawberry automatically create the Adobe Cache folder structure in the project and itwill also ensure that Adobe project and media files can be shared properly
The token is a replacement string for file names This means that if your token says replace_me in these settingsand you go on to create an Adobe Premiere project named replace_me and put it in your template folder thetemplate will be used and automatically renamed based on the Strawberry project name that is open This way anAdobe Premiere template project file called replace_mePR will be named StrawberryprojectnamePR each timeyou create a new project from within Strawberry
In the row pattern you can define how a project name based on this template should look like The stringYmd-name will result in the project name 20130810-ProjectName Putting the date inside the projectname will enable your user to search for projects by typing in the date If you dont need the date in the project nameyou can simply delete the date related parts of the string and leave the name piece If you need the date part youcan modify it to your requirements In order to understand the formatting for doing this please refer to the unix timeman page at httpunixhelpedacukCGIman-cgidate
After you are done click Create and go to the Strawberry Client Create a new project using the Adobe Premieretemplate Now open Adobe Premiere and create a new project Name the project replace_me and set the captureformat to HDV Ensure that all Scratch Disk locations are set to same as project
Templates
49
Click ok to create and open the project Once the project is opened go to EditgtPreferences Media and choosethe Adobe Cache on your Strawberry media volume as the destination for Media Cache Files and Media CacheDatabase
Templates
50
Tip If you are using the Adobe Premiere Panel launch it now If a user creates a project based on this template thepanel will launch automatically with the new project
Click OK to confirm your changes Now save the project and leave Adobe Premiere Navigate to your local Adobeprojects folder and copy the newly created project file replace_meprproj to the media_1 folder of the Adobetemplate location that you created
Now every time an editor creates a new project using the Adobe Premiere template the replace_mepr templatewill be used and all the settings preferences and destinations will be inherited and used in the newStrawberryprojectnamepr
Rename a Templates
Templates
51
Purpose You want give the Templates a new name for differentation
Usage Log into the admin panel and click on the MISC tab Expand the MANAGE TEMPLATES bar Check thetemplate what you want rename below the templates list is a button says RENAME and fill out with the new nameIf you are ready click CONFIRM else if you want go back click CANCEL
Duplicate a TemplatePurpose Use dublicate a template if you want clone the settings
Usage Log into the admin panel and click on the MISC tab Expand the MANAGE TEMPLATES bar Check thetemplate what you want duplicate below the templates list is a button says DUPLICATE and fill out with the newname If you are ready confirm it with click DUPLICATE else if you want to stop the prozess click CANCEL
Delete a Template(s)Purpose If you want delete a template(s) eg Didnt needed anymore
Usage Log into the admin panel and click on the MISC tab EXPAND the MANAGE TEMPLATES bar Checkthe template what you want delete below the templates list is a button says DELETE
Configuring the Avid AtticWhen utilizing Avid Media Composer the Avid Attic functionality might be important to your workflow To make theAvid Attic work with strawberry please perform the following steps
1 Close Avid Media Composer
2 Navigate to the Avid Attic folder on our computerWin UsersPublicPublic DocumentsAvid editing application
Mac Macintosh HDUsersSharedAvid editing application
3 Rename the Avid Attic folder to Avid Attic_Old
4 Open an Avid Media Composer project using the Strawberry client and open the project in Avid
5 Close the project in Avid Media Composer
6 Go back to the Avid attic and check whether Avid has created a new Attic folder
7 Check the attic folder for the project that was recently opened in Strawberry
Manage IndexersCheck the following boxes if you want the features or unchecked if not
Enable deep indexing for media files
Index adobe premiere project files
Index avid bin files
Storage Quota
Templates
52
Purpose In this section you can define how much physical storage space all projects managed by strawberry areallowed to occupy The quota is a soft quota meaning that there is no physical storage restriction once it getsexpired However Strawberry will send a warning email if if the quota that you defined has been reached
Usage Log into the admin panel and click on the MISC tab Expand the STORAGE QUOTA bar Define howmuch space (in Gigabytes) all projects managed by strawberry are allowed to occupy and press SAVE You canchange this quota at any time
MYSQL BackupWhen clicking the Backup Now button Strawberry creates a dump of its MySQL database The default location forthe database dump is optsb4databackups The default destination can be reconfigured in theoptsb4appfsbaseconfigdatabase-backupyml file
Versions amp LicenseThis section is for license and support purpose only
VIEW Proxy Encoder
Supported Video Audio and Image File FormatsSupported Video Formats amp CodecsApple Intermediate Codec (MOV)Apple MJPEG-B (MOV)Apple ProRes (MOV)
Arri Alexa (ARI)
AS-11 IMX 50 (MXF)AS-11 AVC Intra 100 (MXF)
(X)AVC Intra 50100 (MOV MXF)
Avid 11 amp 11xAvid DV amp DV100
Avid DNxHD (MOV MXF)(45 60 75 90 90x 110 110x 120 120x 145 185 185x 220 220-10Bit)
Avid Interplay C93 amp MVE videoAvid MPEG2 50 - SDAvid Meridien Compressed SD amp Uncompressed SDAvid Packed amp RGBPacked
AVS (Standard amp Chinese)
Black Magic R210
Canopus LosslessCinepak
VIEW Proxy Encoder
53
DV (PAL amp NTSC)
DVCPRO HD | 100 MbpsDVCPRO 50 | 50 MbpsDVCPRO 25 | 25 Mbps
H261H263 H263-1996H263+ H263-1998 H263 version 2H264 AVC MPEG-4 AVC MPEG-4 (MP4 MOV MXF)
HDV
MJPEG amp MJPEG LosslessMPEG 1 amp 2 (M1V M2T M2V MPEG MPG MPGV MPV VOB)MPEG 4 (M4A M4P M4V MP4)
P2 - AVC-Intra 50 100 (MOV MXF)P2 - DVCPRO 25 50 100 (MOV MXF)
QuickTime uncompressed
Red Digital Cine Camera (R3D)
Windows Media Video (All Versions)
XDCAM 25XDCAM IMX 30XDCAM HD 50XDCAM SXS 50
Also SupportedAvid 11 10-bit RGB PackerFlash Video (FLV)Microsoft Video 1On2 VP3On2 VP5On2 VP6QuickTime 8BPS videoQuickTime Animation (RLE) videoQuickTime Graphics (SMC)QuickTime video (RPZA)R10K AJA Kona 10-bit RGB CodecR210 Quicktime Uncompressed RGB 10-bitTheoraVP8VP9WMV7
Supported Audio Formats amp CodecsMost CommonAAC+AACAC-3
CAF
MP3 (All Versions)MPEG-4 (All Versions)
PCM (All Versions amp Bitrates)
WAV
WMA (All Versions)
Also Supported
VIEW Proxy Encoder
54
Apple lossless audioATRAC1ATRAC3ATRAC3+Bink AudioCore Audio Format (CAF)DV audioEnhanced AC-3FLAC (Free Lossless Audio Codec)MACE (Macintosh Audio CompressionExpansion) 31MACE (Macintosh Audio CompressionExpansion) 61MLP (Meridian Lossless Packing)MP1 (MPEG audio layer 1)MP2 (MPEG audio layer 2)OpusRealAudio 10 (144K)RealAudio 20 (288K)RealAudio 30 (dnet)RealAudio LosslessRealAudio SIPR ACELPNETVorbisWindows Media Audio Voice
Supported Image Formats|Targa |TIF |PSD |PSB |PNG |JPG |IFF |GIF |BMP |DPX |EXR |ARI |EPS |AI
Enabling or Disabling ViewLog into the admin panel and click on the VIEW tab If VIEW is enabled proxy files will be created automaticallybased on the criteria below If VIEW is disabled proxy file encoding will not take place and he user front endautomatically jumps to list view instead of thumbnail view
Proxy Encoder ConfigurationIn this menu you can choose from properties of the Strawberry generated proxy files These options include
bull Proxy File Location shows where Strawberry saves the proxy files that it generates This location is definedupon installation and can only be changed by modifying the Strawberry configuration files on the Strawberryserver
bull Bitrate Define the proxy bitrate (per second) Please keep in mind that lower bitrates might be more suitablefor users connecting over the Internet while higher bit rates are good for LAN operations Is there a goldenrule Unfortunately not If you are using the Strawberry Preditor Add-on we recommend a low proxy bitrate(700k - 900k)
bull Resolution Choose a resolution for your proxy files There should always be a coherence between theresolution and the bit rate For example A 1920x1080 proxy file should have a bitrate of at least ~1200k whilea 640x360 proxy should look good with a 600k bitrate
bull Image Sequence Recognition When Strawberry VIEW detects an image sequence (Basename amp Count) withmore than 20 individual images it will create a preview MP4 file out of it An image sequence must have adelimiter between its basename and its count Valid delimiters are - (dash) (dot) and _ (underscore)sequence-name_001 is an example of a valid naming convention
bull Time Code Burn-In If you wish to have a video time code burned into your proxy files you should enable thisfeature
bull Time Code Label Position Defines whether the proxy time codes (or image layer names) are burned in on thebottom or on top of the proxy file
V isual Watermark Check this box if you want Strawberry to burn a visual watermark into your proxy files
bull Watermark Position Decide on which position of the screen your watermark image should be visible
VIEW Proxy Encoder
55
bull Watermark Image Upload a Watermark image as a png file The image should not be larger than your currentproxy resoultion and should have a transparent background You can download example watermarks heredlflavoursyscommanualssupporting_filesExample_Proxy_Watermarkszip
bull Watermark Preview Previews your uploaded watermark in respect of the current proxy resolution as well asthe current Timecode burn-in position
Blacklists amp Whitelists
bull Factory File Blacklist This is a factory blacklist provided by FlavourSys The blacklist has been populatedbased on best practice workflows If you need any of the factory blacklist file extensions whitelisted just enterthe extension into the Files Whitelist
bull File Blacklist Enter any file extension that you dont wish to see in the Strawberry user interface Strawberrywill then ignore files that are having this extension meaning that no proxies are generated However you canstill use the files on the FinderExplorer level in your projects In order to blacklist an item just enter extensionand press enter Press the save button to confirm
bull File Whitelist If you need to whitelist any extensions from the Factory File Blacklist just enter its extensioninto the Files Whitelist In order to whitelist an item just enter extension and press enter Press the savebutton to confirm
bull Factory Folders Blacklist This is a factory blacklist provided by FlavourSys The blacklist has been populatedbased on best practice workflows If you need any of the factory folder blacklist whitelisted just enter the foldername into the Folders Whitelist and press enter Press the save button to confirm
bull Folders Blacklist (Recursive) Enter any folder name that you dont wish to see in the Strawberry user interfaceStrawberry will then ignore the folder and its content meaning that no proxies are created You can still useblacklisted items on the FinderExplorer level in your projects In order to blacklist a folder just enter the foldername into the blacklist and press enter Press the save button to confirm
bull Folders Whitelist (Recursive) If you need to whitelist any folder from the Factory Folders Blacklist just enterits name into the Folders Whitelist and press enter Press the save button to confirm
Applying Blacklist amp Whitelist ChangesStrawberry 5 applies blacklist changes automatically In order to apply whitelist changes please perform thefollowing steps Also perform these steps in order to apply blacklist changes in Strawberry 44 or older versions
VIEW Proxy Encoder
56
1 Login to the Administration panel
2 Click on the MANAGE PROJECT tab
3 Select the project on which you want to apply the operation
4 Click the VIEW button below the project list
5 Select the radio button Rescan Project(s) and confirmDepending on the amount of files in the affected project this operation can take several minutes
Node and Worker Control
Purpose In this section of the admin panel you monitor and change the status of each VIEW encoding node that isintegrated in your environment You also have the possibility to set Schedulers so that you can decide if the nodesand the workers run
Usage Log into the admin panel and click on the VIEW tab Expand the NODE AND WORKER CONTROL barHere you can select from the following options
bull NODE ID The internal ID of each encoding node
bull NODE ADDRESS The hostname or IP address and port under which each node can be reached
bull STATUS Green means running yellow means paused and red means not running
bull NUMBER OF WORKERS Number of encoding workers (threads) that work at the same time Choose theamount of workers based on the amount of CPU cores of each node One worker per core works very well butleave at least one core for the OS and the rest of the Strawberry system The Strawberry Server license comeswith 3 Workers additional workers must be licensed separately
bull Actions Stop start restart or edit a scheduler for individual nodes
Content Download OptionsPurpose If you want to allow user to download media assets using the front end you can define this here Forinstance for workflows requiring executive review or for film schools where faculty could grade from home thisfeature can be beneficial however for feature film workflows this feature can be turned off
Usage Log into the admin panel and click on the VIEW tab Expand the CONTENT DOWNLOAD OPTIONS barIf you want to enable users to download low resolution media files (proxy files) from the front end check the boxnext to Allow users to download proxy files If you want to enable users to download high resolution media filesfrom the front end check the box next to Allow users to download high-res files
Rescan-Project(s)Purpose Scans the project for new files and newly supported file formats and attempts to encode them to proxyfiles It will also apply black list white list changes to existing projects
Usage Log into the Administration panel and click on the PROJECTS tab Expand the MANAGE PROJECTSbar Select the project(s) that you want to rescan and press the VIEW button below the project list and checkRescan Project(s) and confirm it
Repair-Project(s)
VIEW Proxy Encoder
57
Purpose Scans the project for new files and newly supported file formats and attempts to encode them to proxyfiles It will also apply black list white list changes to existing projects
Usage Log into the Administration panel and click on the PROJECTS tab Expand the MANAGE PROJECTSbar Select the project(s) that you want to repair and press the VIEW button below the project list and check RepairProject(s) and confirm it
Reencode-EverythingPurpose Deletes every file in the project to see if meta data have been changed Also looks for new files and newlysupported file formats and attempst to encode them to proxy files It will also apply black list white list changes toexisting projects
Usage Log into the Administration panel and click on the PROJECTS tab Expand the MANAGE PROJECTSbar Select the project(s) that you want to reencode-everything and press the VIEW button below the project listand check Reencode-Everything and confirm it
Miscellaneous
Manage TemplatesPlease visit this manuals rarr Templates larr chapter to get template related information
Safe SearchPurpose ldquoSafe Searchrdquo is an ldquoin edit suiterdquo security feature for Strawberry managed content Its aim is to reducethe visibility and searchability of content while a project with specific custom metadata is open This prevents thatclients see content of other clients while working on a project inside the editing room
Enabling Safe SearchLogin into the Strawberry Administrator panel and select the ldquoMiscrdquo tab Open the ldquoSearch settings and check thebox next to ldquoEnable Safe Search Featurerdquo
Define ldquoSafe Searchrdquo MetadataOnce ldquoSafe Searchrdquo is enabled click on the ldquoProjectsrdquo tab and open the ldquoCustom Metadatardquo menu Select a set andthen a drop down menu within it Then click on ldquoEdit Valuerdquo
Miscellaneous
58
Next to each drop down menu is a checkbox called ldquoSafe Searchrdquo Check this box for each value for which the ldquoSafeSearch filter should apply
When a user opens a project that includes a ldquoSafe Searchrdquo metadata the search field provides the informationaccordingly (safe search enabled for ldquometadata namerdquo) From this point on all searches will be carried within therelated safe search metadata context This applies until the project is closed
Miscellaneous
59
Good to Know
bull Only one drop down menu can have safe search metadata
bull Safe search metadata in the Administrator panel should not be changed enabled or disabled while projects areopened as this can lead to inconsistent search results
Manage IndexersAvailable in Strawberry version 42 or newer
GeneralCheck the following boxes if you want the features or unchecked if not
bull Enable Deep Indexing for Media Files(If enabled Strawberry will extract technical metadata from media files If it is disabled Strawberry will only index filenames and file sizes This feature needs to be enabled in order for the proxy encoding to work)
bull Index Adobe Premiere Project Files(If enabled Strawberry will extract master clip names a descriptions comments from Adobe Premiere master clipsto make these information visible amp searchable in the front-end)
bull Index Avid bin files(If enabled Strawberry will extract master clips names and sequence names from Avid bins to make theseinformation searchable in the front-end However when searching for an Avid master clip or sequence name theuser will not be provided with a visual presentation of the asset or sequence but will only see the project(s) thatcontains these information since this feature is beta we recommend to turn it of)
bull Extract Exif metadata from images(If enabled Strawberry will extract EXIF metadata from image files
bull Extract XMP metadata from files(if enabled Strawberry will extract XMP metadata from media files)
bull Extract XML metadata (Experimental)(if enabled Strawberry will extract XML metadata from xml sidecard files Please contact us for an overview ofsupported XML schemes)
bull Search for technical metadata(If enabled Strawberry will extract technical metadata from video files as well as ID3 tags (album Artist etc) fromaudio files
Technical Metadata WhitelistStrawberry maintains a search index that allows user to carry out searches in an extremely fast fashion Since thissearch index is stored in the server memory its size must be limited and therefor can not include all possible searchparameters Administrator can define the search parameters by white-listing them
Miscellaneous
60
Enter any label that you wish to add to the Strawberry search index To insert a label just click next to an existinglabel and start typing An auto completion list will show available results for your search term Select the technicalmetadata label that you wish to add to the search index Use the x button next to a labels name to remove a labelfrom the search index The changes will not apply immediately but on the next build of the search index (once anight) If you want to apply the settings immediately SSH login to the Strawberry server as root and type thecommand sb reindex
Storage Quota
Purpose In this section you can define how much physical storage space all projects managed by strawberry areallowed to occupy The quota is a soft quota meaning that there is no physical storage restriction once it getsexpired However Strawberry will send a warning email if if the quota that you defined has been reached
Usage Log into the admin panel and click on the MISC tab Expand the STORAGE QUOTA bar Define howmuch space (in Gigabytes) all projects managed by strawberry are allowed to occupy and press SAVE You canchange this quota at any time
Adobe Premiere Specific Feature
Auto-Link media from Library into projectThis feature is part of a custom development and currently not documented
Auto-Ingest local media into projectPurpose If a user imports media from a usb or local hdd into an Adobe Premiere project that is managed byStrawberry Strawberry can automatically copy that media into the projects media volume This ensures that allmedia used in a Premiere project is actually on the centralized storage
Usage Log into the admin panel and click on the MISC tab Expand the Auto Import Library amp unmanaged Assets(Adobe Premiere Only) bar If you wish to enable the Auto-ingest feature check the box next to it and define aninterval The interval determines how often the Strawberry Adobe panel will check for unmanaged inside each openPremiere project
Auto-Link subproject media into projectPurpose If a user imports media from a subproject into an Adobe Premiere project that is managed by StrawberryStrawberry can automatically link that into the from the subproject into the parent project This ensures that anyproject is self contained at any point
Miscellaneous
61
Usage Log into the admin panel and click on the MISC tab Expand the Auto Import Library amp unmanaged Assets(Adobe Premiere Only) bar If you wish to enable the Auto-link feature check the box next to it and define aninterval The interval determines how often the Strawberry Adobe panel will check for imported subproject mediainside the current project to link it
PreditorDefine the Timeout based on which a user should be automatically logged out of Preditor In the process Strawberrywill also automatically close the users sequence in order to free the license slot Preditor creates auto-saves of opensequences every minute and stores these on the server so that progress does not get lost even if the sequence getsauto-closed
SMTP SetupPurpose Strawberry has the ability to send email notifications on specific criteria This usually is the case if a teamexpires its storage quota or if assets are shared via email using the built-in functions For this feature to workStrawberry needs to be provided with STMP information
Usage
1 Login to the Strawberry server and cd to optsb4appfsbaseconfig
2 Open the file smtpymlexample and replace the example SMTP values with your own ones
3 Save the file as smtpymlThe Strawberry services needs to be restarted for the changes to apply
MYSQL BackupWhen clicking the Backup Now button Strawberry creates a dump of its MySQL database The default location forthe database dump is optsb4appbackups The default destination can be reconfigured in theoptsb4appfsbaseconfigdatabase-backupyml file
Empty TrashPressing the Empty Trash Now button will instantly remove all contents from the Strawberry trash folder
Osiris OptionShared Edits only
Purpose If the Osiris option is enabled Strawberry will mount its project media volumes in a specific way AvidMedia Composer will detect these volumes as volumes from an Avid storage and will provide bin locking for allStrawberry managed Media Composer projects
Versions amp LicenseThis section shows you the current version numbers of the Strawberry 4 modules that are installed on yourStrawberry server Additionally it provides you with license related information for your site
Updating a LicenseOnly use this method if you are running Strawberry in a Non-High Availability environment
Please go to the Strawberry admin panel misc versions amp license and click the NEW LICENSE button Copy andpaste the license string in there and click the UPDATE button Once this is done SSH login to the Strawberryserver and type service strawberry4 restart The license will be applied once the Strawberry service has beenrestarted
Legal Information
Legal Information
62
AVID is a trademark of Avid Technologies (wwwavidcom) Apple and FCP are trademarks of Apple in the US(wwwapplecom) Adobe and Premiere are trademarks of Adobe (wwwadobecom) All product names logos andbrands are property of their respective owners All company product and service names used in this manual are foridentification purposes only Use of these names logos and brands does not imply endorsement
Legal Information
63
- Last Updated July 20 2017
-
- Introduction
- System Requirements
-
- Storage File System Requirements
-
- List of Certified Storage Vendors
- List of Supported Storage File Systems
-
- Strawberry Server HWSW Requirements for Production Environments
- Minimum Server HWSW Requirements for Demonstration amp POC Environments
- Minimum Requirements for a dedicated View Proxy Encoding Node
- Requirements for the Strawberry Client
-
- Strawberry Client SSL
-
- Requirements for the Strawberry Adobe Panel
- Minimum Web Browser Requirements
-
- Installation Manuals
-
- Strawberry Client
-
- Installing the Client
- Starting the Client
- Upgrading the Client
- Deleting the Client
-
- Client Configuration for NAS
-
- SMB Mounts Configuration
- Paths to Editing applications (App Launcher)
- Mount your drives under Windows 7 amp 8
- Mount your drives under OSX
-
- Client Configuration for StorNext amp XSAN
-
- SAN Mount Configuration
-
- Client Configuration for Shared Edits under macOS
- Client Configuration for Shared Edits under Windows
- Changing the Clients Fuse Blocksize (macOS only)
- Adobe Panel
-
- Installing the Panel
- Updating the Panel
- Removing the Panel
- Testing the Panel
-
- Users Roles amp Teams
-
- Manage Roles
-
- Available Capabilities
- Creating a role
- Editing a role
- Deleting a role
-
- Manage Users
-
- Creating a User
- Changing a Users Role
- User Specific Roles
- Assigning a User to Teams
- Deleting a User
- Removing a User from a Team
-
- Manage Teams
-
- Creating a Team
- Changing a Teams Name
- Changing a Teams Quota
- Deleting a Team
-
- Manage Edits
-
- Manage Projects
-
- Manage Online Projects
-
- Force Closing a Project
- Deleting one or multiple Projects
- Archiving a Project
-
- Manage Archived Projects
-
- Retrieving a Project from the Archive
-
- Download Project List
- Custom Metadata
-
- Manage Libraries
-
- Introduction
- Library States
- Ingest Libraries
-
- Creating a Library Project
- Configuring an Ingest Library
- Configuring the Library Ingest Interval
- Configuring the Library Clean Interval
- Good to Know
-
- External Libraries
-
- Creating a Library Project
- Configuring an External Library
- Configuring the Library Clean Interval
- Configuring the External Library Reindex Interval
- Good to Know
-
- Custom Metadata
-
- Custom Metadata Sets
- The Master Set
- Creating a Metadata Set
- Connecting Metadata Sets
- Deleting a Metadata Set
- Creating a Dropdown Menu
- Creating a Text Input Field
- Creating a Replacement Pattern
- Editing a Value
- Deleting a Value
- Creating Project Status Flags
- Deleting Project Status Flags
- Supported Unix Time Modifiers
-
- Archive amp Copy To
-
- Creating an Archive Strategy
- Canceling an ArchiveRetrieval Job
- Clearing ArchiveRetrieval Errors
- Project Copy-to Strategies
- Asset Copy-to Strategies
- Good to Know
-
- Freezing Archived Projects
-
- Templates
-
- Working with Templates
- Creating a Template (Avid Media Composer)
- Creating a Template (Adobe Premiere)
- Rename a Templates
- Duplicate a Template
- Delete a Template(s)
- Configuring the Avid Attic
- Manage Indexers
- Storage Quota
- MYSQL Backup
- Versions amp License
-
- VIEW Proxy Encoder
-
- Supported Video Audio and Image File Formats
- Enabling or Disabling View
- Proxy Encoder Configuration
- Blacklists amp Whitelists
- Applying Blacklist amp Whitelist Changes
- Node and Worker Control
- Content Download Options
- Rescan-Project(s)
- Repair-Project(s)
- Reencode-Everything
-
- Miscellaneous
-
- Manage Templates
- Safe Search
-
- Enabling Safe Search
- Define ldquoSafe Searchrdquo Metadata
- Good to Know
-
- Manage Indexers
-
- General
- Technical Metadata Whitelist
-
- Storage Quota
- Adobe Premiere Specific Feature
-
- Auto-Link media from Library into project
- Auto-Ingest local media into project
- Auto-Link subproject media into project
-
- Preditor
- SMTP Setup
- MYSQL Backup
- Empty Trash
- Osiris Option
- Versions amp License
-
- Updating a License
-
- Legal Information
-

Once the library has been created it will appear under Projects Manage Libraries inside the Strawberry Adminpanel
Configuring an Ingest LibraryPreparation Before configuring an ingest library you need to create an ingest watch folder The watch folder can belocated on one of your Strawberry-managed storages or on any storage accessible by the Strawberry server Theingest watch folder can not be located within the Strawberry root (eg optsb4data) or any sub folder below thispath To review how the storage root is configured on your system login to the Strawberry server and type catoptsb4appfsbaseconfigstrawrageyml The storage root is provided in the line root_path
1 Go to Projects Manage Libraries and checkbox the Library that you created in the previous step The librarywill be shown as Not Configured
2 Click on the Edit button below the library project list The following options appear
bull Name - Name of the Library
bull Watchfolder Type - Library Ingest or External Library Select Ingest Library here
bull Ingest Path - The path to the ingest watchfolder as seen by the Strawberry server
bull Target Storage - The storage to which ingested content should be moved This is only relevant if Strawberryis controlling multiple storage systems
bull Encoding Priority - The encoding priority for proxy files in this Library The ration between normal and highpriority is 14
Manage Libraries
31
bull Example for a Library Ingest configuration
Configuring the Library Ingest IntervalPurpose The library ingest interval determines how often Strawberry will check all your configured ingest watchfolders for new media files in order to move them to the target library By default the value is set to 1 minuteAssuming you added new media to the ingest watch folder Strawberry will see the files after 1 minute One minutelater it will check if the files size in the ingest watch folder changed (to determine if the file is still being copied) If thefile size did not change Strawberry will move it to the target library If the file size changed Strawberry will checkagain 1 minute later and so on
UsageIn order to change the Library Ingest Interval go to Projects Manage Libraries and adjust the value accordinglyto your needs
Configuring the Library Clean IntervalPurpose The clean interval scans your existing libraries for deleted media files on a recurring basis This however isonly important if you delete media files directly from the library folder on the storage and not from the Strawberryuser interface If you are not deleting Library media directly from the storage we recommend to set the recurrency toweekly instead of daily
Manage Libraries
32
Good to Know
bull There can only be one ingest watchfolder per library
bull Folder structures inside the ingest watchfolders will refelct inside the Strawberry library project
bull For usability reasons folder strctures inside the ingest watchfolders will not be deleted
bull Libraries can be archived equally to normal projects
External LibrariesPurpose An External Library is a folder structure outside of the usual Strawberry managed folder structure on thestorage Strawberry can index that external folder structure to make it seachable and (proxy-)viewable from theStrawberry user interfaces Media in External Libraries remains where it is meaning Strawberry will notautomatically move but only monitor it
Creating a Library Project
1 In order to create a new Library project you need to create a normal project first To do so open the Strawberryclient application and create a new project Name the project as you wish the library to be named Once theproject has been created close it and go back to the admin panel
Manage Libraries
33
2 In the admin panel go to Projects Manage Online Projects and checkbox the project that you created in theprevious step No click on the Flag as Library button on the lower right of the project list Then confirm withyes
Once the library has been created it will appear under Projects Manage Libraries inside the Strawberry Adminpanel
Configuring an External LibraryPreparation Before configuring an ingest library you need to make sure that the folder structure that Strawberryshould watch is reachable by the Strawberry server If you are unsure how to do this please contact next levelsupport
1 Go to Projects Manage Libraries and checkbox the Library that you created in the previous step The librarywill be shown as Not Configured
2 Click on the Edit button below the library project list The following options appear
bull Name - Name of the Library
bull Watchfolder Type - Library Ingest or External Library - Select External Library here
bull External Path - The path to the folder structure that you wish to be watched by Strawberry
bull Target Storage - The storage to which ingested content should be moved This is only relevant if Strawberryis controlling multiple storage systems
bull Encoding Priority - The encoding priority for proxy files in this Library The ration between normal and highpriority is 14
Manage Libraries
34
bull Example for an External Library configuration
Configuring the Library Clean IntervalPurpose The clean interval scan your existing libraries for deleted media files on a recurring basis This however isonly important if you delete media files directly from the library folder on the storage and not from the Strawberryuser interface If you are not deleting Library media directly from the storage we recommend to set the recurrency toweekly instead of daily
Configuring the External Library Reindex IntervalPurpose The external library reindex scans your existing libraries for new modified and deleted media files on arecurring basis This make sure that all changes in the external location will reflect within Strawberry The ExternalLibrary Reindex is MUCH slower than the Library Clean Interval which is why it is not possible to run it hourly Werecommend a daily or even better week recurrency for this index job
Manage Libraries
35
Good to Know
bull There can only be one External Library location per library project
bull Folder structures inside the external library will refelct inside the Strawberry library project
bull When adding a media from an External Library to an open Strawberry project that media will always becopied
Custom Metadata
Custom Metadata SetsPurpose This feature allows the Administrators to create several metadata sets Metadata sets can either containdrop down menus or text input fields Users will be be asked to select from the values provided in the metadata setsupon project creation
How the custom metadata could look in the user frontend
An example of custom metadata fields asking the user to provide the requested information Metadata fields withan asterisk symbol are mandatory for the user to fill out
The Master SetUsage Log into the Administration panel and click on the PROJECTS tab Expand the CUSTOM METADATAbar
The master set is the default set for all Strawberry installations and it is the set that every user sees upon projectcreation The master set can be populated with drop down menus and text input fields
Creating a Metadata SetUsage Log into the Administration panel and click on the PROJECTS tab Expand the CUSTOM METADATAbar
Custom Metadata
36
Click the ADD SET button and provide a name for the new set Once the set is created you can populate it withmetadata values like dropdown menus or text input fields
Connecting Metadata SetsUsage Log into the Administration panel and click on the PROJECTS tab Expand the CUSTOM METADATAbar
Metadata sets can be connected via drop down menus meaning that a specific drop drop down selection will load aspecific metadata set for the user In order to connect a drop down value with a metadata set edit the metadatavalue by clicking the checkbox next to the value and then the EDIT VALUE button
Each drop down menu contains Values and Targets The value is the drop down value that the user can choosefrom upon project creating The target is the metadata set to which the value should refer If the target None isselected the value will not load any metadata set If a target set is selected this target set will be loaded when theuser chooses this specific value
Deleting a Metadata Set
Custom Metadata
37
Usage Log into the Administration panel and click on the PROJECTS tab Expand the CUSTOM METADATAbar Select the metadata set that you wish to delete by checking the box next to it and then press the delete buttonon the botton of the metadata set list
Creating a Dropdown MenuUsage Log into the Administration panel and click on the PROJECTS tab Expand the CUSTOM METADATAbar
Click the ADD VALUE button and provide the following information
bull Name The name of the dropdown menu as the user will see it (for example Customer)
bull Type dropdown menu
bull Maximum Characters Not relevant for dropdown
bull Restrict input to Not relvant for dropdown
bull Pattern Not relvant for dropdownbull Mandatory Defines if this value is mandatory (checked) or not (unchecked)
bull Use in Project String Defines if items from this dropdown will appear in the project name if the users enablesthe checkbox Create Project Name from Above Entries upon project creation
No you can type the drodown items into the Value field To add additional drodown values click on the + buttonon the right of the value field To connect a drop down value with another Metadata Set select the set as a Targetnext to the related value
Click CONFIRM when done
Custom Metadata
38
Creating a Text Input FieldUsage Log into the Administration panel and click on the PROJECTS tab Expand the CUSTOM METADATAbar
Click the ADD VALUE button and provide the following information
bull Name The name of the text input field as the user will see it (for example Project Number)
bull Type Text Input
bull Maximum Characters The amount of characters a user can type into that field 0 equals infinite
bull Restrict input to Restrict input to numbers only letters only or numbers amp letters No restriction will allowany UTF-8 character
bull Pattern Not relevant for text input
bull Mandatory Defines if this value is mandatory (checked) or not (unchecked)
bull Use in Project String Defines if items from this text input field will appear in the project name if the usersenables the checkbox Create Project Name from Above Entries upon project creation
Click CONFIRM when done
Custom Metadata
39
Creating a Replacement PatternUsage Replacements patterns enable Strawberry to automatically create date values based on Unix date modifiersA List of possible modifiers can be found below Usage Log into the Administration panel and click on thePROJECTS tab Expand the CUSTOM METADATA bar
Click the ADD VALUE button and provide the following information
bull Name The name of the pattern field as the user will see it (for example Date)
bull Type Replacement Pattern
bull Maximum Characters Not relevant for text replacement pattern
bull Restrict input to Not relevant for text replacement pattern
bull Pattern A pattern consisting of Unix modifiers A pattern such as eg Y m d equals year month date
bull Mandatory Not relevant for text replacement pattern
bull Use in Project String Defines if the output from this pattern will appear in the project name if the users enablesthe checkbox Create Project Name from Above Entries upon project creation
Click CONFIRM when done
Custom Metadata
40
Editing a ValueAvailable in Strawberry version 40 or newerUsage Log into the Administration panel and click on the PROJECTS tab Expand the CUSTOM METADATAbar Expand the metadata set that contains the value you want to edit and then select the value by checking the boxnext to it Change the value properties as required and then click CONFIRM
Deleting a ValueUsage Log into the Administration panel and click on the PROJECTS tab Expand the CUSTOM METADATAbar Expand the metadata set that contains the value you want to delete and then select the value by checking thebox next to it Now click on DELETE VALUE
Available in Strawberry version 40 or newer
Creating Project Status FlagsAvailable in Strawberry version 40 or newerPurpose Project statuses help users to determine what the working status of a project is Statuses can be forinstance in editing in color grading ready for approval etc and are defined by the administrator The statuses ofeach project is displayed in the metadata area of the Strawberry 4 user interface
Usage Log into the Administration panel and click on the PROJECTS tab Expand the STATUS OPTIONS barNow click on ADD STATUS and define a name for the new status Once the status is created users can choose itfrom the Strawberry frontend
Deleting Project Status FlagsPurpose Deleting status flags will prevent users from being able to select that status in the future However whendelting a status flag it will remain attached to the projects that are already using it
Custom Metadata
41
Usage Log into the Administration panel and click on the PROJECTS tab Expand the STATUS OPTIONS barNow click on the checkbox next to the status flag that you want to delete and press the DELETE VALUE button
Supported Unix Time Modifiers
bull a localersquos abbreviated weekday name (eg Sun)
bull A localersquos full weekday name (eg Sunday)
bull b localersquos abbreviated month name (eg Jan)
bull B localersquos full month name (eg January)
bull C century like Y except omit last two digits (eg 20)
bull d day of month (eg 01)
bull D date same as mdy
bull e day of month space padded same as _d
bull F full date same as Y-m-d
bull h same as b
bull H hour (0023)
bull I hour (0112)
bull j day of year (001366)
bull k hour ( 023)
bull l hour ( 112)
bull m month (0112)
bull M minute (0059)
bull p localersquos equivalent of either AM or PM blank if not known
bull P like p but lower case
bull r localersquos 12-hour clock time (eg 111104 PM)
bull R 24-hour hour and minute same as HM
bull s seconds since 1970-01-01 000000 UTC
bull S second (0060)
bull T time same as HMS
bull u day of week (17) 1 is Monday
bull U week number of year with Sunday as first day of week (0053)
bull w day of week (06) 0 is Sunday
bull W week number of year with Monday as first day of week (0053)
bull y last two digits of year (0099)
bull Y year
bull z +hhmm numeric timezone (eg -0400)
bull Z alphabetic time zone abbreviation (eg EDT)
Archive amp Copy ToStrawberry allows certain users (admins amp users but not guests) to archive and retrieve editing projects When performing an archive operation Strawberry takes every single file which is part of the project and sends it to an archive destination which was previously defined by the administrator As soon as the project is in the archive Strawberry 4 will delete it from the production storage (aka source) but will keep the metadata and proxy files The
Archive amp Copy To
42
archive path defined here is also the retrieval path If you look for a more sophisticated archivalretrieval process youshould have a look inside the Strawberry API documentation
Creating an Archive StrategyZIP is not longer supported as an archive method in Strawberry because of missing CRC checksumcapabilitiesPurpose Archive strategies allow you to define discrete archive locations and methodologies for different types ofprojects When a user presses the Archive Project button in the user front-end Strawberry will offer the archivestrategies defined here
Usage Log into the Administration panel and click on the Archive tab Expand the ARCHIVE STRATEGIES barClick the ADD button and provide the following information
bull Name The name of the archive strategy The users see the name of the strategy when he or she attempts toarchive a project
bull Type The archive type Please select SB native if you are not using Archiware P5 or Masstore
bull Path The path (aka archive destination) for projects archived using this strategy
bull Method
bull plain Strawberry archives the project and media files without compressing them It archives theprojects folder structure as it is
bull tarball Puts the project amp media files of a project into a tarball before archiving itbull Check
bull Fingerprint Sequential integrity check on a file that only detects serious file damages but no minordefectsbull CRCs are specifically designed to protect against common types of errors on data transmissionswhere they can provide quick and reasonable assurance of the integrity of data delivered Howeverthey are not suitable for protecting against intentional alteration of data
bull None No data integrity check at allbull EnableDisable Strategy Define if an archive strategy is available for users (enabled) or not (disabled)
Archive amp Copy To
43
Canceling an ArchiveRetrieval JobArchive or retrieval jobs can currently only be canceled from the Strawberry user interface but not from theAdministration panel In order to Cancel an archive or retrieval job do the following
1 Login to the user interface as an Administrator and right click on the affected project
2 Select Cancel ArchiveRetrieval Job and confirmIt will take a few seconds up to a couple of minutes until the cancellation has been performed Once it is done youwill see a warning sign next to the project name The warning sign indicates that the operation has been aborted bythe user
When a project archivalretrieval failed the project will have a warning sign next to its name
Clearing ArchiveRetrieval ErrorsIn case a project archive or retrieval failed (either it was canceled by a user or failed for other reasons) you can resetthe project state back to normal by performing the following operations
1 Login to the Strawberry user interface as an Administrator and right click on the affected project
2 Select Clear Archive Error from the context menu and confirmIt will take a few seconds until the fail state of the project has been cleared and the project is displayed asnormal Once the front end reports that the clearance has been successfully done you may retry to archive orretrieve the project if required
Project Copy-to StrategiesPurpose Strawberry enables users to copy projects to another location This location can be another storagedevice (for backup purposes) a render farm or other external application watch folders This feature works verysimilar to the Archive function The main difference is that copied projects will not be deleted from the mediastorage (source volume) but remain there for further use
Usage Log into the Administration panel and click on the Archive tab Expand the Project Copy-to Strategiesbar Click the ADD button and provide the following information
bull Name The name of the copy-to strategy The users see the name of the strategy when he or she attempts tocopy a project
bull Path The path (aka copy-to destination) for projects copied using this strategy
bull Method
bull plain Strawberry archives the project and media files without compressing them It backups theprojects folder structure as it is
bull tarball Puts the project amp media files of a project into a tarball before copying it
bull zip Puts the project amp media files of a project into a zip file before copying it (Please Note Zip filescan not be CRC checked)
bull Check
bull Fingerprint Sequential integrity check on a file that only detects serious file damages but no minordefects
Archive amp Copy To
44
bull CRCs are specifically designed to protect against common types of errors on data transmissionswhere they can provide quick and reasonable assurance of the integrity of data delivered Howeverthey are not suitable for protecting against intentional alteration of data
bull None No data integrity check at allbull EnableDisable Strategy Define if an archive strategy is available for users (enabled) or not (disabled)
Asset Copy-to StrategiesPurpose Strawberry enables users to copy individual assets to another location This location can be anotherstorage device (for backup purpose) a render farm or external application This feature works very similar to theArchive function The difference is that copied assets will not be deleted from the media storage but remain therefor further use
Usage Log into the Administration panel and click on the Archive tab Expand the Asset Backup Strategies barClick the ADD button and provide the following information
bull Name The name of the copy-to strategy The users see the name of the strategy when he or she attempts tocopy a project
bull Path The path (aka archive destination) for projects copied using this strategy
bull Method
bull plain Strawberry archives the project and media files without compressing them It backups theprojects folder structure as it is
bull tarball Puts the project amp media files of a project into a tarball before copying it
bull zip Puts the project amp media files of a project into a zip file before copying it (Please Note Zip filescan not be CRC checked)
bull Check
bull Fingerprint Sequential integrity check on a file that only detects serious file damages but no minordefects
bull CRCs are specifically designed to protect against common types of errors on data transmissionswhere they can provide quick and reasonable assurance of the integrity of data delivered Howeverthey are not suitable for protecting against intentional alteration of data
bull None No data integrity check at allbull EnableDisable Strategy Define if an archive strategy is available for users (enabled) or not (disabled)
Good to Know
Freezing Archived ProjectsAvailable in Strawberry version 44 or newerIn order to avoid that users are accidentally retrieving archived projects you can freeze these projects using rarrfreezeoptions larr
Templates
Working with Templates
Templates
45
Purpose Templates are an extremely efficient way to prepare standardized project settings and content for allStrawbery users in your facility Templates can contain custom file and folder structures
Example 1 Application Specific Templates
One example to illustrate the benefit of templates can be working with Avid Media Composer in different frame rates(24 frames and 25 frames) Avid does not allow to switch the frame rate within a project With Strawberry you couldcreate two templates one for 24 frames and one for 25 frames and copy the related Avid project files into thistemplate When a user creates a project from on of these templates the corresponding projects files (24 frames or25 frames) will be copied into the new projects an renamed after the new project so the user does not need to createa new Avid project manually after he or she created a project in strawberry
Example 2 Production Specific Templates
Another example of working with templates can be a specific production that requires specific preparations Mostmedia facilities create individual folder structures for different productions so that people save graphics visualeffects and sound effects in the right location on the storage Usually these folder structures need to be recreated foreach episode of a production With Strawberry you can create a template which contains a specific folder structureand even media files and copy your prepared folder and media files into this template As soon as a user choosesthe template upon project creation the folders and files that you prepared in the template will be copied over to thenew project and are immediately available for the user
Creating a Template (Avid Media Composer)Before users can create any Avid projects using the Strawberry client software you need to have at least ONEtemplate Log into the admin panel and click on the MISC tab Expand the TEMPLATES bar Now click theCREATE NEW button
Strawberry will ask you for a Template name a preset a token and a naming pattern
Choose a name that best characterizes your template In this example we will create an Avid template that containsa high definition Avid project with a resolution of 1080p So it makes sense to call the template Avid 1080p
In the preset row click on the little down arrow and choose the Avid preset When a user creates a projectbased on an Avid template Strawberry automatically create the Avid MediaFiles and OMFI MediaFiles folderstructure in the project and it will also ensure that Avid project and media files can be shared properly
The token is a replacement string for a file name This means that if your token says replace_me and you createan Avid template named replace_me and copy it into your template folder (discussed later) every time thetemplate replace_me is used the token text (in this case replace_me) will be changed to the name of the currentStrawberry project So the Avid project file called replace_meavp in your templates folder will be used and namedprojectnameavp as its created in your Strawberry project
In the row pattern you can define how a project name based on this template should look The stringYmd-name will result in the project name 20130810-ProjectName Putting the date inside the projectname will enable your user to search for projects by typing in the date If you dont need the date in the project nameyou can simply delete the date-related parts of the string and leave the name piece If you need the date part youcan modify it to your requirements In order to understand the formatting for doing this please refer to the unix timeman page at httpunixhelpedacukCGIman-cgidate
Templates
46
After you are done click Create and then open Avid Media Composer Create a new local project calledreplace_me with the setting 1080p25
Open the newly created project delete the bin that Avid always makes in new project and empty the Avid trashfolder
In order to ensure that Media Composer will recognize network volumes as media drives open Tools gt Console andtype in alldrives If you see the message All drives will be viewed as media drives (Was previously set to havingonly true media drives act as media drives) you are good to go If you see the message Only true media drives willbe viewed as media drives (Was previously set to having all drives act as media drives) type alldrives againThere are just two possible options
Now go to Tools gt Media Creation gt Capture and select the Strawberry media drive (mapped as a networkdrive on your Computer) as the AudioVideo file destination Click on both Apply to All buttons and then click onOK Now close the project
Templates
47
Navigate to the Strawberry template folder on your storage (Strawberrytemplates) Within that template folder youwill see a folder that is named after the template you created in the Strawberry admin panel (in this case we called itAvid 1080p) Inside this folder will be a folder called media_1 and one called projects
Use the Finder or Explorer to navigate to your local Avid projects folder (eg UsersFlavourSysDocumentsAvidProjects) and open the replace_me project folder Copy the files replace_meavp replace_me Settingsxml andreplace_me Settingsavs to your clipboard
Paste the files into your StrawberrytemplatesAvid 1080pprojects folder If an editor creates a new project using thistemplate Strawberry will rename the replace_me string with the name of the current Strawberry project
Now every time a Strawberry user creates a new project based on this template it has all the right settings export preferences etc that it will inherit from the replace_me project that you created and set up before copying it into the Strawberrytemplatesltyour template namegtprojects folder If you need to modify or improve your template
Templates
48
simply make the changes to the local replace_me project and re-copy the three files into theStrawberrytemplatesltyour template namegtprojects folder
Creating a Template (Adobe Premiere)Before you can create an Adobe Premiere editing project from within the Strawberry client software you need tocreate a template for Strawberry to use Click on the Template Tab in the Admin panel and then click on CreateNew
Strawberry will ask you for a Template name a preset a token and a naming pattern
Choose a name that best characterizes your template In this example we will create an Adobe Premiere templatethat contains an Adobe Premiere project So it makes sense to call the template Adobe Premiere
In the preset row click on the little down arrow and choose the Adobe preset When a user creates a projectbased on an Adobe template Strawberry automatically create the Adobe Cache folder structure in the project and itwill also ensure that Adobe project and media files can be shared properly
The token is a replacement string for file names This means that if your token says replace_me in these settingsand you go on to create an Adobe Premiere project named replace_me and put it in your template folder thetemplate will be used and automatically renamed based on the Strawberry project name that is open This way anAdobe Premiere template project file called replace_mePR will be named StrawberryprojectnamePR each timeyou create a new project from within Strawberry
In the row pattern you can define how a project name based on this template should look like The stringYmd-name will result in the project name 20130810-ProjectName Putting the date inside the projectname will enable your user to search for projects by typing in the date If you dont need the date in the project nameyou can simply delete the date related parts of the string and leave the name piece If you need the date part youcan modify it to your requirements In order to understand the formatting for doing this please refer to the unix timeman page at httpunixhelpedacukCGIman-cgidate
After you are done click Create and go to the Strawberry Client Create a new project using the Adobe Premieretemplate Now open Adobe Premiere and create a new project Name the project replace_me and set the captureformat to HDV Ensure that all Scratch Disk locations are set to same as project
Templates
49
Click ok to create and open the project Once the project is opened go to EditgtPreferences Media and choosethe Adobe Cache on your Strawberry media volume as the destination for Media Cache Files and Media CacheDatabase
Templates
50
Tip If you are using the Adobe Premiere Panel launch it now If a user creates a project based on this template thepanel will launch automatically with the new project
Click OK to confirm your changes Now save the project and leave Adobe Premiere Navigate to your local Adobeprojects folder and copy the newly created project file replace_meprproj to the media_1 folder of the Adobetemplate location that you created
Now every time an editor creates a new project using the Adobe Premiere template the replace_mepr templatewill be used and all the settings preferences and destinations will be inherited and used in the newStrawberryprojectnamepr
Rename a Templates
Templates
51
Purpose You want give the Templates a new name for differentation
Usage Log into the admin panel and click on the MISC tab Expand the MANAGE TEMPLATES bar Check thetemplate what you want rename below the templates list is a button says RENAME and fill out with the new nameIf you are ready click CONFIRM else if you want go back click CANCEL
Duplicate a TemplatePurpose Use dublicate a template if you want clone the settings
Usage Log into the admin panel and click on the MISC tab Expand the MANAGE TEMPLATES bar Check thetemplate what you want duplicate below the templates list is a button says DUPLICATE and fill out with the newname If you are ready confirm it with click DUPLICATE else if you want to stop the prozess click CANCEL
Delete a Template(s)Purpose If you want delete a template(s) eg Didnt needed anymore
Usage Log into the admin panel and click on the MISC tab EXPAND the MANAGE TEMPLATES bar Checkthe template what you want delete below the templates list is a button says DELETE
Configuring the Avid AtticWhen utilizing Avid Media Composer the Avid Attic functionality might be important to your workflow To make theAvid Attic work with strawberry please perform the following steps
1 Close Avid Media Composer
2 Navigate to the Avid Attic folder on our computerWin UsersPublicPublic DocumentsAvid editing application
Mac Macintosh HDUsersSharedAvid editing application
3 Rename the Avid Attic folder to Avid Attic_Old
4 Open an Avid Media Composer project using the Strawberry client and open the project in Avid
5 Close the project in Avid Media Composer
6 Go back to the Avid attic and check whether Avid has created a new Attic folder
7 Check the attic folder for the project that was recently opened in Strawberry
Manage IndexersCheck the following boxes if you want the features or unchecked if not
Enable deep indexing for media files
Index adobe premiere project files
Index avid bin files
Storage Quota
Templates
52
Purpose In this section you can define how much physical storage space all projects managed by strawberry areallowed to occupy The quota is a soft quota meaning that there is no physical storage restriction once it getsexpired However Strawberry will send a warning email if if the quota that you defined has been reached
Usage Log into the admin panel and click on the MISC tab Expand the STORAGE QUOTA bar Define howmuch space (in Gigabytes) all projects managed by strawberry are allowed to occupy and press SAVE You canchange this quota at any time
MYSQL BackupWhen clicking the Backup Now button Strawberry creates a dump of its MySQL database The default location forthe database dump is optsb4databackups The default destination can be reconfigured in theoptsb4appfsbaseconfigdatabase-backupyml file
Versions amp LicenseThis section is for license and support purpose only
VIEW Proxy Encoder
Supported Video Audio and Image File FormatsSupported Video Formats amp CodecsApple Intermediate Codec (MOV)Apple MJPEG-B (MOV)Apple ProRes (MOV)
Arri Alexa (ARI)
AS-11 IMX 50 (MXF)AS-11 AVC Intra 100 (MXF)
(X)AVC Intra 50100 (MOV MXF)
Avid 11 amp 11xAvid DV amp DV100
Avid DNxHD (MOV MXF)(45 60 75 90 90x 110 110x 120 120x 145 185 185x 220 220-10Bit)
Avid Interplay C93 amp MVE videoAvid MPEG2 50 - SDAvid Meridien Compressed SD amp Uncompressed SDAvid Packed amp RGBPacked
AVS (Standard amp Chinese)
Black Magic R210
Canopus LosslessCinepak
VIEW Proxy Encoder
53
DV (PAL amp NTSC)
DVCPRO HD | 100 MbpsDVCPRO 50 | 50 MbpsDVCPRO 25 | 25 Mbps
H261H263 H263-1996H263+ H263-1998 H263 version 2H264 AVC MPEG-4 AVC MPEG-4 (MP4 MOV MXF)
HDV
MJPEG amp MJPEG LosslessMPEG 1 amp 2 (M1V M2T M2V MPEG MPG MPGV MPV VOB)MPEG 4 (M4A M4P M4V MP4)
P2 - AVC-Intra 50 100 (MOV MXF)P2 - DVCPRO 25 50 100 (MOV MXF)
QuickTime uncompressed
Red Digital Cine Camera (R3D)
Windows Media Video (All Versions)
XDCAM 25XDCAM IMX 30XDCAM HD 50XDCAM SXS 50
Also SupportedAvid 11 10-bit RGB PackerFlash Video (FLV)Microsoft Video 1On2 VP3On2 VP5On2 VP6QuickTime 8BPS videoQuickTime Animation (RLE) videoQuickTime Graphics (SMC)QuickTime video (RPZA)R10K AJA Kona 10-bit RGB CodecR210 Quicktime Uncompressed RGB 10-bitTheoraVP8VP9WMV7
Supported Audio Formats amp CodecsMost CommonAAC+AACAC-3
CAF
MP3 (All Versions)MPEG-4 (All Versions)
PCM (All Versions amp Bitrates)
WAV
WMA (All Versions)
Also Supported
VIEW Proxy Encoder
54
Apple lossless audioATRAC1ATRAC3ATRAC3+Bink AudioCore Audio Format (CAF)DV audioEnhanced AC-3FLAC (Free Lossless Audio Codec)MACE (Macintosh Audio CompressionExpansion) 31MACE (Macintosh Audio CompressionExpansion) 61MLP (Meridian Lossless Packing)MP1 (MPEG audio layer 1)MP2 (MPEG audio layer 2)OpusRealAudio 10 (144K)RealAudio 20 (288K)RealAudio 30 (dnet)RealAudio LosslessRealAudio SIPR ACELPNETVorbisWindows Media Audio Voice
Supported Image Formats|Targa |TIF |PSD |PSB |PNG |JPG |IFF |GIF |BMP |DPX |EXR |ARI |EPS |AI
Enabling or Disabling ViewLog into the admin panel and click on the VIEW tab If VIEW is enabled proxy files will be created automaticallybased on the criteria below If VIEW is disabled proxy file encoding will not take place and he user front endautomatically jumps to list view instead of thumbnail view
Proxy Encoder ConfigurationIn this menu you can choose from properties of the Strawberry generated proxy files These options include
bull Proxy File Location shows where Strawberry saves the proxy files that it generates This location is definedupon installation and can only be changed by modifying the Strawberry configuration files on the Strawberryserver
bull Bitrate Define the proxy bitrate (per second) Please keep in mind that lower bitrates might be more suitablefor users connecting over the Internet while higher bit rates are good for LAN operations Is there a goldenrule Unfortunately not If you are using the Strawberry Preditor Add-on we recommend a low proxy bitrate(700k - 900k)
bull Resolution Choose a resolution for your proxy files There should always be a coherence between theresolution and the bit rate For example A 1920x1080 proxy file should have a bitrate of at least ~1200k whilea 640x360 proxy should look good with a 600k bitrate
bull Image Sequence Recognition When Strawberry VIEW detects an image sequence (Basename amp Count) withmore than 20 individual images it will create a preview MP4 file out of it An image sequence must have adelimiter between its basename and its count Valid delimiters are - (dash) (dot) and _ (underscore)sequence-name_001 is an example of a valid naming convention
bull Time Code Burn-In If you wish to have a video time code burned into your proxy files you should enable thisfeature
bull Time Code Label Position Defines whether the proxy time codes (or image layer names) are burned in on thebottom or on top of the proxy file
V isual Watermark Check this box if you want Strawberry to burn a visual watermark into your proxy files
bull Watermark Position Decide on which position of the screen your watermark image should be visible
VIEW Proxy Encoder
55
bull Watermark Image Upload a Watermark image as a png file The image should not be larger than your currentproxy resoultion and should have a transparent background You can download example watermarks heredlflavoursyscommanualssupporting_filesExample_Proxy_Watermarkszip
bull Watermark Preview Previews your uploaded watermark in respect of the current proxy resolution as well asthe current Timecode burn-in position
Blacklists amp Whitelists
bull Factory File Blacklist This is a factory blacklist provided by FlavourSys The blacklist has been populatedbased on best practice workflows If you need any of the factory blacklist file extensions whitelisted just enterthe extension into the Files Whitelist
bull File Blacklist Enter any file extension that you dont wish to see in the Strawberry user interface Strawberrywill then ignore files that are having this extension meaning that no proxies are generated However you canstill use the files on the FinderExplorer level in your projects In order to blacklist an item just enter extensionand press enter Press the save button to confirm
bull File Whitelist If you need to whitelist any extensions from the Factory File Blacklist just enter its extensioninto the Files Whitelist In order to whitelist an item just enter extension and press enter Press the savebutton to confirm
bull Factory Folders Blacklist This is a factory blacklist provided by FlavourSys The blacklist has been populatedbased on best practice workflows If you need any of the factory folder blacklist whitelisted just enter the foldername into the Folders Whitelist and press enter Press the save button to confirm
bull Folders Blacklist (Recursive) Enter any folder name that you dont wish to see in the Strawberry user interfaceStrawberry will then ignore the folder and its content meaning that no proxies are created You can still useblacklisted items on the FinderExplorer level in your projects In order to blacklist a folder just enter the foldername into the blacklist and press enter Press the save button to confirm
bull Folders Whitelist (Recursive) If you need to whitelist any folder from the Factory Folders Blacklist just enterits name into the Folders Whitelist and press enter Press the save button to confirm
Applying Blacklist amp Whitelist ChangesStrawberry 5 applies blacklist changes automatically In order to apply whitelist changes please perform thefollowing steps Also perform these steps in order to apply blacklist changes in Strawberry 44 or older versions
VIEW Proxy Encoder
56
1 Login to the Administration panel
2 Click on the MANAGE PROJECT tab
3 Select the project on which you want to apply the operation
4 Click the VIEW button below the project list
5 Select the radio button Rescan Project(s) and confirmDepending on the amount of files in the affected project this operation can take several minutes
Node and Worker Control
Purpose In this section of the admin panel you monitor and change the status of each VIEW encoding node that isintegrated in your environment You also have the possibility to set Schedulers so that you can decide if the nodesand the workers run
Usage Log into the admin panel and click on the VIEW tab Expand the NODE AND WORKER CONTROL barHere you can select from the following options
bull NODE ID The internal ID of each encoding node
bull NODE ADDRESS The hostname or IP address and port under which each node can be reached
bull STATUS Green means running yellow means paused and red means not running
bull NUMBER OF WORKERS Number of encoding workers (threads) that work at the same time Choose theamount of workers based on the amount of CPU cores of each node One worker per core works very well butleave at least one core for the OS and the rest of the Strawberry system The Strawberry Server license comeswith 3 Workers additional workers must be licensed separately
bull Actions Stop start restart or edit a scheduler for individual nodes
Content Download OptionsPurpose If you want to allow user to download media assets using the front end you can define this here Forinstance for workflows requiring executive review or for film schools where faculty could grade from home thisfeature can be beneficial however for feature film workflows this feature can be turned off
Usage Log into the admin panel and click on the VIEW tab Expand the CONTENT DOWNLOAD OPTIONS barIf you want to enable users to download low resolution media files (proxy files) from the front end check the boxnext to Allow users to download proxy files If you want to enable users to download high resolution media filesfrom the front end check the box next to Allow users to download high-res files
Rescan-Project(s)Purpose Scans the project for new files and newly supported file formats and attempts to encode them to proxyfiles It will also apply black list white list changes to existing projects
Usage Log into the Administration panel and click on the PROJECTS tab Expand the MANAGE PROJECTSbar Select the project(s) that you want to rescan and press the VIEW button below the project list and checkRescan Project(s) and confirm it
Repair-Project(s)
VIEW Proxy Encoder
57
Purpose Scans the project for new files and newly supported file formats and attempts to encode them to proxyfiles It will also apply black list white list changes to existing projects
Usage Log into the Administration panel and click on the PROJECTS tab Expand the MANAGE PROJECTSbar Select the project(s) that you want to repair and press the VIEW button below the project list and check RepairProject(s) and confirm it
Reencode-EverythingPurpose Deletes every file in the project to see if meta data have been changed Also looks for new files and newlysupported file formats and attempst to encode them to proxy files It will also apply black list white list changes toexisting projects
Usage Log into the Administration panel and click on the PROJECTS tab Expand the MANAGE PROJECTSbar Select the project(s) that you want to reencode-everything and press the VIEW button below the project listand check Reencode-Everything and confirm it
Miscellaneous
Manage TemplatesPlease visit this manuals rarr Templates larr chapter to get template related information
Safe SearchPurpose ldquoSafe Searchrdquo is an ldquoin edit suiterdquo security feature for Strawberry managed content Its aim is to reducethe visibility and searchability of content while a project with specific custom metadata is open This prevents thatclients see content of other clients while working on a project inside the editing room
Enabling Safe SearchLogin into the Strawberry Administrator panel and select the ldquoMiscrdquo tab Open the ldquoSearch settings and check thebox next to ldquoEnable Safe Search Featurerdquo
Define ldquoSafe Searchrdquo MetadataOnce ldquoSafe Searchrdquo is enabled click on the ldquoProjectsrdquo tab and open the ldquoCustom Metadatardquo menu Select a set andthen a drop down menu within it Then click on ldquoEdit Valuerdquo
Miscellaneous
58
Next to each drop down menu is a checkbox called ldquoSafe Searchrdquo Check this box for each value for which the ldquoSafeSearch filter should apply
When a user opens a project that includes a ldquoSafe Searchrdquo metadata the search field provides the informationaccordingly (safe search enabled for ldquometadata namerdquo) From this point on all searches will be carried within therelated safe search metadata context This applies until the project is closed
Miscellaneous
59
Good to Know
bull Only one drop down menu can have safe search metadata
bull Safe search metadata in the Administrator panel should not be changed enabled or disabled while projects areopened as this can lead to inconsistent search results
Manage IndexersAvailable in Strawberry version 42 or newer
GeneralCheck the following boxes if you want the features or unchecked if not
bull Enable Deep Indexing for Media Files(If enabled Strawberry will extract technical metadata from media files If it is disabled Strawberry will only index filenames and file sizes This feature needs to be enabled in order for the proxy encoding to work)
bull Index Adobe Premiere Project Files(If enabled Strawberry will extract master clip names a descriptions comments from Adobe Premiere master clipsto make these information visible amp searchable in the front-end)
bull Index Avid bin files(If enabled Strawberry will extract master clips names and sequence names from Avid bins to make theseinformation searchable in the front-end However when searching for an Avid master clip or sequence name theuser will not be provided with a visual presentation of the asset or sequence but will only see the project(s) thatcontains these information since this feature is beta we recommend to turn it of)
bull Extract Exif metadata from images(If enabled Strawberry will extract EXIF metadata from image files
bull Extract XMP metadata from files(if enabled Strawberry will extract XMP metadata from media files)
bull Extract XML metadata (Experimental)(if enabled Strawberry will extract XML metadata from xml sidecard files Please contact us for an overview ofsupported XML schemes)
bull Search for technical metadata(If enabled Strawberry will extract technical metadata from video files as well as ID3 tags (album Artist etc) fromaudio files
Technical Metadata WhitelistStrawberry maintains a search index that allows user to carry out searches in an extremely fast fashion Since thissearch index is stored in the server memory its size must be limited and therefor can not include all possible searchparameters Administrator can define the search parameters by white-listing them
Miscellaneous
60
Enter any label that you wish to add to the Strawberry search index To insert a label just click next to an existinglabel and start typing An auto completion list will show available results for your search term Select the technicalmetadata label that you wish to add to the search index Use the x button next to a labels name to remove a labelfrom the search index The changes will not apply immediately but on the next build of the search index (once anight) If you want to apply the settings immediately SSH login to the Strawberry server as root and type thecommand sb reindex
Storage Quota
Purpose In this section you can define how much physical storage space all projects managed by strawberry areallowed to occupy The quota is a soft quota meaning that there is no physical storage restriction once it getsexpired However Strawberry will send a warning email if if the quota that you defined has been reached
Usage Log into the admin panel and click on the MISC tab Expand the STORAGE QUOTA bar Define howmuch space (in Gigabytes) all projects managed by strawberry are allowed to occupy and press SAVE You canchange this quota at any time
Adobe Premiere Specific Feature
Auto-Link media from Library into projectThis feature is part of a custom development and currently not documented
Auto-Ingest local media into projectPurpose If a user imports media from a usb or local hdd into an Adobe Premiere project that is managed byStrawberry Strawberry can automatically copy that media into the projects media volume This ensures that allmedia used in a Premiere project is actually on the centralized storage
Usage Log into the admin panel and click on the MISC tab Expand the Auto Import Library amp unmanaged Assets(Adobe Premiere Only) bar If you wish to enable the Auto-ingest feature check the box next to it and define aninterval The interval determines how often the Strawberry Adobe panel will check for unmanaged inside each openPremiere project
Auto-Link subproject media into projectPurpose If a user imports media from a subproject into an Adobe Premiere project that is managed by StrawberryStrawberry can automatically link that into the from the subproject into the parent project This ensures that anyproject is self contained at any point
Miscellaneous
61
Usage Log into the admin panel and click on the MISC tab Expand the Auto Import Library amp unmanaged Assets(Adobe Premiere Only) bar If you wish to enable the Auto-link feature check the box next to it and define aninterval The interval determines how often the Strawberry Adobe panel will check for imported subproject mediainside the current project to link it
PreditorDefine the Timeout based on which a user should be automatically logged out of Preditor In the process Strawberrywill also automatically close the users sequence in order to free the license slot Preditor creates auto-saves of opensequences every minute and stores these on the server so that progress does not get lost even if the sequence getsauto-closed
SMTP SetupPurpose Strawberry has the ability to send email notifications on specific criteria This usually is the case if a teamexpires its storage quota or if assets are shared via email using the built-in functions For this feature to workStrawberry needs to be provided with STMP information
Usage
1 Login to the Strawberry server and cd to optsb4appfsbaseconfig
2 Open the file smtpymlexample and replace the example SMTP values with your own ones
3 Save the file as smtpymlThe Strawberry services needs to be restarted for the changes to apply
MYSQL BackupWhen clicking the Backup Now button Strawberry creates a dump of its MySQL database The default location forthe database dump is optsb4appbackups The default destination can be reconfigured in theoptsb4appfsbaseconfigdatabase-backupyml file
Empty TrashPressing the Empty Trash Now button will instantly remove all contents from the Strawberry trash folder
Osiris OptionShared Edits only
Purpose If the Osiris option is enabled Strawberry will mount its project media volumes in a specific way AvidMedia Composer will detect these volumes as volumes from an Avid storage and will provide bin locking for allStrawberry managed Media Composer projects
Versions amp LicenseThis section shows you the current version numbers of the Strawberry 4 modules that are installed on yourStrawberry server Additionally it provides you with license related information for your site
Updating a LicenseOnly use this method if you are running Strawberry in a Non-High Availability environment
Please go to the Strawberry admin panel misc versions amp license and click the NEW LICENSE button Copy andpaste the license string in there and click the UPDATE button Once this is done SSH login to the Strawberryserver and type service strawberry4 restart The license will be applied once the Strawberry service has beenrestarted
Legal Information
Legal Information
62
AVID is a trademark of Avid Technologies (wwwavidcom) Apple and FCP are trademarks of Apple in the US(wwwapplecom) Adobe and Premiere are trademarks of Adobe (wwwadobecom) All product names logos andbrands are property of their respective owners All company product and service names used in this manual are foridentification purposes only Use of these names logos and brands does not imply endorsement
Legal Information
63
- Last Updated July 20 2017
-
- Introduction
- System Requirements
-
- Storage File System Requirements
-
- List of Certified Storage Vendors
- List of Supported Storage File Systems
-
- Strawberry Server HWSW Requirements for Production Environments
- Minimum Server HWSW Requirements for Demonstration amp POC Environments
- Minimum Requirements for a dedicated View Proxy Encoding Node
- Requirements for the Strawberry Client
-
- Strawberry Client SSL
-
- Requirements for the Strawberry Adobe Panel
- Minimum Web Browser Requirements
-
- Installation Manuals
-
- Strawberry Client
-
- Installing the Client
- Starting the Client
- Upgrading the Client
- Deleting the Client
-
- Client Configuration for NAS
-
- SMB Mounts Configuration
- Paths to Editing applications (App Launcher)
- Mount your drives under Windows 7 amp 8
- Mount your drives under OSX
-
- Client Configuration for StorNext amp XSAN
-
- SAN Mount Configuration
-
- Client Configuration for Shared Edits under macOS
- Client Configuration for Shared Edits under Windows
- Changing the Clients Fuse Blocksize (macOS only)
- Adobe Panel
-
- Installing the Panel
- Updating the Panel
- Removing the Panel
- Testing the Panel
-
- Users Roles amp Teams
-
- Manage Roles
-
- Available Capabilities
- Creating a role
- Editing a role
- Deleting a role
-
- Manage Users
-
- Creating a User
- Changing a Users Role
- User Specific Roles
- Assigning a User to Teams
- Deleting a User
- Removing a User from a Team
-
- Manage Teams
-
- Creating a Team
- Changing a Teams Name
- Changing a Teams Quota
- Deleting a Team
-
- Manage Edits
-
- Manage Projects
-
- Manage Online Projects
-
- Force Closing a Project
- Deleting one or multiple Projects
- Archiving a Project
-
- Manage Archived Projects
-
- Retrieving a Project from the Archive
-
- Download Project List
- Custom Metadata
-
- Manage Libraries
-
- Introduction
- Library States
- Ingest Libraries
-
- Creating a Library Project
- Configuring an Ingest Library
- Configuring the Library Ingest Interval
- Configuring the Library Clean Interval
- Good to Know
-
- External Libraries
-
- Creating a Library Project
- Configuring an External Library
- Configuring the Library Clean Interval
- Configuring the External Library Reindex Interval
- Good to Know
-
- Custom Metadata
-
- Custom Metadata Sets
- The Master Set
- Creating a Metadata Set
- Connecting Metadata Sets
- Deleting a Metadata Set
- Creating a Dropdown Menu
- Creating a Text Input Field
- Creating a Replacement Pattern
- Editing a Value
- Deleting a Value
- Creating Project Status Flags
- Deleting Project Status Flags
- Supported Unix Time Modifiers
-
- Archive amp Copy To
-
- Creating an Archive Strategy
- Canceling an ArchiveRetrieval Job
- Clearing ArchiveRetrieval Errors
- Project Copy-to Strategies
- Asset Copy-to Strategies
- Good to Know
-
- Freezing Archived Projects
-
- Templates
-
- Working with Templates
- Creating a Template (Avid Media Composer)
- Creating a Template (Adobe Premiere)
- Rename a Templates
- Duplicate a Template
- Delete a Template(s)
- Configuring the Avid Attic
- Manage Indexers
- Storage Quota
- MYSQL Backup
- Versions amp License
-
- VIEW Proxy Encoder
-
- Supported Video Audio and Image File Formats
- Enabling or Disabling View
- Proxy Encoder Configuration
- Blacklists amp Whitelists
- Applying Blacklist amp Whitelist Changes
- Node and Worker Control
- Content Download Options
- Rescan-Project(s)
- Repair-Project(s)
- Reencode-Everything
-
- Miscellaneous
-
- Manage Templates
- Safe Search
-
- Enabling Safe Search
- Define ldquoSafe Searchrdquo Metadata
- Good to Know
-
- Manage Indexers
-
- General
- Technical Metadata Whitelist
-
- Storage Quota
- Adobe Premiere Specific Feature
-
- Auto-Link media from Library into project
- Auto-Ingest local media into project
- Auto-Link subproject media into project
-
- Preditor
- SMTP Setup
- MYSQL Backup
- Empty Trash
- Osiris Option
- Versions amp License
-
- Updating a License
-
- Legal Information
-
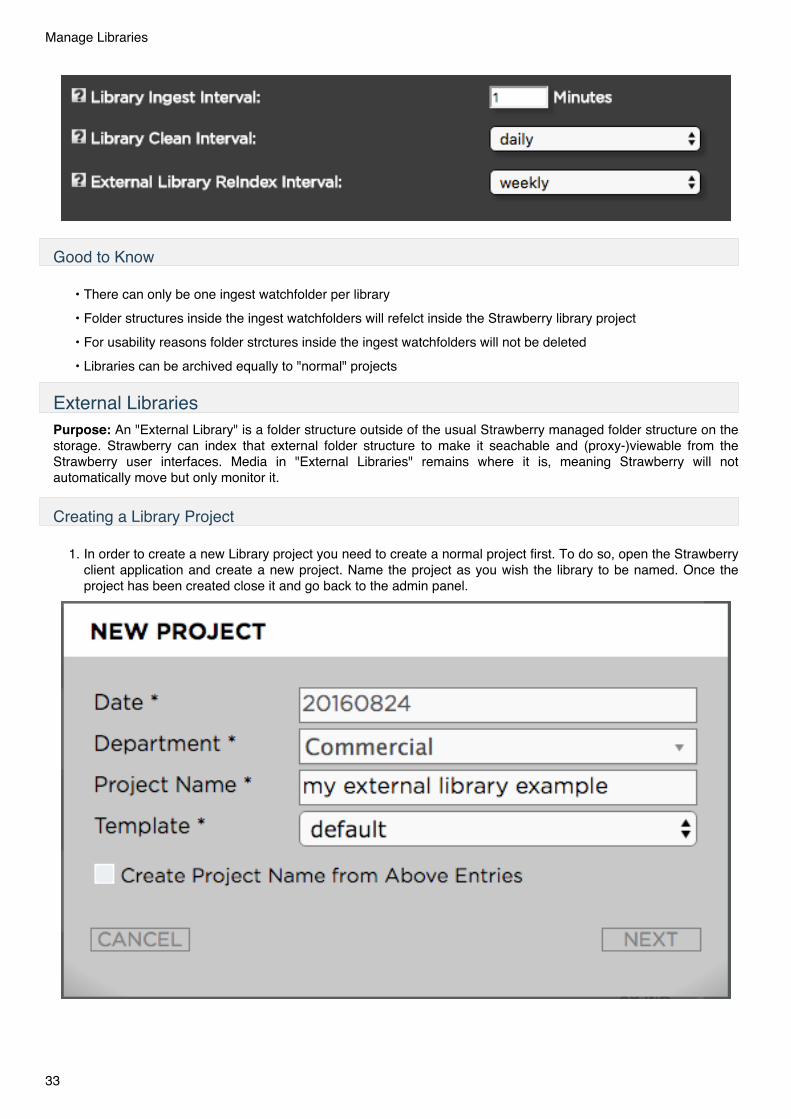
Good to Know
bull There can only be one ingest watchfolder per library
bull Folder structures inside the ingest watchfolders will refelct inside the Strawberry library project
bull For usability reasons folder strctures inside the ingest watchfolders will not be deleted
bull Libraries can be archived equally to normal projects
External LibrariesPurpose An External Library is a folder structure outside of the usual Strawberry managed folder structure on thestorage Strawberry can index that external folder structure to make it seachable and (proxy-)viewable from theStrawberry user interfaces Media in External Libraries remains where it is meaning Strawberry will notautomatically move but only monitor it
Creating a Library Project
1 In order to create a new Library project you need to create a normal project first To do so open the Strawberryclient application and create a new project Name the project as you wish the library to be named Once theproject has been created close it and go back to the admin panel
Manage Libraries
33
2 In the admin panel go to Projects Manage Online Projects and checkbox the project that you created in theprevious step No click on the Flag as Library button on the lower right of the project list Then confirm withyes
Once the library has been created it will appear under Projects Manage Libraries inside the Strawberry Adminpanel
Configuring an External LibraryPreparation Before configuring an ingest library you need to make sure that the folder structure that Strawberryshould watch is reachable by the Strawberry server If you are unsure how to do this please contact next levelsupport
1 Go to Projects Manage Libraries and checkbox the Library that you created in the previous step The librarywill be shown as Not Configured
2 Click on the Edit button below the library project list The following options appear
bull Name - Name of the Library
bull Watchfolder Type - Library Ingest or External Library - Select External Library here
bull External Path - The path to the folder structure that you wish to be watched by Strawberry
bull Target Storage - The storage to which ingested content should be moved This is only relevant if Strawberryis controlling multiple storage systems
bull Encoding Priority - The encoding priority for proxy files in this Library The ration between normal and highpriority is 14
Manage Libraries
34
bull Example for an External Library configuration
Configuring the Library Clean IntervalPurpose The clean interval scan your existing libraries for deleted media files on a recurring basis This however isonly important if you delete media files directly from the library folder on the storage and not from the Strawberryuser interface If you are not deleting Library media directly from the storage we recommend to set the recurrency toweekly instead of daily
Configuring the External Library Reindex IntervalPurpose The external library reindex scans your existing libraries for new modified and deleted media files on arecurring basis This make sure that all changes in the external location will reflect within Strawberry The ExternalLibrary Reindex is MUCH slower than the Library Clean Interval which is why it is not possible to run it hourly Werecommend a daily or even better week recurrency for this index job
Manage Libraries
35
Good to Know
bull There can only be one External Library location per library project
bull Folder structures inside the external library will refelct inside the Strawberry library project
bull When adding a media from an External Library to an open Strawberry project that media will always becopied
Custom Metadata
Custom Metadata SetsPurpose This feature allows the Administrators to create several metadata sets Metadata sets can either containdrop down menus or text input fields Users will be be asked to select from the values provided in the metadata setsupon project creation
How the custom metadata could look in the user frontend
An example of custom metadata fields asking the user to provide the requested information Metadata fields withan asterisk symbol are mandatory for the user to fill out
The Master SetUsage Log into the Administration panel and click on the PROJECTS tab Expand the CUSTOM METADATAbar
The master set is the default set for all Strawberry installations and it is the set that every user sees upon projectcreation The master set can be populated with drop down menus and text input fields
Creating a Metadata SetUsage Log into the Administration panel and click on the PROJECTS tab Expand the CUSTOM METADATAbar
Custom Metadata
36
Click the ADD SET button and provide a name for the new set Once the set is created you can populate it withmetadata values like dropdown menus or text input fields
Connecting Metadata SetsUsage Log into the Administration panel and click on the PROJECTS tab Expand the CUSTOM METADATAbar
Metadata sets can be connected via drop down menus meaning that a specific drop drop down selection will load aspecific metadata set for the user In order to connect a drop down value with a metadata set edit the metadatavalue by clicking the checkbox next to the value and then the EDIT VALUE button
Each drop down menu contains Values and Targets The value is the drop down value that the user can choosefrom upon project creating The target is the metadata set to which the value should refer If the target None isselected the value will not load any metadata set If a target set is selected this target set will be loaded when theuser chooses this specific value
Deleting a Metadata Set
Custom Metadata
37
Usage Log into the Administration panel and click on the PROJECTS tab Expand the CUSTOM METADATAbar Select the metadata set that you wish to delete by checking the box next to it and then press the delete buttonon the botton of the metadata set list
Creating a Dropdown MenuUsage Log into the Administration panel and click on the PROJECTS tab Expand the CUSTOM METADATAbar
Click the ADD VALUE button and provide the following information
bull Name The name of the dropdown menu as the user will see it (for example Customer)
bull Type dropdown menu
bull Maximum Characters Not relevant for dropdown
bull Restrict input to Not relvant for dropdown
bull Pattern Not relvant for dropdownbull Mandatory Defines if this value is mandatory (checked) or not (unchecked)
bull Use in Project String Defines if items from this dropdown will appear in the project name if the users enablesthe checkbox Create Project Name from Above Entries upon project creation
No you can type the drodown items into the Value field To add additional drodown values click on the + buttonon the right of the value field To connect a drop down value with another Metadata Set select the set as a Targetnext to the related value
Click CONFIRM when done
Custom Metadata
38
Creating a Text Input FieldUsage Log into the Administration panel and click on the PROJECTS tab Expand the CUSTOM METADATAbar
Click the ADD VALUE button and provide the following information
bull Name The name of the text input field as the user will see it (for example Project Number)
bull Type Text Input
bull Maximum Characters The amount of characters a user can type into that field 0 equals infinite
bull Restrict input to Restrict input to numbers only letters only or numbers amp letters No restriction will allowany UTF-8 character
bull Pattern Not relevant for text input
bull Mandatory Defines if this value is mandatory (checked) or not (unchecked)
bull Use in Project String Defines if items from this text input field will appear in the project name if the usersenables the checkbox Create Project Name from Above Entries upon project creation
Click CONFIRM when done
Custom Metadata
39
Creating a Replacement PatternUsage Replacements patterns enable Strawberry to automatically create date values based on Unix date modifiersA List of possible modifiers can be found below Usage Log into the Administration panel and click on thePROJECTS tab Expand the CUSTOM METADATA bar
Click the ADD VALUE button and provide the following information
bull Name The name of the pattern field as the user will see it (for example Date)
bull Type Replacement Pattern
bull Maximum Characters Not relevant for text replacement pattern
bull Restrict input to Not relevant for text replacement pattern
bull Pattern A pattern consisting of Unix modifiers A pattern such as eg Y m d equals year month date
bull Mandatory Not relevant for text replacement pattern
bull Use in Project String Defines if the output from this pattern will appear in the project name if the users enablesthe checkbox Create Project Name from Above Entries upon project creation
Click CONFIRM when done
Custom Metadata
40
Editing a ValueAvailable in Strawberry version 40 or newerUsage Log into the Administration panel and click on the PROJECTS tab Expand the CUSTOM METADATAbar Expand the metadata set that contains the value you want to edit and then select the value by checking the boxnext to it Change the value properties as required and then click CONFIRM
Deleting a ValueUsage Log into the Administration panel and click on the PROJECTS tab Expand the CUSTOM METADATAbar Expand the metadata set that contains the value you want to delete and then select the value by checking thebox next to it Now click on DELETE VALUE
Available in Strawberry version 40 or newer
Creating Project Status FlagsAvailable in Strawberry version 40 or newerPurpose Project statuses help users to determine what the working status of a project is Statuses can be forinstance in editing in color grading ready for approval etc and are defined by the administrator The statuses ofeach project is displayed in the metadata area of the Strawberry 4 user interface
Usage Log into the Administration panel and click on the PROJECTS tab Expand the STATUS OPTIONS barNow click on ADD STATUS and define a name for the new status Once the status is created users can choose itfrom the Strawberry frontend
Deleting Project Status FlagsPurpose Deleting status flags will prevent users from being able to select that status in the future However whendelting a status flag it will remain attached to the projects that are already using it
Custom Metadata
41
Usage Log into the Administration panel and click on the PROJECTS tab Expand the STATUS OPTIONS barNow click on the checkbox next to the status flag that you want to delete and press the DELETE VALUE button
Supported Unix Time Modifiers
bull a localersquos abbreviated weekday name (eg Sun)
bull A localersquos full weekday name (eg Sunday)
bull b localersquos abbreviated month name (eg Jan)
bull B localersquos full month name (eg January)
bull C century like Y except omit last two digits (eg 20)
bull d day of month (eg 01)
bull D date same as mdy
bull e day of month space padded same as _d
bull F full date same as Y-m-d
bull h same as b
bull H hour (0023)
bull I hour (0112)
bull j day of year (001366)
bull k hour ( 023)
bull l hour ( 112)
bull m month (0112)
bull M minute (0059)
bull p localersquos equivalent of either AM or PM blank if not known
bull P like p but lower case
bull r localersquos 12-hour clock time (eg 111104 PM)
bull R 24-hour hour and minute same as HM
bull s seconds since 1970-01-01 000000 UTC
bull S second (0060)
bull T time same as HMS
bull u day of week (17) 1 is Monday
bull U week number of year with Sunday as first day of week (0053)
bull w day of week (06) 0 is Sunday
bull W week number of year with Monday as first day of week (0053)
bull y last two digits of year (0099)
bull Y year
bull z +hhmm numeric timezone (eg -0400)
bull Z alphabetic time zone abbreviation (eg EDT)
Archive amp Copy ToStrawberry allows certain users (admins amp users but not guests) to archive and retrieve editing projects When performing an archive operation Strawberry takes every single file which is part of the project and sends it to an archive destination which was previously defined by the administrator As soon as the project is in the archive Strawberry 4 will delete it from the production storage (aka source) but will keep the metadata and proxy files The
Archive amp Copy To
42
archive path defined here is also the retrieval path If you look for a more sophisticated archivalretrieval process youshould have a look inside the Strawberry API documentation
Creating an Archive StrategyZIP is not longer supported as an archive method in Strawberry because of missing CRC checksumcapabilitiesPurpose Archive strategies allow you to define discrete archive locations and methodologies for different types ofprojects When a user presses the Archive Project button in the user front-end Strawberry will offer the archivestrategies defined here
Usage Log into the Administration panel and click on the Archive tab Expand the ARCHIVE STRATEGIES barClick the ADD button and provide the following information
bull Name The name of the archive strategy The users see the name of the strategy when he or she attempts toarchive a project
bull Type The archive type Please select SB native if you are not using Archiware P5 or Masstore
bull Path The path (aka archive destination) for projects archived using this strategy
bull Method
bull plain Strawberry archives the project and media files without compressing them It archives theprojects folder structure as it is
bull tarball Puts the project amp media files of a project into a tarball before archiving itbull Check
bull Fingerprint Sequential integrity check on a file that only detects serious file damages but no minordefectsbull CRCs are specifically designed to protect against common types of errors on data transmissionswhere they can provide quick and reasonable assurance of the integrity of data delivered Howeverthey are not suitable for protecting against intentional alteration of data
bull None No data integrity check at allbull EnableDisable Strategy Define if an archive strategy is available for users (enabled) or not (disabled)
Archive amp Copy To
43
Canceling an ArchiveRetrieval JobArchive or retrieval jobs can currently only be canceled from the Strawberry user interface but not from theAdministration panel In order to Cancel an archive or retrieval job do the following
1 Login to the user interface as an Administrator and right click on the affected project
2 Select Cancel ArchiveRetrieval Job and confirmIt will take a few seconds up to a couple of minutes until the cancellation has been performed Once it is done youwill see a warning sign next to the project name The warning sign indicates that the operation has been aborted bythe user
When a project archivalretrieval failed the project will have a warning sign next to its name
Clearing ArchiveRetrieval ErrorsIn case a project archive or retrieval failed (either it was canceled by a user or failed for other reasons) you can resetthe project state back to normal by performing the following operations
1 Login to the Strawberry user interface as an Administrator and right click on the affected project
2 Select Clear Archive Error from the context menu and confirmIt will take a few seconds until the fail state of the project has been cleared and the project is displayed asnormal Once the front end reports that the clearance has been successfully done you may retry to archive orretrieve the project if required
Project Copy-to StrategiesPurpose Strawberry enables users to copy projects to another location This location can be another storagedevice (for backup purposes) a render farm or other external application watch folders This feature works verysimilar to the Archive function The main difference is that copied projects will not be deleted from the mediastorage (source volume) but remain there for further use
Usage Log into the Administration panel and click on the Archive tab Expand the Project Copy-to Strategiesbar Click the ADD button and provide the following information
bull Name The name of the copy-to strategy The users see the name of the strategy when he or she attempts tocopy a project
bull Path The path (aka copy-to destination) for projects copied using this strategy
bull Method
bull plain Strawberry archives the project and media files without compressing them It backups theprojects folder structure as it is
bull tarball Puts the project amp media files of a project into a tarball before copying it
bull zip Puts the project amp media files of a project into a zip file before copying it (Please Note Zip filescan not be CRC checked)
bull Check
bull Fingerprint Sequential integrity check on a file that only detects serious file damages but no minordefects
Archive amp Copy To
44
bull CRCs are specifically designed to protect against common types of errors on data transmissionswhere they can provide quick and reasonable assurance of the integrity of data delivered Howeverthey are not suitable for protecting against intentional alteration of data
bull None No data integrity check at allbull EnableDisable Strategy Define if an archive strategy is available for users (enabled) or not (disabled)
Asset Copy-to StrategiesPurpose Strawberry enables users to copy individual assets to another location This location can be anotherstorage device (for backup purpose) a render farm or external application This feature works very similar to theArchive function The difference is that copied assets will not be deleted from the media storage but remain therefor further use
Usage Log into the Administration panel and click on the Archive tab Expand the Asset Backup Strategies barClick the ADD button and provide the following information
bull Name The name of the copy-to strategy The users see the name of the strategy when he or she attempts tocopy a project
bull Path The path (aka archive destination) for projects copied using this strategy
bull Method
bull plain Strawberry archives the project and media files without compressing them It backups theprojects folder structure as it is
bull tarball Puts the project amp media files of a project into a tarball before copying it
bull zip Puts the project amp media files of a project into a zip file before copying it (Please Note Zip filescan not be CRC checked)
bull Check
bull Fingerprint Sequential integrity check on a file that only detects serious file damages but no minordefects
bull CRCs are specifically designed to protect against common types of errors on data transmissionswhere they can provide quick and reasonable assurance of the integrity of data delivered Howeverthey are not suitable for protecting against intentional alteration of data
bull None No data integrity check at allbull EnableDisable Strategy Define if an archive strategy is available for users (enabled) or not (disabled)
Good to Know
Freezing Archived ProjectsAvailable in Strawberry version 44 or newerIn order to avoid that users are accidentally retrieving archived projects you can freeze these projects using rarrfreezeoptions larr
Templates
Working with Templates
Templates
45
Purpose Templates are an extremely efficient way to prepare standardized project settings and content for allStrawbery users in your facility Templates can contain custom file and folder structures
Example 1 Application Specific Templates
One example to illustrate the benefit of templates can be working with Avid Media Composer in different frame rates(24 frames and 25 frames) Avid does not allow to switch the frame rate within a project With Strawberry you couldcreate two templates one for 24 frames and one for 25 frames and copy the related Avid project files into thistemplate When a user creates a project from on of these templates the corresponding projects files (24 frames or25 frames) will be copied into the new projects an renamed after the new project so the user does not need to createa new Avid project manually after he or she created a project in strawberry
Example 2 Production Specific Templates
Another example of working with templates can be a specific production that requires specific preparations Mostmedia facilities create individual folder structures for different productions so that people save graphics visualeffects and sound effects in the right location on the storage Usually these folder structures need to be recreated foreach episode of a production With Strawberry you can create a template which contains a specific folder structureand even media files and copy your prepared folder and media files into this template As soon as a user choosesthe template upon project creation the folders and files that you prepared in the template will be copied over to thenew project and are immediately available for the user
Creating a Template (Avid Media Composer)Before users can create any Avid projects using the Strawberry client software you need to have at least ONEtemplate Log into the admin panel and click on the MISC tab Expand the TEMPLATES bar Now click theCREATE NEW button
Strawberry will ask you for a Template name a preset a token and a naming pattern
Choose a name that best characterizes your template In this example we will create an Avid template that containsa high definition Avid project with a resolution of 1080p So it makes sense to call the template Avid 1080p
In the preset row click on the little down arrow and choose the Avid preset When a user creates a projectbased on an Avid template Strawberry automatically create the Avid MediaFiles and OMFI MediaFiles folderstructure in the project and it will also ensure that Avid project and media files can be shared properly
The token is a replacement string for a file name This means that if your token says replace_me and you createan Avid template named replace_me and copy it into your template folder (discussed later) every time thetemplate replace_me is used the token text (in this case replace_me) will be changed to the name of the currentStrawberry project So the Avid project file called replace_meavp in your templates folder will be used and namedprojectnameavp as its created in your Strawberry project
In the row pattern you can define how a project name based on this template should look The stringYmd-name will result in the project name 20130810-ProjectName Putting the date inside the projectname will enable your user to search for projects by typing in the date If you dont need the date in the project nameyou can simply delete the date-related parts of the string and leave the name piece If you need the date part youcan modify it to your requirements In order to understand the formatting for doing this please refer to the unix timeman page at httpunixhelpedacukCGIman-cgidate
Templates
46
After you are done click Create and then open Avid Media Composer Create a new local project calledreplace_me with the setting 1080p25
Open the newly created project delete the bin that Avid always makes in new project and empty the Avid trashfolder
In order to ensure that Media Composer will recognize network volumes as media drives open Tools gt Console andtype in alldrives If you see the message All drives will be viewed as media drives (Was previously set to havingonly true media drives act as media drives) you are good to go If you see the message Only true media drives willbe viewed as media drives (Was previously set to having all drives act as media drives) type alldrives againThere are just two possible options
Now go to Tools gt Media Creation gt Capture and select the Strawberry media drive (mapped as a networkdrive on your Computer) as the AudioVideo file destination Click on both Apply to All buttons and then click onOK Now close the project
Templates
47
Navigate to the Strawberry template folder on your storage (Strawberrytemplates) Within that template folder youwill see a folder that is named after the template you created in the Strawberry admin panel (in this case we called itAvid 1080p) Inside this folder will be a folder called media_1 and one called projects
Use the Finder or Explorer to navigate to your local Avid projects folder (eg UsersFlavourSysDocumentsAvidProjects) and open the replace_me project folder Copy the files replace_meavp replace_me Settingsxml andreplace_me Settingsavs to your clipboard
Paste the files into your StrawberrytemplatesAvid 1080pprojects folder If an editor creates a new project using thistemplate Strawberry will rename the replace_me string with the name of the current Strawberry project
Now every time a Strawberry user creates a new project based on this template it has all the right settings export preferences etc that it will inherit from the replace_me project that you created and set up before copying it into the Strawberrytemplatesltyour template namegtprojects folder If you need to modify or improve your template
Templates
48
simply make the changes to the local replace_me project and re-copy the three files into theStrawberrytemplatesltyour template namegtprojects folder
Creating a Template (Adobe Premiere)Before you can create an Adobe Premiere editing project from within the Strawberry client software you need tocreate a template for Strawberry to use Click on the Template Tab in the Admin panel and then click on CreateNew
Strawberry will ask you for a Template name a preset a token and a naming pattern
Choose a name that best characterizes your template In this example we will create an Adobe Premiere templatethat contains an Adobe Premiere project So it makes sense to call the template Adobe Premiere
In the preset row click on the little down arrow and choose the Adobe preset When a user creates a projectbased on an Adobe template Strawberry automatically create the Adobe Cache folder structure in the project and itwill also ensure that Adobe project and media files can be shared properly
The token is a replacement string for file names This means that if your token says replace_me in these settingsand you go on to create an Adobe Premiere project named replace_me and put it in your template folder thetemplate will be used and automatically renamed based on the Strawberry project name that is open This way anAdobe Premiere template project file called replace_mePR will be named StrawberryprojectnamePR each timeyou create a new project from within Strawberry
In the row pattern you can define how a project name based on this template should look like The stringYmd-name will result in the project name 20130810-ProjectName Putting the date inside the projectname will enable your user to search for projects by typing in the date If you dont need the date in the project nameyou can simply delete the date related parts of the string and leave the name piece If you need the date part youcan modify it to your requirements In order to understand the formatting for doing this please refer to the unix timeman page at httpunixhelpedacukCGIman-cgidate
After you are done click Create and go to the Strawberry Client Create a new project using the Adobe Premieretemplate Now open Adobe Premiere and create a new project Name the project replace_me and set the captureformat to HDV Ensure that all Scratch Disk locations are set to same as project
Templates
49
Click ok to create and open the project Once the project is opened go to EditgtPreferences Media and choosethe Adobe Cache on your Strawberry media volume as the destination for Media Cache Files and Media CacheDatabase
Templates
50
Tip If you are using the Adobe Premiere Panel launch it now If a user creates a project based on this template thepanel will launch automatically with the new project
Click OK to confirm your changes Now save the project and leave Adobe Premiere Navigate to your local Adobeprojects folder and copy the newly created project file replace_meprproj to the media_1 folder of the Adobetemplate location that you created
Now every time an editor creates a new project using the Adobe Premiere template the replace_mepr templatewill be used and all the settings preferences and destinations will be inherited and used in the newStrawberryprojectnamepr
Rename a Templates
Templates
51
Purpose You want give the Templates a new name for differentation
Usage Log into the admin panel and click on the MISC tab Expand the MANAGE TEMPLATES bar Check thetemplate what you want rename below the templates list is a button says RENAME and fill out with the new nameIf you are ready click CONFIRM else if you want go back click CANCEL
Duplicate a TemplatePurpose Use dublicate a template if you want clone the settings
Usage Log into the admin panel and click on the MISC tab Expand the MANAGE TEMPLATES bar Check thetemplate what you want duplicate below the templates list is a button says DUPLICATE and fill out with the newname If you are ready confirm it with click DUPLICATE else if you want to stop the prozess click CANCEL
Delete a Template(s)Purpose If you want delete a template(s) eg Didnt needed anymore
Usage Log into the admin panel and click on the MISC tab EXPAND the MANAGE TEMPLATES bar Checkthe template what you want delete below the templates list is a button says DELETE
Configuring the Avid AtticWhen utilizing Avid Media Composer the Avid Attic functionality might be important to your workflow To make theAvid Attic work with strawberry please perform the following steps
1 Close Avid Media Composer
2 Navigate to the Avid Attic folder on our computerWin UsersPublicPublic DocumentsAvid editing application
Mac Macintosh HDUsersSharedAvid editing application
3 Rename the Avid Attic folder to Avid Attic_Old
4 Open an Avid Media Composer project using the Strawberry client and open the project in Avid
5 Close the project in Avid Media Composer
6 Go back to the Avid attic and check whether Avid has created a new Attic folder
7 Check the attic folder for the project that was recently opened in Strawberry
Manage IndexersCheck the following boxes if you want the features or unchecked if not
Enable deep indexing for media files
Index adobe premiere project files
Index avid bin files
Storage Quota
Templates
52
Purpose In this section you can define how much physical storage space all projects managed by strawberry areallowed to occupy The quota is a soft quota meaning that there is no physical storage restriction once it getsexpired However Strawberry will send a warning email if if the quota that you defined has been reached
Usage Log into the admin panel and click on the MISC tab Expand the STORAGE QUOTA bar Define howmuch space (in Gigabytes) all projects managed by strawberry are allowed to occupy and press SAVE You canchange this quota at any time
MYSQL BackupWhen clicking the Backup Now button Strawberry creates a dump of its MySQL database The default location forthe database dump is optsb4databackups The default destination can be reconfigured in theoptsb4appfsbaseconfigdatabase-backupyml file
Versions amp LicenseThis section is for license and support purpose only
VIEW Proxy Encoder
Supported Video Audio and Image File FormatsSupported Video Formats amp CodecsApple Intermediate Codec (MOV)Apple MJPEG-B (MOV)Apple ProRes (MOV)
Arri Alexa (ARI)
AS-11 IMX 50 (MXF)AS-11 AVC Intra 100 (MXF)
(X)AVC Intra 50100 (MOV MXF)
Avid 11 amp 11xAvid DV amp DV100
Avid DNxHD (MOV MXF)(45 60 75 90 90x 110 110x 120 120x 145 185 185x 220 220-10Bit)
Avid Interplay C93 amp MVE videoAvid MPEG2 50 - SDAvid Meridien Compressed SD amp Uncompressed SDAvid Packed amp RGBPacked
AVS (Standard amp Chinese)
Black Magic R210
Canopus LosslessCinepak
VIEW Proxy Encoder
53
DV (PAL amp NTSC)
DVCPRO HD | 100 MbpsDVCPRO 50 | 50 MbpsDVCPRO 25 | 25 Mbps
H261H263 H263-1996H263+ H263-1998 H263 version 2H264 AVC MPEG-4 AVC MPEG-4 (MP4 MOV MXF)
HDV
MJPEG amp MJPEG LosslessMPEG 1 amp 2 (M1V M2T M2V MPEG MPG MPGV MPV VOB)MPEG 4 (M4A M4P M4V MP4)
P2 - AVC-Intra 50 100 (MOV MXF)P2 - DVCPRO 25 50 100 (MOV MXF)
QuickTime uncompressed
Red Digital Cine Camera (R3D)
Windows Media Video (All Versions)
XDCAM 25XDCAM IMX 30XDCAM HD 50XDCAM SXS 50
Also SupportedAvid 11 10-bit RGB PackerFlash Video (FLV)Microsoft Video 1On2 VP3On2 VP5On2 VP6QuickTime 8BPS videoQuickTime Animation (RLE) videoQuickTime Graphics (SMC)QuickTime video (RPZA)R10K AJA Kona 10-bit RGB CodecR210 Quicktime Uncompressed RGB 10-bitTheoraVP8VP9WMV7
Supported Audio Formats amp CodecsMost CommonAAC+AACAC-3
CAF
MP3 (All Versions)MPEG-4 (All Versions)
PCM (All Versions amp Bitrates)
WAV
WMA (All Versions)
Also Supported
VIEW Proxy Encoder
54
Apple lossless audioATRAC1ATRAC3ATRAC3+Bink AudioCore Audio Format (CAF)DV audioEnhanced AC-3FLAC (Free Lossless Audio Codec)MACE (Macintosh Audio CompressionExpansion) 31MACE (Macintosh Audio CompressionExpansion) 61MLP (Meridian Lossless Packing)MP1 (MPEG audio layer 1)MP2 (MPEG audio layer 2)OpusRealAudio 10 (144K)RealAudio 20 (288K)RealAudio 30 (dnet)RealAudio LosslessRealAudio SIPR ACELPNETVorbisWindows Media Audio Voice
Supported Image Formats|Targa |TIF |PSD |PSB |PNG |JPG |IFF |GIF |BMP |DPX |EXR |ARI |EPS |AI
Enabling or Disabling ViewLog into the admin panel and click on the VIEW tab If VIEW is enabled proxy files will be created automaticallybased on the criteria below If VIEW is disabled proxy file encoding will not take place and he user front endautomatically jumps to list view instead of thumbnail view
Proxy Encoder ConfigurationIn this menu you can choose from properties of the Strawberry generated proxy files These options include
bull Proxy File Location shows where Strawberry saves the proxy files that it generates This location is definedupon installation and can only be changed by modifying the Strawberry configuration files on the Strawberryserver
bull Bitrate Define the proxy bitrate (per second) Please keep in mind that lower bitrates might be more suitablefor users connecting over the Internet while higher bit rates are good for LAN operations Is there a goldenrule Unfortunately not If you are using the Strawberry Preditor Add-on we recommend a low proxy bitrate(700k - 900k)
bull Resolution Choose a resolution for your proxy files There should always be a coherence between theresolution and the bit rate For example A 1920x1080 proxy file should have a bitrate of at least ~1200k whilea 640x360 proxy should look good with a 600k bitrate
bull Image Sequence Recognition When Strawberry VIEW detects an image sequence (Basename amp Count) withmore than 20 individual images it will create a preview MP4 file out of it An image sequence must have adelimiter between its basename and its count Valid delimiters are - (dash) (dot) and _ (underscore)sequence-name_001 is an example of a valid naming convention
bull Time Code Burn-In If you wish to have a video time code burned into your proxy files you should enable thisfeature
bull Time Code Label Position Defines whether the proxy time codes (or image layer names) are burned in on thebottom or on top of the proxy file
V isual Watermark Check this box if you want Strawberry to burn a visual watermark into your proxy files
bull Watermark Position Decide on which position of the screen your watermark image should be visible
VIEW Proxy Encoder
55
bull Watermark Image Upload a Watermark image as a png file The image should not be larger than your currentproxy resoultion and should have a transparent background You can download example watermarks heredlflavoursyscommanualssupporting_filesExample_Proxy_Watermarkszip
bull Watermark Preview Previews your uploaded watermark in respect of the current proxy resolution as well asthe current Timecode burn-in position
Blacklists amp Whitelists
bull Factory File Blacklist This is a factory blacklist provided by FlavourSys The blacklist has been populatedbased on best practice workflows If you need any of the factory blacklist file extensions whitelisted just enterthe extension into the Files Whitelist
bull File Blacklist Enter any file extension that you dont wish to see in the Strawberry user interface Strawberrywill then ignore files that are having this extension meaning that no proxies are generated However you canstill use the files on the FinderExplorer level in your projects In order to blacklist an item just enter extensionand press enter Press the save button to confirm
bull File Whitelist If you need to whitelist any extensions from the Factory File Blacklist just enter its extensioninto the Files Whitelist In order to whitelist an item just enter extension and press enter Press the savebutton to confirm
bull Factory Folders Blacklist This is a factory blacklist provided by FlavourSys The blacklist has been populatedbased on best practice workflows If you need any of the factory folder blacklist whitelisted just enter the foldername into the Folders Whitelist and press enter Press the save button to confirm
bull Folders Blacklist (Recursive) Enter any folder name that you dont wish to see in the Strawberry user interfaceStrawberry will then ignore the folder and its content meaning that no proxies are created You can still useblacklisted items on the FinderExplorer level in your projects In order to blacklist a folder just enter the foldername into the blacklist and press enter Press the save button to confirm
bull Folders Whitelist (Recursive) If you need to whitelist any folder from the Factory Folders Blacklist just enterits name into the Folders Whitelist and press enter Press the save button to confirm
Applying Blacklist amp Whitelist ChangesStrawberry 5 applies blacklist changes automatically In order to apply whitelist changes please perform thefollowing steps Also perform these steps in order to apply blacklist changes in Strawberry 44 or older versions
VIEW Proxy Encoder
56
1 Login to the Administration panel
2 Click on the MANAGE PROJECT tab
3 Select the project on which you want to apply the operation
4 Click the VIEW button below the project list
5 Select the radio button Rescan Project(s) and confirmDepending on the amount of files in the affected project this operation can take several minutes
Node and Worker Control
Purpose In this section of the admin panel you monitor and change the status of each VIEW encoding node that isintegrated in your environment You also have the possibility to set Schedulers so that you can decide if the nodesand the workers run
Usage Log into the admin panel and click on the VIEW tab Expand the NODE AND WORKER CONTROL barHere you can select from the following options
bull NODE ID The internal ID of each encoding node
bull NODE ADDRESS The hostname or IP address and port under which each node can be reached
bull STATUS Green means running yellow means paused and red means not running
bull NUMBER OF WORKERS Number of encoding workers (threads) that work at the same time Choose theamount of workers based on the amount of CPU cores of each node One worker per core works very well butleave at least one core for the OS and the rest of the Strawberry system The Strawberry Server license comeswith 3 Workers additional workers must be licensed separately
bull Actions Stop start restart or edit a scheduler for individual nodes
Content Download OptionsPurpose If you want to allow user to download media assets using the front end you can define this here Forinstance for workflows requiring executive review or for film schools where faculty could grade from home thisfeature can be beneficial however for feature film workflows this feature can be turned off
Usage Log into the admin panel and click on the VIEW tab Expand the CONTENT DOWNLOAD OPTIONS barIf you want to enable users to download low resolution media files (proxy files) from the front end check the boxnext to Allow users to download proxy files If you want to enable users to download high resolution media filesfrom the front end check the box next to Allow users to download high-res files
Rescan-Project(s)Purpose Scans the project for new files and newly supported file formats and attempts to encode them to proxyfiles It will also apply black list white list changes to existing projects
Usage Log into the Administration panel and click on the PROJECTS tab Expand the MANAGE PROJECTSbar Select the project(s) that you want to rescan and press the VIEW button below the project list and checkRescan Project(s) and confirm it
Repair-Project(s)
VIEW Proxy Encoder
57
Purpose Scans the project for new files and newly supported file formats and attempts to encode them to proxyfiles It will also apply black list white list changes to existing projects
Usage Log into the Administration panel and click on the PROJECTS tab Expand the MANAGE PROJECTSbar Select the project(s) that you want to repair and press the VIEW button below the project list and check RepairProject(s) and confirm it
Reencode-EverythingPurpose Deletes every file in the project to see if meta data have been changed Also looks for new files and newlysupported file formats and attempst to encode them to proxy files It will also apply black list white list changes toexisting projects
Usage Log into the Administration panel and click on the PROJECTS tab Expand the MANAGE PROJECTSbar Select the project(s) that you want to reencode-everything and press the VIEW button below the project listand check Reencode-Everything and confirm it
Miscellaneous
Manage TemplatesPlease visit this manuals rarr Templates larr chapter to get template related information
Safe SearchPurpose ldquoSafe Searchrdquo is an ldquoin edit suiterdquo security feature for Strawberry managed content Its aim is to reducethe visibility and searchability of content while a project with specific custom metadata is open This prevents thatclients see content of other clients while working on a project inside the editing room
Enabling Safe SearchLogin into the Strawberry Administrator panel and select the ldquoMiscrdquo tab Open the ldquoSearch settings and check thebox next to ldquoEnable Safe Search Featurerdquo
Define ldquoSafe Searchrdquo MetadataOnce ldquoSafe Searchrdquo is enabled click on the ldquoProjectsrdquo tab and open the ldquoCustom Metadatardquo menu Select a set andthen a drop down menu within it Then click on ldquoEdit Valuerdquo
Miscellaneous
58
Next to each drop down menu is a checkbox called ldquoSafe Searchrdquo Check this box for each value for which the ldquoSafeSearch filter should apply
When a user opens a project that includes a ldquoSafe Searchrdquo metadata the search field provides the informationaccordingly (safe search enabled for ldquometadata namerdquo) From this point on all searches will be carried within therelated safe search metadata context This applies until the project is closed
Miscellaneous
59
Good to Know
bull Only one drop down menu can have safe search metadata
bull Safe search metadata in the Administrator panel should not be changed enabled or disabled while projects areopened as this can lead to inconsistent search results
Manage IndexersAvailable in Strawberry version 42 or newer
GeneralCheck the following boxes if you want the features or unchecked if not
bull Enable Deep Indexing for Media Files(If enabled Strawberry will extract technical metadata from media files If it is disabled Strawberry will only index filenames and file sizes This feature needs to be enabled in order for the proxy encoding to work)
bull Index Adobe Premiere Project Files(If enabled Strawberry will extract master clip names a descriptions comments from Adobe Premiere master clipsto make these information visible amp searchable in the front-end)
bull Index Avid bin files(If enabled Strawberry will extract master clips names and sequence names from Avid bins to make theseinformation searchable in the front-end However when searching for an Avid master clip or sequence name theuser will not be provided with a visual presentation of the asset or sequence but will only see the project(s) thatcontains these information since this feature is beta we recommend to turn it of)
bull Extract Exif metadata from images(If enabled Strawberry will extract EXIF metadata from image files
bull Extract XMP metadata from files(if enabled Strawberry will extract XMP metadata from media files)
bull Extract XML metadata (Experimental)(if enabled Strawberry will extract XML metadata from xml sidecard files Please contact us for an overview ofsupported XML schemes)
bull Search for technical metadata(If enabled Strawberry will extract technical metadata from video files as well as ID3 tags (album Artist etc) fromaudio files
Technical Metadata WhitelistStrawberry maintains a search index that allows user to carry out searches in an extremely fast fashion Since thissearch index is stored in the server memory its size must be limited and therefor can not include all possible searchparameters Administrator can define the search parameters by white-listing them
Miscellaneous
60
Enter any label that you wish to add to the Strawberry search index To insert a label just click next to an existinglabel and start typing An auto completion list will show available results for your search term Select the technicalmetadata label that you wish to add to the search index Use the x button next to a labels name to remove a labelfrom the search index The changes will not apply immediately but on the next build of the search index (once anight) If you want to apply the settings immediately SSH login to the Strawberry server as root and type thecommand sb reindex
Storage Quota
Purpose In this section you can define how much physical storage space all projects managed by strawberry areallowed to occupy The quota is a soft quota meaning that there is no physical storage restriction once it getsexpired However Strawberry will send a warning email if if the quota that you defined has been reached
Usage Log into the admin panel and click on the MISC tab Expand the STORAGE QUOTA bar Define howmuch space (in Gigabytes) all projects managed by strawberry are allowed to occupy and press SAVE You canchange this quota at any time
Adobe Premiere Specific Feature
Auto-Link media from Library into projectThis feature is part of a custom development and currently not documented
Auto-Ingest local media into projectPurpose If a user imports media from a usb or local hdd into an Adobe Premiere project that is managed byStrawberry Strawberry can automatically copy that media into the projects media volume This ensures that allmedia used in a Premiere project is actually on the centralized storage
Usage Log into the admin panel and click on the MISC tab Expand the Auto Import Library amp unmanaged Assets(Adobe Premiere Only) bar If you wish to enable the Auto-ingest feature check the box next to it and define aninterval The interval determines how often the Strawberry Adobe panel will check for unmanaged inside each openPremiere project
Auto-Link subproject media into projectPurpose If a user imports media from a subproject into an Adobe Premiere project that is managed by StrawberryStrawberry can automatically link that into the from the subproject into the parent project This ensures that anyproject is self contained at any point
Miscellaneous
61
Usage Log into the admin panel and click on the MISC tab Expand the Auto Import Library amp unmanaged Assets(Adobe Premiere Only) bar If you wish to enable the Auto-link feature check the box next to it and define aninterval The interval determines how often the Strawberry Adobe panel will check for imported subproject mediainside the current project to link it
PreditorDefine the Timeout based on which a user should be automatically logged out of Preditor In the process Strawberrywill also automatically close the users sequence in order to free the license slot Preditor creates auto-saves of opensequences every minute and stores these on the server so that progress does not get lost even if the sequence getsauto-closed
SMTP SetupPurpose Strawberry has the ability to send email notifications on specific criteria This usually is the case if a teamexpires its storage quota or if assets are shared via email using the built-in functions For this feature to workStrawberry needs to be provided with STMP information
Usage
1 Login to the Strawberry server and cd to optsb4appfsbaseconfig
2 Open the file smtpymlexample and replace the example SMTP values with your own ones
3 Save the file as smtpymlThe Strawberry services needs to be restarted for the changes to apply
MYSQL BackupWhen clicking the Backup Now button Strawberry creates a dump of its MySQL database The default location forthe database dump is optsb4appbackups The default destination can be reconfigured in theoptsb4appfsbaseconfigdatabase-backupyml file
Empty TrashPressing the Empty Trash Now button will instantly remove all contents from the Strawberry trash folder
Osiris OptionShared Edits only
Purpose If the Osiris option is enabled Strawberry will mount its project media volumes in a specific way AvidMedia Composer will detect these volumes as volumes from an Avid storage and will provide bin locking for allStrawberry managed Media Composer projects
Versions amp LicenseThis section shows you the current version numbers of the Strawberry 4 modules that are installed on yourStrawberry server Additionally it provides you with license related information for your site
Updating a LicenseOnly use this method if you are running Strawberry in a Non-High Availability environment
Please go to the Strawberry admin panel misc versions amp license and click the NEW LICENSE button Copy andpaste the license string in there and click the UPDATE button Once this is done SSH login to the Strawberryserver and type service strawberry4 restart The license will be applied once the Strawberry service has beenrestarted
Legal Information
Legal Information
62
AVID is a trademark of Avid Technologies (wwwavidcom) Apple and FCP are trademarks of Apple in the US(wwwapplecom) Adobe and Premiere are trademarks of Adobe (wwwadobecom) All product names logos andbrands are property of their respective owners All company product and service names used in this manual are foridentification purposes only Use of these names logos and brands does not imply endorsement
Legal Information
63
- Last Updated July 20 2017
-
- Introduction
- System Requirements
-
- Storage File System Requirements
-
- List of Certified Storage Vendors
- List of Supported Storage File Systems
-
- Strawberry Server HWSW Requirements for Production Environments
- Minimum Server HWSW Requirements for Demonstration amp POC Environments
- Minimum Requirements for a dedicated View Proxy Encoding Node
- Requirements for the Strawberry Client
-
- Strawberry Client SSL
-
- Requirements for the Strawberry Adobe Panel
- Minimum Web Browser Requirements
-
- Installation Manuals
-
- Strawberry Client
-
- Installing the Client
- Starting the Client
- Upgrading the Client
- Deleting the Client
-
- Client Configuration for NAS
-
- SMB Mounts Configuration
- Paths to Editing applications (App Launcher)
- Mount your drives under Windows 7 amp 8
- Mount your drives under OSX
-
- Client Configuration for StorNext amp XSAN
-
- SAN Mount Configuration
-
- Client Configuration for Shared Edits under macOS
- Client Configuration for Shared Edits under Windows
- Changing the Clients Fuse Blocksize (macOS only)
- Adobe Panel
-
- Installing the Panel
- Updating the Panel
- Removing the Panel
- Testing the Panel
-
- Users Roles amp Teams
-
- Manage Roles
-
- Available Capabilities
- Creating a role
- Editing a role
- Deleting a role
-
- Manage Users
-
- Creating a User
- Changing a Users Role
- User Specific Roles
- Assigning a User to Teams
- Deleting a User
- Removing a User from a Team
-
- Manage Teams
-
- Creating a Team
- Changing a Teams Name
- Changing a Teams Quota
- Deleting a Team
-
- Manage Edits
-
- Manage Projects
-
- Manage Online Projects
-
- Force Closing a Project
- Deleting one or multiple Projects
- Archiving a Project
-
- Manage Archived Projects
-
- Retrieving a Project from the Archive
-
- Download Project List
- Custom Metadata
-
- Manage Libraries
-
- Introduction
- Library States
- Ingest Libraries
-
- Creating a Library Project
- Configuring an Ingest Library
- Configuring the Library Ingest Interval
- Configuring the Library Clean Interval
- Good to Know
-
- External Libraries
-
- Creating a Library Project
- Configuring an External Library
- Configuring the Library Clean Interval
- Configuring the External Library Reindex Interval
- Good to Know
-
- Custom Metadata
-
- Custom Metadata Sets
- The Master Set
- Creating a Metadata Set
- Connecting Metadata Sets
- Deleting a Metadata Set
- Creating a Dropdown Menu
- Creating a Text Input Field
- Creating a Replacement Pattern
- Editing a Value
- Deleting a Value
- Creating Project Status Flags
- Deleting Project Status Flags
- Supported Unix Time Modifiers
-
- Archive amp Copy To
-
- Creating an Archive Strategy
- Canceling an ArchiveRetrieval Job
- Clearing ArchiveRetrieval Errors
- Project Copy-to Strategies
- Asset Copy-to Strategies
- Good to Know
-
- Freezing Archived Projects
-
- Templates
-
- Working with Templates
- Creating a Template (Avid Media Composer)
- Creating a Template (Adobe Premiere)
- Rename a Templates
- Duplicate a Template
- Delete a Template(s)
- Configuring the Avid Attic
- Manage Indexers
- Storage Quota
- MYSQL Backup
- Versions amp License
-
- VIEW Proxy Encoder
-
- Supported Video Audio and Image File Formats
- Enabling or Disabling View
- Proxy Encoder Configuration
- Blacklists amp Whitelists
- Applying Blacklist amp Whitelist Changes
- Node and Worker Control
- Content Download Options
- Rescan-Project(s)
- Repair-Project(s)
- Reencode-Everything
-
- Miscellaneous
-
- Manage Templates
- Safe Search
-
- Enabling Safe Search
- Define ldquoSafe Searchrdquo Metadata
- Good to Know
-
- Manage Indexers
-
- General
- Technical Metadata Whitelist
-
- Storage Quota
- Adobe Premiere Specific Feature
-
- Auto-Link media from Library into project
- Auto-Ingest local media into project
- Auto-Link subproject media into project
-
- Preditor
- SMTP Setup
- MYSQL Backup
- Empty Trash
- Osiris Option
- Versions amp License
-
- Updating a License
-
- Legal Information
-

Good to Know
bull There can only be one External Library location per library project
bull Folder structures inside the external library will refelct inside the Strawberry library project
bull When adding a media from an External Library to an open Strawberry project that media will always becopied
Custom Metadata
Custom Metadata SetsPurpose This feature allows the Administrators to create several metadata sets Metadata sets can either containdrop down menus or text input fields Users will be be asked to select from the values provided in the metadata setsupon project creation
How the custom metadata could look in the user frontend
An example of custom metadata fields asking the user to provide the requested information Metadata fields withan asterisk symbol are mandatory for the user to fill out
The Master SetUsage Log into the Administration panel and click on the PROJECTS tab Expand the CUSTOM METADATAbar
The master set is the default set for all Strawberry installations and it is the set that every user sees upon projectcreation The master set can be populated with drop down menus and text input fields
Creating a Metadata SetUsage Log into the Administration panel and click on the PROJECTS tab Expand the CUSTOM METADATAbar
Custom Metadata
36
Click the ADD SET button and provide a name for the new set Once the set is created you can populate it withmetadata values like dropdown menus or text input fields
Connecting Metadata SetsUsage Log into the Administration panel and click on the PROJECTS tab Expand the CUSTOM METADATAbar
Metadata sets can be connected via drop down menus meaning that a specific drop drop down selection will load aspecific metadata set for the user In order to connect a drop down value with a metadata set edit the metadatavalue by clicking the checkbox next to the value and then the EDIT VALUE button
Each drop down menu contains Values and Targets The value is the drop down value that the user can choosefrom upon project creating The target is the metadata set to which the value should refer If the target None isselected the value will not load any metadata set If a target set is selected this target set will be loaded when theuser chooses this specific value
Deleting a Metadata Set
Custom Metadata
37
Usage Log into the Administration panel and click on the PROJECTS tab Expand the CUSTOM METADATAbar Select the metadata set that you wish to delete by checking the box next to it and then press the delete buttonon the botton of the metadata set list
Creating a Dropdown MenuUsage Log into the Administration panel and click on the PROJECTS tab Expand the CUSTOM METADATAbar
Click the ADD VALUE button and provide the following information
bull Name The name of the dropdown menu as the user will see it (for example Customer)
bull Type dropdown menu
bull Maximum Characters Not relevant for dropdown
bull Restrict input to Not relvant for dropdown
bull Pattern Not relvant for dropdownbull Mandatory Defines if this value is mandatory (checked) or not (unchecked)
bull Use in Project String Defines if items from this dropdown will appear in the project name if the users enablesthe checkbox Create Project Name from Above Entries upon project creation
No you can type the drodown items into the Value field To add additional drodown values click on the + buttonon the right of the value field To connect a drop down value with another Metadata Set select the set as a Targetnext to the related value
Click CONFIRM when done
Custom Metadata
38
Creating a Text Input FieldUsage Log into the Administration panel and click on the PROJECTS tab Expand the CUSTOM METADATAbar
Click the ADD VALUE button and provide the following information
bull Name The name of the text input field as the user will see it (for example Project Number)
bull Type Text Input
bull Maximum Characters The amount of characters a user can type into that field 0 equals infinite
bull Restrict input to Restrict input to numbers only letters only or numbers amp letters No restriction will allowany UTF-8 character
bull Pattern Not relevant for text input
bull Mandatory Defines if this value is mandatory (checked) or not (unchecked)
bull Use in Project String Defines if items from this text input field will appear in the project name if the usersenables the checkbox Create Project Name from Above Entries upon project creation
Click CONFIRM when done
Custom Metadata
39
Creating a Replacement PatternUsage Replacements patterns enable Strawberry to automatically create date values based on Unix date modifiersA List of possible modifiers can be found below Usage Log into the Administration panel and click on thePROJECTS tab Expand the CUSTOM METADATA bar
Click the ADD VALUE button and provide the following information
bull Name The name of the pattern field as the user will see it (for example Date)
bull Type Replacement Pattern
bull Maximum Characters Not relevant for text replacement pattern
bull Restrict input to Not relevant for text replacement pattern
bull Pattern A pattern consisting of Unix modifiers A pattern such as eg Y m d equals year month date
bull Mandatory Not relevant for text replacement pattern
bull Use in Project String Defines if the output from this pattern will appear in the project name if the users enablesthe checkbox Create Project Name from Above Entries upon project creation
Click CONFIRM when done
Custom Metadata
40
Editing a ValueAvailable in Strawberry version 40 or newerUsage Log into the Administration panel and click on the PROJECTS tab Expand the CUSTOM METADATAbar Expand the metadata set that contains the value you want to edit and then select the value by checking the boxnext to it Change the value properties as required and then click CONFIRM
Deleting a ValueUsage Log into the Administration panel and click on the PROJECTS tab Expand the CUSTOM METADATAbar Expand the metadata set that contains the value you want to delete and then select the value by checking thebox next to it Now click on DELETE VALUE
Available in Strawberry version 40 or newer
Creating Project Status FlagsAvailable in Strawberry version 40 or newerPurpose Project statuses help users to determine what the working status of a project is Statuses can be forinstance in editing in color grading ready for approval etc and are defined by the administrator The statuses ofeach project is displayed in the metadata area of the Strawberry 4 user interface
Usage Log into the Administration panel and click on the PROJECTS tab Expand the STATUS OPTIONS barNow click on ADD STATUS and define a name for the new status Once the status is created users can choose itfrom the Strawberry frontend
Deleting Project Status FlagsPurpose Deleting status flags will prevent users from being able to select that status in the future However whendelting a status flag it will remain attached to the projects that are already using it
Custom Metadata
41
Usage Log into the Administration panel and click on the PROJECTS tab Expand the STATUS OPTIONS barNow click on the checkbox next to the status flag that you want to delete and press the DELETE VALUE button
Supported Unix Time Modifiers
bull a localersquos abbreviated weekday name (eg Sun)
bull A localersquos full weekday name (eg Sunday)
bull b localersquos abbreviated month name (eg Jan)
bull B localersquos full month name (eg January)
bull C century like Y except omit last two digits (eg 20)
bull d day of month (eg 01)
bull D date same as mdy
bull e day of month space padded same as _d
bull F full date same as Y-m-d
bull h same as b
bull H hour (0023)
bull I hour (0112)
bull j day of year (001366)
bull k hour ( 023)
bull l hour ( 112)
bull m month (0112)
bull M minute (0059)
bull p localersquos equivalent of either AM or PM blank if not known
bull P like p but lower case
bull r localersquos 12-hour clock time (eg 111104 PM)
bull R 24-hour hour and minute same as HM
bull s seconds since 1970-01-01 000000 UTC
bull S second (0060)
bull T time same as HMS
bull u day of week (17) 1 is Monday
bull U week number of year with Sunday as first day of week (0053)
bull w day of week (06) 0 is Sunday
bull W week number of year with Monday as first day of week (0053)
bull y last two digits of year (0099)
bull Y year
bull z +hhmm numeric timezone (eg -0400)
bull Z alphabetic time zone abbreviation (eg EDT)
Archive amp Copy ToStrawberry allows certain users (admins amp users but not guests) to archive and retrieve editing projects When performing an archive operation Strawberry takes every single file which is part of the project and sends it to an archive destination which was previously defined by the administrator As soon as the project is in the archive Strawberry 4 will delete it from the production storage (aka source) but will keep the metadata and proxy files The
Archive amp Copy To
42
archive path defined here is also the retrieval path If you look for a more sophisticated archivalretrieval process youshould have a look inside the Strawberry API documentation
Creating an Archive StrategyZIP is not longer supported as an archive method in Strawberry because of missing CRC checksumcapabilitiesPurpose Archive strategies allow you to define discrete archive locations and methodologies for different types ofprojects When a user presses the Archive Project button in the user front-end Strawberry will offer the archivestrategies defined here
Usage Log into the Administration panel and click on the Archive tab Expand the ARCHIVE STRATEGIES barClick the ADD button and provide the following information
bull Name The name of the archive strategy The users see the name of the strategy when he or she attempts toarchive a project
bull Type The archive type Please select SB native if you are not using Archiware P5 or Masstore
bull Path The path (aka archive destination) for projects archived using this strategy
bull Method
bull plain Strawberry archives the project and media files without compressing them It archives theprojects folder structure as it is
bull tarball Puts the project amp media files of a project into a tarball before archiving itbull Check
bull Fingerprint Sequential integrity check on a file that only detects serious file damages but no minordefectsbull CRCs are specifically designed to protect against common types of errors on data transmissionswhere they can provide quick and reasonable assurance of the integrity of data delivered Howeverthey are not suitable for protecting against intentional alteration of data
bull None No data integrity check at allbull EnableDisable Strategy Define if an archive strategy is available for users (enabled) or not (disabled)
Archive amp Copy To
43
Canceling an ArchiveRetrieval JobArchive or retrieval jobs can currently only be canceled from the Strawberry user interface but not from theAdministration panel In order to Cancel an archive or retrieval job do the following
1 Login to the user interface as an Administrator and right click on the affected project
2 Select Cancel ArchiveRetrieval Job and confirmIt will take a few seconds up to a couple of minutes until the cancellation has been performed Once it is done youwill see a warning sign next to the project name The warning sign indicates that the operation has been aborted bythe user
When a project archivalretrieval failed the project will have a warning sign next to its name
Clearing ArchiveRetrieval ErrorsIn case a project archive or retrieval failed (either it was canceled by a user or failed for other reasons) you can resetthe project state back to normal by performing the following operations
1 Login to the Strawberry user interface as an Administrator and right click on the affected project
2 Select Clear Archive Error from the context menu and confirmIt will take a few seconds until the fail state of the project has been cleared and the project is displayed asnormal Once the front end reports that the clearance has been successfully done you may retry to archive orretrieve the project if required
Project Copy-to StrategiesPurpose Strawberry enables users to copy projects to another location This location can be another storagedevice (for backup purposes) a render farm or other external application watch folders This feature works verysimilar to the Archive function The main difference is that copied projects will not be deleted from the mediastorage (source volume) but remain there for further use
Usage Log into the Administration panel and click on the Archive tab Expand the Project Copy-to Strategiesbar Click the ADD button and provide the following information
bull Name The name of the copy-to strategy The users see the name of the strategy when he or she attempts tocopy a project
bull Path The path (aka copy-to destination) for projects copied using this strategy
bull Method
bull plain Strawberry archives the project and media files without compressing them It backups theprojects folder structure as it is
bull tarball Puts the project amp media files of a project into a tarball before copying it
bull zip Puts the project amp media files of a project into a zip file before copying it (Please Note Zip filescan not be CRC checked)
bull Check
bull Fingerprint Sequential integrity check on a file that only detects serious file damages but no minordefects
Archive amp Copy To
44
bull CRCs are specifically designed to protect against common types of errors on data transmissionswhere they can provide quick and reasonable assurance of the integrity of data delivered Howeverthey are not suitable for protecting against intentional alteration of data
bull None No data integrity check at allbull EnableDisable Strategy Define if an archive strategy is available for users (enabled) or not (disabled)
Asset Copy-to StrategiesPurpose Strawberry enables users to copy individual assets to another location This location can be anotherstorage device (for backup purpose) a render farm or external application This feature works very similar to theArchive function The difference is that copied assets will not be deleted from the media storage but remain therefor further use
Usage Log into the Administration panel and click on the Archive tab Expand the Asset Backup Strategies barClick the ADD button and provide the following information
bull Name The name of the copy-to strategy The users see the name of the strategy when he or she attempts tocopy a project
bull Path The path (aka archive destination) for projects copied using this strategy
bull Method
bull plain Strawberry archives the project and media files without compressing them It backups theprojects folder structure as it is
bull tarball Puts the project amp media files of a project into a tarball before copying it
bull zip Puts the project amp media files of a project into a zip file before copying it (Please Note Zip filescan not be CRC checked)
bull Check
bull Fingerprint Sequential integrity check on a file that only detects serious file damages but no minordefects
bull CRCs are specifically designed to protect against common types of errors on data transmissionswhere they can provide quick and reasonable assurance of the integrity of data delivered Howeverthey are not suitable for protecting against intentional alteration of data
bull None No data integrity check at allbull EnableDisable Strategy Define if an archive strategy is available for users (enabled) or not (disabled)
Good to Know
Freezing Archived ProjectsAvailable in Strawberry version 44 or newerIn order to avoid that users are accidentally retrieving archived projects you can freeze these projects using rarrfreezeoptions larr
Templates
Working with Templates
Templates
45
Purpose Templates are an extremely efficient way to prepare standardized project settings and content for allStrawbery users in your facility Templates can contain custom file and folder structures
Example 1 Application Specific Templates
One example to illustrate the benefit of templates can be working with Avid Media Composer in different frame rates(24 frames and 25 frames) Avid does not allow to switch the frame rate within a project With Strawberry you couldcreate two templates one for 24 frames and one for 25 frames and copy the related Avid project files into thistemplate When a user creates a project from on of these templates the corresponding projects files (24 frames or25 frames) will be copied into the new projects an renamed after the new project so the user does not need to createa new Avid project manually after he or she created a project in strawberry
Example 2 Production Specific Templates
Another example of working with templates can be a specific production that requires specific preparations Mostmedia facilities create individual folder structures for different productions so that people save graphics visualeffects and sound effects in the right location on the storage Usually these folder structures need to be recreated foreach episode of a production With Strawberry you can create a template which contains a specific folder structureand even media files and copy your prepared folder and media files into this template As soon as a user choosesthe template upon project creation the folders and files that you prepared in the template will be copied over to thenew project and are immediately available for the user
Creating a Template (Avid Media Composer)Before users can create any Avid projects using the Strawberry client software you need to have at least ONEtemplate Log into the admin panel and click on the MISC tab Expand the TEMPLATES bar Now click theCREATE NEW button
Strawberry will ask you for a Template name a preset a token and a naming pattern
Choose a name that best characterizes your template In this example we will create an Avid template that containsa high definition Avid project with a resolution of 1080p So it makes sense to call the template Avid 1080p
In the preset row click on the little down arrow and choose the Avid preset When a user creates a projectbased on an Avid template Strawberry automatically create the Avid MediaFiles and OMFI MediaFiles folderstructure in the project and it will also ensure that Avid project and media files can be shared properly
The token is a replacement string for a file name This means that if your token says replace_me and you createan Avid template named replace_me and copy it into your template folder (discussed later) every time thetemplate replace_me is used the token text (in this case replace_me) will be changed to the name of the currentStrawberry project So the Avid project file called replace_meavp in your templates folder will be used and namedprojectnameavp as its created in your Strawberry project
In the row pattern you can define how a project name based on this template should look The stringYmd-name will result in the project name 20130810-ProjectName Putting the date inside the projectname will enable your user to search for projects by typing in the date If you dont need the date in the project nameyou can simply delete the date-related parts of the string and leave the name piece If you need the date part youcan modify it to your requirements In order to understand the formatting for doing this please refer to the unix timeman page at httpunixhelpedacukCGIman-cgidate
Templates
46
After you are done click Create and then open Avid Media Composer Create a new local project calledreplace_me with the setting 1080p25
Open the newly created project delete the bin that Avid always makes in new project and empty the Avid trashfolder
In order to ensure that Media Composer will recognize network volumes as media drives open Tools gt Console andtype in alldrives If you see the message All drives will be viewed as media drives (Was previously set to havingonly true media drives act as media drives) you are good to go If you see the message Only true media drives willbe viewed as media drives (Was previously set to having all drives act as media drives) type alldrives againThere are just two possible options
Now go to Tools gt Media Creation gt Capture and select the Strawberry media drive (mapped as a networkdrive on your Computer) as the AudioVideo file destination Click on both Apply to All buttons and then click onOK Now close the project
Templates
47
Navigate to the Strawberry template folder on your storage (Strawberrytemplates) Within that template folder youwill see a folder that is named after the template you created in the Strawberry admin panel (in this case we called itAvid 1080p) Inside this folder will be a folder called media_1 and one called projects
Use the Finder or Explorer to navigate to your local Avid projects folder (eg UsersFlavourSysDocumentsAvidProjects) and open the replace_me project folder Copy the files replace_meavp replace_me Settingsxml andreplace_me Settingsavs to your clipboard
Paste the files into your StrawberrytemplatesAvid 1080pprojects folder If an editor creates a new project using thistemplate Strawberry will rename the replace_me string with the name of the current Strawberry project
Now every time a Strawberry user creates a new project based on this template it has all the right settings export preferences etc that it will inherit from the replace_me project that you created and set up before copying it into the Strawberrytemplatesltyour template namegtprojects folder If you need to modify or improve your template
Templates
48
simply make the changes to the local replace_me project and re-copy the three files into theStrawberrytemplatesltyour template namegtprojects folder
Creating a Template (Adobe Premiere)Before you can create an Adobe Premiere editing project from within the Strawberry client software you need tocreate a template for Strawberry to use Click on the Template Tab in the Admin panel and then click on CreateNew
Strawberry will ask you for a Template name a preset a token and a naming pattern
Choose a name that best characterizes your template In this example we will create an Adobe Premiere templatethat contains an Adobe Premiere project So it makes sense to call the template Adobe Premiere
In the preset row click on the little down arrow and choose the Adobe preset When a user creates a projectbased on an Adobe template Strawberry automatically create the Adobe Cache folder structure in the project and itwill also ensure that Adobe project and media files can be shared properly
The token is a replacement string for file names This means that if your token says replace_me in these settingsand you go on to create an Adobe Premiere project named replace_me and put it in your template folder thetemplate will be used and automatically renamed based on the Strawberry project name that is open This way anAdobe Premiere template project file called replace_mePR will be named StrawberryprojectnamePR each timeyou create a new project from within Strawberry
In the row pattern you can define how a project name based on this template should look like The stringYmd-name will result in the project name 20130810-ProjectName Putting the date inside the projectname will enable your user to search for projects by typing in the date If you dont need the date in the project nameyou can simply delete the date related parts of the string and leave the name piece If you need the date part youcan modify it to your requirements In order to understand the formatting for doing this please refer to the unix timeman page at httpunixhelpedacukCGIman-cgidate
After you are done click Create and go to the Strawberry Client Create a new project using the Adobe Premieretemplate Now open Adobe Premiere and create a new project Name the project replace_me and set the captureformat to HDV Ensure that all Scratch Disk locations are set to same as project
Templates
49
Click ok to create and open the project Once the project is opened go to EditgtPreferences Media and choosethe Adobe Cache on your Strawberry media volume as the destination for Media Cache Files and Media CacheDatabase
Templates
50
Tip If you are using the Adobe Premiere Panel launch it now If a user creates a project based on this template thepanel will launch automatically with the new project
Click OK to confirm your changes Now save the project and leave Adobe Premiere Navigate to your local Adobeprojects folder and copy the newly created project file replace_meprproj to the media_1 folder of the Adobetemplate location that you created
Now every time an editor creates a new project using the Adobe Premiere template the replace_mepr templatewill be used and all the settings preferences and destinations will be inherited and used in the newStrawberryprojectnamepr
Rename a Templates
Templates
51
Purpose You want give the Templates a new name for differentation
Usage Log into the admin panel and click on the MISC tab Expand the MANAGE TEMPLATES bar Check thetemplate what you want rename below the templates list is a button says RENAME and fill out with the new nameIf you are ready click CONFIRM else if you want go back click CANCEL
Duplicate a TemplatePurpose Use dublicate a template if you want clone the settings
Usage Log into the admin panel and click on the MISC tab Expand the MANAGE TEMPLATES bar Check thetemplate what you want duplicate below the templates list is a button says DUPLICATE and fill out with the newname If you are ready confirm it with click DUPLICATE else if you want to stop the prozess click CANCEL
Delete a Template(s)Purpose If you want delete a template(s) eg Didnt needed anymore
Usage Log into the admin panel and click on the MISC tab EXPAND the MANAGE TEMPLATES bar Checkthe template what you want delete below the templates list is a button says DELETE
Configuring the Avid AtticWhen utilizing Avid Media Composer the Avid Attic functionality might be important to your workflow To make theAvid Attic work with strawberry please perform the following steps
1 Close Avid Media Composer
2 Navigate to the Avid Attic folder on our computerWin UsersPublicPublic DocumentsAvid editing application
Mac Macintosh HDUsersSharedAvid editing application
3 Rename the Avid Attic folder to Avid Attic_Old
4 Open an Avid Media Composer project using the Strawberry client and open the project in Avid
5 Close the project in Avid Media Composer
6 Go back to the Avid attic and check whether Avid has created a new Attic folder
7 Check the attic folder for the project that was recently opened in Strawberry
Manage IndexersCheck the following boxes if you want the features or unchecked if not
Enable deep indexing for media files
Index adobe premiere project files
Index avid bin files
Storage Quota
Templates
52
Purpose In this section you can define how much physical storage space all projects managed by strawberry areallowed to occupy The quota is a soft quota meaning that there is no physical storage restriction once it getsexpired However Strawberry will send a warning email if if the quota that you defined has been reached
Usage Log into the admin panel and click on the MISC tab Expand the STORAGE QUOTA bar Define howmuch space (in Gigabytes) all projects managed by strawberry are allowed to occupy and press SAVE You canchange this quota at any time
MYSQL BackupWhen clicking the Backup Now button Strawberry creates a dump of its MySQL database The default location forthe database dump is optsb4databackups The default destination can be reconfigured in theoptsb4appfsbaseconfigdatabase-backupyml file
Versions amp LicenseThis section is for license and support purpose only
VIEW Proxy Encoder
Supported Video Audio and Image File FormatsSupported Video Formats amp CodecsApple Intermediate Codec (MOV)Apple MJPEG-B (MOV)Apple ProRes (MOV)
Arri Alexa (ARI)
AS-11 IMX 50 (MXF)AS-11 AVC Intra 100 (MXF)
(X)AVC Intra 50100 (MOV MXF)
Avid 11 amp 11xAvid DV amp DV100
Avid DNxHD (MOV MXF)(45 60 75 90 90x 110 110x 120 120x 145 185 185x 220 220-10Bit)
Avid Interplay C93 amp MVE videoAvid MPEG2 50 - SDAvid Meridien Compressed SD amp Uncompressed SDAvid Packed amp RGBPacked
AVS (Standard amp Chinese)
Black Magic R210
Canopus LosslessCinepak
VIEW Proxy Encoder
53
DV (PAL amp NTSC)
DVCPRO HD | 100 MbpsDVCPRO 50 | 50 MbpsDVCPRO 25 | 25 Mbps
H261H263 H263-1996H263+ H263-1998 H263 version 2H264 AVC MPEG-4 AVC MPEG-4 (MP4 MOV MXF)
HDV
MJPEG amp MJPEG LosslessMPEG 1 amp 2 (M1V M2T M2V MPEG MPG MPGV MPV VOB)MPEG 4 (M4A M4P M4V MP4)
P2 - AVC-Intra 50 100 (MOV MXF)P2 - DVCPRO 25 50 100 (MOV MXF)
QuickTime uncompressed
Red Digital Cine Camera (R3D)
Windows Media Video (All Versions)
XDCAM 25XDCAM IMX 30XDCAM HD 50XDCAM SXS 50
Also SupportedAvid 11 10-bit RGB PackerFlash Video (FLV)Microsoft Video 1On2 VP3On2 VP5On2 VP6QuickTime 8BPS videoQuickTime Animation (RLE) videoQuickTime Graphics (SMC)QuickTime video (RPZA)R10K AJA Kona 10-bit RGB CodecR210 Quicktime Uncompressed RGB 10-bitTheoraVP8VP9WMV7
Supported Audio Formats amp CodecsMost CommonAAC+AACAC-3
CAF
MP3 (All Versions)MPEG-4 (All Versions)
PCM (All Versions amp Bitrates)
WAV
WMA (All Versions)
Also Supported
VIEW Proxy Encoder
54
Apple lossless audioATRAC1ATRAC3ATRAC3+Bink AudioCore Audio Format (CAF)DV audioEnhanced AC-3FLAC (Free Lossless Audio Codec)MACE (Macintosh Audio CompressionExpansion) 31MACE (Macintosh Audio CompressionExpansion) 61MLP (Meridian Lossless Packing)MP1 (MPEG audio layer 1)MP2 (MPEG audio layer 2)OpusRealAudio 10 (144K)RealAudio 20 (288K)RealAudio 30 (dnet)RealAudio LosslessRealAudio SIPR ACELPNETVorbisWindows Media Audio Voice
Supported Image Formats|Targa |TIF |PSD |PSB |PNG |JPG |IFF |GIF |BMP |DPX |EXR |ARI |EPS |AI
Enabling or Disabling ViewLog into the admin panel and click on the VIEW tab If VIEW is enabled proxy files will be created automaticallybased on the criteria below If VIEW is disabled proxy file encoding will not take place and he user front endautomatically jumps to list view instead of thumbnail view
Proxy Encoder ConfigurationIn this menu you can choose from properties of the Strawberry generated proxy files These options include
bull Proxy File Location shows where Strawberry saves the proxy files that it generates This location is definedupon installation and can only be changed by modifying the Strawberry configuration files on the Strawberryserver
bull Bitrate Define the proxy bitrate (per second) Please keep in mind that lower bitrates might be more suitablefor users connecting over the Internet while higher bit rates are good for LAN operations Is there a goldenrule Unfortunately not If you are using the Strawberry Preditor Add-on we recommend a low proxy bitrate(700k - 900k)
bull Resolution Choose a resolution for your proxy files There should always be a coherence between theresolution and the bit rate For example A 1920x1080 proxy file should have a bitrate of at least ~1200k whilea 640x360 proxy should look good with a 600k bitrate
bull Image Sequence Recognition When Strawberry VIEW detects an image sequence (Basename amp Count) withmore than 20 individual images it will create a preview MP4 file out of it An image sequence must have adelimiter between its basename and its count Valid delimiters are - (dash) (dot) and _ (underscore)sequence-name_001 is an example of a valid naming convention
bull Time Code Burn-In If you wish to have a video time code burned into your proxy files you should enable thisfeature
bull Time Code Label Position Defines whether the proxy time codes (or image layer names) are burned in on thebottom or on top of the proxy file
V isual Watermark Check this box if you want Strawberry to burn a visual watermark into your proxy files
bull Watermark Position Decide on which position of the screen your watermark image should be visible
VIEW Proxy Encoder
55
bull Watermark Image Upload a Watermark image as a png file The image should not be larger than your currentproxy resoultion and should have a transparent background You can download example watermarks heredlflavoursyscommanualssupporting_filesExample_Proxy_Watermarkszip
bull Watermark Preview Previews your uploaded watermark in respect of the current proxy resolution as well asthe current Timecode burn-in position
Blacklists amp Whitelists
bull Factory File Blacklist This is a factory blacklist provided by FlavourSys The blacklist has been populatedbased on best practice workflows If you need any of the factory blacklist file extensions whitelisted just enterthe extension into the Files Whitelist
bull File Blacklist Enter any file extension that you dont wish to see in the Strawberry user interface Strawberrywill then ignore files that are having this extension meaning that no proxies are generated However you canstill use the files on the FinderExplorer level in your projects In order to blacklist an item just enter extensionand press enter Press the save button to confirm
bull File Whitelist If you need to whitelist any extensions from the Factory File Blacklist just enter its extensioninto the Files Whitelist In order to whitelist an item just enter extension and press enter Press the savebutton to confirm
bull Factory Folders Blacklist This is a factory blacklist provided by FlavourSys The blacklist has been populatedbased on best practice workflows If you need any of the factory folder blacklist whitelisted just enter the foldername into the Folders Whitelist and press enter Press the save button to confirm
bull Folders Blacklist (Recursive) Enter any folder name that you dont wish to see in the Strawberry user interfaceStrawberry will then ignore the folder and its content meaning that no proxies are created You can still useblacklisted items on the FinderExplorer level in your projects In order to blacklist a folder just enter the foldername into the blacklist and press enter Press the save button to confirm
bull Folders Whitelist (Recursive) If you need to whitelist any folder from the Factory Folders Blacklist just enterits name into the Folders Whitelist and press enter Press the save button to confirm
Applying Blacklist amp Whitelist ChangesStrawberry 5 applies blacklist changes automatically In order to apply whitelist changes please perform thefollowing steps Also perform these steps in order to apply blacklist changes in Strawberry 44 or older versions
VIEW Proxy Encoder
56
1 Login to the Administration panel
2 Click on the MANAGE PROJECT tab
3 Select the project on which you want to apply the operation
4 Click the VIEW button below the project list
5 Select the radio button Rescan Project(s) and confirmDepending on the amount of files in the affected project this operation can take several minutes
Node and Worker Control
Purpose In this section of the admin panel you monitor and change the status of each VIEW encoding node that isintegrated in your environment You also have the possibility to set Schedulers so that you can decide if the nodesand the workers run
Usage Log into the admin panel and click on the VIEW tab Expand the NODE AND WORKER CONTROL barHere you can select from the following options
bull NODE ID The internal ID of each encoding node
bull NODE ADDRESS The hostname or IP address and port under which each node can be reached
bull STATUS Green means running yellow means paused and red means not running
bull NUMBER OF WORKERS Number of encoding workers (threads) that work at the same time Choose theamount of workers based on the amount of CPU cores of each node One worker per core works very well butleave at least one core for the OS and the rest of the Strawberry system The Strawberry Server license comeswith 3 Workers additional workers must be licensed separately
bull Actions Stop start restart or edit a scheduler for individual nodes
Content Download OptionsPurpose If you want to allow user to download media assets using the front end you can define this here Forinstance for workflows requiring executive review or for film schools where faculty could grade from home thisfeature can be beneficial however for feature film workflows this feature can be turned off
Usage Log into the admin panel and click on the VIEW tab Expand the CONTENT DOWNLOAD OPTIONS barIf you want to enable users to download low resolution media files (proxy files) from the front end check the boxnext to Allow users to download proxy files If you want to enable users to download high resolution media filesfrom the front end check the box next to Allow users to download high-res files
Rescan-Project(s)Purpose Scans the project for new files and newly supported file formats and attempts to encode them to proxyfiles It will also apply black list white list changes to existing projects
Usage Log into the Administration panel and click on the PROJECTS tab Expand the MANAGE PROJECTSbar Select the project(s) that you want to rescan and press the VIEW button below the project list and checkRescan Project(s) and confirm it
Repair-Project(s)
VIEW Proxy Encoder
57
Purpose Scans the project for new files and newly supported file formats and attempts to encode them to proxyfiles It will also apply black list white list changes to existing projects
Usage Log into the Administration panel and click on the PROJECTS tab Expand the MANAGE PROJECTSbar Select the project(s) that you want to repair and press the VIEW button below the project list and check RepairProject(s) and confirm it
Reencode-EverythingPurpose Deletes every file in the project to see if meta data have been changed Also looks for new files and newlysupported file formats and attempst to encode them to proxy files It will also apply black list white list changes toexisting projects
Usage Log into the Administration panel and click on the PROJECTS tab Expand the MANAGE PROJECTSbar Select the project(s) that you want to reencode-everything and press the VIEW button below the project listand check Reencode-Everything and confirm it
Miscellaneous
Manage TemplatesPlease visit this manuals rarr Templates larr chapter to get template related information
Safe SearchPurpose ldquoSafe Searchrdquo is an ldquoin edit suiterdquo security feature for Strawberry managed content Its aim is to reducethe visibility and searchability of content while a project with specific custom metadata is open This prevents thatclients see content of other clients while working on a project inside the editing room
Enabling Safe SearchLogin into the Strawberry Administrator panel and select the ldquoMiscrdquo tab Open the ldquoSearch settings and check thebox next to ldquoEnable Safe Search Featurerdquo
Define ldquoSafe Searchrdquo MetadataOnce ldquoSafe Searchrdquo is enabled click on the ldquoProjectsrdquo tab and open the ldquoCustom Metadatardquo menu Select a set andthen a drop down menu within it Then click on ldquoEdit Valuerdquo
Miscellaneous
58
Next to each drop down menu is a checkbox called ldquoSafe Searchrdquo Check this box for each value for which the ldquoSafeSearch filter should apply
When a user opens a project that includes a ldquoSafe Searchrdquo metadata the search field provides the informationaccordingly (safe search enabled for ldquometadata namerdquo) From this point on all searches will be carried within therelated safe search metadata context This applies until the project is closed
Miscellaneous
59
Good to Know
bull Only one drop down menu can have safe search metadata
bull Safe search metadata in the Administrator panel should not be changed enabled or disabled while projects areopened as this can lead to inconsistent search results
Manage IndexersAvailable in Strawberry version 42 or newer
GeneralCheck the following boxes if you want the features or unchecked if not
bull Enable Deep Indexing for Media Files(If enabled Strawberry will extract technical metadata from media files If it is disabled Strawberry will only index filenames and file sizes This feature needs to be enabled in order for the proxy encoding to work)
bull Index Adobe Premiere Project Files(If enabled Strawberry will extract master clip names a descriptions comments from Adobe Premiere master clipsto make these information visible amp searchable in the front-end)
bull Index Avid bin files(If enabled Strawberry will extract master clips names and sequence names from Avid bins to make theseinformation searchable in the front-end However when searching for an Avid master clip or sequence name theuser will not be provided with a visual presentation of the asset or sequence but will only see the project(s) thatcontains these information since this feature is beta we recommend to turn it of)
bull Extract Exif metadata from images(If enabled Strawberry will extract EXIF metadata from image files
bull Extract XMP metadata from files(if enabled Strawberry will extract XMP metadata from media files)
bull Extract XML metadata (Experimental)(if enabled Strawberry will extract XML metadata from xml sidecard files Please contact us for an overview ofsupported XML schemes)
bull Search for technical metadata(If enabled Strawberry will extract technical metadata from video files as well as ID3 tags (album Artist etc) fromaudio files
Technical Metadata WhitelistStrawberry maintains a search index that allows user to carry out searches in an extremely fast fashion Since thissearch index is stored in the server memory its size must be limited and therefor can not include all possible searchparameters Administrator can define the search parameters by white-listing them
Miscellaneous
60
Enter any label that you wish to add to the Strawberry search index To insert a label just click next to an existinglabel and start typing An auto completion list will show available results for your search term Select the technicalmetadata label that you wish to add to the search index Use the x button next to a labels name to remove a labelfrom the search index The changes will not apply immediately but on the next build of the search index (once anight) If you want to apply the settings immediately SSH login to the Strawberry server as root and type thecommand sb reindex
Storage Quota
Purpose In this section you can define how much physical storage space all projects managed by strawberry areallowed to occupy The quota is a soft quota meaning that there is no physical storage restriction once it getsexpired However Strawberry will send a warning email if if the quota that you defined has been reached
Usage Log into the admin panel and click on the MISC tab Expand the STORAGE QUOTA bar Define howmuch space (in Gigabytes) all projects managed by strawberry are allowed to occupy and press SAVE You canchange this quota at any time
Adobe Premiere Specific Feature
Auto-Link media from Library into projectThis feature is part of a custom development and currently not documented
Auto-Ingest local media into projectPurpose If a user imports media from a usb or local hdd into an Adobe Premiere project that is managed byStrawberry Strawberry can automatically copy that media into the projects media volume This ensures that allmedia used in a Premiere project is actually on the centralized storage
Usage Log into the admin panel and click on the MISC tab Expand the Auto Import Library amp unmanaged Assets(Adobe Premiere Only) bar If you wish to enable the Auto-ingest feature check the box next to it and define aninterval The interval determines how often the Strawberry Adobe panel will check for unmanaged inside each openPremiere project
Auto-Link subproject media into projectPurpose If a user imports media from a subproject into an Adobe Premiere project that is managed by StrawberryStrawberry can automatically link that into the from the subproject into the parent project This ensures that anyproject is self contained at any point
Miscellaneous
61
Usage Log into the admin panel and click on the MISC tab Expand the Auto Import Library amp unmanaged Assets(Adobe Premiere Only) bar If you wish to enable the Auto-link feature check the box next to it and define aninterval The interval determines how often the Strawberry Adobe panel will check for imported subproject mediainside the current project to link it
PreditorDefine the Timeout based on which a user should be automatically logged out of Preditor In the process Strawberrywill also automatically close the users sequence in order to free the license slot Preditor creates auto-saves of opensequences every minute and stores these on the server so that progress does not get lost even if the sequence getsauto-closed
SMTP SetupPurpose Strawberry has the ability to send email notifications on specific criteria This usually is the case if a teamexpires its storage quota or if assets are shared via email using the built-in functions For this feature to workStrawberry needs to be provided with STMP information
Usage
1 Login to the Strawberry server and cd to optsb4appfsbaseconfig
2 Open the file smtpymlexample and replace the example SMTP values with your own ones
3 Save the file as smtpymlThe Strawberry services needs to be restarted for the changes to apply
MYSQL BackupWhen clicking the Backup Now button Strawberry creates a dump of its MySQL database The default location forthe database dump is optsb4appbackups The default destination can be reconfigured in theoptsb4appfsbaseconfigdatabase-backupyml file
Empty TrashPressing the Empty Trash Now button will instantly remove all contents from the Strawberry trash folder
Osiris OptionShared Edits only
Purpose If the Osiris option is enabled Strawberry will mount its project media volumes in a specific way AvidMedia Composer will detect these volumes as volumes from an Avid storage and will provide bin locking for allStrawberry managed Media Composer projects
Versions amp LicenseThis section shows you the current version numbers of the Strawberry 4 modules that are installed on yourStrawberry server Additionally it provides you with license related information for your site
Updating a LicenseOnly use this method if you are running Strawberry in a Non-High Availability environment
Please go to the Strawberry admin panel misc versions amp license and click the NEW LICENSE button Copy andpaste the license string in there and click the UPDATE button Once this is done SSH login to the Strawberryserver and type service strawberry4 restart The license will be applied once the Strawberry service has beenrestarted
Legal Information
Legal Information
62
AVID is a trademark of Avid Technologies (wwwavidcom) Apple and FCP are trademarks of Apple in the US(wwwapplecom) Adobe and Premiere are trademarks of Adobe (wwwadobecom) All product names logos andbrands are property of their respective owners All company product and service names used in this manual are foridentification purposes only Use of these names logos and brands does not imply endorsement
Legal Information
63
- Last Updated July 20 2017
-
- Introduction
- System Requirements
-
- Storage File System Requirements
-
- List of Certified Storage Vendors
- List of Supported Storage File Systems
-
- Strawberry Server HWSW Requirements for Production Environments
- Minimum Server HWSW Requirements for Demonstration amp POC Environments
- Minimum Requirements for a dedicated View Proxy Encoding Node
- Requirements for the Strawberry Client
-
- Strawberry Client SSL
-
- Requirements for the Strawberry Adobe Panel
- Minimum Web Browser Requirements
-
- Installation Manuals
-
- Strawberry Client
-
- Installing the Client
- Starting the Client
- Upgrading the Client
- Deleting the Client
-
- Client Configuration for NAS
-
- SMB Mounts Configuration
- Paths to Editing applications (App Launcher)
- Mount your drives under Windows 7 amp 8
- Mount your drives under OSX
-
- Client Configuration for StorNext amp XSAN
-
- SAN Mount Configuration
-
- Client Configuration for Shared Edits under macOS
- Client Configuration for Shared Edits under Windows
- Changing the Clients Fuse Blocksize (macOS only)
- Adobe Panel
-
- Installing the Panel
- Updating the Panel
- Removing the Panel
- Testing the Panel
-
- Users Roles amp Teams
-
- Manage Roles
-
- Available Capabilities
- Creating a role
- Editing a role
- Deleting a role
-
- Manage Users
-
- Creating a User
- Changing a Users Role
- User Specific Roles
- Assigning a User to Teams
- Deleting a User
- Removing a User from a Team
-
- Manage Teams
-
- Creating a Team
- Changing a Teams Name
- Changing a Teams Quota
- Deleting a Team
-
- Manage Edits
-
- Manage Projects
-
- Manage Online Projects
-
- Force Closing a Project
- Deleting one or multiple Projects
- Archiving a Project
-
- Manage Archived Projects
-
- Retrieving a Project from the Archive
-
- Download Project List
- Custom Metadata
-
- Manage Libraries
-
- Introduction
- Library States
- Ingest Libraries
-
- Creating a Library Project
- Configuring an Ingest Library
- Configuring the Library Ingest Interval
- Configuring the Library Clean Interval
- Good to Know
-
- External Libraries
-
- Creating a Library Project
- Configuring an External Library
- Configuring the Library Clean Interval
- Configuring the External Library Reindex Interval
- Good to Know
-
- Custom Metadata
-
- Custom Metadata Sets
- The Master Set
- Creating a Metadata Set
- Connecting Metadata Sets
- Deleting a Metadata Set
- Creating a Dropdown Menu
- Creating a Text Input Field
- Creating a Replacement Pattern
- Editing a Value
- Deleting a Value
- Creating Project Status Flags
- Deleting Project Status Flags
- Supported Unix Time Modifiers
-
- Archive amp Copy To
-
- Creating an Archive Strategy
- Canceling an ArchiveRetrieval Job
- Clearing ArchiveRetrieval Errors
- Project Copy-to Strategies
- Asset Copy-to Strategies
- Good to Know
-
- Freezing Archived Projects
-
- Templates
-
- Working with Templates
- Creating a Template (Avid Media Composer)
- Creating a Template (Adobe Premiere)
- Rename a Templates
- Duplicate a Template
- Delete a Template(s)
- Configuring the Avid Attic
- Manage Indexers
- Storage Quota
- MYSQL Backup
- Versions amp License
-
- VIEW Proxy Encoder
-
- Supported Video Audio and Image File Formats
- Enabling or Disabling View
- Proxy Encoder Configuration
- Blacklists amp Whitelists
- Applying Blacklist amp Whitelist Changes
- Node and Worker Control
- Content Download Options
- Rescan-Project(s)
- Repair-Project(s)
- Reencode-Everything
-
- Miscellaneous
-
- Manage Templates
- Safe Search
-
- Enabling Safe Search
- Define ldquoSafe Searchrdquo Metadata
- Good to Know
-
- Manage Indexers
-
- General
- Technical Metadata Whitelist
-
- Storage Quota
- Adobe Premiere Specific Feature
-
- Auto-Link media from Library into project
- Auto-Ingest local media into project
- Auto-Link subproject media into project
-
- Preditor
- SMTP Setup
- MYSQL Backup
- Empty Trash
- Osiris Option
- Versions amp License
-
- Updating a License
-
- Legal Information
-
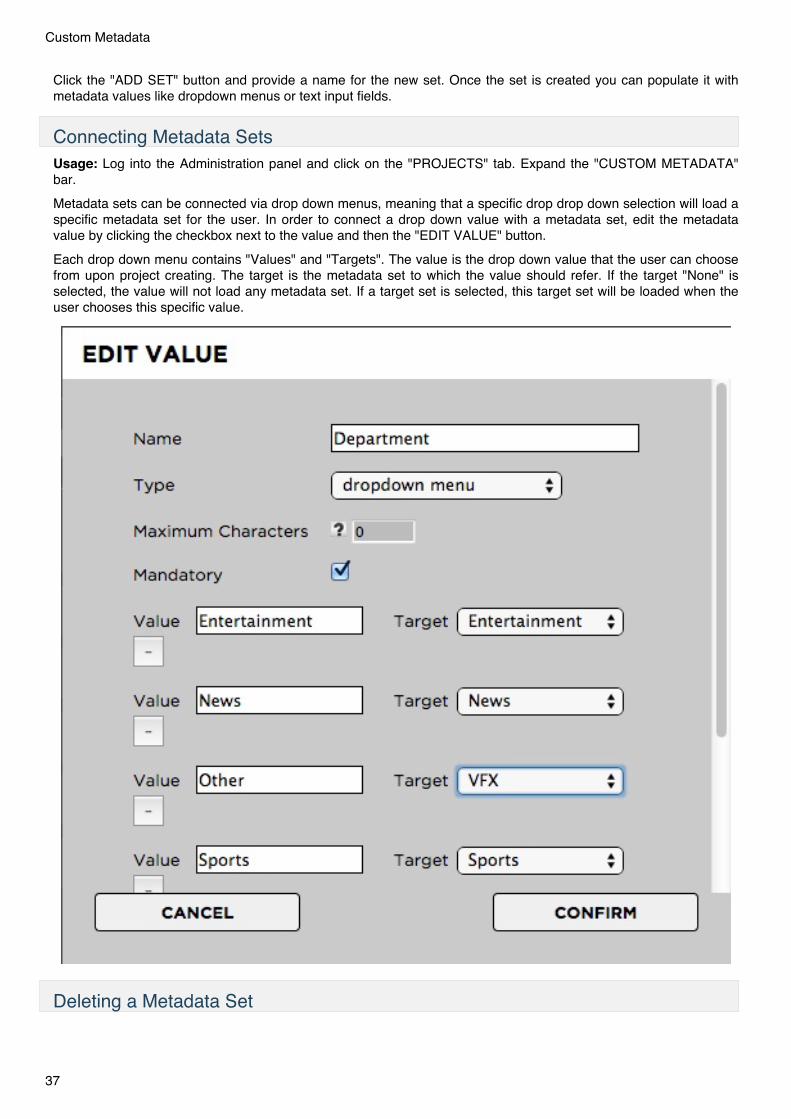
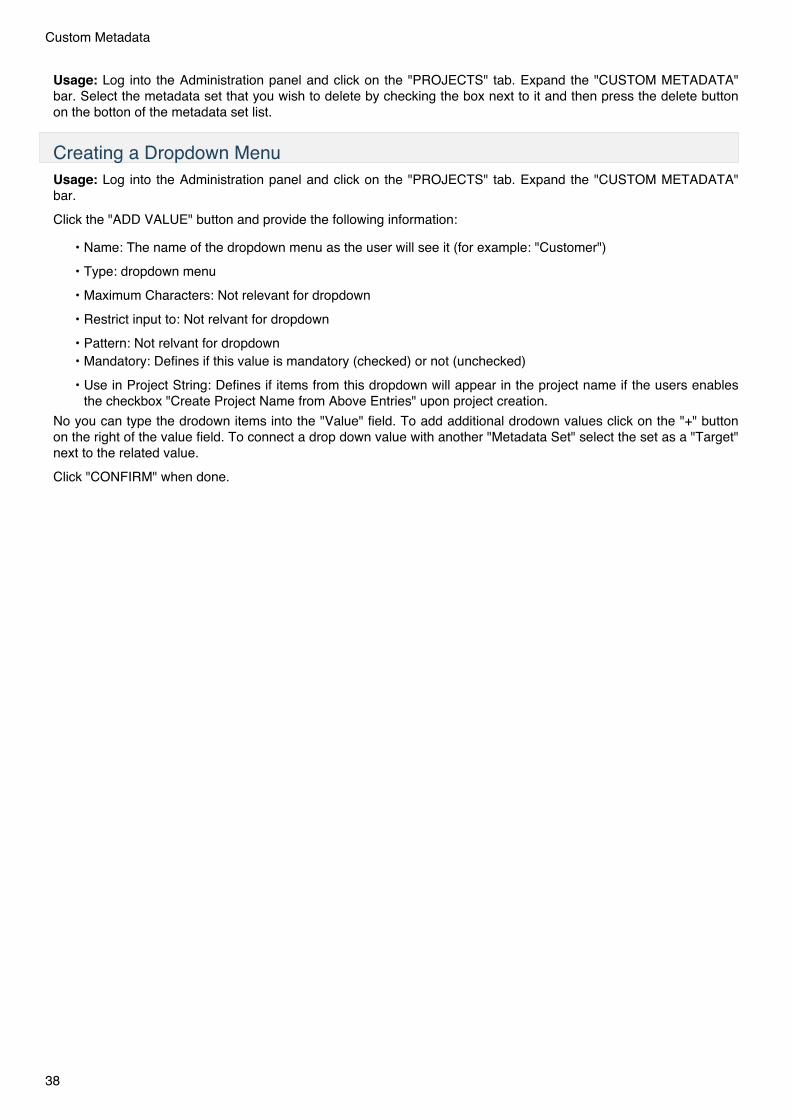
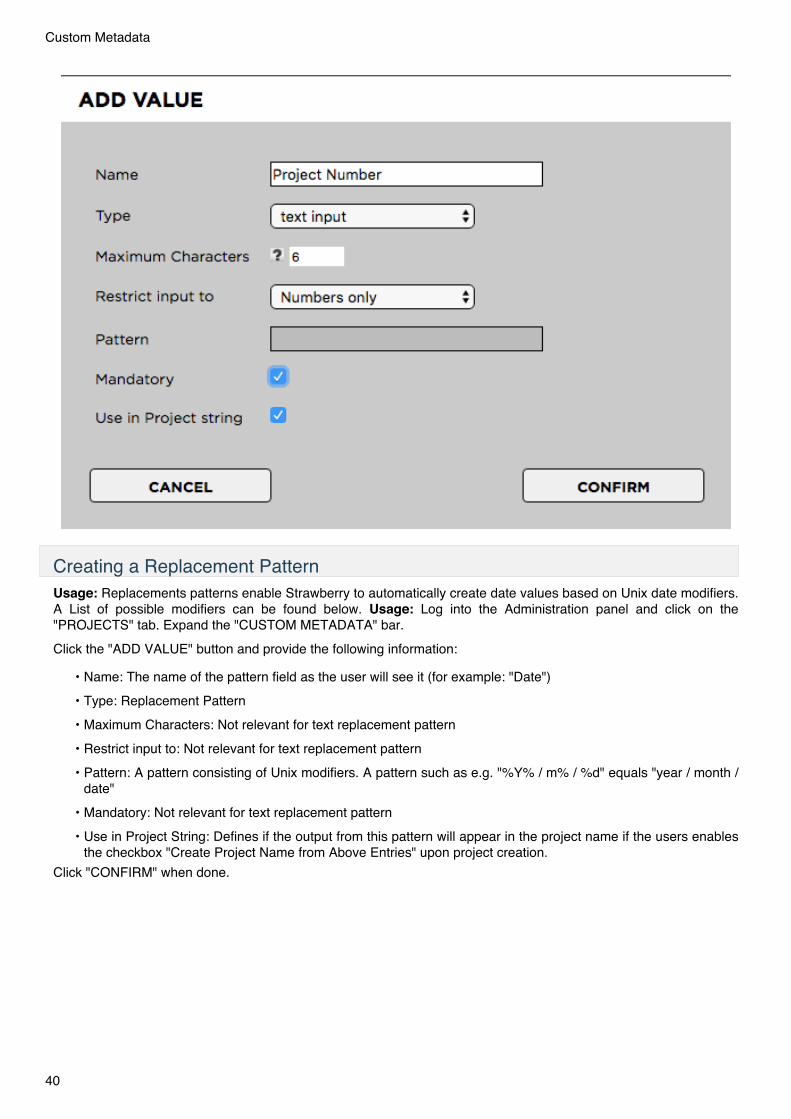

bull CRCs are specifically designed to protect against common types of errors on data transmissionswhere they can provide quick and reasonable assurance of the integrity of data delivered Howeverthey are not suitable for protecting against intentional alteration of data
bull None No data integrity check at allbull EnableDisable Strategy Define if an archive strategy is available for users (enabled) or not (disabled)
Asset Copy-to StrategiesPurpose Strawberry enables users to copy individual assets to another location This location can be anotherstorage device (for backup purpose) a render farm or external application This feature works very similar to theArchive function The difference is that copied assets will not be deleted from the media storage but remain therefor further use
Usage Log into the Administration panel and click on the Archive tab Expand the Asset Backup Strategies barClick the ADD button and provide the following information
bull Name The name of the copy-to strategy The users see the name of the strategy when he or she attempts tocopy a project
bull Path The path (aka archive destination) for projects copied using this strategy
bull Method
bull plain Strawberry archives the project and media files without compressing them It backups theprojects folder structure as it is
bull tarball Puts the project amp media files of a project into a tarball before copying it
bull zip Puts the project amp media files of a project into a zip file before copying it (Please Note Zip filescan not be CRC checked)
bull Check
bull Fingerprint Sequential integrity check on a file that only detects serious file damages but no minordefects
bull CRCs are specifically designed to protect against common types of errors on data transmissionswhere they can provide quick and reasonable assurance of the integrity of data delivered Howeverthey are not suitable for protecting against intentional alteration of data
bull None No data integrity check at allbull EnableDisable Strategy Define if an archive strategy is available for users (enabled) or not (disabled)
Good to Know
Freezing Archived ProjectsAvailable in Strawberry version 44 or newerIn order to avoid that users are accidentally retrieving archived projects you can freeze these projects using rarrfreezeoptions larr
Templates
Working with Templates
Templates
45
Purpose Templates are an extremely efficient way to prepare standardized project settings and content for allStrawbery users in your facility Templates can contain custom file and folder structures
Example 1 Application Specific Templates
One example to illustrate the benefit of templates can be working with Avid Media Composer in different frame rates(24 frames and 25 frames) Avid does not allow to switch the frame rate within a project With Strawberry you couldcreate two templates one for 24 frames and one for 25 frames and copy the related Avid project files into thistemplate When a user creates a project from on of these templates the corresponding projects files (24 frames or25 frames) will be copied into the new projects an renamed after the new project so the user does not need to createa new Avid project manually after he or she created a project in strawberry
Example 2 Production Specific Templates
Another example of working with templates can be a specific production that requires specific preparations Mostmedia facilities create individual folder structures for different productions so that people save graphics visualeffects and sound effects in the right location on the storage Usually these folder structures need to be recreated foreach episode of a production With Strawberry you can create a template which contains a specific folder structureand even media files and copy your prepared folder and media files into this template As soon as a user choosesthe template upon project creation the folders and files that you prepared in the template will be copied over to thenew project and are immediately available for the user
Creating a Template (Avid Media Composer)Before users can create any Avid projects using the Strawberry client software you need to have at least ONEtemplate Log into the admin panel and click on the MISC tab Expand the TEMPLATES bar Now click theCREATE NEW button
Strawberry will ask you for a Template name a preset a token and a naming pattern
Choose a name that best characterizes your template In this example we will create an Avid template that containsa high definition Avid project with a resolution of 1080p So it makes sense to call the template Avid 1080p
In the preset row click on the little down arrow and choose the Avid preset When a user creates a projectbased on an Avid template Strawberry automatically create the Avid MediaFiles and OMFI MediaFiles folderstructure in the project and it will also ensure that Avid project and media files can be shared properly
The token is a replacement string for a file name This means that if your token says replace_me and you createan Avid template named replace_me and copy it into your template folder (discussed later) every time thetemplate replace_me is used the token text (in this case replace_me) will be changed to the name of the currentStrawberry project So the Avid project file called replace_meavp in your templates folder will be used and namedprojectnameavp as its created in your Strawberry project
In the row pattern you can define how a project name based on this template should look The stringYmd-name will result in the project name 20130810-ProjectName Putting the date inside the projectname will enable your user to search for projects by typing in the date If you dont need the date in the project nameyou can simply delete the date-related parts of the string and leave the name piece If you need the date part youcan modify it to your requirements In order to understand the formatting for doing this please refer to the unix timeman page at httpunixhelpedacukCGIman-cgidate
Templates
46
After you are done click Create and then open Avid Media Composer Create a new local project calledreplace_me with the setting 1080p25
Open the newly created project delete the bin that Avid always makes in new project and empty the Avid trashfolder
In order to ensure that Media Composer will recognize network volumes as media drives open Tools gt Console andtype in alldrives If you see the message All drives will be viewed as media drives (Was previously set to havingonly true media drives act as media drives) you are good to go If you see the message Only true media drives willbe viewed as media drives (Was previously set to having all drives act as media drives) type alldrives againThere are just two possible options
Now go to Tools gt Media Creation gt Capture and select the Strawberry media drive (mapped as a networkdrive on your Computer) as the AudioVideo file destination Click on both Apply to All buttons and then click onOK Now close the project
Templates
47
Navigate to the Strawberry template folder on your storage (Strawberrytemplates) Within that template folder youwill see a folder that is named after the template you created in the Strawberry admin panel (in this case we called itAvid 1080p) Inside this folder will be a folder called media_1 and one called projects
Use the Finder or Explorer to navigate to your local Avid projects folder (eg UsersFlavourSysDocumentsAvidProjects) and open the replace_me project folder Copy the files replace_meavp replace_me Settingsxml andreplace_me Settingsavs to your clipboard
Paste the files into your StrawberrytemplatesAvid 1080pprojects folder If an editor creates a new project using thistemplate Strawberry will rename the replace_me string with the name of the current Strawberry project
Now every time a Strawberry user creates a new project based on this template it has all the right settings export preferences etc that it will inherit from the replace_me project that you created and set up before copying it into the Strawberrytemplatesltyour template namegtprojects folder If you need to modify or improve your template
Templates
48
simply make the changes to the local replace_me project and re-copy the three files into theStrawberrytemplatesltyour template namegtprojects folder
Creating a Template (Adobe Premiere)Before you can create an Adobe Premiere editing project from within the Strawberry client software you need tocreate a template for Strawberry to use Click on the Template Tab in the Admin panel and then click on CreateNew
Strawberry will ask you for a Template name a preset a token and a naming pattern
Choose a name that best characterizes your template In this example we will create an Adobe Premiere templatethat contains an Adobe Premiere project So it makes sense to call the template Adobe Premiere
In the preset row click on the little down arrow and choose the Adobe preset When a user creates a projectbased on an Adobe template Strawberry automatically create the Adobe Cache folder structure in the project and itwill also ensure that Adobe project and media files can be shared properly
The token is a replacement string for file names This means that if your token says replace_me in these settingsand you go on to create an Adobe Premiere project named replace_me and put it in your template folder thetemplate will be used and automatically renamed based on the Strawberry project name that is open This way anAdobe Premiere template project file called replace_mePR will be named StrawberryprojectnamePR each timeyou create a new project from within Strawberry
In the row pattern you can define how a project name based on this template should look like The stringYmd-name will result in the project name 20130810-ProjectName Putting the date inside the projectname will enable your user to search for projects by typing in the date If you dont need the date in the project nameyou can simply delete the date related parts of the string and leave the name piece If you need the date part youcan modify it to your requirements In order to understand the formatting for doing this please refer to the unix timeman page at httpunixhelpedacukCGIman-cgidate
After you are done click Create and go to the Strawberry Client Create a new project using the Adobe Premieretemplate Now open Adobe Premiere and create a new project Name the project replace_me and set the captureformat to HDV Ensure that all Scratch Disk locations are set to same as project
Templates
49
Click ok to create and open the project Once the project is opened go to EditgtPreferences Media and choosethe Adobe Cache on your Strawberry media volume as the destination for Media Cache Files and Media CacheDatabase
Templates
50
Tip If you are using the Adobe Premiere Panel launch it now If a user creates a project based on this template thepanel will launch automatically with the new project
Click OK to confirm your changes Now save the project and leave Adobe Premiere Navigate to your local Adobeprojects folder and copy the newly created project file replace_meprproj to the media_1 folder of the Adobetemplate location that you created
Now every time an editor creates a new project using the Adobe Premiere template the replace_mepr templatewill be used and all the settings preferences and destinations will be inherited and used in the newStrawberryprojectnamepr
Rename a Templates
Templates
51
Purpose You want give the Templates a new name for differentation
Usage Log into the admin panel and click on the MISC tab Expand the MANAGE TEMPLATES bar Check thetemplate what you want rename below the templates list is a button says RENAME and fill out with the new nameIf you are ready click CONFIRM else if you want go back click CANCEL
Duplicate a TemplatePurpose Use dublicate a template if you want clone the settings
Usage Log into the admin panel and click on the MISC tab Expand the MANAGE TEMPLATES bar Check thetemplate what you want duplicate below the templates list is a button says DUPLICATE and fill out with the newname If you are ready confirm it with click DUPLICATE else if you want to stop the prozess click CANCEL
Delete a Template(s)Purpose If you want delete a template(s) eg Didnt needed anymore
Usage Log into the admin panel and click on the MISC tab EXPAND the MANAGE TEMPLATES bar Checkthe template what you want delete below the templates list is a button says DELETE
Configuring the Avid AtticWhen utilizing Avid Media Composer the Avid Attic functionality might be important to your workflow To make theAvid Attic work with strawberry please perform the following steps
1 Close Avid Media Composer
2 Navigate to the Avid Attic folder on our computerWin UsersPublicPublic DocumentsAvid editing application
Mac Macintosh HDUsersSharedAvid editing application
3 Rename the Avid Attic folder to Avid Attic_Old
4 Open an Avid Media Composer project using the Strawberry client and open the project in Avid
5 Close the project in Avid Media Composer
6 Go back to the Avid attic and check whether Avid has created a new Attic folder
7 Check the attic folder for the project that was recently opened in Strawberry
Manage IndexersCheck the following boxes if you want the features or unchecked if not
Enable deep indexing for media files
Index adobe premiere project files
Index avid bin files
Storage Quota
Templates
52
Purpose In this section you can define how much physical storage space all projects managed by strawberry areallowed to occupy The quota is a soft quota meaning that there is no physical storage restriction once it getsexpired However Strawberry will send a warning email if if the quota that you defined has been reached
Usage Log into the admin panel and click on the MISC tab Expand the STORAGE QUOTA bar Define howmuch space (in Gigabytes) all projects managed by strawberry are allowed to occupy and press SAVE You canchange this quota at any time
MYSQL BackupWhen clicking the Backup Now button Strawberry creates a dump of its MySQL database The default location forthe database dump is optsb4databackups The default destination can be reconfigured in theoptsb4appfsbaseconfigdatabase-backupyml file
Versions amp LicenseThis section is for license and support purpose only
VIEW Proxy Encoder
Supported Video Audio and Image File FormatsSupported Video Formats amp CodecsApple Intermediate Codec (MOV)Apple MJPEG-B (MOV)Apple ProRes (MOV)
Arri Alexa (ARI)
AS-11 IMX 50 (MXF)AS-11 AVC Intra 100 (MXF)
(X)AVC Intra 50100 (MOV MXF)
Avid 11 amp 11xAvid DV amp DV100
Avid DNxHD (MOV MXF)(45 60 75 90 90x 110 110x 120 120x 145 185 185x 220 220-10Bit)
Avid Interplay C93 amp MVE videoAvid MPEG2 50 - SDAvid Meridien Compressed SD amp Uncompressed SDAvid Packed amp RGBPacked
AVS (Standard amp Chinese)
Black Magic R210
Canopus LosslessCinepak
VIEW Proxy Encoder
53
DV (PAL amp NTSC)
DVCPRO HD | 100 MbpsDVCPRO 50 | 50 MbpsDVCPRO 25 | 25 Mbps
H261H263 H263-1996H263+ H263-1998 H263 version 2H264 AVC MPEG-4 AVC MPEG-4 (MP4 MOV MXF)
HDV
MJPEG amp MJPEG LosslessMPEG 1 amp 2 (M1V M2T M2V MPEG MPG MPGV MPV VOB)MPEG 4 (M4A M4P M4V MP4)
P2 - AVC-Intra 50 100 (MOV MXF)P2 - DVCPRO 25 50 100 (MOV MXF)
QuickTime uncompressed
Red Digital Cine Camera (R3D)
Windows Media Video (All Versions)
XDCAM 25XDCAM IMX 30XDCAM HD 50XDCAM SXS 50
Also SupportedAvid 11 10-bit RGB PackerFlash Video (FLV)Microsoft Video 1On2 VP3On2 VP5On2 VP6QuickTime 8BPS videoQuickTime Animation (RLE) videoQuickTime Graphics (SMC)QuickTime video (RPZA)R10K AJA Kona 10-bit RGB CodecR210 Quicktime Uncompressed RGB 10-bitTheoraVP8VP9WMV7
Supported Audio Formats amp CodecsMost CommonAAC+AACAC-3
CAF
MP3 (All Versions)MPEG-4 (All Versions)
PCM (All Versions amp Bitrates)
WAV
WMA (All Versions)
Also Supported
VIEW Proxy Encoder
54
Apple lossless audioATRAC1ATRAC3ATRAC3+Bink AudioCore Audio Format (CAF)DV audioEnhanced AC-3FLAC (Free Lossless Audio Codec)MACE (Macintosh Audio CompressionExpansion) 31MACE (Macintosh Audio CompressionExpansion) 61MLP (Meridian Lossless Packing)MP1 (MPEG audio layer 1)MP2 (MPEG audio layer 2)OpusRealAudio 10 (144K)RealAudio 20 (288K)RealAudio 30 (dnet)RealAudio LosslessRealAudio SIPR ACELPNETVorbisWindows Media Audio Voice
Supported Image Formats|Targa |TIF |PSD |PSB |PNG |JPG |IFF |GIF |BMP |DPX |EXR |ARI |EPS |AI
Enabling or Disabling ViewLog into the admin panel and click on the VIEW tab If VIEW is enabled proxy files will be created automaticallybased on the criteria below If VIEW is disabled proxy file encoding will not take place and he user front endautomatically jumps to list view instead of thumbnail view
Proxy Encoder ConfigurationIn this menu you can choose from properties of the Strawberry generated proxy files These options include
bull Proxy File Location shows where Strawberry saves the proxy files that it generates This location is definedupon installation and can only be changed by modifying the Strawberry configuration files on the Strawberryserver
bull Bitrate Define the proxy bitrate (per second) Please keep in mind that lower bitrates might be more suitablefor users connecting over the Internet while higher bit rates are good for LAN operations Is there a goldenrule Unfortunately not If you are using the Strawberry Preditor Add-on we recommend a low proxy bitrate(700k - 900k)
bull Resolution Choose a resolution for your proxy files There should always be a coherence between theresolution and the bit rate For example A 1920x1080 proxy file should have a bitrate of at least ~1200k whilea 640x360 proxy should look good with a 600k bitrate
bull Image Sequence Recognition When Strawberry VIEW detects an image sequence (Basename amp Count) withmore than 20 individual images it will create a preview MP4 file out of it An image sequence must have adelimiter between its basename and its count Valid delimiters are - (dash) (dot) and _ (underscore)sequence-name_001 is an example of a valid naming convention
bull Time Code Burn-In If you wish to have a video time code burned into your proxy files you should enable thisfeature
bull Time Code Label Position Defines whether the proxy time codes (or image layer names) are burned in on thebottom or on top of the proxy file
V isual Watermark Check this box if you want Strawberry to burn a visual watermark into your proxy files
bull Watermark Position Decide on which position of the screen your watermark image should be visible
VIEW Proxy Encoder
55
bull Watermark Image Upload a Watermark image as a png file The image should not be larger than your currentproxy resoultion and should have a transparent background You can download example watermarks heredlflavoursyscommanualssupporting_filesExample_Proxy_Watermarkszip
bull Watermark Preview Previews your uploaded watermark in respect of the current proxy resolution as well asthe current Timecode burn-in position
Blacklists amp Whitelists
bull Factory File Blacklist This is a factory blacklist provided by FlavourSys The blacklist has been populatedbased on best practice workflows If you need any of the factory blacklist file extensions whitelisted just enterthe extension into the Files Whitelist
bull File Blacklist Enter any file extension that you dont wish to see in the Strawberry user interface Strawberrywill then ignore files that are having this extension meaning that no proxies are generated However you canstill use the files on the FinderExplorer level in your projects In order to blacklist an item just enter extensionand press enter Press the save button to confirm
bull File Whitelist If you need to whitelist any extensions from the Factory File Blacklist just enter its extensioninto the Files Whitelist In order to whitelist an item just enter extension and press enter Press the savebutton to confirm
bull Factory Folders Blacklist This is a factory blacklist provided by FlavourSys The blacklist has been populatedbased on best practice workflows If you need any of the factory folder blacklist whitelisted just enter the foldername into the Folders Whitelist and press enter Press the save button to confirm
bull Folders Blacklist (Recursive) Enter any folder name that you dont wish to see in the Strawberry user interfaceStrawberry will then ignore the folder and its content meaning that no proxies are created You can still useblacklisted items on the FinderExplorer level in your projects In order to blacklist a folder just enter the foldername into the blacklist and press enter Press the save button to confirm
bull Folders Whitelist (Recursive) If you need to whitelist any folder from the Factory Folders Blacklist just enterits name into the Folders Whitelist and press enter Press the save button to confirm
Applying Blacklist amp Whitelist ChangesStrawberry 5 applies blacklist changes automatically In order to apply whitelist changes please perform thefollowing steps Also perform these steps in order to apply blacklist changes in Strawberry 44 or older versions
VIEW Proxy Encoder
56
1 Login to the Administration panel
2 Click on the MANAGE PROJECT tab
3 Select the project on which you want to apply the operation
4 Click the VIEW button below the project list
5 Select the radio button Rescan Project(s) and confirmDepending on the amount of files in the affected project this operation can take several minutes
Node and Worker Control
Purpose In this section of the admin panel you monitor and change the status of each VIEW encoding node that isintegrated in your environment You also have the possibility to set Schedulers so that you can decide if the nodesand the workers run
Usage Log into the admin panel and click on the VIEW tab Expand the NODE AND WORKER CONTROL barHere you can select from the following options
bull NODE ID The internal ID of each encoding node
bull NODE ADDRESS The hostname or IP address and port under which each node can be reached
bull STATUS Green means running yellow means paused and red means not running
bull NUMBER OF WORKERS Number of encoding workers (threads) that work at the same time Choose theamount of workers based on the amount of CPU cores of each node One worker per core works very well butleave at least one core for the OS and the rest of the Strawberry system The Strawberry Server license comeswith 3 Workers additional workers must be licensed separately
bull Actions Stop start restart or edit a scheduler for individual nodes
Content Download OptionsPurpose If you want to allow user to download media assets using the front end you can define this here Forinstance for workflows requiring executive review or for film schools where faculty could grade from home thisfeature can be beneficial however for feature film workflows this feature can be turned off
Usage Log into the admin panel and click on the VIEW tab Expand the CONTENT DOWNLOAD OPTIONS barIf you want to enable users to download low resolution media files (proxy files) from the front end check the boxnext to Allow users to download proxy files If you want to enable users to download high resolution media filesfrom the front end check the box next to Allow users to download high-res files
Rescan-Project(s)Purpose Scans the project for new files and newly supported file formats and attempts to encode them to proxyfiles It will also apply black list white list changes to existing projects
Usage Log into the Administration panel and click on the PROJECTS tab Expand the MANAGE PROJECTSbar Select the project(s) that you want to rescan and press the VIEW button below the project list and checkRescan Project(s) and confirm it
Repair-Project(s)
VIEW Proxy Encoder
57
Purpose Scans the project for new files and newly supported file formats and attempts to encode them to proxyfiles It will also apply black list white list changes to existing projects
Usage Log into the Administration panel and click on the PROJECTS tab Expand the MANAGE PROJECTSbar Select the project(s) that you want to repair and press the VIEW button below the project list and check RepairProject(s) and confirm it
Reencode-EverythingPurpose Deletes every file in the project to see if meta data have been changed Also looks for new files and newlysupported file formats and attempst to encode them to proxy files It will also apply black list white list changes toexisting projects
Usage Log into the Administration panel and click on the PROJECTS tab Expand the MANAGE PROJECTSbar Select the project(s) that you want to reencode-everything and press the VIEW button below the project listand check Reencode-Everything and confirm it
Miscellaneous
Manage TemplatesPlease visit this manuals rarr Templates larr chapter to get template related information
Safe SearchPurpose ldquoSafe Searchrdquo is an ldquoin edit suiterdquo security feature for Strawberry managed content Its aim is to reducethe visibility and searchability of content while a project with specific custom metadata is open This prevents thatclients see content of other clients while working on a project inside the editing room
Enabling Safe SearchLogin into the Strawberry Administrator panel and select the ldquoMiscrdquo tab Open the ldquoSearch settings and check thebox next to ldquoEnable Safe Search Featurerdquo
Define ldquoSafe Searchrdquo MetadataOnce ldquoSafe Searchrdquo is enabled click on the ldquoProjectsrdquo tab and open the ldquoCustom Metadatardquo menu Select a set andthen a drop down menu within it Then click on ldquoEdit Valuerdquo
Miscellaneous
58
Next to each drop down menu is a checkbox called ldquoSafe Searchrdquo Check this box for each value for which the ldquoSafeSearch filter should apply
When a user opens a project that includes a ldquoSafe Searchrdquo metadata the search field provides the informationaccordingly (safe search enabled for ldquometadata namerdquo) From this point on all searches will be carried within therelated safe search metadata context This applies until the project is closed
Miscellaneous
59
Good to Know
bull Only one drop down menu can have safe search metadata
bull Safe search metadata in the Administrator panel should not be changed enabled or disabled while projects areopened as this can lead to inconsistent search results
Manage IndexersAvailable in Strawberry version 42 or newer
GeneralCheck the following boxes if you want the features or unchecked if not
bull Enable Deep Indexing for Media Files(If enabled Strawberry will extract technical metadata from media files If it is disabled Strawberry will only index filenames and file sizes This feature needs to be enabled in order for the proxy encoding to work)
bull Index Adobe Premiere Project Files(If enabled Strawberry will extract master clip names a descriptions comments from Adobe Premiere master clipsto make these information visible amp searchable in the front-end)
bull Index Avid bin files(If enabled Strawberry will extract master clips names and sequence names from Avid bins to make theseinformation searchable in the front-end However when searching for an Avid master clip or sequence name theuser will not be provided with a visual presentation of the asset or sequence but will only see the project(s) thatcontains these information since this feature is beta we recommend to turn it of)
bull Extract Exif metadata from images(If enabled Strawberry will extract EXIF metadata from image files
bull Extract XMP metadata from files(if enabled Strawberry will extract XMP metadata from media files)
bull Extract XML metadata (Experimental)(if enabled Strawberry will extract XML metadata from xml sidecard files Please contact us for an overview ofsupported XML schemes)
bull Search for technical metadata(If enabled Strawberry will extract technical metadata from video files as well as ID3 tags (album Artist etc) fromaudio files
Technical Metadata WhitelistStrawberry maintains a search index that allows user to carry out searches in an extremely fast fashion Since thissearch index is stored in the server memory its size must be limited and therefor can not include all possible searchparameters Administrator can define the search parameters by white-listing them
Miscellaneous
60
Enter any label that you wish to add to the Strawberry search index To insert a label just click next to an existinglabel and start typing An auto completion list will show available results for your search term Select the technicalmetadata label that you wish to add to the search index Use the x button next to a labels name to remove a labelfrom the search index The changes will not apply immediately but on the next build of the search index (once anight) If you want to apply the settings immediately SSH login to the Strawberry server as root and type thecommand sb reindex
Storage Quota
Purpose In this section you can define how much physical storage space all projects managed by strawberry areallowed to occupy The quota is a soft quota meaning that there is no physical storage restriction once it getsexpired However Strawberry will send a warning email if if the quota that you defined has been reached
Usage Log into the admin panel and click on the MISC tab Expand the STORAGE QUOTA bar Define howmuch space (in Gigabytes) all projects managed by strawberry are allowed to occupy and press SAVE You canchange this quota at any time
Adobe Premiere Specific Feature
Auto-Link media from Library into projectThis feature is part of a custom development and currently not documented
Auto-Ingest local media into projectPurpose If a user imports media from a usb or local hdd into an Adobe Premiere project that is managed byStrawberry Strawberry can automatically copy that media into the projects media volume This ensures that allmedia used in a Premiere project is actually on the centralized storage
Usage Log into the admin panel and click on the MISC tab Expand the Auto Import Library amp unmanaged Assets(Adobe Premiere Only) bar If you wish to enable the Auto-ingest feature check the box next to it and define aninterval The interval determines how often the Strawberry Adobe panel will check for unmanaged inside each openPremiere project
Auto-Link subproject media into projectPurpose If a user imports media from a subproject into an Adobe Premiere project that is managed by StrawberryStrawberry can automatically link that into the from the subproject into the parent project This ensures that anyproject is self contained at any point
Miscellaneous
61
Usage Log into the admin panel and click on the MISC tab Expand the Auto Import Library amp unmanaged Assets(Adobe Premiere Only) bar If you wish to enable the Auto-link feature check the box next to it and define aninterval The interval determines how often the Strawberry Adobe panel will check for imported subproject mediainside the current project to link it
PreditorDefine the Timeout based on which a user should be automatically logged out of Preditor In the process Strawberrywill also automatically close the users sequence in order to free the license slot Preditor creates auto-saves of opensequences every minute and stores these on the server so that progress does not get lost even if the sequence getsauto-closed
SMTP SetupPurpose Strawberry has the ability to send email notifications on specific criteria This usually is the case if a teamexpires its storage quota or if assets are shared via email using the built-in functions For this feature to workStrawberry needs to be provided with STMP information
Usage
1 Login to the Strawberry server and cd to optsb4appfsbaseconfig
2 Open the file smtpymlexample and replace the example SMTP values with your own ones
3 Save the file as smtpymlThe Strawberry services needs to be restarted for the changes to apply
MYSQL BackupWhen clicking the Backup Now button Strawberry creates a dump of its MySQL database The default location forthe database dump is optsb4appbackups The default destination can be reconfigured in theoptsb4appfsbaseconfigdatabase-backupyml file
Empty TrashPressing the Empty Trash Now button will instantly remove all contents from the Strawberry trash folder
Osiris OptionShared Edits only
Purpose If the Osiris option is enabled Strawberry will mount its project media volumes in a specific way AvidMedia Composer will detect these volumes as volumes from an Avid storage and will provide bin locking for allStrawberry managed Media Composer projects
Versions amp LicenseThis section shows you the current version numbers of the Strawberry 4 modules that are installed on yourStrawberry server Additionally it provides you with license related information for your site
Updating a LicenseOnly use this method if you are running Strawberry in a Non-High Availability environment
Please go to the Strawberry admin panel misc versions amp license and click the NEW LICENSE button Copy andpaste the license string in there and click the UPDATE button Once this is done SSH login to the Strawberryserver and type service strawberry4 restart The license will be applied once the Strawberry service has beenrestarted
Legal Information
Legal Information
62
AVID is a trademark of Avid Technologies (wwwavidcom) Apple and FCP are trademarks of Apple in the US(wwwapplecom) Adobe and Premiere are trademarks of Adobe (wwwadobecom) All product names logos andbrands are property of their respective owners All company product and service names used in this manual are foridentification purposes only Use of these names logos and brands does not imply endorsement
Legal Information
63
- Last Updated July 20 2017
-
- Introduction
- System Requirements
-
- Storage File System Requirements
-
- List of Certified Storage Vendors
- List of Supported Storage File Systems
-
- Strawberry Server HWSW Requirements for Production Environments
- Minimum Server HWSW Requirements for Demonstration amp POC Environments
- Minimum Requirements for a dedicated View Proxy Encoding Node
- Requirements for the Strawberry Client
-
- Strawberry Client SSL
-
- Requirements for the Strawberry Adobe Panel
- Minimum Web Browser Requirements
-
- Installation Manuals
-
- Strawberry Client
-
- Installing the Client
- Starting the Client
- Upgrading the Client
- Deleting the Client
-
- Client Configuration for NAS
-
- SMB Mounts Configuration
- Paths to Editing applications (App Launcher)
- Mount your drives under Windows 7 amp 8
- Mount your drives under OSX
-
- Client Configuration for StorNext amp XSAN
-
- SAN Mount Configuration
-
- Client Configuration for Shared Edits under macOS
- Client Configuration for Shared Edits under Windows
- Changing the Clients Fuse Blocksize (macOS only)
- Adobe Panel
-
- Installing the Panel
- Updating the Panel
- Removing the Panel
- Testing the Panel
-
- Users Roles amp Teams
-
- Manage Roles
-
- Available Capabilities
- Creating a role
- Editing a role
- Deleting a role
-
- Manage Users
-
- Creating a User
- Changing a Users Role
- User Specific Roles
- Assigning a User to Teams
- Deleting a User
- Removing a User from a Team
-
- Manage Teams
-
- Creating a Team
- Changing a Teams Name
- Changing a Teams Quota
- Deleting a Team
-
- Manage Edits
-
- Manage Projects
-
- Manage Online Projects
-
- Force Closing a Project
- Deleting one or multiple Projects
- Archiving a Project
-
- Manage Archived Projects
-
- Retrieving a Project from the Archive
-
- Download Project List
- Custom Metadata
-
- Manage Libraries
-
- Introduction
- Library States
- Ingest Libraries
-
- Creating a Library Project
- Configuring an Ingest Library
- Configuring the Library Ingest Interval
- Configuring the Library Clean Interval
- Good to Know
-
- External Libraries
-
- Creating a Library Project
- Configuring an External Library
- Configuring the Library Clean Interval
- Configuring the External Library Reindex Interval
- Good to Know
-
- Custom Metadata
-
- Custom Metadata Sets
- The Master Set
- Creating a Metadata Set
- Connecting Metadata Sets
- Deleting a Metadata Set
- Creating a Dropdown Menu
- Creating a Text Input Field
- Creating a Replacement Pattern
- Editing a Value
- Deleting a Value
- Creating Project Status Flags
- Deleting Project Status Flags
- Supported Unix Time Modifiers
-
- Archive amp Copy To
-
- Creating an Archive Strategy
- Canceling an ArchiveRetrieval Job
- Clearing ArchiveRetrieval Errors
- Project Copy-to Strategies
- Asset Copy-to Strategies
- Good to Know
-
- Freezing Archived Projects
-
- Templates
-
- Working with Templates
- Creating a Template (Avid Media Composer)
- Creating a Template (Adobe Premiere)
- Rename a Templates
- Duplicate a Template
- Delete a Template(s)
- Configuring the Avid Attic
- Manage Indexers
- Storage Quota
- MYSQL Backup
- Versions amp License
-
- VIEW Proxy Encoder
-
- Supported Video Audio and Image File Formats
- Enabling or Disabling View
- Proxy Encoder Configuration
- Blacklists amp Whitelists
- Applying Blacklist amp Whitelist Changes
- Node and Worker Control
- Content Download Options
- Rescan-Project(s)
- Repair-Project(s)
- Reencode-Everything
-
- Miscellaneous
-
- Manage Templates
- Safe Search
-
- Enabling Safe Search
- Define ldquoSafe Searchrdquo Metadata
- Good to Know
-
- Manage Indexers
-
- General
- Technical Metadata Whitelist
-
- Storage Quota
- Adobe Premiere Specific Feature
-
- Auto-Link media from Library into project
- Auto-Ingest local media into project
- Auto-Link subproject media into project
-
- Preditor
- SMTP Setup
- MYSQL Backup
- Empty Trash
- Osiris Option
- Versions amp License
-
- Updating a License
-
- Legal Information
-
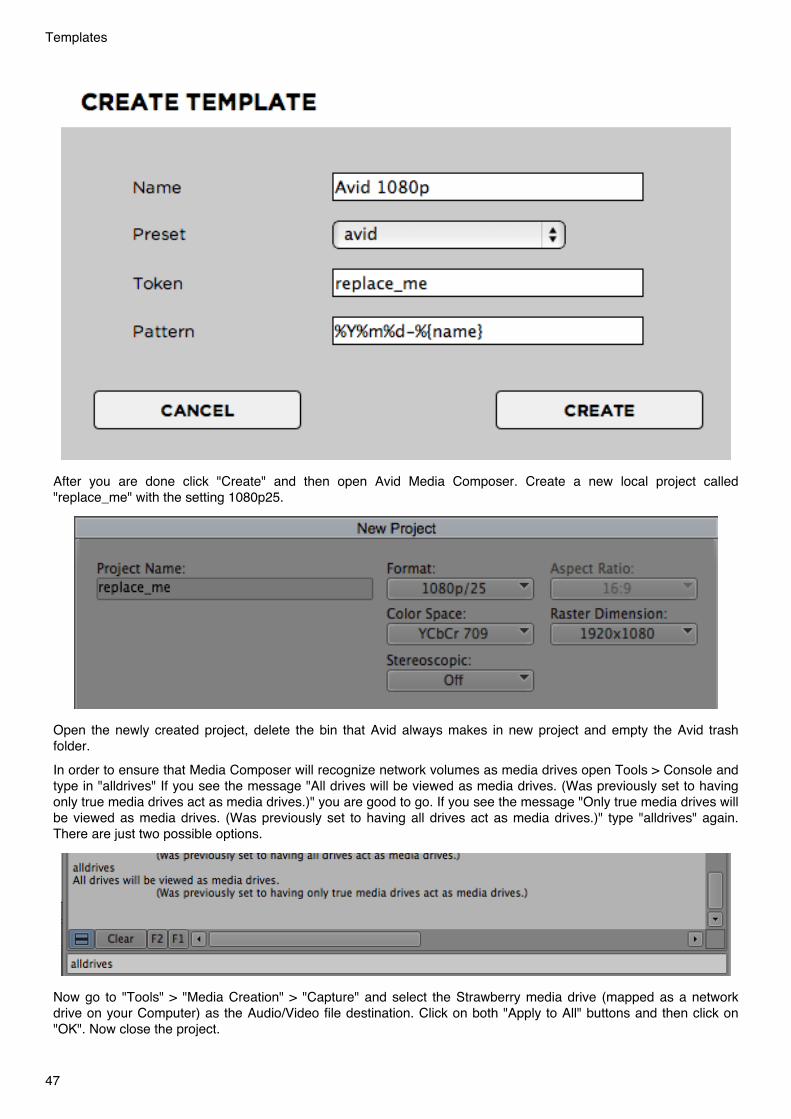
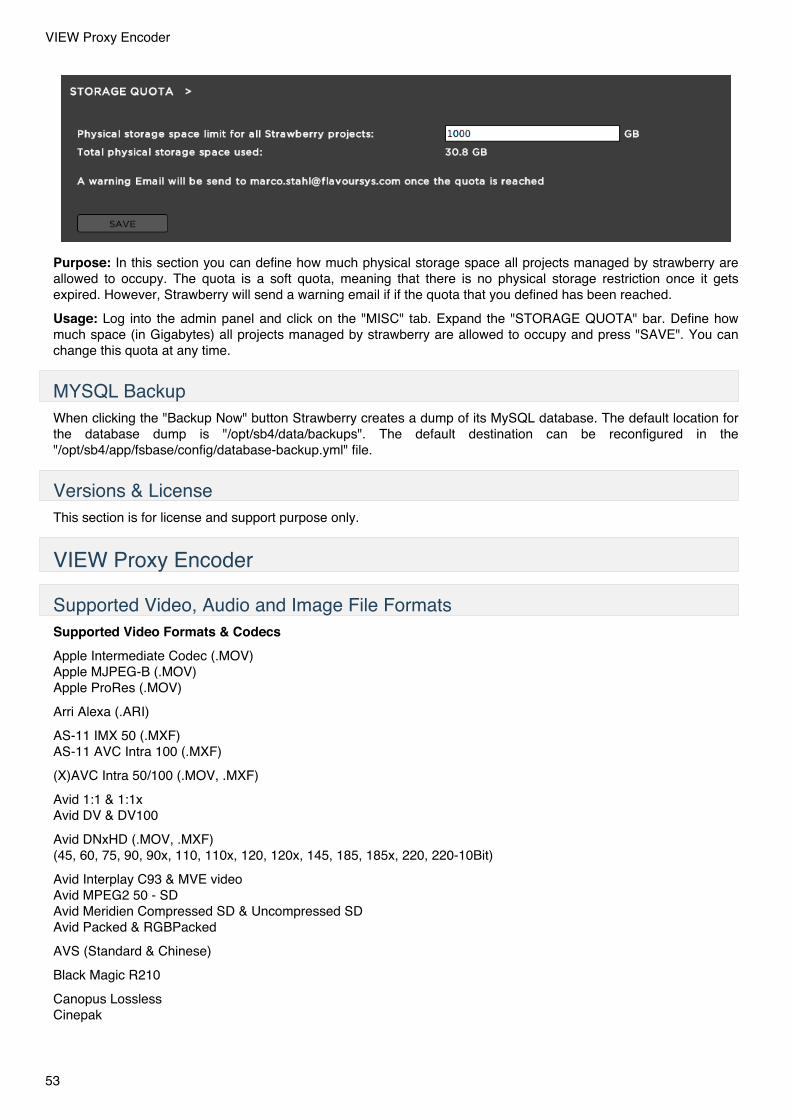
Purpose In this section you can define how much physical storage space all projects managed by strawberry areallowed to occupy The quota is a soft quota meaning that there is no physical storage restriction once it getsexpired However Strawberry will send a warning email if if the quota that you defined has been reached
Usage Log into the admin panel and click on the MISC tab Expand the STORAGE QUOTA bar Define howmuch space (in Gigabytes) all projects managed by strawberry are allowed to occupy and press SAVE You canchange this quota at any time
MYSQL BackupWhen clicking the Backup Now button Strawberry creates a dump of its MySQL database The default location forthe database dump is optsb4databackups The default destination can be reconfigured in theoptsb4appfsbaseconfigdatabase-backupyml file
Versions amp LicenseThis section is for license and support purpose only
VIEW Proxy Encoder
Supported Video Audio and Image File FormatsSupported Video Formats amp CodecsApple Intermediate Codec (MOV)Apple MJPEG-B (MOV)Apple ProRes (MOV)
Arri Alexa (ARI)
AS-11 IMX 50 (MXF)AS-11 AVC Intra 100 (MXF)
(X)AVC Intra 50100 (MOV MXF)
Avid 11 amp 11xAvid DV amp DV100
Avid DNxHD (MOV MXF)(45 60 75 90 90x 110 110x 120 120x 145 185 185x 220 220-10Bit)
Avid Interplay C93 amp MVE videoAvid MPEG2 50 - SDAvid Meridien Compressed SD amp Uncompressed SDAvid Packed amp RGBPacked
AVS (Standard amp Chinese)
Black Magic R210
Canopus LosslessCinepak
VIEW Proxy Encoder
53
DV (PAL amp NTSC)
DVCPRO HD | 100 MbpsDVCPRO 50 | 50 MbpsDVCPRO 25 | 25 Mbps
H261H263 H263-1996H263+ H263-1998 H263 version 2H264 AVC MPEG-4 AVC MPEG-4 (MP4 MOV MXF)
HDV
MJPEG amp MJPEG LosslessMPEG 1 amp 2 (M1V M2T M2V MPEG MPG MPGV MPV VOB)MPEG 4 (M4A M4P M4V MP4)
P2 - AVC-Intra 50 100 (MOV MXF)P2 - DVCPRO 25 50 100 (MOV MXF)
QuickTime uncompressed
Red Digital Cine Camera (R3D)
Windows Media Video (All Versions)
XDCAM 25XDCAM IMX 30XDCAM HD 50XDCAM SXS 50
Also SupportedAvid 11 10-bit RGB PackerFlash Video (FLV)Microsoft Video 1On2 VP3On2 VP5On2 VP6QuickTime 8BPS videoQuickTime Animation (RLE) videoQuickTime Graphics (SMC)QuickTime video (RPZA)R10K AJA Kona 10-bit RGB CodecR210 Quicktime Uncompressed RGB 10-bitTheoraVP8VP9WMV7
Supported Audio Formats amp CodecsMost CommonAAC+AACAC-3
CAF
MP3 (All Versions)MPEG-4 (All Versions)
PCM (All Versions amp Bitrates)
WAV
WMA (All Versions)
Also Supported
VIEW Proxy Encoder
54
Apple lossless audioATRAC1ATRAC3ATRAC3+Bink AudioCore Audio Format (CAF)DV audioEnhanced AC-3FLAC (Free Lossless Audio Codec)MACE (Macintosh Audio CompressionExpansion) 31MACE (Macintosh Audio CompressionExpansion) 61MLP (Meridian Lossless Packing)MP1 (MPEG audio layer 1)MP2 (MPEG audio layer 2)OpusRealAudio 10 (144K)RealAudio 20 (288K)RealAudio 30 (dnet)RealAudio LosslessRealAudio SIPR ACELPNETVorbisWindows Media Audio Voice
Supported Image Formats|Targa |TIF |PSD |PSB |PNG |JPG |IFF |GIF |BMP |DPX |EXR |ARI |EPS |AI
Enabling or Disabling ViewLog into the admin panel and click on the VIEW tab If VIEW is enabled proxy files will be created automaticallybased on the criteria below If VIEW is disabled proxy file encoding will not take place and he user front endautomatically jumps to list view instead of thumbnail view
Proxy Encoder ConfigurationIn this menu you can choose from properties of the Strawberry generated proxy files These options include
bull Proxy File Location shows where Strawberry saves the proxy files that it generates This location is definedupon installation and can only be changed by modifying the Strawberry configuration files on the Strawberryserver
bull Bitrate Define the proxy bitrate (per second) Please keep in mind that lower bitrates might be more suitablefor users connecting over the Internet while higher bit rates are good for LAN operations Is there a goldenrule Unfortunately not If you are using the Strawberry Preditor Add-on we recommend a low proxy bitrate(700k - 900k)
bull Resolution Choose a resolution for your proxy files There should always be a coherence between theresolution and the bit rate For example A 1920x1080 proxy file should have a bitrate of at least ~1200k whilea 640x360 proxy should look good with a 600k bitrate
bull Image Sequence Recognition When Strawberry VIEW detects an image sequence (Basename amp Count) withmore than 20 individual images it will create a preview MP4 file out of it An image sequence must have adelimiter between its basename and its count Valid delimiters are - (dash) (dot) and _ (underscore)sequence-name_001 is an example of a valid naming convention
bull Time Code Burn-In If you wish to have a video time code burned into your proxy files you should enable thisfeature
bull Time Code Label Position Defines whether the proxy time codes (or image layer names) are burned in on thebottom or on top of the proxy file
V isual Watermark Check this box if you want Strawberry to burn a visual watermark into your proxy files
bull Watermark Position Decide on which position of the screen your watermark image should be visible
VIEW Proxy Encoder
55
bull Watermark Image Upload a Watermark image as a png file The image should not be larger than your currentproxy resoultion and should have a transparent background You can download example watermarks heredlflavoursyscommanualssupporting_filesExample_Proxy_Watermarkszip
bull Watermark Preview Previews your uploaded watermark in respect of the current proxy resolution as well asthe current Timecode burn-in position
Blacklists amp Whitelists
bull Factory File Blacklist This is a factory blacklist provided by FlavourSys The blacklist has been populatedbased on best practice workflows If you need any of the factory blacklist file extensions whitelisted just enterthe extension into the Files Whitelist
bull File Blacklist Enter any file extension that you dont wish to see in the Strawberry user interface Strawberrywill then ignore files that are having this extension meaning that no proxies are generated However you canstill use the files on the FinderExplorer level in your projects In order to blacklist an item just enter extensionand press enter Press the save button to confirm
bull File Whitelist If you need to whitelist any extensions from the Factory File Blacklist just enter its extensioninto the Files Whitelist In order to whitelist an item just enter extension and press enter Press the savebutton to confirm
bull Factory Folders Blacklist This is a factory blacklist provided by FlavourSys The blacklist has been populatedbased on best practice workflows If you need any of the factory folder blacklist whitelisted just enter the foldername into the Folders Whitelist and press enter Press the save button to confirm
bull Folders Blacklist (Recursive) Enter any folder name that you dont wish to see in the Strawberry user interfaceStrawberry will then ignore the folder and its content meaning that no proxies are created You can still useblacklisted items on the FinderExplorer level in your projects In order to blacklist a folder just enter the foldername into the blacklist and press enter Press the save button to confirm
bull Folders Whitelist (Recursive) If you need to whitelist any folder from the Factory Folders Blacklist just enterits name into the Folders Whitelist and press enter Press the save button to confirm
Applying Blacklist amp Whitelist ChangesStrawberry 5 applies blacklist changes automatically In order to apply whitelist changes please perform thefollowing steps Also perform these steps in order to apply blacklist changes in Strawberry 44 or older versions
VIEW Proxy Encoder
56
1 Login to the Administration panel
2 Click on the MANAGE PROJECT tab
3 Select the project on which you want to apply the operation
4 Click the VIEW button below the project list
5 Select the radio button Rescan Project(s) and confirmDepending on the amount of files in the affected project this operation can take several minutes
Node and Worker Control
Purpose In this section of the admin panel you monitor and change the status of each VIEW encoding node that isintegrated in your environment You also have the possibility to set Schedulers so that you can decide if the nodesand the workers run
Usage Log into the admin panel and click on the VIEW tab Expand the NODE AND WORKER CONTROL barHere you can select from the following options
bull NODE ID The internal ID of each encoding node
bull NODE ADDRESS The hostname or IP address and port under which each node can be reached
bull STATUS Green means running yellow means paused and red means not running
bull NUMBER OF WORKERS Number of encoding workers (threads) that work at the same time Choose theamount of workers based on the amount of CPU cores of each node One worker per core works very well butleave at least one core for the OS and the rest of the Strawberry system The Strawberry Server license comeswith 3 Workers additional workers must be licensed separately
bull Actions Stop start restart or edit a scheduler for individual nodes
Content Download OptionsPurpose If you want to allow user to download media assets using the front end you can define this here Forinstance for workflows requiring executive review or for film schools where faculty could grade from home thisfeature can be beneficial however for feature film workflows this feature can be turned off
Usage Log into the admin panel and click on the VIEW tab Expand the CONTENT DOWNLOAD OPTIONS barIf you want to enable users to download low resolution media files (proxy files) from the front end check the boxnext to Allow users to download proxy files If you want to enable users to download high resolution media filesfrom the front end check the box next to Allow users to download high-res files
Rescan-Project(s)Purpose Scans the project for new files and newly supported file formats and attempts to encode them to proxyfiles It will also apply black list white list changes to existing projects
Usage Log into the Administration panel and click on the PROJECTS tab Expand the MANAGE PROJECTSbar Select the project(s) that you want to rescan and press the VIEW button below the project list and checkRescan Project(s) and confirm it
Repair-Project(s)
VIEW Proxy Encoder
57
Purpose Scans the project for new files and newly supported file formats and attempts to encode them to proxyfiles It will also apply black list white list changes to existing projects
Usage Log into the Administration panel and click on the PROJECTS tab Expand the MANAGE PROJECTSbar Select the project(s) that you want to repair and press the VIEW button below the project list and check RepairProject(s) and confirm it
Reencode-EverythingPurpose Deletes every file in the project to see if meta data have been changed Also looks for new files and newlysupported file formats and attempst to encode them to proxy files It will also apply black list white list changes toexisting projects
Usage Log into the Administration panel and click on the PROJECTS tab Expand the MANAGE PROJECTSbar Select the project(s) that you want to reencode-everything and press the VIEW button below the project listand check Reencode-Everything and confirm it
Miscellaneous
Manage TemplatesPlease visit this manuals rarr Templates larr chapter to get template related information
Safe SearchPurpose ldquoSafe Searchrdquo is an ldquoin edit suiterdquo security feature for Strawberry managed content Its aim is to reducethe visibility and searchability of content while a project with specific custom metadata is open This prevents thatclients see content of other clients while working on a project inside the editing room
Enabling Safe SearchLogin into the Strawberry Administrator panel and select the ldquoMiscrdquo tab Open the ldquoSearch settings and check thebox next to ldquoEnable Safe Search Featurerdquo
Define ldquoSafe Searchrdquo MetadataOnce ldquoSafe Searchrdquo is enabled click on the ldquoProjectsrdquo tab and open the ldquoCustom Metadatardquo menu Select a set andthen a drop down menu within it Then click on ldquoEdit Valuerdquo
Miscellaneous
58
Next to each drop down menu is a checkbox called ldquoSafe Searchrdquo Check this box for each value for which the ldquoSafeSearch filter should apply
When a user opens a project that includes a ldquoSafe Searchrdquo metadata the search field provides the informationaccordingly (safe search enabled for ldquometadata namerdquo) From this point on all searches will be carried within therelated safe search metadata context This applies until the project is closed
Miscellaneous
59
Good to Know
bull Only one drop down menu can have safe search metadata
bull Safe search metadata in the Administrator panel should not be changed enabled or disabled while projects areopened as this can lead to inconsistent search results
Manage IndexersAvailable in Strawberry version 42 or newer
GeneralCheck the following boxes if you want the features or unchecked if not
bull Enable Deep Indexing for Media Files(If enabled Strawberry will extract technical metadata from media files If it is disabled Strawberry will only index filenames and file sizes This feature needs to be enabled in order for the proxy encoding to work)
bull Index Adobe Premiere Project Files(If enabled Strawberry will extract master clip names a descriptions comments from Adobe Premiere master clipsto make these information visible amp searchable in the front-end)
bull Index Avid bin files(If enabled Strawberry will extract master clips names and sequence names from Avid bins to make theseinformation searchable in the front-end However when searching for an Avid master clip or sequence name theuser will not be provided with a visual presentation of the asset or sequence but will only see the project(s) thatcontains these information since this feature is beta we recommend to turn it of)
bull Extract Exif metadata from images(If enabled Strawberry will extract EXIF metadata from image files
bull Extract XMP metadata from files(if enabled Strawberry will extract XMP metadata from media files)
bull Extract XML metadata (Experimental)(if enabled Strawberry will extract XML metadata from xml sidecard files Please contact us for an overview ofsupported XML schemes)
bull Search for technical metadata(If enabled Strawberry will extract technical metadata from video files as well as ID3 tags (album Artist etc) fromaudio files
Technical Metadata WhitelistStrawberry maintains a search index that allows user to carry out searches in an extremely fast fashion Since thissearch index is stored in the server memory its size must be limited and therefor can not include all possible searchparameters Administrator can define the search parameters by white-listing them
Miscellaneous
60
Enter any label that you wish to add to the Strawberry search index To insert a label just click next to an existinglabel and start typing An auto completion list will show available results for your search term Select the technicalmetadata label that you wish to add to the search index Use the x button next to a labels name to remove a labelfrom the search index The changes will not apply immediately but on the next build of the search index (once anight) If you want to apply the settings immediately SSH login to the Strawberry server as root and type thecommand sb reindex
Storage Quota
Purpose In this section you can define how much physical storage space all projects managed by strawberry areallowed to occupy The quota is a soft quota meaning that there is no physical storage restriction once it getsexpired However Strawberry will send a warning email if if the quota that you defined has been reached
Usage Log into the admin panel and click on the MISC tab Expand the STORAGE QUOTA bar Define howmuch space (in Gigabytes) all projects managed by strawberry are allowed to occupy and press SAVE You canchange this quota at any time
Adobe Premiere Specific Feature
Auto-Link media from Library into projectThis feature is part of a custom development and currently not documented
Auto-Ingest local media into projectPurpose If a user imports media from a usb or local hdd into an Adobe Premiere project that is managed byStrawberry Strawberry can automatically copy that media into the projects media volume This ensures that allmedia used in a Premiere project is actually on the centralized storage
Usage Log into the admin panel and click on the MISC tab Expand the Auto Import Library amp unmanaged Assets(Adobe Premiere Only) bar If you wish to enable the Auto-ingest feature check the box next to it and define aninterval The interval determines how often the Strawberry Adobe panel will check for unmanaged inside each openPremiere project
Auto-Link subproject media into projectPurpose If a user imports media from a subproject into an Adobe Premiere project that is managed by StrawberryStrawberry can automatically link that into the from the subproject into the parent project This ensures that anyproject is self contained at any point
Miscellaneous
61
Usage Log into the admin panel and click on the MISC tab Expand the Auto Import Library amp unmanaged Assets(Adobe Premiere Only) bar If you wish to enable the Auto-link feature check the box next to it and define aninterval The interval determines how often the Strawberry Adobe panel will check for imported subproject mediainside the current project to link it
PreditorDefine the Timeout based on which a user should be automatically logged out of Preditor In the process Strawberrywill also automatically close the users sequence in order to free the license slot Preditor creates auto-saves of opensequences every minute and stores these on the server so that progress does not get lost even if the sequence getsauto-closed
SMTP SetupPurpose Strawberry has the ability to send email notifications on specific criteria This usually is the case if a teamexpires its storage quota or if assets are shared via email using the built-in functions For this feature to workStrawberry needs to be provided with STMP information
Usage
1 Login to the Strawberry server and cd to optsb4appfsbaseconfig
2 Open the file smtpymlexample and replace the example SMTP values with your own ones
3 Save the file as smtpymlThe Strawberry services needs to be restarted for the changes to apply
MYSQL BackupWhen clicking the Backup Now button Strawberry creates a dump of its MySQL database The default location forthe database dump is optsb4appbackups The default destination can be reconfigured in theoptsb4appfsbaseconfigdatabase-backupyml file
Empty TrashPressing the Empty Trash Now button will instantly remove all contents from the Strawberry trash folder
Osiris OptionShared Edits only
Purpose If the Osiris option is enabled Strawberry will mount its project media volumes in a specific way AvidMedia Composer will detect these volumes as volumes from an Avid storage and will provide bin locking for allStrawberry managed Media Composer projects
Versions amp LicenseThis section shows you the current version numbers of the Strawberry 4 modules that are installed on yourStrawberry server Additionally it provides you with license related information for your site
Updating a LicenseOnly use this method if you are running Strawberry in a Non-High Availability environment
Please go to the Strawberry admin panel misc versions amp license and click the NEW LICENSE button Copy andpaste the license string in there and click the UPDATE button Once this is done SSH login to the Strawberryserver and type service strawberry4 restart The license will be applied once the Strawberry service has beenrestarted
Legal Information
Legal Information
62
AVID is a trademark of Avid Technologies (wwwavidcom) Apple and FCP are trademarks of Apple in the US(wwwapplecom) Adobe and Premiere are trademarks of Adobe (wwwadobecom) All product names logos andbrands are property of their respective owners All company product and service names used in this manual are foridentification purposes only Use of these names logos and brands does not imply endorsement
Legal Information
63
- Last Updated July 20 2017
-
- Introduction
- System Requirements
-
- Storage File System Requirements
-
- List of Certified Storage Vendors
- List of Supported Storage File Systems
-
- Strawberry Server HWSW Requirements for Production Environments
- Minimum Server HWSW Requirements for Demonstration amp POC Environments
- Minimum Requirements for a dedicated View Proxy Encoding Node
- Requirements for the Strawberry Client
-
- Strawberry Client SSL
-
- Requirements for the Strawberry Adobe Panel
- Minimum Web Browser Requirements
-
- Installation Manuals
-
- Strawberry Client
-
- Installing the Client
- Starting the Client
- Upgrading the Client
- Deleting the Client
-
- Client Configuration for NAS
-
- SMB Mounts Configuration
- Paths to Editing applications (App Launcher)
- Mount your drives under Windows 7 amp 8
- Mount your drives under OSX
-
- Client Configuration for StorNext amp XSAN
-
- SAN Mount Configuration
-
- Client Configuration for Shared Edits under macOS
- Client Configuration for Shared Edits under Windows
- Changing the Clients Fuse Blocksize (macOS only)
- Adobe Panel
-
- Installing the Panel
- Updating the Panel
- Removing the Panel
- Testing the Panel
-
- Users Roles amp Teams
-
- Manage Roles
-
- Available Capabilities
- Creating a role
- Editing a role
- Deleting a role
-
- Manage Users
-
- Creating a User
- Changing a Users Role
- User Specific Roles
- Assigning a User to Teams
- Deleting a User
- Removing a User from a Team
-
- Manage Teams
-
- Creating a Team
- Changing a Teams Name
- Changing a Teams Quota
- Deleting a Team
-
- Manage Edits
-
- Manage Projects
-
- Manage Online Projects
-
- Force Closing a Project
- Deleting one or multiple Projects
- Archiving a Project
-
- Manage Archived Projects
-
- Retrieving a Project from the Archive
-
- Download Project List
- Custom Metadata
-
- Manage Libraries
-
- Introduction
- Library States
- Ingest Libraries
-
- Creating a Library Project
- Configuring an Ingest Library
- Configuring the Library Ingest Interval
- Configuring the Library Clean Interval
- Good to Know
-
- External Libraries
-
- Creating a Library Project
- Configuring an External Library
- Configuring the Library Clean Interval
- Configuring the External Library Reindex Interval
- Good to Know
-
- Custom Metadata
-
- Custom Metadata Sets
- The Master Set
- Creating a Metadata Set
- Connecting Metadata Sets
- Deleting a Metadata Set
- Creating a Dropdown Menu
- Creating a Text Input Field
- Creating a Replacement Pattern
- Editing a Value
- Deleting a Value
- Creating Project Status Flags
- Deleting Project Status Flags
- Supported Unix Time Modifiers
-
- Archive amp Copy To
-
- Creating an Archive Strategy
- Canceling an ArchiveRetrieval Job
- Clearing ArchiveRetrieval Errors
- Project Copy-to Strategies
- Asset Copy-to Strategies
- Good to Know
-
- Freezing Archived Projects
-
- Templates
-
- Working with Templates
- Creating a Template (Avid Media Composer)
- Creating a Template (Adobe Premiere)
- Rename a Templates
- Duplicate a Template
- Delete a Template(s)
- Configuring the Avid Attic
- Manage Indexers
- Storage Quota
- MYSQL Backup
- Versions amp License
-
- VIEW Proxy Encoder
-
- Supported Video Audio and Image File Formats
- Enabling or Disabling View
- Proxy Encoder Configuration
- Blacklists amp Whitelists
- Applying Blacklist amp Whitelist Changes
- Node and Worker Control
- Content Download Options
- Rescan-Project(s)
- Repair-Project(s)
- Reencode-Everything
-
- Miscellaneous
-
- Manage Templates
- Safe Search
-
- Enabling Safe Search
- Define ldquoSafe Searchrdquo Metadata
- Good to Know
-
- Manage Indexers
-
- General
- Technical Metadata Whitelist
-
- Storage Quota
- Adobe Premiere Specific Feature
-
- Auto-Link media from Library into project
- Auto-Ingest local media into project
- Auto-Link subproject media into project
-
- Preditor
- SMTP Setup
- MYSQL Backup
- Empty Trash
- Osiris Option
- Versions amp License
-
- Updating a License
-
- Legal Information
-