contents › inc › uploads › ckeditor › operating... · this colorimeter is a precise...
TRANSCRIPT

Contents
Product Description....................................................................................... 1
Cautions ......................................................................................................... 1
I. Button Description ...................................................................................... 3
II. Interface Description ................................................................................. 5
III. Battery Description and Installation ........................................................ 6
IV. Changing Measuring Aperture 8
V. Operating Instruction ................................................................................ 9
(I) Turning On ........................................................................................................ 9
1. Preparations Before Power On .................................................................. 9
2. Turning On .................................................................................................. 9
(II) Measurement.................................................................................................... 9
1. Measurement Locating ............................................................................... 9
2. Standard Measurement .............................................................................. 9
3. Sample Measurement .............................................................................. 10
(III) Connect Colorimeter to PC .......................................................................... 11
(IV)Print ................................................................................................................. 13
VI. System Function Description ................................................................ 14
1. Record and Standard Entering ................................................................. 14
2. White and Black Calibration ..................................................................... 16
3. Tolerance Setting ...................................................................................... 17
4. Delete Records ......................................................................................... 18
5. Light Source Selection ............................................................................. 21
6. Display Mode ............................................................................................ 22
7. Function Setting ....................................................................................... 26
VII. Product Parameters .............................................................................. 34
1. Product Features ...................................................................................... 34
2. Product Specifications .............................................................................. 36

NR60CP Precision Colorimeter
1
Product Description
Note: This user manual is for model NR60CP, NR110, NR10QC colorimeter,
but all the following descriptions are according to model NR60CP. You will find
NR110 and NR10QC technical parameters in appendix.
This instrument is researched and developed in accordance with CIE
(International Commission on Illumination) and CNS (China National
Standards). It is a high precise colorimeter with simple user interface and
stable performance. It can be powered by both Li-ion battery and external
DC power supply.
The instrument has following advantages:
● Can perform measurement at start-up. No need to calibrate each time which
simplify the operation.
● Adopt illuminating locating and precise cross locating to aim at the tested
object quickly.
● 4mm measuring aperture for more measurement occasions.
● Save data automatically.
● The precise and stable hand-head structure to make the measurement
easier.
Cautions
● This colorimeter is a precise measuring instrument. Please avoid dramatic
changes of external environment when measuring. These changes,
including the flicker of surrounding light, the rapid change of temperature,
will affect the measuring accuracy.
● Keep the instrument balanceable; make sure the measuring aperture cling to
the test sample, and no shaking or shifting when measuring. Please prevent
the colorimeter from fierce collision or crash.
● This instrument is not waterproof. Do not use it in high humidity environment
or in water.
● Keep the colorimeter clean. Avoid dust, powder or solid particles entering the
measuring aperture and the instrument.

NR60CP Precision Colorimeter
2
● Replace the white calibration cover and put the colorimeter into instrument
cabinet when not in use.
● Please take out the battery to prevent the colorimeter from damage if you
don’t use it for a long time.
● Please keep the colorimeter in a cool dry place.
● Any unauthorized changes to the colorimeter are not permitted, or it will
affect the measuring accuracy, even cause irreversible damage.

NR60CP Precision Colorimeter
3
I. Button Description
The following is a brief introduction of the buttons. We will give more detailed
information about its function separately in next chapters.
Figure 1 Button Function
Up
Down
Back
Menu
Enter

NR60CP Precision Colorimeter
4
Figure 2 Testing Button Diagram
Button Function Introduction
1. Menu
2. Up
3. Down
4. Enter
5. Back
6. Testing
Testing

NR60CP Precision Colorimeter
5
II. Interface Description
Figure 3 Interface Diagram
Interface Description
1. Power Switch: Push the switch to “1” to turn on the colorimeter. Push the
switch to “0” to turn it off.
2. DC Interface: It is used to connect to external power source. The
specification of external power source is 5V=2A.
3. USB Interface / RS-232 Interface: This interface is a common interface.
The instrument judges the connection status automatically. USB interface
is used to transfer data to PC. Its baud rate is 115200bps. RS-232 interface
is used to connect to the printer.
Note: When connecting to external power source, please press the
power switch to start the instrument.
AC_DC Powder Port
USB/RS232 Inteface
Power Switch

NR60CP Precision Colorimeter
6
III. Battery Description and Installation
Battery Description
1. The Battery is Li-ion 3.7V = 0.5A. Its capacity is 3200mAh.
2. Please use original Li-ion battery. Do not use other batteries, or it will cause
irreversible damage.
3. Please take out the battery to prevent the colorimeter from the damage of
battery leakage if you don’t use it for a long time.
4. When charging the battery, the instrument must connect external power
source or USB cable to connect the PC. Meanwhile, push the switch to “1”,
and then the battery will be charging. If not charge the battery, then take out
the battery and connect external power source, the instrument still works
normally.
5. When charging the battery, dynamic battery icon will display on the top right
corner of measurement interface.
Battery Installation
1. When installing battery, be sure the power is cut off. (The switch is pushed
to “0”). Then remove the battery cover.
2. Insert the Li-ion battery into battery compartment and push it gently in right
direction.
3. Put the battery cover on Li-ion battery, and then push it up.

NR60CP Precision Colorimeter
7
Figure 4 Battery Installation
Li-ion Battery
Battery Cover

NR60CP Precision Colorimeter
8
IV. Changing Measuring Aperture
1. Measuring Aperture Installation
As shown in Figure 5, make the measuring aperture align at the installation
position of integrating sphere. Then gently turn it counterclockwise. When
hear slight “Da”, it means measuring aperture is buckled with integrating
sphere. Then the installation is finished.
2. Measuring Aperture Dismantlement
As shown in Figure 5, gently turn measuring aperture clockwise. When
hear slight “Da”, it means the measuring aperture is separated with the
buckling parts of integrating sphere. Then the measuring aperture is
dismantled.
Figure 5 Installation and Dismantlement of Measuring Aperture
Note: some models are only equipped with cross platform measuring
aperture.
Cross Platform Measuring
Aperture
Small Area Measuring
Aperture

NR60CP Precision Colorimeter
9
V. Operating Instruction
(I) Turning On
1. Preparations Before Power On
Check whether there is battery powered or external power supply.
2. Turning On
Push the power switch to “1”, the LCD screen will display 3nh logo.
After a few seconds, it will enter Standard Measurement interface
automatically, and the default display is L*a*b*C*H.
(II) Measurement
1. Measurement Locating
The instrument can locate by measurement facula. Enter “Standard
Measurement” or “Sample Measurement” interface, press the “Testing”
key and hold it. The facula will appear at the moment. You can observe
the matching status between the facula and the measured sample. At
the same time, hold the measuring aperture close to the measured
sample and adjust it. Then the alignment is achieved.
After the locating, release “Testing” button. The instrument will finish
sample testing in approx. 1 sec and display color parameters of the
measured sample.
2. Standard Measurement
Enter standard measurement to perform measurement, as shown in
Figure 6, align the measuring aperture to the sample, press “Testing”
button, the screen will display color data of this sample.

NR60CP Precision Colorimeter
10
Figure 6 Standard Measurement Interface
3. Sample Measurement
After completing standard measurement, press “Enter” button, the
instrument will enter “Sample Measurement” interface automatically, as
shown in Figure 7. Align the measuring aperture to the test sample to
perform sample measurement.

NR60CP Precision Colorimeter
11
Figure 7 Sample Measurement Interface
Note: During the measurement (Approx. 1 sec), all buttons are
ineffective.
(III) Connect Colorimeter to PC (only for models
equipped with software)
Press “MENU ” button to enter the main menu, as shown in Figure 8.
Then, select “Comm” to enter an interface shown in Figure 9. Follow
the tips in the interface, connect colorimeter to the PC with USB cable.
Press “Enter” button, the instrument will enter “Communicating…”
interface, as shown in Figure 10.

NR60CP Precision Colorimeter
12
Figure 8 Main Menu
Figure 9 USB Communication

NR60CP Precision Colorimeter
13
Figure 10 “Communicating” Interface
(IV)print
Connect colorimeter to the printer. When the colorimeter is in “Standard
Measurement” or “Sample Measurement” interface, you can print
measurement data automatically.

NR60CP Precision Colorimeter
14
VI. System Function Description
Abut operating the functions of this colorimeter, please through main menu as
shown in Figure 8.
1. Record and Standard Entering
a) Record
Select “Record” in main menu to enter “Standard Record”, as shown in
Figure 11. The figure shows the standard sample data. You can check
different standard data through “Up” and “Down”. “T002” is a standard
number. After selecting a standard, you can press “Enter” to check test
sample data and color difference, as shown in Figure 12. You can
check different data through “Up” and “Down”. No.001 is the serial
number of sample measurement.
Figure 11 Standard Record

NR60CP Precision Colorimeter
15
Figure 12 Sample Record
b) Standard Entering
In some cases, it’s needed to measure color difference under a saved
standard. Then, you can select “Record” in main menu to enter
standard sample records interface. You can search the needed
standard data through “Up” and “Down”. After finding it, press
“Menu ” button, and then the standard record is entered to the
measurement interface, press “Enter”, you can perform sample
measurement under this standard.
c) Sample Record Entered to a Standard
In some cases, it’s needed to use a stored sample as a standard. Then,
you can select “Record” to enter sample records interface, as shown in
Figure 12. You can search the needed sample data through “Up” and
“Down”. After finding it, press “Menu ” button, and then the sample
record is entered to the measurement interface as a standard, press
“Enter”, you can perform the color measurement under this standard.
NR60CP Precision Colorimeter
16
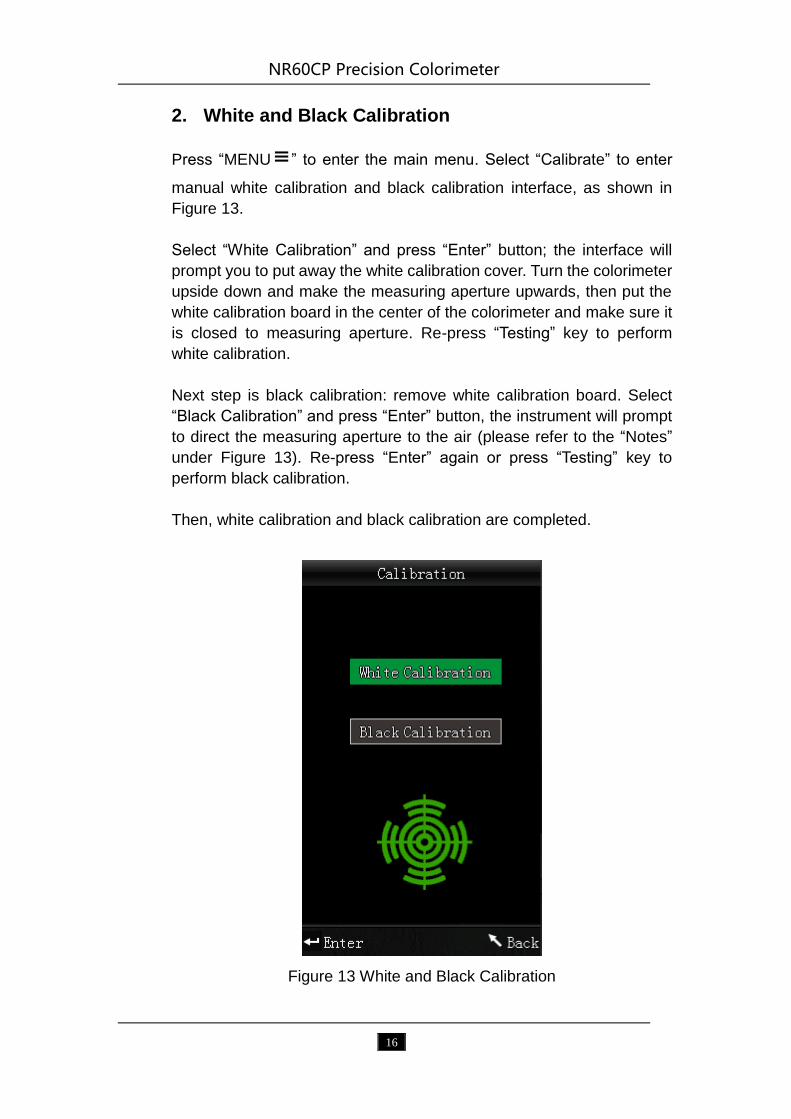
2. White and Black Calibration
Press “MENU ” to enter the main menu. Select “Calibrate” to enter
manual white calibration and black calibration interface, as shown in
Figure 13.
Select “White Calibration” and press “Enter” button; the interface will
prompt you to put away the white calibration cover. Turn the colorimeter
upside down and make the measuring aperture upwards, then put the
white calibration board in the center of the colorimeter and make sure it
is closed to measuring aperture. Re-press “Testing” key to perform
white calibration.
Next step is black calibration: remove white calibration board. Select
“Black Calibration” and press “Enter” button, the instrument will prompt
to direct the measuring aperture to the air (please refer to the “Notes”
under Figure 13). Re-press “Enter” again or press “Testing” key to
perform black calibration.
Then, white calibration and black calibration are completed.
Figure 13 White and Black Calibration

NR60CP Precision Colorimeter
17
Notes:
1. When performing black calibration, direct the measuring port to the
air. Be sure the black calibration is starting in a dark, no bright light
source environment. Keep the measuring port more than 1m away
from any reflective items (hands, desks, walls etc.).
2. No need to enforce black and white calibration. Once turning it on,
you can start the measurement. It is suggested to perform
calibration in following occasions: first use, great change of the
environment, long-term unused or inaccurate data.
3. Tolerance Setting
Select “Tolerance” in main menu to enter tolerance setting interface, as
shown in Figure 14. You can add or subtract the number in which the
cursor is positioned through “Up” and “Down” button. After setting the
number to the needed one, press “Enter” button, the cursor will jump to
the last number. When the cursor is in the last number, press “Enter”
button to save the settings and return to the main menu.
If you don’t want to set or modify the tolerance, you can press “Back”
button to return to the main menu.
Figure 14 Tolerance Setting

NR60CP Precision Colorimeter
18
The tolerance value is artificial. It is a standard value to judge whether the total
color difference ΔE is qualified or not according to the demand of color
management. If ΔE is smaller than tolerance value, then it is qualified. If ΔE is
bigger than tolerance value, then it is unqualified. As shown in Figure 14-1, the
ΔE in sample measurement interface is unqualified.
Figure 15 Sample Measurement Interface
4. Delete Records
Select “Delete” in main menu to enter the interface shown in Figure 15.
There are two options: “Delete All Samples” and “Delete All Records”.

NR60CP Precision Colorimeter
19
Figure 16 Delete Records
a) Delete All Samples
When select “Delete All Samples”, it will delete all test samples in the
instrument and save the standard records. Then, the instrument will
display a warning interface, as shown in Figure 16. Press “Enter”, all
sample data will be deleted, but the standard records are still retained.

NR60CP Precision Colorimeter
20
Figure 17 “Delete All Samples” Warning Interface
b) Delete All Records
When select “All Records Delete”, all records in the instrument will be
deleted, including all standard records and all sample records. Then,
the instrument will pop up a warning interface, as shown in Figure 17.
Press “Enter” button, all records in the instrument will be deleted.
Note: Please operate this interface carefully, in case of accidental
deletion of the needed historical records.

NR60CP Precision Colorimeter
21
Figure 18 “Delete All Records” Warning Interface
5. Light Source Selection
Click “Light” in main menu. Customer can choose the light source

NR60CP Precision Colorimeter
22
Figure 19 Light Source Selection
6. Display Mode
Select “Display” in the main menu to enter an interface, as shown in
Figure 19. You can select different color spaces according to your need.
This selection will affect the display in “Standard Measurement” and
“Sample Measurement” interfaces. You can make settings by pressing
“Up” and “Down” button. Then press “Enter” to save the settings and
return to main menu.

NR60CP Precision Colorimeter
23
Figure 20 Display Mode Interface Figure 21 CIE L*a*b*C*H*
Figure 22 CIE L*a*b* Figure 23 CIE XYZ

NR60CP Precision Colorimeter
24
The display mode will default to “CIE L*a*b*C*H*”. This instrument has 8
display modes: “CIE L*a*b*C*H*”, “CIE L*a*b*”, “CIE XYZ”, “CIE RGB”, “CIE
L*U*V”, “L*a*b* Whiteness & Yellowness”, “Color Fastness” and “Staining
Fastness” (Figure 21~Figure 29). In addition, “CIE XYZ”, “CIE RGB”, “CIE
L*U*V” only have standard measurement. Other modes have both standard
measurement and sample measurement.
Figure 24 CIE RGB Figure CIE L*U*V*

NR60CP Precision Colorimeter
25
Figure 26 Whiteness&Yellowness Figure 27 Whiteness&Yellowness
Standard Measurement Sample Measurement
Figure 28 Color Fastness Figure 29 Staining Fastness

NR60CP Precision Colorimeter
26
7. Function Setting
Select “Settings” in main menu to enter an interface shown in Figure 23.
You can select the object according to your need by pressing “Up” and
“Down” buttons. Press “Enter” to enter the corresponding setting
interface. After completing these settings, press “Enter” button to save
the settings and return to the previous menu.
Figure 30 Function Setting
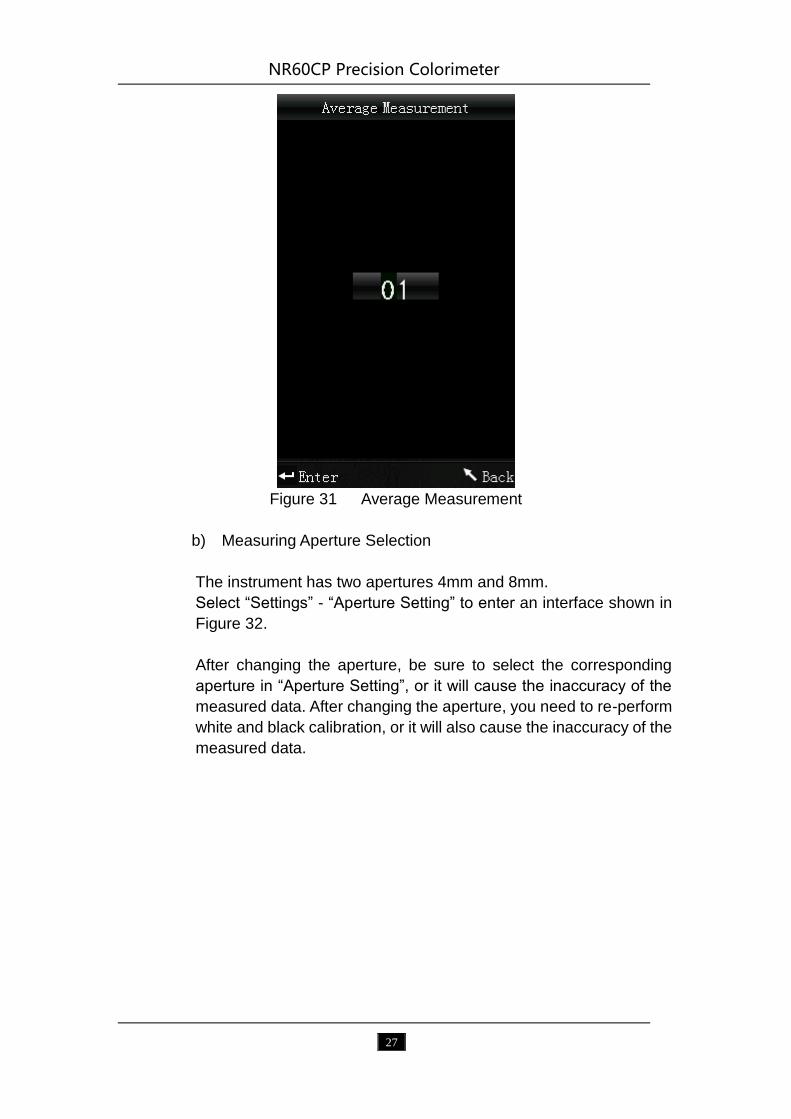
a) Average Measurement
Select “Average” in the main menu to enter an interface shown in
Figure 31. You can set the times of average measurements according
to your need. You can add or subtract the times by pressing “Up” and
“Down” buttons. Press “Enter” to save the settings and return to the
main menu. When the number is set to “00”, “01”, the instrument will
only make single measurement, and will not perform average
measurement. The instrument is defaulted to one time measurement.
NR60CP Precision Colorimeter
27
Figure 31 Average Measurement
b) Measuring Aperture Selection
The instrument has two apertures 4mm and 8mm.
Select “Settings” - “Aperture Setting” to enter an interface shown in
Figure 32.
After changing the aperture, be sure to select the corresponding
aperture in “Aperture Setting”, or it will cause the inaccuracy of the
measured data. After changing the aperture, you need to re-perform
white and black calibration, or it will also cause the inaccuracy of the
measured data.

NR60CP Precision Colorimeter
28
Figure 32 Average Measurement
c) Auto Save
Click “Auto Save” in “Setting”. You can set the save method.

NR60CP Precision Colorimeter
29
Figure 33 Auto Save
d) Language Selection
Click “Language” in “Setting”. You can select the language
English/Chinese.

NR60CP Precision Colorimeter
30
Figure 34 Language Selection
e) Select “Time & Date” to enter an interface shown in Figure 35. You
can make settings by pressing the button “Up” and “Down. In Figure
36 and Figure 37, you can add or subtract time and date by pressing
the button “Up” and “Down. In Figure 38 and Figure 39, you can set
display format of time and date by pressing “Up” and “Down”. Press
“Enter” to save the settings and return to the previous menu.
If you don’t want to set or modify time and date, you can press “Back”
button to return to the main menu.

NR60CP Precision Colorimeter
31
Figure 35 Time & Date Figure 36 Time Setting

NR60CP Precision Colorimeter
32
Figure37 Date Setting Figure 38 Time Format
Figure 39 Date Format Figure 40 Color Difference Formula

NR60CP Precision Colorimeter
33
f) Select “’Color Diff Formula” in main menu, as shown in Figure 40.
Customer can choose the required color difference formula.
g) Select “Settings” - “Contrast” to set the backlight brightness.
h) Select “Settings” - “Restore Factory Set”, as shown in Figure 41. Press
“Enter” button. The instrument will restore to factory default setting and clear
all records.
Note: When you choose this setting, it will pop up a warning. Please
operate it carefully. If you don’t want to carry out “Restore Factory
Settings”, please press “Back” button.
Figure 41 Restore Factory Set

NR60CP Precision Colorimeter
34
VII. Product Parameters
1. Product Features
● The instrument fully considered the user experience, adopting humanized
design concept – make the measurement easier.
● Adopting creative facula locating and cross locating – make the
measurement conveniently, quickly and accurately.
● Small measuring aperture – easy to measure concave-convex object.
● No need to calibrate each time which simplify the operation.
● New integrating sphere optical path design – improve measurement stability
and precision.
● This colorimeter has various color spaces. The users can select it according
to their needs. And the instrument can display Whiteness, Yellowness and
Color Fastness which is used widely.
● The precise and stable hand-head structure to make the measurement
easier.

NR60CP Precision Colorimeter
35
2. Product Specifications
Model NR60CP
Illuminating/viewing geometry 8/d (8°illumination angle/diffuse viewing)
Measuring aperture Φ8mm, Φ4mm
Locating Illumination Locating/Cross Locating
Measuring End Face Large stable end face and small
concave-convex end face
Detector Silicon photoelectric diode
Color Space
CIE L*a*b; CIE XYZ; CIE RGB;CIEL*u*v;
CIE*C*H; Whiteness &Yellowness; Color
Fastness
Color Difference Formula ΔE*ab; ΔL*ab; ΔE*C*H; ΔECIE94;
ΔEHunter
Light Source D65, D50, A, C, F2, F6, F7, F8, F10, F11,
F12
Measuring light source LED blue light excitation
Errors between each
equipment ≤0.50ΔE*ab
Storage 100 pcs standard samples; 10000 pcs test
samples
Repeatability
Standard deviation within ΔE*ab 0.05
Measurement conditions: Average of 30
measurements of standard white plate
Weight 500g
Size 205 x 67 x 80 mm

NR60CP Precision Colorimeter
36
Power source Rechargeable lithium-ion battery
3.7VDC@3200mAh
Battery life 5 years, more than 1.6 million times
Measuring times before
recharge More than 5000 times after charging
Display TFT True Color 2.8inch@ (16:9)
Operating temperature -10~40℃ (14℉~104℉)
Humidity range relative humidity 0~85% with no
condensation
PC Software CQCS3 Color Quality Management
Software
Data interface USB RS232
Portable packing bag Original
Standard accessories
Powder adapter, Li-ion battery, operating
instruction, white calibration board,
wristband, 4mm and 8mm measuring
aperture, software CD, USB cable,
Optional accessories Miniature thermal printer, Powder Test
Box

NR60CP Precision Colorimeter
37
Model NR110
Illuminating/viewing geometry 8/d (8°illumination angle/diffuse viewing)
Measuring aperture Φ4mm
Locating Illumination Locating/Cross Locating
Measuring End Face Large stable end face and small
concave-convex end face
Detector Silicon photoelectric diode
Color Space CIE L*a*b*C*H: CIE L*a*b; CIE XYZ;
Color Difference Formula ΔE*ab; ΔL*ab; ΔE*C*H;
Light Source D65
Measuring light source LED blue light excitation
Errors between each
equipment ≤0.50ΔE*ab
Storage 100 pcs standard samples; 20000 pcs test
samples
Repeatability
Standard deviation within ΔE*ab 0.08
Measurement conditions: Average of 30
measurements of standard white plate
Weight 450g
Size 205 x 67 x 80 mm

NR60CP Precision Colorimeter
38
Power source Rechargeable lithium-ion battery
3.7VDC@3200mAh
Battery life 3 years, more than 1.6 million times
Measuring times before
recharge More than 3000 times after charging
Display TFT True Color 2.8inch@ (16:9)
Operating temperature -10~40℃ (14℉~104℉)
Humidity range relative humidity 0~85% with no
condensation
PC Software CQCS3 Color Quality Management
Software
Data interface USB RS232
Portable packing bag Original
Standard accessories
Horizontal charger, Li-ion battery,
operating instruction, white calibration
board, wristband, cross platform, 4mm
measuring aperture, software CD, USB
cable, 4mm aperture for small
concave-convex surface
Optional accessories Miniature thermal printer, Powder Test
Box, AC adapter

NR60CP Precision Colorimeter
39
Model NR10QC
Illuminating/viewing geometry 8/d (8°illumination angle/diffuse viewing)
Measuring aperture Φ4mm
Locating Illumination Locating/Cross Locating
Detector Silicon photoelectric diode
Color Space CIE L*a*b;
Color Difference Formula ΔE*ab;
Light Source D65
Measuring light source LED blue light excitation
Errors between each
equipment ≤0.20ΔE*ab
Storage 100 pcs standard samples; 10000 pcs test
samples
Repeatability
Standard deviation within ΔE*ab 0.03
Measurement conditions: Average of 30
measurements of standard white plate
Weight 500g
Size 205 x 67 x 80 mm
Power source Rechargeable lithium-ion battery
3.7VDC@3200mAh

NR60CP Precision Colorimeter
40
Battery life 5 years, more than 1.6 million times
Measuring times before
recharge More than 3000 times after charging
Display TFT True Color 2.8inch@ (16:9)
Operating temperature -10~40℃ (14℉~104℉)
Humidity range relative humidity 0~85% with no
condensation
Standard accessories
Horizontal charger, Li-ion battery,
operating instruction, 4mm measuring
aperture,
Optional accessories Miniature thermal printer,
*Note: The specifications are subject to change without notice.

NR60CP Precision Colorimeter
41
Appendix
1. The Color of Objects
There are three major elements to perceive color: light, object and observer.
Any change of these three elements will influence the observer’s color
perception. When the light source and the observer don’t change, then the
object will determine the observer’s color perception.
Objects can affect the final color perception because the reflectance spectra
(transmittance spectra) of the object have modulated the light source spectrum.
Different objects have different reflectance spectra (transmittance spectra).
The light source spectrum modulates the reflectance spectra (transmittance
spectra) of different objects to obtain different results. The observer is the
same, so it shows different colors. The theory is shown in the figure below.

NR60CP Precision Colorimeter
42
2. Human Eyes to Distinguish Colors
The color difference unit, NBS, is derived from the unit of color difference
formula which is established by Judd-Hunter. In 1939, the American Bureau of
Standards adopts this color difference formula and calculates the color
difference according to it. When the absolute value is 1, it is called “The NBS
Color Difference Unit”.
Since then, people would consciously adjust the later color difference formulas
to be similar with the NBS units. The formulas such as Hunter Lab, CIE LAB
and CIE LUV are generally similar to NBS (not exactly the same),therefore, do
not mistake the color difference units calculated by other color difference
formulas are all NBS.
In national standards GB7705-87 (lithograph), GB7706-87 (letterpress),
GB7707-87 (gravure) which promulgated by the National Bureau of Standards,
the color printings rating in the same batch and same color according to color
difference are defined as follows: General Product ΔE ab≤5.00~6.00, Fine
Product ΔE ab≤4.00~5.00. Meanwhile, this quality standard is considered as
a qualification for state enterprises promotion.
Table: The Perception Degree between NBS Unit and Color Difference
NBS Unit Color Difference Perception Degree of Color Difference
0.0~0.50
0.5~1.51
1.5~3
3~6
Above 6
The Tiny Color Difference: Travel
The Smaller Color Difference: slight
The Small Color Difference: Noticeable
The Big Color Difference: appreciable
The Bigger Color Difference: much