congratulations contents - current designs kayaksx(1)s(dysqzpoezutwg3b45huy3vif))/pdf/cd... ·...
TRANSCRIPT

Congratulations
( 1 )
Congratulations on purchasing one of the finest kayaks in the world. SinceCurrent Designs' beginning in 1982, we have dedicated ourselves to design-ing and building exceptional touring kayaks and accessories. Each CurrentDesigns model is hand built by experienced boat builders using the bestmaterials and latest techniques.
Current Designs kayaks are respected worldwide for their innovation andhigh quality. Our boats are a statement of our devotion to the sport of pad-dling and the pride we take in our work.
Designing and building quality kayaks takes time, patience, and skill. We arecommitted to offering the best product and value on the market. Paddling isa lifetime sport, and, at Current Designs, we are dedicated to meeting yourneeds in the years ahead.
Happy Paddling!
Mike CichanowskiOwner
ContentsSafety.......................................................................2
Fitting Into Your Kayak .............................................3
Storage Compartments & Hatches .........................4-5
Rudder & Skeg Operation ......................................6-7
Carrying & Loading Your Kayak.................................8
Transportation and Storage.......................................9
Getting Into Your Kayak ....................................10-11
Identifying your Kayak & Add Ons......................12-13
Custom Accessory Attachment................................14
Care & Maintenance...............................................15
Paddles .............................................................16-17
Repairs..............................................................18-19
Before You Go… instructional material...................20

( 2 )
Current Designs Owner ’s Manual
Safety
Kayaking can be a high risk sport and, while it isvery easy to simply 'paddle' a touring kayak,there are a lot of potential pitfalls and dangerswaiting for the unwary kayaker. The kayak is anextraordinarily seaworthy craft when in thehands of a skilled paddler.
However, at the novice stage you will be particu-larly vulnerable to adverse weather and waterconditions. Kayaks, because of their limitedspeed, are especially sensitive to wind, waves,and currents. A thorough knowledge of thesefactors, and how they interrelate, is far moreimportant to the kayaker than it is to operatorsof faster vessels.
We, at Current Designs, are concerned for yoursafety, and we strongly encourage you to takethe time to learn the basic skills and understandthe fundamentals of good seamanship.
For safe kayak touring, it is essential that youlearn and practice some method of re-entry inthe event of a capsize. In many regions, coldwater is the greatest danger to the kayaker. Coldwater is very debilitating and will quickly causeyou to lose the strength needed to re-enter yourkayak. Therefore, it is important that you prac-tice your re-entry until you master it, so that youcan minimize time spent in the water.
We strongly encourage you to always paddlewith at least one other person so that there issomeone available to assist in the event of acapsize. You should also learn and practice someform of self rescue in case your partner cannotassist you, or if you find yourself alone.
The information in this manual is intended onlyas a guide to get you started. We strongly rec-ommend that you take a course and read asmuch as possible about the sport.
Appropriate equipment, including clothing suit-able for the conditions, and wearing a PFD (per-sonal flotation device) is imperative to safe pad-dling. Common sense, a realistic understandingof your paddling skills, and knowledge of yourlocal paddling environment are the keys to a life-time of enjoyment and are your greatest safetytools once on the water.
Practice self rescue techniques.

( 3 )
Fitting Into Your Kayak
Before you get on the water, it is important thatyou take a few moments to make all necessaryadjust the footrests and backrest. To achieve aproper fit, you should be sitting upright withsome lower back support.
Footrests - The balls of your feet should pressevenly against the footrests with your kneesslightly bent. You should not be seated so tightlythat you cannot relax your legs.
To lengthen or shorten the footrests, first makesure your rudder is up and centered in its chock,then pull the lever behind the pedal towards you.
This will release the pedal and allow you to slideit backward or forward in its track. Make surethat the pedal 'locks' solidly back into positionand that both footrests are adjusted to the sameposition.
To adjust footpedals if your kayak has a skeg ora toe-actuated rudder system turn the lever onthe tracking 90 degrees. Use your toe to movefootrest forward and backward until desited lent-gth is reached. Turn level back 90 degrees tolock footpedal in place.
Backrest and Seat - For back support, thebackrest can be adjusted forward and backwardwith the web strap which runs through the seatback and fastens with a pinch buckle. Somemodels have a back band. It is best to adjustyour backrest and seat before setting out to pad-dle. When you are sitting properly you will havesupport on the balls of your feet as they rest onthe foot pedals. Support under your thighs willbe provided by the sloped seat base. Everybodyis different and you may have to adjust thesecontrols several times until you find the mostcomfortable position for you.
( 4 )
Current Designs Owner ’s Manual
Storage Compartments & Hatches
HATCH COVERS
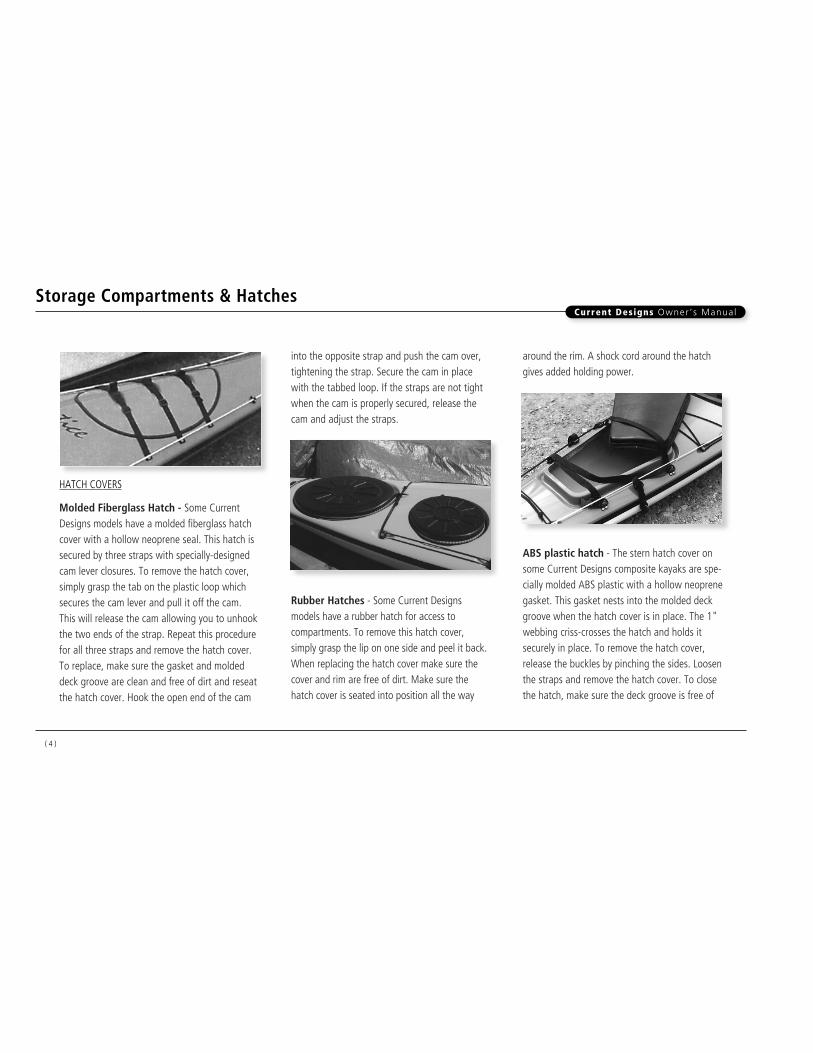
Molded Fiberglass Hatch - Some CurrentDesigns models have a molded fiberglass hatchcover with a hollow neoprene seal. This hatch issecured by three straps with specially-designedcam lever closures. To remove the hatch cover,simply grasp the tab on the plastic loop whichsecures the cam lever and pull it off the cam.This will release the cam allowing you to unhookthe two ends of the strap. Repeat this procedurefor all three straps and remove the hatch cover.To replace, make sure the gasket and moldeddeck groove are clean and free of dirt and reseatthe hatch cover. Hook the open end of the cam
into the opposite strap and push the cam over,tightening the strap. Secure the cam in placewith the tabbed loop. If the straps are not tightwhen the cam is properly secured, release thecam and adjust the straps.
Rubber Hatches - Some Current Designs models have a rubber hatch for access to compartments. To remove this hatch cover, simply grasp the lip on one side and peel it back.When replacing the hatch cover make sure thecover and rim are free of dirt. Make sure thehatch cover is seated into position all the way
around the rim. A shock cord around the hatchgives added holding power.
ABS plastic hatch - The stern hatch cover onsome Current Designs composite kayaks are spe-cially molded ABS plastic with a hollow neoprenegasket. This gasket nests into the molded deckgroove when the hatch cover is in place. The 1"webbing criss-crosses the hatch and holds itsecurely in place. To remove the hatch cover,release the buckles by pinching the sides. Loosenthe straps and remove the hatch cover. To closethe hatch, make sure the deck groove is free of
any debris and press the hatch cover into placemaking sure it is seated properly. First, connectthe buckle of the criss-cross strap and pull ittight to compress the gasket. Repeat the sameprocess for the center strap. This strap works asa backup. (Tip: Pull on the straps with a firm eventension rather than a jerk.)
Neoprene/Polyethylene Hatch - SomeCurrent Designs’ polyethylene kayaks have a cus-tom made neoprene hatch cover that fits overthe hatch flange giving a completely waterproof
seal. A hard cover goes over the top of the seal-ing cover to protect it. This hard cover is held inplace with pinch buckles and straps.
Leak Prevention - To prevent the possibility ofleaks, it is important that you inspect your hatch-es and covers regularly to make sure the gasketsare in good repair and the deck grooves areclean and free of dirt. (Tip: Although we strive tomake our kayaks as watertight as possible, werecommend, as a precaution, that you put yourgear in waterproof storage bags.)
BULKHEADS
It is essential for all kayaks to have flotation orbuoyancy at both ends of the boat. Most CurrentDesigns kayaks have bulkheads to close off thebow and stern compartments which provide nec-essary flotation. The Breeze uses a flotation bagin the bow, and the Kestrel has a foam pillar forbuoyancy.
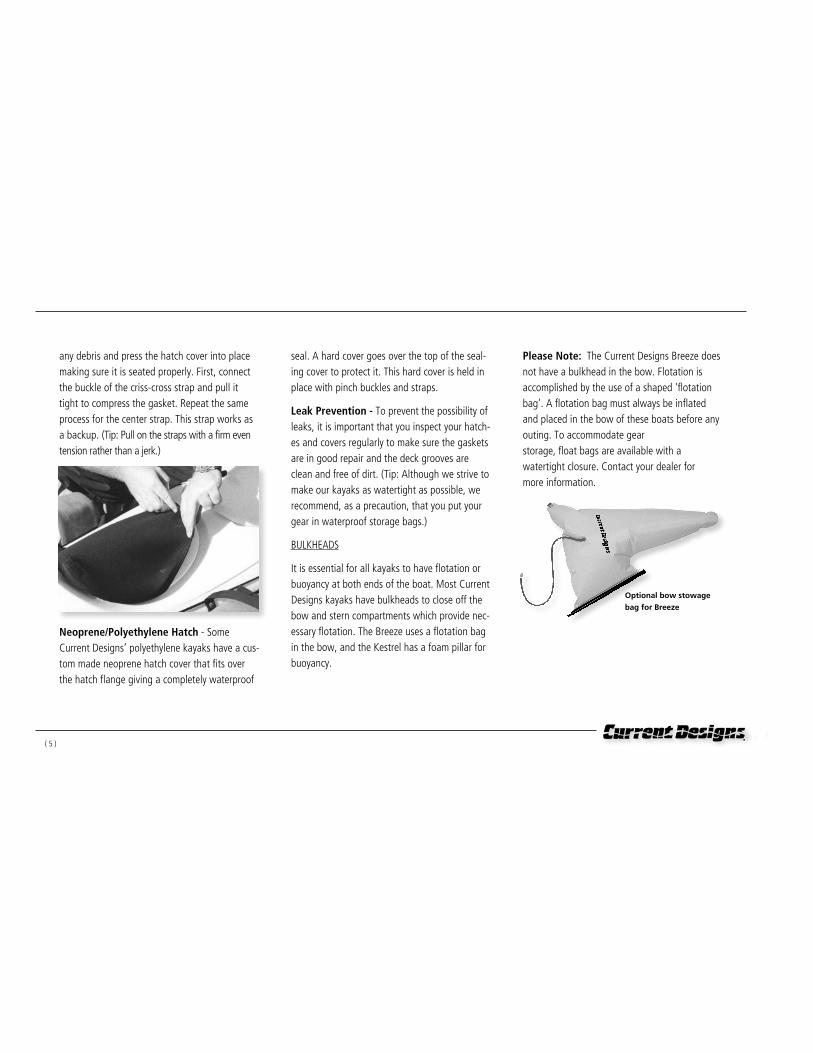
Please Note: The Current Designs Breeze doesnot have a bulkhead in the bow. Flotation isaccomplished by the use of a shaped 'flotationbag'. A flotation bag must always be inflatedand placed in the bow of these boats before anyouting. To accommodate gear storage, float bags are available with a watertight closure. Contact your dealer for more information.
Optional bow stowage
bag for Breeze
( 5 )

Current Designs Owner ’s Manual
Rudder & Skeg Operation
Many or our kayaks come equipped with a rudder. Our kayaks are designedto track well, and it is our belief that a kayak should not need a rudder topaddle well. However, we also recognize that a rudder can be very useful inadverse weather conditions, such as quartering winds or following seas. Inthese conditions rudders can enhance the kayak's performance and save thepaddler a great deal of energy. We recommend that you paddle without arudder as much as possible and use paddle strokes to control your boat sothat you develop good paddling skills rather than a dependence on your rudder.Use your rudder when necessary. It is certainly worth having when you need it.
Deploying the Rudder Blade - The Current Designs rudder system deployswith an easy one-handed operation. On the starboard deck just behind thecockpit is the downhaul and uphaul control lines. Each of the lines has aplastic ball attached to it to act as a grab handle. With the rudder in the “ondeck” position deploy the rudder by simply grabbing the ball that is furthestaway from you and pulling it towards you.
Note: By cleating the bungee-cord that is closest to the cockpit (uphaulside), while the rudder is deployed, it will hold the rudder blade down if yourun over any debris or submerged object while paddling.
Retracting the rudder blade - To return the rudder blade to the “ondeck” position simply repeat the same procedure for deploying by grabbingthe ball that is furthest away from you and pulling it towards you. Ensure thatyour foot pedals are even with each other, to allow the rudder blade to nestproperly into the “V-chock” on the rear deck.
( 6 )

( 7 )
Rudder Steering - With your footrests properly adjusted, steering with the rudder is very easy. When the blade is down and you are moving forward:
• To turn right, push the right foot control forward;
• To turn left, push your left foot control forward;
• To travel in a straight line, keep the footrests even.
When the rudder is raised, the foot controls provide braces for your feet andserve to keep you fixed comfortably in your kayak.
WARNING - The rudder should always be raised out of the water whenlaunching and landing to prevent possible damage to the kayak. SKEGS
Some Current Designs models do not have rudders but have skegs. A Skeg islocated under the hull near the stern of the craft. It is deployed by a slider onthe right side of the cockpit. Although deploying the skeg decreases maneu-verability, it use useful for improve tracking when needed.
Current Designs Owner ’s Manual
Carrying & Loading Your Kayak
CARRYING
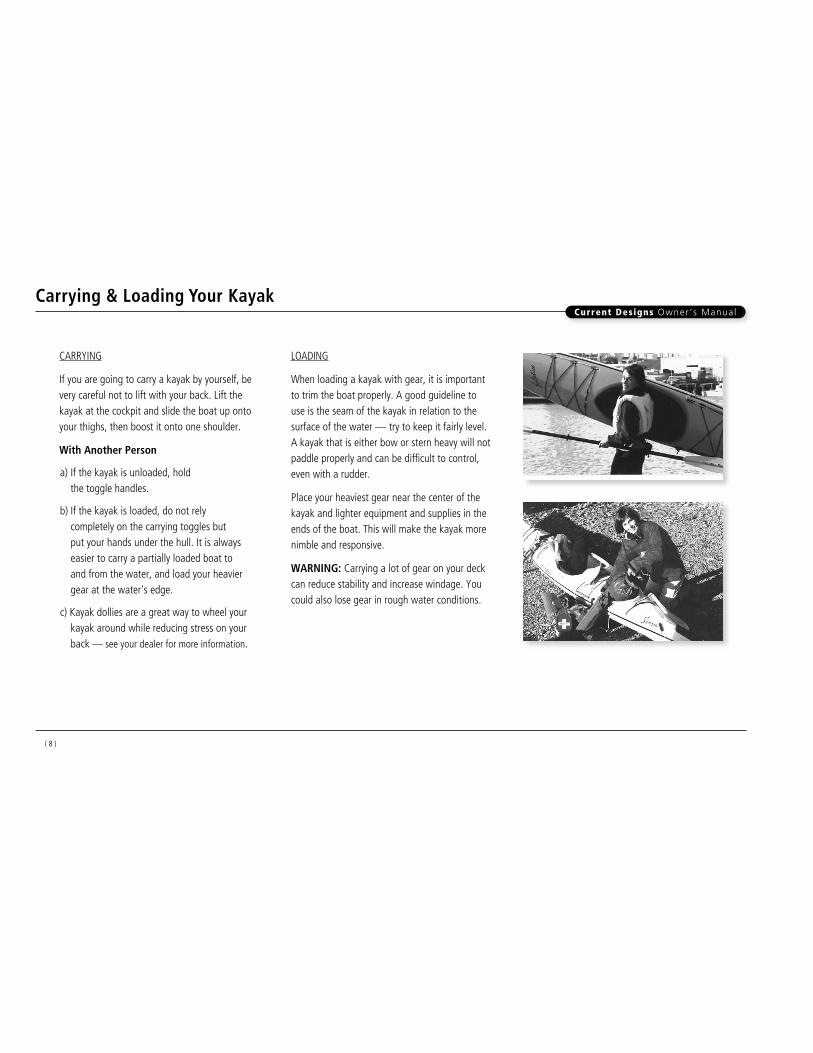
If you are going to carry a kayak by yourself, bevery careful not to lift with your back. Lift thekayak at the cockpit and slide the boat up ontoyour thighs, then boost it onto one shoulder.
With Another Person
a) If the kayak is unloaded, hold the toggle handles.
b) If the kayak is loaded, do not rely completely on the carrying toggles but put your hands under the hull. It is alwayseasier to carry a partially loaded boat to and from the water, and load your heaviergear at the water's edge.
c) Kayak dollies are a great way to wheel yourkayak around while reducing stress on yourback — see your dealer for more information.
LOADING
When loading a kayak with gear, it is importantto trim the boat properly. A good guideline touse is the seam of the kayak in relation to thesurface of the water — try to keep it fairly level.A kayak that is either bow or stern heavy will notpaddle properly and can be difficult to control,even with a rudder.
Place your heaviest gear near the center of thekayak and lighter equipment and supplies in theends of the boat. This will make the kayak morenimble and responsive.
WARNING: Carrying a lot of gear on your deckcan reduce stability and increase windage. Youcould also lose gear in rough water conditions.
( 8 )

Improper transportation of your kayak can easily cause damage. A qualityroof rack with specialized kayak carriers is a small price to pay for protectingyour boat and vehicle. A composite kayak is usually carried deck up and hulldown because the hull is built stiffer than the deck. Don't transport yourkayak on a set of flat bars unless you pad the bars in such a way as to cradle the hull.
Avoid over-tightening your tie-down lines. The lines need to be secure, butmany over-zealous boat owners, worried about their boat coming off the car,over-tighten the ropes and cause damage to the boat's gel-coat by puttingundue stress on the hull. Snug down the lines over the kayak and be certainto tie down the bow and stern. This will give the boat more lateral stabilityand will help secure the kayak and the racks to the car. Some racks have'towers' or upright supports which allow the kayak to be carried on its sidewhere the boat is stiffest.
Polyethylene kayaks can warp if tied down too tightly on a flat roof rack.Plastic can take the shape of the roof rack if the kayak is not supported prop-erly. Cradles are highly recommended to keep the hull of your kayak fromgetting roof rack dents.
• Specialized straps are recommended as a positive securing system (Do not use bungee cords to fasten your boat to your roof rack!)
• Make sure your rudder is pulled up tightly. Secure the rudder with a bungee for extra protection.
• A cockpit cover is a good idea to keep water out of your kayak.
WARNING: Never transport a loaded kayak on a roof rack. The hull may not support the extra weight.
Transportation & Storage
( 9 )

Current Designs Owner ’s Manual
Getting Into Your Kayak
You have your paddle, your kayak is set up and you are ready to go. Put your spray skirt on by stepping into it. Pull the skirt up and tighten the waist adjusters so that the skirt fits snugly.
There are several easy techniques for getting into and out of your kayak without capsizing.
General Entry - To enter the kayak, squat beside the cockpit, with the pad-dle behind you, just behind the cockpit, and grip the paddle shaft and theback of the cockpit rim with one hand, thumb to the stern and your fingers inthe cockpit. Grasp the paddle shaft with the other hand midway between thecockpit and the far blade. Do not support all of your weight on the shaft atthis point, as you may damage the paddle. Using the paddle as an outriggeragainst the shore, place your feet and legs inside the cockpit and slide yourbottom into the seat. Once you are safely in the seat, bring the paddlearound in front of you, where you can keep an eye on it, and begin attachingyour spray skirt. Start by putting the spray skirt over the back of the cockpitrim (the 'coaming'). Then, stretch the skirt over the front of the coaming.Make sure that the sides are on correctly. It is important that the release tabor grab loop on the front of the skirt is not folded under, inside the boat. Youneed to be able to reach it easily for quick release.
NOTE: Special lightweight paddles may not support your weight. In thatcase, straddle the boat, plunk your seat down, then bring your legs in.
( 10 )

( 11 )
Rocky Launch Site - If the launch site is rocky, begin by placing the kayakin the water close to shore at a point where the hull will not rest on anyrocks. Place one end of the paddle shaft immediately behind the cockpit,resting on the deck of the boat. Rest the other end of the paddle on theshore to act as an 'outrigger', stabilizing the boat.
Launching Through Waves - If you are launching from a sandy beach, inan area with wave action, place the kayak on the beach close to the waterline with the bow facing the water. Get into your kayak (using the proceduredescribed above), and put your spray skirt on. By carefully timing the waves,you can scoot yourself forward into the water just when a large enough wavepicks up your kayak.
Exiting - Once you have completed your outing, simply reverse the process.To release the spray skirt, simply pull forward, up and back on the releasecord. To exit, use the paddle for support, just as before, and climb out.
PRACTICE TIPS
a) Spray Skirt - We recommend that you practice attaching and reattachingyour spray skirt before you go out on your first paddle. Make sure that it isneither too tight nor too loose. You can tighten the tension of the shockcord by pulling it and tying another knot.
b) Wet Exit - We also strongly recommend that you practice a 'wet exit',(exiting the kayak while capsized) in a pool or lake near shore, to makesure you are comfortable with releasing the spray skirt and getting out ofthe boat. The first time you try a wet exit, make sure someone is standingbeside you in the water to assist you. Again, we recommend that you takesome professional instruction.

( 12 )
Current Designs Owner ’s Manual
Identifying your Kayak & Add Ons
IDENTIFYING YOUR KAYAK
The Coast Guard has recommended that personal identification be put inyour craft to help authorities in the event that your boat is found. This identi-fication can help authorities to determine whether or not a full scale searchshould be launched. You should also record your serial number and keep it ina secure place apart from your boat and gear. The serial number can befound on the right side of your boat near the stern.
CUSTOM FITTING
With proper adjustment of the footrests and backrest, you will find your new Current Designs kayak very comfortable. However, for even more comfort and better boat control, you may wish to add some additionalpadding to your kayak.
You will notice that your new Current Designs kayak has closed cell foam padding under the thigh braces where your knees contact the deck. This padding gives a secure feeling of control when lean turning or rolling your kayak.

( 13 )
As you paddle more, you will find that you will use your knees and hips tocontrol the boat. Some paddlers like to add additional blocks of foam alongthe inner edge of the cockpit opening right beside their knees in order to pro-vide additional support and prevent their knees from slipping out of the cock-pit when bracing or rolling. The foam can be shaped with a knife and coarserasp, then bonded into place with contact cement.
Additionally, you may find that you would like a tighter fit in the seat. Usingblocks of foam, you can shape pads and bond them into place on either sideof your seat supports. These pads will keep your hips from sliding side-to-sidewhen bracing or rolling. If the shape of the backrest does not fit you well, it ispossible to reshape it with closed cell foam in order to give you the best pos-sible shape.
To bond foam to your boat you should sand the area you wish to bond tothen clean the area with methyl alcohol or clean water. Use a waterproofcontact cement to bond the foam to the boat. Self-adhesive backed foam isnow available in many specialty stores. New adhesive systems are allowingeasier outfitting of kayaks with less mess.
Custom hip pads installed

Current Designs Owner ’s Manual
Custom Accessory Attachment
We offer a variety of accessories for your newkayak, please check the accessory sections of ourcatalog or website at www.cdkayak.com
Additional Deck Rigging - You may want toadd additional deck rigging to your kayak.Before you mount any hardware, make sure thatyou will not hit it with your hands while pad-dling. Do not mount any sharp objects on yourdeck that could hurt you when doing a rescue.
Securing Gear Inside the Cockpit - You mayalso want to consider adding additional deckeyes and clips underneath your deck and in thecockpit to secure loose gear. This will preventyou from losing equipment in the event of a cap-size. (Tip: Secure your gear tightly in place, donot merely 'tether' it to the boat as all that gearhanging from your cockpit can cause entrapmentor impede re-entry in the event of a capsize.)For Composites, use an epoxy adhesive tomount deck eyes in place. Sand both thekayak surface and the deck eye with 100grit sandpaper. Apply the epoxy, set the
deck eye in place, and secure it with a piece ofmasking tape until the glue dries.
In polyethylene kayaks, a mechanical fastener,such as a stainless steel nut and bolt, is recommended as glues do not bond well to polyethylene.
Bilge Pump - This necessary piece of safetyequipment is usually carried under the deckbungee cords, but can also be mounted out ofthe way under the peak of the deck. Mount deckeyes and run a light piece of bungee cord
through them. Make sure that youmount the pump with the
handle close to the cock-pit opening so that
you can reach it quicklyand easily. (Tip: Make sure that
your bilge pump floats when full ofwater. If not, wrap some closed cell
foam around it to give it some positivebuoyancy. Secure the foam in place with contactcement or duct tape.)
Compass - If you would like to mount a com-pass in the deck of your new Current Designskayak, we have custom mounting plates avail-able to fit your kayak's deck. Contact your deal-er, or us, for more information. Other marinecompasses may mount easily on the deck of yourkayak. Before you mount your compass, makesure that you will be able to read it easily whilepaddling your kayak.
Your Current Designs dealer may offer customoutfitting. Talk to your dealer for differentoptions in outfitting.
( 14 )

Care & Maintenance
STORAGE
If you store your kayak outside, turn the boatupside down to prevent water from accumulat-ing inside it. Make a cover to protect the kayak.A gel-coat finish can fade and polyethylene candeteriorate with extended exposure to sunlight.Having your boat supported by slings or havingcradles for the boat will help prevent warpage ordeforming of the shape.
PREVENTATIVE MAINTENANCE
Loosen the straps on the hatches if your kayak isnot being used. This will prevent the seals frombecoming compressed over time which mayeventually allow water to seep into the compart-ment.
Rinse the rudder assembly and foot pedals. Aperiodic rinse with fresh water will wash out anygrit or dirt that may have accumulated in themechanisms and affect their performance.
Inspect the rudder controls and cables. Check forwear and replace if necessary.
Washing and Waxing - Keeping your kayakclean and shiny will actually make it last longer.If your kayak has a gel-coat finish, then wash itwith a very mild detergent to avoid removing anywax finish. A good quality marine wax is idealfor protecting the deck and hull from the harsheffects of the sun. Polyethylene kayaks do notneed to be waxed, but love to be clean. Thereare various UV protectants that can be pur-chased from your dealer.
Scratches - If you are using your kayak, you aregoing to scratch it from time to time. Scratchesare a normal and expected part of paddling. Ifyou have a composite kayak with a gel-coat fin-ish and you damage the gel-coat to the pointwhere you can see the fiberglass under the gel, arepair is recommended. Most paddle sport shopscan perform this type of repair. It is also easyenough for you to do at home. See 'Gel-coatRepair' on page 18.
If you have a polyethylene kayak, the material isextremely tough but will get scratches andgouges which are nearly always superficial. Ifyou suspect that you have structural damage,the linear polyethylene material can be welded.
If you have one of our new TCS (ThermoformedComposite System) kayaks, you may havealready found out that they're very difficult todamage. You can buff our most shallow scratch-es with any polishing compound and a buffer. Ifyou have a deeper gouge, please see "Gel-coatand TCS Repair" on page 18.
( 15 )

( 16 )
Current Designs Owner ’s Manual
Paddles
FEATHERED OR UNFEATHERED
The choice of whether to paddle with a feath-ered or unfeathered paddle is largely a personalone. Each style has advantages and disadvan-tages for the ocean paddler. (Tip: Once you havechosen the method best for you, stick with it.You need to instinctively know your paddle bladeorientation at all times.)
Paddling Unfeathered - (Both paddle bladesare in the same plane). This is the easiest way tobegin as you can just pick up your paddle andgo. It requires no wrist twisting and can be bet-ter in strong cross winds and strong tail winds,particularly with larger bladed paddles.
Paddling Feathered - (Blades are offset slight-ly less than 90 degrees to each other). Thisrequires the controlling wrist to roll back to pre-sent the opposite blade to the water. Featheredpaddling can be better in strong headwinds andwhen 'breaking out' through large waves sincethe forward moving blade slices through the
wind and spray. It may take the new paddler alittle while longer to get used to the featheringaction, but it will quickly become natural.
Take-Apart Shafts - All Cadence touring pad-dles are available with take-apart shafts, andcan be changed from unfeathered to a choice ofpre-set feather angles.
Lever - Lock feathering and length systemThe Lever-lock ferrule allows you to adjust thelength and feather angle of our composite pad-dles with a simple flip of a lever - fine tune yourpaddle to suit your preferences perfectly.
The Lever lock system allows paddle lengthadjustment up to 10 cm, and infinite featheradjustment with markings from 0 - 80 degrees.The Lever-lock ferrel is standard on Phantomcomosite paddles.
Feathered: blades are offset
Unfeathered: both paddle blades in same plane

It is essential that you choose a paddle that suitsyour physical size, paddling style, and the type ofkayak that you use. With thousands of paddlestrokes involved in every kayak trip, a paddlethat is the wrong size or poorly designed willquickly turn an enjoyable day on the water into along day of hard work.
Blade Size - We offer different sizes and shapesof blades to fit different needs. A smaller bladearea is like a lower gear; with less resistance inthe water it is easier to maintain an even stroke
cadence for a longer time. Also, a smaller bladewill cause less strain on the paddler. A largerblade will give you more power, faster accelera-tion and will provide better bracing. Find theblade size that will accomplish what you need.
Shaft Length - We offer several Standardlengths of paddle shafts. With a longer shaft,you will have a slower stroke rate with moreresistance. A shorter shaft requires a fasterstroke rate, with less resistance, to maintain thesame speed. Our optional Lever-lock ferrule
option allows you to fine tune shaft length up 10cm as well as infinite feather adjustment.
Choose the paddle that suits your size, paddlingstyle and boat type. Above all, the paddle shouldbe comfortable to use.
Different shaft configurations, like the BentShaft, gives paddles a more ergonomic feelwhich applies less stress to wrists, arms andshoulders.
Materials - We offer several material choices,so you can better suit your paddle to your needs.From the injection molded Aura to a graphitebent shaft Phantom, the CadenceTM line of pad-dles covers a broad range of styles and sizes sothere is sure to be a Cadence for every paddler.
( 17 )
Paddle Sizing
Aura -Fiberglassinjectedblade
Phantom GX -Graphiteinjected blade
Phantom FX -Fiberglassinjectedblade
Medallion -Fiberglassinjectedblade
Phantom FXComposite -Fiberglassinjectedblade
Phantom GXComposite -Graphiteinjectedblade

Current Designs Owner ’s Manual
Gel-coat and TCS Repair
Gel-coat Repair - Scratches or chips in the hullof a composite kayak can be easily repaired. Gel-coat is available through your dealer or directlyfrom us.
1. Remove loose gel and bevel the edges of the
scratches with a utility knife. Sand the area in
and around the scratch using 220 grit sandpaper
until the shine is removed. Clean the area with
acetone or lacquer thinner. (Acetone is highly
flammable and should be treated with care.)
2. Place enough gel on a piece of cardboard and
add hardener at 4 to 5 drops per tablespoon of
gel. Mix thoroughly for about one minute using a
stir stick. (The hardener is an irritant to skin and
extremely dangerous if it comes in contact with
the eyes.)
3. Apply the mixture immediately and spread it into
the repair leaving it slightly raised above the sur-
face. Remove any excess outside of the repair
area with a knife or acetone. Let dry for 2 to 4
hours to allow for full shrinkage. (Tip: best
results are achieved if the repair is covered with
cellophane or wax paper while still wet.)
4. Wet sand the repair with #320 or #400 sandpa-
per backed with a block of wood until the repair
is almost level with the surrounding area. Apply
water liberally and finish the area with #600
sandpaper. Avoid sanding the surrounding area
until you are ready to use the #600 sandpaper.
5. Polish the area with a mild rubbing compound.
You can use an electric polishing machine for a
higher gloss. For the final gloss, use a quality
automotive or marine wax.
6. Color fade may make a perfect match difficult.
7. If it is necessary to repair a large area of gel-coat,
you may want to contact your dealer as to the
best way to proceed with the boat repairs.
8. If your boat receives structural damage take it to
a professional to do the repair or to get advice
on specific damage.
TCS (Thermoformed Composite System)Repair - Scratches or chips in the hull of a TCSTM
kayak can be easily repaired. Use MethylMethacrylate, which is available from your dealeror directly from us.
1. Clean and sand the gouge and 1/2" of the sur-
rounding area using a 400 grit wet/dry sandpa-
per. Remove any jagged edges with a knife.
2. Apply resin (Super glue, Methyl Methacrylate) so
that the gouge is filled just higher than the sur-
rounding area.
3. Using 1 or 2 mil mylar plastic or acetate (avail-
able at office supply stores), press it tightly on
the gouge, starting at one end and using mask-
ing tape to keep it tight to the hull.
4. After 3 to 4 hours remove the tape and plastic.
The repair will need 24 hours at room tempera-
ture to achieve full strength.
5. Finish sand and polish if desired.
If you kayak has more severe damage (a split or
worse), please contact the factory at 507-454-5430
for more detailed instructions.
( 18 )

( 19 )
Polyethylene Kayak Repairs
Current Designs polyethylene models are rotationally molded from linear polyethylene. Polyethylene is ideally suited to withstand accidentalbangs, scrapes, and impacts. This is one reason why polyethylene kayaks are so popular.
Care and maintenance are minimal on a polyethylene kayak but necessary tothe longevity of the craft.
Store Your Kayak Carefully - Polyethylene is more prone to warpage thana composite kayak. Store and transport your craft in a manner that preventsdeformation. Always use a cradled storage and transport system. If the shapeof the kayak changes, it will effect how the kayak paddles.
Dents - Dents in a boat will often pop out on their own or with a little heaton a warm sunny day (or by using a hairdryer). In extreme cases, support thekayak to allow it to go back to its original shape, then fill the kayak with hotwater and heat the outside of the hull with either a heat gun or a very hothairdryer. If the warpage does not come out, then put an internal braceinside the kayak to push the dent out. Be careful not to overheat the area. If,at any point, the boat begins to melt, stop and allow the boat to cool beforetrying again.
Holes and Cracks - Our linear polyethylene is easily repaired by an experi-enced plastic welder in the unlikely event that it is actually broken. If youcrack or put a hole in your kayak, then it is recommended that you see yourCurrent Designs dealer or take the kayak to an experienced plastic welder.We have color matched polyethylene welding rods.
A dent can be removed by applying heat.

BOOKS
The Basic Essentials of Kayaking, Mike Wyatt
The Bombproof Roll and Beyond, Paul Dutky
The Coastal Kayaker's Manual, Randal Washburne
Complete Book of Sea Kayaking, Derek Hutchinson
Eskimo Rolling, Derek Hutchinson
The Essential Sea Kayaker, David Seidman
Expedition Kayaking, Derek Hutchinson
Fundamentals of Kayak Navigation, David Burch
Kayak Camping, David Harrison
Sea Kayaking, John Dowd
Sea Kayaking, Nigel Foster
Sea Kayaking Basics, David Harrison
Sea Kayaking For Women, Shelley Johnson
JOURNALS
Sea Kayaker Magazine
Canoe and Kayak Magazine
Paddler Magazine
Wavelength
VIDEOS
Capsize Recoveries and Rescue Procedures, Wayne Horodowich
Kayaking can be a safe and rewarding activity ifcommon sense prevails and certain precautions aretaken. Before you put in for a day's paddle, checkthat you have the following:
ALWAYS TAKE:
• water, food
• a kayak in good, serviceable condition, withplenty of secure buoyancy, fore and aft
• a paddle
• a sprayskirt that fits your boat
• a personal flotation device (PFD)
• a whistle
• clothing suitable for the conditions
• a bailer or pump
• an accessible spare paddle, minimum of one per group
• paddle float
YOU SHOULD ALSO CONSIDER:
• an accessible flare pack
• rain gear, and extra clothing in a waterproof bag
• a minimum of 15 meters of floatable line
• charts and tide tables, current tablesif appropriate
• a compass,
• a knife
• first aid kit
• matches or a lighter
• a weather radio
• a tow line
Before You GoCurrent Designs Owner ’s Manual
( 20 )