config@web key & certificate generation - sage rtu's...ssl ca certificate & key...
TRANSCRIPT
SAGE1-SFT-S0210 Baseline Document Version 1.1 Proprietary and Confidential to Schneider Electric
config@WEB Key & Certificate
Generation
SAGE1-SFT-S0210 Baseline Document Version 1.1 Proprietary and Confidential to Schneider Electric
Schneider Electric North America Headquarters
1415 South Roselle Road
Palatine, IL 60067
Phone: 1-847-397-2600
Fax: 1-847-925-7500
Schneider Electric
14400 Hollister St., Suite #400
Houston, TX 77066-5706
Phone: 1-713-920-6800
Fax: 1-713-920-6909
E-mail: [email protected]
config@WEB Key & Certificate Generation
For Reference Only
© Copyright 2013 by Schneider Electric
The information contained in this document is confidential and proprietary to Schneider Electric. It is not to be copied or disclosed for
any purpose except as specifically authorized in writing by Schneider Electric. Although the information contained herein was correct and
verified at the time of publication, it is subject to change without notice.
Manual No. SAGE1-SFT-S0210
Rev Date Description Approval
1.0 September 20,
2012
Initial release
1.1 December 6,
2013
Added Introduction. Updates to procedures for SSH and
SSL Generation.
Dan Stark, Manager, RTU S/W
Engineering


Chapter 1 - Introduction config@WEB Key & Certificate Generation 3
SAGE1-SFT-S0210 Baseline Document Version 1.1 Proprietary and Confidential to Schneider Electric
1 Introduction This document explains the process for creating the keys and certificates required for secure communications
between the RTU and other devices on the network.
The two main methods for use to secure the communications are SSH (Secure Shell protocol), and SSL (Secure
Socket Layer). Each of these methods will be explained in its own chapter.
SSH requires the creation of public and private keys. The program used to create these keys in the examples is
PuTTYgen. These keys are used with SSH and SFTP protocols. The SSH chapter explains the creation of the
following necessary keys for secure communication of the RTU on the network.
Server RSA Key Pair
Server DSA Key Pair
Client RSA Key Pairs
Client DSA Key Pair (NOT recommended, therefore no example is given)
SSL requires the creation of keys and a certificate of authenticity. The program used to create the keys and
certificates in the examples is OpenSSL. These keys and certificates are used with the HTTPS and IPsec protocols.
The SSL chapter explains the creation of two types of certificate and key creation:
SSL Self-Signed Certificate & Key Creation
SSL CA Certificate & Key Creation
( CA = Certificate Authority

Chapter 2 - SSH Key Generation config@WEB Key & Certificate Generation 5
SAGE1-SFT-S0210 Baseline Document Version 1.1 Proprietary and Confidential to Schneider Electric
2 SSH Key Generation
2.1 RTU (Server) Keys
2.1.1 The RTU Private Keys
DSA_PRV.KEY
RSA_PRV.KEY
The two files listed above contain the private key generated using the RSA and DSA algorithms. These
files enable the RTU to decrypt messages sent that have been encrypted using the public keys described in
the following section. The private keys are generated with 2048-bit size.
2.1.2 The RTU Public Keys
DSA_PUB.KEY
RSA_PUB.KEY
The two files listed above contain the public key corresponding to the private keys above, generated with
the DSA and RSA algorithms. Typically, this public key is transmitted over the network to the remote SSH
client during the SSH connection setup, as it does not need to be kept a secret like the private key. These
keys are provided in case the SSH client being used does not know how to obtain this key information over
the network (yes, there are some SSH client software like this). The public keys are generated with 2048-
bit size.
2.2 User (Client) Keys
It is recommended that the DSA algorithm NOT be used to generate the user’s private/public key pairs,
therefore this document only describes key pairs generated using the RSA algorithm.
2.2.1 User Private Keys
If PuTTYGen key generator was used to generate the keypair, the default format is a “.ppk” file. This
format is understood by the PuTTY SSH client software. If you are not using PuTTY, the “.ppk” file may
not be recognizable by the SSH client, and the private key may need to be converted into either the
OpenSSH or the ssh.com format, depending on your SSH client software needs. Consult your SSH Client
software manual to learn which format and file naming convention is supported for the private keys.
“Username”.ppk default suffix by PuTTYGen, with
user’s name same as the public key
OpenSSH or ssh.com formats are not defined. The following are suggested conventions:
“Username”_OpenSSH_prv.key Users name same as public key, suffix
Is whatever customer desires.
“Username”_ssh_dot_com.key Users name same as public key, suffix
Is whatever customer desires.
2.2.2 User’s Public Keys
“Username”.pk2 There must be one unique key file
for each user, where “Username”
is the login userid for that user.

Chapter 2 - SSH Key Generation config@WEB Key & Certificate Generation 6
SAGE1-SFT-S0210 Baseline Document Version 1.1 Proprietary and Confidential to Schneider Electric
For example, if there are three userid’s created with SSH permissions, and the userid’s are: Administrator,
JohnSmith, and JaneDoe, there must be a unique public/private key pairs generated for each user as
follows:
Public Key & Private Key
Administrator.pk2 & Administrator.ppk
JohnSmith.pk2 & JohnSmith.ppk
JaneDoe.pk2 & JaneDoe.ppk
2.3 Client RSA Key Example
Launch PuTTYGen Key Generator.
Figure 2-1 Set “Type of key to generate:” to “SSH-2 RSA” (SSH-2 RSA is default)

Chapter 2 - SSH Key Generation config@WEB Key & Certificate Generation 7
SAGE1-SFT-S0210 Baseline Document Version 1.1 Proprietary and Confidential to Schneider Electric
Figure 2-2 Set the “Number of bits in a generated key:” to 2048 as shown
Chapter 2 - SSH Key Generation config@WEB Key & Certificate Generation 8
SAGE1-SFT-S0210 Baseline Document Version 1.1 Proprietary and Confidential to Schneider Electric
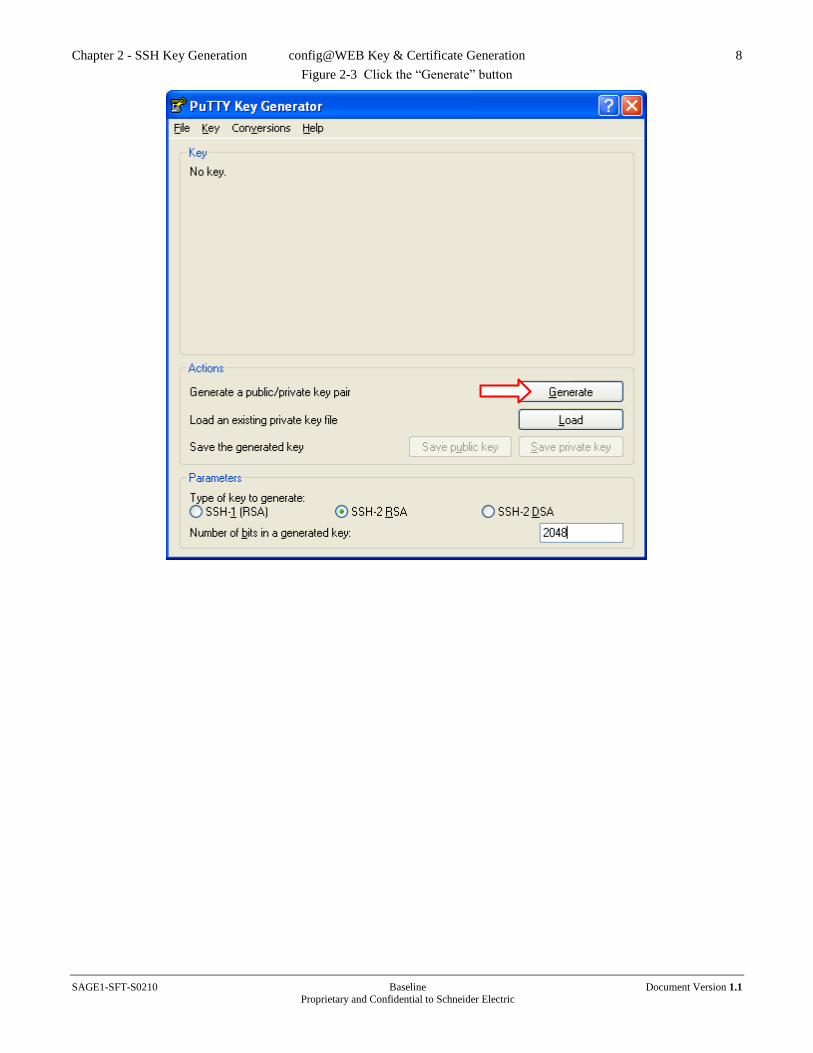
Figure 2-3 Click the “Generate” button
Chapter 2 - SSH Key Generation config@WEB Key & Certificate Generation 9
SAGE1-SFT-S0210 Baseline Document Version 1.1 Proprietary and Confidential to Schneider Electric
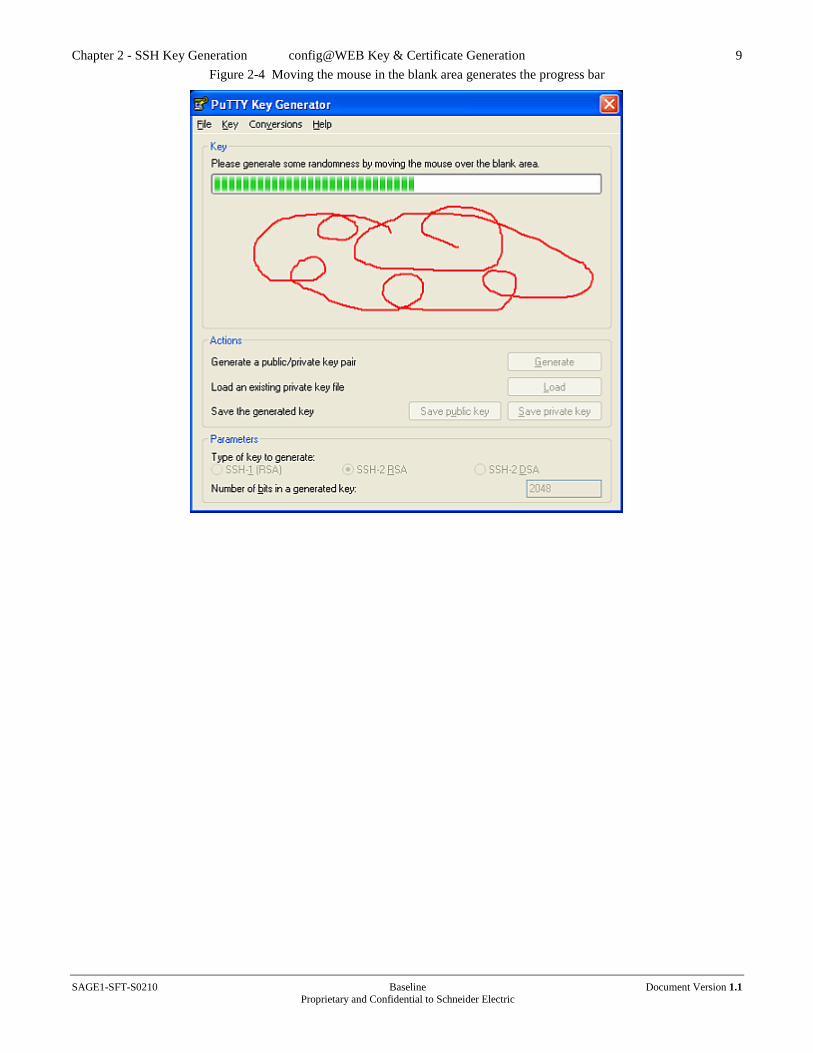
Figure 2-4 Moving the mouse in the blank area generates the progress bar
Chapter 2 - SSH Key Generation config@WEB Key & Certificate Generation 10
SAGE1-SFT-S0210 Baseline Document Version 1.1 Proprietary and Confidential to Schneider Electric
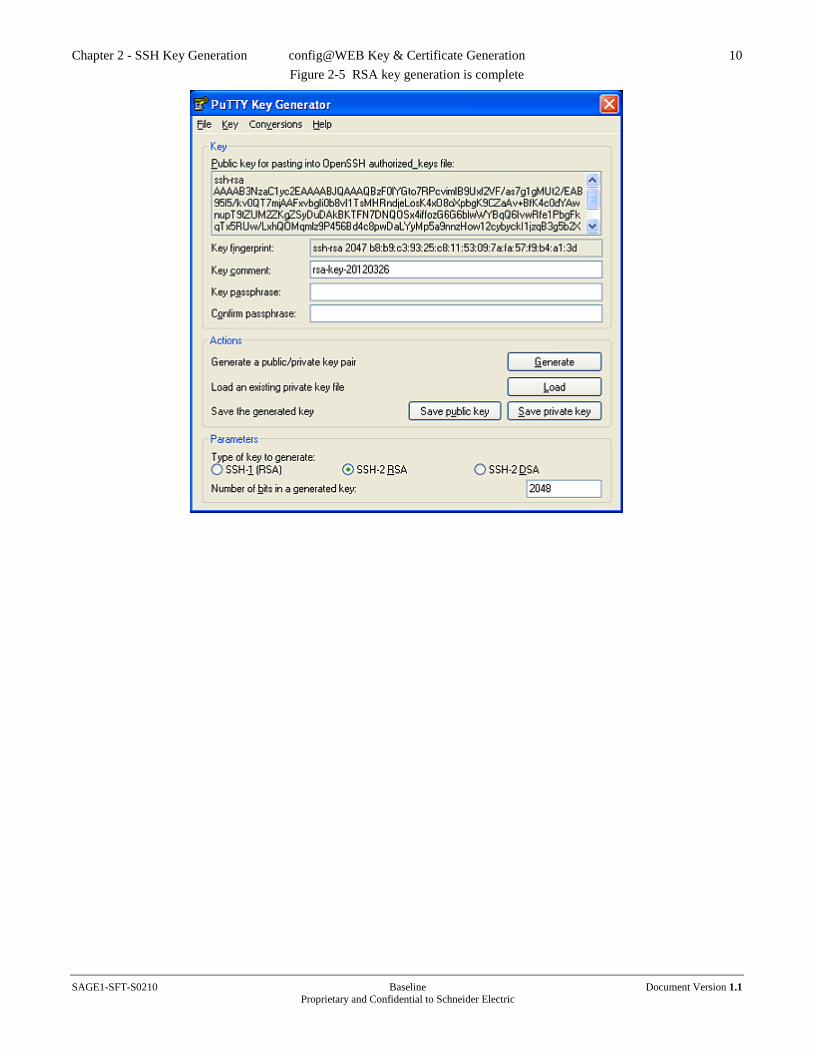
Figure 2-5 RSA key generation is complete

Chapter 2 - SSH Key Generation config@WEB Key & Certificate Generation 11
SAGE1-SFT-S0210 Baseline Document Version 1.1 Proprietary and Confidential to Schneider Electric
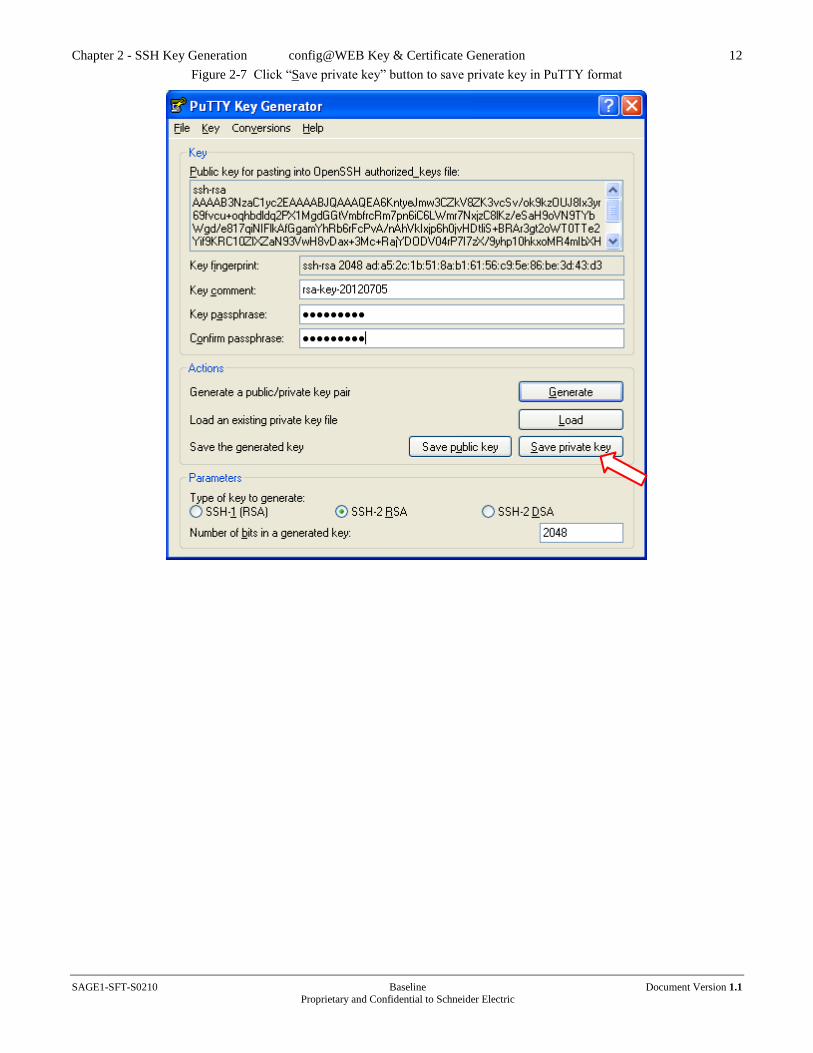
Figure 2-6 Enter secret passphrase for the private key, and again to confirm
Chapter 2 - SSH Key Generation config@WEB Key & Certificate Generation 12
SAGE1-SFT-S0210 Baseline Document Version 1.1 Proprietary and Confidential to Schneider Electric
Figure 2-7 Click “Save private key” button to save private key in PuTTY format
Chapter 2 - SSH Key Generation config@WEB Key & Certificate Generation 13
SAGE1-SFT-S0210 Baseline Document Version 1.1 Proprietary and Confidential to Schneider Electric
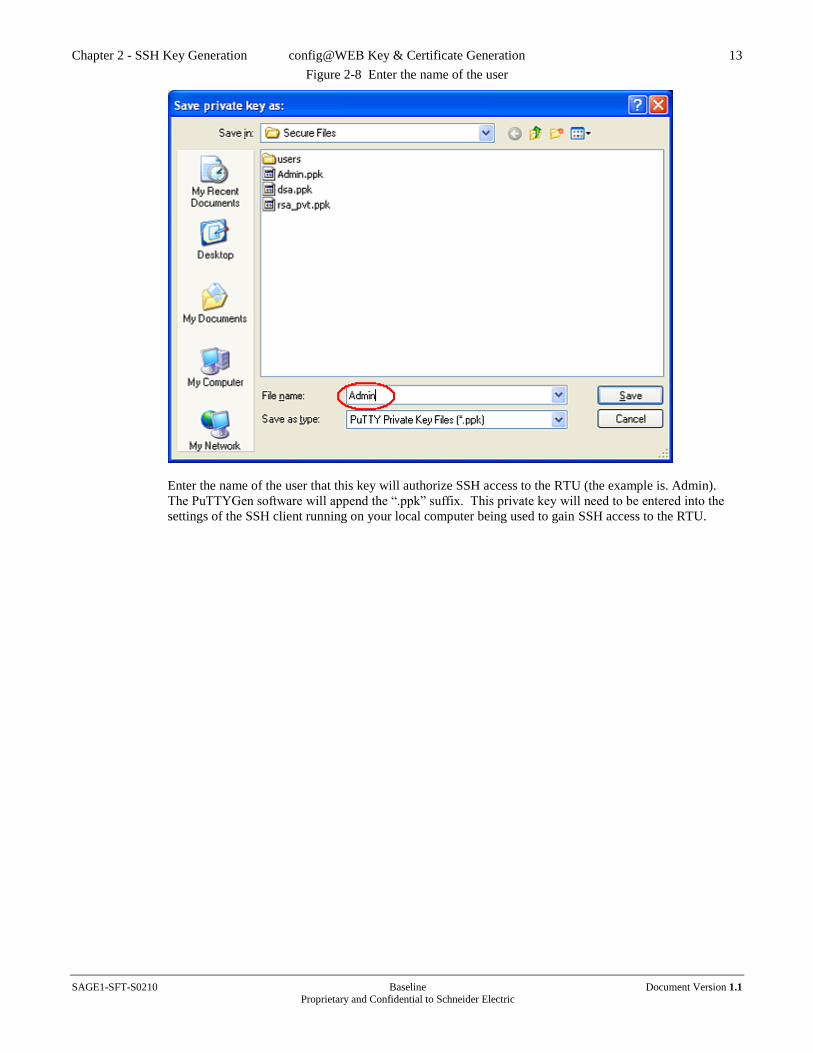
Figure 2-8 Enter the name of the user
Enter the name of the user that this key will authorize SSH access to the RTU (the example is. Admin).
The PuTTYGen software will append the “.ppk” suffix. This private key will need to be entered into the
settings of the SSH client running on your local computer being used to gain SSH access to the RTU.
Chapter 2 - SSH Key Generation config@WEB Key & Certificate Generation 14
SAGE1-SFT-S0210 Baseline Document Version 1.1 Proprietary and Confidential to Schneider Electric
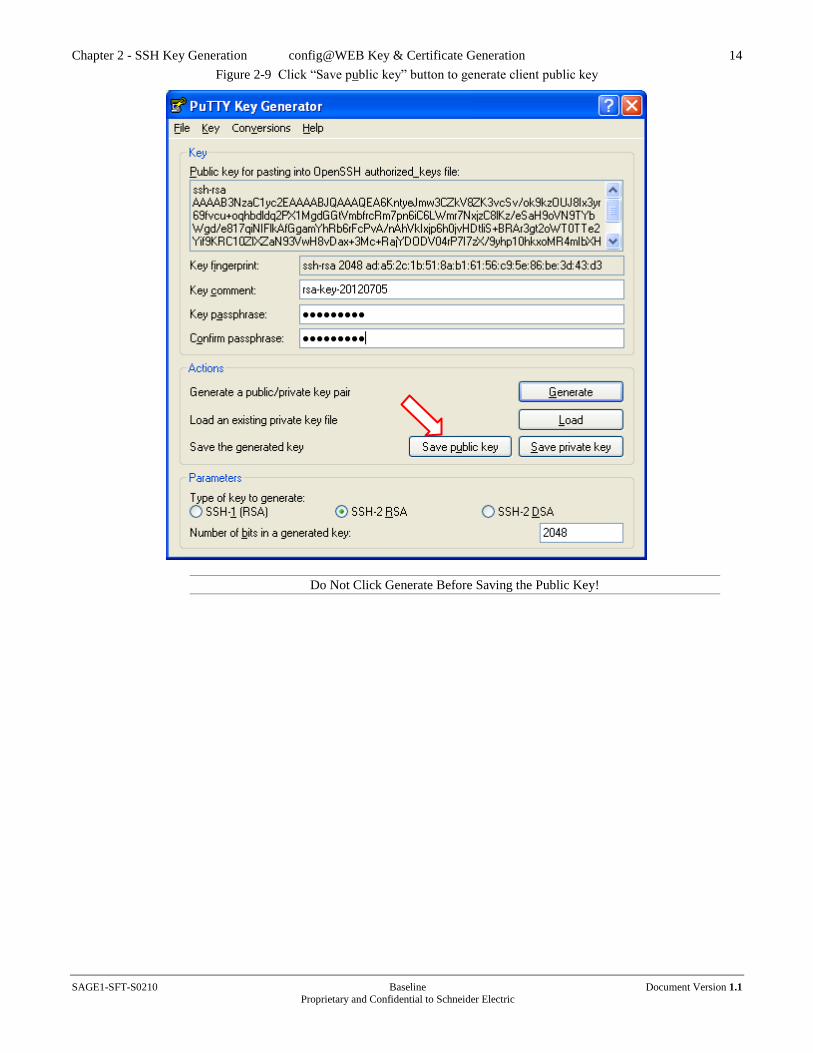
Figure 2-9 Click “Save public key” button to generate client public key
Do Not Click Generate Before Saving the Public Key!
Chapter 2 - SSH Key Generation config@WEB Key & Certificate Generation 15
SAGE1-SFT-S0210 Baseline Document Version 1.1 Proprietary and Confidential to Schneider Electric
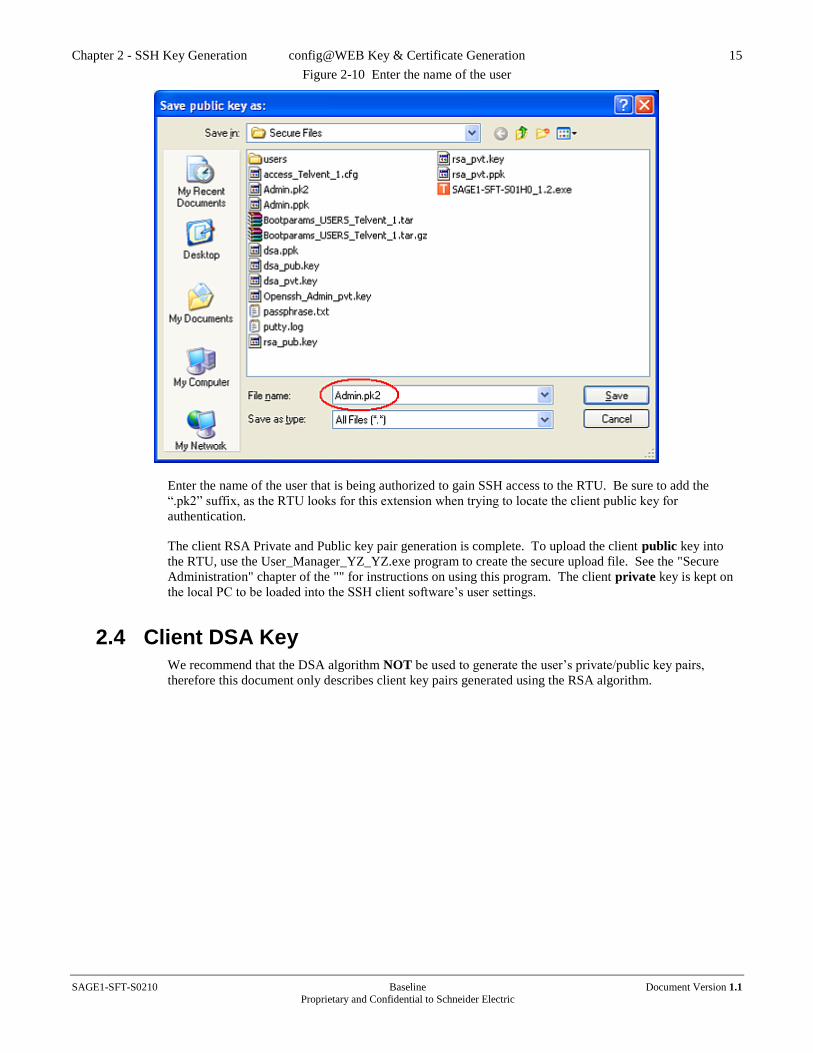
Figure 2-10 Enter the name of the user
Enter the name of the user that is being authorized to gain SSH access to the RTU. Be sure to add the
“.pk2” suffix, as the RTU looks for this extension when trying to locate the client public key for
authentication.
The client RSA Private and Public key pair generation is complete. To upload the client public key into
the RTU, use the User_Manager_YZ_YZ.exe program to create the secure upload file. See the "Secure
Administration" chapter of the "" for instructions on using this program. The client private key is kept on
the local PC to be loaded into the SSH client software’s user settings.
2.4 Client DSA Key
We recommend that the DSA algorithm NOT be used to generate the user’s private/public key pairs,
therefore this document only describes client key pairs generated using the RSA algorithm.

Chapter 2 - SSH Key Generation config@WEB Key & Certificate Generation 16
SAGE1-SFT-S0210 Baseline Document Version 1.1 Proprietary and Confidential to Schneider Electric
2.5 Server RSA Key Example
Launch PuTTY Key Generator.
Figure 2-11 Set “Type of key to generate:” to “SSH-2 RSA” (default)

Chapter 2 - SSH Key Generation config@WEB Key & Certificate Generation 17
SAGE1-SFT-S0210 Baseline Document Version 1.1 Proprietary and Confidential to Schneider Electric
Figure 2-12 Set the “Number of bits in a generated key:” to 2048 as shown
Chapter 2 - SSH Key Generation config@WEB Key & Certificate Generation 18
SAGE1-SFT-S0210 Baseline Document Version 1.1 Proprietary and Confidential to Schneider Electric
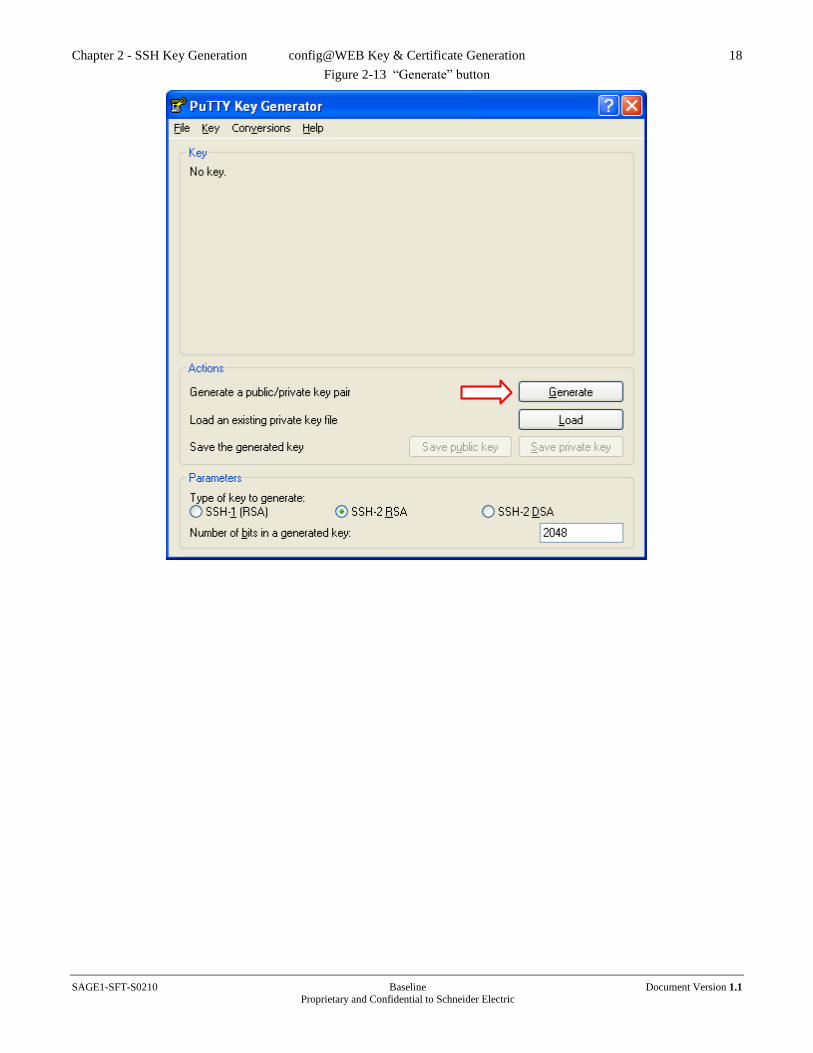
Figure 2-13 “Generate” button
Chapter 2 - SSH Key Generation config@WEB Key & Certificate Generation 19
SAGE1-SFT-S0210 Baseline Document Version 1.1 Proprietary and Confidential to Schneider Electric
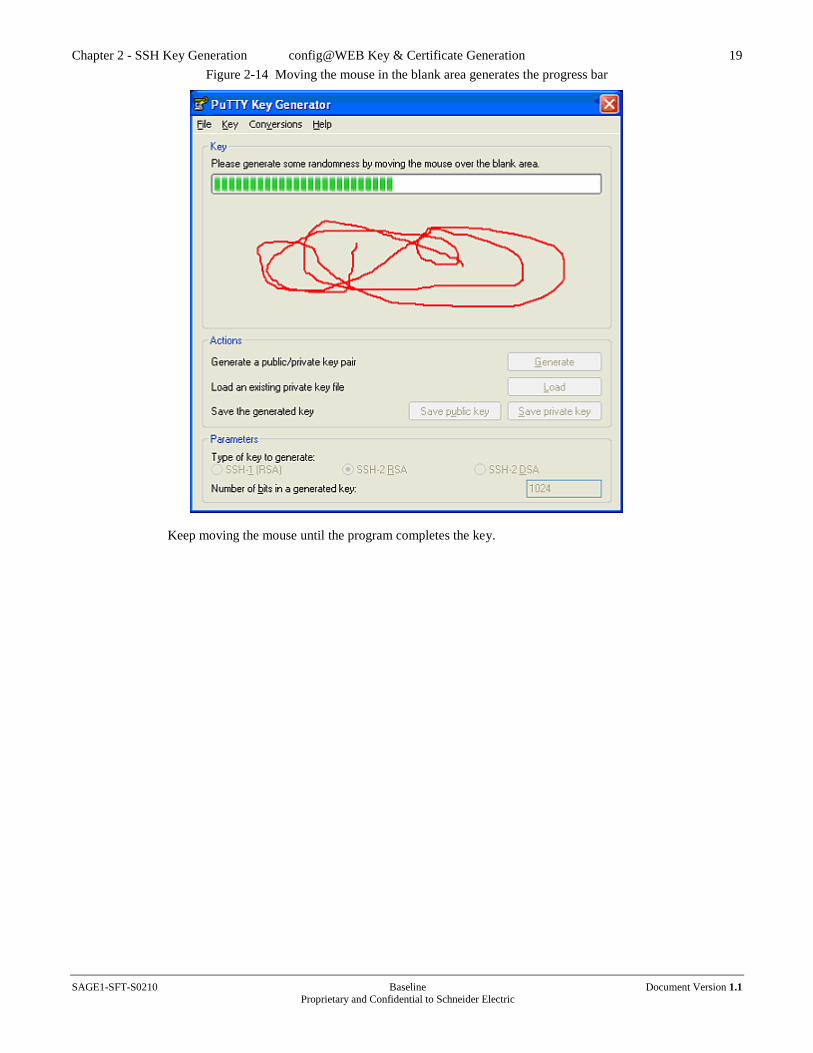
Figure 2-14 Moving the mouse in the blank area generates the progress bar
Keep moving the mouse until the program completes the key.
Chapter 2 - SSH Key Generation config@WEB Key & Certificate Generation 20
SAGE1-SFT-S0210 Baseline Document Version 1.1 Proprietary and Confidential to Schneider Electric
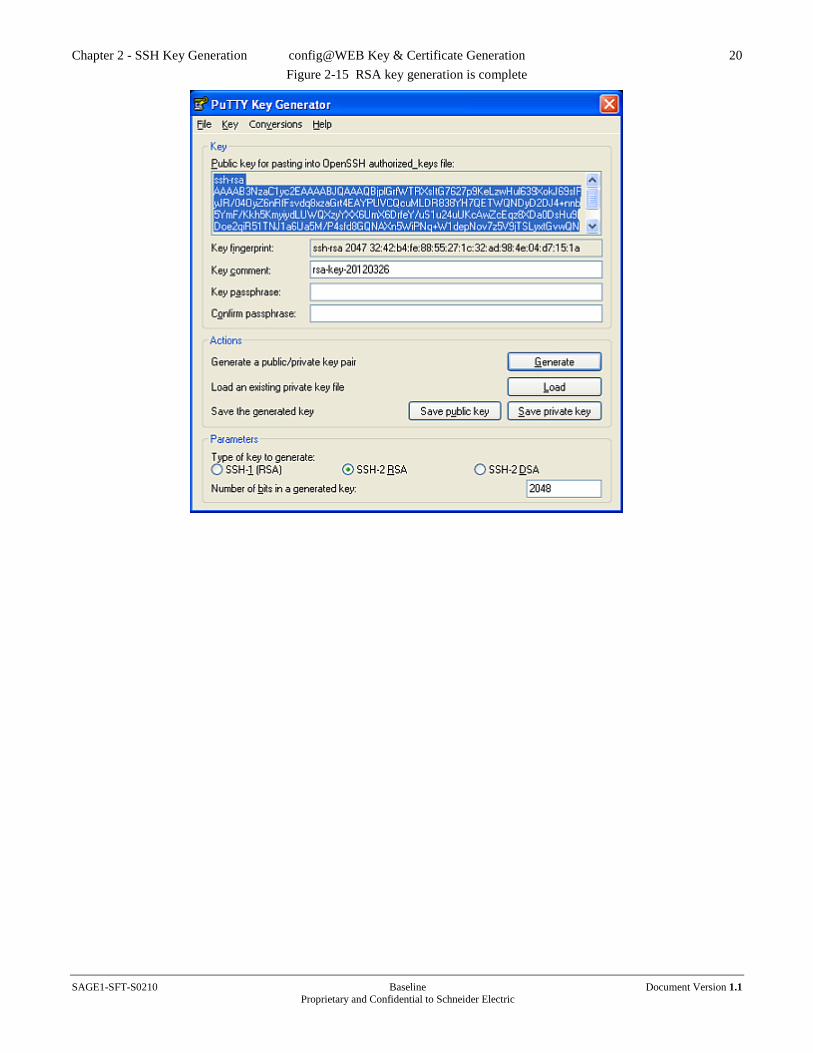
Figure 2-15 RSA key generation is complete
Chapter 2 - SSH Key Generation config@WEB Key & Certificate Generation 21
SAGE1-SFT-S0210 Baseline Document Version 1.1 Proprietary and Confidential to Schneider Electric
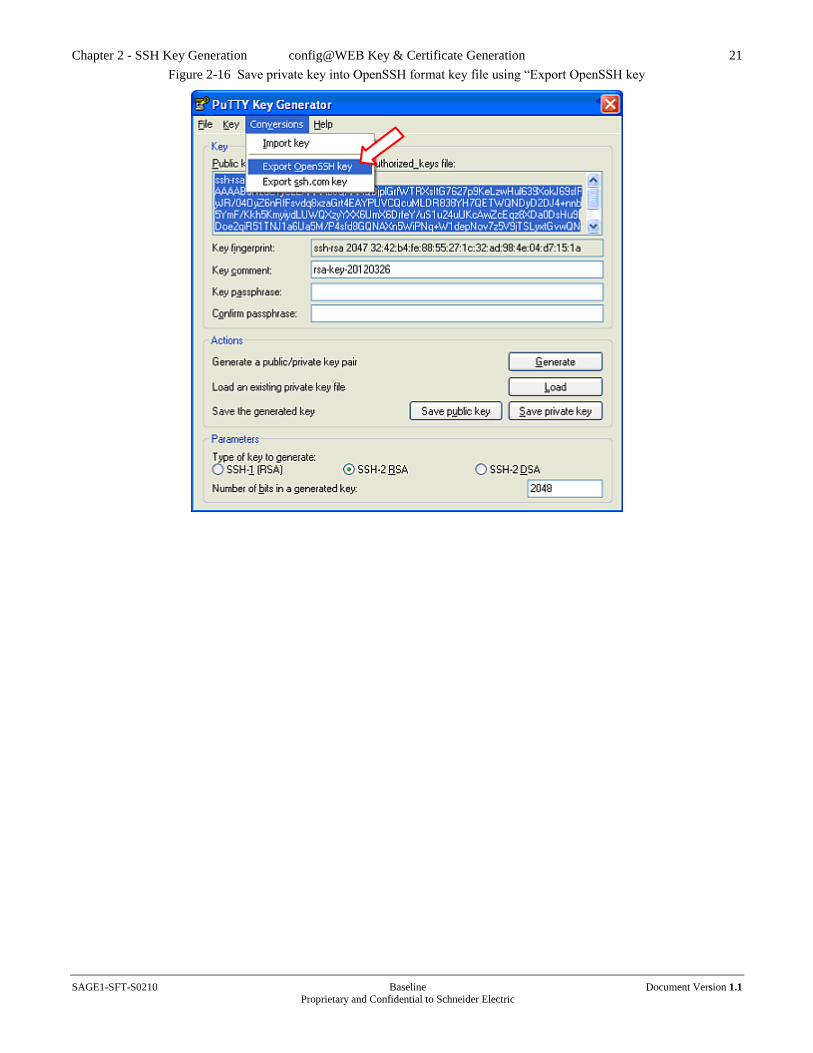
Figure 2-16 Save private key into OpenSSH format key file using “Export OpenSSH key
Chapter 2 - SSH Key Generation config@WEB Key & Certificate Generation 22
SAGE1-SFT-S0210 Baseline Document Version 1.1 Proprietary and Confidential to Schneider Electric
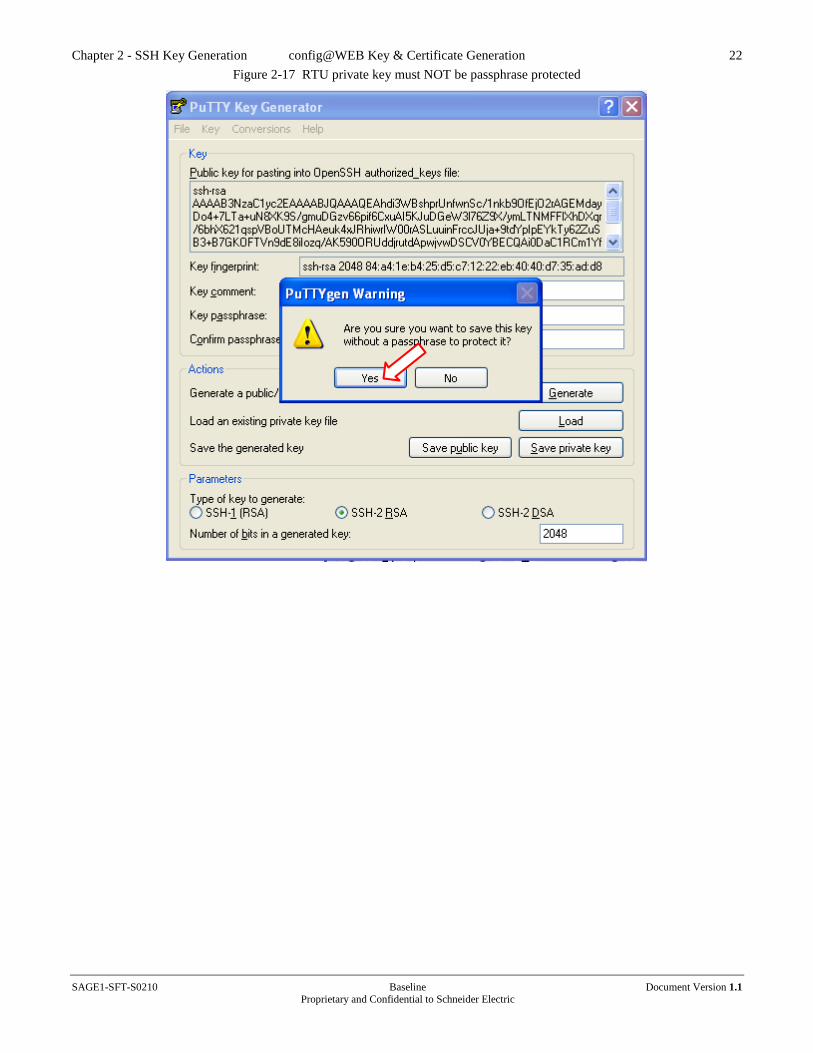
Figure 2-17 RTU private key must NOT be passphrase protected
Chapter 2 - SSH Key Generation config@WEB Key & Certificate Generation 23
SAGE1-SFT-S0210 Baseline Document Version 1.1 Proprietary and Confidential to Schneider Electric
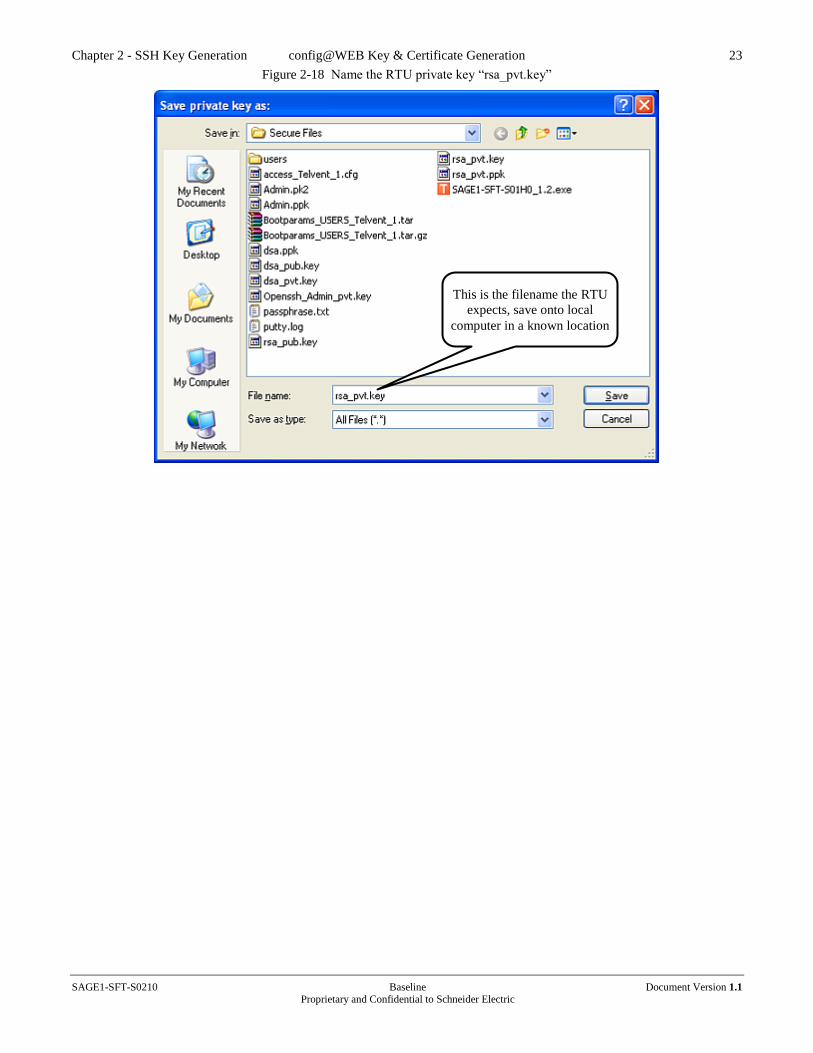
Figure 2-18 Name the RTU private key “rsa_pvt.key”
This is the filename the RTU
expects, save onto local
computer in a known location
Chapter 2 - SSH Key Generation config@WEB Key & Certificate Generation 24
SAGE1-SFT-S0210 Baseline Document Version 1.1 Proprietary and Confidential to Schneider Electric
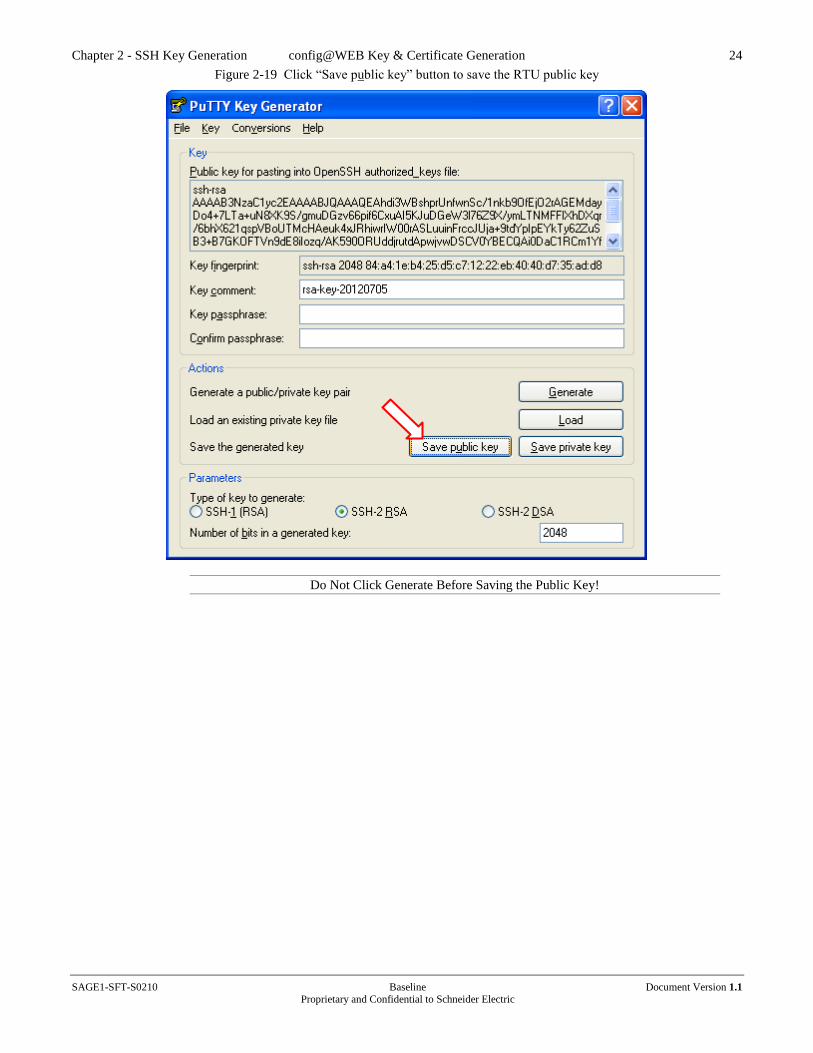
Figure 2-19 Click “Save public key” button to save the RTU public key
Do Not Click Generate Before Saving the Public Key!
Chapter 2 - SSH Key Generation config@WEB Key & Certificate Generation 25
SAGE1-SFT-S0210 Baseline Document Version 1.1 Proprietary and Confidential to Schneider Electric
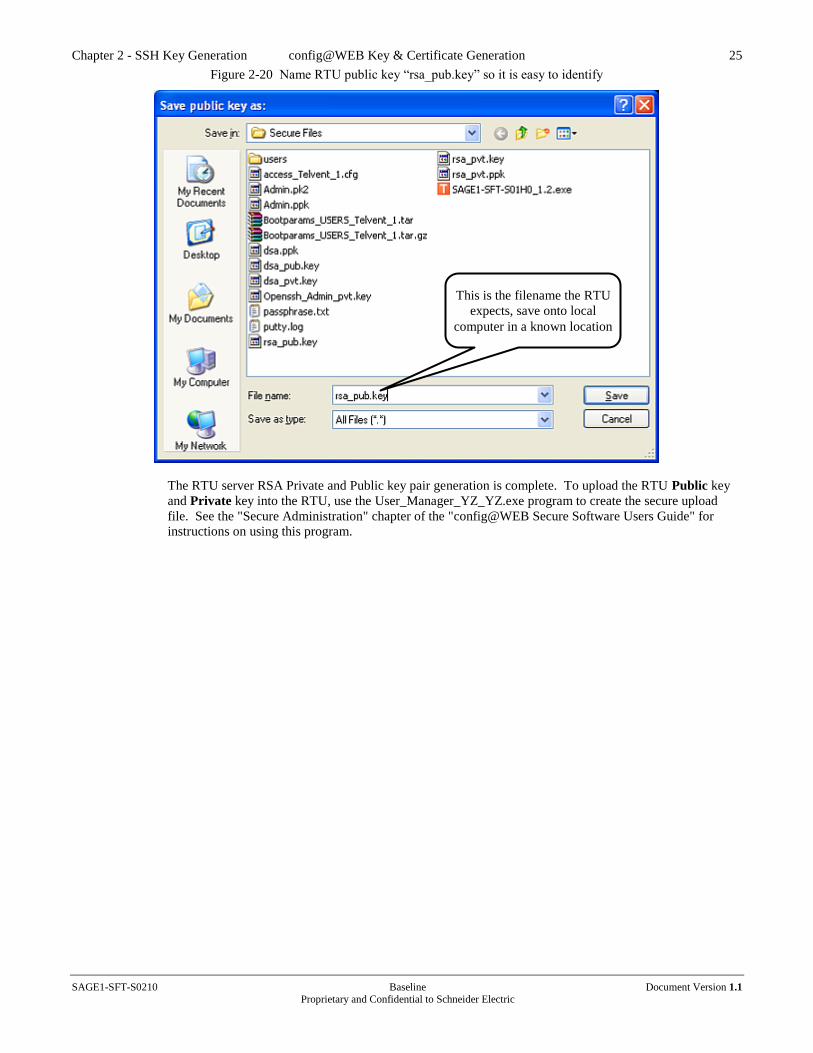
Figure 2-20 Name RTU public key “rsa_pub.key” so it is easy to identify
The RTU server RSA Private and Public key pair generation is complete. To upload the RTU Public key
and Private key into the RTU, use the User_Manager_YZ_YZ.exe program to create the secure upload
file. See the "Secure Administration" chapter of the "config@WEB Secure Software Users Guide" for
instructions on using this program.
This is the filename the RTU
expects, save onto local
computer in a known location
Chapter 2 - SSH Key Generation config@WEB Key & Certificate Generation 26
SAGE1-SFT-S0210 Baseline Document Version 1.1 Proprietary and Confidential to Schneider Electric
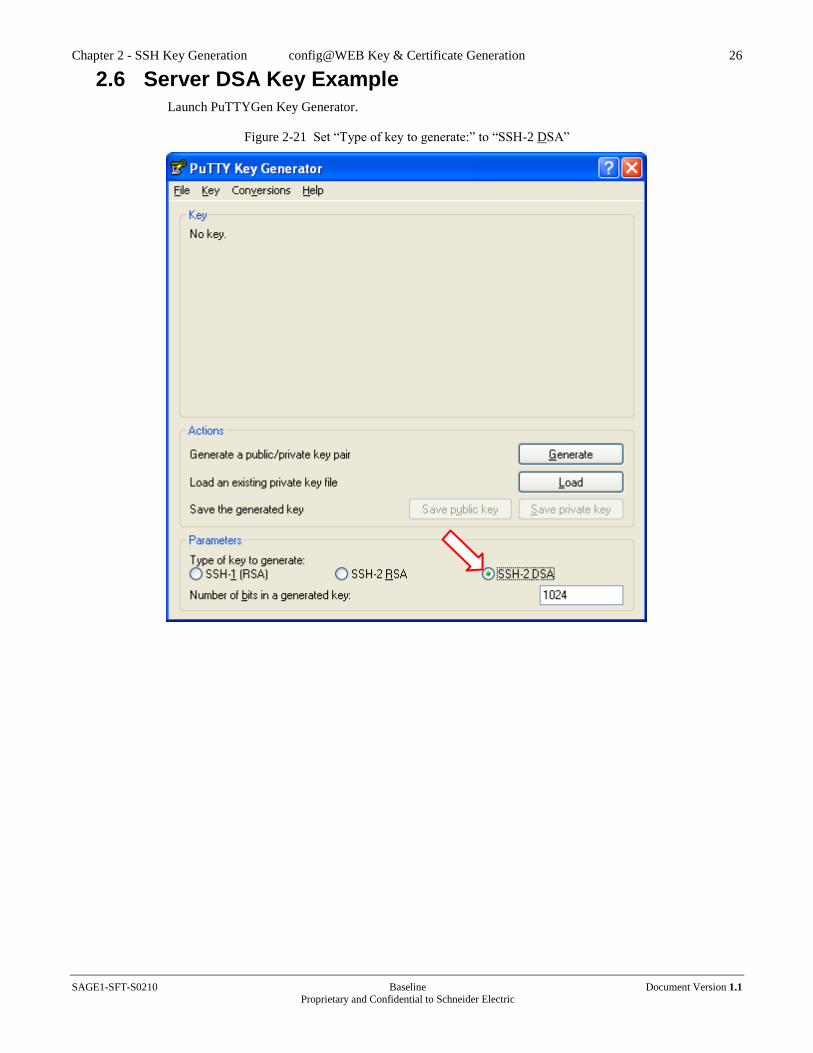
2.6 Server DSA Key Example
Launch PuTTYGen Key Generator.
Figure 2-21 Set “Type of key to generate:” to “SSH-2 DSA”
Chapter 2 - SSH Key Generation config@WEB Key & Certificate Generation 27
SAGE1-SFT-S0210 Baseline Document Version 1.1 Proprietary and Confidential to Schneider Electric
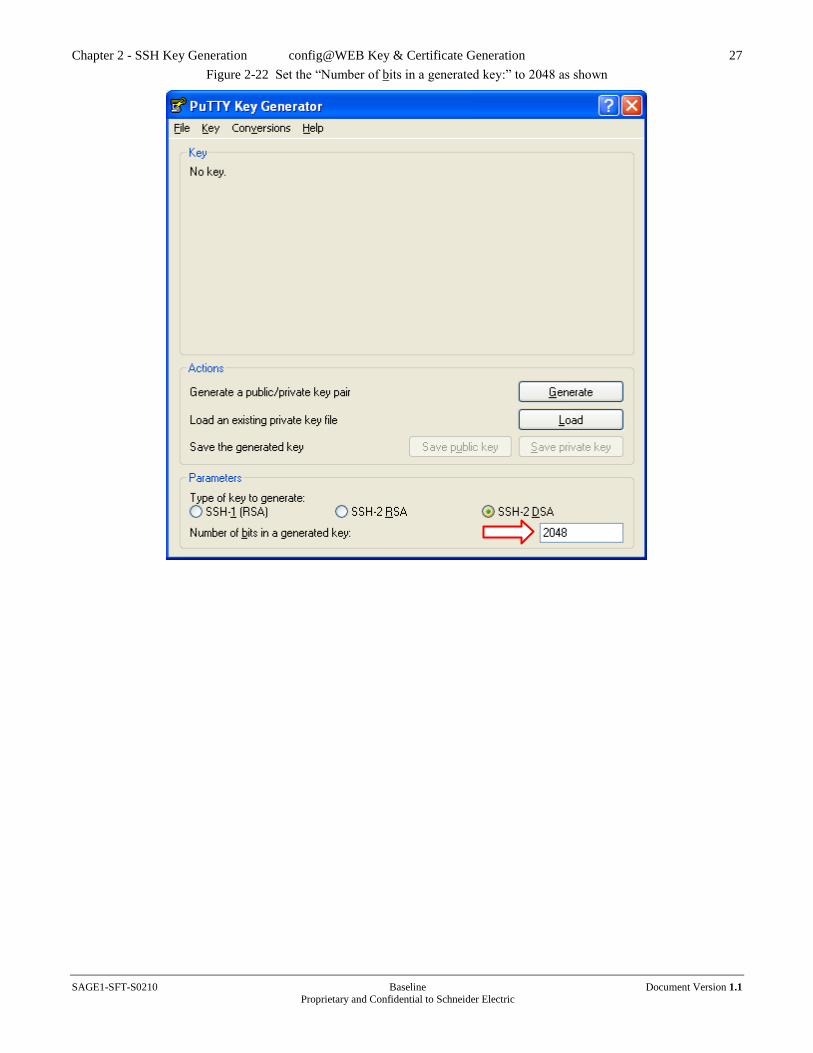
Figure 2-22 Set the “Number of bits in a generated key:” to 2048 as shown

Chapter 2 - SSH Key Generation config@WEB Key & Certificate Generation 28
SAGE1-SFT-S0210 Baseline Document Version 1.1 Proprietary and Confidential to Schneider Electric
Figure 2-23 Click the “Generate” button

Chapter 2 - SSH Key Generation config@WEB Key & Certificate Generation 29
SAGE1-SFT-S0210 Baseline Document Version 1.1 Proprietary and Confidential to Schneider Electric
Figure 2-24 Moving the mouse in the blank area generates the progress bar
Keep moving the mouse until the program completes the key.
Chapter 2 - SSH Key Generation config@WEB Key & Certificate Generation 30
SAGE1-SFT-S0210 Baseline Document Version 1.1 Proprietary and Confidential to Schneider Electric
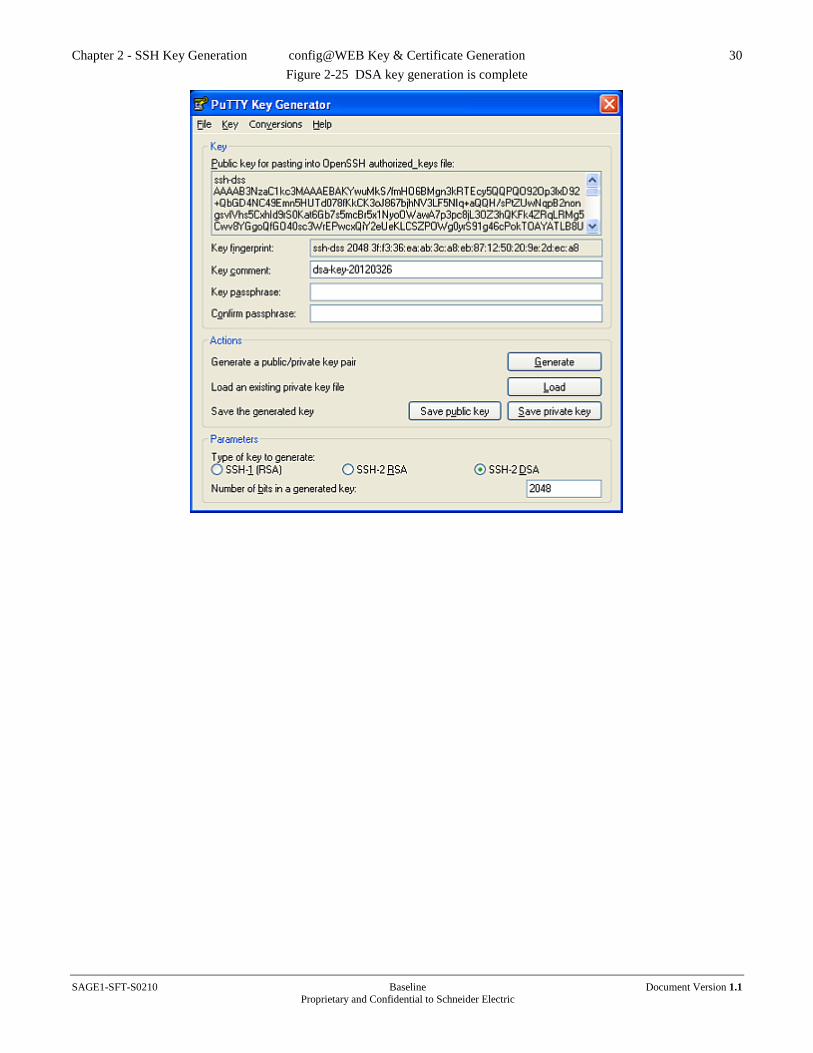
Figure 2-25 DSA key generation is complete
Chapter 2 - SSH Key Generation config@WEB Key & Certificate Generation 31
SAGE1-SFT-S0210 Baseline Document Version 1.1 Proprietary and Confidential to Schneider Electric
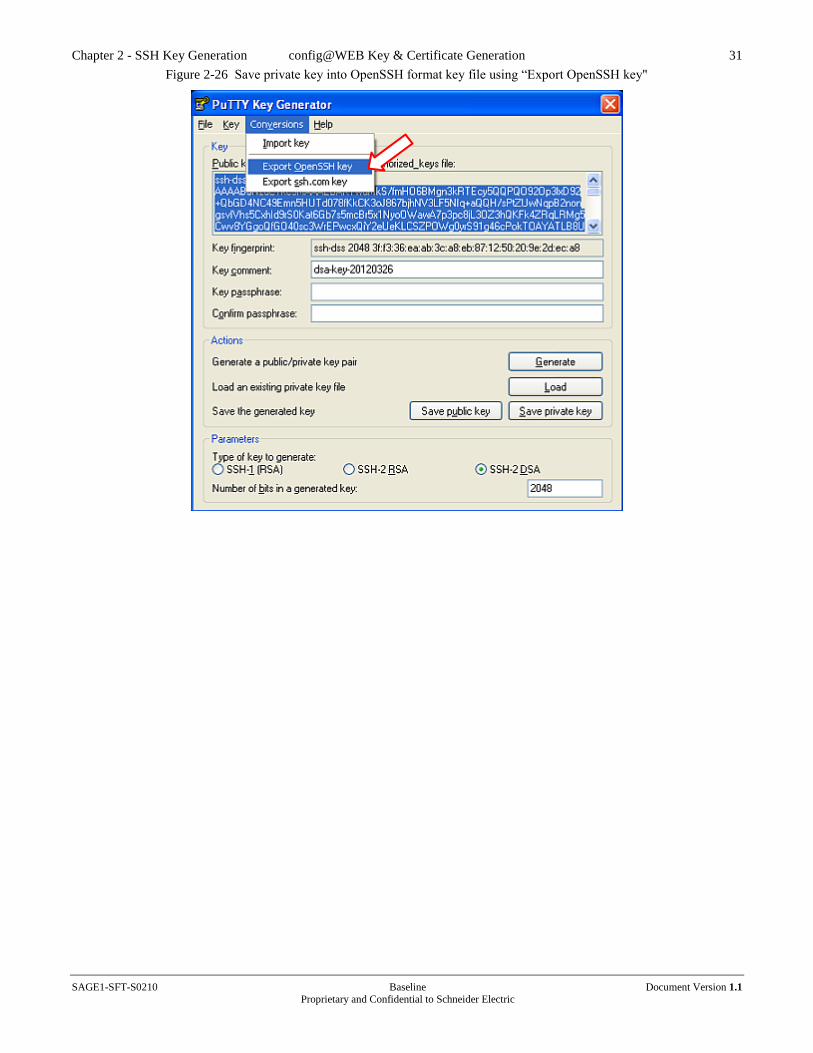
Figure 2-26 Save private key into OpenSSH format key file using “Export OpenSSH key"
Chapter 2 - SSH Key Generation config@WEB Key & Certificate Generation 32
SAGE1-SFT-S0210 Baseline Document Version 1.1 Proprietary and Confidential to Schneider Electric
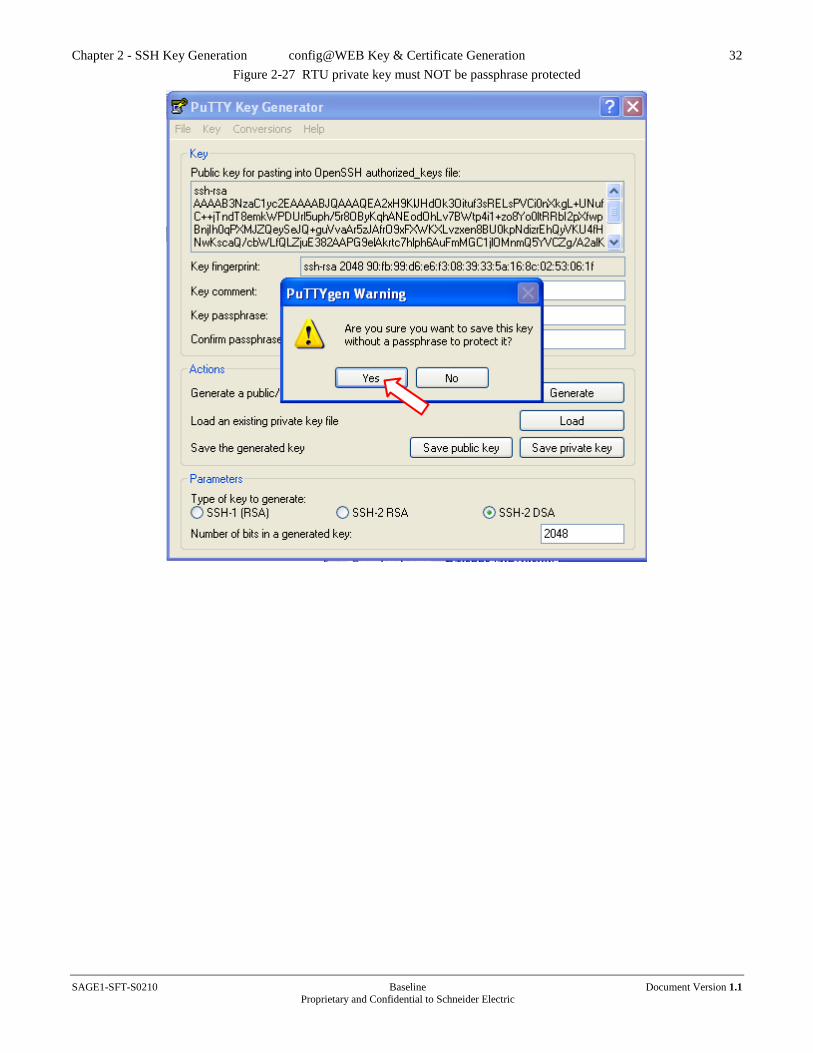
Figure 2-27 RTU private key must NOT be passphrase protected
Chapter 2 - SSH Key Generation config@WEB Key & Certificate Generation 33
SAGE1-SFT-S0210 Baseline Document Version 1.1 Proprietary and Confidential to Schneider Electric
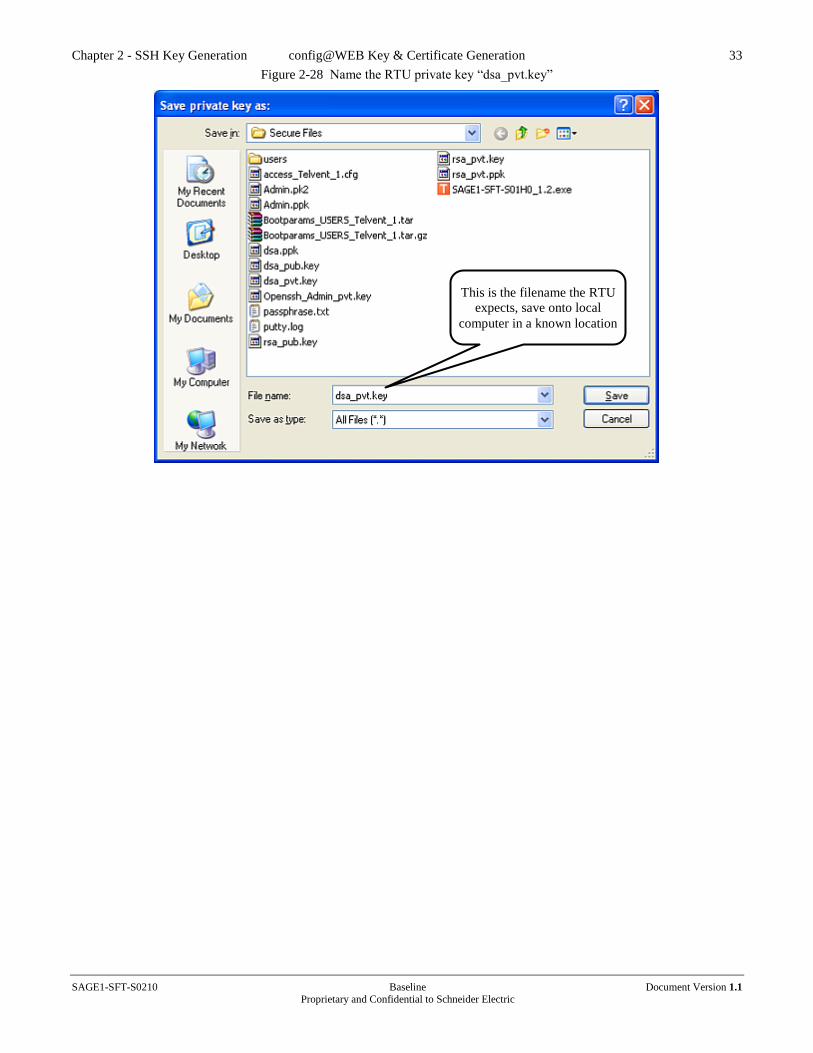
Figure 2-28 Name the RTU private key “dsa_pvt.key”
This is the filename the RTU
expects, save onto local
computer in a known location
Chapter 2 - SSH Key Generation config@WEB Key & Certificate Generation 34
SAGE1-SFT-S0210 Baseline Document Version 1.1 Proprietary and Confidential to Schneider Electric
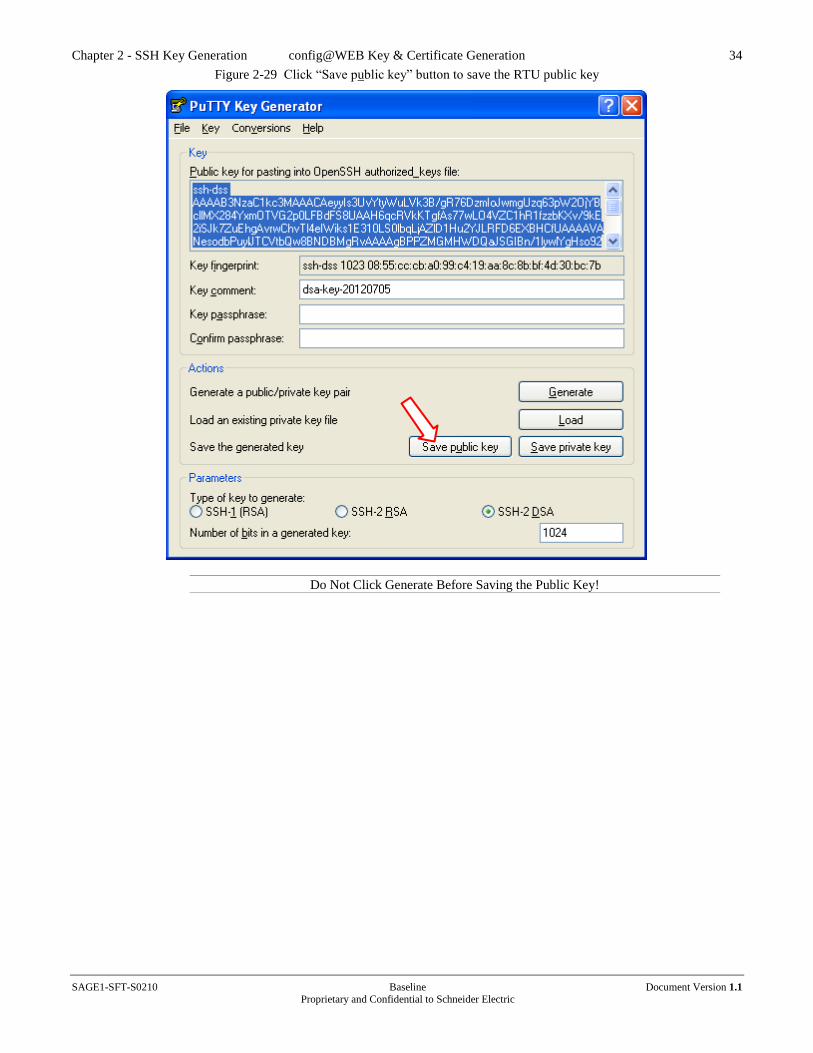
Figure 2-29 Click “Save public key” button to save the RTU public key
Do Not Click Generate Before Saving the Public Key!

Chapter 2 - SSH Key Generation config@WEB Key & Certificate Generation 35
SAGE1-SFT-S0210 Baseline Document Version 1.1 Proprietary and Confidential to Schneider Electric
Figure 2-30 Name RTU public key “dsa_pub.key” so it is easy to identify
The RTU server DSA Private and Public key pair generation is complete. To upload the RTU private key
and public key into the RTU, use the User_Manager_YZ_YZ.exe program to create the secure upload file.
See the "Secure Administration" chapter of the "config@WEB Secure Software Users Guide" for
instructions on using this program.
This is the filename the
RTU expects, save onto
local computer in a known
location

Chapter 3 - SSL Keys and Certificates config@WEB Key & Certificate Generation 37
SAGE1-SFT-S0210 Baseline Document Version 1.1 Proprietary and Confidential to Schneider Electric
3 SSL Keys and Certificates
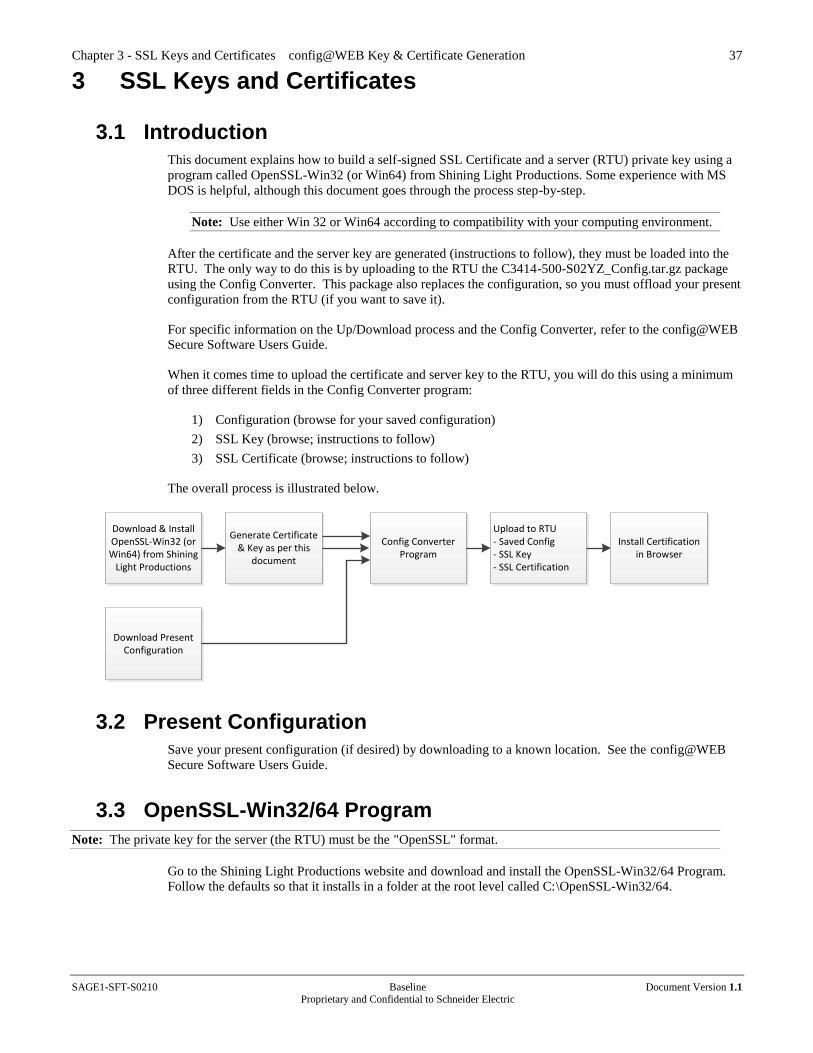
3.1 Introduction
This document explains how to build a self-signed SSL Certificate and a server (RTU) private key using a
program called OpenSSL-Win32 (or Win64) from Shining Light Productions. Some experience with MS
DOS is helpful, although this document goes through the process step-by-step.
Note: Use either Win 32 or Win64 according to compatibility with your computing environment.
After the certificate and the server key are generated (instructions to follow), they must be loaded into the
RTU. The only way to do this is by uploading to the RTU the C3414-500-S02YZ_Config.tar.gz package
using the Config Converter. This package also replaces the configuration, so you must offload your present
configuration from the RTU (if you want to save it).
For specific information on the Up/Download process and the Config Converter, refer to the config@WEB
Secure Software Users Guide.
When it comes time to upload the certificate and server key to the RTU, you will do this using a minimum
of three different fields in the Config Converter program:
1) Configuration (browse for your saved configuration)
2) SSL Key (browse; instructions to follow)
3) SSL Certificate (browse; instructions to follow)
The overall process is illustrated below.
3.2 Present Configuration
Save your present configuration (if desired) by downloading to a known location. See the config@WEB
Secure Software Users Guide.
3.3 OpenSSL-Win32/64 Program
Note: The private key for the server (the RTU) must be the "OpenSSL" format.
Go to the Shining Light Productions website and download and install the OpenSSL-Win32/64 Program.
Follow the defaults so that it installs in a folder at the root level called C:\OpenSSL-Win32/64.
Download & Install OpenSSL-Win32 (or Win64) from Shining
Light Productions
Generate Certificate & Key as per this
document
Upload to RTU- Saved Config- SSL Key- SSL Certification
Install Certification in Browser
Download Present Configuration
Config Converter Program
Chapter 3 - SSL Keys and Certificates config@WEB Key & Certificate Generation 38
SAGE1-SFT-S0210 Baseline Document Version 1.1 Proprietary and Confidential to Schneider Electric
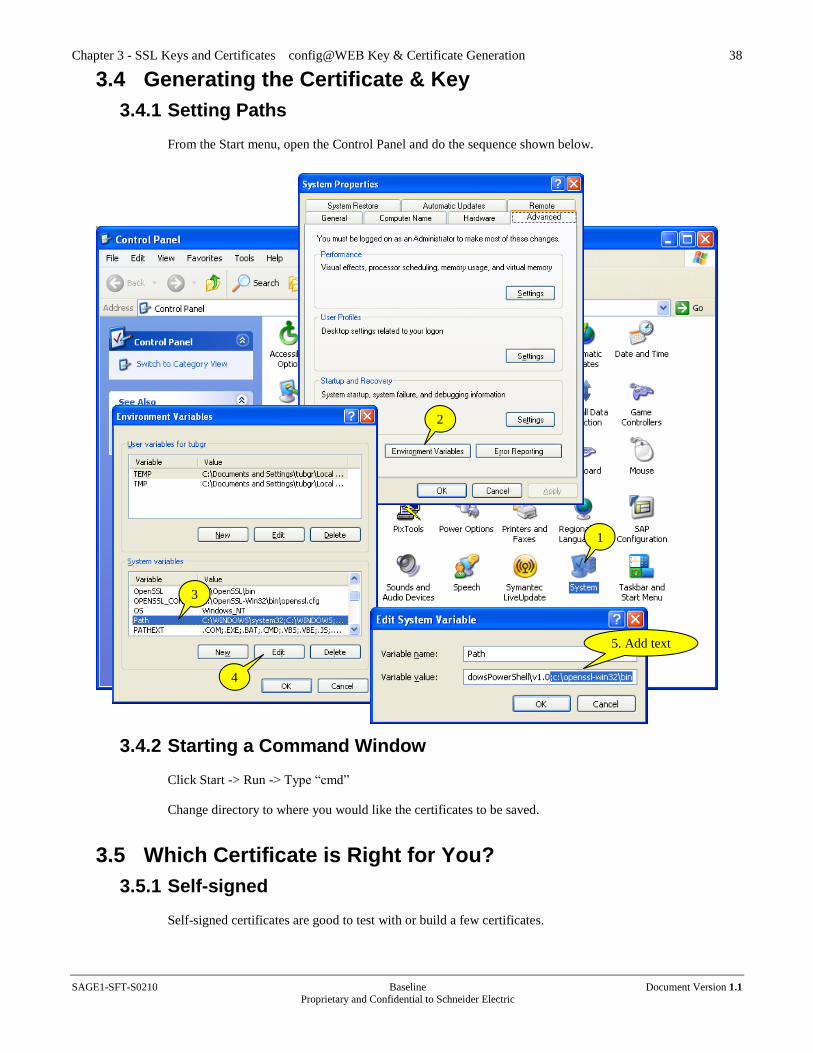
3.4 Generating the Certificate & Key
3.4.1 Setting Paths
From the Start menu, open the Control Panel and do the sequence shown below.
3.4.2 Starting a Command Window
Click Start -> Run -> Type “cmd”
Change directory to where you would like the certificates to be saved.
3.5 Which Certificate is Right for You?
3.5.1 Self-signed
Self-signed certificates are good to test with or build a few certificates.
1
2
3
5. Add text
4

Chapter 3 - SSL Keys and Certificates config@WEB Key & Certificate Generation 39
SAGE1-SFT-S0210 Baseline Document Version 1.1 Proprietary and Confidential to Schneider Electric
3.5.2 Certificate Authority (CA)
More secure. Certificates verified by trusted company. (Verisign, Thawte, etc.) See Figure 3-1 for a screen
visual
3.6 Self-Signed Certificate & Key Creation
3.6.1 Creating a Private Key
This command generates 1024 bit RSA key with Triple-DES encryption.
openssl genrsa -des3 -out server.key 1024
3.6.2 Creating a CSR
This command creates a Certificate Signing Request.
openssl req -new -key server.key -out server.csr
The server.csr file contains all the information needed to make a certificate. These are sent to CA
(Certification Authority) or Self signed to make a valid certificate.
3.6.3 Remove Passphrase from Key
To make the private key secure, the passphrase must be removed.
copy server.key server.key.org
openssl rsa -in server.key.org -out server.key
3.6.4 Creating a Self-Signed Certificate
Sign the Certificate request using the server private key.
openssl x509 -req -days 365 -in server.csr -signkey server.key -out server.crt
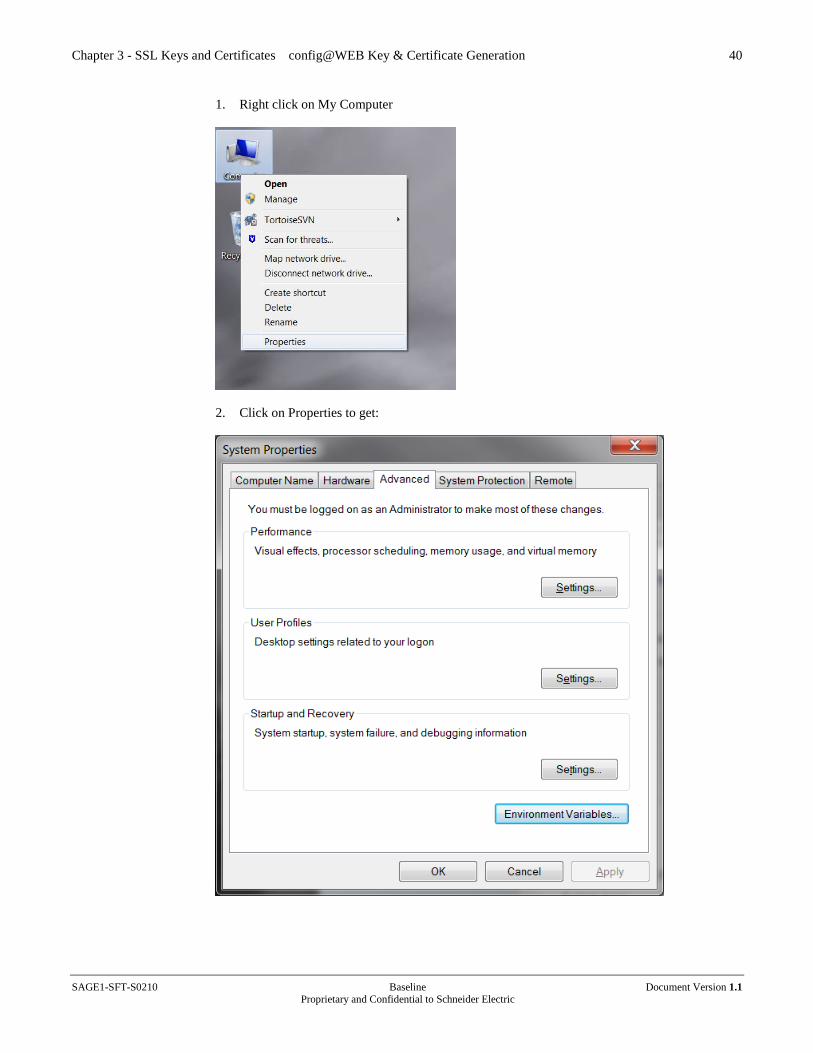
Note: In the event of an error stating "unable to write random state," create an environmental variable
RAND and set it equal to ".rnd". This may be done with the following steps.
If you do not get this error, proceed to Section 3.8
Chapter 3 - SSL Keys and Certificates config@WEB Key & Certificate Generation 40
SAGE1-SFT-S0210 Baseline Document Version 1.1 Proprietary and Confidential to Schneider Electric
1. Right click on My Computer
2. Click on Properties to get:
Chapter 3 - SSL Keys and Certificates config@WEB Key & Certificate Generation 41
SAGE1-SFT-S0210 Baseline Document Version 1.1 Proprietary and Confidential to Schneider Electric
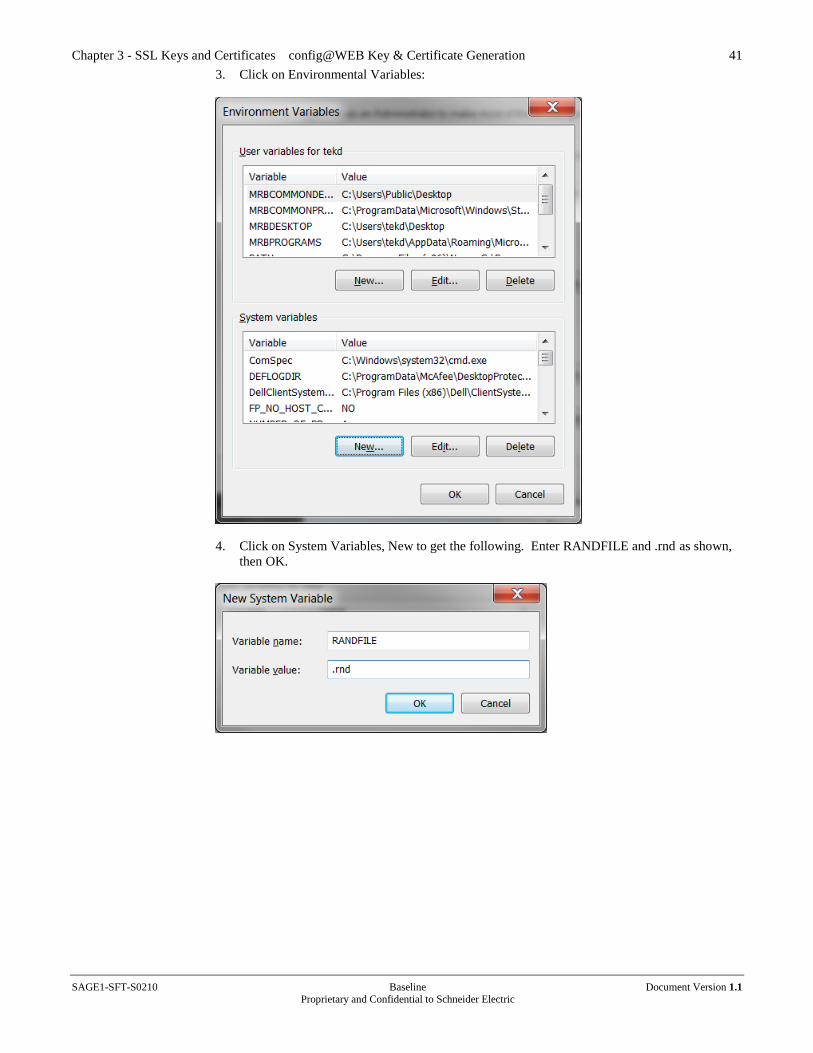
3. Click on Environmental Variables:
4. Click on System Variables, New to get the following. Enter RANDFILE and .rnd as shown,
then OK.
Chapter 3 - SSL Keys and Certificates config@WEB Key & Certificate Generation 42
SAGE1-SFT-S0210 Baseline Document Version 1.1 Proprietary and Confidential to Schneider Electric
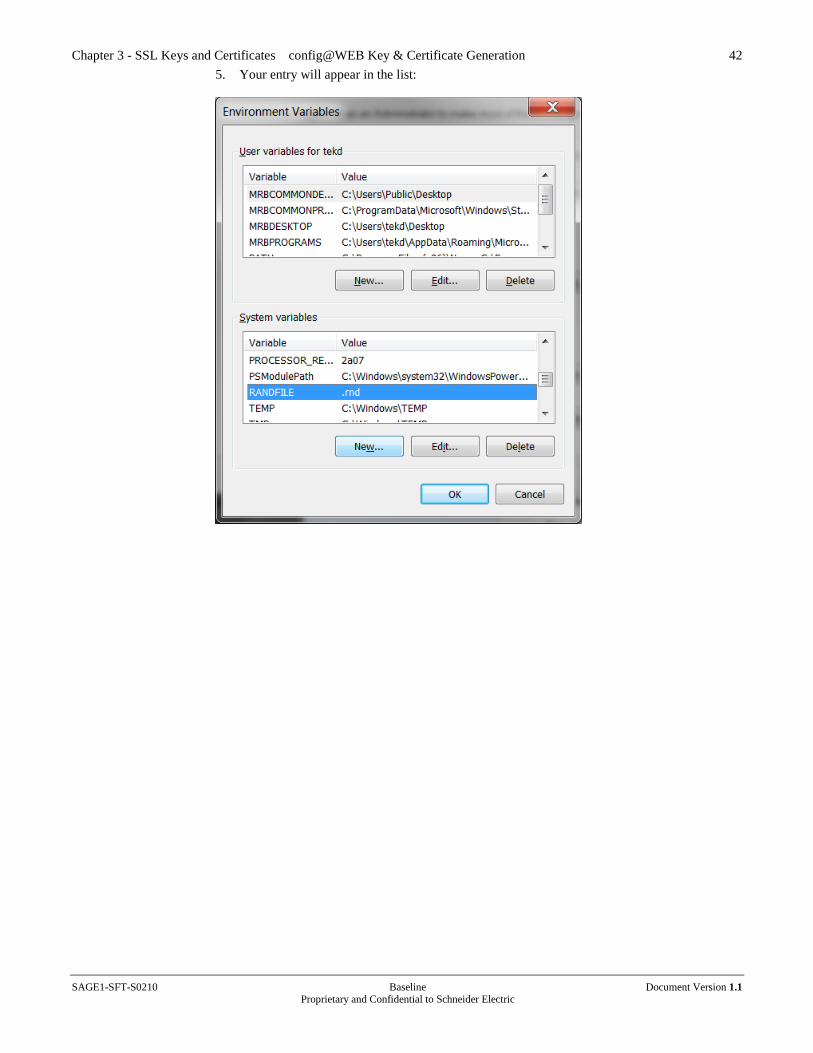
5. Your entry will appear in the list:
Chapter 3 - SSL Keys and Certificates config@WEB Key & Certificate Generation 43
SAGE1-SFT-S0210 Baseline Document Version 1.1 Proprietary and Confidential to Schneider Electric
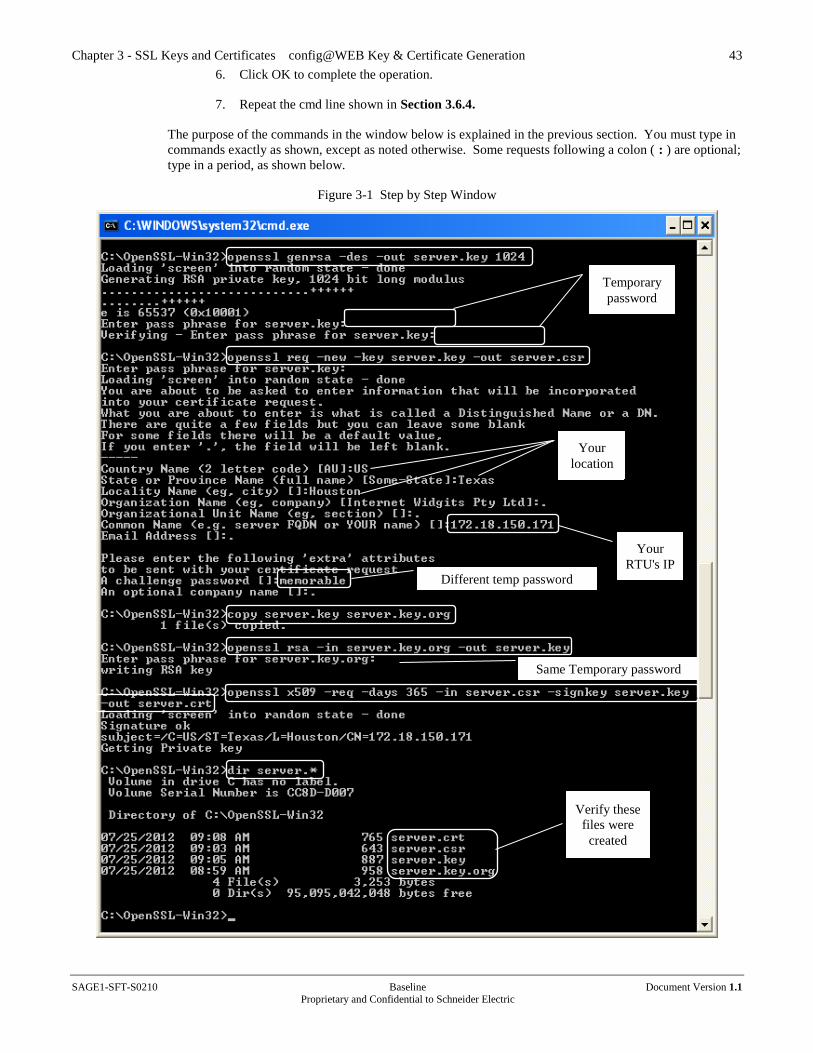
6. Click OK to complete the operation.
7. Repeat the cmd line shown in Section 3.6.4.
The purpose of the commands in the window below is explained in the previous section. You must type in
commands exactly as shown, except as noted otherwise. Some requests following a colon ( : ) are optional;
type in a period, as shown below.
Figure 3-1 Step by Step Window
Your
location
Your
location
Your
RTU's IP
Your
location
Temporary
password Temporary
password
Same Temporary password
Different temp password
Verify these
files were
created
Chapter 3 - SSL Keys and Certificates config@WEB Key & Certificate Generation 44
SAGE1-SFT-S0210 Baseline Document Version 1.1 Proprietary and Confidential to Schneider Electric
At the end of this process, the files shown above must exist. You will use two of them in the Config
Converter.
3.7 CA Certificate & Key Creation
3.7.1 Creating a Server Key and a Certificate Signing Request (CSR)
Command to generate server key:
openssl genrsa -des3 -out server.key 4096
Command to generate server certificate request:
openssl req -new -key server.key -out server.csr
3.7.2 Remove Passphrase from Key
copy server.key server.key.org
openssl rsa -in server.key.org -out server.key
3.7.3 Command to generate a CA Signed Certificate
openssl x509 -req -days 365 -in server.csr -CA ca.crt -CAkey ca.key -set_serial 01 -out server.crt
Note: Every time a new certificate is signed using the CA.key the serial number must be
incremented.
The CA Certificate and Key will become part of your configuration to be uploaded to the RTU.
3.8 Uploading New Configuration to the RTU
Upload C3414-500-S02YZ_Config.tar.gz to the RTU. If you need help, see the config@WEB Secure
Software Users Guide. Be sure to reset the RTU after upload.
3.9 Installing a Certificate in Browser
Please see the config@WEB Secure Software Users Guide.