configuring the dbs pc and vcm to use usb
TRANSCRIPT

D B S U S E R ' S M A N U A L
Configuring the DBS PC and VCM to Use USB
Configuring the DBS PC and VCM for USB Before you can use your USB cable to perform VCM updates using DBS, you must configure the DBS PC and the VCM for USB. This configuration step needs to be done only once. To prepare DBS and your VCM for USB communication, please follow the directions in this section, according to the Windows operating system that you have on your PC. IMPORTANT: These steps assume that you have already installed DBS V32.0.
Appendix
B

D B S U S E R ' S M A N U A L
Configuring the DBS PC and VCM for USB (continued) Follow the flowchart below to configure the DBS PC and VCM for USB.
Check the NGS+ software version number on your VCM. See Appendix A.
Is the NGS+ software
Start
Y N c
Your VCM IS NOT configured for USB
Figure 1: Updating the VCM Using the DBS PC and USB
version V24.1 or greater?
Have you configured yoPC for USB
Update your VCM to 24.1 or greater using Ethernet (see Chapter 2).
Close DBS and disconnect VCM
power.
Your VCM is now configured for
USB!
Would you like to configure your PC
for USB now?
Y
You will have to configure your PC for USB before you can update the VCM using USB.
N
Follow the procedusection (accordingoperating system oPC) to configure yoUSB.
You can updateVCM using USBnext time you ran NGS+ softwupdate.
Your VCM IS onfigured for USB
ur ?
N
Y
You can update your VCM using USB
NOW!
re in this to the n the DBS ur PC for
your the
eceive are

D B S U S E R ' S M A N U A L
Install USB Drivers for Windows 98
• Close the DBS application.
• Connect your VCM to your PC using your USB cable.
• Power up the VCM by connecting the VCM's power cable to the VCM. After the VCM boots up, you will see a window similar to the following.
• Depending on how Windows 98 was installed, the Windows 98 disk may be required during this procedure.
Figure 2: Add New Hardware Wizard Initial Screen
Select Next

D B S U S E R ' S M A N U A L
Figure 3: Add New Hardware Wizard – Search for Driver
Figure 4: Add New Hardware Wizard – Browse for Location
1 Select Search for the best driver for your device.
2 Click Next.
2 Click Browse
1 Check Specify a Location

D B S U S E R ' S M A N U A L
Figure 5: Browse for Folder
Figure 6: Add New Hardware Wizard - Specify Location
1
2
Highlight the c:\Program Files\Ford Motor Company\Diagnostic Base Station\vcm folder
Select OK.
1 The location you selected will be displayed
2 Select Next.

D B S U S E R ' S M A N U A L
Figure 7: Add New Hardware Wizard - Updated Driver Selection
Figure 8: Add New Hardware Wizard – Located Driver
1 Select The updated driver (Recommended)
Select Next.
2 Select Next.

D B S U S E R ' S M A N U A L
Figure 9: Coping Files Progress Screen
Figure 10: Add New Hardware Wizard Completion Screen
Figure 11: Restart Your Computer Message
A progress bar will show the USB driver being copied to your PC. You may be asked to insert your Windows 98 disk at this time.
Select Finish.
Select Yes. IMPORTANT: Please leave your VCM powered up during the restart of your PC.

D B S U S E R ' S M A N U A L
Configure the IP Address for USB – Windows 98
Figure 12: Control Panel Icons for Windows 98
Figure 13: Network Configuration for Windows 98
2
3
2
3
1
1 Make sure your VCM is connected via USB and powered up.
Select: Start Settings Control Panel.
Double click on the Network icon.
Highlight TCP/IP-> Teradyne (GNA600 (USB)
Select Properties.
Select the Configuration tab

D B S U S E R ' S M A N U A L
Figure 14: TCP/IP Properties Screen for Windows 98 with IP address needed for USB
Figure 15: System Settings Change - Restart Computer Screen
The DBS PC is now set up to communicate with your VCM using USB. You do not need to perform this step again unless you uninstall and reinstall DBS. To update your VCM using USB, follow the steps in Chapter 2, but use the USB cable instead of the network/Ethernet cable and DO NOT configure your DBS PC for Ethernet communication. You may continue to update your VCM using your network/Ethernet cable if you prefer.
1 Select the IP Address tab
2 Select Specify an IP Address
3 Set IPAddress: 192.168.1.1 Subnet Mask: 255.255.255.0
4 Select OK.
Select Yes.

D B S U S E R ' S M A N U A L
Install USB Drivers for Windows XP
• Close the DBS application.
• Connect your VCM to your PC using your USB cable.
• Power up the VCM by connecting the VCM's power cable to the VCM. After the VCM boots up, you will see a window similar to the following.
Figure 16: Found New Hardware Message
Figure 17: Found New Hardware Wizard
Found New Hardware will appear momentarily.
2 Select Next.
1 Select Install the software automatically

D B S U S E R ' S M A N U A L
Figure 18: Found New Hardware Wizard Screen 2
Figure 19: Hardware Installation screen
This screen will appear momentarily.
Select Continue Anyway

D B S U S E R ' S M A N U A L
Figure 20: Completing Hardware Wizard
Select Finish.

D B S U S E R ' S M A N U A L
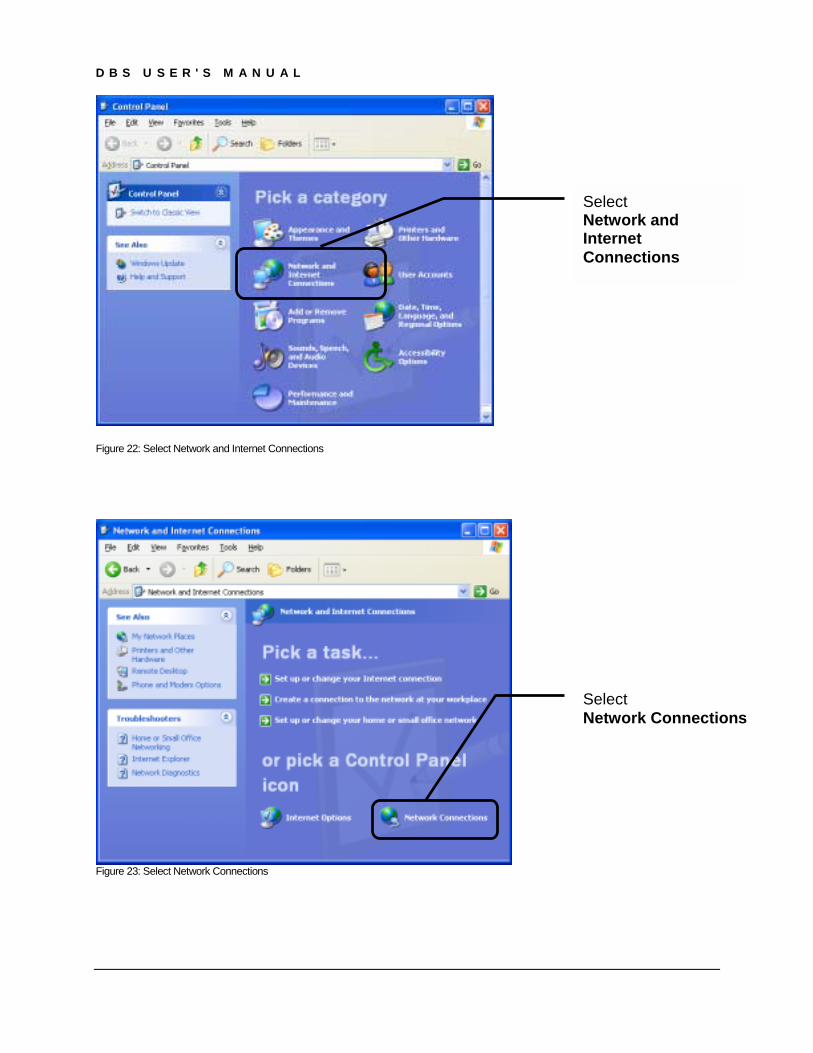
Configure the IP Address for USB – Windows XP
Figure 21: Windows XP Start Menu
2 Select Start Control Panel
1 Make sure your VCM is connected via USB and powered up.
D B S U S E R ' S M A N U A L
Figure 22: Select Network and Internet Connections
Figure 23: Select Network Connections
Select Network and Internet Connections
Select Network Connections

D B S U S E R ' S M A N U A L
Figure 24: Select Teradyne GNA600 (USB)
IMPORTANT: The connection labeled Teradyne GNA600 (USB) will not appear until the VCM has fully booted up, which could take up to one minute.
Figure 25: Select Properties
Double click on the connection labeled Teradyne GNA600 (USB)
Select Properties

D B S U S E R ' S M A N U A L
Figure 26: Select Internet Protocol (TCP/IP)
Figure 27: Internet Protocol (TCP/IP) Properties
Select Internet Protocol (TCP/IP)
1 Select Use the following IP address
2 Set IPAddress: 192.168.1.1 Subnet Mask: 255.255.255.0
3 Select OK.

D B S U S E R ' S M A N U A L
The DBS PC is now set up to communicate with your VCM using USB. You do not need to perform this step again unless you uninstall and reinstall DBS. To update your VCM using USB, follow the steps in Chapter 2, but use the USB cable instead of the network/Ethernet cable and DO NOT configure your DBS PC for Ethernet communication. You may continue to update your VCM using your network/Ethernet cable if you prefer.

D B S U S E R ' S M A N U A L
Install USB Drivers for Windows 2000
• Close the DBS application.
• Connect your VCM to your PC using your USB cable.
• Power up the VCM by connecting the VCM's power cable to the VCM. After the VCM boots up, you will see a window similar to the following
Figure 28: Found New Hardware
Figure 29: Digital Signature Not Found
This screen will appear momentarily.
Select Yes.

D B S U S E R ' S M A N U A L
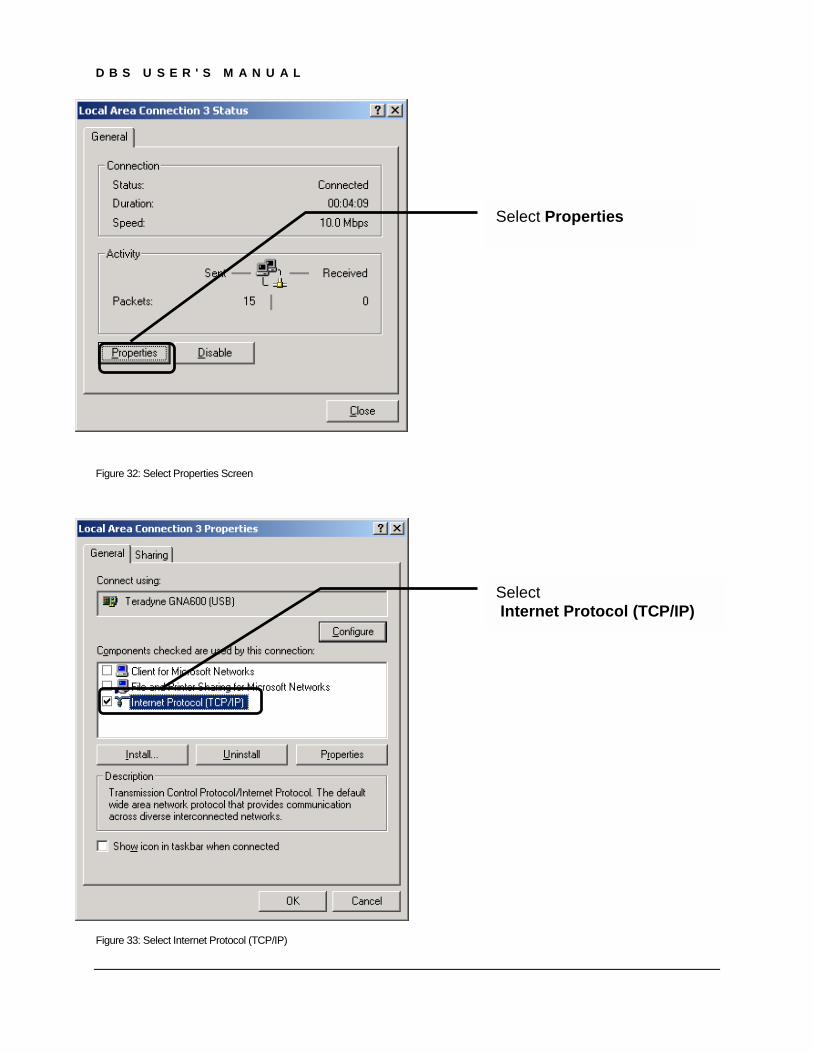
Configure the IP Address for USB – Windows 2000
Figure 30: Select Network and Dial Up Connections
Figure 31: Select Teradyne GNA600 (USB)
IMPORTANT: The connection labeled Teradyne GNA600 (USB) will not appear until the VCM has fully booted up, which could take up to one minute.
2 Select Start Settings
3 Double click on
Network and Dial Up Connections
Double click on the connection labeled Teradyne GNA600 (USB)
1 Make sure your VCM is connected via USB and powered up.
D B S U S E R ' S M A N U A L
Figure 32: Select Properties Screen
Figure 33: Select Internet Protocol (TCP/IP)
Select Properties
Select Internet Protocol (TCP/IP)

D B S U S E R ' S M A N U A L
Figure 34: Setting the IP Address and Subnet Mask for Windows 2000
The DBS PC is now set up to communicate with your VCM using USB. You do not need to perform this step again unless you uninstall and reinstall DBS. To update your VCM using USB, follow the steps in Chapter 2, but use the USB cable instead of the network/Ethernet cable and DO NOT configure your DBS PC for Ethernet communication. You may continue to update your VCM using your network/Ethernet cable if you prefer.
1 Select Use the following IP address
3 Select OK
2 Set IPAddress: 192.168.1.1 Subnet Mask: 255.255.255.0