configuring certificates on cisco vcs expressway...5-2 cisco webex enabled telepresence...
TRANSCRIPT

CiscoOL-21352-02
C H A P T E R 5
Configuring Certificates on Cisco VCS ExpresswayRevised: April 2014
IntroductionThis chapter describes the best practices for configuring certificates on Cisco VCS Expressway.
There are three parts to the configuration:
• Generating a certificate signing request (CSR)
• Installing the SSL Server Certificate on the VCS Expressway
• Configuring the Trusted CA List on the VCS Expressway
Both VCS Expressway X7.2.2 and X8.1 are supported. There are important differences in how each are configured, which are noted in the procedures that follow.
Caution Customers using Static NAT on VCS Expressway X7.2.2 are highly recommended to not upgrade to X8.1. If you are using Static NAT with X8.1, refer to the recommended workarounds in VCS Expressway X8.1 Encryption Issue and Workarounds.
VCS Expressway X8.1 Encryption Issue and WorkaroundsThere is an issue with the Encrypt on Behalf feature in VCS Expressway X8.1 when using Static NAT. Because VCS Expressway X8.1 uses the Ethernet 2 IP address for the media part in SDP, the media part of calls will fail. (Caveat ID: CSCum90139). Customers using Static NAT on their VCS Expressways running X7.2.2 are urged not to upgrade to X8.1 until a maintenance release fixes this issue.
If you are using Static NAT on VCS Expressway X8.1, Cisco recommends one of the following workarounds:
• Downgrade VCS Expressway to X7.2.2.
• Reconfigure VCS Expressway X8.1 to not use Static NAT.
• Use VCS Control to Encrypt on Behalf instead of VCS Expressway.
To use VCS Control to encrypt on behalf, do the following:
5-1 WebEx Enabled TelePresence Configuration Guide

Chapter 5 Configuring Certificates on Cisco VCS Expressway Videos Available
Step 1 On MCU, turn Encryption OFF for all conferences.
Step 2 On VCS Control, change the dedicated WebEx Traversal zone to Force Encrypted.
Step 3 On VCS Expressway, change the dedicated WebEx DNS zone to Encryption Auto.
Videos AvailableThe entire configuration process for VCS Expressway 7.2.2 is also described and demonstrated in the following video series:
Configuring Certificates on Cisco VCS Expressway for WebEx Enabled TelePresence
Supported CertificatesMake sure you submit your certificate signing request to a public certificate authority that issues a certificate that WebEx supports.
Note Self-signed certificates are NOT supported.
WebEx supports certificates that are issued by specific Root Certificate Authorities. Certificate providers may have multiple Root Certificate Authorities and not all may be supported by WebEx. Your certificate must be issued by one of the following Root Certificate Authorities (or one of their Intermediate Certificate Authorities) or the call from your VCS Expressway will not be authorized by WebEx:
• entrust_ev_ca
• digicert_global_root_ca
• verisign_class_2_public_primary_ca_-_g3
• godaddy_class_2_ca_root_certificate
• Go Daddy Root Certification Authority - G2
• verisign_class_3_public_primary_ca_-_g5
• verisign_class_3_public_primary_ca_-_g3
• dst_root_ca_x3
• verisign_class_3_public_primary_ca_-_g2
• equifax_secure_ca
• entrust_2048_ca*
• verisign_class_1_public_primary_ca_-_g3
• ca_cert_signing_authority
• geotrust_global_ca
• globalsign_root_ca
• thawte_primary_root_ca
• geotrust_primary_ca
5-2Cisco WebEx Enabled TelePresence Configuration Guide
OL-21352-02

Chapter 5 Configuring Certificates on Cisco VCS Expressway Generating a Certificate Signing Request (CSR)
• addtrust_external_ca_root
Note This list may change over time. For the most current information, contact WebEx.
*To use a certificate generated by entrust_2048_ca with Cisco VCS Expressway, you must replace the Entrust Root CA certificate in the trusted CA list on the Cisco VCS Expressway with the newest version available from Entrust.
You can download the newer entrust_2048_ca.cer file from the Root Certificates list on the Entrust web site at the following URL:
https://www.entrust.net/downloads/root_index.cfm
Caution Wildcard certificates are not supported on VCS Expressway.
Generating a Certificate Signing Request (CSR)To generate a certificate signing request, do the following:
Step 1 In VCS Expressway:
• X7.2.2, go to Maintenance > Certificate management > Server certificate.
• X8.1, go to Maintenance > Security certificates > Server certificate.
Step 2 Click Generate CSR.
5-3Cisco WebEx Enabled TelePresence Configuration Guide
OL-21352-02

Chapter 5 Configuring Certificates on Cisco VCS Expressway Generating a Certificate Signing Request (CSR)
5-4Cisco WebEx Enabled TelePresence Configuration Guide
OL-21352-02

Chapter 5 Configuring Certificates on Cisco VCS Expressway Generating a Certificate Signing Request (CSR)
Step 3 Enter the required information for the CSR and click Generate CSR.
After clicking the Generate CSR button, the Server Certificate page is displayed and a message indicating that CSR creation was successful.
Note The private key is automatically generated as part of the CSR creation process. DO NOT click the option to Discard CSR, this will force you to regenerate the CSR and the auto-generated private key will not appear on the Server Certificate page.
5-5Cisco WebEx Enabled TelePresence Configuration Guide
OL-21352-02

Chapter 5 Configuring Certificates on Cisco VCS Expressway Generating a Certificate Signing Request (CSR)
Step 4 In order to complete the CSR process and receive a signed certificate from a supported public certificate authority (CA), you must download the CSR by clicking Download.
Most certificate authorities will require the CSR to be provided in a PKCS#10 request format (Shown below).
5-6Cisco WebEx Enabled TelePresence Configuration Guide
OL-21352-02

Chapter 5 Configuring Certificates on Cisco VCS Expressway Installing the SSL Server Certificate on the VCS Expressway
Step 5 Submit the CSR to your public CA.
Note Important: Make sure your public CA provides you with an SSL server certificate that includes both Server and Client Auth keys.
Once you’ve received the SSL server certificate from your public CA, you are ready to install it on the VCS Expressway.
Installing the SSL Server Certificate on the VCS Expressway
Note Before installing the server certificate on the VCS Expressway, make sure it is in the .PEM format. If the certificate you received is in a .CER format, you can convert it to a .PEM file by simply changing the file extension to .PEM.
Caution The server certificate must not be stacked along with the root or intermediate CA Certificates.
To Install the SSL server certificate on the VCS Expressway, do the following:
5-7Cisco WebEx Enabled TelePresence Configuration Guide
OL-21352-02

Chapter 5 Configuring Certificates on Cisco VCS Expressway Installing the SSL Server Certificate on the VCS Expressway
Step 1 (Recommended) Open the server certificate in a text editing application such as Notepad and verify that you see a single certificate (Noted by Begin and End Certificate brackets).
You may also want to verify that the validity of the server certificate by opening it as a .CER file. Here you should observe that the Issued to field is that of the VCS Expressway server.
5-8Cisco WebEx Enabled TelePresence Configuration Guide
OL-21352-02

Chapter 5 Configuring Certificates on Cisco VCS Expressway Installing the SSL Server Certificate on the VCS Expressway
Tip It is worth noting whether the CA that issued the certificate uses an intermediate CA or issues/signs certificates from a root CA. If an intermediate CA is involved then you’ll need to “stack” or add the Intermediate CA Certificate to the Trusted CA Certificate.
5-9Cisco WebEx Enabled TelePresence Configuration Guide
OL-21352-02

Chapter 5 Configuring Certificates on Cisco VCS Expressway Installing the SSL Server Certificate on the VCS Expressway
Step 2 In VCS Expressway:
• X7.2.2, Go to Maintenance > Certificate management > Server certificate.
• X8.1, Go to Maintenance > Security certificates > Server certificate.
Step 3 Click Browse and select the server certificate that you received from the public CA and click Open.
Note The server certificate must be loaded on to the Expressway in the .PEM certificate format.
Step 4 Click Upload server certificate data.
5-10Cisco WebEx Enabled TelePresence Configuration Guide
OL-21352-02

Chapter 5 Configuring Certificates on Cisco VCS Expressway Installing the SSL Server Certificate on the VCS Expressway
After uploading the server certificate, you’ll see a message at the top of the page indicating that files were uploaded.
5-11Cisco WebEx Enabled TelePresence Configuration Guide
OL-21352-02

Chapter 5 Configuring Certificates on Cisco VCS Expressway Configuring the Trusted CA Certificate List on the VCS Expressway
Configuring the Trusted CA Certificate List on the VCS Expressway
The version of VCS Expressway you are using will determine how you configure the trusted CA certificate list.
VCS Expressway X7.2.2
The default trusted CA certificate list for VCS Expressway X7.2.2 contains 140 certificates. It is very likely the public root CA that issued your server certificate is already part of the default trusted CA certificate list.
For details on how to configure the trusted CA certificate list on VCS Expressway X7.2.2, go to Configuring the Trusted CA Certificate List on VCS Expressway X7.2.2.
VCS Expressway Upgraded from X7.2.2 to X8.1
If you upgraded your VCS Expressway from X7.2.2 to X8.1, the trusted CA certificate list from X7.2.2 will be retained.
5-12Cisco WebEx Enabled TelePresence Configuration Guide
OL-21352-02

Chapter 5 Configuring Certificates on Cisco VCS Expressway Configuring the Trusted CA Certificate List on the VCS Expressway
For details on how to configure the trusted CA certificate list on VCS Expressway upgraded from X7.2.2 to X8.1, go to Configuring the Trusted CA Certificate List on VCS Expressway Upgraded from X7.2.2 to X8.1.
VCS Expressway X8.1
If you are using a freshly installed VCS Expressway X8.1, you will need to load your own list of trusted CA certificates, because it does not (by default) contain any certificates in its default trusted CA certificate list.
In addition, you will need to add the root certificate used by the WebEx cloud to the default trusted CA certificate list on your VCS Expressway, which is DST Root CA X3.
For details on how to configure the trusted CA certificate list on a freshly installed VCS Expressway X8.1, go to Configuring the Trusted CA Certificate List on VCS Expressway X8.1.
Configuring the Trusted CA Certificate List on VCS Expressway X7.2.2If the default trusted CA certificate list is not currently in use, it is recommended that you reset it back to the default CA Certificate. This will simplify the process of ensuring the required certificates are in place.
Resetting the Trusted CA Certificate List on VCS Expressway X7.2.2
To reset the trusted CA certificate list on VCS Expressway X7.2.2, do the following:
Step 1 Go to Maintenance > Certificate management > Trusted CA certificate and click Reset to default CA certificate.
Note Your VCS Expressway must trust the certificate issuer of the server certificate that’s passed by the server during the client/server SSL Handshake, in this case the server will be the SIP Proxy in the WebEx Cloud.
The default trusted CA certificate list on the VCS Expressway already contains the public root CA Certificate for the server certificate that the cloud will present. The root CA for the WebEx cloud is DST Root CA X3 with an intermediate CA of Cisco SSCA2.
If the server certificate was issued by the root CA (rather than an intermediate CA), it is likely that the root certificate is part of the default trusted CA list.
5-13Cisco WebEx Enabled TelePresence Configuration Guide
OL-21352-02

Chapter 5 Configuring Certificates on Cisco VCS Expressway Configuring the Trusted CA Certificate List on the VCS Expressway
Step 2 It is best practice to verify that the proper root certificate is present. You may do this by clicking Show CA certificate.
This will open in a new window displaying the default Trusted CA list that is currently loaded on the VCS Expressway.
Step 3 Search for the root CA that issued the server certificate.
If the server certificate is issued by the top-level root CA and NOT by an intermediate CA and the valid root CA certificate is present in the default trusted CA certificate list, then certificate configuration on your VCS Expressway is complete.
If the server certificate is issued by an intermediate CA, go to the next section.
Note If the certificate for the top-level root CA that issued your server certificate is not part of the default trusted CA certificate list, you must add it using the same procedure that is described for stacking the intermediate CA certificate, detailed in the next section.
5-14Cisco WebEx Enabled TelePresence Configuration Guide
OL-21352-02

Chapter 5 Configuring Certificates on Cisco VCS Expressway Configuring the Trusted CA Certificate List on the VCS Expressway
Stacking the Intermediate CA Certificate in the Trusted CA Certificate List on VCS Expressway X7.2.2
In some cases, root CAs will use an intermediate CA to issue certificates.
If the server certificate is issued by an intermediate CA, then you’ll need to add the intermediate CA certificate to the default Trusted CA list.
Figure 5-1 Server Certificate in .CER File Format
Unless the public CA provided you the exact intermediate and root certificates that must be loaded, you can retrieve them from the server certificate. In some cases this is a better approach to ensure you’re that you’re stacking the correct intermediate CA certificate.
Step 1 Open the server certificate as a .CER file (see Figure 5-1)
Step 2 Click the Certification Path tab, double-click the Intermediate Certificate.
This will open the intermediate CA certificate in a separate certificate viewer.
Step 3 Make sure the ‘Issued to’ field displays the name of the Intermediate CA.
Step 4 Click the Details tab followed by Copy to File…
5-15Cisco WebEx Enabled TelePresence Configuration Guide
OL-21352-02

Chapter 5 Configuring Certificates on Cisco VCS Expressway Configuring the Trusted CA Certificate List on the VCS Expressway
The ‘Welcome to the Certificate Export Wizard’ appears.
Step 5 Click Next.
Step 6 Choose Base-64 encoded X.509 (.CER) as the Export File Format and click Next.
Step 7 Name the file, click Next, and Finish.
5-16Cisco WebEx Enabled TelePresence Configuration Guide
OL-21352-02

Chapter 5 Configuring Certificates on Cisco VCS Expressway Configuring the Trusted CA Certificate List on the VCS Expressway
Step 8 Copy the default Trusted CA list from the VCS Expressway by going to Maintenance > Certificate management > Trusted CA certificate and clicking Show CA Certificate. In the window that opens, select all contents.
Step 9 Paste the contents into a text editing application such as Notepad.
Step 10 Open the intermediate.cer file within a new window of your text editing application and copy the contents to your clipboard.
Step 11 Do a search for the existing root CA certificate within the text file that contains the contents of the default Trusted CA list.
Step 12 Paste the intermediate CA certificate above the root certificate.
Step 13 Save the text file as .PEM file (Example: NewDefaultCA.pem)
5-17Cisco WebEx Enabled TelePresence Configuration Guide
OL-21352-02

Chapter 5 Configuring Certificates on Cisco VCS Expressway Configuring the Trusted CA Certificate List on the VCS Expressway
Note If the root CA is not part of the default trusted CA list. Follow same procedure of stacking the intermediate CA certificate.
Step 14 Click Browse, find your newly created/stacked Trusted CA list and click Open.
Step 15 Click Upload CA certificate.
5-18Cisco WebEx Enabled TelePresence Configuration Guide
OL-21352-02

Chapter 5 Configuring Certificates on Cisco VCS Expressway Configuring the Trusted CA Certificate List on the VCS Expressway
Certificate configuration on your VCS Expressway X7.2.2 is complete.
For additional details on how to configure client/server certificates, including information about security terminology and definitions, refer to the “Cisco VCS Certificate Creation and Use Deployment Guide (X7.2)” at the following location:
https://www.cisco.com/en/US/docs/telepresence/infrastructure/vcs/config_guide/Cisco_VCS_Certificate_Creation_and_Use_Deployment_Guide_X7-2.pdf
Configuring the Trusted CA Certificate List on VCS Expressway Upgraded from X7.2.2 to X8.1
If the default trusted CA certificate list is not currently in use, it is recommended that you reset it back to the default CA Certificate. This will simplify the process of ensuring the required certificates are in place.
Resetting the Trusted CA Certificate List on VCS Expressway Upgraded from X7.2.2. to X8.1
To reset the trusted CA certificate list on VCS Expressway X8.1, do the following:
Step 1 Go to Maintenance > Security certificates > Trusted CA certificate and click Reset to default CA certificate.
Note Your VCS Expressway must trust the certificate issuer of the server certificate that’s passed by the server during the client/server SSL Handshake, in this case the server will be the SIP Proxy in the WebEx Cloud.
The default trusted CA certificate list on the VCS Expressway already contains the public root CA Certificate for the server certificate that the cloud will present. The root CA for the WebEx cloud is DST Root CA X3 with an intermediate CA of Cisco SSCA2.
If the server certificate was issued by the root CA (rather than an intermediate CA), it is likely that the root certificate is part of the default trusted CA list.
Step 2 It is best practice to verify that the proper root certificate is present. You may do this by clicking Show all (PEM file).
5-19Cisco WebEx Enabled TelePresence Configuration Guide
OL-21352-02

Chapter 5 Configuring Certificates on Cisco VCS Expressway Configuring the Trusted CA Certificate List on the VCS Expressway
This will open in a new window displaying the default Trusted CA list that is currently loaded on the VCS Expressway.
Step 3 Search for the root CA that issued the server certificate.
If the server certificate is issued by the top-level root CA and NOT by an intermediate CA and the valid root CA certificate is present in the default trusted CA certificate list, then certificate configuration on your VCS Expressway is complete.
If the server certificate is issued by an intermediate CA or if the certificate for the top-level root CA that issued your server certificate is not part of the trusted CA certificate list, you must add it to the trusted CA certificate list, as detailed in the next section.
Adding the Intermediate CA Certificate to VCS Expressway X8.1
In some cases, root CAs will use an intermediate CA to issue certificates.
If the server certificate is issued by an intermediate CA, then you’ll need to add the intermediate CA certificate to the default trusted CA certificate list.
5-20Cisco WebEx Enabled TelePresence Configuration Guide
OL-21352-02
Chapter 5 Configuring Certificates on Cisco VCS Expressway Configuring the Trusted CA Certificate List on the VCS Expressway
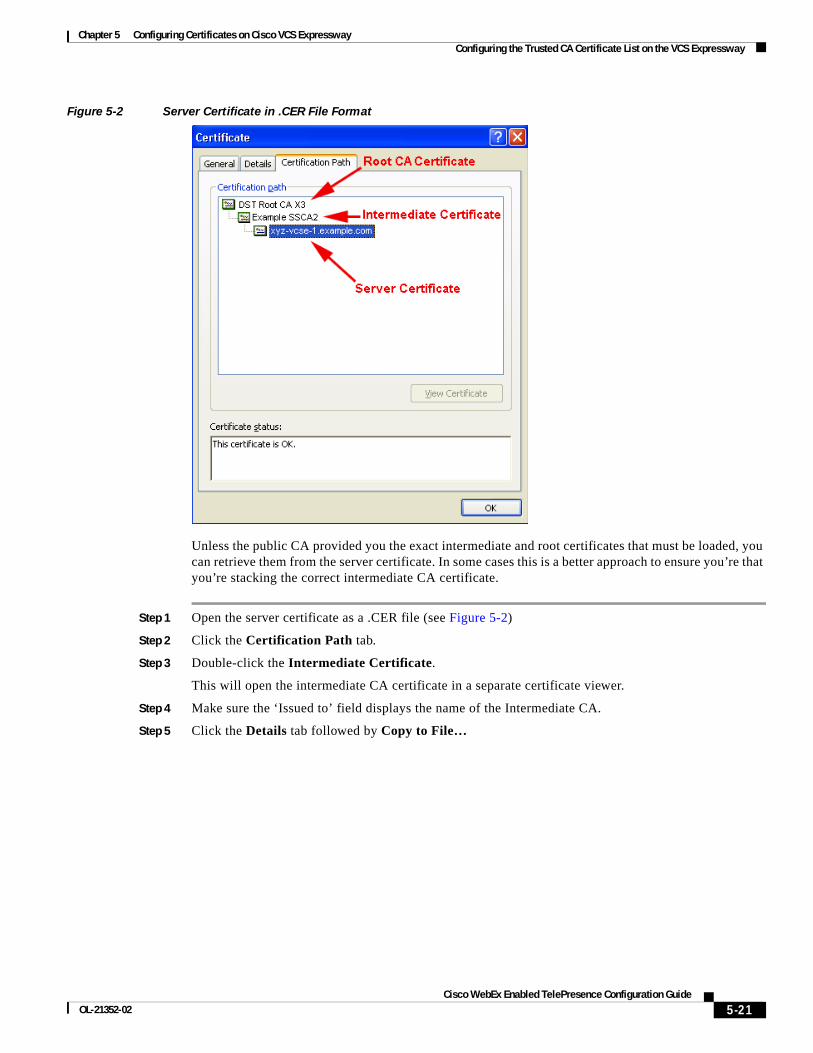
Figure 5-2 Server Certificate in .CER File Format
Unless the public CA provided you the exact intermediate and root certificates that must be loaded, you can retrieve them from the server certificate. In some cases this is a better approach to ensure you’re that you’re stacking the correct intermediate CA certificate.
Step 1 Open the server certificate as a .CER file (see Figure 5-2)
Step 2 Click the Certification Path tab.
Step 3 Double-click the Intermediate Certificate.
This will open the intermediate CA certificate in a separate certificate viewer.
Step 4 Make sure the ‘Issued to’ field displays the name of the Intermediate CA.
Step 5 Click the Details tab followed by Copy to File…
5-21Cisco WebEx Enabled TelePresence Configuration Guide
OL-21352-02

Chapter 5 Configuring Certificates on Cisco VCS Expressway Configuring the Trusted CA Certificate List on the VCS Expressway
The ‘Welcome to the Certificate Export Wizard’ appears.
Step 6 Click Next.
Step 7 Choose Base-64 encoded X.509 (.CER) as the Export File Format and click Next.
Step 8 Name the file, click Next, and Finish.
5-22Cisco WebEx Enabled TelePresence Configuration Guide
OL-21352-02

Chapter 5 Configuring Certificates on Cisco VCS Expressway Configuring the Trusted CA Certificate List on the VCS Expressway
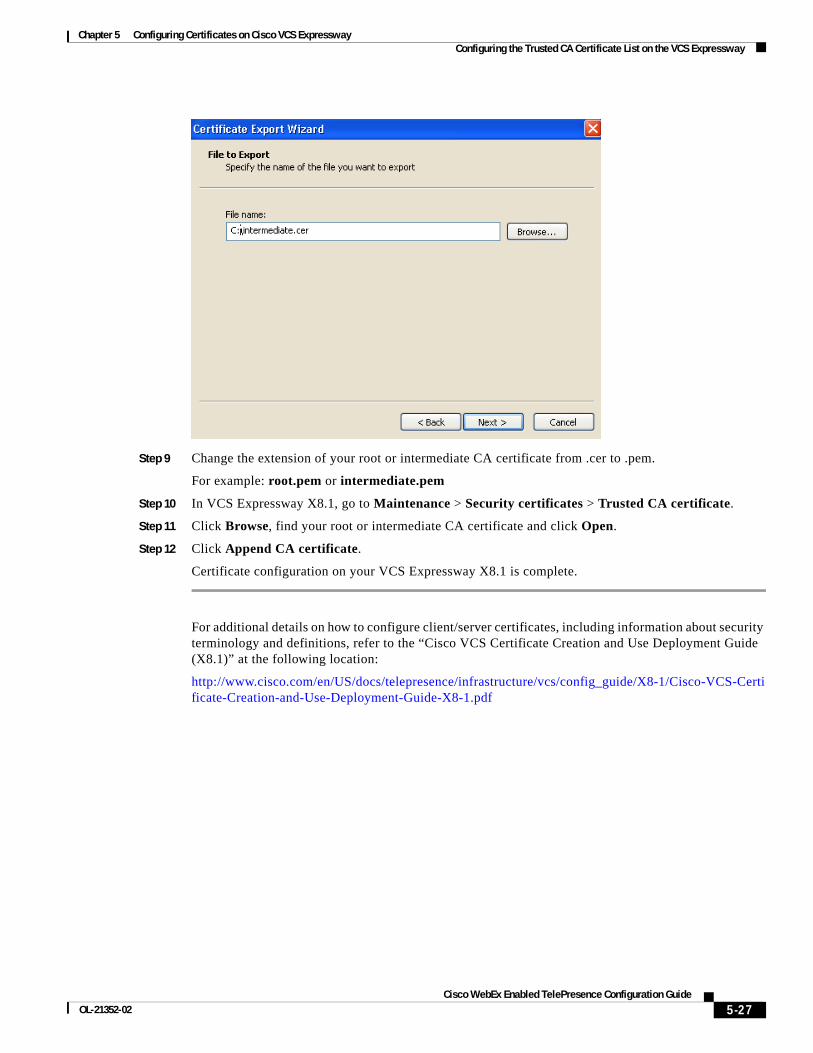
Step 9 Change the extension of your intermediate CA certificate from .cer to .pem.
For example: intermediate.pem
Step 10 In VCS Expressway X8.1, go to Maintenance > Security certificates > Trusted CA certificate.
Step 11 Click Browse, find your intermediate CA certificate and click Open.
Step 12 Click Append CA certificate.
Certificate configuration on your VCS Expressway X8.1 is complete.
For additional details on how to configure client/server certificates, including information about security terminology and definitions, refer to the “Cisco VCS Certificate Creation and Use Deployment Guide (X8.1)” at the following location:
http://www.cisco.com/en/US/docs/telepresence/infrastructure/vcs/config_guide/X8-1/Cisco-VCS-Certificate-Creation-and-Use-Deployment-Guide-X8-1.pdf
Configuring the Trusted CA Certificate List on VCS Expressway X8.1Because a freshly installed VCS Expressway X8.1, does not have certificates in its trusted CA certificates list, you must add the following two certificates:
• The DST Root CA certificate (the root CA for the WebEx cloud)
• The CA certificate of the CA that issued your server certificate
5-23Cisco WebEx Enabled TelePresence Configuration Guide
OL-21352-02

Chapter 5 Configuring Certificates on Cisco VCS Expressway Configuring the Trusted CA Certificate List on the VCS Expressway
Adding the DST Root Certificate to VCS Expressway X8.1
Your VCS Expressway must trust the certificate issuer of the server certificate that’s passed by the server during the client/server SSL Handshake, in this case the server will be the SIP Proxy in the WebEx Cloud, which is DST Root CA.
To add the DST Root certificate to the trusted CA certificate list on VCS Expressway X8.1, do the following:
Step 1 Go to: http://www.identrust.com/doc/SSLTrustIDCAA5_DSTCAX3.p7b
A page with the DST Root certificate contents appears with “-----Begin Certificate-----” at the top.
Step 2 Select and copy the entire contents of the page.
Step 3 Open a text editor, such as Notepad, on your computer and paste the contents of the DST Root certificate.
Step 4 Save the text file with an extension of .PEM. For example: dst_root_ca.pem.
Step 5 In VCS Expressway X8.1, go to Maintenance > Security certificates > Trusted CA certificate.
Step 6 Click Browse, select the DST Root certificate you saved in step 4 and click Open.
Step 7 Click Append CA certificate.
Adding the Root or Intermediate CA Certificate to VCS Expressway X8.1
For the WebEx cloud to trust your VCS Expressway’s server certificate, you must add the root or intermediate CA certificate for the CA that issued your server certificate.
Unless the public CA provided you the exact intermediate or root certificates that must be loaded, you can retrieve them from the server certificate. In some cases this is a better approach to ensure you’re that you’re stacking the correct intermediate CA certificate.
To add the root or intermediate CA to VCS Expressway X8.1, do the following:
Step 1 Open the server certificate as a .CER file
Step 2 Click the Certification Path tab. (see Figure 5-3)
5-24Cisco WebEx Enabled TelePresence Configuration Guide
OL-21352-02

Chapter 5 Configuring Certificates on Cisco VCS Expressway Configuring the Trusted CA Certificate List on the VCS Expressway
Figure 5-3 Server Certificate from Intermediate CA in .CER File Format
Note The server certificate example shown here is one issued by an intermediate CA. If your certificate was issued by a root CA, you would only see 2 certificates (the root and server certificates).
Step 3 Open the CA certificate:
• If your certificate was issued by a root CA, double-click the Root CA Certificate.
• If your certificate was issued by an intermediate CA, double-click the Intermediate Certificate.
This will open the CA certificate in a separate certificate viewer.
Step 4 Make sure the ‘Issued to’ field displays the name of the root or intermediate CA.
Step 5 Click the Details tab followed by Copy to File…
5-25Cisco WebEx Enabled TelePresence Configuration Guide
OL-21352-02

Chapter 5 Configuring Certificates on Cisco VCS Expressway Configuring the Trusted CA Certificate List on the VCS Expressway
The ‘Welcome to the Certificate Export Wizard’ appears.
Step 6 Click Next.
Step 7 Choose Base-64 encoded X.509 (.CER) as the Export File Format and click Next.
Step 8 Name the file, click Next, and Finish.
5-26Cisco WebEx Enabled TelePresence Configuration Guide
OL-21352-02
Chapter 5 Configuring Certificates on Cisco VCS Expressway Configuring the Trusted CA Certificate List on the VCS Expressway
Step 9 Change the extension of your root or intermediate CA certificate from .cer to .pem.
For example: root.pem or intermediate.pem
Step 10 In VCS Expressway X8.1, go to Maintenance > Security certificates > Trusted CA certificate.
Step 11 Click Browse, find your root or intermediate CA certificate and click Open.
Step 12 Click Append CA certificate.
Certificate configuration on your VCS Expressway X8.1 is complete.
For additional details on how to configure client/server certificates, including information about security terminology and definitions, refer to the “Cisco VCS Certificate Creation and Use Deployment Guide (X8.1)” at the following location:
http://www.cisco.com/en/US/docs/telepresence/infrastructure/vcs/config_guide/X8-1/Cisco-VCS-Certificate-Creation-and-Use-Deployment-Guide-X8-1.pdf
5-27Cisco WebEx Enabled TelePresence Configuration Guide
OL-21352-02

Chapter 5 Configuring Certificates on Cisco VCS Expressway Configuring the Trusted CA Certificate List on the VCS Expressway
5-28Cisco WebEx Enabled TelePresence Configuration Guide
OL-21352-02