configuring azure authenticationwith azure ad, user names are email addresses, while for on-premises...
TRANSCRIPT

WHITE PAPER
Configuring Azure Authentication Quick Guide for PBPS, PBW, PBUL and PBIS

Configuring Azure MFA © 2018. BeyondTrust Software, Inc.
1
Contents Configuring Azure MFA for PowerBroker Password Safe using RADIUS ..................................................2
Option 1: On-Premises MFA Server..................................................................................................2
Option 2: Network Policy Server (NPS) ........................................................................................... 10
Configuring Azure MFA for PowerBroker for Windows using RADIUS ................................................... 14
Configuring Azure MFA for PowerBroker for Unix and Linux, and PBIS, using RADIUS ........................... 18
Configuring PBUL....................................................................................................................... 18
Testing the Configuration........................................................................................................... 20
Configuring Azure MFA for PowerBroker Password Safe Direct Connect .............................................. 22
Configuring Azure MFA for PowerBroker Password Safe using SAML ................................................... 25

Configuring Azure MFA © 2018. BeyondTrust Software, Inc.
2
Configuring Azure MFA for PowerBroker Password Safe using RADIUS
OPTION 1: ON-PREMISES MFA SERVER
You can download the Azure MFA Server and generate the activation credentials from the Azure Portal.
See https://docs.microsoft.com/en-us/azure/multi-factor-authentication/multi-factor-authentication-
get-started-server
1. In the Azure portal, download MFA server installer and generate activation credentials.

Configuring Azure MFA © 2018. BeyondTrust Software, Inc.
3
2. In the Multi-Factor Server console, import a test AD user.

Configuring Azure MFA © 2018. BeyondTrust Software, Inc.
4
3. Configure clients and ports.

Configuring Azure MFA © 2018. BeyondTrust Software, Inc.
5
4. Configure the target (Active Directory DC).
5. Enable RADIUS for the domain controller.

Configuring Azure MFA © 2018. BeyondTrust Software, Inc.
6
6. For the test user, you can enable authentication method (Phone call standard selected).

Configuring Azure MFA © 2018. BeyondTrust Software, Inc.
7
7. In BeyondInsight, configure RADIUS Authentication.

Configuring Azure MFA © 2018. BeyondTrust Software, Inc.
8
8. Create a test group in AD, add a test user, and import in BeyondInsight. Configure the test user for
RADIUS.

Configuring Azure MFA © 2018. BeyondTrust Software, Inc.
9
9. Log on to BeyondInsight with the test user.
10. Since Phone Call/Standard is selected, after receiving a call and pressing #, you will be logged on.

Configuring Azure MFA © 2018. BeyondTrust Software, Inc.
10
OPTION 2: NETWORK POLICY SERVER (NPS)
There are many possible architectures, some including AD Connect, used to synchronize Azure AD with
on-premises AD, etc. This section configures NPS, which can be on-premises or in Azure. NPS is a server
role on Windows server, and can be added with Server Manager. For more information, visit the links
below:
https://nolabnoparty.com/en/setup-nps-for-radius-authentication-in-active-directory/
https://docs.microsoft.com/en-us/azure/multi-factor-authentication/multi-factor-authentication-nps-
extension
You want to start by reviewing the configuration of NPS. Then you will need to create a new network
policy, and a client for the BeyondInsight server.
1. Check the ports that the NPS server is listening to for RADIUS, right-click on NPS (Local), and select
Properties.
Configuring Azure MFA © 2018. BeyondTrust Software, Inc.
11
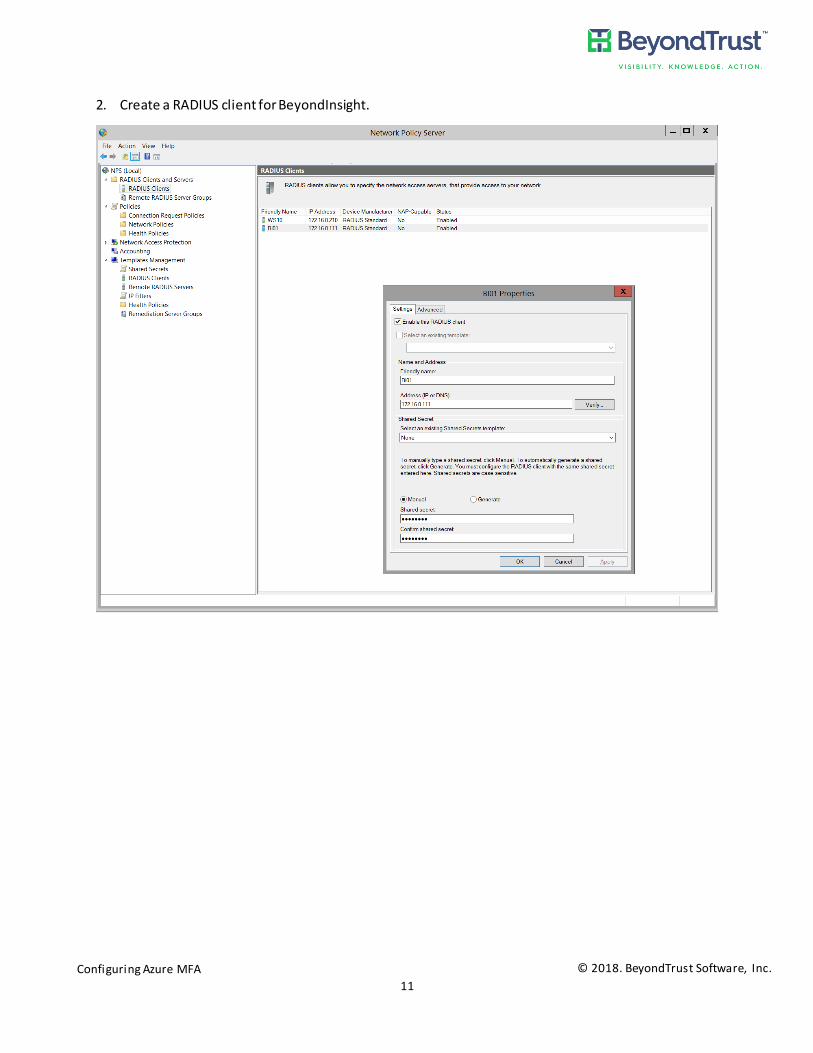
2. Create a RADIUS client for BeyondInsight.

Configuring Azure MFA © 2018. BeyondTrust Software, Inc.
12
3. Create a network policy. You need to register Active Directory (right-click on NPS (Local). The
example uses 3 conditions: AD Group membership and NAS (Identifier and IPv4 Address).
4. Configure RADIUS Authentication in BeyondInsight. Select the Transmit NAS Identifiers check box
(BeyondInsight and IP address strings). You also need to configure a test user.

Configuring Azure MFA © 2018. BeyondTrust Software, Inc.
13
You can use Event Viewer to help troubleshoot your configuration.
With Azure AD, user names are email addresses, while for on-premises AD, you use samAccountName,
for the value you are sending to NPS via the User Configuration page in BeyondInsight.
Without an authentication factor configured in NPS, simple user name/password, validated against
Active Directory, allows the user to login to BeyondInsight or Password Safe (versions prior to 6.4.4).
With a factor configured, you see the challenge after a successful login (user name/password).

Configuring Azure MFA © 2018. BeyondTrust Software, Inc.
14
Configuring Azure MFA for PowerBroker for Windows using RADIUS
1. Using Group Policy Editor, or Policy Editor, create the Multifactor record. Increase timeout to 30 or
60 seconds, enter the shared secret you selected for Azure RADIUS Server, and select User name
and Password from the Initial Request menu.

Configuring Azure MFA © 2018. BeyondTrust Software, Inc.
15
2. Create a user message.

Configuring Azure MFA © 2018. BeyondTrust Software, Inc.
16
3. Create a test Privileged Identity rule for an application.
4. Create a shortcut for C:\Windows\system32\mspaint.exe on your desktop.
Configuring Azure MFA © 2018. BeyondTrust Software, Inc.
17
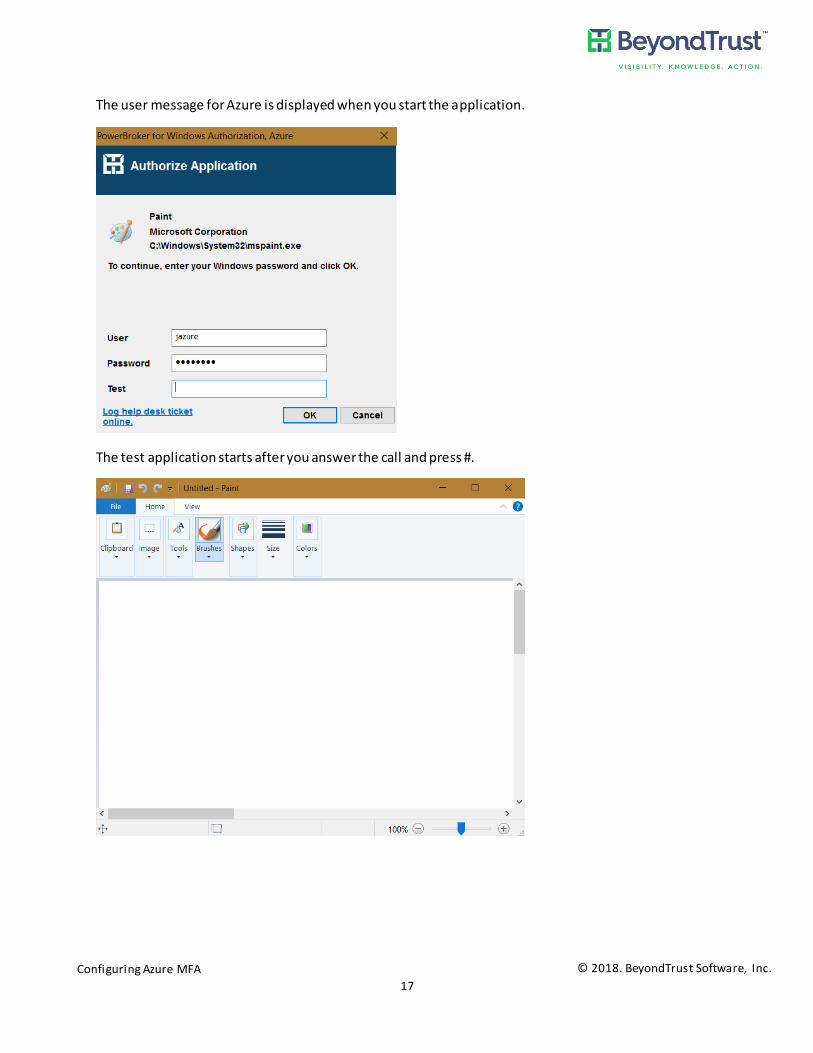
The user message for Azure is displayed when you start the application.
The test application starts after you answer the call and press #.

Configuring Azure MFA © 2018. BeyondTrust Software, Inc.
18
Configuring Azure MFA for PowerBroker for Unix and Linux, and PBIS,
using RADIUS
To configure your Unix or Linux host for PAM/RADIUS authentication, you can follow the steps below.
1. Copy the pam_radius_auth module from /usr/lib/beyondtrust/pb to
/lib64/security/pam_radius_auth.so
2. Create a config file for your PAM server: /etc/raddb/server
Format is: ip_address:port sharedsecret timeout
For example: dc01:1712 btlab16* 60
3. Edit /etc/pam.d/sshd as follow:
auth required pam_radius_auth.so
account required pam_radius_auth.so
password required pam_radius_auth.so
auth substack password-auth
auth include postlogin
----------------------
4. You may need to change /etc/ssh/sshd_config to allow for PAM (UsePam yes).
If PAM is not yet available on the Unix or Linux host, follow the steps in above document to install it
using yum.
5. Restart sshd for ssh configuration to take effect: service sshd restart
Note: If you plan to use Password Safe with Azure MFA, configuring the host itself for PAM/RADIUS will be redundant.
Configuring PBUL
We will configure and test one Use Case around pbrun and a privileged command. These steps are
based on CentOS 64 bit.
1. Copy the pam_radius_auth module from /usr/lib/beyondtrust/pb to
/lib64/security/pam_radius_auth.so
2. Create a config file for your PAM server: /etc/raddb/server
3. Create file pbul_pam_radius under /etc/pam.d:
#task control module
auth required pam_radius_auth.so
account required pam_radius_auth.so
password required pam_radius_auth.so
-----------
Then you can configure a role, e.g. DemoRole, to allow elevated commands and use PAM.
4. In /etc/pb/pbul_functions.conf, add this section:

Configuring Azure MFA © 2018. BeyondTrust Software, Inc.
19
# Procedure DemoRole:
# If 'EnableDemoRole' is enabled, it allows any user in DemoUsers (default all users) to run
commands in DemoCommands (default 'id' and 'whoami') as 'root'
#
procedure DemoRole()
{
if ( EnableDemoRole && user in DemoUsers && (runhost in DemoHosts ||
TargetRunHostShortName in DemoHosts) && basename(command) in DemoCommands )
{
SetRunEnv("root", true);
accept;
}
}
5. In /etc/pb/pbul_policy.conf, add this section:
# This enables "Demo role", which allows any user in DemoUsers (default all users) to run
commands in DemoCommands (default 'id' and 'whoami') as 'root'
# on any host in DemoHosts (default all hosts)
# By default, this role is disabled. To ensable this set EnableDemoRole to true below.
#
# IMPORTANT: note that ANY command in the list of DemoCommands will run as 'root'.
#
EnableDemoRole = true;
DemoUsers = {"amiller","jsmith1"};
DemoCommands = {"id", "whoami","useradd","userdel"};
DemoHosts = {runhost, TargetRunHostShortName};
runconfirmuser = "btuapi";
runconfirmpasswdservice = "pbul_pam_radius";
DemoRole();
6. Create a user on your Unix or Linux host to match the user in Azure, e.g. jsmith1 in above example.
Configuring Azure MFA © 2018. BeyondTrust Software, Inc.
20
Testing the Configuration
You are ready to test the configuration.
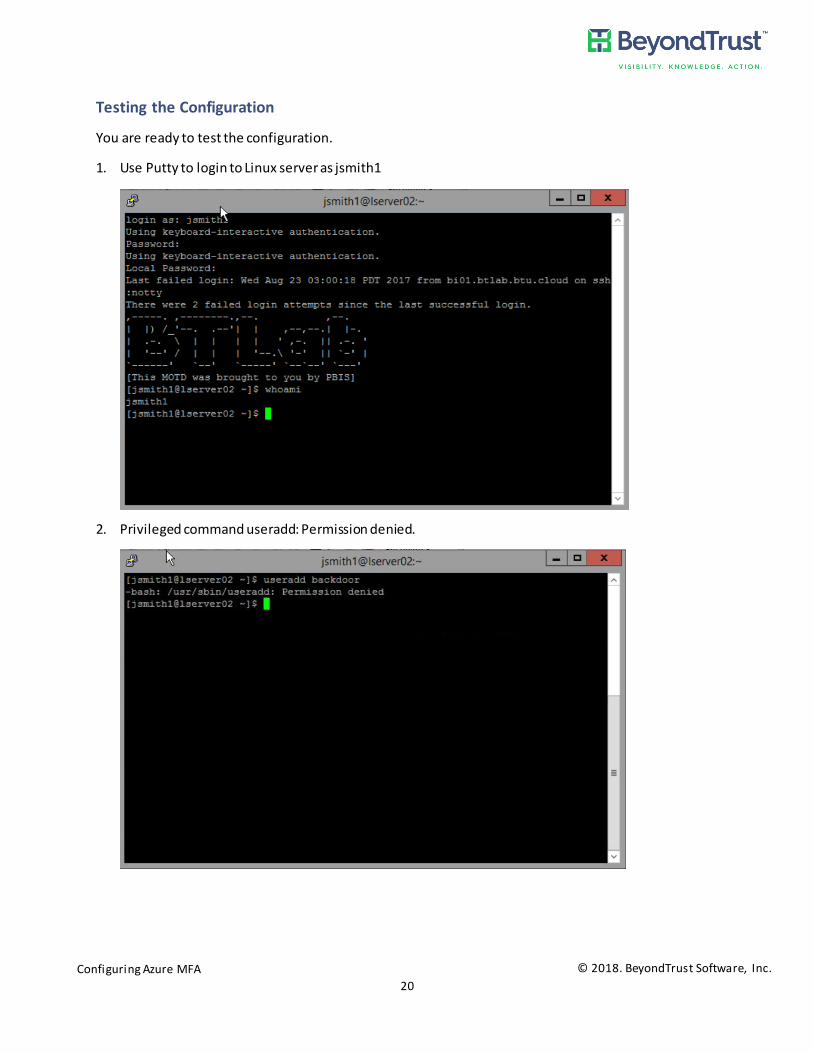
1. Use Putty to login to Linux server as jsmith1
2. Privileged command useradd: Permission denied.

Configuring Azure MFA © 2018. BeyondTrust Software, Inc.
21
3. Using pbrun, PAM/RADIUS authentication is triggered. Once authenticated, command executes and
user backdoor is created.
4. Then you should be authenticated.
Since userdel command is also included in policy, you can follow the same steps for userdel.

Configuring Azure MFA © 2018. BeyondTrust Software, Inc.
22
Configuring Azure MFA for PowerBroker Password Safe Direct Connect
For Direct Connect, you can use Azure MFA. In our lab, we used Phone/Standard, so we only need to answer the call and press # to get authenticated.
For SSH sessions, we can configure Putty or the tool of our choice with a SSH link similar to the following:
username@managed_account@asset@proxy
Example: btlab\jazure@mdavis_uadmin@lserver01@bi01
The default port (4422) is the port for the Password Safe proxy. Port 22 is the port behind the proxy for the target host.
The test user with the app on its mobile is an Active Directory user in my lab.
1. Configure RADIUS for test user jazure.

Configuring Azure MFA © 2018. BeyondTrust Software, Inc.
23
2. Multi-tabbed PuTTY configuration.
3. Direct Connect session in MTPuTTY.

Configuring Azure MFA © 2018. BeyondTrust Software, Inc.
24
4. Direct Connect configuration in Terminals (free tool).
5. Starting the session in Terminals. Answer the phone and press #.

Configuring Azure MFA © 2018. BeyondTrust Software, Inc.
25
Configuring Azure MFA for PowerBroker Password Safe using SAML
This section is generic, steps may be slightly different. Refer to Microsoft documentation.
1. Log on to the Azure Portal.
2. Click Add Application.
3. Click Create New App.
4. Select SAML 2.0 as the sign in method.
5. Click Create.
6. Enter an application name.
7. Click Next.
8. Enter Single sign on URL
https://ServerURL/eEye.RetinaCSSAML/saml/AssertionConsumerService.aspx
9. Select the check box Use this for Recipient and Destination URL.
10. Enter Audience URI (SP Entity ID)
https://ServerURL/eEye.RetinaCSSAML
11. Select test username from the Application username menu.
12. Add attributes:
• Group (Required) set as literal. This must match the group created in BeyondInsight.
• Name (Required)
• Email (Optional)
• Surname (Optional)
• GivenName (Optional)
13. Click Next.
14. Select appropriate settings for Azure support and click Finish.
15. Click View Setup Instructions.
16. Copy the Identity Provider Single Sign-On URL. Save the value to be used in step 21.
17. Copy the Identity Provider Issuer. Save the value to be used in next step 21.
18. Click Download Certificate and save this on the BeyondInsight server in
C:\Program Files (x86)\eEye Digital Security\Retina CS\WebSiteSAML\Certificates
19. Rename the certificate to “Azure.cer”.
20. Open the saml.config file:
C:\Program Files (x86)\eEye Digital Security\Retina CS\WebSiteSAML\saml.config
21. In Notepad, edit ServiceProvider Name:
• edit PartnerIdentityProvider Name: Identity Provider Issuer from step 17.
• edit SingleSignOnServiceUrl: Identity Provider Single Sign-On URL from step 16.
• edit SingleLogoutServiceUrl: Identity Provider Single Sign-On URL from step 16.
22. Save the saml.config file.

Configuring Azure MFA © 2018. BeyondTrust Software, Inc.
26
23. Open the web.config file:
C:\Program Files (x86)\eEye Digital Security\Retina CS\WebSiteSAML\web.config
24. In Notepad, edit the PartnerIdP value: Identity Provider Issuer from step 17.
25. Save the web.config file.