configuring a site-to-site vpn tunnel between …...application notes for configuring a site-to-site...
TRANSCRIPT

SZ; Reviewed: WCH 6/17/2004
Solution & Interoperability Test Lab Application Notes ©2004 Avaya Inc. All Rights Reserved.
1 of 32 NetScr-SOffice.doc
Avaya Solution & Interoperability Test Lab
Application Notes for Configuring a Site-to-Site VPN Tunnel Between Avaya Small Office and NetScreen 5XT, and a Dynamic VPN Tunnel Between Avaya Small Office and NetScreen-Remote Client - Issue 1.0
Abstract
These Application Notes present a sample configuration for NetScreen 5XT and NetScreen-Remote Client working with Avaya Small Office and Avaya PhoneManager in an IPSec VPN environment.

SZ; Reviewed: WCH 6/17/2004
Solution & Interoperability Test Lab Application Notes ©2004 Avaya Inc. All Rights Reserved.
2 of 32 NetScr-SOffice.doc
1. Introduction These Application Notes describe the VPN configurations among the NetScreen 5XT security device, NetScreen-Remote client, and Avaya Small Office 2.0. The Avaya Small Office and the NetScreen 5XT are configured to provide a site-to-site IPSec Tunnel between Site A and Site B, and the NetScreen-Remote client is configured to set up a dynamic IPSec tunnel between the PC on Site C and the Small Office on Site A to support Avaya PhoneManager. Figure 1 displays the network configuration used for verification.
NetScreen-5XT
Avaya S8300 Media Server with G700 Media Gateway
AvayaSmall Office
Avaya 4600 Series IP Telephone
x40001
Avaya 6400Series Telephone
x30003Avaya 6400
Series Telephonex40003
Site-to-SiteIPSec tunnels
Avaya IP Softphone
x40002
Site A
Site B
Avaya PhoneManagerx30002
Avaya 4600 SeriesIP Telephone
x30001
Site C
Avaya PhoneManager with NetScreen-Remote Client
x50020
Avaya P330RStackable Switch
Avaya P333TStackable Switch
Dynamic tunnels
IP: 200.1.1.0/24
IP: 70.1.1.0/24
IP: 115.1.1.0/24
Avaya P333TStackable Switch Avaya P333T
Stackable Switch
110.1.1.0/24
90.1.1.0/24
.1
.1
.2 .2
.100
Figure 1: Network Configuration

SZ; Reviewed: WCH 6/17/2004
Solution & Interoperability Test Lab Application Notes ©2004 Avaya Inc. All Rights Reserved.
3 of 32 NetScr-SOffice.doc
Table 1 lists IP addresses and subnet mask for devices used in those tests. Device Interface IP Address/Mask Gateway Small Office
LAN 1 (Private) LAN 2 (Public)
200.1.1.1/24 110.1.1.1/24
Default: 110.1.1.2
NetScreen 5XT
Ethernet 1 (Private) Ethernet 2 (Public)
70.1.1.1/24 90.1.1.1/24
90.1.1.2
NetScreen –Remote Client
NIC on PC
115.1.1.100/24
115.1.1.1
Cajun P330R
Vlan1 (to Small Office) Vlan90 (to NetScreen 5XT) Vlan115 (to Site C)
110.1.1.2/24 90.1.1.2/24 115.1.1.1/24
110.1.1.1 90.1.1.1
Table 1: IP Address/Mask Assignment
2. Equipment and Software Validated Table 2 shows equipment and software used for the sample configuration provided:
Equipment Software Avaya Small Office 2.0 Avaya S8300 Media Server running Communication Manager Software
2.0
Avaya 4620 IP Telephone 2.0 Avaya PhoneManager 2.0.13 Avaya P333R Stackable Switch 4.0.8 Avaya P333T Stackable Switch 4.0.17 NetScreen 5XT 5.0.r3.0 NetScreen-Remote 10.0.0 (Build 10)
Table 2: Equipment and Software Used in Testing
3. Site-to-Site IPSec Tunnel between the Small Office and the NetScreen 5XT
3.1. Configure the NetScreen 5XT The site-to-site VPN tunnel between the NetScreen 5XT and Avaya Small Office is configured based on the following parameters:
SZ; Reviewed: WCH 6/17/2004
Solution & Interoperability Test Lab Application Notes ©2004 Avaya Inc. All Rights Reserved.
4 of 32 NetScr-SOffice.doc
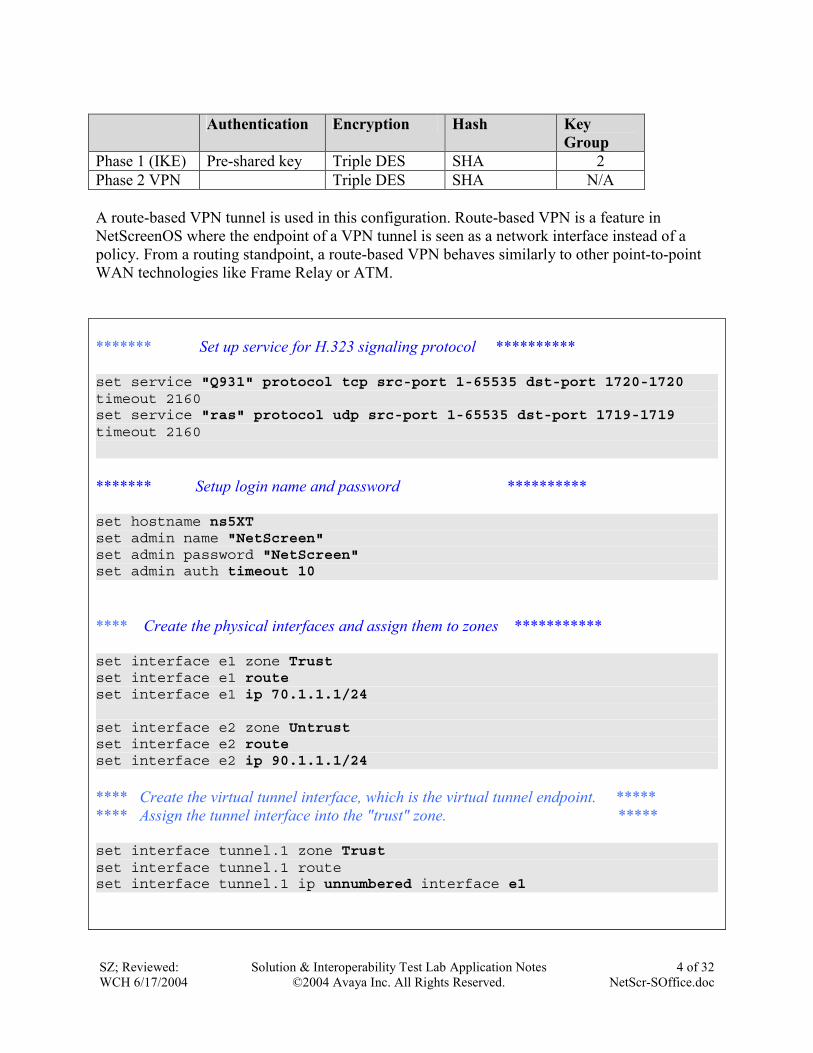
Authentication Encryption Hash Key
Group Phase 1 (IKE) Pre-shared key Triple DES SHA 2 Phase 2 VPN Triple DES SHA N/A A route-based VPN tunnel is used in this configuration. Route-based VPN is a feature in NetScreenOS where the endpoint of a VPN tunnel is seen as a network interface instead of a policy. From a routing standpoint, a route-based VPN behaves similarly to other point-to-point WAN technologies like Frame Relay or ATM. ******* Set up service for H.323 signaling protocol ********** set service "Q931" protocol tcp src-port 1-65535 dst-port 1720-1720 timeout 2160 set service "ras" protocol udp src-port 1-65535 dst-port 1719-1719 timeout 2160 ******* Setup login name and password ********** set hostname ns5XT set admin name "NetScreen" set admin password "NetScreen" set admin auth timeout 10 **** Create the physical interfaces and assign them to zones *********** set interface e1 zone Trust set interface e1 route set interface e1 ip 70.1.1.1/24 set interface e2 zone Untrust set interface e2 route set interface e2 ip 90.1.1.1/24 **** Create the virtual tunnel interface, which is the virtual tunnel endpoint. ***** **** Assign the tunnel interface into the "trust" zone. ***** set interface tunnel.1 zone Trust set interface tunnel.1 route set interface tunnel.1 ip unnumbered interface e1
SZ; Reviewed: WCH 6/17/2004
Solution & Interoperability Test Lab Application Notes ©2004 Avaya Inc. All Rights Reserved.
5 of 32 NetScr-SOffice.doc
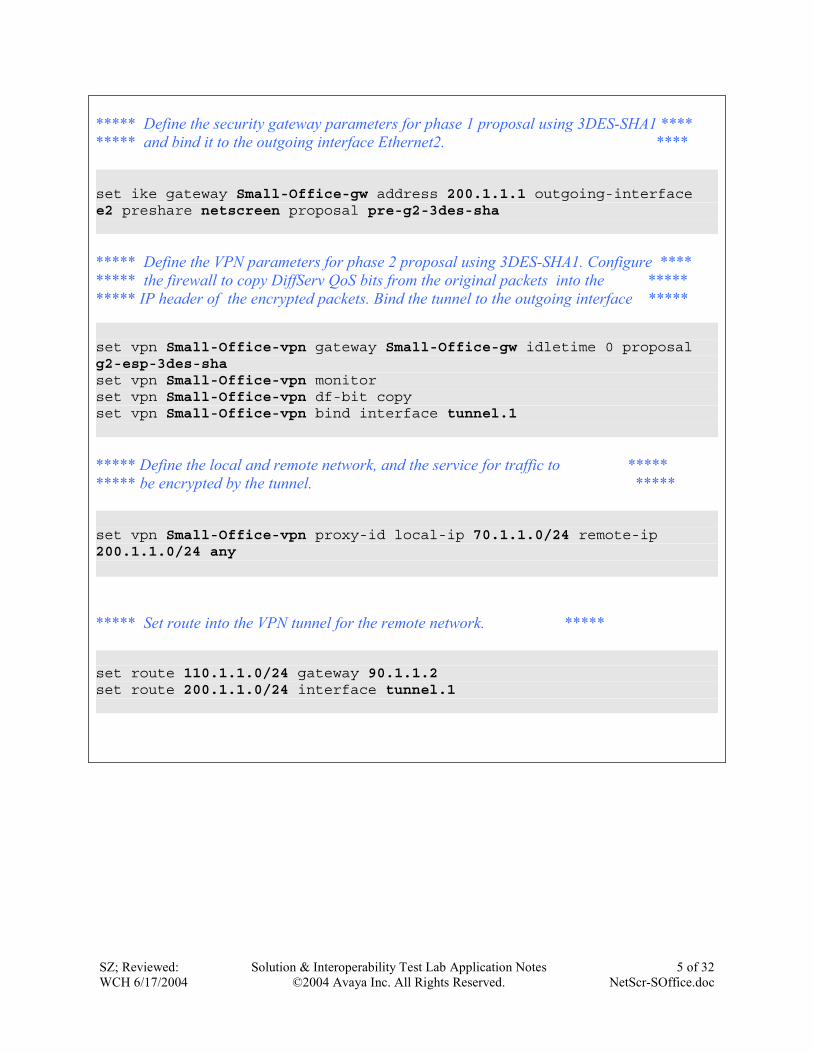
***** Define the security gateway parameters for phase 1 proposal using 3DES-SHA1 **** ***** and bind it to the outgoing interface Ethernet2. **** set ike gateway Small-Office-gw address 200.1.1.1 outgoing-interface e2 preshare netscreen proposal pre-g2-3des-sha
***** Define the VPN parameters for phase 2 proposal using 3DES-SHA1. Configure **** ***** the firewall to copy DiffServ QoS bits from the original packets into the ***** ***** IP header of the encrypted packets. Bind the tunnel to the outgoing interface ***** set vpn Small-Office-vpn gateway Small-Office-gw idletime 0 proposal g2-esp-3des-sha set vpn Small-Office-vpn monitor set vpn Small-Office-vpn df-bit copy set vpn Small-Office-vpn bind interface tunnel.1
***** Define the local and remote network, and the service for traffic to ***** ***** be encrypted by the tunnel. ***** set vpn Small-Office-vpn proxy-id local-ip 70.1.1.0/24 remote-ip 200.1.1.0/24 any ***** Set route into the VPN tunnel for the remote network. ***** set route 110.1.1.0/24 gateway 90.1.1.2 set route 200.1.1.0/24 interface tunnel.1
SZ; Reviewed: WCH 6/17/2004
Solution & Interoperability Test Lab Application Notes ©2004 Avaya Inc. All Rights Reserved.
6 of 32 NetScr-SOffice.doc
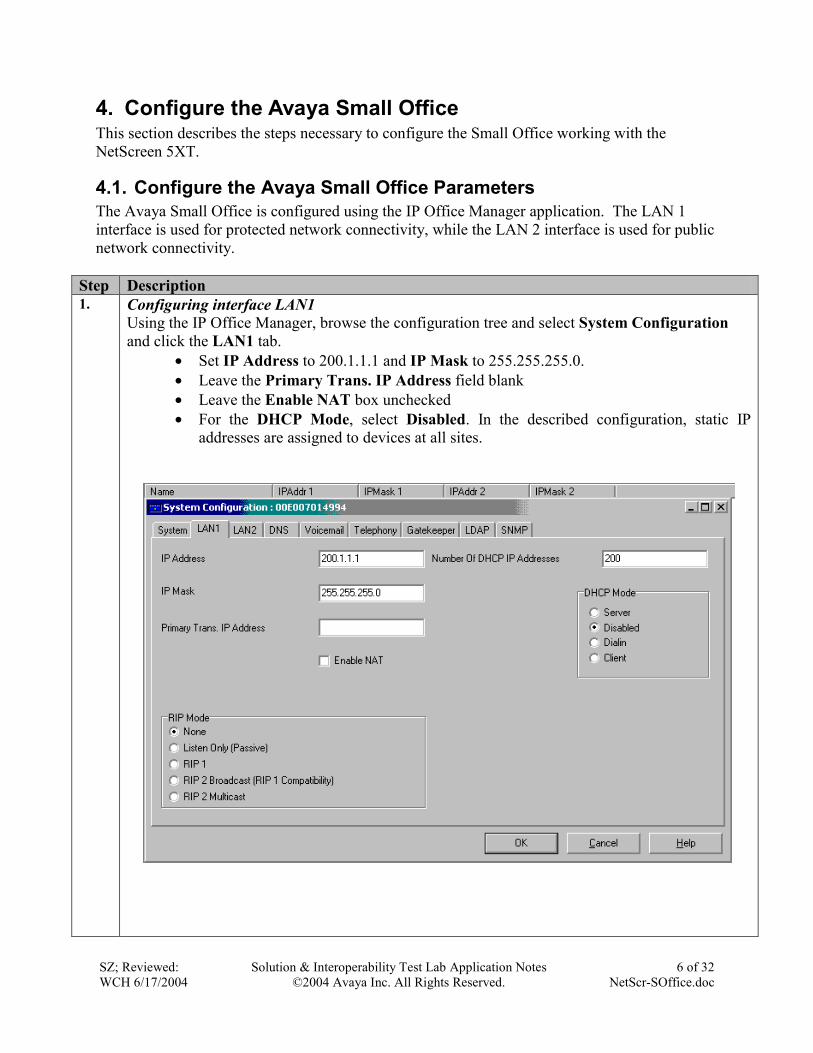
4. Configure the Avaya Small Office This section describes the steps necessary to configure the Small Office working with the NetScreen 5XT.
4.1. Configure the Avaya Small Office Parameters The Avaya Small Office is configured using the IP Office Manager application. The LAN 1 interface is used for protected network connectivity, while the LAN 2 interface is used for public network connectivity.
Step Description 1. Configuring interface LAN1
Using the IP Office Manager, browse the configuration tree and select System Configuration and click the LAN1 tab.
• Set IP Address to 200.1.1.1 and IP Mask to 255.255.255.0. • Leave the Primary Trans. IP Address field blank • Leave the Enable NAT box unchecked • For the DHCP Mode, select Disabled. In the described configuration, static IP
addresses are assigned to devices at all sites.

SZ; Reviewed: WCH 6/17/2004
Solution & Interoperability Test Lab Application Notes ©2004 Avaya Inc. All Rights Reserved.
7 of 32 NetScr-SOffice.doc
Step Description 2. Configuring interface LAN2
Click the LAN2 tab. • Set IP Address to 110.1.1.1 and IP Mask to 255.255.255.0. • Leave the Primary Trans. IP Address field blank • Leave the Enable NAT box unchecked • For the DHCP Mode, select Disabled • Click OK when done.
SZ; Reviewed: WCH 6/17/2004
Solution & Interoperability Test Lab Application Notes ©2004 Avaya Inc. All Rights Reserved.
8 of 32 NetScr-SOffice.doc
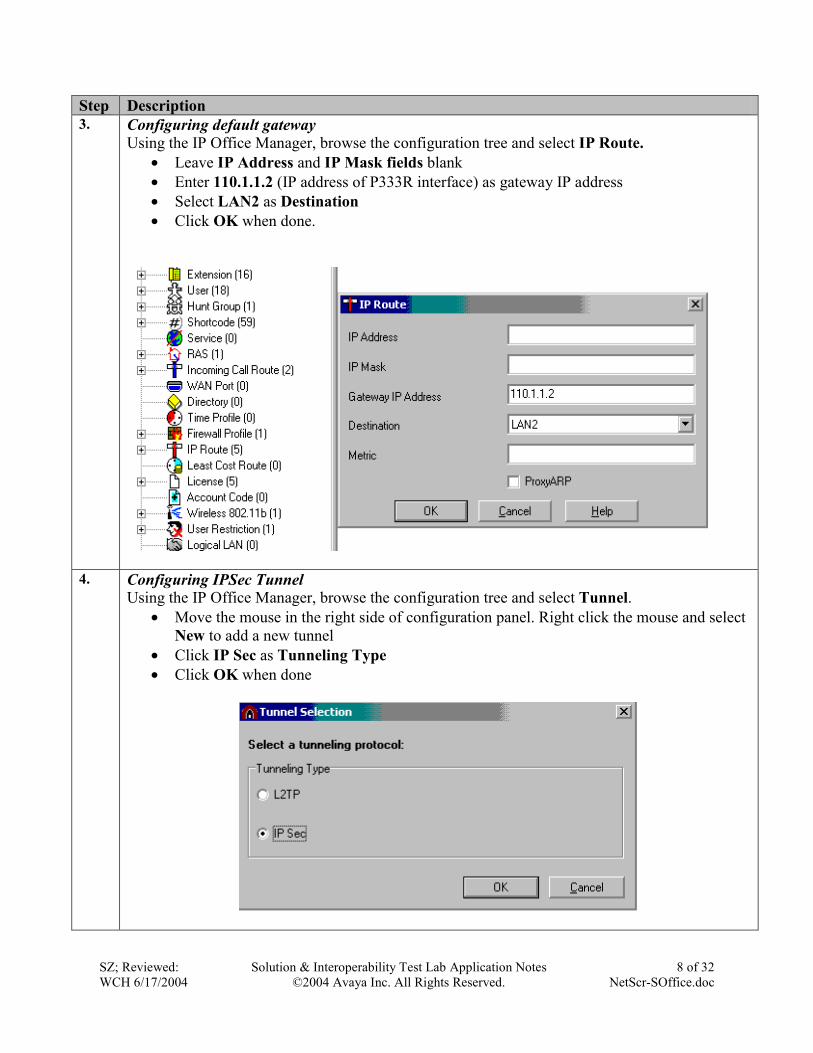
Step Description 3. Configuring default gateway
Using the IP Office Manager, browse the configuration tree and select IP Route. • Leave IP Address and IP Mask fields blank • Enter 110.1.1.2 (IP address of P333R interface) as gateway IP address • Select LAN2 as Destination • Click OK when done.
4. Configuring IPSec Tunnel Using the IP Office Manager, browse the configuration tree and select Tunnel.
• Move the mouse in the right side of configuration panel. Right click the mouse and select New to add a new tunnel
• Click IP Sec as Tunneling Type • Click OK when done
SZ; Reviewed: WCH 6/17/2004
Solution & Interoperability Test Lab Application Notes ©2004 Avaya Inc. All Rights Reserved.
9 of 32 NetScr-SOffice.doc
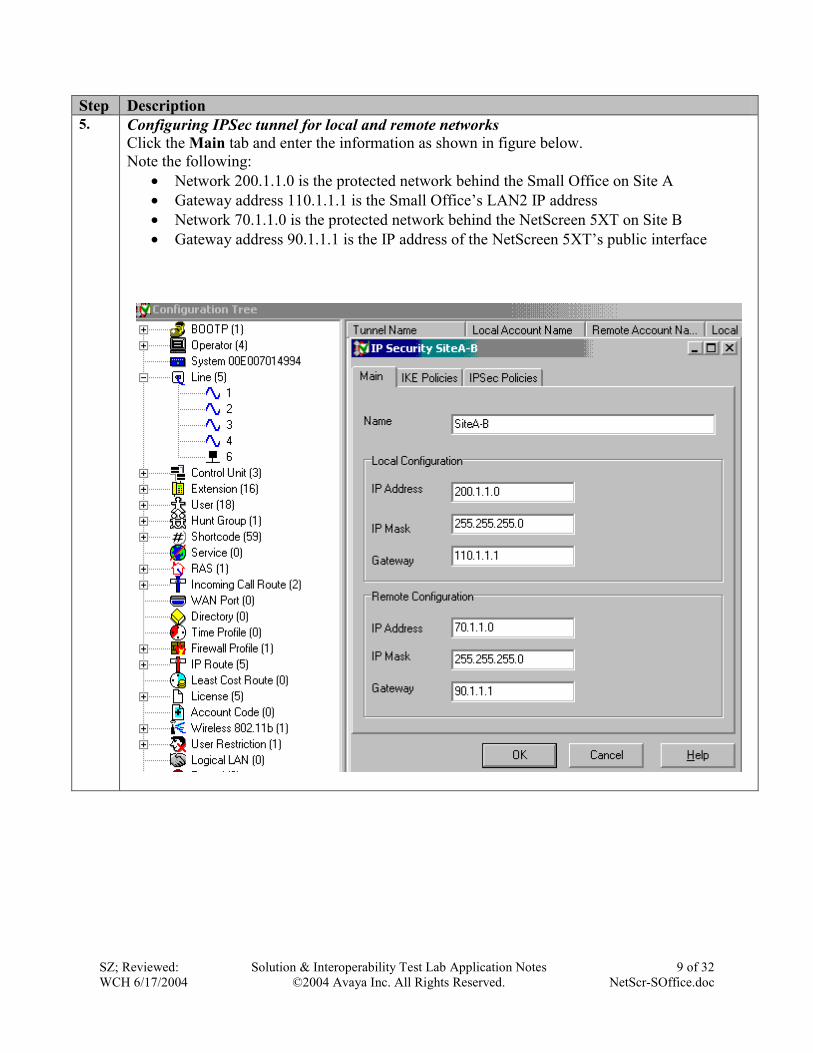
Step Description 5. Configuring IPSec tunnel for local and remote networks
Click the Main tab and enter the information as shown in figure below. Note the following:
• Network 200.1.1.0 is the protected network behind the Small Office on Site A • Gateway address 110.1.1.1 is the Small Office’s LAN2 IP address • Network 70.1.1.0 is the protected network behind the NetScreen 5XT on Site B • Gateway address 90.1.1.1 is the IP address of the NetScreen 5XT’s public interface

SZ; Reviewed: WCH 6/17/2004
Solution & Interoperability Test Lab Application Notes ©2004 Avaya Inc. All Rights Reserved.
10 of 32 NetScr-SOffice.doc
Step Description 6. Configuring the IKE Policies (phase 1)
• Click the IKE Policies tab • Enter the password in the Shared Secret field • Re-enter the password in the Confirm Password field • Select ID Prot (Main mode) in the Exchange Type field • Select 3DES CBC in the Encryption field • Select SHA in the Authentication field • Select Group 2 in the DH Group field • Select Seconds in the Life Type field • Type 28800 in the Life field
SZ; Reviewed: WCH 6/17/2004
Solution & Interoperability Test Lab Application Notes ©2004 Avaya Inc. All Rights Reserved.
11 of 32 NetScr-SOffice.doc
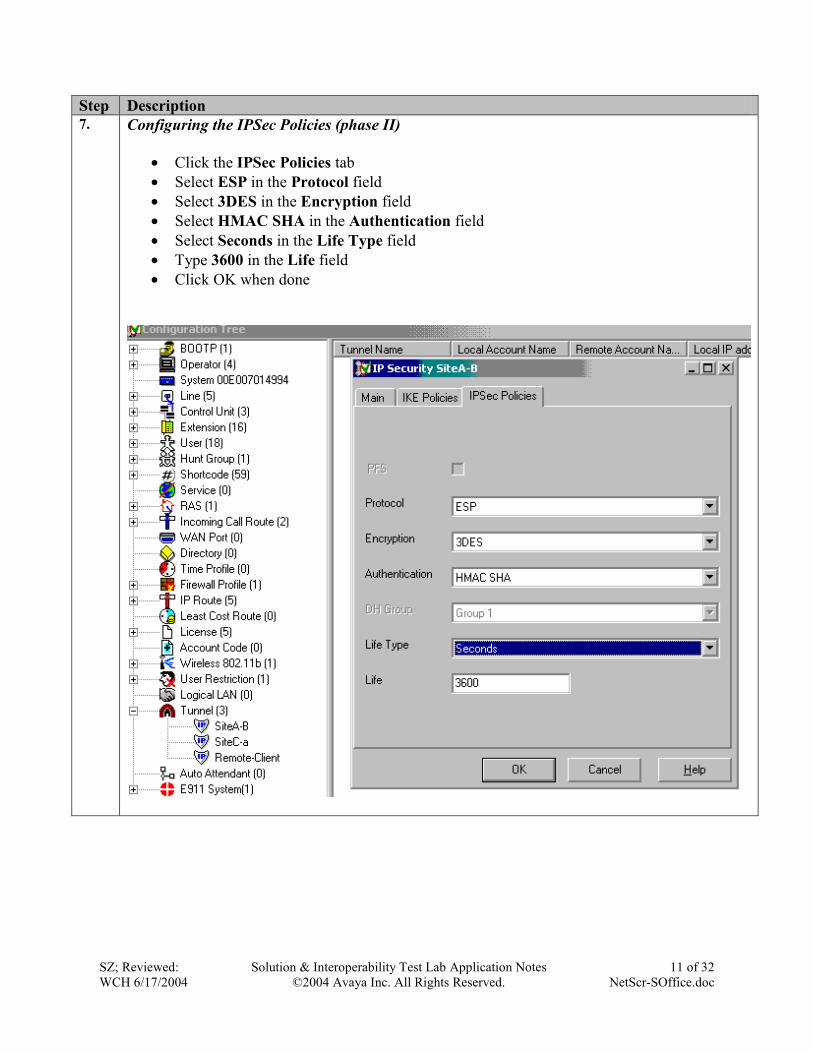
Step Description 7. Configuring the IPSec Policies (phase II)
• Click the IPSec Policies tab • Select ESP in the Protocol field • Select 3DES in the Encryption field • Select HMAC SHA in the Authentication field • Select Seconds in the Life Type field • Type 3600 in the Life field • Click OK when done

SZ; Reviewed: WCH 6/17/2004
Solution & Interoperability Test Lab Application Notes ©2004 Avaya Inc. All Rights Reserved.
12 of 32 NetScr-SOffice.doc
Step Description 8. Configuring line options
Using the IP Office Manager, browse the configuration tree and select Line. • Enter 06 in the Line Number field • Enter description in Telephone Number field (optional) • Enter 6 as Incoming Group and Outgoing Group ID • Enter 20 as voice and data channels as shown in figure below
SZ; Reviewed: WCH 6/17/2004
Solution & Interoperability Test Lab Application Notes ©2004 Avaya Inc. All Rights Reserved.
13 of 32 NetScr-SOffice.doc
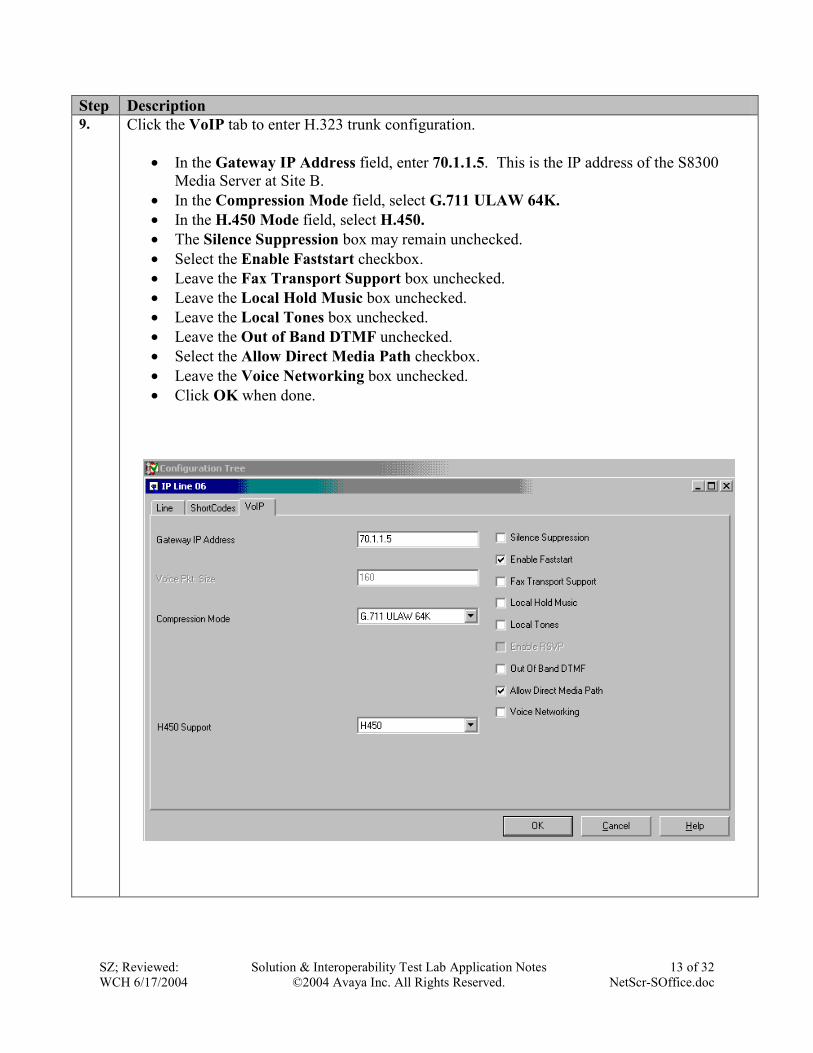
Step Description 9. Click the VoIP tab to enter H.323 trunk configuration.
• In the Gateway IP Address field, enter 70.1.1.5. This is the IP address of the S8300
Media Server at Site B. • In the Compression Mode field, select G.711 ULAW 64K. • In the H.450 Mode field, select H.450. • The Silence Suppression box may remain unchecked. • Select the Enable Faststart checkbox. • Leave the Fax Transport Support box unchecked. • Leave the Local Hold Music box unchecked. • Leave the Local Tones box unchecked. • Leave the Out of Band DTMF unchecked. • Select the Allow Direct Media Path checkbox. • Leave the Voice Networking box unchecked. • Click OK when done.
SZ; Reviewed: WCH 6/17/2004
Solution & Interoperability Test Lab Application Notes ©2004 Avaya Inc. All Rights Reserved.
14 of 32 NetScr-SOffice.doc
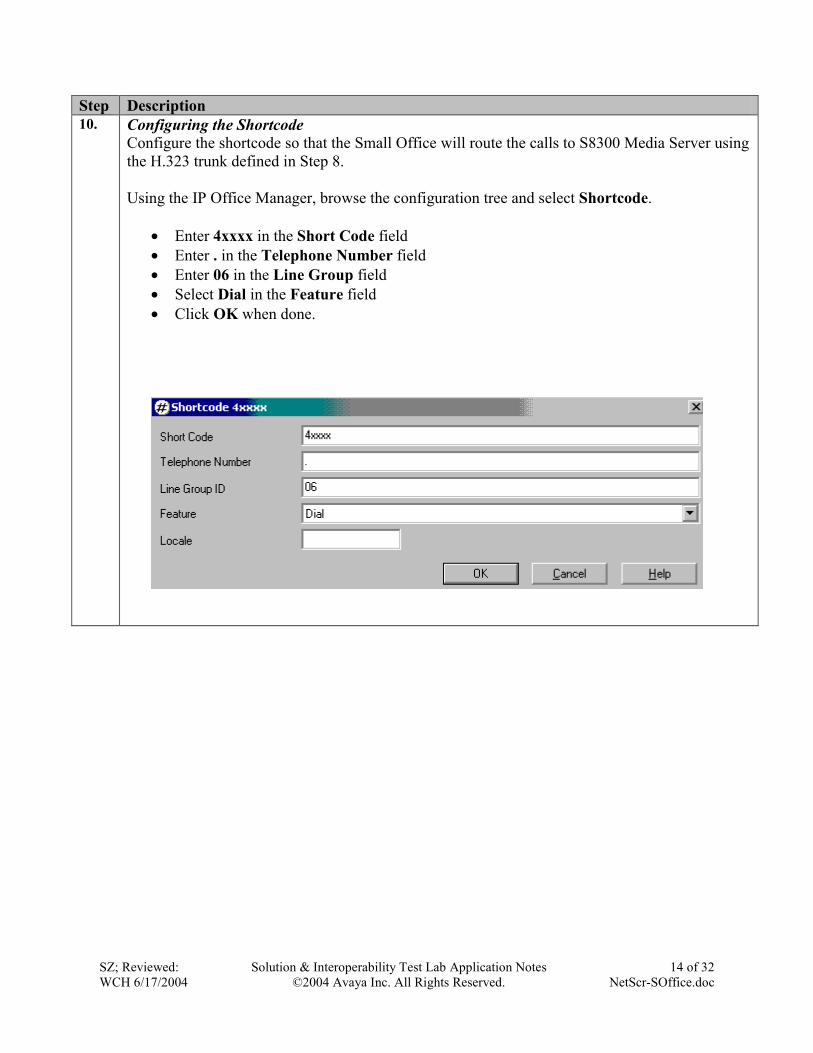
Step Description 10. Configuring the Shortcode
Configure the shortcode so that the Small Office will route the calls to S8300 Media Server using the H.323 trunk defined in Step 8. Using the IP Office Manager, browse the configuration tree and select Shortcode.
• Enter 4xxxx in the Short Code field • Enter . in the Telephone Number field • Enter 06 in the Line Group field • Select Dial in the Feature field • Click OK when done.
SZ; Reviewed: WCH 6/17/2004
Solution & Interoperability Test Lab Application Notes ©2004 Avaya Inc. All Rights Reserved.
15 of 32 NetScr-SOffice.doc
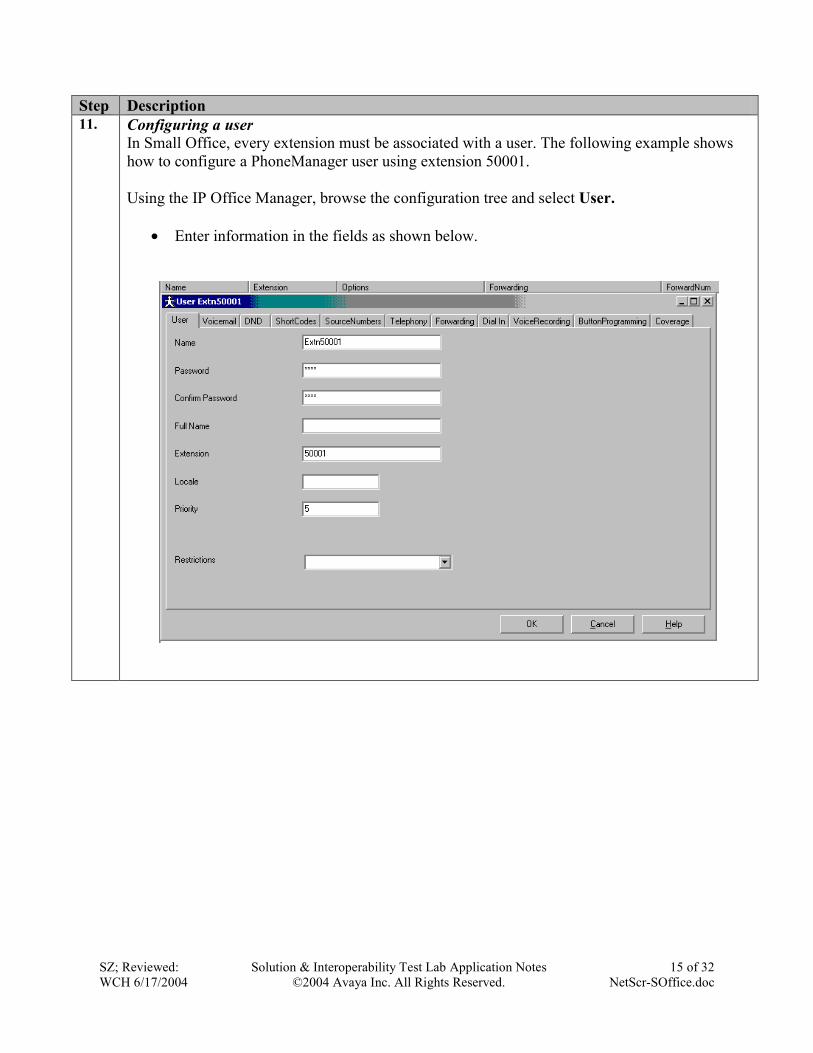
Step Description 11. Configuring a user
In Small Office, every extension must be associated with a user. The following example shows how to configure a PhoneManager user using extension 50001. Using the IP Office Manager, browse the configuration tree and select User.
• Enter information in the fields as shown below.

SZ; Reviewed: WCH 6/17/2004
Solution & Interoperability Test Lab Application Notes ©2004 Avaya Inc. All Rights Reserved.
16 of 32 NetScr-SOffice.doc
Step Description 12. • Click the Telephony tab
• Select VoIP from the Phone Manager Type field • Leave other parameters as default • Click OK when done.
SZ; Reviewed: WCH 6/17/2004
Solution & Interoperability Test Lab Application Notes ©2004 Avaya Inc. All Rights Reserved.
17 of 32 NetScr-SOffice.doc
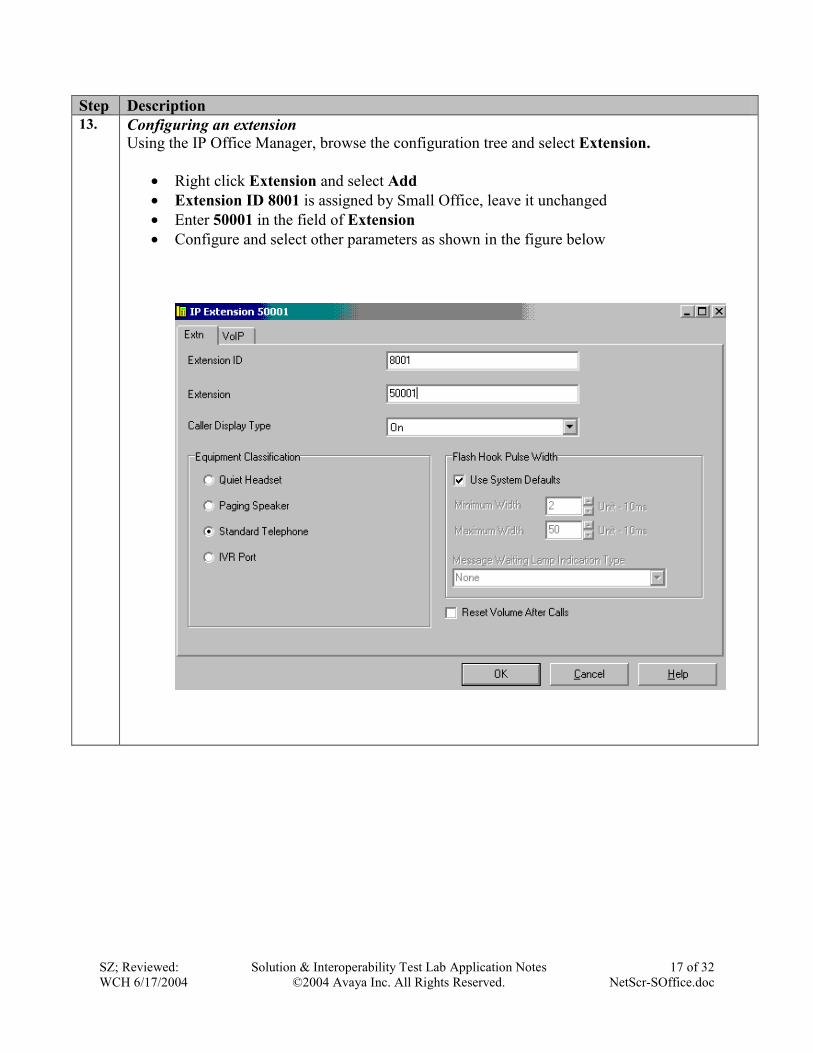
Step Description 13. Configuring an extension
Using the IP Office Manager, browse the configuration tree and select Extension.
• Right click Extension and select Add • Extension ID 8001 is assigned by Small Office, leave it unchanged • Enter 50001 in the field of Extension • Configure and select other parameters as shown in the figure below

SZ; Reviewed: WCH 6/17/2004
Solution & Interoperability Test Lab Application Notes ©2004 Avaya Inc. All Rights Reserved.
18 of 32 NetScr-SOffice.doc
Step Description 14.
• Select the VoIP tab • Configure and select other parameters as shown in the figure below • Click OK when done.
15.
Save changes to the Small Office
• Under the Manager File Menu item, select Save. At the Send Config to dialog box, click the immediately reboot mode radio button and press OK.
• If the Small Office Server IP address has been changed, update the PC address and reset the Manager “preferences” setting under the File menu before reconnecting.

SZ; Reviewed: WCH 6/17/2004
Solution & Interoperability Test Lab Application Notes ©2004 Avaya Inc. All Rights Reserved.
19 of 32 NetScr-SOffice.doc
5. Remote IPSec Tunnel between the Avaya Small Office and the NetScreen-Remote Client
This section describes the steps necessary to configure the Avaya Small Office and the NetScreen-Remote client to establish a remote IPSec tunnel.
5.1. Configure the Avaya Small Office The Avaya Small Office is configured as a VPN tunnel gateway for NetScreen-Remote Client. To support a generic VPN installation package and avoid user specific configuration on the VPN client, the user should be configured to authenticate with a password, either maintained locally on the firewall or on a RADIUS server.
Step Description 1.
Configuring IPSec Tunnel Using the IP Office Manager, browse the configuration tree and select Tunnel.
• Move the mouse in the right side of configuration panel. Right click the mouse and select New to add a new tunnel
• Click IP Sec as Tunneling Type • Click OK when done

SZ; Reviewed: WCH 6/17/2004
Solution & Interoperability Test Lab Application Notes ©2004 Avaya Inc. All Rights Reserved.
20 of 32 NetScr-SOffice.doc
Step Description 2.
Configuring local and remote networks for the tunnel Click the Main tab and enter the information as shown in figure below. Note the following: Under the Local Confguration:
• Network 200.1.1.0 is the protected network behind the Small Office on Site A • Gateway address 110.1.1.1 is the Small Office’s LAN2 IP address
Under the Remote Confguration:
• Network 115.1.1.0 is the protected network in Site C • Gateway address 115.1.1.100 is the IP address of the PC on which the NetScreen-Remote
client resides

SZ; Reviewed: WCH 6/17/2004
Solution & Interoperability Test Lab Application Notes ©2004 Avaya Inc. All Rights Reserved.
21 of 32 NetScr-SOffice.doc
Step Description 3.
Configuring the IKE Policies (phase 1) • Click the IKE Policies tab • Enter the password in the Shared Secret field • Re-enter the password in the Confirm Password field • Select Aggressive in the Exchange Type field • Select 3DES CBC in the Encryption field • Select SHA in the Authentication field • Select Group 2 in the DH Group field • Select Seconds in the Life Type field • Type 3660 in the Life field
Configuring the IPSec Policies (phase II)

SZ; Reviewed: WCH 6/17/2004
Solution & Interoperability Test Lab Application Notes ©2004 Avaya Inc. All Rights Reserved.
22 of 32 NetScr-SOffice.doc
Step Description 4.
• Click the IPSec Policies tab • Select ESP in the Protocol field • Select 3DES in the Encryption field • Select HMAC SHA in the Authentication field • Select Seconds in the Life Type field • Type 3600 in the Life field • Click OK when done
5. Save changes to the Small Office
• Under the Manager File Menu item, select Save. At the Send Config to dialog box, click the immediately reboot mode radio button and press OK.
• If the IP Office Server IP address has been changed, update the PC address and reset the Manager “preferences” setting under the File menu before reconnecting.
SZ; Reviewed: WCH 6/17/2004
Solution & Interoperability Test Lab Application Notes ©2004 Avaya Inc. All Rights Reserved.
23 of 32 NetScr-SOffice.doc
5.2. Configure the NetScreen-Remote Client
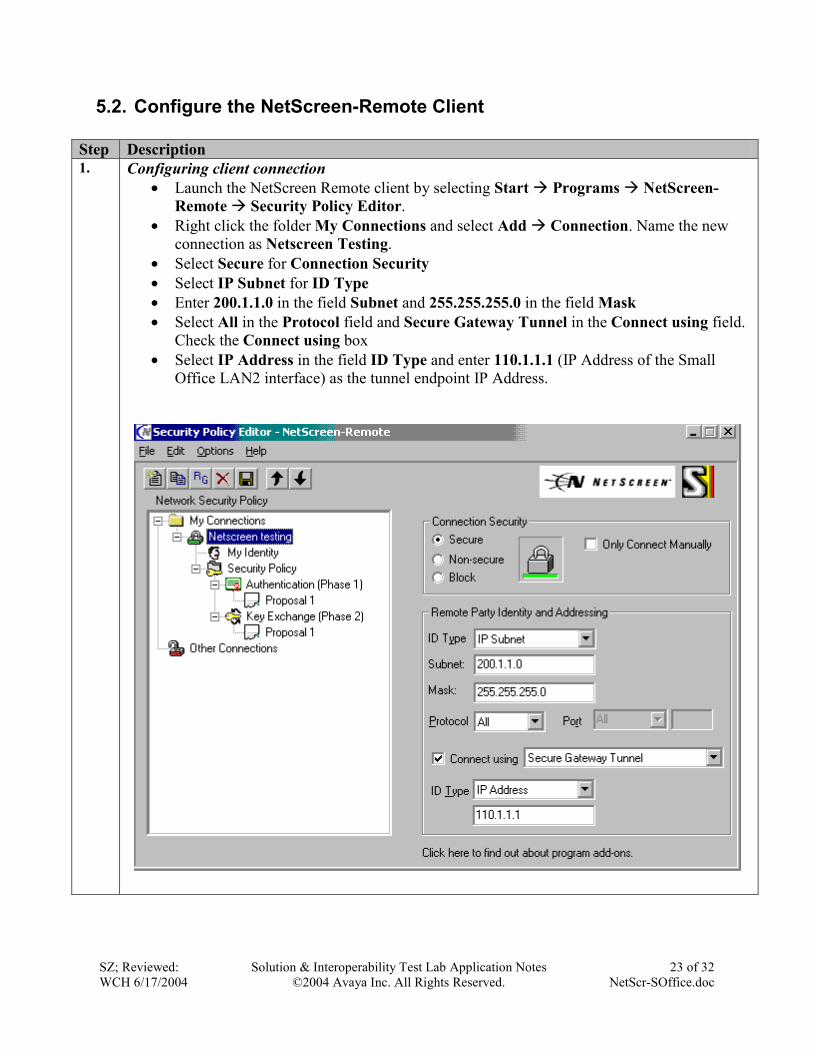
Step Description 1. Configuring client connection
• Launch the NetScreen Remote client by selecting Start Programs NetScreen-Remote Security Policy Editor.
• Right click the folder My Connections and select Add Connection. Name the new connection as Netscreen Testing.
• Select Secure for Connection Security • Select IP Subnet for ID Type • Enter 200.1.1.0 in the field Subnet and 255.255.255.0 in the field Mask • Select All in the Protocol field and Secure Gateway Tunnel in the Connect using field.
Check the Connect using box • Select IP Address in the field ID Type and enter 110.1.1.1 (IP Address of the Small
Office LAN2 interface) as the tunnel endpoint IP Address.
SZ; Reviewed: WCH 6/17/2004
Solution & Interoperability Test Lab Application Notes ©2004 Avaya Inc. All Rights Reserved.
24 of 32 NetScr-SOffice.doc
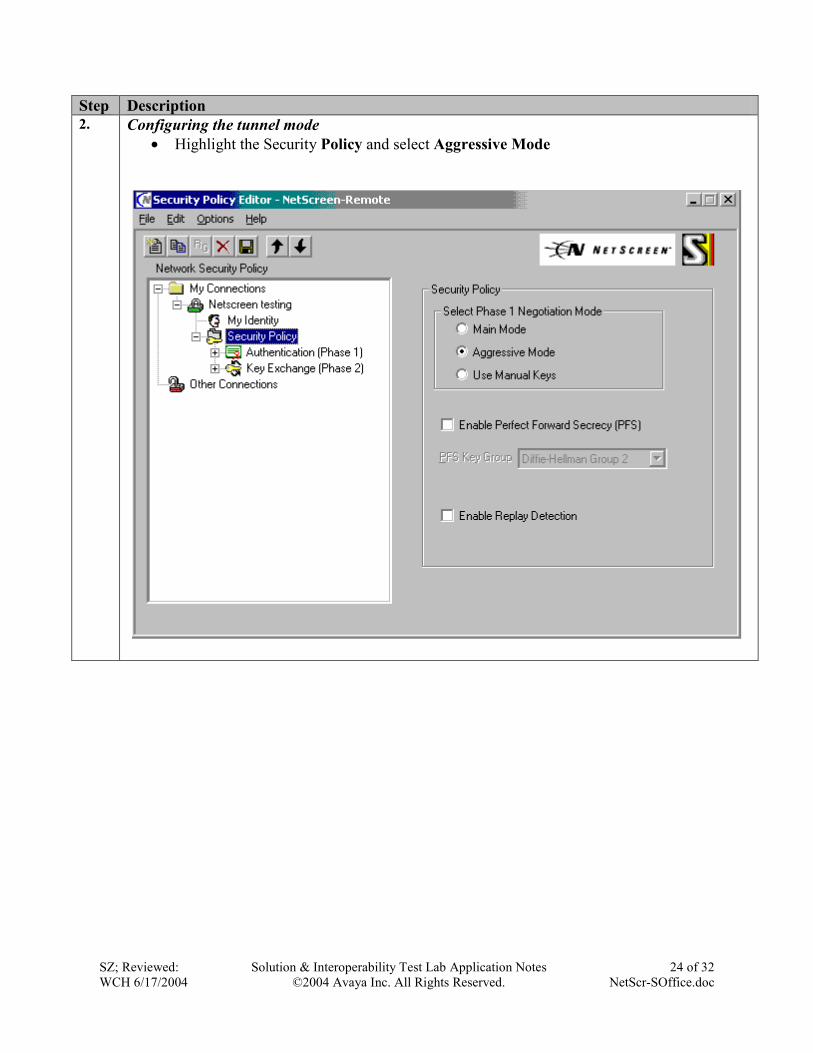
Step Description 2. Configuring the tunnel mode
• Highlight the Security Policy and select Aggressive Mode
SZ; Reviewed: WCH 6/17/2004
Solution & Interoperability Test Lab Application Notes ©2004 Avaya Inc. All Rights Reserved.
25 of 32 NetScr-SOffice.doc
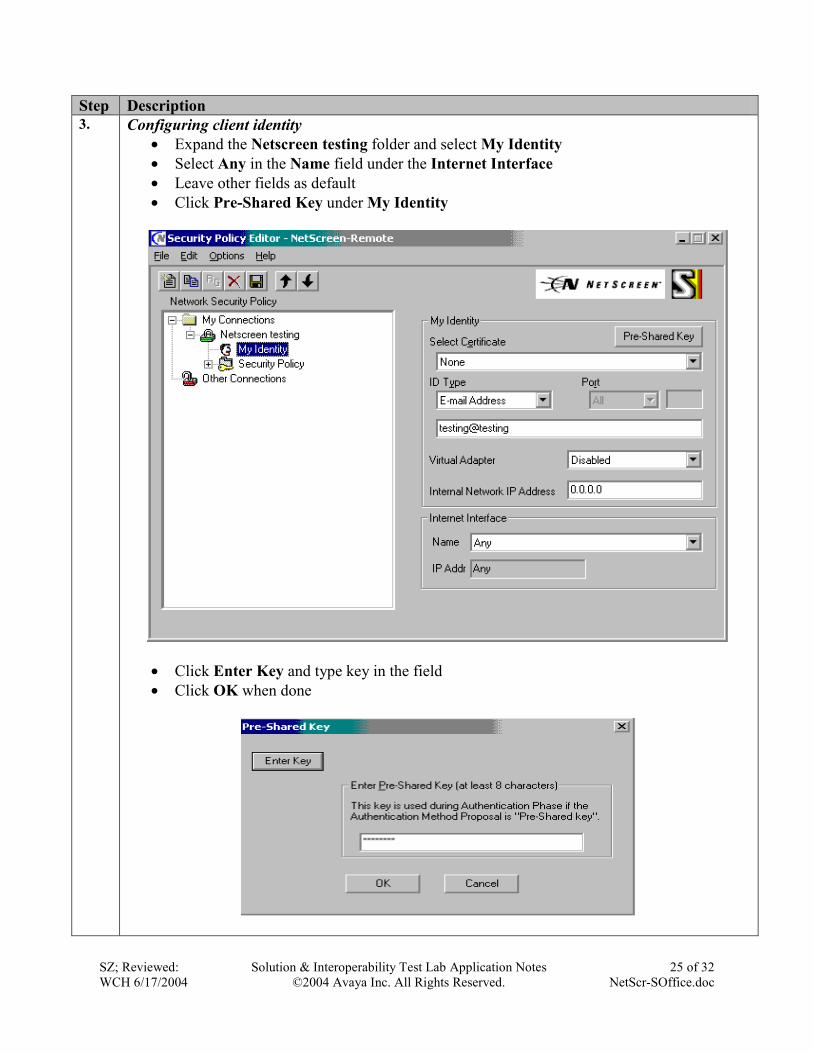
Step Description 3. Configuring client identity
• Expand the Netscreen testing folder and select My Identity • Select Any in the Name field under the Internet Interface • Leave other fields as default • Click Pre-Shared Key under My Identity
• Click Enter Key and type key in the field • Click OK when done

SZ; Reviewed: WCH 6/17/2004
Solution & Interoperability Test Lab Application Notes ©2004 Avaya Inc. All Rights Reserved.
26 of 32 NetScr-SOffice.doc
Step Description 4. Configuring phase 1 proposal
• Expand folder Security Policy Authentication (Phase 1) Proposal 1 • Select Pre-Shared Key under Authentication Method • Select Triple DES for Encrypt Alg, and SHA-1 for Hash Alg • Select Unspecified for SA Life, and Diffie-Hellman Group 2 for Key Group
SZ; Reviewed: WCH 6/17/2004
Solution & Interoperability Test Lab Application Notes ©2004 Avaya Inc. All Rights Reserved.
27 of 32 NetScr-SOffice.doc
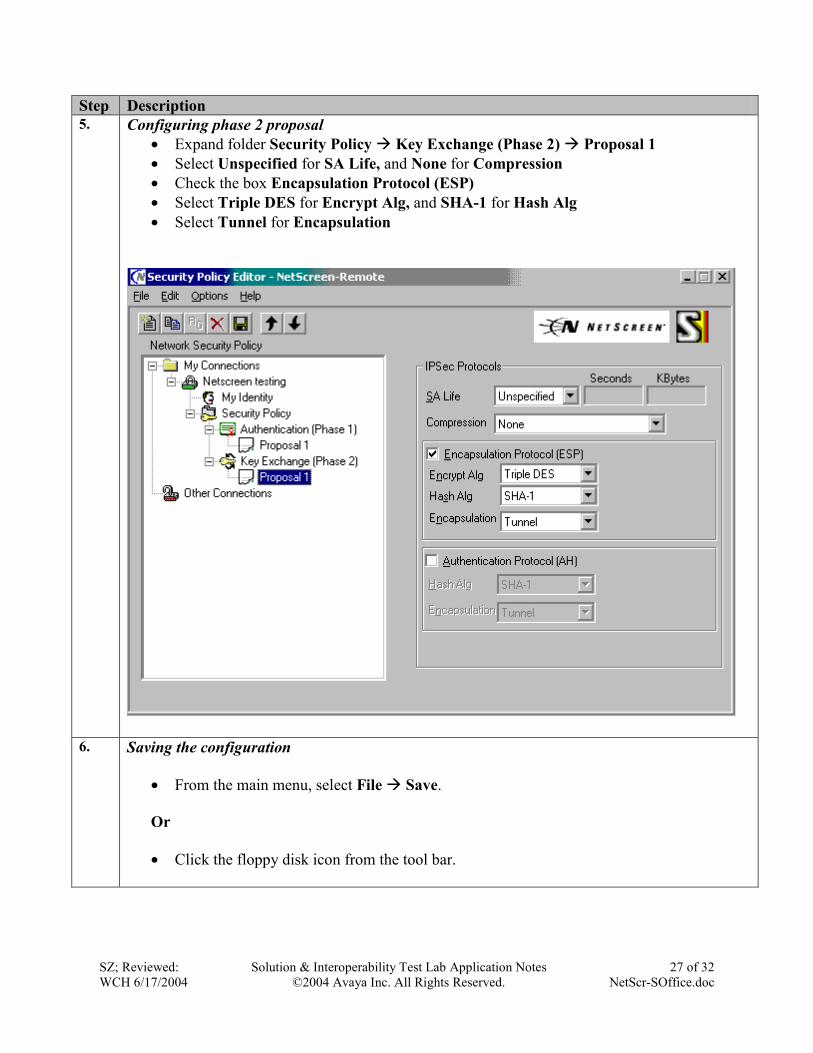
Step Description 5. Configuring phase 2 proposal
• Expand folder Security Policy Key Exchange (Phase 2) Proposal 1 • Select Unspecified for SA Life, and None for Compression • Check the box Encapsulation Protocol (ESP) • Select Triple DES for Encrypt Alg, and SHA-1 for Hash Alg • Select Tunnel for Encapsulation
6. Saving the configuration
• From the main menu, select File Save. Or • Click the floppy disk icon from the tool bar.
SZ; Reviewed: WCH 6/17/2004
Solution & Interoperability Test Lab Application Notes ©2004 Avaya Inc. All Rights Reserved.
28 of 32 NetScr-SOffice.doc
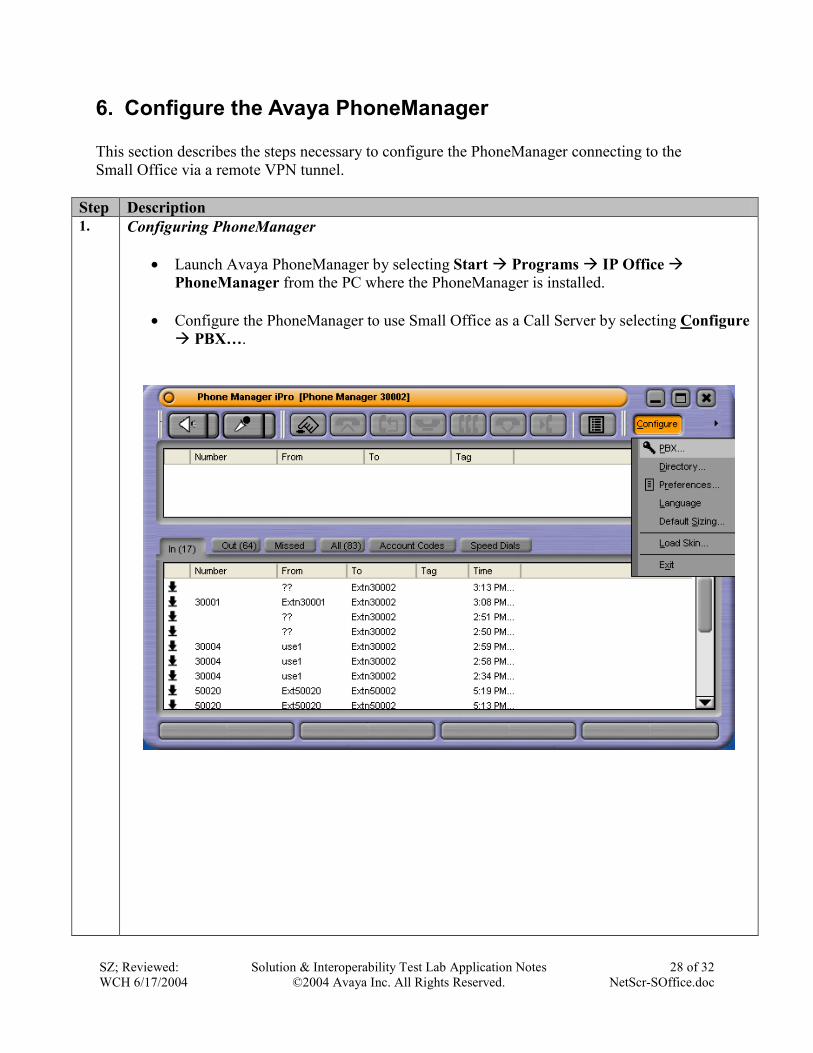
6. Configure the Avaya PhoneManager This section describes the steps necessary to configure the PhoneManager connecting to the Small Office via a remote VPN tunnel.
Step Description 1. Configuring PhoneManager
• Launch Avaya PhoneManager by selecting Start Programs IP Office
PhoneManager from the PC where the PhoneManager is installed.
• Configure the PhoneManager to use Small Office as a Call Server by selecting Configure PBX….

SZ; Reviewed: WCH 6/17/2004
Solution & Interoperability Test Lab Application Notes ©2004 Avaya Inc. All Rights Reserved.
29 of 32 NetScr-SOffice.doc
• In the field UserName, select Ext50020 (previously created from the Small Office) • In the field Password, Enter the password previously defined • In the field PBX Address, enter the Small Office’s private interface IP Address 200.1.1.1 • Click Login >> to log into Small Office

SZ; Reviewed: WCH 6/17/2004
Solution & Interoperability Test Lab Application Notes ©2004 Avaya Inc. All Rights Reserved.
30 of 32 NetScr-SOffice.doc
2. • To set codec preferences for the PhoneManager, select Configure Preferences … • Highlight the codec and move it up or down by clicking the up or down button • Check the box Enable FastStart • Click OK when done
7. Verification Steps The following verification steps can be used to verify correct system operation:
• Make a call from the IP telephone on site A to the digital telephone on site B, and verify the voice quality is good.
• Use an Ethernet sniffer to decode the VoIP packets on the public side, and verify that the packets are encapsulated with IPSec header.
• Launch the NetScreen-Remote client and verify that the remote VPN tunnel is up between the NetScreen-Remote client and the Small Office.
• Launch the PhoneManager and verify that the PhoneManager can register with the Small Office successfully through the IPSec tunnel.
• Make a call from the PhoneManager on site C to the IP telephone on site A, and verify that the voice quality is good.
SZ; Reviewed: WCH 6/17/2004
Solution & Interoperability Test Lab Application Notes ©2004 Avaya Inc. All Rights Reserved.
31 of 32 NetScr-SOffice.doc
• Make a call from digital telephone on site A to the PhoneManager on site C. While the calls is up, conference the IP Telephone at site B and verify that all three parties are in the conference, and the voice quality is good.
8. Conclusion These Application Notes describe the configuration steps necessary to allow Avaya Small Office and Avaya PhoneManager to work with NetScreen 5XT security device and NetScreen-Remote client. All configurations described have been tested and all test cases have been successfully completed.
9. Additional References For Avaya IP Office related configuration information, visit http://support.avaya.com/

SZ; Reviewed: WCH 6/17/2004
Solution & Interoperability Test Lab Application Notes ©2004 Avaya Inc. All Rights Reserved.
32 of 32 NetScr-SOffice.doc
©2004 Avaya Inc. All Rights Reserved. Avaya and the Avaya Logo are trademarks of Avaya Inc. All trademarks identified by ® and ™ are registered trademarks or trademarks, respectively, of Avaya Inc. All other trademarks are the property of their respective owners. The information provided in these Application Notes is subject to change without notice. The configurations, technical data, and recommendations provided in these Application Notes are believed to be accurate and dependable, but are presented without express or implied warranty. Users are responsible for their application of any products specified in these Application Notes. Please e-mail any questions or comments pertaining to these Application Notes along with the full title name and filename, located in the lower right corner, directly to the Avaya DeveloperConnection Program at [email protected].