configuration - marian university
TRANSCRIPT

Ellucian RecruiterConfiguration
Recruiter Release 2.6 October 19, 2012
For corrections and clarifications to this manual, see AnswerNet page 9227

Banner®, Colleague®, PowerCAMPUS®, Luminis® and Datatel® are trademarks of Ellucian or its affiliates and are registered in the U.S. and other countries. Ellucian, Advance, DegreeWorks, fsaATLAS, Course Signals, SmartCall, Recruiter, MOX, ILP, and WCMS are trademarks of Ellucian or its affiliates. Other names may be trademarks of their respective owners.
©2012 Ellucian. All rights reserved. The unauthorized possession, use, reproduction, distribution, display or disclosure of this material or the information contained herein is prohibited.
Contains confidential and proprietary information of Ellucian and its subsidiaries. Use of these materials is limited to Ellucian licensees, and is subject to the terms and conditions of one or more written license agreements between Ellucian and the licensee in question.
In preparing and providing this publication, Ellucian is not rendering legal, accounting, or other similar professional services. Ellucian makes no claims that an institution's use of this publication or the software for which it is provided will insure compliance with applicable federal or state laws, rules, or regulations. Each organization should seek legal, accounting and other similar professional services from competent providers of the organization’s own choosing.
Prepared by: Ellucian 4375 Fair Lakes Court Fairfax, Virginia 22033 United States of America
Revision History
Publication Date Summary
October 19, 2012 New version that supports Recruiter 2.6 software.

Table of Contents
9 Introduction
11 About This Manual11 Who Should Read This Manual11 What This Manual Covers11 How This Manual Is Organized12 Where to Find More Information
13 Architecture
15 Recruiter Components and System Architecture
15 In This Chapter16 Understanding Recruiter Architecture16 Microsoft Dynamics CRM Software Platforms17 Recruiter Servers20 Architecture Diagrams23 Communications Diagrams
27 Recruiter Data Model27 In This Chapter28 Understanding Recruiter Data and Relationships28 Entities and Relationships29 Hierarchical Relationships29 Defining Relationships30 Data Integrity30 Relationship Behavior32 Self-Referential Relationships32 Limitations for Hierarchical Relationships32 Relationship Mapping33 Application Entities34 Contact Entity Diagram35 Metadata Tools35 Entity Metadata Browser36 Metadata Document Generator
Configuration, Recruiter Release 2.6 October 19, 2012 3
Table of Contents
39 Recruiter Business Rules39 In This Chapter40 Prospects (Contact Entity)40 Create Record40 Set Default Data41 Validate Data43 Update Record43 Set Default Data44 Validate Data44 Delete Record45 Suspects (Lead Entity)45 Create Record45 Set Default Data46 Validate Data47 Update Record47 Delete Record48 Applications (Core Application Entity)48 Create Record48 Set Default Data50 Validate Data50 Update Record50 Set Default Data51 Validate Data53 Delete Record54 Events (Event Participant Entity)54 Create Record54 Set Default Data54 Validate Data55 Update Record55 Set Default Data55 Validate Data56 Delete Record57 Test Scores (Test Score Entity)57 Create Test Score Record58 ACT Test Score59 College Board (SAT)60 GMAT60 TOEFL61 GRE62 LSAT63 Validate Subtest Data64 Match Test Score to Prospect or Suspect Record64 Associate Test Score to Prospect
4 Configuration, Recruiter Release 2.6 October 19, 2012
Table of Contents
67 Extending Microsoft Dynamics CRM
69 Microsoft Dynamics CRM 2011 Solutions69 In This Chapter70 Extending Functionality with Microsoft Dynamics CRM 2011
Solutions71 Guidelines and Limitations72 How Solutions Work73 Create an Unmanaged Solution73 Add New or Existing Solution Components74 View or Edit Unmanaged Solution Components76 Using Recruiter Features in Multiple Business Units
79 Configuring Recruiter
81 Configuring Forms81 In This Chapter82 Understanding Forms82 Guidelines and Limitations82 Fields82 Forms83 External Website Forms84 Creating Custom Forms and Configuring Fields on Forms85 Create Custom Forms90 Add Fields to a Form90 Add Fields from a Main Entity to a Form93 Add Subform Fields to an External Website Form99 Customize Forms Using the Extended Form Editor
105 Create a Filter on a Field for the External Website108 Create Hierarchical Validation Lists for the External Website111 Set Field Security in Recruiter112 Add Security to a Field114 Create a Field Security Profile and Add Teams or Users116 Manage Validation Lists117 Validation List Display Order118 Create a Validation List Entry120 Creating Multiple Forms for the External Website120 Multiple Event Forms on the External Website124 Multiple Prospect Account Forms on the External Website128 Multiple Prospect Profile Forms on the External Website
133 Configuring Applications133 In This Chapter134 Understanding Applications
Configuration, Recruiter Release 2.6 October 19, 2012 5

Table of Contents
134 Guidelines and Limitations136 Configuring Application Types and Forms137 Create Custom Application Types138 Configure the Application Form141 Configuring the Application Folder141 Set Up the Application Folder141 Cover Page Form144 Application Folder Review Form145 Application Folder Statuses146 Custom Workflows148 Single Reviewer Workflow149 Importing Applications150 Setting Up the General Application Import151 Copy the Application Import Template153 Add Fields to the Application Staging Record153 Add Fields to the Staging Record Form154 Add Field Mappings for Fields on the Staging Record157 Create the Data Map for the Staging Record158 Create the Application Data Catalog159 Create the Staging Record Processing Workflow162 Setting Up the Common Application Import162 Set Up the Common Application Import163 Define the Common Application Catalog Mapping164 Define the Common Application Supplement Import165 Set the Defaults on the Application Type165 Verify that Data was Provisioned from Recruiter
167 Configuring and Using Workflows167 In This Chapter168 Understanding Workflows168 Guidelines and Limitations168 Workflow Limits169 General Workflow Guidelines170 Specific Workflow Guidelines170 Workflow Schedules171 Delivered Workflows177 Delivered Workflow Templates179 Creating Workflows179 Create Workflows Process181 Publish Workflows182 Monitor Workflow Jobs184 Scheduling Workflows184 Workflow Schedule Restrictions
6 Configuration, Recruiter Release 2.6 October 19, 2012

Table of Contents
185 Create a Workflow Schedule188 Resolve Workflow Schedule Warnings190 Creating Specific Recruiter Workflows190 Create Item Received Workflow for High School or College
Transcript194 Create Item Received Workflow for Test Score Import200 Configure Prospect Ratings Workflow207 Configure Prospect Ratings Workflow from FAFSA
Information207 Identify Your Institutions for Prospect Ratings and
Competitive Comparison209 Configure Prospect Ratings from FAFSA Information219 Setting Up a Customized E-mail for Event Participants
225 Configuring and Using E-mail225 In This Chapter226 Configuring E-mail Templates and Mail Merge Documents227 Create E-mail Templates to Quick Forms on the External
Website231 Create an E-mail Template for Activating External Website
Accounts234 Create Mail Merge Documents with Marketing Lists237 Create Microsoft Dynamics CRM Activities for Mail Merge
Items237 Create a Centralized Letter View240 Configuring ExactTarget240 Configure User Mappings242 Run the ExactTarget Send Entities Tool245 Configure Field Mapping for Contacts, Leads, and
Accounts248 Configure Field Mapping for a Prospect’s Related
Contacts251 Configure E-mail Mapping (optional)253 Create ExactTarget E-mails254 Create ExactTarget E-mails to Quick Forms on the
External Website259 Set Up and Send ExactTarget E-mails Manually from
Recruiter262 Set Up Workflows to Send ExactTarget E-mails from
Recruiter262 Create ExactTarget Marketing Automations264 Create Workflows Without Conditions to Send
ExactTarget E-mails
Configuration, Recruiter Release 2.6 October 19, 2012 7

Table of Contents
268 Create Workflows with Conditions to Send ExactTarget E-mails
275 Configuring Recruiter Imports275 In This Chapter276 Defining Import Contract Mappings for Delivered Recruiter
Imports276 Define Suspect Import Contracts277 Define Test Score Import Contracts279 Understanding the Custom Import Process280 Guidelines and Limitations280 General Custom Imports281 Common Custom Import Scenarios282 Preparing Data for Import into Recruiter284 Importing Data into Recruiter284 Export a Data Map285 Import a Data Map285 Manually Edit a Data Map287 Import Data into a Single Entity298 Import Data into Multiple Entities322 Verifying Results of Import into Recruiter322 Review Import Jobs and Resolve Import Errors
8 Configuration, Recruiter Release 2.6 October 19, 2012

ConfigurationIntroduction


Introduction
About This Manual
Who Should Read This ManualAnyone responsible for configuring Ellucian Recruiter™ should read this manual. Typically, the procedures in this manual would be performed by a Recruiter administrator.
What This Manual CoversThis manual contains conceptual information and procedures for configuring the Recruiter software. Prior to performing the tasks in this manual, you must have completed the installation of all the prerequisites and Recruiter.
Specifically, this manual includes information about:
Understanding the Recruiter architecture, data model, and business rules.
Extending Microsoft® Dynamics CRM® software with solutions.
Extending Recruiter software by configuring forms, applications, workflows, e-mail, and custom imports.
How This Manual Is OrganizedThe Introduction section, which you are reading now, provides information about this manual and its organization, along with where to go to find additional information.
The Architecture section provides Recruiter architecture and communication diagrams; details about entity relationships, metadata tools, and a diagram of the Contact entity and related Recruiter-delivered entities; and business rules for common Recruiter entities.
The Extending Microsoft Dynamics CRM section provides information about extending Microsoft Dynamics CRM with solutions.
Configuration, Recruiter Release 2.6 October 19, 2012 11
Introduction: About This Manual
The Configuring Recruiter section provides information about configuring common Recruiter elements, such as forms, applications, workflows, e-mail, and custom imports.
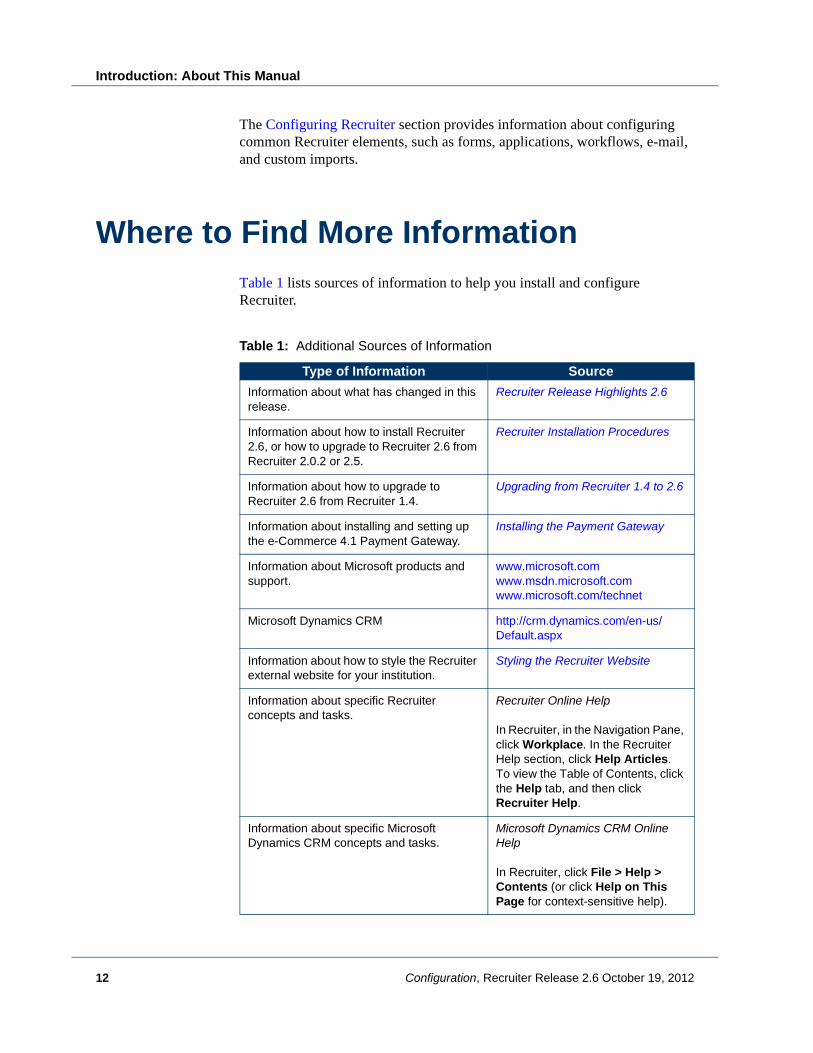
Where to Find More InformationTable 1 lists sources of information to help you install and configure Recruiter.
Table 1: Additional Sources of Information
Type of Information Source
Information about what has changed in this release.
Recruiter Release Highlights 2.6
Information about how to install Recruiter 2.6, or how to upgrade to Recruiter 2.6 from Recruiter 2.0.2 or 2.5.
Recruiter Installation Procedures
Information about how to upgrade to Recruiter 2.6 from Recruiter 1.4.
Upgrading from Recruiter 1.4 to 2.6
Information about installing and setting up the e-Commerce 4.1 Payment Gateway.
Installing the Payment Gateway
Information about Microsoft products and support.
www.microsoft.com www.msdn.microsoft.com www.microsoft.com/technet
Microsoft Dynamics CRM http://crm.dynamics.com/en-us/Default.aspx
Information about how to style the Recruiter external website for your institution.
Styling the Recruiter Website
Information about specific Recruiter concepts and tasks.
Recruiter Online Help
In Recruiter, in the Navigation Pane, click Workplace. In the Recruiter Help section, click Help Articles. To view the Table of Contents, click the Help tab, and then click Recruiter Help.
Information about specific Microsoft Dynamics CRM concepts and tasks.
Microsoft Dynamics CRM Online Help
In Recruiter, click File > Help > Contents (or click Help on This Page for context-sensitive help).
12 Configuration, Recruiter Release 2.6 October 19, 2012

ConfigurationArchitecture


Architecture
Recruiter Components and System Architecture
In This ChapterThis chapter provides information about the Recruiter components and system architecture.
Table 2 lists the topics covered in this chapter.
Table 2: Topics in This Chapter
Topic Page
Understanding Recruiter Architecture 16
Architecture Diagrams 20
Communications Diagrams 23
Configuration, Recruiter Release 2.6 October 19, 2012 15

Architecture: Recruiter Components and System Architecture
Understanding Recruiter ArchitectureRecruiter leverages the Microsoft Dynamics CRM platform, which is a highly extensible business model that provides the core technology infrastructure for Recruiter. Recruiter extends the native Microsoft Dynamics CRM functionality to provide a recruiting and enrollment operations platform, a prospective student website with an online application, and a marketing and communications console.
The core functionality within Microsoft Dynamics CRM includes a security model, data access, metadata manipulation, workflows, reports, activities, marketing lists, campaigns, direct e-mail options, duplicate detection rules, and more. Microsoft Dynamics CRM also provides native process and forms models for items delivered in Recruiter, such as territory management, enrollment goals, trips, events, applications, suspects, prospects, organizations, and imports (for applications, test scores, and suspects). Microsoft Dynamics CRM can be accessed using Internet Explorer or through the integrated Microsoft Outlook client.
Additionally, Recruiter provides integration with third-party payment management, bulk e-mail configuration and marketing, and postal address cleansing software products. Microsoft Dynamics CRM can also be extended with downloadable solutions, such as activity feeds.
Microsoft Dynamics CRM Software Platforms
The following software platforms are used with Microsoft Dynamics CRM 2011.
On-premise server software:
CRM 2011
SQL Server 2008 R2 or SQL Server 2012
Windows Server 2008 R2 / IIS 7.5
.NET 4.0
Online (hosted) software:
CRM Online / Hosted CRM
Windows Azure
16 Configuration, Recruiter Release 2.6 October 19, 2012

Understanding Recruiter Architecture
Supported clients for on-premise and online deployments:
Windows Internet Explorer 9
Microsoft Outlook
Mobile Access
Recruiter Servers
Though you might have additional servers or shared servers, the following four servers are recommended for Recruiter components.
Table 3: Recruiter Servers
Server FQDN (example) What Is Installed
Recruiter Database Server recruiterdb.mycollege.edu SQL Server Microsoft CRM Databases SQL Server Reporting Service SQL Server Reporting Data Connector
CRM Application Server recruiterapp.mycollege.edu Microsoft Dynamics CRM Recruiter Recruiter Response Services ExactTarget Payment Gateway Response Services E-mail Router
Recruiter Web Front-End Server
publicweb.mycollege.edu recruiterwfe.mycollege.edu
Recruiter Web Components Merchant Provider Payment Gateway
Recruiter Web Services Server (Colleague UI Server)
collweb.mycollege.edu recruiterwebservice.mycollege.edu
Recruiter Web Services (includes Colleague Core Web Service)
Configuration, Recruiter Release 2.6 October 19, 2012 17

Architecture: Recruiter Components and System Architecture
Figure 1 shows the CRM application server, Recruiter Web Services server, and Recruiter web front-end server primary components and services for the on-premise deployment.
Figure 1: Recruiter On-Premise Server Components and Services
18 Configuration, Recruiter Release 2.6 October 19, 2012

Understanding Recruiter Architecture
Figure 2 shows the primary components and services for the online (hosted) deployment.
Figure 2: Recruiter Online Components and Services
Configuration, Recruiter Release 2.6 October 19, 2012 19

Architecture: Recruiter Components and System Architecture
Architecture DiagramsThis section contains diagrams that show the Recruiter architecture.
Figure 3 shows the Recruiter internal architecture components, which are managed behind a firewall. The server that hosts the external website (called the Recruiter web front-end server) is the only public-facing external server component.
Figure 3: Recruiter Internal Network Architecture
20 Configuration, Recruiter Release 2.6 October 19, 2012

Architecture Diagrams
Figure 4 compares how the Recruiter architecture components are managed in a Microsoft Dynamics CRM on-premise deployment and an online (hosted) deployment.
Figure 4: On-Premise or Online Deployments
Configuration, Recruiter Release 2.6 October 19, 2012 21
Architecture: Recruiter Components and System Architecture
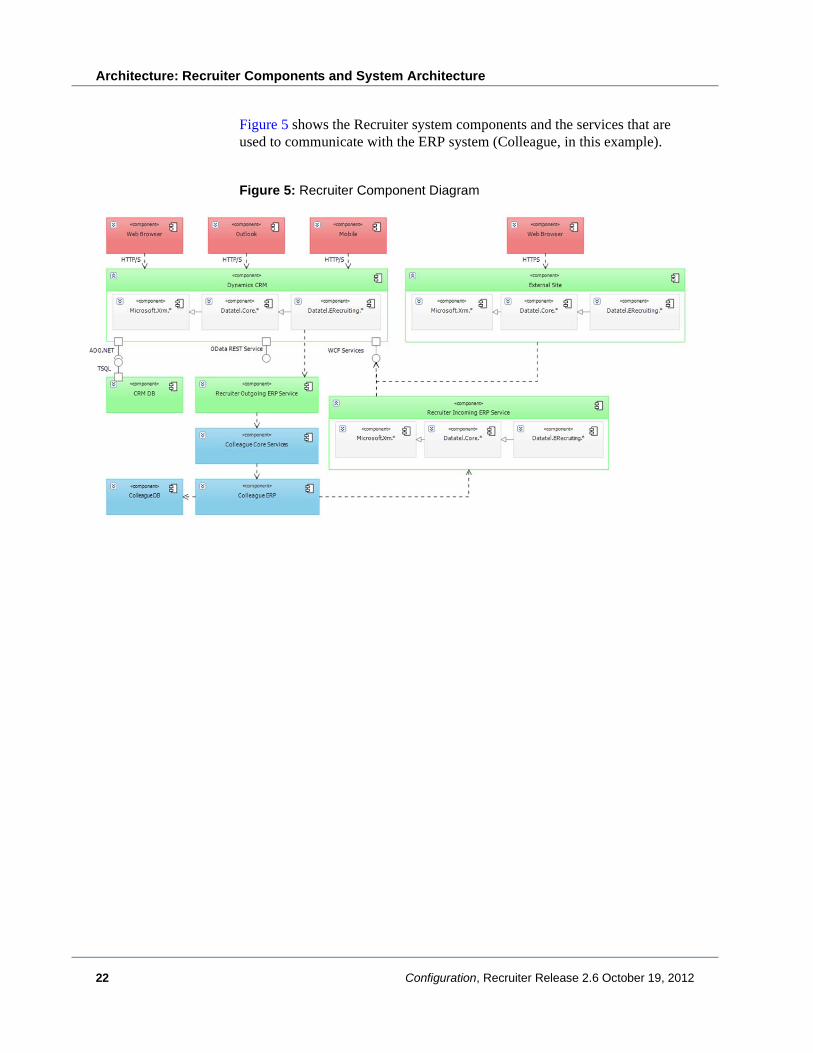
Figure 5 shows the Recruiter system components and the services that are used to communicate with the ERP system (Colleague, in this example).
Figure 5: Recruiter Component Diagram
22 Configuration, Recruiter Release 2.6 October 19, 2012

Communications Diagrams
Communications DiagramsThis section contains diagrams that show Recruiter inbound and outbound communications.
Figure 6 shows inbound and outbound communications between Recruiter and the ERP system (Colleague, in this example).
Figure 6: Recruiter and Colleague Communications
Configuration, Recruiter Release 2.6 October 19, 2012 23

Architecture: Recruiter Components and System Architecture
Figure 7 shows inbound and outbound communications between Recruiter and Payment Gateway, the third-party payment management software product.
Figure 7: Recruiter and Payment Gateway Communications
Figure 8 shows inbound and outbound communications between Recruiter and ExactTarget, the third-party bulk e-mail configuration and marketing software product.
Figure 8: Recruiter and ExactTarget Communications
24 Configuration, Recruiter Release 2.6 October 19, 2012

Communications Diagrams
Figure 9 shows inbound and outbound communications between Recruiter and StrikeIron, the third-party postal address cleansing software product.
Figure 9: Recruiter and StrikeIron Communications
Configuration, Recruiter Release 2.6 October 19, 2012 25

Architecture: Recruiter Components and System Architecture
26 Configuration, Recruiter Release 2.6 October 19, 2012

Architecture
Recruiter Data Model
In This ChapterThis chapter provides information about the Recruiter data model.
Table 4 lists the topics covered in this chapter.
Table 4: Topics in This Chapter
Topic Page
Understanding Recruiter Data and Relationships 28
Contact Entity Diagram 34
Metadata Tools 35
Configuration, Recruiter Release 2.6 October 19, 2012 27

Architecture: Recruiter Data Model
Understanding Recruiter Data and Relationships
The following sections contain information about entities, relationships, and the Recruiter application entities.
Entities and Relationships
Entities, which are structures that are used to maintain data, are related to each other using relationships. Relationships determine how entities function with each other. Both entities and relationships are core features of Microsoft Dynamics CRM.
You can create one of three relationship types between records:
1:N Relationship. A 1:N relationship is created or viewed from the primary entity. Any one record from the primary entity can be referenced by many records from the related entity. A 1:N relationship is a hierarchical relationship in which the primary entity is the parent record.
N:1 Relationship. An N:1 relationship is created or viewed from the related entity. Many records from the related entity can reference any one record from the primary entity. An N:1 relationship is a hierarchical relationship in which the related entity is the child record.
N:N (Many-to-Many) Relationship. An N:N relationship allows you to reciprocally relate one or more records of an entity to a record of another entity. Also, an N:N relationship may be self-referential, meaning reciprocally relating one or more records of an entity to a record in the same entity. N:N relationships are not hierarchical because a record does not store a unique reference to another record. Users who are associated with a security role that allows Read and Append privileges to one entity and Read, Write, and Append To privileges to another entity can relate records using this relationship.
28 Configuration, Recruiter Release 2.6 October 19, 2012
Understanding Recruiter Data and Relationships
Hierarchical Relationships
Hierarchical relationships require that one of the records have a field to store a unique identifier that references another record. Hierarchical relationships include the following record types:
Child record. The record in a hierarchical relationship (with a parent record) that stores the unique identifier reference to the parent record. One parent record can be related to many child records. Child records have Lookup fields in the form to allow them to be related to a parent record.
Parent record. The record in a hierarchical relationship (with a child record) that is referenced by the unique identifier stored in the child record. One parent record can be related to many child records.
Each child record can store a reference to one parent record. A parent record can be referenced by an unlimited number of child records. The parent record can display all of the child records in the Related section of the Navigation Pane as associated views. An associated view is a view of an entity that is displayed in the forms of other entities. The associated view is different from the views that are visible for the entity in its own area of the user interface. For example, in the Navigation Pane of a prospect form (Contact entity), you can click Applications to view and open an application form. This is the Application associated view. There can be only one associated view of each entity.
Hierarchical relationships provide opportunities to configure a number of behaviors that affect data integrity and the business rules in your organization. There are also limitations on the types of relationships that you can create. Review the sections below for more information.
Defining Relationships
Relationships are defined between entities. In a hierarchical relationship, the entity that represents the child record is called the related entity, whereas the entity that represents the parent record is called the primary entity. A related entity is associated with a primary entity through a unique reference defined by using a Lookup control on the related entity form. For example, a High School Academic History related entity has a unique reference to the Contact entity.
A relationship attribute, also known as a Lookup attribute, is created on the related entity to allow records to store the unique reference to the primary entity. The relationship attribute only exists in a related entity when a hierarchical relationship exists. When this attribute is added to the form of the related entity, the Lookup control is displayed to allow the record to be related
Configuration, Recruiter Release 2.6 October 19, 2012 29

Architecture: Recruiter Data Model
to another record as defined in the relationship. Relationship attributes can be created either by creating a relationship, which will automatically create the Lookup attribute, or by creating a Lookup attribute, which will automatically create the relationship.
Data Integrity
A hierarchical relationship introduces the opportunity to define rules for data integrity. For example, a high school academic history record has no meaning if it is not associated with a specific prospect record. Sometimes relationships are required, and you can only create them or add them from a primary entity. However, some items, such as task activities, can be meaningful whether they are associated to another record or not. In this case, relating a task activity to another record is optional.
When you create a relationship, you must choose whether to enforce rules for data integrity. If you make the relationship field on the related entity required by setting a requirement level of Business Required, you can guarantee that each of the related entity records created will be related to a record of the primary entity. The requirement level is the setting that determines whether users must enter data. For example, when the requirement level of a field is set to Business Required, users will be unable to save the record without entering data in that field.
Relationship Behavior
After you create a hierarchical relationship, you can control how the relationship behaves to support data integrity and business rules for your institution. The relationship can control how actions performed on a parent record cascade down to a child record.
You can configure the relationship behavior for the following actions performed on the primary entity record:
Assign. The related records will be assigned to the same user.
Share. The related entity records will also be shared with the same user or team.
Unshare. The related entity records will no longer be shared with the same user or team.
Reparent. If the owner of the primary entity record changes because the primary entity record was reparented, the owner of any related records will be set to the same owner as the primary entity record.
30 Configuration, Recruiter Release 2.6 October 19, 2012

Understanding Recruiter Data and Relationships
Delete. The related records can be deleted or unlinked from the primary entity record, or the delete action can be canceled.
Merge. The related records associated with the subordinate record will be reparented to the master record.
You can choose from three predefined and commonly used types of behavior, or choose to configure the cascading action performed on the record of the primary entity.
The three predefined types of behavior are:
Parental. All actions cascade down to the child records. Deleting a parent record also deletes all child records. Reassigning a parent record to a user also reassigns all the child records to the same user. Each entity can have only one parental relationship.
Referential. No actions cascade down to the child records. Deleting a parent record also deletes any linking data in any child record.
Referential, Restrict Delete. No actions cascade down to the child records, and the deletion is not allowed if there are any child records.
For most actions, the cascading behavior choices are:
Cascade All. This is a parental type of behavior. The action cascades down to all child records, including inactive records.
Cascade Active. The action only cascades down to all active child records.
Cascade User-Owned. The action only cascades down to child records assigned to the same user as the owner of the parent record.
Cascade None. This a referential type of behavior. The action does not cascade down to child records.
Data integrity must be preserved when data in records changes or when the status of records change. If the relationship is required, deleting a parent record breaks the data integrity of any child record. There are three ways to address this:
Use Referential, Restrict Delete behavior to prevent the deletion of any record with a child record.
Use Parental behavior to delete any child record when deleting a parent record.
If using “Configurable Casacading,” then set the Delete action to Cascade All or Referential, Restrict Delete.
If the relationship is not required, it is sufficient to remove the data that establishes the link to the deleted parent record.
Configuration, Recruiter Release 2.6 October 19, 2012 31

Architecture: Recruiter Data Model
In addition to data integrity, your business can apply relationship behavior when data in records changes or when the status of records change. The relationship behavior can cascade this action so that it does not need to be done manually.
Self-Referential Relationships
All relationship types can be self-referential. This means that an entity can have a relationship with itself. This permits records to be directly associated with other records of the same type. For example, events can be linked to related events.
The only limitation to self-referential relationships is that records cannot be related to themselves in a parental relationship, which would create a circular reference. Instead, a self-referential relationship must be a referential relationship.
Limitations for Hierarchical Relationships
The following limitations exist for hierarchical relationships:
Each entity can have only one parental relationship. Most Microsoft Dynamics CRM system entities already have a parental relationship and this relationship cannot be changed.
Entities can have referential relationships with any entity. You can create multiple relationships between two entities. Entities can have referential relationships with themselves, allowing linked records of the same type. However, a record cannot be linked to itself.
Relationship Mapping
You can create new child records in an associated view. When this happens, data from the parent record is copied into the form for the new child record. By default, a reference to the parent record is always copied to the relationship Lookup field in the child record. You can choose whether data from other fields should be copied at the same time. More information, see the Mapping Entity Fields article in the Microsoft Dynamics CRM help.
32 Configuration, Recruiter Release 2.6 October 19, 2012

Understanding Recruiter Data and Relationships
Application Entities
Each time an application type is created, Recruiter creates a new application type entity (for example, “datatel_undergraduateapplicationtemplate”). Each application type entity has a child relationship to the core Application entity (“datatel_application”). The core Application entity has a child relationship to the Contact entity.
When a prospective student creates an application, that application data flows from the prospect record (Contact entity) to the core application record (Application entity) to the application type record (“datatel_applicationtypename” entity). When the application is submitted for admissions processing, this data flow is reversed. The application status changes to “Submitted” on the application type record, data is passed through the core application record, and the status on the prospect record changes to “Application Submitted.” The specific data that flows from the prospect record to the core application record and from the core application record to the application type record (and vice versa) is determined by the mappings in the relationships between those entities.
Configuration, Recruiter Release 2.6 October 19, 2012 33

Architecture: Recruiter Data Model
Contact Entity DiagramFigure 10 shows the display names and schema names for the Contact entity (prospect) and the 1:N related entities that are displayed in the Navigation Pane on the prospect form.
Figure 10: Contact Entity and Related Entities
34 Configuration, Recruiter Release 2.6 October 19, 2012

Metadata Tools
Metadata ToolsThe following tools can be used to find and generate information about metadata in Recruiter.
Entity Metadata Browser
You can use the Entity Metadata Browser to view entities and their properties in Microsoft Dynamics CRM. The Entity Metadata Browser is a managed solution available in the downloadable files that are available in the Microsoft Dynamics CRM Software Development Toolkit (SDK).
You can import the Entity Metadata Browser from either the CRM application server or from your local hard drive (as long as you have access to the CRM application server).
You can download the SDK from the following location:
http://www.microsoft.com/en-us/download/details.aspx?id=24004
After you have downloaded the SDK, you must run it to extract the files.
The Entity Metadata Browser solution is available from the following directory in the SDK:
SDK\Tools\MetadataBrowser\MetadataBrowser_1_0_0_3_managed.zip
You can import the Entity Metadata Browser solution into Microsoft Dynamics CRM as follows:
Step 1. In Recruiter, in the Navigation Pane, click Settings, and then click Solutions.
Step 2. In the Solutions pane, click Import.
Step 3. Click Browse, go to the SDK\Tools\MetadataBrowser directory in the location where you downloaded the SDK, select the MetadataBrowser_1_0_0_3_managed.zip file, and click Next.
Configuration, Recruiter Release 2.6 October 19, 2012 35

Architecture: Recruiter Data Model
Step 4. Review the solution information, and click Next.
Step 5. Select the import options as needed, and click Next.
Step 6. When the import is finished, click Close.
Step 7. The Entity Metadata Browser is displayed in the list of solutions. Double-click MetadataBrowser to open it.
The crmsdk2011.chm file in the root SDK folder contains information about how to use the Entity Metadata Browser. You can begin with the Browse the Metadata for Your Organization topic.
Metadata Document Generator
You can use the Metadata Document Generator for Microsoft Dynamics CRM to generate documentation about entities and attributes metadata. The Metadata Document Generator provides a view of specific metadata in either a Microsoft Office Excel spreadsheet or a Microsoft Office Word document.
You can run the Metadata Document Generator from either the CRM application server or from your local hard drive (as long as you have access to the CRM application server). If you run the tool from your local hard drive, you must also install the Windows Identity Foundation update with the proper .NET assemblies. These assemblies are already installed on the CRM application server.
You can download the Metadata Document Generator from the following location:
http://metadatadocgenerator.codeplex.com/
After you have downloaded the Metadata Document Generator, you must extract the files.
You can download the Windows Identity Foundation update from the following location:
http://www.microsoft.com/en-us/download/details.aspx?id=17331
36 Configuration, Recruiter Release 2.6 October 19, 2012
Metadata Tools
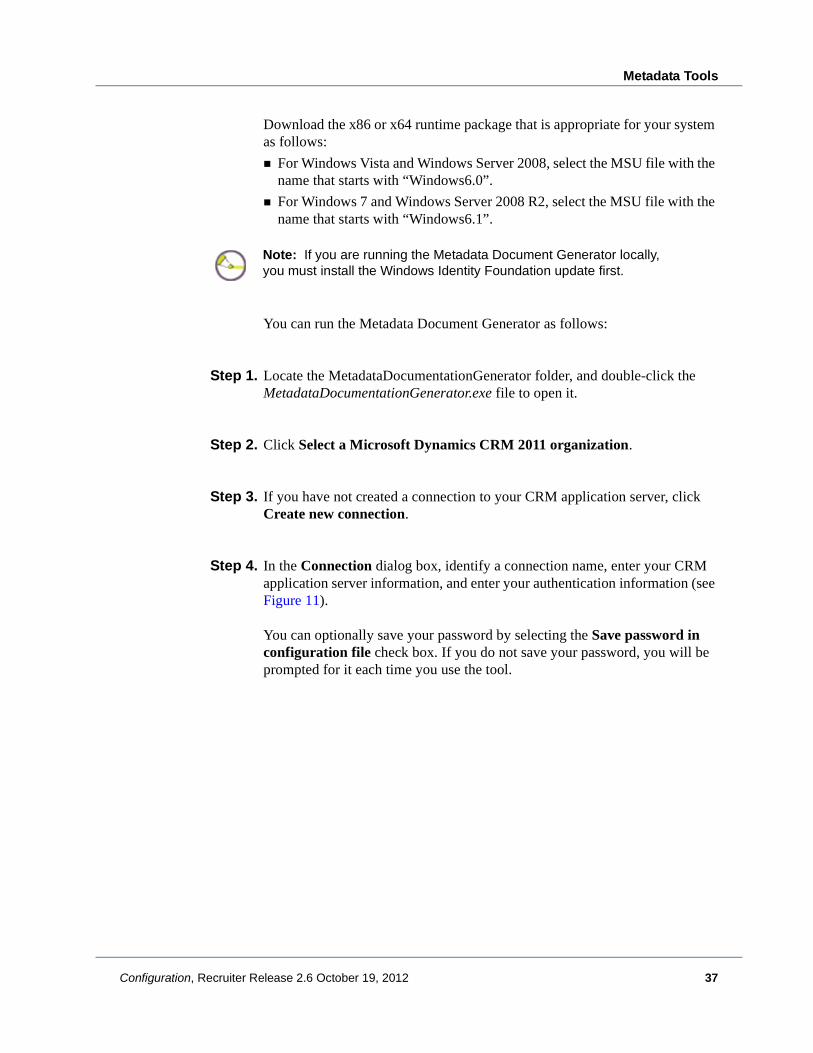
Download the x86 or x64 runtime package that is appropriate for your system as follows:
For Windows Vista and Windows Server 2008, select the MSU file with the name that starts with “Windows6.0”.
For Windows 7 and Windows Server 2008 R2, select the MSU file with the name that starts with “Windows6.1”.
You can run the Metadata Document Generator as follows:
Step 1. Locate the MetadataDocumentationGenerator folder, and double-click the MetadataDocumentationGenerator.exe file to open it.
Step 2. Click Select a Microsoft Dynamics CRM 2011 organization.
Step 3. If you have not created a connection to your CRM application server, click Create new connection.
Step 4. In the Connection dialog box, identify a connection name, enter your CRM application server information, and enter your authentication information (see Figure 11).
You can optionally save your password by selecting the Save password in configuration file check box. If you do not save your password, you will be prompted for it each time you use the tool.
Note: If you are running the Metadata Document Generator locally, you must install the Windows Identity Foundation update first.
Configuration, Recruiter Release 2.6 October 19, 2012 37

Architecture: Recruiter Data Model
Figure 11: Connection Dialog Box
Step 5. Click Get Orgs to retrieve your CRM organization names, and then select the one you want to use.
Step 6. Click OK.
Step 7. If prompted, click Yes to connect to the server.
Step 8. After the server has connected successfully, click OK.
The following page contains screenshots that depict how to use the Metadata Document Generator:
http://metadatadocgenerator.codeplex.com/
38 Configuration, Recruiter Release 2.6 October 19, 2012

Architecture
Recruiter Business Rules
In This ChapterThis chapter provides information about common Recruiter business rules and validation logic. These sections cover rules and logic associated with prospects, suspects, applications, events, and test scores.
Table 5 lists the topics covered in this chapter.
Table 5: Topics in This Chapter
Topic Page
Prospects (Contact Entity) 40
Suspects (Lead Entity) 45
Applications (Core Application Entity) 48
Events (Event Participant Entity) 54
Test Scores (Test Score Entity) 57
Configuration, Recruiter Release 2.6 October 19, 2012 39

Architecture: Recruiter Business Rules
Prospects (Contact Entity)This section contains the validation logic that Recruiter uses in addition to the native Microsoft Dynamics CRM validation that is based on the Contact entity metadata, which is the entity used for prospects. The CRM validation logic checks for required fields, data type validation (for example, a date field must be a valid date), validation for number ranges, etc.
Create Record
Set Default Data
Table 6 shows the logic that Recruiter follows to set the default data when creating a prospect record.
Table 6: Set Default Data
Logic
1. If Primary Address State/Province (Lookup) is specified, set the value in Address 1: State/Province (varchar) to the default abbreviation for Primary Address State/Province; or if no Primary Address State/Province is specified, clear the value for Address 1: State/Province.
2. Set Academic Level of Interest to the level associated with Academic Program of Interest if one was specified.
3. Set default settings for an international address:
a. If the primary address is specified to be international (“Is this an International Address?” is selected), clear any values in State/Province and Zip/Postal Code.
b. If the primary address is not specified to be international, clear Street 3 (Foreign Address line).
c. Repeat steps 3a and 3b for Parent 1 address, Parent 2 address, and Legal Guardian address.
4. Set default settings for Country:
a. If State/Province is set for the primary address, set associated Country for State/Province on the primary address.
b. Repeat step 4a for Parent 1 address, Parent 2 address, and Legal Guardian address.
40 Configuration, Recruiter Release 2.6 October 19, 2012

Prospects (Contact Entity)
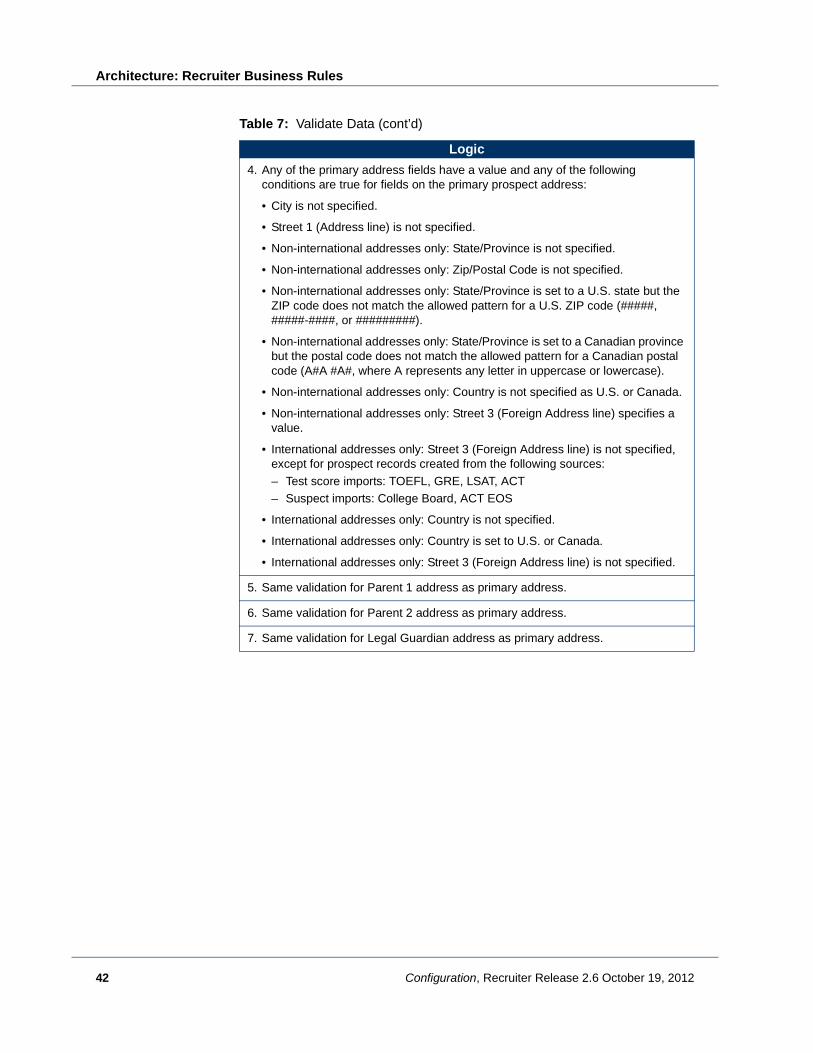
Validate Data
Table 7 shows the logic that Recruiter follows to validate the data when creating a prospect record.
5. If “Is Parent1 address the same as prospect?” is selected, set the following Parent 1 address fields to be the same as the corresponding fields on the prospect record:
• Address Line 1
• Address Line 2
• Address 3 (Foreign Address line)
• City
• State/Province
• County
• Zip/Postal Code
• Country
• International Address?
6. If the prospect is being created from a promoted suspect, set Relationship Type to “Prospective Student”.
Table 7: Validate Data
Logic
Note: Recruiter will generate an error if any of the following conditions are true, and the transaction will fail.
1. Birth Date is set to a date in the future.
2. SSN has a value and it does not match an accepted pattern for a Social Security number (###-##-#### or #########, where # represents any digit, with 000-00-0000 or 000000000 not being allowed).
3. SIN has a value and it does not match an accepted pattern for a Social Insurance Number (###-###-### or #########, where # represents any digit, with 000-000-000 or 000000000 not being allowed).
Table 6: Set Default Data (cont’d)
Logic
Configuration, Recruiter Release 2.6 October 19, 2012 41
Architecture: Recruiter Business Rules
4. Any of the primary address fields have a value and any of the following conditions are true for fields on the primary prospect address:
• City is not specified.
• Street 1 (Address line) is not specified.
• Non-international addresses only: State/Province is not specified.
• Non-international addresses only: Zip/Postal Code is not specified.
• Non-international addresses only: State/Province is set to a U.S. state but the ZIP code does not match the allowed pattern for a U.S. ZIP code (#####, #####-####, or #########).
• Non-international addresses only: State/Province is set to a Canadian province but the postal code does not match the allowed pattern for a Canadian postal code (A#A #A#, where A represents any letter in uppercase or lowercase).
• Non-international addresses only: Country is not specified as U.S. or Canada.
• Non-international addresses only: Street 3 (Foreign Address line) specifies a value.
• International addresses only: Street 3 (Foreign Address line) is not specified, except for prospect records created from the following sources:
– Test score imports: TOEFL, GRE, LSAT, ACT– Suspect imports: College Board, ACT EOS
• International addresses only: Country is not specified.
• International addresses only: Country is set to U.S. or Canada.
• International addresses only: Street 3 (Foreign Address line) is not specified.
5. Same validation for Parent 1 address as primary address.
6. Same validation for Parent 2 address as primary address.
7. Same validation for Legal Guardian address as primary address.
Table 7: Validate Data (cont’d)
Logic
42 Configuration, Recruiter Release 2.6 October 19, 2012

Prospects (Contact Entity)
Update Record
All validation from “Create Record” beginning on page 40 applies when updating a prospect record, with the following additions.
Set Default Data
Table 8 shows the logic that Recruiter follows to set the default data when updating a prospect record.
Table 8: Set Default Data
Logic
1. Set Prospect Status appropriately (only if Prospect Status is not set to “Enrolled”):
a. If the primary application's Accepted On date specifies a value, set Prospect Status to “Accepted”.
b. If the primary application's status is “Application Exported to ERP”, set Prospect Status to the same.
c. If the primary application's status is “Application Marked Complete”, set Prospect Status to the same.
d. If the primary application's status is “Application Started”, set Prospect Status to the same.
e. If the primary application's status is “Application Submitted”, set Prospect Status to the same.
2. Set the following prospect field values to the values of the same fields on the primary application:
• Application Started Date
• Application Submitted Date
• Application Marked Complete Date
• Application Moved to ERP Date
• Application Accepted
• Application Withdrawn Date
• Location (only if specified on the primary application)
3. Determine if the prospect has any pending official test scores and set Pending Official Test Scores to “true” or “false” appropriately.
Configuration, Recruiter Release 2.6 October 19, 2012 43

Architecture: Recruiter Business Rules
Validate Data
Table 9 shows the logic that Recruiter follows to validate the data when updating a prospect record.
Delete Record
No validation logic is performed when deleting a prospect record.
When deleting a prospect record (Contact entity), the following 1:N or N:N related data is also deleted:
Extracurricular activities
High School Academic History
College Academic History
Transcript courses
AP, IB, and SAT Subject test scores
Communication history
Primary test scores
Official test scores and any associated subtest records
FAFSA data
FA Award data
Table 9: Validate Data
Logic
Note: Recruiter will generate an error if any of the following conditions are true, and the transaction will fail.
1. Primary Application Lookup previously had a value and is now empty.
2. Primary Application Lookup is set to a withdrawn application.
Note: Any additional related data will also be deleted if the relationship with the Contact entity specifies the “Cascade All” Delete action.
44 Configuration, Recruiter Release 2.6 October 19, 2012

Suspects (Lead Entity)
Suspects (Lead Entity)This section contains the validation logic that Recruiter uses in addition to the native Microsoft Dynamics CRM validation that is based on the Lead entity metadata, which is the entity used for suspects. The CRM validation logic checks for required fields, data type validation (for example, a date field must be a valid date), validation for number ranges, etc.
Create Record
Set Default Data
Table 10 shows the logic that Recruiter follows to set the default data when creating a suspect record.
Table 10: Set Default Data
Logic
1. If Primary Address State/Province (Lookup) is specified, set the value in Address 1: State/Province (varchar) to the default abbreviation for Primary Address State/Province; or if no Primary Address State/Province is specified, clear the value for Address 1: State/Province.
2. Set default setting for an international address:
a. If the primary address is specified to be international (“Is this an international address?” is selected), clear any values set in State/Province and Zip/Postal Code.
3. Set default setting for Country:
a. If State/Province is set for the primary address, set associated Country for State/Province on the primary address.
4. If Academic Term does not have a value, it is set, if possible, from whichever of the following conditions matches first (in order):
a. Academic Term Mapping record exists for the suspect's graduation year.
b. A default term is specified in the Academic Term Mapping table.
c. A default term is specified in the Configuration Setting “DefaultAcademicStartTerm”.
Configuration, Recruiter Release 2.6 October 19, 2012 45

Architecture: Recruiter Business Rules
Validate Data
Table 11 shows the logic that Recruiter follows to validate the data when creating a suspect record.
Table 11: Validate Data
Logic
Note: Recruiter will generate an error if any of the following conditions are true, and the transaction will fail.
1. At least one valid contact method is not specified from the list below:
• E-mail Address (must be a valid e-mail address)
• Home Phone
• Mobile Phone
2. An e-mail address is specified that is not valid.
3. Birthdate is set to a date in the future.
4. Any of the primary address fields have a value and any of the following conditions are true for fields on the primary prospect address:
• City is not specified.
• Street 1 (Address line) is not specified.
• Non-international addresses only: State/Province is not specified.
• Non-international addresses only: Zip/Postal Code is not specified.
• Non-international addresses only: State/Province is set to a U.S. state but the ZIP code does not match the allowed pattern for a U.S. ZIP code (#####, #####-####, or #########).
• Non-international addresses only: State/Province is set to a Canadian province but the postal code does not match the allowed pattern for a Canadian postal code (A#A #A#, where A represents any letter in uppercase or lowercase).
• Non-international addresses only: Country is not specified as U.S. or Canada.
• Non-international addresses only: Street 3 (Foreign Address Line) specifies a value.
• International addresses only: Street 3 (Foreign Address Line) is not specified, except for suspect records created from the following sources:
– College Board– ACT EOS
• International addresses only: Country is not specified.
• International addresses only: Country is set to U.S. or Canada.
46 Configuration, Recruiter Release 2.6 October 19, 2012

Suspects (Lead Entity)
Update Record
All validation from “Create Record” beginning on page 45 applies when updating a suspect record.
Delete Record
No validation logic is performed when deleting a suspect record.
Configuration, Recruiter Release 2.6 October 19, 2012 47

Architecture: Recruiter Business Rules
Applications (Core Application Entity)This section contains the validation logic that Recruiter uses for the core Application entity, called “datatel_application”.
This entity is not the same as the entity that is created for each application type (“datatel_applicationtypename”). When an application type is created (for example, an undergraduate application type), a new entity is also created (for example, “datatel_undergraduateapplicationtemplate”) from the source application type entity. There is a 1:N relationship from the core Application entity to each application type entity.
Any operation that changes the status of an application, such as submitting the application through the external website, will cause an update to the associated core Application entity record, which will trigger the update logic in this section.
For more information about this relationship, see “Application Entities” on page 33.
Create Record
Set Default Data
Table 12 shows the logic that Recruiter follows to set the default data when creating an application record.
Table 12: Set Default Data
Logic
1. If a new application is created for a prospect and the Source is not “Imported”, any related data that is mapped in the 1:N relationship between the Contact entity and the core Application entity is copied to the application.
2. If Application Status is not specified, set it to “Started”.
3. If Reference Number is not specified, generate a 16-character unique identifier.
4. If Source is not specified, set it to “Internal Data Entry”.
5. If Academic Level, Academic Program, Admit Type, Anticipated Entry Term, Decision Plan, or Location are not specified, set them to any corresponding default settings that are set on Application Type of the new application.
48 Configuration, Recruiter Release 2.6 October 19, 2012

Applications (Core Application Entity)
6. If Academic Program is specified (or has a default setting from Application Type) and Academic Level is not specified, set Academic Level to the level specified on the academic program record.
7. Set default settings for an international address:
a. If the permanent address is specified to be international (“Is permanent address not in U.S. or Canada?” is selected), clear any values in State/Province and Zip/Postal Code.
b. If the permanent address is not specified to be international, clear Foreign Address Line.
c. Repeat steps 7a and 7b for Temporary Address, Parent 1 address, Parent 2 address, Legal Guardian address, and Emergency Contact address.
8. Set default settings for Country:
a. If State/Province is set on the permanent address, set associated Country for State/Province on the permanent address.
b. If the address is not international and a Country is specified but no State/Province is specified, clear Country.
b. Repeat step 8a and 8b for Temporary Address, Parent 1 address, Parent 2 address, Legal Guardian address, and Emergency Contact address.
9. Copy permanent address.
a. If “Parent 1 lives at same address?” is selected, the following Parent 1 address fields are set to be the same as the corresponding fields on the prospect record:– Address Line 1– Address Line 2
– Foreign Address Line– City– State/Province
– County– Zip/Postal Code– Country
– Is parent 1 address not in U.S. or Canada?
b. Repeat step 9a for Parent 2 address and Legal Guardian address.
Table 12: Set Default Data (cont’d)
Logic
Configuration, Recruiter Release 2.6 October 19, 2012 49

Architecture: Recruiter Business Rules
Validate Data
Table 13 shows the logic that Recruiter follows to validate the data when creating an application record.
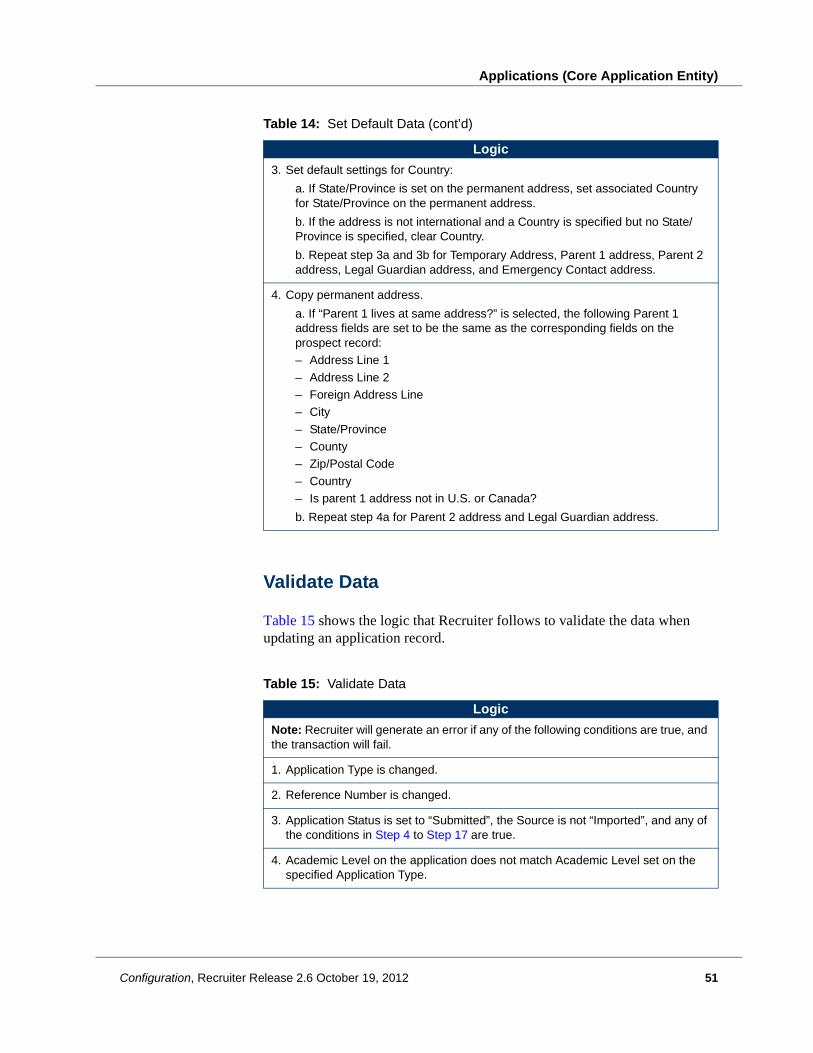
Update Record
Set Default Data
Table 14 shows the logic that Recruiter follows to set the default data when updating an application record.
Table 13: Validate Data
Logic
Note: Recruiter will generate an error if any of the following conditions are true, and the transaction will fail.
1. Application Type is not specified.
2. Prospect is not specified.
Table 14: Set Default Data
Logic
1. If Academic Program is specified (or has a default setting from Application Type) and Academic Level is not specified, set Academic Level to the level specified on the academic program record.
2. Set default settings for an international address:
a. If the permanent address is specified to be international (“Is permanent address not in U.S. or Canada?” is selected), clear any values in State/Province and Zip/Postal Code.
b. If the permanent address is not specified to be international, clear Foreign Address Line.
c. Repeat steps 2a and 2b for Temporary Address, Parent 1 address, Parent 2 address, Legal Guardian address, and Emergency Contact address.
50 Configuration, Recruiter Release 2.6 October 19, 2012
Applications (Core Application Entity)
Validate Data
Table 15 shows the logic that Recruiter follows to validate the data when updating an application record.
3. Set default settings for Country:
a. If State/Province is set on the permanent address, set associated Country for State/Province on the permanent address.
b. If the address is not international and a Country is specified but no State/Province is specified, clear Country.
b. Repeat step 3a and 3b for Temporary Address, Parent 1 address, Parent 2 address, Legal Guardian address, and Emergency Contact address.
4. Copy permanent address.
a. If “Parent 1 lives at same address?” is selected, the following Parent 1 address fields are set to be the same as the corresponding fields on the prospect record:– Address Line 1
– Address Line 2– Foreign Address Line– City
– State/Province– County– Zip/Postal Code
– Country– Is parent 1 address not in U.S. or Canada?
b. Repeat step 4a for Parent 2 address and Legal Guardian address.
Table 15: Validate Data
Logic
Note: Recruiter will generate an error if any of the following conditions are true, and the transaction will fail.
1. Application Type is changed.
2. Reference Number is changed.
3. Application Status is set to “Submitted”, the Source is not “Imported”, and any of the conditions in Step 4 to Step 17 are true.
4. Academic Level on the application does not match Academic Level set on the specified Application Type.
Table 14: Set Default Data (cont’d)
Logic
Configuration, Recruiter Release 2.6 October 19, 2012 51

Architecture: Recruiter Business Rules
5. SSN has a value and it does not match an accepted pattern for a Social Security number (###-##-#### or #########, where # represents any digit, with 000-00-0000 or 000000000 not being allowed).
6. SIN has a value and it does not match an accepted pattern for a Social Insurance Number (###-###-### or #########, where # represents any digit, with 000-000-000 or 000000000 not being allowed).
7. Alien Registration Number, U.S. Entry Date, or Visa Type are specified, but Citizenship Status is not specified.
8. Any of the permanent address fields have a value and any of the following conditions are true for fields on the permanent address:
• City is not specified.
• Address Line 1 is not specified.
• Non-international addresses only: State/Province is not specified.
• Non-international addresses only: Zip/Postal Code is not specified.
• Non-international addresses only: State/Province is set to a U.S. state but the ZIP code does not match the allowed pattern for a U.S. ZIP code (#####, #####-####, or #########).
• Non-international addresses only: State/Province is set to a Canadian province but the postal code does not match the allowed pattern for a Canadian postal code (A#A #A#, where A represents any letter in uppercase or lowercase).
• Non-international addresses only: Country is not specified as U.S. or Canada.
• Non-international addresses only: Foreign Address Line specifies a value.
• International addresses only: Foreign Address Line is not specified.
• International addresses only: Country is not specified.
• International addresses only: Country is set to U.S. or Canada.
9. If “Is current address different than permanent address?” is selected for Temporary Address, perform the same validation as Step 8 for Temporary Address.
10.“Is current address different than permanent address?” is selected and Temporary Address Expiration Date precedes Temporary Address Effective Date.
11.Validate parent data:
a. If Parent 1 is specified, generate an error and fail the transaction if any of the following are true:– Parent 1 First Name is not specified.
– Parent 1 Last Name is not specified.– Parent 1 Birth Date does not occur in the past.– Parent 1 Date Deceased does not occur in the past.
b. If “Parent 1 lives at same address?” is not selected for Parent 1, perform the same validation as step Step 8 for Parent 1 address.
c. Repeat steps 11a and 11b for Parent 2.
Table 15: Validate Data (cont’d)
Logic
52 Configuration, Recruiter Release 2.6 October 19, 2012

Applications (Core Application Entity)
Delete Record
No validation logic is performed when deleting an application record.
12.Legal Guardian Validation
a. If Legal Guardian is specified, generate an error and fail the transaction if any of the following are true: – Legal Guardian Birth Date occurs in the past.
b. If “Legal guardian lives at same address?” is not selected for Legal Guardian, perform the same validation as Step 8 for Legal Guardian address.
13.If Emergency Contact Street Address 1 is specified, perform the same validation in Step 8 for Emergency Contact address.
14.Validate sibling data:
a. If Sibling 1 First Name, Sibling 1 Last Name, or Sibling 1 Relationship is specified, generate an error and fail the transaction if any of the following conditions are true:– Sibling 1 First Name is not specified.
– Sibling 1 Last Name is not specified.– Sibling 1 Relationship is not specified.– Sibling 1 Birth Date does not occur in the past.
b. Repeat step 14a for Sibling 2 and Sibling 3.
15.Any fields that are required on the corresponding application type entity (“datatel_applicationtypename”) record are not specified.
16.The “Certify” field (“datatel_certify”) on the corresponding application type entity (“datatel_applicationtypename”) record is not selected.
17.Birth Date does not occur in the past.
18.Generate errors for Application Status if any of the following conditions are true:
• Application Status is changed to “Started” from any other status.
• Application Status is changed to “Submitted” and the previous status was not “Started”.
• Application Status is changed to “Withdrawn” and the previous status was set to “Exported to ERP”.
• Application Status is set to “Marked Complete” and the previous status was not “Submitted”.
• Application Status is set to “Marked Complete” and there are missing required supplemental items.
Table 15: Validate Data (cont’d)
Logic
Configuration, Recruiter Release 2.6 October 19, 2012 53

Architecture: Recruiter Business Rules
Events (Event Participant Entity)This section contains the validation logic that Recruiter uses in addition to the native Microsoft Dynamics CRM validation that is based on the Event Participant entity metadata. The CRM validation logic checks for required fields, data type validation (for example, a date field must be a valid date), validation for number ranges, etc.
Create Record
Set Default Data
No default data is set when creating an event record.
Validate Data
Table 16 shows the logic that Recruiter follows to validate the data when creating an event record.
Table 16: Validate Data
Logic
Note: Recruiter will generate an error if any of the following conditions are true, and the transaction will fail.
1. The event end date and time precedes the event start date and time.
2. Either the event end date and time or the event start date and time is empty.
3. The event minimum capacity exceeds the event maximum capacity.
4. The event attendees goal is less than the minimum capacity or greater than the maximum capacity.
5. The current user does not have the Event Approver security role but is setting Event Status to a value other than “Draft” or “Ready for Approval” when the event has not been approved (Approved By field does not have a value).
54 Configuration, Recruiter Release 2.6 October 19, 2012

Events (Event Participant Entity)
Update Record
All validation from “Create Record” beginning on page 54 applies when updating an event record, with the following additions.
Set Default Data
No default data is set when updating an event record.
Validate Data
Table 17 shows the logic that Recruiter follows to validate the data when updating an event record.
6. Event is being saved as “Open” or “Ready For Approval”, and any of the following conditions are true:
• Event Location does not have a value.
• Event Code does not have a value.
• The “Will this event be promoted on the web?” field is set to “Yes,” but the Web Short Description field does not have a value.
• The “Will this event be promoted on the web?” field is set to “Yes,” but the Web Long Description field does not have a value.
7. A new event is created with a status of “Complete”, “Closed”, or “Cancelled”.
8. The “Will this event be promoted on the web?” field is set to “Yes,” but the user specified in the Reply To field does not have an e-mail address specified on the CRM user record.
Table 16: Validate Data (cont’d)
Logic
Table 17: Validate Data
Logic
Note: Recruiter will generate an error if any of the following conditions are true, and the transaction will fail.
1. Event is being updated (other than event metrics) after the status was previously set to “Cancelled” or “Complete”.
2. Event Status is updated to “Draft” from any other status.
Configuration, Recruiter Release 2.6 October 19, 2012 55

Architecture: Recruiter Business Rules
Delete Record
No validation logic is performed when deleting an event record.
3. Event Status is updated to “Ready for Approval” and the previous status was not “Draft”.
4. Event Status is updated to “Open” and the previous status was not “Draft” or “Ready for Approval”.
5. Event Status is updated to “Complete” and the previous status was not “Open” or “Closed”.
6. Event Status is updated to “Closed” and the previous status was not “Open”.
7. Event Status is updated to “Cancelled” and the previous status was “Complete”.
Table 17: Validate Data (cont’d)
Logic
56 Configuration, Recruiter Release 2.6 October 19, 2012

Test Scores (Test Score Entity)
Test Scores (Test Score Entity)The basic process for a test score import is as follows:
1. The import process creates a staging record in the Test Score Staging Record entity (“datatel_testscorestagingrecord”).
2. The appropriate workflow runs to perform the following actions on the test score staging record:
a. Recruiter attempts to validate and create records in the Test Score entity (“datatel_testscore”).
b. Recruiter attempts to associate test score records with a prospect.
The following sections contain the validation logic used when creating test score records and matching test scores to prospect or suspect records.
Create Test Score Record
Recruiter creates official test scores based on the following test score sources:
ACT
College Board (SAT)
GMAT
TOEFL
GRE
LSAT
Table 18 shows the logic that Recruiter follows when creating a test score record. These steps are performed for each test score type.
Table 18: Create Test Score Record
Logic
1. Set the owner of the test score to the user who ran the import.
2. Set the name of the test score to a concatenation of the test type, test date, and composite score.
3. Perform the source-specific validation described in the following sections.
4. If the test score validation fails, create a task activity to track the failure.
Configuration, Recruiter Release 2.6 October 19, 2012 57

Architecture: Recruiter Business Rules
ACT Test Score
Table 19 shows the logic that Recruiter follows to validate the data when creating the ACT test score.
5. If the test score validation succeeds, validate the student data or find a matching prospect or suspect.
• If a matching prospect or suspect is found, attach the test score to that record.
• If no matching prospect or suspect is found, create a new prospect record. If the prospect record validation fails and the record cannot be created, the test score is not associated with a prospect record.
6. If the test score is associated with a prospect record, calculate and update the associated primary score.
Table 19: Validate ACT Test Score Data
Logic
Note: Recruiter will generate an error if any of the following conditions are true, and the transaction will fail.
1. Test date is not supplied or not valid.
2. ACT subtest records cannot be created because of the validation described in “Validate Subtest Data” on page 63.
Table 18: Create Test Score Record (cont’d)
Logic
58 Configuration, Recruiter Release 2.6 October 19, 2012

Test Scores (Test Score Entity)
College Board (SAT)
For College Board, Recruiter creates both SAT reasoning and SAT subject tests.
SAT Reasoning
Recruiter creates test score records for the most recent SAT reasoning test scores, in addition to the previous five scores (which are optionally provided on the same staging record). Table 20 shows the logic that Recruiter follows to validate the data when creating the SAT reasoning test score.
SAT Subject
Recruiter creates test score records for the most recent SAT subject test scores, in addition to the previous five scores (which are optionally provided on the same staging record). Table 21 shows the logic that Recruiter follows to validate the data when creating the SAT subject test score.
Table 20: Validate SAT Reasoning Test Score Data
Logic
Note: Recruiter will generate an error if any of the following conditions are true, and the transaction will fail.
1. Test date is not supplied or not valid.
2. SAT reasoning subtest records (verbal, math, or writing) cannot be created because of the validation described in “Validate Subtest Data” on page 63, or because at least one valid subtest score cannot be created.
Table 21: Validate SAT Subject Test Score Data
Logic
Note: Recruiter will generate an error if any of the following conditions are true, and the transaction will fail.
1. Test date is not supplied or not valid.
2. SAT subject subtest records cannot be created because of the validation described in “Validate Subtest Data” on page 63, or because the subject type is not valid.
Configuration, Recruiter Release 2.6 October 19, 2012 59

Architecture: Recruiter Business Rules
GMAT
Table 22 shows the logic that Recruiter follows to validate the data when creating the GMAT test score.
TOEFL
Table 23 shows the logic that Recruiter follows to validate the data when creating the TOEFL test score.
Table 22: Validate GMAT Test Score Data
Logic
Note: Recruiter will generate an error if any of the following conditions are true, and the transaction will fail.
1. At least one of the up to three GMAT scores are not valid for any of the following reasons:
• Score specifies an irregularity code.
• Test date is not supplied or not valid.
• GMAT subtest records cannot be created because of the validation described in “Validate Subtest Data” on page 63.
Table 23: Validate TOEFL Test Score Data
Logic
Note: Recruiter will generate an error if any of the following conditions are true, and the transaction will fail.
1. Test date is not supplied or not valid.
2. TOEFL test type is not supplied.
3. TOEFL test type is “I” (IBT), and any of the IB Listening, IB Reading, IB Speaking, IB Writing, or IB Total Score subtests cannot be created because of the validation described in “Validate Subtest Data” on page 63.
4. TOEFL test type is “P” (paper-based test), and any of the PB Section I, PB Section II, PB Section III, PB Converted TWE, or PB Total Score subtests cannot be created because of the validation described in “Validate Subtest Data” on page 63.
60 Configuration, Recruiter Release 2.6 October 19, 2012

Test Scores (Test Score Entity)
GRE
Table 24 shows the logic that Recruiter follows to validate the data when creating the GRE test score.
5. TOEFL test type is “C” (computer-based test, deprecated in July 2011), and any of the CBT Listening, CBT Reading, CBT Essay Rating, CBT Structure/Writing, or CBT Total Score subtests cannot be created because of the validation described in “Validate Subtest Data” on page 63.
6. TOEFL test type is “S” (test of spoken English), and the TSE Score subtest cannot be created because of the validation described in “Validate Subtest Data” on page 63.
Table 24: Validate GRE Test Score Data
Logic
Note: Recruiter will generate an error if any of the following conditions are true, and the transaction will fail.
1. Test date is not supplied or not valid.
2. Test code is “2” or “02” (General Metatest), and Verbal, Quantitative, or Writing subtest records cannot be created because of the validation described in “Validate Subtest Data” on page 63.
3. Test code is “3” or “03” (Revised General Test), and Verbal (Revised), Quantitative (Revised), or Writing (Revised) subtest records cannot be created because of the validation described in “Validate Subtest Data” on page 63.
4. Test code is “22” (Biochemistry, Cell & Molecular Biology Metatest), and Biochem Cell & Molecular Biology, Biochemistry, Cell Biology, or Molecular Biology and Genetics subtest records cannot be created because of the validation described in “Validate Subtest Data” on page 63.
5. Test code is “24” (Biology Metatest), and Biology, Cellular and Molecular Biology, Organismal Biology, or Ecology and Evolution subtest records cannot be created because of the validation described in “Validate Subtest Data” on page 63.
6. Test code is “27” (Chemistry Metatest), and Chemistry subtest record cannot be created because of the validation described in “Validate Subtest Data” on page 63.
7. Test code is “29” (Computer Science Metatest), and Computer Science subtest record cannot be created because of the validation described in “Validate Subtest Data” on page 63.
8. Test code is “64” (Literature in English Metatest), and Literature in English subtest record cannot be created because of the validation described in “Validate Subtest Data” on page 63.
Table 23: Validate TOEFL Test Score Data (cont’d)
Logic
Configuration, Recruiter Release 2.6 October 19, 2012 61

Architecture: Recruiter Business Rules
LSAT
Table 25 shows the logic that Recruiter follows to validate the data when creating the LSAT test score.
9. Test code is “68” (Mathematics Metatest), and Mathematics subtest record cannot be created because of the validation described in “Validate Subtest Data” on page 63.
10.Test code is “77” (Physics Metatest), and Physics subtest record cannot be created because of the validation described in “Validate Subtest Data” on page 63.
11.Test code is “81” (Psychology Metatest), and Psychology, Experimental Psychology, or Social Psychology subtest records cannot be created because of the validation described in “Validate Subtest Data” on page 63.
Table 25: Validate LSAT Test Score Data
Logic
Note: Recruiter will generate an error if any of the following conditions are true, and the transaction will fail.
1. Test date is not supplied or not valid.
2. Number of tests reported is not supplied or not valid.
3. LSAT Average Score is not supplied.
4. LSAT Average Score subtest record cannot be created because of the validation described in “Validate Subtest Data” on page 63.
5. Subtest records for any of the up to 12 LSAT scores provided cannot be created because of the validation described in “Validate Subtest Data” on page 63.
Table 24: Validate GRE Test Score Data (cont’d)
Logic
62 Configuration, Recruiter Release 2.6 October 19, 2012

Test Scores (Test Score Entity)
Validate Subtest Data
Table 26 shows the logic that Recruiter follows to validate subtest data.
Table 26: Validate Subtest Data
Logic
Note: Recruiter will generate an error if any of the following conditions are true, and the transaction will fail.
1. Parent test score is not supplied.
2. Subtest type is not valid for the parent test type.
3. Subtest has a numeric score that cannot be parsed into a valid decimal value or that falls outside the allowed minimum and maximum values.
4. Subtest has a numeric score that is not a multiple of the “increments” specified for the subtest.
Configuration, Recruiter Release 2.6 October 19, 2012 63

Architecture: Recruiter Business Rules
Match Test Score to Prospect or Suspect Record
Table 27 shows the logic that Recruiter follows when matching a test score to a prospect or suspect record. These steps are performed for each test score type.
Associate Test Score to Prospect
Table 28 shows the logic that Recruiter follows to associate a test score to a prospect.
Table 27: Match Test Score to Prospect or Suspect
Logic
1. Ensure that duplicate detection is enabled.
2. Determine whether an active, unambiguous match can be identified for the staging record using the duplicate detection rules defined with the Test Score Staging Record entity as the base record type and either the Contact or Lead entity as the matching record type.
• If a single prospect is found, check to see if the test score is a duplicate for the prospect. If so, do not create it (and delete it if it has already been created). Otherwise associate the test score with the prospect as described in the section “Associate Test Score to Prospect” on page 64.
• If multiple matches are found, indicate this on the test score record so that it can be resolved using the Prospect Matcher.
• If a single suspect is found, promote that suspect to a prospect and associate the score to this new prospect as described in the section “Associate Test Score to Prospect” on page 64.
• If no matches are found, create a prospect from the Test Score Staging Record data, and associate the test score with the new prospect as described in the section “Associate Test Score to Prospect” on page 64.
Table 28: Associate Test Score to Prospect
Logic
Note: Recruiter will generate an error if any of the following conditions are true, and the transaction will fail.
1. Associate the test score to the prospect by specifying the prospect ID on the test score.
2. Perform any vendor-specific mapping of data to the prospect, including:
• Religious denomination
• Academic interests
64 Configuration, Recruiter Release 2.6 October 19, 2012

Test Scores (Test Score Entity)
3. Create an academic history record if missing for any school information on the test score.
4. Update the flag for the prospect that indicates there are pending official scores that need to be sent to the ERP system.
5. Calculate a prospect’s primary scores and primary composite score for the test type in context.
Table 28: Associate Test Score to Prospect (cont’d)
Logic
Configuration, Recruiter Release 2.6 October 19, 2012 65

Architecture: Recruiter Business Rules
66 Configuration, Recruiter Release 2.6 October 19, 2012

ConfigurationExtending Microsoft Dynamics CRM


Extending Microsoft Dynamics CRM
Microsoft Dynamics CRM 2011 Solutions
In This ChapterThis chapter provides information about extending Recruiter functionality using Microsoft Dynamics CRM 2011 solutions.
Table 29 lists the topics covered in this chapter.
Table 29: Topics in This Chapter
Topic Page
Extending Functionality with Microsoft Dynamics CRM 2011 Solutions
70
Using Recruiter Features in Multiple Business Units 76
Configuration, Recruiter Release 2.6 October 19, 2012 69

Extending Microsoft Dynamics CRM: Microsoft Dynamics CRM 2011 Solutions
Extending Functionality with Microsoft Dynamics CRM 2011 Solutions
After you have installed Recruiter and have had a chance to use Recruiter, you may need to customize the software. Microsoft Dynamics CRM 2011 provides the ability to extend functionality and the user interface using solutions. There are two types of Microsoft Dynamics CRM solutions: Unmanaged and Managed.
A managed solution represents a completed solution that is intended to be distributed and installed. For example, the Recruiter solution is a managed solution. An unmanaged solution is one that is not intended to be distributed outside of your institution. For example, the customizations that you make to Recruiter are unmanaged.
The most common customizations you can make are the following:
Add dashboards, charts, or reports.
Add a new form.
Change a form.
Add fields.
Remove fields from a form that are not required.
For more information about configuring forms and other Recruiter elements, see “Configuring Recruiter” beginning on page 79.
Note: For more information about solutions, how to create a solution, or how to add items to a solution, see Package and Distribute Extensions with Microsoft Dynamics CRM Solutions, available from the Microsoft® MSDN website.
70 Configuration, Recruiter Release 2.6 October 19, 2012

Extending Functionality with Microsoft Dynamics CRM 2011 Solutions
Guidelines and Limitations
When using Microsoft Dynamics CRM solutions to extend the functionality of Recruiter, the following is recommended:
Choose an unmanaged solution.
When adding items to the solution, do not select the Including required components option.
Modify the default publisher to set your customization prefix. Use your customer number as your customization prefix; do not use “datatel” as the customization prefix.
Do not make changes to the delivered form script registration.
Do not make changes to the delivered web resources or IFRAME elements on a form.
Do not make changes to the existing entity schema, including data types and field length. Changing these items could have consequences in other entities. For example, if you change a field on the application, you will also have to change the same field on the prospect form. If you do not make the changes in both places, errors are generated that could cause issues when creating applications or prospects. We recommend that you do not make any database changes that could be destructive.
Do not remove any of the delivered entities or attributes, but you can add new entities and attributes.
Do not make changes to the delivered plug-in registration, but you can register new plug-ins.
Do not make changes to the delivered processes or process templates, but you can create new processes and process templates.
Do not make changes to the delivered reports, but you can create new reports.
Do not make changes to the delivered web resources, but you can create new web resources.
If possible, create a new section or tab for any changes you make to a form, rather than making changes to the Ellucian-delivered sections. This will allow the form elements to merge properly when updates for Recruiter are released. You can also create new forms based on the Ellucian-delivered forms to maintain separation from Recruiter updates.
If you export your solution to apply it to another environment, make sure that both environments are using the same version of CRM (including any Update Rollups) and the same version of Recruiter (including any hot fixes or customizations made by Ellucian Services).
You can bundle a custom application in an unmanaged solution, but if you load that solution into another environment it will not work without first exporting the related metadata from the original environment and then importing it into the new environment.
Configuration, Recruiter Release 2.6 October 19, 2012 71

Extending Microsoft Dynamics CRM: Microsoft Dynamics CRM 2011 Solutions
How Solutions Work
This section contains general information about how solutions work in Microsoft Dynamics CRM:
To create a new solution, you must first create a solution record. Then, you can associate solution components with the solution. You can also create new solution components in the context of the new solution or add components from existing solutions.
Each solution is associated with a publisher record that contains details about the solution creator. The publisher record includes a customization prefix added to the names of any of the publisher's solution components.
To customize a solution, you must have the System Administrator or System Customizer security role, or equivalent privileges.
Whether a component is customizable is determined by the managed properties that were set when the component was added to the system. Managed properties control which customization tasks can be performed on a solution component. The managed properties take effect only after the solution is packaged (exported) as a managed solution and installed in another organization.
You can delete or remove components from an unmanaged solution, but not from a managed solution. To delete a component eliminates it permanently. To remove a component withdraws it from an unmanaged solution, while leaving it available for use elsewhere.
For those with a required security role, an unmanaged solution has no restrictions on adding, deleting, updating, testing, importing, or exporting solution components. A solution is developed as an unmanaged solution. This differs from a managed solution, where you cannot add or remove components.
A managed solution has partial or full restrictions on customizing solution components. You can package and export a solution as a managed solution to control customizing solution components when installed into another organization. You cannot add or remove components from a managed solution. This differs from an unmanaged solution, where you can add or remove components.
You can only delete custom entities and components that you have created.
A solution is unmanaged while under development. You can export a solution as managed or unmanaged.
Solutions often include solution components with relationships, Lookup fields, and related functionality or dependencies. Before deleting a solution that has solution components with dependencies, first remove the dependencies. For more information, see “Understanding Recruiter Data and Relationships” on page 28.
72 Configuration, Recruiter Release 2.6 October 19, 2012

Extending Functionality with Microsoft Dynamics CRM 2011 Solutions
Create an Unmanaged Solution
Step 1. In the Navigation Pane, click Settings, and then click Solutions.
Step 2. In the Solutions pane, click New.
Step 3. Complete the required fields, and click Save. By default, this saves an unmanaged solution.
Step 4. To add a new or existing component to your solution, in the Component Type list, click the type you want to add. Then, in the main pane, click New or Add Existing. For more information, see the next section, “Add New or Existing Solution Components.”
Step 5. Click Save and Close. Your new unmanaged solution is in the Solutions list.
Add New or Existing Solution Components
You can add new or existing components to any unmanaged solution. Components can be created in the customization area of Microsoft Dynamics CRM, or can be developed outside of Microsoft Dynamics CRM. For more information about developing solutions, see the Microsoft Dynamics CRM Software Development Toolkit (SDK).
Step 1. In the Navigation Pane, click Settings, and then click Solutions.
Step 2. In the Solutions pane, double-click the name of the unmanaged solution to which you want to add components.
Step 3. In the Navigation Pane, click the component type that you want to add. You can add new or existing components for most component types. Do one of the following:
To add an existing component, in the main pane, click Add Existing. Select the component, and click OK. If you are adding an entity, when prompted,
Configuration, Recruiter Release 2.6 October 19, 2012 73

Extending Microsoft Dynamics CRM: Microsoft Dynamics CRM 2011 Solutions
select the No, do not include required components check box, and then click OK.
To create a new component, click New. Specify the component values, and click Save and Close.
To read the steps for adding or creating each type of component, click the help icon for it.
Step 4. Click Save and Close to save your unmanaged solution and any components that you have added to it.
Step 5. When your customizations are complete, publish them:
To publish customizations for only the component that you are currently editing, on the Home tab, click Publish.
To publish customizations for all unpublished components at one time, click Publish All Customizations from the main customizations dialog box.
View or Edit Unmanaged Solution Components
All components that make up an unmanaged solution are listed in the window for that solution. This topic lists any actions you can perform for those components.
Follow these steps to view or edit unmanaged solution components.
Step 1. In the Navigation Pane, click Settings, and then click Solutions.
Step 2. Double-click the row for the unmanaged solution. The unmanaged solution opens in a new window.
Step 3. In the Navigation Pane, click Components to see a list of all solution components in the main pane. To see components for an individual type, click a type from the Component Type list.
The component type and the properties set by the creator of the component determines whether a component is customizable. In each component list, the Customizable column has “True” for a customizable component.
74 Configuration, Recruiter Release 2.6 October 19, 2012
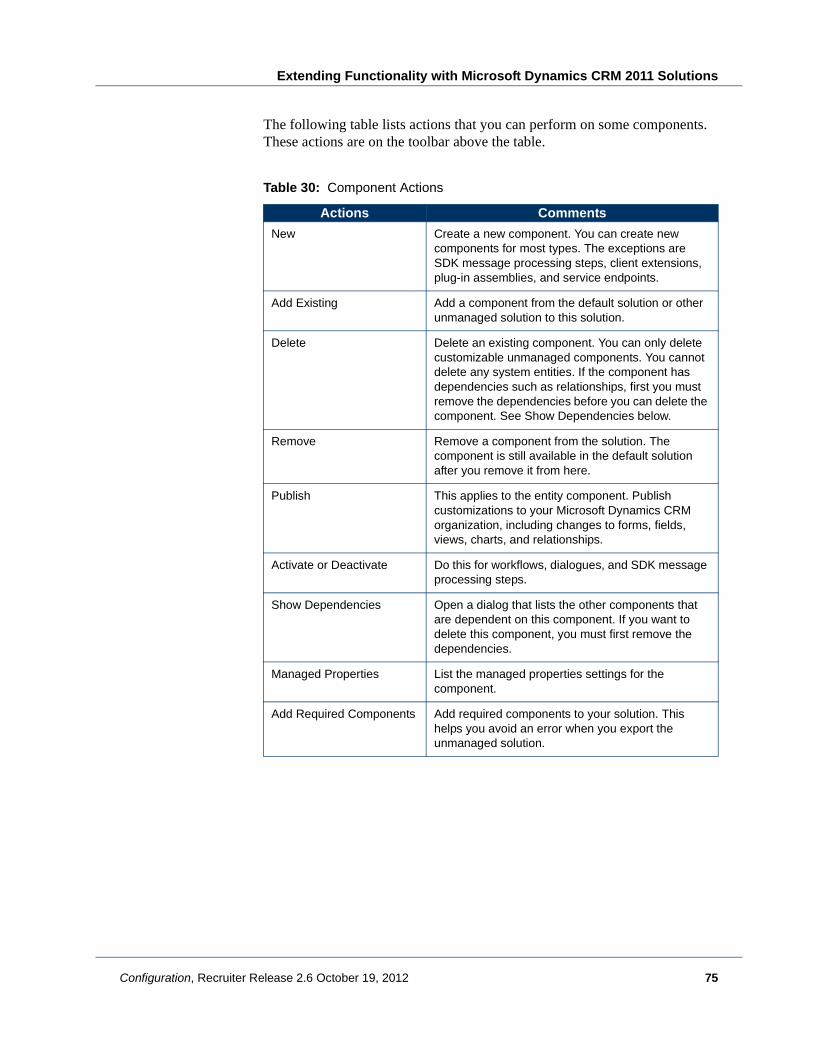
Extending Functionality with Microsoft Dynamics CRM 2011 Solutions
The following table lists actions that you can perform on some components. These actions are on the toolbar above the table.
Table 30: Component Actions
Actions Comments
New Create a new component. You can create new components for most types. The exceptions are SDK message processing steps, client extensions, plug-in assemblies, and service endpoints.
Add Existing Add a component from the default solution or other unmanaged solution to this solution.
Delete Delete an existing component. You can only delete customizable unmanaged components. You cannot delete any system entities. If the component has dependencies such as relationships, first you must remove the dependencies before you can delete the component. See Show Dependencies below.
Remove Remove a component from the solution. The component is still available in the default solution after you remove it from here.
Publish This applies to the entity component. Publish customizations to your Microsoft Dynamics CRM organization, including changes to forms, fields, views, charts, and relationships.
Activate or Deactivate Do this for workflows, dialogues, and SDK message processing steps.
Show Dependencies Open a dialog that lists the other components that are dependent on this component. If you want to delete this component, you must first remove the dependencies.
Managed Properties List the managed properties settings for the component.
Add Required Components Add required components to your solution. This helps you avoid an error when you export the unmanaged solution.
Configuration, Recruiter Release 2.6 October 19, 2012 75

Extending Microsoft Dynamics CRM: Microsoft Dynamics CRM 2011 Solutions
Using Recruiter Features in Multiple Business Units
When multiple business units are provisioned in a Microsoft Dynamics CRM organization, additional configuration must be performed to allow access to features in Recruiter that are restricted using “access” security roles and to allow access to processes that are delivered at the top-level parent business unit.
Access roles are special security roles that are delivered with Recruiter that contain no individual permissions, but are assigned to users or teams solely to grant access to specific features.
The Recruiter access roles are:
Application Status Override Access
Event Approver
Import Applications Access
Import Suspects Access
Import Test Scores Access
Prospect Plus Access
Recruiting Home Access
Recruiting Home Director Access
Trip Home Access
For more information about what features of Recruiter require these access roles, see the Security Role Information in Recruiter article in the Recruiter help.
The access roles are provisioned by the Recruiter installation at the top-level parent business unit of a CRM organization. If child business units are created after the installation, CRM will automatically copy security roles from the parent business unit into the child business unit, including the access roles. However, Recruiter functionality that is restricted using these roles will only allow access if the user is assigned the top-level, original version of the corresponding role and will not accept copies of the roles in child business units. CRM users cannot be directly assigned roles that are defined outside of their business unit. Therefore, a CRM user assigned to a child business unit will initially be unable to use these restricted Recruiter features.
To resolve this situation, you must create one or more CRM teams that belong to the top-level business unit and assign the desired access roles to these teams. Users in the child business unit can then be added as members of these
76 Configuration, Recruiter Release 2.6 October 19, 2012

Using Recruiter Features in Multiple Business Units
top-level teams, which will assign the corresponding top-level access roles to the members. These users will then be able to access the restricted Recruiter features associated with these roles.
Additionally, Recruiter delivers certain processes, such as specific workflows and dialogues, at the top-level parent business unit. To make sure that users in a child business unit can access these processes, you must create a custom access role that has access to the Process entity at the top-level parent business unit. Then, as with all other delivered access roles, create one or more CRM teams that belong to the top-level business unit and assign this access role to those teams. Users in the child business unit can then be added as members to this top-level team, which will assign the corresponding Process entity access to the members.
Configuration, Recruiter Release 2.6 October 19, 2012 77

Extending Microsoft Dynamics CRM: Microsoft Dynamics CRM 2011 Solutions
78 Configuration, Recruiter Release 2.6 October 19, 2012
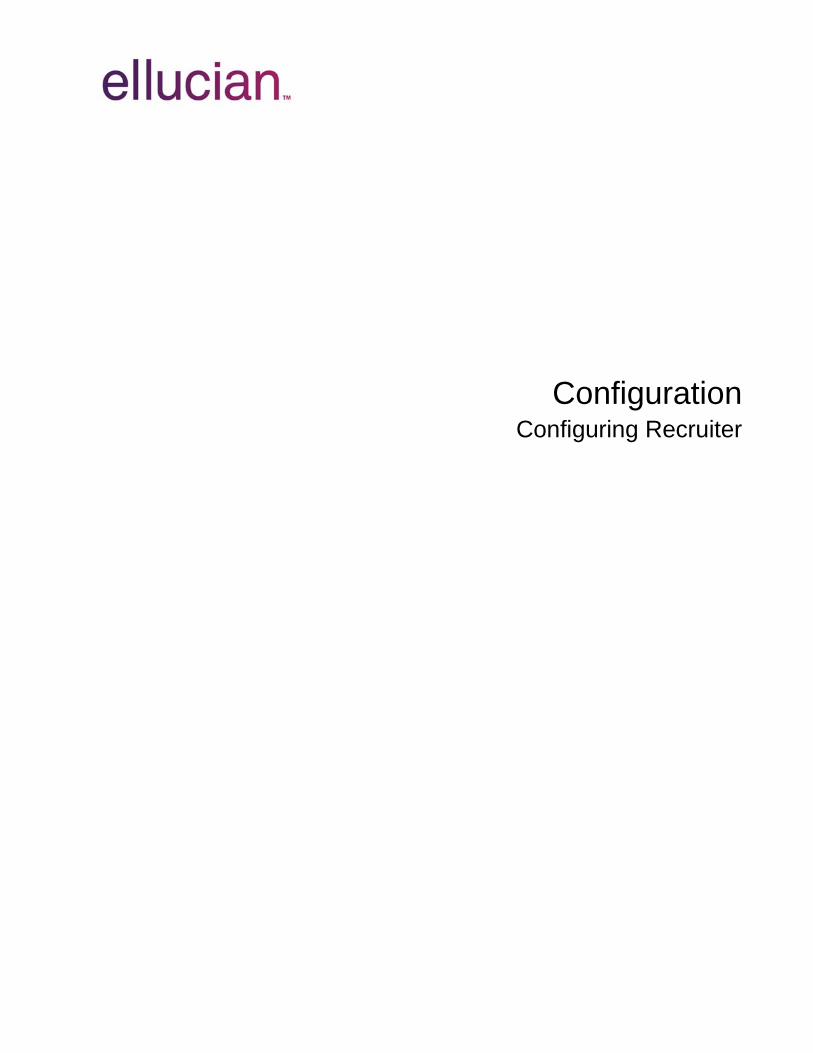
ConfigurationConfiguring Recruiter


Configuring Recruiter
Configuring Forms
In This ChapterThis chapter provides guidelines and instructions for configuring forms in Recruiter.
Table 31 lists the topics covered in this chapter.
Table 31: Topics in This Chapter
Topic Page
Understanding Forms 82
Creating Custom Forms and Configuring Fields on Forms 84
Creating Multiple Forms for the External Website 120
Configuration, Recruiter Release 2.6 October 19, 2012 81

Configuring Recruiter: Configuring Forms
Understanding FormsForms are pages that display detailed information that users have entered, such as for a prospect or an event. The information entered in a form about a specific item is stored as a record. Forms contain many customizable elements, including fields.
Guidelines and Limitations
The following sections contain best practice guidelines and limitations for configuring forms and fields.
Fields You cannot delete required fields.
You cannot apply a requirement level to a field through a form. You apply requirement level constraints directly to a field, which is also called an attribute.
Field requirements cannot be set on a form-by-form basis, because a field can be used on more than one form.
You cannot change the permissions on a field to which you do not have security role access privileges.
Before deleting a field from a form, make sure the field is not required by other components or custom scripts.
Any time you change user interface elements or implement form scripts for an entity, you must publish changes to apply them. Any customizations that change the data schema of Microsoft Dynamics CRM, such as custom entities, relationships, or fields, are applied immediately.
Forms Subforms are unique to the external website. They will not be displayed if
they are added to forms that are intended to be used inside of Recruiter.
You cannot modify the visual style of forms, such as the font style, font size, or colors, using the form editor. Modification of the Cascading Style Sheets (CSS) pages in Recruiter or style properties of the form through scripts are not supported.
82 Configuration, Recruiter Release 2.6 October 19, 2012

Understanding Forms
None of the extended form metadata is copied over to a new form. You must hide or reconfigure those sections on a new form. For example, when you save a copy of a form, you must manually re-hide any fields that were also hidden on the original form.
If possible, create a new section or tab for any changes you make to a form, rather than making changes to the delivered sections. This will allow the form elements to merge properly when updates for Recruiter are released. You can also create new forms that are based on the delivered forms to maintain separation from Recruiter updates.
Do not make changes to the delivered form script registration, web resources, or IFRAME elements on a form. You can copy an existing form and customize it for your institution; however, use caution when making these types of changes, because there may be dependencies on the existing form script and the web resources or IFRAME elements on a form.
External Website Forms You cannot include a required field in a section that can be conditionally
hidden.
You must not delete a form that is used on the external website. This can include a subform, or a custom Create Account/Prospect Inquiry, Update Profile, or Event Registration form. The system will not warn you if you delete a form that is used on the external website.
You must not delete a field that is used to determine conditional visibility of a section. The system will not warn you that the field is being used in this way.
On the My Account form, if you add a field to the Profile display, you should also add the field to the Update Profile form so that prospects can update that information.
Configuration, Recruiter Release 2.6 October 19, 2012 83

Configuring Recruiter: Configuring Forms
Creating Custom Forms and Configuring Fields on Forms
This section contains information about creating custom forms and configuring fields on forms. For general information about entities, entity relationships, entity fields, mapping relationships between entity fields, and entity views, see the Microsoft Dynamics CRM help. You can begin with the Understanding Entities article. For more information about entity relationships in Recruiter, see “Recruiter Data Model” on page 27.
Some features are native to Microsoft Dynamics CRM and the procedures are contained in the Microsoft Dynamics CRM help. Other features are Recruiter-specific extensions of native CRM features, or have additional guidelines, and are described in this section.
Table 32 contains a list of procedures related to creating custom forms and configuring fields on forms. This information includes the procedure title and where you can find more information.
Table 32: Procedures for Forms
Procedure Location
Create Custom Forms page 85
Create or edit entity fields Microsoft Dynamics CRM Help
Create or edit mapping between fields Microsoft Dynamics CRM Help
Add Fields to a Form page 90
Customize Forms Using the Extended Form Editor page 99
Create a Filter on a Field for the External Website page 105
Create Hierarchical Validation Lists for the External Website
page 108
Set Field Security in Recruiter page 111
Manage Validation Lists page 116
84 Configuration, Recruiter Release 2.6 October 19, 2012

Creating Custom Forms and Configuring Fields on Forms
Create Custom Forms
You can create custom forms in one of three ways. You can:
Edit an existing form for an entity.
Copy an existing form for an entity to create a new form.
Create a new form for an entity.
Recruiter delivers a number of default forms. You can either edit these forms or copy them. If you edit a form for an entity, we recommend that you create a new section or tab for any changes you make to a form, rather than making changes to the delivered sections. This will allow the form elements to merge properly when updates for Recruiter are released.
Copying a form allows you to re-use existing elements, such as a form’s navigation, fields, properties, event scripts, and security roles. You can also add, remove, or edit these existing elements, or add or edit fields, sections, tabs, navigation, and properties associated with the form.
To edit or copy an existing form, the existing form must have a form type of Main. If you create a new form, its form type is Main and it will be identical to the form named Information. Each main form is comprised of one or more tabs. Each tab can have one or more sections. Each section contains one or more fields or IFRAMES.
Prior to creating a custom form, you must be working within your unmanaged solution. For more information about unmanaged solutions, see the Edit Unmanaged Solutions article in the Microsoft Dynamics CRM help. If you have not yet created an unmanaged solution, see “Extending Functionality with Microsoft Dynamics CRM 2011 Solutions” on page 70 for additional guidelines.
For more information about how to make any of the specific changes to the forms that are referenced in this procedure, see the Edit the main form for an entity article in the Microsoft Dynamics CRM help.
Follow this procedure to create a custom form.
Step 1. In the Navigation Pane, click Settings, and then click Solutions.
Step 2. In the Solutions pane, double-click the name of your unmanaged solution to open it. The main customizations dialog box is displayed as shown in Figure 12.
Configuration, Recruiter Release 2.6 October 19, 2012 85
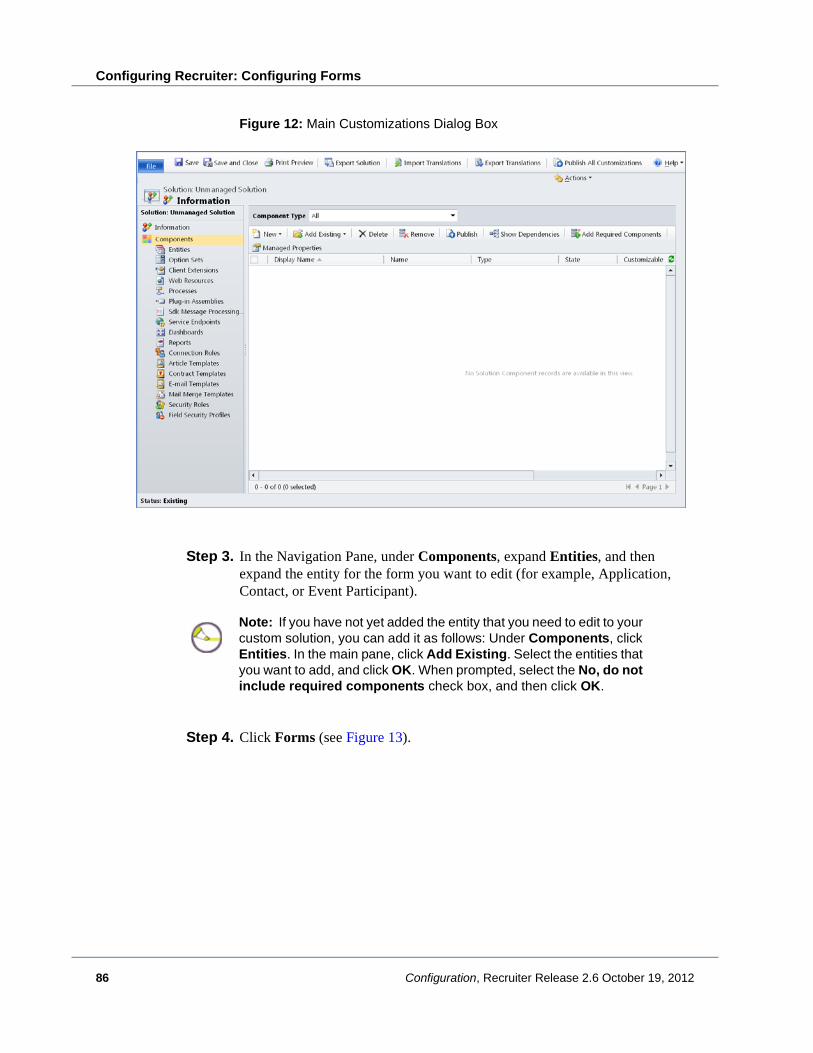
Configuring Recruiter: Configuring Forms
Figure 12: Main Customizations Dialog Box
Step 3. In the Navigation Pane, under Components, expand Entities, and then expand the entity for the form you want to edit (for example, Application, Contact, or Event Participant).
Step 4. Click Forms (see Figure 13).
Note: If you have not yet added the entity that you need to edit to your custom solution, you can add it as follows: Under Components, click Entities. In the main pane, click Add Existing. Select the entities that you want to add, and click OK. When prompted, select the No, do not include required components check box, and then click OK.
86 Configuration, Recruiter Release 2.6 October 19, 2012

Creating Custom Forms and Configuring Fields on Forms
Figure 13: Application Forms
Step 5. In the main pane, do one of the following:
To edit an existing form or copy an existing form, double-click any form with a Form Type of Main.
To create a new form, click New.
The appropriate form is displayed (see Figure 14).
Configuration, Recruiter Release 2.6 October 19, 2012 87
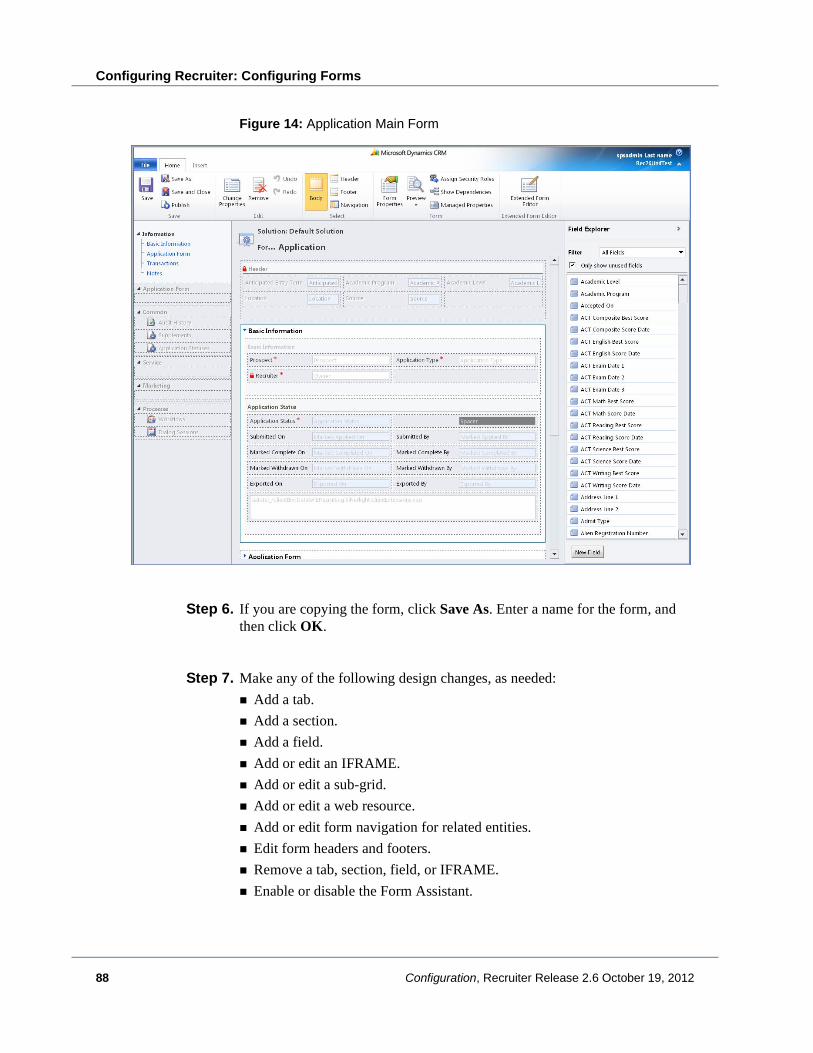
Configuring Recruiter: Configuring Forms
Figure 14: Application Main Form
Step 6. If you are copying the form, click Save As. Enter a name for the form, and then click OK.
Step 7. Make any of the following design changes, as needed:
Add a tab.
Add a section.
Add a field.
Add or edit an IFRAME.
Add or edit a sub-grid.
Add or edit a web resource.
Add or edit form navigation for related entities.
Edit form headers and footers.
Remove a tab, section, field, or IFRAME.
Enable or disable the Form Assistant.
88 Configuration, Recruiter Release 2.6 October 19, 2012

Creating Custom Forms and Configuring Fields on Forms
Step 8. Edit properties for parts of the form, as needed:
Edit form properties.
Edit form field properties.
Edit tab properties.
Edit section properties.
Step 9. Add event scripts, as needed.
Step 10. Determine which security roles will be able to view the form and assign them to the form, as needed.
Step 11. Preview how the form appears and how it functions:
a. On the Home tab, click Preview, and then select Create Form, Update Form, or Read-Only Form.
b. To close the Preview form, on the File menu, click Close.
Step 12. When you finish editing the form, click Save.
Step 13. When your customizations are complete, publish them:
To publish customizations for only the component that you are currently editing, on the Home tab, click Publish.
To publish customizations for all unpublished components at one time, click Publish All Customizations from the main customizations dialog box.
Configuration, Recruiter Release 2.6 October 19, 2012 89

Configuring Recruiter: Configuring Forms
Add Fields to a Form
You can customize a form to add additional fields that will help you meet your institution’s needs. Fields can be added to a form either from the main entity for that form or from a related entity for that form, also referred to as a subform. The eligible entities for a subform can be seen by examining the 1:N related entities for the primary entity. For example, a subform to Prospect is High School Info or Academic Interests.
Some of the common scenarios when you might need to customize a form to add fields are:
Add fields to capture additional address information.
Add a subform to capture high school information.
Add a subform to capture college information.
Add a subform to capture academic interests.
Add a subform to capture career goals.
Add a subform to capture extracurricular information.
Add fields or subforms to capture test score information.
Add a subform to capture event guest information.
To complete these procedures, you must be assigned the System Administrator or System Customizer security role, or equivalent privileges.
Add Fields from a Main Entity to a Form
Follow this procedure to add fields from a main entity to a form.
Step 1. In the Navigation Pane, click Settings, and then click Solutions.
Note: You can only add fields from a subform to the Prospect, Application, and Event forms. Subforms are unique to the external website. They will not be displayed if they are added to forms that are intended to be used inside of Recruiter.
Note: You can view the 1:N relationships for a primary entity within your unmanaged solution as follows: Go to Settings > Solutions, and open the unmanaged solution. In the Navigation Pane, expand Entities, expand the primary entity, and click 1:N Relationships.
90 Configuration, Recruiter Release 2.6 October 19, 2012

Creating Custom Forms and Configuring Fields on Forms
Step 2. In the Solutions pane, double-click the name of your unmanaged solution to open it.
Step 3. In the Navigation Pane, under Components, expand Entities, and then expand the entity you want (Application, Contact, or Event Participant).
Step 4. Click Forms.
Step 5. In the main pane, click a form to edit it if it has a Form Type of Main. Figure 15 shows the Default Update Prospect Profile Form as an example.
Figure 15: Default Update Prospect Profile Form
Step 6. In the form, select the section to which you want to add a field.
Configuration, Recruiter Release 2.6 October 19, 2012 91

Configuring Recruiter: Configuring Forms
Step 7. In the Field Explorer pane, double-click the field that you want to add to the form. The field is displayed on the form in the selected section (see Figure 16).
Figure 16: Mobile Phone Field Added to My Profile Section
Step 8. When you finish editing the form, click Save.
Step 9. When your customizations are complete, publish them:
To publish customizations for only the component that you are currently editing, on the Home tab, click Publish.
To publish customizations for all unpublished components at one time, click Publish All Customizations from the main customizations dialog box.
Note: The new field is added to the section and field location you currently have selected. You can change the location of the field if necessary by dragging it to the desired area of the form.
92 Configuration, Recruiter Release 2.6 October 19, 2012

Creating Custom Forms and Configuring Fields on Forms
Add Subform Fields to an External Website Form
Follow this procedure to add subform fields to an external website form.
Step 1. In the Navigation Pane, click Settings, and then click Solutions.
Step 2. In the Solutions pane, double-click the name of your unmanaged solution to open it.
Step 3. In the Navigation Pane, under Components, expand Entities, and then expand the entity you want (Application, Contact, or Event Participant).
Step 4. Click Forms.
Step 5. In the main pane, click a form to edit it if it has a Form Type of Main. Figure 17 shows the Default Update Prospect Profile Form as an example.
Configuration, Recruiter Release 2.6 October 19, 2012 93

Configuring Recruiter: Configuring Forms
Figure 17: Default Update Prospect Profile Form
Step 6. Click the tab area where you would like to add a section.
Step 7. On the Insert tab, in the Section group, click One Column or Two Columns (see Figure 18).
We recommend that you select the same number of columns as is on the subform to ensure proper field alignment and display.
Note: The new section is added to the bottom of the tab. You can change the location of the section if necessary by dragging it to the desired area of the form.
Note: You cannot add any additional fields to a section that contains a subform.
94 Configuration, Recruiter Release 2.6 October 19, 2012

Creating Custom Forms and Configuring Fields on Forms
Figure 18: Section Added to Basics Tab
Step 8. To change the name of the section on the form, on the Home tab, click Change Properties. The Section Properties dialog box is displayed (see Figure 19).
Configuration, Recruiter Release 2.6 October 19, 2012 95

Configuring Recruiter: Configuring Forms
Figure 19: Section Properties Dialog Box
Step 9. In the Label field, type the name that you want to display as the label for the section, and click OK.
Step 10. On the Home tab, in the Extended Form Editor area, click Extended Form Editor. The Extended Section Properties dialog box is displayed (see Figure 20).
For more information about using the Extended Form Editor, see “Customize Forms Using the Extended Form Editor” on page 99.
96 Configuration, Recruiter Release 2.6 October 19, 2012

Creating Custom Forms and Configuring Fields on Forms
Figure 20: Extended Section Properties Dialog Box
Step 11. In the Entity to Display as Subform field, select the subform that you want to be displayed.
Step 12. In the Display Name field, enter the text that you want to display for the record on the external website. For example, if you enter “High School”, the form will display “Add High School”.
Step 13. In the Minimum Instances Required field, enter the number of items that a prospect must enter in this section. For example, enter 1 if a prospect must enter at least one high school, or enter 0 if the prospect does not have to enter any high school information.
Note: The options available in the drop-down box are the child entities (1:N relationship) that are not already included on the form. For example, if you are adding a subform to an Event form, your choices could include event guest information.
Configuration, Recruiter Release 2.6 October 19, 2012 97

Configuring Recruiter: Configuring Forms
Step 14. In the Maximum Instances Allowed field, enter the maximum number of items that a prospect can enter.
Step 15. If you want to customize the subform to include only the fields you want to display, click Customize Subform (see Figure 21). The Form Editor is displayed, where you can add and remove fields. When the subform is displayed on the external website, only the first section on the first tab is shown. If you want to display fields in Recruiter but not on the external website, you can move fields into the second section of the subform.
One reason you might want to customize a subform is to hide fields that are inappropriate to display on the external website. For example, the Career Goals form contains an Owner field that is required but is not a field that a prospect would need to specify a value for.
Figure 21: Subform Customization Dialog Box
Step 16. Click Save and Close to close the subform customization dialog box.
Note: If you are adding the Event Guest subform, any value in this field is ignored. The number of guests allowed is determined on the event setup.
Note: Only one form for each entity is used as the subform; therefore, if you customize the subform, it will be customized on each form where it is used.
98 Configuration, Recruiter Release 2.6 October 19, 2012

Creating Custom Forms and Configuring Fields on Forms
Step 17. Click Save and Close to close the Extended Section Properties dialog box.
Step 18. When you finish editing the form, click Save.
Step 19. When your customizations are complete, publish them:
To publish customizations for only the component that you are currently editing, on the Home tab, click Publish.
To publish customizations for all unpublished components at one time, click Publish All Customizations from the main customizations dialog box.
If you have created a new Prospect form that contains added fields, you will need to use the Generate Create Account URL option to access the URL for your external website. For more information about how to access the URL, see “Multiple Prospect Account Forms on the External Website” on page 124.
Customize Forms Using the Extended Form Editor
The Extended Form Editor allows you to enhance forms that are going to be displayed on the external website, for example, the Create Account form. With the Extended Form Editor, you can (conditionally or by default) customize your forms to show or hide tabs, sections, and fields; add subforms to the form; add regular expressions to fields for validation; and append additional CSS classes onto specific form areas.
To complete this procedure, you must be assigned the System Administrator or System Customizer security role, or equivalent privileges, along with customization privileges to specific entities that the Extended Form Editor uses (for example, Form, Form Field, Form Section, and Form Tab).
Step 1. In the Navigation Pane, click Settings, and then click Solutions.
Note: Any time you change user interface elements or implement form scripts for an entity, you must publish your changes. Publishing changes applies the customizations to the form and refreshes the cache on the external website.
Configuration, Recruiter Release 2.6 October 19, 2012 99
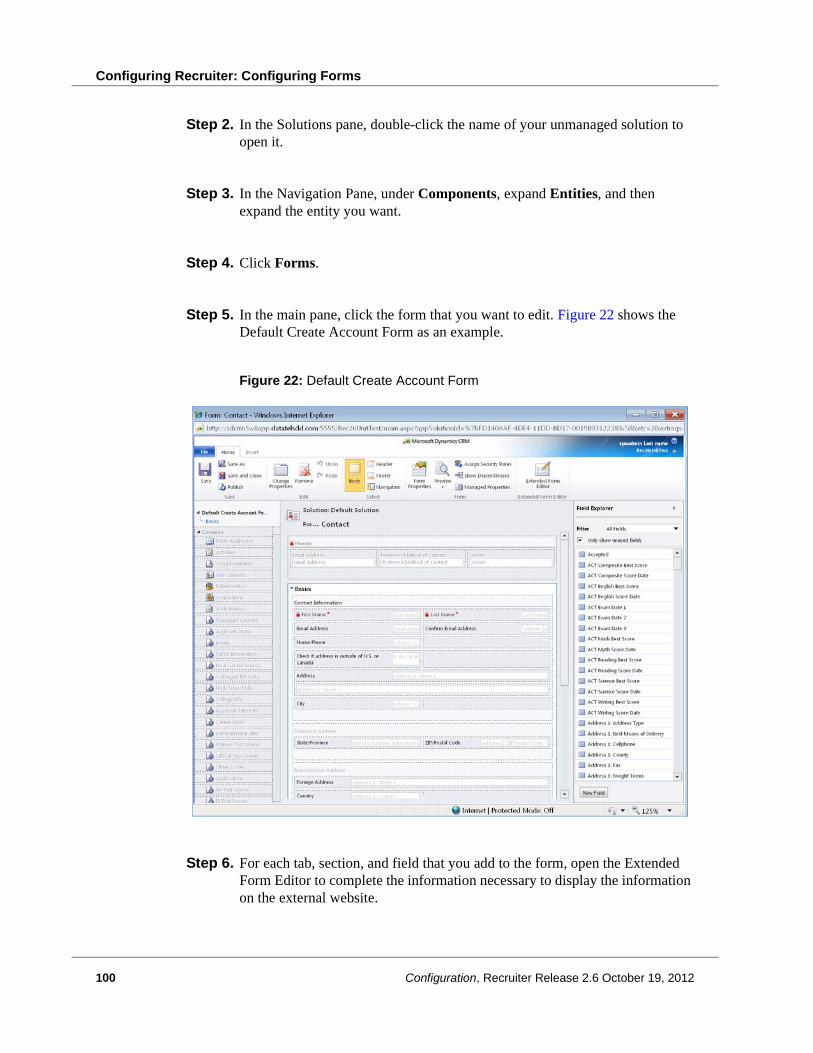
Configuring Recruiter: Configuring Forms
Step 2. In the Solutions pane, double-click the name of your unmanaged solution to open it.
Step 3. In the Navigation Pane, under Components, expand Entities, and then expand the entity you want.
Step 4. Click Forms.
Step 5. In the main pane, click the form that you want to edit. Figure 22 shows the Default Create Account Form as an example.
Figure 22: Default Create Account Form
Step 6. For each tab, section, and field that you add to the form, open the Extended Form Editor to complete the information necessary to display the information on the external website.
100 Configuration, Recruiter Release 2.6 October 19, 2012

Creating Custom Forms and Configuring Fields on Forms
Step 7. For each tab, select the tab and click Extended Form Editor. The Extended Tab Properties dialog box is displayed (see Figure 23). Enter the following:
Show Online. Select the check box if this tab should be displayed on the external website.
Instructions. Enter any text that you want to display on the tab that informs a user how to fill out the fields on the tab.
Additional CSS Classes. Enter a custom CSS class that you want to use to style this tab. You can reuse a CSS class you have already defined a style for or enter a new CSS class name. Recruiter adds the CSS class to the tab when it is displayed on the external website.
When you finish editing a tab, click Save and Close to close the Extended Tab Properties dialog box.
Figure 23: Extended Tab Properties Dialog Box
Step 8. For each section on a tab, select the section and click Extended Form Editor. The Extended Section Properties dialog box is displayed (see Figure 24). Enter the following:
Show Online. If you want the section always to appear on the external website, select Yes. If you want the section only to appear under a particular circumstance, select Conditionally. If you do not want the section to appear on the external website, select No.
Instructions. Enter any text that you want to display on the tab that informs a user how to fill out the fields on the section.
Configuration, Recruiter Release 2.6 October 19, 2012 101
Configuring Recruiter: Configuring Forms
Conditional Section Visibility. If you have selected the “Conditionally” option for the Show Online field, you must set the conditions under which you want this section to be displayed. Use the drop-down list to select the field on you want to base the condition, and then select the value that should trigger the conditional section. For example, if a prospect indicates that he or she has work experience, you can have the subsection expand so that the prospect can enter information about that work experience. If the prospect indicates that he or she does not have any work experience, the subsection would not be displayed.
Subform Properties. If you want a subform to appear in this section, select the entity name and provide a display name. To indicate how many times the subform should appear, enter a minimum and maximum number. You can click Customize Subform to modify the subform. The CRM form entity is displayed.
Additional CSS Classes. Enter a custom CSS class that you want to use to style this section. You can reuse a CSS class you have already defined a style for or enter a new CSS class name. Recruiter adds the CSS class to the section when it is displayed on the external website.
When you finish editing a section, click Save and Close to close the Extended Section Properties dialog box.
102 Configuration, Recruiter Release 2.6 October 19, 2012

Creating Custom Forms and Configuring Fields on Forms
Figure 24: Extended Section Properties Dialog Box
Step 9. For each field, select the field and click Extended Form Editor. The Extended Field Properties dialog box is displayed (see Figure 25). Enter the following:
Show Online. Select the check box if this field should be displayed on the external website.
Explanatory Text. Enter any text that you want to display above the field to describe how the user completes the field.
Optional Regular Expressions Validation. If you want to validate the value entered in this field to ensure it is in the correct format, enter a regular expression.
Regular Expression Validation Error. Enter the error that should be displayed if the validation fails.
Additional CSS Classes. Enter a custom CSS class that you want to use to style this field. You can reuse a CSS class you have already defined a style
Configuration, Recruiter Release 2.6 October 19, 2012 103

Configuring Recruiter: Configuring Forms
for or enter a new CSS class name. Recruiter adds the CSS class to the field when it is displayed on the external website.
When you finish editing a field, click Save and Close to close the Extended Field Properties dialog box.
Figure 25: Extended Field Properties Dialog Box
Step 10. When you finish editing the form, click Save.
Step 11. When your customizations are complete, publish them:
To publish customizations for only the component that you are currently editing, on the Home tab, in the Save group, click Publish.
To publish customizations for all unpublished components at one time, click Publish All Customizations from the main customizations dialog box.
The custom CSS classes you create for styling purposes on the external website must be defined in the Extended Form Editor, the corresponding ASPX pages, and your custom stylesheet. For more information about styling your Recruiter external website, see the Styling the Recruiter Website manual.
104 Configuration, Recruiter Release 2.6 October 19, 2012

Creating Custom Forms and Configuring Fields on Forms
Create a Filter on a Field for the External Website
Use the Field Properties for the Form Editor to specify a filter on a drop-down field on your external website. The filter allows you to show a subset of values in the drop-down field and not all the values in that entity. For example, you might have three academic levels (undergraduate, graduate, and continuing education), but you only want to show two academic levels on the external website (undergraduate and graduate). You would create a view on the academic level of interest entity that would select undergraduate and graduate and associate that view with the field on a form.
Before you can begin, you must create a view that will select the values that you want to show (see Figure 26). For more information, see the Create or edit views: unmanaged solution article in the Microsoft Dynamics CRM help.
Figure 26: New View
To complete this procedure, you must be assigned the System Administrator or System Customizer security role, or equivalent privileges.
Follow this procedure to create a filter on a field on the external website.
Step 1. In the Navigation Pane, click Settings, and then click Solutions.
Configuration, Recruiter Release 2.6 October 19, 2012 105

Configuring Recruiter: Configuring Forms
Step 2. In the Solutions pane, double-click the name of your unmanaged solution to open it.
Step 3. In the Navigation Pane, under Components, expand Entities, and then expand the entity that you want to maintain.
Step 4. Click Forms.
Step 5. In the main pane, click the form that you want to edit. Figure 27 shows the Default Update Prospect Profile Form as an example.
Figure 27: Default Update Prospect Profile Form
Step 6. Select the field that you want to filter.
106 Configuration, Recruiter Release 2.6 October 19, 2012
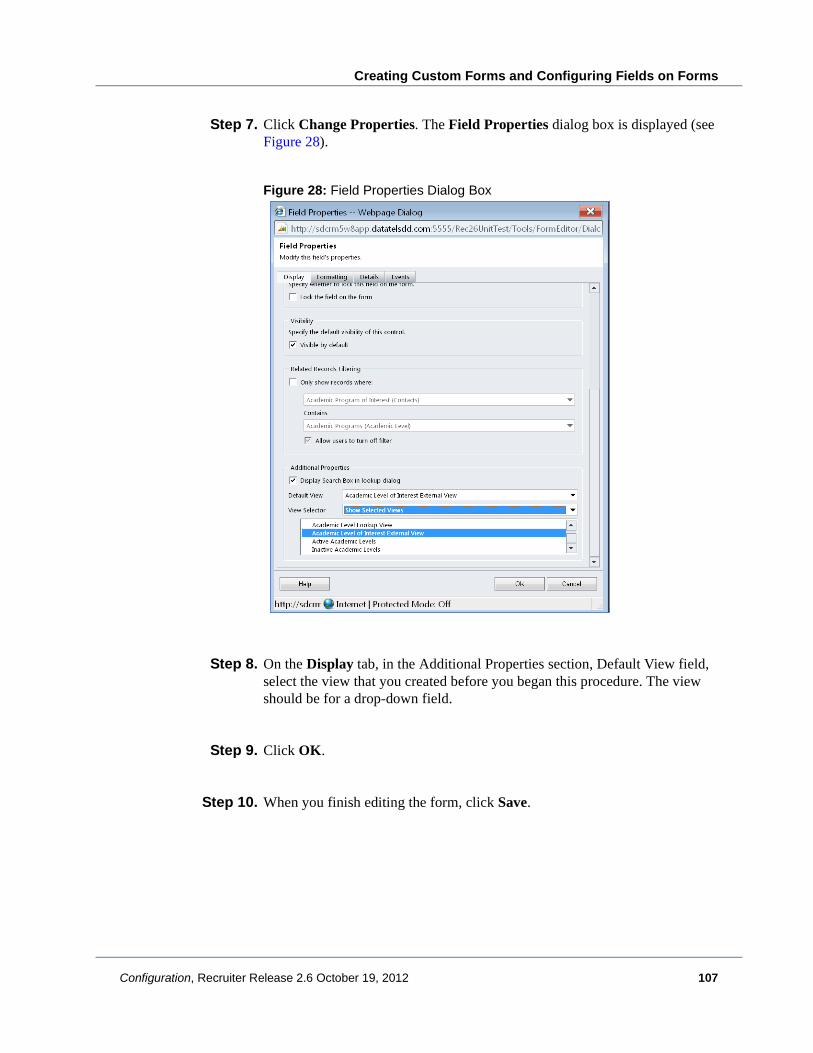
Creating Custom Forms and Configuring Fields on Forms
Step 7. Click Change Properties. The Field Properties dialog box is displayed (see Figure 28).
Figure 28: Field Properties Dialog Box
Step 8. On the Display tab, in the Additional Properties section, Default View field, select the view that you created before you began this procedure. The view should be for a drop-down field.
Step 9. Click OK.
Step 10. When you finish editing the form, click Save.
Configuration, Recruiter Release 2.6 October 19, 2012 107

Configuring Recruiter: Configuring Forms
Step 11. When your customizations are complete, publish them:
To publish customizations for only the component that you are currently editing, on the Home tab, click Publish.
To publish customizations for all unpublished components at one time, click Publish All Customizations from the main customizations dialog box.
Step 12. Access your external website to view the changes.
Create Hierarchical Validation Lists for the External Website
Use the Related Records Filtering section in the Field Properties for the Form Editor to filter the list of displayed records in the Lookup. For example, you can do this to show only the academic programs that are available for a particular academic level. Because academic level contains a 1:N relationship with academic program, then selecting, for example, the undergraduate level would cause the academic program drop-down field to be populated with only the records that are set to the undergraduate academic level.
To complete this procedure, you must be assigned the System Administrator security role.
Follow this procedure to create hierarchical lists for the external website.
Step 1. In the Navigation Pane, click Settings, and then click Solutions.
Step 2. In the Solutions pane, double-click the name of your unmanaged solution to open it.
Step 3. In the Navigation Pane, under Components, expand Entities, and then expand the entity that you want to maintain.
Step 4. Click Forms.
Step 5. In the main pane, click the form that you want to edit. Figure 29 shows the Default Update Prospect Profile Form as an example.
108 Configuration, Recruiter Release 2.6 October 19, 2012

Creating Custom Forms and Configuring Fields on Forms
Figure 29: Default Update Prospect Profile Form
Step 6. Select the field that you want to be filtered. For example, if you are trying to filter the academic programs based on the academic level selected, you would select the Academic Program of Interest field.
Step 7. Click Change Properties. The Field Properties dialog box is displayed (see Figure 30).
Configuration, Recruiter Release 2.6 October 19, 2012 109

Configuring Recruiter: Configuring Forms
Figure 30: Field Properties Dialog Box
Step 8. On the Display tab, in the Related Records Filtering section, select the Only show records where check box.
Step 9. Select the correct conditions to create the filtering. For example, you could enter Academic Level Of Interest in the first field and Academic Level in the Contains drop-down field.
Step 10. Select the Allow users to turn off filter check box to give users the option of turning off the filter you define here. This makes it possible for them to view a wider range of records. If you want to make sure that users only see the limited range of records defined by this filter, clear this check box.
Step 11. Click OK.
Note: If selected, only Recruiter users are able to turn off the filter. External website users do not have the option to turn off the filter.
110 Configuration, Recruiter Release 2.6 October 19, 2012

Creating Custom Forms and Configuring Fields on Forms
Step 12. When you finish editing the form, click Save.
Step 13. When your customizations are complete, publish them:
To publish customizations for only the component that you are currently editing, on the Home tab, click Publish.
To publish customizations for all unpublished components at one time, click Publish All Customizations from the main customizations dialog box.
Step 14. Access your external website to view the changes.
Set Field Security in Recruiter
Microsoft Dynamics CRM provides the option to restrict the access of a field for individual users or teams. For example, you might want to limit who can view the Social Security Number (SSN) to only the user who is responsible for entering the SSN. To manage the permissions of a field, you must first enable field level security and then create a field security profile. For example, you would have to access the field properties for the “datatel_ssn” field to enable security and then set the Allow Read option in the field security profile to “No.”
Note: You cannot change the permissions on a field to which you do not have security role access privileges.
ALERT! You should not enable field-level security for fields that are modified by a Recruiter plug-in. Recruiter will generate errors if users who do not have access to these fields attempt to update them. You should also not limit “Write” access to any field for users who must perform functions that are related to that field. For example, when an application status is modified, certain fields on the prospect form are also updated by a Recruiter plug-in (for example, the date fields in the Application Status Information section). If a user has access to update an application, but is restricted from “Write” access to certain fields on the prospect form, Recruiter will generate errors.
Configuration, Recruiter Release 2.6 October 19, 2012 111

Configuring Recruiter: Configuring Forms
Prior to setting field security, you must be working within your unmanaged solution. For more information about unmanaged solutions, see the Edit Unmanaged Solutions article in the Microsoft Dynamics CRM help. If you have not yet created an unmanaged solution, see “Extending Functionality with Microsoft Dynamics CRM 2011 Solutions” on page 70 for additional guidelines.
To complete these procedures, you must be assigned the System Administrator or System Customizer security role, or equivalent privileges.
Add Security to a Field
Follow this procedure to add security to a field.
Step 1. In the Navigation Pane, click Settings, and then click Solutions.
Step 2. In the Solutions pane, double-click the name of your unmanaged solution to open it.
Step 3. In the Navigation Pane, under Components, expand Entities, and then expand the entity that has the custom field you want to secure.
Step 4. Click Fields (see Figure 31).
112 Configuration, Recruiter Release 2.6 October 19, 2012

Creating Custom Forms and Configuring Fields on Forms
Figure 31: Customizable Fields List
Step 5. From the View field, select Custom. This will open the list of fields for which you can enable security.
Step 6. Double-click the field that you want to open (see Figure 32).
Figure 32: Customizable Field
Configuration, Recruiter Release 2.6 October 19, 2012 113

Configuring Recruiter: Configuring Forms
Step 7. Next to Field Security, click Enable to secure the field. To remove security from the field, click Disable.
Step 8. Click Save and Close.
Step 9. To publish your customizations, click Publish All Customizations from the main customizations dialog box
Create a Field Security Profile and Add Teams or Users
Follow this procedure to create a field security profile and add teams or users to the profile.
Step 1. In the Navigation Pane, click Settings, and then click Administration.
Step 2. In the Administration pane, click Field Security Profiles.
Step 3. In the Field Security Profiles pane, click New to create a new profile. You can also click an existing profile to add users or teams to it. The Field Security Profile dialog box is displayed as shown in Figure 33.
Figure 33: Field Security Profile Dialog Box
Step 4. If you are creating a new field security profile, click Save to access the Navigation Pane options for the profile.
114 Configuration, Recruiter Release 2.6 October 19, 2012

Creating Custom Forms and Configuring Fields on Forms
Step 5. In the Navigation Pane, click Field Permissions (see Figure 34).
Figure 34: Field Permissions
Step 6. Select a field permission, and then click Edit (see Figure 35).
Figure 35: Edit Field Security Dialog Box
Step 7. Select the types of permissions the users and teams assigned to the field security profile will have for the secured field.
Step 8. Click OK.
Step 9. In the Navigation Pane, click Teams or Users (see Figure 36).
Configuration, Recruiter Release 2.6 October 19, 2012 115

Configuring Recruiter: Configuring Forms
Figure 36: Field Security Profile Users
Step 10. Click Add. The Look Up Records dialog box is displayed.
Step 11. Select a team or user from the list or search for a team or user and select it.
Step 12. Click OK.
Step 13. Repeat Step 9 through Step 12 to add multiple teams or users to the profile.
Step 14. Click Save and Close.
Manage Validation Lists
Validation lists allow you to create a drop-down list in a field from which a user can select a value on the external website. For example, there are validation lists for academic level, gender, and source. The majority of validation lists are provisioned from your ERP system. You can create, edit, or delete validation list entries, but there are certain restrictions. For more information, see either the “Provisioning Data from Colleague and Setting Up Translation Tables” section (for Colleague users) or the “Provisioning Data from Your ERP System” section of the Recruiter Installation Procedures manual.
116 Configuration, Recruiter Release 2.6 October 19, 2012

Creating Custom Forms and Configuring Fields on Forms
Validation List Display Order
Setting the display order on a validation list determines the order in which the values are displayed in drop-down fields. After you have determined the order in which you want the entries sorted, access the validation list and set the Display Order for each entry. Table 33 lists the options for the sort order.
Table 33: Validation List Sort Order
Sort Option Additional Information Example
No sorting The default sorting order for a validation list without a defined sorting order is alphanumeric.
Not applicable
Basic sorting You can number each entry in the validation list to sort the values in a specific order.
1,2,3…
Force a value to the top of the list
If you want to have a specific value at the beginning of the list, you can enter a display order on that one particular value. The remaining entries in the validation list are sorted alphanumerically.
Note: If you are provisioning values from your ERP system and you want a particular value at the beginning of your list, but you do not want to have the remaining values in alphanumeric order, we recommend that you sort your CSV file before importing the values into Recruiter, and then do not use a sorting option.
1
Renumber the sorting order If you have a new value that you want to insert between two other values, you can use a decimal number to place the new entry between two entries when a sort order is already entered. This allows you to not have to change the display order on all the values in your validation list.
2, 2.01, 3…
Group entries If you want to put together a collection of entries, you can group entries by setting the same display order on several entries. For example, if you want to group together the undergraduate degrees, you would put the same display order value on all of the undergraduate degrees and another value on all of the graduate degrees. Within each group, the entries are sorted alphanumerically.
1,1,2,2,3,3…
Group entries with a specific sort order within groups.
If you want to sort the values within a group in a specific order, you can use decimal numbers to determine the display order.
1.1, 1.2, 2.1, 2.2…
Configuration, Recruiter Release 2.6 October 19, 2012 117

Configuring Recruiter: Configuring Forms
Create a Validation List Entry
You can create entries for validation lists that are displayed on the external website.
To complete this procedure, you must be assigned the System Administrator security role or a role that allows you full access to the specific entities in the Validation List Manager.
Step 1. In the Navigation Pane, click Settings, and then click Validation List Management. The validation lists are displayed.
Step 2. To create a new validation list entry, click New, or double-click the name of an existing validation list entry to edit it (see Figure 37).
Figure 37: Validation List Entry
118 Configuration, Recruiter Release 2.6 October 19, 2012

Creating Custom Forms and Configuring Fields on Forms
Step 3. In the General section, enter the following information:
Name. Enter the name of the entry you want to display in the drop-down fields. This is a required field.
Additional Requirements. Depending upon the validation list entry, you may need to enter additional information. For example, you may need to enter an abbreviation for the name or an academic term.
Display Order. Enter a value as either an integer or a decimal number. For example, 1, 2, 3.01, or 4.10. For more information, see “Validation List Display Order” on page 117.
Step 4. Click Save & Close.
Configuration, Recruiter Release 2.6 October 19, 2012 119

Configuring Recruiter: Configuring Forms
Creating Multiple Forms for the External Website
You can create multiple forms for your Recruiter external website. By creating multiple forms, you can guide the prospective student experience with your institution and allow students to provide different information depending on the situation or need. This section provides information about how to create multiple event, prospect account, and prospect profile forms for your external website.
Multiple Event Forms on the External Website
Recruiter provides you with the option to have multiple event forms on your external website. This allows you to create a different form for each type of event your institution holds. For example, you may want to collect additional information about a prospective student who is attending an admissions workshop versus a prospective student who is attending a campus tour. To do this, you would need two different event forms with different fields.
Provided with Recruiter is a Default Event Form that you can use for any or all of your event types. If you want to create a separate event form for an event type, you will need to create a custom form using the Event Participant entity. The procedure below outlines the steps that you must follow to create and assign the custom forms for an event type.
To complete this procedure, you must be assigned the System Administrator or System Customizer security role, or equivalent privileges.
Step 1. In the Navigation Pane, click Settings, and then click Solutions.
Step 2. In the Solutions pane, double-click the name of your unmanaged solution to open it.
Step 3. In the Navigation Pane, under Components, expand Entities, and then expand the Event Participant entity.
Step 4. Click Forms.
120 Configuration, Recruiter Release 2.6 October 19, 2012

Creating Multiple Forms for the External Website
Step 5. Double-click the Default Event Form to open it (see Figure 38).
Figure 38: Default Event Form
Step 6. Click Save As, identify a new name for the form, and click OK. This will save the default external form as a new form.
However: None of the extended form metadata is copied over to the new form. This means that the International/Domestic address sections will need to be reconfigured for the international address option, and the section that must be hidden will need to be configured to be hidden using the Extended Form Editor.
To complete the configuration of the metadata, you will need to access the Extended Form Editor for the different sections described below. For more information, see “Customize Forms Using the Extended Form Editor” on page 99.
Configuration, Recruiter Release 2.6 October 19, 2012 121
Configuring Recruiter: Configuring Forms
To display the correct fields on the external website form when the international address option is selected, you must configure the following section properties using the Extended Form Editor:
Domestic Address. The Show Online field needs to be set to “Conditionally.” The Display Section When field needs to be set to “Is this an International Address?” and “is false.”
International Address. The Show Online field needs to be set to “Conditionally.” The Display Section When field needs to be set to “Is this an International Address?” and “is true.”
The section labeled “Hidden” contains fields that should not be displayed to a prospective student but are required fields for a form to function properly. To hide this section, select the section, access the Extended Form Editor, and set the Show Online field to “No.”
Step 7. Modify the form to ensure that you add the fields your institution needs to capture data from a prospect. You have the option to change field placement, remove optional fields, change the field labels, or add custom fields to the form. You cannot add subforms to the form.
Step 8. Hide any sections or fields that were designated as hidden on the form from which you copied this form.
Step 9. When you finish editing the form, click Save.
Step 10. When your customizations are complete, publish them:
To publish customizations for only the component that you are currently editing, on the Home tab, click Publish.
To publish customizations for all unpublished components at one time, click Publish All Customizations from the main customizations dialog box.
Note: You must include both the EMail Address and Confirm EMail Address fields on the form somewhere, or the external website will not work when a student submits the form. For more information about using the form editor, see the Create a new form for an entity article in the Microsoft Dynamics CRM help.
Note: If you do not hide a particular field or section, a user will see “ERROR: HIDE THIS FIELD!” on the external website.
122 Configuration, Recruiter Release 2.6 October 19, 2012

Creating Multiple Forms for the External Website
Step 11. To associate the new form to the event type, in the Navigation Pane, click Travel & Events, and then click Event Codes.
Step 12. In the Event Codes pane, double-click the event code that you want to modify (see Figure 39).
Figure 39: Event Code
Step 13. In the General section, from the “Select a form for the external website” field, select which form you want to show on the external website. If you do not select a form, the event will be displayed using the Default Event Form delivered with Recruiter.
Step 14. Click Save & Close.
Step 15. Access your external website to view the changes.
Configuration, Recruiter Release 2.6 October 19, 2012 123

Configuring Recruiter: Configuring Forms
Multiple Prospect Account Forms on the External Website
Recruiter provides you with the option to have multiple prospect account forms available on your external website. This could include both:
A prospect inquiry form that allows a prospective student to share demographic information with your institution without creating an account.
A prospect form that allows a prospective student to create an account and input demographic information.
Provided with Recruiter is a Default Create Account Form that you can use on your website or that you can use as the base for your own custom forms. The Create Account and Prospect Inquiry forms are created using the Contact entity. You can create one custom form and use it for both a prospect inquiry page and a create account page on your website, or create a custom form for each. The URL you generate for the form determines whether the create account fields are appended to the webpage when a prospect accesses that particular page on your website. The procedure below outlines the steps you must follow to create and assign the custom forms for use.
To complete this procedure, you must be assigned the System Administrator or System Customizer security role, or equivalent privileges.
Step 1. In the Navigation Pane, click Settings, and then click Solutions.
Step 2. In the Solutions pane, double-click the name of your unmanaged solution to open it.
Step 3. In the Navigation Pane, under Components, expand Entities, and then expand the Contact entity.
Step 4. Click Forms.
Step 5. Double-click the Default Create Account Form to open it (see Figure 40).
Note: If you set up a prospect inquiry version of the form, you can potentially have duplicate records if the prospect later creates an account.
124 Configuration, Recruiter Release 2.6 October 19, 2012

Creating Multiple Forms for the External Website
Figure 40: Default Create Account Form
Step 6. Click Save As, identify a new name for the form, and click OK. This will save the default external form as a new form.
However: None of the extended form metadata is copied over to the new form. This means that the International/Domestic address sections will need to be reconfigured for the international address option, and the section that must be hidden will need to be configured to be hidden using the Extended Form Editor.
To complete the configuration of the metadata, you will need to access the Extended Form Editor for the different sections described below. For more information, see “Customize Forms Using the Extended Form Editor” on page 99.
Configuration, Recruiter Release 2.6 October 19, 2012 125

Configuring Recruiter: Configuring Forms
To display the correct fields on the external website form when the international address option is selected, you must configure the following section properties using the Extended Form Editor:
Domestic Address. The Show Online field needs to be set to “Conditionally.” The Display Section When field needs to be set to “Is this an International Address?” and “is false.”
International Address. The Show Online field needs to be set to “Conditionally.” The Display Section When field needs to be set to “Is this an International Address?” and “is true.”
The section labeled “Hidden” contains fields that should not be displayed to a prospective student but are required fields for a form to function properly. To hide this section, select the section, access the Extended Form Editor, and set the Show Online field to “No.”
Step 7. Modify the form to ensure that you add the fields your institution needs to capture data from a prospect. You have the option to change field placement, remove optional fields, change the field labels, or add custom fields to the form. You cannot add subforms to the form.
Step 8. Hide any sections or fields that were designated as hidden on the form from which you copied this form.
Step 9. When you finish editing the form, click Save.
Step 10. When your customizations are complete, publish them:
To publish customizations for only the component that you are currently editing, on the Home tab, click Publish.
To publish customizations for all unpublished components at one time, click Publish All Customizations from the main customizations dialog box.
Note: You do not need to add the fields that a prospect would use to create an account to the form. The fields are appended to the form on your website when the webpage is accessed. Also, you must include both the E-Mail Address and Confirm E-Mail Address fields on the form, or the external website will not work when a student submits the form. For more information about using the form editor, see the Create a new form for an entity article in the Microsoft Dynamics CRM help.
Note: If you do not hide a particular field or section, a user will see “ERROR: HIDE THIS FIELD!” on the external website.
126 Configuration, Recruiter Release 2.6 October 19, 2012

Creating Multiple Forms for the External Website
Step 11. To generate the URL that is associated with the form, in the Navigation Pane, click Settings, then click Settings Home.
Step 12. In the main pane, click Generate Create Account URL (see Figure 41).
Figure 41: Generate Create Account URL Dialog Box
Step 13. Select the form you created from the “Select a form to generate the URL for:” field.
Step 14. If you want to create a URL for the prospect inquiry version of the form, select the Is Inquiry Form? check box.
Step 15. Select and copy the link that is generated. (Use the Ctrl+C keyboard shortcut to copy the link.)
Step 16. Add the link to the desired page on the external website.
As you develop your external website, you may want to have multiple Prospect Inquiry or Create Account forms. Doing so may require you to re-order and change the way your external website is set up. For help with redesigning your external website, contact your Ellucian Business Advisor.
Configuration, Recruiter Release 2.6 October 19, 2012 127

Configuring Recruiter: Configuring Forms
Each version of the Create Account or Prospect Inquiry form for which you generate a link also has its own custom prospect source code. This allows you to see which form the prospect used on your external website. The prospect source code is the form source code plus the form abbreviation. For example, for a Create Account form, the source code is “CA” and the form abbreviation for the Default Create Account Form is “DCAF,” which means the prospect source code would be “CADCAF.” If you are creating a Prospect Inquiry form, the source code is “PI,” which would mean that, for the same form, the prospect source code would be “PIDCAF.”
Multiple Prospect Profile Forms on the External Website
Recruiter provides you with the option to have multiple prospect profile forms available on your external website. This could include both:
A prospect profile form that allows prospects to view their existing demographic information.
A prospect profile form that allows prospects to update their demographic information.
Provided with Recruiter are a Default Prospect Profile Form and a Default Update Prospect Profile Form that you can use as the base for your own custom forms. These forms are created using the Contact entity. You must create two forms: one for viewing prospect profile information and one for updating prospect profile information. We recommend that you copy these forms to create new ones. It is also recommended that you use the same fields on each form unless you want a prospect to view information but not update that information. The procedure below outlines the steps you must follow to create and assign the custom forms for use.
To complete this procedure, you must be assigned the System Administrator or System Customizer security role, or equivalent privileges.
Step 1. In the Navigation Pane, click Settings, and then click Solutions.
Step 2. In the Solutions pane, double-click the name of your unmanaged solution to open it.
Step 3. In the Navigation Pane, under Components, expand Entities, and then expand the Contact entity.
128 Configuration, Recruiter Release 2.6 October 19, 2012
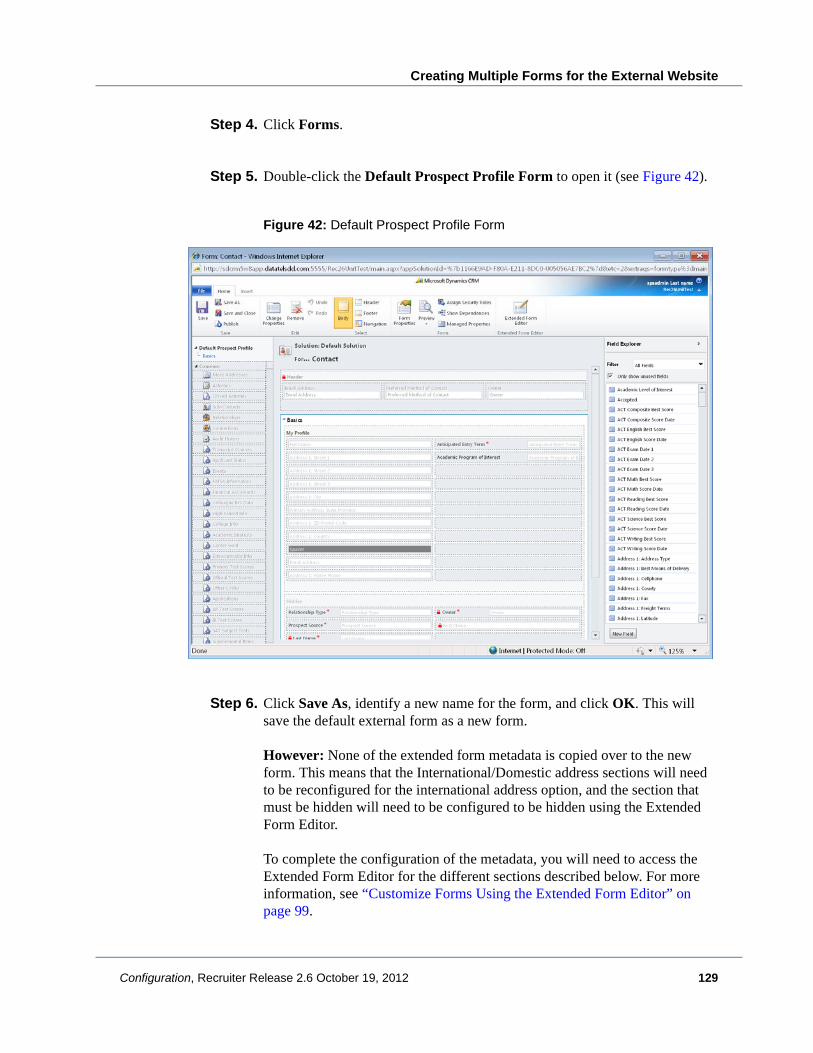
Creating Multiple Forms for the External Website
Step 4. Click Forms.
Step 5. Double-click the Default Prospect Profile Form to open it (see Figure 42).
Figure 42: Default Prospect Profile Form
Step 6. Click Save As, identify a new name for the form, and click OK. This will save the default external form as a new form.
However: None of the extended form metadata is copied over to the new form. This means that the International/Domestic address sections will need to be reconfigured for the international address option, and the section that must be hidden will need to be configured to be hidden using the Extended Form Editor.
To complete the configuration of the metadata, you will need to access the Extended Form Editor for the different sections described below. For more information, see “Customize Forms Using the Extended Form Editor” on page 99.
Configuration, Recruiter Release 2.6 October 19, 2012 129

Configuring Recruiter: Configuring Forms
To display the correct fields on the external website form when the international address option is selected, you must configure the following section properties using the Extended Form Editor:
Domestic Address. The Show Online field needs to be set to “Conditionally.” The Display Section When field needs to be set to “Is this an International Address?” and “is false.”
International Address. The Show Online field needs to be set to “Conditionally.” The Display Section When field needs to be set to “Is this an International Address?” and “is true.”
The section labeled “Hidden” contains fields that should not be displayed to a prospective student but are required fields for a form to function properly. To hide this section, select the section, access the Extended Form Editor, and set the Show Online field to “No.”
Step 7. Modify the form to ensure that you add the fields that your institution wants to allow the prospect to view or update, depending on the form. You have the option to change field placement, remove optional fields, change the field labels, or add custom fields to the form. You cannot add subforms to the form.
For more information about using the form editor, see the Create a new form for an entity article in the Microsoft Dynamics CRM help.
Step 8. Hide any sections or fields that were designated as hidden on the form from which you copied this form.
Step 9. When you finish editing the form, click Save.
Step 10. When your customizations are complete, publish them:
To publish customizations for only the component that you are currently editing, on the Home tab, click Publish.
To publish customizations for all unpublished components at one time, click Publish All Customizations from the main customizations dialog box.
Note: If you do not hide a particular field or section, a user will see “ERROR: HIDE THIS FIELD!” on the external website.
130 Configuration, Recruiter Release 2.6 October 19, 2012

Creating Multiple Forms for the External Website
Step 11. For both forms, copy the form ID in Recruiter and paste the form ID for each form into the correct ASPX page on the external website as follows:
a. To copy the form ID, follow Step 1 through Step 4 to locate the form, and then double-click the form to open it in Recruiter. While on the form, use the Ctrl+N keyboard shortcut to open the form in a new window. In the URL address field, locate the section in the URL that is directly after “formId%3d” and before the next “%”, and then use the Ctrl+C keyboard shortcut to copy the value. http://<server>/<org>/main.aspx?appSolutionId=%7bFD140AAF-4DF4-11DD-BD17-0019B9312238%7d&etc=2&extraqs= formtype%3dmain%26formId%3dDDC4E148-101B-4E74-A619-EAD32BFD3AC8%26action%3d-1&pagetype=formeditor
b. To paste the form ID, locate and open the following ASPX pages, and then paste the value into the Form ID property:
• MyAccount.aspx page. Use this page for the custom prospect profile page.
• UpdateProfile.aspx page. Use this page for the custom update prospect profile form.
For more information about how to locate the ASPX pages and additional properties that you can set on these pages, see the Styling the Recruiter Website manual.
Configuration, Recruiter Release 2.6 October 19, 2012 131

Configuring Recruiter: Configuring Forms
132 Configuration, Recruiter Release 2.6 October 19, 2012

Configuring Recruiter
Configuring Applications
In This ChapterThis chapter provides guidelines and instructions for configuring applications in Recruiter.
Table 34 lists the topics covered in this chapter.
Table 34: Topics in This Chapter
Topic Page
Understanding Applications 134
Configuring Application Types and Forms 136
Configuring the Application Folder 141
Importing Applications 149
Configuration, Recruiter Release 2.6 October 19, 2012 133

Configuring Recruiter: Configuring Applications
Understanding ApplicationsApplications are a tool to collect complete and accurate information from a prospect to help aid in the admissions decision. An application consists of the application form and any supplemental items. After the completed application form, required supplemental items, and application fee has been paid, an application folder is complete. Use the Applications area of Recruiter to enter and maintain applications. If a prospect submits multiple applications, Recruiter designates the most recent application as the primary application, which is used to determine the prospect status and status dates. If no applications have been submitted, the primary application is the first application the prospect created. For more information about applications, see the Applications Overview article in the help.
The application types delivered with Recruiter can be used as templates for new application types that can then be modified as necessary to fit the needs of your institution.
Guidelines and Limitations
Use the application types delivered with Recruiter as the source for creating your own applications types. You can then modify the application type as necessary to fit the needs of your institution.
When customizing application types, note the following guidelines and limitations:
You cannot add IFRAMES to the application types.
Any addresses on the application type must include Address Line 1, City, State or Province, ZIP or Postal Code, Country, or Foreign Address fields must be on the application type. This applies to Permanent Address, Temporary Address, Parent 1 Address, Parent 2 Address, Legal Guardian Address, and Emergency Contact Address.
If the application type collects Parent 1 or Parent 2 information, the First Name and Last Name fields must be on the application type.
If the application type collects sibling information, the First Name, Last Name, and Relationship fields must be on the application type.
Note: Do not make changes directly to the application types that are delivered with Recruiter because those customizations would be lost when there are any updates or modifications to the delivered application types.
134 Configuration, Recruiter Release 2.6 October 19, 2012
Understanding Applications
You can modify the section labels, subsection labels, and field labels as necessary. When modifying field labels, it is important to customize the Default Attribute label for the field if you want the field label used internally for items such as reports. The Default Attribute label can be different than the field label on the form if you want a prospect to see a different label name.
You can make any optional field required, but you should not make required fields optional because this can adversely affect business rules associated with that field.
Configuration, Recruiter Release 2.6 October 19, 2012 135

Configuring Recruiter: Configuring Applications
Configuring Application Types and Forms
Your institution can have several different applications to accommodate different populations of prospects. For example, you might have an undergraduate application, a graduate application, and a continuing education application. Each application might have similar information with a similar look and feel, but have specific information based on the program that a prospect is applying for.
The following provides a high-level overview of the steps you must complete to create and customize a new application form:
1. Create a new application type. You must specify the new application type name and originating application type. The originating application type is used as a template for the new application. All the default data and customization from the originating application will be copied to the new application type.
2. Customize the form. You can modify the layout of the form to include additional data, or you can remove fields and sections.
3. Add Application to Website. After the application has been defined, you can create a link to the application with a URL of “application.aspx?type=datatel_applicationtypename”. The link must then be added to the applicationlist.aspx page to allow a prospect access to the application.
Note: Do not use any of the Recruiter-delivered Common Application application type as the originating application types when you create a new application type or a new application.
Note: The application type name that you enter in the URL comes from the Application Form Entity field on the Application Type form. A value appears in this field only after the application form has been successfully created.
136 Configuration, Recruiter Release 2.6 October 19, 2012

Configuring Application Types and Forms
Create Custom Application Types
An application type is a template for an application. It is on the application type that you define what information you want to collect from a prospect and the layout of the fields on the application.
There are no prerequisites for this procedure. In order to complete this procedure, you must be assigned either the System Administrator role or you must be assigned the System Customizer role and one of the following:
Administrative Assistant
Application Administrator
Director of Admissions
Recruiter
Step 1. In the Navigation Pane, click Applications, and then click Application Type.
Step 2. On the ribbon, click New.
Step 3. In the General section, enter or edit information as needed:
Name. Enter a name for the application type with a length of 100 characters or fewer.
Originating Application Type. Enter the application type that you want to use as the source for your application type. You can use Lookup to select an application type. Do not use the Common Application application type as the originating application type when creating a new application type or application.
Application Display Name. Enter the name of the application as you want it to appear on your external website. For example, the name in this field is displayed on the My Account page.
Academic Level. Enter the default academic level for this application. You can use Lookup to select an academic level. When you set the application level, only the academic programs with the same academic level that you entered in this field will be displayed on the application on your website.
Default Academic Program. Enter the default academic program for this application. You can use Lookup to select an academic program. When prospective students create a new application, the academic program that you enter in this field is displayed. Prospective students can then change the academic program if necessary.
Default Term. Enter the default term for this application. You can use Lookup to select a default term. When prospective students create a new
Configuration, Recruiter Release 2.6 October 19, 2012 137

Configuring Recruiter: Configuring Applications
application, the term that you enter in this field is displayed. Prospective students can then change the term if necessary.
Location. Enter the default campus location for this application. You can use Lookup to select a default location. When prospective students create a new application, the location that you enter in this field is displayed if this field is included on the application form. Prospective students can then change the location if necessary.
Default Admit Type. Enter the default admit type for this application type. You can use Lookup to select a default admit type. When prospective students create a new application, the admit type that you enter in this field is displayed if this field is included on the application form. Prospective students can then change the admit type if necessary.
Default Decision Plan. Enter the default decision plan for this application type. You can use Lookup to select a default decision plan. When prospective students create a new application, the decision plan that you enter in this field is displayed if this field is included on the application form. Prospective students can then change the decision plan if necessary.
eCommerce Item. Enter the default eCommerce item for this application type. You can use Lookup to select an eCommerce item. The eCommerce item that you select determines the fee that the prospective students are charged when they submit their application.
Cover Page Form. Select the cover page form to use for the application folder. When an application folder is created, Recruiter uses this form to determine what information the cover page displays.
Review Form. Select the review form to use for the application folder. When an application folder review is created, Recruiter uses this form to determine which information is displayed to the reviewer.
Auto Complete and Send to ERP. If you have enabled the workflows that automatically send a completed application to your ERP system, enter Yes for the workflows that you want to run.
Step 4. Click Save. When you are ready to create the form for the application, see “Configure the Application Form” on page 138.
Configure the Application Form
After you have created an application type, you can create an application.
Step 1. From the Navigation Pane, click Applications, and then click Application Type.
138 Configuration, Recruiter Release 2.6 October 19, 2012

Configuring Application Types and Forms
Step 2. Open the application type record you want to create the application form for.
Step 3. Click Create Application Form (Figure 43).
Figure 43: Example of the Create Application Form Button
Step 4. After Recruiter finishes processing, click Configure Application Form on the ribbon.
Step 5. Complete any of the following options to customize the application type:
Add or edit a tab. To add a new tab, click on the Insert menu, and on the Tab submenu, select either one column or two column tab. To edit a tab, select the tab that you want to edit, then in the Common Tasks area, click Change Properties. On the Add a Tab or Tab Properties dialog box, in the Name field, enter a name for the tab, and then click OK.
Add or edit a section. To add a section, access the Insert menu in the Common Tasks area, click the tab that you want to add a section to, then click the section submenu and choose the number of columns you want to have in your section. To edit a section, select a tab, and then select the section that you want to edit. In the Common Tasks area, click Change Properties. In the Section Properties dialog box, in the Display section, add or change the following: • In the Name field, enter a unique name for the section. • In the Label field, enter the name you want to display on the form.• Select the Show the name of this section on the form check box if you
want the section name to be visible. For example, if you want to use the section to group several fields together, leave this check box cleared.
• If you select the Show the label of this section on the form check box, you can select the Show a line at top of the section check box to add a divider line underneath the name of the section.
Technical Tip: The process of creating the application form can potentially take a long time. Do not close the form until the process is complete.
Configuration, Recruiter Release 2.6 October 19, 2012 139

Configuring Recruiter: Configuring Applications
• On the Formatting tab, select the option for the two column layout. The Recruiter online application only supports the Two Column layout with field labels on the left.
• Click OK.
Add or edit a field. To add a new field, use the Field Explorer on the right hand side of the form customization to add fields to the form. The field must be related to the application type to appear in the list. To edit a field, select the field you want to edit, and then in the Common Tasks area, click Change Properties. In the Field Properties dialog box, edit the field as follows:• Change the label used for this field. This will not change the attribute
display name, just the text in this form. The display name is the label that is used by default when an attribute is displayed on a form, in a list, or in a report. The display name for each attribute can be changed in the Customization area by a user with an appropriate security role.
• If necessary, select the Display label on the form check box to make the label visible on the form. Clear the check box if you want to have a field with no label, for example, if the field is the only one in a section with a clearly descriptive name.
• Select Disabled on the form to make the field read-only, for example, if the field displays a value calculated by a client-side script.
• In the Location area, select the tab and section to which you want it to be located.
• Select Field is read-only to make the field read-only, for example, if the field displays a value calculated by a client-side script.
• On the Name tab, the fields are read-only by default, and cannot be changed in the form for the entity.
• Click OK.
Step 6. When your customizations are complete, click Save.
Step 7. Click Publish to publish your customizations.
Step 8. Click Save & Close.
Note: The following fields are not supported by Recruiter: Width of Field's Label Area, Variable Field Width, and Fixed Field Width.
Note: The following fields are not supported by Recruiter: Turn off automatic resolutions in field on the Display tab, all fields on the Events tab, and all fields on the Formatting tab.
140 Configuration, Recruiter Release 2.6 October 19, 2012

Configuring the Application Folder
Configuring the Application FolderAn application folder is an application review process that gives a group of people the option to review, comment on, and provide a suggested admission decision on an application.
The following options are available for customizing the application folder process for your institution:
Create different application folder review forms for different application types.
Create different cover sheet forms for different application types.
Create additional application folder statuses.
Create a workflow to set the application folder status.
Create a workflow to set the application folder owner.
Create a workflow to assign application folder reviewers.
Set Up the Application Folder
For different application types, you can define different reviews and different cover pages to ensure that the correct information is displayed and reviewed.
Cover Page Form
Using the Contact entity, you can create a custom form to include the specific information that you want to display in the Cover Page section of the application folder (as seen in Figure 44 on page 142).
Note: Before you begin setting up your Application Folder Review process, the ExternalApplicationFormLocation configuration must be defined.
Configuration, Recruiter Release 2.6 October 19, 2012 141

Configuring Recruiter: Configuring Applications
Figure 44: Example of an Application Folder Cover Page
The information you include on the cover page could include demographic information, desirability rating, or SAT scores. There may be factors that you want to highlight on the cover page depending upon the application type. For example, if an applicant has taken four years of the same foreign language. The information is available on the application but would need to be tagged to be included on the coversheet. To do this, you would have to create a custom attribute on the Contact entity, which can be populated by a workflow and added to a customized version of the cover page. You would then have to write a custom workflow or manually populate the data in this custom field.
Follow the steps below to customize your cover page.
Step 1. From within your custom solution, select the Contact entity.
Step 2. Expand the Forms section and select the Default Application Cover Page form.
Step 3. From the ribbon, click Save As and give the form a new name.
Note: You should not add subforms to cover pages because it will cause issues when you try to print the application folder. Recruiter does allow for the addition of subgrids to a cover page.
142 Configuration, Recruiter Release 2.6 October 19, 2012
Configuring the Application Folder
Step 4. Modify the cover page by adding new fields or deleting existing fields. For more information about customizing a form, see “Configuring Forms” on page 81.
Step 5. Select Save.
Step 6. Select Publish.
Step 7. From the Navigation Pane, click Applications, and then Application Types.
Step 8. Access the application type you want to assign the new cover page to.
Step 9. In the Cover Page Form field, select the name of the cover page that you just created.
Step 10. Click Save & Close.
Note: If you do not see your changes to the cover page, you may need to recycle the app pool. Contact your System Administrator for more information.
Note: If you do not assign a custom cover page to an application type, Recruiter uses the default form delivered with Recruiter.
Configuration, Recruiter Release 2.6 October 19, 2012 143

Configuring Recruiter: Configuring Applications
Application Folder Review Form
Using the Application Folder Review entity, you can create a custom form to include the specific information that you want the reviewers to evaluate (as seen in Figure 45 on page 144).
Figure 45: Example of an Application Folder Review Form
The Application Folder Review entity contains a superset of attributes, but each form displays only the attributes applicable to that application type. The Application Folder Review entity includes fields for overall comments, essay comments, academic comments, and activities comments. If there are other things that you want a reviewer to comment on, you can add the attribute to the Application Folder Review entity and then to the custom form.
Follow the steps below to customize the Application Folder Review Form.
Step 1. From within your custom solution, select the Application Folder Review entity.
Step 2. Expand the Forms section and select the Default Review Form.
Step 3. On the ribbon, select Save As and give the form a new name.
144 Configuration, Recruiter Release 2.6 October 19, 2012

Configuring the Application Folder
Step 4. Modify the application folder review form by adding new fields or deleting any existing fields. For more information about customizing a form, see “Configuring Forms” on page 81.
Step 5. Click Save.
Step 6. Click Publish.
Step 7. From the Navigation Pane, click Applications, and then Application Types.
Step 8. Access the application type that you want to assign to the new application folder review form.
Step 9. In the Review Form field, select the name of the application folder review form that you just created.
Step 10. Click Save & Close.
Application Folder Statuses
An application folder status indicates what stage of the review process the application is in. You can add additional statuses that map back to the delivered categories to further refine the status of the application folder. These statuses are part of the Application Folder statuses in the Validation List Management section of Settings. Ellucian delivers codes of “Application in progress,” “Ready for review,” “Review in progress,” “Review on hold,” “Review complete,” and “Review cancelled,” which can be used to categorize additional status codes that you create.
If you are going to use the Application Folder Review process for appeals, you may also want to set up application statuses for the different steps in the appeal process. For example, if there is a lengthy review process, the “Appeal in Progress” status can be set. After the final decision is made, the folder can be assigned “Appeal Completed” status. If the decision is overturned, a new Application Status Type record can be used with a status of “Accepted Appeal” or “Appeal Denied.”
Note: If you do not assign a custom review form to an application type, Recruiter uses the default form delivered with Recruiter.
Configuration, Recruiter Release 2.6 October 19, 2012 145

Configuring Recruiter: Configuring Applications
Custom Workflows
To automate some of the processing of the Application Folder review process, you can create workflows to change the application folder status, assign a different owner, and assign reviewers. We recommend that you create one workflow to handle one or more of these options instead of separate workflows for each option.
To create your workflow, use the Application Folder entity. You can set the workflow to start when a specific field changes. For example, if the folder should not be worked on until the application is marked complete, use the “Application Completed” attribute as a trigger.
The workflow can have up to four stages, depending on how much you want to automate the process. In the first stage, you should verify that the application has the correct status, as in this example the workflow is verifying that the application is marked complete. In this step, you should configure the condition as shown in Figure 46.
Figure 46: Verifiy Application Marked Complete
In the next stage, an owner can be assigned to the application folder. If the application has been submitted, you can use attributes from the application to determine the owner. If the application has only been started, these attributes will not be populated. For example, if the application has been marked complete, you can select an owner based on the academic program. In this step, you should configure the condition using the Specify Condition dialog box as shown in Figure 47.
Figure 47: Assign Owner to Application Folder
You will want to replace the name of the owner with the name of a user in your system. You will have to repeat this step for each academic program or other conditions that you use.
146 Configuration, Recruiter Release 2.6 October 19, 2012

Configuring the Application Folder
In the next stage, reviewers can be assigned to the application folder. If the application has been submitted, you can use attributes from the application to determine a reviewer. When the review is created, the system will automatically share the folder with the reviewer. You can use this workflow to additionally create a task for the reviewer, or send an email. In this example, if the applicant is not a U.S. Citizen, a special reviewer is assigned. In this step, you should configure the condition using the Specify Condition dialog box as shown in Figure 48.
Figure 48: Assign Reviewers to Application Folder
To assign the reviewers, click on Set Properties and enter the name of the reviewer. You can repeat this step for any condition that you want to specify or reviewer that you want to assign.
In the final stage, the status of the application folder can be automatically set. For example, because the owner and reviewers have already been assigned, the folder can be set automatically as “Review in progress.” In this step you should configure the condition as shown in Figure 49.
Figure 49: Set Status of Application Folder
To assign the application status, you would click on Set Properties and set the status.
Configuration, Recruiter Release 2.6 October 19, 2012 147

Configuring Recruiter: Configuring Applications
Single Reviewer Workflow
If an application folder has only one reviewer, you can use a workflow to automate the process of updating the application folder with the proposed decision and comments. Using the “Folder Single Review Completed” workflow template, you can create your own custom workflow. The workflow is created on the Application Folder Review entity and is triggered when the application folder review status is set to “Completed.” You can customize the workflow by specifying which attributes you want to copy over. For example, you might want to copy over the rating or comments. Figure 50 is an example of the workflow and a piece of data that will be copied from the review form to the application folder.
Figure 50: Example of the Folder Single Review Template and Properties
148 Configuration, Recruiter Release 2.6 October 19, 2012

Importing Applications
Importing ApplicationsRecruiter includes an option to import applications from different vendors. Recruiter is configured to import the Common Application. If you need to import applications from another source, for example the Royall application, you can configure Recruiter to import those applications using the general application import process.
The Application import process uses the following file formats:
Text (.txt) file format, tab field delimiter with no data delimiter.
Comma Separated Value (.csv) file format with comma field delimiter or double-quote data delimiter.
The format of the application data must be converted into one of the supported file formats with one record per row in the file before the data can be imported. The import process expects that the first row of the import file is a header row, specifying the name of the data in that column.
Recruiter requires that the following fields be included in the application import to satisfy Recruiter’s basic business requirements:
First Name
Last Name
Address Line 1
City
State/Province
Zip/Postal Code
Academic Program (Lookup to value in Recruiter)
Anticipated Entry Term (Lookup to value in Recruiter)
For information about how to import applications, see the Import Applications article in Recruiter.
Note: The General Application Import process does not include the ability to import supplemental items.
Configuration, Recruiter Release 2.6 October 19, 2012 149

Configuring Recruiter: Configuring Applications
Setting Up the General Application Import
To import a general application, you will need to set up the entities, data map, and data catalog required by Recruiter. The following is a high-level overview of the steps you must complete:
1. Copy the Application Import Template. You need to create a new application type in Recruiter based on the Application Import Template. See “Copy the Application Import Template” on page 151.
2. Add Fields to the New Application Staging Record. Data that is included in the application import file needs a corresponding field in the staging record in order to be successfully imported. See “Copy the Application Import Template” on page 151.
3. Add Fields to the Staging Record Form. The fields that you added to the staging record needs to be added to the associated staging record form so the data can be viewed. See “Add Fields to the Staging Record Form” on page 153.
4. Add Field Mappings for New Fields. When the staging record is processed, the data in the application and prospect records is updated from the staging record based on the mapping you create and the relationship between the records in the mapping. See “Add Field Mappings for Fields on the Staging Record” on page 154.
5. Create a Data Map. You need to create a map between the columns in the application import file and the location of the data in the staging record. See“Create the Data Map for the Staging Record” on page 157.
6. Create the Application Data Catalog. The data catalog ties all the pieces of the application import together and needs to be populated with the names of the records you created. See “Create the Application Data Catalog” on page 158.
7. Create the Staging Record Processing Workflow. The workflow that you create is used when an error occurs during the import process and the processing needs to be attempted again after the errors have been corrected. See“Create the Staging Record Processing Workflow” on page 159.
150 Configuration, Recruiter Release 2.6 October 19, 2012

Importing Applications
Copy the Application Import Template
Follow the steps below to create a new application type and the application form entity.
Step 1. In the Navigation Pane, click Applications, and then Application Types.
Step 2. On the ribbon, click New.
Step 3. In the Name field, enter a name that corresponds to the type of applications that you are going to import.
Step 4. In the Originating Application field, enter Application Import Template. Figure 51 is an example of an application type.
Figure 51: Example of an Application Type
Step 5. Complete the remaining fields on the Application Form as needed. For more information about creating an application type, see “Create Custom Application Types” on page 137.
Step 6. Click Save.
Step 7. Click Create Application Form. Recruiter copies the template entity and creates the new application staging record that will hold the raw application
Application Name Application Template
Configuration, Recruiter Release 2.6 October 19, 2012 151

Configuring Recruiter: Configuring Applications
data. When Recruiter completes the process, the Application Form Entity field is populated with an entity name. Make note of the entity name because you will need to know it to complete the setup.
Step 8. Click Save & Close.
Step 9. Add the new entity you just created to your custom solution. For more information about working with your custom solution, see the Add new or existing solution components article in the Microsoft Dynamics CRM help.
Step 10. Working inside your custom solution, expand the Entities node and click on the name of the application type you just created. This will be the value from the Application Form Entity field on the Application Type.
Step 11. Click on the Activities field (Figure 52). Setting this value will allow for import errors to be associated with the import.
Figure 52: Example of the General Settings
Step 12. Click Save.
Activities Field
152 Configuration, Recruiter Release 2.6 October 19, 2012

Importing Applications
Add Fields to the Application Staging Record
The new application type you just created only contains the necessary fields to create a prospect. To import the additional fields in your import file, you must add fields to the application data staging record.
For new fields that will appear only on the application form, you add the fields only to the application staging record, which you just created. This will allow you to view the application for the prospect, and detail on the Application Form section to see the new fields.
For new fields that you want to be displayed on both the application and the Prospect form, you will need to add the same fields to the following:
The application staging record (created in the previous step)
The Application entity
The Contact record
When adding the field to multiple records, make sure that the fields match exactly. These fields will later be mapped together and errors will occur if the field properties do not match between the related records.
For more information about how to add fields to an entity, see the Create or edit entity fields article in Microsoft Dynamics CRM.
Add Fields to the Staging Record Form
Any fields that you add to the application staging record should also be added to the form for the staging record to allow the data to be displayed and corrected if necessary. For more information about customizing a form, see “Configuring Forms” on page 81.
Technical Tip: The Application Import, ExternalID, and Is Update fields are copied from the template and should not be added on the application. These fields are used by the plugins and workflows for the processing of applications.
Configuration, Recruiter Release 2.6 October 19, 2012 153

Configuring Recruiter: Configuring Applications
Add Field Mappings for Fields on the Staging Record
When the staging record is processed and the application and prospect records are created, the data from the staging record must have a corresponding field in the application or prospect record.
Follow the steps below to map the fields on the application staging record.
Step 1. From the Navigation Pane, click Settings, and then Customization.
Step 2. Open your custom solution.
Step 3. To map fields on the application, from the Navigation Pane, expand the Entities node and application type you created, and then click on N:1 Relationships.
Step 4. Open the record that has a primary entity of “Application” (Figure 53).
Figure 53: Example of the Application Type Customization
Step 5. From the Navigation Pane, select Mappings.
Technical Tip: If you map to or from a field that is not displayed on a form, the mapping will not be complete until the field is added to a form.
154 Configuration, Recruiter Release 2.6 October 19, 2012

Importing Applications
Step 6. From the Action toolbar, select New. The Create Field Mapping dialog box is displayed (Figure 54).
Figure 54: Example of the Create Field Mapping Dialog Box
Step 7. Select the source field from Source Entity Fields column. Select the target field from Target Entity Fields column. Both fields must be of the same type and the same format.
When you select fields, consider the following mapping requirements:
The length of the target field must be equal to or greater than the length of the source field.
The target field cannot be already mapped to another field.
The source field must be visible on the form.
The target field must be a field into which a user can enter data.
If the fields are option set (picklists), the integer values for each option should be identical.
Address ID values cannot be mapped.
Step 8. Click Ok.
Step 9. Click Save & Close after you have added all of your field mappings for the application.
Configuration, Recruiter Release 2.6 October 19, 2012 155

Configuring Recruiter: Configuring Applications
Step 10. When your customizations are complete, publish them.
Step 11. To map fields to the prospect record, expand the Entities node and then the Application node and select N:1 Relationships.
Step 12. Open the record that has a primary entity of “Contact.”
Figure 55: Example of the Prospect Customization
Step 13. From the Navigation Pane, select Mappings.
Step 14. From the Action toolbar, select New. The Create Field Mapping dialog box is displayed.
Step 15. Select the source field from Source Entity Fields column. Select the target field from Target Entity Fields column. Both fields must be of the same type and the same format.
156 Configuration, Recruiter Release 2.6 October 19, 2012

Importing Applications
When you select fields, consider the following mapping requirements:
The length of the target field must be equal to or greater than the length of the source field.
The target field cannot already be mapped to another field.
The source field must be visible on the form.
The target field must be a field into which a user can enter data.
If the fields are option set (picklists), the integer values for each option should be identical.
Address ID values cannot be mapped.
Step 16. Click Ok.
Step 17. Click Save & Close after you have added all of your field mappings for the application.
Step 18. When your customizations are complete, publish them.
Create the Data Map for the Staging Record
Map the fields in your application import file to fields in the staging record, you will need to create a data map.
To create a new data map, we recommend that you attempt a native CRM import and use the Import Data Wizard. In the Import Data Wizard, select “Default (Automatic Mapping)” to give you control of each field mapping. If the Import Data Wizard is unable to map your source data automatically, the Map Record Types and Map Fields pages are displayed to manually map your data. For step-by-step instructions on using the Import Data Wizard, see “Import Data into a Single Entity” on page 287. For more information about the Import Data Wizard, see the Create a data map for use with import article in the Microsoft Dynamics CRM help.
After you have completed the Data Import Wizard and created your data map, you must add additional code to your data map to support the custom processing that occurs when running the application import. Add this mapping to the data map, from the Navigation Pane, click Settings > Data Management > Data Maps. Highlight the data map you just created, and on the Action toolbar, click Export. The resulting XML file describes the mappings specified in the wizard. You must then use an editor to manually modify the XML file as described below.
Configuration, Recruiter Release 2.6 October 19, 2012 157

Configuring Recruiter: Configuring Applications
The <EntityMap> element at the top of the file needs to be changed so that the value in the SourceEntityName field matches what is found in the TargetEntityName field. Both fields should be the schema name for the application type record you created (see Figure 56).
Figure 56: EntityMap Element
The following <AttributeMap> element needs to be added to the collection (see Figure 57).
Figure 57: AttributeMap Element
After you add the additional information, you will need to save the file and then import the file back into Recruiter.
Create the Application Data Catalog
The Application Data Catalog ties all the pieces together that you have created. To complete this procedure, you must be designated as a Deployment Manager for CRM. Follow the steps below to create an Application Data Catalog.
Note: The Application Import Template Mapping data map has been delivered with Recruiter and can be used as a model when creating your new data map.
158 Configuration, Recruiter Release 2.6 October 19, 2012

Importing Applications
Step 1. From the Navigation Pane, click Recruiting Imports, and then Application Catalogs.
Step 2. On the ribbon, click New.
Step 3. In the Name field, enter a unique name that identifies which application import this catalog is related to.
Step 4. In the Application Type field, enter the name of the application type you created for the application import.
Step 5. In the Data Map field, enter the name of the data map you created for the application import.
Step 6. In the Prospect Source field, enter the source you want assigned to any prospects that are created as a result of the application import.
Step 7. Click Save & Close.
Create the Staging Record Processing Workflow
If errors occur when Recruiter tries to create application and prospect records from the staging records, the errors must be resolved. Then, using the workflow that you build, the process can finish creating all the necessary records with the correct data. Follow the steps below to create the workflow.
Step 1. From the Navigation Pane, click Settings, and then Processes.
Step 2. From the Action toolbar, click New. The Create Process dialog box is displayed.
Step 3. In the Name field, enter the name for the workflow.
Step 4. In the Entity field, select the entity that was created when you created the application type for this application import.
Configuration, Recruiter Release 2.6 October 19, 2012 159

Configuring Recruiter: Configuring Applications
Step 5. In the Category field, select Workflow.
Step 6. Click Ok. The Process form is displayed.
Step 7. In the Available to Run field, select As an on-demand process.
Step 8. In the Scope field, select User.
Step 9. Clear the Record is Created check box.
Step 10. Click Add Step, and then Create Record.
Figure 58: Example of the Workflow Step
Step 11. Type a description of the step you are creating. For example, you could enter a description of “Create new workflow task to process general application records.”
Step 12. In the Create field, select Workflow Task.
Step 13. Click Set Properties. The Create Workflow Task form is displayed.
Step 14. In the Name field, enter a name for the workflow task that will be created by this workflow.
Step 15. In the Operation field, enter Process Application Data Record.
160 Configuration, Recruiter Release 2.6 October 19, 2012

Importing Applications
Figure 59: Example of the General Section Properties
Step 16. Expand the Application Import section.
Step 17. In the Data Application Schema Name field, enter the name of the entity that was created when you created the application type for this application import.
Step 18. For the Data Application ID field, use the Form Assistant to add the External ID field on the staging record in this field.
Figure 60: Example of the Application Import Section
Step 19. Click Save and Close.
Step 20. Click Activate.
Step 21. Click Close.
The setup for the General Application Import process is complete. For information about how to import applications, see the Import Applications article in Recruiter.
Configuration, Recruiter Release 2.6 October 19, 2012 161

Configuring Recruiter: Configuring Applications
Setting Up the Common Application Import
The import for the Common Applicaton includes a standard import template that matches the mapping created by Ellucian for importng the Common Application into Recruiter. For a complete list of all the fields on the Common Application and what is included in the standard import template, see AnswerNet support solution 8711.
Before you can import the Common Application, you must complete the setup for the Common Application.
Set Up the Common Application Import
You must complete the following tasks before you can begin importing the Common Application:
Define the Common Application Catalog Mapping. The catalog is used to transform data and codes used by the Common Application into data that is accepted by Recruiter. See “Define the Common Application Catalog Mapping” on page 163.
Define the Common Application Supplement Import. The Common Application includes supplemental information that you can import into Recruiter. To import the additional information, you must define the location that the information is imported into. See “Define the Common Application Supplement Import” on page 164.
Set the Defaults on the Application Type. Setting the default values on the application type allows you to define values for data that is not imported from the Common Application. See “Set the Defaults on the Application Type” on page 165.
Verify that Data was Provisioned from Recruiter. The “Create Applications from Import Set” workflow relies on the codes provisioned during the Recruiter installation process to properly create an application record. See “Verify that Data was Provisioned from Recruiter” on page 165.
Note: Do not change the Common Application import data map that is delivered in Recruiter. The data map is used to create the staging records and must remain as it is delivered for the process to work correctly.
162 Configuration, Recruiter Release 2.6 October 19, 2012
Importing Applications
Define the Common Application Catalog Mapping
The Common Application uses a common data catalog to transform data and codes in the Common Application data file to codes that are used in Recruiter. The following maps must be defined:
Activity
Career
Citizenship
Denomination
Major
Marital Status
Decision Plan
Term
Student Type
If you do not define all of the mapping in the Common Application catalog, you could potentially lose data. For example, if you do not map a denomination code that is included on a Common Application, the denomination in Recruiter will be blank.
In order to complete this procedure, you will need to be assigned to one of the following security roles:
Administrative Assistant
Application Administrator
Director of Admissions
Recruiter
Step 1. In the Navigation Pane, click Recruiting Imports, and then click Common App Catalogs.
Step 2. From the list of Common Application catalogs, click the name of the catalog for which you want to define mapping.
Step 3. In the Navigation Pane, select the map for which you want to update codes.
Note: The catalog also allows you to define a default source value for any new prospects that are created during the import process.
Configuration, Recruiter Release 2.6 October 19, 2012 163

Configuring Recruiter: Configuring Applications
Step 4. For each Common Application code that needs to be mapped, click the code to open the record, and then enter the Recruiter value that corresponds to the Common Application code.
Step 5. Click Save & Close.
Step 6. Repeat steps 4 and 5 for each code within the current map.
Step 7. Repeat steps 3 through 6 for each map in the catalog.
Define the Common Application Supplement Import
Supplemental application data can be imported into Recruiter in the same manner as the Common Application after you have set up Recruiter to accept the data. To set up your Common Application supplement import, you must complete the following:
Create fields in the supplement entity. The Common Application includes a set of files for each year. You will need to find the supplement entity for the current year and add fields to that entity for the data in the supplement. For example, for the 2012-2013 record layout, you would add fields to the Common Application 2012 Supplement entity. For more information about how to add fields to an entity, see the Create or edit entity fields article in Microsoft Dynamics CRM.
Create a form with the fields you just created on it. The fields you created for the supplemental data must be added to a form to allow the data to be viewed. For more information about customizing a form, see “Configuring Forms” on page 81.
Create an data map. To transfer the data in the supplement files to the fields in Recruiter, you must create a data map. For more information about data maps, see the Create a data map for use with import article in the Microsoft Dynamics CRM.
Assign the data map and entity name in the Common Application Data Catalog. Access the data catalog for the Common Application and enter the supplement entity name and data map name to the data catalog.
164 Configuration, Recruiter Release 2.6 October 19, 2012

Importing Applications
Set the Defaults on the Application Type
Defining the default values on the application type can prevent some errors that could occur when an application record or prospect record is created in Recruiter. For the application type that you have defined for the Common Application, you can enter data in the following fields:
Default Academic Program
Default Term
Location
Default Admit Type
Default Decision Plan
If an application does not include a value for any of the above fields, or that value is not mapped on the data catalog, the default value from the application type will be used instead.
For more information, see the “Create Custom Application Types” on page 137.
Verify that Data was Provisioned from Recruiter
The “Create Applications from Import Set” workflow relies on the codes for the State and Country field that are provisioned during the installation of Recruiter. If the data has been replaced with codes from your ERP system, errors could be generated that will need to be manually corrected.
The setup for the Common Application import is now complete. For information about how to import applications, see the Import Applications article in Recruiter.
Configuration, Recruiter Release 2.6 October 19, 2012 165

Configuring Recruiter: Configuring Applications
166 Configuration, Recruiter Release 2.6 October 19, 2012

Configuring Recruiter
Configuring and Using Workflows
In This ChapterThis chapter provides guidelines and instructions for configuring workflows in Recruiter.
Table 35 lists the topics covered in this chapter.
Table 35: Topics in This Chapter
Topic Page
Understanding Workflows 168
Creating Workflows 179
Scheduling Workflows 184
Creating Specific Recruiter Workflows 190
Configuration, Recruiter Release 2.6 October 19, 2012 167
Configuring Recruiter: Configuring and Using Workflows
Understanding WorkflowsWorkflows allow you to automate business processes to ensure that specific actions are performed consistently and to minimize repetitive tasks.
Guidelines and Limitations
The following sections describe workflow limits and best practice guidelines for configuring workflows.
Workflow Limits
Workflows are extremely powerful ways to automate tasks, but inefficient workflow setup and use can easily overload your system. If you reach a workflow limit, the workflow will fail. If you reach any of the following limits, you should re-evaluate how the process is set up rather than bypass the limit:
A workflow cannot exceed four nested conditional statement blocks.
A workflow cannot call itself more than six times in 60 minutes.
A workflow cannot exceed a “depth” level of eight. This level includes child workflows. Every time a running plug-in or workflow issues a message request to the web services that triggers another plug-in or workflow to run, the depth property is increased. If the depth property reaches its maximum value within the configured time limit, the system considers this behavior to be an infinite loop, and all further plug-in or workflow processing is stopped for the parent workflow.
Though certain limits (constraint values) can be changed, doing so is unsupported and can be dangerous to your system, potentially causing it to shut down.
168 Configuration, Recruiter Release 2.6 October 19, 2012

Understanding Workflows
General Workflow Guidelines
The following general guidelines should be used when configuring workflows:
Always be aware of the indirect impact of workflows. Workflows can also cause plug-ins or other workflows to run.
Consider the potential volume of the actions that you are performing with the workflow. For example, if you are setting up a workflow to create multiple records or to create records for bulk imports, you should consider the impact of performing that number of actions on your system each time you run the workflow. You should also consider the frequency in which you will need to perform those actions. If you have a workflow that creates a record, then a bulk import for that entity will run that workflow for each record that is imported.
Limit triggering conditions, especially “update” conditions. Keep the list of updated fields that will trigger the workflow to the bare minimum needed. Be careful if the workflow updates the target record (either directly or indirectly) so that it does not run in a way that it can possibly trigger itself and run in an infinite loop.
Consider the tradeoffs when breaking up a large workflow into child workflows. • Child workflows can be used to break up complex processes; however,
child workflows run asynchronously, and the parent workflow continues to run after the child workflow is started.
• Using child workflows contributes to depth of the parent workflow and the overall load of the parent workflow. In general, throughput is better with one large workflow rather than breaking up that workflow into multiple child workflows.
Consider how workflow actions persist to the database.• Workflows automatically persist to the database when creating records,
updating records, setting record statuses, starting a child workflow, or setting a workflow stage. For any custom activity in a workflow, it is up to the person who is developing the activity to set it to persist when the activity completes.
• If a workflow moves into the “Waiting” state because of an error and then is later resumed, it will run all steps since it last persisted to the database, which could cause duplicated database logic.
• You should be aware of how many workflows and actions are persisting to the database at any given time. If you have more than one workflow that will persist for a long time because processing is occurring on a large number of records (for example, all prospect records), this could affect performance.
Configuration, Recruiter Release 2.6 October 19, 2012 169
Configuring Recruiter: Configuring and Using Workflows
• To avoid a workflow persisting to the database too often, try to build in “wait” conditions against actions that are guaranteed to occur, or rewrite the workflow to trigger only when updating a field.
Understand “execution time” for each workflow. Execution time is evaluated when the step within the workflow is processed, not when the workflow is started. For example, if the workflow is in a “Waiting” state, when it resumes, the execution time in the next step is based on when that step is processed, which could be much later than when the workflow first started.
Keep the target record set to the minimum possible. For example, only run your workflow against a view of active records to avoid updating inactive records that you no longer need to update.
Limit the number of fields that you update to a minimum set.
Set your workflow options to automatically delete completed workflow jobs for your custom workflows.
Specific Workflow Guidelines Communications workflows should be created off of the core Application
entity (“datatel_application”) rather than a specific application entity (“datatel_applicationtypename” entity). For more information about the Recruiter application entities, see “Application Entities” on page 33.
You should not create workflows that are triggered by the date fields in the Application Status Information section of the prospect form. These dates are updated each time an application that is related to the prospect is created or the application status changes. Instead, you should use the Application Status field on the application form, because that field is only updated when that specific application status changes.
Workflow Schedules Understand the full impact of scheduling and how the workflow will impact
the system. For example, the “Bulk Territory Reassignment” workflow runs on all prospect records in the target territory each time it is run.
Assign the minimum frequency that satisfies your business needs. For example, running the “Bulk Territory Reassignment” workflow weekly instead of daily may provide sufficient territory assignment updates for your institution.
Avoid scheduling intensive processes during peak hours of system use.
170 Configuration, Recruiter Release 2.6 October 19, 2012

Understanding Workflows
Delivered Workflows
Recruiter delivers a number of workflows that must be activated to automate specific actions. Table 36 contains the list of delivered Recruiter workflows and their descriptions.
ALERT! You should not change delivered workflows. If you do, certain Recruiter actions might not function as expected. This information is provided so that you can understand what each workflow does and use it as needed.
Note: The ExactTarget workflows are delivered as part of the ExactTarget installation. For more information, see the documentation provided by ExactTarget.
Note: You can create a workflow schedule for most on-demand workflows. For more information, see “Scheduling Workflows” on page 184.
Table 36: Delivered Workflows
Workflow Name Description
Assign Application Folder Reviewers Dialog that takes a user through the process of selecting one or more CRM users to act as a reviewer for an application folder. For each user, a review is created and the folder is shared with that user. For more information, see “Configuring the Application Folder” on page 141.
Attach Supplement to Common App 2011 Relates a new supplement with an existing application record (for 2011 versions of the Common Application).
Attach Supplement to Common Application Relates a new supplement with an existing application record (for 2009 versions of the Common Application).
Attach Supplement to Common Application 2010
Relates a new supplement with an existing application record (for 2010 versions of the Common Application).
Attach Supplement to Common Application 2012
Relates a new supplement with an existing application record (for 2012 versions of the Common Application).
Configuration, Recruiter Release 2.6 October 19, 2012 171
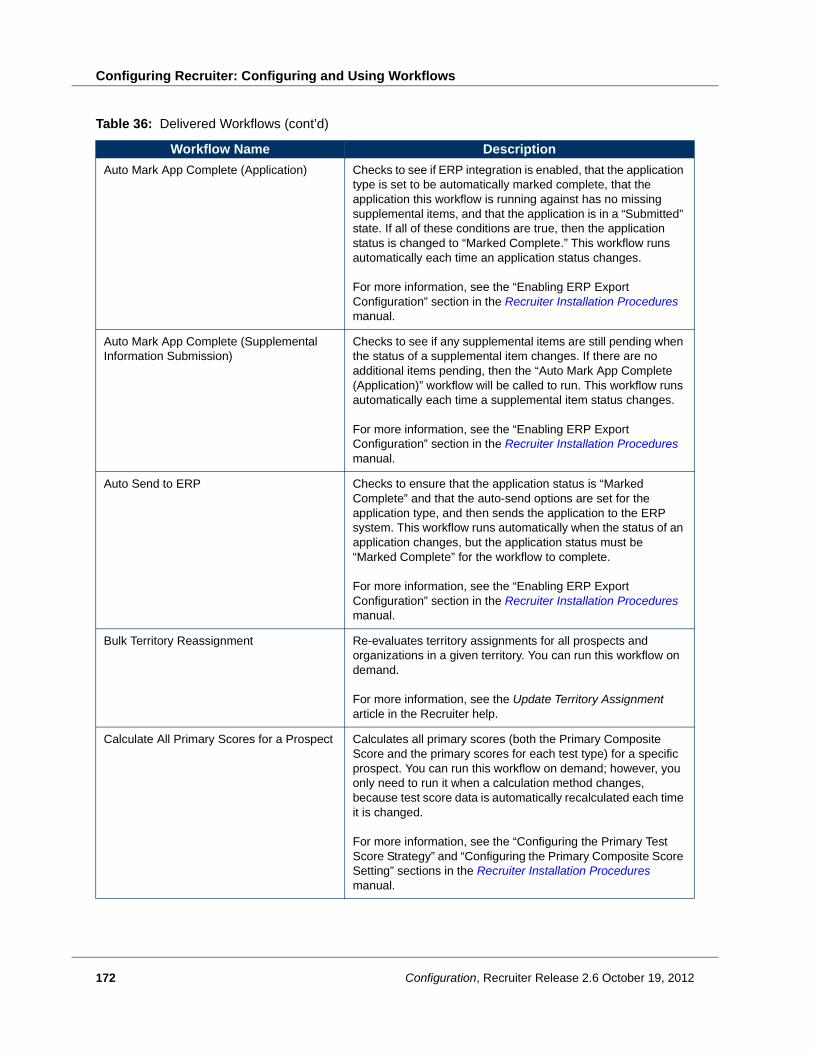
Configuring Recruiter: Configuring and Using Workflows
Auto Mark App Complete (Application) Checks to see if ERP integration is enabled, that the application type is set to be automatically marked complete, that the application this workflow is running against has no missing supplemental items, and that the application is in a “Submitted” state. If all of these conditions are true, then the application status is changed to “Marked Complete.” This workflow runs automatically each time an application status changes.
For more information, see the “Enabling ERP Export Configuration” section in the Recruiter Installation Procedures manual.
Auto Mark App Complete (Supplemental Information Submission)
Checks to see if any supplemental items are still pending when the status of a supplemental item changes. If there are no additional items pending, then the “Auto Mark App Complete (Application)” workflow will be called to run. This workflow runs automatically each time a supplemental item status changes.
For more information, see the “Enabling ERP Export Configuration” section in the Recruiter Installation Procedures manual.
Auto Send to ERP Checks to ensure that the application status is “Marked Complete” and that the auto-send options are set for the application type, and then sends the application to the ERP system. This workflow runs automatically when the status of an application changes, but the application status must be “Marked Complete” for the workflow to complete.
For more information, see the “Enabling ERP Export Configuration” section in the Recruiter Installation Procedures manual.
Bulk Territory Reassignment Re-evaluates territory assignments for all prospects and organizations in a given territory. You can run this workflow on demand.
For more information, see the Update Territory Assignment article in the Recruiter help.
Calculate All Primary Scores for a Prospect Calculates all primary scores (both the Primary Composite Score and the primary scores for each test type) for a specific prospect. You can run this workflow on demand; however, you only need to run it when a calculation method changes, because test score data is automatically recalculated each time it is changed.
For more information, see the “Configuring the Primary Test Score Strategy” and “Configuring the Primary Composite Score Setting” sections in the Recruiter Installation Procedures manual.
Table 36: Delivered Workflows (cont’d)
Workflow Name Description
172 Configuration, Recruiter Release 2.6 October 19, 2012

Understanding Workflows
Calculate All Primary Scores for All Prospects
Calculates all primary scores (both the Primary Composite Score and the primary scores for each test type) for all prospects. You should run this workflow on demand only when the calculation method changes and all prospect records need to be updated.
For more information, see the “Configuring the Primary Test Score Strategy” and “Configuring the Primary Composite Score Setting” sections in the Recruiter Installation Procedures manual.
Calculate Primary Composite Score This workflow is no longer in use (as of Recruiter 2.6). Use the “Calculate All Primary Scores for a Prospect” or “Calculate All Primary Scores for All Prospects” workflows instead.
Campaign Activity Catch Up Processing This workflow is no longer in use (as of Recruiter 2.5). Use the “Catchup Campaign Activity” workflow instead.
Catchup Campaign Activity Performs catch-up processing for campaigns. You can run this workflow on demand.
For more information, see the Define Campaign Catch-up Processing article in the Recruiter help.
Clean Up Prospect Child Data Cleans up duplicate records for specific prospect data. You can run this workflow on demand.
For more information, see the Clean Up Duplicate Prospect Records article in the Recruiter help.
Convert Set of Suspect Stagers Starts the conversion process for eSearch suspect import staging records. This workflow must be activated to convert the suspect staging records into suspect records. If you experience issues, you can run any of the “Create Suspect from eSearch” workflows on demand to create suspect records from the staging records.
For more information about viewing staging records data, see the Manage Staging Records article in the Recruiter help.
Convert Set of Test Score Stagers Starts the conversion process for test score import staging records. This workflow must be activated to convert the test score staging records into test score records. If you experience issues, you can run the “Create Test Score from Staging Record” workflow on demand to create test score records from the staging records.
For more information about viewing staging records data, see the Manage Staging Records article in the Recruiter help.
Table 36: Delivered Workflows (cont’d)
Workflow Name Description
Configuration, Recruiter Release 2.6 October 19, 2012 173

Configuring Recruiter: Configuring and Using Workflows
Create Application from Common App 2009 Creates application records from the 2009 Common Application staging records. You can run this workflow on demand to retry processing after you have resolved errors.
For more information, see the Application Import Overview article in the Recruiter help.
Create Application from Common App 2010 Creates application records from the 2010 Common Application staging records. You can run this workflow on demand to retry processing after you have resolved errors.
For more information, see the Application Import Overview article in the Recruiter help.
Create Application from Common App 2011 Creates application records from the 2011 Common Application staging records. You can run this workflow on demand to retry processing after you have resolved errors.
For more information, see the Application Import Overview article in the Recruiter help.
Create Application from Common App 2012 Creates application records from the 2012 Common Application staging records. You can run this workflow on demand to retry processing after you have resolved errors.
For more information, see the Application Import Overview article in the Recruiter help.
Create Application from Royall App 2010 Creates application records from the 2010 Royall Application staging records. You can run this workflow on demand to retry processing after you have resolved errors.
For more information, see the Application Import Overview article in the Recruiter help.
Create Applications from Import Set Starts the conversion process for application import staging records. This workflow must be activated to convert the application staging records into application records. If you experience issues, you can run any of the “Create Application from...” or “Process Application Import Template” workflows on demand to create application records from the staging records.
For more information, see the Application Import Overview article in the Recruiter help.
Create Suspect from eSearch ACT EOS Creates suspect records from the eSearch ACT EOS staging records. You can run this workflow on demand to retry processing after you have resolved errors.
For more information, see the Import a Suspect List article in the Recruiter help.
Table 36: Delivered Workflows (cont’d)
Workflow Name Description
174 Configuration, Recruiter Release 2.6 October 19, 2012

Understanding Workflows
Create Suspect from eSearch ACT Plan Creates suspect records from the eSearch ACT Plan staging records. You can run this workflow on demand to retry processing after you have resolved errors.
For more information, see the Import a Suspect List article in the Recruiter help.
Create Suspect from eSearch College Board
Creates suspect records from the eSearch College Board staging records. You can run this workflow on demand to retry processing after you have resolved errors.
For more information, see the Import a Suspect List article in the Recruiter help.
Create Suspect from eSearch NRCCUA Creates suspect records from the eSearch NRCCUA staging records. You can run this workflow on demand to retry processing after you have resolved errors.
For more information, see the Import a Suspect List article in the Recruiter help.
Create Test Score From Staging Record Creates test score records from the test score staging records. You can run this workflow on demand to retry processing after you have resolved errors.
For more information, see the Test Score Import Overview article in the Recruiter help.
Determine Prospect Pending Scores Checks prospects for official test scores that have not been sent to the ERP system and flags those test scores as ready for export (from the Navigation Pane, click Recruiting, click Prospects, and select the “Prospects with Test Scores Ready for Export” view). If a test score type has not been identified to be sent to the ERP system, the associated test scores are not flagged for export. You can run this workflow on demand against one or more prospects.
For more information, see the Test Score Export Overview article in the Recruiter help.
ECommerce Cleanup Transactions Cleans up old eCommerce transactions.
Export Applications on Demand Exports applications to a file manually using the Export Now option (from the Navigation Pane, click Applications > Export Applications).
Export Applications on Schedule Exports applications to a file based on the scheduled export that you created using the Schedule Export option (from the Navigation Pane, click Applications > Export Applications).
Export Completed Applications This workflow is no longer in use.
Generate Abbreviated State for Existing Orgs
Updates the field that contains the abbreviated state for existing organizations.
Table 36: Delivered Workflows (cont’d)
Workflow Name Description
Configuration, Recruiter Release 2.6 October 19, 2012 175

Configuring Recruiter: Configuring and Using Workflows
Generate Abbreviated State for Existing Prospects
Updates the field that contains the abbreviated state for existing prospects.
Generate Abbreviated State for Existing Suspects
Updates the field that contains the abbreviated state for existing suspects.
Generate App Folders from Existing Apps Creates application folders for existing applications if they do not exist.
Marketing List Automation This workflow is no longer in use.
Process Application Import Template Creates application records from the General Application staging records. You can run this workflow on demand to retry processing after you have resolved errors.
For more information, see the Application Import Overview article in the Recruiter help.
Process Workflow Schedule Manages the Workflow Scheduler processing tasks. For more information, see “Create a Workflow Schedule” on page 185.
Setup Prospect Create Account Keys Generates the Create Account Key and Create Account Security Key values for prospect Quick Forms links. For Recruiter 2.5 and later versions, you must run this workflow on demand once to generate the field values for pre-existing records. These values will be generated automatically for new records.
For more information, see either “Create E-mail Templates to Quick Forms on the External Website” on page 227 or “Create ExactTarget E-mails to Quick Forms on the External Website” on page 254.
Setup Suspect Create Account Keys Generates the Create Account Key and Create Account Security Key values for suspect Quick Forms links. For Recruiter 2.5 and later versions, you must run this workflow on demand once to generate the field values for pre-existing records. These values will be generated automatically for new records.
For more information, see either “Create E-mail Templates to Quick Forms on the External Website” on page 227 or “Create ExactTarget E-mails to Quick Forms on the External Website” on page 254.
Synchronize Drip Marketing List Removes members from a marketing list associated with a drip campaign by synchronizing the marketing list with the campaign activities. You can run this workflow on demand.
For more information, see the Create Drip Campaigns article in the Recruiter help.
Task Set Failed Monitor Monitors failed workflow task sets. Note: This workflow is a core Recruiter business process and must not be changed.
Table 36: Delivered Workflows (cont’d)
Workflow Name Description
176 Configuration, Recruiter Release 2.6 October 19, 2012

Understanding Workflows
Delivered Workflow Templates
Workflow templates can be used as a basis for creating your own workflows. Table 37 contains the list of delivered Recruiter workflow templates and their descriptions.
Trigger Task Set Processing Processes workflow task sets. Note: This workflow is a core Recruiter business process and must not be changed.
Update Enrollment Goals Calculates enrollment goals. You can run this workflow on demand.
For more information, see the Enrollment Goals Overview article in the Recruiter help.
Update Event Metrics Calculates return on investment (ROI) metrics for an event. You can run this workflow on demand.
For more information, see the Trips Overview article in the Recruiter help.
Update Primary Scores This workflow is no longer in use (as of Recruiter 2.6). We recommend that you use the “Calculate All Primary Scores for a Prospect” or “Calculate All Primary Scores for All Prospects” workflows instead.
Workflow Scheduler This workflow is no longer in use.
Table 36: Delivered Workflows (cont’d)
Workflow Name Description
Note: The ExactTarget workflow templates are delivered as part of the ExactTarget installation. For more information, see the documentation provided by ExactTarget.
Table 37: Delivered Workflow Templates
Workflow Template Name Description
Create Activity when College Transcript Received Template for creating an activity when a college transcript is received. For more information, see “Create Item Received Workflow for High School or College Transcript” on page 190.
Create Activity when HS Transcript Received Template for creating an activity when a high school transcript is received. For more information, see “Create Item Received Workflow for High School or College Transcript” on page 190.
Configuration, Recruiter Release 2.6 October 19, 2012 177

Configuring Recruiter: Configuring and Using Workflows
Desirability Rating Template Template for changing desirability rating for a prospect based on Recruiter’s desirability rating calculation and any custom adjustments. For more information, see “Configure Prospect Ratings Workflow” on page 200.
Folder Single Review Completed Template that updates the application folder with the proposed decision when the review is completed.
Probability Rating Template Template for changing the probability rating for a prospect based on Recruiter’s probability rating calculation and any custom adjustments. For more information, see “Configure Prospect Ratings Workflow” on page 200.
Table 37: Delivered Workflow Templates (cont’d)
Workflow Template Name Description
178 Configuration, Recruiter Release 2.6 October 19, 2012

Creating Workflows
Creating WorkflowsThis section contains high-level process information for creating workflows. Workflows are a native feature of Microsoft Dynamics CRM and the procedures are contained within the Microsoft Dynamics CRM help.
Table 38 contains a list of procedures related to creating workflows. This information includes the procedure title and where you can find more information.
Create Workflows Process
For more information about workflows process and details, see the Creating and Using Workflows article in the Microsoft Dynamics CRM help.
The following steps describe the basic process for creating a workflow.
Step 1. Create an empty workflow or use a workflow template. A workflow template is a type of workflow that serves exclusively as the basis for creating other workflows. Workflow templates cannot start workflow jobs.
Table 38: Procedures for Workflows
Procedure Location
Create Workflows Process page 179
Create or edit a workflow Microsoft Dynamics CRM Help
Specify the conditions for a workflow step Microsoft Dynamics CRM Help
Add or change dynamic values in a workflow Microsoft Dynamics CRM Help
Publish Workflows page 181
Start an On-Demand Workflow Microsoft Dynamics CRM Help
Monitor Workflow Jobs page 182
Cancel or change the status of a system job Microsoft Dynamics CRM Help
Configuration, Recruiter Release 2.6 October 19, 2012 179

Configuring Recruiter: Configuring and Using Workflows
Step 2. Specify the workflow properties, such as its name and the primary entity that it acts on, such as Contact or Application.
Step 3. Under Available to Run, select how you want to make the workflow available to other users in your organization:
As an on-demand workflow. An on-demand workflow is a type of workflow that only runs when a user chooses to apply it to records from a toolbar or menu.
As a child workflow. A child workflow is a type of workflow that runs only when started by another workflow. It is contained within a parent workflow and cannot be run on its own.
Step 4. If you are creating an automatic workflow, under Options for Automatic Workflows, set options unique to workflows that run automatically. An automatic workflow is a type of workflow that runs as soon as the conditions defined in the workflow logic are met, without requiring user action to start it.
Scope. Select the access level that matches the workflow scope that you want to set for this workflow. Access level is the security role setting that determines, for a given entity, who can access records. The workflow scope is the range of records that a particular workflow is allowed to take action on. Available options depend on the access level that you have on your workflow’s primary entity. Workflow jobs started by your workflow will not take action on records owned at a higher access level than your access level.
Start when. Select the check boxes that correspond to the events that you want to start the workflow.
Note: The items available to you in this list depend on the privileges that have been assigned to your security role for the workflow's primary entity.
Note: If you select the Record fields change check box, you must click Select and specify the fields of the primary entity that you want the workflow to monitor for changes.
180 Configuration, Recruiter Release 2.6 October 19, 2012

Creating Workflows
Step 5. Add conditions, workflow actions, and other elements that define your workflow logic:
Conditions are elements of workflow logic that define specific situations and any actions that should be taken when the situations occur. These are the logical “if-then” statements in a workflow.
Workflow actions are elements of workflow logic that specify the actions that should be performed by workflow jobs when conditions defined in the workflow have been met.
Other elements can include all of the conditions, actions, and other logical elements that define when and how a particular workflow takes action on specific records.
Step 6. Publish (activate) the workflow.
Publish Workflows
For more information about publishing workflows, see the Publish or unpublish a workflow article in the Microsoft Dynamics CRM help.
Before you can use the workflow you have created, you must publish it. This is also called activating a workflow. Activating a workflow changes its status from “Draft” to “Activated.” Depending on the type of workflow you created, activating a workflow also makes it available for use in various contexts:
If you have created an automatic workflow, the workflow starts to run when the criteria defined in its conditions are met. An automatic workflow runs as soon as the conditions defined in the workflow logic are met; no user action is required to start the workflow.
If you have created an on-demand workflow, the workflow becomes available to you and other users from toolbars and menus. An on-demand workflow only runs when a user chooses to apply it to records from a toolbar or menu.
If you have created a child workflow, the workflow becomes available to be started from within other workflows. A child workflow runs only when started by another workflow. It is contained within a parent workflow and cannot be run on its own.
You can make a single workflow available in any combination of these three contexts. Unactivated workflows that are in a draft state cannot be used.
Configuration, Recruiter Release 2.6 October 19, 2012 181

Configuring Recruiter: Configuring and Using Workflows
Follow these steps to activate a workflow.
Step 1. In the Navigation Pane, click Settings, and then click Processes.
Step 2. In the Processes pane, select the workflow that you want to activate, and click Activate (Figure 61). Likewise, if you need to deactivate a workflow that is activated, click Deactivate.
Figure 61: Activate and Deactivate Buttons
Step 3. In the confirmation message, click OK.
Monitor Workflow Jobs
Whenever the criteria defined in an automatic workflow are met, or when you start an on-demand workflow, Microsoft Dynamics CRM creates a workflow job. A workflow job is a type of system job that performs the actions defined in a workflow on a specific record. By monitoring the workflow jobs created by a workflow, you can check progress and make sure that there have been no problems with the workflow or its workflow jobs.
Follow these steps to view workflow jobs.
Note: You cannot deactivate workflows that have active workflow jobs. Before you deactivate a workflow, check for any active workflow jobs and cancel them.
ALERT! Canceling a system job is permanent; you cannot resume a canceled system job. Therefore, we recommend that you only postpone the completion of a system job or pause a system job if you are having issues with it. Resuming restarts a system job that was paused.
System jobs are a type of process that can continue independently or in the background. Several features use system jobs to perform tasks automatically, including workflows, imports, and duplicate detection.
182 Configuration, Recruiter Release 2.6 October 19, 2012
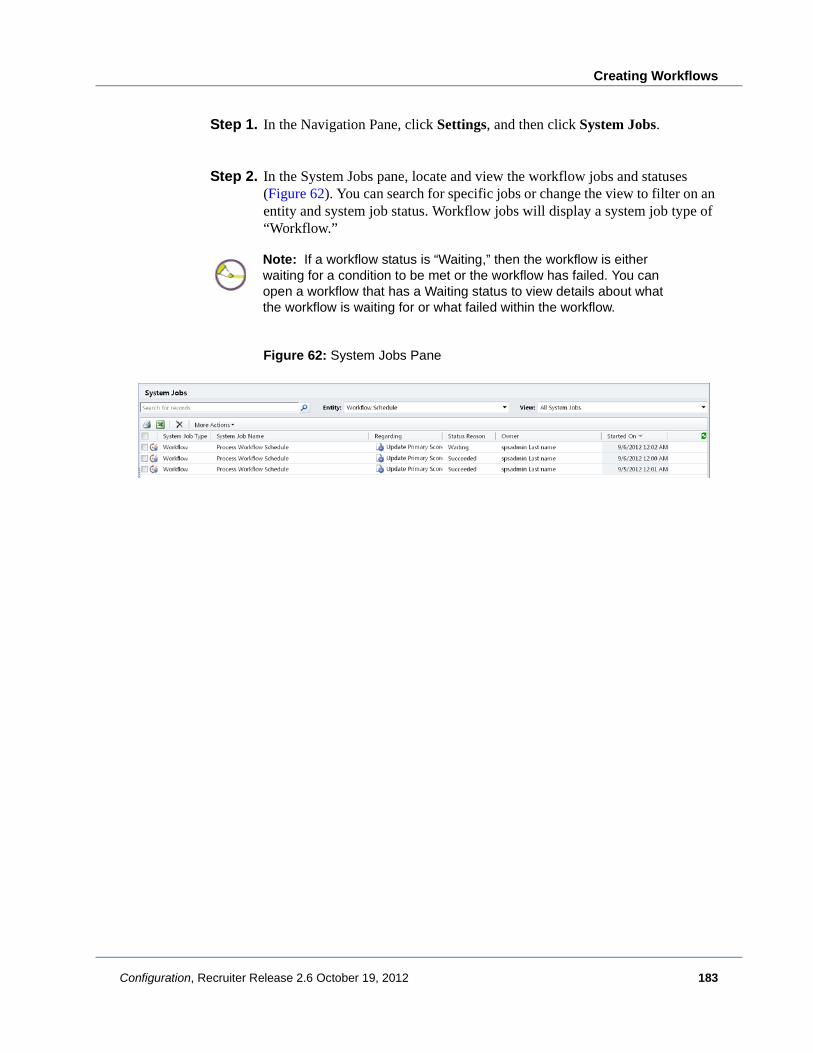
Creating Workflows
Step 1. In the Navigation Pane, click Settings, and then click System Jobs.
Step 2. In the System Jobs pane, locate and view the workflow jobs and statuses (Figure 62). You can search for specific jobs or change the view to filter on an entity and system job status. Workflow jobs will display a system job type of “Workflow.”
Figure 62: System Jobs Pane
Note: If a workflow status is “Waiting,” then the workflow is either waiting for a condition to be met or the workflow has failed. You can open a workflow that has a Waiting status to view details about what the workflow is waiting for or what failed within the workflow.
Configuration, Recruiter Release 2.6 October 19, 2012 183

Configuring Recruiter: Configuring and Using Workflows
Scheduling WorkflowsRecruiter provides the ability to schedule workflows. This section contains information on restrictions to scheduling workflows and using the Workflow Scheduler.
Workflow Schedule Restrictions
There are instances where there are restrictions on workflow schedules that prevent you from scheduling certain workflows. Some of the restrictions are only in CRM online (as indicated by “Online only”) and some of the restrictions apply to both an on-premise and a CRM online deployment (as indicated by “All”). The following are the workflows that have scheduling restrictions:
Disallow Scheduling:
Bulk Territory Assignment (Online only)
Catchup Campaign Activity (Online only)
Convert Set of Suspect Stagers (All)
Convert Set of Test Score Stagers (All)
Create Applications from Import Set (All)
Synchronize Drip Marketing Lists (Online only)
Recruiter has restrictions with workflow schedules with an online deployment because of an issue where workflows timeout when a workflow causes a plug-in to be triggered. The workflow eventually encounters constraints enforced by CRM online regarding the amount of resources that can be allocated to plug-ins. If you are creating your own workflows in a CRM online environment, you should restrict the number of times you are updating prospect records or application records because this causes plug-ins to be triggered and could lead to a timeout issue.
In addition, when you are setting up workflow schedules in your online Recruiter environment, there could be timeout issues if you are running a workflow on several hundred records at one time.
For information about how to create a workflow schedule, see “Create a Workflow Schedule” on page 185.
184 Configuration, Recruiter Release 2.6 October 19, 2012
Scheduling Workflows
Create a Workflow Schedule
You can use the Workflow Scheduler to create a schedule upon which a workflow is run. For example, you can schedule the Bulk Territory Assignment workflow to run every night to reassign prospects to a new territory. You can also use the Workflow Scheduler to run any workflow schedules on demand. The Workflow Scheduler includes the option to stop, start, and delete workflow schedules as needed.
Each workflow schedule includes a date and time for the last time it was run and for the next time it will be run. The time in these fields is determined by your setting in the “Set the time zone you are in” field on the Options menu (File > Options, General tab).
When you are configuring the Workflow Scheduler, you should keep in mind that every iteration of the scheduler waits until all of the scheduled workflows are run. If there are too many workflows to be run in the time before the scheduler’s own next run, it will skip its next iteration and run again as soon as it finishes. For example:
1 a.m. – Scheduler Run #1
2 a.m. – Scheduler Run #2
If the workflows scheduled in run #1 have not been completed by CRM by 2 a.m., scheduler run #2 will be postponed until after those workflows finish. This issue can be resolved by increasing the interval at which the scheduler runs, say to every 240 minutes, instead of the default 60 minutes, assuming you do not have any schedules that must be run on an hourly basis.
To complete this task, you must be assigned the System Administrator security role. You should also review “Workflow Schedule Restrictions” on page 184.
Follow these steps to create a workflow schedule.
Step 1. In the Navigation Pane, click Settings, and then click Workflow Scheduler.
Note: After a workflow schedule is created or has been stopped, you must manually start the workflow schedule to begin the processing. For any workflow schedules that are overdue, you are presented with a message about the workflow being overdue when you start the workflow schedule again. You can either let the workflow schedule run at the next scheduled time or you can run the workflow schedule immediately.
Configuration, Recruiter Release 2.6 October 19, 2012 185

Configuring Recruiter: Configuring and Using Workflows
Step 2. In the Workflow Scheduler pane, make sure that the Days to Keep Log field contains a value, in days, that indicates how long you want to keep information about the running of a workflow schedule in the log.
Step 3. Click Add new schedule . The Workflow Info dialog box is displayed (Figure 63).
Figure 63: Workflow Info Dialog Box
Step 4. In the Workflow Info section, enter information or requirements as needed in the following fields:
Name. Enter the name for the workflow schedule that you are creating.
Workflow. Enter the name of the workflow that you want to create a schedule for, use Lookup to search for the workflow. After you select a workflow, additional fields become available.
Status. This field is filled in automatically with the “Active” status, but you can select a different status from the drop-down list. Note: After you complete the first three fields on the form, additional sections become available.
186 Configuration, Recruiter Release 2.6 October 19, 2012

Scheduling Workflows
Step 5. In the Workflow Criteria section, enter information or requirements as needed in the following fields:
Entity. This field is filled in automatically with the name of the entity based on the workflow you selected.
Entity ID. To run the workflow on a particular record in an entity, use Lookup to search for the ID. Note: If you select the wrong ID or want to use the Criteria View field to limit the records instead, click Clear.
Criteria View. Select a view to limit the records that should be processed by the workflow. Note: You can use either the Criteria View or the Entity ID field to limit the records the workflow processes, but you cannot use both.
Step 6. In the Workflow Schedule section, enter information or requirements as needed in the following fields:
Start Date. Enter the date on which you want the schedule to begin. This is the date on which you want the workflow to begin being automatically processed.
End Date. Enter the date on which you want the schedule to end. This is the date on which you want the workflow to stop processing.
Occurs Every. Select the frequency for the schedule. This is how often you want the workflow to be automatically processed. From the drop-down box, you can indicate a value that represents hours, days, or weeks. If you select “Days,” you also need to specify the hour of the day that you want the schedule to be run. If you select “Weeks,” you need to specify the hour of the day and the day of the week.
Step 7. Click Save to create the workflow schedule.
Note: The time you enter in the Run at (Hour Only) field should be set to when you want to run the workflow schedule in your time zone as it is set in CRM. The Next Run and Last Run times that appear on the Workflow Schedule grid view are set to your local time zone. For example, if your time zone is set to Eastern Time (GMT -5.00), and you enter midnight as the run time, the workflow will run at midnight according to your time zone, but the Frequency Description will show the time in Greenwich Mean Time (GMT).
Configuration, Recruiter Release 2.6 October 19, 2012 187

Configuring Recruiter: Configuring and Using Workflows
Step 8. Click Start to begin the workflow schedule.
Resolve Workflow Schedule Warnings
When you are monitoring your workflow schedules, you might see a status of “Running – Warning.” You must review and resolve these warnings for the workflow schedule to continue. For more information on monitoring workflow jobs, see “Monitor Workflow Jobs” on page 182.
You can resolve workflow schedule warnings as follows.
Step 1. In the Navigation Pane, click Settings, and then click Workflow Scheduler.
Step 2. In the Workflow Scheduler pane, Status column, click the Running - Warning link.
Step 3. View the History section. The last workflow will show either a “Failed” or “Waiting” status reason.
Note: You can run a workflow schedule on demand by selecting the workflow schedule and then clicking Run selected schedules.
You can use this option if you want to run a workflow against a view, but you do not want to run it on a scheduled basis. Instead, you can create a workflow schedule and run it on demand as needed. You can also use this option if you want to run a workflow sooner than the next scheduled interval. For example, if you need to view immediate statistics for a workflow that you have scheduled to run on a recurring basis, such as updating enrollment goals, you can run the workflow schedule on demand.
188 Configuration, Recruiter Release 2.6 October 19, 2012

Scheduling Workflows
Step 4. For a “Failed” status, do the following:
a. Click the link in the System Job Name column to open the workflow.
b. From the Workflow dialog box, in the Navigation Pane, click Details and look for any errors.
c. Attempt to resolve the error conditions. After the error conditions have been resolved, you can stop and restart the workflow schedule.
To stop and restart the workflow schedule, from the Workflow Scheduler
pane (Settings > Workflow Scheduler), click Stop and then click
Start .
Step 5. For a “Waiting” status, do the following:
a. Click the link in the System Job Name column to open the workflow.
b. From the Workflow dialog box, in the Navigation Pane, click Details and look for any errors.
c. Attempt to resolve the error conditions. After the error conditions have been resolved, you cancel the workflow, and then stop and restart the workflow schedule. If there are no errors, you should attempt to pause and then resume the workflow.
The Cancel, Pause, and Resume buttons are at the top of the Workflow Dialog window (Figure 64). The Pause and Resume buttons will only be displayed for a workflow that is in a “Waiting” status.
To stop and restart the workflow schedule, from the Workflow Scheduler
pane (Settings > Workflow Scheduler), click Stop and then click
Start .
Figure 64: Workflow Dialog Buttons
Configuration, Recruiter Release 2.6 October 19, 2012 189

Configuring Recruiter: Configuring and Using Workflows
Creating Specific Recruiter WorkflowsThis section contains information and procedures for implementing specific workflows scenarios.
For more information about workflows and how to create workflows, see “Creating Workflows” on page 179.
Create Item Received Workflow for High School or College Transcript
Transcripts can be used as supplemental items for an application. To create the correct activities and items received records for a transcript, you must define a workflow that creates an activity. Recruiter provides two workflow templates to assist you, named “Create Activity when HS Transcript Received” and “Create Activity when College Transcript Received.”
To complete this procedure, you must be assigned the System Administrator or System Customizer security role, or equivalent privileges.
Follow this procedure to create an item received workflow for either high school or college transcripts.
Step 1. In the Navigation Pane, click Settings, and then click Processes.
Step 2. In the Processes pane, click New. The Create Process dialog box is displayed as shown in Figure 65.
190 Configuration, Recruiter Release 2.6 October 19, 2012

Creating Specific Recruiter Workflows
Figure 65: Create Process Dialog Box
Step 3. Enter the following information:
Process Name. Type the name that you want to use for this workflow.
Entity. Select the High School Academic History entity for high school transcripts or the College Academic History entity for college transcripts.
Category. Select Workflow.
Type. Select New process from an existing template, and then select either the Create Activity when HS Transcript Received or Create Activity when College Transcript Received check box. The template that is displayed depends on the entity you select.
Step 4. Click OK. The Information dialog box is displayed as shown in Figure 66.
Configuration, Recruiter Release 2.6 October 19, 2012 191

Configuring Recruiter: Configuring and Using Workflows
Figure 66: Information Dialog Box
Step 5. On the General tab in the main pane, set the following workflow properties:
From the Activate As list, select Process.
Under Available to Run, select As an on-demand process.
Under Options for Automatic Processes, select Organization from the Scope field and leave the Record is created and Record fields change check boxes selected from the Starts When field. The record field that is selected is the Transcript Stored field on the High School or College Academic History record (you can confirm this by clicking Select).
These selections ensure that the process can be run independently, and that the workflow is started when the record is created or when the selected record field is changed.
192 Configuration, Recruiter Release 2.6 October 19, 2012

Creating Specific Recruiter Workflows
Step 6. Under the “Create activity” rule, beside the Create drop-down, click Set Properties. The Create Item Received dialog box is displayed as show in Step 67.
Figure 67: Create Item Received Dialog Box
Step 7. In the Activity Code field, enter the activity code or use Lookup to locate the activity code that is to be used for transcript activities.
Step 8. Click Save and Close.
Step 9. Click Activate.
Step 10. Click Close.
Step 11. Repeat Step 2 through Step 10 to create the second workflow.
Configuration, Recruiter Release 2.6 October 19, 2012 193
Configuring Recruiter: Configuring and Using Workflows
Create Item Received Workflow for Test Score Import
Official test scores can be used as supplemental items for an application. To create the correct activities and items received records for an imported test score, you must define a workflow that creates an activity.
Before you can begin, you should create the activity codes for each test score that you import. We recommend that you create a separate activity code for each different test type. For more information, see the Supplemental Submissions Overview article in the Recruiter help.
To complete this procedure, you must be assigned the System Administrator or System Customizer security role, or equivalent privileges.
Follow this procedure to create an item received workflow for test score imports.
Step 1. From the Navigation pane, click Settings, and then Processes.
Step 2. In the Processes pane, click New. The Create Process dialog box is displayed as shown in Figure 68.
194 Configuration, Recruiter Release 2.6 October 19, 2012

Creating Specific Recruiter Workflows
Figure 68: Create Process Dialog Box
Step 3. Enter the following information:
Process Name. Type the name that you want to use for this workflow.
Entity. Select the Test Score entity.
Category. Select Workflow.
Type. Leave the field set to New blank process.
Step 4. Click OK. The Information dialog box is displayed as shown in Figure 69.
Configuration, Recruiter Release 2.6 October 19, 2012 195

Configuring Recruiter: Configuring and Using Workflows
Figure 69: Information Dialog Box
Step 5. On the General tab in the main pane, set the following workflow properties:
From the Activate As list, select Process.
Under Available to Run, select As an on-demand process.
Under Options for Automatic Processes, select Organization from the Scope field and leave the Record is created selected from the Starts When field.
These selections ensure that the process can be run independently, and that the workflow is started when the record is created.
196 Configuration, Recruiter Release 2.6 October 19, 2012

Creating Specific Recruiter Workflows
Step 6. To set up a condition that verifies that the test score was received from an official source:
a. Click Add Step, and then select Check Condition.
b. Type a condition description, such as “If this test score came from an official source,” and then click the provided link to configure the condition. The Specify Condition dialog box is displayed as shown in Figure 70.
Figure 70: Specify Condition Dialog Box
c. Select the Test Score CRM entity, Test Score Source field, and Equals condition. Use Lookup to locate the correct source, click the >> button to move the value to the right pane, and then click OK. For example, if you are creating a condition for SAT tests, select College Board. Click Save and Close.
Step 7. To set up a condition that verifies that a specific test type was received:
a. Select the row of the condition that you created in Step 6 (“If this test score came from an official source”), click Add Step, and then select Check Condition.
b. Type a condition description, such as “If this is an SAT Reasoning test,” and then click the provided link to configure the condition. The Specify Condition dialog box is displayed as shown in Figure 71.
Configuration, Recruiter Release 2.6 October 19, 2012 197
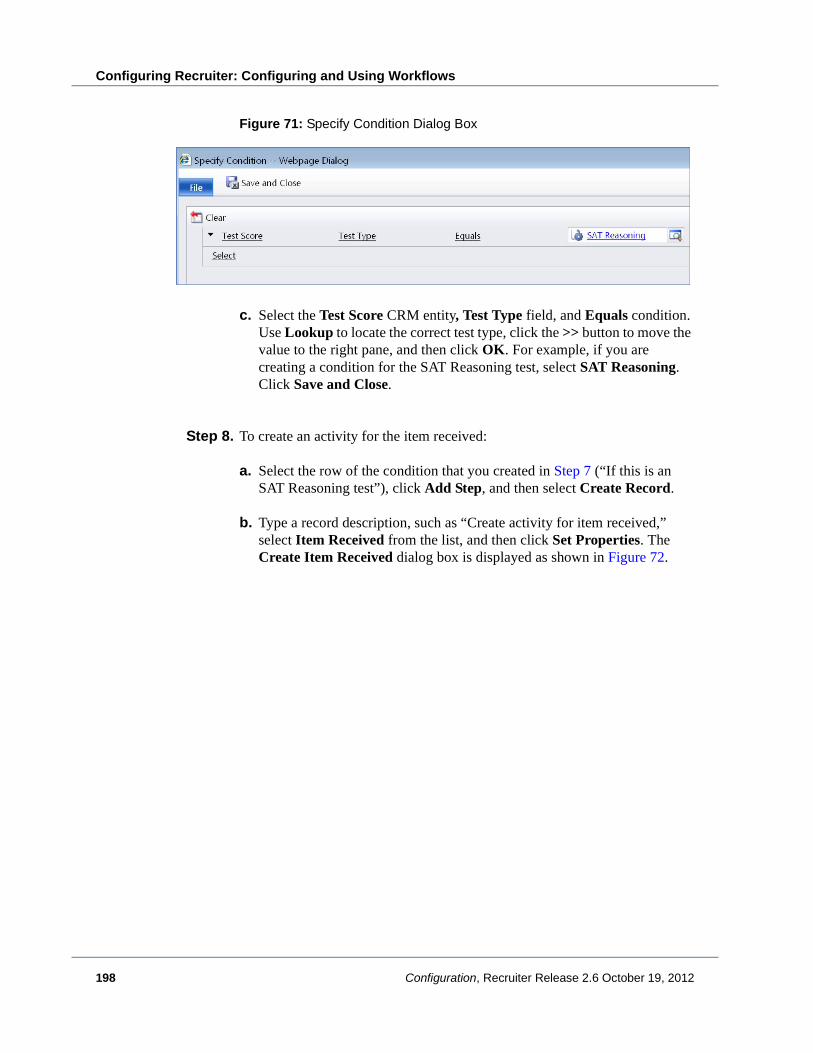
Configuring Recruiter: Configuring and Using Workflows
Figure 71: Specify Condition Dialog Box
c. Select the Test Score CRM entity, Test Type field, and Equals condition. Use Lookup to locate the correct test type, click the >> button to move the value to the right pane, and then click OK. For example, if you are creating a condition for the SAT Reasoning test, select SAT Reasoning. Click Save and Close.
Step 8. To create an activity for the item received:
a. Select the row of the condition that you created in Step 7 (“If this is an SAT Reasoning test”), click Add Step, and then select Create Record.
b. Type a record description, such as “Create activity for item received,” select Item Received from the list, and then click Set Properties. The Create Item Received dialog box is displayed as shown in Figure 72.
198 Configuration, Recruiter Release 2.6 October 19, 2012

Creating Specific Recruiter Workflows
Figure 72: Create Item Received Dialog Box
c. Specify information in the following fields.• Subject. Enter the subject name for the activity.• Activity Code. Enter the activity code that you want assigned when the
activity is created for this test type. • Set any of the other properties if necessary.
d. Click Save and Close.
Step 9. To mark an activity complete when the item is received:
a. Click Add Step, and then select Change Status.
b. Type a description, such as “Mark activity complete for item received,” select the name of the record that you created in Step 8 from the Change record status to list, and then select Completed.
Step 10. Repeat Step 6 through Step 9 for each different test type, selecting the correct source, test type, and activity code.
Configuration, Recruiter Release 2.6 October 19, 2012 199

Configuring Recruiter: Configuring and Using Workflows
Step 11. Review the steps, conditions, and records that you have added to the workflow. They should be similar to what is shown as the example in Figure 73.
Figure 73: Example Test Score Item Received Workflow Conditions and Records
Step 12. Click Activate.
Step 13. Click Close.
Configure Prospect Ratings Workflow
Recruiter can calculate the following ratings for a prospect:
Desirability Rating. A measurement of the desirability of a prospective student for your institution.
Probability Rating. A measurement of how likely the prospective student is to attend your institution.
You can configure prospect ratings calculations by using Recruiter’s workflow function with conditional workflow steps that support the ability to adjust and set the rating. Within the workflow definition, you can define specific rating values for certain conditions for each type of rating. For example, if the prospect’s city equals your city, add 10 points to the probability rating; if the prospect’s state equals your state, add 5 points to the probability rating.
To define a rating, follow these steps.
Step 1. From the Navigation Pane, click Settings, and then click Processes.
200 Configuration, Recruiter Release 2.6 October 19, 2012
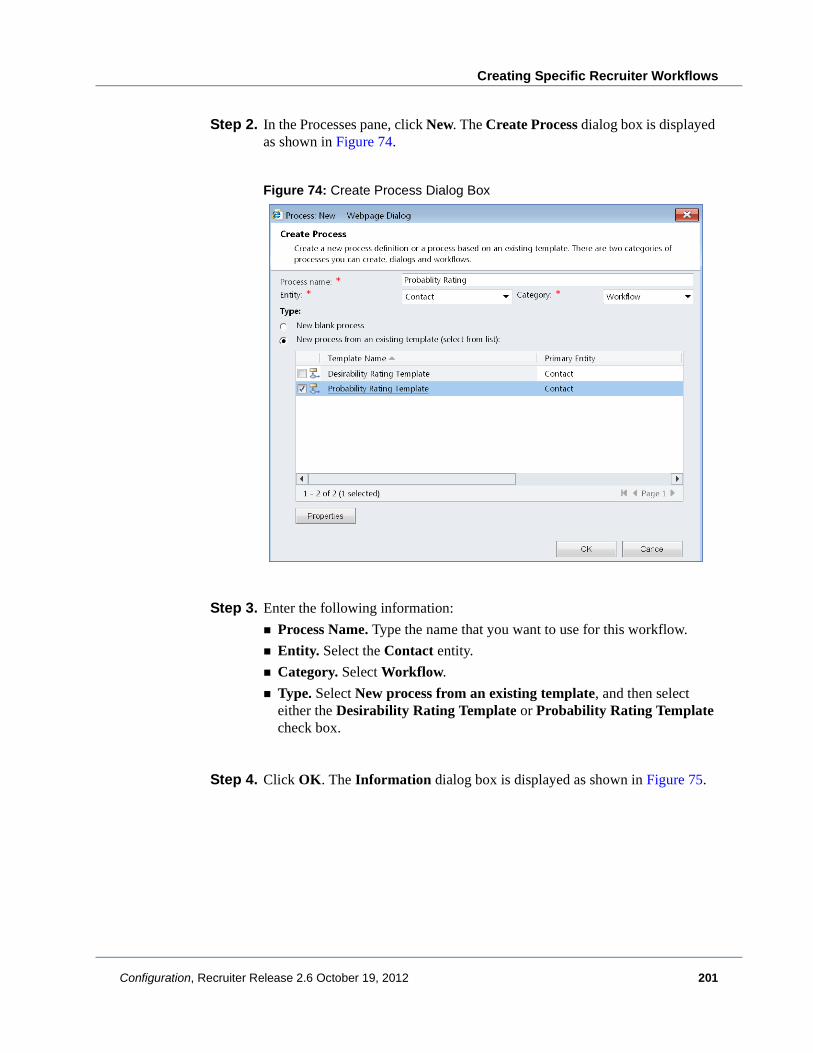
Creating Specific Recruiter Workflows
Step 2. In the Processes pane, click New. The Create Process dialog box is displayed as shown in Figure 74.
Figure 74: Create Process Dialog Box
Step 3. Enter the following information:
Process Name. Type the name that you want to use for this workflow.
Entity. Select the Contact entity.
Category. Select Workflow.
Type. Select New process from an existing template, and then select either the Desirability Rating Template or Probability Rating Template check box.
Step 4. Click OK. The Information dialog box is displayed as shown in Figure 75.
Configuration, Recruiter Release 2.6 October 19, 2012 201

Configuring Recruiter: Configuring and Using Workflows
Figure 75: Information Dialog Box
Step 5. On the General tab in the main pane, set the following workflow properties:
From the Activate As list, select Process.
Under Available to Run, select As an on-demand process.
Under Options for Automatic Processes, select Organization from the Scope field and leave the Record is created and Record fields change check boxes selected from the Starts When field. The record fields that are selected are the Prospect Status and Recruiter’s Probability Points fields (you can confirm this by clicking Select).
These selections ensure that the process can be run independently, and that the workflow is started when the record is created.
202 Configuration, Recruiter Release 2.6 October 19, 2012

Creating Specific Recruiter Workflows
Now, you can customize the delivered template to meet the needs of your institution.
Figure 76: Do Not Change First Two Steps in Workflow
Figure 77: Do Not Change Last Two Steps in Workflow
Step 6. To add a new rating adjustment, do as follows. You must add any rating adjustments after the first two steps and before the last two steps in the template.
a. Click Add Step, and then click Create Record.
b. Type a record description, select the type of adjustment you would like to make from the Create drop-down box, and then click Set Properties to specify the details of your ratings adjustment. The delivered entities for ratings adjustments are all prefixed with “Rating.”
When specifying the details of your ratings adjustment, each ratings adjustment activity contains a Rating Calculation field. This value is set based on the rating you are creating. You must use the Form Assistant in the right navigation pane (Figure 78) to set the Rating Calculation field for the rating adjustments you create manually. The Rating Calculation field will already be defined for examples in the template.
ALERT! The template is populated with several steps. Do not remove the first two (see Figure 76) or last two steps (see Figure 77) in the workflow. These steps are important in calculating the correct rating. The steps in between are examples of ratings adjustments and can be deleted or changed.
Configuration, Recruiter Release 2.6 October 19, 2012 203
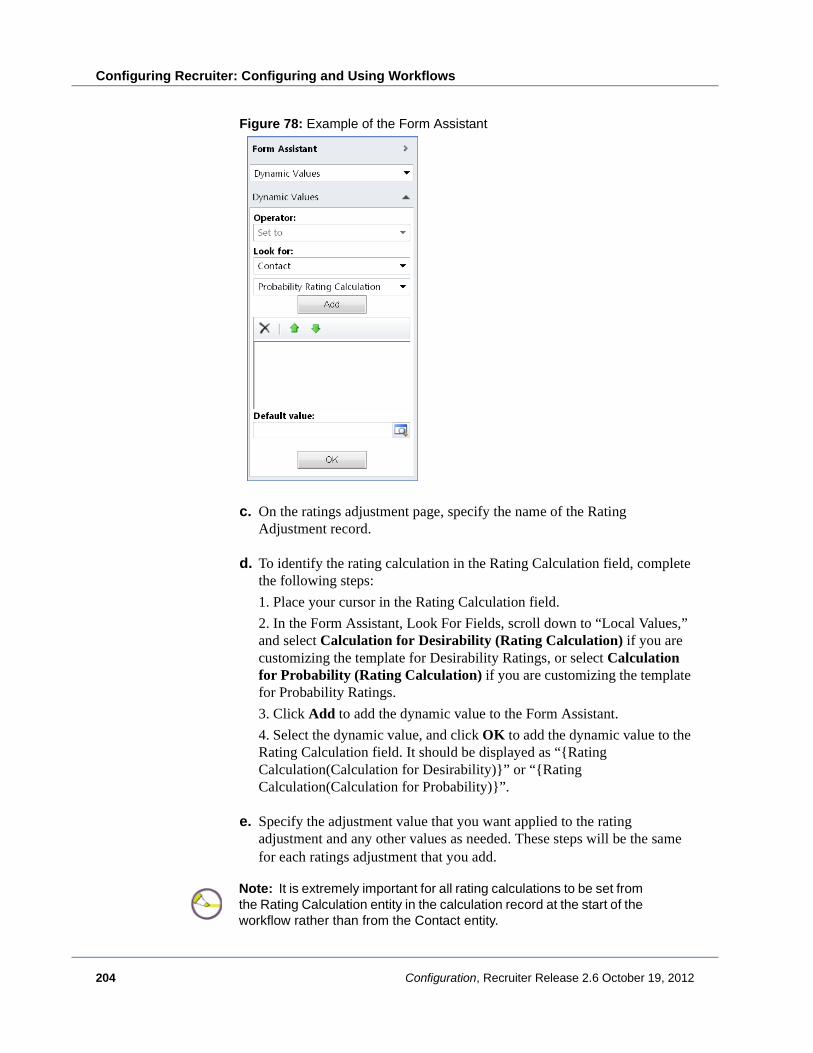
Configuring Recruiter: Configuring and Using Workflows
Figure 78: Example of the Form Assistant
c. On the ratings adjustment page, specify the name of the Rating Adjustment record.
d. To identify the rating calculation in the Rating Calculation field, complete the following steps:
1. Place your cursor in the Rating Calculation field.
2. In the Form Assistant, Look For Fields, scroll down to “Local Values,” and select Calculation for Desirability (Rating Calculation) if you are customizing the template for Desirability Ratings, or select Calculation for Probability (Rating Calculation) if you are customizing the template for Probability Ratings.
3. Click Add to add the dynamic value to the Form Assistant.
4. Select the dynamic value, and click OK to add the dynamic value to the Rating Calculation field. It should be displayed as “{Rating Calculation(Calculation for Desirability)}” or “{Rating Calculation(Calculation for Probability)}”.
e. Specify the adjustment value that you want applied to the rating adjustment and any other values as needed. These steps will be the same for each ratings adjustment that you add.
Note: It is extremely important for all rating calculations to be set from the Rating Calculation entity in the calculation record at the start of the workflow rather than from the Contact entity.
204 Configuration, Recruiter Release 2.6 October 19, 2012

Creating Specific Recruiter Workflows
The following are rating adjustment options that you can use in the workflows:
Rating Adjustment. This activity adjusts the rating by a specified amount and is typically used after a native workflow check condition such as “if city equals x, add 5 points to the rating.” • Adjustment Value. This property is a positive or negative integer value by
which to adjust the rating.
Rating Adjustment for Event Participation. This activity lets you adjust ratings based on event participation child data. • Adjustment Value. This property is a positive or negative integer value by
which to adjust the rating. • Adjust Rating. This property allows the Adjustment Value to be applied
for each event participation found, or once if the workflow finds any event participation.
• Event Code. This property tells the activity to look only for events defined with this code.
• Event Participation. This property tells the activity to look for any events for which the prospect has registered, or only events attended by the prospect.
• Date Range Start. This property tells the activity to look only for events that occur on or after this date and time.
• Date Range End. This property tells the activity to look only for events that occur on or before this date and time.
Rating for Supplemental Info Received. This activity lets you adjust ratings based on supplemental information submission child data. • Adjustment Value. This property is a positive or negative integer value by
which to adjust the rating. • Adjust Rating. This property allows the Adjustment Value to be applied
for each supplemental information submission found, or once if the workflow finds any supplemental submissions.
• Supplemental Info Type. This property tells the activity to look only for submissions defined as this type.
• Date Range Start. This property tells the activity to look only for submissions that occur on or after this date and time.
• Date Range End. This property tells the activity to look only for submissions that occur on or before this date and time.
Configuration, Recruiter Release 2.6 October 19, 2012 205

Configuring Recruiter: Configuring and Using Workflows
Rating Adjustment for Communications Sent By Prospect. This activity lets you adjust ratings based on communications sent by the prospect to your institution. • Adjustment Value. This property is a positive or negative integer value by
which to adjust the rating. • Adjust Rating. This property allows the Adjustment Value to be applied
for each communication found, or once if the workflow finds any communications.
• Include Email. This property tells the activity whether to include emails sent by the prospect to your institution.
• Include Phone Calls. This property tells the activity whether to include phone calls received by the institution from the prospect.
• Include Faxes. This property tells the activity whether to include faxes received by the institution from the prospect.
• Include Letters. This property tells the activity whether to include letters received by the institution from the prospect.
Rating Adjustment for High School History. This activity lets you adjust ratings based on high school academic history child data.• Adjustment Value. This property is a positive or negative integer value by
which to adjust the rating. • Adjust Rating. This property allows the Adjustment Value to be applied
for each high school academic history record found, or once if the workflow finds any high school academic history records.
• Date Range Start. This property tells the activity to look only for high school academic history records that occur on or after this date and time.
• Date Range End. This property tells the activity to look only for high school academic history records that occur on or before this date and time.
• Home Schooled. This property tells the activity whether to include or disregard home schooled records when adjusting ratings based on high school academic history.
• Minimum fields. These properties tell the activity to look for only high school academic history records that contain the minimum defined value for that field.
• Maximum fields. These properties tell the activity to look for only high school academic history records that contain the maximum defined value for that field.
206 Configuration, Recruiter Release 2.6 October 19, 2012

Creating Specific Recruiter Workflows
Rating Adjustment for Primary Test Scores.• Adjustment Value. This property is a positive or negative integer value by
which to adjust the rating. • Adjust Rating. This property allows the Adjustment Value to be applied
for each primary test score found, or once if the workflow finds any primary test scores.
• Minimum Primary Score. This property tell the activity to include only primary test scores that meet the minimum value.
• Maximum Primary Score. This property tell the activity to include only primary test scores that meet the maximum value.
• Test Type. This property tells the activity to look only for primary scores defined as this test type.
• Minimum Scores Received Per Type. This property tells the activity to include only primary test scores that meet the minimum value for the defined test type.
• Maximum Scores Received Per Type. This property tells the activity to include only primary test scores that meet the maximum value for the defined test type.
Step 7. After you have set these parameters, click Activate.
Step 8. Click Close.
Configure Prospect Ratings Workflow from FAFSA Information
As a part of the integration with your ERP system, Recruiter has the ability to store FAFSA information that has been received from your ERP system. You can use this information to adjust prospect ratings and to rate how your institution compares to other institutions that prospects have identified on their FAFSA applications.
Identify Your Institutions for Prospect Ratings and Competitive Comparison
Each FAFSA record that is imported into Recruiter has 10 fields referencing the institutions that the student listed on the FAFSA application to receive the information. You must first identify your institutions in Recruiter from the
Configuration, Recruiter Release 2.6 October 19, 2012 207

Configuring Recruiter: Configuring and Using Workflows
Federal School Code Validation list so that they can be used to adjust prospect ratings and selected in the “Competitive Institution Comparison from FAFSA Data” report. See the Recruiter online help for more information about using the report.
Follow the steps below to identify your institutions in Recruiter from the Federal School Code validation list.
Step 1. In the Navigation Pane, click Settings, and then click Validation List Management.
Step 2. Click Federal School Code.
Step 3. Click the name of your institution to open the associated federal school code record.
Step 4. In the “Is this our institution?” field, select Yes.
Step 5. If necessary, you can update the name and address in your institution’s federal school code record.
Step 6. Click Save & Close.
Step 7. Repeat Step 3 through Step 6 to identify additional federal school code records as your institution. For example, you may have to identify more than one institution if your institution has more than one location.
ALERT! Do not change the value in the School Code field. This value is the federal school code that is used by the federal government and is not related to the organization CEEB code.
208 Configuration, Recruiter Release 2.6 October 19, 2012

Creating Specific Recruiter Workflows
Configure Prospect Ratings from FAFSA Information
Recruiter can calculate the following ratings for a prospect:
Desirability Rating. A measurement of the desirability of a prospective student for your institution.
Probability Rating. A measurement of how likely the prospective student is to attend your institution.
You can configure prospect ratings calculations by creating a workflow in Recruiter that adjusts and sets the ratings based on specific conditions. You can use the FAFSA information that is sent to Recruiter from your ERP system in your prospect ratings workflow to adjust a prospect’s desirability and probability to your institution.
Each FAFSA record that is imported into Recruiter has 10 fields referencing the institutions that the student listed on the FAFSA application to receive the information. You must identify your institutions in Recruiter from the Federal School Code Validation list so that they can be used to adjust prospect ratings. See “Identify Your Institutions for Prospect Ratings and Competitive Comparison” on page 207.
After you have identified your institutions, you can create a workflow in Recruiter to configure prospect desirability and probability ratings from the FAFSA information.
Follow the steps below to create a workflow to configure prospect ratings from FAFSA information.
Step 1. In the Navigation Pane, click Settings, and then click Processes.
The following example creates a workflow that increases a prospect’s probability rating if the prospect listed the institution in the top three schools on the FAFSA application.
Step 2. In the Processes pane, click New to create a new process. The Create Process dialog box is displayed as shown in Figure 79.
Configuration, Recruiter Release 2.6 October 19, 2012 209

Configuring Recruiter: Configuring and Using Workflows
Figure 79: Create Process Dialog Box
Step 3. Enter the following information:
Process Name. Type the name that you want to use for this workflow.
Entity. Select the FAFSA Information entity.
Category. Select Workflow.
Type. Leave the field set to New blank process.
Step 4. Click OK. The Information dialog box is displayed as shown in Figure 80.
210 Configuration, Recruiter Release 2.6 October 19, 2012

Creating Specific Recruiter Workflows
Figure 80: Information Dialog Box
Step 5. On the General tab in the main pane, set the following workflow properties:
From the Activate As list, select Process.
Under Available to Run, select As an on-demand process.
Under Options for Automatic Processes, select Organization from the Scope field and leave the Record is created selected from the Starts When field.
These selections ensure that the process can be run independently, and that the workflow is started when the record is created.
Configuration, Recruiter Release 2.6 October 19, 2012 211

Configuring Recruiter: Configuring and Using Workflows
Step 6. To set up a condition that verifies that the prospect is a prospective student and not another type of contact:
a. Click Add Step, and then select Check Condition.
b. Type a condition description, such as “Only run on prospective students,” and then click the provided link to configure the condition. The Specify Condition dialog box is displayed as shown in Figure 81.
Figure 81: Specify Condition Dialog Box
c. Select the Prospect (Contact) CRM entity, Relationship Type field, and Does Not Equal condition. Use Lookup to select Prospective Student, click the >> button to move the value to the right pane, and then click OK. Click Save and Close.
Step 7. To stop the workflow if the prospect is not a prospective student, select the row under the new condition, click Add Step, and then select Stop Workflow. Type a description, such as “Stop workflow,” and select Succeeded.
Step 8. To create a Rating Calculation record for a prospect’s probability:
a. Select the row of the condition that you created in Step 6 (“Only run on prospective students”), click Add Step, and select Create Record.
b. Type a record description, such as “Calculation for probability,” select Rating Calculation from the list, and then click Set Properties. The Create Rating Calculation dialog box is displayed as shown in Figure 82.
212 Configuration, Recruiter Release 2.6 October 19, 2012

Creating Specific Recruiter Workflows
Figure 82: Create Rating Calculation Dialog Box
c. Specify information in the following fields.• Prospect. Identify the prospect. In the Form Assistant (in the right
navigation pane), you can specify dynamic values for the workflow. In the Look For fields, confirm that the FAFSA Information CRM entity is selected, and Prospect is selected. Click Add to add the dynamic value to the Form Assistant, select the dynamic value, and click OK to add the dynamic value to the Prospect field. It should be displayed as “{Prospect(FAFSA Information)}”.
• Rating Type. Select the rating type that you want this workflow to affect. • Calculation Status. Select In Progress.
d. Click Save and Close.
Step 9. To check for an institution listed in a specific position in the FAFSA data:
a. Select the row of the condition that you created in Step 8 (“Calculation for probability”), click Add Step, and select Check Condition.
b. Type a condition description, such as “Check for our school as #1 position,” and then click the provided link to configure the condition. The Specify Condition dialog box is displayed as shown in Figure 83.
Configuration, Recruiter Release 2.6 October 19, 2012 213

Configuring Recruiter: Configuring and Using Workflows
Figure 83: Specify Condition Dialog Box
c. Select the 1st (Federal School Code) CRM entity, Is Our Institution field, and Equals condition. Use Lookup to select Yes, click the >> button to move the value to the right pane, and then click OK. Click Save and Close.
Step 10. To create a Rating Adjustment record for a prospect’s probability:
a. Select the row of the condition that you created in Step 9 (“Check for our school as #1 position”), click Add Step, and select Create Record.
b. Type a record description, such as “Add 75 points for #1 position,” select Rating: Adjustment from the list, and then click Set Properties. The Create Rating Adjustment dialog box is displayed as shown in Figure 84.
Figure 84: Create Rating Adjustment Dialog Box
214 Configuration, Recruiter Release 2.6 October 19, 2012
Creating Specific Recruiter Workflows
c. Specify information in the following fields.• Name. Specify the name of the Rating Adjustment record, such as “Adjust
rating 75 points for being in #1 position.”• Rating Calculation. Identify the rating calculation. In the Form Assistant
(in the right navigation pane), you can specify dynamic values for the workflow. In the Look For fields, confirm that the Calculation for probability (Rating) CRM entity is selected and that Rating Calculation is selected. Click Add to add the dynamic value to the Form Assistant, select the dynamic value, and click OK to add the dynamic value to the Rating Calculation field. It should be displayed as “{Rating Calculation(Calculation for probability)}”.
• Adjustment Value. Specify the adjustment value that you want to apply, such as “75.”
d. Click Save and Close.
Step 11. If you want to adjust rating calculations based on additional positions in the FAFSA data, you can add additional conditions and records to the same workflow. For example, if you want to adjust the rating calculation for position #2 by 50 points and position #3 by 25 points, you can add an additional condition and record for each.
To add additional conditions and records:
a. Select the condition that you created in Step 9, click Add Step, and select Conditional Branch.
b. Click the provided link to configure the condition. Configure the condition as specified in Step 9, each time identifying a new institution position.
c. Select the row under the new condition, click Add Step, and select Create Record. Create the Rating Adjustment record as specified in Step 10, each time identifying a new rating adjustment value.
d. Repeat Step a through Step c as necessary, each time selecting the new condition to branch from, to create additional conditions and records.
Configuration, Recruiter Release 2.6 October 19, 2012 215

Configuring Recruiter: Configuring and Using Workflows
Step 12. You must update the calculation regardless of whether the workflow meets the conditions that you have created. To update the rating calculation:
a. Select the row of the condition that you created in Step 9 (“Check for our school as #1 position”), click Add Step, and select Update Record.
b. Type a record description, such as “Update rating calculation” select Calculation for probability (Rating) from the list, and then click Set Properties. The Update Rating Calculation dialog box is displayed as shown in Figure 85.
Figure 85: Update Rating Calculation Dialog Box
c. In the Calculation Status field, select Complete.
d. Click Save and Close.
Step 13. To update a prospect with the rating calculation:
a. Select the row of the condition that you created in Step 12 (“Update rating calculation”), click Add Step, and select Update Record.
b. Type a record description, such as “Update prospect with rating calculation” select Prospect (Contact) from the list, and then click Set Properties. The Update Contact dialog box is displayed as shown in Figure 86.
216 Configuration, Recruiter Release 2.6 October 19, 2012

Creating Specific Recruiter Workflows
Figure 86: Update Contact Dialog Box, Rating Area
c. Locate the Rating area.
d. Specify information in the following fields:• Probability Rating. Identify the probability rating. In the Form Assistant
(in the right navigation pane), you can specify dynamic values for the workflow. In the Look For fields, confirm that the Calculation for probability (Rating) CRM entity is selected and Rating is selected. Click Add to add the dynamic value to the Form Assistant, select the dynamic value, and click OK to add the dynamic value to the Probability Rating Calculation field. It should be displayed as “{Rating(Calculation for probability (Rating))}”.
• Probability Rating Calculation. Identify the probability rating calculation. In the Form Assistant (in the right navigation pane), you can specify dynamic values for the workflow. In the Look For fields, confirm that the Calculation for probability (Rating) CRM entity is selected and Rating Calculation is selected. Click Add to add the dynamic value to the Form Assistant, select the dynamic value, and click OK to add the dynamic value to the Probability Rating Calculation field. It should be displayed as “{Rating Calculation(Calculation for probability (Rating Calculation))}”.
e. Click Save and Close.
Configuration, Recruiter Release 2.6 October 19, 2012 217

Configuring Recruiter: Configuring and Using Workflows
Step 14. Review the steps, conditions, and records that you have added to the workflow. They should be similar to what is shown as the example in Figure 87.
Figure 87: Example Prospect Ratings Workflow Conditions and Records
Step 15. Click Activate.
Step 16. Click Close.
The prospect rating will be calculated and applied when a new FAFSA information record is created for the related prospect. You can deactivate the workflow and adjust the workflow settings at any time. When you reactivate the workflow, the updated calculation is applied to FAFSA information records when they are created.
218 Configuration, Recruiter Release 2.6 October 19, 2012

Creating Specific Recruiter Workflows
Setting Up a Customized E-mail for Event Participants
As part of Recruiter, you have the option of sending e-mails to prospects who register for an event either through your external website or who are registered manually by a Recruiter. Setting up Recruiter to allow you to send customized e-mails to an event participant is a two step process. First you have to disable a configuration setting and create a new workflow that sends the e-mail.
Step 1. In the Navigation Pane, select Settings, and then Configuration Settings.
Step 2. In the Configuration Settings pane, open the EventRegistrationConfirmationEmailEnabled configuration setting.
Step 3. In the Value field, enter FALSE.
Step 4. Click Save & Close.
Step 5. In the Navigation Pane, click Processes.
Step 6. Click New to create a new process. The Create Process dialog box is displayed as shown in Figure 88.
Configuration, Recruiter Release 2.6 October 19, 2012 219

Configuring Recruiter: Configuring and Using Workflows
Figure 88: Create Process Dialog Box
Step 7. Enter the following information:
Process Name. Type the name that you want to use for this workflow.
Entity. Select the Event Participant entity.
Category. Select Workflow.
Type. Leave the field set to New blank process.
Step 8. Click OK. The Information dialog box is displayed as shown in Figure 89.
220 Configuration, Recruiter Release 2.6 October 19, 2012

Creating Specific Recruiter Workflows
Figure 89: Information Dialog Box
Step 9. On the General tab in the main pane, set the following workflow properties:
From the Activate As list, select Process.
Under Available to Run, select As an on-demand process.
Under Options for Automatic Processes, select Organization from the Scope field and leave the Record is created selected from the Starts When field.
These selections ensure that the process can be run independently, and that the workflow is started when the record is created.
Configuration, Recruiter Release 2.6 October 19, 2012 221

Configuring Recruiter: Configuring and Using Workflows
Step 10. To add a condition to the workflow:
a. Click Add Step, and select Send E-mail.
b. Type a condition description (for example, “If prospect has registered”), select if you want to create a custom e-mail message or use a template as the basis for your e-mail message, and then click Set Properties.
c. Enter values in the appropriate fields. This includes the To and From fields and either enter text for the e-mail or select the template you want to use for the e-mail. Figure 90 is an example of the E-mail dialog box for a custom e-mail, and Figure 91 is an example of the E-mail dialog box for an e-mail using a template.
d. If you are creating a new e-mail, you must update the Regarding field from the default value to be “{Contact(Participant (Contact))}”. In the Form Assistant in the right navigation pane (Figure 92), Look For fields, select Participant (Contact) as the CRM entity, and select Contact from the next list. Click Add to add the dynamic value to the Form Assistant, select the dynamic value, and click OK to add the dynamic value to the Regarding field.
Figure 90: Example of Properties for a Custom Event Participant E-mail
222 Configuration, Recruiter Release 2.6 October 19, 2012

Creating Specific Recruiter Workflows
Figure 91: Example of Properties for an Event Participant E-mail Template
Figure 92: Example of the Form Assistant
Step 11. Click Save and Close.
Configuration, Recruiter Release 2.6 October 19, 2012 223

Configuring Recruiter: Configuring and Using Workflows
Step 12. Click Activate.
Step 13. Click Close.
224 Configuration, Recruiter Release 2.6 October 19, 2012
Configuring Recruiter
Configuring and Using E-mail
In This ChapterThis chapter provides guidelines and instructions for configuring Microsoft Dynamics CRM e-mail templates and mail merge documents and configuring ExactTarget e-mail settings to send e-mails from Recruiter.
Table 39 lists the topics covered in this chapter.
Table 39: Topics in This Section
Topic Page
Configuring E-mail Templates and Mail Merge Documents 226
Create E-mail Templates to Quick Forms on the External Website 227
Create an E-mail Template for Activating External Website Accounts 231
Create Mail Merge Documents with Marketing Lists 234
Create Microsoft Dynamics CRM Activities for Mail Merge Items 237
Create a Centralized Letter View 237
Configuring ExactTarget 240
Configure User Mappings 240
Run the ExactTarget Send Entities Tool 242
Configure Field Mapping for Contacts, Leads, and Accounts 245
Configure Field Mapping for a Prospect’s Related Contacts 248
Configure E-mail Mapping (optional) 251
Create ExactTarget E-mails 253
Create ExactTarget E-mails to Quick Forms on the External Website 254
Set Up and Send ExactTarget E-mails Manually from Recruiter 259
Set Up Workflows to Send ExactTarget E-mails from Recruiter 262
Configuration, Recruiter Release 2.6 October 19, 2012 225

Configuring Recruiter: Configuring and Using E-mail
Configuring E-mail Templates and Mail Merge Documents
There are two main methods of creating customer-facing documents: mail merge and direct e-mail. With mail merge, you can use Microsoft Office Word and Word templates to create letters, faxes, envelopes, and e-mail messages. With direct e-mail, also called bulk e-mail, you can send a mass mailing of the same message using Microsoft Dynamics CRM e-mail templates to multiple e-mail recipients.
An e-mail template is a framework for an e-mail message, contract, or article. E-mail templates are used to ensure consistent layouts and content in similar types of documents and allow you to use Microsoft Dynamics CRM data for e-mail messages. These templates cannot be used with Word mail merges; you must instead use the direct e-mail feature.
This section contains information about creating e-mail templates and mail merge documents. Some features are native to Microsoft Dynamics CRM and the procedures are contained in the Microsoft Dynamics CRM help. Other features are Recruiter-specific extensions of native Microsoft Dynamics CRM features, or additional guidelines, and are described in this section.
Table 40 contains a list of procedures related to creating e-mail templates and mail merge documents. This information includes the procedure title and where you can find more information.
Table 40: Procedures for E-mail Templates and Mail Merge Documents
Procedure Location
Creating E-mail Templates
Create or edit an e-mail template Microsoft Dynamics CRM Help
Add and edit the data fields in an e-mail template Microsoft Dynamics CRM Help
Create E-mail Templates to Quick Forms on the External Website page 227
Create an E-mail Template for Activating External Website Accounts page 231
Create and send an e-mail activity in the Web application Microsoft Dynamics CRM Help
Send Direct E-mail to Customers Microsoft Dynamics CRM Help
Creating Mail Merge Documents
Create a Microsoft Office Word mail merge document Microsoft Dynamics CRM Help
Save a Microsoft Office Word template for mail merge Microsoft Dynamics CRM Help
226 Configuration, Recruiter Release 2.6 October 19, 2012

Configuring E-mail Templates and Mail Merge Documents
Create E-mail Templates to Quick Forms on the External Website
When you create e-mail templates, you can include a link that sends suspects or prospects to Quick Forms on your Recruiter external website. When suspects or prospects use this link, a page is displayed that allows them to verify their identity using their birth date. After they have verified their identity, they are directed to the page specified in the e-mail. This page allows them to create an account or complete an inquiry form with prepopulated data. Because the only option for verifying a person’s identity is by using the person’s birth date, you should only send e-mails to people who have a birth date entered in Recruiter. If the person’s birth date is not in Recruiter, that person will not be able to verify his or her identity and link to the Recruiter account. For more information on creating multiple prospect forms to use as Quick Forms, see “Multiple Prospect Account Forms on the External Website” on page 124.
Quick Forms on your Recruiter external website used in combination with a purchased suspect list allows you to pursue additional leads for prospects. You can send the suspects on the list an e-mail encouraging them to visit your website where they can create an account or complete an inquiry form, thus building a relationship with them.
To provide links to prospects and suspects for these forms, you will need to create a separate e-mail template (as seen in Figure 93) for each of the different Create Account or Prospect Inquiry pages that your institution has created, for both suspects and prospects. You need separate e-mail templates because each of the different forms has a unique URL that must be included in the e-mail template, and the URL identifies whether the e-mail goes to suspects or prospects.
Create Mail Merge Documents with Marketing Lists page 234
Create Microsoft Dynamics CRM Activities for Mail Merge Items page 237
Create a Centralized Letter View page 237
Sending and Receiving E-mail in Microsoft Dynamics CRM for Outlook Microsoft Dynamics CRM Help
Table 40: Procedures for E-mail Templates and Mail Merge Documents (cont’d)
Procedure Location
Configuration, Recruiter Release 2.6 October 19, 2012 227

Configuring Recruiter: Configuring and Using E-mail
Figure 93: Example of a Quick Forms E-mail Template
To send an e-mail using the templates you have created, see the Create and send an e-mail activity in the Web application article in the Microsoft Dynamics CRM help.
Follow these steps to create links in e-mail templates to multiple prospect forms on the external website.
Step 1. From the Navigation Pane, select Settings, and then Templates.
Step 2. In the Templates pane, click E-mail Templates.
Step 3. In the E-mail Templates pane, click New.
Note: This feature is not available in Microsoft Dynamics CRM for Outlook. Use Microsoft Office Word mail merge templates instead. You can add attachments to an e-mail message template or any e-mail message created with an e-mail template, such as a direct e-mail or a quick campaign. To add an attachment to an e-mail template, you must first save the template. Then, open the saved template, scroll down, and click New E-Mail Attachment to open the Browse dialog box and select your attachment.
228 Configuration, Recruiter Release 2.6 October 19, 2012
Configuring E-mail Templates and Mail Merge Documents
Step 4. In the E-Mail Template Type dialog box, select the Contact type from the Template Type list, and then click OK.
Step 5. On the E-mail Templates form, you must enter the following information:
Title. Type a meaningful and descriptive title for the template. The title is displayed in the list of templates.
Subject. Type the subject of the e-mail message created with this template. This appears as the Subject line in the e-mail message and overwrites the existing text.
Step 6. You can type a description of the template. This is not displayed to the recipient.
Step 7. In the field on the bottom on the form, type the text that you want to send in this message. Use the Formatting toolbar to edit the text.
Step 8. Type the URL to include in the e-mail. Your URL will need to be structured as follows:
<a href=“http://test.com/Datatel.ERecruiting.Web.External/pages/createaccountverify.aspx?p={!ENTITY:Create Account Key;}&k={!ENTITY:Create Account Security Key;}&f=5e05431d-9f68-4158-a72f-74cf6dc7b9cf”>Click this link to apply!</a>
Where:
“Test.com” is replaced with the name of your external website.
The “createaccountverify.aspx” file name sends users to the Create Account page where they are required to enter a username and password. If you need to send users to a Prospect Inquiry page where no username and password are required, change to the text to “prospectinquiryverify.aspx”.
The parameter “p=” is used for prospect links, and should be changed to “s=” for suspect links.
The parameter “f=” is retrieved using the Generate Create Account URL form. You must copy the section beginning with “f=” from the output and paste it into the e-mail template.
The text used for the link can be modified to fit the needs of your institution.
Note: If you choose a specific record type, such as lead or opportunity, the template is available only for that record type. This cannot be changed. To use the same content for another record type, create a new template.
Configuration, Recruiter Release 2.6 October 19, 2012 229

Configuring Recruiter: Configuring and Using E-mail
“{!ENTITY: Create Account Key;}” needs to be replaced with the appropriate data field. Highlight this string and click Insert/Update. In the Data Field Values dialog box, click Add. Depending on whether you are sending the e-mail to a prospect or a suspect, the Record Type would be Contact for a prospect or Lead for a suspect. From the Field list, select Create Account Key and click OK. Click OK again to insert the data field.
“{!ENTITY:Create Account Security Key;}” needs to be replaced with the appropriate data field. Highlight this string and click Insert/Update. In the Data Field Values dialog box, click Add. Depending on whether you are sending the e-mail to a prospect or a suspect, the Record Type would be Contact for a prospect or Lead for a suspect. From the Field list, select Create Account Security Key and click OK. Click OK again to insert the data field.
Step 9. To insert additional data fields to display information such as a prospect’s name, click Insert/Update, and then in the Data Field Values dialog box, click Add.
Step 10. In the Add Data Value dialog box, select the Record type and Field, and then click OK.
Step 11. Click OK again to insert the data.
Step 12. Click Save and Close.
Step 13. Repeat Step 3 through Step 12 for any additional Create Account or Prospect Inquiry forms your institution has created.
230 Configuration, Recruiter Release 2.6 October 19, 2012

Configuring E-mail Templates and Mail Merge Documents
Create an E-mail Template for Activating External Website Accounts
Institutions can require that prospects activate their accounts on the external website. This feature provides a security check through validation of account information. For more information about the setup for the create account verification process, see the Recruiter 2.6 Release Highlights manual.
As part of the create account verification process, you can set up an e-mail template that contains an activation link. When prospects create an account on the external website, they are sent an e-mail that prompts them to activate the account. Until an account is activated, prospects will not have access to pages that require them to be logged in to the system, such as submitting an application or registering for an event. Instead, they will be redirected to a page that indicates that their account is pending activation. When prospects click the activation link in the e-mail, a page is displayed that indicates the account is activated; prospects can then log in and view their account information.
Recruiter includes a default hardcoded e-mail that is sent to prospects if a custom e-mail template is not created. If you want to send an e-mail that is specific to your institution, you can create a custom e-mail template using this procedure. See Figure 94 for an example of this e-mail template.
Figure 94: E-mail Template for Activating External Website Accounts
Configuration, Recruiter Release 2.6 October 19, 2012 231

Configuring Recruiter: Configuring and Using E-mail
To send an e-mail using the templates you have created, see the Create and send an e-mail activity in the Web application article in the Microsoft Dynamics CRM help.
Follow these steps to create an e-mail template for activating prospect accounts.
Step 1. From the Navigation Pane, select Settings, and then Templates.
Step 2. In the Templates pane, click E-mail Templates.
Step 3. In the E-mail Templates pane, click New.
Step 4. In the E-Mail Template Type dialog box, select the Contact type from the Template Type list, and then click OK.
Step 5. On the E-mail Templates form, you must enter the following information:
Title. Type a meaningful and descriptive title for the template. The title is displayed in the list of templates.
Subject. Type the subject of the e-mail message created with this template. This appears as the Subject line in the e-mail message and overwrites the existing text.
Step 6. You can type a description of the template. This is not displayed to the recipient.
Step 7. In the field on the bottom on the form, type the text that you want to send in this message. Use the Formatting toolbar to edit the text.
Note: This feature is not available in Microsoft Dynamics CRM for Outlook. Use Microsoft Office Word mail merge templates instead. You can add attachments to an e-mail message template or any e-mail message created with an e-mail template, such as a direct e-mail or a quick campaign. To add an attachment to an e-mail template, you must first save the template. Then, open the saved template, scroll down, and click New E-Mail Attachment to open the Browse dialog box and select your attachment.
232 Configuration, Recruiter Release 2.6 October 19, 2012

Configuring E-mail Templates and Mail Merge Documents
Step 8. Type the URL to include in the e-mail. Your URL will need to be structured as follows:
<a href=“http://test.com/Datatel.ERecruiting.Web.External/pages/createaccountlockout.aspx?p={!Contact:Create Account Key;}&k={!Contact:Create Account Security Key;}”>Click to Activate Your Account</a>
Where:
“Test.com” is replaced with the name of your external website.
The “createaccountlockout.aspx” file name sends users to the Account Pending Activation page.
The text used for the link can be modified to fit the needs of your institution.
“{!Contact: Create Account Key;}” needs to be replaced with the appropriate data field. Highlight this string and click Insert/Update. In the Data Field Values dialog box, click Add. The Record Type would be Contact for a prospect. From the Field list, select Create Account Key and click OK. Click OK again to insert the data field.
“{!Contact:Create Account Security Key;}” needs to be replaced with the appropriate data field. Highlight this string and click Insert/Update. In the Data Field Values dialog box, click Add. The Record Type would be Contact for a prospect. From the Field list, select Create Account Security Key and click OK. Click OK again to insert the data field.
Step 9. To insert additional data fields to display information such as a prospect’s name, click Insert/Update, and then in the Data Field Values dialog box, click Add.
Step 10. In the Add Data Value dialog box, select the Record type and Field, and then click OK.
Step 11. Click OK again to insert the data.
Step 12. Click Save and Close.
Step 13. In the Navigation Pane, click Settings, and then click Settings Home.
Configuration, Recruiter Release 2.6 October 19, 2012 233

Configuring Recruiter: Configuring and Using E-mail
Step 14. From the Configuration Setting, Template ID For Account Activation E-mail list, select the name of the e-mail template you just created.
Step 15. From the Configuration Setting, Sender of Account Activation E-mail list, select the name of the user that you have set up as the sender of the activation e-mail.
Create Mail Merge Documents with Marketing Lists
Use the information in this procedure to complete the mail merge process and to print materials to send to a prospect. For more information about creating mail merge documents, see the Create Customer-Ready Documents and Messages article in the Microsoft Dynamics CRM help.
There are no prerequisites for this procedure. To complete this procedure, you must be assigned one of the following security roles: Administrative Assistant, Application Administrative, Director of Admissions, or Recruiter.
INote: If you do not select an e-mail template, the default e-mail will be sent to prospects instead of the custom e-mail template that you created.
Note: If you do not select a sender, then Recruiter will use the user stored in the web.config file of the external website, which is the user who installed the external website. We recommend that you set up a separate user with an e-mail address that is used for the purpose of sending e-mails. The sender must meet the following requirements: The sender must be assigned either the System Administrator
security role or a security role that has the “Send E-mail as Another User” privilege on the Business Management tab selected.
The sender must be an active record. The sender must have an e-mail address that has been approved
by a System Administrator. The sender must have the e-mail access configuration settings set
to use the e-mail router. To do this, access the user record (Settings >Administration > Users), and select E-mail Router in the “E-mail access type - Incoming” and “E-mail access type - Outgoing” fields.
The sender must allow other users to send e-mails on the sender’s behalf. To do this, click File > Options, click the E-mail tab, select the Allow other Microsoft Dynamics CRM users to send e-mail on your behalf check box, and click OK.
234 Configuration, Recruiter Release 2.6 October 19, 2012

Configuring E-mail Templates and Mail Merge Documents
Step 1. From within Microsoft Dynamics CRM for Outlook, access your campaign activities. If you want to filter the campaign activities to only display the activities for which you have to print documents today, you can select a view or use the filters to display only the activities you want.
Step 2. On the Actions toolbar, click Distribute Campaign Activity.
Step 3. In the Mail Merge dialog box, select the type of document you want to use.
Step 4. Select whether you want to start with a blank document or a template. If you select a template option, click the Lookup button to select a template. New mail merge templates are created in the Settings area.
Step 5. If necessary, you can add or delete data fields.
Data fields are placeholders that insert text into an e-mail message or document automatically. The data field represents a category of information that corresponds to one column of information in a data source. The name of each data field is listed in the first row (column heading) of the data source. “PostalCode” and “LastName” are examples of data field names. Microsoft Office Word supports up to 64 data fields, of which Microsoft Dynamics CRM for Outlook reserves two data fields to store the primary key and the record owner.
Step 6. Click OK. Microsoft Dynamics CRM automatically opens a Microsoft Office Word document. In the File Download dialog box, click Open. This is not your mail-merge document; this is an interim page. Follow the directions in the Word document, including clicking CRM.
Step 7. In the Mail Merge Recipient dialog box, verify that the list is accurate, and then click OK.
Note: You will need to verify or have your campaign administrator verify that a campaign exists, an activity exists, and that you are the owner of the activity. Additionally, the campaign activity that you distribute must have one of the following channels selected: Letter via Mail Merge, Fax via Mail Merge, or E-mail via Mail Merge. For more information about campaigns, see the Planning Campaigns article in the Microsoft Dynamics CRM help.
Configuration, Recruiter Release 2.6 October 19, 2012 235

Configuring Recruiter: Configuring and Using E-mail
Step 8. To continue the mail merge, follow the instructions provided by the Mail Merge pane. For more information, see the Microsoft Office Word Help documentation.
Step 9. If you are working in Microsoft Dynamics CRM for Outlook and you have either created a new template or updated an existing template, you can upload the template. To save the document as a template, on the Complete the Merge pane, click Upload Template to CRM. If you are working in the Web application, you can upload the template in the Settings area.
Step 10. When you have completed work on the mail merge document, close it, and then delete the interim mail-merge document (Mail_Merge_nnnn.xml) and the associated text file (Mail_Merge_nnnn.txt) with the same name. Microsoft Word will prompt you to end the current Microsoft Dynamics CRM Mail Merge when you exit from Word. Click OK to continue. Stopping the mail merge does not stop the documents from being printed nor stop any activities in CRM from being updated.
Step 11. If you are working in Microsoft Dynamics CRM for Outlook, after you print or send the document, you can choose to create activities for mail-merge items. For more information, see “Create Microsoft Dynamics CRM Activities for Mail Merge Items” on page 237.
ALERT! Mail merge may leave sensitive data on your computer.
The mail merge process creates two files in addition to your mail merge documents. These files are the data sources used by mail merge and contain Microsoft Dynamics CRM data, which may include sensitive customer information. You should delete these data source files after you complete the mail merge.
Both files have the same name: Mail_Merge[nnnn], where nnnn is a 4-character, randomly generated number. One file is a .doc file and the other is a .txt file. Unless you moved the files or saved them to another directory, these files are usually in a temporary files folder on your computer.
236 Configuration, Recruiter Release 2.6 October 19, 2012
Configuring E-mail Templates and Mail Merge Documents
Create Microsoft Dynamics CRM Activities for Mail Merge Items
If you are working in Microsoft Dynamics CRM for Outlook, you can choose to create Microsoft Dynamics CRM activities for mail merge items.
Step 1. In the Create Activities dialog box, click Create Microsoft Dynamics CRM activities.
Step 2. If you want to change the default values for the activity, click Activity Details, and then make any changes. To save the changes, click OK.
Step 3. In the “Assign activities to” section, select the person to whom the new activities should be assigned.
Step 4. You can choose to have the new activities closed immediately.
Step 5. Click OK to save the changes and create the activities.
Closed activities appear in the history list of the customer record. Open activities appear in the activities list of the customer record and in your list of active activities.
Create a Centralized Letter View
Use the information in this procedure to create a centralized view of campaign activities that have a Letter via Mail Merge type. You can customize your view to include different users or different date ranges depending upon the conditions you select. The steps below help you to create a basic view of pending letters.
Follow the steps below to create a centralized view of letters.
Note: When you access the campaign activity after the mail merge is complete, a new option is available in the Navigation Pane that allows you to see each of the documents that were printed and for whom they were printed.
Configuration, Recruiter Release 2.6 October 19, 2012 237

Configuring Recruiter: Configuring and Using E-mail
Step 1. From within Recruiter, select Advanced Find on the ribbon. The Advanced Find dialog box is displayed.
Step 2. In the Look For field, select Activities.
Step 3. In the Use Saved View field, select My Activities or a view that you have defined to display pending activities. Conditions that limit the items returned by the advanced find are displayed.
Step 4. For the Activity Status condition, select Open and Scheduled as the values.
Step 5. For the Is Regular Activity condition, leave the value set to Yes.
Step 6. For the Party condition, leave the value set to Equals Current User if you want this view to be used by any user, or you can set the view for a particular user by entering the user’s name.
Step 7. In the Select drop-down box, select Activity (Campaign Activity).
Step 8. Enter the following conditions by selecting the following values in the drop-down boxes:
Status Reason Equals Proposed
Channel Equals Letter via Mail Merge
Schedule Start Today
Step 9. On the ribbon, select Save As. The Query Properties dialog box is displayed.
Step 10. Enter the Name for the Advanced Find View you want to create.
Step 11. Select Ok. The new view (as seen in Figure 95) is created. It can be selected from the Activities pane.
238 Configuration, Recruiter Release 2.6 October 19, 2012

Configuring E-mail Templates and Mail Merge Documents
Figure 95: Example of a Centralized View of Letters Query
Configuration, Recruiter Release 2.6 October 19, 2012 239
Configuring Recruiter: Configuring and Using E-mail
Configuring ExactTargetThis section contains information about setting up and using ExactTarget. ExactTarget is integrated with Recruiter to provide the ability to send bulk e-mails as part of your recruitment process.
Before you follow the procedures in this section, you must verify that your ExactTarget configuration settings are correctly defined. For more information about verifying the configuration settings, see the Recruiter Installation Procedures manual.
Configure User Mappings
You need to map only the Recruiter users who need to send e-mails to the ExactTarget users who have been previously defined. If you have not defined your ExactTarget users, see How to Add a User available from ExactTarget.
Follow the steps below to complete the user mappings.
Step 1. In the Navigation Pane, click ExactTarget, and then click ExactTarget Configuration.
Step 2. Click User Mappings. A view of enabled Recruiter users is displayed.
Step 3. Select one or more users that you want to map.
Step 4. In the ribbon, click Enable ExactTarget. The Map ExactTarget Users dialog box is displayed as shown in Figure 96.
Note: In order to complete this procedure, you will need to be assigned the System Administrator role and you will need access to all of the passwords a user was set up with in the ExactTarget console.
240 Configuration, Recruiter Release 2.6 October 19, 2012

Configuring ExactTarget
Figure 96: Example of the Map ExactTarget Users Dialog Box
Step 5. In the ExactTarget User field, select the ExactTarget user that you want to map to the Recruiter user.
Step 6. If this is the first time you have selected the ExactTarget user, the Generate OAuth Token dialog box is displayed. Enter the password for the ExactTarget user as it was defined in the ExactTarget console.
Step 7. Click Map to create the mapping.
Note: You must maintain a one-to-one relationship between ExactTarget users and Recruiter users. If you try to map multiple Recruiter users to the same ExactTarget user, you may receive errors when trying to send e-mails and you will not be able to track the person who sent an e-mail.
Configuration, Recruiter Release 2.6 October 19, 2012 241

Configuring Recruiter: Configuring and Using E-mail
Run the ExactTarget Send Entities Tool
The ExactTarget Send Entities Tool can be used to set up custom entities to which you want to send ExactTarget e-mails. You need to run this tool only if you want to send ExactTarget e-mails to entities in Recruiter other than Contacts, Leads, or Accounts. However, you must still set up the field mappings for these entities. See “Configure Field Mapping for Contacts, Leads, and Accounts” on page 245 for more information.
The tool is installed on the CRM application server by the Recruiter CRM InstallShield.
Perform the following steps to run the ExactTarget Send Entities Tool.
Step 1. On the CRM application server, access the ExactTarget Send Entities Tool. You can access the tool from the following path on the CRM application server:
C:\Program Files\Datatel\Datatel Recruiter 2.x\Utilities
Step 2. In the Utilities folder, open the ExactTargetSendEntitiesTool.zip file and extract the ExactTarget Send Entities Tool.
Step 3. Double-click ExactTarget.Crm.ManageSendEntities.exe to open the ExactTarget Send Entities Tool (Figure 97). Make sure that you open the application and not the XML configuration file with a similar name.
ALERT! You must run the ExactTarget Send Entities Tool as a user with Administrator privileges.
Note: You must identify field mappings for custom entities after you have run the ExactTarget Send Entities Tool.
242 Configuration, Recruiter Release 2.6 October 19, 2012

Configuring ExactTarget
Figure 97: ExactTarget Send Entities Tool
Step 4. Enter the CRM credentials in the provided fields. This is the same information that you entered during the Recruiter CRM installation. For more information, see the Recruiter Installation Procedures manual.
Connection Type. The type of CRM deployment you are utilizing.
Username. The username of the CRM system user set up as a system administrator.
Password. The password for the CRM system user set up as a system administrator.
Domain. The domain of the CRM system user set up as a system administrator.
Server. The URL of the server on which you installed Recruiter. Enter only the fully qualified domain name, without “http://” or “https://”.
Use Https. Indicates if you are using “http://” or “https://”.
Organization. The name of the organization to which you installed Recruiter.
Step 5. Click Connect. If the connection fails, verify your settings and try again.
Step 6. In the Manage ExactTarget Send Entities window (Figure 98), click the Add
New Send Entity button to add a custom entity to which you want to send ExactTarget e-mails.
Configuration, Recruiter Release 2.6 October 19, 2012 243
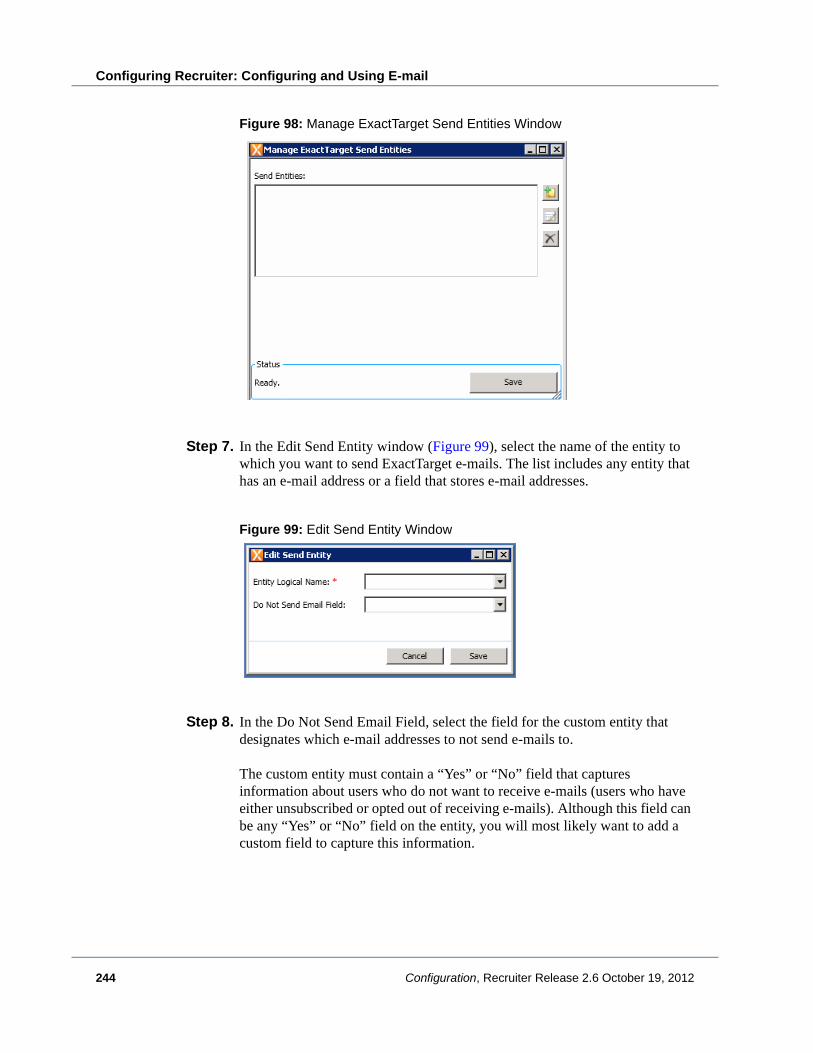
Configuring Recruiter: Configuring and Using E-mail
Figure 98: Manage ExactTarget Send Entities Window
Step 7. In the Edit Send Entity window (Figure 99), select the name of the entity to which you want to send ExactTarget e-mails. The list includes any entity that has an e-mail address or a field that stores e-mail addresses.
Figure 99: Edit Send Entity Window
Step 8. In the Do Not Send Email Field, select the field for the custom entity that designates which e-mail addresses to not send e-mails to.
The custom entity must contain a “Yes” or “No” field that captures information about users who do not want to receive e-mails (users who have either unsubscribed or opted out of receiving e-mails). Although this field can be any “Yes” or “No” field on the entity, you will most likely want to add a custom field to capture this information.
244 Configuration, Recruiter Release 2.6 October 19, 2012

Configuring ExactTarget
Step 9. Click Save on the Edit Send Entity window. The entity that you selected is displayed in the Send Entities area on the Manage ExactTarget Send Entities window.
Step 10. Click Save on the Manage ExactTarget Send Entities window.
Step 11. Click OK to confirm that you want to save and publish changes.
Step 12. When the status at the bottom of the window shows “Complete,” you can close the tool.
After you have successfully run the tool, Recruiter will display a Send ExactTarget Email button in the ribbon for that entity.
Step 13. Identify the field mapping set and create field mappings between the custom entity field names in Recruiter and the field names in ExactTarget so that ExactTarget can send e-mails to the custom entity you set in this tool. See the next section “Configure Field Mapping for Contacts, Leads, and Accounts” for more information.
Configure Field Mapping for Contacts, Leads, and Accounts
Follow the steps below to create field mappings between fields in Recruiter and fields in ExactTarget for Contacts, Leads, or Accounts. This will allow for values to be dynamically filled in on individual e-mails.
Step 1. In the Navigation Pane, click ExactTarget, and then click ExactTarget Configuration.
Step 2. Click Field Mapping. The Field Mapping dialog box is displayed as shown in Figure 100.
Note: To map fields for custom entities, first see “Run the ExactTarget Send Entities Tool” on page 242.
Configuration, Recruiter Release 2.6 October 19, 2012 245

Configuring Recruiter: Configuring and Using E-mail
Figure 100: Example of the Field Mapping Dialog Box
Step 3. To create a new ExactTarget field mapping set, follow the steps below. Otherwise, select an existing ExactTarget field mapping set, and skip to Step 4.
a. Click Add to create a field mapping set.
b. Enter a name.
c. Enter a description.
d. The process automatically adds the default EmailAddress field. Add any additional ExactTarget fields to this mapping set that you want to map to a Recruiter field. This should include any ExactTarget fields for information that you may want to include in an e-mail (see Figure 101). Enter the name, type, and length of the field, and click Add Field. Repeat this step to add additional fields.
e. Click Save.
246 Configuration, Recruiter Release 2.6 October 19, 2012

Configuring ExactTarget
Figure 101: Example of the Field Mapping Set Dialog Box
Step 4. In the Field Mappings section, click Add to add a new row, as shown in Figure 102.
Figure 102: Example of Adding a New Field Mapping
Configuration, Recruiter Release 2.6 October 19, 2012 247

Configuring Recruiter: Configuring and Using E-mail
Step 5. In the CRM Entity field, select the CRM entity that contains the field you want to map.
Step 6. In the CRM Related Entity field, optionally select the related entity that contains the field you want to map. Select the related entity only if the field is contained in the related entity instead of the entity.
Step 7. In the CRM Field Name field, select the field from CRM that you want to map.
Step 8. In the ExactTarget Field Name field, select the ExactTarget field to which you want to map the CRM field.
Step 9. Repeat Step 3 through Step 8 to create and map additional field mapping sets.
Step 10. Click Save.
Configure Field Mapping for a Prospect’s Related Contacts
Follow the steps below to create field mappings between fields in Recruiter and fields in ExactTarget for a prospect’s related contacts. A prospect’s related contacts typically include parents and legal guardians, for example Parent 1, Parent 2, and Legal Guardian, though they can also include other contacts such as high school counselors. This will allow for values to be dynamically filled in on individual e-mails.
Step 1. In the Navigation Pane, click ExactTarget, and then click ExactTarget Configuration.
Note: You must map the ExactTarget EmailAddress field to an e-mail address in each of your field mapping sets to correctly send e-mails using ExactTarget.
Note: To map fields for custom entities, first see “Run the ExactTarget Send Entities Tool” on page 242.
248 Configuration, Recruiter Release 2.6 October 19, 2012

Configuring ExactTarget
Step 2. Click Field Mapping. The Field Mapping dialog box is displayed as shown in Figure 103.
Figure 103: Example of the Field Mapping Dialog Box
Step 3. Create a new ExactTarget field mapping set that indicates it is for Parent 1.
a. Click Add to create a field mapping set.
b. Enter a name.
c. Enter a description.
d. The process automatically adds the default EmailAddress field. Add any additional ExactTarget fields to this mapping set that you want to map to a Recruiter field. This should include any ExactTarget fields for parent and student information that you may want to include in an e-mail (for an example, see Figure 104). Enter the name, type, and length of the field and click Add Field. Repeat this step to add additional fields.
e. Click Save.
Configuration, Recruiter Release 2.6 October 19, 2012 249

Configuring Recruiter: Configuring and Using E-mail
Figure 104: Example of a Parent 1 Field Mapping Set
Step 4. In the Field Mappings section, click Add to add a new row, as shown in Figure 105.
Figure 105: Example of Adding a Parent 1 Field Mapping
Step 5. To map Parent 1 fields, do the following:
250 Configuration, Recruiter Release 2.6 October 19, 2012

Configuring ExactTarget
To map the prospect’s first name, select Contact as the CRM entity, First Name as the CRM field, and the prospect first name ExactTarget field that you identified in Step 3.
To map the Parent 1 e-mail address, click Add, select Contact as the CRM entity, Parent 1 Email Address as the CRM field, and EmailAddress as the ExactTarget field. The ExactTarget EmailAddress field should map to the recipient’s e-mail address.
To map the Parent 1 first name, click Add, select Contact as the CRM entity, Parent 1 First Name as the CRM field, and the parent 1 first name ExactTarget field that you identified in Step 3.
To map the Parent 1 last name, click Add, select Contact as the CRM entity, Parent 1 Last Name as the CRM field, and the parent 1 last name ExactTarget field that you identified in Step 3.
Step 6. Repeat Step 3 through Step 5 to create and map additional field mapping sets for Parent 2 and Legal Guardian.
Step 7. Click Save.
Configure E-mail Mapping (optional)
Follow the steps below to create e-mail mappings between the e-mails created on the ExactTarget website and the field mapping set. This will allow for ExactTarget e-mails and field mapping sets to be automatically associated with each other when you send ExactTarget e-mails or set up ExactTarget workflows.
Step 1. In the Navigation Pane, click ExactTarget, and then click ExactTarget Configuration.
Step 2. Click Email Mapping. The Email Mapping dialog box is displayed as shown in Figure 106.
Note: You must map the ExactTarget EmailAddress field to an e-mail address in each of your field mapping sets to correctly send e-mails using ExactTarget. You can also map other fields from the prospect record to your field mappings.
Configuration, Recruiter Release 2.6 October 19, 2012 251

Configuring Recruiter: Configuring and Using E-mail
Figure 106: Example of the Email Mapping Dialog Box
Step 3. Click Add to add a new row as shown in Figure 107.
Figure 107: Example of Adding a New Email Mapping
252 Configuration, Recruiter Release 2.6 October 19, 2012

Configuring ExactTarget
Step 4. In the Email field, select the ExactTarget e-mail to which you want to map the field mapping set.
Step 5. In the CRM Entity field, select the CRM entity that contains the field mapping set that you want to use. This should match the CRM entity that you selected when you created the field mapping set. See “Configure Field Mapping for Contacts, Leads, and Accounts” on page 245 or “Configure Field Mapping for a Prospect’s Related Contacts” on page 248 for more information.
Step 6. In the Field Mapping field, select the previously created field mapping set that you want to use to map to the ExactTarget e-mail.
Step 7. Repeat Step 3 through Step 6 to create additional e-mail mapping sets.
Step 8. Click Save.
Create ExactTarget E-mails
Go to the ExactTarget website to create an e-mail using the ExactTarget fields that you identified when you created your field mapping sets in the following sections: “Configure Field Mapping for Contacts, Leads, and Accounts” on page 245 and “Configure Field Mapping for a Prospect’s Related Contacts” on page 248. Likewise, you can create an e-mail first and then configure your field mappings.
For more information about how to create, send, and track e-mails, see the documentation provided by ExactTarget.
Configuration, Recruiter Release 2.6 October 19, 2012 253

Configuring Recruiter: Configuring and Using E-mail
Create ExactTarget E-mails to Quick Forms on the External Website
When you create ExactTarget e-mails, you can include a link that sends suspects or prospects to Quick Forms on your Recruiter external website. When suspects or prospects use this link, a page is displayed that allows them to verify their identity using their birth date. After they have verified their identity, they are directed to the page specified in the e-mail. This page allows them to create an account or complete an inquiry form with prepopulated data. Because the only option for verifying a person’s identity is by using the person’s birth date, you should only send e-mails to people who have a birth date entered in Recruiter. If the person's birth date is not in Recruiter, that person will not be able to verify his or her identity and link to the associated Recruiter account. For more information on creating multiple prospect forms to use as Quick Forms, see “Multiple Prospect Account Forms on the External Website” on page 124.
Quick Forms on your Recruiter external website used in combination with a purchased suspect list allows you to pursue additional leads for prospects. You can send the suspects on the list an e-mail encouraging them to visit your website where they can create an account or complete an inquiry form, thus building a relationship with them.
To provide links to prospects and suspects for these forms, you will need to create a separate ExactTarget e-mail for each of the different Create Account or Prospect Inquiry pages that your institution has created, for both suspects and prospects. You need separate e-mails because each of the different forms has a unique URL that must be included in the e-mail, and the URL identifies whether the e-mail goes to suspects or prospects.
Follow these steps to create links in ExactTarget e-mails to multiple prospect forms on the external website.
Step 1. In the Navigation Pane, click ExactTarget, and then click ExactTarget Configuration.
Step 2. Click Field Mapping. The Field Mapping dialog box is displayed as shown in Figure 108.
254 Configuration, Recruiter Release 2.6 October 19, 2012

Configuring ExactTarget
Figure 108: Example of the Field Mapping Dialog Box
Step 3. Add a field mapping set for Contacts (prospects), and create the following ExactTarget fields. These are the fields that you will use in the links in your ExactTarget e-mails to the prospect forms (see Figure 109).
EmailAddress
CreateAccountKey
CreateAccountSecurityKey
To do this:
a. Click Add to create a field mapping set.
b. Enter a name and description for the field mapping set.
c. The process automatically adds the default EmailAddress field. Enter the name, type, and length of the CreateAccountKey field, and click Add Field. Repeat this step to add the CreateAccountSecurityKey field.
d. Click Save.
Configuration, Recruiter Release 2.6 October 19, 2012 255

Configuring Recruiter: Configuring and Using E-mail
Figure 109: Contact Create Account Field Mapping Set
Step 4. On the Field Mapping dialog box, map the fields that you created in the field mapping set in Step 3 to CRM fields as follows (see Figure 110):
Select Contact as the CRM entity, Email Address as the CRM field, and EmailAddress as the ExactTarget field.
Select Contact as the CRM entity, Create Account Key as the CRM field, and CreateAccountKey as the ExactTarget field.
Select Contact as the CRM entity, Create Account Security Key as the CRM field, and CreateAccountSecurityKey as the ExactTarget field.
256 Configuration, Recruiter Release 2.6 October 19, 2012
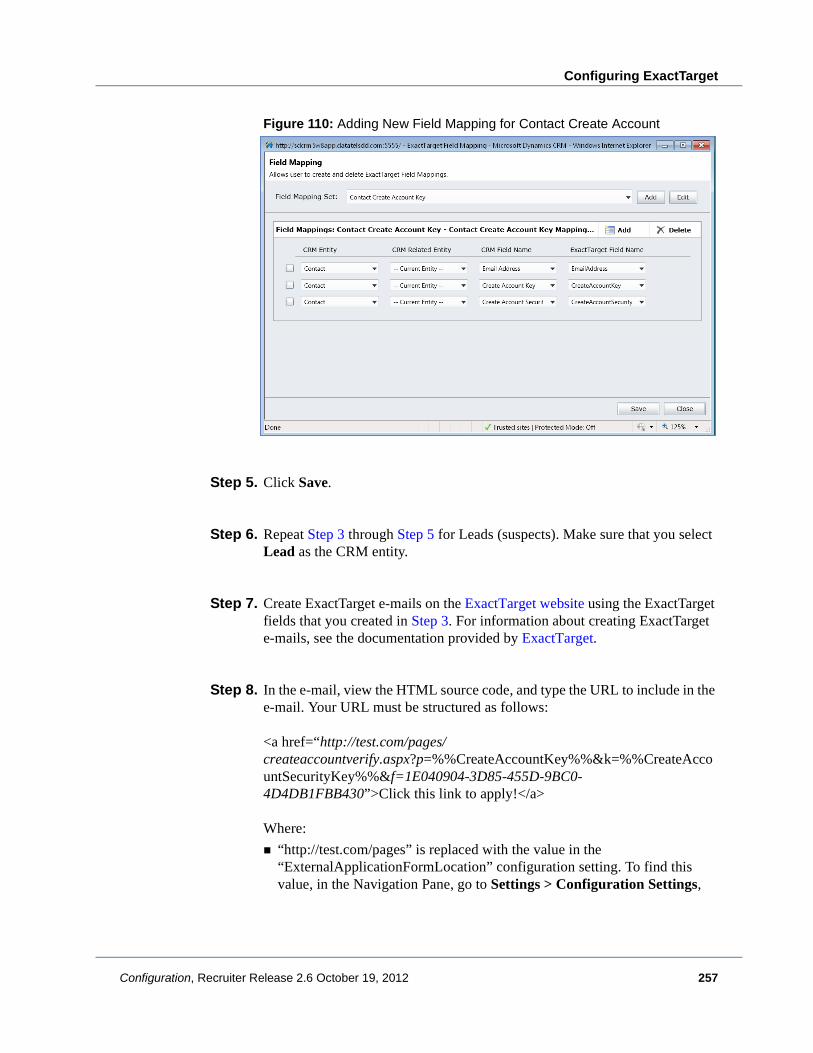
Configuring ExactTarget
Figure 110: Adding New Field Mapping for Contact Create Account
Step 5. Click Save.
Step 6. Repeat Step 3 through Step 5 for Leads (suspects). Make sure that you select Lead as the CRM entity.
Step 7. Create ExactTarget e-mails on the ExactTarget website using the ExactTarget fields that you created in Step 3. For information about creating ExactTarget e-mails, see the documentation provided by ExactTarget.
Step 8. In the e-mail, view the HTML source code, and type the URL to include in the e-mail. Your URL must be structured as follows:
<a href=“http://test.com/pages/createaccountverify.aspx?p=%%CreateAccountKey%%&k=%%CreateAccountSecurityKey%%&f=1E040904-3D85-455D-9BC0-4D4DB1FBB430”>Click this link to apply!</a>
Where:
“http://test.com/pages” is replaced with the value in the “ExternalApplicationFormLocation” configuration setting. To find this value, in the Navigation Pane, go to Settings > Configuration Settings,
Configuration, Recruiter Release 2.6 October 19, 2012 257

Configuring Recruiter: Configuring and Using E-mail
click ExternalApplicationFormLocation, copy the value, and paste it into the e-mail.
The “createaccountverify.aspx” file name sends users to the Create Account page where users are required to enter a username and password. If you need to send users to a Prospect Inquiry page where no username and password are required, change to the text to “prospectinquiryverify.aspx”.
The parameter “p=” is used for prospect links, and should be changed to “s=” for suspect links.
“%%CreateAccountKey%%” and “%%CreateAccountSecurityKey%%” are the variables for the ExactTarget fields that you created in Step 3.
The parameter “f=” and associated value are replaced with the value that is generated using the Generate Create Account URL option. To generate this value, in the Navigation Pane, go to Settings, and click Generate Create Account URL. Then, select the form for which you need to generate the URL. Copy the section beginning with “f=” from the output and paste it into the e-mail.
The link text that is displayed in the e-mail can be modified to fit the needs of your institution.
Step 9. Repeat Step 7 and Step 8 to create additional e-mails with links.
You must create a separate ExactTarget e-mail for each of the different Create Account or Prospect Inquiry pages your institution has created, for both suspects and prospects. You need separate e-mails because each of the different forms has a unique URL that must be included in the e-mail, and the URL identifies whether the e-mail goes to suspects or prospects.
Step 10. After your e-mails are created, you can send them to suspects and prospects that are in Recruiter.
To set up a workflow to send the e-mails, see “Set Up Workflows to Send ExactTarget E-mails from Recruiter” on page 262 for more information.
258 Configuration, Recruiter Release 2.6 October 19, 2012
Configuring ExactTarget
Set Up and Send ExactTarget E-mails Manually from Recruiter
After you have configured your field mappings and created ExactTarget e-mails on the ExactTarget website, you can send ExactTarget e-mails from Recruiter. You can manually send e-mails to prospects, related contacts, suspects, organizations, or marketing lists in Recruiter. A prospect’s related contacts typically include parents and legal guardians, for example Parent 1, Parent 2, and Legal Guardian, though they can include other contacts such as high school counselors.
You can also set up workflows that allow you to automatically send e-mails to prospects, related contacts, suspects, organizations, or marketing lists. See “Set Up Workflows to Send ExactTarget E-mails from Recruiter” on page 262 for more information.
Follow the steps below to manually send ExactTarget e-mails to Recruiter prospects, related contacts, suspects, organizations, or marketing lists.
Step 1. In the Navigation Pane, do one of the following:
To send an e-mail to a prospect, suspect, or organization, click Recruiting, and then click Prospects, Suspects, or Organizations. Click Prospects to send an e-mail to related contacts of a prospect.
To send an e-mail to a marketing list, click Campaigns, and then click Marketing Lists.
Step 2. Depending on the option you selected in Step 1, do one of the following:
Open the record for the prospect, suspect, or organization to whom you want to send an e-mail, or open the prospect who has related contacts to whom you want to send an e-mail.
Select the marketing list to which you want to send an e-mail.
Step 3. In the ribbon, click Send ExactTarget Email. The ExactTarget Email dialog box is displayed as shown in Figure 111.
Configuration, Recruiter Release 2.6 October 19, 2012 259

Configuring Recruiter: Configuring and Using E-mail
Figure 111: ExactTarget Email Dialog Box
Step 4. Select the following information:
Email. Look up the ExactTarget e-mail that you previously created. See “Create ExactTarget E-mails” on page 253 for more information.
Field Mapping Set. Select the field mapping set that you previously created. See “Configure Field Mapping for Contacts, Leads, and Accounts” on page 245 or “Configure Field Mapping for a Prospect’s Related Contacts” on page 248. If you configured e-mail mappings, this will be filled in automatically. See “Configure E-mail Mapping (optional)” on page 251.
Subject. Enter a subject for the e-mail. If you want to create a personalization string from an ExactTarget field, select the field in the adjoining list. The available fields will be whichever ones were created in the field mapping set.
From. Select the e-mail account from which the e-mail will be sent.
260 Configuration, Recruiter Release 2.6 October 19, 2012

Configuring ExactTarget
Recipients. View the recipients or marketing list. If you are using a marketing list, you can verify the email recipient count.
Campaign. Optionally, add an associated campaign.
Send Time. Specify whether the e-mail should be sent immediately or at a later, designated time.
Return individual tracking results with ExactTarget Responses. Select this option if you want to return tracking results to Recruiter from responses to ExactTarget e-mails. The results will be displayed in the ExactTarget > ExactTarget Responses area.
I certify all email recipients have opted in. Select this option to certify that all recipients in the marketing list have opted in to receive e-mails. This option will only be displayed for marketing lists.
Step 5. Click OK.
Step 6. To send the same e-mail to more than one type of related contact, for example Parent 1, Parent 2, and Legal Guardian, repeat Step 3 through Step 5 for the selected prospect, and change the field mapping set to match what you created in “Configure Field Mapping for a Prospect’s Related Contacts” on page 248.
Configuration, Recruiter Release 2.6 October 19, 2012 261

Configuring Recruiter: Configuring and Using E-mail
Set Up Workflows to Send ExactTarget E-mails from Recruiter
After you have configured your field mappings and created ExactTarget e-mails on the ExactTarget website, you can send ExactTarget e-mails from Recruiter. You can set up workflows that allow you to automatically send e-mails to prospects, related contacts, suspects, or organizations in Recruiter. A prospect’s related contacts typically include parents and legal guardians, for example Parent 1, Parent 2, and Legal Guardian, though they can include other contacts such as high school counselors.
You can also manually send e-mails to prospects, related contacts, suspects, organizations, or marketing lists. See “Set Up and Send ExactTarget E-mails Manually from Recruiter” on page 259 for more information.
Create ExactTarget Marketing Automations
In order to send ExactTarget e-mails within workflows in Recruiter, you must create Marketing Automations. An ExactTarget Marketing Automation identifies the ExactTarget e-mail that you want to send, the field mapping set that you want to use, and other automation details. Workflows allow you to automatically send e-mails to prospects, related contacts, suspects, or organizations in Recruiter.
Follow the steps below to set up the ExactTarget Marketing Automation.
Step 1. Select File > ExactTarget > Create Marketing Automation ExactTarget Send. The ExactTarget Email dialog box is displayed as shown in Figure 112.
262 Configuration, Recruiter Release 2.6 October 19, 2012

Configuring ExactTarget
Figure 112: ExactTarget Email Dialog Box
Step 2. Select the following information:
Email. Look up the ExactTarget e-mail that you previously created. See “Create ExactTarget E-mails” on page 253 for more information.
Field Mapping Set. Select the field mapping set that you previously created. See “Configure Field Mapping for Contacts, Leads, and Accounts” on page 245 or “Configure Field Mapping for a Prospect’s Related Contacts” on page 248. If you configured e-mail mappings, this will be filled in automatically. See “Configure E-mail Mapping (optional)” on page 251.
Subject. Enter a subject for the e-mail. If you want to create a personalization string from an ExactTarget field, select the field in the adjoining list. The available fields will be whichever ones were created in the field mapping set.
From. Select the e-mail account from which the e-mail will be sent.
Campaign. Optionally, add an associated campaign.
Return individual tracking results with ExactTarget Responses. Select this option if you want to return tracking results to Recruiter from responses
Configuration, Recruiter Release 2.6 October 19, 2012 263

Configuring Recruiter: Configuring and Using E-mail
to ExactTarget e-mails. The results will be displayed in the ExactTarget > ExactTarget Responses area.
I certify all email recipients have opted in. Select this option to certify that all recipients have opted in to receive e-mails.
Step 3. Click OK.
Step 4. Repeat Step 1 through Step 3 to create additional ExactTarget Marketing Automations. You must create a new ExactTarget Marketing Automation for each entity (Contact, Lead, or Account) that you want to create a workflow for. You must also create a new ExactTarget Marketing Automation for each type of related contact, for example Parent 1, Parent 2, and Legal Guardian, that you will create a record for in a workflow.
Create Workflows Without Conditions to Send ExactTarget E-mails
You can set up workflows without conditions in Recruiter to send ExactTarget e-mails to Recruiter prospects, related contacts, suspects, or organizations. Workflows without conditions allow you to automatically send e-mails to prospects, suspects, or organizations in Recruiter without specific conditions needing to be met to send them. For example, you can set up a workflow to send e-mails to all prospects.
For each entity (contact, lead, or account) that you want to create a workflow for, you must create a field mapping set for the entity and then create an ExactTarget Marketing Automation to use in the workflow. See “Configure Field Mapping for Contacts, Leads, and Accounts” on page 245 and “Create ExactTarget Marketing Automations” on page 262 for more information.
Follow these steps to create a workflow without conditions to send ExactTarget e-mails.
Step 1. In the Navigation Pane, click Settings, and then click Processes.
Step 2. Click New to create a new process. The Create Process dialog box is displayed as shown in Figure 113.
264 Configuration, Recruiter Release 2.6 October 19, 2012
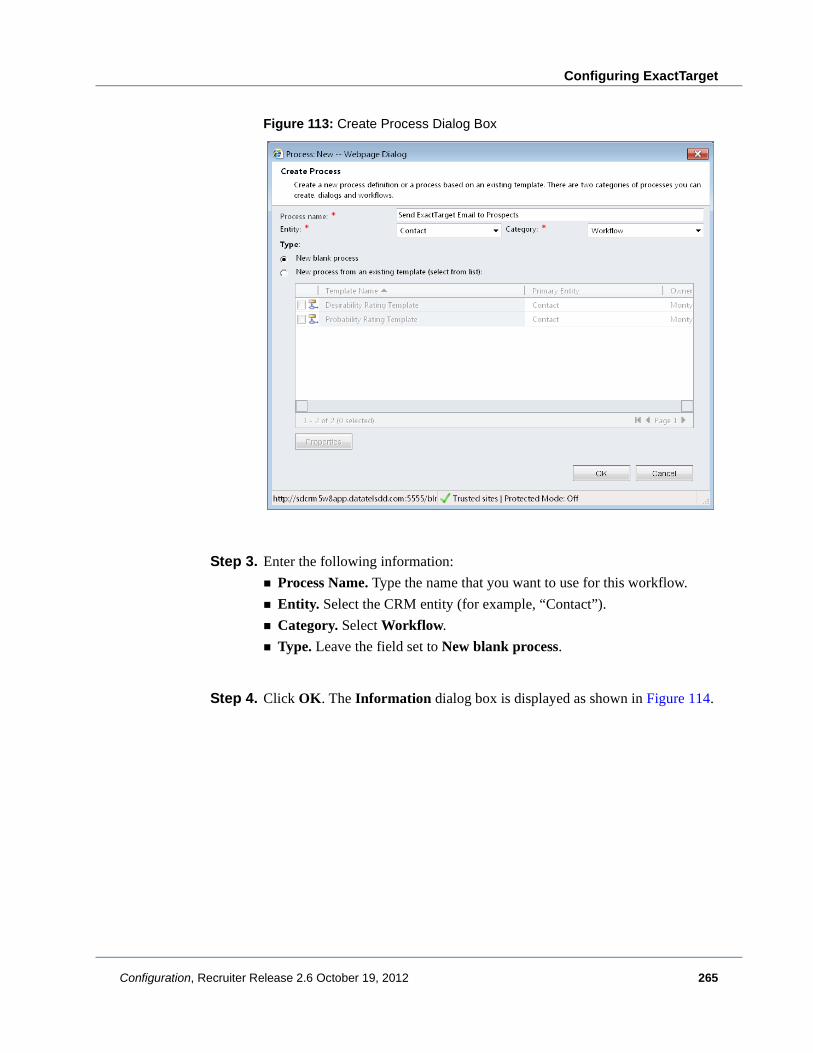
Configuring ExactTarget
Figure 113: Create Process Dialog Box
Step 3. Enter the following information:
Process Name. Type the name that you want to use for this workflow.
Entity. Select the CRM entity (for example, “Contact”).
Category. Select Workflow.
Type. Leave the field set to New blank process.
Step 4. Click OK. The Information dialog box is displayed as shown in Figure 114.
Configuration, Recruiter Release 2.6 October 19, 2012 265

Configuring Recruiter: Configuring and Using E-mail
Figure 114: Information Dialog Box
Step 5. On the General tab in the main pane, set the following workflow properties:
From the Activate As list, select Process.
Under Available to Run, select As an on-demand process, unless you want to create a child process for another process.
Under Options for Automatic Processes, select User from the Scope field and leave the Record is created selected from the Starts When field.
These selections ensure that the process can be run independently, and that the workflow is started when the record is created.
Step 6. To add a record to the workflow, click Add Step, and then select Create Record. The record is created, as shown in Figure 115.
266 Configuration, Recruiter Release 2.6 October 19, 2012

Configuring ExactTarget
Figure 115: Example ExactTarget E-mail Workflow Record
Step 7. Type a record description (for example, “Send e-mail to prospects”), select ExactTarget Send Recipient from the list, and then click Set Properties. The Create ExactTarget Send Recipient dialog box is displayed as shown in Figure 116.
Figure 116: Create ExactTarget Send Recipient Dialog Box
Note: You must select ExactTarget Send Recipient as the record type for all ExactTarget workflows.
Configuration, Recruiter Release 2.6 October 19, 2012 267

Configuring Recruiter: Configuring and Using E-mail
Step 8. Specify information in the following fields. All other fields are optional.
Name. Specify the name of the ExactTarget Send Recipient record (for example, “Send e-mail to prospects”).
Type. Select Individual.
Individual. Identify the recipient details. In the Form Assistant (in the right navigation pane), you can specify dynamic values for the workflow. In both of the Look For fields, select the appropriate dynamic values for the CRM entity (for example, select “Contact” in both fields for a prospect). Click Add to add the dynamic value to the Form Assistant, and click OK to add the dynamic value to the Individual field (for example, it should be displayed as “{Contacts(Contact)}”).
ExactTarget Send. Select the ExactTargetSend record that you previously created for this prospect, suspect, or organization. See “Create ExactTarget Marketing Automations” on page 262.
Step 9. Click Save & Close.
Step 10. Click Save & Close.
Step 11. Repeat Step 2 through Step 10 to create a new workflow for another ExactTarget Marketing Automation or for another entity (for example, Lead or Account).
Create Workflows with Conditions to Send ExactTarget E-mails
You can set up workflows in Recruiter to send ExactTarget e-mails to Recruiter prospects, related contacts, suspects, or organizations. Workflows with conditions allow you to automatically send e-mails to prospects, related contacts, suspects, or organizations when specific conditions are met in Recruiter. For example, you can set up a workflow to send e-mails to prospects whose status has changed, or to a prospect’s related contacts.
For each entity (contact, lead, or account) that you want to create a workflow for, you must create a field mapping set for the entity and then create an ExactTarget Marketing Automation to use in the workflow. See “Configure Field Mapping for Contacts, Leads, and Accounts” on page 245 and “Create ExactTarget Marketing Automations” on page 262 for more information.
268 Configuration, Recruiter Release 2.6 October 19, 2012

Configuring ExactTarget
To set up a workflow that will send an e-mail to more than one type of related contact, for example Parent 1, Parent 2, and Legal Guardian, you must create field mapping sets for each related contact and then create an ExactTarget Marketing Automation for each related contact. See “Configure Field Mapping for a Prospect’s Related Contacts” on page 248 and “Create ExactTarget Marketing Automations” on page 262 for more information.
Follow these steps to create a workflow with conditions to send ExactTarget e-mails. This example shows how to create a workflow to send e-mails to a prospect’s related contacts. However, you can create a workflow for any prospect, suspect, or organization following these general steps.
Step 1. In the Navigation Pane, click Settings, and then click Processes.
Step 2. Click New to create a new process. The Create Process dialog box is displayed as shown in Figure 117.
Figure 117: Create Process Dialog Box
Configuration, Recruiter Release 2.6 October 19, 2012 269

Configuring Recruiter: Configuring and Using E-mail
Step 3. Enter the following information:
Process Name. Type the name that you want to use for this workflow.
Entity. Select the CRM entity (for example, “Contact”).
Category. Select Workflow.
Type. Leave the field set to New blank process.
Step 4. Click OK. The Information dialog box is displayed as shown in Figure 118.
Figure 118: Information Dialog Box
270 Configuration, Recruiter Release 2.6 October 19, 2012
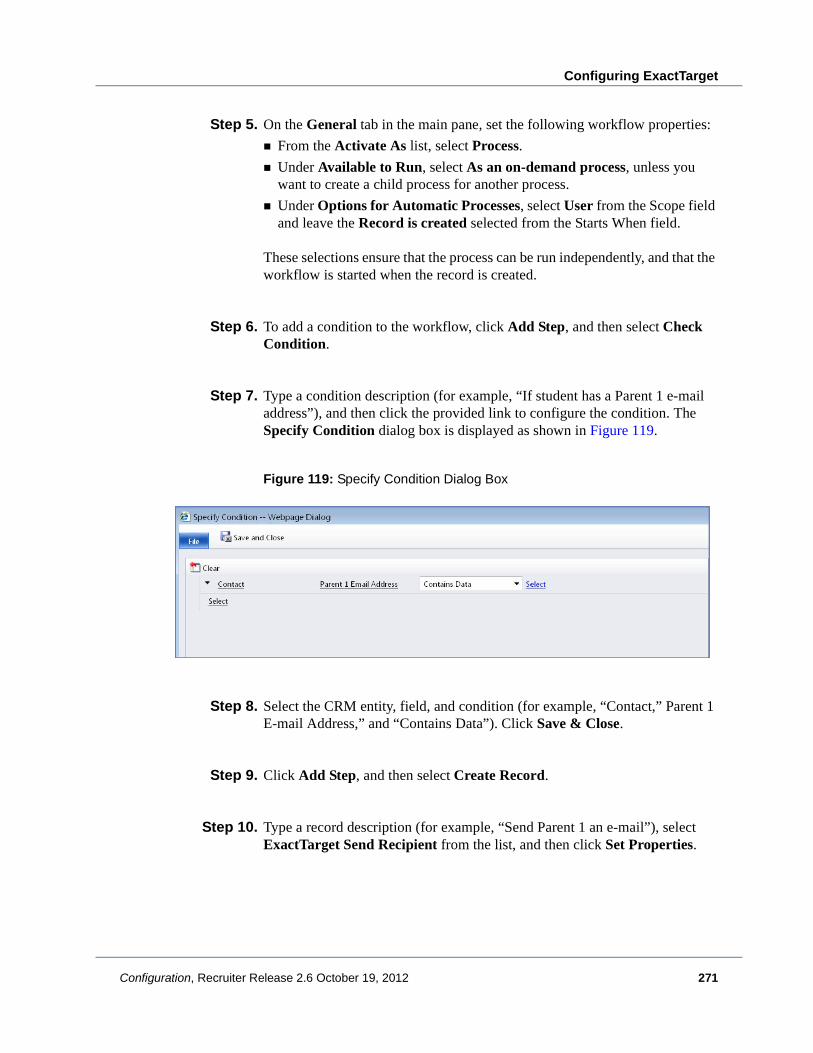
Configuring ExactTarget
Step 5. On the General tab in the main pane, set the following workflow properties:
From the Activate As list, select Process.
Under Available to Run, select As an on-demand process, unless you want to create a child process for another process.
Under Options for Automatic Processes, select User from the Scope field and leave the Record is created selected from the Starts When field.
These selections ensure that the process can be run independently, and that the workflow is started when the record is created.
Step 6. To add a condition to the workflow, click Add Step, and then select Check Condition.
Step 7. Type a condition description (for example, “If student has a Parent 1 e-mail address”), and then click the provided link to configure the condition. The Specify Condition dialog box is displayed as shown in Figure 119.
Figure 119: Specify Condition Dialog Box
Step 8. Select the CRM entity, field, and condition (for example, “Contact,” Parent 1 E-mail Address,” and “Contains Data”). Click Save & Close.
Step 9. Click Add Step, and then select Create Record.
Step 10. Type a record description (for example, “Send Parent 1 an e-mail”), select ExactTarget Send Recipient from the list, and then click Set Properties.
Configuration, Recruiter Release 2.6 October 19, 2012 271

Configuring Recruiter: Configuring and Using E-mail
The Create ExactTarget Send Recipient dialog box is displayed as shown in Figure 120.
Figure 120: Create ExactTarget Send Recipient Dialog Box
Step 11. Specify information in the following fields. All other fields are optional.
Name. Specify the name of the ExactTarget Send Recipient record (for example, “Send Parent 1 E-mail”).
Type. Select Individual.
Individual. Identify the recipient details. In the Form Assistant (in the right navigation pane), you can specify dynamic values for the workflow. In both of the Look For fields, select the appropriate dynamic values for the CRM
Note: You must select ExactTarget Send Recipient as the record type for all ExactTarget workflows.
272 Configuration, Recruiter Release 2.6 October 19, 2012

Configuring ExactTarget
entity (for example, select “Contact” in both fields for the Parent 1 E-mail). Click Add to add the dynamic value to the Form Assistant, and click OK to add the dynamic value to the Individual field (for example, it should be displayed as “{Contacts(Contact)}”).
ExactTarget Send. Select the ExactTargetSend record that you previously created for this prospect, related contact, suspect, or organization. See “Create ExactTarget Marketing Automations” on page 262.
Step 12. Click Save & Close.
Step 13. Repeat Step 6 through Step 12 to add additional conditions and records to the same workflow. You can do this if you want to send an e-mail to more than one entity using similar conditions. For example, if you want to send an e-mail to all related contacts for a prospect, such as Parent 1, Parent 2, and Legal Guardian, you can add an additional condition and record for each. See Figure 121 for an example.
Figure 121: Example Related Contacts Workflow Conditions and Records
Step 14. Click Save & Close.
Configuration, Recruiter Release 2.6 October 19, 2012 273

Configuring Recruiter: Configuring and Using E-mail
274 Configuration, Recruiter Release 2.6 October 19, 2012
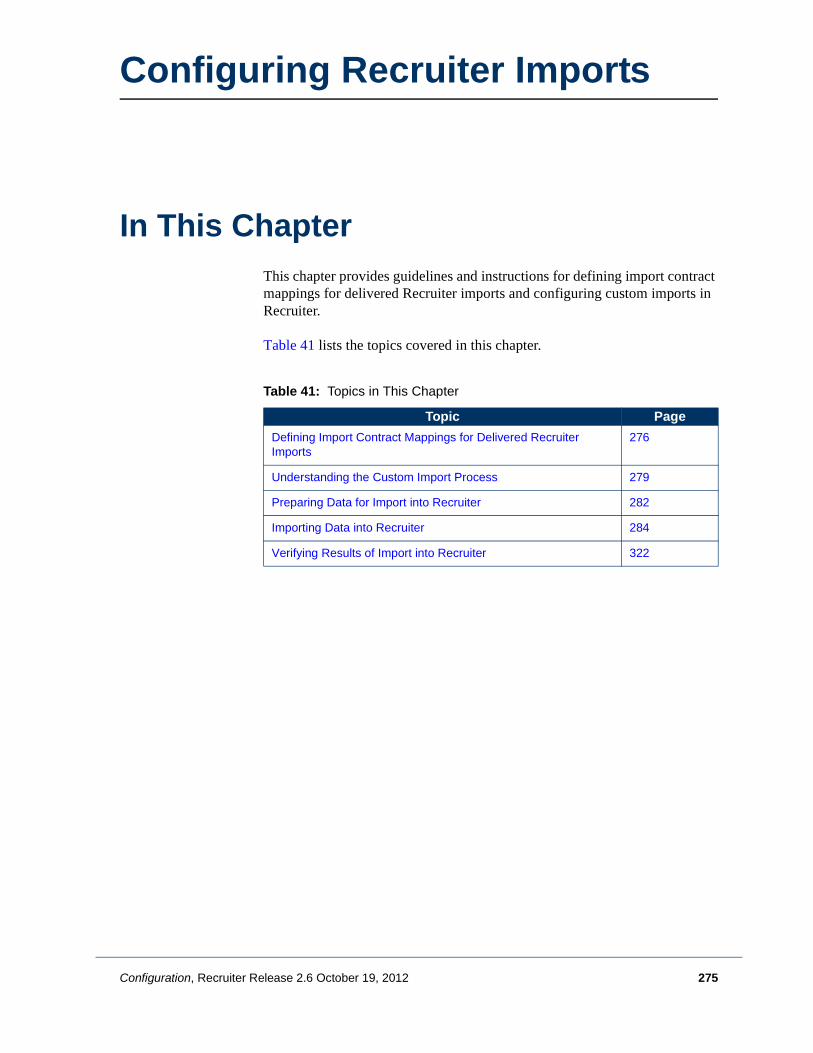
Configuring Recruiter
Configuring Recruiter Imports
In This ChapterThis chapter provides guidelines and instructions for defining import contract mappings for delivered Recruiter imports and configuring custom imports in Recruiter.
Table 41 lists the topics covered in this chapter.
Table 41: Topics in This Chapter
Topic Page
Defining Import Contract Mappings for Delivered Recruiter Imports
276
Understanding the Custom Import Process 279
Preparing Data for Import into Recruiter 282
Importing Data into Recruiter 284
Verifying Results of Import into Recruiter 322
Configuration, Recruiter Release 2.6 October 19, 2012 275

Configuring Recruiter: Configuring Recruiter Imports
Defining Import Contract Mappings for Delivered Recruiter Imports
Recruiter delivers a number of standard imports for third-party suspect lists, test scores, and applications. You can define import contract mappings for delivered suspect and test score imports. These mappings allow you to map certain values that the vendor uses to the codes that you are using in Recruiter. You must define these mappings before importing data into Recruiter so that vendor values can be matched to Recruiter codes during the import. For more information about setting up mappings for application imports, see “Importing Applications” on page 149.
Define Suspect Import Contracts
Certain suspect list vendors use codes to represent academic interests, AP exams, and ethnicity information of the suspects in the list. You must map vendor academic interest codes to academic interest types within Recruiter. AP exams and ethnicity are already mapped as part of the Recruiter installation.
Before you begin, your academic interest types must have been provisioned in Recruiter (Settings > Validation List Management > Academic Interest Type).
To complete this procedure, you must be assigned one of the following security roles: Administrative Assistant, Application Administrator, Director of Admissions, or Recruiter.
Step 1. In the Navigation Pane, click Recruiting Imports, and then click Suspect Import Contracts.
Step 2. Open the contract that you want to configure.
Step 3. In the Navigation Pane, click Academic Interest Mappings.
Note: No records will be displayed for mappings that a vendor does not collect.
276 Configuration, Recruiter Release 2.6 October 19, 2012
Defining Import Contract Mappings for Delivered Recruiter Imports
Step 4. Open the value that you want to map.
Step 5. In the Academic Interest field, use Lookup to select your institution’s equivalent academic interest type.
Step 6. Click Save & Close.
Define Test Score Import Contracts
Certain test score vendors use codes to represent academic interests and denomination information of students associated with the imported test scores. For Recruiter to interpret these codes, they must be mapped to codes within Recruiter.
Before you begin, your academic interest types must have been provisioned into Recruiter (Settings > Validation List Management > Academic Interest Type).
To complete this procedure, you must be assigned one of the following security roles: Administrative Assistant, Application Administrator, Director of Admissions, or Recruiter.
Step 1. In the Navigation Pane, click Recruiting Imports, and then click Test Score Contracts.
Step 2. Open the contract that you want to configure.
Step 3. In the Navigation Pane, click Academic Interest Mappings or Denomination Mappings.
Step 4. Open the value that you want to map.
Note: We recommend that you do not change any of the additional fields in the General section of the form. Doing so could affect the import functionality for that particular contract.
Note: No records will be displayed for mappings that a vendor does not collect.
Configuration, Recruiter Release 2.6 October 19, 2012 277

Configuring Recruiter: Configuring Recruiter Imports
Step 5. Specify the Recruiter code used by your institution. Depending on the mapping type, one of the following fields is displayed:
Academic Interest Type. Use Lookup to select your institution's equivalent academic interest type.
Denomination. Use Lookup to select the appropriate denomination.
Step 6. Click Save & Close.
Note: We recommend that you do not change any of the additional fields in the General section of the form. Doing so could affect the import functionality for that particular contract.
278 Configuration, Recruiter Release 2.6 October 19, 2012

Understanding the Custom Import Process
Understanding the Custom Import Process
Recruiter delivers a number of standard imports for third-party suspect lists, test scores, and applications. If you have a third-party import that is not a standard Recruiter import and is not an application, you can follow this custom import process to import that data into Recruiter. For more information about application imports, see “Importing Applications” on page 149.
There are three main steps to importing data into Recruiter:
1. Prepare the external data for import.
2. Import the data.
3. Verify the results of the import.
There are two main components that are required to import data into Recruiter:
An import file containing the data that you want to import in a comma-separated value (.csv) format.
A data map. A data map is an XML file that contains information about how data from a source system corresponds to data in Recruiter. You can either use an existing data map or create a data map during the import.
You may want to import data of the same type in the future. As long as the structure between the source data and Recruiter does not change between imports, you can set up a data map once and then reuse the data map for subsequent imports.
You can import data into a single entity using one data map, which is the import method that is the least complicated and the least prone to error. You can also import data into more than one entity by creating a combined data map from multiple data maps. For more information, see “Import Data into a Single Entity” on page 287 and “Import Data into Multiple Entities” on page 298.
Configuration, Recruiter Release 2.6 October 19, 2012 279

Configuring Recruiter: Configuring Recruiter Imports
Guidelines and Limitations
The following sections contain best practice guidelines and limitations for configuring custom imports in Recruiter.
General Custom Imports
The following general guidelines should be used when configuring custom imports:
Perform a test import of a smaller set of data (5 to 10 records) before importing a large set of data.
It is important to understand the structure of data in Recruiter before importing any data. You can use the Advanced Find feature (Figure 122), (which is accessible from the Home tab in most Recruiter areas) to view details about Recruiter entities, fields, and values.
Figure 122: Advanced Find
When importing data into Recruiter, you must consider the format of the data that you are importing. If the data that you are importing does not exactly match the name of a field, a Lookup value, or an option set value in Recruiter, and you do not map this data correctly in your data map, you will receive errors and have to resolve the data after the import.
You must ensure that values for Lookups and option sets are defined in Recruiter before the import. If a Lookup value or option set value does not exist in Recruiter, you will receive errors and have to resolve the data after the import.
Recruiter typically matches Lookup values using either a unique name (which is the default option) or a unique abbreviation; though, this is dependent on the Lookup field. Therefore, it is important to either select all possible referred fields when mapping the Lookup field in the import (for example, select both Name and Abbreviation as referred fields), or make
280 Configuration, Recruiter Release 2.6 October 19, 2012

Understanding the Custom Import Process
sure that you always import the same format for that Lookup field. Typically, you will use abbreviation if it is available and use name if no abbreviation exists.
If the column headings in the import file match the field names in Recruiter, the Data Import Wizard will be able to automatically match the fields and values in the data map (with minor exceptions) and you will have fewer items to map manually during an import. In other words, the more inconsistencies that exist between the data you are importing and the Recruiter data structure, the more manual intervention is required to ensure that your data is correctly mapped in Recruiter.
More importantly, if the data is structured and mapped correctly, you will have fewer or no issues to resolve in Recruiter after the import.
For additional information about importing data, see Import Data in Microsoft Dynamics CRM or the Work with Imports article in the Microsoft Dynamics CRM help.
Common Custom Import Scenarios
The following list contains common custom import scenarios:
You cannot import a partial address into Recruiter, because the Recruiter business rules require a complete address. For example, if you import “Address 1: Street 1”, you must also import the city, state, and ZIP/Postal code fields for Address 1. During an import, records with a complete address or no address will be imported correctly; however, those with a partial address will fail to be imported.
Recruiter delivers custom state and gender fields for the Contact entity that differ from the default Microsoft Dynamics CRM fields. When importing data into those fields, make sure that you use the “Primary Address State/Province” field for the state for Address 1 and “Prospect Gender” for the gender.
If you are importing a high school or college into the High School Academic History or College Academic History entities respectively, you should use the “Account Number” field (which is the CEEB code) as the referred field that you map to on the Lookup.
The various prefix and suffix fields do not also have an abbreviation. You must use the “Name” field as the referred field that you map to on the Lookup.
Configuration, Recruiter Release 2.6 October 19, 2012 281

Configuring Recruiter: Configuring Recruiter Imports
Preparing Data for Import into RecruiterFor data to be correctly imported into Recruiter, the data has to be recognized and mapped to the same data in Recruiter. When reviewing the data that you want to import in your worksheet (for example, in a Microsoft Office Excel spreadsheet), review the following:
Are the records in the worksheet all the same type? For example, are they all related to a prospect or a suspect?
You should put records for each entity in a separate file and import them with separate data maps. It is possible to import data into more than one entity, but this requires additional setup. For more information about importing data into multiple entities, see “Import Data into Multiple Entities” on page 298.
Does the data in the worksheet match the data in the Recruiter entity?
If you are importing data for a specific entity, you can download a template that helps you know which fields are used on that entity. To do this, in the Navigation Pane, click Settings, and then click Data Management. In the Data Management pane, click Template for Data Import. Select the record type of the entity, and click Download.
Do you have a header row in your spreadsheet?
Do the header and data rows have the same number of fields?
Do the column headings in the worksheet match the attribute display name values in Recruiter?
Each column heading needs to match a display name for the data to be mapped automatically to the correct fields in Recruiter. For example, “First Name” and “Last Name” fields are separate in Recruiter; therefore, the first and last names in the worksheet must also be split into separate columns.
Also, column headings must match Recruiter field names for the data to be mapped automatically. For example, Recruiter displays “Birth Date,” not “Birthdate” or “DOB”, on the Contact entity. If they do not match, you will have to manually map these fields in the Data Import Wizard.
Does the column data that you intend to map to an option set correspond to the option set values for that field in Recruiter?
To find out, you can use the Advanced Find feature (which is accessible from the Home tab in most Recruiter areas) to search for the option set values.
Does the column data match the format used for that data in Recruiter?
For example, if you are importing a date, you must make sure that the date matches the date format used for that field in Recruiter.
282 Configuration, Recruiter Release 2.6 October 19, 2012

Preparing Data for Import into Recruiter
Do the columns that correspond to required fields have values in the worksheet?
Required fields must contain values; therefore, you must fill in empty cells in the worksheet for those fields.
Have you defined separate columns for each value that you want to import?
You cannot import multiple values from the same worksheet cell. For example, if you are trying to import the top three potential majors for each prospect into the Academic Interest entity, you must create three separate columns in the worksheet, each with a unique name. You can then relate each column name to the same entity in Recruiter.
After you have prepared your worksheet data, save the file as a CSV file and, if prompted to do so, remove all worksheet formatting. CSV files are plain text files in which commas are used to separate data fields. Fields that contain commas are set off by double-quotation marks in the CSV file.
Configuration, Recruiter Release 2.6 October 19, 2012 283

Configuring Recruiter: Configuring Recruiter Imports
Importing Data into RecruiterThis section contains information about managing data maps and performing custom imports.
To complete any of these procedures, you must be assigned one of the following security roles: Administrative Assistant, Application Administrator, Director of Admissions, or Recruiter.
Export a Data Map
You may need to export a data map if you or Ellucian Services need to edit it before reusing. Follow this procedure to export a data map.
Step 1. In the Navigation Pane, click Settings, and then click Data Management.
Step 2. In the Data Management pane, click Data Maps.
Step 3. In the Data Maps pane, select the data map that you want to export, and click Export.
Step 4. In the File Download dialog box, click Save.
Step 5. Specify the location to which you want to save the file, and then click Save.
Exported XML files containing data maps can be edited manually. For more information, see the Data Map Schema Reference article in the Microsoft Dynamics CRM help.
284 Configuration, Recruiter Release 2.6 October 19, 2012

Importing Data into Recruiter
Import a Data Map
You may need to import a data map if you or Ellucian Services have edited it. To import a data map that you have edited, you must do one of the following:
Change both the file name and the name within the XML file of the data map that you are importing so that it no longer matches an existing data map name.
Delete the existing data map with the same name from Recruiter.
Follow this procedure to import a data map.
Step 1. In the Navigation Pane, click Settings, and then click Data Management.
Step 2. In the Data Management pane, click Data Maps.
Step 3. In the Data Maps pane, click Import.
Step 4. In the Import Data Map dialog box, type the name of the file to import or click Browse to locate the file, and then click OK.
A data map must be a well-formed and valid XML file. For more information, see the Data Map Schema Reference article in the Microsoft Dynamics CRM help.
Manually Edit a Data Map
You can edit a data map manually so that you do not have to map data during the import. Before you import your data, export an existing data map, change the exported data map, and then re-import the changed data map for the data import.
Note: You should perform this procedure only if you are familiar with XML.
Configuration, Recruiter Release 2.6 October 19, 2012 285

Configuring Recruiter: Configuring Recruiter Imports
Follow this procedure to manually edit a data map.
Step 1. Export and rename a data map. For more information, see “Export a Data Map” on page 284.
Step 2. Open the data map in your choice of XML editor or text editor.
Step 3. Make changes to the data map following the required schema. For more information, see the Data Map Schema Reference article in the Microsoft Dynamics CRM help.
Step 4. Import the new data map. For more information, see “Import a Data Map” on page 285.
Step 5. Test the new data map by importing a limited amount of data before importing large amounts of data.
286 Configuration, Recruiter Release 2.6 October 19, 2012

Importing Data into Recruiter
Import Data into a Single Entity
You can import data into a single entity using the Data Import Wizard. If you want to use an existing data map that has not already been imported into your CRM organization, you can import that first. For more information about importing data maps, see “Import a Data Map” on page 285.
You can use this procedure to import and map data into a single entity and to create a data map to use on subsequent imports. This procedure shows an example of importing data into the Contact entity, though you can use this procedure for importing data into any Recruiter or custom entity.
Follow this procedure to import data into a single entity.
Step 1. In the Navigation Pane, click Settings.
Step 2. From the Home tab, click Import Data. The Upload Data File dialog box is displayed as shown in Figure 123.
Note: You should perform a test import of a smaller set of data (5 to 10 records) before importing a large set of data.
Note: If you need assistance, the Ellucian Services team can provide you with tools to accomplish your data import needs. They can provide custom Microsoft Office Excel macros and custom data maps to help you with your import or assist you directly with the import. In addition to the standard imports that are delivered in Recruiter, your Ellucian Services consultant might have custom imports already available that, with minor changes, will meet your institution’s needs.
Note: You are responsible for future updates to all custom imports, even those created by Ellucian Services. For example, new fields are added, your import file structure changes, etc.
Configuration, Recruiter Release 2.6 October 19, 2012 287
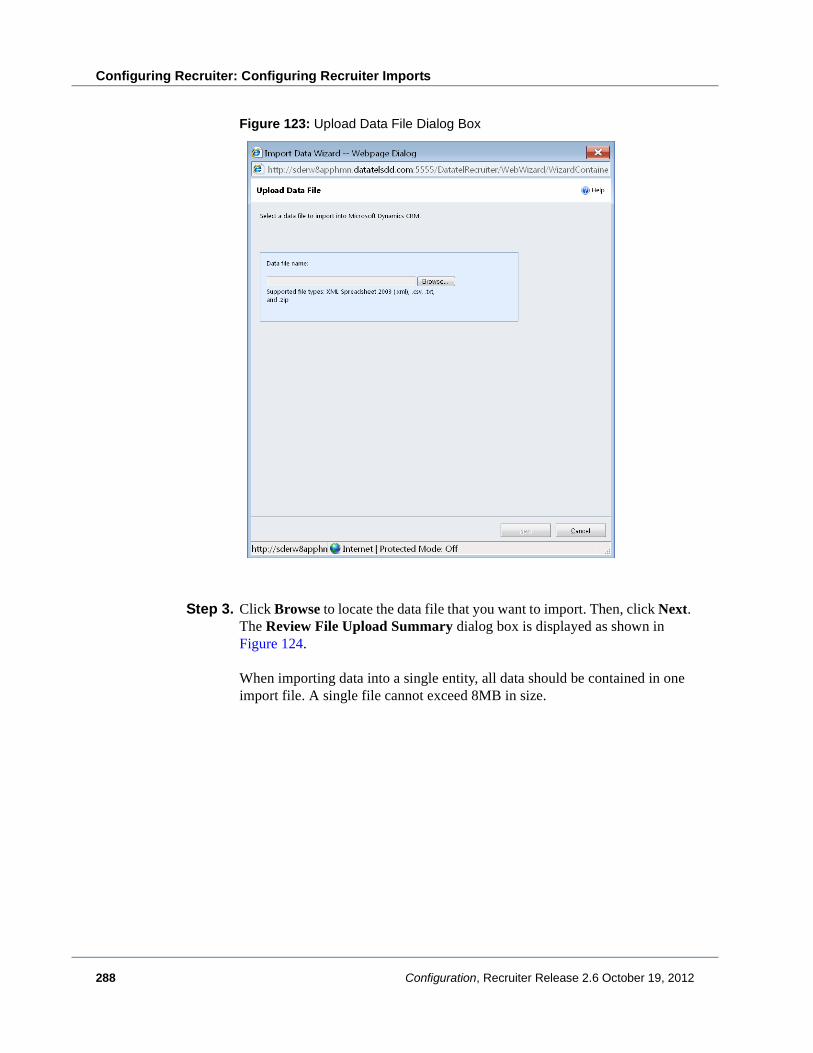
Configuring Recruiter: Configuring Recruiter Imports
Figure 123: Upload Data File Dialog Box
Step 3. Click Browse to locate the data file that you want to import. Then, click Next. The Review File Upload Summary dialog box is displayed as shown in Figure 124.
When importing data into a single entity, all data should be contained in one import file. A single file cannot exceed 8MB in size.
288 Configuration, Recruiter Release 2.6 October 19, 2012

Importing Data into Recruiter
Figure 124: Review File Upload Summary Dialog Box
Step 4. Verify that the correct files were uploaded and that the delimiter settings are correct. If you are uploading standard CSV files, you should not have to change the delimiter settings. Then, click Next. The Select Data Map dialog box is displayed as shown in Figure 125.
Configuration, Recruiter Release 2.6 October 19, 2012 289

Configuring Recruiter: Configuring Recruiter Imports
Figure 125: Select Data Map Dialog Box
Step 5. Select Default (Automatic Mapping) to allow the Import Data Wizard to attempt to map your data automatically, or select a previously created data map. Then, click Next.
If the Import Data Wizard is unable to map all or some of your source data automatically, you will be shown the Map Record Types and Map Fields dialog boxes to manually map your data. If your source files and columns are automatically mapped to Microsoft Dynamics CRM record types and fields and if you need to change the mapping, on the Review Mapping Summary dialog box, click Edit. The Map Record Types dialog box is displayed as shown in Figure 126.
290 Configuration, Recruiter Release 2.6 October 19, 2012

Importing Data into Recruiter
Figure 126: Map Record Types Dialog Box
Step 6. Make sure that your import files are being mapped to the correct Recruiter entity, or select a Recruiter entity from the list. If you are importing multiple files, select the same entity for each one. Then, click Next. The Map Fields dialog box is displayed as shown in Figure 127.
Configuration, Recruiter Release 2.6 October 19, 2012 291

Configuring Recruiter: Configuring Recruiter Imports
Figure 127: Map Fields Dialog Box
Step 7. Validate that all your source fields are being mapped to the correct CRM fields, and select mappings for fields that are incorrect or not mapped. If a field does not exist in CRM, you can create one, or if you decide not to import a certain field, you can choose to ignore it in the import.
To map fields and values:
a. Select the source field that corresponds to the required field on the entity.
b. Select the optional CRM field on the entity that corresponds to the source field in the import file.
292 Configuration, Recruiter Release 2.6 October 19, 2012

Importing Data into Recruiter
c. If a CRM field is a Lookup field (see Figure 128), click the Lookup icon to verify that the source field is being mapped to the correct referred fields on the attribute. The referred fields are the CRM fields that could contain the value formats that you are importing. Typically, this is either Abbreviation or Name; however, it is dependent on the attribute. As needed, select the appropriate referred fields, and then click OK. For example, if you are importing values for the Academic Program attribute and you can import either the abbreviation or the field name, make sure that you have selected both Abbreviation and Name as the referred fields for the Academic Program attribute. In this example, the primary key for the attribute and Name referred fields are selected by default; however, the fields that are selected by default are also dependent on the attribute.
Figure 128: Lookup Reference Dialog Box
d. If a CRM field is an option set (see Figure 129), click the Option Set (also called a picklist) icon to verify that each source option value is being mapped to the correct option value in the option set. For example, if your source option values are Other, Prospective Student, and New and the only available CRM option values are Other and Prospective Student, then you must make sure that New is mapped to an available value, such as Prospective Student.
Configuration, Recruiter Release 2.6 October 19, 2012 293

Configuring Recruiter: Configuring Recruiter Imports
Figure 129: Option Set Mapping Dialog Box
Step 8. After you have completed or verified the field mappings, click Next. The Review Mapping Summary dialog box is displayed as shown in Figure 130.
Note: If you want to save the data map from this import for use on subsequent imports, you should make sure that all possible option set values are included in the data that you are importing and mapped in this data map, or make sure that users who are importing data on subsequent imports know to map new source option values to available option values in Recruiter. Otherwise, you must add these values manually to the data map. For more information, see “Manually Edit a Data Map” on page 285.
294 Configuration, Recruiter Release 2.6 October 19, 2012

Importing Data into Recruiter
Figure 130: Review Mapping Summary Dialog Box
Step 9. Review all your mappings from your source data files. If you need to modify earlier settings, click Edit. Otherwise, click Next. The Review Settings and Import Data dialog box is displayed as shown in Figure 131.
Configuration, Recruiter Release 2.6 October 19, 2012 295

Configuring Recruiter: Configuring Recruiter Imports
Figure 131: Review Settings and Import Data Dialog Box
Step 10. Before starting the import process, you can optionally:
Change settings to allow or not allow duplicates.
Specify an owner of records that do not automatically map to a specific owner.
Specify a data map name to save this data map for future use.
Step 11. Click Submit to begin the import process. The Data Submitted for Import dialog box is displayed as shown in Figure 132.
Note: If you save the data map, it is added to the existing data map list under Customized Maps on the Select Data Map page. You can then use this data map for subsequent imports.
296 Configuration, Recruiter Release 2.6 October 19, 2012

Importing Data into Recruiter
Figure 132: Data Submitted for Import
Step 12. Click Finish when complete.
Configuration, Recruiter Release 2.6 October 19, 2012 297
Configuring Recruiter: Configuring Recruiter Imports
Import Data into Multiple Entities
You can import data into multiple entities using the Data Import Wizard. If you want to use an existing data map that is designed specifically for multiple entity imports and has not already been imported into your CRM organization, you can import that first. For more information about importing data maps, see “Import a Data Map” on page 285.
You can use this procedure to import and map data into multiple entities and to create a data map to use on subsequent imports. This procedure shows an example of importing data into the Contact entity and its related College Academic History entity, though you can use this procedure for importing data into multiple Recruiter and custom entities, or into a single Recruiter or custom entity and its related entities. In this example, you will run through the import process four times to create four different data maps, and then combine those data maps into one data map for subsequent imports.
Follow this procedure to import data into multiple entities.
Step 1. Make sure that you have prepared your data initially for import. For details, see “Preparing Data for Import into Recruiter” on page 282.
ALERT! To perform this procedure, you must have knowledge of your Recruiter data structure and be familiar with XML.
Note: You should perform a test import of a smaller set of data (5 to 10 records) before importing a large set of data.
Note: If you need assistance, the Ellucian Services team can provide you with tools to accomplish your data import needs. They can provide custom Microsoft Office Excel macros and custom data maps to help you with your import or assist you directly with the import. In addition to the standard imports that are delivered in Recruiter, your Ellucian Services consultant might have custom imports already available that, with minor changes, will meet your institution’s needs.
Note: You are responsible for future updates to all custom imports, even those created by Ellucian Services. For example, new fields are added, your import file structure changes, etc.
298 Configuration, Recruiter Release 2.6 October 19, 2012
Importing Data into Recruiter
For imports into multiple entities, you must also do the following:
You must include data for all entities that you want to map in your worksheet.
For example, if you want to import a list of prospects and up to three attended colleges, you must include data for the Contact entity and data for the College Academic History entity, repeated three times.You must repeat the college data three times because each attended college record must be mapped separately to the College Academic History entity. You must also provide unique column heading names for each repeated data set. For example, you can add “College 1”, “College 2”, and “College 3” as prefixes to the field names in Recruiter.
When importing data into an entity and its related entities, you must have one unique piece of data that links the data records to each other.
For example, if you want to import a list of prospects and up to three attended colleges, you must link those colleges to the prospect record that they belong to. In this case, the unique piece of data must be something on the Contact entity, such as Full Name or Contact Primary Key.
Step 2. In the Navigation Pane, click Settings.
Step 3. From the Home tab, click Import Data. The Upload Data File dialog box is displayed as shown in Figure 133.
In this example, you will run through the Data Import Wizard four times to build your combined data map: one time for the import into the Contact entity, and three additional times for each college import into the College Academic History entity.
Note: If you do not want to use Full Name because it may not be unique enough, you can add the Contact Primary Key value to the import file and use it to link each record. The Contact Primary Key must be a GUID, for example “4a156f1b-fd51-4a22-a4ad-2d55d15baf5b”. Other data may not be unique enough; e-mail address is not recommended because some e-mail address values may be blank in the import file. If you have another unique piece of data that is being imported that you would rather use, then you can add this piece of data to the import file and map it to a field in Recruiter during the import. For example, if you are using an ID from your ERP system, you could map it to the ERP ID field or another custom field.
Configuration, Recruiter Release 2.6 October 19, 2012 299

Configuring Recruiter: Configuring Recruiter Imports
Figure 133: Upload Data File Dialog Box
Step 4. Click Browse to locate the data file that you want to import. Then, click Next. The Review File Upload Summary dialog box is displayed as shown in Figure 134.
When importing data into multiple entities, all data should be contained in one import file. On subsequent imports, after you have created your combined data map, you must import a single file that is formatted the same and has the same name as the original file. A single file cannot exceed 8MB in size.
Note: Although it is possible to import a ZIP file into multiple entities, it involves additional steps and is not covered in this procedure.
300 Configuration, Recruiter Release 2.6 October 19, 2012

Importing Data into Recruiter
Figure 134: Review File Upload Summary Dialog Box
Step 5. Verify that the correct file was uploaded and that the delimiter settings are correct. If you are uploading standard a CSV file, you should not have to change the delimiter settings. Then, click Next. The Select Data Map dialog box is displayed as shown in Figure 135.
Configuration, Recruiter Release 2.6 October 19, 2012 301

Configuring Recruiter: Configuring Recruiter Imports
Figure 135: Select Data Map Dialog Box
Step 6. The first time that you import data into multiple entities, select Default (Automatic Mapping). The Import Data Wizard will attempt to map some of your source data automatically, but it will be unable to map all of your source data automatically because multiple entities are contained in one import file. In this example, you will select this option all four times that you run through the Data Import Wizard. You can select the combined data map on subsequent imports after you have created it. Then, click Next.
The first time that you import data, the Map Record Types dialog box is displayed as shown in Figure 136. On subsequent imports with your combined data map, your source files and columns are automatically mapped to Microsoft Dynamics CRM record types and fields and you will be shown the Review Mapping Summary dialog box; you can then skip to step Step 22.
302 Configuration, Recruiter Release 2.6 October 19, 2012

Importing Data into Recruiter
Figure 136: Map Record Types Dialog Box
Step 7. Select the first Recruiter entity to which you want to map your file. In this example, select Contact as shown in Figure 137.
Configuration, Recruiter Release 2.6 October 19, 2012 303

Configuring Recruiter: Configuring Recruiter Imports
Figure 137: Map the Contact Record Type
Step 8. Click Next. The Map Fields dialog box is displayed as shown in Figure 138.
304 Configuration, Recruiter Release 2.6 October 19, 2012

Importing Data into Recruiter
Figure 138: Map Fields Dialog Box
Step 9. Validate that all of the source fields that were automatically mapped for the entity you selected in Step 7 are being mapped to the correct CRM fields, and select mappings for fields that are incorrect or not mapped. If a field does not exist, you can create one, or if you decide not to import a certain field, you can choose to ignore it in the import. You must select Ignore for the source fields that are not part of this particular entity and attribute mapping.
In this example, you will map the fields for the Contact entity and ignore all fields for the College Academic History entity as shown in Figure 139.
Configuration, Recruiter Release 2.6 October 19, 2012 305

Configuring Recruiter: Configuring Recruiter Imports
Figure 139: Map Fields for the Contact Entity
To map fields and values:
a. Select the source field that corresponds to the required field on the entity.
b. Select the optional CRM field on the entity that corresponds to the source field in the import file.
c. If a CRM field is a Lookup field (see Figure 140), click the Lookup icon to verify that the source field is being mapped to the correct referred fields on the attribute. The referred fields are the CRM fields that could contain the value formats that you are importing. Typically, this is either Abbreviation or Name; however, it is dependent on the attribute. As needed, select the appropriate referred fields, and then click OK. For example, if you are importing values for the Academic Program attribute and you can import either the abbreviation or the field name, make sure that you have selected both Abbreviation and Name as the referred fields for the Academic Program attribute. In this example, the primary key for the attribute and Name referred fields are selected by default; however, the fields that are selected by default are also dependent on the attribute.
306 Configuration, Recruiter Release 2.6 October 19, 2012
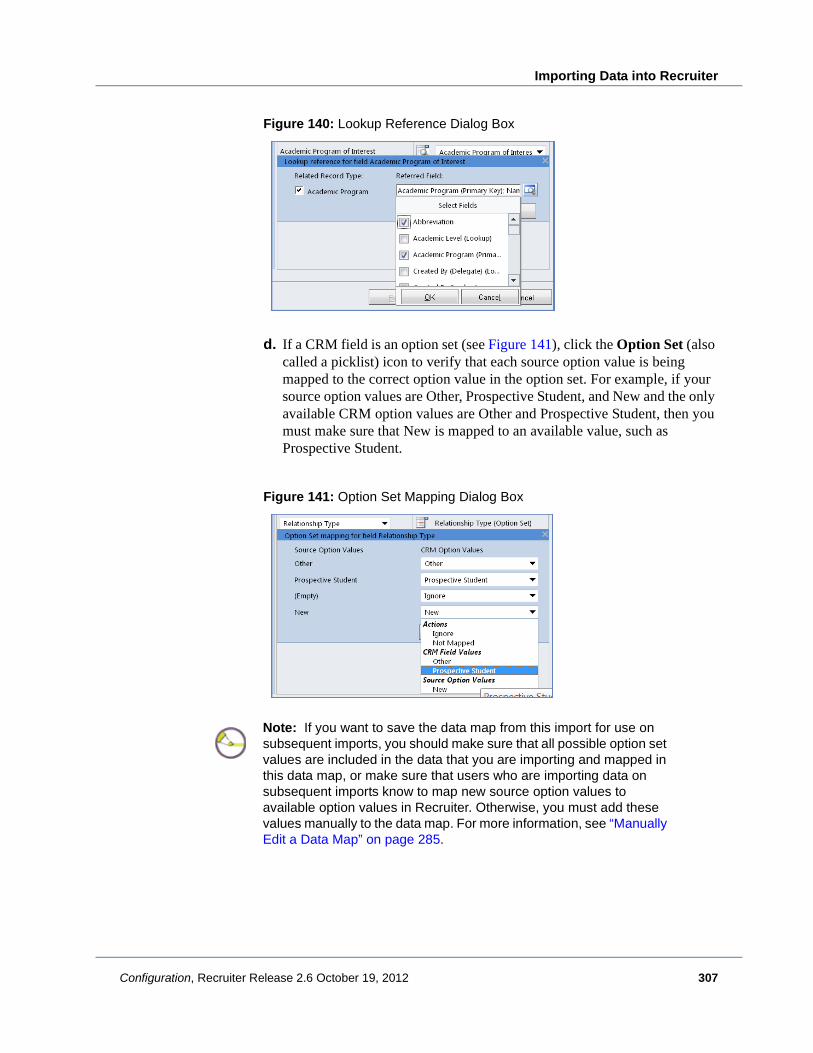
Importing Data into Recruiter
Figure 140: Lookup Reference Dialog Box
d. If a CRM field is an option set (see Figure 141), click the Option Set (also called a picklist) icon to verify that each source option value is being mapped to the correct option value in the option set. For example, if your source option values are Other, Prospective Student, and New and the only available CRM option values are Other and Prospective Student, then you must make sure that New is mapped to an available value, such as Prospective Student.
Figure 141: Option Set Mapping Dialog Box
Note: If you want to save the data map from this import for use on subsequent imports, you should make sure that all possible option set values are included in the data that you are importing and mapped in this data map, or make sure that users who are importing data on subsequent imports know to map new source option values to available option values in Recruiter. Otherwise, you must add these values manually to the data map. For more information, see “Manually Edit a Data Map” on page 285.
Configuration, Recruiter Release 2.6 October 19, 2012 307

Configuring Recruiter: Configuring Recruiter Imports
Step 10. After you have completed or verified the field mappings, click Next. The Review Mapping Summary dialog box is displayed as shown in Figure 142.
Figure 142: Review Mapping Summary Dialog Box
Step 11. Review all your mappings from your source data files. If you need to modify earlier settings, click Edit. Otherwise, click Next. The Review Settings and Import Data dialog box is displayed as shown in Figure 143.
308 Configuration, Recruiter Release 2.6 October 19, 2012

Importing Data into Recruiter
Figure 143: Review Settings and Import Data Dialog Box
Step 12. Before starting the import process, you can optionally:
Change settings to allow or not allow duplicates.
Specify an owner of records that do not automatically map to a specific owner.
Step 13. Specify a data map name to save this data map for future use. In this example, type “Contact”.
Step 14. Click Submit to begin the import process. The Data Submitted for Import dialog box is displayed as shown in Figure 144.
Note: If you save the data map, it is added to the existing data map list under Customized Maps on the Select Data Map page. You will use this data map when combining the data maps into one.
Configuration, Recruiter Release 2.6 October 19, 2012 309

Configuring Recruiter: Configuring Recruiter Imports
Figure 144: Data Submitted for Import
Step 15. Click Finish when complete.
Step 16. Repeat Step 3 through Step 6 to open the Data Import Wizard, upload the import file, and select the default data map.
Step 17. Select the second Recruiter entity to which you want to map your file. In this example, select College Academic History as shown in Figure 145.
310 Configuration, Recruiter Release 2.6 October 19, 2012

Importing Data into Recruiter
Figure 145: Map the College Academic History Record Type
Step 18. Click Next. The Map Fields dialog box is displayed as shown in Figure 146.
Configuration, Recruiter Release 2.6 October 19, 2012 311
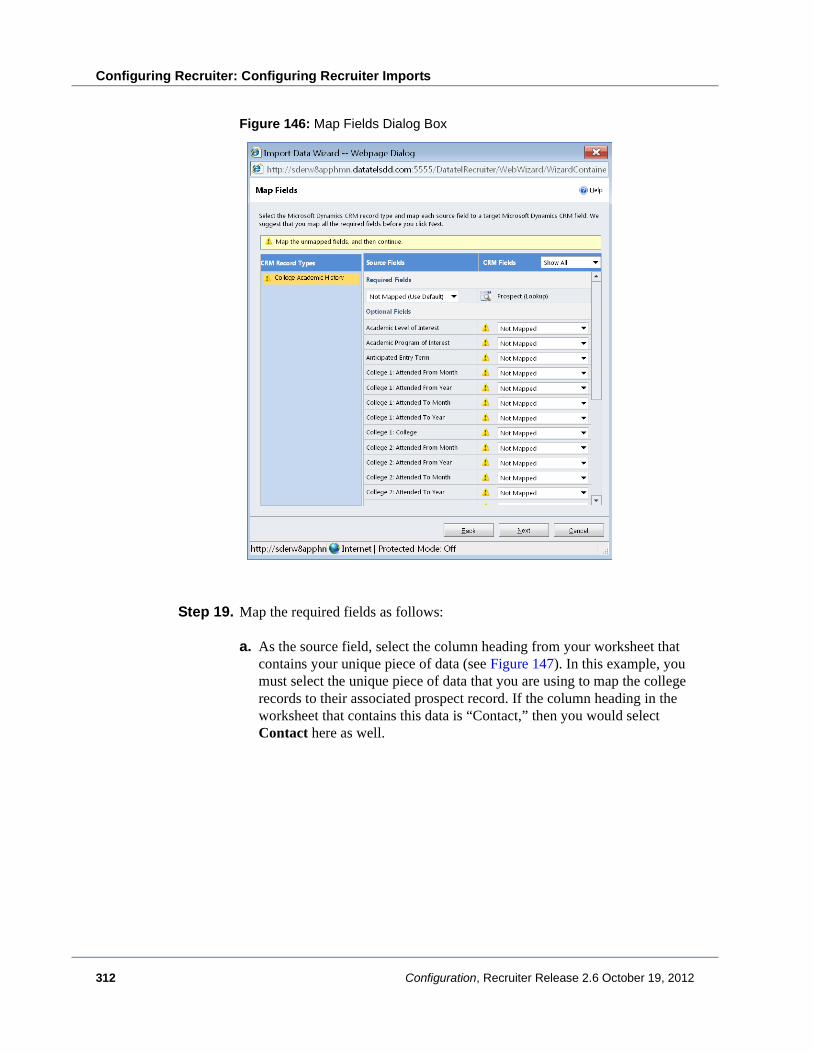
Configuring Recruiter: Configuring Recruiter Imports
Figure 146: Map Fields Dialog Box
Step 19. Map the required fields as follows:
a. As the source field, select the column heading from your worksheet that contains your unique piece of data (see Figure 147). In this example, you must select the unique piece of data that you are using to map the college records to their associated prospect record. If the column heading in the worksheet that contains this data is “Contact,” then you would select Contact here as well.
312 Configuration, Recruiter Release 2.6 October 19, 2012

Importing Data into Recruiter
Figure 147: Source Field, Unique Piece of Data
b. Select the CRM field to which you are mapping your unique piece of data. If you are mapping values to a Lookup field, click the Lookup icon to select the correct referred field on the attribute that contains your unique piece of data, and then click OK. The referred field is the CRM field that contains the value format that you are importing. In this example, you must update the Prospect (Lookup) field so that the source field that you selected in Step a is mapped to the correct referred field on the attribute (see Figure 148). If values in your worksheet should be mapped to the Contact Primary Key, then you would select the Contact (Primary Key) check box here.
Note: You will have the option to verify this field mapping rather than mapping it only if you already mapped the fields when you ran through the import process for the first entity. In this example, for the Contact entity, you would have had to previously map the Contact source field to the Prospect (Lookup) field and Contact Primary Key referred field.
Configuration, Recruiter Release 2.6 October 19, 2012 313

Configuring Recruiter: Configuring Recruiter Imports
Figure 148: Prospect Lookup Reference
Step 20. Validate that all of the other source fields that were automatically mapped for the entity you selected in Step 17 are being mapped to the correct CRM fields, and select mappings for fields that are incorrect or not mapped. If a field does not exist, you can create one, or if you decide not to import a certain field, you can choose to ignore it in the import. You must select Ignore for the source fields that are not part of this particular entity and attribute mapping.
In this example, you will map the “College 1” fields to the College Academic History entity and ignore all fields for the Contact entity and “College 2” and “College 3” fields as shown in Figure 149.
314 Configuration, Recruiter Release 2.6 October 19, 2012

Importing Data into Recruiter
Figure 149: Map Fields for the Contact Entity
To map fields and values:
a. Select the optional CRM field on the entity that corresponds to the source field in the import file.
b. If a CRM field is a Lookup field (see Figure 150), click the Lookup icon to verify that the source field is being mapped to the correct referred fields on the attribute. The referred fields are the CRM fields that could contain the value formats that you are importing. Typically, this is either Abbreviation or Name; however, it is dependent on the attribute. As needed, select the appropriate referred fields, and then click OK. In this example, because you are importing values for the College attribute, make sure that you have selected Account Number as the referred field. In this case, Account Number is selected by default; however, the fields that are selected by default are also dependent on the attribute.
Configuration, Recruiter Release 2.6 October 19, 2012 315

Configuring Recruiter: Configuring Recruiter Imports
Figure 150: Lookup Reference Dialog Box
c. If a CRM field is an option set (see Figure 151), click the Option Set (also called a picklist) icon to verify that each source option value is being mapped to the correct option value in the option set. For example, if your source option values are Other, Prospective Student, and New and the only available CRM option values are Other and Prospective Student, then you must make sure that New is mapped to an available value, such as Prospective Student.
Figure 151: Option Set Mapping Dialog Box
Note: If you want to save the data map from this import for use on subsequent imports, you should make sure that all possible option set values are included in the data that you are importing and mapped in this data map, or make sure that users who are importing data on subsequent imports know to map new source option values to available option values in Recruiter. Otherwise, you must add these values manually to the data map. For more information, see “Manually Edit a Data Map” on page 285.
316 Configuration, Recruiter Release 2.6 October 19, 2012
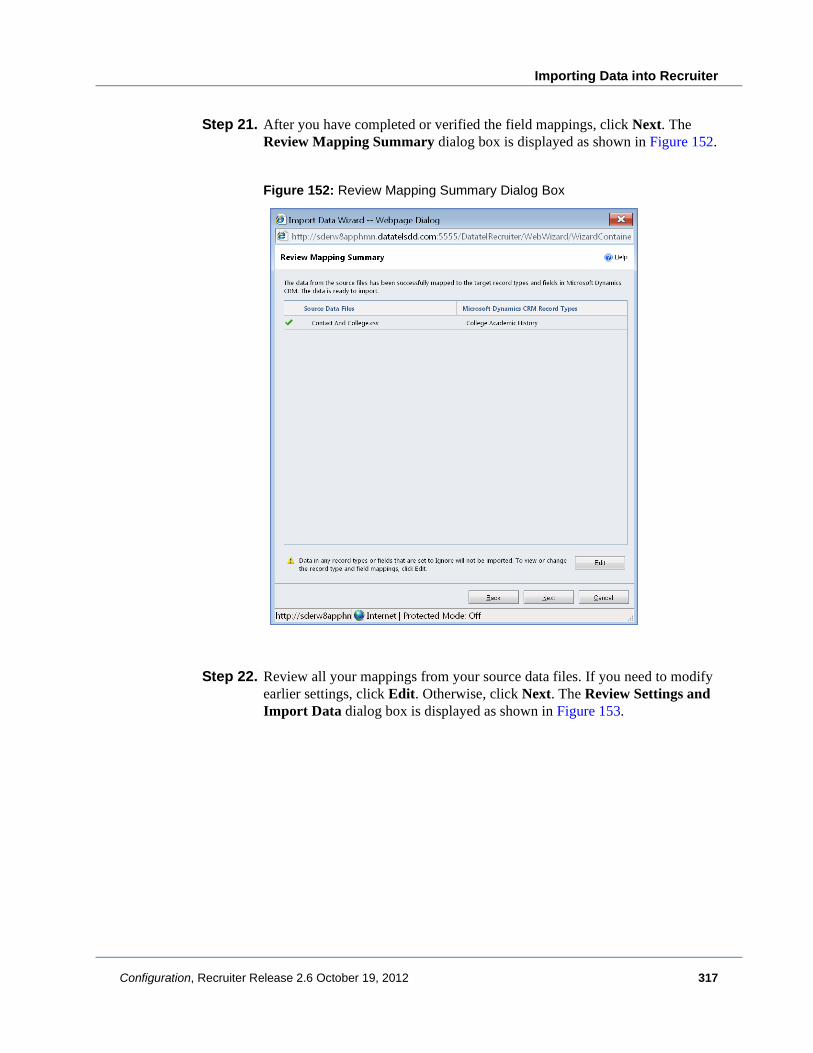
Importing Data into Recruiter
Step 21. After you have completed or verified the field mappings, click Next. The Review Mapping Summary dialog box is displayed as shown in Figure 152.
Figure 152: Review Mapping Summary Dialog Box
Step 22. Review all your mappings from your source data files. If you need to modify earlier settings, click Edit. Otherwise, click Next. The Review Settings and Import Data dialog box is displayed as shown in Figure 153.
Configuration, Recruiter Release 2.6 October 19, 2012 317

Configuring Recruiter: Configuring Recruiter Imports
Figure 153: Review Settings and Import Data Dialog Box
Step 23. Before starting the import process, you can optionally:
Change settings to allow or not allow duplicates.
Specify an owner of records that do not automatically map to a specific owner.
Step 24. Specify a data map name to save this data map for future use. In this example, type “College 1”.
Step 25. Click Submit to begin the import process. The Data Submitted for Import dialog box is displayed as shown in Figure 154.
Note: If you save the data map, it is added to the existing data map list under Customized Maps on the Select Data Map page. You will use this data map when combining the data maps into one.
318 Configuration, Recruiter Release 2.6 October 19, 2012

Importing Data into Recruiter
Figure 154: Data Submitted for Import
Step 26. Click Finish when complete.
Step 27. Repeat Step 3 through Step 6 to open the Data Import Wizard, upload the import file, and select the default data map.
Step 28. Repeat Step 17 through Step 26 two more times to map “College 2” and “College 3” fields to the College Academic History entity and to create a data map for each.
Configuration, Recruiter Release 2.6 October 19, 2012 319
Configuring Recruiter: Configuring Recruiter Imports
Step 29. After you have created all four data maps, export your data maps and manually edit the XML files to combine the data maps into one data map as follows (see Figure 155). For more information, see “Export a Data Map” on page 284.
a. Open the “Contact” data map in your choice of XML editor or text editor, and save it with the name you want for your combined data map. For example, “Contact and Colleges Data Map”.
b. Open the “College 1” data map, copy the opening tag, closing tag, and code between the <EntityMap> and </EntityMap> elements, and paste it into the combined data map, after the </Entity Map> closing tag for the Contact entity data. Repeat this step two more times to copy the code from the “College 2” and “College 3” data maps into the combined data map.
c. In the combined data map, change the following:• Change the <Name> attribute in the <Map> element. This is the name that
will be displayed for the data map in Recruiter; this is not the name of the XML file.
• Change the value for the <EntitiesPerFile> element to “Multiple”.• Change the <SourceEntityName> attribute in each <EntityMap>
element. The value should represent the name of the import file, without the .csv file extension. The first attribute can be the name, while the remaining attributes must have sequential numbers appended to the name, surrounded by parenthesis. For example, if the import file name is “Contact And College.csv”, then the first <SourceEntityName> attribute value can be “Contact and College”, and the three remaining attribute values can be “Contact And College(1)”, “Contact And College(2)”, and “Contact And College(3)”, respectively (see Figure 155).
d. Save the XML file to create the combined data map.
Step 30. Import the combined data map into Recruiter. For more information, see “Import a Data Map” on page 285.
You can now import data on subsequent imports into the same multiple entities using the combined data map.
320 Configuration, Recruiter Release 2.6 October 19, 2012

Importing Data into Recruiter
Figure 155: Sample Combined Data Map XML File
Configuration, Recruiter Release 2.6 October 19, 2012 321

Configuring Recruiter: Configuring Recruiter Imports
Verifying Results of Import into Recruiter
It is important to review the results of your custom imports and to resolve any errors in imported data.
Review Import Jobs and Resolve Import Errors
You can review import jobs after the import to verify the results and resolve errors. You must wait for an import job to complete before you can repair import failures.
Step 1. In the Navigation Pane, click Settings, and then click Data Management.
Step 2. In the Data Management pane, click Imports.
Step 3. In the Imports pane, you can monitor the progress of the import by watching the Status Reason column. The status progresses through these values:
1. Submitted
2. Parsing
3. Transforming
4. Importing
5. Completed
Steps 2 through 4 correspond with the three stages of each import: parsing the file, transforming the data, and importing the data.
Step 4. To view detailed information about the progress of the import job, double-click the name of the import record to open it.
Step 5. During the import, click System Jobs in the Navigation Pane. One system job is created for each import stage. You will only see the following statuses during the import: Parsing, Transforming, and Importing. You can refresh the status at any time by clicking the Refresh icon.
322 Configuration, Recruiter Release 2.6 October 19, 2012

Verifying Results of Import into Recruiter
Step 6. After the import is complete, click General in the Navigation Pane to view the results of the import. The fields in the Results section show the total number of records processed in the import, the number of successful records that were created, the number of partial failures, and the number of failures that resulted in a record not being created.
Step 7. In the Navigation Pane, do one or more of the following:
Open the import record to view the records that did not import. Click System Jobs, and then double-click the import record.
View records that were successfully imported. Click <record types> Fully Imported.
View records that were partially imported. Click <record types> Partially Imported.
View rows that were not imported. Click Failures.
Step 8. Export rows that did not import to a new comma-separated value (CSV) file. To do this:
a. In the Navigation Pane, click Failures.
b. In the main pane, click Export Error Rows.
c. In the File Download dialog box, click Save.
d. Specify the location to which you want to save the file, and then click Save.
e. You can correct the errors in the CSV file, and then try again to import those records into Recruiter.
Configuration, Recruiter Release 2.6 October 19, 2012 323

Configuring Recruiter: Configuring Recruiter Imports
324 Configuration, Recruiter Release 2.6 October 19, 2012