configuration guide tws alerter v2 - algoria · editable fields . directory number: you can specify...
TRANSCRIPT
Configuration Guide
TWS Alerter V2.1
AMT/PTD/TLA/0014/2/1/EN April 2007

Contact and Support AASTRA MATRA Telecom Address: 1 rue Arnold Schoenberg 78280 Guyancourt - France Tel: France: +33 1 30 96 42 42 Fax: +33 1 30 96 42 43 E-mail: [email protected]
Page 2/17 AMT/PTD/TLA/0014/2/1/FR

Configuration Guide
Table of Contents
1. DESCRIPTION......................................................................................................... 5
1.1. Overview .......................................................................................................................................................5
1.2. Features.........................................................................................................................................................5
2. CONFIGURING TWP SERVER ............................................................................... 6
2.1. Prerequisites ................................................................................................................................................6
2.2. Configuring the administration interface .............................................................................................6
3. CONFIGURING THE CLIENT.................................................................................. 9
4. UPDATING TWS ALERTER.................................................................................. 10
4.1. Updating from version 1.1.0xx ..............................................................................................................10
5. ADVANCED CONFIGURATION............................................................................ 11
5.1. Modifying the ini file.................................................................................................................................11
6. CUSTOMIZING TWS ALERTER PAGES.............................................................. 12
6.1. Record pop-up by running an executable ..........................................................................................13
6.2. Record pop-up by opening Microsoft Access...................................................................................15
6.3. Record pop-up by opening an HTML page ........................................................................................16
6.4. Record pop-up with a multi-record ......................................................................................................17
6.5. Non-standard modification.....................................................................................................................17
AMT/PTD/TLA/0014/2/1/FR Page 3/17

Page 4/17 AMT/PTD/TLA/0014/2/1/FR

1. Description
1.1. Overview
TWS (Telephony Web Services) Alerter is a tool for supervising incoming telephone calls via a pop-up record showing detailed information about the caller. It integrates smoothly and effectively into your work environment, and appears only when a call is received. No special computer skills are required to use this document.
1.2. Features
TWS Alerter offers the following telephony services:
• Customized record pop-up: TWS Alerter includes a record pop-up engine which opens applications and retrieves the parameters. Example: client record in Exchange database.
• Off-hook and on-hook • Standard record pop-up: when a call is received, a Windows notification screen
appears showing the name and details of the caller. TWS Alerter retrieves the caller's name and details from all types of business directories.
AMT/PTD/TLA/0014/2/1/FR Page 5/17
2. Configuring TWP Server
2.1. Prerequisites
• You must know the name of the server on which TWP Server is installed (by default TWP or TWS).
• You must have Internet Explorer updated to at least version 5.5. • The TWS_Applications folder on the TWP server must be shared with total access for
all users (see TWS Application Installation Guide for more details). Its default path is C:\Program Files\ TWS\TWS\TWS_Applications.
NOTE: if you are using Windows 98, you must use a short share name with less than 8 characters so that it is visible on client PCs.
2.2. Configuring the administration interface
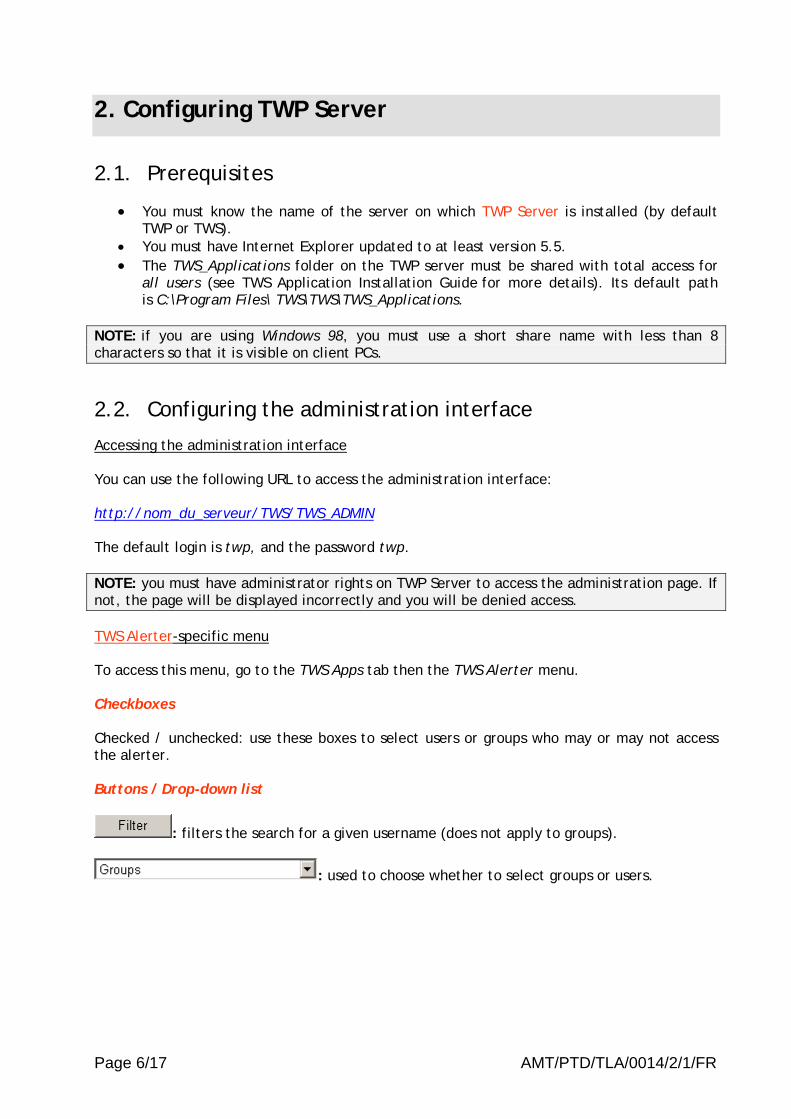
Accessing the administration interface You can use the following URL to access the administration interface: http://nom_du_serveur/TWS/TWS_ADMIN The default login is twp, and the password twp. NOTE: you must have administrator rights on TWP Server to access the administration page. If not, the page will be displayed incorrectly and you will be denied access. TWS Alerter-specific menu To access this menu, go to the TWS Apps tab then the TWS Alerter menu. Checkboxes Checked / unchecked: use these boxes to select users or groups who may or may not access the alerter. Buttons / Drop-down list
: filters the search for a given username (does not apply to groups).
: used to choose whether to select groups or users.
Page 6/17 AMT/PTD/TLA/0014/2/1/FR
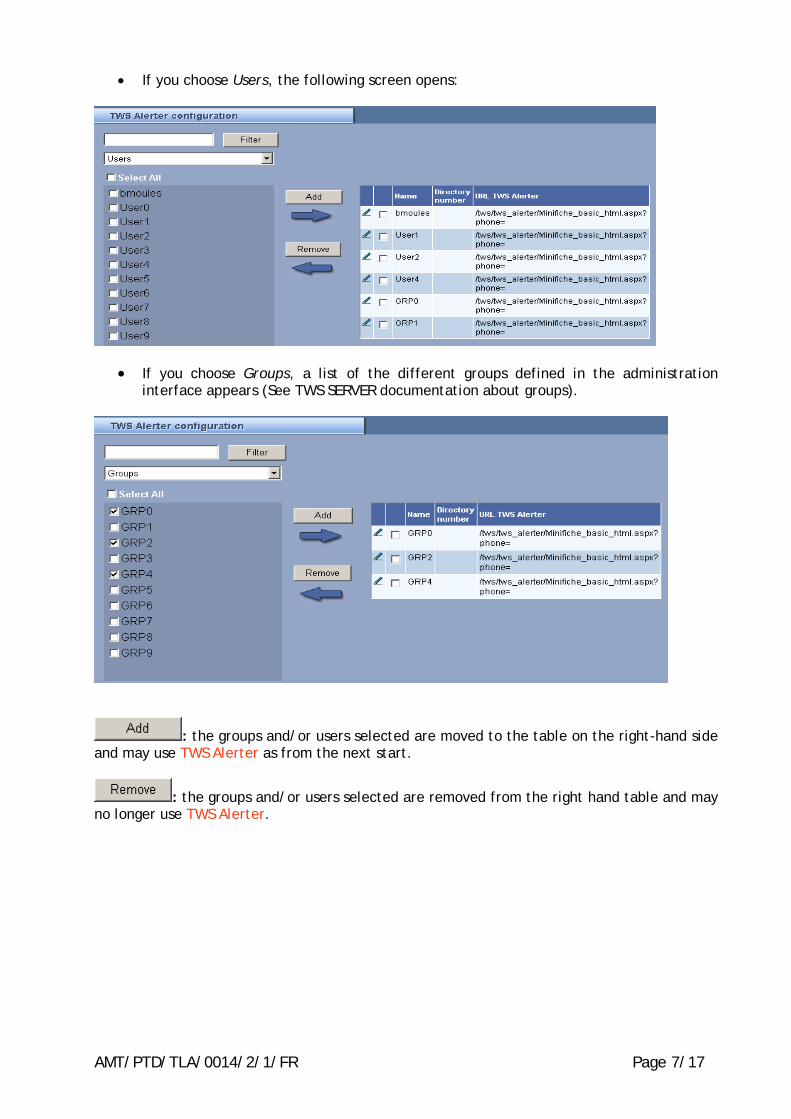
• If you choose Users, the following screen opens:
• If you choose Groups, a list of the different groups defined in the administration interface appears (See TWS SERVER documentation about groups).
: the groups and/or users selected are moved to the table on the right-hand side and may use TWS Alerter as from the next start.
: the groups and/or users selected are removed from the right hand table and may no longer use TWS Alerter.
AMT/PTD/TLA/0014/2/1/FR Page 7/17

Editable fields
Directory number: you can specify a directory number other than the default number entered in the previous menu and which is the same for all the applications. By default, no number appears which means that the default parameters of the user menu will be used (screenshot above). If a number is entered, it then has priority but only for the TWS Alerter application. TWS Alerter URL: the url field is a field which may be customised for each user / group in order to diversify the actions possible for a record pop-up (popping up records from an application, launching an application, opening a url, and so on) (see the chapter "Customising TWS Alerter"). By default, it contains the value specified in the default value sub-menu.
Page 8/17 AMT/PTD/TLA/0014/2/1/FR

3. Configuring the Client
Configuring TWS Alerter is a short process in that there is no programme installation procedure to be launched or even any files to be modified. The installation of the Alerter is related to Caller installation and initialisation. To verify whether the Alerter has been installed at the customer’s, just check in the Windows task bar that the Alerter icon is present.
AMT/PTD/TLA/0014/2/1/FR Page 9/17

4. Updating TWS Alerter
4.1. Updating from version 1.1.0xx
If you are updating TWS Alerter from version 1.1.0xx to version 1.1.1xx, you may need to modify the default user url. In fact, the default standard record may have changed (depending on the original version). You can make this modification in the TWP Server administration interface (see the chapter "Configuring TWP Server").
• Go to the TWS Apps tab, then to the TWS Alerter menu:
• The default url should be /tws/tws_alerter/Minifiche_basic.aspx?phone= If all users have this url or a url selected by the administrator, you do not need to continue this procedure. If not, enter this url in the appropriate field as shown in the screenshot below.
• Then click on Authorised or Not Authorised to apply this url to all users.
Using any of these buttons will apply the Authorised or Not Authorised status to all users. It is again possible to edit them manually.
Page 10/17 AMT/PTD/TLA/0014/2/1/FR
5. Advanced configuration
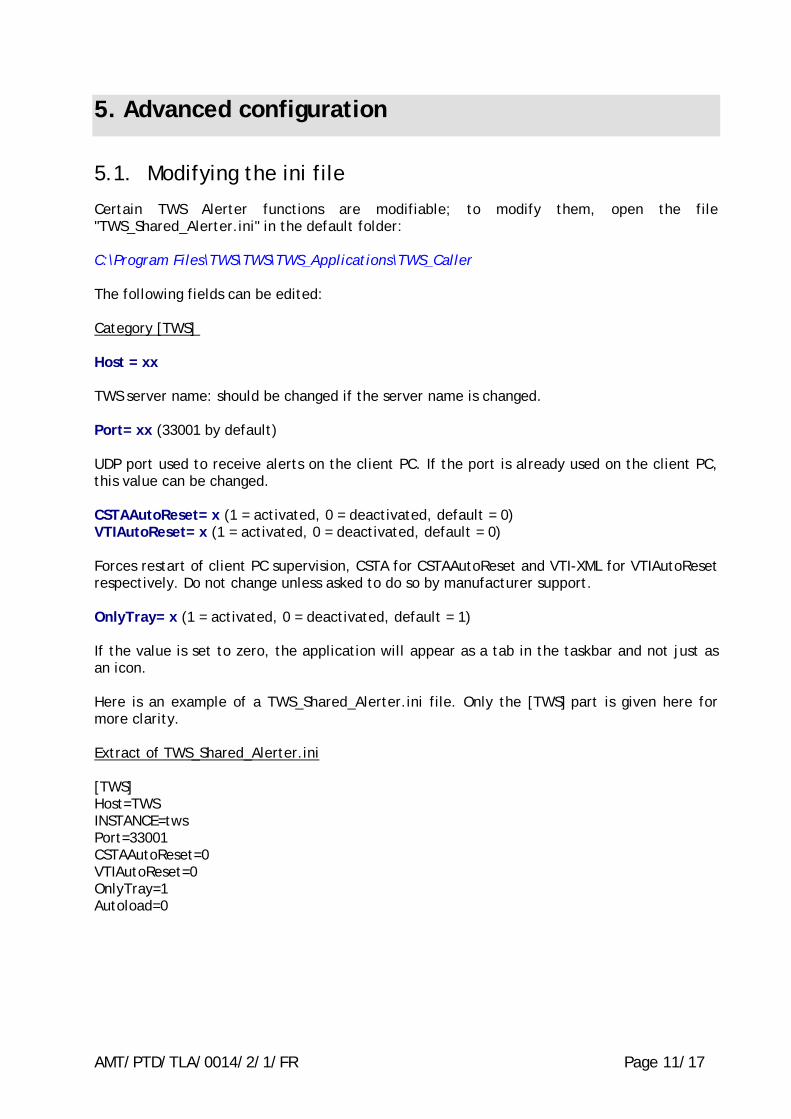
5.1. Modifying the ini file
Certain TWS Alerter functions are modifiable; to modify them, open the file "TWS_Shared_Alerter.ini" in the default folder: C:\Program Files\TWS\TWS\TWS_Applications\TWS_Caller The following fields can be edited: Category [TWS] Host = xx TWS server name: should be changed if the server name is changed. Port= xx (33001 by default) UDP port used to receive alerts on the client PC. If the port is already used on the client PC, this value can be changed. CSTAAutoReset= x (1 = activated, 0 = deactivated, default = 0) VTIAutoReset= x (1 = activated, 0 = deactivated, default = 0) Forces restart of client PC supervision, CSTA for CSTAAutoReset and VTI-XML for VTIAutoReset respectively. Do not change unless asked to do so by manufacturer support. OnlyTray= x (1 = activated, 0 = deactivated, default = 1) If the value is set to zero, the application will appear as a tab in the taskbar and not just as an icon. Here is an example of a TWS_Shared_Alerter.ini file. Only the [TWS] part is given here for more clarity. Extract of TWS_Shared_Alerter.ini [TWS] Host=TWS INSTANCE=tws Port=33001 CSTAAutoReset=0 VTIAutoReset=0 OnlyTray=1 Autoload=0
AMT/PTD/TLA/0014/2/1/FR Page 11/17

6. Customizing TWS Alerter pages
TWS Alerter is delivered with a set of example pages to enable you choose the type of record pop-up you want. There are four default records available for different requirements: MiniFiche_Basic.aspx: this page, which requires no further configuration, provides a detailed record pop-up of an Exchange 2000 contact, provided that the contact found in the TWS reverse directory database has come from an Exchange 2000 directory. MiniFiche_Basic_Exe.aspx: this record runs an executable with, as parameter, either the telephone number or the ID retrieved from the reverse directory. MiniFiche_Basic_Html.aspx: this record brings up a web page with, as parameter, either the telephone number or the ID retrieved from the reverse directory. MiniFiche_Basic_Access.aspx: this record opens MS Access with, as parameter, either the telephone number or the ID retrieved from the reverse directory. This record is a variant of MiniFiche_Basic_Exe.aspx adapted to run Access. To display an Access record, you must have installed MS Access on the client station. Multifiche.aspx: this record groups together the above examples in a single record so that different records can be returned for the same telephone number. An example of the TWS Alerter default page is shown below:
Click the detailed record icon to execute the action, depending on the type of page used. The alerter records mentioned above are located in the directory:
Inetpub\wwwroot\TWS\TWS_Alerter
Any modifications can be made under Notepad supplied with Microsoft Windows.
Page 12/17 AMT/PTD/TLA/0014/2/1/FR

6.1. Record pop-up by running an executable
You can adapt this record to your requirements by editing the record "MiniFiche_Basic_Exe.aspx" with a standard text editor. Proceed as follows: Find the following sequence in the text:
function GetDetail() { szCmd = "C:\\Program Files\\Internet Explorer\\IEXPLORE.EXE http://localhost/tws/tws_caller/minifiche_basic.aspx?phone=" + document.all["lbPhone"].innerHTML; //alert (szCmd); AlerterX.Exec (szCmd); }
In this example the variable szCmd contains the command line which will be executed. In this example the program run is: C:\\Program Files\\Internet Explorer\\IEXPLORE.EXE Simply replace this string to run the executable you require. The ‘\\’ used in the path definition are mandatory. With, as parameter, the following page: http://localhost/tws/tws_caller/minifiche_basic.aspx?phone=" + document.all["lbPhone"].innerHTML; document.all["lbPhone"].innerHTML represents the value of the incoming telephone number. Do not modify this value if you wish to return a record based on the telephone number. You can also use document.all["Clef"].innerHTML if you wish to use the key configured in the shared directory. An ActiveX control is used to run an executable. Consequently, the use of ActiveX controls must be authorized on the sets of users who use this type of record.
AMT/PTD/TLA/0014/2/1/FR Page 13/17
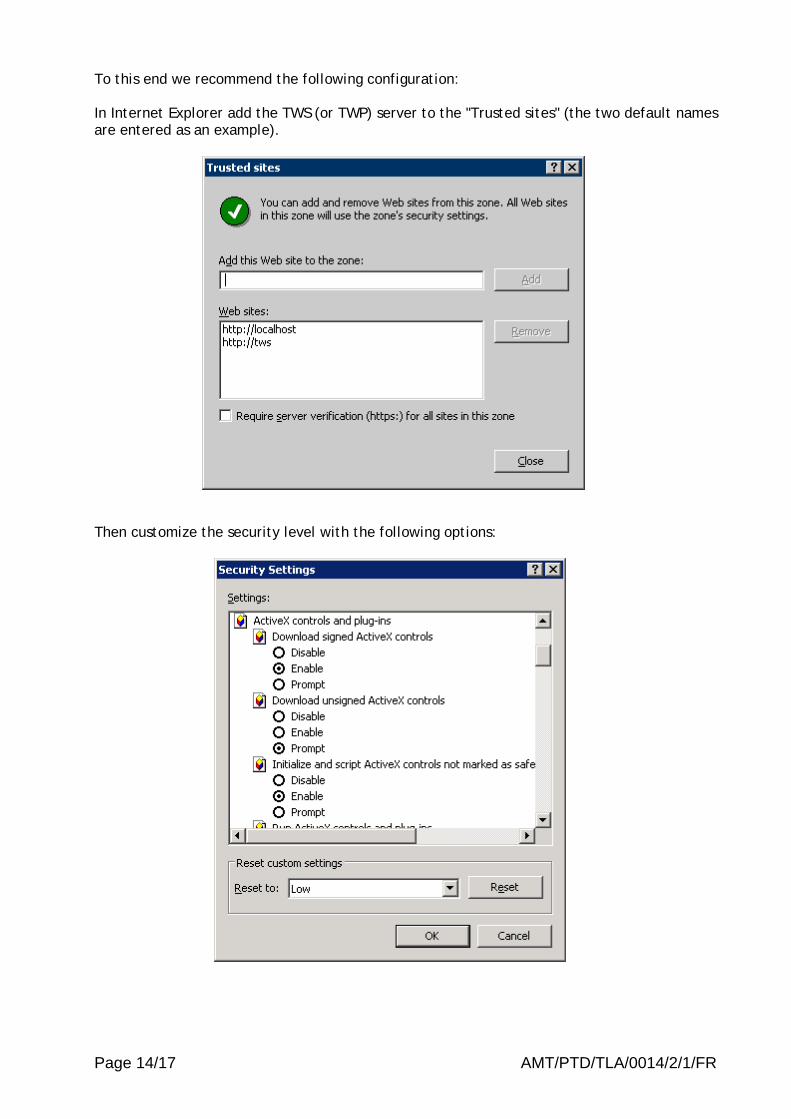
To this end we recommend the following configuration: In Internet Explorer add the TWS (or TWP) server to the "Trusted sites" (the two default names are entered as an example).
Then customize the security level with the following options:
Page 14/17 AMT/PTD/TLA/0014/2/1/FR

You can use Internet Explorer directly to test the page by requesting the following address: http://nom-serveur/tws/tws_caller/MiniFiche_basic_exe.aspx?phone=XXXXXX If the executable does not run, read the error message returned by Internet Explorer.
6.2. Record pop-up by opening Microsoft Access
To open MS Access, edit the record MiniFiche_Basic_Access.aspx with a standard text editor. This record is an adapted version of the record MiniFiche_Basic_Exe.aspx. Find the following sequence in the text:
function GetDetail() { szCmd = "C:\\Program Files\\Microsoft Office2000\\Office\\MSACCESS.EXE C:\\Temp\\VoiceCon\\BizCards.mdb /cmd " + document.all["lbPhone"].innerHTML; //alert (szCmd); AlerterX.Exec (szCmd); }
The szCmd variable contains the command line which will be executed. In this example the program run is: C:\\Program Files\\Microsoft Office2000\\Office\\MSACCESS.EXE Simply replace the MSACCESS.exe access path. The ‘\\’ used in the path definition are mandatory.
AMT/PTD/TLA/0014/2/1/FR Page 15/17

The parameter given is: C:\\Temp\\DBAccess\\Test.mdb /cmd " + document.all["lbPhone"].innerHTML; document.all["lbPhone"].innerHTML represents the value of the incoming telephone number. You can also use document.all["Clef"].innerHTML if you wish to use the key configured in the shared directory. An ActiveX control is used to run an executable. Consequently, the use of ActiveX controls must be authorized on the sets of users who use this type of record (see previous section).
6.3. Record pop-up by opening an HTML page
To open a particular HTML page, edit the record MiniFiche_Basic_Html.aspx with a standard text editor. Find the following sequence in the text:
function GetDetail() { url = http://www.infobel.com/france/wp/revsearch/result.asp? qcitycode=&qstreetcode=&qnacecode=&qcode=20897910&qphone=" + document.all["lbPhone"].innerHTML + "&Submit.x=50&Submit.y=7"; window.open (url); }
The url variable contains the value of the url requested. In this example a request to the site www.Infobel.com is used to run a reverse search. url = http://www.infobel.com/france/wp/revsearch/result.asp?
qcitycode=&qstreetcode=&qnacecode=&qcode=20897910&qphone=" + document.all["lbPhone"].innerHTML + "&Submit.x=50&Submit.y=7";
document.all["lbPhone"].innerHTML represents the value of the incoming telephone number. You can also use document.all["Clef"].innerHTML if you wish to use the key configured in the shared directory.
Page 16/17 AMT/PTD/TLA/0014/2/1/FR

6.4. Record pop-up with a multi-record
Common contact phone number
Scrollbar used to view the different directories in which the contact is located
Pops up an Exchange type record
Contact’s surname and first name
Contact’s company name
Pops up an Access database (form)
This record is presented as follows: let us assume that the contact ‘Durand Pierre’ is contained in Exchange and Access type directories, but there is a different customer record in each of these directories. This type of multi-record allows all the information concerning this contact to be centralised. This multi-record uses all the Exchange and Access directories.
6.5. Non-standard modification
As the pages provided are written in ASPX language, they can be modified at will by any developer with Web skills. These pages can also be replaced by pages entirely re-written in order to adapt to the information display constraints imposed by the dimensions of the TWS Alerter window. The addresses of the pages brought up in TWS Alerter are configured from the TWP administration interface (see the section on configuring from the administration interface). This way, different users can have different pages.
AMT/PTD/TLA/0014/2/1/FR Page 17/17