configuration guide...oracle, oracle8i, oracle 9i, oracle 10g, ... warning: alerts the reader to a...
TRANSCRIPT
LT Auditor+ 2013
Configuration Guide

2 | Confidential and Proprietary LT Auditor+ Configuration Guide
3 | Confidential and Proprietary LT Auditor+ Configuration Guide
Intellectual Property
Copyright © 2007-2014
Blue Lance, LT Auditor+, and the Report Generator are registered trademarks of Blue Lance, Inc.
Microsoft, Windows 2003, Window 2008, Windows XP, Windows 7, Microsoft SQL Server 2005,
Microsoft SQL Server 2008, and Microsoft SQL Server Express Edition are registered trademarks of
Microsoft Corporation in the United States and other countries.
Novell, SUSE Linux and NetWare are registered trademarks of Novell, Inc.
Intel and Pentium are registered trademarks of Intel Corporation.
Oracle, Oracle8i, Oracle 9i, Oracle 10g, Oracle 11g are trademarks of Oracle Corporation.
NetApp and the NetApp logo are trademarks or registered trademarks of NetApp, Inc. in the United
States and/or other countries.
EMC-Celerra is a registered trade mark of EMC2 Corporation.
Blue Lance shall not be held accountable for technical or editorial errors within this document. This
document is provided “as is” without warranty of any kind and is subject to change without notice.

4 | Confidential and Proprietary LT Auditor+ Configuration Guide
Special Conventions
The following special icons are used in this document to alert the reader to important pieces of
information:
Icons Description
WARNING: Alerts the reader to a potential action, practice, or situation that can
result in major damage to data or the system. Damage is permanent and irreversible.
Results may be contrary to what is expected or intended.
CAUTION: Alerts the reader to a potential action, practice, or situation that can
result in minor damage to data or the system. Results may be contrary to what is
expected or intended.
NOTE: Extra or supplementary information that needs to be emphasized to the
reader. Can provide further context, instructions, or understanding
TIP: Useful tips or pointers that can help the reader while they are using the product
or this document.
5 | Confidential and Proprietary LT Auditor+ Configuration Guide
CHAPTER 1 - ABOUT THE DOCUMENT .................................................................................................................... 7
DOCUMENT PURPOSE ...................................................................................................................................................... 7
DOCUMENT AUDIENCE .................................................................................................................................................... 7
DOCUMENT SCOPE ......................................................................................................................................................... 7
USING THIS DOCUMENT ................................................................................................................................................... 8
DOCUMENT STRUCTURE .................................................................................................................................................. 8
CHAPTER 2 – LT AUDITOR+ WORKSPACE ............................................................................................................... 9
CONNECTING TO THE WORKSPACE ..................................................................................................................................... 9
MANAGER GROUPS ...................................................................................................................................................... 11
CREATING AGENT GROUPS ............................................................................................................................................. 11
Default Filter Statement ...................................................................................................................................... 12
Adding Agents to Agent Groups .......................................................................................................................... 17
Renaming Agent Groups ...................................................................................................................................... 19
MODIFYING MANAGER GROUP SETTINGS .......................................................................................................................... 19
MODIFYING AGENT GROUP SETTINGS .............................................................................................................................. 21
NATIVE EVENT LOG ARCHIVE SETTINGS ............................................................................................................................. 22
Event Log Threshold ............................................................................................................................................. 23
Event File Transfer Settings.................................................................................................................................. 25
CHAPTER 3 - AUDIT POLICIES ............................................................................................................................... 27
CONFIGURING LT AUDITOR+ AUDIT POLICIES..................................................................................................................... 27
Common Filter Settings ........................................................................................................................................ 27 Logon Server Filter ............................................................................................................................................................. 28
MANAGER DATA ROLLUP JOB ......................................................................................................................................... 43
AGENT DATA TRANSFER JOB ........................................................................................................................................... 44
CUSTOM JOB ............................................................................................................................................................... 45
CHAPTER 4 - CONFIGURE THE LT AUDITOR+ REPORT CONSOLE ........................................................................... 46
STARTING THE REPORT CONSOLE: .................................................................................................................................... 47
Report Icons ......................................................................................................................................................... 49
REPORT GROUPS AND REPORT ARMS ............................................................................................................................... 50
Report Categories ................................................................................................................................................ 51
Create a new report category .............................................................................................................................. 51
Modify a report category: .................................................................................................................................... 51
Delete a report category: ..................................................................................................................................... 51
CREATING A REPORT QUERY ........................................................................................................................................... 52
Report Statements ............................................................................................................................................... 52 Common Report Statement Tabs for all Report Arms ....................................................................................................... 52
Date & Time .................................................................................................................................................................. 53 Users ............................................................................................................................................................................. 54 Nodes ............................................................................................................................................................................ 54 Servers ........................................................................................................................................................................... 55
Report Statement tabs for File System, Removable Devices, NAS Devices and NSS File Systems Report Arms ................ 56 Files ............................................................................................................................................................................... 56
6 | Confidential and Proprietary LT Auditor+ Configuration Guide
Operations ..................................................................................................................................................................... 57 Report Statement tabs for the Active Directory, eDirectory and NetWare Report Arms .................................................. 57
Classes ........................................................................................................................................................................... 57 Attributes ...................................................................................................................................................................... 58 Objects .......................................................................................................................................................................... 59 Operations ..................................................................................................................................................................... 59
Report Statement tab for the Group Policy Report Arm ................................................................................................... 60 Objects .......................................................................................................................................................................... 60 Attributes ...................................................................................................................................................................... 60
Report Statement tab for the NetWare Report Arm ......................................................................................................... 61 Values ............................................................................................................................................................................ 61
Report Statement tab for the Cross Platform Report Arm ................................................................................................ 61 Report Statement tab for the Audit the Auditor Report Arm ............................................................................................ 62 Report Statement tab for the Rollup Status Monitoring Report Arm ................................................................................ 63
Advanced Settings ............................................................................................................................................... 63 Report Settings .................................................................................................................................................................. 64 Output ............................................................................................................................................................................... 64
Chronological Columnar ................................................................................................................................................ 65 Chronological Columnar Grouped by User .................................................................................................................... 66 Summary Grouped by Operation .................................................................................................................................. 66 Summary Grouped by User ........................................................................................................................................... 67 Failed Logon Summary Report ...................................................................................................................................... 67
Description ........................................................................................................................................................................ 68 Creating additional Report Query Statement: ................................................................................................................... 69 Modify a Report Query Statement: ................................................................................................................................... 69 Delete a Report Query Statement: .................................................................................................................................... 69
Modify a report query, ......................................................................................................................................... 69
Delete a report query: .......................................................................................................................................... 69
Generate a report: ............................................................................................................................................... 69
SCHEDULING A REPORT .................................................................................................................................................. 71
CHAPTER 5 - SECURING LT AUDITOR + ................................................................................................................. 72
AUTHENTICATING TO THE WORKSPACE ............................................................................................................................. 72
LT Auditor+ Security Level 1 ................................................................................................................................. 72
LT Auditor+ Security Level 2 ................................................................................................................................. 76
APPENDIX ............................................................................................................................................................ 79
SYSTEM UPDATE UTILITY ................................................................................................................................................ 79
Overview .............................................................................................................................................................. 79

7 | Confidential and Proprietary LT Auditor+ Configuration Guide
Chapter 1 - About the Document
This chapter provides a general overview of this document and contains following major subsections.
•Document Purpose •Document Audience • Document Scope • Using this Document • Getting Technical support
Document Purpose This document is intended to serve as a document that best describes the procedures and steps for
Installing LT Auditor+. It focuses on the pre-requisites, system requirement and pre-installation of LT
Auditor+.
Document Audience This document is intended for the following users:
Team or person responsible for using the LT Auditor+ application Team or person entrusted with deploying LT Auditor+ in the environment
Document Scope The scope of this document includes information that will help you understand the
functionalities of LT Auditor+.
The scope includes the following major topics:
• Description of key features
• Details on configuring and using LT Auditor+ .
8 | Confidential and Proprietary LT Auditor+ Configuration Guide
Using this Document This section explains the Installation and Configuration of the LT Auditor+.
Document Structure The document is divided into the following chapters:
Chapter Description
About the Document Provides information about this document, including what it is used for, who should read it, what it contains, how it is presented and how it is used.
About LT Auditor+ Configuration Guide Provides information about LT Auditor+ configuration, deployment and management of audit policies.
9 | Confidential and Proprietary LT Auditor+ Configuration Guide
Chapter 2 – LT Auditor+
Workspace
This section will provide detailed steps to show you how to use LT Auditor+ Security Management Console to configure your workspace.
Connecting to the Workspace
1. To launch the Security Management Console click Start → All Programs → Blue Lance, Inc → Management Console.
The first screen prompts you for the database connection information. This lets you connect to the workspace that you need to configure.
For SQL (Management Console):
2. Select Microsoft SQL Server for database type. 3. Provide Server ID.
You must be authenticated to (have credentials to access) the workspace
10 | Confidential and Proprietary LT Auditor+ Configuration Guide
4. Provide Database Name. 5. Select Use NT Integrated Security OR User Name and Password. 6. If User Name and Password is selected, provide the User Name and the Password. 7. Click OK.
For Oracle (Management Console):
1. Select Oracle for Database Type. 2. Provide Host String. 3. Provide User Name 4. Provide Password. 5. Click OK.
11 | Confidential and Proprietary LT Auditor+ Configuration Guide
The Management Console will be launched as soon as you are authenticated to the workspace as displayed in the screen below:
The Management Console is divided into two views. The left pane shows the currently configured workspace with the workspace name as the root node of the tree. Below the root nodes are the Manager Groups and Agent Groups of the workspace. The right pane displays the details of each node highlighted on the left side. Select the workspace root node in the tree to display all the Manager Groups and Agent Groups in the pane on the right side.
Manager Groups Manager groups cannot be created using the Management Console. These groups are created when you install the LT Auditor+ Manager as discussed in the LT Auditor+ Installation guide. A workspace can contain more than one Manager residing in more than one Manager Group.
Creating Agent Groups New Agent Groups are created from the Management Console. To create a new Windows Agent Group, choose one of the following:
1. Click on System → New → Windows Agent Group OR 2. Click on the toolbar icon Windows Agent Group. OR 3. Right click on the Workspace
4. Click Windows Agent Group
You need to place Managers in different Manager Groups if you intend to have different policies for each Manager.

12 | Confidential and Proprietary LT Auditor+ Configuration Guide
When creating a new Agent group in the Management Console, the user must determine the type of
Agent group being created. There are four types of Agent groups available for creation in LT Auditor+
for Windows; these include:
Windows Agent Group – this group type is intended for backward compatibility with older versions of LT Auditor+. It may contain machines of any type.
Domain Controller Group – this group type may only contain domain controller machines.
Member Server Group – this group type may only contain member server machines.
Workstation Group – this group type may only contain non-server machines in the domain.
To create a new Agent group:
1. Right click on the root node of the workspace in the left pane of the Management Console.
2. Select Agent Group ( Windows\SUSE Linux or any other application) 3. The new form for Agent group creation appears as below:
The selection of domain and group type will determine which Agent machines are available in the
workspace for addition to the new Agent group.
A primary Manager is responsible for deploying policies that change within that group. Also, all Agents within that group will attempt data transfer with the primary Manager first, before attempting to transfer to any other Manager in the workspace.
Default Filter Statement
Default filter statements will now be set for each Agent group upon creation, and will vary according to group type as is appropriate. Default filter statements may be modified in any way to suit specific auditing needs, and may be restored to their original configuration at any time by selecting the Restore Default Settings option in the menu.
To view default filters:
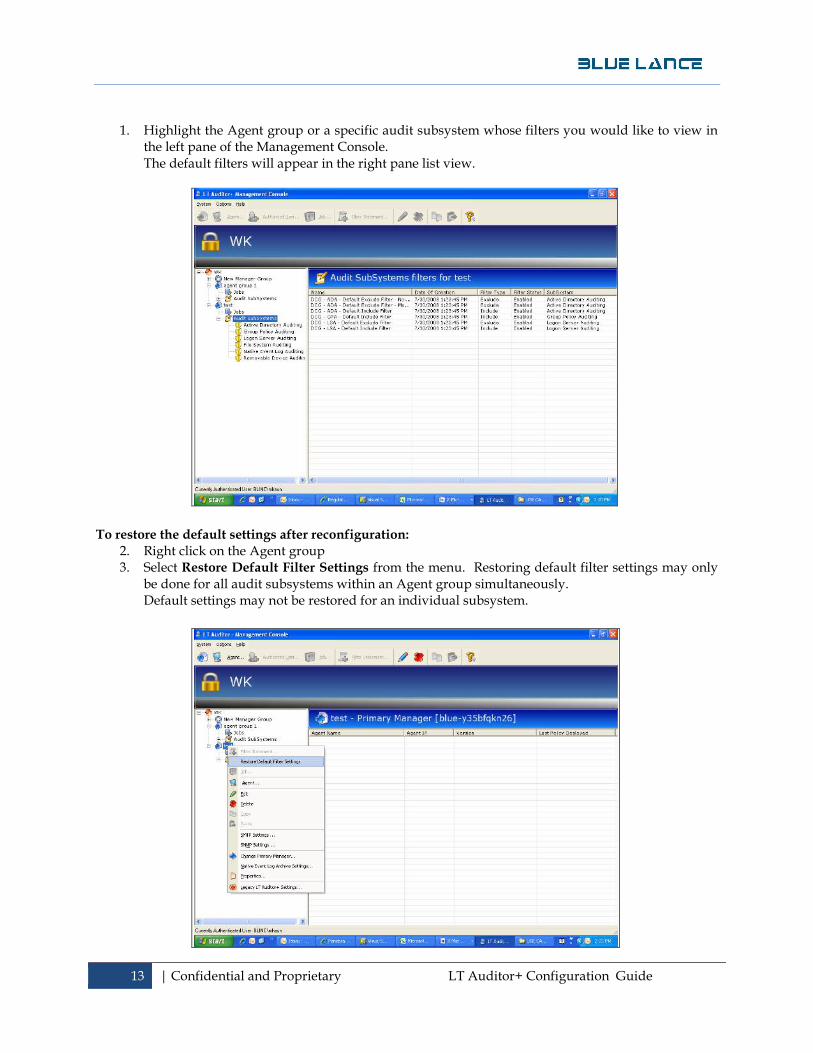
13 | Confidential and Proprietary LT Auditor+ Configuration Guide
1. Highlight the Agent group or a specific audit subsystem whose filters you would like to view in the left pane of the Management Console. The default filters will appear in the right pane list view.
To restore the default settings after reconfiguration:
2. Right click on the Agent group 3. Select Restore Default Filter Settings from the menu. Restoring default filter settings may only
be done for all audit subsystems within an Agent group simultaneously. Default settings may not be restored for an individual subsystem.
14 | Confidential and Proprietary LT Auditor+ Configuration Guide

15 | Confidential and Proprietary LT Auditor+ Configuration Guide
The default filters for each group type are listed below:
Domain Controller Groups Active Directory:
Exclude Noise Users Statement - Excludes Users: *$*, *NT Authority*, *\System*, -\-, -,\,*ANONYMOUS LOGON*
a. Exclude Modify Object Statement – Excludes the “modify object” operation b. Include Statement – Includes all operations
Group Policy:
a. Include Statement – Includes all operations
Logon Server:
a. Exclude Noise Users Statement - Excludes Users: *$*, *NT Authority*, *\System*, -\-, -,\,*ANONYMOUS LOGON*
a. Include Statement – Includes operations Interactive Logon, Remote Interactive Logon, All Directory Authentications, All Failed Logons
Member Server Groups
Logon Server:
a. Exclude Noise Users Statement - Excludes Users: *$*, *NT Authority*, *\System*, -\-, -,\,*ANONYMOUS LOGON*
b. Include Statement: Includes the operations Interactive Logon, Remote Interactive Logon, All
Failed Logons
Removable Device:
a. Exclude Noise Events Statement: Excludes the operation – Write Attribute b. Include Statement: Includes all operations
SAM:
a. Exclude Noise Users Statement - Excludes Users: *$*, *NT Authority*, *\System*, -\-, -,\,*ANONYMOUS LOGON*
a. Exclude Modify Object Statement – Excludes the Modify Object operation b. Include Statement – Includes all operations

16 | Confidential and Proprietary LT Auditor+ Configuration Guide
Workstation Groups Logon Server:
a. Exclude Noise Users Statement - Excludes Users: *$*, *NT Authority*, *\System*, -\-, -,\,*ANONYMOUS LOGON*
b. Include Statement – Includes the operations Interactive Logon, Remote Interactive Logon, All
Failed Logons
Removable Device:
a. Exclude Noise Events Statement – Excludes the operation Write Attribute b. Include Statement – Includes all operations
SAM:
a. Exclude Noise Users Statement - Excludes Users: *$*, *NT Authority*, *\System*, -\-, -,\,*ANONYMOUS LOGON*
b. Exclude Modify Object Statement – Excludes the Modify Object operation c. Include Statement – Includes all operations
Windows Agent Groups
Active Directory:
a. Exclude Noise Users Statement - Excludes Users: *$*, *NT Authority*, *\System*, -\-, -,\,*ANONYMOUS LOGON*
b. Exclude Modify Object Statement – Excludes the Modify Object operation c. Include Statement – Includes all operations
Group Policy:
a. Include Statement – Includes all operations
Logon Server:
a. Exclude Noise Users Statement - Excludes Users: *$*, *NT Authority*, *\System*, -\-, -
,\,*ANONYMOUS LOGON*
b. Include Statement – Includes the operations Interactive Logon, Remote Interactive Logon, All Directory Authentications, All Failed Logons
Removable Device:
a. Exclude Noise Events Statement – Excludes the operation Write Attribute b. Include Statement – Includes all operations
17 | Confidential and Proprietary LT Auditor+ Configuration Guide
Manager Groups
Active Directory:
a. Exclude Noise Users Statement - Excludes Users: *$*, *NT Authority*, *\System*, -\-, -,\,*ANONYMOUS LOGON*
b. Exclude Modify Object Statement – Excludes the Modify Object operation c. Include Statement – Includes all operations
Group Policy:
a. Include Statement – Includes all operations
Logon Server:
a. Exclude Noise Users Statement - Excludes Users: *$*, *NT Authority*, *\System*, -\-, -
,\,*ANONYMOUS LOGON*
b. Include Statement – Includes the operations Interactive Logon, Remote Interactive Logon, All Directory Authentications, All Failed Logons
Removable Device:
a. Exclude Noise Events Statement – Excludes the operation Write Attribute b. Include Statement – Includes all operations
Adding Agents to Agent Groups
To add an Agent to a Windows Agent Group, choose one of the following:
1. Click on System →New → Agent OR 2. Click on the toolbar icon Agent OR 3. Right click on Agent Group. 4. Click Agent. 5. Provide the IP address or the machine name of the Agent that needs to be added. 6. The machine must already have the Agent installed, be running, and be a free Agent
in order to be added to an Agent Group. To browse for Agents:
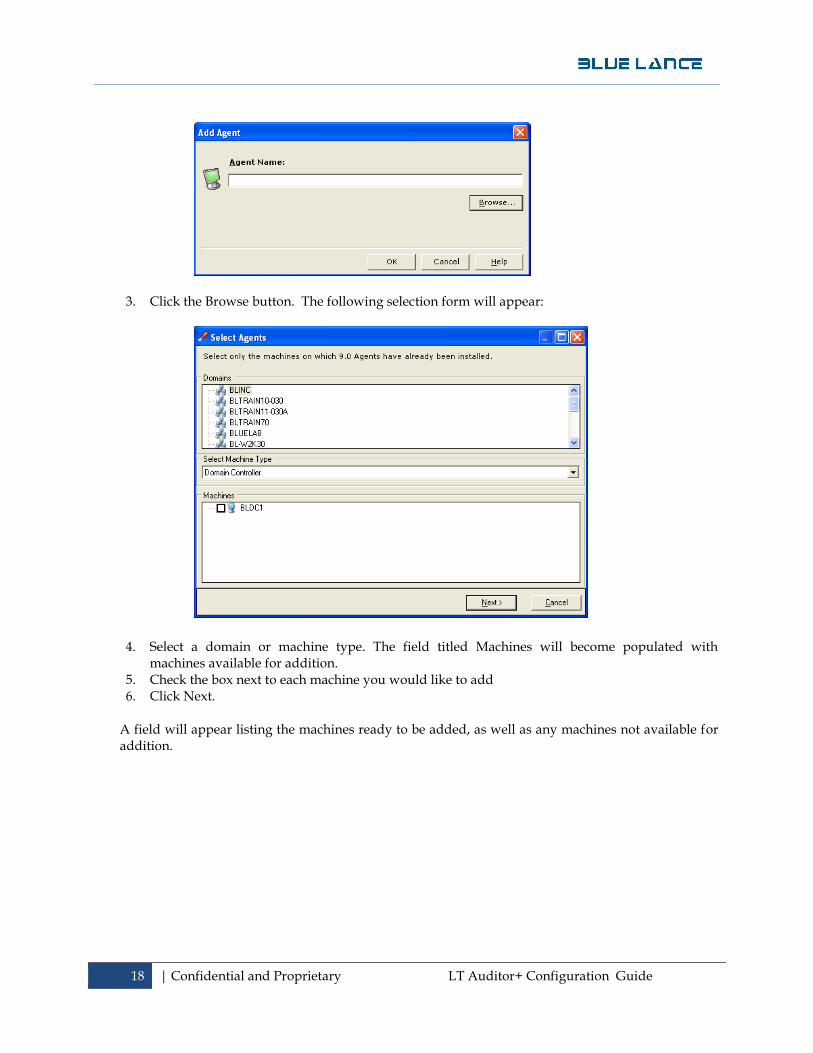
1. Right click on the Agent group to which you would like to add Agents. 2. Select Agent from the menu. The following form will appear:
18 | Confidential and Proprietary LT Auditor+ Configuration Guide
3. Click the Browse button. The following selection form will appear:
4. Select a domain or machine type. The field titled Machines will become populated with machines available for addition.
5. Check the box next to each machine you would like to add 6. Click Next.
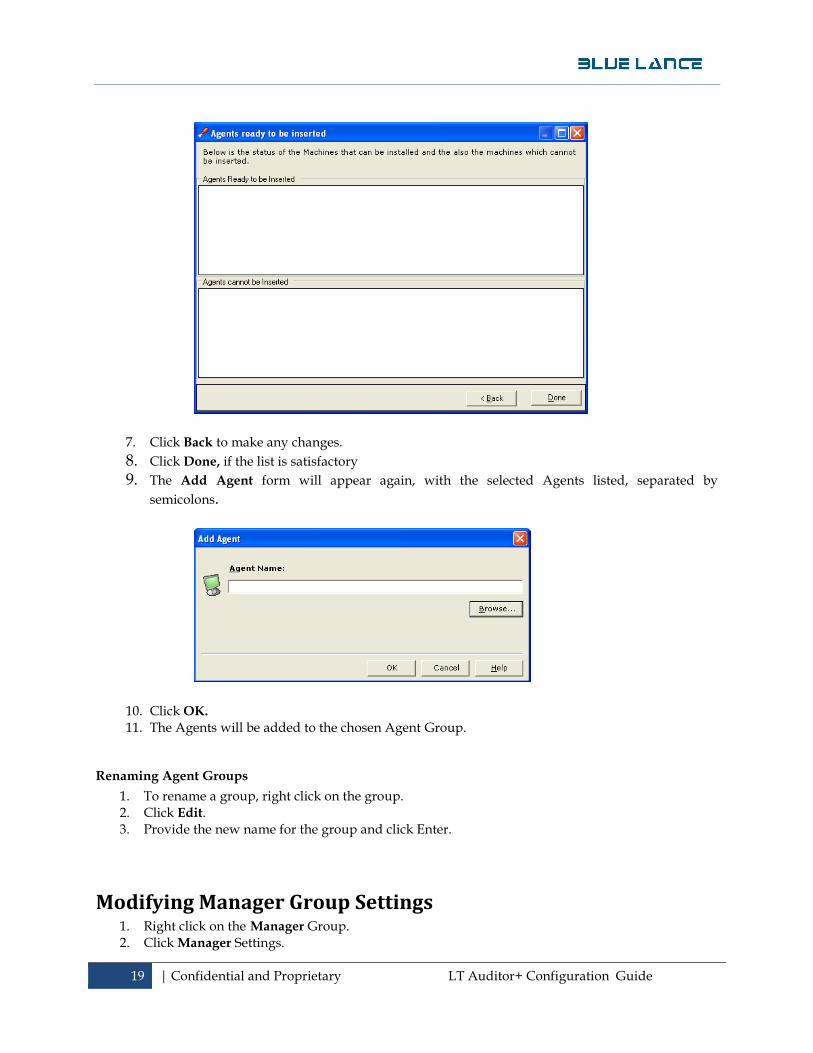
A field will appear listing the machines ready to be added, as well as any machines not available for addition.
19 | Confidential and Proprietary LT Auditor+ Configuration Guide
7. Click Back to make any changes.
8. Click Done, if the list is satisfactory 9. The Add Agent form will appear again, with the selected Agents listed, separated by
semicolons.
10. Click OK.
11. The Agents will be added to the chosen Agent Group.
Renaming Agent Groups
1. To rename a group, right click on the group. 2. Click Edit. 3. Provide the new name for the group and click Enter.
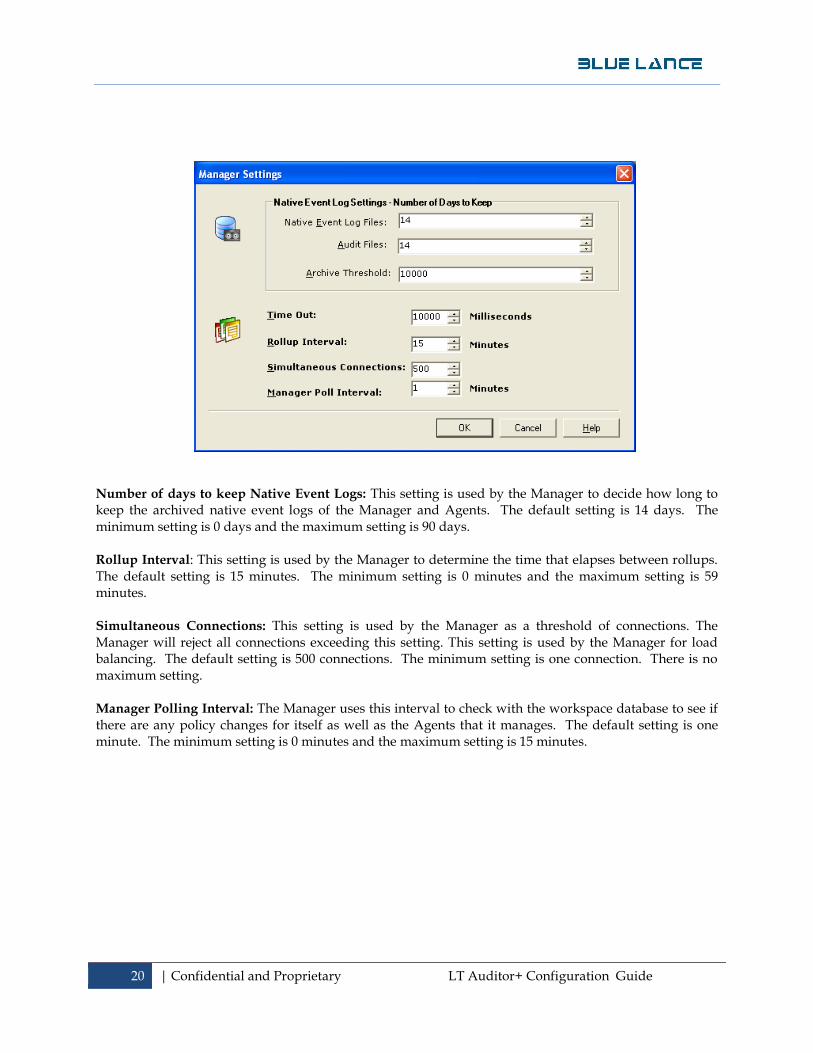
Modifying Manager Group Settings 1. Right click on the Manager Group. 2. Click Manager Settings.
20 | Confidential and Proprietary LT Auditor+ Configuration Guide
Number of days to keep Native Event Logs: This setting is used by the Manager to decide how long to keep the archived native event logs of the Manager and Agents. The default setting is 14 days. The minimum setting is 0 days and the maximum setting is 90 days. Rollup Interval: This setting is used by the Manager to determine the time that elapses between rollups. The default setting is 15 minutes. The minimum setting is 0 minutes and the maximum setting is 59 minutes. Simultaneous Connections: This setting is used by the Manager as a threshold of connections. The Manager will reject all connections exceeding this setting. This setting is used by the Manager for load balancing. The default setting is 500 connections. The minimum setting is one connection. There is no maximum setting. Manager Polling Interval: The Manager uses this interval to check with the workspace database to see if there are any policy changes for itself as well as the Agents that it manages. The default setting is one minute. The minimum setting is 0 minutes and the maximum setting is 15 minutes.
21 | Confidential and Proprietary LT Auditor+ Configuration Guide
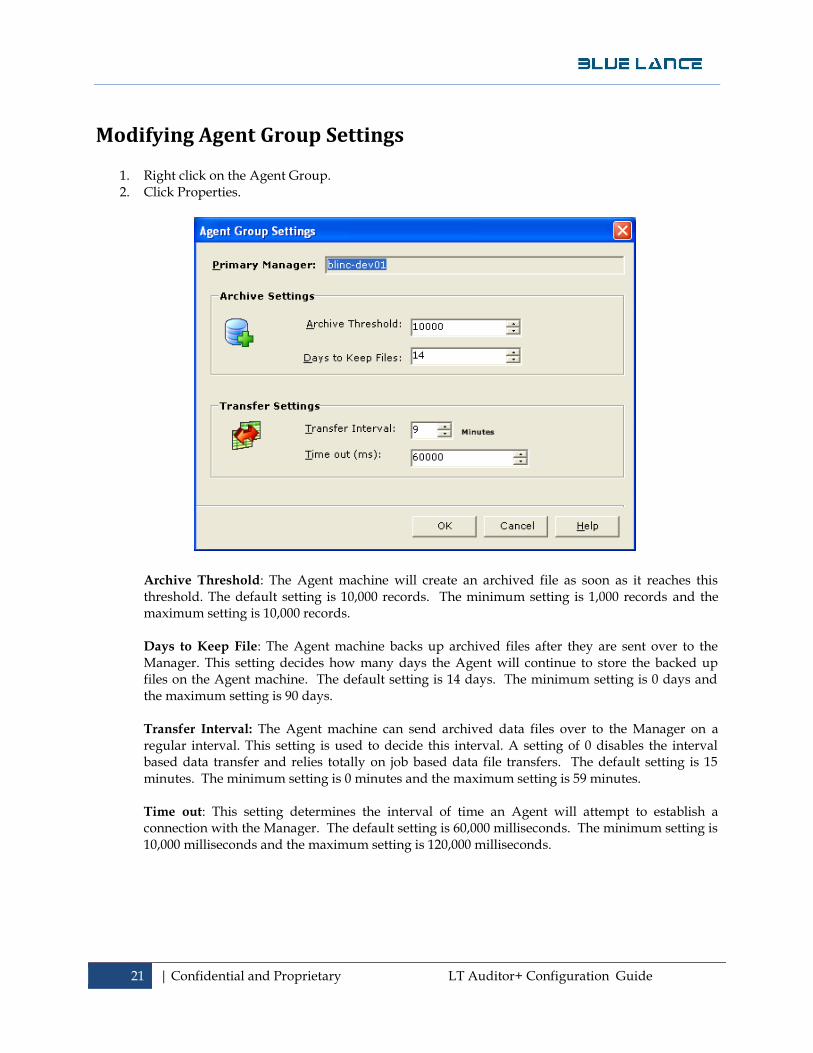
Modifying Agent Group Settings
1. Right click on the Agent Group. 2. Click Properties.
Archive Threshold: The Agent machine will create an archived file as soon as it reaches this threshold. The default setting is 10,000 records. The minimum setting is 1,000 records and the maximum setting is 10,000 records.
Days to Keep File: The Agent machine backs up archived files after they are sent over to the Manager. This setting decides how many days the Agent will continue to store the backed up files on the Agent machine. The default setting is 14 days. The minimum setting is 0 days and the maximum setting is 90 days.
Transfer Interval: The Agent machine can send archived data files over to the Manager on a regular interval. This setting is used to decide this interval. A setting of 0 disables the interval based data transfer and relies totally on job based data file transfers. The default setting is 15 minutes. The minimum setting is 0 minutes and the maximum setting is 59 minutes.
Time out: This setting determines the interval of time an Agent will attempt to establish a connection with the Manager. The default setting is 60,000 milliseconds. The minimum setting is 10,000 milliseconds and the maximum setting is 120,000 milliseconds.

22 | Confidential and Proprietary LT Auditor+ Configuration Guide
Native Event Log Archive Settings 1. Right click on the Manager or Agent Group 2. Click on Native Event Log Archive Settings to show a list of all Native Event Logs that need to be
archived at a specific percentage of their maximum settings.
To add a new Native Event Log archive setting, choose one of the following: 1. Click Add 2. choose appropriate name from list OR 3. Type in the Name 4. Click OK.
To modify a NEL archive setting
1. Select the Event Log Name 2. Click Modify 3. Change the data. 4. Click OK.
To delete a NEL archive setting
1. Select the Event Log Name 2. Click Delete. The system will ask for confirmation. 3. Click Yes.
Archive Threshold: Provide the threshold percentage. The default setting is 80 percent. The minimum setting is 15 percent and the maximum setting is 95 percent.
Modify the Threshold: Choose the event log, click modify, change the threshold.
Delete the Threshold: Choose the event log, click delete, and confirm by clicking yes.

23 | Confidential and Proprietary LT Auditor+ Configuration Guide
Event Log Threshold
This setting allows for the archiving of event logs based on specified thresholds. Archiving of event logs will create a copy of the log, locally, which will then be processed by LT Auditor+. For extremely busy servers, setting a threshold, to force archives should be considered to not lose audit data due to standard event log overwrite settings. To apply threshold limitations through the Manager:
a. Right click on the Manager node in the left pane of the Management Console
b. Select Manager Settings from the drop down menu.
c. Provide a number of events in the Maximum Event Log Threshold for an Arm field. The default setting is 5,000 events. The minimum setting is 5,000 events and the maximum setting is 100,000 events.
d. Click OK once the desired setting has been entered. The settings will take effect the next time the Manager polls the database for policy changes. This is dependent on the Poll Interval setting.

24 | Confidential and Proprietary LT Auditor+ Configuration Guide
To apply threshold limitations through an Agent Group: 1. Right click on the Agent Group node in the left pane of the Management Console 2. Select Properties from the drop down menu.
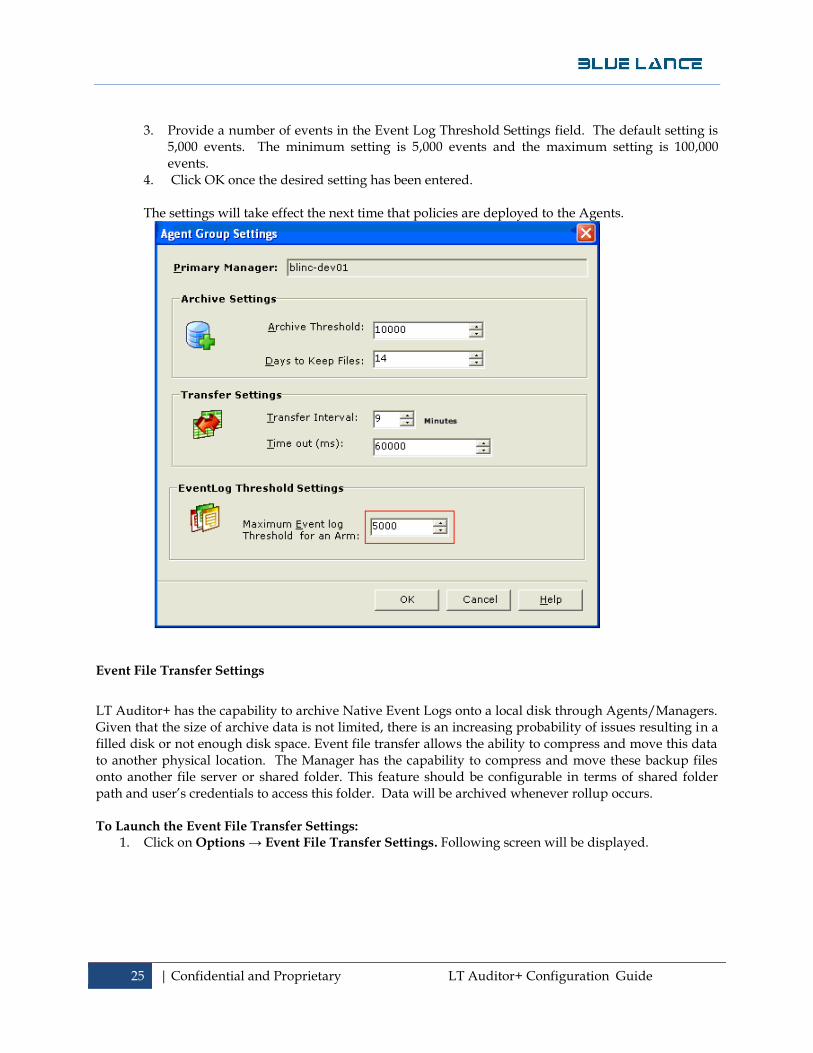
25 | Confidential and Proprietary LT Auditor+ Configuration Guide
3. Provide a number of events in the Event Log Threshold Settings field. The default setting is 5,000 events. The minimum setting is 5,000 events and the maximum setting is 100,000 events.
4. Click OK once the desired setting has been entered.
The settings will take effect the next time that policies are deployed to the Agents.
Event File Transfer Settings
LT Auditor+ has the capability to archive Native Event Logs onto a local disk through Agents/Managers. Given that the size of archive data is not limited, there is an increasing probability of issues resulting in a filled disk or not enough disk space. Event file transfer allows the ability to compress and move this data to another physical location. The Manager has the capability to compress and move these backup files onto another file server or shared folder. This feature should be configurable in terms of shared folder path and user’s credentials to access this folder. Data will be archived whenever rollup occurs. To Launch the Event File Transfer Settings:
1. Click on Options → Event File Transfer Settings. Following screen will be displayed.

26 | Confidential and Proprietary LT Auditor+ Configuration Guide
1. To activate transfer settings, check Activate Backup. Backup Folder: The user should designate the backup folder in which the files will reside once transferred. User Name and Password: This is the user name and password that the user enters to connect to the shared folders or network.
27 | Confidential and Proprietary LT Auditor+ Configuration Guide
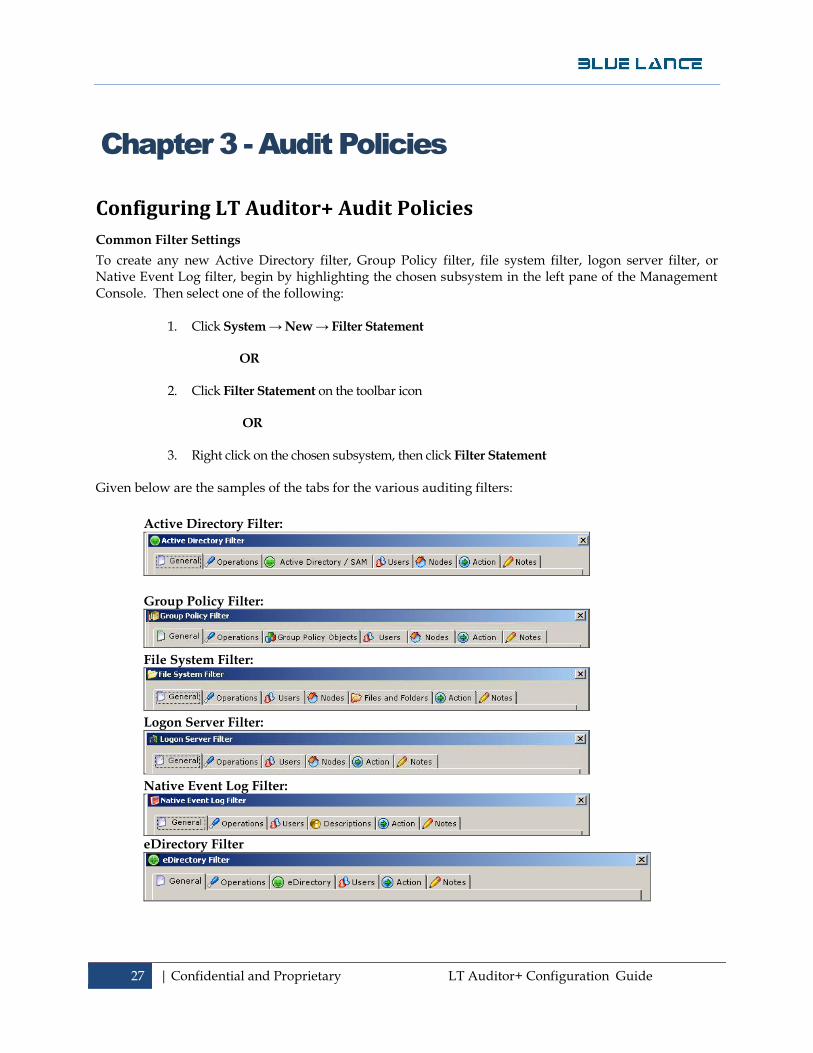
Chapter 3 - Audit Policies
Configuring LT Auditor+ Audit Policies
Common Filter Settings
To create any new Active Directory filter, Group Policy filter, file system filter, logon server filter, or Native Event Log filter, begin by highlighting the chosen subsystem in the left pane of the Management Console. Then select one of the following:
1. Click System → New → Filter Statement
OR
2. Click Filter Statement on the toolbar icon
OR
3. Right click on the chosen subsystem, then click Filter Statement
Given below are the samples of the tabs for the various auditing filters:
Active Directory Filter:
Group Policy Filter:
File System Filter:
Logon Server Filter:
Native Event Log Filter:
eDirectory Filter
28 | Confidential and Proprietary LT Auditor+ Configuration Guide
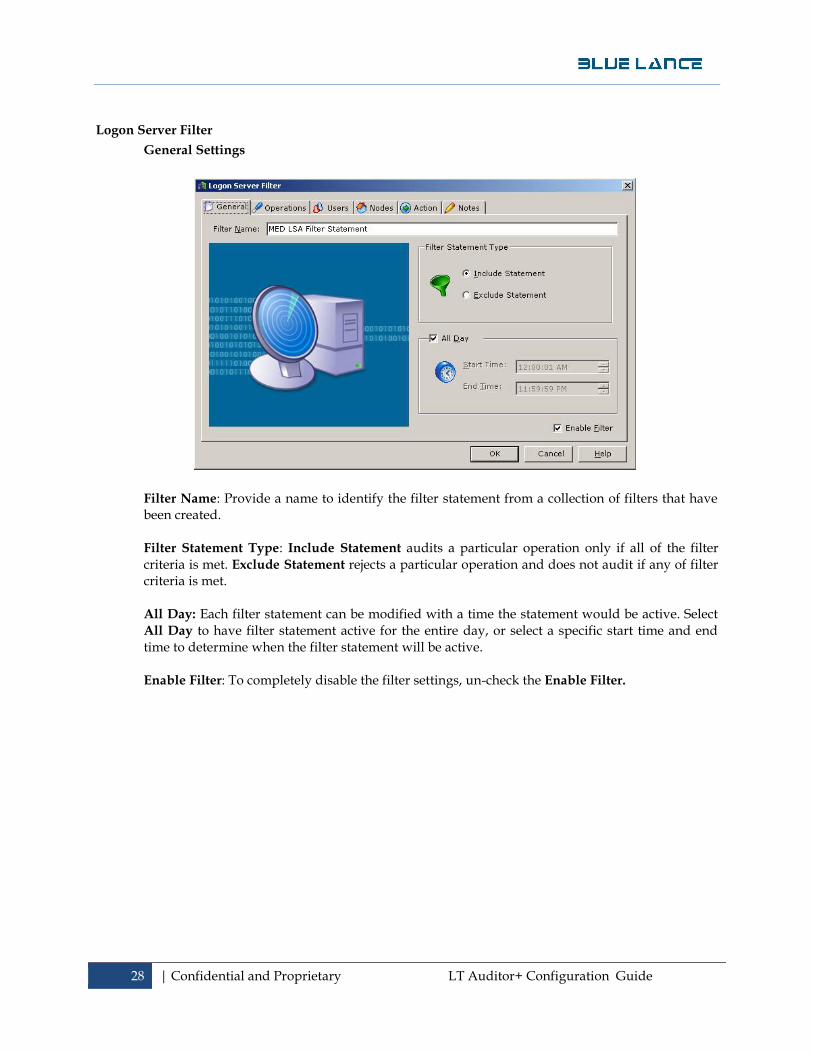
Logon Server Filter
General Settings
Filter Name: Provide a name to identify the filter statement from a collection of filters that have been created.
Filter Statement Type: Include Statement audits a particular operation only if all of the filter criteria is met. Exclude Statement rejects a particular operation and does not audit if any of filter criteria is met.
All Day: Each filter statement can be modified with a time the statement would be active. Select All Day to have filter statement active for the entire day, or select a specific start time and end time to determine when the filter statement will be active.
Enable Filter: To completely disable the filter settings, un-check the Enable Filter.
29 | Confidential and Proprietary LT Auditor+ Configuration Guide
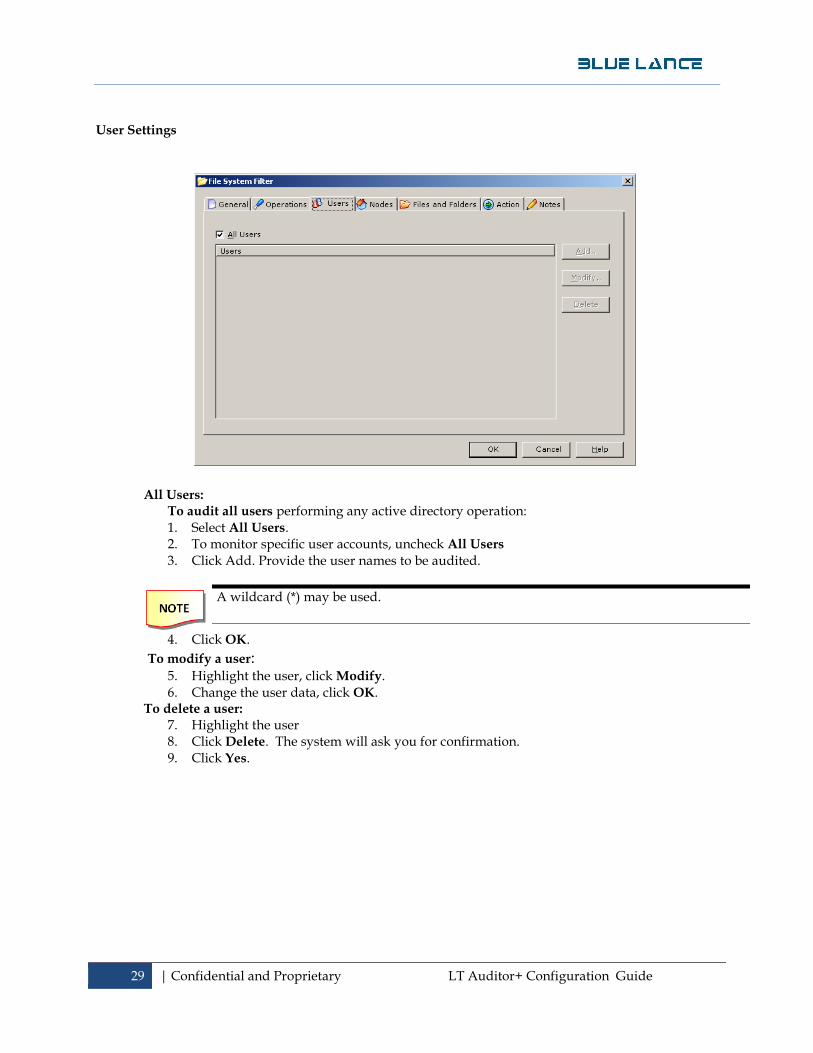
User Settings
All Users: To audit all users performing any active directory operation: 1. Select All Users. 2. To monitor specific user accounts, uncheck All Users 3. Click Add. Provide the user names to be audited.
4. Click OK.
To modify a user: 5. Highlight the user, click Modify. 6. Change the user data, click OK.
To delete a user:
7. Highlight the user 8. Click Delete. The system will ask you for confirmation. 9. Click Yes.
A wildcard (*) may be used.
30 | Confidential and Proprietary LT Auditor+ Configuration Guide
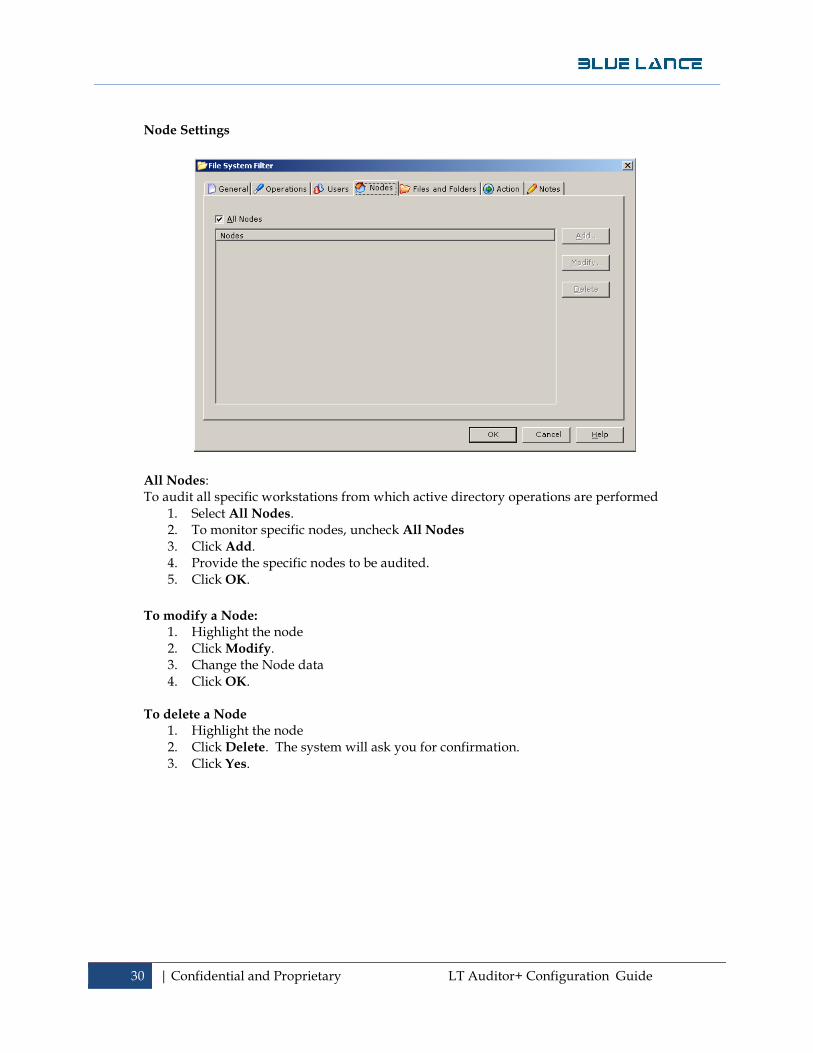
Node Settings
All Nodes: To audit all specific workstations from which active directory operations are performed
1. Select All Nodes. 2. To monitor specific nodes, uncheck All Nodes 3. Click Add. 4. Provide the specific nodes to be audited. 5. Click OK.
To modify a Node:
1. Highlight the node 2. Click Modify. 3. Change the Node data 4. Click OK.
To delete a Node
1. Highlight the node 2. Click Delete. The system will ask you for confirmation. 3. Click Yes.
31 | Confidential and Proprietary LT Auditor+ Configuration Guide
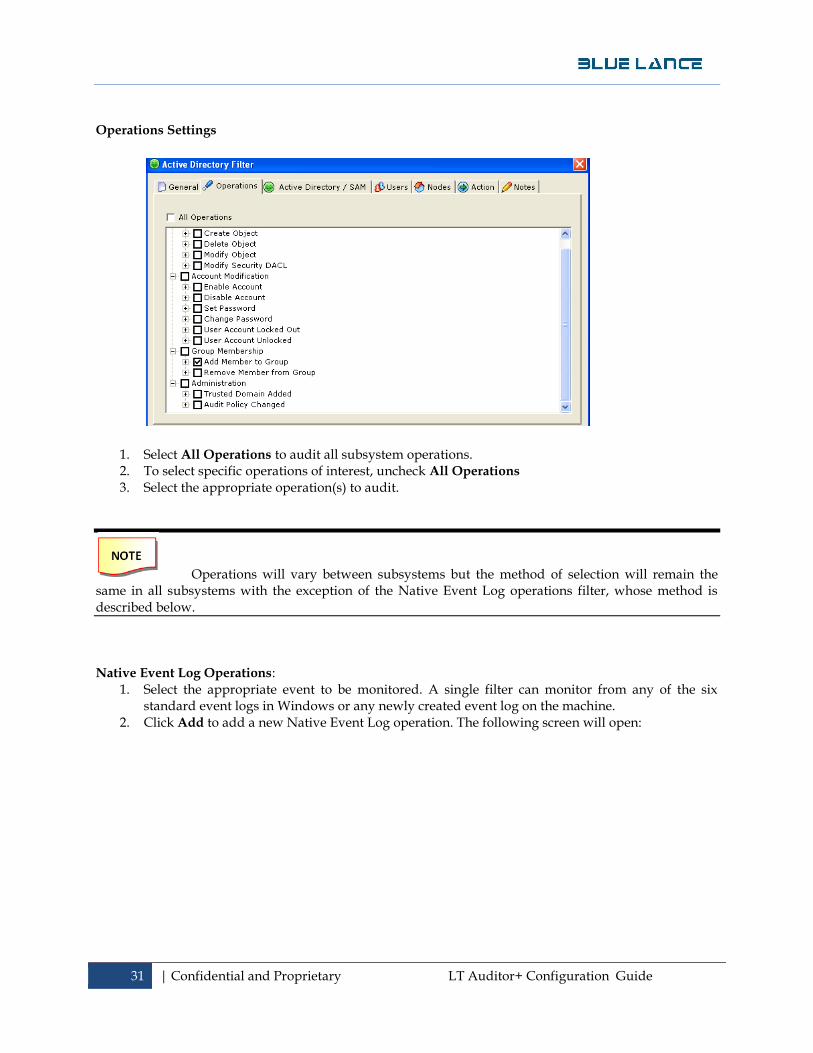
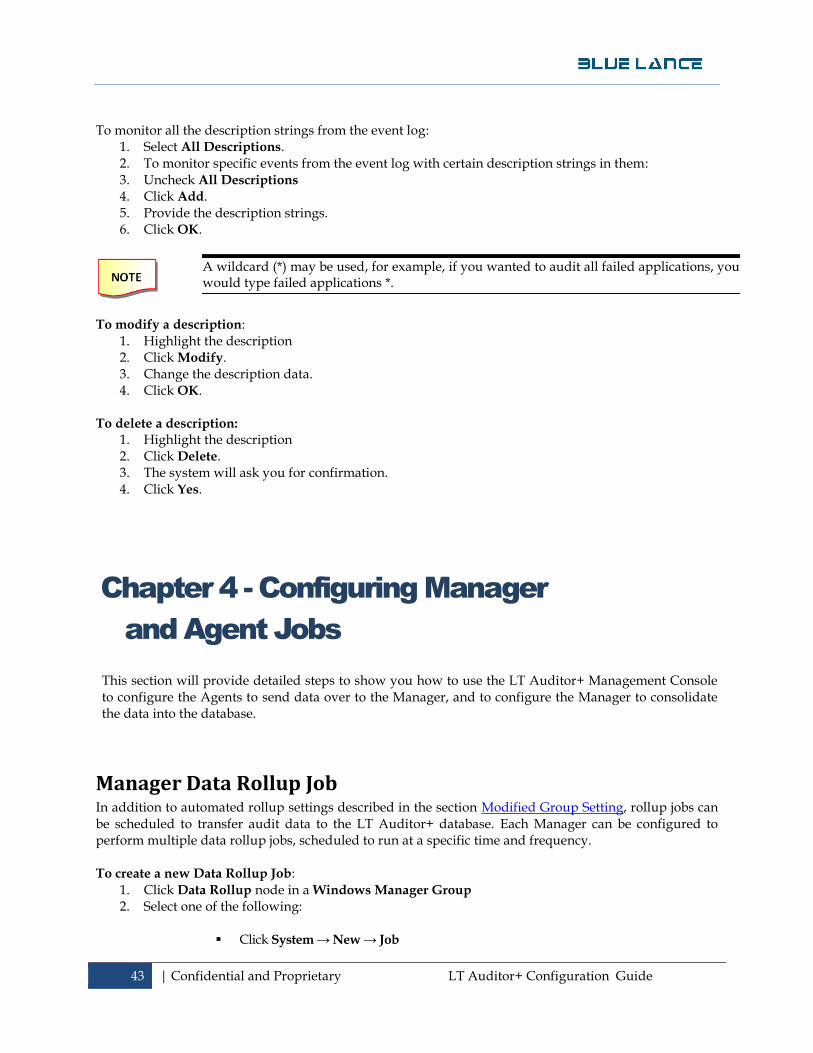
Operations Settings
1. Select All Operations to audit all subsystem operations. 2. To select specific operations of interest, uncheck All Operations 3. Select the appropriate operation(s) to audit.
Operations will vary between subsystems but the method of selection will remain the same in all subsystems with the exception of the Native Event Log operations filter, whose method is described below. Native Event Log Operations:
1. Select the appropriate event to be monitored. A single filter can monitor from any of the six standard event logs in Windows or any newly created event log on the machine.
2. Click Add to add a new Native Event Log operation. The following screen will open:
32 | Confidential and Proprietary LT Auditor+ Configuration Guide
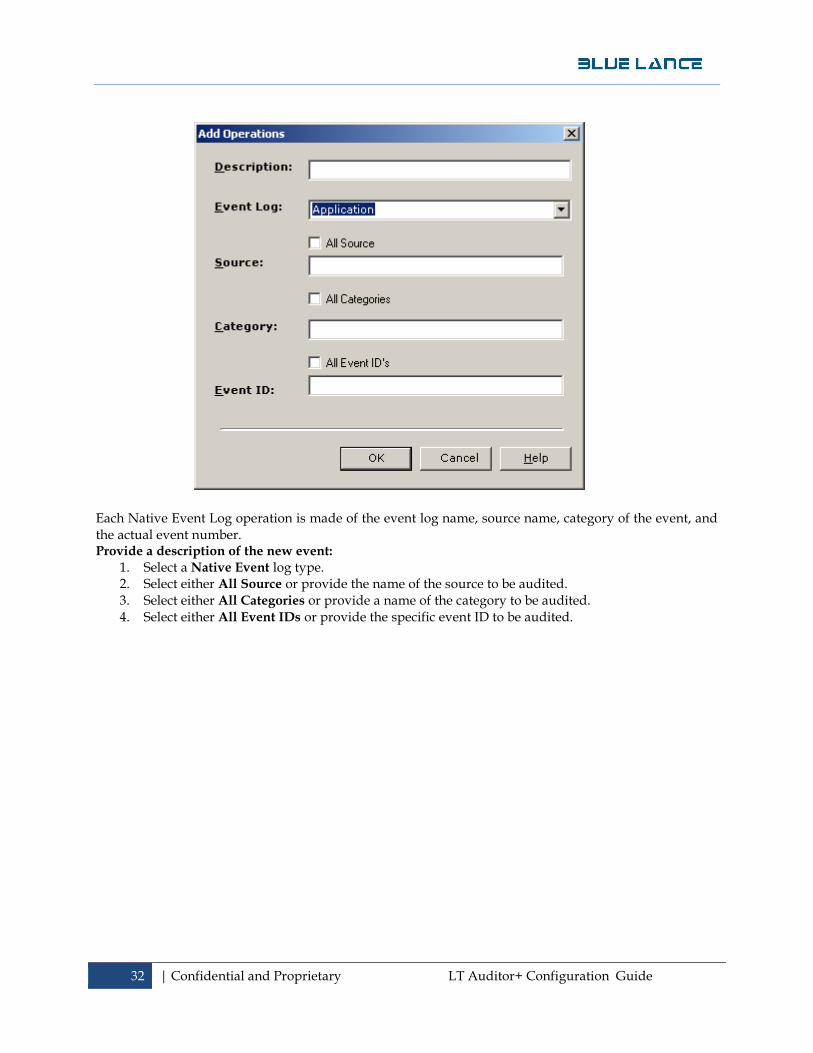
Each Native Event Log operation is made of the event log name, source name, category of the event, and the actual event number. Provide a description of the new event:
1. Select a Native Event log type. 2. Select either All Source or provide the name of the source to be audited. 3. Select either All Categories or provide a name of the category to be audited. 4. Select either All Event IDs or provide the specific event ID to be audited.
33 | Confidential and Proprietary LT Auditor+ Configuration Guide
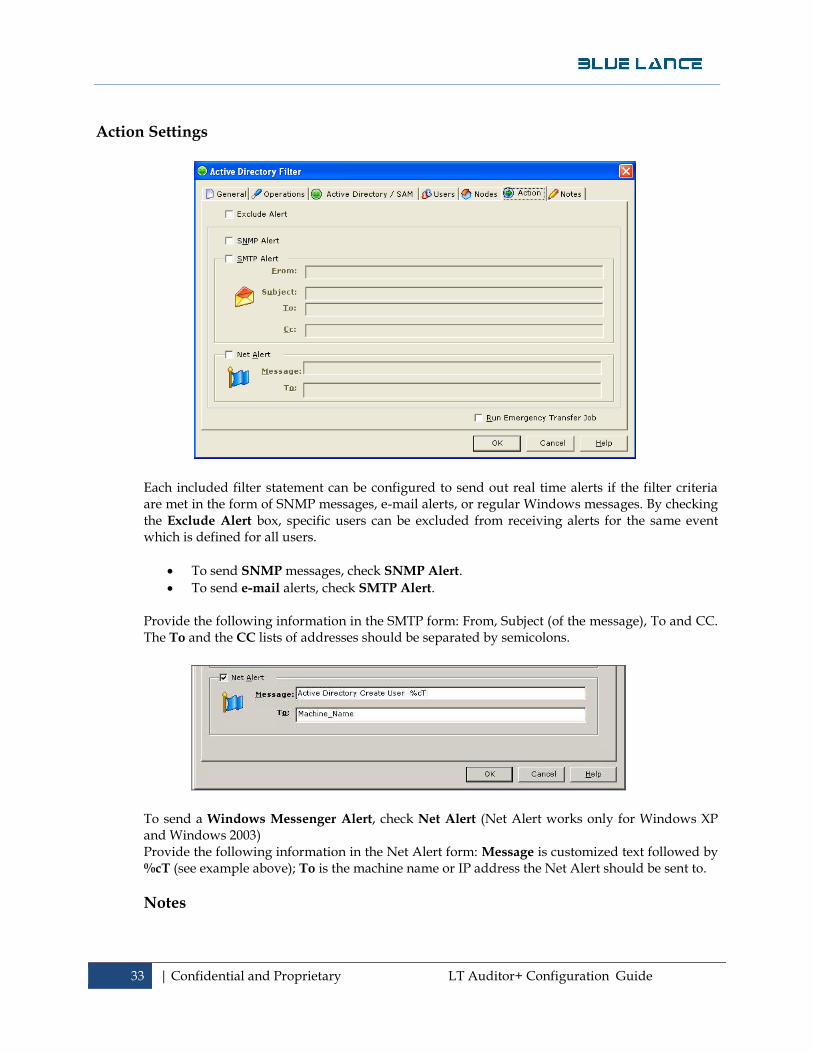
Action Settings
Each included filter statement can be configured to send out real time alerts if the filter criteria are met in the form of SNMP messages, e-mail alerts, or regular Windows messages. By checking the Exclude Alert box, specific users can be excluded from receiving alerts for the same event which is defined for all users.
To send SNMP messages, check SNMP Alert.
To send e-mail alerts, check SMTP Alert. Provide the following information in the SMTP form: From, Subject (of the message), To and CC. The To and the CC lists of addresses should be separated by semicolons.
To send a Windows Messenger Alert, check Net Alert (Net Alert works only for Windows XP and Windows 2003) Provide the following information in the Net Alert form: Message is customized text followed by %cT (see example above); To is the machine name or IP address the Net Alert should be sent to.
Notes

34 | Confidential and Proprietary LT Auditor+ Configuration Guide
The program will automatically keep track of the filter creator, date, filter Modifier, and date it was modified. The filter notes field is provided for the user to track why the filter was created or modified. Filter Settings specific to a Subsystem To create a new filter statement for a category specific to a subsystem (i.e. Active Directory/SAM, eDirectory), highlight your chosen auditing arm in the audit subsystem tree in the left pane of the Management Console, then select one of the following:
1. Click System → New → Filter Statement
OR
2. Click Filter Statement on the toolbar icon.
OR
3. Right click on the Active Directory Subsystem, and then click Filter Statement
Select the tab specific to that subsystem and follow the instructions below to configure that setting.

35 | Confidential and Proprietary LT Auditor+ Configuration Guide
Active Directory / SAM Settings – Active Directory Filter
Entire Active Directory / SAM: To audit the entire active directory on a domain controller, or to audit the local Windows accounts on a standalone machine, select Entire Active Directory / SAM.
Context: If the Entire Active Directory / SAM option is not checked, the context field will become active. Select the ellipse […] to browse for the container in the active directory forest that needs to be monitored. Include Sub Containers: If this is selected, LT Auditor+ will monitor the container specified in the context field and all the sub containers within it. To monitor only the container specified, but not the sub containers, uncheck this option.
Objects: 1. To audit all objects, select All Objects. 2. To audit specific objects, uncheck All Objects. 3. Click Add. 4. Provide description of the object(s) to be audited. Utilizing a wildcard ‘*’ will specify any
part of the object name. For example, cn=john* will audit any object containing the string cn=john.
5. Click OK.
To modify the object
1. Highlight the object in the list 2. Click Modify. 3. Edit the object data. 4. Click OK.
To delete the object
36 | Confidential and Proprietary LT Auditor+ Configuration Guide
1. Highlight the object in the list 2. Click Delete. The system will ask you for confirmation. 3. Click Yes.
Classes: To audit all classes:
1. Select All Classes. 2. To audit specific classes within the active directory, uncheck All Classes. 3. Click Add. 4. Provide the description of the class to be audited. A wildcard ‘*’ can be used. 5. Click OK.
To modify the class:
1. Highlight the class in the list 2. Click Modify. 3. Edit the class data. 4. Click OK.
To delete the class:
1. Highlight the class in the list 2. Click Delete. The system will ask you for confirmation. 3. Click Yes.
Attributes: 1. To audit all attributes: 2. Select All Attributes. 3. Uncheck All Attributes to audit specific attributes within the active directory. 4. Click Add. 5. Provide the description of the attribute(s) to be audited. A wildcard ‘*’ can be used. 6. Click OK.
To modify the attribute:
1. Highlight the attribute in the list, click Modify. 2. Edit the attribute data. 3. Click OK.
To delete the attribute:
1. Highlight the attribute in the list 2. Click Delete when prompted for confirmation. 3. Click Yes.
37 | Confidential and Proprietary LT Auditor+ Configuration Guide
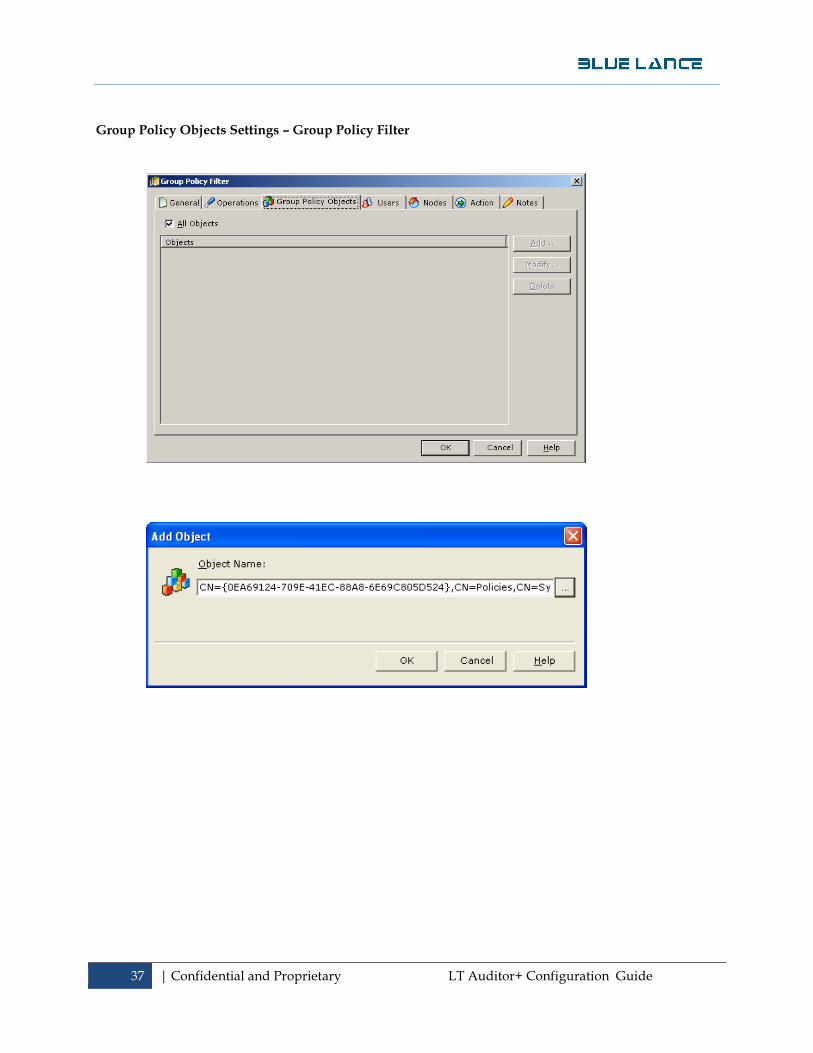
Group Policy Objects Settings – Group Policy Filter
38 | Confidential and Proprietary LT Auditor+ Configuration Guide
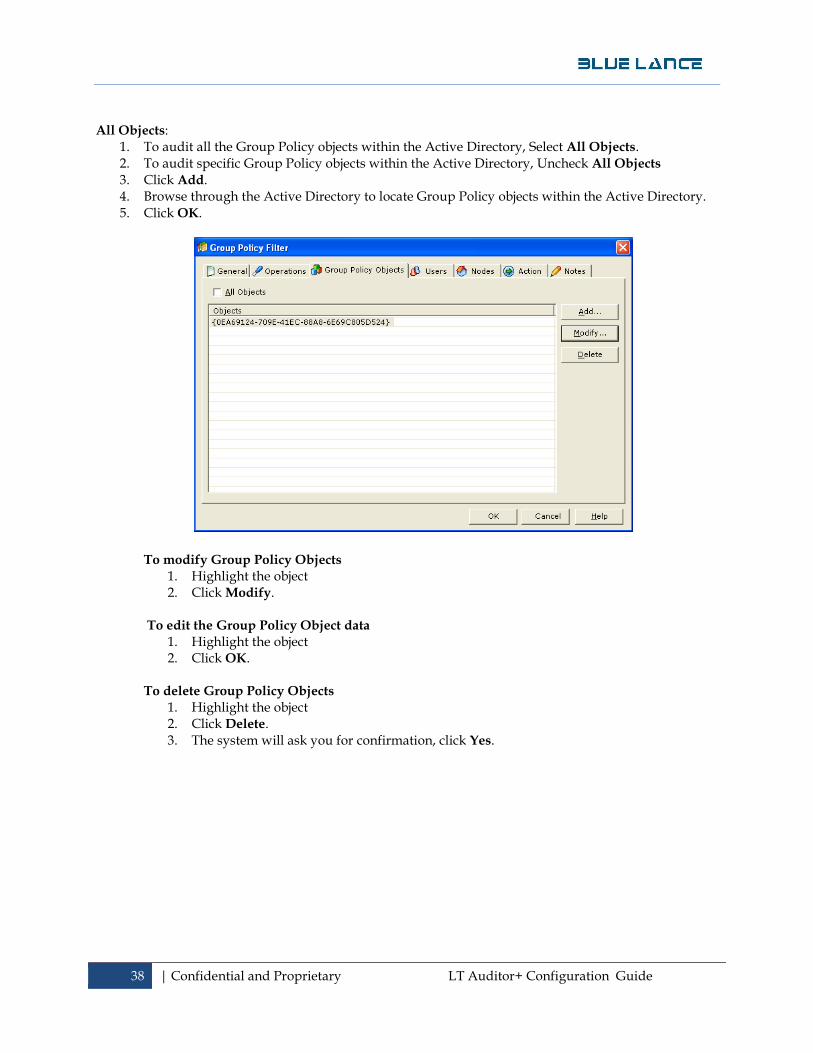
All Objects: 1. To audit all the Group Policy objects within the Active Directory, Select All Objects. 2. To audit specific Group Policy objects within the Active Directory, Uncheck All Objects
3. Click Add. 4. Browse through the Active Directory to locate Group Policy objects within the Active Directory. 5. Click OK.
To modify Group Policy Objects
1. Highlight the object 2. Click Modify.
To edit the Group Policy Object data
1. Highlight the object 2. Click OK.
To delete Group Policy Objects
1. Highlight the object 2. Click Delete. 3. The system will ask you for confirmation, click Yes.
39 | Confidential and Proprietary LT Auditor+ Configuration Guide
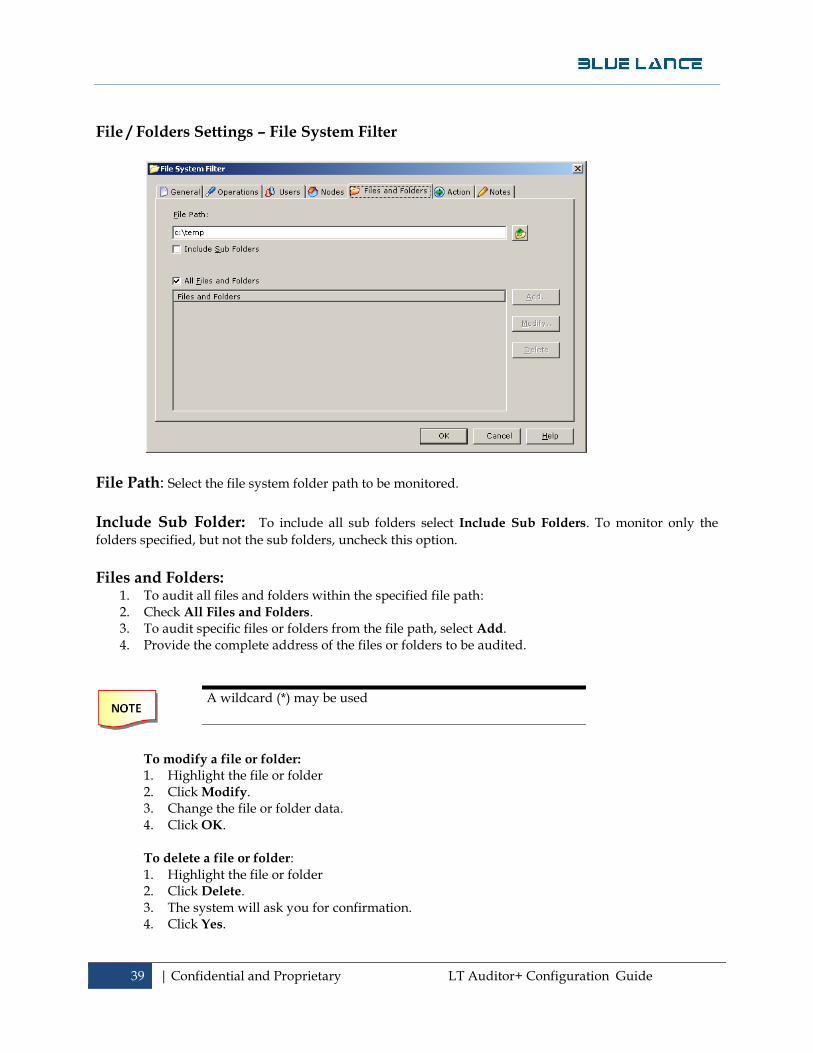
File / Folders Settings – File System Filter
File Path: Select the file system folder path to be monitored. Include Sub Folder: To include all sub folders select Include Sub Folders. To monitor only the
folders specified, but not the sub folders, uncheck this option.
Files and Folders:
1. To audit all files and folders within the specified file path: 2. Check All Files and Folders. 3. To audit specific files or folders from the file path, select Add. 4. Provide the complete address of the files or folders to be audited.
To modify a file or folder: 1. Highlight the file or folder 2. Click Modify. 3. Change the file or folder data. 4. Click OK.
To delete a file or folder: 1. Highlight the file or folder 2. Click Delete. 3. The system will ask you for confirmation. 4. Click Yes.
A wildcard (*) may be used
40 | Confidential and Proprietary LT Auditor+ Configuration Guide
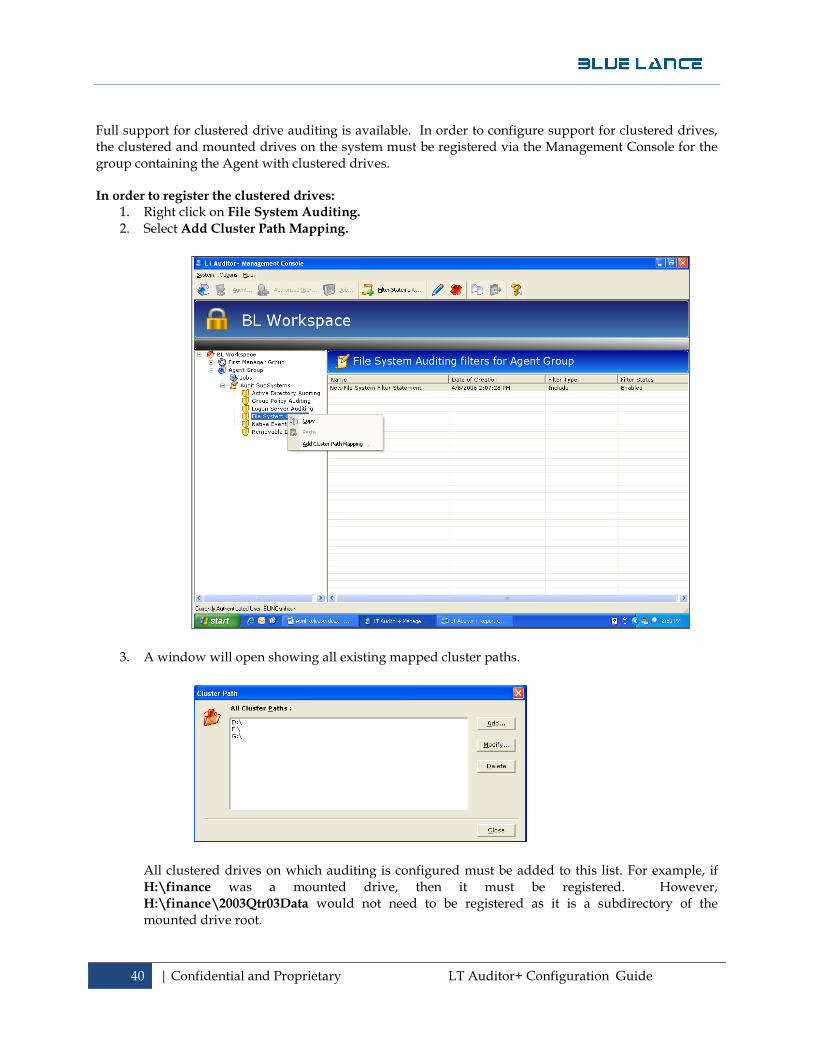
Full support for clustered drive auditing is available. In order to configure support for clustered drives, the clustered and mounted drives on the system must be registered via the Management Console for the group containing the Agent with clustered drives. In order to register the clustered drives:
1. Right click on File System Auditing.
2. Select Add Cluster Path Mapping.
3. A window will open showing all existing mapped cluster paths.
All clustered drives on which auditing is configured must be added to this list. For example, if H:\finance was a mounted drive, then it must be registered. However, H:\finance\2003Qtr03Data would not need to be registered as it is a subdirectory of the mounted drive root.

41 | Confidential and Proprietary LT Auditor+ Configuration Guide
4. Click Add to add a new cluster path. The following window will be displayed as shown below :
5. Manually enter or browse for a cluster path. 6. Click OK.
When configuring a file system filter statement, enter a file path for auditing that includes a mapped cluster drive. If you are auditing a mounted drive, please check the Is Mounted Volume box. If you do not check this box, the entire drive will be audited instead of only the mounted drive.
7. Configure the remainder of the filter statement as needed for auditing.
42 | Confidential and Proprietary LT Auditor+ Configuration Guide
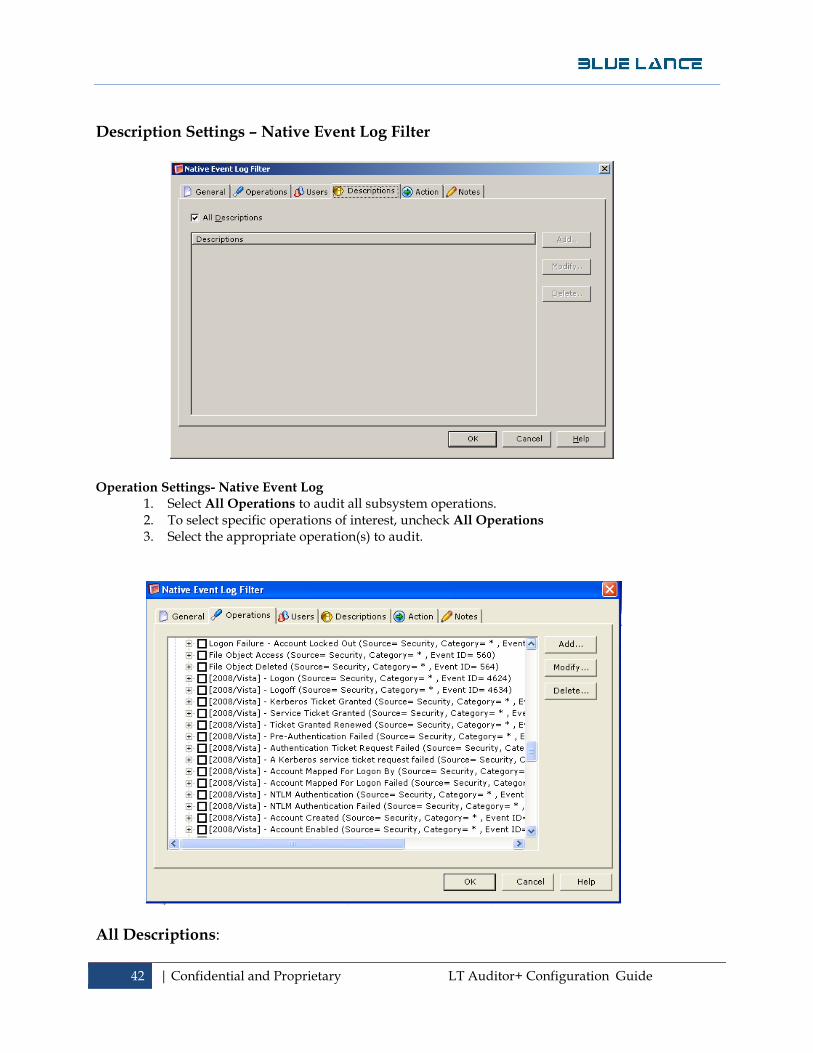
Description Settings – Native Event Log Filter
Operation Settings- Native Event Log 1. Select All Operations to audit all subsystem operations. 2. To select specific operations of interest, uncheck All Operations 3. Select the appropriate operation(s) to audit.
All Descriptions:
43 | Confidential and Proprietary LT Auditor+ Configuration Guide
To monitor all the description strings from the event log: 1. Select All Descriptions. 2. To monitor specific events from the event log with certain description strings in them: 3. Uncheck All Descriptions
4. Click Add. 5. Provide the description strings. 6. Click OK.
To modify a description:
1. Highlight the description 2. Click Modify. 3. Change the description data. 4. Click OK.
To delete a description:
1. Highlight the description 2. Click Delete. 3. The system will ask you for confirmation. 4. Click Yes.
Chapter 4 - Configuring Manager
and Agent Jobs
This section will provide detailed steps to show you how to use the LT Auditor+ Management Console to configure the Agents to send data over to the Manager, and to configure the Manager to consolidate the data into the database.
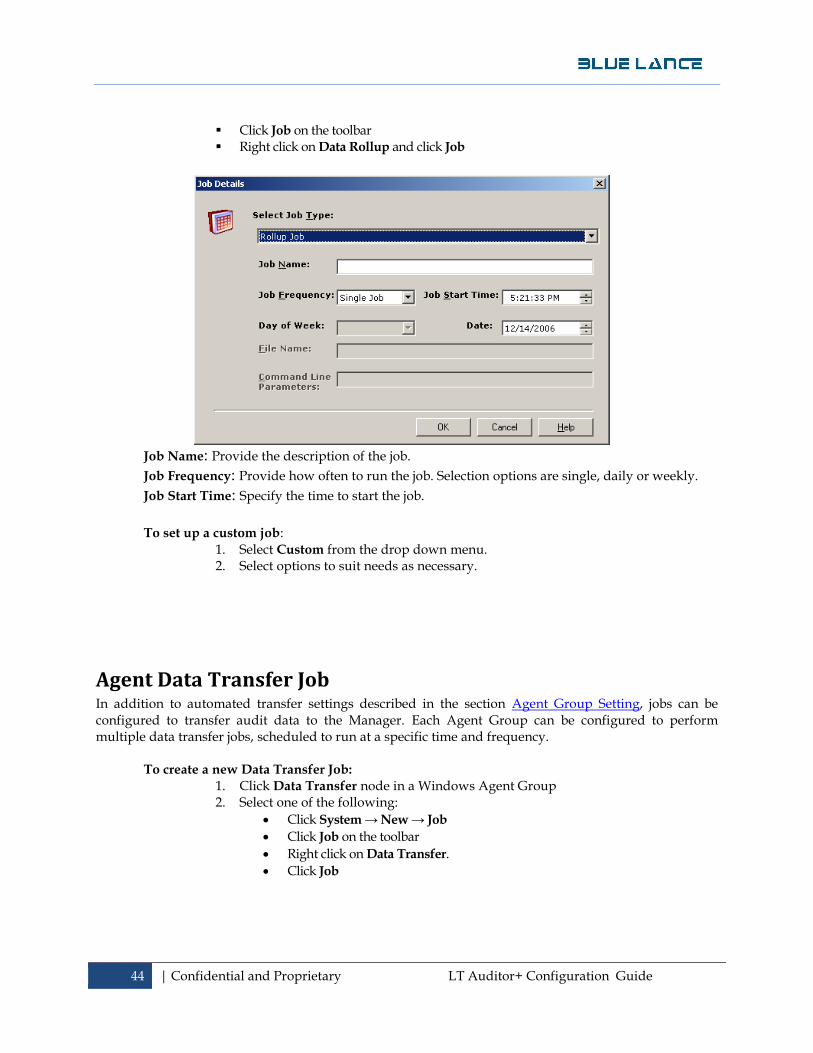
Manager Data Rollup Job In addition to automated rollup settings described in the section Modified Group Setting, rollup jobs can be scheduled to transfer audit data to the LT Auditor+ database. Each Manager can be configured to perform multiple data rollup jobs, scheduled to run at a specific time and frequency. To create a new Data Rollup Job:
1. Click Data Rollup node in a Windows Manager Group 2. Select one of the following:
Click System → New → Job
A wildcard (*) may be used, for example, if you wanted to audit all failed applications, you would type failed applications *.
44 | Confidential and Proprietary LT Auditor+ Configuration Guide
Click Job on the toolbar Right click on Data Rollup and click Job
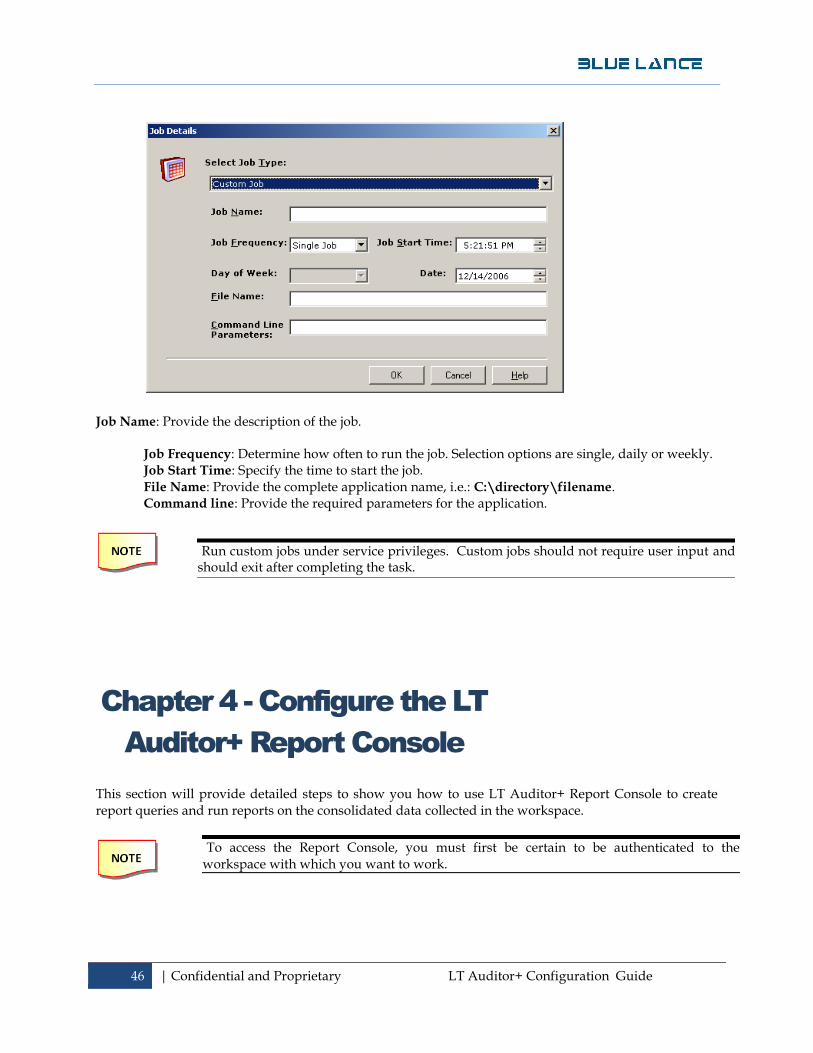
Job Name: Provide the description of the job.
Job Frequency: Provide how often to run the job. Selection options are single, daily or weekly.
Job Start Time: Specify the time to start the job.
To set up a custom job:
1. Select Custom from the drop down menu. 2. Select options to suit needs as necessary.
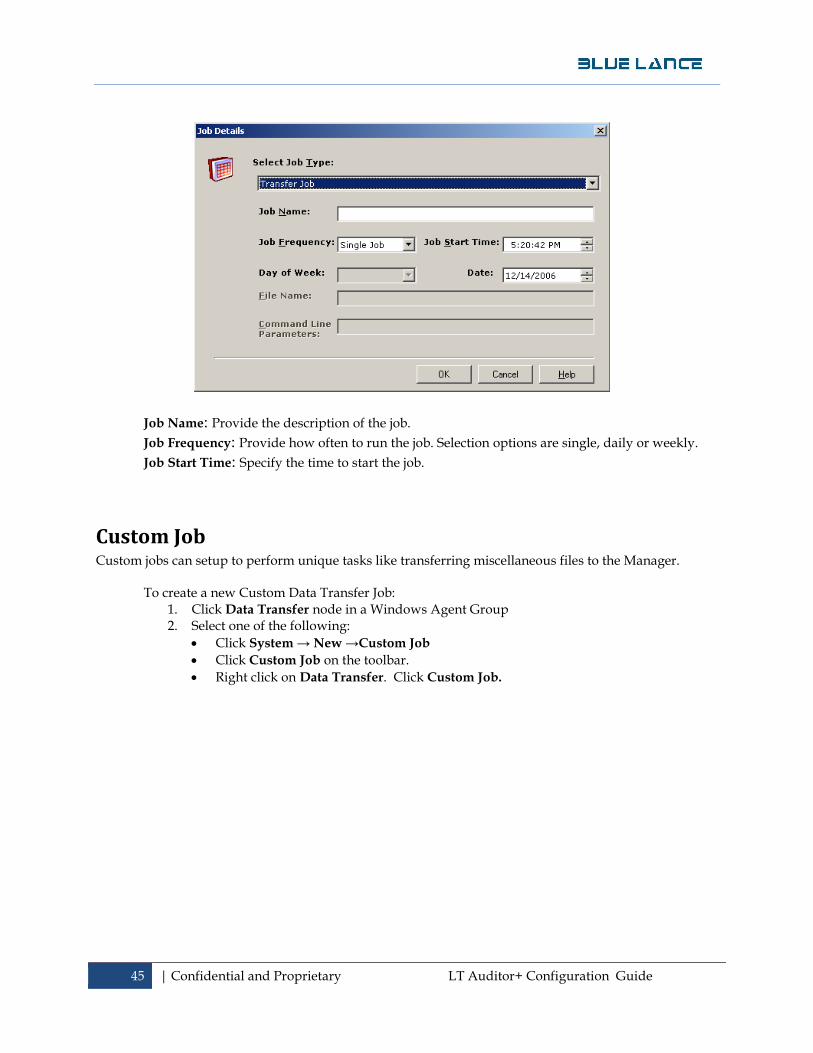
Agent Data Transfer Job In addition to automated transfer settings described in the section Agent Group Setting, jobs can be configured to transfer audit data to the Manager. Each Agent Group can be configured to perform multiple data transfer jobs, scheduled to run at a specific time and frequency.
To create a new Data Transfer Job:
1. Click Data Transfer node in a Windows Agent Group 2. Select one of the following:
Click System → New → Job
Click Job on the toolbar
Right click on Data Transfer.
Click Job
45 | Confidential and Proprietary LT Auditor+ Configuration Guide
Job Name: Provide the description of the job.
Job Frequency: Provide how often to run the job. Selection options are single, daily or weekly.
Job Start Time: Specify the time to start the job.
Custom Job Custom jobs can setup to perform unique tasks like transferring miscellaneous files to the Manager.
To create a new Custom Data Transfer Job: 1. Click Data Transfer node in a Windows Agent Group 2. Select one of the following:
Click System → New →Custom Job
Click Custom Job on the toolbar.
Right click on Data Transfer. Click Custom Job.
46 | Confidential and Proprietary LT Auditor+ Configuration Guide
Job Name: Provide the description of the job.
Job Frequency: Determine how often to run the job. Selection options are single, daily or weekly. Job Start Time: Specify the time to start the job. File Name: Provide the complete application name, i.e.: C:\directory\filename. Command line: Provide the required parameters for the application.
Chapter 4 - Configure the LT
Auditor+ Report Console
This section will provide detailed steps to show you how to use LT Auditor+ Report Console to create report queries and run reports on the consolidated data collected in the workspace.
Run custom jobs under service privileges. Custom jobs should not require user input and should exit after completing the task.
To access the Report Console, you must first be certain to be authenticated to the workspace with which you want to work.
47 | Confidential and Proprietary LT Auditor+ Configuration Guide
Starting the Report Console:
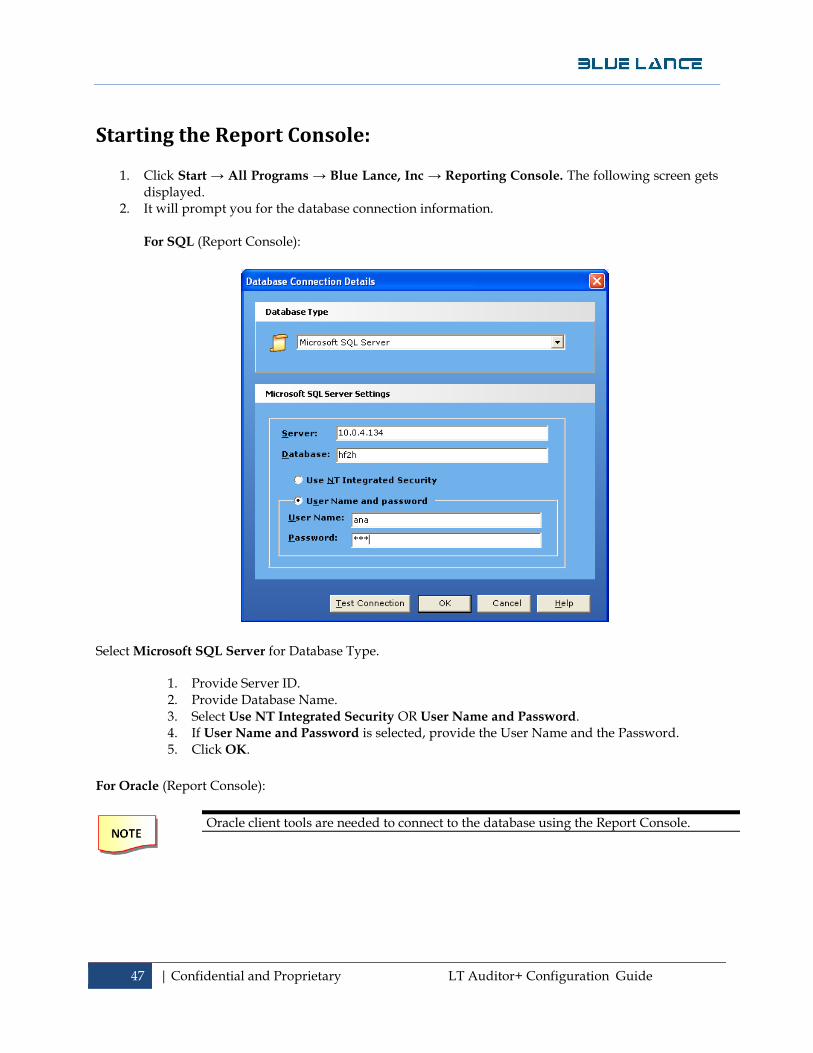
1. Click Start → All Programs → Blue Lance, Inc → Reporting Console. The following screen gets displayed.
2. It will prompt you for the database connection information.
For SQL (Report Console):
Select Microsoft SQL Server for Database Type.
1. Provide Server ID. 2. Provide Database Name. 3. Select Use NT Integrated Security OR User Name and Password. 4. If User Name and Password is selected, provide the User Name and the Password. 5. Click OK.
For Oracle (Report Console):
Oracle client tools are needed to connect to the database using the Report Console.
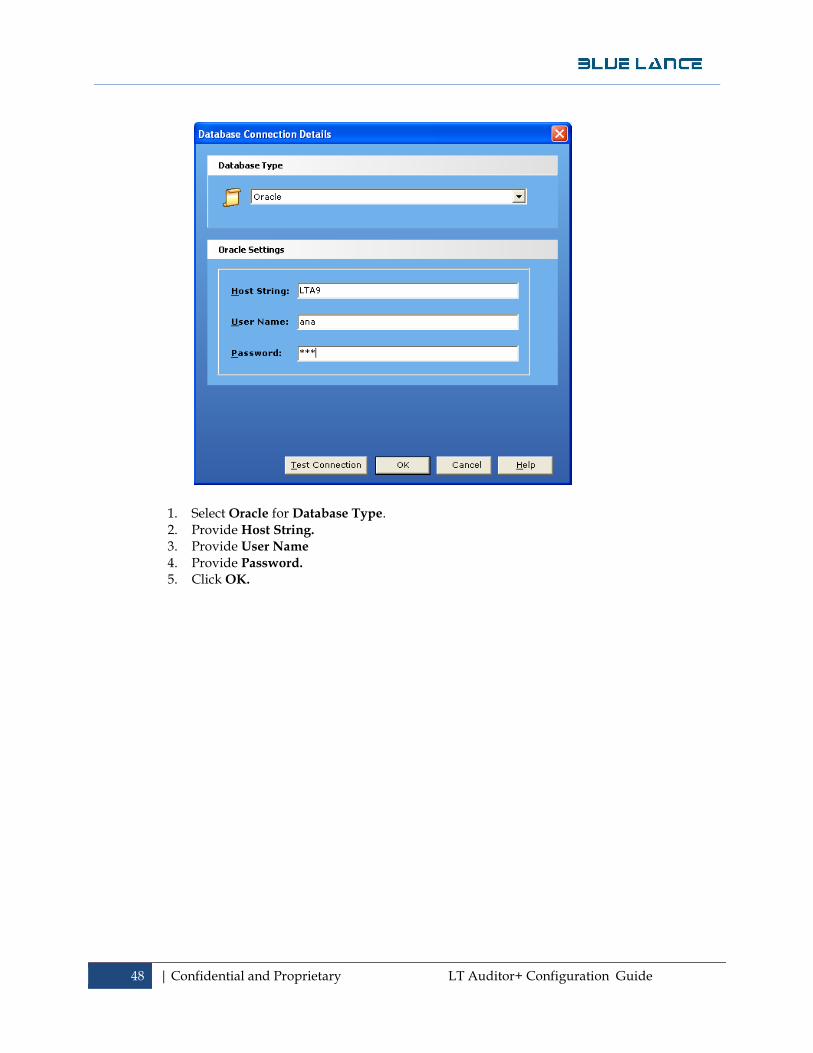
48 | Confidential and Proprietary LT Auditor+ Configuration Guide
1. Select Oracle for Database Type. 2. Provide Host String.
3. Provide User Name 4. Provide Password. 5. Click OK.
49 | Confidential and Proprietary LT Auditor+ Configuration Guide
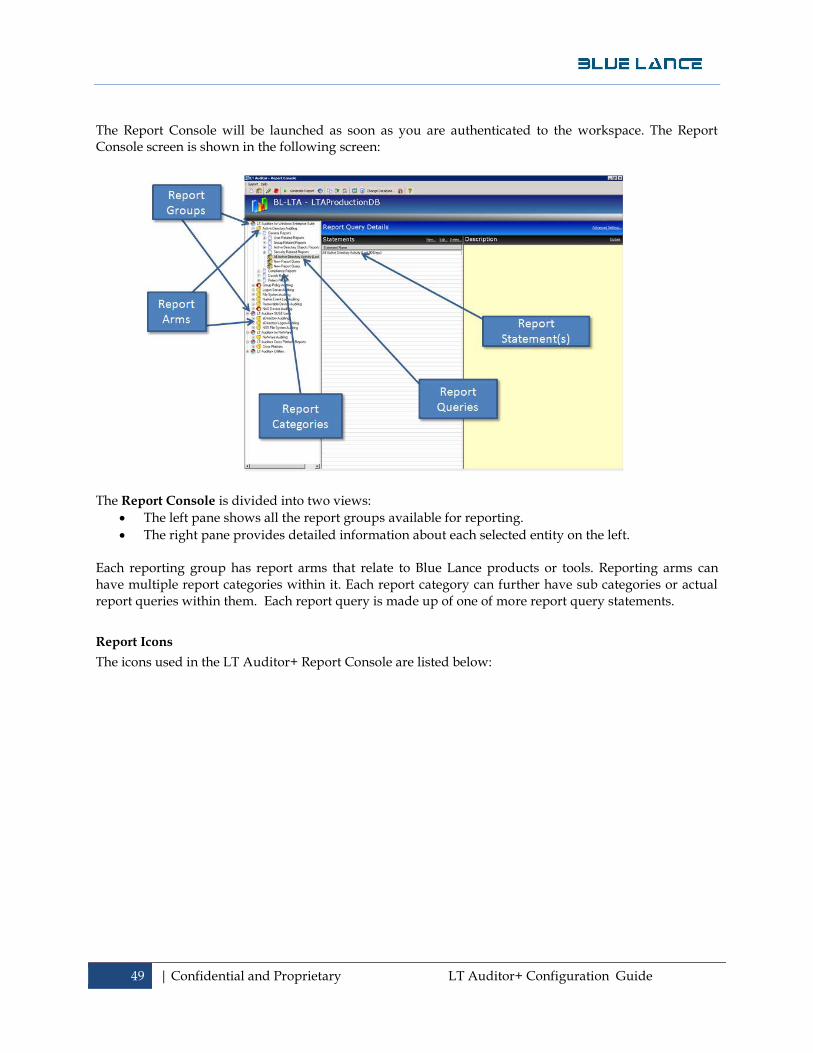
The Report Console will be launched as soon as you are authenticated to the workspace. The Report Console screen is shown in the following screen:
The Report Console is divided into two views:
The left pane shows all the report groups available for reporting.
The right pane provides detailed information about each selected entity on the left. Each reporting group has report arms that relate to Blue Lance products or tools. Reporting arms can have multiple report categories within it. Each report category can further have sub categories or actual report queries within them. Each report query is made up of one of more report query statements.
Report Icons
The icons used in the LT Auditor+ Report Console are listed below:

50 | Confidential and Proprietary LT Auditor+ Configuration Guide
Report Groups and Report Arms The following table lists Report Groups and Report Arms available with LT Auditor+.
Report Group Report Arms Description
LT Auditor+ for Window Enterprise Suite
Active Directory Auditing Reports for Active Directory changes
Group Policy Auditing Report for Group Policy changes
Logon Server Auditing Reports for authentications
File System Auditing Reports for access to files and folders
Native Event Log Auditing Reports on Windows event logs
Removable Media Auditing Reports on access to flash drives and other removable media
NAS Devices Auditing Reports for access on devices like NetApp and EMC-Celerra
LT Auditor+ for SUSE Linux eDirectory Auditing Report on eDirectory changes
eDirectory Logon Auditing Reports on authentications to eDirectory
NSS File System Auditing Reports on access to NSS file systems on SUSE Linux systems
LT Auditor for NetWare NetWare Auditing Reports for Novell NetWare
LT Auditor+ Cross Platform Reports
Cross Platform Reports Reports that can be consolidated across any of the Report Arms
51 | Confidential and Proprietary LT Auditor+ Configuration Guide
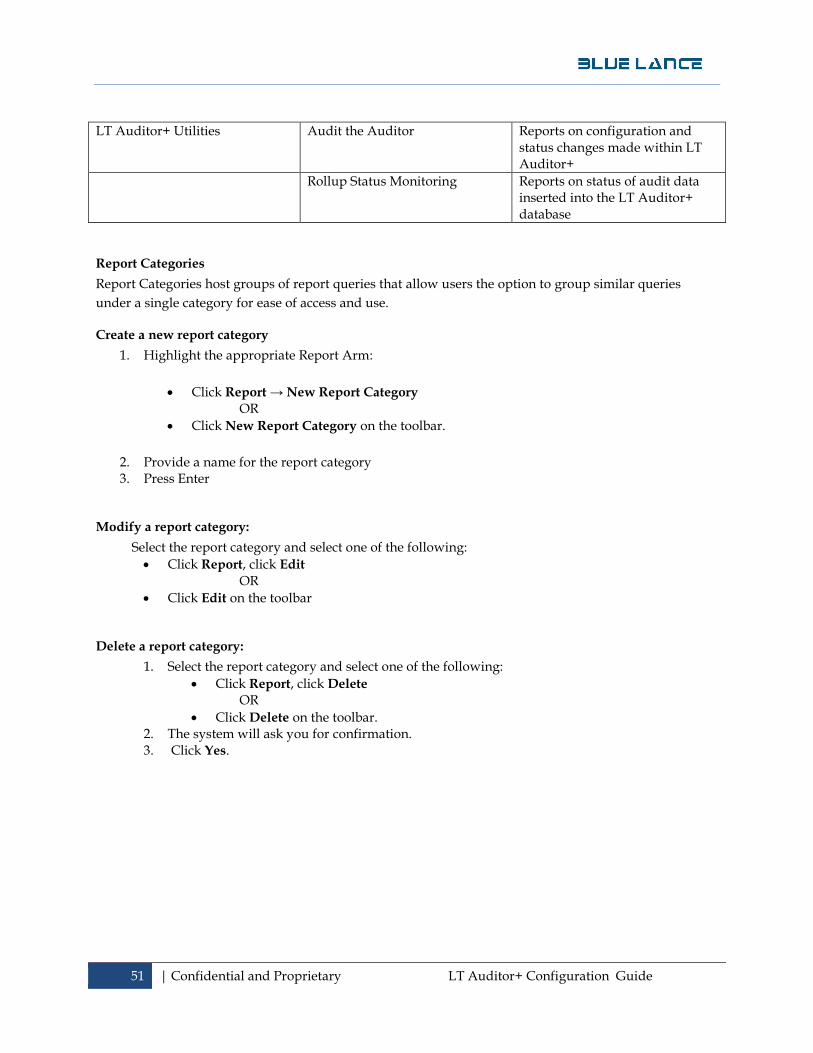
LT Auditor+ Utilities Audit the Auditor Reports on configuration and status changes made within LT Auditor+
Rollup Status Monitoring Reports on status of audit data inserted into the LT Auditor+ database
Report Categories
Report Categories host groups of report queries that allow users the option to group similar queries
under a single category for ease of access and use.
Create a new report category
1. Highlight the appropriate Report Arm:
Click Report → New Report Category
OR
Click New Report Category on the toolbar.
2. Provide a name for the report category 3. Press Enter
Modify a report category:
Select the report category and select one of the following:
Click Report, click Edit OR
Click Edit on the toolbar
Delete a report category:
1. Select the report category and select one of the following:
Click Report, click Delete OR
Click Delete on the toolbar. 2. The system will ask you for confirmation. 3. Click Yes.
52 | Confidential and Proprietary LT Auditor+ Configuration Guide
Creating a Report Query
Report queries determine how data is retrieved from the database for reporting. Every report query is
comprised of one or more query statements. The following steps outline how to create a report query
with one report query statement.
1. Select the report arm category in the left pane of the Report Console. 2. Select one of the following:
Highlight the report category
Click on the Create Report Query icon
A new report query is made up of one or more report query statements. A report statement is created
when creating a report query. Each query can be configured in terms of desired output, format of report
and additional parameters by selecting Advanced Setting which will be discussed later in this session
Report Statements
A report query statement contains a set of parameters that specifies how data is retrieved from the
database on executing the query. A statement is comprised of multiple tabs that allow users to define the
database query.
There are common tabs for all Report Arms as well tabs specific to each arm.
Common Report Statement Tabs for all Report Arms
The common tabs on report statements for all report arms are:
Date &Time
Users
Nodes
Servers
Operations - Though this tab is common, its content varies for each Report Arm. We will discuss the Operations tab for each Report Arm in the Specific Tabs section.

53 | Confidential and Proprietary LT Auditor+ Configuration Guide
Date & Time
This tab is used to specify date range for retrieval of data.
Select Date - runs reports between a start date and an end date.
Reference Date - runs reports from ‘Prior Number of Days’ up to present date
Select Time - runs reports for a specific time.
Continuous Time - This option reports activity from the start date and start time to the end date and end time.
Block of Time - This option reports activity from the start date to the end date and all operations that fall within the specified start time and end time.
54 | Confidential and Proprietary LT Auditor+ Configuration Guide
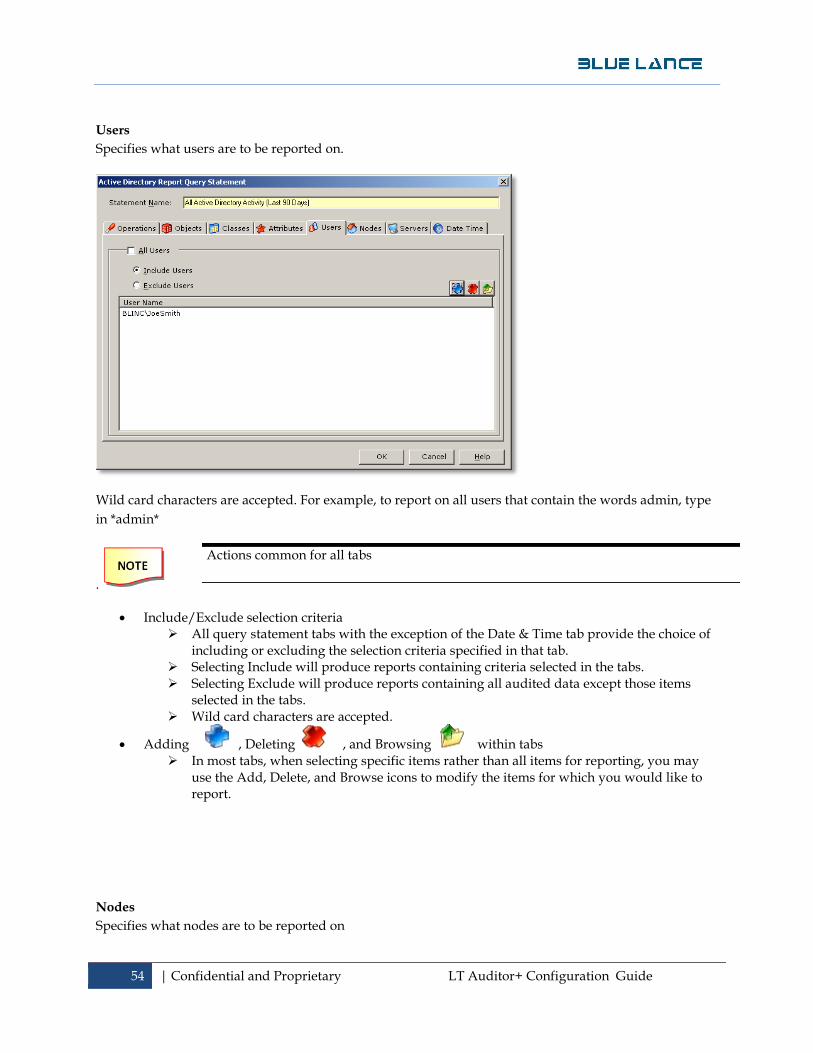
Users
Specifies what users are to be reported on.
Wild card characters are accepted. For example, to report on all users that contain the words admin, type
in *admin*
.
Include/Exclude selection criteria All query statement tabs with the exception of the Date & Time tab provide the choice of
including or excluding the selection criteria specified in that tab. Selecting Include will produce reports containing criteria selected in the tabs. Selecting Exclude will produce reports containing all audited data except those items
selected in the tabs. Wild card characters are accepted.
Adding , Deleting , and Browsing within tabs In most tabs, when selecting specific items rather than all items for reporting, you may
use the Add, Delete, and Browse icons to modify the items for which you would like to report.
Nodes
Specifies what nodes are to be reported on
Actions common for all tabs

55 | Confidential and Proprietary LT Auditor+ Configuration Guide
Servers
Specifies what servers are to be reported on
56 | Confidential and Proprietary LT Auditor+ Configuration Guide
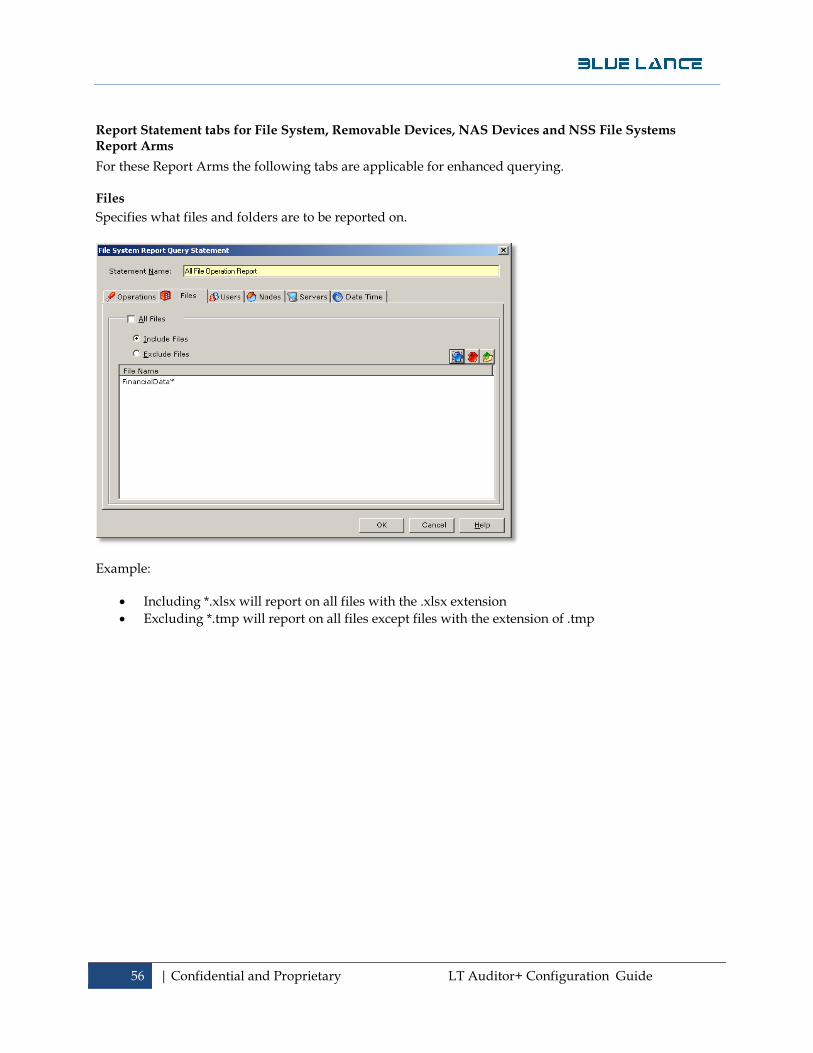
Report Statement tabs for File System, Removable Devices, NAS Devices and NSS File Systems Report Arms
For these Report Arms the following tabs are applicable for enhanced querying.
Files
Specifies what files and folders are to be reported on.
Example:
Including *.xlsx will report on all files with the .xlsx extension
Excluding *.tmp will report on all files except files with the extension of .tmp
57 | Confidential and Proprietary LT Auditor+ Configuration Guide
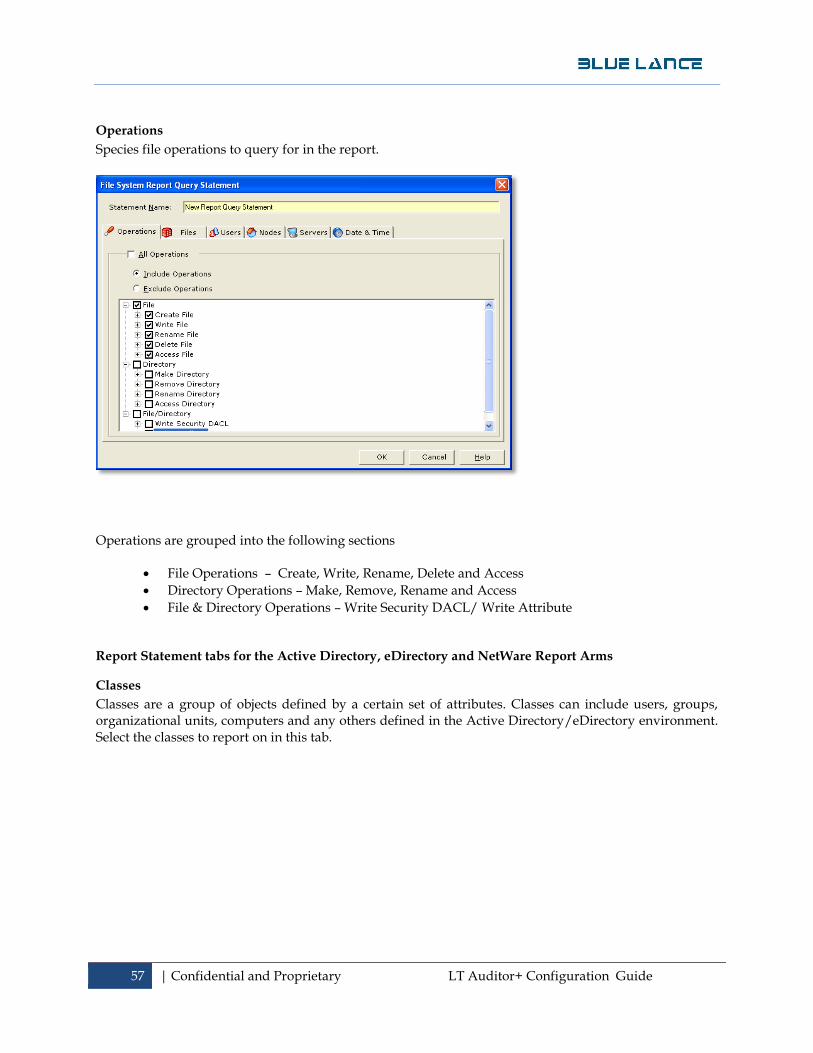
Operations
Species file operations to query for in the report.
Operations are grouped into the following sections
File Operations – Create, Write, Rename, Delete and Access
Directory Operations – Make, Remove, Rename and Access
File & Directory Operations – Write Security DACL/ Write Attribute
Report Statement tabs for the Active Directory, eDirectory and NetWare Report Arms
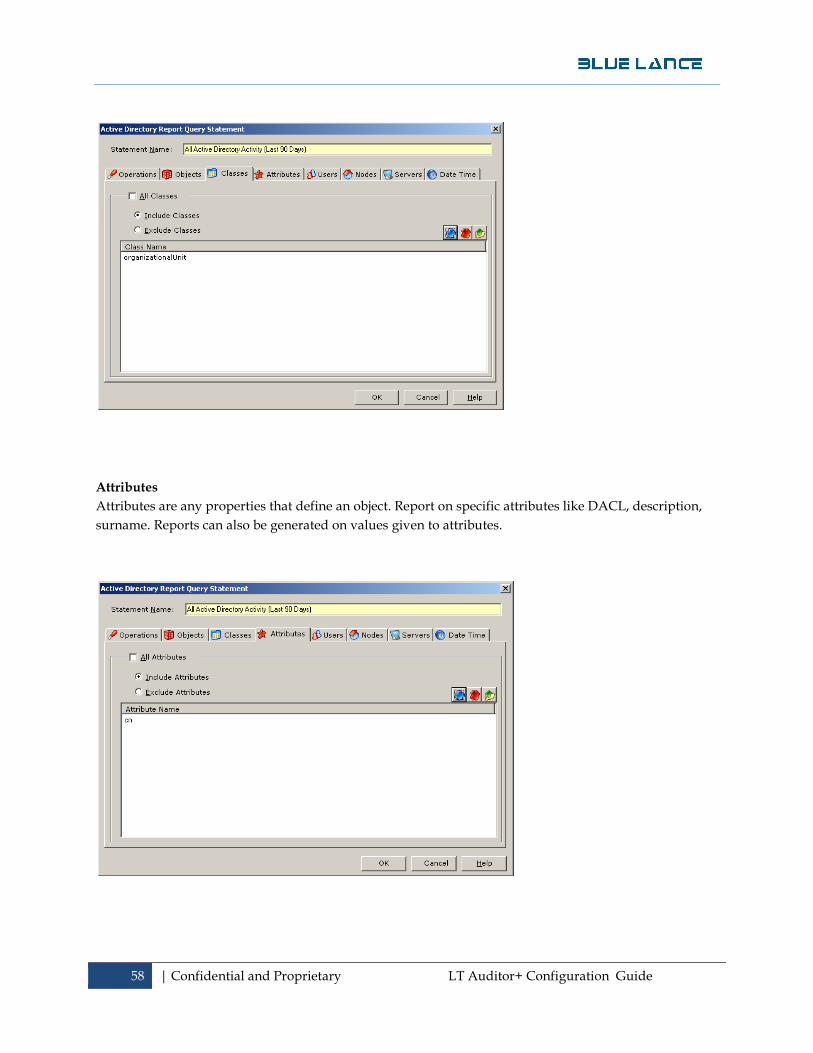
Classes
Classes are a group of objects defined by a certain set of attributes. Classes can include users, groups, organizational units, computers and any others defined in the Active Directory/eDirectory environment. Select the classes to report on in this tab.
58 | Confidential and Proprietary LT Auditor+ Configuration Guide
Attributes
Attributes are any properties that define an object. Report on specific attributes like DACL, description,
surname. Reports can also be generated on values given to attributes.

59 | Confidential and Proprietary LT Auditor+ Configuration Guide
Objects
Objects are entities in the directory. Specific objects to report on in this tab.
Operations
The operations available for reporting in a Directory query are actions related to changes in objects, accounts, group membership, and administration.
The operations available for reporting include: object creation, modification, and deletion; account modification; changes in group membership, password changes and changes in administration.
60 | Confidential and Proprietary LT Auditor+ Configuration Guide
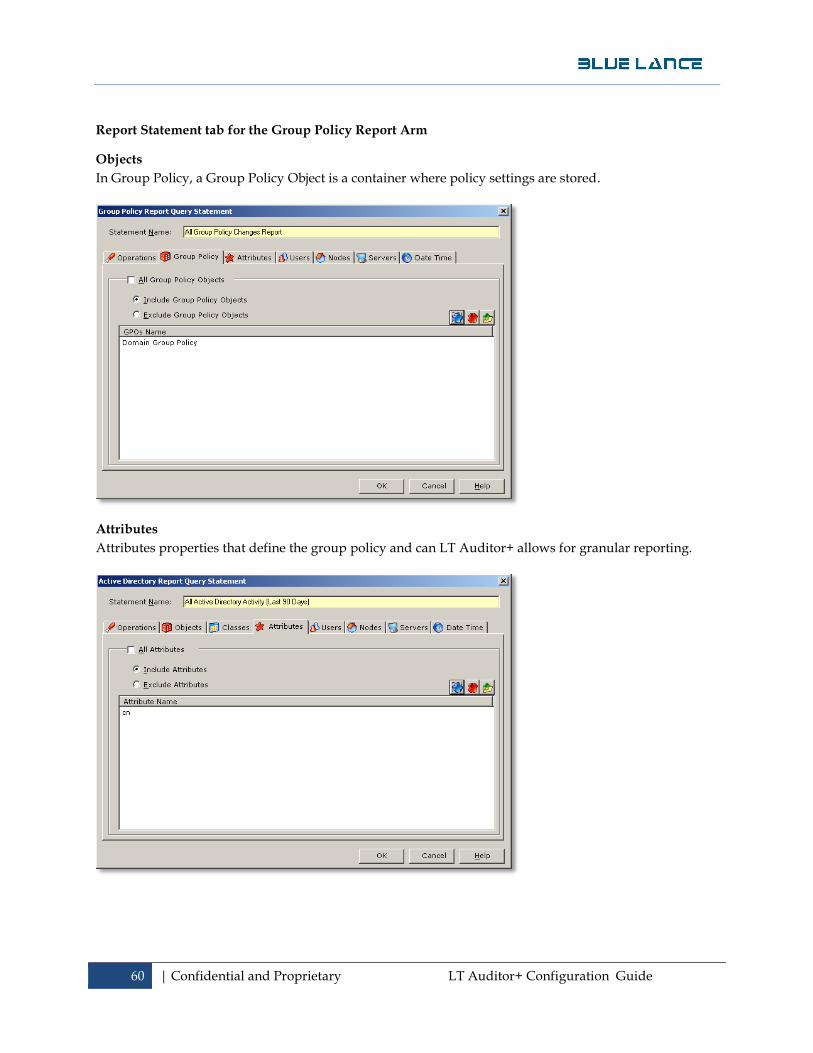
Report Statement tab for the Group Policy Report Arm
Objects
In Group Policy, a Group Policy Object is a container where policy settings are stored.
Attributes
Attributes properties that define the group policy and can LT Auditor+ allows for granular reporting.

61 | Confidential and Proprietary LT Auditor+ Configuration Guide
Report Statement tab for the NetWare Report Arm
Values
Values assigned to attributes can be queried for in this tab.
Report Statement tab for the Cross Platform Report Arm
The cross platform reports allow users to report consolidated information across all report arms. For
example if a single report of Active Directory, eDirectory and NetWare activity was required, one can do
with Cross Plat form reports. Another example would be a query for a particular user’s entire activity
across everything audited with LT Auditor+.
A Cross Platform report statement contains a combination of all tabs discussed above as shown below.
62 | Confidential and Proprietary LT Auditor+ Configuration Guide
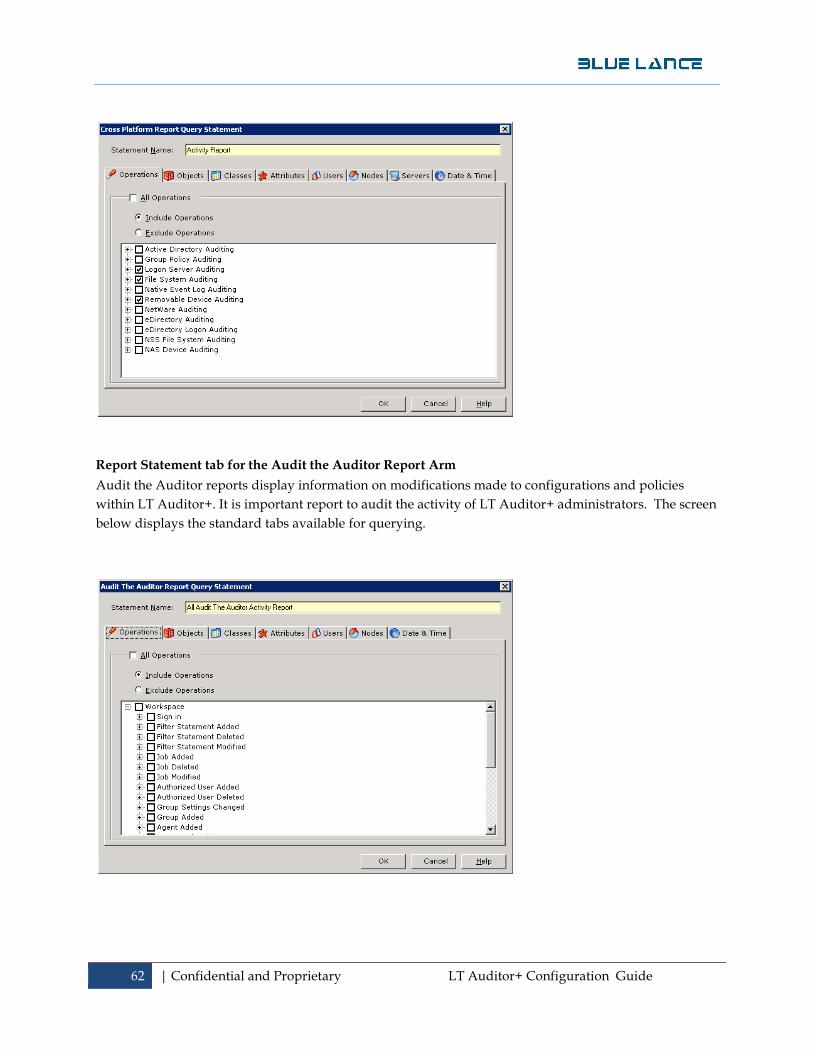
Report Statement tab for the Audit the Auditor Report Arm
Audit the Auditor reports display information on modifications made to configurations and policies
within LT Auditor+. It is important report to audit the activity of LT Auditor+ administrators. The screen
below displays the standard tabs available for querying.
63 | Confidential and Proprietary LT Auditor+ Configuration Guide
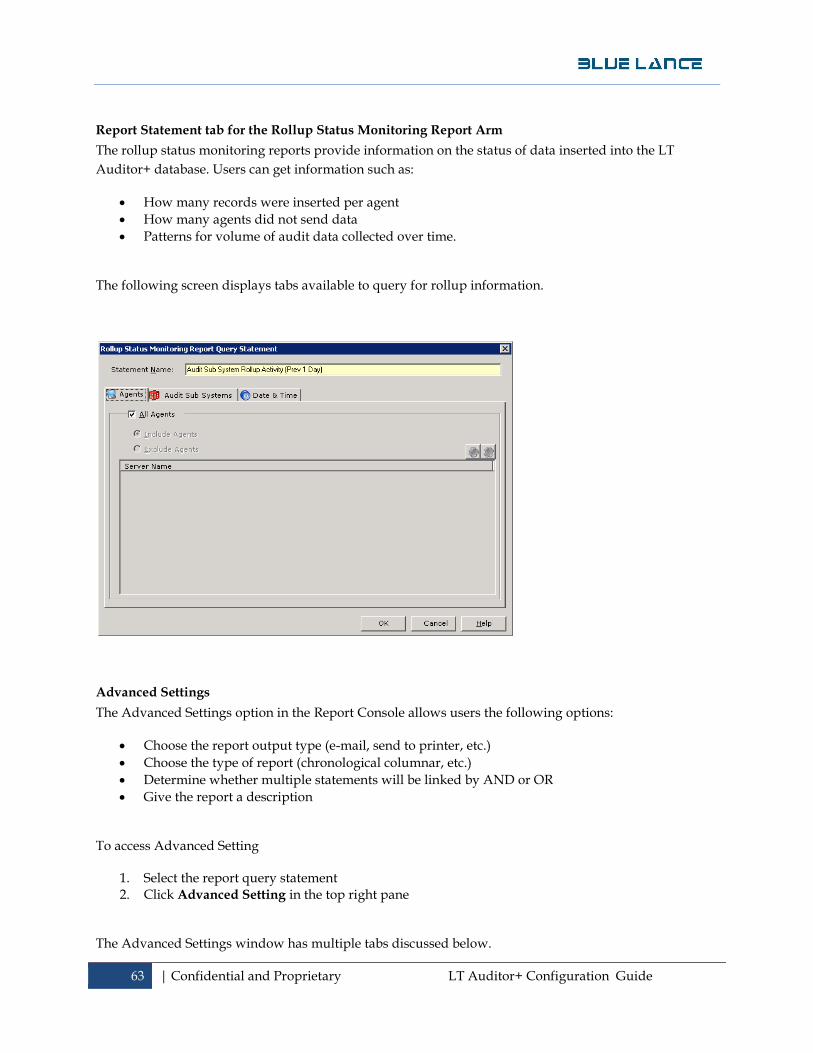
Report Statement tab for the Rollup Status Monitoring Report Arm
The rollup status monitoring reports provide information on the status of data inserted into the LT
Auditor+ database. Users can get information such as:
How many records were inserted per agent
How many agents did not send data
Patterns for volume of audit data collected over time.
The following screen displays tabs available to query for rollup information.
Advanced Settings
The Advanced Settings option in the Report Console allows users the following options:
Choose the report output type (e-mail, send to printer, etc.)
Choose the type of report (chronological columnar, etc.)
Determine whether multiple statements will be linked by AND or OR
Give the report a description
To access Advanced Setting
1. Select the report query statement 2. Click Advanced Setting in the top right pane
The Advanced Settings window has multiple tabs discussed below.

64 | Confidential and Proprietary LT Auditor+ Configuration Guide
Report Settings
Criteria – Used when combining multiple query statements within a query, they may be linked by either
the logical phrase AND or the logical phrase OR.
AND – Using the phrase AND to link query statements will return only the data that applies to the parameters of all statements.
OR – Using the phrase OR to link query statements will return data that applies to the parameters of any statement in a query, not necessarily all statements.
Show Report Title and Sub-title – In this field you may choose to show, hide, or change the report’s title and sub-title.
Show Report Header and Footer – In this field you may choose to show, hide, or change the report’s header and footer.
Additional Arguments – This field is used to write in additional information necessary to run specific types of reports.
Output
Under the Output tab, you will be able to select how you would like to organize the report and where
you would like it to be viewed.
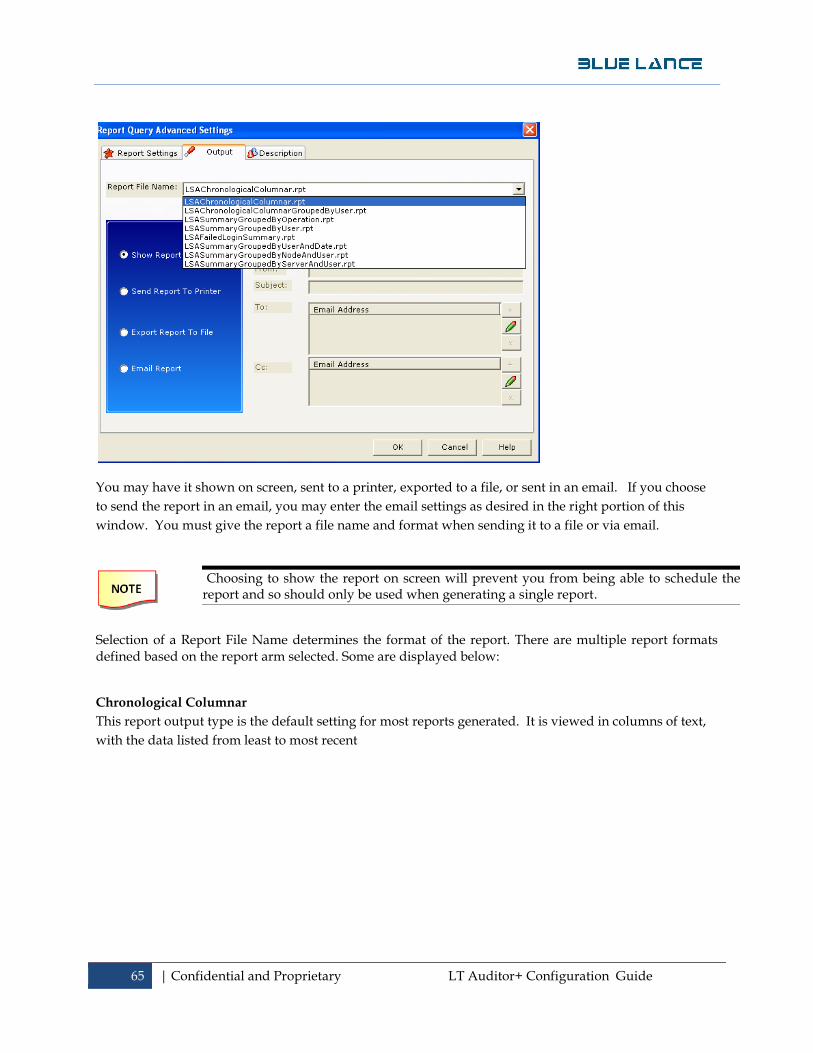
65 | Confidential and Proprietary LT Auditor+ Configuration Guide
You may have it shown on screen, sent to a printer, exported to a file, or sent in an email. If you choose
to send the report in an email, you may enter the email settings as desired in the right portion of this
window. You must give the report a file name and format when sending it to a file or via email.
Selection of a Report File Name determines the format of the report. There are multiple report formats defined based on the report arm selected. Some are displayed below:
Chronological Columnar
This report output type is the default setting for most reports generated. It is viewed in columns of text,
with the data listed from least to most recent
Choosing to show the report on screen will prevent you from being able to schedule the report and so should only be used when generating a single report.

66 | Confidential and Proprietary LT Auditor+ Configuration Guide
Chronological Columnar Grouped by User
This report output type is similar to the one prior, but data is grouped by user. It is then listed in
chronological form from least to most recent data within each user’s group of data.
Summary Grouped by Operation
This report output type is shown in graph form. Each audited operation which is being reported will
represent one bar in the graph. The number of times that operation was performed will be shown by the
height of each bar. The specific counts for each operation will be listed in text format below the graph.
This report also permits the user to drill down into the details.
67 | Confidential and Proprietary LT Auditor+ Configuration Guide
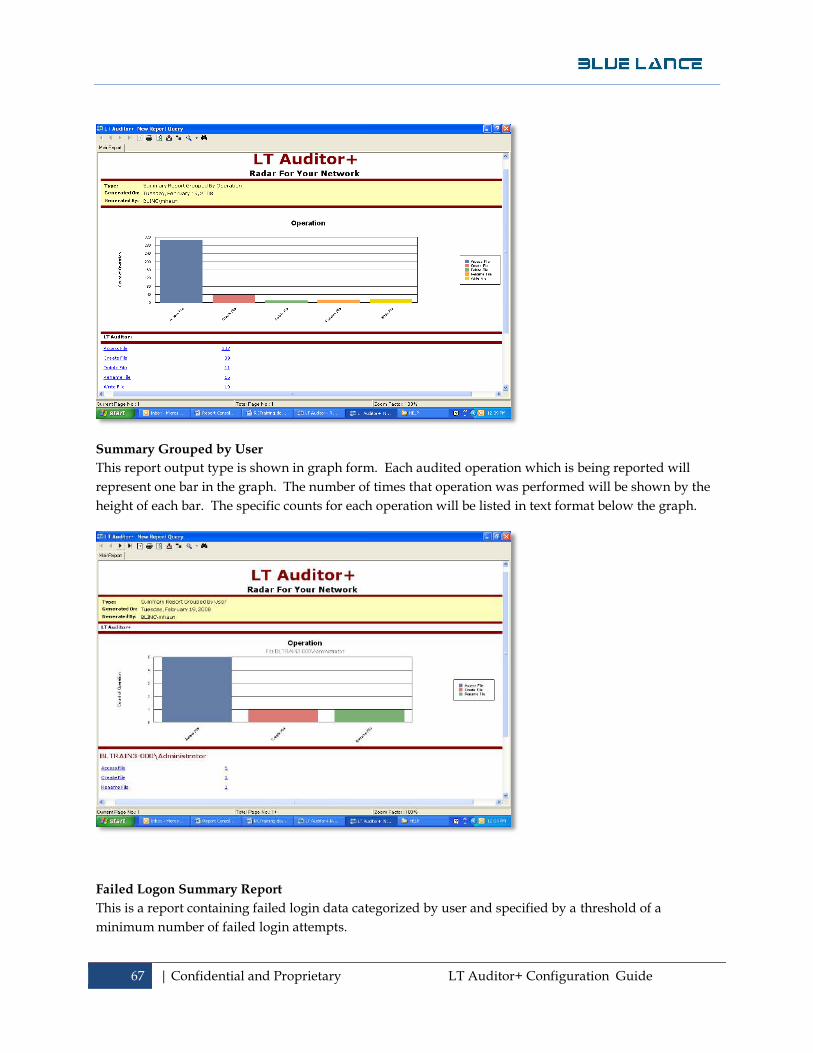
Summary Grouped by User
This report output type is shown in graph form. Each audited operation which is being reported will
represent one bar in the graph. The number of times that operation was performed will be shown by the
height of each bar. The specific counts for each operation will be listed in text format below the graph.
Failed Logon Summary Report
This is a report containing failed login data categorized by user and specified by a threshold of a
minimum number of failed login attempts.
68 | Confidential and Proprietary LT Auditor+ Configuration Guide
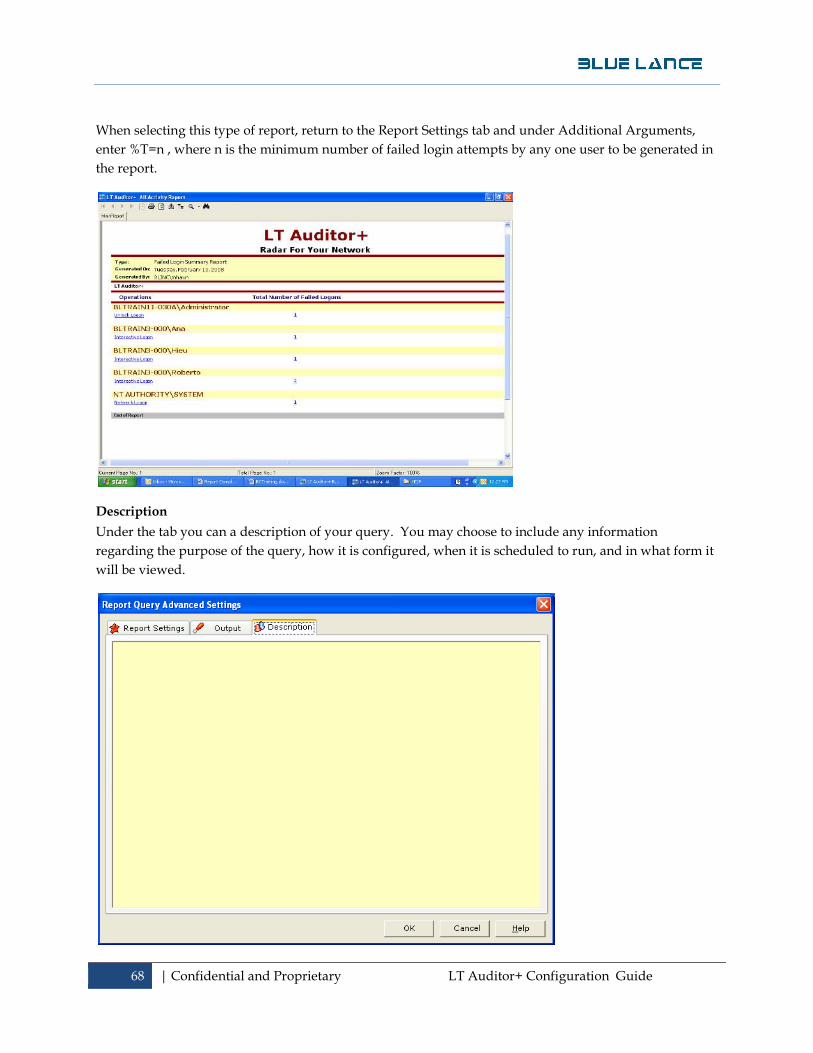
When selecting this type of report, return to the Report Settings tab and under Additional Arguments,
enter %T=n , where n is the minimum number of failed login attempts by any one user to be generated in
the report.
Description
Under the tab you can a description of your query. You may choose to include any information
regarding the purpose of the query, how it is configured, when it is scheduled to run, and in what form it
will be viewed.
69 | Confidential and Proprietary LT Auditor+ Configuration Guide
Creating additional Report Query Statement:
3. Select the report query statement 4. Click New in the right pane displaying all the Report Query statements for the specific report
query.
Modify a Report Query Statement:
1. Select the report query statement 2. Click Edit in the right pane which displays all the report query statements for that report query. 3. Modify the report query statement data. 4. Click OK.
Delete a Report Query Statement:
1. Select the Report Query Statement 2. Click Delete in the right pane which displays all the report query statements for that report
query. 3. Click Yes when prompted for confirmation.
Modify a report query,
1. Select the report query and select one of the following:
2. Click Report → Edit in the menu
OR Click Edit on the toolbar
3. Modify the report query data. 4. Click OK.
Delete a report query:
1. Select the report query. 2. Select one of the following:
Click Report → Delete in the menu
Or Click Delete on the toolbar
3. Click Yes when prompted for confirmation.
Generate a report:
1. Select the report query 2. Select Generate Report from the Report Console toolbar. A sample report is shown below.

70 | Confidential and Proprietary LT Auditor+ Configuration Guide
71 | Confidential and Proprietary LT Auditor+ Configuration Guide
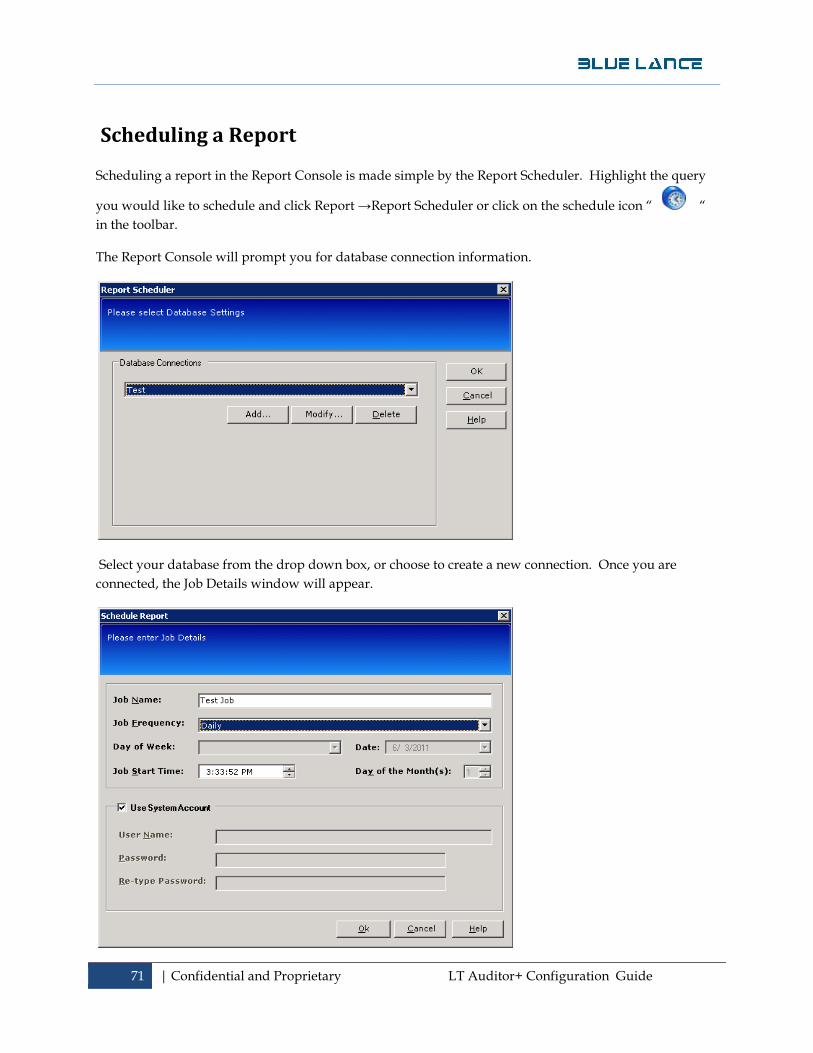
Scheduling a Report Scheduling a report in the Report Console is made simple by the Report Scheduler. Highlight the query
you would like to schedule and click Report →Report Scheduler or click on the schedule icon “ “
in the toolbar.
The Report Console will prompt you for database connection information.
Select your database from the drop down box, or choose to create a new connection. Once you are
connected, the Job Details window will appear.
72 | Confidential and Proprietary LT Auditor+ Configuration Guide
Enter the job name, job frequency, date, and start time as necessary. When properly configured, click
OK. You will receive reports with the frequency you requested in the output format previously
configured in the Advanced Settings window.
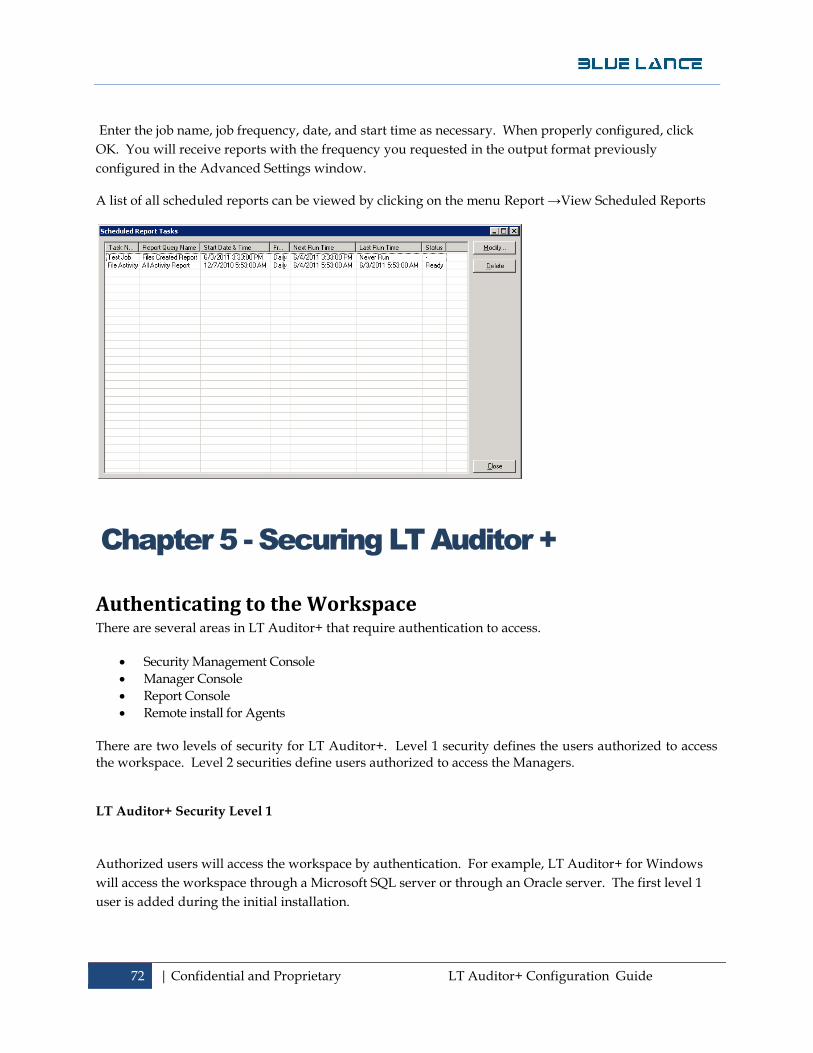
A list of all scheduled reports can be viewed by clicking on the menu Report →View Scheduled Reports
Chapter 5 - Securing LT Auditor +
Authenticating to the Workspace There are several areas in LT Auditor+ that require authentication to access.
Security Management Console
Manager Console
Report Console
Remote install for Agents There are two levels of security for LT Auditor+. Level 1 security defines the users authorized to access the workspace. Level 2 securities define users authorized to access the Managers.
LT Auditor+ Security Level 1
Authorized users will access the workspace by authentication. For example, LT Auditor+ for Windows
will access the workspace through a Microsoft SQL server or through an Oracle server. The first level 1
user is added during the initial installation.
73 | Confidential and Proprietary LT Auditor+ Configuration Guide
To launch the Security Management Console:
1. Click Start → All Programs →Blue Lance, Inc → Management Console. 2. The screen displayed below prompts for the database connection information. 3. Connect to the workspace to add authorized users.
74 | Confidential and Proprietary LT Auditor+ Configuration Guide
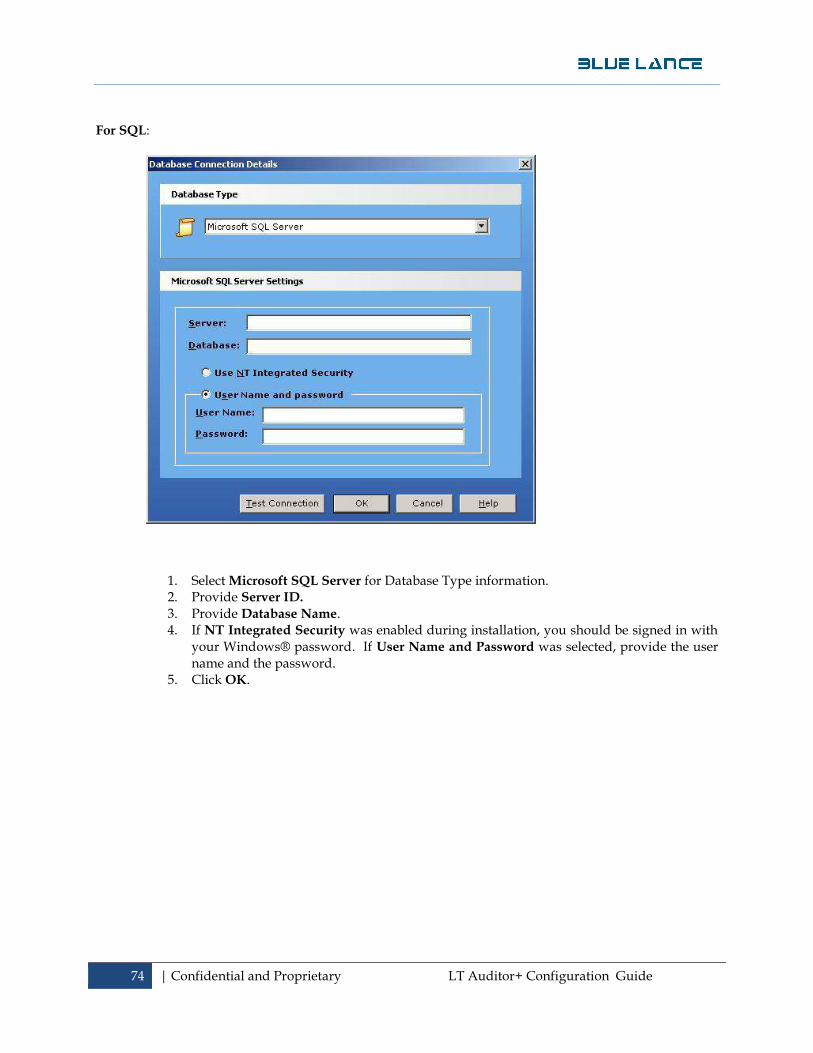
For SQL:
1. Select Microsoft SQL Server for Database Type information. 2. Provide Server ID. 3. Provide Database Name. 4. If NT Integrated Security was enabled during installation, you should be signed in with
your Windows® password. If User Name and Password was selected, provide the user name and the password.
5. Click OK.
75 | Confidential and Proprietary LT Auditor+ Configuration Guide
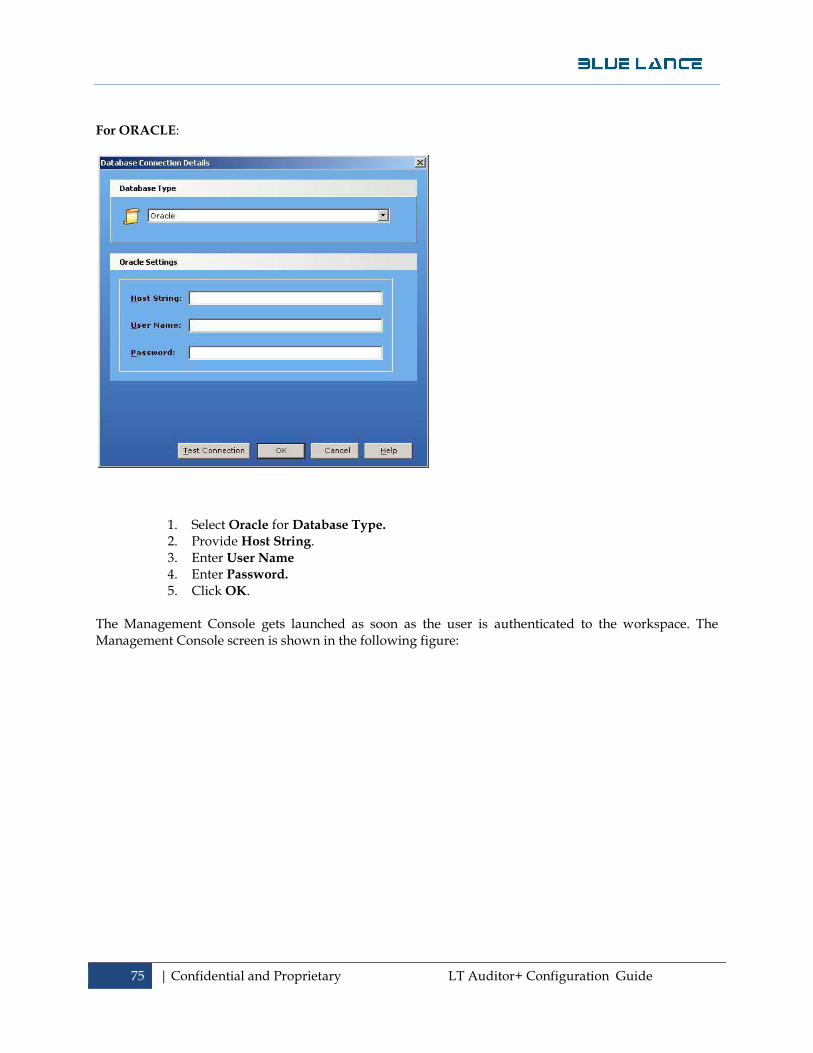
For ORACLE:
1. Select Oracle for Database Type. 2. Provide Host String. 3. Enter User Name 4. Enter Password. 5. Click OK.
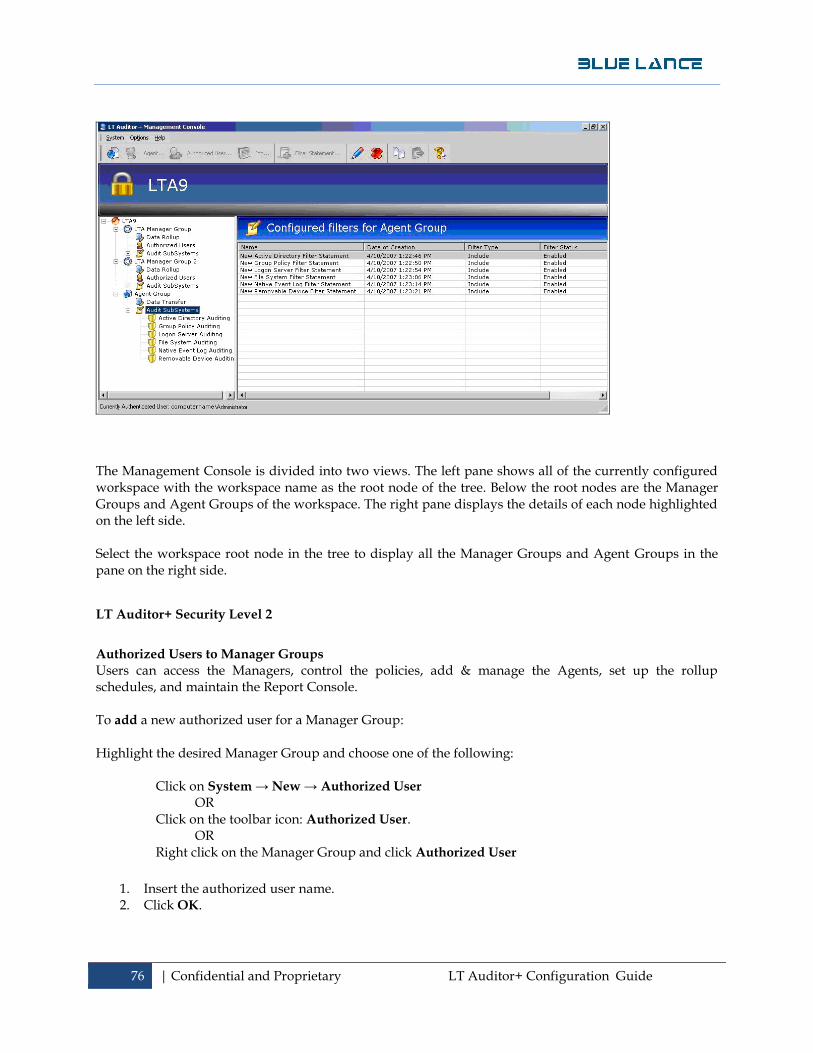
The Management Console gets launched as soon as the user is authenticated to the workspace. The Management Console screen is shown in the following figure:
76 | Confidential and Proprietary LT Auditor+ Configuration Guide
The Management Console is divided into two views. The left pane shows all of the currently configured workspace with the workspace name as the root node of the tree. Below the root nodes are the Manager Groups and Agent Groups of the workspace. The right pane displays the details of each node highlighted on the left side. Select the workspace root node in the tree to display all the Manager Groups and Agent Groups in the pane on the right side.
LT Auditor+ Security Level 2
Authorized Users to Manager Groups
Users can access the Managers, control the policies, add & manage the Agents, set up the rollup schedules, and maintain the Report Console. To add a new authorized user for a Manager Group: Highlight the desired Manager Group and choose one of the following:
Click on System → New → Authorized User
OR Click on the toolbar icon: Authorized User.
OR Right click on the Manager Group and click Authorized User
1. Insert the authorized user name. 2. Click OK.

77 | Confidential and Proprietary LT Auditor+ Configuration Guide
To add the same user to more than one Manager Group, repeat the steps above for each Manager Group this user is authorized to access.
To delete an authorized user for a Manager Group, highlight the desired Manager Group and choose one of the following: Click on System → Delete
OR Highlight the desired authorized user. Click Delete on the toolbar icon.
OR 1. Right click on the authorized user. 2. Click Delete.
3. If there are other users assigned to this Manager, the following screen will be displayed:
4. Click Yes.
5. If this is the only user assigned to this Manager, the following screen is displayed:
78 | Confidential and Proprietary LT Auditor+ Configuration Guide
6. Click Yes.
Authorized User Legacy Settings
Adding an authorized user is similar for Legacy (version 8.0) settings as for the previous section. If a Manager is still using 8.0 settings, apply the 8.0 Agents to this Manager. Load balancing will not apply to the legacy systems until they are upgraded to version 9.
To launch Authorized User Legacy Settings from the Management Console:
1. Select Agent Group 2. Select Legacy LT Auditor+ settings OR Right click on the Agent Group 3. select Legacy LT Auditor + settings OR 4. Select Agent Group → Options → LT Auditor+ settings
To select a Security Policy, select one of the following:
1. Highlight Security Policy a. Click System → Add Authorized User OR b. Highlight Security Policy c. Click Add Authorized User on the toolbar OR d. Highlight Security Policy, click Add Authorized Users.
2. Provide authorized user 3. Click OK.
To modify the authorized user 1. Click Modify 2. Change the data 3. Click OK.
To delete the authorized user
1. Click Delete. 2. Click Yes when prompted for confirmation.

79 | Confidential and Proprietary LT Auditor+ Configuration Guide
Appendix
System Update Utility
Overview
The purpose of the Patch Update Utility is to automatically install patches remotely on LT Auditor+ Agents from a Manager machine hosting LT Auditor+ v9 for Windows. Blue Lance will periodically release patches for LT Auditor+ v9 for Windows. These patches can be downloaded from the Blue Lance support website at www.bluelance.com/support. Following the patch download, the Patch Update Utility can be used to ensure that you have installed and deployed a patch across your environment for optimal performance.
A Patch Update Utility is only available to users that have installed version 9.0.065.0 on your machine that hosts the Management Console for LT Auditor+ v9 for Windows. It can only be successful under the following conditions:
The LT Auditor+ Manager and the LT Auditor+ Management Console must be upgraded with the latest patches.
Direct access is required to Manager that hosts LT Auditor+ v9 for Windows.
User performing a patch must have administrative rights on the Manager machine.
The Management Console Patch can be downloaded off of the website, www.bluelance.com. Copy and download locally and then execute.
System should be accessed/launched by authorized users from existing Management Console application. No other application or process should be allowed to access or launch this application.
80 | Confidential and Proprietary LT Auditor+ Configuration Guide
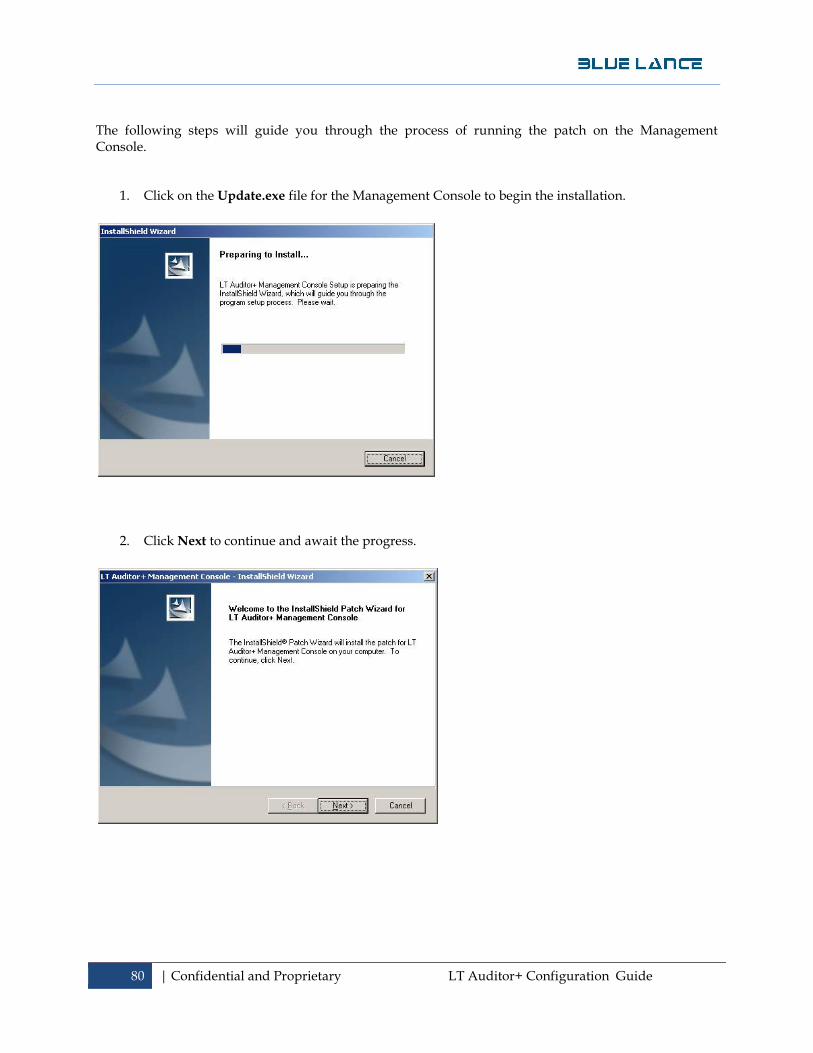
The following steps will guide you through the process of running the patch on the Management Console.
1. Click on the Update.exe file for the Management Console to begin the installation.
2. Click Next to continue and await the progress.
81 | Confidential and Proprietary LT Auditor+ Configuration Guide
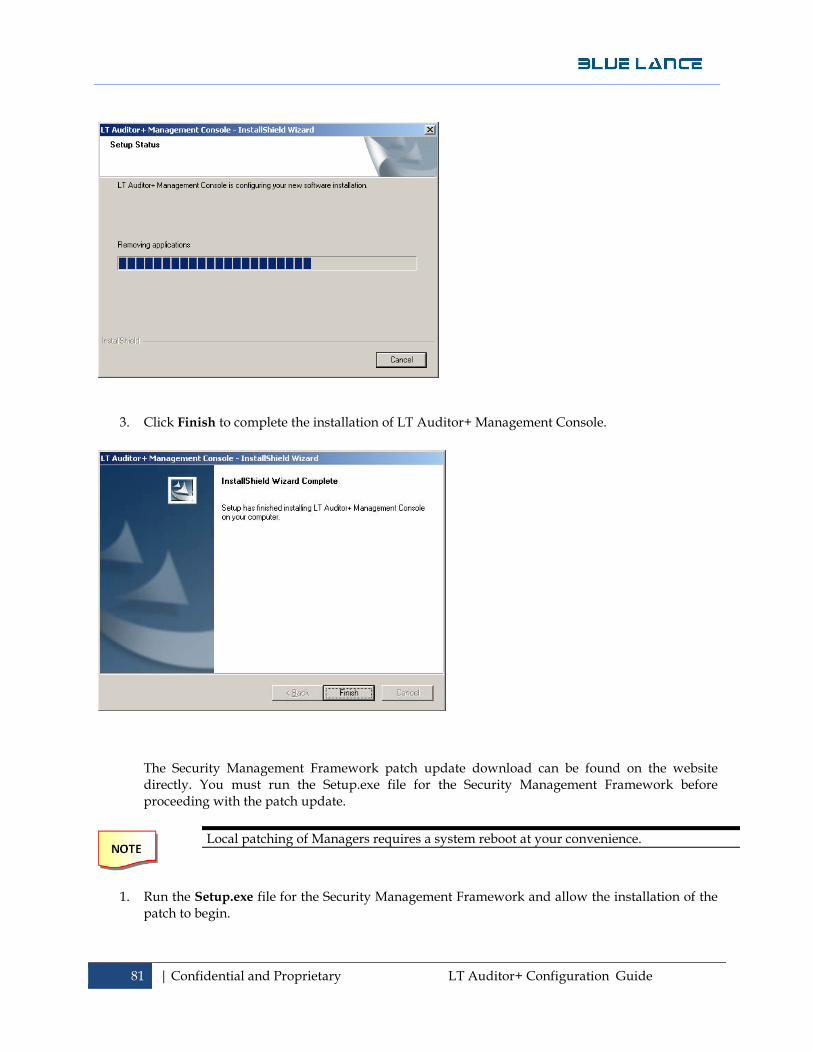
3. Click Finish to complete the installation of LT Auditor+ Management Console.
The Security Management Framework patch update download can be found on the website directly. You must run the Setup.exe file for the Security Management Framework before proceeding with the patch update.
1. Run the Setup.exe file for the Security Management Framework and allow the installation of the patch to begin.
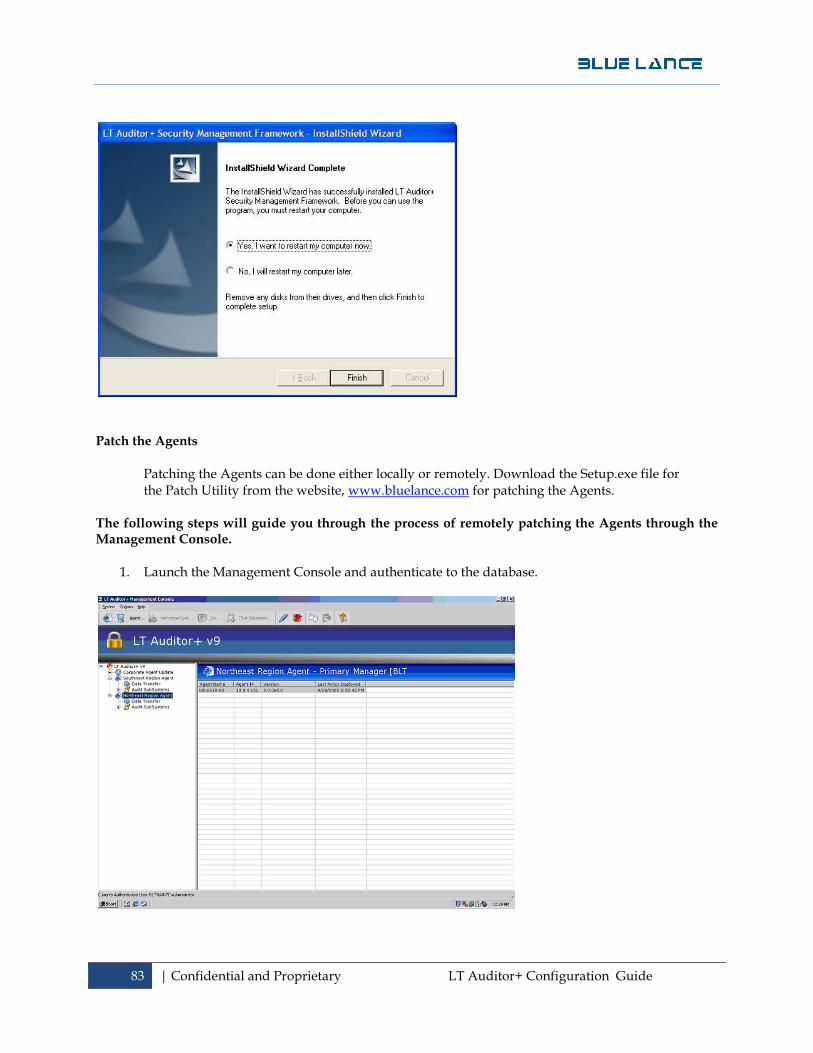
Local patching of Managers requires a system reboot at your convenience.
82 | Confidential and Proprietary LT Auditor+ Configuration Guide
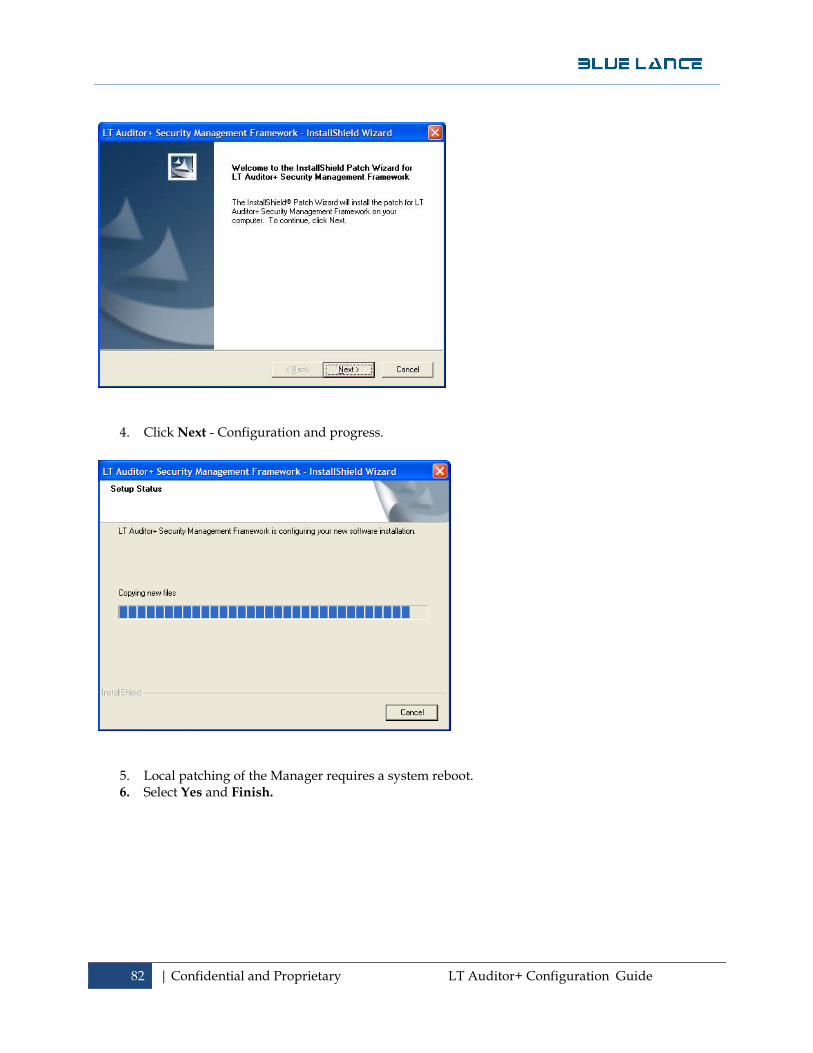
4. Click Next - Configuration and progress.
5. Local patching of the Manager requires a system reboot. 6. Select Yes and Finish.
83 | Confidential and Proprietary LT Auditor+ Configuration Guide
Patch the Agents
Patching the Agents can be done either locally or remotely. Download the Setup.exe file for the Patch Utility from the website, www.bluelance.com for patching the Agents.
The following steps will guide you through the process of remotely patching the Agents through the Management Console.
1. Launch the Management Console and authenticate to the database.
84 | Confidential and Proprietary LT Auditor+ Configuration Guide
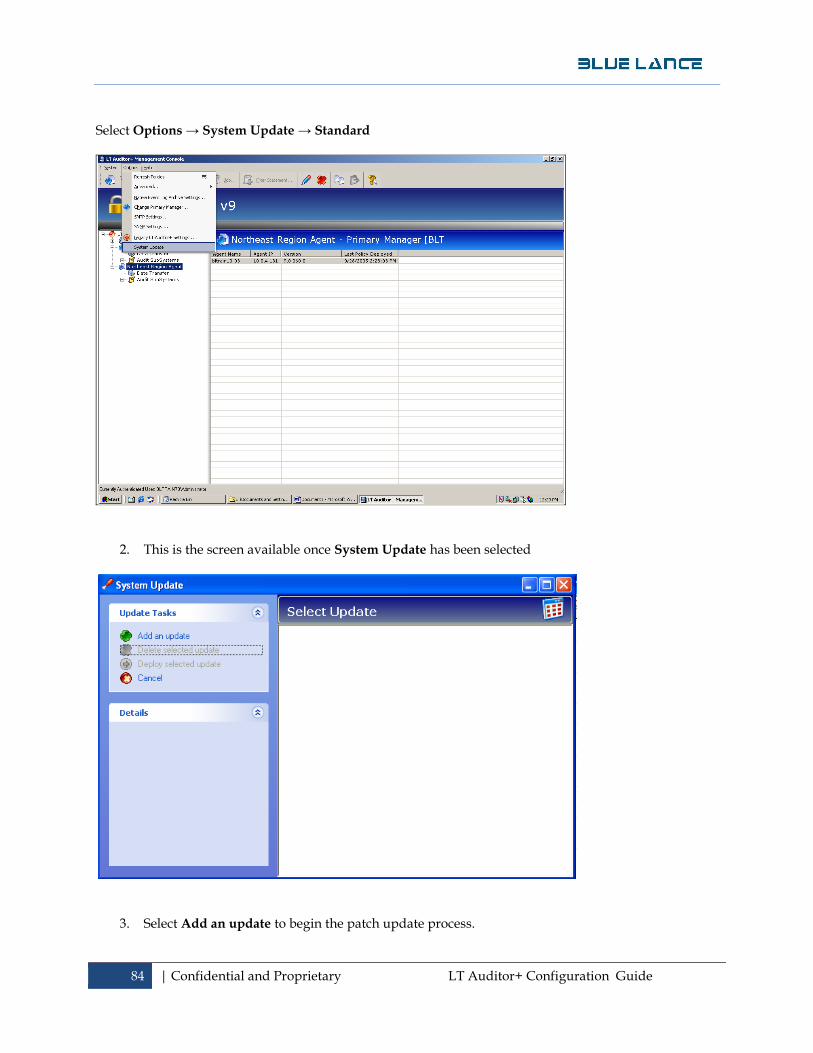
Select Options → System Update → Standard
2. This is the screen available once System Update has been selected
3. Select Add an update to begin the patch update process.

85 | Confidential and Proprietary LT Auditor+ Configuration Guide
4. A system disclaimer should appear.
5. You will then be prompted to locate the patch executable (found on the website or locally copied
folder).
6. The Patch Utility will begin its installation.
86 | Confidential and Proprietary LT Auditor+ Configuration Guide
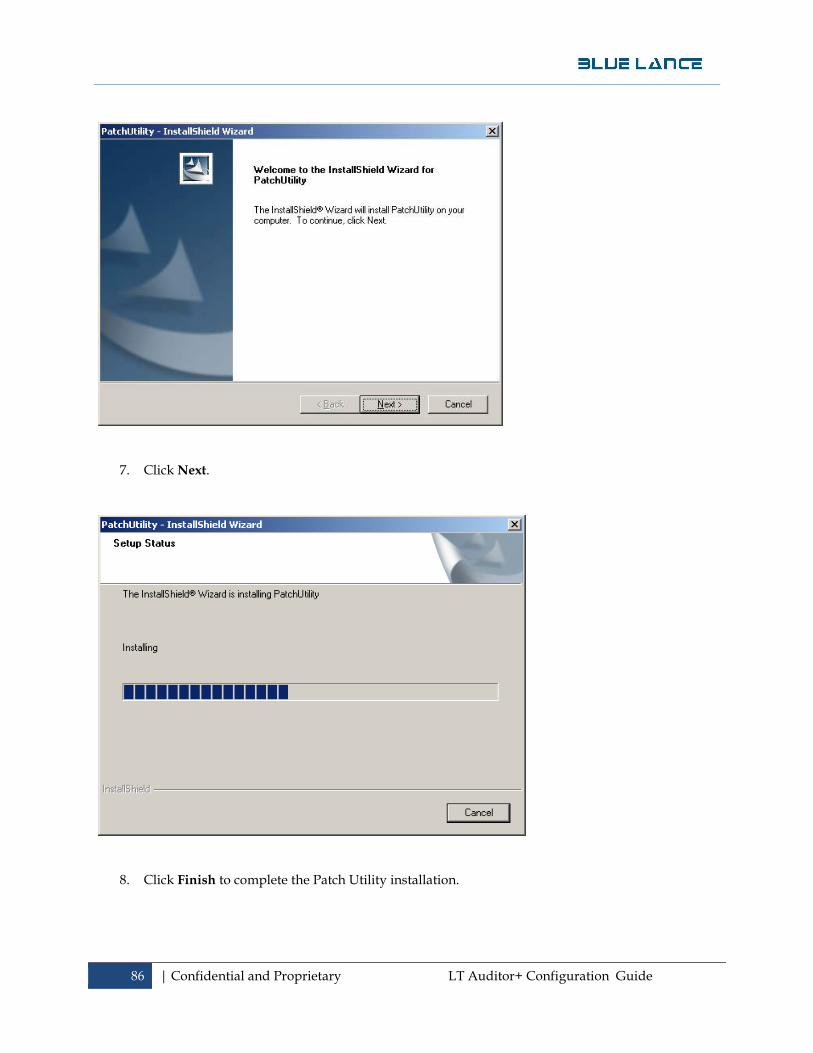
7. Click Next.
8. Click Finish to complete the Patch Utility installation.

87 | Confidential and Proprietary LT Auditor+ Configuration Guide
9. The patch update will then appear under the System Update Service Pack 4. 10. Once highlighted the details will inform the user of the version to which the Agent is applicable.
To delete a patch update:
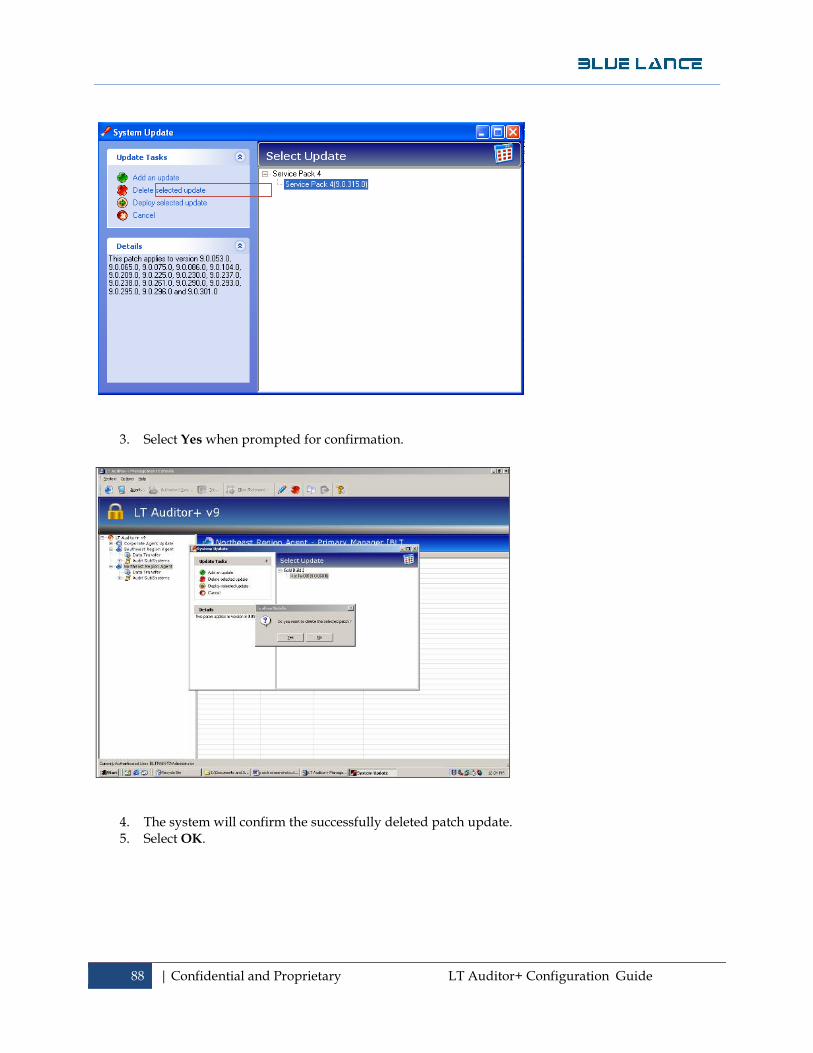
1. Simply highlight the patch update you would like to delete 2. Select Delete selected update.
88 | Confidential and Proprietary LT Auditor+ Configuration Guide
3. Select Yes when prompted for confirmation.
4. The system will confirm the successfully deleted patch update. 5. Select OK.
89 | Confidential and Proprietary LT Auditor+ Configuration Guide
Deploying to a Selected Patch Update
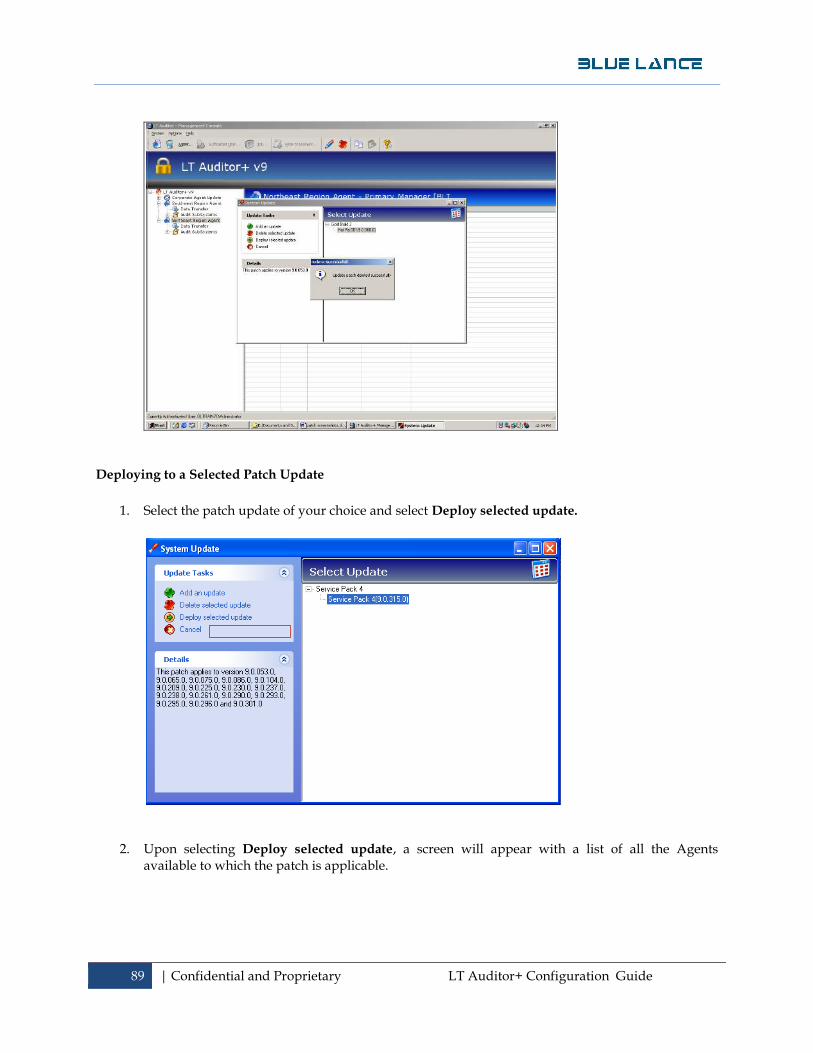
1. Select the patch update of your choice and select Deploy selected update.
2. Upon selecting Deploy selected update, a screen will appear with a list of all the Agents
available to which the patch is applicable.
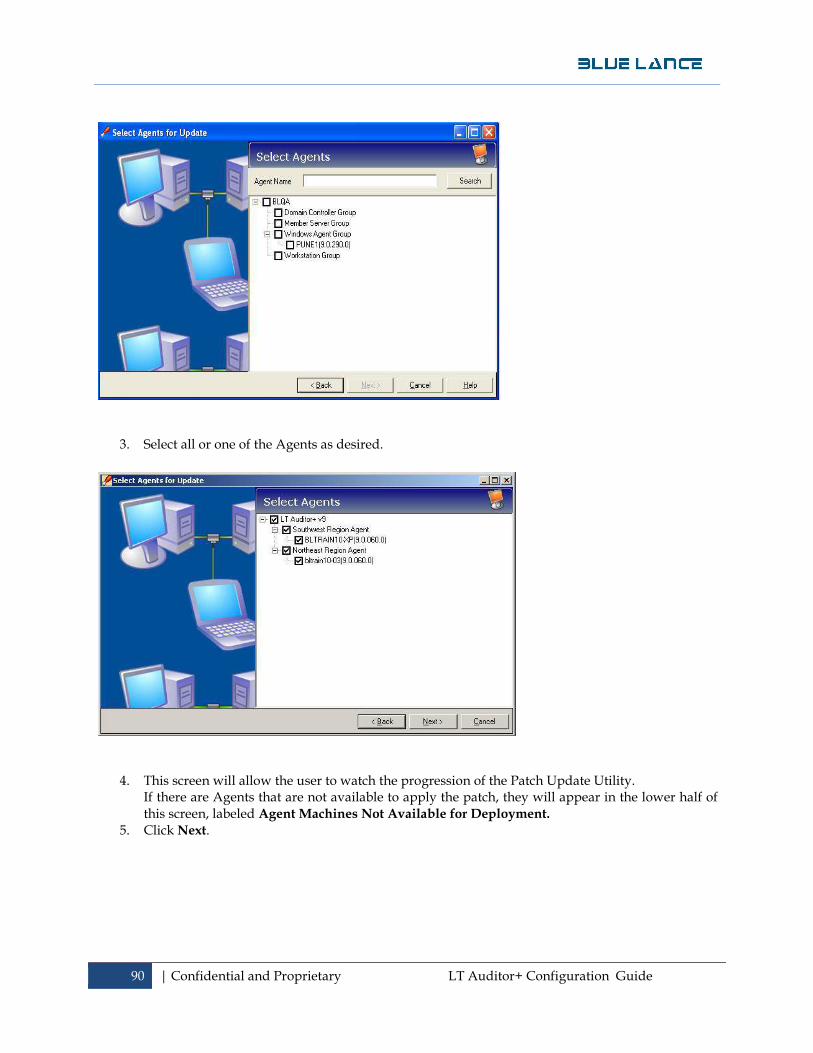
90 | Confidential and Proprietary LT Auditor+ Configuration Guide
3. Select all or one of the Agents as desired.
4. This screen will allow the user to watch the progression of the Patch Update Utility.
If there are Agents that are not available to apply the patch, they will appear in the lower half of this screen, labeled Agent Machines Not Available for Deployment.
5. Click Next.

91 | Confidential and Proprietary LT Auditor+ Configuration Guide
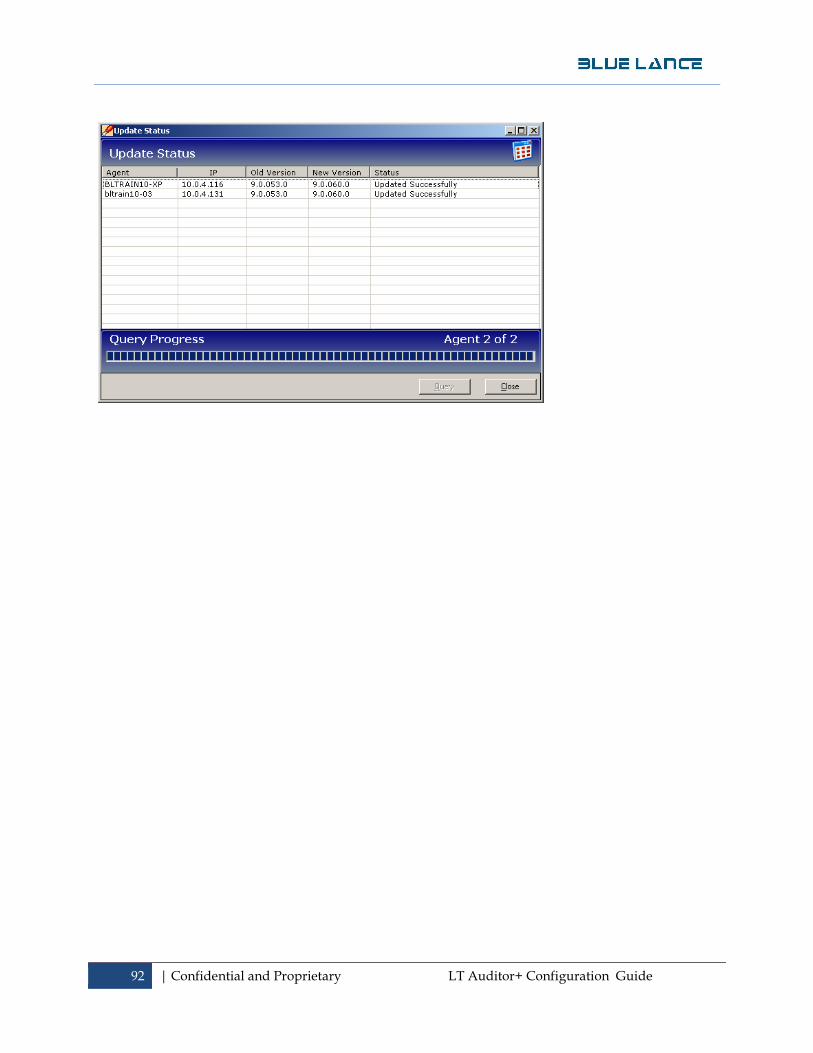
6. A screen will appear showing the update status for each Agent.
7. Click Close once the update progress has completed.
92 | Confidential and Proprietary LT Auditor+ Configuration Guide