conditions of carry - access washington … things are constant for all conditions of carry: 1....
TRANSCRIPT

Washington State Criminal Justice Training Commission - Patrol Rifle Instructor Course 2010
CONDITIONS OF CARRY
Three things are constant for all conditions of carry: 1. Muzzle is pointed in a safe direction 2. Finger is off of the trigger and indexed along the frame above the trigger 3. Safety is “ON”
ACTION/LOADED CARRYIf the risk level of a call is high enough for the rifle to be out of the car, then it should be in this condition. Steps to load the rifle into this condition:
1. Muzzle is pointed in a safe direction with the safety “ON” and trigger finger indexed 2. Full magazine (minus 2 rounds) is in the weapon 3. Work the action to load a round into the chamber 4. Conduct a press check to confirm a round was chambered, OR use the LEFT/RIGHT
loaded magazine technique. 5. Dust cover is closed if applicable.
CRUISER/TRANSPORT CARRY Also known as “patrol car ready” or “cruiser ready.” This is how the rifle should be configured when in the vehicle rack. The bolt is forward/closed on an empty chamber. The safety is “ON” (which requires the hammer to be cocked) and the dust cover is closed on an AR. A full magazine is inserted (minus 2 rounds) and locked in place. To load the rifle into this condition:
1. Muzzle is pointed in a safe direction with the safety “ON” and trigger finger indexed 2. Remove the magazine 3. Open the action and lock the bolt to the rear 4. Visually and physically inspect the chamber to ensure the weapon is unloaded 5. Close the bolt on the empty chamber 6. Seat a loaded magazine (full minus 2 rounds) into the rifle. Remember PUSH/PULL 7. Close the dust cover on an AR
Four checks confirm a proper transport carry condition: 1. Safety is ON 2. Chamber is empty (press check) 3. Full Magazine is seated (minus 2 rounds) 4. Dust cover is closed on an AR
Section 10 - Page 1 of 18 Rev. - 011310
Washington State Criminal Justice Training Commission - Patrol Rifle Instructor Course 2010
SAFE CARRYThe rifle is prepared for short-term LE storage or other administrative use. The steps to load the rifle into this condition:
1. Muzzle is pointed in a safe direction with the safety ON and trigger finger indexed 2. Remove the magazine 3. Open the action and visually and physically inspect the chamber to ensure the weapon is
unloaded 4. Lock the bolt to the rear with a hi-vis chamber block, or let the bolt go forward on a hi-vis
chamber flag 6. Safety is left ON
There is a misconception that patrol rifles should be stored with the bolts closed and hammers down or uncocked in order to relax the hammer spring. This is not true, and dangerous as it is foreseeable that a negligent discharge could occur with any mandatory dropping of hammers onto a supposedly “empty” chamber!! This myth has made its way into LE by way of officers who had prior military experience. Our military has had a need to store firearms long term, sometimes for decades at a time, and some of these old weapon designs incorporate out-dated spring technology where compressed springs could become weakened. Modern spring technology reveals that springs are not harmed by just being compressed but begin to wear when constantly being worked by compression and relaxation. What little damage is done to AR hammer springs comes from cocking/uncocking such as firing or bolt manipulation not by leaving hammers cocked. When the hammer is not cocked or “relaxed”, the safety lever cannot be put on “safe” and this is never an appropriate safety lever position for a LE patrol rifle unless the officer is intentionally firing the patrol rifle. .
Section 10 - Page 2 of 18 Rev. - 011310
Washington State Criminal Justice Training Commission - Patrol Rifle Instructor Course 2010
METHODS OF CARRY
There are many different methods for carrying a rifle; some are widely accepted throughout the law enforcement community, while others are not tactically sound, and considered dangerous. The following methods of carry are recommended for police officers carrying a patrol rifle equipped with the standard 2-point carry strap.
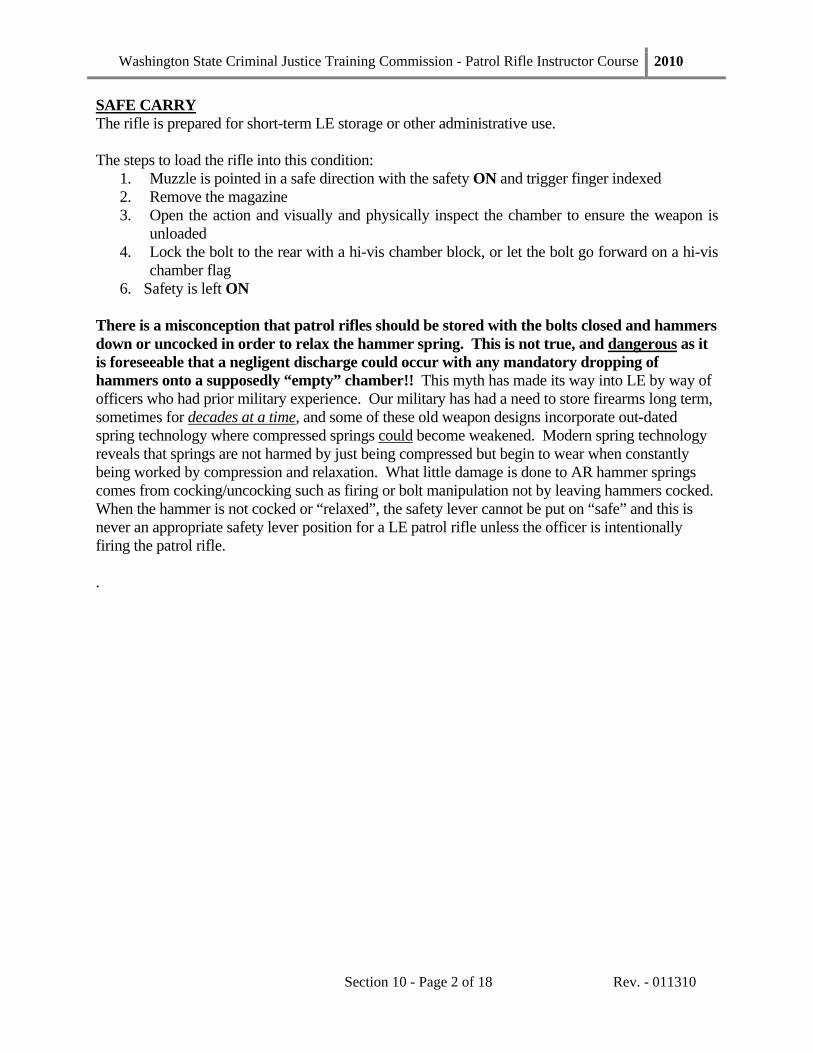
Sling Carry / Muzzle Up (“American”) This is the least preferred of the carry methods. The weapon is slow to bring to bear, the visibility is higher, and the handgun interferes with the firing hand. • Rifle sling over strong shoulder • Muzzle pointed upward • Sling held by strong hand
To deploy the weapon, grasp the sling with the thumb of the firing hand; reach across the body with the support hand, grasping the rifle above the magazine well on the fore-end; rotate the rifle outward while drawing the firing arm back through the sling; rotate the muzzle downward while establishing a firing grip on the pistol grip; mount the weapon into the shoulder pocket, and assume a firing position.
This method of carry is used when moving around on a firing range or walking to and from a patrol car. It is not used in a tactical situation. This carry position interferes with drawing the service pistol and places the muzzle too close to the head.
Section 10 - Page 3 of 18 Rev. - 011310
Washington State Criminal Justice Training Commission - Patrol Rifle Instructor Course 2010
METHODS OF CARRY
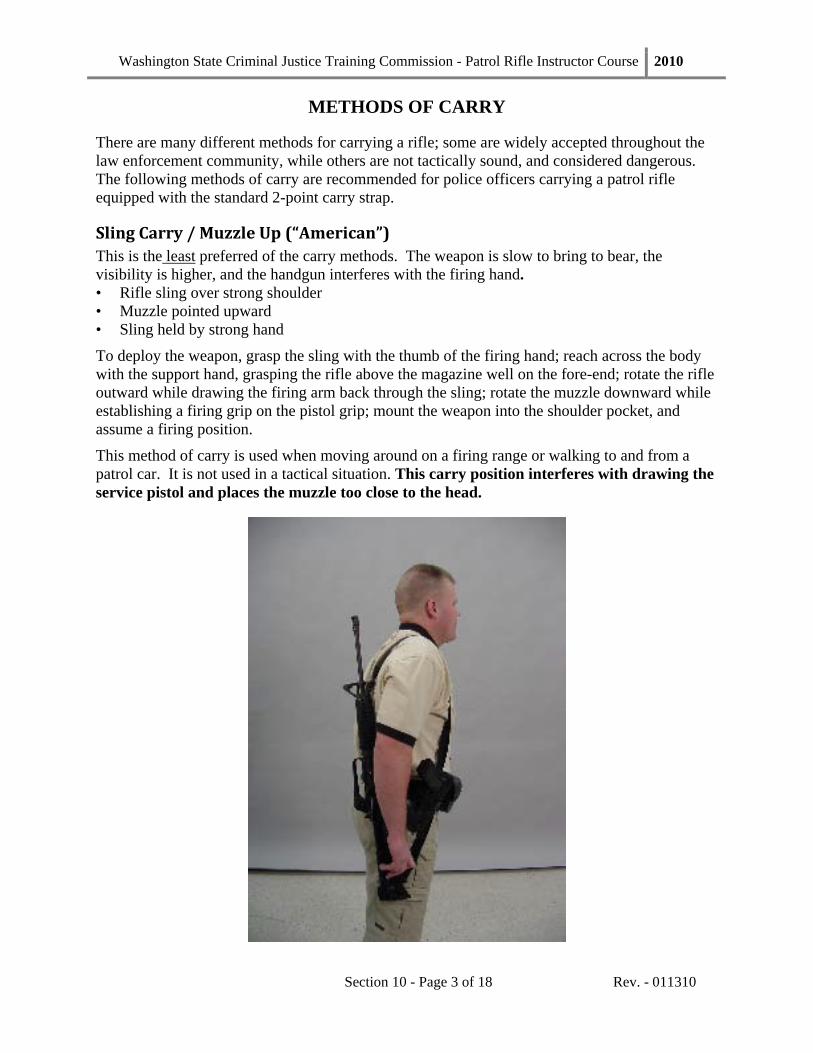
Sling Carry / Muzzle Down (“African”)
This method of carry allows the rifle to be carried on the support side of the body with the muzzle pointed downward. This is a low-profile method of carry, keeping the weapon less visible but ready for rapid deployment. It keeps rain, snow, sleet, and debris from falling into the muzzle of the weapon. Care must be taken to avoid grounding the muzzle into the dirt if a kneeling position is assumed or the officer bends over. The flash suppressor/compensator on an AR may keep dirt/mud/snow from entering the barrel unless the rifle is really jammed into the ground but the flush muzzle of a Mini-14 will not. The muzzle of a rifle that is jammed or obstructed with debris may split upon firing.
To deploy the weapon from this carry position, grasp the fore-end with the support hand, index finger pointing downward; while stepping forward with the support leg, rotate the rifle outward; push the rifle forward, pointing the muzzle toward the target; rotate the sight upward, while grasping the pistol grip with the firing hand; mount the rifle into the shoulder pocket while assuming an aggressive offhand position; disengage the safety, assess the threat, acquire sight alignment, sight picture, and begin the trigger press.
Section 10 - Page 4 of 18 Rev. - 011310

Washington State Criminal Justice Training Commission - Patrol Rifle Instructor Course 2010
METHODS OF CARRY
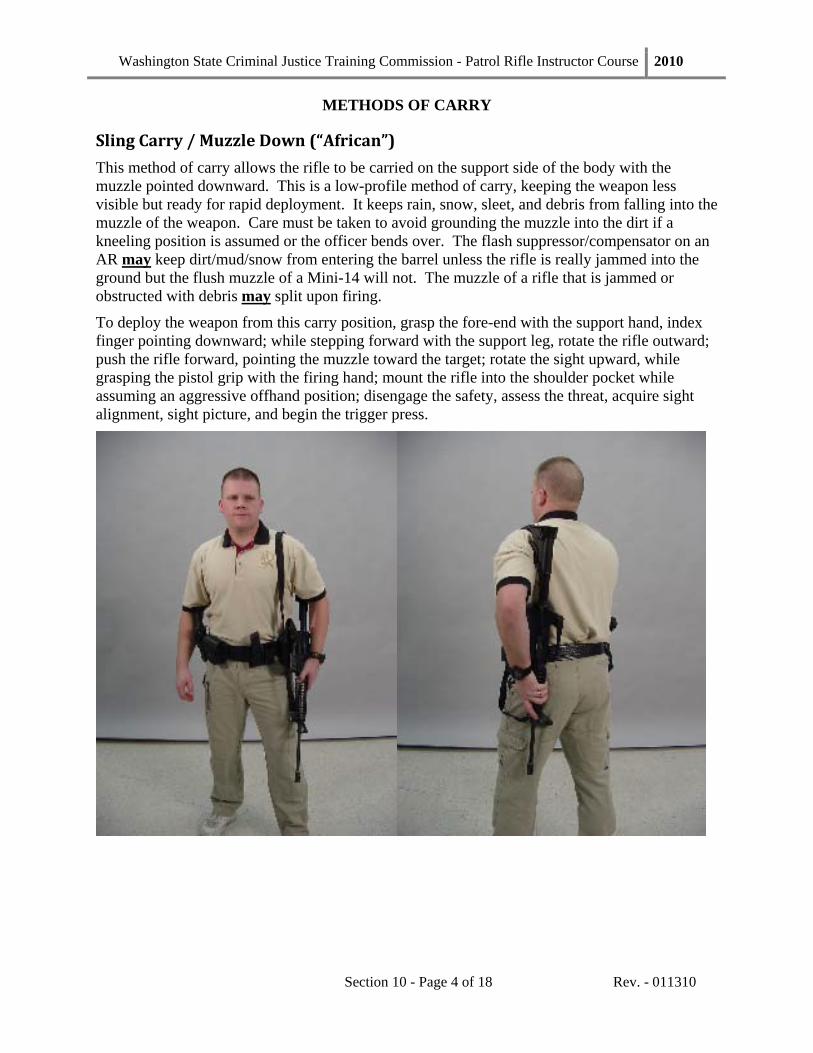
Sling Carry / Across the Back – Muzzle Down Rifle is across Officer’s back with sling over a shoulder. Muzzle is pointed downward or upward. This carry is much slower to deploy.
This method is used when the officer needs both hands free (e.g., climbing a fence). Note: With the weapon behind the officer - muzzle awareness becomes more difficult.
Section 10 - Page 5 of 18 Rev. - 011310
Washington State Criminal Justice Training Commission - Patrol Rifle Instructor Course 2010
METHODS OF CARRY
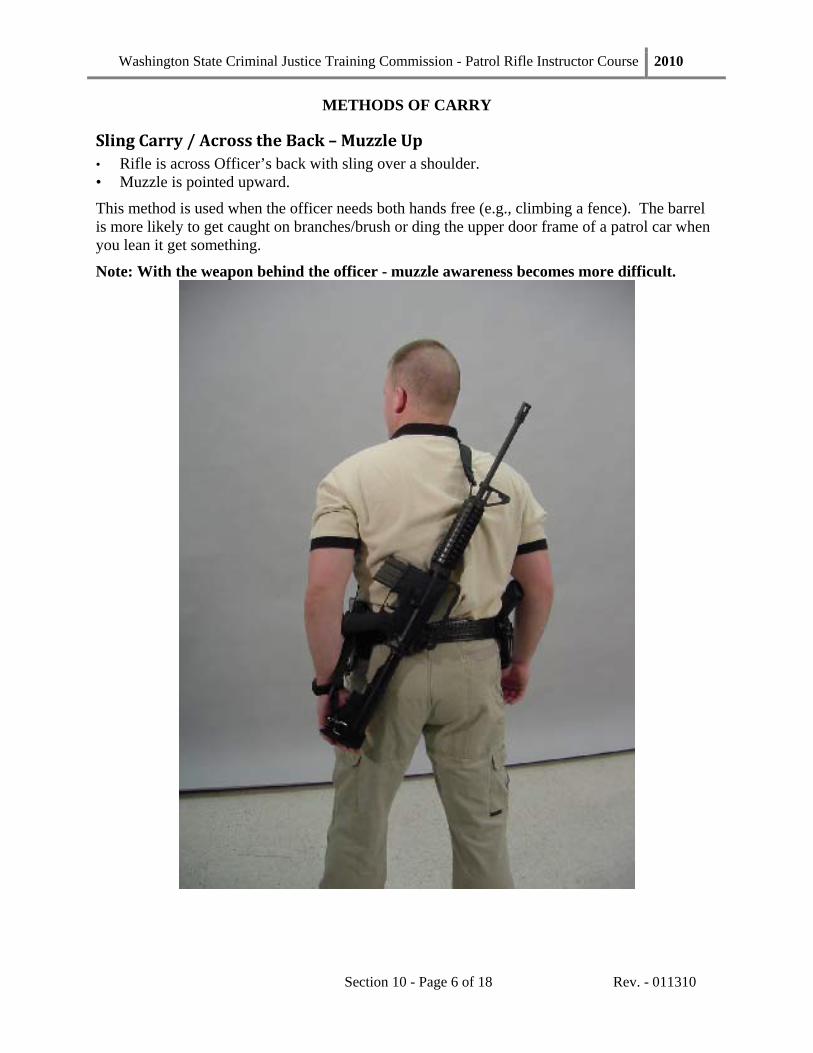
Sling Carry / Across the Back – Muzzle Up • Rifle is across Officer’s back with sling over a shoulder. • Muzzle is pointed upward.
This method is used when the officer needs both hands free (e.g., climbing a fence). The barrel is more likely to get caught on branches/brush or ding the upper door frame of a patrol car when you lean it get something.
Note: With the weapon behind the officer - muzzle awareness becomes more difficult.
Section 10 - Page 6 of 18 Rev. - 011310

Washington State Criminal Justice Training Commission - Patrol Rifle Instructor Course 2010
METHODS OF CARRY
Tactical Sling This is an excellent method of carry when used with an appropriate sling. Unlike the simple carry strap that, generally, is attached at two points at the bottom of the rifle and is designed for shoulder carry in parades; the tactical sling is usually attached to the side of the rifle so that it will lay flat against the body. This carry method allows instant access to the weapon, flows easily into a firing position, allows easy transition of the rifle for use of the handgun, OC, baton, or for handcuffing the maintaining a firing grip on the pistol grip of thedirection, even while maneuvering the firearm wbrought upward, the butt placed in the shoulder Tactical slings are broken down into 3 general cslings and their advantages and disadvantages a
A Single Point sling is a small single loop attached to the rifle at one point and this attachment point is generally to the rear of the receiver, which is to the rear of the balance point of the rifle, causing the rifle to hang muzzle straight down. The single point attachment plate for an AR is an amarket purchase that usually requires the disassembly/reassembly of the receiver extension (buffer tube) from the rear of the receiver; this is armorer-level work and only those qualified should attempt this
fter-
0
Section 1
Standard Carry Strap
suspect. It allows the rifle to be carried while weapon and keeping the muzzle down in a safe ith one hand. To deploy, the rifle is simply
pocket while a firing position is assumed. ategories; single point, 2-point, and 3-point re discussed below.
wplththanthasdothcolo
g
0 - Pa
Single Point Slin
ork or the rifles could be damaged. These ates need to be thoroughly tested to ensure at weapon manipulations, such as racking e charging handle, is not restricted in yway. There are single point attachments at clamp onto the receiver extension, such the Z-360 mount by Tactical Link, and n’t require any disassembly of the AR and e only downside to them is that you can’t llapse the sliding stock to its shortest cked position.
Tactical Link Z-36ge 7 of 18 Rev. - 011310

Washington State Criminal Justice Training Commission - Patrol Rifle Instructor Course 2010
ind
The loop can be worn over either shoulder; when worn over the right shoulder the rifle hangs more center-line and when worn over the left shoulder it hangs more off to the left side; either way the rifle will swing like a pendulum during physical activity unless it is controlled by hand or secured with some kof a weapon catch. This makes a single point less desirable if one needs to go hands-on something or someone. The assets of the single point is that it is very fast to put on, works very well if one is in-and-out of vehicles, and it is the fastest sling to transition the rifle from shoulder to shoulder. During the transition, officers should be trained tabove.
A 2-Point sling is a simple strap that is attachedusually near the front sight base, and at a second butt stock; mounted on the left side of the rifle fo
The strap will have some sort rapid adjustment dlength of the strap with only his support hand.
l
Section 10
Lift the Butt Stock
o lift the butt stock over the sling as pictured
to the side of the rifle at one point forward, point to the rear, usually towards the end of the r right-handers and on the right side for lefties.
Tightening Tai
Loosening Tab
evice that w
- Page 8 of
Left Side Attachments
ill allow the officer to adjust the
18 Rev. - 011310
Washington State Criminal Justice Training Commission - Patrol Rifle Instructor Course 2010
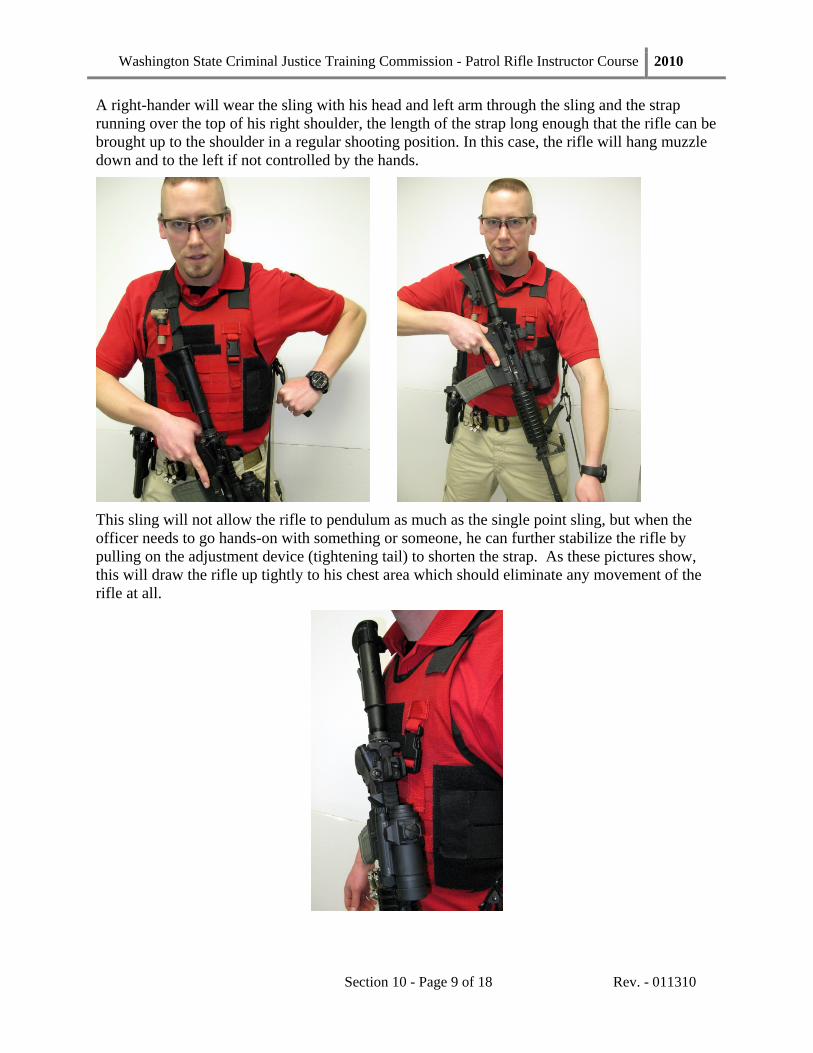
A right-hander will wear the sling with his head and left arm through the sling and the strap running over the top of his right shoulder, the length of the strap long enough that the rifle can be brought up to the shoulder in a regular shooting position. In this case, the rifle will hang muzzle down and to the left if not controlled by the hands.
This sling will not allow the rifle to pendulum as much as the single point sling, but when the officer needs to go hands-on with something or someone, he can further stabilize the rifle by pulling on the adjustment device (tightening tail) to shorten the strap. As these pictures show, this will draw the rifle up tightly to his chest area which should eliminate any movement of the rifle at all.
Section 10 - Page 9 of 18 Rev. - 011310

Washington State Criminal Justice Training Commission - Patrol Rifle Instructor Course 2010
One drawback to the 2-point sling is that it is slow to transition the rifle from strong to support side shoulder as it requires the officer to extend the length of the strap and then drop his left arm/shoulder out of the sling so that there is enough slack in the strap to allow the rifle to make the transition as shown below.
Start of the Transition Begin to Drop the Elbow Through the Sling
Continue to Drop Hand and Shoulder Switch Shoulder to Complete Transition
Section 10 - Page 10 of 18 Rev. - 011310

Washington State Criminal Justice Training Commission - Patrol Rifle Instructor Course 2010
The 3-Point sling was introduced into the US in the 1970’s by HK International when they began to import their MP5 submachine guns and HK 91 and HK93 rifles. This sling was a long strap with a snap-hook on the front end and a metal slider on the rear. The snap-hook attached to the side of the front sight assembly (1st point) with the strap running backwards, alongside the receiver, through a sling swivel (2nd point) on the rear side of the butt stock until the slider end looped back around and was fitter around the portion of the strap that was stretched between the snap-hook and the rear swivel. This slider was now pressure fit into a metal clamp (3rd point) that was welded onto the left side of the receiver, near the mag well.
This sling was onThis sling systemhad a 3rd point of
MP5A2
e of the first tactical slings and was highly regarded by US tactical officers. was then modified to fit most other weapon platforms, none of which actually contact on the weapon as did the HK.
Section 10 - Page 11 of 18 Rev. - 011310
Washington State Criminal Justice Training Commission - Patrol Rifle Instructor Course 2010
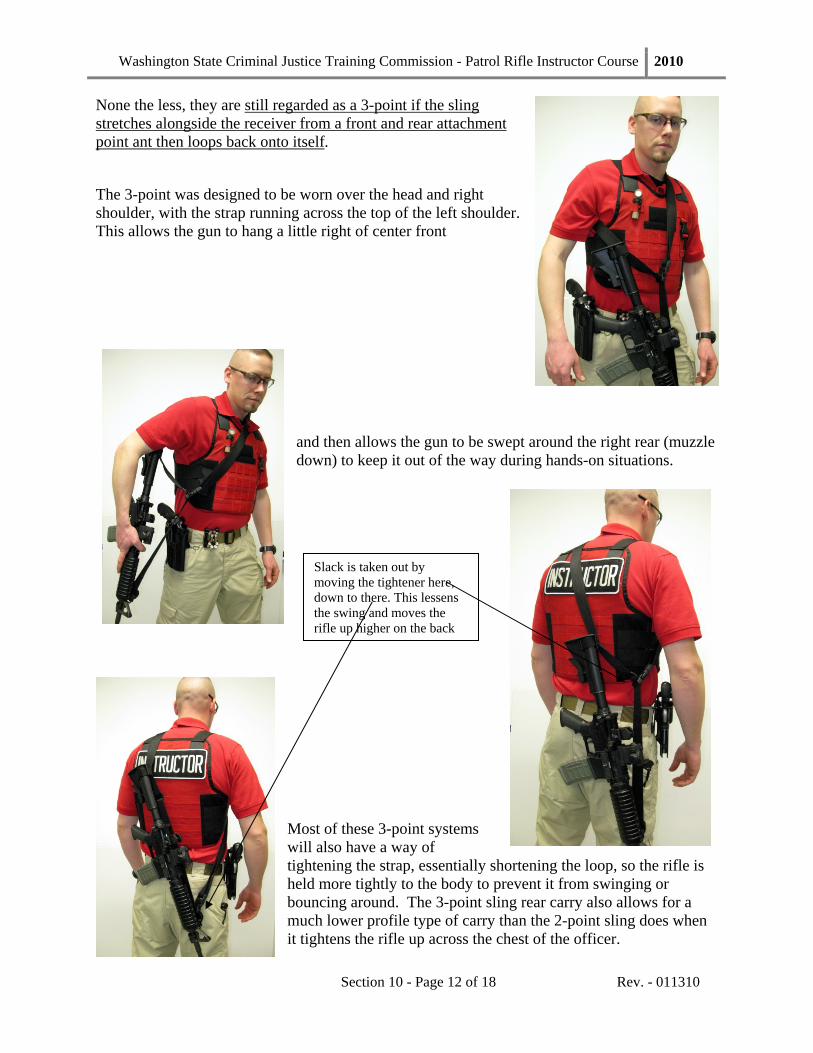
None the less, they are still regarded as a 3-point if the sling stretches alongside the receiver from a front and rear attachment point ant then loops back onto itself.
The 3-point was designed to be worn over the head and right shoulder, with the strap running across the top of the left shoulder. This allows the gun to hang a little right of center front
and then allows the gun to be swept around the right rear (muzzle down) to keep it out of the way during hands-on situations.
Mowiltighhelboumuit t
Slack is taken out by moving the tightener here, down to there. This lessensthe swing and moves the rifle up higher on the back
st of these 3-point systems l also have a way of tening the strap, essentially shortening the loop, so the rifle is
d more tightly to the body to prevent it from swinging or ncing around. The 3-point sling rear carry also allows for a ch lower profile type of carry than the 2-point sling does when ightens the rifle up across the chest of the officer.
Section 10 - Page 12 of 18 Rev. - 011310
Washington State Criminal Justice Training Commission - Patrol Rifle Instructor Course 2010
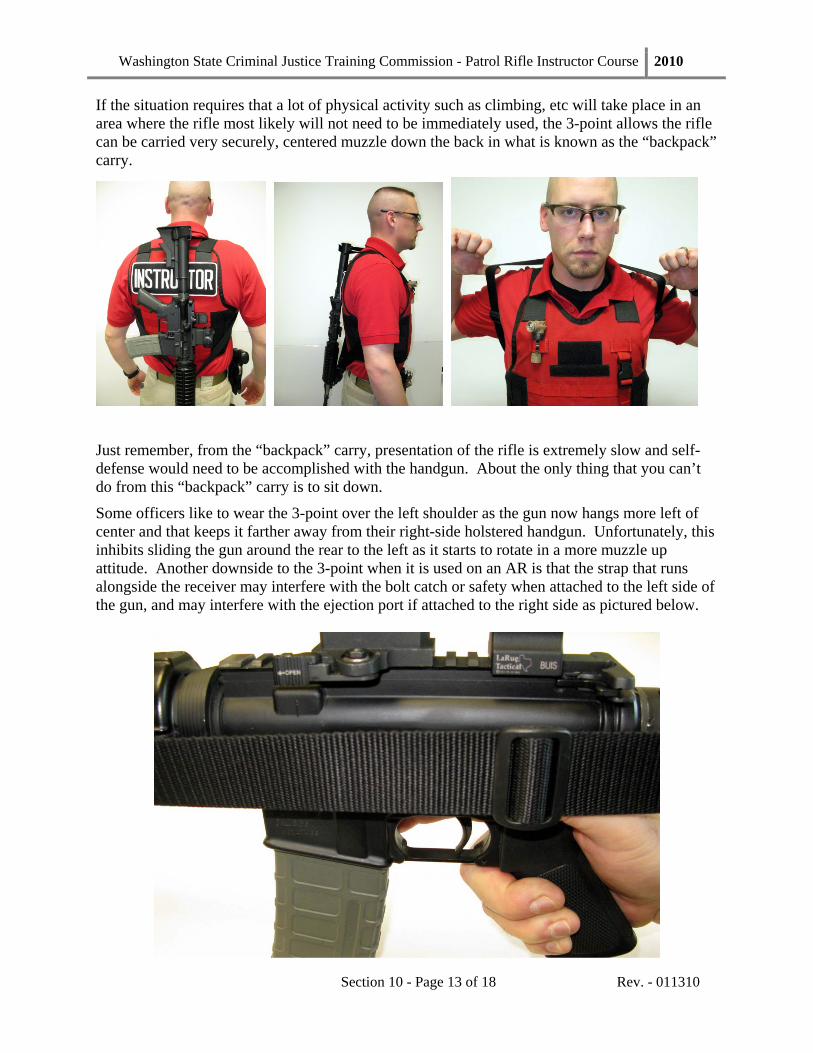
If the situation requires that a lot of physical activity such as climbing, etc will take place in an area where the rifle most likely will not need to be immediately used, the 3-point allows the rifle can be carried very securely, centered muzzle down the back in what is known as the “backpack” carry.
Just remember, from the “backpack” carry, presentation of the rifle is extremely slow and self-defense would need to be accomplished with the handgun. About the only thing that you can’t do from this “backpack” carry is to sit down.
Some officers like to wear the 3-point over the left shoulder as the gun now hangs more left of center and that keeps it farther away from their right-side holstered handgun. Unfortunately, this inhibits sliding the gun around the rear to the left as it starts to rotate in a more muzzle up attitude. Another downside to the 3-point when it is used on an AR is that the strap that runs alongside the receiver may interfere with the bolt catch or safety when attached to the left side of the gun, and may interfere with the ejection port if attached to the right side as pictured below.
Section 10 - Page 13 of 18 Rev. - 011310
Washington State Criminal Justice Training Commission - Patrol Rifle Instructor Course 2010
METHODS OF CARRY
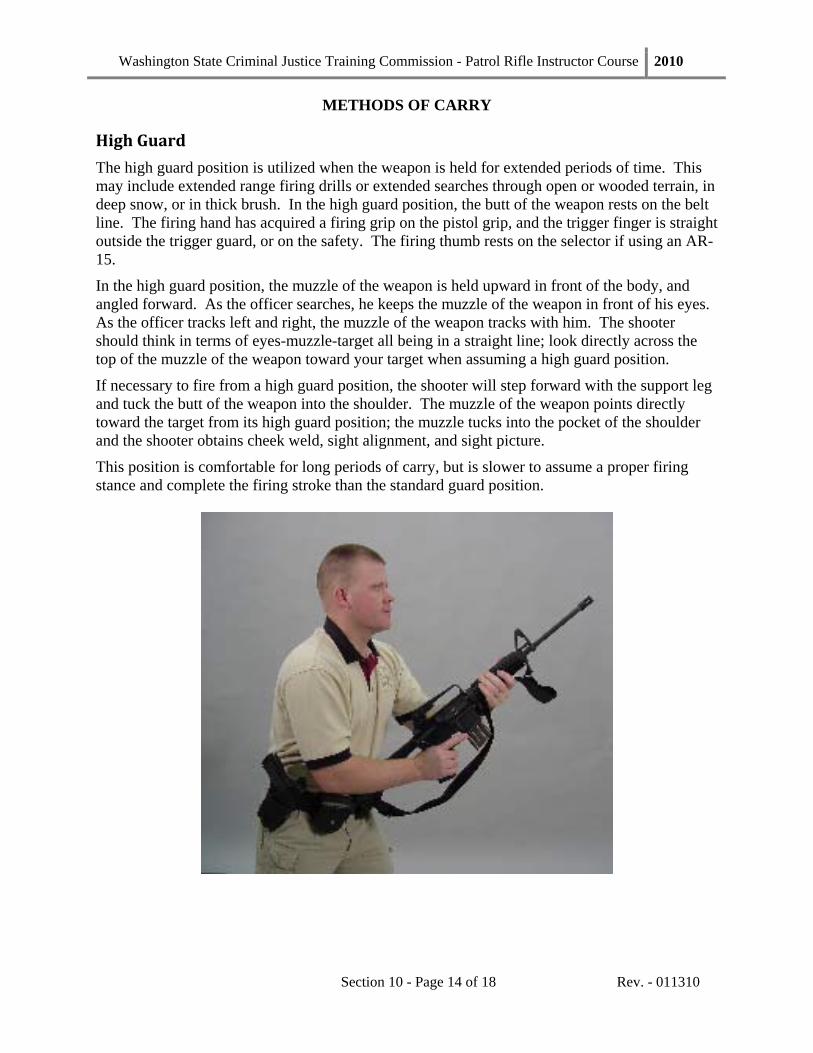
High Guard
The high guard position is utilized when the weapon is held for extended periods of time. This may include extended range firing drills or extended searches through open or wooded terrain, in deep snow, or in thick brush. In the high guard position, the butt of the weapon rests on the belt line. The firing hand has acquired a firing grip on the pistol grip, and the trigger finger is straight outside the trigger guard, or on the safety. The firing thumb rests on the selector if using an AR-15.
In the high guard position, the muzzle of the weapon is held upward in front of the body, and angled forward. As the officer searches, he keeps the muzzle of the weapon in front of his eyes. As the officer tracks left and right, the muzzle of the weapon tracks with him. The shooter should think in terms of eyes-muzzle-target all being in a straight line; look directly across the top of the muzzle of the weapon toward your target when assuming a high guard position.
If necessary to fire from a high guard position, the shooter will step forward with the support leg and tuck the butt of the weapon into the shoulder. The muzzle of the weapon points directly toward the target from its high guard position; the muzzle tucks into the pocket of the shoulder and the shooter obtains cheek weld, sight alignment, and sight picture.
This position is comfortable for long periods of carry, but is slower to assume a proper firing stance and complete the firing stroke than the standard guard position.
Section 10 - Page 14 of 18 Rev. - 011310

Washington State Criminal Justice Training Commission - Patrol Rifle Instructor Course 2010
METHODS OF CARRY
Guard (Ready)
The guard position is utilized in a similar manner to the shotgun or service pistol. The firing hand has acquired a firing grip on the pistol grip of the weapon; the trigger finger is straight and alongside the trigger guard, thumb on the safety (for right handed shooter). The support hand is at the base of the forearm gripping the fore-end of the weapon. The thumb lies alongside the fore-end of the weapon.
The front leg is bent forward and the rear leg is locked; this should be a fairly aggressive forward stance. The upper body is bent forward at the waist to control the recoil of the weapon in a firing stroke.
Should the officer have to fire from the guard stance, the weapon is simply raised, sight alignment is acquired and the firing stroke is completed. Muzzle of rifle pointed at a downward angle in front of officer Buttstock held in pocket of shoulder Handguard held by support hand Safety is “ON”.
Pistol grip held by strong hand with trigger finger indexed straight (for a right handed shooter) or on the safety or straight (for a left-handed shooter).
Section 10 - Page 15 of 18 Rev. - 011310

Washington State Criminal Justice Training Commission - Patrol Rifle Instructor Course 2010
Remember: Your guard position or low ready position is based on the environment. Not on some arbitrary protractor angle.
The officer needs to adapt to his surrounding
Section 10 - Page 16 of 18 Rev. - 011310
Washington State Criminal Justice Training Commission - Patrol Rifle Instructor Course 2010
METHODS OF CARRY
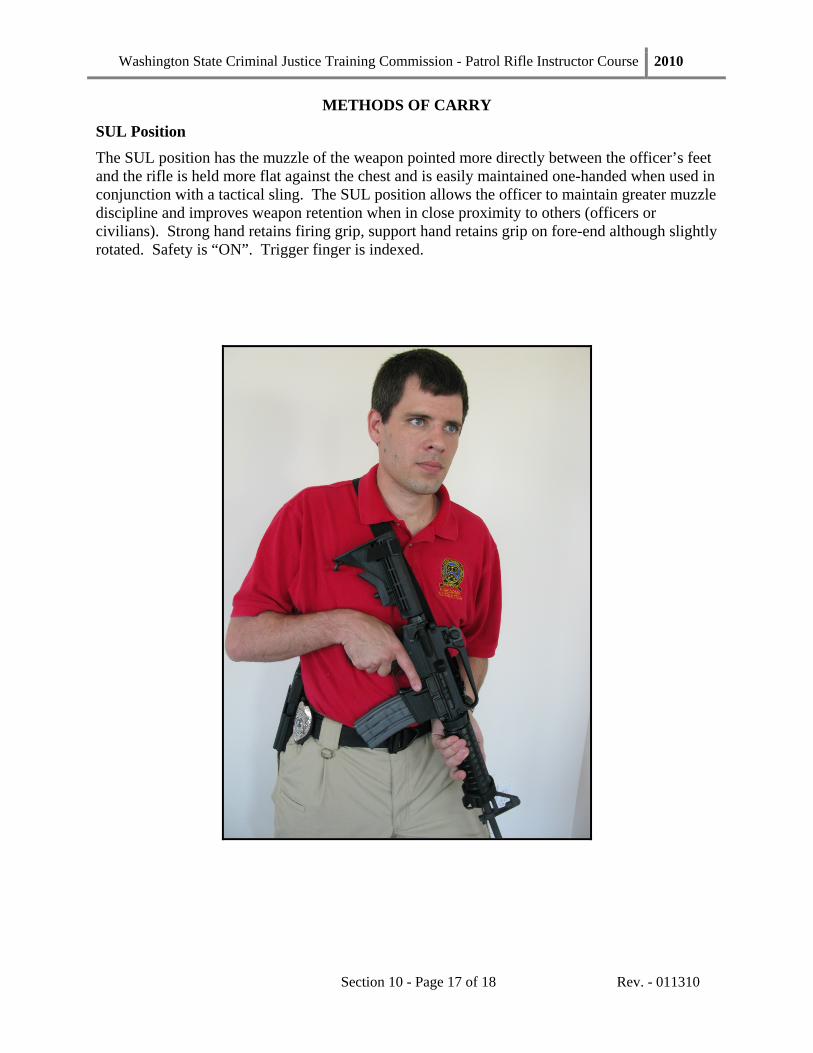
SUL Position The SUL position has the muzzle of the weapon pointed more directly between the officer’s feet and the rifle is held more flat against the chest and is easily maintained one-handed when used in conjunction with a tactical sling. The SUL position allows the officer to maintain greater muzzle discipline and improves weapon retention when in close proximity to others (officers or civilians). Strong hand retains firing grip, support hand retains grip on fore-end although slightly rotated. Safety is “ON”. Trigger finger is indexed.
Section 10 - Page 17 of 18 Rev. - 011310

Washington State Criminal Justice Training Commission - Patrol Rifle Instructor Course 2010
METHODS OF CARRY
Port Arms Position • Rifle held in front of officer with muzzle pointed upward • Handguard held by support hand at shoulder level • Pistol grip held by strong hand at about waist level with trigger finger indexed, on “safe”
This is a high profile carry where the officer wants the rifle to be seen by the public, such as a cover officer at a perimeter checkpoint. This carry is also appropriate when moving through waist-high, grass, brush, or water. Muzzle awareness must always be a consideration!
Section 10 - Page 18 of 18 Rev. - 011310