concur using the concur mobile app - harvard travel … · concur using the concur mobile app ....
TRANSCRIPT
Concur Using the Concur Mobile App
Center for Workplace Development 1 Last Updated: 6/29/2016
Employee Reimbursement System
Overview The Concur for Mobile app enables you to perform many of the same functions available in the Concur system, right from your smartphone. The app is especially useful in a few ways:
• Allows you to use your phone’s camera to capture images of receipts, which you can then upload directly to Concur, reducing the need to store and organize paper copies.
• Enables you to create individual expenses, attach receipts, and add the expenses to an expense report.
This Guide provides step-by-step instructions on completing some of the most common tasks available to you with the app.
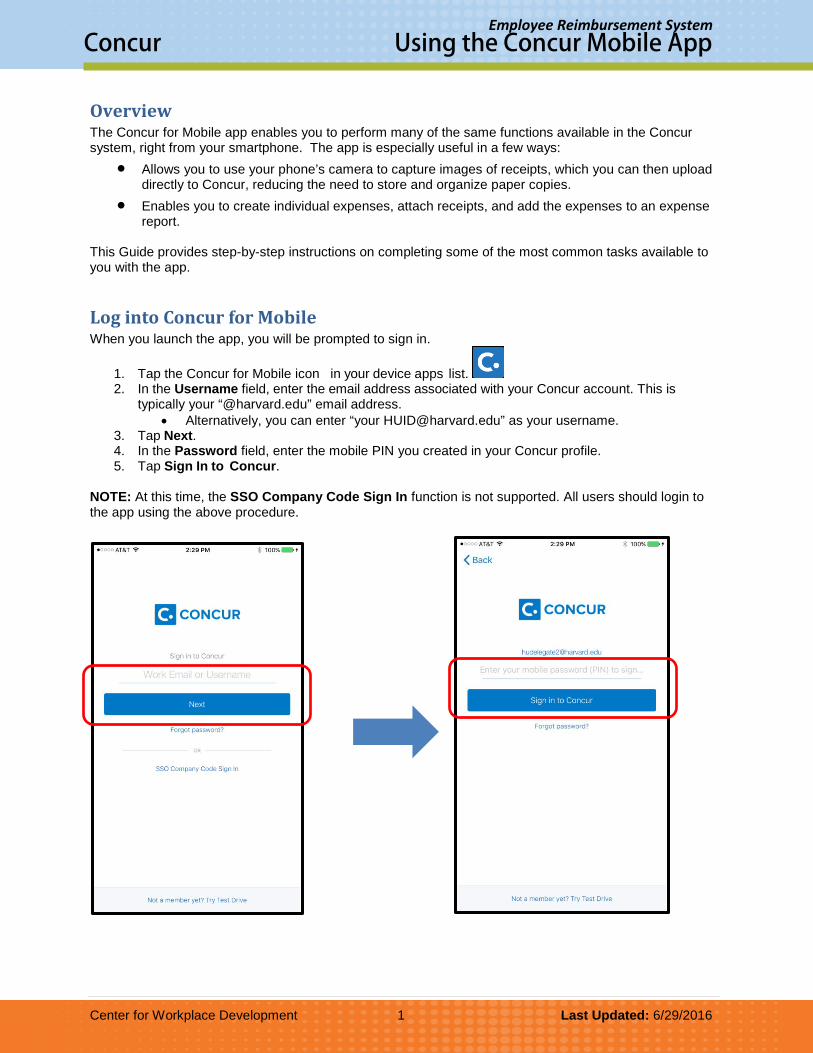
Log into Concur for Mobile When you launch the app, you will be prompted to sign in.
1. Tap the Concur for Mobile icon in your device apps list. 2. In the Username field, enter the email address associated with your Concur account. This is
typically your “@harvard.edu” email address. • Alternatively, you can enter “your [email protected]” as your username.
3. Tap Next. 4. In the Password field, enter the mobile PIN you created in your Concur profile. 5. Tap Sign In to Concur.
NOTE: At this time, the SSO Company Code Sign In function is not supported. All users should login to the app using the above procedure.
Concur Using the Concur Mobile App
Center for Workplace Development 2 Last Updated: 6/29/2016
Employee Reimbursement System
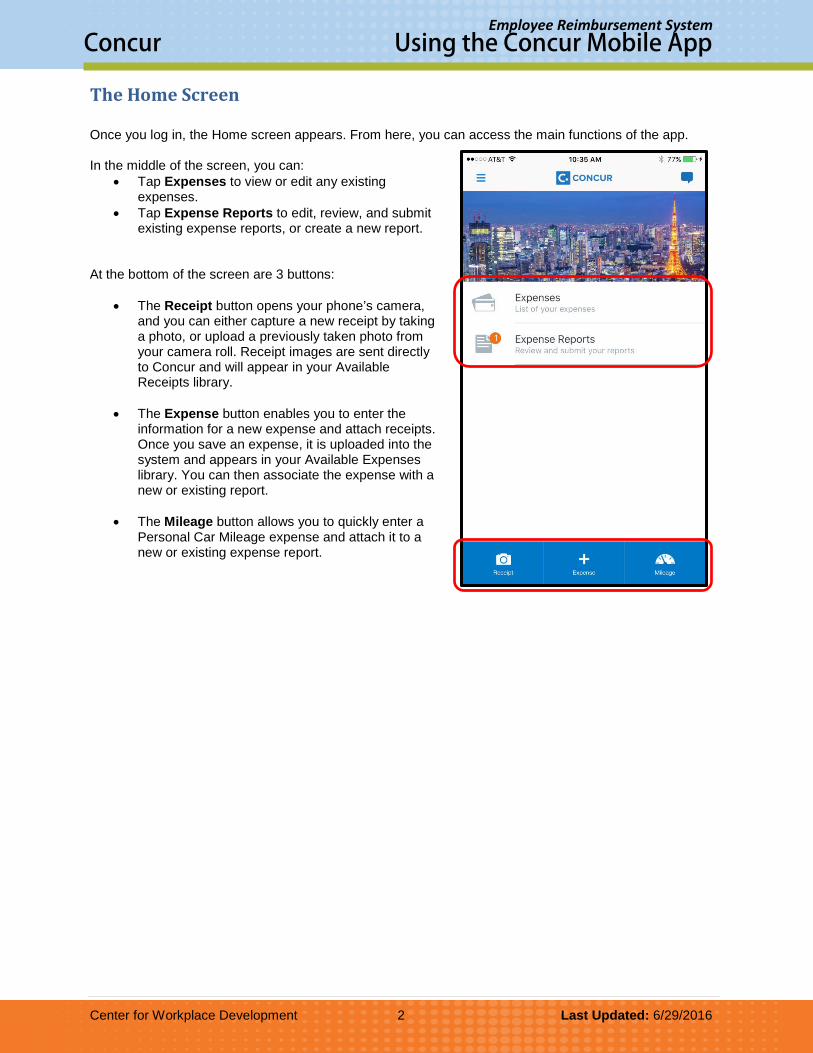
The Home Screen Once you log in, the Home screen appears. From here, you can access the main functions of the app. In the middle of the screen, you can:
• Tap Expenses to view or edit any existing expenses.
• Tap Expense Reports to edit, review, and submit existing expense reports, or create a new report.
At the bottom of the screen are 3 buttons:
• The Receipt button opens your phone’s camera, and you can either capture a new receipt by taking a photo, or upload a previously taken photo from your camera roll. Receipt images are sent directly to Concur and will appear in your Available Receipts library.
• The Expense button enables you to enter the
information for a new expense and attach receipts. Once you save an expense, it is uploaded into the system and appears in your Available Expenses library. You can then associate the expense with a new or existing report.
• The Mileage button allows you to quickly enter a
Personal Car Mileage expense and attach it to a new or existing expense report.

Concur Using the Concur Mobile App
Center for Workplace Development 3 Last Updated: 6/29/2016
Employee Reimbursement System
Uploading Receipts The Concur for Mobile app integrates with your smartphone’s camera, and enables you to take photos of receipts using your phone and send them directly to your Available Receipts library. You can also upload receipt images from your phone’s Photo Album. Capturing New Receipt Images To capture new receipts:
1. At the bottom of the Home screen, tap Receipt. The app opens your phone’s camera function. 2. Take a photo of the desired receipt. The app displays a preview image of the receipt. 3. Do one of the following:
• If you do not like the quality of the image, tap Retake, and then take another image of the receipt.
• If you want to create a new expense based on the receipt, tap Expense. The New Expense screen appears, and you can enter the information about the expense, with the receipt already attached.
• To upload the receipt to your Available Receipts library, tap Done.
Concur Using the Concur Mobile App
Center for Workplace Development 4 Last Updated: 6/29/2016
Employee Reimbursement System
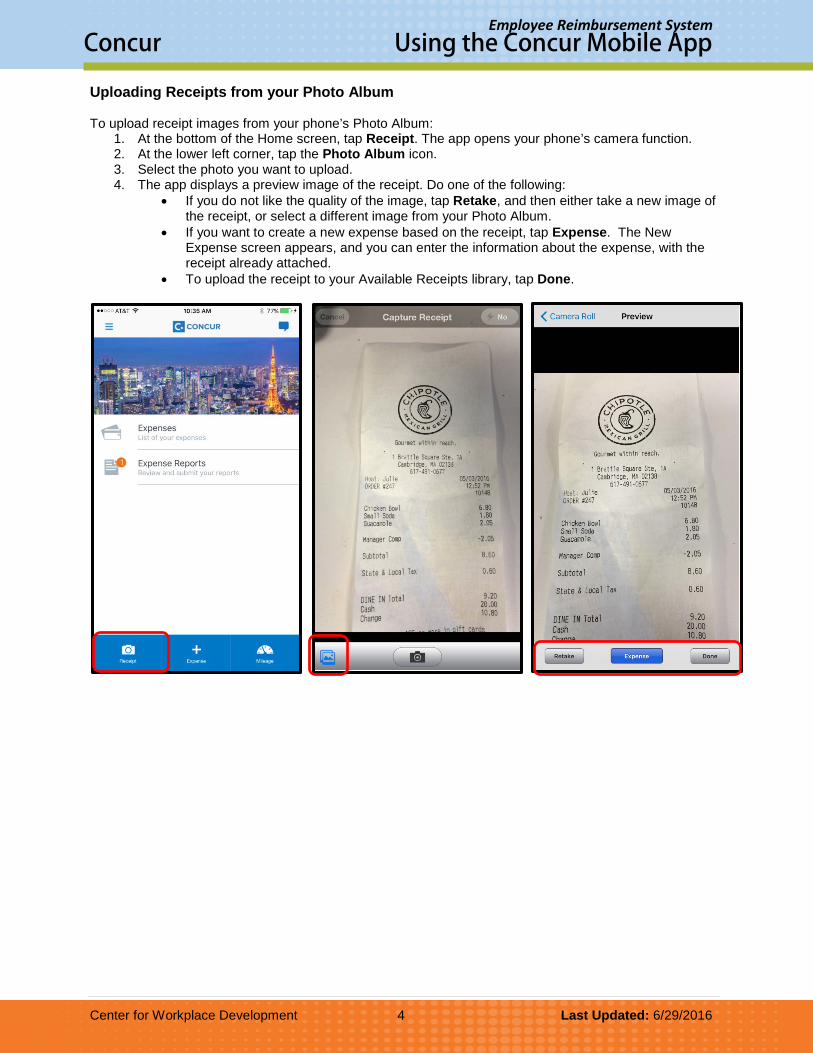
Uploading Receipts from your Photo Album To upload receipt images from your phone’s Photo Album:
1. At the bottom of the Home screen, tap Receipt. The app opens your phone’s camera function. 2. At the lower left corner, tap the Photo Album icon. 3. Select the photo you want to upload. 4. The app displays a preview image of the receipt. Do one of the following:
• If you do not like the quality of the image, tap Retake, and then either take a new image of the receipt, or select a different image from your Photo Album.
• If you want to create a new expense based on the receipt, tap Expense. The New Expense screen appears, and you can enter the information about the expense, with the receipt already attached.
• To upload the receipt to your Available Receipts library, tap Done.

Concur Using the Concur Mobile App
Center for Workplace Development 5 Last Updated: 6/29/2016
Employee Reimbursement System
Viewing Receipts Uploaded receipts that are not attached to a line item expense or expense report header are listed in your Available Receipts library. To view a receipt in your Available Receipts library:
1. In the middle of the Home screen, tap Expense. Your Available Expenses list appears. 2. At the top of the screen, tap the Receipts button. The Available Receipts list appears. 3. Tap the receipt you want to view. The app displays the receipt image.

Concur Using the Concur Mobile App
Center for Workplace Development 6 Last Updated: 6/29/2016
Employee Reimbursement System
Creating Expenses Concur for Mobile gives you the ability to enter expenses quickly and easily. To start, you enter a mobile expense, which includes the basic information about the expense, and gives you the option to add a receipt. To create a mobile expense:
1. At the bottom of the Home screen, tap Expense. • Alternatively, you can tap Expenses in the middle of the Home screen and then tap the + icon
in the top right corner
2. On the Expense screen, complete the fields. Fields marked with an asterisk * are required
3. To add a receipt, tap Add Receipt, and then do one of the following: • Take a picture of the receipt • Select an existing image from your Photo Album • Select a receipt from your Receipts Store.
4. Tap Save. The mobile expense is added to your Available Expenses library.
Once you create the mobile expense, you can include more detailed information - for example, itemizing the expense - by adding it to an expense report, and then making any necessary additions or changes.

Concur Using the Concur Mobile App
Center for Workplace Development 7 Last Updated: 6/29/2016
Employee Reimbursement System
Viewing and Editing Expenses To view and edit existing expenses:
1. On the home screen, tap Expenses to access your list of available expenses. 2. Tap the expense you want to view. The details for the expense appear. 3. On the Expense Details screen, you can make changes by tapping on a field and editing the
information. NOTE: To make more extensive changes, such as itemizing or adding attendees:
• Add the expense to a new expense report and then edit the expense. • Move the expense to an open expense report and then make your changes.
4. To add a receipt, tap Add Receipt, and then do one of the following: • Take a picture of the receipt • Select an existing image from your Photo Album • Select a receipt from your Receipts Store
5. Tap Save.

Concur Using the Concur Mobile App
Center for Workplace Development 8 Last Updated: 6/29/2016
Employee Reimbursement System
Deleting Expenses To delete expenses from your Available Expenses list:
1. On the home screen, tap Expenses to access your list of available expenses. 2. At the lower left corner, tap Edit. Each expense now displays a selection circle on the left side. 3. Tap the selection buttons for each expense you want to delete. 4. In the lower left corner, tap Delete.

Concur Using the Concur Mobile App
Center for Workplace Development 9 Last Updated: 6/29/2016
Employee Reimbursement System
Creating a New Expense Report There are a few ways you can create a new expense report using Concur for Mobile. Two of the most common ways you can create a new report are:
• From the Active Reports screen • When adding an expense on the Expenses screen
From the Active Reports Screen
1. On the home screen, tap Expense Reports. 2. On the Active Reports screen, tap 3. On the Create Report screen:
• Enter the Report Name • The Report Date defaults to the current date, but can be
edited, if necessary • Enter the Business Purpose
o Include the dates of the trip and why the trip is business-related
o If you run out of space, use the Comment field • Select the account code string for the report.
o Based on your Concur profile settings, some or all of the account code fields may be pre-populated, but you can them as needed.
o If you don’t know what codes you should select, contact your Approver or TUB Finance office NOTE: You can save the report without providing a full account code string, but you must select a TUB and ORG.
4. Tap Save. 5. On the Report screen, you can add expenses and attach receipts.

Concur Using the Concur Mobile App
Center for Workplace Development 10 Last Updated: 6/29/2016
Employee Reimbursement System
When Adding an Expense to a Report
1. On the home screen, tap Expenses. 2. On the Expenses screen, tap Add to Report. 3. Select the expense(s) you want to add. 4. Tap Add to Report. 5. On the Select Report screen, tap 6. On the Create Report screen:
• Enter the Report Name • The Report Date defaults to the current date, but can be
edited, if necessary • Enter the Business Purpose
o Include the dates of the trip and why the trip is business-related
o If you run out of space, use the Comment field 7. Select the account code string for the report.
o Based on your Concur profile settings, some or all of the account code fields may be pre-populated, but you can edit them as needed.
o If you don’t know what codes you should select, contact your Approver or TUB Finance office NOTE: You can save the report without providing a full account code string, but you must select a TUB and ORG.
8. Tap Save. The report is created and the selected expenses are automatically added to the report.
9. On the Report screen, you can add additional expenses, attach receipts, etc.

Concur Using the Concur Mobile App
Center for Workplace Development 11 Last Updated: 6/29/2016
Employee Reimbursement System
Adding Expenses to an Expense Report After creating an expense report, you can easily attach any existing expenses, such as corporate card transactions or any out of pocket expenses you have already created. To add existing expenses to an expense report:
1. On the home screen, tap Expenses to access your list of available expenses.
2. On the Expenses screen, tap Add to Report. Selection circles appear next to each expense in the list.
3. Select the expense(s) you want to add to the report 4. Tap Add to Report. 5. Tap the desired report from the list. A confirmation
message appears. 6. Tap Add. The Report screen appears, and the expense(s)
are now attached to the report.

Concur Using the Concur Mobile App
Center for Workplace Development 12 Last Updated: 6/29/2016
Employee Reimbursement System
Editing Expenses on an Expense Report After adding an expense to a report, you can make a number of other changes to the expense, including:
• Completing additional required fields based on the expense type • Itemizing expenses, such as hotel stays • Adding attendees to a business meal expense
To edit expenses on an expense report:
1. On the home screen, tap Expense Reports. 2. On the Active Reports screen, tap the report you want to
view. 3. On the Report Details screen, tap the expense you want to
edit 4. Make the desired changes.
• If there are any empty required fields, you must complete the field before you can save your changes
• Review any exception messages for the expense and address them. Common exception resolutions include attaching a required receipt or adding a comment.
5. To add a receipt, tap Add Receipt, and then do one of the following: • Take a picture of the receipt • Select an existing image from your Photo Album • Select a receipt from your Receipts Store
6. Tap Save.

Concur Using the Concur Mobile App
Center for Workplace Development 13 Last Updated: 6/29/2016
Employee Reimbursement System
Itemizing Expenses Certain expense types, like hotel stays, must be itemized before you can submit a report. You may also need to itemize expenses if a portion of the expense is personal, and should not be reimbursed. To itemize expenses:
1. On the home screen, tap Expense Reports. 2. On the Active Reports screen, tap the report you want to view. 3. On the Report screen, tap the desired expense. 4. On the Expense Details screen, tap Itemize.
5. On the Itemizations screen: • If it is a hotel stay:
a. Enter the Check-In and Check-Out Dates. b. Enter the nightly Room Rate and Room Tax. c. Enter any other recurring charges during the stay, for
example, daily parking changes. • For other expenses:
a. Select the expense type. b. Complete the remaining fields.
6. Tap Save. NOTE: If there is a remaining balance, tap + and create the remaining expenses to bring the remaining balance to zero.
Concur Using the Concur Mobile App
Center for Workplace Development 14 Last Updated: 6/29/2016
Employee Reimbursement System
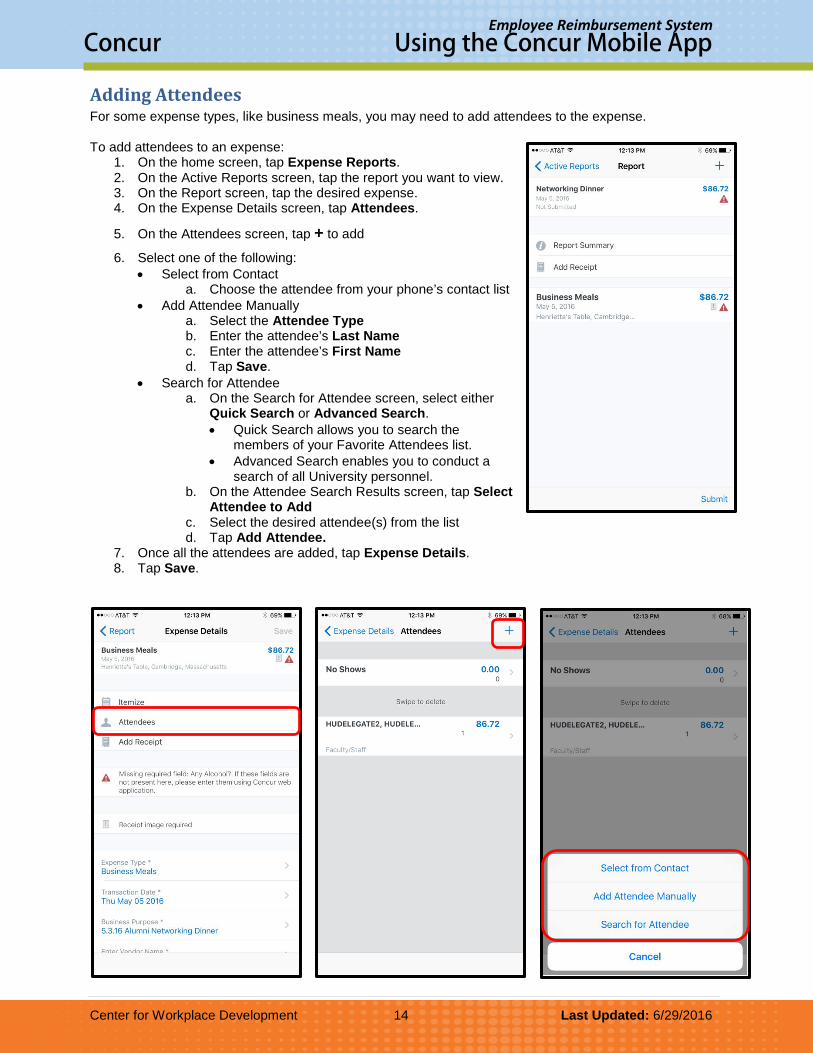
Adding Attendees For some expense types, like business meals, you may need to add attendees to the expense. To add attendees to an expense:
1. On the home screen, tap Expense Reports. 2. On the Active Reports screen, tap the report you want to view. 3. On the Report screen, tap the desired expense. 4. On the Expense Details screen, tap Attendees.
5. On the Attendees screen, tap + to add
6. Select one of the following: • Select from Contact
a. Choose the attendee from your phone’s contact list • Add Attendee Manually
a. Select the Attendee Type b. Enter the attendee’s Last Name c. Enter the attendee’s First Name d. Tap Save.
• Search for Attendee a. On the Search for Attendee screen, select either
Quick Search or Advanced Search. • Quick Search allows you to search the
members of your Favorite Attendees list. • Advanced Search enables you to conduct a
search of all University personnel. b. On the Attendee Search Results screen, tap Select
Attendee to Add c. Select the desired attendee(s) from the list d. Tap Add Attendee.
7. Once all the attendees are added, tap Expense Details. 8. Tap Save.

Concur Using the Concur Mobile App
Center for Workplace Development 15 Last Updated: 6/29/2016
Employee Reimbursement System
Submitting Expense Reports IMPORTANT: Before submitting a report for approval, make sure that any exceptions have been addressed, and all required receipts are attached to the report. To submit a report:
1. On the home screen, tap Expense Reports. 2. On the Active Reports screen, tap the report you want to view. 3. On the Report screen, tap Submit. The report is updated to Submitted status pending approval.
Resources Quick Reference Guides and Online Tutorials Quick Reference Guides provide step-by-step instructions on a number of common tasks in Concur, and online tutorials present a video walk-through of how to perform various tasks and procedures within the system. Both the Guides and online tutorials are available at: travel.harvard.edu/concur-training Concur Support 24 hour support is available through the Concur Support Desk at 866-793-4040. You can also access the Concur Support Portal within the system by clicking the Help menu, and then selecting Contact Support.