computer fingerprint enhancement: the joy of lab color
TRANSCRIPT

Journal of Forensic Identification464 / 62 (5), 2012
Received May 27, 2011; accepted September 22, 2011
Technical Note
Computer Fingerprint Enhancement: The Joy of Lab Color
Jill SmithYork Regional Police Aurora, Ontario, Canada
Abstract: Adobe Photoshop CS5 Extended has a selection of color modes that can help maximize the signal-to-noise ratio when digitally enhancing color images of f ingerprints. This article discusses the Lab color mode in Adobe Photoshop and explains some of the benefits this dynamic mode can provide.
IntroductionFingerprint enhancement in the digital realm has grown
exponentially in the forensic world in recent years, with software and training being more affordable and available to all f inger-print examiners. We now have an extensive arsenal of digital enhancement techniques at our disposal that were not available in the analog domain. Along with these digital tools comes a responsibility to establish authentication of our work [1] and an obligation to provide the court with the clearest, truest, and most complete information and images possible [2].
This requires us to perform our enhancement steps on working copies only of the original document, which is stored and archived in its original state. Any enhancement steps made on these copies must be documented in enough detail that any person with similar training and experience would be able to follow the steps and produce a similar, although not necessarily mathematically exact, result. There are several methods to track

Journal of Forensic Identification62 (5), 2012 \ 465
enhancements: handwriting notes, logging steps in a separate document, or using the “Actions” function in Adobe Photoshop. Adobe Photoshop can be set to track all functions applied to every image that is opened. However, in my opinion, this is not sufficient for tracking steps, but rather a way of corroborating my own notes. My personal choice is to use Actions in Adobe Photoshop, which will record my enhancement steps as I work, and I can play the steps back one by one later on the unenhanced version if I wish. It is important to understand the digital tools we are utilizing and to be capable of explaining the techniques used in lay terms, should the need arise [1].
There is a color mode (Figure 1) in Adobe Photoshop that can often produce good results with some color images (e.g., ninhydrin-developed fingerprints or fingerprints photographed with an alternate light source). This article explores some of the advantages that are offered by Lab color mode.
Figure 1Convert to Lab color mode.

Journal of Forensic Identification466 / 62 (5), 2012
Color Modes in Adobe PhotoshopThe RGB color mode is an additive color model where the
primary colors of red, green, and blue light may be combined to produce all of the colors of the visible spectrum. Equal parts of red, green, and blue light produce white. Most image sensors in digital cameras capture all color information in RGB, using a Bayer array color f ilter, and our computer monitors display color using the RGB color model. Each of the three channels in an RGB image contain not only the color information, but also the brightness and detail information of that image. RGB is a standard color mode; however, the colors of any given image may vary from device to device (e.g., from camera to monitor or monitor to monitor) or from one software application to another, depending on the settings.
The CMYK color mode is a subtractive color model where the secondary colors of cyan, magenta, yellow, and black are pigments that are combined in varying percentages to produce color. White is created when all four components have a value of 0%. Theoretically, black is created when cyan, magenta, and yellow components have a value of 100%, but because of the impurity of the inks, there is a black ink added to achieve a true black. CMYK is the standard color mode used in the print-ing industry. Again, as with the RGB color mode, the CMYK channels contain both the color information of an image, as well as the brightness and detail.
Then there is Lab color mode, which is based on human perception of color. The numeric values in Lab describe every possible color that the human eye can see, as well as colors that we cannot see. Lab describes how a color looks, rather than how much of a color is needed for any particular device, such as a digital camera, monitor, or printer. This is why Lab is said to be a device-independent color model. Color management systems use Lab color to transform a color from one color space to another with predictability [3].

Journal of Forensic Identification62 (5), 2012 \ 467
Lab Color ModeThe interesting thing about Lab color mode that is the most
useful to us is how the color information and detail are separated into channels. The “L” channel represents the lightness compo-nent of an image. The values in the L channel have a range from 0 (black) to 100 (white). Here we will f ind all of the brightness and detail of our image, and it essentially looks like a grayscale version of the image. The “A” channel contains only the green and magenta color information, with values ranging from +127 (brightest possible magenta) to -128 (brightest possible green), with a value of 0 being neutral (neither magenta nor green). The “B” channel contains only the blue and yellow color informa-tion, with values ranging from +127 (brightest possible yellow) to -128 (brightest possible blue), with a value of 0 being neutral (neither yellow nor blue). The far ther away we get from the center “0” value (neutral), the more intense that color will be.
Now that we have brief ly described what Lab color is, the obvious question is, What can it do for us? When the fingerprint or the substrate is in color, it is a good idea to look at all of the color channel options for one that carries strong signal informa-tion. Do include Lab color mode when making this analysis. It will not always be the better option, but when it is, you will find it worth the effort. That said, it is worth noting that you will f ind the A and the B channels to have an extremely compressed dynamic range, and further enhancement will be necessary.
There are occasions when black background patterns, or even a neutral pattern distraction found in the texture of the substrate (e.g., paper), can be minimized by converting to Lab color mode. This is because the black, if it is indeed a neutral black, will be separated into the L channel, and the colors will be found alone in the A and B. For example, if we are working on a ninhydrin print on a store receipt, the black text is in the L, and the magenta-violet fingerprint, or “signal” information, will be found in the A channel without the black text.

Journal of Forensic Identification468 / 62 (5), 2012
Lab Color Procedures
Example 1Anything in the A channel that is lighter than 50% gray is
more magenta than green. In Figure 2, we can see the magenta-violet ridges of the ninhydrin print showing as white. They need to be inverted so that they are dark (Image > Adjustments > Invert).
Also note the extremely compressed dynamic range of Figure 2. It lacks a great deal of contrast, and after conver ting to grayscale, we can address the contrast issue by applying Levels, Curves, or Unsharp Mask. We will apply a Levels function to our inverted image in Figure 3.
Figure 3 illustrates the enhanced A channel, which contained the color information of the image only (specifically magenta and green). We discarded the L channel completely when we selected the A channel and converted to grayscale, which contained the brightness and detail, including the gray-black text printed on the receipt.

Journal of Forensic Identification62 (5), 2012 \ 469
Figure 2In the Channels palette (to open Channels palette, Click: Window >
Channels), highlight the “A” channel. Already you can see an immediate improvement. The ridges are white, and the image needs to be inverted. As you can see, this image has a very compressed dynamic range and needs to
be enhanced with Levels, Curves, or both.
Figure 3Convert to grayscale and make contrast adjustments. Shown in Figure 3 are the Levels adjustment settings, which have improved the image significantly.
Curves and Unsharp Mask are options to enhance further, if desired.

Journal of Forensic Identification470 / 62 (5), 2012
Example 2The next example is a ninhydrin print on newspaper (Figure
4). The ninhydrin print is weak, but there is the added distraction of a green half-tone dot pattern in the background. We are going to use both Lab color mode and RGB color mode to enhance the latent print and mute the distracting background pattern, but this time we will be blending two channels together from two working copies of the same original image.
Please note that ninhydrin prints tend to present a stronger signal in the green channel of an RGB image, the A channel of an Lab image, and the magenta channel of a CMYK image. You will discover this for yourself as you analyze your images, but keep in mind there are occasionally exceptions, so never assume this always to be true.
We now have two identical images open on our desktop; one is an RGB image, and the other is a Lab version. Both are working copies of our original. In the channels palette, click on the name of the channel in the blue bar area to the right of each thumbnail to view each in turn.
We can see now that the ridges are dark in both Figure 5 (green channel) and Figure 6 (A channel). Conversely, the dots are dark in Figure 5 (green channel) and light in Figure 6 (A channel).
Figure 4Original RGB image of a ninhydrin print on newspaper.
Duplicate the image and convert the new copy image to Lab (Image > Mode > Lab color).

Journal of Forensic Identification62 (5), 2012 \ 471
Figure 6The “A” channel in Lab.
Invert the “A” channel so that the ridges are dark, not white.
Figure 5The green channel in RGB.

Journal of Forensic Identification472 / 62 (5), 2012
This is useful, because these two channels can be added or blended together so that the ridge detail is strengthened. If they are blended together at just the right opacity, the light dots of the A and the darker dots of the green will cancel themselves out.
Open the Calculations Dialogue box (Image > Calculations). This is a mathematical function in Adobe Photoshop (similar to Apply Image) that allows us to mathematically blend two images or channels together. The result will be either a new alpha channel in our active image, or we have the option to open it as a new document. (This is where I frequently add, subtract, or multiply channels from multiple images to create a new file.) There are several components in Calculations (Figure 7) that have to be set.
Source 1: Select the RGB image as source 1, and select “green” under the channel option. By clicking the drop-down arrow, a list will appear with all of the images open that have the same pixel dimensions as the image we now have active. Source 2: Select the Lab image (duplicate copy) as source 2, and select “A” under the channel option. Source 1 is applied to Source 2 using the blending mode we specify. Blending mode: Set blending mode to add. The blend-ing modes most useful for forensic enhancement are add, subtract, multiply, and overlay.
Opacity setting: Set the opacity to approximately 35% (the dots blend together to almost disappear).Offset: Set to approximately -140. (Adding the two channels together results in pixel value numbers that are very high, or even higher than the 255 value for white, which makes the image look ridiculously overexposed. Setting the offset to -140 means that 140 values are subtracted from every pixel across the image, bringing all values within the visible range of 0 to 255.)
Result: Choose either New Channel or New Document. Either way will work, because the result is going to be converted to grayscale afterwards.Click OK, and conver t to grayscale, and enhance, using
contrast adjustment tools such as Levels, Curves, and Unsharp Mask.
Journal of Forensic Identification62 (5), 2012 \ 473
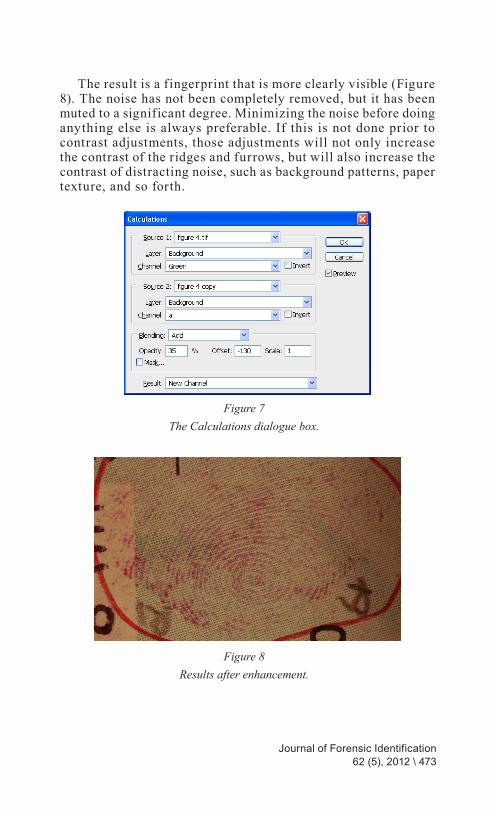
The result is a fingerprint that is more clearly visible (Figure 8). The noise has not been completely removed, but it has been muted to a significant degree. Minimizing the noise before doing anything else is always preferable. If this is not done prior to contrast adjustments, those adjustments will not only increase the contrast of the ridges and furrows, but will also increase the contrast of distracting noise, such as background patterns, paper texture, and so forth.
Figure 7The Calculations dialogue box.
Figure 8Results after enhancement.

Journal of Forensic Identification474 / 62 (5), 2012
Additional Information
Blending ModesMultiply: This function multiplies the pixel values of source 1 with those of source 2. The result is always darker.Overlay: This function multiplies or screens (multiplying the inverse of the channels) the channels with each other, depending on the base channel (source 2). The pixel values of source 1 overlay the base channel (source 2), while preserv-ing its highlights and shadows.Subtract: This function subtracts the pixel values of source 1 from the pixel values of source 2. A resulting negative value will be clipped to 0 (black) unless you compensate with offset.Add: This funciton adds the pixel values of source 1 to the pixel values of source 2. Any resulting values higher than 255 will be clipped to 255 (white) unless you compensate with offset.
OffsetOffset is used when adding or subtracting channels or images together. This setting will equally add or subtract the value specified to all values in the resulting image. This means that positive numbers will lighten the image and negative numbers will darken it. There are 256 possible shades of gray for each pixel in each channel. When adding two channels or images together, the result may be beyond the range of the inten-sity that Domay be represented (seen as being too light). Do not be discouraged. Black is 0 and white is 255, so high numbers are going to make the image very light. The offset is there so that we can correct that by evenly subtracting from all values equally, thus displaying the image within the 0 to 255 range. A negative number in the offset will achieve this.Conversely, if we are subtracting two channels from one another, our overall pixel values are going to be very low, resulting in an extremely dark image. Setting the offset value to a positive number will lighten the image equally.

Journal of Forensic Identification62 (5), 2012 \ 475
ConclusionLab color mode in Adobe Photoshop is certainly a powerful
tool when it comes to extracting fingerprint detail from some color images and is definitely an asset in any repertoire of digital enhancement techniques.
AcknowledgmentSpecial thanks to Detective Sergeant Dave Juck for supporting
the education of our forensic identification bureau and providing the tools necessary for growth in our field. I would also like to thank my friend and mentor Brian Dalrymple (Brian Dalrymple and Associates) for his ceaseless and enthusiastic support.
For further information, please contact:Jill Smith #5150York Regional PoliceForensic Imaging UnitCentral Services Building 47 Don Hillock Dr. Aurora, OntarioCanada L4G [email protected]
References1. Overview of SWGIT and the Use of Imaging Technology in the
Criminal Justice System. Scientific Working Group Imaging Technology (SWGIT). Version 3.3, June 2006, section 1.4.
2. Federal Rules of Evidence; House of Representatives - The Committee on the Judiciary, U.S. Government Printing Office: Washington, DC, 2011, p 39.
3. Margulis , Dan. Photoshop LAB Color - The Canyon Conundrum and Other Adventures in the Most Powerful Colorspace; Peachpit Press: Berkeley, CA. 2005; pp 3–38.