competent data management - a key component · pdf filecompetent data management - a key...
TRANSCRIPT

Competent Data Management -
a key component
Part II – Illustrating the data entry application
using CS-Pro
April 2009
University of Reading
Statistical Services Centre
Data Management
Support to RIU Projects

2 ©SSC 2009 – Illustrating the Process using CS-Pro
Background
This booklet, and an accompanying parallel booklet entitled “Part I – Elements of a
Good Data Entry System” aim to provide guidance on how data entry systems can be
set up and managed. The first part was aimed at the project Data Manager and
focused on discussing the components of a good data entry system that will help in
ensuring quality data. The first booklet can be used as an aid to development of the
data management guidelines for the project.
In this, the second part we show how to implement a data entry system. We use CS-
Pro in this second guide, but the ideas could be implemented equally well in other
packages such as Epi-Info and MS-Access®
. The exact method of implementation
will of course differ, but the concepts remain the same.
Disclaimer
This document is an output from the Research into Use Programme, managed by NR
International, a project funded by the UK Department for International Development
(DFID) for the benefit of developing countries. The views expressed are not
necessarily those of DFID or NR International.
Acknowledgements
We are very grateful to Dr. Parvin Sultana, Middlesex University Flood Hazard
Research Centre, for granting permission to use an example from her research work to
illustrate good features of a data entry system. We also thank Dr. Frances Kimmins,
RIU Management Team for funding the preparation of this guide.
©SSC 2009 – Illustrating the Process using CS-Pro 3
Contents
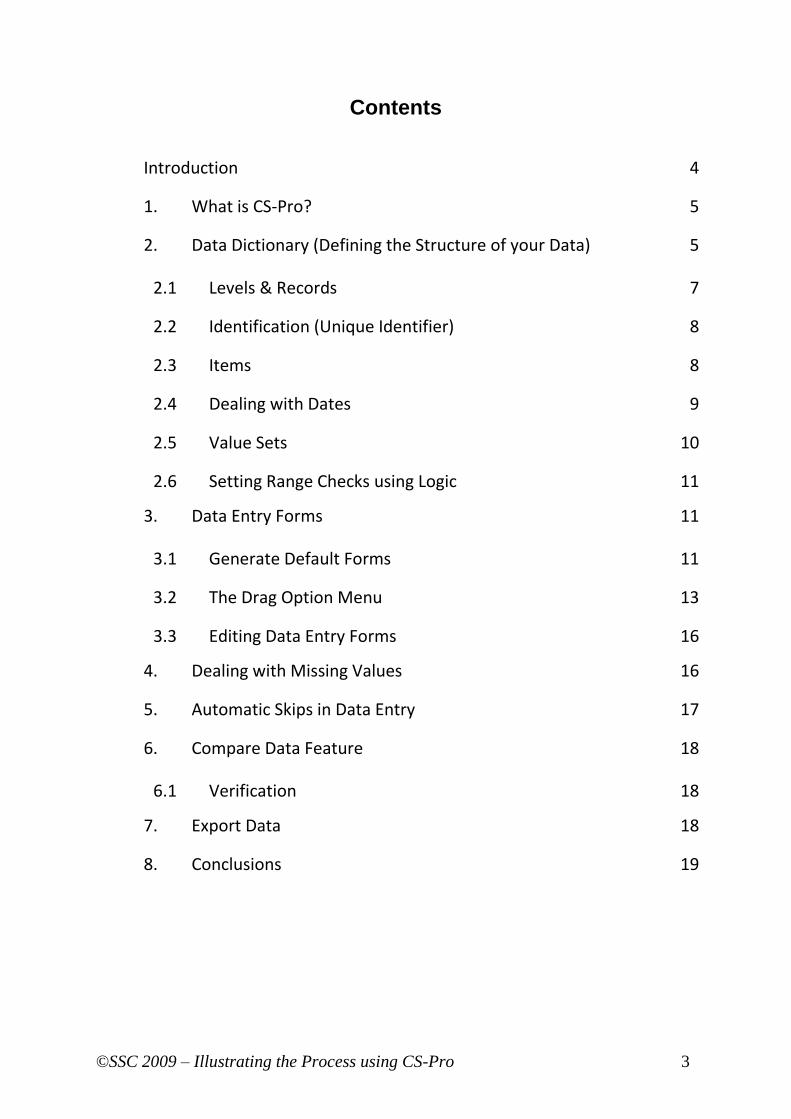
Introduction 4
1. What is CS-Pro? 5
2. Data Dictionary (Defining the Structure of your Data) 5
2.1 Levels & Records 7
2.2 Identification (Unique Identifier) 8
2.3 Items 8
2.4 Dealing with Dates 9
2.5 Value Sets 10
2.6 Setting Range Checks using Logic 11
3. Data Entry Forms 11
3.1 Generate Default Forms 11
3.2 The Drag Option Menu 13
3.3 Editing Data Entry Forms 16
4. Dealing with Missing Values 16
5. Automatic Skips in Data Entry 17
6. Compare Data Feature 18
6.1 Verification 18
7. Export Data 18
8. Conclusions 19

4 ©SSC 2009 – Illustrating the Process using CS-Pro
Introduction
In the booklet entitled “Role of a Database Package for Research Projects”,1 we
considered the strengths and weaknesses of using spreadsheets, such as MS-Excel®
and database packages such as MS-Access®
for data entry. We concluded that, when
used “with discipline”, spreadsheets are adequate when your data has a simple
structure – i.e. one or maybe two levels only. We defined “with discipline” in our
guide called “Disciplined Use of Spreadsheet Packages for Data Entry”.
Spreadsheets are easy to use and very popular, but for complex data structures they
are best avoided.
Database packages are, in many ways, ideal for complex data structures with several
levels. The ability to design data entry screens that resemble the questionnaire is a
particular strength, as is the ability to program automatic skips matching skips in the
questionnaire. One serious disadvantage, however, is that designing and
implementing a database is not a trivial task and there is a very steep learning curve
involved.
Fortunately there is a third option – packages such as CS-Pro, which is used in this
guide to illustrate how the application of rigour and discipline can help in setting up a
good data entry system for capture of data entry errors and validation.
1 The Statistical Services Centre has written a series of guidelines for DFID. The booklets are available online
at www.reading.ac.uk/ssc
©SSC 2009 – Illustrating the Process using CS-Pro 5
1. What is CS-Pro?
CS-Pro (Census and Survey Processing System) is a package for entry, editing,
tabulation and dissemination of census and survey data. CS-Pro was developed
jointly by the U.S. Census Bureau, Macro International and Serpro S.A., with major
funding from the U.S. Agency for International Development. This software can be
downloaded from http://www.census.gov/ipc/www/cspro/ and is available free of
charge.
CS-Pro includes a data entry application, a batch editing application and a tabulation
application. Within the data entry application there are facilities for defining the
structure of your data (the data dictionary), and creating data entry forms. During the
data entry process itself there is the facility to verify data by retyping values and
comparing them to the values previously entered. There is also the facility to
compare two data files created during double data entry, and produce a report on the
discrepancies found.
With the tabulation application you can produce cross-tabulations and frequency
tables which are useful for exploratory data analysis and error checking. For
information on the tabulation application refer to the CS-Pro user guide available from
http://www.census.gov/ipc/www/cspro/doc.html. When you need to transfer to a
statistics package to analyse your data further, CS-Pro provides a useful Export
feature that transfers the data to formats readable by Excel and a variety of statistical
packages. If requested this feature will generate syntax files for STATA, SPSS and
SAS that contain the instructions for reading the data and for labelling the variables.
2. Data Dictionary (Defining the Structure of your Data)
Before you can start to enter data using CS-Pro, you must create a Data Entry
Application. A Data Entry Application contains a set of forms (screens) and logic
(code) which a data entry clerk uses to key data to a data file. Data Entry
Applications can be used to add new data and to modify existing data.
Before creating your data entry forms you must create a Data Dictionary. A Data
Dictionary is part of the Data Entry Application that describes the structure of your
data and how the data are stored within the data file.
By way of example we will use the same questionnaire that we used in the
accompanying guide Part I – Elements of a Good Data Entry System. The
questionnaire is shown in Figure 1.

6 ©SSC 2009 – Illustrating the Process using CS-Pro
Figure 1 – Adapted questionnaire from focus group discussions for PAPD project
The Effectiveness of the PAPD Method Focus Group Discussions in CBFM Sites
Identification Number:
1. Waterbody Type: [ __ ]
(1=Open Beel, 2=Flood Plain Beel, 3=River, 4=River + Open Beel)
2. Area of Waterbody (hectares): [ __ __ __ __ . __ ]
3. Is this a PAPD site?: [ __ ]
(0=No, 1=Yes)
3.1. If yes, please state date PAPD started: [ __ __ / __ __ / __ __ __ __ ] (dd/mm/yyyy)
4. Partner NGO: [ __ __ ]
(1=BRAC, 2=Proshika, 3=Caritas, 4=Banchte Shekha, 5=CNRS, 6=CRED, 7=SUJON, 8=ERA)
4.1. Date of NGO contract: [ __ __ / __ __ / __ __ __ __ ] (dd/mm/yyyy)
5. Date of start of CBFM activities: [ __ __ / __ __ / __ __ __ __ ] (dd/mm/yyyy)
6. Date of formation of CBO: [ __ __ / __ __ / __ __ __ __ ] (dd/mm/yyyy)
7. Please enter the following:
7.1. Number of poor fishers: [ __ __ __ ]
7.2. Number of fishers who fish for income: [ __ __ __ ]
7.3. Number of fishers who fish for food: [ __ __ __ ]
7.4. Number of persons who do not fish: [ __ __ __ ]
8. Number of awareness training activities: [ __ __ ]
9. Number of people in Focus Group discussion: [ __ __ ]
10. Basic information concerning respondents:
No. Type of person (1=Full-time fisher; 2=Part-time fisher; 3=Subsistence fisher; 4=Fish trader; 5=Fish processor
Gender (1=Male, 2=Female)
Involvement in CBFM activities (1=Lots; 2=Some; 3=Little; 4=None)
Perception of changes in social cohesion since start of CBFM activities – scale of +5 to -5
1
2
3
4
5
6
7
8
9
10

©SSC 2009 – Illustrating the Process using CS-Pro 7
2.1 Levels & Records
We described levels and records in section 1 of the accompanying guide. Remember
a level generally equates to a questionnaire and records refer to hierarchical data
within the same questionnaire. In our example survey we have one questionnaire and
thus one level. In our questionnaire questions 1 to 9 provide background information
and generate one set of answers per focus group discussion. Question 10 captures
four pieces of information for each respondent. Thus we have a focus group record
and a respondent record. These two records are shown in Figure 2.
Figure 2 – Group and Respondent Records in Data Dictionary
Note each record has a label and a name. The Type Value is a code that identifies this
kind of record in the data file. For example Figure 3 shows some of the data for this
project. The first row starts with “1” indicating that this is a group record. This is
followed by seven rows that start with “2” indicating seven respondent records.
Figure 3 – How the data are stored in the data file
110120007.712307200252511200101122001230720022600350940631407 21010111105.00 21010221105.00 21010331105.00 21010431105.00 21010521204.00 21010621204.00 21010741205.00 110220008.011007200252511200101122001010320022333578651681607 21020111104.00 21020221105.00 21020321105.00
The GROUP_RECORD in Figure 2, has Required set to “Yes” indicating that each
questionnaire must have an occurrence of this type of record, and as Max is set to 1
there must be one and only one GROUP_RECORD per questionnaire. The
RESPONDENT_RECORD is not required giving the possibility of background
information but no respondent information on the questionnaire. The maximum
number of respondents is set to 10. The maximum needs to be set when you create the
record. In the example above it should be large enough to include the maximum
number of respondents you expect to get when you conduct a focus group discussion.
In a typical household survey with a household roster on the questionnaire, you must
ensure the maximum for the roster record is enough to include all household members
for all households in the survey. Although you can make changes to the dictionary

8 ©SSC 2009 – Illustrating the Process using CS-Pro
later on, this is not something data entry staff should be expected to do and there may
be a tendency to just omit data that does not fit.
2.2 Identification (Unique Identifier)
Identification items uniquely identify the questionnaire. This could be a single value
entered at the top of each questionnaire or it may be a combination of values. Figure 4
shows the identification item for our example which is the Identification Number at the
top of the questionnaire. This number has three digits so when the item is defined in
the dictionary the length must be set to 3.
Figure 4 – Identification Item
In this particular example we have set Zero Fill to Yes which means, for example, an
identification number of 7 will be stored as 007. Data in the identification item will
appear in every record in the data file.
2.3 Items
An item describes a response to a question. In our example the respondent record has
five items as shown in Figure 5. Note that we have included Person Number as an
item. This is the number in the first column of the table on the questionnaire that was
pre-printed (see Figure 1). This item must be included as part of the unique identifier
for the respondent record. We mentioned earlier that the identification item appears
on all records (rows) in the data file. Although the identification item by itself
uniquely identifies the questionnaire, it does not uniquely identify a respondent. For
this we need the combination of Identification Number and Person Number.
Figure 5 – Items in the Respondent Record
Person Number can take any value between 1 and 10. To allow for 10 we must set the
length to 2. Type of person, Gender and Involvement in CBFM activities are all single-
digit codes so for each of these the length (Len in Figure 5) is set to 1. Social Cohesion
©SSC 2009 – Illustrating the Process using CS-Pro 9
is a value between -5 and +5 and we want to allow for two decimal places2. In
calculating the length we must allow a space for the decimal point and, as negative
numbers are included in the range of possible values, we must allow a space for the
minus sign. For example, -4.75 is a possible value for this item and this requires 5
spaces so we must set the length to 5. Note – although there is an option not to store
the decimal point (by setting Dec Char = No) in the data file, we strongly recommend
that you always do store the decimal point when you have decimal places on an item.
This is to avoid any confusion and to prevent, for example, a value such as 63.9 being
read as 639.
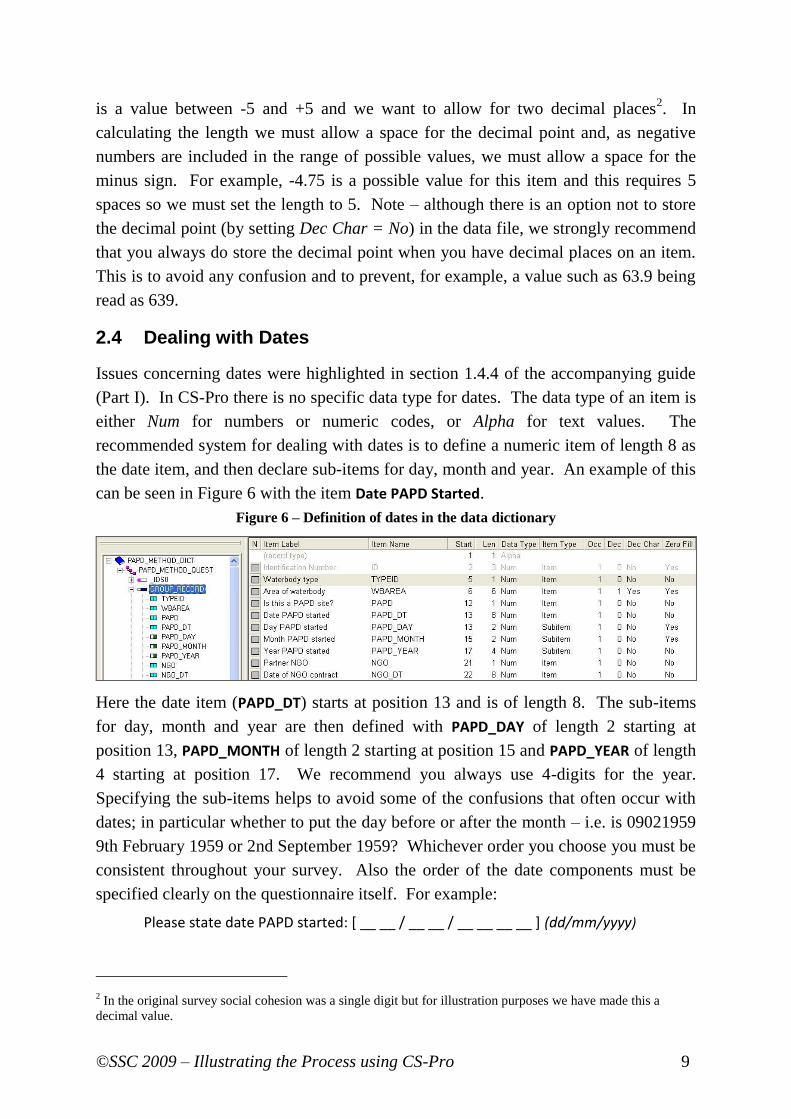
2.4 Dealing with Dates
Issues concerning dates were highlighted in section 1.4.4 of the accompanying guide
(Part I). In CS-Pro there is no specific data type for dates. The data type of an item is
either Num for numbers or numeric codes, or Alpha for text values. The
recommended system for dealing with dates is to define a numeric item of length 8 as
the date item, and then declare sub-items for day, month and year. An example of this
can be seen in Figure 6 with the item Date PAPD Started.
Figure 6 – Definition of dates in the data dictionary
Here the date item (PAPD_DT) starts at position 13 and is of length 8. The sub-items
for day, month and year are then defined with PAPD_DAY of length 2 starting at
position 13, PAPD_MONTH of length 2 starting at position 15 and PAPD_YEAR of length
4 starting at position 17. We recommend you always use 4-digits for the year.
Specifying the sub-items helps to avoid some of the confusions that often occur with
dates; in particular whether to put the day before or after the month – i.e. is 09021959
9th February 1959 or 2nd September 1959? Whichever order you choose you must be
consistent throughout your survey. Also the order of the date components must be
specified clearly on the questionnaire itself. For example:
Please state date PAPD started: [ __ __ / __ __ / __ __ __ __ ] (dd/mm/yyyy)
2 In the original survey social cohesion was a single digit but for illustration purposes we have made this a
decimal value.

10 ©SSC 2009 – Illustrating the Process using CS-Pro
2.5 Value Sets
Value sets in CS-Pro have two possible uses. The first is to set value labels for
numeric codes. For example Figure 7 shows the value set for the Sex item in our
example dataset.
Figure 7 – Value labels for the SEX item
Here we define that code 1 is for Male and code 2 is for Female. As these are numeric
codes, there is no range of values so we do not have a value in the To column. The
value set also sets a range for the data that can be entered into this item. For example
entering a value other than 1 or 2 into the Sex item would result in an OUT OF RANGE
error message appearing.
The second use for value sets is to group numeric data such as age, weight, height, etc.
In our example dataset we have the item Area of Waterbody (WBAREA) for which
values range from 2 to 700 hectares. Figure 8 shows a simple grouping for this item
using a value set.
Figure 8 – Grouping a numeric item using a Value Set
Here we have defined 0 to 25 hectares as small, 25 to 100 hectares as medium and 100
to 700 hectares as large. This value set also has the effect of setting a range on the
data for this item and if we try to enter 701 for example, CS-Pro will show the OUT
OF RANGE error message.
We can also create more than one value set for an item. For example for the item
Month PAPD Started, one value set can set value labels for the months – January to
December , while a second set can group the months into quarters of the year. In
tabulations we can choose which value set to use when we tabulate the month so this
facility gives us a lot of flexibility.

©SSC 2009 – Illustrating the Process using CS-Pro 11
2.6 Setting Range Checks using Logic
Logical checks on the data are often necessary. One such check is a range check.
Figure 9 shows an example of a range check for the item PAPD_DAY using the CS-Pro
language.
Figure 9 – Using Logic to set a Range
This procedure uses a single if statement to check whether the value entered in
PAPD_DAY (note this is not case sensitive) is outside the range 1 to 31. If the value is
outside this range, the function errmsg gives a customised message to the user. The
function reenter will move the cursor back to the PAPD_DAY item on the data entry
form. Note the if statement must finish with endif and there can be as many
statements as you need between if and endif. The if statement also has an optional
else clause – for more information on the CS-Pro language and syntax see the CS-Pro
user manual (available at http://www.census.gov/ipc/www/cspro/doc.html). Note that
logic codes are also immensely useful to check consistency between data items.
3. Data Entry Forms
Once you have created your data dictionary, the next stage is to create the
corresponding data entry forms. Ideally you should aim to make your data entry
forms on the computer match the questionnaire form as much as possible. This
facilitates data entry and minimises errors as the data entry staff are able to match the
position of a value on the questionnaire with the data entry box on the screen.
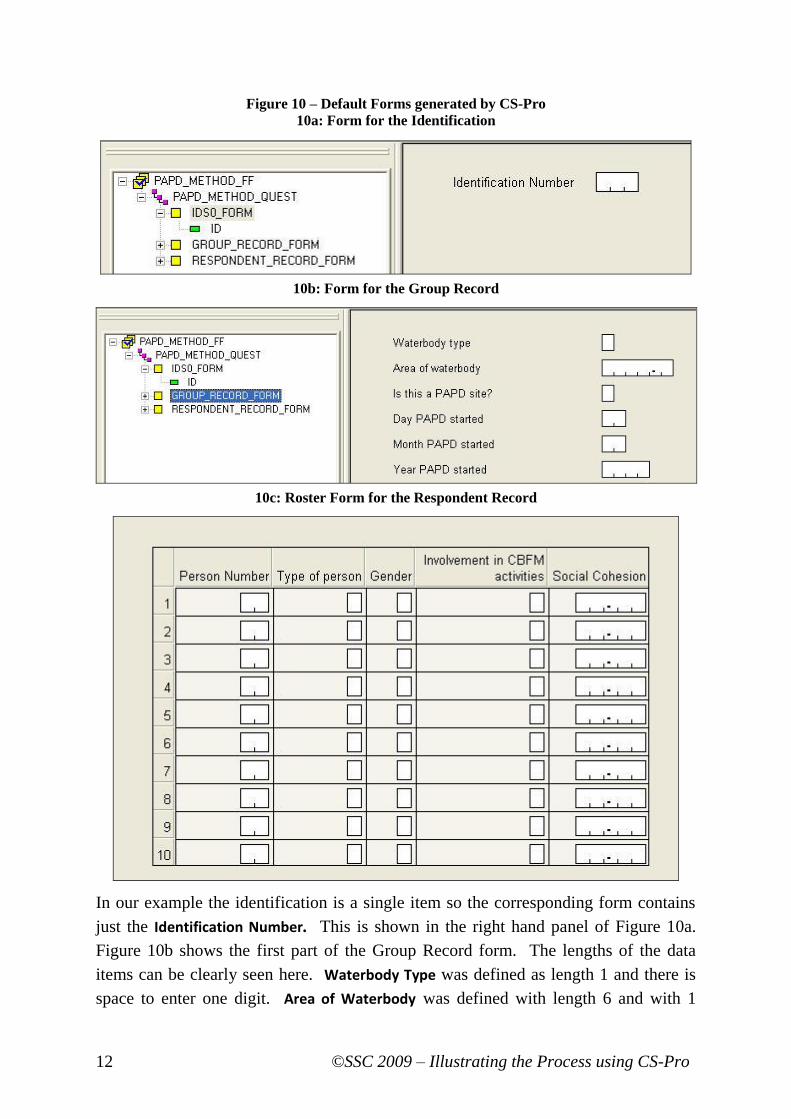
3.1 Generate Default Forms
CS-Pro has an option to generate default data entry forms based on the current data
dictionary. To generate the default forms click the Forms button on the toolbar
then choose Edit Generate Forms. It is often easiest to start with the default
forms, and then edit them to match your questionnaire. The default forms will consist
of one form for the identification items and one form for each of the records in your
dictionary. Thus for our example data we will have 3 default forms as shown in
Figure 10.
12 ©SSC 2009 – Illustrating the Process using CS-Pro
Figure 10 – Default Forms generated by CS-Pro
10a: Form for the Identification
10b: Form for the Group Record
10c: Roster Form for the Respondent Record
In our example the identification is a single item so the corresponding form contains
just the Identification Number. This is shown in the right hand panel of Figure 10a.
Figure 10b shows the first part of the Group Record form. The lengths of the data
items can be clearly seen here. Waterbody Type was defined as length 1 and there is
space to enter one digit. Area of Waterbody was defined with length 6 and with 1

©SSC 2009 – Illustrating the Process using CS-Pro 13
decimal place. Note how the length includes the decimal point. Figure 10c shows the
Respondent form, which is a roster form with 10 rows for up to 10 respondents. This
matches the MAX value we set for the record when it was defined in the dictionary
indication that each focus group can have up to 10 respondents.
3.2 The Drag Option Menu
When you generate default data entry forms - or when you drag a dictionary record
onto a form, the dialog box shown in Figure 11 will appear:
Figure 11 – Drag Option Dialog Box
The Drag Options define how items will look on the form when you drag them across.
As you can see there are three sections to this dialog:
1. Text Options
2. Roster Options
3. Other Options
We will deal with each of these in turn.
3.2.1 Text Options
When an item is dragged onto the form there will be space for the data to be entered
and some text related to the item. You have the choice of using the item label or the
item name for this text and a choice of the text appearing to the right or left of the data

14 ©SSC 2009 – Illustrating the Process using CS-Pro
item. The default option of using labels and having the text to the left is
recommended.
3.2.2 Roster Options
The default roster option is Horizontal. With this option the roster will appear as a
table of rows and columns with each row representing an occurrence of the record and
the columns representing the data items as shown in Figure 10c.
Choosing the vertical option results in a table where the columns represent the
occurrences and the rows represent the data items. You should choose the option
which best matches the layout on your questionnaire.
You should also consider the ease of data entry. During data entry scrolling up and
down is more intuitive than scrolling from right to left so you should aim to make
your form no wider than one screen width (bear in mind that PCs used for data entry
may have a lower screen resolution than the one you use to design the forms). The
vertical layout may be better for records with only 2 or 3 occurrences (i.e. where
MAX=3 when the record was created) but with many data items.
Alternatively you may consider the third option which is not to use a roster. In this
case the data items from the record are put into a separate form which is recurring –
i.e. during data entry you go through this form as many times as needed. This is
shown in Figure 12.
Figure 12 – Using the option “Don’t Roster”
Note with this option, data items from each record (Group and Respondent in our
example) must be on separate forms. If we use a horizontal or vertical roster, the
roster can be placed within the form for the Group record.
3.2.3 Other Options
Whether or not you select the option Require “Enter” key on Entry? is a matter or
personal choice, but you must be consistent throughout your data entry applications
and ensure the details are documented for the data entry staff. So what does this
option mean in practice? By default, during data entry, CS-Pro will automatically
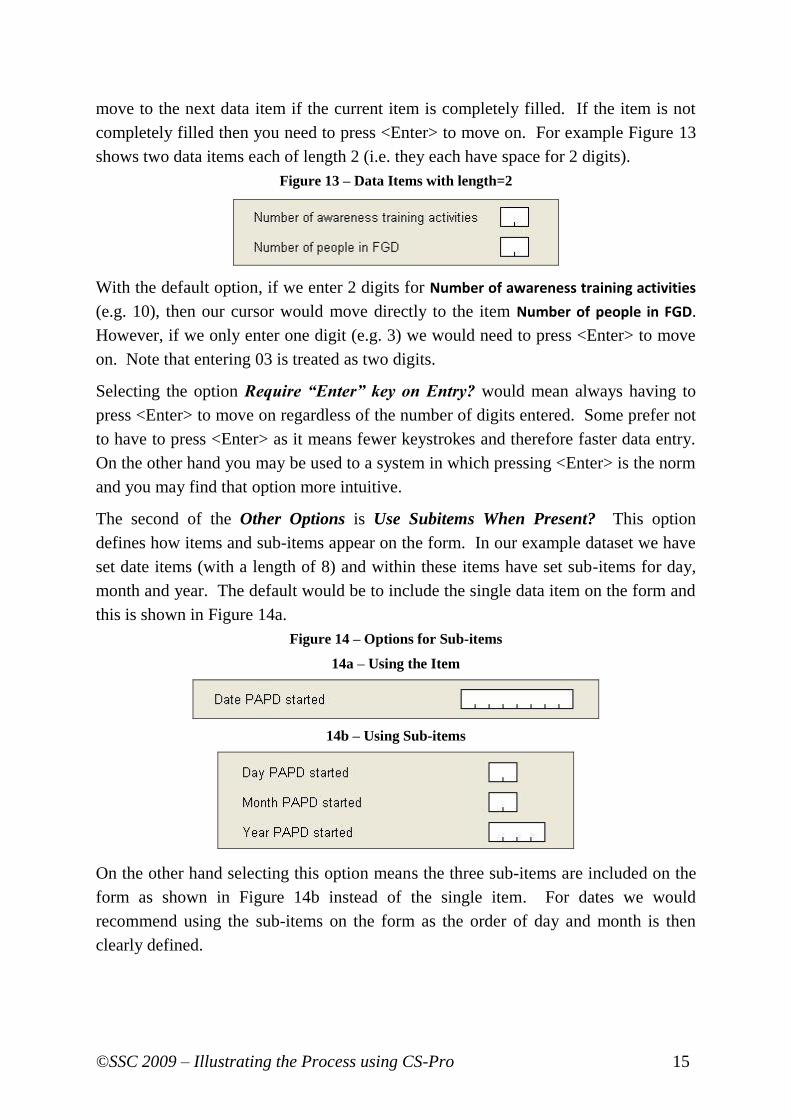
©SSC 2009 – Illustrating the Process using CS-Pro 15
move to the next data item if the current item is completely filled. If the item is not
completely filled then you need to press <Enter> to move on. For example Figure 13
shows two data items each of length 2 (i.e. they each have space for 2 digits).
Figure 13 – Data Items with length=2
With the default option, if we enter 2 digits for Number of awareness training activities
(e.g. 10), then our cursor would move directly to the item Number of people in FGD.
However, if we only enter one digit (e.g. 3) we would need to press <Enter> to move
on. Note that entering 03 is treated as two digits.
Selecting the option Require “Enter” key on Entry? would mean always having to
press <Enter> to move on regardless of the number of digits entered. Some prefer not
to have to press <Enter> as it means fewer keystrokes and therefore faster data entry.
On the other hand you may be used to a system in which pressing <Enter> is the norm
and you may find that option more intuitive.
The second of the Other Options is Use Subitems When Present? This option
defines how items and sub-items appear on the form. In our example dataset we have
set date items (with a length of 8) and within these items have set sub-items for day,
month and year. The default would be to include the single data item on the form and
this is shown in Figure 14a.
Figure 14 – Options for Sub-items
14a – Using the Item
14b – Using Sub-items
On the other hand selecting this option means the three sub-items are included on the
form as shown in Figure 14b instead of the single item. For dates we would
recommend using the sub-items on the form as the order of day and month is then
clearly defined.
16 ©SSC 2009 – Illustrating the Process using CS-Pro
3.3 Editing Data Entry Forms
The default data entry forms can easily be edited and we recommend making your
form on the screen match your questionnaire as closely as possible. This may involve:
adding extra text;
moving and aligning items;
editing existing text;
changing the text font.
Extra text is added by right-clicking on the form in the position where you want the
text to appear and choosing Add Text. In the resulting dialog box you enter the text
you want to appear on the form. You can also select the font and the colour.
The text will appear in the position where you right-clicked but, once selected, this
text (as with other items on the form) can be moved around the form by either using
the mouse or the arrow keys on the keyboard.
An item on the form is selected by clicking on it. Several items can be selected by
holding down the <Ctrl> key as you click each item. Once several items have been
selected, options on the Align menu can be used to align the items to the right, left,
top or bottom. When aligning to the right or left, be aware that items in the same
horizontal plane will be placed on top of each other. The same is true for items in the
same vertical plane when aligning top or bottom. Remember the Undo button is
always available if needed.
Further information on editing forms, including moving items from one form to
another, can be found in the CS-Pro User Guide.
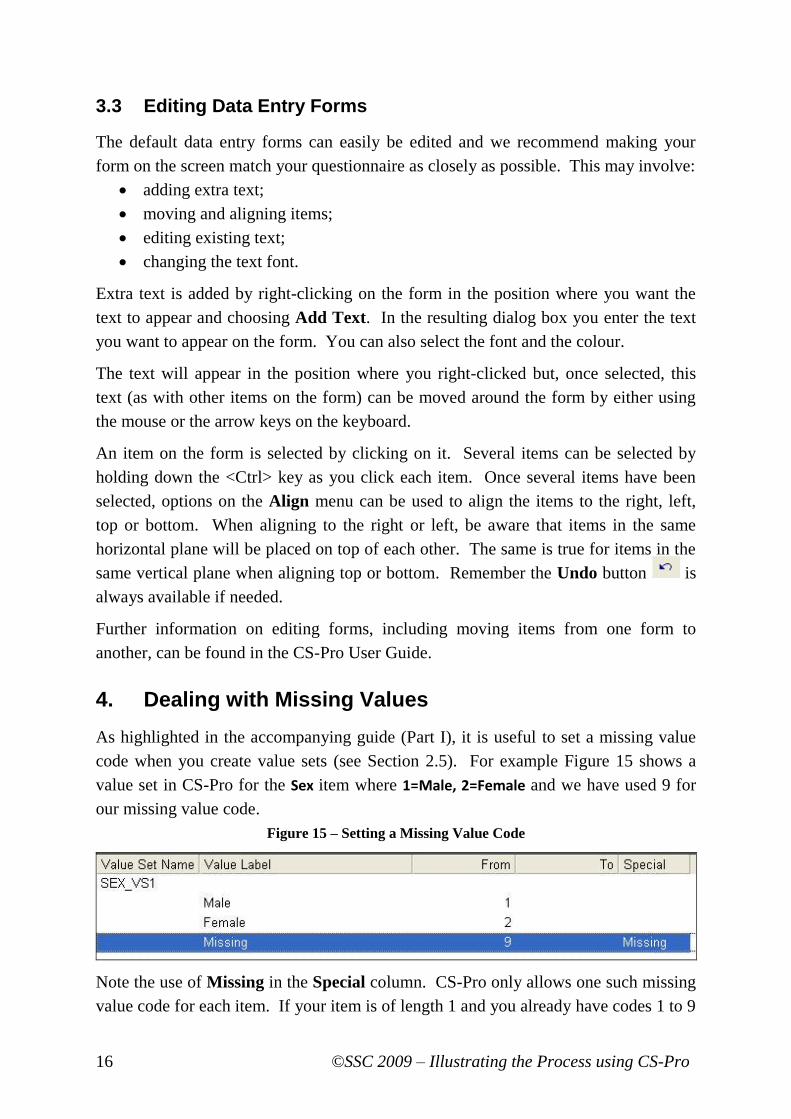
4. Dealing with Missing Values
As highlighted in the accompanying guide (Part I), it is useful to set a missing value
code when you create value sets (see Section 2.5). For example Figure 15 shows a
value set in CS-Pro for the Sex item where 1=Male, 2=Female and we have used 9 for
our missing value code.
Figure 15 – Setting a Missing Value Code
Note the use of Missing in the Special column. CS-Pro only allows one such missing
value code for each item. If your item is of length 1 and you already have codes 1 to 9

©SSC 2009 – Illustrating the Process using CS-Pro 17
assigned then you should change your data item to be of length 2 so that you can
assign 99 as the missing value code. The missing value code can be any non-valid
value but it is best to be consistent and use the same digit in all items. For example
use 9 for one digit numeric codes, 99 for two digit numeric codes, etc.
For items that are not coded but take real values – e.g. age, weight, area, etc. – we
suggested in Part I to use a negative value as the missing value code. As an example
the value -999.9 can be used for the item Area of Waterbody. Note this item is of
length 6 and the missing value code has used all 6 spaces but it could be less. Further
information on missing values can be found in the CS-Pro User Guide.
In CS-Pro you can additionally define a code for not applicable in the same way that
you can for missing – i.e. by using value sets. In our example questionnaire, question
3 asks:
3. Is this a PAPD site? Y/N
3.1 If yes, please state date PAPD started
Clearly the date is not applicable if the site is not a PAPD site. We can set a Not
applicable code for the sub-items of the date – day, month and year. Figure 16 shows
the value set for PAPD_DAY.
Figure 16 – Setting a code for Not Applicable
5. Automatic Skips in Data Entry
Most data entry systems have facilities for programming automatic skips. In CS-Pro
this is done using logic code. In our example dataset, question 3.1 is only relevant if
this is a PAPD site (i.e. the answer to question 3 is Yes). Figure 17 shows the code
associated with question 3.
Figure 17 – Logic Code for an Automatic Skip
This code is executed as soon as data is entered into question 3 (PAPD). If the value
entered is 0 (a no response) then we skip to question 4 (NGO). If not applicable codes

18 ©SSC 2009 – Illustrating the Process using CS-Pro
have been set up for the items skipped then CS-Pro will automatically insert those
codes; alternatively they can be programmed in as shown in Figure 18.
Figure 18 – Setting values for skipped items
6. Compare Data Feature
We recommended double data entry in Part I, followed by a comparison of the two
data files so generated. CS-Pro includes a Compare Data feature for this purpose.
The feature is found on the Tools menu in the data entry application. You need to
specify the dictionary file and the two data files. The results of the comparison are
saved to a text file which should be saved as part of the data management reports for
the project.
6.1 Verification
Some systems have a feature that users often mistake for double data entry. This is
where the data are retyped into the same data file and the values compared to those
that were entered originally. The system immediately tells you if the new value and
the original value do not match. You then need to type the correct value (after having
checked it on the original questionnaire) which is then accepted and stored in the data
file. This feature in CS-Pro is known as Verification. Unlike with the Compare Data
feature, CS-Pro does not provide a file of the discrepancies found during verification.
Verification is better than using no data checks at all, but if the choice is between
verification and double data entry then we would recommend double data entry.
7. Export Data
Export Data is a tool that allows you to export data to statistics software SPSS, SAS or
STATA by creating an ASCII data file and corresponding syntax files to import the
data into the relevant package. The syntax will include commands to label the
variables and variable value codes and set missing value codes as appropriate.
There are various options in the Export Data dialog box. When you have more than
one record in your data we would recommend using the Multiple Files option and the
As Separate Records option. Whether to export items or sub-items depends on what

©SSC 2009 – Illustrating the Process using CS-Pro 19
your sub-items represent. In our examples we have used sub-items for the
components of a date and the recommended action in that instance is to export
subitems.
Note that exporting to SPSS does not produce a .sav file, but instead produces an
ASCII file with the extension .dat and a syntax file with the extension .sps.
8. Conclusions
In the booklet Disciplined Use of Spreadsheets for Data Entry we concluded that
spreadsheet packages, such as MS-Excel, can be used for effective data entry,
particularly for data sets with a simple structure. However, if the data entry
component is large, or complex, then you should consider using a specialised data
entry package. Database packages such as MS-Access are ideal but, as we mentioned
in the introduction, they have a steep learning curve. In showing you what CS-Pro has
to offer we have tried to show an alternative that avoids the potential problems
associated with spreadsheets but is much easier to learn than a database package.
One of the key features that CS-Pro shares with databases packages is the requirement
that you think about the structure of your data before you start. In MS-Access this
would involve setting up the tables and relationships, in CS-Pro this involves creating
the levels, records and items in the data dictionary.
A package that is similar to CS-Pro in many ways is EpiInfo. This is distributed by
the Center for Disease Control and Prevention (CDC), Atlanta, U.S.A. More
information about EpiInfo can be found on the Internet at http://www.cdc.gov/epiinfo/
from where it can be downloaded free of charge.

The Statistical Services Centre (SSC), University of Reading,
UK, undertakes training and consultancy work on a non-
profit-making basis for clients within and outside the
University. This guide has been produced by the SSC for the
DFID funded Research Into Use (RIU) programme, which is
being managed by Natural Resources International Limited.
Statistical Services Centre, University of Reading
P.O. Box 240, Reading RG6 6FN, UK
Tel: +44 118 931 8025
Fax: +44 118 931 8458
web: http://www.reading.ac.uk/ssc/