compatible ipod and iphone memory backup specifications ... · compatibility depends on the...
TRANSCRIPT

Troubleshooting guide
Specifi cations
Dear CustomerThank you for purchasing this product.
For optimum performance and safety, please read these instructions thoroughly before connecting, operating or adjusting this product.Keep this manual for future reference.
WARNING:To reduce the risk of fire, electric shock or product damage,• Do not expose this unit to rain, moisture, dripping or splashing.• Do not place objects filled with liquids, such as vases, on this unit.• Use only the recommended accessories.• Do not remove covers.• Do not repair this unit by yourself. Refer servicing to qualified service personnel.
Product identification marking
LocationProduct
Bottom Main unit
BottomAC adaptor
–If you see this symbol–
Disposal of old Equipment and BatteriesOnly for European Union and countries with recycle systems
The mains plug is the disconnecting device.Install this unit so that the mains plug can be unplugged from the socket outlet immediately.
Operating Instructions
Clock Radio
Model No. RC-CF30GN-K
Panasonic CorporationWeb Site: http://www.panasonic.com
En
ADJ
Z
F
CLOC
RQT0A54-L
Factory reset
CAUTION!To reduce the risk of fire, electric shock or product damage,• Do not install or place this unit in a bookcase, built-in cabinet or in another
confined space. Ensure this unit is well ventilated.• Do not obstruct this unit’s ventilation openings with newspapers, tablecloths, curtains, and similar items.• Do not place sources of naked flames, such as lighted candles, on this unit.
CAUTION!This unit is intended for use in moderate climates.
This unit may receive radio interference caused by mobile telephones during use. If such interference occurs, please increase separation between this unit and the mobile telephone.
Factory reset
Operating Instructions
Clock Radio
Model No. RC-CF30
Panasonic CorporationWeb Site: http://www.panasonic.com
En
ADJ
Z
F
CLOC
RQT0A54-L
Specifi cations
Specifi cations
• iPod nano 7th generation • iPod touch 5th generation
• iPhone 5
• iPhone 5C
• iPhone 5S
• iPhone 6
• iPhone 6 Plus
Compatibility depends on the software version of your iPod or iPhone.
“Made for iPod” and “Made for iPhone” mean that an electronic accessory has been designed to connect specifi cally to iPod, or iPhone, respectively, and has been certifi ed by the developer to meet Apple performance standards.
Apple is not responsible for the operation of this device or its compliance with safety and regulatory standards.
iPhone, iPod nano and iPod touch are trademarks of Apple Inc.,registered in the U.S. and other countries.
Compatible iPod and iPhone
PlacementSet the unit up on an even surface away from direct sunlight, high temperatures, high humidity, and excessive vibration. These conditions can damage the cabinet and other components, thereby shortening the unit’s service life.
Place it at least 15 cm away from wall surfaces to avoid distortion and unwanted acoustical effects.
Do not place heavy items on the unit.
VoltageDo not use high voltage power sources. This can overload the unit and cause a fi re.
Do not use a DC power source. Check the source carefully when setting the unit up on a ship or other places where DC is used.
AC adaptor protectionEnsure the AC adaptor is connected correctly and not damaged. Poor connection and lead damage can cause fi re or electric shock. Do not pull, bend, or place heavy items on the lead.
Grasp the plug fi rmly when unplugging the adaptor. Pulling the AC adaptor can cause electric shock.
Do not handle the plug with wet hands. This can cause electric shock.
Foreign matterDo not let metal objects fall inside the unit. This can cause electric shock or malfunction.
Do not let liquids get into the unit. This can cause electric shock or malfunction. If this occurs, immediately disconnect the unit from the power supply and contact yourdealer.
Do not spray insecticides onto or into the unit. They contain fl ammable gases which can ignite if sprayed into the unit.
ServiceDo not attempt to repair this unit by yourself. If sound is interrupted, indicators fail to light, smoke appears, or any other problem that is not covered in these instructions occurs, disconnect the AC adaptor and contact your dealer or an authorised service centre. Electric shock or damage to the unit can occur if the unit is repaired, disassembled or reconstructed by unqualifi ed persons.
Extend operating life by disconnecting the unit from the power source if it is not tobe used for a long time.
Safety precautions
Please check and identify the supplied accessories.
1 AC adaptor
For others (not supplied)
1 AM loop antenna
Supplied accessories
Troubleshooting guide
The back-up battery (CR2032) saves the clock and alarm settings in the event of apower interruption.
Bottom view
1 Keep the AC adaptor connected to the household mains socket whenunscrewing the screw on the cover of the battery holder using a screwdriver.
2 Open the cover of the battery holder.
3 Insert a new battery with the (+) side facing up.
4 Close the cover of the battery holder and secure it with the screw.
Replacing the batteryThe service life of this battery is approximately 1 month if AC power is down.When the battery is weak, the battery-weak indicator will blink constantly on the display.
Note:• Do not heat or expose to fl ame.• Do not leave the battery(ies) in an automobile exposed to direct sunlight for a long
period of time with doors and windows closed.• Remove the battery if the clock radio is not going to be used for a long period of
time. Store in a cool, dark place.
CAUTION• Danger of explosion if battery is incorrectly replaced. Replace only with the
type recommended by the manufacturer.• When disposing of the batteries, please contact your local authorities or dealer
and ask for the correct method of disposal.
WarningKeep the Button-Type battery out of the reach of children. Never put Button-Type battery in mouth. If swallowed call your doctor.Insert with poles aligned.Do not touch the terminals ( + and - ) with metal objects.
WarningRisk of fire, explosion and burns. Do not recharge, disassemble, heat above100 C or incinerate.
Memory backup
Troubleshooting guideBefore requesting service, make the following checks. If you are in doubt about some of the check points, or if the solutions indicated do not solve the problem, consult your dealer for instructions.
ClockClock cannot be synchronised to iPod or iPhone’s time.• Make sure the iPod or iPhone is securely connected and turned on.• Update your iPod or iPhone with the latest software.Daylight saving time does not work.• Make sure the clock has been set correctly.• Press and hold [ ] in clock mode to activate daylight saving time.
AlarmThe iPod, radio or buzzer alarm does not sound at the preset time.• Check that “ALARM 1” or “ALARM 2” has been correctly activated.The iPod or radio alarm is activated but there is no sound at the preset time.• Check the alarm’s volume setting.
iPod or iPhoneThe iPod or iPhone cannot be operated with this unit.• Make sure the iPod or iPhone has been securely connected and turned on.• Update your iPod or iPhone with the latest software.There is no sound from the iPod or iPhone.• Make sure the iPod or iPhone has been securely connected.• Adjust the volume.The iPod or iPhone does not charge.• Check the connections. Turn off and remove the iPod or iPhone from the dock
connector. Reinsert and turn it on again.
RadioA noise or sound distortion is heard.• Distance the unit away from any television, personal computer or device easily
infl uenced by magnetism.A low hum is heard during AM broadcast.• Separate the antenna from other cables and cords.
o
Specifi cations
Safety precautions
Troubleshooting guide
Specifi cations
Compatible iPod and iPhone
Specifications
AMPLIFIER SECTION RMS Output Power (Mono)
2.6 W (3 ), 1 KHz, 10% THD Front channel
TUNER SECTION FM 10 stations
AM 10 stations Preset memory
Frequency modulation (FM)
87.50 MHz to 108.00 MHz (50 KHz step) Frequency range Antenna terminals 75 (unbalanced)
Amplitude modulation (AM)Frequency range
522 kHz to 1629 kHz (9 kHz step) 520 kHz to 1630 kHz (10 kHz step)
SPEAKER SECTION 1 way, 1 speaker system Type
Impedance 3 Speaker unit(s) 40 mm cone typeFull range
GENERALAC 100 to 240 V, 50/60 Hz Power supply (AC adaptor)
5 V DC Output Power consumption (with iPod or iPhone charging)
11 W Main unit 123 mm x 92 mm x 105 mm Dimension (W x H x D)
MassMain unit 0.357 Kg (approximate)
AC adaptor 0.095 Kg (approximate) 0 C to + 35 C Operating temperature range
20% to 80% RH (no condensation) Operating humidity range
Power consumption in standby mode:Main unit 0.3 W (approximate)AC adaptor 0.3 W (approximate)
Note:1) Specifi cations are subject to change without notice.
Mass and dimensions are approximate.2) Total harmonic distortion is measured by the digital spectrum analyser.
o o
1. The product is warranted for 12 months from the date of purchase. Subject to the conditions of this warranty Panasonic or its Authorised Service Centre will perform necessary service on the product without charge for parts or labour, if in the opinion of Panasonic, the product is found to be faulty within the warranty period.
2. This warranty only applies to Panasonic products purchased in Australia and sold by Panasonic Australia or its Authorised Distributors or Dealers and only where the products are used and serviced within Australia or it's territories. Warranty cover only applies to service carried out by a Panasonic Authorised Service Centre and only if valid proof of purchase is presented when warranty service is requested.
3. This warranty only applies if the product has been installed and used in accordance with the manufacturer’s recommendations (as noted in the operating instructions) under normal use and reasonable care (in the opinion of Panasonic). The warranty covers normal domestic use only and does not cover damage, malfunction or failure resulting from use of incorrect voltages, incorrect installation, accident, misuse, neglect, build-up of dirt or dust, abuse, maladjustment of customer controls, mains supply problems, thunderstorm activity, infestation by insects or vermin, tampering or repair by unauthorised persons (including unauthorised alterations), introduction of sand, humidity or liquids, commercial use such as hotel, office, restaurant, or other business or rental use of the product, exposure to abnormally corrosive conditions or any foreign object or matter having entered the product.
5. Some products may be supplied with Ethernet connection hardware. The warranty is limited on such products and will not cover
6. To claim warranty service, when required, you should:
7. The warranties hereby conferred do not extend to, and exclude, any costs associated with the installation, de-installation or re-installation of a product, including costs related to the mounting, de-mounting or remounting of any screen, (and any other ancillary activities), delivery, handling, freighting, transportation or insurance of the product or any part thereof or replacement of and do not extend to, and exclude, any damage or loss occurring by reason of, during, associated with, or related to such installation, de-installation, re-installation or transit.
Panasonic Authorised Service Centres are located in major metropolitan areas and most regional centres of Australia, however, coverage will vary dependant on product. For advice on exact Authorised Service Centre locations for your product, please telephone our Customer Care Centre on 132600 or visit our website and use the Service Centre Locator.In addition to your rights under this warranty, Panasonic products come with consumer guarantees that cannot be excluded under the Australian Consumer Law. If there is a major failure with the product, you can reject the product and elect to have a refund or to have the product replaced or if you wish you may elect to keep the goods and be compensated for the drop in value of the goods. You are also entitled to have the product repaired or replaced if the product fails to be of acceptable quality and the failure does not amount to a major failure.If there is a major failure in regard to the product which cannot be remedied then you must notify us within a reasonable period by contacting the Panasonic Customer Care Centre. If the failure in the product is not a major failure then Panasonic may choose to repair or replace the product and will do so in a reasonable period of time from receiving notice from you.
If you require assistance regarding warranty conditions or any other enquiries, please visit the Panasonic Australiawebsite www.panasonic.com.au or contact by phone on 132 600
If phoning in, please ensure you have your operating instructions available.
(a) Internet and or DLNA connection / setup related problems (b) Access fees and or charges incurred for internet connection(c) The use of incompatible software or software not specifically stipulated in the product operations manual;
and(d) Any indirect or consequential costs associated with the incorrect use or misuse of the hardware, its connection to the internet or
any other device.
4. This warranty does not cover the following items unless the fault or defect existed at the time of purchase: scsiD elbadroceR ro yar-ulB ,DVD )e()s(traP tenibaC )a(
(b) Video or Audio Tapes (f) Video / Audio Heads from wear and tear in normal use(c) SD cards or USB devices (g) Information stored on Hard Disk Drive, USB stick or SD card (d) User replaceable Batteries (h) DTV reception issues caused by TV Aerial / Cabling / Wall socket(s) etc
Telephone Panasonic’s Customer Care Centre on 132600 or visit our website referred to below and use the Service Centre Locator for the name/address of the nearest Authorised Service Centre. Send or take the product to a Panasonic Authorised Service Centre together with your proof of purchase receipt as a proof of purchase date. Please note that freight and insurance to and / or from your nearest Authorised Service Centre must be arranged by you. Note that home or pick-up/delivery service is available for the following products in the major metropolitan areas of Australia or the normal operating areas of the nearest Authorised Service Centres:
Plasma/LCD televisions / displays (screen size greater than 103 cm)
THIS WARRANTY CARD AND THE PURCHASE DOCKET (OR SIMILAR PROOF OF PURCHASE) SHOULD BE RETAINED BY THE CUSTOMER AT ALL TIMES
Panasonic Australia Pty. LimitedACN 001 592 187 ABN 83 001 592 187
1 Innovation Road, Macquarie Park NSW 2113 PRO-031-F11 Issue: 4.0 01-01-2011
Specifications
Panasonic Warranty
Memory backup
In standby mode, press [ ] and [VOL ], “dEF” will show on LCD. Factory reset is done.
Limited Warranty (FOR AUSTRALIA ONLY)
1 CR2032 Lithium button-type backup battery
(Battery is already installed in the unit.)
Lightning is a trademark of Apple Inc..
GN
Before using the first timeRemove the insulation sheet .
Inserting the batteryWhen there is no battery, the battery weak indicator will bedisplayed until a battery isinserted.
Compatibility depends on the software version. Update your iPhone / iPod to the latest software before using it with this unit.Please be aware that Panasonic accepts no responsibility for the loss of data and / or information.
These symbols are only valid in the European Union and countries with recycle systems.If you wish to discard this product, please contact your localauthorities or dealer and ask for the correct method of disposal.
Rear v iew
To household mains socket FM indoor antenna
AM loop antenna
1 Connect the AM antenna.Stand the antenna up on its base.
2 Connect the AC adaptor.• Do not use an AC adaptor from other equipment.• Do not use any other AC adaptors except the supplied one.• The unit is in the standby condition when the AC adaptor is connected. The
primary circuit is always “live” as long as the AC adaptor is connected to an electrical outlet.
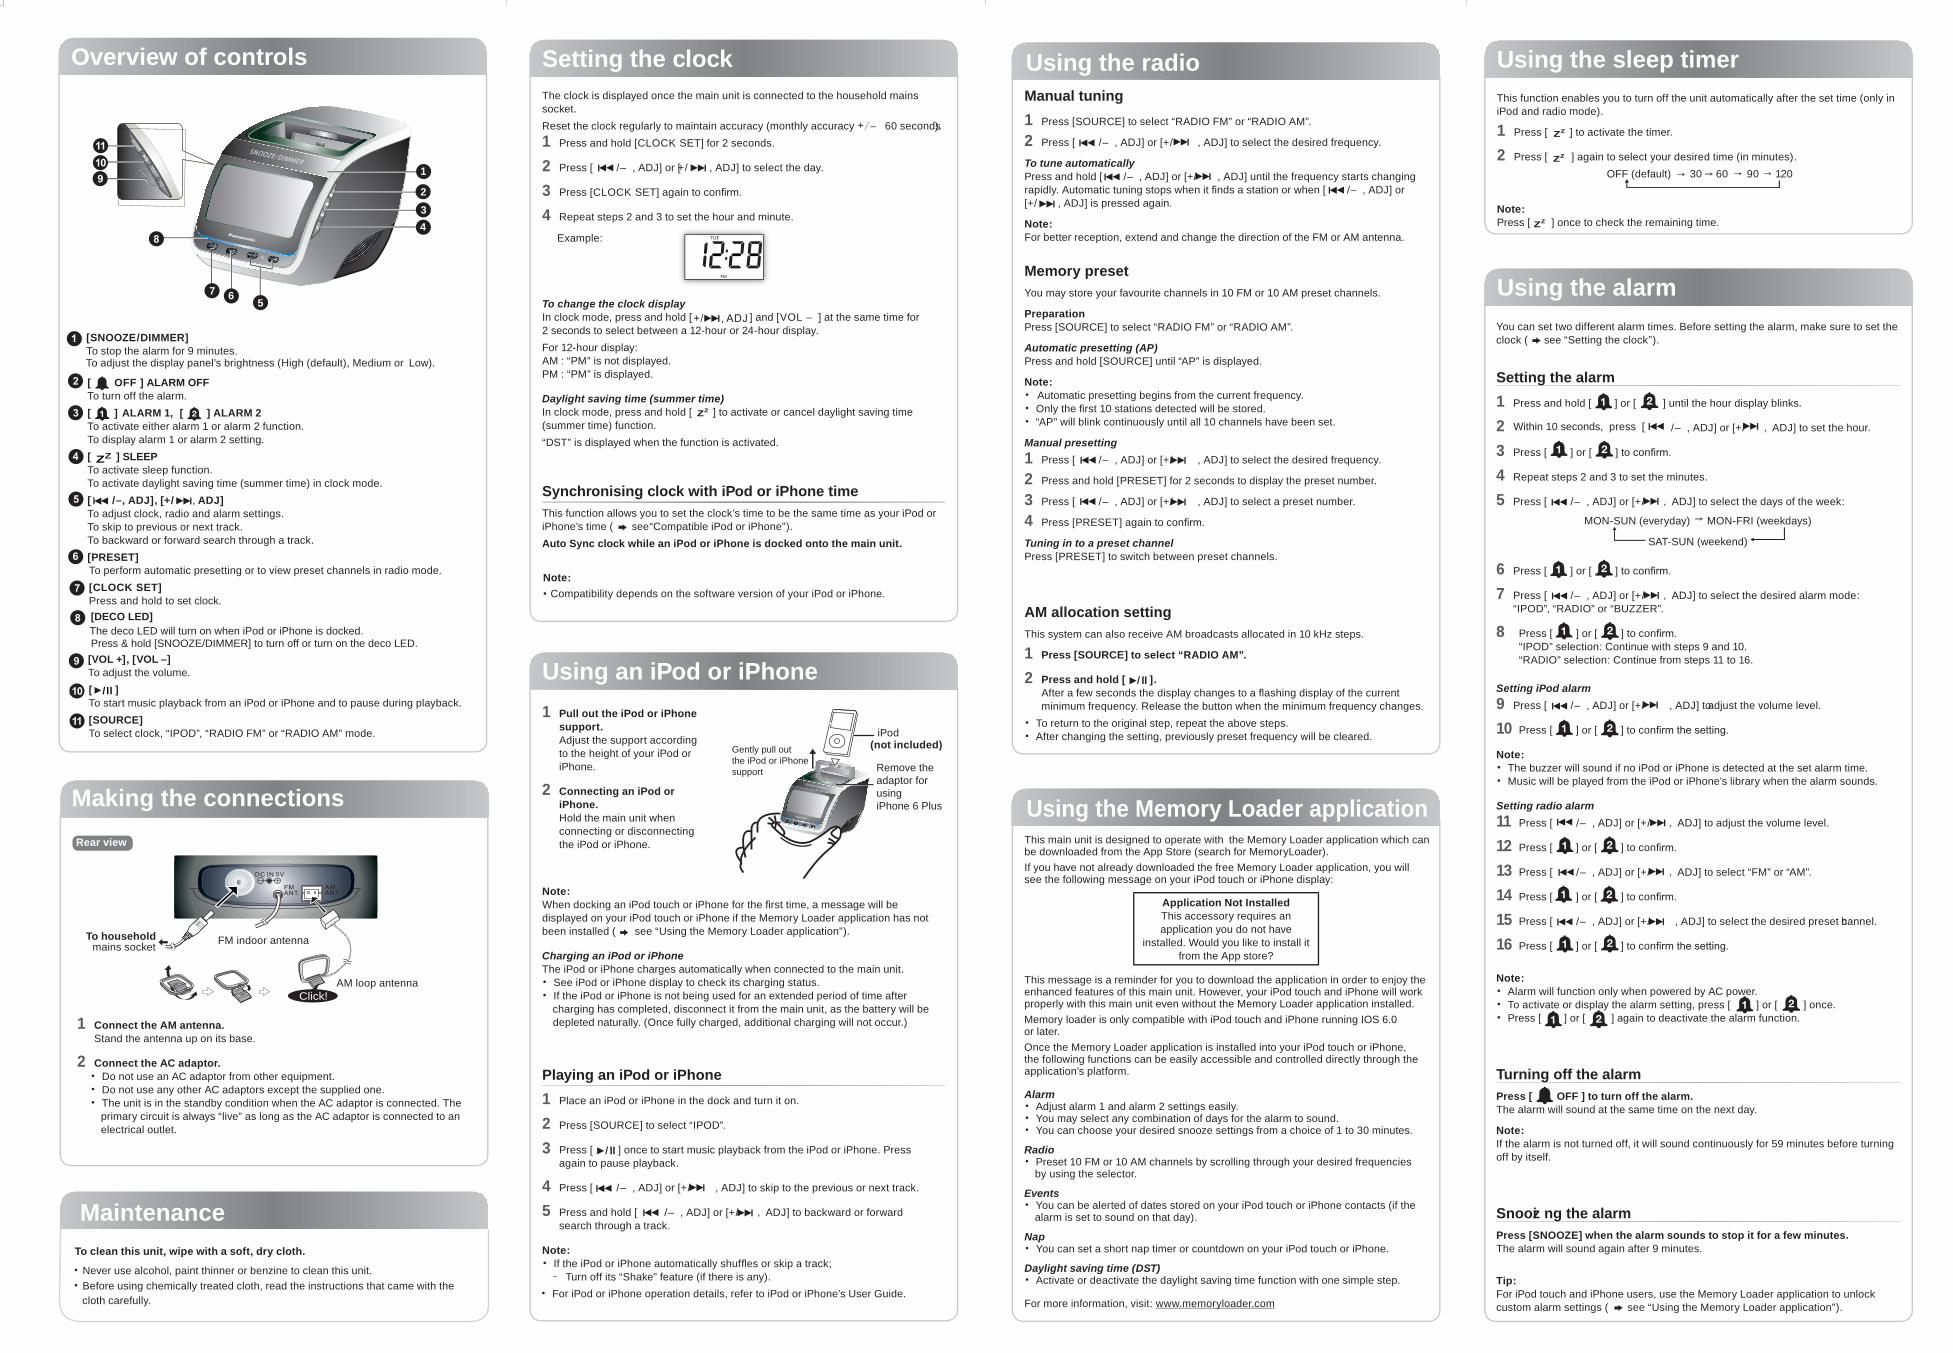
1 [ SNO O Z E / D IMME R] To stop the alarm for 9 minutes.To adjust the display panel’s brightness (High (default), Medium or Low).
2 [ O FF ] ALARM O FFTo turn off the alarm.
3 [ ] ALARM 1, [ ] ALARM 2To activate either alarm 1 or alarm 2 function.To display alarm 1 or alarm 2 setting.
4 [ ] SLE E PTo activate sleep function.To activate daylight saving time (summer time) in clock mode.
5 [ / –, AD J ] , [ + / AD J ]To adjust clock, radio and alarm settings.To skip to previous or next track.To backward or forward search through a track.
6 [ PRE SE T] To perform automatic presetting or to view preset channels in radio mode.
7 [ CLO CK SE T]Press and hold to set clock.
8
[ V O L + ] , [ V O L –]To adjust the volume.
9
[ ]To start music playback from an iPod or iPhone and to pause during playback.
[ SO U RCE ]To select clock, “IPOD”, “RADIO FM” or “RADIO AM” mode.
O v erv iew of controls
Making the connections
To clean this unit, w ipe w ith a soft, dry cloth.
• Never use alcohol, paint thinner or benzine to clean this unit.• Before using chemically treated cloth, read the instructions that came with the
cloth carefully.
Maintenance
/ ll
Z Z
10
ADJ
ZZ
OFF
CLOCK S E T P R E S E T
1
234
567
[ D E CO LE D ]The deco LED will turn on when iPod or iPhone is docked.Press & hold [SNOOZ E/DIMMER] to turn off or turn on the deco LED.
The clock is displayed once the main unit is connected to the household mains socket.Reset the clock regularly to maintain accuracy (monthly accuracy +/ – 60 seconds).1 Press and hold [CLOCK SET] for 2 seconds.
2 Press [ / – , ADJ ] or [ +/ , ADJ ] to select the day.
3 Press [CLOCK SET] again to confir .
4 Repeat steps 2 and 3 to set the hour and minute.
Example:
To change the clock displayIn clock mode, press and hold [ ] and [VOL – ] at the same time for 2 seconds to select between a 12-hour or 24-hour display.For 12-hour display:AM : “PM” is not displayed.PM : “PM” is displayed.
Daylight saving time ( summer time)In clock mode, press and hold [ ] to activate or cancel daylight saving time (summer time) function.“DST” is displayed when the function is activated.
Sy nchronising clock w ith iPod or iPhone timeThis function allows you to set the clock’s time to be the same time as your iPod or iPhone’s time ( see “Compatible iPod or iPhone”).Auto Sy nc clock w hile an iPod or iPhone is docked onto the main unit.
Note:• Compatibility depends on the software version of your iPod or iPhone.
1 Pull out the iPod or iPhone support.Adjust the support according to the height of your iPod or iPhone.
2 Connecting an iPod or iPhone.Hold the main unit when connecting or disconnecting the iPod or iPhone.
iPod
(not included)
Note:When docking an iPod touch or iPhone for the fi rst time, a message will be displayed on your iPod touch or iPhone if the Memory Loader application has not been installed ( see “Using the Memory Loader application”).
Charging an iPod or iPhoneThe iPod or iPhone charges automatically when connected to the main unit.• See iPod or iPhone display to check its charging status.• If the iPod or iPhone is not being used for an extended period of time after
charging has completed, disconnect it from the main unit, as the battery will be depleted naturally. (Once fully charged, additional charging will not occur.)
Play ing an iPod or iPhone1 Place an iPod or iPhone in the dock and turn it on.
2 Press [SOURCE] to select “IPOD”.
3 Press [ ] once to start music playback from the iPod or iPhone. Press again to pause playback.
4 Press [ / – , ADJ ] or [+/ , ADJ ] to skip to the previous or next track.
5 Press and hold [ / – , ADJ ] or [+/ , ADJ ] to backward or forward search through a track.
Note:• If the iPod or iPhone automatically shuffl es or skip a track;– Turn off its “Shake” feature (if there is any).
• For iPod or iPhone operation details, refer to iPod or iPhone’s User Guide.
Setting the clock
U sing an iPod or iPhone
Gently pull outthe iPod or iPhonesupport
ADJZZ
OFF
CLOCK S E T P R E S E T
Remove theadaptor forusingiPhone 6 Plus
Manual tuning1 Press [SOURCE] to select “RADIO FM” or “RADIO AM”.
2 Press [ / – , ADJ ] or [+/ , ADJ ] to select the desired frequency.
To tune automaticallyPress and hold [ / – , ADJ ] or [+/ , ADJ ] until the frequency starts changing rapidly. Automatic tuning stops when it fi nds a station or when [ / – , ADJ ] or [+/ , ADJ ] is pressed again.
Note:For better reception, extend and change the direction of the FM or AM antenna.
Memory presetYou may store your favourite channels in 10 FM or 10 AM preset channels.
PreparationPress [SOURCE] to select “RADIO FM” or “RADIO AM”.
Automatic presetting ( AP)Press and hold [SOURCE] until “AP” is displayed.
Note:• Automatic presetting begins from the current frequency.• Only the fi rst 10 stations detected will be stored.• “AP” will blink continuously until all 10 channels have been set.
Manual presetting1 Press [ / – , ADJ ] or [+/ , ADJ ] to select the desired frequency.
2 Press and hold [PRESET] for 2 seconds to display the preset number.
3 Press [ / – , ADJ ] or [+/ , ADJ ] to select a preset number.
4 Press [PRESET] again to confir .
Tuning in to a preset channelPress [PRESET] to switch between preset channels.
E x cept for Australia and N. Z .
AM allocation settingThis system can also receive AM broadcasts allocated in 10 kHz steps.
1 Press [ SO U RCE ] to select “ RAD IO AM” .
2 Press and hold [ ] .After a few seconds the display changes to a fl ashing display of the current minimum frequency. Release the button when the minimum frequency changes.
• To return to the original step, repeat the above steps.• After changing the setting, previously preset frequency will be cleared.
This main unit is designed to operate with the Memory Loader application which can be downloaded from the App Store (search for MemoryLoader).If you have not already downloaded the free Memory Loader application, you will see the following message on your iPod touch or iPhone display:
Application Not InstalledThis accessory requires an application you do not have
installed. Would you like to install it from the App store?
This message is a reminder for you to download the application in order to enjoy the enhanced features of this main unit. However, your iPod touch and iPhone will work properly with this main unit even without the Memory Loader application installed. Memory loader is only compatible with iPod touch and iPhone running IOS 6.0 or later.Once the Memory Loader application is installed into your iPod touch or iPhone, the following functions can be easily accessible and controlled directly through the application’s platform.
Alarm• Adjust alarm 1 and alarm 2 settings easily.• You may select any combination of days for the alarm to sound.• You can choose your desired snooze settings from a choice of 1 to 30 minutes.
Radio• Preset 10 FM or 10 AM channels by scrolling through your desired frequencies
by using the selector.
Events• You can be alerted of dates stored on your iPod touch or iPhone contacts (if the
alarm is set to sound on that day).
Nap• You can set a short nap timer or countdown on your iPod touch or iPhone.
Daylight saving time ( DST)• Activate or deactivate the daylight saving time function with one simple step.
For more information, visit: www.memoryloader.com
U sing the Memory Loader application
U sing the radio
You can set two different alarm times. Before setting the alarm, make sure to set the clock ( see “Setting the clock”).
Setting the alarm1 Press and hold [ ] or [ ] until the hour display blinks.
2 Within 10 seconds, press [ / – , ADJ ] or [+/ , ADJ ] to set the hour.
3 Press [ ] or [ ] to confir .
4 Repeat steps 2 and 3 to set the minutes.
5 Press [ / – , ADJ ] or [+/ , ADJ ] to select the days of the week:
MON-SUN (everyday) MON-FRI (weekdays)
SAT-SUN (weekend)
6 Press [ ] or [ ] to confir .
7 Press [ / – , ADJ ] or [+/ , ADJ ] to select the desired alarm mode: “IPOD”, “RADIO” or “BUZ Z ER”.
8 Press [ ] or [ ] to confir .“IPOD” selection: Continue with steps 9 and 10.“RADIO” selection: Continue from steps 11 to 16.
Setting iPod alarm9 Press [ / – , ADJ ] or [+/ , ADJ ] to adjust the volume level.
10 Press [ ] or [ ] to confir the setting.
Note:• The buzzer will sound if no iPod or iPhone is detected at the set alarm time.• Music will be played from the iPod or iPhone’s library when the alarm sounds.
Setting radio alarm11 Press [ / – , ADJ ] or [+/ , ADJ ] to adjust the volume level.
12 Press [ ] or [ ] to confir .
13 Press [ / – , ADJ ] or [+/ , ADJ ] to select “FM” or “AM”.
14 Press [ ] or [ ] to confir .
15 Press [ / – , ADJ ] or [+/ , ADJ ] to select the desired preset channel.
16 Press [ ] or [ ] to confir the setting.
Note:• Alarm will function only when powered by AC power.• To activate or display the alarm setting, press [ ] or [ ] once.• Press [ ] or [ ] again to deactivate the alarm function.
Turning off the alarmPress [ O FF ] to turn off the alarm.The alarm will sound at the same time on the next day.
Note:If the alarm is not turned off, it will sound continuously for 59 minutes before turning off by itself.
Snoozi ng the alarmPress [ SNO O Z E ] w hen the alarm sounds to stop it for a few minutes.The alarm will sound again after 9 minutes.
Tip:For iPod touch and iPhone users, use the Memory Loader application to unlock custom alarm settings ( see “Using the Memory Loader application”).
This function enables you to turn off the unit automatically after the set time (only in iPod and radio mode).
1 Press [ ] to activate the timer.
2 Press [ ] again to select your desired time (in minutes).OFF (default) 30 60 90 120
Note:Press [ ] once to check the remaining time.
U sing the alarm
U sing the sleep timer
Click!
Click!