comodo system cleaner user guide
TRANSCRIPT

www.comodo.com
Comodo System-Cleaner User Guide | © 2009 Comodo Security Solutions Inc. | All rights reserved 1
COMODO System-Cleaner
User Guide
Table of Contents
Creating Trust Online ®
Comodo Security Solutions
525 Washington Blvd.
Jersey City, NJ 07310
United States.

www.comodo.com
Table of Contents 1 COMODO System-Cleaner- Introduction...................................................................................................................... 5
1.1 System Requirements.............................................................................................................................................. 7
1.2 Installing COMODO System-Cleaner....................................................................................................................... 7
1.3 Starting COMODO System-Cleaner....................................................................................................................... 13
1.4 COMODO System-Cleaner - Navigation ............................................................................................................... 13
2 Registry Cleaner........................................................................................................................................................... 17
2.1 Clean-up................................................................................................................................................................. 18
2.1.1 Filter Entries................................................................................................................................................... 26
2.1.2 Ignore List....................................................................................................................................................... 28
2.2 Back-up.................................................................................................................................................................. 30
2.3 Settings................................................................................................................................................................... 32
3 Disk Cleaner.................................................................................................................................................................. 34
3.1 Clean-up................................................................................................................................................................. 35
3.1.1 Filter Entries................................................................................................................................................... 43
3.2 Back-up.................................................................................................................................................................. 45
3.3 Duplicate files......................................................................................................................................................... 47
3.4 Settings................................................................................................................................................................... 54
4 Privacy Cleaner............................................................................................................................................................. 56
4.1 Applications............................................................................................................................................................ 57
4.2 Windows................................................................................................................................................................. 65
4.3 Backup.................................................................................................................................................................... 74
4.4 Settings................................................................................................................................................................... 76
5 Autoruns Manager........................................................................................................................................................ 79
5.1 Run......................................................................................................................................................................... 80
Comodo System-Cleaner User Guide | © 2009 Comodo Security Solutions Inc. | All rights reserved 2

www.comodo.com
5.2 Start-up................................................................................................................................................................... 83
5.3 Services.................................................................................................................................................................. 85
5.4 Boot Execute.......................................................................................................................................................... 88
6 File Pend Delete............................................................................................................................................................ 90
6.1 Deleting Locked or Inaccessible Files..................................................................................................................... 91
6.2 Moving Locked or Inaccessible Files...................................................................................................................... 93
7 File Wiper....................................................................................................................................................................... 95
8 System Information...................................................................................................................................................... 99
8.1 Hardware.............................................................................................................................................................. 100
8.2 Software............................................................................................................................................................... 101
9 System Settings.......................................................................................................................................................... 103
9.1 System.................................................................................................................................................................. 104
9.2 Control Panel........................................................................................................................................................ 106
9.3 Windows Explorer................................................................................................................................................. 107
9.4 Logon.................................................................................................................................................................... 110
9.5 Web Browser........................................................................................................................................................ 111
9.6 Settings................................................................................................................................................................. 114
10 Miscellaneous Tasks Overview............................................................................................................................... 115
10.1 Live PC Support.................................................................................................................................................. 116
10.1.1 Uninstalling Live PC Support Client............................................................................................................ 120
10.2 Backup Settings................................................................................................................................................. 121
10.3 Diagnostics......................................................................................................................................................... 126
10.4 Browse Support Forums..................................................................................................................................... 127
10.5 Check for updates when application starts......................................................................................................... 128
10.6 Use Monitor........................................................................................................................................................ 129
11 Uninstalling COMODO System-Cleaner.................................................................................................................. 129
Comodo System-Cleaner User Guide | © 2009 Comodo Security Solutions Inc. | All rights reserved 3

www.comodo.com
Appendix 1 The Windows Registry Explained............................................................................................................. 131
Appendix 2 Using the Portable Version........................................................................................................................ 137
Appendix 3 Live PC Support.......................................................................................................................................... 141
Appendix 4 Encryption Algorithms............................................................................................................................... 143
About Comodo................................................................................................................................................................ 144
Comodo System-Cleaner User Guide | © 2009 Comodo Security Solutions Inc. | All rights reserved 4

www.comodo.com
1 COMODO System-Cleaner- Introduction
COMODO System-Cleaner is a suite of utilities designed to improve the security, performance and usability of Windows 7, Windows Vista and Windows XP computers. It allows users of all experience levels to thoroughly clean their systems of damaging and/or wasteful files, tune various settings of their Windows configuration, diagnose hardware and software problems and generally enhance the performance of the system. The application also features several privacy utilities such as powerful history and usage trail deletion tools.
COMODO System-Cleaner Features:
Clean-up Tasks:
• Registry Cleaner – Optimizes and repairs your Windows registry by running an in-depth scan to identify, remove or repair any unnecessary or corrupted entries. After running a scan, Windows will be able to access the information it needs from the registry much more quickly - meaning your computer will get an immediate performance and stability boost.
• Disk Cleaner – Over time your disk drives become cluttered with temporary Internet files, logs, needless archives, unused icons and duplicate files. This utility lets you quickly clear them all to free up space and improve performance. Also allows you to schedule regular clean up routines.
• Privacy Cleaner - Obliterate your digital paper trail by cleaning history, cache, cookies and usage records from Internet browsers, Windows locations and popular software.
Utilities:
• Autoruns Manager – Enables you to control exactly which programs and services start with Windows to improve Windows boot up time and overall system performance.
• File Pend Delete - Enables you to delete or move locked and inaccessible files.
Comodo System-Cleaner User Guide | © 2009 Comodo Security Solutions Inc. | All rights reserved 5

www.comodo.com
• File Wiper - Enables you to permanently delete files from your disks for protection against potential leak of your confidential information.
• System Information - Detailed and easily accessible 'dashboard' summary of all the hardware and software installed on your computer. Fast access to such details can be invaluable when you are considering hardware upgrades, the ability of your computer to run certain software and can assist you when judging whether to alter important system settings.
• System Settings – Unlock the full potential of your Vista, XP or Windows 7 computer by quickly customizing otherwise obscure Windows settings with point and click ease. With over 50 tweaks in the 'System Settings' area alone, you can optimize Windows behavior in a more powerful and intuitive way than ever before.
Miscellaneous Tasks:
• Live PC Support - Enables you to initiate a chat with a Comodo Support Technician to solve your computer related problems
• Backup Settings - Enables you to configure the backup functionality of Registry Cleaner, Disk Cleaner and Privacy Cleaner
• Diagnostics - Scans your system to make sure that the Comodo System Cleaner application is installed correctly
• Browse Support Forums - Provides easy access to Comodo Forums - a message board exclusively created for our users to discuss anything related to our products
• Check for updates when application starts - Allow the user to specify whether or not the software should automatically check for updates whenever it is started.
• Use Monitor - The registry and file monitor creates a constantly updated record of all modifications to your file system and registry. This record is then referenced at scan-time to greatly improve the speed of system and registry scans. Switch the monitor on or off in this area.
COMODO System-Cleaner Portable Version
The portable version of COMODO System-Cleaner can be deployed on any kind of removable storage media (for example, a USB key fob). This application is designed to store its configuration information and data on the storage media containing its program files. You do not have to install the software on each computer. Instead, the application runs straight from the removable storage device. See Appendix 2 - Using the Portable Version for more details.
This guide is intended to take the user through the installation, configuration and use of COMODO System-Cleaner.
Comodo System-Cleaner User Guide | © 2009 Comodo Security Solutions Inc. | All rights reserved 6

www.comodo.com
1.1 System Requirements
To ensure optimal performance of COMODO System-Cleaner, please ensure that your PC complies with the minimum system requirements:
COMODO System Cleaner - 32 bit and 64 bit versionsSupported Operating Systems
Windows 7 - 32 or 64 bit versionWindows Vista - 32 or 64 bit versionWindows XP - 32 or 64 bit versionWindows 2003 Server - 32 or 64 bit versionMinimum Hardware32 MB RAM20 MB Disk Space
COMODO System Cleaner Portable 32 bit version
COMODO System Cleaner Portable64 bit version
Supported Operating Systems
Windows 7 – 32 bitWindows Vista – 32 bitWindows XP – 32 bitWindows 2003 Server – 32 bitMinimum Hardware32 MB RAM20 MB Disk Space
Supported Operating Systems
Windows 7 - 64 bitWindows Vista - 64 bitWindows XP - 64 bitWindows 2003 Server - 64 bitMinimum Hardware32 MB RAM20 MB Disk Space
1.2 Installing COMODO System-Cleaner
Before you install COMODO System-Cleaner, please make sure to quit all other Windows Programs. The COMODO System-Cleaner installer requires administrative privileges on the computer.
After downloading the COMODO System-Cleaner setup file to your local hard drive, double click on Setup.exe to start the installation wizard.
Step 1 - Choosing the Interface Language
The set up program starts automatically and the Select Setup language dialog is displayed. Comodo System Cleaner is available in several languages.
Comodo System-Cleaner User Guide | © 2009 Comodo Security Solutions Inc. | All rights reserved 7

www.comodo.com
Select the language in which you want the Comodo System Cleaner is to be installed from the list and click OK.
Step 2 - Welcome Screen
Welcome screen of the setup wizard is displayed.
Click Next to continue the installation.
Step 3 - End User License Agreement
Complete the initialization phase by reading and accepting the End User License Agreement (EULA).
Comodo System-Cleaner User Guide | © 2009 Comodo Security Solutions Inc. | All rights reserved 8

www.comodo.com
Click the I Accept button accept and continue installation. If you want to cancel the installation, click I Decline.
Step 4 - Select Destination Folder for Installation
The next screen allows you to select the folder in your hard drive for installing COMODO System-Cleaner. The default path is C:\Program Files\COMODO\System Cleaner.
This stage also allows you to check the available disk space and how much of the disk space is going to be utilized by Comodo System-Cleaner in the different partitions of your hard drive. This is useful to decide on the destination folder where you want to install the application. To check the disk space utilization, click the 'Disk Usage' button.
Comodo System-Cleaner User Guide | © 2009 Comodo Security Solutions Inc. | All rights reserved 9

www.comodo.com
The available disk space and space required for the installation are displayed. Decide on the partition to install the application and click OK. If you want to install the application in a location other than the default location, click Browse to choose a different location. Click Next to continue.
Step 5 – Ready to Install
A confirmation dialog box will be displayed. Click on Back button to review/change any of settings you specified before or press Install to continue with installation process.
Comodo System-Cleaner User Guide | © 2009 Comodo Security Solutions Inc. | All rights reserved 10

www.comodo.com
Step 6 – Setup Progress
A setup status dialog box is displayed. You will see a progress bar indicating that the files are being installed.
Step 7 - Product Activation
Comodo System-Cleaner User Guide | © 2009 Comodo Security Solutions Inc. | All rights reserved 11

www.comodo.com
On completion of Installation, the product Activation dialog is displayed. Comodo System-Cleaner is activated at free of cost for lifetime usage. If you wish to sign up for news about Comodo products then enter your email address in the space provided and select Sign me up for news about Comodo products. This is optional. Click Next.
Step 8 - Installation Completion
An Installation complete screen is displayed. Click 'Finish' to complete installation.
Comodo System-Cleaner User Guide | © 2009 Comodo Security Solutions Inc. | All rights reserved 12

www.comodo.com
You can start the application from the Start Menu. See Starting COMODO System-Cleaner for more details.
1.3 Starting COMODO System-Cleaner
You can access COMODO System-Cleaner through the Windows Start Menu or through the desktop shortcut.
1. Start Menu
After downloading and installing a COMODO System-Cleaner, the setup procedure creates an entry in the 'Programs' section of Windows Start Menu. You can start COMODO System-Cleaner by hitting the 'Start' button and navigating to: Start > All Programs > COMODO > System Cleaner > COMODO System Cleaner.
2. Desktop Shortcut
You can also start COMODO System-Cleaner by double-clicking on the desktop shortcut created during installation.
1.4 COMODO System-Cleaner - Navigation
Comodo System-Cleaner has a streamlined interface that provides fingertip access and control over all functional areas of the software. The left-hand pane contains shortcut buttons for Clean up tasks like Registry Cleaner, Disk Cleaner and Privacy Cleaner and Utilities like Autoruns Manager, File Pend Delete, File Wiper, System Information and System Settings. The main configuration area contains a tab structure that allows you to view and configure your selected tasks.
The 'Miscellaneous' area provides access to general options like self diagnostics, a link to Comodo Support Forums and a link that downloads and installs Comodo's LivePCSupport client (LivePCSupport is a remote assistance service that enables technical experts from Comodo to remotely connect to your PC to fix problems and provide support services). The 'Miscellaneous' area also allows you to configure automatic updates and to enable or disable the Registry and File
Comodo System-Cleaner User Guide | © 2009 Comodo Security Solutions Inc. | All rights reserved 13

www.comodo.com
monitor. The purpose of the monitor is to vastly accelerate the scanning process. The monitor continuously tracks the changes to your system's registry and files as you make them so that you get near-immediate scanning results when you start a registry or file scan.
1. Utility Selection and Updates
The Left hand pane contains functional buttons for:
• Clean My Computer - Clicking the Clean My Computer button runs the Registry clean-up, Disk Clean-up and Privacy Clean-up utilities in consecutive order, giving you the comfort of cleaning your entire system from obsolete registry entries, unnecessary files and your privacy entries with a single click.
• Registry Cleaner - Starts the Registry Cleaner interface. The interface enables you to launch an on-demand scan, back-up your registries, schedule registry scans and so on.
• Disk Cleaner – Starts the Disk Cleaner interface. The interface enables you to launch an on-demand scan, clean duplicate files, schedule disk scans and so on.
• Privacy Cleaner – Starts the Privacy cleaning interface. The interface enables you to launch an on-demand scan and remove paper trails from applications, web browsers, Windows System programs, Windows Explorer and other programs.
• Auroruns Manager - Starts up Autorun configuration wizard to control exactly which programs and services start with Windows to improve Windows boot up time and overall system performance.
• Pend Delete - Starts File Pend Delete wizard to delete or move either locked or inaccessible files from your system.
Comodo System-Cleaner User Guide | © 2009 Comodo Security Solutions Inc. | All rights reserved 14

www.comodo.com
• Wiper - Starts the file wiper wizard to permanently delete unwanted files so that no traces of the file are left in the hard disk.
• System Information - Provides a dashboard summary of all the Hardware and Software installed in your computer.
• System Settings - Starts up the System Settings wizard that enables even a new or an inexperienced user to quickly and easily access the most critical Windows settings which are otherwise hard to reach.
• Check for Updates - Starts the Updates wizard. The update wizard allows you to initiate a manual check for any available software updates.
If any updates are available, you will be prompted to download and install the updates. If none are available, the following dialog will appear, indicating that your installation is up to date.
2. Tab Structure
The upper right hand side pane contains tabs to select the processes that fall under the task selected from the left hand side pane. Clicking on a tab opens the interface for configuring and initiating the process.
3. Main Configuration Area
The main configuration area provides options for configuring the process and settings options when the corresponding tab is selected. It also contains a progress bar indicating the stages in the backup and restore jobs.
3a. Progress Bar
The progress bar indicates the steps executed during the selected process. The step number of the currently executed stage is highlighted during the course of execution of the process.
4. Clean up Job and Schedule Information
The bottom pane gives a summary of Registry Cleaner information and Disk Cleaner information.
• Registry Cleaner - Gives at a glance details of when the last Registry cleaning operation was carried out and and the next scheduled Registry cleaning operation.
• Disk Cleaner - Gives at a glance details of when the last Disk cleaning operation was carried out and and the next scheduled Disk cleaning operation.
5. Windows Controls
• Help - Opens this Help guide. Each functionality of the application has its own dedicated page containing detailed descriptions of it in the help guide.
Comodo System-Cleaner User Guide | © 2009 Comodo Security Solutions Inc. | All rights reserved 15

www.comodo.com
Misc - Opens the Miscellaneous Tasks interface. The Miscellaneous interface in Comodo System-Cleaner contains options for overall configuration and shortcuts to help enhance and improve your experience with the application.
Comodo System-Cleaner User Guide | © 2009 Comodo Security Solutions Inc. | All rights reserved 16

www.comodo.com
2 Registry Cleaner
COMODO System-Cleaner features a fully functional Registry Cleaner. Its purpose is to remove obsolete or unwanted items from Windows registry in order to improve the stability and performance of your computer. Such items may include information left by software that has otherwise been removed from the computer, information that is no longer of use, or keys used by malware. Windows Registry problems can make a Windows system slower, less reliable, unbootable, and in extreme cases can only be fixed by reinstalling the operating system. Click here for more details on Windows Registry.
• The Registry Cleaner conducts a deep scan of your Windows Registry to remove corrupt and unnecessary entries that are causing system slow down and other errors.
• Comprehensive backup system allows you to easily undo any changes.
• You can schedule Scans to run automatically at a time you prefer.
The Registry Cleaner can always be accessed by clicking the Registry Cleaner button in the left hand side pane of the main interface.
Click the links below to see the detailed explanations on each option that can be accessed by clicking respective tabs in Registry Cleaner.
• Clean-up
• Back-up
• Settings
Comodo System-Cleaner User Guide | © 2009 Comodo Security Solutions Inc. | All rights reserved 17

www.comodo.com
2.1 Clean-up
The Clean-up option in the Registry Cleaner enables you to launch an on-demand scan and to configure scan parameters. It can be accessed by clicking Clean-up button in the interface screen of the Registry cleaner.
Features and Benefits of using Registry Clean-up
• The registry clean-up conducts a deep scan of your Windows Registry to remove corrupt and unnecessary entries;
• The removal of the obsolete and unwanted entries enhances the operation speed and stability of your system;
• You can perform the registry clean operation with a few mouse clicks, without any complicated procedures.
Running an On-Demand, Custom Scan and Clean
Configuring and running an on-demand registry scan and clean consists of four simple steps.
Comodo System-Cleaner User Guide | © 2009 Comodo Security Solutions Inc. | All rights reserved 18

www.comodo.com
1. Configuring the Scan Locations;
2. Scanning the Windows Registry;
3. Selecting the Registry Entries to be Cleaned Up;
4. Cleaning the Registry.
To run an on-demand scan, Click Registry Cleaner > Clean-up.
Step - 1 Configuring the Scan Locations
The first stage of the process is to choose the locations to be scanned by the Registry Cleaner. The configuration screen enables you to select specific locations in the Windows Registry to perform a scan and clean obsolete and unwanted entries. The options are explained below.
Definitions of Registry Areas
• Start-up Locations - Windows Registry items that are set to run at Windows startup in this section of the registry. These registry entries contain references to the locations of these items on the hard drive. COMODO Registry Cleaner removes startup items from the registry that no longer exist at their specified locations on the hard drive.
Comodo System-Cleaner User Guide | © 2009 Comodo Security Solutions Inc. | All rights reserved 19
www.comodo.com
• Application Paths - The Windows system supports "per application" paths. If an application registers a path, Windows sets the PATH environment variable as the registered path when it starts that application. When the application no longer exists, related information may be deleted safely - COMODO Registry Cleaner searches for such entries and removes them.
• Shared Dlls - Libraries that offer some form of sharing, allowing the same library to be used by multiple programs at the same time. COMODO Registry Cleaner removes share control files entries from the registry that no longer exist.
• Font Locations - Fonts that are registered in the fonts folder of the Windows operating system. COMODO Registry Cleaner detects the registry entries which reference fonts that no longer exist in the Windows fonts folder and removes them.
• Uninstall Locations – After you have uninstalled and application, the references to the uninstall file may remain in the registry. COMODO Registry Cleaner removes such entries.
• File Extensions - File extensions that are usually registered in the registry during installation of the application. COMODO Registry Cleaner removes Windows file extensions that are no longer associated with applications installed on your system.
• COM and ActiveX - The Registry Cleaner scans for COM/ActiveX object that refer to a non-existing file. This reference is considered invalid and it is removed.
• Help Locations - All installed application should register their help files in this section of Windows Registry. COMODO Registry Cleaner identifies those references to help files that no longer exist.
• Shared Folders - The Registry Cleaner checks every path in the Shared Folders section. If a folder referenced by a path doesn't physically exist, Registry Cleaner removes the path from this registry key.
• System Services - The Registry Cleaner checks every path in the System Services section. If a path doesn't physically exist, Registry Cleaner removes the path from this registry key.
• Menu Order - The Registry Cleaner checks every entry in the Menu Order section. If the entry doesn't physically exist at Start-> Programs, Registry Cleaner removes the entry from this registry key.
• Software - The Registry Cleaner scans all the paths from Software location. If an entry doesn't physically exist, Registry Cleaner removes the entry from the Software registry key.
• Filter Entries - The Registry Cleaner searches the registry for a specific name entered by the user. After the search, Registry Cleaner can remove all the references for the specific name found in the registry. Click here for more details.
• Ignore List - Some registry locations can be specified here using their names, so that the Comodo Registry Cleaner ignores those registry locations during scanning. Click here for more details.
Invert Selection is useful to quickly switch between scan profiles. When this link is clicked, the selected entries turn into unselected and vice-versa.
• Specify the locations to be scanned and cleaned by selecting the respective check boxes and click Scan.
Step - 2 Scanning the Windows Registry
The Registry Cleaner scans your Windows Registry locations selected in Step - 1 and the scanning progress is indicated. If you want to stop the scanning process, click Stop.
Comodo System-Cleaner User Guide | © 2009 Comodo Security Solutions Inc. | All rights reserved 20

www.comodo.com
Note: On completion of scanning, an additional entry called Entries For Expert Users is listed in the scan results screen if the option Extended scan for expert users is enabled in Registry Cleaner > Settings. These are values or keys found in Scanned locations ( Startup, Com and ActiveX etc) and are not recommended to be deleted because this can affect the system. These entries will not be deleted automatically when you click Clean button from the results screen to ensure the stability of the system. If you are an expert user, know the effects of deleting the entries under this category and sure to delete them, you can click the '+' button beside the entry, view the list of registry entries detected to be errors and choose the entries to be cleaned by selecting the checkboxes beside the respective entries. Click here for more details on the Extended scan for expert users option.
Step - 3 Selecting the Registry Entries to be Cleaned Up
The scan results screen is displayed at the end of the scan. No registry changes are implemented until you click the Clean button on this screen. The Registry Cleaner selects important entries to be deleted by default. If you wish to select all the detected entries and get rid of all the errors, just click the Select all link. If you wish to de-select all, just click Select none link. Select the check boxes beside the entries you wish to clear and click Clean.
Comodo System-Cleaner User Guide | © 2009 Comodo Security Solutions Inc. | All rights reserved 21

www.comodo.com
A confirmation dialog will appear to check whether you wish to proceed with the deletion of selected Registry Entries.
• Click Yes to proceed.
Another Confirmation dialog appears for whether to continue the Registry Cleaning process with the Registry Protection function, if you have selected the Use Registry Protection option in the Registry Cleaner > Settings. With this option enabled, the system has to be restarted for the changes to take effect. If any problems occur due to the registry cleaning process, the registry values and keys can be reverted to the old values and keys to ensure continuous trouble free operation of the system. Click here for more details on the Use Registry Protection option. If you want to save the Registry Cleaner Settings before commencing the cleaning operation, select the checkbox Save Settings before clicking Yes.
Comodo System-Cleaner User Guide | © 2009 Comodo Security Solutions Inc. | All rights reserved 22

www.comodo.com
Note: This dialog appears only when the Use Registry Protection option is selected in the Registry Cleaner > Settings.
• Click Yes if you want to use Use Registry Protection option else click No.
You will be asked whether you wish to create a System Restore Point. Click Yes. The application switches to the backup/restore process. (This lets you backup Windows Registry files which were deleted after the scanning process. This way you can use the backup to restore the registry to the initial status in case you encounter some system failure.)
Note: This dialog appears only when the Create Restore point before Cleaning registry is selected in the Registry Cleaner > Settings.
• Click Yes if you want to create a restore point, else click NO. The process moves to Step - 4.
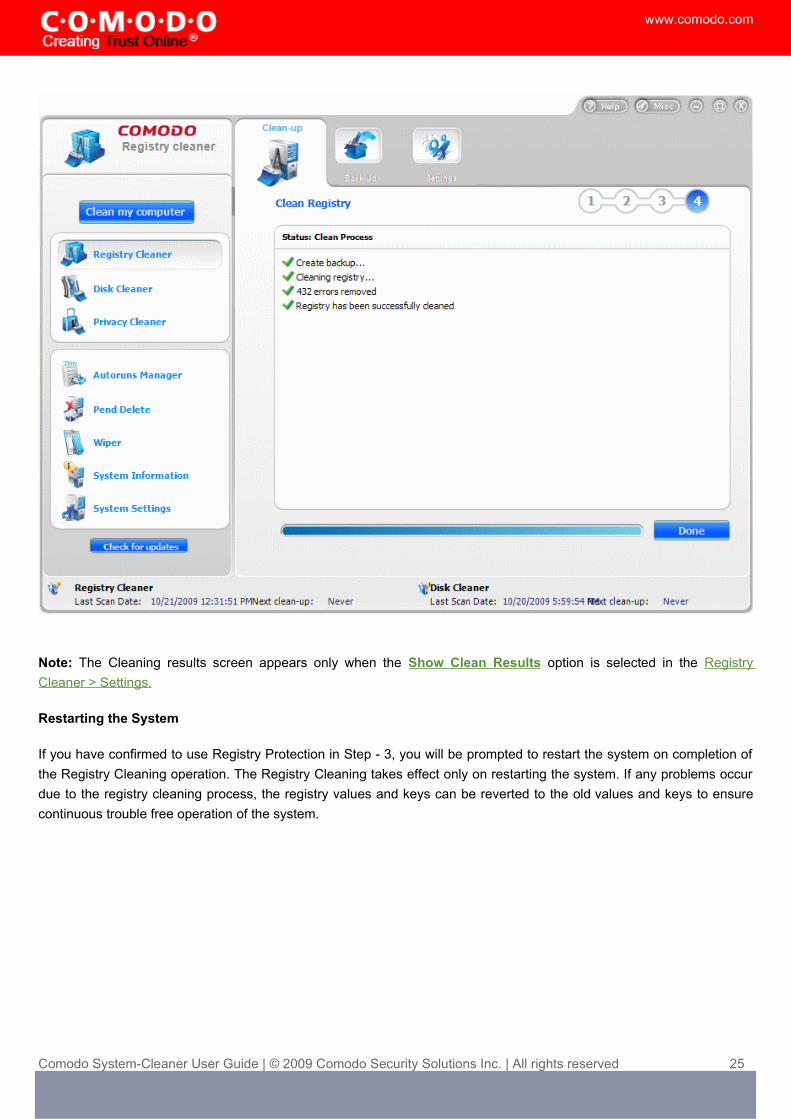
Step - 4 Cleaning the Registry
The Registry Cleaner creates a Restore Point, Creates a Backup of the Registry and starts cleaning the Registry Entries that you selected in step – 3.
Comodo System-Cleaner User Guide | © 2009 Comodo Security Solutions Inc. | All rights reserved 23

www.comodo.com
• The Cleaning progress is indicated.
• On completion of the cleaning process, the cleaning results will be displayed. Click Done to exit the wizard.
Comodo System-Cleaner User Guide | © 2009 Comodo Security Solutions Inc. | All rights reserved 24
www.comodo.com
Note: The Cleaning results screen appears only when the Show Clean Results option is selected in the Registry Cleaner > Settings.
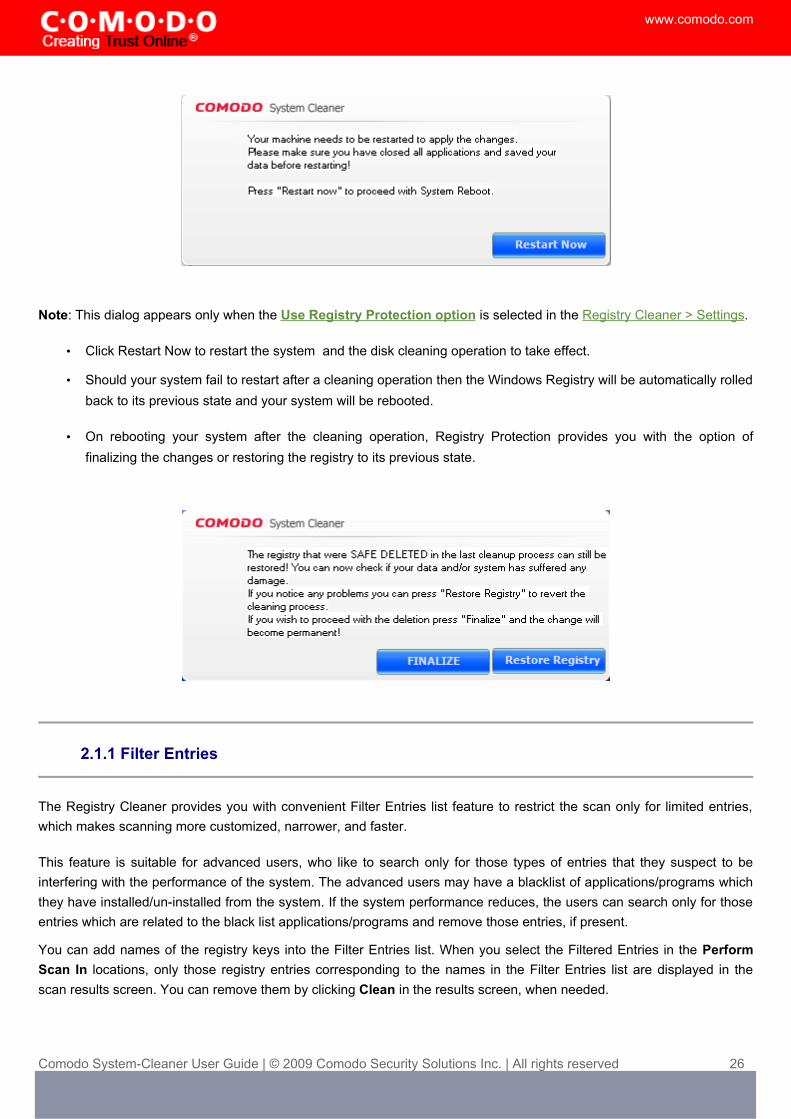
Restarting the System
If you have confirmed to use Registry Protection in Step - 3, you will be prompted to restart the system on completion of the Registry Cleaning operation. The Registry Cleaning takes effect only on restarting the system. If any problems occur due to the registry cleaning process, the registry values and keys can be reverted to the old values and keys to ensure continuous trouble free operation of the system.
Comodo System-Cleaner User Guide | © 2009 Comodo Security Solutions Inc. | All rights reserved 25
www.comodo.com
Note: This dialog appears only when the Use Registry Protection option is selected in the Registry Cleaner > Settings.
• Click Restart Now to restart the system and the disk cleaning operation to take effect.
• Should your system fail to restart after a cleaning operation then the Windows Registry will be automatically rolled back to its previous state and your system will be rebooted.
• On rebooting your system after the cleaning operation, Registry Protection provides you with the option of finalizing the changes or restoring the registry to its previous state.
2.1.1 Filter Entries
The Registry Cleaner provides you with convenient Filter Entries list feature to restrict the scan only for limited entries, which makes scanning more customized, narrower, and faster.
This feature is suitable for advanced users, who like to search only for those types of entries that they suspect to be interfering with the performance of the system. The advanced users may have a blacklist of applications/programs which they have installed/un-installed from the system. If the system performance reduces, the users can search only for those entries which are related to the black list applications/programs and remove those entries, if present.
You can add names of the registry keys into the Filter Entries list. When you select the Filtered Entries in the Perform Scan In locations, only those registry entries corresponding to the names in the Filter Entries list are displayed in the scan results screen. You can remove them by clicking Clean in the results screen, when needed.
Comodo System-Cleaner User Guide | © 2009 Comodo Security Solutions Inc. | All rights reserved 26

www.comodo.com
The Filtered Entries list can be
• Scanned in addition to the areas selected in the main pane.
• Used to perform a targeted scan on certain keys.
To add a new filter entry
1. Click Registry Cleaner > Clean-up.
2. Click on Filter Entries button.
Comodo System-Cleaner User Guide | © 2009 Comodo Security Solutions Inc. | All rights reserved 27

www.comodo.com
3. In the dialog that appears, select the registry key name of the entry to be filtered from the Registry tree in the left hand side pane.
4. Click Add. 5. Repeat the procedure for adding more number of entries. 6. Click Save.
• To remove a registry key from the Filter Entries list, simply select the key name from the right hand side pane and click Remove.
2.1.2 Ignore List
The Ignore List feature of the Registry Cleaner provides you with convenience of excluding a predefined set of Registry keys from scanning. The Registry Cleaner will skip those registry keys whose names are included in the Ignore List, which makes scanning more customized, narrower, and faster.
This feature is suitable for advanced users, who like to skip those types of entries that they trust to be not interfering with the performance of the system. The advanced users may have a white list of applications/programs which they have
Comodo System-Cleaner User Guide | © 2009 Comodo Security Solutions Inc. | All rights reserved 28

www.comodo.com
installed/un-installed from the system. The users can exclude those entries which relate to the trusted applications/programs by including the names of the respective registry keys into the Ignore List.
You can add names of the registry keys into the Ignore List. When you run an on-demand scan or a scheduled scan, the entries in the Ignore list will be excluded every time until you remove the entry from the list.
To add a new entry into the ignore list
1. Click Registry Cleaner > Clean-up. 2. Click on Ignore List button.
Comodo System-Cleaner User Guide | © 2009 Comodo Security Solutions Inc. | All rights reserved 29

www.comodo.com
3. In the dialog that appears, select the registry key name of the entry to be ignored from the Registry tree in the left hand side pane.
4. Click Add. 5. Repeat the procedure for adding more number of entries. 6. Click Save.
• To remove a registry key from the Ignore list, simply select the key name from the right hand side pane and click Remove.
2.2 Back-up
The Registry Cleaner has a Backup function which creates a back-up of the Windows Registry before every on-demand and scheduled scan and clean. The backups are stored in date and time stamped folders in the location of your choice. You can store the backup files in your computer locally, on a computer in your network or even in an FTP server. This back-up function enables you to restore the registry to a previous state in case you encounter some system failure or if you want to undo any changes.
By default, the Registry Cleaner automatically creates a backup of the entries it changes in the Windows Registry before each scan. You can disable this option in Settings of the Registry Cleaner.
Note: COMODO strongly recommends not to disable back-up option.
Comodo System-Cleaner User Guide | © 2009 Comodo Security Solutions Inc. | All rights reserved 30

www.comodo.com
Restoring Windows Registry from backup
To restore the registry in case you encounter some system failure
1. Click Registry Cleaner > Back-up. 2. Right-click on the backup name you need to return to.
3. Select Restore from the context sensitive menu.
The Registry entries will be backed up to their original locations and a completion dialog is displayed.
Comodo System-Cleaner User Guide | © 2009 Comodo Security Solutions Inc. | All rights reserved 31

www.comodo.com
2.3 Settings
The Settings option in the Registry cleaner interface allows you to configure various options related to the operation of the Registry Cleaner. The Settings panel can be accessed by clicking the Settings tab in the Registry Cleaner interface.
Run a Scan when application starts - With this option checked, the Registry Cleaner will automatically scan the Windows Registry every time you run the COMODO System-Cleaner.
Run a registry Scan and Clean - The Registry Cleaner scans and cleans can be scheduled to run at a specific date and time: Every Day - Scan and clean are performed daily;
Every Week - Weekly once scan and clean are performed on the specified day (e.g.: If you set the weekly scan and clean on Sunday, this operation will be performed each Sunday since the moment have enabled it. ) Every Month - Monthly once scan and clean are performed on the specified day (e.g.: If you set the monthly scan and clean on July, 20th, this operation will be performed each 20th day of next months since the moment you have enabled it.)Once - Single time at the specific time and date.
Comodo System-Cleaner User Guide | © 2009 Comodo Security Solutions Inc. | All rights reserved 32

www.comodo.com
To schedule scan and clean, check the box alongside the needed option, set time and date if needed, and click 'Ok'. The schedule would be saved and scan and clean are performed at the appropriate date and time you specified.
Note: If the user doesn't have a windows password, he/she cannot use scheduled scan and clean option.
Create Restore point before Cleaning Registry - Selecting this option creates a Windows restore point prior to the registry cleaning operation. A Windows restore point is a snapshot of your system as it currently stands. This is useful because it allows you to roll back your system to its last known working state in the event of system failure or performance problems following software or hardware re-configuration. COMODO System-Cleaner provides this essential failsafe feature in all cleaning modules (for example, you also have the option to create a restore point before running Disk Cleaner and Privacy Cleaner operations). See also System Settings > Settings.
Create Backup before Cleaning registry - If enabled, full backup of your Window's Registry will be created before EACH cleaning of the registry. This is the default and highly recommended setting. You can use this backup file to restore the registry to the current status in case you encounter some system failure or if you want to undo any changes. See also Restoring Windows Registry from backup section. You can store the backup files in compressed, encrypted and password protected, providing an additional level of safety. You have to enter this password every time you restore the registry entries from the backup created by the Registry Cleaner. For more details on location, compression and encryption settings of the backup files, see Miscellaneous > Backup Settings section.
Show Warnings - The warning dialogs from the Registry Cleaner are displayed only if this option is enabled. Uncheck this option if you don't want to see the warning messages and dialogs. See also System Settings > Settings.
Store logs for registry Clean - If enabled, the Registry Cleaner logs events history about each scan action and result.
Show log... button - Allows to view logs history. (see below)
Use Registry Protection - Provides an additional level of security to Registry Cleaning operations:
• The Windows Registry hives will be backed up prior to any cleaning operation.
Comodo System-Cleaner User Guide | © 2009 Comodo Security Solutions Inc. | All rights reserved 33

www.comodo.com
• Should your system fail to restart after a cleaning operation then the Windows Registry will be automatically rolled back to its previous state and your system automatically rebooted.
• On rebooting your system after any cleaning operation, Registry Protection provides you with the option of finalizing the changes or restoring the registry to its previous state.
Comodo recommends that users leave this setting enabled.
Extended scan for expert users – The registry cleaner scans critical locations like Startup, Com and ActiveX etc. and provides the scan results only if this option is selected. The values or keys from the Registry files, found in these locations are not recommended to be deleted because this can affect the system. When this option is enabled you will see an an additional entry called Entries For Expert Users listed in the results screen after running a Registry Scan. These entries will not be deleted automatically on Registry Clean-up to ensure the stability of the system. If you are an expert user and know the effects of removing these registry entries, you can do so by manually selecting the entries to be cleaned from the scan results screen.
Show Scan Results after Analyze - The Scan Results screen will appear after running an on-demand registry scan, only when this option is checked. The Scan Results window will wait for your response to clean the registry. If this option is left unchecked, the registry cleaner starts cleaning the registry immediately on completion of scanning, without waiting for your response.
Show Clean Results - The Cleaning Results Screen will appear after running an on-demand registry cleaning operation, only when this option is checked. The Clean Results window will wait for your response to close the wizard by clicking Done. If this option is left unchecked, the registry cleaner closed the registry cleaning wizard immediately on completion of the cleaning operation, without waiting for your response.
• Click Apply for the settings to take effect.
3 Disk Cleaner
COMODO System-Cleaner features a fully functional Disk Cleaner. Its purpose is to scan and remove junk or garbage files which occupy a considerable space in your hard disks. These files include temporary files created by Windows, user, files retained in the Recycle bin, Windows log files, temporary Internet files, temporary files created by Office Suite etc. This functionality also scans the system for duplicate files stored elsewhere. Removal of unnecessary files from the hard drive provides more space for the applications in progress to store their data at an easy reach and improves the access speed. You can also schedule Scans to run automatically at the time you prefer.
The Disk Cleaner can always be accessed by clicking Disk Cleaner button in the left hand side pane of the main interface. The Disk Cleaner interface allows you to run on-demand scans, scheduling scans and cleans, configuring settings etc.
Click the links below to see the detailed explanations on each option in Disk Cleaner.
• Clean-up
• Backup
• Duplicate Files
• Settings
Comodo System-Cleaner User Guide | © 2009 Comodo Security Solutions Inc. | All rights reserved 34

www.comodo.com
3.1 Clean-up
The Clean-up option in the Disk Cleaner enables you to launch an on-demand scan and to configure scan parameters. It can be accessed by clicking Clean-up button in the interface screen of the Disk cleaner.
Features and Benefits of using Disk Clean-up
• The Disk clean-up conducts a scan of your hard disks Registry to remove junk and garbage files;
• The removal of the junk and unwanted files frees your disk space for use by running processes, thereby enhances the operation speed and stability of your system;
• You can perform the disk clean operation with a few mouse clicks, without any complicated procedures.
Running an On-Demand, Custom Scan and Clean
Configuring and running an on-demand disk scan and clean consists of four simple steps.
1. Configuring the scan locations;
Comodo System-Cleaner User Guide | © 2009 Comodo Security Solutions Inc. | All rights reserved 35

www.comodo.com
2. Scanning the disks;
3. Selecting the files to be removed;
4. Cleaning the disks.
To run an on-demand scan, Click Disk Cleaner > Clean-up.
Step - 1 Configuring the Scan Locations
The first stage of the process is to choose the locations to be scanned by the Disk Cleaner. The configuration screen enables you to select types of unwanted files from your hard disk, to be scanned and clean. The options are explained below.
• Filter Entries - The Disk Cleaner searches the disk for a specific name entered by the user. After the search, the Disk Cleaner can remove all the references for the specific name found in the files. Click here for more details.
• Other - Selecting this option automatically selects all the types in this category.
• Unused Icons - Selecting this option checks for the icons and will attempt to open the program represented by the icon. If the program could not be opened, this means that the icon is junk and can be deleted. The icons will be added on a list and the user has the choice to unselect or select certain icons for deletion.
Comodo System-Cleaner User Guide | © 2009 Comodo Security Solutions Inc. | All rights reserved 36

www.comodo.com
• Recycle Bin - The files held in the Recycle bin folder can be removed.
• Windows Log Files - Windows maintains Log files for various processes like scan disk etc. in respective folders. Selecting this option scans the selected paths for log and history files for removal. Selecting this option automatically selects all the types in this category.
• Recent Files List - Windows stores the list of all the files that have recently been used by the user in the HKCU\Software\Microsoft\Windows\ CurrentVersion\Explorer\RecentDocs registry key. Selecting this option scans the path for this type of files for removal.
• Debug Memory Log Files - Windows generates log files when it makes memory debug. Selecting this option scans for this type of folders, and deletes them at user request.
• Windows Temp Files - Many applications and windows create temporary files which can occupy a lot of space. In windows, temporary files are represented by the extensions *.temp, *.$$$, *.~mp. Selecting this option scans the selected paths for temporary files for removal. Selecting this option automatically selects all the types in this category.
• Windows Temp Directory - Scans Temp directory of Windows and removes all the files that are not in use.
Comodo System-Cleaner User Guide | © 2009 Comodo Security Solutions Inc. | All rights reserved 37

www.comodo.com
• Windows Update Temp Files - The Windows updates received from the server are stored in a temp directory for installation during shutdown. These files reside in the folder even after the updates are installed. Selecting this option scans the folder and deletes the files that are not in use.
Specify the locations to be scanned and cleaned by selecting the respective check boxes and click Scan.
Step - 2 Scanning the Disks
The Disk Cleaner scans the locations in your hard disk drive as selected in Step - 1 and the scanning progress is indicated. If you want to stop the scanning process, click Stop.
Step - 3 Selecting the Files to be Removed The scan results screen is displayed at the end of the scan. No changes are implemented until you click the Clean button on this screen. The number of junk files detected and the space occupied by those files in the hard disk are also displayed at the bottom. The Disk Cleaner selects important entries to be deleted by default. If you wish to select all the detected entries and get rid of all the errors, just click the Select all button. If you wish to deselect all, just click Select none button. Select the check boxes beside the entries you wish to clear and click Clean.
Comodo System-Cleaner User Guide | © 2009 Comodo Security Solutions Inc. | All rights reserved 38

www.comodo.com
A confirmation dialog appears for whether to continue the Disk Cleaning operation with the Safe Deletion function., if you have selected the Use SAFE DELETE to remove files in Disk Cleaner > Settings. With this option enabled, the system has to be restarted for the changes to take effect. If you have accidentally selected vital files while setting a disk cleaning operation, the files can be restored restored automatically or manually. Click here for more details on the Use SAFE DELETE to remove files option.
Note: This dialog appears only when the Use SAFE DELETE to remove files option is selected in the Disk Cleaner > Settings.
Comodo System-Cleaner User Guide | © 2009 Comodo Security Solutions Inc. | All rights reserved 39

www.comodo.com
• Click Yes if you want to use Use SAFE DELETE to remove files option else click No.
You will be asked whether you wish to create a Restore Point. If you click Yes, the application switches to the backup/restore process. (This lets you backup the files which were deleted after the scanning process. This way you can use the backup to restore the files at a a later time.)
Note: This dialog appears only when the Create Restore point before Cleaning disk option is selected in the Disk Cleaner > Settings.
• Click Yes if you want to create a restore point, else click NO.
Step - 4 Cleaning the Disks
The Disk Cleaner creates a Restore Point, Creates a Backup of the files to be deleted and starts removing the files that you selected in step – 3.
Comodo System-Cleaner User Guide | © 2009 Comodo Security Solutions Inc. | All rights reserved 40

www.comodo.com
• The Cleaning progress is indicated.
• On completion of the cleaning process, the cleaning results will be displayed. Click Done to exit the wizard.
Comodo System-Cleaner User Guide | © 2009 Comodo Security Solutions Inc. | All rights reserved 41

www.comodo.com
Note: The Clean results screen appears only when the Show Clean Results option is selected in the Disk Cleaner > Settings.
Restarting the System
If you have confirmed to use Safe Delete Function in Step - 3, you will be prompted to restart the system on completion of the Cleaning operation. The Disk Cleaning takes effect only on restarting the system. If any problems occur due to the disk cleaning process, the files can be reverted to their original locations to ensure continuous trouble free operation of the system.
Comodo System-Cleaner User Guide | © 2009 Comodo Security Solutions Inc. | All rights reserved 42

www.comodo.com
Note: This dialog appears only when the Use Safe Delete to remove files is selected in the Disk Cleaner > Settings.
• Click Restart Now to restart the system and the disk cleaning operation to take effect.
• Should your system fail to restart after the cleaning operation then the files will be automatically restored to their original locations and your system will be rebooted.
• On rebooting your system after the cleaning operation, the Safe Delete function provides you with the option of finalizing the changes or restoring the files to their original locations.
3.1.1 Filter Entries
The Disk Cleaner provides you with convenient Filter Entries list feature to restrict the scan only for limited files and paths, which makes scanning more customized, narrower, and faster.
This feature is suitable for advanced users, who like to search only for those types of files and paths that they suspect to be interfering with the performance of the system. The advanced users may have a blacklist of applications/programs that occupy a considerable space in the hard disk.
You can add files into the Filter Entries list. When you select the Filtered Entries in the Clean-up panel, only those registry entries corresponding to the names in the Filter Entries list are displayed in the scan results screen. You can remove them by clicking Clean button in the results screen, when needed.
The Filtered Entries list can be
• Scanned in addition to the areas selected in the main panel. • Used to perform a targeted scan on certain files.
Comodo System-Cleaner User Guide | © 2009 Comodo Security Solutions Inc. | All rights reserved 43

www.comodo.com
To add a new filter entry
1. Click Disk Cleaner > Clean-up.2. Click on Filter Entries button. A warning dialog appears.
3. Click Ok to proceed.
Comodo System-Cleaner User Guide | © 2009 Comodo Security Solutions Inc. | All rights reserved 44
www.comodo.com
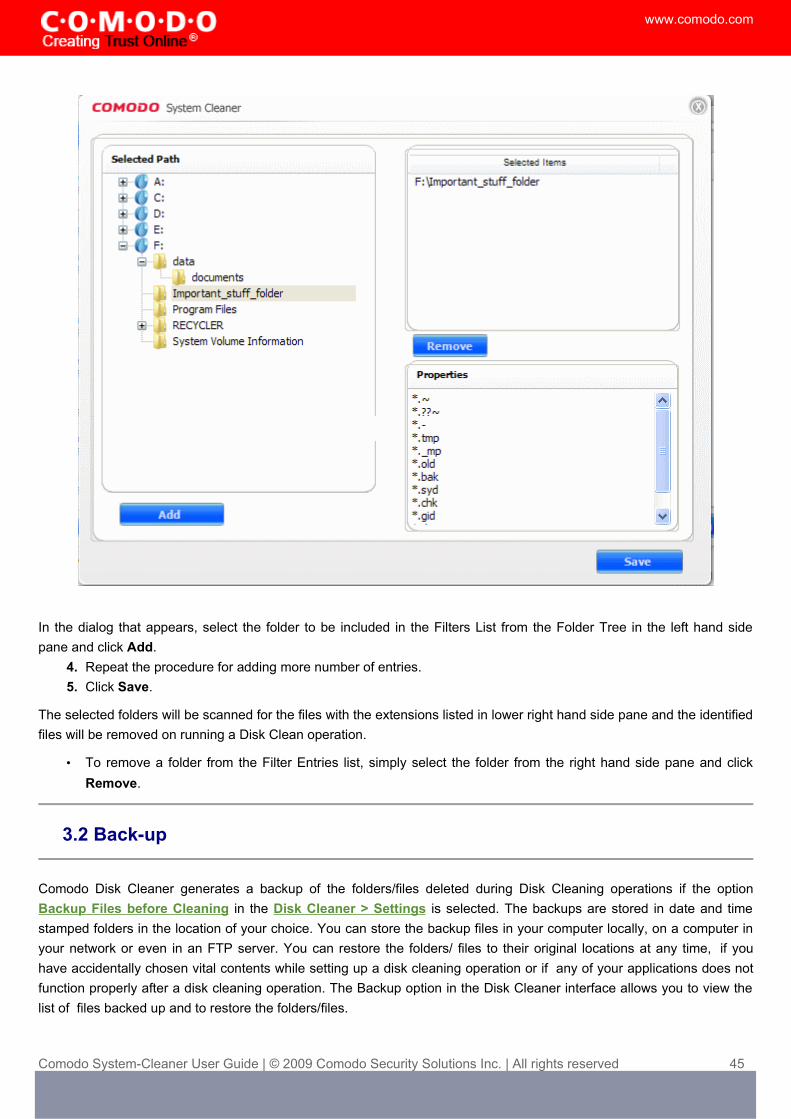
In the dialog that appears, select the folder to be included in the Filters List from the Folder Tree in the left hand side pane and click Add.
4. Repeat the procedure for adding more number of entries.5. Click Save.
The selected folders will be scanned for the files with the extensions listed in lower right hand side pane and the identified files will be removed on running a Disk Clean operation.
• To remove a folder from the Filter Entries list, simply select the folder from the right hand side pane and click Remove.
3.2 Back-up
Comodo Disk Cleaner generates a backup of the folders/files deleted during Disk Cleaning operations if the option Backup Files before Cleaning in the Disk Cleaner > Settings is selected. The backups are stored in date and time stamped folders in the location of your choice. You can store the backup files in your computer locally, on a computer in your network or even in an FTP server. You can restore the folders/ files to their original locations at any time, if you have accidentally chosen vital contents while setting up a disk cleaning operation or if any of your applications does not function properly after a disk cleaning operation. The Backup option in the Disk Cleaner interface allows you to view the list of files backed up and to restore the folders/files.
Comodo System-Cleaner User Guide | © 2009 Comodo Security Solutions Inc. | All rights reserved 45

www.comodo.com
Restoring Files from Backup
To Restore a deleted folder/file
1. Click Disk Cleaner > Backup.
The folders and files which were backed up previously are shown in a tree structure.
2. Select the file or folder you wish to restore. To select multiple files/folders, use 'Control' or 'Shift' key on the keyboard.
Comodo System-Cleaner User Guide | © 2009 Comodo Security Solutions Inc. | All rights reserved 46

www.comodo.com
3. Click Restore. 4. If you have chosen to encrypt the backup files in the Disk Cleaner > Settings > Backup Files before Cleaning
settings, enter the password for decrypting the files during restoration and click OK.
Note: This dialog appears only when Encryption of Backup is chosen in the Miscellaneous > Backup Settings.
The files are restored to their original locations.
3.3 Duplicate files
The Duplicate files option in the Disk Cleaner scans the selected drive partition or a selected path and searches the
Comodo System-Cleaner User Guide | © 2009 Comodo Security Solutions Inc. | All rights reserved 47

www.comodo.com
copies of same file stored in different folders. This is useful in removing redundant or duplicate files stored in an obscure folder and you could have forgotten storing those. The files are identified as exact copies by performing a checksum between the current reference file and all the files from the search path so that the duplicate files can be detected even if they are named differently. Maintaining several copies of the same file not only occupies the disk space unnecessarily but also confuses the user due the bulk it adds.
Features and Benefits of using Duplicate Files option• Enables to identify the copies of same file under different names and stored in different folders in a given path;
• Enables to delete the unnecessary copies, removing clutter in the hard disk and freeing its space;
• Provides more space for the current processes to access the hard disk, improving the performance of the system.
The Duplicate Files option in the Disk Cleaner enables you to run two types of scans.1. Simple Scan - The utility scans the disk for all types of files.
2. Advanced Scan - The utility scans the disk only for files of types Movies, Music and/or pictures as you select from the check boxes below Advanced Scan in this interface. This is very much useful when you want to remove the duplicate files of only these types. Selecting the file types for removal saves a large amount of time.
Comodo System-Cleaner User Guide | © 2009 Comodo Security Solutions Inc. | All rights reserved 48

www.comodo.com
Running an On-Demand, Custom Scan and Clean
Configuring and running an on-demand disk scan for identifying duplicate files and deleting them consists of three simple steps.
1. Configuring the Scan Locations
2. Scanning the Disks
3. Selecting the Files to be Deleted and Completing Deletion
To run an on-demand scan for duplicate files in a disk or folder , Click Disk Cleaner > Duplicate Files tab.
Step - 1 Configuring the Scan LocationsThe first stage of the process is to choose the locations to be scanned by the Disk Cleaner. The configuration screen enables you to select the drive partitions or specific folders of your hard disk to identify the duplicate files.
1. Select the drive to be checked for duplicate files from the tree structure in the right hand side pane. To navigate to a selected path in the drive, click on the '+' button beside the drive icon and select the path.
2. Select the Scan type from Simple Scan and Advanced Scan. Select the file types if you have selected Advanced Scan.
Comodo System-Cleaner User Guide | © 2009 Comodo Security Solutions Inc. | All rights reserved 49

www.comodo.com
3. Click Scan.
Step - 2 Scanning the Disks
The Disk Cleaner scans the locations in your hard disk drive as selected in Step - 1 and the scanning status is indicated at the bottom. If you want to stop the scanning process, click Stop.
Step - 3 Selecting the Files to be Deleted and Completing Deletion
The scan results screen is displayed at the end of the scan. No changes are implemented until you click the Clean button on this screen. The identified duplicate files are listed in the right hand side pane. Clicking the '+' button beside each file displays the path and file names of the files with identical content.
Comodo System-Cleaner User Guide | © 2009 Comodo Security Solutions Inc. | All rights reserved 50

www.comodo.com
• Select the files to be deleted by selecting the checkboxes beside the file names and click Delete.
A confirmation dialog appears for whether to continue the deletion operation with the Safe Delete function., if you have selected the Use SAFE DELETE to remove files in Disk Cleaner > Settings. With this option enabled, the system has to be restarted for the changes to take effect. If you have accidentally selected vital files while setting a disk cleaning operation, the files can be restored restored automatically or manually. Click here for more details on the Use SAFE DELETE to remove files option.
Comodo System-Cleaner User Guide | © 2009 Comodo Security Solutions Inc. | All rights reserved 51

www.comodo.com
Note: This dialog appears only when the Use SAFE DELETE to remove files option is selected in the Disk Cleaner > Settings.
• Click Yes if you want to use Use SAFE DELETE to remove files option else click No.
The Disk Cleaner creates a Backup of the files to be deleted and starts deleting the selected files. The Cleaning progress is indicated.
• On completion of the cleaning process, the cleaning results will be displayed. Click Done to exit the wizard.
Comodo System-Cleaner User Guide | © 2009 Comodo Security Solutions Inc. | All rights reserved 52

www.comodo.com
Note: The Cleaning results screen appears only when the Show Clean Results option is selected in the Disk Cleaner > Settings.
Restarting the System
If you have confirmed to use Safe Delete Function in Step - 3, you will be prompted to restart the system on completion of the Cleaning operation. The Disk Cleaning takes effect only on restarting the system. If any problems occur due to the disk cleaning process, the files can be reverted to their original locations to ensure continuous trouble free operation of the system.
Note: This dialog appears only when the Use Safe Delete to remove files is selected in the Disk Cleaner > Settings.
Comodo System-Cleaner User Guide | © 2009 Comodo Security Solutions Inc. | All rights reserved 53

www.comodo.com
• Click Restart Now to restart the system and the duplicate file deletion operation to take effect.
• Should your system fail to restart after the cleaning operation then the files will be automatically restored to their original locations and your system will be rebooted.
• On rebooting your system after the cleaning operation, the Safe Delete function provides you with the option of finalizing the changes or restoring the files to their original locations.
The selected files will be deleted from the hard disk on finalization.
3.4 Settings
The Settings option in the Disk cleaner interface allows you to configure various options related to the operation of the Disk Cleaner. The Settings panel can be accessed by clicking the Settings tab in the Disk Cleaner interface.
Run a Scan when application starts - With this option checked, the Disk Cleaner will automatically scan your hard disk every time you run the COMODO System-Cleaner with the settings specified in the Disk Cleaner > Clean-up interface.
Run a Scan and Clean - The Disk Cleaner scans and cleans can be scheduled to run at a specific date and time: Every Day - Scan and clean are performed daily;Every Week - Weekly once scan and clean are performed on the specified day (e.g.: If you set the weekly scan and clean on Sunday, this operation will be performed each Sunday since the moment have enabled it.) Every Month - Monthly once scan and clean are performed on the specified day (e.g.: If you set the monthly scan and clean on July, 20th, this operation will be performed each 20th day of next months since the moment you have enabled it.)Once - Single time at specific time and date.
To schedule scan and clean, check the box alongside the needed option, set time and date if needed, and click 'Ok'. The schedule would be saved and scan and clean are performed at the appropriate date and time you specified.
Note: If the user doesn't have a windows password, he/she cannot use scheduled scan and clean option.
Comodo System-Cleaner User Guide | © 2009 Comodo Security Solutions Inc. | All rights reserved 54

www.comodo.com
Use SAFE DELETE to remove files - Provides an additional level of failsafe security to Disk Cleaning operations:
• All files selected for removal will be backed up prior to any cleaning operation.
• Should your system fail to restart after a cleaning operation then the safe-deleted files will be automatically restored and your system will be rebooted.
• On rebooting your system after any cleaning operation, SAFE DELETE provides you with the option to either finalize the deletion or restore the deleted files.
Comodo recommends that users leave this setting enabled.
Create Restore point before Cleaning disk - Selecting this option creates a Windows restore point prior to the registry cleaning operation. A Windows restore point is a snapshot of your system as it currently stands. This is useful because it allows you to roll back your system to its last known working state in the event of system failure or performance problems following software or hardware re-configuration. COMODO System-Cleaner provides this essential failsafe feature in all cleaning modules (for example, you also have the option to create a restore point before running Registry Cleaner and Privacy Cleaner operations). See also System Settings > Settings.
Show warnings - The warning dialogs from the Disk Cleaner are displayed only if this option is enabled. Uncheck this option if you don't want to see the warning messages and dialogs. See also System Settings > Settings.
Store logs for Disk Clean - If enabled, the Disk Cleaner logs events history about each scan action and result.
Comodo System-Cleaner User Guide | © 2009 Comodo Security Solutions Inc. | All rights reserved 55

www.comodo.com
Show log... button - Allows to view logs history. (see below)
Show Scan Results after Analyze - The Scan Results screen will appear after running an on-demand disk scan from the main interface, only when this option is checked. The Scan Results window will wait for your response to clean the disk. If this option is left unchecked, the Disk Cleaner starts cleaning the disks immediately on completion of scanning, without waiting for your response.
Show Clean Results - The Cleaning Results Screen will appear after running an on-demand disk cleaning operation, only when this option is checked. The Clean Results window will wait for your response to close the wizard by clicking Done. If this option is left unchecked, the disk cleaner closes the cleaning wizard immediately on completion of the cleaning operation, without waiting for your response.
Backup Files before Cleaning - Selecting this option instructs the Disk Cleaner to preserve backup for folders/files deleted during any disk cleaning operation. This way you can use the backup to restore the files at any time on necessity, in case you have accidentally selected some vital files during disk cleaning operation. You can store the backup files in compressed, encrypted and password protected, providing an additional level of safety. In this way you are protected from others from maliciously restoring the files you deleted. You have to enter this password every time you restore files from the backup created by the Disk Cleaner. For more details on location, compression and encryption settings of the backup files, see Miscellaneous > Backup Settings section.
• Click Apply for the settings to take effect.
4 Privacy Cleaner
Windows stores all the tracks , when you surf online using your browser softwares, or when you use any of your Windows applications. The track history can be easily accessed by others who use your computer intruding into your privacy. The
Comodo System-Cleaner User Guide | © 2009 Comodo Security Solutions Inc. | All rights reserved 56

www.comodo.com
Privacy cleaner component of COMODO System-Cleaner can identify and delete all your browser cache, cookies, history, typed URLs, autocomplete history. Also it allows you to delete tracks of applications, such as playlists of different mediaplayers, recent files of Office Suite, and other most used applications.
The Privacy Cleaner can always be accessed by clicking Privacy Cleaner button in the left hand side pane of the main interface.
Click the links below to see the detailed explanations on each option in Privacy Cleaner.
• Applications
• Windows
• Backup
• Settings
4.1 Applications
Comodo System-Cleaner User Guide | © 2009 Comodo Security Solutions Inc. | All rights reserved 57

www.comodo.com
The Applications option in the Privacy Cleaner allows you to quickly erase your cache, cookies, Internet history, visited Websites, typed URLs, temporary Internet folders, the traces of files that you have opened with a variety of applications like list of recently opened documents. Privacy Cleaner helps to maintain your privacy by not allowing others to see which Websites you have visited through your web browsers, access message archives of Instant Messengers, and downloaders. This option also scans your system for cleaning the tracks of applications,such as playlists of Mediaplayers, recent files of Office Suite, Acrobat reader ,Winzip, etc. This provides a privacy in the form that the other persons getting access to your computer cannot know what files you have used previously with the selected applications and are blocked access to your confidential documents.
Features and Benefits of using Privacy Cleaner > Applications
• Scan and remove and delete temporary Internet files.
• Scan and remove cookies: small files that websites store on your computers for identification purposes.
• Delete autocomplete forms: logins, user names, passwords and other personal information entered at websites and keywords entered at search engines.
• Remove Internet history - the lists of visited websites
• Remove the traces of files like recently opened documents, playlists of mediaplayers etc. to prevent others from knowing what files you have opened earlier.
Comodo System-Cleaner User Guide | © 2009 Comodo Security Solutions Inc. | All rights reserved 58

www.comodo.com
Comodo maintains a constantly updated database of applications with the files and registry keys to be cleaned for each application for ensuring the privacy of the user. When COMODO System-Cleaner is run for the first time, it checks for the applications installed in your system and downloads the corresponding updates from the Comodo Servers. Every time you run CSC, it checks for the new applications installed in your system, checks for the availability of updates from Comodo servers and downloads them. By this way, CSC maintains an up-to-date database of the applications to be scanned and cleaned. The update progress is indicated at the bottom right hand side corner of your screen.
Running an On-Demand, Custom Scan and Clean
Configuring and running an on-demand scan for your private data in the applications and cleaning them consists of four simple steps.
1. Configuring the Scan Locations;
2. Scanning the Browsers/Applications;
3. Selecting the Entries to be Removed;
4. Cleaning the Browsers/Applications.
To run an on-demand scan, Click Privacy Cleaner > Applications.
Step - 1 Configuring the Scan Locations
The first stage of the process is to choose the browser/applications from which you want to clear your private data. The configuration screen displays the list of web browsers and applications installed in your system. Each item in the list has sub entries which can be accessed by clicking the '+' button beside the application name.
Comodo System-Cleaner User Guide | © 2009 Comodo Security Solutions Inc. | All rights reserved 59

www.comodo.com
1. Select the browser/application from which you want to delete the trace of the files used.
Note: If you want to select all the entries at once, click on Select All button and if you want to deselect all, click on Select None button. If you want to remove all the traces from the selected application, select the check box beside the application name. If you want to delete only selected entries from the application, click the '+' mark to open the options and select the required entries.
2. Click the Scan button.
Step 2 - Scanning the Browsers/Applications
The Privacy Cleaner scans the files in the Browsers/Applications selected in the Step - 1 and the scanning progress is indicated. If you want to stop the scanning process, click Stop.
Comodo System-Cleaner User Guide | © 2009 Comodo Security Solutions Inc. | All rights reserved 60

www.comodo.com
Step - 3 Selecting the Entries to be Removed
The scan results screen is displayed at the end of the scan. No changes are implemented until you click the Clean button on this screen. The number of files detected is also displayed at the bottom. The Privacy Cleaner selects important entries to be deleted by default. If you wish to select all the detected entries and get rid of all the errors, just click the Select all button. If you wish to deselect all, just click Select none button. Select the check boxes beside the entries you wish to clear and click Clean.
Comodo System-Cleaner User Guide | © 2009 Comodo Security Solutions Inc. | All rights reserved 61

www.comodo.com
A confirmation dialog appears for whether to continue the Privacy Cleaning operation with the Safe Delete function, if you have selected the Use SAFE DELETE/REGISTRY PROTECTION in Privacy Cleaner > Settings. With this option enabled, the system has to be restarted for the changes to take effect. If you have accidentally selected vital files while setting a disk cleaning operation, the files can be restored restored automatically or manually. Click here for more details on the Use SAFE DELETE/REGISTRY PROTECTION option.
Note: This dialog appears only when the Use SAFE DELETE/REGISTRY PROTECTION option is selected in the Privacy Cleaner > Settings.
Comodo System-Cleaner User Guide | © 2009 Comodo Security Solutions Inc. | All rights reserved 62

www.comodo.com
• Click Yes if you want to use Use SAFE DELETE/REGISTRY PROTECTION option else click No.
You will be asked whether you wish to create a Restore Point. If you click Yes, the application switches to the backup/restore process. (This lets you backup the files which were deleted after the scanning process. This way you can use the backup to restore the files at a a later time.)
Note: This dialog appears only when the Create restore point before cleaning option is selected in the Privacy Cleaner > Settings.
• Click Yes if you want to create a restore point, else click NO.
Step - 4 Cleaning the Browsers/Applications
The Privacy Cleaner creates a Restore Point, Creates a Backup of the files to be deleted and starts removing the files that you selected in step – 3.
Comodo System-Cleaner User Guide | © 2009 Comodo Security Solutions Inc. | All rights reserved 63

www.comodo.com
• The Cleaning progress is indicated.
• On completion of the cleaning process, the cleaning results will be displayed. Click Done to exit the wizard.
Note: The Cleaning results screen appears only when the Show Clean Results option is selected in the Privacy Cleaner > Settings.
Restarting the System
If you have confirmed to use Safe Delete Function in Step - 3, you will be prompted to restart the system on completion of the Cleaning operation. The Privacy Cleaning takes effect only on restarting the system. If any problems occur due to the cleaning process, the files can be reverted to their original locations to ensure continuous trouble free operation of the system.
Comodo System-Cleaner User Guide | © 2009 Comodo Security Solutions Inc. | All rights reserved 64

www.comodo.com
Note: This dialog appears only when the Use Safe Delete to remove files is selected in the Privacy Cleaner Cleaner > Settings.
• Click Restart Now to restart the system and the privacy cleaning operation to take effect.
• Should your system fail to restart after the cleaning operation then the files will be automatically restored to their original locations and your system will be rebooted.
• On rebooting your system after the cleaning operation, the Safe Delete function provides you with the option of finalizing the changes or restoring the files to their original locations.
4.2 Windows
The Windows option in the Privacy Cleaner allows you to erase the traces of the history of your offline activities at granular level. This provides a privacy in the form that the other persons getting access to your computer cannot know run history, search history, open/save history, etc. accessed by you. Removal of this temporary files and the traces frees up the disk space and improves the speed of your system.
Features of using Privacy Cleaner > Windows
• Scans and cleans and delete temporary files created by Windows System programs, Windows Explorer and other programs.
• Scans and cleans system Registry: run list, search results, mapped network drives, attached peripheral devices, last opened Registry key, etc.
• Scans and cleans activity traces from your Office Suite, standard Windows, media players playlists and other applications.
Comodo System-Cleaner User Guide | © 2009 Comodo Security Solutions Inc. | All rights reserved 65

www.comodo.com
• Frees up disk space and speeds up your system.
The traces that can be removed from the system are:
• Applications log files
• Dll cache
• Driver cache
• Media player history
• Media player playlists
• Memory dumps
• Printers spool files
• RegEdit favourites list
• System backup files
The traces that can be removed from the Explorer history are:
• Find file history
• Install locations
• Last visited locations
• Open locations
• Registry stream Most Recently Used (MRUs)
• Run history
• Start menu order history
Comodo System-Cleaner User Guide | © 2009 Comodo Security Solutions Inc. | All rights reserved 66

www.comodo.com
Running an On-Demand, Custom Scan and Clean
Configuring and running an on-demand scan for your private data in the Windows Programs, Windows Explorer, Media Players and so on and cleaning them consists of four simple steps.
1. Configuring the Scan Locations;
2. Scanning the Selected Areas;
3. Selecting the Entries to be Removed;
4. Cleaning the Selected Areas.
To run an on-demand scan, Click Privacy Cleaner > Windows.
Step - 1 Configuring the Scan Locations
The first stage of the process is to choose the locations from which you want to clear your private data. The configuration screen displays the list of temporary files that store the history of your access to different Windows programs, Windows Explorer, Media Players and other programs. Each item in the list has sub entries which can be accessed by clicking the + button beside the application name.
Comodo System-Cleaner User Guide | © 2009 Comodo Security Solutions Inc. | All rights reserved 67

www.comodo.com
1. Select the areas from which you want to delete the trace of the files used.
Note: If you want to select all the entries at once, click on Select All button and if you want to deselect all, click on Select None button. If you want to remove all the traces from the selected area, select the check box beside the area name. If you want to delete only selected entries from the application, click the '+' mark to open the options and select the required entries.
2. Click the Scan button.
Step 2 - Scanning the Selected Areas
The Privacy Cleaner scans the files in the areas selected in the Step - 1 and the scanning progress is indicated. If you want to stop the scanning process, click Stop.
Comodo System-Cleaner User Guide | © 2009 Comodo Security Solutions Inc. | All rights reserved 68

www.comodo.com
Step - 3 Selecting the Entries to be Removed
The scan results screen is displayed at the end of the scan. No changes are implemented until you click the Cleanbutton on this screen. The temporary files associated with the selected programs are listed and the number of files detected is also displayed at the bottom. The Privacy Cleaner selects important entries to be deleted by default. If you wish to select all the detected entries and get rid of all the errors, just click the Select all button. If you wish to deselect all, just click Select none button. Select the check boxes beside the entries you wish to clear and click Clean.
Comodo System-Cleaner User Guide | © 2009 Comodo Security Solutions Inc. | All rights reserved 69

www.comodo.com
A confirmation dialog appears for whether to continue the Privacy Cleaning operation with the Safe Delete function, if you have selected the Use SAFE DELETE/REGISTRY PROTECTION in Privacy Cleaner > Settings. With this option enabled, the system has to be restarted for the changes to take effect. If you have accidentally selected vital files while setting a disk cleaning operation, the files can be restored restored automatically or manually. Click here for more details on the Use SAFE DELETE/REGISTRY PROTECTION option.
Comodo System-Cleaner User Guide | © 2009 Comodo Security Solutions Inc. | All rights reserved 70

www.comodo.com
Note: This dialog appears only when the Use SAFE DELETE to remove files option is selected in the Privacy Cleaner > Settings.
• Click Yes if you want to use Use SAFE DELETE to remove files option else click No.
You will be asked whether you wish to create a Restore Point. If you click Yes, the application switches to the backup/restore process. (This lets you backup the files which were deleted after the scanning process. This way you can use the backup to restore the files at a a later time.)
Note: This dialog appears only when the Create restore point before cleaning option is selected in the Privacy Cleaner > Settings.
• Click Yes if you want to create a restore point, else click NO.
Step - 4 Cleaning the Selected Areas
The Privacy Cleaner creates a Restore Point, Creates a Backup of the files to be deleted and starts removing the files that you selected in step – 3.
Comodo System-Cleaner User Guide | © 2009 Comodo Security Solutions Inc. | All rights reserved 71

www.comodo.com
• The Cleaning progress is indicated.
• On completion of the cleaning process, the cleaning results will be displayed. Click Done to exit the wizard.
Comodo System-Cleaner User Guide | © 2009 Comodo Security Solutions Inc. | All rights reserved 72

www.comodo.com
Note: The Cleaning results screen appears only when the Show Clean Results option is selected in the Privacy Cleaner > Settings.
Restarting the System
If you have confirmed to use Safe Delete Function in Step - 3, you will be prompted to restart the system on completion of the Cleaning operation. The Privacy Cleaning takes effect only on restarting the system. If any problems occur due to the cleaning process, the files can be reverted to their original locations to ensure continuous trouble free operation of the system.
Comodo System-Cleaner User Guide | © 2009 Comodo Security Solutions Inc. | All rights reserved 73

www.comodo.com
Note: This dialog appears only when the Use Safe Delete to remove files is selected in the Privacy Cleaner Cleaner > Settings.
• Click Restart Now to restart the system and the privacy cleaning operation to take effect.
• Should your system fail to restart after the cleaning operation then the files will be automatically restored to their original locations and your system will be rebooted.
• On rebooting your system after the cleaning operation, the Safe Delete function provides you with the option of finalizing the changes or restoring the files to their original locations.
4.3 Backup
Comodo Privacy Cleaner generates a backup of the folders/files deleted during the privacy cleaning operations if the option Backup files before cleaning in the Privacy Cleaner > Settings menu is selected. The backups are stored in date and time stamped folders in the location of your choice. You can store the backup files in your computer locally, on a computer in your network or even in an FTP server. You can restore the folders/ files to their original locations at any time, if you have accidentally chosen vital contents while setting up a privacy cleaning operation. The Backup option in the Privacy Cleaner interface allows you to view the list of files backed up and to restore the folders/files.
Restoring Files from Backup
To Restore a deleted folder/file
1. Click Privacy Cleaner > Backup.
Comodo System-Cleaner User Guide | © 2009 Comodo Security Solutions Inc. | All rights reserved 74

www.comodo.com
The folders and files which were backed up previously are shown in a tree structure.
2. Select the file or folder you wish to restore. To select multiple files/folders, use 'Control' or 'Shift' key on the keyboard.
Comodo System-Cleaner User Guide | © 2009 Comodo Security Solutions Inc. | All rights reserved 75

www.comodo.com
3. Click Restore. 4. If you have chosen to encrypt the backup files in the Miscellaneous > Backup Settings, enter the password for
decrypting the files during restoration and click OK.
Your deleted files will be restored to their original locations.
4.4 Settings
The Settings option in the Privacy cleaner interface allows you to configure various options related to the operation of the Privacy Cleaner. The Settings panel can be accessed by clicking the Settings tab in the Privacy cleaner interface.
Comodo System-Cleaner User Guide | © 2009 Comodo Security Solutions Inc. | All rights reserved 76

www.comodo.com
Create restore point before cleaning - Selecting this option creates a Windows restore point prior to the registry cleaning operation. A Windows restore point is a snapshot of your system as it currently stands. This is useful because it allows you to roll back your system to its last known working state in the event of system failure or performance problems following software or hardware re-configuration. COMODO System-Cleaner provides this essential failsafe feature in all cleaning modules (for example, you also have the option to create a restore point before running Registry Cleaner and Disk Cleaner operations). See also System Settings > Settings .
Show Warnings - The warning dialogs from the Privacy Cleaner are displayed only if this option is enabled. Uncheck this option if you don't want to see the warning messages and dialogs. See also System Settings > Settings.
Store logs for Privacy Cleaner - If enabled, the Privacy Cleaner logs events history about each scan action and result.
Show log... button - Allows to view logs history. (see below)
Comodo System-Cleaner User Guide | © 2009 Comodo Security Solutions Inc. | All rights reserved 77

www.comodo.com
Use SAFE DELETE/REGISTRY PROTECTION - Provides an additional level of failsafe security to File Cleaning operations:
• All files selected for removal will be backed up prior to any cleaning operation.
• Should your system fail to restart after a cleaning operation then the safe-deleted files will be automatically restored and your system rebooted.
• On rebooting your system after any cleaning operation, SAFE DELETE provides you with the option to either finalize the deletion or restore the deleted files.
Comodo recommends that users leave this setting enabled.
Show scan results before cleaning - The Scan Results screen will appear after running an on-demand privacy scan and clean. If this option is left unchecked, the Privacy Cleaner starts cleaning the files immediately on completion of scanning, without waiting for your response.
Show Clean Results - The Cleaning Results Screen will appear after running a privacy cleaning operation, only when this option is checked. The Clean Results window will wait for your response to close the wizard by clicking Done. If this option is left unchecked, the privacy cleaner closes the cleaning wizard immediately on completion of the cleaning operation, without waiting for your response.
Backup files before Cleaning - Selecting this option instructs the Privacy Cleaner to preserve backup for folders/files deleted during any privacy cleaning operation. This way you can use the backup to restore the files at any time on necessity, in case you have accidentally selected some vital files during the cleaning operation. You can store the backup files in compressed, encrypted and password protected, providing an additional level of safety. In this way you are protected from others from maliciously restoring the files you deleted. You have to enter this password every time you restore files from the backup created by the Privacy Cleaner. For more details on location, compression and encryption settings of the backup files, see Miscellaneous > Backup Settings section.
• Click Apply for the settings to take effect.
Comodo System-Cleaner User Guide | © 2009 Comodo Security Solutions Inc. | All rights reserved 78

www.comodo.com
5 Autoruns Manager
The number of start-up programs - the programs that are loaded into the system during system start-up is one of the critical factors that affect the operating speed of your system. Even though, there are certain startup programs which are essential for your computer to function, there are some other programs that are automatically configured to load at startup when you install those applications. These programs are not essentially required until you actually use the application they belong to, and the rest of the time they run in the background unnecessarily, consuming the system resources. To enhance the system performance and to optimize the system speed, you can remove this type of start-up entries.This saves system resources and improves the performance of your system. You can also add some programs to load at start-up, if you need them, using Autoruns option of COMODO System-Cleaner.
The Autoruns Manager interface can always be accessed by clicking the Autoruns Manager button in the left hand side pane of the main interface. Click the links below to see the detailed explanations on each option in the Autoruns Manager Interface.
• Run
• Start-up
• Services
• Boot Execute
Comodo System-Cleaner User Guide | © 2009 Comodo Security Solutions Inc. | All rights reserved 79

www.comodo.com
5.1 Run
The Run option in the Autoruns Manager allows you to enable or disable programs that automatically load into the system during system start-up and keeps running in the background. You can identify the programs which are not needed to be loaded during system start-up and delete them from start-up program list. You can also add the programs which are needed to be run at the background from the system start-up, easily. Blocking unwanted programs from running in the background saves system resources and improves the performance of the system.
Benefits of using Run option in the Autorun Manager
• Frees system resources allocated for the unwanted programs for use by needed applications.
• Makes the system faster.
• Optimizes the system and makes the system to start faster.
• Is very simple to configure, without using complicated procedures like editing Windows Registry entries.
• Enables to configure very much needed or often used programs to automatically start-up when Windows starts, for easy access and saving time and user efforts spent on opening the required application after starting Windows.
Comodo System-Cleaner User Guide | © 2009 Comodo Security Solutions Inc. | All rights reserved 80
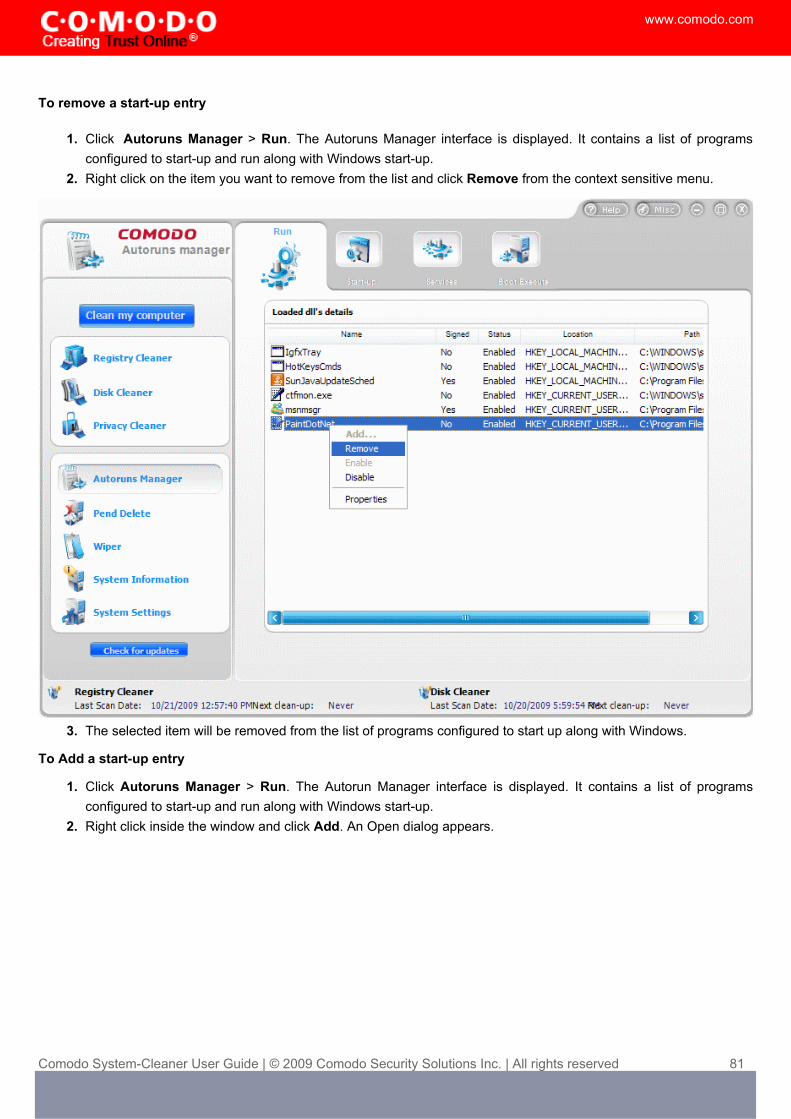
www.comodo.com
To remove a start-up entry
1. Click Autoruns Manager > Run. The Autoruns Manager interface is displayed. It contains a list of programs configured to start-up and run along with Windows start-up.
2. Right click on the item you want to remove from the list and click Remove from the context sensitive menu.
3. The selected item will be removed from the list of programs configured to start up along with Windows.
To Add a start-up entry
1. Click Autoruns Manager > Run. The Autorun Manager interface is displayed. It contains a list of programs configured to start-up and run along with Windows start-up.
2. Right click inside the window and click Add. An Open dialog appears.
Comodo System-Cleaner User Guide | © 2009 Comodo Security Solutions Inc. | All rights reserved 81

www.comodo.com
3. Navigate to the program you wish to add as the start-up entry and click Open. A 'Root Key' dialog will appear indicating the registry entry location.
4. Specify the User type by clicking at the drop-down arrow at the dialog.
Types of users:
Current user - On inserting a startup item into this hive, the chosen .exe will run at start up after the current user logs in to the machine.
Local Machine - On inserting a startup item into this hive, the chosen .exe will run at start up for every user.
Comodo System-Cleaner User Guide | © 2009 Comodo Security Solutions Inc. | All rights reserved 82

www.comodo.com
• Click OK. The selected program is added to the list. It will start-up along with Windows when you next time start Windows.
Tips : Right clicking on any item in the window also allows you to perform the following actions:
• Enable - The selected program can be assigned the status 'Enabled' status, meaning the application will be loaded and run along with the system start-up.
• Disable - The selected application will be assigned the status 'Disabled', meaning the application will be loaded into system memory along with the startup of the system but not started automatically. The program can be started from the Windows Start menu.
• View the properties of the Program - Clicking 'Properties' from the right click menu displays 'Properties' dialog of the selected program.
5.2 Start-up
The Start-up option in the Autoruns Manager allows you to enable or disable start-up links or shortcuts for target programs that automatically load into the system during system start-up and keeps running in the background. These shortcuts are normally placed at the right end of the task bar. You can identify the shortcuts which are not needed to be loaded during system start-up and delete them from start-up program list. You can also add the shortcuts which are needed to be run at the background from the system start-up, easily. Blocking unwanted shortcut programs from running in the background saves system resources and improves the performance of the system.
To remove a shortcut entry
1. Click Autoruns Manager > Start-up. The Autorun Manager interface is displayed. It contains a list of shortcuts (files with .lnk extension) configured to start-up and run along with Windows start-up.
2. Right click on the item you want to remove from the list.
Comodo System-Cleaner User Guide | © 2009 Comodo Security Solutions Inc. | All rights reserved 83

www.comodo.com
3. Click Remove. The selected entry will be removed from the list of Windows Startup links.
To add a shortcut entry
1. Click Autoruns Manager > Start-up. The Autorun Manager interface is displayed. It contains a list of shortcuts configured to start-up and run along with Windows start-up.
2. Right click inside the window and click Add. An Open dialog appears.
Comodo System-Cleaner User Guide | © 2009 Comodo Security Solutions Inc. | All rights reserved 84

www.comodo.com
3. Navigate to the program for which you wish to add a shortcut and click Open. The shortcut is created.
Tips : Right clicking on any item in the window also allows you to view the properties of the selected application.
5.3 Services
A Windows service is an executable that performs program and operating system specific functions without requiring user intervention. Services are loaded during system boot up and apply to all users. Unlike ‘Startup’ items which are loaded after a particular user logs on to a system, services are loaded before any users log on and run for all users. The services
Comodo System-Cleaner User Guide | © 2009 Comodo Security Solutions Inc. | All rights reserved 85

www.comodo.com
are similar to processes that are listed in the Task Manager. Services are configured to start when Windows is started and run in the background as long as Windows is running. Most services are required for the stable operation of your operating system or are required for the correct operation of software that you have installed. The ‘Services’ area of COMODO System-Cleaner allows you view all services that are currently running on your system and to modify their behavior.
The Services tab in the Autoruns Manager interface allows you view the properties of the services and the drivers that are started and running with the Windows.
To view the properties of the running services/drivers
1. Click Autoruns Manager > Services. The Autorun Manager interface is displayed. It contains a list of services configured to start-up and run along with Windows start-up.
2. Right click on the item you want to view the properties.
3. Click Properties. The properties of the selected item is displayed in an information dialog.
Comodo System-Cleaner User Guide | © 2009 Comodo Security Solutions Inc. | All rights reserved 86

www.comodo.com
• Clicking the Advanced button in the information dialog allows you to :
• Register Driver/Service - Register the selected service with the Autoruns Manager.
• Unregister Driver/Service - Unregister the defined service with the Autoruns Manager.
• Driver/Service Start - Specify when to start the selected service. The options available are:
Comodo System-Cleaner User Guide | © 2009 Comodo Security Solutions Inc. | All rights reserved 87

www.comodo.com
• BOOT - The device driver will be started by the operating system loader.
• SYSTEM - The device driver will be started by the I/O system after boot devices such as the boot file system and disk driver have been initialized. The device driver started using this flag is not critical to the system boot.
• AUTOMATIC - The device driver or service will be started by the Autoruns manager automatically during system startup.
• DEMAND - The device driver or the service will be started by the Autoruns manager when a process calls the StartService function.
• DISABLED - The device driver or the service will be disabled and would not be allowed to start.
• Start Driver/Service - Start the selected service with the Autoruns Manager. The user does not have to fully specify the service to start it.
• Stop Driver/service - Stops the selected service with the Autoruns Manager. The user does not have to fully specify the service to stop it.
5.4 Boot Execute
Boot Execute specifies the applications, services, and commands executed during Windows startup. The Boot Execute option in the Autoruns Manager interface allows you to remove any applications, services or commands which you do not want to be executed during start-up. Eliminating unnecessary boot up execution items can not only improve startup speed but can also lead to Windows running smoother and faster in general usage. Conversely, this interface also allows you to add an application or service that you actively require to be executed at startup (for example, an antivirus scan)
To remove a Boot Execute entry
1. Click Autoruns Manager > Boot Execute. The Autoruns Manager interface is displayed. It contains a list of Boot Executables.
2. Right click on the item you want to remove from the list.
Comodo System-Cleaner User Guide | © 2009 Comodo Security Solutions Inc. | All rights reserved 88

www.comodo.com
3. Click Remove. The selected item is removed from the Boot Executables list.
To add a Boot Execute entry
1. Click Autoruns Manager > Boot Execute. The Autoruns Manager interface is displayed. It contains a list of Boot Executables.
2. Right click inside the window and click Add. An Open dialog appears.
Comodo System-Cleaner User Guide | © 2009 Comodo Security Solutions Inc. | All rights reserved 89

www.comodo.com
3. Navigate to the program for which you wish to add as Boot Execute and click Open. A new entry is created.
Tips : Right clicking on any item in the window also allows you to view the properties of the selected Boot Execute.
6 File Pend Delete
The File Pend Delete/Move utilities allow you to delete or move locked and inaccessible files. Files may be 'locked' for many reasons, including because the current user is not logged in as the administrator. Also, deletion or movement may
Comodo System-Cleaner User Guide | © 2009 Comodo Security Solutions Inc. | All rights reserved 90

www.comodo.com
not be possible because the file is currently being used by another process. For example - when trying to delete an unwanted file you may encounter an error message "Cannot delete <filename>: It is being used by another person or program. Close any programs that might be using the file and try again." Sometimes it is difficult to identify the program using the file even from the task manager or it might be used by some program running at the background. ‘File Pend Delete’ allows you to schedule the deletion of inaccessible files on next reboot. Similarly, ‘File Pend Move’ allows will move the file to a folder of your choice upon next reboot.
The Pend Delete interface can be accessed by clicking the Pend Delete button in the left hand side pane. Click the links below to see the detailed explanations on each option in the Pend Delete Interface.
• Pend Delete
• Pend Move
6.1 Deleting Locked or Inaccessible Files
1. Click Pend Delete > Pend Delete. 2. Click Add. The 'Select Files' dialog will appear.
Comodo System-Cleaner User Guide | © 2009 Comodo Security Solutions Inc. | All rights reserved 91

www.comodo.com
3. Select the files you wish to delete from the folder tree structure and click ok. The selected files will be added to the list of files to be deleted. If you want to add more files, click ADD and repeat the process. If you want to remove a file from the list of files to be deleted, select the file from the list and click Remove. The removed files will not be deleted from your system.
Comodo System-Cleaner User Guide | © 2009 Comodo Security Solutions Inc. | All rights reserved 92

www.comodo.com
4. On completion of adding the files, click Delete.
The files in the list will be removed from your computer on the next restart.
6.2 Moving Locked or Inaccessible Files
1. Click Pend Delete > Pend Move The File Pend Move interface opens. 2. Click Add. The 'Select Files' dialog will appear.
Comodo System-Cleaner User Guide | © 2009 Comodo Security Solutions Inc. | All rights reserved 93

www.comodo.com
3. Select the files you wish to move, from the folder tree structure in the left hand side pane. 4. Select the destination folder, from the folder tree structure in the right hand side pane and click Ok. The selected
files will be added to the list of files to be moved and displayed along with their selected destination path. If you want to add more files, click ADD and repeat the process. If you want to remove a file from the list of files to be moved, select the file from the list and click Remove. The removed files will not be moved to the new path.
Comodo System-Cleaner User Guide | © 2009 Comodo Security Solutions Inc. | All rights reserved 94

www.comodo.com
5. On completion of adding files, click Move.
The files in the list will be moved to the folder of your choice on the next restart of the system.
7 File Wiper
When you delete folders/files from your hard disk or even empty your Recycle Bin, Windows retains the contents of these files in the disk and it only deletes the references to these files from the files system tables. The contents of all deleted files remain on the disk and can be easily restored using any recovery utility, posing a high risk of identity theft, leak of confidential and sensitive data like Business data, Credit card information etc. To ensure the permanent deletion of the files, the files are to be wiped out of your system, i.e. the files are to be shredded and are to be rendered un-restorable. The Wiper utility in the COMODO System-Cleaner, totally removes the deleted files from your disks and protects leak of your confidential information. While wiping the files, the powerful wiper application overwrites the contents of the files with zeros or random numbers to a number of times you specify, so that all the contents of the files are overwritten entirely, eliminating even the traces of the original contents in the file before deletion. The file wiper utility also indicates the usage state of the drive partitions in your system.
Comodo System-Cleaner User Guide | © 2009 Comodo Security Solutions Inc. | All rights reserved 95

www.comodo.com
Features and Benefits of using Wiper
• Deletes files permanently so that it is impossible for anyone to recover deleted information.
• Prevents business, credit card or personal data from being retrieved and stolen.
• Unwanted files can be easily and conclusively removed with a few clicks of the mouse.
• Gain peace of mind knowing that nobody can access your confidential files once they have been permanently deleted.
The Wiper interface can always be accessed by clicking the Wiper button in the left hand side pane of the main interface.
The upper right hand side pane in the main configuration area displays a tree structure to select the file/folder to be wiped and the lower pane displays a pie chart indicating the usage state of the drive/partition selected in the upper pane. The snapshot of the usage state of the drive or the partition is useful when considering the operation such as disk re-partitioning.
Wiping Folders/Files Permanently from Your Disks
Configuring the Wiper utility and deleting the unwanted files permanently consists of three simple steps.
Comodo System-Cleaner User Guide | © 2009 Comodo Security Solutions Inc. | All rights reserved 96

www.comodo.com
1. Selecting the Folder/File to be Deleted Permanently;
2. Configuring the Wipe Method;
3. Completing File Wipe Operation.
To wipe files permanently click Wiper button.
Step 1 - Selecting Folder /File to be Deleted Permanently
The first stage of the process is to select the folder/file to be wiped. The upper right hand side pane of the configuration screen enables you to select the folder/file from the folder tree.
Select the Folders/Files from the tree structure and click Next.
Step 2 - Configuring the Wipe Method
The second stage of the process is to configure the wipe method. The options are explained below.
• Zero fill - Selecting this option overwrites the contents of the selected file with zeros repeatedly the number of times you specify in the Iterations drop-down combo box before deletion.
• Any character fill - This option allows you a specify characters or numbers of your choice to be used as fill characters to overwrite the contents of the selected file. When you select this option, type the characters to be used as fill characters in the text box beside the option.
Comodo System-Cleaner User Guide | © 2009 Comodo Security Solutions Inc. | All rights reserved 97

www.comodo.com
• Random fill - Selecting this option makes the application to use any random characters as fill characters.
• US Government Standard fill - Selecting this option makes the application to overwrite the contents of the file with characters according to standards set by US Government.
• Iterations - Specify the number or times the contents of the file to be overwritten with the selected fill characters.
• Select the wipe method and specify the number of iterations from the drop-down combo box. • Click Wipe.
Step 3 - Completing the File Wipe Operation
The File Wiper overwrites the contents of the selected files with the characters selected in step 2, for the number of times selected from the Iterations drop-down combo box and then deletes the files from the hard disks.
Comodo System-Cleaner User Guide | © 2009 Comodo Security Solutions Inc. | All rights reserved 98

www.comodo.com
• The files are wiped-off completely from your system and the completion screen is displayed. Click Done.
8 System Information
The 'System Information' utility provides a detailed and easily accessible 'dashboard' summary of all the hardware and software installed on your computer. The 'Hardware' summary provides an overview of all devices installed on or connected to your computer. The 'Software' summary lists all programs that have been installed on your system (including Windows service packs, updates and hotfixes) and provides the option to uninstall any program in the list.
The 'System Information' utility can serve as an invaluable way to discover salient system information when, for example, considering hardware upgrades, the ability of the system to run certain software or the presence of Windows updates. The system information can also assist you on judging whether to alter other settings that are available in COMODO System- Cleaner in order to improve the performance of your system.
The System Information interface can always be accessed by clicking the System Information button from the main interface.
Comodo System-Cleaner User Guide | © 2009 Comodo Security Solutions Inc. | All rights reserved 99

www.comodo.com
Click the links below to see the detailed explanations on each option in Disk Cleaner.
• Hardware
• Software
8.1 Hardware
The 'Hardware' section of the System Information interface allows you to view information regarding the devices that are installed in your computer. Fast access to such details can be invaluable when you are considering hardware upgrades, the ability of your computer to run certain software and can assist you when judging whether to alter important system settings. Similarly, hardware information can be an invaluable troubleshooting resource. For example, if you are having display issues, you can use the hardware information to determine what display adapter is installed on your computer.
To view the hardware information
• Click System Information > Hardware tab.
Comodo System-Cleaner User Guide | © 2009 Comodo Security Solutions Inc. | All rights reserved 100

www.comodo.com
There will be an initial pause while CSC audits your system's hardware components. Once auditing is complete, your system's devices will be displayed in a tree structure in the left hand pane. Simply select a device to view it's details on the right.
8.2 Software
The 'Software' section of the System Information interface allows you to view a summary of applications and Windows software that is installed on your system. This 'at a glance' list of all installed applications can help you to identify unused, redundant or outdated programs which can be removed - thus freeing up disk space and system resources. The 'Software' information can also assist you to judge whether to alter other settings that are available in COMODO System- Cleaner in order to improve the performance of your system. You are also provided with the option to uninstall any application directly from this interface
To view the software information
• Click System Information > Software tab.
COMODO System-Cleaner checks for the applications installed in your system and displays the results in the right hand side panel. The panel contains a the tree structure showing the version of Windows and other applications installed in
Comodo System-Cleaner User Guide | © 2009 Comodo Security Solutions Inc. | All rights reserved 101

www.comodo.com
your system. The list of installed programs also contains any Windows patches, updates and service packs that have been installed.
COMODO System-Cleaner also checks for the availability of updates regarding the files and registry keys to be cleaned corresponding to each application for ensuring the privacy of the user from Comodo servers and downloads them on clicking the System Information > Software tab.
To view detailed information of version of Windows installed in your system, Click on Windows in the left hand pane. The right pane displays the detailed information of Windows.
To view the detailed information of any installed application in your system, Select the application. The right pane displays the detailed information of the selected application.
Comodo System-Cleaner User Guide | © 2009 Comodo Security Solutions Inc. | All rights reserved 102

www.comodo.com
If you want to uninstall the application, Click Uninstall.
To refresh the list of applications displayed, Click Refresh List.
9 System Settings
The System Settings utility enables even a new or an inexperienced user to quickly and easily access the most critical Windows settings which are otherwise hard to reach. The user can make the configuration settings of the System, Control panel, Windows Explorer, Web browser, logon etc. in a more powerful and intuitive way.
The System Settings interface can always be accessed by clicking the System Settings button in the left hand side pane of the main interface.
Click the links below to see the detailed explanations on each option in System Settings.
• System • Control Panel • Windows Explorer
Comodo System-Cleaner User Guide | © 2009 Comodo Security Solutions Inc. | All rights reserved 103

www.comodo.com
• Logon • Web Browser • Settings
9.1 System
The System option in the System Settings provides quick and easy access to common and advanced Windows settings. You can configure how Windows should behave in different situations where a serious error occurs. Also you can configure the memory management of your system for its improved performance.
The System panel can be accessed by clicking System Settings > System tab. The options available are explained below.
Serious Errors
This area enables you to configure the behavior of Windows in response to a serious error like an application going non-responsive, blue screen errors etc.
Comodo System-Cleaner User Guide | © 2009 Comodo Security Solutions Inc. | All rights reserved 104

www.comodo.com
Restart Window automatically after severe system errors - Restarts your system automatically on occurrence of a serious error without asking for your response.
Automatically terminate applications that have become unresponsive after a certain period of time - Closes the application that does not respond, after waiting for a certain period of time automatically. Any unsaved changes in the file accessed by the application will be lost. The period of time depends on the nature of the application.
Only restart Windows, not the entire system - Makes only the operating system to be restarted, whenever a serious problem occurs. The BIOS will be retained from the previous session.
Note : Selecting the check box beside Serious Errors (mostly blue screens) options will automatically select all the above options.
Memory Management Options
Do not cache drivers and kernel files on the hard drive - Instructs Windows to not to load device driver softwares of various hardware in your system and the kernel files of the operating system on to the hard disks. This option saves disk space and speeds-up system's performance.
Comodo System-Cleaner User Guide | © 2009 Comodo Security Solutions Inc. | All rights reserved 105

www.comodo.com
Remove dll files from memory on release and do not cache them - Instructs Windows to delete the dll files corresponding to the applications that are closed immediately, from the system memory. This saves the system memory, which contributes a lot to the operation speed of the system.
Optimize processor scheduling for applications - Enables allocation of optimal priority levels to the applications that are running simultaneously so that all the running applications are given access to the processor for optimal periods of time. This allows effective usage of the processor resources and contributes to the performance of the system.
Optimize memory usage for system cache - Enables perfect allocation of system memory for the system cache. This contributes to the performance improvement of the system.
Optimize the Contiguous File Allocation Size - Instructs the Windows to perfect the allocation of size of temporary files that are created ad-hoc, on execution of running applications.
Automatic Boot Disk optimization - Optimizes the partition of your hard disk, set as Boot Disk, i.e. WIndows partition.
Note : Selecting the check box beside Memory Management options will automatically select all the above options.
• To reset to the default options, click Reset to Defaults button. • Click Apply for the settings to take effect.
9.2 Control Panel
The Control Panel option in the System Settings allows you to alter the default configuration of Windows Control Panel GUI quickly and easily as per your requirements. You can restrict access to important control panel options like Add or Remove programs, Add or Remove Windows components, Altering display options and so on, so that any other user getting access to your computer cannot alter your Windows settings, install malicious programs etc., in your system.
The Control Panel settings interface can be accessed by clicking System Settings > Control Panel tab. The options available are explained below.
Pool USB ports at a given period of time not only every millisecond - the default setting - Enables the check carried out for presence of USB connection, carried out every milli second.
Disable Add or Remove components in Control Panel - Restricts access to Add or Remove Windows Components option (needs restart of your computer)
Disable Add or Remove programs in Control Panel - Restricts access to Add or Remove Programs option in the Control Panel (needs restart of your computer)
Disable Display in the Control Panel - Restricts access to Display Properties interface both from the Control Panel and by right-clicking on the desktop.
Disable Settings tab in Display Properties - Restricts access to Settings tab in the Display Properties dialog.
Disable Appearance tab in display Properties - Restricts access to Appearance tab in the Display Properties dialog.
Comodo System-Cleaner User Guide | © 2009 Comodo Security Solutions Inc. | All rights reserved 106

www.comodo.com
Disable screensaver tab in display Properties - Restricts access to Screensaver tab in the Display Properties dialog.
Periodically search the network for new computers - Searches the network like LAN to which you are connected, for new computers, at pre-specified intervals.
Activate bandwidth limiting - Selecting this option activates network bandwidth limiter in Windows. This means that the Internet traffic speed is restricted to a certain speed.
Disable Task Manager - Disables the Windows Task Manager. You cannot access Task Manager from both right clicking at the task bar and presssing Ctrl+Alt+Del.
Note : Selecting the check box beside Select all will automatically select all the above options.
• To reset to the default options, click Reset to Defaults button. • Click Apply for the settings to take effect.
9.3 Windows Explorer
The Windows Explorer option in the System Settings allows you to alter the default configuration of Windows Explorer
Comodo System-Cleaner User Guide | © 2009 Comodo Security Solutions Inc. | All rights reserved 107
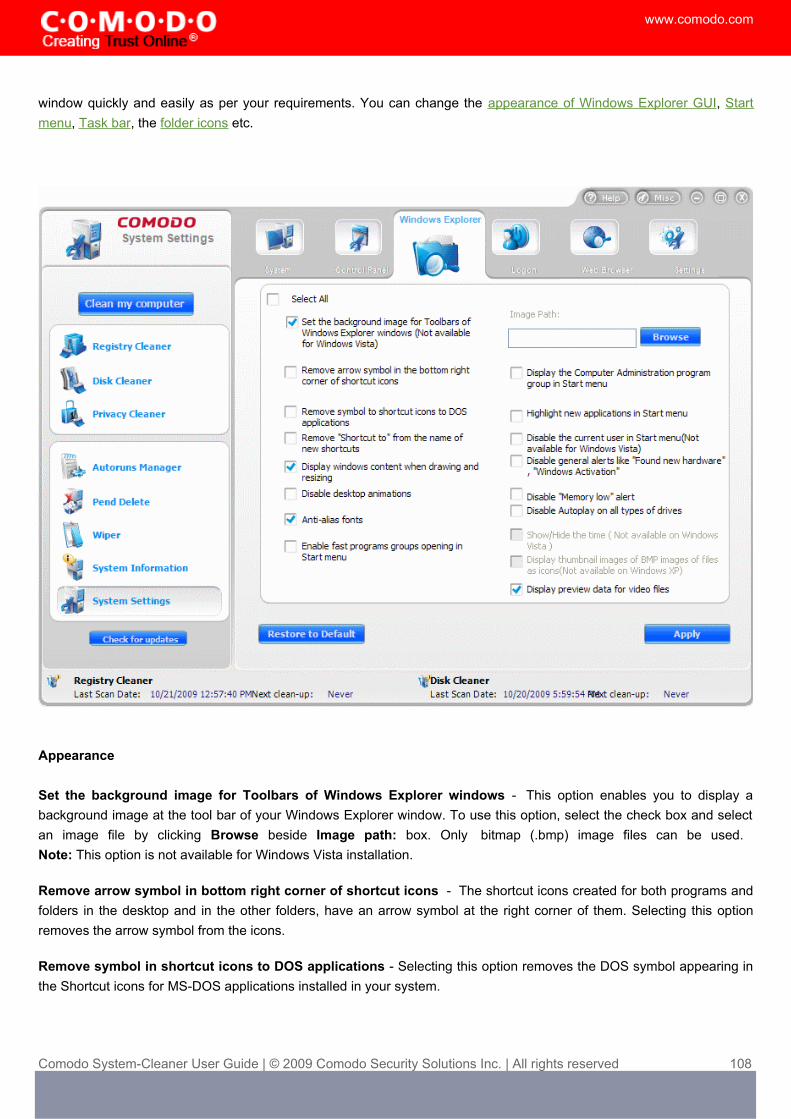
www.comodo.com
window quickly and easily as per your requirements. You can change the appearance of Windows Explorer GUI, Start menu, Task bar, the folder icons etc.
Appearance
Set the background image for Toolbars of Windows Explorer windows - This option enables you to display a background image at the tool bar of your Windows Explorer window. To use this option, select the check box and select an image file by clicking Browse beside Image path: box. Only bitmap (.bmp) image files can be used. Note: This option is not available for Windows Vista installation.
Remove arrow symbol in bottom right corner of shortcut icons - The shortcut icons created for both programs and folders in the desktop and in the other folders, have an arrow symbol at the right corner of them. Selecting this option removes the arrow symbol from the icons.
Remove symbol in shortcut icons to DOS applications - Selecting this option removes the DOS symbol appearing in the Shortcut icons for MS-DOS applications installed in your system.
Comodo System-Cleaner User Guide | © 2009 Comodo Security Solutions Inc. | All rights reserved 108

www.comodo.com
Remove “Shortcut to” from the name of new shortcuts - The shortcut icon created for a program, folder or a file in desktop or in a folder will have the name "Shortcut to <file name>. Selecting this option removes the words 'Shortcut to' from the file name displayed below the icon.
Display windows content when dragging and resizing - Selecting this option prevents the contents in a window being disappeared, when the window is resized or dragged.
Disable desktop animations - Selecting this option disables Desktop animations, which are installed for making the computer more attractive, overcome boredom and to boost up your mind and body. Disabling the animations frees the memory and system resources consumed by the animation programs and improves system performance.Note: This option is not available for Windows 2000 installation.
Anti-alias fonts - Selecting this option enables Anti-aliasing fonts, to make the appearance of any text smooth and readable online.
Start Menu
Enable fast program groups opening in Start menu - Enables display of a shortcut to Add/Remove Programs in the Start Menu.
Display the Computer Administration program group in the Start menu - Enables the display of shortcuts of programs used by Administrators, in Accessories pane of Start Menu.
Highlight new applications in the Start menu - Enabling this option highlights any newly installed program in the Start menu.
Disable of the current user in the Start menu - Selecting this option hides the display of the currently logged on user name at the top of the Start Menu.
Note: This option is not available for Windows Vista installation.
Taskbar
Disable general alerts like “Found new hardware”, “Windows activation” - Avoids general and sometimes annoying alerts like Found New Hardware and Windows Activation alerts during start-up of the system.
Disable “Memory low” alert - Windows generates alerts whenever the virtual memory in your computer goes low, while executing certain applications. Selecting this option avoids such alerts. Select this option if you are sure about the availability of virtual memory in your system.
Show/hide the time - Selecting this option hides the clock displayed at the right end of the task bar.
Note: This option is not available for Windows Vista installation.
Other settings
Disable Autoplay on all types of drives - Whenever a CD or DVD (especially audio or video CD or DVD) is inserted into the respective drive, Windows automatically starts playing the disk with the default application like Window Media
Comodo System-Cleaner User Guide | © 2009 Comodo Security Solutions Inc. | All rights reserved 109

www.comodo.com
Player. Selecting this option disables this Autoplay function so that the playback of the disk can be started only when you wish, manually.
Display thumbnail images of BMP image files as icons - Selecting this option makes the bmp files stored in a folder to be displayed as icons when the folder is viewed through Windows Explorer window.
Note: This option is not available for Windows XP installation.
Display preview data for video files - Selecting this option displays the first frame of a video sequence as icon representing the video file in Windows Explorer window.
Note : Selecting the check box beside Select all will automatically select all the above options.
• To reset to the default options, click Reset to Defaults button. • Click Apply for the settings to take effect.
9.4 Logon
The Logon option in the System Settings allows you to configure various options related to logging on to Windows. You can customize the Welcome message displayed when you log on, change the background, logon sound etc.
The Logon settings panel can be accessed by clicking System Settings > Logon tab. The options available are explained below.
Automatically logon a certain user when windows starts – Selecting this option makes the application to store the user name, password and the network domain and to supply every time your system starts. You need not enter your name and password every time and Windows will automatically logon with stored user name.
Change the logon message - This option enables you to change the welcome message displayed when you log on to Windows. To change the logon message, select the check box, type a caption for your message and the message in the respective text boxes.
Change the logon sound - The sound played during log on can be changed using this option. To change the sound file, select the check box and select a sound file by clicking Browse. The sound file should be in wave (.wav) format.
Comodo System-Cleaner User Guide | © 2009 Comodo Security Solutions Inc. | All rights reserved 110

www.comodo.com
Note : Selecting the check box beside Select all will automatically select all the above options. • To reset to the default options, click Reset to Defaults button. • Click Apply for the settings to take effect.
9.5 Web Browser
The Web Browser option in the System Settings allows you to alter the default configuration of Internet Explorer quickly and easily as per your requirements. You can change the look of Internet Explorer GUI, restrict access to selected menu items in the GUI, change default home page etc., which otherwise require a long process.
The Web browser settings panel can be accessed by clicking System Settings > Web Browser tab. The options available are explained below.
Allow Internet Explorer to check for updates automatically when the user is online - Makes Internet Explorer to check for updates for Internet Explorer automatically, whenever the user has logged on to Internet connection.
Comodo System-Cleaner User Guide | © 2009 Comodo Security Solutions Inc. | All rights reserved 111

www.comodo.com
Disable all scheduled offline pages - Disables the scheduled downloading of Web pages for offline viewing and synchronization (e.g. Internet Explorer > Tools > Synchronize...)
Delete the contents of Temporary Internet Files folder when exiting the browser - This option adds to the privacy of the user and also frees the disk space from the temporary Internet files, by automatically deleting the temporary files when Internet Explorer is closed.
Enable Windows authentication - Selecting this option enables Windows integrated authentication when you try to access any Internet Information Services (IIS) web server. You will be prompted for the password before you access the server.
User can define his own title text for Internet Explorer - This option enables you to enter text of your choice to appear in the title bar of Internet Explorer window, instead of the words Internet Explorer. To use this option, select the check box and type the text of your choice (e.g. <your name> explores) in the IE Title text box.
User can display custom background image in Internet Explorer Toolbar - This option enables you to display a background image at the tool bar of your Internet Explorer window. To use this option, select the check box and select an image file by clicking Browse beside Image: box. Only bitmap (.bmp) image files can be used.
Comodo System-Cleaner User Guide | © 2009 Comodo Security Solutions Inc. | All rights reserved 112

www.comodo.com
Note: This option is available only for Internet Explorer version 7 and above.
Show only frequently-used items in Favorites - The Favorites menu in the Internet Explorer lists the websites you have added as your favorite sites. If you have too many sites added to the list, the difficulty in choosing the site you wish from the favorites menu arises. Selecting this option, restricts the display of the favorites only to the recently used ones.
Disable/enable items in Internet Explorer menu - This option enables you to enable or disable menu items in the menu bar of Internet Explorer interface. Selecting this option opens a menu selection dialog. you can select the items you wish to disable from the Internet Explorer menu bar and tool bars from the dialog and click Apply. The disabled menu items and the options will not be displayed in the Internet Explorer interface.
Note : Selecting the check box beside Select all will automatically select all the options.
Change the homepage of Internet Explorer - The current home page of your Internet Explorer (set using Tools > Internet Options > Home Page) can be easily changed using this option. To change the current home page, select this option and type the URL of the webpage you wish to set as the home page in the Homepage: text box.
Change the default program for source code viewer - Internet Explorer can display the HTML source code for Web pages, on clicking View > Source from the Internet Explorer menu bar. By default, notepad.exe is set as the source code viewer. This option enables you to set a program of your choice to display the source code for web pages. To change the default program, select the check box and select the program to be used by clicking Browse beside the Program: text box.
Comodo System-Cleaner User Guide | © 2009 Comodo Security Solutions Inc. | All rights reserved 113

www.comodo.com
Disable File Download in Internet Explorer - Selecting this option blocks any downloads through Internet Explorer. This option can be used to limit Internet usage from your system.
Note : Selecting the check box beside Select all will automatically select all the above options.
• To reset to the default options, click Reset to Defaults button. • Click Apply for the settings to take effect.
9.6 Settings
The Settings option in the System Settings interface allows you to configure various options related to the operation of the COMODO System-Cleaner globally. The settings configured in this interface overrules the corresponding settings made individually for each of the modules like Registry Cleaner, Disk Cleaner and the Privacy Cleaner.
The Settings panel can be accessed by clicking the System Settings > Settings tab. The options available are explained below.
Comodo System-Cleaner User Guide | © 2009 Comodo Security Solutions Inc. | All rights reserved 114

www.comodo.com
Create restore point before Apply Changes - Selecting this option creates a Windows restore point before commencing any of the registry, disk and privacy cleaning operations. A Windows restore point is a snapshot of your system as it currently stands. This is useful because it allows you to roll back your system to its last known working state in the event of system failure or performance problems following software or hardware re-configuration. COMODO System-Cleaner provides this essential failsafe feature in all cleaning modules (for example, you also have the option to create a restore point before running Disk Cleaner operations)
Show Warnings - The warning dialogs from the Registry Cleaner, Disk Cleaner and the Privacy Cleaner are displayed if this option is enabled. Uncheck this option if you don't want to see the warning messages and dialogs from any of the Cleaners or you want to have the warning dialogs from the cleaners selectively. You can check this option in the settings panel of the respective cleaners to get the warning dialogs from only those .
• Click Apply for the settings to take effect.
10 Miscellaneous Tasks Overview
The Miscellaneous menu in COMODO System-Cleaner contains options for overall configuration and shortcuts to help enhance and improve your experience with the application.
The Miscellaneous management interface can be accessed at all times by clicking on the Miscellaneous button in the Windows Controls area. Click the links below to see the detailed explanations on each option in this menu.
• C.O.M.O.D.O live PC support
• Backup Settings
• Diagnostics
• Browse Support Forums
• Check for updates when application starts
• Use Monitor
Comodo System-Cleaner User Guide | © 2009 Comodo Security Solutions Inc. | All rights reserved 115

www.comodo.com
10.1 Live PC Support
COMODO Live PC Support is a remote assistance service offered by Security Experts in Comodo who can access your computer through their Remote Desktop. Should you need any assistance or encounter a problem with your system, you can get an immediate solution from our computer experts by clicking the C.O.M.O.D.O live PC support link in the Miscellaneous Tasks interface of COMODO System-Cleaner.
Comodo System-Cleaner User Guide | © 2009 Comodo Security Solutions Inc. | All rights reserved 116

www.comodo.com
More details on Live PC Support can be found in Appendix 3 Live PC Support.
The service requires a Live PC Support client installed in your system.
To install the Live PC Support client
• Click the link C.O.M.O.D.O live PC support from the Miscellaneous Tasks interface.
The client is automatically downloaded and installed The shortcut icon appears on your desktop and a
Live PC Support quick launch icon appears in the system tray.
The installation is a one time process. Once installed, clicking the C.O.M.O.D.O live PC support link or the desktop shortcut icon will automatically launch the application enabling you to chat with a Comodo Computer Support Technician any time.
In order to get the Live PC Support services, you need to sign up for a 30 day free trial account.
Comodo System-Cleaner User Guide | © 2009 Comodo Security Solutions Inc. | All rights reserved 117

www.comodo.com
To sign up for a 30 day free trial
• Visit http://www.livepcsupport.com/trial/
• Click on Click Here link to get your Free Activation Code and follow the sign up procedures . Your subscription ID will be sent to you by email.
To launch Live PC Support
• Click the link C.O.M.O.D.O live PC support from the Miscellaneous Tasks interface; • Double click on the shortcut icon to Live PC Support from the desktop; • Click on the LivePCSupport system tray icon; or • Launch Live PC Support from the Start Menu - Click All Programs > COMODO > livePCsupport > Comodo
livePCsupport.
A Login box is opened.
Comodo System-Cleaner User Guide | © 2009 Comodo Security Solutions Inc. | All rights reserved 118

www.comodo.com
• Enter your subscriber ID that was sent to you through email on signing up for 30 day free trial in the Subscriber ID: text box and click Next. Within seconds, a Comodo Support Technician will respond in a chat window and ask you to describe the problem.
• Type your question in the text box and click Send.
Comodo System-Cleaner User Guide | © 2009 Comodo Security Solutions Inc. | All rights reserved 119

www.comodo.com
The technician will access your computer through a remote desktop, make the changes necessary to solve your problem and get your PC working perfectly.
10.1.1 Uninstalling Live PC Support Client
To uninstall Live PC Support Client
• Click All Programs > COMODO > livePCsupport > Uninstall.
Or
• Open Control Panel. • Double click Add/Remove Programs • Select Comodo livePCsupport. • Click Remove
The uninstall confirmation dialog appears.
Comodo System-Cleaner User Guide | © 2009 Comodo Security Solutions Inc. | All rights reserved 120

www.comodo.com
• Click Yes. The uninstall progress is indicated. You must restart your system for the uninstallation to take effect.
• Click Yes for completing the uninstallation process and restarting your system.
10.2 Backup Settings
The Backup Settings option in the Miscellaneous Tasks interface allows you to configure the backup functionality of the Registry Cleaner, Disk Cleaner and the Privacy Cleaner. You can set the location in which the backup files created during the cleaning operations are to be stored and the level of compression of the files to be stored. You can also configure the backup functionality to store the backup files encrypted and password protected for an additional level of safety. Setting a password protection requires the password to be entered every time a backup file is restored and prevents others from maliciously restoring the files you deleted.
The backup settings panel can be accessed by clicking Backup Settings in the Miscellaneous tasks interface. Click the links below for more details on the options in this interface.
• Compression Settings ;
• Encryption Settings ;
• Setting a location for backup files .
Comodo System-Cleaner User Guide | © 2009 Comodo Security Solutions Inc. | All rights reserved 121

www.comodo.com
Compression Settings - COMODO System-Cleaner will compress all backup files and store them with the filename having extension .cbu (e.g. CDC.cbu) inside the date stamped folders, in the destination of your choice. You can choose the compression level for the backup files from 'None' through 'Maximum'. Higher the compression level, lower the backup disk space requirement. Select the level you want to use from the Compression drop-down menu.
Encryption Settings - You can choose to store your backup files encrypted and password protected by selecting an encryption algorithm and setting a password.
Comodo System-Cleaner User Guide | © 2009 Comodo Security Solutions Inc. | All rights reserved 122

www.comodo.com
To encrypt the backup files
• Select the checkbox Password Protection. • Select the Encryption Algorithm you want to use for encrypting the backup files from the drop-down menu.
Encryption Algorithms:AES - 128bit / strongestSerpent - 128,192 or 256 bit / very strongXor - Variable block size / weakBlowfish - 64-bit block / strong3DES - 168-bit/ strongTwofish - 128-bit block/ strong
For more details on Encryption Algorithms, see Appendix 4 Encryption Algorithms.
• Type a password in the Password text box and retype the password in the Confirm Password text box. You have to enter this password every time you are restoring files/registry entries from a backup file.
Setting a Location for Storing the Backup Files - You can choose the destination for storing your backup files from the Backup Path drop-down menu. Depending on the requirement you can choose the destinations from:
• My Computer - Saves your backup file on your local hard drive. • Network Computer - Saves your backup file on another computer in the network. • FTP server - Saves your backup file on a FTP server.
After selecting the Destination for backup you want from the upper panel, you will need to make a further selection from the lower panel.
My Computer - If you wish to store the backup files in your local hard disk, select My Computer from the drop-down menu. The disk drives and folders in your computer are displayed as a tree structure in the lower panel.
• Navigate to the drive partition and the folder where you wish to save the backup file.
Comodo System-Cleaner User Guide | © 2009 Comodo Security Solutions Inc. | All rights reserved 123

www.comodo.com
The folder you selected will be displayed in the text box at the bottom of the pane.
• If you want to create a new sub folder under the selected drive/folder, click Create Folder button. You will be prompted to enter a name for the new folder.
• Type a name for the new folder and click 'ok'. A new folder with the given name will be created under the selected folder. To store the backup in the new folder, select it from the tree structure in the lower panel.
Tip - If you wish to have your backup in a removable media like a CD, DVD, select a destination in your hard disk drive. On completion of a clean-up job, you can copy the backup files to a CD/DVD using your preferred CD/DVD authoring program..Network Computer - If you are connected in a network, you can also choose to save your backup files on an another computer in your network. This is a good practice so that you will be able restore your original files deleted accidentally even if your computer crashes and you have to reinstall the Windows again.
Comodo System-Cleaner User Guide | © 2009 Comodo Security Solutions Inc. | All rights reserved 124
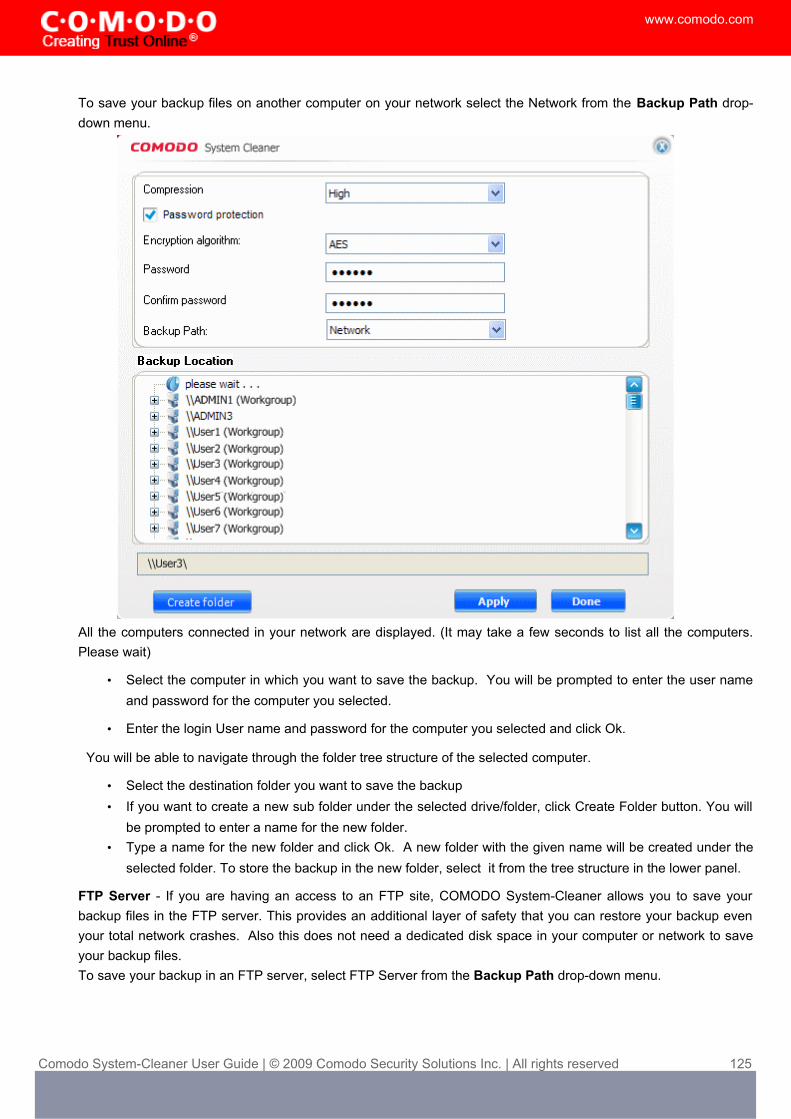
www.comodo.com
To save your backup files on another computer on your network select the Network from the Backup Path drop-down menu.
All the computers connected in your network are displayed. (It may take a few seconds to list all the computers. Please wait)
• Select the computer in which you want to save the backup. You will be prompted to enter the user name and password for the computer you selected.
• Enter the login User name and password for the computer you selected and click Ok.
You will be able to navigate through the folder tree structure of the selected computer.
• Select the destination folder you want to save the backup • If you want to create a new sub folder under the selected drive/folder, click Create Folder button. You will
be prompted to enter a name for the new folder. • Type a name for the new folder and click Ok. A new folder with the given name will be created under the
selected folder. To store the backup in the new folder, select it from the tree structure in the lower panel.
FTP Server - If you are having an access to an FTP site, COMODO System-Cleaner allows you to save your backup files in the FTP server. This provides an additional layer of safety that you can restore your backup even your total network crashes. Also this does not need a dedicated disk space in your computer or network to save your backup files. To save your backup in an FTP server, select FTP Server from the Backup Path drop-down menu.
Comodo System-Cleaner User Guide | © 2009 Comodo Security Solutions Inc. | All rights reserved 125

www.comodo.com
The lower pane displays the login page for your FTP server
• Type the name of your FTP server in the Server text box (The prefix ftp:// is optional) • Type your Username for thr FTP server in the Username text box • Type your password for accessing the FTP server. • Click Connect.
On successful login, you can browse the server and create new folders for storing your backup.
• Select the destination folder you want to save the backup • If you want to create a new sub folder under the selected drive/folder, click Create Folder button. You will
be prompted to enter a name for the new folder. • Type a name for the new folder and click OK. A new folder with the given name will be created under the
selected folder. To store the backup in the new folder, select it from the tree structure in the lower panel.
• Click Apply for your settings to take effect. From the next Registry Clean, Disk Clean or Privacy Clean operations, the backup files will be stored as per the settings made in this interface.
10.3 Diagnostics
COMODO System-Cleaner contains its own integrity checker. This checker will scan your system to make sure that the application is installed correctly and also check your computer's File System - to check that all COMODO System-Cleaner files are present and have been correctly installed.
Comodo System-Cleaner User Guide | © 2009 Comodo Security Solutions Inc. | All rights reserved 126
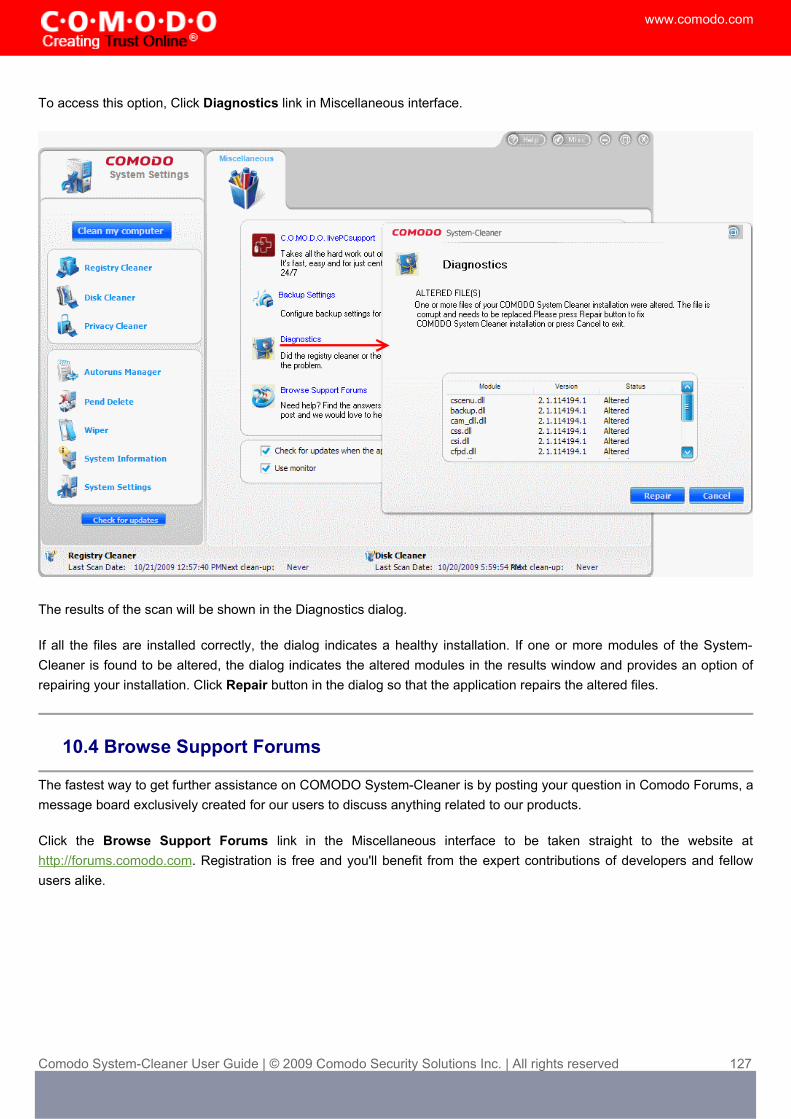
www.comodo.com
To access this option, Click Diagnostics link in Miscellaneous interface.
The results of the scan will be shown in the Diagnostics dialog.
If all the files are installed correctly, the dialog indicates a healthy installation. If one or more modules of the System-Cleaner is found to be altered, the dialog indicates the altered modules in the results window and provides an option of repairing your installation. Click Repair button in the dialog so that the application repairs the altered files.
10.4 Browse Support Forums
The fastest way to get further assistance on COMODO System-Cleaner is by posting your question in Comodo Forums, a message board exclusively created for our users to discuss anything related to our products.
Click the Browse Support Forums link in the Miscellaneous interface to be taken straight to the website at http://forums.comodo.com. Registration is free and you'll benefit from the expert contributions of developers and fellow users alike.
Comodo System-Cleaner User Guide | © 2009 Comodo Security Solutions Inc. | All rights reserved 127

www.comodo.com
Online Knowledge Base
We also have an online knowledge base and support ticketing system at http://support.comodo.com. Registration is free.
10.5 Check for updates when application starts
Comodo System Cleaner can be configured to automatically check for updates whenever the software is started. As the name suggests, this option allows the user to enable or disable such automatic checks.
Comodo System-Cleaner User Guide | © 2009 Comodo Security Solutions Inc. | All rights reserved 128
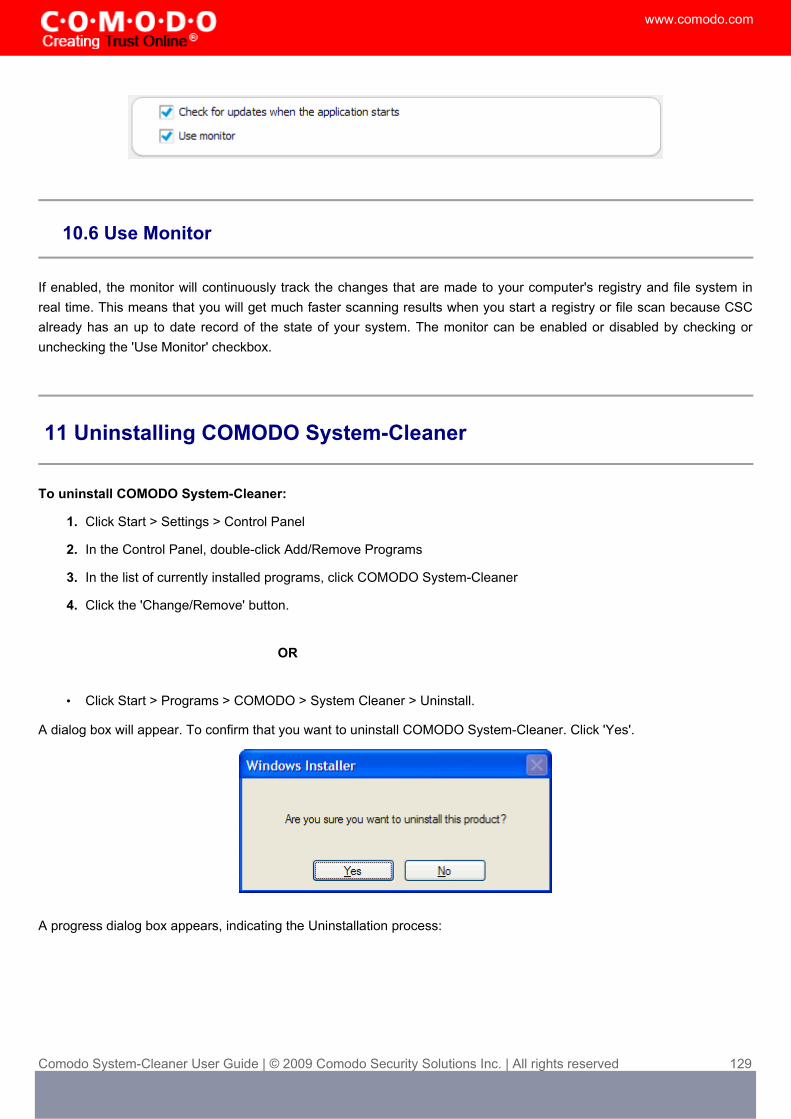
www.comodo.com
10.6 Use Monitor
If enabled, the monitor will continuously track the changes that are made to your computer's registry and file system in real time. This means that you will get much faster scanning results when you start a registry or file scan because CSC already has an up to date record of the state of your system. The monitor can be enabled or disabled by checking or unchecking the 'Use Monitor' checkbox.
11 Uninstalling COMODO System-Cleaner
To uninstall COMODO System-Cleaner:
1. Click Start > Settings > Control Panel
2. In the Control Panel, double-click Add/Remove Programs
3. In the list of currently installed programs, click COMODO System-Cleaner
4. Click the 'Change/Remove' button.
OR
• Click Start > Programs > COMODO > System Cleaner > Uninstall.
A dialog box will appear. To confirm that you want to uninstall COMODO System-Cleaner. Click 'Yes'.
A progress dialog box appears, indicating the Uninstallation process:
Comodo System-Cleaner User Guide | © 2009 Comodo Security Solutions Inc. | All rights reserved 129
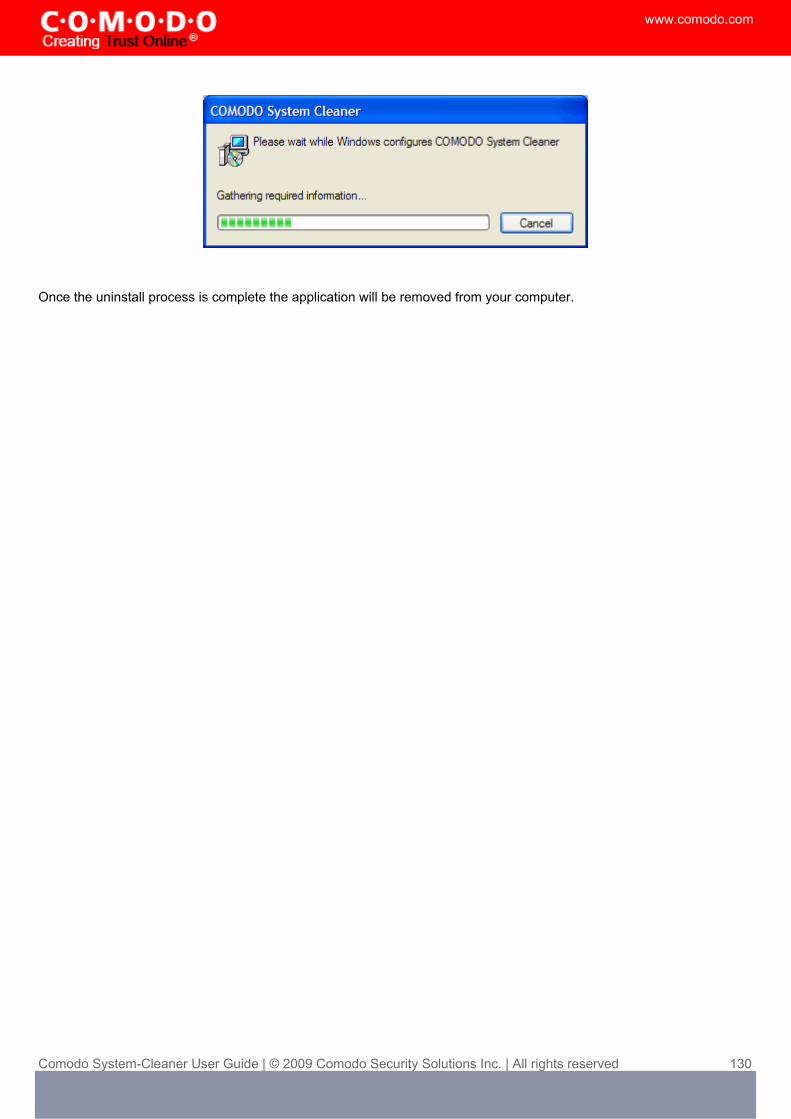
www.comodo.com
Once the uninstall process is complete the application will be removed from your computer.
Comodo System-Cleaner User Guide | © 2009 Comodo Security Solutions Inc. | All rights reserved 130

www.comodo.com
Appendix 1 The Windows Registry Explained
Introduction
Whenever a user installs a software program/application, a hardware or a device driver for a newly connected hardware in a Windows based computer system, the initial configuration settings of these are stored as keys and values in a system defined, central hierarchal database repository called Windows Registry. During the usage of the software or the hardware, the changes made to these configurations are updated in the registry. Also, the changes made to Control Panel settings, file associations, Windows components and so on, during the use of the computer, are updated in the registry.
The software and the system components retrieve their latest configuration from the registry during their runtime to continue their operation as per the settings made by the current user. The registry also serves as an index to the operation of the kernel, revealing runtime information of the system..
Registry is a critical factor for stability, reliability and performance of a computer. Most of the computer problems are caused by system registry errors. Invalid registry keys left as traces by applications that are no more used or uninstalled from the computer, and so on, may cause troubles including degradation in system performance in terms of operating speed, reliability etc., crashes, stalls and so on.
Purpose
The Windows Registry serves as an archive for collecting and storing the configuration settings of Windows components, installed hardwares/softwares/applications etc. in the computer system. A Windows component, hardware or a software, retrieves the registry entries or keys relating to it, every time it is invoked, to start its functionalities with its last modified settings according to the currently logged user. It also modifies the registry entries or keys corresponding to it, in its course of execution. When keys are added to the registry, the data are sorted as computer-specific data or user-specific data in order to support multiple users.
Location
In Windows NT based operating systems like Windows XP, 2000, and 2003, the Registry files are stored in the Windows\System32\Config folder. These files are named:
• Software;
• System;
• SAM;
• Security;
• Default; and
• UserDiff.
These files do not have a file extension. The information contained in these files are explained later.
Comodo System-Cleaner User Guide | © 2009 Comodo Security Solutions Inc. | All rights reserved 131

www.comodo.com
Apart from this, in the Documents and Settings folder corresponding to each user of the system, one more Registry file named NTuser.dat is stored. The NTuser.dat file stores all the preferences/settings specific to the user. These settings will override settings default settings of the system when the user logs-in.
Accessing the Windows Registry
You can view the registry files by running the regedit command.
To view the registry files
1 Click Start > Run...
2 Type regedit in the Open: box.
3 Click OK.
Structure of the Windows Registry
The Windows Registry has a structure similar to Windows folders and files. Each main folder is named as a Hive. Each hive contains sub folders called Keys. These keys contain subkeys with configuration values for each software program/system component of the computer. There are five main Hives, whose descriptions are listed below:
Comodo System-Cleaner User Guide | © 2009 Comodo Security Solutions Inc. | All rights reserved 132

www.comodo.com
HKEY_CLASSES_ROOT - The software settings about the file system, shortcut information, information on file associations and other user interface information are stored in this hive. The file association information information are essentially used by Windows to invoke the correct program when a file is opened using Windows Explorer.
HKEY_USERS – The configuration settings for each hardware and software item in the computer system, corresponding to each of the users of the computer system are stored in this hive. The information on the user's folders, user's choices of themes, colors and Control Panel settings are stored here as user's profile. This hive has a subkey for each user storing his/her user's profile.
HKEY_CURRENT_USER - The configuration settings for each hardware and software item in the computer system, corresponding to the currently logged-on user are stored in this hive. This hive is dynamic, i.e. whenever a user logs-on into the system, the settings corresponding to the user are retrieved from the respective subkey of H_KEY_USERS as user profile and stored in this hive. If a currently active item modifies a registry entry in its course of operation, the change will affect only the current user.
HKEY_LOCAL_MACHINE - The configuration settings for hardware and software for all users of the computer are stored in this hive. The information stored here is computer specific and not user specific.
HKEY_CURRENT_CONFIG - The current hardware configuration settings, pointing to HKEY_LOCAL_MACHINE\Config are stored in this hive. This hive is dynamic, meaning it is built on the run.
The files in the Windows\System32\Config folder and their associations with the hives are shown below.
Comodo System-Cleaner User Guide | © 2009 Comodo Security Solutions Inc. | All rights reserved 133

www.comodo.com
File Name Associated Hive Information ContainedSoftware HKEY_LOCAL_MACHINE\SOFTWARE Information about all the software items in the system,
Windows performance parameters and the default Windows settings.
System HKEY_LOCAL_MACHINE\SYSTEM Information about all the hardware items in the system.
Sam HKEY_LOCAL_MACHINE\SAM Information about the Security Accounts Manager service.
Security HKEY_LOCAL_MACHINE\SECURITY Information about security. Neither of Security and SAM, can be viewed using Regedit, unless you reset the permissions.
Default HKEY_USERS\.DEFAULT Default user settings. But the Ntuser.dat file corresponding to the currently logged-on user overrides the default user settings.
Userdiff Not associated with any hive. Information about the corresponding subkeys in the HKEY_USERS Hive for each registered user.
How Problems with the Registry can Occur
The Windows Registry keeps accumulating of a large number of unwanted, obsolete, and incorrect data which are mostly left by uninstalled programs. The most common reasons for accumulation of the junk entries are:
Installing and uninstalling software programs, particularly video, audio, photo, graphics and games softwares frequently;
Browsing through Internet sites that automatically install components like Active X and accessing unsolicited mails with malicious attachments;
• Adding too many programs into the system;
• Altering Control Panel settings frequently;
• Altering hardware, hard disk, memory, joysticks, monitor, printer or scanner frequently;
• Installing programs with embedded spyware;
• Viruses, Trojan horses and key loggers and so on.
• The adding up of too much of junk entries over time increases the size of the registry and makes it fragmented and corrupted.
How do the Registry Problems Affect Your System
The Windows registry which in increased in size due to accumulation of junk entries, fragmented and corrupted due to the traces left by improperly uninstalled programs leads to:
• Degradation in performance of the computer system . The operating speed of the system will be notably reduced, as each active process/application takes a longer time to refer to registry and acquire/modify its registry entry. The time-out problem also leads to frequent program error messages;
Comodo System-Cleaner User Guide | © 2009 Comodo Security Solutions Inc. | All rights reserved 134

www.comodo.com
• Reduction in reliability. The active process/application may not be able to reach its respective registry entry due to fragmentation of registry of increased size, resulting in unexpected termination of the programs. This makes the user to lose any unsaved data;
• Reduction in stability. The fragmented, slow registry takes a long time to fulfill requests sent to it by the active programs and hardware devices and causes system freezes and rebooting.
• System crash. Excessive damage to the Registry can even make the system unbootable.
Why do you need a Registry cleaner
When you notice a reduction in the operating speed of your computer, repeated freezes or taking a longtime to startup, you can take the indication as starting of degradation of your registry. Your registry needs a clean-up, meaning that the obsolete, unwanted and invalid entries must be identified from your registry and to be deleted. You can manually edit your registry and fix these problems yourself, if you’re a computer expert.
As a word of caution, performing a registry cleanup using the Registry Editor is not so easy and safe. The probability of unknowingly altering or deleting a registry entry, vital for the healthy operation of your system, is incomparably higher than that of deleting the entry to be actually deleted. Your system may be irreparably damaged.
It is always recommended to use a Registry cleaner software regularly to tidy up your systems registry. A registry cleaner scans your registry and detects the unwanted entries to be removed. It deletes the unwanted entries only after your confirmation and leaves the vital registry entries intact. This ensures that you can restore your systems health and performance within a few mouse clicks without the fear of damaging your system. There are no chances for removing any vital entries and hence is safe.
Benefits of Using a Registry Cleaner
The registry cleaner software not only scans your systems registry for detecting and cleaning any unwanted registry entries but also defragments your systems registry, making it compact and leaving some available free space in your hard drive.
• The active processes/applications are enabled to seamlessly access their corresponding registry entries, both for acquisition of the configuration settings and to alter them in the course of their execution. The operating speed of the system increases and the system is restored to its highest level of performance. The annoying error messages can be avoided.
• The active processes/applications can reach their corresponding registry quickly and without fail avoiding unexpected termination of programs. The users need not lose any unsaved data and system is rendered reliable.
• The clean, compact and fast registry can cater to the requests sent to it by the active programs and hardware devices promptly, avoiding system freezes and rebooting. This adds up to the stability of the system.
• The newly installed software programs can easily create registry entries and store their configuration settings in a clean registry.
Prevention is better than cure. Instead of waiting for your Registry to build up debris and cleaning it, regular cleaning of it at a set frequency maintains the health of the system consistently. The Registry cleaner software offer scheduling facility, wherein you can set scheduled scans and clean your registry. Even if you forget to start registry cleaning, the registry
Comodo System-Cleaner User Guide | © 2009 Comodo Security Solutions Inc. | All rights reserved 135

www.comodo.com
cleaner automatically runs a scan and cleans your registry at scheduled times. Regular cleaning of your registry does not give a room for registry damage and your system is totally protected from system crash.
The registry cleaner software also backs-up your systems registry before performing every clean-up, providing you with an option of reverting your system to an early stage, in case you need do it.
Apart from cleaning your registry, some Registry cleaner softwares also aid in optimizing your systems performance. One of the reasons for slow start-up and reduction in your systems operating speed other than the registry problems, is number of start-up programs. Even though, there are certain startup programs which are essential for your computer to function, there are some that are usually configured to load at startup when you install those applications. These programs are usually not required until you actually use the application they belong to, and the rest of the time they run in the background unnecessarily, consuming system resources. You can use msconfig command to select the programs to be loaded during start-up, but again, it is not easy and safe.
Comodo System-Cleaner User Guide | © 2009 Comodo Security Solutions Inc. | All rights reserved 136

www.comodo.com
Appendix 2 Using the Portable Version
The portable version of Comodo System-Cleaner can be deployed on any kind of removable storage media (for example, a USB key fob). You can run the application on any computer you visit simply by plugging the removable storage media in and double clicking on the application (.exe) you want to start without, installing the application on each computer. The application runs straight from the removable storage device. Click the links below for detailed descriptions.
• Why do I need Portable Software?
• Downloading and Setting up the Portable Version
• Running COMODO System-Cleaner Applications
Why do I need Portable software?
As the name indicates, a portable application is the one which is carried on a removable storage media (for example, a USB key fob) and can be executed straight from the media, without any installation process. The benefits are:
• Mobility - As the application and all configuration parameters are carried on a key fob in your pocket you can easily run them on any computer you visit. Network administrators can quickly run registry and disk cleaning operations on workstations using the same settings without going through the hassle of downloading, installing and configuring the application locally.
• No installation required - You are relieved from the time consuming process of installing the software in your system. All it requires is to copy the folder containing the program files into the USB memory.
• Saves system resources - As application is held only on a removable media, it does not require any space in hard drive of any system in which it is run. Also all the settings information are stored in the same removable media containing the program files, and not in the system registry.
The portable version of COMODO System-Cleaner is a handy suite of utilities, for use on any computer to improve the its security, performance and usability.
It allows you to:
• Clean the Windows registry by removing obsolete and unwanted items and to improve system performance
• Clean the hard disks by removing unnecessary and temporary files
• Delete all your browser cache, cookies, history, typed URLs, autocomplete history, tracks of applications etc. to protect your privacy
• Easily access the most critical Windows settings and configure Start-up entries, which are otherwise hard to reach, for tweaking the system
Comodo System-Cleaner User Guide | © 2009 Comodo Security Solutions Inc. | All rights reserved 137
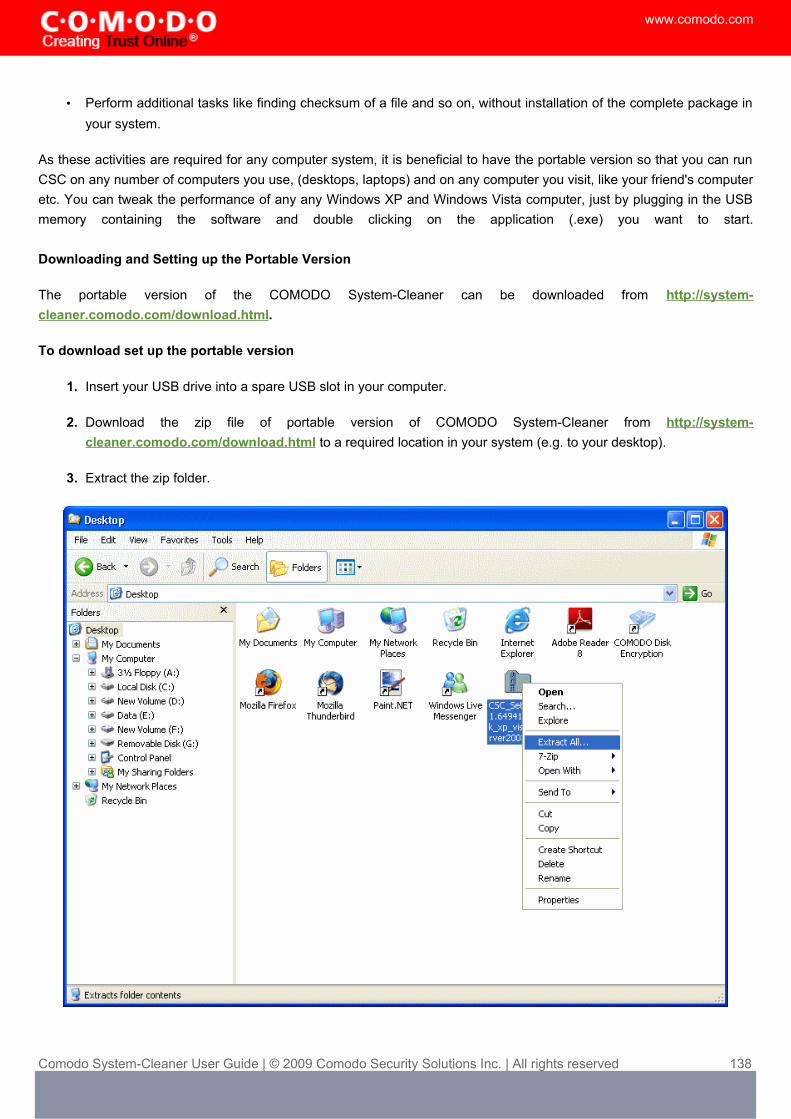
www.comodo.com
• Perform additional tasks like finding checksum of a file and so on, without installation of the complete package in your system.
As these activities are required for any computer system, it is beneficial to have the portable version so that you can run CSC on any number of computers you use, (desktops, laptops) and on any computer you visit, like your friend's computer etc. You can tweak the performance of any any Windows XP and Windows Vista computer, just by plugging in the USB memory containing the software and double clicking on the application (.exe) you want to start.
Downloading and Setting up the Portable Version
The portable version of the COMODO System-Cleaner can be downloaded from http://system-cleaner.comodo.com/download.html.
To download set up the portable version
1. Insert your USB drive into a spare USB slot in your computer.
2. Download the zip file of portable version of COMODO System-Cleaner from http://system-cleaner.comodo.com/download.html to a required location in your system (e.g. to your desktop).
3. Extract the zip folder.
Comodo System-Cleaner User Guide | © 2009 Comodo Security Solutions Inc. | All rights reserved 138

www.comodo.com
4. Open the extracted folder and copy the folder named COMODO into the USB drive.
Thats it! The portable COMODO System-Cleaner is ready to use. The COMODO System-Cleaner application (and all the individual applications) is inside the Comodo folder. The next part of this guide explains how to run applications from your USB key fob.
Running COMODO System-Cleaner Applications
The portable version of COMODO System-Cleaner is a handy suite of multiple utilities. You can run any of the utilities you want by opening the folder named COMODO in the USB drive and clicking the .exe file of the respective application.
To run the required application from the portable version
1. Insert the USB drive into a USB slot in your computer.
2. Explore the USB drive and open the folder named COMODO > System-Cleaner.
Comodo System-Cleaner User Guide | © 2009 Comodo Security Solutions Inc. | All rights reserved 139

www.comodo.com
The folder contains several application files. The file names and the corresponding applications are listed below.
File Name Application (Click on the application name for more details)
CSC.exe Comodo System-Cleaner (opens the main interface of the full suite)
CAM.exe Comodo Autorun Manager
CDC.exe Comodo Disk Cleaner
CPC.exe Comodo Privacy Cleaner
CRC.exe Comodo Registry Cleaner
CSI.exe Comodo System Information
CSS.exe Comodo System Settings
3. Double click on the icon corresponding to the application you wish to run. The application will start immediately.
Comodo System-Cleaner User Guide | © 2009 Comodo Security Solutions Inc. | All rights reserved 140

www.comodo.com
Appendix 3 Live PC Support
Live PC Support offers the quickest, most comprehensive way of getting help with your computer problems. Live PC Support is carried out by Comodo computer experts establishing a remote desktop connection to your machine and fixing your computer’s problems right in front of your eyes. No longer do you need to make time consuming calls to impatient help desk support staff. Instead, just sit back and relax while our friendly technicians do the work for you.
Live PC Support includes the following services:
• Virus Diagnosis / Removal - Scanning your PC to check for viruses and spyware. Automatic/manual removal of the detected viruses.
• PC Tune Up - Running full scans to evaluate issues affecting your computer's performance. Fine Tuning key areas and improving speed and stability.
• Internet Login Protection - Activating your computer's basic security settings to prevent loss of sensitive data and identity theft.
• Email Account Set Up - Setting up your Internet-based email account—any provider, any account. Great for new computers and novice email users.
• Software Installation - Installing your Comodo products and customizing configuration for maximum security protection and efficiency.
• Printer Set Up and Troubleshooting - Installing or updating software and printer drivers, checking ink levels and configuring your printer to work on a wireless or wired network.
• Green PC - Optimizing your power management setting based on how you use your computer. Go green and save money on your electric bill.
• Computer Troubleshooting - Checking basic hardware conflicts in Windows.
Features:
• Our experts are available 24 hours per day to perform the services listed above.
• Unlimited incidents on an unlimited number of computers.
• 30 days Free Trial !!
• Enjoy using your problem-free computer once again !!
Please visit http://www.livepcsupport.com for more details.
The service requires the LivePCSupport client installed in your system.
To download and install the LivePCSupport client
• Click the C.O.M.O.D.O live PC support link in the Miscellaneous management interface of Comodo System-Cleaner
This will automatically install and launch the client. Within seconds, a Comodo Support Technician will respond in a chat window and ask you to describe the problem. After you do, our computer expert takes over! LivePCSupport enables our experts to actually tap into your computer and make the changes necessary to solve your problem, and get your PC working perfectly.
Comodo System-Cleaner User Guide | © 2009 Comodo Security Solutions Inc. | All rights reserved 141

www.comodo.com
If you once install the client, you can initiate the chat at any time by clicking the link any time.
For technical product questions please visit: https://support.comodo.com/ (Comodo’s Customer Service management system requires you to establish a free service account. Your service account provides access to Comodo’s extensive Knowledgebase, Customer Forums, and Live Chat support and offers the ability to submit support requests into our service management system. )
LivePCSupport is also a part of Comodo Internet Security Pro. CIS Pro customers receive the $99 value ‘Total Security and Support’ Live PC Support package as part of their $39 per year subscription to CIS Pro. Please visit http://livepcsupport.com for full product details. Please visit http://personalfirewall.comodo.com to sign up for Comodo Internet Security Pro.
Comodo System-Cleaner User Guide | © 2009 Comodo Security Solutions Inc. | All rights reserved 142

www.comodo.com
Appendix 4 Encryption Algorithms
AlgorithmBlock Size /
Encryption level / Speed
Brief Description Recommendation
AES (Advanced Encryption Standard )
128 bits/Strongest
Also known as Rijndael. This cipher is used for encryption by default.
Ideal for both domestic and exportable use.
Serpent 128, 192 or 256 / very strong / fast
128, 192, 256-bit block cipher. Designed by Ross Anderson, Eli Biham and Lars Knudsen as a candidate for the Advanced Encryption Standard.
Ideal for both domestic and exportable use.
3DES168
bits/strong/Slow
Applies Data encryption Standard (DES) cipher three consecutive times to the message to form the message digest. Offers protection against meet-in-the-middle attacks.
Suitable for domestic use.
XORVariable block
size /very weak / very fast
160 bit key. XOR encryption is a trivially simple symmetric cipher which is used in many applications where security is not a defined requirement
Not recommended
Blowfish
64-bit block / variable key
length: 32 bits to 448
bits/strong/fast
Symmetric block cipher. It is a Feistel network, iterating a simple encryption function 16 times. The block size is 64 bits, and the key can be any length up to 448 bits. Designed by Bruce Schneier.
Ideal for both domestic and exportable use.
Much faster than DES and IDEA.
Twofish
128-bit block/ 28-, 192-, or 256-bit key/
strong/ very fast
Symmetric key block cipher with a block size of 128 bits and key sizes up to 256 bits.
A widely used and recommended choice
for most cases.
Comodo System-Cleaner User Guide | © 2009 Comodo Security Solutions Inc. | All rights reserved 143

www.comodo.com
About Comodo
The Comodo companies provide the infrastructure that is essential in enabling e-merchants, other Internet-connected companies, software companies, and individual consumers to interact and conduct business via the Internet safely and securely. The Comodo companies offer PKI SSL, Code Signing, Content Verification and E-Mail Certificates; award winning PC security software; vulnerability scanning services for PCI Compliance; secure email and fax services.
Continual innovation, a core competence in PKI, and a commitment to reversing the growth of Internet-crime distinguish the Comodo companies as vital players in the Internet's ongoing development. Comodo secures and authenticates online transactions and communications for over 200,000 business customers and has over 10,000,000 installations of desktop security products.
For additional information on Comodo - visit http://www.comodo.com/
Comodo System-Cleaner User Guide | © 2009 Comodo Security Solutions Inc. | All rights reserved 144
Comodo Security Solutions, Inc.
525 Washington Blvd.
Jersey City,
NJ 07310
United States.
Tel: +1 888 266 6361
Email: [email protected]
Comodo CA Limited
3rd Floor, 26 Office Village, Exchange Quay,
Trafford Road, Salford,
Greater Manchester M5 3EQ,
United Kingdom.
Tel : +44 (0) 161 874 7070
Fax : +44 (0) 161 877 7025