comodo added new training mode and clean pc mode
TRANSCRIPT

Comodo Firewall Pro 3.0 – User Guide 1
Comodo Firewall Pro 3.0
User Guide
Creating Trust OnlineTM

Table of Contents
Comodo Firewall Pro – Introduction ................................................................................................................................ 4
What's New in Comodo Firewall Pro ........................................................................................................................... 7
Installation ..................................................................................................................................................................... 9
System Requirements ................................................................................................................................................ 25
Starting Comodo Firewall Pro .................................................................................................................................... 25
General Navigation and Firewall Summary .............................................................................................................. 27
Understanding Alerts .................................................................................................................................................. 30
Firewall Task Center ........................................................................................................................................................ 36
Network Security Policy .............................................................................................................................................38
Pre-defined Firewall Policies ..................................................................................................................................... 52
Attack Detection Settings .......................................................................................................................................... 54
Firewall Behavior Settings ......................................................................................................................................... 58
View Firewall Events ................................................................................................................................................... 61
Define a New Trusted Application ............................................................................................................................. 66
Define a New Blocked Application ............................................................................................................................ 68
Stealth Ports Wizard ................................................................................................................................................... 70
View Active Connections ........................................................................................................................................... 73
My Port Sets ................................................................................................................................................................ 75
My Network Zones ...................................................................................................................................................... 78
My Blocked Network Zones ....................................................................................................................................... 81
Defense+ Tasks Overview ............................................................................................................................................... 84
View Defense+ Events ................................................................................................................................................ 87
My Protected Files ...................................................................................................................................................... 91
My Quarantined Files .................................................................................................................................................. 94
My Pending Files ......................................................................................................................................................... 96
Comodo Firewall Pro 3.0 – User Guide 2

My Own Safe Files ....................................................................................................................................................... 98
View Active Process List .......................................................................................................................................... 100
My Trusted Software Vendors ................................................................................................................................. 101
Scan My System ........................................................................................................................................................ 106
My Protected Registry Keys .................................................................................................................................... 108
My Protected COM Interfaces .................................................................................................................................. 111
Computer Security Policy ........................................................................................................................................ 114
Image Execution Control Settings .......................................................................................................................... 120
Predefined Security Policies .................................................................................................................................... 122
Defense+ Settings ..................................................................................................................................................... 123
Miscellaneous Overview ................................................................................................................................................ 129
Manage My Configurations ...................................................................................................................................... 135
Diagnostics ................................................................................................................................................................ 140
Check for Updates .................................................................................................................................................... 141
Submit Suspicious Files ........................................................................................................................................... 143
Browse Support Forums .......................................................................................................................................... 146
Help ............................................................................................................................................................................ 147
About .......................................................................................................................................................................... 148
About Comodo ............................................................................................................................................................... 149
Comodo Firewall Pro 3.0 – User Guide 3

Comodo Firewall Pro - Introduction
Overview
Comodo Firewall Pro offers 360° protection against internal and external threats by combining enterprise class packet filtering firewall with an advanced host intrusion prevention system. The new-look interface facilitates quick and easy access to all major settings, including the powerful and highly configurable security rules interface.
Built from the ground upwards with our security in mind, this award winning firewall constantly monitors and defends your system from inbound and outbound attacks. Version 3.0 now features a fully fledged Host Intrusion Prevention System called Defense+ to protect your critical operating system files and block viruses and malware before they ever get the chance to install. In fact, Defense+ is so good at blocking malware, you may never need a dedicated anti-virus program ever again.
The new-look firewall features a friendly graphical user interface; highly granular configuration options; easily understood and informative alerts; wizard-based detection of trusted zones and much more. Comodo Firewall Pro delivers enterprise class protection and can be used ‘out of the box’ - so even the most inexperienced users will not have to deal with complex configuration issues after installation.
Comodo Firewall Pro includes an integrated executable file database, which is a comprehensive classification of all known executable files. It is the only firewall which provides such significant information with users.
This introductory section is intended to provide an overview of the basics of Comodo Firewall Pro and should be of interest to all users.
Introduction
• What's New In Comodo Firewall Pro
• Installing Comodo Firewall Pro
• System Requirements
• Starting Comodo Firewall
• General Navigation and Firewall Summary
• Understanding Alerts
The remaining three sections of the guide cover every aspect of the configuration Comodo Firewall Pro. Advanced users interested in configuring their own security policies and rules may want to make 'Network Security Policy' and 'Computer Security Policy ' their starting points.
Firewall Task Center
• Overview of Task Interface
Comodo Firewall Pro 3.0 – User Guide 4

Common Tasks
• View Firewall Events
• Define a New Trusted Application
• Define a New Blocked Application
• Stealth Ports Wizard
• View Active Connections
• My Port Sets
• My Network Zones
• My Blocked Network Zones
Advanced
• Network Security Policy
• Predefined Firewall Policies
• Attack Detection Settings
• Firewall Behavior Settings
Defense+ Task Center
• Overview of Task Interface
Common Tasks
• View Defense+ Events
• My Protected Files
• My Quarantined Files
• My Pending Files
• My Own Safe Files
• View Active Process List
• My Trusted Software Vendors
Comodo Firewall Pro 3.0 – User Guide 5

• Scan my System
• My Protected Registry Keys
• My Protected COM Interfaces
Advanced
• Computer Security Policy
• Predefined Security Policies
• Image Execution Control Settings
• Defense+ Settings
Miscellaneous
• Overview of Miscellaneous Tasks Interface
• Settings
• Manage My Configurations
• Diagnostics
• Check For Updates
• Submit Suspicious Files
• Browse Support Forums
• Help
• About
Comodo Firewall Pro 3.0 – User Guide 6

What's New in Comodo Firewall Pro
New in Version 3.0
NEW! Defense+ Host Intrusion Prevention System Control
• Virtually Bulletproof protection against root-kits, inter-process memory injections, key-loggers and more;
• Authenticates the integrity of every program before allowing it to load into your computer’s memory;
• Alerts you every time unknown or untrusted applications attempts to run or install;
• Blocks Viruses, Trojans and Spy-ware before they can ever get onto your system;
• Prevents unauthorized modification of critical operating system files and registry entries.
IMPOROVED! Advanced Network Firewall Engine
Comodo Firewall Pro has always offered the highest levels of perimeter security against inbound and outbound threats – meaning you get the strongest possible protection against hackers, malware and identity thieves. Now we’ve improved it again by adding new features such as Stealth Mode to make your PC completely invisible to opportunistic port scans; Wizard based auto-detection of trusted zones; Password protection of firewall settings; Diagnostics to analyze your system for potential conflicts with the firewall and much more.
NEW! Intuitive Graphical User Interface
• Summary screen gives an at-a-glance snapshot of your security settings;
• Easy and quick navigation between each module of the firewall;
• Simple point and click configuration – no steep learning curves;
• New completely redesigned security rules interface - you can quickly set granular access rights and privileges on a global or per application. The firewall also contains pre-set policies and wizards that help simplify the rule setting process.
IMPROVED! Security rules interface
Version 3.0 gives offers more control over security settings than ever before. Users can quickly set granular internet access rights and privileges on a global or per application basis using the flexible and easy to understand GUI. This version also sees the introduction of pre-set security policies which allow you to deploy a sophisticated hierarchy of firewall rules with a couple of mouse clicks.
IMPROVED! Application Behavior Analysis
CFP 3.0 features advanced protocol driver level protection - essential for the defense of your PC against Trojans that run their own protocol drivers.
Improved! Event logging
Comodo Firewall Pro 3.0 – User Guide 7

Version 3.0 features a vastly improved log management module – allowing users to export records of firewall activity according to several user-defined filters. Beginners and advanced users alike will greatly benefit from this essential troubleshooting feature.
NEW! Added new ‘Training Mode’ and 'Clean PC' Mode
This mode enables the firewall and host intrusion prevention systems to automatically create ‘allow’ rules for new components of applications you have decided to trust, so you won’t receive pointless alerts for those programs you trust – the firewall will learn how they work and only warn you when it detects truly suspicious behavior.
NEW! Windows Security Center Integration
Comodo Firewall Pro 3.0 is fully recognized by Windows Vista/XP Security Center as a trusted firewall.
IMPROVED! Application Recognition Database (Extensive and proprietary application safe list)
Comodo Firewall Pro includes an extensive white-list of safe executables called the ‘Comodo Safe-List Database’. This database checks the integrity of every executable and Firewall Pro will alert you of potentially damaging applications before they are installed. This level of protection is new because traditionally firewalls only detect harmful applications from a blacklist of known malware – often-missing new forms of malware as might be launched in day zero attacks.
Firewall Pro is continually updated and currently over 1,000,000 applications are in Comodo Safe list, representing virtually one of the largest safe lists within the security industry.
NEW! Self Protection against Critical Process Termination
Viruses and Trojans often try to disable your computer’s security applications so that they can operate without detection. Comodo Firewall Pro protects its own registry entries, system files and processes so malware can never shut it down or sabotage the installation.
IMPROVED! Submit Suspicious Files to Comodo
Are you the first victim of a brand new type of spyware? Users can help combat zero-hour threats by using the built in submit feature to send files to Comodo for analysis. Comodo will then analyze the files for any potential threats and update our database for all users.
Comodo Firewall Pro 3.0 – User Guide 8

Installation
Before you install Comodo Firewall Pro, read the installation instructions carefully and also review the system requirements listed in this chapter.
Installation Process
To install, download the Comodo Firewall Pro setup files to your local hard drive. (setup.exe can be downloaded from http://www.personalfirewall.comodo.com )
Next, double click on the setup file to start the installation wizard and follow the process as below.
STEP 1: Uninstall Other Firewall Programs
Before you install Comodo Firewall Pro, you must uninstall any third party Firewall programs installed in your PC. This is necessary as other firewall programs may interfere with the installation of Comodo Firewall Pro and reduce the protection offered by it. Click Yes.
Comodo Firewall Pro 3.0 – User Guide 9

STEP 2: Welcome dialog box
The set up program starts automatically and the Welcome wizard is displayed. At this time, you may cancel the install process or continue with the Comodo Firewall Pro Setup program. Click Next to continue.
Comodo Firewall Pro 3.0 – User Guide 10

STEP 3: License Agreement
When Comodo Firewall Pro is installed for the first time, you must complete the initialization phase by reading and accepting the license agreement. After you read the End-User License Agreement, click Yes to continue installation. If you decline, you cannot continue with the installation.
Comodo Firewall Pro 3.0 – User Guide 11

STEP 4: Location Destination Folder
On the Destination Wizard page, confirm the location of the Firewall installation files.
To install the program in the default destination location, click Next. The default destination directory is the C:\Program Files\Comodo\Firewall.
If you do not wish to install the Firewall files in the default location, to install to a different folder, click BROWSE and select another folder. Click OK to continue with the installation process.
Comodo Firewall Pro 3.0 – User Guide 12

STEP 5: Set Up Status Box
A setup status dialog box is displayed. You will see a progress bar indicating that files are being installed.
STEP 6: Welcome Screen
A configuration wizard dialog box will open. Click "Next" to continue with installation.
Comodo Firewall Pro 3.0 – User Guide 13

STEP 7: Install Defense+
Next you choose which type of installation (and protection level) you would prefer :
Comodo Firewall Pro 3.0 – User Guide 14

The choices explained:
Firewall with Defense+ (Recommended) - This is the most complete option and offers the greatest level of security. Choosing this will install Comodo Firewall Pro's Host Intrusion Prevention System - "Defense+" - in addition to the packet filtering firewall. Defense+ can stop malware, viruses, trojans and worms before they ever get a chance to install themselves by blocking their ability to make changes to your operating system, applications, registry, running processes and important system files. This extra layer of protection represents an significant increase in security and is recommended for the vast majority of users.
Firewall ('Leak Protection' option NOT checked)- This option is only recommended for experienced firewall users that have alternative Host Intrusion Prevention software installed on their systems. Choosing this option will install ONLY the packeting filtering network and will not offer leak protection - essential for blocking malicious software (like worms and trojans) from making outgoing connection attempts. This isn't to say this option is an unwise choice (the network firewall is one of the strongest available - offering highly effective and configurable inbound and outbound protection) but it is important to realise that, on it's own, it does not offer the leak protection afforded by Defense+.
If you do not wish to install the full Defense+ option but still want leak protection then we advise you choose:
Firewall (with 'Leak Protection' option checked) - This option installs the packet filtering firewall as above and some, but not all, Defense+ functionality to provide effective leak protection against malware. Simplistically speaking, this option will monitor the activities of suspicious executables and will alert the user when an internet connection leak could occur. Certain monitoring and file/folder protection is, however, disabled under this configuration. This option will create a protection level that is similar to, but slightly more secure than, the protection offered by Comodo Firewall Pro 2.4.
Click 'Next' to continue installation.
Comodo Firewall Pro 3.0 – User Guide 15

STEP 8: Install Comodo SafeSurf Browser Toolbar
The Comodo SafeSurf Toolbar protects against data theft, computer crashes and system damage by preventing most types of Buffer Overflow attacks. This type of attack occurs when a malicious program or script deliberately sends more data to a target applications memory buffer than the buffer can handle - which can be exploited to create a back door to the system though which a hacker can gain access. Comodo developed the SafeSurf Toolbar explicitly to protect end-users from these kinds of attacks whilst they browse the Internet. After installation, the program will monitor and protect the memory space of all applications that are running on your system and immediately block any buffer overflow attacks. Apart from providing another essential layer of protection, the toolbar also provides one-click access to news, search, shopping; a built in pop-up blocker; is compatible with all major browsers and can be separately uninstalled or disabled at any time after installation.
After reviewing the EULA and installation options, click 'Next' to continue.
STEP 9: Starting configuration
Next, the installer will begin configuring your system and copying the application signature database to your computer.
Comodo Firewall Pro 3.0 – User Guide 16

STEP 10: Malware Scanning Setup
Next, Comodo Firewall Pro will scan your computer's fixed drives for the presence of known malware and viruses. It is strongly recommended that you run the scan as it will help ensure that you computer enjoys the maximum protection levels right from the first installation of the firewall.
Click Next to begin the scan. If you don't wish to scan at this time then un-check the 'Scan My System for Malware' box and click 'Finish'.
Comodo Firewall Pro 3.0 – User Guide 17

STEP 11: Scanning Progress and Results
Comodo Firewall Pro will now scan your fixed drives for the presence of known viruses and trojans.
At scan completion, you will see a list of any discovered malware.
Comodo Firewall Pro 3.0 – User Guide 18

The example above shows a typical list of discovered malware. By default, all discovered malware is selected (checkmarked). If you Click "Save As", the detected malware can be saved in your system. Clicking 'Delete All' will instruct Comodo Firewall Pro to attempt to delete the selected malware. (This is the recommended option). If you click 'Exit' WITHOUT deleting the listed malware, you will be given the following reminder:
Click 'No' to skip malware deletion and proceed to the last stage - Restarting Your System. Click 'Yes' to return to the scan results screen to delete the discovered malware.
Comodo Firewall Pro 3.0 – User Guide 19

STEP 12: Restart your system
Your system must be restarted in order to finalise the installation. Please save any unsaved data and Click Finish to reboot. Uncheck the 'Restart Now' option If you would rather reboot at a later time.
STEP 13: After you restart your machine:
After restarting, if your computer is connected to a home or work network, then you will be prompted to configure it at the 'New Private Network Detected!' dialog:
Comodo Firewall Pro 3.0 – User Guide 20

Step 1: Even home users with a single computer will have to configure a home network in order to connect to the internet (this is usually displayed in the Step 1 text field as you network card). Most users should accept this name.
Step 2: If you wish your computer to accept connections from other PC's in this network or for printer sharing, then also select this option (e.g. a work or home network). This will then become a trusted network. Users that only have a single home computer connecting to the internet should avoid this setting.
Select 'Do not automatically detect new networks' If you are an experienced user that wishes to manually set-up their own trusted networks (this can be done in 'My Network Zones' and through the 'Stealth Ports Wizard')
You must select OK to confirm your choice. If you click on 'Close' button, all the network connections will be blocked.
STEP 14: Comodo Firewall Pro Plus
After first rebooting, all users are offered the opportunity to upgrade to Comodo Firewall Pro Plus.
Comodo Firewall Pro Plus is a virus protection and removal service that delivers security and peace of mind above and beyond traditional anti-virus solutions. From just $39 per year, Comodo experts will remotely diagnose then cleanse your system of malware and viruses if your machine should become infected. After totally eradicating the malicious software using a range of specialist security tools , our experts will then reconfigure your firewall to set your computer up for maximum security. Comodo Firewall Pro Plus is available in two service offerings :
• Comodo Pro Plus - Warranty Only - $39 per year. Virus removal and system remediation in the event your PC becomes infected by malware. 2 incidents per year. *
• Comodo Pro Plus - Warranty + Installation - $79 per year. Same incident based remediation service as above PLUS expert installation and configuration of your firewall.
Users that take advantage of the Pro Plus warranty will enjoy the peace of mind afforded by having security experts on call 24 hours a day to help out in case of emergency.
Scenario one: If no malware remains on your system after the earlier scan then will see the following information dialog after Windows startup:
Comodo Firewall Pro 3.0 – User Guide 21

Select 'Yes, I'm Interested...' then 'Next >' to be directed to the Comodo website where you can find more details about the warranty and to complete the registration process.
Select 'No, thanks' then 'Next >' if you are not interested in upgrading to Comodo Firewall Pro Plus. The Comodo Firewall Pro interface will then open.
Scenario Two: If any malware could not be automatically deleted (because doing so would be harmful to important files or to your computer) then you will see the following dialog box:
What are my options?:
• I have an A-VSMART subscription and would like to use it - For existing warranty holders only. Selecting this option (and clicking OK) will connect to the Comodo servers so you can begin placing a request to remove the
Comodo Firewall Pro 3.0 – User Guide 22

malware on your machine. Comodo Firewall Pro will automatically link the malware scan results to your account. After professionally removing the malware, our experts will also configure your firewall for optimal security.
• I do not have an A-VSMART subscription but would like to subscribe - Register for an A-VSMART warranty and get Comodo experts to remove the malware for you before professionally installing and configuring your firewall for optimal security. If you select this option Comodo Firewall Pro will open your internet browser and connect to the Comodo website to complete the ordering process.
• Keep them quarantined and close this window: . Clicking 'No' at this dialog will skip the application/service engagement process and restart your computer. The identified malware will automatically be rendered harmless and can be manually reviewed and/or removed at a later time by visiting the quarantine section of Comodo Firewall Pro.
Click OK to continue onto the Comodo Firewall Pro Management interface.
Comodo Firewall Pro management interface
After installation, the Comodo Firewall Pro shortcut will be displayed on the Windows desktop:
To start Comodo Firewall Pro, double-click on the shortcut (or the tray icon) and the management interface will open.
Your computer is automatically protected by the firewall every time you start it. You do not have to explicitly start the firewall to protect your computer.
Comodo Firewall Pro 3.0 – User Guide 23

Closing this window will exit the Comodo Firewall Pro management interface. The firewall will remain active, protecting your computer, in the background.
To completely shut the program down, right-click on the Comodo Firewall Pro and select 'Exit'. If you choose to exit, you will see a dialog box confirming whether you want to exit or not.
If you choose to exit, the Firewall will be disabled and will not protect your PC.
Comodo Firewall Pro 3.0 – User Guide 24

System Requirements
To ensure optimal performance of Comodo Firewall Pro, please ensure that your PC complies with the minimum system requirements as stated below:
• Windows Vista (Both 32-bit and 64-bit versions)
• Windows XP (Both 32-bit and 64-bit versions)
• Internet Explorer Version 5.1 or above
• 64 MB available RAM
• 60 MB hard disk space for 32-bit versions and 80MB for 64-bit versions
Starting Comodo Firewall Pro
After installation, Comodo Firewall Pro will automatically start whenever you start Windows. In order to configure and view settings within Comodo Firewall Pro you need to access the management interface.
There are 3 different ways to access the management interface of Comodo Firewall Pro - System Tray Icon, via Windows Desktop, via the Windows Start menu.
1. Comodo Firewall Pro Tray Icon
Just double click the shield icon to start the main firewall interface. (By right-clicking on the tray icon, you can access short cuts to other firewall settings).
2. Windows Desktop
Just double click the shield icon in the desktop to start Comodo Firewall Pro.
3. Start Menu
Comodo Firewall Pro 3.0 – User Guide 25

You can also access Comodo Firewall Pro via the Windows Start Menu.
Click 'Start' and select All Programs->Comodo-> Firewall->Comodo Firewall Pro.
Using any of the methods outlined above will lead you to the main interface as shown below:
Comodo Firewall Pro 3.0 – User Guide 26

General Navigation and Firewall Summary
After installation, Comodo Firewall Pro automatically protects any computer on which it is installed. You do not have to start the program to be protected.
See Starting Comodo Firewall Pro if you are unsure of how to access the main interface.
Persistent Navigation
Comodo Firewall Pro is divided into four main areas indicated by the icons at the top right hand corner of the interface. Each of these areas contains several sub-sections that allow you total control over configuration of the firewall and defense+ settings.
Summary - contains at-a-glance details of firewall settings, activity and new. See the 'Summary' section for more details.
Firewall - clicking this icon will take you to the ' Firewall Tasks ' configuration area. Advanced users are advised to first visit the Network Security Policy area for an introduction to firewall policies and rule creation
Defense+ - clicking this icon will take you to the 'Defense+' configuration area. Advanced users are advised to first visit the Computer Security Policy area for an introduction to Defense+ policies and rule creation
Miscellaneous - clicking this icon will take you to the 'Miscellaneous' options section which contains several areas relating to overall configuration.
Firewall Summary
By default, the management interface displays the 'Summary' area information. You can access this area at any time by selecting the 'Summary' tab as shown above.
Comodo Firewall Pro 3.0 – User Guide 27

1. Summary:
• System Status - shows systems activity and recommendations on actions you need to perform.
• Network Defense - The 'Network Defense' area contains:
• The total number of intrusion attempts that the firewall has blocked since installation
• Your current Firewall Security Level (or 'Firewall Behaviour Setting) is shown in blue, underlined font. 'Safe Mode' is the Firewall security setting in the example shown above.
• Comodo Firewall Pro allows you to quickly customize firewall security by using the Firewall Security Level slider to move between preset security levels. Clicking on this blue text opens the firewall behavior settings panel and allows you to adjust the security level to your own preferences. This section also allows you to configure the frequency of alerts.
For a complete explanation of this part of the firewall, please see 'Firewall Behavior Settings'.
• Inbound/Outbound Connections. A numerical summary of currently active inbound and outbound connections to and from your computer. More details on active connections can be found in the 'View Active Connections' section of 'Firewall Tasks' and the 'Traffic' section on the summary screen.
Comodo Firewall Pro 3.0 – User Guide 28

• 'Stop All Activities' / 'Restore All Activities' - Allows you to toggle network activity on or off. Specifically, clicking 'Stop All Activities' will instantly block all incoming and outgoing network connections - placing the firewall in the 'Block All Mode' of 'Firewall Security Settings'. Similarly, clicking 'Restore All Activities' will re-implement your previous Firewall Security Level
• Proactive Defense - The 'Proactive Defense' area contains:
• The total number of suspicious activities that Defense+ has blocked since installation.
• Your current Defense+ Security Level - shown in blue, underlined font. 'Safe Mode' is the Defense+ security setting in the example shown above.
• Comodo Firewall Pro allows you to quickly customize the Defense+ security level using a convenient slider to move between preset security levels. Clicking on this blue text opens the Defense+ Settings panel allows you to quickly access this slider to adjust this security level to your own preferences. This section also allows you to configure the frequency of alerts. For a complete explanation of this section, please see 'Defense+ Settings'.
• Number of Currently Active Processes - A quick summary of all processes/applications that are running on your computer. You can see in-depth details of all running processes by in the 'View Active Processes' module of Defense+ Tasks.
• Number of files waiting for your review - The number of files currently in the 'My Pending Files' section. See the 'My Pending Files' section of this help guide for more details.
• 'Switch to Installation Mode' / ' Switch to Previous Mode' - Allows you to quickly toggle between 'Defense+ Installation mode' and your most recent Defense+ Security Level.
'Installation Mode' allows you to quickly install or run an application that you trust which is, as yet, unknown to Comodo Firewall Pro. For more details, see Defense+ Settings.
2. Highlights - The Highlights section displays information about Security Alerts and News related to Comodo Firewall Pro & latest Critical security updates. Clicking on the text in the Highlights box takes you to the Comodo website to read more details.
3. Traffic - The summary screen of Comodo Firewall Pro displays a bar graph showing the applications that are currently connected to the internet and are sending or receiving data. The summary also displays the % of total traffic each application is responsible for and the filename of the executable. Clicking on any application leads to the more detailed 'View Active Connections' interface.
4. Tip of the Day - This section contains helps you to use Comodo Firewall Pro to its maximum potential by displaying information about features you may have missed.
Comodo Firewall Pro 3.0 – User Guide 29
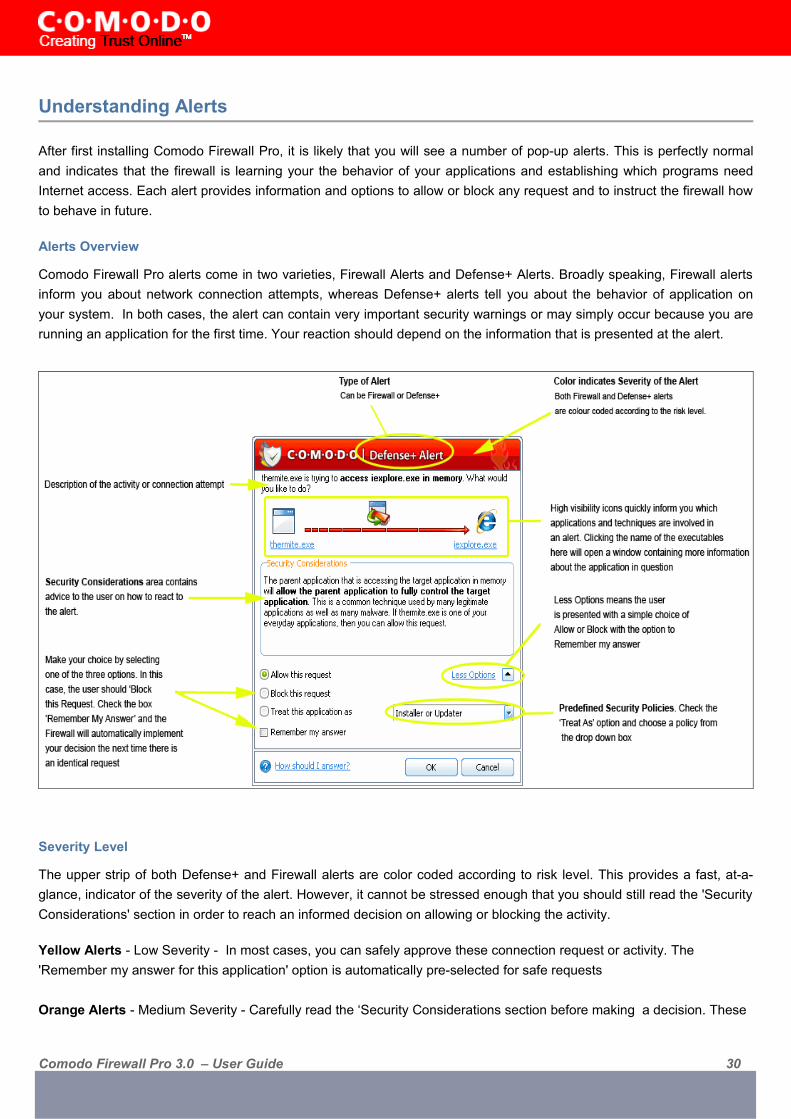
Understanding Alerts
After first installing Comodo Firewall Pro, it is likely that you will see a number of pop-up alerts. This is perfectly normal and indicates that the firewall is learning your the behavior of your applications and establishing which programs need Internet access. Each alert provides information and options to allow or block any request and to instruct the firewall how to behave in future.
Alerts Overview
Comodo Firewall Pro alerts come in two varieties, Firewall Alerts and Defense+ Alerts. Broadly speaking, Firewall alerts inform you about network connection attempts, whereas Defense+ alerts tell you about the behavior of application on your system. In both cases, the alert can contain very important security warnings or may simply occur because you are running an application for the first time. Your reaction should depend on the information that is presented at the alert.
Severity Level
The upper strip of both Defense+ and Firewall alerts are color coded according to risk level. This provides a fast, at-a-glance, indicator of the severity of the alert. However, it cannot be stressed enough that you should still read the 'Security Considerations' section in order to reach an informed decision on allowing or blocking the activity.
Yellow Alerts - Low Severity - In most cases, you can safely approve these connection request or activity. The 'Remember my answer for this application' option is automatically pre-selected for safe requests
Orange Alerts - Medium Severity - Carefully read the ‘Security Considerations section before making a decision. These
Comodo Firewall Pro 3.0 – User Guide 30

alerts could be the result of a harmless process or activity by a trusted program or an indication of an attack by malware. If you know the application to be safe, then it is usually okay to allow the request. If you do not recognize the application performing the activity or connection request then you should block it.
Red Alerts - High Severity - These alerts indicate highly suspicious behavior that is consistent with the activity of a trojan horse, virus or other malware program. Carefully read the information provided when deciding whether to allow it to proceed.
Now that we've outlined the basic construction of an alert, let’s look at how you should react to them:
How Should I answer the Firewall Alerts?
Points to consider:
1. Carefully read the 'Security Considerations' section. Comodo Firewall Pro can recognize thousands of safe applications. (For example, Internet Explorer and Outlook are safe applications). If the application is known to be safe - it is written directly in the security considerations section along with advice that it is safe to proceed. Similarly, if the application is unknown and cannot be recognized you will be informed of this. If it is one of your everyday applications that you want to grant internet access to then you should 'Allow This Request' (it may be the case that the application has not yet been added to the safe application database yet).
If you don't recognize the application then we recommend you select 'Block This Request' but don't select the 'Remember My Answer' checkbox.
In all cases, clicking on the name of the application will open a properties window that can help you determine whether or not to proceed:
2. If you are sure that it is one of your everyday application, try to use the 'Treat This Application As' option as much as possible. This will deploy a predefined firewall policy on the target application category. For example, you may choose to
Comodo Firewall Pro 3.0 – User Guide 31

apply the policy 'Web Browser' to the known and trusted applications 'Internet Explorer', 'FireFox' and 'Opera' . Each predefined policy has been specifically designed by Comodo to optimize the security level of a certain type of application.
If you do not see the 'Treat this Application As' option, you should click 'More Options'. Remember to check the box 'Remember My Answer'.
3. If Comodo Firewall Pro reports behavior consistent with that of malware in the security considerations section then you should block the request AND click 'Remember My Answer' to make the setting permanent.
How Should I answer the Defense+ Alerts?
Points to consider:
1. As with Firewall Alerts, carefully read the 'Security Considerations' section. Comodo Firewall Pro can recognize thousands of safe applications. If the application is known to be safe - it is written directly in the security considerations section along with advice that it is safe to proceed. Similarly, if the application is unknown and cannot be recognized you will be informed of this. If it is one of your everyday applications that you want to grant execution rights to then you should 'Allow This Request'. If you don't recognize the application then we recommend you select 'Block This Request' but don't select the 'Remember My Answer' checkbox.
If you don't recognize the application then we recommend you select 'Block This Request' but don't select the 'Remember My Answer' checkbox.
2. Avoid using the 'Installer or Updater' policy if you are not installing an application. This is because treating an application as an 'Installer or Updater' grants maximum possible privileges onto to an application - something that is not required by most 'already installed' applications. If select 'Installer or Updater', you may consider using it temporarily with 'Remember My Answer' left unchecked.
3. Pay special attention to 'Device Driver Installation' and 'Physical Memory Access' alerts. Again, not many legitimate applications would cause such an alert and this is usually a good indicator of malware/rootkit like behavior. Unless you know for a fact that the application performing the activity is legitimate, then Comodo recommend blocking these requests.
Comodo Firewall Pro 3.0 – User Guide 32

4. Protected Registry Key Alerts usually occur when you install a new application. If you haven't been installing a new program and do not recognize the application requesting the access, then a 'Protected Registry Key Alert' should be a cause for concern.
Comodo Firewall Pro 3.0 – User Guide 33

5. 'Protected File Alerts' usually occur when you try to download or copy files or when you update an already installed application. Were you installing new software or trying to download an application from the internet? If you are downloading a file from the 'net, try to use the 'Allow without Remembering' option to cut down on the creation of unnecessary rules within the firewall.
If an application is trying to create an executable file in the Windows directory (or any of its subdirectories) then pay special attention. The Windows directory is a favorite target of malware applications. If you are not installing any new applications or updating Windows then make sure you recognize the application in question. If you don't then 'Block This Request' without checking the 'Remember My Answer' box.
If an application is trying to create a new file with a random filename e.g. "hughbasd.dll" then it is probably a virus and you should block it permanently by selecting 'Treat As' 'Isolated Application' (third down in the graphic below).
6. If Comodo Firewall Pro reports a malware behavior in the security considerations section then you should block the request permanently by also selecting the 'Remember My Answer' option. As this is probably a virus, you should also submit the application in question to Comodo for analysis.
7. Unrecognized applications are not always bad. Your best loved applications may very well be safe but not yet included in the Comodo certified application database. If the security considerations section says “If xxx is one of your everyday applications, you can allow this request”, you may allow the request permanently if you are sure it is not a virus. You may report it to Comodo for further analysis and inclusion in the certified application database.
8. If Defense+ is in Clean PC Mode, you will probably be seeing the alerts for any new applications introduced to the system - but not for the ones you have already installed. You may review the 'My Pending Files' section for your newly installed applications and remove them from the list for them to be considered as clean.
9. Avoid using “Trusted Application” or “Windows System Application” policies for you email clients, web browsers, IM or P2P applications. These applications do not need such powerful access rights.
10. In 'Paranoid Mode', 'Safe mode' and 'Clean PC' mode, Comodo Firewall Pro will make it easy to install new applications that you trust by offering you the opportunity to temporarily engage 'Installation Mode'. If you are installing a new, unknown application.
Defense+ will alert you with a pop-up notification and, as you want to allow this application to continue installing, you should select 'Treat this application as an Installer or Updater'. You will subsequently see the following:
Comodo Firewall Pro 3.0 – User Guide 34

This will be followed by the following reminder:
Comodo Firewall Pro 3.0 – User Guide 35

Firewall Task Center
The Firewall Task Center allows you to quickly and easily configure all aspects of the Firewall and divided into two sections: Common Tasks and Advanced Tasks.
It can be accessed at all times by clicking on the Firewall Shield button. ( third button from the top right).
Common Tasks
'Common Tasks' allow you to create rules for applications and network connections through a series of shortcuts and wizards. Click on the links below to see detailed explanations of each area in this section.
• View Firewall Events • Define a New Trusted Application • Define a New Blocked Application • Stealth Ports Wizard • View Active Connections • My Port Sets • My Network Zones • My Blocked Network Zones
Comodo Firewall Pro 3.0 – User Guide 36

Advanced Tasks
'Advanced Tasks' enables more experienced users to define firewall policy and settings at an in-depth, granular level. Click on the links below to see detailed explanations of each area in this section.
• Network Security Policy • Predefined Firewall Policies • Attack Detection Settings • Firewall Behavior Settings
Comodo Firewall Pro 3.0 – User Guide 37

Network Security Policy
The Network Security Policy interface is the nerve center of Comodo Firewall Pro's firewall engine and allows advanced users to configure and deploy traffic filtering rules and policies on an application specific and global basis.
The interface is divided into two main sections - Application Rules and Global Rules
The 'Application Rules' tab allows users to view, manage and define the network and internet access rights of applications on your system.
The 'Global Rules' tab allows users view, manage and define overall network policy that applies to your computer and is independent of application rules.
Both application rules and global rules are consulted when the firewall is determining whether or not to allow or block a connection attempt.
• For Outgoing connection attempts, the application rules are consulted first then the global rules. • For Incoming connection attempts, the global rules are consulted first then application specific rules.
See General Navigation for a summary of the navigational options available from the main Network Security Policy inter-face.
See the section ' Application Rules' for help to configure application rules and policies
See the section 'Global Rules' for help to configure global rules and to understand the interaction between global and ap-plication rules.
Comodo Firewall Pro 3.0 – User Guide 38

General Navigation:
Add... - On the 'Application Rules' tab this button allows the user to Add a new Application to the list then create it's poli - cy. On the 'Global Rules' tab it enables you to add and configure a new global rule using the Network Control Rule inter-face.
Edit... - Allows the user to modify the selected rule or application policy. See Overview of Policies and Rules, Creating and Modifying Network Policy and Understanding Network Control Rules.
Remove... - Deletes the currently policy or rule
Move Up - Raises the currently selected rule or policy up one row in the priority list. Users can also re-prioritize policies or re-assign individual rules to another application's policy by dragging and dropping.
Move Down - Lowers the currently selected rule or policy down one row in the priority list. Users can also re-prioritize policies or re-assign individual rules to another application's policy by dragging and dropping.
Purge - Runs a system check to verify that all the applications for which policies are listed are actually installed on the host machine at the path specified. If not, the policy is removed, or 'purged', from the list.
Users can re-order the priority of policies by simply dragging and dropping the rule in question. Alternatively, select the rule you wish to re-prioritize and click either the 'Move Up' or 'Move Down' button.
Application Rules
See Overview of Policies and Rules for an explanation of rule and policy structure and how these are represented in the main Application Rules interface
See Application Network Access Control interface for an introduction to the rule setting interface
See Creating and Modifying Network Policies to learn how to create and edit network policies
See Understanding Network Control Rules for an overview of the meaning, construction and importance of individual rules
See Adding and Editing a Network Control Rule for an explanation of individual rule configuration.
Overview of Policies and Rules
Whenever an application makes a request for internet or network access, Comodo Firewall Pro will allow or deny this re-quest based upon the Firewall Policy that has been specified for that application. Firewall Policies are, in turn, made up from one or more individual network access rules. Each individual network access rule contains instructions that deter-mine whether the application should be allowed or blocked; which protocols it is allowed to use; which ports it is allowed to use and so forth.
Comodo Firewall Pro 3.0 – User Guide 39

If you wish to modify the firewall policy for an application:
• Double click on the application name to begin 'Creating or Modifying Network Policy'
• Select the application name, right-click and choose 'Edit' to begin 'Creating or Modifying Network Policy'
• Select the application name and click the 'Edit... button on the right to begin 'Creating or Modifying Network Poli-cy'
If you wish to modify an individual rule within the policy:
• Double click on the specific rule to begin 'Adding and Editing a Network Control Rule'
• Select the specific rule right-click then choose 'Edit' to begin 'Adding and Editing a Network Control Rule'
• Select the specific rule and click the 'Edit...' button on the right to begin 'Adding and Editing a Network Control Rule'
Users can also re-prioritize policies or re-assign individual rules to another application's policy by dragging and dropping.
Although each policy can be defined from the ground up by individually configuring its constituent rules, this practice would be time consuming if it had to be performed for every single program on your system. For this reason, Comodo Firewall Pro contains a selection of predefined policies according to broad application category. For example, you may choose to apply the policy 'Web Browser' to the applications 'Internet Explorer', 'FireFox' and 'Opera'. Each predefined policy has been specifically designed by Comodo to optimize the security level of a certain type of application. Users can, of course, modify these predefined policies to suit their environment and requirements. For more details, see Predefined Firewall Policies.
Application Network Access Control interface
Network control rules can be added/modified/removed and re-ordered through the Application Network Access Control in-terface. Any rules created using Adding and Editing a Network Control Rule will be displayed in this list.
Comodo Firewall Pro 3.0 – User Guide 40

Comodo Firewall Pro applies rules on a per packet basis and applies the first rule that matches that packet type to be fil-tered (see Understanding Network Control Rules for more information). If there are a number of rules in the list relating to a packet type then one nearer the top of the list will be applied.
Users can re-order the priority of rules by simply dragging and dropping the rule in question. Alternatively, select the rule you wish to re-prioritize and click either the 'Move Up' or 'Move Down' button. To begin creating network policies, first read 'Overview of Policies and Rules' then ' Creating and Modifying Network Policies .'
Creating and Modifying Network Policies
To begin defining an application's network policy, you need take two basic steps.
(1) Select the application that you wish the policy to apply to .
(2) Configure the rules for this application's policy .
(1) Select the application that you wish the policy to apply to
If you wish to define a policy for a new application (i.e. one that is not already listed) then click the 'Add...' button in the main application rules interface . This will bring up the 'Application Network Access Control' interface shown below:
Comodo Firewall Pro 3.0 – User Guide 41

Because this is a new application, you will notice that the 'Application Path' field is blank. (If you are modifying an existing policy, then this interface will show the individual rules for that application's policy).
Click the 'Select' button.
You now have 3 methods available to choose the application for which you wish to create a policy - File Groups; Running Processes and Browse... (to application)
(i) File Groups - choosing this option allows you to create firewall policy for a category of pre-set files or folders. For ex-ample, selecting 'Executables' would enable you to create a firewall policy for any file that attempts to connect to the in-ternet with the extensions .exe .dll .sys .ocx .bat .pif .scr .cpl . Other such categories available include 'Windows System Applications' , 'Windows Updater Applications' , 'Start Up Folders' etc - each of which provide a fast and convenient way to apply a generic policy to important files and folders. To view the file types and folders that will be affected by choosing one of these options, you need to visit the Defense+ area of Comodo Firewall Pro by navigating to: Defense+ > My Pro-tected Files > Groups...
More details on Files and File Groupings is available in this help guide in the My Protected Files and My Quarantined Files sections.
(ii) Running Processes - as the name suggests, this option allows you to create and deploy firewall policy for any pro-cess that is currently running on your PC.
Comodo Firewall Pro 3.0 – User Guide 42
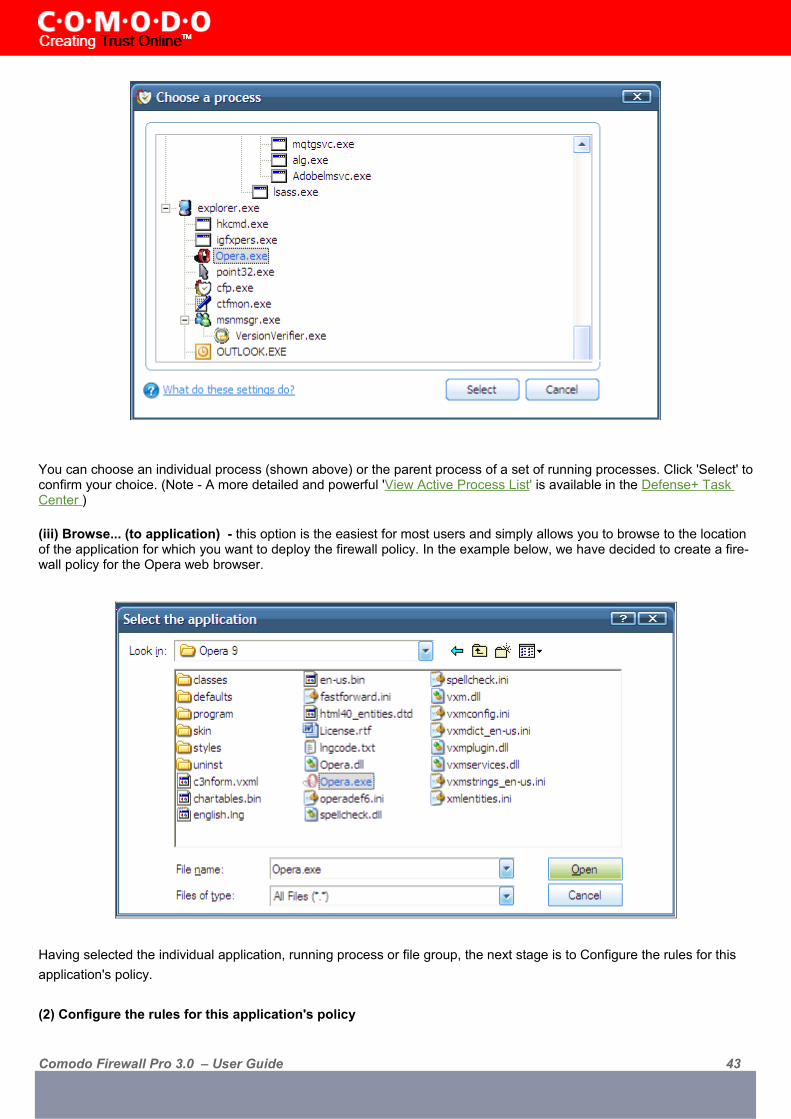
You can choose an individual process (shown above) or the parent process of a set of running processes. Click 'Select' to confirm your choice. (Note - A more detailed and powerful 'View Active Process List' is available in the Defense+ Task Center )
(iii) Browse... (to application) - this option is the easiest for most users and simply allows you to browse to the location of the application for which you want to deploy the firewall policy. In the example below, we have decided to create a fire-wall policy for the Opera web browser.
Having selected the individual application, running process or file group, the next stage is to Configure the rules for this application's policy.
(2) Configure the rules for this application's policy
Comodo Firewall Pro 3.0 – User Guide 43

There are two broad options available for creating a policy that will apply to an application - Use a Pre-defined Policy or Use a Custom Policy.
(i) Use a Predefined Policy - Selecting this option allows the user to quickly deploy a existing policy on to the target ap-plication. Choose the policy you wish to use from the drop down menu. In the example below, we have chosen 'Web Browser' because we are creating a policy for the 'Opera' browser. The name of the predefined policy you choose will be displayed in the 'Treat As' column for that application in the Application Rules interface. (Note: Predefined Policies, once chosen, cannot be modified directly from this interface - they can only be modified and defined using the Predefined Firewall Policies interface. If you require the ability to add or modify rules for an application then you are effectively creat-ing a new, custom policy and should choose the more flexible Use Custom Policy option instead.)
(ii) Use a Custom Policy- designed for more experienced users, the 'Custom Policy' option enables full control over the configuration of firewall policy and the parameters of each rule within that policy.
Comodo Firewall Pro 3.0 – User Guide 44

You can create an entirely new policy or use a predefined policy as a starting point by:
• Clicking the 'Add..' button to add individual network control rules. See 'Adding and Editing a Network Control Rule' for an overview of the process.
• Use the 'Copy From...' button to populate the list with the network control rules of a Predefined Security Policy
• Use the 'Copy From...' button to populate the list with the network control rules of another applications policy
General tips: If you wish to create a reusable policy for deployment on multiple applications, we advise you add a new Pre-defined Firewall Policy (or modify one of the existing ones to suit your needs) - then come back to this section and use the 'Use Pre-defined Policy' option to roll it out.
If you want to build a bespoke policy for maybe one or two specific applications, then we advise you choose the 'Use a Custom Policy ' option and create your policy either from scratch by adding individual rules (click the 'Add..' button) or by using one of the built-in policies as a starting point.
Understanding Network Control Rules
At their core, each network control rule can be thought of as a simple IF THEN trigger - a set of conditions (or attributes) pertaining to a packet of data from a particular application and an action it will enforce if those conditions are met.
As a packet filtering firewall, Comodo Firewall Pro analyses the attributes of every single packet of data that attempts to enter or leave your computer. Attributes of a packet include the application that is sending or receiving the packet, the protocol it is using, the direction in which it is traveling, the source and destination IP addresses and the ports it is at-tempting to traverse. The firewall will then try to find a network control rule that matches all the conditional attributes of this packet in order to determine whether or not it should be allowed to proceed. If there is no corresponding network con-trol rule, then the connection will be automatically blocked until a rule is created.
Comodo Firewall Pro 3.0 – User Guide 45

The actual conditions (attributes) you will see* on a particular Network Control Rule are determined by the protocol cho-sen in Adding and Editing a Network Control Rule .
If you chose 'TCP', 'UDP' or 'TCP and 'UDP', then the rule will have the form: Action | Protocol | Direction |Source Ad-dress | Destination Address | Source Port | Destination Port
If you chose 'ICMP', then the rule will have the form: Action | Protocol | Direction |Source Address | Destination Ad-dress | ICMP Details
If you chose 'IP', then the rule will have the form: Action | Protocol | Direction |Source Address | Destination Ad-dress | IP Details
Action: The action the firewall will take when the conditions of the rule are met. The rule will show 'Allow', 'Block' or 'Ask'.**
Protocol : States the protocol that the target application must be attempting to use when sending or receiving pack-ets of data. The rule will show 'TCP', 'UDP', 'TCP or UDP', 'ICMP' or 'IP'
Direction : States the direction of traffic that the data packet must be attempting to negotiate. The rule will show 'In', 'Out' or 'In/Out'
Source Address : States the source address of the connection attempt. The rule will show 'From' followed by one of the following: IP , IP range , IP Mask , Network Zone , Host Name or Mac Address
Destination Address : States the address of the connection attempt. The rule will show 'To' followed by one of the following: IP , IP range , IP Mask , Network Zone , Host Name or Mac Address
Source Port: States the port(s) that the application must be attempting to send packets of data through. Will show 'Where Source Port Is' followed by one of the following: 'Any', 'Port #' , 'Port Range' or 'Port Set'
Destination Port : States the port(s) on the remote entity that the application must be attempting to send to. Will show 'Where Source Port Is' followed by one of the following: 'Any', 'Port #' , 'Port Range' or 'Port Set
ICMP Details : States the ICMP message that must be detected to trigger the action. See Adding and Editing a Network Control Rule for details of available messages that can be displayed.
IP Details : States the type of IP protocol that must be detected to trigger the action: See Adding and Editing a Net-work Control Rule to see the list of available IP protocols that can be displayed here.
Once a rule is applied, Comodo Firewall Pro will monitor all network traffic relating to the chosen application and take the specified action if the conditions are met. Users should also see the section 'Global Rules' to understand the interaction between Application Rules and Global Rules.
Comodo Firewall Pro 3.0 – User Guide 46
* If you chose to add a descriptive name when creating the rule then this name will be displayed here rather than it's full parameters. See the next section, 'Adding and Editing a Network Control Rule', for more details.
** If you selected 'Log as a firewall event if this rule is fired' then the action will be post fixed with "& Log". (e.g. Block & Log)
Adding and Editing a Network Control Rule
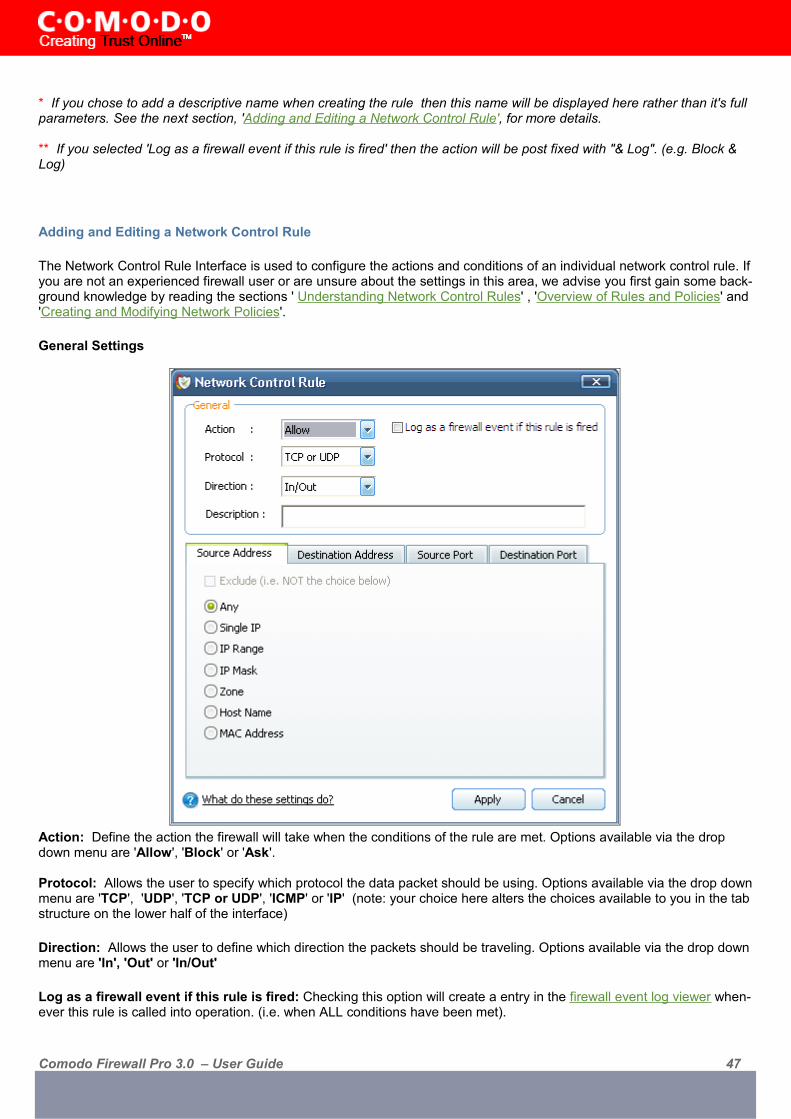
The Network Control Rule Interface is used to configure the actions and conditions of an individual network control rule. If you are not an experienced firewall user or are unsure about the settings in this area, we advise you first gain some back-ground knowledge by reading the sections ' Understanding Network Control Rules' , 'Overview of Rules and Policies' and 'Creating and Modifying Network Policies'.
General Settings
Action: Define the action the firewall will take when the conditions of the rule are met. Options available via the drop down menu are 'Allow', 'Block' or 'Ask'.
Protocol: Allows the user to specify which protocol the data packet should be using. Options available via the drop down menu are 'TCP', 'UDP', 'TCP or UDP', 'ICMP' or 'IP' (note: your choice here alters the choices available to you in the tab structure on the lower half of the interface)
Direction: Allows the user to define which direction the packets should be traveling. Options available via the drop down menu are 'In', 'Out' or 'In/Out'
Log as a firewall event if this rule is fired: Checking this option will create a entry in the firewall event log viewer when-ever this rule is called into operation. (i.e. when ALL conditions have been met).
Comodo Firewall Pro 3.0 – User Guide 47

Description: Allows you to type a friendly name for the rule. Some users find it more intuitive to name a rule by it's in-tended purpose. ( 'Allow Outgoing HTTP requests'). If you create a friendly name, then this will be displayed to represent instead of the full actions/conditions in the main Application Rules Interface and the Application Network Access Control interface.
TCP' or 'UPD' or 'TCP or UDP'
If you select 'TCP' or 'UPD' or 'TCP or UDP' as the Protocol for your network, then you will have to define the source and destination IP addresses and ports receiving and sending the information.
Source Address and Destination Address:
1. You can choose any IP Address by selecting 'Any' .This menu defaults to an IP range of 0.0.0.0- 255.255.255.255 to allow connection from all IP addresses.
2. You can choose a Single IP address by selecting 'Single IP' and entering the IP address in the IP address text box, e.g., 192.168.200.113.
3. You can choose an 'IP Range' by selecting IP Range - for example the range in your private network and enter-ing the IP addresses in the Start Range and End Range text boxes.
4. You can choose 'IP Mask' by selecting IP Mask. IP networks can be divided into smaller networks called subnet works (or subnets). An IP address/ Mask is a subnet defined by IP address and mask of the network. Enter the IP address and Mask of the network.
5. You can choose an entire network zone by selecting 'Zone' .This menu defaults to Local Area Network. But you can also define your own zone by first creating a Zone through the 'My Network Zones ' area.
6. You can choose a named host by selecting a 'Host Name' which denotes your IP address. 7. You can choose a MAC Address by selecting MAC Address and entering the address in the address text box.
Exclude (i.e. NOT the choice below)
The opposite of what you specify is applicable. For example, if you are creating an 'Allow' rule and you check the 'Ex-clude' box in the 'Source IP' tab and enter values for the IP range, then that IP range will be excluded . You will have to create a separate 'Allow' rule for the range of IP addresses that you DO want to use.
Source Port and Destination Port:
Comodo Firewall Pro 3.0 – User Guide 48

Enter the source and destination Port in the text box.
1. You can choose any port number by selecting 'Any' - set by default , 0- 65535. 2. You can choose a Single Port number by selecting 'Single Port' and selecting the single port numbers from the
list. 3. You can choose a Port Range by selecting 'Port Range' and selecting the port numbers from the From and To
list. 4. You can choose a predefined Port Set by choosing 'A Set of Ports'. If you wish to create a port set then please
see the section 'My Port Sets'.
ICMP
When you select ICMP as the protocol in General Settings, you will be shown a list of ICMP message type in the 'ICMP Details' tab alongside the Source Address and Destination Address tabs. The last two tabs are configured identically to the explanation above. You will not see the source and destination port tabs.
ICMP Details
ICMP (Internet Control Message Protocol) packets contain error and control information which is used to announce net-work errors, network congestion, timeouts, and to assist in troubleshooting. It is used mainly for performing traces and pings. Pinging is frequently used to perform a quick test before attempting to initiate communications. If you are using or have used a peer-to-peer file-sharing program, you might find yourself being pinged a lot. So you can create rules to al-low / block specific types of ping requests. With Comodo Firewall Pro you can create rules to allow/ deny inbound ICMP packets that provide you with information and minimize security risk.
1. Type in the source/ destination IP address. Source IP is the IP address from which the traffic originated and des-tination IP is the IP address of the computer that is receiving packets of information.
Comodo Firewall Pro 3.0 – User Guide 49

2. Specify ICMP Message , Types and Codes. An ICMP message includes a Message that specifies the type, that is, the format of the ICMP message.When you select a particular ICMP message, the menu defaults to set its code and type as well. If you select the ICMP message type 'Custom' then you will be asked to specify the code and type.
3. If you want to be alerted when this rule is met , check the box ‘Create an alert when this rule is fired’.
IP
When you select IP as the protocol in General Settings , you will be shown a list of ICMP message type in the 'ICMP De-tails' tab alongside the Source Address and Destination Address tabs. The last two tabs are configured identically to the explanation above. You will not see the source and destination port tabs.
IP Details
Select the types of IP protocol that you wish to allow. The IP protocols listed are ICMP ( Internet Control Message Proto-col), IGMP ( Internet Group Management Protocol), GGP (Gateway-to-Gateway Protocol) , TCP ( Transmission Control Protocol) UDP (User Datagram Protocol) and PUP (Parc Universal Packet).
Global Rules
Unlike application rules, which are applied to and triggered by traffic relating to a specific application, Global Rules are applied to ALL traffic traveling in and out of your computer.
Comodo Firewall Pro 3.0 – User Guide 50

Comodo Firewall Pro analyses every packet of data in and out of your PC using combination of Application and Global Rules.
• For Outgoing connection attempts, the application rules are consulted first and the global rules second. • For Incoming connection attempts, the global rules are consulted first and the application rules second.
Therefore, outgoing traffic has to 'pass' both the application rule then any global rules before it is allowed out of your system. Similarly, incoming traffic has to 'pass' any global rules first then application specific rules that may apply to the packet.
Global Rules are mainly, but not exclusively, used to filter incoming traffic for protocols other than TCP or UDP.
The configuration of Global Rules is identical to that for application rules. To add a global rule, click the 'Add...' button on the right. To edit an existing global rule, right click and select 'edit'.
See Application Network Access Control interface for an introduction to the rule setting interface
See Understanding Network Control Rules for an overview of the meaning, construction and importance of individual rules
See Adding and Editing a Network Control Rule for an explanation of individual rule configuration
Comodo Firewall Pro 3.0 – User Guide 51

Pre-defined Firewall Policies
As the name suggests, a predefined firewall policy is a set of one or more individual network control rules that have been saved and can be re-used and deployed on multiple applications. (Note - this section is for advanced and experienced users. If you are a novice user or are new to Comodo Firewall Pro, we advise you first read the Network Security Policy section in this help guide if you have not already done so).
Although each application's firewall policy could be defined from the ground up by individually configuring its constituent rules, this practice may prove time consuming if it had to be performed for every single program on your system. For this reason, Comodo Firewall Pro contains a selection of predefined policies according to broad application category. For ex-ample, you may choose to apply the policy 'Web Browser' to the applications 'Internet Explorer', 'FireFox' and 'Opera'. Each predefined policy has been specifically designed by Comodo to optimize the security level of a certain type of appli-cation. Users can, of course, modify these predefined policies to suit their environment and requirements. (for example, you may wish to keep the 'Web Browsers' name but wish to redefine the parameters of it rules).
To view or edit an existing predefined policy:
• Double click on the Policy Name in the list• Select the Policy Name in the list, right-click and choose 'Edit'• Select the Policy Name and click the 'Edit... button on the right
Details of the process from this point on can be found here.
To add a new predefined policy, click the 'Add...' button. This will launch the policy creation dialog shown below.
Comodo Firewall Pro 3.0 – User Guide 52

As this is a new predefined policy, you will need to name it in the text field at the top. It is advised that you choose a name that accurately describes the category/type of application you wish to define policy for. Next you should add and config-ure the individual rules for this policy. See ' Adding and Editing a Network Control Rule ' for more advice on this.
Once created, this policy can be quickly called as a 'Predefined Policy' when creating or modifying a network policy.
Comodo Firewall Pro 3.0 – User Guide 53

Attack Detection Settings
'Intrusion Detection' tab
Comodo Firewall Pro features advanced detection settings to help protect your computer against common types of denial of service (DoS) attack. When launching a denial of service or 'flood' attack, an attacker bombards a target machine with so many connection requests that your computer is unable to accept legitimate connections, effectively shutting down your web, email, FTP or VPN server.
The Attack Detection Settings area allows you to configure the parameters of this protection.
TCP Flood / UDP Flood / ICMP Flood
Flood attacks happen when thousands of packets of data are sent from a spoofed IP source address to a victim's ma-chine. The victim's machine automatically sends back a response to these requests (a SYN packet) and waits for an ac-knowledgment (an ACK packet). But, because they were "sent" from a spoofed IP address, the victim's machine will nev-er receive any responses/acknowledgment packets. This results in a backlog of unanswered requests that begins to fill up the victim's connection table. When the connection table is full, the victim's machine will refuse to accept any new con-nections - which means your computer will no longer be able to connect to the internet, send email, use FTP services etc. When this is done multiple times from multiple sources it floods the victim machine, which has a limit of unacknowledged responses it can handle, and may cause it to crash.
Comodo Firewall Pro 3.0 – User Guide 54

By default, Comodo Firewall Pro is configured to accept traffic using TCP, UDP and ICMP protocols at a maximum rate of packets per second for a set duration of time. The defaults are for all three protocols are set at 20 packets per second for a continuous duration of 20 seconds. The number of packets per second and the maximum duration that the firewall should accept packets at this rate can be reconfigured to the user's preference by altering the appropriate field. If these thresholds are exceeded, a DOS attack is detected and the Firewall goes into emergency mode.
The firewall will stay in emergency mode for the duration set by user. By default this is set at 120 seconds. Users can al-ter this time length to their own preference by configuring How long should the firewall stay in emergency mode while the host is under DOS attack? In emergency mode, all inbound traffic is blocked except those previously established and ac-tive connections. However, all outbound traffic is still allowed.
Users also have the option to configure how long to block incoming traffic from a host suspected of perpetrating a port scan. The default is 5 minutes. During this time, no traffic will be accepted from the host.
How long should a suspicious host be automatically blocked after it attempts a port scan?
If a port scan is detected, the Firewall identifies the host scanning your system as suspicious and automatically blocks it for a set period of time - by default 5 minutes. During these 5 minutes, the suspicious host cannot access the user's sys-tem but the users system can access it.
How long should the firewall stay in emergency mode whilst the host is under DOS attack?
When a DOS is detected, the Firewall goes into emergency mode for a fixed period of time - set by default to 120 sec-onds. Users can configure the length of time to their own preferences.
Protect the ARP Cache
Checking this option means Comodo Firewall Pro will start performing stateful inspection of ARP (Address Resolution Protocol) connections. This will block spoof ARP requests and protect your computer from ARP cache poisoning attacks
The ARP Cache (or ARP Table) is a record of IP addresses stored on your computer that is used to map IP addresses to MAC addresses. Stateful inspection involves the analysis of data within the lowest levels of the protocol stack and com-paring the current session to previous ones in order to detect suspicious activity.
Background - Every device on a network has two addresses: a MAC (Media Access Control) address and an IP (Inter-net Protocol) address. The MAC address is the address of the physical network interface card inside the device, and nev-er changes for the life of the device (in other words, the network card inside your PC has a hardcoded MAC address that it will keep even if you install it in a different machine.) On the other hand, the IP address can change if the machine moves to another part of the network or the network uses DHCP to assign dynamic IP addresses. In order to correctly route a packet of data from a host to the destination network card it is essential to maintain a record of the correlation be-tween a device's IP address and it's MAC address. The Address Resolution Protocol performs this function by matching an IP address to its appropriate MAC address (and vice versa). The ARP cache is a record of all the IP and MAC ad-dresses that your computer has matched together.
Hackers can potentially alter a computer's ARP cache of matching IP/MAC address pairs to launch a variety of attacks in-cluding, Denial of Service attacks, Man in the Middle attacks and MAC address flooding and ARP request spoofing. It should be noted, that a successful ARP attack is almost always dependent on the hacker having physical access to your network or direct control of a machine on your network - therefore this setting is of more relevance to network administra-tors than home users.
Block gratuitous ARP frames
A gratuitous ARP frame is an ARP Reply that is broadcast to all machines in a network and is not in response to any ARP Request. When an ARP Reply is broadcast, all hosts are required to update their local ARP caches, whether or not the ARP Reply was in response to an ARP Request they had issued. Gratuitous ARP frames are important as they update your machine's ARP cache whenever there is a change to another machine on the network (for example, if a network card is replaced in a machine on the network, then a gratuitous ARP frame will inform your machine of this change and
Comodo Firewall Pro 3.0 – User Guide 55

request to update your ARP cache so that data can be correctly routed). Enabling this setting you will block such re-quests - protecting the ARP cache from potentially malicious updates.
'Miscellaneous' tab
Block fragmented IP Datagrams
When a connection is opened between two computers, they must agree on a Mass Transmission Unit (MTU). IP Data-gram fragmentation occurs when data passes through a router with an MTU less than the MTU you are using i.e when a datagram is larger than the MTU of the network over which it must be sent, it is divided into smaller 'fragments' which are each sent separately. Fragmented IP packets can create threats similar to a DOS attack. Moreover, these fragmentations can double the amount of time it takes to send a single packet and slow down your download time.
Comodo Firewall Pro is set by default to block fragmented IP datagrams i.e the option Block Fragmented IP datagrams is checked by default.
Do Protocol Analysis
Protocol Analysis is key to the detection of fake packets used in denial of service attacks. Checking this option means Comodo Firewall Pro checks every packet conforms to that protocols standards. If not, then the packets are blocked.
Comodo Firewall Pro 3.0 – User Guide 56

Do Packet Checksum Verification
Every packet of data sent to your machine has a signature attached. With this option enabled, Comodo Firewall Pro will recalculate the checksum of the incoming packet and compare this against the checksum stated in the signature. If the two do not match then the packet has been altered since transmission and Comodo Firewall Pro will block it. Although this feature has security benefits it is also very resource intensive and your internet connection speed may take a large hit if checksum verification is performed on each packet. This feature is intended for use by advanced users and Comodo advise most home users not to enable this feature.
Monitor other NDIS protocols than TCP/IP
This will force Comodo Firewall Pro to capture the packets belonging to any other protocol diver than TCP/IP. Trojans can potentially use their own protocol driver to send/receive packets. This option is useful to catch such attempts. This option is disabled by default: because it can reduce system performance and may be incompatible with some protocol drivers.
Comodo Firewall Pro 3.0 – User Guide 57

Firewall Behavior Settings
Firewall Behavior Settings allows you to quickly configure the security of your computer and the frequency of alerts that are generated. This dialog box can be accessed in the 'Advanced' section of 'Firewall Tasks' and, more immediately, by clicking on the blue text next to 'Firewall Security Level' on the Summary Screen (shown below).
'General Settings' tab
Comodo Firewall Pro allows you to customize firewall security by using the Firewall Security Level slider to change preset security levels.
The choices available are: Block All, Custom Policy Mode, Safe mode (default), Training Mode and Disabled. The setting you choose here will also be displayed on the summary screen.
• Block All Mode: The firewall blocks all traffic in and out of your computer regardless of any user-defined configu-ration and rules. The firewall will not attempt to learn the behavior of any applications and will not automatically create traffic rules for any applications. Choosing this option will effectively prevent your computer from accessing any networks, including the internet.
Comodo Firewall Pro 3.0 – User Guide 58

• Custom Policy Mode: The firewall applies ONLY the custom security configurations and network traffic policies specified by the user. New users may want to think of this as the 'Do Not Learn' setting because the firewall will not attempt to learn the behavior of any applications. Nor will it automatically create network traffic rules for those applications. You will receive alerts every time there is a connection attempt by an application - even for applica-tions on the Comodo Safe list (unless, of course, you have specified rules and policies that instruct the firewall to trust the application's connection attempt).
If any application tries to make a connection to the outside, the firewall audits all the loaded components and checks each against the list of components already allowed or blocked. If a component is found to be blocked, the entire application is denied internet access and an alert is generated. This setting is advised for experienced firewall users that wish to maximize the visibility and control over traffic in and out of their computer.
• Safe mode: While filtering network traffic, the firewall will automatically create rules that allow all traffic for the components of applications certified as 'Safe' by Comodo. For non-certified new applications, you will receive an alert whenever that application attempts to access the network. Should you choose, you can grant that applica-tion internet access by choosing 'Treat this application as a Trusted Application' at the alert. This will deploy the predefined firewall policy 'Trusted Application' onto the application.
'Safe mode' is the recommended setting for most users - combining the highest levels of security with an easy-to-manage number of connection alerts.
• Training Mode : The firewall will monitor network traffic and create automatic allow rules for all new applications until the security level is adjusted. You will not receive any alerts in 'Training Mode' mode. If you choose the 'Training Mode' setting, we advise that you are 100% sure that all applications installed on your computer are as-signed the correct network access rights.
Tip: Use this setting temporarily while playing an online game for the first time. This will suppress all alerts while the firewall learns the components of the game that need internet access and automatically create 'allow' rules for them. Afterwards you can switch back to your previous mode.
• Disabled: Disables the firewall and makes it inactive. All incoming and outgoing connections are allowed irre-spective of the restrictions set by the user. Comodo strongly advise against this setting unless you are sure that you are not currently connected to any local or wireless networks.
Keep an alert on screen for maximum (n) secondsDetermines how long the Firewall will show an alert for without any user intervention. By default, the timeout is set at 120 seconds. You may adjust this setting to your own preference.
'Alert Settings' tab
Users can configure the amount of alerts that Comodo Firewall Pro generates using the slider on this tab. Raising or low-ering the slider will change the amount of alerts accordingly. It should be noted that this does not affect your security, which is determined by the rules you have configured (for example, in 'Network Security Policy' ). For the majority of users, the default setting of 'Low' is the perfect level - ensuring you are kept informed of connection attempts and suspi-cious behaviors whilst not overwhelming you with alert messages.
The Alert Frequency settings refer only to connection attempts by applications or from IP addresses that you have not (yet) decided to trust. For example, you could specify a very high alert frequency level, but will not receive any alerts at all if you have chosen to trust the application that is making the connection attempt.
Comodo Firewall Pro 3.0 – User Guide 59

• Very High: The firewall will show separate alerts for outgoing and incoming connection requests for both TCP and UDP protocols on specific ports and for specific IP addresses, for an application. This setting provides the highest degree of visibility to inbound and outbound connection attempts but leads to a proliferation of firewall alerts. For example, using a browser to connect to your internet home-page may generate as many as 5 separate alerts for an outgoing TCP connection alone.
• High: The firewall will show separate alerts for outgoing and incoming connection requests for both TCP and UDP protocols on specific ports for an application.
• Medium: The firewall will show alerts for outgoing and incoming connection requests for both TCP and UDP pro-tocols for an application.
• Low: The firewall will show alerts for outgoing and incoming connection requests for an application. This is the setting recommended by Comodo and is suitable for the majority of users.
• Very Low: The firewall will show only one alert for an application.
Checkboxes
Enable Alerts for TCP Requests / Enable Alerts for UDP Requests / Enable Alerts for ICMP Requests - In conjunction with the slider, these checkboxes allow you to fine-tune the number of alerts you see according to protocol.
Comodo Firewall Pro 3.0 – User Guide 60

View Firewall Events
The 'Firewall Events' area contains logs of actions taken by the firewall. A 'Firewall Event' is recorded whenever an appli-cation or process makes a connection attempt that contravenes a rule your Network Security Policy (Note: You must have checked the box 'Log as a firewall event if this rule is fired' for the event to be logged.)
Column Descriptions
1. Application - indicates which application or process propagated the event. If the application has no icon, the de-fault system icon for executable files will be used;
2. Action - indicates how the firewall reacted to the connection attempt. 3. Protocol - represents the Protocol application attempted to use to create the connection. This is usually TCP/IP
or UDP - which are the most heavily used networking protocols. 4. Source IP - States the IP address of the host that made the connection attempt. 5. Source Port - States the port number on the host at the source IP which was used to make this connection at-
tempt. 6. Destination IP - States the IP address of the host to which the connection attempt was made. This is usually the
IP address of your computer. 7. Destination Port - States the port number on the host at the destination IP to which the connection attempt was
made. This usually indicates the port number on your computer. 8. Date/Time - contains precise details of the date and time of the connection attempt.
'Refresh' - reloads and updates the displayed list to include all events generated since the time you first accessed the 'Firewall Events' area
'More ...' - clicking this button loads the full, Comodo Firewall Pro Log Viewer module. See below for more details on this module.
Log Viewer Module
This area contains a full history of logged events for both the Firewall and Defense+ modules. It also allows you to build custom log files based on specific filters and to export log files for archiving or troubleshooting purposes.
Comodo Firewall Pro 3.0 – User Guide 61

The Log Viewer Module is divided into two sections. The left hand panel displays a set of handy, pre-defined time Filters for both the Firewall and Defense+ event log files. The right hand panel displays the actual events that were logged for the time period you selected in the left hand panel (or the events that correspond to the filtering criteria you selected)
Filtering Log Files
Comodo Firewall allows you to create custom views of all logged events according to user defined criteria.
Preset Time Filters:
Clicking on any of the preset filters in the left hand panel will alter the display in the right hand panel in the following ways:
Today - Displays all logged events for today.
This Week - Displays all logged events during the past 7 days.
This Month - Displays all logged events during the past 30 days.
All the Times - Displays every event logged since Comodo Firewall Pro was installed. (If you have cleared the log history since installation, this option shows all logs created since that clearance).
The example below shows an example display when the Defense+ Logs for 'Today' are displayed.
Note: The type of events logged by the 'Firewall' component of Comodo Firewall Pro differ to those logged by Defense+ component. This means the information and the columns displayed in the right hand panel will change depending on
Comodo Firewall Pro 3.0 – User Guide 62

which type of log you have selected in the left hand panel. For more details on the data shown in the columns, see either View Firewall Events or View Defense+ Events .
User Defined Filters:
Having chosen a preset time filter from the left hand panel, you can further refine the displayed events according to specific filters. The type of filters available for Firewall logs differ to those available for Defense+ logs. The table be-low provides a summary of available filters and their meanings:
Firewall Filters Defense+ Filters
Date – displays only the events between two user defined dates
Date – displays only the events between two user defined dates
Application Name – displays only the events propagated by a specific application
Application Name – displays only the events propagated by a specific application
Protocol – displays only the events that involved a specific protocol
Target Name – displays only the events that involved a specified target application
Source IP address – displays only the events that originated from a specific IP address
Action– displays events according to the response (or action taken) by the firewall.
Source Port – displays only the events that originated from a specific port number
Destination IP address - displays only the events with a specific target IP address
Destination Port - displays only the events with a specific target port number
Action – displays events according to the response (or action taken) by the firewall. Choices are ‘Blocked’, Allowed’ and ‘Unknown’
You can access the user defined filters in two ways -
(i) Filter Menu - access by clicking 'Filter > Firewall Logs / Defense+ Logs > Filter by...'
(ii) Context Sensitive Menu - right clicking on any event will also allow you to specify the additional filters
Comodo Firewall Pro 3.0 – User Guide 63

Exporting Log Files to HTML
Exporting log files is useful for archiving and troubleshooting purposes. There are two ways to export log files using Log Viewer interface - using the context sensitive menu and via the 'File' menu option. After making your choice, you will be asked to specify a name for the exported html file and the location you wish to save to.
(i) File Menu
• Firewall Logs - will export the Firewall log that is currently being displayed in the right hand panel (e.g. If you have selected 'This week' in the Firewall tree then that is the log file that will be exported)
• Defense+ Logs - will export the Defense+ log that is currently being displayed in the right hand panel • All - will export ALL logs for ALL TIME for both Defense+ and Firewall as a single html file.
(ii) Context Sensitive Menu - right click in the log display window to export the currently displayed log file to html.
Comodo Firewall Pro 3.0 – User Guide 64

You can export a custom view that you created using the available Filters by right clicking and selecting 'Export To HTML' from the context sensitive menu. Again, you will be asked to provide a filename and save location for the file.
Comodo Firewall Pro 3.0 – User Guide 65

Define a New Trusted Application
Comodo Firewall Pro allows you to prepare a list of trusted applications and configure their access rights to networks and the internet. This shortcut represents a convenient way to create an automatic 'Allow Requests' rule for an individual ap-plication - meaning that inbound and outbound connections are automatically permitted.
Advanced users can reconfigure the parameters of this rule in the section 'Network Security Policy'.
To begin defining a new trusted application:
1. Click on Define a New Trusted Application link in Firewall Tasks > Common Tasks.2. A dialog box will appear asking you to select the application you want to trust.
3. Click the 'Select' button.
Comodo Firewall Pro 3.0 – User Guide 66

4. You now have 3 methods available to choose the application that you want to trust - 'File Groups'; 'Running Processes' and 'Browse'... (to application).
File Groups - choosing this option allows you to choose your application from a category of pre-set files or fold-ers. For example, selecting 'Executables' would enable you to create an allow rule for any file that attempts to connect to the internet with the extensions .exe .dll .sys .ocx .bat .pif .scr .cpl . Other such categories available in-clude 'Windows System Applications' , 'Windows Updater Applications' , 'Start Up Folders' etc - each of which provide a fast and convenient way to batch select important files and folders. To view the file types and folders that will be affected by choosing one of these options, you need to visit the Defense+ area of Comodo Firewall Pro by navigating to: Defense+ > My Protected Files > Groups...
Running Processes - as the name suggests, this option allows you to choose the target application from a list of processes that are currently running on your PC.
Browse... (to application) - this option is the easiest for most users and simply allows you to browse to the lo-cation of the application which you want to trust.
5. When you have chosen the application using one of the methods above, the application name will appear along with its location:
Click Apply to confirm your choice. The new 'ALLOW ALL REQUESTS ' rule for the application takes effect im-mediately. When this application seeks internet access Comodo Firewall Pro will automatically grant it.
Comodo Firewall Pro 3.0 – User Guide 67

Define a New Blocked Application
Comodo Firewall Pro allows you to prepare a list of blocked applications that you do not want to access the internet. This shortcut represents a convenient way to create such an automatic 'block and log' rule - meaning that inbound and out-bound connections are automatically blocked to this application. Any connection attempts by the application will also be logged in the Firewall Events interface.
Advanced users can view and edit the parameters of this new rule in 'Network Security Policy'. (for example, you later re-alize that a program really ought to be allowed some level of internet access)
To begin defining a new blocked application:
1. Click the Define a New Blocked Application link in Firewall Tasks > Common Tasks.2. A dialog box will appear asking you the select the application that you want to be blocked:
3. Click the 'Select' button:
4. You now have 3 methods available to choose the application that you want to block - 'File Groups'; 'Running Processes' and 'Browse'... (to application).
Comodo Firewall Pro 3.0 – User Guide 68

File Groups - choosing this option allows you to choose your application from a category of pre-set files or fold-ers. For example, selecting 'Executables' would enable you to create a block rule for any file that attempts to con-nect to the internet with the extensions .exe .dll .sys .ocx .bat .pif .scr .cpl . Other such categories available in-clude 'Windows System Applications' , 'Windows Updater Applications' , 'Start Up Folders' etc - each of which provide a fast and convenient way to batch select important files and folders. To view the file types and folders that will be affected by choosing one of these options, you need to visit the Defense+ area of Comodo Firewall Pro by navigating to: Defense+ > My Protected Files > Groups...
Running Processes - as the name suggests, this option allows you to choose the target application from a list of processes that are currently running on your PC.
Browse... (to application) - this option is the easiest for most users and simply allows you to browse to the lo-cation of the application which you want to block.
5. When you have chosen the application using one of the methods above, the application name will appear along with its location:
Click Apply to confirm your choice. The new block and log rule for the application takes effect immediately. When this application seeks internet access Comodo Firewall Pro will automatically deny it and record an entry in the View Firewall Events interface.
Comodo Firewall Pro 3.0 – User Guide 69

Stealth Ports Wizard
'Port Stealthing' is a security feature whereby ports on an internet connected PC are hidden from sight- eliciting no re-sponse to opportunistic port scans.
(note for beginners: Your computer sends and receives data to other computers and to the internet through an interface called a 'port'. There are over 65,000 numbered ports on every computer - with certain ports being traditionally reserved for certain services. For example, your machine will almost definitely connect to the internet using port 80 and port 443. Your e-mail application will connect to your mailserver through port 25. A 'port scanning' attack consists of sending a message to each of your computer ports, one at a time. This information gathering technique is used by hackers to find out which ports are open and which ports are being used by services on your machine. With this knowledge, a hacker can determine which attacks are likely to work if used against your machine. Stealthing a port effectively makes it invisible to a port scan. This differs from simply ‘closing’ a port as NO response is given to any connection attempts (‘closed’ ports respond with a ‘closed’ reply- revealing to the hacker that there is actual-ly a PC in existence.) This provides an extremely high level of security to your PC. If a hacker or automated scanner can-not 'see' your computers ports then they will presume it is offline and move on to other targets. You will still be able to connect to internet and transfer information as usual but remain invisible to outside threats. Comodo Firewall Pro pro-vides the user with flexible stealthing options:
1. Click on Stealth Ports Wizard in Firewall Tasks > Common Tasks.
2. You have three options to choose from:
Click the option you would like more details on:
Define a new trusted network - stealth my ports to EVERYONE elseAlert me to incoming connections - stealth my ports on a per-case basis
Comodo Firewall Pro 3.0 – User Guide 70

Block all incoming connections - stealth my ports to everyone
Define a new trusted network - stealth my ports to EVERYONE else
Selecting this option means your machine's ports will be stealthed (invisible) to everyone EXCEPT those net-works that you specify as trusted. To begin the wizard, click the 'Next' button'.
A dialog box will appear asking you to choose the new trusted zone:3.
o If you have already configured a network zone then leave the upper option selected and choose your de-sired network from the 'Zone Name' drop down box and click 'Finish'. If you have not yet defined a zone you wish to trust, you can do so in the 'My Network Zones' area of the firewall. OR
o To manually define and trust a new zone from this dialog box, check the box 'I would like to define a new network'.
Comodo Firewall Pro 3.0 – User Guide 71

Enter the IP range for the zone for which you want your computer to be visible - starting from the Start IP to the End IP (or specify a Subnet Mask)
Click 'Finish' to create the new Zone rule.
If you wish to add more than one zone, simply repeat this wizard.
Using the 'Define a new trusted network - stealth my ports to EVERYONE else' option will create a new trusted zone by adding the following rules in the 'Global Rules' interface:
The specific parameters of the descriptive rule name above are:
Allow | IP | Out | From Any IP Address | To <ZONE> | Where Protocol is ANY
Allow | IP | In | From <ZONE> | To Any IP Address | Where Protocol is ANY
If you would like more information on the meaning and construction of rules, please click here.
Alert me to incoming connections - stealth my ports on a per-case basis
You will see a firewall alert every time there is a request for an incoming connection. The alert will ask your permission on whether or not you wish the connection to proceed. This can be useful for applications such as Peer to Peer networking and Remote desktop applications that require port visibility in order to connect to your machine. Specifically, this option will add the following rule in the 'Global Rules' interface:
Block | ICMP | In | From Any IP Address | To Any IP Address | Where Message is ECHO REQUEST
If you would like more information on the meaning and construction of rules, please click here
Block all incoming connections - stealth my ports to everyone
Selecting this option means your computer's ports are invisible to all networks, irrespective of whether you trust them or not. The average home user (using a single computer that is not part of a home LAN) will find this option the most conve-nient and secure. You will not be alerted when the incoming connection is blocked, but the rule will add an entry in the firewall event log file. Specifically, this option will add the following rule in the 'Global Rules' interface:
Block And Log | IP | In | From Any IP Address | To Any IP Address | Where Protocol is Any
If you would like more information on the meaning and construction of rules, please click here
Comodo Firewall Pro 3.0 – User Guide 72

View Active Connections
The Active Connections interface contains an at-a-glance summary of all currently active connections on a per-applica-tion basis. You can view all the applications that are connected; all the individual connections that each application is re-sponsible for; the direction of the traffic; the source IP and port and the destination IP and port. You can also see the total amount of traffic that has passed in and out of your system over each connection.
This list is updated in real time whenever an application creates a new connection or drops an existing connection. The View Active Connections is an extremely useful aid when testing firewall configuration; troubleshooting new firewall poli-cies and rules; monitoring the connection activity of individual applications and your system as a whole and for terminat-ing any unwanted connections.
Column Description:
1. Protocol Shows the application that is making the connection; the protocol it is using and the direction of the traf-fic. Each application may have more than one connection at any time.
2. Source (IP : Port) - The source IP Address and source port that the applications connecting through. If the ap-plication is waiting for communication and the port is open, it is described as ‘Listening’.
3. Destination (IP : Port) - The destination IP Address and destination port that the application is connecting to. This will be blank if the 'Source' column is 'Listening'.
4. Bytes In - Represents the total bytes of incoming data since this connection was first allowed5. Bytes Out - Represents the total bytes of outgoing data since this connection was first allowed
Context Sensitive Menu
Right click on items in the list to see the context sensitive menu.
Comodo Firewall Pro 3.0 – User Guide 73

• If you wish to view the full path of the application, right click on the application name select 'Show Full Path'.
• If you wish to terminate a connection belonging to an application, right click on the specific connection and click 'Terminate Connection'
Comodo Firewall Pro 3.0 – User Guide 74

My Port Sets
Port Sets are handy, predefined groupings of one or more ports that can be re-used and deployed across multiple Appli-cation Rules and Global Rules.
The name of the port set is listed above the actual port numbers that belong to that set. The default port sets shipped with Comodo Firewall are:
HTTP Ports: 80 and 443. These are the default ports for http traffic. Your internet browser will use this ports to connect to the internet and other networks.
POP3/SMTP Ports: 110, 25, 143, 995, 465. These are the ports that are typically used by mail clients like Outlook Ex-press and WinMail for communication using the POP3, SMTP and IMAP protocols.
Privileged Ports: 0-1024 - This set can be deployed if you wish to create a rule that allows or blocks access to the privi-leged port range of 0-1024. Privileged ports are so called because it is usually desirable to prevent users from running services on these ports. Network admins usually reserve or prohibit the use of these ports.
• To Add a new port set, you need to:
(i) Define a name for the set
(ii) Select the port numbers you want to belong to this named set• Define a name for the set - Click the 'Add...' button on the right hand side and select 'A New Port Set...' from the
drop down menu:
Comodo Firewall Pro 3.0 – User Guide 75

• Next type a name for the port set. In the example below, we have chosen to name our port set 'A test port set'
• Click Apply. The new port set will appear in the main port set list:
• Select the port numbers you want to belong to this named set - Right click on the name of the new port set and select 'Add...' from the menu:
• This will open the port selection dialog:
Specify 'Any' to choose all ports; specify a single port or define a port range by typing the start and end port num-bers. Click Apply to commit your choice. If you wish to add more ports to this set then repeat the process from 'Select the port numbers you want to belong to this named set'
Comodo Firewall Pro 3.0 – User Guide 76

• To edit the name of an existing port set - select the name of the set in the list (e.g. HTTP Ports) and click 'Edit...' to bring up the naming dialog.
• To add port numbers to an existing port set - right click on the set name and click 'add..' as shown earlier OR se-lect the port set name, click the 'Add..' button on the right and select 'A new port' from the drop down menu.
• To modify or change the existing port numbers in a port set - right click ON the port number you wish to change and select 'Edit..' OR select the actual port number (not the port set name) and click the 'Edit... button on the right.
When defining or modifying a network control rule, any port sets listed in this interface, including any new ones you cre-ate, will be available for selection and deployment in the 'Source Port' and 'Destination Port' tabs by selecting 'A set of Ports' :
Comodo Firewall Pro 3.0 – User Guide 77

My Network Zones
A computer network is a connection between computers through a cable or some type of wireless connection. It enables users to share information and devices between computers and other users within the network. Obviously, there are cer-tain computer networks that you will need to grant access to - including your home or work network. Conversely, there may be other networks that you will want to restrict communication with - or even block entirely.
Comodo Firewall Pro allows you to define 'Network Zones' and to specify the access privileges of these zones. A 'Net-work Zone' can consist of an individual machine (including a single home computer connecting to the internet) or a net-work of thousands of machines, to which access can be granted or denied.
To access the 'My Network Zone' interface (above), click on 'My Network Zones' in Firewall Tasks > Common Tasks
Note 1: Adding a zone to this area does not, in itself, define any permission levels or access rights to the zone. This area allows to define the zones so you can quickly assign such permissions in other areas of the firewall.
Note 2: A network zone can be designated as 'Trusted' and allowed access by using the 'Stealth Ports Wizard' (An ex-ample would be your home computer or network)
Note 3: A network zone can be designated as 'Blocked' and denied access by using the 'My Blocked Network Zones' in-terface. (An example would be a known spyware site)
Note 4: An application can be assigned specific access rights to and from a network zone when defining an Application Rule. Similarly, a custom Global Rule can be assigned to a network zone to all activity from a zone.
Note 5: By default, Comodo Firewall Pro will automatically detect any new networks (LAN, Wireless etc). This can be dis-abled in the Miscellaneous – Settings area of the firewall.
To add a New Network Zone, you need to (i) Define a name for the zone (ii) Select the addresses to be included in this zone.
Comodo Firewall Pro 3.0 – User Guide 78

1. Define a name for the zone - Click the 'Add...' button on the right hand side and select 'A New Network Zone...' from the drop down menu:
2. A dialog box will appear asking you to specify new zone's name. Choose a name that accurately describes the network you are creating.
3. Click Apply to confirm your zone name. This will add the name of your new zone to the My Network Zones list:
4. Next you have to Select the addresses to be included in this zone. Right click on the name of the new zone and select 'Add...' from the menu:
5. The 'Add a New Address' dialog allows you to specify an address by typing an IP address; an IP range; an IP ad-dress mask; a host name or a MAC address.
Comodo Firewall Pro 3.0 – User Guide 79

Click 'Apply' to confirm your choice. The new zone will now appear in the main list along with the addresses you assigned to it.
Once created, a network zone can be:
• Quickly called as 'Zone' when creating or modifying a network policy
• Quickly called and designated as a trusted zone from the 'Stealth Ports Wizard' interface
• Quickly called and designated as a blocked zone from the 'My Blocked Network Zones' interface
To edit the name of an existing Network Zone - select the name of the zone in the list (e.g. home) and select 'Edit...' to bring up the naming dialog.
To add more addresses to an existing Network Zone - right click on the zone name and click 'Add...' as shown earlier OR select the zone name, click the 'Add..' button on the right and select 'A New Address... from the drop down menu.
To modify or change the existing address in a zone - right click on the address (not the zone name) and select 'Edit..' OR select the actual address (not the zone name) and click the 'Edit... button on the right.
Comodo Firewall Pro 3.0 – User Guide 80

My Blocked Network Zones
A computer network enables users to share information and devices between computers and other users within the net-work. Obviously, there are certain computer networks that you will need 'trust' and grant access to - for example your home or work network. Unfortunately, there may be other, untrustworthy networks that you will want to restrict communi-cation with - or even block entirely. (note - we advise new or inexperienced users to first read 'My Network Zones' , 'Stealth Ports Wizard' and 'Network Security Policy' before blocking zones using this interface.)
The 'My Blocked Network Zones' area allows you to:
• Deny access to a specific network by selecting a pre-existing network zone and designating it as blocked
• Deny access to a specific network by manually defining a new blocked zone
'My Blocked Network Zones' can be accessed by navigation to 'Firewall Tasks > Common Tasks > My Blocked Network Zones.
Note 1 - You must create a zone before you can block it. There are two ways to do this (i) Using 'My Network Zones' to name and specify the network you want to block (ii) Directly from this interface using 'New blocked address...'
Note 2 - You cannot reconfigure pre-existing network zones from this interface. (e.g., to add or modify IP addresses). You need to use 'My Network Zones' if you want to change the settings of existing zones.
Deny access to a specific network by selecting a pre-existing network zone and designating it as blocked
• Click the 'Add..' button at the top right and select 'Network Zones' then the particular zone you wish to block.
Comodo Firewall Pro 3.0 – User Guide 81

• The selected zone will appear in the main interface.
Click 'Apply' to confirm your choice. All traffic intended for and originating from computer or devices in this zone will now be blocked.
Deny access to a specific network by manually defining a new blocked zone
• Click the 'Add..' button at the top right and select 'A New Blocked Address' . This will launch the following dialog where you can specify the IP address(es), IP Mask, Host Name or MAC address that you wish to block.
After clicking 'Apply' to confirm your choice, the address(es) you blocked will appear in the main interface. You can modify these addresses at any time by selecting the entry and clicking 'Edit'
Comodo Firewall Pro 3.0 – User Guide 82

Click 'Apply' to confirm your choice. All traffic intended for and originating from computer or devices in this zone will now be blocked.
Special Note: Creating a blocked network zone implements a 'block all' global rule for the zone in question. However, unlike when you create a 'Trusted Zone', this rule is not displayed or editable from the global rules tab of the Network Se-curity Policy interface. This is because whereas you are likely to be trusting only a few zones, there is the potential that you will have to block many. The constant addition of such block rules would make the interface unmanageable for most users.
Comodo Firewall Pro 3.0 – User Guide 83

Defense+ Tasks Overview
The Defense+ component of Comodo Firewall Pro is a host intrusion prevention system that constantly monitors the ac-tivities of all executable files on your PC. With Defense+ activated, the user is warned EVERY time an unknown applica-tion executable (.exe, .dll, .sys, .bat etc) attempts to run. The only executables that are allowed to run are the ones you give permission to.
The Defense+ Task Center allows you to quickly and easily configure all aspects of Defense+ and is divided into two sec-tions: Common tasks and Advanced.
It can be accessed at all times by clicking on the Defense+ Shield button (second button from the top right).
Common Tasks
Click the links below to see detailed explanations of each area in this section.
• View Defense+ Events • Scan my System • My Protected Files • My Quarantined Files • My Pending Files • My Own Safe Files • View Active Process List • My Trusted Software Vendors • My Protected Registry Keys • My Protected COM Interfaces
Comodo Firewall Pro 3.0 – User Guide 84

Advanced
'Advanced Tasks' enables more experienced users to define Defense+ security policy and settings at an in-depth, granu-lar level. Click on the links below to see detailed explanations of each area in this section.
• Computer Security Policy
• Predefined Security Policies
• Image Execution Control Settings
• Defense+ Settings
Comodo Firewall Pro 3.0 – User Guide 85
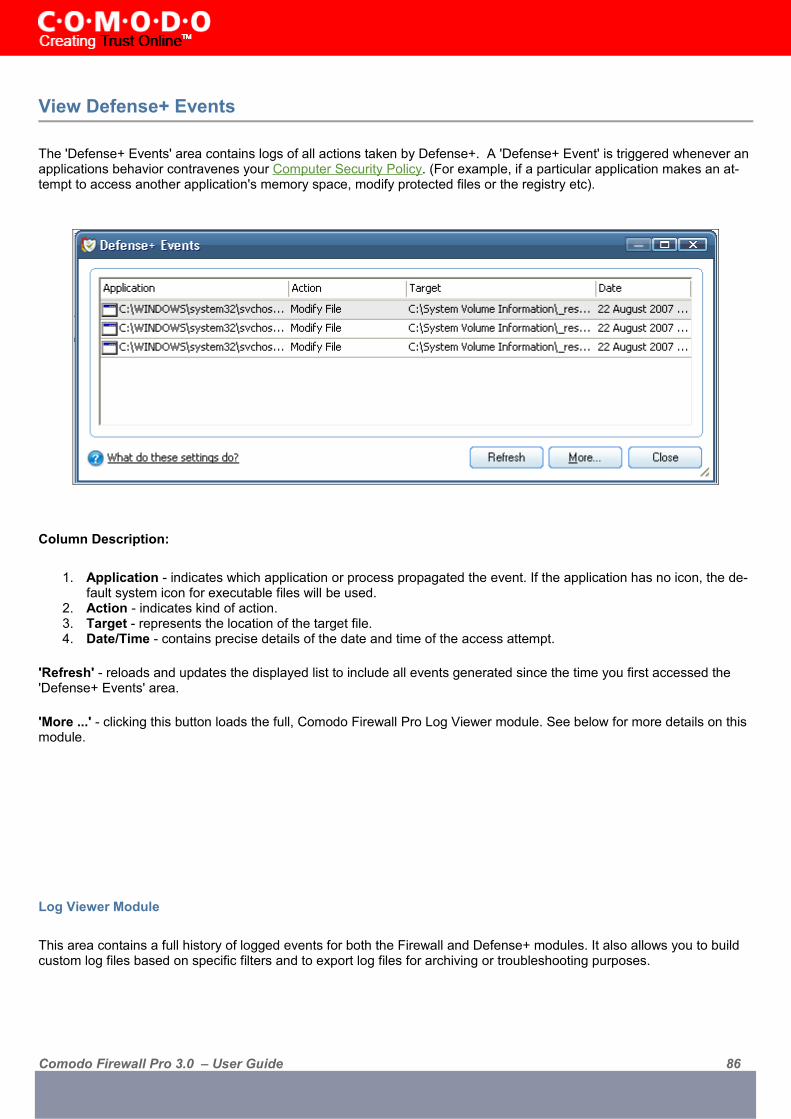
View Defense+ Events
The 'Defense+ Events' area contains logs of all actions taken by Defense+. A 'Defense+ Event' is triggered whenever an applications behavior contravenes your Computer Security Policy. (For example, if a particular application makes an at-tempt to access another application's memory space, modify protected files or the registry etc).
Column Description:
1. Application - indicates which application or process propagated the event. If the application has no icon, the de-fault system icon for executable files will be used.
2. Action - indicates kind of action. 3. Target - represents the location of the target file. 4. Date/Time - contains precise details of the date and time of the access attempt.
'Refresh' - reloads and updates the displayed list to include all events generated since the time you first accessed the 'Defense+ Events' area.
'More ...' - clicking this button loads the full, Comodo Firewall Pro Log Viewer module. See below for more details on this module.
Log Viewer Module
This area contains a full history of logged events for both the Firewall and Defense+ modules. It also allows you to build custom log files based on specific filters and to export log files for archiving or troubleshooting purposes.
Comodo Firewall Pro 3.0 – User Guide 86

The Log Viewer Module is divided into two sections. The left hand panel displays a set of handy, pre-defined time Filters for both the Firewall and Defense+ event log files. The right hand panel displays the actual events that were logged for the time period you selected in the left hand panel (or the events that correspond to the filtering criteria you selected)
Filtering Log Files
Comodo Firewall allows you to create custom views of all logged events according to user defined criteria.
Preset Time Filters:
Clicking on any of the preset filters in the left hand panel will alter the display in the right hand panel in the follow-ing ways:
Today - Displays all logged events for today.
This Week - Displays all logged events during the past 7 days.
This Month - Displays all logged events during the past 30 days.
All the Times - Displays every event logged since Comodo Firewall Pro was installed. (If you have cleared the log history since installation, this option shows all logs created since that clearance).
The example below shows an example display when the Defense+ Logs for 'Today' are displayed.
Comodo Firewall Pro 3.0 – User Guide 87
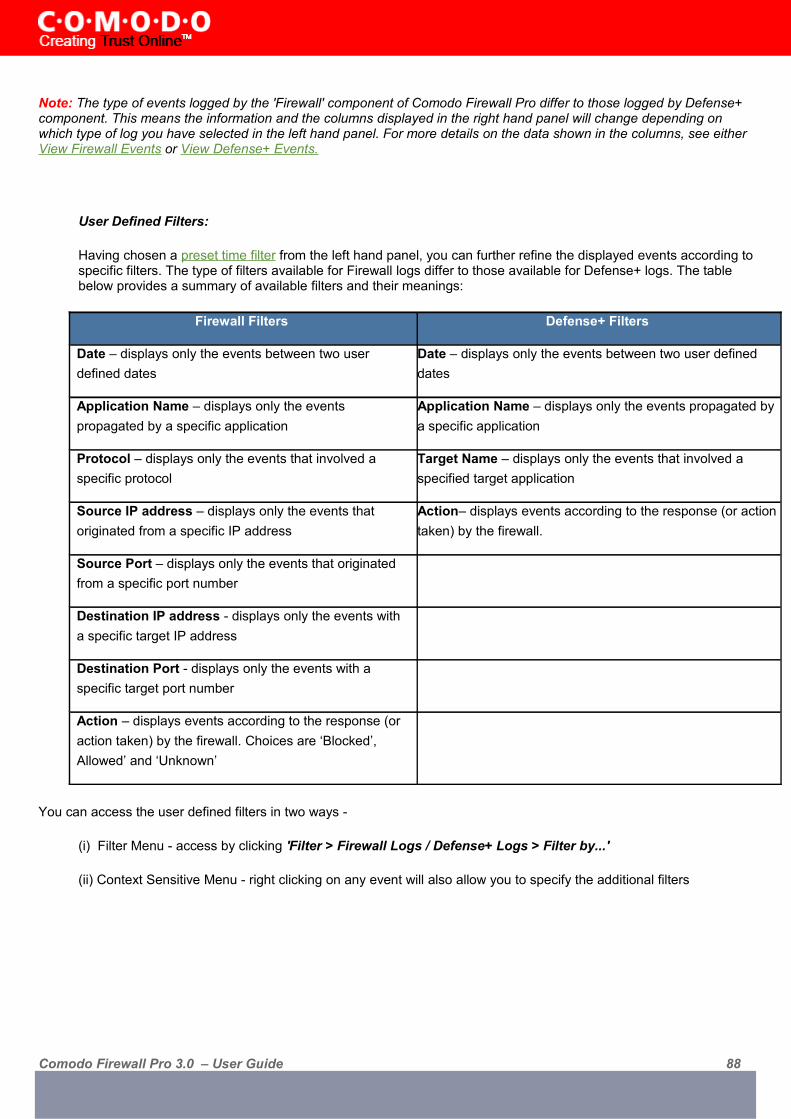
Note: The type of events logged by the 'Firewall' component of Comodo Firewall Pro differ to those logged by Defense+ component. This means the information and the columns displayed in the right hand panel will change depending on which type of log you have selected in the left hand panel. For more details on the data shown in the columns, see either View Firewall Events or View Defense+ Events.
User Defined Filters:
Having chosen a preset time filter from the left hand panel, you can further refine the displayed events according to specific filters. The type of filters available for Firewall logs differ to those available for Defense+ logs. The table below provides a summary of available filters and their meanings:
Firewall Filters Defense+ Filters
Date – displays only the events between two user defined dates
Date – displays only the events between two user defined dates
Application Name – displays only the events propagated by a specific application
Application Name – displays only the events propagated by a specific application
Protocol – displays only the events that involved a specific protocol
Target Name – displays only the events that involved a specified target application
Source IP address – displays only the events that originated from a specific IP address
Action– displays events according to the response (or action taken) by the firewall.
Source Port – displays only the events that originated from a specific port number
Destination IP address - displays only the events with a specific target IP address
Destination Port - displays only the events with a specific target port number
Action – displays events according to the response (or action taken) by the firewall. Choices are ‘Blocked’, Allowed’ and ‘Unknown’
You can access the user defined filters in two ways -
(i) Filter Menu - access by clicking 'Filter > Firewall Logs / Defense+ Logs > Filter by...'
(ii) Context Sensitive Menu - right clicking on any event will also allow you to specify the additional filters
Comodo Firewall Pro 3.0 – User Guide 88

Exporting Log Files to HTML
Exporting log files is useful for archiving and troubleshooting purposes. There are two ways to export log files using Log Viewer interface - using the context sensitive menu and via the 'File' menu option. After making your choice, you will be asked to specify a name for the exported html file and the location you wish to save to.
(i) File Menu
• Firewall Logs - will export the Firewall log that is currently being displayed in the right hand panel (e.g. If you have selected 'This week' in the Firewall tree then that is the log file that will be exported)
• Defense+ Logs - will export the Defense+ log that is currently being displayed in the right hand panel • All - will export ALL logs for ALL TIME for both Defense+ and Firewall as a single html file.
(ii) Context Sensitive Menu - right click in the log display window to export the currently displayed log file to html.
Comodo Firewall Pro 3.0 – User Guide 89

You can export a custom view that you created using the available Filters by right clicking and selecting 'Export To HTML' from the context sensitive menu. Again, you will be asked to provide a filename and save location for the file.
Comodo Firewall Pro 3.0 – User Guide 90

My Protected Files
This section allows you to protect specific files and folders against unauthorized modification. Protecting files prevents modification by malicious programs such as virus, trojans and spyware. It is also useful for safeguarding very valuable files (spreadsheets, databases, documents) by denying anyone and any program the ability to modify the file - avoiding the possibility of accidental or deliberate sabotage. If a file is 'Protected' it can still be accessed and read by users, but not altered. A good example of a file that ought to be protected is the your 'hosts' file. (c:\windows\system32\drivers\etc\hosts). Placing this in the 'My Protected Files' area would allow web browsers to access and read from the file as per normal. However, should any process attempt to modify it then Comodo Firewall Pro will block this attempt and produce a 'Protected File Access' pop-up alert.
To access My Protected Files, navigate to: Defense+ Tasks > Common Tasks > My Protected Files.
To manually add an individual file; file group or process, click the 'Add' button. Click here for a description of the choices available when selecting a file.
Comodo Firewall Pro 3.0 – User Guide 91

Exceptions
Users can choose to selectively allow another application (or file group) to modify a protected file by affording the appro-priate Access Right in 'Computer Security Policy' . A simplistic example would be the imaginary file 'Accounts.xls'. You would want the Excel program to be able to modify this file as you are working on it, but you would not want it to be ac-cessed by a potential malicious program. You would first add the spreadsheet to the 'My Protected Files' area by clicking the 'Add' button then 'Browse...' to 'Accounts.xls'. Once added to 'My Protected Files', you would go into 'Computer Secu-rity Policy' and create an exception for Excel so that it alone could modify 'accounts.xls'.
Another example of where protected files should be given selective access is the Windows system directory at 'c:\win-dows\system32'. Files in this folder should be off-limits to modification by anything except certain, Trusted, applications like Windows Updater Applications. In this case, you would add the directory c:\windows\system32\* to the 'My Protected Files' area (* = all files in this directory). Next go to 'Computer Security Policy', locate the file group 'Windows Updater Ap-plications' in the list and follow the same process outlined above to create an exception for that group of executables.
The 'Groups...' button allows the user to access the 'My File Groups' interface:
Comodo Firewall Pro 3.0 – User Guide 92

File groups are handy, predefined groupings of one or more file types. Creating a file group allows you to quickly deploy a Computer Security Policy across multiple file types and applications.
This interface allows you to
• Create a new File Group by clicking the 'Add' button • Edit the names of an Existing File Group or File by right-clicking and selecting the 'Edit' button • Add a file to an existing file group by selecting the File Group name from the list then clicking 'Add > Select From
>....' • Re-assign files to another file group by dragging and dropping
Note: This area is for the creation and modification of file groups only. You will not be able to modify the security policy of any applications or files from here. To do that, you should use the Computer Security Policy interface or the Predefined Security Policy Interface.
Comodo Firewall Pro 3.0 – User Guide 93

My Quarantined Files
Comodo Firewall Pro allows you to lock-down files and folders by completely denying all access rights to them from other processes or users - effectively cutting it off from the rest of your system. If the file you quarantine is an executable then neither you nor anything else will be able to run that program. Unlike files that are placed in 'My Protected Files', users cannot selectively allow any process access to a quarantined file.
In order to access My Quarantined Files, navigate to: Defense+ Tasks > Common Tasks > My Quarantined Files.
To manually add an individual file; file group or process, click the 'Add' button. Click here for a description of the choices available when selecting a file.
Additionally, files can be transferred into the My Quarantined Files module using the 'Move to..' button in the 'My Pending Files' and 'My Own Safe Files' areas.
Comodo Firewall Pro 3.0 – User Guide 94

The 'Groups...' button allows the user to access the 'My File Groups' interface:
File groups are handy, predefined groupings of one or more file types. Creating a file group allows you to deploy a cus-tom or predefined computer security policy across multiple file types and applications.
The 'My File Groups' interface allows you to:
• Create a new File Group by clicking the 'Add' button • Edit the names of an Existing File Group or File by right-clicking and selecting the 'Edit' button • Add a file to an existing file group by selecting the File Group name from the list then clicking 'Add > Select From
>....' • Re-assign files to another file group by dragging and dropping
Note - This area is for the creation and modification of file groups only. You will not be able to modify the security policy of any applications or files from here. To do that, you should use the Computer Security Policy interface or the Predefined Security Policy Interface.
Comodo Firewall Pro 3.0 – User Guide 95

My Pending Files
Once installed, Comodo Firewall Pro watches all file system activity on your computer. Every new executable file intro-duced to the computer, is first scanned against the Comodo certified safe files database. If they are not safe, they are added to the 'My Pending Files' for users to review and possibly submit to COMODO. Apart from new executables, any executables that are modified are also moved to the 'My Pending Files' area.
“My Pending Files” is specifically important while Defense+ is in 'Clean PC Mode'. In Clean PC Mode, the files in 'My Pending Files' are NOT considered clean. For more information, please check 'Clean PC Mode' on the Defense+ settings page.
The 'My Pending Files Area allows the user to:
• Assess the pending files to determine whether or not they are to be trusted. If they are trustworthy, they can be moved to 'My Safe Files' using the 'Move to' button. Similarly, files that are suspicious can be moved to the 'My Quarantined Files' area.
• Use the 'Lookup...' feature to see if the master Comodo safelist contains more information.
• Send the file to Comodo for analysis using the 'Submit' feature
• Manually add files to the pending list for look-ups or submitting to Comodo
• Use the 'Purge' feature to scan the list for files that no longer exist on your system and remove them from the "My Pending Files' list.
In order to access pending files, navigate to: Defense+ Tasks > Common Tasks > My Pending Files.
The 'Lookup...' button allows you to check for information on the files by consulting the master Comodo safelist, Se-lect the file(s) you want to check and click the Lookup... button. This will contact Comodo servers to conduct a search of Comodo's master safe list database to check if any information is available about the file in question. If no information is available, you are presented with the option to submit them to Comodo for analysis:
Comodo Firewall Pro 3.0 – User Guide 96

Clicking the "Submit" button will automatically begin the file submission process.
After sending the file to us, our developers will determine whether or not it represents a threat to your security. If it is found to be trustworthy, it will be added to the Comodo safelist. (see the section Submit Suspicious Files for more details on this)
You can manually add files to the Pending Files list by clicking the 'Add..' button and either browsing to their location on your hard drive or selecting a running process:
The 'Move to...' option allows you to transfer the files out of the 'My Pending Files' area and into either the My Own Safe Files or My Quarantined Files areas of Defense+:
Files can also be transferred into this module by clicking the 'Move to...' button in the 'My Own Safe Files' area.
Comodo Firewall Pro 3.0 – User Guide 97

My Own Safe Files
Comodo Firewall Pro allows you to define a personal safelist of files to complement the default Comodo safelist.
Files added to this area are automatically given Defense+ trusted status. If an executable is unknown to the Defense+ safelist then, ordinarily, it and all its active components will generate Defense+ alerts when they run. Of course, you could choose the 'Treat this as a Trusted Application' option at the alert but it is often more convenient to classify entire directo-ries of files as 'My Own Safe Files'.
By adding executables to this list (including subfolders containing many components) you can reduce the amount of alerts that Defense+ generates whilst maintaining a higher level of Defense+ security. This is particularly useful for devel-opers that are creating new applications that, by their nature, are as yet unknown to the Comodo safelist. Files can be transferred into this module by clicking the 'Move' button in the 'My Pending Files' and 'My Quarantined Files' areas.
Click the 'Add' button to manually imports files or processes into this area:
The 'Move to...' option allows you to transfer the selected files out of the 'My Own Safe Files' area and into either the My Pending Files or My Quarantined Files areas of Defense+:
Comodo Firewall Pro 3.0 – User Guide 98

The 'Lookup...' button allows you to check for information on the selected files by consulting the master Comodo safe-list, This will contact Comodo servers to conduct a search of Comodo's master safe list database to check if any informa-tion is available about the file in question. If no information is available, you are presented with the option to submit them to Comodo for analysis:
Clicking the "Submit" button will automatically begin the file submission process. This is particularly useful in the case of 'My Own Safe Files' as it will allow the files you know to be safe to be added to the master Comodo safelist. This list will then be distributed to all other installations of the firewall and allow all users to trust these files.
Comodo Firewall Pro 3.0 – User Guide 99

View Active Process List
To view Active Process list, navigate to: Defense+ > Common Tasks > Active Process List.
The interface displays all currently active processes that are running on your PC and the parent application of those pro-cesses. By tracing an application's parent process, Defense+ can detect whether a non-trusted application is attempting to spawn an already trusted application and thus deny access rights for that trusted application. This system provides the very highest protection against trojans, malware and rootkits that try to use trusted software to launch an attack.
Application - Displays the names of the applications which are currently running on your PC.
PID - Process Identification Number.
Company - Displays the name of the software developer
User Name - The name of the user that started the process
Right click on any process to:
Show the full path: Displays the location on your location of the executable in addition to it's name
Terminate: Shuts down the currently selected process
Terminate and quarantine: Shuts down the currently selected process and places the executable into the My Quaran-tined Files section of Defense+.
Comodo Firewall Pro 3.0 – User Guide 100

My Trusted Software Vendors
Comodo Firewall Pro can now validate digitally signed applications from trusted vendors. Trusted Vendors are those companies that digitally sign 3rd party software to verify it's authenticity and integrity. This signature is then counter-signed by an organization called a Trusted Certificate Authority. By default, Defense+ will detect software that is signed by a software vendor and counter-signed by a Trusted Certificate Authority. It will then automatically add that software to the Comodo safe list.
The 'My Trusted Software Vendors' section can be found by navigating to Defense+ > Common Tasks > My Trusted Software Vendors.
Click here to read background information on digitally signing software
Click here to learn how to Add / Define a user-trusted vendor
Background
Many software vendors digitally sign their software with a code signing certificate. This practice helps end-users to verify:
(i) Content Source: The software they are downloading and are about to install really comes from the publisher that signed it.
(ii) Content Integrity: That the software they are downloading and are about to install has not be modified or corrupt-ed since it was signed.
In short, users benefit if software is digitally signed because they know who published the software and that the code has-n't been tampered with - that are downloading and installing the genuine software.
The 'Vendors' that digitally sign the software to attest to it's probity are the 3rd party software developers. These are the company names you see listed in the first column in the graphic above.
However, companies can't just 'sign' their own software and expect it to be trusted. This is why each code signing certifi-cate is counter-signed by an organization called a 'Trusted Certificate Authority'. 'Comodo CA Limited' and 'Verisign' are two examples of a Trusted CA's and are authorized to counter-sign 3rd party software. This counter-signature is critical to the trust process and a Trusted CA will only counter-sign a vendor's certificate after it has conducted detailed checks that the vendor is a legitimate company.
Comodo Firewall Pro 3.0 – User Guide 101

All files that are signed by the listed 'vendors' will be automatically trusted by the Defense+ module of Comodo Firewall Pro. (if you would like to read more about code signing certificates, see http://www.instantssl.com/code-signing/).
One way of telling whether an executable file has been digitally signed is checking the properties of the .exe file in ques-tion. For example, the main program executable for Comodo Firewall Pro is called 'cfp.exe' and has been digitally signed.
• Browse to the (default) installation directory of C:\Program Files\Comodo\Firewall • Right click on the file 'cpf.exe'• Select 'Properties' from the menu • Click the tab 'Digital Signatures' (if there is no such tab then the software has not been signed)
This will display the name of the CA that signed the software as shown below:
Click the 'Details' button to view digital signature information. Click 'View Certificate' to inspect the actual code signing certificate. (see below)
Comodo Firewall Pro 3.0 – User Guide 102

It should be noted that the example above is a special case in that Comodo, as creator of 'cpf.exe', is both the signer of the software and, as a trusted CA, it is also the counter-signer (see the 'Countersignatures' box). In the vast majority of cases, the signer or the certificate (the vendor) and the counter signer (the Trusted CA) will be different. See this exam-ple for more details.
Adding and Defining a user-trusted Vendor
A software vendor can be added to the 'Trusted Software Vendors' list in two ways:
• By reading the vendor's signature from an executable file on your local drive• By reading the vendor's signature from an running process
Click the add button on the right hand side and select 'Read from a signed executable...'. Browse to the location of the ex-ecutable your local drive. In the example below, we are adding the executable 'YahooMessenger.exe'.
Comodo Firewall Pro 3.0 – User Guide 103

After clicking 'Open', Comodo Firewall will check that the .exe file is signed by the vendor and counter-signed by a Trust-ed CA. If so, the vendor (software signer) will be added to the Trusted Vendor list:
In the example above, Comodo Personal Firewall was able to verify and trust the vendor signature on YahooMessen-ger.exe because it had been counter-signed by the trusted CA 'Verisign'. The software signer 'Yahoo! Inc' is now a trust-ed vendor and is added to the list. All future software that is signed by the vendor 'Yahoo! Inc' will be automatically added to the Comodo safe list UNLESS you change this setting in Defense+ settings.
Comodo Firewall Pro 3.0 – User Guide 104

Comodo Firewall Pro also allows you to add a trusted vendor by selecting from processes that are currently running on your PC. To do this, click the 'Add...' button and select 'Choose from a running process...':
Select the signed executable that you want to trust and click the 'Select' button. Comodo Firewall Pro will perform the same certificate check as described above.
If the firewall cannot verify that the software certificate is signed by a Trusted CA then it will not add the software vendor to the list of 'My Trusted Vendors' . In this case, you will see the following error message:
Note: The 'My Trusted Software Vendors' list displays two types of software vendors:
• User defined trusted software vendors - As the name suggests, these are added by the user via one of the two methods outlined earlier. These vendors can be removed by the user by selecting and clicking the 'Remove' but-ton. All software created by user certified vendors is automatically added to the firewall safelist.
• Comodo defined trusted software vendors - These are the vendors that Comodo, in it's capacity as a Trusted CA, has independently validated as a legitimate company. Comodo certified vendors are hardcoded into the firewall and cannot be removed. All software created by Comodo certified vendors is automatically added to the firewall safelist.
Comodo Firewall Pro 3.0 – User Guide 105

Scan My System
The 'Scan My System' feature allows users to run on-demand scans on their fixed hard drives that will detect known malware, trojans and spyware. If malicious executables are discovered on your system then they can be immediately deleted straight from the scan results window. In addition to the proactive system monitoring of Defense+ and fully featured packet filtering firewall, the 'Scan My System' feature adds another layer of protection for users wishing to completely secure their systems. Comodo recommends all users run a system scan at least once per week.
Running an On-Demand Malware Scan on your system
To run an on demand scan on your computer, first click the 'Scan My System' icon in Defense+ Tasks Overview
Comodo Firewall Pro will automatically commence scanning your hard drives:
Scan progress is displayed at the top of the interface and any suspicious files are displayed in the 'Scan Results' pane. The scan can be paused or stopped at any time by clicking the appropriate buttons at the lower right corner. When the scanner has finished checking your hard drive, you will see the 'Scan Complete' interface which contains details of any malware that was discovered:
Comodo Firewall Pro 3.0 – User Guide 106

• The 'Scan Results' pane displays a list of all suspicious files detected during the scan
• The 'Status' column displays the name of the threat that was discovered. In other words, the name of the malware that has infected the file listed in the 'Location' column
• The 'Location' column displays the location and filename of the infected file or malicious executable.
To delete all the listed files, click the 'Delete' button. Clicking 'Exit' will close the Scan System interface and return the user to the main interface.
Background info: The name of the threat (status column) can often be different to the actual file name stated in the 'Location' column. This is especially true in the case of Trojan horse programs which are specifically re-named to resemble or duplicate the name of recognizable, trusted programs. (for example a trojan called 'I_steal_your_credit_card_details.exe' may be re-named after the Internet Explorer executable 'iexplore.exe' in an attempt to fool the user into granting it internet access or to allow it to run in the first place. Comodo Firewall Pro's scanner overcomes this by checking the digital signature of all the files it scans against a 'black list' of the digital signatures of known malicious programs. This means it will detect all infected files - including those that attempt to masquerade as another program.
Comodo Firewall Pro 3.0 – User Guide 107

My Protected Registry Keys
Comodo Firewall Pro automatically protects system critical registry keys against modification. Irreversible damage can be caused to your system if important registry keys are corrupted or modified in any way. It is essential that your registry keys are protected against attack.
In order to access 'My Protected Registry Keys', navigate to: Defense+ Tasks > Common Tasks > My Protected Registry
You can import additional registry keys that you wish to protect by clicking the 'Add' button:
The 'Registry Groups' option allows you to batch select and import predefined groups of important registry keys. Comodo provide a default selection of 'Automatic Startup' (keys), 'Comodo Keys', 'Internet Explorer Keys' and 'Important Keys'.
The 'Registry Entries....' option opens the Windows registry editor within the Comodo Firewall Pro interface and allow you to select individual keys.
You can add items manually by browsing the registry tree in the right hand pane. Drag & drop specific registry keys into the 'Selected Items' pane. To add item manually enter its name in the field and press the '+' button.
Comodo Firewall Pro 3.0 – User Guide 108

The 'Groups...' button allows the user to access the 'My Registry Groups' interface:
Registry groups are handy, predefined groupings of important registry keys.
Comodo Firewall Pro 3.0 – User Guide 109

This interface allows you to
• Create a new registry key Group by clicking the 'Add' button • Add keys to your new group by selecting the Registry Group name from the list then clicking 'Add > Select From
> Registry Key...' • Add keys to a preexisting group by selecting its name from the list then clicking 'Add > Select From > Registry
Key...' • Edit the names of existing registry key Group or individual key by right-clicking and selecting the 'Edit' button • Re-assign registry keys to another group by dragging and dropping
Comodo Firewall Pro 3.0 – User Guide 110

My Protected COM Interfaces
Component Object Model (COM) is Microsoft's object-oriented programming model that defines how objects interact with-in a single application or between applications - specifying how components work together and interoperate. COM is used as the basis for Active X and OLE - two favorite targets of hackers and malicious programs to launch attacks on your computer. It is a critical part of any security system to restrict processes from accessing the Component Object Mod-el - in other words, to protect the COM interfaces.
Comodo Firewall Pro automatically protects COM interfaces against modification, corruption and manipulation by mali-cious processes. The predefined COM Interface groups can be accessed by clicking the 'Groups...' button.
In order to access 'My Protected COM Interfaces', navigate to: Defense+ Tasks > Common Tasks > My Protected COM.
You can import additional COM interfaces that you wish to protect by clicking the 'Add' button:
The 'COM Groups' option allows you to batch select and import predefined COM interfaces.
Comodo Firewall Pro 3.0 – User Guide 111

The 'COM Components....' option allows you to add individual COM components. You can add items manually by brows-ing the components in the right hand pane. Drag & drop specific components into the 'Selected Items' pane. To add man-ually add a component' enter its name in the field and press the '+' button.
To access 'My COM Interface Groups', click on the 'Groups' button.
Comodo Firewall Pro 3.0 – User Guide 112

COM groups are handy, predefined groupings of COM interfaces.
This interface allows you to
• Create a new COM Group by clicking the 'Add' button • Add components to your new group by selecting the group name from the list then clicking 'Add > Select From >
COM components...' • Add keys to a pre-existing COM group by selecting its name from the list then clicking 'Add > Select From > COM
components...' • Edit the names of existing COM Group or individual component by right-clicking and selecting the 'Edit' button • Re-assign COM components to another group by dragging and dropping
Comodo Firewall Pro 3.0 – User Guide 113

Computer Security Policy
The Computer Security Policy area allows the user to view, manage and edit the Defense+ security policies that apply to applications.
The first column, 'Application Name', displays a list of the applications on your system for which a security policy has been deployed. If the application belongs to a file group, then all member applications assume the security policy of the file group. The second column, 'Treat as', column displays the name of the security policy assigned to the application or group of applications in column one.
General Navigation:
Add... - Allows the user to Add a new Application to the list then create it's policy. See the section 'Creating or Modifying a Defense+ Security Policy'.
Edit... - Allows the user to modify the Defense+ security policy of the selected application. See the section 'Creating or Modifying a Defense+ Security Policy'.
Remove - Deletes the current policy. Note - you cannot remove individual applications from a file group using this inter-face - you must use the 'My File Groups' interface to do this.
Purge - Runs a system check to verify that all the applications for which policies are listed are actually installed on the host machine at the path specified. If not, the policy is removed, or 'purged', from the list.
Users can re-order the priority of policies by simply dragging and dropping the application name or file group name in question. To alter the priority of applications that belong to a file group, you must use the 'My File Groups' interface.
Creating or Modifying a Defense+ Security Policy
To begin defining a application's Defense+ policy, you need take two basic steps.
Comodo Firewall Pro 3.0 – User Guide 114
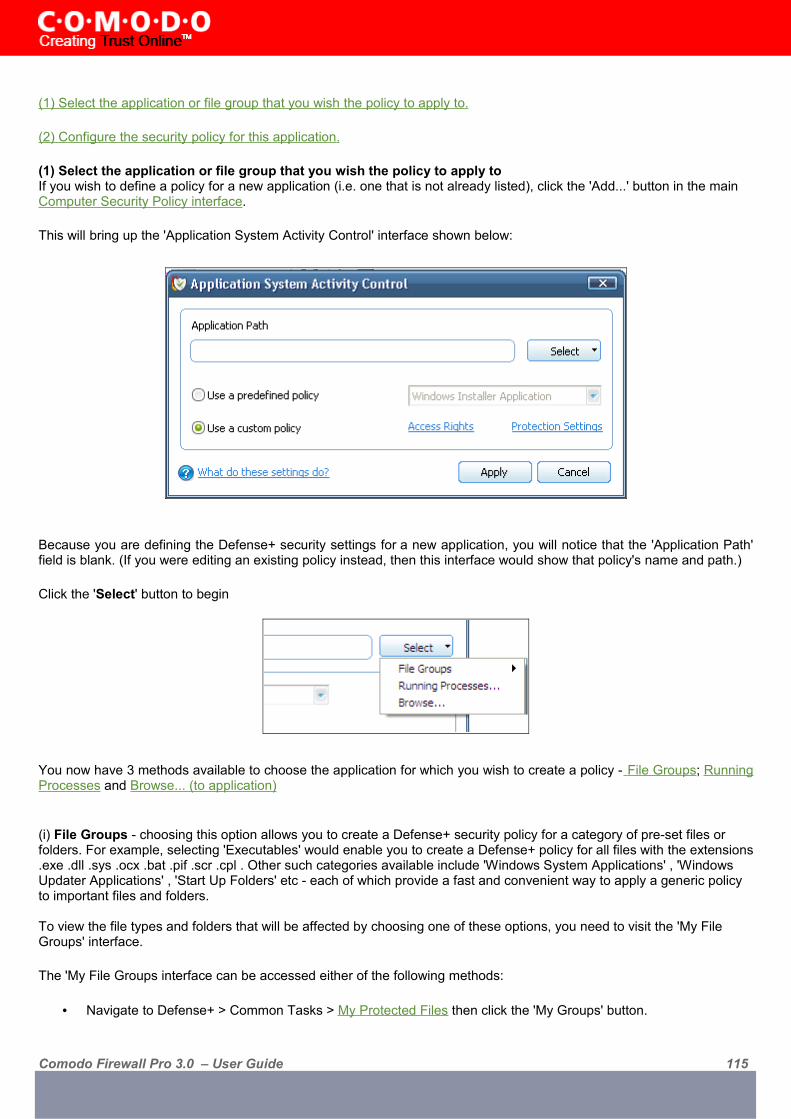
(1) Select the application or file group that you wish the policy to apply to.
(2) Configure the security policy for this application .
(1) Select the application or file group that you wish the policy to apply toIf you wish to define a policy for a new application (i.e. one that is not already listed), click the 'Add...' button in the main Computer Security Policy interface.
This will bring up the 'Application System Activity Control' interface shown below:
Because you are defining the Defense+ security settings for a new application, you will notice that the 'Application Path' field is blank. (If you were editing an existing policy instead, then this interface would show that policy's name and path.)
Click the 'Select' button to begin
You now have 3 methods available to choose the application for which you wish to create a policy - File Groups ; Running Processes and Browse... (to application)
(i) File Groups - choosing this option allows you to create a Defense+ security policy for a category of pre-set files or folders. For example, selecting 'Executables' would enable you to create a Defense+ policy for all files with the extensions .exe .dll .sys .ocx .bat .pif .scr .cpl . Other such categories available include 'Windows System Applications' , 'Windows Updater Applications' , 'Start Up Folders' etc - each of which provide a fast and convenient way to apply a generic policy to important files and folders.
To view the file types and folders that will be affected by choosing one of these options, you need to visit the 'My File Groups' interface.
The 'My File Groups interface can be accessed either of the following methods:
• Navigate to Defense+ > Common Tasks > My Protected Files then click the 'My Groups' button.
Comodo Firewall Pro 3.0 – User Guide 115

• Navigate to Defense+ > Common Tasks > My Quarantined Files then click the 'My Groups' button.
(ii) Running Processes - as the name suggests, this option allows you to create and deploy a Defense+ policy for any process that is currently running on your PC.
You can choose an individual process (shown above) or the parent process of a set of running processes. Click 'Select' to confirm your choice. (iii) Browse... (to application) - this option is the easiest for most users and simply allows you to browse to the location of the application for which you want to deploy the Defense+ security policy.
Comodo Firewall Pro 3.0 – User Guide 116
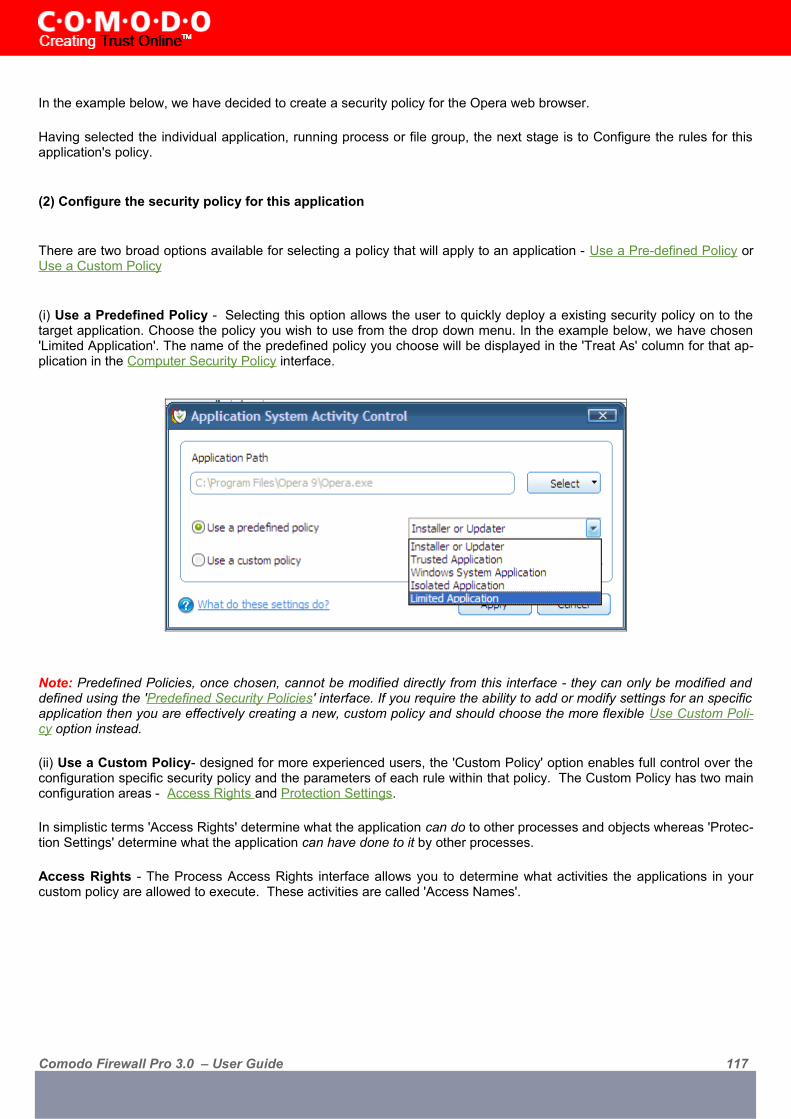
In the example below, we have decided to create a security policy for the Opera web browser.
Having selected the individual application, running process or file group, the next stage is to Configure the rules for this application's policy.
(2) Configure the security policy for this application
There are two broad options available for selecting a policy that will apply to an application - Use a Pre-defined Policy or Use a Custom Policy
(i) Use a Predefined Policy - Selecting this option allows the user to quickly deploy a existing security policy on to the target application. Choose the policy you wish to use from the drop down menu. In the example below, we have chosen 'Limited Application'. The name of the predefined policy you choose will be displayed in the 'Treat As' column for that ap-plication in the Computer Security Policy interface.
Note: Predefined Policies, once chosen, cannot be modified directly from this interface - they can only be modified and defined using the 'Predefined Security Policies' interface. If you require the ability to add or modify settings for an specific application then you are effectively creating a new, custom policy and should choose the more flexible Use Custom Poli-cy option instead.
(ii) Use a Custom Policy- designed for more experienced users, the 'Custom Policy' option enables full control over the configuration specific security policy and the parameters of each rule within that policy. The Custom Policy has two main configuration areas - Access Rights and Protection Settings.
In simplistic terms 'Access Rights' determine what the application can do to other processes and objects whereas 'Protec-tion Settings' determine what the application can have done to it by other processes.
Access Rights - The Process Access Rights interface allows you to determine what activities the applications in your custom policy are allowed to execute. These activities are called 'Access Names'.
Comodo Firewall Pro 3.0 – User Guide 117

Click here to view a list of definitions of the Action Names listed above and the implications of choosing to Ask, Allow or Block for each setting.
Exceptions to your choice of 'Ask', 'Allow' or 'Block' can be specified for the policy by clicking the 'Modify...' button on the right.:
Select the 'Allowed Applications' or 'Blocked Applications' tab depending on the type of exception you wish to create.
Comodo Firewall Pro 3.0 – User Guide 118

Clicking 'Add' will allow you to choose which applications or file groups you wish this exception to apply to. (click here for an explanation of available options)
In the example above , the default action for 'Run as an executable' is 'Ask'. This means Defense+ will generate an alert asking your permission if 'Opera.exe' tried to run another program. Clicking 'Modify' then adding 'Outlook.exe' to the 'Al-lowed Applications' tab creates an exception to this rule. Opera.exe is now allowed to run 'Outlook.exe' but an alert will be generated if it tries to run any other application.
Protection Settings - Protection Settings determine how protected the application or file group in your policy is against activities by other processes. These protections are called 'Protection Types'.
Select 'Yes' to enable monitoring and protect the application or file group against the process listed in the 'Protection Type' column. Select 'No' to disable such protection.
Click here to view a list of definitions of the 'Protection Types' listed above and the implications of activating each setting.
Exceptions to your choice of 'Yes' or 'No' can be specified in the application's policy by clicking the 'Modify...' button on the right.
Click 'Apply' to confirm your setting.
Comodo Firewall Pro 3.0 – User Guide 119

Image Execution Control Settings
Image Execution Control is an integral part of the Defense+ engine. If your Defense+ Security Level is set to ' 'Safe mode' or 'Clean PC Mode', then it is responsible for authenticating every executable image that is loaded into the memory.
Comodo Firewall Pro calculates the hash an executable at the point it attempts to load into memory. It then compares this hash with the list of known/recognized applications that are on the Comodo safe list. If the hash matches the one on record for the executable, then the application is safe. If no matching hash is found on the safelist, then the executable is 'unrecognized' and you will receive an alert.
This area allows you to quickly determine how proactive the monitor should be and which types of files it should check.
'General' tab
Adjust the slider to your preferred protection level:
Aggressive - This setting instructs Defense+ to intercept the file types listed in the 'Files to Check' tab before they are loaded into memory and also Intercepts prefetching/caching attempts for the executable files.
Normal - Same as aggressive but does not intercept prefetching/caching attempts. This is the default and recommend-ed setting.
Disabled - No execution control is applied to the executable files.
Click 'Apply' to implement your settings.
'Files to Check' tab
Comodo Firewall Pro 3.0 – User Guide 120
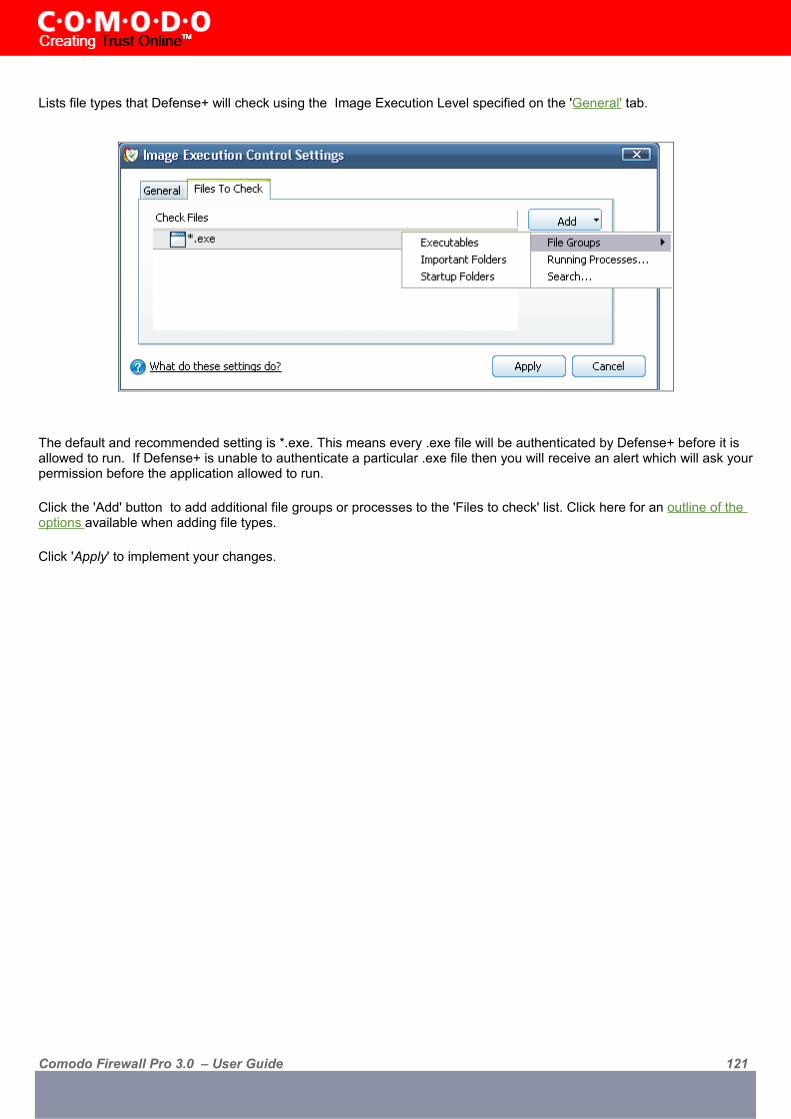
Lists file types that Defense+ will check using the Image Execution Level specified on the 'General' tab.
The default and recommended setting is *.exe. This means every .exe file will be authenticated by Defense+ before it is allowed to run. If Defense+ is unable to authenticate a particular .exe file then you will receive an alert which will ask your permission before the application allowed to run.
Click the 'Add' button to add additional file groups or processes to the 'Files to check' list. Click here for an outline of the options available when adding file types.
Click 'Apply' to implement your changes.
Comodo Firewall Pro 3.0 – User Guide 121

Predefined Security Policies
As the name suggests, a predefined security policy is a set of access rights and protection settings that have been saved and can be re-used and deployed on multiple applications. Each policy is comprised of a number of 'Rules' and each of these 'Rules' is defined by a set of conditions/settings/parameters. 'Predefined Security Policies' is a set of policies that concern an application's access rights to memory, other programs, the registry etc. (Note - this section is for advanced and experienced users. If you are a novice user to Comodo Firewall Pro, we advise you first read the Computer Security Policy section in this help guide if you have not already done so)
Although each application's security policy could be defined from the ground up by individually configuring its constituent rules, this practice may prove time consuming if it had to be performed for every single program on your system. For this reason, Comodo Firewall Pro contains a selection of predefined policies according to broad application category. Each predefined policy has been specifically designed by Comodo to optimize the security level of a certain type of application. Users can, of course, modify these predefined policies to suit their environment and requirements.
To configure this category, navigate to: Defense+ > Advanced > Predefined Security Policies. There are four default se-curity policies listed under the Policy Name column.
To view or edit an existing predefined policy:
• Double click on the Policy Name in the list• Select the Policy Name in the list, right-click and choose 'Edit'• Select the Policy Name and click the 'Edit... button on the right
From here, you can modify a policy's name and, if desired, make changes to its 'Process Access Rights' and 'Protection Settings'. Any changes you make here will be automatically rolled out to all applications currently under that policy.
To create a new predefined policy you should click the 'Add..' button, type a name for the policy then follow the same configuration procedure as outlined for creating a custom, application specific policy. Click here to view.
Once created, your policy will be available for deployment onto specific application or file groups via the Computer Secu-rity Policy section of Defense+ .
Comodo Firewall Pro 3.0 – User Guide 122

Defense+ Settings
The Defense+ component of Comodo Firewall Pro is a host intrusion prevention system that constantly monitors the ac-tivities of all executable files on your PC. With Defense+ activated, the user is warned EVERY time an unknown applica-tion executable (.exe, .dll, .sys, .bat etc) attempts to run. The only executables that are allowed to run are the ones you give permission to. An application can be given such permission to run in a variety of ways including; manually granting them execution rights in Computer Security Policy; by deciding to treat the executable as trusted at a Defense+ alert or simply because the application is on the Comodo safe list. Defense+ also automatically protects system-critical files and folders such as registry entries to prevent unauthorized modification. Such protection adds another layer of defense to Comodo Firewall Pro by preventing malware from ever running and by preventing any processes from making changes to vital system files.
Note for beginners: This page will often refer to 'executables' (or 'executable files'). An 'executable' is a file that can in-struct your computer to perform a task or function. Every program, application and device you run on your computer re-quires an executable file of some kind to start it. The most recognisable type of executable file is the '.exe' file. (e.g., when you start Microsoft Word, the executable file 'winword.exe' instructs your computer to start and run the Word appli-cation). Other types of executable files include those with extensions .cpl .dll, .drv, .inf, .ocx, .pf, .scr, .sys.
Unfortunately, not all executables can be trusted. Some executables, broadly categorised as malware, can instruct your computer to delete valuable data; steal your identity; corrupt system files; give control of your PC to a hacker and much more. You may also have heard these referred to as Trojans, scripts and worms. Worse still, these programs are explicit-ly designed to run without you knowing about them. Defense+ is designed to make sure you DO know about them by blocking all unknown executables and alerting you whenever they try to run.
The Defense+ Settings area allows you to quickly configure the security level and behavior of Defense+ during operation. This settings area can be accessed in the 'Advanced' section of 'Defense+ Tasks' and, more immediately, by clicking on the blue text next to 'Defense+' on the Summary Screen (shown below).
'General Settings' tab
Comodo Firewall Pro allows you to customize the behavior of Defense+ by adjusting a Security Level slider to switch be-tween preset security levels.
The choices available are: Paranoid, Safe mode, Clean PC Mode, Training Mode and Disabled. The setting you choose here will also be displayed on the firewall summary screen.
Comodo Firewall Pro 3.0 – User Guide 123

• Paranoid Mode: This is the highest security level setting and means that Defense+ will monitor and control all executable files apart from those that you have deemed safe. The firewall will not attempt to learn the behavior of any applications - even those applications on the Comodo safe list. and will only use your configuration settings to filter critical system activity. Similarly, the firewall will not automatically create 'Allow' rules for any executables - although you still have the option to treat an application as 'Trusted' at the Defense+ alert. Choosing this option will generate the most amount of Defense+ alerts and is recommended for advanced users that require complete awareness of activity on their system.
• Safe mode: While monitoring critical system activity, the firewall will automatically learn the activity of executa-bles and applications certified as 'Safe' by Comodo. It will also automatically create 'Allow' rules these activities. For non-certified, unknown, applications, you will receive an alert whenever that application attempts to run. Should you choose, you can add that new application to the safe list by choosing 'Treat this application as a Trusted Application' at the alert. This will instruct the firewall not to generate an alert the next time it runs. If your machine is not new or known to be free of malware and other threats as in 'Clean PC Mode' then 'Safe mode' is recommended setting for most users - combining the highest levels of security with an easy-to-manage num-ber of Defense+ alerts.
• Clean PC Mode: From the time you set the slider to 'Clean PC Mode', Defense+ will learn the activities of the ap-plications currently installed on the computer while all new executables introduced to the system are monitored and controlled. This patent-pending mode of operation is the recommended option on a new computer or one that the user knows to be clean of malware and other threats. From this point onwards Defense+ will alert the user whenever a new, unrecognized application is being installed. In this mode, the files in 'My Pending Files' are excluded from being considered as clean and are monitored and controlled.
Installation Mode: Installer applications and updaters may need to execute other processes in order to run ef-fectively. These are called 'Child Processes'. In 'Paranoid', Safe' and 'Clean PC modes', Defense+ would raise an alert every time these child processes attempted to execute because they have no access rights. Whilst in one of these 3 modes, Comodo Firewall Pro will make it easy to install new applications that you trust by offering
Comodo Firewall Pro 3.0 – User Guide 124

you the opportunity to temporarily engage 'Installation Mode' - which will temporarily bestow these child process-es with the same access rights as the parent process - so allowing the installation to proceed without the usual alerts.
If you are installing a new, unknown application. Defense+ will alert you with a pop-up notification and, as you want to allow this application to continue installing, you should select 'Treat this application as an Installer or Up-dater'. You will subsequently see the following:
Clicking 'Yes' will engage 'Installation Mode' and so grant child processes with the same access rights as the parent process. This will be followed by the following reminder that you need to switch back to your previous mode:
• Training Mode: The firewall will monitor and learn the activity of any and all executables and create automatic 'Allow' rules until the security level is adjusted. You will not receive any Defense+ alerts in 'Training Mode'. If you choose the 'Training Mode' setting, we advise that you are 100% sure that all applications and executables in-stalled on your computer are safe to run.
Tip: This mode can be used as the “Gaming Mode”. It is handy to use this setting temporarily when you are run-ning an (unknown but trusted) application or Games for the first time. This will suppress all Defense+ alerts while the firewall learns the components of the application that need to run on your machine and automatically create 'Allow' rules for them. Afterwards, you can switch back to 'Safe mode' mode).
• Disabled: Disables Defense+ protection. All executables and applications are allowed to run irrespective of your configuration settings. Comodo strongly advise against this setting unless you are confident that you have an al-ternative intrusion defense system installed on your computer.
Keep an alert on screen for maximum (n) seconds - Determines how long the Firewall will show a Defense+ alert with-out any user intervention. By default, the timeout is set at 120 seconds. You may adjust this setting to your own prefer-ence.
Trust applications digitally signed by Trusted Software Vendors - Leaving this option checked means software which is signed by a Trusted Certificate Authority will be automatically added to the safe list. Comodo recommend leaving this option enabled. For more details, see My Trusted Software Vendors.
Comodo Firewall Pro 3.0 – User Guide 125

Block all unknown requests if the application is closed - Checking this box will block all unknown requests (those not included in your Computer Security Policy) if Comodo Firewall Pro is not running/has been shut down.
Deactivate Defense+ permanently (Requires a system restart) - Shuts down the Defense+ Host Intrusion element of Comodo Firewall Pro PERMANENTLY. The firewall is not affected and will continue to protect your computer even if you deactivate Defense+. Comodo do not recommend users close Defense+ unless they are sure they have alternative Intru-sion Prevention Systems installed.
'Monitor Settings' tab
The 'Monitor Settings' tab allows you configure which activities, entities and objects should be monitored by Defense+.
Note: The settings you choose here are universally applied.
• If you disable monitoring of an activity, entity or object using this interface it will completely switch off monitoring of that activity on a global basis - effectively creating a universal 'Allow' rule for that activity. This 'Allow' setting will over-rule any policy specific 'Block' or 'Ask' setting for that activity that you may have selected using the 'Ac-cess Rights' and 'Protection Settings' interface.
Activities To Monitor:
Interprocess Memory Access - Malware programs use memory space modification to inject malicious code for numer-ous types of attacks, including recording your keyboard strokes; modifying the behavior of the invaded application; steal-ing confidential data by sending confidential information from one process to another process etc. One of the most seri-ous aspects of memory-space breaches is the ability of the offending malware to take the identity of the invaded process, or 'impersonate' the application under attack. This makes life harder for traditional virus scanning software and intrusion-detection systems. Leave this box checked and Defense+ will alert you when an application attempts to modify the mem-ory space allocated to another application.
Comodo Firewall Pro 3.0 – User Guide 126

Windows/WinEvent Hooks - In the Microsoft Windows® operating system, a hook is a mechanism by which a function can intercept events (messages, mouse actions, keystrokes) before they reach an application. The function can act on events and, in some cases, modify or discard them. Originally developed to allow legitimate software developers to de-velop more powerful and useful applications, hooks have also been exploited by hackers to create more powerful mal-ware. Examples include malware that can record every stroke on your keyboard; record your mouse movements; moni-tor and modify all messages on your computer; take over control of your mouse and keyboard to remotely administer your computer. Leaving this box checked means that you are warned every time a hook is executed by an untrusted applica-tion.
Device Driver Installations - Device drivers are small programs that allow applications and/or operating systems to in-teract with a hardware device on your computer. Hardware devices include your disk drives, graphics card, wireless and LAN network cards, CPU, mouse, USB devices, monitor, DVD player etc.. Even the installation of a perfectly well-inten-tioned device driver can lead to system instability if it conflicts with other drivers on your system. The installation of a ma-licious driver could, obviously, cause irreparable damage to your computer or even pass control of that device to a hack-er. Leaving this box checked means Defense+ will alert you every time a device driver is installed on your machine by an untrusted application.
Loopback Networking - Loopback connections refer to the internal communications within your PC. Any data transmit-ted by your computer through a loopback connection is immediately also received by it. This involves no connection out-side your computer to the internet or a local network. The IP address of the loopback network is 127.0.0.1, which you may have heard referred to under its domain name of 'http://localhost' i.e. the address of your computer. Loopback chan-nel attacks can be used to flood your computer with TCP and/or UDP requests which can smash your IP stack or crash your computer. Leaving this box checked means Defense+ will alert you every time a process attempts to communicate using the loopback channel.
Process Terminations - A process is a running instance of a program. (for example, the Comodo Firewall Pro process is called 'cfp.exe'. Press 'Ctrl+Alt+Delete' and click on 'Processes' to see the full list that are running on your system). Ter-minating a process will, obviously, terminate the program. Viruses and Trojan horses often try to shut down the processes of any security software you have been running in order to bypass it. With this setting enabled, Defense+ will monitor and alert you to all attempts by an untrusted application to close down another application.
Window Messages - This setting means Comodo Firewall Pro will monitor and detect if one application attempts to send special Windows Messages to modify the behavior of another application (e.g. by using the WM_PASTE command).
DNS Client Service - This setting alerts you if an application attempts to access the 'Windows DNS service' - possibly in order to launch a DNS recursion attack. A DNS recursion attack is a type of Distributed Denial of Service attack whereby an malicious entity sends several thousand spoofed requests to a DNS server. The requests are spoofed in that they ap-pear to come from the target or 'victim' server but in fact come from different sources - often a network of 'zombie' pc's which are sending out these requests without the owners knowledge. The DNS servers are tricked into sending all their replies to the victim server - overwhelming it with requests and causing it to crash. Leaving this setting enabled will pre-vent malware from using the DNS Client Service to launch such an attack.
Note for beginners: DNS stands for Domain Name System. It is the part of the Internet infrastructure that translates a familiar domain name, such as 'example.com' to an IP address like 123.456.789.04. This is essential because the Inter-net routes messages to their destinations on the basis of this destination IP address, not the domain name. Whenever you type a domain name, your internet browser contacts a DNS server and makes a 'DNS Query'. In simplistic terms, this query is 'What is the IP address of example.com?'. Once the IP address has been located, the DNS server replies to your computer, telling it to connect to the IP in question.
Entities To Monitor Against Modifications
Check the boxes against the needed options, if you want to enable monitoring of them:
- Protected COM Interfaces enables monitoring of COM interfaces you specified here.- Protected Registry Keys enables monitoring of Registry keys you specified here.- Protected Files/Folders enables monitoring of files and folders you specified here .
Comodo Firewall Pro 3.0 – User Guide 127

Objects To Monitor Against Direct Access
Determines whether or not Comodo Firewall Pro should monitor access to system critical objects on your computer.. Us-ing direct access methods, malicious applications can obtain data from a storage devices, modify or infect other exe-cutable software, record keystrokes and more. Comodo advise the average user to leave these settings enabled:
- Physical MemoryMonitors your computer's memory for direct access by an applications and processes. Malicious programs will attempt to access physical memory to run a wide range of exploits - the most famous being the 'Buffer Overflow' exploit. Buffer overruns occur when an interface designed to store a certain amount of data at a specific address in memory allows a malicious process to supply too much data to that address., This overwrites its internal structures and can be used by malware to force the system to execute its code.
- Computer MonitorComodo Firewall Pro will raise an alert every time a process tries to directly access your computer monitor. Although le-gitimate applications will sometimes require this access, there is also an emerging category of spyware-programs that use such access to monitor users' activities. (for example, to take screenshots of your current desktop; to record your browsing activities etc)
- DisksMonitors your local disk drives for direct access by running processes. This helps guard against malicious software that need this access to, for example, obtain data stored on the drives, destroy files on a hard disk, format the drive or corrupt the file system by writing junk data.
- Keyboard Monitors your keyboard for access attempts. Malicious software, known as 'keyloggers', can record every stroke you make on your keyboard and can be used to steal your passwords, credit card numbers and other personal data. With this setting checked, Comodo Firewall Pro will alert you every time an application attempts to establish direct access to your keyboard.
Comodo Firewall Pro 3.0 – User Guide 128
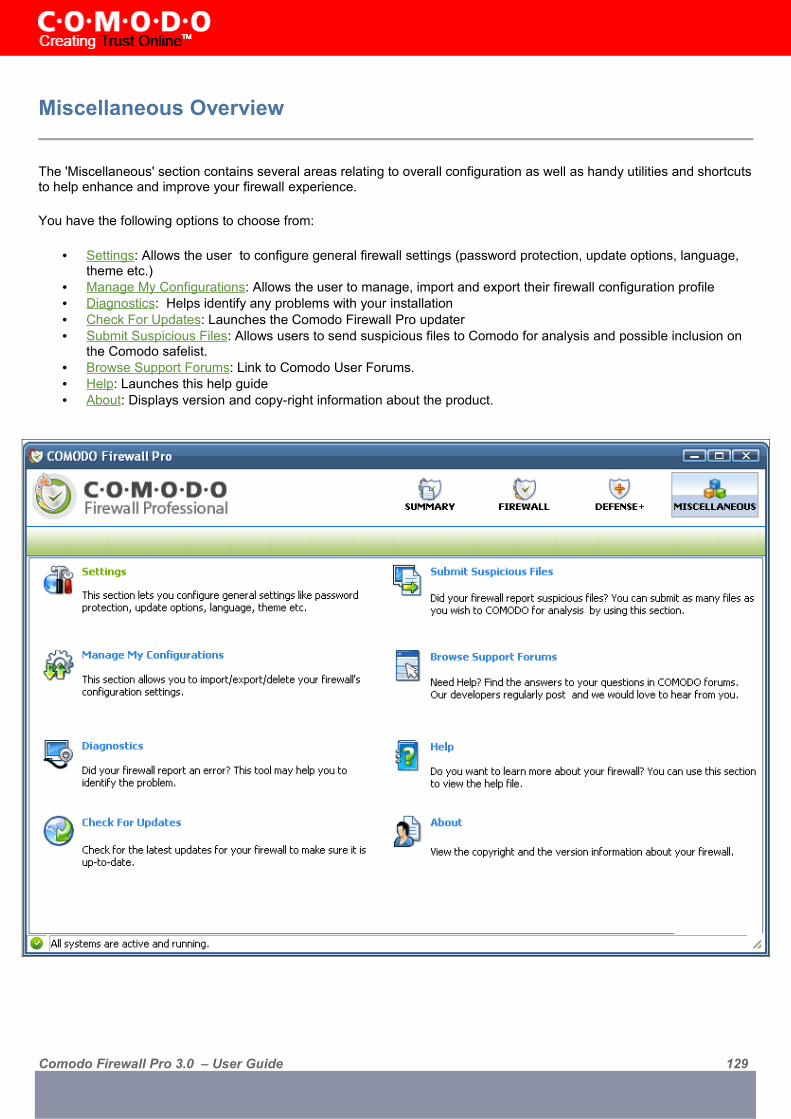
Miscellaneous Overview
The 'Miscellaneous' section contains several areas relating to overall configuration as well as handy utilities and shortcuts to help enhance and improve your firewall experience.
You have the following options to choose from:
• Settings : Allows the user to configure general firewall settings (password protection, update options, language, theme etc.)
• Manage My Configurations : Allows the user to manage, import and export their firewall configuration profile • Diagnostics : Helps identify any problems with your installation• Check For Updates : Launches the Comodo Firewall Pro updater• Submit Suspicious Files : Allows users to send suspicious files to Comodo for analysis and possible inclusion on
the Comodo safelist.• Browse Support Forums : Link to Comodo User Forums.• Help : Launches this help guide• About : Displays version and copy-right information about the product.
Comodo Firewall Pro 3.0 – User Guide 129

Settings
The 'Settings' dialog box allows you to configure various options related to the operation of Comodo Firewall Pro and can be accessed by clicking the 'Miscellaneous' button followed by 'Settings'.
'General' tab
• Automatically start the application with Windows (Recommended) - With this option checked, Comodo Fire-wall Pro will be automatically loaded every time you start your computer. This is the default and highly recom-mended setting. Unchecking this box means the application will not load at computer startup and, unless you have an alternative firewall/intrusion detection system running, your computer will not be protected.
• Show the balloon messages - These are the notifications that appear in the bottom right hand corner of your screen - just above the tray icons. Usually these messages say ' Comodo Firewall Pro is learning ' or 'Defense+ is learning ' and are generated when these modules are learning the activity of previously unknown components of trusted applications. Uncheck this option if you do not want to see these messages.
• Show the traffic animation in tray - By default, the application's 'Shield' tray icon displays a small animation whenever traffic moves to or from your computer.
Comodo Firewall Pro 3.0 – User Guide 130

If the traffic is outbound, you will see green arrows moving upwards on the right hand side of the shield. Similarly, for inbound traffic you will see red arrows moving down the left hand side. This provides a very useful indicator of the real-time movement of data in and out of your computer. Uncheck this box If you would rather not see this an-imation.
• Automatically Detect New Private Networks - Checking this option means that the firewall will automatically detect any new networks that the computer is connected to. Comodo recommends users to leave this option at its default, enabled setting.
'Parental Control' tab
The parental control tab allows you to configure password protection for Comodo Firewall Pro.
• Enable password protection for settings - Checking this box will activate password protection for all important configuration sections and wizards within the interface. If you choose this option, you must first specify and con-firm a password by clicking the 'Change Password...' button. You will be asked for this password every time you try to access important configuration areas (for example, all sections in the Defense+ Tasks and Firewall Tasks areas will require this password before allowing you to view or modify their settings)
This setting is of particular value to parents, network administrators and administrators of shared computers to prevent other users from modifying critical firewall settings and exposing the machine to threats.
• Suppress Firewall alerts when password protection is enabled - If checked, no Firewall Alerts will be dis-played when password protection is enabled. Parents and network admins may want to enable this setting if they do not want users to be made aware when a Firewall alert has been triggered. For example, a trojan horse pro-gram may be attempting to download itself or transmit private information to a third party. Usually, the firewall would generate an alert and ask the user how to proceed. If that user is a child or an inexperienced user then
Comodo Firewall Pro 3.0 – User Guide 131
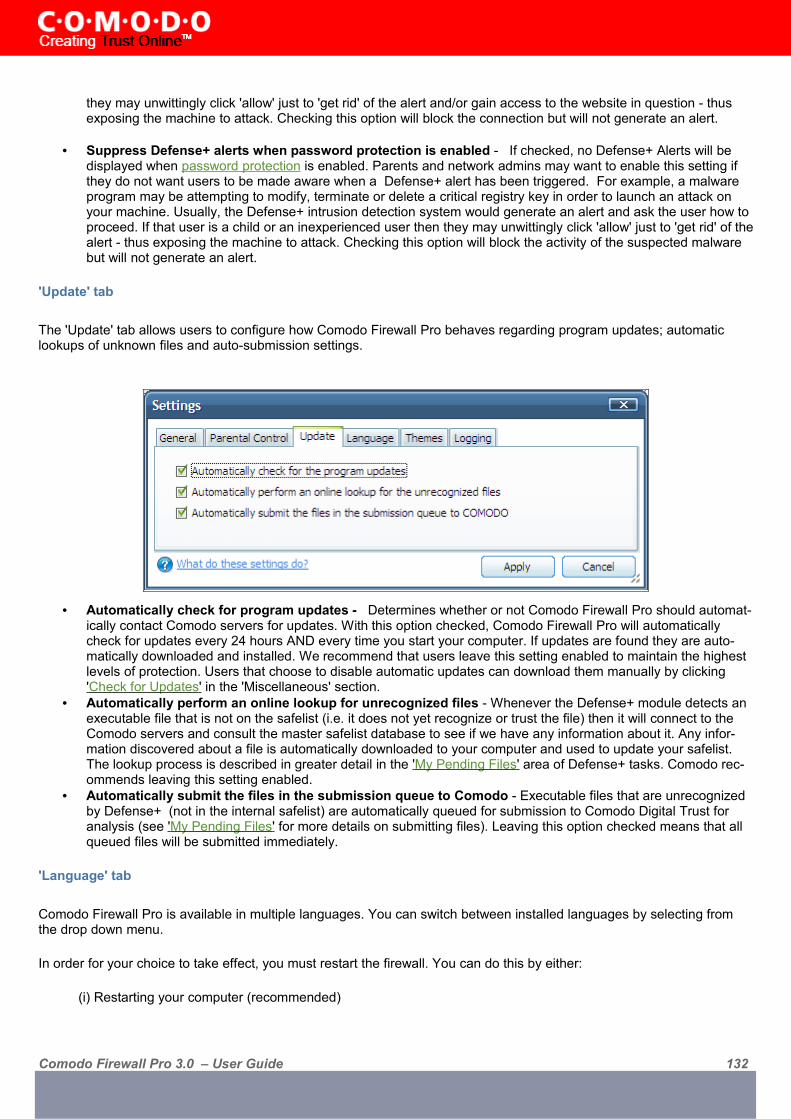
they may unwittingly click 'allow' just to 'get rid' of the alert and/or gain access to the website in question - thus exposing the machine to attack. Checking this option will block the connection but will not generate an alert.
• Suppress Defense+ alerts when password protection is enabled - If checked, no Defense+ Alerts will be displayed when password protection is enabled. Parents and network admins may want to enable this setting if they do not want users to be made aware when a Defense+ alert has been triggered. For example, a malware program may be attempting to modify, terminate or delete a critical registry key in order to launch an attack on your machine. Usually, the Defense+ intrusion detection system would generate an alert and ask the user how to proceed. If that user is a child or an inexperienced user then they may unwittingly click 'allow' just to 'get rid' of the alert - thus exposing the machine to attack. Checking this option will block the activity of the suspected malware but will not generate an alert.
'Update' tab
The 'Update' tab allows users to configure how Comodo Firewall Pro behaves regarding program updates; automatic lookups of unknown files and auto-submission settings.
• Automatically check for program updates - Determines whether or not Comodo Firewall Pro should automat-ically contact Comodo servers for updates. With this option checked, Comodo Firewall Pro will automatically check for updates every 24 hours AND every time you start your computer. If updates are found they are auto-matically downloaded and installed. We recommend that users leave this setting enabled to maintain the highest levels of protection. Users that choose to disable automatic updates can download them manually by clicking ' Check for Updates ' in the 'Miscellaneous' section.
• Automatically perform an online lookup for unrecognized files - Whenever the Defense+ module detects an executable file that is not on the safelist (i.e. it does not yet recognize or trust the file) then it will connect to the Comodo servers and consult the master safelist database to see if we have any information about it. Any infor-mation discovered about a file is automatically downloaded to your computer and used to update your safelist. The lookup process is described in greater detail in the ' My Pending Files ' area of Defense+ tasks. Comodo rec-ommends leaving this setting enabled.
• Automatically submit the files in the submission queue to Comodo - Executable files that are unrecognized by Defense+ (not in the internal safelist) are automatically queued for submission to Comodo Digital Trust for analysis (see ' My Pending Files ' for more details on submitting files). Leaving this option checked means that all queued files will be submitted immediately.
'Language' tab
Comodo Firewall Pro is available in multiple languages. You can switch between installed languages by selecting from the drop down menu.
In order for your choice to take effect, you must restart the firewall. You can do this by either:
(i) Restarting your computer (recommended)
Comodo Firewall Pro 3.0 – User Guide 132
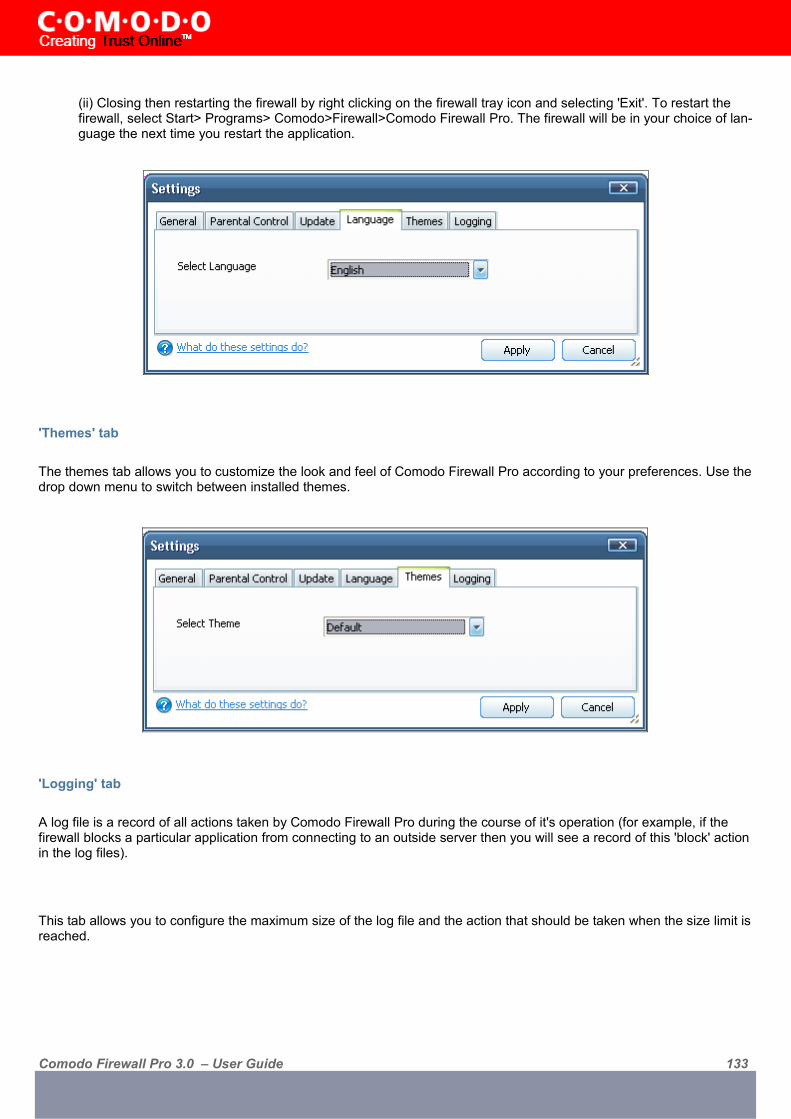
(ii) Closing then restarting the firewall by right clicking on the firewall tray icon and selecting 'Exit'. To restart the firewall, select Start> Programs> Comodo>Firewall>Comodo Firewall Pro. The firewall will be in your choice of lan-guage the next time you restart the application.
'Themes' tab
The themes tab allows you to customize the look and feel of Comodo Firewall Pro according to your preferences. Use the drop down menu to switch between installed themes.
'Logging' tab
A log file is a record of all actions taken by Comodo Firewall Pro during the course of it's operation (for example, if the firewall blocks a particular application from connecting to an outside server then you will see a record of this 'block' action in the log files).
This tab allows you to configure the maximum size of the log file and the action that should be taken when the size limit is reached.
Comodo Firewall Pro 3.0 – User Guide 133

• If the log file size exceeds 'n' MB - choose the maximum size of the log file before Comodo Firewall implements your choice of action:
o Delete it and create a new file - choosing this option means the firewall will delete the current log file af-ter it reaches the specified size and create a new one. All events recorded in the file at the point it reach-es the size limit will be deleted and the logging will start over from scratch in a new file. If you wish to maintain archives of your log files you should either (i) select 'Move it to the specified folder' (explained below) (ii) regularly export your log files to html using the log viewer module.
o Move it to the specified folder - instead of deleting the log file, the firewall will move it to a folder of your choice when the size limit is reached. Click the blue text to choose the location of your folder.
o Disable Firewall Logging - checking this box means NO firewall events will be recorded in the 'View Firewall Events' interface. This setting will over-rule any individual 'Log as a firewall event...' instructions you created when 'Adding and Editing a Network Control Rule'.
o Disable Defense+ Logging - checking this box means NO firewall events will be recorded in the 'View Defense+ Events' interface. This setting will over-rule any individual log instructions that have been creat-ed for an application.
For the majority of users, we recommend leaving the maximum log file size at the default 2mb. This will provide easily enough records for effective troubleshooting. Advanced users may want to specify a larger file size in order to view records stretching further back in time when the log viewer module is accessed.
Log files and log file management are discussed in more detail in the sections 'View Firewall Events' and 'View Defense+ Events'.
Comodo Firewall Pro 3.0 – User Guide 134

Manage My Configurations
Comodo Firewall Pro allows you to maintain, save and export multiple configurations of your firewall settings. This is es-pecially useful if you are a network administrator looking to roll out a standard security configuration across multiple com-puters. This feature is also a great time saver for anyone with more than one computer because it allows you to quickly implement your firewall security settings on other computers that you own without having to manually re-configure them.
To access 'Manage My Configurations', navigate to 'Miscellaneous > Manage My Configurations'. You have the following import/export options -
Click the area on which you would like more information:
o Export my configuration to a file o Import a saved configuration from a file o Select a different active configuration setting o Delete an inactive configuration profile
Comodo Firewall Pro 3.0 – User Guide 135

Export my configuration to a file
If this is the first time you have accessed this interface you will see two preset choices -
• 'COMODO - Optimum Security' (which is the configuration 'Firewall with Defense+ (recommended)' )
• 'COMODO - Network Security' (which is the configuration 'Firewall + Leak Test Protection' )
The name of YOUR CURRENTLY ACTIVE CONFIGURATION will have a checkmark next to it. In the example shown above, 'COMODO Network Security' is the currently active profile. Important Note: Any changes you have made to the firewall settings since installation are recorded in this, active, profile.
You have the opportunity to export your current configuration (including changes made since installation) under the preset name (Optimum or Network Security). However, Comodo advise that you create a new name when you export your custom configuration.
To export your existing configuration, click the export button then your currently active configuration (in the example above, 'COMODO - Network Security). Type a filename for the profile (e.g. 'My Firewall Profile') and save to the location of your choice.
Comodo Firewall Pro 3.0 – User Guide 136

Import a saved configuration from a file
Importing a configuration profile allows you to store any profile within Comodo Firewall Pro. Any profiles you import do no become active until you select them for use.
To import a profile choose 'Import As....' or 'Import....' . Browse to the location of the saved profile and click 'Open'.
Comodo Firewall Pro 3.0 – User Guide 137
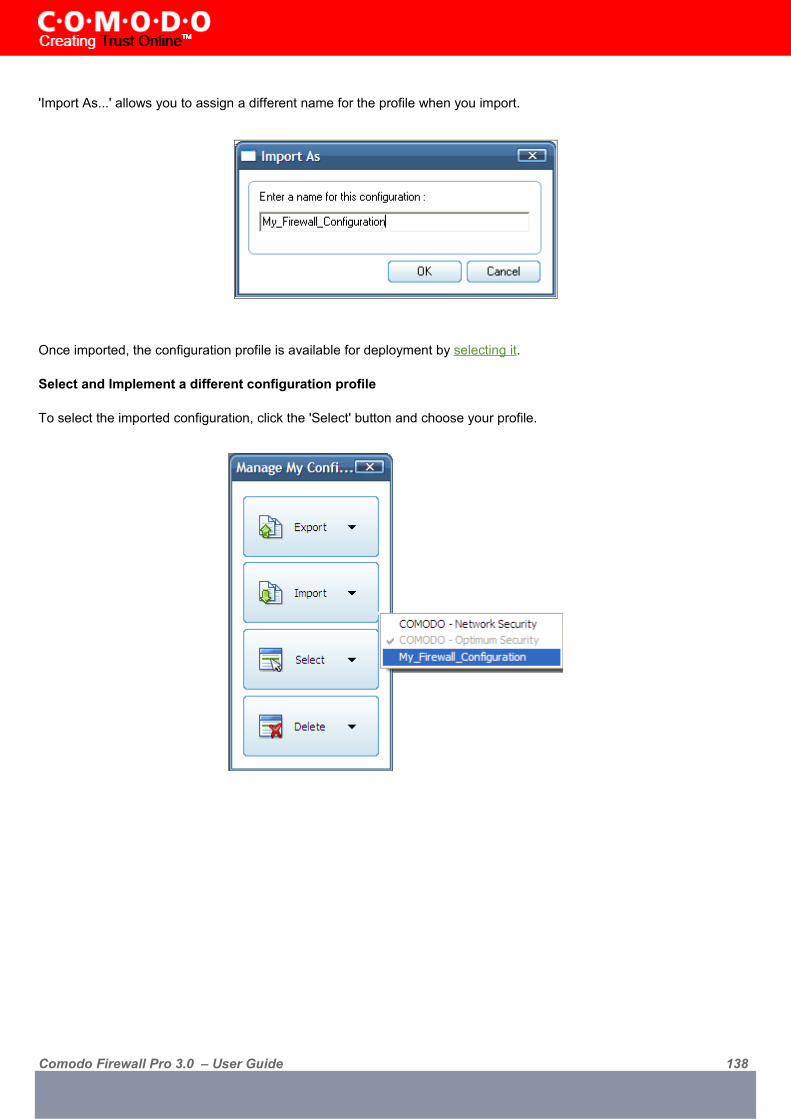
'Import As...' allows you to assign a different name for the profile when you import.
Once imported, the configuration profile is available for deployment by selecting it.
Select and Implement a different configuration profile
To select the imported configuration, click the 'Select' button and choose your profile.
Comodo Firewall Pro 3.0 – User Guide 138

Delete an inactive configuration profile
You can remove any unwanted configuration profiles using the 'Delete' button. You cannot delete the profile that the Fire-wall using - only the inactive ones. In the example below, 'My_Firewall_Configuration' is grayed out because it is the cur-rently active profile. You can however, delete the inactive profile, 'COMODO - Active Security'
Comodo Firewall Pro 3.0 – User Guide 139

Diagnostics
Comodo Firewall Pro contains it's own integrity checker. This checker will scan your system to make sure that the firewall is installed correctly. It will check your computers:
• File System - to check that all of Comodo's system files are present and have been correctly installed• Registry - to check that all of Comodo's registry keys are present and in the correctly installed• Checks for the presence of software that is known to have compatibility issues with Comodo Firewall Pro.
The results of the scan will be shown in the following pop-up window
Comodo Firewall Pro 3.0 – User Guide 140

Check for Updates
Updates can be downloaded and installed at any time by clicking the 'Check for Updates' link in Miscellaneous section.
To check for updates available, click on 'Start' button.
Comodo Firewall Pro 3.0 – User Guide 141

To initiate the update process click the Start button (If you want to download and install the updates later, click the 'Abort' button.)
After the installation process is completed, Click OK. You will then be asked to restart the system. Click Yes to reboot the system now or No to reboot at a later time.
Comodo Firewall Pro 3.0 – User Guide 142

Submit Suspicious Files
Files which are not in the Comodo safelist and are also unknown to the user can be submitted directly to Comodo for analysis and possible addition to the safelist.
File Submission Process
Files can be transferred into this module by clicking the 'Move to..' button in the 'My Pending Files' and 'My Own Safe Files' areas. The interface also allows you to manually add files that you would like to submit. Click 'Add' to manually add suspicious files to the 'List of Files'. Similarly, to remove a file from the submission process, click the 'Remove' button.
Use the 'Add...' button to manually select and add executables to the list.
Comodo Firewall Pro 3.0 – User Guide 143

The drop down allows you to choose the type of executable you wish to block. After locating the file or files you wish to submit, click the 'Open' button. Note: You cannot submit files that are already on the Comodo safe list.
You have the option to add an accompanying description to each file you submit and also the option to associate your email ID with the submitted file(s). Our analysts may use this address to contact you should they require further clarifica-tions.
Click 'Submit' to send the files to Comodo for analysis.
Comodo Firewall Pro 3.0 – User Guide 144

Please wait for the confirmation to be displayed after clicking the Submit button to ensure that the file is submitted suc-cessfully. Comodo will analyze the file you submit. If it is found to be trustworthy, it will be added to the Comodo safelist.
Comodo Firewall Pro 3.0 – User Guide 145

Browse Support Forums
The fastest way to get further assistance on Comodo Firewall Pro is by posting your question Comodo Forums, a mes-sage board exclusively created for our users to discuss anything related to our products.
Click the 'Browse Support Forums' link to be taken straight to the website at http://forums.comodo.com. Registration is free and you'll benefit from the expert contributions of developers and fellow users alike.
Online Knowledge Base
We also have an online knowledge base and support ticketing system at http://support.comodo.com. Registration is free.
Comodo Firewall Pro 3.0 – User Guide 146

Help
Clicking the 'Help' link in the Miscellaneous section will open this help guide. Each area has its own dedicated page con-taining detailed descriptions of the application's functionality.
Comodo Firewall Pro 3.0 – User Guide 147

About
Click the 'About' icon in the Miscellaneous Section Summary page to view the 'About' information dialog.
From here you can view information about the Version Number of the Firewall that is installed on your computer , the Web site from where you can download the latest version of the Comodo Firewall Pro and the status of your license like Subscription validity and the type of License.
Comodo Firewall Pro 3.0 – User Guide 148

About Comodo
Comodo is a leading global provider of Identity and Trust Assurance services on the Internet, with over 200,000
customers worldwide. Headquartered in Jersey City, NJ with global offices in the UK, Ukraine, and India, the company offers businesses and consumers the intelligent security, authentication and assurance services necessary to ensure trust in online transactions.
As a leading Certification Authority, and in combination with the Digital Trust Lab (DTL), Comodo helps enterprises address digital ecommerce and infrastructure needs with reliable, third generation solutions that improve customer relationship, enhance customer trust and create efficiencies across digital ecommerce operations. Comodo's solutions include SSL certificates, integrated Web hosting management solutions, web content authentication, infrastructure services, digital ecommerce services, digital certification, identity assurance, customer privacy and vulnerability management solutions.
Comodo is delivering the highly rated Comodo Firewall Pro free to consumers as part of an initiative to empower
consumers to create a safe and trusted online experience whenever they go online. This initiative will make available free to all consumers some of the leading tools that consumers can use to be safe and avoid leading threats such as Phishing attacks.
To download Comodo Firewall Pro and other free security products, visit http://www.Comodogroup.com/products/free_products.html
Comodo Firewall Pro 3.0 – User Guide 149