common exercise induced injuries: stretches and …...strengthening exercises for prevention of...
TRANSCRIPT

Common Exercise Induced Injuries: Stretches and Exercises for
Prevention and Treatment
Rotator Cuff Injuries: The most common upper-extremity problem experienced by both recreational and
professional athletes. The rotator cuff is made up of four muscles that help stabilize and move the shoulder:
supraspinatus, infraspinatus, teres minor, and subscapularis (SITS).
Common Injuries:
Rotator cuff impingements (squeezing of tendons under joint structures and surfaces)
Rotator cuff tendonitis (inflammation, pain, and swelling)
Rotator cuff tears (partial or complete tears of rotator cuff tendons)
Common symptoms include pain, weakness, and loss of range of motion in the shoulder.
Self-Care Treatment: Rest and ice multiple times a day.
Over the counter anti-inflammatory medication can help control swelling and pain.
Strengthening Exercises for Prevention of Rotator Cuff Injuries:
Exercise #1: Shoulder Press — Keep bar or
dumbbells slightly in front of shoulder and
above ear level.
Exercise #3: Bench Press – Keep
bar a few inches above chest
when lowering and keep arms
close to the body.
Start Finish
Exercise #2: Lateral Pull– Down – Pull bar down in
front of head.
Start Finish
Start Finish
Exercise #4: Reverse Incline Dumbbell Flys — Let
arms hang to both sides with elbows slightly bent.
Raise dumbbells as if you are touching elbows to the
ceiling until elbows are parallel to the floor.

Stretch #1: Lie flat on your back with your legs straight and cross
the injured leg across your body, keeping your shoulders flat on the
ground. Hold position and repeat with other leg.
IT Band Injuries: Iliotibial band syndrome – an overuse injury common in runners, cyclists, and participants of
other aerobic activities. Pain is often felt in the outside of the knee when the hip is flexed or the knee is bent.
Self-Care Treatment:
Rest and stretching are the first steps in treatment.
Use the foam roller to roll injured leg over the roller. Increase the time each day. Once most of the pain and swelling has started to subside, you can begin stretching and strengthening
exercises to strengthen the hip and knees.
Stretch #2: Lie flat on your back and pull the
knee of injured leg toward your chest. Keep
both legs straight and the uninjured leg flat on
the ground. Hold and repeat with other leg.
Stretch #3: Pull the foot of your
injured leg to the back of your
buttocks and cross uninjured leg
over injured leg and push down.
Hold position and repeat with
other leg.
Stretch #4: Cross injured leg over
the uninjured side and pull the leg as
close to your chest as possible. Hold
and repeat with other leg.
Exercise #1: Clams — Lie on your side with your hips and shoulders in a
straight line. Bend your knees so your thighs make a 90 degree angle with
your body. Keeping your feet together, slowly rotate the top leg so that the
knee opens. Return to starting position and repeat with both legs.
Start Finish
Exercise #2: Dirty Dog — Get in a hands and knees
position with your hips over your knees and your
wrists in line with your shoulders. Your neck should
be in line with your spine throughout the movement.
Without moving the rest of the body, slowly lift one
knee out and up to the side. Hold this position and
lower back to starting position. Repeat with both
legs.
Start Finish
Exercise #3: Squat —
Stand with feet shoulder
width apart and bend
knees until reaching a 90
degree angle with the
ground. Keep the knees
from going over the
front of your toes by
lowering as if you are
sitting into a chair.
Plantar Fasciitis: Pain and inflammation of the thick band of tissue, the plantar fascia, that runs through the bot-
tom of your foot, connecting your heel bone and your toes, and supporting the arch of your foot. This is one of the
most common causes of heel pain. The stabbing pain usually emerges in the morning during your first few steps,
after standing for a long period of time, or standing up from a seated position.
Self-Care Treatment:
Rest and ice.
Heat calf muscle before getting out of bed in the morning in order to increase blood flow.
Self-massage beginning over foreleg and continuing to the foot. Once most of the pain and swelling has started to subside, you can begin stretching and strengthening
exercises to strengthen the foot and ankle muscles.
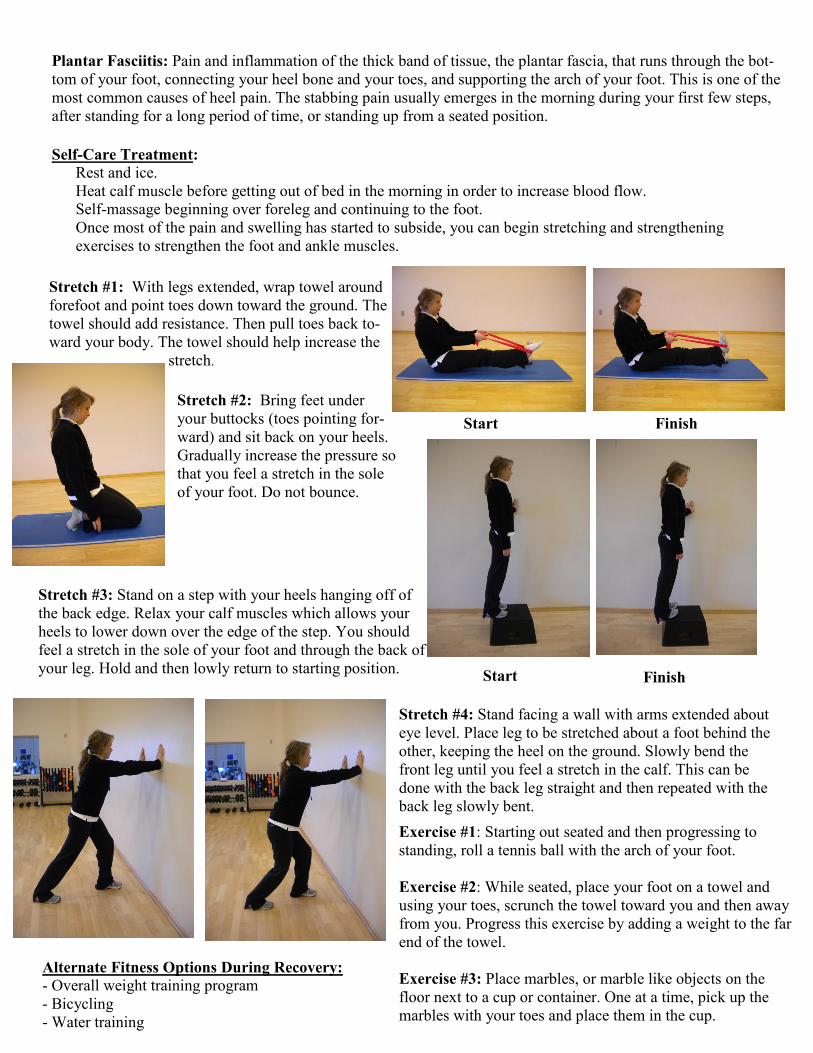
Stretch #1: With legs extended, wrap towel around
forefoot and point toes down toward the ground. The
towel should add resistance. Then pull toes back to-
ward your body. The towel should help increase the
stretch.
Start Finish
Stretch #2: Bring feet under
your buttocks (toes pointing for-
ward) and sit back on your heels.
Gradually increase the pressure so
that you feel a stretch in the sole
of your foot. Do not bounce.
Start Finish
Stretch #3: Stand on a step with your heels hanging off of
the back edge. Relax your calf muscles which allows your
heels to lower down over the edge of the step. You should
feel a stretch in the sole of your foot and through the back of
your leg. Hold and then lowly return to starting position.
Stretch #4: Stand facing a wall with arms extended about
eye level. Place leg to be stretched about a foot behind the
other, keeping the heel on the ground. Slowly bend the
front leg until you feel a stretch in the calf. This can be
done with the back leg straight and then repeated with the
back leg slowly bent.
Exercise #1: Starting out seated and then progressing to
standing, roll a tennis ball with the arch of your foot.
Exercise #2: While seated, place your foot on a towel and
using your toes, scrunch the towel toward you and then away
from you. Progress this exercise by adding a weight to the far
end of the towel.
Exercise #3: Place marbles, or marble like objects on the
floor next to a cup or container. One at a time, pick up the
marbles with your toes and place them in the cup.
Alternate Fitness Options During Recovery:
- Overall weight training program
- Bicycling
- Water training

Shin Splints: Many exercise-induced leg injuries are referred to as shin splints. These injuries are most
commonly caused by overuse.
Common Injuries (referred to as shin splints):
Medial Tibial Stress Syndrome (MTSS or periostitis)
Chronic Compartment Syndrome (causes pain over the front
of the shin bone and is quickly relieved by rest)
Stress Fractures (a small fracture of a bone caused by repeated physical strain)
Self-Care Treatment:
Discontinue workout as soon as you feel pain.
Ice the shin multiple times a day to help reduce the inflammation.
Anti-inflammatory medication can help control swelling and pain.
Once most of the pain and swelling has started to subside, you can begin stretching and strengthening
exercises to strengthen the lower leg and ankle muscles.
Stretch #1: Stand on a step with your heels hanging off of the
back edge. Relax your calf muscles which allows your heels to
lower down over the edge of the step and then lift as high as
you can onto your toes. Repeat multiple times.
Start Finish
Stretch #2: Stand facing a wall with arms extended about eye level.
Place leg to be stretched about a foot behind the other, keeping the
heel on the ground, and slowly bend the other leg until you feel a
stretch in the calf. Hold and repeat multiple times. Then repeat
again, this time slowly bending the back leg while still keeping heel
on the ground.
Stretch #3: To stretch the front of the low-
er leg, kneel down and sit on your heels,
toes pointing backwards. Carefully push
down on the heels and hold this position
and repeat. Stretch #4: Sit in a chair with shoes off
and injured leg extended. Flex the foot
back toward the body, and then point the
toes away. Repeat multiple times and
perform with both legs. Strengthening Exercises:
Exercise #1: Walk on your heels with toes up toward your body.
Exercise #2: Toe raises — Sit with both feet flat on the floor. Keep heel on the ground and lift the toes of one foot up
off the ground as high as possible. Hold for a few seconds and lower back to starting position. Repeat multiple times
and with both legs.
Exercise #3: Calf raises — Stand with legs shoulder width apart and knees straight. Lift heels off ground as high as
possible so you are standing on your tip toes and slowly lower back to starting position. Repeat multiple times. Start
with two legs at the same time and progress to one leg at a time.
Alternate Fitness Options During Recovery:
Stationary Bike
Pool Workouts
* For any of the above injuries, if symptoms do not improve or get worse, seek attention from a medical provider. If you have any questions about this workout, e-mail us at [email protected].