command center access control software - nextgenid.com enrollment primer.pdf · nextgenid bioaxs...
TRANSCRIPT

NextgenID BioAxs System Family: Member Enrollment Primer
Command Center Access Control Software™
NextgenID BioAxs System Family: Member Enrollment Primer Mailing Address: NextgenID, Ltd. 10226 San PedroSuite 100 San Antonio, TX 78216 USA Contacts: Phone: (210) 530-9991 Fax: (210) 530-9992 Email: [email protected]
Copyright ©2004 NextgenID, Ltd. All Rights Reserved 1

NextgenID BioAxs System Family: Member Enrollment Primer
Notices Notice: The information in this document is subject to change without notice. Please contact [email protected] and refer to P/N NG-DOC-BA-CC-Enrollment . Notice: Any use of this product is subject to the terms and acceptance of the NextgenID Ltd “Software Agreement.” You may request a copy of the “Software Agreement” from NextgenID Ltd by contacting [email protected]. Please review this agreement carefully. Notice: Windows™, Windows 2000™, Windows NT™, Windows XP™ are trademarks and/or registered trademark of Microsoft Corporation in the United States and/or other countries. Notice: The NextgenID Ltd. Logo, and the NextgenID Ltd products referred to herein are either the trademarks or the registered trademarks of NextgenID Ltd. All other trademarks are property of their respective owners. NextgenID Ltd. assumes no responsibility for errors that may appear in this manual. Information contained herein is subject to change without notice.
Copyright ©2004 NextgenID, Ltd. All Rights Reserved 2

NextgenID BioAxs System Family: Member Enrollment Primer
Introduction User enrollment and management on the NextgenID BioAxs access control platforms facilitated through the Command Center Access Con ol So ware included with your system. The member enrollment process is designed to promote high enrollment throughput for the entry of both member demographics and user biometric information.
tr ft
Some key features of the Command Center enrollment process are
• Centralized User enrollment o User management and enrollment is centralized within your facility, no need to
enroll at each secured point of entry (access panel).
• Multiple Enrollment stations. o One or more enrollment stations can be utilized to handle departmental or
organizational boundaries.
• Granular administration o Advanced features of the Command Center Software (Organizational Security)
allow for departmentalized and secure management of member and access control system resources throughout the organization.
The remaining sections illustrate the member enrollment process for a new member.
Copyright ©2004 NextgenID, Ltd. All Rights Reserved 3

NextgenID BioAxs System Family: Member Enrollment Primer
New Member Enrollment Wizard The member enrollment wizard guides the enroller through a series of steps necessary to gather a user’s demographic and biometric information. It is important to note that when using the Organizational Security features of the Command Center Software, the enroller may be restricted from certain enrollment operations described in the following sections; operations can include but are not limited to actions such as:
• Assigning Access Panel privileges • Enabling system lockdown override for a member. • Modifying user biometric and non-biometric access credentials.
Gathering Member Information
Enter the Member's Demographic Information First Name and Last Name are required fields. Depending on the System Settings of the Command Center, a PIN may or may not be required. A PIN must be numeric. Duplicate PINs are not allowed.
Select Member Settings Checking the "Member has Lockdown Override Privilege" box will allow this Member access during a Lockdown State. Checking the Member's Privileges Will Expire On check box will allow the Administrator to set an expiration date. If this box is not checked the member account will never expire.
Scan Integrated Systems Information If one or more of you installed BioAxs panels access have been configured to accept a third party reader credential (wiegand card, fob etc), the information is entered here via a credential reader appropriate for the media. Duplicate credentials are not allowed. If your system does not include this optional equipment you may skip this section.
Copyright ©2004 NextgenID, Ltd. All Rights Reserved 4

NextgenID BioAxs System Family: Member Enrollment Primer
Figure 1 Select the [Next] button at the bottom of the page to continue to next step.
Copyright ©2004 NextgenID, Ltd. All Rights Reserved 5

NextgenID BioAxs System Family: Member Enrollment Primer
DOD Common Access Card Enrollment A Department of Defense (DoD) Common Access Card (CAC) can be used for populating most of the member demographic information along with the CAC EDIPI card credential. The CAC Enrollment mode is enabled by the system administrator. Utilizing the barcode reader included in the CAC enrollment kit, the enroller is prompted to scan the member’s card. Upon successful scan, the member’s demographic information along with the CAC Credential Identifier will be automatically input into the member information and CAC data screens. Figure 2, Figure 3
Figure 2 CAC Enrollment via barcode reader
Copyright ©2004 NextgenID, Ltd. All Rights Reserved 6

NextgenID BioAxs System Family: Member Enrollment Primer
Figure 3 CAC Demographics
Copyright ©2004 NextgenID, Ltd. All Rights Reserved 7

NextgenID BioAxs System Family: Member Enrollment Primer
Member Enrollment: Gathering Additional Data Gathering Additional Data Page is an optional, customizable page that allows for the collection of additional data about the Member. If desired your organization can define custom fields to be filled in for each member during the enrollment process.
1. Enter additional data as requested Type the text in the custom fields provided.
Since this step is optional, you can simply click on the [Next] button to skip this step.
Select the [Next] button at the bottom of the page to continue to next step.
Copyright ©2004 NextgenID, Ltd. All Rights Reserved 8

NextgenID BioAxs System Family: Member Enrollment Primer
Member Enrollment: Gathering Fingerprints
Fingerprint Enrollment
1. Select the finger(s) you wish to enroll The system is capable of enrolling all ten fingerprints for a given user. Generally, it is good practice to enroll two or three fingers for each Member. The Member enrolling will need to press his/her finger on the scanner ten times for each finger selected for enrollment. It takes on average 20 to 30 seconds to enroll each finger.
2. Select a Finger Once you have decided on the finger that you would like to enroll, click on the [Enroll] button in front of the finger name. This action will automatically take you to the fingerprint enrollment wizard.
Copyright ©2004 NextgenID, Ltd. All Rights Reserved 9

NextgenID BioAxs System Family: Member Enrollment Primer
A. Step 1 of 2 - Fingerprint Enrollment You will be prompted to scan the finger that you selected a total of 5 times. Each time the finger is scanned, a feature count is gathered and the results displayed in the status box above the image windows. The higher the feature count, the quicker you will be located once you scan your finger on the sensor. So your goal is to get a high feature count. You may restart the enrollment at anytime by selecting the [Restart Enrollment] button. Should you find it necessary to change fingers, just click on the [Cancel] button and select a new finger to enroll.
When you have scanned your finger with five acceptable prints, you will automatically advance to step 2 of 2 of the fingerprint enrollment wizard.
Copyright ©2004 NextgenID, Ltd. All Rights Reserved 10

NextgenID BioAxs System Family: Member Enrollment Primer
B. Step 2 of 2 – Fingerprint Template Quality Test This optional (but recommended) step is a quality measure that assures that the fingerprint that was enrolled in step 1 is capable of matching the member currently being enrolled. If there are any problems you will be asked to restart the test or re-enroll the finger. When you scan your finger, the feature count will once again be displayed in the status box. Once the finger has been successfully scanned and matched five times and you receive a message indicating Testing Completed Successfully. Click on the [Finish] button. You are then returned to Step 2 of 6, Gathering Fingerprints and may elect to continue or enroll another finger.
At this point, an enrollment template for the selected finger has been generated. Click on Finish to complete the fingerprint enrollment process. If you desire, you may enroll a second finger or set the Duress indicator for an enrolled finger
Copyright ©2004 NextgenID, Ltd. All Rights Reserved 11
NextgenID BioAxs System Family: Member Enrollment Primer
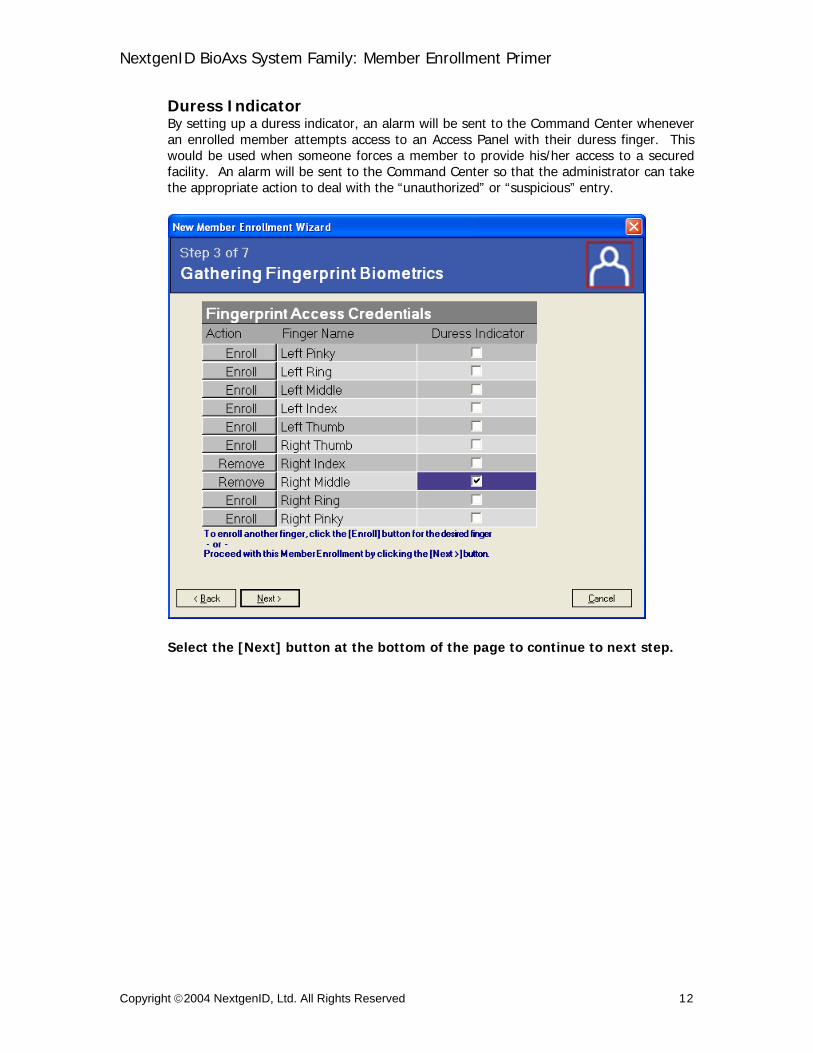
Duress Indicator By setting up a duress indicator, an alarm will be sent to the Command Center whenever an enrolled member attempts access to an Access Panel with their duress finger. This would be used when someone forces a member to provide his/her access to a secured facility. An alarm will be sent to the Command Center so that the administrator can take the appropriate action to deal with the “unauthorized” or “suspicious” entry.
Select the [Next] button at the bottom of the page to continue to next step.
Copyright ©2004 NextgenID, Ltd. All Rights Reserved 12

NextgenID BioAxs System Family: Member Enrollment Primer
Member Enrollment: Enroll a Trusted Photograph If your system is setup for face recognition as a biometric signature, adding a photograph of the enrolling member will assist the administrator in his/her job. Additionally, this photograph will be displayed along with any access control events or alarms generated by this member.
1. Click on [Start Video] The enrolling member’s picture will be displayed under Video Source.
2. Click on [Take Picture] If the administrator is satisfied with the picture displayed under Video Source, he/she may click on [Take Picture] to capture the image.
3. Trusted Enrollment Photograph
After the administrator clicks on [Take Picture], the image is displayed under the Trusted Enrollment Photograph section. If for any reason, the administrator is not satisfied with the image, he/she can click on [Delete Photo] to delete the image and start again.
Select the [Next] button at the bottom of the page to continue to next step.
Copyright ©2004 NextgenID, Ltd. All Rights Reserved 13

NextgenID BioAxs System Family: Member Enrollment Primer
Member Enrollment: Gathering Iris Information If your system is setup to use iris as a biometric signature, the iris information is captured in this step. Simply click on the [Enroll] button for either the left or right eye and follow the voice prompt to enroll the appropriate iris. Iris Enrollment typically takes between 5 and 20 seconds per eye.
Select the [Next] button at the bottom of the page to continue to next step.
Copyright ©2004 NextgenID, Ltd. All Rights Reserved 14

NextgenID BioAxs System Family: Member Enrollment Primer
Member Enrollment: Assigning Group Memberships Group assignments are the most efficient way to manage the access to your facility. It allows the Administrator to assign the same access for an entire group of Members. If the access needs to change, only the group access has to be modified to apply the change to all Members of the group.
1. Select the appropriate group(s) that the Member will be enrolled Select a group located in the Available Groups list and use the [Add>] button to enroll the Member in that group. You may assign multiple groups as needed. To remove groups during enrollment use the [<Remove] button. This will remove the group from the Enrolled Groups list and place it in the Available Groups list.
Select the [Next] button at the bottom of the page to continue to the next step.
Copyright ©2004 NextgenID, Ltd. All Rights Reserved 15

NextgenID BioAxs System Family: Member Enrollment Primer
Member Enrollment: Assign Individual Access Privileges Assign Individual Access Privileges page enables the Member to be assigned to an Individual Group. Additionally, access panel(s), access times, and Guest Privileges can be assigned at this point.
1. Adding Individual Access Privileges Click on the Individual Access Privileges box.
2. Assigning an Access Panel
Select the desired access panel from the Access Panel list.
3. Assigning Guest Privileges (For systems installed with Tailgating Countermeasures) Click on the Guest Privilege box.
4. Assigning Access Times
Select a Start Time (Day, Hour and Minute) and a Stop Time (Day, Hour and Minute). Once the desired times have been selected click on the [Add] button. This step may be repeated to assign differing access time for the week.
Copyright ©2004 NextgenID, Ltd. All Rights Reserved 16

NextgenID BioAxs System Family: Member Enrollment Primer
Finishing the Member Enrollment process Once the selected access times have been added, select the [Finish] button at the bottom of the page to complete the Member Enrollment. The Member will become active within a few seconds of completing the enrollment process.
Copyright ©2004 NextgenID, Ltd. All Rights Reserved 17

NextgenID BioAxs System Family: Member Enrollment Primer
Editing Member Information The Member information entered during enrollment can be accessed by clicking on the [Edit] button on the Members tool bar. Data can be edited and saved as desired. These steps consist of:
• Editing Member Information including Member Demographics and Member Settings • Editing Additional Information • Editing Group Membership • Enrolling or removing fingers • Editing Access Privileges
Editing an Existing Member Navigate to the Edit Member link in the command center.
1. Select Enrollments in the left navigation window
2. Select Members in the left navigation window
3. Locate the Member by using any of the following methods:
A. Perform a Search See Member Search for further details on using this option.
B. Use the alphabetical listing (A-Z bar) Select a letter on the A-Z bar on the right side of the Member screen to display an alphabetically sorted list of Members by last name.
C. Click on the Members Icon in the left frame The last 30 enrolled Member names will appear in the Members Viewer.
4. Highlight the Member you wish to edit by clicking on the Member's name.
Click on the [Edit] button on the Members Tool Bar (or double click on the Member). Select the appropriate tab containing the information you want to edit.
Copyright ©2004 NextgenID, Ltd. All Rights Reserved 18

NextgenID BioAxs System Family: Member Enrollment Primer
A. Demographics Member Information Tab: This screen will allow you to modify the Member demographic information, whether or not member has override privileges, if there is an expiration date on the account, and proximity or magnetic card ID (if present). DoD Profile Tab: This screen will allow you to modify the Member DoD profile via CAC Card scan or manual input. Additional Data Tab: This is a customizable area that allows you to store additional data. Enrollment Photograph Tab: An administrator can delete an old enrollment photograph and take an updated picture from this tab.
B. Biometrics Fingerprint Enrollment Tab: This will allows you to enroll or remove fingerprints. Face Enrollment Tab: An administrator can approve or reject member pictures here for use with the face recognition biometric. Iris Enrollment Tab: This will allow you to enroll or remove iris information.
C. Access Privileges Group Membership Tab: This will allow you to edit or assign Group Membership Access Privileges. Individual Access Tab: This will allow you to edit or assign Individual Access Privileges.
Copyright ©2004 NextgenID, Ltd. All Rights Reserved 19

NextgenID BioAxs System Family: Member Enrollment Primer
Delete Member The Delete Member function performs a two-step delete to confirm the deletion prior to removal. When the delete button is pressed a confirmation will appear to verify that you want to delete the Member. Once the Member has been deleted it is not recoverable. All access times for the Member will expire. Navigate to the Members Section
• Select [Enrollments] button in the left navigation window • Select Members Icon in the left navigation window
Deleting an Existing Member The steps below detail how to delete a Member. Once a Member is deleted it is not recoverable. The Member's Access privileges will expire and entry will not be allowed.
1. Locate the Member Click on the [Enrollments] button; click on the Members Icon; using the A-Z bar, click on the first letter of the last name of the Member that you want to delete; select the member from the Members Viewer
2. Delete the Member
Click on the [Delete] button in the Member Tool Bar. 3. Confirm the Delete
Dialog box appears to confirm that you want to delete the member. Click on the [OK] button to confirm or the [Cancel] button to cancel. Member is removed from the viewer and all access privileges have expired.
Copyright ©2004 NextgenID, Ltd. All Rights Reserved 20