combining multiple images with enfuse 4 - …enblend.sourceforge.net/enfuse.doc/enfuse_4.2.pdf ·...
TRANSCRIPT

Combining Multiple Images
with
Enfuse 4.2
Andrew Mihal∗ Christoph Spiel
2016-03-29†
∗Original author†Date reliably determined via source-code management system.

i
Abstract
This manual is for Enfuse version 〈4.2〉, a tool to merge different exposuresof the same scene to produce an image that looks much like a tone-mappedimage.
Copyright c© 2004–2009 Andrew Mihal.Copyright c© 2009–2016 Christoph Spiel.
Permission is granted to copy, distribute and/or modify thisdocument under the terms of the GNU Free DocumentationLicense, Version 1.2 or any later version published by the FreeSoftware Foundation; with no Invariant Sections, no Front-CoverTexts and no Back-Cover Texts. A copy of the license is includedin the section entitled “GNU Free Documentation License”.

Short Contents
1 Overview 1
2 Known Limitations 3
3 Workflowc 4
4 Invocation 15
5 Weighting Functions 44
6 Color Spacesc 69
7 Understanding Masksc 75
8 Applications of Enfuse 78
A Helpful Programsc 91
B Bug Reportsc 94
C Authorsc 97
D GNU FDLc 98
Indices 105
Contents
List of Tables . . . . . . . . . . . . . . . . . . . . . . . . . . . . . . vi
List of Figures . . . . . . . . . . . . . . . . . . . . . . . . . . . . . vii
List of Examples . . . . . . . . . . . . . . . . . . . . . . . . . . . . viii
1 Overview 1
2 Known Limitations 3
3 Workflowc 4
3.1 Standard Workflow . . . . . . . . . . . . . . . . . . . . . . . . 4
3.2 External Masks . . . . . . . . . . . . . . . . . . . . . . . . . . 6
3.3 Interacting with Enfusec . . . . . . . . . . . . . . . . . . . . . 8
3.3.1 Finding Out Details . . . . . . . . . . . . . . . . . . . 8
3.3.2 Console Messages . . . . . . . . . . . . . . . . . . . . . 12
3.3.3 Environment Variables . . . . . . . . . . . . . . . . . . 14
4 Invocation 15
4.1 Image Requirements . . . . . . . . . . . . . . . . . . . . . . . 15
4.2 Command-Line Options . . . . . . . . . . . . . . . . . . . . . 15
4.2.1 Common Optionsc . . . . . . . . . . . . . . . . . . . . 16
4.2.2 Advanced Optionsc . . . . . . . . . . . . . . . . . . . . 18
4.2.3 Fusion Options . . . . . . . . . . . . . . . . . . . . . . 22
4.2.4 Expert Options . . . . . . . . . . . . . . . . . . . . . . 23
4.2.5 Expert Fusion Options . . . . . . . . . . . . . . . . . . 25
4.2.6 Information Optionsc . . . . . . . . . . . . . . . . . . 35
4.3 Option Delimitersc . . . . . . . . . . . . . . . . . . . . . . . . 36
4.3.1 Numeric Arguments . . . . . . . . . . . . . . . . . . . 36
4.3.2 Filename Arguments . . . . . . . . . . . . . . . . . . . 36
4.4 Response Filesc . . . . . . . . . . . . . . . . . . . . . . . . . . 37
4.4.1 Response File Format . . . . . . . . . . . . . . . . . . 38
4.4.2 Syntactic Comments . . . . . . . . . . . . . . . . . . . 39
iv
4.4.3 Globbing Algorithms . . . . . . . . . . . . . . . . . . . 39
4.4.4 Default Layer Selection . . . . . . . . . . . . . . . . . 41
4.5 Layer Selectionc . . . . . . . . . . . . . . . . . . . . . . . . . . 41
4.5.1 Layer Selection Syntax . . . . . . . . . . . . . . . . . . 41
4.5.2 Tools for Multi-Page Files . . . . . . . . . . . . . . . . 43
5 Weighting Functions 44
5.1 Weighting Pixels . . . . . . . . . . . . . . . . . . . . . . . . . 44
5.1.1 Weighted Average . . . . . . . . . . . . . . . . . . . . 44
5.1.2 Disabling Averaging . . . . . . . . . . . . . . . . . . . 45
5.1.3 Single Criterion Fusing . . . . . . . . . . . . . . . . . . 45
5.2 Exposure Weighting . . . . . . . . . . . . . . . . . . . . . . . 46
5.2.1 Built-In Functions . . . . . . . . . . . . . . . . . . . . 46
5.2.2 User-Defined Functions . . . . . . . . . . . . . . . . . 52
5.2.3 User-Defined Dynamic Functions . . . . . . . . . . . . 52
5.3 Saturation Weighting . . . . . . . . . . . . . . . . . . . . . . . 61
5.4 Local Contrast Weighting . . . . . . . . . . . . . . . . . . . . 61
5.4.1 Standard Deviation . . . . . . . . . . . . . . . . . . . 62
5.4.2 Laplacian of Gaussian . . . . . . . . . . . . . . . . . . 63
5.4.3 Blend SDev and LoG . . . . . . . . . . . . . . . . . . 66
5.4.4 Scaling and Choice of Mode . . . . . . . . . . . . . . . 66
5.5 Local Entropy Weighting . . . . . . . . . . . . . . . . . . . . 66
6 Color Spacesc 69
6.1 Mathematical Preliminaries . . . . . . . . . . . . . . . . . . . 69
6.2 Floating-Point Images . . . . . . . . . . . . . . . . . . . . . . 71
6.3 Color Profiles . . . . . . . . . . . . . . . . . . . . . . . . . . . 72
6.4 Blending Color Spaces . . . . . . . . . . . . . . . . . . . . . . 72
6.5 Practical Considerations . . . . . . . . . . . . . . . . . . . . . 74
7 Understanding Masksc 75
7.1 Masks In Input Files . . . . . . . . . . . . . . . . . . . . . . . 75
7.2 Weight Mask Files . . . . . . . . . . . . . . . . . . . . . . . . 77

v
8 Applications of Enfuse 78
8.1 What Makes Images Fusable? . . . . . . . . . . . . . . . . . . 78
8.2 Repetition – Noise Reduction . . . . . . . . . . . . . . . . . . 79
8.3 Exposure Series – Dynamic Range Increase . . . . . . . . . . 79
8.3.1 Tips For Beginners . . . . . . . . . . . . . . . . . . . . 80
8.3.2 Common Misconceptions . . . . . . . . . . . . . . . . 81
8.4 Flash Exposure Series – Directed Lighting . . . . . . . . . . . 81
8.5 Polarization Series – Saturation Enhancement . . . . . . . . . 81
8.6 Focus Stacks – Depth-of-Field Increase . . . . . . . . . . . . . 82
8.6.1 Why create focus stacks? . . . . . . . . . . . . . . . . 82
8.6.2 Preparing Focus Stacks . . . . . . . . . . . . . . . . . 82
8.6.3 Local Contrast Based Fusing . . . . . . . . . . . . . . 82
8.6.4 Basic Focus Stacking . . . . . . . . . . . . . . . . . . . 83
8.6.5 Advanced Focus Stacking . . . . . . . . . . . . . . . . 83
8.6.6 Tips For Focus Stacking Experts . . . . . . . . . . . . 87
A Helpful Programsc 91
A.1 Raw Image Conversion . . . . . . . . . . . . . . . . . . . . . . 91
A.2 Image Alignment and Rendering . . . . . . . . . . . . . . . . 91
A.3 Image Manipulation . . . . . . . . . . . . . . . . . . . . . . . 91
A.4 High Dynamic Range . . . . . . . . . . . . . . . . . . . . . . . 92
A.5 Libraries . . . . . . . . . . . . . . . . . . . . . . . . . . . . . . 92
A.6 Meta-Data Handling . . . . . . . . . . . . . . . . . . . . . . . 92
A.7 Camera Firmware Extension . . . . . . . . . . . . . . . . . . 93
B Bug Reportsc 94
B.1 Found a Bug? . . . . . . . . . . . . . . . . . . . . . . . . . . . 94
B.2 How to Report Bugs . . . . . . . . . . . . . . . . . . . . . . . 94
B.3 Sending Patches . . . . . . . . . . . . . . . . . . . . . . . . . 95
C Authorsc 97
D GNU FDLc 98

vi
Indices 105
Syntactic Comment Index . . . . . . . . . . . . . . . . . . . . . . . 105
Program/Application Index . . . . . . . . . . . . . . . . . . . . . . 106
Option Index . . . . . . . . . . . . . . . . . . . . . . . . . . . . . . 107
General Index . . . . . . . . . . . . . . . . . . . . . . . . . . . . . . 109
Chapters or sections marked with a “c”-sign appear in bothmanuals, i.e. the Enfuse manual and the Enblend manual. Thecommonality extends to all sub-sections of the marked one.
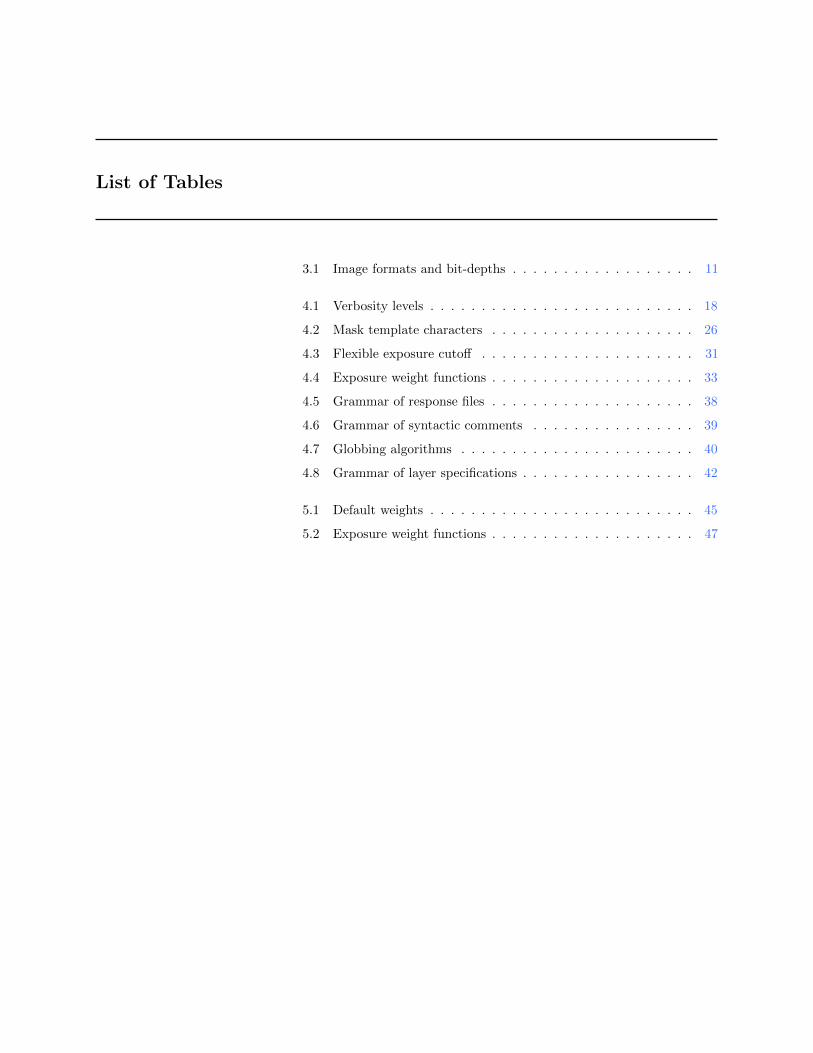
List of Tables
3.1 Image formats and bit-depths . . . . . . . . . . . . . . . . . . 11
4.1 Verbosity levels . . . . . . . . . . . . . . . . . . . . . . . . . . 18
4.2 Mask template characters . . . . . . . . . . . . . . . . . . . . 26
4.3 Flexible exposure cutoff . . . . . . . . . . . . . . . . . . . . . 31
4.4 Exposure weight functions . . . . . . . . . . . . . . . . . . . . 33
4.5 Grammar of response files . . . . . . . . . . . . . . . . . . . . 38
4.6 Grammar of syntactic comments . . . . . . . . . . . . . . . . 39
4.7 Globbing algorithms . . . . . . . . . . . . . . . . . . . . . . . 40
4.8 Grammar of layer specifications . . . . . . . . . . . . . . . . . 42
5.1 Default weights . . . . . . . . . . . . . . . . . . . . . . . . . . 45
5.2 Exposure weight functions . . . . . . . . . . . . . . . . . . . . 47

List of Figures
3.1 Photographic workflow . . . . . . . . . . . . . . . . . . . . . . 5
3.2 External mask workflow . . . . . . . . . . . . . . . . . . . . . 7
4.1 Entropy cutoff function . . . . . . . . . . . . . . . . . . . . . 28
4.2 Exposure cutoff function . . . . . . . . . . . . . . . . . . . . . 31
5.1 Gaussian weight function . . . . . . . . . . . . . . . . . . . . 47
5.2 Lorentzian function . . . . . . . . . . . . . . . . . . . . . . 48
5.3 Half-Sine function . . . . . . . . . . . . . . . . . . . . . . . . 49
5.4 Full-Sine function . . . . . . . . . . . . . . . . . . . . . . . . . 50
5.5 Bi-Square function . . . . . . . . . . . . . . . . . . . . . . . . 51
5.6 Comparison of exposure weight functions . . . . . . . . . . . 52
5.7 Local analysis window . . . . . . . . . . . . . . . . . . . . . . 62
5.8 Laplacian-of-Gaussian . . . . . . . . . . . . . . . . . . . . 65
5.9 Entropy function . . . . . . . . . . . . . . . . . . . . . . . . . 67
6.1 Log-transform . . . . . . . . . . . . . . . . . . . . . . . . . . . 71
8.1 Sharp edge . . . . . . . . . . . . . . . . . . . . . . . . . . . . 84
8.2 Smooth edge . . . . . . . . . . . . . . . . . . . . . . . . . . . 85
8.3 Focus stacking decision tree. . . . . . . . . . . . . . . . . . . . 88

List of Examples
3.1 Output of ‘enfuse --version’ . . . . . . . . . . . . . . . . . 83.2 Output of ‘enfuse --version --verbose’ . . . . . . . . . . 103.3 Output of ‘enfuse --show-software-components’ . . . . . . 124.1 ImageMagick for exposure cutoff . . . . . . . . . . . . . . . . . 304.2 Complete response file . . . . . . . . . . . . . . . . . . . . . . 394.3 Filename-globbing syntactic comment . . . . . . . . . . . . . 405.1 Simple dynamic exposure weight function . . . . . . . . . . . 565.2 Templated dynamic exposure weight function . . . . . . . . . 575.3 Dynamic exposure weight function with extra arguments . . . 597.1 Using identify. . . . . . . . . . . . . . . . . . . . . . . . . . . 757.2 Using tiff info. . . . . . . . . . . . . . . . . . . . . . . . . . . . 76
x
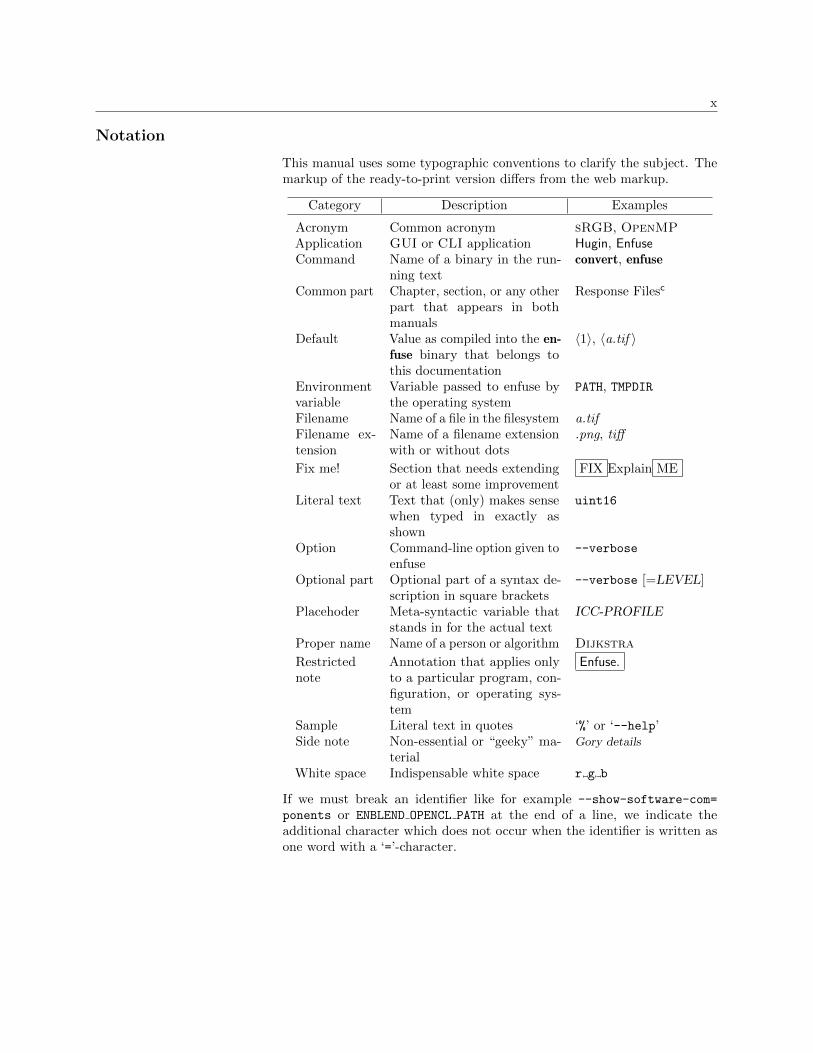
Notation
This manual uses some typographic conventions to clarify the subject. Themarkup of the ready-to-print version differs from the web markup.
Category Description Examples
Acronym Common acronym sRGB, OpenMPApplication GUI or CLI application Hugin, EnfuseCommand Name of a binary in the run-
ning textconvert, enfuse
Common part Chapter, section, or any otherpart that appears in bothmanuals
Response Filesc
Default Value as compiled into the en-fuse binary that belongs tothis documentation
〈1〉, 〈a.tif 〉
Environmentvariable
Variable passed to enfuse bythe operating system
PATH, TMPDIR
Filename Name of a file in the filesystem a.tifFilename ex-tension
Name of a filename extensionwith or without dots
.png, tiff
Fix me! Section that needs extendingor at least some improvement
FIX Explain ME
Literal text Text that (only) makes sensewhen typed in exactly asshown
uint16
Option Command-line option given toenfuse
--verbose
Optional part Optional part of a syntax de-scription in square brackets
--verbose [=LEVEL]
Placehoder Meta-syntactic variable thatstands in for the actual text
ICC-PROFILE
Proper name Name of a person or algorithm Dijkstra
Restrictednote
Annotation that applies onlyto a particular program, con-figuration, or operating sys-tem
Enfuse.
Sample Literal text in quotes ‘%’ or ‘--help’Side note Non-essential or “geeky” ma-
terialGory details
White space Indispensable white space r g b
If we must break an identifier like for example --show-software-com=
ponents or ENBLEND OPENCL PATH at the end of a line, we indicate theadditional character which does not occur when the identifier is written asone word with a ‘=’-character.
1 Overview
Enfuse merges overlapping images using the Mertens-KautzVan Reethexposure fusion algorithm.) This is a quick way for example to blenddifferently exposed images into a nice output image, without producingintermediate high-dynamic range (HDR) images that are then tone-mappedto a viewable image. This simplified process often works much better thantone-mapping algorithms.
Enfuse can also be used to build extended depth-of-field (DoF) images byblending a focus stack.
The idea is that pixels in the input images are weighted according to qualitiessuch as, for example, proper exposure, good local contrast, or high saturation.These weights determine how much a given pixel will contribute to the finalimage.
A Burt-Adelson multi-resolution spline blender) is used to combine theimages according to the weights. The multi-resolution blending ensures thattransitions between regions where different images contribute are difficult tospot.
Enfuse uses up to four criteria to judge the quality of a pixel:
ExposureThe exposure criteria favors pixels with luminance close to the middleof the range. These pixels are considered better exposed than thosewith high or low luminance levels.
SaturationThe saturation criteria favors highly-saturated pixels. Note that satu-ration is only defined for color pixels.
Local ContrastThe contrast criteria favors pixels inside a high-contrast neighborhood.Enfuse can use standard deviation, Laplacian magnitude, or a blendof both as local contrast measure.
Local EntropyThe entropy criteria prefers pixels inside a high-entropy neighborhood.In addition, Enfuse allows the user to mitigate the problem of noisyimages when using entropy weighting by setting a black threshold.
See Table 5.1 for the default weights of these criteria.
) Tom Mertens, Jan Kautz, and Frank van Reeth, “Exposure Fusion”, Pro-ceedings of the 15th Pacific Conference on Computer Graphics and Applications 2007,pages 382–390.
) Peter J. Burt and Edward H. Adelson, “A Multiresolution Spline With Appli-cation to Image Mosaics”, ACM Transactions on Graphics, Vol. 2, No. 4, October 1983,pages 217–236.

2
For the concept of pixel weighting, and details on the different weightingfunctions, see Chapter 5 on page 44.
Adjust how much importance is given to each criterion by setting the weightparameters on the command line. For example, if you set
--exposure-weight=1.0 --saturation-weight=0.5
Enfuse will favor well-exposed pixels over highly-saturated pixels when blend-ing the source images. The effect of these parameters on the final result willnot always be clear in advance. The quality of the result is subject to yourartistic interpretation. Playing with the weights may or may not give a morepleasing result. The authors encourage the users to experiment, perhapsusing down-sized or cropped images for speed.
Down-sizing (also called “down-sampling”) with a good interpo-lator reduces noise, which might not be desired to judge the imagequality of the original-size image. Cropping can offer an alternative,though.
Enfuse expects but does not require each input image to have an alphachannel. By setting the alpha values of pixels to zero, users can manuallyremove those pixels from consideration when blending. If an input imagelacks an alpha channel, Enfuse will issue a warning and continue assumingall pixels should contribute to the final output. Any alpha value other thanzero is interpreted as “this pixel should contribute to the final image”.
The input images are processed in the order they appear on the commandline. Multi-layer images are processed from the first layer to the last beforeEnfuse considers the next image on the command line. Consult Section 4.5on how to change the images’ order within multi-layer image files.
Find out more about Enfuse on its SourceForge) web page).
) http://sourceforge.net/) http://enblend.sourceforge.net/

2 Known Limitations
Enfuse has its limitations. Some of them are inherent to the programs properothers are “imported” by using libraries as for example VIGRA). Here aresome of the known ones.
• The BigTIFF image format is not supported.
• Total size of any – even intermediate – image is limited to 231 pixels,this is two giga-pixels.
) https://ukoethe.github.io/vigra/

3 Photographic Workflowc
Enfuse and Enblend are parts of a chain of tools to assemble images.
• Enblend combines a series of pictures taken at the same location butin different directions.
• Enfuse merges photos of the same subject at the same location andsame direction, but taken with varying exposure parameters.
3.1 Standard, All-In-One Workflow
Figure 3.1 shows where Enfuse and Enblend sit in the tool chain of thestandard workflow.
Take ImagesTake multiple images to form a panorama, an exposure series, a focusstack, etc.. . .
There is one exception with Enfuse when a single raw image is convertedmultiple times to get several – typically differently “exposed” – images.
Exemplary Benefits:
• Many pictures taken from the same vantage point but showingdifferent viewing directions. – Panorama
• Pictures of the same subject exposed with different shutter speeds.– Exposure series
• Images of the same subject focused at differing distances. – Focusstack
Remaining Problem: The “overlayed” images may not fit together, thatis the overlay regions may not match exactly.
Convert ImagesConvert the raw data) exploiting the full dynamic range of the cameraand capitalize on a high-quality conversion.
Align ImagesAlign the images so as to make them match as well as possible.
Again there is one exception and this is when images naturally align.For example, a series of images taken from a rock solid tripod witha cable release without touching the camera, or images taken with ashift lens, can align without further user intervention.
This step submits the images to affine transformations.
) https://luminous-landscape.com/understanding-raw-files-explained/

3.1. STANDARD WORKFLOW 5
Take Images
Convert Images
[raw]
[else]
DCRaw, UFRaw, etc.
Align Images
Combine Images
Hugin, PanoTools
Postprocess
Enblend, Enfuse
The Gimp et al.
Figure 3.1: Photographic workflow with Enfuse and Enblend.
3.2. EXTERNAL MASKS 6
If necessary, it rectifies the lens’ distortions (e.g. barrel or pincushion),too.
Sometimes even luminance or color differences between pairs of over-laying images are corrected (“photometric alignment”).
Benefit: The overlay areas of images match as closely as possiblegiven the quality if the input images and the lens model used in thetransformation.
Remaining Problem: The images may still not align perfectly, forexample, because of parallax) errors, or blur produced by camerashake.
Combine ImagesEnfuse and Enblend combine the aligned images into one.
Benefit: The overlay areas become imperceptible for all but the mostmisaligned images.
Remaining Problem: Enblend and Enfuse write images with an alphachannel; for more information on alpha channels see Chapter 7 onpage 75. Furthermore, the final image rarely is rectangular.
Post-processPost-process the combined image with your favorite tool. Often theuser will want to crop the image and simultaneously throw away thealpha channel.
View
Enjoy
3.2 External Masks
In the usual workflow Enfuse and Enblend generate the blending and fusingmasks according to the command-line options and the input images includingtheir associated alpha-channels, and then they immediately use these masksfor multi-resolution blending or multi-resolution fusing the output image.
Sometimes more control over the masks is wanted. To this end, bothapplications provide the option pair --load-masks and --save-masks. SeeChapter 4 on page 15, for detailed explanations of both options. With thehelp of these options the processing can be broken up into two phases:
1. Save masks with --save-masks. Generate masks and save them intoimage files.
Avoid option --output here unless the blended or fused image at thispoint is wanted.
2. Load possibly modified masks with --load-masks from files and thenblend or fuse the final image with the help of the loaded masks only.
) https://en.wikipedia.org/wiki/Parallax
3.2. EXTERNAL MASKS 7
Generate Masks
Modify Masks
Enblend, Enfuse --save-masks
Blend or FuseUsing Masks
Any image editor
Enblend, Enfuse --load-masks
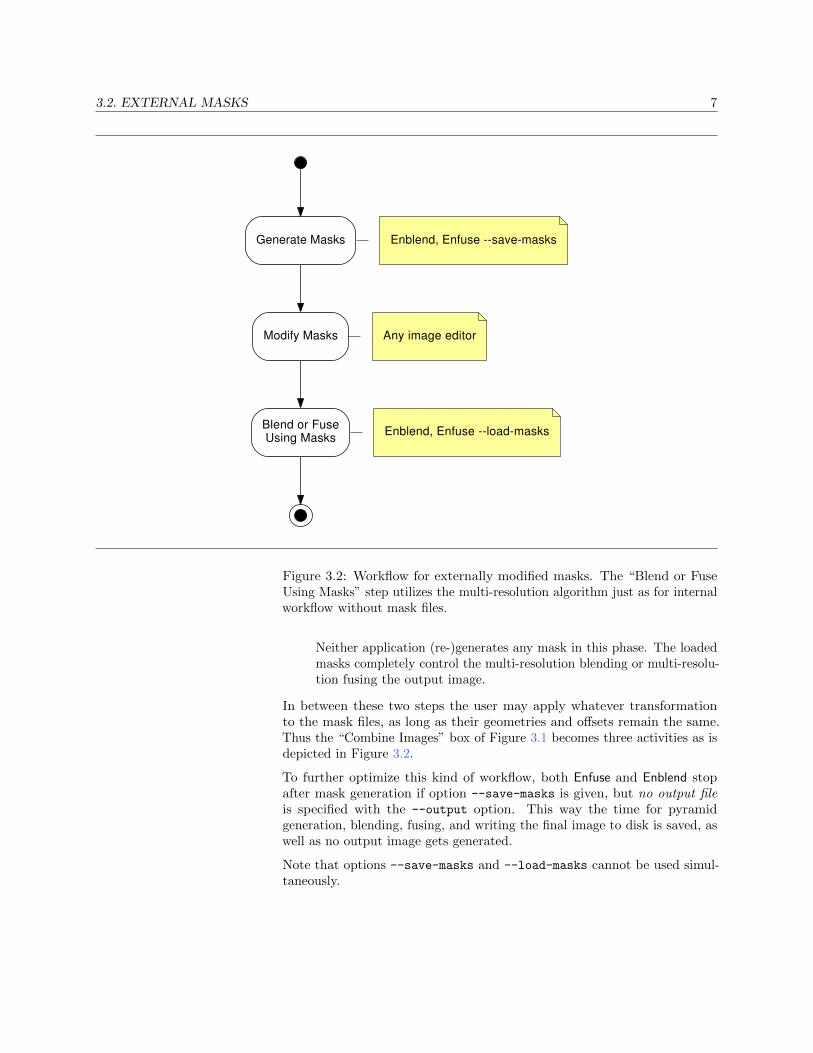
Figure 3.2: Workflow for externally modified masks. The “Blend or FuseUsing Masks” step utilizes the multi-resolution algorithm just as for internalworkflow without mask files.
Neither application (re-)generates any mask in this phase. The loadedmasks completely control the multi-resolution blending or multi-resolu-tion fusing the output image.
In between these two steps the user may apply whatever transformationto the mask files, as long as their geometries and offsets remain the same.Thus the “Combine Images” box of Figure 3.1 becomes three activities as isdepicted in Figure 3.2.
To further optimize this kind of workflow, both Enfuse and Enblend stopafter mask generation if option --save-masks is given, but no output fileis specified with the --output option. This way the time for pyramidgeneration, blending, fusing, and writing the final image to disk is saved, aswell as no output image gets generated.
Note that options --save-masks and --load-masks cannot be used simul-taneously.

3.3. INTERACTING WITH ENFUSEC 8
$ enfuse --version
enfuse 4.2-02c1f45857b4
Copyright (C) 2004-2009 Andrew Mihal.
Copyright (C) 2009-2015 Christoph Spiel.
License GPLv2+: GNU GPL version 2 or later
<http://www.gnu.org/licenses/gpl.html>
This is free software: you are free to change and redistribute
it.
There is NO WARRANTY, to the extent permitted by law.
Written by Andrew Mihal, Christoph Spiel and others.
Example 3.1: Example output of enfuse when called with option --version.
3.3 Interacting with Enfusec
This section explains how to find out about the inner workings of yourversion of Enfuse without looking at the source code. And it states howto interact with Enfuse besides passing command-line options and imagefilenames.
3.3.1 Finding Out Details About enfuse
An enfuse binary can come in several configurations. The exact name ofthe binary may vary and it may or may not reflect the “kind of enfuse”.Therefore, enfuse offers several options that allow the user to query exactly. . .
− what its exact version number is (see Sec. 3.3.1 on page 8 and op-tion --version, page 35),
− what features it does support (see Sec. 3.3.1 on page 9 and op-tions --version, page 35 and --verbose, page 18),
− which image formats it can read and write without the need of con-version (see Sec. 3.3.1 on page 10 and option --show-image-formats,page 35),
− who built it, (see Sec. 3.3.1 on page 11 and option --show-signature,page 35), and finally
− what compiler and libraries were used to do so (see Sec. 3.3.1 on page 11and option --show-software-components, page 35).
The information are explained in detail in the following sections.
Exact Version Number
Example 3.1 shows a possible output of ‘enfuse --version’. The versionnumber at the beginning of the text tells about the exact version of thebinary. It is the number that can be compared with the version number ofthis document, which by the way is 〈4.2〉. Our slightly cranky markup (seealso Notation, page ix) dispels copy-paste errors.
3.3. INTERACTING WITH ENFUSEC 9
The version indicator consist of a two (major and minor version) or three(major and minor version plus patch-level) numbers separated by dots and anoptional hexadecimal identifier. Binaries from the “Development Branch” areassigned two-part version numbers, whereas a three-part version number isreserved for the “Stable Branch” of development. Officially released versionslack the hexadecimal identifier.
Examples:
4.1.3-0a816672d475
Some unreleased version from the “Stable Branch”, which finally willlead to version 4.1.3.
4.1.3
Officially released version 4.1.3 in the “Stable Branch”.
4.2-1e4d237daabf
Some unreleased version from the “Development Branch”, which finallywill lead to version 4.2.
4.2
Officially released version 4.2 in the “Development Branch”.
Matching the version codes is the only reliably way to pair a given binarywith its manual page (“manual page for enblend 4.2-1e4d237daabf”) and itsdocumentation. This document mentions the version code for example onits Title Page and the Abstract, page i.
The twelve-digit hexadecimal ID-CODE is automatically generated by oursource-code versioning system, Mercurial). Use the ID-CODE to look upthe version on the web in our public source code repository) or, if you havecloned the project to your own workspace, with the command
hg log --verbose --rev ID-CODE
Compiled-In Features
Adding option --verbose to --version will reproduce the information de-scribed in the previous section plus a list of “extra features”. Any unavailablefeature in the particular binary queried returns
Extra feature: ...: no
whereas available features answer “yes” followed by a detailed report on thefeature and its connection to some library or specific hardware. Example 3.2on page 10 shows such a report. Remember that your binary may includemore or less of the features displayed there.
The ‘--version --verbose’ combo is one of the first things test if enfuse“suddenly” behaves strangely.
(1.) “I’m running my enfuse on a multi-core system, but it does not makeuse of it.”
Check for extra feature OpenMP.
) https://www.mercurial-scm.org/) http://hg.code.sf.net/p/enblend/code

3.3. INTERACTING WITH ENFUSEC 10
$ enfuse --version --verbose
enfuse 4.2-95f1fed2bf2d
Extra feature: dynamic linking support: yes
Extra feature: image cache: no
Extra feature: OpenMP: no
Copyright (C) 2004-2009 Andrew Mihal.
Copyright (C) 2009-2015 Christoph Spiel.
License GPLv2+: GNU GPL version 2 or later <http://www.gnu.org/licenses/gpl.html>
This is free software: you are free to change and redistribute it.
There is NO WARRANTY, to the extent permitted by law.
Written by Andrew Mihal, Christoph Spiel and others.
Example 3.2: Example output of enfuse when called with options --versionand --verbose together.
(2.) “My enfuse complains when I call it with ‘--gpu’!”
Check for extra feature OpenCL.
(3.) “enfuse is so slow!”
Ensure that neither feature mmap-view nor image-cache has beencompiled in.
(4.) “enfuse eats away too much memory! Can I tell it to unload that ontothe disk?”
No, there is no command-line switch for that, but you can use a versionwith mmap-view feature.
(5.) “My enfuse has OpenMP enabled. Does it support dynamic adjustmentof the number of threads?”
Under extra feature OpenMP look for “support for dynamic adjust-ment of the number of threads”.
Supported Images Formats
Enfuse can read and write a fixed set of image formats if it was compiledto support them. For example the EXR-format requires special supportlibraries. Use option --show-image-formats to find out
− what image-data formats are supported,− what filename extensions are recognized, and− what per-channel depths have been compiled into the enfuse binary.
The only three image formats always supported are

3.3. INTERACTING WITH ENFUSEC 11
Channel Bit-DepthFormat Mask Profile Integral Floating-Point
uint8 uint16 uint32 float double
JPEG − • • − − − −PNG • • • • − − −PNM ? − • • • − −[V]TIFF • • • • • • •
Table 3.1: Bit-depths of selected image formats. These are the maximumcapabilities of the formats themselves, not Enfuse’s. The “Mask”-columnindicates whether the format supports an image mask (alpha-channel), seealso Chapter 7. Column “Profile” shows whether the image format allowsfor ICC-profiles to be included; see also Chapter 6.
− JPEG,− PNG, and− TIFF.
All others are optional. In particular the high-dynamic range (HDR) formatOpenEXR only gets compiled if several non-standard libraries are available.
The provided per-channel depths range from just one, namely “8 bits unsignedintegral” (uint8) up to seven:
− 8 bits unsigned integral, ‘uint8’− 16 bits unsigned or signed integral, ‘uint16’ or ‘int16’− 32 bits unsigned or signed integral, ‘uint32’ or ‘int32’− 32 bits floating-point, ‘float’− 64 bits floating-point, ‘double’
Table 3.1 summarizes the channel bit depths of some prominent imageformats.
Name Of Builder
During building each enfuse is automatically signed to give the users anextra level of confidence that it was constructed by someone that they cantrust to get it right. Access this signature with ‘--show-signature’ andenfuse will print something like
Compiled on sgctrl03 by Walter Harriman on Wed, Dec 22 2004,
16:07:22 GMT-7.
where machine name, person, and date-time depend on the build.
Compiler And Libraries Used To Build
Sometimes enfuse refuses to start or runs into trouble because the librariessupplied to it do not match the ones it was compiled with. Option --show-
software-components can be helpful to diagnose the problem in such cases,

3.3. INTERACTING WITH ENFUSEC 12
$ enfuse --show-software-components
Compiler
g++ 4.9.1
implementing OpenMP standard of 2013-7
implementing Cilk version 2.0
without support of " Cilk for" keyword
Libraries
GSL: 1.15
Little CMS: 2.7.0
Vigra: 1.10.0
Example 3.3: Output of enfuse when asked to reveal the compiler that wasused to build it along with the libraries it was linked against.
because it shows the version information of Enfuse’s most important librariesas they have identified themselves during compile-time.
Furthermore the report reveals the compiler used to build enfuse alongwith the most important compiler extensions like, for example, OpenMP.Example 3.3 shows such a report.
3.3.2 Console Messages
Enfuse is meant to read multiple images, “montage” them together, andfinally write a single output image. So, any console messages either servethe entertainment desire of the user or indicate problems.
When enfuse is instructed to only show information about its configuration(see Section 4.2.6 on page 35) the text goes to Standard Output. enfusesends error and warning messages to Standard Error. The messages follow afixed format.
enfuse: [CATEGORY:] MESSAGE
where CATEGORY is
error: A serious problem that sooner or later will lead to a program stop.The result will definitely not be what the user wants – including nooutput image at all, as enfuse deletes corrupted or incomplete outputimages.
Most messages drop category name ‘error’ and plainly write MES-SAGE:
enblend: input image "1.tif" does not have an alpha chan=
nel
If an ‘error’ actually leads to a premature termination of enfuse, itreturns code 1 to the operating system. On successful termination thereturn code is 0.
warning: A problem that forces enfuse to take an alternate execution pathor drop some assumptions about the input.

3.3. INTERACTING WITH ENFUSEC 13
info: No problem, just a “nice-to-know” information for the user.
note: Not a standalone CATEGORY, but an additional explanation thatsometimes trails messages in one of the above categories. Errors,warnings and infos tell the causes, notes inform about the actions takenby enfuse. Here is an example, where a warning gets augmented by anote:
enblend: warning: input images too small for coarse mask
enblend: note: switching to fine mask
timing: A measurement of the execution duration and thus a sub-categoryof info.
Sadly, not all messages can be sorted in the category scheme.
Debug Messages: Though debug messages generally come devoid of a spe-cific form the more civilized of them start each line with a plus sign ‘+’.Example:
+ checkpoint: leaving channel width alone
Foreign Sources: enfuse depends on various foreign software componentsthat issue their own messages. We try to catch them and press themin our category scheme, but some of them invariably slip through.The most prominent members of this rogue fraction are the notices ofVIGRA) as e.g.
enfuse: an exception occurred
enfuse: Precondition violation!
...
and LibTIFF):
TIFFReadDirectory: Warning, img0001.tif: wrong data type
1 for "RichTIFFIPTC"; tag ignored.
“Should-Never-Happen”: An internal consistency check fails or a cautiousroutine detects a problem with its parameters and racks up the digitalequivalent of a nervous breakdown. Sometimes these messages end inthe word ‘Aborted’.
terminate called after throwing an instance of ’...’
what(): ...
Aborted
If the installation of enfuse is correct, this type of message may warranta bug report as explained in Appendix B on page 94.
In very unfortunate circumstances Enfuse quits because of a problem, butdoes not show any message. The output file then either does not exist or it isbroken. One known reason are out-of-memory situations, where the processneeds additional memory, but cannot allocate it and while terminating needseven more memory so that the operating system wipes it out completelywherever it then happens to be in its execution path.
) https://ukoethe.github.io/vigra/) http://www.remotesensing.org/libtiff/
3.3. INTERACTING WITH ENFUSEC 14
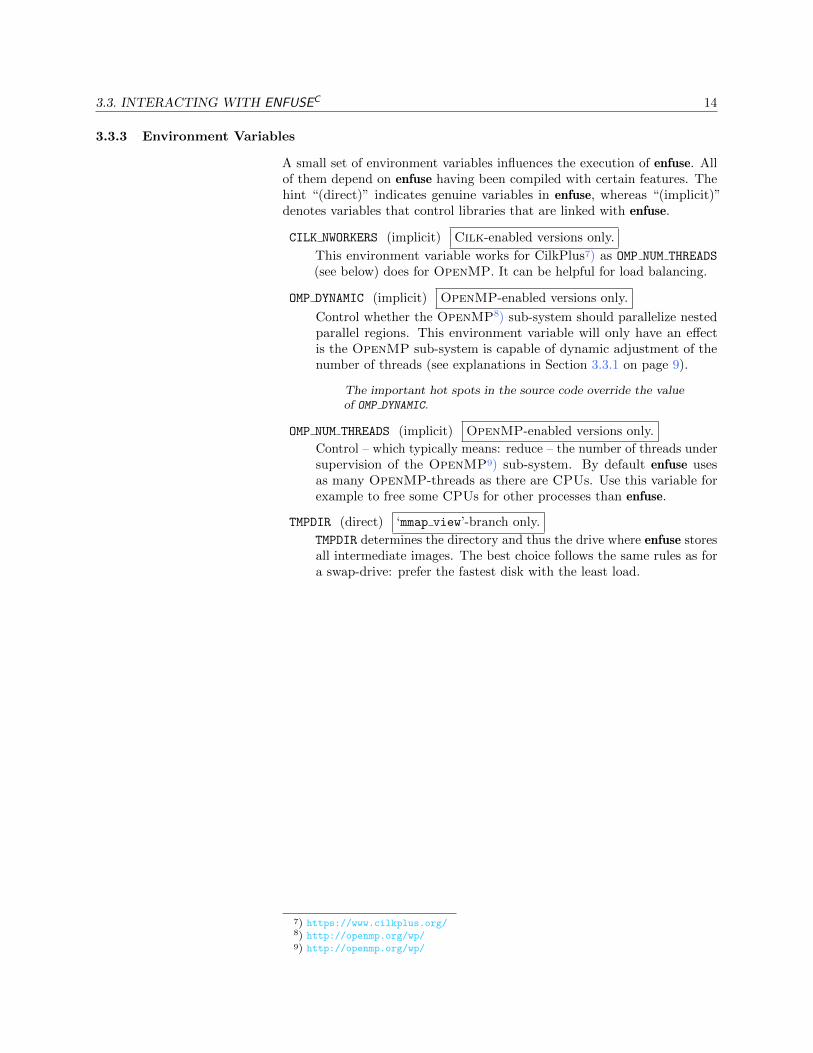
3.3.3 Environment Variables
A small set of environment variables influences the execution of enfuse. Allof them depend on enfuse having been compiled with certain features. Thehint “(direct)” indicates genuine variables in enfuse, whereas “(implicit)”denotes variables that control libraries that are linked with enfuse.
CILK NWORKERS (implicit) Cilk-enabled versions only.
This environment variable works for CilkPlus) as OMP NUM THREADS
(see below) does for OpenMP. It can be helpful for load balancing.
OMP DYNAMIC (implicit) OpenMP-enabled versions only.
Control whether the OpenMP) sub-system should parallelize nestedparallel regions. This environment variable will only have an effectis the OpenMP sub-system is capable of dynamic adjustment of thenumber of threads (see explanations in Section 3.3.1 on page 9).
The important hot spots in the source code override the valueof OMP DYNAMIC.
OMP NUM THREADS (implicit) OpenMP-enabled versions only.
Control – which typically means: reduce – the number of threads undersupervision of the OpenMP) sub-system. By default enfuse usesas many OpenMP-threads as there are CPUs. Use this variable forexample to free some CPUs for other processes than enfuse.
TMPDIR (direct) ‘mmap view’-branch only.
TMPDIR determines the directory and thus the drive where enfuse storesall intermediate images. The best choice follows the same rules as fora swap-drive: prefer the fastest disk with the least load.
) https://www.cilkplus.org/) http://openmp.org/wp/) http://openmp.org/wp/

4 Invocation
Fuse the sequence of images INPUT. . . into a single IMAGE.
enfuse [OPTIONS] [--output=IMAGE] INPUT. . .
INPUT images are either specified literally or via so-called response files(see Section 4.4). The latter are an alternative to specifying image filenameson the command line. If omitted, the name of the output IMAGE defaultsto 〈a.tif 〉.
4.1 Input Image Requirements
All input images for Enfuse must comply with the following requirements.
• The images overlap.
• The images agree on their number of bits-per-channel, i.e., their“depth”:
– uint8,
– uint16,
– float,
– etc.
See option --depth below for an explanation of different (output)depths.
• Enfuse understands the images’ filename extensions as well as their fileformats.
You can check the supported extensions and formats by calling Enfusewith option --show-image-formats.
Moreover, there are some good practices, which are not enforced by theapplication, but almost certainly deliver superior results.
• Either all files lack an ICC profile, or all images are supplied with thesame ICC profile.
• If the images’ meta-data contains resolution information (“DPI”), itis the same for all pictures.
4.2 Command-Line Options
In this section we group the options as the command-line help
$ enfuse --help
4.2. COMMAND-LINE OPTIONS 16
does and sort them alphabetically within their groups. For an alphabeticlist of all options consult the Option Index, page 107.
enfuse accepts arguments to any option in uppercase as well as in lowercaseletters. For example, ‘deflate’, ‘Deflate’ and ‘DEFLATE’ as argumentsto the --compression option described below all instruct enfuse to usethe Deflate compression scheme. This manual denotes all arguments inlowercase for consistency.
4.2.1 Common Optionsc
Common options control some overall features of Enfuse. They are called“common” because they are used most often. However, in fact, Enfuse andEnblend do have these options in common.
--compression=COMPRESSION
Write a compressed output file. The default is not to compress theoutput image.
Depending on the output file format, Enfuse accepts different valuesfor COMPRESSION.
JPEG format.The compression either is a literal integer or a keyword-optioncombination.
LEVEL
Set JPEG quality LEVEL, where LEVEL is an integer thatranges from 0–100.
jpeg[:LEVEL ]Same as above; without the optional argument just switchon standard JPEG compression.
jpeg-arith[:LEVEL ]Switch on arithmetic JPEG compression. With optional argu-ment set the arithmetic compression LEVEL, where LEVELis an integer that ranges from 0–100.
TIF format.Here, COMPRESSION is one of the keywords:
none
Do not compress. This is the default.
deflate
Use the Deflate compression scheme also called ZIP-in-TIFF. Deflate is a lossless data compression algorithm thatuses a combination of the LZ77 algorithm and Huffmancoding.
jpeg[:LEVEL ]Use JPEG compression. With optional argument set thecompression LEVEL, where LEVEL is an integer that rangesfrom 0–100.

4.2. COMMAND-LINE OPTIONS 17
lzw
Use Lempel-Ziv-Welch (LZW) adaptive compression scheme.LZW compression is lossless.
packbits
Use PackBits compression scheme. PackBits is a particularvariant of run-length compression; it is lossless.
Any other format.Other formats do not accept a COMPRESSION setting. How-ever, the underlying VIGRA) library automatically compressespng-files with the Deflate method. (VIGRA is the imagemanipulation library upon which Enfuse is based.)
-l LEVELS
--levels=LEVELSUse at most this many LEVELS for pyramid) blending if LEVELS ispositive, or reduce the maximum number of levels used by −LEVELS ifLEVELS is negative; ‘auto’ or ‘automatic’ restore the default, whichis to use the maximum possible number of levels for each overlappingregion.
The number of levels used in a pyramid controls the balance betweenlocal and global image features (contrast, saturation, . . . ) in theblended region. Fewer levels emphasize local features and suppressglobal ones. The more levels a pyramid has, the more global featureswill be taken into account.
As a guideline, remember that each new level works ona linear scale twice as large as the previous one. So, the ze-roth layer, the original image, obviously defines the image atsingle-pixel scale, the first level works at two-pixel scale, andgenerally, the nth level contains image data at 2n-pixel scale.This is the reason why an image of width× height pixels cannotbe deconstructed into a pyramid of more than
blog2(min(width, height))c levels.
If too few levels are used, “halos” around regions of stronglocal feature variation can show up. On the other hand, if toomany levels are used, the image might contain too much globalfeatures. Usually, the latter is not a problem, but is highlydesired. This is the reason, why the default is to use as manylevels as is possible given the size of the overlap regions. Enfusemay still use a smaller number of levels if the geometry of theoverlap region demands.
Positive values of LEVELS limit the maximum number of pyramidlevels. Depending on the size and geometry of the overlap regions thismay or may not influence any pyramid. Negative values of LEVELS re-duce the number of pyramid levels below the maximum no matter whatthe actual maximum is and thus always influence all pyramids. Use
) https://ukoethe.github.io/vigra/) As Dr. Daniel Jackson correctly noted, actually, it is not a pyramid: “Ziggaurat,
it’s a Ziggaurat.”

4.2. COMMAND-LINE OPTIONS 18
Level Messages
0 only warnings and errors1 reading and writing of images2 mask generation, pyramid, and blending3 reading of response files, color conversions4 image sizes, bounding boxes and intersection sizes
5 Enblend only. detailed information on the optimizer runs
6 estimations of required memory in selected processingsteps
Table 4.1: Verbosity levels of enfuse; each level includes all messages of thelower levels.
‘auto’ or ‘automatic’ as LEVELS to restore the automatic calculationof the maximum number of levels.
The valid range of the absolute value of LEVELS is 〈1〉 to 〈29〉.
-o FILE
--output=FILE
Place fused output image in FILE. If ‘--output’ is omitted, Enfusewrites the resulting image to 〈a.tif 〉.
-v [LEVEL ]--verbose[=LEVEL ]
Without an argument, increase the verbosity of progress reporting.Giving more --verbose options will make Enfuse more verbose; seeSection 3.3.1 on page 8 for an exemplary output. Directly set averbosity level with a non-negative integral LEVEL. Table 4.1 showsthe messages available at a particular LEVEL.
The default verbosity level of Enfuse is 〈1〉.
4.2.2 Advanced Optionsc
Advanced options control e.g. the channel depth, color model, and thecropping of the output image.
--blend-colorspace=COLORSPACE
Force blending in selected COLORSPACE. Given well matched imagesthis option should not change the output image much. However,if Enfuse must blend vastly different colors (as e.g. anti-colors) theresulting image heavily depends on the COLORSPACE.
Usually, Enfuse chooses defaults depending on the input images:
• For grayscale or color input images with ICC profiles the defaultis to use CIELUV colorspace.
• Images without color profiles and floating-point images are blendedin the trivial luminance interval (grayscale) or RGB-color cubeby default.
On the order of fast to slow computation, Enfuse supports the followingblend colorspaces.

4.2. COMMAND-LINE OPTIONS 19
identity
id
unitCompute blended colors in a naıve way sidestepping any dedicatedcolorspace.
• Use trivial, 1-dimensional luminance interval (see Eqn. 6.1 onpage 69) for grayscale images and
• for color images utilize 3-dimensional RGB-cube (see Eqn. 6.6on page 70) spanned by the input ICC profile or sRGB ifno profiles are present. In the latter case, consider passingoption --fallback-profile, page 23 to force a differentprofile than sRGB upon all input images.
lab
cielab
lstar
l-starBlend pixels in the CIEL*a*b* colorspace.
luv
cieluvBlend pixels in the CIEL*u*v* colorspace.
ciecam
ciecam02
jch
Blend pixels in the CIECAM02 colorspace.
-c
--ciecamDeprecated. Use ‘--blend-colorspace=ciecam’ instead. To emulatethe negated option --no-ciecam use --blend-colorspace=identity.
-d DEPTH
--depth=DEPTH
Force the number of bits per channel and the numeric format of theoutput image, this is, the DEPTH. The number of bits per channel isalso known as “channel width” or “channel depth”.
Enfuse always uses a smart way to change the channel depth to assurehighest image quality at the expense of memory, whether requanti-zation is implicit because of the output format or explicit throughoption --depth.
• If the output-channel depth is larger than the input-channel depthof the input images, the input images’ channels are widened tothe output channel depth immediately after loading, that is, assoon as possible. Enfuse then performs all blending operations atthe output-channel depth, thereby preserving minute color detailswhich can appear in the blending areas.
• If the output-channel depth is smaller than the input-channeldepth of the input images, the output image’s channels are nar-rowed only right before it is written to the output FILE, that is,
4.2. COMMAND-LINE OPTIONS 20
as late as possible. Thus the data benefits from the wider inputchannels for the longest time.
All DEPTH specifications are valid in lowercase as well as uppercaseletters. For integer format, use
8
uint8
Unsigned 8 bit; range: 0 . . . 255
int16
Signed 16 bit; range: −32768 . . . 32767
16
uint16
Unsigned 16 bit; range: 0 . . . 65535
int32
Signed 32 bit; range: −2147483648 . . . 2147483647
32
uint32
Unsigned 32 bit; range: 0 . . . 4294967295
For floating-point format, use
r32
real32
float
IEEE754 single precision floating-point, 32 bit wide, 24 bit sig-nificant;
− Minimum normalized value: 1.2 · 10−38
− Epsilon: 1.2 · 10−7
− Maximum finite value: 3.4 · 1038
r64
real64
double
IEEE754 double precision floating-point, 64 bit wide, 53 bitsignificant;
− Minimum normalized value: 2.2 · 10−308
− Epsilon: 2.2 · 10−16
− Maximum finite value: 1.8 · 10308
If the requested DEPTH is not supported by the output file format,Enfuse warns and chooses the DEPTH that matches best.
Versions with OpenEXR read/write support only.
The OpenEXR data format is treated as IEEE754 float in-ternally. Externally, on disk, OpenEXR data is representedby “half” precision floating-point numbers.
OpenEXR) half precision floating-point, 16 bit wide,10 bit significant;− Minimum normalized value: 9.3 · 10−10
− Epsilon: 2.0 · 10−3

4.2. COMMAND-LINE OPTIONS 21
− Maximum finite value: 4.3 · 109
2
-f WIDTHxHEIGHT [+xXOFFSET+yYOFFSET ]Ensure that the minimum “canvas” size of the output image is at leastWIDTH×HEIGHT. Optionally specify the XOFFSET and YOFFSETof the canvas, too.
This option only is useful when the input images are cropped TIFFfiles, such as those produced by nona.
Note that option -f neither rescales the output image, nor shrinks thecanvas size below the minimum size occupied by the union of all inputimages.
-g Save alpha channel as “associated”. See the TIFF documentation)for an explanation.
The Gimp before version 2.0 and CinePaint (see Appendix A on page 91)exhibit unusual behavior when loading images with unassociated alphachannels. Use option -g to work around this problem. With this flagEnfuse will create the output image with the “associated alpha tag”set, even though the image is really unassociated alpha.
-w [MODE ]--wrap[=MODE ]
Blend around the boundaries of the panorama, or “wrap around”.
As this option significantly increases memory usage and computationtime only use it, if the panorama will be
− consulted for any kind measurement, this is, all boundaries mustmatch as accurately as possible, or
− printed out and the boundaries glued together, or− fed into a virtual reality (VR) generator, which creates a seamless
environment.
Otherwise, always avoid this option!
With this option Enfuse treats the set of input images (panorama)of width w and height h as an infinite data structure, where eachpixel P (x, y) of the input images represents the set of pixels SP (x, y).
Solid-state physicists will be reminded of the Born-von Karmanboundary condition).
MODE takes the following values:
none
open
This is a “no-op”; it has the same effect as not giving ‘--wrap’ atall. The set of input images is considered open at its boundaries.
) http://www.openexr.com/about.html#features) http://www.awaresystems.be/imaging/tiff/tifftags/extrasamples.html) https://en.wikipedia.org/wiki/Born-von_Karman_boundary_condition

4.2. COMMAND-LINE OPTIONS 22
horizontal
Wrap around horizontally:
SP (x, y) = {P (x+mw, y) : m ∈ Z}.
This is useful for 360◦ horizontal panoramas as it eliminates theleft and right borders.
vertical
Wrap around vertically:
SP (x, y) = {P (x, y + nh) : n ∈ Z}.
This is useful for 360◦ vertical panoramas as it eliminates the topand bottom borders.
both
horizontal+vertical
vertical+horizontalWrap around both horizontally and vertically:
SP (x, y) = {P (x+mw, y + nh) : m,n ∈ Z}.
In this mode, both left and right borders, as well as top andbottom borders, are eliminated.
Specifying ‘--wrap’ without MODE selects horizontal wrapping.
4.2.3 Fusion Options
Fusion options define the proportion to which each input image’s pixelcontributes to the output image.
--contrast-weight=WEIGHT
Sets the relative WEIGHT of high local-contrast pixels.
Valid range: 〈0〉 ≤WEIGHT ≤ 〈1〉, default: 〈0.0〉.
See Section 5.4 and 4.2.4, option --contrast-window-size, page 27.
--entropy-weight=WEIGHT
Sets the relative WEIGHT of high local entropy pixels.
Valid range: 〈0〉 ≤WEIGHT ≤ 〈1〉, default: 〈0.0〉.
See Section 4.2.4 and 5.5, options --entropy-window-size, page 29and --entropy-cutoff, page 27.
--exposure-optimum=OPTIMUM
Determine at what normalized exposure value the OPTIMUM exposureof the input images is. This is, set the position of the maximum of theexposure weight curve. Use this option to fine-tune exposure weighting.
Valid range: 〈0〉 ≤ OPTIMUM ≤ 〈1〉, default: 〈0.5〉.

4.2. COMMAND-LINE OPTIONS 23
--exposure-weight=WEIGHT
Set the relative WEIGHT of the “well-exposedness” criterion as de-fined by the chosen exposure weight function (see option --expo=
sure-weight-function, page 30 below). Increasing this weight rela-tive to the others will make well-exposed pixels contribute more to thefinal output.
Valid range: 〈0〉 ≤WEIGHT ≤ 〈1〉, default: 〈1.0〉.
See Section 5.2 on page 46.
--exposure-width=WIDTH
Set the characteristic WIDTH (FWHM) of the exposure weight func-tion. Low numbers give less weight to pixels that are far from theuser-defined optimum (option --exposure-optimum, page 22) and viceversa. Use this option to fine-tune exposure weighting (See Section 5.2on page 46).
Valid range: WIDTH > 〈0〉, default: 〈0.2〉.
--hard-mask
Force hard blend masks on the finest scale. This is the opposite flag ofoption --soft-mask, page 23.
This blending mode avoids averaging of fine details (only) at theexpense of increasing the noise. However it considerably improves thesharpness of focus stacks. Blending with hard masks has only provenuseful with focus stacks.
See also Section 4.2.3 and options --contrast-weight, page 22 aswell as --contrast-window-size, page 27 above.
--saturation-weight=WEIGHT
Set the relative WEIGHT of high-saturation pixels. Increasing thisweight makes pixels with high saturation contribute more to the finaloutput.
Valid range: 〈0〉 ≤WEIGHT ≤ 〈1〉, default: 〈0.2〉.
Saturation weighting is only defined for color images; see Section 5.3.
--soft-mask
Consider all masks when fusing. This is the default.
4.2.4 Expert Options
Control inner workings of Enfuse and the reading/writing of weight masks.
--fallback-profile=PROFILE-FILENAME
Use the ICC profile in PROFILE-FILENAME instead of the defaultsRGB. This option only is effective if the input images come withoutcolor profiles and blending is not performed in the trivial luminanceinterval or RGB-cube.
Compare option --blend-colorspace, page 18 and Chapter 6.3 onpage 72 on color profiles.
--layer-selector=ALGORITHM
Override the standard layer selector algorithm ‘〈all-layers〉’.
4.2. COMMAND-LINE OPTIONS 24
Enfuse offers the following algorithms:
all-layers
Select all layers in all images.
first-layer
Select only first layer in each multi-layer image. For single-layerimages this is the same as ‘all-layers’.
last-layer
Select only last layer in each multi-layer image. For single-layerimages this is the same as ‘all-layers’.
largest-layer
Select largest layer in each multi-layer image, where the “large-ness”, this is the size is defined by the product of the layer widthand its height. The channel width of the layer is ignored. Forsingle-layer images this is the same as ‘all-layers’.
no-layer
Do not select any layer in any image.
This algorithm is useful to temporarily exclude some images inresponse files.
--load-masks (1st form)--load-masks=SOFT-MASK-TEMPLATE (2nd form)--load-masks=SOFT-MASK-TEMPLATE:
HARD-MASK-TEMPLATE (3rd form)
Load masks from images instead of computing them.
The masks must be grayscale images. All image formats understood byEnfuse (see option --show-image-formats, page 35) are viable maskfile formats, though those with floating-point pixels for example TIFFor VIFF are suited best.
1st form: Load all soft-weight masks from files that were pre-viously saved with option --save-masks, page 25. HARD-MASK-TEMPLATE is effective only when loading hard masks(see option --hard-mask, page 23). The respective defaults are〈softmask-%n.tif〉 and 〈hardmask-%n.tif〉.
In the 2nd form SOFT-MASK-TEMPLATE defines the names of thesoft-mask files.
In the 3rd form HARD-MASK-TEMPLATE additionally defines thenames of the hard-mask files. See option --save-masks, page 25 belowfor the description of mask templates.
Options --load-masks and --save-masks are mutually exclusive.
--parameter=KEY [=VALUE ][:...]Set a KEY -VALUE pair, where VALUE is optional. This option iscumulative. Separate multiple pairs with the usual numeric delimiters.
This option has the negated form ‘--no-parameter’, which takes oneor more KEY s and removes them from the list of defined parameters.The special key ‘*’ deletes all parameters at once.

4.2. COMMAND-LINE OPTIONS 25
Parameters allow the developers to change the internal workings ofEnfuse without the need to recompile or relink.
Daniel Jackson: I just hope we won’t regret giving them those gateaddresses.
Jack O’Neill: I don’t think we will, first one being a black hole and all.They get progressively darker after that.
--save-masks (1st form)--save-masks=SOFT-MASK-TEMPLATE (2nd form)--save-masks=SOFT-MASK-TEMPLATE:
HARD-MASK-TEMPLATE (3rd form)
Save the generated weight masks to image files.
1st form: Save all soft-weight masks in files. If option --hard-mask,page 23 is effective also save the hard masks. The defaults are〈softmask-%n.tif〉 and 〈hardmask-%n.tif〉.
In the 2nd form SOFT-MASK-TEMPLATE defines the names of thesoft-mask files.
In the 3rd form HARD-MASK-TEMPLATE additionally defines thenames of the hard-mask files.
Enfuse will stop after saving all masks unless option --output, page 18is given, too. With both options given, this is, ‘--save-masks’ and‘--output’, Enfuse saves all masks and then proceeds to fuse the outputimage.
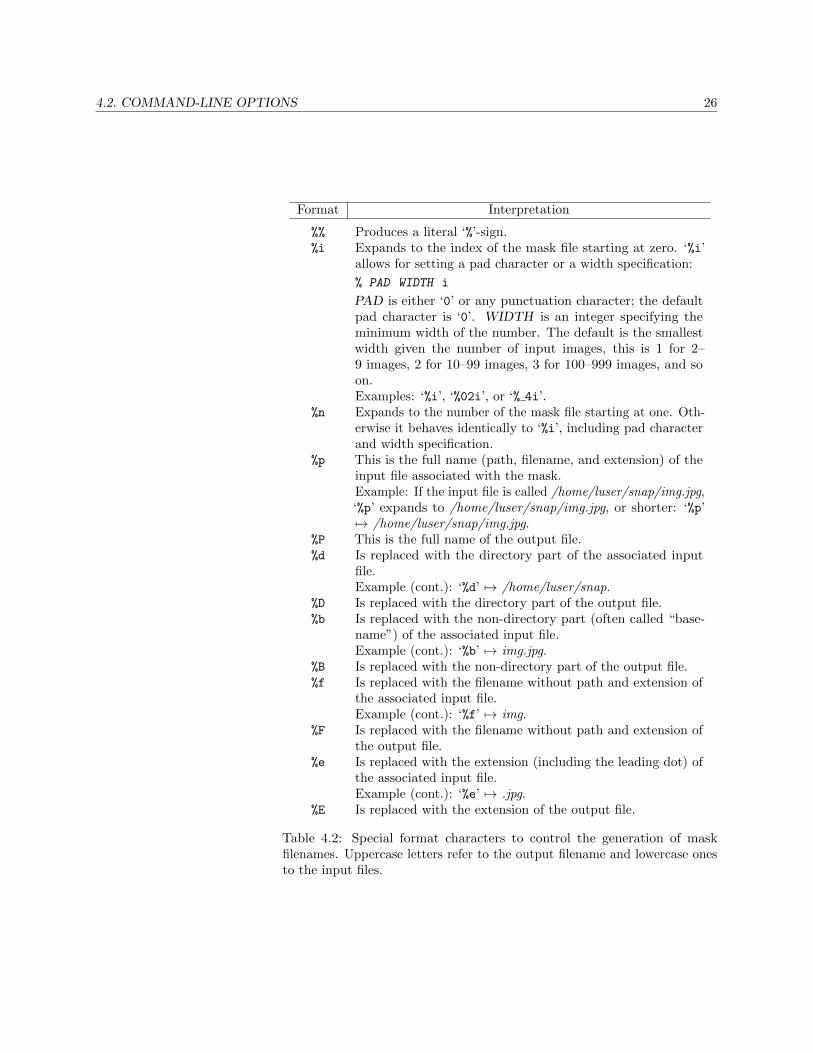
Both SOFT-MASK-TEMPLATE and HARD-MASK-TEMPLATEdefine templates that are expanded for each mask file. In a template apercent sign (‘%’) introduces a variable part. All other characters arecopied literally. Lowercase letters refer to the name of the respectiveinput file, whereas uppercase ones refer to the name of the output file.Table 4.2 on page 26 lists all variables.
A fancy mask filename template could look like
%D/mask-%02n-%f.tif
It puts the mask files into the same directory as the output file (‘%D’),generates a two-digit index (‘%02n’) to keep the mask files nicely sorted,and decorates the mask filename with the name of the associated inputfile (‘%f’) for easy recognition.
The masks carry the totaled images’ weights. They consist of single-channel, this is grayscale, floating-point data and thus preferably aresaved in floating-point form. Enfuse defaults to floating-point TIFF.
Options --load-masks and --save-masks are mutually exclusive.
4.2.5 Expert Fusion Options
Expert fusion options control details of contrast-weight algorithms and theyset ultimate cutoffs for entropy and exposure fusion.
4.2. COMMAND-LINE OPTIONS 26
Format Interpretation
%% Produces a literal ‘%’-sign.%i Expands to the index of the mask file starting at zero. ‘%i’
allows for setting a pad character or a width specification:
% PAD WIDTH i
PAD is either ‘0’ or any punctuation character; the defaultpad character is ‘0’. WIDTH is an integer specifying theminimum width of the number. The default is the smallestwidth given the number of input images, this is 1 for 2–9 images, 2 for 10–99 images, 3 for 100–999 images, and soon.Examples: ‘%i’, ‘%02i’, or ‘% 4i’.
%n Expands to the number of the mask file starting at one. Oth-erwise it behaves identically to ‘%i’, including pad characterand width specification.
%p This is the full name (path, filename, and extension) of theinput file associated with the mask.Example: If the input file is called /home/luser/snap/img.jpg,‘%p’ expands to /home/luser/snap/img.jpg, or shorter: ‘%p’7→ /home/luser/snap/img.jpg.
%P This is the full name of the output file.%d Is replaced with the directory part of the associated input
file.Example (cont.): ‘%d’ 7→ /home/luser/snap.
%D Is replaced with the directory part of the output file.%b Is replaced with the non-directory part (often called “base-
name”) of the associated input file.Example (cont.): ‘%b’ 7→ img.jpg.
%B Is replaced with the non-directory part of the output file.%f Is replaced with the filename without path and extension of
the associated input file.Example (cont.): ‘%f’ 7→ img.
%F Is replaced with the filename without path and extension ofthe output file.
%e Is replaced with the extension (including the leading dot) ofthe associated input file.Example (cont.): ‘%e’ 7→ .jpg.
%E Is replaced with the extension of the output file.
Table 4.2: Special format characters to control the generation of maskfilenames. Uppercase letters refer to the output filename and lowercase onesto the input files.
4.2. COMMAND-LINE OPTIONS 27
--contrast-edge-scale=EDGE-SCALE [:LCE-SCALE:LCE-FACTOR ]
A non-zero value for EDGE-SCALE switches on the Laplacian-of-Gaussian (LoG) edge detection algorithm. EDGE-SCALE isthe radius of the Gaussian used in the search for edges. Default:〈0.0〉 pixels.
A positive LCE-SCALE turns on local contrast enhancement (LCE)before the LoG edge detection. LCE-SCALE is the radius of theGaussian used in the enhancement step, LCE-FACTOR is the weightfactor (“strength”). Enfuse calculates the enhanced values of theoriginal ones with
enhanced :=
(1 + LCE -FACTOR) * original -
LCE -FACTOR * GaussianSmooth(original ,
LCE -SCALE).
LCE-SCALE defaults to 〈0.0〉 pixels and LCE-FACTOR defaults to〈0.0〉. Append ‘%’ to LCE-SCALE to specify the radius as a percentageof EDGE-SCALE. Append ‘%’ to LCE-FACTOR to specify the weightas a percentage.
--contrast-min-curvature=CURVATURE
Define the minimum CURVATURE for the LoG edge detection. De-fault: 〈0〉. Append a ‘%’ to specify the minimum curvature relative tomaximum pixel value in the source image (for example 255 or 65535).
A positive value makes Enfuse use the local contrast data (controlledwith option --contrast-window-size, page 27) for curvatures lessthan CURVATURE and LoG data for values above it.
A negative value truncates all curvatures less than −CURVATURE tozero. Values above CURVATURE are left unchanged. This effectivelysuppresses weak edges.
--contrast-window-size=SIZE
Set the window SIZE for local contrast analysis. The window will bea square of SIZE × SIZE pixels. If given an even SIZE, Enfuse willautomatically use the next odd number.
For contrast analysis SIZE values larger than 5 pixels might result ina blurry composite image. Values of 3 and 5 pixels have given goodresults on focus stacks.
Valid range: SIZE ≥ 〈3〉, default: 〈5〉 pixels.
See also Section 4.2.3 on page 22, options --contrast-weight, page 22and --hard-mask, page 23.
--entropy-cutoff=LOWER-CUTOFF [:UPPER-CUTOFF ]Define a cutoff function Y ′ for the normalized luminance Y by LOWER-CUTOFF and UPPER-CUTOFF, which gets applied (only) before thelocal-entropy calculation. LOWER-CUTOFF is the value below whichpixels are mapped to pure black when calculating the local entropy ofthe pixel’s surroundings. Optionally also define the UPPER-CUTOFFvalue above which pixels are mapped to pure white.

4.2. COMMAND-LINE OPTIONS 28
0
0.2
0.4
0.6
0.8
1
0 0.2 0.4 0.6 0.8 1
Y′
Y
Figure 4.1: Modified lightness Y ′, Eqn. 4.1, for LOWER-CUTOFF = 5%and UPPER-CUTOFF = 90%, which are rather extreme values.
Y ′ =
0 for Y ≤ LOWER-CUTOFF,1 for Y ≥ UPPER-CUTOFF andY otherwise.
(4.1)
Also see Section 5.5 on page 66 for an explanation of local entropy.Figure 4.1 on page 28 shows an example for the luminance mapping.
Note that the entropy cutoff does not apply directly to the local-entropy H of a pixel or its weight wH , but the luminance image thatget fed into the local-entropy weight calculation. However, assigningconstant values to extreme shadows or highlights in general decreasestheir local entropy, thereby reducing the pixels’ weights.
For color images LOWER-CUTOFF and UPPER-CUTOFF are ap-plied separately and independently to each channel.
Append a ‘%’-sign to specify the cutoff relative to maximum pixel valuein the source image (for example 255 or 65535). Negative UPPER-CUTOFF values indicate the maximum minus the absolute UPPER-CUTOFF value; the same holds for negative percentages.
Defaults: 〈0%〉 for LOWER-CUTOFF and 〈100%〉 for UPPER-CUT=OFF, that is, all pixels’ values are taken into account.
Note that a high LOWER-CUTOFF value lightens theresulting image, as dark and presumably noisy pixels are av-

4.2. COMMAND-LINE OPTIONS 29
eraged with equal weights. With LOWER-CUTOFF = 0, thedefault, on the other hand, “noise” might be interpreted ashigh entropy and the noisy pixels get a high weight, which inturn renders the resulting image darker. Analogously, a lowUPPER-CUTOFF darkens the output image.
--entropy-window-size=SIZE
Window SIZE for local entropy analysis. The window will be a squareof SIZE× SIZE pixels.
In the entropy calculation SIZE values of 3 to 7 yield an acceptablecompromise of the locality of the information and the significance ofthe local entropy value itself.
Valid range: SIZE ≥ 〈3〉, default: 〈3〉 pixels.
If given an even SIZE Enfuse will automatically use the next-largerodd number.
--exposure-cutoff=LOWER-CUTOFF [:UPPER-CUTOFF [:LOWER-PRO=JECTOR:UPPER-PROJECTOR ]]
Define an exposure-cutoff function by the luminances LOWER-CUT=OFF and UPPER-CUTOFF. Pixels below the lower or above theupper cutoff get a weight of exactly zero irrespective of the activeexposure-weight function.
For color images the values of LOWER-CUTOFF and UPPER-CUT=OFF refer to the gray-scale projection as selected with LOWER-PRO=JECTOR and UPPER-PROJECTOR. This is similar to option --gray-
projector.
Append a ‘%’-sign to specify the cutoff relative to maximum pixel valuein the source image (for example 255 or 65535). Negative UPPER-CUTOFF values indicate the maximum minus the absolute UPPER-CUTOFF value; the same holds for negative percentages.
The impact of this option is similar, but not identical totransforming all input images with ImageMagick’s) convert(see Appendix A on page 91) prior to fusing with the com-mands demonstrated in Example 4.1.Transforming some or all input images as shown in the examplegives the user more flexibility because the thresholds can bechosen for each image individually.
The option allows to specify projection operators as in option --gray-
projector for the LOWER-CUTOFF and UPPER-CUTOFF thresh-olds.
This option can be helpful if the user wants to exclude underexposedor overexposed pixels from the fusing process in all of the input im-ages. The values of LOWER-CUTOFF and UPPER-CUTOFF aswell as the gray-scale projector determine which pixels are considered“underexposed” or “overexposed”. As any change of the exposure-weight curve this option changes the brightness of the resulting image:increasing LOWER-CUTOFF lightens the final image and loweringUPPER-CUTOFF darkens it.
) https://www.imagemagick.org/script/index.php

4.2. COMMAND-LINE OPTIONS 30
$ convert IMAGE \
\( +clone -threshold LOWER-CUTOFF \) \
-compose copy opacity -composite \
MASKED-IMAGE
$ convert IMAGE \
\( \
\( IMAGE -threshold LOWER-CUTOFF \) \
\( IMAGE -threshold UPPER-CUTOFF -negate \) \
-compose multiply -composite \
\) \
-compose copy opacity -composite \
MASKED-IMAGE
Example 4.1: Using ImageMagick for exposure cutoff operations. The firstexample only applies a lower cutoff, whereas the second one applies both alower and an upper cutoff to the images.
Defaults: 〈0%〉 for LOWER-CUTOFF and 〈100%〉 for UPPER-CUT=OFF, that is, all pixels’ values are weighted according to the “uncut”exposure-weight curve.
Figure 4.2 shows an example.
The gray-scale projectors LOWER-PROJECTOR and UPPER-PRO=JECTOR default to ‘〈anti-value〉’ and ‘〈value〉’, which are usuallythe best choices for effective cutoff operations on the respective ends.
Note that the application of the respective cutoffs is completely inde-pendent of the actual shape of the exposure weight function.
If a set of images stubbornly refuses to “react” to this option, lookat their histograms to verify the cutoff actually falls into populatedranges of the histograms. In the absence of an image manipulationprogram like The Gimp), ImageMagick’s) can be used to generatehistograms), like, for example,
$ convert -define histogram:unique-colors=false \
IMAGE histogram:- | \
display
The syntax of this option is flexible enough to combine ease of use andprecision, as Table 4.3 demonstrates.
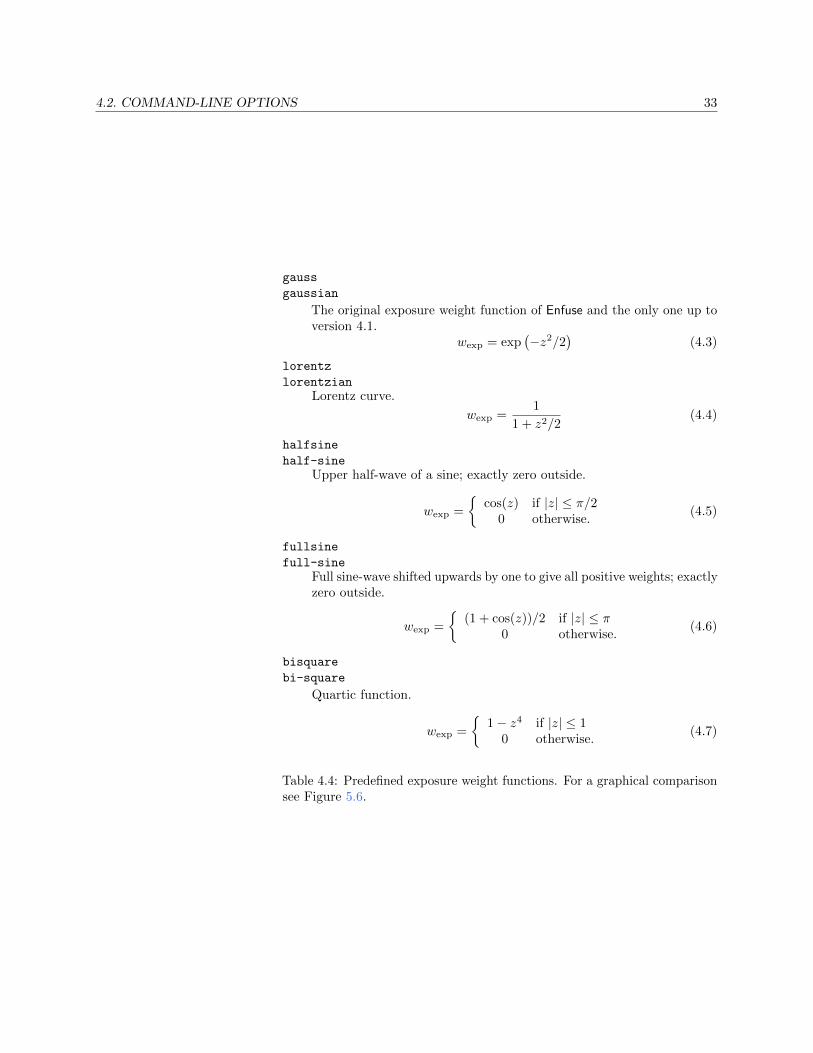
--exposure-weight-function=WEIGHT-FUNCTION (1st form)--exposure-weight-function=SHARED-OBJECT:SYMBOL [:ARGUMENT [:...]] (2nd form)
1st form: override the default exposure weight function (〈gaussian〉)and instead use one of the weight-functions in Table 4.4 on page 33.
) http://www.gimp.org/) https://www.imagemagick.org/script/index.php) https://www.imagemagick.org/Usage/files/#histogram

4.2. COMMAND-LINE OPTIONS 31
0
0.2
0.4
0.6
0.8
1
0 0.2 0.4 0.6 0.8 1
wY
Y
Figure 4.2: Exposure weight wY after an exposure-cutoff ofLOWER-CUTOFF = 5% and UPPER-CUTOFF = 97% was applied toa Gaussian with the optimum = 0.5 and width = 0.2.
Task Cutoff Setting Effect
Suppress some noise. --exposure-cutoff=5% The percentage makes the cutoffspecification channel-width ag-nostic.
Shave off pure white pixels. --exposure-cutoff=0:-1 This cutoff specification onlyworks for integral pixels, but itwill set the weight of the verybrightest pixels to zero.
Shave off bright white pixels. --exposure-cutoff=0:-1% Here we exclude the brightest 1%of pixels form the exposure fusionno matter whether the image isencoded with integers or floating-point numbers.
Suppress some noise and shaveoff pure white pixels.
--exposure-cutoff=5%:-1 Combine the effects of lower andupper cutoff, while mixing rela-tive and absolute specifications.
Table 4.3: Some possible exposure-cutoff settings and their effects on theexposure weights.

4.2. COMMAND-LINE OPTIONS 32
Versions with dynamic-linking support only.
2nd form: dynamically load SHARED-OBJECT and useSYMBOL as user-defined exposure weight function. Option-ally pass the user-defined function ARGUMENTs.
Depending on the operating system environment,a “shared object” is sometimes also called a “dynamiclibrary”.
2
In Table 4.4 the variable wexp denotes the exposure weight and zrepresents the normalized luminance Y linearly transformed by theexposure optimum Yopt (option --exposure-optimum) and width (op-tion --exposure-width) according to the linear transform
z =Y − Yopt
width. (4.2)
Internally Enfuse uses a rescaled width that gives all weight functionsthe same full width at half of the maximum (FWHM), also see Fig-ure 5.6. This means for the user that changing the exposure functionneither changes the optimum exposure nor the width.
For a detailed explanation of all the weight functions Section 5.2 onpage 46.
If this option is given more than once, the last instance wins.
--gray-projector=PROJECTOR
Use gray projector PROJECTOR for conversion of RGB images tograyscale:
(R,G,B)→ Y.
In this version of Enfuse, the option is effective for exposure weightingand local contrast weighting and PROJECTOR defaults to ‘〈average〉’.
Valid values for PROJECTOR are:
anti-value
Do the opposite of the ‘value’ projector: take the minimum ofall color channels.
Y = min(R,G,B)
This projector can be useful when exposure weighing while em-ploying a lower cutoff (see option --exposure-cutoff) to reducethe noise in the fused image.
average
Average red, green, and blue channel with equal weights. This isthe default, and it often is a good projector for gamma = 1 data.
Y =R+G+B
3
4.2. COMMAND-LINE OPTIONS 33
gauss
gaussian
The original exposure weight function of Enfuse and the only one up toversion 4.1.
wexp = exp(−z2/2
)(4.3)
lorentz
lorentzianLorentz curve.
wexp =1
1 + z2/2(4.4)
halfsine
half-sineUpper half-wave of a sine; exactly zero outside.
wexp =
{cos(z) if |z| ≤ π/2
0 otherwise.(4.5)
fullsine
full-sineFull sine-wave shifted upwards by one to give all positive weights; exactlyzero outside.
wexp =
{(1 + cos(z))/2 if |z| ≤ π
0 otherwise.(4.6)
bisquare
bi-square
Quartic function.
wexp =
{1− z4 if |z| ≤ 1
0 otherwise.(4.7)
Table 4.4: Predefined exposure weight functions. For a graphical comparisonsee Figure 5.6.

4.2. COMMAND-LINE OPTIONS 34
channel-mixer:RED-WEIGHT:GREEN-WEIGHT:BLUE-WEIGHT
Weight the channels as given.
Y = RED-WEIGHT × R +GREEN-WEIGHT × G +BLUE-WEIGHT × B
The weights are automatically normalized to one, so
--gray-projector=channel-mixer:0.25:0.5:0.25
--gray-projector=channel-mixer:1:2:1
--gray-projector=channel-mixer:25:50:25
all define the same mixer configuration.
The three weights RED-WEIGHT, GREEN-WEIGHT, and BLUE-WEIGHT define the relative weight of the respective color channel.The sum of all weights is normalized to one.
l-star
Use the L-channel of the L*a*b*-conversion of the image as itsgrayscale representation. This is a useful projector for gamma = 1data. It reveals minute contrast variations even in the shadowsand the highlights. This projector is computationally expensive.Compare with ‘pl-star’, which is intended for gamma-correctedimages.
See Wikipedia) for a detailed description of the Lab color space.
lightness
Compute the lightness of each RGB pixel as in an Hue-Saturation-Lightness (HSL) conversion of the image.
Y =max(R,G,B) + min(R,G,B)
2
luminance
Use the weighted average of the RGB pixel’s channels as definedby CIE (“Commission Internationale de l’Eclairage”) and theJPEG standard.
Y = 0.30×R+ 0.59×G+ 0.11×B
pl-star
Use the L-channel of the L*a*b*-conversion of the image as itsgrayscale representation. This is a useful projector for gamma-corrected data. It reveals minute contrast variations even inthe shadows and the highlights. This projector is computation-ally expensive. Compare with ‘l-star’, which is intended forgamma = 1 images.
See Wikipedia) for a detailed description of the Lab color space.
) https://en.wikipedia.org/wiki/Lab_color_space) https://en.wikipedia.org/wiki/Lab_color_space
4.2. COMMAND-LINE OPTIONS 35
value
Take the Value-channel of the Hue-Saturation-Value (HSV) con-version of the image.
Y = max(R,G,B)
4.2.6 Information Optionsc
-h
--help
Print information on the command-line syntax and all available options,giving a boiled-down version of this manual.
--show-globbing-algorithms
Show all globbing algorithms.
Depending on the build-time configuration and the operating systemthe binary may support different globbing algorithms. See Section 4.4.3on page 39.
--show-image-formats
Show all recognized image formats, their filename extensions and thesupported per-channel depths.
Depending on the build-time configuration and the operating system,the binary supports different image formats, typically: BMP, EXR,GIF, HDR, JPEG, PNG, PNM, SUN, TIFF, and VIFF and rec-ognizes different image-filename extensions, again typically: bmp, exr,gif, hdr, jpeg, jpg, pbm, pgm, png, pnm, ppm, ras, tif, tiff, and xv.
The maximum number of different per-channel depths any enfuseprovides is seven:
− 8 bits unsigned integral, ‘uint8’− 16 bits unsigned or signed integral, ‘uint16’ or ‘int16’− 32 bits unsigned or signed integral, ‘uint32’ or ‘int32’− 32 bits floating-point, ‘float’− 64 bits floating-point, ‘double’
--show-signature
Show the user name of the person who compiled the binary, when thebinary was compiled, and on which machine this was done.
This information can be helpful to ensure the binary was created by atrustworthy builder.
--show-software-components
Show the name and version of the compiler that built Enfuse followedby the versions of all important libraries against which Enfuse wascompiled and linked.
Technically, the version information is taken from header files, thusit is independent of the dynamic-library environment the binary runswithin. The library versions printed here can help to reveal versionmismatches with respect to the actual dynamic libraries available tothe binary.
4.3. OPTION DELIMITERSC 36
-V
--versionOutput information on the binary’s version.
Team this option with --verbose, page 18 to show configurationdetails, like the extra features that may have been compiled in. Fordetails consult Section 3.3.1 on page 8.
4.3 Option Delimitersc
Enfuse and Enblend allow the arguments supplied to the programs’ optionsto be separated by different separators. The online documentation and thismanual, however, exclusively use the colon ‘:’ in every syntax definition andin all examples.
4.3.1 Numeric Arguments
Valid delimiters are the semicolon ‘;’, the colon ‘:’, and the slash ‘/’. Alldelimiters may be mixed within any option that takes numeric arguments.
Examples using some Enfuse options:
--contrast-edge-scale=0.667:6.67:3.5
Separate all arguments with colons.
--contrast-edge-scale=0.667;6.67;3.5
Use semi-colons.
--contrast-edge-scale=0.667;6.67/3.5
Mix semicolon and slash in weird ways.
--entropy-cutoff=3%/99%
All delimiters also work in conjunction with percentages.
--gray-projector=channel-mixer:3/6/1
Separate arguments with a colon and two slashes.
--gray-projector=channel-mixer/30;60:10
Go wild and Enfuse will understand.
4.3.2 Filename Arguments
Here, the accepted delimiters are comma ‘,’, semicolon ‘;’, and colon ‘:’.Again, all delimiters may be mixed within any option that has filenamearguments.
Examples:
--save-masks=soft-mask-%03i.tif:hard-mask-03%i.tif
Separate all arguments with colons.
--save-masks=%d/soft-%n.tif,%d/hard-%n.tif
Use a comma.
4.4. RESPONSE FILESC 37
4.4 Response Filesc
A response file contains names of images or other response filenames.Introduce response file names at the command line or in a response file withan 〈@〉 character.
Enfuse and Enblend process the list INPUT strictly from left to right, ex-panding response files in depth-first order. Multi-layer files are processedfrom first layer to the last. The following examples only show Enblend, butEnfuse works exactly the same.
Solely image filenames.Example:
enblend image-1.tif image-2.tif image-3.tif
The ultimate order in which the images are processed is: image-1.tif,image-2.tif, image-3.tif.
Single response file.Example:
enblend @list
where file list contains
img1.exr
img2.exr
img3.exr
img4.exr
Ultimate order: img1.exr, img2.exr, img3.exr, img4.exr.
Mixed literal names and response files.Example:
enblend @master.list image-09.png image-10.png
where file master.list comprises of
image-01.png
@first.list
image-04.png
@second.list
image-08.png
first.list is
image-02.png
image-03.png
and second.list contains
image-05.png
image-06.png
image-07.png
Ultimate order: image-01.png, image-02.png, image-03.png, image-04.png, image-05.png, image-06.png, image-07.png, image-08.png, image-09.png, image-10.png,

4.4. RESPONSE FILESC 38
response-file ::= line*line ::= (comment | file-spec) [‘\r’] ‘\n’comment ::= space* ‘#’ textfile-spec ::= space* ‘@’ filename space*space ::= ‘ ’ | ‘\t’
where text is an arbitrary string and filename is any filename.
Table 4.5: EBNF definition of the grammar of response files.
4.4.1 Response File Format
Response files contain one filename per line. Blank lines or lines beginningwith a 〈#〉 sign are ignored; the latter can serve as comments. Filenamesthat begin with a 〈@〉 character denote other response files. Table 4.5 statesa formal grammar of response files in EBNF).
In a response file relative filenames are used relative the response file itself,not relative to the current-working directory of the application.
The above grammar might surprise the user in the some ways.
White-space trimmed at both line endsFor convenience, white-space at the beginning and at the end of eachline is ignored. However, this implies that response files cannot rep-resent filenames that start or end with white-space, as there is noquoting syntax. Filenames with embedded white-space cause no prob-lems, though.
Only whole-line commentsComments in response files always occupy a complete line. There areno “line-ending comments”. Thus, in
#exposure series
img-0.33ev.tif #"middle" EV
img-1.33ev.tif
img+0.67ev.tif
only the first line contains a comment, whereas the second line includesnone. Rather, it refers to a file called
img-0.33ev.tif #"middle" EV
Image filenames cannot start with 〈@〉A 〈@〉 sign invariably introduces a response file, even if the filename’sextension hints towards an image.
If Enfuse or Enblend do not recognize a response file, they will skip the fileand issue a warning. To force a file being recognized as a response file addone of the following syntactic comments to the first line of the file.
response-file: true
enblend-response-file: true
enfuse-response-file: true
Finally, Example 4.2 shows a complete response file.
) https://en.wikipedia.org/wiki/Ebnf

4.4. RESPONSE FILESC 39
# 4\pi panorama!
# These pictures were taken with the panorama head.
@ round-shots.list
# Freehand sky shot.
zenith.tif
# "Legs, will you go away?" images.
nadir-2.tif
nadir-5.tif
nadir.tif
Example 4.2: Example of a complete response file.
syntactic-comment ::= space* ‘#’ space* key space* ‘:’ space* valuekey ::= (‘A’. . . ‘Z’ | ‘a’. . . ‘z’ | ‘-’)+
where value is an arbitrary string.
Table 4.6: EBNF definition of the grammar of syntactic comments inresponse files.
4.4.2 Syntactic Comments
Comments that follow the format described in Table 4.6 are treated asinstructions how to interpret the rest of the response file. A syntacticcomment is effective immediately and its effect persists to the end of theresponse file, unless another syntactic comment undoes it.
Unknown syntactic comments are silently ignored.
A special index for syntactic comments, page 105 lists them in alphabeticorder.
4.4.3 Globbing Algorithms
The three equivalent syntactic keys
− glob,− globbing, or− filename-globbing
control the algorithm that Enfuse or Enblend use to glob filenames in responsefiles.
All versions of Enfuse and Enblend support at least two algorithms: literal,which is the default, and wildcard. See Table 4.7 for a list of all possibleglobbing algorithms. To find out about the algorithms in your version ofEnfuse or Enblend use option --show-globbing-algorithms.
Example 4.3 gives an example of how to control filename-globbing in aresponse file.

4.4. RESPONSE FILESC 40
literal
Do not glob. Interpret all filenames in response files as literals. This isthe default.Please remember that white-space at both ends of a line in a responsefile always gets discarded.
wildcard
Glob using the wildcard characters ‘?’, ‘*’, ‘[’, and ‘]’.The Win32 implementation only globs the filename part of a path,whereas all other implementations perform wildcard expansion in allpath components. Also see glob(7)a).
none
Alias for literal.shell
The shell globbing algorithm works as literal does. In addition,it interprets the wildcard characters ‘{’, ‘@’, and ‘~’. This makes theexpansion process behave more like common UN*X shells.
sh
Alias for shell.
a) http://man7.org/linux/man-pages/man7/glob.7.html
Table 4.7: Globbing algorithms for the use in response files.
# Horizontal panorama
# 15 images
# filename-globbing: wildcard
image 000[0-9].tif
image 001[0-4].tif
Example 4.3: Control filename-globbing in a response file with a syntacticcomment.

4.5. LAYER SELECTIONC 41
4.4.4 Default Layer Selection
The key layer-selector provides the same functionality as does the com-mand-line option --layer-selector, but on a per response-file basis. SeeSection 4.2.1.
This syntactic comment affects the layer selection of all images listed afterit including those in included response files until another layer-selector
overrides it.
4.5 Layer Selectionc
Some image formats, like for example TIFF, allow for storing more thanone image in a single file, where all the contained images can have differentsizes, number of channels, resolutions, compression schemes, etc. The filethere acts as a container for an ordered set of images.
In the TIFF-documentation these are known as “multi-page” files andbecause the image data in a TIFF-file is associated with a “directory”,the files sometimes are also called “multi-directory” files. In this manual,multiple images in a file are called “layers”.
The main advantage of multi-layer files over a set of single-layer ones is acleaner work area with less image-files and thus an easier handling of theintermediate products which get created when generating a panorama orfused image, and in particularly with regard to panoramas of fused images.
The difficulty in working with layers is their lack of a possibly mnemonicnaming scheme. They do not have telling names like taoth-vaclarush orvalos-cor, but only numbers.
4.5.1 Layer Selection Syntax
To give the user the same flexibility in specifying and ordering images aswith single-layer images, both Enfuse and Enblend offer a special syntax toselect layers in multi-page files by appending a layer-specification to theimage file name. Table 4.8 defines the grammar of layer-specifications.
Selecting a tuple of layers with a layer-specification overrides the activelayer selection algorithm. See also option --layer-selector, page 23 andSection 4.4 on page 37. Layer selection works at the command-line as wellas in Response Files; see Section 4.4.
The simplest layer-specification are the layer-indexes. The first layer getsindex 1, the second layer 2, and so on. Zero never is a valid index! Forconvenience indexing backwards) is also possible. This means by prefixingan index with a minus-sign (‘-’) counting will start with the last layer of theassociated multi-page image, such that the last layer always has index -1,the next to last index -2 and so on. Out-of-range indexes are silently ignoredwhether forward or backward.
The single layer of a single-layer file always can be accessed either withindex ‘1’ or ‘-1’.
) Samantha Carter: “There has to be a way to reverse the process. The answerhas to be here.”
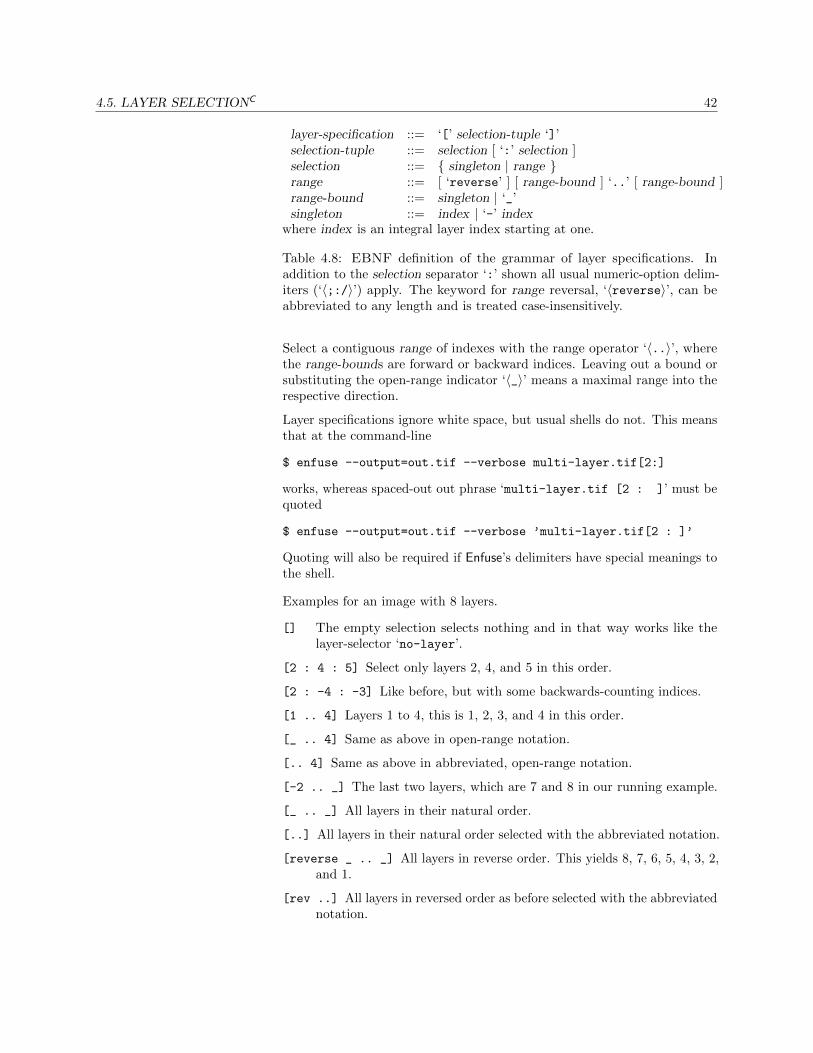
4.5. LAYER SELECTIONC 42
layer-specification ::= ‘[’ selection-tuple ‘]’selection-tuple ::= selection [ ‘:’ selection ]selection ::= { singleton | range }range ::= [ ‘reverse’ ] [ range-bound ] ‘..’ [ range-bound ]range-bound ::= singleton | ‘_’singleton ::= index | ‘-’ index
where index is an integral layer index starting at one.
Table 4.8: EBNF definition of the grammar of layer specifications. Inaddition to the selection separator ‘:’ shown all usual numeric-option delim-iters (‘〈;:/〉’) apply. The keyword for range reversal, ‘〈reverse〉’, can beabbreviated to any length and is treated case-insensitively.
Select a contiguous range of indexes with the range operator ‘〈..〉’, wherethe range-bounds are forward or backward indices. Leaving out a bound orsubstituting the open-range indicator ‘〈_〉’ means a maximal range into therespective direction.
Layer specifications ignore white space, but usual shells do not. This meansthat at the command-line
$ enfuse --output=out.tif --verbose multi-layer.tif[2:]
works, whereas spaced-out out phrase ‘multi-layer.tif [2 : ]’ must bequoted
$ enfuse --output=out.tif --verbose ’multi-layer.tif[2 : ]’
Quoting will also be required if Enfuse’s delimiters have special meanings tothe shell.
Examples for an image with 8 layers.
[] The empty selection selects nothing and in that way works like thelayer-selector ‘no-layer’.
[2 : 4 : 5] Select only layers 2, 4, and 5 in this order.
[2 : -4 : -3] Like before, but with some backwards-counting indices.
[1 .. 4] Layers 1 to 4, this is 1, 2, 3, and 4 in this order.
[_ .. 4] Same as above in open-range notation.
[.. 4] Same as above in abbreviated, open-range notation.
[-2 .. _] The last two layers, which are 7 and 8 in our running example.
[_ .. _] All layers in their natural order.
[..] All layers in their natural order selected with the abbreviated notation.
[reverse _ .. _] All layers in reverse order. This yields 8, 7, 6, 5, 4, 3, 2,and 1.
[rev ..] All layers in reversed order as before selected with the abbreviatednotation.

4.5. LAYER SELECTIONC 43
[r -3 ..] The last three layers in reverse order, this is 8, 7 and 6 in ourrunning example.
Shell expansion will not work anymore with a file name termi-nated by a layer specification expression (or anything else), becauseto the shell it is not a file name anymore. Work around with, forexample,
$ enfuse ‘for x in image-??.tif; do echo $x[2]; done‘
or
$ enfuse $(ls -1 image-??.tif | sed -e ’s/$/[2]/’)
The order of the indices determines the order of the layers, this is,the images. An index can occur multiple times, which causes layerto be considered again. Consequently, this will lead to an error withEnblend, but may be desired with Enfuse in soft-mask mode to givethe image more weight by mentioning it more than once.
4.5.2 Tools for Multi-Page Files
Here are some tools that are particularly useful when working with multi-pagefiles. For more helpful utilities check out Appendix A on page 91.
• Hugin’s stitcher, nona produces multi-page TIFF file, when called withthe ‘-m TIFF multilayer’-option.
• The utility tiffcp of the TIFF-LibTIFF tool suite) merges severalTIFF-images into a single multi-page file.
• The sister program tiffsplit splits a multi-page file into a set of single-page TIFF-images.
• Another utility of the same origin, tiffinfo, is very helpful when inquiringthe contents of single- or multi-page file TIFF-files.
• All tools of the ImageMagick)-suite, like, for example, convert anddisplay use a similar syntax) as Enfuse to select layers (which inImageMagick parlance are called “frames”) in multi-page files. Pleasenote that ImageMagick tools start indexing at zero, whereas we startat one.
• Enfuse and Enblend by default apply the ‘〈all-layers〉’ selector (seeoption --layer-selector, page 23) to each of the input images.
Please bear in mind that some image-processing tools – none of the abovethough – do not handle multi-page files correctly, where the most unfruitfulones only take care of the first layer and silently ignore any further layers.
) http://www.remotesensing.org/libtiff/) https://www.imagemagick.org/script/index.php) https://www.imagemagick.org/script/command-line-processing.php#input

5 Weighting Functions
As has been noted in the introductory Overview (page 1), Enfuse supportsfour different types of weighting. The following sections describe the conceptof weighting and all weighting functions in detail.
5.1 Weighting Pixels
Image fusion maps each pixel P (i, x, y) of every input image i to a singlepixel Q(x, y) in the output image:
P (i, x, y)→ Q(x, y),
where x runs from 1 to the width of the images, y from 1 to the height, andi from 1 to the number n of input images.
w(P (1, x, y))P (1, x, y) + . . .+ w(P (n, x, y))P (n, x, y)→ Q(x, y), (5.1)
where
• each w is non-negative to yield a physical intensity and
• the sum of all w is 1 to leave the total intensity unchanged.
The pixel weights w themselves are weighted sums with the same constraints
w(P ) = wexp fexp(P )+
wsat fsat(P )+
wcont fcont(P, rcont)+
went fent(P, rent).
Here we have abbreviated P (i, x, y) to P for simplicity. The user defines theconstants wexp, wsat, wcont, and went with the options --exposure-weight,--saturation-weight, --contrast-weight, and --entropy-weight respec-tively. The functions fexp, fsat, fcont, and fent along with the windowsizes rcont and rent are explained in the next sections.
5.1.1 Weighted Average
By default, Enfuse uses a weighted average, where each pixel contributes asmuch as its weight demands. Of course the weights can be extreme, favoringonly a few pixels or even only one pixel in the input stack. Extremes are nottypical, however.
Equal weights are another extreme that turns (5.1) into an arithmetic average.This is why we sometimes speak of the “averaging property” of this weightingalgorithm, like smoothing out noise.

5.1. WEIGHTING PIXELS 45
Criterion Default Weight
Exposure 〈1.0〉Saturation 〈0.2〉Local Contrast 〈0.0〉Local Entropy 〈0.0〉
Table 5.1: Enfuse’s default weights as compiled into enfuse.
5.1.2 Disabling Averaging: Option ‘--hard-mask’
The weighted average computation as described above has proven to bewidely successful with the exception of one special case: focus stacking,where the averaging noticeably softens the final image.
Use ‘--hard-mask’ to switch Enfuse into a different weighting mode, wherethe pixel with the highest weight wins, this is, gets weight one, and all otherpixels get the weight of zero. With option --hard-mask (5.1) becomes
P (i, x, y)→ Q(x, y),
wherew(P (i, x, y)) ≥ w(P (j, x, y)) for all 1 ≤ j ≤ n.
Note that this “averaging” scheme lacks the nice noise-reduction property ofthe weighted average (5.1), because only a single input pixel contributes tothe output.
5.1.3 Single Criterion Fusing
Enfuse allows the user to weight each pixel of an input image by up to fourdifferent criteria (see e.g. Chapter 1 on page 1). However, it does not forcethe user to do so. For some applications and more often simply to gainfurther insight into the weighting and fusing process, looking at only a singlecriterion is the preferred way to work.
The version of Enfuse for which this documentation was prepared, uses thedefault weights as stated in Table 5.1. Notice that by default more than oneweight is larger than zero, which means they are active.
To disable a particular criterion set its weight to zero as for example
$ enfuse \
--exposure-weight=1 --saturation-weight=0 \
--contrast-weight=0 --entropy-weight=0 \
image [1-3].png
instructs Enfuse to consider only the exposure weight. Combine this withoption --save-masks and it will become clearer how Enfuse computes theexposure weight for the set of images.
Another problem that can be inspected by fusing with just a single activecriterion and saving the masks is if the weights of one criterion completelyoverpower all others.
5.2. EXPOSURE WEIGHTING 46
5.2 Exposure Weighting
Exposure weighting prefers pixels with a luminance Y close to the user-chosen optimum value (option --exposure-optimum, default: 〈0.5〉) of thenormalized, real-valued luminance interval (0, 1).
RGB-pixels get converted to luminance before using the grayscale projectorgiven by ‘--gray-projector’, which defaults to average. Grayscale pixelssimply are identified with luminance.
In the normalized luminance interval 0.0 represents pure black and 1.0represents pure white independently of the data type of the input image.This is, for a JPEG image the luminance 255 maps to 1.0 in the normalizedinterval and for a 32 bit TIFF picture the highest luminance value 4294967295also maps to 1.0. The middle of the luminance interval, 0.5, is where aneutral gray tone ends up with every camera that had no exposure correctiondialed in, for example the image of any gray-card or white-card.
The exposure weighting algorithm only looks at a single pixel at a time; thepixel’s neighborhood is not taken into account.
5.2.1 Built-In Functions
Up to Enfuse version 4.1 the only weighting function is the Gaussian
wexp(Y ) = exp
(−1
2
(Y − Yopt
width
)2), (4.3 rep.)
whose maximum position Yopt and width are controlled by the command lineoptions --exposure-optimum and --exposure-width respectively, whereYopt defaults to 〈0.5〉 and width defaults to 〈0.2〉. Figure 5.1 shows someGaussians.
The options --exposure-optimum and --exposure-width serve to fine-tunethe final result without changing the set of input images. Option --expo=
sure-optimum sets the point of optimum exposure. Increasing the optimummakes Enfuse prefer lighter pixels, rendering the final image lighter, and viceversa. Option --exposure-width defines the width of acceptable exposures.Small values of width penalize exposures that deviate from optimum more,and vice versa.
In Enfuse version 4.2 several new exposure weight functions have been added.Select them with option --exposure-weight-function. For the followingpresentation we refer to the linear luminance transform
z =Y − Yopt
width. (4.2 rep.)
as introduced in Eqn. 4.2 on page 32.
Functions Gaussianwexp(z) = exp
(−z2/2
)(4.3 rep.)
and Lorentzian
wexp(z) =1
1 + z2/2(4.4 rep.)
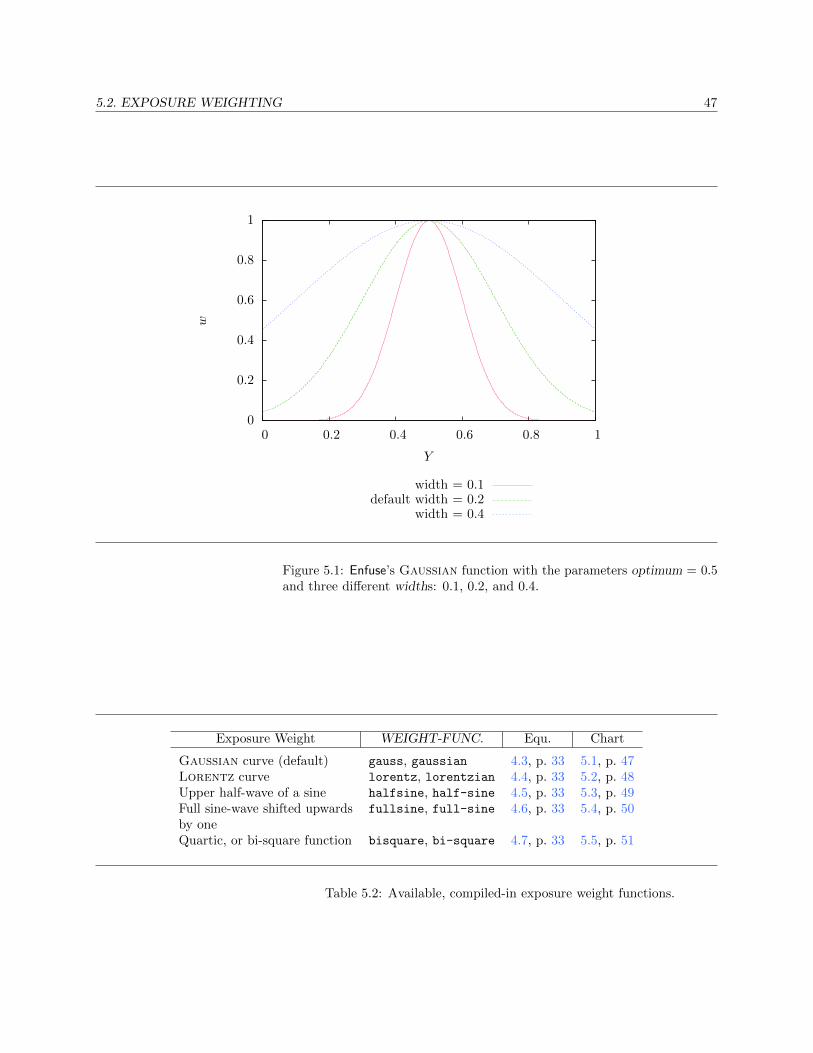
5.2. EXPOSURE WEIGHTING 47
0
0.2
0.4
0.6
0.8
1
0 0.2 0.4 0.6 0.8 1
w
Y
width = 0.1default width = 0.2
width = 0.4
Figure 5.1: Enfuse’s Gaussian function with the parameters optimum = 0.5and three different widths: 0.1, 0.2, and 0.4.
Exposure Weight WEIGHT-FUNC. Equ. Chart
Gaussian curve (default) gauss, gaussian 4.3, p. 33 5.1, p. 47Lorentz curve lorentz, lorentzian 4.4, p. 33 5.2, p. 48Upper half-wave of a sine halfsine, half-sine 4.5, p. 33 5.3, p. 49Full sine-wave shifted upwardsby one
fullsine, full-sine 4.6, p. 33 5.4, p. 50
Quartic, or bi-square function bisquare, bi-square 4.7, p. 33 5.5, p. 51
Table 5.2: Available, compiled-in exposure weight functions.

5.2. EXPOSURE WEIGHTING 48
0
0.2
0.4
0.6
0.8
1
0 0.2 0.4 0.6 0.8 1
w
Y
width = 0.1default width = 0.2
width = 0.4
Figure 5.2: Enfuse’s Lorentzian function with the parameters optimum =0.5 and three different widths: 0.1, 0.2, and 0.4.

5.2. EXPOSURE WEIGHTING 49
0
0.2
0.4
0.6
0.8
1
0 0.2 0.4 0.6 0.8 1
w
Y
width = 0.1default width = 0.2
width = 0.4
Figure 5.3: Enfuse’s Half-Sine function with the parameters optimum = 0.5and three different widths: 0.1, 0.2, and 0.4.
behave like 1− z2 around the optimum. However for large |z| the Gaussianweight rolls off like exp(−z2/2) and the Lorentzian only as z−2.
Both, the Gaussian and the Lorentzian are easy to use, because they donot go exactly to zero. Thus, Enfuse can select “better” pixels even far awayfrom the chosen optimum.
Again, Half-Sine
wexp(z) =
{cos(z) if |z| ≤ π/2
0 otherwise.(4.5 rep.)
and Full-Sine
wexp(z) =
{(1 + cos(z))/2 if |z| ≤ π
0 otherwise.(4.6 rep.)
behave like 1− z2 around the optimum, like Gaussian and Lorentzian.However for large |z| they both are exactly zero. The difference is howthey decrease just before they reach zero. Half-Sine behaves like z − z′ andFull-Sine like (z − z′′)2, where z′ and z′′ are the respective zeros.
Bi-Square
wexp(z) =
{1− z4 if |z| ≤ 1
0 otherwise.(4.7 rep.)
is the only predefined function that behaves like 1− z4 around the optimum.

5.2. EXPOSURE WEIGHTING 50
0
0.2
0.4
0.6
0.8
1
0 0.2 0.4 0.6 0.8 1
w
Y
width = 0.1default width = 0.2
width = 0.4
Figure 5.4: Enfuse’s Full-Sine function with the parameters optimum = 0.5and three different widths: 0.1, 0.2, and 0.4.

5.2. EXPOSURE WEIGHTING 51
0
0.2
0.4
0.6
0.8
1
0 0.2 0.4 0.6 0.8 1
w
Y
width = 0.1default width = 0.2
width = 0.4
Figure 5.5: Enfuse’s Bi-Square function with the parameters optimum = 0.5and three different widths: 0.1, 0.2, and 0.4.

5.2. EXPOSURE WEIGHTING 52
0
0.5
1
0 0.2 0.4 0.6 0.8 1
w
Y
GaussianLorentzian
Half-Sine
Full-SineBi-Square
Figure 5.6: Comparison of all of Enfuse’s built-in exposure weight func-tions w(Y ) for the default values of optimum = 0.5 and width = 0.2. Notethat all functions intersect at w = 1/2, this is, they share the same FWHM.
The weight functions Half-Sine, Full-Sine, and Bi-Square are more difficultto use, because they yield exactly zero if the normalized luminance of a pixelis far enough away from the optimum. This can lead to pathologies if theluminances of the same pixel position in all N input images are assigneda weight of zero. For all-zero weights Enfuse falls back to weighing equally.This is, each pixel gets a weight of 1/N, which may or may not be the desiredresult. However, if the width is chosen so large that the weight never vanishesor the input images span a large enough range of luminances for each andevery pixel, the problem is circumnavigated.
Another way of cutting off underexposed or overexposed pixels is to useoption --exposure-cutoff, which has the additional benefit of allowing tochoose upper and lower cutoff separately.
Figure 5.6 compares all available exposure weight functions for the sameparameters, namely their defaults. They all intersect at w = 1/2 indepen-dently of optimum or width, making it simple to just try them out withoutfundamentally changing brightness.
5.2.2 User-Defined Exposure Weighting Functions
5.2.3 User-Defined, Dynamically-Linked Exposure Weighting Functions
Dynamic Linking-enabled versions only.

5.2. EXPOSURE WEIGHTING 53
On operating systems, where dynamic linking (or synonymously: dynamicloading) of code is possible, for Enfuse executables compiled with dynamic-linking support (see Section 3.3.1 on page 8 on how to check this feature),Enfuse can work with user-defined exposure weighting functions, passedwith the long form of option --exposure-weight-function, load the expo-sure weight function identified by SYMBOL from SHARED-OBJECT andoptionally pass some ARGUMENTs:
--exposure-weight-function=SHARED-OBJECT:SYMBOL [:ARGUMENT [:...]]
Some notes on the arguments of this option:
• SHARED-OBJECT is a filename (typically ending in .so or .dll).Depending on the operating system and the dynamic-loader imple-mentation compiled into enfuse, SHARED-OBJECT may or may notrequire a path.
Linux
If SHARED-OBJECT does not contain a slash (‘/’), thedynamic loader only searches along LD LIBRARY PATH; it evenignores the current working directory unless LD LIBRARY -
PATH contains a dot (‘.’). So, to use a SHARED-OBJECTliving in the current directory either sayenv LD LIBRARY PATH=$LD LIBRARY PATH:. \
enfuse --exposure-weight-function=SHARED-OBJECT:...
orenfuse --exposure-weight-function=./SHARED-OBJECT:...
For details of the search algorithm please consult themanual page of dlopen(3).
2
OS X
If SHARED-OBJECT does not contain a slash (‘/’), thedynamic loader searches the following paths or directoriesuntil it finds a compatible Mach-O file:
1. LD LIBRARY PATH,2. DYLD LIBRARY PATH,3. current working directory, and finally4. DYLD FALLBACK LIBRARY PATH.
For details of the search algorithm please consult themanual page of dlopen(3).
2
Windows
If SHARED-OBJECT specifies an absolute filename, ex-actly this file is used. Otherwise Enfuse searches in thefollowing directories and in this order:
1. The directory from which enfuse is loaded.2. The system directory.3. The Windows directory.4. The current directory.
5.2. EXPOSURE WEIGHTING 54
5. The directories that are listed in the PATH environmentvariable.
For details consult the manual page of LoadLibrary.
2
• There is no way knowing which of the symbols inside of SHARED-OBJECT are suitable for SYMBOL without knowledge of source codeof SHARED-OBJECT.
• A weight function has access to additional ARGUMENTs passed in byappending them after SYMBOL with the usual delimiters. How theseARGUMENTs are interpreted and how many of them are requiredis encoded in the weight-function. Enfuse supports ARGUMENTs; itneither restricts their number nor their type.
Usually, neither the exposure optimum (--exposure-optimum=OPTIMUM) nor the width (--exposure-width=WIDTH) ofthe exposure function are ARGUMENTs, because they arealways explicitly passed on to any exposure weight function.
For example, assuming variable power.cc of the supplied examples wascompiled to variable power.so, we can override the default exponent of2 with
enfuse --exposure-weight-function=\
variable power.so:vpower:1.8 ...
Prerequisites
To use a home-grown exposure-weight function several prerequisites must bemet. On the software side
1. The operating system allows loading additional code during the execu-tion of an application.
2. Enfuse is compiled with the extra feature “dynamic linking support”.
3. Either
(a) The same compiler that compiled Enfuse is available or at least
(b) A compiler that produces compatible object code to the compilerthat compiled Enfuse.
The latter is called “ABI-compatible”. An example for a pair ofABI-compatible compilers is GNU’s g++ and Intel’s icpc.
To find out which compiler built your version of enfuse use option --show-
software-components.
4. The base-class header file exposure weight base.h is available.
Between chair and keyboard:
• A firm understanding of weighting pixels in the fusion process and inparticular in the cumulative ascription of different weights.
• A basic understanding of object-oriented programming paired with theability to compile and link single-source C++-files.

5.2. EXPOSURE WEIGHTING 55
• A realistic expectation of the limitations of tailoring weight functions.
Coding Guidelines
1. Derive the weight function from the supplied C++ base-class Expo=
sureWeight, which is defined in header file exposure weight base.h. Itresides in the src sub-directory of the source distribution and – fora correctly installed package – in directory /opt/enblend/share/doc/enblend-enfuse/examples/enfuse.
2. At least override method weight.
• Domain: define weight for normalized luminance values y fromzero to one including both interval ends: 0 ≤ y ≤ 1.
• Image: Let the weight w fall in the interval from zero to one:0 ≤ w ≤ 1. The weights can be all the same, w = const. This is,they can encode a constant weight, as long as the constant is notzero.
Enfuse checks this property and refuses to continue if any weightis outside the required range or all weights are zero.
• (Optionally) Rescale the WIDTH of the function to match theFWHM of Enfuse’s original Gauss curve. The macro FWHM -
GAUSSIAN is defined exactly to this end.
3. If necessary, rewrite methods initialize and normalize, too.
4. OpenMP-enabled versions only.
Enfuse never calls initialize in an OpenMP parallel execution envi-ronment. However, OpenMP-enabled versions of Enfuse call normal=ize and weight in parallel sections.
Technically, the functors which the user-defined weight functions arepart of are copy-constructed for each OpenMP worker thread. Thus,there is no contention within the ExposureWeight sub-classes. Al-though, if normalize or weight access a shared resource these accessesmust be protected by serialization instructions. One solution is to useOpenMP directives, like for example,
#pragma omp critical
{
std::cout << "foobar!" << std::endl;
}
Experienced hackers will recognize occasions when to prefer otherconstructs, like, for example #pragma omp atomic or simply an atomicdata-type (e.g. sig atomic t from signal.h).
Remember to compile all modules that use OpenMP directives withthe (compiler-specific) flags that turn on OpenMP. For g++ this is‘-fopenmp’ and for icpc it is ‘-fopenmp’ or ‘-openmp’.
5. To raise an exception associated with the derived, user-defined exposure-weight class, throw
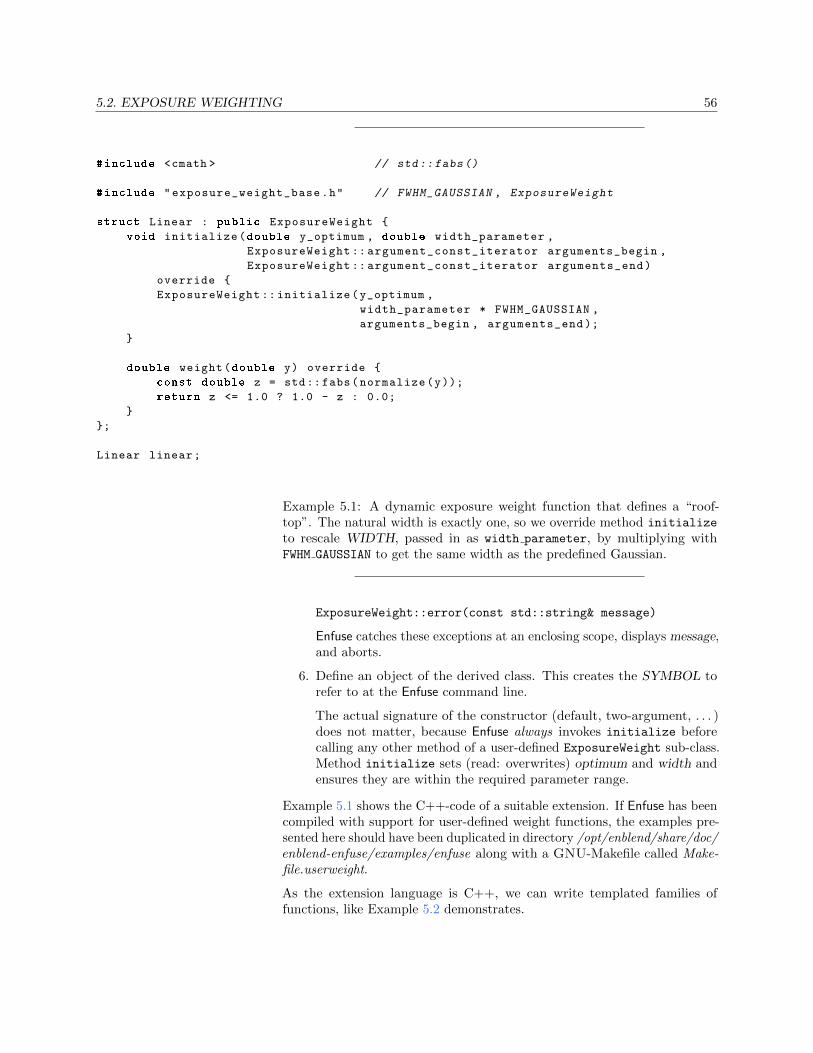
5.2. EXPOSURE WEIGHTING 56
#include <cmath > // std::fabs()
#include "exposure_weight_base.h" // FWHM_GAUSSIAN , ExposureWeight
struct Linear : public ExposureWeight {
void initialize(double y_optimum , double width_parameter ,
ExposureWeight :: argument_const_iterator arguments_begin ,
ExposureWeight :: argument_const_iterator arguments_end)
override {
ExposureWeight :: initialize(y_optimum ,
width_parameter * FWHM_GAUSSIAN ,
arguments_begin , arguments_end );
}
double weight(double y) override {
const double z = std::fabs(normalize(y));
return z <= 1.0 ? 1.0 - z : 0.0;
}
};
Linear linear;
Example 5.1: A dynamic exposure weight function that defines a “roof-top”. The natural width is exactly one, so we override method initialize
to rescale WIDTH, passed in as width parameter, by multiplying withFWHM GAUSSIAN to get the same width as the predefined Gaussian.
ExposureWeight::error(const std::string& message)
Enfuse catches these exceptions at an enclosing scope, displays message,and aborts.
6. Define an object of the derived class. This creates the SYMBOL torefer to at the Enfuse command line.
The actual signature of the constructor (default, two-argument, . . . )does not matter, because Enfuse always invokes initialize beforecalling any other method of a user-defined ExposureWeight sub-class.Method initialize sets (read: overwrites) optimum and width andensures they are within the required parameter range.
Example 5.1 shows the C++-code of a suitable extension. If Enfuse has beencompiled with support for user-defined weight functions, the examples pre-sented here should have been duplicated in directory /opt/enblend/share/doc/enblend-enfuse/examples/enfuse along with a GNU-Makefile called Make-file.userweight.
As the extension language is C++, we can write templated families offunctions, like Example 5.2 demonstrates.
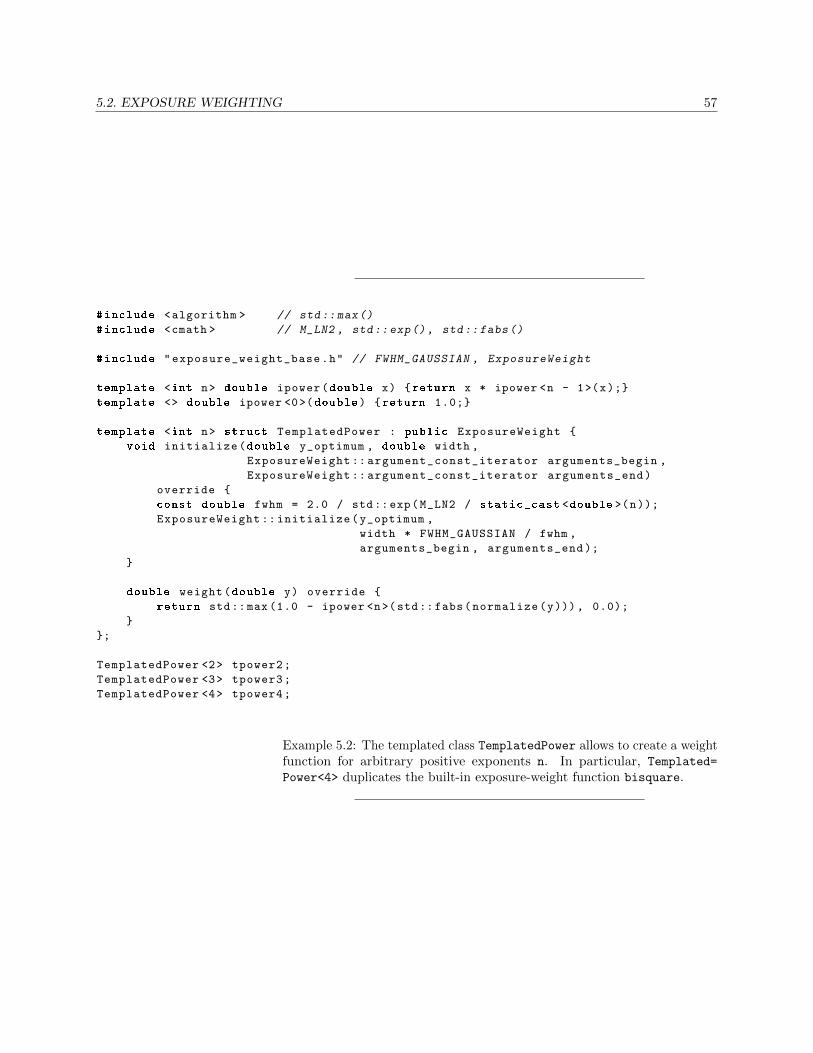
5.2. EXPOSURE WEIGHTING 57
#include <algorithm > // std::max()
#include <cmath > // M_LN2 , std::exp(), std::fabs()
#include "exposure_weight_base.h" // FWHM_GAUSSIAN , ExposureWeight
template <int n> double ipower(double x) {return x * ipower <n - 1>(x);}
template <> double ipower <0>(double) {return 1.0;}
template <int n> struct TemplatedPower : public ExposureWeight {
void initialize(double y_optimum , double width ,
ExposureWeight :: argument_const_iterator arguments_begin ,
ExposureWeight :: argument_const_iterator arguments_end)
override {
const double fwhm = 2.0 / std::exp(M_LN2 / static_cast <double >(n));
ExposureWeight :: initialize(y_optimum ,
width * FWHM_GAUSSIAN / fwhm ,
arguments_begin , arguments_end );
}
double weight(double y) override {
return std::max (1.0 - ipower <n>(std::fabs(normalize(y))), 0.0);
}
};
TemplatedPower <2> tpower2;
TemplatedPower <3> tpower3;
TemplatedPower <4> tpower4;
Example 5.2: The templated class TemplatedPower allows to create a weightfunction for arbitrary positive exponents n. In particular, Templated=
Power<4> duplicates the built-in exposure-weight function bisquare.
5.2. EXPOSURE WEIGHTING 58
The last example, 5.3, shows a weight function that accesses an extraARGUMENT passed in with --exposure-weight-function. A class likeVariablePower allows full control over the exponent at the command lineincluding fractional exponents thereby generalizing both of the previousexamples.
Performance Considerations
Exposure weighting objects are created and destroyed only O(1) times. Thus,method initialize could be used to perform all kinds of computationallyexpensive tasks. In contrast, methods normalize and weight are called forevery pixel in each of the input images. Therefore, if performance of theweight function is a problem, these two functions are the prime candidatesfor optimization.
Compiling, Linking, and Loading
Linux
Compile and link using the GNU-compiler), g++, for examplewith
g++ -std=c++11 \
-O2 -fpic -I<PATH-TO-BASE-CLASS-HEADER> \
-shared -Wl,-soname,dynexp.so \
-o dynexp.so \
dynexp.cc
The important options are
-fpic
Instruct the compiler’s code-generator to produce position-independent code (PIC), which is suitable for a sharedobject. Some systems require ‘-fPIC’ instead of ‘-fpic’.
-shared
Tell the linker to create a shared object instead of the defaultexecutable. On some systems, the library must be “blessed”,by passing the shared-object name (soname) directly to thelinker (-Wl).Of course more than one object file can be linked into asingle shared object.
Finally, the weight function can be selected by its SYM-BOL name in the SHARED-OBJECT.
enfuse --exposure-weight-function=dynexp.so:linear...
2
OS X
On OS X the creation of shared objects – or loadable modules– has been tested with the C-language frontend of LLVM),clang++), and should work on OS X Mavericks (10.9) or higher.
) https://gcc.gnu.org/

5.2. EXPOSURE WEIGHTING 59
#include <algorithm > // std::max()
#include <cerrno > // errno
#include <cmath > // M_LN2 , std::exp(), std::fabs(), std::pow()
#include "exposure_weight_base.h" // FWHM_GAUSSIAN , ExposureWeight
class VariablePower : public ExposureWeight {
typedef ExposureWeight super;
public:
void initialize(double y_optimum , double width ,
ExposureWeight :: argument_const_iterator arguments_begin ,
ExposureWeight :: argument_const_iterator arguments_end)
override {
if (arguments_begin == arguments_end) {
exponent = 2.0;
} else {
char* tail;
errno = 0;
exponent = strtod(arguments_begin ->c_str(), &tail);
if (*tail != 0 || errno != 0) {
throw super ::error("non -numeric exponent");
}
if (exponent <= 0.0 || exponent > 4.0) {
throw super ::error("exponent x out of range 0 < x <= 4");
}
}
const double fwhm = 2.0 / std::exp(M_LN2 / exponent );
super :: initialize(y_optimum , width * FWHM_GAUSSIAN / fwhm ,
arguments_begin , arguments_end );
}
double weight(double y) override {
return std::max (1.0 - std::pow(std::fabs(normalize(y)), exponent), 0.0);
}
private:
double exponent;
};
VariablePower vpower;
Example 5.3: Dynamic exposure weight function that accesses thefirst extra argument from the tuple of arguments passed with op-tion --exposure-weight-function.

5.2. EXPOSURE WEIGHTING 60
clang++ -std=c++11 -stdlib=libc++ \
-O2 -bundle -I<PATH-TO-BASE-CLASS-HEADER> \
-o dynexp.so \
dynexp.cc
The important option here is ‘-bundle’ which instructs thecompiler’s code-generator to produce a loadable module.
Finally, the weight function can be selected by its SYM-BOL name in the SHARED-OBJECT.
enfuse --exposure-weight-function=dynexp.so:linear...
2
Windows
On Windows the creation of shared objects – or dynamic linklibraries (DLL files) as they are called here – has been testedwith the MinGW compiler chain and with MS-Visual C++ 2012.
• Compile and link using the MinGW compiler with
g++ -g -O2 -I<PATH-TO-BASE-CLASS-HEADER> -c dyn=
exp.cc
g++ -g -shared -Wl,-soname,dynexp.dll -o dyn=
exp.dll dynexp.o
For details see the explanation for the GNU compiler above.Windows neither requires options -fpic nor -fPIC.• When using the MS-Visual C++ compiler, you need to
explicitly export SYMBOL. There are two possibilities toachieve this. Use only one variant, not both at the sametime.
1. Either use "C" linkage and define the object using theconstruction declspec(dllexport). For Example 5.1the object definition has to be extended to
extern "C"
{
__declspec(dllexport) Linear linear;
}
2. Or, alternatively, create a module-definition file (.def )and pass this file to the linker (in: Project Prop-erties, Linker, Module Definition File). ForExample 5.1, this file would look likeLIBRARY dynexp
EXPORTS
linear @@1
Finally, the weight function can be selected by its SYMBOLin the dynamic link library.
enfuse --exposure-weight-function=dynexp.dll:linear...
2
Summary of influential options
) http://llvm.org/) http://clang.llvm.org/
5.3. SATURATION WEIGHTING 61
--exposure-optimum: Section 4.2.3 on page 22
--exposure-weight-function: Section 4.2.5 on page 30
--exposure-weight: Section 4.2.3 on page 22
--exposure-width: Section 4.2.3 on page 23
--gray-projector: Section 4.2.5 on page 32
5.3 Saturation Weighting
Saturation weighting prefers pixels with a high saturation, where the sat-uration SHSL is computed in HSL color space. For an introduction to theHSL color space, please consult Wikipedia).
Taking the largest and smallest components of the RGB-value (R,G,B) inthe normalized RGB-cube
vmin = min(R,G,B) and
vmax = max(R,G,B),
we define chromaC = vmax − vmin
and lightnessL = (vmax + vmin)/2.
Enfuse computes the saturation of the pixel according to the followingformula:
SHSL =
{0 if C = 0C
1−|2L−1| otherwise.(5.2)
The saturation weighting algorithm only looks at a single pixel at a time.The neighborhood of the pixel is not taken into account.
Obviously, saturation weighting can only be defined for RGB-images, notfor grayscale ones. If you need something similar, check out Section 5.5 onEntropy Weighting, which works for both RGB and grayscale pictures.
Summary of influential options
--saturation-weight: Section 4.2.3 on page 23
5.4 Local Contrast Weighting
Local contrast weighting favors pixels inside a high contrast neighborhood.The notion of “high contrast” is defined either by two different criteria or bya blend of both:
• The standard deviation (SDev) of all the pixels in the local analysiswindow is large. See Section 5.4.1 on page 62.
• The Laplacian-of-Gaussian (LoG) has a large magnitude. See Sec-tion 5.4.2 on page 63.
) https://en.wikipedia.org/wiki/HSL_and_HSV

5.4. LOCAL CONTRAST WEIGHTING 62
N N N
N C N
N N N
N N N
N C N
N N N
N N
N
N
N
N
N N N N N
NNNNN
window size: 5window size: 3
Figure 5.7: Examples of local analysis windows for the sizes 3 and 5. “C”marks the center where the pixel gets the weight. “N” denote neighboringpixels, which all contribute to the weight.
• If the LoG magnitude is below a given threshold, use SDev data,otherwise stick with LoG. See Section 5.4.3 on page 66.
Enfuse converts every RGB image to grayscale before it determines itscontrast. Option --gray-projector, page 32 controls the projector function.Depending on the subject, one of several grayscale projectors may yield thebest black-and-white contrast for image fusion.
In the following sections we describe each algorithm in detail.
5.4.1 Standard Deviation
The pixel under consideration C sits exactly in the center of a square, theso-called local analysis window. It always has an uneven edge length. Theuser sets the size with option --contrast-window-size. Figure 5.7 showstwo windows with different sizes.
During the analysis, Enfuse scans the local analysis window across all rowsand all columns) of each of the input images to compute the contrast weightof every pixel.
Summary of influential options
--contrast-weight: Section 4.2.3 on page 22
--contrast-window-size: Section 4.2.5 on page 27
--gray-projector: Section 4.2.5 on page 32
--hard-mask: Section 4.2.3 on page 23
) In the current implementation a floor(contrast-window-size / 2)-wide borderaround the images remains unprocessed and gets a weight of zero.

5.4. LOCAL CONTRAST WEIGHTING 63
Statistical Moments
We start with the probability function w of the random variable X:
w : x→ p({ω : X(ω) = x}).
It associates a probability p with each of the n different possible outcomes ωof the random variable X.
Based on w, we define the expectation value or “First Moment” of therandom variable X:
ExX :=
n∑i=1
xiw(xi).
Using the definition of the expectation value, we define the variance, or“Second Moment” as
VarX := Ex((X − ExX)2
),
and the standard deviation as
σX :=√VarX.
Obviously, the variance of X is the expectation value of the squared deviationfrom the expectation value of X itself. Note that the variance’s dimensionis X’s dimension squared; the standard deviation rectifies the dimension tomake it comparable with X itself again.
Estimators
In Enfuse, we assume that X follows a uniform probability function w(x) =const. That is, all pixel values in the local analysis window are considered tobe equally probable. Thus, the expectation value and the variance can beestimated from the pixel values like this
ExX :=1
n
n∑i=1
xi.
In other words: the expectation value is the arithmetic mean of the lightnessof all pixels in the local analysis window. Analogously, the variance becomes
VarX :=1
n− 1Ex((X − ExX)2
).
5.4.2 Laplacian of Gaussian
The Laplacian-of-Gaussian (LoG) is an operator to detect edges in animage. Sometimes the LoG-operator is also called Marr-Hildreth opera-tor. A Laplacian-of-Gaussian operator, vigra::laplacianOfGaussian)is part of the package VIGRA) that Enfuse is built upon and is used
) https://ukoethe.github.io/vigra/doc-release/vigra/group_
_ConvolutionFilters.html) https://ukoethe.github.io/vigra/

5.4. LOCAL CONTRAST WEIGHTING 64
for edge detection if option --contrast-edge-scale is non-zero and--contrast-min-curvature equal to or less than zero.
Let the Gaussian function be
g(x, y) =1
2πσ2exp
(−x
2 + y2
2σ2
)The parameter σ, the argument of option --contrast-edge-scale, is thelength scale on which edges are detected by g(x, y). We apply the Laplacianoperator in Cartesian coordinates
4 ≡ ∇ · ∇ =∂2
∂x2+
∂2
∂y2
to g(x, y), to arrive at a continuous representation of the two-dimensionalfilter kernel
k(x, y) =ξ2 − 1
πσ4exp(−ξ2), (5.3)
where we have used the dimensionless distance ξ from the origin
ξ2 =x2 + y2
2σ2.
Enfuse uses a discrete approximation of k in the convolution with the image.The operator is radially symmetric with respect to the origin, which is whywe can easily plot it in Figure 5.8, setting R =
√x2 + y2.
See also HIPR2: Laplacian-of-Gaussian).
Sometimes the LoG is plagued by noise in the input images. After all,it is a numerical approximation of the second derivative and deriving al-ways “roughens” a function. The (normalized) mask files relentlessly dis-close such problems. Use option --contrast-min-curvature with a nega-tive argument CURVATURE to suppress all edges with a curvature below−CURVATURE (which is a positive value). Check the effects with themask files and particularly the hard-mask files (〈hardmask-%n.tif 〉) if usingoption --hard-mask.
To indicate the CURVATURE in relative terms, which is particularly compre-hensible for humans, append a percent sign (‘%’). Try minimum curvaturesstarting from −0.5% to −3%.
Summary of influential options
--contrast-edge-scale: Section 4.2.5 on page 25
--contrast-min-curvature: Section 4.2.5 on page 27
--contrast-weight: Section 4.2.3 on page 22
--hard-mask: Section 4.2.3 on page 23
) http://homepages.inf.ed.ac.uk/rbf/HIPR2/log.htm
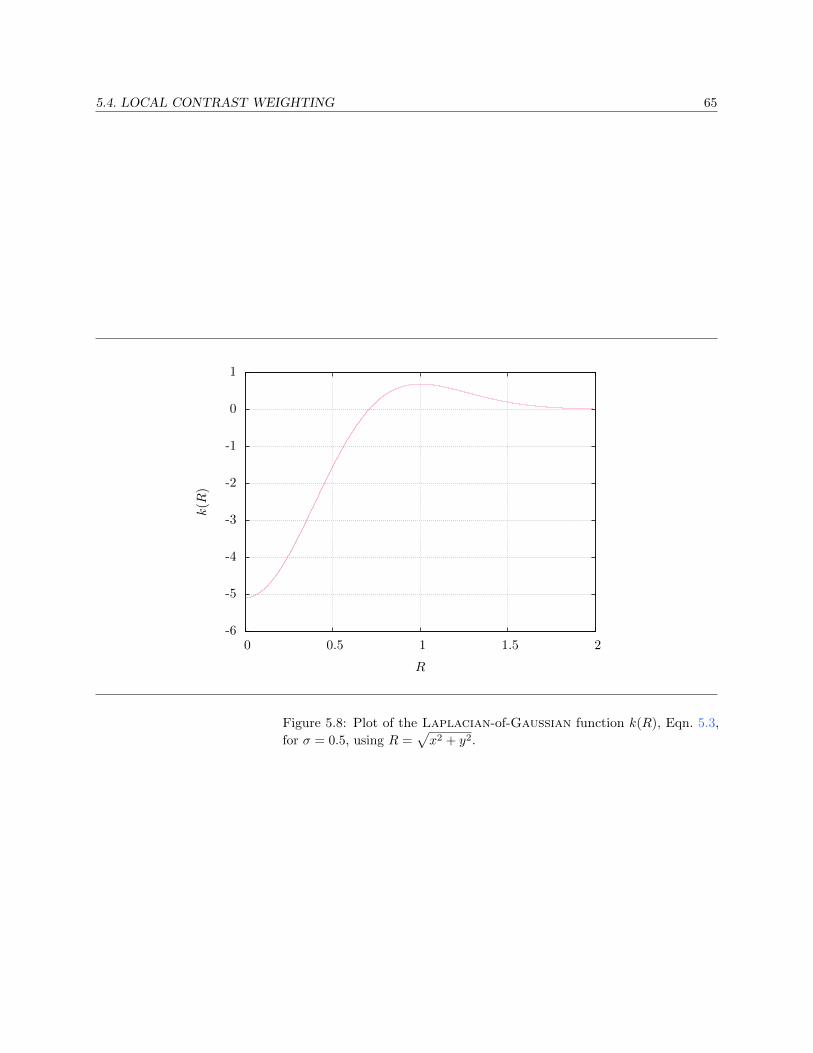
5.4. LOCAL CONTRAST WEIGHTING 65
-6
-5
-4
-3
-2
-1
0
1
0 0.5 1 1.5 2
k(R
)
R
Figure 5.8: Plot of the Laplacian-of-Gaussian function k(R), Eqn. 5.3,
for σ = 0.5, using R =√x2 + y2.

5.5. LOCAL ENTROPY WEIGHTING 66
5.4.3 Blend Standard Deviation and Laplacian-of-Gaussian
Enfuse can team the standard deviation computation and Laplacian of Gaus-sian to deliver the best of both methods. Use a positive argument CURVA-TURE with option --contrast-min-curvature to combine both algorithms.In this mode of operation Enfuse computes the SDev-weight and the LoG-weight, then uses the LoG to decide whether to go with that value or preferthe SDev data. If the LoG is greater than CURVATURE Enfuse uses theweight delivered by the LoG, otherwise the SDev-weight is rescaled suchthat its maximum is equal to CURVATURE, and the scaled SDev is usedas weight.
This technique merges the two edge detection methods where they are best.The LoG excels with clear edges and cannot be fooled by strong but smoothgradients. However, it is bad at detecting faint edges and it is susceptibleto noise. The SDev on the other hand shines with even the most marginaledges, and resists noise quite well. Its weakness is that is is easily deceivedby strong and smooth gradients. Tuning CURVATURE the user can pickthe best threshold for a given set of images.
Summary of influential options
--contrast-edge-scale: Section 4.2.5 on page 25
--contrast-min-curvature: Section 4.2.5 on page 27
--contrast-weight: Section 4.2.3 on page 22
--contrast-window-size: Section 4.2.5 on page 27
--gray-projector: Section 4.2.5 on page 32
--hard-mask: Section 4.2.3 on page 23
5.4.4 Scaling and Choice of Mode
Experience has shown that neither the parameters EDGESCALE and CUR-VATURE nor the mode of operation (SDev-only, LoG-only, or a blend ofboth) scales to different image sizes. In practice, this means that if youstart with a set of reduced size images, say 2808 × 1872 pixels, carefullyoptimize EDGESCALE, CURVATURE and so on, and find LoG-only thebest mode, and then switch to the original resolution of 5616× 3744 pixels,multiplying (or dividing) the parameters by four and sticking to LoG-onlymight not result in the best fused image. For best quality, perform theparameter optimization and the search for the most appropriate mode atthe final resolution.
5.5 Local Entropy Weighting
Entropy weighting prefers pixels inside a high entropy neighborhood.
Let S be an n-ary source. Watching the output of S an observer on averagegains the information
Ha(n) :=∑x∈S
p(x) loga(1/p(x))

5.5. LOCAL ENTROPY WEIGHTING 67
0
0.2
0.4
0.6
0.8
1
0 0.2 0.4 0.6 0.8 1
H2(p
)
p
Figure 5.9: Entropy function H2(p) for an experiment with exactly twooutcomes.
per emitted message, where we assume the knowledge of the probabilityfunction p(S). The expectation value Ha(n) is called entropy of the source S.Entropy measures our uncertainty if we are to guess which message getschosen by the source in the future. The unit of the entropy depends on thechoice of the constant a > 1. Obviously
Hb(n) = Ha(n)/ loga(b)
holds for all b > 1. We use a = 2 for entropy weighting and set the entropyof the “impossible message” to zero according to
limp→0
p loga(1/p) = 0.
Figure 5.9 shows an entropy function.
For more on (information) entropy visit Wikipedia).
Enfuse computes a pixel’s entropy by considering the pixel itself and itssurrounding pixels quite similar to Local-Contrast Weighting (5.4 on page 61).The size of the window is set by ‘--entropy-window-size’. Choosingthe right size is difficult, because there is a serious tradeoff between thelocality of the data and the size of the sample used to compute H. A largewindow results in a large sample size and therefore in a reliable entropy,
) https://en.wikipedia.org/wiki/Information_entropy

5.5. LOCAL ENTROPY WEIGHTING 68
but considering pixels far away from the center degrades H into a non-localmeasure. For small windows the opposite holds true.
Another difficulty arises from the use of entropy as a weighting function indark parts of an image, that is, in areas where the signal-to-noise ratio islow. Without any precautions, high noise is taken to be high entropy, whichmight not be desired. Use option --entropy-cutoff to control the blacklevel when computing the entropy.
On the other extreme side of lightness, very light parts of an image, thesensor might already have overflown without the signal reaching 1.0 in thenormalized luminance interval. For these pixels the entropy is zero andEnfuse can be told of the threshold by properly setting the second argumentof ‘--entropy-cutoff’.
Summary of influential options
--entropy-cutoff: Section 4.2.5 on page 27
--entropy-weight: Section 4.2.3 on page 22
--entropy-window-size: Section 4.2.5 on page 29

6 Color Spaces And Color Profilesc
This chapter explains the connection of pixel data types, ICC)-color profiles,blend color spaces in Enfuse or Enblend.
Here, we collectively speak of blending and do not distinguish fusing, for thebasic operations are the same. Furthermore, we assume the multi-resolutionspline algorithm has calculated a set of weights wi for i = 1, 2, . . . and∑wi = 1 for each pixel that must be blended from the participating input
pixels Pi, i = 1, 2, . . ..
In the simplest, non-trivial case we have to blend a pair of grayscale inputpixels. Given their luminances L1, L2 and their weighting factor 0 ≤ w ≤ 1,what luminance L is their “weighted average”? This is the heart of Enfuse’sand Enblend’s pyramidal blending operations! We are in particular interestedin a weighted average that appears visually correct, this is, our eyes andbrains consider L convincing or at the very least credible.
Note that Enfuse and Enblend face different obstacles in their respec-tive domains of use.
EnblendThe overlapping areas usually are well matched both geomet-rically and photometrically. The differences of the pixels thatmust be blended are small.
Enfuse (using a Soft Mask))The input images greatly differ in exposure, saturation, orcontrast. This is exactly why we want to fuse them. Thus, theluminance, saturation, and hue differences to be handled byEnfuse are generally quite high.
The details of blending pixels and in particular color pixels is quite intricate,which is why we start this chapter with a mathematical introduction.
6.1 Mathematical Preliminaries
Let us first address grayscale images because they only require us to talkabout luminances. For a linear representation of luminances, we just blendfor a given t with
L = tL1 + (1− t)L2 with 0 ≤ t ≤ 1, (6.1)
where the luminances Li, i = 1, 2, range from zero to their data-type depen-dent maximum value Lmax, thereby defining a “luminance interval”. Wecan always map this interval to (0, 1) by dividing the luminances by themaximum, which is why we call the latter “normalized luminance interval”:
(0, Lmax)→ (0, 1) (6.2)
) https://en.wikipedia.org/wiki/ICC_profile) Fusing with a Hard Mask is different, because exactly one weight factor is unity
and all the others are zero. There is nothing to blend – just to copy.

6.1. MATHEMATICAL PRELIMINARIES 70
Obviously,0 ≤ L ≤ 1 (6.3)
holds for all values L := L/Lmax in the normalized luminance interval.
Sometimes images are gamma-encoded with exponent γ and the blendedluminance becomes
L′ =(tL
1/γ1 + (1− t)L1/γ
2
)γ, (6.4)
which couples t and L′ in a non-linear way. See also Eric Brasseur’sexplanation of the gamma error in picture scaling).
Typical gamma values are γ = 2.2 for sRGB and AdobeRGB,1.8 for AppleRGB, and ProPhotoRGB, 1.0 for Linear Rec709RGB and any others with “linear” in their names. For an extensiveoverview check out Bruce Lindbloom’s Information on WorkingColor Spaces.)
The usual color-input images fed into Enfuse are RGB-encoded, which meanseach pixel comes as a triple of values (r, g, b)
Tthat represent the red, green,
and blue parts. We apply the normalization (6.2) to each of the three primarycolors and arrive at an “ RGB-cube” with unit edge length. The vectors ofprimary colors span the cube
~r =
100
, ~g =
010
and ~b =
001
.
For each point inside – familiarly called pixel – the generalization of (6.3)holds 0
00
≤ r
gb
≤ 1
11
. (6.5)
Blending the pixels of color images is more complicated than blending plainluminances. Although we can write down the naıve blending equation, (6.1),again for RGB-coded pixels
P1 :=
r1g1b1
and P2 :=
r2g2b2
and trivially arrive at
P :=
rgb
= t
r1g1b1
+ (1− t)
r2g2b2
with 0 ≤ t ≤ 1, (6.6)
but this means
− we implicitly treat the color components ri, gi, bi as separate luminances,which they are not and moreover
− we neglect the visual aspects, namely luminance, saturation, and hueof the blended color pixel P .
) http://www.4p8.com/eric.brasseur/gamma.html) http://www.brucelindbloom.com/index.html?WorkingSpaceInfo.html

6.2. FLOATING-POINT IMAGES 71
0
1
2
3
4
5
6
-20 0 20 40 60 80 100
Log(L
)
L
Figure 6.1: Forward Log-transform shown for the range of −20 ≤ L ≤ 100.The domain of Log(L) is the whole real axis.
6.2 Floating-Point Images
Floating-point images (EXR, floating-point TIFF, or VIFF) get a specialtreatment. Their values L are first converted by the Log-transform.
Log(L) :=
{1 + log(1 + L) for L ≥ 0 and1/(1− L) otherwise,
(6.7)
which is undone by the inverse transform after blending. Here, log(x) with alower-case initial denotes the natural logarithmic function (i.e. to base e).Figure 6.1 shows the forward transform in the range from −20 to 100. AroundL = 0 function Log(L) has the series expansion
Log(L) = 1 + L+L2
2+O(L3), for 0 ≤ L < 1.
This transform serves two purposes:
• During blending, even completely non-negative images can result innegative pixels. A Log-transform followed by the inverse guaranteesall-positive output.
• For HDR data, the Log-transform puts the samples closer to a percep-tual space making the blending a little more pleasing.
In the current version of Enfuse and Enblend it is strongly recommended to useblending inside the RGB-cube whenever the input data is in floating-pointformat; this is the default, too.
6.3. COLOR PROFILES 72
6.3 Color Profiles
ICC-color profiles completely absorb gamma encodings (6.4) and ICC profileaware software like Enfuse and Enblend decode and encode images automati-cally respecting the gamma curves. Moreover color profiles define what isthe darkest representable black, so called black-point
L = 0 and (r, g, b)T
= (0, 0, 0)T
and analogously what is the purest and brightest white, the white-point
L = 1 and (r, g, b)T
= (1, 1, 1)T.
By default, Enfuse and Enblend expect that either
1. no input image has a color profile or2. all images come with the same ICC profile.
Even black-and-white images benefit from having attached appropriateprofiles!
In Case 1. the applications blend grayscale images in the normalized lumin-ance interval and color images inside the sRGB-cube. To override the defaultsRGB-profile select the desired profile with option --fallback-profile,page 23.
In Case 2. the images first are by default transformed to CIELUV) colorspace – respecting the input color profile – then they are blended or fused,and finally the data get transformed back to RGB color space defined bythe profile of the input images. Consequently, the input profile is assigned tothe output image. Enforce a different blending color space than CIELUVwith option --blend-colorspace, page 18.
Mixing different ICC profiles or alternating between images with profilesand without them generates warnings as it generally leads to unpredictableresults.
Floating-Point images are an exception to the above rules. They are alwaysblended in the RGB cube by default. The next section describes theirtreatment in detail.
6.4 Blending Color Spaces
Enfuse and Enblend offer to work inside the RGB-cube (6.5) or in severalperceptually uniform color spaces. To override the default select a particularblending color space with option --blend-colorspace, page 18. Here arethe four available color spaces.
Identity Space / RGB-Color CubeCalculate the blended pixel inside the luminance interval (6.1) forgrayscale images and inside the RGB-color cube as given in (6.6).
This is the fastest color space to do computations within, i.e. it con-sumes by far the least computing power, because no transform to orfrom any of the perceptually uniform color spaces is done.
) https://en.wikipedia.org/wiki/CIECAM02

6.4. BLENDING COLOR SPACES 73
L*a*b*)Represent each pixel as lightness L∗, red-green difference a∗, and yellow-blue difference b∗. The L*a*b* color space encompasses all perceivablecolors. It is completely independent of any device characteristics,approximates human vision, and is perceptually uniform.
Enfuse uses perceptual rendering intent and either the input profile’swhite-point or, if the ICC-profile lacks the cmsSigMediaWhitePoint=
Tag, fall back to the D50 white-point (see, e.g. Standard illuminant)).
The conversions from and to L*a*b* are moderately fast to compute;L*a*b* mode is two to three times slower than working within theRGB-color cube.
CIEL*u*v*)Represent each pixel as lightness L∗ and two color differences u∗ andv∗. Formulas of each are too complicated to show them here.
The L*u*v* tries to be perceptually uniform in lightness as well as incolor.
The applications use the same rendering intent and white-point as withL*a*b*.
The conversions from and to L*u*v* are almost as fast to compute asL*a*b*.
CIECAM02)Represent each pixel as lightness J , chroma C (“colorfulness”), andhue angle h.
Internally, the polar coordinates (C, h) are translated toCartesian coordinates for the pyramids.
The transformations to CIECAM02 color space and back use per-ceptual rendering intent, the D50 white point (see, e.g. Standardilluminant)), 500 lumen surrounding light (“average” in CIECAM02parlance), and assume complete adaption.
Both CIELUV and CIELAB only model the color information gen-erated for small and isolated color samples. They cannot model thecontextual effects of color perception. However, CIECAM02 canrepresent luminance adaptation, chromatic contrast and chromaticassimilation that arise in real world viewing conditions with heteroge-neous, strongly contrasted, or three dimensional color sources.
Computationally, CIECAM02 is the most expensive blend color space.If an appreciable number of pixels need additional refinement steps thespeed of the transformation further drops. Expect CIECAM02 modeto be 8–800 times slower than blending within the RGB-color cube.
) https://en.wikipedia.org/wiki/Lab_color_space) https://en.wikipedia.org/wiki/Standard_illuminant) https://en.wikipedia.org/wiki/CIELUV_color_space) https://en.wikipedia.org/wiki/CIECAM02
) https://en.wikipedia.org/wiki/Standard_illuminant
6.5. PRACTICAL CONSIDERATIONS 74
Surprisingly often blending “inside the RGB-cube” works, although percep-tually uniform color spaces, which represent luminance, saturation, and hueare preferable for blending and fusing operations.
6.5 Practical Considerations
• For small projects stick with the default blend colorspaces.
• For large projects switch on blending in the RGB color cube to speedup the assembly of the images. When satisfied with all other parame-ters use one of the computationally more expensive, but perceptuallyuniform color spaces.
• Banding is best fought by input images with a high bit depth (≥ 16 bitsper channel). A cheap and mostly vain trick is to force a large outputbit depth with option --depth, page 19. No blend color space canavoid banding if parts of the input images are almost “monochrome”.
• Enfuse only. No color space can fix blown highlights when fusing by
exposure-weight; use ‘--exposure-cutoff’, page 29 for this purposeand check whether saturation weight is zero.

7 Understanding Masksc
A binary mask indicates for every pixel of an image if this pixel must beconsidered in further processing, or ignored. For a weight mask, the value ofthe mask determines how much the pixel contributes, zero again meaning“no contribution”.
Masks arise in two places: as part of the input files and as separate files,showing the actual pixel weights prior to image blending or fusion. We shallexplore both occurrences in the next sections.
7.1 Masks In Input Files
Each of the input files for Enfuse and Enblend can contain its own mask.Both applications interpret them as binary masks no matter how many bitsper image pixel they contain.
Use ImageMagick’s identify (see Example 7.1) or, for TIFF files only, tiff info(see Example 7.2) to inquire quickly whether a file contains a mask. Ap-pendix A on page 91 shows where to find these programs on the web.
The “Matte” part of the image class and the “Extra Samples” line tell usthat the file features a mask. Also, many interactive image manipulationprograms show the mask as a separate channel, sometimes called “alpha”.There, the white (high mask value) parts of the mask enable pixels and black(low mask value) parts suppress them.
The multitude of terms all describing the concept of a mask is confusing.
MaskA mask defines a selection of pixels. A value of zero represents anunselected pixel. The maximum value (“white”) represents a selected
$ identify -version
Version: ImageMagick 6.7.7-10 2014-03-08 Q16
http://www.imagemagick.org
Copyright: Copyright (C) 1999-2012 ImageMagick Studio LLC
Features: OpenMP
$ identify -format "%f %m %wx%h %r %q-bit" image-0000.tif
image-0000.tif TIFF 917x1187 DirectClass sRGB Matte 16-bit
^^^^^
mask
Example 7.1: Using identify to find out about the mask in image-0000.tif.‘Matte’ indicates the existence of a mask.

7.1. MASKS IN INPUT FILES 76
$ tiffinfo
LIBTIFF, Version 4.0.2
Copyright (c) 1988-1996 Sam Leffler
Copyright (c) 1991-1996 Silicon Graphics, Inc.
...
$ tiffinfo image-0000.tif
TIFF Directory at off set 0x3a8182 (3834242)
Subfile Type: (0 = 0x0)
Image Width: 917 Image Length: 1187
Resolution: 150, 150 pixels/inch
Position: 0, 0
Bits/Sample: 8
Sample Format: unsigned integer
Compression Scheme: PackBits
Photometric Interpretation: RGB color
Extra Samples: 1<unassoc-alpha> mask
Orientation: row 0 top, col 0 lhs
Samples/Pixel: 4 R, G, B, and
mask
Rows/Strip: 285
Planar Configuration: single image plane
ImageFullWidth: 3000
ImageFullLength: 1187
Example 7.2: Using tiff info to find out about the mask in image-0000.tif.Here the line ‘Extra Samples’ indicates one extra sample per pixel, which isinterpreted as an unassociated alpha-channel; Enfuse and Enblend interpretthis as mask. The second hint tiff info gives is in ‘Samples/Pixel’, where –for a RGB-image – the 4 = 3 + 1 tells about the extra channel.

7.2. WEIGHT MASK FILES 77
pixel and the values between zero and the maximum are partiallyselected pixels. See Gimp-Savy.)
Alpha ChannelThe alpha channel stores the transparency value for each pixel, typicallyin the range from zero to one. A value of zero means the pixel iscompletely transparent, thus does not contribute to the image. A valueof one on the other hand means the pixel is completely opaque.
MatteThe notion “matte” as used by ImageMagick refers to an inverted alphachannel, more precisely: 1 − alpha. See ImageMagick) for furtherexplanations.
Enfuse and Enblend only consider pixels that have an associated mask valueother than zero. If an input image does not have an alpha channel, Enblendwarns and assumes a mask of all non-zero values, that is, it will use everypixel of the input image for fusion.
Stitchers like nona add a mask to their output images.
Sometimes it is helpful to manually modify a mask before fusion. For exampleto suppress unwanted objects (insects and cars come into mind) that movedacross the scene during the exposures. If the masks of all input images areblack at a certain position, the output image will have a hole in that position.
7.2 Weight Mask Files
FIX Show some weight masks and explain them. ME
) http://gimp-savvy.com/BOOK/index.html?node42.html) https://www.imagemagick.org/Usage/transform/
8 Applications of Enfuse
This section describes some of the novel possibilities that Enfuse offers thephotographer. In contrast to the previous chapters, it centers around theeffects on the final image.
8.1 What Makes Images Fusable?
Images should align well to be suitable for fusion. However, there is nohard mathematical rule what “well” means. The alignment requirements for16 MPixel images to yield a sharp 4”× 6” print at 300 dpi or even for webpresentation are relatively low, whereas the alignment of 8 MPixel imagesfor a 12”× 18” print ought to be tight.
If the input images need to be aligned, Hugin (see also Appendix A.2 onpage 91) is the tool of choice. It produces images exactly in the format thatEnfuse expects.
Sometimes images naturally align extremely well so that no re-alignment isrequired. An image series with preprogrammed exposure steps taken in rapidsuccession where the camera is mounted on a heavy tripod and a humongousball head, mirror lockup, and a cable release are used, comes to mind.
When in doubt about what will work, try it, and judge for yourself.
Useful ideas for a good alignment:
• Fix all camera parameters that are not explicitly varied.
Aperture: Engage full manual or aperture-priority mode.
Auto-focus: Disable “Auto Focus”. Be aware that the auto-focusfunction could be linked to shutter-release button position “halfpressed” or to the shutter release in insidious ways.
Closed eyepiece: Close the eyepiece when using a cable release tosuppress variations in stray light. (This tip applies only to singlelens reflex cameras.)
Exposure time/Shutter speed: Use the shortest possible exposure timeor, in other words, use the fastest shutter speed to avoid blurcaused by camera shake or motion blur.
Flash power: Explicitly control the flash power of all flashes. This issometimes called “flash exposure lock”.
Sensitivity: Disable “Auto ISO”.
White balance: Disable “Auto White Balance”. Instead, use the mostsuitable fixed white balance or take the white balance off a whitecard. When in doubt, use the setting “Daylight” or equivalent.
• Steady the camera by any means.
8.2. REPETITION – NOISE REDUCTION 79
– Apply your best camera bracing technique combined with con-trolled breathing.
– Prefer a monopod, or better, a rigid tripod with a heavy head.
– Use a cable release if possible.
– (This applies to cameras with a moving mirror only.) Engage“mirror lockup”.
– Consider automatic bracketing when applicable.
– Activate camera- or lens-based image stabilization if you aresure that it improves the image quality in your particular case;otherwise disengage the feature.
For some lens-based image stabilization systems, it is known thatthey “lock” into different positions every time they are activated.Moreover, some stabilization systems decrease the image qualityif the lens is mounted on a tripod.
• Fire in rapid succession.
8.2 Repetition – Noise Reduction
Main Purpose: Reduce noise
With the default settings, Enfuse computes a weighted average of the inputpixels. For a series of images, repeated with identical settings, this resultsin a reduction of (photon shot) noise. In other words, the dynamic rangeincreases slightly, because the higher signal-to-noise ratio makes darkershades usable. Furthermore, smooth or glossy surfaces get a “cleaner” look,and edges become visually sharper. The nitty-gritty reportage look thatsometimes stems from a high sensitivity setting disappears.
Averaged images, and therefore low-noise images, are the base for a multitudeof techniques like, for example, differences. The most prominent method inthis class is dark-frame subtraction.
Enfuse sets defaults for the exposure-weight to 〈1.0〉, for saturation-weight to〈0.2〉 and for all other weights to zero, a good combination for noise reduc-tion. Eliminating the saturation component with --saturation-weight=
0.0 sometimes can be worth the extra run.
8.3 Exposure Series – Dynamic Range Increase
Main Purpose: Increase manageable dynamic range
An exposure series is a set of images taken with identical parameters exceptfor the exposure time. Some cameras even provide special functions toautomate recording exposure series. See the instruction manual of yourmodel for details. Also check out the features that Magic Lantern offers toshoot HDR-series and to extend the dynamic range right in the camera.
Enfuse’s defaults for exposure weight, 〈1.0〉 and saturation weight, 〈0.2〉 arewell suited for fusion of color images. Remember that saturation weightingonly works for RGB data. Option --saturation-weight helps to control

8.3. EXPOSURE SERIES – DYNAMIC RANGE INCREASE 80
burnt-out highlights, as these are heavily desaturated. Alternatively, useoption --exposure-cutoff to suppress noise or blown-out highlights withoutaltering the overall brightness too much. If no image suffers from troublesomehighlights, the relative saturation weight can be reduced and even be set tozero.
For black and white images ‘--entropy-weight’ can be an alternative to‘--saturation-weight’ because it suppresses overexposed pixels, as thesecontain little information. However, entropy weighting is not limited to gray-scale data; it has been successfully applied to RGB images, too. Note thatentropy weighting considers each color channel of an RGB image separatelyand chooses the channel with the minimum entropy as representative for thewhole pixel.
Enfuse offers the photographer tremendous flexibility in fusing differentlyexposed images. Whether you combine only two pictures or a series of21, Enfuse imposes no limits on you. Accordingly, the photographic effectsachieved range from subtle to surreal, like the late 1980s “Max Headroom”TV-Series, to really unreal. Like some time ago in the chemical days ofphotography, when a new developer opened unseen possibilities for artists,exposure fusion extends a photographer’s expressive space in the digitalage. Whether the results look good or bad, whether the images are dull orexciting, is entirely up the artist.
In the next sections we give assistance to starters, and rectify several mis-conceptions about Enfuse.
8.3.1 Tips For Beginners
Here are some tips to get you in business quickly.
Include the best single exposure.Include the exposure you would have taken if you did not use Enfusein your series. It gives you a solid starting point. Think of the otherimages as augmenting this best single exposure to bring out the lightand dark features you would like to see.
Begin with as small a number of images as possible.Pre-visualizing the results of Enfuse is difficult. The more images putinto the fusion process and the wider their EV-spacing is, the morechallenging visualizing the output image becomes. Therefore, start offwith as few images as possible.
You can take a larger series of images and only use part of it.
Start with a moderate EV-spacing.As has been pointed out in the previous item, a wide EV-spacingmakes pre-visualization harder. So start out with a spacing of 2/3 EVto 4/3 EV.
Use Magic Lantern’s dual-ISO mode (and avoid Enfuse).Magic Lantern can reprogram a camera to take a single short withtwo different sensor speeds. They call it “dual-ISO” mode. Thenon-standard RAW image created that way must be processed with
8.4. FLASH EXPOSURE SERIES – DIRECTED LIGHTING 81
cr2hdr), which produces a DNG file readable with the usual RAW con-verters.
8.3.2 Common Misconceptions
Here are some surprisingly common misconceptions about exposure series.
A single image cannot be the source of an exposure series.Raw-files in particular lend themselves to be converted multiple timesand the results being fused together. The technique is simpler, faster,and usually even looks better than digital blending) (as opposed tousing a graduated neutral density filter) or blending exposures) in animage manipulation program. Moreover, perfect alignment comes freeof charge!
An exposure series must feature symmetrically-spaced exposures.Twice wrong! Neither do the exposures have to be “symmetric” like{0 EV, −2/3 EV, +2/3 EV}, nor does the number of exposures have tobe odd. Series like {−4/3 EV, −1/3 EV, +1/3 EV} or {−1 EV, 1 EV}might be just right. By the way, the order in which the images weretaken does not matter either.
An exposure series must cover the whole dynamic range of the scene.If you do not want to cover the whole range, you do not have to. SomeHDR programs require the user to take a light probe, whereas Enfuseoffers the user complete freedom of exposure.
Paul E. Debevec) defines: “A light probe image is an om-nidirectional, high dynamic range image that records the inci-dent illumination conditions at a particular point in space.”
All exposure values must be different.You can repeat any exposure as often as you like. That way youcombine an exposure series with parts of Section 8.2, emphasizing themultiply occurring exposures and reducing noise.
8.4 Flash Exposure Series – Directed Lighting
Main Purpose: ???
FIX Text? ME
8.5 Polarization Series – Saturation Enhancement
Main Purpose: Reflection suppression, saturation enhancement
In the current implementation of Enfuse, it is not possible in general to fusea polarization series. Naıvely (ab)using ‘--saturation-weight’ will notwork.
) cr2hdr is part of Magic Lantern’s source distribution.) https://luminous-landscape.com/digital-blending/) https://www.gimp.org/tutorials/Blending_Exposures/) http://www.pauldebevec.com/
8.6. FOCUS STACKS – DEPTH-OF-FIELD INCREASE 82
8.6 Focus Stacks – Depth-of-Field Increase
Main Purpose: Synthetic Depth-of-Field Increase
A focus stack is a series of images where the distance of the focal plane fromthe sensor varies. Sloppily speaking, the images were focused at differentdistances. Fusing such a stack increases the depth-of-field (DoF) beyondthe physical limits of diffraction.
8.6.1 Why create focus stacks?
Given
• a fixed sensor or film size,
• a lens’ particular focal length, and
• a notion about “sharpness”, technically speaking the size of the circle-of-confusion (CoC)
the photographer controls the depth-of-field with the aperture. Smallerapertures – this is larger aperture numbers – increase the DoF and viceversa. However, smaller apertures increase diffraction which in turn rendersthe image unsharp. So, there is an optimum aperture where the photographergets maximum DoF. Sadly, for some purposes like macro shots it is notenough. One way out is to combine the sharp parts of images focused atdifferent distances, thereby artificially increasing the total DoF. This isexactly what Enfuse can do.
All lenses have a so called “sweet spot” aperture, where their resolutionis best. Taking pictures at this aperture, the photographer squeezes themaximum quality out of the lens. But: the “sweet spot” aperture often isonly one or two stops away from wide open. Wouldn’t it be great to be ablecombine these best-possible images to form one high-quality, sufficient-DoFimage? Welcome to Enfuse’s local-contrast selection abilities.
8.6.2 Preparing Focus Stacks
We are going to combine images with limited DoF to increase their in-focusparts. The whole process is about image sharpness. Therefore, the inputimages must align very well, not just well, but very well. For optimumresults the maximum control point distance in Hugin should not exceed0.3–0.5 pixels to ensure perfect blending.
As in all image fusion operations it is preferable to use 16 bit linear (i.e.gamma = 1) images throughout, but 8 bit gamma-encoded images will do.Naturally, high signal-to-noise (SNR) ratio input data always is welcome.
8.6.3 Local Contrast Based Fusing
A bare bones call to Enfuse for focus stacking could look like this.
$ enfuse \
--exposure-weight=0 \
--saturation-weight=0 \
--contrast-weight=1 \
8.6. FOCUS STACKS – DEPTH-OF-FIELD INCREASE 83
--hard-mask \
... \
--output=output.tif \
input-<0000-9999>.tif
Here is what each option causes:
--exposure-weight=0
Switch off exposure based pixel selection. The default weight is 〈1.0〉.
--saturation-weight=0
Switch off saturation based pixel selection. The default weight is 〈0.2〉.
--contrast-weight=1
Switch on pixel selection based on local contrast.
--hard-mask
Select the best pixel from the image stack and ignore all others. With-out this option, Enfuse uses all pixels in the stack and weights themaccording to their respective quality, which in our case is local contrast.Without ‘--hard-mask’, the result will always look a bit soft. See alsoSection 5.4 on page 61.
If you want to see some entertaining progress messages – local-contrastweighting takes a while –, also pass the --verbose option for an entertainingprogress report.
8.6.4 Basic Focus Stacking
For a large class of image stacks Enfuse’s default algorithm, as selected in8.6.3, to determine the sharpness produces nice results. The algorithm usesa moving square window, the so-called contrast window. It computes thestandard deviation of the pixels inside of the window. The program thenselects the window’s center pixel of the image in the stack where the standarddeviation is largest, that is, the local contrast reaches the maximum.
However, the algorithm fails to deliver good masks for images which exhibithigh contrast edges on the scale of the contrast window size. The typicalartifacts that show up are
• faint dark seams on the light side of the high contrast edges and
• extremely soft, slightly lighter seams on the dark side of the highcontrast edges,
where the distance of the seams from the middle of the edge is comparableto the contrast window size.
If your results do not show any of these artifacts, stick with the basicalgorithm. Advanced focus stacking, as described in the next sections,delivers superior results in case of artifacts, though requires manually tuningseveral parameters.
8.6.5 Advanced Focus Stacking
If your fused image shows any of the defects described in the previous section,you can try a more difficult-to-use algorithm that effectively works around
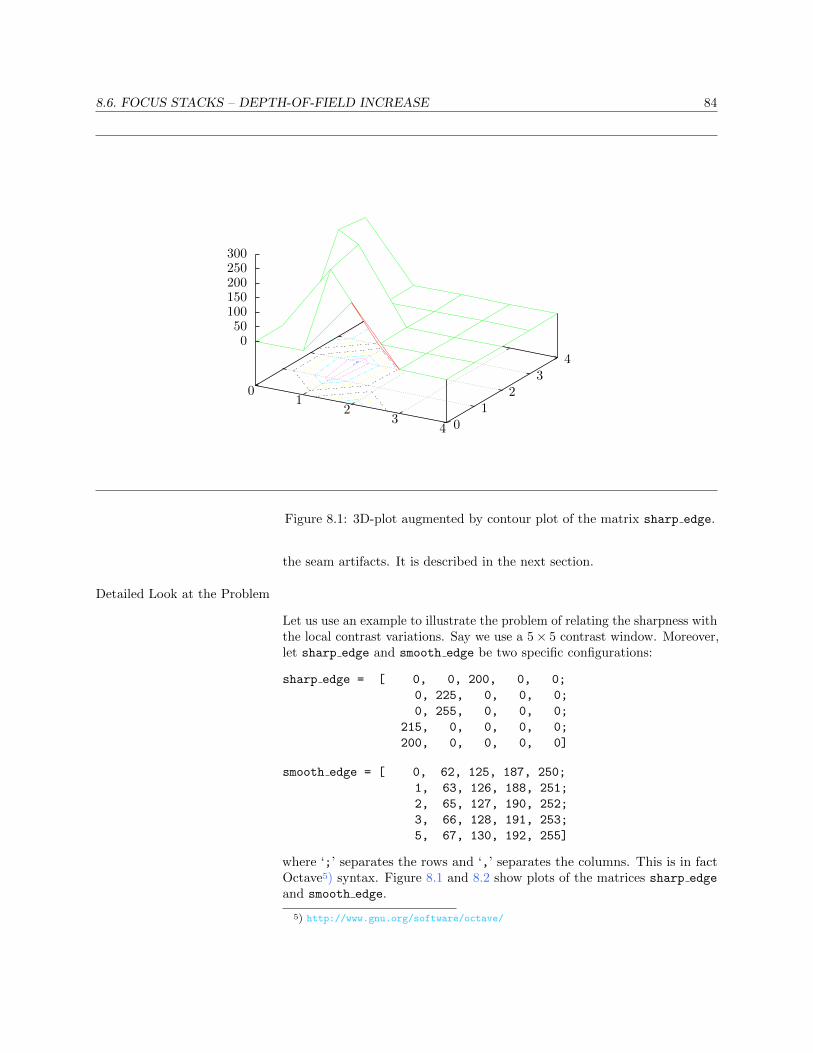
8.6. FOCUS STACKS – DEPTH-OF-FIELD INCREASE 84
01
23
4 01
23
4
050
100150200250300
Figure 8.1: 3D-plot augmented by contour plot of the matrix sharp edge.
the seam artifacts. It is described in the next section.
Detailed Look at the Problem
Let us use an example to illustrate the problem of relating the sharpness withthe local contrast variations. Say we use a 5× 5 contrast window. Moreover,let sharp edge and smooth edge be two specific configurations:
sharp edge = [ 0, 0, 200, 0, 0;
0, 225, 0, 0, 0;
0, 255, 0, 0, 0;
215, 0, 0, 0, 0;
200, 0, 0, 0, 0]
smooth edge = [ 0, 62, 125, 187, 250;
1, 63, 126, 188, 251;
2, 65, 127, 190, 252;
3, 66, 128, 191, 253;
5, 67, 130, 192, 255]
where ‘;’ separates the rows and ‘,’ separates the columns. This is in factOctave) syntax. Figure 8.1 and 8.2 show plots of the matrices sharp edge
and smooth edge.
) http://www.gnu.org/software/octave/

8.6. FOCUS STACKS – DEPTH-OF-FIELD INCREASE 85
01
23
4 01
23
4
050
100150200250300
Figure 8.2: 3D-plot augmented by contour plot of the matrix smooth edge.
Our intuition lets us “see” an extremely sharp edge in the first matrix, whereasthe second one describes an extraordinarily smooth diagonal intensity ramp.Which one will be selected? Well, sharp edge has a standard deviation of88.07 and smooth edge has 88.41. Thus, smooth edge wins, contradictingour intuition, and even worse, our intention! Sadly, configurations likesmooth edge occur more often with high-quality, good bokeh) lenses. Infact, they are the very manifestation of “good bokeh”. Therefore, Laplacianedge detection plays an important role when working with high-qualitylenses.
Laplacian Edge Detection
Enfuse provides a Laplacian-based algorithm that can help in situations whereweighting based on the standard deviation fails. It is activated with a positivevalue for SCALE in --contrast-edge-scale=SCALE. The Laplacian willdetect two-dimensional curvature on the scale of SCALE. Here and in thefollowing we simply speak of “curvature” where we mean “magnitude ofcurvature”. That is, we shall not distinguish between convex and concaveedges. Enfuse always use the magnitude of curvature for weighting.
Typically, SCALE ranges between 0.1 pixels and 0.5 pixels, where 0.3 pixelsare a reasonable starting point. To find the best value for SCALE though,usually some experimentation will be necessary. Use ‘--save-masks’ to getall soft-mask (default: 〈softmask-%n.tif〉) and hard-mask files (default:
) https://luminous-landscape.com/bokeh/

8.6. FOCUS STACKS – DEPTH-OF-FIELD INCREASE 86
〈hardmask-%n.tif〉). Check how different scales affect the artifacts. Alsosee Chapter 7 on page 75.
Local Contrast Enhancement
Sometimes Enfuse misses smoother edges with ‘--contrast-edge-scale’and a little local contrast enhancement (LCE) helps. Set --contrast-edge-scale=SCALE:LCE-SCALE:LCE-FACTOR, where LCE-SCALE and LCE-FACTOR work like the unsharp mask) filters in various image manipulationprograms. Start with LCE-SCALE ten times the value of SCALE and aLCE-FACTOR of 2–5.
LCE-SCALE can be specified as a percentage of SCALE. LCE-FACTORalso can be specified as a percentage. Examples:
--contrast-edge-scale=0.3:3.0:3
--contrast-edge-scale=0.3:1000%:3.0
--contrast-edge-scale=0.3:3:300%
--contrast-edge-scale=0.3:1000%:300%
By default LCE is turned off.
Suppressing Noise or Recognizing Faint Edges
The Laplacian-based algorithm is much better at resisting the seam problemthan the local-contrast algorithm, but it has two shortcomings:
1. The Laplacian is very susceptible to noise and2. it fails to recognize faint edges.
The option --contrast-min-curvature option helps to mitigate both flaws.
The argument to --contrast-min-curvature=CURVATURE either is anabsolute lightness value, e.g. 0. . . 255 for 8 bit data and 0. . . 65535 for 16 bitdata, or, when given with a ‘%’-sign it is a relative lightness value rangingfrom 0% to 100%.
To suppress unreal edges or counter excessive noise, use the --contrast-
min-curvature option with a negative curvature measure CURVATURE.This forces all curvatures less than −CURVATURE to zero.
A positive curvature measure CURVATURE makes Enfuse merge the LoGdata with the local-contrast data. Every curvature larger than or equal toCURVATURE is left unchanged, and every curvature less than CURVATUREgets replaced with the rescaled local-contrast data, such that the largestlocal contrast is just below CURVATURE. This combines the best parts ofboth techniques and ensures a precise edge detection over the whole rangeof edge curvatures.
Summary
--contrast-edge-scale=0.3
Use LoG to detect edges on a scale of 0.3 pixels. Apply the defaultgrayscale projector: average.
) http://www.cambridgeincolour.com/tutorials/unsharp-mask.htm

8.6. FOCUS STACKS – DEPTH-OF-FIELD INCREASE 87
--contrast-edge-scale=0.3 --gray-projector=l-star
Use LoG to detect edges on a scale of 0.3 pixels. Apply the L*-grayscaleprojector.
--contrast-edge-scale=0.3:3:300%
Use LoG to detect edges on a scale of 0.3 pixels, pre-sharpen the inputimages by 300% on a scale of 3 pixels. Apply the default grayscaleprojector: average.
--contrast-edge-scale=0.3 --contrast-min-curvature=-0.5%
Use LoG to detect edges on a scale of 0.3 pixels. Apply the defaultgrayscale projector: average and throw away all edges with a curvatureof less than 0.5%.
--contrast-edge-scale=0.3 --contrast-min-curvature=0.5%
--contrast-window-size=7Use LoG to detect edges on a scale of 0.3 pixels. Apply the defaultgrayscale projector: average and throw away all edges with a curvatureof less than 0.5% and replace the LoG data between 0% and 0.5%with SDev data. Use a window of 7× 7 pixel window to compute theSDev.
Focus Stacking Decision Tree
Figure 8.3 helps the user to arrive at a well-fused focus stack with as fewsteps as possible.
Always start with the default, contrast weighting with a local contrastwindow. Only if seams appear as described in Section 8.6.5 switch toLaplacian-of-Gaussian contrast detection.
If some seams remain even in LoG-mode, decrease the sensitivity of the edgedetection with a positive --contrast-min-curvature. A too high valueof --contrast-min-curvature suppresses fine detail though. Part of thedetail can be brought back with pre-sharpening, that is, 8.6.5 or combiningLoG with local-contrast-window mode by using a negative --contrast-
min-curvature.
Carefully examining the masks (option --save-masks) that Enfuse useshelps to judge the effects of the parameters.
8.6.6 Tips For Focus Stacking Experts
We have collected some advice with which even focus-stacking adepts canbenefit.
• Ensure that the sensor is clean.
Aligning focus stacks requires varying the viewing angle, which corre-sponds to a changing focal length. Hence, the same pixel on the sensorgets mapped onto different positions in the final image. Dirt spots willoccur not only once but as many times as there are images in the stack– something that is no fun to correct in post-processing.
Along the same lines, the photographer may want to consider to preparedark frames before, and possibly also after, the shoot of the focus stack,to subtract hot pixels before fusion.
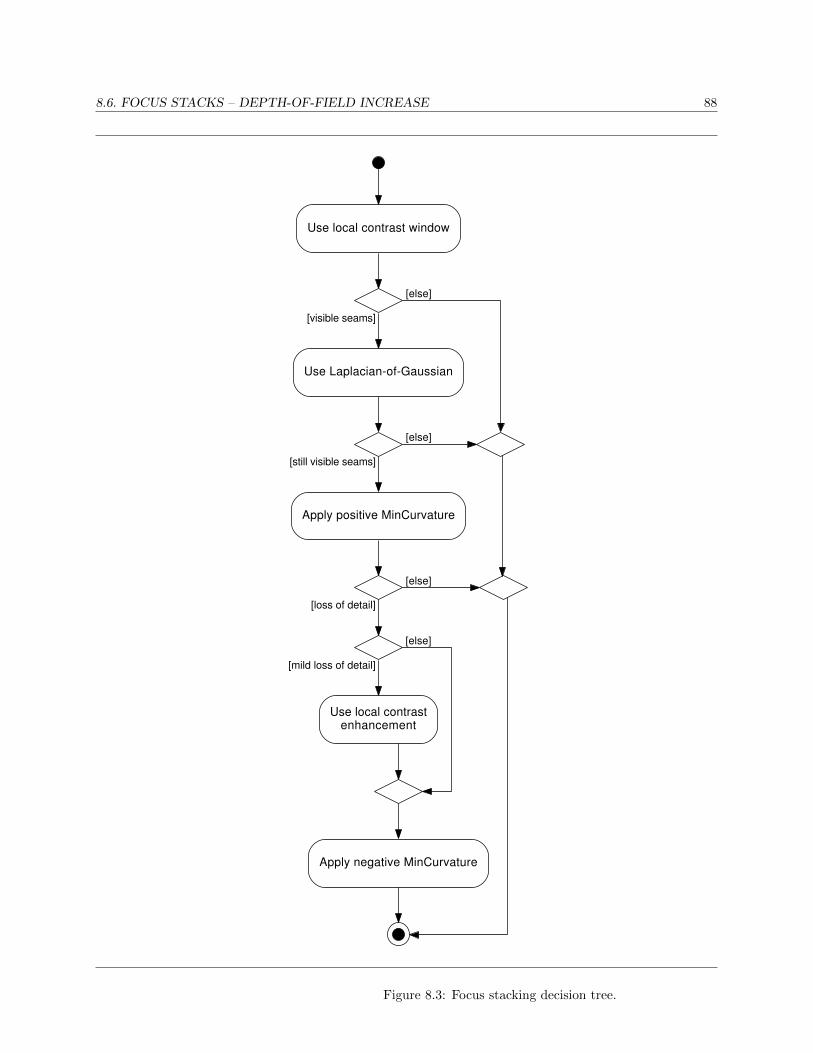
8.6. FOCUS STACKS – DEPTH-OF-FIELD INCREASE 88
Use local contrast window
Use Laplacian-of-Gaussian
[visible seams]
[else]
[else]
Apply positive MinCurvature
[still visible seams]
[else]
[loss of detail]
Use local contrastenhancement
[mild loss of detail]
[else]
Apply negative MinCurvature
Figure 8.3: Focus stacking decision tree.

8.6. FOCUS STACKS – DEPTH-OF-FIELD INCREASE 89
• Prefer a low-sensitivity setting (“ISO”) on the camera to get low-noiseimages.
Fusing with option --hard-mask does not average, and thus does notsuppress any noise in the input images.
• If the transition of in-focus to out-of-focus areas is too abrupt, recordthe images with closest and farthest focusing distances twice: firstwith the intended working aperture, and a second time with a smallaperture (large aperture number).
The small aperture will give the fused image a more natural in-focusto out-of-focus transition and the working-aperture shots supply thedetail in the in-focus regions.
• Consider the use of Magic Lantern (Appendix A.7 on page 93) toautomate the creation of focus stacks.

8.6. FOCUS STACKS – DEPTH-OF-FIELD INCREASE 90
You have your answer, Daniel Jackson. I suggest you act on it. –Morgan le Fay (Ganos Lal)

Appendix A Helpful Programs And Librariesc
Several programs and libraries have proven helpful when working with Enfuseor Enblend.
A.1 Raw Image Conversion
• Darktable) is an open-source photography workflow application andraw-image developer.
• DCRaw) is a universal raw-converter written by David Coffin.
• RawTherapee) is powerful open-source raw converter for Win∗, MacOSand Linux.
• UFRaw) is a raw-converter written by Udi Fuchs and based onDCRaw (see above). It adds a GUI (ufraw), versatile batch processing(ufraw-batch), and some additional features such as cropping, noisereduction with wavelets, and automatic lens-error correction.
A.2 Image Alignment and Rendering
• Hugin) is a GUI that aligns and stitches images.
It comes with several command-line tools, like for example nona tostitch panorama images, align image stack to align overlapping imagesfor HDR or create focus stacks, and fulla to correct lens errors.
• PanoTools) the successor of Helmut Dersch’s original PanoTools)offers a set of command-line driven applications to create panora-mas. Most notable are PTOptimizer for control point optimization andPTmender, an image stitcher.
A.3 Image Manipulation
• CinePaint) is a branch of an early Gimp forked off at version 1.0.4. Itsports much less features than the current Gimp, but offers 8 bit, 16 bitand 32 bit color channels, HDR (for example floating-point TIFF, andOpenEXR), and a tightly integrated color management system.
) http://www.darktable.org/) http://www.cybercom.net/~dcoffin/dcraw/) http://www.rawtherapee.com/) http://ufraw.sourceforge.net/) http://hugin.sourceforge.net/) http://panotools.sourceforge.net/) http://webuser.fh-furtwangen.de/~dersch/) http://www.cinepaint.org/

A.4. HIGH DYNAMIC RANGE 92
• The Gimp) is a general purpose image manipulation program. At thetime of this writing it is still limited to images with only 8 bits perchannel.
• G’Mic) is an open and full-featured framework for image processing,providing several different user interfaces to convert, manipulate, filter,and visualize generic image datasets.
• Both ImageMagick) and GraphicsMagick) are general-purpose com-mand-line controlled image-manipulation programs, for example, con-vert, display, identify, and montage. GraphicsMagick bundles mostImageMagick invocations in the single dispatcher call to gm.
A.4 High Dynamic Range
• OpenEXR) offers libraries and some programs to work with the EXRHDR-format, for example the EXR display utility exrdisplay.
• PFSTools) read, write, modify, and tonemap high-dynamic range(HDR) images.
A.5 Major Libraries
• LibJPEG) is a library for handling the JPEG (JFIF) image format.
• LibPNG) is a library that handles the Portable Network Graphics(PNG) image format.
• LibTIFF) offers a library and utility programs to manipulate theubiquitous Tagged Image File Format, TIFF.
The nifty tiffinfo command in the LibTIFF distribution quickly inquiresthe most important properties of TIFF files.
A.6 Meta-Data Handling
• EXIFTool) reads and writes EXIF meta-data. In particular it copiesmeta-data from one image to another.
• LittleCMS) is the color-management library used by Hugin, DCRaw,UFRaw, Enfuse, and Enblend. It supplies some binaries, too. tificc, anICC color profile applier, is of particular interest.
) http://www.gimp.org/) http://gmic.sourceforge.net/) https://www.imagemagick.org/script/index.php) http://www.graphicsmagick.org/) http://www.openexr.com/) http://pfstools.sourceforge.net/) http://www.ijg.org/) http://www.libpng.org/pub/png/libpng.html) http://www.remotesensing.org/libtiff/) http://www.sno.phy.queensu.ca/~phil/exiftool/) http://www.littlecms.com/

A.7. CAMERA FIRMWARE EXTENSION 93
A.7 Camera Firmware Extension
• Magic Lantern) is a software add-on that runs from the SD (SecureDigital) or CF (Compact Flash) card and adds new features to camerasof a certain Japanese brand of cameras as for example
– Dual-ISO (more precisely: simultaneous dual sensor speed); thisoperation mode may in fact obviate the need for Enfuse.
– Focus stacking
– HDR-bracketing
) http://www.magiclantern.fm/index.html

Appendix B Bug Reportsc
Most of this appendix was taken from the Octave) documentation.
Bug reports play an important role in making Enfuse and Enblend reliableand enjoyable.
When you encounter a problem, the first thing to do is to see if it is alreadyknown. To this end, visit the package’s LaunchPad) bug database). Searchit for your particular problem. If it is not known, please report it.
In order for a bug report to serve its purpose, you must include the informa-tion that makes it possible to fix the bug.
B.1 Have You Really Found a Bug?
If you are not sure whether you have found a bug, here are some guidelines:
• If Enfuse or Enblend get a fatal signal, for any options or input images,that is a bug.
• If Enfuse or Enblend produce incorrect results, for any input whatever,that is a bug.
• If Enfuse or Enblend produce an error message for valid input, that isa bug.
• If Enfuse or Enblend do not produce an error message for invalid input,that is a bug.
B.2 How to Report Bugs
The fundamental principle of reporting bugs usefully is this: report all thefacts. If you are not sure whether to state a fact or leave it out, state it.Often people omit facts because they think they know what causes theproblem and they conclude that some details do not matter. Play it safeand give a specific, complete example.
Keep in mind that the purpose of a bug report is to enable someone to fixthe bug if it is not known. Always write your bug reports on the assumptionthat the bug is not known.
Try to make your bug report self-contained. If we have to ask you for moreinformation, it is best if you include all the previous information in yourresponse, as well as the information that was missing.
To enable someone to investigate the bug, you should include all these things:
) http://www.gnu.org/software/octave/) https://launchpad.net/) 〈https://bugs.launchpad.net/enblend〉

B.3. SENDING PATCHES 95
• The exact version and configuration of Enfuse. You can get the databy running enfuse with the options --version and --verbose to-gether. See also Section 3.3.1 on page 8 on how to find out the exactconfiguration of your binary.
• A complete set of input images that will reproduce the bug. Strive fora minimal set of small images, where images up to 1500×1000 pixelsqualify as small.
• The type of machine you are using, and the operating system nameand its version number.
• A complete list of any modifications you have made to the source. Beprecise about these changes. Show a delta generated with diff for them.
• Details of any other deviations from the standard procedure for in-stalling Enfuse and Enblend.
• The exact command line you use to call Enfuse or Enblend, which thentriggers the bug.
Examples:
$ ~/local/bin/enblend -v \
--fine-mask \
--optimizer-weights=3:2 \
--mask-vectorize=12.5% \
image-1.png image-2.png
or:
$ /local/bin/enfuse \
--verbose \
--exposure-weight=0 --saturation-weight=0
--entropy-weight=1 \
--gray-projector=l-star \
--entropy-cutoff=1.667% \
layer-01.ppm layer-02.ppm layer-03.ppm
If you call Enfuse or Enblend from within a GUI like, for example,Hugin) or ImageFuser) by Harry van der Wolf, copy&paste orwrite down the command line that launches Enfuse or Enblend.
• A description of what behavior you observe that you believe is incorrect.For example, “The application gets a fatal signal,” or, “The outputimage contains black holes.”
Of course, if the bug is that the application gets a fatal signal, thenone cannot miss it. But if the bug is incorrect output, we might notnotice unless it is glaringly wrong.
B.3 Sending Patches for Enfuse or Enblend
If you would like to write bug fixes or improvements for Enfuse or Enblend,that is very helpful. When you send your changes, please follow these
) http://hugin.sourceforge.net/) http://imagefuser.sourceforge.net/onlinemanual/

B.3. SENDING PATCHES 96
guidelines to avoid causing extra work for us in studying the patches. If youdo not follow these guidelines, your information might still be useful, butusing it will take extra work.
• Send an explanation with your changes of what problem they fix orwhat improvement they bring about. For a bug fix, just include a copyof the bug report, and explain why the change fixes the bug.
• Always include a proper bug report for the problem you think you havefixed. We need to convince ourselves that the change is right beforeinstalling it. Even if it is right, we might have trouble judging it if wedo not have a way to reproduce the problem.
• Include all the comments that are appropriate to help people readingthe source in the future understand why this change was needed.
• Do not mix together changes made for different reasons. Send themindividually.
If you make two changes for separate reasons, then we might not wantto install them both. We might want to install just one.
• Use the version control system to make your diffs. Prefer the unifieddiff) format: hg diff --unified 4.
• You can increase the probability that your patch gets applied by basingit on a recent revision of the sources.
) https://en.wikipedia.org/wiki/Diff#Unified_format

Appendix C Authorsc
Andrew Mihal ([email protected]) has written Enblendand Enfuse.
Contributors (in alphabetical order)
• Pablo d’Angelo ([email protected]) added the con-trast criteria.
• Joe Beda: Win32 porting up to version 3.2.
• Kornel Benko, [email protected]: CMake sup-port for version 4.0.
• Roger Goodman: Proofreading of the manuals.
• Miko laj Leszczynski, [email protected]: Graph-Cut algorithm in Enblend.
• Max Lyons.
• Mark aka ‘mjz’: Win32 porting up to version 3.2.
• Thomas Modes, [email protected]: continuous Win32porting and permanent CMake support.
• Ryan Sleevi, [email protected]: Win32 portingof version 4.0.
• Christoph Spiel ([email protected]) added the grayprojectors, the LoG-based edge detection, an O(n)-algorithm for thecalculation of local contrast, entropy weighting, and various otherfeatures.
• Brent Townshend, [email protected]: HDRsupport.
Thanks to Simon Andriot and Pablo Joubert for suggesting the Mertens-Kautz-Van Reeth technique and the name “Enfuse”.

Appendix D The GNU Free Documentation Licensec
Version 1.2, November 2002
Copyright c© 2000, 2001, 2002 Free Software Foundation, Inc.51 Franklin St, Fifth Floor, Boston, MA 02110–1301, USA
Everyone is permitted to copy and distribute verbatim copiesof this license document, but changing it is not allowed.
0. PREAMBLEThe purpose of this License is to make a manual, textbook, or otherfunctional and useful document free in the sense of freedom: to assureeveryone the effective freedom to copy and redistribute it, with or with-out modifying it, either commercially or noncommercially. Secondarily,this License preserves for the author and publisher a way to get creditfor their work, while not being considered responsible for modificationsmade by others.
This License is a kind of “copyleft”, which means that derivativeworks of the document must themselves be free in the same sense. Itcomplements the GNU General Public License, which is a copyleftlicense designed for free software.
We have designed this License in order to use it for manuals forfree software, because free software needs free documentation: a freeprogram should come with manuals providing the same freedoms thatthe software does. But this License is not limited to software manuals;it can be used for any textual work, regardless of subject matter orwhether it is published as a printed book. We recommend this Licenseprincipally for works whose purpose is instruction or reference.
1. APPLICABILITY AND DEFINITIONSThis License applies to any manual or other work, in any medium,that contains a notice placed by the copyright holder saying it can bedistributed under the terms of this License. Such a notice grants aworld-wide, royalty-free license, unlimited in duration, to use that workunder the conditions stated herein. The “Document”, below, refers toany such manual or work. Any member of the public is a licensee, andis addressed as “you”. You accept the license if you copy, modify ordistribute the work in a way requiring permission under copyright law.
A “Modified Version” of the Document means any work containingthe Document or a portion of it, either copied verbatim, or withmodifications and/or translated into another language.
A “Secondary Section” is a named appendix or a front-matter sec-tion of the Document that deals exclusively with the relationship ofthe publishers or authors of the Document to the Document’s overallsubject (or to related matters) and contains nothing that could fall
99
directly within that overall subject. (Thus, if the Document is in parta textbook of mathematics, a Secondary Section may not explain anymathematics.) The relationship could be a matter of historical connec-tion with the subject or with related matters, or of legal, commercial,philosophical, ethical or political position regarding them.
The “Invariant Sections” are certain Secondary Sections whose titlesare designated, as being those of Invariant Sections, in the notice thatsays that the Document is released under this License. If a sectiondoes not fit the above definition of Secondary then it is not allowed tobe designated as Invariant. The Document may contain zero InvariantSections. If the Document does not identify any Invariant Sectionsthen there are none.
The “Cover Texts” are certain short passages of text that are listed,as Front-Cover Texts or Back-Cover Texts, in the notice that says thatthe Document is released under this License. A Front-Cover Text maybe at most 5 words, and a Back-Cover Text may be at most 25 words.
A “Transparent” copy of the Document means a machine-readable copy,represented in a format whose specification is available to the generalpublic, that is suitable for revising the document straightforwardlywith generic text editors or (for images composed of pixels) genericpaint programs or (for drawings) some widely available drawing editor,and that is suitable for input to text formatters or for automatictranslation to a variety of formats suitable for input to text formatters.A copy made in an otherwise Transparent file format whose markup,or absence of markup, has been arranged to thwart or discouragesubsequent modification by readers is not Transparent. An imageformat is not Transparent if used for any substantial amount of text.A copy that is not “Transparent” is called “Opaque”.
Examples of suitable formats for Transparent copies include plain asciiwithout markup, Texinfo input format, LATEX input format, SGMLor XML using a publicly available DTD, and standard-conformingsimple HTML, PostScript or PDF designed for human modification.Examples of transparent image formats include PNG, XCF and JPG.Opaque formats include proprietary formats that can be read andedited only by proprietary word processors, SGML or XML for whichthe DTD and/or processing tools are not generally available, andthe machine-generated HTML, PostScript or PDF produced by someword processors for output purposes only.
The “Title Page” means, for a printed book, the title page itself, plussuch following pages as are needed to hold, legibly, the material thisLicense requires to appear in the title page. For works in formatswhich do not have any title page as such, “Title Page” means the textnear the most prominent appearance of the work’s title, preceding thebeginning of the body of the text.
A section “Entitled XYZ” means a named subunit of the Documentwhose title either is precisely XYZ or contains XYZ in parenthesesfollowing text that translates XYZ in another language. (Here XYZstands for a specific section name mentioned below, such as “Ac-knowledgements”, “Dedications”, “Endorsements”, or “History”.) To

100
“Preserve the Title” of such a section when you modify the Documentmeans that it remains a section “Entitled XYZ” according to thisdefinition.
The Document may include Warranty Disclaimers next to the noticewhich states that this License applies to the Document. These WarrantyDisclaimers are considered to be included by reference in this License,but only as regards disclaiming warranties: any other implication thatthese Warranty Disclaimers may have is void and has no effect on themeaning of this License.
2. VERBATIM COPYINGYou may copy and distribute the Document in any medium, eithercommercially or noncommercially, provided that this License, thecopyright notices, and the license notice saying this License appliesto the Document are reproduced in all copies, and that you add noother conditions whatsoever to those of this License. You may notuse technical measures to obstruct or control the reading or furthercopying of the copies you make or distribute. However, you may acceptcompensation in exchange for copies. If you distribute a large enoughnumber of copies you must also follow the conditions in section 3.
You may also lend copies, under the same conditions stated above, andyou may publicly display copies.
3. COPYING IN QUANTITYIf you publish printed copies (or copies in media that commonly haveprinted covers) of the Document, numbering more than 100, and theDocument’s license notice requires Cover Texts, you must enclose thecopies in covers that carry, clearly and legibly, all these Cover Texts:Front-Cover Texts on the front cover, and Back-Cover Texts on theback cover. Both covers must also clearly and legibly identify you asthe publisher of these copies. The front cover must present the full titlewith all words of the title equally prominent and visible. You may addother material on the covers in addition. Copying with changes limitedto the covers, as long as they preserve the title of the Document andsatisfy these conditions, can be treated as verbatim copying in otherrespects.
If the required texts for either cover are too voluminous to fit legibly,you should put the first ones listed (as many as fit reasonably) on theactual cover, and continue the rest onto adjacent pages.
If you publish or distribute Opaque copies of the Document numberingmore than 100, you must either include a machine-readable Transparentcopy along with each Opaque copy, or state in or with each Opaque copya computer-network location from which the general network-usingpublic has access to download using public-standard network protocolsa complete Transparent copy of the Document, free of added material.If you use the latter option, you must take reasonably prudent steps,when you begin distribution of Opaque copies in quantity, to ensurethat this Transparent copy will remain thus accessible at the statedlocation until at least one year after the last time you distribute anOpaque copy (directly or through your agents or retailers) of thatedition to the public.

101
It is requested, but not required, that you contact the authors of theDocument well before redistributing any large number of copies, togive them a chance to provide you with an updated version of theDocument.
4. MODIFICATIONSYou may copy and distribute a Modified Version of the Document underthe conditions of sections 2 and 3 above, provided that you releasethe Modified Version under precisely this License, with the ModifiedVersion filling the role of the Document, thus licensing distributionand modification of the Modified Version to whoever possesses a copyof it. In addition, you must do these things in the Modified Version:
A. Use in the Title Page (and on the covers, if any) a title distinctfrom that of the Document, and from those of previous versions(which should, if there were any, be listed in the History section ofthe Document). You may use the same title as a previous versionif the original publisher of that version gives permission.
B. List on the Title Page, as authors, one or more persons or entitiesresponsible for authorship of the modifications in the ModifiedVersion, together with at least five of the principal authors of theDocument (all of its principal authors, if it has fewer than five),unless they release you from this requirement.
C. State on the Title page the name of the publisher of the ModifiedVersion, as the publisher.
D. Preserve all the copyright notices of the Document.
E. Add an appropriate copyright notice for your modifications adja-cent to the other copyright notices.
F. Include, immediately after the copyright notices, a license noticegiving the public permission to use the Modified Version underthe terms of this License, in the form shown in the Addendumbelow.
G. Preserve in that license notice the full lists of Invariant Sectionsand required Cover Texts given in the Document’s license notice.
H. Include an unaltered copy of this License.
I. Preserve the section Entitled “History”, Preserve its Title, andadd to it an item stating at least the title, year, new authors, andpublisher of the Modified Version as given on the Title Page. Ifthere is no section Entitled “History” in the Document, create onestating the title, year, authors, and publisher of the Document asgiven on its Title Page, then add an item describing the ModifiedVersion as stated in the previous sentence.
J. Preserve the network location, if any, given in the Document forpublic access to a Transparent copy of the Document, and likewisethe network locations given in the Document for previous versionsit was based on. These may be placed in the “History” section.You may omit a network location for a work that was published
102
at least four years before the Document itself, or if the originalpublisher of the version it refers to gives permission.
K. For any section Entitled “Acknowledgements” or “Dedications”,Preserve the Title of the section, and preserve in the section all thesubstance and tone of each of the contributor acknowledgementsand/or dedications given therein.
L. Preserve all the Invariant Sections of the Document, unaltered intheir text and in their titles. Section numbers or the equivalentare not considered part of the section titles.
M. Delete any section Entitled “Endorsements”. Such a section maynot be included in the Modified Version.
N. Do not retitle any existing section to be Entitled “Endorsements”or to conflict in title with any Invariant Section.
O. Preserve any Warranty Disclaimers.
If the Modified Version includes new front-matter sections or appendicesthat qualify as Secondary Sections and contain no material copied fromthe Document, you may at your option designate some or all of thesesections as invariant. To do this, add their titles to the list of InvariantSections in the Modified Version’s license notice. These titles must bedistinct from any other section titles.
You may add a section Entitled “Endorsements”, provided it con-tains nothing but endorsements of your Modified Version by variousparties—for example, statements of peer review or that the text hasbeen approved by an organization as the authoritative definition of astandard.
You may add a passage of up to five words as a Front-Cover Text,and a passage of up to 25 words as a Back-Cover Text, to the endof the list of Cover Texts in the Modified Version. Only one passageof Front-Cover Text and one of Back-Cover Text may be added by(or through arrangements made by) any one entity. If the Documentalready includes a cover text for the same cover, previously added byyou or by arrangement made by the same entity you are acting onbehalf of, you may not add another; but you may replace the old one,on explicit permission from the previous publisher that added the oldone.
The author(s) and publisher(s) of the Document do not by this Licensegive permission to use their names for publicity for or to assert orimply endorsement of any Modified Version.
5. COMBINING DOCUMENTSYou may combine the Document with other documents released underthis License, under the terms defined in section 4 above for modifiedversions, provided that you include in the combination all of theInvariant Sections of all of the original documents, unmodified, andlist them all as Invariant Sections of your combined work in its licensenotice, and that you preserve all their Warranty Disclaimers.

103
The combined work need only contain one copy of this License, andmultiple identical Invariant Sections may be replaced with a singlecopy. If there are multiple Invariant Sections with the same name butdifferent contents, make the title of each such section unique by addingat the end of it, in parentheses, the name of the original author orpublisher of that section if known, or else a unique number. Make thesame adjustment to the section titles in the list of Invariant Sectionsin the license notice of the combined work.
In the combination, you must combine any sections Entitled “History”in the various original documents, forming one section Entitled “His-tory”; likewise combine any sections Entitled “Acknowledgements”,and any sections Entitled “Dedications”. You must delete all sectionsEntitled “Endorsements.”
6. COLLECTIONS OF DOCUMENTSYou may make a collection consisting of the Document and otherdocuments released under this License, and replace the individualcopies of this License in the various documents with a single copy thatis included in the collection, provided that you follow the rules of thisLicense for verbatim copying of each of the documents in all otherrespects.
You may extract a single document from such a collection, and dis-tribute it individually under this License, provided you insert a copyof this License into the extracted document, and follow this License inall other respects regarding verbatim copying of that document.
7. AGGREGATION WITH INDEPENDENT WORKSA compilation of the Document or its derivatives with other separateand independent documents or works, in or on a volume of a storage ordistribution medium, is called an “aggregate” if the copyright resultingfrom the compilation is not used to limit the legal rights of the com-pilation’s users beyond what the individual works permit. When theDocument is included in an aggregate, this License does not apply tothe other works in the aggregate which are not themselves derivativeworks of the Document.
If the Cover Text requirement of section 3 is applicable to these copiesof the Document, then if the Document is less than one half of theentire aggregate, the Document’s Cover Texts may be placed on coversthat bracket the Document within the aggregate, or the electronicequivalent of covers if the Document is in electronic form. Otherwisethey must appear on printed covers that bracket the whole aggregate.
8. TRANSLATIONTranslation is considered a kind of modification, so you may distributetranslations of the Document under the terms of section 4. ReplacingInvariant Sections with translations requires special permission fromtheir copyright holders, but you may include translations of someor all Invariant Sections in addition to the original versions of theseInvariant Sections. You may include a translation of this License, andall the license notices in the Document, and any Warranty Disclaimers,provided that you also include the original English version of thisLicense and the original versions of those notices and disclaimers. In

104
case of a disagreement between the translation and the original versionof this License or a notice or disclaimer, the original version will prevail.
If a section in the Document is Entitled “Acknowledgements”, “Dedi-cations”, or “History”, the requirement (section 4) to Preserve its Title(section 1) will typically require changing the actual title.
9. TERMINATIONYou may not copy, modify, sublicense, or distribute the Documentexcept as expressly provided for under this License. Any other attemptto copy, modify, sublicense or distribute the Document is void, andwill automatically terminate your rights under this License. However,parties who have received copies, or rights, from you under this Licensewill not have their licenses terminated so long as such parties remainin full compliance.
10. FUTURE REVISIONS OF THIS LICENSEThe Free Software Foundation may publish new, revised versions ofthe GNU Free Documentation License from time to time. Such newversions will be similar in spirit to the present version, but may differin detail to address new problems or concerns. See GNU Copyleft).
Each version of the License is given a distinguishing version number.If the Document specifies that a particular numbered version of thisLicense “or any later version” applies to it, you have the option offollowing the terms and conditions either of that specified version orof any later version that has been published (not as a draft) by theFree Software Foundation. If the Document does not specify a versionnumber of this License, you may choose any version ever published(not as a draft) by the Free Software Foundation.
) http://www.gnu.org/copyleft/

Syntactic Comment Index
enblend-response-file, 38enfuse-response-file, 38filename-globbing, 39globbing, 39glob, 39layer-selector, 41response-file, 38
105

Program/Application Index
If a program belongs to a larger package, it has its association mentionedin parenthesis.
CinePaint, 91Cinepaint, 21Darktable, 91Gimp, 5, 21, 30, 91GraphicsMagick, 92Hugin, 5, 43, 78, 91, 95ImageFuser, 95ImageMagick, 29, 30, 92LittleCMS, 92Magic Lantern, 93Mercurial, 9PanoTools, 5, 91RawTherapee, 91UFRaw, 91PFSTools, 92PTOptimizer (PanoTools), 91PTmender (PanoTools), 91align image stack (Hugin), 91convert (ImageMagick), 43, 92convert, 29dcraw, 5, 91display (ImageMagick), 43, 92exiftool, 92exrdisplay (OpenEXR), 92fulla (Hugin), 91gm (GraphicsMagick), 92gmic, 92identify (ImageMagick), 75, 92montage (ImageMagick), 92nona (Hugin), 21, 43, 77, 91tiffcp (LibTIFF), 43tiffinfo (LibTIFF), 43tiffinfo (libtiff), 75, 92tiffsplit (LibTIFF), 43tificc (LittleCMS), 92ufraw-batch, 91ufraw, 5, 91
106
Option Index
Locations marked like 12 indicate the place of the option’s genuine de-scription.
--blend-colorspace, 18--ciecam, 19--compression, 16--contrast-edge-scale, 25--contrast-min-curvature, 27--contrast-weight, 22--contrast-window-size, 27--depth, 19--entropy-cutoff, 27--entropy-weight, 22--entropy-window-size, 29--exposure-cutoff, 29, 52--exposure-optimum, 22, 46, 54--exposure-weight-function, 30, 46, 53--exposure-weight, 22--exposure-width, 23, 46, 54--fallback-profile, 23--gray-projector, 32, 46--hard-mask, 23, 45, 89--help, 35--layer-selector, 23--levels, 17--load-masks, 6, 24--no-ciecam, 19--no-parameter, 24--output, 6, 18--parameter, 24--saturation-weight, 23--save-masks, 6, 25--show-globbing-algorithms, 35--show-image-formats, 10, 35--show-signature, 11, 35--show-software-components, 11, 35, 54--soft-mask, 23--verbose, 9, 18--version, 8, 9, 35--wrap, 21-V (long: --version), 35-c (long: --ciecam), 19-d (long: --depth), 19-f, 21
107

108
-g, 21-h (long: --help), 35-l (long: --levels), 17-o (long: --output), 18-v (long: --verbose), 18-w (long: --wrap), 21

General Index
Locations marked like 12 indicate the location where a term gets intro-duced or defined. Tables, lists, etc. that summarize material are indicatedlike 34.
Symbols#(response file comment), 38@ (response file prefix), 37
Numbers360◦
horizontal panorama, see panorama, 360◦
vertical panorama, see panorama, 360◦
Aactive criteria, see criteria, activeAdelson, Edward H., 1advanced focus stacking, see focus stacking, advanced
recognizing faint edges, 86suppressing noise, 86
advanced options, 18–22affine transformation, see transformation, affinealgorithm, see globbing algorithm
globbing, 35algorithms
globbing, 40alignment
photometric, 6alpha, 75alpha channel
associated, 21anti-value gray projector, see gray projector, anti-valueaperture
sweet spot, 82applications of Enfuse, 78–89arithmetic JPEG compression, see compressionassociated alpha channel, see alpha channel, associatedauthors, 97average
disabling, 45weighted, 44
average gray projector, see gray projector, average
109

110
Bbasic focus stacking, see focus stacking, basicBigTIFF, 3binary mask, see mask, binarybinary version, see software, versionbit depth, see bits per channelbits per channel, 11, 19black-and-white image, see image, black-and-whiteblack-point, 72blend colorspace, see colorspace, blendblending color space, see colorspace, for blending and fusingblending exposures, 81blending pixels, see pixels, blendingBorn, Max, 21bracketing
HDR, 93branches of Enfuse/Enblend
development, 8Brasseur, Eric, 70bug
database at LaunchPad, 94reports, 94–96
how to, 94identification of bugs, 94sending patches, 95
builder, 11Burt, Peter J., 1Burt-Adelson, 1
CCarter, Samantha, 41channel
alpha, 2, 6, 11, 77depth, 19width, see channel, depth
channel-mixer gray projector, see gray projector, channel-mixerCIECAM02 colorspace, see colorspace, CIECAM02, see colorspace,
CIECAM02CIEL*a*b* colorspace, see colorspace, CIEL*a*b*CIEL*u*v* colorspace, see colorspace, CIEL*u*v*, see colorspace,
CIEL*u*v*CILK NWORKERS, see environment variable, CILK NWORKERS
circle-of-confusion, 82CoC, see circle-of-confusioncode,see also return code, 12code repository, see public repositorycoding guidelines, 55color appearance model, 18color cube
RGB, 19, 72sRGB, 72

111
RGB, 18color profile, 69, 72color profiles
math, 69colorspace, 69–74
CIECAM02, 19, 73CIEL*a*b*, 19CIEL*u*v*, 19, 73HSL, 61L*a*b*, 72blend, 18CIELUV, 18for blending and fusing, 72practical considerations, 74
command-line, 15common options, 16–18compiled-in features, see featurescompiler, 11compression, 16
JPEG, 16JPEG of TIFF, 16LZW, 16arithmetic JPEG, 16deflate, 16packbits, 17
console messages, 12contrast
local enhancement, 27minimum curvature, 27window size, 27
contrast enhancementlocal, 86
contrast weight, see weight, local contrastcontrast weighting, see weighting, local contrastcontrast weighting using Laplacian-of-Gaussian, see weighting, contrast
using Laplacian-of-Gaussiancontrast weighting using a blend of methods, see weighting, contrast using
a blend of methodscontrast weighting using standard deviation, see weighting, contrast using
standard deviationconventions
typographic, see notationconversion
raw, 4RGB-L*a*b*, see RGB-L*a*b* conversion
criteriaactive, 45overpowering one another, 45
cutoffexposure, see exposure, cutoff
cutoff entropy, see entropy, cutoff

112
DD50 white-point, see white-point, D50dark frame, 87decision tree
focus stacking, 87default layer selection, 41default output filename, see filename, output, defaultdefault weights, see weights, defaultdeflate compression, see compressiondelimiters,see also options, delimiters, 36depth-of-field, 1, 82depth-of-focus increase, 82detailed configuration, 8development branch, see branches, developmentdigital blending, 81disabling average, see average, disablingdlopen
Linux, 53OS X, 53
DoF, see depth-of-field, see depth-of-fielddouble precision float (IEEE754), see IEEE754, double precision floatdual-ISO, 93DYLD FALLBACK LIBRARY PATH, see environment variable, DYLD FALLBACK -
LIBRARY PATH
DYLD LIBRARY PATH, see environment variable, DYLD LIBRARY PATH
dynamic library, 32, 52dynamic linking, see linking, dynamicdynamic linking support, 54dynamic loading, see loading, dynamicdynamic range increase, 79, 81dynamic-library environment, 35
Eedge detection
Laplacian, 85entropy, see weighting, local entropy
cutoff, 27definition, 66window size, 29
entropy weight, see weight, entropyentropy weighting, see weighting, local entropyenvironment,see also environment variable, 14environment variable, 14, 14
CILK NWORKERS, 14DYLD FALLBACK LIBRARY PATH, 53DYLD LIBRARY PATH, 53LD LIBRARY PATH, 53OMP DYNAMIC, 14OMP NUM THREADS, 14TMPDIR, 14
113
estimators, 63EXIF, 92expectation value, 63expert focus stacking tips, see tips, focus stacking expertsexpert fusion options, 25–35expert options, 23–25exposure
cutoff, 29optimum, 22weight, 22width, 23
exposure fusion, see fusion, exposureexposure series, see series, exposure
common misconceptions, 81tips for beginners, 80
exposure weightfunction, see weight, function, exposurelinear transform, 32
exposure weight function, 33FWHM, 32bi-square, 47bisquare, 47full-sine, 47fullsine, 47gauss, 46, 47half-sine, 47halfsine, 47lorentz, 47Gaussian, 46, 47Lorentzian, 47Lorentz curve, 47bi-square, 33bisquare, 33full width half maximum, 32full-sine, 33fullsine, 33gauss, 33gaussian, 33half-sine, 33halfsine, 33lorentz, 33lorentzian, 33
exposure weight functions, 47exposure weighting, see weighting, exposure, see weighting, exposure
functions, 44EXR, 92EXR image, see image, EXRexternal mask, 6extra features, see featuresextra samples, 75

114
Ffallback profile, see profile, fallbackFDL, see GNU Free Documentation Licensefeatures, 9file
Mach-O, 53multi-page, 41response, 15, 37
filenameliteral, 15output, 18
default, 18filename template, see mask, filename templatefirst moment, see moment, firstflash exposure series, see series, flash exposurefloating-point TIFF image, see image, floating-point TIFFfloating-point TIFF mask, see mask, floating-point TIFFfloating-point VIFF image, see image, floating-point VIFFfloating-point image, see image, floating-pointfocus stacking
advanced, 83basic, 83
focus stacking decision tree, see decision tree, focus stackingfocus stacks, 82
fusing, 82preparation, 82why to create them?, 82
formatimage, 35
format of response file, see response file formatfull width half maximum, 32fusing
local-contrast-based, 82single criterion, 45
fusing pixels, see pixels, fusingfusion
exposure, 1fusion options, 22–23FWHM, 23, see full width half maximum
GGanos Lal, see Morgan le Fayglob, 40globbing algorithm, 39
literal, 39, 40none, 40shell, 40sh, 40wildcard, 39, 40
globbing algorithms, see algorithm, globbing, 40GNU FDL, see GNU Free Documentation LicenseGNU Free Documentation License, 98

115
grammarresponse file, see response file, grammarsyntactic comment, 39
gray projector, 32anti-value, 32average, 32channel-mixer, 32l-star, 34lightness, 34luminance, 34pl-star, 34value, 34
grayscale projector, see projector, grayscale
Hhalf precision float (OpenEXR), see OpenEXR, half precision floathard mask, see mask, hardHDR, see high dynamic range, 92HDR-bracketing, see bracketing, HDRheader files, 35help, 35helpful libraries, 92helpful programs, 91–93
HDR, 92camera firmware, 93High Dynamic Range, 92image alignment, 91image manipulation, 91image rendering, 91libraries, 92meta-data handling, 92raw image conversion, 91
high dynamic range, 1hot pixels, 87HSL colorspace, see colorspace, HSL
IICC, 92ICC profile, see profile, ICC, see profile, ICCICC profile black-point, see black-pointICC profile white-point, see white-pointICC profile, see profile, ICCIEEE754
double precision float, 20single precision float, 20
imageEXR, 71black-and-white, 72directory, 41floating-point, 71floating-point TIFF, 71floating-point VIFF, 71
116
frame, 43image formats, 10, 11, see format, image
JPEG, 10OpenEXR, 11PNG, 11TIFF, 11
image processing order, see order of image processingimage requirements, see requirements, imageimages
fusable, 78information
on software components, 35information options, 35–36input mask, see mask, input filesinteraction with Enfuse, 8–14invocation, 15–43
JJackson, Daniel, 17, 25, 90JFIF, see JPEGJPEG, 92JPEG compression, see compressionJPEG quality level, see compression
Kvon Karman, Theodore, 21Kautz, Jan, 1known limitations, 3
LL*a*b* colorspace, see colorspace, L*a*b*l-star gray projector, see gray projector, l-starLaplacian edge detection, see edge detection, LaplacianLaplacian-of-Gaussian, 25, 63LaunchPad
bug database, see bug, database at LaunchPadlayer
image, 41selection, 41–43
layer selection, 23all layers, 24default, 41first layer, 24largest-layer, 24last layer, 24no layer, 24
layer selection syntax, 41LCE, see local contrast enhancementLD LIBRARY PATH, see environment variable, LD LIBRARY PATH
lens distortioncorrection of, 4
level

117
verbosity, 18levels
pyramid, 17LibJPEG, 92LibPNG, 92libraries, 11library
dynamic, see dynamic library, see dynamic libraryLibTiff, 92light probe, 81lightness gray projector, see gray projector, lightnessLindbloom, Bruce, 70linking
dynamic, 52literal filename, see filename, literalload mask, see mask, loadingloading
dynamic, 52LoadLibrary (Windows), 54local analysis window, see window, local-analysislocal contrast, see weighting, local contrastlocal contrast enhancement, see contrast, local enhancement, see contrast
enhancement, locallocal contrast problem, 84local contrast weight, see weight, local contrastlocal contrast weighting, see weighting, local contrastlocal entropy, see weighting, local entropylocal entropy weighting, see weighting, local entropy, 66–68local-contrast-based fusing, 82LoG, see Laplacian-of-GaussianLoG, see Laplacian-of-Gaussianlog-transform, see transform, logluminance, 69luminance gray projector, see gray projector, luminanceluminance interval, 69
normalized, 46, 69, 70trivial, 19, 23
LZW compression, see compression
Mmask, 75
binary, 75external, 6filename template, 24, 25floating-point TIFF, 25hard, 23input files, 75loading, 24save, 25soft, 23template character, 26
‘%’, 26

118
‘B’, 26‘b’, 26‘D’, 26‘d’, 26‘E’, 26‘e’, 26‘F’, 26‘f’, 26‘i’, 26‘n’, 26‘P’, 26‘p’, 26
weight, 75, 77Math-O file, see file, Mach-Omatte, 75, 77Mertens, Tom, 1message
category, 12error, 12info, 12note, 13timing, 13warning, 12
console, 12debug, 13foreign sources, 13“should never happen”, 13
mode of operation (SDev, LoG, . . . ), 66moment
first, 63second, 63
Morgan le Fay, 90multi-page file,see also layer, 41, see file, multi-page
tools, 43multi-resolution spline, 1
Nname of builder, 11natural sharp-unsharp transition, 89noise reduction, 79normalized luminance interval, see luminance interval, normalizednotation, vii
OO’Neill, Jack, 25object
shared, see shared object, see shared objectOMP DYNAMIC, see environment variable, OMP DYNAMIC
OMP NUM THREADS, see environment variable, OMP NUM THREADS
only save mask, see save mask onlyOpenEXR, 92

119
data format, 20half precision float, 20
OpenMP, 12, 14optimum exposure, see exposure, optimumoption delimiters, see options, delimitersoptions, 15–36
advanced, 18common, 16delimiters, 36
filename arguments, 36numeric arguments, 36
expert, 23fusion, 22fusion for experts, 25information, 35
orderof image processing, 37
outputfile compression, 16
output filename, see filename, outputdefault, see filename, output, default
output imageset size, 21
overpowering criteria, see criteria, overpoweringoverview, 1–2
Ppackbits compression, see compressionpanorama
360◦
horizontal, 22vertical, 22
parallax error, 6perceptual rendering intent, see rendering intentperformance considerations, 58photographic workflow, 4–14photometric alignment, see alignment, photometricpixels
blending, 69fusing, 69hot, 87
pl-star gray projector, see gray projector, pl-starPNG, 92polarization series, see series, polarizationprobability function, 63problem reports, see bug reportsprofile
fallback, 23ICC, 11, 18, 69
projectorgrayscale, 46
projector to grayscale, see gray projector

120
public repository, 9pyramid levels, see levels, pyramid
Qquery
compiler, 11features, 9image formats, 10libraries, 11name of builder, 11
query version, see version, query
Rrandom variable, 63raw conversion, see conversion, rawVan Reeth, Frank, 1rendering intent
perceptual, 73requantization, 19requirements
image, 15response file, see file, response
comment (‘#’), see ‘#’force recognition of, 38format, 38grammar, 38syntactic comment, 39
response file prefix‘@’, see ‘@’
response files, 37–41return code, 12RGB color cube, see color cube, RGB, see color cube, RGBRGB’-L*a*b* conversion, 34RGB-cube, 23RGB-L*a*b* conversion, 34
Ssaturation enhancement, 81saturation weight, 23saturation weighting, see weighting, saturation, see weighting, saturationsave mask, see mask, save
only, 25scaling of parameters, 66second moment, see moment, secondsensor
use clean, 87series
exposure, 79flash exposure, 81polarization, 81simple, 79
shared object, 30, 52

121
signal-to-noise ratio, 82signature, 11, 35signed binary, see signaturesimple series, see series, simplesingle criterion fusing, see fusing, single criterionsingle precision float (IEEE754), see IEEE754, single precision floatsize
canvas, 21SNR, see signal-to-noise ratiosoft mask, see mask, softsoftware
components, see information, on software componentsversion, 35
software version, see version, softwaresource code repository, see public repositorySourceForge, 2spline, see multi-resolution splinesRGB, 19sRGB color cube, see color cube, sRGBstandard deviation, 63standard workflow, see workflow, standardstatistical moments, 63subtraction of dark frame, 87sweet spot aperture, see aperture, sweet spotsyntactic comment
grammar, 39response file, see response file, syntactic comment
syntaxlayer selection, 41
grammar, 42
TTIFF, 92tips
focus stacking experts, 87TMPDIR, see environment variable, TMPDIRtransform
floating-point images, 71log, 71
transformationaffine, 4
transitionnatural sharp-unsharp, 89
typographic conventions, see notation
Uunassociated alpha channel, see alpha channel, associatedunderstanding masks, 75–77
122
Vvalue gray projector, see gray projector, valuevariable, see environment variablevariance, 63verbosity level, see level, verbosityversion, see software, version
query, 8software, 8
VIFF floating-point image, see image, floating-point VIFFvirtual reality, 21VR, see virtual reality
Wweight
entropy, 22exposure, see exposure, weightfunction
exposure, 30local contrast, 22mask, see mask, weightsaturation, see saturation weight
weighted average, see average, weightedweighting
contrast using Laplacian-of-Gaussian, 63contrast using a blend of methods, 66contrast using standard deviation, 62entropy, 61exposure, 1, 46
built-in, 46prerequisites, 54user-defined, 52
general concept of, 44local contrast, 1, 61local entropy, 1, 66
window size, 67saturation, 1, 61
weighting factor, 69weighting functions, 44–68weights
default, 45white-point, 72
D50, 72, 73width of exposure weight curve, see exposure, widthwindow
local-analysis, 62window size
contrast, see contrast, window sizeentropy, see entropy, window size
workflow, see photographic workflowEnblend, 5Enfuse, 5external mask, 7

123
standard, 4wrap around, 21