collection of dried blood spots (dbs) from infants for pcr
TRANSCRIPT

CS242103-C
Collection of Dried Blood Spots (DBS) from Infants for PCR Testing
1. Gather necessary supplies • Gloves • DBS Card • Lancet (2mm) • Skin Disinfectant • Gauze or Cotton Wool • Pen • Sharps Container
2. Complete all necessary paperwork • Clinic Register(s) • Laboratory Request/Report Form • DBS Card
3. Choose the area to be pricked and ask the mother to warm this area by gently rubbing it with her hands.
• Infants 6wks-4mo: heel • Infants 4mo-10mo: big toe • Infants >10mo or >10kg: fnger
4.
Wash and glove hands. If gloves have powder, wash of powder.
7.
Wipe away the frst spot of blood, allow a large drop of blood to collect.
8. Touch the flter paper gently against the large drop and allow it to completely fll the circle. Collect at least 3 full circles.
5.
Position the baby with the foot or hand down, clean the spot to be pricked with skin disinfectant, allow to dry for 30 seconds.
9.
Clean area with gauze and apply gentle pressure to stop bleeding. Ensure the wound is clean and bleeding has stopped for at least fve minutes. Complete documentation and recheck the wound before the baby leaves your care. 6.
Gently squeeze and release the area to be pricked until it is ready to be bled, prick the infant in the selected spot with the 2mm lancet.
Valid DBS Specimen
CS242103-C

Drying and Packaging Dried Blood Spot (DBS) Samples
Supplies
DBS CardDrying Rack Glassine Paper
Desiccant Packs Humidity Indicator Individual Bag (Left)/
Batch Bag (Right)
1
1.
Drying
Leave DBS on a drying rack in a clean, dry, protected area until dried completely, for at least 4 hours or overnight.
• While drying, DBS should not be touched and should be kept out of direct sunlight.
• If your site collects DBS for both Early Infant Diagnosis (EID)* and HIV viral load (VL) monitoring, then two sets of drying racks are needed. Label one drying rack for EID DBS and the other for VL DBS.
You may label each DBS card “EID” or “VL” at the time of specimen collection in order to ensure that it is dried in the correct rack
In order to avoid nucleic acid contamination, the DBS for EID and VL should NEVER be dried together on the same rack. EID DBS are used for HIV diagnostic testing, while VL DBS are used for HIV monitoring. This type of contamination can lead to inaccurate test results.
2. Keep lab request forms with DBS cards.
Note: The term Early Infant Diagnosis (EID) here is used broadly to include all virologic testing for the purpose of HIV diagnosis in infants and children <18 months of age.

Drying and Packaging Dried Blood Spot (DBS) Samples
PackagingKey Points:
2
• It is important to package each DBS card separately so that the cards do not contaminate each other.
• Package DBS for EID and VL at different times to prevent contamination.
• Packaging may depend on clinic volume and available supplies.
Follow Route A (preferred method) if you are using glassine paper or envelopes to separate DBS.Follow Route B if you are using individual zip closure plastic bags to separate DBS.
1.
2.
4.
3.
5.
Route A (Preferred method of packaging)
Place each DBS in a glassine paper or envelope so that DBS cards will not have direct contact with one other.
Insert up to 10 individually wrapped DBS cards into the batch bag. Add 10 desiccant packets to the batch bag.
Add at least one humidity card per batch bag. Gently press the bag to remove air before sealing.
Place the bag of DBS, all the DBS lab forms and the specimen delivery checklist into the shipping envelope.
• Use specimen delivery checklist to verify that you have a lab form for each DBS.
• Label the envelope with:
Clinic name
“EID” or “VL”
Date you are sending the specimens to the lab
• Place the envelope in designated area to be picked up for the laboratory.
After the DBS has been prepared for transport, it can be stored at room temperature for up to two weeks.
If DBS specimens cannot be shipped within two weeks, then they should be stored at -70°C until shipment (or -20°C if freezer at -70°C is not available). If a sample has been at the clinic for longer than two weeks without appropriate storage, then a new sample is needed.
CS280275
3
1.
2.
4.
3.
5.
Drying and Packaging Dried Blood Spot (DBS) Samples
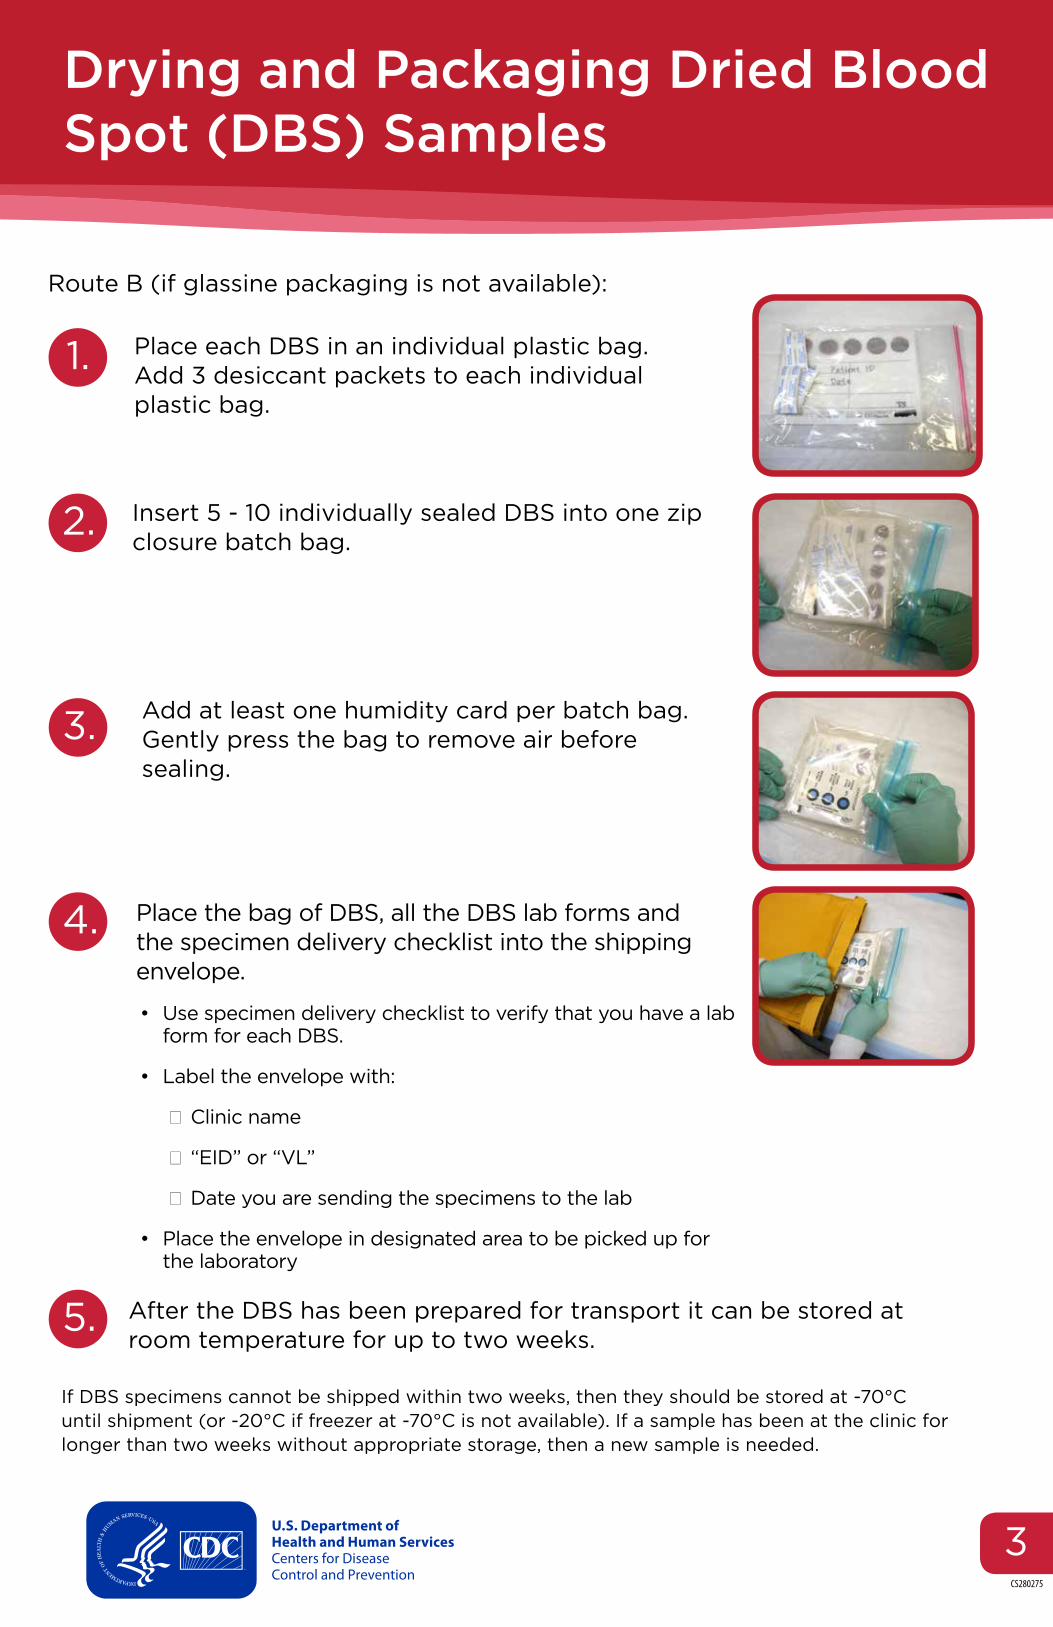
Route B (if glassine packaging is not available):
Place each DBS in an individual plastic bag. Add 3 desiccant packets to each individual plastic bag.
Insert 5 - 10 individually sealed DBS into one zip closure batch bag.
Add at least one humidity card per batch bag. Gently press the bag to remove air before sealing.
Place the bag of DBS, all the DBS lab forms and the specimen delivery checklist into the shipping envelope.
• Use specimen delivery checklist to verify that you have a lab form for each DBS.
• Label the envelope with:
Clinic name
“EID” or “VL”
Date you are sending the specimens to the lab
• Place the envelope in designated area to be picked up for the laboratory
After the DBS has been prepared for transport it can be stored at room temperature for up to two weeks.
If DBS specimens cannot be shipped within two weeks, then they should be stored at -70°C until shipment (or -20°C if freezer at -70°C is not available). If a sample has been at the clinic for longer than two weeks without appropriate storage, then a new sample is needed.
CS280275