collect guide 2019 - gov.uk · collect and dfe sign in (dsi) 6 dfe sign-in 6 sign in to your dfe...
TRANSCRIPT

COLLECT Guide 2019 COLLECT guide for local authorities
2
Contents
Introduction 4
Useful hints 5
COLLECT and DFE SIGN IN (DSI) 6
DfE Sign-in 6
Sign in to your DfE Sign-in account 6
Local authority ‘Source page’ screen. 8
Upload return 8
Add return on screen 8
Open return 8
Submit return 8
Export to file 8
Launch reports 9
Delete return 9
Upload a return 10
Agent page (for collections where the authority is the agent) 12
Filter by 12
Performance summary 13
Sources 13
Agent functions 14
Adding a Return on screen (if applicable to your collection) 15
Loading a return for a single school (If applicable to the collection) 18
Uploading multiple files (if applicable to the collection). 20
Viewing the return details 21
Editing data within the return 22
Errors 23
Total return errors 23
Return level errors 23
To view all errors and queries on the return 23
Correcting errors 24
Providing clarification/ supplementary information 25
Submitting a return 27

3
‘Clean data submit’ in COLLECT. (If applicable to your collection) 27
Approving the return 28
Queues 30
Reports 33
Exporting a return 35
Export selected 35
Export multiple 35
Export all 35
Academy export 35
Selecting format 36
Screen functionality 38
Screen navigation 38
Navigation controls 38
Mode buttons 39
Help 40

4
Introduction
The COLLECT (collections online for learning, education, children and teachers) portal is used by schools, local authorities and the department for education for processing data collection returns. Major benefits of the portal include real time data collection monitoring and progress reporting, the ability of a local authority to view exactly the same information as the department for education when queries arise and being a website there are no installation issues.
This document is designed to guide local authority users through the various aspects of COLLECT from initial submission, data validation and final approval by the department for education.
The department now collects data from a wide range of users; generic terminology must be used within COLLECT. A provider of data is known as a ‘source’, an ‘agent’ is someone who undertakes verification and checking of the data and a ‘collector’ is the final destination of the information.

5
Useful hints
Very important - re-submissions – if a data return for a local authority already exists in the system and you upload another file, it will overwrite the original return completely no matter where it is in the workflow (submitted or authorised). All error notes and data item notes will disappear only return notes are retained. If you try to upload a file that is already in the system then you will be given the following message
We recommend that you take great care when selecting this option and make sure that all parties who may be working, or have worked on this return agree to the re-submission. When uploading a zip file containing many data then please be aware that you will not be prompted with the above message if any of the settings contained in the zip file are already on the system. It will automatically overwrite the return without warning you.
When navigating around the COLLECT system it is important that you use the COLLECT ‘drill up’ button or COLLECT ‘back’ button which are toward the top right of your COLLECT screen. If the ‘drill up’ or ‘back’ buttons are not visible then you may be in one of the earlier screens and to navigate back from here you will need to click ‘back to my COLLECT page’ page located at the top of your COLLECT screen above your login name. You will be either given an error message or ‘thrown’ out of the system if you use your web browser back button.
When amending errors, once you have completed your actions on a particular error you will need to drill back out of that record to the main screen before being able to select another error to investigate. If you try to select an error and have found the error through the ‘all errors’ page before drilling out, you will be given the error message: ‘cannot choose another error to investigate’

6
COLLECT and DFE SIGN IN (DSI)
Access to COLLECT is through the department’s DFE Sign in ( DSI)
BETA This is a new service – your feedback will help us to improve it.
DfE Sign-in Contents
• Overview • I already have a DfE Sign-in account • I need to migrate my Secure Access account to DfE Sign-in • I don't have a DfE Sign-in account or a Secure Access account
Sign in to your DfE Sign-in account You'll need your DfE Sign-in email address and password to sign-in.
Sign in
Full DFE Sign in guides are published on the DFE Website.
Once successfully registered, click on to ‘home’ and then click on ‘COLLECT’ to enter COLLECT as below:
Then click on to ‘continue’ to enter COLLECT as below:
7
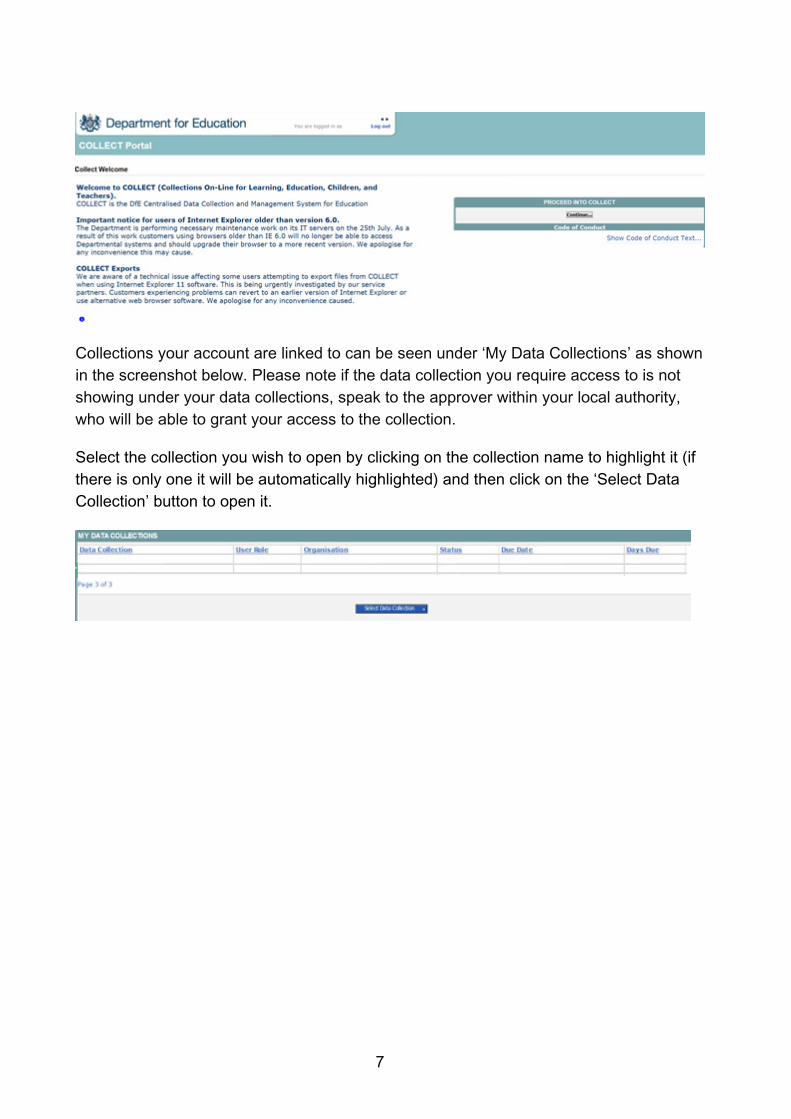
Collections your account are linked to can be seen under ‘My Data Collections’ as shown in the screenshot below. Please note if the data collection you require access to is not showing under your data collections, speak to the approver within your local authority, who will be able to grant your access to the collection.
Select the collection you wish to open by clicking on the collection name to highlight it (if there is only one it will be automatically highlighted) and then click on the ‘Select Data Collection’ button to open it.

8
Local authority ‘Source page’ screen.
The next screen (‘Source page’) provides a summary of the latest position with respect to the selected data collection. You will see information on the current status of your collection return and will be presented with a number of options.
Upload return
Clicking on this button launches a page to allow the local authority user (source) to browse for the xml file and load.
Add return on screen
Allows the source to type the return on screen – if applicable to the data collection.
Open return
This option is greyed out until the data is loaded and is used to access the loaded data for editing or viewing.
Submit return
This option is greyed out until the data is loaded and validated and is used to submit the data to the department. This should only be done when the data is complete and clean. Once a return has been submitted control then passes to the department.
Export to file
This option is greyed out until the data is loaded and is used to export the loaded data either as a single xml file (in the input xml format) or as a number of csv files with one file per data table.

9
Launch reports
This option launches the local authority’s reports options.
Delete return
This option is greyed out until the data is loaded and is used to delete the local authority data from the system.

10
Upload a return
To upload the return click on the ‘Browse…’ button to navigate to the required file. You then need to select ‘Upload’ to load the data.
If a new version of the data is loaded, all ‘Notes’ (excluding return level notes and ‘History’) are deleted, together with the loaded data before the new data is loaded.
If data is already loaded you will be asked if you want to overwrite it. Answering no will stop the data load, answering yes will delete the existing data and load the new data.
If the xml file is in the wrong format or contains the wrong type of data, for example, a letter in a date field, the file will be rejected with an explanatory message.
Whilst the data is being loaded the above message will be displayed.
Once the file has been successfully loaded the following message will appear.

11
The data return has now been placed in a queue to be validated. When COLLECT is busy this process may take some time and users may come back later to view any validation errors present within the return.
When you click on ‘OK’ you will return to the ‘Source page’ and the status will be ‘Waiting_for_validation’. When the return reaches the front of the queue, the status on the ‘Source page’ will change to ‘Validation_in_progess’ and then ‘Loaded’ when it is finished.
12
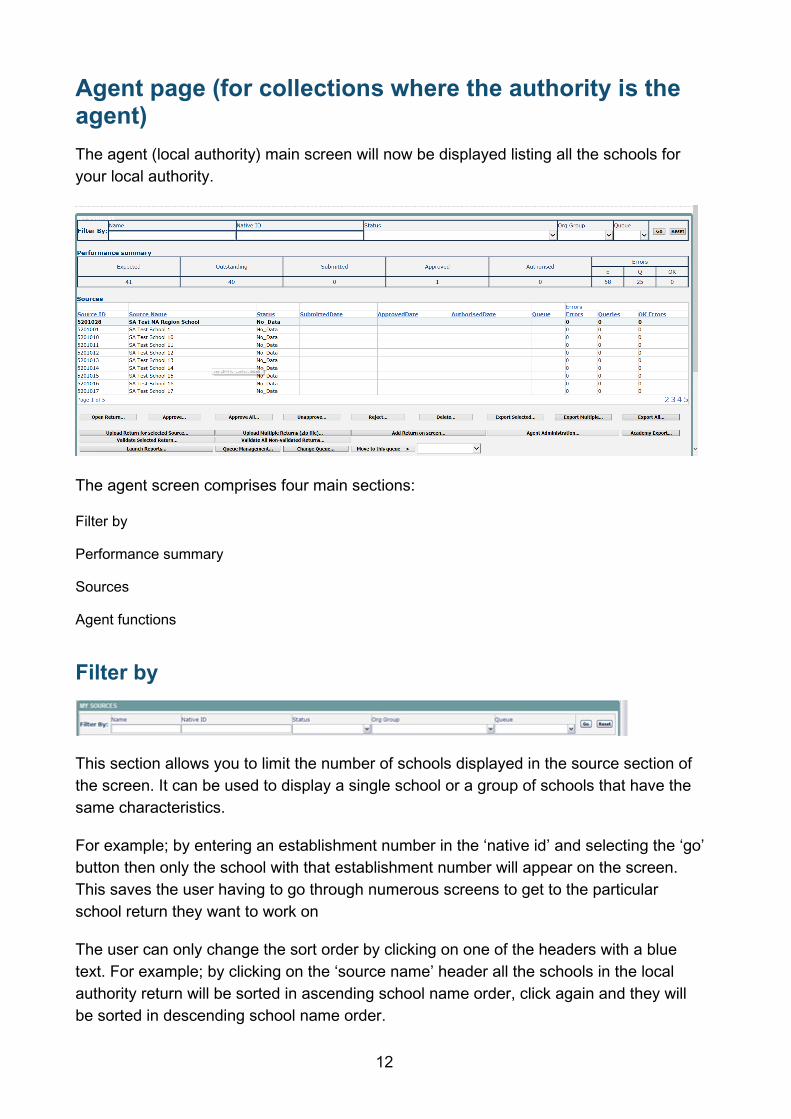
Agent page (for collections where the authority is the agent)
The agent (local authority) main screen will now be displayed listing all the schools for your local authority.
The agent screen comprises four main sections: Filter by
Performance summary
Sources
Agent functions
Filter by
This section allows you to limit the number of schools displayed in the source section of the screen. It can be used to display a single school or a group of schools that have the same characteristics.
For example; by entering an establishment number in the ‘native id’ and selecting the ‘go’ button then only the school with that establishment number will appear on the screen. This saves the user having to go through numerous screens to get to the particular school return they want to work on
The user can only change the sort order by clicking on one of the headers with a blue text. For example; by clicking on the ‘source name’ header all the schools in the local authority return will be sorted in ascending school name order, click again and they will be sorted in descending school name order.

13
Performance summary
This area of the screen shows a breakdown of the status of the returns for the authority’s schools that are part of the collection.
It shows :
The total number of schools that a return is expected from;
The total number of schools who have yet to submit their return;
The total number of schools who have submitted their return;
The total number of school returns approved by the local authority;
The total number of school returns authorised by the department for education;
The total number of errors across all returns, sorted by error severity.
This section is refreshed any time a change is made to the underlying data e.g. when the status of a school return has changed from ‘submitted’ to ‘approved’, the approved total will be incremented by 1, while the submitted total will decrease by 1.
Sources
This section lists all of the data sources for whom a data return is expected for the collection (unless a filter has been applied).
14
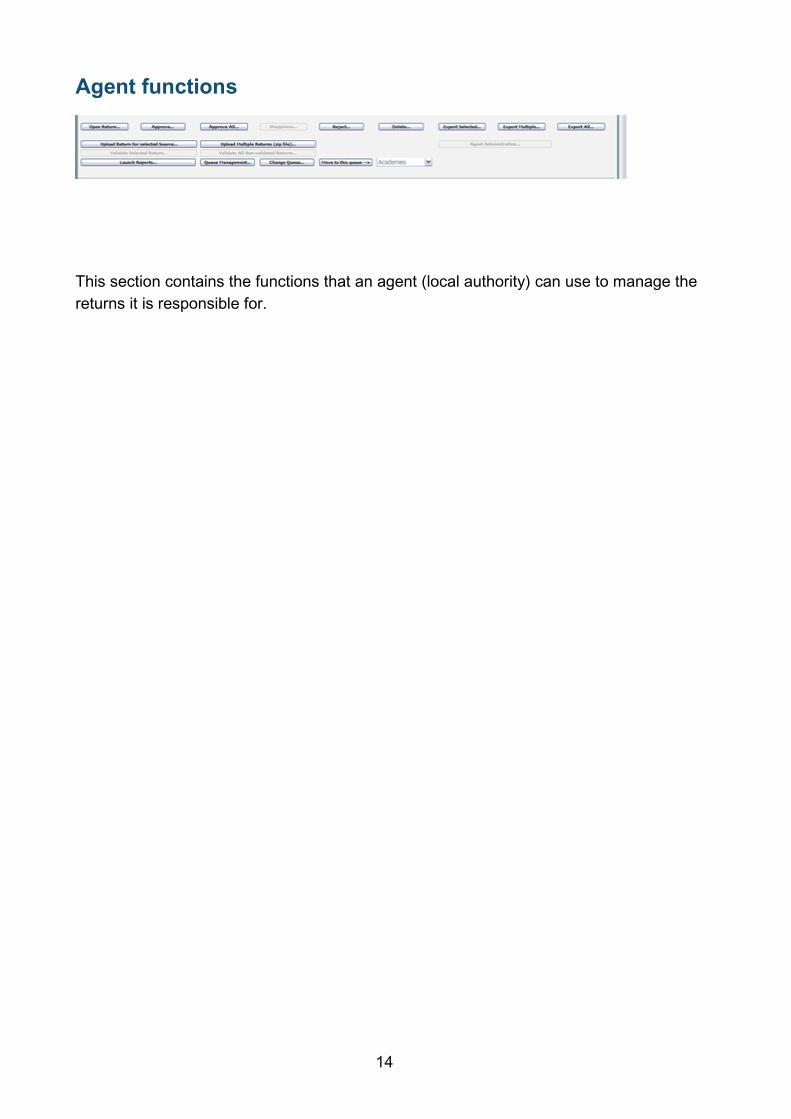
Agent functions
This section contains the functions that an agent (local authority) can use to manage the returns it is responsible for.

15
Adding a Return on screen (if applicable to your collection)
Click on the ‘Add Return on screen’ button.
The next screen to appear is the web form. You will need to enter the information in each field then click ‘Save’. N.B The screen shots used are for SEN2 and may vary from other collections.
16
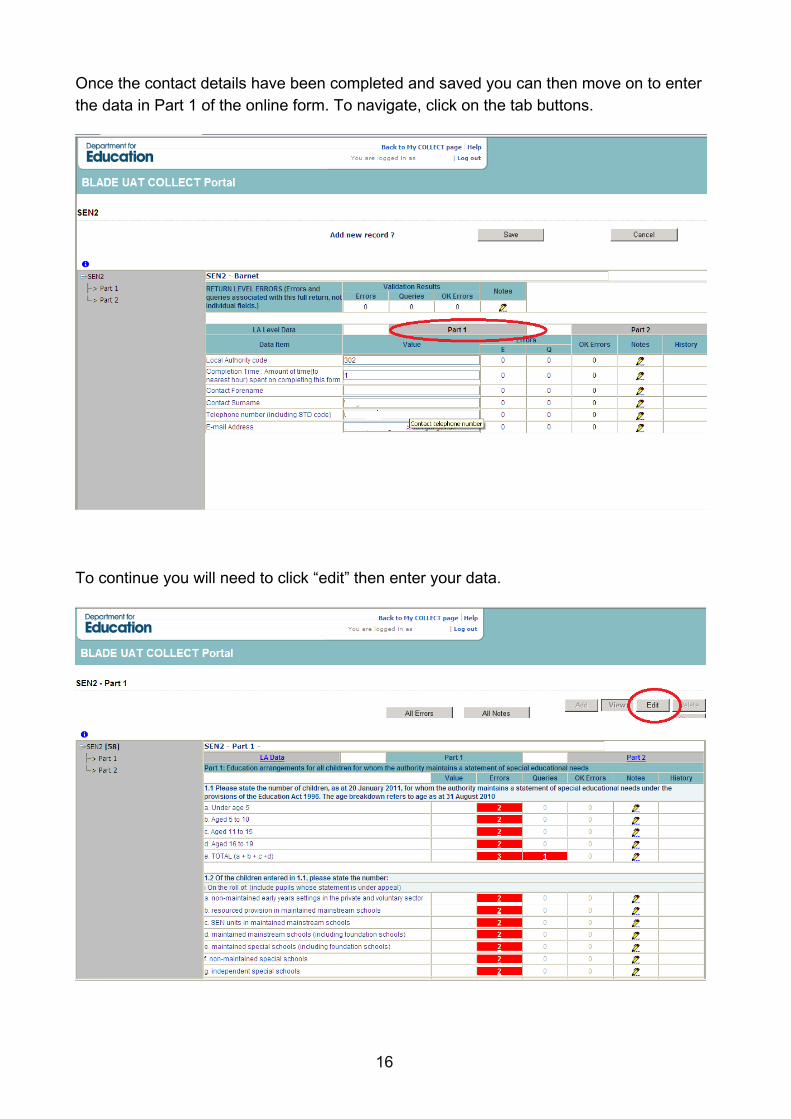
Once the contact details have been completed and saved you can then move on to enter the data in Part 1 of the online form. To navigate, click on the tab buttons.
To continue you will need to click “edit” then enter your data.

17
Once part 1 has been completed move on to the other parts as necessary by clicking the relevant tab. As in Part 1 you will need to click ‘edit’ before entering data into the fields.
Continue to navigate through the form, using the tab and edit buttons, until parts 1 through to 7 have been completed.
Please note – Do not use your web browser buttons to navigate through a return. Unpredictable behaviour may be experienced if you use the back and forward buttons on your web browser’s toolbar.
To navigate through the return please use the options given on the COLLECT screen.
18
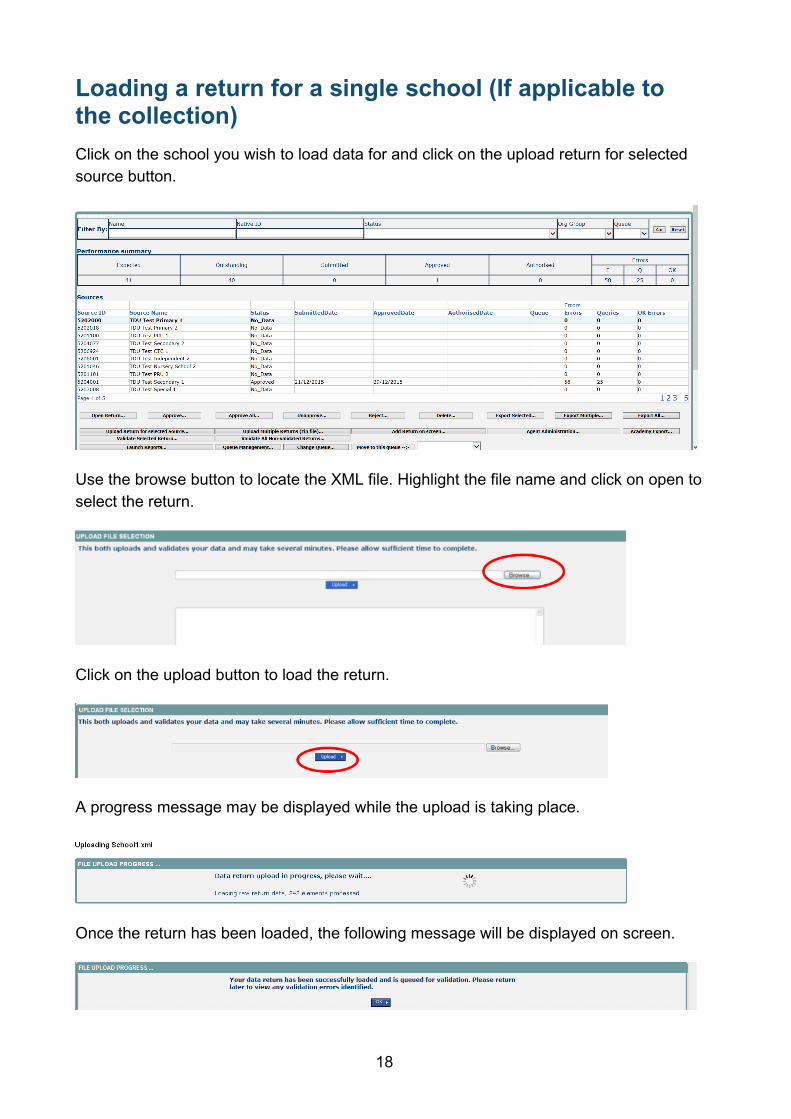
Loading a return for a single school (If applicable to the collection)
Click on the school you wish to load data for and click on the upload return for selected source button.
Use the browse button to locate the XML file. Highlight the file name and click on open to select the return.
Click on the upload button to load the return.
A progress message may be displayed while the upload is taking place.
Once the return has been loaded, the following message will be displayed on screen.

19
This indicates that the return has successfully loaded and is now placed in the validation queue to be validated.
Press the ok button to return to the agent main page.
During periods of heavy demand, there may be a delay before the return is validated. Whilst the return has a status of "waiting_for_validation" then the return cannot be viewed or edited.
Once the return has been validated, you need to view the data and look at any errors or queries that have occurred. Dealing with errors and queries is explained in the section ‘Correcting errors’.
The only difference being that when an local authority uploads a return then the status will be set to ‘submitted’. When a school uploads a return the status will be set to ‘loaded & validated’.
Once the return has been validated, the return status section on the source main page will display "submitted" and the date. The total number of errors and queries found in the return will also be displayed. Additional function buttons will also be available in the return management section.

20
Uploading multiple files (if applicable to the collection).
Local authorities can load multiple return files in a single transaction, rather than having to load each file individually. Before the facility can be used all files to be loaded must be placed in a zip file.
To access the facility, click on the upload multiple returns (zip file) button.
Click on the browse button to navigate to the zip file in explorer (examplezipfile.zip) that you want to upload.
Once found, click on the upload button to load the data into COLLECT. After the upload has been initiated a progress screen may be displayed, which will show details of the files as they are being loaded.
Once a file is validated a results screen will show whether the file was successfully loaded.

21
Viewing the return details
Select a return from the ‘agent’ screen by clicking on school row and click on ‘open return’ to view it.
You can view the return details by clicking on the various ‘view all’ links at the bottom of the screen.
When you click on the ‘view all’ for pupils on roll this takes you into the pupil section. This displays the ‘records; list’, with all pupils visible. You can use the filter bar to identify a particular pupil. Or click on the headers to sort alphabetically.
22
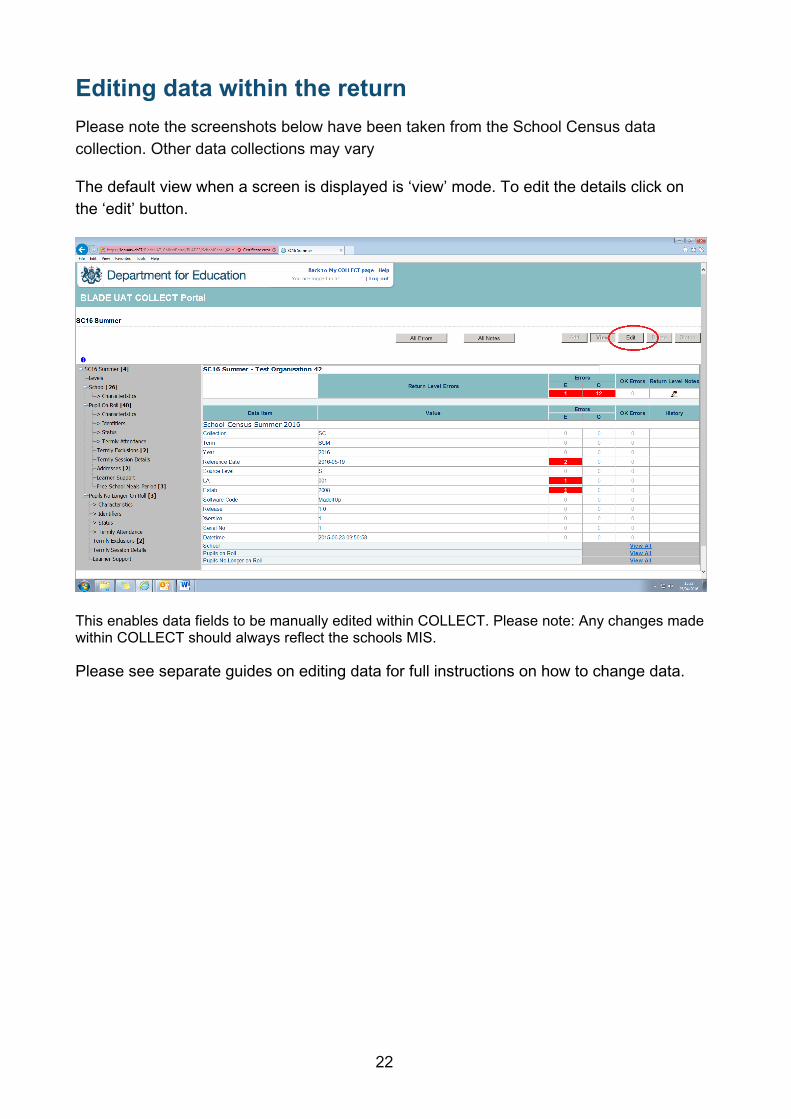
Editing data within the return
Please note the screenshots below have been taken from the School Census data collection. Other data collections may vary
The default view when a screen is displayed is ‘view’ mode. To edit the details click on the ‘edit’ button.
This enables data fields to be manually edited within COLLECT. Please note: Any changes made within COLLECT should always reflect the schools MIS.
Please see separate guides on editing data for full instructions on how to change data.

23
Errors
When a return has been uploaded a number of validation checks are run against the data in that return and will trigger errors or queries.
All errors and queries are highlighted in red against the relevant data item.
There are two levels of errors, ‘return level’ and ‘data item level’
Total return errors
The breakdown of errors for a school return is shown in the return status section of the school’s main screen.
Return level errors
Return level errors relate to a validation rule that applies to the return as a whole rather than an individual data item within the return.
To view all errors and queries on the return
Click on ‘all errors’ at the top of the screen.
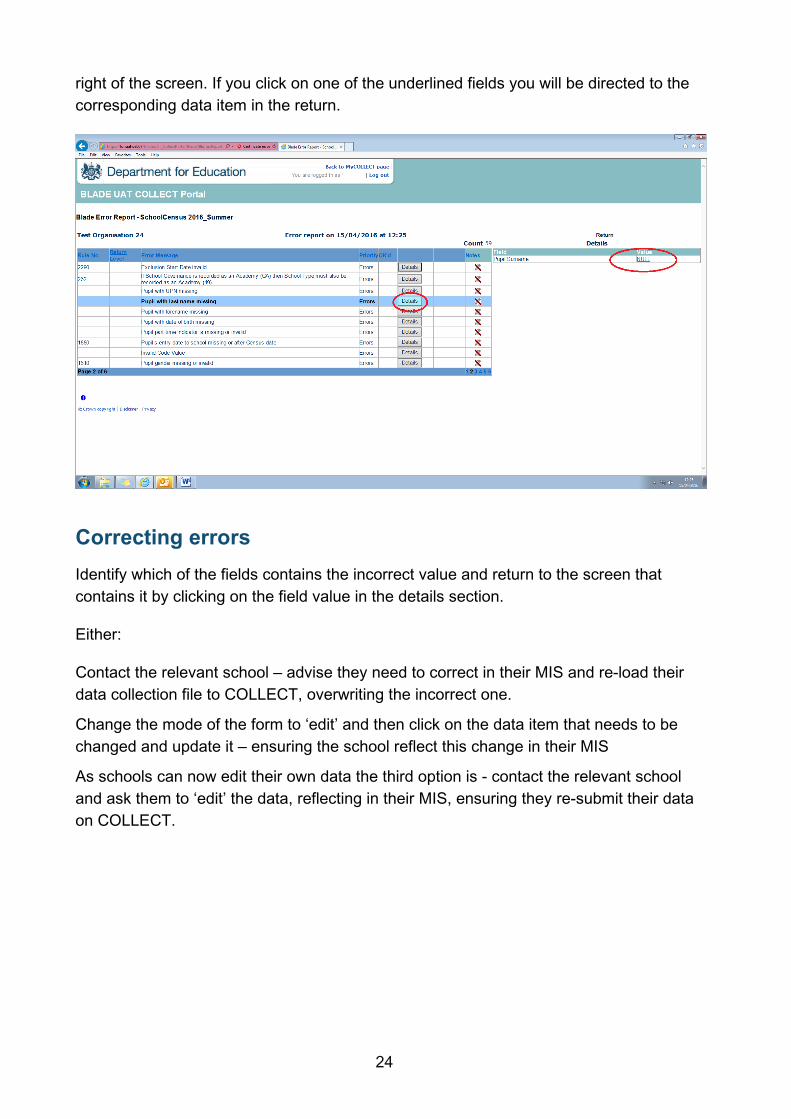
You will then be shown a list of all errors and queries relating to your return. Click on the details button to see which data items the validation is checking, these will show to the
24
right of the screen. If you click on one of the underlined fields you will be directed to the corresponding data item in the return.
Correcting errors
Identify which of the fields contains the incorrect value and return to the screen that contains it by clicking on the field value in the details section.
Either:
Contact the relevant school – advise they need to correct in their MIS and re-load their data collection file to COLLECT, overwriting the incorrect one.
Change the mode of the form to ‘edit’ and then click on the data item that needs to be changed and update it – ensuring the school reflect this change in their MIS
As schools can now edit their own data the third option is - contact the relevant school and ask them to ‘edit’ the data, reflecting in their MIS, ensuring they re-submit their data on COLLECT.

25
Providing clarification/ supplementary information
In some instances you will be requested to provide explanatory information (as part of email communications you will receive a document which will provide guidance on what notepad explanation would be expected for individual queries). This will be made available on our Department for Education - GOV.UK website and searching for the relevant data collection in the search bar.
If a notepad entry is not returned the EDD Helpdesk will have to contact the local authority for further information.
You can add notes in “return level notes” section.
To add a return level note double click on the pen icon in the return level notes section.
Click add new note
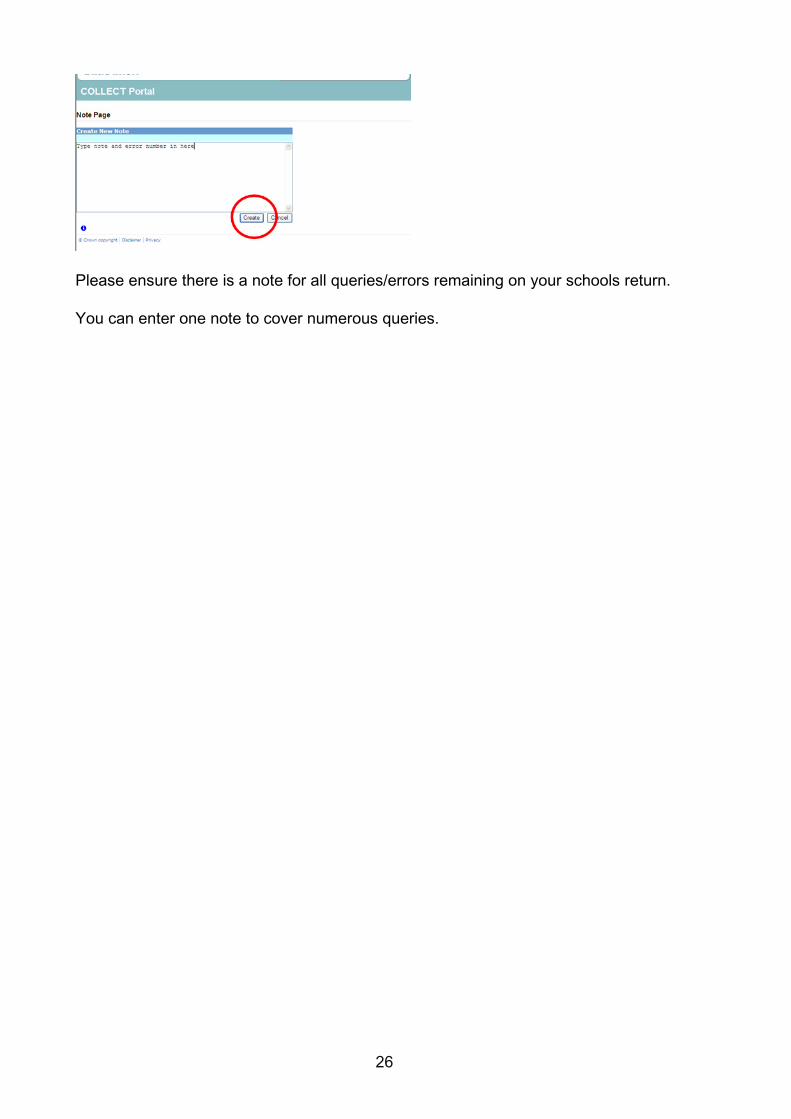
Type your note and the error number in the box provided and click create.
26
Please ensure there is a note for all queries/errors remaining on your schools return.
You can enter one note to cover numerous queries.
27
Submitting a return
‘Clean data submit’ in COLLECT. (If applicable to your collection)
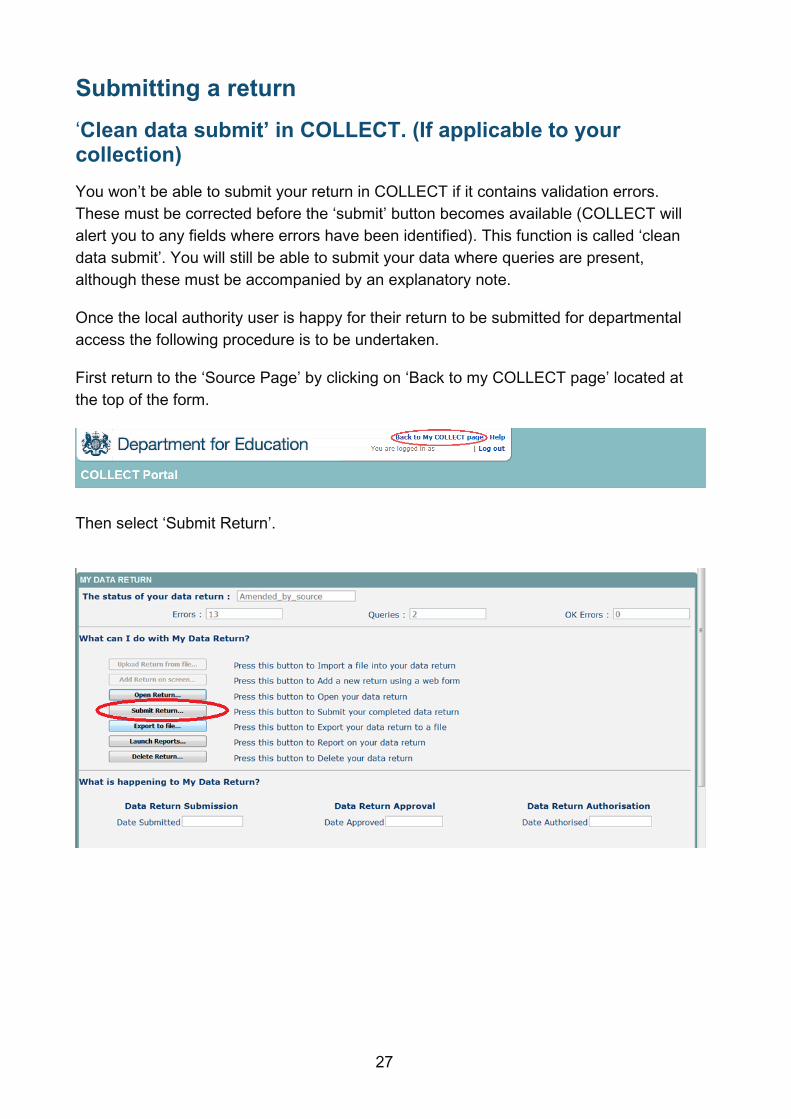
You won’t be able to submit your return in COLLECT if it contains validation errors. These must be corrected before the ‘submit’ button becomes available (COLLECT will alert you to any fields where errors have been identified). This function is called ‘clean data submit’. You will still be able to submit your data where queries are present, although these must be accompanied by an explanatory note.
Once the local authority user is happy for their return to be submitted for departmental access the following procedure is to be undertaken.
First return to the ‘Source Page’ by clicking on ‘Back to my COLLECT page’ located at the top of the form.
Then select ‘Submit Return’.

28
Approving the return
The local authority is responsible for ‘approving’ the return once the school has ‘submitted’ it. The local authority is expected to investigate and resolve any outstanding return errors before approving a return. By approving the return the local authority have indicated that the return has been checked for accuracy and completeness and therefore authorising the submission to be used by the department.
To ‘Approve’ a return:
Go to the ‘agent main screen’ and select the school by clicking on its name.
Once selected, approve the return by clicking the approve (approve the highlighted single return) or approve all (approves all returns at submitted stage) button.

29
Screen information will be updated:
The status of the return will be set to ‘approved’ and the ‘date approved’ will be completed
The ‘approved’ total in the performance summary will increase by 1 and the ‘submitted’ count will decrease by 1 The approve button will now be disabled for this return The unapprove button will now be enabled.

30
Queues
When a number of people are working on census files, the use of the 'queue' facility can help effective working. The use of 'queues' helps in the allocation and identification of who is working on which files and therefore helps to ensure that two or more people don't try and work on the same file. From the agent page click the queue management button.
This will take you to the page entitled 'work flow queues management' To add a name, click the add button.
Type your name (or the name of a colleague) into the 'queue name' box then click ok. (Instead of a name you may wish to apportion schools by a day of week or by some other description depending on your local authority's validation procedures).
The name/description will now be displayed in alphabetical order in the 'registered queues' box.
Use the update button to modify a selected name/description.
31
The remove button allows you to remove a name/description from the 'registered queues' list. However, this can only be done if any schools linked with a particular name are removed first.
NB: The check-box used to set the 'default queue' was originally intended to allow a default queue to be allocated for a workflow stage; however the emerging requirement for the use of queues is for local authority’s to assign their own, as they work in different ways. It is therefore not applicable and has no effect on queues.
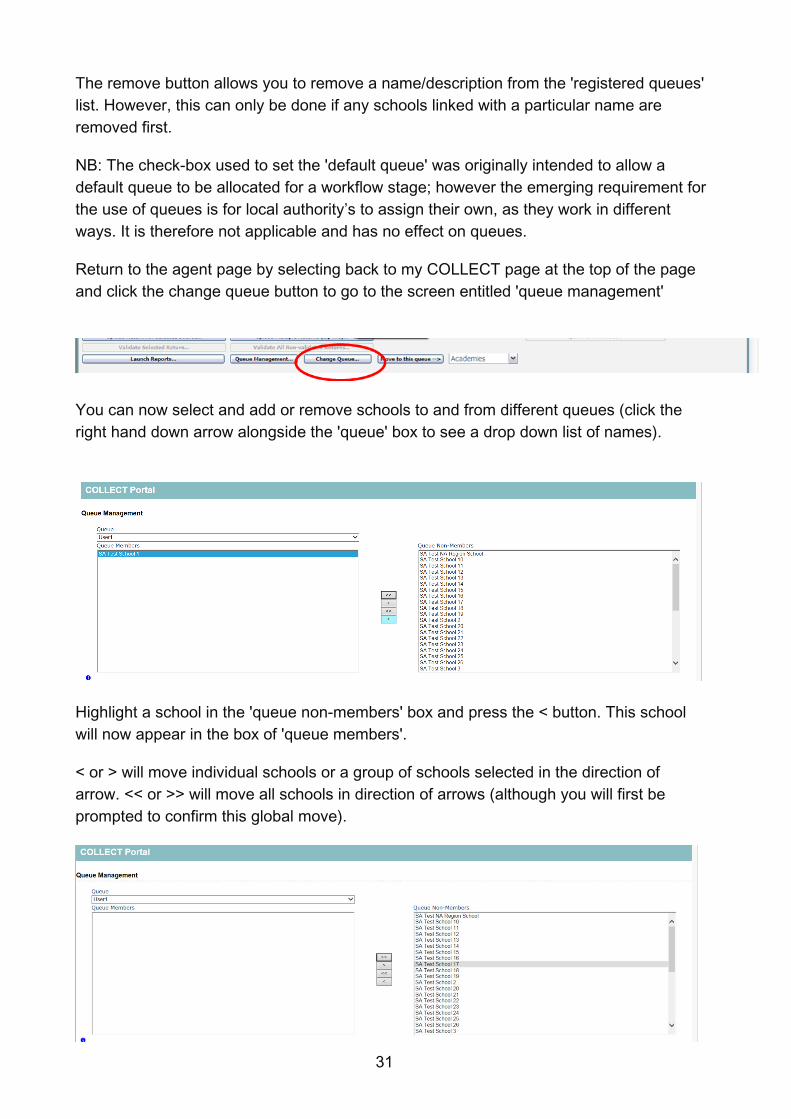
Return to the agent page by selecting back to my COLLECT page at the top of the page and click the change queue button to go to the screen entitled 'queue management'
You can now select and add or remove schools to and from different queues (click the right hand down arrow alongside the 'queue' box to see a drop down list of names).
Highlight a school in the 'queue non-members' box and press the < button. This school will now appear in the box of 'queue members'.
< or > will move individual schools or a group of schools selected in the direction of arrow. << or >> will move all schools in direction of arrows (although you will first be prompted to confirm this global move).

32
Return to the agent page by selecting back to my COLLECT page at the top of the page and you will see that selected school has now been assigned to the selected queue.
An alternative way to attach a school to a particular person is to highlight the school (under 'source name') then click the move to this queue button. This can be a safer way to allocate schools to queues because you can see if any schools are already allocated to another queue first.
33
Reports
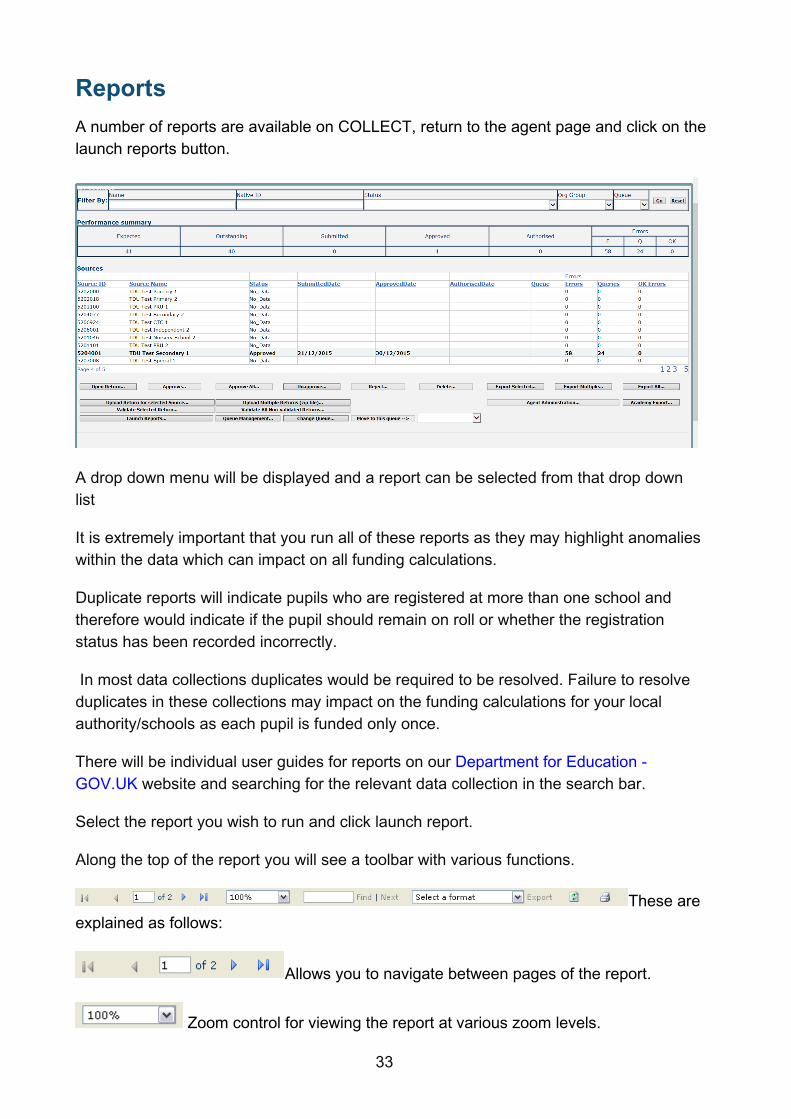
A number of reports are available on COLLECT, return to the agent page and click on the launch reports button.
A drop down menu will be displayed and a report can be selected from that drop down list
It is extremely important that you run all of these reports as they may highlight anomalies within the data which can impact on all funding calculations.
Duplicate reports will indicate pupils who are registered at more than one school and therefore would indicate if the pupil should remain on roll or whether the registration status has been recorded incorrectly.
In most data collections duplicates would be required to be resolved. Failure to resolve duplicates in these collections may impact on the funding calculations for your local authority/schools as each pupil is funded only once.
There will be individual user guides for reports on our Department for Education - GOV.UK website and searching for the relevant data collection in the search bar.
Select the report you wish to run and click launch report.
Along the top of the report you will see a toolbar with various functions.
These are explained as follows:
Allows you to navigate between pages of the report.
Zoom control for viewing the report at various zoom levels.
34
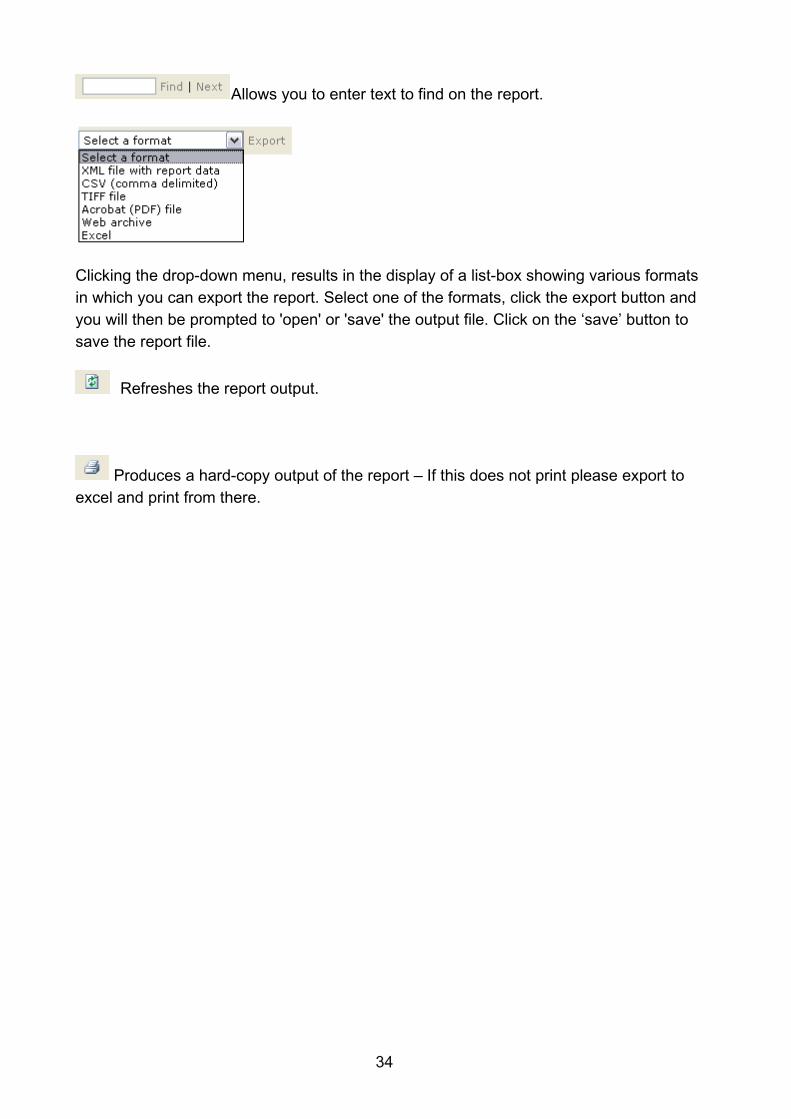
Allows you to enter text to find on the report.
Clicking the drop-down menu, results in the display of a list-box showing various formats in which you can export the report. Select one of the formats, click the export button and you will then be prompted to 'open' or 'save' the output file. Click on the ‘save’ button to save the report file.
Refreshes the report output.
Produces a hard-copy output of the report – If this does not print please export to excel and print from there.
35
Exporting a return
A return can be exported in xml or csv format
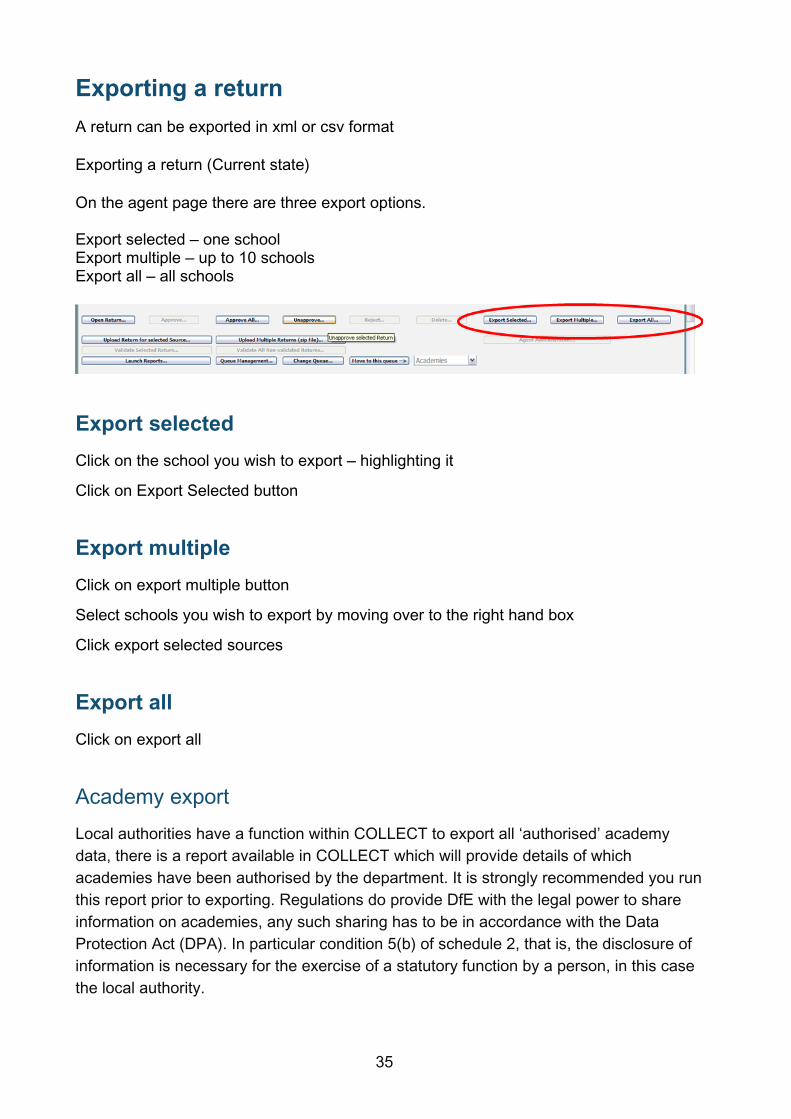
Exporting a return (Current state)
On the agent page there are three export options. Export selected – one school Export multiple – up to 10 schools Export all – all schools
Export selected
Click on the school you wish to export – highlighting it
Click on Export Selected button
Export multiple
Click on export multiple button
Select schools you wish to export by moving over to the right hand box
Click export selected sources
Export all
Click on export all
Academy export
Local authorities have a function within COLLECT to export all ‘authorised’ academy data, there is a report available in COLLECT which will provide details of which academies have been authorised by the department. It is strongly recommended you run this report prior to exporting. Regulations do provide DfE with the legal power to share information on academies, any such sharing has to be in accordance with the Data Protection Act (DPA). In particular condition 5(b) of schedule 2, that is, the disclosure of information is necessary for the exercise of a statutory function by a person, in this case the local authority.
36
In light of this requirement, the DfE currently only has legal permission to share a subset of academy data direct with local authorities, anything not contained within the export the department for education are unable to share.
Click on academy export
Selecting format
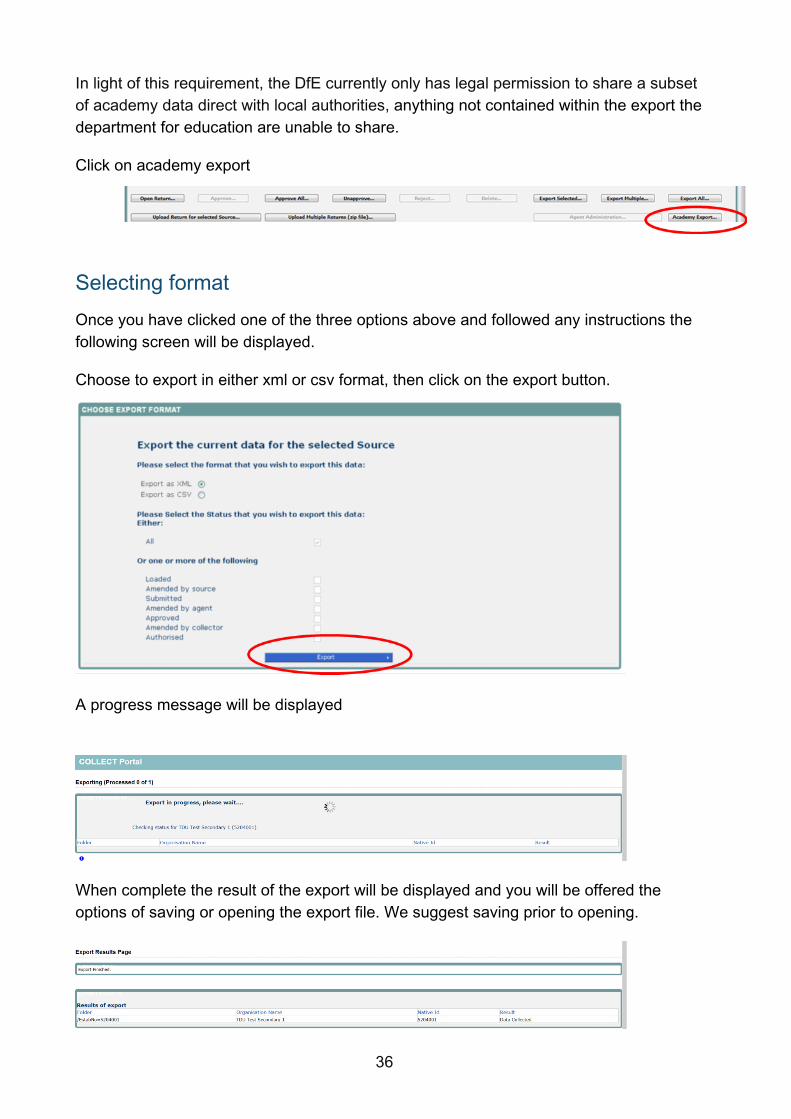
Once you have clicked one of the three options above and followed any instructions the following screen will be displayed.
Choose to export in either xml or csv format, then click on the export button.
A progress message will be displayed
When complete the result of the export will be displayed and you will be offered the options of saving or opening the export file. We suggest saving prior to opening.
37
Important note: if the export process fails, with a message stating that Internet explorer has blocked download of a file, you might succeed if you try again.
On the second attempt, hold down the Ctrl key down continuously from before you click on export until after you see the resulting files displayed in windows explorer. If this is still not successful, you will have to adjust the security settings on your internet browser.
Adjusting security settings
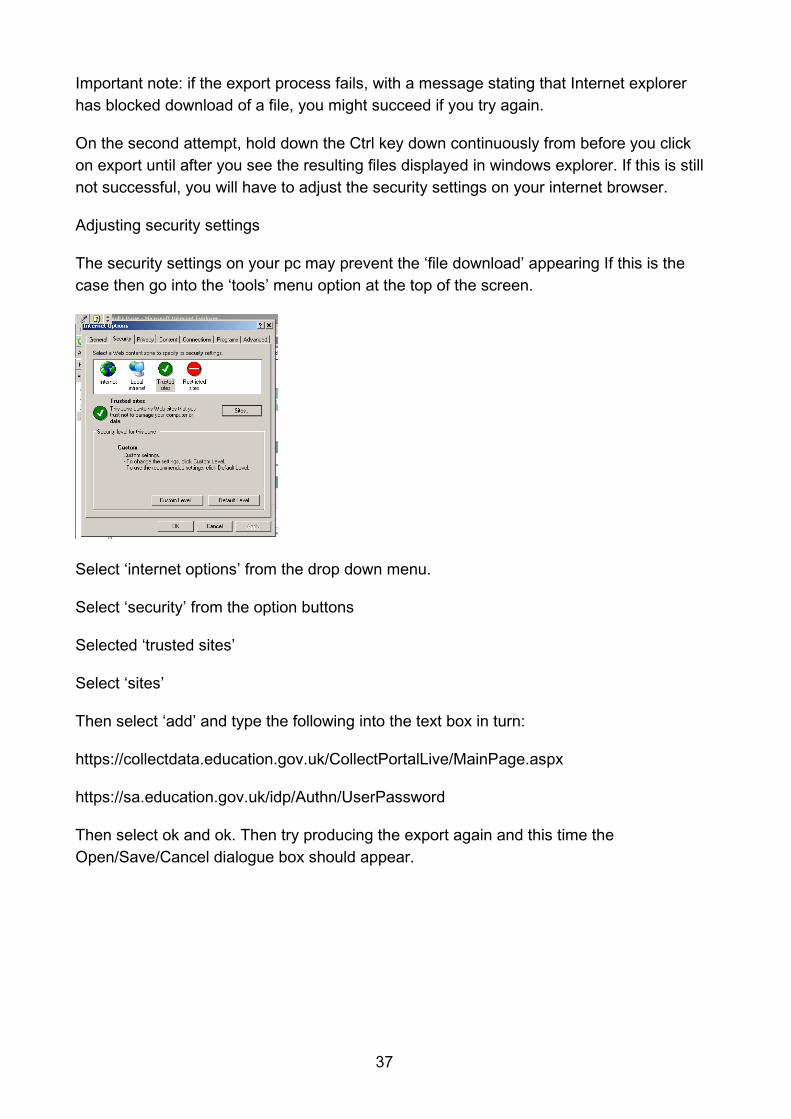
The security settings on your pc may prevent the ‘file download’ appearing If this is the case then go into the ‘tools’ menu option at the top of the screen.
Select ‘internet options’ from the drop down menu.
Select ‘security’ from the option buttons
Selected ‘trusted sites’
Select ‘sites’
Then select ‘add’ and type the following into the text box in turn:
https://collectdata.education.gov.uk/CollectPortalLive/MainPage.aspx
https://sa.education.gov.uk/idp/Authn/UserPassword
Then select ok and ok. Then try producing the export again and this time the Open/Save/Cancel dialogue box should appear.
38
Screen functionality
Before viewing the return it is useful to understand some of the basic controls and screen operations.
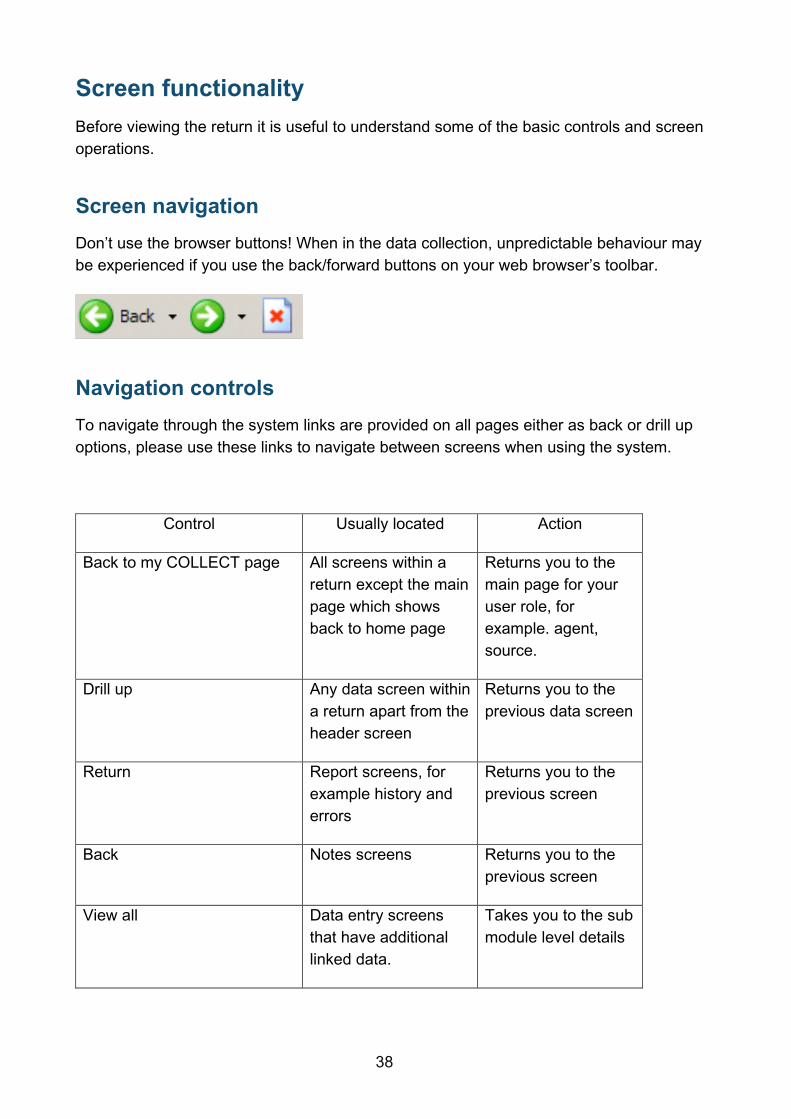
Screen navigation
Don’t use the browser buttons! When in the data collection, unpredictable behaviour may be experienced if you use the back/forward buttons on your web browser’s toolbar.
Navigation controls
To navigate through the system links are provided on all pages either as back or drill up options, please use these links to navigate between screens when using the system.
Control Usually located Action
Back to my COLLECT page All screens within a return except the main page which shows back to home page
Returns you to the main page for your user role, for example. agent, source.
Drill up Any data screen within a return apart from the header screen
Returns you to the previous data screen
Return Report screens, for example history and errors
Returns you to the previous screen
Back Notes screens Returns you to the previous screen
View all Data entry screens that have additional linked data.
Takes you to the sub module level details

39
Mode buttons
Those buttons determine which operation mode the on-screen data form is in, and which operations are available.
Dark grey text on sunken button with light border = ‘Active’ mode
Black text on button and highlighted border = ‘Available’ mode
Light grey text on button with light border = ‘Unavailable’ mode
40
Help
COLLECT access is administered directly by local authorities for their users. This includes registering for COLLECT, activating your account and giving you access to specific collections. Please get in touch with the approver in your local authority who will be able to make sure that you have the appropriate access.
If you are experiencing problems with COLLECT or have a data collection query, please submit a service request to the data collection helpdesk. If you are having problems logging into DFE sign in, please refer to the ‘help’ section on DFE Sign In access. If you are still unable to resolve your issue, please submit a service request to the sa service desk.

41
© Crown copyright 2016
This publication (not including logos) is licensed under the terms of the Open Government Licence v3.0 except where otherwise stated. Where we have identified any third party copyright information you will need to obtain permission from the copyright holders concerned.
To view this licence: visit www.nationalarchives.gov.uk/doc/open-government-licence/version/3 email [email protected] write to Information Policy Team, The National Archives, Kew, London, TW9 4DU
About this publication: enquiries www.education.gov.uk/contactus download www.gov.uk/government/publications
Reference: DFE-00359-2016
Follow us on Twitter: @educationgovuk
Like us on Facebook: facebook.com/educationgovuk