collada cts tutorial v8 - 2column - khronos group · google sketchup™, autodesk® 3ds max® and...
TRANSCRIPT

© 2011 Khronos Group© 2011 Khronos Group© 2011 Khronos Group© 2011 Khronos Group. All product names are trademarks or registered trademarks of their respective holders.
COLLADA CTS TutorialCOLLADA CTS TutorialCOLLADA CTS TutorialCOLLADA CTS Tutorial By Paula Berinstein
[email protected] | July 2011
OverviewOverviewOverviewOverview The COLLADA™ intermediate language specification is intended to standardize 3D data, but there’s a wide variation in the way applications work with COLLADA files. To help developers adhere to the standard and create 3D tools that work together seamlessly, the Khronos Group created the COLLADA Conformance Test Suite (CTS). The objective of the tests is to insure that conformant products can import from and export to other conformant products so that the entire 3D tool chain performs seamlessly. The tests may be used on one target application alone for both conformance and regression testing, or to verify interoperability between one application and another, e.g., Google SketchUp™, Autodesk® 3ds Max® and Autodesk® Maya®. The COLLADA CTS comprises 613 tests. There are three possible levels of conformance (badges)--Baseline, Superior, and Exemplary—but regardless of the application’s capabilities, all the tests must be run. Based on the results, the framework determines which, if any, badge to award. The conformance tests can be used on two types of applications: import only and import/export. Import-only applications include 3D document viewers, game engines, ray tracers, and rendering packages. Import/export applications include most traditional content creation tools that do modeling and animation. Both classes of applications must be able to render COLLADA data as an image because that is the primary method the CTS uses to determine whether a COLLADA document has been correctly understood. For a complete test, the software must also be able to import and export
COLLADA documents. You can test packages that support only some of these functions, but they can only earn conformance within the context of a conformant implementation environment (i.e., one that has already passed the test suite) that provides the missing functionality. The suite tests: The suite tests: The suite tests: The suite tests:
• Whether the target application handles COLLADA input and output properly, and whether files are rendered consistently using files created under different conditions (Import, Render, Export)
• Whether the target application
outputs COLLADA documents that conform to the COLLADA schema (Validate).
Some of the issues tested are:Some of the issues tested are:Some of the issues tested are:Some of the issues tested are:
• How complete the support is for each feature
• How robust the target application is when bad data is encountered
• Whether images and movie clips look as expected
• Whether all features are preserved during a load/save cycle.
© 2011 Khronos Group© 2011 Khronos Group© 2011 Khronos Group© 2011 Khronos Group. All product names are trademarks or registered trademarks of their respective holders.
Types of tests include:Types of tests include:Types of tests include:Types of tests include:
• Minimal unit tests for specific features, like document referencing and skinning
• System tests that exercise desirable common scenarios, such as skinned rag doll export/import with COLLADA FX materials on different body parts
• Stress tests for very large scenes • Handling of local or temporary test
data • Handling of invalid or corrupt data.
All importers must be able to read any valid COLLADA document without failure, even if that document contains features not supported by the importer. Features beyond the importer’s level of support are not required to be understood, but simply encountering them should not cause the importer to fail. Unusual or unexpected ordering or quantity of elements should not cause an importer to fail as long as the document validates to schema. For example, library elements may occur in any order and libraries of the same type can appear multiple times. Importers must not require their own COLLADA extensions in order to understand valid documents. All exporters must create documents that validate to the COLLADA schema. Documents exported by the implementation should support the same feature set as that implementation's importer in order to provide a lossless (roundtrip) content pipeline. The CTS works through a GUI. You can also use a command line interface, and certain functions can be performed through the Windows file viewer. (The suite currently works only on computers running the Microsoft Windows® operating system.)
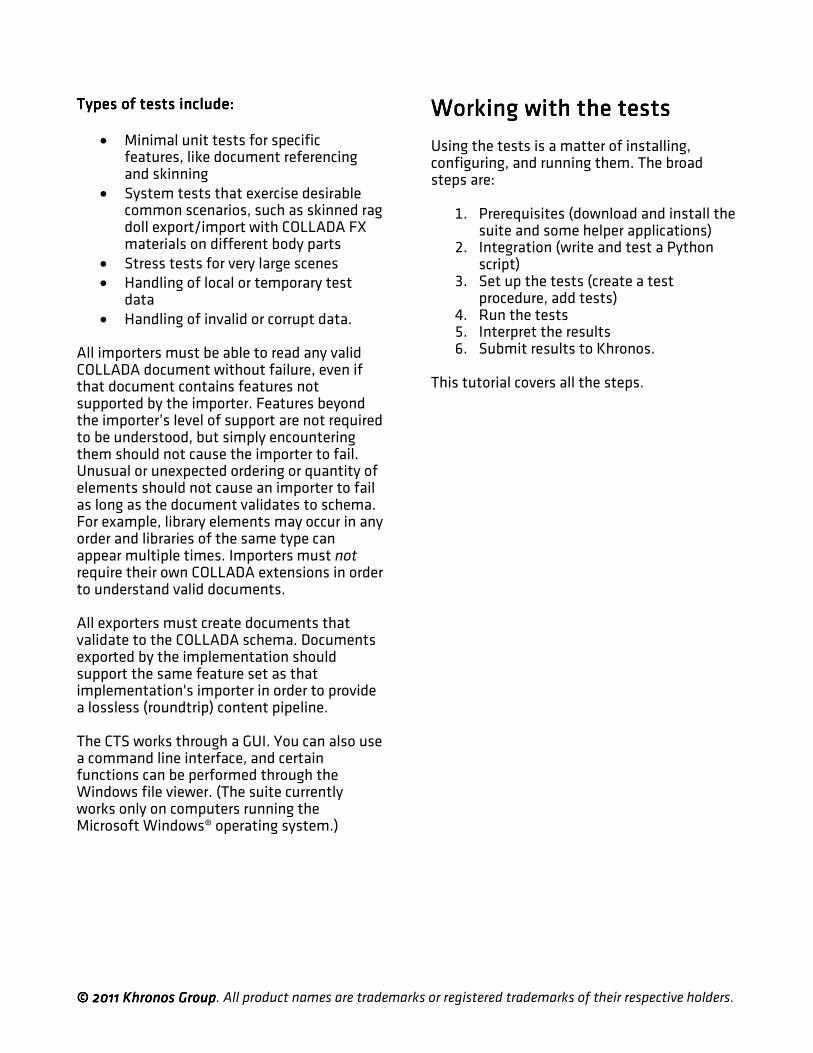
Working with the testsWorking with the testsWorking with the testsWorking with the tests Using the tests is a matter of installing, configuring, and running them. The broad steps are:
1. Prerequisites (download and install the suite and some helper applications)
2. Integration (write and test a Python script)
3. Set up the tests (create a test procedure, add tests)
4. Run the tests 5. Interpret the results 6. Submit results to Khronos.
This tutorial covers all the steps.

© 2011 Khronos Group© 2011 Khronos Group© 2011 Khronos Group© 2011 Khronos Group. All product names are trademarks or registered trademarks of their respective holders.
Things you need to know Things you need to know Things you need to know Things you need to know about the testsabout the testsabout the testsabout the tests
Blessed images
The CTS incorporates the idea of “blessing.” This has nothing to do with religion, but refers to results that have been officially “blessed” by Khronos, i.e., considered correct and conformant by the COLLADA work group. A set of blessed images and animations comes with the test suite; you can compare these with your results to see how close you are and how you differ. Other than that, you don’t have to worry about the idea of blessing. (There are some legacy menus and sections in the documentation that refer to blessing; ignore them.)
Figure 1. A blessed image.Figure 1. A blessed image.Figure 1. A blessed image.Figure 1. A blessed image. Because COLLADA is not a rendering standard, not all applications will render images the same way. Differences can include variations in lighting, cameras, geometry, shading, color space, anti-aliasing, and so on. Nevertheless, the tests have been designed such that the
target application must generate its own images so that an “internally consistent” comparison can be made by the framework. Image comparison tools also allow the integrator or developer to easily compare against “blessed” images as an aid to debugging. Exact pixel-for-pixel matches are not required in order to pass a test. Types of testsTypes of testsTypes of testsTypes of tests There are three types of tests: simple, medium, and complex:
1. SimpleSimpleSimpleSimple. Tests that pass/fail based on successful importing, or importing and then exporting a COLLADA document. Examples include tests that check for proper handling of URIs on import/export, checking for unwanted adding/removing of elements from the document, testing sensitivity to element ordering, and checking for the ability to process any valid COLLADA document without crashing.
2. MediumMediumMediumMedium. Tests that require a
successful import, export, and rendering of the exported document in the target application. These tests are generally used to confirm that programs are correctly processing and re-exporting a document without corrupting the geometry and other elements in it.
3. ComplexComplexComplexComplex. Tests that require a
successful import, export, and rendering of the exported document in the target application. This type of test insures that the application is correctly interpreting the contents of the document. It is used to check how well the application handles materials, textures, cameras, lights, etc.

© 2011 Khronos Group© 2011 Khronos Group© 2011 Khronos Group© 2011 Khronos Group. All product names are trademarks or registered trademarks of their respective holders.
Two cyclesTwo cyclesTwo cyclesTwo cycles Each test runs through two cycles:
• The first cycleThe first cycleThe first cycleThe first cycle involves importing the test case's COLLADA document, rendering it, and exporting it. This cycle tests whether the target application can import and work with a valid COLLADA document (that was possibly) created in another tool.
• In the second cycleIn the second cycleIn the second cycleIn the second cycle, the COLLADA
document that was exported in the first cycle is reimported into the target application, re-rendered, and validated against the COLLADA schema. This cycle tests whether the document exported in the first cycle imports and compares properly and outputs valid COLLADA that can be imported by other conformant tools. The Validate step is needed to verify that the exported document meets criteria not tested in the Export step.
As you can see, a complete test includes two import and render operations. The first time, you import the test document furnished by Khronos; the second time, you import the document you just exported. This workflow is shown in Figure 2.
Figure 2. The steps in a test. Understanding Figure 2. The steps in a test. Understanding Figure 2. The steps in a test. Understanding Figure 2. The steps in a test. Understanding this workflow is key to passing the tests.this workflow is key to passing the tests.this workflow is key to passing the tests.this workflow is key to passing the tests.
Datasets for input and outputDatasets for input and outputDatasets for input and outputDatasets for input and output A collection of datasets come with the test suite (the StandardDataSets directory). These datasets hold the input to the tests. Some input files come with the suite; others are generated by the tests. The paths to the input are specified in the integration script.

© 2011 Khronos Group© 2011 Khronos Group© 2011 Khronos Group© 2011 Khronos Group. All product names are trademarks or registered trademarks of their respective holders.
The output files are written to subdirectories in the TestProcedures directory.
Figure 3. The StandardDataSets directory in Figure 3. The StandardDataSets directory in Figure 3. The StandardDataSets directory in Figure 3. The StandardDataSets directory in the CTS hierarchy.the CTS hierarchy.the CTS hierarchy.the CTS hierarchy.
Getting StartedGetting StartedGetting StartedGetting Started In order to run the COLLADA conformance tests, your application must be able to:
• Read and write COLLADA files • Render a PNG image (at 512 x 512!) • Include scriptable viewpoints and
scriptable lights. The tests run on Windows machines only right now. The conformance test framework only officially supports 32-bit Windows, but you can run it on a 64-bit machine. Make sure your system has enough juice; the tests take up a lot of memory. Downloading and installing the CTSDownloading and installing the CTSDownloading and installing the CTSDownloading and installing the CTS The test suite uses long file names that can cause problems on Windows systems by exceeding the 255-character path name limit. To make sure your installation goes smoothly, unzip the package in the root directory of your disk volume or some other directory with a short path name.
PrerequisitesPrerequisitesPrerequisitesPrerequisites PythonPythonPythonPython----related toolsrelated toolsrelated toolsrelated tools Before you can run the suite, you will need to install some Python-related tools, which you can find in the CTS\Prerequisites directory. (The directories referred to in this tutorial are part of the test framework, not areas of the Khronos site.) These include Python itself, the Win32 extensions, wxPython, and pyOpenGL. Even though the suite comes with the correct version of Python, you may have to install more than one version because so me applications, such as Blender, need them. It is a good idea to check the "add software" panel on your computer before installing anything to see if more recent versions of these tools are already installed. You must use the version numbers shown in this directory or higher. If your copy of Python isn’t installed in the standard location, you may need to set its path in the config file. On Windows 7 and Vista, you have to install the Python tools as an administrator. .NET.NET.NET.NET Check to make sure the Microsoft .NET framework is installed. If you don’t have it, the framework cannot validate your COLLADA documents (MSXML is the default validator), and you can’t enable crash detection. You can disable crash detection or specify the timeout value in the config file. See the Integration section of this tutorial.

© 2011 Khronos Group© 2011 Khronos Group© 2011 Khronos Group© 2011 Khronos Group. All product names are trademarks or registered trademarks of their respective holders.
IntegrationIntegrationIntegrationIntegration Integration involves sending information back and forth between the test suite and the target application. It’s accomplished by writing and running a Python script and modifying a config file that comes with the suite. The Python script generates and executes other scripts for the target application. Integrating a target application with the test suite requires the following steps:
1. Create the Python script in the Scripts directory to map your application. Usually you will copy an existing script and modify it.
2. Update config.txt in the top-level directory to set up your application path. 3. Debug by running a small sample of the suite.
TheTheTheThe config file config file config file config file The config file is held in the root of the CTS directory. Each line in the config file is a setting. On the left is the description; on the right, separated from the description by tabs, is the value.You will need to update the config file with the path for your application. Make sure you use a tab delimiter between the key and value and that your editor doesn't convert tabs to spaces. Be sure, too, that there isn’t a blank line at the end of the file. If there is a blank line at the end, you will get an error message like this:
C:\CTS>colladatestsuite.py Traceback (most recent call last): File "C:\CTS\COLLADATestSuite.py", line 16, in ? frame = MainFrame(None, wx.ID_ANY, "COLLADA 1.4 Conformance Test Suite") File "C:\CTS\Core\FTestSuiteGUI.py", line 813, in __init__ FSFrame.__init__(self, self, False) File "C:\CTS\Core\FTestSuiteGUI.py", line 104, in __init__ FTestSuite.__init__(self) File "C:\CTS\Core\FTestSuite.py", line 26, in __init__ key, value = line.split("\t",1) ValueError: need more than 1 value to unpack
If the key and value aren’t separated by tabs, you’ll get this error: FTestSuite.py line 26.

© 2011 Khronos Group© 2011 Khronos Group© 2011 Khronos Group© 2011 Khronos Group. All product names are trademarks or registered trademarks of their respective holders.
Figure 4. A config file that works for multiple target applications: Autodesk® Maya®, Figure 4. A config file that works for multiple target applications: Autodesk® Maya®, Figure 4. A config file that works for multiple target applications: Autodesk® Maya®, Figure 4. A config file that works for multiple target applications: Autodesk® Maya®, Autodesk® 3ds Max®, AuAutodesk® 3ds Max®, AuAutodesk® 3ds Max®, AuAutodesk® 3ds Max®, Autodesk® Softimage®, NVIDIA FXComposer, Blender, and Google todesk® Softimage®, NVIDIA FXComposer, Blender, and Google todesk® Softimage®, NVIDIA FXComposer, Blender, and Google todesk® Softimage®, NVIDIA FXComposer, Blender, and Google SketchUp™. SketchUp™. SketchUp™. SketchUp™.
The Python scriptThe Python scriptThe Python scriptThe Python script You can find a variety of existing integration scripts in the Scripts folder of the CTS directory:
• FApplication is the basic script from which all the others are derived. You can find some useful comments there
• FMax is the script for Autodesk® 3ds Max®
• FMaya is the script for Autodesk® Maya®
• FMimic is a bare bones script that includes a placeholder for a target application. It doesn’t actually run an application, but it does let you run the tests. (They fail, of course, because there is no application to interface with.)
• FXsi is the script for Autodesk® Softimage®.
The most important issues in writing a script, or adapting an existing one, are understanding:
• What the inputs are, where to find them, and what to do with them
• What outputs you produce and where they go
• The status codes you get and return. If your application doesn’t support cameras and lighting and/or doesn’t read camera and lighting parameters from the COLLADA document, you may have to set the camera and light positions in your Python script, as you need cameras and lights in order to render and you must use the settings the tests require. Some testers have found that they need to delete their default lights and cameras so that the application properly renders the values in the COLLADA document.

© 2011 Khronos Group© 2011 Khronos Group© 2011 Khronos Group© 2011 Khronos Group. All product names are trademarks or registered trademarks of their respective holders.
You do not have to write log files, but doing so can be useful for double-checking that the steps in each operation have executed correctly. If you do write log files, each step must be checked and written to the log separately. Here is some pseudo code contributed by Simone Nicolò, a software engineer at Google, that shows how to write the log file for an Import operation for Google SketchUp:
Get the return value from Import return_value = Sketchup.active_model.import "<model_path>" then based on the return value write the log if return_value # write 'Import Succeeded' to the log else # write 'Import Failed' to the log end
You will need to call the following methods in the following order. You can find the list of methods in HowToIntegrateSoftware.doc. The document also includes specific info on dealing with cameras.
1. Init 2. BeginScript 3. WriteImport 4. WriteRender 5. WriteExport 6. EndScript 7. RunScript 8. BeginScript 9. WriteImport 10. WriteRender 11. EndScript 12. RunScript
You need to implement these methods:You need to implement these methods:You need to implement these methods:You need to implement these methods: GetPrettyName()GetPrettyName()GetPrettyName()GetPrettyName(): return string. Returns the application name, which is hard-coded in the script.
GetOperationsList()GetOperationsList()GetOperationsList()GetOperationsList(): return operations. Returns a list of operations the application performs: import, export and render. GetSettingsForOperation(operation):GetSettingsForOperation(operation):GetSettingsForOperation(operation):GetSettingsForOperation(operation): return settings. Returns a list of settings with default values for a given operation. BeginScript(workingDir): BeginScript(workingDir): BeginScript(workingDir): BeginScript(workingDir): return nothing. For initializations. Command-line tools probably
won't need the Script methods. WorkingDir is for temporary files. You must use this dir for your application’s output. Each import starts a script sequence, and if render/export are there, they are batched together. EndScript(): EndScript(): EndScript(): EndScript(): return nothing. Called after writing all operations but before RunScript is called. Can be used for cleanup. RunScript(): RunScript(): RunScript(): RunScript(): return nothing. Runs the script that executes the target application. WriteImport(filename, logname, outputDir, WriteImport(filename, logname, outputDir, WriteImport(filename, logname, outputDir, WriteImport(filename, logname, outputDir, settings, isAnimated, cameraRig, settings, isAnimated, cameraRig, settings, isAnimated, cameraRig, settings, isAnimated, cameraRig, llllightingRig)ightingRig)ightingRig)ightingRig): return outputs. Writes the importing filename to the current script. Logname is the log file for this operation. OutputDir is for outputs. Returns a list of filenames relative to outputDir.
WriteRender(logname, outputDir, settings, WriteRender(logname, outputDir, settings, WriteRender(logname, outputDir, settings, WriteRender(logname, outputDir, settings, isAnimateisAnimateisAnimateisAnimated, cameraRig, lightingRig): d, cameraRig, lightingRig): d, cameraRig, lightingRig): d, cameraRig, lightingRig): return outputs. Writes rendering commands to the imported file. logFilename is the log file. outputDir is for outputs. Returns a list of filenames relative to outputDir. Must include at least one .PNG file. WriteExport(lognameWriteExport(lognameWriteExport(lognameWriteExport(logname, outputDir, settings, , outputDir, settings, , outputDir, settings, , outputDir, settings, isAnimated):isAnimated):isAnimated):isAnimated): return outputs. Writes exporting commands to the imported file. logFilename is the log file. outputDir is for outputs. Returns a list of filenames relative to outputDir.

© 2011 Khronos Group© 2011 Khronos Group© 2011 Khronos Group© 2011 Khronos Group. All product names are trademarks or registered trademarks of their respective holders.
These methods pass information to the script that runs the target application. This script is run in the RunScript method. TTTThe FApplication script as a modelhe FApplication script as a modelhe FApplication script as a modelhe FApplication script as a model Let’s look at the FApplication script in the Scripts directory to see what it says about methods, input, and output. Note the imported librariNote the imported librariNote the imported librariNote the imported libraries:es:es:es:
• os (a Python module) • os.path (a Python module) • subprocess (a Python module) • Core.Common.FUtils (resides in the C:\CTS\Core\Common directory). Gets and replaces
filename extensions; determines whether a filename extension is that of an image file; determines whether a filename is a proper filename; gets directory names and paths; parses dates; and so on
• Core.Common.FConstants (defines the constants the scripts use). Class FApplication is the abstract class for the target application. The class has tClass FApplication is the abstract class for the target application. The class has tClass FApplication is the abstract class for the target application. The class has tClass FApplication is the abstract class for the target application. The class has these defs:hese defs:hese defs:hese defs:
Def NameDef NameDef NameDef Name FunctionFunctionFunctionFunction InputInputInputInput ReturnsReturnsReturnsReturns
__init____init____init____init__ Create the FApplication Config file Nothing
SetApplicationIndexSetApplicationIndexSetApplicationIndexSetApplicationIndex Set the application index An integer Nothing
SetTestProcedureDirSetTestProcedureDirSetTestProcedureDirSetTestProcedureDir Set the test procedure directory for detecting crashes
A string representing the absolute file path for the test procedure
Nothing
GetPrettyNameGetPrettyNameGetPrettyNameGetPrettyName Returns the application name, which the user sees when creating a test procedure
Hard-coded Nothing
GetOperationsListGetOperationsListGetOperationsListGetOperationsList Return the operations available in the application (import, export, render)
None A list of strings representing constants held in an imported library
GetSettingsForOperationGetSettingsForOperationGetSettingsForOperationGetSettingsForOperation Returns the settings for the target application with respect to the given operation (import, export, render)
A constant from an imported library
A list of settings
BeginScriptBeginScriptBeginScriptBeginScript Performs any initializations necessary to run a test
A string representation of a temporary file for the scripts that run the target application
Nothing
EndScriptEndScriptEndScriptEndScript Perform finalizations needed for running a test
None Nothing
RunScriptRunScriptRunScriptRunScript Executes the script that runs the target application
None Nothing

© 2011 Khronos Group© 2011 Khronos Group© 2011 Khronos Group© 2011 Khronos Group. All product names are trademarks or registered trademarks of their respective holders.
WriteValidateWriteValidateWriteValidateWriteValidate Writes the script that executes a validator application
Name of the file to be validated; the name of the log file, which has already been created; the path for the output directory; the settings; a boolean indicating whether the file is animated
Locations of the output files other than the log file
WriteImportWriteImportWriteImportWriteImport Writes the import operation to the script that runs the target application
Name of the file to import; the name of the log file; the path of the output directory; a list of settings; a boolean indicating whether the file is animated
Locations of the output files other than the log file
WriteRenderWriteRenderWriteRenderWriteRender Writes the render operation to the script that runs the target application
Name of the log file; the path of the output directory; a list of settings; a boolean indicating whether the file is animated
Locations of the output files other than the log file
WriteExportWriteExportWriteExportWriteExport Writes the export operation to the script that runs the target application
Name of the log file; the path of the output directory; a list of settings; and a boolean indicating whether the file is animated
Locations of the output files other than the log file
AddToScriptAddToScriptAddToScriptAddToScript Call the appropriate Write method for the operation
A constant from an imported library; the name of the file to be imported; the name of the log file, which has already been created; the path of the output directory; a list of settings; a boolean indicating whether the file is animated
Locations of the output files other than the log file
RunApplication, RunApplication, RunApplication, RunApplication, WriteCrashDetectBegin,WriteCrashDetectBegin,WriteCrashDetectBegin,WriteCrashDetectBegin, WriteCrashDetectWriteCrashDetectWriteCrashDetectWriteCrashDetect
Check for crashes and handle them if they occur
Various Various
GetSettingValueAs, GetSettingValueAs, GetSettingValueAs, GetSettingValueAs, FindDefaultFindDefaultFindDefaultFindDefault
Get the application name and settings
Various Various
For more information on integration, see HowtoIntegrateSoftware.doc in the C:\CTS\Documentation\HowtoAddSoftware directory Creating and running the testsCreating and running the testsCreating and running the testsCreating and running the tests To start the test suite GUI, click on the Python script COLLADATestSuite.py in the CTS root directory. The empty CTS GUI will launch.
Figure 5. The empty CTS GUI.Figure 5. The empty CTS GUI.Figure 5. The empty CTS GUI.Figure 5. The empty CTS GUI.
Before you can run the tests, there are a Before you can run the tests, there are a Before you can run the tests, there are a Before you can run the tests, there are a few things you must do:few things you must do:few things you must do:few things you must do:
1. Create a new test procedure (File menu)
2. Open the procedure you just created (File menu)
3. Add tests (Test menu). Then the full test grid will appear, and you can run the tests. To run the tests with an existing procedure (which you’ll do if your first run doesn’t result in a badge), just select File|Open Test procedure, and the full test grid will appear.

© 2011 Khronos Group© 2011 Khronos Group© 2011 Khronos Group© 2011 Khronos Group. All product names are trademarks or registered trademarks of their respective holders.
Figure 6. Opening an existing test Figure 6. Opening an existing test Figure 6. Opening an existing test Figure 6. Opening an existing test pppprocedure. rocedure. rocedure. rocedure. Creating a test procedureCreating a test procedureCreating a test procedureCreating a test procedure A test procedure comprises a series of tasks: import, export, render, and validate. Each task can generate one or more COLLADA documents and/or images. You need to create and configure a test procedure before you can run any tests. Test procedures can be reused. The input to a procedure is one or more data sets, which are found in the StandardDataSets subdirectory of the CTS hierarchy. To create a new test procedure, select File|New Test Procedure, and fill in the title: <Product Name> CTS Submission. For Google SketchUp, for example, your procedure name might be SketchUp_CTS_Submission. Note: Some test procedure names will not work with spaces.
Figure 7. The New Test PrFigure 7. The New Test PrFigure 7. The New Test PrFigure 7. The New Test Procedure dialog.ocedure dialog.ocedure dialog.ocedure dialog. In the Add Operation box, select each of the tasks in the order specified here (which is not necessarily the order in which the operations appear in the box): 1. Import → <ProductName> → Add. Import
is the only task that requires a product name. The product name will appear in the right-hand window. (When you run the integration script, the name of your application will be added to the Import drop-down box.) See Figure 8.

© 2011 Khronos Group© 2011 Khronos Group© 2011 Khronos Group© 2011 Khronos Group. All product names are trademarks or registered trademarks of their respective holders.
Figure 8. Figure 8. Figure 8. Figure 8. The Add Operation box. The Add Operation box. The Add Operation box. The Add Operation box. First First First First select Import, then the prodselect Import, then the prodselect Import, then the prodselect Import, then the product name.uct name.uct name.uct name. 2. Add Operation: Render → Add. Note the
Chosen Operations box. The operations must be selected and display in the proper order. Watch out: Export, which should be selected after Render, appears before Render in the Add Operation box. See Figure 9.
FigFigFigFigureureureure 9. 9. 9. 9. After Import, select Render, After Import, select Render, After Import, select Render, After Import, select Render, not not not not EEEExport.xport.xport.xport. 3. Add Operation: Export → Add.
See Figure 10.

© 2011 Khronos Group© 2011 Khronos Group© 2011 Khronos Group© 2011 Khronos Group. All product names are trademarks or registered trademarks of their respective holders.
Figure 10. After Import and Render, Figure 10. After Import and Render, Figure 10. After Import and Render, Figure 10. After Import and Render, select Export.select Export.select Export.select Export. 4. Add Operation: Import → <ProductName>
→ Add. 5. Add Operation: Render → Add. 6. Add Operation: Validate → MSXML 6.0 →
Add. See Figure 11.
Figure 11. After Import, Render, Export, Figure 11. After Import, Render, Export, Figure 11. After Import, Render, Export, Figure 11. After Import, Render, Export, Import, and Render, select Validate.Import, and Render, select Validate.Import, and Render, select Validate.Import, and Render, select Validate. You cannot add comments to a test procedure after it’s been created. Do this now if you’re going to do it at all. You may add comments to test results at any time, however. Select OK. OK. OK. OK. Now you’ve got a test procedure and you’re ready to add tests. The TestProcedures directory, which holds not only procedures, but also the output from the tests, should now have been created. It does not come with the tests, but is produced on the fly at this point in the setup process. Even though the conformance test suite manual mentions that there is a sample test procedure, the CTS does not come with one.
© 2011 Khronos Group© 2011 Khronos Group© 2011 Khronos Group© 2011 Khronos Group. All product names are trademarks or registered trademarks of their respective holders.
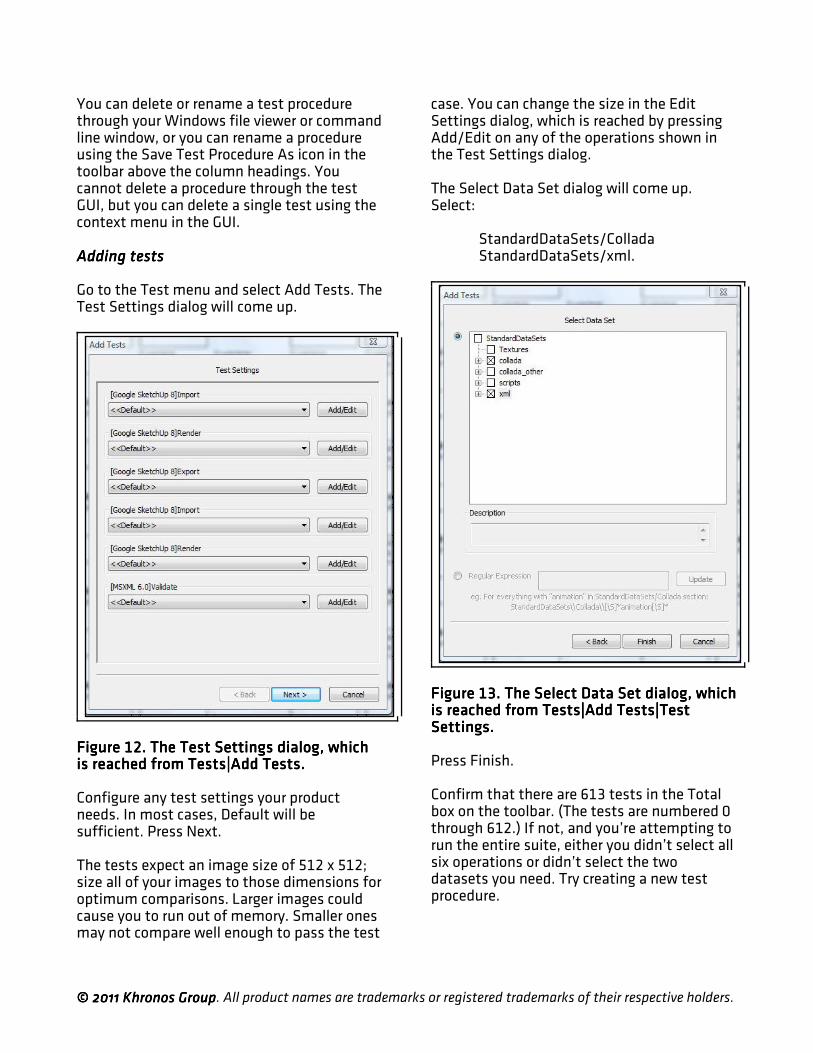
You can delete or rename a test procedure through your Windows file viewer or command line window, or you can rename a procedure using the Save Test Procedure As icon in the toolbar above the column headings. You cannot delete a procedure through the test GUI, but you can delete a single test using the context menu in the GUI. Adding testsAdding testsAdding testsAdding tests Go to the Test menu and select Add Tests. The Test Settings dialog will come up.
Figure 12. The Test Settings dialog, which Figure 12. The Test Settings dialog, which Figure 12. The Test Settings dialog, which Figure 12. The Test Settings dialog, which is reached from Tests|Add Tests.is reached from Tests|Add Tests.is reached from Tests|Add Tests.is reached from Tests|Add Tests. Configure any test settings your product needs. In most cases, Default will be sufficient. Press Next. The tests expect an image size of 512 x 512; size all of your images to those dimensions for optimum comparisons. Larger images could cause you to run out of memory. Smaller ones may not compare well enough to pass the test
case. You can change the size in the Edit Settings dialog, which is reached by pressing Add/Edit on any of the operations shown in the Test Settings dialog. The Select Data Set dialog will come up. Select:
StandardDataSets/Collada StandardDataSets/xml.
Figure 13. The Select Data Set dialog, which Figure 13. The Select Data Set dialog, which Figure 13. The Select Data Set dialog, which Figure 13. The Select Data Set dialog, which is reached from Tests|Add Tests|Test is reached from Tests|Add Tests|Test is reached from Tests|Add Tests|Test is reached from Tests|Add Tests|Test Settings.Settings.Settings.Settings. Press Finish. Confirm that there are 613 tests in the Total box on the toolbar. (The tests are numbered 0 through 612.) If not, and you’re attempting to run the entire suite, either you didn’t select all six operations or didn’t select the two datasets you need. Try creating a new test procedure.

© 2011 Khronos Group© 2011 Khronos Group© 2011 Khronos Group© 2011 Khronos Group. All product names are trademarks or registered trademarks of their respective holders.
The gridThe gridThe gridThe grid Once the grid displays, you can use not only the menus and the toolbar, but also the context commands, which you can see by right-clicking on a particular cell. Some context commands are available from every cell; some are cell-specific. There is a list of the context menus in section 9.7 of the CTS manual, Context Menus. The CTS displays standard format images. If a format can’t be displayed, you’ll get a message to that effect. The grid comes up using factory-set display options, but you can change the way it looks by using File|Preferences.
Figure 14. The PreferenFigure 14. The PreferenFigure 14. The PreferenFigure 14. The Preferences dialog box, ces dialog box, ces dialog box, ces dialog box, which is reached from File|Preferences.which is reached from File|Preferences.which is reached from File|Preferences.which is reached from File|Preferences. If you check the Show Blessed or Show Previous boxes, the Blessed and/or Previous (from the previous test) images will be displayed in the operation columns of the grid (Import, Render, and Export, but not Validate). Displaying these images makes the grid very wide, but you can counteract that to some extent by reducing the size of the preview images from the standard 100 x 100 to something smaller.
You can rearrange the order of the columns in the grid or hide them entirely using the Shown Columns box. To change the order, highlight the desired column and click Move Up or Move Down until the column is where you want it. To hide a column, highlight the name of the column and press >>. To unhide a column, select the column name in the Hidden Columns box and press <<. When you click OK, the grid will update itself. If you want to use an external viewer to look at images, you can select one in Preferences|Diff Viewer. Just browse to the program you prefer. Running the testsRunning the testsRunning the testsRunning the tests The input to the tests comes from the Standard Data Sets dialog box, which you can get to from the Tests|Add Tests dialog. Each test is composed of a COLLADA document (.DAE file) and a judging script. Some of the scripts have different requirements for different badges, so it is possible to pass the Baseline level and not the Superior or Exemplary, or Baseline and Superior, but not Exemplary, for a given test. The description of the test, i.e., what is being tested, is displayed in the Description column in the GUI and comes from the subject element in the .DAE file. For more information on what is being tested, see COLLADA_CTS_test_cases.xls in the c:\CTS\TestCaseDocumentation directory. You can also check the judging scripts to see what each test is looking for. The judging scripts are contained in the StandardDataSets folder structure along with the COLLADA input document for each test. Selecting testsSelecting testsSelecting testsSelecting tests You can launch all the tests or a portion of them from the Test menu. You can also run a single test from the context menu (right-click) when the cursor is positioned in its row. Some tests depend on the successful completion of other tests, so don’t (initially) run tests out of order.

© 2011 Khronos Group© 2011 Khronos Group© 2011 Khronos Group© 2011 Khronos Group. All product names are trademarks or registered trademarks of their respective holders.
You can select a range of tests by using the CTL and/or SHIFT keys just as you do with any Windows application. Hold down the CTL key while selecting more than one test. To select a block, highlight the topmost test, then hold SHIFT down while you select the last test in the sequence. All the tests in between the two will highlight and you can Run Selected from the Test menu. There is no easy way to select only Baseline tests, but don’t worry about that: there’s no reason to do so. You have to run all the tests in order to earn a badge. While the tests are runningWhile the tests are runningWhile the tests are runningWhile the tests are running You cannot minimize or move the CTS GUI while tests are running. The CTS divides each test into three sections comprising one or more steps and runs them one after the other to minimize loading time for the target application. The steps, which correspond to the operations Import, Render, Export, and Validate in the order you set them up, are numbered 0 through 5; the test grid shows which number goes with which operation. In Figure 15, the scripts for steps 0, 1, and 2 have been created and executed; steps 3, 4, and 5 will run when the first batch has completed.
Figure 15. The suite displays simple Figure 15. The suite displays simple Figure 15. The suite displays simple Figure 15. The suite displays simple progress messages while the tests are progress messages while the tests are progress messages while the tests are progress messages while the tests are running. running. running. running.
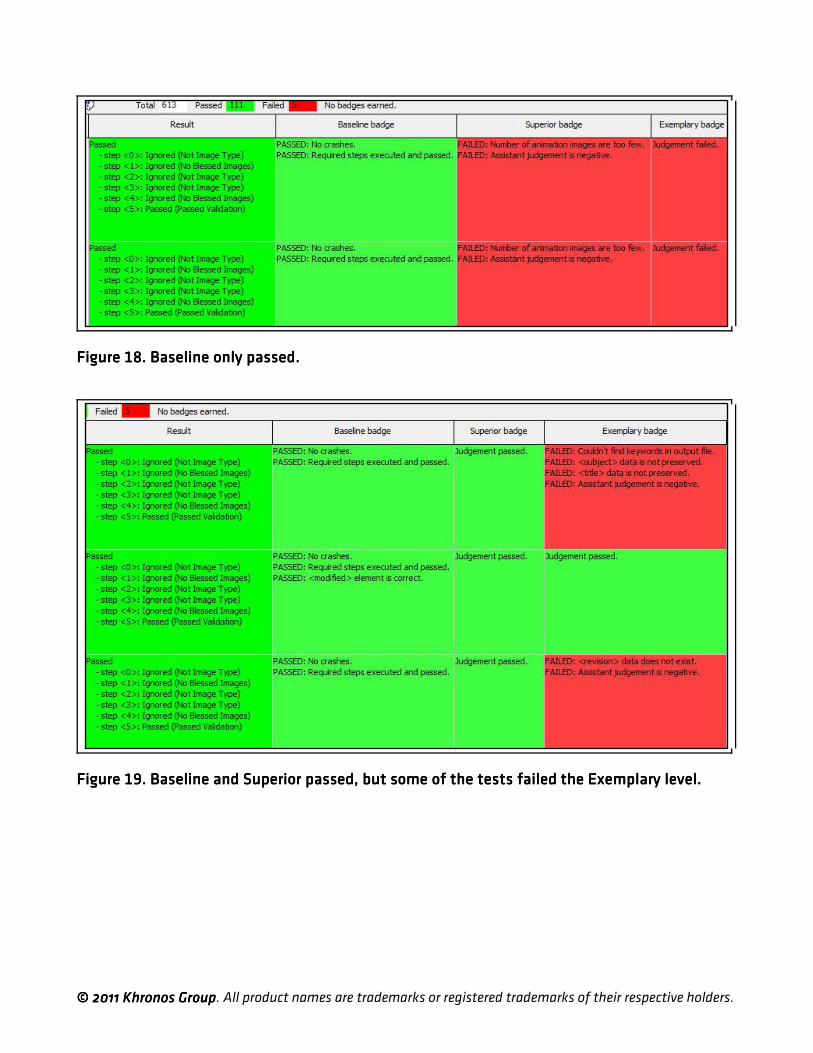
When a test crashes, the CTS attempts to locate the last test that completed and reruns the suite from there until it finds the test that crashed. Once you have fixed the issue that caused the test to crash, CTS will eventually manage to continue past the failing test. You can set crash detection to yes or no and specify the timeout value in the config file. Figure 23 shows what a crashed test looks like in the grid: the Result column is red. By contrast, Figure 17 shows what a failed test looks like: green in the Result column, red where the application failed to win a badge. Canceling testsCanceling testsCanceling testsCanceling tests
When you cancel the tests, the CTS waits until it reaches the next section before performing the cancel operation. As of the time of writing, this feature doesn’t work correctly, and you have to use the Task Manager to quit the CTS. Be aware that if you cancel, the suite ignores the entire run, and you have to start over. As a safeguard, you might want to run small groups of tests to begin with. Reading the resultsReading the resultsReading the resultsReading the results When evaluating the results of a test, the most important columns to check are Results and the three badge columns. The Results column tells you whether the test worked as expected. Green means yes; red means that the test failed in some way. The three badge columns tell you whether the COLLADA files meet expectations. If they do, the column(s) will be green; if not, they will be red. It is possible for a Results column to be green and one or more badge columns to be red. This means that the test didn’t blow up but a badge was not achieved because the target application failed to meet expectations.

© 2011 Khronos Group© 2011 Khronos Group© 2011 Khronos Group© 2011 Khronos Group. All product names are trademarks or registered trademarks of their respective holders.
When a test passes, you get messages that look like this:
Figure 16. A green (passed) indication in the Result column has nothing to do with badges. Figure 16. A green (passed) indication in the Result column has nothing to do with badges. Figure 16. A green (passed) indication in the Result column has nothing to do with badges. Figure 16. A green (passed) indication in the Result column has nothing to do with badges. It simply means that the test executed properly (didn’t crash). It simply means that the test executed properly (didn’t crash). It simply means that the test executed properly (didn’t crash). It simply means that the test executed properly (didn’t crash).
FigureFigureFigureFigure 17. Green in Result, red in badge: When the Result column is green, 17. Green in Result, red in badge: When the Result column is green, 17. Green in Result, red in badge: When the Result column is green, 17. Green in Result, red in badge: When the Result column is green, the test/application has run okay, but a badge wasn’t awarded.the test/application has run okay, but a badge wasn’t awarded.the test/application has run okay, but a badge wasn’t awarded.the test/application has run okay, but a badge wasn’t awarded.
© 2011 Khronos Group© 2011 Khronos Group© 2011 Khronos Group© 2011 Khronos Group. All product names are trademarks or registered trademarks of their respective holders.
Figure 18. Baseline only passed.Figure 18. Baseline only passed.Figure 18. Baseline only passed.Figure 18. Baseline only passed.
Figure 19. Baseline and Superior passed, but some of the tests failed the ExemplaFigure 19. Baseline and Superior passed, but some of the tests failed the ExemplaFigure 19. Baseline and Superior passed, but some of the tests failed the ExemplaFigure 19. Baseline and Superior passed, but some of the tests failed the Exemplary level.ry level.ry level.ry level.

© 2011 Khronos Group© 2011 Khronos Group© 2011 Khronos Group© 2011 Khronos Group. All product names are trademarks or registered trademarks of their respective holders.
Figure 20. Test run successfully and all levels passed. Figure 20. Test run successfully and all levels passed. Figure 20. Test run successfully and all levels passed. Figure 20. Test run successfully and all levels passed. You can add comments to a test’s row by double-clicking in the Comments cell.
Figure 21. The Comments cell.Figure 21. The Comments cell.Figure 21. The Comments cell.Figure 21. The Comments cell. The Test Scene column in the grid contains a link to the COLLADA document used as input to the test. You can open the COLLADA document by using the View Image option in the context menu. The Test Filename column shows the name of the document prefaced by its path in the StandardDataSets directory.
The Import, Render, Export, Import, Render, and Validate columns contain links to the output from each of those tasks for a given test. The first Import column links to the application’s native file generated from the Test Scene COLLADA document. The second Import column links to the application’s native file generated from the first cycle’s exported COLLADA document. The Blessed column shows what the rendered COLLADA document should look like. Depending on what’s being tested, if your Render columns don’t resemble the blessed image, you know immediately that something is wrong. (If rendering the image isn’t the objective of the test, a non-match doesn’t matter.)

© 2011 Khronos Group© 2011 Khronos Group© 2011 Khronos Group© 2011 Khronos Group. All product names are trademarks or registered trademarks of their respective holders.
Don’t worry about anything the manual or the context menu say about blessing an execution. This is a legacy item that isn’t used. You can export your results to HTML so others can see them. When you do, the CTS gives you a scorecard at the top of the HTML page. (See Figure 22.)
Figure 22. CTS results exported to HTML with the results listed at the top.Figure 22. CTS results exported to HTML with the results listed at the top.Figure 22. CTS results exported to HTML with the results listed at the top.Figure 22. CTS results exported to HTML with the results listed at the top. What to do wWhat to do wWhat to do wWhat to do when a test failshen a test failshen a test failshen a test fails The Result column tells you how each step in the test fared. Possible messages include:
• Ignored • Warning • Passed
If there’s green in the Result column and a badge column, it means the test executed correctly and a badge was awarded. If there’s green in the Result column and red in a badge column, the application can execute the test correctly (i.e. all the Import/Render/ Export steps were successful) but the output files are not COLLADA conformant.
Figure 23. When a test crashes, thFigure 23. When a test crashes, thFigure 23. When a test crashes, thFigure 23. When a test crashes, the Result e Result e Result e Result column turns red. column turns red. column turns red. column turns red.
When a Validate task fails, the CTS tells you how many warnings and errors you got. You

© 2011 Khronos Group© 2011 Khronos Group© 2011 Khronos Group© 2011 Khronos Group. All product names are trademarks or registered trademarks of their respective holders.
can view the errors by clicking on View Report in the context menu for the Validate cell in question. See Figure 24.
Figure 24. The ViFigure 24. The ViFigure 24. The ViFigure 24. The View Report function from ew Report function from ew Report function from ew Report function from the context menu is used to diagnose failed the context menu is used to diagnose failed the context menu is used to diagnose failed the context menu is used to diagnose failed Validate operations. Validate operations. Validate operations. Validate operations.
A test can fail if a prerequisite test has not been run and/or passed. When that happens, you get a message telling you which test(s) you need to run, by name, not test number (e.g., “_Reference _Oneimage test case”). However, the suite is meant to be run in the order presented, so you won’t encounter this situation under normal circumstances. Comparing test runsComparing test runsComparing test runsComparing test runs The CTS allows you to compare test runs against each other. Comparing test runs helps pinpoint bugs and areas of nonconformance. You might want to see previous error messages, which don’t display on the grid once a test has been superseded. You might also want to see whether a step that failed in the past is now passing, or you may want to compare output to see whether it’s improved. By comparing images, you can see if you are getting warmer or colder. You can tell which tests have been run more than once by checking the Different from Previous column.
Figure 25. Comparing test runs.Figure 25. Comparing test runs.Figure 25. Comparing test runs.Figure 25. Comparing test runs.

© 2011 Khronos Group© 2011 Khronos Group© 2011 Khronos Group© 2011 Khronos Group. All product names are trademarks or registered trademarks of their respective holders.
To see the results of a previous test, right-click anywhere in the test row and select Show Previous. You can delete an execution from the GUI by right-clicking on the test and selecting Delete Execution. The histories are stored in the TestProcedures directory.
When you compare executions, the results of the selected tests display in a pop-up window. Beware: when you select an execution to compare with the current one, all you have to go by is the date and sequence number of the execution! If you want to know which execution of many to choose, you have to keep track of dates and sequence numbers!
Comparing imagesComparing imagesComparing imagesComparing images
Comparing images helps you diagnose problems in your application. You can compare what the application is generating with the ideal—the blessed image that comes with the suite—or with images you’ve produced during different test runs or steps.
There are three dialog boxes involved in the image comparison process: the Compare Image With, where you select the images you want to use; the Image Comparison, where you actually look at the images side by side; and the Image Diff dialog, which shows you the pixel-by-pixel differences.
Figure 26. Use the context menu on the Figure 26. Use the context menu on the Figure 26. Use the context menu on the Figure 26. Use the context menu on the image you want to image you want to image you want to image you want to ccccompare.ompare.ompare.ompare.
The Compare Image With dialogThe Compare Image With dialogThe Compare Image With dialogThe Compare Image With dialog
To compare images generated by a particular test with blessed images or with other images your application has produced during conformance testing, select the thumbnail for the image in question and right-click to bring up the context menu. Select Compare Image, and the Compare Image With dialog will pop up.

© 2011 Khronos Group© 2011 Khronos Group© 2011 Khronos Group© 2011 Khronos Group. All product names are trademarks or registered trademarks of their respective holders.
You can include the blessed image in your comparison, but you cannot choose only the blessed image; you must also select another image generated during testing, either as output from a different step, or from a different execution, or from a different test, or from a different test procedure. Fortunately, you don’t have to remember every place you’ve generated a like image; the drop-down
menu in the dialog shows you the options, and you select from those. Steps are numbered 0-5; different executions are identified by date and sequence number. If there are no valid different tests or test procedures, those choices will be grayed out, and you won’t be able to select from them.
FigFigFigFigure 27. The Compare Image With dialog box showing the various steps in the selected test. ure 27. The Compare Image With dialog box showing the various steps in the selected test. ure 27. The Compare Image With dialog box showing the various steps in the selected test. ure 27. The Compare Image With dialog box showing the various steps in the selected test. All the steps are listed even though some of them don’t generate images.All the steps are listed even though some of them don’t generate images.All the steps are listed even though some of them don’t generate images.All the steps are listed even though some of them don’t generate images. The Image Comparison dialogThe Image Comparison dialogThe Image Comparison dialogThe Image Comparison dialog In this box, the images you’ve selected are displayed side by side. If you’ve included the blessed image, you’ll see it on the far left. The reference image—the one from the test you highlighted in the GUI—displays in the middle, and the image you’ve chosen to compare with is on the right. Metadata about the test and the execution date and sequence appears
above. If your image is part of an animation, you can page through the frames by using the right and left arrows. In Figure 28, you can see that there’s a shader problem in the tested image: the link on the left has no shading at all.

© 2011 Khronos Group© 2011 Khronos Group© 2011 Khronos Group© 2011 Khronos Group. All product names are trademarks or registered trademarks of their respective holders.
Figure 28. The image comparison dialog.Figure 28. The image comparison dialog.Figure 28. The image comparison dialog.Figure 28. The image comparison dialog. The Image Diff dialogThe Image Diff dialogThe Image Diff dialogThe Image Diff dialog The Image Diff box shows you the absolute and relative differences between your image and either the blessed or the comparison image. On the lefthand side of the Image Diff box, you can see the absolute pixel by pixel difference. On the right is the grayscale relative difference where the most different pixels are shown in white. To compare your image with the blessed image, press Different Blessed. To compare your image with the comparison image, press Diff Image2. You can only make one comparison at a time. Because the absolute difference is calculated by subtracting one set of pixels from the other, the result shows you where there are rendering deviations. (If the images are exactly
the same, the absolute difference will come out black, so the blacker the absolute difference, the more the images match.) The relative difference is the grayscale representation of those absolute differences normalized. The magnitude of the greatest difference is shown as white, which means that anywhere you see white, the relative difference image differs most from the comparison image. In Figure 29, the image on the left shows that there’s a shading problem. The black areas are okay, but the strong blue and yellow areas show that there’s too much blue and yellow in the tested image. In the image on the right, you can see that the areas of greatest difference—the strongest white—occur in the glove.

© 2011 Khronos Group© 2011 Khronos Group© 2011 Khronos Group© 2011 Khronos Group. All product names are trademarks or registered trademarks of their respective holders.
Figure 29. Another image coFigure 29. Another image coFigure 29. Another image coFigure 29. Another image comparison. mparison. mparison. mparison.
TroubleshootingTroubleshootingTroubleshootingTroubleshooting SetupSetupSetupSetup If the test suite will not launch, run the Python script from command-line to see error reports. If wx or OpenGL is mentioned make sure you installed both packages into the correct Python version. If your script code doesn’t compile, the suite will not launch. Do not render .PNG images at a resolution greater than 512 x 512 or you could run out of memory. During testing, the size of input and output documents will be compared and warnings will be generated if the output document grows in size by an unusual amount.
This will not cause a test to fail but implementers are strongly encouraged to follow these recommendations to avoid excessive growth of documents.
• Exporters should strip non-significant leading/trailing zeros from numbers in the output.
• If the XML output is indented, indentations should be kept to a reasonable minimum. Two spaces or one hard tab per level is sufficient.
• Indentations should be avoided when writing out large arrays or lists of numbers. These can be written as a single long line of text with separating spaces or they can be broken into multiple non-indented lines.

© 2011 Khronos Group© 2011 Khronos Group© 2011 Khronos Group© 2011 Khronos Group. All product names are trademarks or registered trademarks of their respective holders.
Judging scripts Judging scripts Judging scripts Judging scripts To achieve a badge beyond Baseline, your application must pass the Baseline tests and and and and the Superior and/or Exemplary tests. Even though some tests are labeled “Superior” or “Exemplary,” they are not the only ones that test advanced capabilities. Each test comes with a judging script that looks at the outputs and status returns from the test. The judging scripts are stored with the test cases in the StandardDataSets directory. You have to drill down to the lowest level of a directory to find them; they’re stored
at the same level as the .DAE file input to the test. These files contain useful information about what the test is looking for in order to satisfy each badge level. For example, if you look at the multi_contributor judging script (Test ID 0711, #2 on the grid) in the folder, C:\CTS\StandardDataSets\collada\library_geometries\geometry\asset\contributor\, you will see that this test involves all three badge levels and deals with them like this:
# JudgeBaseline: just verifies that the standard steps did not crash. # JudgeSuperior: also verifies that the validation steps are not in error.# JudgeExemplary: same as intermediate badge.
These comments will quickly tell you whether the test does anything special for the advanced badges. (You may also want to check the code to make sure they’re correct. There are cases in which the comments contradict the code.) In this case, the Superior level and Exemplary levels require that the target application meet additional criteria.
We see also that at the baseline level, not only must the test not crash, but import/export/validate must exist and pass, while render must only exist. You can verify which operations the test is performing in the code. Only import, export, and validate are used. Render is absent:
self.__assistant.CheckSteps(context, ["Import", "Export", "Validate"], [])
However, in a script like C:\CTS\StandardDataSets\collada\library_cameras\camera\_reference\_reference_optics_orthographic_zfar_z_near (Test ID 0106, #90 on the grid), all the operations are necessary:
self.__assistant.CheckSteps(context, ["Import", "Export", "Validate"], ["Render"])
The Render operation must exist because at the Superior level, the rendered images are compared, in this line:
self.__assistant.CompareRenderedImages(context)
The multi_contributor script tests all the levels separately, returning unique results for each, but the camera script tests only the Baseline and Superior levels, returning the same result for both the Superior and Exemplary levels.

© 2011 Khronos Group© 2011 Khronos Group© 2011 Khronos Group© 2011 Khronos Group. All product names are trademarks or registered trademarks of their respective holders.
The judging script driverThe judging script driverThe judging script driverThe judging script driver
The judging script for each test passes parameters to the judging driver script, FResult, which is stored in the C:\CTS\Core\Logic directory. That script contains the status codes that determine the results of a test: PASSED_IMAGE = 0
PASSED_ANIMATION = 1 PASSED_VALIDATION = 2 FAILED_IMAGE = 3 FAILED_ANIMATION = 4 FAILED_VALIDATION = 5 FAILED_MISSING = 6 IGNORED_TYPE = 7 IGNORED_NO_BLESS_IMAGE = 8 IGNORED_NO_BLESS_ANIMATION = 9 IGNORED_NONE = 10 CRASH = 11
These status codes govern what goes in the badge and results columns in the GUI. The COLLThe COLLThe COLLThe COLLADA input documentsADA input documentsADA input documentsADA input documents You can look at the COLLADA input documents to see the information you're trying to process. For example, using the tests from the judging script section, look at the accompanying .DAE input files, C:\CTS\StandardDataSets\collada\library_geometries\geometry\asset\contributor\multi_contributor.DAE and C:\CTS\StandardDataSets\collada\library_cameras\camera\_reference\_reference_optics_orthographic_zfar_z_near\_reference_optics_orthographic_zfar_z_near.DAE.
You can see that the multi_contributor document contains two contributors (one of whom is Bugs Bunny). The camera document contains a main camera with these attributes:
<library_cameras> <camera id="mainCamera" name="mainCamera"> <optics> <technique_common> <orthographic> <ymag>100</ymag> <aspect_ratio>1</aspect_ratio> <znear>0.1</znear> <zfar>5000</zfar> </orthographic> </technique_common> </optics> </camera>
</library_cameras>
All the COLLADA input files are available in the StandardDataSets directory. You can open them directly from the GUI by selecting the Test Scene cell, then View Image from the context menu.
© 2011 Khronos Group© 2011 Khronos Group© 2011 Khronos Group© 2011 Khronos Group. All product names are trademarks or registered trademarks of their respective holders.
The COLLADA output documentsThe COLLADA output documentsThe COLLADA output documentsThe COLLADA output documents
You can see what you’re generating by examining your COLLADA output documents. There are two ways to view them:
1. The easiest way is to right-click on the export column in the GUI and select View Image, then Text Only. The menu item says View Image, but the result is an XML text file, not an image.
2. You can also look in the Test Procedures directory. You must drill down from the test number through the specific execution to the desired step to get to the .DAE file. Open as you would any text file.
DocumentationDocumentationDocumentationDocumentation In the CTS Documentation directory, you will find:
• The CTS Manual (CTSManual.doc)
• A COLLADA CTF How To (CTF_How_To.doc) that covers setup, fixing Autodesk® Maya® errors, creating and running a simple test procedure, how to create your own test, and how to add a test to a local copy of the framework
• A brief COLLADA CTS overview
(README.doc) that explains simply how to create a test procedure and submit results.
and in the subdirectory HowToAddSoftware, HowToIntegrateSoftware.doc, which lists the methods you’ll need in your integration script and tells you how to call them. There are two Python scripts in the Scripts subdirectory of HowToAddSoftware: FDebug and FMimic. FDebug helps you debug your integration script by printing a message and
parameters for all steps in the process. FMimic is a simple renderer that attempts to pass by copying the input and providing a single test image. It is used to validate that this type of renderer cannot pass the conformance suite. It also serves as a good example for command line tools that want to integrate with the suite. The public COLLADA mailing list is a great resource for asking questions and reporting bugs. To subscribe to the public COLLADA mailing list, send an email to [email protected]. In the body of your message include the line subscribe public_collada. You will receive an email with instructions asking you to confirm your email address. Once you are subscribed, you can send messages to the public COLLADA mailing list by emailing [email protected]. Submitting Results to KhronosSubmitting Results to KhronosSubmitting Results to KhronosSubmitting Results to Khronos Once you’ve passed all the tests, you can submit your results to Khronos, where reviewers will examine your results, integration script, and other material. You will need to include two text files in your submission package: submission_details.txt and build_information_text, both of which are found in the CTS documentation folder. You will also need to include the source of all files edited to fix bugs in the suite and integrate your application with it. The important thing to know about submitting results is that you should document your work throughout the process because Khronos will ask you for details. The build_information_template.txt file requires lists of all files added/removed/modified to fix bugs and summarizes the integration and build procedure.

© 2011 Khronos Group© 2011 Khronos Group© 2011 Khronos Group© 2011 Khronos Group. All product names are trademarks or registered trademarks of their respective holders.
Here is a sample. Lines preceded by a pound sign are comments: Mod: config.txt - Added My Software to list Add: Scripts/FMySoftware.py - Integration script for my software Mod: StandardDataSets/Collada/asset/up_axis/up_axis.dae - Does not validate Rem: StandardDataSets/Collada/asset/up_axis/up_axis.dae - Invalid Test # Document any binaries changed and why. python: Version 2.6.2 - Required to run correctly on Windows 7 pythonurl: http://www.python.org/download/python_2.6.2.exe
You will also need to fill out submission_details_template.txt, which asks for information about your product(s), the version of COLLADA being tested, supporting libraries used, the date of the tests used, Bugzilla bugs and waivers, and so on. You will also need to submit any changed test suite source code, which should be modified only to fix bugs, and your implementation script. Place the source code in a directory called ChangeSet, which should go in the same relative path as the install directory.
The PackagedResults folder in the CTS directory contains other files necessary for submission: the results of your tests (automatically placed) and a spreadsheet summarizing your results. Add build_information_template.txt and submission_details_template.txt to the folder and go to the Upload test results area of the Implementers or Adopters section of the Khronos Web site to submit.