cobalt developer's guide · cobalt is a business framework designed to give the internal...
TRANSCRIPT

COBALT Developer's GuideCOBALT Developer's Guide
JV RoigJV RoigRevision Date: Revision Date: Dec 5, 2013Dec 5, 2013

[This manual is incomplete and is a work in progress.
Always check for the latest copy of the manual from http://cobalt.jvroig.com]
i

PrefacePreface
In the Information Age, companies live and die by the quality of their data, information, and the reportsand decision-making generated from collected information.
All these – from data collection to production of metrics for decision-making – depend on the qualityof the processes and business software used by the company. Crappy systems collect crappy data,which in turn produce crappy information, which then result in crappy reports and metrics, finallyending with crappy decision-making.
We can't have that. And this is where Cobalt steps in.
Cobalt gives developers a better way to work – a faster, more reliable way to develop businessapplications.
Cobalt is a business framework designed to give the internal software development team of a companythe tools to create secure business-oriented information systems very fast, and completely take overredundant parts of software development.
The Cobalt mantra is “Reasonable defaults over endless customization”. Cobalt does not bog youdown with too much configuration. Every Cobalt system is good to go right after being baked by theCobalt code generator, allowing you to rapidly prototype new systems or additional modules forexisting projects.
This manual is meant to get you started with Cobalt, and show you a better path to successfuldevelopment of internal business software.
Good luck and have fun!
ii

Conventions UsedConventions Used
Fonts
When a word / phrase / label refers to something specific in a code (such as a function or object), or anobject in the UI (such as a specific button or other form control), or the name of a database, table, orfield being discussed, it appears like this, to emphasize that the particular word / phrase / labelrefers to a specific entity in code, database, or UI. For example:
– Please click the Submit button. (Refers to an element in the UI)
– Imagine a table, branch, with three fields: branch_id, branch_name, andbranch_description. (All instances of the special bold font refer to database objects)
– ucwords() is used to transform field names to field labels. (Refers to a PHP function)
When a word / phrase is meant as a value instead of an object, it appears like this. This means theword / phrase is something you should type in a box, or choose from a list, or a command you shouldenter in a terminal or command line interface. For example:
– If on the same machine as Cobalt, then this is simply “localhost”. (Refers to text that youshould type in a textbox)
– in Linux, this would be through a command similar to: chmod 0777 /path/to/Projects(Refers to a command to enter in a terminal / CLI)
Message Boxes
Various message boxes are used, depending on what kind of information they provide.
Warning!This is a Warning Box. These boxes are meant to give you a heads up on potentialproblems you may encounter, tell you stuff you shouldn't do (and why).
This is a Tip/Note Box. It is used for emphasizing good practices, handing outtips regarding the topic, and occasionally also for clarifying certain concepts orpresenting side notes.
Code:This is a Code Box. Normally, that means these boxes contains actual code (PHP code or SQL Code), but I also often use them as an ASCII-art drawing board of sorts to simulate terminal / console / CLI output.
iii

Table of ContentsPreface...................................................................................................................................................iiConventions Used................................................................................................................................iii
Fonts................................................................................................................................................iiiMessage Boxes................................................................................................................................iii
Chapter 1: Cobalt Overview....................................................................................................................1What is Cobalt?.....................................................................................................................................1
Cobalt as a Code Generator..............................................................................................................1Cobalt as a Framework.....................................................................................................................2
A Specialized Framework+Code Generator for the Enterprise.............................................................5Getting Started.......................................................................................................................................6
Prerequisites.....................................................................................................................................6System Requirements.......................................................................................................................7Installation........................................................................................................................................7
Chapter 2: The Cobalt Code Generator.................................................................................................10Generator Concept...............................................................................................................................10
Starting a New Project....................................................................................................................11Point Cobalt to the Database..........................................................................................................12Tell Cobalt to Import the Tables in the Database...........................................................................14Tell Cobalt to Generate a Complete System...................................................................................17Starting a Newly-Generated System..............................................................................................19
Automatically-Generated System Components..................................................................................23Login/Logout Module....................................................................................................................24User Management...........................................................................................................................24User Passport Management............................................................................................................26Module Control .............................................................................................................................30User Links and Passport Groups Management..............................................................................32Security Monitor.............................................................................................................................34Change Password............................................................................................................................37Change Skin....................................................................................................................................38
Fine-Tuning Your Project....................................................................................................................39Assigning a Different Control Type to a Field...............................................................................39Assigning a List of Acceptable Values for a Certain Field.............................................................41Changing the Label of a Field........................................................................................................44Changing the Field to Optional Instead of Required......................................................................46Adding Relationship Information Between Tables: 1-1.................................................................46Adding Relationship Information Between Tables: 1-M................................................................53
Chapter 3: The Cobalt Framework Reference.......................................................................................55Framework vs the Code Generator......................................................................................................55global_config.php................................................................................................................................55char_set_class.php...............................................................................................................................57
Member: allowed_chars.................................................................................................................57Member: allow_space.....................................................................................................................57
iv

Method: add_allowed_chars()........................................................................................................58Method: generate_alphanum_set().................................................................................................58Method: generate_alpha_set()........................................................................................................59Method: generate_num_set()..........................................................................................................60
validation_class.php............................................................................................................................61Member: validity............................................................................................................................61Member: error_message.................................................................................................................61Member: invalid_chars...................................................................................................................61Method: validate_data()..................................................................................................................62Method: check_data_set()..............................................................................................................62Method: check_char_set()..............................................................................................................63Method: check_if_null().................................................................................................................64
v

Illustration IndexFigure 1: A form control field (above) and the data dictionary code behind it (below)............................2
Figure 2: Result of modifying the "Control_Type" element to "Textarea"................................................3
Figure 3: Error message triggered by submission of input with invalid character(s)................................4
Figure 4: Modifications to "Char_Set_Method" and "Extra_Chars_Allowed" values, to allow only letters as valid input.......................................................................................................................4
Figure 5: After the modifications in Figure 4, numbers have also become invalid input..........................5
Figure 6: The project screen of a successful install – no “FATAL ERROR” messages can be seen.........8
Figure 7: The project screen of an unsuccessful install. The cobalt database was not found....................9
Figure 8: The Cobalt code generator. 1.) Supply database connection information to Cobalt. 2.) Import tables from your database into Cobalt. 3.) Generate the project..................................................10
Figure 9: The Create a New Project box..................................................................................................11
Figure 10: Creating database connections: From the Cobalt Control Center, click Database Connections(above) then Create New Connection (below).............................................................................12
Figure 11: Pointing Cobalt to your database............................................................................................13
Figure 12: Importing tables: From the Cobalt Control Center, click Tables (above) then Import Tables (below).........................................................................................................................................15
Figure 13: Importing Tables: Choosing a database connection...............................................................16
Figure 14: Importing Tables: Choosing tables and indicating subdirectories for their modules.............16
Figure 15: Generating the System: From the Cobalt Control Center, click “Generate Project”.............17
Figure 16: Generating the System: Leave everything checked, click the GENERATE! button..............18
Figure 17: Hopefully, everything went well and you'll see this screen...................................................19
Figure 18: System Generation Failed: You need to change the permissions of the cobalt/Generator/Projects folder so that Cobalt can write in it....................................................19
Figure 19: After a successful system generation, your project can be found in the "cobalt/Generator/Projects" folder...............................................................................................20
Figure 20: The "new_system.sql" file can be found inside the base directory of your project...............21
Figure 21: Login screen of the generated system. Default username is "root", with the password "password"...................................................................................................................................22
Figure 22: After logging in, you are shown your Control Center. The header displays your project name, while the left sidebar provides quick access to available modules even when you are currently not in your Control Center............................................................................................23
Figure 23: User management provided by Cobalt...................................................................................24
Figure 24: Each user needs to be connected to a person record..............................................................25
Figure 25: Person management provided by Cobalt, used in tandem with the user management modules........................................................................................................................................25
Figure 26: The Cobalt Passport System: check or uncheck modules as necessary to define what a user can do in the system.....................................................................................................................27
Figure 27: The Manage User Roles screen. Click the “Add new user role” link to create a role............28
Figure 28: Creating a new role: enter a role name and description, then click "Submit"........................28
vi

Figure 29: Your newly created role is visible in the table after submitting. Click the "Role Permissions" link to define permissions for the new role..................................................................................29
Figure 30: Defining role permissions. To change the number of modules assigned to the role, enter the number you need in the textbox labeled “Change # of items to”, then click “Go”.....................30
Figure 31: The module control interface provided by Cobalt to toggle modules on or off.....................31
Figure 32: After modifying the status of some modules and then clicking "Save Changes", Cobalt confirms that the changes have been applied through the success message shown above..........32
Figure 33: User links management provided by Cobalt..........................................................................33
Figure 34: Editing a user link record. .....................................................................................................34
Figure 35: User passport groups management provided by Cobalt.........................................................35
Figure 36: The Cobalt Security Monitor screen. From here you can view the system log, with various filtering options at your disposal..................................................................................................36
Figure 37: The Security Monitor results screen. It shows you the settings you chose and the results, with pagination if the results exceed the page limit (default = 50 entries per page)...................36
Figure 38: The printable version of the Security Monitor results page...................................................37
Figure 39: Cobalt provides a way for users to change their passwords...................................................38
Figure 40: The Change Skin module.......................................................................................................39
Figure 41: To modify field information, click "Table Fields" from the Cobalt Control Center..............41
Figure 42: The "List View: Table Fields" screen. To Edit a field, click its pencil icon under the Operations column.......................................................................................................................41
Figure 43: Click the drop-down list and choose the new control type you want for the field.................42
Figure 44: From the Cobalt Control Center, click Predefined Lists to manage Cobalt's available lists of values for drop-down lists and radio buttons...............................................................................43
Figure 45: The List View: Predefined Lists screen..................................................................................43
Figure 46: The Create New List screen...................................................................................................44
Figure 47: Assigning a predefined list to a field: Choose "Predefined List" in #2 of Additional Options, then the appropriate predefined list in #3....................................................................................45
Figure 48: Modifying the field label: Simply type the label you want in the "Label" textbox................46
Figure 49: Setting "Attribute" to "None" makes the field optional.........................................................47
Figure 50: From the Cobalt Control Center, click "Table Relations"......................................................48
Figure 51: Click "Define New Relationship" to start telling Cobalt about a 1-1 or 1-M relationship.. . .49
Figure 52: The "Define Table Relation" screen.......................................................................................49
Figure 53: The information that Cobalt needs to know about the "branch->branch_type" relationship. 51
Figure 54: How the List View page would look if the relationship was not defined...............................52
Figure 55: How the Add module would look if the relationship was not defined...................................52
Figure 56: How the List View page would look if the relationship was defined before generation.......53
Figure 57: How the Add module would look if the relationship was defined before generation. Label was changed, and the control is now a drop-down list based on the contents of table “branch_type”..............................................................................................................................53
Figure 58: The input for "employee->employee_skills" 1-M relationship..............................................55
vii
Cobalt Developer's Guide Chapter 1: Cobalt Overview
Chapter 1: Cobalt OverviewChapter 1: Cobalt Overview
What is Cobalt?What is Cobalt?
Cobalt is a web-based code generator and framework using PHP and MySQL designed for creatingmulti-user, administrative, business-oriented web applications (and little else).
It is a code generator, so it is capable of producing a complete working system based on theinformation you feed it (data dictionary and a few miscellaneous data for certain special cases andfine-tuning).
It is also a framework. This means it contains a set of classes, functions and core files that allow you tocreate applications much easier and faster than if you were to start from scratch.
Cobalt was previously known as "SCV2". The name "SCV2" stands for "SYNERGY Core, Version 2",as it was originally intended to be a much-needed improvement to the original SYNERGY Core whichI made circa 2005-2006 for a school management system. But as I worked on it, it started to become alot more than just an overhaul of the SYNERGY Core, eventually becoming the code generator andframework that it is now.
The basic idea behind Cobalt is this: redundant development tasks (like creating "add/edit/delete/view"modules, or CRUD) should be done automatically so that we can have more efficient use of our time.Instead of spending 70% of our time working on redundant parts of the system, we should just spend aminimal amount of time on them by letting a code generator do most of the redundant work for us. Thisway, we focus most of our energies on the really important parts of system development: the systemdesign, special modules, and the reports.
Cobalt as a Code Generator
Cobalt's most visible feature is a code generator that reads your database metadata (data dictionary) andmakes assumptions regarding what kind of form controls you will most likely need based on the datatypes it finds.
After pointing it to your database (supplying necessary information such as the host name, databasename, username, password), you can then ask it to import the tables (that is, the metadata). After theimport is finished, you can generate a complete system that has a basic but production-readyAdd/Edit/Delete/View interface per table. By default, the generated system also includes the followingcomponents:
• Login/logout module
• User management
JV Roig Revision Date: Dec 5, 2013 1

Cobalt Developer's Guide Chapter 1: Cobalt Overview
• User passport management (ACL-based user privilege management, with RBAC emulation)
• Module control (allows the system admin to turn modules on or off)
• User links (system modules) and passport groups (module grouping) management
• Security Monitor (comprehensive audit trail)
• Change Skin (UI theme management) and Change Password modules for users
These components will be discussed in more detail in Chapter 2: The Cobalt Code Generator.
These default components result in a complete, fully-functioning system, from login to logout, alongwith powerful system administration features.
Cobalt as a Framework
Cobalt's framework is meant to simplify the life of a business application developer. Cobalt (theframework) is model-driven, in that the data dictionary file of each table controls most of the behaviorof the created modules, and simple changes in the data dictionary file can result in significantmodifications of the modules, without requiring much actual re-programming.
For example, let's say you have a table called branch, and it has a field called branch_name (amongothers). Refer to Figure 1 for a screenshot and a peek at the source code.
JV Roig Revision Date: Dec 5, 2013 2
Figure 1: A form control field (above) and the data dictionary code behind it (below).

Cobalt Developer's Guide Chapter 1: Cobalt Overview
Let's forget for the moment that a textbox is indeed the perfect control type for data entry of branchnames. What if we wanted to use a textarea instead? Figure 1 shows that the Control_Type ofbranch_name is set to “Textbox”. We simply have to change this to “Textarea” to effect the changewe desire (see Figure 2).
That was very simple, wasn't it? There wasn't any real programming involved – just changing a value inone array element (which is actually part of a larger multi-dimensional array that makes up the datadictionary for the table; we'll get to that in more detail in Chapter 3: The Cobalt Framework).
Let's take a different example, one that captures more complicated behavior. (For this new example, weeffectively undo the change to a textarea, and we are back to a regular textbox for the “branch_name”field.) Cobalt-generated modules already have a default (and very loose) filtering in place, allowingalphanumeric input, plus a host of special characters. This can be seen in the elementsarr_charset_Method and Extra_Chars_Allowed (both Figure 1 and Figure 2 show this).“generateAlphaNumSet” in arr_charset_Method means the acceptable character set for the inputwill be alphanumeric (letters and numbers), while the Extra_Chars_Allowed element lists all othercharacters that should also be allowed (separated by spaces; note that the first entry, a single quote, is
JV Roig Revision Date: Dec 5, 2013 3
Figure 2: Result of modifying the "Control_Type" element to "Textarea"

Cobalt Developer's Guide Chapter 1: Cobalt Overview
escaped because it is the same as the delimiter used). If a character that is not a letter, number, or any ofthe extra chars listed is entered as input, an error message will alert the user that an invalid characterwas detected upon submission. In this case, the greater-than symbol ( > ) is an invalid character, since itis not alphanumeric, and is not listed in Extra_Chars_Allowed. Attempting to submit a branch namewith the greater-than symbol will trigger the aforementioned error message (Figure 3).
What if we actually wanted branch names to only accept letters? Modifying the character filter toaccomplish this is easy: adjust the arr_charset_Method to “generateAlphaSet”, then set theExtra_Chars_Allowed element to blank (Figure 4 shows the modifications, Figure 5 the result).
JV Roig Revision Date: Dec 5, 2013 4
Figure 3: Error message triggered by submission of input with invalid character(s).
Figure 4: Modifications to "arr_charset_Method" and "Extra_Chars_Allowed" values, to allow only letters as valid input.

Cobalt Developer's Guide Chapter 1: Cobalt Overview
That's all it took to change the input filter: modifying the values of two elements. It's hardly aprogramming challenge.
There are a lot more things possible to accomplish just by modifying the data dictionary code. Thiskind of power and flexibility in the data dictionary is what makes the Cobalt framework a boon tobusiness application developers – it takes little effort to accomplish some of the most common tasksthat need to be accomplished, be it setting the proper form control types, or input filters (and this is notjust limited to character filters – even the max length, required fields, or even a whitelist of acceptablevalues can all be set quite easily through the data dictionary code).
Aside from the data dictionary structure, the Cobalt framework also has other components that providepowerful and convenient tools for developers. We'll go through them all in detail in Chapter 3.
A Specialized Framework+Code Generator for the EnterpriseA Specialized Framework+Code Generator for the Enterprise
Cobalt is a very specialized framework and code generator meant for business applicationdevelopment.
By "specialized", I mean that Cobalt isn't a general purpose framework to create PHP applications andweb services. Instead, Cobalt is meant to create administrative web apps that follow a specific style -the style that Cobalt makes them. I guess that means you can say that Cobalt is a highly opinionatedsoftware. This makes Cobalt suffer in flexibility/adaptability - but the trade-off is that it makes youextremely more productive when you use it for its intended purpose of creating multi-user,administrative web apps (online enrollment and school management system, accounting, assetmanagement, inventory, human resources, and local government information systems are just a fewexamples of what Cobalt has been used to create).
JV Roig Revision Date: Dec 5, 2013 5
Figure 5: After the modifications in Figure 4, numbers have also become invalid input.

Cobalt Developer's Guide Chapter 1: Cobalt Overview
As a specialized framework for the enterprise, Cobalt offers a well-polished, production-ready set ofautomatically generated modules and framework components that are a must for enterprise use:
• Fine-grained user privilege system that is very flexible and easily modified
• Built-in security features protecting against common attack vectors for the web:
• Cross-Site Request Forgery (CSRF or XSRF)
• SQL Injection
• Session Fixation
• Cross-Site Scripting (XSS)
• A password system that does not store user passwords in cleartext, and instead usescryptographically-strong password hashing algorithms with key stretching to hash passwords,combined with a per user salt. Number of rounds for the stretching is easily configurable tobalance performance and security, and keep up with increases in available computing power.
• Use of cryptographically-secure PRNG for the creation of form keys and password salts.
• Comprehensive audit trail that logs each user's actions (modules visited, buttons clicked) and allqueries that get executed. The exhaustiveness of the logging mechanism is easily modified. Bydefault, clicking links (modules) and buttons, as well as all queries (except for SELECTqueries) are logged.
• Built-in data filtering and validation for user input (allowed characters, allowed values, maxlength, and required field,)
• Data validation and character set classes to make custom data filtering easier, or override thedefault data filtering in place when needed.
If all you want is to create a photo gallery on your personal website, or maybe create your own simpleblog, Cobalt will get you nowhere. This is not to say that Cobalt will be worthless; it can still save youa little time (on the administrative aspects of your site/blog) . But you won't feel the power that Cobaltaffords you in terms of productivity if a photo gallery or a blog is what you are after.
Getting StartedGetting Started
This section contains instructions for setting up a Cobalt development environment. If you already havePHP installed, you can skip the Prerequisites section.
Prerequisites
To get started with Cobalt, you'll need a working webserver (with PHP support) and MySQL.
In Windows (XP, Vista, 7), the easiest and fastest way to achieve this is to download XAMPP for
JV Roig Revision Date: Dec 5, 2013 6
Cobalt Developer's Guide Chapter 1: Cobalt Overview
Windows from Apache Friends (http://www.apachefriends.org).
In Linux, XAMPP is also an option (Apache Friends also has an XAMPP package for Linux), butinstalling a webserver with PHP support is usually as easy as a single command for most Linuxdistributions ("yum install httpd php" or "apt-get httpd php").
System Requirements
Any modern computer made within the last 7 years (2005 onwards) should be more than capable ofsupporting Cobalt.
The slowest machine that has ever run Cobalt is an old MSI netbook I used to have (MSI Wind U100,with an Atom N270 processor and 1GB RAM). This is a pretty slow machine, but it handles Cobalt andCobalt-based apps just fine (for development purposes only), on both Windows XP and Linux (Fedora).
Also, I sometimes use a laptop powered by an AMD V105 processor (single core, 1.2GHz) and 2GB ofRAM to develop and debug Cobalt itself from time to time, as well as to develop, test, and present afew Cobalt-based apps.
Unless your dev system is significantly slower than either of these two machines, your system shouldhave no problem with Cobalt development.
As for Operating System requirements, there are none. As long as your favorite OS supports some sortof webserver with PHP, you are good to go.
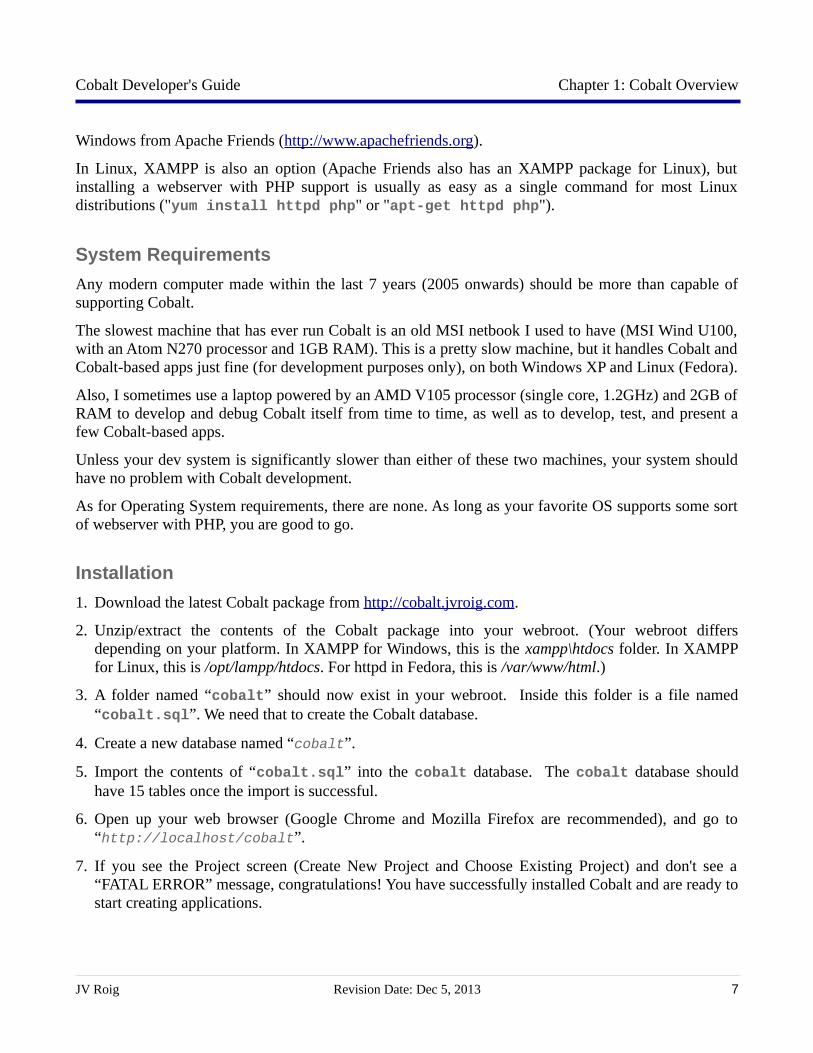
Installation
1. Download the latest Cobalt package from http://cobalt.jvroig.com.
2. Unzip/extract the contents of the Cobalt package into your webroot. (Your webroot differsdepending on your platform. In XAMPP for Windows, this is the xampp\htdocs folder. In XAMPPfor Linux, this is /opt/lampp/htdocs. For httpd in Fedora, this is /var/www/html.)
3. A folder named “cobalt” should now exist in your webroot. Inside this folder is a file named“cobalt.sql”. We need that to create the Cobalt database.
4. Create a new database named “cobalt”.
5. Import the contents of “cobalt.sql” into the cobalt database. The cobalt database shouldhave 15 tables once the import is successful.
6. Open up your web browser (Google Chrome and Mozilla Firefox are recommended), and go to“http://localhost/cobalt”.
7. If you see the Project screen (Create New Project and Choose Existing Project) and don't see a“FATAL ERROR” message, congratulations! You have successfully installed Cobalt and are ready tostart creating applications.
JV Roig Revision Date: Dec 5, 2013 7

Cobalt Developer's Guide Chapter 1: Cobalt Overview
JV Roig Revision Date: Dec 5, 2013 8
Figure 6: The project screen of a successful install – no “FATAL ERROR” messages can be seen.

Cobalt Developer's Guide Chapter 1: Cobalt Overview
JV Roig Revision Date: Dec 5, 2013 9

Cobalt Developer's Guide Chapter 2: The Cobalt Code Generator
Chapter 2: The Cobalt Code GeneratorChapter 2: The Cobalt Code Generator
Generator ConceptGenerator Concept
The code generator is the most visible feature of Cobalt. How it works can be summarized as follows:
• Point Cobalt to your database.
• Tell Cobalt to import the tables in the database.
• Tell Cobalt to generate a complete system based on the metadata it collected.
While this effectively summarizes the concept behind the Cobalt code generator,this in no way covers the extent of what the code generator can accomplish, or thefine-tuning you can make before the code generator starts creating the project.This simply shows the basic principle behind the code generator: let it read yourdatabase metadata, then let it create a base system based on the metadata.
JV Roig Revision Date: Dec 5, 2013 10
Figure 8: The Cobalt code generator. 1.) Supply database connection information to Cobalt. 2.) Import tables from your database into Cobalt. 3.) Generate the project.

Cobalt Developer's Guide Chapter 2: The Cobalt Code Generator
Starting a New Project
Your Cobalt experience starts with the Choose Project screen (refer to the last portion of Chapter 1,Installation section).
Naturally, having no projects in Cobalt yet, all you can actually do at this point is to create a newproject:
• Project name – what you want your new project to be named
• Client – your client or customer for this project (or simply yourself if you are just learning)
• Description – a brief description of the project
• Base Directory – name of the main folder/directory that will contain the entire project.
Project name is important because that will be prominently displayed in the resulting system: loginscreen, header, and browser window title.
Client has no use beyond mere project information, and has no bearing on the resulting system.
Description also has no functional bearing on the project, so this is non-critical. However, the textyou specify here will be displayed in the “About” screen of the generated system.
JV Roig Revision Date: Dec 5, 2013 11
Figure 9: The Create a New Project box.

Cobalt Developer's Guide Chapter 2: The Cobalt Code Generator
Base Directory is the most important of all the information requested here. This will be what isplaced in your webroot, therefore also how your project will be accessed through the URL. Forexample, if you put “test” here, then a folder named test will be created and all project files andsubdirectories will be created inside that folder, and accessing the system through your browser can bedone with “localhost/test”.
Point Cobalt to the Database
Pointing Cobalt to the database simply means supplying database connection information to Cobalt, sothat the code generator can connect to your database and read your database metadata.
From the Cobalt Control Center, click Database Connections, then Create New Connection.
A read-only database user connection will suffice – you don't need to supply root/admin accessinformation, and in fact it is not recommended that you use anything but a read-only (“safe”) useraccount for Cobalt, for security reasons, if you actually make Cobalt connect to a production (live)server.
JV Roig Revision Date: Dec 5, 2013 12

Cobalt Developer's Guide Chapter 2: The Cobalt Code Generator
In most cases, however, you are probably connecting to a database that is also being ran by your owndev machine. In such a scenario, feel free to not bother creating a read-only database user for Cobalt.As long as the credentials (host, username, password) you give to Cobalt aren't actual live productionserver credentials, it's fine.
The information you will need to supply are the following:
• DB Connection Name – just any label you want to identify this database connection, such as“connection 1” or “con1” or “Accounting DB”.
• Hostname – the hostname or IP address of the database server. If on the same machine asCobalt, then this is simply “localhost”.
• Database – the name of the database you want Cobalt to scan.
• Username – database account that Cobalt should use to access the database.
• Password – the password for the database account you want Cobalt to use. Can be blank toaccommodate a developer's local dev environment where the local database has a defaultaccount with no password.
JV Roig Revision Date: Dec 5, 2013 13
Figure 11: Pointing Cobalt to your database

Cobalt Developer's Guide Chapter 2: The Cobalt Code Generator
• Confirm password – retyping the password just to make sure you didn't make a typo, sincethe password field is not human readable.
• Use as Default – this only matters for projects that have more than one database. You cancompletely ignore this if your project only has one database involved. If your project hasmultiple databases, then you need to choose one to set as default. This default databaseconnection will not affect your code generation activities; it will simply use the defaultconnection information as the information in the base class for database connections.
After supplying all the requested information to make a successful database connection, you cancontinue adding more database connections (if your project has multiple databases). Cobalt supports apractically-unlimited number of database connections per project, so just add connections as needed.
Tell Cobalt to Import the Tables in the Database
From the Cobalt Control Center, click Tables, then click Import Tables. (Figure 12)
You will be greeted by the Import Tables screen. (Figure 13). Choose the database connection you wantto use, then click Submit.
Cobalt will show you a list of all the tables found using the specified database connection. (Figure 14).All checked tables will be imported. You may uncheck tables as you see fit.
The Folder / Subdirectory field is used to tell Cobalt that the module files that will be generatedfor the particular table should be placed in a folder inside the base directory (therefore, a subdirectory),with the folder name corresponding to the text you type in the Folder / Subdirectory field.
For example, if you indicate “stockkeeping_modules” as the subdirectory for tables branch,branch_type, and item (these are just imaginary table names for our hypothetical project for thepurposes of this example), and assuming our base directory is “test”, then Cobalt will place allmodule files for branch, branch_type, and item in “test/stockkeeping_modules”.
If left blank, Cobalt will simply place all created modules for that table inside the base directory.Following our example above, had we left the field blank for the three tables mentioned, then all theirmodule files would simply be located inside the “test” directory.
Click Submit when you are done checking/unchecking tables and specifying their subdirectories.
It is recommended that you do not leave the Folder / Subdirectory fieldblank for real projects, otherwise the base directory will get cluttered with lotsof files really fast. Cobalt creates 6 module files per table, so even with a lownumber of tables in a project (such as ten to fifteen tables), your basedirectory will be cluttered with lots of mostly unrelated module files, making itharder to locate files you are looking to open for editing.
JV Roig Revision Date: Dec 5, 2013 14

Cobalt Developer's Guide Chapter 2: The Cobalt Code Generator
JV Roig Revision Date: Dec 5, 2013 15

Cobalt Developer's Guide Chapter 2: The Cobalt Code Generator
JV Roig Revision Date: Dec 5, 2013 16
Figure 14: Importing Tables: Choosing tables and indicating subdirectories for their modules.

Cobalt Developer's Guide Chapter 2: The Cobalt Code Generator
Tell Cobalt to Generate a Complete System
From the Cobalt Control Center, click Generate Project. (Figure 15)
You will find yourself in the Generate Project screen. You'll find a table with three columns:
• Column 1 lists the tables you asked Cobalt to import earlier, plus the option to generate acomplete system (standard application components, core files, system administration)
• Column 2 contains the subclass checkbox of each table – if checked, Cobalt will create the datadictionary file, data abstraction subclass, and HTML subclass for the corresponding table.Remember the data dictionary file demonstration from Chapter 1? This is what creates it.
• Column 3 contains the modules checkbox of each table – if checked, Cobalt will create add /edit / delete / view / report modules for the corresponding table. These modules rely on thesubclasses for operation.
The final checkbox (“Generate standard application components, core files, and system administrationcomponents”) tells Cobalt to create not just individual subclasses and modules, but instead create acomplete, cohesive system by generating the following components:
• Login/logout module
JV Roig Revision Date: Dec 5, 2013 17
Figure 15: Generating the System: From the Cobalt Control Center, click “Generate Project”

Cobalt Developer's Guide Chapter 2: The Cobalt Code Generator
• Control Center (the home page for each user, listing all their available modules)
• Change Skin (UI theme management) and Change Password modules for users
• User management
• User passport management (ACL-based user privilege management, with RBAC emulation)
• Module control (allows the system admin to turn modules on or off)
• User links (system modules) and passport groups (module grouping) management
• Security Monitor (comprehensive audit trail)
At this point, you don't need to bother about unchecking items, you just want to click the Generate!button. (Figure 16)
If everything succeeds, you'll be greeted by a success screen. (Figure 17)
JV Roig Revision Date: Dec 5, 2013 18

Cobalt Developer's Guide Chapter 2: The Cobalt Code Generator
Depending on your platform (especially if it is a Linux distribution), you may have to modify thepermissions of the Projects folder (“cobalt/Generator/Projects”) so that Cobalt can create your basedirectory and project files inside the Projects folder. If this is the case, Cobalt alerts you with theSystem Generation Failed screen instead of the success screen. (Figure 18)
Fixing this error is easy, just make sure the Projects folder is writeable by PHP. You don't really haveto worry about restricting write access to only PHP, though. Since Cobalt is installed on your devmachine (not on a server of any importance), you can simply make the Projects folder world-writeable(in Linux, this would be through a command similar to: chmod 0777 /path/to/Projects).
After updating the folder permissions to allow Cobalt write access, click the Back button then clickGenerate! again. You should see the success screen now.
That's it – you've just generated a Cobalt system in those few steps. All you have to do now is start upthat new system.
Starting a Newly-Generated System
Now that Cobalt has generated a new system for you, you just have to transfer the files to yourwebroot, then load the framework tables into your database.
To transfer the files to your webroot, go to Cobalt's Projects folder (“cobalt/Generator/Projects”).After a successful system generation, the Projects folder should now contain a folder named afterthe base directory you specified for your project. Just cut-and-paste that into your webroot.
JV Roig Revision Date: Dec 5, 2013 19
Figure 18: System Generation Failed: You need to change the permissions of the cobalt/Generator/Projects folder so that Cobalt can write in it.

Cobalt Developer's Guide Chapter 2: The Cobalt Code Generator
All that's left now is to load the framework tables into your database. Remember the last checkbox inthe Generate Project screen, the option that says “Generate standard application components, core files,and system administration components”? We need the framework tables to make those componentswork.
To make this happen, Cobalt also generated an SQL file called new_system.sql which contains abunch of SQL commands to create the framework tables, including table records specific to yourproject (module names and permissions). You can find this inside your project's base directory (Figure20). Import that file into your database. After a successful import, you'll find that you have 11 newtables, namely:
• person
• system_log
• system_settings
• system_skins
JV Roig Revision Date: Dec 5, 2013 20

Cobalt Developer's Guide Chapter 2: The Cobalt Code Generator
• user
• user_links
• user_passport
• user_passport_groups
• user_role
• user_role_links
• user_types
With the project files copied to your webroot and the framework tables imported into your database,you can now login to your new system and try it out. Open a new tab or browser window, andaccessing the system through the URL “localhost/<base directory>”. For example, if your base
JV Roig Revision Date: Dec 5, 2013 21
Figure 20: The "new_system.sql" file can be found inside the base directory of your project.

Cobalt Developer's Guide Chapter 2: The Cobalt Code Generator
directory is “test”, then the URL to access the generated system is “localhost/test”.
You should be greeted by a login screen (Figure 21). It will say “Welcome to <Project Name>”. Inour example, we put “Cobalt Test Project”, so our login screen in Figure 21 says “Welcome toCobalt Test Project”.
The default (and only) user is root, and the password is “password”.
Login successfully and you should reach your Control Center (this is what Cobalt calls each user'slanding page / home page). From your Control Center, you can see all module groups you can access(by default for the root user, you have two groups available: “Default”, which contains all modulesmade from the tables you imported into Cobalt, and “Sysadmin”, which contains all systemadministration modules).
You'll find that your project name is again displayed very prominently, this time as the header.
There is also a sidebar on the left for quick access to modules. This sidebar is on a different frame so nomatter what module you are currently in, this sidebar remains and you can quickly transfer to adifferent module without having to go back to your Control Center each time.
This ends the Generator Concept section. As mentioned from the start, that concept is as simple asthis: let it read your database metadata, then let it create a base system based on the metadata.
JV Roig Revision Date: Dec 5, 2013 22
Figure 21: Login screen of the generated system. Default username is "root", with the password "password".

Cobalt Developer's Guide Chapter 2: The Cobalt Code Generator
Automatically-Generated System ComponentsAutomatically-Generated System Components
Back in Chapter 1, in the section titled “Cobalt as a Code Generator”, we briefly mentioned thefollowing components as being automatically created for us:
• Login/logout module
• User management
• User passport management (ACL-based user privilege management, with RBAC emulation)
• Module control (allows the system admin to turn modules on or off)
• User links (system modules) and passport groups (module grouping) management
• Security Monitor (comprehensive audit trail)
• Change Skin (UI theme management) and Change Password modules for users
We'll go through them in more detail one by one.
JV Roig Revision Date: Dec 5, 2013 23

Cobalt Developer's Guide Chapter 2: The Cobalt Code Generator
Login/Logout Module
We've already seen this in action: our introduction into the newly-generated system started withmeeting the login screen.
Cobalt creates this login screen for us (paired with the logout mechanism, accessed through the headermenu bar option helpfully marked “LOGOUT”).
Figure 21 shows the login screen, while the logout option can be seen in the header menu of Figure 22.
User Management
Cobalt provides user management as part of the default package. You can add/edit/delete/view usersthrough the user management modules, accessed by clicking the Manage user icon in your ControlCenter under the Sysadmin group. Alternatively, you can also find the Manage user link in thesidebar on the left, listed under the Sysadmin group.
Each user needs to be connected to a person (Figure 24). Most often this is an employee of thecompany, but depending on the type of project you are working on or your setting, this person can alsobe a different entity – for example, a student in an academic setting, a customer if your system providescustomers direct access to certain features or functionality, or a supplier if your system providessuppliers access to certain modules related to their service to the company.
JV Roig Revision Date: Dec 5, 2013 24
Figure 23: User management provided by Cobalt.

Cobalt Developer's Guide Chapter 2: The Cobalt Code Generator
To add a new person into the database, access the Manage person link in your Control Center orsidebar under the “Sysadmin” group.
Cobalt creates a person table as the default repository of all persons to become users (along with theperson management modules you accessed through the Manage person link). You can override thisbehavior later (effectively obsoleting the person table). For example, if your project encompasses the
JV Roig Revision Date: Dec 5, 2013 25

Cobalt Developer's Guide Chapter 2: The Cobalt Code Generator
Human Resources department, you most certainly already have a table for employees. You can use thattable as the repository for persons to become users, instead of the person table that Cobalt offers youby default. However, we'll need to learn more about the framework itself to get this done, so we'll needto finish Chapter 3 first before attempting to do so.
User Passport Management
In Cobalt, the permissions or access privileges of the users of the system are defined through thepassport system. The main interface for the passport system can be accessed through the Set UserPassports link in your Control Center or sidebar under the Sysadmin group.
Cobalt's passport system is an access control list (ACL)-based permission system. In essence, there is alist of all modules in the system for each user, and you can specify (through a checkbox) whether theycan access a specific module or not. Cobalt defines a “module” as a single, atomic functionality thatcan be assigned to users; therefore, the “Add User” module is different from the “Edit User” module,although we often think of them as just parts of a greater “User” module. This simplifies the concept of“modules” and allows the passport system to be very fine-grained. Just by checking/unchecking theappropriate checkboxes in a user's passport, you can define his system privileges quickly.
JV Roig Revision Date: Dec 5, 2013 26
Figure 26: The Cobalt Passport System: check or uncheck modules as necessary to define what a user can do in the system.

Cobalt Developer's Guide Chapter 2: The Cobalt Code Generator
The most basic permission is the “Manage [table name]” permission. For all intents and purposes,the “Manage” links are the “View” permission, allowing nothing but viewing – no adding, editing, ordeleting. For example, let's take the “Manage user” permission. If you assign this to a user, the userwill see the Manage user icon in his Control Center and the Manage user link in his sidebar, bothunder the Sysadmin group, and he will be granted access to the List View module.
If he has other related permissions as well (such as “Add user”, “Edit user”, and “Delete user”),he will be able to see links to these modules inside the List View module. Edit and Delete links arefound in the Operations column. The Add link can be found at the top of the List View table, andanother link at the bottom.
However, if the user only has the “Manage user” link checked, but the rest of the related permissionsare left unchecked, he will not see any Add, Edit, or Delete links.
As expected, if you provide a user the “Add” permission for a particular set of modules, but forget toassign them the “Manage” link for that set of modules, he won't be able to see his desired module in theControl Center or sidebar. Since the “Manage” permissions are the “View” permissions, it makes nosense for a user to be able to add, edit, or delete records without actually being allowed to view records.
Managing permissions solely through the basic ACL interface can be very redundant. Since each newuser will have to be defined a passport, you (assuming you are the system administrator) may findyourself having to check little checkboxes repeatedly as users are added into the system. This kind oftediousness is avoided by a role-based permission system or RBAC (role-based access control);unfortunately, RBAC is much less flexible than ACL (read: does not support fine-grained permissionsper user).
Despite being completely ACL-based, Cobalt mitigates this tediousness by providing RBAC emulation:
• Go to Manage user roles, either through the Control Center or sidebar, under Sysadmin.
• Click “Add new user role”. (Figure 27)
• Enter a role name and description. (Figure 28)
• Click Submit.
• Your newly named role should now be visible in the table. Click Role Permissions underthe Operations column. (Figure 29)
• Define as many permissions for this role as you want. For example, if you want to issue 10permissions to this new role, input “10” into the textbox labeled “Change # of items to:”and click Go. (Figure 30)
JV Roig Revision Date: Dec 5, 2013 27

Cobalt Developer's Guide Chapter 2: The Cobalt Code Generator
• Choose the permissions you want from the drop-down lists.
• When you are done assigning all the permissions for the role, click Submit.
• Go to Set User Passports, either through the Control Center or sidebar, under Sysadmin.
• Click the Role-Based Access Control Interface link (top right). (
• Instead of defining the user's permission by manipulating lots of little checkboxes, you nowdefine or re-define the user's permission by assigning a role (or roles). The role you just createdwill be visible in the drop-down list labeled Role.
JV Roig Revision Date: Dec 5, 2013 28

Cobalt Developer's Guide Chapter 2: The Cobalt Code Generator
JV Roig Revision Date: Dec 5, 2013 29
Figure 29: Your newly created role is visible in the table after submitting. Click the "Role Permissions" link to define permissions for the new role.
Figure 30: Defining role permissions. To change the number of modules assigned to the role, enter the number you need in the textbox labeled “Change # of items to”, then click “Go”..

Cobalt Developer's Guide Chapter 2: The Cobalt Code Generator
• After choosing a role from the list, the permissions associated with that role is shown to you.Click Assign to give all the listed permissions to the user.
• There is an Exclusive Role checkbox beside the role list. If you check this, Cobalt willmake sure the user is assigned only the permissions in this role by deleting all existingpermissions the user has before assigning the permissions associated with the role you are aboutto assign.
Take note that Cobalt does not actually store the roles you assign for a user. Cobalt is completelyACL-based, so this RBAC-emulation is just an interface for system admins to be able to assignpermissions to new users more efficiently. If you update the permissions for a role (adding or removingsome permissions for that role), users you previously assigned the role to will not be affected. You willhave to modify their passports individually, either by re-assigning exclusively the newly modified role,or through the standard ACL interface; which way is more efficient or applicable depends on thechanges to the permissions. For minor changes, you will almost always end up using the standard ACLinterface because the user passport can be modified very quickly.
Module Control
There are cases when a module or a set of modules need to be off limits to everyone, such asfunctionality that are only used periodically or follows a strict schedule (for example, a businessmodule that needs to be inaccessible during cut-off periods, or the enrollment module of a schoolduring non-enrollment periods), or when the affected modules are undergoing maintenance.
JV Roig Revision Date: Dec 5, 2013 30

Cobalt Developer's Guide Chapter 2: The Cobalt Code Generator
Technically, you could achieve this through the passport system, but that would be very tedious – you'dhave to go through each user's passport setting and uncheck the affected modules, only to go throughall of them again. System admins will find that hell.
To mitigate this, Cobalt provides a module control interface that allows you to turn modules off and onagain at will. As seen in Figure 31, all system modules are listed with a checkbox beside them, quitesimilar to the standard ACL interface for setting user passports. Uncheck modules that you want to turnoff, then click Save Changes when you are done. You should see a success message. (Figure 32)
To turn them on again, just check the appropriate checkboxes, then click Save Changes.
When a module is turned off, it behaves as if it was removed from the passport of each user. Users willnot be able to access the module or even see the module at all (whether in the Control Center orsidebar, or in the appropriate List View module). Even root, the default super administrator account,will not have access to the module.
When a module is turned on again, it behaves as if it was re-assigned to all appropriate users (simplybecause we did not actually remove the module from anybody's passport).
Turning unnecessary modules off is a good system administrator practice, to make sure evencompletely-innocent and accidental use of such modules do not happen outside of the supposedactivation periods. It is absolutely recommended to turn off a module that is currently undermaintenance, to make sure no unforeseen side effects will not even have a chance to be triggered.
JV Roig Revision Date: Dec 5, 2013 31

Cobalt Developer's Guide Chapter 2: The Cobalt Code Generator
User Links and Passport Groups Management
Cobalt uses the term “user links” to describe system modules, since system modules most often looklike normal web links to the user – accessed through a hyperlink.
Cobalt provides a way for devs or system admins to maintain this table of user links, to make anynecessary changes, such as renaming a module (a very likely use case, especially if the default nameprovided by Cobalt is not very pretty or “user friendly”, since it is simply based on the relevant tablename), or adding a new user link (such as for a newly-developed module that did not come from theCobalt code generator), or deleting user links that are obsolete or not needed.
From your Control Center or sidebar, under the Syadmin group, click Manage user links.
From the screen shown in Figure 33 you can add, edit, or delete user links as necessary.
Notice that the sixth column, passport group, contains either “Sysadmin” or “Default”. This isthe field that contains the label for the module groups that you've seen in the Control Center and in thesidebar.
Try adding a new link (click “Add new user links”) or editing an existing link (the pencil iconbeside a record), and you will see that the form control (data entry) for passport group is a drop-downlist. (Figure 34). This drop-down list contains only “Sysadmin” and “Default”, but don't worry, thepassport groups themselves are customizable – you are not stuck with “Sysadmin” and “Default”forever.
JV Roig Revision Date: Dec 5, 2013 32

Cobalt Developer's Guide Chapter 2: The Cobalt Code Generator
To customize your passport groups (make new ones, rename or remove old ones, etc), click Manageuser passport groups from your Control Center or sidebar.
From the “List view: user passport groups” screen, you can customize your passport groups by adding,editing, and deleting passport groups. When you are done creating new groups, renaming existinggroups, and/or deleting old groups, your changes will be reflected in the user links modules. Your newgroups will become part of the values in the passport group drop-down lists in the Add and Editmodules of user links, and if you renamed “Default” (perhaps to something more suitable and fitting toyour project, such as “Logistics” or “Accounting”), you will see that all modules previously classifiedas “Default” will now be classified as the new group name.
JV Roig Revision Date: Dec 5, 2013 33

Cobalt Developer's Guide Chapter 2: The Cobalt Code Generator
Security Monitor
By default, Cobalt logs a huge amount of system events:
• Each module access of a user.
• Every database query (SQL) that happens (except for SELECT statements).
Cobalt provides a way to conveniently view these logs along with some optional filtering optionsthrough the Security Monitor module. From your Control Center or sidebar, click SecurityMonitor.
To view the log without any filter, choose the following options:
• DATE & TIME RANGE: Since beginning
• USER: All Users
• MODULE: All Modules
• Keyword Search: Off
• IP Address Filter: Off
After setting those options, click View Security Monitor. Cobalt will show you the log entries
JV Roig Revision Date: Dec 5, 2013 34

Cobalt Developer's Guide Chapter 2: The Cobalt Code Generator
that match your filters (in this case, no filter at all) in what resembles a standard Cobalt “list view”screen, complete with pagination. (Figure 37)
If you want the log result in printable form, click Printable View instead. (Figure 38)
JV Roig Revision Date: Dec 5, 2013 35
Figure 37: The Security Monitor results screen. It shows you the settings you chose and the results, with pagination if the results exceed the page limit (default = 50 entries per page)

Cobalt Developer's Guide Chapter 2: The Cobalt Code Generator
You can use any combination of options to filter your log search. Take note of the following behaviors:
• DATE & TIME RANGE: Follow the format in the example to make sure Cobalt understandswhat you mean. The strtotime() function is used to evaluate the date and time, whichunderstands most date strings, but the farther you deviate from the sample format, the morelikely it becomes that your date and time range will be misinterpreted.
• USER: The user filter takes your supplied username and searches for an exact match.
• MODULE: The module filter takes your supplied module string, and searches for entries whosemodule field contains the module string, not necessarily an exact match. Whatever you supplyis enclosed in %...%. Searching for “Login.php” will match “/test/Login.php”, whichmakes filtering for modules easier – even though Cobalt records the full path of the module(starting from webroot), you only actually need to supply the filename of the module. As longas all modules have unique names (they should), you don't need to bother about supplying thefull path from the webroot.
• Keyword Search: The keyword search filters only the Action field. Whatever you supply isenclosed in %...%. Combine this with your ability to customize log messages with keywords ofyour choosing, and you can filter for actions you want to monitor very easily just by supplyingthe unique keywords you give to certain actions / functions of the system.
• IP Address Filter: You can supply a full IP address, or a partial IP address. Whatever yousupply is enclosed in %...%. Take note that it is possible for the IP address column to containtwo addresses separated by a colon. In these cases, that means Cobalt detected that a proxyserver was used, so the IP address of the proxy and the client was logged. The first IP address isthe client IP, while the second one is the IP address of the proxy. It is also possible for the firstIP address (the one before the colon) to actually contain multiple IP addresses separated bycommas.
JV Roig Revision Date: Dec 5, 2013 36

Cobalt Developer's Guide Chapter 2: The Cobalt Code Generator
Change Password
Cobalt provides a way for all users to change their passwords as they desire. From the header menu,click PASSWORD to access the Change Password module.
This functions as most password changing modules do:
• Supply your old password first, to verify that the request to change password is legitimate.
• Type in your new password twice to prevent accidental typing errors turning your password intoa mystery.
• Click Submit to finish, or Cancel if you change your mind and don't want to change yourpassword at this time.
Cobalt will show you a success message if everything went well. Otherwise, Cobalt will show you anerror message, telling you exactly what you need to fix (for example, the old password you typed doesnot match your existing password, or the new passwords don't match each other).
JV Roig Revision Date: Dec 5, 2013 37

Cobalt Developer's Guide Chapter 2: The Cobalt Code Generator
Change Skin
Cobalt sports a “skinnable” / theme-able user interface (UI). Users can change the UI theme to suittheir preferences (darker, lighter, preferred color scheme, etc) by accessing the Change Skin moduleand choosing from the available system skins.
To access the Change Skin module, click SKIN from the header menu.
The Cobalt Default skin uses a lot of advanced CSS to give a more presentable and user-friendlyUI (rounded corners, shadows, and highlighting of rows and buttons upon mouseover). Those runningon slow machines may feel that the UI is slow or takes too much CPU power. If so, choose the CobaltMinimal skin for a simpler, faster UI.
Changing the system skin does not affect functionality.All changes are merely aesthetic.
JV Roig Revision Date: Dec 5, 2013 38

Cobalt Developer's Guide Chapter 2: The Cobalt Code Generator
Fine-Tuning Your ProjectFine-Tuning Your Project
Unless your project is a very simple one, the output of Cobalt's code generator will not fit your needswithout some fine-tuning. This includes:
• Assigning a different control type to a field, instead of the one assigned by Cobalt.
• Assigning a list of acceptable values for a certain field.
• Changing the labels for each field.
• Changing the attribute of a field to become optional instead of required.
• Adding relationship information between tables.
The code generator interface allows you to make these modifications so that the resulting system iscloser to your actual desires.
You can also do all these modifications outside of the code generator interface, by modifying the datadictionary code of relevant modules as necessary (we tackled this a bit in Chapter 1). In fact, morefine-tuning is possible through data dictionary code modification than through the code generatorinterface.
Take note that there is a certain advantage to doing as much fine-tuning aspossible through the code generator before generating the project: you canregenerate the project at any time, and your fine-tuning will remain. If you didall fine-tuning through data dictionary code modification, all these modificationswill not persist if you regenerate the project.
Assigning a Different Control Type to a Field
The default control type assigned by Cobalt to a field is based on the data type Cobalt detected for thatfield. The only exception here are fields named “remarks” or “description”, to which Cobaltautomatically assigns a textarea as the default control type.
In cases where you feel Cobalt's default choice for the control type of a field isn't optimal, you canoverride Cobalt's choice and assign a different control type.
From the Cobalt Control Center, click Table Fields. (Figure 41)
You should now find yourself in the List View: Table Fields screen. This page lists all the fields in allthe tables that Cobalt imported. The entries are arranged in alphabetical order per table.
Find the field you want to modify, then click the pencil icon beside it under the Operations column.This will bring you to the Edit Table Field screen.
JV Roig Revision Date: Dec 5, 2013 39

Cobalt Developer's Guide Chapter 2: The Cobalt Code Generator
JV Roig Revision Date: Dec 5, 2013 40

Cobalt Developer's Guide Chapter 2: The Cobalt Code Generator
As illustrated in Figure 43, click the Control Type drop-down list, then choose the new control type youwant for the field.
Warning!The “Special Textbox” control type is currently unsupported. It's a feature thatis currently still under development. Don't use it. Currently, choosing itresults in the same thing as choosing “None”.
For the moment, disregard the other options available. Let's just focus on choosing a new control type.Click Submit when you are done choosing a new control type.
Assigning a List of Acceptable Values for a Certain Field.
If you chose either Drop-down List or Radio Buttons, you need to tell Cobalt the data source,otherwise the resulting drop-down list or radio buttons will have no options for the user.
Cobalt keeps lists of values you can assign to fields having a drop-down list or radio button as theircontrol type. These lists of values are called predefined lists.
To see the available predefined lists, click Predefined Lists from the Cobalt Control Center.(Figure 44)
JV Roig Revision Date: Dec 5, 2013 41

Cobalt Developer's Guide Chapter 2: The Cobalt Code Generator
You should now find yourself in the List View: Predefined Lists page. (Figure 45 )
From here, you can see the default predefined lists that Cobalt ships with. You can freely modify them(for example, adding items to the list or modifying the existing items) by clicking the Edit button(pencil icon) beside the list you are interested in.
To change the number of items, enter the total number of items you want in the box labeled “Change #of items to”, and then click GO.
Warning!The number you enter is not the number of additional textboxes. Rather, it is thetotal number of textboxes to display. If you enter a number that is less than theexisting items in the list, the last few entries that exceed the new number willbe removed.
You can also add a new predefined list into Cobalt. Click Create New List at the top of the table.
JV Roig Revision Date: Dec 5, 2013 42

Cobalt Developer's Guide Chapter 2: The Cobalt Code Generator
Enter your preferred list name and a short description, then enter the items you want to appear in thelist.
The variable number of textboxes for list items works exactly like described in the Edit screen. Inputthe total number of items you want in the small textbox labeled “Change # of items to” and clickGO.
When you are done listing all the items you want, click Submit.
Cobalt will not sort the list; the list items will appear in the order that youentered them. If you want the items to be ordered in a particular way, list themin that particular order.
Now that you are finished creating and/or modifying predefined lists, you can now try assigning yournew (or newly-modified) predefined list to fields that use radio buttons or drop-down lists as controls:
JV Roig Revision Date: Dec 5, 2013 43

Cobalt Developer's Guide Chapter 2: The Cobalt Code Generator
• From the Cobalt Control Center, click Table Fields, then the Edit button (pencil icon)beside the field you want to modify.
• Change the control type either to a drop-down list or radio button
• Scroll down to #2 of Additional Options, choose Predefined List. (This step is onlynecessary if you chose Drop-down List instead of Radio Buttons.)
• Choose the predefined list you want in #3 of Additional Options.
• Click Submit.
A particular predefined list can be assigned to multiple fields in differenttables, or even multiple fields in the same table. Just repeat the steps above foreach field you wish to assign a predefined list to.
Changing the Label of a Field
Cobalt derives the field label from field name itself, only cleaning it up a bit by replacing underscoreswith spaces, and attempting to capitalize it properly using PHP's ucwords() function (capitalizing thefirst letter of each word).
If your field name isn't very cryptic, the default label provided by Cobalt will usually suffice. For
JV Roig Revision Date: Dec 5, 2013 44
Figure 47: Assigning a predefined list to a field: Choose "Predefined List" in #2 of Additional Options,then the appropriate predefined list in #3.

Cobalt Developer's Guide Chapter 2: The Cobalt Code Generator
example, if your field is called “employee_name”, the resulting label would be “Employee Name”.
However, if your field name is a bit less structured than that, say, “empname”, then the default labelwould become “Empname”. This is far from ideal, but you may have no control over the field names(old database, existing project, you are not involved in the database design, etc). In this case, all youcan really do is override the default labels Cobalt assigned.
To change the field label into something more appropriate, click Table Fields from the CobaltControl Center, then the Edit button (pencil icon) beside the field whose label you wish to modify.
The Label textbox (below the Control Type drop-down list) contains the field label. Enter the newlabel you want here. (Figure 48)
The field label has nothing to do with the variable name associated with thecontrol, or the field name included in SQL queries. The field label is completelyfor display purposes only, as the column name in List View pages and the textdisplayed beside the control in Add/Edit/Delete/View pages.
JV Roig Revision Date: Dec 5, 2013 45
Figure 48: Modifying the field label: Simply type the label you want in the "Label" textbox..
Cobalt Developer's Guide Chapter 2: The Cobalt Code Generator
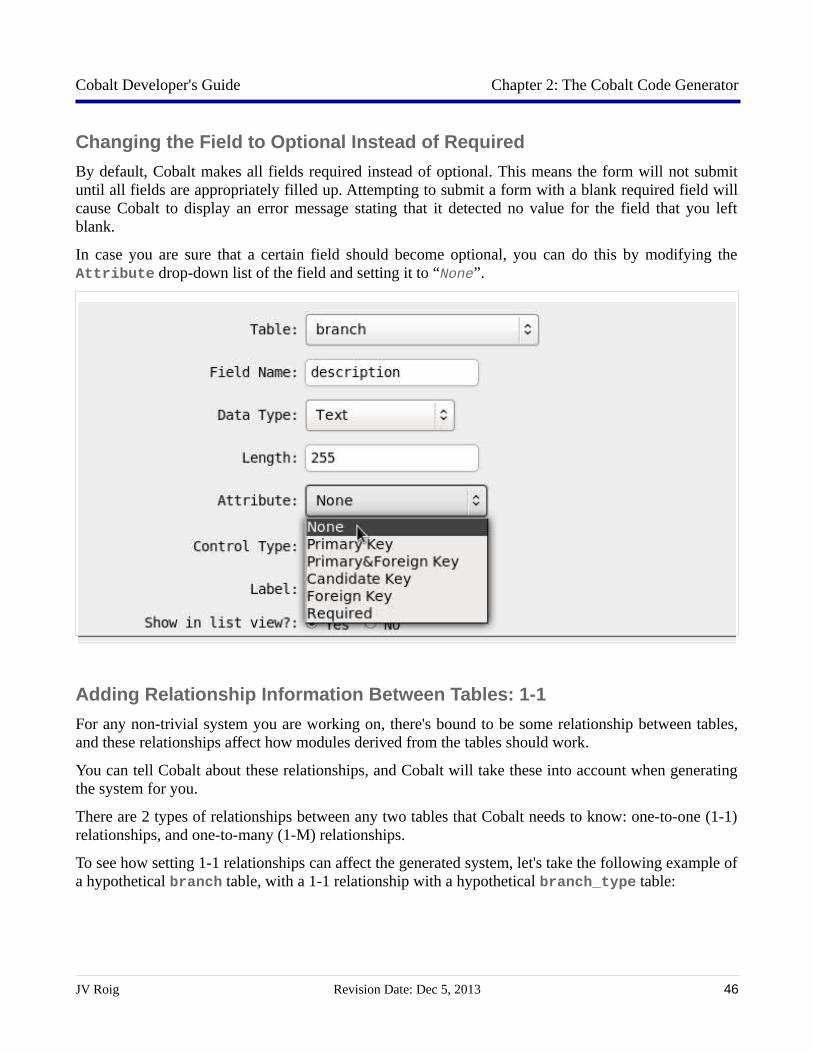
Changing the Field to Optional Instead of Required
By default, Cobalt makes all fields required instead of optional. This means the form will not submituntil all fields are appropriately filled up. Attempting to submit a form with a blank required field willcause Cobalt to display an error message stating that it detected no value for the field that you leftblank.
In case you are sure that a certain field should become optional, you can do this by modifying theAttribute drop-down list of the field and setting it to “None”.
Adding Relationship Information Between Tables: 1-1
For any non-trivial system you are working on, there's bound to be some relationship between tables,and these relationships affect how modules derived from the tables should work.
You can tell Cobalt about these relationships, and Cobalt will take these into account when generatingthe system for you.
There are 2 types of relationships between any two tables that Cobalt needs to know: one-to-one (1-1)relationships, and one-to-many (1-M) relationships.
To see how setting 1-1 relationships can affect the generated system, let's take the following example ofa hypothetical branch table, with a 1-1 relationship with a hypothetical branch_type table:
JV Roig Revision Date: Dec 5, 2013 46

Cobalt Developer's Guide Chapter 2: The Cobalt Code Generator
Code:branch ( branch_id int, branch_name varchar(255), branch_type_id int, description varchar(255))
branch_type ( branch_type_id int, branch_type_title varchar(255), description varchar(255))
The code box above shows the relevant details for our branch and branch_type tables. We've got atable of branches, and a separate table that stores the different branch types that branches could have.Although we show no foreign key constraints above, it's pretty easy to spot that what we actually wantis for branch to be related with branch_type through the branch_type_id field:
Code:branch ( branch_type_id int <--------|) | |branch_type ( | branch_type_id int <--------| )
We want the branch_type_id of branch to refer to values in the table branch_type. To tell Cobaltthis relationship between branch and branch_type, click Table Relations from the Cobalt ControlCenter, then click Define New Relationship in the List View: Table Relations screen.
JV Roig Revision Date: Dec 5, 2013 47
Figure 51: Click "Define New Relationship" to start telling Cobalt about a 1-1 or 1-M relationship.

Cobalt Developer's Guide Chapter 2: The Cobalt Code Generator
You should now find yourself in the Define Table Relation screen. (Figure 52). From here, you set whatkind of relationship you wish to define (1-1 or 1-M), and set the parent and child in the relationship.
In our hypothetical branch and branch_type relationship, it is a 1-1 relationship, and our parent isthe branch_type table because it is the source of the data. It's not enough to just say what table is theparent and what table is the child, we also need to indicate what fields connect them, therefore settingthe parent and child means choosing both the table AND field.
Let's review the relationship we want to tell Cobalt about:
Code:branch ( branch_type_id int <--------| === This is the child, it refers to its parent) | table for valid values |branch_type ( | branch_type_id int <--------| === This is the parent, source of data)
From there, we get that the parent is branch_type.branch_type_id, while the child isbranch.branch_type_id.
In 1-1 relationships, you don't actually want to use the child's foreign key for display purposes. Forexample, when our system displays the list of branches (we are just continuing our example usingbranch and branch_type), we want the list to actually show the type of branch (as text), not thebranch type ID. The code box below simulates this to provide more clarity:
JV Roig Revision Date: Dec 5, 2013 48

Cobalt Developer's Guide Chapter 2: The Cobalt Code Generator
Code:Sample values for branch_type table:branch_type_id | branch_type_title | Description 1 Store + Warehouse Branches that have their own warehouse 2 Store Only Branches that rely on central warehouse
(Below is what we don't want to see when listing branches)
branch_id | branch_name | branch_type 1 Main Store 1 2 Branch 1 1 3 Branch 2 2
(Below is what we actually want to see)
branch_id | branch_name | branch_type 1 Main Store Store + Warehouse 2 Branch 1 Store + Warehouse 3 Branch 2 Store Only
For this purpose, you need to tell Cobalt what text you want it to substitute for the child's foreign key.In our example above, we want the branch_type_title as the substitute (replacement) forbranch.branch_type_id when it comes to display purposes. To tell Cobalt about this textsubstitution, you enter “branch_type_title” in Child Field Subtext box. Figure 53 shows thecomplete information that Cobalt needs in order to understand the relationship we envision between thebranch and branch_type tables.
Clicking Submit finalizes the relationship, and Cobalt can generate a more-polished set of modules for
JV Roig Revision Date: Dec 5, 2013 49

Cobalt Developer's Guide Chapter 2: The Cobalt Code Generator
the branch table, thanks to the relationship information you entered.
Figures 54 and 55 shows you how the List View and input form for branch would look like if norelationship information was given to Cobalt before generating the system.
Figures 56 and 57 shows you how the List View and input form for branch would look if therelationship information shown in Figure 53 was given to Cobalt before generating the system.
The difference between the two sets of screenshots is hard to miss:
• Figure 54 shows that the List View page displays the branch type ID (numbers, not veryinformative, not very user-friendly).
• In contrast, Figure 56 shows that the List View page displays the actual branch type title (text,immediately informative, user-friendly), since we defined Child Field Subtext of therelationship to be branch_type_title.
• Figure 55 shows that the Add module has a simple textbox as the control type, a veryuser-unfriendly way to ask for the branch type ID.
• In contrast, Figure 57 shows that the Add module has a drop-down list, whose options comefrom the contents of the branch_type table. This is a much-improved, user-friendly way toinput the branch type.
JV Roig Revision Date: Dec 5, 2013 50

Cobalt Developer's Guide Chapter 2: The Cobalt Code Generator
JV Roig Revision Date: Dec 5, 2013 51
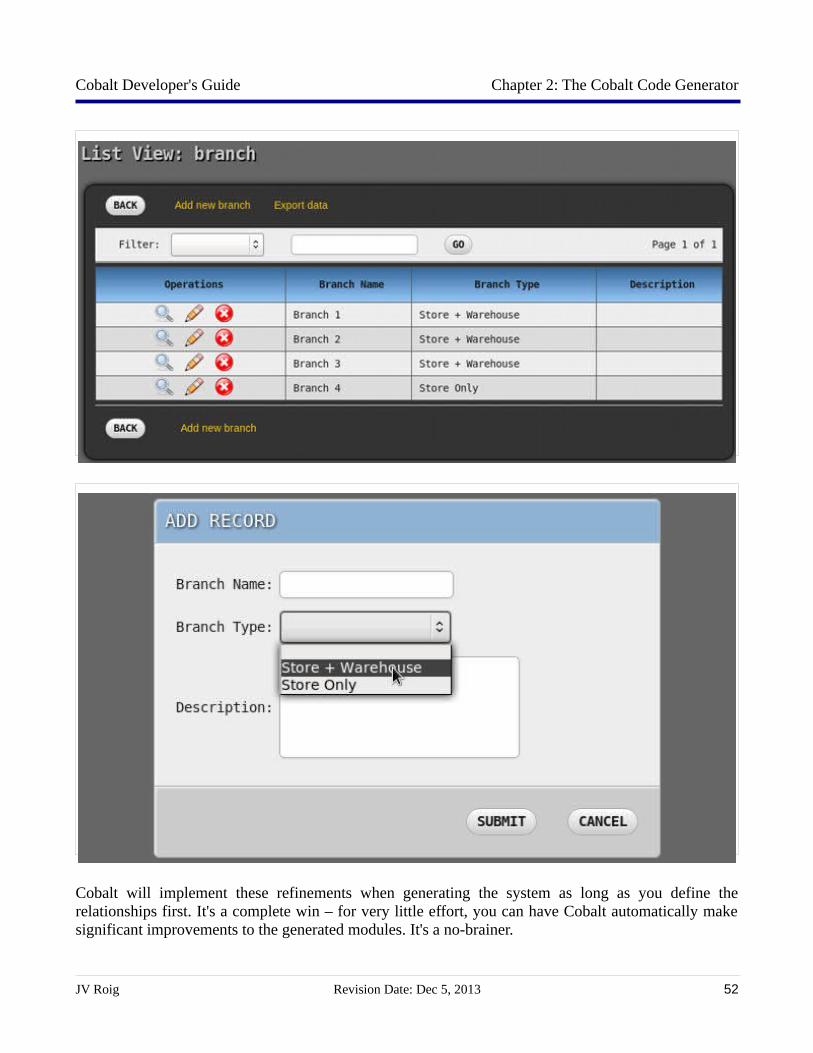
Cobalt Developer's Guide Chapter 2: The Cobalt Code Generator
Cobalt will implement these refinements when generating the system as long as you define therelationships first. It's a complete win – for very little effort, you can have Cobalt automatically makesignificant improvements to the generated modules. It's a no-brainer.
JV Roig Revision Date: Dec 5, 2013 52

Cobalt Developer's Guide Chapter 2: The Cobalt Code Generator
If you forgot to specify a relationship before generating the project, you cansimply go back to the Cobalt Control Center, define the relationship, generate theproject again, then overwrite the existing project that lacks the relationshiprefinements.
Warning!The tip above works pefectly if you haven't modified any of the resultingproject's code yet! If you've already modified certain parts of the project'ssource code, be careful not to overwrite the modified parts with “fresh” onesfrom the code generator. You'll lose a lot of good work that way, so be careful!
Adding Relationship Information Between Tables: 1-M
1-M table relationships instruct Cobalt to modify the input forms of the parent table to accommodateentry of a variable number of rows to the child table.
For example, let's say you have an employee table, and an employee_skills table, as described inthe code box below:
Code:employee ( employee_id char(10), last_name varchar(255), first_name varchar(255), middle_name varchar(255))
employee_skills ( employee_id char(10), auto_id int, -- we probably want this as some auto-incrementing field skill` varchar(255))
It's easy enough to see that employee and employee_skills are related through each other'semployee_id field. This isn't a 1-1 relationship, though. In this case, we probably designed these twotables so that we can store an employee's basic information and a list of his/her skills (there are manygood reasons to have the skills in a separate table instead of being just a field, but let's not get into thatright now).
In such a case, we say that the two tables form a 1-M relationship – that is, one record in employee isrelated to (or, you may say, “owns”) multiple records in employee_skills. Here, “multiple” (like the“many” part in “one-to-many”) can actually be any number, starting from zero to infinity.
Just a side note: As far as the basic database design goes, we call these “1-M”,although in an ERD you may see distinctions between a relationship that may have
JV Roig Revision Date: Dec 5, 2013 53

Cobalt Developer's Guide Chapter 2: The Cobalt Code Generator
zero child records and a relationship that must have at least one child record.The distinction really isn't that important, because our sample structures abovewouldn't really change at all.
Telling Cobalt about a 1-M relationship is slightly easier than a 1-1 relationship. It's still the sameprocess, but this time you don't indicate a Child Field Subtext value. That makes sense because youdon't really substitute anything in a 1-M relationship.
Our settings for the new relationship would be:
• Relation: ONE-to-MANY
• Parent: employee.employee_id
• Child: employee_skills.employee_id
• Child Field Subtext: (None; box is disabled for 1-M relationships)
The same information is illustrated in Figure 58.
JV Roig Revision Date: Dec 5, 2013 54
Figure 58: The input for "employee->employee_skills" 1-M relationship.

Cobalt Developer's Guide Chapter 3: The Cobalt Framework Reference
Chapter 3: Chapter 3: The Cobalt The Cobalt Framework ReferenceFramework Reference
Framework vs the Code GeneratorFramework vs the Code Generator
The Code Generator (see previous chapter) is meant to assist you in creating standard components foryour system. In the grand scheme of things the utility of this component is a lot less than theFramework component of Cobalt, because in the entire development lifecycle of the project, you'll bespending most of your time working with the framework instead of the code generator.
The entire framework component is pre-packaged with the output of the code generator (unless youunchecked the “Generate standard application components, core files, andsystem administration components” checkbox before creating the project). You can find thisframework inside “core” folder inside the base directory of your generated project.
The common roles of the Cobalt framework can be summarized as “Structure, Logic, Function,Control”
• Structure – provides an organized set of abstractions and components to help in codemaintainability and extensibility.
• Logic – provides reasonable guides to help system developers implement system features andmake design decisions.
• Function – provides convenience features, such as built-in components, classes and functions.to help developers accomplish common development tasks faster and with less code.
• Control – provides developers a way to easily extend, manage and adapt the framework asnecessary as the requirements of the system or project change.
In the next sections, we'll go through each of the different components of the framework and gothrough each of their respective functionalities and settings.
global_config.phpglobal_config.php
This core file contains the global configuration settings of the system. Configurations that belong hereare information that are true for every user, and will rarely change. The settings here are in the form ofconstants (using define() call) because they should never change during run time, and they should beglobally accessible.
global_config.php defines the following constants:
JV Roig Revision Date: Dec 5, 2013 55

Cobalt Developer's Guide Chapter 3: The Cobalt Framework Reference
• BASE_DIRECTORY – specifies the base directory. This is the name of the top-levelfolder/directory of the system, inside the server's webroot. If you rename your base directory inthe file system for any reason, you will have to change this value to match it in order for yoursystem to continue functioning as expected. Primarily, however, this configuration exists so thatyou can decouple your modules from the actual base directory name.
• FULLPATH_CORE – specifies the full filesystem path to the system's core folder.
• LOGIN_PAGE – specifies the webpath and filename of the login page.
• HOME_PAGE – specifies the webpath and filename of the home page (by default, this is theControl Center screen). Lots of modules will redirect to the home page upon hitting the cancelbutton, so this setting allows you to control where all those modules should redirect instead (ifyou so choose) by just changing a single value in a single location.
• INDEX_TARGET – specifies where the index.php files in each subdirectory of the system willredirect. By default, this defaults to Cobalt's parent frame (start.php). This setting will allowyou to change the targets for every index.php file by just changing a single value in a singlelocation.
• TMP_HYPERLINK_PATH – specifies the webpath to the directory where uploaded files andtemporary files were written to. Using this constant, you can easily display, for example, a validdownload link to a user for the file requested to be downloaded.
• TMP_DIRECTORY – specifies the full filesystem path to the directory where uploaded files andtemporary files will be written to. This constant is used to be able to easily specify the full pathwhere uploaded files will be saved.
• MULTI_BYTE_ENCODING – specifies the multi-byte encoding scheme for character sets that usemore than one byte to encode a character. Unless you have a valid reason to do so, you shouldleave this at the default value of utf-8.
• TIMEZONE_SETTING – specifies the timezone setting (e.g., 'Asia/Manila') that the date andtime functions of PHP will use. Cobalt will usually auto-detect the correct timezone so yougenerally do not have to change this value. However, auto-detection relies on your platform'stimezone setting; if you did not configure the correct timezone in your operating system, thenCobalt will likely have detected the wrong timezone for you.
• DEBUG_MODE – TRUE or FALSE only; this determines if the system is considered to be runningin “debug mode” or not. Debug mode means that Cobalt's error handler will output privateportions of error messages (more specific details), which can greatly assist developers duringdevelopment of the system. During production (go live / actual rollout), however, we usually donot want the private, specific portions of error messages to be displayed, as they most likelyleak too much information to would-be attackers. Therefore, DEBUG_MODE should be set toFALSE once your system is in the live/production server.
• LOG_FILE – this is a soon-to-be-deprecated setting. Uncommenting this will allow you to have
JV Roig Revision Date: Dec 5, 2013 56

Cobalt Developer's Guide Chapter 3: The Cobalt Framework Reference
file-based logging, aside from database-backed logging. File-based logging is harder to use,filter and sort, so this option is no longer recommended. Unless you have a very good reason todo so, leave this alone and commented out.
char_set_classchar_set_class.php.php
This core class is used to generate character sets for use in filtering. Various methods are provided toallow you a fast way to generate an array of characters according to your desired parameters.
Warning!Note that this is completely different from character set encoding, which refersto how characters are encoded (such as ASCII, ISO-8859-01, or UTF-8) to beunderstood by systems that will read those characters.
Member: allowed_chars
(data type: array)
(default value: none – empty array)
This member will contain the resulting sets of characters created according to your use of the class.
Member: allow_space
(data type: boolean)
(default value: TRUE)
This member specifies whether the character set methods should include the space character into theresulting character set. By default, the space character is treated as “allowed”, therefore alwaysincluded in character sets generated by this class.
Toggle this to FALSE if you want to generate a specific character set that does not include the spacecharacter.
Example:
require_once 'char_set_class.php'$obj_charset = new char_set();$obj_charset->generate_alphanum_set();$arr_charset_1 = $obj_charset->allowed_chars; //Alphanumeric chars + space$obj_charset->allow_space = FALSE;$arr_charset_2 = $obj_charset->allowed_chars; //Alphanumeric chars, no space
JV Roig Revision Date: Dec 5, 2013 57

Cobalt Developer's Guide Chapter 3: The Cobalt Framework Reference
Method: add_allowed_chars()
Parameters:
• $allow (data type: string) – the characters to add to the character set array, delimited by thespace character.
Return value:
• None.
This appends extra characters into the character set. You normally do not have to invoke this manually,as it is normally employed as a helper function for the other methods. However, in cases where youhave to incrementally add characters into the character set after specific operations, it is used just likeordinary methods.
Example:
require_once 'char_set_class.php'$obj_charset = new char_set();$obj_charset->generate_num_set();$arr_charset_1 = $obj_charset->allowed_chars; //0 to 9 only, with space.//... do something with this char set ...//$obj_charset->add_allowed_chars('a b c');$arr_charset_1 = $obj_charset->allowed_chars; //0 to 9, a-c, with space.//... do something with this new char set...//$obj_charset->add_allowed_chars('! ?');$arr_charset_1 = $obj_charset->allowed_chars; //0 to 9, a-c, '!' and '?', w/space.//... do something with this new char set with the two punctuation chars ...//
Method: generate_alphanum_set()
Parameters:
• $allow (data type: string; Optional) – if specified, the characters to add to the character setarray, delimited by the space character.
Return value:
• None.
Creates an array composed of alphanumeric characters (0-9, A-Z, a-z).
If $this->allow_space is TRUE (default value), the space character is included in the resultingarray.
If the optional parameter $allow is used, the characters (delimited by a space) supplied will be
JV Roig Revision Date: Dec 5, 2013 58

Cobalt Developer's Guide Chapter 3: The Cobalt Framework Reference
included in the resulting array.
Example:
require_once 'char_set_class.php'$obj_charset = new char_set();
//This will contain A-Z, a-z, 0-9, and the space character.$obj_charset->generate_alphanum_set();$arr_charset_1 = $obj_charset->allowed_chars;
//This will contain A-Z, a-z, 0-9, but no space character.$obj_charset->allow_space=FALSE;$obj_charset->generate_alphanum_set();$arr_charset_2 = $obj_charset->allowed_chars;
//This will contain A-Z, a-z, 0-9, space, and the //following four punctuation marks: ! ? . ,$obj_charset->allow_space=TRUE;$obj_charset->generate_alphanum_set('! ? . ,');$arr_charset_3 = $obj_charset->allowed_chars;
Method: generate_alpha_set()
Parameters:
• $allow (data type: string; Optional) – if specified, the characters to add to the character setarray, delimited by the space character.
Return value:
• None.
Creates an array composed of alphabetic characters (A-Z, a-z).
If $this->allow_space is TRUE (default value), the space character is included in the resultingarray.
If the optional parameter $allow is used, the characters (delimited by a space) supplied will beincluded in the resulting array.
Example:
require_once 'char_set_class.php'
JV Roig Revision Date: Dec 5, 2013 59

Cobalt Developer's Guide Chapter 3: The Cobalt Framework Reference
$obj_charset = new char_set();
//This will contain A-Z and a-z, and the space character.$obj_charset->generate_alpha_set();$arr_charset_1 = $obj_charset->allowed_chars;
//This will contain A-Z and a-z, but no space character.$obj_charset->allow_space=FALSE;$obj_charset->generate_alpha_set();$arr_charset_2 = $obj_charset->allowed_chars;
//This will contain A-Z, a-z, space, and the //following four punctuation marks: ! ? . ,$obj_charset->allow_space=TRUE;$obj_charset->generate_alpha_set('! ? . ,');$arr_charset_3 = $obj_charset->allowed_chars;
Method: generate_num_set()
Parameters:
• $allow (data type: string; Optional) – if specified, the characters to add to the character setarray, delimited by the space character.
Return value:
• None.
Creates an array composed of numeric characters (0-9).
If $this->allow_space is TRUE (default value), the space character is included in the resultingarray.
If the optional parameter $allow is used, the characters (delimited by a space) supplied will beincluded in the resulting array.
Example:
require_once 'char_set_class.php'$obj_charset = new char_set();
//This will contain 0-9, and the space character.$obj_charset->generate_num_set();$arr_charset_1 = $obj_charset->allowed_chars;
//This will contain 0-9 only, no space character.$obj_charset->allow_space=FALSE;$obj_charset->generate_num_set();
JV Roig Revision Date: Dec 5, 2013 60

Cobalt Developer's Guide Chapter 3: The Cobalt Framework Reference
$arr_charset_2 = $obj_charset->allowed_chars;
//This will contain A-Z, a-z, 0-9, space, and the //following four punctuation marks: ! ? . ,$obj_charset->allow_space=TRUE;$obj_charset->generate_alphanum_set('! ? . ,');$arr_charset_3 = $obj_charset->allowed_chars;
validation_class.phpvalidation_class.php
This core class provides data validation functions to allow you to check if submitted input conforms tothe expectations – for example, verifies that it contains only the allowed characters, or that it containsonly the allowed values (a whitelist approach), or that it does not have any unwanted values (a blacklistapproach).
Normally, you do not have to invoke methods from this class manually, as it is usually used indirectlyand automatically by invoking the sanitize() method of your data abstraction subclass.
Member: validity
(data type: boolean)
(default value: FALSE)
This member will the final result of the validation routines done for a particular input. FALSE indicatesinvalid input, TRUE indicates the input conforms to expected or allowed values.
Member: error_message
(data type: string)
(default value: none – empty string)
If the validation routines end in FALSE (invalid input was detected), this member will contain theappropriate error message string, which you can then use to display an appropriate message to thescreen or log. Otherwise, this member will remain empty.
Member: invalid_chars
(data type: array)
(default value: none – empty array)
If the validation routines end in FALSE (invalid input was detected), this member will contian all illegalcharacters (characters not found in the allowed character set) that the relevant validation routine found(check_char_set() ).
JV Roig Revision Date: Dec 5, 2013 61

Cobalt Developer's Guide Chapter 3: The Cobalt Framework Reference
If the validation routines end in TRUE, or if no allowed character set was specified, this member willremain empty.
Method: validate_data()
Parameters:
• $unclean (data type: string) – the input that needs to be validated.
• $type (data type: string) – specifies what data type $unclean is expected to be.
• $char_set (data type: array; Optional) – if specified, this sets the allowed characters that$unclean may have. Any character not included here that is found in $unclean will cause thevalidation to result in FALSE, and all such illegal characters will be added to the$invalid_chars array.
• $valid_set (data type: array; Optional) – if specified, this sets the possible values that willbe used either as a blacklist (i.e., a list of unacceptable values) or a whitelist (i.e., a list ofacceptable values).
• $whitelist (data type: boolean; Optional) – controls how $valid_set is interpreted. TRUE(default) means $valid_set will be treated as a whitelist, FALSE means $valid_set will betreated as a blacklist.
Return value:
• None.
validate_data() will perform necessary data validation depending on the value of $type.
$char_set, if supplied, contains the valid characters that the data may possess – anything else willmean the data will be considered invalid.
$valid_set, if supplied, contains a set of data, the use of which depends on the setting of$whitelist. If $whitelist is set to TRUE (it is by default), then $valid_set is considered to be awhitelist, meaning the only valid values for the submitted data should be in $valid_set, otherwisethe data is regarded as invalid, whatever it is. On the other hand, if $whitelist is set to FALSE, then$valid_set is treated as a blacklist, meaning its contents represent invalid values - if the submitteddata matches a value in $valid_set, then the submitted data is regarded as invalid.
Method: check_data_set()
Parameters:
• $unclean (data type: string) – the input that needs to be validated.
JV Roig Revision Date: Dec 5, 2013 62

Cobalt Developer's Guide Chapter 3: The Cobalt Framework Reference
• $valid_set (data type: array) – the possible values that will be used either as a blacklist (i.e.,a list of unacceptable values) or a whitelist (i.e., a list of acceptable values).
• $whitelist (data type: boolean) – controls how $valid_set is interpreted. TRUE (default)means $valid_set will be treated as a whitelist, FALSE means $valid_set will be treatedas a blacklist.
Return value:
• None.
This function checks if the submitted data conforms to the defined whitelist or blacklist, as specified in$valid_set and $whitelist.
This method is automatically invoked by validate_data() if the $valid_set parameter waspassed to validate_data().
Upon success ($unclean was found in the whitelist or not found in the blacklist) this will set$this->validity to to TRUE. Otherwise, $this->validity will remain FALSE (default value)and $this->error_message will be appended with an appropriate error message fragment('Invalid value submitted in: '). However, this error message is incomplete (hence, called afragment), and the appropriate field name will have to be supplied to complete it. Higher-levelabstractions deal with this complexity automatically (particularly the sanitize() method of yourdata abstraction subclass), so this is not something that developers will normally have to domanually, particularly in the use case of accepting form data and validating them.
Method: check_char_set()
Parameters:
• $unclean (data type: string) – the input that needs to be validated.
• $char_set (data type: array) – specifies the set of characters that $unclean is allowed tocontain.
Return value:
• None.
This function checks if the submitted data contains only the specified allowed characters.
This method is automatically invoked by validate_data() if the $char_set parameter was passedto validate_data().
Upon success ($unclean was found to contain only valid characers) this will set $this->validity
JV Roig Revision Date: Dec 5, 2013 63

Cobalt Developer's Guide Chapter 3: The Cobalt Framework Reference
to TRUE. Otherwise, $this->validity will remain FALSE (default value) and$this->invalid_chars will be filled with all the invalid characters found.
Method: check_if_null()
Parameters:
• $label (data type: string) – the label for the data to be inspected.
• $value (data type: any) – the data to be inspected
Return value:
• (string): the error message. If all submitted data are not empty (success scenario), this will be anempty string,
This function accepts an arbitrary number of paramters, and these parameters will be treated as pairs.The first parameter in a pair is regarded as $label, while the second in the pair is regarded as$value.
This function checks if the submitted data (all $value parameters) are not empty or null. If one ormore of the submitted data is found to be empty, this functon will return an error message saying “Novalue detected: $label”, where $label corresponds to the $label paried with the $value thatwas found to be empty.
This method is automatically invoked by higher-level abstractions and is not usually needed to bemanually called in a module, particularly in the validation of submitted form data that is automaticallydone by Cobalt generated modules.
Example:
require_once 'validation_class.php'$validator = new validation;
//Let's pretend that the following variables represent submitted form data, and//not manually initialized variables.$item = 'Shipping box';$weight = '25kg';$remarks = '';
//Assuming that all three submitted variables should not be blank:$error_message = $validator->check_if_null('Item', $item);$error_message .= $validator->check_if_null('Weight', $weight);$error_message .= $validator->check_if_null('Remarks', $remarks);
//Since we set $remarks to empty, this will output//”No value detected: Remarks”echo $error_message;
JV Roig Revision Date: Dec 5, 2013 64

Cobalt Developer's Guide Chapter 3: The Cobalt Framework Reference
//This function can actually accept multiple sets of parameters, so we//can accomplish the same thing as above using this syntax:$error_message = $validator->check_if_null('Item', $item, 'Weight', $weight, 'Remarks', $remarks);echo $error_message;//Output is still “No value detected: Remarks”;
JV Roig Revision Date: Dec 5, 2013 65