coaguchek xs system user manual...coagulation test on the coaguchek xs meter. user manual this...
TRANSCRIPT

This is a CLIA waived system.
User Manual


The contents of this manual, including all graphics and photographs, are the property of Roche Diagnostics. No part of this document may be reproduced or transmitted in any form or by any means, electronic or mechanical, for any purpose, without the express written permission of Roche Diagnostics.
Roche Diagnostics has made every reasonable effort to ensure that all the information contained in this manual is correct at the time of printing. However, Roche Diagnostics reserves the right to make any changes necessary without notice as part of ongoing product development.
For USA: For Prescription use only
This manual was created by the Roche Diagnostics Engineering Operations department. Direct questions or concerns regarding the contents of this document to:
Roche Diagnostics Engineering Operations Department 9115 Hague Road P.O. Box 50457 Indianapolis, IN 46250-0457 USA
COAGUCHEK is a trademark of Roche.
All other trademarks are property of their respective owners.
© 2011-2016, Roche Diagnostics.
US Order Number: 04837991001 (07)-0816 Distribution in USA by: Roche Diagnostics, Indianapolis, IN
This document is available electronically at www.coaguchek-usa.com
Revisions to this document are provided by Roche Diagnostics when necessary. No part of this document may be reproduced in any form or by any means without prior written consent.
i

Manual version Revision date Changes
Version 3.0 November 2009 New document
Version 4.0 March 2011 Revised to update meter pictures, remove patent information, add disposal information, and update product specifications section.
Version 5.0 September 2013 Revised ERROR 6 verbiage.
Version 6.0 February 2016 Revised for additional test strip material number
Version 7.0 August 2016 Added GTIN information and revised section “Out of Range Values”
ii

iii
Section HeadAbout this Manual .............................................................................1
Symbols and Abbreviations ...........................................................................1User Resources ..................................................................................2
Video ......................................................................................................................2Getting Started ...................................................................................................2User Manual ........................................................................................................2Test Strip Package Inserts .............................................................................2
The CoaguChek XS System .............................................................3Anticoagulation Medication ..........................................................................3Blood-clotting Time ..........................................................................................3How the System Works ...................................................................................4The CoaguChek XS Meter .............................................................................5Operating Conditions .......................................................................................6
Getting Started ...................................................................................7Batteries ................................................................................................................7Installing (or Replacing) Batteries ..............................................................8Meter Setup .........................................................................................................9Setting the Date and Time.............................................................................9Code Chip ......................................................................................................... 12Inserting a New Code Chip ........................................................................ 12Integrated Quality Controls ........................................................................ 14
Testing a Blood Sample................................................................. 15Tips for a Good Fingerstick ........................................................................ 15Important Notes about Blood Testing .................................................... 16
Always............................................................................................................ 16Never .............................................................................................................. 16Infection Control ........................................................................................ 17
Preparing for a Test ....................................................................................... 18Performing a Test ........................................................................................... 20Out of Range Values ..................................................................................... 24Optional Testing Methods .......................................................................... 25
Using Capillary Tubes .............................................................................. 25Using Venous Blood ................................................................................. 28
Table of Contents

Memory ............................................................................................. 30Storing Test Results in Memory ............................................................... 30Reviewing Stored Test Results .................................................................. 30Erasing Stored Test Results ....................................................................... 32
Cleaning the Meter ......................................................................... 34Cleaning the Exterior .................................................................................... 34Cleaning the Test Strip Guide ................................................................... 35
Advanced Features ......................................................................... 37Setting Advanced Features ........................................................................ 38
The Meter’s Display........................................................................ 39
Error Messages ............................................................................... 40Error Messages You May See After You Apply Blood .................... 44
Other Information............................................................................ 48Ordering Information for Health Care Professionals ........................ 48Product Limitations ....................................................................................... 48Product Specifications ................................................................................. 49Support/Services ............................................................................................ 50Symbols .............................................................................................................. 51Disposal of the Meter, Test Strips, Lancets, and Batteries ............ 54Warranty ............................................................................................................ 55
iv

Symbols and AbbreviationsThe test strip insert, the label on the back of the meter, the User Manual, and other packaging material may contain the following symbols or abbreviations:
Use by
Batch code/Lot number
In vitro diagnostic medical device
Catalog number
Consult instructions for use
Caution, consult accompanying documents. Refer to safety-related notes in the manual accompanying this instrument
Manufacturer
Temperature limitation (Store at)
The system fulfills the Canadian and U.S. safety requirements (UL LISTED, in accordance with UL 61010A-1:02 and CAN/CSA-C22.2 No.61010-1-04).
Rx Only For prescription use only
Global Trade Item Number
1
About this Manual

2
Several resources are available to help you use and maintain the CoaguChek XS System.
Video (DVD Format)The CoaguChek XS System Video is for new users of the CoaguChek XS System. The video will help you get comfortable with the CoaguChek XS Meter and the testing procedure.
Getting StartedThe Getting Started guide shows you how to perform your first coagulation test on the CoaguChek XS Meter.
User ManualThis CoaguChek XS System User Manual is a comprehensive guide to the meter and test strips. It is designed to provide answers to your questions about the meter’s operation and use. Read this entire manual carefully, and refer to it as necessary.
Test Strip Package InsertsBe sure to read the test strip package insert for important updates and keep the insert from your current test strip package for future reference.
User Resources

3
The CoaguChek XS System is intended for use by professional healthcare providers for quantitative prothrombin time testing for the monitoring of warfarin therapy. The CoaguChek XS System uses fresh capillary or nonanticoagulated venous whole blood.
Anticoagulation MedicationAnticoagulation medications, also known as blood thinners, are prescribed to avoid unwanted clots. Blood-clotting time must be monitored to ensure that a patient’s medication dosage is correct.
Blood-clotting TimeThe rate at which blood clots is measured in units called INR. It is very important for patients to stay within their target INR range. If the INR is too low, the risk of blood clots increases. If the INR is too high, the risk for internal bleeding increases. Everyone’s INR is different. The patient’s doctor determines the best INR range for the patient, depending on why the patient is taking anticoagulants and how the patient reacts to them. The doctor also determines how often the patient’s blood should be tested. The doctor needs to know the patient’s blood-clotting time in order to successfully treat the patient.
The CoaguChek XS System

4
How the System WorksThe CoaguChek XS System includes a meter and CoaguChek XS PT test strips. Each box of test strips has its own code chip that you insert into the meter. The code chip contains important information about the test strips such as their expiration date and lot number. The meter and test strips work together to provide a safe and reliable system for testing blood-clotting time. The CoaguChek XS System makes measuring blood-clotting time easy. The display on the meter guides you through the testing process. With the code chip inserted in the meter, you simply insert a test strip and apply a blood sample. The meter displays the result in about a minute. The meter automatically stores the result in memory so that you can easily recall results.The CoaguChek XS PT test strip contains various ingredients. When a blood drop is applied, the meter starts the test and the blood mixes with the ingredients on the test strip. When the meter determines that the blood has clotted, it stops the measurement and calculates the result.

5
The CoaguChek XS MeterA DisplayB M (Memory) ButtonC ON-OFF ButtonD Test Strip Guide CoverE Test Strip Guide
F Battery Compartment CoverG Code Chip SlotH SET ButtonI Data Port
A F
GB
H
C
DE
I

6
Operating ConditionsTo ensure that the CoaguChek XS Meter functions correctly, follow these guidelines:• Use the meter at room temperature, between 59°F and 90°F
(15°C and 32°C).• Use the meter at a relative humidity of less than 85%,
without condensation.• When testing, keep the meter level.• If you store the meter for a period of time, remove the batteries. • Do not use the meter at an altitude higher than 14,000 feet
(4,300 meters). • Do not use the meter near a strong magnetic field, such as
a microwave oven, as this may interfere with the meter’s proper operation.
Note: The CoaguChek XS Meter automatically shuts off after 3 minutes if no buttons have been pushed.

7
Refer to the Getting Started guide to learn how to set up the meter and prepare for and run your first blood-clotting-time test.
BatteriesThe CoaguChek XS Meter uses 4 AAA batteries. The recommended batteries, alkaline-manganese batteries, should last for approximately 300 tests. When you power the meter on, the display briefly shows the battery symbol. The battery symbol is divided into 4 segments. With new, fresh batteries in the meter, the battery symbol shows all 4 segments.When only 1 segment appears, replace the batteries. When only 1 segment appears you can still access results stored in the meter’s memory.If you insert new batteries within 1 minute of removing the old batteries, the date and time settings will remain in memory. But if you do need to reset the date and time, refer to the Meter Setup section in this manual. The meter saves battery power by automatically powering off after 3 minutes, unless you press a button or insert a test strip. Even when the batteries are removed, the test results are saved in memory.
Getting Started

8
Installing (or Replacing) BatteriesHave ready 4 AAA batteries.
1. Open Battery Compartment
2. Insert New Batteries
3. Power Off
With the meter powered off, turn it over. Press the latch gently inward and lift the cover. Remove the old batteries, if necessary.
Position the batteries according to the diagram inside the battery compartment. Replace the cover. Turn the meter back over.
Power the meter off .

Meter SetupThe CoaguChek XS Meter is preset with the U.S. date format (month-day-year) and U.S. time format (12-hour as opposed to 24-hour).Before you use the meter for the first time—or if there is no battery power for more than 1 minute—you’ll have to set the current date and time. In addition, the meter has certain advanced features that you can set up if you plan to use them. See the Advanced Features section in this manual to learn more about the advanced features and how to set them up.
Setting the Date and TimeThe date and time settings are important. Each time you run a test, the meter compares its date with the test strip’s expiration date. If the test strips are expired, the meter displays an error message and prevents you from running a test.Whenever you put batteries in the meter, it automatically goes to Setup mode (where you set the date and time). You can also go to Setup mode at any time by pressing the SET button .To set the date and time, you’ll use these buttons:• to change a setting.• to accept a setting.
9

10
1. Go to Setup Mode
2. Set Today’s Date
If the meter is not already in Setup mode, press the SET button .
The date format flashes in the upper-right corner.
Press the SET button .Press the M button to change the year. Press the SET button .Press the M button to change the month. Press the SET button .Press the M button to change the day. Press the SET button .

11
3. Set Current Time
4. Power Off
The time format flashes in the upper-left corner.
Press the SET button .Press the M button to change the hour. Press the SET button .Press the M button to change the minutes. Press the SET button .
Power the meter off .

12
Code ChipEach box of test strips comes with its own code chip. The code chip provides the meter with information such as the lot number and expiration date of the test strips. Before each test, make sure the correct code chip is in the meter. Each time you open a new box of test strips, replace the old code chip with the new one.Protect the code chip from moisture and also from equipment that produces magnetic fields, such as a microwave oven.
Inserting a New Code ChipHave the correct code chip ready.
1. Remove Old Code Chip With the meter powered off, remove the old code chip and throw it away.

13
2. Match Codes
3. Insert New Code Chip
Make sure that the three-number code on the new test strip container matches the three-number code on the new code chip.
Slide the new code chip into the code chip slot until it snaps into place.

14
Integrated Quality ControlsThe CoaguChek XS System has quality control functions integrated into the meter and test strips, so you never have to run quality control tests with liquid quality controls. The meter automatically runs its own quality control test as part of every blood test.
When the quality control test runs, the letters QC flash on the meter’s display. When the quality control test completes, a checkmark (P) appears following the letters QC. Then the meter continues to run the blood test. If the quality control test fails, the meter displays the following error message. See the Error Messages section in this manual for an explanation of this (and other) error messages and what to do when they occur.

15
Testing a Blood SampleTips for a Good Fingerstick
For fingerstick blood testing, increasing the blood flow in the finger will help you get a good drop of blood. Before you prick the finger, try the following techniques until you see that the fingertip has good color:
• Warm the hand by having the patient hold it under his or her armpit, use a hand warmer, and/or wash the hand with warm water.
• Have the patient hold his or her arm down to the side, so that the hand is below the waist.
• Massage the finger from its base.
If needed, immediately after pricking, gently squeeze the finger from the base to encourage blood to flow.

16
Important Notes About Blood TestingAlways
• Operate the meter at temperatures between 59°F and 90°F (15°C and 32°C).
• Refer to the test strip package insert for proper use and handling of test strips.
• Keep the test strip guide and meter clean. You may occasionally need to clean them. See the Cleaning the Meter section in this manual for more information.
Never • Store the meter in damp or humid conditions (greater than
85% humidity). • Remove or insert the code chip while the meter is
performing a test. • Use a code chip from a box of test strips other than the
one in use. • Open a container of test strips or touch a test strip with wet
hands or wet gloves.• Touch or remove the test strip during a test. • Wait more than 15 seconds after sticking the fingertip before
applying the blood.• Add more blood after the test has begun. • Touch any buttons while a test is in progress.• Perform a test with a drop of blood from a previous fingerstick.

17
Infection ControlFollow appropriate infection control guidelines.• Use gloves.• Use a separate lancet for each person.• Dispose of used lancets and test strips in a stable container with
a lid according to infection control guidelines.• Follow all other hygiene and safety procedures applicable.
Caution: There is a potential risk of infection. Medical staff and other persons using the CoaguChek XS Meter to perform tests on more than one patient must be aware that any object coming into contact with human blood is a potential source of infection. (See: National Committee for Clinical Laboratory Standards: Protection of Laboratory Workers from Instrument Biohazards and Infectious Disease Transmitted by Blood, Body Fluids, and Tissue. Approved Guideline, NCCLS document M29-A, 1997.) Dispose of used items according to the disposal policy of your facility.

18
Preparing for a Test
1. Gather Items Gather the following items:• CoaguChek XS Meter• Container of test strips• Test strip code chip• CoaguChek lancet
2. Match Codes Make sure the code number on the test strip container and the code chip match.
Each box of test strips comes with a matching code chip. Every time you open a new box of test strips, you must replace the code chip.

19
4. Wash Hands Have the patient wash his or her hands in warm, soapy water. Or, clean the fingertip with an alcohol wipe.
Make sure the fingertip is thoroughly dry.
3. Insert Code Chip Make sure the meter is powered off. With the code number facing up, insert the code chip into the code chip slot until it snaps into place.
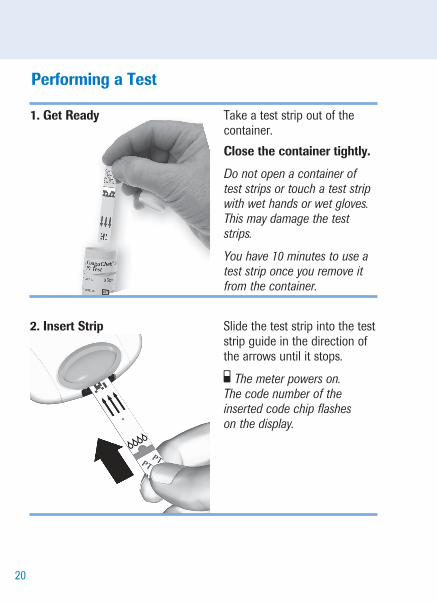
1. Get Ready Take a test strip out of the container. Close the container tightly.
Do not open a container of test strips or touch a test strip with wet hands or wet gloves. This may damage the test strips.
You have 10 minutes to use a test strip once you remove it from the container.
2. Insert Strip Slide the test strip into the test strip guide in the direction of the arrows until it stops.
The meter powers on. The code number of the inserted code chip flashes on the display.
20
Performing a Test

21
3. Match the Code Confirm that the number displayed matches the number on the test strip container, then press .If the numbers are different, make sure you are using the code chip that came with the test strips you are using.
An hourglass appears as the meter warms up, which takes about thirty seconds.
When the meter is warmed up a flashing test strip appears and the meter begins a countdown. You have 180 seconds to apply blood to the test strip.
4. Collect the Blood Twist the protective cap off the CoaguChek lancet.
Massage the finger until you see increased color in the fingertip. Keeping the hand down, press the tip of the lancet firmly against the side of the fingertip. Press the blue trigger button.
Gently squeeze from the base of the finger to develop a hanging drop of blood.

6. Apply the Blood Within 15 seconds of sticking the fingertip, apply the blood to the target area of the test strip—either from the top or side of the test strip.
Hold the blood drop to the test strip until you hear a beep. The flashing blood drop symbol disappears. Do not add more blood to the test strip. Do not touch the test strip.
The result appears in about 1 minute.
5. Identify the Target Area Find the target area on the test strip.
You can dose the target area by bringing the patient’s finger to the top of the test strip or by bringing the meter to the patient’s finger so that the side of the test strip touches the blood drop.
22

23
7. Record Result Record the result according to your facility’s guidelines.
8. Clean Up Place the used test strip and lancet in an approved container. Power the meter off .
If the meter is dirty, wipe it clean with a recommended cleaner.

24
Out of Range ValuesThe CoaguChek XS PT test strips provide test results if the INR value is 0.8 and 8.0. If the result falls outside of this range, the meter displays < (less than) 0.8 or > (greater than) 8.0. If the meter indicates an out-of-range value, refer to the test strip package insert and repeat the test.In rare cases, an “error 7” message can occur in patients with long coagulation times (> 8 INR). If this error message appears again when the test is repeated, the result must be checked using another method.
OR
If a “c” is displayed along with the result, the hematocrit value might be very low or the blood sample might not have been collected properly (e.g., wet hands). Repeat the measurement and make sure that the patient’s hands are dry. If the message persists, perform a hematocrit check.

25
1. Prepare the Capillary Tube Firmly insert the end of the capillary tube into the capillary bulb. Completely insert the tube into the bulb to break the bulb diaphragm.
Do not push the capillary tube in so far that it extends beyond the top of the bulb.
Optional Testing Methods
Using Capillary TubesYou may use capillary tubes to collect the blood from a fingerstick and to dose the test strip. Use only CoaguChek Capillary Tubes/Bulbs, REF 11621173001. Do not use glass capillary tubes or capillary tubes that contain anticoagulants. The following steps are optional to the fingerstick blood sample instructions in the Preparing for a Test and Performing a Test sections of this manual.

26
2. Fill the Capillary Tube When the flashing test strip appears on the meter’s display, stick the fingertip. Then touch the capillary tube to the blood drop. Keep the tube level, and allow it to fill by capillary action. Fill the tube only halfway.
Avoid getting air bubbles into the sample. Do not touch the hole at the top of the bulb. If blood gets into the bulb during sample collection, discard the bulb and repeat the test with a new test strip and fingerstick.
3. Dose the Test Strip Within 15 seconds of sticking the fingertip, apply the blood to the test strip. Put your finger over the hole at the end of the capillary tube. Hold the capillary tube directly over the target area of the test strip. Squeeze the bulb to dispense one hanging drop of blood.
Do not touch the test strip, move the meter, or add more blood during testing.

27
4. Record Result Record the result according to your facility’s guidelines.
5. Dispose of Blood Collection Items
After testing, discard the capillary tube along with the used test strip and lancet according to infection control guidelines.

28
1. Collect the Venous Sample When the flashing test strip appears on the meter’s display, collect the venous blood sample.
Do not perform venipuncture until the flashing test strip is displayed.
Using Venous BloodYou may use the CoaguChek XS Meter to test venous blood. Blood may be collected directly using a butterfly or a needle and syringe. Do not clean the syringe tip with alcohol or water prior to dosing the test strip. Use only a plastic syringe free of anticoagulant. Do not use glass. The syringe needle should be 23 gauge or larger. A 21 gauge or larger needle is recommended.
Note: Refer to the Preparing for a Test and Performing a Test sections of this manual for fingerstick blood testing instructions.

29
2. Dose the Test Strip Discard the first 4 drops of blood. Then immediately place 1 hanging drop of blood directly onto the target area of the test strip. Completely cover the target area.
Do not touch the test strip. Do not introduce air bubbles, move the meter, or add more blood during testing.
3. Record Result Record the result according to your facility’s guidelines.
4. Dispose of Blood Collection Items
After testing, discard the needle, syringe, or butterfly, and used test strip according to infection control guidelines.
30
Storing Test Results in MemoryThe CoaguChek XS Meter automatically stores up to 300 test results and their dates and times in its memory. If the memory is full when you perform a test, the oldest result is automatically deleted. The most recent result is always saved.When viewing results in memory, results can be changed between INR and Seconds by pressing the Set button on the meter side. This allows the user to toggle between seconds and INR.
Note: All test results, including their date and time, remain in memory even when the meter is without batteries.
Reviewing Stored Test ResultsYou can review stored test results even when the meter’s battery power is low. To review results in memory:
Memory
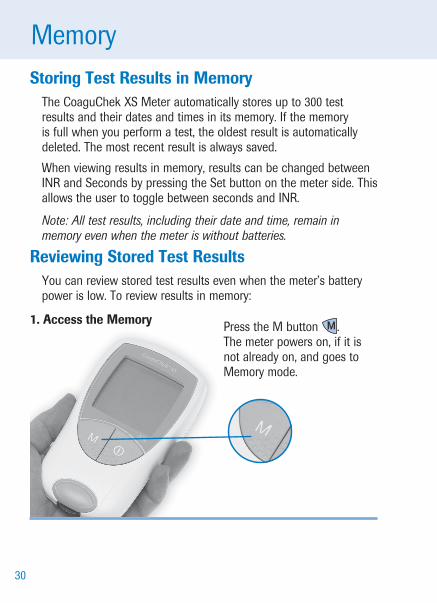
1. Access the Memory Press the M button . The meter powers on, if it is not already on, and goes to Memory mode.

31
2. View Most Recent Result The most recent test result appears. The letters mem indicate that you are viewing a result in memory. The time and date of the test also appear. If there are no results in memory, a 0 appears in the display’s top-right corner.
3. View Earlier Results To view earlier results, press the M button again . After you have viewed all the results in the memory, 3 dashes appear.

32
Erasing Stored Test ResultsYou can erase all of the test results that are stored in the meter’s memory. You cannot, however, erase individual test results.To erase all stored results:
1. Go to Erase mode. With the meter powered off, press and hold down the M button . While you are holding down the M button, press the ON-OFF button and then hold down both buttons for at least 5 seconds.
The meter displays mem (flashing) and clr. The number of results in memory is shown in the top-right corner of the display.

33
2. Confirm Press the M button to confirm that you want to erase the entire memory.
Note: To exit Erase mode without erasing the results, press the ON-OFF button instead.
The hourglass symbol flashes while the test results are being erased. Then, the counter is set to 0 and 3 dashes appear.

34
Cleaning/Disinfecting the MeterIt is important to follow the procedures below to clean and disinfect the meter. Failure to follow these procedures may cause malfunction of the meter. • Do not use sprays of any sort• Ensure that swab or cloth is only damp, not wet
Cleaning/Disinfecting the Exterior• Use only the following items for cleaning/disinfecting the
CoaguChek XS meter housing for a contact time of >1 minute: – 70% isopropyl alcohol – 10% Sodium hypochlorite solution (1 part bleach to 9 parts deionized water, made fresh every 24 hours) – Note: Do not use any other disinfectants/cleaning solutions on the meter housing.
1. Clean/Disinfect the Exterior
2. Dry the Exterior
With the meter powered off, wipe the meter’s exterior clean.• Do not let liquid accumulate
near any opening. Make sure that no liquid enters the meter.
With a lint-free tissue, dry the meter.• Wipe away residual moisture
and fluids after cleaning the housing.
• Allow wiped areas to dry for at least 10 minutes before performing a test.

35
Cleaning/Disinfecting the Test Strip Guide• Use only 70% isopropyl alcohol or 10% bleach solution to clean
the CoaguChek XS test strip guide.• Do not use any other cleaning/disinfecting solutions on the
test strip guide. Use of other cleaning/disinfecting solutions could result in damage to the meter.
1. Open the Cover
2. Clean/Disinfect the Test Strip Guide
With the meter powered off, use your thumbnail to open the cover of the test strip guide by pressing its front edge upward. Move the cover safely away from the meter. Then rinse the cover with water or wipe it clean.
• Hold the meter upright with the test strip guide facing down.
• Clean the easily accessible areas with a cotton swab.
• Ensure the swab is only damp, not wet.
• Apply cleaning agent for a contact time of >1 minute (refer to the corresponding product labeling). Wipe away residual moisture and fluids.

36
3. Allow to Dry
4. Close the Cover
With the cover off, allow the test strip guide to dry for at least 10 minutes before re-attaching the test strip guide cover and testing again.
Close the cover, and make sure it snaps into place.
Caution: Do not insert any objects into the test strip guide. Doing so could damage the electrical contacts behind the test strip guide.

37
The CoaguChek XS Meter includes advanced features that you can set up as necessary. They are:• Changing the unit of measurement• Disabling the beep (With the beep enabled, the meter beeps
when it detects a test strip, when it is ready for you to apply a sample, when it detects a sample, when the result is displayed, and when an error occurs—3 short beeps.)
• Setting a therapeutic range (for INR only)
The following table shows the setting options and the default setting for each advanced feature:
Advanced Features
Feature Setting Options Default SettingUnit %Q INR Sec INRBeep On On OffTherapeutic range On Off(for INR only) OffSet range Lower range (1.5 – 3.5) 1.5 INR(in INR) Upper range (2.5 – 4.5) 2.5 INR

38
Setting Advanced FeaturesYou can access these settings by going to Setup mode. To go to Setup mode, press the SET button . The date format, flashing, will appear. Once you are in Setup mode, you’ll use these buttons:• to change a setting• to accept a setting (and move on to the next setting)
Note: When you go to Setup mode, the date format, date, time format, and time settings appear first. Press the SET button to move past the date and time settings to get to the advanced settings.

39
When you power the meter on, it briefly shows all the display’s letters, numbers, and symbols. Regularly check that all segments of each letter, number, and symbol appear. Please compare your meter’s display to the meter display shown here on this page.You can display all the letters, numbers, and symbols for a longer time to allow comparison. To do this, you will power the meter on and then hold down the ON-OFF button .The full display should appear as follows:
The Meter’s Display

40
Error MessagesYou may see the following error messages while using the CoaguChek XS Meter. If you see an error message, first try to correct the problem using the solution described below. If the problem persists, call Roche Diagnostics Technical Service Center at 1-800-428-4674, 24 hours a day, 7 days a week.
Error: Test StripA test strip was already inserted when the meter was powered on. If you did not remove the test strip after the last test, you will see this error. This error could also occur if the meter timed out after you inserted the test strip.The test strip is unusable.The test strip is not a CoaguChek XS PT test strip.
Solution:Remove the test strip. Then repeat the test with a new CoaguChek XS PT test strip.

41
Error: Meter TemperatureThe meter is too cold or too warm to measure correctly.
Solution:Power the meter off and allow it to stand for about 30 minutes at room temperature (between 59°F and 90°F).
Error: BatteryThe battery level is too low.
Solution:Replace the batteries. See the Batteries section of this manual.

42
Error: Code ChipThe code chip is missing, not properly inserted, or damaged.
Solution:Check to see if you have the correct code chip properly inserted in the meter. For more information, see the Code Chip section of this manual.If the code chip is damaged, call Roche Diagnostics Technical Service Center at 1-800-428-4674.
Error: Test Strip Guide CoverThe test strip guide cover is not properly closed.
Solution:Close the test strip guide cover.

43
Error: Test Strip ExpiredThe test strip has expired.
Solution:Check the meter’s date setting. If it is not correct, set the correct date. For more information, see the Meter Setup section of this manual.If the date is correct, power the meter off and remove the code chip and the test strip. Then use the code chip and a test strip from a new box of test strips.
Error: Test Strip UnusableThe test strip is unusable.
Solution:Power the meter off, remove the test strip, and then re-insert it. If the error message reappears, discard the unusable test strip and use a new one.

44
Error: Blood ApplicationError applying blood to the test strip.
Solution:Power the meter off and remove the test strip. Repeat the test using a new test strip and blood taken from a new fingerstick from a different finger.
Error: Time ExceededYou did not apply blood to the test strip within 180 seconds after the blood drop symbol appeared.
Solution:Power the meter off and remove the test strip. Repeat the test using the same test strip and blood taken from a new fingerstick from a different finger.
Error Messages You May See After You Apply Blood

45
Error: Test Strip InterferenceThe test strip was touched or removed during the test.
Solution:Power the meter off and remove the test strip. Repeat the test using a new test strip and blood taken from a new fingerstick from a different finger.Do not touch or remove the test strip when a test is in progress.NOTE: For meters with serial number UP0910000 and lower: In rare cases, “ERROR 6” may indicate extremely high coagulation times (> 10 INR, < 5% Quick). If “ERROR 6” is displayed repeatedly, the result must be checked using another method.

46
Error: Quality Control FailureThe test strip failed the internal quality control check. The test strip is unusable.
Solution:Power the meter off and remove the test strip. Repeat the test using a new test strip and blood taken from a new fingerstick from a different finger.

47
Error: Measurement ErrorMeasurement error caused by the blood sample.
Solution:Do not touch or remove the test strip when a test is in progress.Be sure to apply the blood drop to the test strip within 15 seconds of sticking the fingertip.In rare cases, “error 7” message can occur in patients with long coagulation times (> 8 INR). If this error message appears again when the test is repeated, the result must be checked using another method. The CoaguChek XS PT test strip may be used for patients under a combination therapy of oral anticoagulants plus heparin injections. Under no circumstances should heparinized capillary tubes be used for sample application. If capillary tubes are used, please use only the dedicated CoaguChek capillary tubes.In rare cases, patients with abnormal or unusally long clotting times may receive an “ERROR 7” message.

48
If you still receive this message when you repeat the test, you must use an alternative test method to confirm the result.
Error: Internal ErrorAn error occurred during the internal diagnostic test.
Solution:Power the meter off and remove the batteries. Wait at least 1 minute before re-inserting the batteries in the battery compartment. Re-set the date and time as described in the Meter Setup section of this manual.Caution: The date and time must be set correctly.Repeat the test. If you see the same error message again, the meter has a defect.

49
Error: Internal Error Solution:Because this error indicates possible damage to the heater plate contacts, call the Roche Diagnostics Technical Service Center at 1-800-428-4674 to have the meter replaced.

50
Ordering Information for Health Care Professionals
Please contact Roche Diagnostics Customer Service at 1-800-428-5076.
REF/Cat. NumberCoaguChek XS System 04837975001 (includes carrying case) CoaguChek XS PT Test 04625315160 2 x 24 tests CoaguChek XS PT Test 07797826160 1 x 24 tests CoaguChek Lancets 04348150001 Box of 200 Capillary Tubes/Bulbs 11621173001
Product LimitationsPlease read the information packaged with the test strips regarding up-to-date product specifications and limitations.
Other Information

51
Product SpecificationsOperating Conditions
Temperature 59°F to 90°F (15°C to 32°C)Relative humidity less than 85% (without condensation)Maximum altitude 14,000 feet (4300 m)Placement Operate the meter on a level, vibration-free
surface or hold it so it is roughly horizontal.Measuring range Refer to test strip package insert.Memory 300 test results with date and timeInterface Infrared interface, LED/IRED Class 1Battery operation 4 AAA batteries Number of tests per Up to 2 years or up to 300 tests set of batteries (depending on frequency of use)Safety class IIIAutomatic power-off After 3 minutesDimensions 5.43 x 3.07 x 1.10 in (138 x 78 x 28 mm)Weight 4.48 oz. or 127 g (without batteries)

52
Sample Material
Sample type Capillary whole blood or non-anticoagulated venous whole blood.
Sample size At least 8 µLInterference Refer to the test strip package insert.
Non-Operating Storage and Transport Conditions
Temperature range -13°F to 158°F (-25°C to 70°C)Relative humidity 10% to 85% (without condensation)
Support/ServicesQuestions
Please call the Roche Diagnostics Technical Service Center at 1-800-428-4674 if you have questions regarding the handling of your meter, the reliability of your results, or if you suspect the meter is defective.
RepairsPlease note that repairs, new settings or other modifications to the meter may only be performed by persons authorized by Roche Diagnostics.

53
SymbolsThe following table lists all of the display screen icons and their meaning.
Symbol Meaning Test strip (without sample application area)
Test strip (with sample application area)
Apply sample
User must wait until the meter has completed an action.
24-hour time format
12-hour time format
Time between midnight and noon (in 12-hour time format)
Time between noon and midnight (in 12-hour time format)
Indicates the results are displayed as a Quick percentage value.
Indicates the results are displayed in Seconds.
Indicates the results are displayed in INR units.

54
Symbol Meaning Beep tone is enabled
Beep tone is disabled
Result is above the chosen therapeutic range (only with INR as unit) Result is below the chosen therapeutic range (only with INR as unit)
• Results in the chosen unit • Error numbers
Memory contains no results or no further results
Displays the time in HH:MM format
Displays the date in DD-MM-YY, MM-DD-YY or YY-MM-DD format.
The monitor is in Setup Mode.
Indicates the code number of the code chip inserted in the meter.
Result in the chosen unit is above the measuring range. Result in the chosen unit is below the measuring range.

Symbol Meaning Battery status: • When the batteries still have their full
charge, all segments are lit. • Individual segments disappear one by one
as the batteries become weaker. • When there is no segment remaining, you
can no longer perform a test. You can, however, still access the meter’s memory.
The meter is in Memory Mode.
Automatic quality control completed successfully
Reports an error (see Error messages)
Room or meter temperature is outside the acceptable range.
Communication is taking place via the infrared interface
Measurement chamber cover is open.
55

5656
Disposal of the Meter, Test Strips, Lancets, and Batteries
Any product coming in contact with blood is considered contaminated (potentially infectious).* During normal testing, the meter may come in contact with blood. Lancing devices may also be considered sharps. Disposal of sharps is regulated by law in many jurisdictions.
The European Union has a requirement for improving waste management practices for certain electronic equipment, but meters fall outside the scope of the European Directive 2002/96/EC.** This is not a requirement for the United States; however, Roche is committed to recycling and sustainability. Please consider the following points when disposing of your used testing materials:• Comply with any laws or ordinances relating to the disposal of
sharps and/or contaminated products. Contact your local health department or other appropriate authorities for proper handling and disposal of used meters, used test strips, used lancets, and used batteries.
• Consider recycling of the meters and batteries at an appropriate facility. Be aware the meter is potentially hazardous electronics scrap (e-scrap) and should be disposed of accordingly. The batteries are potentially hazardous also and should be disposed of accordingly.
• Decontaminate the meter before recycling or disposing. Wipe the outside of the meter with dilution of bleach solution (one part bleach to nine parts water).
• Users in professional environments (i.e., healthcare professionals) should follow the existing policies and procedures governing the proper handling and disposal of potentially infectious waste, e-scrap and batteries.*29 CFR 1910.1030 - Bloodborne pathogens
**Directive 2002/96/EC - Directive on waste electrical and electronic equipment (WEEE)

57
WarrantyCoaguChek XS Meter Limited (1 Year) Warranty
ROCHE DIAGNOSTICS warrants, to the original purchaser only, that the meter shall be free from all defects in material and workmanship for a period of one year from the date of purchase.Purchaser’s sole and exclusive remedy, with respect to the CoaguChek XS meter and parts thereof, shall be the repair and/or replacement of the meter or parts at Roche Diagnostics’ option.THE ABOVE WARRANTY IS EXCLUSIVE OF ALL OTHER WARRANTIES, AND ROCHE DIAGNOSTICS MAKES NO OTHER WARRANTIES, EXPRESS OR IMPLIED, INCLUDING WITHOUT LIMITATION THE IMPLIED WARRANTY OF MERCHANTABILITY OR FITNESS FOR A PARTICULAR PURPOSE. IN NO EVENT SHALL ROCHE DIAGNOSTICS BE LIABLE TO THE PURCHASER OR ANY OTHER PERSON FOR ANY INCIDENTAL, CONSEQUENTIAL, INDIRECT, SPECIAL OR PUNITIVE DAMAGES ARISING FROM OR IN ANY WAY CONNECTED WITH THE PURCHASE OR USE OF THE METER. NO WARRANTY OF MERCHANTABILITY OR FITNESS FOR A PARTICULAR PURPOSE, IF ANY IS IMPLIED FROM THE SALE OF THE COAGUCHEK XS METER, SHALL EXTEND FOR A LONGER DURATION THAN THE DURATION OF THE EXPRESS WARRANTY STATED ABOVE. The foregoing warranty shall not apply to a meter which is damaged by accident or subject to alteration, misuse, tampering, and/or abuse. Meters which show damage or misuse will be handled in accordance with Roche Diagnostics’ non-warranty service policy.The warranty of the repaired/replacement meter will expire on the date of the original warranty expiration or ninety (90) days after shipment of a replacement system, whichever period is longer.

58
Notes

COAGUCHEK is a trademark of Roche.
Roche Diagnostics GmbH Sandhofer Strasse 116 68305 Mannheim, Germany
Made in Germany
Manufactured for and distributed in the U.S.A. by: Roche Diagnostics 9115 Hague Road Indianapolis, IN 46250-0457
Rx Only
www.roche.com www.coaguchek-usa.com www.usdiagnostics.roche.com 0
4837
9910
01(0
7) 2
016-
08 U
SA