cmx-125 manual online
TRANSCRIPT

7/23/2019 CMX-125 Manual Online
http://slidepdf.com/reader/full/cmx-125-manual-online 1/10
CEMENTMIXER550W 125L
INSTRUCTION MANUAL
SPECIFICATIONSInput Power: 230-240V~50Hz
Motor: 550W
No Load Speed 2950/min
Drum Speed: 32/min
Gross Drum Volume: 125L (4.41 cu ft)
Unmixed Dry Volume: 100L (3.53 cu ft)
Mixed Wet Volume: 91L (3.21 cu ft)
Drum Mouth: Ø375mm (14 ¾”)
IP Rating: IP44
Weight: 48kg
CMX-125
WHAT’S IN THE BOX
Cement Mixer
Assembly Fasteners
ozito.com.au
2
4
2
2
2
6
4
M8 55
M8 65
M8 60
M8 20
M8 20
M8 30
M8 20
1M10 70
2
10
2
4
M8 16 1
1
2
M8 25
4
4
4
8
7/23/2019 CMX-125 Manual Online
http://slidepdf.com/reader/full/cmx-125-manual-online 2/10

7/23/2019 CMX-125 Manual Online
http://slidepdf.com/reader/full/cmx-125-manual-online 3/10

7/23/2019 CMX-125 Manual Online
http://slidepdf.com/reader/full/cmx-125-manual-online 4/10

7/23/2019 CMX-125 Manual Online
http://slidepdf.com/reader/full/cmx-125-manual-online 5/10
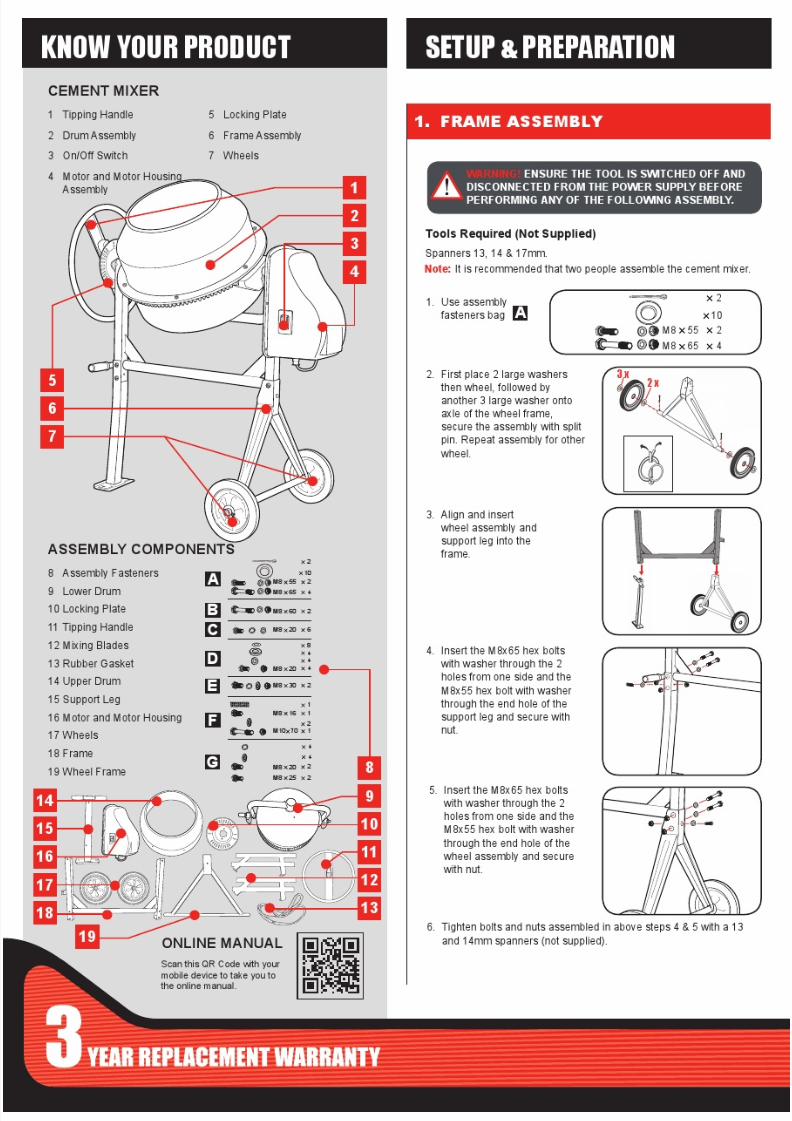
6. PLACEMENT 7. CONTROLS
The product may only be placed on a at surface. To provide added
stability screw the product to a concrete oor with the proper xation
materials including bolts, screws and washers.
1. Disengage the locating pins
by pulling out on the control
handle away from the locking
plate to allow the drum to
rotate.
The Support Leg has two
mounting holes that can be used
to ensure sufcient stabili ty. Use
two screws or bolts (not included,
recommended size M10 ) to secure.
Drip Loop
To avoid the possibil ity of the appliance plug or power point getting wet,
the user should arrange a “drip loop” in the cord connecting the cement
mixer to a wall mounted power point.
WARNING! DO NOT PLACE ANY MATERIAL UNDER THE
PRODUCT TO ADJUST THE HEIGHT OR TO ATTEMPT
TO IMPROVE ITS STABILITY! IF THE PRODUCT IS ON
AN ANGLE AND/OR WOBBLY, MOVE IT TO A DIFFERENT
LOCATION. NEVER OPERATE THE PRODUCT ON SOFTSURFACES SUCH AS A LAWN OR GRAVEL SINCE IT
COULD SINK OR TIP OVER DURING OPERATION!
CAUTION! TO REDUCE THE RISK OF ELECTRICAL
SHOCK, THE USE OF A RESIDUAL CURRENT DEVICE
(RATED 30mA OR LESS) IS RECOMMENDED.
OPERATION
Setting the Operating Position
2. Rotate the drum to the desired
position by aligning the
locating pin with two of the
holes in the locking plate.
WARNING! HOLD THE CONTROL HANDLE TIGHTLY
WHILE TURNING IT.

7/23/2019 CMX-125 Manual Online
http://slidepdf.com/reader/full/cmx-125-manual-online 6/10
For best loading results, proceed as follows:
• Add the required amount of stone into the drum.
• Add the required amount of sand into the drum.
• Add the required amount of cement into the drum.
• Pour the required amount of water into the drum.
Note: When measuring out cement and ballast (or sharp sand/gravel),
• Never put any of your body parts (including hands) inside the drum while it is
rotating.
• Wipe off any external material on the motor cover. Do not use petrol,
turpentine, lacquer, paint thinner, dry cleaning uids or similar products.
• The use of chemical products or solvents may damage the motor cover.
• Thoroughly clean your cement mixer at the end of each days operation.
• Keep your cement mixer clean. The slightest trace of material left in the drumassembly will harden and attract more material each time the machine is used.
• Dried cement should be scraped out of the drum assembly.
• DO NOT throw bricks into the drum assembly to clean it out.
• DO NOT beat on the drum with a shovel, hammer or other tools to break up
accumulation of dried cement mix as the cement mixer may be damaged.
• The drum may be scoured for approximately 2 minutes, using a 1” stone and
water mixture. After this, discharge the stone/water mixture and hose down the
drum assembly inside and out.
• The IP44 protection clad construction of the mixer enables the DRUM
ASSEMBLY ONLY to be hosed down safely. Avoid getting water on the motor
and motor housing, DO NOT wet the motor and motor housing.
General Maintenance
• Ball bearings are packed with grease at the factory. No further lubrication of
bearings is required.
• During normal use, painted surfaces can lose their coating during the mixing
process. Wipe all exposed surfaces regularly with an oily rag to prevent
corrosion. (Note: Loss of paint and rust are not covered under warranty.)
• Keep air vents clean of dust and dirt.
• Remove dust and dirt from the cement mixer regularly with soft cloth, brush or
compressed air. Use a mild detergent and a soft cloth to clean plastic parts.
• If the power cord is damaged, have it replaced by an electrician or a power tool
OPERATION
IMPORTANT! ALWAYS START THE CEMENT MIXER
BEFORE LOADING THE DRUM. LOAD THE DRUM WHILE
IT IS ROTATING.
IMPORTANT! ENSURE MATERIAL IS NOT LOADED INTO
THE MIXER ALL AT ONCE. ADD THE MATERIAL STEADILY
OVER THE MIXING BLADES, THIS HELPS TO AVOID
THE MATERIAL FROM STICKING TO THE BACK OF THE
DRUM.
WARNING!
1. DO NOT LET THE SHOVEL MOUTH OR ANY OTHER DEVICES
ENTER THE DRUM MOUTH DURING LOADING.2. NEVER PLACE HANDS INSIDE THE REVOLVING DRUM OR
NEAR ANY ROTATING PARTS.
3. PLACE THE CEMENT MIXER AS CLOSE AS POSSIBLE TO THE
WORK SITE. DO NOT MOVE THE CEMENT MIXER WHEN LOADED.
4. RETIGHTEN ALL BOLTS ATTACHING MOTOR AND MOTOR
HOUSING ASSEMBLY, DRUM ASSEMBLY AND FRAME ASSEMBLY
AFTER FIRST MIX.
8. LOADING THE DRUM WARNING! ENSURE THE TOOL IS SWITCHED OFF AND
DISCONNECTED FROM THE POWER SUPPLY BEFORE
PERFORMING ANY OF THE FOLLOWING MAINTENANCE.
WARNING! DO NOT POUR OR SPRAY WATER DIRECTLY INTO
OR OVER THE MOTOR COVER.
MAINTENANCE
7/23/2019 CMX-125 Manual Online
http://slidepdf.com/reader/full/cmx-125-manual-online 7/10
DESCRIPTION OF SYMBOLSTROUBLESHOOTING
Double insulated
Danger of electric shock
5124
FAULT POSSIBLE CAUSES SOLUTION
The Cement
Mixer does not
start.
Not Connected to mains
power
Connect to mains power
Power cord or plug is
defective.
Contact Ozito customer
service.
Other electrical defect to the
product
Contact Ozito customer
service.
Cement Mixer
does not reachfull power
Extension cord not suitable
for operation with this product
Use suitable extension
cord..
Power source (e.g.
Generator) has too low
voltage.
Connect to another power
source.
Mixing volume is too large Reduce the amount of
material
Unsatisfactory
result
Mixer blades are dull/
damaged
Replace with new ones
Mixer blades not suitable for
work piece material
Use proper mixing blades
Excessive
vibration or
noise
Mixer blades are dull/
damaged.
Replace with new ones
Bolts/nuts are loose. Tighten bolts/nuts.

7/23/2019 CMX-125 Manual Online
http://slidepdf.com/reader/full/cmx-125-manual-online 8/10
SPARE PARTSTool: Cement MixerModel No. CMX-125

7/23/2019 CMX-125 Manual Online
http://slidepdf.com/reader/full/cmx-125-manual-online 9/10
GENERAL POWER TOOL SAFETY WARNINGS
ELECTRICAL SAFETY
WARNING! Read all safety warnings and all instructions. Failure to follow the warnings and
instructions may result in electric shock, re and/or serious injury.
Save all warnings and instructions for future reference. The term “power tool” in the warnings refers
to your mains-operated (corded) power tool or battery-operated (cordless) power tool.
1. Work area safety
a. Keep work area clean and well lit. Cluttered or dark areas invite accidents.
b. Do not operate power tools in explosive atmospheres, such as in the presence of ammable
liquids, gases or dust. Power tools create sparks which may ignite the dust or fumes.
c. Keep children and bystanders away while operating a power tool. Distractions can cause you to
lose control.
2. Electrical safetya. Power tool plugs must match the outlet. Never modify the plug in any way. Do not use any
adapter plugs with earthed (grounded) power tools. Unmodied plugs and matching outlets will
reduce risk of electric shock.
b. Avoid body contact with earthed or grounded surfaces, such as pipes, radiators, ranges and
refrigerators. There is an increased risk of electric shock if your body is earthed or grounded.
c. Do not expose power tools to rain or wet conditions. Water entering a power tool will increase the
risk of electric shock.
d. Do not abuse the cord. Never use the cord for carrying, pulling or unplugging the power tool.
Keep cord away from heat, oil, sharp edges or moving parts. Damaged or entangled cords increase
the risk of electric shock.
e. When operating a power tool outdoors, use an extension cord suitable for outdoor use. Use of a
cord suitable for outdoor use reduces the risk of electric shock.
f. If operating a power tool in a damp location is unavoidable, use a residual current device (RCD)
protected supply. Use of an RCD reduces the risk of electric shock.
d. Remove any adjusting key or wrench before turning the power tool on. A wrench or a key left
attached to a rotating part of the power tool may result in personal injury.
e. Do not overreach. Keep proper footing and balance at all times. This enables better control of the
power tool in unexpected situations.
f. Dress properly. Do not wear loose clothing or jewellery. Keep your hair, clothing and gloves away
from moving parts. Loose clothes, jewellery or long hair can be caught in moving parts.
g. If devices are provided for the connection of dust extraction and collection facilities, ensure
these are connected and properly used. Use of dust collection can reduce dust-related hazards.
4. Power tool use and care
a. Do not force the power tool. Use the correct power tool for your application. The correct power tool
will do the job better and safer at the rate for which it was designed.b. Do not use the power tool if the switch does not turn it on and off. Any power tool that cannot be
controlled with the switch is dangerous and must be repaired.
c. Disconnect the plug from the power source and/or the battery pack from the power tool before
making any adjustments, changing accessories, or storing power tools. Such preventive safety
measures reduce the risk of starting the power tool accidentally.
d. Store idle power tools out of the reach of children and do not allow persons unfamiliar with the
power tool or these instructions to operate the power tool. Power tools are dangerous in the hands
of untrained users.
e. Maintain power tools. Check for misalignment or binding of moving parts, breakage of parts and
any other condition that may affect the power tool’s operation. If damaged, have the power tool
repaired before use. Many accidents are caused by poorly maintained power tools.
f. Keep cutting tools sharp and clean. Properly maintained cutting tools with sharp cutting edges are
less likely to bind and are easier to control.
g. Use the power tool, accessories and tool bits etc. in accordance with these instructions, taking
WARNING! When using mains-powered tools, basic safety precautions, including the
following, should always be followed to reduce risk of re, electric shock, personal injury and
material damage.
Read the whole manual carefully and make sure you know how to switch the tool off in an emergency, before
operating the tool.
Save these instructions and other documents supplied with this tool for future reference.
The manufacturer cannot accept any liability for damage or accidents which arise due to a failure to follow these
instructions and the safety information.
This product has been designed for 230V and 240V only. Always check that the power supply corresponds to
the voltage on the rating plate.
Note: The supply of 230V and 240V is interchangeable for Australia and New Zealand.
This tool is double insulated therefore no earth wire is required.
The power supply for this product should be protected by a residual current device (rated at 30mA or less). A
residual current device reduces the risk of electric shock.
Note: Double insulation does not take the place of normal safety precautions when operating this tool. The
insulation system is for added protection against injury resulting from a possible electrical insulation failure
within the tool.
Using an Extension Lead
Always use an approved extension lead suitable for the power input of this tool. Before use, inspect the
extension lead for signs of damage, wear and ageing. Replace the extension lead if damaged or defective.
When using an extension lead on a reel, always unwind the lead completely. Use of an extension lead not
suitable for the power input of the tool or which is damaged or defective may result in a risk of re and electric
shock.

7/23/2019 CMX-125 Manual Online
http://slidepdf.com/reader/full/cmx-125-manual-online 10/10
IN ORDER TO MAKE A CLAIM UNDER THIS
WARRANTY YOU MUST RETURN THE PRODUCT
TO YOUR NEAREST BUNNINGS WAREHOUSE WITH
YOUR BUNNINGS REGISTER RECEIPT. PRIOR TO
RETURNING YOUR PRODUCT FOR WARRANTYPLEASE TELEPHONE OUR CUSTOMER SERVICE
HELPLINE:
Australia 1800 069 486
New Zealand 0508 069 4863 YEAR REPLACEMENT WARRANTY Your product is guaranteed for a period of 36 months fromthe original date of purchase and is intended for DIY (Do It Yourself)use only. If a product is defective it will be replaced in accordance withthe terms of this warranty. If a product is defective it willbe replaced in accordance with the terms of this warranty.
Warranty excludes consumable parts, for example: leather washers,rubber gasket, damage to mixing bowl and damage to the wheelscaused by transportation
WARNINGThe following actions will result in the warranty being void.
•
If the tool has been operated on a supply voltage other than that specified onthe tool.
• If the tool shows signs of damage or defects caused by or resulting from
abuse, accidents or alterations.
• Failure to perform maintenance as set out within the instruction manual.
• If the tool is disassembled or tampered with in any way.
• Professional, Industrial or high frequency use.
WARRANTY
TO ENSURE A SPEEDY RESPONSE PLEASE
HAVE THE MODEL NUMBER AND DATE OFPURCHASE AVAILABLE. A CUSTOMER SERVICE
REPRESENTATIVE WILL TAKE YOUR CALL
AND ANSWER ANY QUESTIONS YOU MAY
HAVE RELATING TO THE WARRANTY POLICY
OR PROCEDURE.
OZITO Australia/New Zealand (Head Office) 1-23 Letcon Drive, Bangholme, Victoria, Australia 3175.
The benefits provided under this warranty are in additionto other rights and remedies which are available to you at law.
Our goods come with guarantees that cannot be excludedat law. You are entitled to a replacement or refund for a major failureand for compensation for any other reasonably foreseeable loss ordamage. You are also entitled to have the goods repaired
or replaced if the goods fail to be of acceptable quality and the failuredoes not amount to a major failure.
Generally you will be responsible for all costs associated witha claim under this warranty, however, where you have sufferedany additional direct loss as a result of a defective product youmay be able to claim such expenses by contacting our customer servicehelpline above.
0415