cmr2720 en om ing
TRANSCRIPT
CMR27207” TOUCH SCREEN
MECHLESS RECEIVER
AM-FM, Bluetooth
INSTALLATION &OWNER’S MANUAL

CMR2720
22
INFORMATION
The Bluetooth® word mark and logos are registered trademarks owned by Bluetooth SIG, Inc.
microSD Logo is a registered trademark of SD-3C, LLC.
Siri and Apple are registered trademarks owned by Apple, Inc.
Google Assistant and Android are trademarks owned by Google LLC.Other trademarks and trade names are those of their respective owners.
FCC ComplianceThis device complies with Part 15 of the FCC Rules. Operation is subject to the following two conditions:
(1) this device may not cause harmful interference, and(2) this device must accept any interference received, including interference that may cause undesired operation.
Warning: responsible for compliance could void the user’s authority to operate the equipment.
Note: This equipment has been tested and found to comply with the limits for a Class B digital device, pursuant to Part 15 of the FCC Rules. These limits are designed to provide reasonable protection against harmful interference in a residential installation. This equipment generates, uses and can radiate radio frequency energy and, if not installed and used in accordance with the instructions, may cause harmful interference to radio communications. However, there is no guarantee that interference will not occur in a particular installation. If this equipment does cause harmful interference to radio or television reception, which can be
correct the interference by one or more of the following measures:
• Reorient or relocate the receiving antenna.• Increase the separation between the equipment and receiver.
receiver is connected.
Copyright and Trademark

33
CMR2720 INFORMATION
Please read all instructions carefully before attempting to install or operate.
Due to its technical nature, it is highly recommended that your JENSEN CAR2720 is installed by a professional installer or an authorized dealer. This product is only for use in vehicles with 12VDC negative ground only.
To prevent damage or injury:
• Make sure to ground the unit securely to the vehicle chassis ground.• Do not remove the top or bottom covers of the unit.
of water splashing.
• When replacing a fuse, only use a new one with the prescribed rating. Using a fuse with the wrong rating may cause the unit to malfunction.
• Use only the provided hardware and wire harness.• You cannot view video while the vehicle is moving. Find a safe place to park and engage the parking brake.
persists, consult your nearest JENSEN dealer or call tech assistance @ 1-888-921-4088.
or volatile solvents such as paint thinner and alcohol. They can scratch the surface of the
• When the temperature of the unit falls (as in winter), the liquid crystal inside the screen will become darker than usual. Normal brightness will return after using the monitor for a while.
cables or other cables with an area of 0.75mm (AWG 18) or more to prevent voltage drops.
Safety Notice

INSTALLATIONCMR2720
44
Please read and understand entire manual before installation.
installation assistance.
Before You Start• Disconnect negative battery terminal. • Avoid installing the unit where it would be subject to high temperatures, such as from direct sunlight, or where it would be
Getting Started• Unpack unit from its protective packaging.• Connect vehicle wiring harness and antenna to this receivers
you are unsure.
harness adapter (sold separately).• Reconnect battery negative terminal. • Test for correct operation and secure back into dashboard.• Snap trim ring into place if needed.
Preparation
Typical ISO-DIN Installation
Unit
Trim Ring

55
CMR2720 INSTALLATION
TipsWhen replacing a fuse, make sure to use the correct type and amperage. Using an incorrect fuse could cause damage. The unit uses (1) 10 amp ATC blade-type fuse located on the back of the unit.
Front / Rear camera inputs Up to two cameras (not included) can be used. We recommend JENSEN Part # BUCAM200J for front camera and BUCAM300AJ or BUCAM400AJ for rear camera.
Input / Output Wiring Diagram
SW
C IN
PU
TG
RA
Y/R
ED
OPERATIONCMR2720
66
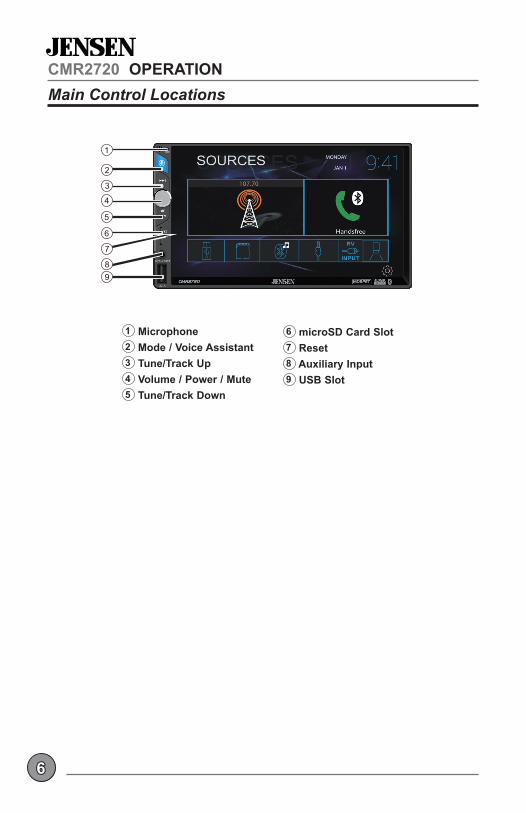
Main Control Locations
1 Microphone 2
345
6 microSD Card Slot7 Reset89 USB Slot

77
OPERATIONCMR2720Source Menu Operation
Press to access Radio.
Press to access Bluetooth phone.
Press to display and adjust system settings.
Press to display the rear and front cameras.
Press to access AV input.
Press to access the Bluetooth music.
Radio 1
Bluetooth Phone 2
Settings 3
Camera 4
AV Input 5
6
BT Music 7
microSD 8
USB 9
1 2
9
3
58 7 6 4

OPERATIONCMR2720
88
On Screen Controls
1 52 3 4
Press up to two times to dim the screen. Press a third time to put the unit in standby mode (screen will go black). Press anywhere on the screen to return to normal screen operation.
Press to activate the voice assistant feature.
Press to access and adjust audio settings.
Press to directly access your phone’s navigation app (refer to Navigation Hot Button section of the manual for setup instructions).
Press to display and adjust system settings.
Screen Brightness 1
Voice Assistant 2
Audio 3
Navigation Hot Button 4
Settings 5

99
OPERATIONCMR2720
Select any of the preset EQ settings (Flat, Classic, Rock, Pop, Jazz, Beat or User) or use the touch screen to manually adjust EQ settings.
Select any of the preset Surround settings: Concert, Church, Passive, Wide, Live or None.
Adjust balance (8L to 8R) and fader (8F to 8R), or use the touch screen to manually adjust balance and fader settings.
Audio Settings

OPERATIONCMR2720
1010
Settings Menu
From the Main Menu, press the gear icon to access the Setup menu and adjust the following: General, Audio, Display and Bluetooth.
General: • OSD Language - Select English.• Wallpaper - Select from three different wallpaper options.• Radio Area - Select Europe, USA, South America or Asia.• Time Setting - Set the date (month, day, year) and time (hours,
.• Beep - Enable or disable the audible beep.• Camera - Enable or disable the rear camera input.• Version - Press to display version numbers.• Restore Default - Press to restore unit to default factory settings.
Audio: • Audio Settings - Press to access and adjust audio settings. • Subwoofer- Press to adjust subwoofer frequency and volume.• Loudness - Enable or disable the loudness feature.
Display: • Aspect Ratio - Select desired region (America, Europe or Latin). • Adjust - Press to adjust screen brightness, contrast, hue, saturation
and shaprness.• Panel - Select from the following Backlight settings: Off, 10 seconds,
20 seconds or 30 seconds.
Bluetooth: • Bluetooth - Turn Bluetooth signal on or off. • Auto Answer - Turn auto answer feature on or off.
1111
OPERATIONCMR2720Tuner Operation
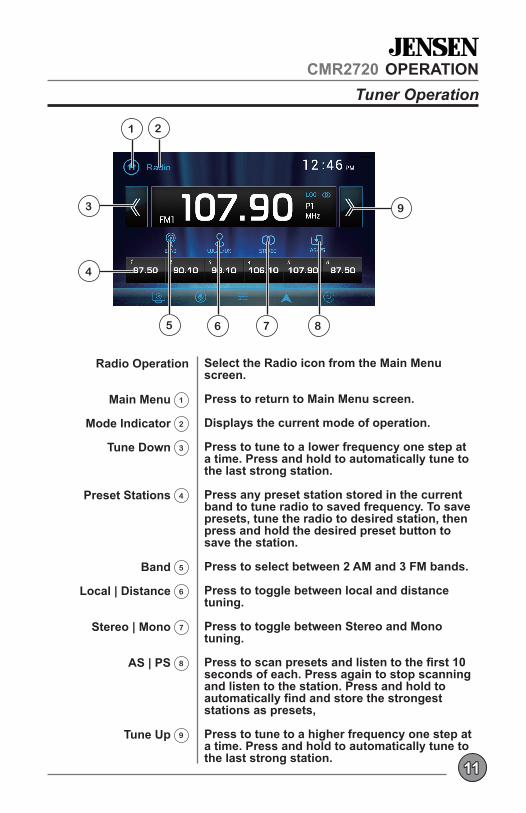
Radio Operation
Main Menu 1
Mode Indicator 2
Tune Down 3
Preset Stations 4
Band 5
Local | Distance 6
Stereo | Mono 7
AS | PS 8
Tune Up 9
Select the Radio icon from the Main Menu screen.
Press to return to Main Menu screen.
Displays the current mode of operation.
Press to tune to a lower frequency one step at a time. Press and hold to automatically tune to the last strong station.
Press any preset station stored in the current band to tune radio to saved frequency. To save presets, tune the radio to desired station, then press and hold the desired preset button to save the station.
Press to select between 2 AM and 3 FM bands.
Press to toggle between local and distance tuning.
Press to toggle between Stereo and Mono tuning.
seconds of each. Press again to stop scanning and listen to the station. Press and hold to
stations as presets,
Press to tune to a higher frequency one step at a time. Press and hold to automatically tune to the last strong station.
1 2
5 6 7 8
3
4
9

OPERATIONCMR2720
1212
USB/microSD Operation
1 2
4 5 6 7
3
Main Menu 1
Mode Indicator 2
File Information 3
Previous Track 4
5
6
Folder Search 7
Random 8
Repeat 9
insert a USB device or microSD card, and playback will begin automatically. To return to USB or microSD playback from another mode of operation, select the corresponding icon from the Main Menu.
Press to return to Main Menu screen.
Displays the current mode of operation.
Press to go back to the previous track. Press and hold to fast reverse the current track, then press PLAY / PAUSE to resume playback.
Press to pause the current track, then press again to resume playback.
to fast forward the current track, then press PLAY / PAUSE to resume playback.
list, then press on the name of the desired folder to
to access it.
8
9

1313
OPERATIONCMR2720Media Compatibility
The following types of files are not compatible:• MP3 PRO format, MP3 playlists• RMP format• WAV format• WMV format• AAC, protected AAC, M4A format
MP3 playback sequence begins in the root folder. Any folders
ISO9660 standards:
numbers 0-9, and “_” (underscore). Some characters may not be displayed correctly, depending on the character type.
Some files may not play, depending on sampling rates and bit rates. For best results, use the following settings when ripping MP3 files: 128kbps or higher constant bit rate; 44.1kHz or higher sampling frequency.
Media Compatibility
Playback Order
Compatible Recording
Formats
Notes
File Type MP3
File System FATFAT 12 X
FileX
MPEGFormat
MPEG 1MPEG 2
MPEG 2.5
SamplingFrequency
MPEG 1MPEG 2
MPEG 2.5
BitrateMPEG 1 32 ~ 320kbpsMPEG 2 8 ~ 160kbps
MPEG 2.5 8 ~ 160kbps
Other Information
Directory Depth UnlimitedFile Name Length 32 bytesTotal File Number 2000 files
Total Folder Number 200 foldersFile Number via Folder 2000 files
MP3 ID3 TAGTitle, Artist, Album
Notes:• It is not possible to view JPG files on the in-dash monitor while the vehicle is
moving. This is a safety feature to prevent driver distraction. • The JPG image viewer function will only operate when vehicle is in park and the
parking brake is engaged.
OPERATIONCMR2720
1414
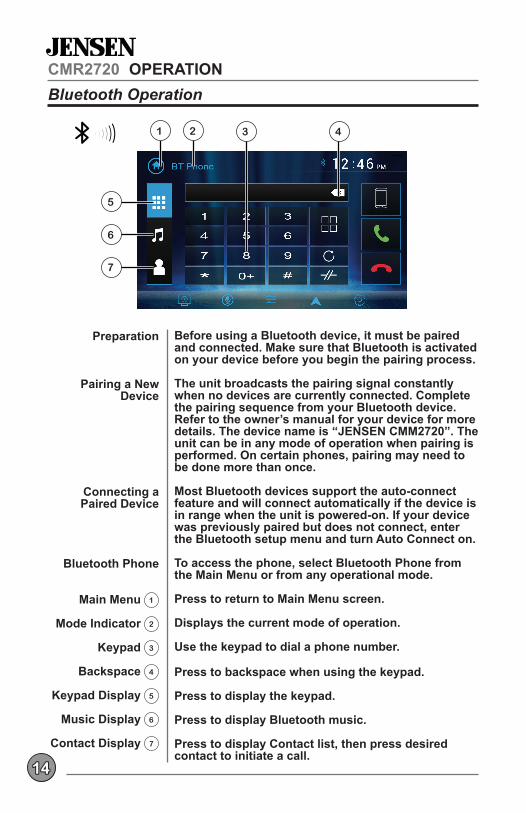
Preparation
Pairing a New Device
Connecting a Paired Device
Bluetooth Phone
Main Menu 1
Mode Indicator 2
Keypad 3
Backspace 4
Keypad Display 5
Music Display 6
Contact Display 7
Before using a Bluetooth device, it must be paired and connected. Make sure that Bluetooth is activated on your device before you begin the pairing process.
The unit broadcasts the pairing signal constantly when no devices are currently connected. Complete the pairing sequence from your Bluetooth device. Refer to the owner’s manual for your device for more details. The device name is “JENSEN CMM2720”. The unit can be in any mode of operation when pairing is performed. On certain phones, pairing may need to be done more than once.
Most Bluetooth devices support the auto-connect feature and will connect automatically if the device is in range when the unit is powered-on. If your device was previously paired but does not connect, enter the Bluetooth setup menu and turn Auto Connect on.
To access the phone, select Bluetooth Phone from the Main Menu or from any operational mode.
Press to return to Main Menu screen.
Displays the current mode of operation.
Use the keypad to dial a phone number.
Press to backspace when using the keypad.
Press to display the keypad.
Press to display Bluetooth music.
Press to display Contact list, then press desired contact to initiate a call.
1 2
Bluetooth Operation
6
7
5
3 4

1515
OPERATIONCMR2720Bluetooth Operation
Paired Device List 8
Talk 9
End Call 10
Previous Track 11
12
13
Press to display a list of paired devices, and select desired device to connect.
Press to connect a call to the number entered.
Press to end a call.
Press to go back to the previous track.
Press to pause the current track, then press again to resume playback.
11 12 13
9
10
8

OPERATIONCMR2720
1616
App OperationThe Jensen Smart app is the ultimate wireless remote control for your receiver. You can download the Jensen Smart app from the Apple App Store or Google Play Store and install it on your smartphone or tablet. Scan the following QR code to download the Jensen J-Link P1 application on your smartphone.
Voice AssistantYour receiver is designed with an easy access voice activation button to use Siri® or the Google Assistant™ via your car’s Bluetooth. Interact with your smartphone assistant while you drive with only the push of a button!
Bluetooth should be paired between your smartphone and the receiver. Press the voice activation button, and the receiver will switch into Bluetooth mode, This will activate Siri® or Google Assistant™ on your smartphone. You will need to manually switch back to the previous or desired mode once this operation is terminated.
Navigation Hot ButtonOnce the Jensen Smart app is installed, press the Navi hot button to connect your receiver to your phone through the on-screen UI. Instantly stream audio from your favorite navigation apps on a connected smartphone through your car’s receiver vla Bluetooth.
Note: A smartphone with data is required to stream navigation.
1717
OPERATIONCMR2720Rear Camera
Connect an optional rear camera to the Rear Camera inputs (Yellow RCA connector for video and Black RCA connector for audio). Refer to the wiring diagram for details.
Manual selection - Touch the REAR CAMERA icon from the Main Menu or from any operational mode (when enabled) to select camera mode. Touch
Note: The manual mode is for dedicated cameras that are ALWAYS on while driving, it is not meant for cameras that are connected to the vehicle’s reverse light. The unit will automatically select camera mode when connected to the reverse lamp circuitry.
of the front panel.
headphone output of the device).
Auxiliary Input
headphone output of the device).
A/V Input
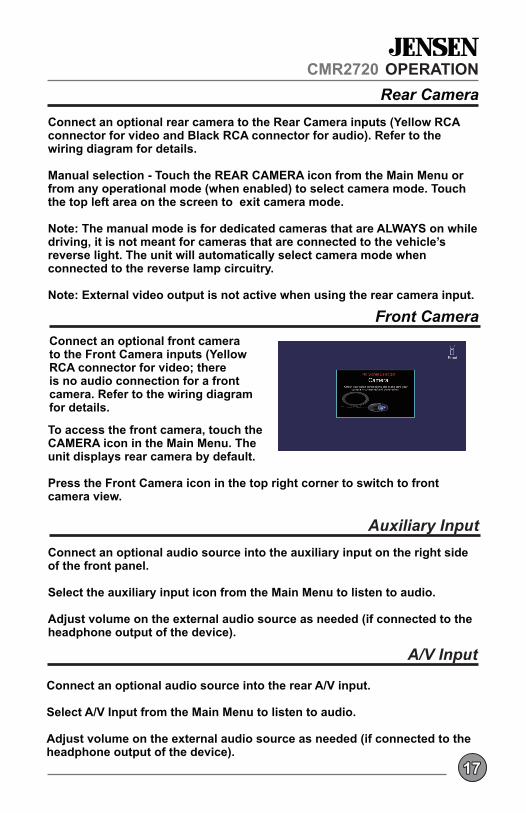
Front CameraConnect an optional front camera to the Front Camera inputs (Yellow RCA connector for video; there is no audio connection for a front camera. Refer to the wiring diagram for details.
To access the front camera, touch the CAMERA icon in the Main Menu. The unit displays rear camera by default.
Press the Front Camera icon in the top right corner to switch to front camera view.
OPERATIONCMR2720
1818
Steering Wheel Controls
We recommend the PAC SWI-RC .
3. When programming the SWI-RC, if a function is not supported (or not desired), then the function MUST be skipped as per the PAC SWI-RC instructions.
4. The SWC function MUST be programmed in the correct order per the PAC SWI-RC radio function mapping order instructions.
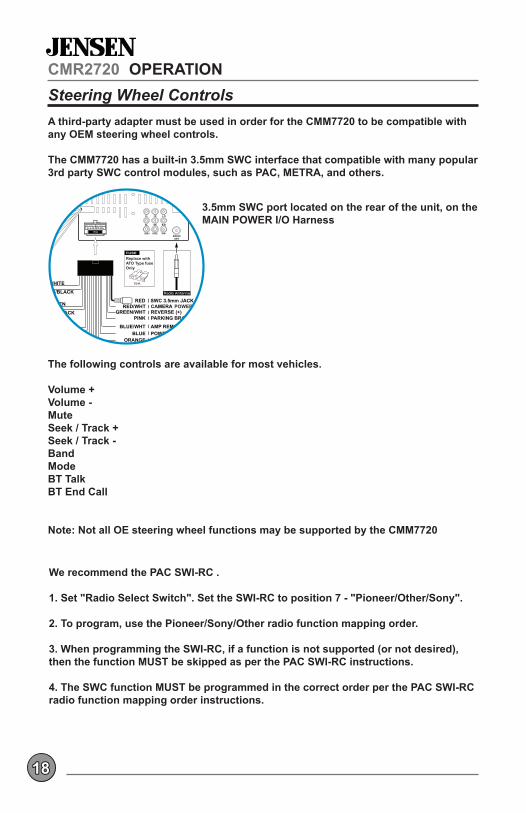
A third-party adapter must be used in order for the CMM7720 to be compatible with any OEM steering wheel controls.
The CMM7720 has a built-in 3.5mm SWC interface that compatible with many popular 3rd party SWC control modules, such as PAC, METRA, and others.
The following controls are available for most vehicles.
Volume +Volume -Mute
BandModeBT TalkBT End Call
Note: Not all OE steering wheel functions may be supported by the CMM7720
POWER M
Replace withATO Type fuseOnly
3.5mm SWC port located on the rear of the unit, on the

1919
OPERATIONCMR2720Limited One Year Warranty
vary from state to state.
Namsung America Inc. warrants this product to the original purchaser to be free from defects in material and workmanship for a period of one year from the date of the original purchase.
Namsung America Inc. agrees, at our option, during the warranty period, to repair any defect in material or workmanship or to furnish an equal new, renewed or
Subsequent replacement products are warranted for the balance of the original warranty period.
Who is covered?
from an authorized Dual dealer and used in the U.S.A.
What is covered? This warranty covers all defects in material and workmanship in this product. The
incorrect line voltage, unauthorized repair or failure to follow instructions supplied with the product, or damage occurring during return shipment of the product.
www.jensenmobile.com
What to do?1. Before you call for service, check the troubleshooting guide in your owner’s manual. A slight adjustment of any custom controls may save you a service call.2. If you require service during the warranty period, you must carefully pack the product (preferably in the original package) and ship it by prepaid transportation with a copy of the original receipt from the retailer to an authorized service center.3. Please describe your problem in writing and include your name, a return UPS
shipment.4. For more information and for the location of the nearest authorized service center please contact us by one of the following methods:
• Call us toll-free at 1-888-921-4088• E-mail us at [email protected]
obligation, liability, right, claim or remedy in contract or tort, whether or not arising from the company’s negligence, actual or imputed. No person or representative is authorized to assume for the company any other liability in connection with the sale of this product. In no event shall the company be liable for indirect, incidental or consequential damages.

CMR2720
2020
OPTIONS
General PROBLEM CAUSE ACTION
Unit will not turn on
(no power)
incorrect voltageCheck connections for proper voltage (11~16VDC)
Black wire not connected Check ground connection
Blown fuse on unit or vehicle Replace fuse(s)
Unit has power(but no sound)
Speaker wires not connected Check all connections, including speakers
Speakers are blown Replace speakers
One or more speaker wires touching each other or touching chassis ground
Insulate all bare speaker wires from each other and chassis ground
Unit blowsfuse(s)
Yellow or red wire touching chassis ground Check for pinched or shorted wires
Speaker wires touching chassis ground Check for pinched or shorted wires
Incorrect fuse rating Use fuse with correct rating
Unit has audio(but no video)
Parking brake safety circuit not connectedParking brake not applied
Check connections at parking brakeApply parking brake as described in manual
Video Playback Codec is not supported See Media Codec Support section
Please keep your original sales receipt and be prepared to provide this receipt in the event you require service, as your original receipt is considered the best proof of purchase and indicates the date you purchased your JENSEN product.
Dealer Name:
Dealer Phone:
Purchase Date:
For Your Records
Dealer Info
Troubleshooting
Customer Support1-888-921-4088(Monday-Friday, 9AM-5PM EST)

2121
CMR2720 WARRANTY
87.5MHz-107.9MHz87.50MHz-108.00MHz8.5dBf10dBf30dB30Hz-13kHz
530kHz-1710kHz<42dBu30Hz-2.2kHz
4.1 + EDR
500 nit
LEDCapacitive
11~16VDC2.1A4~8 ohms2 Volts RMS
FM Tuner
US Tuning Range: EU Tuning Range:
Usable Sensitivity:50dB Quieting Sensitivity:
Stereo Separation@ 1kHz:Frequency Response:
AM Tuner
Tuning Range: Usable Sensitivity:
Frequency Response:
Bluetooth
Version:
Range:
Monitor
Brightness:TFT Resolution:
TFT Backlighting:Touch Screen Type:
General
Operation Voltage Input:USB 1 Charge Output:
Speaker Nominal Impedance:Line Output Voltage:
Dimensions:
CEA-2006 Power Standard Specifications(reference: 14.4VDC +/- 0.2V, 20Hz~20kHz)
Power Output: 16 Watts RMS x 4 channels at 4 ohms and 1% THD+N Signal to Noise Ratio: 75dBA (reference: 1 watt into 4 ohms)

CMR2720INSTALLATION &OWNER’S MANUAL
Customer Support1-888-921-4088(Monday-Friday, 9AM-5PM EST)
Designed and Engineered in USA
NSA0420Printed in China
Namsung America Inc. ©2020 Namsung America Inc.All rights reserved.
All rights reserved. No part of this publication may be reproduced, distributed, or transmitted in any form or by any means, including photocopying, recording, or other electronic or mechanical methods, without the prior written permission of NAMSUNG AMERICA INC.