cmp-1: ceiling mount parts cmp-1 column assembly manual
TRANSCRIPT

CMP-1 Column Assembly
Manual
CMP-1: CEILING MOUNT PARTS
Adjustable Fixed
Fully read and complete the instructions in this manual prior to assembling the Ceiling Tilt Mount.

All Rights Reserved. 2014 SkyVue®

3InstallatIon ManualCMP-1 Parts / ColuMn asseMbly |
Table of ConTenTs
Common Ceiling mount Parts
adjustable Ceiling Column Parts
adjustable Column digram
assembling adjustable Column
Fixed Ceiling Column Parts
Fixed Column diagram
assembling Fixed Column
oPtional swivel adaPter diagram
5
678
121314
17

4 All Rights Reserved. 2014 SkyVue®

5InstallatIon ManualCMP-1 Parts / ColuMn asseMbly |
2 qty. Ceiling/Mounting Star Plate
Common Ceiling Mount Parts:These parts are found in the supplied Ceiling Mount Parts (CMP-1) box
1 qty. Elbow Assembly
1 qty. Coupler
1 qty. Security Allen Wrench
2 qty. - Set Screw
2 qty. Security Set Screw
4 qty. 5/16” Hex Head Bolts
12 qty. Flat Washers
4 qty. NyLock Nuts
4 qty. 5/16” Lag Bolts
Tools Required for Installation:
Ratchet with 1/2” Socket Drill with 3/16” Wood Bit
1/2”
6 All Rights Reserved. 2014 SkyVue®
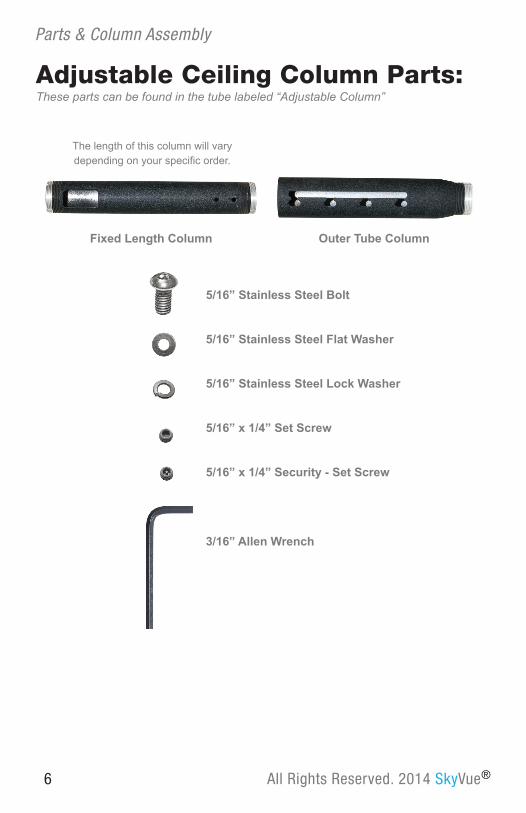
Parts & Column Assembly
Adjustable Ceiling Column Parts:These parts can be found in the tube labeled “Adjustable Column”
Fixed Length Column
The length of this column will vary depending on your specific order.
5/16” Stainless Steel Bolt
5/16” Stainless Steel Flat Washer
5/16” Stainless Steel Lock Washer
5/16” x 1/4” Set Screw
5/16” x 1/4” Security - Set Screw
3/16” Allen Wrench
Outer Tube Column

7InstallatIon ManualCMP-1 Parts / ColuMn asseMbly |
Adjustable Column Digram:
Security - Set Screw
Security - Set Screw
Security - Set Screw
Security - Set Screw
(Opposite Side) 2 qty.
Security Set Screws
Bolt
Lock Washer
Flat WasherAdjustable Column
Coupler
Elbow Assembly
Ceiling Star Plate
Mounting Star Plate

8 All Rights Reserved. 2014 SkyVue®
Parts & Column Assembly
Assembling Adjustable Column:
• Thread elbow assembly to mounting star plate, paying special attention not to cross thread the parts.
• Hand tighten set screw.
Security set screws will get fully secured after final adjustments have been made.
• Thread coupler to elbow assembly, paying special attention not to cross thread the parts.
• Hand tighten set screw.
Security set screw will get fully secured after final adjustments have been made.
If you have purchased the optional swivel adapter, please refer to the last page for reference diagram before proceeding with installation.
Security - Set Screw
Security - Set Screw
Coupler
9InstallatIon ManualCMP-1 Parts / ColuMn asseMbly |
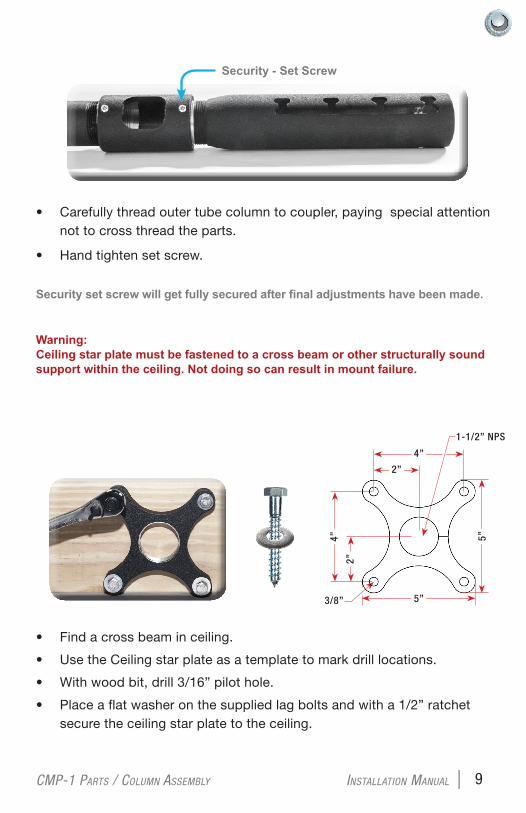
• Carefully thread outer tube column to coupler, paying special attention not to cross thread the parts.
• Hand tighten set screw.
Security set screw will get fully secured after final adjustments have been made.
• Find a cross beam in ceiling.
• Use the Ceiling star plate as a template to mark drill locations.
• With wood bit, drill 3/16” pilot hole.
• Place a flat washer on the supplied lag bolts and with a 1/2” ratchet secure the ceiling star plate to the ceiling.
Security - Set Screw
Warning: Ceiling star plate must be fastened to a cross beam or other structurally sound support within the ceiling. Not doing so can result in mount failure.
3/8”
4”
2”
5”
5”4”
2”
1-1/2” NPS
10 All Rights Reserved. 2014 SkyVue®
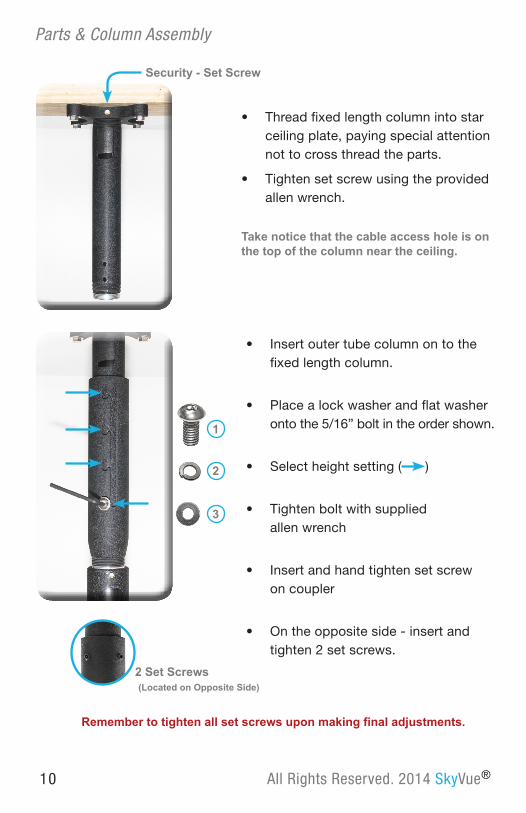
Parts & Column Assembly
• Thread fixed length column into star ceiling plate, paying special attention not to cross thread the parts.
• Tighten set screw using the provided allen wrench.
Take notice that the cable access hole is on the top of the column near the ceiling.
• Insert outer tube column on to the fixed length column.
• Place a lock washer and flat washer onto the 5/16” bolt in the order shown.
• Select height setting ( )
• Tighten bolt with supplied allen wrench
• Insert and hand tighten set screw on coupler
• On the opposite side - insert and tighten 2 set screws.
2 Set Screws (Located on Opposite Side)
Security - Set Screw
Remember to tighten all set screws upon making final adjustments.
1
2
3

11InstallatIon ManualCMP-1 Parts / ColuMn asseMbly |
Remember to tighten all set screws upon making final adjustments.
Proceed to the box labeled:
CMTM to complete your installation

12 All Rights Reserved. 2014 SkyVue®
Parts & Column Assembly
Fixed Ceiling Column Parts:These parts can be found in the tube labeled “Fixed Column”
Fixed Length Column
The length of this column will vary depending on your specific order.

13InstallatIon ManualCMP-1 Parts / ColuMn asseMbly |
Fixed Column Diagram:
Security - Set Screw
Security - Set Screw
Security - Set Screw
Security - Set Screw
Fixed Column
Coupler
Elbow Assembly
Ceiling Star Plate
Mounting Star Plate

14 All Rights Reserved. 2014 SkyVue®
Parts & Column Assembly
Assembling Fixed Column:
• Thread elbow assembly to mounting star plate, paying special attention not to cross thread the parts.
• Hand tighten set screw.
Security set screws will get fully secured after final adjustments have been made.
• Thread coupler to elbow assembly, paying special attention not to cross thread the parts.
• Hand tighten set screw.
Security set screw will get fully secured after final adjustments have been made.
If you have purchased the optional swivel adapter, please refer to the last page for reference diagram before proceeding with installation.
Security - Set Screw
Security - Set Screw
Coupler

15InstallatIon ManualCMP-1 Parts / ColuMn asseMbly |
• Thread the fixed length column into the lower assembly, paying special attention not to cross thread the parts.
• Hand tighten set screw.
Take notice that the cable access hole is on the top of the column near the ceiling. Security set screw will get fully secured after final adjustments have been made.
If you have purchased the optional swivel adapter, please refer to the last page for reference diagram before proceeding with installation.
• Find a cross beam in ceiling.
• Use the Ceiling star plate as a template to mark drill locations.
• With wood bit, drill 3/16” pilot hole.
• Place a flat washer on the supplied lag bolts and with a 1/2” ratchet secure the ceiling star plate to the ceiling.
Warning: Ceiling star plate must be fastened to a cross beam or other structurally sound support within the ceiling. Not doing so can result in mount failure.
3/8”
4”
2”
5”
5”4”
2”
1-1/2” NPS
Cable Access Holes
16 All Rights Reserved. 2014 SkyVue®
Parts & Column Assembly
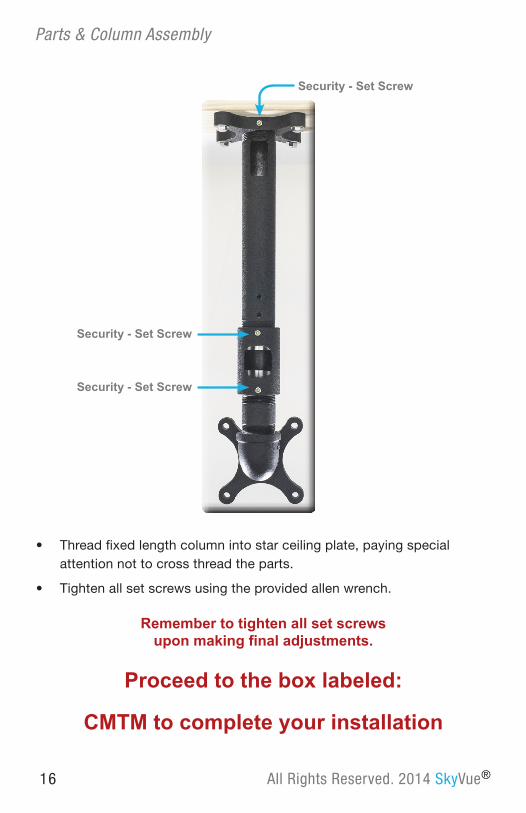
• Thread fixed length column into star ceiling plate, paying special attention not to cross thread the parts.
• Tighten all set screws using the provided allen wrench.
Security - Set Screw
Security - Set Screw
Security - Set Screw
Remember to tighten all set screws upon making final adjustments.
Proceed to the box labeled:
CMTM to complete your installation

17InstallatIon ManualCMP-1 Parts / ColuMn asseMbly |
The optional swivel adapter gets placed above the coupler in both the adjustable and fixed ceiling mount assemblies.
Optional Swivel Adapter Diagram
Factor in an additional 5.125” to ceiling mount clearance when choosing to use the HD Swivel Adapter.
3”
5.12
5”
Ceili
ngTV
Stop Set Screw
4”
4”2”
2”

All Rights Reserved. 2014 SkyVue®
Notes: