cluster to clusterlagoas.com/produtos/double-take/docs/cluster to clus… · · 2006-02-24cluster...
TRANSCRIPT
Cluster to Cluster Failover Using Double-Take
Cluster to Cluster Failover Using Double-Take published August 2001
NSI and Double-Take are registered trademarks of Network Specialists, Inc. GeoCluster is a trademark of NSI Software. All other products are trademarks of their respective companies.
© 1996–2001 NSI Software
Double-Take Support for Application Failover
Double-Take’s file system replication process is application independent and replicates any file system changes (including permissions and attributes) written to NTFS, FAT or FAT32 file systems by any application or process, subject to specific exceptions called out in the User’s Guide or readme.txt file. Maintaining point-in-time consistent file system replicas and providing server monitoring and automatic or manual failover of the server name and IP address are the primary functions of the Double-Take software and we offer support to qualified customers should these functions fail to operate in accordance with our published documentation, regardless of what application or process is manipulating the data.
NSI Software may provide application notes and other documents that provide implementation guidelines on how to use Double-Take functions and replicas to manually or automatically failover or recover many popular third party applications and a general process to accomplish failover or recovery of many other third party applications. While these steps are believed to be accurate for the specific configuration, Double-Take version, and application versions originally tested, due to the number of possible configurations and variables, NSI Software can only test selected combinations and may provide only limited support for the operation and configuration of third party applications or the behavior of those applications before, during, or after failover, in its discretion. In cases where NSI Software has no direct access to or experience with a particular application or configuration, NSI Software support may also be limited to only the actual replication of the file system data and failover (name and IP address) of the server.
For assistance in validating, implementing or troubleshooting these or other possible configurations with third party applications, NSI Software and its partners may offer professional services on a fee basis to apply best practices for assisting with third party applications to recover automatically or manually using replicated data.
This, and any other, application note is provided solely for the convenience of our customers and is not intended to bind NSI Software to any obligation.
Table of Contents
Introduction .....................................................................................................................................1
Requirements ...................................................................................................................................1
Configuring the First Cluster .........................................................................................................2Configure the virtual server on the first cluster ...................................................................................... 2Install and Configure Double-Take on the first cluster ........................................................................... 8Configure the Double-Take replication set .............................................................................................. 9Configure the Double-Take Source Connection resource ................................................................... 10
Configuring the Second Cluster ...................................................................................................12Configure the virtual server on the second cluster ............................................................................... 12Install Double-Take on the second cluster ............................................................................................. 12Configure the Double-Take scripts ......................................................................................................... 13
Bring the Components Online and Begin Monitoring ...............................................................14
Monitoring Failover .......................................................................................................................15
Failing Back to Your First Cluster ...............................................................................................16
Cluster to Cluster Failover Using Double-Take
IntroductionNSI Software’s Double-Take provides real-time data protection and replication for cluster environments. This document describes the steps necessary to configure Double-Take to failover from one Microsoft Windows 2000/NT cluster to another.
This document is intended for network administrators with experience installing, configuring, and maintaining network applications, including Double-Take and Microsoft Cluster Service (MSCS).
Requirements! Each node must meet one of the following operating system requirements:
! Microsoft Windows NT 4.0 with Service Pack 4 or higher ! Microsoft Windows 2000 Advanced Server or Datacenter
! Each node must be member servers in the same domain.
! Each node must have a licensed copy of Double-Take 4.x.
NOTE: Each node should be running the same operating system. Although cross-platform mirroring and replication are available, NSI Software recommends that each node be the same platform for effective failover and failback.
Cluster to Cluster Failover Using Double-Take Page 1 of 18
Configuring the First ClusterConfigure the virtual server on the first clusterClient machines need to access a server when looking for an application, but when on a cluster, the client won’t know which node owns the application. Therefore, a virtual server needs to be created. This virtual server will have an IP address and a network name and it will move between nodes as necessasry. The clients will always be able to see and access the application by the virtual server, no matter which node owns it.
To create a virtual server you must create a resource group and add to it an IP address, network name, and a physical disk. If you already have a virtual server with these three resources, you can skip this section and continue with Install and Configure Double-Take on the first cluster on page 8.
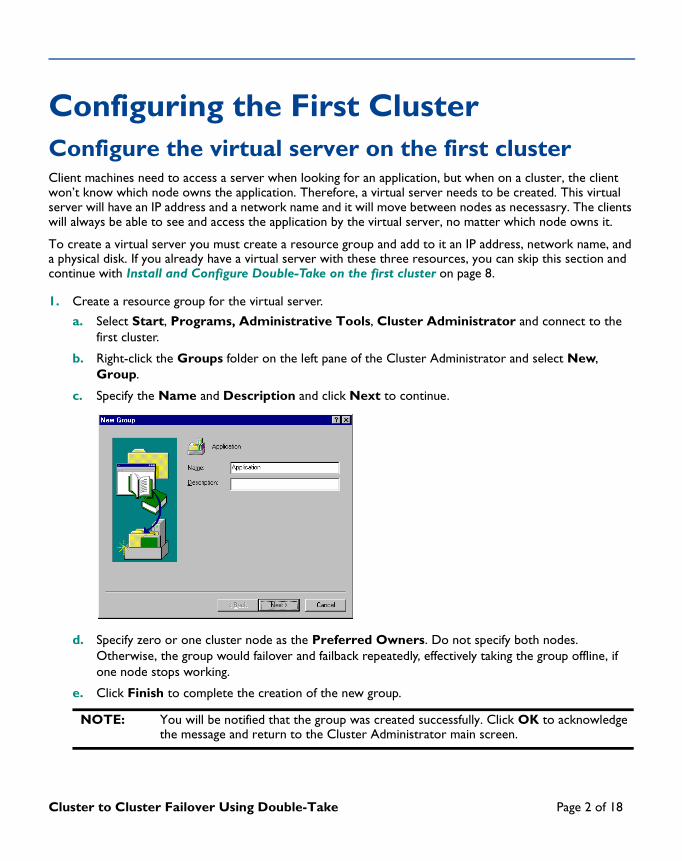
1. Create a resource group for the virtual server.
a. Select Start, Programs, Administrative Tools, Cluster Administrator and connect to the first cluster.
b. Right-click the Groups folder on the left pane of the Cluster Administrator and select New, Group.
c. Specify the Name and Description and click Next to continue.
d. Specify zero or one cluster node as the Preferred Owners. Do not specify both nodes. Otherwise, the group would failover and failback repeatedly, effectively taking the group offline, if one node stops working.
e. Click Finish to complete the creation of the new group.
NOTE: You will be notified that the group was created successfully. Click OK to acknowledge the message and return to the Cluster Administrator main screen.
Cluster to Cluster Failover Using Double-Take Page 2 of 18

2. Create an IP Address resource for the new group.
a. Right-click the group that you just created and select New, Resource.
b. Specify the following fields on the New Resource dialog box:
! Name—Specify a name that identifies this resource as the IP address for the group. This name must be unique within the cluster.
! Description—You can optionally add a more detailed description for this resource.
! Resource type—Specify IP Address.
! Group—The application group name should be selected. If it is not, select the correct group name.
c. Click Next to continue.
d. Verify that both nodes appear as the Possible Owners and click Next to continue.
e. There are no Dependencies required. Click Next to continue.
Cluster to Cluster Failover Using Double-Take Page 3 of 18
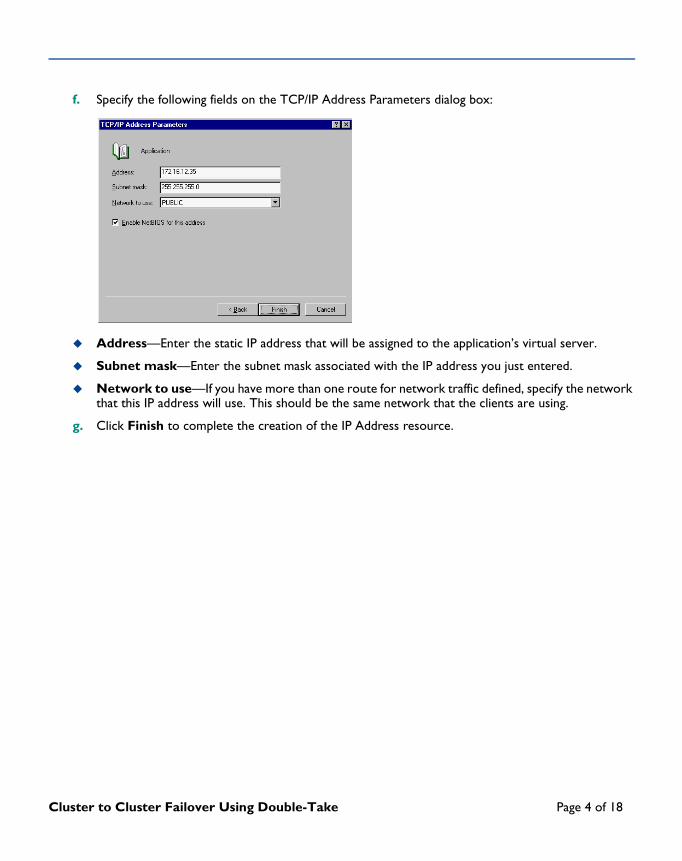
f. Specify the following fields on the TCP/IP Address Parameters dialog box:
! Address—Enter the static IP address that will be assigned to the application’s virtual server.
! Subnet mask—Enter the subnet mask associated with the IP address you just entered.
! Network to use—If you have more than one route for network traffic defined, specify the network that this IP address will use. This should be the same network that the clients are using.
g. Click Finish to complete the creation of the IP Address resource.
Cluster to Cluster Failover Using Double-Take Page 4 of 18

3. Create a Network Name resource for the new group.
a. Right-click the group and select New, Resource.
b. Specify the following fields on the New Resource dialog box:
! Name—Specify a name that identifies this resource as the virtual server for the application. This name must be unique within the cluster.
! Description—You can optionally add a more detailed description for this resource.
! Resource type—Specify Network Name.
! Group—The application group name should be selected. If it is not, select the correct group name.
c. Click Next to continue.
d. Verify that both nodes appear as Possible Owners and click Next to continue.
Cluster to Cluster Failover Using Double-Take Page 5 of 18
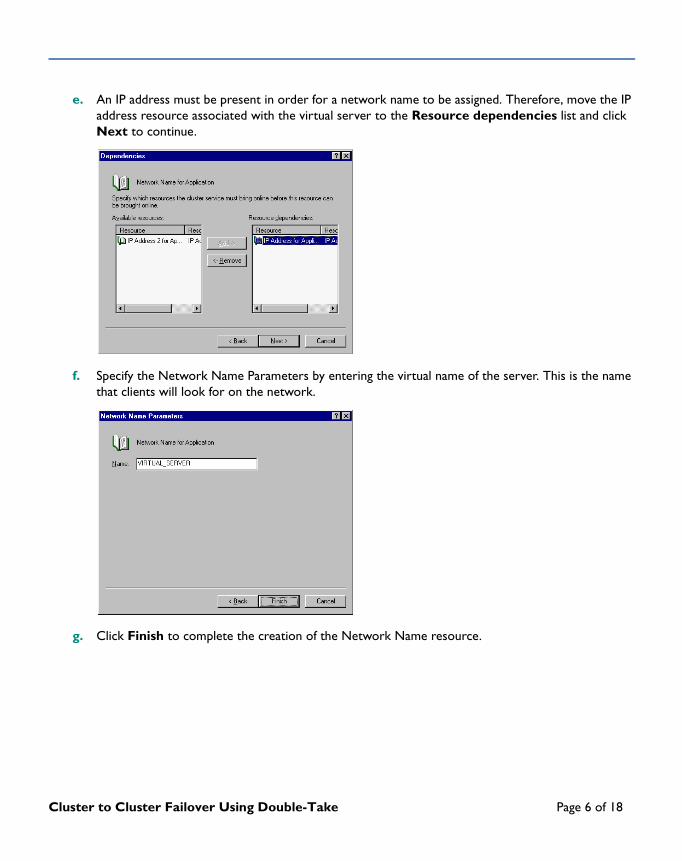
e. An IP address must be present in order for a network name to be assigned. Therefore, move the IP address resource associated with the virtual server to the Resource dependencies list and click Next to continue.
f. Specify the Network Name Parameters by entering the virtual name of the server. This is the name that clients will look for on the network.
g. Click Finish to complete the creation of the Network Name resource.
Cluster to Cluster Failover Using Double-Take Page 6 of 18
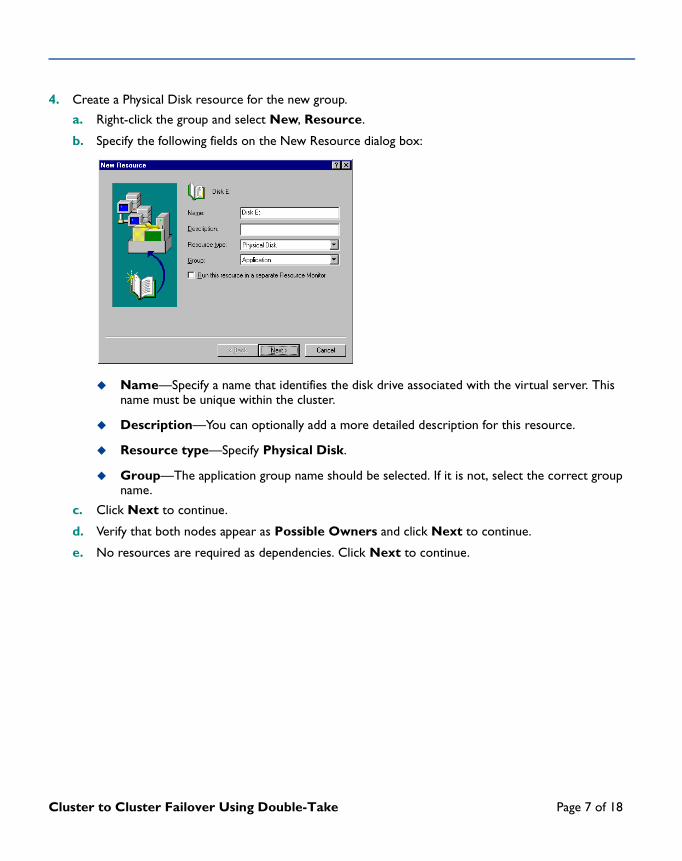
4. Create a Physical Disk resource for the new group.
a. Right-click the group and select New, Resource.
b. Specify the following fields on the New Resource dialog box:
! Name—Specify a name that identifies the disk drive associated with the virtual server. This name must be unique within the cluster.
! Description—You can optionally add a more detailed description for this resource.
! Resource type—Specify Physical Disk.
! Group—The application group name should be selected. If it is not, select the correct group name.
c. Click Next to continue.
d. Verify that both nodes appear as Possible Owners and click Next to continue.
e. No resources are required as dependencies. Click Next to continue.
Cluster to Cluster Failover Using Double-Take Page 7 of 18
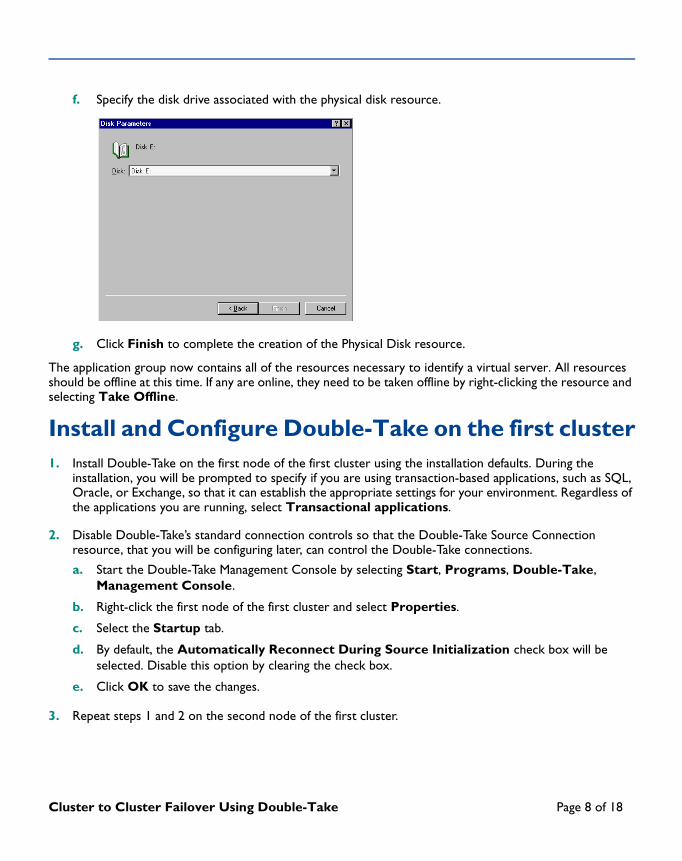
f. Specify the disk drive associated with the physical disk resource.
g. Click Finish to complete the creation of the Physical Disk resource.
The application group now contains all of the resources necessary to identify a virtual server. All resources should be offline at this time. If any are online, they need to be taken offline by right-clicking the resource and selecting Take Offline.
Install and Configure Double-Take on the first cluster1. Install Double-Take on the first node of the first cluster using the installation defaults. During the
installation, you will be prompted to specify if you are using transaction-based applications, such as SQL, Oracle, or Exchange, so that it can establish the appropriate settings for your environment. Regardless of the applications you are running, select Transactional applications.
2. Disable Double-Take’s standard connection controls so that the Double-Take Source Connection resource, that you will be configuring later, can control the Double-Take connections.
a. Start the Double-Take Management Console by selecting Start, Programs, Double-Take, Management Console.
b. Right-click the first node of the first cluster and select Properties.
c. Select the Startup tab.
d. By default, the Automatically Reconnect During Source Initialization check box will be selected. Disable this option by clearing the check box.
e. Click OK to save the changes.
3. Repeat steps 1 and 2 on the second node of the first cluster.
Cluster to Cluster Failover Using Double-Take Page 8 of 18
Configure the Double-Take replication setIn order for the clusters to be synchronized, the data that is changed on the first cluster must be replicated to the second cluster. Double-Take handles this task by establishing a replication set which identifies the data that is changing.
1. On the node owning the group you wish to protect, start the Double-Take Management Console by selecting Start, Programs, Double-Take, Management Console.
2. Double-click on the node on the left pane of the Management Console to login.
3. Right-click the node and select New, Replication Set.
4. Enter a name for the replication set and press Enter.
5. On the right pane of the Management Console, select the directory and files in the tree that are associated with the group and virtual server you are protecting.
6. Right-click the replication set name and select Save.
7. Right-click the replication set that you just created and select Properties.
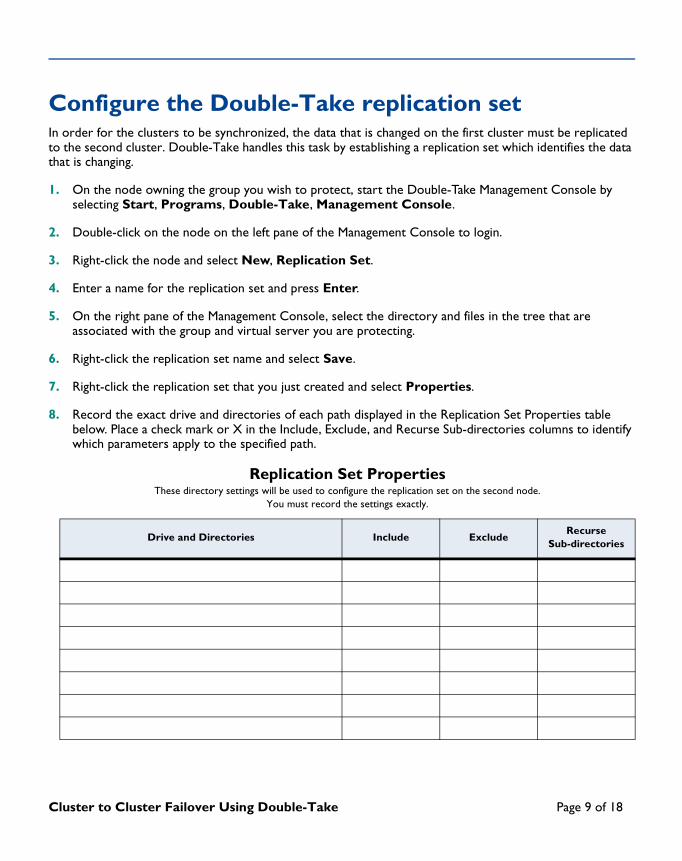
8. Record the exact drive and directories of each path displayed in the Replication Set Properties table below. Place a check mark or X in the Include, Exclude, and Recurse Sub-directories columns to identify which parameters apply to the specified path.
Replication Set PropertiesThese directory settings will be used to configure the replication set on the second node.
You must record the settings exactly.
Drive and Directories Include ExcludeRecurse
Sub-directories
Cluster to Cluster Failover Using Double-Take Page 9 of 18
9. Double-click on the second node on the left pane of the Management Console to login.
10. Right-click the node and select New, Replication Set.
11. Enter the exact, case-sensitive name for the replication set as specified on the first node and press Enter.
12. Right-click the replication set that you just created and select Properties.
13. Click Add.
14. Specify one of the drive and directory paths that you recorded in the table Replication Set Properties. Be sure and mark the correct Include, Exclude and Recurse sub-directories options that need to be applied.
15. Click OK to save the replication set rule.
16. Repeat steps 13-15 for each path and directory on the first node.
17. Right-click the replication set name and select Save.
NOTE: Each replication set rule must be identical to the replication set rule on the first node in order for the disaster recovery process to work correctly.
NOTE: Each drive and directory will appear in the Replication Set Properties even though the second node may not have access to these locations right now. That is not a problem.
Cluster to Cluster Failover Using Double-Take Page 10 of 18

Configure the Double-Take Source Connection resourceThe Double-Take Source Connection resource controls the Double-Take connections. You need to configure this resource through the Cluster Administrator.
1. Select Start, Programs, Administrative Tools, Cluster Administrator.
2. Right-click the application group you were working with earlier and select New, Resource.
3. Specify the following fields on the New Resource dialog box:
! Name—Specify a name that indicates this is the Double-Take virtual server connection. ! Description—You can optionally add a more detailed description for this resource. ! Resource type—Specify Double-Take Source Connection.! Group—The application group name should be selected. If it is not, select the correct group name.
4. Click Next to continue.
5. Verify that both nodes appear as Possible Owners and click Next to continue.
6. No resources are required as dependencies. Click Next to continue.
Cluster to Cluster Failover Using Double-Take Page 11 of 18
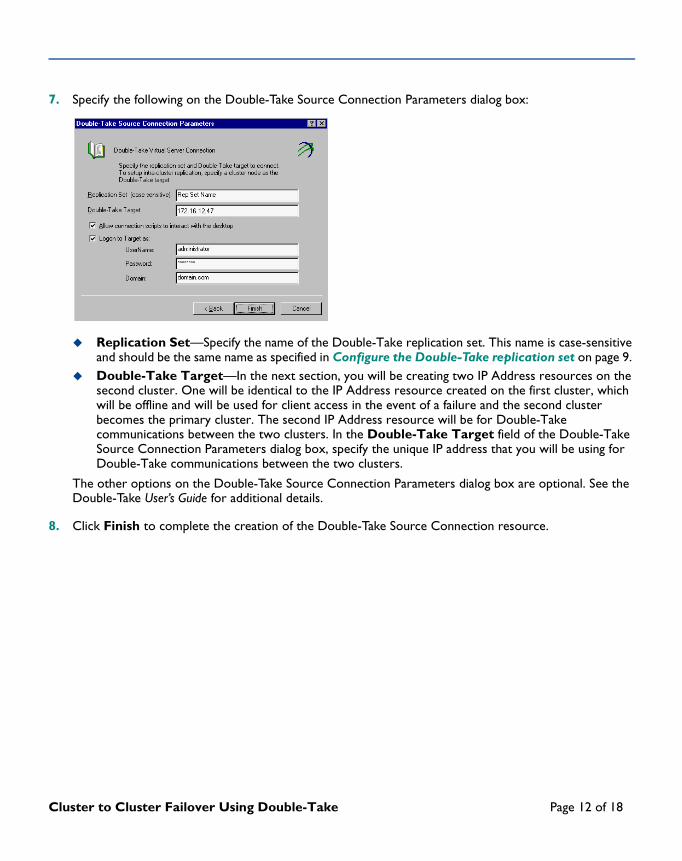
7. Specify the following on the Double-Take Source Connection Parameters dialog box:
! Replication Set—Specify the name of the Double-Take replication set. This name is case-sensitive and should be the same name as specified in Configure the Double-Take replication set on page 9.
! Double-Take Target—In the next section, you will be creating two IP Address resources on the second cluster. One will be identical to the IP Address resource created on the first cluster, which will be offline and will be used for client access in the event of a failure and the second cluster becomes the primary cluster. The second IP Address resource will be for Double-Take communications between the two clusters. In the Double-Take Target field of the Double-Take Source Connection Parameters dialog box, specify the unique IP address that you will be using for Double-Take communications between the two clusters.
The other options on the Double-Take Source Connection Parameters dialog box are optional. See the Double-Take User’s Guide for additional details.
8. Click Finish to complete the creation of the Double-Take Source Connection resource.
Cluster to Cluster Failover Using Double-Take Page 12 of 18

Configuring the Second ClusterConfigure the virtual server on the second cluster1. Verify that all resources in the Application group created on the first cluster are offline except the
Physical Disk resource which will need to be brought online. (Right-click on the resource and select Bring Online or Take Offline as appropriate.)
2. Repeat the steps in Configure the virtual server on the first cluster on page 2 to create an identical resource group, IP Address resource, Network Name resource, and Physical Disk resource on the second cluster.
3. The IP address created in step 2 above is offline while the second cluster is the Double-Take target. If a failure should occur and the second cluster becomes the primary cluster that the clients are accessing, this IP address will be brought online during failover. Therefore, the second cluster has to have another IP address that Double-Take can use for its communications. In the resource group that you created in step 2 above, create another IP Address resource specific for Double-Take communications. This should be the same IP address that you specified for the Double-Take Target on the Double-Take Source Connection Parameters dialog box in step 7 of Configure the Double-Take Source Connection resource.
Install Double-Take on the second cluster1. Install Double-Take on the first node of the second cluster using the installation defaults. During the
installation, you will be prompted to specify if you are using transaction-based applications, such as SQL, Oracle, or Exchange, so that it can establish the appropriate settings for your environment. Regardless of the applications you are running, select Transactional applications.
2. Disable Double-Take’s standard connection controls so that the Double-Take Source Connection resource can control the Double-Take connections.
a. Start the Double-Take Management Console be selecting Start, Programs, Double-Take, Management Console.
b. Right-click the first node of the second cluster and select Properties.
c. Select the Startup tab.
d. By default, the Automatically Reconnect During Source Initialization check box will be selected. Disable this option by clearing the check box.
e. Click OK to save the changes.
3. Repeat step 1 and 2 on the second node of the second cluster.
NOTE: Make sure that none of the resources are online after you create them.
Cluster to Cluster Failover Using Double-Take Page 13 of 18
Configure the Double-Take scriptsIn the event of a failure, for example, if the virtual server IP Address on the first cluster were to fail, the Double-Take failover script would control the resources on the second cluster. Likewise, after you have resolved the failure on the first cluster, the failback script would control the resources on the first cluster.
1. Create a failover script to be used on the second cluster in the event of a failover.
a. Select Start, Program Files, Accessories, NotePad.
b. Type the following case-sensitive command:
Cluster group “Group_Name” /ONLINE
Substitute the name of the group where you created the virtual server, as in step 1 under Configure the virtual server on the first cluster on page 2. For example, you might use the command Cluster group “Application” /ONLINE.
c. Save the file as postover.bat on the shared drive of the second cluster and close Notepad.
2. Create a failback script to be used on the first cluster in the event of a failback.
a. Select Start, Program Files, Accessories, NotePad.
b. Type the following case-sensitive command:
Cluster resource “IP_Address_Resource_Name” /OFFLINE
Substitute the name of the IP Address resource assigned to the virtual server, as in step 2 under Configure the virtual server on the first cluster on page 2. For example, you might use the command Cluster resource “IP Address for Application” /OFFLINE.
c. Save the file as preback.bat on the shared drive of the second cluster and close Notepad.
Cluster to Cluster Failover Using Double-Take Page 14 of 18

Bring the Components Online and Begin MonitoringThe final step is to bring the components online and for the second cluster to begin monitoring the first cluster for a failure.
1. Open the first cluster in Cluster Administrator (Start, Programs, Administrative Tools, Cluster Administrator) and right-click the Application group and select Bring Online. Verify that all of the resources in the group are brought online successfully.
2. Configure the second cluster to monitor the first.
a. On a node of the second cluster, select Start, Program Files, Double-Take, Failover Control Center.
b. Select the node you are running on from the Target Machine list box.
c. Click Add Monitor.
d. You need to enter an IP address to monitor instead of a source machine name, so when the Insert Source Machine dialog box appears, click Cancel.
e. On the Monitor Settings dialog box, click Custom Insert.
f. Specify the IP address and network name for the virtual server (see Configure the virtual server on the first cluster on page 2) and click OK.
g. Select the IP address to be monitored by marking the check box to the left the address in the Names to Monitor tree.
h. Clear all of the settings in the Perform Failover Of section.
i. Clear the Use .SHR Share Mapping File (If Available) option.
j. Click Scripts.
k. Enter the path and file name for the postover.bat in the Post-Failover field and enter the path and file name for the preback.bat in the Pre-Failback field. These are the script files created in Configure the Double-Take scripts on page 14.
l. Click OK to save and close the scripts information.
m. Click OK to save and close the monitor information.
3. Repeat step 2 on the second node of the second cluster.
Double-Take is now replicating from the first to the second cluster and the second cluster is now monitoring the IP address of the first cluster. In the event that both nodes of the first cluster fail, Double-Take will bring the resources online on the second cluster.
Cluster to Cluster Failover Using Double-Take Page 15 of 18

Monitoring FailoverNow that replication is occuring between the two clusters and the second cluster is monitoring the first for failover, you will need to know if and when there is a problem. Since it can be essential to quickly know the status of your machines, Double-Take offers various methods for monitoring the status of failover. When the Failover Control Center is running, you will see four visual indicators:
! The Failover Control Center Time to Fail counter
! The Failover Control Center status bar located at the bottom of the window
! The Failover Control Center colored bullets to the left of each IP address and source machine
! The Windows desktop icon tray containing a failover icon
NOTE: You can minimize the Failover Control Center and, although it will not appear in your Windows taskbar, it will still be active and the failover icon will still appear in the desktop icon tray.
The Failover Control Center does not have to be running for failover to occur.
Colored Bullets Time to Fail Counter
Status Bar Windows Desktop Icon Tray
Cluster to Cluster Failover Using Double-Take Page 16 of 18

The following table identifies how the visual indicators change as the status of failover changes.
Failing Back to Your First ClusterIf your first cluster experiences a failure causing both nodes to fail, such as a power outage, your second cluster will stand in for the first while you resolve the issues. During this downtime, users may be updating data on the second cluster. When your first cluster is ready to come back online, the data is no longer current and must be updated with the new data on the second cluster.
1. Verify that the first cluster is not connected to the network. If it is, disconnect it.
2. Resolve the problem(s) that caused the failure.
3. Verify that all of the resources in the application group on the first cluster are offline. If they are not, take them offline.
4. On the second cluster, select Start, Programs, Double-Take, Failover Control Center.
5. Select the target machine (the owning node on the second cluster) that is currently standing in for the failed cluster.
Time to Fail Countdown Status Bar Colored BulletsDesktopIcon Tray
Source is Online
The Time to Fail counter is counting down and resetting each time a heartbeat is received from the source machine.
The status bar indicates that the target machine is monitoring the source machine.
The bullets are green. a
a. When the Time to Fail value has decreased by 25% of the entire timeout period, the bullet changes fromgreen to yellow, indicating that the target has not received a response from the source. The yellow bullet is acaution signal. If a response from the source is received, the countdown resets and the bullets change back togreen. If the countown reaches zero without the target receiving a response from the source, failover begins.
The Windows desktop icon tray contains a failover icon with red and green computers.
Source Fails and Failover is
Initiated
The Time to Fail countdown value is 0.
The status bar displays the source machine and IP address currently being assumed by the target.
The bullets are red. The Windows desktop icon tray contains a failover icon with red and green computers.
Failover is Complete
The Time to Fail counter is replaced with the “Failed Over” message.
The status bar indicates that monitoring has continued.
The bullets are red. The Windows desktop icon tray contains a failover icon with a red computer.
Cluster to Cluster Failover Using Double-Take Page 17 of 18
6. Select the failed virtual server and click Failback. The pre-failback script created during Configure the Double-Take scripts stops the virtual server on the second cluster so that no additional changes can be made.
7. You will be prompted to determine if you want to continue monitoring the source. Do not choose Continue or Stop at this time.
8. Connect the first cluster to the network.
9. Wait for the IP address to be online on the first cluster and then back on the second cluster, select whether or not you want to continue monitoring this source machine.
10. To begin the restoration process, open the Double-Take Management Console on the second cluster and select Tools, Restoration Manager.
11. Complete the appropriate fields as described:! Original Source—The name of the owning node on the first cluster where the data original resided.! Restore From—The name of the owning node on the second cluster that contains the replicated
data.! Replication Set—The name of the replication set to be restored.! Restore To—The name of the owning node on the first cluster.
12. Identify the correct drive mappings for the data and any other restoration options necessary. For detailed information on the restoration options, see the Double-Take User’s Guide.
13. Verify that the selections you have made are correct and click Restore. The restoration procedure time will vary depending on the amount of data that you have to restore.
14. After the restoration is complete, bring the application group online on the first cluster.
At this time, your data is restored back to your first cluster and it is again the primary application server, and, if you selected to continue failover monitoring, the second cluster is available to stand in for the first in the event of another failure.
Cluster to Cluster Failover Using Double-Take Page 18 of 18