client for open enterprise server user guide
TRANSCRIPT

Client for Open Enterprise ServerUser guide
July 2021

Legal Notices© Copyright 2017 - 2021 Micro Focus or one of its affiliates.
The only warranties for products and services of Micro Focus and its affiliates and licensors (“Micro Focus”) are as may be set forth in the express warranty statements accompanying such products and services. Nothing herein should be construed as constituting an additional warranty. Micro Focus shall not be liable for technical or editorial errors or omissions contained herein. The information contained herein is subject to change without notice.
2

Contents
About This Guide 5
1 Using the Client for Open Enterprise Server 71.1 How Do I Use the Client Tray Application Menu? . . . . . . . . . . . . . . . . . . . . . . . . . . . . . . . . . . . . . . . . . 71.2 Logging In to the Network . . . . . . . . . . . . . . . . . . . . . . . . . . . . . . . . . . . . . . . . . . . . . . . . . . . . . . . . . . . . 8
1.2.1 Logging In to the Network With Advanced Authentication Enabled . . . . . . . . . . . . . . . . . . . 91.2.2 Running Novell Login Scripts During Login . . . . . . . . . . . . . . . . . . . . . . . . . . . . . . . . . . . . . . 11
1.3 Logging Out of a Network Location (Server or Tree) . . . . . . . . . . . . . . . . . . . . . . . . . . . . . . . . . . . . . . 111.4 Viewing Your Network Connections. . . . . . . . . . . . . . . . . . . . . . . . . . . . . . . . . . . . . . . . . . . . . . . . . . . . 121.5 Mapping Network Drives . . . . . . . . . . . . . . . . . . . . . . . . . . . . . . . . . . . . . . . . . . . . . . . . . . . . . . . . . . . . 121.6 Disconnecting a Mapped Drive. . . . . . . . . . . . . . . . . . . . . . . . . . . . . . . . . . . . . . . . . . . . . . . . . . . . . . . . 131.7 OES Utilities . . . . . . . . . . . . . . . . . . . . . . . . . . . . . . . . . . . . . . . . . . . . . . . . . . . . . . . . . . . . . . . . . . . . . . . 141.8 Configuring Your User Account. . . . . . . . . . . . . . . . . . . . . . . . . . . . . . . . . . . . . . . . . . . . . . . . . . . . . . . . 141.9 Creating a Customized List of Browseable Paths. . . . . . . . . . . . . . . . . . . . . . . . . . . . . . . . . . . . . . . . . . 14
1.9.1 Adding a Browseable Path . . . . . . . . . . . . . . . . . . . . . . . . . . . . . . . . . . . . . . . . . . . . . . . . . . . . 151.9.2 Using a Browseable Path . . . . . . . . . . . . . . . . . . . . . . . . . . . . . . . . . . . . . . . . . . . . . . . . . . . . . 15
1.10 Configuring the Client Tray Application Icon . . . . . . . . . . . . . . . . . . . . . . . . . . . . . . . . . . . . . . . . . . . . . 151.11 Updating the Client for Open Enterprise Server . . . . . . . . . . . . . . . . . . . . . . . . . . . . . . . . . . . . . . . . . . 161.12 Configuring Client Properties . . . . . . . . . . . . . . . . . . . . . . . . . . . . . . . . . . . . . . . . . . . . . . . . . . . . . . . . . 17
2 Using OES Utilities 192.1 Copying Files to or from a Volume . . . . . . . . . . . . . . . . . . . . . . . . . . . . . . . . . . . . . . . . . . . . . . . . . . . . 192.2 Assigning Rights to Volumes, Files, and Directories . . . . . . . . . . . . . . . . . . . . . . . . . . . . . . . . . . . . . . . 22
2.2.1 Limiting Access to My Files and Directories . . . . . . . . . . . . . . . . . . . . . . . . . . . . . . . . . . . . . . 242.3 Setting Inherited Rights and Filters . . . . . . . . . . . . . . . . . . . . . . . . . . . . . . . . . . . . . . . . . . . . . . . . . . . . 242.4 Viewing and Setting Object Properties . . . . . . . . . . . . . . . . . . . . . . . . . . . . . . . . . . . . . . . . . . . . . . . . . 26
2.4.1 Viewing and Setting File and Folder Properties . . . . . . . . . . . . . . . . . . . . . . . . . . . . . . . . . . . 262.4.2 Viewing Volume Properties . . . . . . . . . . . . . . . . . . . . . . . . . . . . . . . . . . . . . . . . . . . . . . . . . . . 28
2.5 Salvaging and Purging Deleted Files. . . . . . . . . . . . . . . . . . . . . . . . . . . . . . . . . . . . . . . . . . . . . . . . . . . . 302.5.1 Salvaging Deleted Files. . . . . . . . . . . . . . . . . . . . . . . . . . . . . . . . . . . . . . . . . . . . . . . . . . . . . . . 302.5.2 Purging Deleted Files . . . . . . . . . . . . . . . . . . . . . . . . . . . . . . . . . . . . . . . . . . . . . . . . . . . . . . . . 312.5.3 Salvage and Purge Errors . . . . . . . . . . . . . . . . . . . . . . . . . . . . . . . . . . . . . . . . . . . . . . . . . . . . . 32
2.6 Sending a Broadcast Message . . . . . . . . . . . . . . . . . . . . . . . . . . . . . . . . . . . . . . . . . . . . . . . . . . . . . . . . 34
3 Configuring Your User Account 353.1 Viewing Personal Information . . . . . . . . . . . . . . . . . . . . . . . . . . . . . . . . . . . . . . . . . . . . . . . . . . . . . . . . 353.2 Viewing Work Information . . . . . . . . . . . . . . . . . . . . . . . . . . . . . . . . . . . . . . . . . . . . . . . . . . . . . . . . . . . 363.3 Displaying Mailing Information. . . . . . . . . . . . . . . . . . . . . . . . . . . . . . . . . . . . . . . . . . . . . . . . . . . . . . . . 363.4 Editing Your Login Script . . . . . . . . . . . . . . . . . . . . . . . . . . . . . . . . . . . . . . . . . . . . . . . . . . . . . . . . . . . . . 373.5 Configuring Login Account Information . . . . . . . . . . . . . . . . . . . . . . . . . . . . . . . . . . . . . . . . . . . . . . . . . 383.6 Changing Your Network Password . . . . . . . . . . . . . . . . . . . . . . . . . . . . . . . . . . . . . . . . . . . . . . . . . . . . . 39
3.6.1 Using the Client Tray Application Menu to Change Your Network Password . . . . . . . . . . . 393.6.2 Using Ctrl+Alt+Delete to Change Your Network Password . . . . . . . . . . . . . . . . . . . . . . . . . . 41
Contents 3
3.6.3 Using the Client Tray Application Menu to Change Password When Advanced Authentication is Enabled . . . . . . . . . . . . . . . . . . . . . . . . . . . . . . . . . . . . . . . . . . . . . . . . . . . . . . . . . . . . . . . . . 42
3.7 Viewing Group Memberships . . . . . . . . . . . . . . . . . . . . . . . . . . . . . . . . . . . . . . . . . . . . . . . . . . . . . . . . . 443.8 Challenge/Response Administration . . . . . . . . . . . . . . . . . . . . . . . . . . . . . . . . . . . . . . . . . . . . . . . . . . . 443.9 Managing Your Login Profiles . . . . . . . . . . . . . . . . . . . . . . . . . . . . . . . . . . . . . . . . . . . . . . . . . . . . . . . . . 45
3.9.1 Creating a Login Profile . . . . . . . . . . . . . . . . . . . . . . . . . . . . . . . . . . . . . . . . . . . . . . . . . . . . . . 453.9.2 Viewing or Editing a Login Profile . . . . . . . . . . . . . . . . . . . . . . . . . . . . . . . . . . . . . . . . . . . . . . 473.9.3 Removing a Login Profile . . . . . . . . . . . . . . . . . . . . . . . . . . . . . . . . . . . . . . . . . . . . . . . . . . . . . 473.9.4 Enabling the Use of DHCP In a Personal Login Profile . . . . . . . . . . . . . . . . . . . . . . . . . . . . . . 47
A Documentation Updates 51
4

About This Guide
This guide describes how to use the Client for Open Enterprise Server for Windows features available in the Client notification area. This guide contains the following sections:
Chapter 1, “Using the Client for Open Enterprise Server,” on page 7 Chapter 2, “Using OES Utilities,” on page 19 Chapter 3, “Configuring Your User Account,” on page 35
AudienceThis guide is intended for users of the Client for Open Enterprise Server.
FeedbackWe want to hear your comments and suggestions about this manual and the other documentation included with this product. Please use the User Comments feature at the bottom of each page of the online documentation enter your comments there.
Documentation UpdatesFor the latest version of this documentation, see the Client for Open Enterprise Server online documentation (https://www.microfocus.com/documentation/client-for-open-enterprise-server/2-sp6/).
Additional DocumentationFor information on installing the Client for Open Enterprise Server, see the Client for Open Enterprise Server Installation Quick Start.
For information on administering the Client for Open Enterprise Server, see the Client for Open Enterprise Server Administration Guide.
For information on login scripts, see the Novell Login Scripts Guide.
About This Guide 5

6 About This Guide

1 1Using the Client for Open Enterprise Server
The Client for Open Enterprise Server software extends the capabilities of Windows 11, Windows 10, Windows 8, and Windows 7 workstation, Windows 2012 server, Windows 2016 server, Windows 2019 server, and Windows 2022 server desktops by providing access to NetWare® and Open Enterprise Server (OES). When installed on Windows 11, Windows 10, Windows 8, or Windows 7 workstations, Windows 2012 servers, Windows 2016 servers, Windows 2019 servers, or Windows 2022 servers, the Client lets you enjoy the full range of OES services, such as authentication via eDirectory™, network browsing and service resolution, and secure and reliable file system access. The Client for Open Enterprise Server supports the Novell traditional NCP™ protocol.
For information on installing the Client for Open Enterprise Server, see the Client for Open Enterprise Server Installation Quick Start.
This section contains the following information:
Section 1.1, “How Do I Use the Client Tray Application Menu?,” on page 7 Section 1.2, “Logging In to the Network,” on page 8 Section 1.3, “Logging Out of a Network Location (Server or Tree),” on page 11 Section 1.4, “Viewing Your Network Connections,” on page 12 Section 1.5, “Mapping Network Drives,” on page 12 Section 1.6, “Disconnecting a Mapped Drive,” on page 13 Section 1.7, “OES Utilities,” on page 14 Section 1.8, “Configuring Your User Account,” on page 14 Section 1.9, “Creating a Customized List of Browseable Paths,” on page 14 Section 1.10, “Configuring the Client Tray Application Icon,” on page 15 Section 1.11, “Updating the Client for Open Enterprise Server,” on page 16 Section 1.12, “Configuring Client Properties,” on page 17
1.1 How Do I Use the Client Tray Application Menu? Many of the Client for Open Enterprise features are available when you right-click the Client Tray Application icon in the notification area of the taskbar, located in the bottom right portion of your screen.
Figure 1-1 Icon in the Notification Area of the Taskbar
Right-clicking a Network folder also displays a menu of workstation features, where Client features are preceded by an logo.
Using the Client for Open Enterprise Server 7

Figure 1-2 Sample Network Folder Right-Click Menu
Right-click in the taskbar to see the following menu:
Figure 1-3 Tray Application Menu
The icon is automatically added to the notification area when you install the Client. If the Client tray icon is removed from the notification area for any reason, you can restore it by double-clicking C:\Program Files\Novell\Client\nwtray.exe in Windows Explorer.
1.2 Logging In to the NetworkWhen you log in to the network, you gain access to directories and files as well as other services provided by OES servers. Your network administrator should provide you with the required information so that you can log in.
1 Right-click , then click OES Login.2 Type your username and password, then click Advanced.
8 Using the Client for Open Enterprise Server

3 Specify the tree, context, and server information for the server you want to connect to. You can type a DNS name or an IP address for the server. See your network administrator for this information. If your network has SLP set up, you can browse a list of available trees, contexts, and servers by clicking their associated buttons.
4 (Optional) To run login scripts during this login session, click the Script tab, then select the options needed to run the login scripts. For more information on login scripts, see Section 1.2.2, “Running Novell Login Scripts During Login,” on page 11.
5 Click OK to log in to the server specified in Step 3.
1.2.1 Logging In to the Network With Advanced Authentication EnabledIf Advanced Authentication Client is enabled to be used during eDirectory login, when a network login is attempted from the desktop, the Client for Open Enterprise Server presents an additional tab, Advanced, in the eDirectory login dialog. On this tab you can specify the Advanced Authentication user and server information.
Using the Client for Open Enterprise Server 9

If a separate username is not specified, the eDirectory username that was specified is used as the default Advanced Authentication username.
Proceeding with the login provides an interface for Advanced Authentication logon based on the Advanced Authentication method configured for your account.
Upon successful Advanced Authentication logon, the network login proceeds transparently.
10 Using the Client for Open Enterprise Server
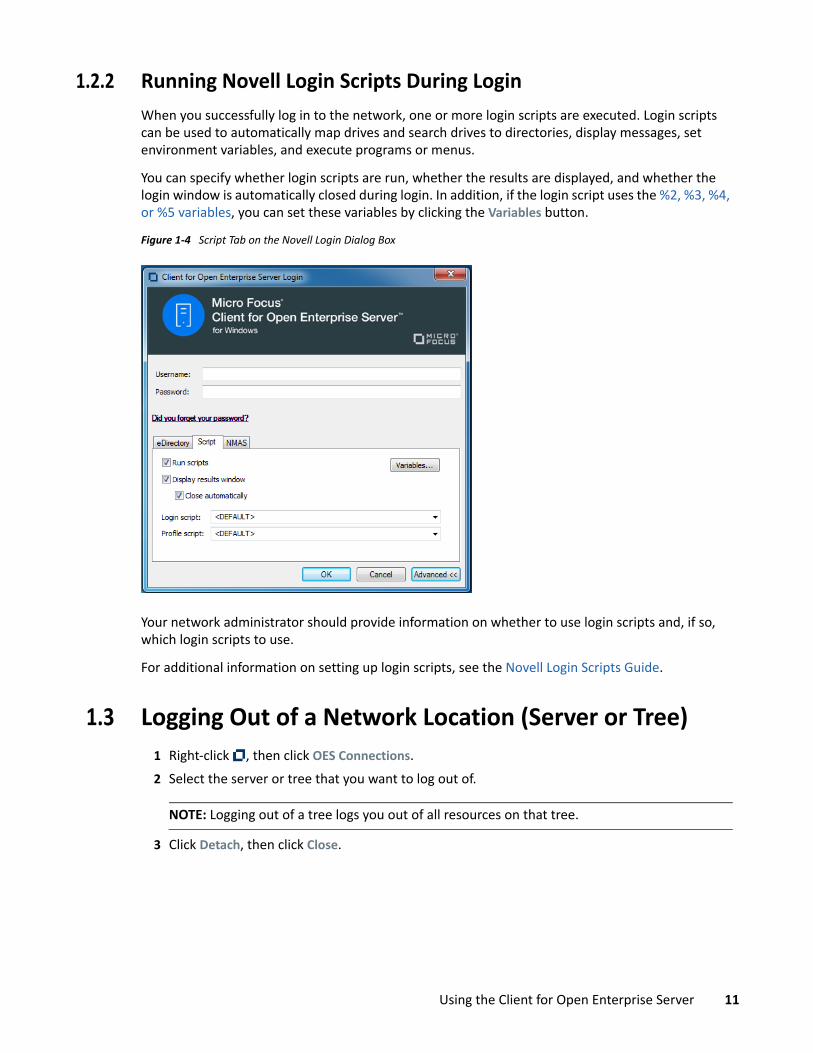
1.2.2 Running Novell Login Scripts During Login When you successfully log in to the network, one or more login scripts are executed. Login scripts can be used to automatically map drives and search drives to directories, display messages, set environment variables, and execute programs or menus.
You can specify whether login scripts are run, whether the results are displayed, and whether the login window is automatically closed during login. In addition, if the login script uses the %2, %3, %4, or %5 variables, you can set these variables by clicking the Variables button.
Figure 1-4 Script Tab on the Novell Login Dialog Box
Your network administrator should provide information on whether to use login scripts and, if so, which login scripts to use.
For additional information on setting up login scripts, see the Novell Login Scripts Guide.
1.3 Logging Out of a Network Location (Server or Tree)1 Right-click , then click OES Connections.2 Select the server or tree that you want to log out of.
NOTE: Logging out of a tree logs you out of all resources on that tree.
3 Click Detach, then click Close.
Using the Client for Open Enterprise Server 11

1.4 Viewing Your Network ConnectionsOES Connections allows you to see what servers and trees you are logged in to. You can refresh connections, set a specific tree as your primary connection, or log out of a tree or server.
1 Right-click , then click OES Connections.
2 Do any of the following: Set a connection as the primary connection: Select the server you want to set as the
primary connection, then click Set Primary. Refresh a connection: Select the connection that you want to refresh, then click Refresh. Disconnect from a connection: Select the connection you want to detach from, then click
Detach.3 Click Close.
1.5 Mapping Network DrivesWhen you map a drive, you create a connection to a drive on the network. After the drive is mapped, you can use it like a local hard disk, provided you have sufficient rights on the drive. You can map to a specific folder on the drive or to the root of the drive.
1 Right-click , then click OES Map Network Drive.
12 Using the Client for Open Enterprise Server

2 Select the drive letter you want to use for the network connection. 3 Specify the path to the directory you want to map.
The path can be in either of these formats:Universal Naming Convention format: \\server\volume\directory\subdirectoryOES format: server\volume:\directory\subdirectory
NOTE: A volume is a segment of a server. The volumes of a server display next to folder icons when you double-click a server.
You can also click the Browse button and locate the directory you want to map.4 (Optional) To reestablish this drive mapping the next time you log in, select Check to always map
this drive letter when you start Windows.
TIP: To prevent the automatic drive mapping in the next log in, disconnect the mapped drive.
5 (Optional) Select Map Search Drive if you want to specify the drive as a search drive.If you select Map Search Drive, you can choose whether this mapping should be at the beginning or the end of the path.
6 Click Map.
1.6 Disconnecting a Mapped Drive1 Right-click > Disconnect Network Drive.
Using the Client for Open Enterprise Server 13

2 Select the drives that you want to disconnect. Shift+click or Ctrl+click to select more than one drive.
3 Click OK to disconnect the selected drives.
1.7 OES UtilitiesYou can access various OES utilities, such as OES Copy, Salvage, Purge, and Inherited Rights and Filters, by selecting the OES Utilities option on the menu. For more detailed information, see Chapter 2, “Using OES Utilities,” on page 19.
1.8 Configuring Your User AccountYou can view or configure various aspects of your user account by selecting the User Administration for option on the menu. For more detailed information on these options, see Chapter 3, “Configuring Your User Account,” on page 35.
1.9 Creating a Customized List of Browseable PathsYou can use the Browse To feature to create a customized list of browseable paths. If you often use the same locations on the network, you can add these locations to your paths list. Then, when you need to go to one of those locations, you can select it from the list rather than browsing the network to find the location.
Browseable paths let you quickly access frequently used files without mapping drives every time you log in. Too many mapped drives can considerably lengthen the time it takes to log in. Browseable paths also help you find those locations you use frequently but don’t normally map to, as well as those that you use infrequently and can never remember.
14 Using the Client for Open Enterprise Server

1.9.1 Adding a Browseable Path1 Right-click , then click Browse To > Edit Browseable Path.
2 Specify the path that you want to add.If you’re unsure of the path, browse the network until you find the location you want to add.
3 Click Add.The locations you add are automatically added to the Browse To menu.
1.9.2 Using a Browseable Path1 Right-click , then click Browse To.2 Click the path you want to access.
You can also select from the following options:Computer: Opens the Windows Computer folder. The Computer folder gives you access to locations such as your hard drive, CD or DVD drives, removable media, and network locations that are connected to your computer. You can also access other devices connected to your computer, such as external hard drives and digital cameras.Network: Opens the Windows Network folder. The Network folder gives you access to computers and devices on your network. You can view the contents of network computers and find shared files and folders. You can also view and install network devices, such as printers.
1.10 Configuring the Client Tray Application IconYou can configure the icon so the features you use most often are available by double-clicking or by pressing Shift when you double-click the icon. By default, double-clicking the icon opens the Windows 7 Network dialog box. Pressing Shift when you double-click the icon opens the OES Map Network Drive dialog box.
1 Right-click , then click Configure System Tray Icon.
Using the Client for Open Enterprise Server 15
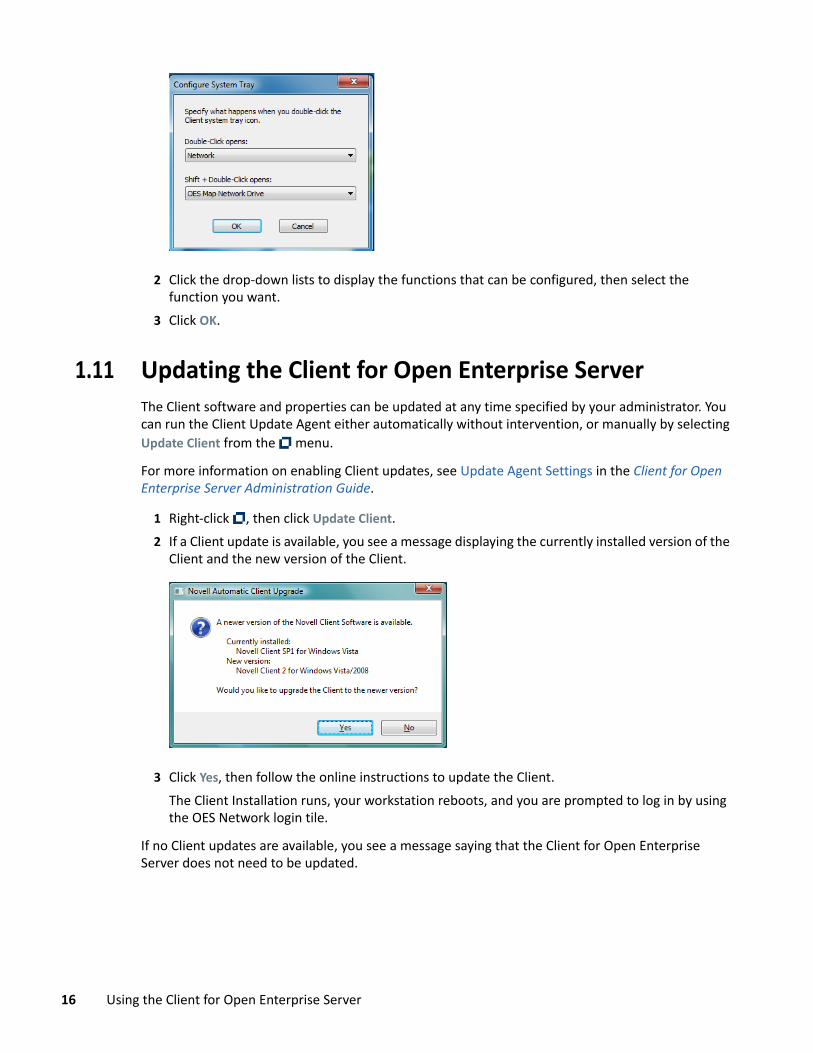
2 Click the drop-down lists to display the functions that can be configured, then select the function you want.
3 Click OK.
1.11 Updating the Client for Open Enterprise ServerThe Client software and properties can be updated at any time specified by your administrator. You can run the Client Update Agent either automatically without intervention, or manually by selecting Update Client from the menu.
For more information on enabling Client updates, see Update Agent Settings in the Client for Open Enterprise Server Administration Guide.
1 Right-click , then click Update Client.2 If a Client update is available, you see a message displaying the currently installed version of the
Client and the new version of the Client.
3 Click Yes, then follow the online instructions to update the Client.The Client Installation runs, your workstation reboots, and you are prompted to log in by using the OES Network login tile.
If no Client updates are available, you see a message saying that the Client for Open Enterprise Server does not need to be updated.
16 Using the Client for Open Enterprise Server

1.12 Configuring Client Properties1 Right-click , then click Client Properties.
2 Use the options in the Client Configuration dialog box to configure the way the Client works in your network.Do not change any properties without first contacting your network administrator. Changing properties can damage the performance of your network connections and can prevent you from logging in to the network.For more detailed information, see Setting Client Properties in the Client for Open Enterprise Server Administration Guide.
3 Click OK to close the dialog box.
Using the Client for Open Enterprise Server 17

18 Using the Client for Open Enterprise Server
2 2Using OES Utilities
You can access various OES utilities by selecting the OES Utilities option from the menu. The options on the submenu let you do the following:
Section 2.1, “Copying Files to or from a Volume,” on page 19 Section 2.2, “Assigning Rights to Volumes, Files, and Directories,” on page 22 Section 2.3, “Setting Inherited Rights and Filters,” on page 24 Section 2.4, “Viewing and Setting Object Properties,” on page 26 Section 2.5, “Salvaging and Purging Deleted Files,” on page 30 Section 2.6, “Sending a Broadcast Message,” on page 34
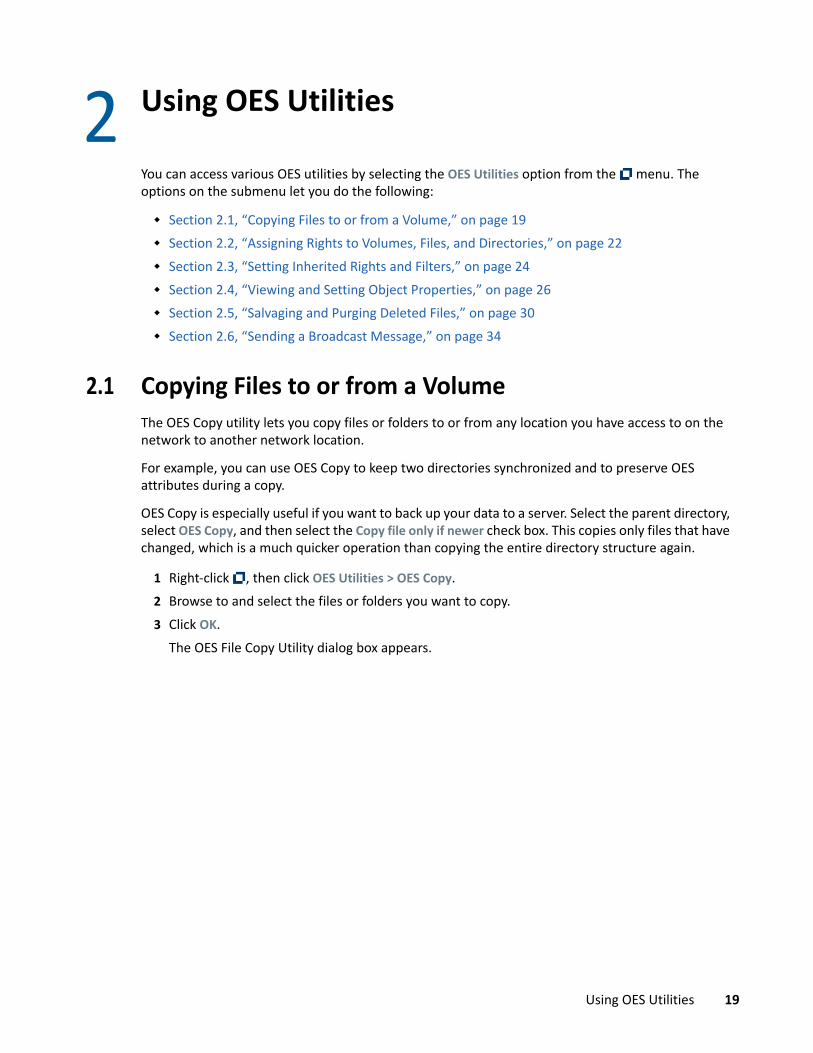
2.1 Copying Files to or from a Volume The OES Copy utility lets you copy files or folders to or from any location you have access to on the network to another network location.
For example, you can use OES Copy to keep two directories synchronized and to preserve OES attributes during a copy.
OES Copy is especially useful if you want to back up your data to a server. Select the parent directory, select OES Copy, and then select the Copy file only if newer check box. This copies only files that have changed, which is a much quicker operation than copying the entire directory structure again.
1 Right-click , then click OES Utilities > OES Copy. 2 Browse to and select the files or folders you want to copy.3 Click OK.
The OES File Copy Utility dialog box appears.
Using OES Utilities 19

4 Select the file copy options you want applied to the files you are copying.Keep attributes on copy: Don’t change the file attributes when you copy the file. The file will have the same attributes in the destination location that it has in the source directory.Modify attributes on copy: Assign different attributes to the file after copying it than it has in the source directory. Specify the attributes you want to assign to the file in the OES File Attributes list.Copy file only if newer: Copy the file to the destination directory only if the file you are copying is newer than the file with the same name that already exists in the destination directory. If the file does not exist in the destination directory, the file is copied to the destination directory.Copy file only if already exists: Copy the file only if a file with the same name already exists in the destination directory.
5 (Optional) Specify the attributes you want applied to the file.You can specify attributes only if Modify attributes on copy is selected.
20 Using OES Utilities

Attribute Description
Archive Needed Marks the file so it is included if the directory is archived.
Shareable Allows more than one user to access the file at the same time. This attribute is usually used only on files with the Read Only attribute.
Transactional Allows a file to be tracked and protected by the Transaction Tracking System™ (TTS™) feature. TTS allows interrupted operations to be backed out of the file, restoring it to an uncorrupted state. All database files that need TTS protection should be marked with this attribute. A file that is flagged Transactional cannot be deleted or renamed. A file cannot be flagged Transactional while it is open. The Modify right is required to flag a file as Transactional.
Rename Inhibit Prevents the name of the file or folder from being changed. The Modify right is required to change this attribute. A user with the Modify right can change this attribute and then
rename the file. This attribute is automatically set and removed when the Read
Only attribute is set or removed.
Don’t Suballocate Previous versions of NetWare® worked with a fixed block size, determined at the time of installation. The block size became the smallest unit of storage on the file server’s hard disk. Generally, the larger the block size, the better the throughput between file server RAM and the hard disk. However, larger block sizes waste disk space. OES subdivides a disk block into smaller suballocation units of 512 bytes. This ensures that disk space is used efficiently.
If you don’t want to use the suballocation units on the files you’re copying, select Don’t Suballocate.
Execute Only Permanently prevents files from being copied. Copy Inhibit prevents Macintosh* users from copying a file. This attribute overrides Read and File Scan trustee rights.
Hidden Hides the volume, directory, or file from the DOS or OS/2* DIR command and prevents it from being deleted or copied The OES NDIR command shows the file if the user has File Scan rights.
Using OES Utilities 21

6 Click OK to copy the files.
2.2 Assigning Rights to Volumes, Files, and DirectoriesThe Trustee Rights utility lets you display and give rights to volumes, files, and directories on a OES server. A trustee is an object (such as a User object, Group object, Organizational Role objects, or container object) that has (or will have) rights to a volume, directory, or file. Trustee assignments allow you to assign ownership, set permissions, and monitor user access.
1 Right-click , then click OES Utilities > Trustee Rights.2 Select the folder or file you want to set trustee rights for, then click OK.
Purge Immediate Specifies that this volume, directory, or file is immediately erased from the system if it is deleted. Purged items cannot be recovered. Normally, files deleted by users are saved by OES so they can be
salvaged (recovered). To view a list of deleted files in a directory and recover files, right-
click the directory name and click Salvage. Normally, deleted files are saved until someone purges them or
the OES server runs out of disk allocation blocks on the volume. When a directory is flagged with the Purge Immediate attribute,
any file in that directory is purged when the directory is deleted. Those files and directories can’t be recovered with the Salvage option.
Don’t Migrate Prevents files from being migrated.
Data migration takes files off the server and migrates them onto another media such as a tape or a read/write optical disk. The migrated files are still seen in the directory listing and can be retrieved transparently to the user.
Read Only Specifies that no one can write to this directory or file. When the Read Only attribute is set or removed, OES also sets or removes the Delete Inhibit and Rename Inhibit attributes. A user can’t write to, erase, or rename a directory or file when Read Only is selected.
System Marks the file as a system file.
Delete Inhibit Prevents files and folders from being deleted. This attribute overrides the Erase trustee right. The Modify right is required to change this attribute. A user with the Modify and Erase rights can change this attribute
and delete the file. This attribute is set and removed when the Read-Only attribute is
set and removed.
Immediate Compress Specifies that every file in this directory should be compressed as soon as possible after it is closed.
Attribute Description
22 Using OES Utilities
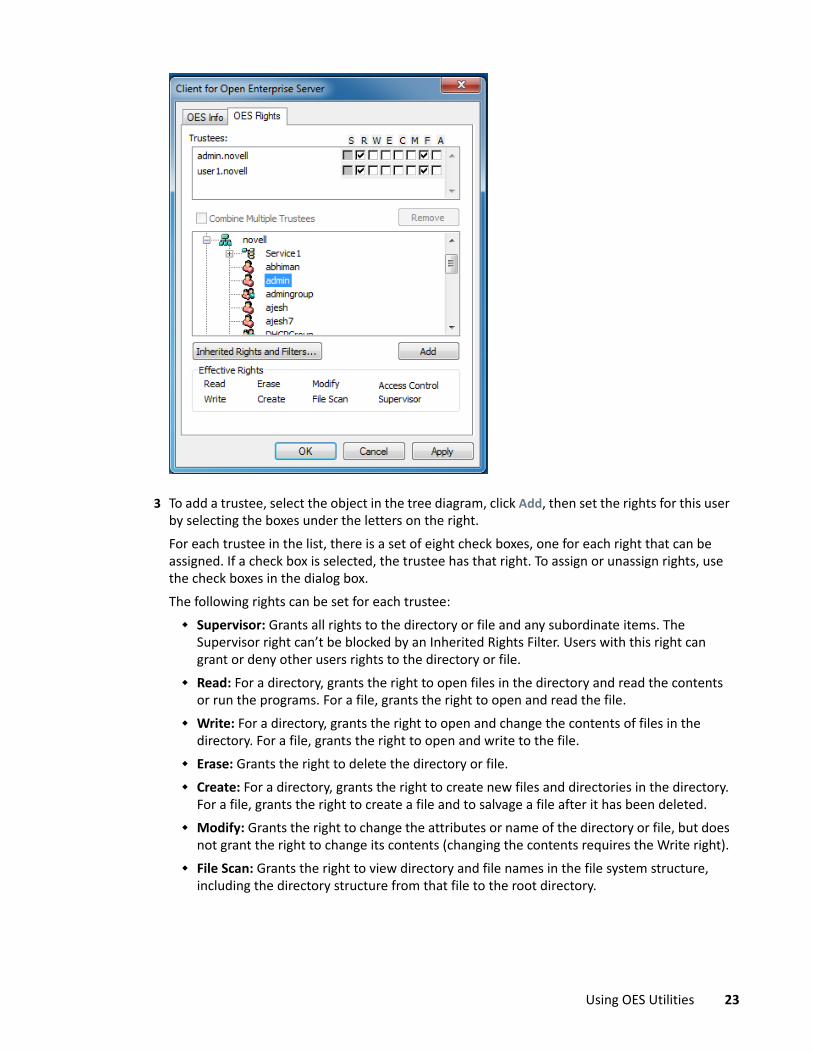
3 To add a trustee, select the object in the tree diagram, click Add, then set the rights for this user by selecting the boxes under the letters on the right.For each trustee in the list, there is a set of eight check boxes, one for each right that can be assigned. If a check box is selected, the trustee has that right. To assign or unassign rights, use the check boxes in the dialog box.The following rights can be set for each trustee: Supervisor: Grants all rights to the directory or file and any subordinate items. The
Supervisor right can’t be blocked by an Inherited Rights Filter. Users with this right can grant or deny other users rights to the directory or file.
Read: For a directory, grants the right to open files in the directory and read the contents or run the programs. For a file, grants the right to open and read the file.
Write: For a directory, grants the right to open and change the contents of files in the directory. For a file, grants the right to open and write to the file.
Erase: Grants the right to delete the directory or file. Create: For a directory, grants the right to create new files and directories in the directory.
For a file, grants the right to create a file and to salvage a file after it has been deleted. Modify: Grants the right to change the attributes or name of the directory or file, but does
not grant the right to change its contents (changing the contents requires the Write right). File Scan: Grants the right to view directory and file names in the file system structure,
including the directory structure from that file to the root directory.
Using OES Utilities 23

Access Control: Grants the right to add and remove trustees for directories and files and modify their trustee assignments and Inherited Rights Filters.This right does not allow to add or remove the Supervisor right. Also, it does not allow to remove the trustee with the Supervisor right.
4 To remove a trustee, select one or more trustees in the Trustees list, then click Remove.5 To view a list of rights and filters inherited by this volume, click Inherited Rights and Filters.6 To apply the same trustee assignments to a group of selected files, click Combine Multiple
Trustees. This check box is available only if you’re viewing the right for multiple files or directories. At least one of the files or directories must have at least one trustee assignment. The trustees and rights shown are the combined trustees and rights for all of the files. If you select Combine Multiple Trustees, the trustee assignments that are chosen apply to all of the selected files after you click OK or Apply.For example, Kim is a trustee of file_a and file_b. Kim has Read, File Scan, and Access Control rights for file_a and Read and File Scan rights for file_b. If you select file_a and file_b and view their properties, Kim is shown as a trustee with Read, File Scan, and Access Control rights.If you select Combine multiple Trustees and then click OK, Kim is given the Access Control right for file_b. Therefore, Kim now has Read, File Scan, and Access Control rights for both file_a and file_b.
7 Click Apply, then click OK when you are finished modifying trustee rights.
2.2.1 Limiting Access to My Files and Directories1 Double-click the Network folder.2 Navigate to the file or directory.3 Right-click the file or directory, then click Properties.4 To change the access attributes of the file or directory, click General, select the attributes you
want, then click Close.
2.3 Setting Inherited Rights and FiltersThe Inherited Rights and Filters utility lets you view and set information about trustees and rights. Rights assignments on eDirectory™ containers can be inheritable or non-inheritable, but all rights assignments on directories are inheritable. You can block such inheritance on individual subordinate items so that the rights aren’t effective on those items, no matter who the trustee is. One exception is that the Supervisor right can’t be blocked.
1 Right-click , then click OES Utilities > Inherited Rights and Filters.2 Select the folder or file you want to view or set inherited rights and filters for, then click OK.
24 Using OES Utilities

The main part of this dialog box is the list of trustees inherited from the selected item and its parent folders.
3 To assign or unassign rights, use the check boxes to the right of a trustee.For each trustee in the list, there is a set of eight check boxes, one for each right that can be inherited. If a check box is selected, the trustee has that right. Read: For a directory, grants the right to open files in the directory and read the contents
or run the programs. For a file, grants the right to open and read the file. Write: For a directory, grants the right to open and change the contents of files in the
directory. For a file, grants the right to open and write to the file. Erase: Grants the right to delete the directory or file. Create: For a directory, grants the right to create new files and directories in the directory.
For a file, grants the right to create a file and to salvage a file after it has been deleted. Modify: Grants the right to change the attributes or name of the directory or file, but does
not grant the right to change its contents (changing the contents requires the Write right). File Scan: Grants the right to view directory and file names in the file system structure,
including the directory structure from that file to the root directory. Access Control: Grants the right to add and remove trustees for directories and files and
modify their trustee assignments and Inherited Rights Filters.This right does not allow to add or remove the Supervisor right. Also, it does not allow to remove the trustee with the Supervisor right.
Supervisor: Grants all rights to the directory or file and any subordinate items. The Supervisor right can’t be blocked by an Inherited Rights Filter. Users with this right can grant or deny other users rights to the directory or file.
4 To see a list of trustees for subfolders of the currently selected folder, click View Trustees Below Directory. A list of all the users and their rights to each subfolder appears. You can modify or remove rights from this list.
Using OES Utilities 25

5 To view a trustee’s current effective rights (taking into account the Inheritance filter), right-click a trustee name, then click Current Effective Rights.Users can receive rights in a number of ways, such as explicit trustee assignments, inheritance, and security equivalence. Rights can also be limited by Inherited Rights Filters and changed or revoked by lower trustee assignments. The net result of all these actions (the rights a user can employ) is called effective rights.
6 To view a trustee’s properties (such as if they have the rights to modify inherited rights at this level), right-click a trustee name, then click Properties.
7 Click Apply, then click OK when you are finished modifying inherited rights and filters.
2.4 Viewing and Setting Object PropertiesThe Object Properties utility lets you view the property pages for a selected object. The property pages let you see information and statistics about that object. If you have sufficient rights, you can set attributes for that object.
Section 2.4.1, “Viewing and Setting File and Folder Properties,” on page 26 Section 2.4.2, “Viewing Volume Properties,” on page 28
2.4.1 Viewing and Setting File and Folder Properties1 Right-click , then click OES Utilities > Object Properties.2 Select the Network file or folder whose properties you want to see, then click OK.3 On the OES Info page, you can view the owner of the folder, the name spaces enabled on the
folder, the amount of disk space available to you, the date the folder was created, updated, and archived, and any attributes set on the folder.
26 Using OES Utilities
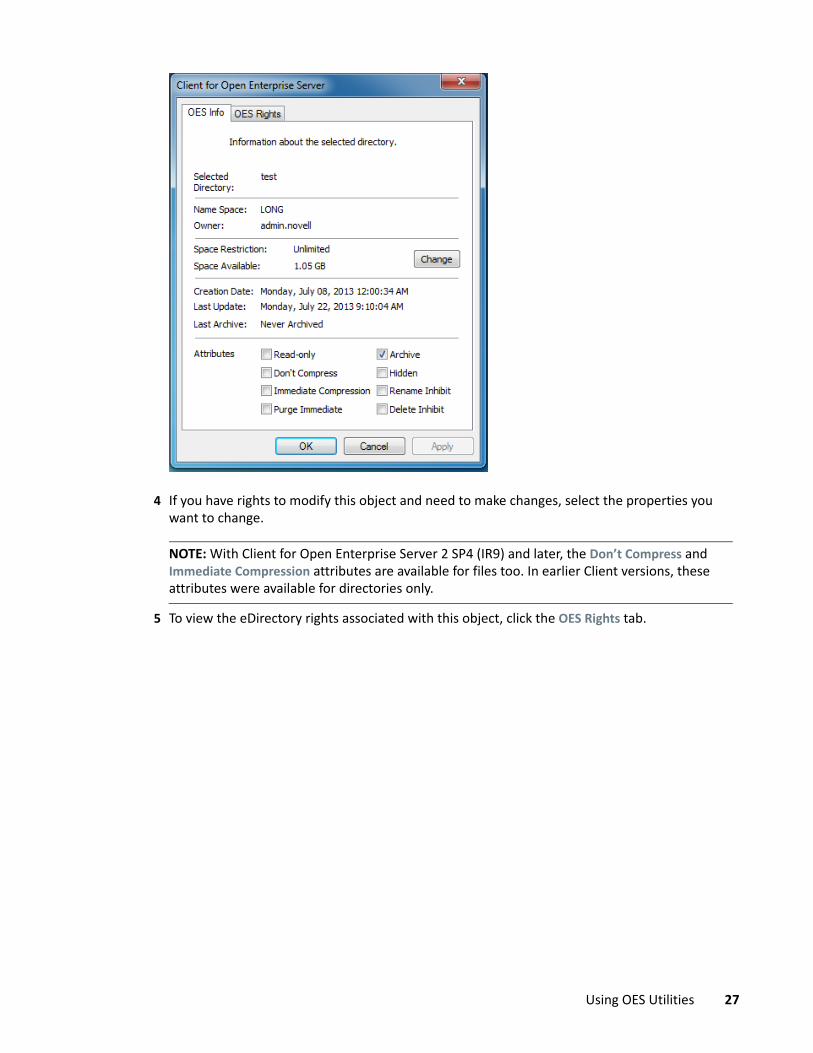
4 If you have rights to modify this object and need to make changes, select the properties you want to change.
NOTE: With Client for Open Enterprise Server 2 SP4 (IR9) and later, the Don’t Compress and Immediate Compression attributes are available for files too. In earlier Client versions, these attributes were available for directories only.
5 To view the eDirectory rights associated with this object, click the OES Rights tab.
Using OES Utilities 27

If you have Access Control rights and need to make changes to the OES rights associated with this object, see Managing File Security in the Client for Open Enterprise Administration Guide for specific steps on setting OES file rights.If you do not have Access Control rights, your effective rights to the file appear in the Effective Rights box. You cannot change these rights.
6 Click Apply, then click OK when you are finished viewing or modifying the object’s properties.
2.4.2 Viewing Volume Properties1 In Windows Explorer, navigate to the OES volume whose properties you want to view.2 Right-click the Volume, then click Properties.3 To view information about the total amount of used and available disk space on the volume and
information about the number of used and available directory entries on the volume, click the OES Volume Statistics tab.
28 Using OES Utilities

The information you can view includes the following: Disk Usage Graph: Pie chart representing the disk usage of the selected volume.The chart
includes the amount of unused space on the volume, the used disk space that is compressed on the volume, the disk space available for use after marked files are purged, and the used disk space on the volume (not including compressed or purgeable space).
Directory Entries Graph: Pie chart representing the number of used directory entries compared to the number of available entries on the volume.
4 To view other information about the OES volume, click the OES Volume Information tab.
Using OES Utilities 29

The information you can view includes the following: Volume Name: The name of the volume. The volume name corresponds to the name of
the disk (or label) for local disks, such as diskettes or workstation hard disks. Server: The server where the volume is located. Object Name: The volume's eDirectory object name. Name Spaces: The name spaces enabled on the volume. Volume Number: The number of the volume. The volume number can be useful in
diagnosing errors. Block Size: The block size of the volume (in kilobytes). User Restriction Graph: The amount of disk space you are using and the amount of
remaining disk space that you can use. Space Restriction is the disk space available to you.5 Click OK when you are finished viewing the object’s properties.
2.5 Salvaging and Purging Deleted FilesThe Salvage utility lets you recover deleted files and directories from OES file systems. The Purge utility lets you purge deleted files and directories from OES file systems. Files that have been purged cannot be recovered.
2.5.1 Salvaging Deleted Files
IMPORTANT: You cannot salvage files or directories from an OES for Linux Reiser volume.
1 Right-click , then click OES Utilities > Salvage.2 Select the folder where the files you want to recover are located, then click OK.3 Select the files you want to recover.
30 Using OES Utilities
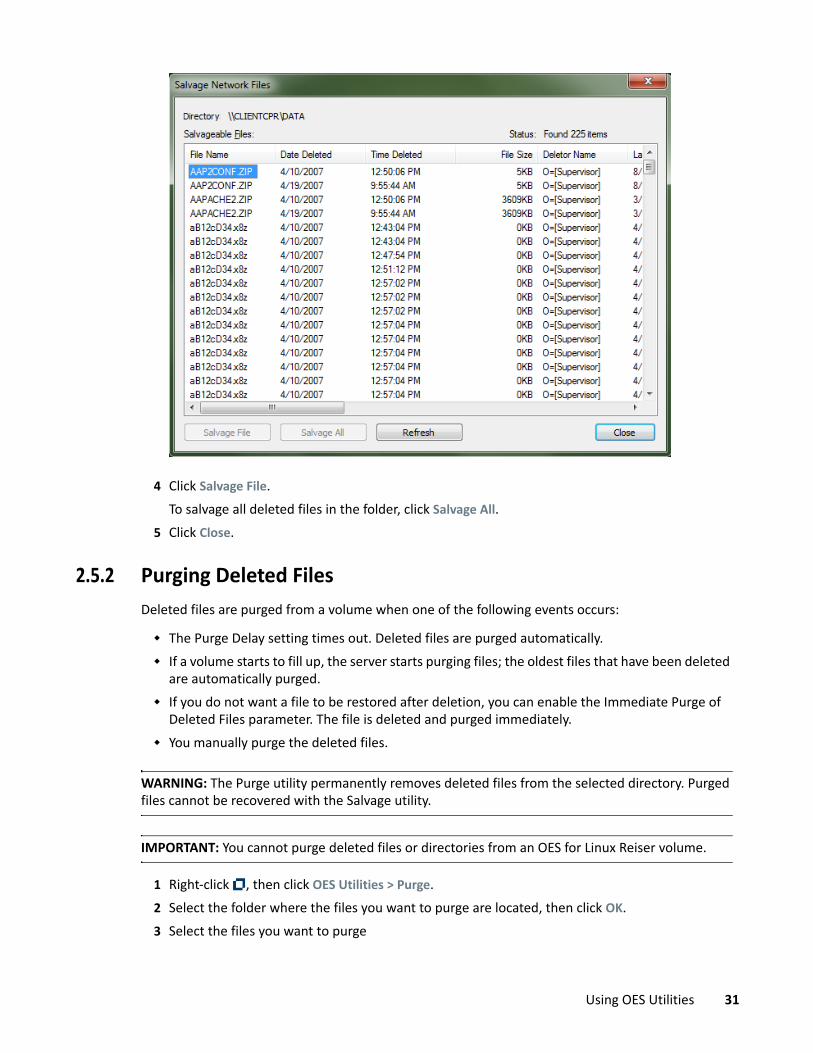
4 Click Salvage File.To salvage all deleted files in the folder, click Salvage All.
5 Click Close.
2.5.2 Purging Deleted FilesDeleted files are purged from a volume when one of the following events occurs:
The Purge Delay setting times out. Deleted files are purged automatically. If a volume starts to fill up, the server starts purging files; the oldest files that have been deleted
are automatically purged. If you do not want a file to be restored after deletion, you can enable the Immediate Purge of
Deleted Files parameter. The file is deleted and purged immediately. You manually purge the deleted files.
WARNING: The Purge utility permanently removes deleted files from the selected directory. Purged files cannot be recovered with the Salvage utility.
IMPORTANT: You cannot purge deleted files or directories from an OES for Linux Reiser volume.
1 Right-click , then click OES Utilities > Purge.2 Select the folder where the files you want to purge are located, then click OK.3 Select the files you want to purge
Using OES Utilities 31

4 Click the appropriate purge option. Click Purge File to purge only the currently selected item(s) from the current directory level
for which the Purge Files dialog was invoked. Click Purge All to purge all the deleted file items and deleted directory items in the current
directory level for which the Purge Files dialog was invoked. Click Purge Subdirectories to purge all the deleted file items and deleted directory items in
the current directory level, and then recurse into each subdirectory and purge all the deleted file items and deleted directory items in them too, starting at the current directory level for which the Purge Files dialog was invoked.
5 Click Close.
2.5.3 Salvage and Purge ErrorsBeginning with Client for Open Enterprise Server 2 SP4 (IR7), the failure of salvage or purge operations displays appropriate error messages.
Complete failure of salvage or purge operation: When all the files selected for salvage or purge fails, an error message with the error code is displayed.
32 Using OES Utilities

Partial failure of salvage or purge operation: When some of the files selected for salvage or purge fails, the details of the files that failed and their respective error codes are displayed in a dialog box.
Open Salvage or Purge window: If you try to open a new Salvage or Purge window when one Salvage or Purge window is already open, an error message is displayed.
Using OES Utilities 33

2.6 Sending a Broadcast MessageTo send a broadcast message
1 From the Client Tray Application menu select OES Utilities > Send Message > To Users.2 Double-click the server to see a list of users and groups connected to it.3 Type the message.4 Select the users and/or groups to send the message to.5 Click Send.
The Send Message Results dialog appears, showing the users and groups that the message was sent to."
34 Using OES Utilities
3 3Configuring Your User Account
You can view or configure various aspects of your eDirectory™ user account by selecting the User Administration for option from the menu. The options on the submenu let you do the following:
Section 3.1, “Viewing Personal Information,” on page 35 Section 3.2, “Viewing Work Information,” on page 36 Section 3.3, “Displaying Mailing Information,” on page 36 Section 3.4, “Editing Your Login Script,” on page 37 Section 3.5, “Configuring Login Account Information,” on page 38 Section 3.6, “Changing Your Network Password,” on page 39 Section 3.7, “Viewing Group Memberships,” on page 44 Section 3.8, “Challenge/Response Administration,” on page 44 Section 3.9, “Managing Your Login Profiles,” on page 45
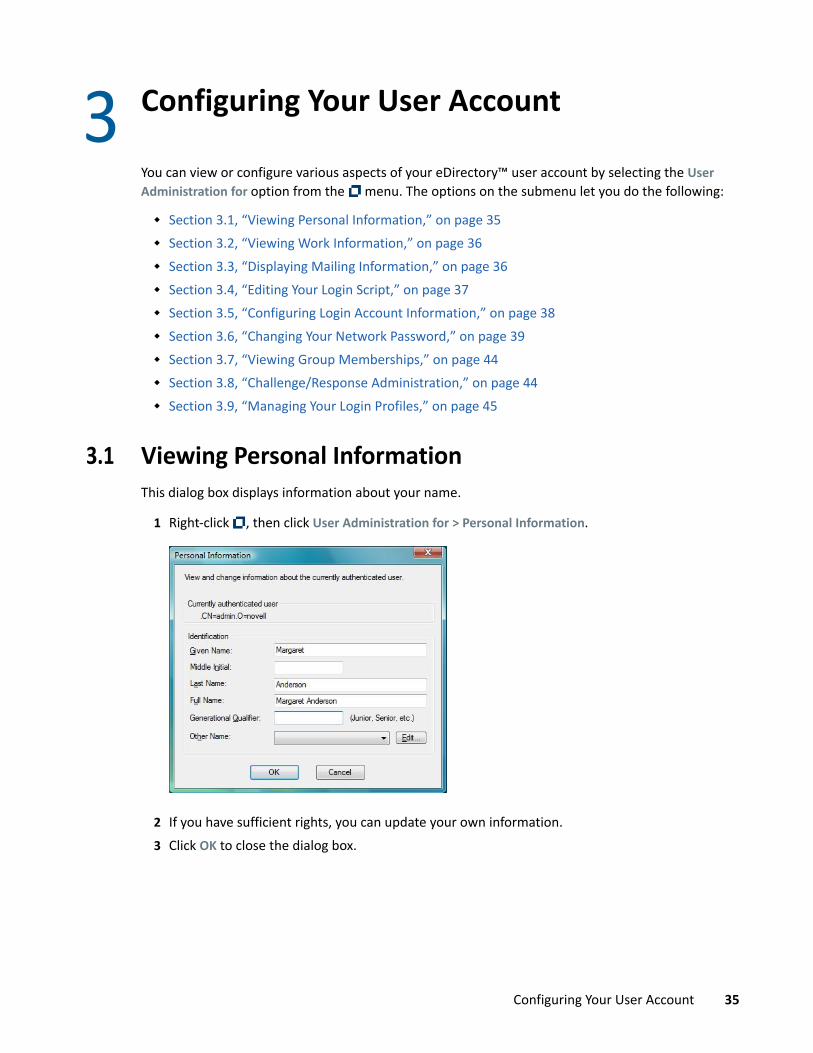
3.1 Viewing Personal InformationThis dialog box displays information about your name.
1 Right-click , then click User Administration for > Personal Information.
2 If you have sufficient rights, you can update your own information.3 Click OK to close the dialog box.
Configuring Your User Account 35

3.2 Viewing Work InformationThis dialog box contains information about your job, including your title, and contact information such as your location and phone and fax numbers.
1 Right-click , then click User Administration for > Work Information.
2 If you have sufficient rights, you can update your own information.3 Click OK to close the dialog box.
3.3 Displaying Mailing InformationThis dialog box displays information about your mailing address.
1 Right-click , then click User Administration for > Mailing Information.
36 Configuring Your User Account

2 If you have sufficient rights, you can update your own information.3 Click OK to close the dialog box.
3.4 Editing Your Login Script This option lets you edit or create the personal login script that runs when you log in.
Check with your network administrator before creating or changing a login script. Your administrator can tell you whether you should create a personal login script on your network, and can provide information on script syntax.
1 Right-click , then click User Administration for > Edit Login Script.
Configuring Your User Account 37
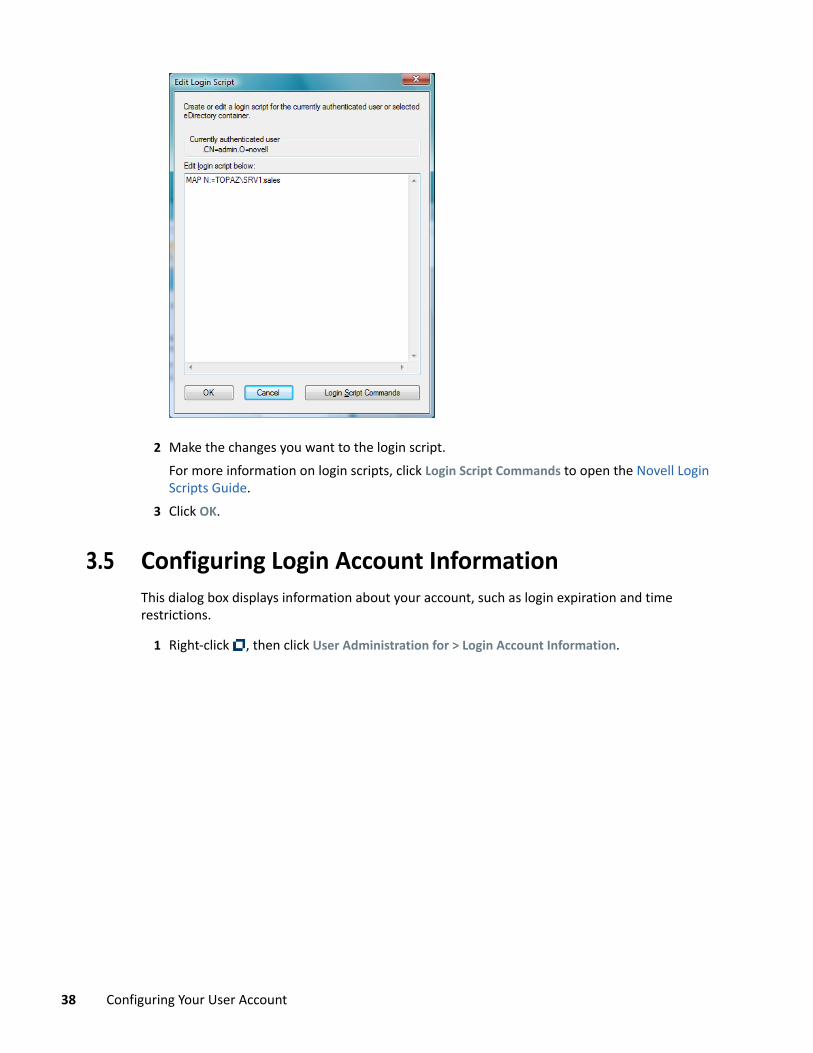
2 Make the changes you want to the login script.For more information on login scripts, click Login Script Commands to open the Novell Login Scripts Guide.
3 Click OK.
3.5 Configuring Login Account InformationThis dialog box displays information about your account, such as login expiration and time restrictions.
1 Right-click , then click User Administration for > Login Account Information.
38 Configuring Your User Account

2 View your login and account information.3 Click OK to close the dialog box.
3.6 Changing Your Network PasswordYou can use either of the following ways to change you Network password:
Section 3.6.1, “Using the Client Tray Application Menu to Change Your Network Password,” on page 39
Section 3.6.2, “Using Ctrl+Alt+Delete to Change Your Network Password,” on page 41 Section 3.6.3, “Using the Client Tray Application Menu to Change Password When Advanced
Authentication is Enabled,” on page 42
3.6.1 Using the Client Tray Application Menu to Change Your Network PasswordUse the User Password Administration dialog box to view information about your password restrictions and to change your eDirectory password.
1 Right-click , then click User Administration for >Password Administration.
Configuring Your User Account 39

2 Click Change Password.3 Select the users whose password you want to change.
For example, you can change your Network password and your Windows 7 password, or you can change only your Network password.
4 Type your current password in the Old password field.5 Type your new password in the New password field. 6 Retype the new password in the Confirm field. 7 Click OK.
You will receive a message telling you that the passwords for all selected resources were successfully changed.
8 Click OK to close the message, then click OK to close the User Password Administration dialog box.
40 Configuring Your User Account

3.6.2 Using Ctrl+Alt+Delete to Change Your Network PasswordIf you are logged into eDirectory, you can use the following steps to change your Network password. If you are not logged into eDirectory, pressing Ctrl+Alt+Delete then clicking Change a password will let you change your local user password only.
1 Press Ctrl+Alt+Delete, then click Change a password.2 Click the logon tile.3 Type your current Network password in the Old password field,.type your new password in the
New password field, then retype the new password in the Confirm new password field.
4 Press Enter.After the old password is verified, and if the new passwords you specified match, the Network Change Password dialog box opens.
5 Select which resources you want the password change to go to.
Configuring Your User Account 41
For example, you can change your Network password and your Windows 7 password, or you can change only your Network password.
6 Click OK.You will receive a message telling you that your password has been changed.
7 Click OK to close the message.
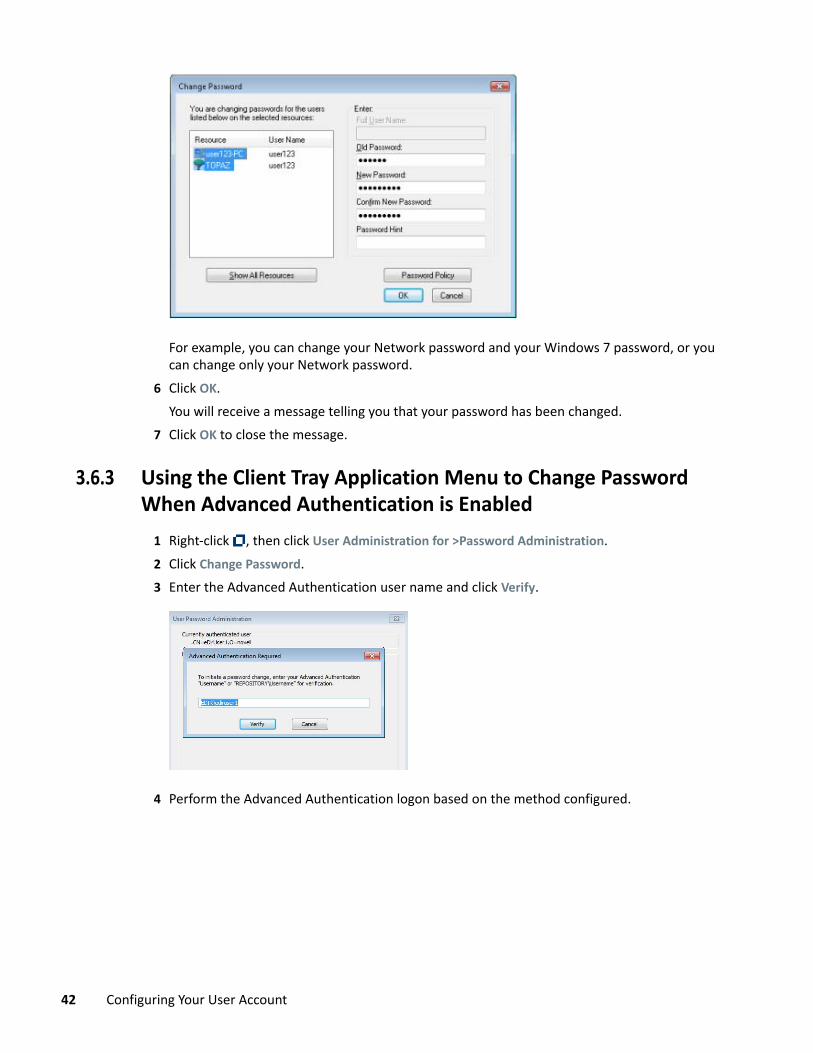
3.6.3 Using the Client Tray Application Menu to Change Password When Advanced Authentication is Enabled
1 Right-click , then click User Administration for >Password Administration.2 Click Change Password.3 Enter the Advanced Authentication user name and click Verify.
4 Perform the Advanced Authentication logon based on the method configured.
42 Configuring Your User Account

5 Select the resources for which you want to change the password.
6 Type your current password in the Old password field.7 Type your new password in the New password field. 8 Retype the new password in the Confirm field. 9 Click OK.
You will receive a message telling you that the passwords for all selected resources were successfully changed.
10 Click OK to close the message, then click OK to close the User Password Administration dialog box.
Configuring Your User Account 43

3.7 Viewing Group MembershipsThis dialog box displays a list of the groups you belong to. A group is a collection of users who have the same rights to the same network resources.
1 Right-click , then click User Administration for > Group Memberships.
2 View the list of the groups you belong to.3 Click OK to close the dialog box.
3.8 Challenge/Response AdministrationWhen you log in, the Client for Open Enterprise checks to see if your system administrator has enabled the Forgotten Password feature and if you have entered responses to the challenge questions. If you have not entered responses, you are notified and a dialog box opens so that you can enter your responses. If the password policy uses a password hint or a password reminder and this option was not set, the Client prompts you to enter this information.
If your system administrator has not enabled the Forgotten Password feature, you receive a message telling you that you cannot administer the challenge/response feature because Forgotten Password has not been enabled
1 Right-click , then click User Administration for > Challenge/Response Administration.2 Depending on how your system administrator configured the challenge sets, enter your
information in the dialog boxes presented. For example, if your administrator specifies four questions in the challenge set, enter your information in four different dialog boxes.
44 Configuring Your User Account
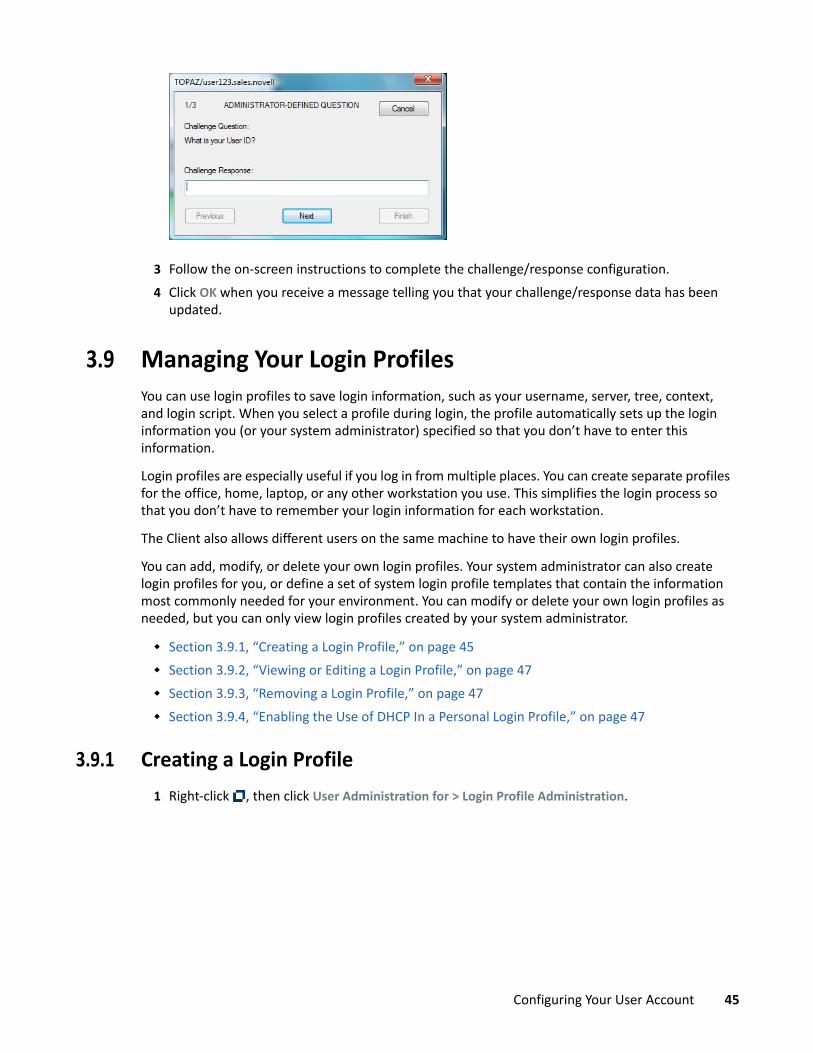
3 Follow the on-screen instructions to complete the challenge/response configuration. 4 Click OK when you receive a message telling you that your challenge/response data has been
updated.
3.9 Managing Your Login ProfilesYou can use login profiles to save login information, such as your username, server, tree, context, and login script. When you select a profile during login, the profile automatically sets up the login information you (or your system administrator) specified so that you don’t have to enter this information.
Login profiles are especially useful if you log in from multiple places. You can create separate profiles for the office, home, laptop, or any other workstation you use. This simplifies the login process so that you don’t have to remember your login information for each workstation.
The Client also allows different users on the same machine to have their own login profiles.
You can add, modify, or delete your own login profiles. Your system administrator can also create login profiles for you, or define a set of system login profile templates that contain the information most commonly needed for your environment. You can modify or delete your own login profiles as needed, but you can only view login profiles created by your system administrator.
Section 3.9.1, “Creating a Login Profile,” on page 45 Section 3.9.2, “Viewing or Editing a Login Profile,” on page 47 Section 3.9.3, “Removing a Login Profile,” on page 47 Section 3.9.4, “Enabling the Use of DHCP In a Personal Login Profile,” on page 47
3.9.1 Creating a Login Profile1 Right-click , then click User Administration for > Login Profile Administration.
Configuring Your User Account 45

2 To create a login profile, type the name of the profile you want to add in the User Login Profile text box, then click Add.
3 In the OES Login dialog box, specify the login information you want for this profile, such as the user's name, server, and context.
4 Click OK to close the OES Login dialog box, then click Close.
When you log in using the OES Login dialog box, you can use the Login Profile drop-down list to select the login profile you created.
46 Configuring Your User Account
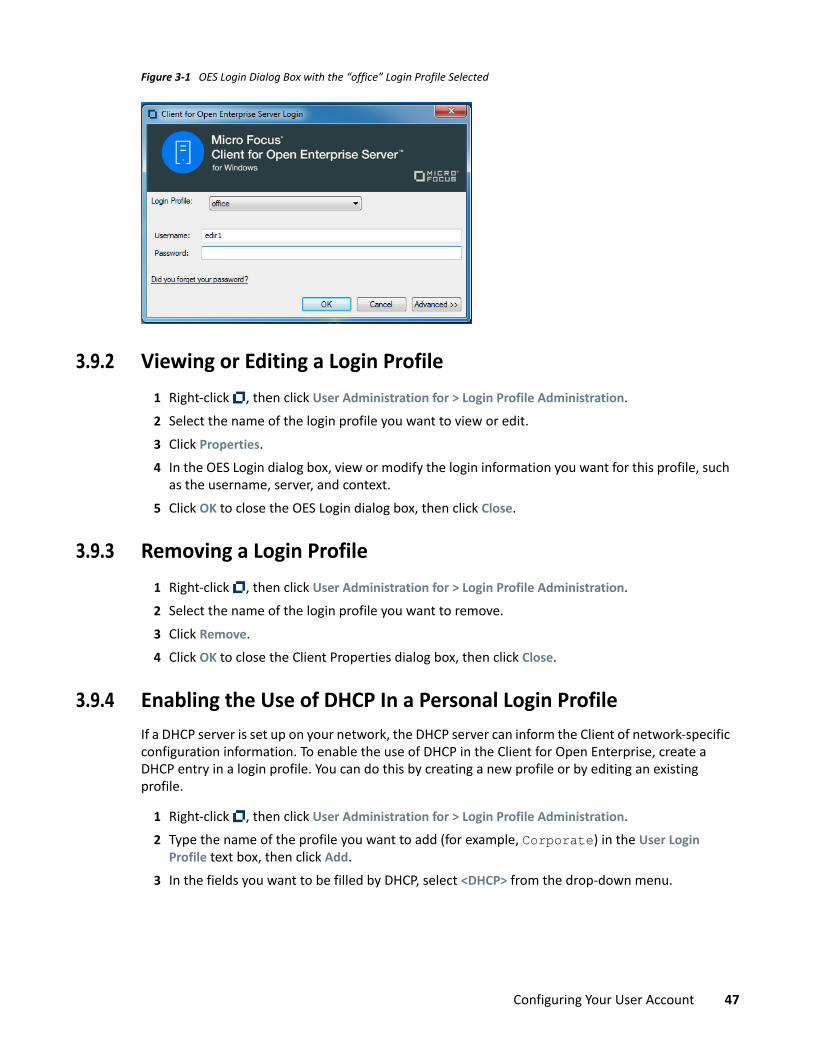
Figure 3-1 OES Login Dialog Box with the “office” Login Profile Selected
3.9.2 Viewing or Editing a Login Profile1 Right-click , then click User Administration for > Login Profile Administration.2 Select the name of the login profile you want to view or edit.3 Click Properties.4 In the OES Login dialog box, view or modify the login information you want for this profile, such
as the username, server, and context.5 Click OK to close the OES Login dialog box, then click Close.
3.9.3 Removing a Login Profile1 Right-click , then click User Administration for > Login Profile Administration.2 Select the name of the login profile you want to remove.3 Click Remove.4 Click OK to close the Client Properties dialog box, then click Close.
3.9.4 Enabling the Use of DHCP In a Personal Login ProfileIf a DHCP server is set up on your network, the DHCP server can inform the Client of network-specific configuration information. To enable the use of DHCP in the Client for Open Enterprise, create a DHCP entry in a login profile. You can do this by creating a new profile or by editing an existing profile.
1 Right-click , then click User Administration for > Login Profile Administration.2 Type the name of the profile you want to add (for example, Corporate) in the User Login
Profile text box, then click Add.3 In the fields you want to be filled by DHCP, select <DHCP> from the drop-down menu.
Configuring Your User Account 47

4 Click OK, then click Close.The next time you open the OES Login dialog box, the DHCP profile you created is available as an option on the Login Profile drop-down menu. Select the DHCP profile from the Login Profile drop-down menu to automatically populate the fields that were given the <DHCP> option in Step 3 with whatever the DHCP server sends.
NOTE: When using the login profile to perform a OES login, you can overwrite the values displayed by DHCP, but the changes are in effect only for that specific login. If <DHCP> is chosen as an option in a login profile for Tree, Context, or Server, you cannot remove it by simply editing the field when logging in or by saving the profile on successful login. Any values entered
48 Configuring Your User Account

in these fields during login are not saved when <DHCP> is enabled for that field. If you want to permanently change the values in that field, you must edit the login profile using either the System Profile Manager (System Login Profiles tab on the Client Properties dialog box) or the User Profile Manager (Login Profile Administration option on the Client Tray Application menu).
Configuring Your User Account 49

50 Configuring Your User Account

A ADocumentation Updates
The Client for Open Enterprise Server User Guide has been updated as shown below.
May 2016
September 30, 2015
January 30, 2013
Section Change
All Novell Client is rebranded to Client for Open Enterprise Server. Updated the guide content to reflect the branding changes.
Section Change
All Updated guide content to reflect the added support for Windows 10 in the SP4 IR1 release.
Section Change
All Updated guide content to reflect the added support for Windows 8 and Windows Server 2012 in the SP3 release.
Documentation Updates 51

52 Documentation Updates