clearwire m100 mondi ug
TRANSCRIPT

8/14/2019 Clearwire M100 Mondi UG
http://slidepdf.com/reader/full/clearwire-m100-mondi-ug 1/150
Samsung Mondi™W i M A X / W i - F i
M o b i l e I n t e r n e t T a b l e t
User GuidePlease read this guide before operating your
device, and keep it for future reference.

8/14/2019 Clearwire M100 Mondi UG
http://slidepdf.com/reader/full/clearwire-m100-mondi-ug 2/150
SWD-M100_UG_CF03_PS_072109_F5
Intellectual Property All Intellectual Property, as defined below, owned by or which is otherwise the property of Samsung or its respective suppliers relatinthe SAMSUNG Device, including but not limited to, accessories, parts, or software relating there to (the “Device System”), is proprieSamsung and protected under federal laws, state laws, and international treaty provisions. Intellectual Property includes, but is not limto, inventions (patentable or unpatentable), patents, trade secrets, copyrights, software, computer programs, and related documentatio
and other works of authorship. You may not infringe or otherwise violate the rights secured by the Intellectual Property. Moreover, yoagree that you will not (and will not attempt to) modify, prepare derivative works of, reverse engineer, decompile, disassemble, orotherwise attempt to create source code from the software. No title to or ownership in the Intellectual Property is transferred to you. Aapplicable rights of the Intellectual Property shall remain with SAMSUNG and its suppliers.
Samsung Telecommunications America (STA), LLCHeadquarters: Customer Care Center:1301 E. Lookout Drive 1000 Klein Rd.
Richardson, TX 75082 Plano, TX 75074Toll Free Tel: 1.888.987.HELP (4357)Internet Address:http://www.samsungusa.com
©2009 Samsung Telecommunications America, LLC is a registered trademark of Samsung Electronics America, Inc. and its relatedentities.Do you have questions about your Samsung Device?For 24 hour information and assistance, we offer a new FAQ/ARS System (Automated Response System) at:
www.samsungtelecom.com/support

8/14/2019 Clearwire M100 Mondi UG
http://slidepdf.com/reader/full/clearwire-m100-mondi-ug 3/150
The Bluetooth® word mark, figure mark (stylized “B Design”), and combination mark (Bluetooth word mark and “B Design”) are registetrademarks and are wholly owned by the Bluetooth SIG.microSD™ and the microSD logo are Trademarks of the SD Card Association.
Open Source SoftwareSome software components of this product incorporate source code covered under GNU General Public License (GPL), GNU Lesser Ge
Public License (LGPL), OpenSSL License, BSD License and other open source licenses. To obtain the source code covered under the osource licenses, please visit:http://www.samsungnetwork.com/Home/opensource.
Disclaimer of Warranties; Exclusion of LiabilityEXCEPT AS SET FORTH IN THE EXPRESS WARRANTY CONTAINED ON THE WARRANTY PAGE ENCLOSED WITH THE PPURCHASER TAKES THE PRODUCT "AS IS", AND SAMSUNG MAKES NO EXPRESS OR IMPLIED WARRANTY OF ANY KWITH RESPECT TO THE PRODUCT, INCLUDING BUT NOT LIMITED TO THE MERCHANTABILITY OF THE PRODUCT OR
PARTICULAR PURPOSE OR USE; THE DESIGN, CONDITION OR QUALITY OF THE PRODUCT; THE PERFORMANCE OF TWORKMANSHIP OF THE PRODUCT OR THE COMPONENTS CONTAINED THEREIN; OR COMPLIANCE OF THE PRODUCREQUIREMENTS OF ANY LAW, RULE, SPECIFICATION OR CONTRACT PERTAINING THERETO. NOTHING CONTAINED MANUAL SHALL BE CONSTRUED TO CREATE AN EXPRESS OR IMPLIED WARRANTY OF ANY KIND WHATSOEVER WPRODUCT. IN ADDITION, SAMSUNG SHALL NOT BE LIABLE FOR ANY DAMAGES OF ANY KIND RESULTING FROM THTHE PRODUCT OR ARISING FROM THE BREACH OF THE EXPRESS WARRANTY, INCLUDING INCIDENTAL, SPECIAL ODAMAGES, OR LOSS OF ANTICIPATED PROFITS OR BENEFITS.

8/14/2019 Clearwire M100 Mondi UG
http://slidepdf.com/reader/full/clearwire-m100-mondi-ug 4/150
1
Table of Contents
Section 1: Introduction ................................................... 4 Accessing the Online User Guide . . . . . . . . . . . . . . . . . . . . . . . 4Powering the Device . . . . . . . . . . . . . . . . . . . . . . . . . . . . . . . . . 4Initial Device Setup . . . . . . . . . . . . . . . . . . . . . . . . . . . . . . . . . . 5Charger and Battery Replacement . . . . . . . . . . . . . . . . . . . . . . 6Using the Kickstand . . . . . . . . . . . . . . . . . . . . . . . . . . . . . . . . . 9microSD Card Overview . . . . . . . . . . . . . . . . . . . . . . . . . . . . . . 9Rebooting the Device After a Lockup . . . . . . . . . . . . . . . . . . . 11Installing the Mondi into the Navigation Car Kit . . . . . . . . . . . . 12
Section 2: Basics ......................................................... 14Features of Your Device . . . . . . . . . . . . . . . . . . . . . . . . . . . . . 14
Your Device . . . . . . . . . . . . . . . . . . . . . . . . . . . . . . . . . . . . . .15
Navigating the Today Screen . . . . . . . . . . . . . . . . . . . . . . . . . 19Title Bar Icon Overview . . . . . . . . . . . . . . . . . . . . . . . . . . . . . . 22Locking Your Device . . . . . . . . . . . . . . . . . . . . . . . . . . . . . . . . 23Calibrating your Touchscreen . . . . . . . . . . . . . . . . . . . . . . . . . 25Menu Navigation . . . . . . . . . . . . . . . . . . . . . . . . . . . . . . . . . . . 25
Adjusting Your Volume Levels . . . . . . . . . . . . . . . . . . . . . . . . . 28Formatting the Device’s Memory . . . . . . . . . . . . . . . . . . . . . . 29Formatting the microSD Card . . . . . . . . . . . . . . . . . . . . . . . . . 30
Entering Text Using the QWERTY Keyboard . . . . . . . . . . . . . . . 30Entering Text using the Onscreen Keyboard . . . . . . . . . . . . . . 34 Adjusting Text Input Settings . . . . . . . . . . . . . . . . . . . . . . . . .34Widgets . . . . . . . . . . . . . . . . . . . . . . . . . . . . . . . . . . . . . . . . . 35
Widget Bar Navigation . . . . . . . . . . . . . . . . . . . . . . . . . . . . . . 35Section 3: Communication and Connection ................ 41
Communication Setup . . . . . . . . . . . . . . . . . . . . . . . . . . . . . . 41 Airplane Mode . . . . . . . . . . . . . . . . . . . . . . . . . . . . . . . . . . . . 42 Activating Wi-Fi Communication . . . . . . . . . . . . . . . . . . . . . . . 43Connecting to a Mobile WiMAX Network . . . . . . . . . . . . . . . . . Bluetooth Communication . . . . . . . . . . . . . . . . . . . . . . . . . . . 47
Section 4: Customizations ........................................... 51Customizing the Today Screen . . . . . . . . . . . . . . . . . . . . . . . . 51Customizing the Start Menu . . . . . . . . . . . . . . . . . . . . . . . . . . 53Customizing the Applications Panel . . . . . . . . . . . . . . . . . . . . 53Customizing Your Backlight Display . . . . . . . . . . . . . . . . . . . . 54
Customizing Your Power Settings Page . . . . . . . . . . . . . . . . . 55Customizing the Size of the Onscreen Type . . . . . . . . . . . . . . 57
Section 5: Synchronization .......................................... 58Computer Requirements . . . . . . . . . . . . . . . . . . . . . . . . . . . . 58Installation of ActiveSync on Your Computer . . . . . . . . . . . . . . 5Connection of ActiveSync . . . . . . . . . . . . . . . . . . . . . . . . . . . . 59Configuring ActiveSync . . . . . . . . . . . . . . . . . . . . . . . . . . . . . 59Setting Up Windows Media Player Sync Options . . . . . . . . . . . 6
Synchronizing Music with Windows Media Player . . . . . . . . . . 6Connecting to the Device via ActiveSync . . . . . . . . . . . . . . . . 6Loading Files to Your microSD Card . . . . . . . . . . . . . . . . . . . . 64

8/14/2019 Clearwire M100 Mondi UG
http://slidepdf.com/reader/full/clearwire-m100-mondi-ug 5/150
2
Section 6: Email Setup ................................................. 68Setting Up an IMAP or POP3 Account . . . . . . . . . . . . . . . . . . . 68Editing an Email Account . . . . . . . . . . . . . . . . . . . . . . . . . . . . 72Using ActiveSync to Configure Your Outlook
Exchange Settings . . . . . . . . . . . . . . . . . . . . . . . . . . . . . . . 74Checking Your Outlook Email from the Today Screen . . . . . . . 76
Section 7: Calendar and Contacts ............................... 78Calendar . . . . . . . . . . . . . . . . . . . . . . . . . . . . . . . . . . . . . . . . 78Contacts . . . . . . . . . . . . . . . . . . . . . . . . . . . . . . . . . . . . . . . . 81Utilizing the Communication Bar . . . . . . . . . . . . . . . . . . . . . . 84
Section 8: Applications ................................................85Microsoft Mobile Applications - Internet Explorer . . . . . . . . . . 85Microsoft Mobile Applications - Office Mobile . . . . . . . . . . . . . 86Windows Media Player . . . . . . . . . . . . . . . . . . . . . . . . . . . . . . 89MultiMedia Player . . . . . . . . . . . . . . . . . . . . . . . . . . . . . . . . . 90Instant Messenger . . . . . . . . . . . . . . . . . . . . . . . . . . . . . . . . . 92Calculator . . . . . . . . . . . . . . . . . . . . . . . . . . . . . . . . . . . . . . . 92Clocks . . . . . . . . . . . . . . . . . . . . . . . . . . . . . . . . . . . . . . . . . . 92Using TaskSwitcher to Close Applications . . . . . . . . . . . . . . . 99ROUTE 66 Navigation . . . . . . . . . . . . . . . . . . . . . . . . . . . . . . 100
Section 9: Camera and Camcorder ............................106Taking a Picture . . . . . . . . . . . . . . . . . . . . . . . . . . . . . . . . . . 106Camera Page Overview . . . . . . . . . . . . . . . . . . . . . . . . . . . . 107Shooting Video . . . . . . . . . . . . . . . . . . . . . . . . . . . . . . . . . . . 111Camcorder Page Overview . . . . . . . . . . . . . . . . . . . . . . . . . . 111Navigating the Multimedia Page . . . . . . . . . . . . . . . . . . . . . . 114
Deleting an Image . . . . . . . . . . . . . . . . . . . . . . . . . . . . . . . . 114Using Photo Slides . . . . . . . . . . . . . . . . . . . . . . . . . . . . . . . . 114Beaming an Image . . . . . . . . . . . . . . . . . . . . . . . . . . . . . . . 116
Attaching an Image to an Outgoing Email . . . . . . . . . . . . . . 116 Assigning an Image to a Contacts Entry . . . . . . . . . . . . . . . . 117 Assigning an Image to the Today Background . . . . . . . . . . . 117
Section 10: Health and Safety Information ............... 119Health and Safety Information . . . . . . . . . . . . . . . . . . . . . . . 119Samsung Mobile Products and Recycling . . . . . . . . . . . . . . . 119UL Certified Travel Adapter . . . . . . . . . . . . . . . . . . . . . . . . . 119Consumer Information on Wireless Devices . . . . . . . . . . . . . 119Road Safety . . . . . . . . . . . . . . . . . . . . . . . . . . . . . . . . . . . . . 125Responsible Listening . . . . . . . . . . . . . . . . . . . . . . . . . . . . . 126Operating Environment . . . . . . . . . . . . . . . . . . . . . . . . . . . . 128Using Your Device Near Other Electronic Devices . . . . . . . . . 128Potentially Explosive Environments . . . . . . . . . . . . . . . . . . . 130FCC Notice and Cautions . . . . . . . . . . . . . . . . . . . . . . . . . . . 130Other Important Safety Information . . . . . . . . . . . . . . . . . . . 131Product Performance . . . . . . . . . . . . . . . . . . . . . . . . . . . . . . 131
Availability of Various Features/Ring Tones . . . . . . . . . . . . . 132WiMAX Language . . . . . . . . . . . . . . . . . . . . . . . . . . . . . . . . 132Battery Standby and Talk Time . . . . . . . . . . . . . . . . . . . . . . 132Battery Precautions . . . . . . . . . . . . . . . . . . . . . . . . . . . . . . . 132
Window Mounted Accessory Precautions . . . . . . . . . . . . . . . 134Care and Maintenance . . . . . . . . . . . . . . . . . . . . . . . . . . . . . 134

8/14/2019 Clearwire M100 Mondi UG
http://slidepdf.com/reader/full/clearwire-m100-mondi-ug 6/150
3
Section 11: Warranty Information ............................. 136Standard Limited Warranty . . . . . . . . . . . . . . . . . . . . . . . . . . 136End User License Agreement for Software . . . . . . . . . . . . . .139
Index ............................................................................144

8/14/2019 Clearwire M100 Mondi UG
http://slidepdf.com/reader/full/clearwire-m100-mondi-ug 7/150
Introduction 4
Section 1: Introduction
The Mondi™ (WiMAX Wireless Internet Tablet) now lets youenhance your on-the-go experience. You can now take yourcomputer with you and enjoy all of its functionality on a tabletpowered by Microsoft’s Windows Mobile™ 6.1 technology.
Mondi™ offers a 4.3-inch diagonal screen which easily displaysyour favorite documents, data, Web sites, and expands youronline experiences with applications such as Microsoft Office®
Suite, Route 66®, Widget application shortcuts,Camera/Camcorder, and Windows Media Player®. All this accessis accomplished far easier with the availability of a full QWERTYkeyboard.
Accessing the Online User Guide1. Launch your Internet browser.
2. Enter the following address into the Address field.
• www.samsung.com/us/mondi/userguide
Powering the Device
Starting up on your new device is quick and easy. This sectionwalks you through the procedures to turn on your device, use thecharger, install an optional microSD card, and reset the device.
Powering On your Device
Press and hold , until it vibrates and then shows thepowering up animation.
Powering Off your Device
Press and hold until you see and hear the poweringdown sequence (Samsung information with sound) on the
display screen.
RESETRESET
Power Button

8/14/2019 Clearwire M100 Mondi UG
http://slidepdf.com/reader/full/clearwire-m100-mondi-ug 8/150
5
Initial Device Setup
If your device has never been powered on before and isinitializing for the first time, you will need to follow theseprocedures. These same steps are necessary if the device is everHard Reset (to factory default parameters).
1. Touch the main Windows Mobile 6.1 screen to begin theinitialization process.
2. Remove the Stylus from the side compartment (adjacent tothe Left Action key) (seen below).
3. Use your stylus to calibrate the touch accuracy of thescreen by both accurately and firmly touching the center each onscreen crosshair. Repeat this process for everycrosshair that appears until this step has successfullycompleted.
Note:This process may need to be repeated to accurately calibrate thedevice. Once successfully calibrated, you are directed onto the Timand Date screen.
Left Action key
Stylus

8/14/2019 Clearwire M100 Mondi UG
http://slidepdf.com/reader/full/clearwire-m100-mondi-ug 9/150
Introduction 6
4. Use the drop down lists to adjust the fields within the dateand time page. Options include Time zone, Date, and Time.
• TheDatefield launches an onscreen calendar. Touch a date fromthe calendar to make your update.
• TheTimefield requires that you first touch an onscreen number,then use your QWERTY keyboard to update the time value.
5. Touch Nextto complete the Data and Time updates.
Charger and Battery Replacement
Note:If your handset has a touch screen display, please note that a touchscreen responds best to a light touch from the pad of your finger or anon-metallic stylus. Using excessive force or a metallic object whenpressing on the touch screen may damage the tempered glass surfaceand void the warranty.For more information, refer to“Warranty Information” on page 136.
Note:Long backlight settings, searching for service, vibrate mode, browseruse, and other variables can reduce the battery’s usage times.
Charging the Battery
Charge the device’s battery as soon as possible so you can beginusing your device. Even though the battery has been chargedprior to packaging, it is important to keep track of your battery’scharge.
If the battery level becomes too low, your device automaticallyturns off, and you will lose any current information. For a quick check of your battery level, glance at the battery charge indicatorlocated in the upper-right corner of your device’s display screen.If the battery charge is getting too low, the battery icon ( )blinks and the device sounds a warning tone.
Using the Travel Adapter
Your device is powered by a rechargeable Li-ion battery. Theincluded Travel Adapter charges your device’s internal battery.Use only Samsung-approved batteries and chargers.
1. Locate the Power/USB Data jack (page 8).
2. Flip open the protective cover and plug the flat end of the
charger into the device’s Power/USB Data jack located onthe side of the device.
3. Plug the other end into a compatible electrical outlet.

8/14/2019 Clearwire M100 Mondi UG
http://slidepdf.com/reader/full/clearwire-m100-mondi-ug 10/150
7
Installing the Battery
Warning!:Do not handle a damaged or leaking Li-Ion battery as this actioncan result in being burned.
1. In a single motion, press down on the cover, slide it awayfrom the lens (1), and then carefully lift the battery cover(2) away from the device.
2. Insert the battery into the opening (3), making sure to linup the gold contacts on the inside of the battery to thoseon the device. Gently press down to secure the battery (4
IncorrectCorrect
M I C M I C
8/14/2019 Clearwire M100 Mondi UG
http://slidepdf.com/reader/full/clearwire-m100-mondi-ug 11/150
Introduction 8
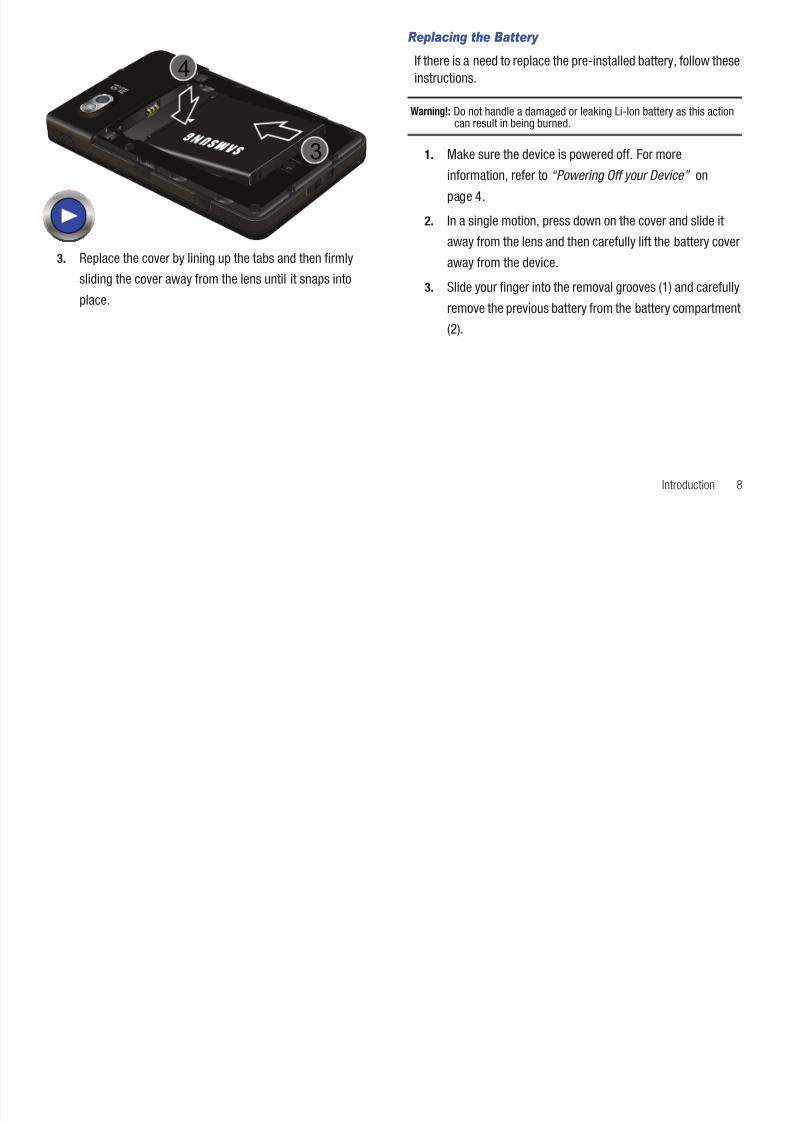
3. Replace the cover by lining up the tabs and then firmly
sliding the cover away from the lens until it snaps intoplace.
Replacing the Battery
If there is a need to replace the pre-installed battery, follow theseinstructions.
Warning!:Do not handle a damaged or leaking Li-Ion battery as this actioncan result in being burned.
1. Make sure the device is powered off.For moreinformation, refer to“Powering Off your Device” on
page 4.
2. In a single motion, press down on the cover and slide itaway from the lens and then carefully lift the battery coveraway from the device.
3. Slide your finger into the removal grooves (1) and carefull
remove the previous battery from the battery compartment(2).

8/14/2019 Clearwire M100 Mondi UG
http://slidepdf.com/reader/full/clearwire-m100-mondi-ug 12/150
9
Using the Kickstand
The Mondi comes with a kickstand that is built into the rear
battery cover and can be pulled out to support the device whenrested upon a flat surface.
1. Turn the unit over to reveal the back battery cover.
2. Insert your finger into the groove at the end of the standand carefully pull outwards. When fully extended, thestand rests at a 45-degree angle from the battery cover.
3. Lay the device on a flat surface.
Note:Be careful not to extend the kickstand past the 45-degree angle as thiswill damage the stand.
microSD Card Overview
Although your device comes with 4GB of built-in memory, yocan supplement this storage capacity by adding an optionalmicroSD™ (Secure Digital) memory card. This added card is
used to provide a larger capacity storage medium to your devicIt allows you to store data, documents, images, videos, andmusic onto your microSD card vs within device’s internalmemory.

8/14/2019 Clearwire M100 Mondi UG
http://slidepdf.com/reader/full/clearwire-m100-mondi-ug 13/150
Introduction 10
Note:The device has been tested to support cards of up to 32GB. ThismicroSD card is an optional accessory, a card greater than 2GB isrecommended.
Warning!:DO NOT remove a microSD card while files are being accessed ortransferred, as this can result in loss or damage of data.
Caution!:Make sure your battery is fully charged before accessing/using themicroSD card. Accessed data may become damaged or unusable ifthe battery runs out while using the microSD card.
Caution!:Ejection of the card is spring-loaded. As the microSD card is beingdischarged from the slot, be prepared to catch it and keep it fromfalling onto the floor.
Installation of the microSD Card
1. Locate the microSD card slot.
2. Flip open the microSD card slot cover.
3. With the gold contact pins facing downward, carefullyinsert the card into the opening and firmly push it in untilyou hear a click (indicating the card is securely installed).
4. Once you are notified, touchHide(from the bottom left ofthe screen) to acknowledge the card is properly insertedand ready to use.
Important!:It is recommended you only use an optional microSD card of atleast 2GB (up to 16GB). Using non-recommended microSD cardcould cause data loss and damage your device.
Incorrect Correct
M I C M I C

8/14/2019 Clearwire M100 Mondi UG
http://slidepdf.com/reader/full/clearwire-m100-mondi-ug 14/150
11
Removal of the microSD Card
1. Locate the microSD card slot on the underside of thedevice and flip open the microSD card slot cover.
2. Firmly press the card into the slot and release it. The cardshould pop partially out of the slot.
Note: You may need to use the tip of the included Stylus to push the card intothe slot.
3. Remove the card from the slot.
4. Place the microSD card cover back over the slot.
Rebooting the Device After a Lockup
The Reset button allows you to quickly turn off the device in theevent of a program or application error. In this case your Mondi™would appear to “freeze” and become unresponsive.
1. Turn the device over and locate the Reset button positionedadjacent to the Power button (seen below).
2. Firmly insert the soft plastic tip of the included Stylus in
this slot or until the device exits the current screen andcycles power to the device (turns off then back on)(page 5).
Note:This reset action retains all of your device’s default parameters andsettings. This action is similar to that of a soft reset function on youcomputer which only restarts the machine while maintaining allcurrent data intact.
RES ET RES ET
RESETRESET
Reset Slot

8/14/2019 Clearwire M100 Mondi UG
http://slidepdf.com/reader/full/clearwire-m100-mondi-ug 15/150
Introduction 12
Installing the Mondi into the Navigation Car Kit
Mondi comes with a Car Kit that allows you to mount the deviceonto a car’s windshield. This is useful when using the Mondi’sRoute66™ application to receive (call out/display) drivingdirections. The kit consists of a Car Cradle and Suction Holder.
Important!:The cradle and suction holder must first be installed onto yourwindshield prior to mounting the Mondi onto it. The Mondi mustrest in the cradle in the proper orientation to prevent it fromfalling out during different driving conditions.
1. The Suction Holder can be bent (1) to adjust it for propermounting to a windshield and the correct angle for supportof the Mondi.
2. In a single motion, insert the bottom of the Car Cradle intothe base of the cradle connector (2).
3. Push the top towards the cradle connector and snap it intoplace (3). This secures the Cradle to the Suction Holder.
Suction Cup
Cradle Connector
Suction Cup Release
Suction Holder
Cradle
Mondi
Clasp
8/14/2019 Clearwire M100 Mondi UG
http://slidepdf.com/reader/full/clearwire-m100-mondi-ug 16/150
13
Note:It is recommended that you clean the windshield area prior to affixingthe suction cup. This clean surface helps to better adhere the Car Kitand establish a secure bond.
4. Firmly clasp both pieces (now joined) and secure the
suction cup to the windshield (4).
• If you must remove and reposition the suction cup, pull on theplastic release located at the top of the suction cup.
5. With the Car Kit secured to the windshield, carefully insertthe bottom of the Mondi into the cradle (5) and then snap itback (6). This action secures the clasp at the top of thecradle onto the top of the Mondi unit to hold in place duringdriving.
Note:The Mondi is supported at the base of the unit and secured to thecradle by the clasp at the top. Make sure the Mondi snaps into thebase and is secure prior to starting any car motion.
Removing the Mondi from the Car Kit
1. Gently pull up on the cradle’s clasp to release its grip onthe Mondi.
2. Carefully slide the Mondi up at an angle away from thecradle.
Removing the Car Kit from the Windshield
1. Remove the Mondi from the Car Cradle.
Important!: You must FIRST remove the Mondi from the kit before continuIf you do not, the Mondi can fall out of the cradle and damageupon impact with the floor.
2. Locate the suction cup release (plastic tab atop the suctio
cup).
3. Firmly pull it out (away from the suction cup) until theSuction Holder releases its grip from the windshield.
Warning!:Do not affix the Car Kit to either side windows as this can blocyour view and hinder driving visibility.

8/14/2019 Clearwire M100 Mondi UG
http://slidepdf.com/reader/full/clearwire-m100-mondi-ug 17/150
Basics 14
Section 2: Basics
Your Mondi™ Internet Tablet is packed with features thatsimplify your life and expand your ability to keep you bothconnected to your office and stay in touch with the people thatare important to you. This section will guide you through thebasic functions features of your device.
Your device provides many of the features associated with apersonal computer with exceptional portability, mobileapplications, and integration of a portable device. The device ispowered by Windows Mobile 6.1®, providing the power andfamiliarity of Microsoft Windows.
Features of Your Device
Your tablet is an easy-to-use and offers many significantfeatures. The following list outlines a few of the features includedin your device.• Touchscreen provides quick response to a variety of menus and
options• Windows Mobile 6.1 Classic• Windows ActiveSync® synchronization software
• Large 4.3 inch (800 x 480 pixel) screen displaying up to 16M (million)onscreen colors• 4GB of internal memory
• 3MP (megapixel) digital camera• Full slide out QWERTY keyboard• Customizable Widget application shortcuts• Downloadable applications (via online purchase)• Built-in Bluetooth technology• Mobile WiMAX high-speed Internet access capable• Built-in Wi-Fi support• Full HTML Browser• GPS Navigation (via embedded GPS chip)• User friendly, menu driven access to features and options• Microsoft Office Mobile® Suite applications (Excel Mobile, OneNot
Mobile, PowerPoint Mobile, and Word Mobile)• Outlook email client• Internet email support (Google™ Mail, Yahoo® Mail, etc.)• Support for playback of both streaming audio and video via sites,
well as local media (within microSD card).• Video Output (via optional mini-USB to HDMI cable)

8/14/2019 Clearwire M100 Mondi UG
http://slidepdf.com/reader/full/clearwire-m100-mondi-ug 18/150
15
Your Device
1. Display shows the information needed to operate your
device, such as the signal strength, battery level, time,active application, etc.
2. Webcam lensis used to shoot a streaming video of the useduring a video conference.
3. Light sensor uses the ambient light level to adjust bothscreen brightness/contrast.
• In a bright light condition (outdoors), the sensor causes the de
to increase the brightness and contrast for better viewing.• In a dark light condition, the sensor adjusts the device’s brigh
and contrast for better viewing.
4. LEDdisplays the current charging and network status.
• Green LED (solid) indicates the battery has been completelycharged.
• Red LED (solid) indicates the battery is charging.
• Green LED (blinking) indicates the device is attempting to cto a Mobile WiMAX network.
• Yellow LED (blinking) indicates a charging error.
• Cyan LED (blinking) indicates the device is attempting a conto a Wi-Fi network.
• Magenta LED (blinking) indicates an error message or anoutstanding notification the user has not yet read (accompanion onscreen ).
7
8 9 10 1211
5
43
21
13
15
14
6
16
18
17

8/14/2019 Clearwire M100 Mondi UG
http://slidepdf.com/reader/full/clearwire-m100-mondi-ug 19/150
Basics 16
5. Left Action key ( ) is used to launch either theMobileWidget screen or the TaskSwitcher application.
• Single press (quick) toggles between the MobileWidget screenwhere you can use available Widgets ( page 35)and the Todayscreen.
• Press and hold to activate the TaskSwitcher application that allowsto display which applications are currently running on the deviceand then choose which is displayed full screen and active.
6. Internet Explorer keyshort press to launch Internet Explorerand long press to launch the Opera mobile browser.
7. Left Softkey ( ) is used to navigate through menus andapplications by selecting the choice indicated on the lowerleft area of the display screen. Softkeys are touch-sensitive keys, that appear in your display, and changefunction according to the current feature being used.
8. Navigation touch padlets you access the device’s menusand selects the highlighted choice when navigating
through a menu. Pressing the center button activates anonscreen function (similar to pressing Enter) and selects
the highlighted choice when navigating through a menu.
9. Fn key(Function) key, toggle to access the numbers/ symbols shown at the top left of selected keys on theQWERTY keyboard. This feature is activated by pressingand holding theFnkey in conjunction with other specifiedkeys.
10. Windows keyprovides ready-access to the Start menu thatcontains links to all the device’s applications, settings, and
other quick links.
11. Symbol keyprovides access to symbol characters.
12. Space keylets you add spaces between words andcharacters.
Note:Pressing both the Space and Fnkey activates the TV out function, thatcan only be used with the mini-USB to HDMI cable.
13. Messaging Keya short press provides access to theMessaging menu.
• Press briefly to access the Messaging page (to access both Outloand Internet mail).
• Press and hold to launch the Notes application (to create newnotes).14. OK keylets you end programs or then hide them.

8/14/2019 Clearwire M100 Mondi UG
http://slidepdf.com/reader/full/clearwire-m100-mondi-ug 20/150
17
15. Page Up/Dnallows you to navigate up and down throughthe currently active page, and also to navigate through thedifferent menu options.
16. Right Softkey ( ) is used to navigate through menusand applications by selecting the choice indicated on the
lower right area of the display screen. Softkeys are touch-sensitive keys, that appear in your display, and change
function according to the current feature being used.
17. Right Action key ( ) is used to either return to the Todayscreen (without exiting the current application) orLock/Unlock the device (simple lock without password).
• Single press (quick) returns you to the previous screen.• Pressing this key ends/closes certain applications, such as Camera,
Opera, Smart Reader, and Sudoku.• Press and hold to activate the screen lock/unlock functionality that
prevents accidental feature activation via inadvertent screentouches.For more information, refer to“Locking Your Device” on page 23.
18. QWERTY keyboardprovides an alphanumeric character
keyboard layout.For more information, refer to“Entering Text Using the QWERTY Keyboard” on page 30.
19. Speakers left and right stereo speakers.
20. Camera Buttonlets you access the Camera mode you caneither take pictures or shoot videos (Camcorder mode).
• Single press to access the Photo Slides feature.• Press and hold to access the Camera mode.
21. Reset Buttonlets you reset your device and ends all
applications currently running.22. Power Button , located at the top rim of the device, lets
you either turn the device on/off (press hold) or help
conserve power by toggling the on/off state of the displascreen (single press).
• This single press conserves power by temporarily turning offscreen without shutting down the device. To turn the LCD basimply slide out the QWERTY keyboard.
Note: Adjusting the screen brightness and temporarily shutting off the screcan greatly increase battery usage times.
23. Power/USB Data jacklets you connect a travel adapter(power), USB data cable (data transfer), or HDMI cable(video out).CAUTION! Inserting an accessory into the
incorrect jack may damage the device.

8/14/2019 Clearwire M100 Mondi UG
http://slidepdf.com/reader/full/clearwire-m100-mondi-ug 21/150
Basics 18
24. Headset jackallows you to plug in a stereo headset (soldseparately).
25. Stylusstorage location of included stylus touch pen. It isrecommended that you use this pen when making youronscreen selections. Using your fingers can be lessaccurate, possibly scratch the screen, and leaveunnecessary residue.
26. Microphoneallows the device to record external audiosources.
27. microSD Slotlets you use a microSD card to expand the
memory of your device.For more information, refer to“microSD Card Overview” on page 9.
28. Volume keyallows you to adjust the device’s master
volume level that can also be done by activating the Volume slider from the Title Bar (page 20).
29. Kickstandpulls out and provides support for the Mondiwhen resting on a flat horizontal surface.
RESETRESET
25
26
27
2824
23
2120
19
22

8/14/2019 Clearwire M100 Mondi UG
http://slidepdf.com/reader/full/clearwire-m100-mondi-ug 22/150
19
30. Camera/Mirrorprovides a 3.0 MP camera, with includedmirror, that lets you take pictures and shoot videos.
Navigating the Today Screen
Mondi™ is powered by Windows Mobile 6.1® Classic, providinthe power and familiarity of Microsoft Windows. Mobile versiof popular Microsoft applications such as Word, Excel®,Windows Media Player® and Outlook ® eliminating the need tolearn new software.
The main screen is called theTodayscreen. The items listed onthis screen provide quick access to several user selectableapplications (via Start menu or Shortcuts), Contacts, options, asettings. The Today screen displays important information, sucas upcoming appointments, status indicators, the current date,and time.
You can also launch a program directly by first activating the
Start menu drop-down list and then selecting the related tab anthe program’s associated icon.Single press the ( ) (right action key) to launch the TodayScreen (Home).
3029
8/14/2019 Clearwire M100 Mondi UG
http://slidepdf.com/reader/full/clearwire-m100-mondi-ug 23/150
Basics 20
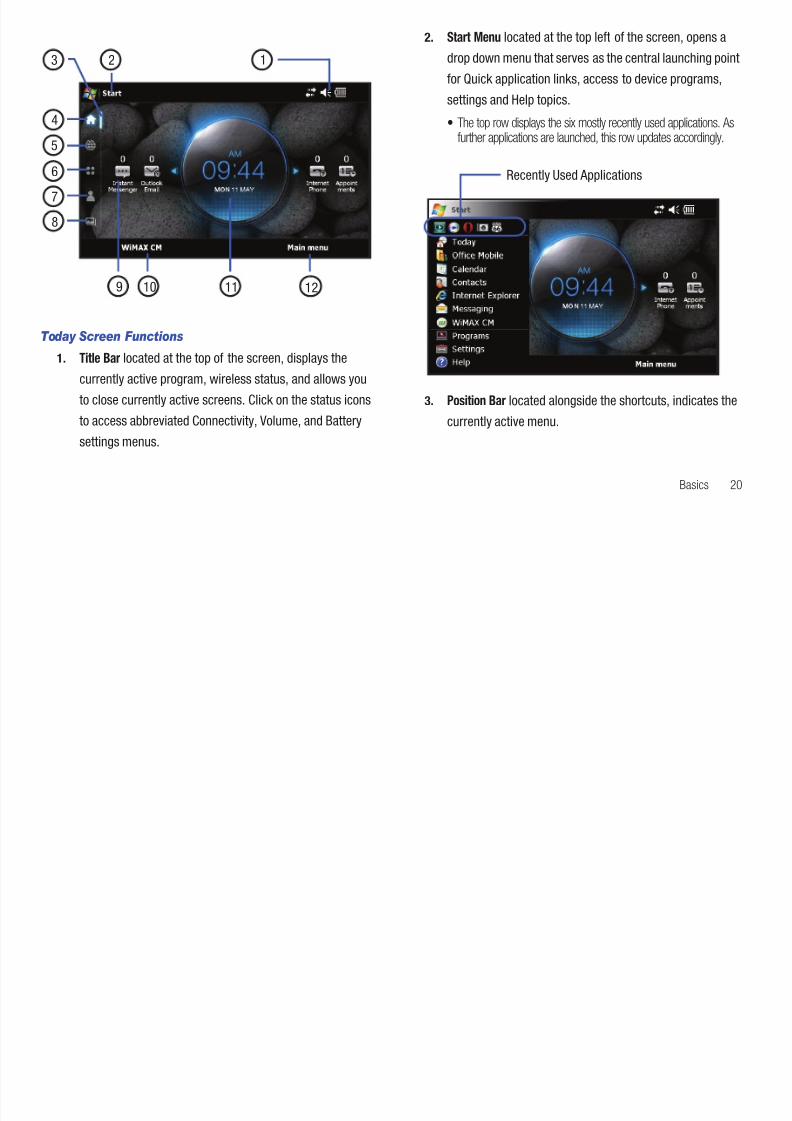
Today Screen Functions
1. Title Barlocated at the top of the screen, displays thecurrently active program, wireless status, and allows youto close currently active screens. Click on the status icons
to access abbreviated Connectivity, Volume, and Batterysettings menus.
2. Start Menulocated at the top left of the screen, opens adrop down menu that serves as the central launching pointfor Quick application links, access to device programs,settings and Help topics.
• The top row displays the six mostly recently used applications.further applications are launched, this row updates accordingly.
3. Position Barlocated alongside the shortcuts, indicates the
currently active menu.
7
8
9 10 11 12
65
4
2 13
Recently Used Applications

8/14/2019 Clearwire M100 Mondi UG
http://slidepdf.com/reader/full/clearwire-m100-mondi-ug 24/150
21
4. Home Shortcut( ) displays the Today screen thatcontains quick links to IM, Outlook email, Date/Timeinformation, Internet Phone, and any Upcoming
Appointments.
5. Web Pages Shortcut( ) displays either aThumbnailor
Perspectiveview of currently stored Favorite WebBookmarks or Browsing History.
• TouchMenu(right softkey)> Display as > Thumbnail Viewtodisplay the Bookmark (History) page images in a grid view (2 rowsby 4 columns).
• TouchMenu(right softkey)> Display as > Perspective Viewtodisplay the Bookmarks (History) as a scrollable set of icons (onebehind another).
• TouchMenu(right softkey)> View >Favorite Bookmarkto displayyour favorite bookmarks. (These can be displayed in either aThumbnail or Perspective view.)
• TouchMenu(right softkey)> View > Historyto display thebrowsing history. (These can be displayed in either a Thumbnail orPerspective view.)
• TouchEdit Favorite Bookmark(left softkey) to edit your favoritebookmarks.
6. Applications (Main menu) Shortcut( ) displays a gridview of 12 preferred Main menu application shortcuts(Favorites). These entries can be modified byEdit(ing)which shortcuts appear onscreen.
Note:This listing of applications are different than thosePrograms providedby the Windows Mobile 6.1® operating system (Start > Programs).
7. Favorite Contacts Shortcut( ) displays a scrollable lisof currently available Favorite Contacts. Scroll though t
entries and tap an icon/card (image) to access theinformation for that particular Contacts entry.For moreinformation, refer to“Contacts” on page 81.
8. Multimedia Shortcut( ) displays a grid list of currentavailable My Photos and Videos (Camera Album) and alsoother available videos (Video Thumbnails) stored within ththe device or within the internal microSD card.
9. Quick Accessdisplays onscreen icons (on the Today page
that provide current information regarding your Instant
Messages, Outlook emails, Time/Date, Internet Phone, a Appointments.

8/14/2019 Clearwire M100 Mondi UG
http://slidepdf.com/reader/full/clearwire-m100-mondi-ug 25/150
Basics 22
• Instant Messengerdisplays any unread chat messages.• Outlook Emaildisplays the number of unreademail messages.• Clockdisplays the current date and time information.• Internet Phonedisplays any missed Internet Phone calls.• Appointmentsdisplays the number of upcoming Calendar
appointments or events. Touch this field to open the Calendar page.
10. WiMAX CM(left softkey) activates the Mobile WiMAXConnection Manager page where you can easily establisha connection between your device and an available
CLEAR® network.
11. Magnifierdisplays the information specific to the featurelocated beneath it.
12. Main menu(right softkey) displays a grid view of your mostpopular applications (Favorites). Functions the same as
touching theApplicationsShortcut icon ( ) from the leftof the screen.
Title Bar Icon Overview
The following table lists the onscreen icons, shown within theTitle Bar, and their descriptions.
Indicates the battery is fully charged. Tap thisicon to display the Battery power tab.
Indicates the battery is fully discharged. Tap thisicon to display the Battery power tab.
Indicates the device is connected to a powercable and is currently being charged.
Indicates the speaker is turned on. Tap this iconto access the onscreen Volume slider and adjustthe volume level.
Indicates the speaker is set to vibrate only. Tapthis icon to access the onscreen Volume sliderand adjust the volume level.
Indicates the speaker is turned off and vibrateis disabled. Tap this icon to access the onscreen
Volume slider and adjust the volume level.
Indicates the device is working to establish awireless connection.

8/14/2019 Clearwire M100 Mondi UG
http://slidepdf.com/reader/full/clearwire-m100-mondi-ug 26/150
23
Locking Your Device
The device can be locked either manually or automatically via theSettings menu.
Manually Locking the Device
This manual process temporarily locks the device without theneed to utilize a password.
1. Single press the Power button ( ) to turn off thescreen but keep the device on in the background.
– or –Press and hold the ( ) (right action key) to lock thescreen from accidental usage, but keep the screen on.
Manually Unlocking the Device
1. Single press the Power button ( ) to turn the screeback on.
– or –Touch Unlock(left softkey) and tap the onscreen greyUnlockbutton.
– or –
Press and hold the ( ) (right action key) to unlock the
screen.
Indicates the device failed to establish awireless connection.
Indicates an inactive Mobile WiMAX connection.
Indicates an active Mobile WiMAX connectionhas been established and you are currentlyusing an active WiMAX broadband connection.
Indicates an active Wi-Fi connection.
Indicates an inactive Wi-Fi connection.
Indicates an error or issue with the device andits functionality. Touch the icon to reveal thenotification.

8/14/2019 Clearwire M100 Mondi UG
http://slidepdf.com/reader/full/clearwire-m100-mondi-ug 27/150
Basics 24
Setting Up an Automatic Lock State
When you setup an automatic lock on your device, it requires apassword be entered prior to returning to normal operation.When a password is set up, the device can be lockedimmediately upon command, configured to lock after a specifiedperiod of inactivity, or after the LCD blanks out.
1. From theTodayscreen, touch Start > Settings.
2. Touch the Personaltab and tap Lock( ).
3. Set up a timeout value by touching thePrompt if deviceunused forfield then use the drop-down list to select a
value (amount of unused time required before you areprompted for a password if the device becomes idle).
Enabling this option activates the remaining fields.4. Touch the Password typefield and enter the desired
information:
• Simple PIN: must be at least four characters in length and cannotcontain a simple sequence such as 0000, 1111, or 1234.
• Strong alphanumeric: must be at least seven characters in lengthand must contain at least one character from each of the following
categories: uppercase/lowercase letters, numerals, and symbols.Examples of strong alphanumeric passwords aresb?8A!3and%$VH5hW.
5. Touch thePassword field then use the QWERTY keyboardto enter the desired password.
6. Touch theConfirm passwordfield then use the QWERTYkeyboard to re-enter the same password.
7. Touch to save your password.
8. Touch Yesto confirm your selection.
Creating a Password Hint
One method of making sure you don’t accidentally forget yournew password is to use the Hint feature.
1. From theTodayscreen, touch Start > Settings.
2. Touch thePersonaltab and tap Lock( ).
Note:If you have previously created your password, you are prompted totouch the onscreen password filed, use the QWERTY keyboard to enteyour password, then touchUnlockbefore you can make any updates orchanges.
3. Touch the onscreen Hinttab and use your QWERTYkeyboard to enter a hint for your password into the dialogbox.
ok
M N i i

8/14/2019 Clearwire M100 Mondi UG
http://slidepdf.com/reader/full/clearwire-m100-mondi-ug 28/150
25
Note:This hint may be visible to others, so do not enter your password intothis field. The hint you set will only appear after five consecutiveincorrect passwords have been entered.
4. Touch to save your new password hint.
Unlocking the Device after a Timeout
1. From thePasswordscreen, touch the password field.
2. Use your QWERTY keyboard to enter your Lock password.
3. Touch Unlock(left softkey) to unlock the device.
Calibrating your Touchscreen
It is important to calibrate your monitor properly so that yourtouches are read accurately by the device.
1. From theTodayscreen, touch Start ( )> Settings.2. Touch the Systemtab and tap Screen( ).
3. Use your Stylus pen to touch theAlign Screenbutton.
4. Firmly and carefully touch the center of each crosshair andrepeat this process until the calibration session hascompleted (this could take 2 - 3 repetitions).
5. Touch to complete the process and return to theprevious screen.
Menu Navigation
You can tailor the device’s range of functions to fit your needsusing both menus and widgets. Menus, sub-menus, and featurecan be accessed by scrolling through the available onscreenmenus.
Opening an Application
Tap the associated onscreen icon.
• Touch or to exit from the current menu and retuthe previous screen.
• Press (right action key) to exit from the current location function, and return to the Main Menu.
Note:These actions only exit from (close) the current application while stmaintaining them active in the background.
Closing an Application
Applications are only closed (no longer active) when they areexited via the application’s own Menu options. Simply touchin
or will only minimize the current application andkeep it running actively in the background. These, still runningapplications can utilize your device resources, slow down yourdevice and drain your battery faster.
ok
ok
X ok
X ok
T l li ti N i ti Th h M

8/14/2019 Clearwire M100 Mondi UG
http://slidepdf.com/reader/full/clearwire-m100-mondi-ug 29/150
Basics 26
To close your applications:1. Touch the application’s softkey optionMenu > Exit.
– or –
Press and hold (left action key) to launch theTaskSwitcherapplication.
• This application visually displays any applications currently runningin the background.
• It also provides the option to either bring a selected applicationforward or End (close) it.
2. Flip through and center the desired application. The namewill appear above it.
3. Touch eitherEnd(to terminate the current app) orEnd All
(to close all background applications).For moreinformation, refer to“Using TaskSwitcher to Close
Applications” on page 99.
Navigating Through Menus
As you navigate through a menu, options display on the screenas scrollable lists. Menu tabs (located at the bottom of mostscreens, provide access to additional screen options).
To navigate a scrollable list:
1. From theTodayscreen, touch Start ( ).
2. Touch and gently press an onscreen option.
3. From the available list of options you can either:
• Touch an onscreen entry to activate it.• Firmly press and slide your finger up or down the screen to scr
through lists of menu items.• Navigate through a long list by pressing either volume key up o
down.
Note:Tapping or touching individual entries on the list opens the list entry.
Quick Navigation Among the Device Panels

8/14/2019 Clearwire M100 Mondi UG
http://slidepdf.com/reader/full/clearwire-m100-mondi-ug 30/150
27
Note:Scrolling requires that you press firmly on the screen then drag. Whenscrolling through a list (see adjacent image) make sure not to touch orpress individual entries on the list as this will open the list entry.
Quick Navigation Among the Device Panels
Each of the available shortcuts (seen below) opens an associatepanel that can be activated by flipping across the page as seenbelow.
In a single motion, touch and drag up or down along either si(left or right) of the current panel. This actions creates acube-like effect as you flip among the different panels.
Touch or Tap
Scrolling ThroughOptions/Selections
onscreen options
43
2 1
1 Panels display the associated features functions and 2 Using the stylus select the desired level on the slider

8/14/2019 Clearwire M100 Mondi UG
http://slidepdf.com/reader/full/clearwire-m100-mondi-ug 31/150
Basics 28
1. Panels display the associated features, functions andshortcuts for shortcut.
2. Shortcutsprovide access to each of the five availablepanels.
3. Applications panelprovides a grid view of the 12 preferred
Main menu application shortcuts (Favorites). These iconscan be customized to display any 12 application shortcuts(from those available).
4. Favorite Contacts paneldisplays a scrollable list of currentlyavailable Favorite Contacts cards.
Adjusting Your Volume Levels
You can set the volume for the device notifications by followingthese steps:
1. From theTodayscreen, touch (located at the top ofyour screen). A menu then displays with the onscreenslider needed to adjust the device volume.
2. Using the stylus, select the desired level on the sliderlocated under Volume.
• Touch eitherOn(activate the device sounds),Vibrate(only avibration is felt - no sound), orOff(mutes both onboard speakersand turns off the vibration feature). The onscreen volume iconchanges accordingly.
3. Select again to exit.
Note: You can also press and hold the slider, or the side volume keys to movethe selection up and down along the slider range.
Updating Sound Events
The Sounds & Notifications page allows you to select the actionfor which you hear sounds and how to notify you when those
different events occur.1. From theTodayscreen, touch Start ( )> Settings.
2. Touch thePersonaltab, then tap Sounds & Notifications.
3. Activate sound notifications for any of the following event
by touching any of the following:
• Events (warnings, system events)
• Programs and Notifications (alarms, reminders)• Screen taps (Soft or Loud)• Hardware buttons (Soft or Loud)
4 Touch the Notificationstab to then assign specific audio Formatting the Device’s Memory

8/14/2019 Clearwire M100 Mondi UG
http://slidepdf.com/reader/full/clearwire-m100-mondi-ug 32/150
29
4. Touch the Notificationstab to then assign specific audiofiles (or vibrate) to play for specific applications or actions.
5. Touch the Eventdrop-down list and select one of thefollowing events:
• ActiveSync: Begin sync
• ActiveSync: End sync• Beam: Autoreceive• Connection disconnected• Connection established• Messaging: New e-mail message• Reminders• Wireless network detected
6. Activate any of the following notification actions by tappingthe field adjacent to each:
• Play Sound• Repeat• Display message on screen• Flash light for• Vibrate
7. Touch to save your new settings and return to the
Personaltab.
Formatting the Device s Memory
Both the internal device storage location (Main Storage) andmicroSD card (Storage Card) can be cleared of content via a HReset and reformat process.
TheMain Storage(My Device) location has only ~90 MB ofstorage capacity to contain your installed applications and filesOnce this capacity is reached, you can obtain an error messageindicating you need to clean up the Main Storage location (youhave reached the 90 MB limit of your storage capacity and canno longer install additional applications).
TheMy Storagelocation contains as much storage capacity asprovided by your internal microSD card. If given the option fordestination of installed applications and files, it is recommendyou use the My Storage location on the microSD card.
1. From theTodayscreen, touch Start ( )> Settings.
2. Touch theSystemtab and tap Hard Reset.
• TheMemorytab refers to the device’s internal memory storag• TheStorage Cardtab refers to the installed microSD card’s
storage.
Note:This can also be accessed from a similar menu by using the followisteps: tap the Applicationsshortcut > Basic Settings.
3. Touch theMemorytab.
ok
4 Tap either an individual onscreenResetbutton for either Formatting the microSD Card

8/14/2019 Clearwire M100 Mondi UG
http://slidepdf.com/reader/full/clearwire-m100-mondi-ug 33/150
Basics 30
4. Tap either an individual onscreenResetbutton for eitherthe Main Storage or My Storage locations.
– or –
Tap Clear Memoryto delete both locations.
• If selecting the Clear Memory option, you will need to type in ‘Yes’
within the onscreen field and then tapYesto continue.
5. Tap Yesto continue with the format process.
Important!:If you clear all memory, all previously configured settings anddevice data will be deleted and the unit will be reset to its factory
defaulted settings. You will then need to setup the device again(page 5).
Formatting the microSD Card
After you have installed an optional microSD card, you can thenuse the Format feature to clear any pre-existing information andthen use it for data storage.
1. From theTodayscreen, touch Start ( )> Settings.
2. Touch theSystemtab and tap Hard Reset.
3. Touch theStorage Cardtab and tap Format.
4. Tap Yesto continue with the format process.
For more information, refer to“Formatting the microSD Card” onpage 65.
Entering Text Using the QWERTY Keyboard
Your device provides convenient ways to enter words, letters,punctuation, and numbers whenever you are prompted to entertext (for example, when entering information into a field, surfingthe Web, or when using Microsoft® Outlook ® and TextMessaging).
To access the QWERTY keyboard
1. Firmly grasp the front and back of the Mondi with bothhands.
2. In a single motion, use your thumbs to slide the top section When you display a screen where you can enter text, use the

8/14/2019 Clearwire M100 Mondi UG
http://slidepdf.com/reader/full/clearwire-m100-mondi-ug 34/150
31
. a s g e ot o , use you t u bs to s de t e top sect oof the device up to open, as shown in the followingillustration.
The built-in QWERTY keyboard supports quick and easy textinput, just as you would when using a computer’s keyboard.Mondi also provides an onscreen virtual QWERTY keyboard thatfunctions in the same fashion.
W e you d sp ay a sc ee w e e you ca e te te t, use t ekeyboard to enter different character types:
Note:When the key entering mode is changed to eitherShiftor Fn, theircorresponding icons are shown adjacent to at the bottom of thescreen.
Softkey (right)
Softkey (left) QWERTYKeyboard
Function: Allows you to use characters displayed athe top of the QWERTY keys.Examples: 1, 5, 0, $, @, #, ?
CAPS/SHIFT: Converts the alphabetic character intouppercase. Changes the text input mode betweenUpper/Lower case modes.
Symbol: Launches the Symbols page from whereyou choose from an onscreen list of symbols andother character sets. Touch an onscreen itemto insert it into your text field.
Delete: Deletes the previous character, similar tothe backspace key on a computer keyboard. Thiskey has two different functions: in its default modit functions as a 'backspace’, within Fn mode, it
functions as a 'delete' key.
Enter: Moves the insertion point to the next line in a

8/14/2019 Clearwire M100 Mondi UG
http://slidepdf.com/reader/full/clearwire-m100-mondi-ug 35/150
Basics 32
The keyboard provides dual-use keys labeled with alphabeticcharacters on the lower half and numbers and symbols on the
upper half. Press the key combination corresponding to thecharacter you want to enter.
Entering Characters
Characters can be entered using either Uppercase or Lowercase.1. Slide out the QWERTY keyboard and press to make
the next entered character uppercase. Characters thenrevert back to lowercase after the next character is typed.
2. Press the desired text key.
• For example, to enter the word “Sam”, type the keyboard sequencebelow.
• If you make a mistake and enter the wrong character, pressto erase a single character. Press and hold to erase anentire word.
3. To enter all uppercase characters, press twice tomaintain all consecutive characters in uppercase.
Entering Numbers
The keyboard can be used to enter numbers, letters, andsymbols. Although these keys default to text (letters), numberscan be input by using in conjunction with the correctnumber key.
1. Press to input the character displayed on the top rowof the next QWERTY key pressed.
Enter: Moves the insertion point to the next line in amessage.
Sam
SAM
2. Press the desired key. 1. Position the cursor where you want the symbol to appea

8/14/2019 Clearwire M100 Mondi UG
http://slidepdf.com/reader/full/clearwire-m100-mondi-ug 36/150
33
y
– or –
To only enter all top row characters, press twice.
• For example, to enter “11:30”, you would use the keyboardsequence shown below.
• If you make a mistake and enter the wrong character, pressto erase a single character. Press and hold to erase anentire word.
Entering Symbols
Symbols can be entered from the keyboard (using the key)or from the Symbols page (accessed using the key).
Note:To use (Symbols page), the Text Input Mode must be set toSamsung Keypad.
y y ppwithin your message.
2. Press to launch the onscreen Symbols page. Thereare up to eight pages of symbols (accessible by the bottomleft button. Ex:1/8 thru 8/8).
3. Touch an onscreen entry to insert the selected symbol.There are multiple pages of available symbols.
– or –
1. Choose to insert a QWERTY keyboard symbol bypositioning the cursor where you want the symbol toappear within your message.
2. Press and then press the key for the symbol youwish to insert. This method uses the symbols etched on
the corresponding QWERT key.11:30
Pat@
Entering Text using the Onscreen Keyboard 1. From theTodayscreen, touch Start ( )> Settings.

8/14/2019 Clearwire M100 Mondi UG
http://slidepdf.com/reader/full/clearwire-m100-mondi-ug 37/150
Basics 34
In those onscreen pages where text can be entered into eitherfields, strings, or messages, the device also provides access toan onscreen virtual QWERTY keyboard.
1. From a place where you can enter text, touch the onscreentext field.
2. Touch to pull up an onscreen keyboard.
3. Make your character selections using the same methodsdiscussed within the previous Entering Text, Numbers, andSymbols sections.
4. Once complete, touch again to close the onscreenkeyboard.
Adjusting Text Input Settings
The Mondi does not, by default, use the standard Microsoft inputmethod but rather an XT9 input method. This method can beconfigured via the Mondi Input settings page.
XT9 is a new text input software that allows you to easily entertext faster on a Windows Mobile-based device. XT9 allows forword prediction, word completion, and real-time spellingcorrections.
2. Touch thePersonaltab, then touch Input.
3. Touch theInput Methodtab.
4. WithSamsung Keypadselected, touch the onscreenOptions..button.
5. Configure the desired XT9 settings:
• XT9 Settings: allows you to select your input language, adjust yword completion, spelling correction, auto-substitution, andregional correction settings.
• XT9 Dictionaries: provides access to the built-in dictionaries: XtMy Words and XT9 Auto-Substitution.
• About XT9: describes the XT9 input software version informati
• XT9 Help: provides end-user onscreen help for the XT9 inputsoftware.6. Touch Done(left softkey) or tap to save your new
settings and return to the previous page.
Note:Some of these features may not be compatible with the SamsungKeyboard Input method.
ok
Widgets Accessing the Widget Bar

8/14/2019 Clearwire M100 Mondi UG
http://slidepdf.com/reader/full/clearwire-m100-mondi-ug 38/150
35
The MobileWidget page (via the Widget Bar) provides quick access to mini-programs (widgets). This bar gives youinformation at a glance and provides easy access to frequentlyused tools such as (Analog Clock, Digital Clock, Calendar, MusicPlayer, Photo, Dual Clock/World Clock, Today’s Events, Wireless
Manger, Memo, AccuWeather, Google, Yahoo Financial and YahooOne Search). This bar makes great use of the available space onyour device.
The Widget Bar is a pane on the bottom of the Widget Desktoparea that houses user-selected mini-applications and keepsthem organized and always accessible.
You can easily customize the Widget area by either docking thesemini-apps to the Widget Desktop area or placing them back within the Widget Bar for later use.
Widget Bar Navigation
You can drag the widgets to the desktop to use the application orfeature, then drag it back to the Widget Bar when you arefinished.
1. From theTodayscreen, touch Start ( )> Programs >Widget.
– or –
Quickly press and release the left action key ( ).
2. Tap the grey tab’s blue arrow (bottom of the screen) totemporarily display the Widget Bar tab.
3. Tap the tab’s blue arrow again to close the Widget bar orwait a few seconds for it to close automatically.
Adding and Deleting Widgets from the Desktop
1. From theTodayscreen, touch Start ( )> Programs >
Widget.– or –
Quickly press and release the left action key ( ).
• Widget Bar- provides a horizontal list of available widgets.
• Widget Desktop- is the available workspace where you can placed i d id O l d h Wid D k h

8/14/2019 Clearwire M100 Mondi UG
http://slidepdf.com/reader/full/clearwire-m100-mondi-ug 39/150
Basics 36
any desired widget apps. Once placed on the Widget Desktop, theyare immediately available and active. Their position on the desktopcan easily be changed by, in a single motion, touching anddragging to a new location.
2. Touch and hold the widget (1).
3. In a single motion, touch and drag an available widgetfrom the Widget Bar (1) to the Widget Desktop area (2).
4. While still holding the icon, in a single motion, drag it overto the new location on the Widget Desktop area andrelease your finger from the screen (2).
5. Repeat this process for any additional widgets you wish toadd.
– or –
To remove a Widget from the Desktop area (2), touch anddrag the onscreen widget and drag it back into the WidgetBar (1).
Widget Bar Widget DesktopDesktop Pages
Note:Widgets are not activated by default on the device but must first beRearranging Widgets within the Widget Bar

8/14/2019 Clearwire M100 Mondi UG
http://slidepdf.com/reader/full/clearwire-m100-mondi-ug 40/150
37
Note:Widgets are not activated by default on the device but must first beactivated via the Widgets menu.
Placing Widgets on Separate Pages
The three buttons at the top of the Widget Desktop correspond toavailable pages that can contain Widgets. Since not all the
available Widgets can be displayed on a single page, these allowyou to select from one of three available pages
1. From theTodayscreen, touch Start ( )> Programs >Widget.
– or –
Quickly press and release the left action key ( ).
2. Touch any of the three Desktop page icons (at the top ofthe page) to display one of three available Desktop pages.
You can place (anchor) a selected Widget to any of theseactive pages.
3. In a single motion, touch and drag an available widgetfrom the Widget Bar (1) to the Widget Desktop area (2).
1. From theTodayscreen, touch Start ( )> Programs >Widget.
2. In a single motion, touch and drag a widget from itscurrent location on the Widget Bar and move it to a new
position either between two existing Widget icons or at tbeginning/end of the listing.
– or –
While still holding the icon, in a single motion, drag it awfrom the widget bar (1) then drag it back into its newlocation in the list.
Activating a Widget 1. Locate your widget (whether it is still docked in the Wid
bar or in another location).
2. Touch the Desktop Widget icon to activate themini-application (widget).
Widget Icons
Calendar: allows you to access the Calendar

8/14/2019 Clearwire M100 Mondi UG
http://slidepdf.com/reader/full/clearwire-m100-mondi-ug 41/150
Basics 38
The following table contains a description of each availableWidget, it’s function, and how to navigate to that particularapplication. If the application is already described in anothersection of this user manual, only a cross reference is thenprovided.
Note:Some of these Widgets require an active broadband connection prior toactivation and use.
Analog Clock: displays the current time on ananalog clock.
• Touch, drag and drop the Analog clock onto
the desktop to view the time in an analogformat.
Digital Clock: displays the current time on adigital clock.
• Touch, drag and drop the Digital clock onto thedesktop to view the time in a digital format.
AM10 36
feature and choose a specific date by tappingfrom a date from an onscreen calendar.
With the Calendar feature, you can:
• Consult the calendar by day, week, month,year, or Agenda.
• Set schedules and note anniversaries.
• Write memos to keep track of your schedule.
• Set an alarm to act as a reminder, if necessary.
• For more information, refer to“Calendar” onpage 78.
Multimedia Player: allows you to launch the
Multimedia Player application where you canplay music and video files stored both locallyand within the microSD card to then controltheir playback.
• Touch, drag and drop, then tap the MusicPlayer icon to launch the multimedia player.
• Touch the arrows on the widget to control the
playback of the currently active song or video.
3
No Library
Photo: allows you to view the list of device images, Today’s Events: allows you to review theMon0302

8/14/2019 Clearwire M100 Mondi UG
http://slidepdf.com/reader/full/clearwire-m100-mondi-ug 42/150
39
received in messages, or taken by the camera. You can then set/assign the image as thecurrent wallpaper for the Widget Desktop.
• For more information, refer to“Widgets” onpage 35.
Dual Clock/World Clock: displays current time inboth the current location and within anotheruser-defined international location. Via theClocks application, you can set alarms, assignanniversary dates, access the stopwatchfeature, and view the World Clock.
You can also view times from other parts ofthe world.
• Touch, drag and drop the World Clock onto thedesktop to view the time in dual locations.
• For more information, refer to“Clocks” onpage 92.
Pac...
Par...
Calendar events for the current day.
With the Calendar feature, you can:
• Consult the calendar by day, week, month,year, or Agenda.
• Set schedules and note anniversaries.• Write memos to keep track of your schedule
• Set an alarm to act as a reminder, if necessary
• For more information, refer to“Calendar” onpage 78.
Wireless Manager: Launches the WirelessManager application that allows you to activate
the Airplane mode, access/alter and manageyour Wi-Fi, Bluetooth, and Mobile WiMAXconnections.
• Touch, drag and drop, then tap the WirelessManager icon to launch the Wireless Manageapplication.
• For more information, refer to“Widgets” on
page 35. For more information, refer to“Communication and Connection” onpage 41.
Memo: launches the Notes application where Yahoo Finance: uses your current data

8/14/2019 Clearwire M100 Mondi UG
http://slidepdf.com/reader/full/clearwire-m100-mondi-ug 43/150
Basics 40
you can then create, store and reviewpreviously created notes/memos.
• For more information, refer to“Widgets” onpage 35.
AccuWeather: uses your current dataconnection to access and display an onscreenpopup containing real-time weather informationfor a specified location. You must have an activedata connection to use this feature.
• For more information, refer to“Widgets” onpage 35.
Google: launches a Google™ search fieldwhere you can search the Web by entering asearch string (using your QWERTY keyboard).
You must have an active data connection to usethis feature.
• For more information, refer to“Widgets” onpage 35.
Accuc c uWeatherea the r
.comcom
connection to display an onscreen windowcontaining the latest Yahoo financial news.
• For more information, refer to“Widgets” onpage 35.
Yahoo One Search: launches a Yahoo searchfield where you can search the Web (US orInternational) by entering a search string (usingyour QWERTY keyboard). You must have anactive data connection to use this feature.
• For more information, refer to“Widgets” onpage 35.
TM
Section 3: Communication and Connection

8/14/2019 Clearwire M100 Mondi UG
http://slidepdf.com/reader/full/clearwire-m100-mondi-ug 44/150
41
Communication Setup
Your device is capable of obtaining broadband Internet Access viaeither of these two available methods:• Wi-Fi access• Mobile WiMAX connection
Note:Quick Access (activate/deactivate & configure) to the Airplane Mode,Bluetooth, Wi-Fi and Mobile WiMAX CM features is available from theTodayscreen by touching ( )> Basic Settings.
Wireless Manager Overview
Wireless Manager application that allows you to activate the
Airplane mode, access/alter and manage your Wi-Fi, Bluetooth,and Mobile WiMAX connections.
Accessing the Wireless Manager Page
1. From theTodayscreen, touch Start ( )> Settings.
2. Touch the Connectionstab and tap Wireless Manager ( ).
– or –
From the Title bar, touch the connection icon ( ), thentouch the blue Wireless Managerlink.
3. Locate the desired connection method (Bluetooth, Wi-Fi
Mobile WiMAX [see adjacent image]).
Wireless Manager
Wireless ManagerWidget
Page
Accessing the Wireless Manager Widget
1 F th T d t h St t ( )> P >Airplane Mode
l d ll f d f

8/14/2019 Clearwire M100 Mondi UG
http://slidepdf.com/reader/full/clearwire-m100-mondi-ug 45/150
Communication and Connection 42
1. From theTodayscreen, touch Start ( )> Programs >Widget.
2. In a single motion, touch and drag the Wireless Managerwidget ( ) from its current location on the Widget Bar
and move it to the Widget Desktop.Communication Methods - Overview
The two available methods for connectivity are:• Mobile WiMAX- is developed primarily for wireless metropolitan area
networks (WMANs).– provides broadband speeds without the need for cables.– Allows for a wider range of mobility.
Note: *Please check with your Mobile WiMAX provider for available localbroadband speeds.
• Wi-Fi- has primarily been developed for wireless local area networks(WLANs).– Transmission range of up to 100m.– Wi-Fi networks have limited range compared to Mobile WiMAX.
Airplane Mode allows you to use many of your device’s featuressuch as Games, Office, Multimedia, etc., when you are in anairplane or in any other area where data usage is prohibited.When your device is in Airplane Mode ( ), it cannot send orreceive any data or access online information.
1. From theTodayscreen, touch Start ( )> Programs >Widget.
2. In a single motion, touch and drag the Wireless Managerwidget ( ) from the Widget Bar to the Widget Desktoparea.
3. Touch theAirplane Modefield to toggle its activity state
between On ( ) orOff ( ).
Note: Activating Airplane mode deactivates all Bluetooth, Wi-Fi, and WiMAcommunication.
4. Press ( ) (right action key) to return to the Today screen
Activating Wi-Fi Communication
Wi Fi i i i i i d
Establishing a Wi-Fi Connection
1 From theTodayscreen touch Start ( )> Settings

8/14/2019 Clearwire M100 Mondi UG
http://slidepdf.com/reader/full/clearwire-m100-mondi-ug 46/150
43
Wi-Fi communication requires access to an existing andaccessible Wireless Access Point (WAP). These WAPs can eitherbe Open(unsecured) as within most Hot Spots, orSecured (requiring knowledge of the Router name and password). Thefollowing is a list of Wi-Fi icons displayed on the device:
1. From theTodayscreen, touch Start ( )> Settings.
2. Touch the Connectionstab and tap Wireless Manager ( ).
– or –
From the Title bar, touch the connection icon ( ), thentouch the blue Wireless Managerlink.
3. Touch ON(within the Wi-Fi area) to toggle the active state.
1. From theTodayscreen, touch Start ( )> Settings.
2. Touch theConnectionstab and tap Wireless Manager ( ).
3. Touch Menu(right softkey)> Wi-Fi Settings.
4. From the Wi-Fi Settings page, filter the list of availablenetworks by touching an available onscreen network or
expand the search by choosing one of the following:
• All Available• Only access points• Only computer-to-computer
5. Touch Menu(right softkey)> Add New...to add a newconnection, or touch an available connection to edit itsparameters.
6. From the Configure Wireless Network page, touch theNetwork namefield and use the QWERTY keyboard to ena name for the new network connection.
Indicates an active Wi-Fi connection.
Indicates an inactive Wi-Fi connection.
7. Select from the following security connection presets fromthe Connects todrop down:
13. Touch theNetwork Adapterstab to select a My networkcard connects to:entry (The Internet or Work) and modify

8/14/2019 Clearwire M100 Mondi UG
http://slidepdf.com/reader/full/clearwire-m100-mondi-ug 47/150
Communication and Connection 44
the Connects todrop down:
– SelectThe Internetif the network connects to the Internet (does notuse proxy settings).
– SelectWorkif the network does not connect to the Internet (uses proxysettings).
8. Touch any of the remaining fields to place a checkmark alongside their entries (checkmarks indicate activity).
• If the network has SSID broadcasting disabled (is “hidden”), selectThis is a hidden network.
• If the connection is for an ad-hoc network, selectThis device is adevice-to-device (ad-hoc) connection.
9. Touch Next(right softkey) to continue onto the Authentication and Data Encryption information. Use the
information provided by your Network administrator tocomplete this section.
10. Use the QWERTY keyboard to complete this informationand touch Next(right softkey) to continue.
11. Complete the process by selecting the appropriate securityprotocol parameters from the EAP type drop-down menu.
12. Touch Finish(right softkey) to complete the process.
card connects to:entry (The Internet or Work) and modifyan adapter from the list provided.
Connecting to a Mobile WiMAX Network
Mobile WiMAX provides broadband Internet access over a widecoverage area than available with Wi-Fi or Bluetooth. Connectioto a WiMAX network requires the activation of service. Duringcommunication to the Internet, the device uses any previouslyconfigured wireless network connections (WiMAX or WLAN/ Wi-Fi).
Note:Mobile WiMAX connectivity is only available in limited markets andmust be accompanied by an active WiMAX service plan prior toestablishing any Mobile WiMAX connectivity.
Activating the Mobile WiMAX Hardware
Before you can establish an active Mobile WiMAX data sessionyour built-in WiMAX hardware must first be activated. Once yoactivate the connection via the WiMAX CM (Connection Managthe WiMAX connection is automatically enabled.
Note:This device is expected to achieve speeds that are twice that of 3Gwireless service. Overall internet experience will vary depending on anumber of factors including device parameters, patterns of usage,network conditions and the characteristics of websites visited.
1. From theTodayscreen, touch Start ( )> WiMAX CM.
– or –Warning!:This is a unique wireless ID and should be kept secured. It is
recommended that you properly dispose of any written record o

8/14/2019 Clearwire M100 Mondi UG
http://slidepdf.com/reader/full/clearwire-m100-mondi-ug 48/150
45
– or –
Touch ( ) from the left side of the device screen tolaunch the Main Menu screen and touchBasic Settings >Mobile WiMAX CM.
Locating your MAC ID Your MAC ID is a device specific identification that is requiredprior to gaining access to a wireless system. Your device’sinternal Bluetooth, Wi-Fi, and Mobile WiMAX components all havea specific and unique MAC ID. It is this alphanumeric sequencewhich you must obtain prior to registration of your device for useon the CLEAR WiMAX network.
1. From theTodayscreen, touch Start ( )> Settings.
2. Touch the Systemtab, then tap Version( ).
3. Scroll down this Version page and locate the MobileWiMAX section wherein you will see the MAC value listed.
4. Write down this alphanumeric string and use it during yourregistration process.
recommended that you properly dispose of any written record othis ID after registration.
Online setup for Mobile WiMAX Access
If you have not already created a CLEAR service account, youneed to do so prior to connection. Without an active account,your device only allows access to the mainwww.clear.comWebpage.
There are three current methods for creating a CLEAR accoun• Directly from your Mondi(page 46).• Log intowww.clear.comand click CLEAR Services.• Call CLEAR at 1-888-888-3113 and follow the audio prompts.
Important!:It is recommended that you setup and register your device onlivia a computer with access to the Internet.
Creating an Account from within Mondi
1 From theTodayscreen touch WiMAX CM(left softkey)
5. Initiate a connection.

8/14/2019 Clearwire M100 Mondi UG
http://slidepdf.com/reader/full/clearwire-m100-mondi-ug 49/150
Communication and Connection 46
1. From theTodayscreen, touch WiMAX CM(left softkey).
– or –
From theTodayscreen, touch Start ( )> WiMAX CM.
2. Touch Connect. Once successfully connected, you are
returned to the Todayscreen.3. Once connected to Mobile WiMAX, launch your Opera
browser and follow the onscreen instructions. You will betaken to the CLEAR website and prompted to create anaccount. Your device MAC ID will be automatically detectedby the system.
Creating an Account from CLEAR Website1. Log intowww.clear.comfrom a computer.
2. Click on theCLEAR Servicestab.
3. Follow the onscreen instructions to create a new CLEARaccount and assign your device’s MAC ID(page 45).
4. Once complete, return to the main CLEAR Web page and
click My Account(top of the page) to confirm yourinformation and activation status.
Initiating a Mobile WiMAX Connection
Note:Prior to Mobile WiMAX usage, you must signup for a service plan. Forservice plans and coverage information, seewww.clear.com.
Note:If you do not have a CLEAR account,see “Online setup for Mobile WiMAX Access” on page 45.
If you have already set up a CLEAR WiMAX account, your Mondi MID will be detected by the system and you will then be allowed fullWiMAX access.
1. From theTodayscreen, touch WiMAX CM(left softkey).
– or –Bluetooth Communication
Bluetooth is a short-range wireless communications technolog

8/14/2019 Clearwire M100 Mondi UG
http://slidepdf.com/reader/full/clearwire-m100-mondi-ug 50/150
47
or
From theTodayscreen, touch Start ( )> WiMAX CM.
2. Touch Connect. Once successfully connected, you are
returned to the Today screen. Confirm the WiMAX icon
within the Title Bar (top of screen) indicates an activeConnection ( ).
• If not already registered, launch a browser and then follow theonscreen setup and connection procedures to enter the informationassociated with your CLEAR account.For more information, refer to“Online setup for Mobile WiMAX Access” on page 45.
Important!:For assistance with account activation and troubleshootingCLEAR WiMAX service, contact CLEAR at: www.clear.com or1-888-888-3113.
Bluetooth is a short range wireless communications technologcapable of exchanging information over a distance of about30 feet without requiring a physical connection. Unlike infrareyou don't need to line up the devices to beam information withBluetooth. If the devices are within range of one another, you cexchange information between them, even if they are located idifferent rooms.
When the Bluetooth radio is turned off, you cannot communic(send or receive data) via Bluetooth. A Bluetooth connection wan externally paired device allows you to transfer images,Calendar dates, themes, and other data files.
To save battery life or in situations where radio use is prohibitesuch as airline travel, you can turn off the Bluetooth wirelesstechnology.
1. From theTodayscreen, touch Start ( )> Settings.
2. Touch theConnectionstab and tap Wireless Manager ( ).
3. Touch ON(within the Bluetooth area seen below) to toggthe active state.
5. Touch theDevicestab and tap Add new device...from theonscreen list. Your device then displays a list of discovered

8/14/2019 Clearwire M100 Mondi UG
http://slidepdf.com/reader/full/clearwire-m100-mondi-ug 51/150
Communication and Connection 48
4. Touch Menu(right softkey) to access the Bluetooth
Settings. Adding a Bluetooth Device
1. From theTodayscreen, touch Start ( )> Settings.
2. Touch the Connectionstab and tap Wireless Manager ( ).
3. Touch Menu(right softkey)> Bluetooth Settings.
4. Prepare your external Bluetooth device for communicationand detection.
p yBluetooth devices that have been detected within itscommunication range.
Note:To be detectable, external Bluetooth devices must be enabled forvisibility so the Mondi can detect the device and then connect to it. Ifyour device does not appear in the list of available devices, make surethis feature is active on the target device.
6. Touch the device you wish to pair with and touchNext (right softkey).
• If your target device does not appear within the list of availabledevices, touchRefreshto repeat the discovery process.
7. Touch thePasscode field, use the QWERTY keyboard toenter the numeric passcode, and press Next(right softkey).
You are then notified the pairing is in progress.
Note:If the target device does not require a passcode, touchNexttocontinue.
8. Enter the corresponding Passcode information on your
target device to complete the pairing process.
Creating a Device Name
1. From theTodayscreen, touch Start ( )> Settings.
7. Confirm the Device name update by navigating to theBluetooth Setting - My Info tab:

8/14/2019 Clearwire M100 Mondi UG
http://slidepdf.com/reader/full/clearwire-m100-mondi-ug 52/150
49
y , ( ) g
2. Touch the Systemtab and tap About( ).
3. Touch the Device IDtab and double tap the Device namefield to highlight current name.
Note: You can also view the Device Name via theMy Infotab within theBluetooth Settings page.
4. Use either the onscreen keyboard (or slide out the QWERTYkeyboard) and enter the new name for this device.For
more information, refer to“Entering Text Using the
QWERTY Keyboard” on page 30.
5. Touch the Descriptionfield to enter additional information.
6. Touch to store the new information and return to the
previous screen.
Note:If this name has previously been assigned within theStart > Settings >Owner Informationpage, this information is then updated first.
• From theTodayscreen, touchStart( )> Settings >Connections tab.
• TapBluetooth( ) and touch theMy Info tab. 8. Confirm the name was correctly updated.
Device Visibility
1. From theTodayscreen, touch Start ( )> Settings.
2. Touch theConnectionstab and tap Bluetooth( ).
3. Touch theModetab and then tap the Make this devicevisible to other devicesbox to either activate or deactivatthe visibility (discoverability) of your device by others.
• Your device becomes visible to other devices when you transyour device’s name to others in your area. This allows other dto detect your device and request a connection. If your devicevisible, you can still detect and connect to other devices, whihiding yourself from others.
ok
Making Bluetooth Secure
When the Bluetooth Visibility on your Mondi is turned on, your

8/14/2019 Clearwire M100 Mondi UG
http://slidepdf.com/reader/full/clearwire-m100-mondi-ug 53/150
Communication and Connection 50
y y , ydevice is wirelessly transmitting its device name and status toevery device within its range. This transmission can pose asecurity risk and incite unauthorized connection to your device. Itis recommended that you remain hidden unless an active pairingis necessary.
Beaming
The process of transmitting data between two paired Bluetoothdevices is known as Beaming. Data is directly transmitted/sharedto a target device. This device must be visible and must accepteither your incoming data or agree to be paired with your device.
The Samsung Mondi™ Mobile Internet Tablet supports beamingof several different file types:• Windows Mobile Themes (see the User Guide for more information)• Microsoft Excel Workbook data (page 87)• Microsoft Word Document data (page 89)• Calendar Events(page 80)• Contact entries (page 84)• Image or Video file (page 116)
Section 4: Customizations
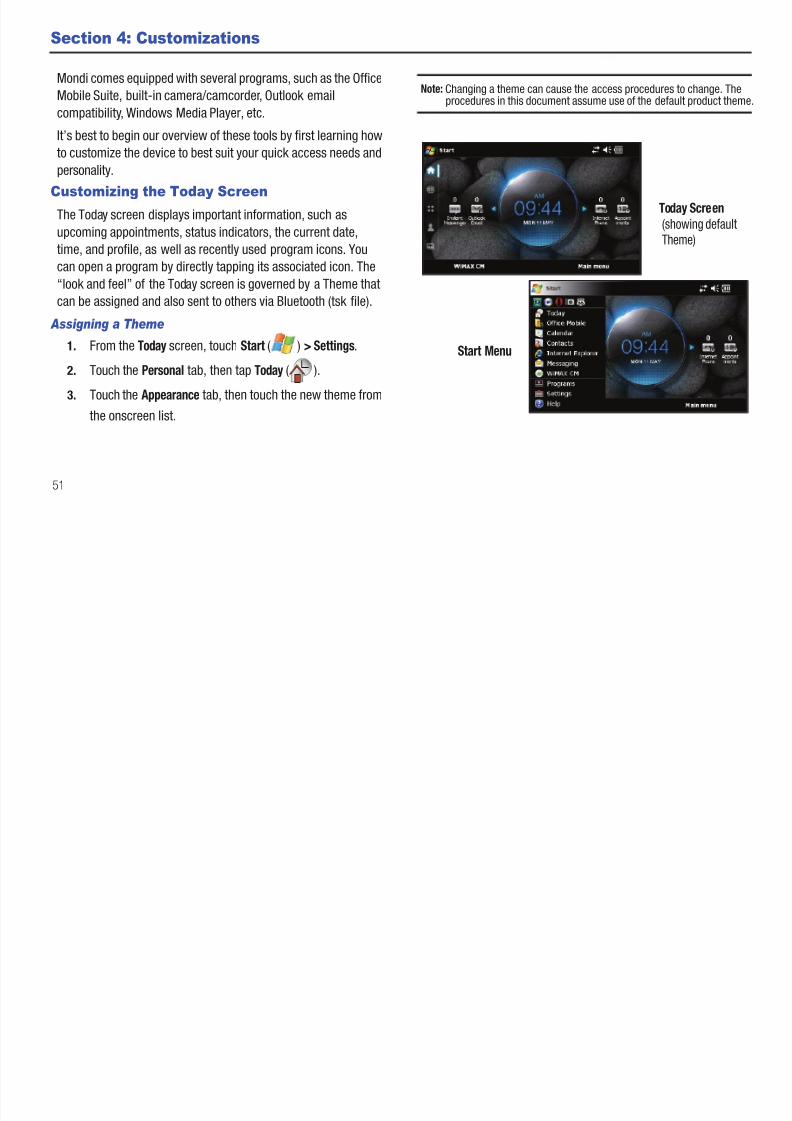
8/14/2019 Clearwire M100 Mondi UG
http://slidepdf.com/reader/full/clearwire-m100-mondi-ug 54/150
51
Mondi comes equipped with several programs, such as the OfficeMobile Suite, built-in camera/camcorder, Outlook emailcompatibility, Windows Media Player, etc.
It’s best to begin our overview of these tools by first learning how
to customize the device to best suit your quick access needs andpersonality.
Customizing the Today Screen
The Today screen displays important information, such asupcoming appointments, status indicators, the current date,time, and profile, as well as recently used program icons. Youcan open a program by directly tapping its associated icon. The“look and feel” of the Today screen is governed by a Theme thatcan be assigned and also sent to others via Bluetooth (tsk file).
Assigning a Theme
1. From theTodayscreen, touch Start ( )> Settings.
2. Touch the Personal tab, then tap Today( ).
3. Touch the Appearancetab, then touch the new theme fromthe onscreen list.
Note:Changing a theme can cause the access procedures to change. Theprocedures in this document assume use of the default product them
Today Screen
Start Menu
(showing defaultTheme)

8/14/2019 Clearwire M100 Mondi UG
http://slidepdf.com/reader/full/clearwire-m100-mondi-ug 55/150
4. Select those items which will appear on the Today screenby toggling each entry either on or off. Changing the state
Note:Select up to seven items you want displayed within the Start menu.There can only be at most seven items selected at any one time.

8/14/2019 Clearwire M100 Mondi UG
http://slidepdf.com/reader/full/clearwire-m100-mondi-ug 56/150
53
is done by tapping each item and placing/removing acheck mark adjacent to each entry.
• Remove these items by removing the check mark from each item.5. Position each item (from top to bottom) on the list by
highlighting an entry and using the onscreenMove Up / Move Downbuttons to position them in the list.
6. Touch to store the Item list, its arrangement, andreturn to the Personaltab.
Customizing the Start Menu
The Start menu contains quick links to all the device’s
applications and settings information, it functions similar to itscomputer-based counterpart. To access the Start menu, simplyuse the stylus to tap in the upper left corner of the screen on theword Start. A drop down menu list is then displayed, and fromthere, all other applications and settings can be accessed.
1. From theTodayscreen, touch Start ( )> Settings.
2. Touch the Personal tab, then tap Menus.
3. Enable/Disable an application from the list by tapping itsadjacent box.
4. Touch to save your new selections and return to thPersonaltab.
Customizing the Applications Panel
The Applications panel is accessed by touching to thendisplay a grid view of 12 preferred Main menu application
shortcuts (Favorites).For more information, refer to“Quick Navigation Among the Device Panels” on page 27.
ok
ok
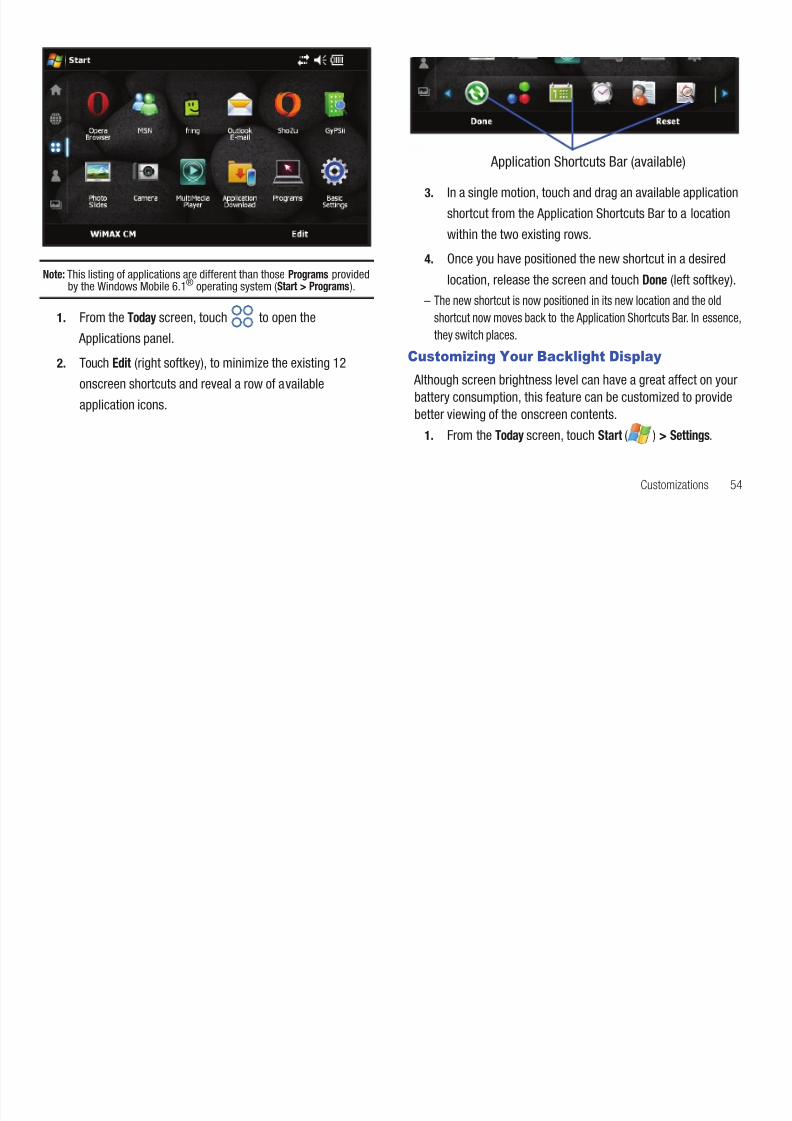
8/14/2019 Clearwire M100 Mondi UG
http://slidepdf.com/reader/full/clearwire-m100-mondi-ug 57/150
Customizations 54
Note:This listing of applications are different than thoseProgramsprovidedby the Windows Mobile 6.1® operating system (Start > Programs).
1. From theTodayscreen, touch to open the Applications panel.
2. Touch Edit(right softkey), to minimize the existing 12onscreen shortcuts and reveal a row of availableapplication icons.
3. In a single motion, touch and drag an available applicationshortcut from the Application Shortcuts Bar to a locationwithin the two existing rows.
4. Once you have positioned the new shortcut in a desired
location, release the screen and touch Done(left softkey).– The new shortcut is now positioned in its new location and the old
shortcut now moves back to the Application Shortcuts Bar. In essethey switch places.
Customizing Your Backlight Display
Although screen brightness level can have a great affect on yourbattery consumption, this feature can be customized to providebetter viewing of the onscreen contents.
1. From theTodayscreen, touch Start ( )> Settings.
Application Shortcuts Bar (available)
2. Touch the Systemtab, then tap Backlight.
• By default, the device is set up to automatically adjust the backlightbrightness level
3. Touch theBattery Powertab and begin to make yourchanges.

8/14/2019 Clearwire M100 Mondi UG
http://slidepdf.com/reader/full/clearwire-m100-mondi-ug 58/150
55
brightness level.3. Tap the Manual Adjustmentradio box, then touch and drag
the slider to adjust the brightness level.
• If the slider does not respond to a sliding action, tap the slider at a
different location to change the setting.4. Touch to save your new selections and return to the
Systemtab.
Customizing Your Power Settings Page
Keeping track of the battery’s charge is very important. If thebattery level gets too low, your device automatically shuts downand can cause you to lose important data.
1. From theTodayscreen, touch Start ( )> Settings.
2. Touch the Systemtab, then tap Power.
• TheBatterytab indicates the current charge state of the internalbattery.
Adjusting the Device’s Behavior - Battery Powered
1. From theTodayscreen, touch Start ( )> Settings.
2. Touch the Systemtab, then tap Power.
4. Touch a box to activate a feature and then alter itscorresponding field.
• Turn on backlightturns the backlight back on after a shutoff, wa button is pressed or the screen is tapped.
• Turn off backlightprovides a power save feature for your deviconserve battery power by turning off only the screen. Valuesfrom Always on to 5 minutes.
• Turn off deviceprovides a power save feature for your deviceconserve battery power by turning off the entire device. Valurange from Always on to 5 minutes.
5. Touch to save your new settings and return to theSystemtab.
Adjusting the Device’s Behavior - Externally Powered
1. From theTodayscreen, touch Start ( )> Settings.
2. Touch theSystemtab, then tap Power.
3. Touch theExternal Powertab and begin to make yourchanges.
ok
ok
4. Touch a box to activate a feature and then alter itscorresponding field.
• Keypad light timedetermines the length of time the keypadremains illuminated after a key is pressed (1 to 10 seconds).
5 Touch to save your new settings and return to theok

8/14/2019 Clearwire M100 Mondi UG
http://slidepdf.com/reader/full/clearwire-m100-mondi-ug 59/150
Customizations 56
• Turn on backlightturns the backlight back on after a shutoff, whena button is pressed or the screen is tapped.
• Turn off backlightprovides a power save feature for your device byturning off only the screen. Values range from 1 minute to Alwayson.
• Turn off deviceprovides a power save feature for your device byturning off the entire device. Values range from 1 minute to Alwayson.
5. Touch to save your new settings and return to the
Systemtab.
Adjusting the Device’s Behavior - Keypad
1. From theTodayscreen, touch Start ( )> Settings.
2. Touch the Systemtab, then tap Power.
3. Touch the Keypadtab and begin to make your changes.
4. Touch a box to activate a feature and then alter itscorresponding field.
• Keypad lightturns the keypad light either Off (no key presses willactivate it) or On (where it turned on anytime its it used or during a
Custom Time (where the Keypad illuminates during a set range oftime- Start Time and End Time).
5. Touch to save your new settings and return to theSystemtab.
Adjusting the Device’s Behavior - VoIP
1. From theTodayscreen, touch Start ( )> Settings.
2. Touch theSystemtab, then tap Power.
3. Touch theVoIPtab and begin to make your changes.
4. Touch a box to activate a feature and then alter itscorresponding field.
• Turn off backlight when callingturns the backlight either Off forset amount of time during a VoIP call (Always turn on, 5 secon
10 seconds).5. Touch to save your new settings and return to the
Systemtab.
Adjusting the Device’s Behavior - Performance
1. From theTodayscreen, touch Start ( )> Settings.
2. Touch theSystemtab, then tap Power.
3. Touch thePerformancetab and begin to make yourchanges.
ok
ok
4. Tap an option from the CPU Performance drop-down list.This is similar to settings used when overclocking ad kt t
4. Touch theText Sizetab, then touch along the text sizeslider to manually adjust the size of onscreen text. Refer th E l fi ld f l f h t th

8/14/2019 Clearwire M100 Mondi UG
http://slidepdf.com/reader/full/clearwire-m100-mondi-ug 60/150
57
desktop computer.
• CPU Performanceadjusts the processor’s performance.Modifications to the performance setting can either deplete thebattery faster (High) or extend battery life (Low).
• Options are: High, Normal, Low, and Auto.5. Touch to save your new settings and return to the
Systemtab.
Customizing the Size of the Onscreen Type
Some text fonts used within options or menus can be hard toread for some users, luckily, the Mondi comes with the ability toallow customization of onscreen text.
1. From theTodayscreen, touch Start ( )> Settings.2. Touch the Systemtab, then tap Screen.
3. Touch the ClearTypetab and place a checkmark alongsidethe Enable ClearTypebox. This adjusts the crispness of theonscreen text.
the onscreen Examplefield for a sample of what theadjusted font will look like.
5. Touch to save your new settings and return to theSystemtab.
ok
ok
Section 5: Synchronization
Your device features a built in ActiveSync® utility that allows you • Video card: VGA graphics card or compatible video graphics ada

8/14/2019 Clearwire M100 Mondi UG
http://slidepdf.com/reader/full/clearwire-m100-mondi-ug 61/150
Synchronization 58
Your device features a built-in ActiveSync utility that allows youto synchronize data between your computer and your device.This built-in application works either with a computer-installedversion of the application (that launches when a compatibledevice is connected to a target computer) or as a stand-alonefeature (requiring an active broadband connection). This softwarehelps keep Contacts, Calendar, Tasks, or Inbox data up-to-date.
For additional help with Synchronization between your deviceand your computer, you can reference the following onlineinformation:Windows Mobile How-Tos.
Computer Requirements
The computer to which you install ActiveSync (v4.5 or higher)must meet the following hardware and software requirements:• Operating system: Microsoft Windows XP with SP1 or later, Windows
2000 with SP4, Windows XP Tablet PC Edition, or Windows Server2003.
• Web browser: Microsoft Internet Explorer 6 or later (required).• Storage: Hard-disk drive with 12 to 65 MB of free space. (Actual
requirements will vary depending on features selected and system
configuration.)• I/O Port: USB port (1.0 or higher)• Optical drive: DVD-ROM drive
• Video card: VGA graphics card or compatible video graphics adasupporting 256 colors or more.
Note:It is recommended that you either setup a Outlook relationshipbetween your Mondi and computer via ActiveSync (direct connection
or wireless) and not from within Outlook.
Installation of ActiveSync on Your Computer 1. Download and install the ActiveSync application from the
Microsoft® site to your machine: ActiveSync4.5.
2. Launch the setup program and follow the onscreeninstructions.
At the end of the installation process, you will see an ActiveSynicon appear in your taskbar.• Synchronization will begin automatically the first time your devic
connected to your computer.• All selected synchronization items will be copied from your comp
to your device and Windows Explorer will create a shortcut to theMobile drive.
Once you begin the synchronization process (by connecting yourdevice to your computer) the Microsoft ActiveSync window wilautomatically open.
Your device will remain connected to the computer aftersynchronization is complete. If any selected content is changedon your computer (new email, photos, playlist updates, etc.)
4. Connect the other end into the Power/USB Data jack on tleft side of the device. (The Synchronization Setup Wizawill launch on your computer and prompt you to set up a

8/14/2019 Clearwire M100 Mondi UG
http://slidepdf.com/reader/full/clearwire-m100-mondi-ug 62/150
59
y p ( p p y p )Microsoft ActiveSync automatically re-syncs the information onthe device. You can open the device’s file directory in ActiveSyncon your computer by clickingTools > Explore Pocket PCfrom the
ActiveSync main menu. You can then copy files quickly and easily
from the device to the computer, or vice versa.Connection of ActiveSync
Your computer can assign a different profile to each device that isconnected to it via the ActiveSync application. Once you connectyour first Mondi device, it will show up as SWD-M100 within theFile > Mobile Devicesmenu.
1. Right-click the ActiveSync icon found in your computer’s
taskbar and select the Connection Settings...option.2. Make sure the following options are checked and click OK:
• Allow USB Connections• Open ActiveSync when my device connects
3. Connect one end of the USB data cable (included with yourdevice) into the USB port on your computer.
will launch on your computer and prompt you to set up async partnership with the device.)
Configuring ActiveSync1. From the initial Synchronization Setup Wizard, click Next
(1) to begin the setup process.
2. If you do not use Microsoft Exchange®
(for Outlook), skipto step 3.
IncorrectCorrect
M I C
M I C
To set up an Exchange Server connection, complete thefollowing steps.
• Enter an Exchange Server Address (also known as the Outlook Access server address) (3).
• If your server requires an encrypted connection, check the box

8/14/2019 Clearwire M100 Mondi UG
http://slidepdf.com/reader/full/clearwire-m100-mondi-ug 63/150
Synchronization 60
• Check the box in theSynchronize directly with a server runningMicrosoft Exchange field(2) and click Next.
Note:The information in these fields is case-sensitive. Some fields may havealready been filled in by your device upon connection to yourcomputer.
“This server requires an encrypted (SSL) connection.”• Enter yourUser name, Password, andDomaininformation.• To enable automatic email synchronization, check the box forSave
password.
• Click Nextto continue3. From the Synchronization Options screen, check all
information types you would like to synchronize with youdevice and your computer. (Contacts, Calendar, Email,
Tasks, Notes, Favorites, Files, and Media.)
4. Click Nextto continue.
5. Check the box forAllow wireless data connectionsif youwould like to allow this connection type (usually disabled your device is using an active USB connection), and click
Next.
6. Click Finishto complete the setup process and establishthe partnership. ActiveSync will save the settings andbegin synchronizing your device with your computer basedon those settings.
Note:Media synchronization can require that you launch Windows MediaPlayer to finish the process of setting up the partnership.

8/14/2019 Clearwire M100 Mondi UG
http://slidepdf.com/reader/full/clearwire-m100-mondi-ug 64/150
61
Setting Up Windows Media Player Sync Options
If you choose to synchronize multimedia files (pictures, videos,and music), you will need to set up a sync partnership betweenyour device and your computer's Windows Media Player.
Note:The MP4 video format, although not recognized by Windows MediaPlayer, can be played back via theMultiMedia Playeravailable from theApplicationspanel.
It is recommended that you have the latest version of WindowsMedia Player installed (at the time of print it was version 11).(You can verify you have the latest version by clickingHelp >Check for Updates... from the Media Player menu.)
1. VerifyMediawas selected from within the SynchronizationOptions window (described in the previous section).
2. From within the Synchronized items field (adjacent to theMedia entry) click theSetup must be completedlink.
3. In the pop-up dialog box, click Yesto begin the setupprocess.
4. Launch Windows Media Player. (Your device appearswithin the left pane.)
Note:If your device contains an internal microSD card, both the built-indevice storage location and internal microSD card (listed asStorageCard) are listed as two separate device entries on the left pane.
5. Click on theSynctab to launch the partnership process.
• If the Device Setup screen (shown above) does not appear,right-click on the device icon (left pane) and selectSetup Sync...
6. Enter a new name for the device (as it will appear withinthe Windows Media Player’s left pane) and click Finish.
F d t il d i f ti ti g iq d i
Synchronizing Music with Windows Media Player 1. Click on any of the available library categories (such as
Artist Album or Songs) to display a list of all current mus

8/14/2019 Clearwire M100 Mondi UG
http://slidepdf.com/reader/full/clearwire-m100-mondi-ug 65/150
Synchronization 62
For more detailed information on creating a unique device name,see “Creating a Device Name” on page 49.
Artist, Album, or Songs) to display a list of all current musfiles detected by Windows Media Player.
• For the purpose of this section, Genre has been selected.
Note:Songs that are copy-protected (DRM protection) will not be transferreand can result in a transfer error message.
2. Select a song and drag it to the Sync List section of the
application (right pane). (The available memory indicatorwill change depending on the size of the selected song.)
3. When you have finished selecting songs, click Start Synctobegin the upload process from your computer to yourdevice’s Music folder.
• If this list is later updated on your computer, it will be updated oyour device during the next synchronization session.
Before you continue, confirm the download and installation of ActiveSync application to your machine: ActiveSync4.5.
1. From theTodayscreen, touch Start ( )> Programs >

8/14/2019 Clearwire M100 Mondi UG
http://slidepdf.com/reader/full/clearwire-m100-mondi-ug 66/150
63
Connecting to the Device via ActiveSync
ActiveSync allows you to synchronize data between yourcomputer and your device. Synchronization compares the dataon your device with your desktop computer and updates bothyour device and computer with the latest data. Before you canconnect your device to your computer via USB, you will need toinstall the ActiveSync application.
ActiveSync.
2. Touch theConnectionstab and tap External Connections.
3. Connect one end of the USB Data cable to your comput
4. Plug the other end of the USB cable into your Power/USData jack connection located on the side of the device.
5. Touch Sync(left softkey) to begin the synch process.
6. From within the ActiveSync application, click Explore.
7. Double-click theMy Windows Mobile-Based Deviceicon toreveal all the device contents (both storage card andinternal device folders).
8. Double-click theStorage Cardfolder, then navigate toMEDIA.
9. Open the MEDIAfolder, copy your selected video files anpaste them into this folder.
For detailed information about using ActiveSync to setup yourexchange email services, see “Using ActiveSync to Configure Your Outlook Exchange Settings” on page 74.
Loading Files to Your microSD Card
Verify your microSD card is securely installed into the device.Formore information, refer to“Installation of the microSD Card” on
Once the device is connected to the computer, you can transferyour data to or from the microSD card. One method of datatransfer involves the detection of the device as an external
d i h d i l i h A i S ®

8/14/2019 Clearwire M100 Mondi UG
http://slidepdf.com/reader/full/clearwire-m100-mondi-ug 67/150
Synchronization 64
page 10.
Before using your device’s mass storage capabilities, you need toprepare your device’s data services to synchronize with yourdesktop or laptop computer.
storage device, method two involves using the ActiveSync® application to synchronize file between your device and yourcomputer.
The device can be configured to communicate with yourcomputer as an extension of your computer by using the
ActiveSync utility which is used to synchronize computerapplications with your device.
Reviewing the microSD Card Information
1. From theTodayscreen, touch Start ( )> Settings.
2. Touch theSystemtab and tap Memory.
3. Touch either the Main or Storage Card tabs to revealdetailed memory information:
• Maintab - reveals theTotal, In use, andFreestorage sizes forboth the general Storage and Program areas.
• Storage Cardtab - reveals theTotal, In use, andFreestoragesizes for both the My Storage and Storage Card areas.
4. Touch to return to the previous page.
Incorrect Correct
M I C M I C
ok
Formatting the microSD Card
Both the internal device storage location (Main Storage) andmicroSD card (Storage Card) can be cleared of content via a Hard
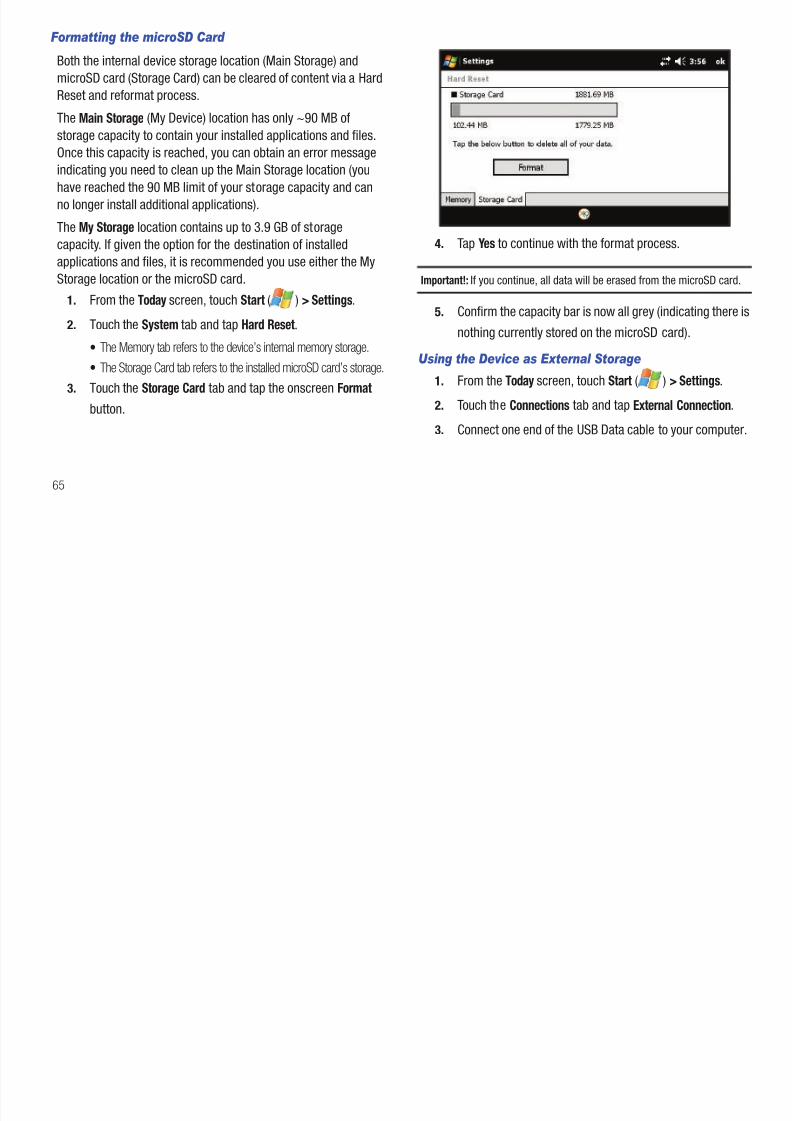
8/14/2019 Clearwire M100 Mondi UG
http://slidepdf.com/reader/full/clearwire-m100-mondi-ug 68/150
65
Reset and reformat process.
TheMain Storage(My Device) location has only ~90 MB ofstorage capacity to contain your installed applications and files.Once this capacity is reached, you can obtain an error messageindicating you need to clean up the Main Storage location (youhave reached the 90 MB limit of your storage capacity and canno longer install additional applications).
TheMy Storagelocation contains up to 3.9 GB of storagecapacity. If given the option for the destination of installedapplications and files, it is recommended you use either the MyStorage location or the microSD card.
1. From theTodayscreen, touch Start ( )> Settings.2. Touch the Systemtab and tap Hard Reset.
• The Memory tab refers to the device’s internal memory storage.• The Storage Card tab refers to the installed microSD card’s storage.
3. Touch the Storage Cardtab and tap the onscreen Formatbutton.
4. Tap Yesto continue with the format process.
Important!:If you continue, all data will be erased from the microSD card
5. Confirm the capacity bar is now all grey (indicating therenothing currently stored on the microSD card).
Using the Device as External Storage
1. From theTodayscreen, touch Start ( )> Settings.
2. Touch theConnectionstab and tap External Connection.
3. Connect one end of the USB Data cable to your comput
4. Plug the other end of the USB cable into your Power/USBData jack located on the side of the device.
– or –
8. Double-click this removable drive and view the availablefolders. It is recommended that you create some folders tocontain your media and data content. Below is an example

8/14/2019 Clearwire M100 Mondi UG
http://slidepdf.com/reader/full/clearwire-m100-mondi-ug 69/150
Synchronization 66
From theTodayscreen, touch Application( )> BasicSettings > USB.
5. Tap Mass Storageand select either My Storage(internalstorage) orStorage Card(microSD card) as the destination.
6. Touch to save your setting and initiate USB MassStorage Mode. (Wait for the connection to be completed.When connected, your computer will automatically detectyour device.)
7. Once your computer has detected the device and properlyinstalled the USB Drivers, return to your Windows desktop,open Windows Explorer and locate the removable drivenow assigned to the detected microSD card.
Note: After formatting the microSD card, all folders and files are deleted.Only after taking a photograph using the Mondi is the DCIM foldercreated on the card.
of some possible folder names:
• DCIM- default location for pictures and videos shot with the devCreated once a picture is taken with the device.
• MEDIA- default location for multimedia video files (user-define• MUSIC- default storage location for music files (user-defined).• OTHERS- used for data storage of any other file type
(user-defined).
Note:If any of these folders is not automatically created, access the devicevia ActiveSync and manually create them.
9. Open the MEDIAfolder, copy your selected video files andpaste them into this folder.
10. Once complete, touch the onscreenEXITbutton to
terminate the Mass Storage Mode.
Warning!:Formatting either the “My Storage” or “microSD card” from youcomputer may result in a performance decrease. This actionshould be done via the Mondi Hard Reset page.
ok
Viewing files on microSD card via Mondi
1. From theTodayscreen, touch Start ( )> Programs >File Explorer.
4. Touch Up(left softkey) to go up a level in the folderhierarchy structure.
– or –

8/14/2019 Clearwire M100 Mondi UG
http://slidepdf.com/reader/full/clearwire-m100-mondi-ug 70/150
67
2. Touch the navigation drop-down menu at the top-left of theFile Explorer screen (seen below).
3. Choose a storage location:
• My Device(for programs 90MB)• My Storage(Mondi Internal Storage)
• Storage Card(inserted microSD card)
Touch Menu(right softkey) to access the File Explorermenu options.
5. Tap a file to then launch it within an associated applicati
Section 6: Email Setup
Setting Up an IMAP or POP3 Account

8/14/2019 Clearwire M100 Mondi UG
http://slidepdf.com/reader/full/clearwire-m100-mondi-ug 71/150
Email Setup 68
To send and receive email messages through an ISP (InternetService Provider) account, or to use the device to access yourcorporate email through a VPN (Virtual Private Network), you willfirst need to set up both an IMAP (Internet Message AccessProtocol) and/or a POP3 (Post Office Protocol) account.
Note: You must first have an active Internet connection prior to initiating thesetup process. If you want to send and receive email messagesthrough an ISP account, or if you wish to use your device to accessyour corporate email through a VPN, you will first need to set up/createan IMAP (Internet Message Access Protocol) or a POP3 (Post OfficeProtocol) account.
1. From theTodayscreen, touch Start ( )> Messaging.2. Touch Setup E-mailor highlight the option and tapSelect
(left softkey).
3. Use the QWERTY keyboard to enter an email address andpassword. For more information, refer to“Entering Text
Using the QWERTY Keyboard” on page 30.
4. Verify theSave passwordbox is checked. This function isactivated by default to allow the device to always
remember your password during later access to this emailaccount.
• To prevent other users from viewing your emails, tap theSavepasswordbox to deactivate the feature.
• The device will then attempt to determine the necessarycommunication settings for both incoming and outgoing emailmessages.
5. Touch Next(right softkey) to continue to the next screenwhere you can enable the Try to get e-mail settingsautomatically from the Internetoption. This enabling allows
• This name will appear within the device’s list of available emaccounts on your Messages screen.

8/14/2019 Clearwire M100 Mondi UG
http://slidepdf.com/reader/full/clearwire-m100-mondi-ug 72/150
69
the device to then attempt to retrieve these settingsautomatically. This process may take several minutes.
6. Touch Next(right softkey), if the device was able to
automatically retrieve the necessary settings, touchNext(right softkey).
– or –
If the device was unable to automatically obtain thesettings, touch Previous(left softkey) to return to the initialE-mail Setup screen and proceed with the manual setup
process, see “Manual Setup of a POP3 or IMAP Account” on page 70.
7. Tap the Your name:field and then use the QWERTYkeyboard to enter the name you wish to use with this email
account. This will be the name used in the From field whenyour emails go out to recipients.
• If desired, use the keyboard to also update theAccount displaynameyou wish to use for this email account.
Note:Internet mail addresses carriers such as Gmail and Yahoo. The deviis able to detect the appropriate IMAP configurations for both carriThe Gmail fetch feature has been tested to work very well with this
device.
8. Touch Next(right softkey).
9. Touch the Automatic Send/Receivedrop-down list field an
select the time interval you would like for your device tosend and check for new email.
10. Touch the blueReview all download settingslink if you wishto modify other advanced email settings and parameters.
• For more information, refer to“Editing an Email Account” on72
3. Use the QWERTY keyboard to enter an email address andpassword. For more information, refer to“Entering Text
Using the QWERTY Keyboard” on page 30.

8/14/2019 Clearwire M100 Mondi UG
http://slidepdf.com/reader/full/clearwire-m100-mondi-ug 73/150
Email Setup 70
page 72.11. Press Finish(right softkey).
Manual Setup of a POP3 or IMAP Account
If the Automatic configuration procedures were unsuccessful, orif you need access to an email account via a VPN serverconnection, contact your ISP (Internet Service Provider) or ITNetwork Administrator to obtain the following information prior tobeginning the manual setup process:
• Account type (IMAP or POP3)• Incoming and Outgoing Mail Server Names
• Username and Password• Domain Name• Special Security Settings (if utilized)
You can also obtain additional email configuration tips and helpby going to:Windows Mobile How-Tos.
1. From theTodayscreen, touch Start ( )> Messaging.
2. Use the Navigation keys to highlightSetup E-mail(if not
already) and either touchSelect(left softkey) or double tapthe option.
4. Verify theSave passwordbox is checked. This function isactivated by default to allow the device to alwaysremember your password during later access to this email
account.• To prevent other users from viewing your emails, tap theSave
passwordbox to deactivate the feature.
• The device will then attempt to determine the necessarycommunication settings for both incoming and outgoing emailmessages.
5. Touch Next(right softkey).
6. Remove the check mark from theTry to get e-mail settingsautomatically from the Internetoption by tapping the box
adjacent to the option.
7. Touch Next(right softkey).
8. Touch the field below theYour e-mail provideroption and
select Internet e-mailby tapping the entry.
9. Touch Next(right softkey).
10. Tap the Your name:field and then use the QWERTYkeyboard to enter the name you wish to use with this emailaccount. This will be the name used in theFromfield when
14. Use the QWERTY keyboard to enter your account UserName and Password information.For more information,refer to “Entering Text Using the QWERTY Keyboard” on

8/14/2019 Clearwire M100 Mondi UG
http://slidepdf.com/reader/full/clearwire-m100-mondi-ug 74/150
71
your emails go out to recipients.
• If desired, use the keyboard to also update theAccount displaynameyou wish to use for this email account.
11. Touch Next(right softkey).12. Use your QWERTY keyboard to enter the Incoming mail
server information and then tap the Account type
drop-down field to then select eitherPOP3or IMAP4.
13. Touch Next(right softkey).
page 30.
15. TouchNext(right softkey) and verify theSave passwordboxis checked. This function is activated by default to allow
the device to always remember your password during lataccess to this email account.
• To prevent other users from viewing your emails, tap theSavepasswordbox to deactivate the feature.
• The device will then attempt to determine the necessarycommunication settings for both incoming and outgoing emmessages.
16. Touch Next(right softkey), then enter the Outgoing (SMTmail server information.
17. Verify the appropriate fields are active by tapping them aplacing a checkmark alongside their entries.
• Outgoing server requires authenticationis used if you need touse a password for outgoing mail in addition to incoming ma(Please contact your System Administrator for detailed serverequirements.)

8/14/2019 Clearwire M100 Mondi UG
http://slidepdf.com/reader/full/clearwire-m100-mondi-ug 75/150
10. Either confirm the outgoing (SMTP) mail server informationand field selections are correct, or make changes, andtouch Next(right softkey).
Changing the Send/Receive Schedule Settings
1. From theTodayscreen, touch Start ( )> Messaging.
2. Use the Navigation keys to highlight the email account.

8/14/2019 Clearwire M100 Mondi UG
http://slidepdf.com/reader/full/clearwire-m100-mondi-ug 76/150
73
11. From this Outgoing (SMTP) screen, confirm the correctSMTP information and then touch the blueAdvanced ServerSettingslink.
12. From this SMTP page, enable/disable any setting you wishby tapping the empty box adjacent to the options.
• Require SSL for Incoming e-mailto enable SSL encryption ofincoming email (if supported by the mail server).
• Require SSL for Outgoing e-mailto enable SSL encryption ofoutgoing email (if supported by the mail server).
13. Within theNetwork connectionfield, tap the drop-down list
and select a firewall connection setting by tapping eitherThe Internet(open-no firewall) orWork(behind a firewall).
14. When you have finished making changes, touchDone (left softkey) and then touchNext(right softkey).
15. Continue onto the remaining screens to Change theSend/Receive Schedule settings (page 73) and alter the
Download Size settings (page 74).
3. Touch Menu(right softkey)> Optionsand tap the Accounttab.
4. Tap the desired email account from the onscreen list tothen launch the Email Setup page.
5. Touch theSend/Receive Schedulelink.
6. Select the time interval within theAutomatic Send/Receidrop-down field that you would like for your device to seand check for new email.
7. Select the time frame within theDownload messages drop-down field to select the age of messages to
download from the server. (The longer the time period, tmore messages will be downloaded.)
8. Touch the blueAdvanced Settingslink.
9. Activate/deactivate any settings you wish to change bytapping the boxes adjacent to each option.
• Send/receive when I click Sendto automatically check for andownload new messages whenever you Send a message.
• Use automatic send/receive schedule when roamingtocontinue to check your email at predetermined intervals even if youare in a roaming area.
10. Select a deletion action within theWhen deleting messages:
6. Select a message format within theMessage Format: drop-down field. This selection allows you to view youremail messages as either HTML or Plain Text documents.

8/14/2019 Clearwire M100 Mondi UG
http://slidepdf.com/reader/full/clearwire-m100-mondi-ug 77/150
Email Setup 74
drop-down field to choose whether to automatically deleteor retain messages on your email server when you delete
those messages from your device.
11. Touch Done(left softkey) once you have completed youredits.
12. Continue onto the remaining screens to alter the DownloadSize settings (page 74).
Changing the Download Size Settings
1. From theTodayscreen, touch Start ( )> Messaging.
2. Use the Navigation keys to highlight the email account.
3. Touch Menu(right softkey)> Optionsand tap the Accountstab.
4. Tap the desired email account from the onscreen list tothen launch the Email Setup page.
5. Touch the Download Size Settingslink.
7. Select a message size limit within theMessage downloadlimit:drop-down field. This selection allows you to limit thsize of files attached to email messages.
8. Touch Done(left softkey) once you have completed youredits and finish the process of altering the email settings.
Using ActiveSync to Configure Your OutlookExchange Settings
This method of utilizing your built-in ActiveSync applicationworks to not only assist in the Outlook Exchange Server® configuration process by wirelessly establishing thecommunication parameters with the remote server, but also helpto then synchronize emails, contacts, and more, with yourcomputer’s current Outlook application.
Before you can begin this process, you must:• Have an established data connection to the Web via either Wi-Fi o
Mobile WiMAX.
• Work with your System Administrator to obtain the following pieces ofinformation:– Exchange Server address and domain name.– Your user name and password.
6. Use your keyboard (QWERTY or onscreen) to enter theserver address and touch Next(right softkey).
• If your network requires SSL encryption, activate theThis serverrequires an encrypted (SSL) connectionoption.

8/14/2019 Clearwire M100 Mondi UG
http://slidepdf.com/reader/full/clearwire-m100-mondi-ug 78/150
75
1. From theTodayscreen, touch Start ( )> Programs >ActiveSync.
2. Touch Menu(right softkey)> Add Server Source...
3. Use the QWERTY keyboard to enter an email address.Formore information, refer to“Entering Text Using the
QWERTY Keyboard” on page 30.
4. Uncheck theAttempt to detect Exchange Server Settingsautomaticallybox by tapping the adjacent box. Thisfunction is activated by default to allow the device toalways try and automatically detect the connectionsettings of the remote exchange server.
Note:With most secured servers, enabling this option typically returns anerror since they require a manual connection.
5. Touch Next(right softkey) to continue onto the Server Address page.
requires an encrypted (SSL) connectionoption.7. Use your keyboard (QWERTY or onscreen) to enter you
user name, password, and domain name. (The password
is case-sensitive.)
8. Leave theSave passwordbox checked to avoid having toenter the password whenever you log on to this account,and touch Next(right softkey).
9. Place a check adjacent to those boxes for the types ofinformation you wish to synchronize with the ExchangeServer, and then touch Finish(left softkey).
h h i l h i i il
Checking Your Outlook Email from the TodayScreen
1. Navigate back to the Today screen and touch the onscreenOutlook shortcut to display the most currently received
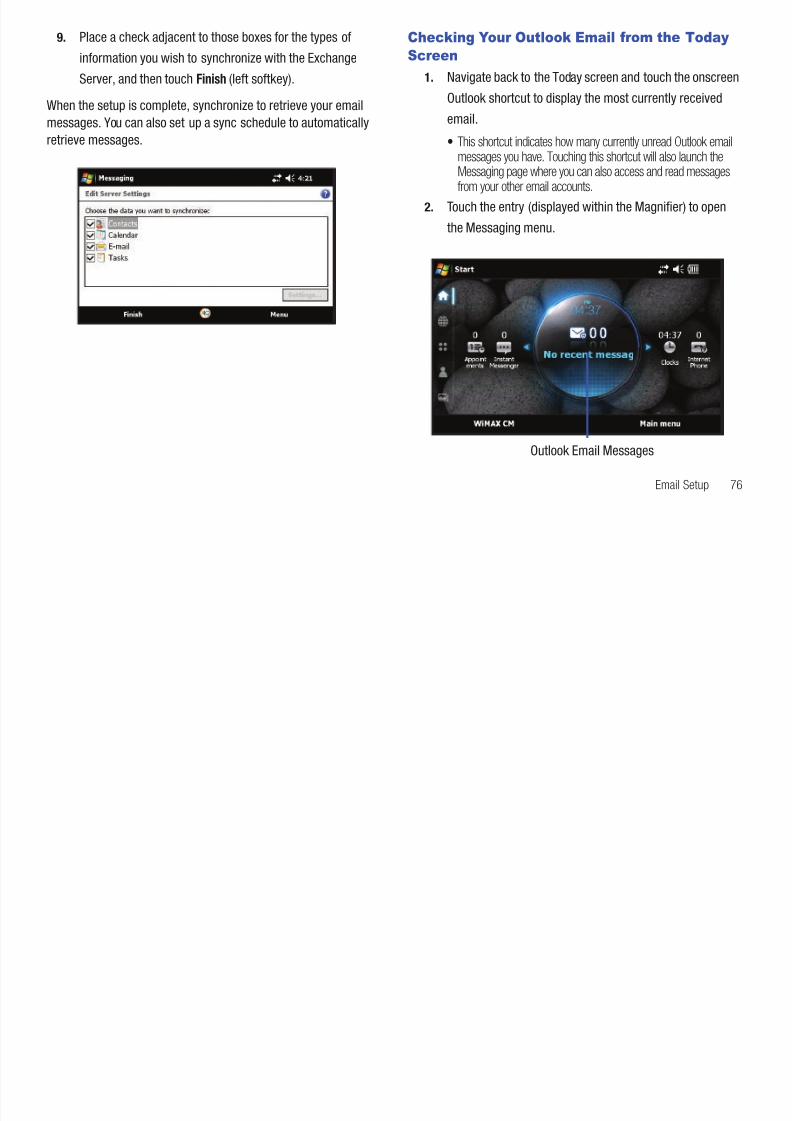
8/14/2019 Clearwire M100 Mondi UG
http://slidepdf.com/reader/full/clearwire-m100-mondi-ug 79/150
Email Setup 76
When the setup is complete, synchronize to retrieve your emailmessages. You can also set up a sync schedule to automaticallyretrieve messages.
Outlook shortcut to display the most currently receivedemail.
• This shortcut indicates how many currently unread Outlook emmessages you have. Touching this shortcut will also launch theMessaging page where you can also access and read messagesfrom your other email accounts.
2. Touch the entry (displayed within the Magnifier) to openthe Messaging menu.
Outlook Email Messages
3. Touch an email account to then display a list of unreademail messages.
4. Touch an onscreen email message to then read itscontents Use your Stylus to move the slider (on the right of

8/14/2019 Clearwire M100 Mondi UG
http://slidepdf.com/reader/full/clearwire-m100-mondi-ug 80/150
77
contents. Use your Stylus to move the slider (on the right ofthe message) up or down to scroll through longermessages.
Section 7: Calendar and Contacts
Calendar
Your Calendar helps organize your time and reminds you of
6. Select a time and date for the event by selecting the
corresponding fields, touching the onscreen calendar to
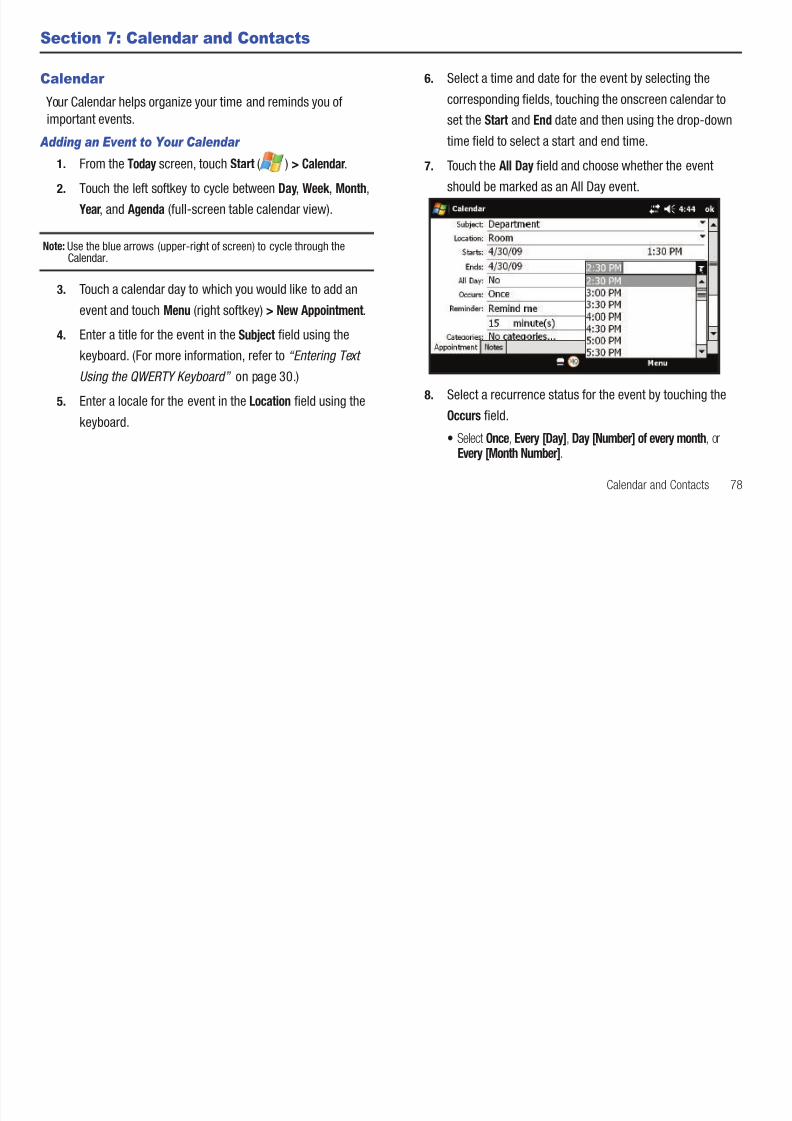
8/14/2019 Clearwire M100 Mondi UG
http://slidepdf.com/reader/full/clearwire-m100-mondi-ug 81/150
Calendar and Contacts 78
Your Calendar helps organize your time and reminds you ofimportant events.
Adding an Event to Your Calendar
1. From theTodayscreen, touch Start ( )> Calendar.2. Touch the left softkey to cycle betweenDay, Week, Month,
Year, and Agenda(full-screen table calendar view).
Note:Use the blue arrows (upper-right of screen) to cycle through theCalendar.
3. Touch a calendar day to which you would like to add an
event and touch Menu(right softkey)> New Appointment.
4. Enter a title for the event in theSubjectfield using thekeyboard. (For more information, refer to“Entering Text
Using the QWERTY Keyboard” on page 30.)
5. Enter a locale for the event in theLocationfield using the
keyboard.
p g , gset the Start and Enddate and then using the drop-down
time field to select a start and end time.
7. Touch theAll Dayfield and choose whether the eventshould be marked as an All Day event.
8. Select a recurrence status for the event by touching theOccursfield.
• SelectOnce, Every [Day], Day [Number] of every month, orEvery [Month Number].
9. Select an alarm time for the event by touching theReminderfield.
• SelectNoneorRemindme to toggle the activation state of thereminder feature.
13. Select a sensitivity for the event by touching theSensitivitfield.
• SelectNormal, Personal, Private, orConfidential.14. Touch theNotestab and use your QWERTY keyboard to

8/14/2019 Clearwire M100 Mondi UG
http://slidepdf.com/reader/full/clearwire-m100-mondi-ug 82/150
79
• Select a reminder time interval:1, 5, 10, 15, 30, or45.• Select a timeframe:minutes(s), hour(s), day(s), orweek(s).
10. Assign a Category for the new event by touching theCategoriesfield.
• Assign any of the following:Business, Holiday, Personal, orSeasonal. Any combination of category types can be selected.
• TouchNew(left softkey) to create a new category type by usingyour QWERTY keyboard and touchingDone(left softkey).
11. Select the number of Attendees for the event (default isNoattendees...).
• Select to add either aRequired Attendeeor anOptional Attendee.• Touch either field or touchMenu(right softkey)> Add Required
Attendee/Add Optional Attendee. For more information, refer to“Adding a New Contact” on page 82.
12. Select a status category for the event by touching the
Status field.
• SelectFree, Tentative, Busy, orOut of Office.
14. Touch theNotestab and use your QWERTY keyboard to
enter an optional note.
15. Touch to save the new event and return to the
previous calendar page.
Reviewing Calendar Events
You can quickly access any calendar entries by either selectingcurrent event from the Today screen or by accessing theCalendar via the Start menu.
1. From theTodayscreen, touch Start ( )> Calendar.
2. Touch the left or right blue arrows (located in theupper-right of the Calendar screen) to scroll throughcurrently created events.
• If you don't see your event, touch the left softkey to cycle betDay, Week , Month, Year, and Agenda(full-screen table calendarview).
3. Touch an event from the screen to open the event.
ok
Editing a Calendar Event
1. From theTodayscreen, touch Start ( )> Calendar.
2. Locate the event and tap the entry.
3 Touch Menu(right softkey)> Editto open the Calendar
Beaming a Calendar Event
1. Verify you are actively paired to another Bluetooth deviceMake sure that device is visible and detectable.For moreinformation, refer to“Bluetooth Communication” on

8/14/2019 Clearwire M100 Mondi UG
http://slidepdf.com/reader/full/clearwire-m100-mondi-ug 83/150
Calendar and Contacts 80
3. Touch Menu(right softkey)> Editto open the CalendarEvent page where you can modify any necessary fields.
4. Touch to save the new event and return to theprevious calendar page.
Deleting a Calendar Event
1. From theTodayscreen, touch Start ( )> Calendar.
2. Find the date of your calendar event and tap the event todisplay its details. (You can use the upper-right blue arrowsto cycle through your calendar dates and locate yourevent.)
3. Touch Menu(right softkey)> Delete Appointment.....
4. Touch Yes to confirm the deletion orNoto cancel theoperation.
5. Touch to return to the previous calendar page.
,
page 47.
2. From theTodayscreen, touch Start ( )> Calendar.
3. Find the date of your calendar event and tap the event todisplay its details. (You can use the upper-right blue arrows
to cycle through your calendar dates and locate yourevent.)
4. Touch Menu(right softkey)> Beam Appointment.... Mondibegins to search for visible devices within its range.
5. Touch the device name from the list to begin transmission.The recipient will have to accept the incoming Calendarevent file before the process is complete.
Note:Please allow a few minutes for the device names to be completelypopulated within the onscreen list.
6. Touch to return to the previous page.
ok
X
ok
Contacts
Your device’s Contacts list helps you stay in touch withcolleagues, friends and family by keeping track of all theircontact information.

8/14/2019 Clearwire M100 Mondi UG
http://slidepdf.com/reader/full/clearwire-m100-mondi-ug 84/150
81
Note:If your device was synchronized to your Outlook account via ActiveSync, your current Contacts list would contain populated entries.For more information, refer to“Using ActiveSync to Configure Your
Outlook Exchange Settings” on page 74.
Navigating within Contacts
1. From theTodayscreen, touch (Favorite Contactsshortcut). This reveals a scrollable listing of all currently
stored contacts.
2. In a single motion, touch and drag a contact card across
the screen to scroll through the available entries.3. To access the communication features for a selected
Contact:
• Tap a Contact card from the onscreen list to open thecommunication bar.
• Touch a communication option to initiate that function,see“Utilizing the Communication Bar” on page 84.
• Contact card- contains the contact information specific to aparticular contact.
• Communication bar- provides quick access to variouscommunication functions. Touching any function icon launchcommunication session with the target contact using the selecommunication method:– Options include: IM1/IM2/IM3 (Instant Message string 1, 2 & 3
VoIP1/VoIP2/VoIP3 (Voice Over IP - Internet Telephony), and E(Outlook or Internet Mail).
Contact cardCommunication bar
Adding a New Contact
1. From theTodayscreen, touch (Favorite Contactsshortcut).
2. Slide or touch an empty Contact entry to the center
5. Tap the Picture icon to assign a photo to the Contact.
• Touch theMy Picturesdrop-down list and select images from adifferent location such as:My Pictures, My Storage, orStorageCard.
• Touch an image from the desired location to then apply it to the

8/14/2019 Clearwire M100 Mondi UG
http://slidepdf.com/reader/full/clearwire-m100-mondi-ug 85/150
Calendar and Contacts 82
p y yposition and tap the card (indicated by a Plus sign where a
picture would be). This opens the Phonebook page.
3. Touch Menu(right softkey)> New.
4. Enter a name for the entry (using either the QWERTY
keyboard).For more information, refer to“Entering Text Using the QWERTY Keyboard” on page 30.
• Touch an image from the desired location to then apply it to thecurrent entry.
6. Enter phone numbers for the current contact by touching
any of the telephone fields (Mobile tel, Work tel, orHome tel). For more information, refer to“Entering Text
Using the QWERTY Keyboard” on page 30.
7. Enter an Email address for the current contact by touchingthe E-mailfield.
8. Enter Instant Messenger addresses for the current contact
by touching any of theIM, IM2, or IM3fields.9. Enter a VoIP ID for the current contact by touching any of
the VoIP, VoIP2, or VoIP3fields.
Note:These VoIP IDs can not be saved to the contact within the SamsungPhonebook.
Contact cardDefault image Empty Contact(with custom image)
10. Select a Category type for the current contact by touchingthe Categoriesfield and touching the selection field andplacing a checkmark alongside those categories you wishto assign.
3. Touch Edit(left softkey) to open the Contact’s informatiopage and begin making changes to those fields you needupdated.
– or –

8/14/2019 Clearwire M100 Mondi UG
http://slidepdf.com/reader/full/clearwire-m100-mondi-ug 86/150
83
• If new categories exist, touchMenu(right softkey)> New Category to begin creating your own.
• Enter a category name and touchSave(left softkey).11. Touch Save (left softkey) to save the new entry once you
have filled in all the desired fields and assigned yourcategories.
12. Complete the process by touching the new entry from thePhonebook list.
Editing an Existing Contacts Entry
1. From theTodayscreen, touch (Favorite Contactsshortcut).
2. In a single motion, slide a desired Contact entry card to thecenter location and touchOpen Contact(left softkey).
Touch Menu(right softkey)> Edit.
4. Touch an onscreen field and update the information as
desired. For more information, refer to“Entering Text Usin
the QWERTY Keyboard” on page 30.
5. Touch to save your changes and return to thescrollable Contacts page.
Deleting an Existing Contacts Entry
1. From theTodayscreen, touch (Favorite Contacts
shortcut).
2. Slide a desired Contact entry card to the center location.
3. Touch Menu(right softkey)> Delete Contact.
4. Touch Yesto confirm the deletion of the current entry. Th
current Contact card is then reverted back to an emptyentry.
ok
Beaming a Contacts Entry
1. From theTodayscreen, touch (Favorite Contactsshortcut).
2. Slide a desired Contacts entry card to the center location
Utilizing the Communication Bar
This bar appears once a Contact card has been tapped andactivated. These provide you with communication optionsspecific to the selected card.
h d h (

8/14/2019 Clearwire M100 Mondi UG
http://slidepdf.com/reader/full/clearwire-m100-mondi-ug 87/150
Calendar and Contacts 84
and touch Open Contact(left softkey).
3. Touch Menu(right softkey)> Send Contact > Beam. Mondi
begins to search for visible devices within its range.
4. Touch the device name from the list to begin transmission.The recipient will have to accept the incoming Contactcard file before the process is complete.
Note:Please allow a few minutes for the device names to be completelypopulated within the onscreen list.
5. Touch to return to the previous page.
1. From theTodayscreen, touch (Favorite Contactsshortcut).
2. Slide a desired Contact entry card to the center locationand activate it by tapping the card once.
3. Tap the card again to launch the Communication Bar toaccess the various communication applications. The bar isclosed when the Contact entry card is tapped again.
ok
Section 8: Applications
Mondi is loaded with familiar Microsoft® Office Mobileapplications such as Pocket Outlook, Pocket Internet Explorer,MSN® Messenger Windows® Media™ Player Word/PowerPoint/
Saving a Web Address as a Favorite Location
1. From theTodayscreen, touch Start ( )> Internet
8/14/2019 Clearwire M100 Mondi UG
http://slidepdf.com/reader/full/clearwire-m100-mondi-ug 88/150
85
MSN Messenger, Windows Media™ Player, Word/PowerPoint/ Excel Mobile, and several other specialty applications. In additionto the applications, your device is Camera/Camcorder ready.
Microsoft Mobile Applications - InternetExplorer
Use of any online feature requires that you already be connectedto the Internet by either WiMAX or Wi-Fi. (For more information,refer to “Communication and Connection” on page 41.)
From theTodayscreen, touch Start ( )> Internet Explorer.
Navigating the Web
1. Touch Menu(right softkey)> Go to Web Address. Thisaction highlights the Address bar at the top of the browser
page.
2. Enter a Web address by using either your QWERTYkeyboard or touch to display an onscreen keyboard.
3. Once the address is entered, press or tap the web
address from below the address bar.
Explorer.
2. Touch Menu(right softkey)> Go to Web Address.
3. Enter a Web address and press .
4. With the Web site onscreen, touchMenu(right softkey)>Add to Favorites.
5. Touch theNamefield and input a descriptive name for thbookmark.
6. Confirm theAddress (URL)is correct or touch the field an
enter the correct information.7. Select a Folder location to house this new Favorites
Bookmark.
8. Touch Add(left softkey) to store the new bookmark andreturn to the previous page.
Microsoft Mobile Applications - Office Mobile
Mondi is loaded with mobile versions of the following 2007 Officeapplications: Excel Mobile, Word Mobile, PowerPoint Mobile, andOneNote Mobile.
E l M bil O i
• If there are existing workbooks on this device, the Excel Mobiaccess screen displays any previously created workbooks. Tocreate a new workbook, press theNewsoftkey.
3. Create a new workbook by using your QWERTY keyboarto enter data into respective fields.For more information,

8/14/2019 Clearwire M100 Mondi UG
http://slidepdf.com/reader/full/clearwire-m100-mondi-ug 89/150
Applications
Excel Mobile Overview
Excel Mobile works with Microsoft Excel on your computer togive you easy access to copies of your workbooks. You cancreate new workbooks or copy workbooks from your computer toyour device. Synchronize workbooks between your computer andyour device (via ActiveSync) to ensure that you have the most up-to-date content in both locations. Excel Mobile also providesfundamental spreadsheet tools, such as formulas, functions,sorting, and filtering.
Creating a New Excel Workbook
1. From theTodayscreen, touch Start( )> Office Mobile >Excel Mobile.
Note:If this is your first workbook, a blank workbook is displayed afterselecting Excel Mobile.
2. Touch New(left softkey) to begin creation of a new
Workbook.
p ,refer to “Entering Text Using the QWERTY Keyboard” on
page 30.
• For access to additional features and functions, touchMenu (right softkey).
4. Once you are finished, touchMenu(right softkey)> File >Save As...
5. Choose a fileName, Folderlocation, fileType, fileLocation,and touch Save.
6.Touch to return to the previous page.
Deleting a Pre-existing Workbook
1. From theTodayscreen, touch Start( )> Office Mobile >Excel Mobile.
2. Touch an entry from the Excel Mobile file access screen.
3. Touch Menu(right softkey)> File > Delete.
4. Confirm the deletion by touchingYes. Touch Noto cancelthe deletion.
ok
Beaming a Workbook
Workbook files can be beamed directly to another Bluetooth-compatible device as long as that recipient is visible andaccepting incoming data.
1 From theTodayscreen touch Start ( )> Office Mobile >
3. Use the QWERTY keyboard to create your new note.Formore information, refer to“Entering Text Using the
QWERTY Keyboard” on page 30.
4. Touch Menu(right softkey) to select additional formattin

8/14/2019 Clearwire M100 Mondi UG
http://slidepdf.com/reader/full/clearwire-m100-mondi-ug 90/150
87
1. From theTodayscreen, touch Start ( )> Office Mobile >Excel Mobile.
2. Touch an entry from the Excel Mobile file access screen.3. Touch Menu(right softkey)> File > Beam.... Mondi begins
to search for visible devices within its range.
4. Touch the device from the list to begin transmission. Therecipient will have to accept the incoming data file beforethe process is complete.
5. Touch to return to the previous page.
OneNote Mobile Overview
OneNote Mobile is a digital notebook that allows you to gather,store, and manage information in a single location.
Creating a New Note
1. From theTodayscreen, touch Start ( )> Office Mobile >OneNote Mobile.
2. Touch New(left softkey) to begin creating the new note.
options.
5. Complete the process by touchingDone(left softkey).
Word Mobile Overview
Word Mobile works with the Microsoft Word already on yourcomputer to give you easy access to copies of your documentswhile on the go. You can create new documents or copy existinones from your computer to your device. Synchronize thedocuments between your computer and your device (via
ActiveSync) to ensure you have the most up-to-date content in
both locations. Use Word Mobile to create documents, such asletters, meeting minutes, and trip reports.
Creating a New Word Document
1. From theTodayscreen, touch Start ( )> Office MobileWord Mobile.
• If there are no documents on this device, a new documentautomatically displays.
ok
• If there are existing documents on this device, the file accessscreen displays. To create a new document, pressNew(leftsoftkey).
2. Use the QWERTY keyboard to create your new document.For more information, refer to“Entering Text Using the
2. Touch Menu(right softkey)> Tools > Options. Choose fromany of the following options:
• Default template- Allows you to select a document format suchMeeting Notes, Memo, Phone Memo, To Do, Word 97–2003document, and Word Document (.docx) as the default documen

8/14/2019 Clearwire M100 Mondi UG
http://slidepdf.com/reader/full/clearwire-m100-mondi-ug 91/150
Applications
QWERTY Keyboard” on page 30.
3. Once you are finished, touchMenu(right softkey)> File >Save As...
4. Choose a fileName, Folderlocation, fileType, fileLocation,and touch Save.
• You can save a document in any one of the following formats: WordDocument (*.docx), Word Template (*.dotx), Rich Text Format (*.rtf),or Plain Text (*.txt).
5. Touch to return to the previous page.
Accessing Word Mobile’s Options
1. From theTodayscreen, touch Start( )> Office Mobile >Word Mobile.
• If there are no documents on this device, a new documentautomatically displays.
• If there are existing documents on this device, the file accessscreen displays. To create a new document, pressNew (left softkey).
( )any consecutive new documents.
• Save to- Allows you to select the default storage location of neword documents. Choose from among: Main memory, My Storor Storage Card.
• Display in list view- Allows you to display Word files, Rich TexFiles, Plain Text Files, All Known File Types.
3. Touch to save your changes and return to theprevious page.
Deleting a Pre-existing Document
1. From theTodayscreen, touch Start( )> Office Mobile >Word Mobile.
2. Touch an entry from the Word Mobile file access screen.
3. Touch Menu(right softkey)> File > Delete.
4. Confirm the deletion by touchingYes. Touch Noto cancelthe deletion.
ok
ok
Beaming a Word Document
Word Documents can be beamed directly to another Bluetooth-compatible device as long as that recipient is visible andaccepting incoming data.
1 From theTodayscreen touch Start ( )> Office Mobile >
The device provides display of video on a 4.3 inch screen(visible). Any imported video should be scaled to fit within thaonscreen dimension and then copied into the MEDIA folder onmicroSD card.
Launching Media Player

8/14/2019 Clearwire M100 Mondi UG
http://slidepdf.com/reader/full/clearwire-m100-mondi-ug 92/150
89
1. From theTodayscreen, touch Start ( )> Office Mobile >Word Mobile.
2. Touch an entry from the Word Mobile file access screen.
3. Touch Menu(right softkey)> File > Beam.... Mondi beginsto search for visible devices within its range.
4. Touch the device from the list to begin transmission. Therecipient will have to accept the incoming data file beforethe process is complete.
5. Touch to return to the previous page.
Windows Media Player
Use Microsoft Windows Media Player® to play digital audio andvideo files that are stored on your device or downloaded from theInternet. You can play files in either an MP3 format, or in theiroriginal Windows Media format, including files with extensions:.wmaand .wmv.
g y
From theTodayscreen, touch Start ( )> Programs >Windows Media.
Loading a Media File into the Player
1. From theTodayscreen, touch Start ( )> Programs >Windows Media.
2. Touch Menu(right softkey)> Open File > Storage Card >[folder location]. Use the File System screen to locate youdesired multimedia file.
Note:The location of video files is not fixed but created by users. The [folocation] description above denotes the user-created folder housingthe media files.
3. Touch the desired media file from the available list.
4. Touch Play(left softkey) to begin playback.
ok
Media Player Controls • Select either Rewind or Fast Forward during playback or whilepaused to skip back to the beginning of the current file and to sahead to the end.
• The playback slider control above the control icons adjusts theplayback progress of the selected file.
V l C t l dj h d l l d i l b k
Magnification Media Player Online

8/14/2019 Clearwire M100 Mondi UG
http://slidepdf.com/reader/full/clearwire-m100-mondi-ug 93/150
Applications
With the Media Player window open, you can change or use anyof the following application functions:• Magnification- allows you to toggle between a Fullscreen and Fit to
Page view. To exit from the Fullscreen mode, tap the screen.• Media Player Online- provides access to the Windows Media Player
homepage where you can access other media content.• Player Controls- provides access to the Play/Pause, Next and
Previous functions.
• Select Play to listen to a file. The Play icon turns into the Pause icononce the file begins playing.
• Volume Controls- adjusts the sound level during playback.
Touch Menu(right softkey) to access additional application
functions.MultiMedia Player
Use Mondi’s MultiMedia Player® to playback digital audio andvideo files that are stored on your device or stream content froma destination URL address. This player is fully compatible withthe following file types:
• Audio: WMA, MP3, WAV
• Video: MP4, WMV, and DivX encoded mediaLaunching the MultiMedia Player
1. From theTodayscreen, touch Start ( )> Programs >MultiMedia Player.
– or –
From theTodayscreen, touch (Multimedia shortcut)>Video Thumbnails(right softkey)> Multimedia Player(leftsoftkey).
Player Controls Volume Controls
Loading a Media File into the Player
1. From theTodayscreen, touch Start ( )> Programs >MultiMedia Player. The application then searches both thebuilt-in storage areas and any folder locations within the
internal microSD card
• Refresh: Re-scans the Mondi device for new or updated multfiles.
• Exit: to exit the application.3. from one of the available list of files, tap an entry to beg
playback.

8/14/2019 Clearwire M100 Mondi UG
http://slidepdf.com/reader/full/clearwire-m100-mondi-ug 94/150
91
internal microSD card.
2. Touch the bottom tab to then select a MultiMedia Player
application.
• Audio: provides access to a scrollable list of all detected audiocontent. Each entry describes the audio file name, artist and totaltime. Tap an entry to begin playback.– Tapping the audio icon allows you to choose from the following song
filters: Genre, Playlist, Artist, and Album.• Video: provides access to a showcase of video thumbnails from
which you can tap an icon and launch a compatible video file.• Streaming: displays an onscreen URL• Settings: access and configure the various application settings
(DRM and Web connection).
MultiMedia Player Compatibility
The Windows Media Player recognizes wmv, and avi videoformats. The MultiMedia Player recognizes avi, wmv, and mpvideo formats, as well as DivX® encoded media files. For moredetailed information on the Multimedia Player, please refer to online User Guide
Devices certified to play DivX video: ABOUT DIVX VIDEO: DivX® is a digital video format created byDivX, Inc. This is an official DivX Certified device that plays
video. ABOUT DIVX VIDEO-ON-DEMAND: This DivX® Certified devicemust be registered with DivX in order to play DivX Video-on-Demand (VOD) content. First generate the DivX VOD registrcode for your device and submit it during the registrationprocess.
[Important: DivX VOD content is protected by a DivX DRM (
Rights Management) system that restricts playback to registereDivX Certified devices.
Audio Video Streaming Settings Refresh Exit
If you try to play DivX VOD content not authorized for your device,the message "Authorization Error" will be displayed and yourcontent will not play.] Learn more at www.divx.com/vod.
Instant Messenger
Messenger (Windows Live Messenger®) is an instant messaging
Calculator
Your device comes with a built-in calculator.1. From theTodayscreen, touch Start ( )> Programs >
PowerCalc.

8/14/2019 Clearwire M100 Mondi UG
http://slidepdf.com/reader/full/clearwire-m100-mondi-ug 95/150
Applications
g ( g ) g gclient created by Microsoft® for peer to peer communication.
1. From theTodayscreen, touch Start ( )> Programs >
Messenger.
2. Touch Sign in(left softkey) to begin the login process.
3. Read the onscreen licensing agreement and touchAccept (left softkey).
4. Touch the E-mail addressand Password fields and enter
the information associated with your Messenger account.
Use the QWERTY keyboard to create your new document.For more information, refer to“Entering Text Using the
QWERTY Keyboard” on page 30.
5. Select a email carrier (hotmail.com, live.com, msn.com, orOther [such as yahoo.com]).
6. Touch Next(left softkey) to connect to the remote service
and complete the login process.
2. Enter numbers using either your QWERTY or onscreenkeyboard.
Clocks Allows you to manage various time events (Alarms, Anniversaries, Stopwatch, and World Clock).
Creating a New Alarm Event
Your device comes with a built-in alarm clock feature that has thethe ability to create various alarm events.
1. From theTodayscreen, touch the Date/Time shortcut.
– or –
From theTodayscreen, touch Start ( )> Programs >Clocks.
2. Tap the Alarmtab, then touch New(left softkey).
6. Touch theTimefield to open an onscreen time settingspage.

8/14/2019 Clearwire M100 Mondi UG
http://slidepdf.com/reader/full/clearwire-m100-mondi-ug 96/150
93
3. Touch the Alarmfield and enter a unique name for thisalarm event. For more information, refer to“Entering Text
Using the QWERTY Keyboard” on page 30.
4. Select a repeating status for the alarm by touching eitherOnor Off.
5. Select the week day assigned to the alarm by touching theonscreen day (Sunday - Saturday).
• If the Repeat function was activated (ON), you can select more thanone day.
7. Touch a time field entry (Hour or Minutes) to activate thselection.
8. Touch either the blue circle (below the grey slider) or thslider itself, and drag it either left (to decrease the value) right (to increase the value).
• Drag and hold the slider at one end to increase the incrementvalue adjustment. The further you drag the slider to one end another, the faster the counter changes.
• You can also touch the+ or- buttons to accomplish the same
action. Touch and hold these buttons to increase the speed of time change.
9. Touch Doneto complete the time assignment.
10. Select a snooze setting by touching theSnoozefield andthen selecting one of the available options (via either a tapor by using your Up/Down Navigation keys):None, 1 Min,3 Min 5 Min 7 Minor 10 Min
Activating/Deactivating an Alarm1. From theTodayscreen, touch Start ( )> Programs >
Clocks.
– or –
From theTodayscreen touch the Date/Time shortcut

8/14/2019 Clearwire M100 Mondi UG
http://slidepdf.com/reader/full/clearwire-m100-mondi-ug 97/150
Applications
3 Min, 5 Min, 7 Minor 10 Min.
11. Select an alarm sound (Ringtone, Vibrate, or System
generated sound) for the alarm by touching theSoundProfilefield and selecting one of the available options (via
either a tap or by using your Up/Down Navigation keys).
• If you selected Ring or System, a sound field will appear below theSound Profile field.
• Touch an available audio file to play a sample.12. Adjust the alarm volume by either touching and dragging
the volume slider across the screen or touching eithervolume icon (+/-).
Note:If you select a Ring or System Sound Profile, the Volume slider willappear. If you select Vibrate, no Volume adjustment is possible.
13. Touch Done(left softkey) once you have finished creating
the alarm.
From theTodayscreen, touch the Date/Time shortcut.
2. Tap the Alarmtab, then touch either the ONor OFF(at the
right of the tab) to toggle the active state of the selectedalarm event.
Deleting an Alarm Event
1. From theTodayscreen, touch Start ( )> Programs >Clocks.
– or –
From theTodayscreen, touch the Date/Time shortcut.
2. Tap the Alarmtab, then touch Menu(right softkey)> DeleteMode.
3. Tap the adjacent to the alarm event you wish to
delete.
• To delete all existing Alarms, touchDelete All(left softkey).
4. Touch Yesto confirm the deletion of the selected alarm.
X
5. Touch Done(right softkey) to exit from the Delete Mode ifthere are remaining alarm events.
Creating a New Anniversary Event
Your device comes with a built-in Anniversary feature thatprovides the ability to create reminders for specific anniversary
8/14/2019 Clearwire M100 Mondi UG
http://slidepdf.com/reader/full/clearwire-m100-mondi-ug 98/150
95
provides the ability to create reminders for specific anniversaryevents based on a calendar date (versus a time event).
1. From theTodayscreen, touch Start ( )> Programs >Clocks.
– or –
From theTodayscreen, touch the Date/Time shortcut.
2. Tap the Anniversarytab, then touch New(left softkey).
3. Touch the Namefield and enter a unique name for this
anniversary event.For more information, refer to“Entering Text Using the QWERTY Keyboard” on page 30.
4. Touch the Datefield to open an onscreen calendar from
where you can select a date for the event by tapping a dayfrom the desired month and touchDone(left softkey).
Touch the left and right arrows atop the calendar to moveto either the previous or next month.
5. Touch theTimefield to open an onscreen time settingspage to adjust the time settings, see “Creating a New
Alarm Event” on page 92.
6. Touch theRepeatfield and select a repeating status for thanniversary event by touching eitherAnnually, Monthlyor
Weekly.
7. Select an alarm sound (Ringtone, Vibrate, or System generated sound) for the alarm by touching theSoundProfilefield and selecting one of the available options (v
either a tap or by using your Up/Down Navigation keys
• If you selected Ring or System, a Volume field will appear below theSound Profile field.
• Touch an available audio file to play a sample.8. Adjust the alarm volume by either touching and dragging
the volume slider across the screen or touching either
Deleting an Anniversary Event 1. From theTodayscreen, touch Start ( )> Programs >
Clocks.
– or –
From theTodayscreen, touch the Date/Time shortcut.

8/14/2019 Clearwire M100 Mondi UG
http://slidepdf.com/reader/full/clearwire-m100-mondi-ug 99/150
Applications
volume icon (+/-).
Note:If you select a Ring or System Sound Profile, the Volume slider willappear. If you select Vibrate, no Volume adjustment is possible.
9. Touch Done(left softkey) once you have finished creatingthe anniversary event.
Activating/Deactivating an Anniversary Alert
1. From theTodayscreen, touch Start ( )> Programs >
Clocks.– or –
From theTodayscreen, touch the Date/Time shortcut.
2. Tap the Anniversarytab, then touch the drop-down field (atthe right of the tab) and make a selection:OFF, Today,1 day, 3 day, or7 dayto toggle the notification setting of the
selected anniversary alert.
From theTodayscreen, touch the Date/Time shortcut.
2. Tap the Anniversarytab, then touch Menu(right softkey)>
Delete Mode.3. Tap the adjacent to the anniversary event you wish to
delete.
• To delete all existing Anniversaries, touchDelete All(left softkey).4. Touch Yesto confirm the deletion of the selected alarm.
5. Touch Done(right softkey) to exit from the Delete Mode if
there are remaining anniversary events.
X
Using the StopWatch
Your device comes with a built-in stopwatch feature.1. From theTodayscreen, touch Start ( )> Programs >
Clocks.
– or –
Using the World Clock
This tab lets you to view the current time at various locations ithe world, and assign up to three locations as your favorites (obeing your Home location).

8/14/2019 Clearwire M100 Mondi UG
http://slidepdf.com/reader/full/clearwire-m100-mondi-ug 100/150
97
From theTodayscreen, touch the Date/Time shortcut.
2. Tap the StopWatchtab.
3. Touch Start (right softkey) to turn on the timer.
4. Touch Stop (right softkey) to stop the timer.
Note:Times can be recorded by touchingRecord(left softkey)
5. Touch Reset (left softkey) to set the timer counter back to
zero.
6. Touch to exit the application and return to theprevious screen.
Viewing Time Around the World
1. From theTodayscreen, touch Start ( )> Programs >Clocks.
– or –
From theTodayscreen, touch the Date/Time shortcut.
2. Tap the World Clocktab.
X
World Clock Map Favorite Locations

8/14/2019 Clearwire M100 Mondi UG
http://slidepdf.com/reader/full/clearwire-m100-mondi-ug 101/150
3. Touch the drop-down arrow adjacent to the Time Zonefield to then select a different city from your current timezone.
– or –
Touch to open a list of world cities from which you
As more and more applications are left running, they can utilizyour device resources, slow down your device and drain yourbattery faster.
1. Press and hold (left action key) to launch the
TaskSwitcherapplication.

8/14/2019 Clearwire M100 Mondi UG
http://slidepdf.com/reader/full/clearwire-m100-mondi-ug 102/150
99
can choose a new location.
Note:TheDSTfield will reflect (activated/deactivated) if the selected arearecognizes Daylight Savings Time and can make such an adjustmentto its time tracking.
4. Touch Done(left softkey) to update and store these
changes.
Using TaskSwitcher to Close Applications
Applications are only closed (no longer active) when they areexited via the application’s own Menu options. Simply touchingor will only minimize the current application and
keep it running actively in the background.
Unlike most computers, wherein minimized applications appearas blocks located along the bottom of the screen (Task Bar), onMondi, these, still running, applications are left to run in thebackground.
• This application visually displays any applications currently in the background.
• It also provides the option to either bring a selected applicatioforward or End (close) it.
X ok
Active Applications Ending Options Display
Access to Multimedia Player
2. Flip through the currently open applications and center thedesired application on the screen. Selected applicationsdisplay their name above the image.
3. Touch eitherEnd(to terminate the current app) orEnd All(to close all background applications).
Note:Once installed, the maps are associated to your Mondi. If these mapswere installed onto a microSD and then inserted into another device,they would not function as they are registered to the specific Mondi onwhich they were installed.
Installing the Application and Maps

8/14/2019 Clearwire M100 Mondi UG
http://slidepdf.com/reader/full/clearwire-m100-mondi-ug 103/150
Applications
4. Touch the Display icon (bottom-right) to change the way
the currently active applications are displayed.• Options are:Horizontal ListorVertical Grid.
Note:The Multimedia Player can be launched directly from the TaskSwitcher(bottom Left of screen).
ROUTE 66 Navigation
ROUTE 66™ is a ready-to-use navigation solution that comes
complete with built-in voice-guided 3D GPS navigation based onyour current location. Mondi utilizes its built-in GPS hardware towork in tandem with the ROUTE 66 software and provide youreal-time and accurate map information, including access todigital maps with POIs (points of interest). The application isloaded onto the Mondi DVD and must be installed from yourcomputer, to a connected Mondi device. The included maps canbe loaded to either the device’s built-in storage space or to an
optional microSD card.
If you have already setup an ActiveSync connection between youMondi and your computer, you will have to make a small
modification to your ActiveSync settings prior to disc installatioto prevent any conflicts during setup. These setup proceduresare based on the usage of the ActiveSync 4.5 application.
1. Prior to setup, make sure your Mondi has access to theInternet as this is necessary to complete the setup andregistration process. For more information, refer to“Communication Setup” on page 41.
Important!:To install the maps onto your microSD card you will need a cardwith at least 1GB of available space (2GB microSD card orgreater is recommended).
2. When installing the maps to the card, you will need toestablish a direct USB Mass Storage connection (vs
ActiveSync).
• From theTodayscreen, touchStart( )> Settings.
• Touch theConnectionstab and tapExternal Connections.• Touch the Mass Storage radio box, then chooseStorage Card from
the drop-down list. The Mondi then establishes a new USBconnection with your computer and allows access to the internalmicroSD card as an external storage location.
• Touch to save the new connection type and place the devicei USB M S M d
7. Insert your Mondi DVD disc into your available DVD dThe splash screen should then appear on your screen.
8. From the Splash screen click Additional Tools > SamsunOEM Applications > PC Utility > ROUTE66.
9. From the main Route 66 application screen, click INSTALok

8/14/2019 Clearwire M100 Mondi UG
http://slidepdf.com/reader/full/clearwire-m100-mondi-ug 104/150
101
into USB Mass Storage Mode.• In this way, the Route 66 application can place the necessary files
directly onto the card.3. Locate the grey ActiveSync icon within the Taskbar area of
the Desktop (bottom-right). The icon should be grey whenMondi is not connected.
4. Right-click on the icon and selectConnection Settings....
5. Uncheck theAllow USB connectionsfield and click OK . The
ROUTE 66 installation requires an open USB port tocommunicate with the connected device.
Important!:If this field is not unchecked, the necessary connection can notbe made and you will receive an error message during setup. Ifyou receive an ActiveSync connection error, ignore it for now.
6. Power-up the Mondi unit and connect it directly to yourcomputer via the USB cable. The ActiveSync icon shouldremain grey after connection, if not, repeat steps 1 thru 3.
pp ,
10. Choose a language and click Next > Next.
11. Accept the licensing agreement and click Next.
12. Select a language and gender for the vocal navigationinstructions (when Mondi speaks the navigationaldirections) and click Next. Each language has anassociated gender (Maleor Female).
13. Place a checkmark adjacent to the desired maps you wis
uploaded for use and click Next. The default isUnitedStates and Canada.
Note:If you receive a connection error message, set the Mondi to MassStorage Mode (Step 2) and click Retry.
14. Select Format storage mediumand click Next. It isrecommended that the maps be installed onto a clean andempty microSD card. Once the maps are installed, themicroSD card is then paired for use with your specificMondi device.
18. From the main Route 66 application screen, click EXIT >EXIT.
19. Click the onscreenExitbutton on the Mondi to exit the USBMass Storage Mode. Tap the onscreenYesto complete thisprocess.

8/14/2019 Clearwire M100 Mondi UG
http://slidepdf.com/reader/full/clearwire-m100-mondi-ug 105/150
Applications
Important!:Formatting the microSD card will erase all information and leave
the card empty of data.
15. Read the onscreen popup describing the format process
and click Yes. Your microSD card is then formatted todelete all pre-existing information and prepared for uploadof the ROUTE 66 map files and folders.
16. Click Install to begin the installation process of both the
maps to the microSD card as well as any other necessaryfiles.
Note:This process can take several minutes. Do not disconnect your devicefrom the computer. These files will occupy over 1GB of storage spaceon the microSD card.
17. Click Finishto complete the installation process and exit
the wizard.
20. From theTodayscreen, touch Start ( )> Programs >
ROUTE66 WM8.21. Read the Mondi onscreen legal disclaimer and tapAccept.
Use the Up/Down blue arrows to scroll through thedisclaimer.
22. Tap Noto exit from reading the disclaimer message again.The Mondi then begins to use its internal GPS hardware toobtain your current location.
23. Locate your ROUTE66 Voucher code from the stickeraffixed to either the DVD sleeve or the Navigation GSG a
tap Yes.
24. Use either the onscreen keyboard or Mondi’s own QWERTkeyboard to enter your Voucher code.

8/14/2019 Clearwire M100 Mondi UG
http://slidepdf.com/reader/full/clearwire-m100-mondi-ug 106/150
• Call(greyed out as Mondi can not make direct calls)• Zoom to cursor: zooms the current map to indicate more detail
about the selected target location.• Show information: displays additional popup information when
any onscreen map object is touched (street, locale, area). Theonscreen popup disappears once a new location is touched.
d
• Navigate: navigate based on an available online database ofinformation and then navigate based on one of the followingparameters: Locations, Favorites, History, Points-of-Interest,Contacts (with their associated locations), and a location based ospecific Latitude/Longitude.
• Travel mode: create a custom navigation based on driving eitherthe fastest route, shortest route, or walking. Touch to green sele

8/14/2019 Clearwire M100 Mondi UG
http://slidepdf.com/reader/full/clearwire-m100-mondi-ug 107/150
Applications
• Send cursor position: records your current location and thenprovides you the ability to send it to an external recipient via either
e-mail or Bluetooth. Some options may be greyed-out.• Save cursor position: Stores the current location as: a contact
entry, Favorite Location, as your home address, or as your officeaddress.
• Search for Points-of-interest: displays points of interest near bothyour current location and along a selected travel route.
• Add to route: opens the Plan new route view where you select anew route for your current trip.
3. Touch Back icon ( ) to exit from the current menu.4. Touch the Main menu icon ( ) to reveal options that
are available during either navigation or map browsing.Options included in the Main menu are:
• Search: select from an available online database of information andthen search based on one of the following parameters: Locations,Favorites, History, Points-of-Interest, Contacts (with their associated
locations), and a location based on a specific Latitude/Longitude.
, , g gicon to store this new selection.
• Extras: use one of the additional Route66 services, such as: MapTraffic information, Safety cameras, Weather updates, Voices (tchange the current readout language and gender), Colour schem(to change the current Route66 color scheme), Travel guides,Update (update the Route 66 software version), and Enter vouccode (update or add a new Voucher code).
• Zoom: alter the current map zoom magnification.
• View: select different visualization options such as: Day/Nightcolours, 2D/3D perspectives, Navigation screen layout, GPSinformation, GPS stats, Volume levels, and information About R66.
• Send: send one of the following to an external recipient: currenMap as image, GPS position, current selected Cursor position, route description.
• Save: stores (within either the application itself or within themicroSD card) a current Map location as an image, GPS locatioa selected Cursor position.
• Routes: select a different route.
• Settings: customize the Route66 application settings such as:General, Map, Navigation, Speed, Alarm, Extras, Legend, Screenorientation, Date & Time, or calibrate screen.
• Photos: access locally stored images.• Help: provides onscreen help information about Route66.• Exit: exits the Route66 application.

8/14/2019 Clearwire M100 Mondi UG
http://slidepdf.com/reader/full/clearwire-m100-mondi-ug 108/150
105
For additional usage information, visithttp://www.66.com/support/ ,and select User Manuals.
Section 9: Camera and Camcorder
Mondi™ has a built-in camera lens that provides the ability totake full color digital pictures and shoot high-quality video.Images can be viewed using the device’s display, and theinstantly send them to family and friends, just point-and-click.
2. Using the device’s display screen as a viewfinder, aim the
camera lens at your subject.
3. Press until the shutter sounds. (The picture isi ll d i h DCIM f ld f i h
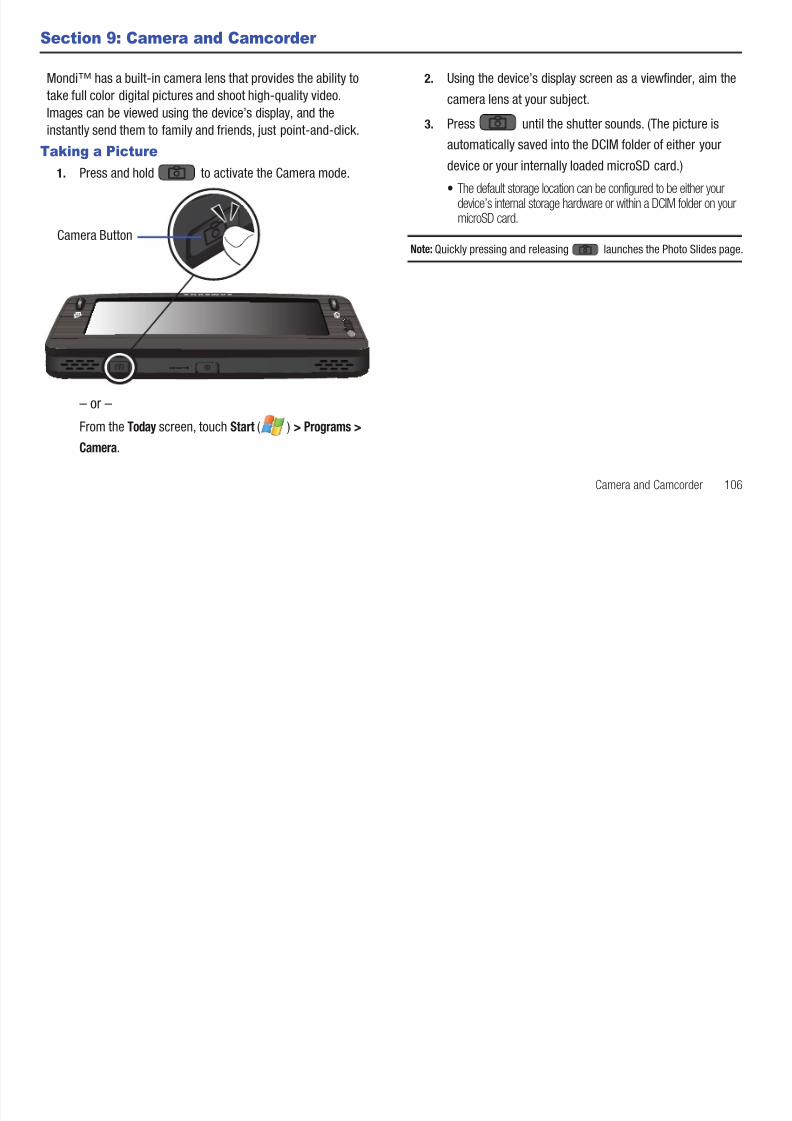
8/14/2019 Clearwire M100 Mondi UG
http://slidepdf.com/reader/full/clearwire-m100-mondi-ug 109/150
Camera and Camcorder 106
Taking a Picture
1. Press and hold to activate the Camera mode.
– or –
From theTodayscreen, touch Start ( )> Programs >
Camera.
automatically saved into the DCIM folder of either your
device or your internally loaded microSD card.)
• The default storage location can be configured to be either yourdevice’s internal storage hardware or within a DCIM folder on microSD card.
Note:Quickly pressing and releasing launches the Photo Slides page
RESETRESET
Camera Button
Camera Page OverviewThe default mode for this device is the Camera mode. Below isan overview of the Camera page and its features.
Available Memory Current StorageLocation
Changes the Shooting Mode. Once you changethe mode, the corresponding indicator is displaye
• Single: takes a single photo and allows you toview it before returning to the shooting mode.
• Smile shot: the camera focuses on the subjectand snaps the photograph once it detects a

8/14/2019 Clearwire M100 Mondi UG
http://slidepdf.com/reader/full/clearwire-m100-mondi-ug 110/150
107
Toggles between the Camera and Camcordermodes. This icon indicates the current mode isCamera.
3.8 GB.8 GB
Viewfinder
and snaps the photograph once it detects asmile.
• Multi: takes a succession of photos.
• Mosaic: Takes either two or four photos andthen groups them together into a single finalimage.
• Panorama: takes a landscape photo and places ablack mat in front of the photo so it looks likethere are six panels in one photo.
Adjusts the shutter speed (scene). Allows you toset the camera options and capture scenes suchas None (Normal), Portrait, Landscape, Sports,Night shot, Sunset, Dawn, Text, or Backlight.
Adjusts the image resolution (file size).
• Sizes include: Normal (2048x1536), Normal(1600x1200), Normal (1280x960), Normal
(640x480), Wide (800x480).
• Timer: allows you to set a time delay before the camera takes thphoto. Select the length of delay you want by touching Off,2 seconds, 5 seconds, and 10 seconds. When you press
, the camera takes the photo after the specified timeelapses.
• White balance: allows you to choose from the following: Auto,Daylight, Cloudy, Tungsten, or Fluorescent.
Adjusts the camera settings among two tabs:Camera and Settings.For more information, refer to“Adjusting Camera Settings” on page 108.
Exits the current mode and returns you to thepreviously active page.

8/14/2019 Clearwire M100 Mondi UG
http://slidepdf.com/reader/full/clearwire-m100-mondi-ug 111/150
Camera and Camcorder 108
Adjusting Camera Settings
1. Press and hold to activate the Camera mode.
2. Touch to enter the camera settings pages.
3. If not already open, tap to adjust the following
camera settings:
• Effect: allows you to change the color tone or apply special effeto your photos. Options include: None, B&W, Sepia, Aqua,Watercolor, or Negative.
• ISO: allows you to adjust the ISO sensitivity of the camera imagsensor. Selections are: Auto, 100, 200, or 400 speed.
• Metering: allows you to set how the camera measures or metersthe light source: Center-weighted, Spot, or Matrix.
• Quality: allows you to set the image quality to: High, Normal, oEconomy.
• GPS: allows you to activate the GPS tracking feature which addyour current location information to the image file’s propertiesinformation. This feature is enabled via the internal GPScomponents.
Note:Touch the Up/Down arrows (right side of Camera settings page) toscroll down to additional entries such as Metering, Quality, and GPS.
Allows you to focus on the center of theviewfinder. Modes are Auto Focus, Macro, or OFF.
Adjusts the image brightness level by eitherincreasing or decreasing the level.
Launches the My Photos folder viewer whereyou can specify file-specific actions such astransfer via email/Bluetooth, deletion, file info, etc..
4. If not already open, tap to adjust the remainingcamera settings:
• Guideline: displays an onscreen grid that can be used to properlyalign the elements of the image before you take the picture.
• Review Screen: reveals the current picture within the My Photospage. This allows you to both confirm you like the new picture andalso undertake one of many file specific functions
From theTodayscreen, touch Start ( )> Programs >Camera.
2. Touch (My Photos) to access the My Photos pagedisplaying the last available image.

8/14/2019 Clearwire M100 Mondi UG
http://slidepdf.com/reader/full/clearwire-m100-mondi-ug 112/150
109
also undertake one of many file-specific functions.• Default Storage: allows you to change the current default storage
location by choosing from one of the following:My device, MyStorage, orStorage Card(microSD card).
• Shutter sound: allows you to select a tone to play when thecamera’s shutter opens and closes. Sound selections are shutter 1,shutter 2, shutter 3, shutter 4, or shutter 5.
5. Touch OK to confirm your selections, save these newmodifications and return to the Camera mode.
Using the My Photos PageThe My Photos page allows you to review your previously takenimages and initiate file-specific features such as: editing theimage, activate/deactivate GPS, review file Information, zoom,send the image to other party, and delete the current image.
1. Press and hold to activate the Camera mode.
– or –
3. Activate a feature by touching any of the followingfunctions:
Allows you to open the image for editing. Withinediting you can create onscreen notes byassigning a color for a line, determine the thickness,then draw these text/lines atop the image bytouching and dragging across the screen. As youwould draw on a dry-erase board with a marker.
Use the onscreen slider to increase/decrease themagnification of the currently active file.
• Touch to return to the previous page.
Exits the current page and returns you to thepreviously active mode.

8/14/2019 Clearwire M100 Mondi UG
http://slidepdf.com/reader/full/clearwire-m100-mondi-ug 113/150
Camera and Camcorder 110
would draw on a dry erase board with a marker.
• Touch OK to accept and store the note atop thecurrent image, then return to the main MyPhotos page.
• Allows you attach the GPS position informationto an image. When activated, GPS information isadded. When deactivated, this positioninformation is automatically added.
Accesses the image’s File Details page thatprovides additional information about the currentimage.
• If GPS was activate and functional while thecurrent picture was taken, the related GPSinformation is stored within the file properties.
• Touch to return to the previous page.
Sends the current image to an external recipient
via either Bluetooth(page 116) or as an emailattachment (page 116).
• Touch to return to the previous page.
Assigns the current image as either the Caller IDimage for a specific Contacts entry (page 117) oras the Today background wallpaper (page 117).
• Touch to return to the previous page.
Deletes the current image from the My Photosfolder.
• Touch Yesto confirm the deletion.
Shooting Video1. Press and hold to activate the Camera mode.
– or –
From theTodayscreen, touch Start ( )> Programs >Camera.
3.8 GB.8 GB
Available Memory Current StoragLocation

8/14/2019 Clearwire M100 Mondi UG
http://slidepdf.com/reader/full/clearwire-m100-mondi-ug 114/150
111
2. From the Camera mode, touch > Camcorderto
activate the Camcorder mode.3. Using the device’s display screen as a viewfinder, aim the
camera lens at your subject.
4. Press until the shutter sounds. (The video isautomatically saved into the selected storage location: Mydevice, My Storage, or Storage Card.)
• The default storage location can be configured to be either yourdevice’s internal storage hardware or within a DCIM folder on yourmicroSD card.
Camcorder Page Overview
The default mode for this device is the Camera mode. Below isan overview of the Camcorder page and its features.
Toggles between the Camcorder and Cameramodes. This icon indicates the current mode isCamcorder.
Adjusts the image resolution (file size).
• Sizes include: Normal (640x480) or Normal(320x240).
Adjusts the camcorder settings among two tabs:Camcorder and Settings.For more information, refeto “Adjusting Camcorder Settings” on page 112.
• White balance: allows you to choose from the following: Auto,Daylight, Cloudy, Tungsten, or Fluorescent.
• Effect: allows you to change the color tone or apply special effeto your photos. Options include: None, B&W, Sepia, Aqua,Watercolor, or Negative.
• Quality: allows you to set the image quality to: High, Normal, oEconomy.
Exits the current mode and returns you to thepreviously active page.
Allows you to focus on the center of theviewfinder. Modes are Auto Focus, Macro, or Off.
Adjusts the image brightness level by either

8/14/2019 Clearwire M100 Mondi UG
http://slidepdf.com/reader/full/clearwire-m100-mondi-ug 115/150
Camera and Camcorder 112
Adjusting Camcorder Settings
1. Press and hold to activate the Camera mode.
2. Touch to enter the camcorder settings pages.3. If not already open, tap to adjust the following
camera settings:
• Record Sounds: allows you activate/deactivate the onboardmicrophone and add sound to your recorded video. Adding audioincreases the file size.
• Timer: allows you to set a time delay before Mondi begins
recording: OFF, 2 seconds, 5 seconds, or 10 seconds.
Note:Touch the Up/Down arrows (right side of Camcorder settings page) toscroll down to additional entries such as Quality.
4. If not already open, tap to adjust the remainingcamcorder settings:
• Guideline: displays an onscreen grid that can be used to properlalign the elements of the image before you shoot your video.
• Review Screen: reveals the current video within the My Photospage. This allows you to both confirm you like the new video aalso undertake one of many file-specific functions.
• Default Storage: allows you to change the current default storaglocation by choosing from one of the following:My device, MyStorage, orStorage Card(microSD card).
5. Touch OK to confirm your selections, save these new
modifications and return to the Camera mode.
increasing or decreasing the level.
Launches the My Videos folder viewer whereyou can specify file-specific actions such astransfer via email/Bluetooth, deletion, and file info.
Using the My Videos PageThe My Videos page allows you to review your previously shotvideos and initiate file-specific features such as: review fileinformation, send the image to other party, and delete the currentimage.
1. Press and hold to activate the Camera mode.
3. Activate a feature by touching any of the followingfunctions:
Accesses the video’s File Details page thatprovides additional information about the currentvideo.

8/14/2019 Clearwire M100 Mondi UG
http://slidepdf.com/reader/full/clearwire-m100-mondi-ug 116/150
113
– or –
From theTodayscreen, touch Start ( )> Programs >Camera.
2. Touch (My Videos) to access the My Videos pagedisplaying a thumbnail of the most recent video.
Play button
• Touch to return to the previous page.
Exits the current page and returns you to thepreviously active mode.
Sends the current video to an external recipientvia either Bluetooth (page 116) or as an emailattachment (page 116).
• Touch to return to the previous page.
Deletes the current video from the My Videosfolder.
• Touch Yesto confirm the deletion.
Plays the currently displayed video file.
Navigating the Multimedia Page1. From theTodayscreen, touch (Multimedia shortcut).
This reveals a listing of all currently stored images andvideos.
– From this view you can tap Multimedia Player (left softkey) to quiaccess the Multimedia Player (Audio, Video, Streaming media, andsettings).
• Tapping Camera Album (right softkey) returns you to the My Pand My Videos access.
2. Tap an image or video from the list to activate it.
Deleting an Image

8/14/2019 Clearwire M100 Mondi UG
http://slidepdf.com/reader/full/clearwire-m100-mondi-ug 117/150
Camera and Camcorder 114
Note:Up to 54 pictures and 45 videos can be seen here.
• Tapping My Photos (left softkey) displays thumbnails of recentphotos.
• Tapping My Videos (left softkey) displays thumbnails of recentvideos.
• Tapping Video Thumbnails (right softkey) provides access athumbnail listing of other video files detected by Mondi that werenot shot by its video camcorder.
g g1. Press and hold to activate the Camera mode.
– or –
From theTodayscreen, touch Start ( )> Programs >Camera.
2. Touch (My Photos) to access the My Photos pagedisplaying the last available image.
3. Tap the screen to display the image option icons.
4. Tap to delete the image.
5. Tap Yesto confirm the deletion.
Using Photo Slides
This application allows you to not only create albums, edit, andview stored images, but also create a slideshow of these imagesusing music already available within your Mondi.
Launching a Slide show 1. Press and release to activate the Photo Slides
page.
– or –
From theTodayscreen, touch Start ( )> Programs >Photo Slides.
Assessing Slide show menu options1. Once the slideshow begins to play, touch the screen to
reveal the onscreen menu options:
2. Tap an onscreen icon to activate the correspondingfunction:
• Play/Pause slide show: pauses and resumes playback of the

8/14/2019 Clearwire M100 Mondi UG
http://slidepdf.com/reader/full/clearwire-m100-mondi-ug 118/150
115
• This page not only displays any images taken by the built-incamera, but also album cover art, and those images stored withinthe My Pictures folder.
• All of these images can be displayed during a slideshow by folder oralbum.
2. Touch an image icon from a selected folder location toindicate which image will mark the beginning of theslideshow series (indicated by a blue box around it). These
can be displayed during a slideshow by folder or album.
3. Touch Menu(right softkey)> Slide showto activate theslideshow. The show begins to playback using the firstdetected song from within the MultiMedia Players’ songlisting.
y p p ycurrent slide show.
• Stop Slide show: stops the playback of the current slide showpresentation.
• Previous/Next image: lets you display either a previous imagthe series or the next image in the series.
• Rotate image: lets you rotate the current image to best displaythe Mondi screen.
• Music Selection: tap a song entry from the list to add it to thesequence of background music being played during the slide Removing the checkmark from these songs, silences the slideby not choosing any song for playback during the presentatio
• Exit: to exit the slideshow application and return to the Photopage.
Beaming an ImageBeaming an image file requires the image be open and selectedwithin the Photo Slides page before initiating the action.
1. Press and hold . This activates the camera.
2. Touch (My Photos) to access the My Photos pagedisplaying the last available image.
Attaching an Image to an Outgoing EmailThis process allows you to assign a selected image to a desiredContacts entry.
1. Press and hold . This activates the camera.
2. Touch (My Photos) to access the My Photos pagedisplaying the last available image.

8/14/2019 Clearwire M100 Mondi UG
http://slidepdf.com/reader/full/clearwire-m100-mondi-ug 119/150
Camera and Camcorder 116
• Scroll across the screen to flip through the available images.
• The image number is listed at the bottom of the screen.
3. Touch an image from the list to activate it thentouch .
4. TapBluetoothand Mondi begins to search for visibledevices within its range.
5. Touch the device name from the list to begin transmission.
The recipient will have to accept the incoming image filebefore the process is complete.
Note:Please allow a few minutes for the device names to be completelypopulated within the onscreen list.
6. Touch to return to the previous page.
• Scroll across the screen to flip through the available images.
• The image number is listed at the bottom of the screen.
3. Touch an image from the list to activate it thentouch .
4. TapEmailand Mondi attaches the image to a new emailusing the default email account (Outlook or Internet mail
[POP3]) from the list of available accounts.
• For more information, refer to“Email Setup” on page 68.5. With the selected image already attached to a new email
message, use the QWERTY keyboard to complete theTo:,Subjectand body text information.For more information,refer to “Entering Text Using the QWERTY Keyboard” on
page 30.ok
6. Touch Send (left softkey) to complete and send the newoutgoing email message.
Assigning an Image to a Contacts Entry1. From theTodayscreen, touch (Favorite Contacts
shortcut). This reveals a scrollable listing of all currently
stored contacts.
3. Touch Edit(left softkey) to open the Contact’s informatiopage and begin making changes to those fields you needupdated.
– or –
Touch Menu(right softkey)> Edit.
4. Tap the Picture field to begin the update process:
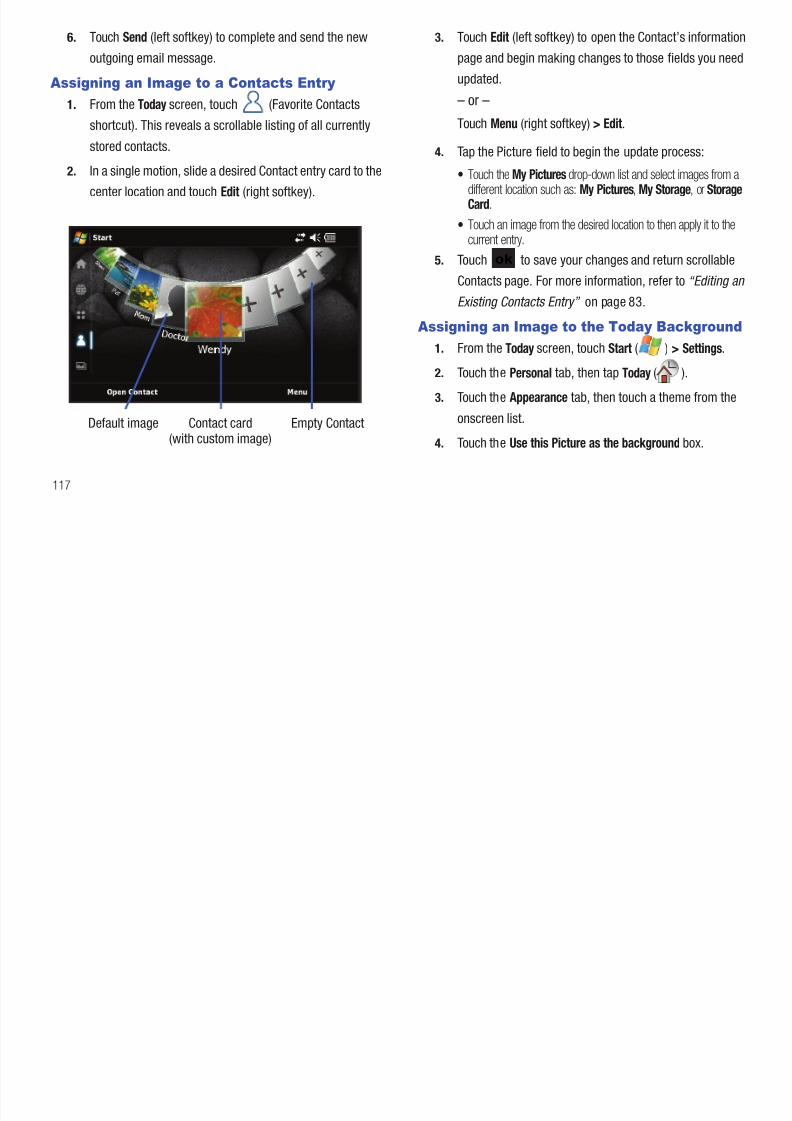
8/14/2019 Clearwire M100 Mondi UG
http://slidepdf.com/reader/full/clearwire-m100-mondi-ug 120/150
117
2. In a single motion, slide a desired Contact entry card to thecenter location and touchEdit(right softkey).
4. Tap the Picture field to begin the update process:
• Touch theMy Picturesdrop-down list and select images from different location such as:My Pictures, My Storage, orStorageCard.
• Touch an image from the desired location to then apply it to tcurrent entry.
5. Touch to save your changes and return scrollableContacts page. For more information, refer to“Editing an
Existing Contacts Entry” on page 83.
Assigning an Image to the Today Background1. From theTodayscreen, touch Start ( )> Settings.
2. Touch thePersonaltab, then tap Today( ).
3. Touch theAppearancetab, then touch a theme from the
onscreen list.
4. Touch theUse this Picture as the backgroundbox.Contact cardDefault image Empty Contact
(with custom image)
ok
5. Touch Browseto begin the search of your new image.6. From the Open page, touch the drop down arrow to the
right of theFolderfield and touch a folder location from thelist of available areas such as:DCIM(default for takenimages).
7. Touch the Typefield and selectPicture Files.

8/14/2019 Clearwire M100 Mondi UG
http://slidepdf.com/reader/full/clearwire-m100-mondi-ug 121/150
Camera and Camcorder 118
8. From the populated list of available images, touch an entryto then assign that picture as the new background image.
9. Touch to store the new image as part of thebackground.
ok
Section 10: Health and Safety Information
This section outlines the safety precautions associated with usingyour device. These safety precautions should be followed tosafely use your device.
Health and Safety Information
Warning Regarding Display
FAILURE TO FOLLOW THE INSTRUCTIONS OUTLINEDTO SERIOUS PERSONAL INJURY AND POSSIBLE PROPDAMAGE.
IMPORTANT SAFETY INSTRUCTIONS - SAVE THESEINSTRUCTIONS.
8/14/2019 Clearwire M100 Mondi UG
http://slidepdf.com/reader/full/clearwire-m100-mondi-ug 122/150
119
Warning Regarding Display
The display on your handset is made of glass or acrylic and couldbreak if your handset is dropped or if it receives significantimpact. Do not use if screen is broken or cracked as this couldcause injury to you.
Samsung Mobile Products and Recycling
Samsung cares for the environment and encourages itscustomers to recycle Samsung mobile devices and genuine
Samsung accessories.Go to: https://fun.samsungmobileusa.com/recycling/index.jspfor moreinformation.
UL Certified Travel Adapter
The Travel Adapter for this device has met applicable UL safetyrequirements. Please adhere to the following safety instructionsper UL guidelines.
DANGER - TO REDUCE THE RISK OF FIRE OR ELECTRCAREFULLY FOLLOW THESE INSTRUCTIONS.
FOR CONNECTION TO A SUPPLY NOT IN NORTH AMER AN ATTACHMENT PLUG ADAPTOR OF THE PROPERCONFIGURATION FOR THE POWER OUTLET. THIS POWINTENDED TO BE CORRECTLY ORIENTATED IN A VERHORIZONTAL OR FLOOR MOUNT POSITION.
Consumer Information on Wireless Devices
The U.S. Food and Drug Administration (FDA) has published series of Questions and Answers for consumers relating to radfrequency (RF) exposure from wireless devices. The FDA publication includes the following information:
What kinds of devices are the subject of this update?
The term wireless device refers here to hand-held wirelessdevices with built-in antennas, often called "cell," "mobile," or"PCS" devices. These types of wireless devices can expose the
user to measurable radio frequency energy (RF) because of theshort distance between the device and the user's head. These RFexposures are limited by Federal Communications Commissionsafety guidelines that were developed with the advice of FDA andother federal health and safety agencies.
When the device is located at greater distances from the user,the exposure to RF is drastically lower because a person's RF
d idl i h i i di f h
have suggested that some biological effects may occur, but suchfindings have not been confirmed by additional research.
In some cases, other researchers have had difficulty inreproducing those studies, or in determining the reasons forinconsistent results.
What is FDA's role concerning the safety of wirelessdevices?

8/14/2019 Clearwire M100 Mondi UG
http://slidepdf.com/reader/full/clearwire-m100-mondi-ug 123/150
Health and Safety Information 120
exposure decreases rapidly with increasing distance from the
source. The so-called "cordless devices," which have a base unitconnected to the telephone wiring in a house, typically operate atfar lower power levels, and thus produce RF exposures wellwithin the FCC's compliance limits.
Do wireless devices pose a health hazard?
The available scientific evidence does not show that any healthproblems are associated with using wireless devices. There is no
proof, however, that wireless devices are absolutely safe.Wireless devices emit low levels of radio frequency energy (RF) inthe microwave range while being used. They also emit very lowlevels of RF when in the stand-by mode. Whereas high levels ofRF can produce health effects (by heating tissue), exposure tolow level RF that does not produce heating effects causes noknown adverse health effects. Many studies of low level RFexposures have not found any biological effects. Some studies
Under the law, FDA does not review the safety of radiation-emitting consumer products such as wireless devices before theycan be sold, as it does with new drugs or medical devices.However, the agency has authority to take action if wirelessdevices are shown to emit radio frequency energy (RF) at a levethat is hazardous to the user. In such a case, FDA could requirethe manufacturers of wireless devices to notify users of thehealth hazard and to repair, replace or recall the devices so that
the hazard no longer exists. Although the existing scientific data do not justify FDA regulatoactions, FDA has urged the wireless device industry to take anumber of steps, including the following:• Support needed research into possible biological effects of RF of
type emitted by wireless devices;• Design wireless devices in a way that minimizes any RF exposure
the user that is not necessary for device function; and
• Cooperate in providing users of wireless devices with the best possibleinformation on possible effects of wireless device use on humanhealth.
FDA belongs to an interagency working group of the federalagencies that have responsibility for different aspects of RFsafety to ensure coordinated efforts at the federal level. Thefollowing agencies belong to this working group:
thousands of times lower than those they can get from wirelesdevices.
Base stations are thus not the primary subject of the safetyquestions discussed in this document.
What are the results of the research done already?
The research done thus far has produced conflicting results, anmany studies have suffered from flaws in their research

8/14/2019 Clearwire M100 Mondi UG
http://slidepdf.com/reader/full/clearwire-m100-mondi-ug 124/150
121
• National Institute for Occupational Safety and Health• Environmental Protection Agency• Federal Communications Commission• Occupational Safety and Health Administration• National Telecommunications and Information Administration
The National Institutes of Health participates in some interagencyworking group activities, as well.
FDA shares regulatory responsibilities for wireless devices withthe Federal Communications Commission (FCC). All devices thatare sold in the United States must comply with FCC safetyguidelines that limit RF exposure. FCC relies on FDA and otherhealth agencies for safety questions about wireless devices.
FCC also regulates the base stations that the wireless devicenetworks rely upon. While these base stations operate at higherpower than do the wireless devices themselves, the RFexposures that people get from these base stations are typically
many studies have suffered from flaws in their research
methods. Animal experiments investigating the effects of radiofrequency energy (RF) exposures characteristic of wirelessdevices have yielded conflicting results that often cannot berepeated in other laboratories. A few animal studies, however,have suggested that low levels of RF could accelerate thedevelopment of cancer in laboratory animals.
However, many of the studies that showed increased tumordevelopment used animals that had been genetically engineere
or treated with cancer-causing chemicals so as to be pre-disposed to develop cancer in absence of RF exposure. Otherstudies exposed the animals to RF for up to 22 hours per day.These conditions are not similar to the conditions under whichpeople use wireless devices, so we don't know with certaintywhat the results of such studies mean for human health.
Three large epidemiology studies have been published sinceDecember 2000. Between them, the studies investigated anypossible association between the use of wireless devices and
primary brain cancer, glioma, meningioma, or acoustic neuroma,tumors of the brain or salivary gland, leukemia, or other cancers.None of the studies demonstrated the existence of any harmfulhealth effects from wireless devices RF exposures. However,none of the studies can answer questions about long-termexposures, since the average period of device use in thesestudies was around three years.
Wh t h i d d t d id h th RF
Many factors affect this measurement, such as the angle atwhich the device is held, or which model of device is used.
What is FDA doing to find out more about the possiblehealth effects of wireless device RF?
FDA is working with the U.S. National Toxicology Program andwith groups of investigators around the world to ensure that highpriority animal studies are conducted to address important

8/14/2019 Clearwire M100 Mondi UG
http://slidepdf.com/reader/full/clearwire-m100-mondi-ug 125/150
Health and Safety Information 122
What research is needed to decide whether RF exposure
from wireless devices poses a health risk? A combination of laboratory studies and epidemiological studiesof people actually using wireless devices would provide some ofthe data that are needed. Lifetime animal exposure studies couldbe completed in a few years. However, very large numbers ofanimals would be needed to provide reliable proof of a cancerpromoting effect if one exists. Epidemiological studies canprovide data that is directly applicable to human populations, butten or more years' follow-up may be needed to provide answersabout some health effects, such as cancer. This is because theinterval between the time of exposure to a cancer-causing agentand the time tumors develop - if they do - may be many, manyyears. The interpretation of epidemiological studies is hamperedby difficulties in measuring actual RF exposure during day-to-dayuse of wireless devices.
questions about the effects of exposure to radio frequencyenergy (RF). FDA has been a leading participant in the WorldHealth Organization international Electromagnetic Fields (EMF)Project since its inception in 1996. An influential result of thiswork has been the development of a detailed agenda of researchneeds that has driven the establishment of new researchprograms around the world. The Project has also helped developa series of public information documents on EMF issues.
FDA and Cellular Telecommunications & Internet Association(CTIA) have a formal Cooperative Research and Development Agreement (CRADA) to do research on wireless device safety.FDA provides the scientific oversight, obtaining input fromexperts in government, industry, and academic organizations.
CTIA-funded research is conducted through contracts toindependent investigators. The initial research will include bothlaboratory studies and studies of wireless device users. The
CRADA will also include a broad assessment of additional
research needs in the context of the latest researchdevelopments around the world.
What steps can I take to reduce my exposure to radiofrequency energy from my wireless device?
If there is a risk from these products - and at this point we do notknow that there is - it is probably very small. But if you areconcerned about avoiding even potential risks, you can take a
What about children using wireless devices? The scientific evidence does not show a danger to users ofwireless devices, including children and teenagers. If you wanttake steps to lower exposure to radio frequency energy (RF), thmeasures described above would apply to children andteenagers using wireless devices. Reducing the time of wirelesdevice use and increasing the distance between the user and theRF source will reduce RF exposure

8/14/2019 Clearwire M100 Mondi UG
http://slidepdf.com/reader/full/clearwire-m100-mondi-ug 126/150
123
few simple steps to minimize your exposure to radio frequencyenergy (RF). Since time is a key factor in how much exposure aperson receives, reducing the amount of time spent using awireless device will reduce RF exposure.• If you must conduct extended conversations by wireless device every
day, you could place more distance between your body and the sourceof the RF, since the exposure level drops off dramatically with distance.For example, you could use a headset and carry the wireless deviceaway from your body or use a wireless device connected to a remoteantenna.
Again, the scientific data do not demonstrate that wirelessdevices are harmful. But if you are concerned about the RFexposure from these products, you can use measures like thosedescribed above to reduce your RF exposure from wirelessdevice use.
RF source will reduce RF exposure.
Some groups sponsored by other national governments haveadvised that children be discouraged from using wireless devicat all. For example, the government in the United Kingdomdistributed leaflets containing such a recommendation inDecember 2000. They noted that no evidence exists that usingwireless device causes brain tumors or other ill effects.
Their recommendation to limit wireless device use by children
was strictly precautionary; it was not based on scientificevidence that any health hazard exists.
Do hands-free kits for wireless devices reducerisks from exposure to RF emissions?
Since there are no known risks from exposure to RF emissionsfrom wireless devices, there is no reason to believe that hands-free kits reduce risks. Hands-free kits can be used with wirelesdevices for convenience and comfort.
These systems reduce the absorption of RF energy in the headbecause the device, which is the source of the RF emissions, willnot be placed against the head. On the other hand, if the deviceis mounted against the waist or other part of the body during use,then that part of the body will absorb more RF energy. Wirelessdevices marketed in the U.S. are required to meet safetyrequirements regardless of whether they are used against thehead or against the body. Either configuration should result in
these defendants lacked a reasonable basis to substantiate theirclaim.
What about wireless device interference withmedical equipment?
Radio frequency energy (RF) from wireless devices can interactwith some electronic devices. For this reason, FDA helpeddevelop a detailed test method to measure electromagnetic

8/14/2019 Clearwire M100 Mondi UG
http://slidepdf.com/reader/full/clearwire-m100-mondi-ug 127/150
Health and Safety Information 124
g y g
compliance with the safety limit.Do wireless device accessories that claim to shield the head from RF radiation work?
Since there are no known risks from exposure to RF emissionsfrom wireless devices, there is no reason to believe thataccessories that claim to shield the head from those emissionsreduce risks. Some products that claim to shield the user from RFabsorption use special device cases, while others involve nothingmore than a metallic accessory attached to the device. Studieshave shown that these products generally do not work asadvertised. Unlike "hand-free" kits, these so-called "shields"may interfere with proper operation of the device. The devicemay be forced to boost its power to compensate, leading to anincrease in RF absorption. In February 2002, the Federal tradeCommission (FTC) charged two companies that sold devices thatclaimed to protect wireless device users from radiation withmaking false and unsubstantiated claims. According to FTC,
interference (EMI) of implanted cardiac pacemakers anddefibrillators from wireless devices. This test method is now parof a standard sponsored by the Association for the Advancementof Medical instrumentation (AAMI). The final draft, a joint efforFDA, medical device manufacturers, and many other groups, wascompleted in late 2000. This standard will allow manufacturersto ensure that cardiac pacemakers and defibrillators are safefrom wireless device EMI. FDA has tested wireless devices andhelped develop a voluntary standard sponsored by the Institute ofElectrical and Electronic Engineers (IEEE). This standard specifitest methods and performance requirements for hearing aids andwireless devices so that no interference occurs when a personuses a compatible device and a compatible hearing aid at thesame time. This standard was approved by the IEEE in 2000.
FDA continues to monitor the use of wireless devices for possiblinteractions with other medical devices. Should harmful
interference be found to occur, FDA will conduct testing to assessthe interference and work to resolve the problem.
Additional information on the safety of RF exposures from varioussources can be obtained from the following organizations(Updated 12/1/2006):• FCC RF Safety Program:
http://www.fcc.gov/oet/rfsafety/ • Environmental Protection Agency (EPA):
Road SafetyIf you have downloaded VoIP software to your device in orderuse it as a phone, you should exercise caution in driving whileusing that feature.
When driving a car, driving is your first responsibility. When uyour wireless device behind the wheel of a car, practice goodcommon sense and remember the following tips:

8/14/2019 Clearwire M100 Mondi UG
http://slidepdf.com/reader/full/clearwire-m100-mondi-ug 128/150
125
• Environmental Protection Agency (EPA):http://www.epa.gov/radiation/
• Occupational Safety and Health Administration's (OSHA):http://www.osha.gov/SLTC/radiofrequencyradiation/index.html
• National Institute for Occupational Safety and Health (NIOSH):http://www.cdc.gov/niosh/homepage.html
• World Health Organization (WHO):http://www.who.int/peh-emf/
•International Commission on Non-Ionizing Radiation Protection:http://www.icnirp.de
• Health Protection Agency:http://www.hpa.org.uk/radiation
• US Food and Drug Administration:http://www.fda.gov/cellphones
1. Get to know your wireless device and its features, such aspeed dial and redial. If available, these features help yoto place your call without taking your attention off the ro
2. When available, use a hands-free device. If possible, addan additional layer of convenience and safety to yourwireless device with one of the many hands freeaccessories available today.
3. Position your wireless device within easy reach. Be ableaccess your wireless device without removing your eyes
from the road. If you get an incoming call at aninconvenient time, let your voice mail answer it for you.
4.Let the person you are speaking with know you are driving;if necessary, suspend the call in heavy traffic or hazardousweather conditions. Rain, sleet, snow, ice and even heavytraffic can be hazardous.
5. Do not take notes or look up device numbers while driving.Jotting down a "to do" list or flipping through your addressbook takes attention away from your primary
8.Do not use your device to make any emergency oremergency service calls ( e.g. 211, 911, 999, etc.). Tomake calls of this type you must use a landline or acell/mobile phone.
"The wireless industry reminds you to use your device safely whdriving."
For more information please call 1-888-901-SAFE or visit our
8/14/2019 Clearwire M100 Mondi UG
http://slidepdf.com/reader/full/clearwire-m100-mondi-ug 129/150
Health and Safety Information 126
book takes attention away from your primary
responsibility, driving safely.
6. Dial sensibly and assess the traffic; if possible, place callswhen you are not moving or before pulling into traffic. Tryto plan calls when your car will be stationary. If you need to
make a call while moving, dial only a few numbers, check the road and your mirrors, then continue.
7. Do not engage in stressful or emotional conversations thatmay be distracting. Make people you are talking withaware you are driving and suspend conversations thathave the potential to divert your attention from the road.
For more information, please call 1-888-901-SAFE, or visit our
web-site www.ctia.org.
Important!:If you are using a handset other than a standard numeric keypad,please call 1-888-901-7233.
Provided by the Cellular Telecommunications & Internet Association.
Responsible Listening
Caution!: Avoid potential hearing loss.
Damage to hearing occurs when a person is exposed to loudsounds over time. The risk of hearing loss increases as sound isplayed louder and for longer durations. Prolonged exposure toloud sounds (including music) is the most common cause ofpreventable hearing loss. Some scientific research suggests thatusing portable audio devices, such as portable music players and
cellular devices, at high volume settings for long durations maylead to permanent noise-induced hearing loss. This includes theuse of headphones (including headsets, earbuds, and Bluetoothor other wireless devices).
Exposure to very loud sound has also been associated in somestudies with tinnitus (a ringing in the ear), hypersensitivity tosound and distorted hearing.
Individual susceptibility to noise induced hearing loss and
noise. By blocking background environment noise, noise canceheadphones should allow you to hear the music at lower volumewhen using earbuds.
• Limit the amount of time you listen. As the volume increases, leis required before you hearing could be affected.
• Avoid using headphones after exposure to extremely loud noisesas rock concerts, that might cause temporary hearing loss. Temphearing loss might cause unsafe volumes to sound normal.

8/14/2019 Clearwire M100 Mondi UG
http://slidepdf.com/reader/full/clearwire-m100-mondi-ug 130/150
127
Individual susceptibility to noise-induced hearing loss andpotential hearing problem varies. Additionally, the amount ofsound produced by a portable audio device varies depending onthe nature of the sound, the device settings, and the headphonesthat are used. As a result, there is no single volume setting that isappropriate for everyone or for every combination of sound,settings and equipment.
You should follow some commonsense recommendations whenusing any portable audio device:• Set the volume in a quiet environment and select the lowest volume at
which you can hear adequately.• When using headphones, turn the volume down if you cannot hear the
people speaking near you or if the person sitting next to you can hearwhat you are listening to.
• Do not turn the volume up to block out noisy surroundings. If youchoose to listen to your portable device in a noisy environment, use
noise-cancelling headphones to block out background environmental
• Do not listen at any volume that causes you discomfort. If youexperience ringing in your ears, hear muffled speech or experieany temporary hearing difficulty after listening to your portabledevice, discontinue use and consult your doctor.
You can obtain additional information on this subject from thefollowing sources: American Academy of Audiology
11730 Plaza American Drive, Suite 300
Reston, VA 20190
Voice: (800) 222-2336
Email: [email protected]
Internet:http://www.audiology.org
Operating EnvironmentRemember to follow any special regulations in force in any areaand always switch your device off whenever it is forbidden to useit, or when it may cause interference or danger. When connectingthe device or any accessory to another device, read its user'sguide for detailed safety instructions. Do not connectincompatible products.
As with other mobile radio transmitting equipment users are
National Institute on Deafness and Other Communication DisordersNational Institutes of Health
31 Center Drive, MSC 2320
Bethesda, MD 20892-2320
Email: [email protected]
Internet:http://www.nidcd.nih.gov/

8/14/2019 Clearwire M100 Mondi UG
http://slidepdf.com/reader/full/clearwire-m100-mondi-ug 131/150
Health and Safety Information 128
As with other mobile radio transmitting equipment, users areadvised that for the satisfactory operation of the equipment andfor the safety of personnel, it is recommended that theequipment should only be used in the normal operating position(held to your ear with the antenna pointing over your shoulder ifyou are using an external antenna).
Using Your Device Near Other ElectronicDevices
Most modern electronic equipment is shielded from radiofrequency (RF) signals. However, certain electronic equipmentmay not be shielded against the RF signals from your wirelessdevice. Consult the manufacturer to discuss alternatives.
National Institute for Occupational Safety and Health (NIOSH)395 E Street, S.W.
Suite 9200
Patriots Plaza Building
Washington, DC 20201
Voice: 1-800-35-NIOSH (1-800-356-4647)
1-800-CDC-INFO (1-800-232-4636)Outside the U.S. 513-533-8328
Email: [email protected]
Internet:http://www.cdc.gov
1-888-232-6348 TTY
Internet:http://www.cdc.gov/niosh/topics/noise/default.html
Implantable Medical Devices
A minimum separation of six (6) inches should be maintainedbetween a handheld wireless device and an implantable medicaldevice, such as a pacemaker or implantable cardioverterdefibrillator, to avoid potential interference with the device.
Persons who have such devices:• Should ALWAYS keep the device more than six (6) inches from their
implantable medical device when the device is turned ON;
HAC/Wi-Fi Language
This phone has been tested and rated for use with hearing aidsfor some of the wireless technologies that it uses. However, themay be some newer wireless technologies used in this phonethat have not been tested yet for use with hearing aids. It isimportant to try the different features of this phone thoroughlyand in different locations, using your hearing aid or cochlearimplant, to determine if you hear any interfering noise. Consul
8/14/2019 Clearwire M100 Mondi UG
http://slidepdf.com/reader/full/clearwire-m100-mondi-ug 132/150
129
implantable medical device when the device is turned ON;• Should not carry the device in a breast pocket;• Should use the ear opposite the implantable medical device to
minimize the potential for interference;• Should turn the device OFF immediately if there is any reason to
suspect that interference is taking place.• Should read and follow the directions from the manufacturer of your
implantable medical device. if you have any questions about using
your wireless device with such a device, consult your health careprovider.
For more information see: http://www.fcc.gov/oet/rfsafety/rf-faqs.html
Hearing Aid Compatibility with Mobile Devices
Some digital wireless devices may interfere with some hearingaids. In the event of such interference, you may wish to consult
your hearing aid manufacturer to discuss alternatives.
p y y g
your service provider about its return and exchange policies anfor information on hearing aid compatibility.
Other Medical Devices
If you use any other personal medical devices, consult themanufacturer of your device to determine if it is adequatelyshielded from external RF energy. Your physician may be able assist you in obtaining this information. Switch your device of
health care facilities when any regulations posted in these areainstruct you to do so. Hospitals or health care facilities may beusing equipment that could be sensitive to external RF energy.
Vehicles
RF signals may affect improperly installed or inadequatelyshielded electronic systems in motor vehicles. Check with themanufacturer or its representative regarding your vehicle. Youshould also consult the manufacturer of any equipment that habeen added to your vehicle.
Posted Facilities
Switch your device off in any facility where posted noticesrequire you to do so.
Potentially Explosive Environments
Switch your device off when in any area with a potentiallyexplosive atmosphere and obey all signs and instructions. Sparksin such areas could cause an explosion or fire resulting in bodilyinjury or even death
Restricting Children's access to your Device
Your device is not a toy. Children should not be allowed to playwith it because they could hurt themselves and others, damagethe device or make calls that increase your device bill.
FCC Notice and Cautions
FCC Notice
The device may cause TV or radio interference if used in close

8/14/2019 Clearwire M100 Mondi UG
http://slidepdf.com/reader/full/clearwire-m100-mondi-ug 133/150
Health and Safety Information 130
injury or even death.
Users are advised to switch the device off while at a refuelingpoint (service station). Users are reminded of the need to observerestrictions on the use of radio equipment in fuel depots (fuelstorage and distribution areas), chemical plants or where blastingoperations are in progress.
Areas with a potentially explosive atmosphere are often but notalways clearly marked. They include below deck on boats,
chemical transfer or storage facilities, vehicles using liquefiedpetroleum gas (such as propane or butane), areas where the aircontains chemicals or particles, such as grain, dust or metalpowders, and any other area where you would normally beadvised to turn off your vehicle engine.
proximity to receiving equipment. The FCC can require you tostop using the device if such interference cannot be eliminated.
Vehicles using liquefied petroleum gas (such as propane orbutane) must comply with the National Fire Protection Standard(NFPA-58). For a copy of this standard, contact the National FireProtection Association: NFPA (National Fire Protection Agency)
1 Batterymarch Park
Quincy, Massachusetts
USA 02169-7471
Internet:http://www.nfpa.org
Cautions
Any changes or modifications to your device not expresslyapproved in this document could void your warranty for thisequipment, and void your authority to operate this equipment.Only use approved batteries, antennas and chargers. The use ofany unauthorized accessories may be dangerous and void thedevice warranty if said accessories cause damage or a defect tothe device.
• Switch your device off before boarding an aircraft. The use of wdevice in aircraft is illegal and may be dangerous to the aircraftoperation.
• Failure to observe these instructions may lead to the suspensiondenial of telephone services to the offender, or legal action, or b
Product Performance
Understanding the Power Save Feature
If d i i bl t fi d ig l ft hi g P

8/14/2019 Clearwire M100 Mondi UG
http://slidepdf.com/reader/full/clearwire-m100-mondi-ug 134/150
131
Although your device is quite sturdy, it is a complex piece ofequipment and can be broken. Avoid dropping, hitting, bendingor sitting on it.
Other Important Safety Information• Only qualified personnel should service the device or install the device
in a vehicle. Faulty installation or service may be dangerous and mayinvalidate any warranty applicable to the device.
• Check regularly that all wireless device equipment in your vehicle ismounted and operating properly.• Do not store or carry flammable liquids, gases or explosive materials in
the same compartment as the device, its parts or accessories.• For vehicles equipped with an air bag, remember that an air bag
inflates with great force. Do not place objects, including both installedor portable wireless equipment in the area over the air bag or in the airbag deployment area. If wireless equipment is improperly installed and
the air bag inflates, serious injury could result.
If your device is unable to find a signal after searching, a PoweSave feature is automatically activated. If your device is activeperiodically rechecks service availability or you can check ityourself by pressing any key.
Anytime the Power Save feature is activated, a message displayon the screen. When a signal is found, your device returns tostandby mode.
Maintaining Your Device's Peak Performance
For the best care of your device, only authorized personnelshould service your device and accessories. Faulty service mayvoid the warranty.
There are several simple guidelines to operating your deviceproperly and maintaining safe, satisfactory service.• If your device is equipped with an external antenna, hold the de
with the antenna raised, fully-extended and over your shoulder.
• Do not hold, bend or twist the device's antenna, if applicable.
• Do not use the device if the antenna is damaged.• If your device is equipped with an internal antenna, obstructing the
internal antenna could inhibit call performance.• Speak directly into the device's receiver.• Avoid exposing your device and accessories to rain or liquid spills. If
your device does get wet, immediately turn the power off and removethe battery. If it is inoperable, call Customer Care for service.
Availability of Various Features/Ring Tones
Battery Standby and Talk Time
Standby and talk times will vary depending on device usagepatterns and conditions. Battery power consumption depends onfactors such as network configuration, signal strength, operatingtemperature, features selected, frequency of calls, and voice,data, and other application usage patterns.
Battery Precautions• Avoid dropping the cell device. Dropping it, especially on a hard

8/14/2019 Clearwire M100 Mondi UG
http://slidepdf.com/reader/full/clearwire-m100-mondi-ug 135/150
Health and Safety Information 132
y g
Many services and features are network dependent and mayrequire additional subscription and/or usage charges. Not allfeatures are available for purchase or use in all areas.Downloadable Ring Tones may be available at an additional cost.Other conditions and restrictions may apply. See your serviceprovider for additional information.
WiMAX Language
This device is expected to achieve speeds that are twice that of3G wireless service. Overall internet experience will varydepending on a number of factors including device parameters,patterns of usage, network conditions and the characteristics ofwebsites visited.
pp g . pp g , p ysurface, can potentially cause damage to the device and battery. If suspect damage to the device or battery, take it to a service center inspection.
• Never use any charger or battery that is damaged in any way.• Do not modify or remanufacture the battery as this could result in
serious safety hazards.• If you use the device near the network's base station, it uses less
power; talk and standby time are greatly affected by the signalstrength on the cellular network and the parameters set by thenetwork operator.
• Follow battery usage, storage and charging guidelines found in thuser’s guide.
• Battery charging time depends on the remaining battery charge andthe type of battery and charger used. The battery can be charged anddischarged hundreds of times, but it will gradually wear out. When theoperation time (talk time and standby time) is noticeably shorter thannormal, it is time to buy a new battery.
• If left unused, a fully charged battery will discharge itself over time.• Use only Samsung-approved batteries and recharge your battery only
with Samsung-approved chargers. When a charger is not in use,
• Do not leave the battery in hot or cold places, such as in a car insummer or winter conditions, as you will reduce the capacity anlifetime of the battery. Always try to keep the battery at roomtemperature. A device with a hot or cold battery may temporariwork, even when the battery is fully charged. Li-ion batteries arparticularly affected by temperatures below 0 °C (32 °F).
• Do not place the device in areas that may get very hot, such as onear a cooking surface, cooking appliance, iron, or radiator.
8/14/2019 Clearwire M100 Mondi UG
http://slidepdf.com/reader/full/clearwire-m100-mondi-ug 136/150
133
disconnect it from the power source. Do not leave the batteryconnected to a charger for more than a week, since overcharging mayshorten its life.
• Do not use incompatible cell device batteries and chargers. Some Websites and second-hand dealers, not associated with reputablemanufacturers and carriers, might be selling incompatible or evencounterfeit batteries and chargers. Consumers should purchasemanufacturer or carrier recommended products and accessories. If
unsure about whether a replacement battery or charger is compatible,contact the manufacturer of the battery or charger.
• Misuse or use of incompatible devices, batteries, and charging devicescould result in damage to the equipment and a possible risk of fire,explosion, leakage, or other serious hazard.
• Extreme temperatures will affect the charging capacity of your battery:it may require cooling or warming first.
• Do not get your device or battery wet. Even though they will drappear to operate normally, the circuitry could slowly corrode apose a safety hazard.
• Do not short-circuit the battery. Accidental short-circuiting can when a metallic object (coin, clip or pen) causes a direct connecbetween the + and - terminals of the battery (metal strips on thebattery), for example when you carry a spare battery in a pockebag. Short-circuiting the terminals may damage the battery or th
object causing the short-circuiting.• Do not permit a battery out of the device to come in contact with
objects, such as coins, keys or jewelry.• Do not crush, puncture or put a high degree of pressure on the b
as this can cause an internal short-circuit, resulting in overheati
8/14/2019 Clearwire M100 Mondi UG
http://slidepdf.com/reader/full/clearwire-m100-mondi-ug 137/150
• Do not paint the device. Paint can clog the device's moving parts andprevent proper operation.
• Do not put the device in or on heating devices, such as a microwaveoven, a stove or a radiator. The device may explode when overheated.
• If your device is equipped with an external antenna, use only thesupplied or an approved replacement antenna. Unauthorized antennasor modified accessories may damage the device and violateregulations governing radio devices.

8/14/2019 Clearwire M100 Mondi UG
http://slidepdf.com/reader/full/clearwire-m100-mondi-ug 138/150
135
• If the device, battery, charger or any accessory is not working properly,take it to your nearest qualified service facility. The personnel therewill assist you, and if necessary, arrange for service.
Section 11: Warranty Information
Standard Limited Warranty
What is Covered and For How Long?SAMSUNG TELECOMMUNICATIONS AMERICA, LLC ("SAMSUNG")warrants to the original purchaser ("Purchaser") that SAMSUNG'sPhones and accessories ("Products") are free from defects inmaterial and workmanship under normal use and service for the
equipment not furnished or approved by SAMSUNG; (e) defectsdamage from improper testing, operation, maintenance,installation, or adjustment; (f) installation, maintenance, andservice of Product, or (g) Product used or purchased outside theUnited States or Canada.
This Limited Warranty covers batteries only if battery capacity

8/14/2019 Clearwire M100 Mondi UG
http://slidepdf.com/reader/full/clearwire-m100-mondi-ug 139/150
Warranty Information 136
period commencing upon the date of purchase and continuing forthe following specified period of time after that date:
What is Not Covered?This Limited Warranty is conditioned upon
proper use of Product by Purchaser. This Limited Warranty doesnot cover: (a) defects or damage resulting from accident, misuse,abuse, neglect, unusual physical, electrical or electromechanicalstress, or modification of any part of Product, including antenna,or cosmetic damage; (b) equipment that has the serial numberremoved or made illegible; (c) any plastic surfaces or otherexternally exposed parts that are scratched or damaged due tonormal use; (d) malfunctions resulting from the use of Product in
conjunction with accessories, products, or ancillary/peripheral
falls below 80% of rated capacity or the battery leaks, and thisLimited Warranty does not cover any battery if (i) the battery habeen charged by a battery charger not specified or approved bySAMSUNG for charging the battery, (ii) any of the seals on thebattery are broken or show evidence of tampering, or (iii) thebattery has been used in equipment other than the SAMSUNGphone for which it is specified.
What are SAMSUNG's Obligations?During the applicable warrantyperiod, SAMSUNG will repair or replace, at SAMSUNG's soleoption, without charge to Purchaser, any defective componentpart of Product. To obtain service under this Limited Warranty,Purchaser must return Product to an authorized phone servicefacility in an adequate container for shipping, accompanied byPurchaser's sales receipt or comparable substitute proof of saleshowing the date of purchase, the serial number of Product andthe sellers' name and address. To obtain assistance on where to
Device 1 Year
Batteries 1 Year
deliver the Product, call Samsung Customer Care at 1-888-987-4357. Upon receipt, SAMSUNG will promptly repair or replace thedefective Product. SAMSUNG may, at SAMSUNG's sole option,use rebuilt, reconditioned, or new parts or components whenrepairing any Product or replace Product with a rebuilt,reconditioned or new Product. Repaired/replaced leather cases,pouches and holsters will be warranted for a period of ninety (90)days. All other repaired/replaced Product will be warranted for aperiod equal to the remainder of the original Limited Warranty on
• WARRANTIES OF TITLE OR NON-INFRINGEMENT;• DESIGN, CONDITION, QUALITY, OR PERFORMANCE OF• THE WORKMANSHIP OF THE PRODUCT OR THE COMP
CONTAINED THEREIN; OR• COMPLIANCE OF THE PRODUCT WITH THE REQUIREM
LAW, RULE, SPECIFICATION OR CONTRACT PERTAININ
NOTHING CONTAINED IN THE INSTRUCTION MANUACONSTRUED TO CREATE AN EXPRESS WARRANTY OF
8/14/2019 Clearwire M100 Mondi UG
http://slidepdf.com/reader/full/clearwire-m100-mondi-ug 140/150
137
p q g ythe original Product or for 90 days, whichever is longer. Allreplaced parts, components, boards and equipment shallbecome the property of SAMSUNG.
If SAMSUNG determines that any Product is not covered by thisLimited Warranty, Purchaser must pay all parts, shipping, andlabor charges for the repair or return of such Product.
WHAT ARE THE LIMITS ON SAMSUNG'S WARRANTY/LIABILITY?
EXCEPT AS SET FORTH IN THE EXPRESS WARRANTY CONTAINEDHEREIN, PURCHASER TAKES THE PRODUCT "AS IS," ANDSAMSUNG MAKES NO WARRANTY OR REPRESENTATION ANDTHERE ARE NO CONDITIONS, EXPRESS OR IMPLIED, STATUTORYOR OTHERWISE, OF ANY KIND WHATSOEVER WITH RESPECT TOTHE PRODUCT, INCLUDING BUT NOT LIMITED TO:• THE MERCHANTABILITY OF THE PRODUCT OR ITS FITNESS FOR ANY
PARTICULAR PURPOSE OR USE;
WHATSOEVER WITH RESPECT TO THE PRODUCT. ALLWARRANTIES AND CONDITIONS THAT MAY ARISE BYOF LAW, INCLUDING IF APPLICABLE THE IMPLIED WAOF MERCHANTABILITY AND FITNESS FOR A PARTICUPURPOSE, ARE HEREBY LIMITED TO THE SAME DURATIME AS THE EXPRESS WRITTEN WARRANTY STATEDSOME STATES/PROVINCES DO NOT ALLOW LIMITATIOLONG AN IMPLIED WARRANTY LASTS, SO THE ABOVE
MAY NOT APPLY TO YOU. IN ADDITION, SAMSUNG SHLIABLE FOR ANY DAMAGES OF ANY KIND RESULTINPURCHASE, USE, OR MISUSE OF, OR INABILITY TO USPRODUCT OR ARISING DIRECTLY OR INDIRECTLY FROOR LOSS OF USE OF THE PRODUCT OR FROM THE BRTHE EXPRESS WARRANTY, INCLUDING INCIDENTAL, CONSEQUENTIAL OR SIMILAR DAMAGES, OR LOSS O
ANTICIPATED PROFITS OR BENEFITS, OR FOR DAMAG
FROM ANY TORT (INCLUDING NEGLIGENCE OR GROS
NEGLIGENCE) OR FAULT COMMITTED BY SAMSUNG, ITS AGENTSOR EMPLOYEES, OR FOR ANY BREACH OF CONTRACT OR FOR
ANY CLAIM BROUGHT AGAINST PURCHASER BY ANY OTHERPARTY. SOME STATES/PROVINCES DO NOT ALLOW THEEXCLUSION OR LIMITATION OF INCIDENTAL OR CONSEQUENTIALDAMAGES, SO THE ABOVE LIMITATION OR EXCLUSION MAY NOT
APPLY TO YOU. THIS WARRANTY GIVES YOU SPECIFIC LEGALRIGHTS, AND YOU MAY ALSO HAVE OTHER RIGHTS, WHICH VARYFROM STATE TO STATE/PROVINCE TO PROVINCE. THIS LIMITED
OR EQUIPMENT, WHETHER SUCH THIRD-PARTY SOFTWEQUIPMENT IS INCLUDED WITH THE PRODUCT DISTRISAMSUNG OR OTHERWISE, INCLUDING THE ABILITY TINTEGRATE ANY SUCH SOFTWARE OR EQUIPMENT WITPRODUCT. THE QUALITY, CAPABILITIES, OPERATIONS,PERFORMANCE AND SUITABILITY OF ANY SUCH THIRSOFTWARE OR EQUIPMENT LIE SOLELY WITH THE PUR
AND THE DIRECT VENDOR, OWNER OR SUPPLIER OF SUTHIRD-PARTY SOFTWARE OR EQUIPMENT, AS THE CASE

8/14/2019 Clearwire M100 Mondi UG
http://slidepdf.com/reader/full/clearwire-m100-mondi-ug 141/150
Warranty Information 138
WARRANTY SHALL NOT EXTEND TO ANYONE OTHER THAN THEORIGINAL PURCHASER OF THIS PRODUCT AND STATESPURCHASER'S EXCLUSIVE REMEDY. IF ANY PORTION OF THISLIMITED WARRANTY IS HELD ILLEGAL OR UNENFORCEABLE BYREASON OF ANY LAW, SUCH PARTIAL ILLEGALITY ORUNENFORCEABILITY SHALL NOT AFFECT THE ENFORCEABILITYFOR THE REMAINDER OF THIS LIMITED WARRANTY WHICHPURCHASER ACKNOWLEDGES IS AND WILL ALWAYS BECONSTRUED TO BE LIMITED BY ITS TERMS OR AS LIMITED ASTHE LAW PERMITS. THE PARTIES UNDERSTAND THAT THEPURCHASER MAY USE THIRD-PARTY SOFTWARE OR EQUIPMENTIN CONJUNCTION WITH THE PRODUCT. SAMSUNG MAKES NOWARRANTIES OR REPRESENTATIONS AND THERE ARE NOCONDITIONS, EXPRESS OR IMPLIED, STATUTORY OROTHERWISE, AS TO THE QUALITY, CAPABILITIES, OPERATIONS,PERFORMANCE OR SUITABILITY OF ANY THIRDPARTY SOFTWARE
This Limited Warranty allocates risk of Product failure betweenPurchaser and SAMSUNG, and SAMSUNG's Product pricingreflects this allocation of risk and the limitations of liabilitycontained in this Limited Warranty. The agents, employees,distributors, and dealers of SAMSUNG are not authorized to makmodifications to this Limited Warranty, or make additionalwarranties binding on SAMSUNG. Accordingly, additional
statements such as dealer advertising or presentation, whetheroral or written, do not constitute warranties by SAMSUNG andshould not be relied upon.
End User License Agreement for Software
IMPORTANT. READ CAREFULLY: This End User License Agreement("EULA") is a legal agreement between you (either an individualor a single entity) and Samsung Electronics Co., Ltd. for softwareowned by Samsung Electronics Co., Ltd. and its affiliatedcompanies and its third party suppliers and licensors thataccompanies this EULA, which includes computer software andmay include associated media, printed materials, "online" or
only; provided that the backup copy must include all copyrightother proprietary notices contained on the original.
2. RESERVATION OF RIGHTS AND OWNERSHIP. Samsungall rights not expressly granted to you in this EULA. The Softwis protected by copyright and other intellectual property laws atreaties. Samsung or its suppliers own the title, copyright andother intellectual property rights in the Software. The Softwarelicensed, not sold.

8/14/2019 Clearwire M100 Mondi UG
http://slidepdf.com/reader/full/clearwire-m100-mondi-ug 142/150
139
electronic documentation ("Software"). BY CLICKING THE "I ACCEPT" BUTTON (OR IF YOU BYPASS OR OTHERWISE DISABLETHE "I ACCEPT", AND STILL INSTALL, COPY, DOWNLOAD,
ACCESS OR OTHERWISE USE THE SOFTWARE), YOU AGREE TOBE BOUND BY THE TERMS OF THIS EULA. IF YOU DO NOT
ACCEPT THE TERMS IN THIS EULA, YOU MUST CLICK THE"DECLINE" BUTTON, DISCONTINUE USE OF THE SOFTWARE.
1. GRANT OF LICENSE. Samsung grants you the following rights
provided that you comply with all terms and conditions of thisEULA: You may install, use, access, display and run one copy ofthe Software on the local hard disk(s) or other permanent storagemedia of one computer and use the Software on a singlecomputer or a mobile device at a time, and you may not makethe Software available over a network where it could be used bymultiple computers at the same time. You may make one copy ofthe Software in machine-readable form for backup purposes
3. LIMITATIONS ON END USER RIGHTS. You may not revengineer, decompile, disassemble, or otherwise attempt todiscover the source code or algorithms of, the Software (excepand only to the extent that such activity is expressly permitted applicable law notwithstanding this limitation), or modify, ordisable any features of, the Software, or create derivative workbased on the Software. You may not rent, lease, lend, sublicenor provide commercial hosting services with the Software.
4. CONSENT TO USE OF DATA. You agree that Samsung anaffiliates may collect and use technical information gathered apart of the product support services related to the Softwareprovided to you, if any, related to the Software. Samsung mayuse this information solely to improve its products or to providcustomized services or technologies to you and will not disclothis information in a form that personally identifies you.
5. UPGRADES. This EULA applies to updates, supplements andadd-on components (if any) of the Software that Samsung mayprovide to you or make available to you after the date you obtainyour initial copy of the Software, unless we provide other termsalong with such upgrade. To use Software identified as anupgrade, you must first be licensed for the Software identified bySamsung as eligible for the upgrade. After upgrading, you mayno longer use the Software that formed the basis for yourupgrade eligibility.
8. TERMINATION. This EULA is effective until terminated. Yorights under this License will terminate automatically withoutnotice from Samsung if you fail to comply with any of the termsand conditions of this EULA. Upon termination of this EULA, yshall cease all use of the Software and destroy all copies, full orpartial, of the Software.
9. DISCLAIMER OF WARRANTIES. You expressly acknowledand agree that use of the Software is at your sole risk and that
8/14/2019 Clearwire M100 Mondi UG
http://slidepdf.com/reader/full/clearwire-m100-mondi-ug 143/150
Warranty Information 140
6. SOFTWARE TRANSFER. You may not transfer this EULA or therights to the Software granted herein to any third party unless itis in connection with the sale of the mobile device which theSoftware accompanied. In such event, the transfer must includeall of the Software (including all component parts, the media andprinted materials, any upgrades, this EULA) and you may notretain any copies of the Software. The transfer may not be an
indirect transfer, such as a consignment. Prior to the transfer, theend user receiving the Software must agree to all the EULA terms.
7. EXPORT RESTRICTIONS. You acknowledge that the Software issubject to export restrictions of various countries. You agree tocomply with all applicable international and national laws thatapply to the Software, including the U.S. Export AdministrationRegulations, as well as end user, end use, and destination
restrictions issued by U.S. and other governments.
the entire risk as to satisfactory quality, performance, accuracyand effort is with you. TO THE MAXIMUM EXTENT PERMIT APPLICABLE LAW, THE SOFTWARE IS PROVIDED "AS ISWITH ALL FAULTS AND WITHOUT WARRANTY OF ANYSAMSUNG AND ITS LICENSORS (COLLECTIVELY REFER"SAMSUNG" FOR THE PURPOSES OF SECTIONS 9, 10 andHEREBY DISCLAIM ALL WARRANTIES AND CONDITIONRESPECT TO THE SOFTWARE, EITHER EXPRESS, IMPLIE
STATUTORY, INCLUDING, BUT NOT LIMITED TO, THE IMWARRANTIES AND/OR CONDITIONS OF MERCHANTABISATISFACTORY QUALITY OR WORKMANLIKE EFFORT, OFOR A PARTICULAR PURPOSE, OF RELIABILITY OR AVAOF ACCURACY, OF LACK OF VIRUSES, OF QUIET ENJOY
AND NON-INFRINGEMENT OF THIRD PARTY RIGHTS. SADOES NOT WARRANT AGAINST INTERFERENCE WITH YENJOYMENT OF THE SOFTWARE, THAT THE FUNCTION
CONTAINED IN THE SOFTWARE WILL MEET YOUR
REQUIREMENTS, THAT THE OPERATION OF THE SOFTWARE WILLBE UNINTERRUPTED OR ERROR-FREE, OR THAT DEFECTS IN THESOFTWARE WILL BE CORRECTED. NO ORAL OR WRITTENINFORMATION OR ADVICE GIVEN BY SAMSUNG OR A SAMSUNG
AUTHORIZED REPRESENTATIVE SHALL CREATE A WARRANTY.SHOULD THE SOFTWARE PROVE DEFECTIVE, YOU ASSUME THEENTIRE COST OF ALL NECESSARY SERVICING, REPAIR ORCORRECTION. SOME JURISDICTIONS DO NOT ALLOW THEEXCLUSION OF IMPLIED WARRANTIES OR LIMITATIONS ON
OR OTHERWISE) AND EVEN IF SAMSUNG HAS BEEN ATHE POSSIBILITY OF SUCH DAMAGES. SOME JURISDNOT ALLOW THE LIMITATION OF LIABILITY FOR PERINJURY, OR OF INCIDENTAL OR CONSEQUENTIAL DAMTHIS LIMITATION MAY NOT APPLY TO YOU.
11. LIMITATION OF LIABILITY. Notwithstanding any damagyou might incur for any reason whatsoever (including, withoutlimitation, all damages referenced herein and all direct or gener

8/14/2019 Clearwire M100 Mondi UG
http://slidepdf.com/reader/full/clearwire-m100-mondi-ug 144/150
141
APPLICABLE STATUTORY RIGHTS OF A CONSUMER, SO THESEEXCLUSIONS AND LIMITATIONS MAY NOT APPLY TO YOU.
10. EXCLUSION OF INCIDENTAL, CONSEQUENTIAL AND CERTAINOTHER DAMAGES. TO THE EXTENT NOT PROHIBITED BY LAW, INNO EVENT SHALL SAMSUNG BE LIABLE FOR PERSONAL INJURY,OR ANY INCIDENTAL, SPECIAL, INDIRECT OR CONSEQUENTIALDAMAGES WHATSOEVER, OR FOR LOSS OF PROFITS, LOSS OF
DATA, BUSINESS INTERRUPTION, OR FOR ANY PECUNIARYDAMAGES OR LOSSES, ARISING OUT OF OR RELATED TO YOURUSE OR INABILITY TO USE THE SOFTWARE, THE PROVISION OFOR FAILURE TO PROVIDE SUPPORT OR OTHER SERVICES,INFORMATION, SOFTWARE, AND RELATED CONTENT THROUGHTHE SOFTWARE OR OTHERWISE ARISING OUT OF THE USE OFTHE SOFTWARE, OR OTHERWISE UNDER OR IN CONNECTIONWITH ANY PROVISION OF THIS EULA, HOWEVER CAUSED,
REGARDLESS OF THE THEORY OF LIABILITY (CONTRACT, TORT
damages in contract or anything else), the entire liability ofSamsung under any provision of this EULA and your exclusivremedy hereunder shall be limited to the greater of the actualdamages you incur in reasonable reliance on the Software up tthe amount actually paid by you for the Software or US$5.00. Tforegoing limitations, exclusions and disclaimers (includingSections 9, 10 and 11) shall apply to the maximum extentpermitted by applicable law, even if any remedy fails its essent
purpose.12. U.S. GOVERNMENT END USERS. The Software is licenonly with "restricted rights" and as "commercial items"consisting of "commercial software" and "commercial softwardocumentation" with only those rights as are granted to all othend users pursuant to the terms and conditions herein.
13. APPLICABLE LAW. This EULA is governed by the laws ofTEXAS, without regard to conflicts of laws principles. This EULA shall not be governed by the UN Convention on Contracts for theInternational Sale of Goods, the application of which is expresslyexcluded. If a dispute, controversy or difference is not amicablysettled, it shall be finally resolved by arbitration in Seoul, Korea inaccordance with the Arbitration Rules of the Korean Commercial
Arbitration Board. The award of arbitration shall be final andbinding upon the parties.
To avoid unintended information leaks and other problems of thisort, it is recommended that the device be returned to Samsung’sCustomer Care Center for an Extended File System (EFS) Clearwhich will eliminate all user memory and return all settings todefault settings. Please contact the Samsung Customer CareCenterfor details.
Important!:Please provide warranty information (proof of purchase) toSamsung’s Customer Care Center in order to provide this serviceat no charge. If the warranty has expired on the device, charges
l
8/14/2019 Clearwire M100 Mondi UG
http://slidepdf.com/reader/full/clearwire-m100-mondi-ug 145/150
Warranty Information 142
14. ENTIRE AGREEMENT; SEVERABILITY. This EULA is the entireagreement between you and Samsung relating to the Softwareand supersedes all prior or contemporaneous oral or writtencommunications, proposals and representations with respect tothe Software or any other subject matter covered by this EULA. Ifany provision of this EULA is held to be void, invalid,unenforceable or illegal, the other provisions shall continue in full
force and effect.Precautions for Transfer and Disposal
If data stored on this device is deleted or reformatted using thestandard methods, the data only appears to be removed on asuperficial level, and it may be possible for someone to retrieveand reuse the data by means of special software.
may apply.
Customer Care Center:
1000 Klein Rd.
Plano, TX 75074
Toll Free Tel: 1.888.987.HELP (4357)
Samsung Telecommunications America, LLC:
1301 East Lookout Drive
Richardson, Texas 75082
Phone: 1-800-SAMSUNG (726-7864)
Important!:If you are using a handset other than a standard numeric keypad,dial the numbers listed in brackets.
Phone: 1-888-987-HELP (4357)©2009 Samsung Telecommunications America. All rightsreserved. Samsung and Mondi are all trademarks of SamsungElectronics America, Inc. and its related entities.
DivX® is a registered trademark of DivX, Inc., and is used underlicense.
No reproduction in whole or in part allowed without prior writtenapproval. Specifications and availability subject to change
i h i

8/14/2019 Clearwire M100 Mondi UG
http://slidepdf.com/reader/full/clearwire-m100-mondi-ug 146/150
143
without notice.
Index
AActiveSync 58
Configuration 59Connection 59Windows Media Player 61
Adjusting Text Input Settings 34
Ai l M d 42
Bluetooth Adding a Device 48Beaming a Theme 52Device Name 49Device Visibility 49Overview 47
S it 50
New Alarm 92New Anniversary Event 95StopWatch 97
Viewing TimeAround the World 97World Clock 97
Communication Bar 84
C i t i S t 41

8/14/2019 Clearwire M100 Mondi UG
http://slidepdf.com/reader/full/clearwire-m100-mondi-ug 147/150
144
Airplane Mode 42ApplicationClosing 25Opening 25
Applicatio nsClosing 99
Applications Shortcuts Bar 54B
BacklightDisplay Customization 54
BatteryCharging 6Installation 7Replacement 8
Battery Powered 55Beaming
Image 116
Security 50 CCalculator 92
PowerCalc 92Calendar 78Camcorder
Overview 111Settings 112
Shooting Video 111CameraSettings 108
CLEAR Account Activation 45Customer Service 45
Clocks 97 Alarm Activation/Deactivation 94
Deleting an Alarm Event 94
Communicat ion Setup 41Overview 42Creating a Device Name 49Customization
Applications Panel 53Backlight 54Onscreen Type 57Power Settings Page 55
Start Menu 53Today Screen 51 Volume Levels 28
DDevice
Automatic Lock State 24 AutomaticLocking 24Features 14
Locking 23, 24
Manually Locking 23Manually Unlocking 23Unlock ing after Timeout 25
Views 15Device Panels 27
EExternally Powered 55
FFavorite Conta cts 81
Improving Performanc eClosing Applications 99
Initial Device Setup 5K
Keypad 56L
Locking 23Lockup
Rebooting11
Connecting 44Creating an Account from Mondi 46Creating an Accountfrom Web 46Hardware Activation 44Initiating a Connection 46Online Setup 45
MobileWidget 35Mondi Car Kit
Installation 12R l f Wid hi ld 13

8/14/2019 Clearwire M100 Mondi UG
http://slidepdf.com/reader/full/clearwire-m100-mondi-ug 148/150
145
First time use 5Formatting
Device Memory 29microSD Card 65microSD card 30
HHard Reset 5, 29, 65
Health and Safety Information 119IImage
Assigning to Background 117 Assigning to Contacts Entry 117 Attachingto Email 116Beaming 116Deleting 114
Photo Slides 114
MMAC ID 45
Locating 45Main Storage 29, 65Menu Navigati on 25MicroSD Card 30microSD Card
External Storage 65Formatting 65Installation 10Loading Files 64Overview 9Removal 11Reviewing Information 64
Mobile WiMAX
Access 45
Removal from Windshield 13Removal of Mondi 13
Multimedia P ageNavigation 114
MultiMedia PlayerLaunching 90Loading Content 91Overview 90
Multimedia sh ortcut 90, 114Navigating 114
MultimMedia Pl ayer 91Compatibility 91DiVX 91
My Device 29, 65My Storage 29, 65
PPassword Hin t 24Performance 56Phone Safety 128Power Settings
Customization 55Power ing
Off 4
Slide showLaunching 115Menu Options 115Muting Sound 115
Sound Events 28Standard Limited Warranty
136Start
Menu Customization 53Synchronizati on 58
Today Assigning Items 52Image Selection 52Screen Customization 51Theme Assignment 51
Today Scree nFunctions 20Navigating 19
Travel Adapter 6Type

8/14/2019 Clearwire M100 Mondi UG
http://slidepdf.com/reader/full/clearwire-m100-mondi-ug 149/150
146
Off 4On 4
QQWERTY Keyboard
Accessing 30Entering Text 30
R
Rebooting 11ROUTE 66Installation 100Overview 100Usage 103
SSetup
WiMAX Service 45
Synchronizati on 58 ActiveSync 58Computer Requirements 58
TTaskSwitcher 26, 99
Closing Applications 99Text
Entering Characters 32Entering Numbers 32Entering Symbols 33Entering using Onscreen Keyboard
34Entering usingQWERTY 30InputSettings 34
Theme 51Bluetooth Beaming 52
TypeCustomizing the Size 57
UUL Certificatio n 119Unlocking 23, 25User Guide 4
Accessing 4V
Video 111Viewing Files 67Visibility 49VoIP 56Volume
Adjusting Levels 28
WWarranty In formation 136Widget Bar 35Widgets 35
Accessing 35 Activation 37 Adding to the Widget bar 35Deleting from the Widget bar 35Icons 38Rearranging 37

8/14/2019 Clearwire M100 Mondi UG
http://slidepdf.com/reader/full/clearwire-m100-mondi-ug 150/150
Rearranging 37Wi-Fi
Activation 43Establishing a Connection 43
WiMAX CM 45Windows Media Player
Sync Options 61Synchronizing Music 62
Wireless Man ager 41 Accessing 41Bluetooth 47