clearswift secure icap gateway integration with f5… · clearswift secure icap gateway integration...
TRANSCRIPT
Clearswift SECURE ICAP Gateway integration with F5® BIG-IP® Local Traffic Manager™ (LTM)
Technical Guide
Version 01
29/06/2015
| 2 | www.clearswift.com
Copyright Version 1.0, June, 2015
Published by Clearswift Ltd.
© 1995–2015 Clearswift Ltd.
All rights reserved.
The materials contained herein are the sole property of Clearswift Ltd unless otherwise stated. The
property of Clearswift may not be reproduced or disseminated or transmitted in any form or by any
means electronic, mechanical, photocopying, recording, or otherwise stored in any retrievable system
or otherwise used in any manner whatsoever, in part or in whole, without the express permission
of Clearswift Ltd.
Information in this document may contain references to fictional persons, companies, products and events
for illustrative purposes. Any similarities to real persons, companies, products and events are coincidental
and Clearswift shall not be liable for any loss suffered as a result of such similarities.
The Clearswift Logo and Clearswift product names are trademarks of Clearswift Ltd. All other trademarks
are the property of their respective owners. Clearswift Ltd. (registered number 3367495) is registered in
Britain with registered offices at 1310 Waterside, Arlington Business Park, Theale, Reading, Berkshire RG7
4SA, England. Users should ensure that they comply with all national legislation regarding the export,
import, and use of cryptography.
Clearswift reserves the right to change any part of this document at any time.
| 3 | www.clearswift.com
Contents1 Introduction 4
2 Architecture Overview 4
3 Configuration and Setup 4
3.1 Overview 4
3.2 Clearswift SECURE ICAP Gateway configuration 5
3.3 F5 BIG-IP LTM configuration 6
3.3.1 Creating custom ICAP profiles 7
3.3.2 Creating the SECURE ICAP Gateways pool 7
3.3.3 Creating a OneConnect profile for connections reuse 8
3.3.4 Creating the internal virtual servers 9
3.3.5 Creating a Request Adapt and a Response Adapt profile 10
3.3.6 Creating a HTTP profile 10
3.3.7 Creating a pool of web servers 11
3.3.8 Creating a HT TP virtual server 12
3.4 Testing the configuration 13
4 Troubleshooting 15
4.1 Slow response 15
4.2 Standard procedure 15
5 FAQ – Frequently Asked Questions 15
| 4 | www.clearswift.com
1 IntroductionClearswift technology provides the ability to dissect communication flows and inspect their content to
identify critical information and perform the appropriate mitigation actions as defined in the information
security policy. Thanks to the Clearswift SECURE ICAP Gateway this technology is made available to third
parties that can make use of the ICAP interface to enforce the corporate security policy.
F5 ensures application delivery and security in data centers, hybrid cloud environments, and future
software-defined networks. BIG-IP LTM product provides a full proxy architecture with the ability to act
as an ICAP client to make use of available external adaptation services like the ones provided by Cleaswift
SECURE ICAP Gateway.
By combining both solutions, clients can benefit from high performance and optimized application delivery
while ensuring the appropriate information security policy is applied on both incoming and outgoing traffic.
This guide provides the list of tasks to deploy and configure an integrated achitecture. It is advisable to
follow the deployment and configuration guides from both F5 and Clearswift for their respective products
to have a better understanding of the capabilities of the technology as well as to configure the platform
to be able to fulfill the business and technical requirements.
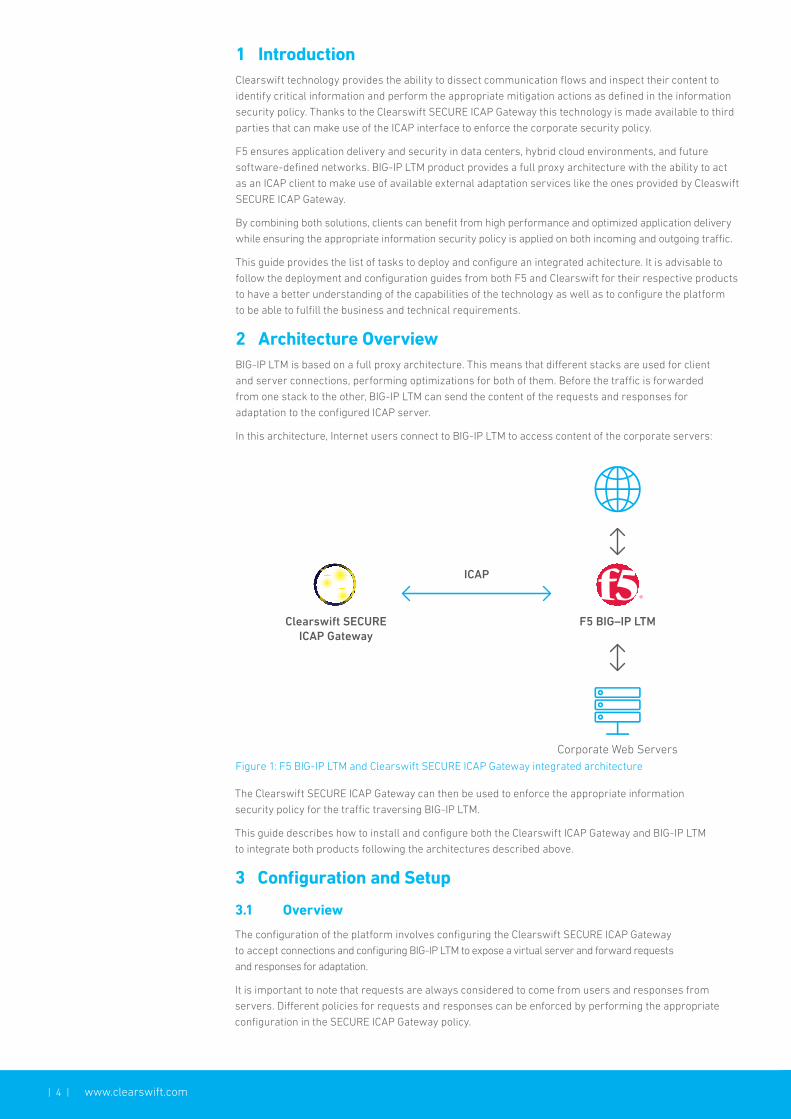
2 Architecture OverviewBIG-IP LTM is based on a full proxy architecture. This means that different stacks are used for client
and server connections, performing optimizations for both of them. Before the traffic is forwarded
from one stack to the other, BIG-IP LTM can send the content of the requests and responses for
adaptation to the configured ICAP server.
In this architecture, Internet users connect to BIG-IP LTM to access content of the corporate servers:
Figure 1: F5 BIG-IP LTM and Clearswift SECURE ICAP Gateway integrated architecture
The Clearswift SECURE ICAP Gateway can then be used to enforce the appropriate information
security policy for the traffic traversing BIG-IP LTM.
This guide describes how to install and configure both the Clearswift ICAP Gateway and BIG-IP LTM
to integrate both products following the architectures described above.
3 Configuration and Setup
3.1 Overview
The configuration of the platform involves configuring the Clearswift SECURE ICAP Gateway
to accept connections and configuring BIG-IP LTM to expose a virtual server and forward requests
and responses for adaptation.
It is important to note that requests are always considered to come from users and responses from
servers. Different policies for requests and responses can be enforced by performing the appropriate
configuration in the SECURE ICAP Gateway policy.
ICAP
Clearswift SECURE ICAP Gateway
F5 BIG–IP LTM
Corporate Web Servers
| 5 | www.clearswift.com
BIG-IP LTM configuration tasks include the creation of a virtual server to accept requests for a pool of web
servers. This configuration is shown as a reference, as in existing deployments there should already exist
a list of virtual servers to which content adaptation is to be applied.
The following sections describe how to configure the integration of both products.
3.2 Clearswift SECURE ICAP Gateway configuration
BIG-IP LTM acts as an ICAP client as it sends requests for content to be inspected. The Clearswift SECURE
ICAP Gateway acts as an ICAP server, as it responds to requests made by BIG-IP LTM.
The ICAP Gateway controls only requests from the accepted ICAP clients. Thus, the IP address that BIG-IP
LTM will be using to communicate to the ICAP Gateway is required.
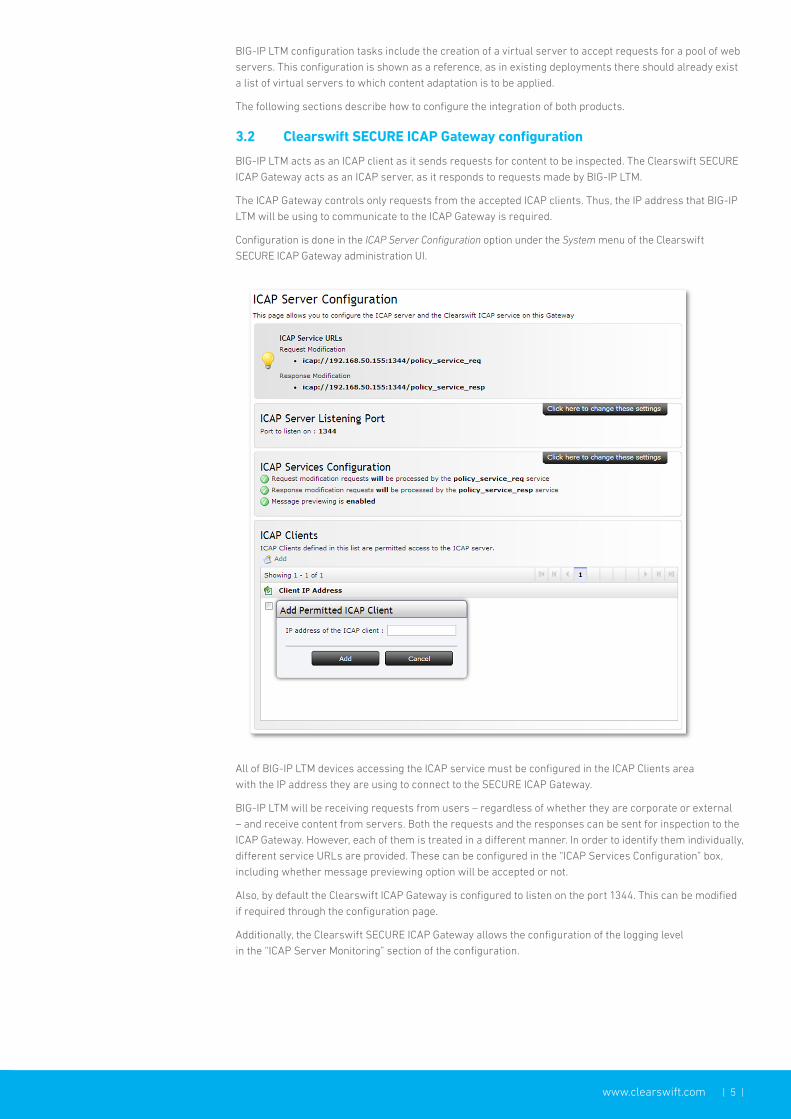
Configuration is done in the ICAP Server Configuration option under the System menu of the Clearswift
SECURE ICAP Gateway administration UI.
All of BIG-IP LTM devices accessing the ICAP service must be configured in the ICAP Clients area
with the IP address they are using to connect to the SECURE ICAP Gateway.
BIG-IP LTM will be receiving requests from users – regardless of whether they are corporate or external
– and receive content from servers. Both the requests and the responses can be sent for inspection to the
ICAP Gateway. However, each of them is treated in a different manner. In order to identify them individually,
different service URLs are provided. These can be configured in the “ICAP Services Configuration” box,
including whether message previewing option will be accepted or not.
Also, by default the Clearswift ICAP Gateway is configured to listen on the port 1344. This can be modified
if required through the configuration page.
Additionally, the Clearswift SECURE ICAP Gateway allows the configuration of the logging level
in the “ICAP Server Monitoring” section of the configuration.
| 6 | www.clearswift.com
3.3 BIG-IP LTM configuration
The configuration is similar to a standard definition of a HTTP virtual server and the associated pool of web
servers to process client requests. However, an additional internal virtual server is configured for the pool
of SECURE ICAP Gateways.
Whenever a client request gets into the virtual server it is accepted, but the request
is forwarded to the internal virtual server.
The internal virtual server is defined to forward the request to a pool of ICAP servers to do the
content inspection and modification. The modified response is then sent to the selected web
server from the configured pool.
The internal virtual server needs to use an ICAP profile, so that BIG-IP LTM knows how to forward
the HTTP request as an ICAP message.
Response adaptation has to be configured through a profile so that it gets properly redirected for inspection.
The configuration consists of the following steps:
1. Creating custom ICAP profiles
2. Ceating the SECURE ICAP Gateways pool
3. Creating a OneConnect profile for connections reuse – Optional
4. Creating the internal virtual servers
5. Creating a Request Adapt and a Response Adapt profile
6. Creating a HTTP profile
7. Creating a pool of web servers
8. Creating a HTTP virtual server
Steps 6, 7 and 8 define a virtual server to access a pool of web servers. These steps are shown as an
example. In existing deployments an existing virtual server will be used, so there will be no need to define it.
The step by step guide to configure BIG-IP LTM to integrate with the Clearswift SECURE ICAP Gateway
follows.
It must be noted that high levels of logging can have a negative performance impact on the platform.

| 7 | www.clearswift.com
3.3.1 Creating custom ICAP profiles
These profiles are required for BIG-IP LTM to wrap the HTTP request or response into an ICAP message.
From the F5 Web UI:
1. Navigate to Local Traffic -> Profiles -> Services -> ICAP and click on Create
2. Set a unique name for the profile, e.g. SIG_Request
3. Make sure the Parent Profile parameter is set to icap
4. Customize the URI and Preview Length parameters by selecting the tick
boxes on the right and set them to:
a. URI (if configuring the request service): icap://${SERVER_IP}:${SERVER_PORT}/policy_service_req
b. URI (if configuring the response service): icap://${SERVER_IP}:${SERVER_PORT}/policy_service_resp
c. Preview Length: 0
5. Click on Finished to save
Please ensure the request and the response profiles are created and that both have the Preview Length
parameter set to 0. These profiles can now be assigned to the internal virtual servers that send the ICAP
messages to the SECURE ICAP Gateway.
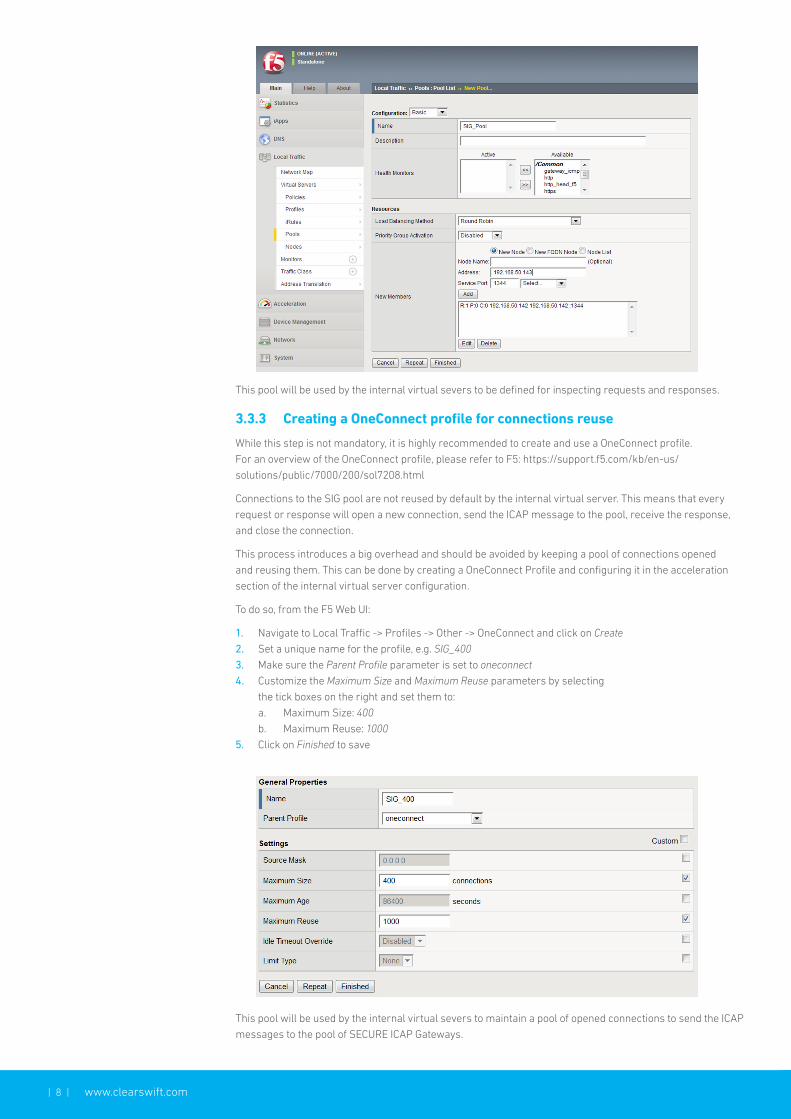
3.3.2 Creating the SECURE ICAP Gateways pool
The internal virtual servers will redirect the traffic to a pool of ICAP servers. In this section the definition
of the pool of available SECURE ICAP Gateways is done. Please note that some of the parameters can
be modified to, for example, modify the load balancing method.
Please note that even if requests and responses are to be analyzed, only one pool of SECURE ICAP
Gateways needs to be defined, unless otherwise required by architectural decisions.
From the F5 Web UI:
1. Navigate to Local Traffic -> Pools and click on Create
2. Set a unique name to the pool, e.g. SIG_Pool
3. Set the following options:
a. Health Monitors: tcp
b. Load Balancing Method: Round Robin
c. Priority Group Activation: Disabled
4. In the New Members area add one by one the available SECURE ICAP Gateways by
specifying their IP address and port (1344 by default) and clicking on Add
5. Click on Finished to save the changes
| 8 | www.clearswift.com
3.3.3 Creating a OneConnect profile for connections reuse
While this step is not mandatory, it is highly recommended to create and use a OneConnect profile.
For an overview of the OneConnect profile, please refer to F5: https://support.f5.com/kb/en-us/
solutions/public/7000/200/sol7208.html
Connections to the SIG pool are not reused by default by the internal virtual server. This means that every
request or response will open a new connection, send the ICAP message to the pool, receive the response,
and close the connection.
This process introduces a big overhead and should be avoided by keeping a pool of connections opened
and reusing them. This can be done by creating a OneConnect Profile and configuring it in the acceleration
section of the internal virtual server configuration.
To do so, from the F5 Web UI:
1. Navigate to Local Traffic -> Profiles -> Other -> OneConnect and click on Create
2. Set a unique name for the profile, e.g. SIG_400
3. Make sure the Parent Profile parameter is set to oneconnect
4. Customize the Maximum Size and Maximum Reuse parameters by selecting
the tick boxes on the right and set them to:
a. Maximum Size: 400
b. Maximum Reuse: 1000
5. Click on Finished to save
This pool will be used by the internal virtual severs to be defined for inspecting requests and responses.
This pool will be used by the internal virtual severs to maintain a pool of opened connections to send the ICAP
messages to the pool of SECURE ICAP Gateways.
| 9 | www.clearswift.com
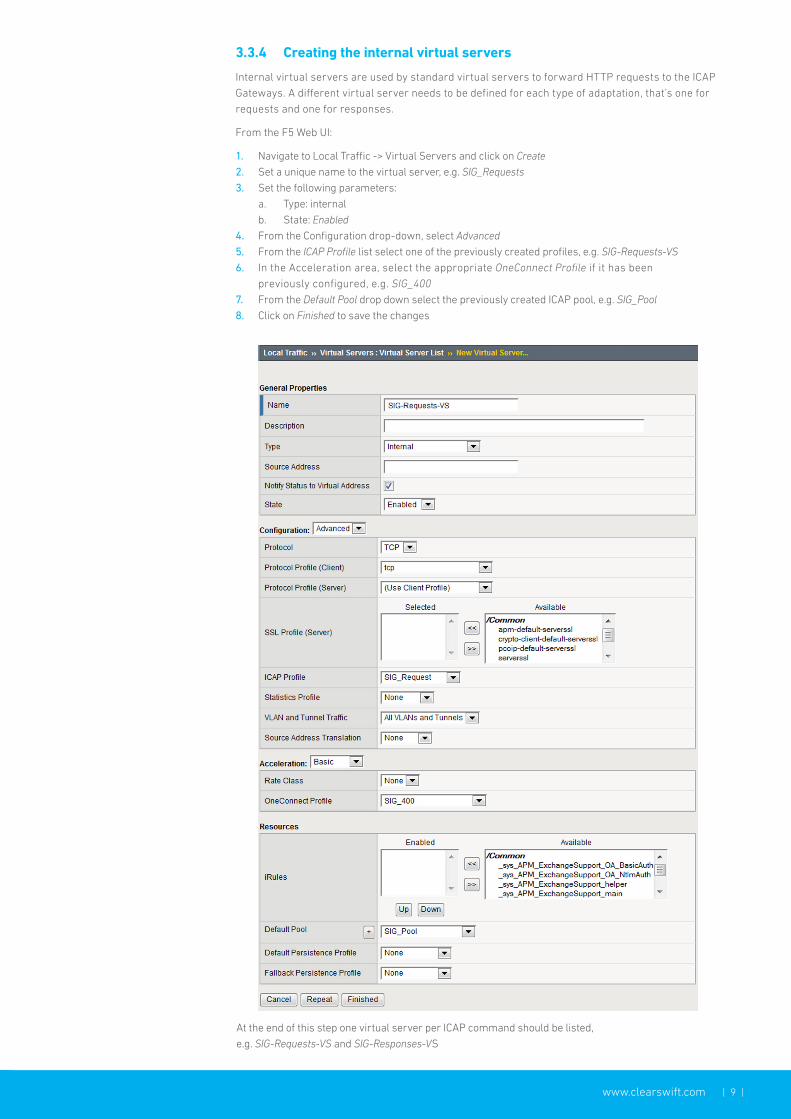
At the end of this step one virtual server per ICAP command should be listed,
e.g. SIG-Requests-VS and SIG-Responses-VS
3.3.4 Creating the internal virtual servers
Internal virtual servers are used by standard virtual servers to forward HTTP requests to the ICAP
Gateways. A different virtual server needs to be defined for each type of adaptation, that’s one for
requests and one for responses.
From the F5 Web UI:
1. Navigate to Local Traffic -> Virtual Servers and click on Create
2. Set a unique name to the virtual server, e.g. SIG_Requests
3. Set the following parameters:
a. Type: internal
b. State: Enabled
4. From the Configuration drop-down, select Advanced
5. From the ICAP Profile list select one of the previously created profiles, e.g. SIG-Requests-VS
6. In the Acceleration area, select the appropriate OneConnect Profile if it has been
previously configured, e.g. SIG_400
7. From the Default Pool drop down select the previously created ICAP pool, e.g. SIG_Pool
8. Click on Finished to save the changes
| 10 | www.clearswift.com
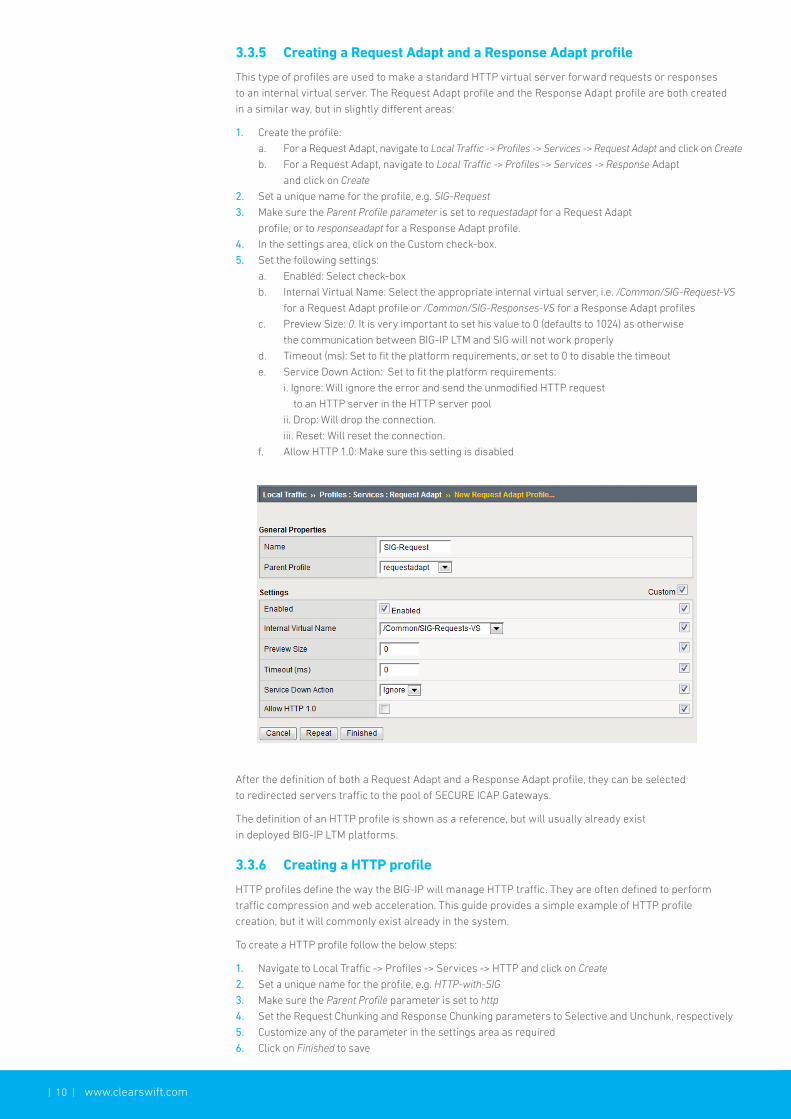
3.3.5 Creating a Request Adapt and a Response Adapt profile
This type of profiles are used to make a standard HTTP virtual server forward requests or responses
to an internal virtual server. The Request Adapt profile and the Response Adapt profile are both created
in a similar way, but in slightly different areas:
1. Create the profile:
a. For a Request Adapt, navigate to Local Traffic -> Profiles -> Services -> Request Adapt and click on Create
b. For a Request Adapt, navigate to Local Traffic -> Profiles -> Services -> Response Adapt
and click on Create
2. Set a unique name for the profile, e.g. SIG-Request
3. Make sure the Parent Profile parameter is set to requestadapt for a Request Adapt
profile, or to responseadapt for a Response Adapt profile.
4. In the settings area, click on the Custom check-box.
5. Set the following settings:
a. Enabled: Select check-box
b. Internal Virtual Name: Select the appropriate internal virtual server, i.e. /Common/SIG-Request-VS
for a Request Adapt profile or /Common/SIG-Responses-VS for a Response Adapt profiles
c. Preview Size: 0. It is very important to set his value to 0 (defaults to 1024) as otherwise
the communication between BIG-IP LTM and SIG will not work properly
d. Timeout (ms): Set to fit the platform requirements, or set to 0 to disable the timeout
e. Service Down Action: Set to fit the platform requirements:
i. I gnore: Will ignore the error and send the unmodified HTTP request
to an HTTP server in the HTTP server pool
ii. Drop: Will drop the connection.
iii. Reset: Will reset the connection.
f. Allow HTTP 1.0: Make sure this setting is disabled
After the definition of both a Request Adapt and a Response Adapt profile, they can be selected
to redirected servers traffic to the pool of SECURE ICAP Gateways.
The definition of an HTTP profile is shown as a reference, but will usually already exist
in deployed BIG-IP LTM platforms.
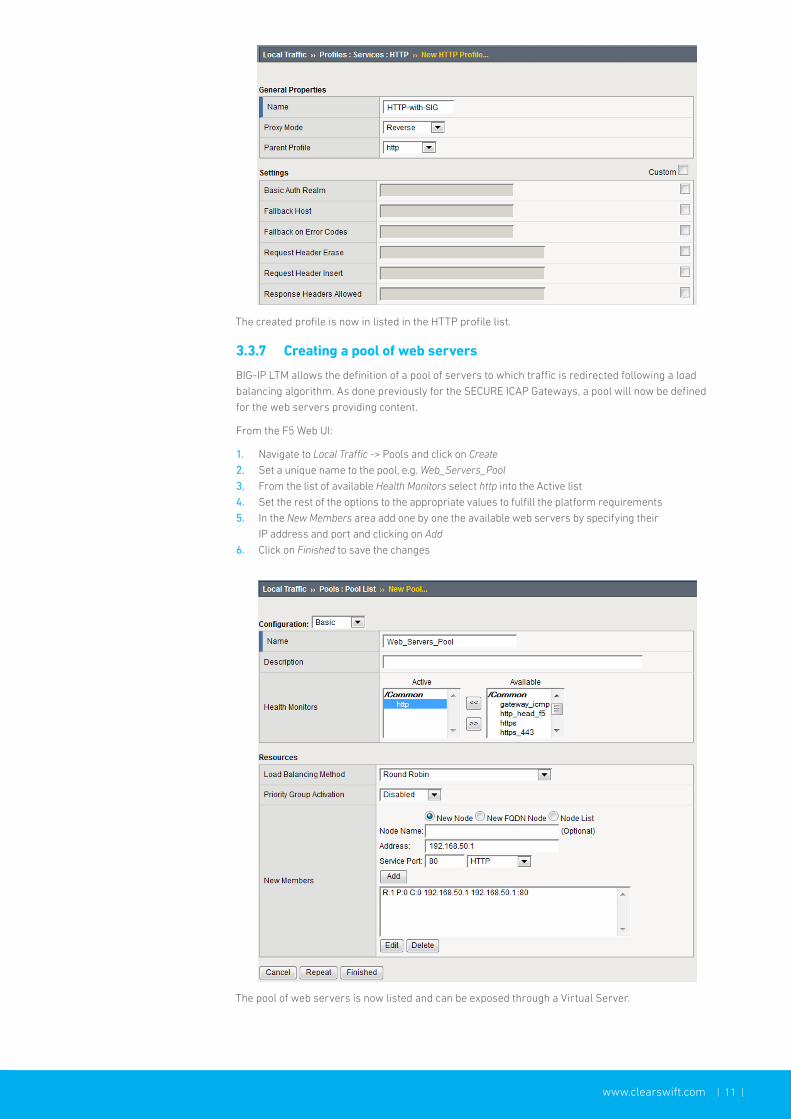
3.3.6 Creating a HTTP profile
HTTP profiles define the way the BIG-IP will manage HTTP traffic. They are often defined to perform
traffic compression and web acceleration. This guide provides a simple example of HTTP profile
creation, but it will commonly exist already in the system.
To create a HTTP profile follow the below steps:
1. Navigate to Local Traffic -> Profiles -> Services -> HTTP and click on Create
2. Set a unique name for the profile, e.g. HTTP-with-SIG
3. Make sure the Parent Profile parameter is set to http
4. Set the Request Chunking and Response Chunking parameters to Selective and Unchunk, respectively
5. Customize any of the parameter in the settings area as required
6. Click on Finished to save
| 11 | www.clearswift.com
3.3.7 Creating a pool of web servers
BIG-IP LTM allows the definition of a pool of servers to which traffic is redirected following a load
balancing algorithm. As done previously for the SECURE ICAP Gateways, a pool will now be defined
for the web servers providing content.
From the F5 Web UI:
1. Navigate to Local Traffic -> Pools and click on Create
2. Set a unique name to the pool, e.g. Web_Servers_Pool
3. From the list of available Health Monitors select http into the Active list
4. Set the rest of the options to the appropriate values to fulfill the platform requirements
5. In the New Members area add one by one the available web servers by specifying their
IP address and port and clicking on Add
6. Click on Finished to save the changes
The pool of web servers is now listed and can be exposed through a Virtual Server.
The created profile is now in listed in the HTTP profile list.

| 12 | www.clearswift.com
3.3.8 Creating a HTTP virtual server
A virtual server receives requests and redirects them to a pool of servers to be served. In the
definition of the virtual server a request or response adaptation profile can be selected to send
the traffic to adaptation before being sent to its final destination.
From the F5 Web UI:
1. Navigate to Local Traffic -> Virtual Servers and click on Create
2. Set a unique name to the virtual server, e.g. Web_with_SIG_Adaptation
3. Set the type to Standard
4. Set the Destination Address and Service Port to the IP address and port that will be receving
connections from clients. The IP address must be available and not in the loopback network.
5. Set the State parameter to Enabled
6. From the Configuration drop-down, select Advanced
7. From the HTTP Profile list select the previously created one, e.g. HTTP-with-SIG
8. From the Request Adapt Profile select the profile created previously to adapt requests
through the SECURE ICAP Gateway, e.g. SIG-Request
9. From the Response Adapt Profile select the profile created previously to adapt responses
through the SECURE ICAP Gateway, e.g. SIG-Response
10. From the Source Address Translation list select Auto Map
11. In the Resources configuration area, from the Default Pool list select the previously created
web servers pool, e.g. Web_Servers_Pool
12. Set the rest of parameters to the appropriate values to fulfill the platform requirements
13. Click on Finished to save the changes

| 13 | www.clearswift.com
After this step, the pool of web servers will be exposed through the IP specified for this virtual server with
the requests and responses being redirected for adaptation through ICAP to the defined pool of SECURE
ICAP Gateways.
3.4 Testing the configuration
The simplest test to confirm that everything has been configured correctly is to browse to the defined
IP address in the HTTP virtual server definition, ideally using its DNS name. In case there is a problem
with the ICAP server, there will be delays accessing the page.
Additionally,BIG-IP LTM checks for the availability of the configured services through the configured health
monitors. Browsing to the list of virtual servers or pools provides a view of the status of the services:
In order to validate that adaptation is done correctly, it is advisable to configure a test policy in the SECURE
ICAP Gateway and check it is applied correctly. The following steps show how to test a redaction policy for
PCI related information.
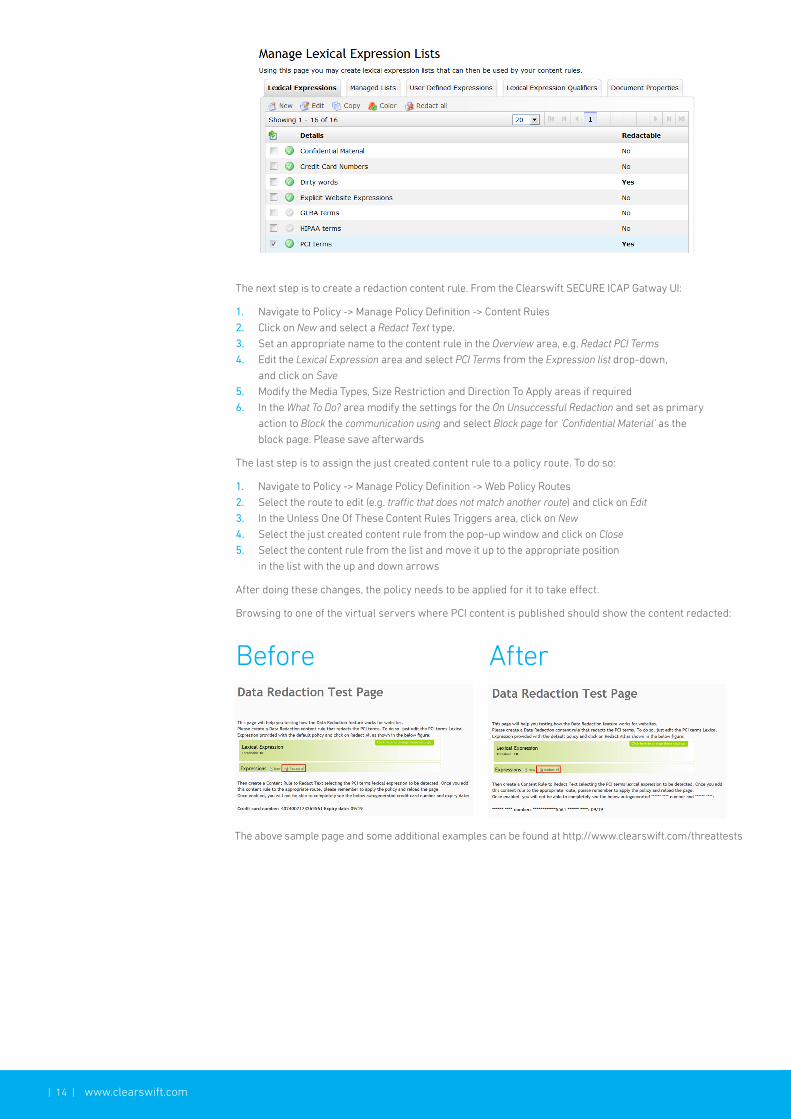
From the SECURE ICAP Gateway Web UI:
1. Navigate to Policy -> Policy References -> Lexical Expressions
2. Select the checkbox for the PCI Terms expression list and click on the Redact All button,
checking that the Redactable column now shows Yes for the selected expression list
Please note that only the relevant sections are shown in the previous image.
| 14 | www.clearswift.com
The above sample page and some additional examples can be found at http://www.clearswift.com/threattests
The next step is to create a redaction content rule. From the Clearswift SECURE ICAP Gatway UI:
1. Navigate to Policy -> Manage Policy Definition -> Content Rules
2. Click on New and select a Redact Text type.
3. Set an appropriate name to the content rule in the Overview area, e.g. Redact PCI Terms
4. Edit the Lexical Expression area and select PCI Terms from the Expression list drop-down,
and click on Save
5. Modify the Media Types, Size Restriction and Direction To Apply areas if required
6. In the What To Do? area modify the settings for the On Unsuccessful Redaction and set as primary
action to Block the communication using and select Block page for ‘Confidential Material’ as the
block page. Please save afterwards
The last step is to assign the just created content rule to a policy route. To do so:
1. Navigate to Policy -> Manage Policy Definition -> Web Policy Routes
2. Select the route to edit (e.g. traffic that does not match another route) and click on Edit
3. In the Unless One Of These Content Rules Triggers area, click on New
4. Select the just created content rule from the pop-up window and click on Close
5. Select the content rule from the list and move it up to the appropriate position
in the list with the up and down arrows
After doing these changes, the policy needs to be applied for it to take effect.
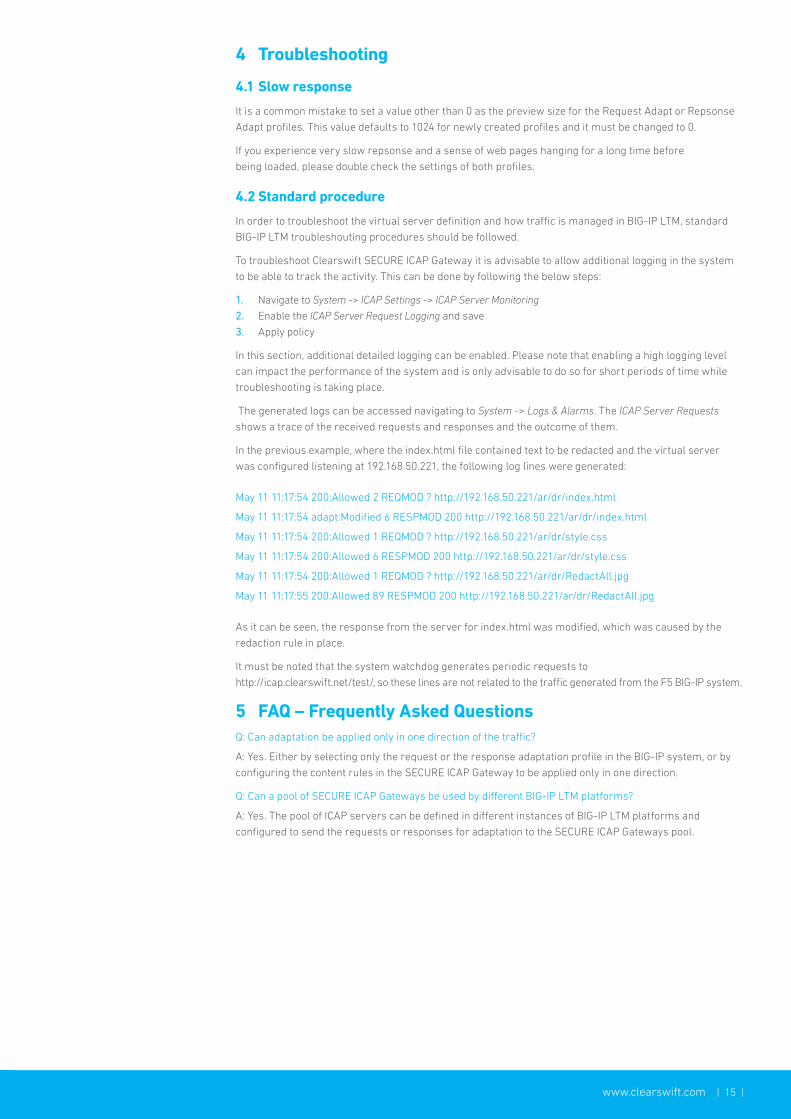
Browsing to one of the virtual servers where PCI content is published should show the content redacted:
Before After
| 15 | www.clearswift.com
4 Troubleshooting
4.1 Slow response
It is a common mistake to set a value other than 0 as the preview size for the Request Adapt or Repsonse
Adapt profiles. This value defaults to 1024 for newly created profiles and it must be changed to 0.
If you experience very slow repsonse and a sense of web pages hanging for a long time before
being loaded, please double check the settings of both profiles.
4.2 Standard procedure
In order to troubleshoot the virtual server definition and how traffic is managed in BIG-IP LTM, standard
BIG-IP LTM troubleshouting procedures should be followed.
To troubleshoot Clearswift SECURE ICAP Gateway it is advisable to allow additional logging in the system
to be able to track the activity. This can be done by following the below steps:
1. Navigate to System -> ICAP Settings -> ICAP Server Monitoring
2. Enable the ICAP Server Request Logging and save
3. Apply policy
In this section, additional detailed logging can be enabled. Please note that enabling a high logging level
can impact the performance of the system and is only advisable to do so for short periods of time while
troubleshooting is taking place.
The generated logs can be accessed navigating to System -> Logs & Alarms. The ICAP Server Requests
shows a trace of the received requests and responses and the outcome of them.
In the previous example, where the index.html file contained text to be redacted and the virtual server
was configured listening at 192.168.50.221, the following log lines were generated:
May 11 11:17:54 200:Allowed 2 REQMOD ? http://192.168.50.221/ar/dr/index.html
May 11 11:17:54 adapt:Modified 6 RESPMOD 200 http://192.168.50.221/ar/dr/index.html
May 11 11:17:54 200:Allowed 1 REQMOD ? http://192.168.50.221/ar/dr/style.css
May 11 11:17:54 200:Allowed 6 RESPMOD 200 http://192.168.50.221/ar/dr/style.css
May 11 11:17:54 200:Allowed 1 REQMOD ? http://192.168.50.221/ar/dr/RedactAll.jpg
May 11 11:17:55 200:Allowed 89 RESPMOD 200 http://192.168.50.221/ar/dr/RedactAll.jpg
As it can be seen, the response from the server for index.html was modified, which was caused by the
redaction rule in place.
It must be noted that the system watchdog generates periodic requests to
http://icap.clearswift.net/test/, so these lines are not related to the traffic generated from the F5 BIG-IP system.
5 FAQ – Frequently Asked QuestionsQ: Can adaptation be applied only in one direction of the traffic?
A: Yes. Either by selecting only the request or the response adaptation profile in the BIG-IP system, or by
configuring the content rules in the SECURE ICAP Gateway to be applied only in one direction.
Q: Can a pool of SECURE ICAP Gateways be used by different BIG-IP LTM platforms?
A: Yes. The pool of ICAP servers can be defined in different instances of BIG-IP LTM platforms and
configured to send the requests or responses for adaptation to the SECURE ICAP Gateways pool.
www.clearswift.com
United KingdomClearswift Ltd
1310 Waterside
Arlington Business Park
Theale
Reading, RG7 4SA
UK
GermanyClearswift GmbH
Landsberger Straße 302
D-80 687 Munich
GERMANY
United StatesClearswift Corporation
309 Fellowship Road
Suite 200
Mount Laurel, NJ 08054
UNITED STATES
JapanClearswift K.K
Shinjuku Park Tower N30th Floor
3-7-1 Nishi-Shinjuku
Tokyo 163-1030
JAPAN
AustraliaClearswift (Asia/Pacific) Pty Ltd
Level 17
40 Mount Street
North Sydney
New South Wales, 2060
AUSTRALIA
Clearswift is trusted by organizations globally to protect their critical information, giving them the freedom to securely collaborate and drive business growth. Our unique technology supports a straightforward and ‘adaptive’ data loss prevention solution, avoiding the risk of business interruption and enabling organizations to have 100% visibility of their critical information 100% of the time.
As a global organization, Clearswift has headquarters in the United States, Europe, Australia and Japan, with an extensive partner network of more than 900 resellers across the globe.